

Page 1
EXP09CKEWI
EXP11CKEWI
EN AIR CONDITIONER
FR CLIMATISEUR
IT CONDIZIONATORE
NL AIR CONDITIONER
DE KLIMAGERÄT
PL KLIMATYZACJA
CZ KLIMATIZAČNÍ ZAŘÍZENÍ
USER MANUAL
MODE D'EMPLOI
MANUALE DELL’UTENTE
GEBRUIKSAANWIJZING
BEDIENUNGSANLEITUNG
INSTRUKCJA OBSŁUGI
UŽIVATELSKÁ PŘÍRUČKA
2
24
46
68
90
112
134
Page 2
2 www.electrolux.com
CONTENTS
1. SAFETY INFORMATION �������������������������������������������������������������������������������������3
2. SAFETY INSTRUCTION ������������������������������������������������������������������������������������� 6
3. UNIT DESCRIPTION ����������������������������������������������������������������������������������� 10
4. ACCESSORIES INCLUDED ��������������������������������������������������������������������� 10
5. INSTALLATION INSTRUCTIONS ��������������������������������������������������������������������� 11
6. AIR CONDITIONER FEATURES ��������������������������������������������������������������������� 14
7. OPERATING INSTRUCTIONS ��������������������������������������������������������������������� 14
8. CARE & CLEANING ������������������������������������������������������������������������������������������� 20
9. TROUBLE SHOOTING ����������������������������������������������������������������������������������� 21
10. ENVIRONMENTAL CONCERNS ��������������������������������������������������������������������� 23
WE’RE THINKING OF YOU
Thank you for purchasing an Electrolux appliance. You’ve chosen a product that brings with
it decades of professional experience and innovation. Ingenious and stylish, it has been
designed with you in mind. So whenever you use it, you can be safe in the knowledge that
you’ll get great results every time.
Welcome to Electrolux.
Visit our website to:
Get usage advice, brochures, trouble shooter, service information:
www.electrolux.com/webselfservice
Register your product for better service:
www.registerelectrolux.com
Buy Accessories, Consumables and Original spare parts for your appliance:
www.electrolux.com/shop
CUSTOMER CARE AND SERVICE
Always use original spare parts.
When contacting our Authorised Service Centre, ensure that you have the following data
available: Model, PNC, Serial Number.
The information can be found on the rating plate.
Warning / Caution-Safety information.
General information and tips.
Environmental information.
Subject to change without notice.
Page 3
1. SAFETY INFORMATION
WARNING!
•This appliance can be used by children aged from 8
years and above and persons with reduced physical,
sensory or mental capabilities or lack of experience
and knowledge if they have been given supervision or
instruction concerning use of the appliance in a safe way
and understand the hazards involved�
•Children shall not play with the appliance�
•If the supply cord is damaged, it must bereplaced by
the manufacturer, its service agent or similarly qualied
persons in order to avoid a hazard�
This manual explains the proper use of your new air
conditioner� Please read this manual carefully before using the
product� This manual should be kept in a safe place for handy
reference�
CAUTION!
•Contact authorised service technician for repair or
maintenance of this unit�
•Contact the installer for installation of this unit�
•The air conditioner is not intended for use by young
children of inrmed persons without supervision�
•Young children should be supervised to ensure that they
do not play with the air conditioner�
•There are local council rules regarding maximum
allowable noise levels emitted by air conditioners�
•If the power cord is to be replaced, replacement work
shall be performed by authorised personnel only�
•Installation work must be performed in accordance with
the national wiring standards by authorised personnel
only(if applicable)� Incorrect connection can cause
overheating and re�
•Take care not to catch ngers on fan when adjusting
horizontal louvres�
•The fuse is 250V 3�15A�
•Cleaning and user maintenance shall not be made by
children without supervision�Be aware that refrigerants
may not contain an odour�
3ENGLISH
Page 4
4 www.electrolux.com
1.1 Important notes
1� Do not operate unit without the air lter�
2� Do not operate unit near any heat source or open re�
3� Do not expose the unit to direct sunlight�
4� Always store or move the unit in an upright position�
5� Do not cover the appliance when in operation or
immediately after use�
6� Always drain condensate before storing unit�
1.2 Point to Keep in Mind When Using Your Air Conditioner
CAUTION!
Warnings for use
•Do not modify any part of this product�
•Do not insert anything into any part of the unit�
•Ensure the power supply used has an appropriate
•Always use a circuit breaker or fuse with the proper amp
•In the event of any abnormality with the air conditioner
voltage rating� Only use a 220V - 240V, 50Hz, 10A
mains electricity supply� Use of a power supply with an
improper voltage rating can result in damage to the unit
an possibly re�
rating� Do not, under any circumstances, use wire, pins
or other objects in place of a proper fuse�
(eg� a burning smell), turn it off immediately and
disconnect the power supply�
CAUTION!
Warning for power supply cord
•This power plug must only be plugged into an
appropriate wall socket� Do not use in conjunction with
any extension cords�
•Push the power plug securely into the socket and make
sure it is not loose�
•Do not pull, deform� or modify the power supply cord,
or immerse it in water� Pulling or misuse of the power
supply cord can result in damage to the unit and cause
electrical shock�
•If the supply cord is damaged, it must be replaced by the
manufacturer or its service agent or a similarly qualied
Page 5
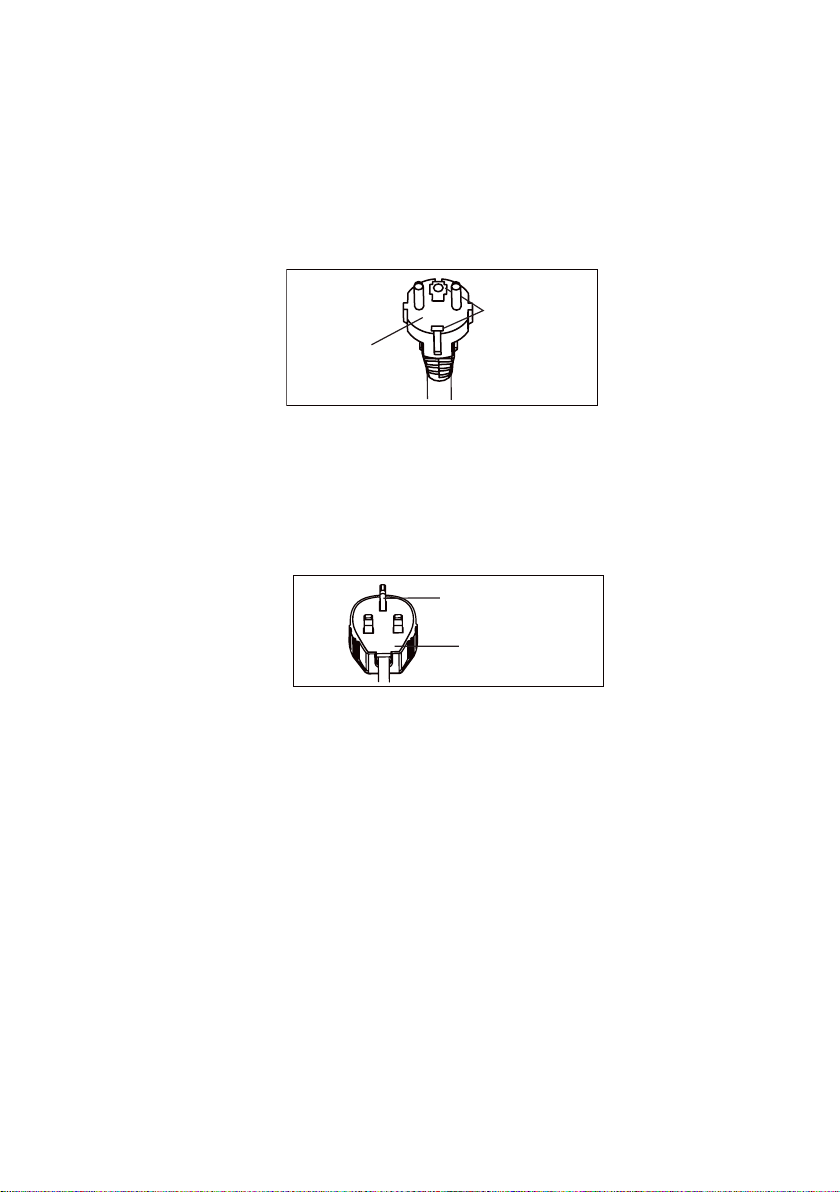
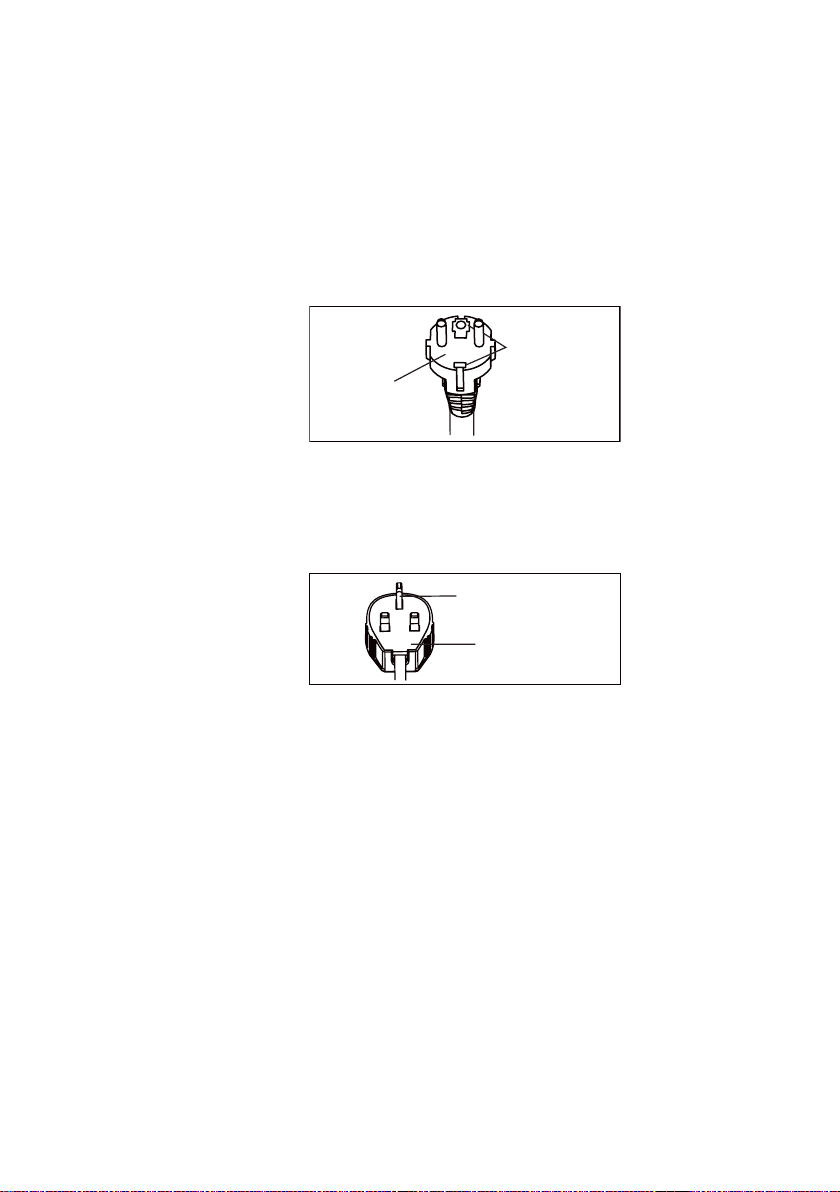
Plug
Grounding tab
person in order to avoid a hazard� Use only the manufacturer
specied power cord for replacement�
•This appliance must be earthed� This appliance is equipped
with a cord having an earth wire� The plug must be plugged
into an outlet that is properly installed and earthed�
•This appliance is equipped with a cord that has a earthed
wire connected to an earthed pin� The plug must be plugged
into a socket that is properly installed and earthed� Do not
under any circumstances cut or remove the square earthed
pin from this plug�
Square earthed pin
5ENGLISH
Plug
(only for UK)
1.3 Usage cautions
•Be sure to turn the unit off and disconnect the power supply
cord before performing any maintenance or cleaning�
•Do not splash or pour water directly onto the unit�Water can
cause electrical shock or equipment damage�
•Drainage should be performed whenever moving the air
conditioner (see page 14)� If any water remains in the tank, it
may spill out while being moved�
•To ensure proper drainage, the drainage hose must have
no kinks and must not be elevated during dehumidicatioin
mode� If not, the drained water may spill out into the room�
•The temperature around the drainage hose must not be
below freezing point when used� Drained water may freeze
inside the hose, causing water inside the unit to overow into
the room�
•Do not block the exhaust air outlet with obstacles� Cooling
Page 6

6 www.electrolux.com
performance may be reduced or stop completely�
•Provide a residual current device (RCD) in order to protect
against electric shock in accordance with British Standard
and Wiring Rules�
•Exposure to direct airow for an extended period of time
could be hazardous to your health� Do not expose occupants,
pets, or plants to direct airow for extended periods of time�
•Do not use this air conditioner for non-specied special
purposes (e�g� preserving precision devices, food, pets,
plants, and art objects)� Usage in such a manner could harm
such property�
2. SAFETY INSTRUCTION
2.1 Notes on Operation
• Allow 3 minutes for the compressor
to restart cooling� If you turn the air
conditioner off and immediately restart
it, allow 3 minutes for the compressor
to restart cooling� There is an electronic
device in the unit that keeps the
compressor turned off for 3 minutes for
safety�
• In the event of a power failure during
use, allow 3 minutes before restarting
the unit� After power is reinstated,
restart the air conditioner� If the power
was off for less than three minutes,
be sure to wait at least three minutes
before restarting the unit� if you restart
the air conditioner within three minutes,
a protective device in the unit may
cause the compressor to shut off� This
protective device will prevent cooling for
about 5 minutes� Any previous setting
will be cancelled and the unit will return
to its initial setting�
• Low temperature operation: Is your
unit freezing up? Freezing may occur
when the unit is set close to 18°C in
low ambient temperature conditions,
especially at night� In these conditions, a
further temperature drop may cause the
unit to freeze� Setting the unit to a higher
temperature will prevent it from freezing�
• Dehumidication mode increases room
temperature� The unit generates heat
during dehumidication mode and the
room temperature will rise� Warm air will
be blown out from the exhaust air outlet,
but this is normal and does not indicate
a problem with the unit�
• This air conditioner blows the warm air
generated by the unit outside the room
via the exhaust hose while in cool mode�
In the mean time, the same amount
of air will enter the room from outside
through any openings of the room�
• Do not use means to accelerate the
defrosting process or to clean, other
than those recommended by the
manufacturer�
• The appliance shall be stored in a room
without continuously operating ignition
sources (for example: open ames, an
operating gas appliance or an operating
electric heater)�
• Do not pierce or burn�
• Compliance with national gas regulations
shall be observed�
• Keep ventilation openings clear of
obstruction�
• The appliance shall be stored in a wellventilated area where the room size
larger than 13 m
2
�
Page 7
7ENGLISH
• Any person who is involved with
working on or breaking into a refrigerant
circuit should hold a current valid
certicate from an industry-accredited
assessment authority, which authorises
their competence to handle refrigerants
safely in accordance with an industry
recognised assessment specication�
• Servicing shall only be performed
as recommended by the equipment
manufacturer� Maintenance and repair
requiring the assistance of other skilled
personnel shall be carried out under the
supervision of the person competent in
the use of ammable refrigerants�
• This product contains a lithium button/
coin cell battery� If a new or used lithium
button/coin cell battery is swallowed
or enters the body, it can cause severe
internal burns and can lead to death in
as little as 2 hours� Always completely
secure the battery compartment� If
the battery compartment does not
close securely, stop using the product,
remove the batteries, and keep it away
from children� If you think batteries might
have been swallowed or placed inside
any part of the body, seek immediate
medical attention�
To prevent injury to the user or other
people and property damage, the following
instructions must be followed�
Incorrect operation due to ignoring
instructions may cause harm or damage�
The seriousness is classied by the
following indications:
WARNING!
This symbol indicates the possibility
of death or serious injury�
CAUTION!
This symbol indicates the possibility
of injury or damage to property�
Meanings of symbols used in this manual
are shown below:
This symbol indicates never to do
this�
This symbol indicates always do
this�
2.2 Warning during usage
WARNING!
Warning during usage
Page 8
8 www.electrolux.com
warning meaning
Plug in power plug properly Otherwise, it may cause electric shock or
re due to excess heat generation
Do not operate or stop the unit by inserting
or pulling out Die power plug
Do not damage or use an unspecied
power cord
It may cause electric shock or re due to
heat generation
It may cause electric shook or re�
If the power cord is damaged, it must
be replaced by the manufacturer or an
authorised service centre or a similarly
qualied person in order to avoid a hazard
Do not modify power cord length or share
the outlet with other appliances
Do not operate with wet hands or in damp
It may cause electric shock or re due to
heat generation
It may cause electric shock
environment
Do not direct airow at room occupants This could harm your health
Always ensure effective earthing Incorrect earthing may cause electric
shock
Do not allow water to run into electric
parts
Always install circuit breaker and a
dedicated power circuit
Unplug the unit if strange sounds, smell, or
It may cause failure of unit or electric
shock
Incorrect installation may cause Are and
electric shock
It may cause re and electric shock
smoke comes from it
Do not use the socket if it is loose or
It may cause re and electric shock
damaged
Do not open the unit during operation It may cause re and electric shock
Keep rearms away It may cause re
Do not use the power cord close to
It may cause re and electric shock
heating appliances
Do not use the power cord near ammable
It may cause an explosion or re
gas or combustibles, such as gasoline,
benzene, thinner, etc�
Ventilate room before operating air
It may cause explosion, re and burns
conditioner if there is a gas leakage from
another appliance
Do not disassemble or modify unit It may cause failure and electric shock
Page 9
CAUTION!
caution meaning
When the air lter is to be removed, do not
It may cause an injury
touch the metal parts of the unit
Do not clean the air conditioner with water Water may enter the unit and degrade the
insulation� It may cause an electric shock
Ventilate the room well when used
An oxygen shortage may occur
together with a stove, etc�
When the unit is to be cleaned, switch off,
and turn off the circuit breaker
Do not clean unit when power is on as it
may cause re and electric shock, it may
cause an injury
Do not place a pet or house plant where it
This could injure the pet or plant
will be exposed to direct air ow
Do not use for special purposes Do not use this air conditioner to
preserve precision devices, food, pets,
plants, and art objects� It may cause
deterioration of quality, etc�
Stop operation and close the window in
storm or cyclone
Operation with windows opened may
cause wetting of indoor and soaking of
household furniture
Hold the plug by the head of the power
It may cause electric shock and damage
plug when taking it out
Turn off the main power switch when not
It may cause failure of product or re
using the unit for a long time
Do not place obstacles around air-inlets or
inside of air-outlet
Always insert the lters securely� Clean
It may cause failure of appliance or
accident
Operation without lters may cause failure
lter once every two weeks
Do not use strong detergent such as wax
or thinner - use a soft cloth
Appearance may be deteriorated due to
change of product colour or scratching of
its surface
Do not place heavy object on the power
There is danger of re or electric shock
cord and ensure that the cord is not
compressed
Do not drink water drained from air
conditioner
It contains contaminants and could make
you sick
Use caution when unpacking and installing Sharp edges could cause injury
If water enters the unit, turn the unit off
It could cause electric shock and damage
at the power outlet and switch off the
circuit breaker� Isolate supply by taking the
power-plug out and contact a qualied
service technician
9ENGLISH
Page 10
10 www.electrolux.com
10
4 5
9
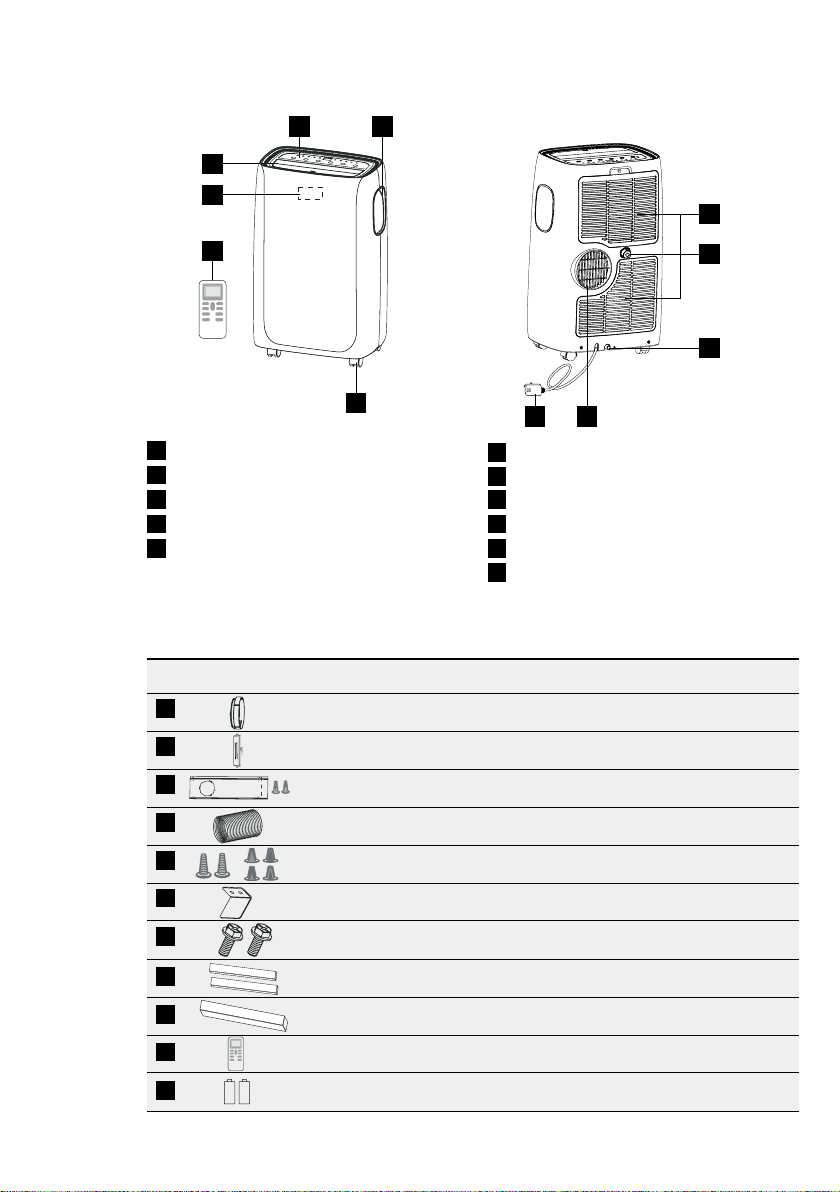
3. UNIT DESCRIPTION
3
2
6
1
11
1
Remote control
2
Signal receiver
3
Room air outlet Bottom drain outlet
4
Control panel
5
Carrying handle(both sides)
4. ACCESSORIES INCLUDED
PARTS PARTS NAME: QUANTITY:
1
2
3
4
5
6
Window kit connector A
Exhaust connector B
Window sliding kit
Exhaust hose
Screws
Safety lock
6
Air intake
Continuous drain outlet
7
8
9
Air exhaust
Power cable
10
11
Castor
7
8
1 pc
1 pc
1 set
1 pc
4 pcs 12�7 screws
2 pcs 19 screws
1 pc
7
8
9
10
11
Bolts
Foam seal A
Foam seal B
Remote control
Bettery
• Check all the accessories are included in the package and please refer to the
installation instructions for their usage�
2 pcs
2 pcs
1 pc
1 set
2 pcs
Page 11
5. INSTALLATION INSTRUCTIONS
Lock
2
Slide onto
1
Fig.7
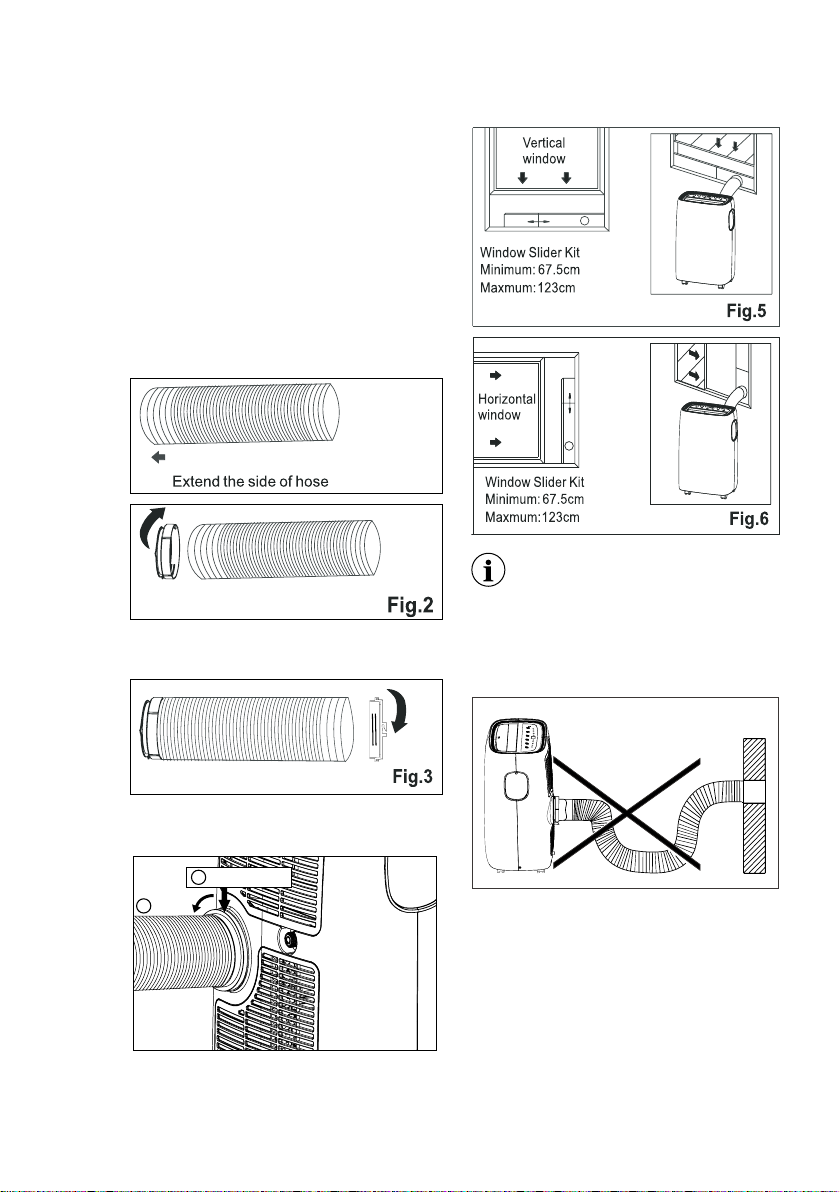
5.1 Exhausting hot air
In the Cool Mode the appliance must be
placed close to a window or opening so
that the warm exhaust air can be ducted
outside� First position unit on a at oor
and make sure there’s a minimum of
30mm clearance around the unit, and is
within the vicinity of a single circuit outlet
power source�
1. Extend either side of the hose(Fig�1) and
screw the hose to connector A (Fig�2)�
Fig.1
2. Extend the other side of the hose and
screw it to connector B (Fig� 3)�
11ENGLISH
The hose can be extended from
its original length of 38cm up to
150cm, but it is the best to keep
the length to minimum required�
Also make sure that the hose does
not have any sharp bends or sags�
(Fig� 7)
3. Install the connector B into the unit
(Fig�4)�
Fig. 4
3. Afx the connector A into the window
slider kit and seal� (Fig�5&6)
5.2 Installation in a double-hung
sash window
1. Cut the foam seals A(adhesive type) to
the proper lengths and attach them to
the window and stool�(Fig�8)
Page 12
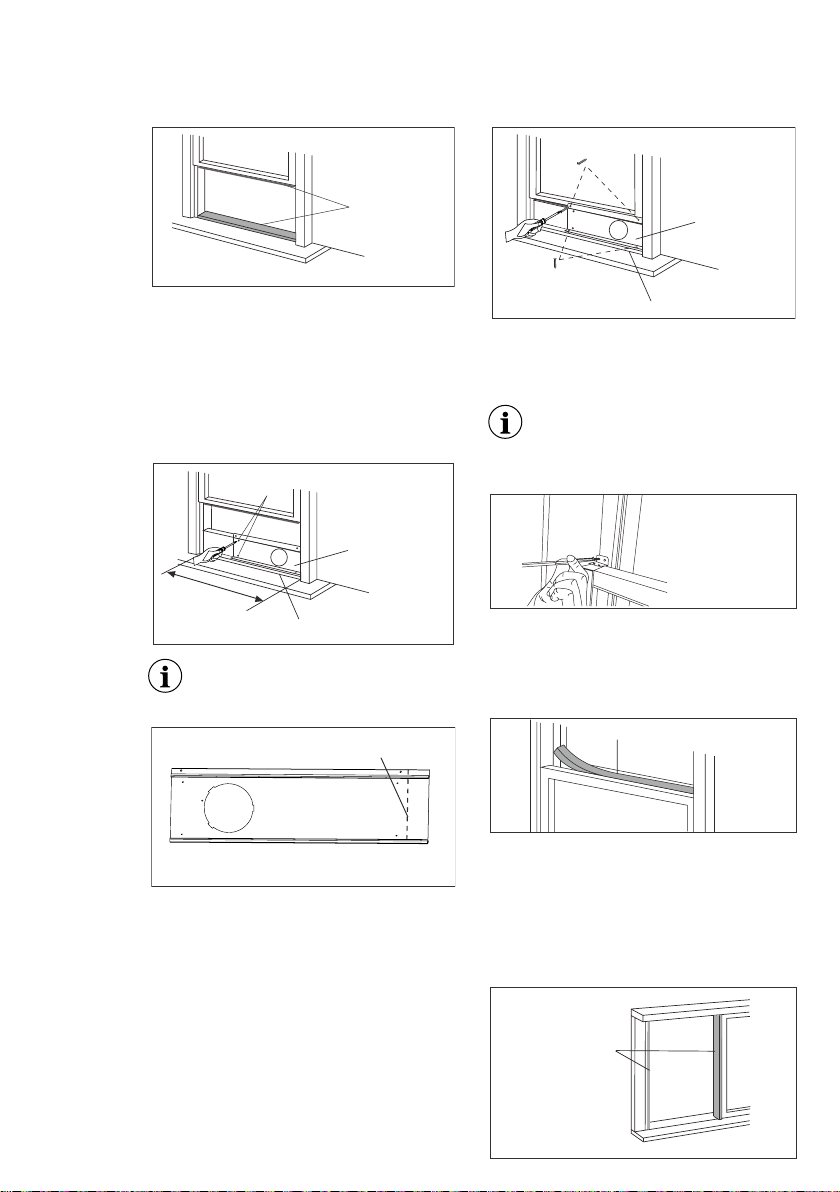
12 www.electrolux.com
12.7mm
s
crews
Foam seal A
(adhesive type)
Fig.8
2. Open the window sash and place the
window slider kit on the window stool
(Fig�9)� Attach the window slider kit to
the window stool� Adjust the length of
the window slider kit according to the
width of window� Screw down the two
screws on the window slider kit� See
Fig�9�
screws
Window slider kit
67.5cm~123cm
Window stool
Cut the adjustable window slider kit
if the width of window is less than
67�5 cm (Fig�10)�
Cut this to fit your window
Fig.9
Window slider kit
19mm screws or 12.7mm
hex head cap screws
Window stool
6. To secure lower sash in place, attach
right angle sash lock with 12�7mm
screw as shown(Fig�12)�
It is difcult to lock the windows
with the safety lock for Vinyl-Clad
windows, so you can use lock by
window itself�
Fig.11
Fig.12
7. Cut the foam seal B to an appropriate
length and seal the open gap between
the top window sash and outer window
sash, as shown in Fig�13�
Foam seal B
Fig.13
Fig.10
3. Close the window sash securely against
the window slider kit�(Fig�11)
4. Drive two 12�7mm screws to secure the
window slider kit to the window sash�
(Fig�11)
5. Secure the window slider kit to the
window stool(Fig�11):
A: For wooden window: Use 19mm
screws for securing�
B: For Vinyl-Clad windows: Use 12�7 hex
head cap screws for securing�
5.2 Installation in a sliding sash
window
1. Cut the foam seals A(adhesive type) to
the proper lengths and attach them to
the window frame� See Fig�14�
Foam seal A
(adhesive type)
Fig.14
Page 13
13ENGLISH
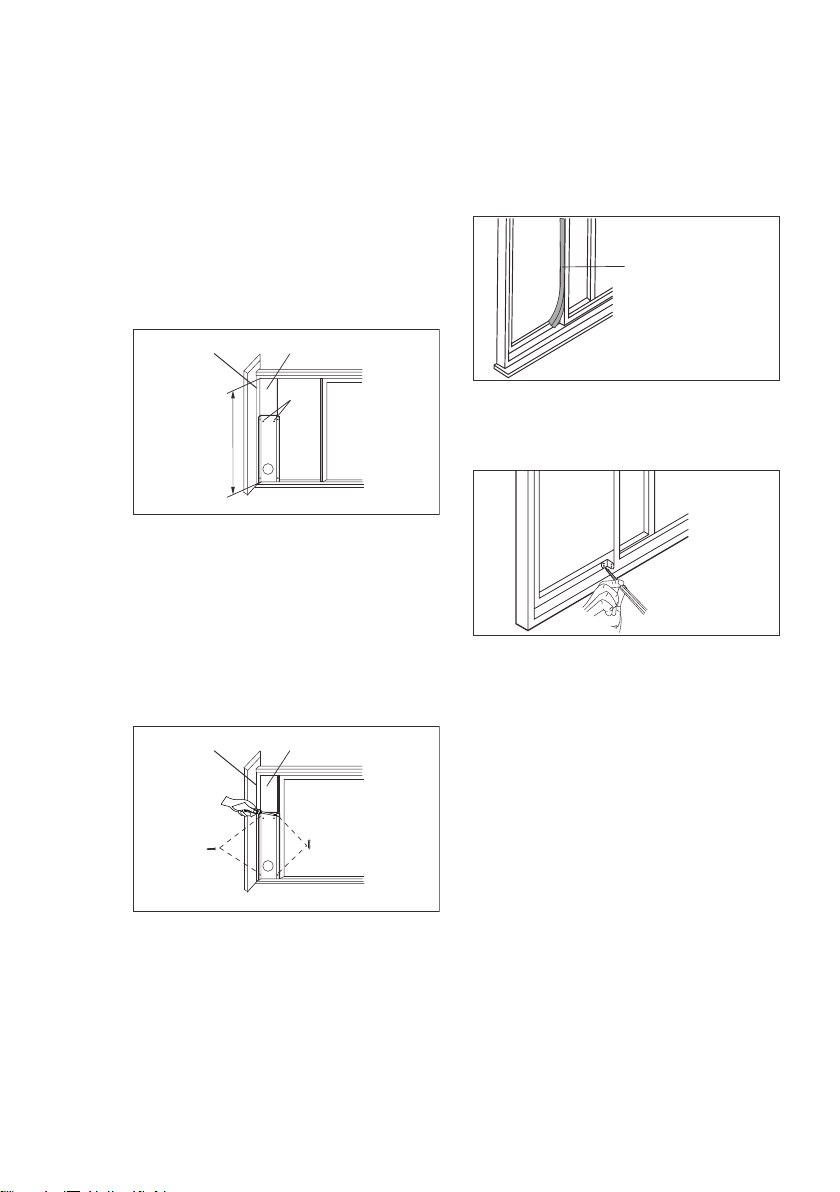
2. Open the window sash and place the
window slider kit on the window stool
(Fig�15)� Attach the window slider kit to
the window stool� Adjust the length of
the window slider kit according to the
height of window� Screw down the two
screws on the window slider kit� See
Fig�15� Cut the adjustable window slider
kit if the height of window is less than
67�5cm (Fig�10)�
Window stool
67.5cm~123cm
Window slider kit
screws
Fig.15
3. Close the window sash securely against
the window slider kit�(Fig�16)
4. Drive two 12�7 mm screws to secure
the window slider kit to the window
sash�(Fig�16)
5. Drive two 19 mm screws to secure the
window slider kit to the window stool�
(Fig�16)
6. Cut the foam seal B to an appropriate
length and seal the open gap between
the sliding sash and outer window sash,
as shown in Fig�17�
Foam seal B
Fig.17
7. To secure sliding sash in place, attach
right angle safety lock with 12�7mm
screw as shown(Fig�18)�
Fig.18
Win
dow stool
12.7mm
screws
Window slider kit
12.7mm
screws
Fig.16
Page 14
14 www.electrolux.com
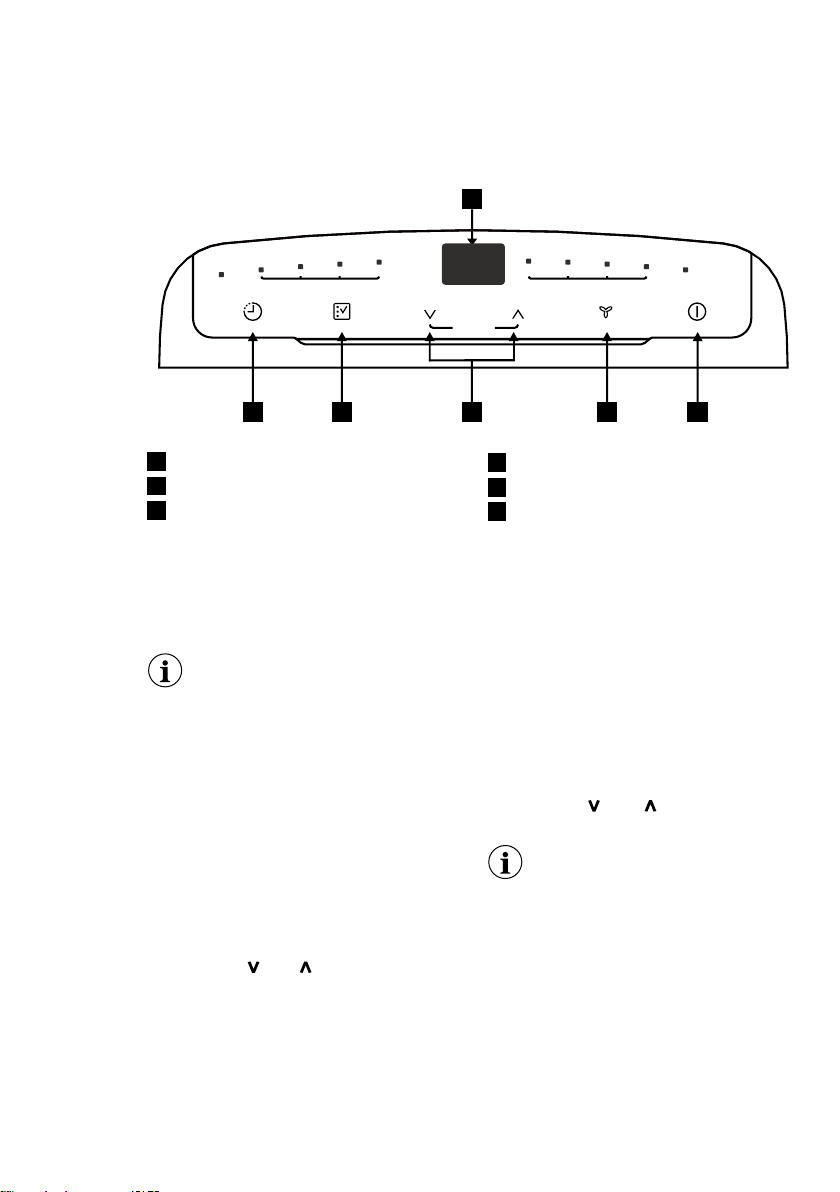
6. AIR CONDITIONER FEATURES
6.1 CONTROL PANEL
cool dryfan autotimer hi medlow auto filter
1
timer
1
Displays temperature/time
2
Power ON/OFF
3
Fan Speed / Filter Reset
mode
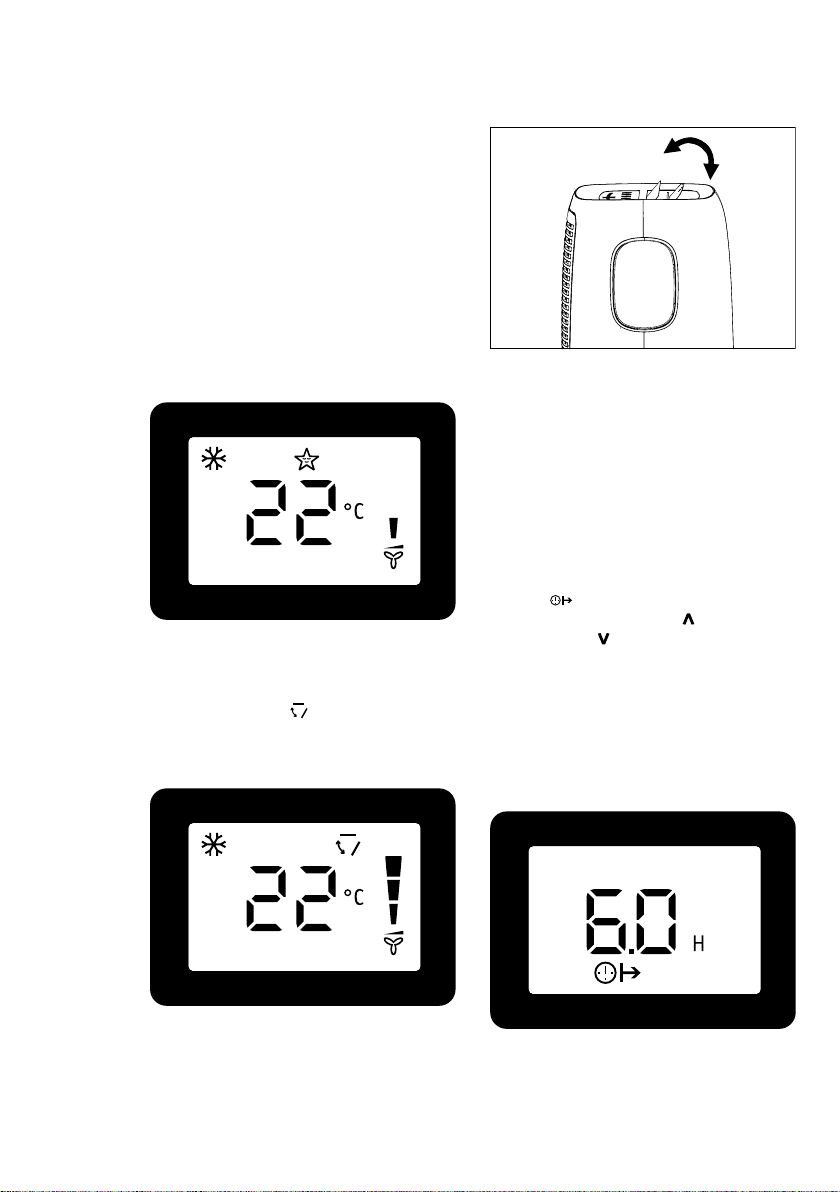
7. OPERATING INSTRUCTIONS
Some of the following instructions
can only be used by using the
Control Panel�
7.1 Usage of the Control Panel
Heating mode (on some models)
In this mode the exhaust adaptor hose
MUST be used�
In this mode, fan speed cannot be
selected�
1. Press the "mode" button until the "Heat"
indicator is lit�
2. Press the " " & " " Temp buttons for
desired setting�
3. Connected drain hose� See 7�3
Drainage section�
Cooling mode
In this mode the exhaust adaptor hose
MUST be used�
temp/timer
fan speed
hold 5s
filter reset
on/off
23456
4
Adjust Temperature or Timer
5
Mode Selection
6
Timer
1. Press the “mode” button until the Cool
mode indicator is lit�
2. Press the "fan speed" button to
choose the fan speed according to the
illumination of the fan speed indicator�
You can choose the “hi”, “med”, “low”,
or “auto” fan speed setting�
3. Press the “ ” or “ ”button to choose
the temperature you want�
It is not necessary to use the
drainage hose in the "cool" mode�
Dry mode
Press the “mode” button until the Dry
mode indicator is lit� The screen displays
the room temperature�
At the same time, the “low” fan indicator
lights�
Note: In this mode, fan speed cannot be
selected�
Fan mode
In this mode, there is no need to use the
exhaust hose or drainage hose�
Page 15
15ENGLISH
1. Press the "mode" button until the Fan
mode indicator is lit�
2. Press the "Fan speed" button to choose
the desired fan speed�
3. The fan will run at the selected speed
and the display will show the room
temperature�
Auto mode
Always have the exhaust hose attached in
this mode�
When you set the air conditioner in Auto
mode, it will automatically select cooling,
heating (inapplicable for cooling only
models), or fan only operation depending
on what temperature you have selected
and the room temperature� The air
conditioner will control room temperature
automatically round the temperature point
set by you�
Under AUTO mode, you can not select the
fan speed�
1� Press the "mode" button until the "Auto
mode" indicator lights�
After the "Auto mode" is selected the unit
will run automatically according to the
actual room air temperature�
Timer mode
The timer facilitates the user to delay the
unit startup or shutdown�
How to delay startup
Plug in the unit, so the unit turns to
standby�
Press the “timer” button, then the Timer
indicator and number of hours on the
screen will ash�
Tap or hold the UP arrow " " or the
DOWN arrow " " to change delay start
timer at 0�5 hour increments up to 10
hours, then at 1 hour increments up to 24
hours�
After 5 seconds, the Timer indicator and
the display stop ashing� The control
will count down the time remaining until
startup�
The unit will start up in the mode as
previously set�
To cancel the setting, press the “timer”
button again� The timer indicator will
switch off�
How to delay shutdown
You can delay shutdown when the unit is
on�
Press the “timer” button, then the Timer
indicator and number of hours on the
screen will ash�
Tap or hold the UP arrow " " or the
DOWN arrow " " to change delay stop
timer at 0�5 hour increments up to 10
hours, then at 1 hour increments up to 24
hours�
After 5 seconds, the Timer indicator and
the display stop ashing, and the display
shows the time remaining until the unit
shuts down�
To cancel the setting, press the “timer”
button again� The timer indicator will
switch off�
Filter reset
This feature is a reminder to clean the Air
Filter (See Care and Cleaning) for more
efcient operation�
The lter indicator will illuminate after 250
hours of operation� To reset after cleaning
the lter, hold the “fan speed” button for 5
seconds, then the “lter” indicator will go
off�
Page 16
16 www.electrolux.com
7.2 Remote Control
1
Remote Control screen
2
Timer on button
3
Timer off button
4
Sleep button
5
Mode button
6
Temp/Timer setting button
7
°F/°C button
8
Swing button
9
Fan Speed button
10
On/Off button
Battery Installation and Important
Instructions
Remove the cover at the back of the
remote control�
Insert the provided batteries correctly(see
the instructions inside the battery
compartment)�
Close up the cover�
To replace the old batteries(which have
been used up)
with two new R03P “AAA” 1�5V batteries,
repeat the steps above�
If the remote control unit is replaced or
discarded, the batteries must be removed
and disposed of in accordance with
local legislation as they do harm to the
environment�
Do not mix old and new batteries�
Do not mix alkaline, standard (carbonzinc) or rechargeable (nickel-cadmium)
batteries�
Do not dispose of batteries in re� Batteries
may explode or leak� If the remote control
is not used for a long time, remove the
batteries from the remote control�
The remote control must be handled with
extreme care� Do not drop it or expose it
to direct sunlight or sources of heat�
This device complies with Part 15 of the
FCC Rules� Operation is subject to the
following two conditions:
(1) This device may not cause harmful
interference, and (2) this device must
accept any interference received, including
interference that may cause undesired
operation�
Point the remote control at the location
of the signal receiver� The remote control
must be no more than 16 ft(5 meters)
away from the unit (without obstacles
between the remote control and the unit)�
User
Max. 5 m
Remote control
Portable AC
How to Use the Remote Control
TURNING THE UNIT ON
Page 17
17ENGLISH
Plug in the unit, then press the “on/
off” button (when turned on, the unit
will operate as the last setting before
shutdown�
To switch the unit off, press “on/off” button
again, then remove the plug�
Do NOT switch the unit off by removing
the plug�
Always switch the unit off by pressing the
“on/off” button and wait for few minutes
before removing the plug�
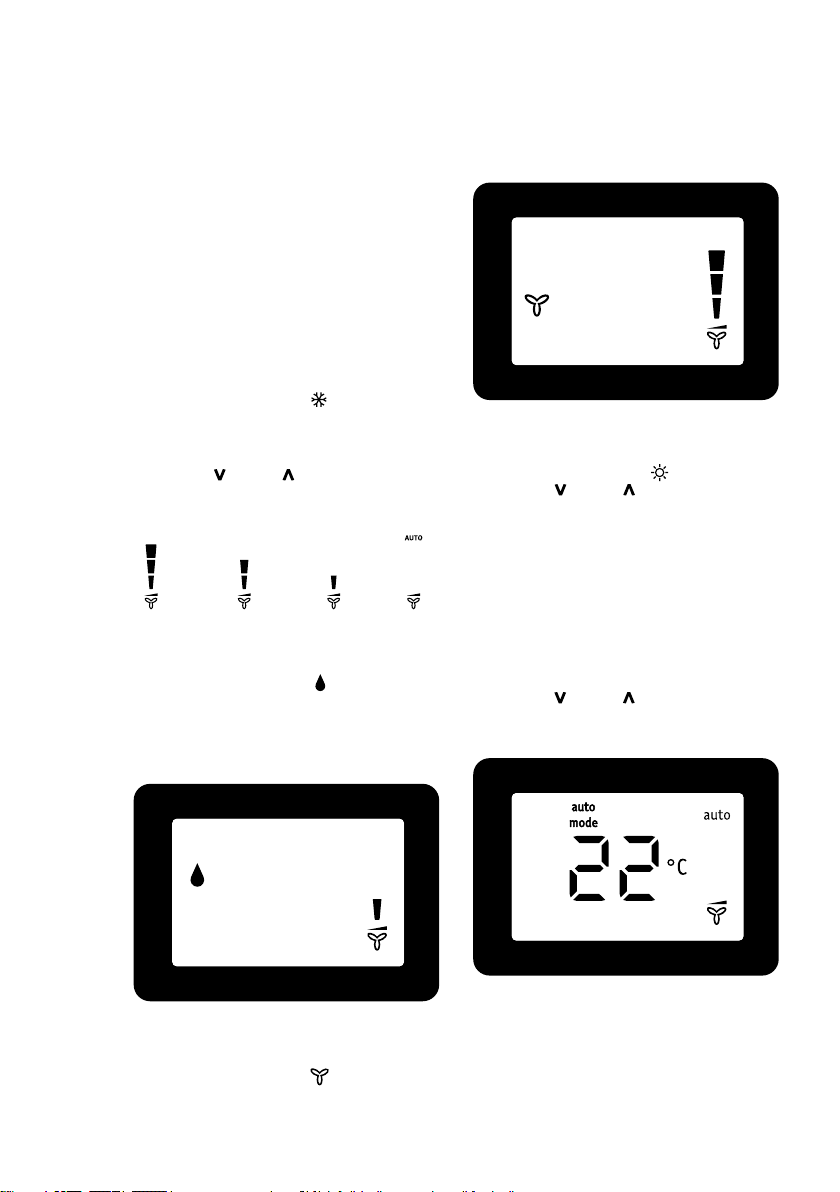
Cool mode
Press the “mode” button until the left side
of LCD screen displays “ ”�
Press the “fan speed” button to choose
the fan speed “Hi”, “Med”, “Low”, and
“Auto”�
Press the “ ” and “ ”button to choose
the temperature you want
High Medium Low Auto
Dry mode
Press the “mode” button until the left side
of LCD screen displays “ ”�
At the same time, the “low” fan symbol
appears on the screen�
Note: In this mode, fan speed cannot be
selected�
Note: In this mode, the air exhaust hose
does not need to be connected�
Heat mode(For Heat & Cool models only)
Press the “mode” button until the left side
of LCD screen displays “ ”�
Press the “ ” and “ ” button to choose
the temperature you want� At the same
time, the “low” fan indicator lights�
Note: In this mode, fan speed cannot be
selected�
AUTO mode
Press the “mode” button until the upper
side of LCD screen displays “ auto ”�
Under AUTO mode, you can not select the
fan speed�
Press the “ ” and “ ” button to choose
the temperature you want�
Fan mode
Press the “mode” button until the left side
of LCD screen displays “ ”�
In this mode, you can select fan speed
“Hi”, “Med”, “Low” or “Auto” by pressing
the Fan speed button and referring to the
diagram�
Sleep mode
When the unit is in Cool, Heat or auto
mode, you can press the “sleep” button
to make the unit run in Sleep mode� In this
mode, the fan speed will be set as “low”
automatically, which cannot be changed�
In Cool mode the selected temperature
will increase by 1 °C 30 minutes after
Page 18
18 www.electrolux.com
the mode is selected� The temperature
will then increase by another 1 °C after
an additional 30 minutes� This new
temperature will be maintained for 7 hours
before it returns to the originally selected
temperature� This ends the "Sleep" mode
and the unit will shut down automatically�
The "Sleep" mode program can be
cancelled at any time during operation
by pressing the "Sleep", “mode” or “fan
speed” button�
Note: In Fan or Dry mode, Sleep mode
cannot be set�
Louver Swing Function
Press the “swing” button to enable louver
swing function, and the upper side of
screen will display “ ”� The louver on the
top panel will swing up and down�
Press this button again to disable the
louver swing function�
°F/°C function
Press the “°F/°C” button to switch
between degree Fahrenheit and degrees
Celsius� Under Dry/Fan mode, you can not
select °F/°C�
Timer mode
How to delay startup
Plug in the unit, so the unit turns to
standby�
Press the “timer on” button, the screen will
display “ ”and “H”�
Tap or hold the UP arrow " " or the
DOWN arrow " " to change delay start
timer at 0�5 hour increments up to 10
hours, then at 1 hour increments up to 24
hours� After 2 seconds, the setting will be
memorized� The control will count down
the time remaining until startup� The unit
will start up in the mode as previously set�
To cancel the setting, press the “timer on”
button again�
Page 19
19ENGLISH
Fig. 21
How to delay shutdown
You can delay shutdown when the unit is
on�
Press the “timer off” button, the screen
displays “ ”and “H”�
Tap or hold the UP arrow " " or the
DOWN arrow " " to change delay stop
timer at 0�5 hour increments up to 10
hours, then at 1 hour increments up to 24
hours� After 2 seconds, the setting will be
memorized, and the display will show the
time remaining until the unit shuts down�
To cancel the setting, press the “timer off”
button again�
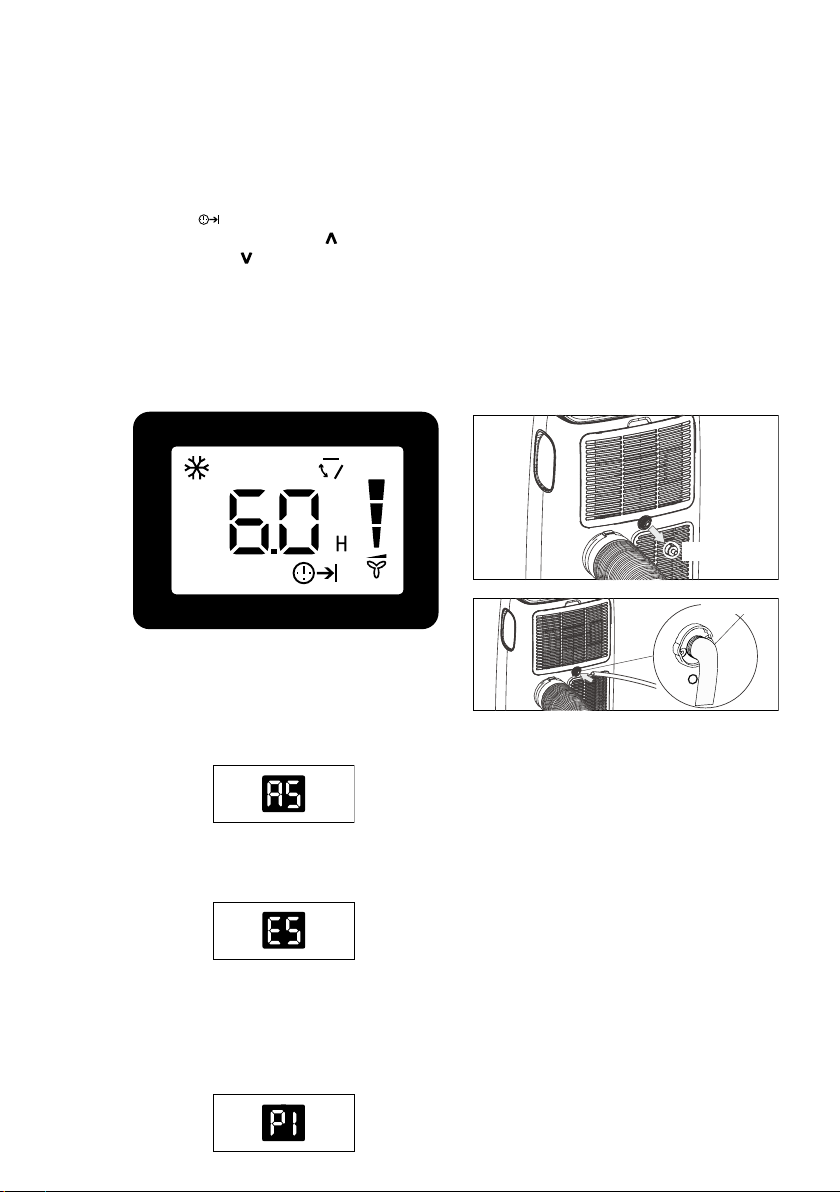
7.3 Fault code
If the display reads "AS" , the room
temperature sensor has failed� Contact
your Authorized Electrolux Service Centre�
If the display reads "ES" , the evaporator
temperature sensor has failed� Contact
your Authorized Electrolux Service Centre�
If the display reads "P1" , bottom tray
is full� Carefully move the unit to a drain
location, remove the bottom drain plug
and let the water drain away� Restart the
machine until the "P1" symbol disappears�
If error repeats, call for service�
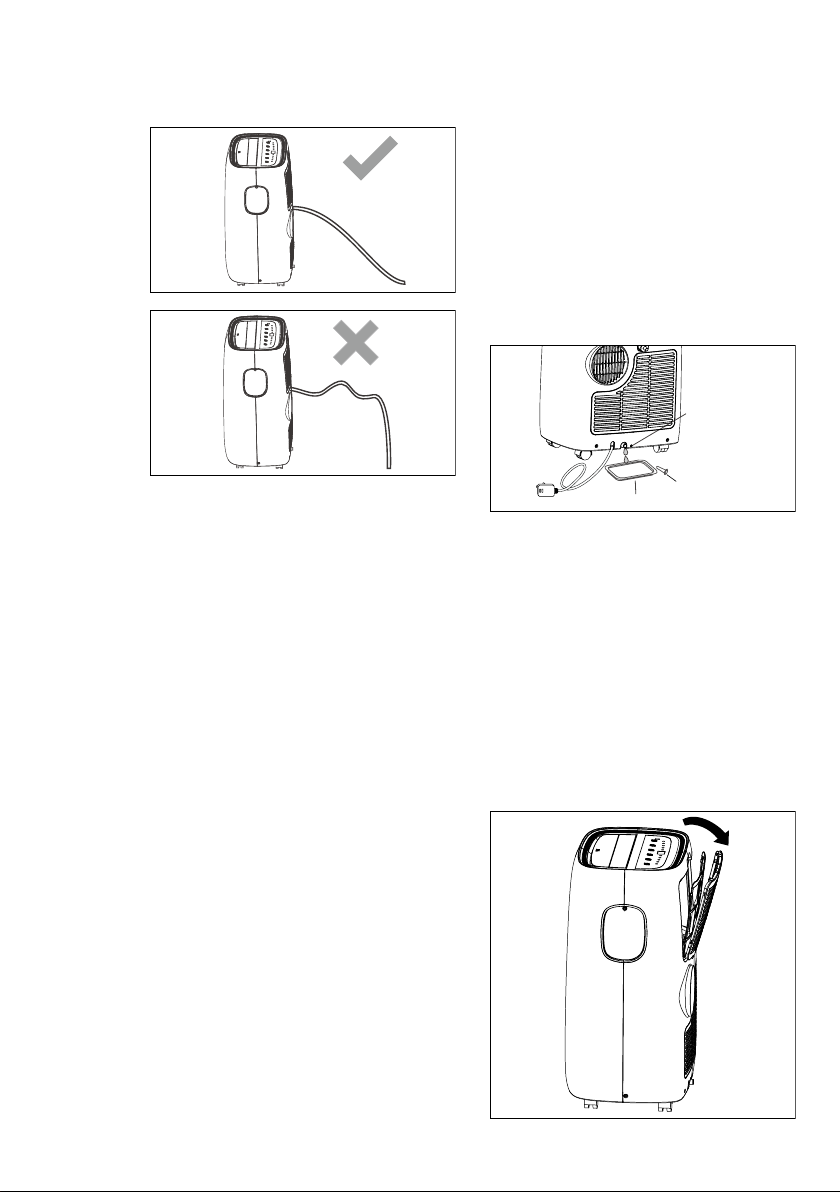
7.4 Drainage instruction
Continuous Drainage
During the DRY mode, you will need a
garden hose (sold separately) to drain the
condensate from the unit�
Follow the steps below:
• Unscrew the drain cap of continuous
drain outlet(Fig�20)�
• Connect one end of the garden hose
(sold separately) to the drain outlet then
lead the other end into a drain that is
lower than the unit(Fig�21)�
Fig. 20
Drain cap
Garden hose
NOTE:
• Condensate may ow out after removing
the drain cap, if the unit is running in
Cool or Auto mode� When you want
to remove the garden hose, prepare
a drip tray (not supplied) to collect the
condensate from the drain outlet�
• Please be sure that the height of the
drain and section of the drain hose
should not be higher than that of the
drain outlet, or the continous drainage
may not work properly�
• During Cool or Auto mode, it is
recommended to disable continuous
drainage by replacing the drain cap to
the drain outlet, to reach the maximum
performance
Page 20
20 www.electrolux.com
Fig. 22
Replace the drain cap to the continuous
drain outlet when no condensate ows
out�
Put the drip tray under the bottom drain
outlet, then remove the rubber stopper
from the drain outlet, to allow the
condensate to ow into the drip tray� If your
drip tray can’t hold all the condensate, a
number of lls will be needed�
Replace the drain cap to the bottom drain
outlet when no condensate ows out�
Bottom
Drain Outlet
Fig. 23
Emptying the condensate residue inside
the unit during winter storage�
Put a drip tray (not supplied) under bottom
drain outlet, then pull out the drain cap to
allow the condensate to ow into the drip
tray�
8. CARE & CLEANING
Clean your air conditioner occasionally to
keep it looking new� Be sure to unplug the
unit before cleaning to prevent shock or
re hazards
8.1 Cleaning the unit
The cabinet and front may be dusted with
an oil-free cloth or washed with a cloth
dampened in a solution of warm water and
mild liquid dishwashing detergent�
Never use harsh cleaners, wax or polish
on the cabinet front�
Be sure to wring excess water from the
cloth before wiping around the controls�
Excess water in or around the controls
may cause damage to the air conditioner�
8.2 Cleaning the lters
Drip tray
Drip cap
NOTE: To ensure all condensate residue
has been removed, tilt the unit by lifting
it slightly upwards from the front until no
more condensate comes out from the
drain outlet�
1. Grasp the upper panel tab and take
off the lter which behind the grill of the
back panel as shown the below gure�
To keep your air conditioner working
efciently, you should clean the lters every
two weeks of operation�
Page 21

21ENGLISH
2. Wash the lter using liquid dishwashing
detergent and warm water under 40°C�
Rinse lter thoroughly� Gently shake
excess water from the lter� Be sure lter
is thoroughly dry before replacing� Or,
instead of washing you may vacuum the
lter clean�
3. Replace the lter after the lter is dry�
Be sure lter is thoroughly dry
before replacing�
8.3 Winter Storage
If the air conditioner will not be used for an
extended period of time:
1. Drain the water collection tank
completely and leave the bottom drain
cap and rubber plug long time enough
to allow any residual water to drain out�
Once the tank is completely drained and
no more water ows out, reinstall the
rubber plug and cap�
9. TROUBLE SHOOTING
Before calling for service, review this list� It
may save you time and expense� This list
includes common occurrences that are
not the result of defective workmanship or
materials in this appliance�
Air conditioner will not operate.
• Wall plug disconnected� Push plug rmly
into wall outlet�
• House fuse blown or circuit breaker
tripped� Replace fuse with time delay
type or reset circuit breaker�
• Control is OFF� Turn Control ON and set
to desired setting�
• P1 appears in the display window� Drain
water as described in 7�3 Drainage
Section �
• Room Temperature lower than the set
temperature (Cool Mode)� Reset the
temperature�
2. Remove and clean the lter, allow it to
dry completely, then reinstall it�
3. Remove the batteries from the remote
control�
4. Store the air conditioner in a cool, dry
location, away from direct sunlight,
extreme temperature, and excessive
dust�
Before using the air conditioner again:
1. Make sure the lter and drain cap are in
place�
2. Check the cord to make sure it is in
good condition, without cracks or
damage�
3. Place new batteries in the remote
control�
4. Install the air conditioner as described in
the Installation Instructions�
Air from unit does not feel cold
enough.
• Room temperature below 16 °C�
Cooling may not occur until room
temperature rises above 16 °C�
• Reset to a lower temperature�
• Compressor shut-off by changing
modes� Wait approximately 3 minutes
and listen for compressor to restart
when set in the COOL mode�
Air conditioner cooling, but room is
too warm - NO ice forming on cooling
coil behind decorative front.
• Outdoor temperature below 16 °C� To
defrost the coil, set Fan mode�
• Air lter may be dirty� Clean lter� Refer
to 8� Care and Cleaning section� To
defrost, set to Fan mode�
• Temperature is set too low for nighttime
cooling� To defrost the coil, set to Fan
mode� Then, set temperature to a higher
setting�
Page 22

22 www.electrolux.com
• Exhaust duct not connected or blocked�
See 5�1 Exhausting hot air Section�
Air conditioner cooling, but room is
too warm - ice forming on cooling coil
behind decorative front
• Dirty air lter - air restricted� Clean air
lter� Refer to 8� Care and Cleaning
section�
• Temperature is set too high� Set
temperature to a lower setting�
• Air directional louvers positioned
improperly� Position louvers for better air
distribution�
• Front of unit is blocked by drapes,
blinds, furniture, etc� - restricts air
distribution� Clear blockage in front of
unit�
• Doors, windows, registers, etc� open cool air escapes� Close doors, windows,
registers, etc�
• Unit recently turned on in hot room�
Allow additional time to remove “stored
heat” from walls, ceiling, oor and
furniture�
Air conditioner turns on and off
rapidly.
• Dirty air lter - air restricted� Clean air
lter�
• Outside temperature extremely hot� Set
FAN speed to a faster setting to bring air
through cooling coils more frequently�
Room too cold.
• Set temperature too low� Increase set
temperature�
PLEASE NOTE: CHECK THE PLATE FOR
THE TYPE OF REFRIGERANT GAS USED
IN YOUR APPLIANCE�
WARNING!
Specic information regarding
appliances with R290 refrigerant
gas�
• Thoroughly read all of the warnings�
• When defrosting and cleaning the
appliance, do not use any tools other
than those recommended by the
manufacturing company�
• The appliance must be placed in an
area without any continuous sources of
ignition (for example: open ames, gas
or electrical appliances in operation)�
• Do not puncture and do not burn�
• Refrigerant gases can be odourless�
• The appliance must be installed, used
and stored in an area that is greater than
2
�
13 m
• This appliance contains 235g or 245g
(see rating label back of unit) of R290
refrigerant gas�
• R290 is a refrigerant gas that complies
with the European directives on the
environment� Do not puncture any part
of the refrigerant circuit�
• If the appliance is installed, operated
or stored in a nonventilated area, the
room must be designed to prevent
the accumulation of refrigerant leaks
resulting in a risk of re or explosion due
to ignition of the refrigerant caused by
electric heaters, stoves, or other sources
of ignition�
• The appliance must be stored in such a
way as to prevent mechanical failure�
• Individuals who operate or work on
the refrigerant circuit must have the
appropriate certication issued by an
accredited organisation that ensures
competence in handling refrigerants
according to a specic evaluation
recognized by associations in the
industry�
• Repairs must be performed based
on the recommendations from the
manufacturing company� Maintenance
and repairs that require the assistance
of other qualied personnel must be
performed under the supervision of
an individual specied in the use of
ammable refrigerants�
Page 23

10. ENVIRONMENTAL CONCERNS
23ENGLISH
Recycle the materials with the symbol �
Put the packaging in applicable
containers to recycle it� Help protect the
environment and human health and to
recycle waste of electrical and electronic
appliances� Do not dispose appliances
marked with the symbol with the
household waste� Return the product to
your local recycling facility or contact your
municipal ofce�
Page 24
24 www.electrolux.com
TABLE DES MATIÈRES
1. INFORMATIONS SUR LA SECURITE ................................................................25
2. INSTRUCTIONS SUR LA SECURITE ..................................................................28
3. DESCRIPTION DE LA MACHINE .......................................................................32
4. ACCESSOIRES INCLUS ....................................................................................32
5. INSTRUCTIONS D'INSTALLATION ....................................................................33
6. FONCTIONS DU CLIMATISEUR ........................................................................36
7. INSTRUCTIONS SUR LE FONCTIONNEMENT ..................................................36
8. ENTRETIEN ET NETTOYAGE ............................................................................43
9. DEPANNAGE ....................................................................................................44
10. QUESTIONS ENVIRONNEMENTALES .............................................................45
NOUS TENONS COMPTE DE VOS BESOINS
Merci d'avoir acheté un appareil Electrolux. Vous avez choisi un produit qui représente des
décennies d'expérience professionnelle et d'innovation. Ingénieux et stylé, il a été conçu
spécialement pour vous. Vous pouvez être certains d'obtenir de bons résultats à chaque
fois que vous l'utilisez.
Bienvenue sur Electrolux.
Visitez notre site Web pour :
Obtenir des conseils sur l'utilisation, des brochures, un guide de dépannage,
des informations sur le service :
www.electrolux.com/webselfservice
Enregistrez votre produit pour un meilleur service :
www.registerelectrolux.com
Achetez des accessoires, des consommables et des pièces de rechange
d'origine pour votre appareil :
www.electrolux.com/shop
SERVICE CLIENTELE
Utilisez toujours des pièces de rechange.
Lorsque vous contactez notre Centre de service autorisé, assurez-vous que vous avez les
données suivantes à votre disposition : Modèle, PNC, Numéro de série.
Les informations peuvent être trouvées sur la plaque signalétique.
Informations sur la sécurité- Avertissement / Attention.
Informations générales et astuces.
Informations sur l'environnement.
Peuvent faire l'objet de modifications sans préavis.
Page 25
1. INFORMATIONS SUR LA SECURITE
AVERTISSEMENT !
•Cet appareil peut être utilisé par des enfants âgés de
8 ans et plus et des personnes avec des capacités
physiques, sensorielles et mentales réduites ou sans
expérience s'ils sont surveillés ou informés sur l'utilisation
de l'appareil en toute sécurité et comprennent les
dangers impliqués.
•Les enfants ne doivent pas jouer avec l'appareil.
•Si le cordon d'alimentation est endommagé, il doit être
remplacé par le fabricant, son agent de service ou des
personnes tout aussi qualifiées pour éviter tout danger.
Ce manuel explique l'utilisation appropriée de votre nouveau
climatiseur. Veuillez lire attentivement ce manuel avant
d'utiliser le produit. Ce manuel doit être conservé dans un
endroit sûr pour référence future.
ATTENTION !
•Contactez un technicien autorisé pour la réparation ou la
maintenance de cette machine.
•Contactez l'installateur pour l'installation de cette machine.
•Le climatiseur n'est pas destiné à être utilisé par de jeunes
enfants ou des personnes invalides sans surveillance.
•Les jeunes enfants doivent être surveillés pour s'assurer
qu'ils ne jouent pas avec le climatiseur.
•Il existe des règles locales concernant les niveaux de
bruit maximum autorisés émis par les climatiseurs.
•Si le cordon d'alimentation doit être remplacé, des
travaux de remplacement doivent être réalisés par le
personnel autorisé uniquement.
•Les travaux d'installation doivent être réalisés selon les
normes de câblage nationales par le personnel autorisé
uniquement (si applicable). Une connexion incorrecte
peut causer la surchauffe et un incendie.
•Prenez soin de ne pas vous coincer les doigts dans le
ventilateur lors de l'ajustement des évents horizontaux.
25ANGLAIS
1.1 Remarques importantes
1. N'utilisez pas l'appareil sans filtre d'air.
2. N'utilisez pas l'appareil près d'une source de chaleur ou d'un
feu ouvert.
Page 26
26 www.electrolux.com
3. N'exposez pas l'appareil à la lumière directe du soleil.
4. Stockez toujours ou déplacez l'appareil en position verticale.
5. Ne couvrez pas l'appareil quand il est en marche ou
immédiatement après utilisation.
6. Vidangez toujours le condensé avant de stocker l'appareil.
1.2 Pointez pour mémoriser lors de l'utilisation de votre
climatiseur
ATTENTION !
Avertissements concernant l'utilisation
•Ne modifiez aucune pièce de ce produit.
•N'insérez rien dans l'appareil.
•Assurez-vous que l'énergie électrique utilisée a une
•Utilisez toujours un disjoncteur ou un fusible avec la
•En cas d'anomalie avec le climatiseur (exemple :
tension nominale appropriée. Utilisez uniquement une
alimentation électrique principale de 220V - 240V, 50Hz,
10A. L'utilisation d'une alimentation électrique avec
une tension nominale inappropriée peut causer des
dommages sur l'appareil et un incendie.
tension appropriée. N'utilisez en aucune circonstance du
fil, des trombones ou autre objet à la place d'un fusible
approprié.
odeur de brûlé), éteignez-le immédiatement et coupez
l'alimentation électrique.
ATTENTION !
Avertissement pour le cordon d'alimentation électrique
•Cette fiche d'alimentation peut être branché dans une
prise secteur appropriée. N'utilisez pas conjointement
avec d'autres rallonges électriques.
•Poussez la fiche d'alimentation fixement dans la prise
secteur et assurez-vous qu'elle n'est pas lâche.
•Ne tirez pas, ne déformez et ne modifiez pas le cordon
d'alimentation électrique et ne l'immergez pas dans l'eau.
Le fait de tirer sur le cordon d'alimentation électrique ou
de mal l'utiliser peut causer des dommages sur l'appareil
et un choc électrique.
Page 27
27ANGLAIS
•Si le cordon d'alimentation est endommagé, il doit être remplacé
par le fabricant, son agent de service ou une personne tout aussi
qualifiée pour éviter tout danger. Utilisez uniquement le cordon
d'alimentation spécifié par le fabricant pour le remplacement.
•Cet appareil doit être mis à la terre. Cet appareil est équipé d'un
cordon muni d'un fil de terre. La fiche peut être branchée à
une sortie correctement installée et mise à la terre.
Patte de mise
Fiche
à la masse
•Cet appareil est équipé d'un cordon muni d'un fil de terre
raccordé à une broche mise à la terre. La fiche peut être
branchée dans une prise secteur correctement installée et
mise à la terre. Ne coupez et ne retirez la broche carré mise à
la terre de cette fiche en aucune circonstance.
Broche carrée mise
à la terre
Fiche
(uniquement pour
le Royaume-Uni)
1.3 Précautions à prendre pendant l'utilisation
•Assurez-vous que l'appareil est éteint et débranchez le
cordon d'alimentation électrique avant de procéder à la
maintenance ou le nettoyage.
•N'éclaboussez ou ne versez pas l'eau directement sur
l'appareil. L'eau peut causer un choc électrique ou un
dommage sur l'équipement.
•La vidange doit être réalisée à chaque déplacement du
climatiseur (voir page 14). Si de l'eau reste dans le réservoir,
elle peut se déverser pendant le déplacement.
•Pour assurer la vidange, le tuyau de vidange ne doit pas avoir
des frisottis et ne doit pas être élevé pendant le mode de
déshumidification. Si non, l'eau vidangée peut se déverser
dans la pièce.
•La température autour du tuyau de vidange ne pas être en
dessous du point de congélation pendant l'utilisation. L'eau
vidangée peut se congeler à l'intérieur du tuyau, ce qui peut
causer le déversement de l'eau dans la pièce.
Page 28

28 www.electrolux.com
•N'obstruez pas la sortie de l'air d'évacuation. Le niveau de
refroidissement peut être réduit ou s'arrêter complètement.
•Fournir un appareil de courant résiduel (RCD) pour assurer
une protection contre les chocs électriques selon Bristish
Standard et les Règlements sur le câblage.
•L'exposition au flux d'air direct pour une période de temps
prolongée peut être dangereuse pour votre santé. N'exposez
pas les occupants, les animaux domestiques ou les plantes au
flux d'air direct pendant des périodes de temps prolongées.
•N'utilisez pas ce climatiseur pour des usages déterminés non
spécifiques (par exemple la préservation des appareils de
précision, les aliments, les animaux domestiques, les plantes
et les objets d'art). Ce type d'utilisation peut endommager
ces matériels.
2. INSTRUCTIONS SUR LA SECURITE
2.1 Remarques sur le fonctionnement
• Laissez passer 3 minutes pour
que le compresseur redémarre le
refroidissement. Si vous éteignez
le climatiseur et le redémarrez
immédiatement, laissez passer 3
minutes pour que le compresseur
redémarre le refroidissement. Un
dispositif électronique dans l'appareil
maintient le compresseur éteint pendant
3 minutes pour des raisons de sécurité.
• En cas de panneau de courant pendant
l'utilisation, laissez 3 minutes s'écouler
avant de redémarrer l'appareil. Après le
rétablissement du courant, redémarrez
le climatiseur. Si le courant a été coupé
pendant plus de trois minutes, assurezvous d'attendre au moins trois minutes
avant de redémarrer l'appareil. Si vous
redémarrez le climatiseur pendant trois
minutes, un dispositif de protection
dans l'appareil peut causer l'arrêt du
compresseur. Ce dispositif de protection
va empêcher le refroidissement pendant
environ 5 minutes. Tout paramètre
précédent sera annulé et l'appareil
retournera aux paramètres initiaux.
• Fonctionnement à basse température
: Votre appareil congèle-t-il ? La
congélation peut survenir lorsque
l'appareil est réglé à environ 18°C
à température ambiante basse,
particulièrement la nuit. Dans ces
conditions, une autre chute de
température peut causer la congélation
de l'appareil. Le réglage de l'appareil à
une température plus élevée empêchera
la congélation.
• Le mode déshumidification augmente
la température ambiante. L'appareil
génère de la chaleur pendant le mode
de déshumidification et la température
ambiante augmente. L'air chaud est
expulsé de la sortie de l'air d'évacuation,
mais cette situation est normale et
n'indique pas de problème avec
l'appareil.
• Ce climatiseur expulse l'air chaud
généré par l'appareil à l'extérieur de la
pièce via le tuyau d'évacuation en mode
Refroidissement. Au même moment, la
même quantité d'air rentre dans la pièce
via des ouvertures de la pièce.
• N'utilisez pas des moyens d'accélération
du processus de dégivrage ou
de nettoyage autres que ceux
recommandés par le fabricant.
Page 29
29ANGLAIS
• L'appareil doit être stocké dans une
pièce sans sources d'inflammation en
service continu (par exemple : flammes
ouvertes, appareil à gaz en service ou
chauffage électrique en service).
• Ne pas percer ou brûler.
• Les procédures doivent être conformes
aux réglementations nationales sur le
gaz.
• Évitez toute obstruction des ouvertures
de ventilation.
• L'appareil doit être stocké dans une
zone bien ventilée où la dimension de la
pièce est supérieure à 13 m
• Toute personne impliquée dans la
manipulation du circuit du réfrigérant
doit détenir un certificat valide en cours
délivré par une autorité d'évaluation
approuvée , qui l'autorise à manipuler
les réfrigérants en toute sécurité selon
la spécification d'évaluation reconnue
dans l'industrie.
2
.
• L'entretien doit être uniquement réalisé
comme recommandé par le fabricant
de l'équipement. La maintenance et
la réparation nécessitant l'assistance
d'autres membres du personnel
qualifiés doivent être réalisées sous la
supervision d'une personne compétente
dans l'utilisation des réfrigérants
inflammables.
• Ce produit contient un accumulateur au
lithium. Si un accumulateur au lithium
neuf ou usagé est avalé, il peut causer
de graves brûlures internes et conduire
à la mort en 2 heures seulement.
Sécurisez toujours complètement
le compartiment des piles. Si le
compartiment des piles ne se ferme
pas correctement, arrêtez d'utiliser le
produit, retirez les piles et éloignezles des enfants. Si vous pensez que
les piles ont été avalées ou rentrer
dans une partie du corps, consultez
immédiatement un médecin.
Pour éviter des blessures à l'utilisateur
ou d'autres personnes et les dommages
matériels, les instructions suivantes
doivent être respectées.
Un fonctionnement incorrect dû au non
respect des instructions peut causer du
tort ou des dommages.
La gravité est classée par les indications
suivantes :
AVERTISSEMENT !
Ce symbole indique la possibilité de
mort ou de blessures graves.
ATTENTION !
Ce symbole indique la possibilité
de blessures ou de dommages
matériels.
Les significations des symboles utilisés
dans le présent manuel sont indiquées cidessous :
Ce symbole indique de ne jamais
effectuer cette action.
Ce symbole indique de toujours
effectuer cette action.
2.2 Avertissement pendant
l'utilisation
AVERTISSEMENT !
Avertissement pendant l'utilisation
Page 30
30 www.electrolux.com
avertissement signication
Branchez correctement la fiche d'alimentation Un branchement incorrect peut causer
Ne démarrez et n'arrêtez pas l'appareil en
l'insérant ou en le débranchant de la fiche
d'alimentation
N'endommagez et n'utilisez pas de cordon
d'alimentation non spécifié
Ne modifiez pas la longueur du cordon
d'alimentation et ne partagez pas la sortie avec
d'autres appareils
N'utilisez pas avec des mains mouillées ou un
environnement humide
Ne dirigez pas le flux d'air vers les occupants
de la pièce
Assurez-vous toujours d'une mise à la terre
efficace
Empêcher l'eau d'entrer dans les pièces
électriques
Installez toujours un disjoncteur et un circuit
d'alimentation dédié
Débranchez l'appareil si des sons, une odeur
étranges ou de la fumée émanent de l'appareil
N'utilisez pas la prise secteur si celle-ci est
lâche ou endommagée
N'ouvrez pas la machine pendant le
fonctionnement
Éloignez les armes à feu Risque d'incendie
N'utilisez pas le cordon d'alimentation près
des appareils de chauffage
N'utilisez pas le cordon d'alimentation près
d'un gaz inflammable ou de combustibles, tels
que l'essence, le benzène, le diluant, etc.
Ventilez la salle avant de faire fonctionner le
climatiseur en cas de fuite de gaz provenant
d'un autre appareil
Ne démontez et ne modifiez pas la machine Cela peut causer une panne et un choc
un choc électrique ou un incendie dû à la
génération excessive de chaleur
Le faire peut causer un choc électrique ou
un incendie dû à la génération de chaleur
Il peut causer un choc électrique ou un
incendie.
Si le cordon d'alimentation est endommagé,
il doit être remplacé par le fabricant, un
centre de service ou une personne tout
aussi qualifiée pour éviter tout danger
Le faire peut causer un choc électrique ou
un incendie dû à la génération de chaleur
Cela peut causer un choc électrique
Cela peut vous causer des problèmes de
santé
Une mise à la terre inappropriée peut causer
un choc électrique
Elle peut causer une panne de la machine
ou un choc électrique
Une installation incorrecte de ces éléments
peut causer un incendie et un choc
électrique
Ils peuvent causer un incendie et un choc
électrique
Ils peuvent causer un incendie et un choc
électrique
Ils peuvent causer un incendie et un choc
électrique
Ils peuvent causer un incendie et un choc
électrique
Cela peut causer une explosion ou un
incendie
Elle peut causer un explosion, un incendie et
des brûlures
électrique
Page 31

ATTENTION !
attention signication
Lorsque le filtre à air doit être retiré, ne touchez
Cela peut causer des blessures
pas les pièces métalliques de l'appareil
Ne nettoyez pas le climatiseur à l'eau De l'eau peut pénétrer dans l'appareil et
dégrader l'isolation. Cela peut causer un
choc électrique
Ventilez bien la pièce si vous utilisez également
Il pourrait avoir manque d'oxygène
une poêle, etc.
Lorsque l'appareil est nettoyé, éteignez et
arrêtez le disjoncteur
Ne nettoyez pas l'appareil lorsque
l'alimentation est activée car cela peut
causer un incendie, un choc électrique et
des blessures
Ne placez pas d'animal domestique ou de
Cela peut les blesser ou les endommager
plante où ils seront exposés directement au
flux d'air
Ne pas utiliser pour un usage déterminé N'utilisez pas ce climatiseur pour préserver
les appareils de précision, les aliments, les
plantes et les objets d'art. Cela peut causer
la détérioration de la qualité, etc.
Arrêtez le fonctionnement et fermez les
fenêtres en cas de tempête ou de cyclone
Avec un fonctionnement avec les fenêtres
ouvertes, les meubles peuvent se mouiller
ou être trempés
Tenez la fiche d'alimentation par la tête pour la
retirer
Coupez l'alimentation principale lorsque vous
n'utilisez pas l'appareil pendant une longue
Risque de choc électrique et
d'endommagement
Au cas contraire, une panne de la machine
ou un incident peut survenir
période de temps
Ne placez aucun obstacle autour des entrées
d'air ou à l'intérieur de la sortie d'air
Insérez toujours les filtres en toute sécurité.
Nettoyez le filtre toutes les deux semaines
N'utilisez pas de détergent fort tel que la cire
ou un diluant - utilisez un tissu doux
Elle peut causer une panne de la machine
ou un accident
Le fonctionnement sans les filtres peut
causer une panne
L'apparence peut se détériorer du fait du
changement de la couleur du produit ou le
grattage de sa surface
Ne placez pas d'objet lourd sur le cordon
d'alimentation et assurez-vous que le cordon
Il existe un risque d'incendie ou de choc
électrique
n'est pas comprimé
Ne buvez pas l'eau tirée du climatiseur Elle contient des contaminants et peut vous
rendre malade
Déballez et installez l'appareil avec précaution Les extrémités tranchantes peuvent causer
des blessures
Si de l'eau rentre dans la machine, éteignez cette
dernière au niveau de la sortie d'alimentation
Risque de choc électrique et
d'endommagement
et arrêtez le disjoncteur. Isolez l'alimentation en
débranchant la fiche d'alimentation et contactez
un technicien qualifié
31ANGLAIS
Page 32

32 www.electrolux.com
10
4 5
9
3. DESCRIPTION DE LA MACHINE
3
2
6
1
11
1
Télécommande
2
Récepteur de signal
3
Sortie d'air ambiant Sortie du drain inférieur
4
Panneau de commande
5
Poignée de transport (deux côtés)
4. ACCESSOIRES INCLUS
PIÈCES NOM DES PIÈCES : QUANTITÉ :
1
2
3
4
5
6
Connecteur du kit de fenêtre A 1 pc
Connecteur d'évacuation B 1 pc
Kit de curseur de fenêtre 1 ensemble
Tuyau d'évacuation 1 pc
Vis
Verrou de sécurité 1 pc
6
Admission d'air
Sortie de vidange continue
7
8
9
Évacuation d'air
Câble d’alimentation
10
11
Castor
Vis de 12,7 mm à 4 pcs
Vis de 19 mm à 2 pcs
7
8
7
8
9
10
11
Boulons 2 pcs
Joint mousse A 2 pcs
Joint mousse B 1 pc
Télécommande 1 ensemble
Pile 2 pcs
• Vérifiez tous les accessoires inclus dans le package et reportez-vous aux instructions
d'installation pour leur utilisation.
Page 33

5. INSTRUCTIONS D'INSTALLATION
Fig.3
33ANGLAIS
5.1 Évacuation de l'air chaud
En mode Refroidissement, l'appareil doit
être placé près d'une fenêtre ou d'une
ouverture de sorte que l'air d'évacuation
chaud puisse être conduit à l'extérieur.
Placez premièrement l'appareil sur un sol
plat et assurez-vous qu'il existe un espace
sûr de 30mm autour de l'appareil et qu'il
se trouve aux environs d'une source
d'énergie de sortie à simple circuit.
1. Étendez chaque côté du tuyau (fig. 1) et
vissez le tuyau au connecteur A (fig. 2).
Étendez le côté du tuyau
2. Étendez l'autre côté du tuyau et vissez-
le au connecteur B (fig. 3).
Fig.1
Fig.2
Fenêtre
verticale
Kit de curseur de fenêtre
Minimum : 67,5 cm
Maximum : 123 cm
Fenêtre
horizontale
Kit de curseur de fenêtre
Minimum : 67,5 cm
Maximum : 123 cm
Le tuyau peut être étendu de sa
longueur initiale de 38cm pouces
jusqu'à 150cm, mais il est mieux de
conserver la longueur au minimum
requis. Assurez-vous également que
le tuyau n'est pas courbé ou fléchi.
(Fig. 7)
Fig.5
Fig.6
Fig.7
3. Installez le connecteur B sur l'appareil
(Fig.4).
1
2
Verrouiller
4. Fixez le connecteur B sur le kit du
Glissez sur
Fig. 4
curseur de fenêtre et le joint. (Fig. 5 et 6)
5.2 Installation d'une fenêtre à
guillotine double
1. Coupez les joints mousse A (type
adhésif) aux longueurs appropriées et
fixez-les à la fenêtre et le rebord.(fig.8)
Page 34

34 www.electrolux.com
12,7 mm
vis 12,7 mm
Joint mousse A
(type adhésif)
Fig.8
2. Ouvrez le châssis de la fenêtre et
placez le kit du curseur de fenêtre sur
le rebord de la fenêtre (fig.9). Fixez le
kit du curseur de fenêtre au rebord de
la fenêtre. Ajustez la longueur du kit du
curseur de fenêtre selon la largeur de la
fenêtre. Vissez les deux vis sur le kit du
curseur de fenêtre. Voir fig.9.
vis
Kit de curseur
de fenêtre
67,5 cm~123 cm
Rebord de fenêtre
Fig.9
Coupez le kit du curseur de fenêtre
réglable si la largeur de la fenêtre est
inférieure à 67,5 cm (fig.10).
Coupez cette partie pour l'adapter à la fenêtre
Kit de curseur
de fenêtre
vis de 19 mm ou
vis de bouchon à
tête hexagonale
Rebord de fenêtre
Fig.11
6. Pour fixer le châssis inférieur, fixez le
verrou à l'angle droit du châssis avec la
vis de 12,7 mm comme indiqué (fig.12).
Il est difficile de verrouiller les
fenêtres avec le verrou du châssis
pour les fenêtres plaqués en vinyle,
vous pouvez donc utiliser le verrou
sur la fenêtre elle-même.
Fig.12
7. Coupez le joint mousse B à la longueur
appropriée et placez-le sur l'espace
ouvert entre le châssis de la fenêtre
supérieure et le châssis de la fenêtre
extérieure, comme indiqué à la figure
13.
Joint mousse B
Fig.10
3. Fermez le châssis de la fenêtre contre le
kit du curseur de fenêtre. (Fig.11)
4. Utilisez deux vis de 12,7 mm pour fixer
le kit du curseur de fenêtre au châssis
de la fenêtre. (fig.11)
5. Fixez le kit du curseur de fenêtre au
rebord de la fenêtre (fig.11) :
A : Pour la fenêtre en bois : Utilisez des vis
de 19mm pour la fixer.
B : Pour les fenêtres plaqués en vinyle
: Utilisez des vis de bouchon à tête
hexagonale de 12,7 mm pour les fixer.
Fig.13
5.3 Installation sur une fenêtre
coulissante
1. Coupez les joints mousse A (type
adhésif) aux longueurs appropriées et
fixez-les au cadre de la fenêtre. Voir
fig.14.
Page 35

Joint mousse A
(type adhésif)
35ANGLAIS
6. Coupez le joint mousse B à la longueur
appropriée et placez-le sur l'espace
ouvert entre le châssis coulissant et le
châssis extérieur de la fenêtre, comme
indiqué à la figure 17.
Fig.14
2. Ouvrez le châssis de la fenêtre et
placez le kit du curseur de fenêtre sur
le rebord de la fenêtre (fig.15). Fixez le
kit du curseur de fenêtre au rebord de
la fenêtre. Ajustez la longueur du kit du
curseur de fenêtre selon la hauteur de la
fenêtre. Vissez les deux vis sur le kit du
curseur de fenêtre. Voir fig.15. Coupez
le kit du curseur de fenêtre réglable si
la hauteur de la fenêtre est inférieure à
67,5cm (fig.10).
Rebord de fenêtre
67,5 cm~123 cm
Kit de curseur de fenêtre
vis
Fig.15
3. Fermez le châssis de la fenêtre contre le
kit du curseur de fenêtre. (Fig.16)
4. Utilisez deux vis de 12,7 mm pour fixer
le kit du curseur de fenêtre au châssis
de la fenêtre. (Fig.16)
5. Utilisez deux vis de 19 mm pour fixer le
kit du curseur de fenêtre au rebord de la
fenêtre. (fig.16)
Rebord de fenêtre
Kit de curseur de fenêtre
Joint mousse B
Fig.17
7. Pour fixer le châssis coulissant, fixez le
verrou à l'angle droit du châssis avec la
vis de 12,7 mm comme indiqué (fig.18).
Fig.18
vis
12,7 mm
vis
12,7 mm
Fig.16
Page 36

36 www.electrolux.com
6. FONCTIONS DU CLIMATISEUR
6.1 PANNEAU DE COMMANDE
cool dryfan autotimer hi medlow auto filter
1
timer
1
Affiche température/Heure
2
MARCHE/ARRET
3
Réinitialiser Vitesse du ventilateur/Filtre
mode
temp/timer
4
Régler Température ou Heure
5
Sélection du mode
6
Minuteur
fan speed
hold 5s
filter reset
7. INSTRUCTIONS SUR LE FONCTIONNEMENT
Certaines des instructions suivantes
peuvent être utilisées uniquement
via le panneau de commande.
7.1 Utilisation du panneau de
commande
Mode Heating (Chauffage) (sur certains
modèles)
Dans ce mode, le tuyau d'évacuation de
l'adaptateur doit être utilisé.
Dans ce mode, la vitesse du ventilateur
peut être sélectionnée.
1. Appuyez sur le bouton "mode (mode)"
jusqu'à ce que le voyant "Chaleur"
s'éclaire.
2. Appuyez sur les boutons de température
” & “ ” pour la configuration
“
souhaitée.
3. Tuyau de vidange raccordé. Voir la
section 7.3 Vidange.
Mode Cooling (Refroidissement)
Dans ce mode, le tuyau d'évacuation de
l'adaptateur doit être utilisé.
1. Appuyez sur le bouton "mode (mode)"
jusqu'à ce que le voyant du mode Froid
s'éclaire.
2. Appuyez sur le bouton "fan speed
(Vitesse du ventilateur)" pour choisir la
vitesse du ventilateur selon l'éclairage du
voyant de vitesse du ventilateur. Vous
pouvez choisir parmi les paramètres de
vitesse de ventilateur “élevé”, “moyen”,
“bas”, ou “automatique”.
3. Appuyez sur le bouton “
pour choisir la température souhaitée.
Il n'est pas nécessaire d'utiliser le
tuyau de vidange en mode "cool
(froid)".
Mode Dry (Sec)
Appuyez sur le bouton "mode (mode)"
jusqu'à ce que le voyant du mode Sec
s'éclaire. L'écran affiche la température
ambiante.
En même temps, le voyant du ventilateur
"bas" s'éclaire.
Remarque: Dans ce mode, la vitesse du
ventilateur peut être sélectionnée.
on/off
23456
” ou “ ”
Page 37

37ANGLAIS
Mode Fan (Ventilateur)
Dans ce mode, il n'est pas nécessaire
d'utiliser le tuyau d'évacuation ou le tuyau
de vidange.
1. Appuyez sur le bouton "mode (mode)"
jusqu'à ce que le voyant du mode
Ventilateur s'éclaire.
2. Appuyez sur le bouton "Fan speed
(Vitesse du ventilateur)" pour choisir la
vitesse du ventilateur désirée.
3. Le ventilateur fonctionne à vitesse
sélectionnée et l'écran affiche la
température ambiante.
Mode Auto (Automatique)
Assurez-vous que le tuyau d'évacuation
est toujours fixé dans ce mode.
Quand vous réglez le climatiseur sur
le mode Automatique, il sélectionne
automatiquement le fonctionnement
en mode refroidissement, chauffage
(inapplicable pour les modèles de
refroidissement uniquement), ou ventilateur
uniquement selon la température
sélectionnée et la température ambiante.
Le climatiseur contrôle la température
ambiante automatiquement autour du
point de température réglé.
En mode AUTOMATIQUE, vous ne pouvez
pas sélectionner la vitesse du ventilateur.
1. Appuyez sur le bouton "mode (mode)"
jusqu'à ce que le voyant "mode Auto"
s'éclaire.
Après la sélection du "Auto mode", la
machine fonctionne automatiquement
selon la température de l'air ambiant.
Mode Timer (Minuteur)
Le minuteur permet à l'utilisateur de
retarder le démarrage ou l'arrêt de
l'appareil.
Comment retarder le démarrage
Branchez l'appareil pour qu'il passe en
mode veille.
Appuyez sur le bouton "timer (minuteur)",
le voyant du minuteur et le nombre
d'heures sur l'écran clignotent.
Tapez ou maintenez la flèche HAUT “
” ou la flèche BAS “
” pour changer le
retard du minuteur de démarrage à des
incréments de 0,5 heur jusqu'à 10 heures,
puis à des incréments d'1 heure jusqu'à
24 heures.
Après 5 secondes, le voyant du minuteur
et l'écran s'arrêtent de clignoter. La
commande compte le temps restant
jusqu'au démarrage.
L'appareil se met à fonctionner avec le
mode précédemment défini.
Pour annuler le réglage, appuyez à
nouveau sur le bouton "timer (minuteur)".
Le voyant du minuteur s'éteint.
Comment retarder l'arrêt
Vous pouvez retarder l'arrêt lorsque
l'appareil est allumé.
Appuyez sur le bouton "timer (minuteur)",
le voyant du minuteur et le nombre
d'heures sur l'écran clignotent.
Tapez ou maintenez la flèche HAUT “
” ou la flèche BAS “ ”pour changer
le retard du minuteur d'arrêt à des
incréments de 0,5 heur jusqu'à 10 heures,
puis à des incréments d'1 heure jusqu'à
24 heures.
Après 5 secondes, le voyant du minuteur
arrête de clignoter, l'écran arrête de
clignoter et affiche le temps restant jusqu'à
l'arrêt de l'appareil.
Pour annuler le réglage, appuyez à
nouveau sur le bouton "timer (minuteur)".
Le voyant du minuteur s'éteint.
Réinitialisation du filtre
Cette fonction est un rappel de nettoyer le
filtre d'air (voir Entretien et Nettoyage) pour
un fonctionnement plus efficace.
Le voyant du filtre s'éclaire après 250
heures de fonctionnement. Pour réinitialiser
après avoir nettoyé le filtre, appuyez et
maintenez le bouton "fan speed (vitesse
du ventilateur)" pendant 5 secondes, et le
voyant "filter" s'éclairera.
Page 38

38 www.electrolux.com
7.2 Télécommande
1
Écran de la télécommande
2
Bouton Timer on (Minuteur activé)
3
Bouton Timer off (Minuteur désactivé)
4
Bouton Sleep (Veille)
5
Bouton Mode (Mode)
6
Bouton Temp/Timer setting (Réglage
Température/Minuteur)
7
Bouton °F/°C
8
Bouton Swing (Balancement)
9
Bouton Fan Speed (Vitesse du Ventilateur)
10
Bouton On/Off (Marche/Arrêt)
Installation des piles et instructions
importantes
Retirez le couvercle à l'arrière de la
télécommande.
Insérez correctement les piles fournies (lire
les consignes à l'intérieur du compartiment
des piles).
Fermez le couvercle.
Pour remplacer les anciennes piles (usagées)
Vac deux piles R03P "AAA" 1,5V, répétez
les étapes ci-dessus.
Si la télécommande est remplacée ou n'est
plus utilisée, les piles doivent être retirées
et mises au rebut selon la législation
locale car elles sont dangereuses pour
l'environnement.
Ne mélangez pas les piles anciennes et les
piles neuves.
Ne mélangez pas les piles alcalines,
standard (carbone-zinc) ou rechargeables
(nickel-cadmium).
Ne jetez pas les piles dans le feu. Les
piles peuvent exploser ou fuir. Si la
télécommande n'est pas utilisée pendant
une période prolongée, retirez les piles de
la télécommande.
La télécommande doit être gérée avec
beaucoup de soin. Ne la laissez pas
tomber et ne l'exposez pas à la lumière
directe du soleil ou à des sources de
chaleur.
Cet appareil est conforme à la Section 15
du Règlement FCC. Le fonctionnement est
soumis aux deux conditions suivantes :
(1) Cet appareil peut ne pas causer
d'interférence nocive, et (2) ce périphérique
doit accepter toute interférence, y compris
les interférences reçues susceptibles de
causer un fonctionnement non désiré.
Pointez la télécommande vers
l'emplacement du récepteur de signal. La
télécommande ne doit pas être située à
plus de 16 pieds(5 mètres) de l'appareil
(sans obstacles entre la télécommande et
l'appareil).
Utilisateur
Max. 5 m
Télécommande
CA portable
Page 39

39ANGLAIS
Utilisation de la télécommande
MISE EN MARCHE DE L'APPAREIL
Branchez l'appareil, puis appuyez sur le
bouton "on/off (marche/arrêt)" (si allumé,
l'appareil fonctionne avec le dernier
réglage avant l'arrêt).
Pour arrêter l'appareil, appuyez sur le
bouton "on/off (marche/arrêt)" à nouveau,
puis débranchez la fiche.
N'éteignez pas l'appareil en débranchant
la fiche.
Arrêtez toujours l'appareil en appuyant
sur le bouton "on/off (marche/arrêt)" et
attendez quelques minutes avant de
débrancher la fiche.
Mode Cool (Froid)
Appuyez sur le bouton “mode (mode)”
jusqu'à ce que l'écran LCD de contrôle
gauche affiche “
”.
Appuyez sur le bouton "fan speed (vitesse
du ventilateur)" pour choisir la vitesse du
ventilateur “Élevé”, “Moyen”, “Bas”, et
“Automatique".
Appuyez sur le bouton “
” et “ ” pour
choisir la température souhaitée
Élevé Moyen Bas Auto
Mode Dry (Sec)
Appuyez sur le bouton “mode (mode)”
jusqu'à ce que l'écran LCD de contrôle
gauche affiche “
”.
Au même moment, le symbole du
ventilateur "low" apparaît sur l'écran.
Remarque: Dans ce mode, la vitesse du
ventilateur peut être sélectionnée.
Mode Fan (Ventilateur)
Appuyez sur le bouton “mode (mode)”
jusqu'à ce que l'écran LCD de contrôle
gauche affiche “
”.
Dans ce mode, vous pouvez sélectionner
la vitesse du ventilateur “Élevé”, “Moyen”,
“Bas” ou "Auto" en appuyant sur le bouton
Vitesse du ventilateur et en vous reportant
au diagramme.
Remarque: Dans ce mode, il n'est
pas nécessaire de brancher le tuyau
d'évacuation de l'air.
Mode Heat (Chaleur) (Pour les modèles
Chauffage et Refroidissement uniquement)
Appuyez sur le bouton “mode (mode)”
jusqu'à ce que l'écran LCD de contrôle
gauche affiche “
Appuyez sur le bouton “
”.
” et “ ” pour
choisir la température souhaitée. En même
temps, le voyant du ventilateur "bas"
s'éclaire.
Remarque: Dans ce mode, la vitesse du
ventilateur peut être sélectionnée.
Mode AUTO (AUTOMATIQUE)
Appuyez sur le bouton “mode (mode)”
jusqu'à ce que le côté supérieur de l'écran
LCD affiche “ auto ”.
En mode AUTOMATIQUE, vous ne pouvez
pas sélectionner la vitesse du ventilateur.
Appuyez sur le bouton “
” et “ ” pour
choisir la température souhaitée.
Page 40

40 www.electrolux.com
Mode Sleep (Veille)
Quand l'appareil est en mode Froid,
Chaleur ou Automatique, vous pouvez
appuyer sur le bouton "sleep (veille)" pour
faire passer l'appareil en mode Veille.
Dans ce mode, la vitesse du ventilateur est
réglée sur "bas" automatiquement, ce qui
ne peut pas être changé.
En mode Froid, la température sélectionné
augmente de 1 °C 30 minutes après avoir
sélectionné le mode. La température
augmente de 1 °C supplémentaire après
30 minutes supplémentaires. Cette
nouvelle température sera maintenue
pendant 7 heures avant de retourner à
la température initialement sélectionnée.
Cette action termine le mode "Sleep
(Veille)" Et l'appareil s'éteint.
Le programme du mode "Veille" peut
être annulé à tout moment pendant le
fonctionnement en appuyant sur le bouton
"Sleep (Veille)", "mode (mode)" ou "fan
speed (vitesse du ventilateur)".
Remarque: En mode Ventilateur ou Sec,
le mode Veille ne peut être réglé.
Fonction de balancement de l'évent
Appuyez sur le bouton "swing
(balancement)" pour activer la fonction
de balancement de l'évent et le côté
supérieur de l'écran s'affiche “
”. L'évent
sur le panneau supérieur balance de haut
en bas.
Appuyez sur le bouton à nouveau pour
désactiver la fonction de balancement de
l'évent.
Fonction °F/°C
Appuyez sur le bouton "°F/°C" pour
balancer entre le degré Fahrenheit et les
degrés Celsius. En mode Sec/Ventilateur,
vous ne pouvez pas sélectionner °F/°C
Mode Timer (Minuteur)
Comment retarder le démarrage
Branchez l'appareil pour qu'il passe en
mode veille.
Appuyez sur le bouton “timer on (minuteur
activé)”, l'écran affiche “
Tapez ou maintenez la flèche HAUT “
” ou la flèche BAS “
” et “H”.
” pour changer le
retard du minuteur de démarrage à des
incréments de 0,5 heur jusqu'à 10 heures,
puis à des incréments d'1 heure jusqu'à
24 heures. Après 2 secondes, le réglage
est mémorisé. La commande compte
le temps restant jusqu'au démarrage.
Page 41

L'appareil se met à fonctionner avec le
mode précédemment défini.
Pour annuler le réglage, appuyez à
nouveau sur le bouton "timer on (minuteur
activé)".
Comment retarder l'arrêt
Vous pouvez retarder l'arrêt lorsque
l'appareil est allumé.
Appuyez sur le bouton "timer off (minuteur
désactivé)", l'écran affiche“
Tapez ou maintenez la flèche HAUT “
” ou la flèche BAS “ ”pour changer
le retard du minuteur d'arrêt à des
incréments de 0,5 heur jusqu'à 10 heures,
puis à des incréments d'1 heure jusqu'à
24 heures. Après 2 secondes, le réglage
est mémorisé et l'écran affiche le temps
restant avant l'arrêt de l'appareil.
Pour annuler le réglage, appuyez à nouveau
sur le bouton "timer off (minuteur désactivé)".
” et “H”.
41ANGLAIS
Si l'écran affiche "ES", le capteur de
température de l'évaporateur est en
panne. Contactez votre service client
Electrolux autorisé.
Si l'écran affiche "P1", le bac inférieur est
plein. Déplacez soigneusement l'appareil
dans un emplacement de vidange,
retirez le bouchon de vidange inférieur et
laissez l'eau s'évacuer. Redémarrez la
machine jusqu'à ce que le symbole "P1"
disparaisse. Si l'erreur se répète, appelez
le service client.
7.4 Instructions sur le vidange
Vidange continue
Pendant le mode SEC, vous aurez besoin
d'un tuyau de jardin (vendu séparément)
pour vidanger le condensé de l'appareil.
Suivez les étapes suivantes :
• Dévissez le bouchon de vidange de la
sortie de vidange continue (Fig.19).
• Raccordez une extrémité du tuyau de
jardin (vendu séparément) à la sortie de
vidange puis conduisez l'autre extrémité
dans un drain situé plus bas que
l'appareil (Fig.20).
7.3 Code de panne
Si l'écran affiche "AS", le capteur de
température ambiante est en panne.
Contactez votre service client Electrolux
autorisé.
Fig.19
Bouchon de
vidange
Page 42

42 www.electrolux.com
r
Tuyau d'arrosage
Fig.22
REMARQUE :
• Le condensé peut s'écouler après
avoir retiré le bouchon de vidange, si
l'appareil fonctionne en mode Froid ou
Automatique. Quand vous voulez retirer
le tuyau d'arrosage, préparez un plateau
d'égouttage (non fourni) pour recueillir
le condensé à partir de la sortie de
vidange.
• Assurez-vous que la hauteur du drain
et la section du tuyau de vidange ne
doivent pas être plus élevée que la
sortie de vidange ou la vidange continue
peut ne pas fonctionner correctement.
• Pendant le mode Froid ou Automatique,
il est recommandé de désactiver la
vidange continue en remplaçant le
bouchon de vidange sur la sortie de
vidange, pour atteindre la performance
maximale.
Fig.20
Vider les restes de condensé dans
l'appareil pendant le stockage d'hiver.
Placez un plateau d'égouttage (non
fourni) sous la sortie de vidange inférieure,
puis retirez le bouchon de vidange pour
permettre au condensé de s'écouler dans
le plateau d'égouttage.
Remplacez le bouchon de vidange sur
la sortie de vidange continue quand le
condensé ne s'écoule pas.
Placez le plateau d'égouttage sous la
sortie de vidange inférieure, puis retirez le
stoppeur en caoutchouc de la sortie de
vidange pour permettre au condensé de
s'écouler dans le plateau d'égouttage.
Si le plateau d'égouttage ne peut pas
contenir tout le condensé, un nombre de
remplissage sera nécessaire.
Remplacez le bouchon de vidange sur
la sortie de vidange inférieure quand le
condensé ne s'écoule pas.
Sortie du
drain inférieu
Fig.21
Larmier
Plateau d'égouttage
REMARQUE : Pour vous assurer que tout
le condensé a été retiré, inclinez l'appareil
en le soulevant légèrement vers le haut
jusqu'à ce que le condensé ne s'écoule
plus de la sortie.
Page 43

8. ENTRETIEN ET NETTOYAGE
Nettoyez votre climatiseur
occasionnellement pour qu'il ait toujours
l'air neuf. Assurez-vous de débrancher
l'appareil avant le nettoyage pour
empêcher un choc ou un incendie
8.1 Nettoyage de l'appareil
Le boîtier et l'avant de l'appareil peuvent
être dépoussiérés avec un tissu sec ou
lavés avec un tissu imbibé d'une solution
d'eau chaude
et d'un liquide vaisselle doux.
N'utilisez jamais de nettoyants durs, de
cire ou de vernis sur l'avant du boîtier.
Assurez-vous d'essorer l'excédent d'eau
du tissu avant de nettoyer autour des
commandes. L'excédent d'eau dans
ou autour des commandes peut causer
l'endommagement du climatiseur.
8.2 Nettoyage des filtres
Pour que votre climatiseur fonctionne de
manière efficace, vous devez nettoyer
les filtres toutes les deux semaines de
fonctionnement.
1. Saisissez l'onglet du panneau et retirez
le filtre situé derrière la grille du panneau
arrière comme indiqué sur la figure cidessous.
43ANGLAIS
2. Lavez le filtre à l'aide d'un liquide
vaisselle et de l'eau chaude à 40°C.
Rincez abondamment le filtre. Secouez
doucement le filtre pour retirer
l'excédent d'eau. Assurez-vous que
le filtre est soigneusement sec avant
de le remplacer. Ou, au lieu de laver
vous pouvez nettoyez le filtre avec un
aspirateur.
3. Remplacez le filtre après qu'il soit sec.
Assurez-vous que le filtre est
soigneusement sec avant de le
remplacer.
8.3 Stockage d'hiver
Si le climatiseur ne sera pas utilisé pendant
une
période de temps prolongée :
1. Vidangez complètement le réservoir et
laissez le bouchon de vidange inférieur
et le bouchon en caoutchouc assez
longtemps pour permettre à tout
excédent d'eau de d'être évacuée.
Quand le réservoir est complètement
vidangé et que l'eau ne s'écoule plus,
réinstallez le bouchon de vidange et le
bouchon en caoutchouc.
2. Retirez et nettoyez le filtre, permettez-
le de sécher complètement, puis
réinstallez-le.
3. Retirez les piles de la télécommande.
4. Stockez le climatiseur dans un endroit
frais, sec, loin de la lumière directe du
soleil, des températures extrêmes et de
la poussière excessive.
Avant d'utiliser à nouveau le climatiseur :
1. Assurez-vous que le filtre et le bouchon
de vidange sont en place.
2. Vérifiez le cordon pour vous assurer
qu'il est en bon état, n'est pas fissuré
ou endommagé.
3. Placez des piles neuves dans la
télécommande.
4. Installez le climatiseur comme décrit
dans les consignes d'installation.
Page 44

44 www.electrolux.com
9. DEPANNAGE
Avant d'appeler le service client, révisez
cette liste. Elle peut vous permettre
d'économiser du temps et de l'argent.
Cette liste inclut des occurrences
communes qui ne résultent pas d'un
défaut de fabrication de cet appareil.
Le climatiseur ne fonctionne pas.
• La prise murale est débranchée.
Poussez fermement la fiche dans la
prise murale.
• Un fusible a disjoncté ou le disjoncteur
s'est déclenché. Remplacez le fusible
par un fusible de type temporisé ou
réinitialisez le disjoncteur.
• La commande est DÉSACTIVÉE.
ACTIVEZ la commande et réglez selon
vos préférences.
• P1 apparaît sur la fenêtre d'affichage.
Eau de vidange comme décrite dans la
section 7.3 Vidange.
• La température de la pièce est inférieure
à la température réglé (Mode Froid).
Réglez à nouveau la température.
L'air qui sort de l'appareil n'est pas
assez froid.
• Température ambiante en dessous de
16°C. Le refroidissement peut ne pas
survenir jusqu'à ce que la température
ambiante passe au-dessus de 16°C.
• Réglez à nouveau la température à une
valeur inférieure.
• Le compresseur s'arrête lorsque les
modes changent. Attendez environ 3
minutes et écoutez le compresseur
redémarrer en mode FROID.
Le climatiseur est en mode
Refroidissement, mais la pièce est
trop chaude, aucune glace NE se
forme sur le serpentin refroidisseur
derrière la partie avant décorative.
• Température extérieure inférieure à
16°C. Pour dégivrer le serpentin, réglez
le mode Ventilateur.
• L'air du filtre peut être sale. Nettoyez
le filtre. Reportez-vous à la section 8.
Entretien et Nettoyage. Pour dégivrer,
réglez le mode Ventilateur.
• La température est réglée à une valeur
trop basse pour le refroidissement de
nuit. Pour dégivrer le serpentin, réglez-le
sur le mode Ventilateur. Ensuite, réglez
la température à une valeur plus élevée.
• Conduit d'évacuation non branché ou
bloqué. Voir la section 5.1 Évacuation
de l' air chaud.
Le climatiseur est en mode
Refroidissement, mais la pièce est
trop chaude, de la glace se forme sur
le serpentin refroidisseur derrière la
partie avant décorative
• Filtre d'air sale – air restreint. Nettoyez le
filtre d'air. Reportez-vous à la section 8.
Entretien et Nettoyage.
• La valeur de température réglée est trop
élevée. Réglez la température à une
valeur inférieure.
• Les évents de direction d'air ne sont pas
bien positionnés. Positionnez les évents
pour une meilleure distribution de l'air.
• L'avant de l'appareil est bloqué par des
rideaux, des stores, des meubles, etc. –
restreint la distribution de l'air. Enlevez
tout obstacle devant l'appareil.
• Portes, fenêtres, registres, etc. ouverts–
l'air froid s'échappe. Fermez les portes,
les fenêtres, les registres, etc.
• L'appareil s'est allumé récemment
dans une pièce chaude. Laissez passer
plus de temps pour retirer "la chaleur
stockée" des murs, du plafond, de la
porte et des meubles.
Le climatiseur s'allume et s'éteint
rapidement.
• Filtre d'air sale – air restreint. Nettoyez le
filtre d'air.
• Température extérieure extrêmement
chaude. Réglez la vitesse du
VENTILATEUR à une valeur plus élevée
pour que l'air sorte des serpentins de
refroidissement plus rapidement.
La pièce est trop froide.
• Réglez la température à une valeur
très basse. Augmentez la température
réglée.
VEUILLEZ NOTER QUE: VERIFIEZ
LA PLAQUE POUR LETYPE DE GAZ
REFRIGERANT UTILISÉ DANS VOTRE
APPAREIL.
Page 45

45ANGLAIS
AVERTISSEMENT !
Les informations spécifiques
concernant les appareils avec le gaz
réfrigérant R290.
• Lisez attentivement tous les
avertissements.
• Lors du dégivrage et le nettoyage de
l'appareil, n'utilisez pas d'outils autres
que ceux recommandés par le fabricant.
• L'appareil doit être placé dans une zone
sans source d'inflammation continue
(par exemple : flammes ouvertes,
appareils à gaz ou électriques en
service).
• Ne pas perforer et ne pas brûler.
• Les gaz réfrigérants peuvent être
inodores.
• L'appareil peut être installé, utilisé et
stocké dans une zone supérieure à
2
.
13 m
• Cet appareil contient 235g ou 245g (voir
l'étiquette du régime nominal à l'arrière
de la machine) du gaz réfrigérant R290.
• R290 est un gaz réfrigérant conforme
aux directives européennes sur
l'environnement. Ne perforez pas les
pièces du circuit du réfrigérant.
• Si l'appareil est installé, utilisé ou
stocké dans une zone non ventilée, la
pièce doit être conçue pour empêcher
l'accumulation de fuites du réfrigérant,
ce qui entraîne un risque d'incendie
ou d'explosion dû à l'inflammation du
réfrigérant causée par les chauffages
électriques, les poêles ou d'autres
sources d'inflammation.
• L'appareil doit être stocké de sorte à
empêcher toute panne mécanique.
• Les personnes qui utilisent ou travaillent
sur le circuit du réfrigérant doivent
détenir une certification appropriée
délivrée par un organisme agréé
qui garantit la compétence dans la
manipulation des réfrigérants selon une
évaluation spécifique reconnue par les
associations dans l'industrie.
• Les réparations doivent être réalisées
selon les recommandations fournies
par la société de fabrication. La
maintenance et les réparations
nécessitant l'assistance d'autres
membres du personnel qualifiés doivent
être réalisées sous la supervision d'une
personne spécialisée dans l'utilisation
des réfrigérants inflammables.
10. QUESTIONS ENVIRONNEMENTALES
Recyclez les matériaux avec symbole.
Place l'emballage dans des récipients
applicables pour recyclage. Contribuez
à la protection de l'environnement et à la
santé humaine et à recycler les déchets
provenant des appareils électriques et
électroniques. Ne mettez pas au rebut
les appareils marqués par le symbole
avec les ordures ménagères. Retournez le
produit à votre centre de recyclage local
ou contactez votre mairie.
Page 46

46 www.electrolux.com
INDICE
1. INFORMAZIONI DI SICUREZZA ........................................................................ 47
2. NORME DI SICUREZZA .................................................................................. 50
3. DESCRIZIONE UNITA’ .................................................................................... 54
4. ACCESSORI INCLUSI ..................................................................................... 54
5. ISTRUZIONI DI INSTALLAZIONE ..................................................................... 55
6. CARATTERISTICHE DEL CONDIZIONATORE ................................................. 58
7. ISTRUZIONI PER L'USO ................................................................................. 58
8. CURA E PULIZIA ............................................................................................. 64
9. RISOLUZIONE DEI PROBLEMI ........................................................................ 65
10. PREOCCUPAZIONI AMBIENTALI .................................................................. 67
STIAMO PENSANDO A TE
Grazie per aver acquistato un apparecchio Electrolux. Hai scelto un prodotto che porta con
sé decenni di esperienza professionale e innovazione. Ingegnoso e alla moda, è stato creato
pensando a te. Quindi ogni volta che lo usi, puoi essere sicuro che avrai grandi risultati ogni
volta.
Benvenuti a Electrolux.
Visita il nostro sito web su:
Ottieni consigli sull’uso, brochure, risoluzioni dei problemi, informazioni sulla
manutenzione:
www.electrolux.com/webselfservice
Registra il tuo prodotto per un servizio migliore:
www.registerelectrolux.com
Compra Accessori, Consumabili e pezzi di ricambio originali per il tuo
apparecchio:
www.electrolux.com/shop
SERVIZIO CLIENTI E MANUTENZIONE
Usa sempre pezzi di ricambio originali.
Quando contatti il Centro di Manutenzione Autorizzato, assicurati di avere i seguenti dati
disponibili: Modello, PNC, Numero seriale.
I dati si possono trovare sulla targhetta di indentificazione.
Avvertimento / Attenzione-Norme di sicurezza.
Informazioni generali e consigli.
Informazioni ambientali.
Soggetto a modifiche senza preavviso.
Page 47

1. INFORMAZIONI DI SICUREZZA
ATTENZIONE!
•Quest’apparecchio può essere usato dai bambini di 8 anni
e oltre e da persone con ridotte capacità fisiche, mentali o
sensoriali o con mancanza di esperienza e conoscenza se
sono supervisionati o istruiti riguardo l’uso dell’applicazione
in modo sicuro e consapevole dei pericoli.
•I bambini non devono giocare con l’apparecchio.
•Se il cavo di alimentazione è danneggiato, deve
essere sostituito dal produttore, da un suo agente di
manutenzione o da persone parimente qualificate per
evitare pericoli.
Questo manuale spiega l’uso corretto del tuo nuovo
condizionatore. Leggi questo manuale attentamente prima di
usare il prodotto. Questo manuale va conservato in un posto
sicuro per una consultazione a portata di mano.
AVVERTENZA!
•Contatta un tecnico di manutenzione autorizzato per la
riparazione o la manutenzione di quest’unità.
•Contatta un installatore autorizzato per l’installazione di
quest’unità.
•Il condizionatore non è inteso per essere usato da
bambini di persone malate senza supervisione.
•I bambini devono essere supervisionati per assicurarsi
che non giochino con il condizionatore.
•Ci sono regole del consiglio locali riguardo i livelli massimi
di rumore consentiti emessi dai condizionatori.
•Se la prolunga deve essere sostituita, la sostituzione
deve essere eseguita esclusivamente da personale
autorizzato.
•Il lavoro di installazione deve essere eseguito secondo
gli standard di cablaggio nazionale esclusivamente da
personale autorizzato (se applicabile). La connessione
sbagliata può causare surriscaldamento e incendio.
•Attenzione a non infilare le dita sulla ventola quando si
regolano le griglie orizzontali.
47ITALIANO
Page 48

48 www.electrolux.com
1.1 note importanti
1. Non mettere in funzione senza il filtro dell’aria.
2. Non mettere in funzione vicino a una qualsiasi fonte di calore
o fuoco vivo.
3. Non esporre l’unità alla luce solare diretta.
4. Conservare o spostare sempre l’unità in posizione verticale.
5. Non coprire l’apparecchio quando in funzinoe o
immediatamente dopo l’uso.
6. Asciugare sempre la condensa prima di conservare l’unità.
1.2 Punti da tenere a mente quando si usa il condizionatore
AVVERTENZA!
Avvertenze per l’uso
•Non modificare alcuna parte del prodotto.
•Non inserire nulla in nessuna parte dell’unità.
•Assicurati che l’alimentazione usata abbia un corretto
•Usare sempre un interruttore o fusibile con la valutazione
•Nel caso di una qualsiasi anomalia con il condizionatore
voltaggio nominale. Usare solo un’alimentazione elettrica
di 220V - 240V, 50Hz, 10A. Usare un’alimentazione con
un voltaggio nominale scorretto può portare a danni
all’unità e a un possibile incendio.
di ampere adatta. Non usare, in nessun caso, fili, puntine
o altri oggetti al posto del fusibile adatto.
(es. odore di bruciato), spegnere immediatamente e
scollegare l’alimentazione.
AVVERTENZA!
Avvertenze per il cavo di alimentazione
•Questa spina deve essere solo collegata in una presa a
muro appropriata. Non usare insieme a prolunghe.
•Spingi la spina in sicurezza nella presa e assicurati che
non sia allentata.
•Non tirare, deformare o modificare il cavo di
alimentazione o immergerlo in acqua. Tirare o non
utilizzare in maniera sbagliata il cavo di alimentazione
può portare danni all’unità e causare scossa elettrica.
•Se il cavo di alimentazione è danneggiato, deve
essere sostituito dal produttore, da un suo agente di
Page 49

manutenzione o da persona parimente qualificata per evitare
pericoli. Usare soltanto il cavo di alimentazione specificato del
produttore per la sostituzione.
•Quest’apparecchio deve essere messo a terra.
Quest’apparecchio è fornito di un cavo che ha una messa a
terra. La spina deve essere collegata alla presa elettrica che è
installata correttamente e messa a terra.
Linguetta di
messa a terra
Spina
•Quest’apparecchio è fornito di un cavo che ha un filo a terra
collegato a un piedino a terra. La spina deve essere collegata
a una presa che è installata correttamente e messa a terra.
Non tagliare o rimuovere il piedino di forma quadrata dalla
spina in nessun caso.
Piedino di messa
a terra quadrato
Spina
49ITALIANO
(solo per Regno Unito)
1.3 Avvertenze per l’uso
•Assicurarsi di spegnere l’unità e di scollegare il cavo di
alimentazione prima di eseguire qualsiasi manutenzione o pulizia.
•Non schizzare o versare acqua direttamente nell’unità. L’acqua
può causare una scossa elettrica o danni all’apparecchio.
•Il drenaggio deve essere eseguito ogni volta che si sposta
il condizionatore (vedi pagina 14). Se rimane dell’acqua nel
serbatoio, potrebbe uscire fuori quando viene spostato.
•Per assicurare un drenaggio corretto, il tubo di drenaggi
non deve avere difetti e non deve essere elevato durante
la modalità di deumidificazione. In caso contrario, l’acqua
drenata potrebbe riversarsi nella stanza.
•La temperatura attorno al tubo di drenaggi non deve essere
sotto il punto di congelamento durante l’uso. L’acqua drenata
può gelare all’interno del tubo, causando il traboccare
dell’acqua all’interno nella stanza.
Page 50

50 www.electrolux.com
•Non bloccare la presa dell’aria di scarico. La prestazione
di raffreddamento potrebbe essere ridotta o interrompersi
completamente.
•Fornire un dispositivi a corrente residua (RCD) per proteggersi
da scossa elettrica secondo gli Standard inglesi e le Regole
di cablaggio.
•L’esposizione al flusso dell’aria diretto per un periodo esteso
di tempo potrebbe essere pericoloso per la tua salute. Non
esporre gli occupanti, gli animali domestici o le piante al
flusso d’aria diretto per estesi periodi di tempo.
•Non usare questo condizionatore per scopi speciali non
specificati (ad es. preservazione dei dispositivi di precisione,
di cibo, animali domestici, piante e oggetti d’arte). Un tale
utilizzo potrebbe danneggiare tale proprietà.
2. NORME DI SICUREZZA
2.1 Note sul funzionamento
• Consenti 3 minuti al compressore
per riavviare il raffreddamento.
Se spegni il condizionatore e lo
riavvii immediatamente, consenti 3
minuti al compressore per riavviare
il raffreddamento. C’è un dispositivo
elettronico nell’unità che mantiene il
compressore spento per 3 minuti per
sicurezza.
• Nel caso di un guasto elettrico durante
l’uso, consenti 3 minuti prima di
riavviare l’unità. Dopo che la corrente è
ripristinata, riavviare il condizionatore.
Se la corrente stata scollegata per
meno di tre minuti, assicurati di
aspettare almeno tre minuti prima di
riavviarla. Se riavvii il condizionatore
entro tre minuti, un dispositivo protettivo
nell’unità può causare lo spegnimento
del compressore. Il dispositivo protettivo
preverrà il raffreddamento per circa
5 minuti. Qualsiasi impostazione
precedente sarà annullata e l’unità
tornerà alla sua impostazione iniziale.
• Bassa temperatura di funzionamento:
La tua unità si sta congelando?
Potrebbe verificarsi il congelamento
quando l’unità è impostata vicino a
18°C in condizioni di temperature
ambientali basse, specialmente di
notte. In queste condizioni, un ulteriore
calo di temperatura potrebbe causare
il congelamento dell’unità. Impostare
l’unità a una temperatura più alta
preverrà il congelamento.
• La modalità deumidificazione aumenta
la temperatura ambiente. L’unità
genera calore durante la modalità di
deumidificazione e la temperatura
ambiente aumenterà. L’aria calda
sarà soffiata via dalla presa di scarico
dell’aria, ma questo è normale e non
indica un problema con l’unità.
• Questo condizionatore soffia l’aria calda
generata dall’unità fuori dalla stanza via
dal tubo di scarico durante la modalità
di raffreddamento. Nel frattempo, la
stessa quantità d’aria entrerà nella
stanza dall’esterno attraverso qualsiasi
apertura della stanza.
• Non usare mezzi per accelerare il
procedimento di scongelamento o di
pulizia diversi da quelli consigliati dal
produttore.
• L’apparecchio deve essere conservato
in una stanza senxza fornti di accensione
continuamente in funzione (per esempio:
Page 51

51ITALIANO
fiamme vive, un apparecchio che
funziona a gas o una stufa elettrica in
funzione).
• Non forare o bruciare.
• Sarà osservata la conformità con le
norme del gas nazionale.
• Mantenere i fori di ventilazione liberi da
ostruzioni.
• L’apparecchio sarà conservato
in un’area ben ventilata in cui la
dimensione della camera è più grande
2
di 13 m
.
• Qualsiasi persona coinvilta nel
funzionamento o nell’interruttore di
un circuito refrigerante deve tenere
un certificato di corrente valido da
un’autorità di valutazione accreditata
dall’industria, che autorizza la loro
competenza a gestire i refrigeranti
secondo le specifiche di valutazione
riconosciute dell’industria.
• La manutenzione deve solo essere
eseguita come consigliato dal produttore
dell’attrezzatura. La manutenzione e la
riparazione che richiedono l’assistenza
di altro personale qualificato devono
essere eseguite sotto la supervisione
della persona competete nell’uso di
refrigeranti infiammabili.
• Questo prodotto contiene un batteria a
cellula/pulsante al litio. Se una batteria a
cellula/pulsante al litio è ingoiata o entra
nel corpo, può causare gravi ustioni
interne e può portare alla morte in poco
più di 2 ore. Assicurare completamente
sempre il vano batteria. Se il vano
batteria non si chiude in sicurezza,
interrompi l’uso del prodotto, rimuovi
le batterie e tienilo lontano dai bambini.
Se pensi che le batterie possano essere
state ingoiate o messe all’interno di
una qualche parte del corpo, cerca
immediatamente un parere medico.
Per prevenire lesioni all’utente o ad altre
persone e danni alla proprietà, devono
essere eseguite le seguenti istruzioni.
Il funzionamento non corretto dovuto
al non rispetto di queste istruzioni può
causare pericolo o danni.
La serietà è classificata dalle seguenti
indicazioni:
ATTENZIONE!
Il simbolo indica la possibilità di
morte o di serie lesioni.
AVVERTENZA!
Il simbolo indica la possibilità o di
lesioni o di danni alla proprietà.
I significati dei simboli usati in questo
manuale sono mostrati in basso:
Questo simbolo indica di non farlo
mai.
Questo simbolo indica di farlo.
2.2 Avvertenze durante l’uso
ATTENZIONE!
Avvertenze durante l’uso
Page 52

52 www.electrolux.com
avvertenza signicato
Collega la spina correttamente In caso contrario, potrebbe causare una
Non mettere in funzione o fermare l’unità
inserendo o estraendo la spina di corrente
Non danneggiare o usare un cavo della
corrente non specificato
Non modificare la lunghezza del cavo di
alimentazione o condividere la presa di
corrente con altri apparecchi
Non metttere in funzione con le mani bagnate
o in un ambiente umido
Non dirigere il flusso dell’aria diretta agli
occupanti della stanza
Assicurare sempre una messa a terra efficace Una messa a terra scorretta può essere
Non consentire all’acqua di scorrere nelle
parti elettriche
Installare sempre l’interruttore e un circuito
elettrico dedicato
Scollegare l’unità se provengono da essa
suoni strani, odori o fumo
Non usare la presa elettrica se larga o
danneggiata
Non aprire l’unità durante il funzionamento Può essere causa di scosse elettriche
Tenere lontano le armi da fuoco Potrebbe provocare un incendio
Non usare il cavo di corrente vicino a
riscaldamenti
Non usare il cavo di corrente vicino a gas
infiammabile o a combustibili, quali benzina,
benzene, diluenti, ecc.
Arieggiare la stanza prima di mettere in
funzione il condizionatore se c’è una perdita
di gas da un altro apparecchio
Non smontare o modificare l’unità Può essere causa di guasto o scossa
scossa elettrica o un incendio dovuto a
un’eccessiva generazione di calore
Potrebbe causare una scossa elettrica
o un incendio dovuto a un’eccessiva
generazione di calore
Può causare scosse elettriche o incendio.
Se il cavo della corrente è danneggiato,
deve essere sostituito dal produttore, da
un centro di manutenzione autorizzato o da
persona parimente qualificata per evitare
pericoli
Potrebbe causare una scossa elettrica
o un incendio dovuto a un’eccessiva
generazione di calore
Questo potrebbe causare una scossa
elettrica
Questo potrebbe danneggiare la tua salute
causa di scosse elettriche
Potrebbe causare guasti dell’unità o
scossa elettrica
Un’installazione scorretta può essere
causa di scosse elettriche
Può essere causa di scosse elettriche
Può essere causa di scosse elettriche
Può essere causa di scosse elettriche
Può causare un esplosione o un incendio
Può causare esplosioni, incendio e ustioni
elettrica
Page 53

AVVERTENZA!
attenzione signicato
Quando il filtro dell’aria deve essere rimosso,
Può causare una lesione
non toccare le parti metalliche dell’unità
Non pulire il condizionatore d’aria con l’acqua L’acqua potrebbe entrare nell’unità e
degradare l’isolamento. Questo potrebbe
causare una scossa elettrica
Arieggiare bene la stanza quando si usa
insieme a una cucina, ecc.
Quando l’unità deve essere pulita, spegnere
e spegnere l’interruttore
Potrebbe verificarsi una mancanza
d’ossigeno
Non pulire l’unità quando la corrente è accesa
poiché potesse causare incendio e scossa
elettrica, potrebbe causare una lesione
Non posizionare un animale domestico o la
pianta domestica dove sarà esposto al flusso
Questo potrebbe lesionare l’animale
domestico o la pianta
d’aria diretto
Non usare per scopi speciali Non usare questo condizionatore per
preservare dei dispositivi di precisione, di
cibo, animali domestici, piante e oggetti
d’arte. Potrebbe causare il deterioramento
della qualità ecc.
Interrompere il funzionamento e chiiudere la
finestra in caso di tempesta o ciclone
Il funzionamento con le finestre aperte
potrebbe causare l’umidificazione
e l’inzuppamento dell’arredamento
domestico interno
Tieni la spina per la testa quando la si estrae Può causare scosse elettriche e danni
Spegnere l’interruttore di rete quando non si
usa l’unità per un lungo tempo
Non posizionare ostacoli attorno alle prese
d’aria o all’interno della presa d’aria
Inserire sempre i filtri in sicurezza. Pulire il
filtro una volta ogni due settimane
Non usare un detergente forte come la cera
o un diluente - usa un panno morbido
Potrebbe causare un guasto al prodotto o
incendi
Potrebbe causare un guasto
all’apparecchio o un incidente
Il funzionamento senza filtri può causare
guasti
L’apparecchio potrebbe essere deteriorato
a causa del cambiamento del colore
del prodotto o al graffiamento della sua
superficie
Non posizionare un oggetto pesante sul cavo
di alimentazione e assicurarsi che il cavo non
C’è pericolo di incendio o di scossa
elettrica
sia compresso
Non bere l’acqua che scorre dal
condizionatore
Fare attenzione durante il disimballaggio e
l’installazione
Se l’acqua entra nell’unità, spegnere
Contiene contaminanti che potrebbero farti
ammalare
Le estremità appuntite possono causare
lesioni
Può causare scosse elettriche e danni
quest’ultima dalla presa e spegnere
l’interruttore. Isolare l’alimentazione
estraendo la spina e contattando un tecnico
di manutenzione qualificato
53ITALIANO
Page 54

54 www.electrolux.com
10
4 5
9
3. DESCRIZIONE UNITA’
3
2
6
1
1
Telecomando
2
Segnale ricevitore
3
Stanza presa d’aria Presa drenaggio inferiore
4
Pannello di controllo
5
Manico di trasporto (entrambi i lati)
4. ACCESSORI INCLUSI
PARTI NOMI PARTI: QUANTITA:
1
2
3
4
5
6
7
8
11
6
Presa d’aria
Presa drenaggio continua
7
8
9
Scarico aria
Cavo di alimentazione
10
11
Rotella
Kit finestra connettore A 1 pezzo
Scarico connettore B 1 pezzo
Kit slider finestra 1 set
Tubo di scarico 1 pezzo
Viti
4 pezzi viti da 12.7
2 pezzi viti da 19
Blocco di sicurezza 1 pezzo
7
8
9
10
11
Bulloni 2 pezzi
Schiuma sigillante A 2 pezzi
Schiuma sigillante B 1 pezzo
Telecomando 1 set
Batteria 2 pezzi
• Verifica che tutti gli accessori siano inclusi nel pacchetto e fai riferimento alle istruzioni
di installazione per il loro utilizzo.
Page 55

5. ISTRUZIONI DI INSTALLAZIONE
Fig.3
55ITALIANO
5.1 Aria calda di scarico
In Cool Mode (Modalità raffreddamento)
l’apparecchio deve essere posizionato
vicino alla finestra o all’apertura in modo
che l’aria di scarico calda possa essere
diretta all’esterno. Per prima cosa
posizionare l’unità su una superficie piana
e assicurarsi che ci sia un minimo di 30
mm di spazio attorno a essa, entro una
fonte di energia elettrica del circuito.
1. Prolungare un lato del tubo o l’altro (Fig.1)
e avvitare il tubo al connettore A (Fig.2).
Fig.1Prolunga il lato del tubo
Fig.2
2. Prolungare l’altro lato del tubo e avvitarlo
al connettore B (Fig.3).
4. Attaccare il connettore A al kit slider
della finestra e sigillare. (Fig.5 e 6)
Finestra
verticale
Kit slider finestra
Minimo: 67,5 cm
Massimo: 123 cm
Finestra
orizzontale
Kit slider finestra
Minimo: 67,5 cm
Massimo: 123 cm
Il tubo può essere allungato dalla
sua lunghezza originale di 38cm
fino a 150cm, ma è meglio tenere
la lunghezza al minimo richiesto.
Assicurarsi inoltre che il tubo non
abbia alcuna piega o afflosciamento.
(Fig. 7)
Fig.5
Fig.6
3. Installare il connettore B nell’unità (Fig.4).
1
Fai scivolare dentro
2
Blocca
Fig.4
Fig.7
Page 56

56 www.electrolux.com
A
5.2 Installazione di una finestra a
doppia fascia sospesa
1. Taglia le schiume sigillanti A (tipo
adesivo) della lunghezza adatta e
attaccarli alla finestra e alla base. (Fig. 8)
Schiuma sigillante
(tipo adesivo)
Fig.8
2. Aprire la finestra a fascia e posizionare
il kit slider della finestra sulla base della
finestra (Fig.9). Attaccare il kit slider della
finestra alla base della finestra. Regolare
la lunghezza del kit slider della finestra
secondo l’ampiezza della finestra.
Avvitare le due viti nel kit slider della
finestra. Si veda la Fig.9.
viti
Kit slider finestra
4. Avvita due viti da 12.7mm per
assicurare il kit slider della finestra alla
fascia della finestra.(Fig.11)
5. Assicurare il kit slider della finestra alla
base della finestra (Fig.11):
A: Per la finestra in legno: Usa viti da
19mm per assicurarli.
B: Per le finestre Vinyl-Clad: Usare la vite a
testa esagonale da 12.7 per assicurarli.
Viti da 12.7 mm
Kit slider finestra
Viti da 19mm o viti a testa
esagonale da 12.7mm
Fermo finestra
Fig.11
6. Per assicurare la fascia inferiore
in posizione, attaccare la fascia di
bloccaggio con angolo a destra con una
vite da 12.7 mm come mostrato (Fig.12).
E’ difficile bloccare le finestre con il
blocco di sicurezza per le finestre
Vinyl-Clad, in modo che tu possa
usare il blocco con la finestra stessa.
67.5cm~123cm
Fermo finestra
Tagliare il kit slider della finestra
regolabile se l’ampiezza della
finestra è meno di 67.5 cm (Fig.10).
Taglia questo per adattare la tua finestra
Fig.10
3. Chiudere la fascia della finestra in
sicurezza contro il kit slider della finestra.
(Fig.11)
Fig.9
Fig.12
7. Taglia il sigillo di schiuma B di una
lunghezza appropriata e sigillare lo
spazio aperto tra la fascia della finestra
superiore e la fascia della finestra
esterna, come mostrato nella Fig.13.
Schiuma sigillante B
Fig.13
Page 57

57ITALIANO
5.3 Installazione di una finestra
scivolante sospesa
1. Taglia le schiume sigillanti A (tipo
adesivo) della lunghezza adatta e
attaccarli alla finestra e alla base. Si
veda la Fig.14.
Schiuma sigillante A
(tipo adesivo)
Fig.14
2. Aprire la finestra a fascia e posizionare
il kit slider della finestra sulla base della
finestra (Fig.15). Attaccare il kit slider
della finestra alla base della finestra.
Regolare la lunghezza del kit slider della
finestra secondo l’altezza della finestra.
Avvitare le due viti nel kit slider della
finestra. Si veda la Fig.15. Tagliare il kit
slider della finestra regolabile se l’altezza
della finestra è meno di 67.5cm (Fig.10).
Fermo finestra
67.5cm~123cm
Kit slider finestra
viti
5. Avvita due viti da 19 mm per assicurare
il kit slider della finestra alla base della
finestra.(Fig.16)
Fermo finestra
Viti da
12.7 mm
Kit slider finestra
Viti da
12.7 mm
Fig.16
6. Taglia il sigillo di schiuma B di una
lunghezza appropriata e sigillare lo
spazio aperto tra la fascia della fascia
scivolante della finestra esterna, come
mostrato nella Fig.17.
Schiuma sigillante B
Fig.17
7. Per assicurare la fascia scivolante
in posizione, attaccare la fascia di
bloccaggio con angolo a destra con una
vite da 12.7 mm come mostrato (Fig.18).
Fig.15
3. Chiudere la fascia della finestra in
sicurezza contro il kit slider della finestra.
(Fig.16)
4. Avvita due viti da 12.7 mm per
assicurare il kit slider della finestra alla
fascia della finestra. (Fig.16)
Fig.18
Page 58

58 www.electrolux.com
6. CARATTERISTICHE DEL CONDIZIONATORE
6.1 PANNELLO DI CONTROLLO
1
cool dryfan autotimer hi medlow auto filter
timer
1
Display temperatura/ora
2
Power ON/OFF (Accensione/Spegnimento)
3
Velocità ventilatore / Reset filtro
mode
7. ISTRUZIONI PER L'USO
Alcune delle seguenti istruzioni
possono solo essere usati con il
Pannello di Controllo.
7.1 Uso del pannello di controllo
Modalità Heating (Riscaldamento) (su
alcuni modelli)
In questa modalità DEVE essere usato il
tubo adattatore di scarico.
In questa modalità non può essere
selezionata la velocità della ventola.
1. Premere il pulsante “mode (modalità)”
fino a che è acceso l’indicatore “Calore“.
2. Premere i pulsanti “
Temperatura per l’impostazione
desiderata.
3. Tubo di drenaggio collegato. Vedere la
sezione 7.3 Drenaggio.
” e “ ”
temp/timer
fan speed
hold 5s
filter reset
on/off
23456
4
Regola temperatura o timer
5
Modalità Selezione
6
Timer
Modalità Cooling (Raffreddamento)
In questa modalità DEVE essere usato il
tubo adattatore di scarico.
1. Premere il pulsante “mode (modalità)”
fino a che è acceso l’indicatore
Raffreddamento.
2. Premere il pulsante “fan speed (velocità
ventola)” per scegliere la velocità
della ventola secondo l’illuminazione
dell’indicatore della velocità della
ventola. Puoi scegliere tra l’impostazione
della velocità della ventola “hi (alto)”,
“med (medio)”, “low (basso)”, o “auto
(auto)”.
3. Premere il pulsante “
” o “ ” per
scegliere la temperatura che desideri.
Non è necessario usare il
tubo di drenaggio in modalità
“raffreddamento”.
Page 59

59ITALIANO
Modalità Dry (Asciutta)
Premere il pulsante “mode (modalità)” fino
a che è acceso l’indicatore “Dry (Asciutta)
“. Lo schermo mostra la temperatura
ambiente.
Contemporaneamente si accende
l’indicatore della ventola “low (basso)”.
Nota: In questa modalità non può essere
selezionata la velocità della ventola.
Modalità Fan (Ventola)
In questa modalità, non c’è bisogno di
usare il tubo di scarico o di drenaggio.
1. Premere il pulsante “mode (modalità)”
fino a che è acceso l’indicatore “Fan
(Ventola)“.
2. Premere il pulsante “Fan speed (Velocità
ventola)” per scegliere la velocità della
ventola desiderata.
3. La ventola si accenderà alla velocità
selezionata e i display mostrerà la
temperatura ambiente.
Modalità Auto (Automatica)
In questa modalità avere sempre il tubo di
scarico attaccato.
Quando imposti il condizionatore
in Modalità automatica, selezionerà
automaticamente il raffreddamento,
il riscaldamento (non applicabile per
i modelli a solo raffreddamento), o il
funzionamento a solo ventola a seconda di
quale temperatura hai selezionato e della
temperatura ambiente. Il condizionatore
controllerà la temperatura ambiente
automaticamente attorno al punto di
temperatura da te impostato.
In modalità AUTOMATICA, non puoi
cambiare la velocità della ventola.
1. Premere il pulsante “mode (modalità)”
fino a che non sono accese le spie “Auto
mode (Modalità automatica)“.
Dopo che è stata selezionata la “Auto
mode (Modalità automatica)”, l’unità si
avvierà automaticamente secondo la
temperatura ambiente dell’aria.
Modalità Timer (Timer)
Il timer facilita l’utente per ritardare l’avvio
o la chiusura dell’unità.
Come ritardare l’avvio
Collegare l’unità, in modo che l’unità passi
in standby.
Premere il pulsante “timer (timer)”, quindi
l’indicatore del Timer e il numero di ore
sullo schermo lampeggerà.
Tocca o tieni premuto la freccia SU“
la freccia GIU’“
” per cambiare il ritardo
” o
del timer di avvio a incrementi di 0.5 ore
fino a 10 ore, quindi a incrementi di 1 ora
fino a 24 ore.
Dopo 5 secondi, l’indicatore del Timer
e il display smettono di lampeggiare. Il
comando eseguirà il conto alla rovescia
del tempo rimanente fino all’avvio.
L’unità si avvierà nella modalità
precedentemente impostata.
Per cancellare l’impostazione premere
di nuovo il pulsante “timer (timer)”.
L’indicatore del timer di spegnerà.
Come ritardare lo spegnimento
Puoi ritardare lo spegnimento quando
l’unità è accesa.
Premere il pulsante “timer (timer)”, quindi
l’indicatore del Timer e il numero di ore
sullo schermo lampeggerà.
Tocca o tieni premuto la freccia SU“
la freccia GIU’“
” per cambiare il ritardo
” o
del timer di interruzione a incrementi di 0.5
ore fino a 10 ore, quindi a incrementi di 1
ora fino a 24 ore.
Dopo 5 secondi, l’indicatore del timer e
il display smetteranno di lampeggiare e il
display mostrerà il tempo rimanente fino
allo spegnimento dell’unità.
Per cancellare l’impostazione premere
di nuovo il pulsante “timer (timer)”.
L’indicatore del timer di spegnerà.
Reset filtro
Questa caratteristica è un promemoria per
pulire il filtro dell’aria (Vedere Cura e Pulizia)
per un funzionamento più efficiente.
L’indicatore de filtro si illuminerà dopo le
250 ore di funzionamento. Per resettare
dopo aver pulito il filtro, tenere premuto
il pulsante “fan speed (velocità della
ventola)” per 5 secondi, poi l’indicatore
“filter (filtro)” si spegnerà.
Page 60

60 www.electrolux.com
7.2 Telecomando
1
Schermata telecomando
2
Pulsante Timer On (Timer On)
3
Pulsante Timer Off (Timer Off)
4
Pulsante Sleep (Sleep)
5
Pulsante Mode (Modalità)
6
Pulsante impostazione Temp/Timer
(Temperatura/Timer)
7
Pulsante °F/°C (°F/°C)
8
Pulsante Swing (Oscilla)
9
Pulsante Fan Speed (Velocità ventola)
10
Pulsante On/Off (On/Off)
Installazione batteria e istruzioni
importanti
Rimuovere il coperchio sul retro del
telecomando.
Inserire le batterie fornite correttamente
(vedere le istruzioni all’interno del vano
batteria).
Chiudere il coperchio.
Sostituire le batterie vecchie (che sono
state usate)
Con due nuove batterie R03P “AAA” da
1.5V, ripetere i passi summenzionati.
Se il telecomando è sostituito o gettato,
le batterie devono essere rimosse e
smaltite secondo le norme locali poiché
danneggiano l’ambiente.
Non mescolare batterie vecchie e nuove.
Non mescolare batterie alcaline, standard
(zinco-carbone) o ricaricabili (nichelcadmio).
Non smaltire le batterie nel fuoco. Le
batterie possono esplodere o avere
perdite. Se il telecomando non viene usato
per lungo tempo, rimuovere le batterie dal
telecomando.
Il telecomando deve essere gestito con
estrema cura. Non lasciarlo cadere o
esporlo alla luce solare diretta o a fonti di
calore.
Questo dispositivo è conforme alla Parte
15 delle Norme FCC. Il funzionamento è
soggetto alle seguenti due condizioni:
(1) Il dispositivo potrebbe non causare
interferenze dannose e (2) questo
dispositivo deve accettare qualsiasi
interferenza ricevuta, incluso l’interferenza
che possa causare un’operazione
indesiderata.
Puntare il telecomando al punto del
segnale del ricevitore. Il telecomando non
deve stare a più di 16 ft(5 metri) lontano
dall’unità (senza ostacoli tra il telecomando
e l’unità).
Utente
Max. 5 m
TELECOMANDO
AC portatile
Page 61

61ITALIANO
Come usare il telecomando
ACCENDERE L’UNITA’
Collega l’unità, poi premi il pulsante “on/
off (on/off)” (quando acceso, l’unità
funzionerà nell’ultima modalità prima dello
spegnimento).
Per spegnere l’unità, premere di nuovo il
pulsante “on/off (on/off)”, poi rimuovere la
spina.
NON spegnere l’unità rimuovendo la spina.
Spegnere sempre l’unità premendo il
pulsante “on/off (on/off)” e attendere
qualche minuto prima di rimuovere la
spina.
Modalità Cool ( Raffreddamento)
Premere il pulsante “mode (modalità)” fino
a che il lato sinistro dello schermo LCD
visualizzerà “
”.
Premere il pulsante “fan speed (Velocità
ventola)” per scegliere la velocità della
ventola “Hi (Alto)”, “Med (Medio)”, “Low
(Basso)”, e “Auto (Auto)”.
Premere il pulsante “
” e “ ” per
scegliere la temperatura che desideri
Alto Medio Basso Automatico
Modalità Dry (Asciutta)
Premere il pulsante “mode (modalità)” fino
a che il lato sinistro dello schermo LCD
visualizzerà “
”.
Contemporaneamente, il simbolo della
ventola apparirà il simbolo “low (basso)”
sullo schermo.
Nota: In questa modalità non può essere
selezionata la velocità della ventola.
Modalità Fan (Ventola)
Premere il pulsante “mode (modalità)” fino
a che il lato sinistro dello schermo LCD
visualizzerà “
”.
In questa modalità, puoi selezionare la
velocità della ventola “Hi (Alto)”, “Med
(Medio)”, “Low (Basso)” o “Auto (Auto)”
premendo il pulsante di velocità della
Ventola e fare riferimento allo schema.
Nota: In questa modalità, il tubo di scarico
dell’aria non deve essere collegato.
Heat mode (Modalità riscaldamento)
(Solo per i modelli riscaldamento e
raffreddamento)
Premere il pulsante “mode (modalità)” fino
a che il lato sinistro dello schermo LCD
visualizzerà “
Premere il pulsante “
”.
” e “ ” per
scegliere la temperatura che desideri.
Contemporaneamente si accende
l’indicatore della ventola “low (basso)”.
Nota: In questa modalità non può essere
selezionata la velocità della ventola.
Modalità AUTO (AUTOMATICA)
Premere il pulsante “mode (modalità)” fino
a che il lato sinistro dello schermo LCD
visualizzerà “ auto (auto)” .
In modalità AUTOMATICA, non puoi
cambiare la velocità della ventola.
Premere il pulsante “
” e “ ” per
scegliere la temperatura che desideri.
Page 62

62 www.electrolux.com
Modalità Sleep (Sleep)
Quando l’unità è in modalità
Raffreddamento, Riscaldamento o
automatico, puoi premere il pulsante “sleep
(sleep)” per avviare l’unità in modalità
Sleep. In questa modalità, la velocità della
ventola sarà impostata su “low (basso)”
automaticamente, che non può essere
cambiata.
In modalità Raffreddamento la temperatura
selezionata aumenterà di 1°C 30 minuti
dopo che la modalità è selezionata. La
temperatura selezionata aumenterà di 1°C
30 minuti. Questa nuova temperatura sarà
mantenuta per 7 ore prima che ritorni alla
temperatura selezionata in origine. Questo
termina la modalità “Sleep (Sleep)” e l'unità
si spegne.
Il programma della modalità “Sleep
(Sleep)” può essere cancellato in qualsiasi
momento durante il funzionamento
premendo il pulsante “Sleep (Sleep)”,
“mode (modalità)” o “fan speed (velocità
ventola)”.
Nota: In modalità Ventola o Asciuga,
la modalità Sleep non può essere
selezionata.
Funzione Oscilla Griglia
Premere il pulsante “swing (oscilla)”
per abilitare la funzione dell’oscillazione
della griglia e sulla parte superiore dello
schermo apparirà“
”. La griglia sul
pannello superiore oscillerà su e giù.
Premere di nuovo il pulsante per
disabilitare la funzione oscilla griglia.
Funzione °F/°C
Premere il pulsante “°F/°C” per passare
dai gradi Fahrenheit ai gradi Celsius.
In modalità Asciutta/Ventola, non puoi
cambiare la °F/°C.
Modalità Timer (Timer)
Come ritardare l’avvio
Collegare l’unità, in modo che l’unità passi
in standby.
Premere il pulsante “timer on (timer on)”, la
schermata visualizzerà “
Tocca o tieni premuto la freccia SU“
o la freccia GIU’“
” per cambiare il
” e “H”.
”
ritardo del timer di avvio a incrementi di
0.5 ore fino a 10 ore, quindi a incrementi
di 1 ora fino a 24 ore. Dopo 2 secondi,
l’impostazione sarà memorizzata. Il
comando eseguirà il conto alla rovescia
del tempo rimanente fino all’avvio. L’unità
si avvierà nella modalità precedentemente
Page 63

63ITALIANO
Pompa
impostata.
Per cancellare l’impostazione premere di
nuovo il pulsante “timer on (timer on)”.
Come ritardare lo spegnimento
Puoi ritardare lo spegnimento quando
l’unità è accesa.
Premere il pulsante “timer off (timer off)”, la
schermata visualizzerà “
Tocca o tieni premuto la freccia SU“
la freccia GIU’“
” per cambiare il ritardo
” e “H”.
” o
del timer di interruzione a incrementi di
0.5 ore fino a 10 ore, quindi a incrementi
di 1 ora fino a 24 ore. Dopo 2 secondi,
l’impostazione sarà memorizzata e il
display smetteranno di lampeggiare e il
display mostrerà il tempo rimanente fino
allo spegnimento dell’unità.
Per cancellare l’impostazione premere di
nuovo il pulsante “timer off (timer off)”.
Se il display mostra “ES” , il sensore
dell’evaporatore della temperatura della
stanza si è guastato. Contatta il tuo Centro
di Manutenzione Electrolux autorizzato.
Se il display mostra “P1” il vassoio in basso
è pieno. Spostare attentamente l’unità in
un posto asciutto, rimuovere la spina di
drenaggio inferiore e lascia che l’acqua sia
drenata. Riavviare la macchina fino a che
non appare il simbolo “P1” . Se l’errore si
ripete, chiamare la manutenzione.
7.4 Istruzioni per il drenaggio
Drenaggio continuo
Durante la modalit ASCIUTTO, avrai
bisogno di un tubo da giardino (venduto
separatamente) per drenare la condensa
dall’unità.
Segui i passi in basso:
• Svita il tappo di drenaggio della presa
del drenaggio continuo (Fig.19).
• Collegare un’estremità del tubo da
giardino (venduto separatamente) alla
presa di drenaggio poi porta l’altra
estremità in un drenaggio che è più
basso dell’unità (Fig.20).
Fig.19
7.3 Codice guasto
Se il display mostra “AS” , il sensore della
temperatura della stanza si è guastato.
Contatta il tuo Centro di Manutenzione
Electrolux autorizzato.
Tappo
drenaggio
Fig.20
Page 64

64 www.electrolux.com
NOTA:
• La condensa potrebbe defluire dopo
aver rimosso il tappo di drenaggio,
se l’unità è attiva in modalità
Raffreddamento o Automatica. Quando
desideri rimuovere il tubo da guardino,
preparare una vaschtta di drenaggio
(non fornita) per raccogliere la condensa
dalla presa di drenaggio.
• Assicurarsi che l’altezza del drenaggio
e la sezione del tubo di drenaggio
non sia più alta di quella della presa di
drenaggio o che il drenaggio continuo
possa non funzionare correttamente.
• Durante la modalità di raffreddamento o
Automatica, si consiglia di disabilitare il
drenaggio continuo sostituendo il tappo
di drenaggio alla presa di drenaggio, per
raggiungere la massima prestazione
Fig.21
Svuotare il residuo di condensa all’interno
dell’unità durante la conservazione
invernale.
Mettere una vaschetta di drenaggio
(non fornita) sotto la presa di drenaggio
inferiore, poi estrai il tappo del drenaggio
per consentire alla condensa di fluire nella
vaschetta del drenaggio.
Sostituire il tappo di drenaggio alla presa di
drenaggio continuo quando non fuoriesce
nessuna condensa.
Mettere la vaschetta di drenaggio sotto
la presa di drenaggio inferiore, poi
rimuovere la plastica dalla presa del
drenaggio per consentire alla condensa
di fluire nella vaschetta del drenaggio. Se
la tua vaschetta per il drenaggio non può
trattenere tutto il condensato, serviranno
diverse ricariche.
Sostituire il tappo di drenaggio alla presa di
drenaggio inferiore quando non fuoriesce
nessuna condensa.
Presa drenaggio
inferiore
Tappo di
sgocciolamento
Vassoio di sgocciolamento
Fig.22
8. CURA E PULIZIA
Pulire il tuo condizionatore occasionalmente
per farlo sembrare nuovo. Assicurarsi
di scollegare l’unità prima di pulire per
prevenire scosse o pericoli di incendio
8.1 Pulizia dell’unità
La struttura e la parte anteriore potrebbero
essere pulite con un panno senza olio
o lavate con un panno inumidito in una
soluzione di acqua calda e
NOTA: Per assicurarsi che tutto il residuo
di condensa sia stato rimosso, inclinare
l’unità sollevandola leggermente verso
l’alto dalla parte anteriore fino a che non
esce più della condensa dalla presa di
drenaggio.
un leggero detergente per lavastoviglie
liquido.
Non usare mai detergenti forti, cera
o lucidante sulla parte anteriore
dell’armadietto.
Assicurarsi di cablare l’acqua in eccesso
dal panno prima di asciugarlo attorno ai
comandi. L’acqua in eccesso dentro o
attorno ai comandi può causare danni al
condizionatore.
Page 65

65ITALIANO
8.2 Pulizia dei filtri
Per far continuare a funzionare con
efficienza il tuo condizionatore devi pulire i
filtri ogni due settimane di utilizzo.
1. Afferrare la linguetta del pannello
superiore e togliere il filtro che sta dietro
alla griglia del pannello posteriore come
mostrato nella figura in basso.
2. Lavare il filtro usando un detergente
lliquido per lavastoviglie e acqua
calda sotto i 40°C. Sciacquare il filtro
accuratamente. Agitare delicatamente
l’acqua in eccesso dal filtro. Assicurarsi
che il filtro sia accuratamente asciutto
prima della sostituzione. Oppure, invece
di lavare puoi aspirare il filtro per pulirlo.
3. Sostituire il filtro dopo che è asciutto.
Assicurarsi che il filtro sia
accuratamente asciutto prima della
sostituzione.
8.3 Conservazione invernale
Se il condizionatore non sar usato per un
lungo periodo di tempo:
1. Drenare la vaschetta di raccolta dell’acqua
completamente e lasciare il tappo di
drenaggio inferiore e la spina di gomma
abbastanza a lung da consentire a
qualsiasi acqua residua di fuoriuscire. Una
volta che la vaschetta è completamente
drenata e non fuoriesce acqua, reinstallare
la spina di gomma e il tappo.
2. Rimuovere e pulire il filtro, fallo asciugare
completamente, poi reinstallarlo.
3. Rimuovere le batterie dal telecomando.
4. Conservare il condizionatore in un luogo
fresco e asciutto, lontano dalla luce
solare diretta, da temperature estreme e
da polvere eccessiva.
Prima di usare di nuovo il condizionatore:
1. Assicurati che il filtro e il tappo di
drenaggio siano a posto.
2. Verificare il cavo per assicurarti che sia in
buone condizioni, senza rotture o danni.
3. Inserire nuove batterie nel telecomando.
4. Installare il condizionatore come
descritto nelle istruzioni di installazione.
9. RISOLUZIONE DEI PROBLEMI
Prima di chiamare la manutenzione,
rivedi quest’elenco. Potrebbe salvare
tempo e denaro. Questo elenco include
presenze comuni che non sono il risultato
di manodopera e materiali difettosi in
quest’apparecchio.
Il condizionatore non funzionerà.
• Spina a muro scollegata. Spingi la spina
con decisione nella presa a muro.
• Fusibile esploso o interruttore rotto.
Sostituire il fusibile con il tipo di ritardo
temporale o il reset dell’interruttore.
• Il comando è SPENTO. Accendi il
comando e impostare l’impostazione
desiderata.
• P1 compare nell’area display. Drenare
l’acqua come descritto nella 7.3 Sezione
Drenaggio.
• La temperatura ambiente è più bassa
della temperatura impostata (Modalità
Raffreddamento). Resettare la
temperatura.
Page 66

66 www.electrolux.com
L’aria dall’unità non è abbastanza
fredda.
• Temperatura ambiente sotto i 16 °C. Il
raffreddamento non avverrà fino a che la
temperatura ambiente si alza oltre i 16
°C.
• Resetta a una temperatura più bassa.
• Il compressore si spegne cambiando
modalità. Attendere circa 3 minuti
e ascolta il riavvio del compressore
quando si imposta la modalità
RAFFREDDAMENTO.
Il condizionatore raffredda, ma la
stanza è troppo calda - NIENTE
ghiaccio si forma sulla spirale
raffreddante dietro la parte anteriore
decorativa.
• Temperatura esterna sotto i 16 °C.
Per decongelare la spirale, imposta la
modalità ventola.
• Il filtro dell’aria potrebbe essere sporco.
Pulire il filtro. Fare riferimento a 8.
Sezione Cura e Pulizia. Per decongelare,
imposta la modalità Ventola.
• La temperatura è impostata troppo
bassa per il raffreddamento notturno.
Per decongelare la spirale, imposta la
modalità Ventola. Quindi impostare la
temperatura a un’impostazione più alta.
• Condotto di scarico non collegato o
bloccato. Vedere sezione 5.1 aria calda
di scarico.
Il condizionatore raffredda, ma la
stanza è troppo calda - Ghiaccio si
forma sulla spirale raffreddante dietro
la parte anteriore decorativa
• Filtro dell’aria sporco - aria limitata.
Pulire il filtro dell’aria. Fare riferimento a
8. Sezione Cura e Pulizia.
• La temperatura è impostata troppo
alta. Impostare la temperatura a
un’impostazione più bassa.
• Le griglie direzionali dell’aria sono
state posizionate in modo corrente.
Posizionare le griglie per una migliore
distribuzione dell’aria.
• La parte anteriore dell’unità è bloccata
dai drappi, da tendine, dal mobilio, ecc.
- restringe la distribuzione dell’aria.
Pulisci il blocco davanti all’unità.
• Porte, finestre, registratori, ecc aperto
- l’aria fredda scappa. Chiudere porte,
finestre, registratori ecc aperti - l’aria
fredda scappa.
• Unità accesa di recente in una stanza
calda. Consentire ulteriore tempo per
rimuovere lo “calore conservato” da
pareti, soffitto, pavimento e mobili.
Il condizionatore si accende e spegne
rapidamente.
• Filtro dell’aria sporco - aria limitata.
Pulire il filtro dell’aria.
• La temperatura era estremamente
calda. Imposta la velocità della
VENTOLA a un’impostazione più veloce
per portare l’aria attraverso le spirali di
raffreddamento più frequentemente.
Stanza da raffreddare.
• Imposta la temperatura troppo bassa.
Aumenta la temperatura impostata.
NOTA: CONTROLLA IL PIATTO PER IL
TIPO DI GAS REFRIGRANTE USATO NEL
TUO APPARECCHIO.
ATTENZIONE!
Informazioni specifiche riguardo gli
apparecchi con gas refrigerante
R290.
• Leggere accuratamente tutti gli
avvenimenti.
• Quando si scongela e si pulisce
l’apparecchio, non usare strumenti
diversi dal quelli consigliati dall’azienda
produttrice.
• L’apparecchio deve essere posizionato
in un’area senza alcuna fonte di
accensione continua (ad esempio:
fiamme vive, gas o apparecchi elettrici in
funzione).
• Non effettuare punture e non bruciare.
• I gas refrigeranti possono essere inodori.
• L’apparecchio deve essere installato,
usato e conservato in un’area che è più
grande di 13 m
2
.
• Quest’apparecchio contiene 235g o
245g (vedere l’etichetta di valutazione
sul retro dell’unità) del gas refrigerante
R290.
Page 67

67ITALIANO
• R290 è un gas refrigerante che
è conforme alle direttive eropee
sull’ambiente. Non puntellare nessuna
parte del circuito refrigerante.
• Se l’apparecchio è installato, messo
in funzione o memorizzato in un’area
non ventilata, ls stanza deve essere
progettata per prevenire l’accumulo delle
perdite del refrigerante comportando
un rischio di incendio o di esplosione
dovuto all’accensione del refrigerante
causato dai riscaldamenti elettrici, dalle
stufe o da altre fonti di accensione.
• L’apparecchio deve essere conservato
in modo da prevenire un guasto
meccanico.
• Gli individui che mettono in funzione
• Le riparazioni devono essere eseguite in
10. PREOCCUPAZIONI AMBIENTALI
Riciclare i materiali con il simbolo.
Mettere l’imballaggio in contenitori
adatti per riciclarli. Aiutare a proteggere
l’ambiente e la salute umana e riciclare
rifiuti di apparecchi elettrici ed elettronici.
Non smaltire gli apparecchi contrassegnati
con il simbolo
Restituire il prodotto nella struttura per
il riciclaggio locale o contattare l’ufficio
municipale.
o lavorano sul circuito devono avere
la certificazione corretta emessa da
un’organizzazione accreditata che
assicuri la competenza nel gestire i
refrigeranti secondo una valutazione
specifica riconosciuta dalle associazioni
nell’industria.
base ai consigli dell’azienda produttrice.
La manutenzione e le riparazioni che
richiedono l’assistenza di altro personale
qualificato devono essere eseguite sotto
la supervisione della persona competete
nell’uso di refrigeranti infiammabili.
insieme ai rifiuti domestici.
Page 68

68 www.electrolux.com
INHOUD
1. VEILIGHEIDSINFORMATIE ............................................................................... 69
2. VEILIGHEIDSAANWIJZIGINGEN ....................................................................... 72
3. BESCHRIJVING VAN DE EENHEID .................................................................. 76
4. MEEGELEVERDE ACCESSOIRES .................................................................... 76
5. INSTALLATIE INSTRUCTIES ............................................................................ 77
6. EIGENSCHAPPEN AIRCONDITIONER ............................................................. 80
7. GEBRUIKSAANWIJZING ................................................................................. 80
8. ZORG EN REINIGING ...................................................................................... 87
9. PROBLEEMOPLOSSING ................................................................................. 88
10. MILIEUOVERWEGINGEN ............................................................................... 89
WE DENKEN AAN U
Dank u voor het aankopen van een Electrolux apparaat. U heeft een product gekozen dat
jarenlange professionele ervaring en innovatie met zich mee brengt. Ingenieus en stijlvol, het
is ontworpen met u in gedachten. Dus wanneer u het gebruikt, kunt u veilig uitgaan van de
wetenschap dat u altijd uitstekende resultaten boekt.
Welkom bij Electrolux.
Bezoek onze website om:
Gebruiksadviezen, brochures, probleemoplossing en service informatie te
verkrijgen:
www.electrolux.com/webselfservice
Registreer uw product voor betere service:
www.registerelectrolux.com
Koop accessoires, verbruiksartikelen en originele onderdelen voor uw apparaat:
www.electrolux.com/shop
KLANTENONDERSTEUNING EN SERVICE
Gebruik altijd originele reserveonderdelen.
Indien u contact opneemt met ons geautoriseerde Servicecentrum, zorg er dan voor dat u
de volgende gegevens bij de hand heeft: Model, PNC, Serienummer.
De informatie vindt u op de typeplaat.
Waarschuwing/Voorzichtig-Veiligheidsinformatie.
Algemene informatie en tips.
Milieu-informatie.
Onder voorbehoud van wijzigingen zonder mededeling.
Page 69

1. VEILIGHEIDSINFORMATIE
WAARSCHUWING!
•Dit apparaat kan worden gebruikt door kinderen van 8 jaar
en ouder en door personen met gereduceerde fysieke,
sensor- of mentale capaciteiten of gebrek aan ervaring
en kennis indien zij onder toezicht staan of genoeg
instructie hebben gehad betreffende het op een veilige
manier gebruiken van het apparaat en zij de mogelijke
gevaren begrijpen.
•Kinderen dienen niet met het apparaat te spelen.
•Indien het netsnoer beschadigd is, dient het te worden
vervangen door de fabrikant, zijn service-agent of
gelijkwaardig gekwalificeerde personen, teneinde
gevaren te voorkomen.
Deze handleiding legt het juiste gebruik uit van uw nieuwe
airconditioner. Leest u deze handleiding alstublieft zorgvuldig
voordat u het product gebruikt. Deze handleiding dient op een
veilige plaats bewaard te worden voor handige raadpleging.
VOORZICHTIG!
•Neem contact op met een geautoriseerde servicemonteur
voor reparatie of onderhoud van deze eenheid.
•Neem contact op met de installateur voor de installatie
van deze eenheid.
•De airconditioner is niet bestemd om zonder
toezicht gebruikt te worden door jonge kinderen of
zwakbegaafden.
•Jonge kinderen dienen onder toezicht te staan om
ervoor te zorgen dat ze niet met de airconditioner spelen.
•Er zijn lokale gemeentelijke regels betreffende de
maximaal toegestane geluidsniveaus voortgebracht door
airconditioners.
•Indien het netsnoer vervangen dient te worden, dienen
de vervangingswerkzaamheden alleen uitgevoerd te
worden door geautoriseerd personeel.
•Installatiewerkzaamheden dienen alleen door
geautoriseerd personeel uitgevoerd te worden in
overeenstemming met de nationale bedradingsnormen
(indien van toepassing). Onjuiste verbinding kan
oververhitting en brand veroorzaken.
•Wees voorzichtig en steek de vingers niet in de ventilator
wanneer u de horizontale kleppen aanpast.
69NEDERLANDS
Page 70

70 www.electrolux.com
1.1 Belangrijke opmerkingen
1. Gebruik de eenheid niet zonder het luchtfilter.
2. Gebruik de eenheid niet in de nabijheid van een
verwarmingsbron of open vuur.
3. Stel de eenheid niet bloot aan direct zonlicht.
4. Bewaar of verplaats de eenheid altijd in rechtopstaande positie.
5. Bedek het apparaat niet indien het gebruikt wordt of direct
na het gebruik.
6. Voer het condenswater altijd af voordat u de eenheid opbergt.
1.2 Punt om in gedachten te houden bij het gebruik van uw
airconditioner
VOORZICHTIG!
Waarschuwingen voor gebruik
•Wijzig geen onderdelen van dit product.
•Steek niets in enig onderdeel van de eenheid.
•Zorg ervoor dat de stroomvoorziening een geschikte
•Gebruik altijd een stroomonderbreker of zekering met
•In geval van enige afwijking met de airconditioner
netspanning heeft. Gebruik alleen een 220V - 240V, 50Hz,
10A stroomvoorziening. Gebruik van een stroomvoorziening
met een onjuiste netspanning kan leiden tot beschadiging
van het eenheid of mogelijke brand.
de juiste amp-waarde. Gebruik onder geen beding
bedrading, stekkers of andere objecten in plaats van een
geschikte zekering.
(bijv. een brandlucht), onmiddellijk uitschakelen en de
stroomvoorziening loskoppelen.
VOORZICHTIG!
Waarschuwing voor het netsnoer
•Deze stekker dient alleen op een geschikte
wandcontactdoos aangesloten te worden. Niet
gebruiken in combinatie met verlengsnoeren.
•Druk de stekker veilig in het stopcontact en zorg ervoor
dat hij niet los zit.
•Trek, vervorm of verander het netsnoer niet en dompel
het in water. Uittrekken of misbruik van het netsnoer kan
leiden tot beschadiging van de eenheid en elektrische
schok veroorzaken.
Page 71

•Indien het netsnoer beschadigd is, dient het te worden
vervangen door de fabrikant, zijn service-agent of
gelijkwaardig gekwalificeerde personen, teneinde gevaren te
voorkomen. Gebruik alleen het netsnoer dat gespecificeerd is
door de fabrikant voor vervanging.
•Dit apparaat dient geaard te worden. Dit apparaat is
uitgevoerd met een snoer met een aardkabel. De stekker
dient op een stopcontact aangesloten te worden die juist
geïnstalleerd en geaard is.
Aardingslip
Plug
•Dit apparaat is uitgevoerd met een snoer dat een aardkabel
heeft die verbonden is met een geaarde pen. De stekker
dient op een stopcontact aangesloten te worden die juist
geïnstalleerd en geaard is. Snijdt of verwijder de vierkante
geaarde pin onder geen beding van deze stekker.
71NEDERLANDS
Vierkante geaarde pen
Plug
(alleen voor het VK)
1.3 Waarschuwingen voor gebruik
•Zorg ervoor dat u de eenheid uitschakelt en het netsnoer los
koppelt voordat er enig onderhoud of schoonmaak verricht
wordt.
•Spat of giet geen water direct op de eenheid. Water kan een
elektrische schok veroorzaken of het apparaat beschadigen.
•Afvoer dient altijd uitgevoerd te worden indien de
airconditioner verplaatst wordt (zie pagina 14). Indien er
enig water in de tank achterblijft, kan het eruit spatten als hij
verplaatst wordt.
•Om voor juiste afvoer te zorgen, dient de afvoerslang geen
kinken hebben en dient niet verhoogd te worden in de
ontvochtigingsmode. Zo niet, kan het afgevoerde water in de
ruimte morsen.
Page 72

72 www.electrolux.com
•De temperatuur rondom de afvoerslang mag niet onder
het vriespunt zijn tijdens het gebruik. Afgevoerd water kan
bevriezen binnen de slang, hetgeen resulteert dat er water
van binnen de eenheid naar de ruimte overloopt.
•Blokkeer de luchtuitlaatopening niet met obstakels. De
koelprestatie kan verminderen of compleet stoppen.
•Zorg voor een aardlekschakelaar (RCD) teneinde hem te
beveiligen tegen elektrische schok, in overeenstemming met
de Engelse normen en bedradingsnormen.
•Blootstelling aan directe luchtstroom voor een langere
tijdsperiode kan gevaren opleveren voor uw gezondheid. Stel
bewoners, huisdieren of planten niet bloot aan een directe
luchtstroom voor langere tijdsperioden.
•Gebruik deze airconditioner niet voor niet-gespecificeerde
speciale doeleinden (bijv. het conserveren van precisieinstrumenten, voedsel, huisdieren, planten en kunstobjecten).
Het op dergelijke manier gebruiken kan deze zaken beschadigen.
2. VEILIGHEIDSAANWIJZIGINGEN
2.1 Opmerkingen over de werking
• Geef de compressor 3 minuten om
opnieuw te beginnen met koelen.
Indien u de airconditioner uitschakelt en
onmiddellijk weer inschakelt, duurt het
3 minuten voordat de compressor weer
begint met koelen. Er bevindt zich een
elektronisch apparaat in de eenheid die
de compressor 3 minuten uitgeschakeld
laat om veiligheidsredenen.
• In geval van een stroomstoring tijdens
gebruik, wacht u 3 minuten alvorens de
eenheid opnieuw te starten. Nadat de
stroom weer is teruggekeerd, herstart
u de airconditioner. Indien de stroom
minder dan drie minuten uitgevallen
was, zorg er dan voor om tenminste drie
minuten te wachten voor het herstarten
van de eenheid. Indien u de airconditioner
binnen drie minuten herstart, kan
een beschermingsvoorziening in
de eenheid ervoor zorgen dat de
compressor uitgeschakeld wordt. Deze
beschermingsvoorziening voorkomt
koeling gedurende 5 minuten. Alle
voorgaande instellingen worden
verwijderd en de eenheid keert terug
naar zijn begin-instelling.
• Werking bij lage temperatuur: Bevriest
uw eenheid? Bevriezing kan optreden
wanneer de eenheid dichtbij 18ºC is
ingesteld in omstandigheden met een
lage omgevingstemperatuur, vooral ‘s
nachts. In deze omstandigheden, kan
een verdere daling van de temperatuur
bevriezing van de eenheid veroorzaken.
Het instellen van de eenheid op een
hogere temperatuur zal bevriezing
voorkomen.
• De ontvochtigingsmode verhoogt
de kamertemperatuur. De
eenheid genereert warmte tijdens
de ontvochtigingsmode en de
kamertemperatuur zal stijgen. Warme
lucht wordt uitgeblazen vanaf de
luchtuitlaatopening, maar dit is normaal
en geeft niet aan dat er een probleem is
met de eenheid.
• Deze airconditioner blaast de warme
lucht die de eenheid genereert buiten
de ruimte via de afvoerslang wanneer
hij in de koelmode is. Tegelijkertijd komt
dezelfde hoeveelheid buitenlucht de
ruimte binnen door alle openingen van
de ruimte.
Page 73

73NEDERLANDS
• Gebruik geen middelen om het
ontdooiproces te versnellen of schoon
te maken behalve welke worden
aanbevolen door de fabrikant.
• Het apparaat dient opgeslagen te
worden in een ruimte zonder continu
werkende ontstekingsbronnen
(bijvoorbeeld: open vuur, een apparaat
dat op gas werkt of een werkende
elektrische verwarming).
• Niet doorboren of verbranden.
• De nationale gasregelgeving dient te
worden nageleefd.
• Houdt ventilatie-openingen vrij van
obstructie.
• Het apparaat dient te worden
opgeborgen in een goed geventileerde
ruimte van meer dan 13 m
• Alle personen die betrokken zijn met
werkzaamheden in of installatie van een
koelcircuit dienen een geldig certificaat
van een, door de industrie aangestelde
beoordelende autoriteit, bezitten,
die hun competentie autoriseert om
koelmiddelen veilig te behandelen in
2
.
overeenkomst met een door de industrie
erkende beoordelingsspecificatie.
• Servicewerkzaamheden dienen alleen
uitgevoerd te worden indien deze
aanbevolen worden door de fabrikant
van het apparaat. Onderhoud en
reparatie dat de aanwezigheid van
ander bekwaam personeel vereist, dient
uitgevoerd te worden onder toezicht
van de competente persoon m.b.t. het
gebruik van ontvlambare koelmiddelen.
• Dit product bevat een lithium knop/
knoopcel batterij. Indien een nieuwe
of gebruikte lithium knoopcel batterij is
ingeslikt of het lichaam binnengaat, kan het
ernstige interne verbranding veroorzaken
en binnen slechts 2 uur tot de dood
leiden. Maak het batterij-compartiment
altijd compleet vast. Indien het batterijcompartiment niet helemaal sluit, stop
dan met het gebruik van het product,
verwijder de batterijen en houdt het weg
van kinderen. Indien u vermoedt dat er
batterijen ingeslikt zijn of binnen een deel
van het lichaam zijn geplaatst, schakel dan
onmiddellijk medische hulp in.
Om verwondingen van de gebruiker of
andere personen en beschadiging van
eigendommen te voorkomen, dienen de
volgende aanwijzingen opgevolgd te worden.
Onjuiste werking als gevolg van het niet
opvolgen van aanwijzingen kunnen letsel
of beschadiging veroorzaken.
De ernst is geclassificeerd door de
volgende indicaties:
WAARSCHUWING!
Dit teken geeft het risico van dood
of ernstig letsel aan.
VOORZICHTIG!
Dit teken geeft het risico van letsel of
beschadiging aan eigendommen aan.
De betekenissen van tekens die gebruikt
zijn in deze handleiding worden hieronder
weergegeven:
Dit teken geeft aan dat u dit nooit
dient te doen.
Dit teken geeft aan dat u dit altijd
dient te doen.
2.2 Waarschuwing tijdens
gebruik
WAARSCHUWING!
Waarschuwing tijdens gebruik
Page 74

74 www.electrolux.com
waarschuwing betekenis
Steek de stekker juist in het stopcontact Anders kan het een elektrische schok
Start of stop de eenheid niet door de stekker
in het stopcontact te steken of eruit te trekken
Beschadig het niet en gebruik geen netsnoer
zonder specificaties
Wijzig de lengte van het netsnoer niet en deel
het stopcontact niet met andere apparaten
Niet gebruiken met natte handen of in een
vochtige omgeving
Richt de luchtstroom niet direct op de
aanwezigen in de ruimte
Zorg altijd voor effectieve aarding Incorrecte aarding kan een elektrische schok
Laat geen water in de elektrische onderdelen
stromen
Installeer altijd een stroomonderbreker en een
apart stroomcircuit
Ontkoppel de eenheid als er een vreemd
geluid, vreemde lucht of rook uitkomt
Gebruik het stopcontact niet indien het los zit
of beschadigd is
Open de eenheid niet tijdens gebruik Het kan brand en een elektrische schok
Houd vuurwapens weg Ze kunnen brand veroorzaken
Gebruik het netsnoer niet in de nabijheid van
verwarmingsapparatuur
Gebruik het netsnoer niet in de nabijheid van
ontvlambaar gas of brandstoffen als benzine,
benzeen, thinner, etc.
Ventileer de ruimte voor gebruik van de
airconditioner indien er een gaslek van een
ander apparaat is
Demonteer of wijzig de eenheid niet Het kan storingen en een elektrische schok
of vuur veroorzaken als gevolg van de
overmatige generatie van hitte.
Het kan een elektrische schok of vuur
veroorzaken als gevolg van de overmatige
generatie van hitte
Het kan een elektrische schok of brand
veroorzaken.
Indien het netsnoer beschadigd is, dient het
onmiddellijk te worden vervangen door de
fabrikant, zijn service-agent of gelijkwaardig
gekwalificeerde personen, teneinde gevaren
te voorkomen
Het kan een elektrische schok of vuur
veroorzaken als gevolg van de overmatige
generatie van hitte
Het kan een elektrische schok veroorzaken
Dit kan uw gezondheid beschadigen
veroorzaken
Het kan een storing van de eenheid of een
elektrische schok veroorzaken
Incorrecte installatie kan een elektrische
schok veroorzaken
Het kan brand en een elektrische schok
veroorzaken
Het kan brand en een elektrische schok
veroorzaken
veroorzaken
Het kan brand en een elektrische schok
veroorzaken
Het kan een explosie of brand veroorzaken
Het kan explosie, vuur en brand veroorzaken
veroorzaken
Page 75

VOORZICHTIG!
voorzichtig betekenis
Indien het luchtfilter verwijderd dient te worden,
Het kan letsel veroorzaken
raak dan niet de metalen delen van de eenheid
aan
Maak de airconditioner niet schoon met water Er kan water in de eenheid komen en de
isolatie aantasten. Het kan een elektrische
schok veroorzaken
Ventileer de ruimte goed indien hij samen met
Er kan een zuurstoftekort optreden
een kachel, etc. gebruikt wordt.
Indien de eenheid gereinigd dient te
worden, schakelt u hem uit en zet u de
stroomonderbreker uit
Maak de eenheid niet schoon indien de
stroom is ingeschakeld, aangezien dat vuur
en een elektrische schok kan veroorzaken,
wat letsel kan veroorzaken
Plaats geen huisdier of plant op een plaats
Dit kan het huisdier of de plant verwonden
waar het blootgesteld wordt aan een directe
luchtstroom
Gebruik hem niet voor speciale doeleinden Gebruik deze airconditioner niet voor het
conserveren van precisie-instrumenten,
voedsel, huisdieren, planten en kunstobjecten.
Het kan de kwaliteit, etc. verslechteren
Stop het gebruik en sluit de ramen bij storm of
orkanen
Gebruik met geopende ramen kan
bevochtiging van het interieur en het intrekken
van vocht in het meubilair veroorzaken
Houdt de stekker bij de kop van de stekker
vast wanneer u hem verwijdert
Schakel de hoofdschakelaar van de voeding
uit wanner u de eenheid een lange periode niet
Het kan een elektrische schok en
beschadiging veroorzaken
Het kan een storing van het product of
brand veroorzaken
gebruikt
Plaats geen obstakels rondom de luchtinlaten
of binnen de luchtinlaat
Plaats de filters altijd goed vast. Maak het filter
eens per twee weken schoon
Gebruik geen sterk schoonmaakmiddel zoals
wax of thinner, gebruik een zachte doek
Het kan een storing van het product of
ongelukken veroorzaken
Gebruik zonder filters kan storing
veroorzaken
Het uiterlijk kan beschadigen als gevolg van
veranderingen van kleur of krassen op het
oppervlak
Plaats geen zware objecten op het netsnoer
en zorg ervoor dat het snoer niet wordt
Er bestaat een gevaar van brand of
elektrische schok
platgedrukt
Drink geen water dat afgevoerd is van de
airconditioner
Wees voorzichtig bij het uitpakken en het
Het bevat besmettingen en kan u ziek
maken
Scherpe hoeken kunnen letsel veroorzaken
installeren
Indien er water in de eenheid komt, schakelt u
de eenheid uit en zet u de stroomonderbreker
Het kan een elektrische schok en
beschadiging veroorzaken
uit. Isoleer de aanvoer door de stekker eruit
te trekken en neem contact op met een
gekwalificeerde servicemonteur
75NEDERLANDS
Page 76

76 www.electrolux.com
10
4 5
9
3. BESCHRIJVING VAN DE EENHEID
3
2
6
1
11
1
Afstandsbediening
2
Ontvanger signaal
3
Luchtuitlaat van de ruimte Afvoeruitlaat bodem
4
Controlepaneel
5
Draagbeugel (beide kanten)
4. MEEGELEVERDE ACCESSOIRES
ONDERDELEN NAAM ONDERDELEN: HOEVEELHEID:
1
2
3
4
5
6
Raamkit aansluiting A 1 stuk
Uitlaat aansluiting B 1 stuk
Raam schuifkit 1 set
Uitlaatslang 1 stuk
Schroeven
Veiligheidsborging 1 stuk
6
Luchtinvoer
Vaste afvoeruitlaat
7
8
9
Luchtuitlaat
Energiekabel
10
11
Castor
7
8
4 stuks 12.7 schroeven
2 stuks 19 schroeven
7
8
9
10
11
Bouten 2 stuks
Schuimafdichting A 2 stuks
Schuimafdichting B 1 stuk
Afstandsbediening 1 set
Batterij 2 stuks
• Controleer of alle accessoires in de verpakking aanwezig zijn en raadpleeg alstublieft
de installatiehandleiding voor hun gebruik.
Page 77

5. INSTALLATIE INSTRUCTIES
Afb.1
de slang
77NEDERLANDS
5.1 Uitlaat warme lucht
In de Koelmode dient het apparaat dichtbij
een raam of opening geplaatst te worden
zodat de uitlaat van warme lucht naar
buiten gevoerd kan worden. Eerst zet u
de eenheid op een vlakke vloer en zorgt
u ervoor dat er minimaal 30mm ruimte is
rondom de eenheid, en dat hij binnen de
reikwijdte van een enkel stopcontact is.
1. Verleng beide zijden van de slang (Afb.1)
en schroef de slang aan aansluiting A
(Afb.2).
Verleng de zijde van
Afb.2
2. Verleng de andere zijde van de slang en
schroef hem aan aansluiting B (Afb.3).
4. Bevestig de aansluiting A aan de
raamschuifkit en afdichting. (Afb.5&6)
Verticaal
raam
Raamschuifkit
Minimum: 67,5 cm
Maximum: 123 cm
Horizontaal
raam
Raamschuifkit
Minimum: 67,5 cm
Maximum: 123 cm
De slang kan uitgetrokken worden
van zijn originele lengt van 38cm tot
150cm, maar het is het beste om
de lengte tot het vereiste minimum
te beperken. Zorg er ook voor dat
de slang geen scherpe bochten of
knikken heeft. (Afb.7)
Afb.5
Afb.6
Afb. 3
3. Installeer de aansluiting B op de eenheid
(Afb.4).
1
Schuif op
2
Borging
Afb.4
Afb.7
Page 78

78 www.electrolux.com
A
5.2 Installatie in een dubbel
opgehangen schuifraam
1. Snijdt de schuimafdichting A (gelijmd
type) op de juiste lengte en bevestig
hem aan het raam en kozijn (Afb.8)
Schuimafdichting
(gelijmd type)
Afb.8
2. Open het schuifraam en plaats de
raamschuifkit op het raamkozijn
(Afb.9). Bevestig de raamschuifkit op
het raamkozijn. Pas de lengte van de
raamschuifkit aan in overeenstemming
met de wijdte van het raam. Schroef
de twee schroeven vast op de
raamschuifkit. Zie Afb.9.
schroeven
Raamschuifkit
4. Schroef twee 12,7mm schroeven om
de raamschuifkit op het schuifraam te
bevestigen (Afb.11)
5. Bevestig de raamschuifkit op het
raamkozijn. (Afb.11):
A: Voor een houten raam: Gebruik 19mm
schroeven voor de bevestiging.
B: Voor Kunststof ramen: Gebruik 12,7
inbus-schroeven voor de bevestiging.
12,7 mm schroeven
Raamschuifkit
19 mm schroeven
of 12,7 mm
inbusschroeven
Raamkozijn
Afb.11
6. Om de onderste schuif op zijn plaats
te houden, bevestig het rechthoek
schuifslot met 12,7mm schroef als
afgebeeld (Afb.12).
Het is moeilijk om de ramen met de
veiligheidsborging voor Kunststof
ramen te sluiten, dus kunt u de
sluiting van het raam zelf gebruiken.
67.5cm~123cm
Raamkozijn
Snijdt de aanpasbare raamschuifkit
indien de wijdte van het raam minder
is dan 67,5cm (Afb.10).
Snijdt dit passend op uw raam
Afb.10
3. Sluit het schuifraam goed tegen de
raamschuifkit. (Afb.11)
Afb.9
Afb.12
7. Snijdt de schuimafdichting B in een
juiste lengte en dicht het open gat
tussen de bovenste raamschuif en de
buitenste raamschuif, zoals afgebeeld in
Afb.13.
Schuimafdichting B Afb.13
Page 79

79NEDERLANDS
Raamkozijn
5.3 Installatie in een dubbel
opgehangen schuifraam
1. Snijdt de schuimafdichtingen A (gelijmd
type) op de juiste lengte en bevestig ze
op het raamframe. Zie Afb.14.
Schuimafdichting A
(gelijmd type)
Afb.14
2. Open het schuifraam en plaats de
raamschuifkit op het raamkozijn
(Afb.15). Bevestig de raamschuifkit op
het raamkozijn. Pas de lengte van de
raamschuifkit aan in overeenstemming
met de hoogte van het raam. Schroef
de twee schroeven vast op de
raamschuifkit. Zie Afb.15. Snijdt de
aanpasbare raamschuifkit indien de
hoogte van het raam minder is dan
67,5cm (Afb.10).
Raamkozijn
67.5 cm~123 cm
Raamschuifkit
screws
5. Schroef twee 19 mm schroeven om
de raamschuifkit op het raamkozijn te
bevestigen (Afb.16)
Raamschuifkit
12,7 mm
schroeven
12,7 mm
schroeven
Afb.16
6. Snijdt de schuimafdichting B in een
juiste lengte en dicht het open gat
tussen het schuifraam en de buitenste
schuifraam, zoals afgebeeld in Afb.17.
Schuimafdichting B
Afb.17
7. Om de onderste schuif op zijn plaats
te houden, bevestig de rechthoek
veiligheidsborging met 12,7mm schroef
als afgebeeld (Afb.18).
Afb.15
3. Sluit het schuifraam goed tegen de
raamschuifkit. (Afb.16)
4. Schroef twee 12,7 mm schroeven om
de raamschuifkit op het schuifraam te
bevestigen. (Afb.16)
Afb.18
Page 80

80 www.electrolux.com
6. EIGENSCHAPPEN AIRCONDITIONER
6.1 CONTROLEPANEEL
1
cool dryfan autotimer hi medlow auto filter
timer
1
Geeft de temperatuur/tijd weer
2
Energie AAN/UIT
3
Ventilatorsnelheid/Reset filter
mode
7. GEBRUIKSAANWIJZING
Sommige van de volgende
instructies kunnen alleen bediend
worden via gebruik van het
controlepaneel.
7.1 Gebruik van het
Controlepaneel
Heating mode (Verwarmingsmode) (op
sommige modellen)
In deze mode MOET de uitlaat
aanpassingsslang gebruikt worden.
In deze mode, kan de ventilatorsnelheid
niet geselecteerd worden.
1. Druk op de knop “mode (mode)” totdat
de “Heat (Verwarmen)” aanduiding
brandt.
2. Druk op de “
knoppen voor de gewenste instelling.
3. Aangesloten afvoerslang. Zie 7.3 sectie
afvoer.
” & “ ” Temperatuur
temp/timer
fan speed
hold 5s
filter reset
on/off
23456
4
Aanpassen temperatuur of timer
5
Selectie mode
6
Timer
Cooling mode (Koelmode)
In deze mode MOET de uitlaat
aanpassingsslang gebruikt worden.
1. Druk op de knop “mode (mode)” totdat
de Koelmode aanduiding brandt.
2. Druk op de knop “fan speed
(ventilatorsnelheid)” om de
ventilatorsnelheid te kiezen in
overeenstemming met de verlichting
van de ventilatorsnelheids-aanduiding.
U kunt kiezen uit “hi”, “med”,
“low”, of “auto” instelling van de
ventilatorsnelheid.
3. Druk op de “
” of “ ” knop om de
gewenste temperatuur te kiezen.
Het is niet nodig om de afvoerslang
te gebruiken in de mode “cool
(Koelen)”.
Page 81

81NEDERLANDS
Mode Dry (Drogen)
Druk op de knop “mode (mode)” totdat
de mode Drogen aanduiding brandt. Het
scherm geeft de temperatuur van de
ruimte aan.
Tegelijkertijd brandt de “low” ventilator
aanduiding.
Opmerking: In deze mode, kan de
ventilatorsnelheid niet geselecteerd
worden.
Fan (Ventilator) mode
In deze mode, is het niet nodig om de
uitlaatslang of afvoerslang te gebruiken.
1. Druk op de knop “mode (mode)” totdat
de aanduiding Ventilator mode brandt.
2. Druk op de knop “Fan speed
(ventilatorsnelheid)” om de gewenste
ventilatorsnelheid te kiezen.
3. De ventilator zal in de geselecteerde
snelheid draaien en de display zal de
temperatuur van de ruimte aangeven.
Auto (Auto) mode
De uitlaatslang dient altijd bevestigd te zijn
in deze mode.
Indien u de airconditioner in de Auto mode
zet, selecteert deze automatisch koelen,
verwarmen (niet van toepassing voor
modellen die alleen koelen), of ventilator,
afhankelijk van de temperatuur die u heeft
geselecteerd en de temperatuur van
de ruimte. De airconditioner beheert de
temperatuur van de ruimte automatisch
rond de temperatuur die u heeft ingesteld.
In de AUTO mode, kunt u de
ventilatorsnelheid niet selecteren.
1. Druk op de knop “mode (mode)” totdat
de “mode Auto” aanduiding brandt.
Nadat de “Auto mode” is geselecteerd,
functioneert de eenheid automatisch
in overeenstemming met de huidige
temperatuur van de ruimte.
Timer (Timer) mode
De timer stelt de gebruiker in staat om het
opstarten of uitschakelen van de eenheid
te vertragen.
Hoe het opstarten vertragen
Sluit de eenheid aan, zodat de eenheid
stand-by staat.
Druk op de knop “timer (timer)”, dan flitst
de Timer aanduiding en het aantal uren op
het scherm.
Tik of houdt de UP pijl “
” ingedrukt om de vertraging van
pijl “
” of de DOWN
de start van de timer te veranderen met
stappen van 0.5 uur tot aan 10 uur, dan in
stappen van 1 uur tot aan 24 uur.
Na 5 seconden, stoppen de Timer
aanduiding en de display met flitsen. De
controle zal de resterende tijd tot het
opstarten terug tellen.
De eenheid zal opstarten in de mode zoals
eerder is ingesteld.
Om de instelling te verwijderen, drukt u
opnieuw op de “timer (timer)” knop. De
timer aanduiding zal uitschakelen.
Hoe het uitschakelen vertragen
U kunt de uitschakeling vertragen als de
eenheid aanstaat.
Druk op de knop “timer (timer)”, dan flitst
de Timer aanduiding en het aantal uren op
het scherm.
Tik of houdt de UP pijl “
” ingedrukt om de vertraging van de
pijl “
” of de DOWN
uitschakeling van de timer te veranderen
met stappen van 0.5 uur tot aan 10 uur,
dan in stappen van 1 uur tot aan 24 uur.
Na 5 seconden, stoppen de timer
aanduiding en de display met flitsen, en de
display geeft de resterende tijd weer tot
het uitschakelen van de eenheid.
Om de instelling te verwijderen, drukt u
opnieuw op de “timer (timer)” knop. De
timer aanduiding zal uitschakelen.
Reset filter
Deze optie is een herinnering om
het luchtfilter te reinigen (Zie Zorg en
Schoonmaak) voor een efficiënter gebruik.
De filter aanduiding gaat branden na
250 uur gebruik. Om te resetten na het
schoonmaken van het filter, houdt u de
“fan speed (ventilatorsnelheid)” knop 5
seconden ingedrukt , dan gaat de “filter”
aanduiding uit.
Page 82

82 www.electrolux.com
7.2 AFSTANDSBEDIENING
1
Scherm afstandsbediening
2
Knop Timer on (Timer aan)
3
Knop Timer off (Timer uit)
4
Knop Sleep (Slapen)
5
Knop Mode (Mode)
6
Knop Temp/Timer setting (Temp/Timer
instellen)
7
°F/°C knop
8
Knop Swing (Swing)
9
Knop Fan Speed (Ventilatorsnelheid)
10
Knop On/Off (Aan/Uit)
Installatie batterij en belangrijke
instructies
Verwijder de klep aan de achterkant van
de afstandsbediening.
Plaats de meegeleverde batterijen correct
(zie de instructies binnen het batterijcompartiment).
Sluit het deksel.
Om de oude batterijen te vervangen (die
opgebruikt zijn)
Met twee nieuwe R03P “AAA” 1,5V
batterijen, bovenstaande stap herhalen.
Indien de afstandsbediening vervangen
of weggegooid is, dienen de batterijen te
worden verwijderd en afgevoerd worden
in overeenstemming met de locale regels,
aangezien zij schadelijk zijn voor het milieu.
Mix geen oude en nieuwe batterijen.
Mix geen alkaline, standaard (Carbon-zink)
of oplaadbare (Ni-Cad) batterijen.
Gooi de batterijen niet weg in het vuur.
Batterijen kunnen exploderen of lekken.
Indien de afstandsbediening gedurende
lange tijd niet wordt gebruikt, de batterijen
uit de afstandsbediening verwijderen.
De afstandsbediening dient met uiterste
zorg te worden behandeld. Laat hem niet
vallen en stel hem niet bloot aan direct
zonlicht of warmtebronnen.
Dit apparaat voldoet aan deel 15 van de
FCC regels. De werking is onderhevig aan
de twee volgende voorwaarden:
(1) Dit apparaat kan geen schadelijke
interferentie veroorzaken, en (2) dit
apparaat dient iedere ontvangen
interferentie te accepteren, inclusief
interferentie die ongewenste werking kan
veroorzaken.
Richt de afstandsbediening op de plaats
van de ontvanger van het signaal. De
afstandsbediening dient op niet meer dan
5 meter (16 ft) afstand van de eenheid
te zijn (zonder obstakels tussen de
afstandsbediening en de eenheid).
Gebruiker
Max. 5 m
Afstandsbediening
Draagbare AC
Page 83

83NEDERLANDS
Hoe gebruikt u de afstandsbediening
DE EENHEID INSCHAKELEN
Sluit de eenheid aan, dan op de “on/
off (aan/uit)” knop drukken (wanneer
ingeschakeld, zal de eenheid in de laatste
instelling voor uitschakelen werken.
Om de eenheid uit te schakelen, drukt u
weer op de “on/off (aan/uit)” knop, dan de
stekker verwijderen.
Schakel de eenheid NIET uit door de
stekker te verwijderen.
Schakel de eenheid altijd uit door op
de “on/off (aan/uit)” knop te drukken en
wacht enige minuten voordat u de stekker
verwijdert.
Mode Cool (Koelen)
Druk op de “mode (mode)” knop totdat
de linkerzijde van het LCD scherm “
”
weergeeft.
Druk op de “fan speed (ventilatorsnelheid)”
knop om de ventilatorsnelheid “Hi”, “Med”,
“Low” of “Auto” te kiezen.
Druk op de “
” en “ ” knop om de
gewenste temperatuur te kiezen.
Hoog Medium Laag Auto
Mode Dry (Drogen)
Druk op de “mode (mode)” knop totdat
de linkerzijde van het LCD scherm “
”
weergeeft.
Tegelijkertijd verschijnt het “low” ventilatorteken op het scherm.
Opmerking: In deze mode, kan de
ventilatorsnelheid niet geselecteerd
worden.
Fan (Ventilator) mode
Druk op de “mode (mode)” knop totdat
de linkerzijde van het LCD scherm “
”
weergeeft.
In deze mode, kunt u de ventilatorsnelheid
“Hi”, “Med”, “Low” of “Auto” kiezen door
de ventilatorsnelheid-knop in te drukken
en naar het diagram te kijken.
Opmerking: In deze mode, hoeft de
afvoerslang niet aangesloten te worden.
Heat mode (Verwarmingsmode) (alleen
voor verwarming & koeling-modellen)
Druk op de “mode (mode)” knop totdat
de linkerzijde van het LCD scherm “
”
weergeeft.
Druk op de “
” en “ ” knop om
de gewenste temperatuur te kiezen.
Tegelijkertijd brandt de “low” ventilator
aanduiding.
Opmerking: In deze mode, kan de
ventilatorsnelheid niet geselecteerd
worden.
AUTO (AUTO) mode
Druk op de “mode (mode)” knop totdat
de bovenzijde van het LCD scherm “auto”
weergeeft.
In de AUTO mode, kunt u de
ventilatorsnelheid niet selecteren.
Druk op de “
” en “ ” knop om de
gewenste temperatuur te kiezen.
Page 84

84 www.electrolux.com
Sleep (Slapen) mode
Indien de eenheid in de Koelen,
Verwarmen of Auto mode is, kunt u de
“sleep (slapen)” knop indrukken om de
eenheid in de Slaapstand te laten werken.
In deze stand wordt de ventilatorsnelheid
automatisch ingesteld op “low”, hetgeen
niet kan worden gewijzigd.
In de mode Koelen zal de geselecteerde
temperatuur na 30 minuten met 1ºC
verhogen nadat de mode is geselecteerd.
Dan zal de temperatuur 30 minuten
daarna nog eens toenemen met 1ºC. Deze
nieuwe temperatuur zal 7 uur gehandhaafd
worden totdat het terugkeert in de
oorspronkelijk ingestelde temperatuur. Dit
beëindigt de “Sleep (Slapen)” mode en het
toestel wordt uitgeschakeld.
Het “Sleep (Slapen)” mode programma
kan op ieder moment afgebroken worden
door op de “Sleep (Slapen)”, “mode
(mode)” of “fan speed (ventilatorsnelheid)”
knop te drukken.
Opmerking: In de mode Ventilator of
Drogen, kan de Sleep-mode niet worden
ingesteld.
Klep-swing functie
Druk op de “swing (swing)” knop om de
klep-swing functie in te schakelen, en
de bovenkant van het scherm zal “
” weergeven. De klep op het bovenste
paneel zal naar boven en naar beneden
draaien.
Druk nogmaals op deze knop om de klepswing functie uit te schakelen.
°F/°C functie
Druk op de “°F/°C” knop om te wisselen
tussen graden Fahrenheit en graden
Celsius. In de Drogen/Ventilator mode,
kunt u °F/°C niet selecteren.
Timer (Timer) mode
Hoe het opstarten vertragen
Sluit de eenheid aan, zodat de eenheid
stand-by staat.
Druk op de “timer on (timer aan)” knop,
het scherm zal “
Tik of houdt de UP pijl “
” ingedrukt om de vertraging van
pijl “
” en “H” aangeven.
” of de DOWN
de start van de timer te veranderen met
stappen van 0.5 uur tot aan 10 uur, dan
in stappen van 1 uur tot aan 24 uur. Na
2 secondes wordt de instelling in het
Page 85

85NEDERLANDS
geheugen opgeslagen. De controle zal
de resterende tijd tot het opstarten terug
tellen. De eenheid zal opstarten in de
mode zoals eerder is ingesteld.
Om de instelling te verwijderen, drukt u
opnieuw op de “timer on (timer aan)” knop.
Hoe het uitschakelen vertragen
U kunt de uitschakeling vertragen als de
eenheid aanstaat.
Druk op de “timer off (timer uit)” knop, het
scherm zal “
Tik of houdt de UP pijl “
” ingedrukt om de vertraging van de
pijl “
uitschakeling van de timer te veranderen
met stappen van 0.5 uur tot aan 10 uur,
dan in stappen van 1 uur tot aan 24 uur.
Na 2 seconden wordt de instelling in het
geheugen opgeslagen, en de display geeft
de resterende tijd weer tot het uitschakelen
van de eenheid.
Om de instelling te verwijderen, drukt u
opnieuw op de “timer off (timer uit)” knop.
” en “H” aangeven.
” of de DOWN
7.3 Storingscode
Indien de display “AS” weergeeft, is er een
storing met de ruimte-temperatuur sensor.
Neem contact op met uw geautoriseerd
Electrolux Service Centrum.
Indien de display “ES” weergeeft, is er een
storing met de verdamper-temperatuur
sensor. Neem contact op met uw
geautoriseerd Electrolux Service Centrum.
Indien de display “P1” aangeeft, is de
bodembak vol. Verplaats de eenheid
voorzichtig naar een andere plaats,
verwijder de bodem afvoerplug en laat
het water wegstromen. Start de machine
opnieuw totdat het “P1” teken verdwijnt.
Indien de storing zich herhaalt, belt u voor
service.
7.4 Afvoer instructie
Vaste afvoer
Tijdens de DROGEN mode, heeft u een
tuinslang (apart verkocht) nodig om
het condenswater van de eenheid af te
voeren.
Volg de onderstaande stappen:
• Schroef de afvoerdop van de vaste
afvoeruitlaat (Afb.19) los.
• Sluit een eind van de tuinslang (apart
verkocht) aan de afvoeruitlaat en voer
het andere uiteinde naar een afvoer die
lager is dan de eenheid (Afb.20).
Page 86

86 www.electrolux.com
Garden hose
Afb.19
Afvoerdop
Afb.20
OPMERKING:
• Er kan condenswater uitstromen na
het verwijderen van de afvoerdop,
indien de eenheid in Koelen of Auto
mode werkt. Indien u de tuinslang wilt
verwijderen, bereidt u een druppelbak
(niet geleverd) om het condenswater
van de afvoeruitlaat op te vangen.
• Zorg er alstublieft voor dat de hoogte
van de afvoer en het gedeelte van de
afvoerslang niet hoger zijn dan die van
de afvoeruitlaat, anders werkt de vaste
afvoer niet correct.
• Tijdens de Koelen of Auto mode, wordt
aanbevolen om de vaste afvoer uit te
schakelen door de afvoerdop door
de afvoeruitlaat te vervangen, om de
maximale prestaties te bereiken
Afb.21
Afb.22
Leeg het residu condenswater binnen de
eenheid tijdens de winteropslag.
Plaats een druppelbak (niet meegeleverd)
onder de bodemafvoeruitlaat, trek dan de
afvoerdop uit om het condenswater in de
druppelbak te laten stromen.
Vervang de afvoerdop door de
vaste afvoeruitlaat wanneer er geen
condenswater uitstroomt.
Plaats de druppelbak (niet meegeleverd)
onder de bodemafvoeruitlaat, trek dan de
rubberen stop uit de afvoeruitlaat om het
condenswater in de druppelbak te laten
stromen. Indien uw druppelbak niet al het
condenswater kan opvangen, is een aantal
vullingen noodzakelijk.
Vervang de afvoerdop door de
bodemafvoeruitlaat wanneer er geen
condenswater uitstroomt.
Afvoeruitlaat
bodem
Druppeldop
Druppelbak
OPMERKING: Om ervoor te zorgen dat
al het condenswater verwijderd is, de
eenheid lichtjes aan de voorkant optillen
totdat er geen condenswater meer uit de
afvoeruitlaat komt.
Page 87

8. ZORG EN REINIGING
87NEDERLANDS
Reinig uw airconditioner af en toe om het
als nieuw te laten lijken. Wees er zeker
van dat u de eenheid ontkoppelt voor
het reinigen om schok of brandgevaar te
voorkomen.
8.1 De eenheid schoonmaken
De kast en voorkant kunnen afgestoft
worden met een olievrije doek of gereinigd
met een doek bevochtigd in een oplossing
van warm water en
een mild vloeibaar afwasmiddel.
Gebruik nooit agressieve
schoonmaakmiddelen, wax of poetsmiddel
voor de voorkant van de kast.
Zorg ervoor om overvloedig water uit
de doek te wringen voor het rondom de
controles vegen. Overvloedig water in of
rondom de controles kan beschadigingen
veroorzaken aan de airconditioner.
8.2 De eenheid schoonmaken
Om uw airconditioning efficiënt te laten
functioneren, dient u de filters iedere twee
weken van gebruik te reinigen.
1. Pak het bovenste paneel-deksel en
neem het filter uit dat zich achter het
rooster van het achterpaneel bevindt,
zoals weergegeven in onderstaande
afbeelding.
2. Was het filter met gebruik van vloeibaar
afwasmiddel en warm water beneden
40°C. Spoel het filter grondig. Schud
het overvloedige water voorzichtig
van het filter af. Zorg ervoor dat het
filter volkomen droog is voor het
terugplaatsen. Of, in plaats van wassen,
kunt u het filter ook schoon zuigen.
3. Plaats het filter terug zodra het filter
droog is.
Zorg ervoor dat het filter volkomen
droog is voor het terugplaatsen.
8.3 Winteropslag
Indien de airconditioner niet wordt gebruikt
voor een
langere tijdsperiode:
1. Voer het water van het opvangreservoir
volledig af en laat de bodemafvoerdop
en rubberen plug een lange tijd eraf om
enig residu water af te voeren. Zodra
het reservoir volledig geleegd is en er
geen water meer uit stroomt, plaatst u
de rubberen plug en de dop weer terug.
2. Verwijder en reinig het filter, laat het
compleet drogen en installeer het weer.
3. Verwijder de batterijen van de
afstandsbediening.
4. Berg het apparaat op in een koele,
droge plaats, weg van direct zonlicht,
extreme temperaturen en overvloedig
stof.
Voordat u de airconditioner weer gebruikt:
1. Zorg ervoor dat het filter en de
afvoerdop op hun plaats zijn.
2. Controleer het netsnoer om er zeker
van te zijn dat die zich in goede
staat bevindt, zonder knikken of
beschadigingen.
3. Plaats nieuwe batterijen in de
afstandsbediening.
4. Installeer de airconditioner zoals
beschreven in de installatie instructies.
Page 88

88 www.electrolux.com
9. PROBLEEMOPLOSSING
Voordat u om service belt, neem s.v.p.
deze lijst door. Het kan u tijd en kosten
besparen. Deze lijst bevat gebruikelijke
gebeurtenissen die niet het resultaat zijn
van slecht vakmanschap of materiaal in dit
apparaat.
De airconditioner werkt niet.
• De stekker is losgekoppeld. Druk de
stekker stevig in het wandstopcontact.
• De zekering of stroomonderbreker
is geactiveerd. Vervang de zekering
met tijdsvertragingstype of reset de
stroomonderbreker.
• De schakelaar staat op OFF. Schakel
het apparaat ON en stel in zoals u dat
wenst.
• In de display verschijnt P1. Voer het
water af als beschreven in 7.3 Sectie
afvoer.
• Temperatuur van de ruimte is lager dan
de ingestelde temperatuur (Koelmode).
Reset de temperatuur.
De lucht van de eenheid voelt niet
koud genoeg aan.
• De temperatuur van de ruimte is
beneden de 16ºC. Koeling vindt niet
plaats totdat de temperatuur van de
ruimte boven de 16ºC stijgt.
• Reset naar een lagere temperatuur.
• De compressor is uitgeschakeld door
wijziging van modes. Wacht ongeveer 3
minuten en luister of u de compressor
hoort herstarten wanneer hij in de
KOEL-mode is ingesteld.
De airconditioner koelt, maar de
ruimte is te warm - GEEN ijsvorming
op de koelspiraal achter de
decoratieve voorkant.
• Buitentemperatuur is beneden de 16ºC.
Om de spoel te ontdooien, stelt u de
Ventilator-mode in.
• Het luchtfilter kan vuil zijn. Reinig filter.
Zie 8. Sectie zorg en reiniging. Om te
ontdooien, stel op ventilator-mode in.
• De temperatuur is te laag ingesteld om ‘s
nachts te koelen. Om te ontdooien, stel
u de ventilator-mode in. Dan stelt u de
temperatuur hoger in.
• De uitlaatslang is niet aangesloten of
geblokkeerd. Zie 5.1 Sectie uitlaat
warme lucht.
De airconditioner koelt, maar de
ruimte is te warm - ijsvorming op de
koelspiraal achter de decoratieve
voorkant
• Vuil luchtfilter - lucht beperkt. Reinig
luchtfilter. Zie 8. Sectie zorg en reiniging.
• De temperatuur is te hoog ingesteld.
Dan stelt u de temperatuur lager in.
• De kleppen die de luchtstroom
richten zijn verkeerd gepositioneerd.
Positioneer de kleppen voor een betere
luchtdistributie.
• De voorkant van de eenheid
is geblokkeerd door doeken,
jaloezieën, meubels, etc. - beperkt de
luchtdistributie. Verwijder de blokkering
voor de eenheid.
• Deuren, ramen, roosters, etc. open de koele lucht ontsnapt. Sluit deuren,
ramen, roosters, etc.
• De eenheid is recent ingeschakeld
in een hete ruimte. Geef extra tijd
om de “opgeslagen hitte” van de
muren, plafond, vloer en meubels te
verwijderen.
De airconditioner schakelt snel aan
en uit.
• Vuil luchtfilter - lucht beperkt. Reinig
luchtfilter.
• De buitentemperatuur is extreem heet.
Stel de ventilatorsnelheid in op een
hogere snelheid om de lucht vaker door
de koelspiralen te voeren.
Ruimte te koud.
• De temperatuur is te laag ingesteld.
Verhoog de instelling van de
temperatuur.
LET ALSTUBLIEFT OP: CONTROLEER DE
PLAAT VOOR HET TYPE KOELGAS DAT
IN UW APPARAAT GEBRUIKT WORDT.
WAARSCHUWING!
Specifieke informatie betreffende
apparaten met R290 koelgas.
Page 89

89NEDERLANDS
• Lees alle waarschuwingen zorgvuldig.
• Bij het dooien en reinigen van het
apparaat, dient u geen andere
instrumenten te gebruiken dan die
worden aanbevolen door de fabrikant.
• Het apparaat dient in een ruimte
geplaatst te worden zonder vaste
ontbrandingsbronnen (bijvoorbeeld:
open vlammen, gas of werkende
elektrische apparaten).
• Niet doorboren en niet verbranden.
• Koelgassen kunnen geurloos zijn.
• Het apparaat dient geïnstalleerd,
gebruikt en opgeslagen worden in een
ruimte die groter is dan 13 m
• Dit apparaat bevat 235g of 245g (zie
waarde op het label achter de eenheid)
R290 koelgas.
• R290 is een koelgas dat voldoet aan de
Europese richtlijnen m.b.t. het milieu.
Doorboor geen enkel deel van het
koelcircuit.
• Indien het apparaat geïnstalleerd,
gebruikt of opgeslagen wordt in
een niet-geventileerde ruimte, dient
2.
de ruimte ontworpen te zijn om de
accumulatie van koelgaslekken, die
leiden tot brand of explosiegevaar,
als gevolg van ontbranding van het
koelgas, veroorzaakt door elektrische
verwarmingen, kachels of andere
ontbrandingsbronnen, te voorkomen.
• Het apparaat dient zodanig opgeborgen
te worden dat mechanische storing
voorkomen wordt.
• Personen die werken aan of het
koelcircuit gebruiken dienen de juiste
certificaten te hebben die uitgegeven
zijn door een geaccrediteerde
organisatie die competentie m.b.t.
de behandeling van koelmiddelen
waarborgt, in overeenstemming met
een specifieke beoordeling die erkend is
door organisaties in de industrie.
• Reparaties dienen uitgevoerd te worden
gebaseerd op de aanbevelingen van de
fabrikant. Onderhoud en reparatie dat
de aanwezigheid van ander bekwaam
personeel vereist, dient uitgevoerd te
worden onder toezicht van een persoon
als gespecificeerd in het gebruik van
ontvlambare koelmiddelen.
10. MILIEUOVERWEGINGEN
Recycle de materialen met het teken.
Stop de verpakking in de juiste
containers om hem te recyclen. Help om
de omgeving en de menselijke gezondheid
te beschermen en afval van elektrische en
elektronische apparaten te recyclen. Gooi
geen apparaten die gemarkeerd zijn met
het teken
afval. Breng het product terug naar uw
lokale recyclingsinrichting of neem contact
op met uw gemeentekantoor.
weg met het huishoudelijk
Page 90

90 www.electrolux.com
INHALT
1. SICHERHEITSHINWEISE ................................................................................. 91
2. SICHERHEITSANWEISUNGEN ........................................................................ 94
3. GERÄTEBESCHREIBUNG ............................................................................... 98
4. MITGELIEFERTES ZUBEHÖR .......................................................................... 98
5. MONTAGEANLEITUNG .................................................................................... 99
6. FUNKTIONEN DES KLIMAGERÄTS ................................................................ 102
7. BETRIEBSANLEITUNG ................................................................................... 102
8. PFLEGE UND REINIGUNG ............................................................................. 109
9. FEHLERBEHEBUNG ...................................................................................... 110
10. UMWELTBELANGE ...................................................................................... 111
WIR DENKEN AN SIE
Vielen Dank, dass Sie sich für ein Electrolux-Gerät entschieden haben. Sie haben ein Produkt
gewählt, hinter dem eine jahrzehntelange professionelle Erfahrung und Innovation steht. Bei der
Entwicklung dieses großartigen und eleganten Geräts haben wir an Sie gedacht. So haben Sie
bei jedem Gebrauch die Gewissheit, dass Sie stets großartige Ergebnisse erzielen werden.
Willkommen bei Electrolux.
Besuchen Sie unsere Website, um:
Hinweise zum Gebrauch, Broschüren, Fehlerbehebung, Serviceinformationen zu
erhalten:
www.electrolux.com/webselfservice
Registrieren Sie Ihr Produkt für einen besseren Service:
www.registerelectrolux.com
Kaufen Sie Zubehör, Verbrauchsmaterialien und Original-Ersatzteile für Ihr Gerät:
www.electrolux.com/shop
KUNDENDIENST UND SERVICE
Verwenden Sie stets originale Ersatzteile.
Halten Sie folgende Angaben bereit, wenn Sie sich an den autorisierten Service-Center
wenden: Modell, Produktnummerncode (PNC), Seriennummer.
Die Informationen finden Sie auf dem Typenschild.
Warnhinweise / Vorsichts- und Sicherheitshinweise.
Allgemeine Informationen und Tipps.
Umwelttipps.
Änderungen vorbehalten.
Page 91

1. SICHERHEITSHINWEISE
WARNUNG!
•Dieses Gerät darf nicht von Kindern unter acht
Jahren und Personen mit verminderten körperlichen,
sensorischen oder geistigen Fähigkeiten oder Personen,
die nicht über ausreichende Erfahrung und Kenntnisse
verfügen, verwendet werden, es sei denn, sie wurden
von einer Person über die sichere Benutzung des Geräts
angewiesen oder von ihr beaufsichtigt und über die
Gefahren unterrichtet.
•Kinder dürfen nicht mit dem Gerät spielen.
•Wenn das Stromkabel beschädigt ist, muss es vom
Hersteller, seinem Dienstleister oder von ähnlich qualifizierten
Personen ersetzt werden, um Gefahren zu vermeiden.
In diesem Handbuch wird erläutert, wie Sie Ihr neues
Klimagerät ordnungsgemäß verwenden. Bitte lesen Sie
dieses Handbuch aufmerksam durch, bevor Sie das Produkt
verwenden. Dieses Handbuch sollte an einem sicheren Ort
griffbereit aufbewahrt werden.
91DEUTSCH
VORSICHT!
•Kontaktieren Sie einen autorisierten Service-Techniker,
der das Gerät repariert oder wartet.
•Kontaktieren Sie den Installateur, der das Gerät montiert.
•Das Klimagerät ist nicht zur Verwendung von
Kleinkindern oder gebrechlichen Personen ohne Aufsicht
vorgesehen.
•Bei Kleinkindern empfiehlt sich die Aufsicht durch
Erwachsene, um zu verhindern, dass das Klimagerät als
Spielzeug verwendet wird.
•Der maximal zulässige Geräuschpegel, der von
Klimageräten ausgeht, wird von den Bestimmungen der
Gemeindeverwaltung geregelt.
•Das Ersetzen des Netzkabels darf ausschließlich von
autorisiertem Personal vorgenommen werden.
•Montagearbeiten müssen in Übereinstimmung mit dem
nationalen Verkabelungsstandard durch autorisiertes
Personal vorgenommen werden (falls zutreffend). Ein
falscher Anschluss kann zu Überhitzung und Brand führen.
•Achten Sie beim Einstellen der horizontalen Luftschlitze
darauf, dass Ihre Finger nicht in das Gebläse geraten.
Page 92

92 www.electrolux.com
1.1 Wichtige Hinweise
1. Gerät nicht ohne Luftfilter betreiben.
2. Gerät nicht in der Nähe einer Wärmequelle oder eines
Kamins betreiben.
3. Gerät keinem direkten Sonnenlicht aussetzen.
4. Gerät stets aufrecht transportieren und immer aufrecht hinstellen.
5. Gerät während des Betriebs oder kurz danach nicht abdecken.
6. Kondensat vor dem Wegstellen des Geräts stets ablassen.
1.2 Bei der Verwendung des Klimageräts ist Folgendes zu
beachten
VORSICHT!
Warnhinweise für den Gebrauch
•Ändern Sie keines der Teile an diesem Produkt.
•Stecken Sie keine Gegenstände in irgendein Teil des Geräts.
•Stellen Sie sicher, dass die Stromversorgung über
•Verwenden Sie stets einen Leistungsschalter oder eine
•Im Falle von Unregelmäßigkeiten mit dem Klimagerät
eine geeignete Bemessungsspannung verfügt. Es darf
nur eine Netzstromversorgung von 220V- 240V,
50Hz und 10A verwendet werden. Die Verwendung
einer Stromversorgung mit einer ungeeigneten
Bemessungsspannung kann zu Schäden am Gerät und
möglicherweise zu einem Brand führen.
Sicherung mit geeignetem Ampere-Wert. Verwenden
Sie auf gar keinen Fall Draht, Stifte oder andere Objekte
anstelle einer richtigen Sicherung.
(z.B. verbrannter Geruch), schalten Sie es umgehend
aus und trennen Sie die Stromversorgung.
VORSICHT!
Warnhinweis für Stromkabel
•Dieser Netzstecker darf nur in eine geeignete
Wandsteckdose gesteckt werden. Nicht zusammen mit
Verlängerungskabeln verwenden.
•Stecken Sie den Netzstecker fest in die Steckdose und
stellen Sie sicher, dass dieser nicht locker ist.
•Nicht am Stromkabel ziehen, es nicht verformen oder
verändern bzw. in Wasser tauchen. Ziehen oder falsche
Anwendung des Stromkabels kann zu Schäden am
Gerät führen und einen elektrischen Schlag verursachen.
Page 93

93DEUTSCH
•Wenn das Stromkabel beschädigt ist, muss es vom Hersteller
oder seinem Dienstleister bzw. von einer ähnlich qualifizierten
Person ersetzt werden, um Gefahren zu vermeiden.
Verwenden Sie hierzu ausschließlich das vom Hersteller
angegebene Stromkabel.
•Dieses Gerät muss geerdet werden. Dieses Gerät ist mit
einem Kabel ausgerüstet, das über eine Erdungsleitung
verfügt. Der Stecker muss in eine richtig angebrachte und
geerdete Steckdose gesteckt werden.
Erdungsnippel
Stecker
•Dieses Gerät ist mit einem Kabel ausgerüstet, das über eine
Erdung verfügt, die mit einem Schutzkontaktstift verbunden
ist. Der Stecker muss in eine richtig angebrachte und
geerdete Steckdose gesteckt werden. Schneiden Sie auf gar
keinen Fall den viereckigen Schutzkontaktstift von diesem
Stecker ab oder oder entfernen Sie ihn.
Viereckiger Schutzkontaktstift
Stecker
(nur für England)
1.3 Vorsichtshinweise für die Verwendung
•Stellen Sie sicher, dass das Gerät ausgeschaltet ist und das
Stromkabel von der Steckdose getrennt wurde, bevor Sie
Reinigungs- oder Wartungsarbeiten vornehmen.
•Lassen Sie kein Wasser und auch keine Wasserspritzer in
direkten Kontakt mit dem Gerät kommen. Wasser kann zu
einem elektrischen Schlag oder zu Schäden am Gerät führen.
•Vor jedem Transport sollte das Wasser aus dem Klimagerät
entfernt werden (siehe Seite 14). Falls Wasser im Tank
verbleibt, kann dieses während des Transports auslaufen.
•Um sicherzustellen, dass das Wasser ordnungsgemäß aus dem
Gerät entfernt wird, darf der Abflussschlauch nicht geknickt sein
und während des Entfeuchtungsmodus nicht angehoben werden.
Falls nicht, kann das abgelassene Wasser in den Raum laufen.
•Die Temperatur in der Nähe des Abflussschlauchs darf
während der Benutzung nicht unter den Gefrierpunkt sinken.
Page 94

94 www.electrolux.com
Abgelassenes Wasser kann im Schlauchinneren gefrieren,
was dazu führt, dass sich Wasser im Gerät ansammelt und in
den Raum zurückläuft.
•Blockieren Sie den Abluftauslass nicht mit irgendwelchen
Gegenständen. Die Kühlleistung wird dadurch reduziert oder
stoppt vollständig.
•Installieren Sie ein Reststromgerät (residual current device,
RCD) gemäß British Standard and Wiring Rules, um vor sich
elektrischen Schlägen zu schützen.
•Eine Exposition gegenüber direktem Luftstrom über einen
längeren Zeitraum kann gefährlich für die Gesundheit sein.
Setzen Sie Bewohnern, Haustieren oder Pflanzen keinen
direkten Luftstrom über längere Zeiträume aus.
•Verwenden Sie dieses Klimagerät nicht für unspezifizierte
Sonderzwecke (z.B. zur Lagerung von Präzisionsgeräten,
Nahrungsmitteln, Haustieren, Pflanzen und Kunstobjekten).
Eine solche Verwendung könnte bei diesen Gegenständen/
Tieren einen Schaden verursachen.
2. SICHERHEITSANWEISUNGEN
2.1 Hinweise zum Betrieb
• Warten Sie 3 Minuten, bis der
Kompressor die Kühlung hochfährt.
Wenn Sie das Klimagerät ausschalten
und sofort danach wieder einschalten,
warten Sie 3 Minuten, bis der
Kompressor die Kühlung wieder
hochgefahren hat. Im Gerät befindet
sich ein elektronisches Teil, das den
Kompressor sicherheitshalber für 3
Minuten ausgeschaltet lässt.
• Bei einem Stromausfall während des
Betriebs warten Sie 3 Minuten, bis das
Gerät erneut gestartet wird. Nachdem der
Strom wieder hergestellt wurde, starten
Sie das Klimagerät erneut. Wenn der
Stromausfall kürzer als drei Minuten war,
stellen Sie sicher, dass Sie mindestens
drei Minuten warten, bevor Sie das Gerät
erneut starten. Wenn Sie das Klimagerät
innerhalb von drei Minuten erneut
starten, kann eine Schutzvorrichtung
im Gerät den Kompressor ausschalten.
Diese Schutzvorrichtung verhindert
die Kühlung für etwa 5 Minuten. Jede
zuvor vorgenommene Einstellung wird
gelöscht und das Gerät kehrt in seinen
Ausgangszustand zurück.
• Niedrigtemperaturbetrieb: Friert Ihr
Gerät ein? Ein Einfrieren tritt auf,
wenn das Gerät auf etwa 18°C bei
niedriger Umgebungstemperatur
gestellt ist, insbesondere nachts. Unter
diesen Umständen kann ein weiterer
Temperaturabfall dazu führen, dass das
Gerät einfriert. Wird das Gerät auf eine
höhere Temperatur eingestellt, wird ein
Einfrieren verhindert.
• Der Entfeuchtungsmodus erhöht die
Umgebungstemperatur. Das Gerät
erzeugt im Entfeuchtungsmodus Wärme
und die Umgebungstemperatur steigt.
Warme Luft wird aus dem Abluftauslass
geblasen, aber das ist normal und stellt
kein Problem mit dem Gerät dar.
• Dieses Klimagerät bläst im Kühlmodus
die vom Gerät erzeugte warme Luft über
den Abluftschlauch nach draußen. In der
Zwischenzeit wird die gleiche Menge
an Luft von außen durch beliebige
Öffnungen in den Raum gelangen.
• Verwenden Sie keine Mittel, um den
Abtauprozess zu beschleunigen, und
auch nicht für die Reinigung, außer
solche, die der Hersteller empfiehlt.
Page 95

95DEUTSCH
• Das Gerät soll in einem Raum aufgestellt
werden, in dem keine kontinuierlich
arbeitenden Zündquellen vorhanden
sind (zum Beispiel: offene Flammen, ein
laufendes Gasgerät oder ein laufendes
Heizgerät).
• Nicht hineinstechen oder anbrennen.
• Einhaltung der nationalen
Bestimmungen muss beachtet werden.
• Belüftungsöffnungen nicht abdecken.
• Das Gerät soll in einem gut belüfteten
Raum von mindestens 13m
werden.
• Jede Person, die sich mit der Arbeit
am oder dem Eindringen in einen
Kältemittelkreislauf befasst, sollte
im Besitz eines aktuell gültigen
Zertifikats von einer von der Branche
akkreditierten Zertifizierungsstelle sein,
das die Kompetenz mit dem sicheren
Umgang mit Kältemitteln gemäß
einer von der Branche anerkannten
Beurteilungsspezifikation bescheinigt.
2
aufgestellt
• Die Instandhaltung darf nur in der Form
stattfinden wie vom Gerätehersteller
empfohlen. Wartung und Reparatur,
bei denen die Hilfe von anderem
Fachpersonal benötigt wird, muss unter
der Aufsicht der Person erfolgen, die
auf dem Gebiet der entflammbaren
Kältemittel fachkundig ist.
• Dieses Produkt enthält eine LithiumKnopfzelle. Falls eine neue oder
gebrauchte Lithium-Knopfzelle verschluckt
wird oder in den Körper gelangt, kann
sie ernsthafte innerliche Verbrennungen
verursachen und in weniger als zwei
Stunden zum Tod führen. Schließen
Sie das Batteriefach immer vollständig.
Falls das Batteriefach nicht vollständig
geschlossen wird, verwenden Sie das
Produkt nicht mehr, entfernen Sie die
Batterien und halten Sie sie von Kindern
fern. Wenn Sie der Meinung sind, dass
Batterien verschluckt oder in ein Körperteil
hineingesteckt worden sind, suchen Sie
sofort einen Arzt auf.
Um Verletzungen des Benutzers oder
anderer Personen sowie Sachschäden
zu vermeiden, müssen die folgenden
Anweisungen eingehalten werden.
Der falsche Betrieb aufgrund von
Missachtung der Anweisungen kann zu
Schäden führen.
Die Schwere der Schäden ist wie folgt
eingeteilt:
WARNUNG!
Dieses Symbol zeigt die
Möglichkeit von Tod oder schweren
Verletzungen an.
VORSICHT!
Dieses Symbol zeigt die Möglichkeit
von Verletzungen oder Schäden an
einer Sache an.
Bedeutungen der in diesem Handbuch
verwendeten Symbole werden unten
dargestellt:
Verboten.
Unbedingt beachten.
2.2 Warnung während des
Gebrauchs
WARNUNG!
Warnung während des Gebrauchs
Page 96

96 www.electrolux.com
warnung bedeutung
Den Stecker immer ganz in die Steckdose
einstecken
Das Gerät nicht einfach durch Herausziehen
bzw. Einstecken des Netzsteckers aus- bzw.
einschalten
Ein fremdes Netzkabel darf weder verwendet
noch beschädigt werden
Die Länge des Netzkabels nicht verändern
oder die Steckdose mit anderen Geräten
teilen
Niemals mit nassen Händen oder in feuchter
Umgebung verwenden
Niemals den Luftstrom direkt auf Personen
im Raum richten
Stets für eine effektive Erdung sorgen Eine falsche Erdung kann zu einem
Kein Wasser in elektrische Bauteile laufen
lassen
Stets einen Leistungsschalter installieren und
für einen geeigneten Stromkreis sorgen
Den Netzstecker des Geräts ziehen, sobald
ein eigenartiges Geräusch, ein seltsamer
Geruch oder Rauch aus dem Gerät austritt
Steckdose nicht verwenden, wenn diese
Locker oder beschädigt ist
Gerät während des Betriebs nicht öffnen Es kann zu einem Brand und elektrischen
Schusswaffen vom Gerät fernhalten Es kann zu einem Brand kommen
Das Netzkabel nicht in der Nähe von
Heizgeräten verwenden
Das Netzkabel nicht in der Nähe von
entzündbaren Gasen oder Brennstoffen, wie
Benzin, Benzol, Verdünner etc. verwenden.
Raum vor Betrieb des Klimageräts lüften, falls
aus einem anderen Gerät Gas austritt
Gerät nicht zerlegen oder modifizieren Es kann zu einem Ausfall und elektrischen
Ansonsten kann es aufgrund von
übermäßiger Hitzebildung zu einem
elektrischen Schlag oder Brand kommen
Ansonsten kann es aufgrund von
Hitzebildung zu einem elektrischen Schlag
oder Brand kommen
Es kann zu einem elektrischen Schlag oder
Brand kommen.
Wenn das Netzkabel beschädigt ist, muss
es vom Hersteller oder einem autorisierten
Service-Center bzw. von einer ähnlich
qualifizierten Person ersetzt werden, um
Gefahren zu vermeiden
Ansonsten kann es aufgrund von
Hitzebildung zu einem elektrischen Schlag
oder Brand kommen
Es kann zu einem elektrischen Schlag
kommen
Hierdurch könnte die Gesundheit gefährdet
werden
elektrischen Schlag führen
Hierdurch kann das Gerät ausfallen oder
es kann zu einem elektrischen Schlag
kommen
Eine falsche Montage kann zu einem Brand
und elektrischen Schlag führen
Es kann zu einem Brand und elektrischen
Schlag kommen
Es kann zu einem Brand und elektrischen
Schlag kommen
Schlag kommen
Es kann zu einem Brand und elektrischen
Schlag kommen
Es kann zu einer Explosion oder einem
Brand kommen
Es kann zu einer Explosion, einem Brand
oder Verbrennungen kommen
Schlag kommen
Page 97

VORSICHT!
vorsicht bedeutung
Wenn der Luftfilter entfernt werden soll, nicht
Es kann zu einer Verletzung kommen
die Metallteile des Geräts berühren
Klimagerät nicht mit Wasser reinigen Wasser könnte in das Gerät eintreten und
die Isolierung beschädigen. Es kann zu
einem elektrischen Schlag kommen
Raum gut lüften, wenn das Gerät in einem Raum
Es kann zu Sauerstoffmangel kommen
steht, in dem sich auch ein Ofen etc. befindet.
Wenn das Gerät gereinigt werden soll,
Leistungsschalter trennen
Gerät nicht reinigen, wenn es eingeschaltet
ist, da es zu einem Brand oder elektrischen
Schlag kommen bzw. eine Verletzung
verursachen kann
Niemals den Luftstrom direkt auf Haustiere
oder Zimmerpflanzen richten
Dadurch könnte das Haustier oder die
Pflanze verletzt werden
Gerät nicht für Sonderzwecke verwenden Dieses Gerät nicht im Zusammenhang
mit der Lagerung von Präzisionsgeräten,
Nahrungsmitteln, Haustieren, Pflanzen und
Kunstobjekten verwenden. Die Qualität des
Geräts etc. kann darunter leiden.
Bei einem Sturm oder Zyklon Betrieb
einstellen und Fenster schließen
Durch den Betrieb bei geöffnetem Fenster
kann es hinein regnen und die Möbel
durchnässen
Stecker beim Herausziehen mit beiden
Händen festhalten
Betriebsschalter ausschalten, wenn das
Gerät für längere Zeit nicht verwendet wird
Niemals Gegenstände in den Lufteinlass oder
den Luftauslass einführen
Filter stets fest einsetzen. Filter alle zwei
Wochen reinigen
Keine scharfen Reinigungsmittel, wie etwa
Wachs oder Verdünner verwenden - nehmen
Sie ein weiches Tuch
Keine schweren Gegenstände auf das
Netzkabel stellen und sicherstellen, dass das
Ansonsten kann es zu einem elektrischen
Schlag und Schäden kommen
Hierdurch kann das Gerät ausfallen oder
es kann zu einem Brand kommen
Hierdurch kann das Gerät ausfallen oder
es kann zu einem Unfall kommen
Ein Betrieb ohne Filter kann zu einem
Ausfall des Geräts führen
Das Aussehen kann sich aufgrund einer
Änderung der Gerätefarbe oder Zerkratzen
der Oberfläche verschlechtern
Es besteht Brandgefahr oder Gefahr eines
elektrischen Schlages
Kabel nicht gequetscht wird
Niemals das Wasser aus dem Klimagerät
trinken
Beim Auspacken und Montieren ist Vorsicht
geboten
Wenn Wasser in das Gerät eintritt, schalten
Sie es am Netzschalter aus und trennen Sie
Es enthält kontaminierte Stoffe und könnte
Sie krank machen
Scharfe Kanten könnten zu Verletzungen
führen
Es könnte zu einem elektrischen Schlag
und Schäden kommen
den Leistungsschalter. Stromversorgung
durch Herausziehen des Netzsteckers
trennen und einen qualifizierten ServiceTechniker kontaktieren
97DEUTSCH
Page 98

98 www.electrolux.com
10
4 5
9
3. GERÄTEBESCHREIBUNG
3
2
6
1
11
1
Fernbedienung
2
Signalempfänger
3
Auslass für Raumluft Auslass für untere Entwässerung
4
Bedienfeld
5
Tragegriff (beidseitig)
4. MITGELIEFERTES ZUBEHÖR
TEILE TEILENAME: MENGE:
1
2
3
4
5
6
Satz für die Fenstermontage Verbindungsstück A
Auslass - Verbindungsstück B 1 Stck.
Anbausatz für Fenster 1 Satz
Abluftschlauch 1 Stck.
Schrauben
Sicherheitsverschluss 1 Stck.
6
Lufteintritt
Auslass für Dauerentwässerung
7
8
9
Luftauslass
Netzkabel
10
11
Rollen
1 Stck.
4 Stck. 12,7mm Schrauben
2 Stck. 19mm Schrauben
7
8
7
8
9
10
11
Bolzen 2 Stck.
Schaumdichtung A 2 Stck.
Schaumdichtung B 1 Stck.
Fernbedienung 1 Satz
Batterien 2 Stck.
• Überprüfen Sie, ob sämtliches Zubehör im Paket vorhanden ist. Lesen Sie bitte auch
die Montageanleitung für den Gebrauch des Zubehörs durch.
Page 99

5. MONTAGEANLEITUNG
A
Abb. 5
HorizontalSchiebefenste
Abb. 6
99DEUTSCH
5.1 Ablassen warmer Luft
Im Cool Mode (Kühlmodus) muss das
Gerät in der Nähe eines Fensters oder
einer Öffnung platziert werden, sodass
die warme Abluft nach draußen gelangen
kann. Stellen Sie das Gerät zuerst auf
eine flache Oberfläche und vergewissern
Sie sich, dass um das Gerät ein Freiraum
von mindestens 30 mm besteht und es in
der Nähe einer Stromversorgung mit einer
einzelnen Steckdose steht.
1. Beide Seiten des Schlauchs (Abb. 1) in
die Länge ziehen und den Schlauch
an Verbindungsstück A anschrauben
(Abb. 2).
Die Seite des Schlauchs in
die Länge ziehen
2. Die andere Seite des Schlauchs in die
Länge ziehen und an Verbindungsstück
B (Abb. 3) anschrauben.
Abb. 1
Abb. 2
4. Verbindungsstück A in den Anbausatz
für Fenster befestigen und schließen.
(Abb. 5 und 6)
Vertikales
Fenster
nbausatz für Fenster
Minimum: 67,5 cm
Maximum: 123 cm
r
Anbausatz für Fenster
Minimum: 67,5 cm
Maximum: 123 cm
Der Schlauch kann von 38 cm auf
bis zu 150 cm in die Länge gezogen
werden. Am besten ist jedoch, die
Länge möglichst gering zu halten.
Sicherstellen, dass der Schlauch
keine scharfen Kanten hat und nicht
verbogen ist. (Abb. 7)
3. Verbindungsstück B in das Gerät
einbauen (Abb. 4).
Aufschieben
1
2
Verschließen
Abb. 7
Abb. 3
Abb. 4
Page 100

100 www.electrolux.com
5.2 Installation in ein
doppelflügeliges
Schiebefenster
1. Schaumdichtungen A (selbstklebend)
auf die richtige Länge schneiden und
an Fenster und Fensterbank anbringen.
(Abb. 8)
Schaumdichtung A
(selbstklebend)
Abb. 8
2. Den Fensterflügel öffnen und den
Anbausatz für Fenster auf die
Fensterbank platzieren (Abb. 9).
Anbausatz für Fenster auf Fensterbank
anbringen. Die Länge des Anbausatzes
für Fenster entsprechend der Breite
des Fensters anpassen. Die beiden
Schrauben in den Anbausatz für Fenster
einschrauben. Siehe Abb. 9.
schrauben
Anbausatz für
Fenster
4. Zwei 12,7mm Schrauben einschrauben,
um den Anbausatz für Fenster am
Fensterflügel zu befestigen. (Abb. 11)
5. Anbausatz für Fenster auf Fensterbank
befestigen (Abb. 11):
A: Für Holzfenster: Zum Befestigen sind
19mm Schrauben erforderlich.
B: Für vinylverkleidete Fenster: 12,7 mm
Sechskantschrauben zum Befestigen
verwenden.
12.7 mm Schrauben
Anbausatz für
Fenster
19 mm Schrauben oder
12,7 mm Sechskantschrauben
Fensterbank
Abb.11
6. Zum Befestigen des unteren Flügels,
den rechtwinkeligen Vorreiber mit einer
12,7 mm Schraube anbringen (Abb. 12).
Es ist schwierig, die Fenster
mit dem Sicherheitsverschluss
für vinylverkleidete Fenster zu
verschließen. Es kann also das
Fensterschloss selbst verwendet
werden.
67,5 cm - 123 cm
Fensterbank
Abb. 9
Den einstellbaren Anbausatz für
Fenster auf die richtige Länge
schneiden, falls die Breite des Fensters
geringer als 67,5 cm (Abb. 10) ist.
Hier abschneiden, damit es in Ihr Fenster passt
Abb. 10
3. Den Fensterflügel fest gegen den
Anbausatz für Fenster schieben. (Abb. 11)
Abb. 12
7. Die Schaumdichtung B auf die
geeignete Länge schneiden und
den Zwischenraum zwischen dem
oberen Fensterflügel und dem äußeren
Fensterflügel, wie in Abb. 13 dargestellt,
abdichten.
Schaumdichtung B
Abb .13
 Loading...