

Page 1
EWP10742
EWP85742
EWP85752
EN
MS
ZH
WASHING MACHINE
34
USER MANUAL
MESIN BASUH MANUAL PENGGUNA
66
洗衣机 用户手册
2
................................................... ....................................................................
Page 2

CONTENTS
WE’RE THINKING OF YOU
CUSTOMER CARE AND SERVICE
2 www.electrolux.com
SAFETY INFORMATION
PRODUCT DESCRIPTION
CONTROL PANEL
BEFORE FIRST USE
DAILY USE
WASHING HINTS
INTERNATIONAL WASH CODE SYMBOLS
CARE AND CLEANING
TROUBLESHOOTING
.............................................................................................. 3
........................................................................................... 5
...................................................................................................... 6
................................................................................................. 12
................................................................................................................ 12
...................................................................................................... 18
............................................................... 21
............................................................................................. 22
............................................................................................... 27
1
2
3
4
5
6
7
8
9
TECHNICAL DATA .................................................................................................... 3010
INSTALLATION.......................................................................................................... 3111
ENVIRONMENT CONCERNS .................................................................................... 3312
Thank you for purchasing an Electrolux appliance. You’ve chosen a product that brings with
it decades of professional experience and innovation. Ingenious and stylish, it has been
designed with you in mind. So whenever you use it, you can be safe in the knowledge that
you’ll get great results every time. Welcome to Electrolux.
We recommend the use of original spare parts.
When contacting Service, ensure that you have the following data available.
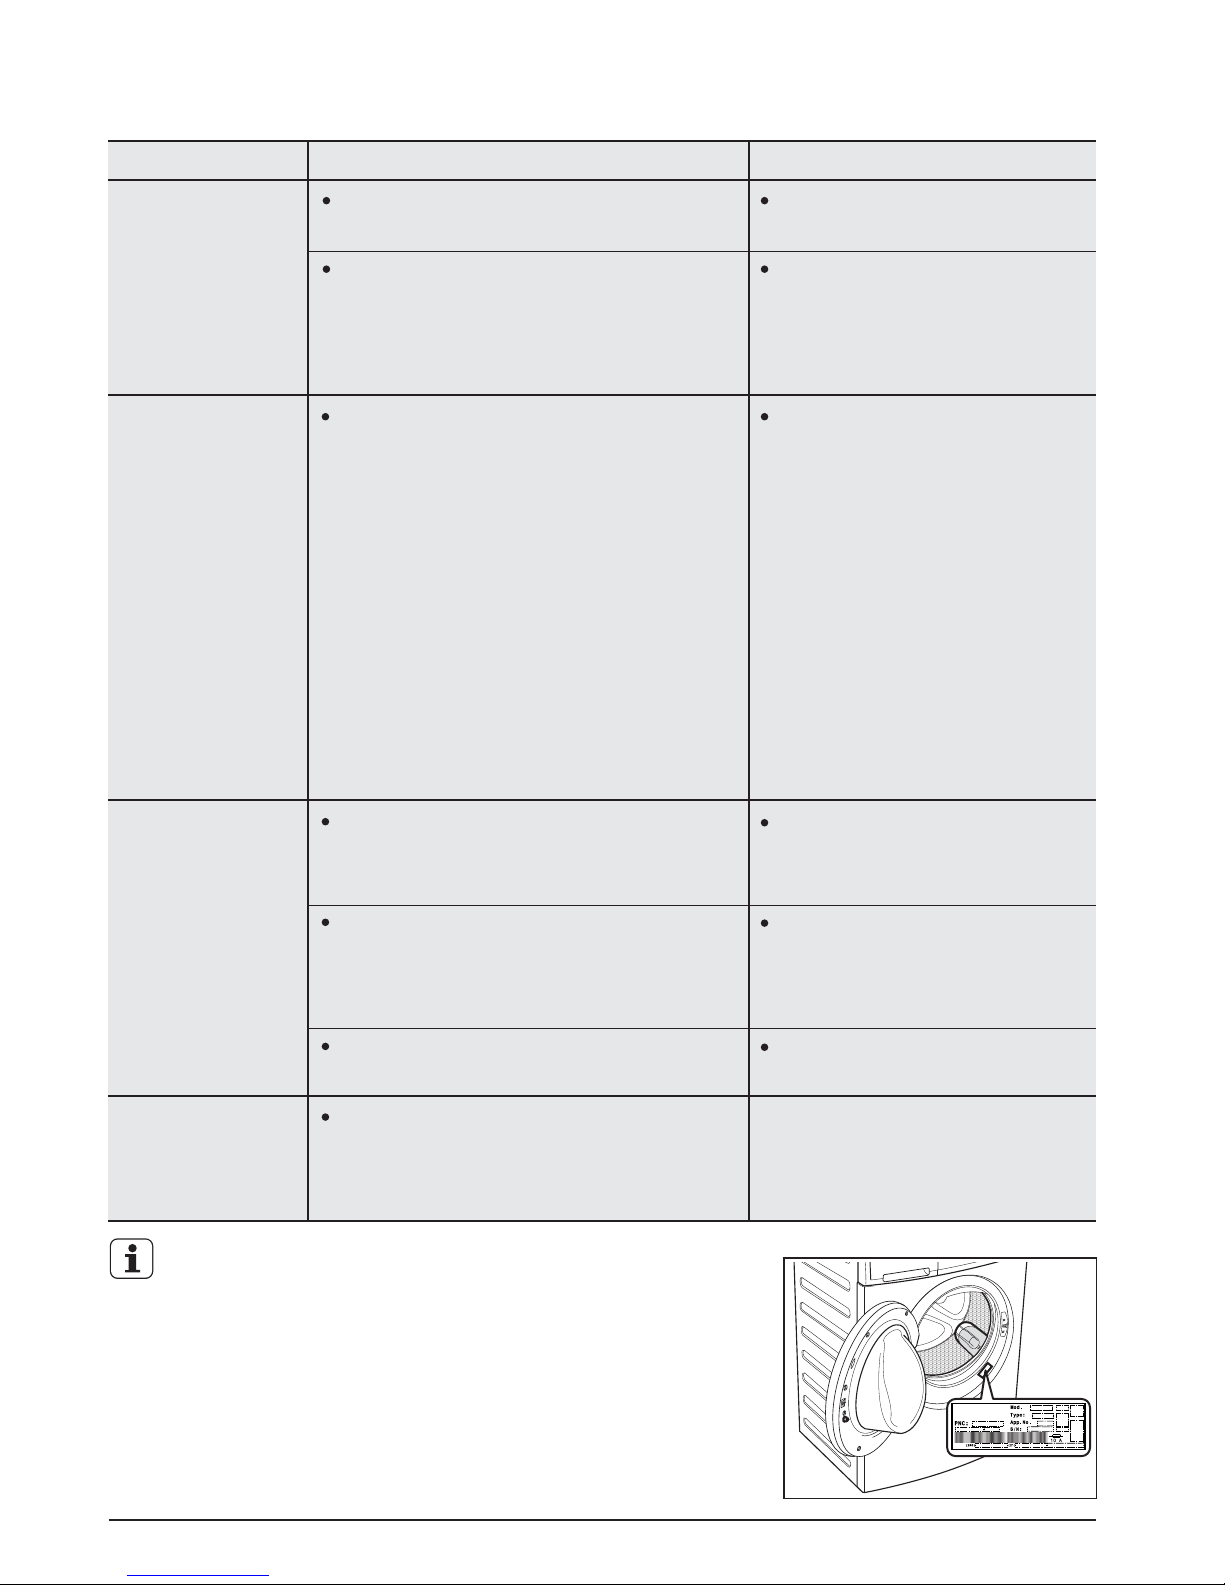
The information can be found on the rating plate. Model, PNC, Serial Number.
Visit our website to:
Get usage advice, brochures, trouble shooter, service information:
www.electrolux.com
Register your product for better service:
www.electrolux.com/productregistration
Buy Accessories, Consumables and Original spare parts for your appliance:
www.electrolux.com/shop
Warning / Caution-Safety information.
General information and tips.
Environmental information.
Subject to change without notice.
Page 3
ENGLISH 3
SAFETY INFORMATION1.
In the interest of your safety and to
ensure the correct use, before installing
and first using the appliance, read this
user manual carefully, including its hints
and warnings.
This appliance is intended to be used in
household and similar applications
such as:
Farm houses
By clients in serviced apartments,
holiday apartments and residential
type environments.
Conditions of use
To avoid unnecessary mistakes and
accidents, it is important to ensure that
all people using the appliance are
thoroughly familiar with its operation and
safety features.
Save these instructions and make sure
that they remain with the appliance if it
is moved or sold, so that everyone
using it through its life will be properly
informed on appliance use and safety.
1.1 GENERAL SAFETY
It is dangerous to alter the
specifications or attempt to modify this
product in anyway.
During high temperature wash
program the door glass may get hot.
Do not touch it!
Make sure that small pets do not
climb into the drum. To avoid this,
please check into the drum before
using the appliance.
Any objects such as coins, safety
pins, nails, screws, stones or any
other hard, sharp material can cause
extensive damage and must not be
placed into the machine.
Only use the advised quantities of
fabric softener and detergent. Damage
to the fabric or appliance can occur if
you overfill. Refer to the manufacturer’s
recommendations of quantities.
Wash small items such as socks,
laces, washable belts etc in a washing
bag or pillow case as it is possible for
such items to slip down between the
tub and the inner drum.
This appliance is not intended for use
by persons (including children) with
reduced physical, sensory or mental
capabilities, or lack of experience and
knowledge, unless they have been
given supervision or instruction
concerning use of the appliance by a
person responsible for their safety.
Do not use your washing machine to
wash articles with whalebones,
material without hems or torn material.
Always unplug the appliance and turn
off the water supply after use, clean
and maintenance.
This appliance is heavy. Care should
be taken when moving it.
When unpacking the appliance, check
that it is not damaged. If in doubt, do
not use it and contact the Service
Centre.
All packing and transit bolts must be
removed before use. Serious damage
can occur to the product and to
property if this is not adhered to. See
relevant section in the user manual.
Under no circumstances should you
attempt to repair the machine yourself.
Repairs carried out by inexperienced
persons may cause injury or serious
malfunctioning. Contact your local
Service Centre. Always insist on
genuine spare parts.
1.2 INSTALLATION
-
-
Page 4
4
www.electrolux.com
After having installed the appliance,
check that it is not standing on the
inlet and drain hose and the worktop
is not pressing the electrical supply
cable.
If the machine is situated on a
carpeted floor, please adjust the feet
in order to allow air to circulate freely.
Always be sure, that there is no water
leakage from hoses and their
connections after the installation.
Any plumbing work required to install
this appliance should be carried out by
a qualified plumber.
This washing machine is not intended
for use by young children or infirm
persons without supervision.
Young children should be supervised
to ensure that they do not play with
the appliance.
The packaging components (e.g.
plastic film, polystyrene) can be
dangerous to children - danger of
suffocation! Keep them out of
children’s reach.
Make sure that children or pets do not
climb into the drum.
Keep all detergents in a safe place out
of children’s reach.
Any electrical work required to install
this appliance should be carried out by
a qualified electrician.
This appliance is designed for
domestic use. It must not be used for
purposes other than those for which it
was designed.
Only wash fabrics which are designed
to be machine washed. Follow the
instructions on each garment label.
Do not overload the appliance. See
the relevant section in the user
manual.
Before washing, ensure that all
pockets are empty and buttons and
zips are fastened. Avoid washing
frayed or torn articles and treat stains
such as paint, ink, rust, and grass
before washing. Underwired bras
must NOT be machine washed.
Garments which have been in contact
with volatile petroleum products
should not be machine washed. If
volatile cleaning fluids are used, care
should be taken to ensure that the
fluid is removed from the garment
before placing in the machine.
Never pull the power supply cable to
remove the plug from the socket;
always take hold of the plug itself.
Never use the washing machine if the
power supply cable, the control panel,
the working surface or the base are
damaged so that the inside of the
washing machine is accessible.
1.3 USE
1.4 CHILD SAFETY
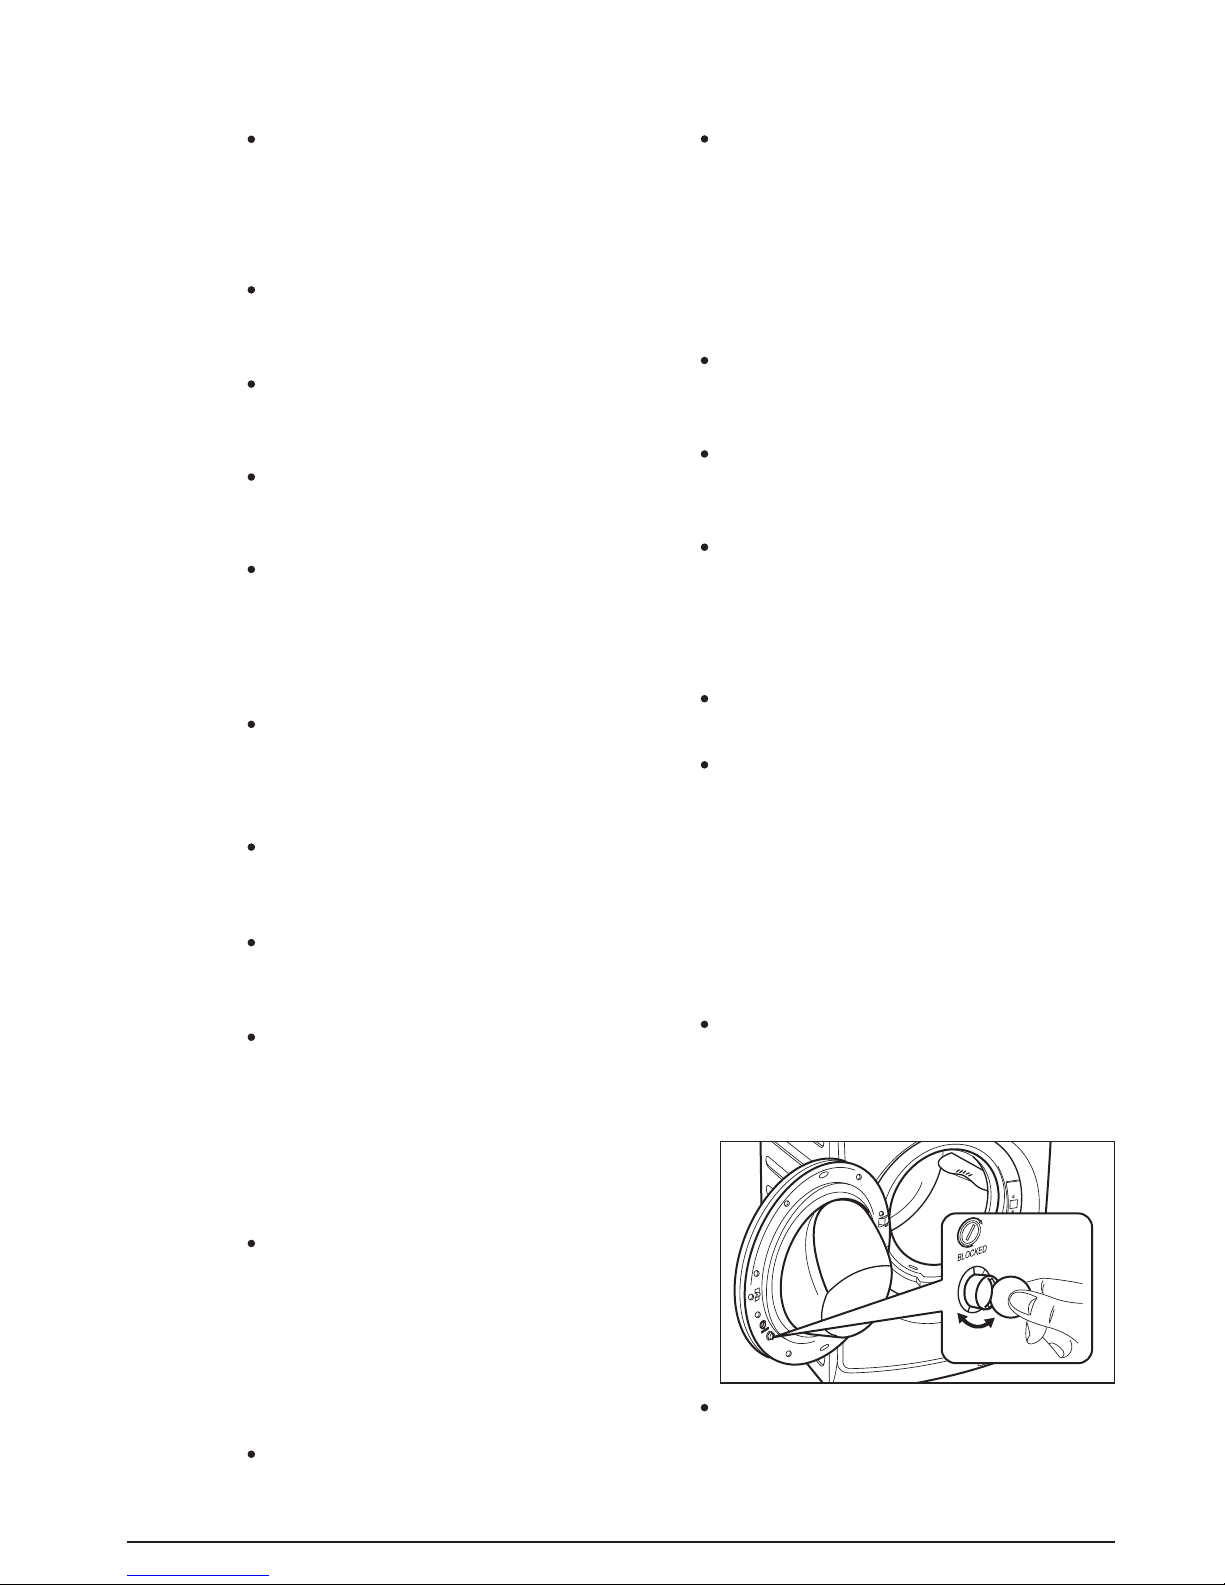
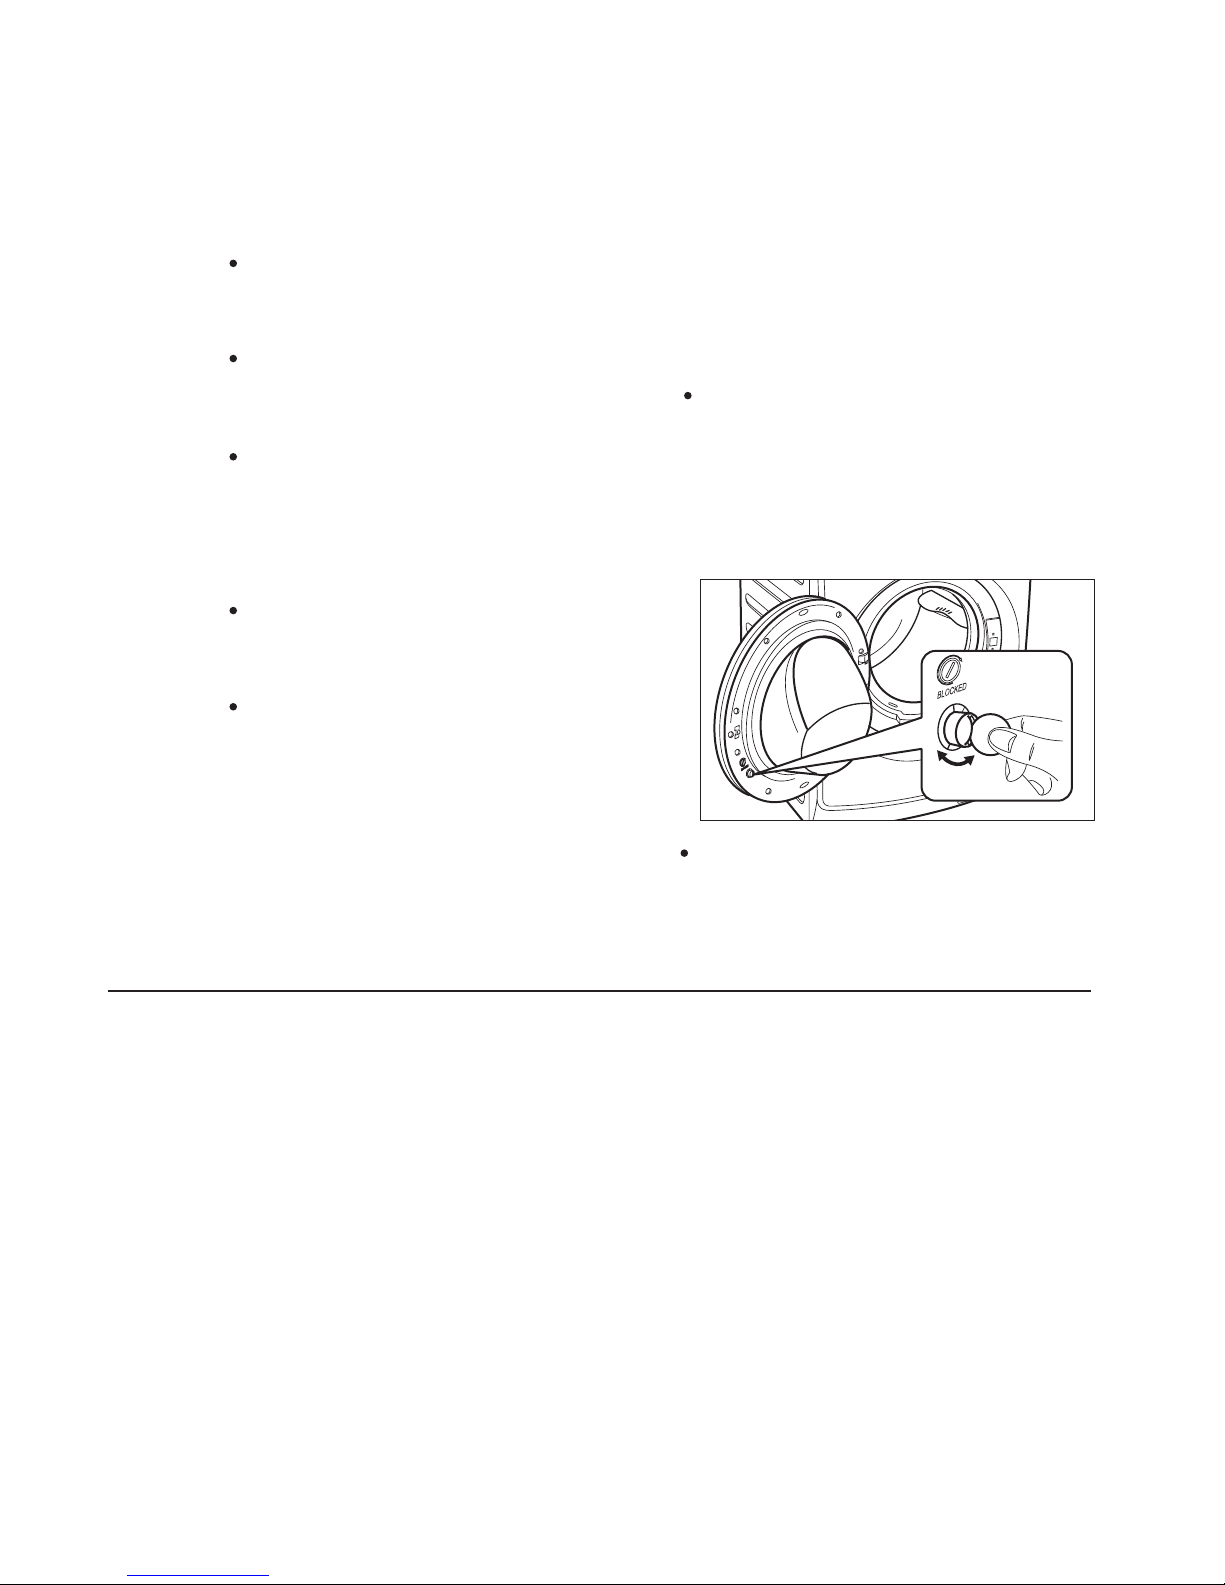
To activate this device, rotate the
button (WITHOUT pressing it) inside
the door clockwise until the groove is
horizontal. If necessary use a coin.
When you activate this device, you
cannot close the door. This prevents
children or pets to be locked in the
drum.
To disable this device and restore the
possibility of closing the door, rotate
the button anti-clockwise until the
groove is vertical.
1.5 CHILD SAFETY DEVICE
Page 5
ENGLISH 5
PRODUCT DESCRIPTION2.
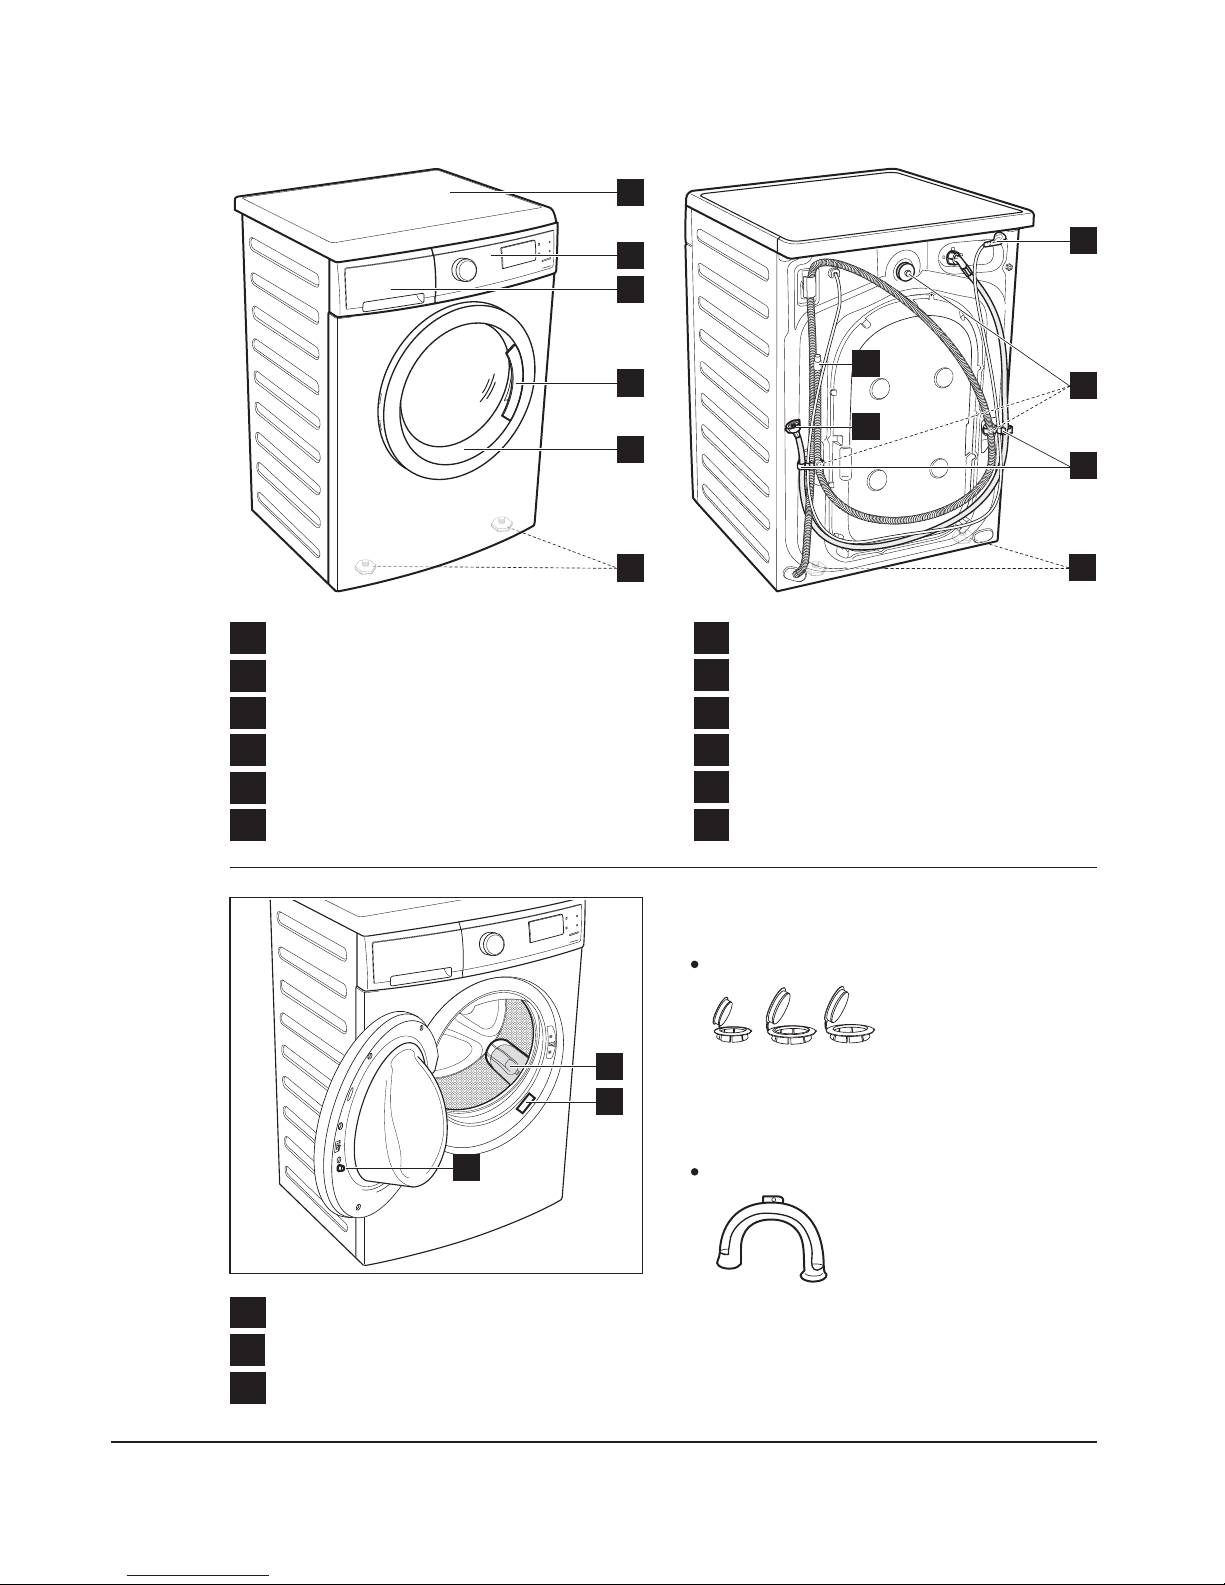
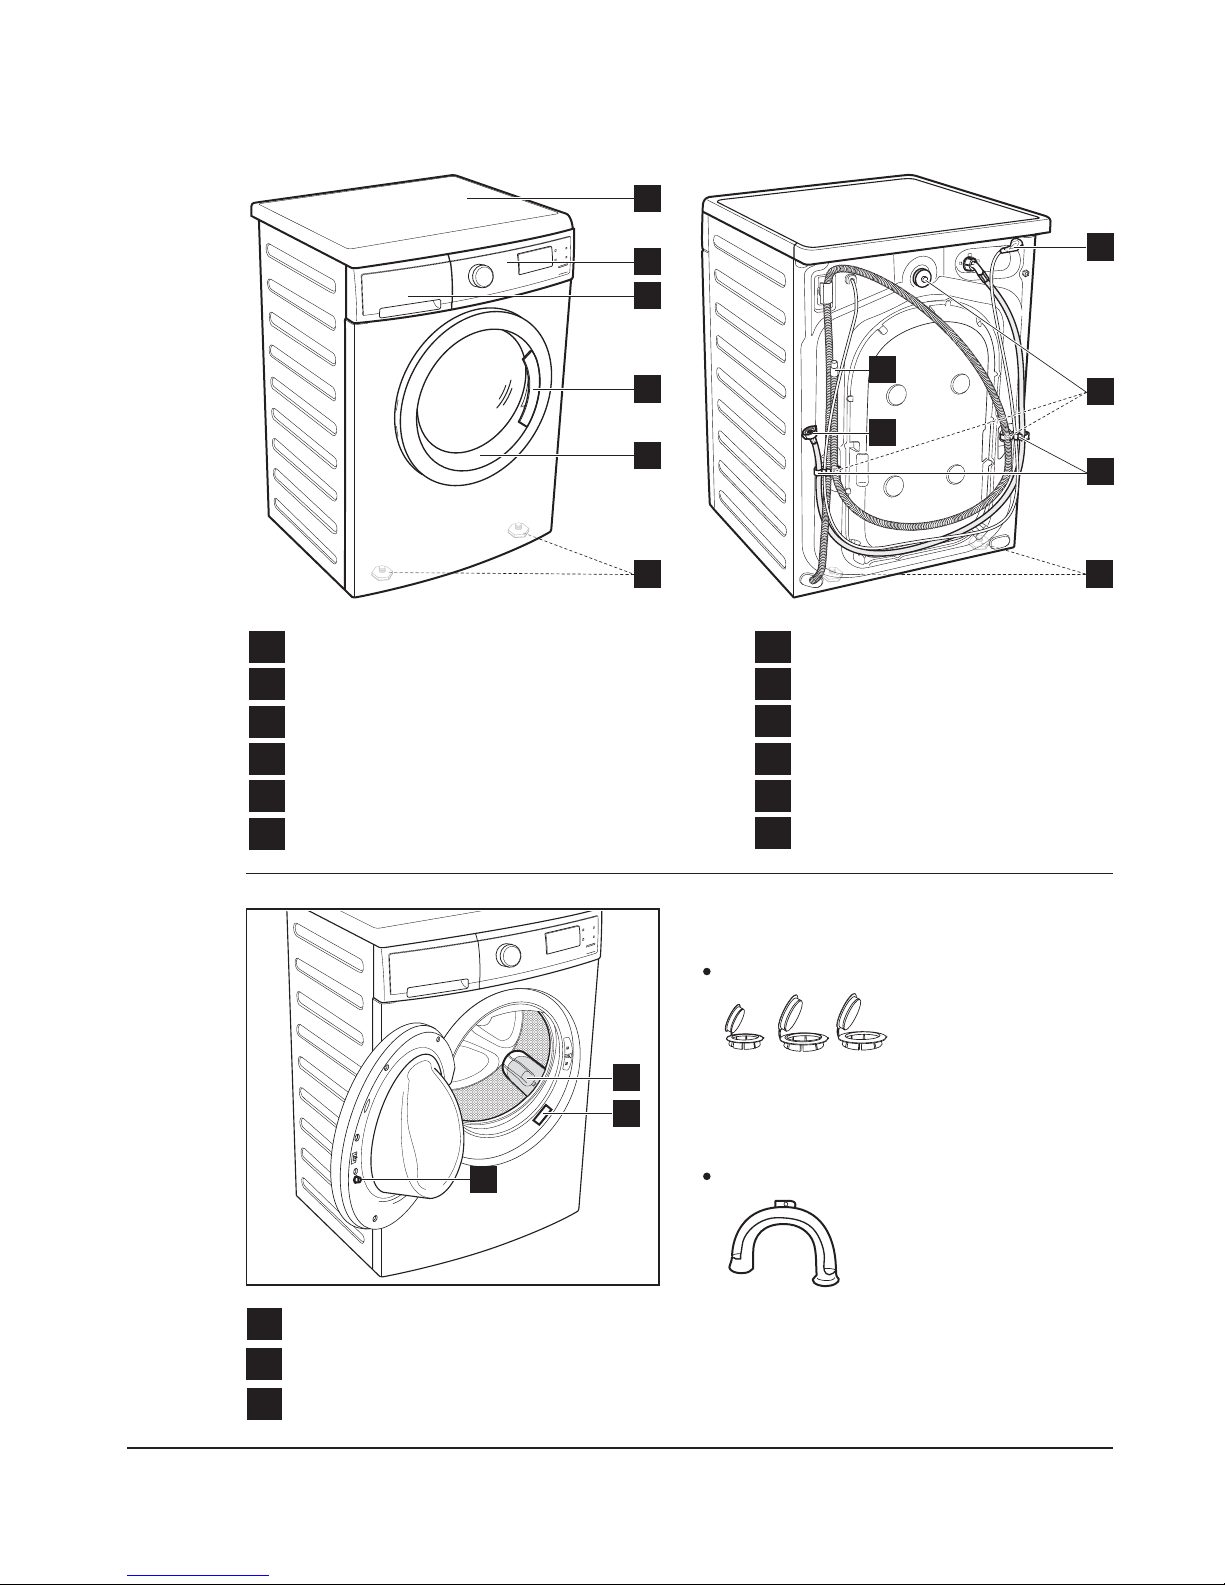
1
Worktop
2
Detergent/Softener Dispenser
3
Control Panel
4
Door Handle
5
Door
13
Door Blocking button
14
Rating Plate
15
Drain Filter
7
6
Level Adjustment Feet (Front)
8
Mains Cable
9
Water Inlet Hose
10
Water Drain Hose
11
Hose Support
12
Back Feet
Transit Bolts
To connect the drain hose on the edge
of a sink.
Plastic caps
To close the holes on the rear side of
the cabinet after the removal of the
transit bolts.
ACCESSORIES
Plastic hose guide
8
9
1
4
5
6
2
3
12
7
11
10
14
15
13
Page 6
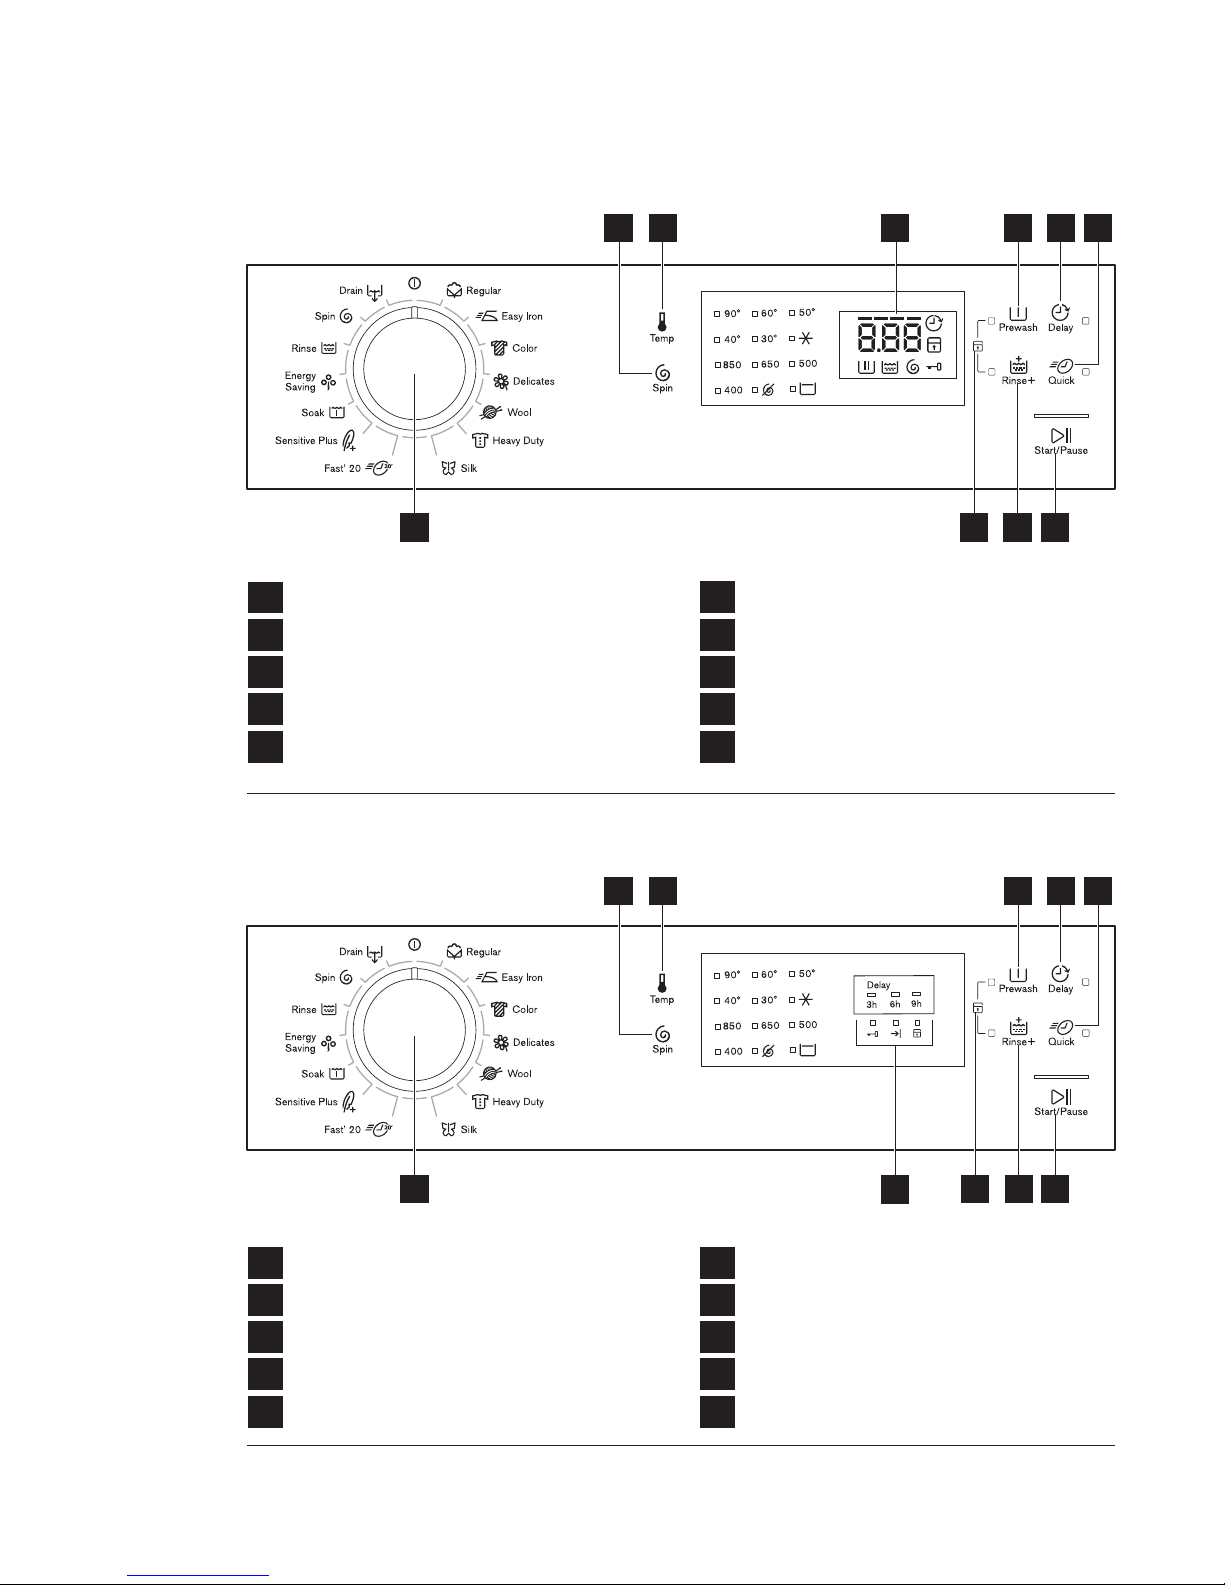
CONTROL PANEL3.
6
www.electrolux.com
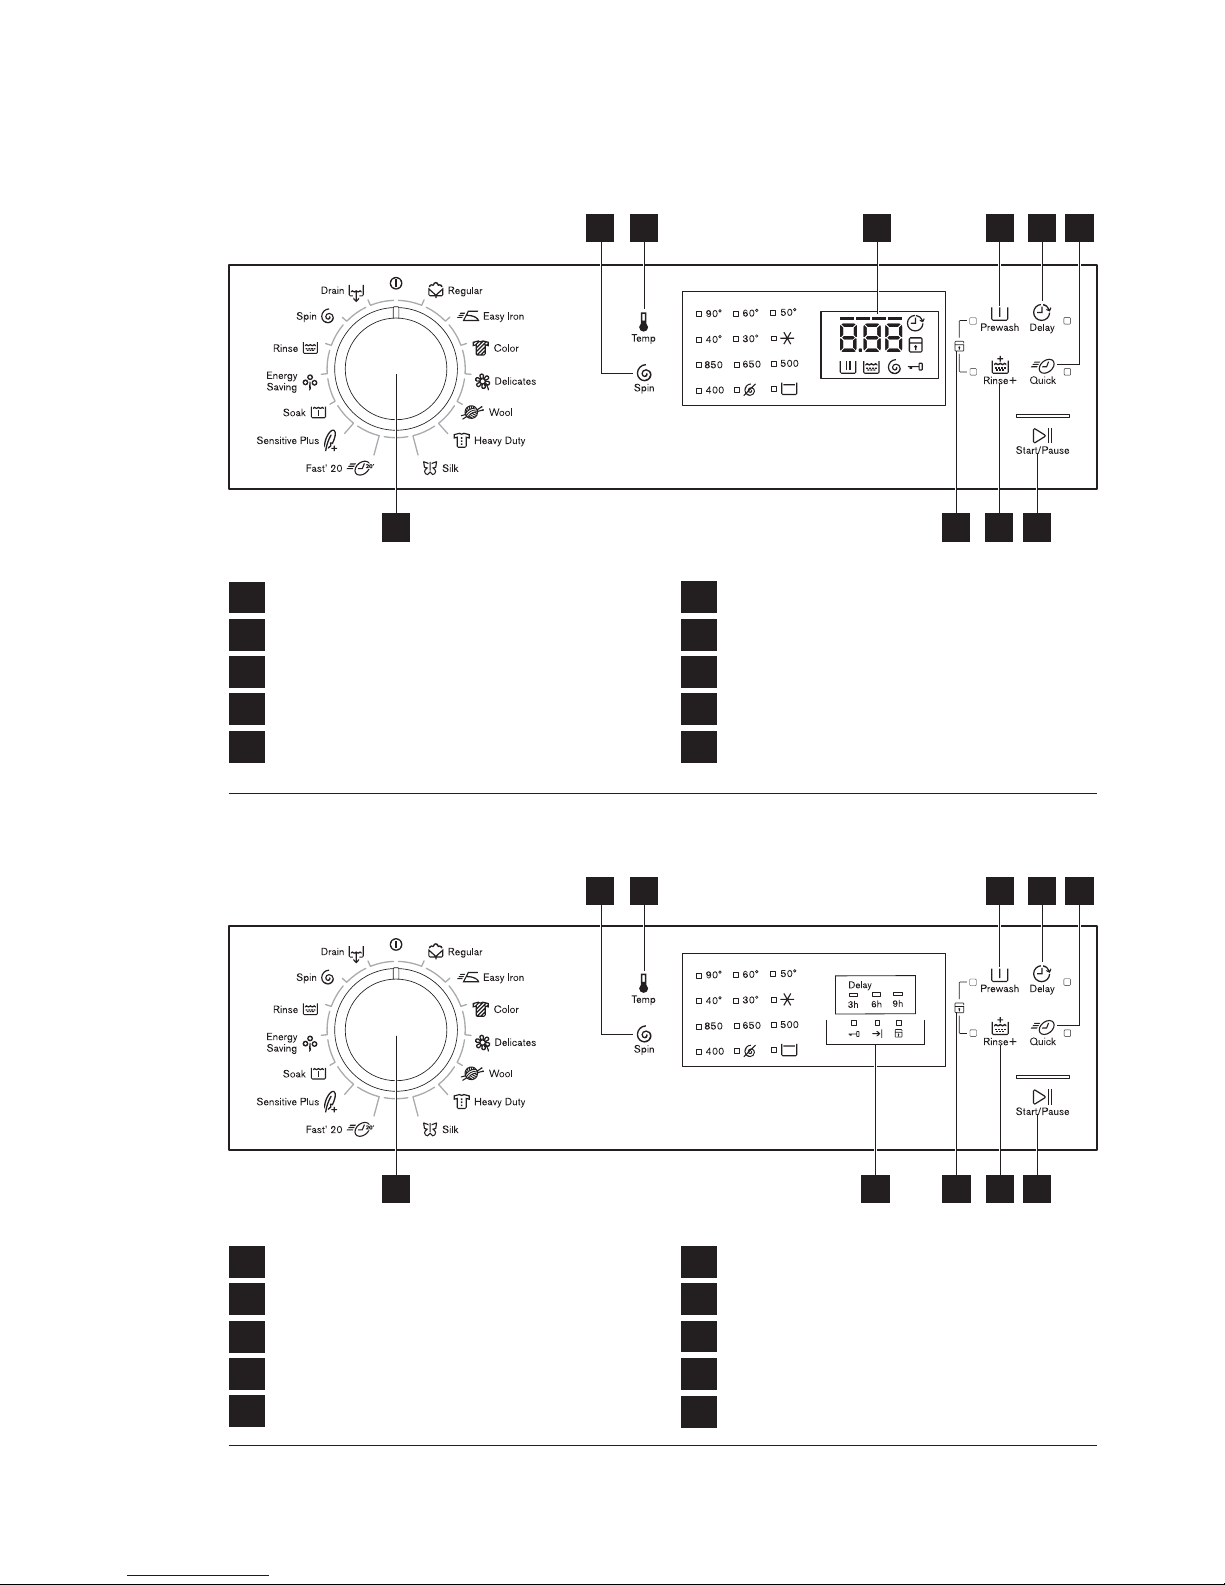
Models: EWP10742, EWP85742
1
2
Program Selector Knob
3
4
Spin Selection Touchpad
5
Temperature Touchpad
6
Display
Start/Pause Touchpad
7
Rinse Plus Touchpad
* model EWP85742
8
Prewash Touchpad
9
Child Lock Option
10
Delay Start Touchpad
Quick Wash Touchpad
Model: EWP85752
1
2
Program Selector Knob
3
Spin Selection Touchpad
Temperature Touchpad
Indicators
6
4
5
Start/Pause Touchpad
7
Rinse Plus Touchpad
10
Child Lock Option
8
Prewash Touchpad
9
Delay Start Touchpad
Quick Wash Touchpad
2 6 7 83
1 9510
1 9510
2 64 7 83
4
Page 7
At the end of program the display
will show ‘ ’ (on display models)
or Washing End ‘ ’ pilot lights
come on (on none-display models)
and the ‘ ’ (Door Lock) indicator
goes off. The door can be opened.
ENGLISH 7
3.1 Program Selector Knob
Turn this knob to set a program.
The washing machine will propose
a temperature and automatically
select the spin value provided for
the program you have chosen.
The selector knob can be turned
either clockwise or anticlockwise.
Position “ ” to reset program/
switching OFF the machine.
At the end of the program the
selector dial must be turned to
position “ ”, to switch the
machine off.
3.2 Spin Selection Touchpad
Press this touchpad repeatedly to
increase or decrease the spin
speed, if you want your laundry to
be spun at a speed different from
the one proposed by the washing
machine.
No spin option eliminates all the
spin phases and increase the
number of rinse.
No Spin
By selecting this option the water of
the last rinse is not emptied out and
the drum turns regularly to prevent
the laundry creases.
Rinse Hold
3.3 Temperature Touchpad
Press this touchpad repeatedly to
increase or decrease the wash
temperature if you want your laundry
to be washed at a temperature
different from the one proposed by
the washing machine (symbol “ ”
corresponds to cold wash).
The door still locked to indicate that
the water must be emptied out.
To empty out the water:
Select “Spin” or “Drain” program.
Reduce the spin speed if needed.
Press the touchpad Start/Pause.
The appliance will drain the water
and then spin.
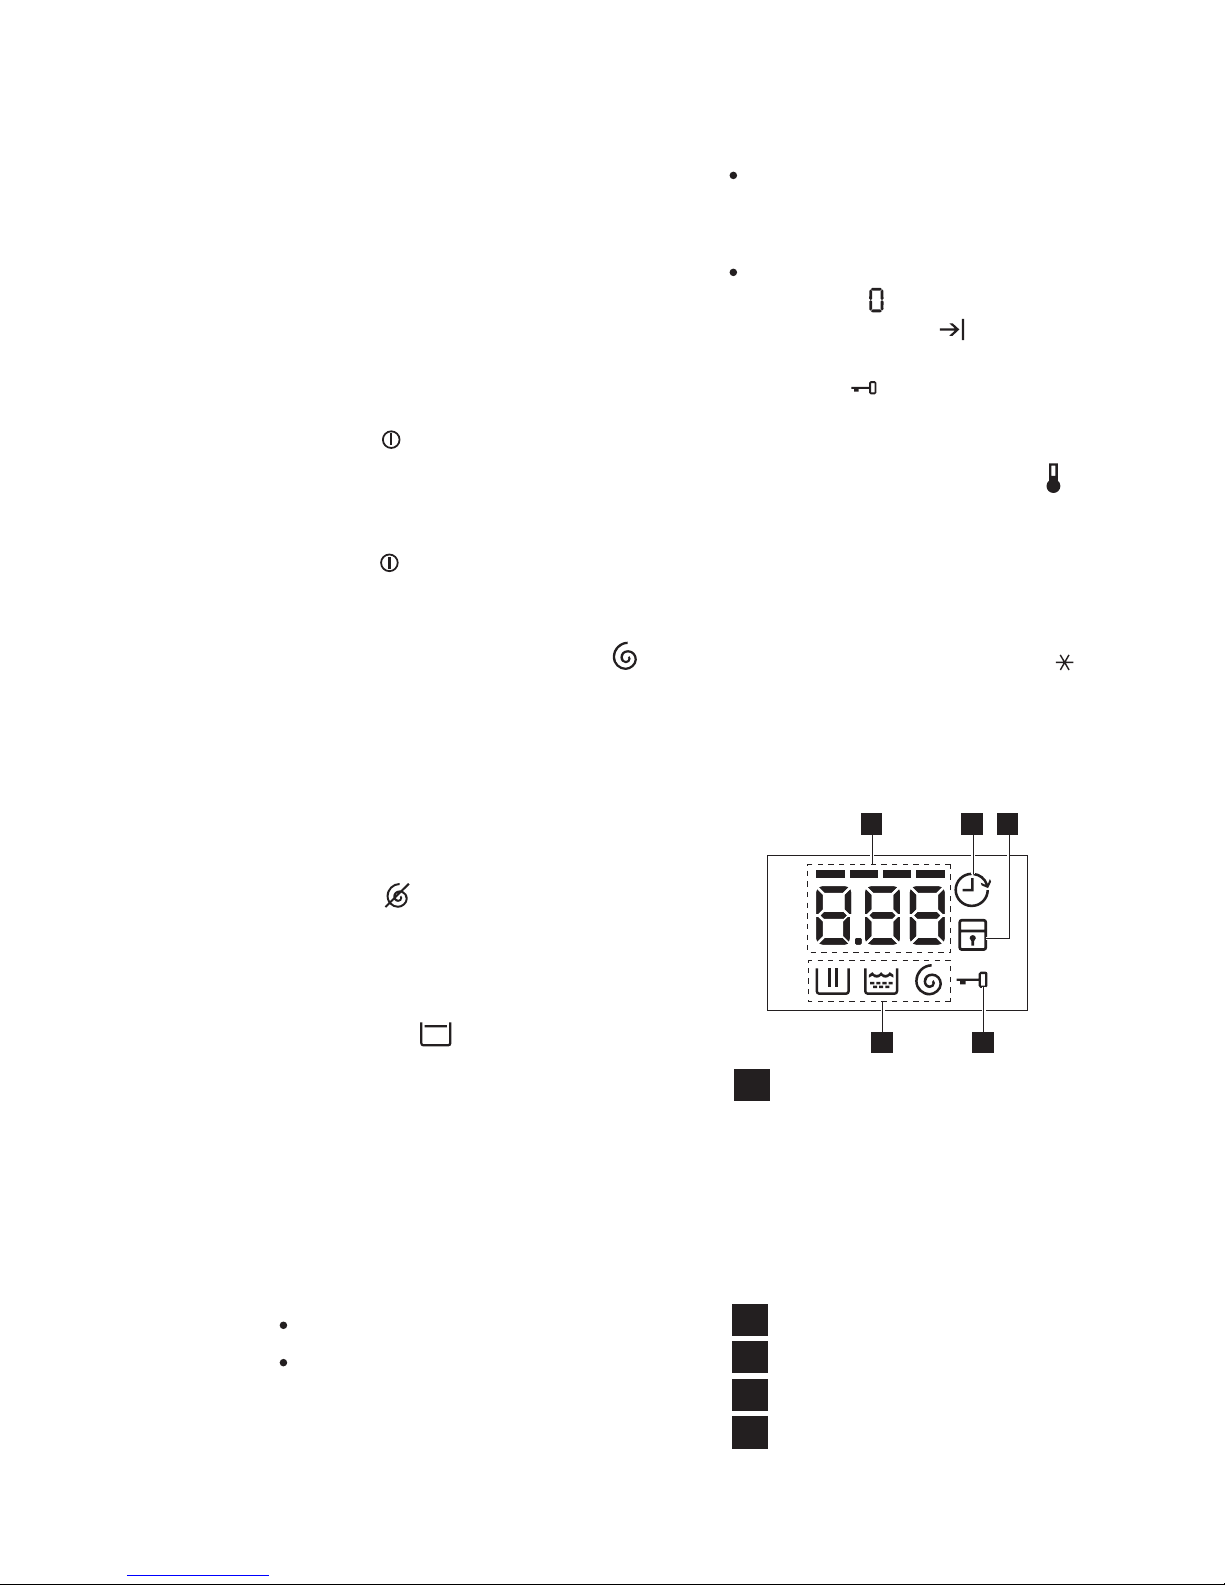
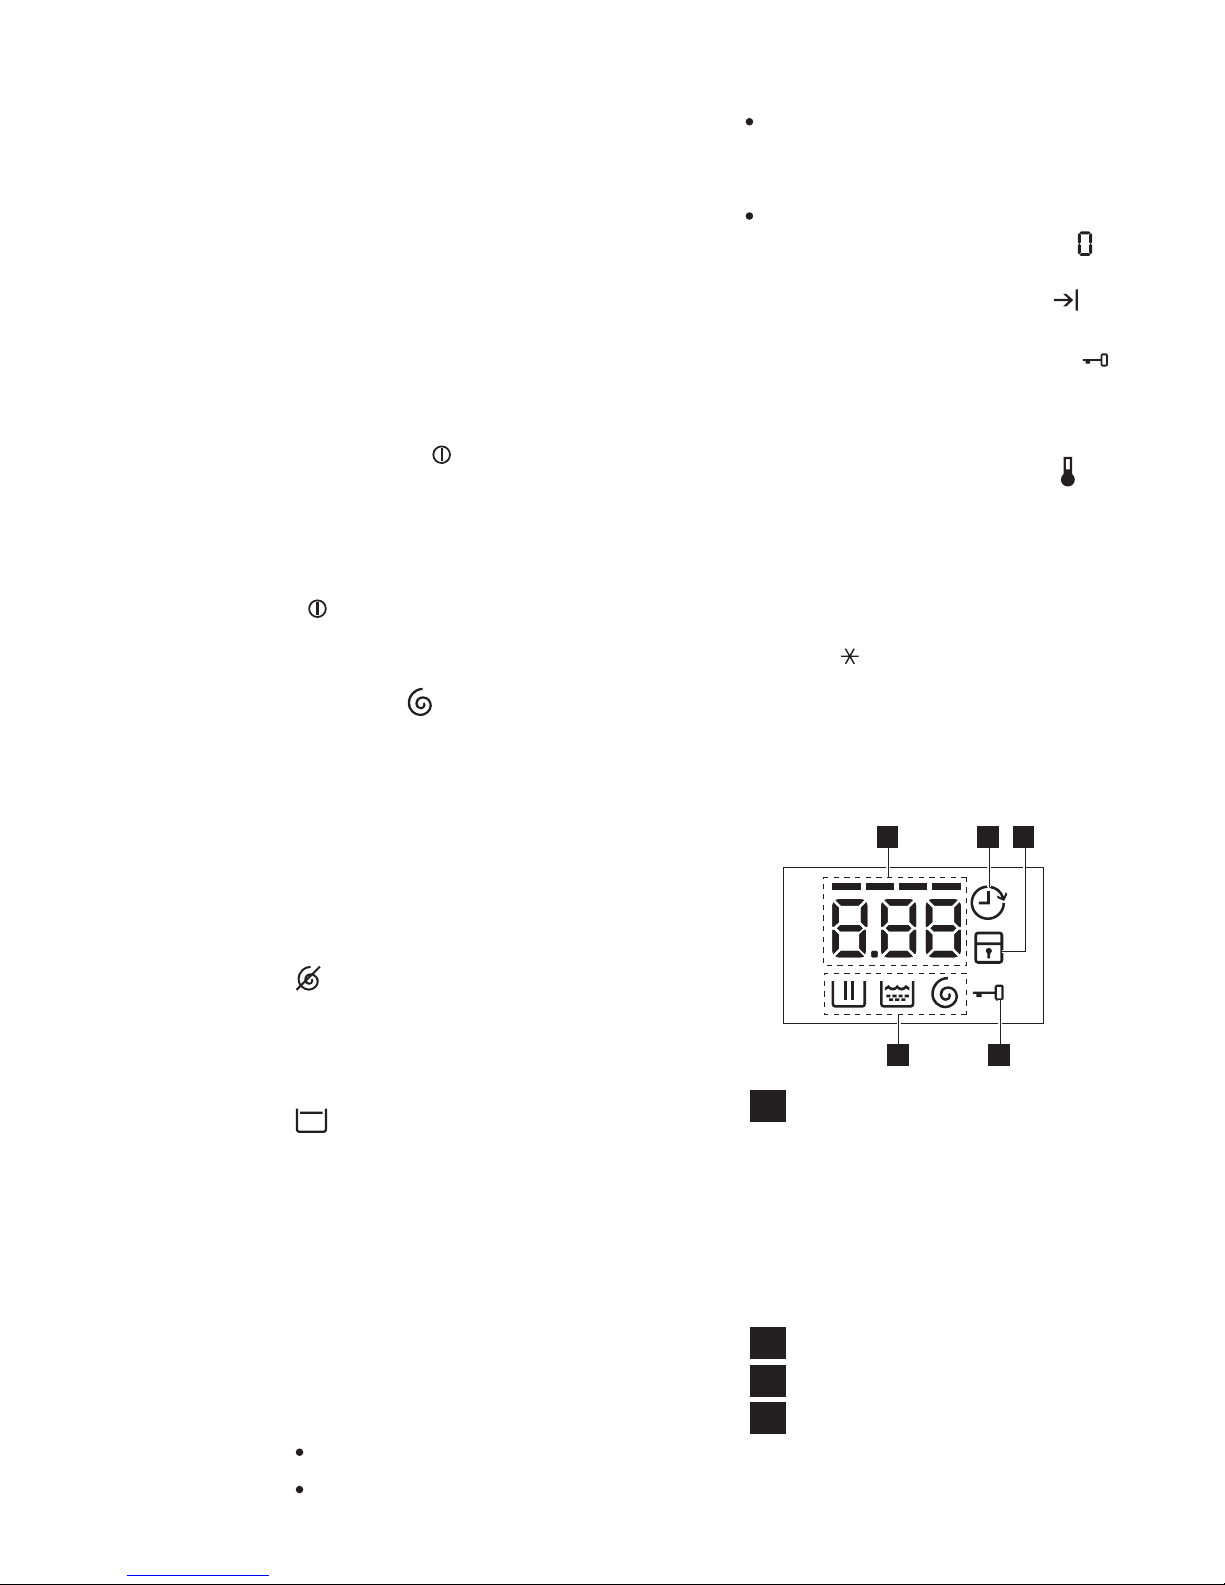
A
Digital Number;
will tell you:
B
-
Washing Phase icon
C
D
Delay Start icon
E
Child Lock icon
Door Lock icon
3.4 Display
(Models : EWP10742, EWP85742)
Washing cycle time.
-
It is on, you cannot open the
door.
-
It is off, you can open the door.
-
The alarm codes. Refer to the
chapter “Troubleshooting” for
their description.
-
Delay start time.
C DA
B E
Page 8
3.7 Prewash Touchpad
8
www.electrolux.com
Select this option if you wish your
laundry to be pre-washed before
the main wash. Use this option for
heavy soil. The indicator of this
option comes on.
When you set this function, put
some of detergent into the “ ”
compartment.
This function increases the program
duration.
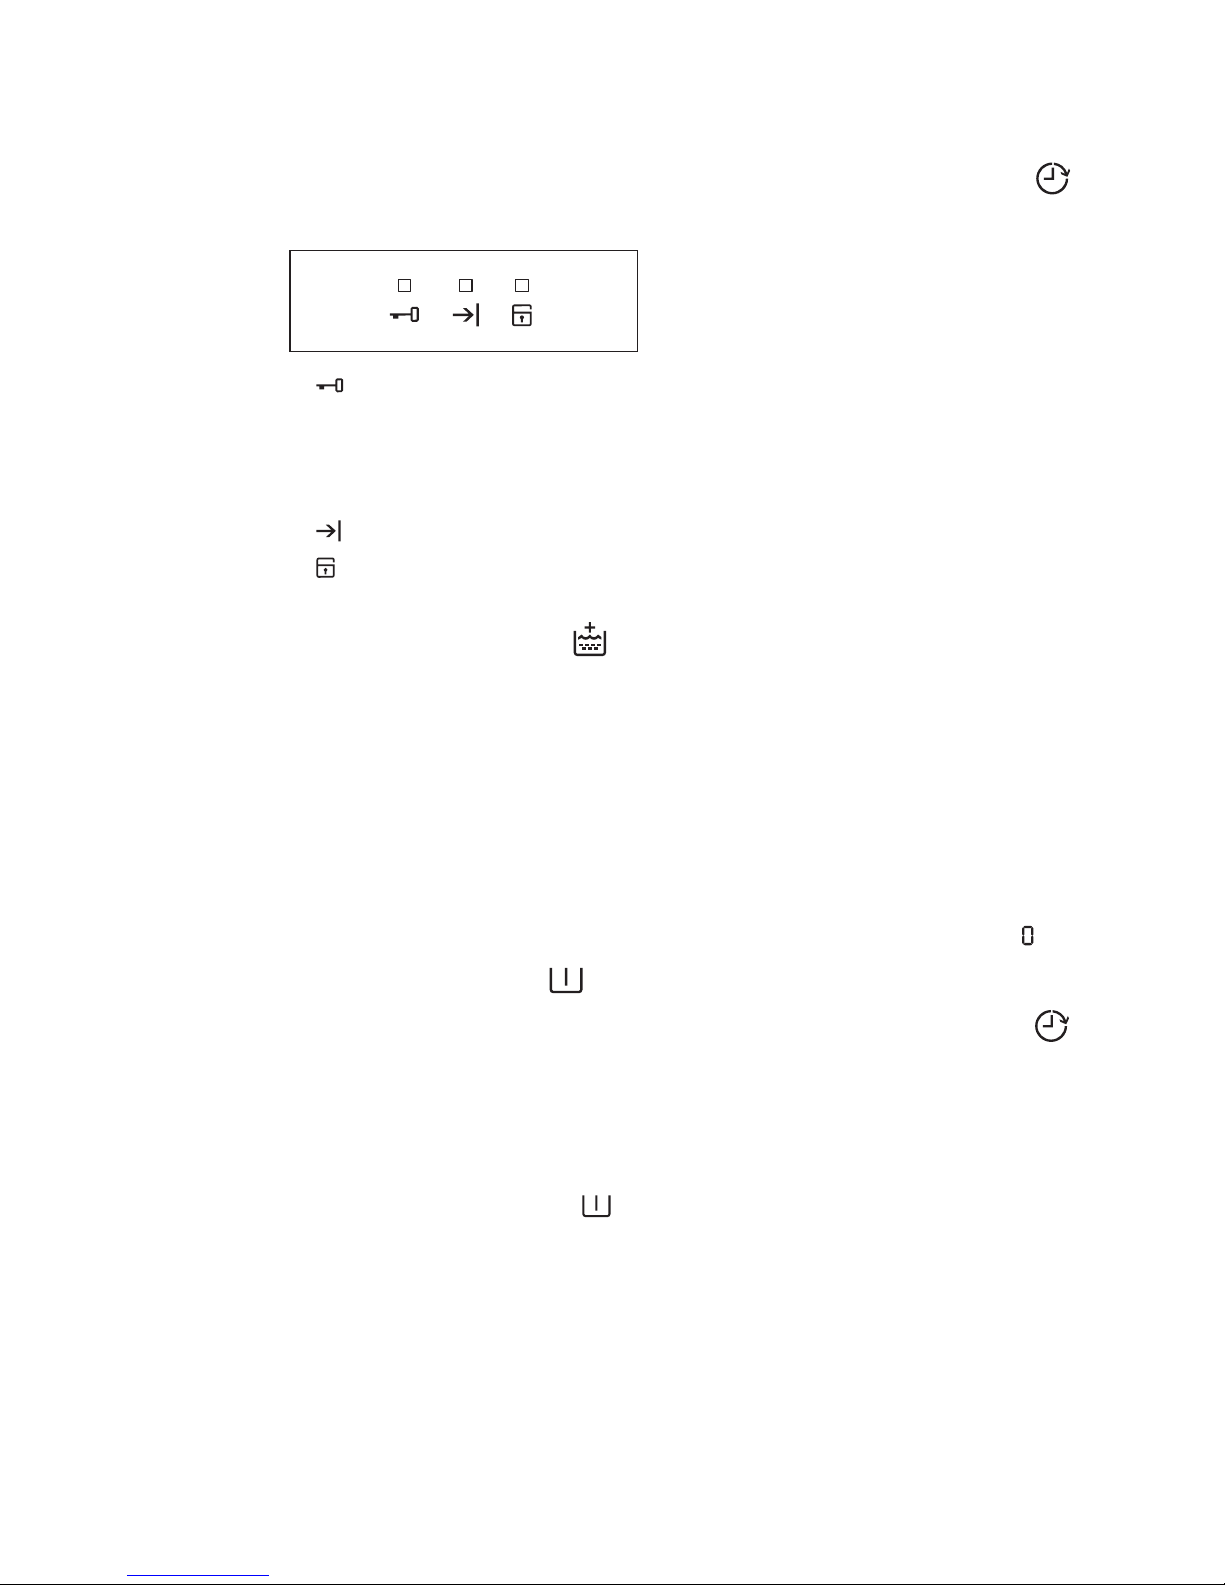
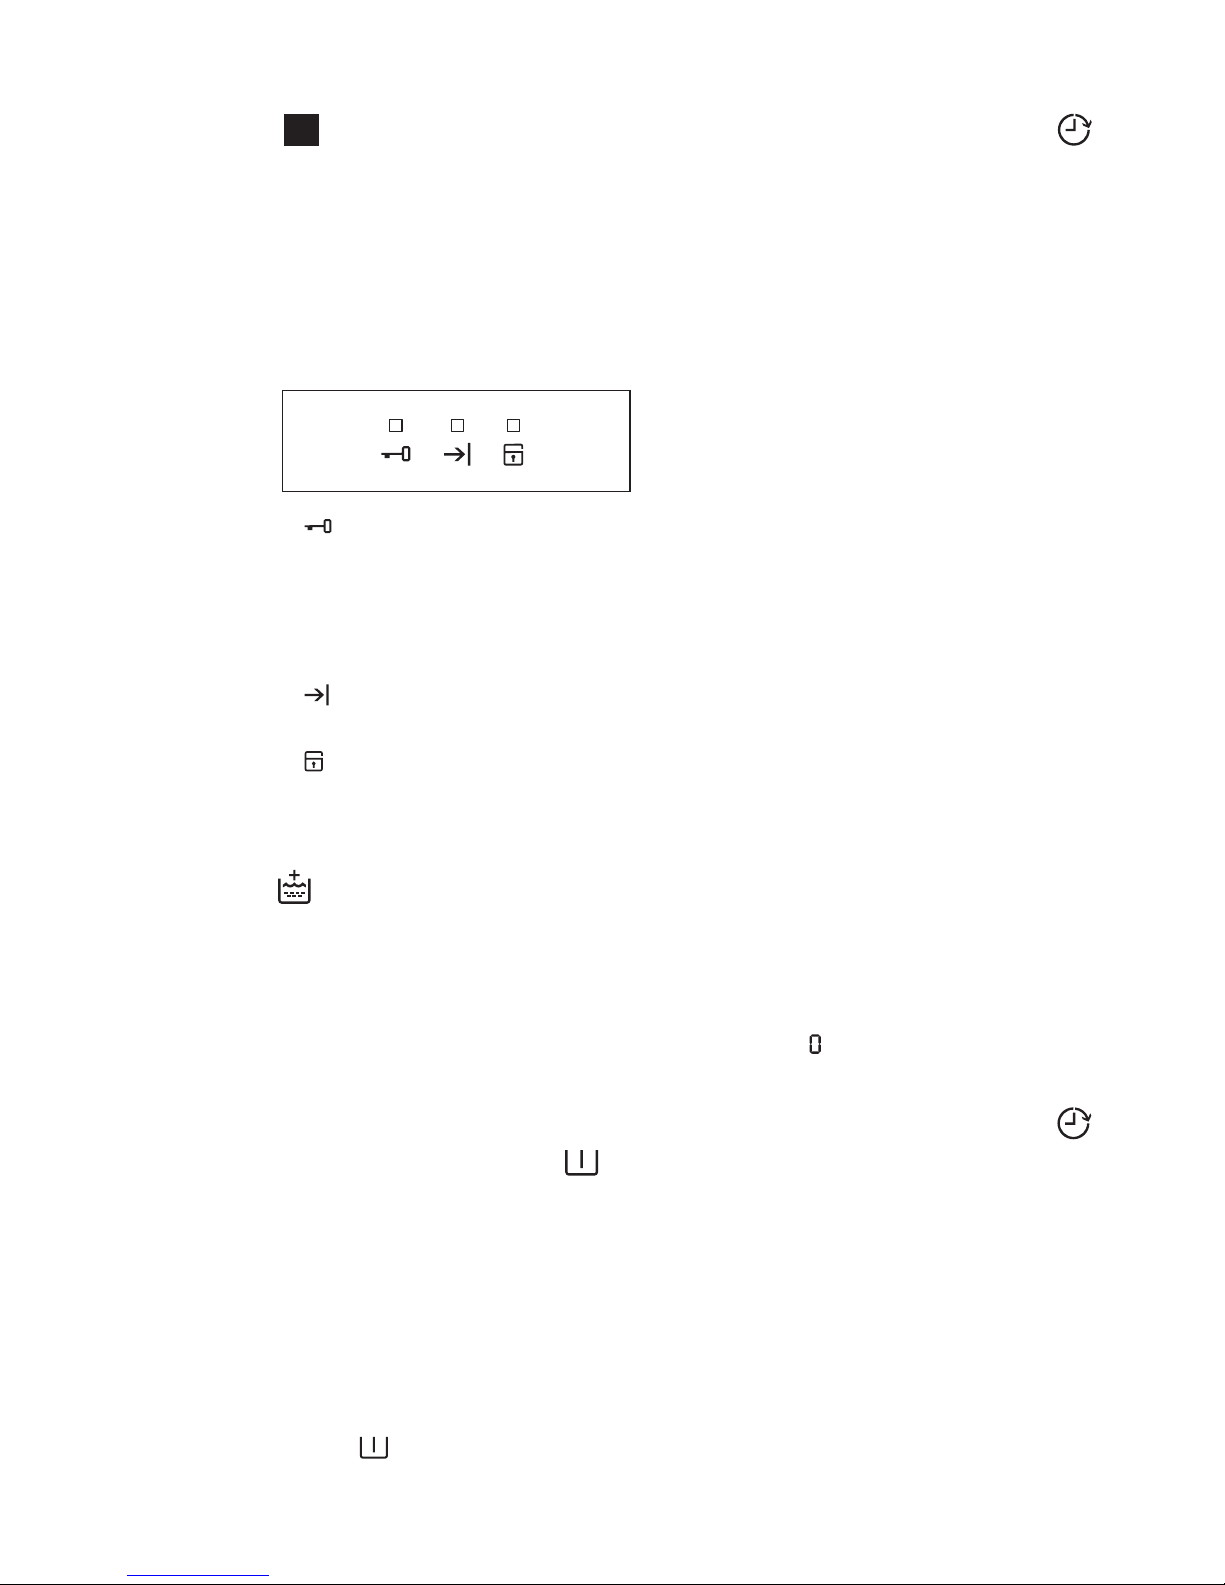
3.5 Indicators
(For Model EWP85752)
-
Door lock indicator.
-
Washing end indicator.
-
Child lock indicator.
LED on, you cannot open the
door.
LED off, you can open the door.
3.6 Rinse Plus Touchpad
This option is recommended for
people who are allergic to
detergents, and in areas where the
water is very soft.
Press it to add rinsing phases to a
program.
The indicator of this option comes
on.
3.8 Delay Start Touchpad
This option makes it possible to
delay the start of the washing
program by 30 min, 60 min or 90
min and then by every hour from 2
to 20 hours.
The delay you have selected is
indicated on the display. The end
time will increase in order to show
you the selected delay.
You must select this option after
you have set the program and
before you press the Start/Pause
touchpad.
If you wish to add laundry in the
machine during the delay time
press Start/Pause touchpad to put
the machine in pause mode. Add
laundry, close the door and press
Start/Pause touchpad again.
You can cancel the delay time at
any moment, by pressing ‘Delay
Start’ touchpad repeatedly till the
display shows delay time ‘ ’, then
press the Start/Pause touchpad.
(For models : EWP10742, EWP85742)
3.9 Delay Start Touchpad
This option makes it possible to
delay the start of the washing
program by 3, 6 and 9 hours.
Press this touchpad repeatedly to
select delay time. The indicator of
this option comes on.
You must select this option after
you have set the program and
before you press the Start/Pause
touchpad.
(For Model EWP85752)
Page 9

ENGLISH 9
3.10 Quick Touchpad
3.11 Start/pause Touchpad
This option can be used for lightly
soiled in order to obtain a good
washing result in a short time.
The washing time will be reduced
according to type of fabric and the
selected temperature.
If you wish to add laundry in the
machine during the delay time
press Start/Pause touchpad to put
the machine in pause mode. Add
laundry, close the door and press
Start/Pause touchpad again.
You can cancel the delay time at
any moment, by pressing ‘Delay
Start’ touchpad repeatedly till the
LED light disappear, then press the
Start/Pause touchpad.
To start the selected program,
press the ‘Start/Pause’.
To interrupt a program which is
running, press the ‘Start/Pause’ to
pause the machine.
To restart the program from the
point at which it was interrupted,
press the ‘Start/Pause’ again.
If you have chosen a delayed start,
after pressing ‘Start/Pause’ the
machine will begin the countdown.
3.12
Buzzer Sounds
The program is completed.
The appliance has a malfunction.
The buzzer sounds operate when:
If you want to disable the buzzer
sound (except for event of
appliance has a malfunction),
press
“Rinse +” and “Quick” touchpads at
the same time for 6 seconds, and
listen for ‘BEEP, BEEP’.
To return to default configuration
press these 2 touchpads at the
same time for 6 seconds, and listen
for ‘BEEPS’.
3.13 Child Lock Option
Your appliance is provided with
CHILD SAFETY LOCK which
permits you to leave the appliance
unsupervised with the door closed
without having to worry that
children might be injured by or
cause damage to the appliance.
Set this option before pressing the
Start/Pause and after having
selected the required wash program.
This function remains enabled even
after the appliance is switched off.
To activate the function, press
‘Prewash’ and ‘Rinse +’
touchpads at the same time
until indicator of this option
comes on.
Setting Child Lock option:
To deactivate the function,
press ‘Prewash’ and ‘Rinse +’
touchpads at the same time
until indicator of this option
goes off.
Page 10
10
www.electrolux.com
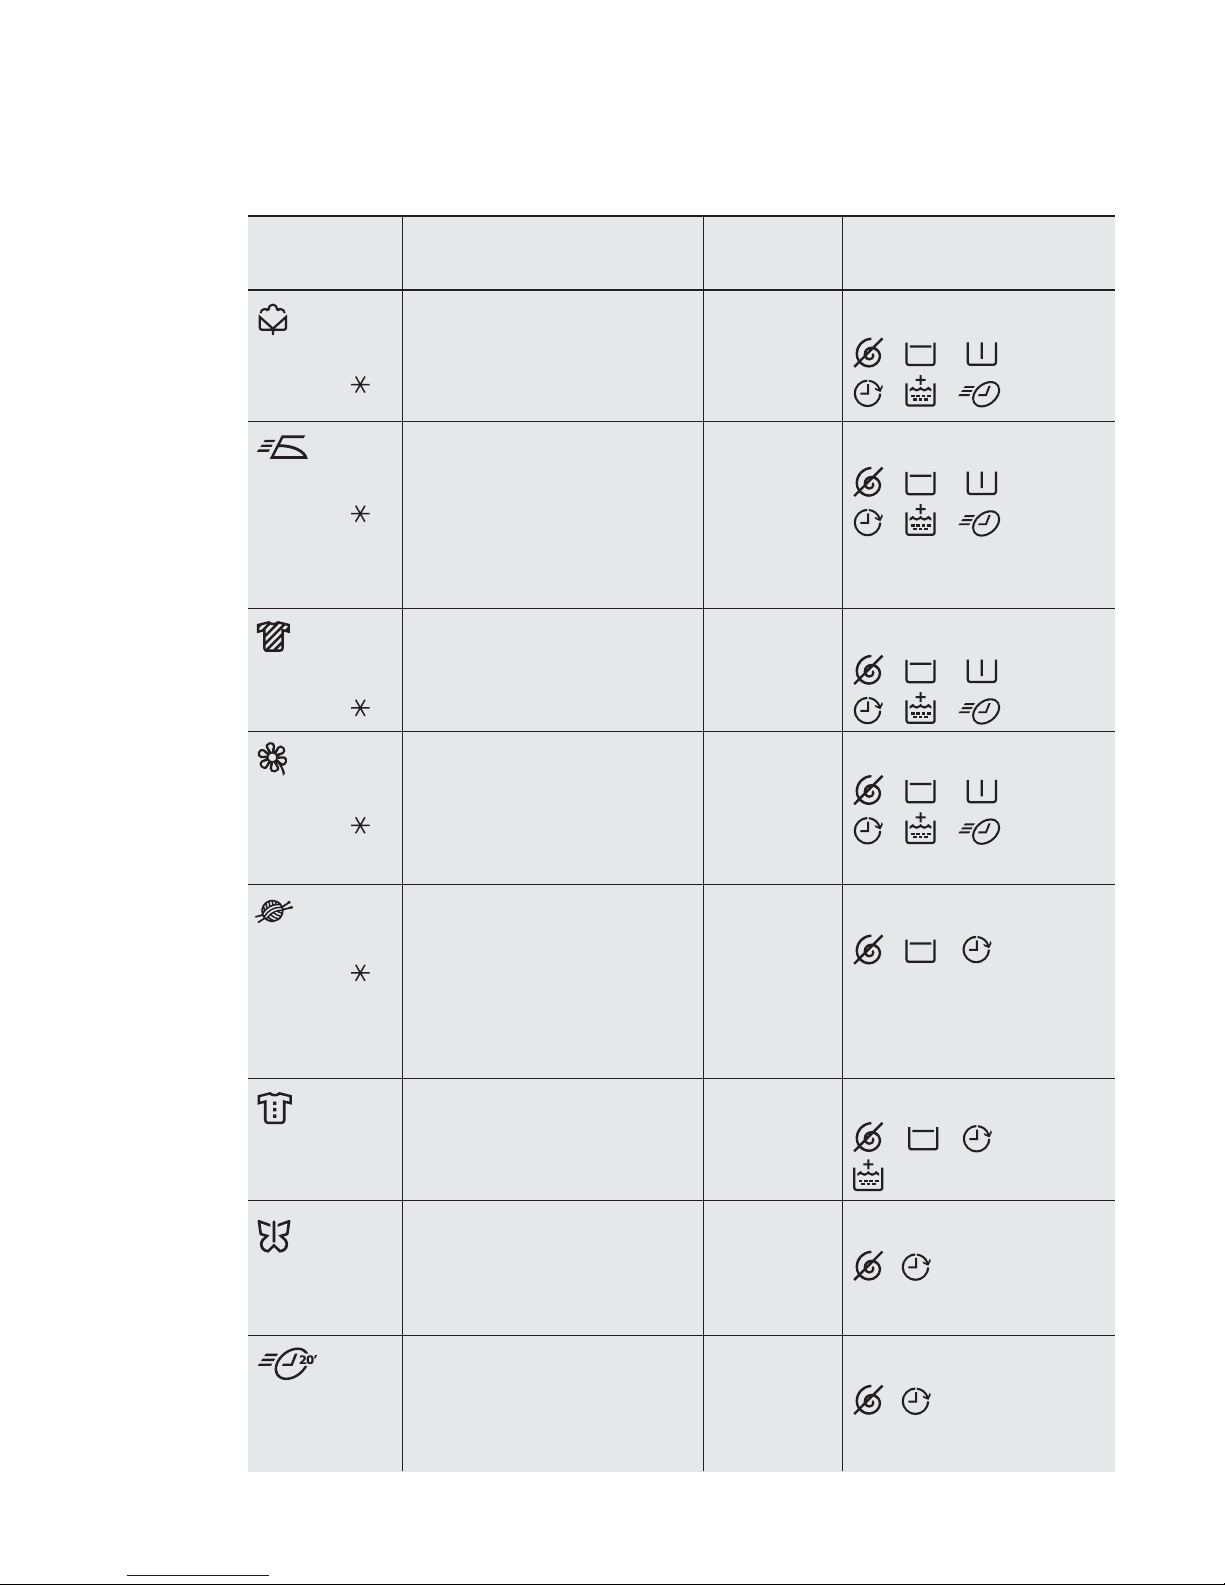
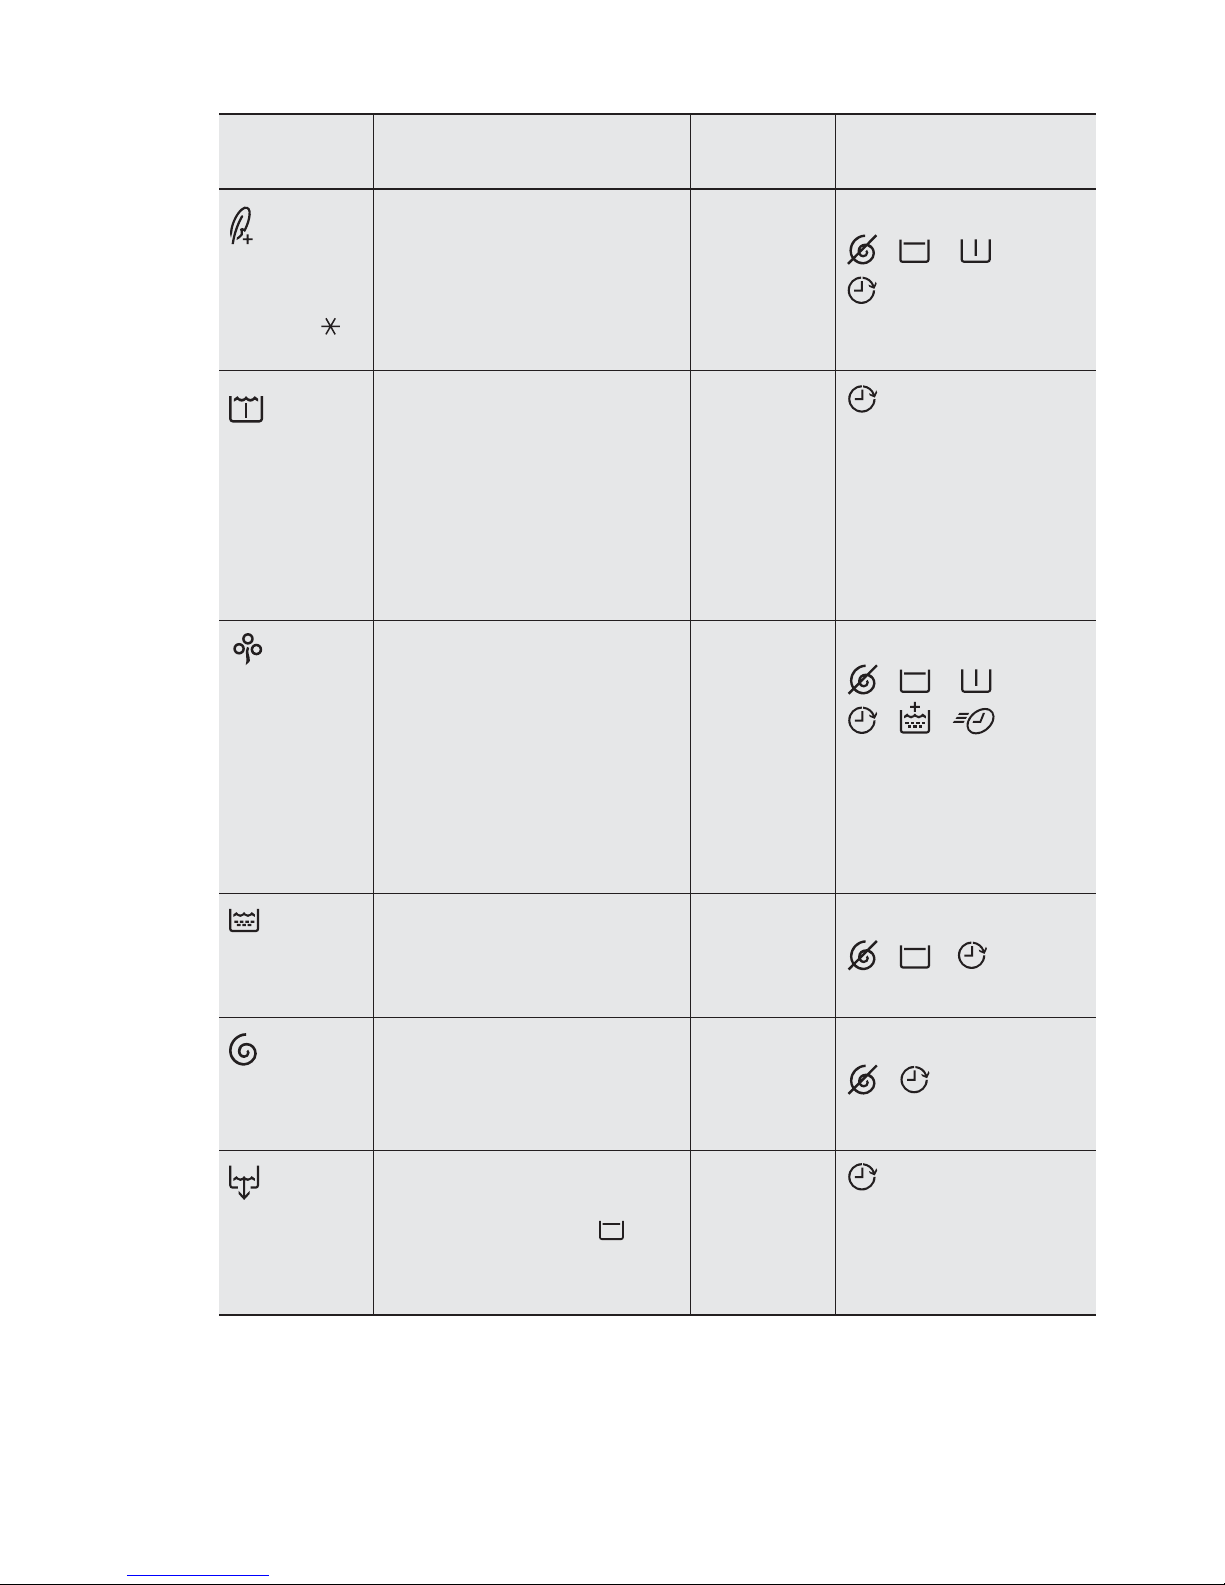
3.14 Programs + Options
Program;
Temperature
Regular;
90 °C to
White and coloured
cotton with heavy level of
soil;
maximum load 7 kg.
Wash
Rinses
Long spin
Spin Reduction /
Easy Iron;
60 °C to
Synthetic or mixed
fabrics, to be ironed
underwear, coloured
garments, non-shirnk
shirts, blouses;
maximum load 3.5 kg.
Wash
Rinses
Short spin
Type of load;
Max. weight of load
Cycle
description
Options can be
combined
Delicates;
40 °C to
Fast’ 20;
30 °C
Delicate fabrics as
acrylics, viscose,
polyester items with
normal soil;
maximum load 3.5 kg
Synthetic and mixed
fabric items. Light soil
and items to freshen up;
maximum load 1.5 kg
/ / /
/ /
Spin Reduction /
/ / /
/ /
Spin Reduction /
/ / /
/ /
Spin Reduction /
/ / /
/ /
Spin Reduction /
/ / /
Spin Reduction /
/
Spin Reduction /
/
Spin Reduction /
/ /
-
-
-
-
-
-
Color;
60 °C to
Colours item of mixed
fabrics.;
maximum load 3.5 kg.
Wash
Rinses
Short spin
-
-
-
Wash
Rinses
Short spin
-
-
-
Wash
Rinses
Short spin
-
-
-
Wash
Rinses
Short spin
-
-
-
Wool;
40 °C to
Specially tested program
for woollen garments
bearing the ‘Pure new
woollen, non-shrink,
machine washable’ label;
maximum load 2 kg.
Heavy Duty;
90 to 40 °C
Clothes that are heavily
soiled;
maximum load 7 kg.
Wash
Rinses
Short spin
-
-
-
Wash
Rinses
Short spin
-
-
-
Silk;
30 °C
Delicate laundry such as
silk curtains in a short
time;
maximum load 3 kg.
Page 11
ENGLISH 11
Program;
Temperature
Type of load;
Max. weight of load
Cycle
description
Options can be
combined
Energy
Saving
60, 40 °C
White and fast coloured,
cotton with normal soil. Set
this program to have a good
washing results and
decrease the energy
consumption. The time of the
washing program is
extended;
maximum load 7 kg.
Spin
Drain
To spin the laundry and to
drain the water in the
drum;
maximum load 7 kg.
For emptying out the last
rinse water in programs
with the ‘Rinse Hold ’
option;
maximum load 7 kg.
Rinse
To rinse and spin the
laundry;
maximum load 7 kg.
For people with sensitive skin
or allergies, white and
coloured cottons designed
for high rinsing efficiency,
especially for solid particles;
maximum load 5 kg.
This program allows you to
soak heavily soiled clothes.
There is a water in the drum
when the program is
completed. To drain the
water refer paragraph
“To empty out the water” ;
maximum load 7 kg.
Sensitive
Plus;
60 °C to
Soak;
30 °C
Wash
Rinses
Short spin
-
-
-
Wash
Rinses
Long spin
-
-
-
- Soak
Spin Reduction /
/ / /
Spin Reduction /
/ / /
/ /
Spin Reduction /
/ /
Spin Reduction /
/
1)
1)
Energy Saving program with 60 °C option selected is recommended for a full
load of normally soiled cottons, and is the water and energy rating label
program.
Drain
Spin phase
-
Drain
-
-
Three
rinses with
softener
Spin phase
-
-
Page 12
12
www.electrolux.com
BEFORE FIRST USE4.
Ensure that the electrical and water
connections comply with the
installation instructions.
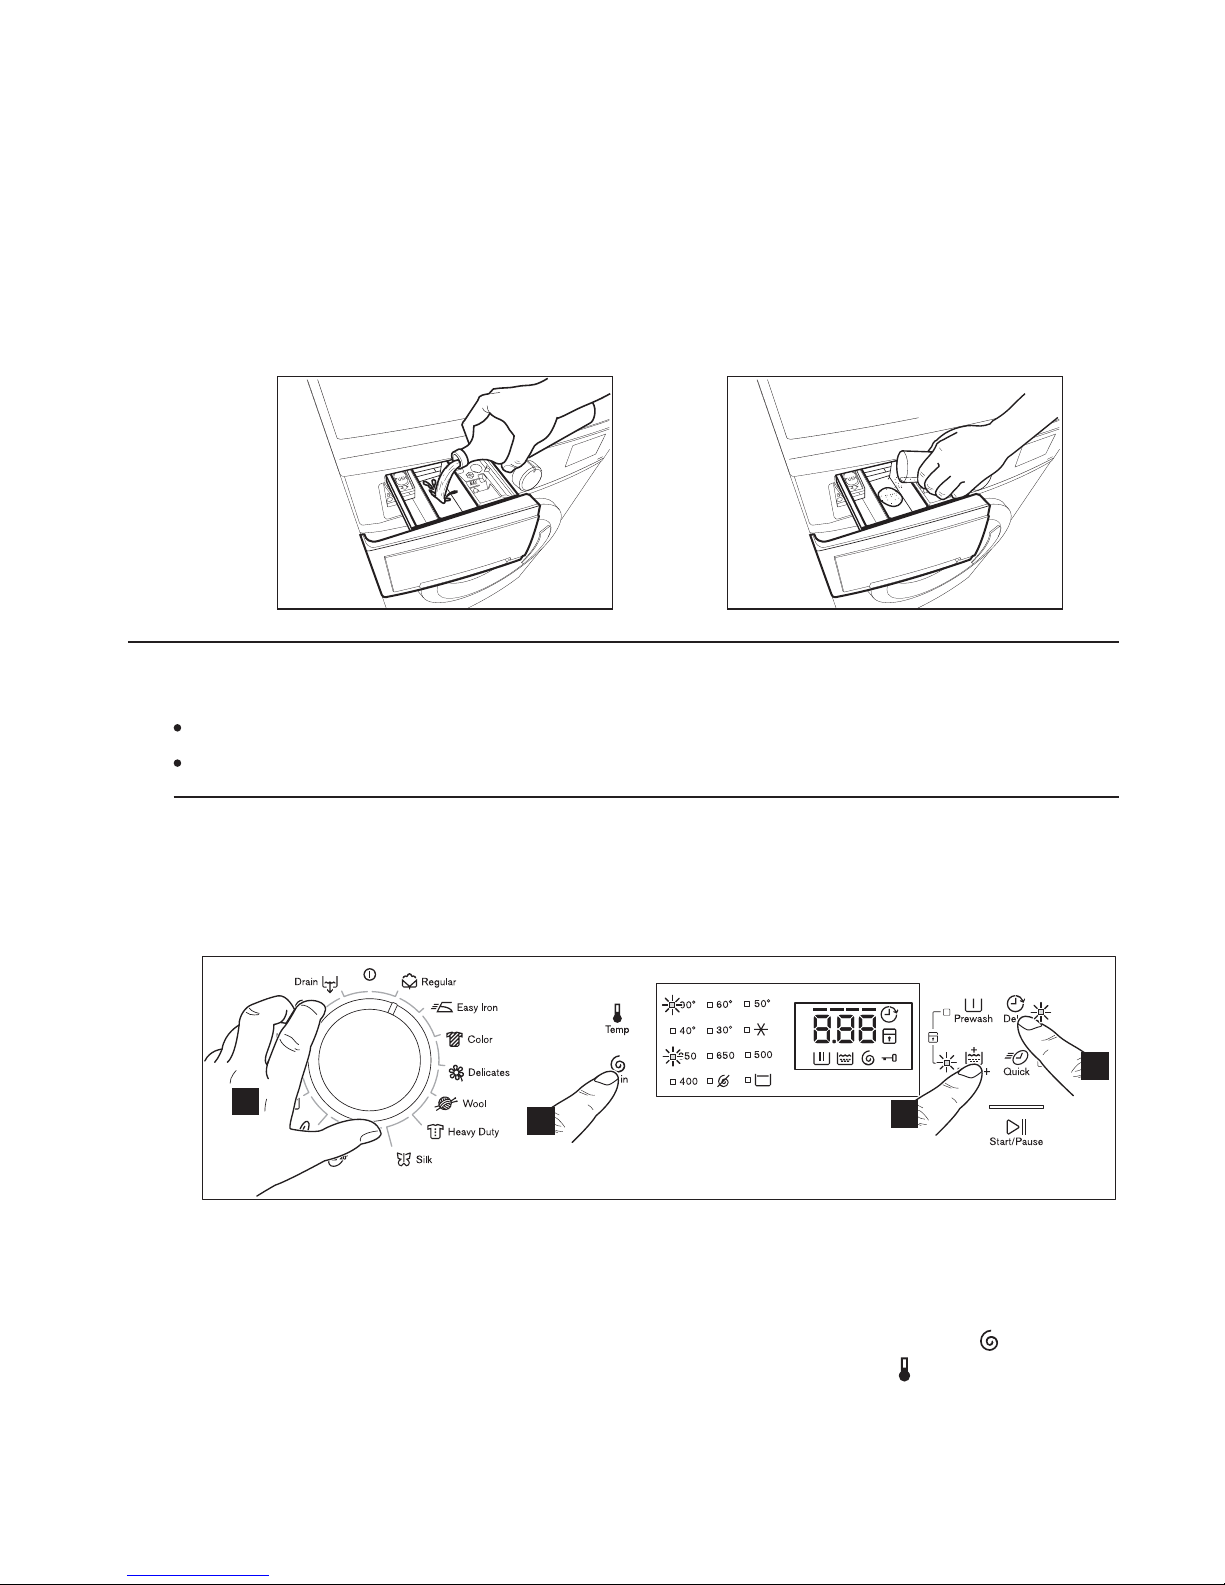
Put 2 litres of water in the
detergent compartment for
washing phase. This activates
the drain system.
1.
2.
3.
Select a Regular cycle at 90 °C,
without any laundry in the machine,
to remove any manufacturing residue
from the drum and tub. Pour 1/2 a
measure of detergent into the
dispenser drawer and start the
machine.
DAILY USE5.
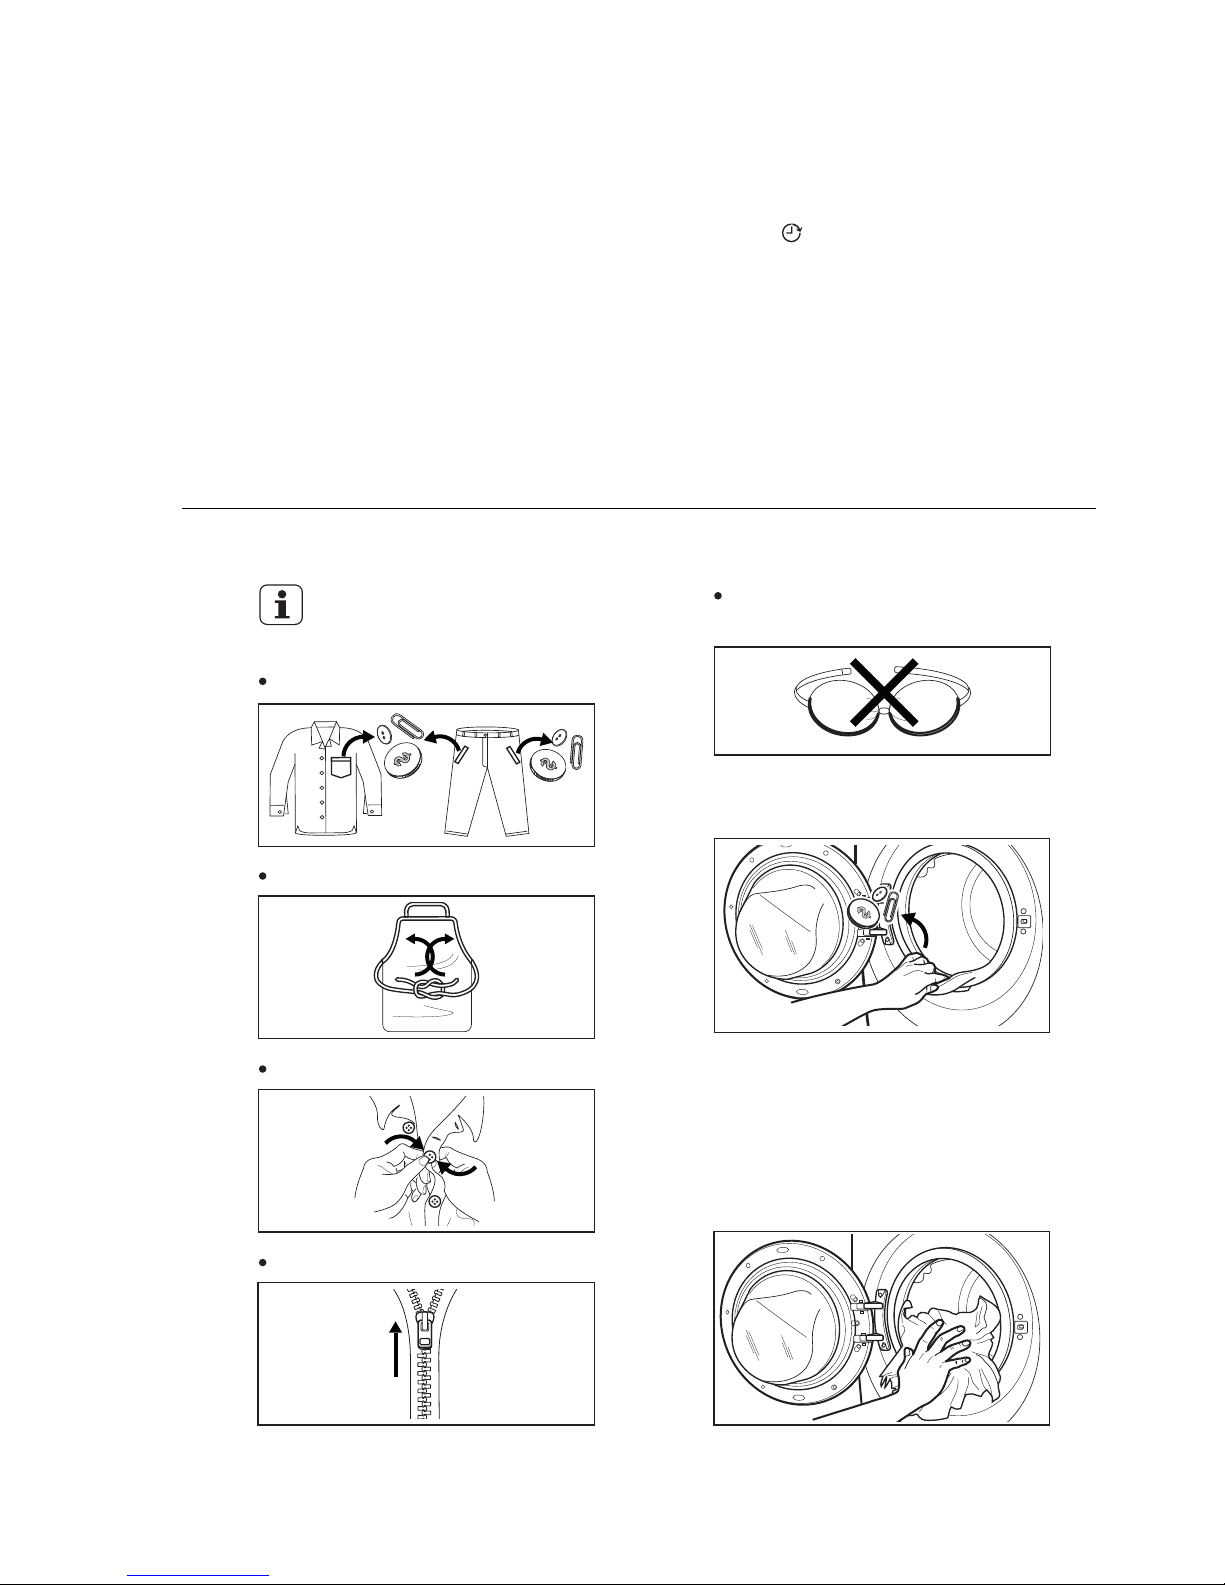
Step 1 - Setting A Program For Washing
5.1 Four Steps Start Up Guide
Connect the mains plug to the mains socket.
Turn the water tap on.
* model EWP85742 (for reference only)
1
2
3
4
1.
Turn the program selector dial to the
required program.
Once you select a wash program,
the program selected will stay at
that position for the whole of the
wash.
-
The selector dial can be turned
either clockwise or anticlockwise.
-
2.
If you want your laundry to be spun
or use temperature different from
the one proposed by the washing
machine, press the Spin ‘ ’ and
the temperature ‘ ’ touchpads
repeatedly to change the spin
speed and temperature.
Page 13
ENGLISH 13
3.
Press the option touchpads, if you
want your laundry to be washed
with special functions.
Different functions can be combined
which is dependent on the program
selected.
When these touchpads are pressed,
the corresponding pilot lights come
on. When they are pressed again,
the pilot lights go out.
4.
If you want
to delay the start of the
washing program
, press the ‘Delay
Start ’ option touchpad repeatedly
to choose your washing machine
delay time.
Step 2 - Loading The Laundry
1.
Before loading the laundry,
please make sure:
Empty pockets.
Tie the cords.
Fasten buttons.
Close zippers.
Place the laundry in the drum,
one item at a time, shaking them
out as much as possible.
3.
Open the door by carefully pulling
the door handle outwards.
Check and remove objects (if
there are any) that could be
trapped in the fold.
2.
Underwired bras must NOT be
machine washed.
Page 14
14
www.electrolux.com
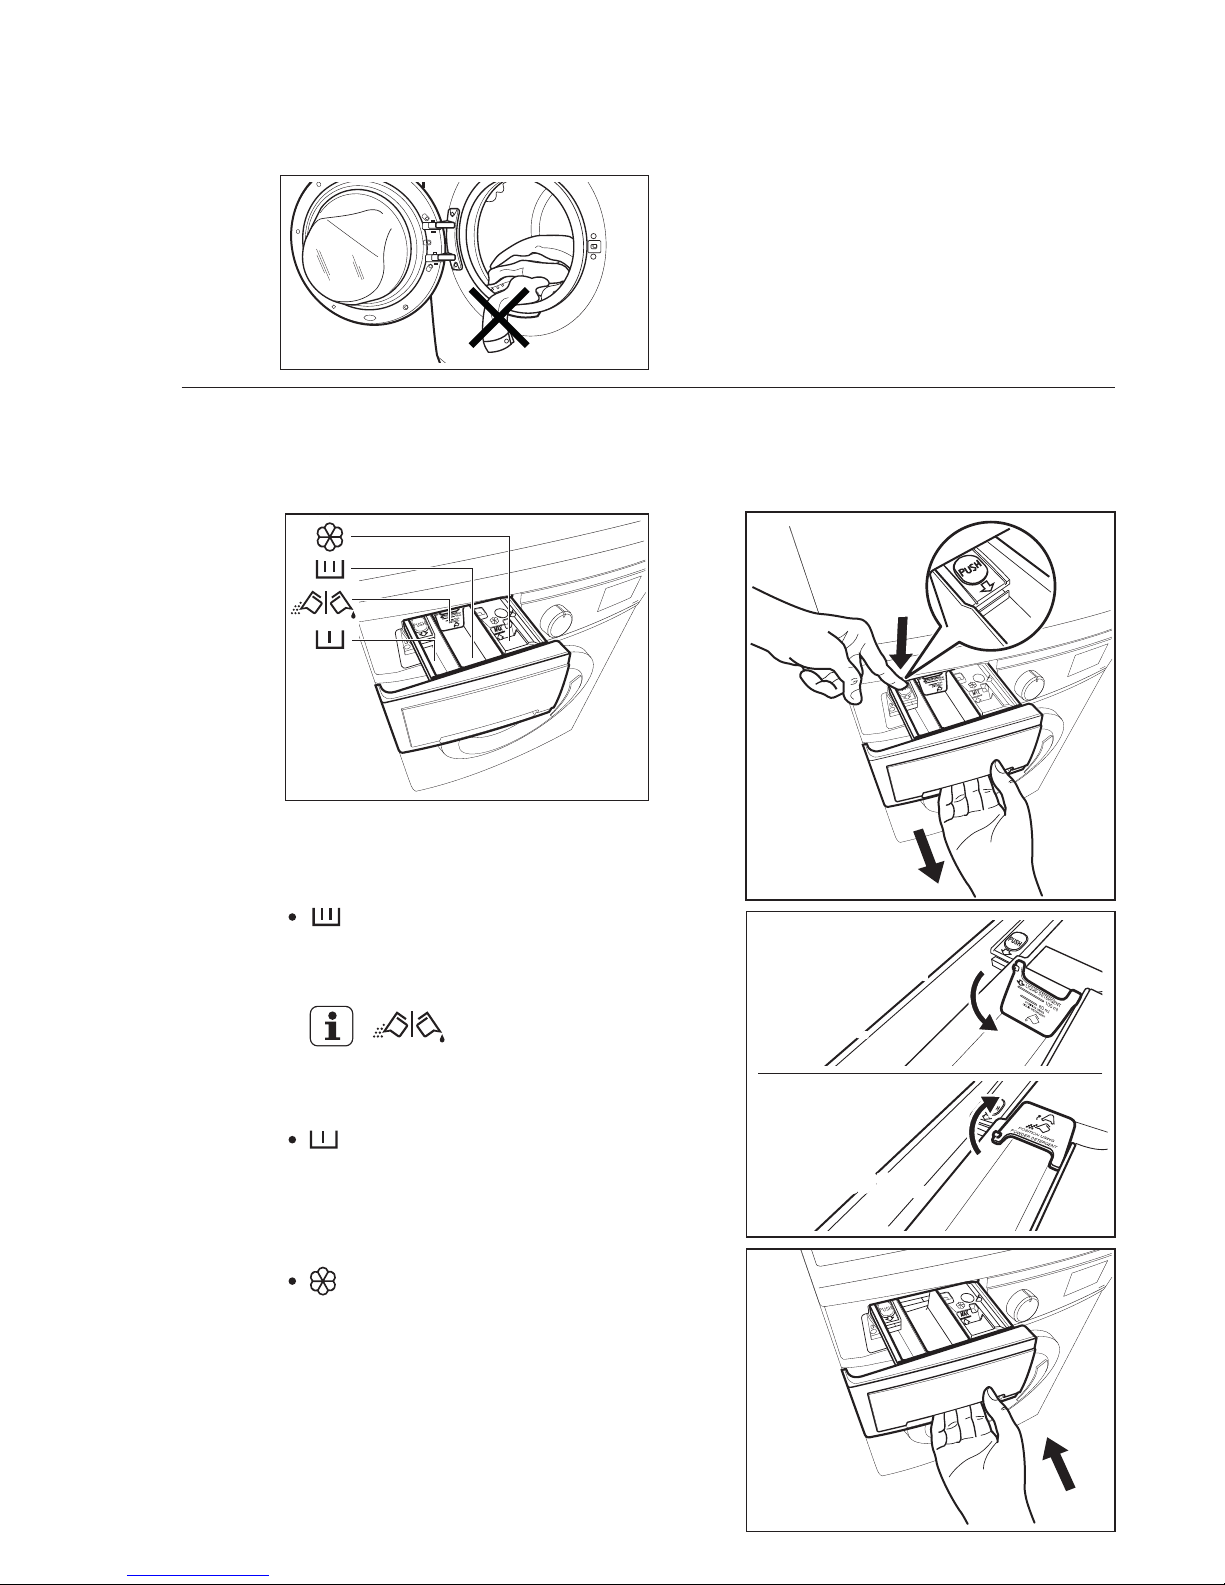
Make sure that no laundry remains
between the seal and the door.
4.
Close the door.
5.
Powder or liquid detergent.
1
3
Position down :
for liquid
detergent.
Position up :
for powder
detergent
(factory setting).
Position down :
for liquid
detergent.
Position up :
for powder
detergent
(factory setting).
2
Step 3 - Using Detergent And Additives
Detergent Dispenser Drawer1.
4
The detergent dispenser is divided
into three compartments.
Compartment ‘SOFTENER’
Compartment ‘PREWASH’
This compartment is used for
fabric conditioner and starching
agent.
This compartment is only used
for detergent when a Prewash
is selected.
Compartment ‘MAIN WASH’
This compartment is used for
detergent on all programs.
Detergent flap
Flap for powder or liquid
detergent.
Page 15
ENGLISH 15
Do not use gelatinous or thick
liquid detergents.
-
Do not put more liquid than the
maximum level.
-
Do not set the DELAY START.
-
Do not set the PREWASH phase.
-
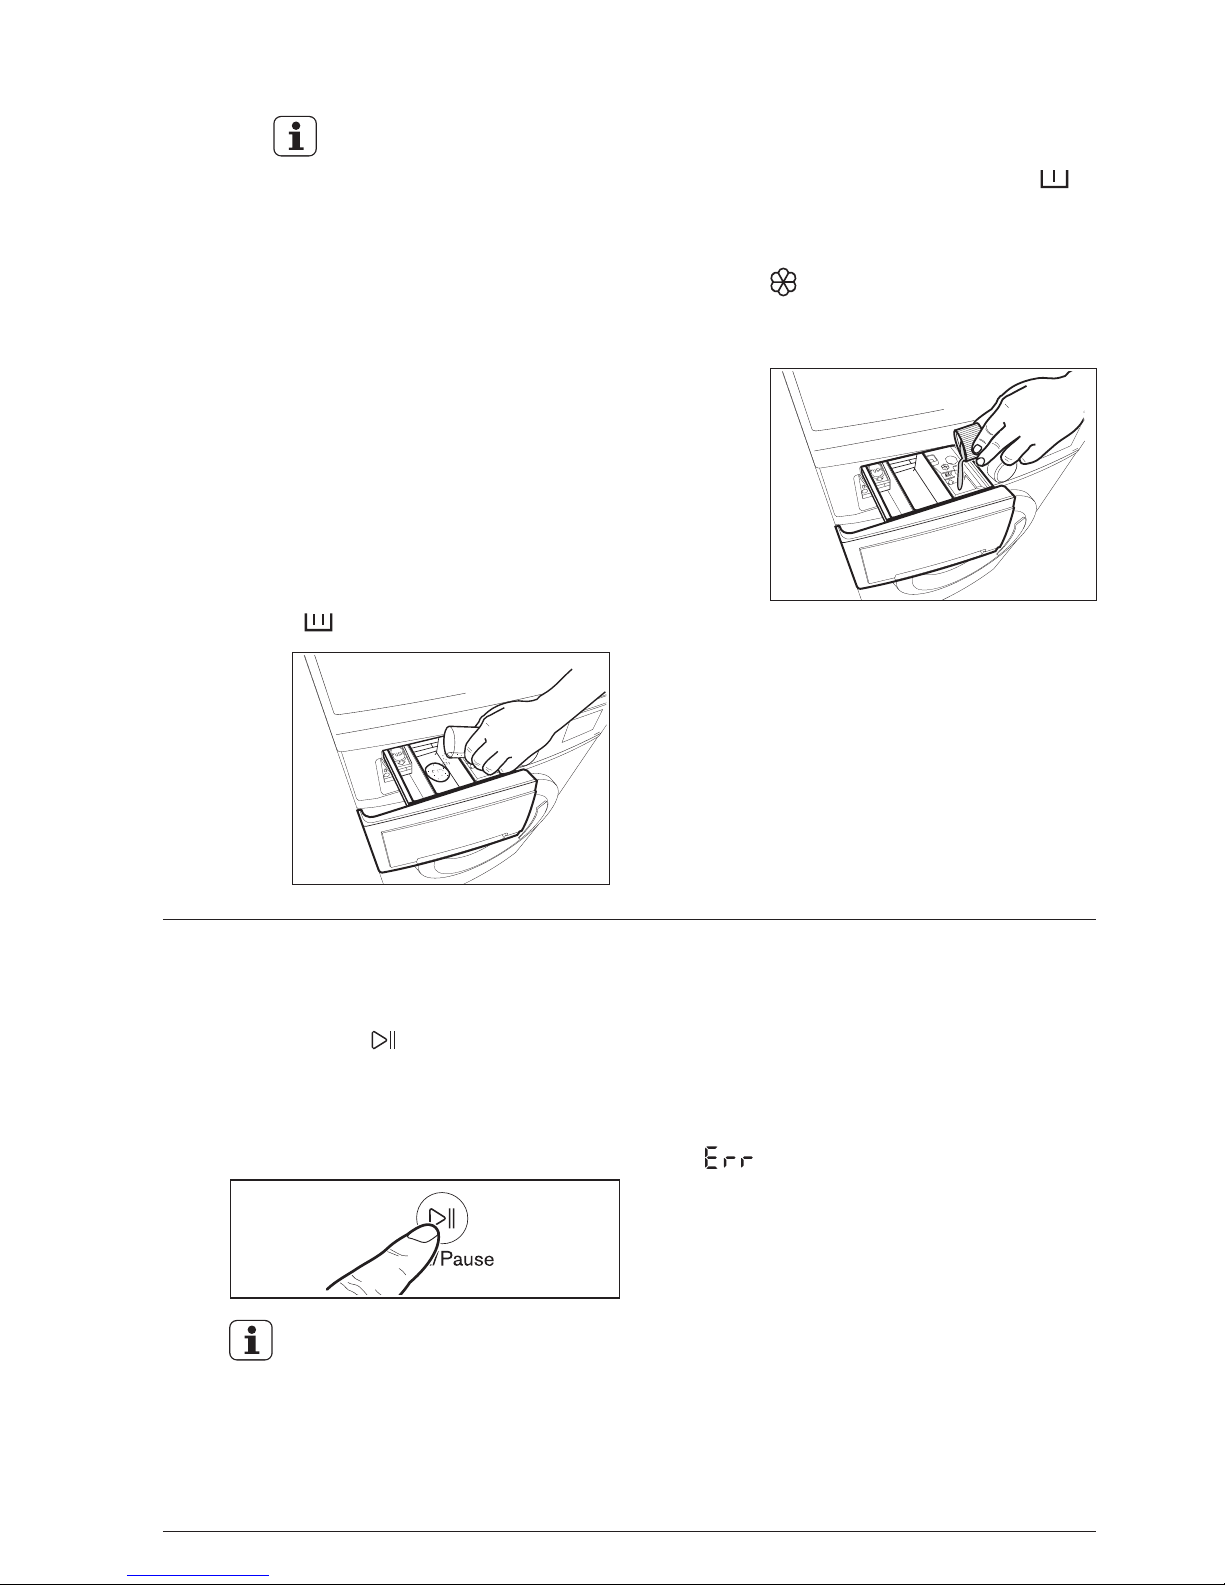
When you use the liquid
detergent:
Measure out the amount of
detergent required, pour it into
the main wash compartment
( ).
Pull out the dispenser drawer until
it stops.
-
-
Measure out the detergent and
the fabric softener;
2.
If you wish to carry out the
“Prewash” phase, pour it into
the compartment marked .
If required, pour fabric softener
into the compartment marked
(the amount used must not
exceed the “MAX” mark in the
drawer).
-
-
Close the drawer gently.
-
The appliance will automatically
adjust the selected program duration
according to the type and size of the
load.
-
Step 4 - Starting a program
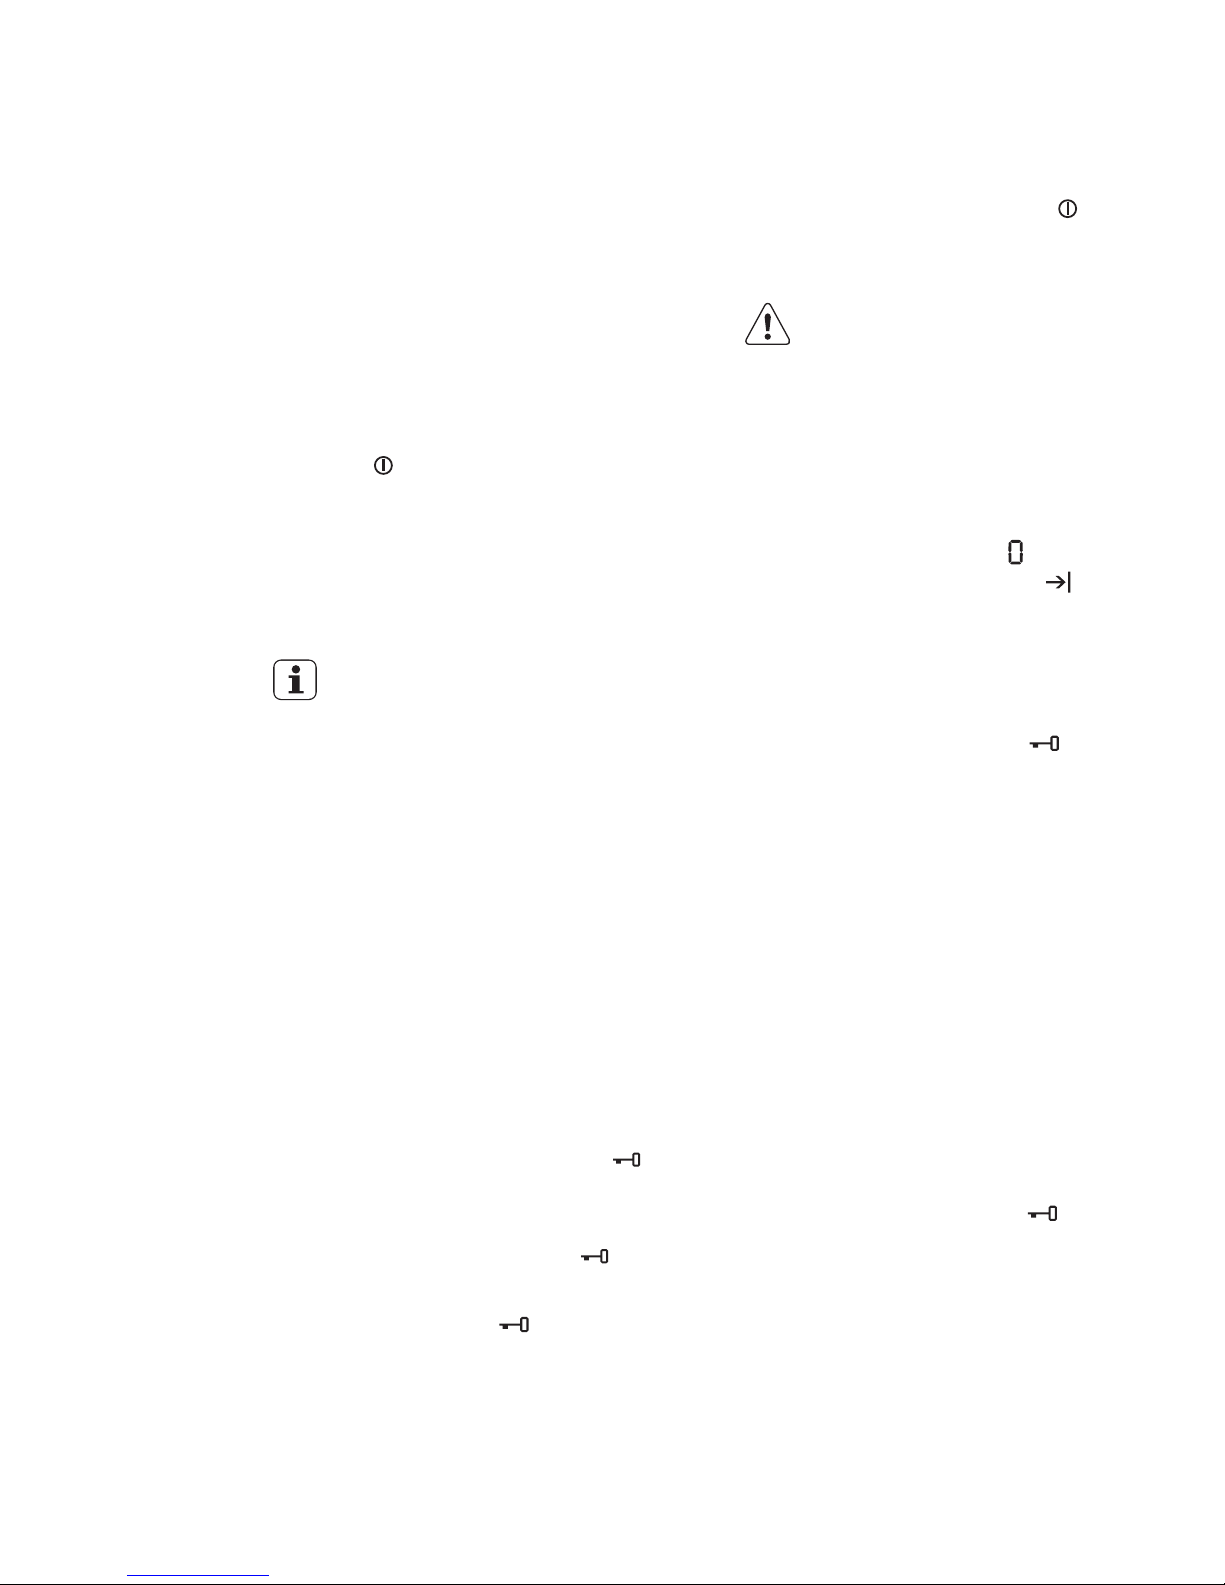
To start a program, press the
Start/Pause ( ) touchpad, the
corresponding pilot light will stop
flashing and a default program duration
will be displayed on the screen (only for
display models).
After approx. 15 minutes from the
start of a program:
ATTENTION!
If you turn the program selector dial to
another program when the machine is
working, the red Start/Pause pilot light
will flash 3 times and the message
‘ ’ will appear on the display (for
display models) to indicate a wrong
selection. The machine will not
perform the new selected program.
Page 16
16
www.electrolux.com
To pause press Start/ Pause. The
indicator will start flashing.
-
Press the Start/Pause again. The
program will continue.
-
5.2 Interruption Of A Program
5.3 Changing A Program
It is possible to change only some option
after the program has started.
Press the touchpad Start/Pause.
The indicator will start flashing.
1.
Change the options.2.
Press Start/Pause again. The program
will continue.
3.
While a program or the delay start is
operating, the appliance door is locked
and the display shows the indicator ‘ ’.
5.4 Changing The Options
5.5 Opening The Door
First set the machine to PAUSE by
pressing the “Start/Pause” touchpad.
Wait until the door lock indicator ‘ ’
goes off, then the door can be opened.
If the door lock indicator ‘ ’ does not
disappear, this means that the machine
is already heating and the water level is
above the bottom edge of the door or
the drum is turning. In this case the door
CAN NOT be opened.
If you can not open the door but you
need to open it you have to switch
the machine off by turn the program
selector knob to the position ‘ ’ to
deactivate the appliance. After about
5 minutes the door can be opened.
Pay attention to the water
level and water temperature.
CAUTION!
The appliance stops automatically.
The acoustic signal will operate.
The display will show ‘ ’ (display
models) or Washing End ‘ ’
pilot lights come on (none-display
models).
The indicator of the Start/Pause
touchpad goes off.
-
-
-
-
-
-
-
-
The door lock indicator ‘ ’
goes off.
Remove the laundry from the
appliance. Make sure that the
drum is empty.
Keep the door ajar, to prevent
the mildew and odours.
Turn off the water tap.
5.6 At The End Of The Program
1.
2.
When The Washing Program
Is Completed, But There Is
Water In The Drum
The drum turns regularly to prevent
the creases in the laundry.
You must drain the water to open
the door.
The door lock indicator ‘ ’ is
on. The door stays locked.
To drain the water:
If necessary, decrease the spin
speed.
Set the “Spin” or “Drain” program.
-
-
5.7
Changing a running program is possible
only by resetting it.
Turn the program selector knob to the
position ‘ ’ to cancel the program
and to turn off the appliance.
1.
Turn the program selector knob to the
new program position and set the new
option, then press ‘Start/Pause’
touchpad again.
The appliance will not drain the
water.
2.
Page 17
ENGLISH 17
3.
Press the touchpad Start/Pause.
The appliance will drain the
water.
When the program is completed
and the door lock indicator ‘ ’
disappear, you can open the
door.
4.
Turn the program selector knob
to the position ‘ ’ to deactivate
the appliance.
5.
5 minutes after the washing program
ends, if you do not deactivate the
appliance, the energy saving function
activates.
The energy saving function decreases
the energy consumption when the
appliance is in the stand by mode.
All indicators and the display will
switch off.
The indicator of the touchpad
Start/Pause will flash slowly.
Press one of the touchpads to
deactivate the energy saving
status.
Stand by mode
5.8
Page 18
18
www.electrolux.com
WASHING HINTS6.
Follow the wash code symbols on
each garment label and the
manufacturer’s washing instructions.
Sort the laundry as follows: whites,
coloureds, synthetics, delicates,
woollens.
6.1 Sorting The Laundry
6.2 Temperatures
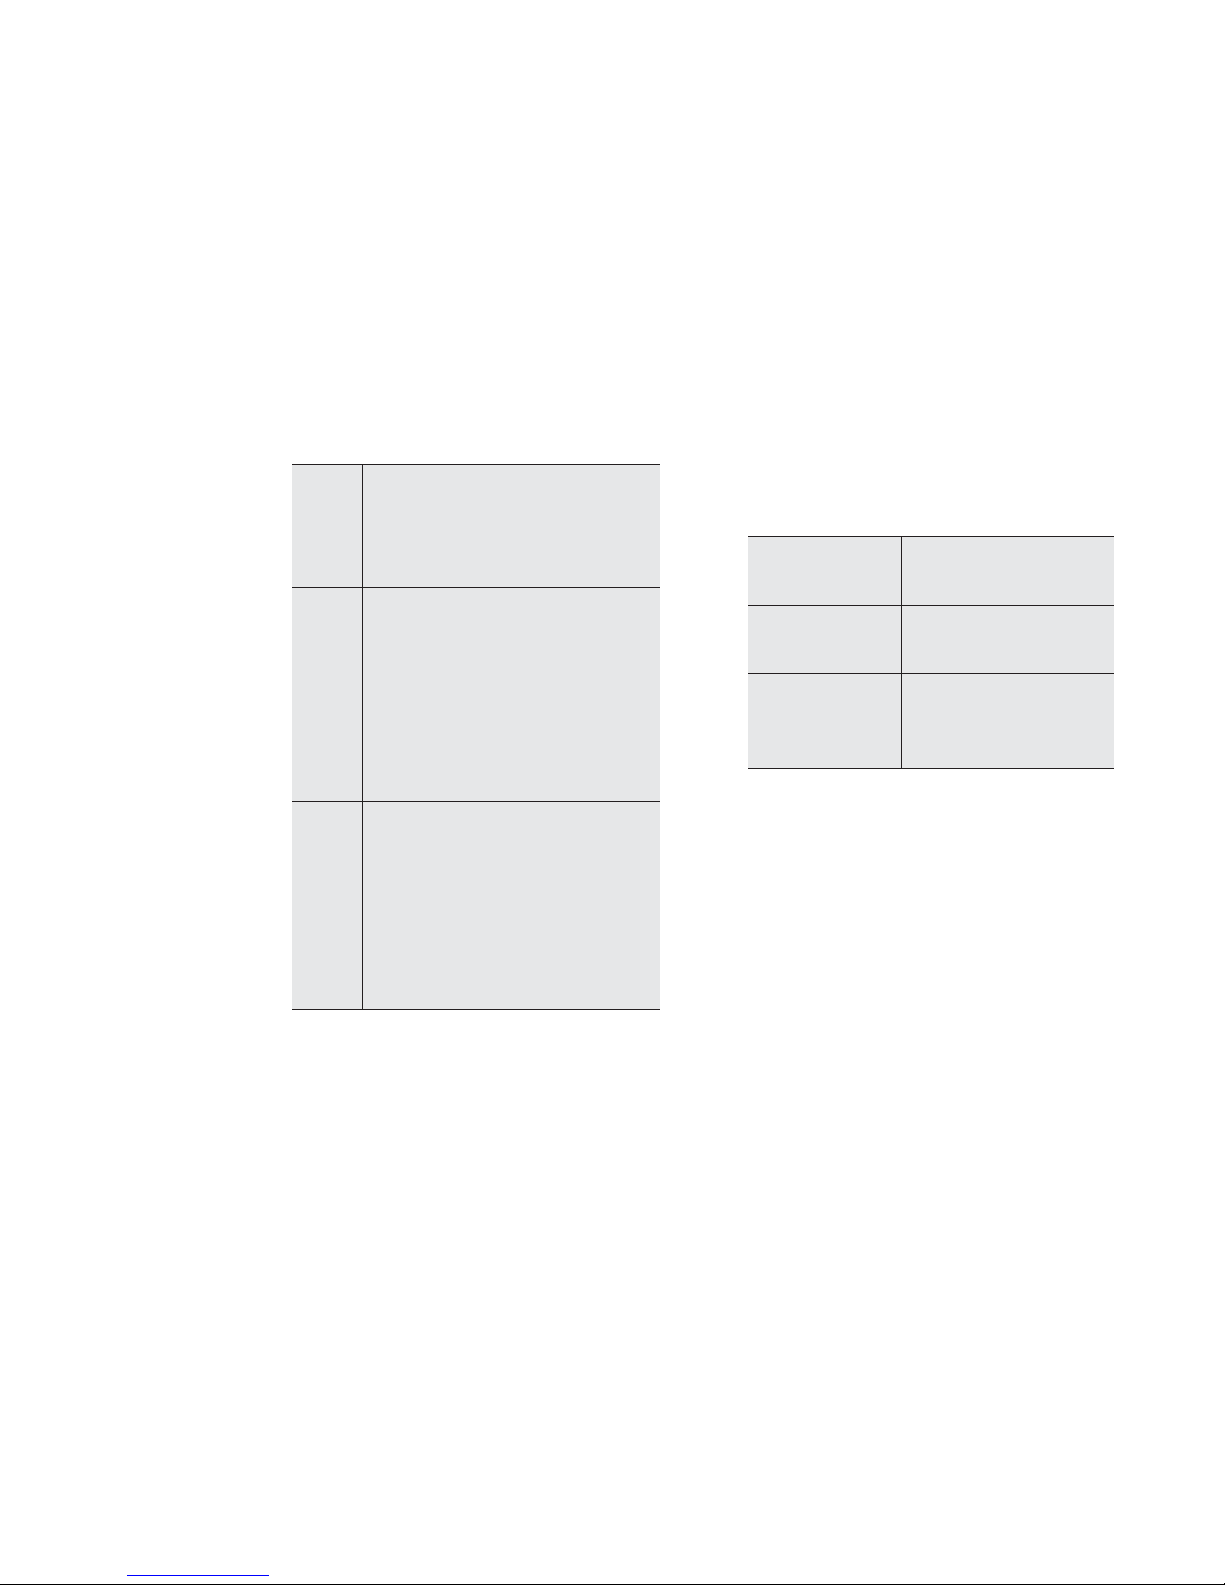
90°C
60°C
50°C
40°C
30°C
Cold
For normally soiled,
colourfast garments (e.g.
shirts, night dresses,
pyjamas....) in linen, cotton
or synthetic fibres and for
lightly soiled white cotton
(e.g.underwear).
For delicate items (e.g. net
curtains), mixed laundry
including synthetic fibres
and woollens bearing the
label pure new wool,
machine washable,
non-shrink.
For normally soiled white
cottons and linen
(e.g. teacloths, towels,
tablecloths, sheets...).
Never wash whites and coloureds
together. Whites may lose their
“whiteness” in the wash.
New coloured items may run in the
first wash; they should therefore be
washed separately the first time.
Button up pillowcases, close zip
fasteners, hooks and poppers. Tie
any belts or long tapes.
Remove persistent stains before
washing.
Rub particularly soiled areas with a
special detergent or detergent paste.
Treat curtains with special care.
Remove hooks or tie them up in a
bag or a net.
Make sure that no metal objects
are left in the laundry (e.g. hair
clips, safety pins, pins).
6.3 Before Loading The
Laundry
Recommended loads are indicated
in the program charts. General
rules:
Washing a maximum load makes
the most efficient use of water and
energy. For heavily soiled laundry,
reduce the load size.
Cotton, linen:
drum full but not
too tightly packed;
Synthetics:
drum no more
than half full;
Delicate
fabrics and
woollens:
drum no more
than one third full.
6.4 Maximum Loads
Blood: treat fresh stains with cold
water. For dried stains, soak
overnight in water with a special
detergent then rub in the soap and
water.
Oil based paint: moisten with
benzine stain remover, lay the
garment on a soft cloth and dab
the stain; treat several times.
Dried grease stains: moisten with
turpentine, lay the garment on a
soft surface and dab the stain with
the fingertips and a cotton cloth.
Stubborn stains may not be
removed by just water and
detergent. It is therefore advisable
to treat them prior to washing.
6.5 Removing Stains
Page 19

ENGLISH 19
Rust: oxalic acid dissolved in hot
water or a rust removing product
used in cold water. Be careful with
rust stains which are not recent
since the cellulose structure will
already have been damaged and
the fabric tends to hole.
Mould stains: treat with bleach,
rinse well (whites and fast
coloureds only).
Grass: soap lightly and treat with
bleach (whites and fast coloureds
only).
Ball point pen and glue: moisten
with acetone (*), lay the garment on
a soft cloth and dab the stain.
Lipstick: moisten with acetone (*)
as above, then treat stains with
methylated spirits. Remove any
residual marks from white fabrics
with bleach.
The detergent and any additives
must be placed in the appropriate
compartments of the dispenser
drawer before starting the wash
program.
Red wine: soak in water and
detergent, rinse and treat with
acetic or citric acid, then rinse.
Treat any residual marks with
bleach.
Ink: depending on the type of ink,
moisten the fabric first with
acetone (*), then with acetic acid;
treat any residual marks on white
fabrics with bleach and then rinse
thoroughly.
Tar stains: first treat with stain
remover, methylated spirits or
benzine, then rub with detergent
paste.
Good washing results also depend
on the choice of detergent and use
of the correct quantities to avoid
waste and protect the
environment.
Although biodegradable, detergents
contain substances which, in large
quantities, can upset the delicate
balance of nature.
The choice of detergent will depend
on the type of fabric (delicates,
woollens, cottons, etc.), the colour,
washing temperature and degree of
soiling.
Only low suds Front load washer
detergents should be used in
this appliance:
(*) do not use acetone on artificial
silk.
6.6 Detergents and Additives
powder detergents for all types
of fabric,
powder detergents for delicate
fabrics (60 °C max) and woollens,
liquid detergents, preferably for
low temperature wash program
(60 °C max) for all types of fabric,
or special for woollens only.
If using concentrated powder
or liquid detergents, a program
without PREWASH must be
selected.
Pour liquid detergent into the
dispenser drawer compartment
marked ‘ ’ just before starting
the program.
Page 20

20
www.electrolux.com
the washload to turn grey,
greasy clothes.
sudsing,
inadequate rinsing.
reduced washing effect,
Any fabric softener or starching
additives must be poured into the
compartment marked ‘ ’ before
starting the wash program.
Follow the product manufacturer’s
recommendations on quantities to
use and do not exceed the MAX
mark in the detergent dispenser
drawer.
The type and quantity of detergent
will depend on the type of fabric,
load size, degree of soiling and
hardness of the water used.
Do not spray stain pre-treatment
products (e.g. Preen) on or near
the machine, as it can attack
plastic materials reducing its
life.
Information on hardness of the
water in your area can be obtained
from the relevant water supply
company, or from your local
authority.
Follow the product manufacturers’
instructions on quantities to use.
Water hardness is classified in
so-called “degrees” of hardness.
6.7 Quantity Of Detergent To Be
Used
Not enough washing powder
causes:
Too much washing powder causes:
you are washing a small load,
large amounts of foam form
during washing.
the laundry is lightly soiled,
Use less detergent if:
Page 21
ENGLISH 21
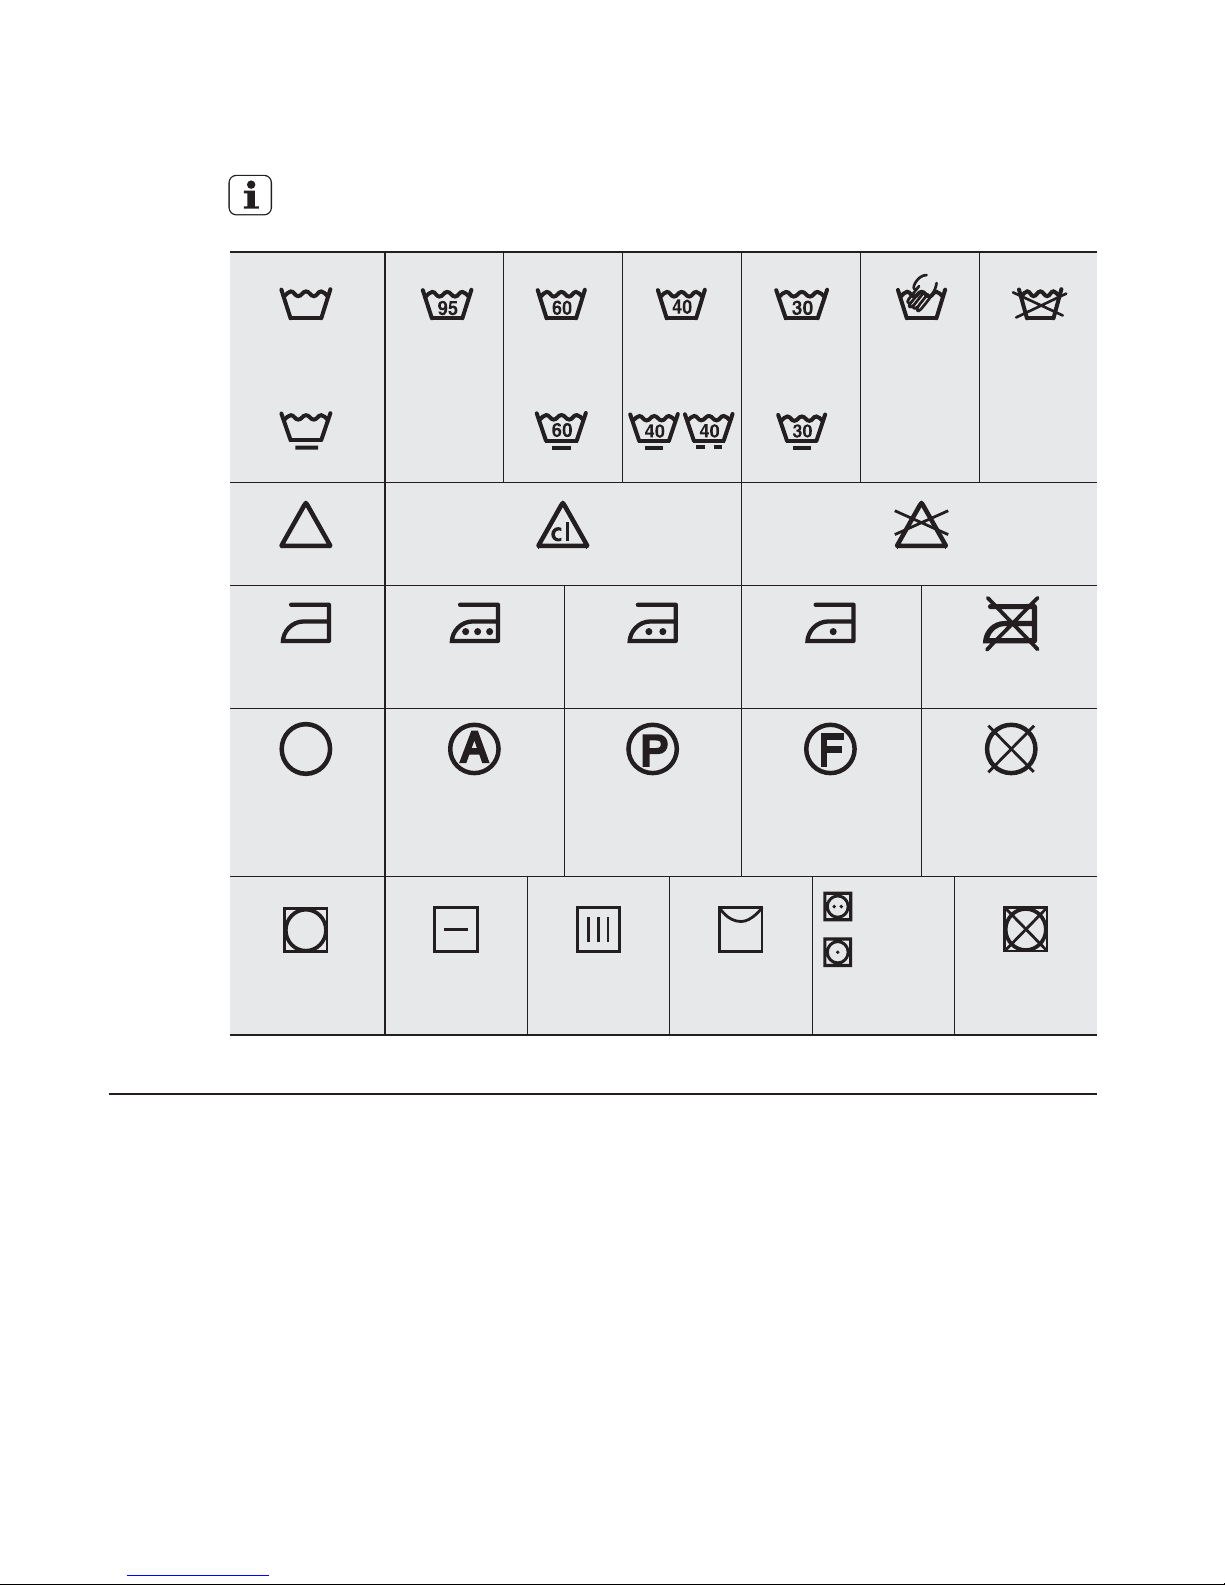
INTERNATIONAL WASH CODE SYMBOLS7.
These symbols appear on fabric labels, in order to help you choose the best
way to treat your laundry.
Bleach in cold water DO NOT bleach
Bleaching
Energetic wash
Delicate wash
Hand wash
Max. wash
temperature
95 °C
Hot iron
max. 200 °C
Dry cleaning in
all solvents
Dry cleaning in
perchlorethylene,
petrol, pure alcohol,
R 111 & R 113
Dry cleaning in
petrol, pure alcohol
and R 113
DO NOT
dry clean
Warm iron
max. 150 °C
Lukewarm iron
max. 110 °C
DO NOT iron
Max. wash
temperature
60 °C
Max. wash
temperature
40 °C
Max. wash
temperature
30 °C
DO NOT
wash at all
Ironing
Dry cleaning
Drying Flat Tumble dry DO NOT
tumble dry
High
temperature
Low
temperature
On clothes
hanger
On the line
Page 22
22
www.electrolux.com
CARE AND CLEANING8.
You must DISCONNECT the
appliance from the electricity
supply, before you can carry out
any cleaning or maintenance
work.
The water we use normally
contains lime. It is a good idea to
periodically use a water softening
powder in the machine.
Clean the appliance only with soap
and warm water. Fully dry all the
surfaces.
Do not use alcohol, solvents or
chemical products.
Do this separately from any laundry
washing, and according to the
softening powder manufacturer's
instructions.
This will help to prevent the
formation of lime deposits.
8.2 Descaling
8.1 External Cleaning
The washing powder and additive
dispenser drawer should be
cleaned regularly.
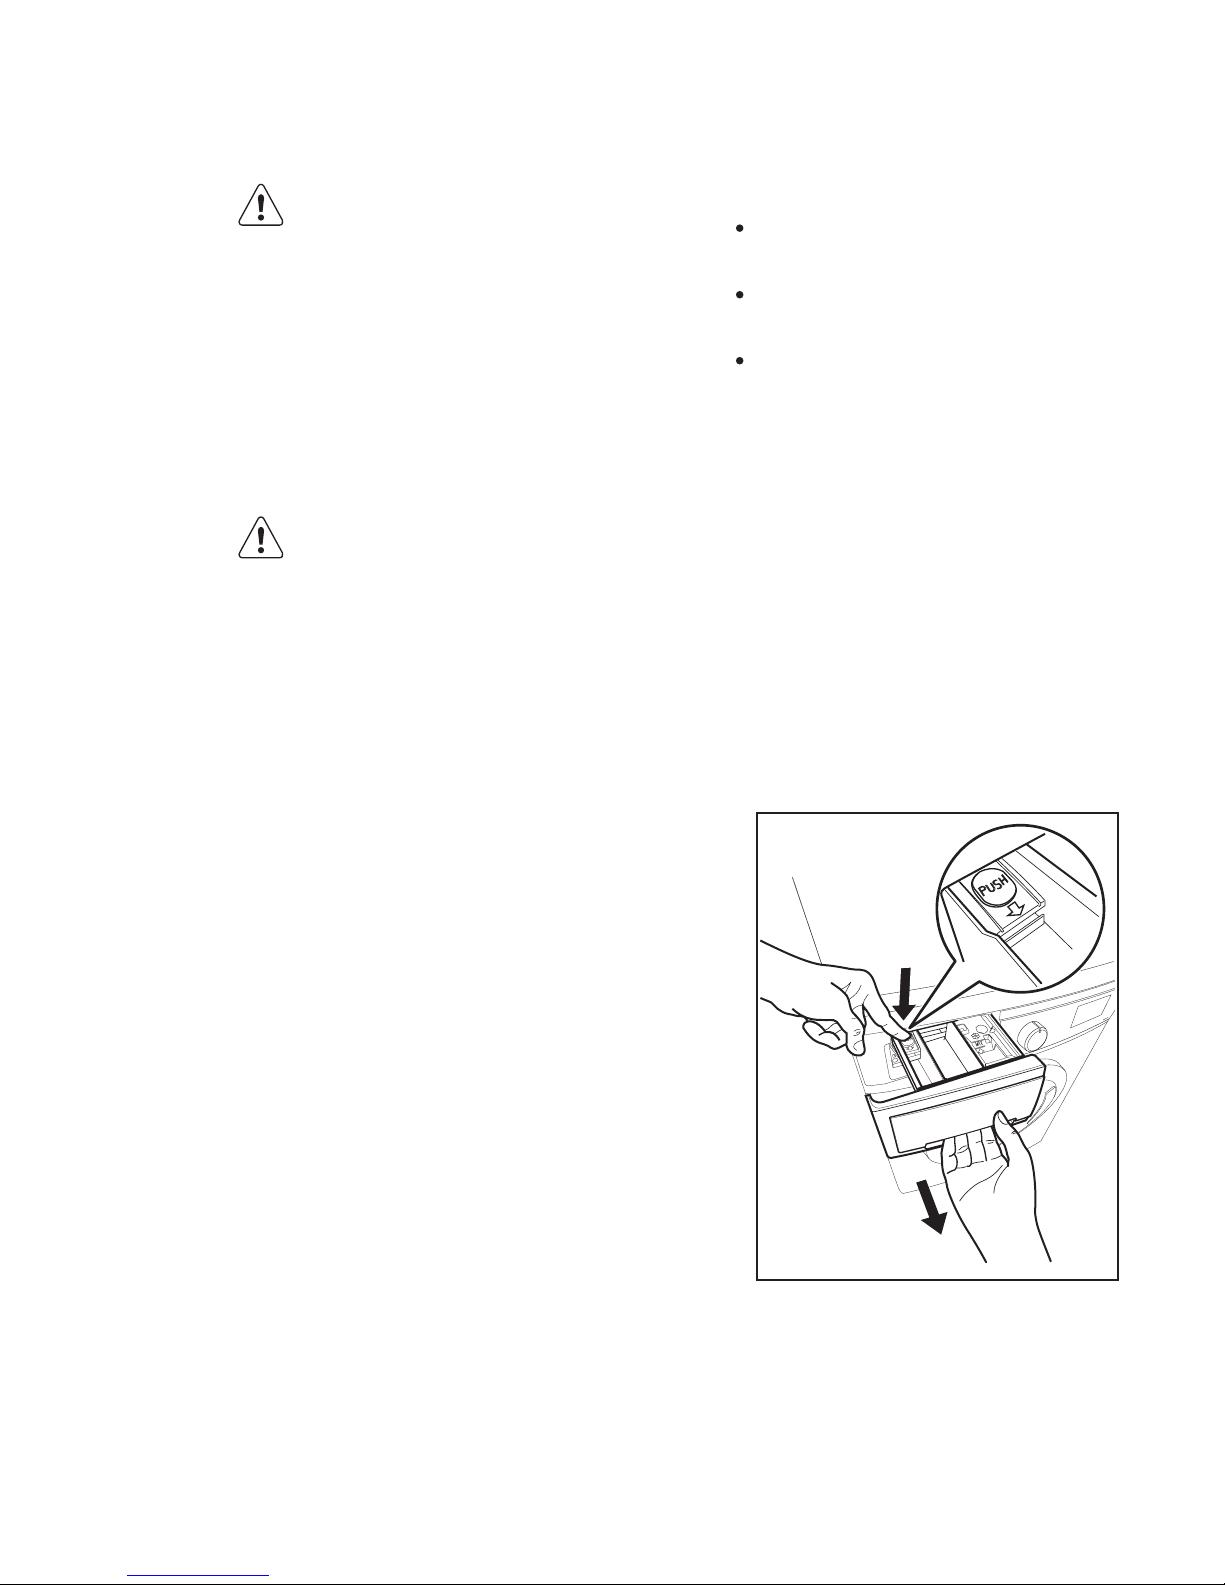
Remove the drawer by pressing
the catch downwards and by
pulling it out. Flush it out under a
tap, to remove any traces of
accumulated powder.
8.5 Cleaning The Dispenser
Drawer
Leave the door open for a while.
This helps to prevent mould and
stagnant smells forming inside the
appliance. Keeping the door open
after a wash will also help to
preserve the door seal.
8.3 After Each Wash
With the use of low temperature
washes it is possible to get a build
up of residues inside the drum.
We recommend that a
maintenance wash be performed
on a regular basis.
8.4 Maintenance Wash
The drum should be empty of
laundry.
Select the hottest “Regular” wash
program.
Use a normal measure of
detergent, must be a powder
with biological properties.
To run a maintenance wash:
WARNING!
CAUTION!
1
2
Page 23
ENGLISH 23
8.7 Cleaning the drain filter
Turn program selector dial to
position Off ( ).
Unplug the appliance.
Open the door.
To clean the drain filter:
Disconnect the mains plug
from the mains socket.
Do not clean the drain filter if
the water in the appliance is
hot.
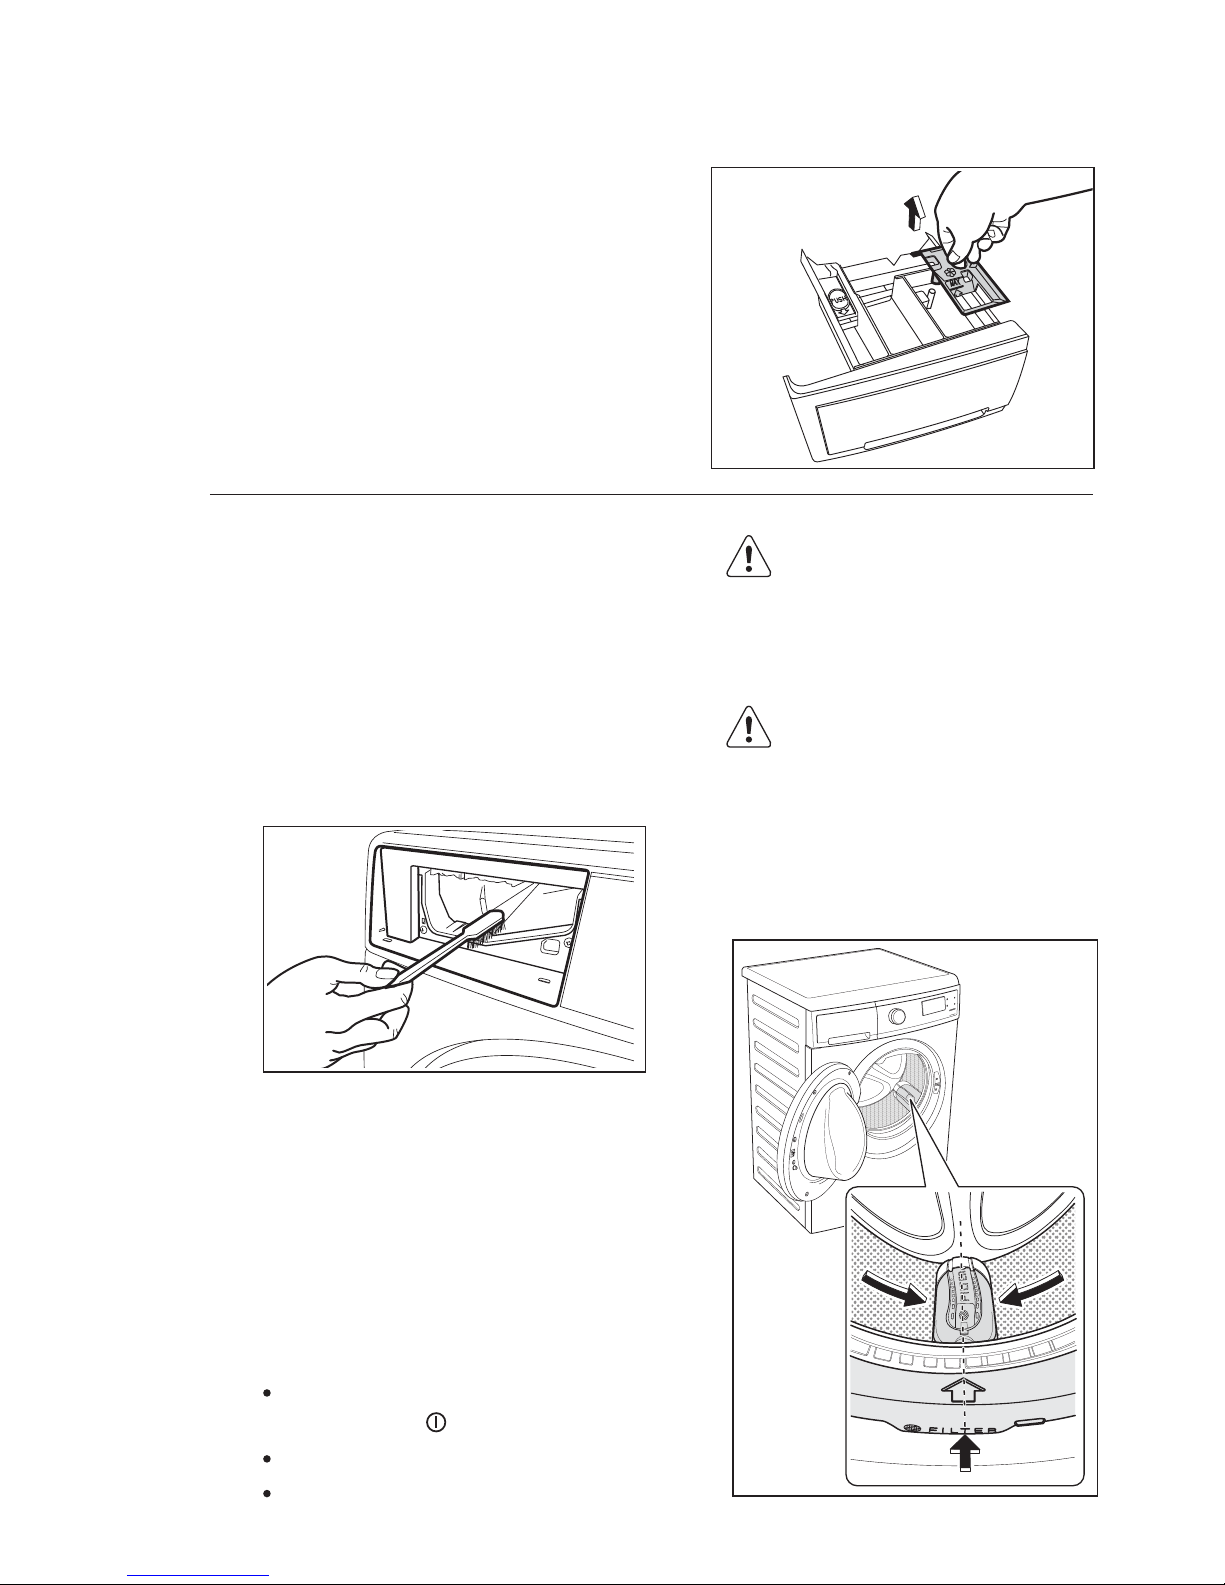
1. Turn the drum and align the filter
cover (FILTER) with the arrow on
the door seal.
WARNING!
WARNING!
Drain filter collects lint and other
items left in the dirty laundry to
prevent pump blockage
The pump must be cleaned regularly.
To clean the filter, proceed as
follows:
To aid cleaning, the top part of the
additive compartment should be
removed.
Having removed the drawer, use a
small brush to clean the recess,
ensuring that all washing powder
residue is removed from the upper
and lower part of the recess.
Replace the drawer and run the
rinse program without any clothes
in the drum.
8.6 Cleaning The Drawer Recess
Page 24
24
www.electrolux.com
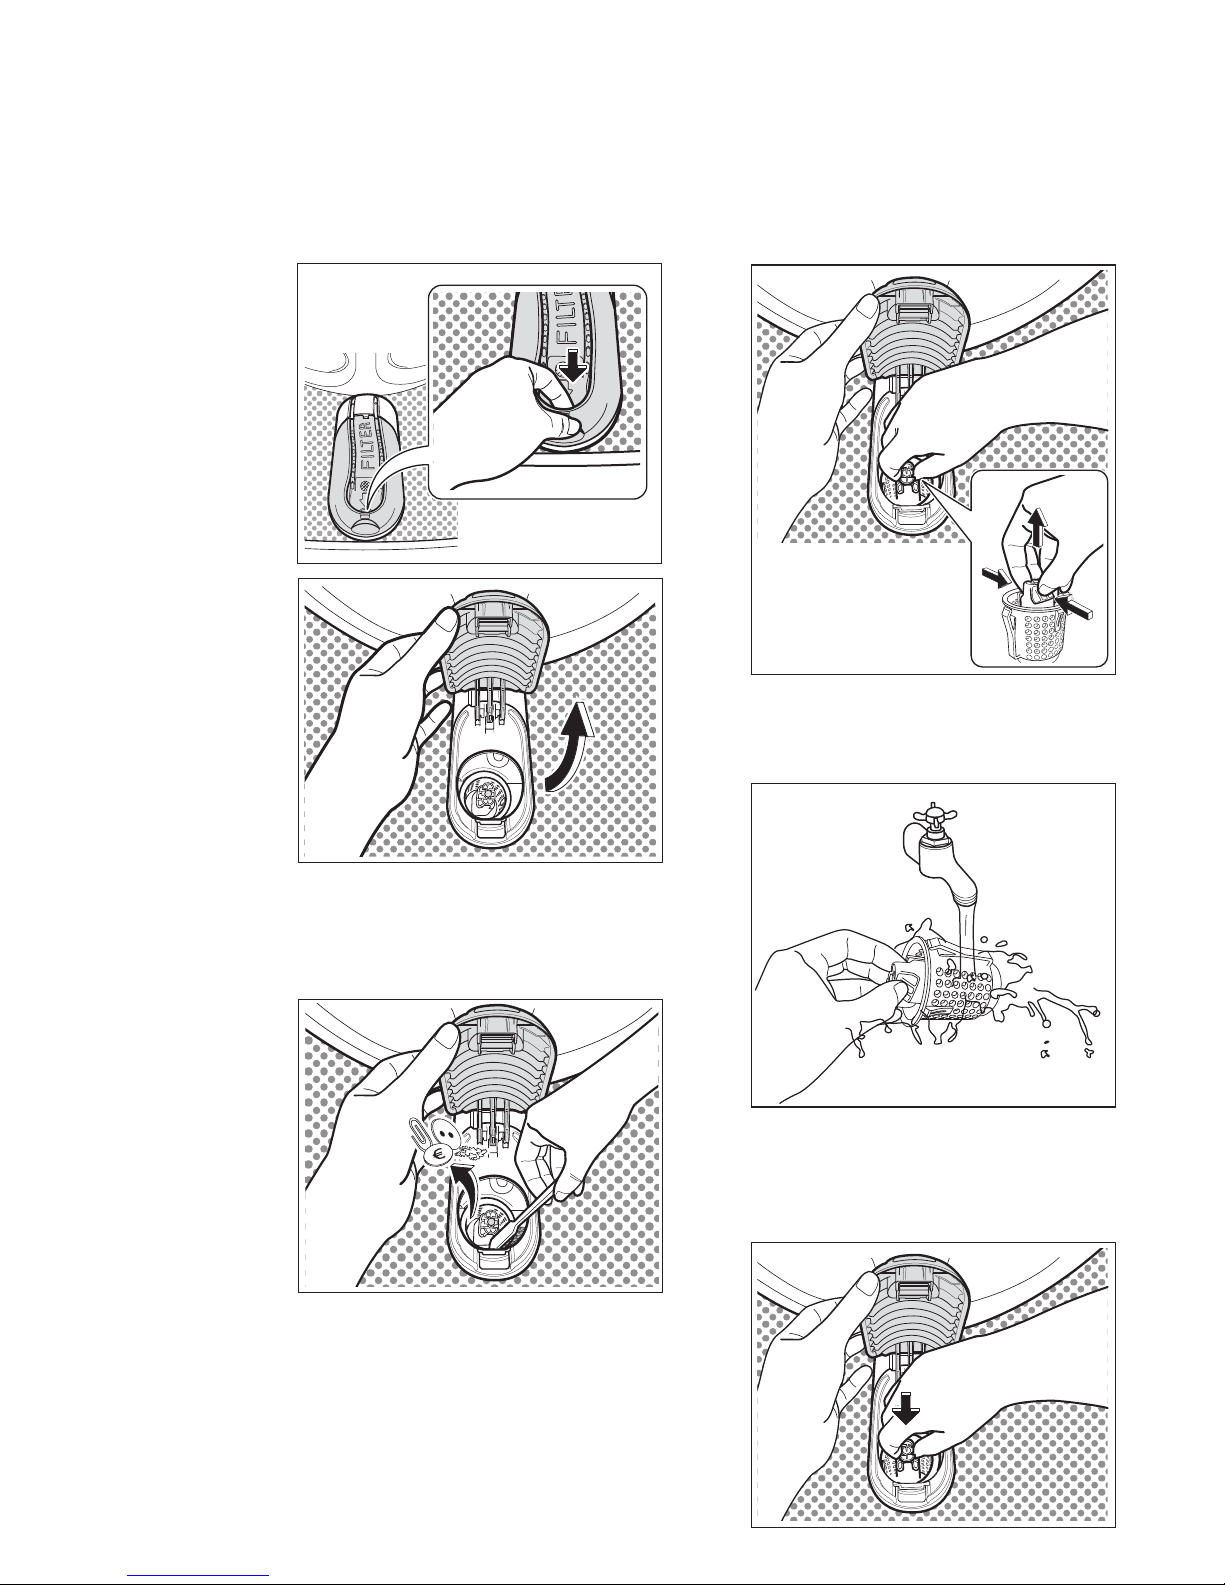
2. Open the filter cover by pressing
the special hook and by rotating
the cover upwards.
Hold filter securly and pull
upwards to remove it from its
position.
Clean the filter under the water
tap.
After cleaning the filter, open the
filter cover and insert the filter
back to its position.
4.
5.
6.
Remove eliminate the eventual
fluff or small objects (if there is
any) around the filter.
3.
Page 25
ENGLISH 25
IMPORTANT!
Close the filter cover.
Insert the mains plug again.
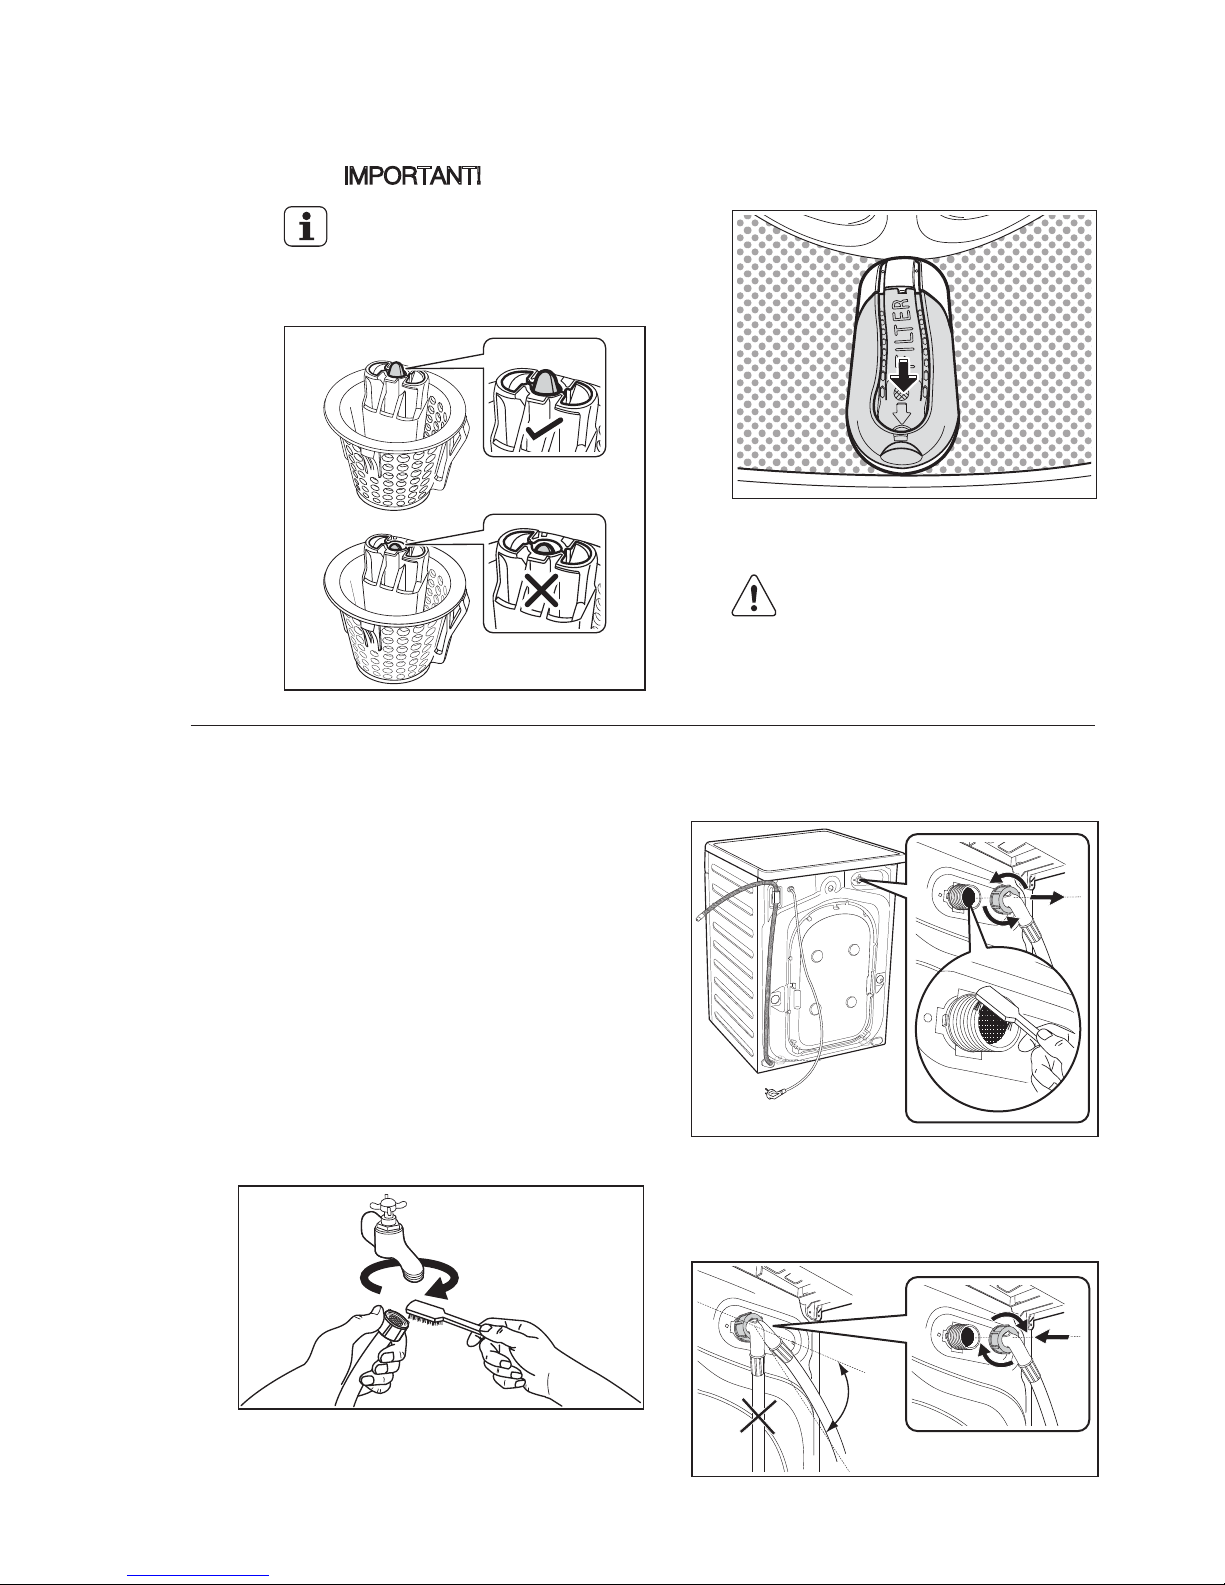
The filter is inserted correctly
when the indicator on this
top is visible and you will
hear “Click” sound.
7.
8.
9.
Do not start washing
clothes without the filter
in its place.
WARNING!
If your water is very hard or contains
traces of lime deposit, the water inlet
filter may become clogged.
It is therefore a good idea to clean it
from time to time.
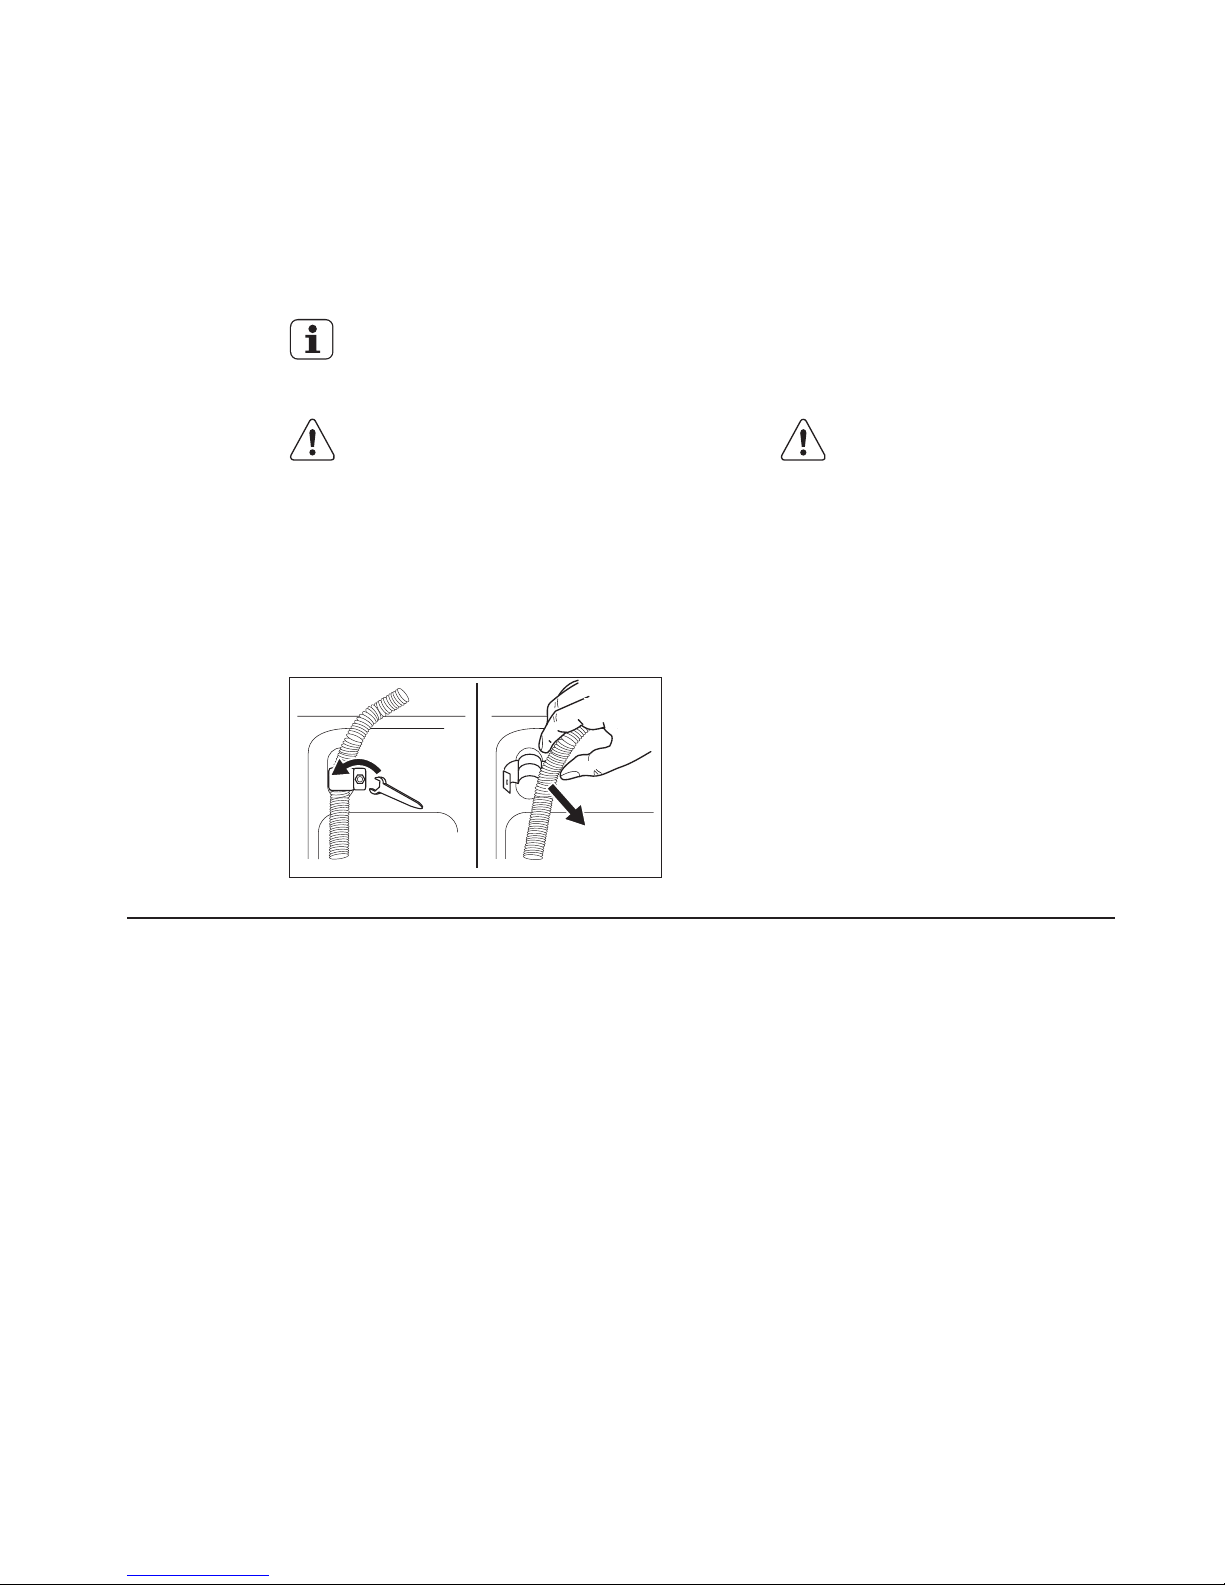
Remove the water inlet hose from
the water tap.
Remove the inlet hose behind the
appliance.
Clean the filter in the valve with a
stiff brush or a towel.
Install again the inlet hose. Make
sure that the couplings are tight to
prevent leakages.
Clean the filter in the inlet hose with
a stiff brush.
8.8 Cleaning The Water Inlet Filter
To clean the water inlet filters:
1.
Close the water tap.
2.
3.
4.
5.
6.
7. Open the water tap.
45°
Page 26
26
www.electrolux.com
If the machine is exposed to
temperatures below 0°C, certain
precautions should be taken.
8.9 The Dangers Of Freezing
Turn off the water tap.1.
2. Unscrew the inlet hose.
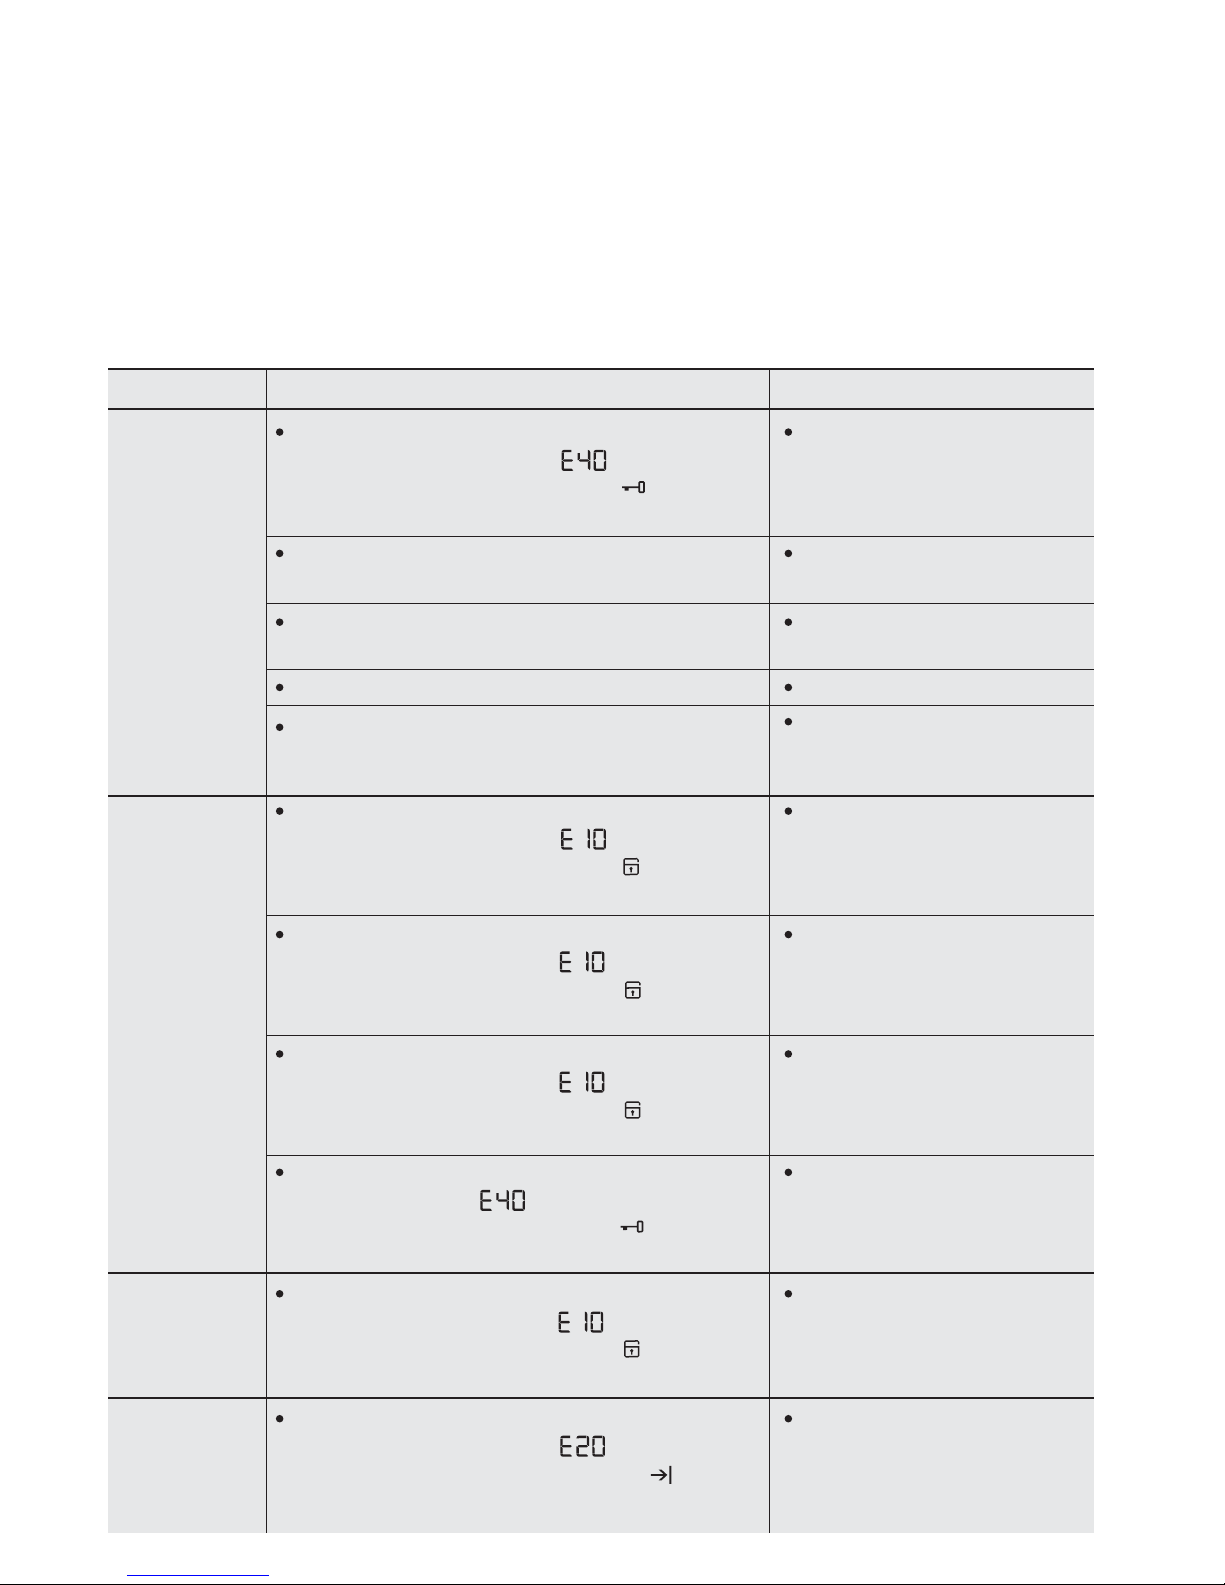
3. Remove the drain hose from the
rear support and unhook it from
sink or spigot.
4. Put the ends of the drain and
inlet hose in a container. Let the
water flow out of the hoses.
5. When no more water flows,
install the inlet hose and the
drain hose again.
Disconnect the mains plug
from the mains socket.
Do this procedure also when
you want to do the emergency
drain.
Make sure that the
temperature is more
than 0 °C before you
use the appliance
again.
The manufacturer is
not responsible for
damages caused by
low temperatures.
Page 27
ENGLISH 27
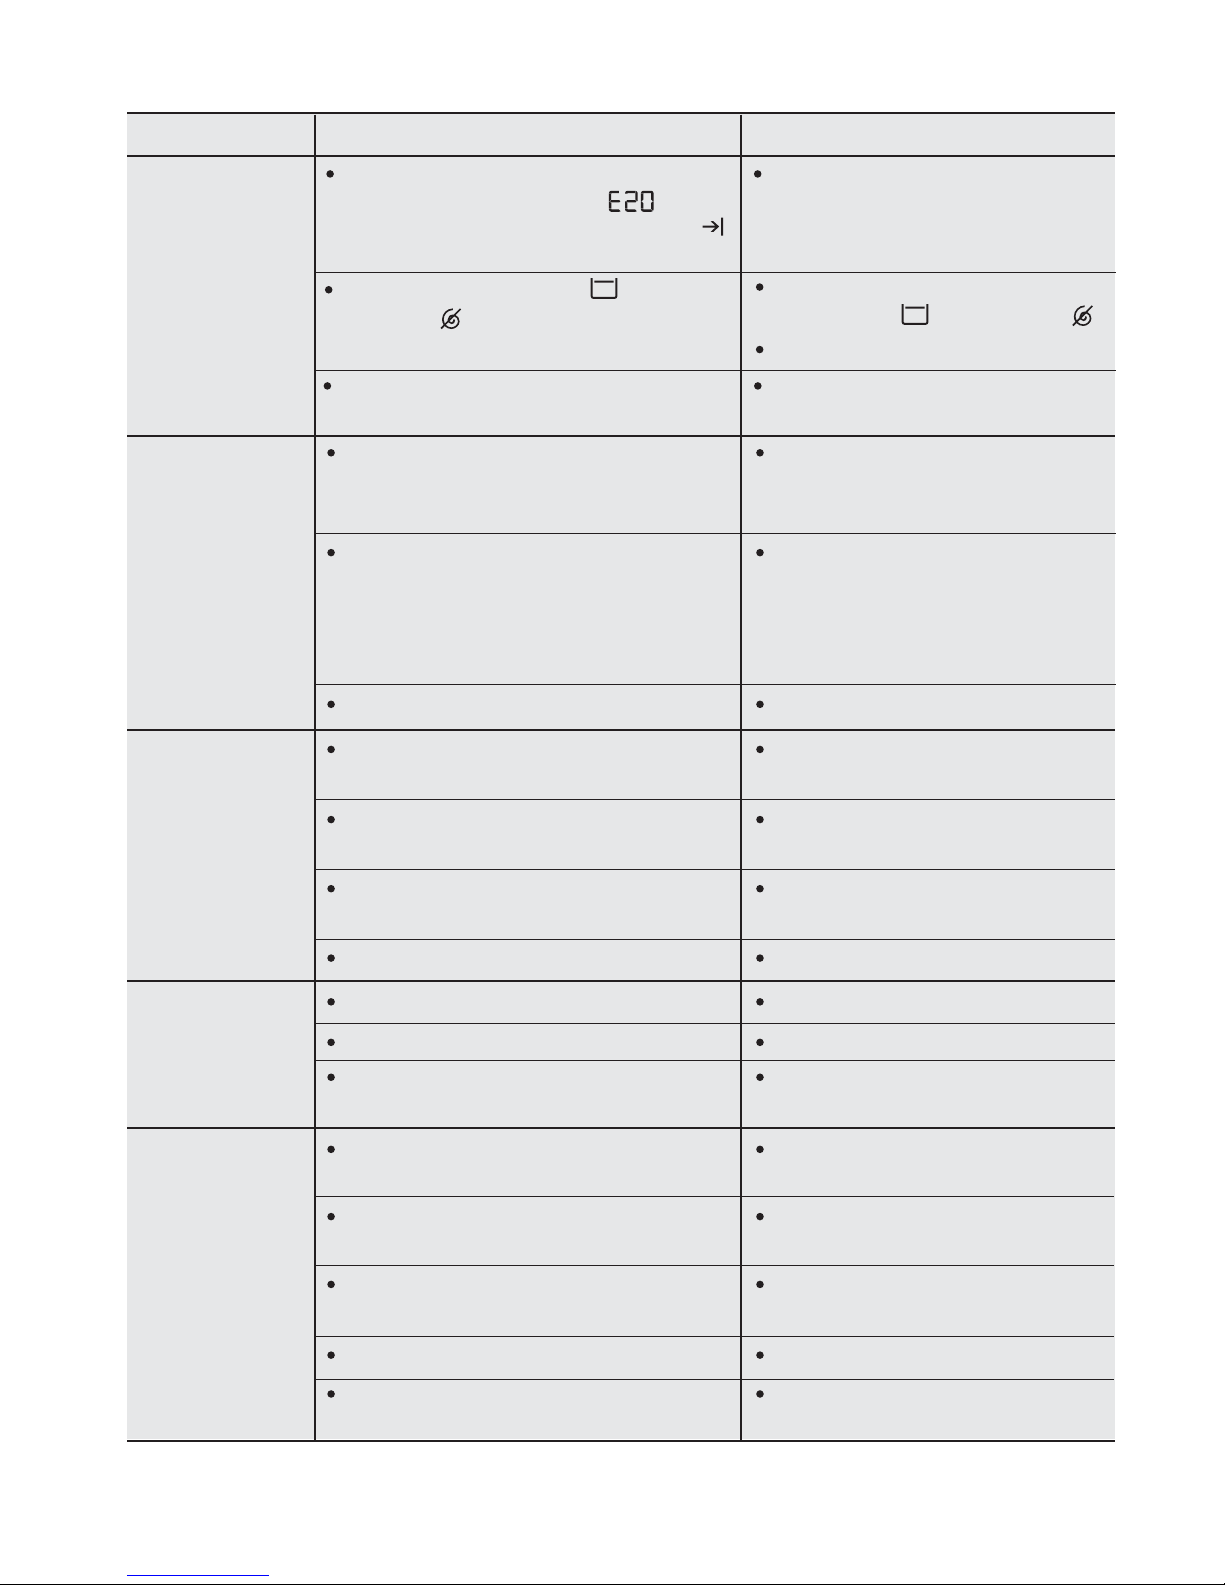
The door has not been closed.
Display model: Error code: .
None-Display model: Door lock ‘ ’ LED
and ‘Start/Pause’ LED flashing.
The plug is not properly inserted in the
power socket.
There is no power at the socket.
Insert the plug into the
power socket.
Please check your domestic
electrical installation.
The Start/Pause button has not been pressed.
Press the Start/Pause button.
The delay start has been selected.
If the laundry are to be
washed immediately, cancel
the delay start.
The inlet hose is squashed or kinked.
Display model: Error code: .
None-Display model: Child lock ‘ ’ LED
and ‘Start/Pause’ LED flashing.
Check the inlet hose
connection.
The end of the drain hose is too low.
Display model: Error code: .
None-Display model: Child lock ‘ ’ LED
and ‘Start/Pause’ LED flashing.
Refer to relevant paragraph
in “water drainage” section.
The drain hose is squashed or kinked.
Display model: Error code: .
None-Display model: Washing End ‘ ’ LED
and ‘Start/Pause’ LED flashing.
Check the drain hose
connection.
The filter in the inlet hose is blocked.
Display model: Error code: .
None-Display model: Child lock ‘ ’ LED
and ‘Start/Pause’ LED flashing.
Clean the water inlet hose
filter.
The door is not properly closed.
Display
model: Error code: .
None-Display model: Door lock ‘ ’ LED
and ‘Start/Pause’ LED flashing.
Close the door firmly.
The water tap is closed.
Display model: Error code: .
None-Display model: Child lock ‘ ’ LED
and ‘Start/Pause’ LED flashing.
Open the water tap.
Close the door firmly.
Certain problems are due to lack of simple maintenance or oversights, which can be solved
easily without calling out an engineer. Before contacting your local Service Centre, please carry
out the checks listed below.
During machine operation it is possible that the RED Start/Pause pilot light flashes to indicate
that the machine is not working.
Once the problem has been eliminated, press the Start/Pause button to restart the
program. If after all checks, the problem persists, contact your local Service Centre.
The washing
machine
does not
start:
The machine
does not fill
the water:
The machine
fills then
empties
immediately:
TROUBLESHOOTING9.
Malfunction Possible cause Solution
The machine
does not
empty
and/or does
not spin:
Page 28
28
www.electrolux.com
Malfunction Possible cause Solution
Too much detergent or unsuitable
detergent (creates too much foam)
has been used.
Reduce the detergent
quantity or use another one.
Check whether there are any leaks
from one of the inlet hose fittings. It is
not always easy to see this as the
water runs down the hose; check to
see if it is damp.
Check the water inlet hose
connection.
Too little detergent or unsuitable
detergent has been used.
Increase the detergent
quantity or use another one.
The program is still running.
Wait until the end of washing cycle.
The transit bolts and packing have
not been removed.
Check the correct
installation of the appliance.
The support feet have not been
adjusted.
Check the correct levelling of
the appliance.
The laundry is not evenly distributed
in the drum.
Pause the machine and
redistribute laundry manually.
There is very little laundry in the drum.
Load more laundry.
Unstable floors eg. wooden floors. Refer to relevant paragraph
in “Positioning” section.
The door lock has not been released.
Wait about 5 minutes.
There is water in the drum. Select “Spin” or “Drain” program
to empty out the water.
Stubborn stains have not been
treated prior to washing.
Use commercial products
to treat the stubborn stains.
The correct temperature was not
selected.
Check if you have selected
the correct temperature.
Excessive laundry load. Reduce load.
The drain hose is damaged. Change it with a new one.
There is water
on the floor:
Unsatisfactory
washing
results:
The door will
not open:
The machine
vibrates or is
noisy:
The machine
does not
empty
and/or does
not spin:
The drain filter is clogged.
Display model: Error code: .
None-Display model: Washing End ‘ ’
LED and ‘Start/Pause’ LED flashing.
Clean the drain filter.
The option ‘Rinse Hold ’ or
‘No Spin ’ has been selected.
Disable the option
‘Rinse Hold ’ or ‘No Spin ’.
Slelect spin program.
Pause the machine and
redistribute laundry manually.
The laundry is not evenly distributed
in the drum.
Page 29
ENGLISH 29
If you are unable to identify or solve the problem, contact
our service centre.
Before telephoning, make a note of the model, serial
number and purchase date of your machine: the Service
Centre will require this information.
Malfunction Possible cause Solution
The electronic unbalance detection
device has cut in because the laundry
is not evenly distributed in the drum.
The laundry is redistributed by reverse
rotation of the drum.
This may happen several times before
the unbalance disappears and normal
spinning can resume. If, after 10
minutes, the laundry is still not evenly
distributed in the drum, the machine
will not spin. In this case, redistribute
the load manually and select the spin
program.
Machine not installed properly. Make sure the levelling of
the appliance is correct.
Refer to ‘Installation’.
Transit bolts or packaging
not removed.
The load may be too small.
Make sure that the packaging
and/or the transit bolts are
removed. Refer to
‘Installation’.
Machines based on modern
technology operate very economically
using very little water without affecting
performance.
Add more laundry in the
drum.
Pause the machine and
redistribute laundry manually.
The machine
makes an
unusual noise:
No water is
visible in the
drum:
Cycle time
longer than
displayed:
Spinning starts
late or the
machine does
not spin:
Reduce the detergent
quantity or use another one.
Redistribute laundry manually in
the drum and start the spin
phase again. Refer to relevant
paragraph in “Positioning”
section.
Detergent over dose.
Machine unbalance.
Page 30
30
www.electrolux.com
TECHNICAL DATA10.
Dimensions
Power supply (voltage/frequency)
Total power absorbed
Minimum fuse protection
Water supply pressure
Maximum load
Spin speed
220-240 V/50 Hz (60 Hz for PHILIPPINES)
2200 W (2000 W for PHILIPPINES)
10 A
0.8 MPa
0.05 MPa
Maximum
Minimum
Width
Height
Depth
59.6 cm
84.7 cm
55.3 cm
Silk
Sensitive Plus
Easy Iron, Color,
Delicates
7.0 Kg
5.0 Kg
Regular, Heavy Duty,
Energy Saving, Rinse,
Spin, Drain
Programs Max. LoadModel
EWP10742, EWP85742,
EWP85752
EWP10742, EWP85742,
EWP85752
EWP10742, EWP85742,
EWP85752
EWP10742, EWP85742,
EWP85752
EWP10742, EWP85742,
EWP85752
EWP10742, EWP85742,
EWP85752
3.0 Kg
Wool 2.0 Kg
Fast’20 1.5 Kg
3.5 Kg
1000 rpm
850 rpm
Regular, Easy Iron,
Color, Delicates,
Wool, Heavy Duty,
Sensitive Plus, Energy
Saving, Rinse, Spin
Programs Max. SpinModel
Silk, Fast’20
EWP10742
800 rpm
EWP10742
EWP85742, EWP85752
650 rpm
EWP85742, EWP85752
Page 31
ENGLISH 31
INSTALLATION11 .
Never place cardboard, wood or
similar materials under the machine
to compensate for any unevenness
in the floor.
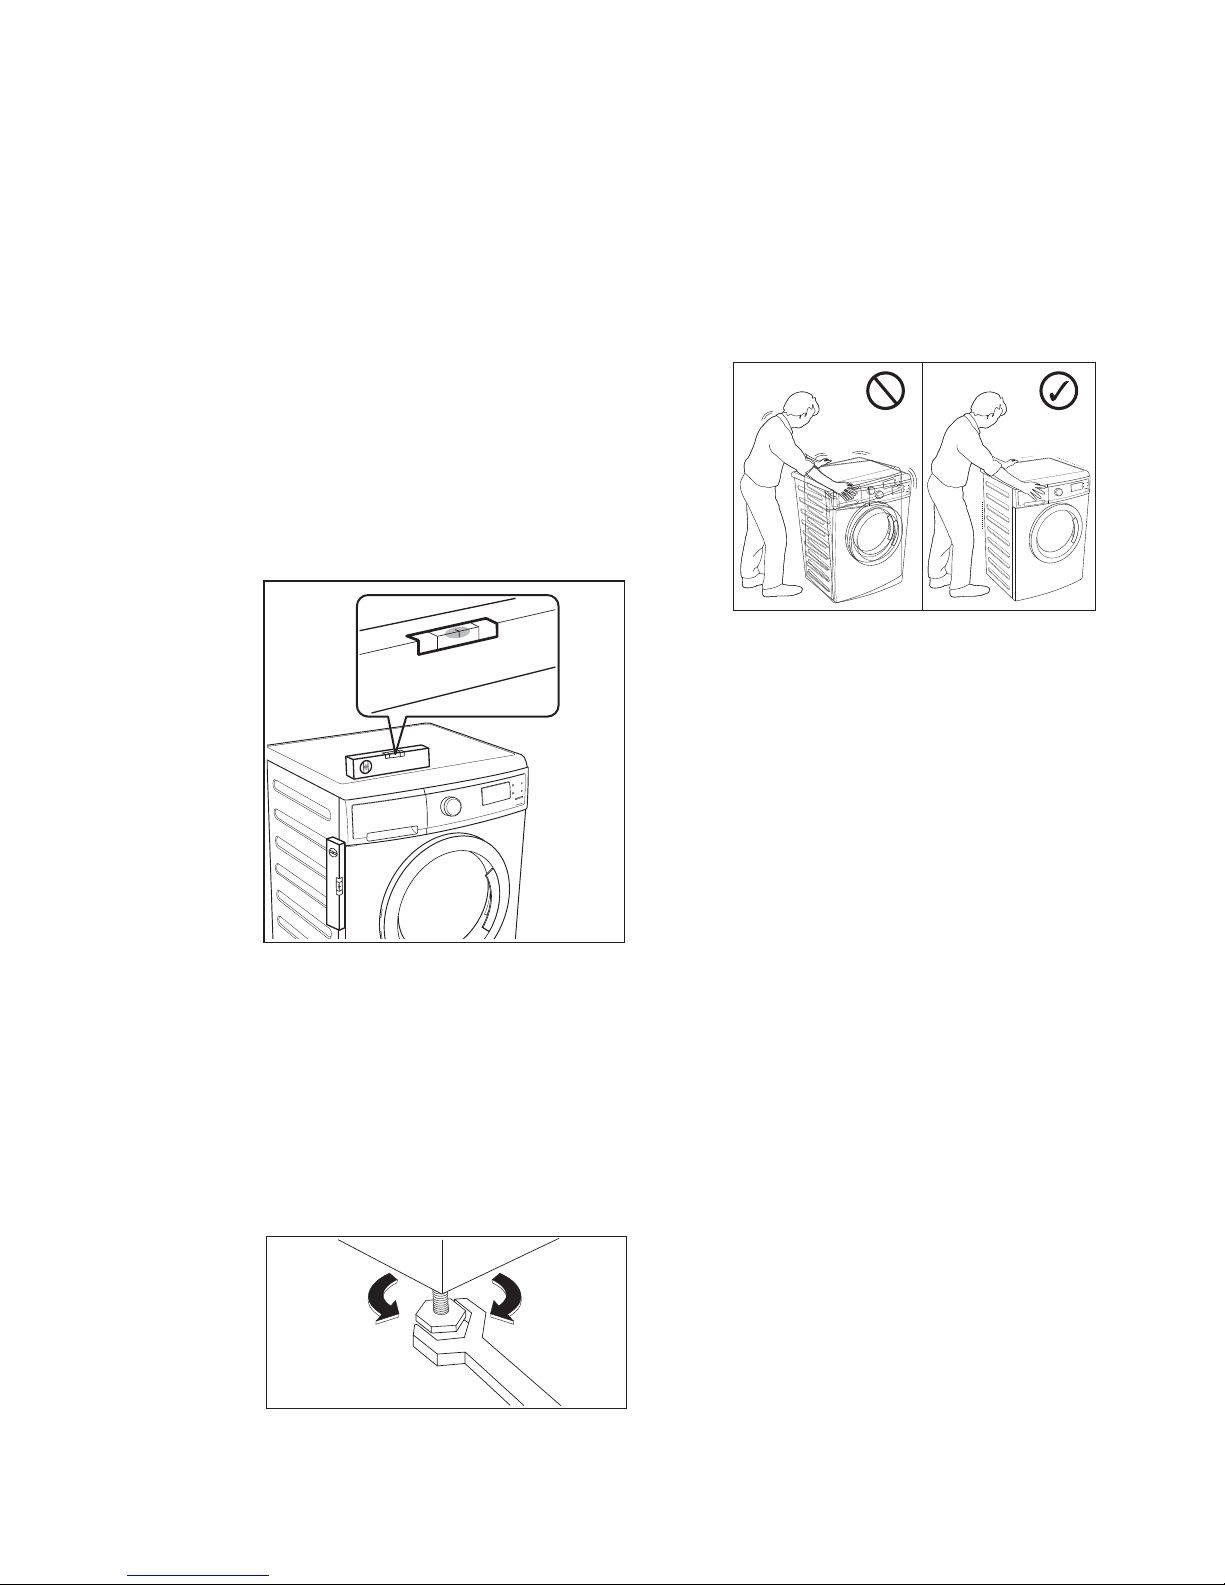
Loosen or tighten the feet to adjust
the level. A correct adjustment of
the appliance level prevents the
vibration, noise and the movement
of the appliance when in operation.
Use a spirit level on the top and side
of the washing machine to check
the levels.
If you do not have a spirit level, as a
guide use the edge of a door frame,
cupboard or bench to check that
the washing machine is level.
When the washing machine is
levelled, try to rock it from corner
to corner. If it does rock, adjust the
legs again until it is levelled and
does not rock.
It is important that your
washing machine stands firm
and level on the floor to ensure
correct operation.
11.1 Positioning
That the appliance must not be
installed behind a lockable door, a
sliding door or a door with a hinge
on the opposite side to that of the
washing machine door is restricted.
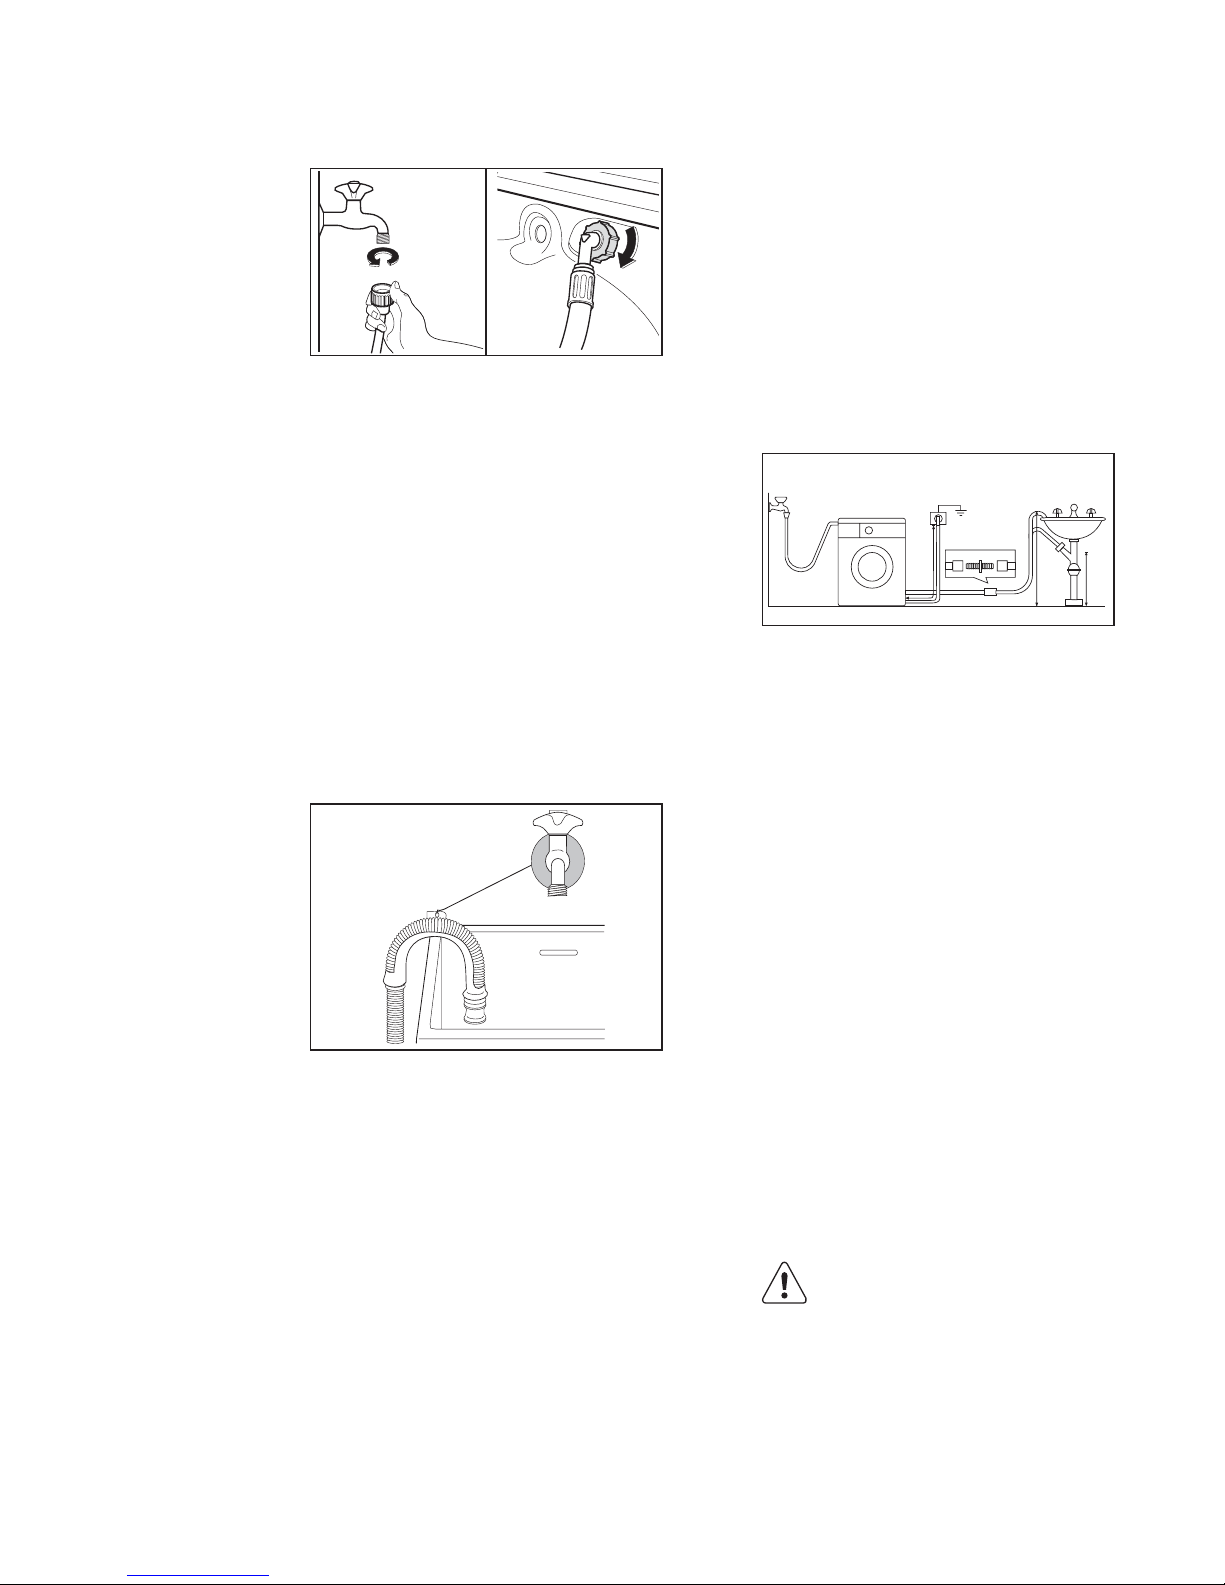
Connect the water inlet hose to a
tap with 3/4” BSP thread.
Use the hose supplied with the
washing machine. DO NOT USE
OLD HOSES.
The other end of the inlet hose
which connects to the machine
can be turned in any direction.
Simply loosen the fitting, rotate
the hose and retighten the fitting,
making sure there are no water
leaks.
11.2 Water Inlet
Install the machine on a flat hard
floor. Make sure that air circulation
around the machine is not
impeded by carpets, rugs etc.
Check that the machine does not
touch the wall or cupboard units.
Page 32
32
www.electrolux.com
The inlet hose must not be
lengthened. If it is too short and
you do not wish to move the tap,
you will have to purchase a new,
longer hose specially designed for
this type of use.
This could be done by tying it to
the tap with a piece of string or
attaching it to the wall.
In a sink drain pipe branch. This
branch must be above the trap so
that the bend is at least 60 cm
above the ground.
Directly into a drain pipe at a
height of not less than 60 cm and
not more than 90 cm.
The end of the drain hose must
always be ventilated, i.e. the
inside diameter of the drain pipe
must be larger than the outside
diameter of the drain hose.
The drain hose must not be
kinked. Run it along the floor; only
the part near the drainage point
must be raised.
The end of the drain hose can be
positioned in three ways:
Hooked over the edge of a sink
using the plastic hose guide
supplied with the machine.
For the correct functioning of the
machine the drain hose must
remain hooked on the proper
support piece situated on the top
part of back side of the appliance.
In this case, make sure the end
cannot come unhooked when the
machine is emptying.
90 cm
60 cm
11.3 Water Drainage
“An incorrect power supply
may void your warranty.”
Check that your domestic
electrical installation can take the
maximum load required (2.2 kW or
2.0 kW for PHILIPPINES), also
taking into account any other
appliances in use.
The manufacturer declines any
responsibility for damage or injury
through failure to comply with the
above safety precaution.
This machine is designed to
operate on a 220-240 V,
single-phase, 50 Hz (60 Hz for
PHILIPPINES) supply.
11.4 Electrical Connection
Connect the machine to
an earthed socket outlet.
CAUTION!
Page 33
ENGLISH 33
Should the appliance power
supply cable need to be replaced,
this should be carried out by our
Service Centre.
When the appliance is installed
the power supply cable must be
easily accessible.
If this appliance is supplied from a
cord extension set or electrical
portable outlet device, the cord
extension set or electrical portable
device must be positioned so that
it is not subject to splashing or
ingress of moisture.
The materials marked with
the symbol are
recyclable.
>PE<=polyethylene
>PS<=polystyrene
>PP<=polypropylene
This means that they can be
recycled by disposing of them
properly in appropriate collection
containers.
To save water, energy and to help
protect the environment, we
recommend that you follow these
tips:
Use authorised disposal sites for
your old appliance. Help to keep
your country tidy!
The symbol on the product
or on its packaging indicates that
this product may not be treated
as household waste.
Instead it shall be handed over to
the applicable collection point for
the recycling of electrical and
electronic equipment.
By ensuring this product is
disposed of correctly, you will
help prevent potential negative
consequences for the
environment and human health,
which could otherwise be caused
by inappropriate waste handling
of this product.
For more detailed information
about recycling of this product,
please contact your local city
office, your household waste
disposal service or the shop
where you purchased the
product.
12.1 Packaging Materials
12.3 Ecological Hints
12.2 Old Machine
ENVIRONMENT CONCERNS12.
Normally soiled laundry may be
washed without prewashing in
order to save detergent, water
and time (the environment is
protected too!).
The machine works more
economically if it is fully loaded.
With adequate pre-treatment,
stains and limited soiling can
be removed; the laundry can
then be washed at a lower
temperature.
Measure out detergent
according to the water
hardness, the degree of soiling
and the quantity of laundry
being washed.
Page 34

34 www.electrolux.com
KANDUNGAN
MAKLUMAT KESELAMATAN
HURAIAN PRODUK
PANEL KAWALAN
SEBELUM PENGGUNAAN YANG PERTAMA
PENGGUNAAN HARIAN
PETUA MEMBASUH
SIMBOL KOD BASUH ANTARABANGSA
PENJAGAAN DAN PEMBERSIHAN
PENYELESAIAN MASALAH
.................................................................................... 35
................................................................................................... 38
.................................................................................................... 39
........................................................... 45
........................................................................................... 45
................................................................................................. 50
.................................................................. 53
.......................................................................... 53
...................................................................................... 59
1
2
3
4
5
6
7
8
9
DATA TEKNIKAL ....................................................................................................... 6210
PEMASANGAN ......................................................................................................... 6311
KEPRIHATINAN ALAM SEKITAR ............................................................................... 6512
KAMI MEMIKIRKAN TENTANG DIRI ANDA
PENJAGAAN DAN PERKHIDMATAN PELANGGAN
Terima kasih kerana membeli perkakas Electrolux. Anda telah memilih produk yang
membawa bersamanya pengalaman profesional dan inovasi yang telah sudah berkembang
sejak berdekad-dekad lamanya. Pintar dan bergaya, ia telah direka bentuk dengan memikirkan tentang diri anda. Maka, setiap kali anda menggunakannya, anda boleh berasa yakin
mengetahui bahawa anda akan memperoleh hasil yang hebat setiap kali.
Selamat datang ke Electrolux.
Kami mengesyorkan penggunaan bahagian ganti tulen.Semasa menghubungi Servis,
pastikan bahawa anda telah menyediakan data yang berikut. Maklumatnya boleh didapati
pada plat label. Model, PNC, Nombor Siri.
layari laman web kami untuk:
Dapatkan nasihat penggunaan, risalah, penyelesai masalah, maklumat servis:
www.electrolux.com
Daftar produk anda untuk mendapatkan perkhidmatan yang lebih baik:
www.electrolux.com/productregistration
Beli Aksesori, Barangan Pakai Buang dan Bahagian ganti tulen untuk perkakas
anda:
www.electrolux.com/shop
Amaran / Maklumat Awas-Keselamatan.
Maklumat dan petua umum.
Maklumat alam sekitar.
Tertakluk pada perubahan tanpa notis.
Page 35

MELAYU 35
MAKLUMAT KESELAMATAN
1.1 KESELAMATAN AM
Adalah merbahaya untuk mengubah
spesifikasi atau cuba mengubah suai
produk ini dalam apa-apa cara sekali
pun.
Semasa program basuh bersuhu
tinggi, kaca pintu boleh menjadi
panas. Jangan sentuh!
Pastikan haiwan peliharaan tidak
memanjat masuk ke dalam dram.
Untuk mengelakkan perkara ini, sila
periksa dalam dram sebelum
menggunakan perkakas.
Objek seperti duit syiling, pin, paku,
skru, batu atau apa-apa benda keras
dan tajam boleh menyebabkan
kerosakan yang serius dan tidak boleh
dimasukkan ke dalam mesin.
Hanya gunakan kuantiti pelembut
pakaian dan detergen yang
disarankan. Kerosakan kepada fabrik
atau peralatan boleh berlaku jika anda
terlebih muatkan. Rujuk cadangan
kuantiti daripada pengilang.
Basuh item kecil seperti sarung kaki,
les, tali pinggang boleh basuh dll
dalam beg basuh atau sarung bantal
kerana item seperti ini boleh termasuk
ke dalam ruang antara tab dan dram
dalaman.
Alat ini tidak ditulukan untuk penggunaan orang (termasuk kanak-kanak)
yang kurang upaya fizikal,sensitiviti
deria atau mental, atau kurang
pengalamandan pengetahuan,
melainkan mereka telah diberi
penyeliaan atau arahan mengenai
penggunaan alat ini oleh orang yang
bertanggungjawab ke atas
keselamatan mereka.
Jangan gunakan mesin pembasuh
untuk membasuh barang dengan
tetulang, barang tanpa jahit tepi atau
terkoyak.
Sentiasa cabut keluar plag perkakas
dan matikan bekalan air selepas
digunakan, dibersihkan dan diselenggarakan.
Anda dilarang untuk memperbaiki
mesin ini sendiri, walau dalam apa
keadaan sekali pun. Kerja-kerja
pembaikan yang dijalankan oleh orang
yang tidak berpengalaman mungkin
menyebabkan kecederaan atau
malfungsi yang serius. Hubungi Pusat
Servis setempat anda.
1.
Demi kepentingan kesela,atan anda dan
untuk memastikan penggunaan yang
betul, sebelum memasang dan perkara
pertama untuk menggunakan mesin ini,
baca panduan pengguna ini dengan
berhati-hati, termasuklah petua dan
amaran. Untuk mengelakkan kesilapan
dan kemalangan yang tidak sepatutnya,
adalah peting untuk memastikan
bahawa semua orang yang menggunakan mesin ini memahami cara
pengendalian dan ciri-ciri keselamatannya. Simpan arahan ini dan pastikan ia
tetap barada bersama mesin ini jika la
dipindahkan atau dljual, supaya semua
orang yang menggunakan alat ini di
sepanjang hayatnya akan mendapat
maklumat yang betul mengenai
penggunaan dan keselamatan alat ini.
Page 36

36
www.electrolux.com
Perkakas ini berat. Hendaklah
berjaga-jaga semasa memindahkannya.
Semasa perkakas dikeluarkan
daripada bungkusannya, periksa
untuk pastikan tiada kerosakan. Jika
berasa ragu, jangan gunakannya dan
hubungilah Pusat Servis.
Semua bolt pengangkutan dan bahan
pembungkusan mesti dikeluarkan
sebelum penggunaan. Kerosakan
serius boleh berlaku kepada produk
dan kepada harta jika tidak mematuhi
langkan ini. Lihat bahagian yang
relevan dalam manual pengguna ini.
1.2 PEMASANGAN
Setelah memasang perkakas ini,
periksa bahawa ia tidak berdiri di atas
hos saluran masuk dan saluran keluar,
dan permukaan kerja tidak menekan
kabel bekalan elektrik pada dinding.
Jika mesin terletak di atas lantai
berkarpet, sila laraskan kaki untuk
membenarkan udara beredar dengan
bebas.
Sentiasa pastikan, bahawa tiada
kebocoran air daripada hos dan
sambungannya selepas pemasangan.
Sebarang kerja paip untuk memasang
perkakas ini harus dilakukan oleh
tukang paip berkelayakan.
Sebarang kerja elektrik untuk
memasang perkakas ini harus
dilakukan oleh tukang elektrik
berkelayakan.
Jangan memuatkan perkakas secara
berlebihan. Lihat bahagian yang
relevan dalam manual pengguna ini.
Sebelum membasuh, pastikan semua
poket dikosongkan dan butang serta
zip diketatkan. Elakkan daripada
membasuh pakaian berbulu atau
koyak dan cuci kotoran seperti cat,
dakwat, karat dan kesan rumput
sebelum pembasuhan. Coli berwayar
bawah TIDAK boleh dibasuh dengan
mesin.
Pakaian yang telah tercemar dengan
produk petrol mudah meruap tidak
boleh dibasuh dengan mesin. Jika
cecair pembersihan mudah meruap
digunakan, berhati-hati untuk memastikan bahawa cecair tersebut ditanggalkan daripada pakaian sebelum
memasukkannya ke dalam mesin.
Jangan tarik kabel bekalan kuasa
untuk mencabut palam daripada
soket; sentiasa pegang, palam dan
cabut.
Jangan gunakan mesin basuh jika
kabel bekalan kuasa, panel kawalan,
permukaan kerja atau tapak mesin
rosak supaya bahagian dalam mesin
basuh tersebut boleh diakseskan.
Perkakas ini direka bentuk untuk
kegunaan rumah. Jangan gunakannya
untuk tujuan selain daripada yang
dimaksudkan.
Basuh fabrik yang ditujukan untuk
dibasuh dengan mesin sahaja. Arahan
di label pakaian hendaklah dipatuhi.
1.3 PENGGUNAAN
Page 37
MELAYU 37
Mesin basuh ini bukan bertujuan untuk
digunakan oleh kanak-kanak kecil atau
orang yang uzur tanpa penyeliaan.
Kanak-kanak hendaklah diselia untuk
memastikan mereka tidak bermain
dengan perkakas tersebut.
Komponen pembungkusan (cth. lapik
plastik, polistirena) boleh
membahayakan kanak-kanak - awas
sesak nafas! Jauhkan daripada
capaian kanak-kanak.
1.4 KESELAMATAN KANAK KANAK
Pastikan kanak-kanak atau haiwan
peliharaan tidak memanjat masuk ke
dalam dram.
Untuk mengaktifkan peranti ini,
pusingkan butang (TANPA
menekannya) terdapat pada pintu
mengikut arah jam sehingga alurnya
melintang.Jika perlu, gunakan duit
syiling.
Apabila anda mengaktifkan peranti ini,
pintu tidak dapat ditutupkan. Ini
mencegah kanak-kanak atau haiwan
peliharaan daripada terkunci di dalam.
Untuk membatalkan peranti ini dan
untuk menutup pintu, putar butang
secara arah lawan jam sehingga
alurnya menegak.
Simpan semua detergen di tempat
yang selamat dan jauh daripada
capaian kanak-kanak.
1.5 PERANTI KESELAMATAN
KANAK-KANAK
Page 38
38
www.electrolux.com
HURAIAN PRODUK2.
8
9
1
4
5
6
2
3
12
7
11
10
14
15
13
1
Meja kerja
2
Tempat Letak Detergen/Pelembut Fabrik
3
Panel Kawalan
4
Pemegang Pintu
5
Pintu
7
6
Pelaras Kaki (Hadapan)
8
Kabel Wayar Utama
9
Hos Saliran Air Masuk
10
Saliran Air keluar
11
Pemegang Hos
12
Kaki Belakang
Bolt Pangangkutan
13
Peranti Penyekat Pintu
14
Plat Label
15
Penapis Pam Alir
Untuk menyambung hos aliran kepada
pinggir sinki.
Penutup plastik
Untuk menutup lubang pada bahagian sisi kabinet selepas pembuangan
bolt pengangkutan.
AKSESORI
Panduan hos plastik
Page 39
PANEL KAWALAN3.
Model: EWP10742, EWP85742
MELAYU 39
1
2
Tombol Pemilih Program
3
4
Pad Sentuh Pilihan Kelajuan Putaran
5
Pad Sentuh Lara Suhu
6
Paparan
Pad Sentuh Mula/Jeda
7
Pad Sentuh Bilas Tambahan
* model EWP85742
8
Pad Sentuh Prabasuh
9
Opsyen Keselamatan Kanak-kanak
10
Pad Sentuh Mula Tunda
Pad Sentuh Basuh Pantas
1
2
Tombol Pemilih Program
3
4
Pad Sentuh Pilihan Kelajuan Putaran
5
Pad Sentuh Lara Suhu
6
Lampu penunjuk bagi
Pad Sentuh Mula/Jeda
7
Pad Sentuh Bilas Tambahan
8
Pad Sentuh Prabasuh
9
Opsyen Keselamatan Kanak-kanak
10
Pad Sentuh Mula Tunda
Pad Sentuh Basuh Pantas
Model: EWP85752
2 6 7 83
4
1 9510
1 9510
2 64 7 83
Page 40
Pada penghujung program,
paparan akan menunjukkan ‘ ’
(pada model paparan) atau
Penamatan Pembasuhan ‘ ’
lampu pandu menyala (pada model
tiada paparan) dan penunjuk ‘ ’
(Kunci Pintu) padam.
40
www.electrolux.com
3.1 Tombol Pemilih Program
Pusing tombol ini untuk memulakan
program. Mesin basuh akan
mengusulkan suhu dan secara
automatik memilih nilai putaran
maksimum yang diperuntukkan
bagi program yang telah anda pilih.
Tombol pemilih boleh diputar
sama ada mengikut arah jam atau
berlawanan arah jam.
Meletakkan “ ” kepada tetapkan
semula program/ MEMATIKAN
mesin.
Di akhir program dail pemilih
hendaklah diputar ke kedudukan
“ ”, untuk mematikan mesin.
3.2 Pad Sentuh Pilihan Kelajuan
Putaran
Tekan pad sentuh ini berulang kali
untuk meningkatkan atau mengurangkan kelajuan putaran, jika
anda ingin pakaian dicuci pada
suhu yang lain daripada yang
diusulkan oleh mesin pembasuh
dan pengering.
Tiada opsyen putar yang menyingkirkan semua fasa putaran dan
menambah bilangan bilasan.
Tiada Putaran
Dengan memilih opsyen ini, air
bilasan terakhir tidak dikosongkan
dan dram berputar dengan kerap
untuk mengelakkan kain kotor
daripada berkedut.
Tunda Bilasan
3.3 Pad Sentuh Laras Suhu
Tekan pad sentuh ini berulang kali
untuk meningkatkan atau mengurangkan suhu, jika ingin pakaian
dicuci pada suhu yang lain daripada
yang diusulkan oleh mesin basuh
(simbol “ ” sepadan dengan
cucian sejuk).
Pintu masih dikunci untuk menunjukkan bahawa semua air perlu
dikeluarkan.
To empty out the water:
Pilih program“Spin” atau “Drain”.
Kurangkan kelajuan putaran jika
perlu.
Tekan Mula/Jeda pad sentuh.
Perkakas akan menyalir air dan
kemudian, memutar.
A
Nombor Digital;
akan menyatakan kepada anda:
B
-
Ikon Fasa Pembasuhan
C
D
Ikon Mula Lewat
Ikon Keselamatan Kanakkanak
3.4 Paparan
(Model: EWP10742, EWP85742)
Masa kitar pembasuhan.
-
Kod penggera. Rujuk kepada
bab “Penyelesaian masalah”
untuk penerangannya.
-
Mula mula lewat.
C DA
B E
Page 41
3.7 Pad Sentuh Prabasuh
MELAYU 41
E
Ikon Pintu Dikuna
3.5 Penunjuk
(Model EWP85752)
-
Penunjuk Pintu Dikuna
-
Penunjuk penamatan
pembasuhan.
-
Penunjuk kunci kanakkanak.
-
Ia dihidupkan, anda tidak
boleh membuka pintu.
-
Ia dimatikan, anda boleh
membuka pintu.
LED dihidupkan,anda tidak
boleh membuka pintu.
LED dimatikan,anda boleh
membuka pintu.
3.6 Pad Sentuh Bilas Tambahan
Opsyen ini disyorkan untuk orang
yang alah kepada detergen dan di
kawasan yang airnya amat lembut.
Tekannya untuk menambah satu
fasa bilasan kepada program.
Penunjuk opsyen ini akan menyala.
(Model: EWP10742, EWP85742)
3.9 Pad Sentuh Mula Tunda
Opsyen ini membuatkannya
berkemungkinan untuk menundakan permulaan program pembasuhan selama 3, 6 dan 9 jam.
Tekan pad sentuh ini berulang kali
untuk memilih tunda masa.
Penunjuk opsyen ini akan menyala.
Anda mesti memilih opsyen ini
setelah anda menetapkan program
dan sebelum anda menekan pad
sentuh Mula/Jeda.
(Model: EWP85752)
Pilih opsyen ini jika anda inginkan
kain cucian anda diprabasuh
sebelum basuhan utama.
Gunakan pilihan ini untuk kotoran
yang degil. Penunjuk opsyen ini
akan menyala.
Apabila anda menetapkan fungsi
ini, masukkan detergen dalam
ruang “ ”.
Fungsi ini meningkatkan tempoh
program.
Anda boleh membatalkan
penundaan masa pada bila-bila
masa dengan menekan pad sentuh
‘Delay Start’ berulang kali sehingga
paparan menunjukkan penundaan
masa ‘ ’, kemudian, tekan pad
sentuh Mula/Jeda.
3.8 Pad Sentuh Mula Tunda
Pilihan ini membolehkan anda
menangguh permulaan program
selama 30 min, 60 min atau 90
min dan kemudian dengan jurang
satu jam antara 2 hingga 20 jam.
Tundaan masa yang anda pilih
akan dipaparkan pada skrin
paparan. Masa tamat basuhan
ditambankan untuk menunjukkan
anda tangguhan yang dipilih.
Anda mesti memilih opsyen ini
setelah anda menetapkan program
dan sebelum butang “Start/Pause”
(Mula/Jeda) ditekan.
Jika anda ingin menambah kain
cucian ke dalam mesin pada masa
tunda tekan pad sentuh Mula/Jeda
untuk meletakkan mesin dalam
mod jeda.
Tambah kain cucian, tutup pintu
dan tekan pad sentuh Mula/Jeda
sekali lagi.
Page 42

42
www.electrolux.com
3.10 Pad Sentuh Pantas
Opsyen ini boleh digunakan untuk
kotoran yang sedikit untuk
mendapatkan hasil cucian dalam
masa yang singkat.
Masa membasuh akan dikurangkan
mengikut jenis kain dan suhu yang
dipilih.
Jika anda ingin menambah kain
cucian ke dalam mesin pada masa
tunda tekan pad sentuh Mula/Jeda
untuk meletakkan mesin dalam
mod jeda. Tambah kain cucian,
tutup pintu dan tekan pad sentuh
Mula/Jeda sekali lagi.
Anda boleh membatalkan tunda
masa pada bila-bila masa dengan
menekan pad sentuh ‘Delay Start’
berulang kali sehingga lampu LED
hilang, kemudian tekan pad sentuh
Mula/Jeda.
3.12
Bunyi Isyarat
Program selesai.
Perkakas mengalami kerosakan.
Bunyi isyarat beroperasi apabila:
Jika anda ingin menyahdaya
bunyi isyarat (kecuali sekiranya
perkakas mengalami kerosakan),
tekan pad sentuh “Rinse +” dan
“Quick” pada masa yang sama
selama 6 saat dan dengar bunyi
‘BIP, BIP’.
Untuk kembali ke konfigurasi asal
tekan 2 pad sentuh ini pada masa
yang sama selama 6 saat, dan
dengar bunyi ‘BIP’.
3.11 Pad Sentuh Mula/Jeda
Untuk memulakan program yang
dipilih, tekan ‘Mula/Jeda’.
Untuk mengganggu program
yang sedang berjalan, tekan
'Mula/Jeda’ untuk menghentikan
sementara mesin.
Untuk memulakan semula program
daripada titik di mana ia dihentikan,
tekan ‘Mula/Jeda’ sekali lagi.
Jika anda memilih tunda mula,
selepas menekan 'Mula/Jeda'
mesin anda akan memulakan
kiraan masa tunda.
3.13 Ciri Keselamatan Kanak kanak
Perkakas anda disediakan
dengan KUNCI KESELAMATAN
KANAK-KANAK yang membenarkan anda untuk meninggalkan
perkakas tidak dijaga dengan
pintu ditutup tanpa perlu risau
kanak-kanak mungkin tercedera
atau menyebabkan kerosakan
kepada perkakas.
Tetapkan opsyen ini sebelum
menekan Start/Pause (Mula/Jeda)
selepas memilih program basuhan
yang diperlukan.
Opsyen ini berfungsi walaupun
selepas perkakasan dimatikan.
Untuk mengaktifkan fungsi ini,
tekan pad sentuh ‘Prewash’ dan
‘Rinse+’ pada masa yang sama
sehingga paparan menunjukkan
simbol ‘ ’.
Menetapkan opsyen Kunci Kanakkanak:
Untuk menyahaktifkan fungsi ini,
tekan pad sentuh ‘Prewash’ dan
‘Rinse+’ pada masa yang sama
sehingga simbol ‘ ’ padam.
Page 43
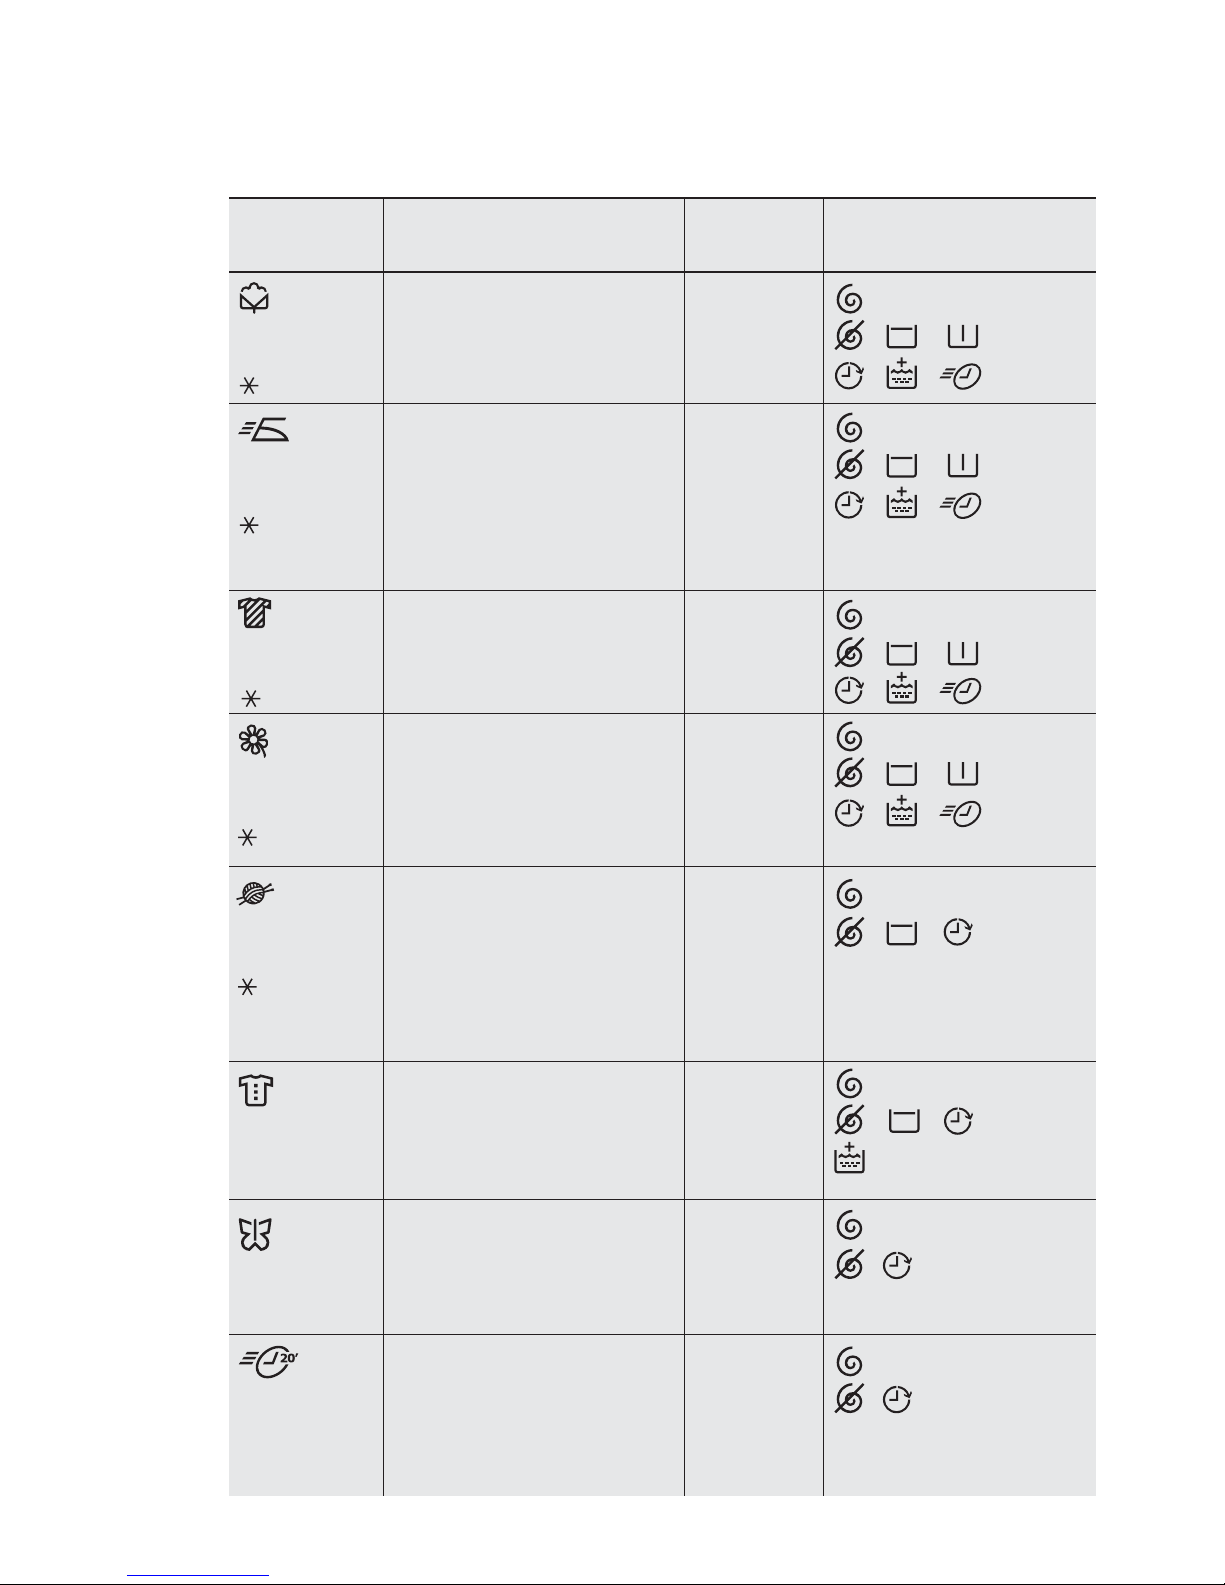
MELAYU 43
3.14 Program + Pilihan Opsyen
Regular;
90 °C hingga
Kapas putih dan
berwarna dengan banyak
kotoran;
beban maks. 7 kg.
(Spin Pengurangan)/
Easy Iron;
60 °C hingga
Kain sintetik atau
campuran, untuk diseterika
pakaian dalam, pakaian
berwarna, kemeja, blaus
tidak mengecut;
beban maksimum 3.5 kg.
Delicates;
40 °C hingga
Fast’ 20;
30 °C
Fabrik lembut seperti
akrilik, viskos, item
poliester dengan
kekotoran biasa;
muatan maks. 3.5 kg
Item fabrik sintetik dan
campuran. Kotoran
sedikit dan item untuk
disegarkan;
muatan maks. 1.5kg
/ / /
/ /
/ / /
/ /
/ / /
/ /
/ / /
/ /
/ / /
/
/
/ /
Color;
60 °C hingga
Item warna bagi
kaincampuran;
beban maksimum 3.5 kg.
Wool;
40 °C hingga
Program diuji khas untuk
pakaian wul yang
mempunyai label 'Wul baru
tulen, tidak mengecut,
basuhan mesin';
muatan maks. 2 kg.
Heavy Duty;
90 hingga
40 °C
Pakaian yang sangat
kotor;
muatan maks. 7 kg.
Silk;
30 °C
Kain kotor yang sangat
halus seperti tirai sutera
dalam masa yang singkat;
beban maksimum 3 kg.
Program;
Suhu
Jenis muatan;
Maks. berat muatan
Uraian
Program
Pilihan boleh
digabungkan
Basuh
Bilas
Pusingan
lama
-
-
-
Basuh
Bilas
Pusingan
pendek
-
-
-
Basuh
Bilas
Pusingan
pendek
-
-
-
Basuh
Bilas
Pusingan
pendek
-
-
-
Basuh
Bilas
Pusingan
pendek
-
-
-
Basuh
Bilas
Pusingan
pendek
-
-
-
Basuh
Bilas
Pusingan
pendek
-
-
-
Basuh
Bilas
Pusingan
pendek
-
-
-
(Spin Pengurangan)/
(Spin Pengurangan)/
(Spin Pengurangan)/
(Spin Pengurangan)/
(Spin Pengurangan)/
(Spin Pengurangan)/
(Spin Pengurangan)/
Page 44
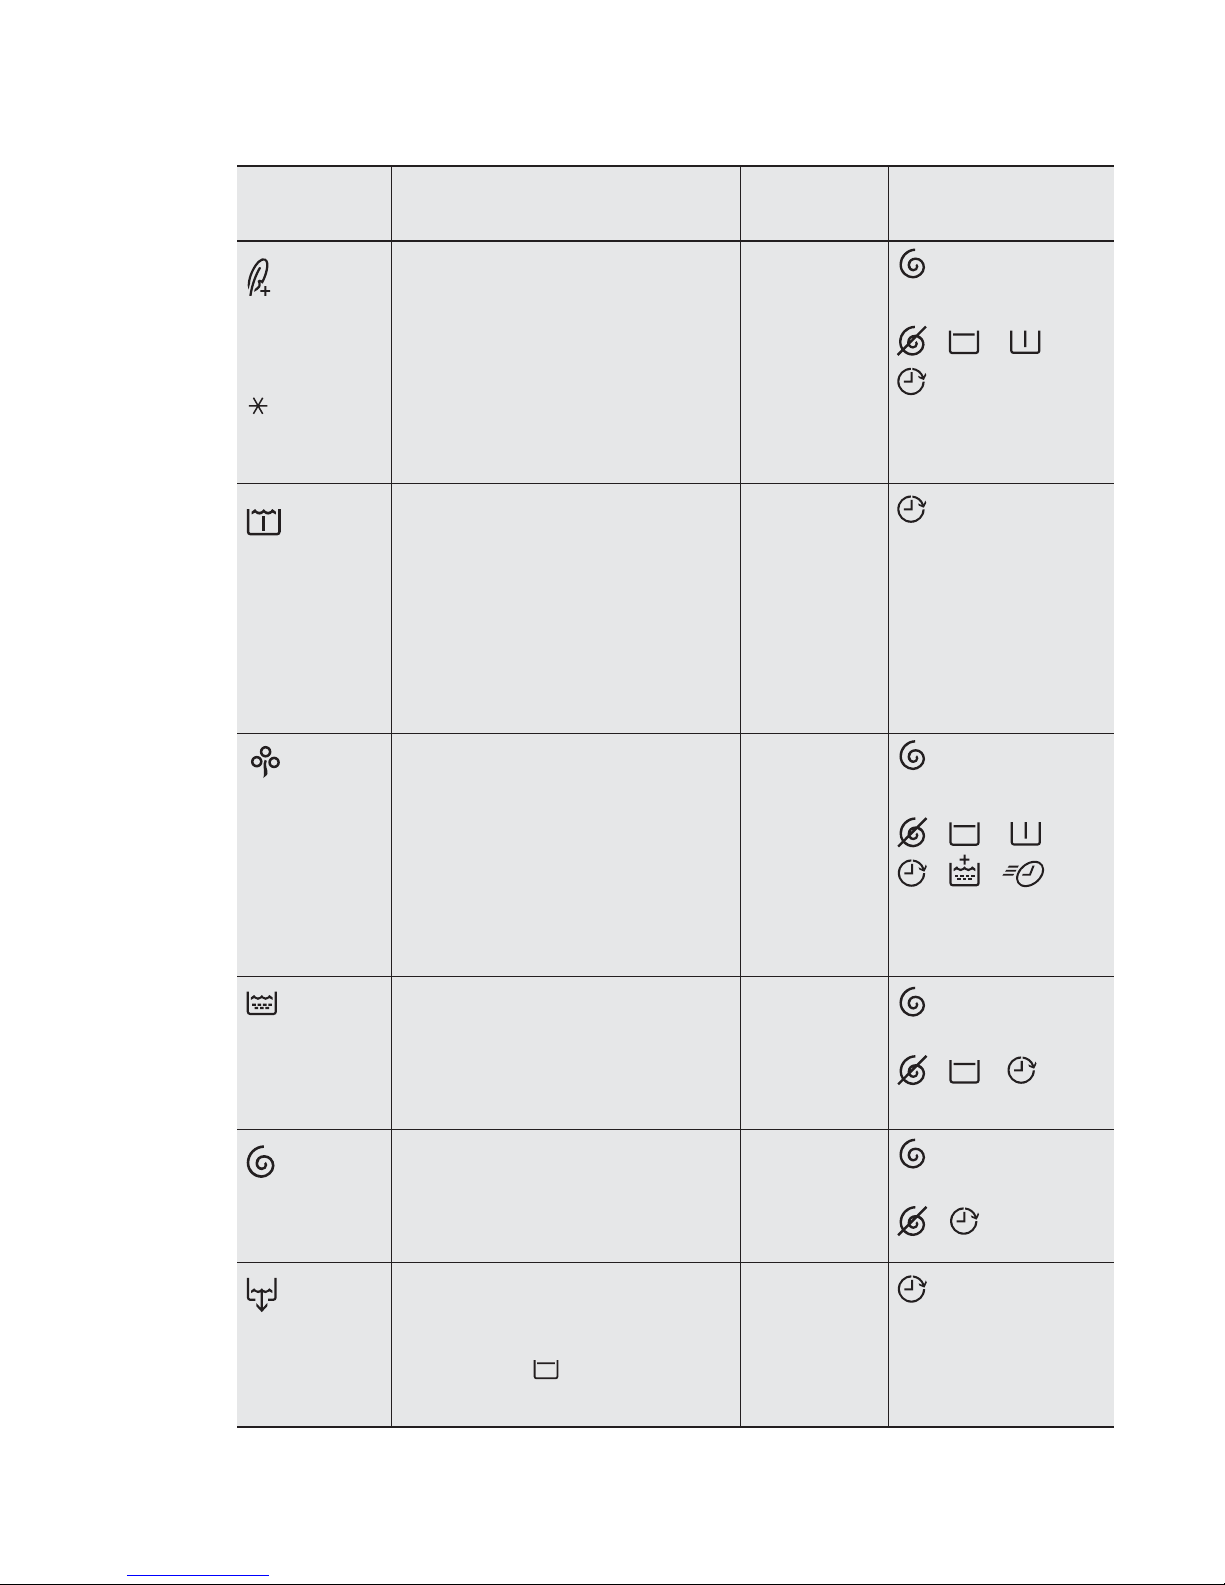
44
www.electrolux.com
Energy
Saving
60, 40 °C
Putih dan mudah luntur warna,
kapas dengan kotoran normal.
Tetapkan program ini untuk
mempunyai hasil cucian yang
baik dan kurangkan penggunaan tenaga. Masa bagi
program pembasuhan dilanjutkan; beban maksimum 7 kg.
Spin
(Putar)
Drain
(Salir)
Untuk memusingkan basuhan
dan menyalirkan air dalam
dram;
beban maksimum 7 kg.
Untuk mengosongkan
bilasan air terakhir di dalam
program dengan opsyen
‘Tunda Bilas ’ ;
beban maksimum 7 kg.
Rinse
(Bilas)
Untuk membilas dan
memusingkan basuhan;
beban maksimum 7 kg.
Untuk orang yang mempunyai kulit yang sensitif atau
alahan, kapas putih dan
berwarna direka untuk
kecekapan membilas yang
tinggi, terutama sekali untuk
partikel padu;
beban maksimum 5 kg.
Program ini membenarkan
anda untuk merendam pakaian
yang sangat kotor. Terdapat air
di dalam dram apabila program
selesai. Untuk menyalir air rujuk
perenggan“Untuk
mengosongkan air”;
beban maksimum 7 kg.
Sensitive
Plus;
60 °C hingga
Soak;
30 °C
- Rendam
/ / /
/ / /
/ /
/ /
/
1)
1)
Program Penjimat Tenaga dengan opsyen 60 °C dicadangkan untuk muatan
penuh kapas dengan kotoran basa, dan adalah program label rating air dan
tenaga.
Fasa Alir
Salir
-
Salir
-
-
Tiga bilasan
dengan
pelembut
Fasa
putaran
-
-
(Spin Pengurangan)/
(Spin Pengurangan)/
(Spin Pengurangan)/
(Spin Pengurangan)/
Program;
Suhu
Jenis muatan;
Maks. berat muatan
Uraian
Program
Pilihan boleh
digabungkan
Basuh
Bilas
Pusingan
pendek
-
-
-
Basuh
Bilas
Pusingan
lama
-
-
-
Page 45
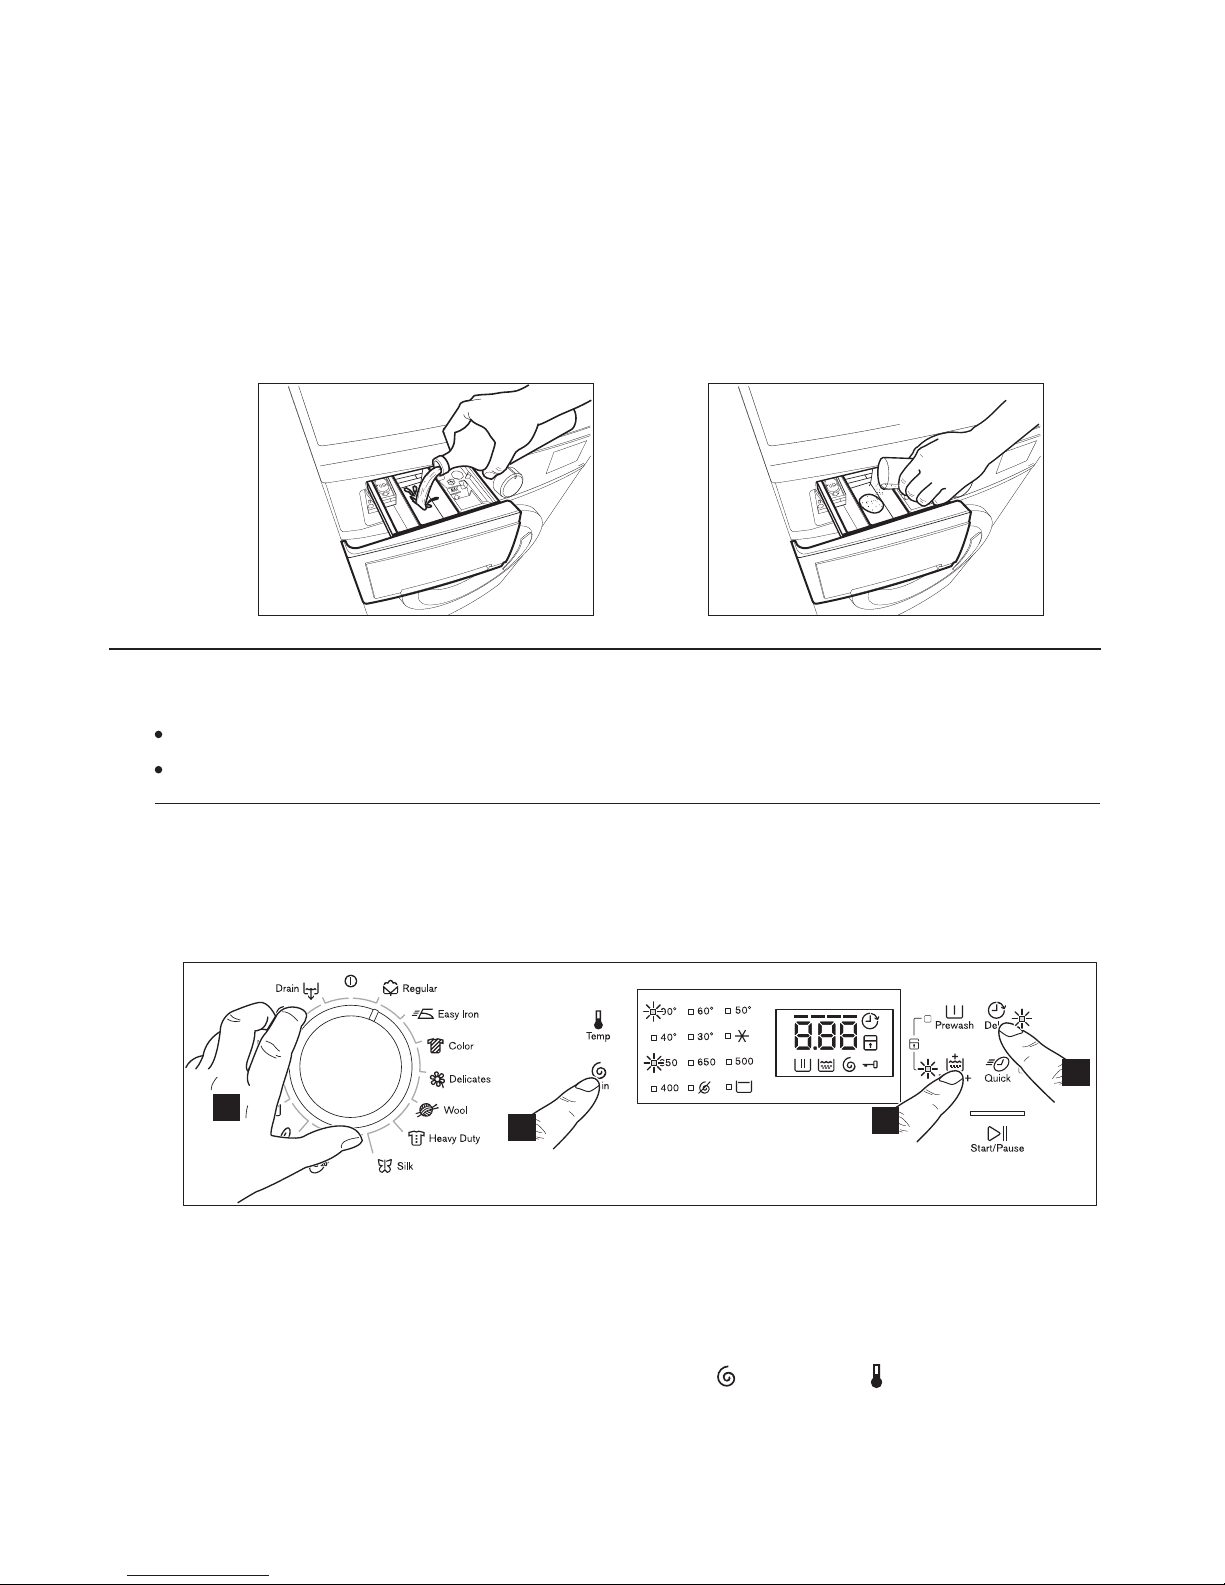
MELAYU 45
SEBELUM PENGGUNAAN YANG PERTAMA4.
PENGGUNAAN HARIAN5.
* model EWP85742
1
2
3
4
1.
Putar dail pemilih program kepada
program yang dikehendaki.
Sebaik sahaja anda memilih program
basuhan, program yang dipilih akan
kekal pada kedudukan tersebut
untuk sepanjang basuhan.
-
Dail pemilih boleh diputar sama ada
mengikut arah jam atau berlawanan
arah jam.
-
2.
Jika anda inginkan kain kotor anda
diputar atau gunakan suhu berlainan
daripada yang diusulkan oleh mesin
pembasuh, tekan pad sentuh Putar
‘ ’ dan suhu ‘ ’ berulang kali untuk
menukar kelajuan dan suhu putaran.
Pastikan sambungan elektrik dan air
mematuhi arahan pemasangan.
Letakkan 2 liter air di dalam petak
detergen untuk fasa basuhan. Ia
mengaktifkan sistem salir.
1.
2.
3.
Pilih kitar Regular pada 90 °C,
tanpa sebarang kain basuhan di
dalam mesin, untuk mengeluarkan
sebarang baki pengilangan dari
dram dan tab. Tuangkan 1/2
sukatan detergen ke dalam petak
basuhan utama dan jalankan mesin.
Pasangkan palam utama kepada soket utama.
Buka bekalan arus air.
Langkah 1 - Menetapkan Program Untuk Pembasuhan
5.1 Panduan Mula Empat Langkah
Page 46
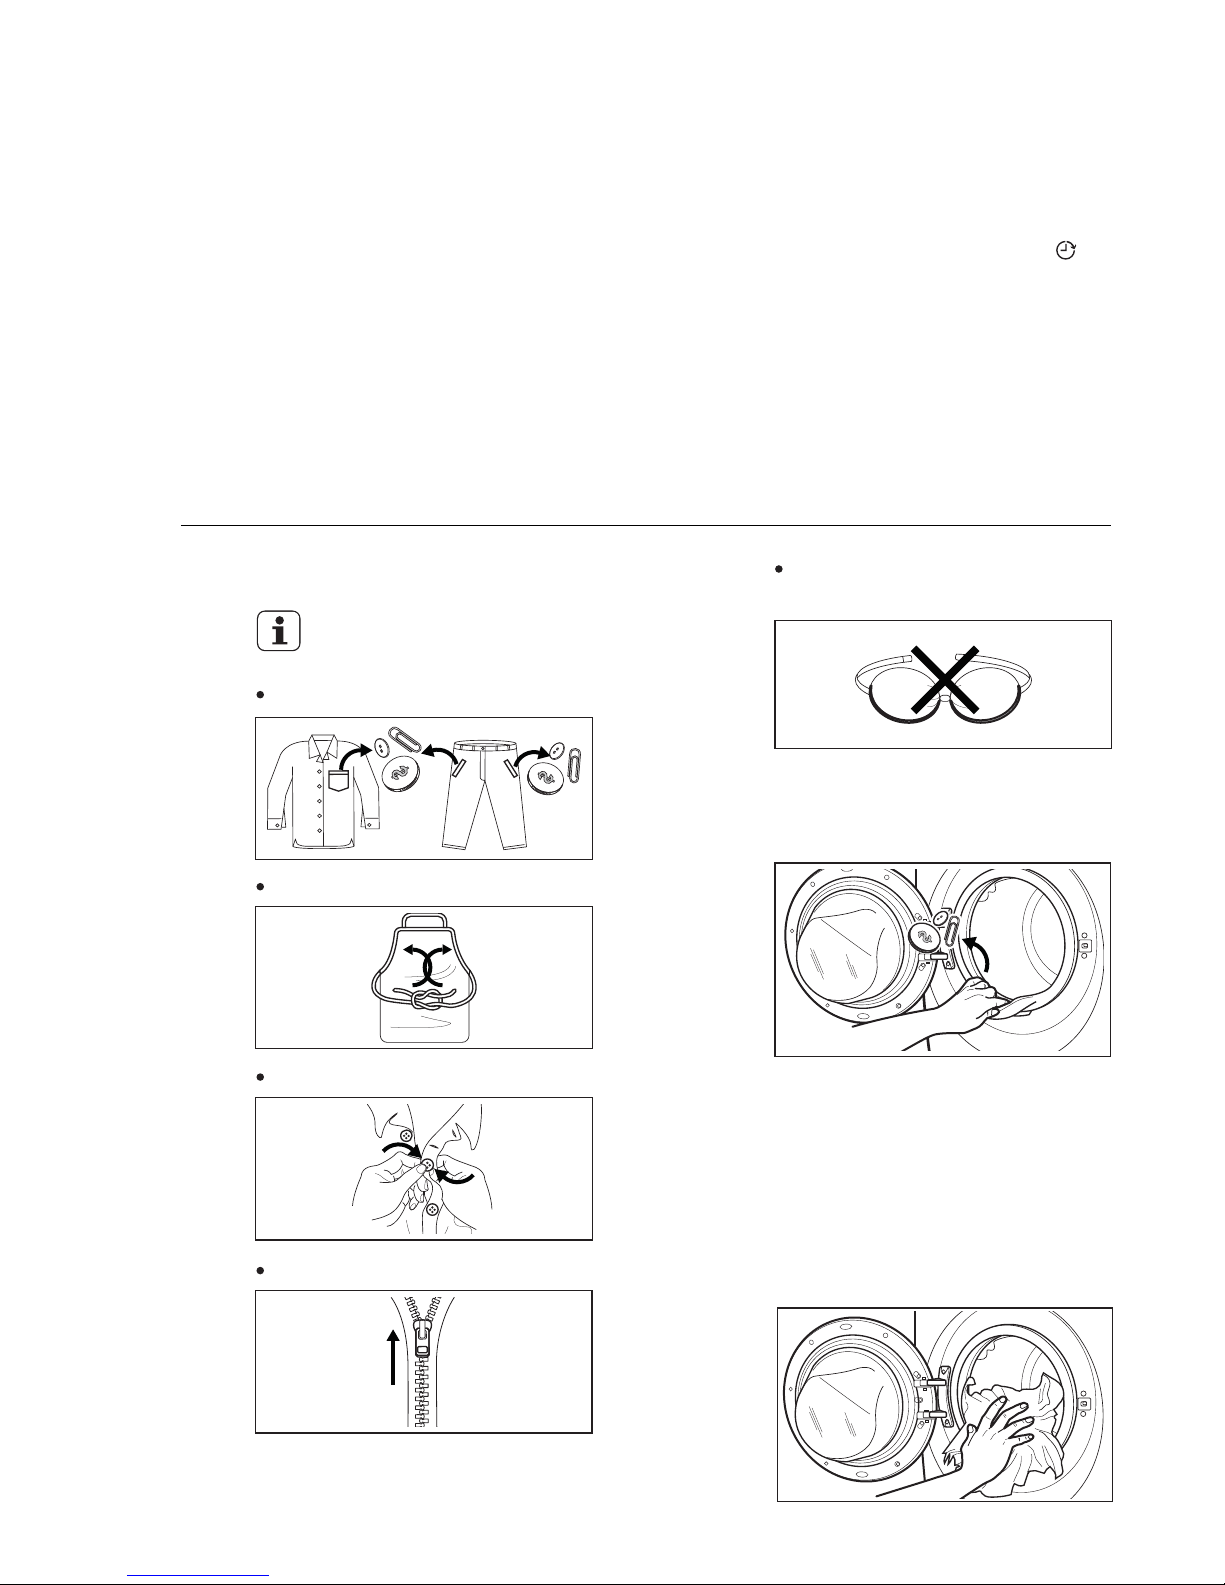
46
www.electrolux.com
3.
4.
Jika anda ingin menundakan
permulaan program basuh, tekan
pad sentuh opsyen ‘Delay Start ’
berulang kali untuk memilih masa
tunda mesin basuh anda.
Pilih dan tekan opsyen pad sentuh,
jika anda inginkan kain basuhan
anda dicuci dengan fungsi khas.
Fungsi berlainan boleh digabungkan
yang bergantung pada program
yang dipilih.
Apabila butang ini ditekan, lampu
pandu yang berkaitan akan menyala.
Apabila ia ditekan lagi, lampu pandu
yang berkaitan akan padam.
Langkah 2 - Memuat Cucian
1.
Sebelum memuatkan cucian,
sila pasti:
Poket Dikosongkan.
Kord diikatkan.
Butang diketatkan.
Zip Ditutupkan.
Masukkan pakaian ke dalam
dram, satu persatu, sambil
menggoncang-goncangkannya
seberapa banyak yang mungkin.
3.
Buka pintu dengan menarik
pemegang pintu perlahan-lahan
ke luar
Periksa dan keluarkan objek (jika
ada) yang boleh tersekat di
dalam lipatan.
2.
Coli berwayar TIDAK boleh
dibasuh dengan mesin.
Page 47
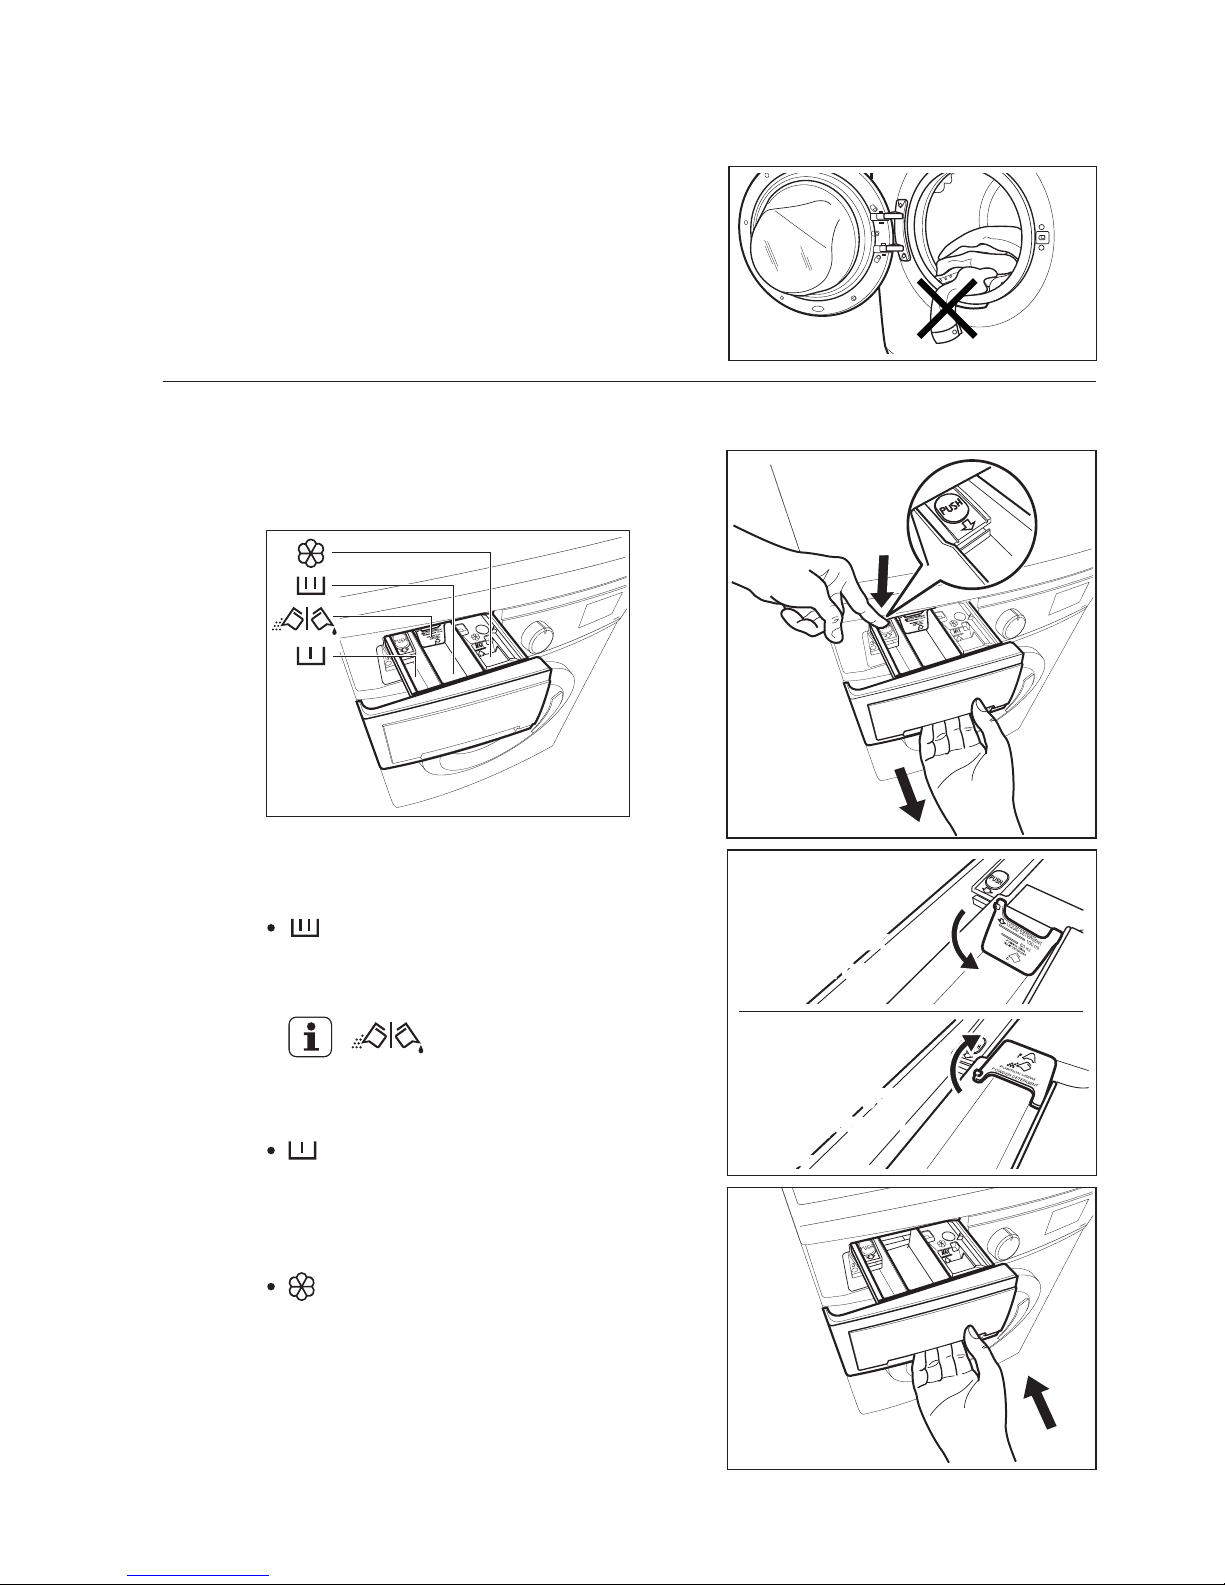
MELAYU 47
Pastikan tiada kain cucian tertinggal
diantara penutup dan pintu.
4.
Tutup pintu muatan.
5.
Detergen serbuk atau cecair.
1
3
2
Laci Dispenser Detergen1.
4
Langkah 3 - Menggunakan Detergen dan
Perapi Tambahan
Dispenser Detergen dibahagikan
kepada tiga ruang.
Ruang ‘SOFTENER’
Ruang ‘PREWASH’
Ruang ini digunakan untuk
perapi fabrik dan agen kanji.
Ruang ini hanya digunakan
untuk detergen apabila
Prabasuh dipilih.
Ruang ‘MAIN WASH’
Ruang ini digunakan untuk
detergen pada semua program.
Detergent flap
Flap untuk detergen
serbuk atau cecair.
Kedudukan
bawah: untuk
detergen cecair.
Kedudukan
atas :
untuk detergen
serbuk (tetapan
kilang).
Kedudukan
bawah: untuk
detergen cecair.
Kedudukan
atas :
untuk detergen
serbuk (tetapan
kilang).
Page 48
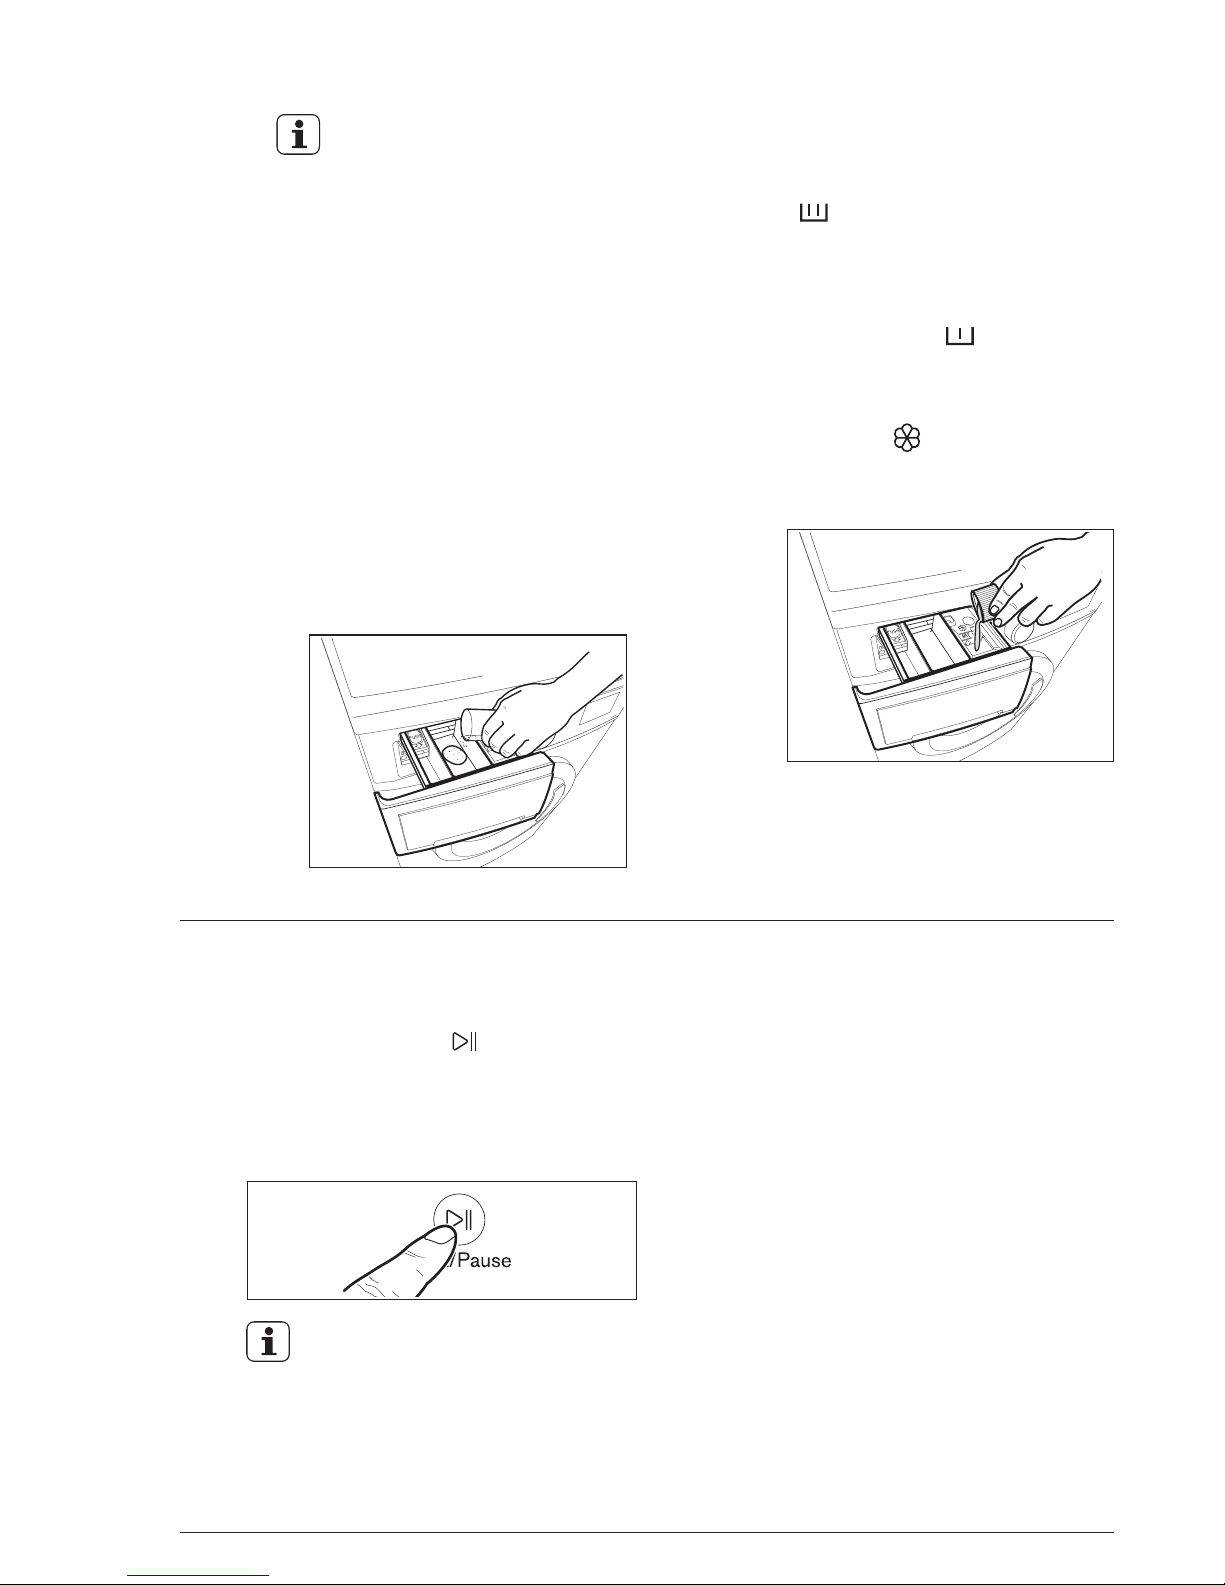
48
www.electrolux.com
Tutup laci perlahan-lahan.
-
PERHATIAN!
Jika anda putar dail program kepada
program lain semasa mesin berfungsi,
lampu pandu Mula/Jeda merah akan
menyala 3 kali untuk menunjukkan
pilihan salah. Mesin tidak akan
menjalankan program yang baru dipilih.
Perkakas akan secara automatik
mengubah suai tempoh program
yang dipilih mengikut jenis dan
saiz muatan.
Langkah 4 - Memulakan program
Untuk memulakan program, tekan pad
sentuh Mula/Jeda ( ), lampu pandu
yang sepadan akan berhenti menyala
dan tempoh program akan dipaparkan
pada skrin (hanya untuk model
paparan).
Selepas kira-kira 15 minit dari
permulaan program:
Jangan gunakan detergen
cecair yang bergelatin atau
pekat.
-
Jangan letakkan cecair lebih
banyak daripada paras
maksimum.
-
Jangan tetapkan “DELAY”.
-
Jangan tetapkan fasa
“PREWASH”.
-
Apabila anda menggunakan detergen cecair:
Tarik keluar petak dispenser
sehingga ia berhenti.
-
Sukat detergen dan pelembut
pakaian;
2.
Ukur sukatan detergen yang
diperlukan, tuang ia ke
dalamtempat basuhan utama
( ).
-
Jika anda mahu melakukan
fasa “Prewash (Pracuci)”,
tuangkannya ke dalam ruang
yang bertanda .
-
Jika perlu, tuangkan pelembut
fabrik ke dalam bekas
bertanda (jumlah yang
digunakan mesti tidak melebihi
tanda“MAX” di dalam petak).
-
Page 49
MELAYU 49
5.3 Menukar Program
Jika anda tidak boleh membuka pintu
tetapi, anda perlu membukanya,
anda perlu mematikan mesin dengan
memutar tombol pemilih program ke
kedudukan ‘ ’ untuk menyahaktifkan perkakas. Selepas kira-kira 5
minit pintu boleh dibuka.
Perkakas berhenti secara automatik.
Isyarat akustik akan beroperasi.
Paparan akan menunjukkan ‘ ’
(model paparan) atau lampu
pandu Basuhan Tamat ‘ ’
menyala (model tiada paparan).
Penunjuk pad sentuh Start/Pause
(Mula/Jeda) padam.
-
-
-
-
-
-
-
-
Penunjuk kunci pintu ‘ ’ padam.
Keluarkan pakaian daripada perkakas. Pastikan dram dikosongkan.
Biarkan pintu terbuka, untuk
mengelakkan kulat dan bau.
Tutup pili air.
5.6 Di Penghujung Program
Menukar program yang berjalan hanya
boleh dilakukan hanya dengan menetapkannya semula.
Putar tombol pemilih program ke
kedudukan ‘ ’ untuk membatalkan program dan matikan perkakas.
1.
Putar tombol pemilih program ke
kedudukan program baru dan
tetakkan opsyen baru, kemudian,
tekan pad sentuh ‘Start/Pause’
(Mula/Jeda) sekali lagi.
Perkakas akan menyalir air.
2.
Untuk menjeda tekan “START/PAUSE”.
Penunjuk akan mula berkelip.
-
Tekan “START/PAUSE” sekali lagi.
Program akan diteruskan.
-
5.2 Gangguan Program
Selepas program bermula, hanya
beberapa opsyen boleh ditukarkan.
Tekan pad sentuh“Start/Pause”
(Mula/Jeda). Penunjuk akan mula
berkelip.
1.
Pilih dantukar opsyen.2.
Tekan Start/Pause sekali lagi.
Program akan diteruskan.
3.
5.4 Menukar Opsyen
Semasa program atau “DELAY” sedang
beroperasi, pintu perkakas dikunci dan
paparan menunjukkan penunjuk ‘ ’.
Tetapkan mesin basuh ke PAUSE
(JEDA)dengan menekan pad
sentuh“Start/Pause” (Mula/Jeda).
Tunggu sehingga penunjuk kunci pintu
‘ ’ padam, barulah pintu boleh
dibuka.
Jika penunjuk kunci pintu ‘ ’ tidak
padam, ini bermakna mesin sudah
mula memanas dan paras air berada
di atas hujung bawah pintu atau
dram sedang berputar. Dalam hal ini
pintu TIDAK BOLEH dibuka.
5.5 Membuka Pintu
Beri perhatian kepada paras
air dan suhu air.
AWAS!
Apabila Program Menbasuh
Selesai, Tetapi Terdapat Air
Di Dalam Dram
Dram berputar secara kerap untuk
mengelakkan renyuk pada pakaian.
Anda mesti mengeringkan air untuk
membuka pintu.
Penunjuk kunci pintu ‘ ’ sedang
bernyala. Pintu kekal berkunci.
-
-
5.7
Page 50
50
www.electrolux.com
Apabila program selesai dan
penunjuk kunci pintu ‘ ’
padam, anda boleh membuka
pintu.
1.
3.
2.
Untuk mengeringkan air:
Tekan pad sentuh“Start/Pause”
(Mula/Jeda). Perkakas akan
menyalir air dan kemudian,
memutar.
Jika perlu, kurangkan kelajuan
memutar.
Tetapkan program“Spin” atau
“Drain”.
4.
Putar tombol pemilih program ke
kedudukan ‘ ’ untuk menyahaktifkan perkakas.
5.
5 minit selepas program membasuh
tamat, jika anda tidak menyahaktifkan perkakas, fungsi penjimatan
tenaga diaktifkan.
Fungsi penjimatan tenaga mengurangkan penggunaan tenaga apabila
perkakas dalam mod siap sedia.
Semua penunjuk dan paparan
akan dimatikan.
Penunjuk pad sentuh
Start/Pause (Mula/Jeda) akan
berkelip perlahan.
Tekan satu daripada pad sentuh
untuk menyahaktifkan status
penjimatan tenaga.
Mod siap sedia
5.8
PETUA MEMBASUH6.
Ikut simbol kod cucian pada setiap
label pakaian dan arahan cucian
pengilang. Asingkan pakaian seperti
berikut: putih, berwarna, sintetik,
bahan halus, bahan wul.
6.1 Mengasingkan Pakaian
6.2 Suhu
90°C
60°C
50°C
40°C
30°C
Sejuk
Bagi kotoran biasa, pakaian
mudah luntur (cth. kemeja,
baju tidur, pijama....)
daripada linen, kapas atau
gentian sintetik dan untuk
kain kapas yang ringan
kotoran (cth.pakaian dalam).
Bagi item halus (cth. langsir
net), pakaian bercampur
termasuk gentian sintetik
dan wul dengan label «wul
baru tulen, boleh dibasuh
mesin, tidak mengecut.
Bagi kain kapas dan linen
dengan kotoran biasa (cth.
alas meja teh, tuala, alas
meja, cadar...).
Jangan basuh pakaian putih dan
berwarna bersama-sama. Pakaian
putih boleh kehilangan “keputihannya” dalam cucian.
Pakaian berwarna yang baru
mungkin luntur dalam basuhan
pertama; maka ia perlu dibasuh
berasingan pada kali pertama.
Butangkan sarung bantal, tutup
zip, cangkuk dan butang ketap.
Ikatkan sebarang tali pinggang atau
pita yang panjang.
Tanggalkan tanda kotoran degil
sebelum membasuh.
Bahagian yang sangat kotor hendaklah digosokkan dengan detergen
khas atau pes detergen. Langsir
hendaklah diperlakukan dengan
cermat. Tanggalkan cangkuk atau
ikatkannya di dalam beg atau jaring.
Pastikan tiada benda logam yang
tertinggal di dalam pakaian (cth.
penyepit rambut, pin, jarum).
6.3 Sebelum Memuatkan Pakaian
Page 51

MELAYU 51
Beban maksimum yang disarankan
dinyatakan di dalam carta
program. Peraturan umum:
Membasuh pakaian dengan beban
maksimum menghasilkan penggunaan air dan tenaga yang paling
cekap. Bagi pakaian yang sangat
kotor, kurangkan saiz muatan.
Kapas, linen:
dram penuh tetapi
tidak terlalu padat;
Sintetik:
dram tidak lebih
daripada separuh
penuh;
Bahan halus
dan wul:
dram tidak lebih
daripada sepertiga
penuh.
6.4 Muatan Maksimum
Darah: bersihkan kotoran yang
masih baru dengan air sejuk. Untuk
kotoran kering, rendam semalaman
di dalam air dengan detergen khas
kemudian gosok dengan sabun
dan air.
Cat berasaskan minyak: lembapkan dengan penghapus kotoran
benzin, bentangkan pakaian di atas
kain lembut dan pedapkan kotoran
tersebut; bersihkan beberapa kali.
Kotoran gris kering: lembapkan
dengan turpentin, bentangkan
pakaian tersebut di atas permukaan yang lembut dan pedabkan
tanda kotoran dengan hujung jari
dan sehelai kain kapas.
Tanda kotoran degil mungkin tidak
dapat ditanggalkan hanya dengan
air dan detergen. Oleh itu, adalah
dinasihatkan untuk merawatnya
terlebih dahulu sebelum membasuh.
6.5 Menanggalkan Kotoran
Karat: asid oksalik dilarutkan dalam
air panas atau produk penghapus
karat digunakan dalam air sejuk.
Berhati-hati dengan tanda karat
yang sudah lama kerana struktur
selulosanya telah rosak dan pakaian
mudah berlubang.
Kotoran kulat: bersihkan dengan
peluntur, bilas dengan betul(kain
putih dan kain berwarna tahan
luntur sahaja).
Rumput: letak sedikit sabun dan
bersihkan dengan peluntur (kain
putih dan kain berwarna tahan
luntur sahaja).
Pena mata bola dan gam:
lembapkan dengan aseton(*),
bentangkan di atas kain lembut
dan pedapkan tanda kotoran itu.
Gincu: lembapkan dengan aseton
(*) seperti di atas, kemudian
bersihkan kotoran dengan spirit
bermetil. Hapuskan sisa tanda
daripada kain putih dengan peluntur.
Wain merah: rendam dalam air
dan detergen, bilas dan bersihkan
dengan asid asetik atau sitrik,
kemudian bilas. Bersihkan
sebarang tanda sisa dengan
peluntur.
Dakwat: bergantung pada jenis
dakwat, lembapkan pakaian dahulu
dengan aseton (*), kemudian dengan
asid asetik; bersihkan sebarang
tanda sisa pada pakaian putih
dengan peluntur dan kemudian bilas
dengan bersih.
Kotoran tar: bersihkan dahulu
dengan penghapus kotoran, spirit
bermetil atau benzin, kemudian
gosokkannya dengan pes
detergen.
(*) jangan gunakan aseton pada
sutera buatan.
Page 52

52
www.electrolux.com
Detergen dan perapi tambahan
mesti diisikan ke dalam petak yang
sesuai di laci dispenser sebelum
memulakan program basuh.
Hasil cucian yang baik juga bergantung kepada pemilihan detergen dan
penggunaan jumlah detergen yang
betul untuk mengelakkan pembaziran dan melindungi alam sekitar.
Meskipun detergen adalah mesra
alam, ia mengandungi bahan yang,
boleh menjejaskan keseimbangan
alam, kalau digunakan dalam
jumlah yang besar.
Pemilihan detergen akan bergantung kepada jenis kain (bahan
halus, bahan wul, kapas, dsb),
warna, suhu cucian dan takat
kotoran.
Hanya detergen pencuci muatan
Hadapan yang rendah buih boleh
digunakan dalam perkakas ini:
6.6 Detergen dan Perapi Tambahan
detergen serbuk bagi semua
jenis kain,
detergen serbuk bagi kain halus
(60 °C maks.) dan bahan wul,
detergen cecair, sebaiknya bagi
program basuh suhu rendah (60
°C maks.) bagi semua jenis kain,
atau khas bagi bahan wul sahaja.
Jika menggunakan serbuk
pencuci pekat atau detergen
cecair, program tanpa
PRACUCI mesti dipilih.
Tuangkan detergen cecair ke
dalam ruang kotak dispenser
bertanda ‘ ’ sebelum memulakan program.
muatan cucian bertukar kelabu,
pakaian bergris.
berbuih,
bilasan tidak mencukupi.
mengurangkan kesan cucian,
Sebarang pelembut atau agen kanji
fabrik mesti dituang ke dalam ruang
yang ditanda ‘ ’ sebelum
memulakan program cucian.
Patuhi saranan pengilang mengenai
kuantiti untuk digunakan dan tidak
melebihitanda MAX dalam petak
dispenser detergen.
Jenis dan kuantiti detergen
bergantung kepada jenis fabrik,
saiz muatan, tahap kotoran dan air
yang digunakan.
Jangan sembur prarawatan
kotoran (cth. Preen) pada atau
berdekatan mesin, kerana ia
boleh memberi kesan kepada
bahan plastik dan mengurangkan jangka hayatnya.
Maklumat mengenai kekerasan air
di kawasan anda boleh didapati
dari syarikat pembekal air atau
dari pihak berkuasa tempatan
anda.
Patuhi arahan pengeluar produk
mengenai jumlah yang perlu
digunakan.
Kesadahan air diklasifikasikan
menurut apa yang disebut "takat"
kesadahan.
6.7 Kuantiti Detergen Untuk
Digunakan
Serbuk pencuci tidak mencukupi akan
menyebabkan:
Terlalu banyak serbuk pencuci akan
menyebabkan:
beban cucian kecil sahaja,
banyak berbuih semasa mesin
sedang membasuh.
pakaian yang kotor sedikit sahaja,
Kurangkan detergen jika:
Page 53
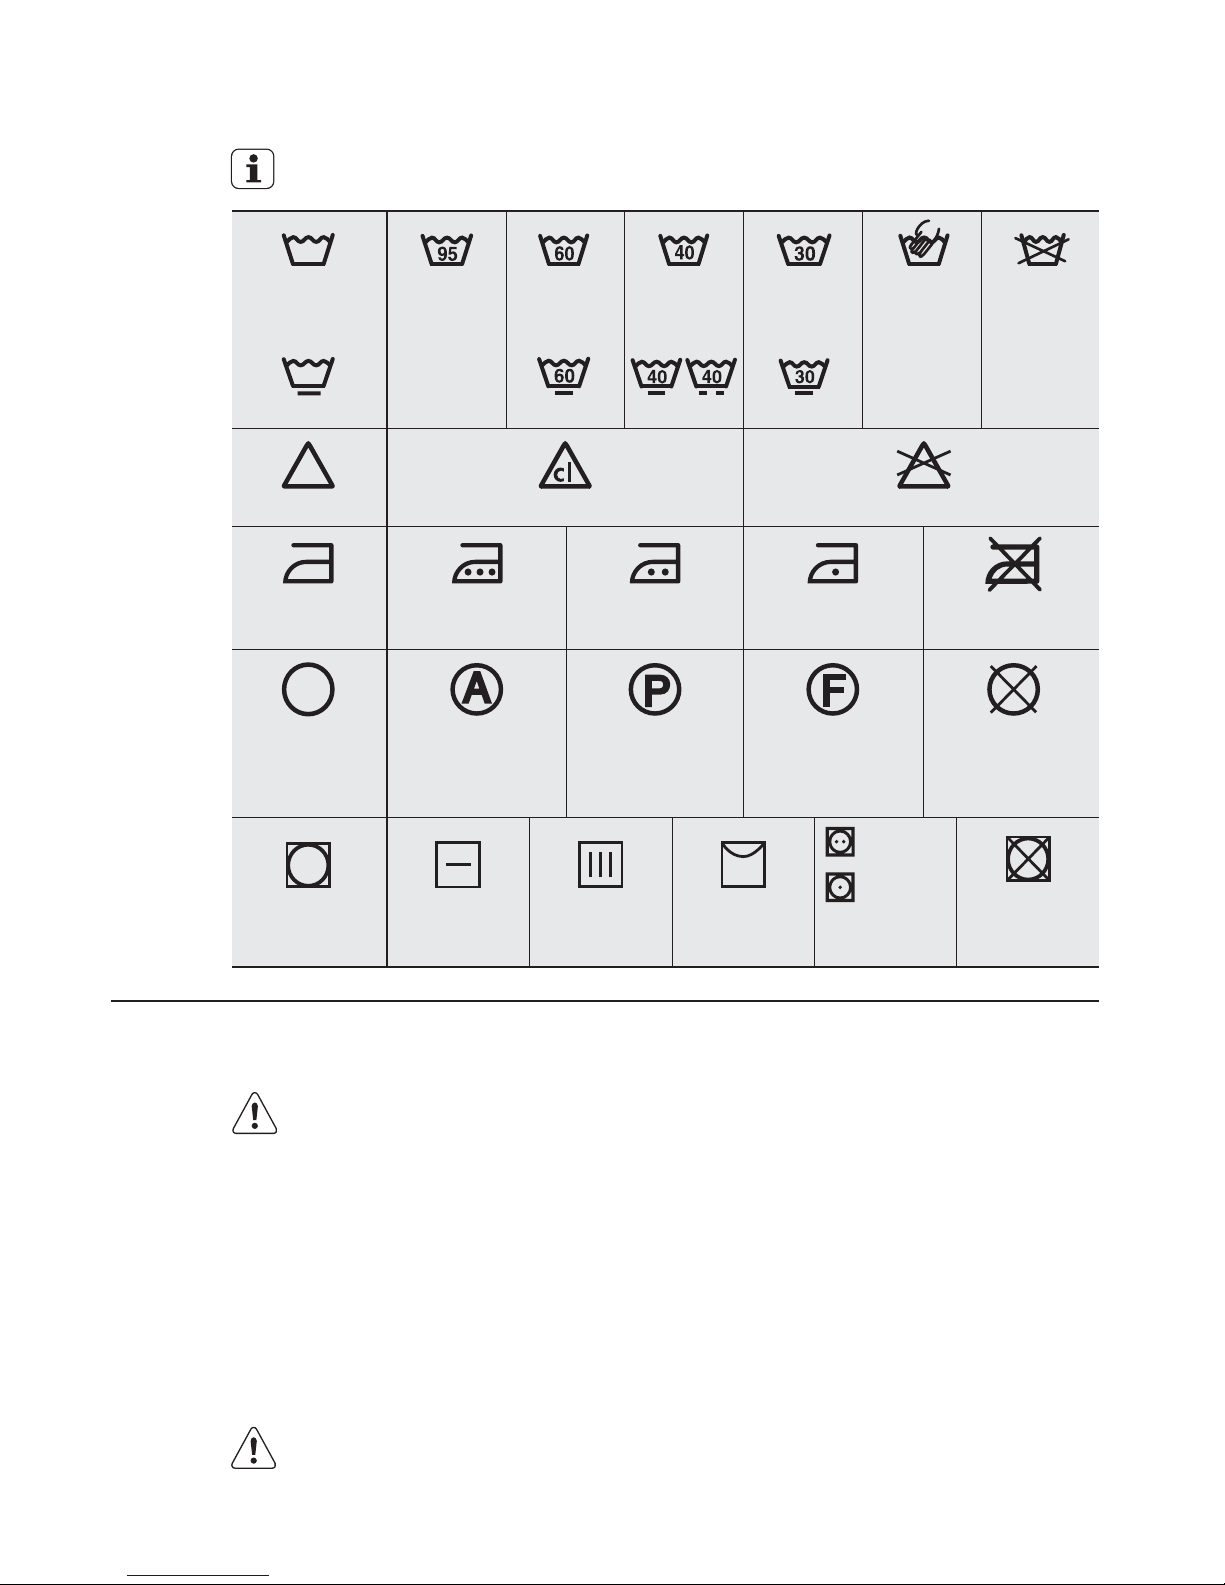
MELAYU 53
SIMBOL KOD BASUH ANTARABANGSA7.
Simbol ini terdapat pada label pakaian, untuk membantu anda memilih cara
terbaik membersih cucian anda.
Meluntur dalam air sejuk JANGAN meluntur
Meluntur
Cucian
bertenaga
Cucian lembut
Cucian
tangan
Suhu
maksimum
cucian 95 °C
Suhu
maksimum
cucian 60 °C
Suhu
maksimum
cucian 40 °C
Suhu
maksimum
cucian 30 °C
Seterika panas
maks. 200 °C
Cucian kering
dalam semua
pelarut
Cucian kering dalam
perkloritelena,
petrol, alkohol tulen,
R 111 & R 113
Cucian kering
dalam petrol,
alkohol tulen dan
R 113
JANGAN
cuci kering
Seterika hangat
maks. 150 °C
Seterika suam
maks. 110 °C
JANGAN
seterika
JANGAN
cuci
Menyeterika
Cucian kering
Mengering Bentangkan Mesin
pengering
JANGAN
gunakan
mesin kering
Suhu tinggi
Suhu rendah
Penyidai pakaianDi ampaian
PENJAGAAN DAN PEMBERSIHAN8.
Anda mesti MEMUTUSKAN
SAMBUNGAN bekalan elektrik
daripada perkakas, sebelum anda
boleh menjalankan pembersihan
atau kerja penyelenggaraan.
Air yang biasa kita gunakan
mengandungi kapur. Adalah
menjadi idea yang baik untuk
kadang kala menggunakan serbuk
pelembut air dalam mesin.
Bersihkan perkakas hanya dengan
sabun dan air suam. Keringkan
semua permukaan sepenuhnya.
Jangan gunakan alkohol,
pelarut atau produk bahan
kimia.
Lakukan ini secara berasingan
daripada cucian pakaian, dan
mengikut arahanserbuk pelembut
yang dikeluarkan oleh kilang.
Ini akan membantu mencegah
pembentukan deposit kapur.
8.2 Menanggalkan kesan kapur
8.1 Pembersihan Luar
AMARAN!
AWAS!
Page 54
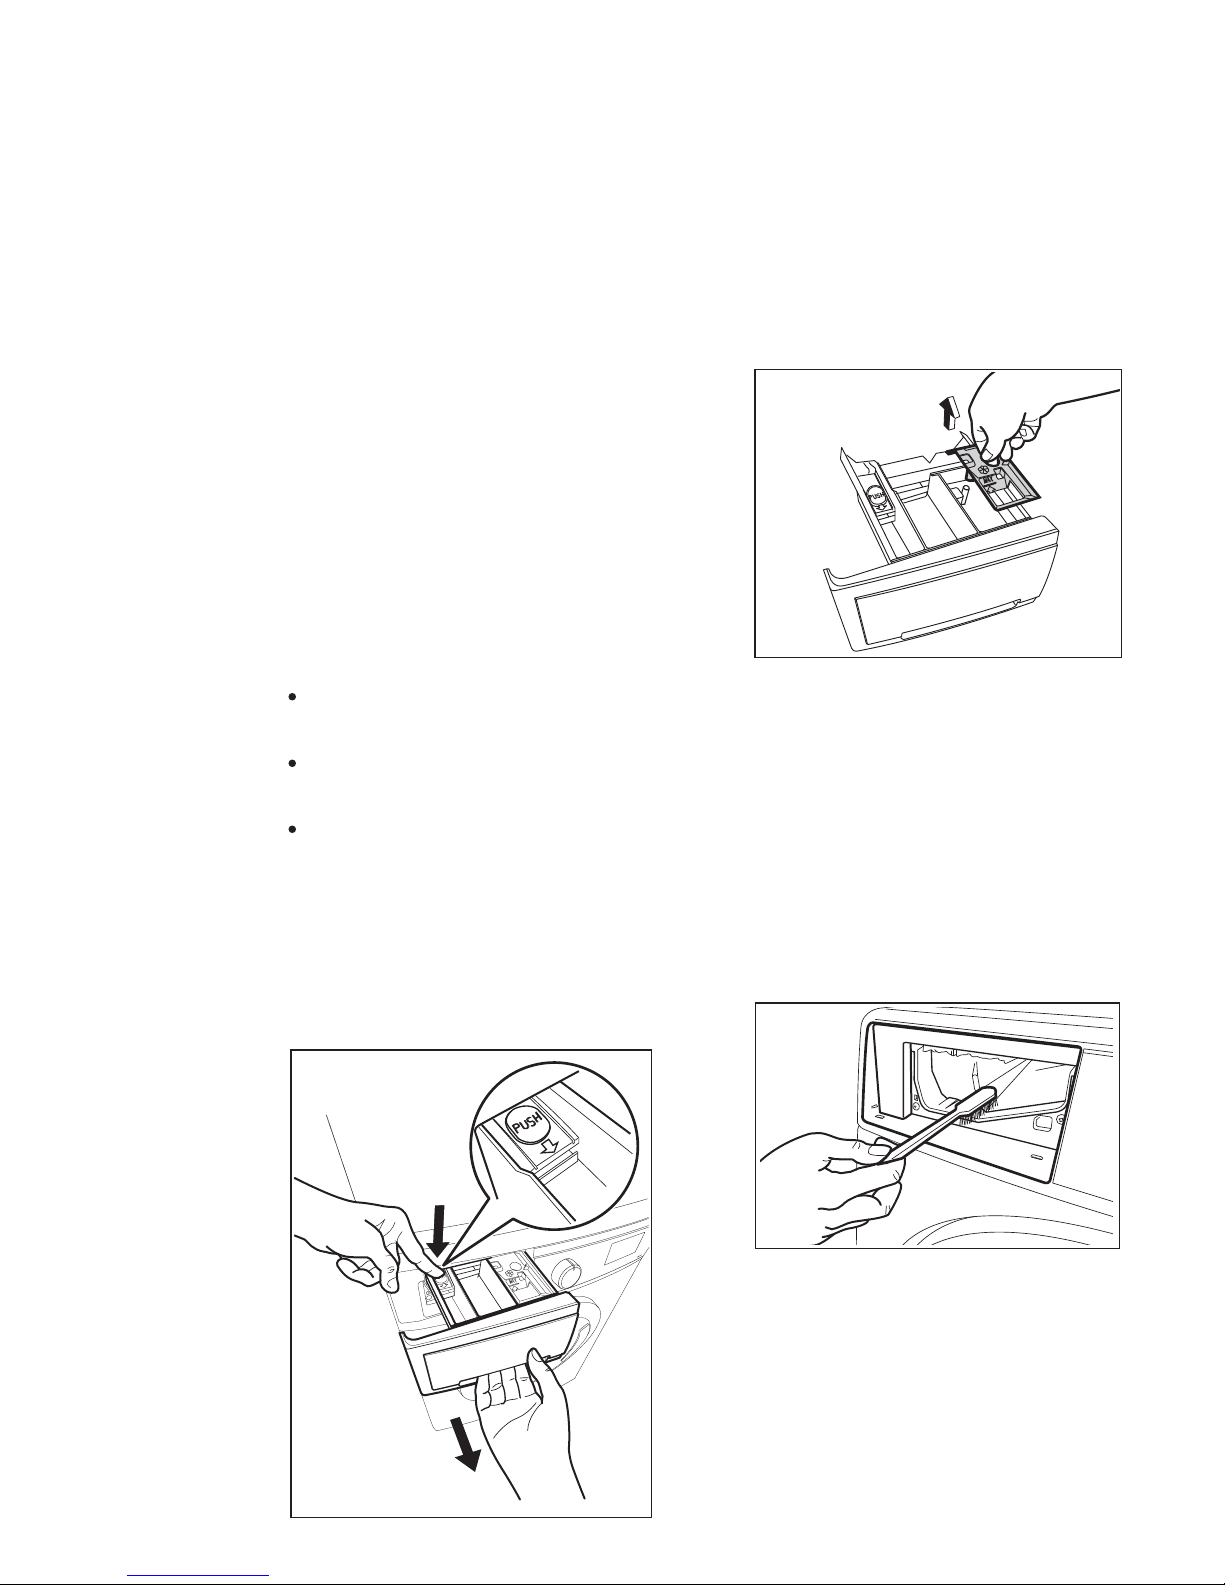
54
www.electrolux.com
1
2
Petak dispenser serbuk cucian dan
perapi tambahan harus kerap
dibersihkan.
Keluarkan petak dengan menekan
selak ke bawah dan teriknya
keluar. Bersihkan dengan air paip,
untuk membuang kesan serbuk
yang terkumpul.
8.5 Membersih Petak Dispenser
Untuk memudahkan pembersihan,
bahagian atas petak perapi
tambahan harus dikeluarkan.
Selepas petak dikeluarkan,
gunakan berus kecil untuk membersihkan bahagian ceruk, pastikan
semua sisa serbuk cucian dibuang
dari atas dan bawah ceruk. Letak
semula petak dan jalankan program
bilas tanpa sebarang pakaian di
dalam dram.
8.6 Membersih Ceruk Petak
Biarkan pintu terbuka sebentar. Ini
membantu mencegah kulat dan bau
lembap yang terbentuk di dalam
perkakas. Membiarkan pintu terbuka
selepas pembasuhan juga akan
membantu memelihara kedap pintu.
8.3 Selepas Setiap Cucian
Dengan penggunaan pembasuhan
suhu rendah, sisa mungkin
terbentuk dan termendap di dalam
dram.
Kami mencadangkan pembasuhan
penyelenggaraan dijalankan secara
tetap.
8.4 Cucian Penyelenggaraan
Dram harus kosong daripada
pakaian.
Pilih program pembasuhan
kapas yang paling panas.
Gunakan ukuran detergen biasa,
serbuk dengan ciri biologikal.
Untuk menjalankan pembasuhan
penyelenggaraan:
Page 55
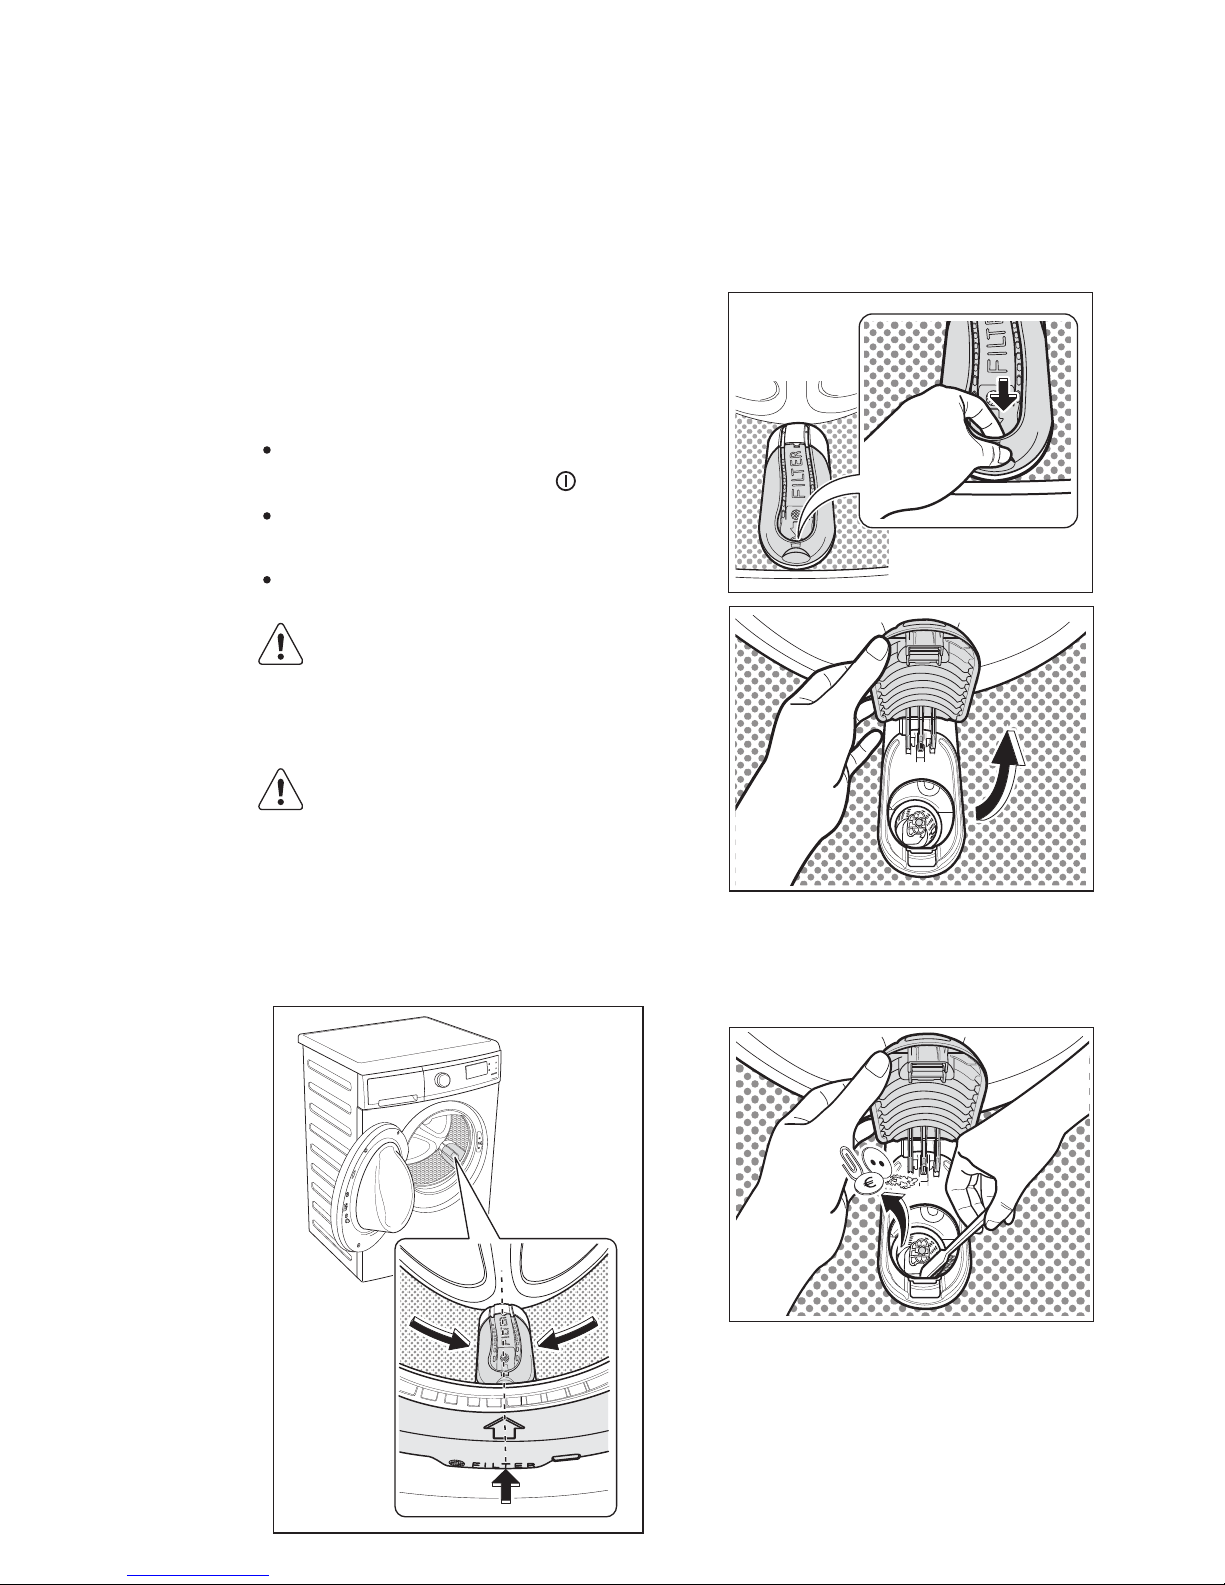
MELAYU 55
8.7 Bersihkan penuras saliran
Putar dail pemilih program
kepada kedudukan Mati ( ).
Cabut palam dari soket bekalan
elektrik
Buka pintu.
Bersihkan penuras saliran:
Cabutkan sambungan plag
utama daripada soket utama.
Jangan bersihkan penapis
salir jika air di dalam perkakas
panas.
1. Putar dram dan sejajarkan penutup
penapis (FILTER) dengan anak
panah pada penutup pintu.
2. Buka penutup penapis dengan
menekan pencangkuk khas dan
dengan memutar penutup ke
arah atas.
AMARAN!
AMARAN!
Salir penapis mengumpul lin dan
item lain yang ditinggalkan di dalam
basuhan kotor untuk mengelakkan
sumbatan pam
Pam perlu dicuci dengan kerap.
Untuk mencuci penapis, teruskan
seperti berikut:
Mengeluarkan menyingkir
sebarang bulu atau objek kecil
(jika ada) di sekeliling penapis.
3.
Page 56
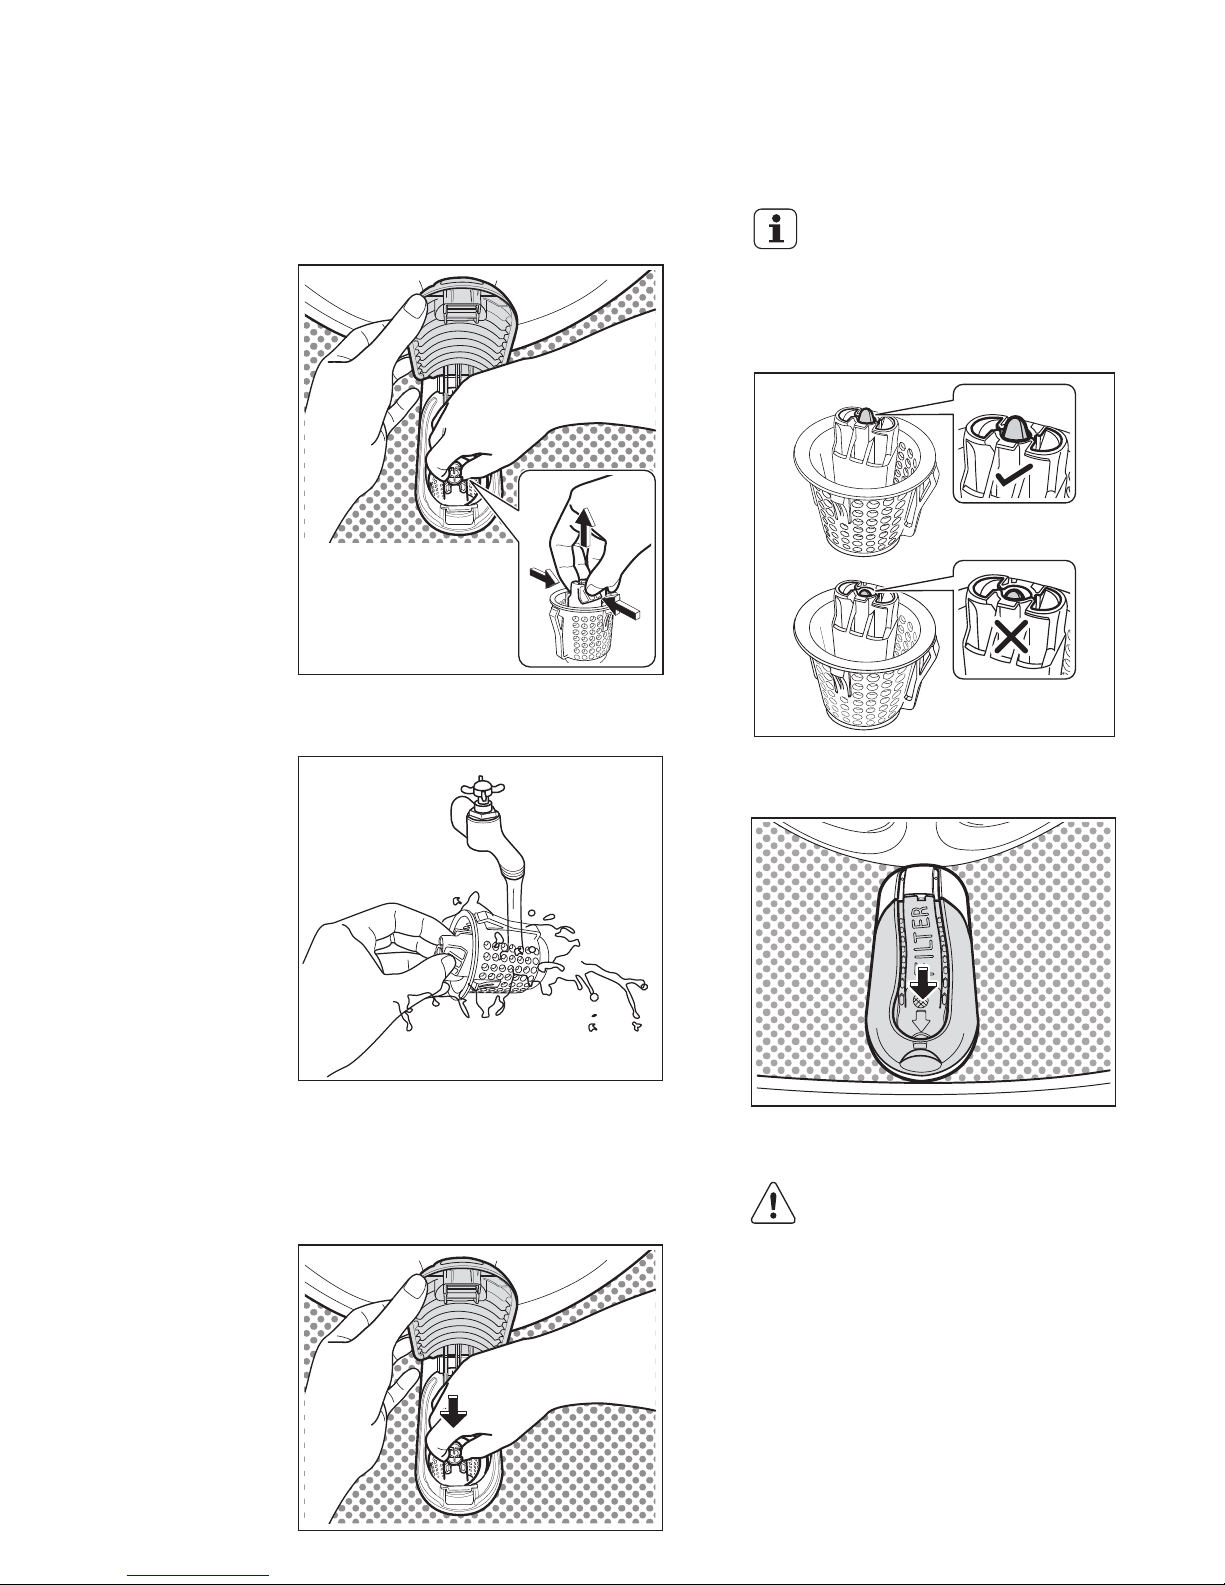
56
www.electrolux.com
PENTING!
Pegang penapis dengan kukuh
dan tarik ke atas untuk mengeluarkannya daripada kedudukan.
Cuci penapis di bawah air paip.
Tutup pintu penuras
Masukkan semula plag utama.
Penapis dimasukkan dengan
betul apabila penunjuk di
bahagian atas ini boleh dilihat
dan anda akan mendengar
bunyi “Klik”.
Selepas mencuci penapis, buka
penutup penapis dan masukkan
semula penapis ke
kedudukannya.
4.
5.
6.
7.
8.
9.
Jangan mula mencuci
pakaian tanpa penapis
diletakkan pada tempatnya.
AMARAN!
Page 57
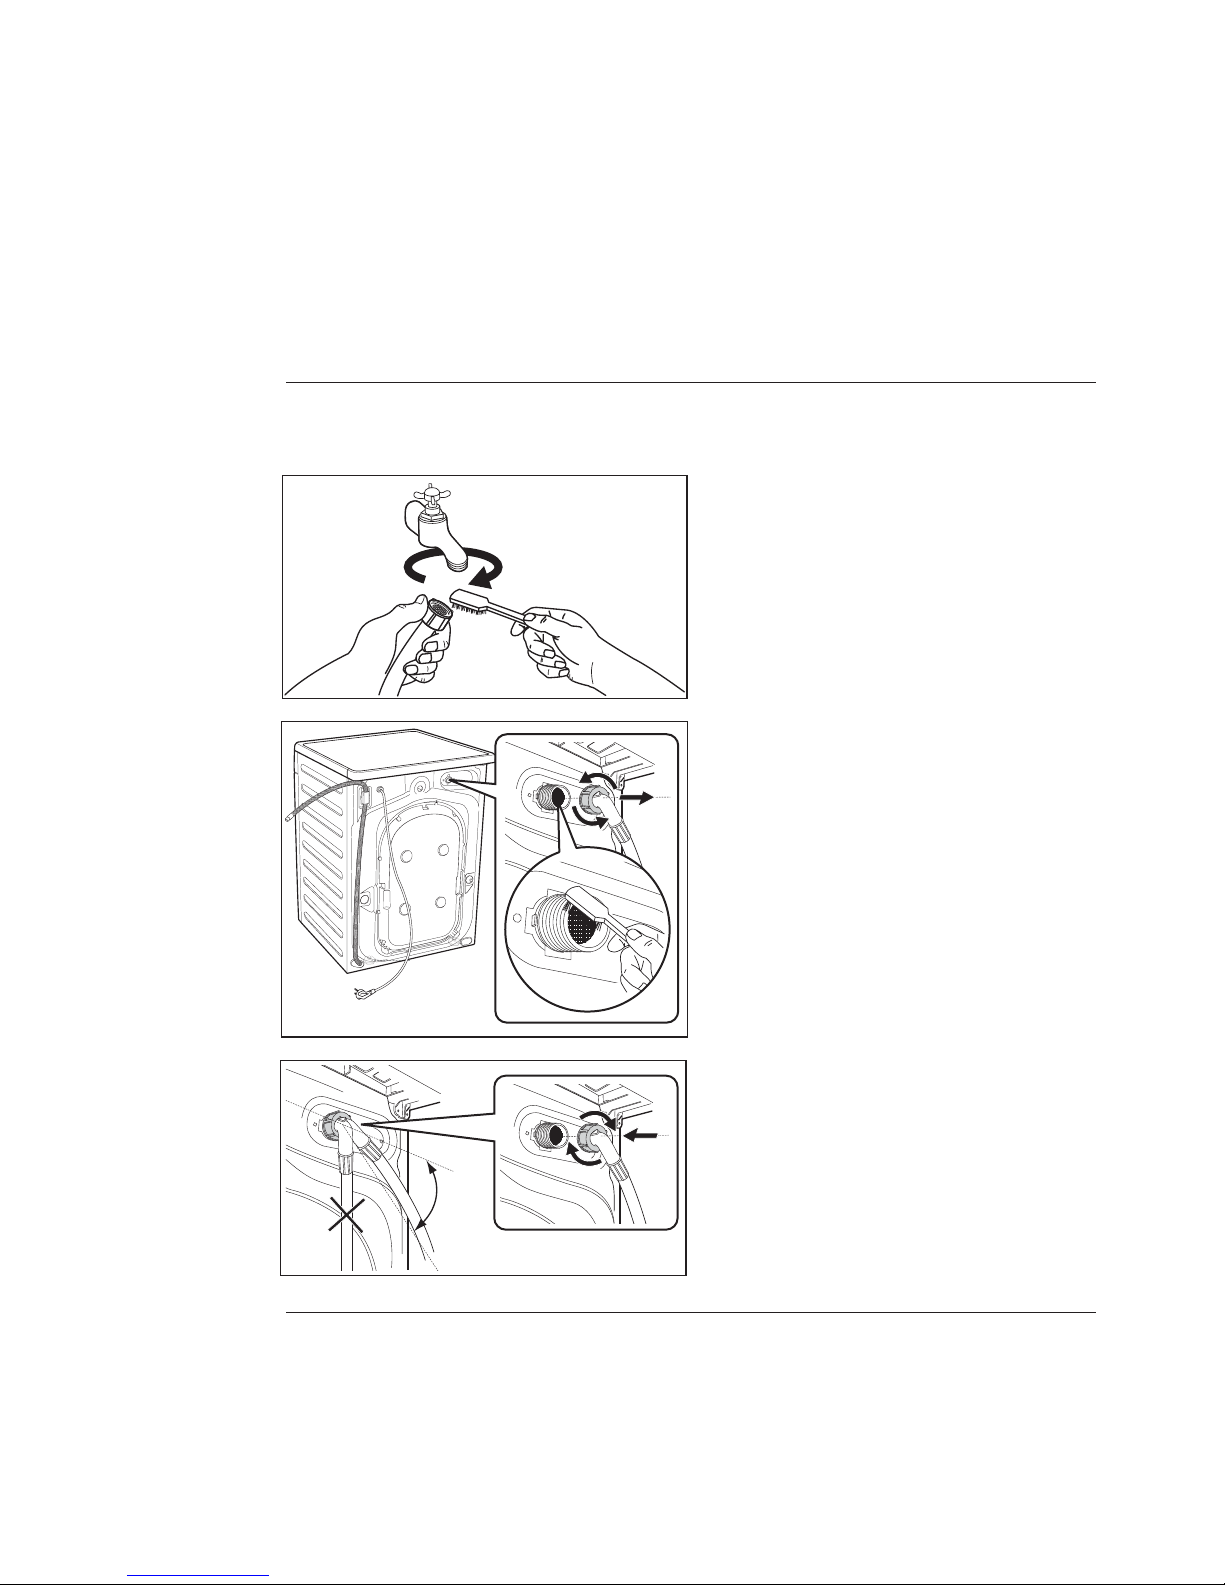
MELAYU 57
Jika air anda keras atau mengandungi kesan deposit kapur, penapis
aliran air masuk mungkin tersumbat.
Oleh itu idea yang baik untuk
membersihkannya dari masa ke
semasa.
8.8 Membersih Penapis Aliran
Air Masuk
Untuk membersihkan penapis aliran air masuk:
1.
Tutup pili air.
2.
Keluarkan hos aliran air masuk
daripada pili air.
3.
Bersihkan penuras dalam hos
dengan berus keras.
4.
Keluarkan hos aliran air masuk di
belakang perkakas.
5.
Bersihkan penapis di dalam injap
dengan berus kasar atau tuala.
6. Pasangkan semula hos aliran air
masuk. Pastikan sambungan
ketat untuk mengelak kebocoran.
7. Buka pili air.
45°
Page 58
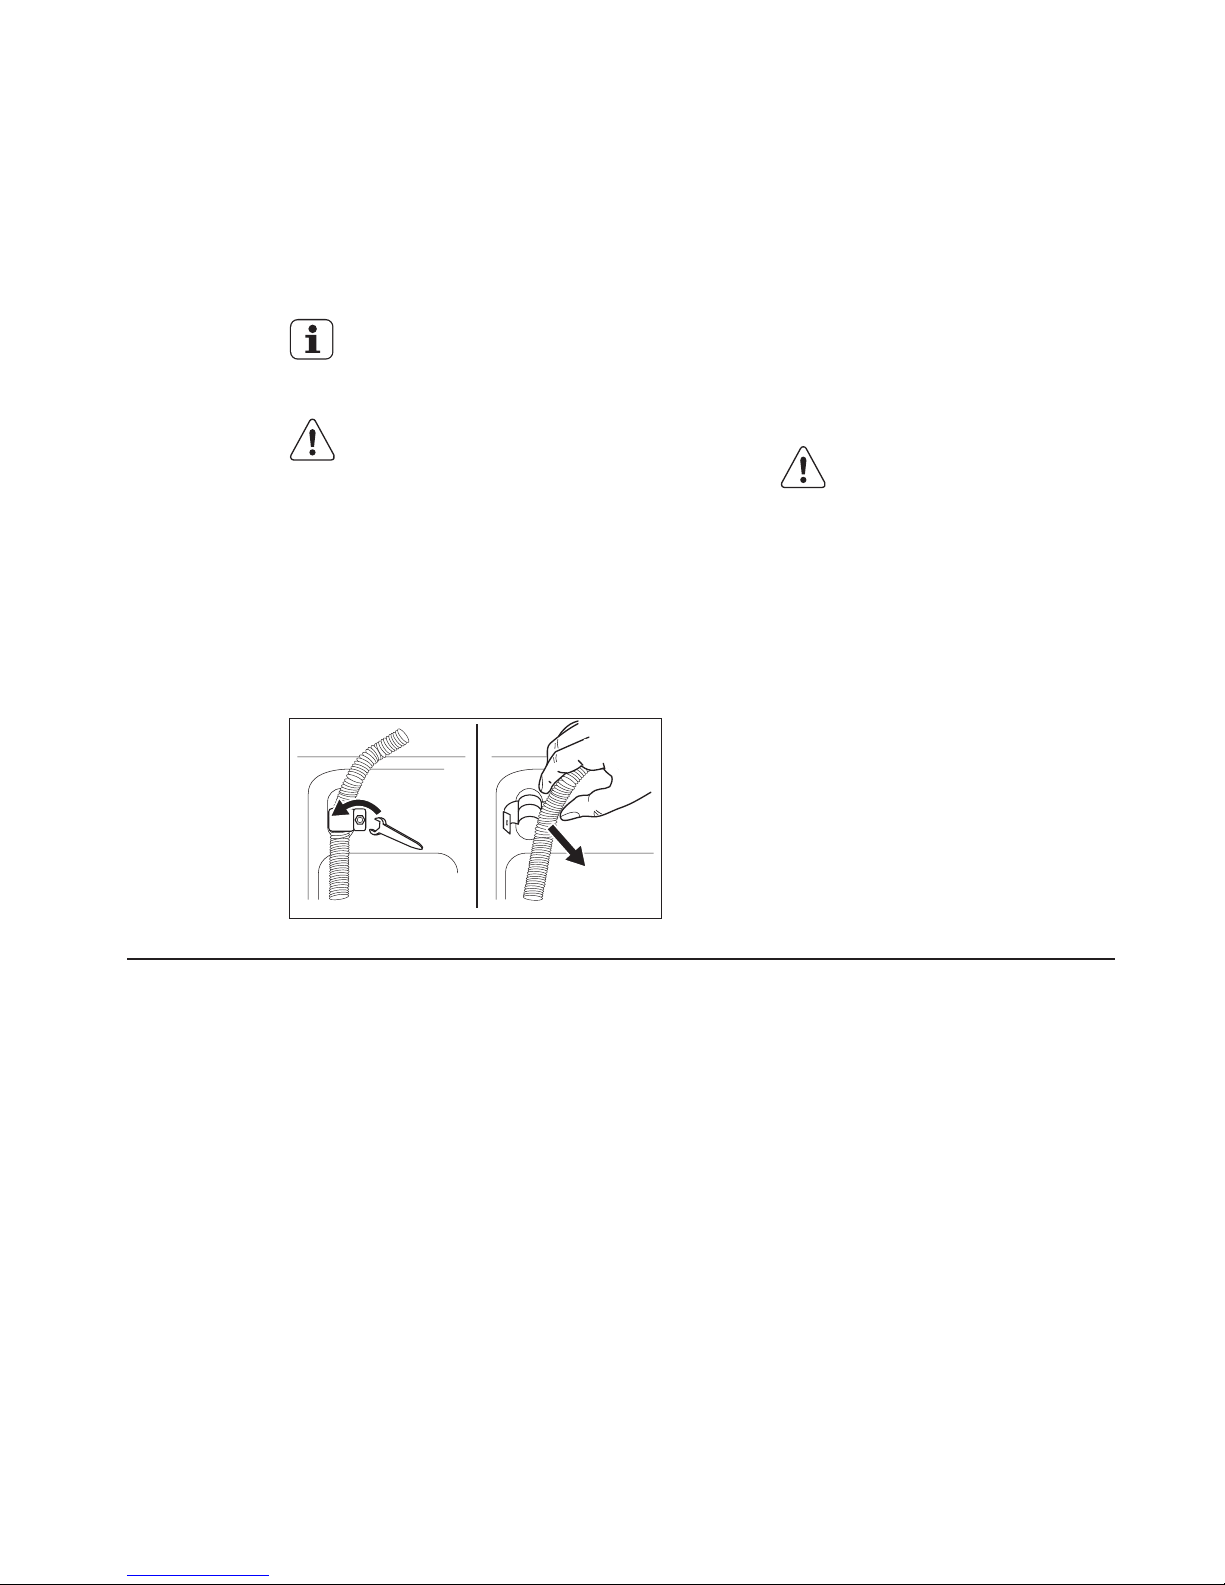
58
www.electrolux.com
Jika mesin terdedah kepada suhu di
bawah 0°C, langkah pencegahan
tertentu harus diambil.
8.9 Bahaya Pembekuan
tutup pili air.1.
2. Buka skru hos salur masuk.
3. Tanggalkan hos salir dari
sokongan belakang dan cabut
pencangkuk dari sink atau
spigot.
4. Letakkan hujung salir dan hos
saluran masuk di dalam bekas.
Biarkan air mengalir keluar
daripada hos.
5. Apabila tiada lagi air mengalir,
pasang hos saluran masuk dan
hos salir sekali lagi.
Putuskan sambungan plag
utama daripada soket
utama.
Lakukan juga prosedur ini
apabila anda ingin melakukan
saliran kecemasan.
Pastikan suhu-lebih
daripada 0 °C sebelum
anda menggunakan
semula perkakas.
Pengilang tidak bertanggungjawab di atas
kerosakan disebabkan
oleh suhu rendah.
Page 59
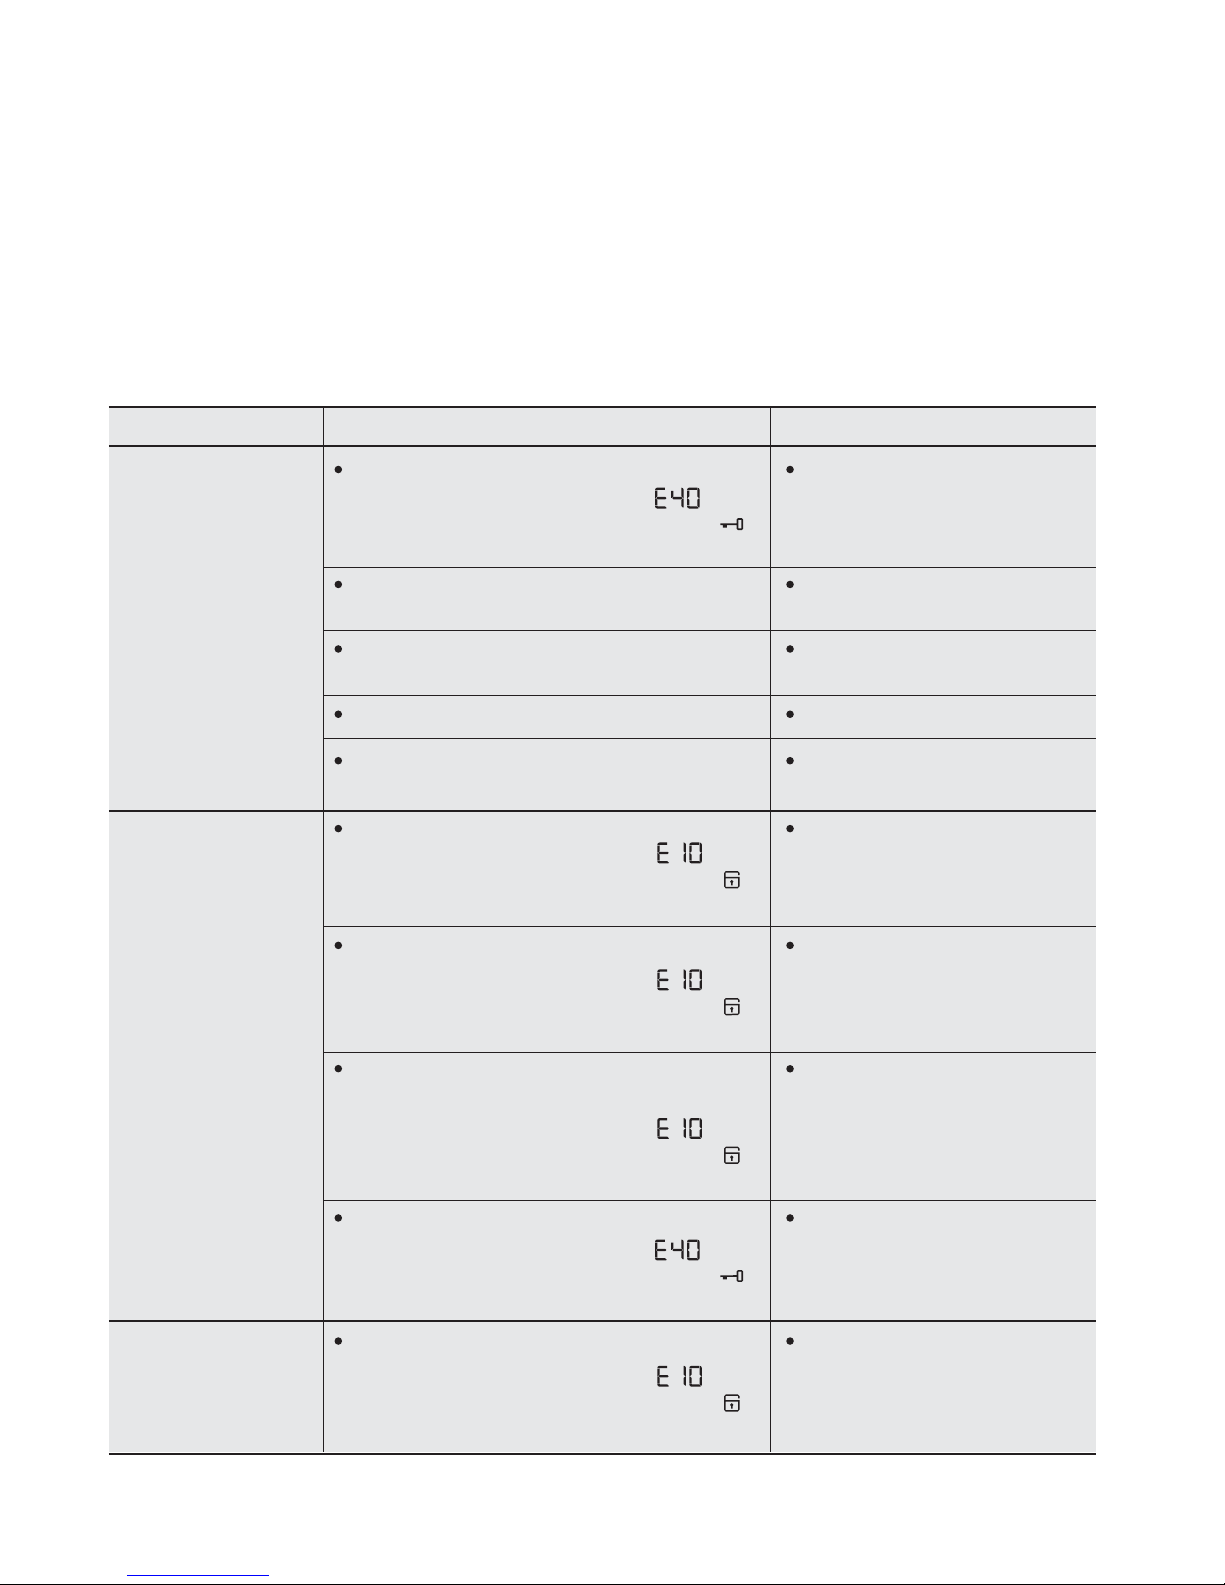
MELAYU 59
Pintu tidak ditutup.
Plag tidak dimasukkan dengan betul ke
dalam soket kuasa.
Tiada bekalan kuasa di soket.
Masukkan plag ke dalam
soket kuasa.
Sila periksa pemasangan
elektrik domestik anda.
Butang Start/Pause tidak ditekan. Tekan butang Start/Pause.
Tunda mula (Delay) telah dipilih.
Jika pakaian mahu dicuci segera,
batalkan tunda mula
(Delay).
Hos air masuk tertindih atau terpiuh. Periksa sambungan hos air
masuk.
Hujung hos saliran terlalu rendah. Sila rujuk perenggan
berkenaan di bahagian
"penyaliran air".
Penuras dalam hos air masuk
tersumbat.
Bersihkan penuras hos air
masuk.
Pintu tidak ditutup dengan betul. Tutup pintu dengan rapi
Pili air tertutup. Buka pili air.
Tutup pintu dengan rapi.
Sesetengah masalah tertentu adalah berpunca daripada kurangnya penyelenggaraan yang
mudah atau kesilapan yang boleh diselesaikan dengan mudah tanpa menghubungi seorang
jurutera. Sebelum menghubungi Pusat Servis tempatan anda, sila jalankan pemeriksaan yang
disenaraikan di bawah. Semasa mesin beroperasi mungkin lampu pandu Mula berkelip untuk
menandakan mesin tidak berfungsi.
Setelah masalah tersebut diselesaikan, tekan butang “START/PAUSE” untuk memulakan
semula program. Jika setelah diperiksa semuanya, masalah masih berlarutan, hubungi Pusat
Servis tempatan anda.
Mesin basuh
tidak boleh
dimulakan:
Mesin tidak
mengisi air:
Mesin mengisi
kemudian terus
menyalirkan:
PENYELESAIAN MASALAH9.
Malfungsi Kemungkinan punca Penyelesaian
Pada model paparan:
Kod ralat
.
Pada model tiada paparan: Door lock ‘ ’
LED dan ‘Start/Pause’ LED menyala.
Pada model paparan:
Kod ralat
.
Pada model tiada paparan: Child lock ‘ ’
LED dan ‘Start/Pause’ LED menyala.
Pada model paparan:
Kod ralat
.
Pada model tiada paparan: Door lock ‘ ’
LED dan ‘Start/Pause’ LED menyala.
Pada model paparan:
Kod ralat
.
Pada model tiada paparan: Child lock ‘ ’
LED dan ‘Start/Pause’ LED menyala.
Pada model paparan:
Kod ralat
.
Pada model tiada paparan: Child lock ‘ ’
LED dan ‘Start/Pause’ LED menyala.
Pada model paparan:
Kod ralat
.
Pada model tiada paparan: Child lock ‘ ’
LED dan ‘Start/Pause’ LED menyala.
Page 60
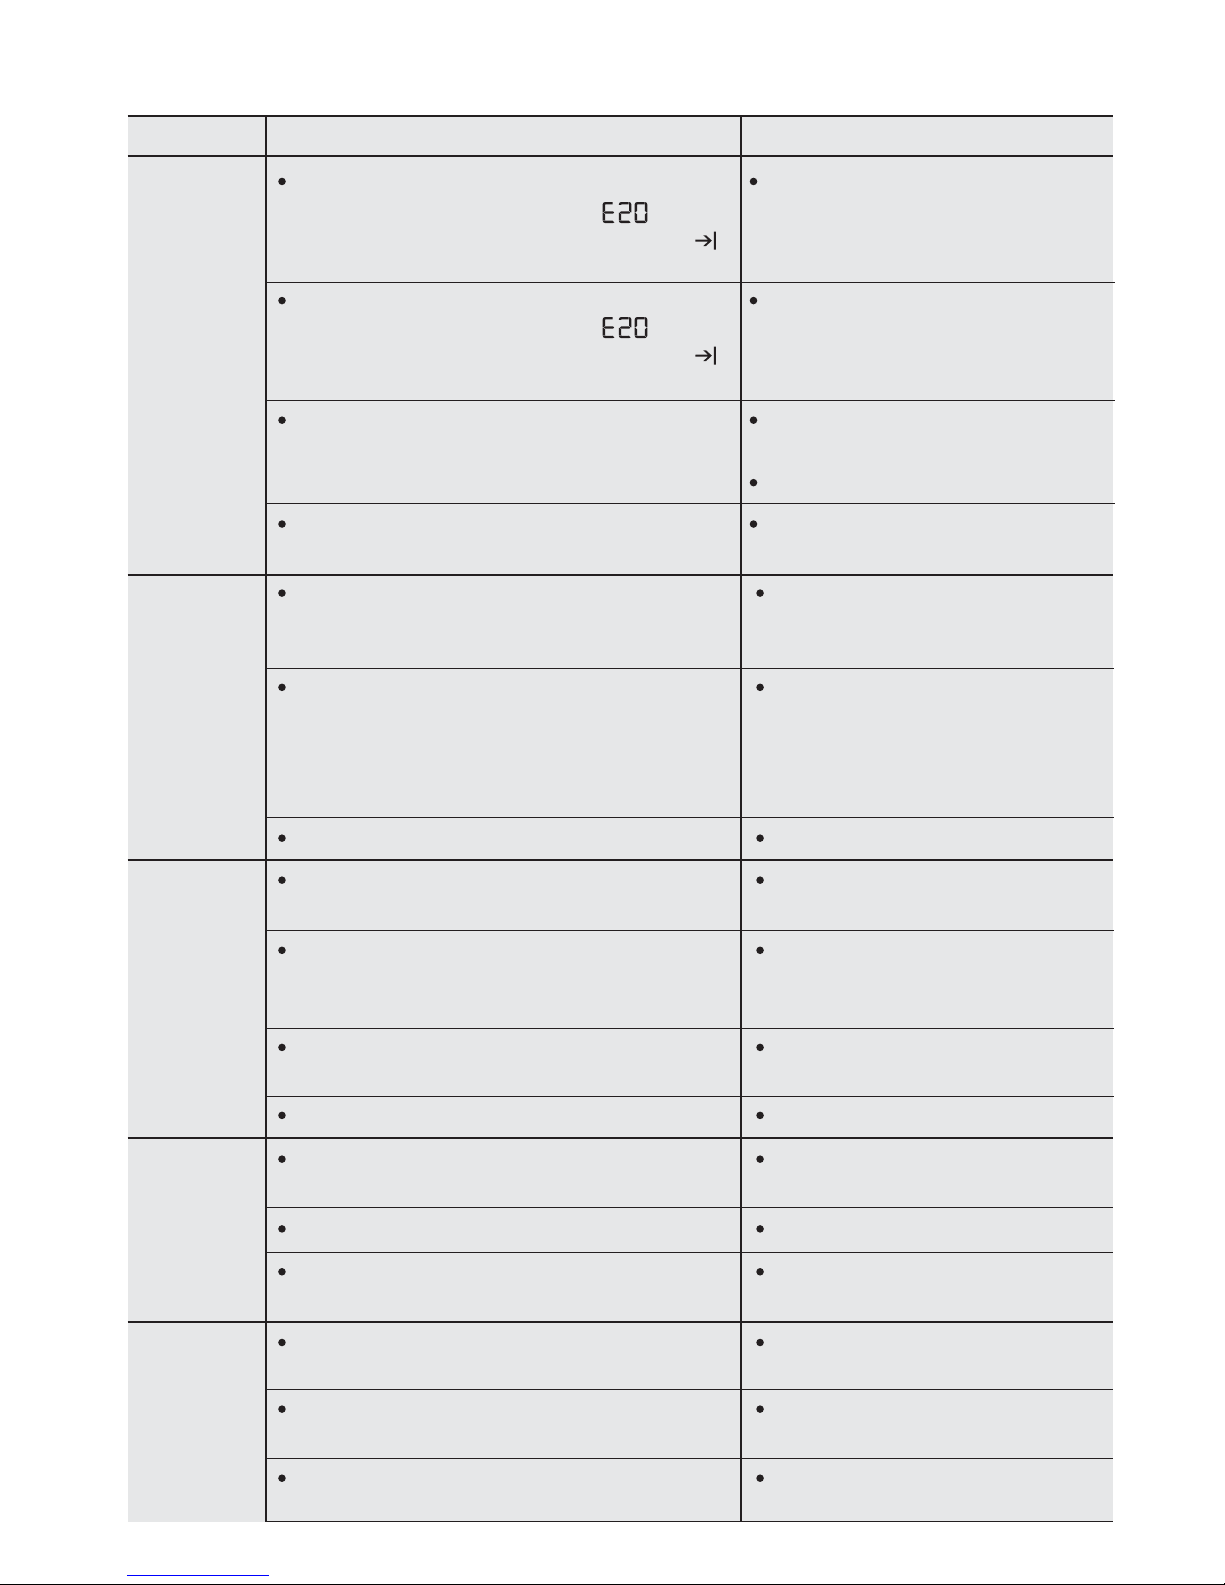
60
www.electrolux.com
Malfungsi Kemungkinan punca Penyelesaian
Terlalu banyak detergen atau detergen
tidak sesuai digunakan (mengeluarkan
terlalu banyak buih).
Kurangkan kuantiti detergen
atau gunakan yang lain.
Periksa sama ada terdapat kebocoran dari
salah satu pemasangan hos air masuk.
Kebocoran itu kadang tala sukar dilihat
kerana air mengalir hos; periksa sama ada
hos itu lembap.
Periksa sambungan hos air
masuk.
Detergen tidak mencukupi atau tidak
sesuai untuk digunakan.
Tingkatkan kuantiti detergen
atau gunakan yang lain.
Program masih berjalan. Tunggu sehingga putaran
basuhan terakhir.
Bolt pengangkutan dan pembungkusan
belum dikeluarkan.
Periksa supaya pemasangan
perkakas dibuat dengan betul.
Kaki penyokong belum
dilaraskan lagi.
Periksa supaya pengarasan
perkakas dibuat dengan betul.
Pakaian tidak diagihkan sama rata di
dalam dram.
Jeda mesin dan agihkan semula
pakaian secara manual.
Kunci pintu belum dibebaskan.
Tunggu kira-kira 5 minit.
Terdapat air di dalam dram. Pilih program ‘Putar’ untuk
menyalirkan air keluar.
Tanda kotoran degil tidak dibersihkan
terlebih dahulu sebelum membasuh.
Gunakan produk komersil untuk
merawat kesan kotoran yang
degil.
Suhu yang betul tidak dipilih.
Periksa sama ada anda telah
memilih suhu yang betul.
Muatan pakaian berlebihan. Kurangkan muatan.
Hos saliran rosak. Tukarkannya dengan yang baru.
Terdapat
air di atas
lantai:
Hasil
cucian
yang tidak
memuaskan:
Pintu
tidak
dapat
dibuka:
Mesin
bergegar
atau
bunyinya
bising:
Pada model paparan:
Kod ralat
.
Pada model tiada paparan: Washing End ‘ ’
LED dan ‘Start/Pause’ LED menyala.
Hos saliran tertindih atau terpiuh.
Periksa sambungan hos
penyaliran.
Pam saliran tersumbat. Bersihkan penuras saliran.
Mesin
tidak
menyalirkan air
dan/atau
tidak
memutar:
Opsyen ‘Rinse Hold’ atau ‘No Spin’
telah dipilih.
Batalkan opsyen ‘Rinse Hold’
atau ‘No Spin’
Pakaian tidak diagihkan sama rata di
dalam dram.
Jeda mesin dan agihkan semula
pakaian secara manual.
Pilih program putaran (Spin).
Pada model paparan:
Kod ralat
.
Pada model tiada paparan: Washing End ‘ ’
LED dan ‘Start/Pause’ LED menyala.
Page 61
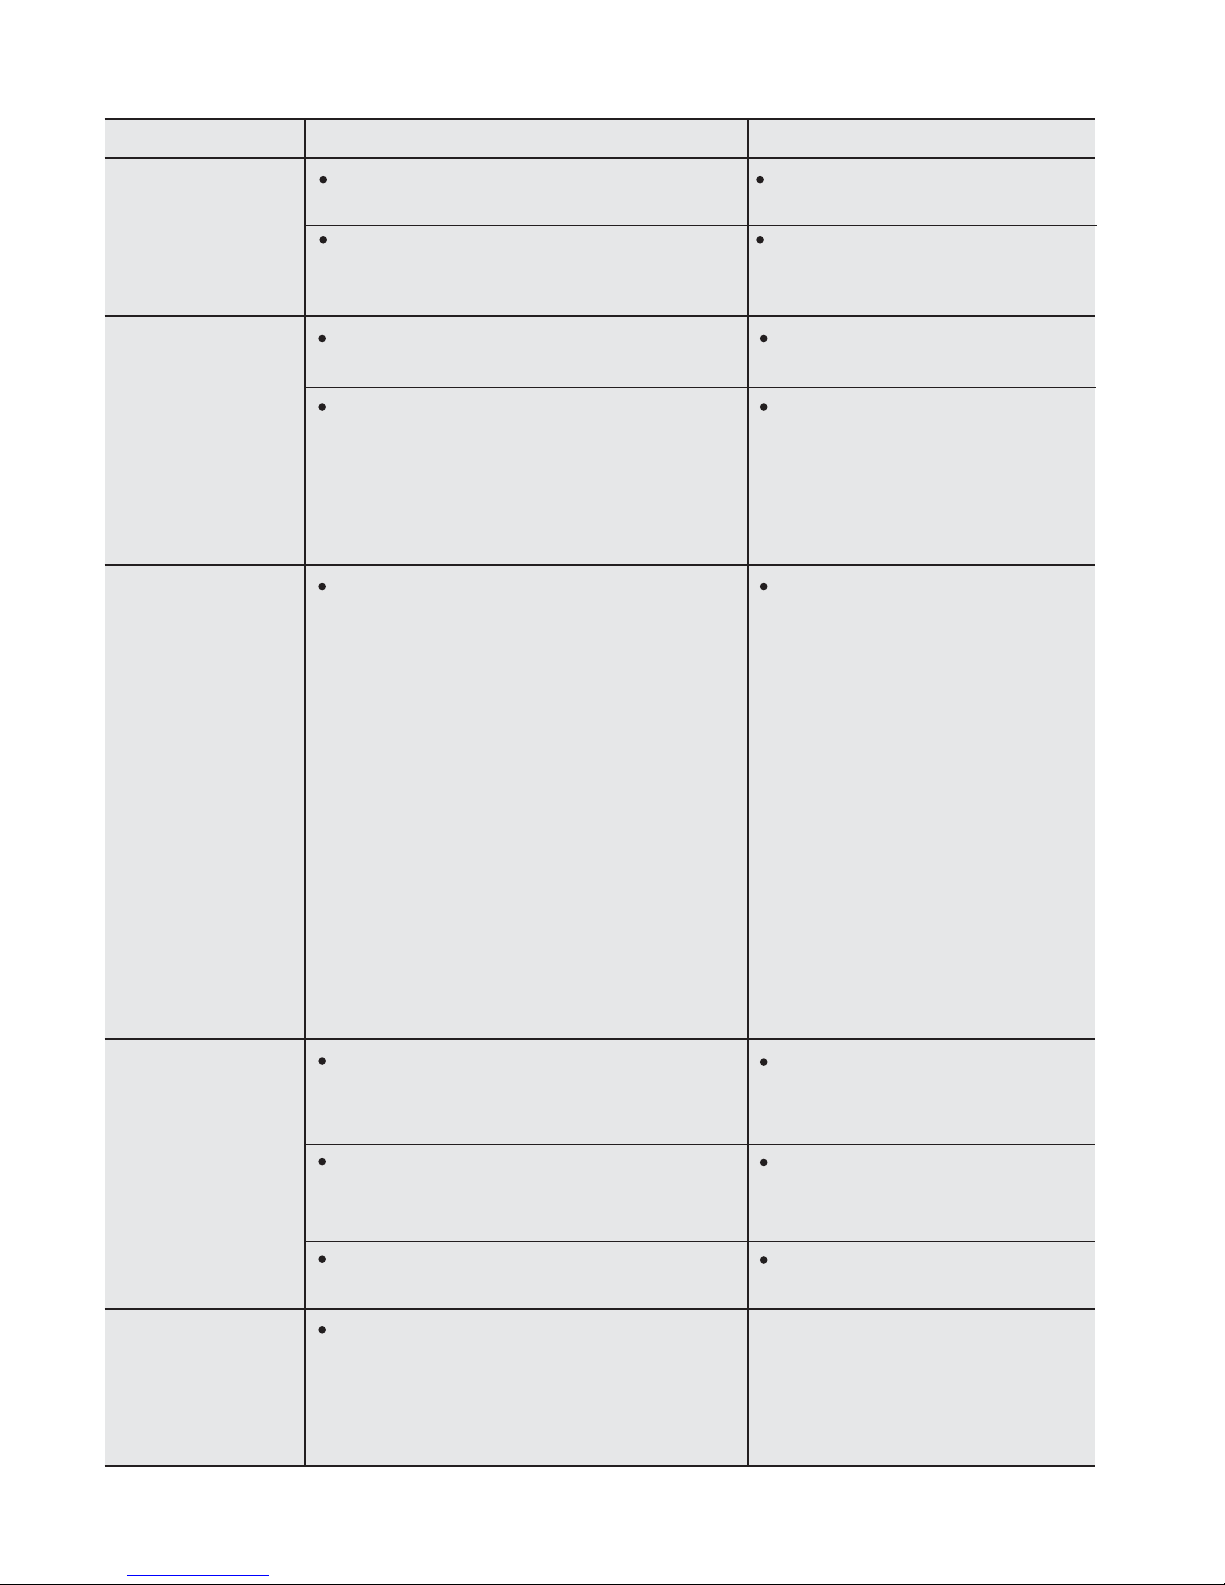
MELAYU 61
Malfungsi Kemungkinan punca Penyelesaian
Peranti pengesan ketidakseimbangan
elektronik telah menyela kerana
pakaian tidak diagihkan sama rata di
dalam dram.
Pakaian diagihkan semula melalui
putaran balikan dram.
Hal ini mungkin berlaku beberapa kali
sebelum ketidakseimbangan hilang dan
pemutaran normal dapat disambungkan semula. Jika, selepas 10 minit,
pakaian masih belum diagihkan sama
rata di dalam dram, mesin tidak akan
berputar. Dalam kes sebegini, sebarkan semula muatan secara manual dan
pilih program putar.
Mesin tidak dipasang dengan betul. Pastikan peletakan aras
perkakas adalah betul. Rujuk
pada ‘Pemasangan’.
Bolt atau bungkusan transit
tidak dikeluarkan.
Muatan terlalu kecil.
Pastikan bungkusan dan/atau
bolt transit dikeluarkan. Rujuk
pada ‘Pemasangan’.
Mesin yang berasaskan teknologi
moden beroperasi secara sangat
ekonomik dengan menggunakan
jumlah air yang sangat sedikit tanpa
menjejaskan prestasi.
Tambah lebih banyak pakaian
ke dalam dram.
Jeda mesin dan agihkan
semula pakaian secara
manual.
Putaran
bermula lambat
atau mesin
tidak berputar:
Mesin
mengeluarkan
bunyi pelik:
Tiada air
kelihatan di
dalam dram:
Kurangkan kuantiti detergen
atau gunakan yang lain.
Agihkan semula pakaian secara
manual di dalam dram dam
mulakan fasa putaran sekali lagi.
Sila rujuk perenggan berkenaan
dalam bahagian
“
Pemasangan
”.
Detergen melebihi dos.
Mesin tidak seimbang.
Masa kitaran
lebih lama
daripada yang
dipaparkan:
Jumlah pakaian di dalam dram terlalu
sedikit.
Muatkan lebih banyak
pakaian.
Lantai tidak stabil cth. lantai kayu. Rujuk perenggan berkenaan
dalam bahagian
“Pemasangan”.
Mesin
bergegar atau
bunyinya
bising:
Page 62
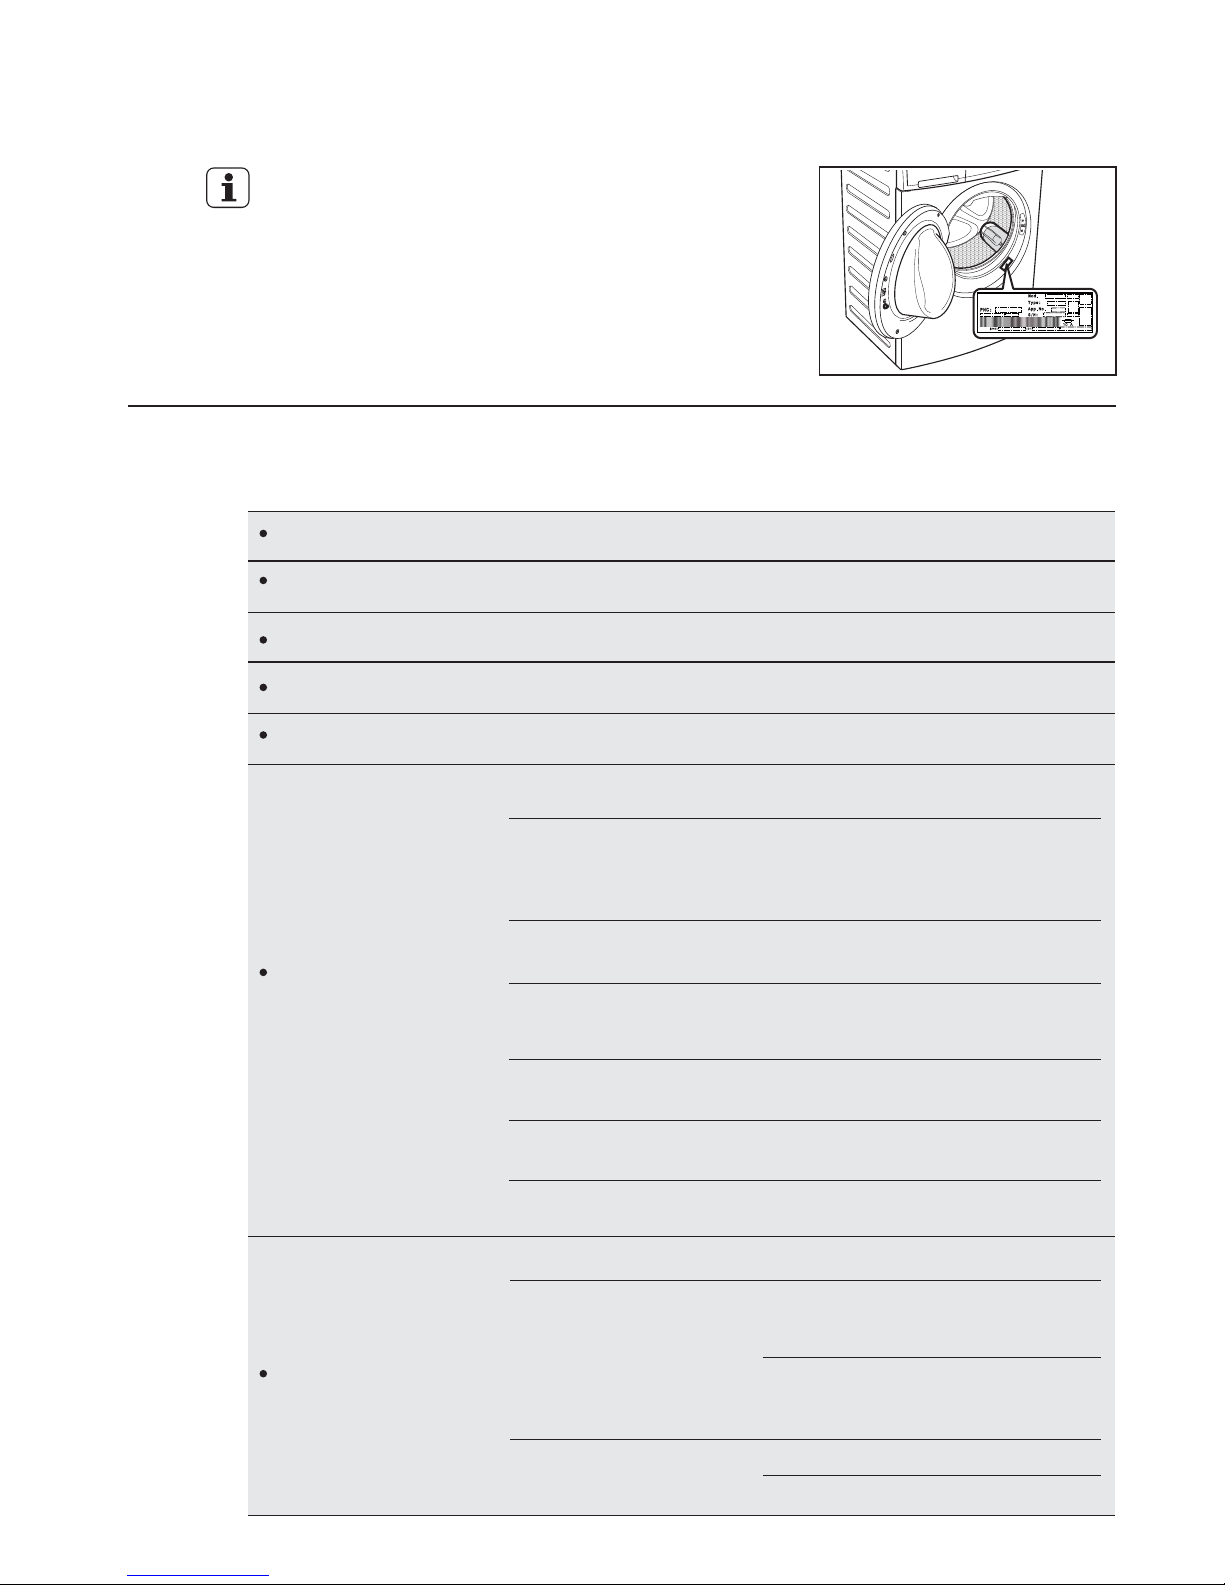
62
www.electrolux.com
DATA TEKNIKAL10.
Beban
maksimum
Spin speed
220-240 V/50 Hz (60 Hz untuk FILIPINA)
2200 W (2000 W untuk FILIPINA)
0.8 MPa/0.05 MPa
Silk
Sensitive Plus
Easy Iron, Color,
Delicates
7.0 Kg
5.0 Kg
Regular, Heavy Duty,
Energy Saving, Rinse,
Spin, Drain
Program Muatan Maks.Model
EWP10742, EWP85742,
EWP85752
EWP10742, EWP85742,
EWP85752
EWP10742, EWP85742,
EWP85752
EWP10742, EWP85742,
EWP85752
EWP10742, EWP85742,
EWP85752
EWP10742, EWP85742,
EWP85752
3.0 Kg
Wool 2.0 Kg
Fast’20 1.5 Kg
3.5 Kg
1000 rpm
850 rpm
Regular, Easy Iron,
Color, Delicates,
Wool, Heavy Duty,
Sensitive Plus, Energy
Saving, Rinse, Spin
Program Putar Maks.Model
Silk, Fast’20
EWP10742
800 rpm
EWP10742
EWP85742, EWP85752
650 rpm
EWP85742, EWP85752
Jika anda tidak dapat mengenal pasti atau
menyelesaikan masalah, hubungi pusat
perkhidmatan kami.
Sebelum menghubungi kami, catat model, nombor
siri dan tarikh pembelian mesin anda: Pusat
Perkhidmatan akan memerlukan maklumat ini.
Dimensi (Lebar / Tinggi / Dalam) 59.6 X 84.7 X 55.3 cm
Bekalan kuasa (Voltan / Frekuensi)
Jumlah kuasa
Tekanan bekalan air (Maksimum / Minimum)
Perlindungan fius minimum 10 A
Page 63
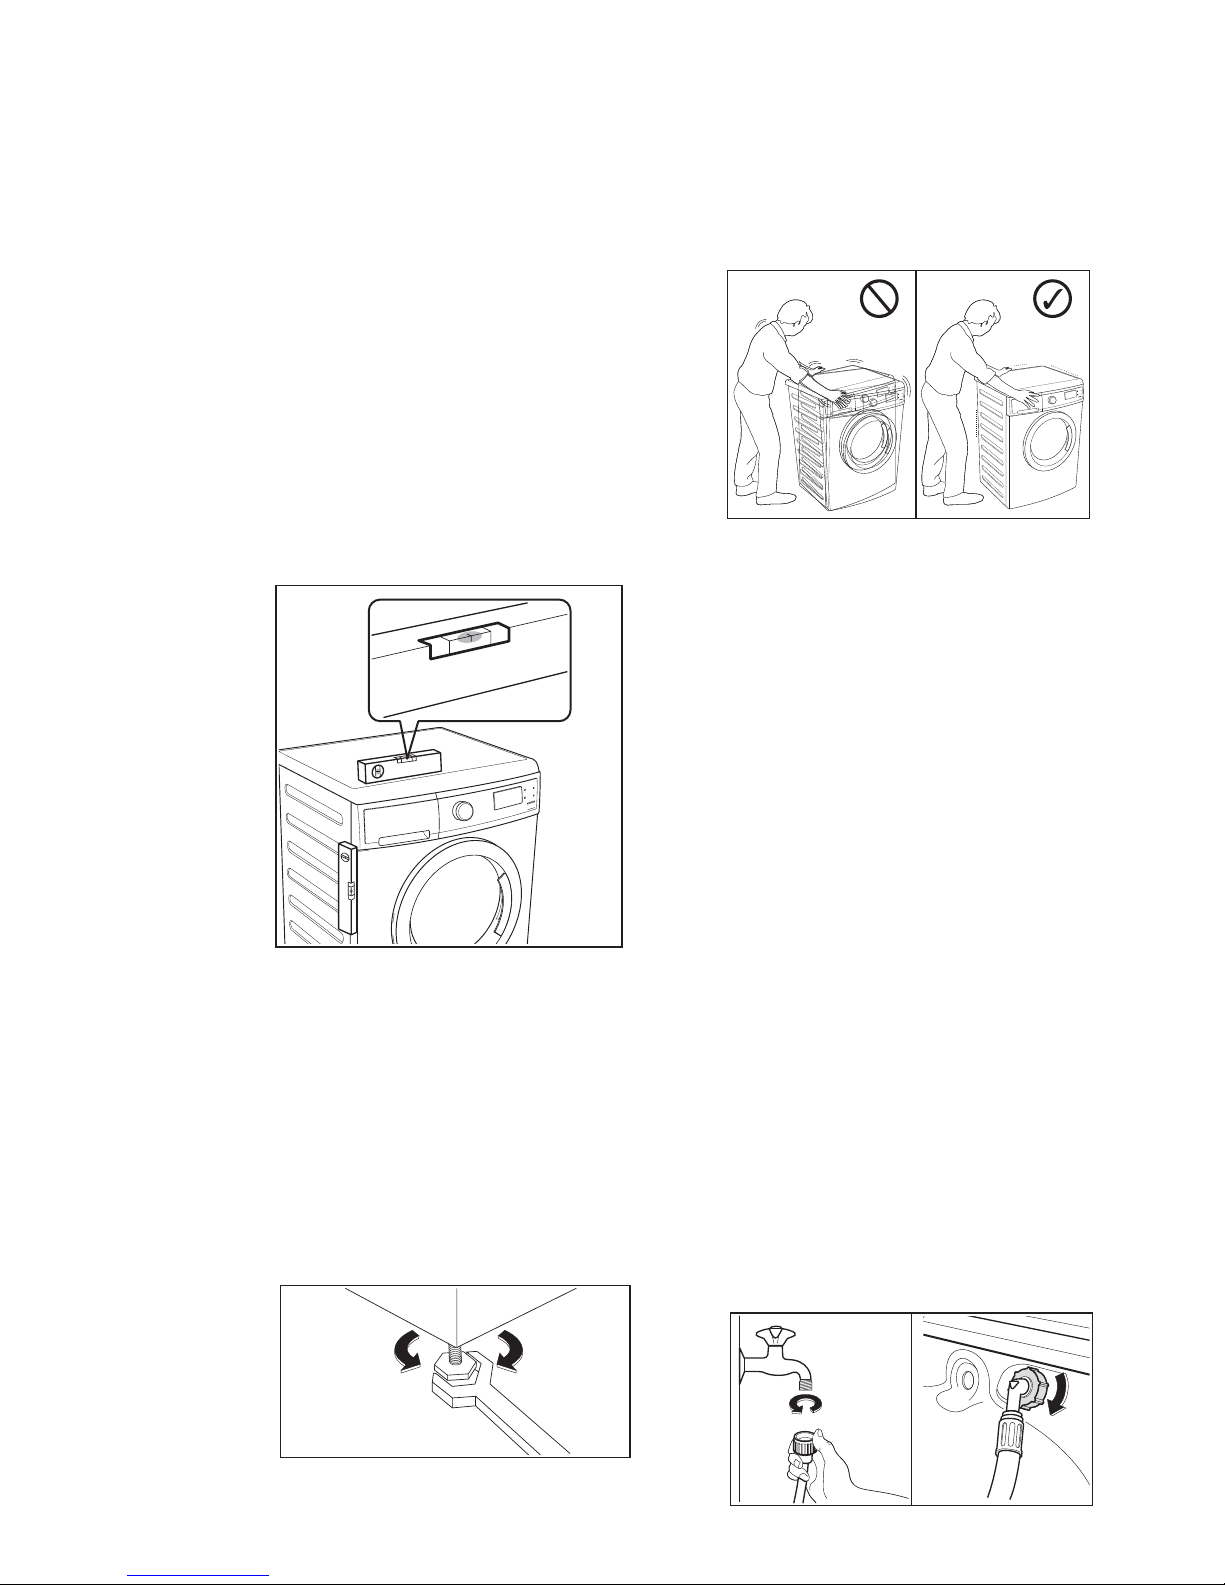
MELAYU 63
PEMASANGAN11 .
Jangan letakkan kadbod, kayu
atau bahan yang sama di bawah
mesin untuk meratakan lantai.
Longgarkan atau ketatkan kaki
untuk melaras ketinggian. Pelarasan yang betul paras perkakas
mencegah getaran, bunyi bising
dan pergerakan perkakas semasa
beroperasi.
Apabila mesin basuh selaras, cuba
goyangkannya dari sudut ke sudut.
Jika ia bergoyang, laras semula
kaki sehingga ia selaras dan tidak
bergoyang.
11.1 Kedudukan mesin
Gunakan paras spirit pada atas
dan sisi mesin basuh untuk
memeriksa paras.
Jika anda tidak mempunyai paras
spirit, sebagai panduan gunakan
hujung bingkai pintu, almari atau
bangku untuk memastikan mesin
basuh selaras.
Penting untuk mesin basuh
anda didudukan kukuh dan rata
di atas lantai untuk memastikan
operasi yang betul.
Perkakas tidak boleh dipasang di
belakang pintu boleh dikunci, pintu
gelongsor atau pintu dengan selak
pada sisi bertentangan pintu mesin
basuh.
Sambungkan hos penyaliran air
masuk kepada pili air dengan alur
BSP 3/4”.
Gunakan hos yang dibekalkan
bersama mesin basuh. JANGAN
GUNAKAN HOS LAMA.
Bahagian hujung lain hos air
masuk yang bersambung dengan
mesin boleh dipusingkan ke arah
mana sekalipun.
Longgar ikatan, pusingkan hos dan
ketatkan semula ikatan, pastikan
tiada kebocoran air.
11.2 Saliran Air Masuk
Pasangkan mesin di atas lantai
yang rata dan keras. Pastikan
peredaran udara di sekeliling mesin
tidak di ganggu oleh permaidani,
dan sebagainya.
Periksa mesin supaya tidak
menyentuh dinding atau almari.
Page 64
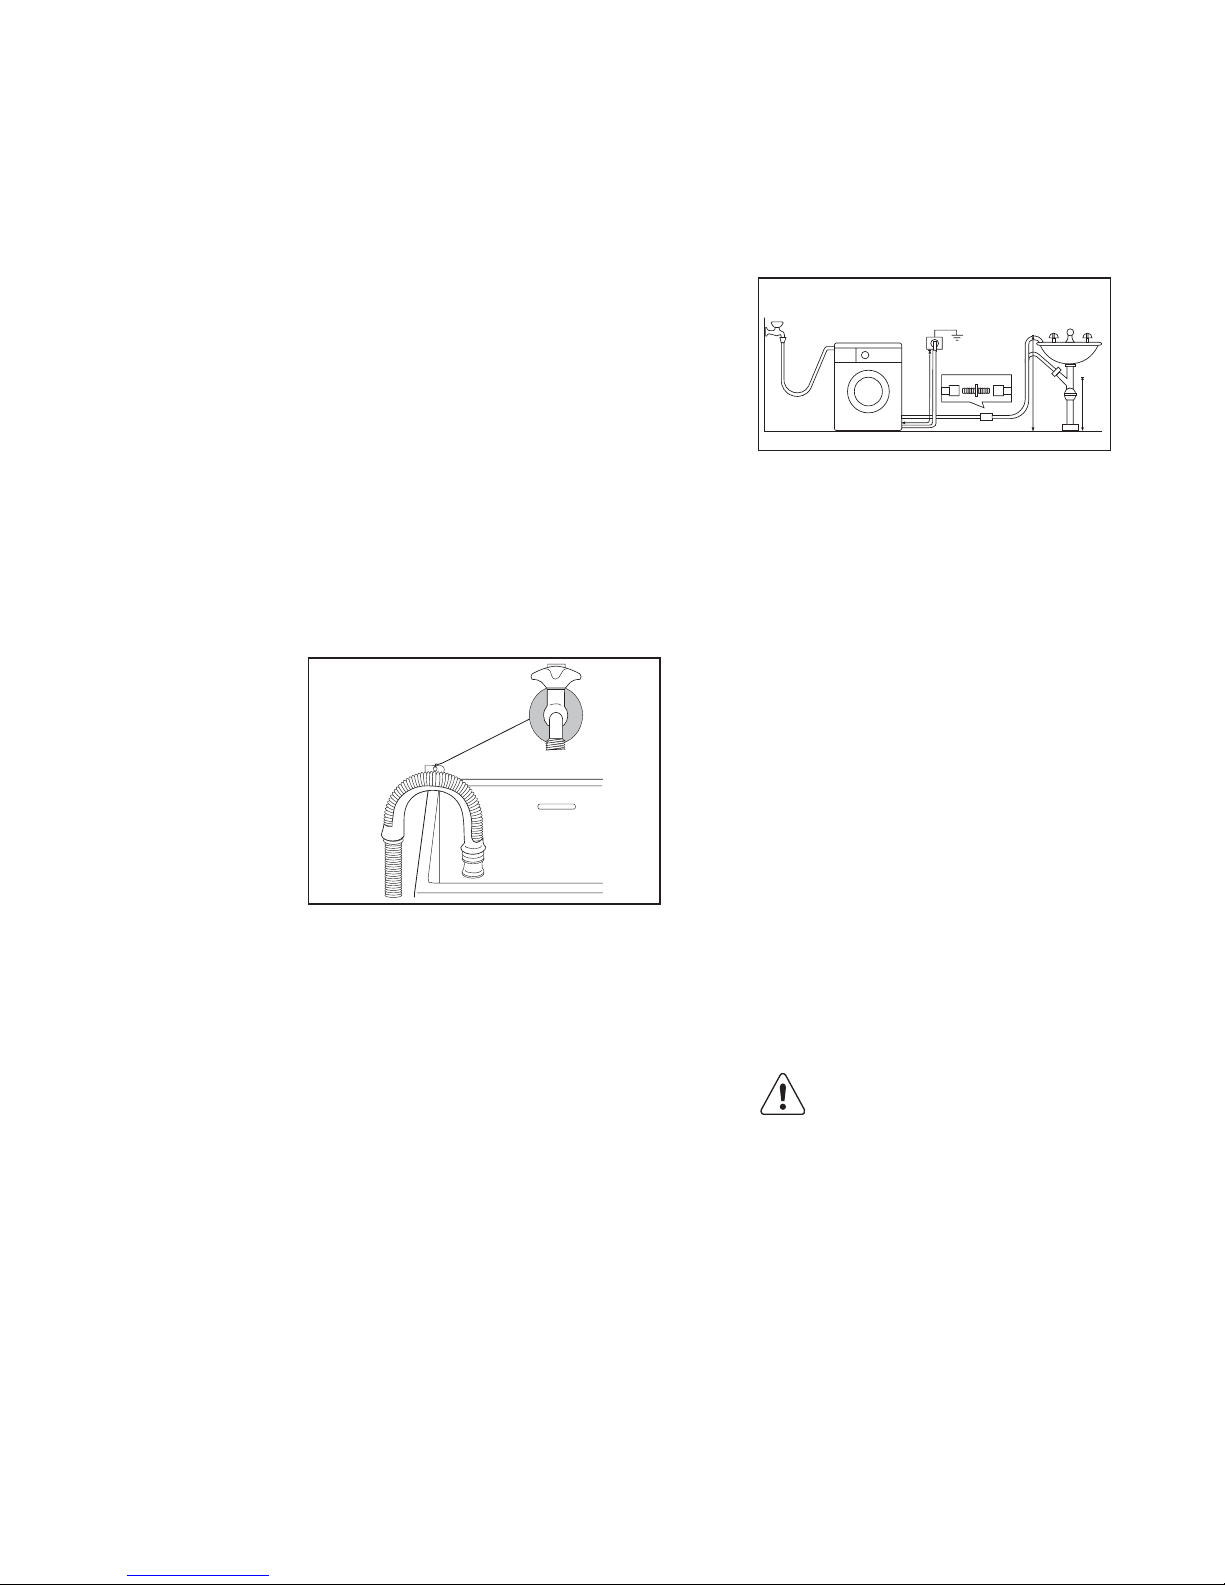
64
www.electrolux.com
Hos air masuk tidak boleh dipanjangkan. Jika ia terlalu pendek dan
anda tidak mahu mengalihkan pili
air, anda perlu membeli hos baru
yang lebih panjang dan yang
dibuat khusus untuk kegunaan
seperti ini.
Ini boleh dilakukan dengan
mengikatnya kepada paip air
dengan tali atau menempatkannya
pada dinding.
Cabang ini mesti di atas
perangkap supaya bengkokan
sekurang-kurangnya 60 cm dari
lantai.
Terus ke dalam paip penyaliran
keluar pada ketinggian tidak
kurang daripada 60 cm dan tidak
lebih daripada 90 cm.
Hujung hos penyaliran air keluar
mesti sentiasa berudara, cth. di
dalam diameter paip penyaliran
air keluar mesti lebih besar
daripada diameter di luar hos.
Hos air keluar tidak boleh
terputar. Terletak di atas lantai;
hanya bahagian berdekatan air
keluar mesti ditinggikan.
Hujung hos saliran boleh
ditentukan kedudukannya dengan
tiga cara:
Disangkutkan pada pinggir sink
menggunakan panduan hos
plastik yang disediakan bersama
mesin.
Untuk mesin berfungsi dengan
betu, hos air keluar mesti
disangkut dengan betul sokongan
yang terletak di bahagian atas
sebelah belakang perkakas.
Dalam hal ini, pastikan hujung
tidak disangkut apabila mesin
dikosongkan.
90 cm
60 cm
11.3 Penyaliran Air
“Bekalan kuasa yang tidak
betul boleh membatalkan
waranti anda.”
Periksa pemasangan elektrik
domestik anda boleh menerima
muatan maksimum yang diperlukan
(2.2 kW / 2.0 kW untuk FILIPINA),
juga mengambilkira perkakas lain
yang sedang digunakan.
Pengilang berhak menolak
sebarang tanggungjawab bagi
kerosakan atau kecederaan
sekiranya gagal mematuhi langkah
pencegahan keselamatan di atas.
Jika kabel bekalan kuasa perkakas
perlu ditukar, ini perlu dilakukan
oleh Pusat Servis kami.
Apabila perkakas dipasangkan,
kabel bekalan kuasa mesti boleh
diakses dengan mudah.
Mesin ini direka untuk beroperasi
pada 220-240 V, fasa tunggal, 50
Hz (60 Hz untuk bekalan FILIPINA).
11.4 Sambungan Elektrik
Sambung mesin pada
alur keluar soket terbumi.
AWAS!
Page 65
MELAYU 65
Jika perkakas ini dibekalkan
kuasa dari set sambungan kord
atau peranti alur keluar boleh alih,
set sambungan kord atau peranti
alur keluar mudah alih mesti
diletakkan pada kedudukan yang
tidak mengenai percikan air atau
mengekang kelembapan.
Bahan yang ditanda dengan
simbol boleh dikitar
semula.
>PE<=polyethylene
>PS<=polystyrene
>PP<=polypropylene
Ini bermakna bahan tersebut boleh
dikitar semula dengan melupuskannya dengan cara yang betul di
dalam bekas pemungutan yang
sesuai.
Untuk menjimatkan air dan tenaga
serta membantu melindungi alam
sekitar, kami menasihatkan agar
petua berikut dipatuhi:
Gunakan tapak pelupusan yang
disahkan bagi perkakas lama.
Bersama-sama kita menjaga
kebersihan negara!
Simbol pada produk atau
pada bungkusannya menunjukkan bahawa produk ini tidak
boleh dianggap sebagai sisa
buangan rumah.
Sebaliknya, ia hendaklah dihantar
ke pusat pungutan yang sesuai
untuk mengitar semula perkakasan elektrik dan elektronik.
Dengan memastikan produk ini
dilupuskan dengan betul, anda
akan membantu menghindarkan
berlakunya kemungkinan akibat
buruk terhadap alam sekitar dan
kesihatan manusia, yang boleh
disebabkan jika produk ini
dilupuskan tidak dengan sewajarnya.
Untuk maklumat lanjut mengenai
kitar semula produk ini, sila
hubungi pejabat bandar tempatan, atau khidmat pembuangan
bahan buangan rumah anda atau
kedai tempat anda membeli
produk ini.
12.1 Bahan Pembungkusan
12.3 Tips Ekologi
12.2 Mesin Lama
KEPRIHATINAN ALAM SEKITAR12.
Kebiasaannya pakaian kotor
boleh dibasuh tanpa pracuci
untuk menjimatkan detergen,
air dan masa (alam sekitar juga
dilindungi!).
Mesin berfungsi dengan lebih
ekonomi jika ia dimuat dengan
penuh.
Dengan prarawatan mencukupi,
kotoran dan kesan kotor terhad
boleh ditanggalkan; cucian
kemudiannya boleh dibasuh
pada suhu lebih rendah.
Sukat detergen mengikut
kekasaran air, tahap kotoran
dan kuantiti cucian yang mahu
dicuci.
Page 66

66 www.electrolux.com
目录
伊莱克斯 - 想你所想!
客户关怀和服务
安全信息
产品图解
控制面板
首次使用前
日常使用
洗衣提示
国际洗衣代码符号
保养和清洁
故障诊断
................................................................................................................... 67
................................................................................................................... 69
................................................................................................................... 70
................................................................................................................ 76
................................................................................................................... 76
................................................................................................................... 82
..................................................................................................... 84
................................................................................................................ 85
................................................................................................................... 90
1
2
3
4
5
6
7
8
9
技术参数 ................................................................................................................... 9310
安装 .......................................................................................................................... 9411
关注环保 ................................................................................................................... 9612
感谢您购买伊莱克斯电器。您选择的产品凝结了我们数十年的专业经验和创新技术。精巧
时尚的外观,尽显人性化设计。因此每次使用它,您都能得到满意的效果。欢迎来到伊莱
克斯的世界。
我们建议使用原厂备件。联系客服人员时,请确保可以提供下面的信息。您可以在产品铭
牌上找到这些信息。例如型号、PNC、序列号。
访问我们的网站:
获取使用建议、产品手册、故障解决方案以及维修服务信息:
www.electrolux.com
注册产品以获得更贴心的服务:
www.electrolux.com/productregistration
为您的电器购买附件、耗材和原厂备件:
www.electrolux.com/shop
警示/安全警告信息。
基本信息和使用提示。
环保信息。
如有更改,恕不另行通知。
Page 67
简体中文 67
安全信息
为了您的安全和确保正确使用洗衣机,
在安装和首次使用本机前,请仔细阅读
本用户手册,包括相关的提示和警告。
本机适合在家庭及类似场合使用,例
如:
农舍
供酒店式公寓、度假公寓以及居住
型环境的客人使用。
使用条件
为避免不必要的错误和意外,务必要确
保本机的所有使用者都充分熟悉其各项
操作特性和安全特性。
请妥善保留本说明书,搬运或出售本机
时,应确保随机附带本说明书,以便机
器使用寿命内的每位使用者都能适当了
解机器的使用方法和安全须知。
1.1
基本安全提示
以任何方式更改产品规格或试图改装
本产品的做法都是危险的。
高温洗衣程序运行期间,机门玻璃可
能会很热。切勿触摸!
确保宠物不会爬入滚筒内。为避免这
种情况的发生,请在使用本机前对滚
筒内进行检查。
任何诸如硬币、别针、钉子、螺丝钉
、石块等物品或任何其他坚硬、锋利
材料都可能造成大面积损坏,因此不
得放入洗衣机中。
仅使用建议用量的衣物柔顺剂和洗涤
剂。如果用量过大,可能会损伤衣物
或洗衣机。请遵循制造商的用量建
议。
袜子、蕾丝带、可洗皮带等小件物品
应放在洗衣袋或枕套内洗涤,因为这
些小物件可能会落入洗衣桶与内滚筒
之间。
本机不适合身体残障、感官或精神功
能减退以及缺乏相关经验和知识的人
员(包括儿童)使用,除非有负责其
安全的人员对其使用本机给予监督或
指导。
不要使用洗衣机洗涤带坚硬部分的物
品、未摺边或开线的衣物。
每次使用、清洁以及保养本机之后,
始终要拔下电源插头并关闭水龙头。
本机非常沉重。搬动时应多加小心。
拆除本机的包装时,请检查洗衣机是
否有任何损坏。如有任何疑问,请勿
使用,并联系维修服务中心。
使用洗衣机之前,必须拆除所有包装
材料和运输螺栓。否则,本产品和其
他财物可能会严重受损。请参阅本用
户手册的相关章节。
在任何情况下,不应尝试自行维修洗
衣机。由缺乏相关经验的人员维修洗
衣机可能会导致人身伤害或设备严重
故障。 请联系您当地的维修服务中
心。 应始终坚持使用原厂备件。
1.2
安装
1.
-
-
洗衣机安装完毕后,检查并确认进水
管和排水管没有被洗衣机压住,且工
作台面不挤压电源线。
如果将本机摆放在铺有地毯的地板上,
请适当调整底脚,以便空气能够自由
流通。
安装完毕后,始终要确保水管及水管
连接处没有漏水现象。
安装本机所需的水管敷设工作应由合
格的水管工人完成。
安装本机所需的电气工作应交由合格
的电工完成。
Page 68
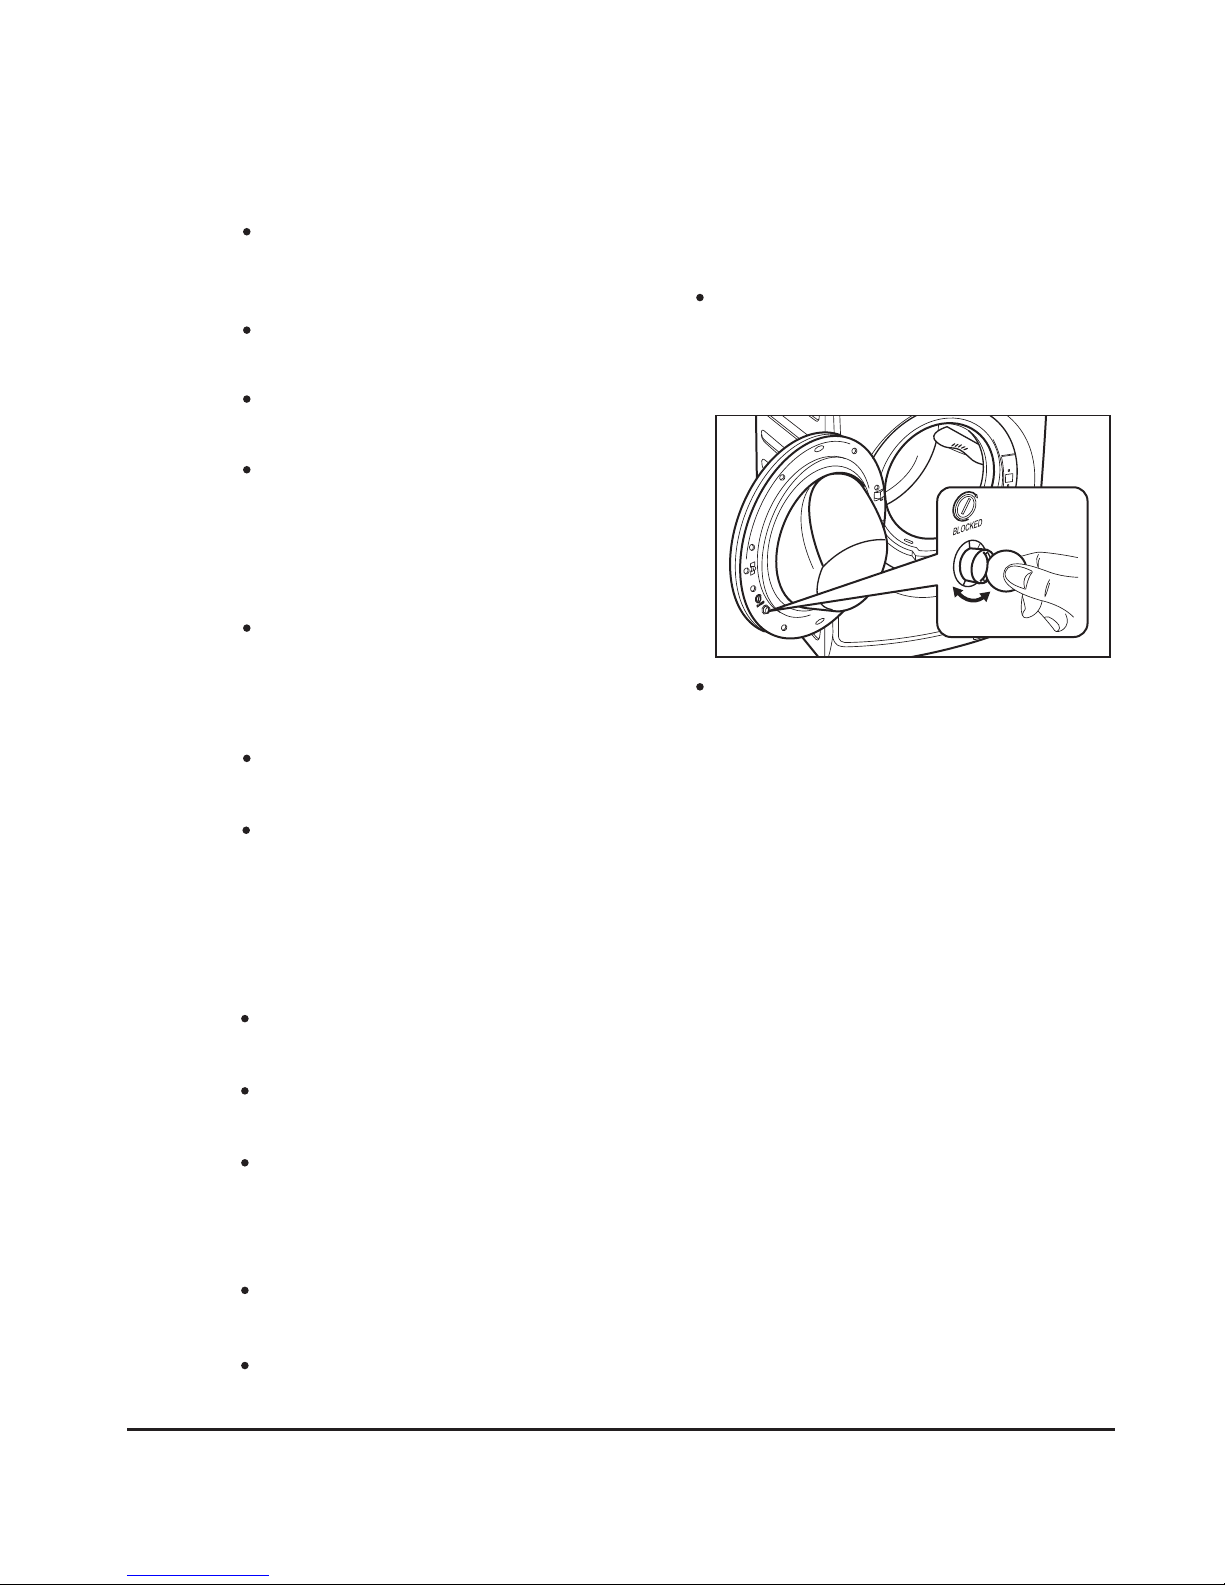
68
www.electrolux.com
除非有适当的监督指导,否则本洗衣
机不供儿童或体弱多病者使用。
应对儿童加以照看,确保他们不会玩
耍洗衣机。
包装材料组件(如塑料薄膜、聚苯乙
烯泡沫)可能危及儿童安全 - 存在窒
息危险!请妥善将其放在儿童无法触
及的地方。
确保儿童或宠物不会爬入滚筒。
要启用此装置,请顺时针旋转(无需
按动)机门内侧的按钮,直到按钮上
的凹槽转至水平位置。如有必要,可
借助硬币。
启用此装置时,机门无法关闭。这样可
以防止儿童或宠物锁在洗衣机内。
要禁用此装置以便可以关闭机门,请
逆时针旋转该按钮,直到按钮上的凹
槽转至垂直位置。
将所有洗涤剂放在儿童无法触及的安
全地方。
本机专为家庭使用而设计。除了专门
设计的用途外,不得将本机用于其他
用途。
仅洗涤适宜机洗的衣物。请遵循每件
衣服标签上的洗涤说明。
不得在本机内放入过量衣物。请参阅
本用户手册的相关章节。
开始洗衣前,确保已掏空所有衣袋、
扣紧纽扣并拉好拉链。避免洗涤有磨
损或破损的物品,并在洗衣前处理颜
料、油墨、锈迹及草叶等污渍。 带钢
圈的胸罩不得机洗。
接触过挥发性石油产品的衣物不得机
洗。 如果使用了挥发性的清洗液,那
么一定要注意确保先除去衣物上的清
洗液,然后再放入洗衣机中。
从电源插座上拔下插头时,切勿拽拉
电源线;始终应用手握住插头。
如果电源线、控制面板、工作台面或
底座发生损坏而露出洗衣机内部,请
勿使用洗衣机。
1.3
使用
1.4
儿童安全
1.5
儿童安全装置
Page 69
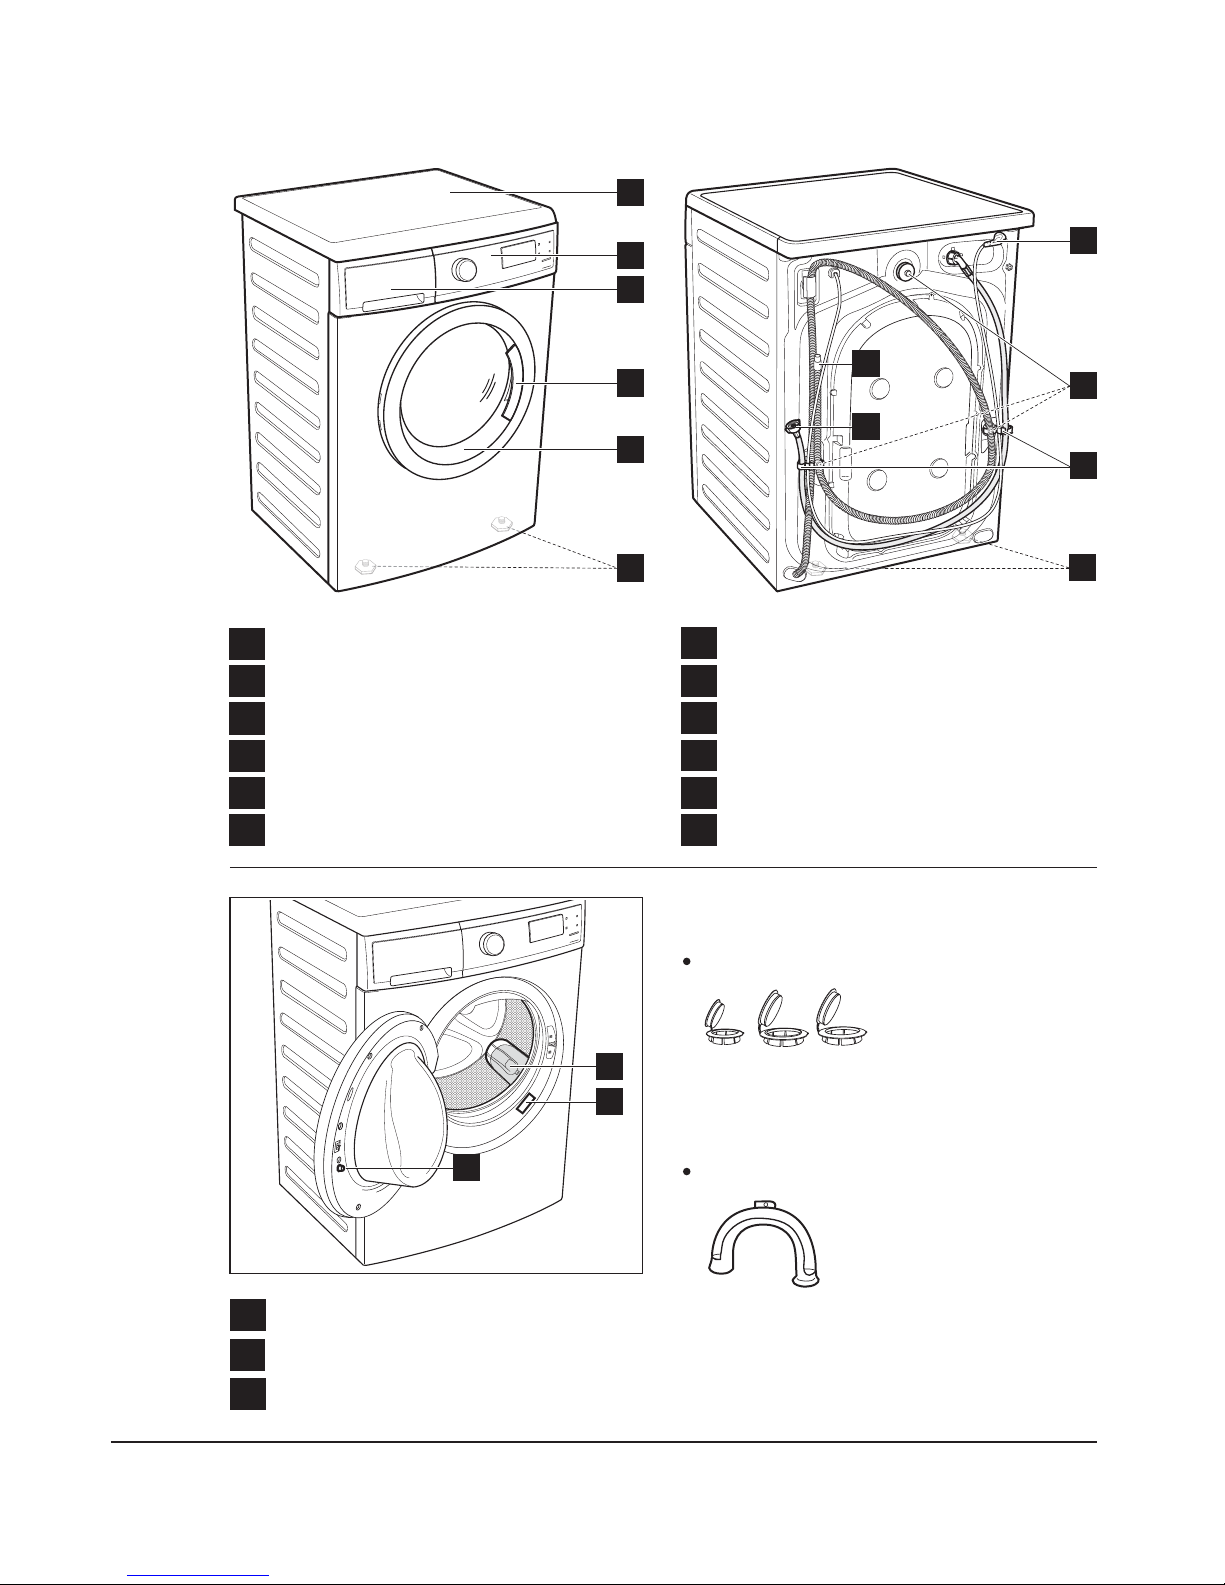
简体中文 69
产品图解
2.
8
9
1
4
5
6
2
3
12
7
11
10
14
15
13
1
工作台面
2
洗涤剂/柔顺剂投放格
3
控制面板
4
机门拉手
5
洗衣机门
7
6
水平调整脚(前端)
8
电源线
9
进水软管
10
排水软管
11
水管夹
12
后端调整脚
运输螺栓
13
机门锁钮
14
铭牌
15
排水泵过滤器
用于将排水管连接在水槽边缘。
塑料盖
用于在卸下运输螺栓后堵住机箱背部
的孔口。
附件
塑料软管导向套
Page 70
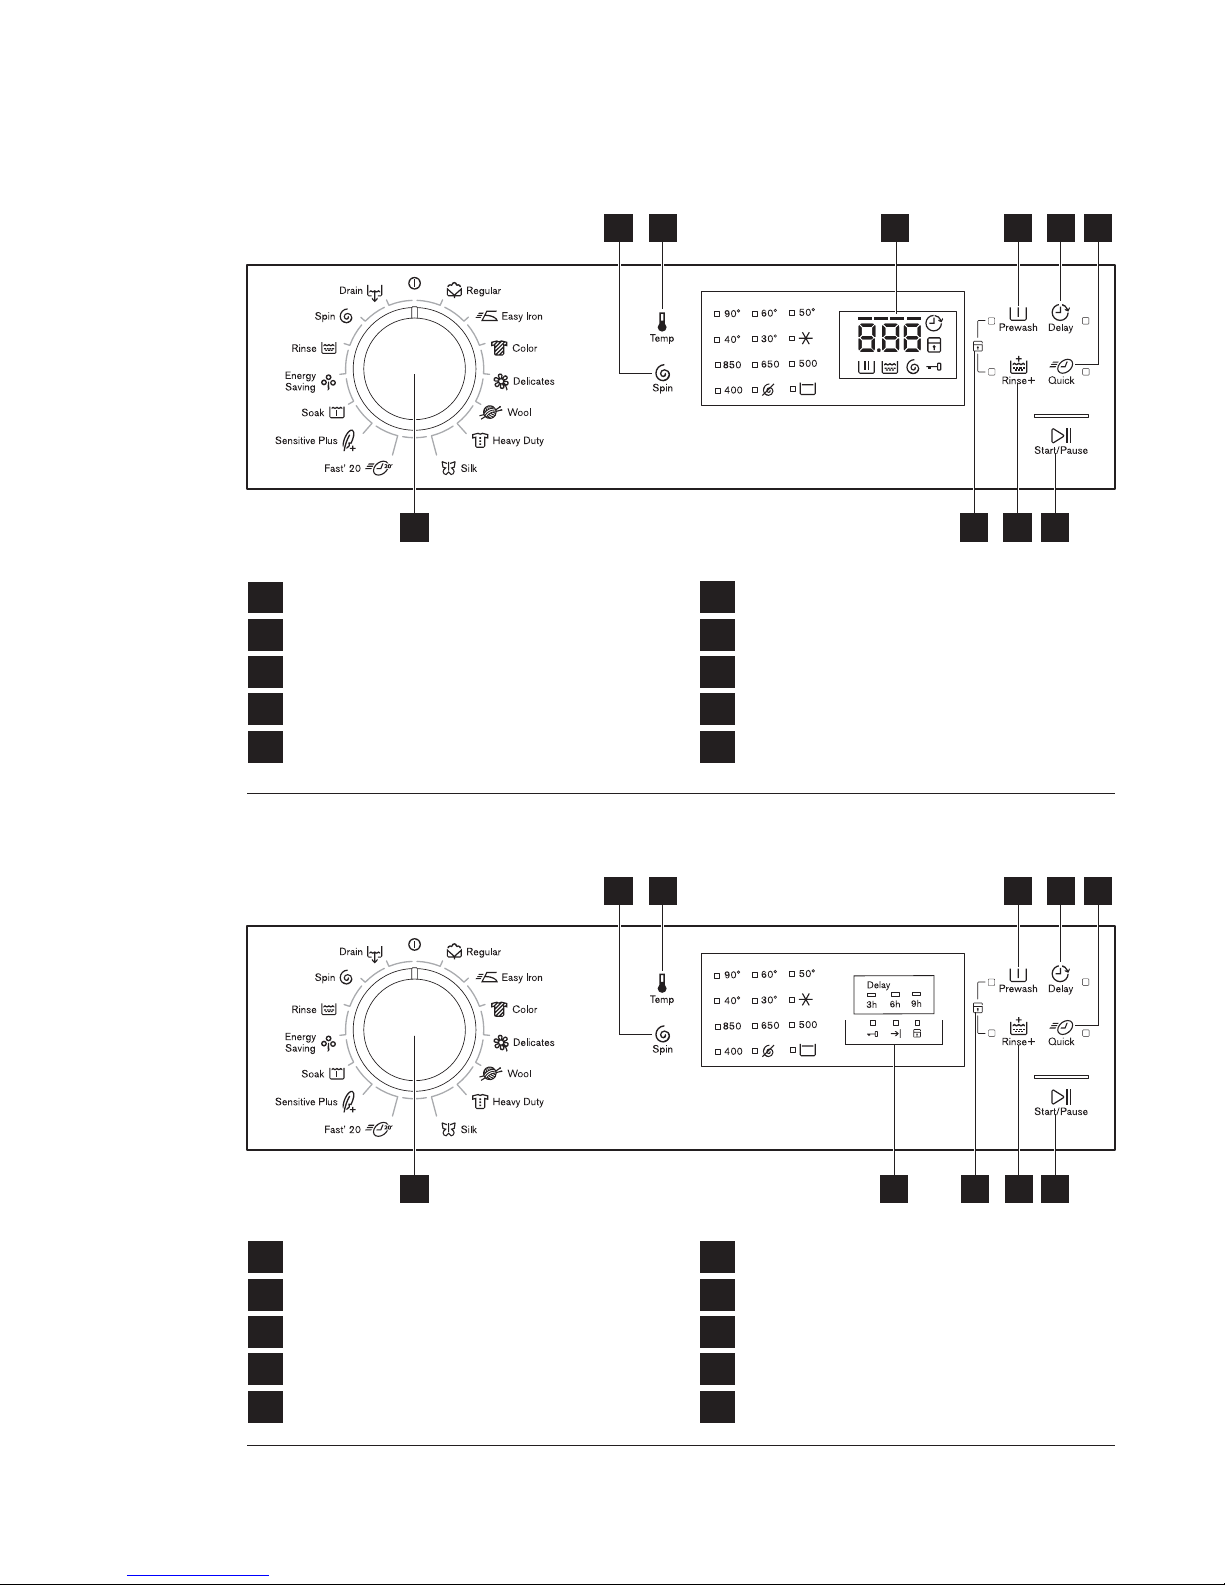
控制面板
3.
70
www.electrolux.com
对于以下型号:
EWP10742, EWP85742
1
2
程序选择旋钮
3
4
脱水选择触控按钮
5
温度触控按钮
6
显示屏
启动/暂停触控按钮
7
加强漂洗触控按钮
* 型号
: EWP85742
8
预洗触控按钮
9
儿童安全锁选项
10
预约触控按钮
快洗触控按钮
1
2
程序选择旋钮
3
4
脱水选择触控按钮
5
温度触控按钮
6
指示标志
启动/暂停触控按钮
7
加强漂洗触控按钮
8
预洗触控按钮
9
儿童安全锁选项
10
预约触控按钮
快洗触控按钮
对于以下型号:
EWP85752
2 6 7 83
4
1 9510
1 9510
2 64 7 83
Page 71
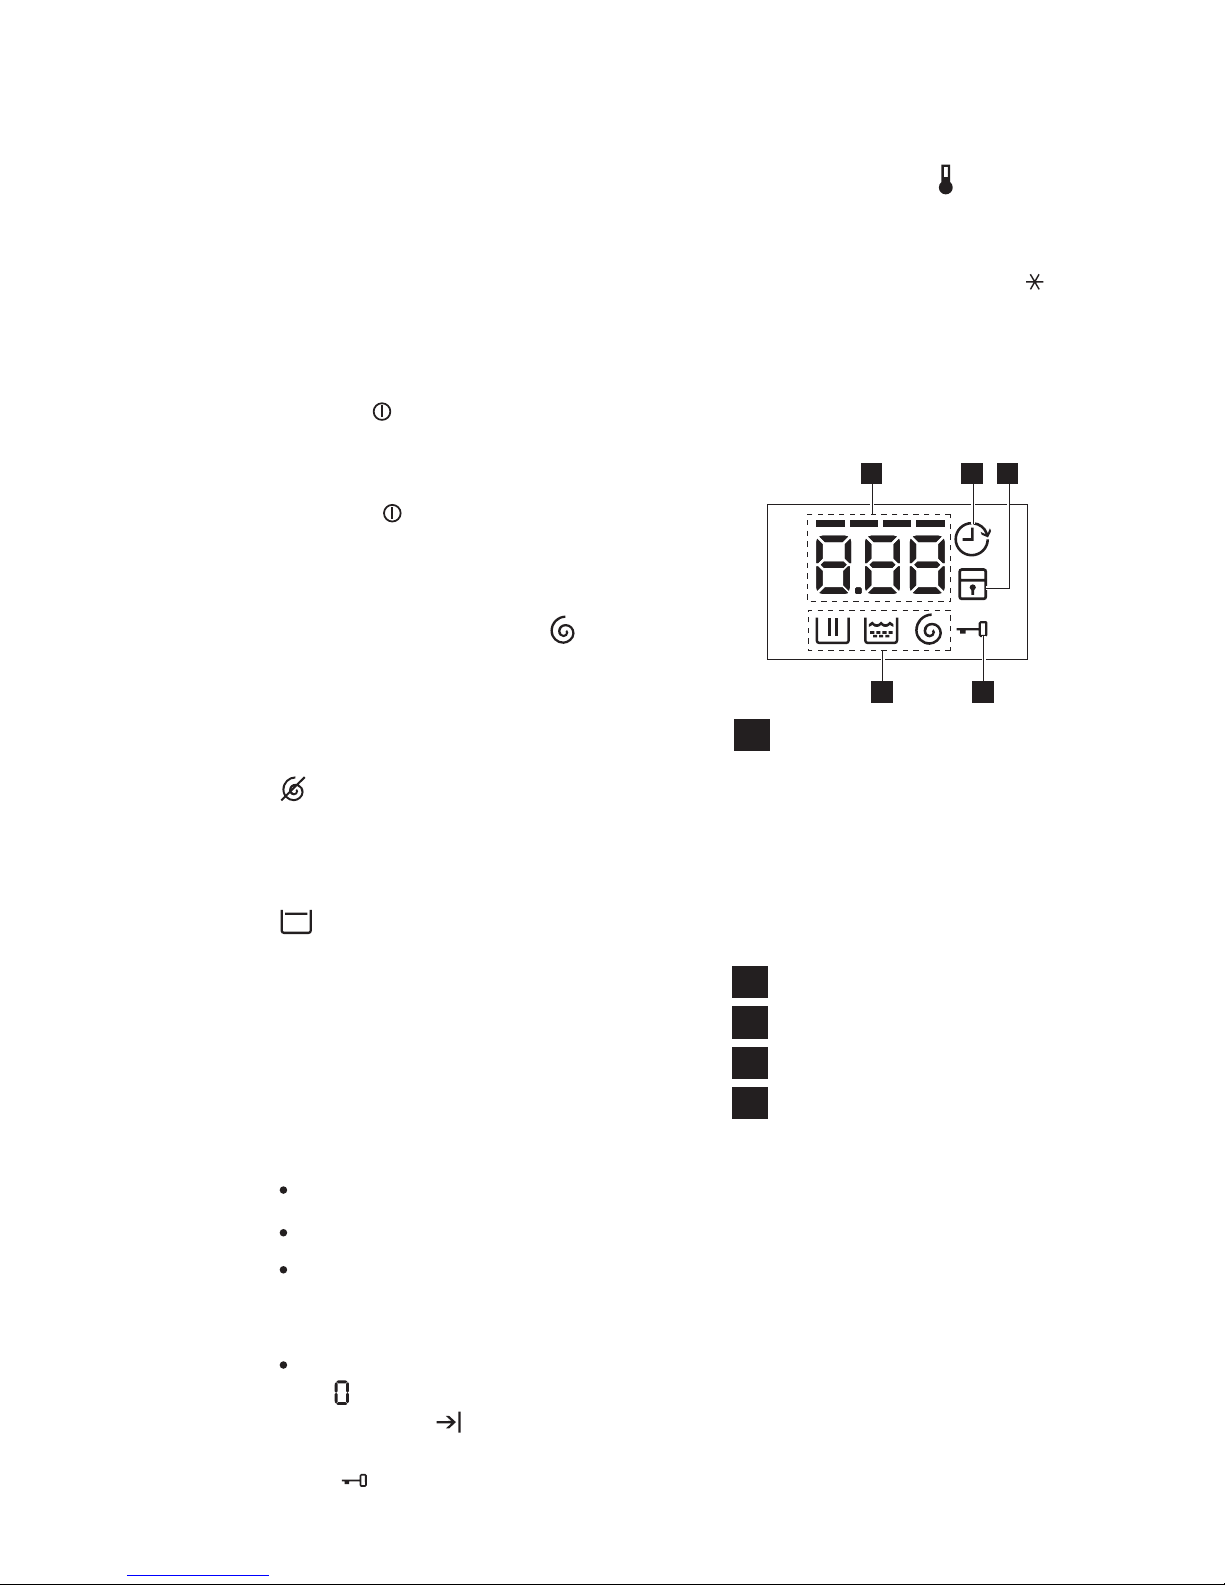
程序结束时,显示屏将显示
“ ”(有显示屏机型),或者
洗衣结束“ ”指示灯将亮起
(无显示屏机型),同时
“ ”(门锁)标志熄灭。
简体中文 71
3.1
程序选择旋钮
旋转此旋钮设定洗衣程序。洗衣
机将针对选定的程序建议洗衣温
度,并自动选择脱水速度值。
选择旋钮可以顺时针或逆时针
旋转。
位置 “ ” 将重置程序/关闭
洗衣机。
洗衣程序结束后,务必将选择旋
钮旋至“ ” 位置,关闭洗衣
机。
选择此选项时,将不排空最后一
次漂洗时的水,并且滚筒会定时
旋转以防止衣物褶皱。
延迟脱水
3.3
温度触控按钮
如果希望使用不同于洗衣机建议的
温度洗涤衣物,请多次按该按钮升
高或降低洗衣温度(符号“ ”
代表冷水洗涤)。
机门仍将保持锁定,以提醒您必
须排空滚筒内的水。
要进行排水:
选择“脱水”或“排水”程序。
根据需要降低脱水速度。
按启动/暂停触控按钮。洗衣
机将排出滚筒内的水并进行脱
水。
A
数字值;
将指示:
B
-
洗衣阶段图标
C
D
预约图标
E
儿童安全锁图标
门锁图标
3.4
显示屏
(对于以下型号:EWP10742, EWP85742)
洗衣循环时间。
-
图标亮起时,无法打开机
门。
-
图标熄灭时,可以打开机
门。
-
报警代码。请参见“故障诊
断”一章了解相关代码的说
明。
-
预约时间。
C DA
B E
3.2
脱水选择触控按钮
如果希望使用不同于洗衣机建议
的转速为衣物脱水,请反复按此
触控按钮加快或减慢脱水转速。
“不脱水”选项将取消所有脱
水阶段并增加漂洗次数。
不脱水
Page 72
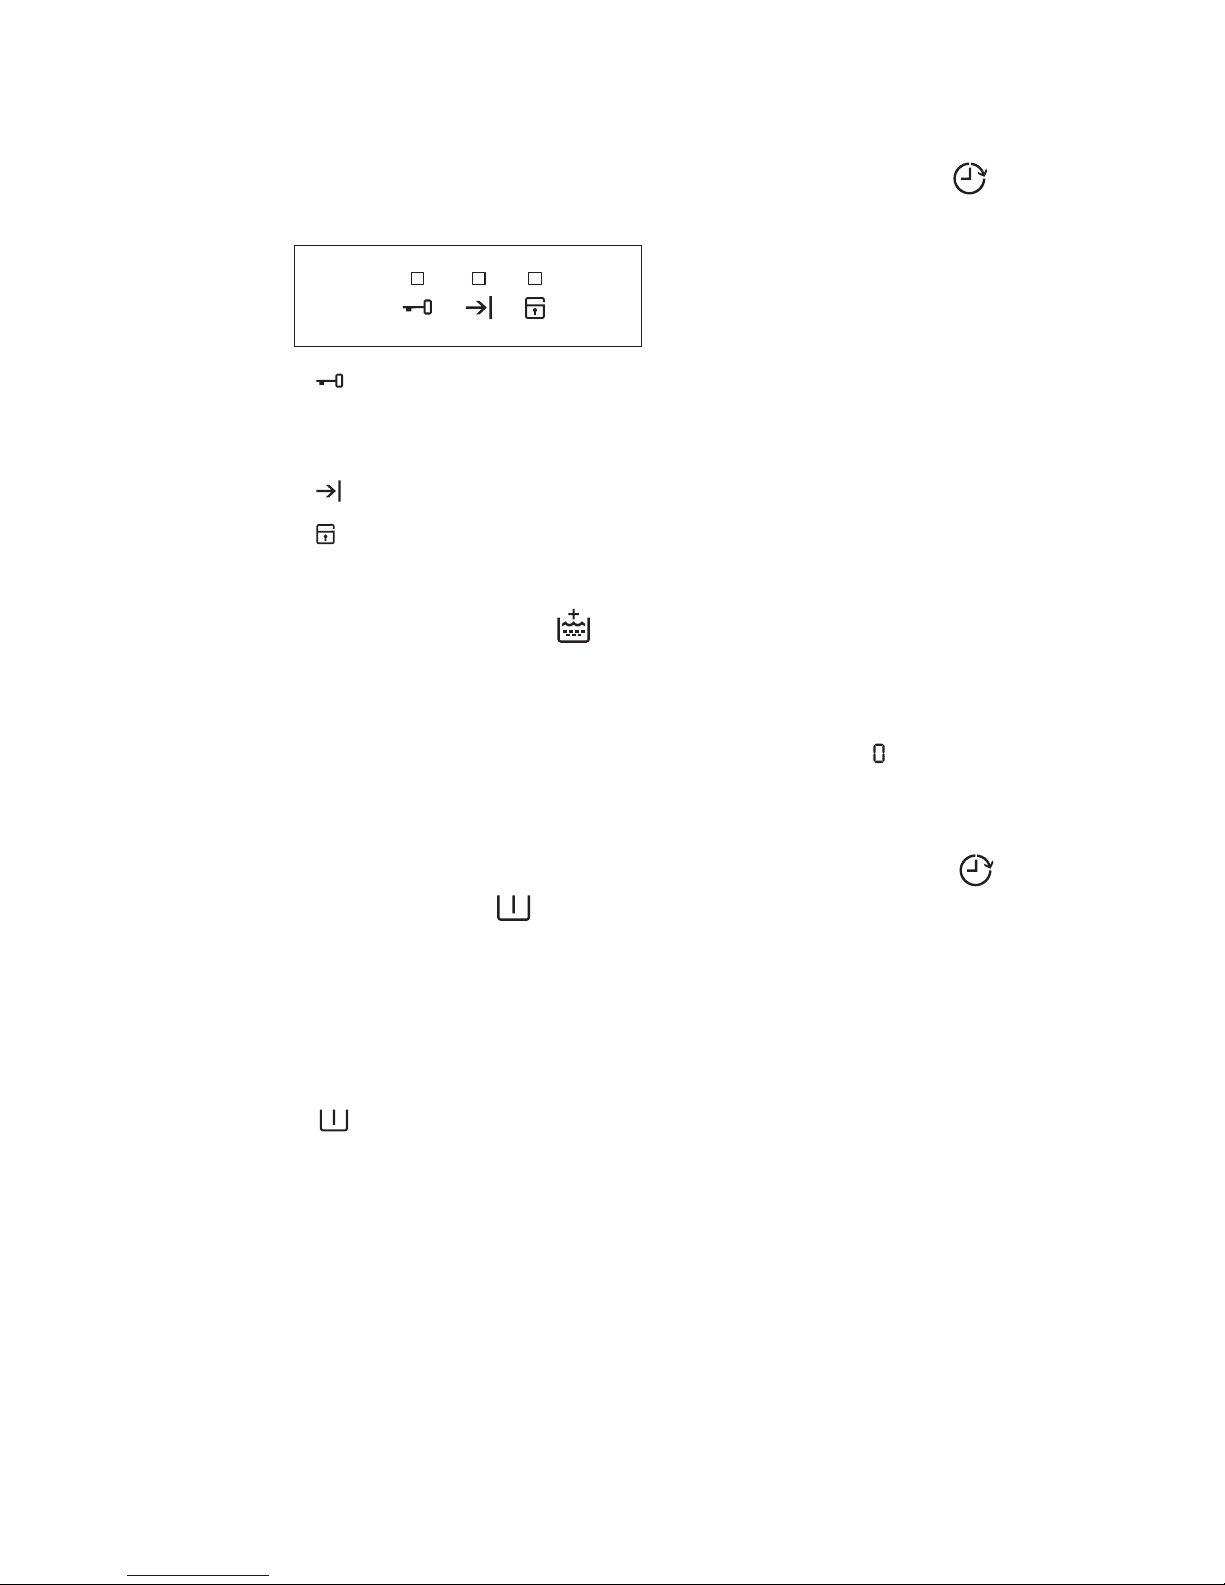
3.7
预洗触控按钮
72
www.electrolux.com
如果希望在开始主洗之前预洗衣
物,请选择此选项。此选项适合
洗涤脏污程度严重的衣物。此选
项的标志将亮起。
当设定此功能时,请将洗涤剂放入
“ ” 投放格中。
此功能将延长程序的持续时间。
3.5
指示标志
(
对于型号
EWP85752)
-
门锁标志。
-
洗衣结束标志。
-
儿童安全锁标志。
LED 灯亮起时,无法打开机门。
LED 灯熄灭时,可以打开机门。
3.6
加强漂洗触控按钮
此选项建议用于对洗涤剂过敏的人
群以及水质很软的地区。
按此按钮将向洗衣程序中添加漂洗
阶段。
此选项的标志将亮起。
3.8
预约触控按钮
此选项可以将洗衣程序的启动时间
向后推迟 30、60或 90 分钟,之
后可按小时推迟 2 至 20 小时。
显示屏上将指示选择的预约时间。
结束时间将相应增加,以体现您选
择的预约时间。
此选项必须在设定好程序之后、按
下启动/暂停触控按钮之前选择。
如果要在延时期间向洗衣机内添
加衣物,请按下启动/暂停触控按
钮,将洗衣机置于暂停模式。添
加衣物,关闭洗衣机门,然后再
次按启动/暂停按钮。
您可以随时取消预约时间:反复按
预约触控按钮,直到显示屏显示预
约时间为“ ”,然后按启动/暂
停触控按钮。
如果要在延时期间向洗衣机内添
加衣物,请按下启动/暂停触控按
钮,将洗衣机置于暂停模式。添
加衣物,关闭洗衣机门,然后再
次按启动/暂停按钮。
您可以随时取消预约时间:反复
按预约触控按钮直到 LED 指示
灯熄灭,然后按启动/暂停触控
按钮。
(对于以下型号:EWP10742, EWP85742)
3.9
预约触控按钮
此选项可以将洗衣程序的启动时间
推迟 3、6 和 9 小时。
反复按此触控按钮选择预约时间。
此选项的标志将亮起。
此选项必须在设定好程序之后、按
下启动/暂停触控按钮之前选择。
(
对于型号
EWP85752)
Page 73

简体中文 73
3.10
快洗触控按钮
3.11
启动/暂停触控按钮
此选项可用于洗涤脏污程度较轻的
衣物,以便在短时间内获得良好的
洗涤效果。
洗衣时间将根据织物类型和所选温
度相应缩短。
要启动选定的程序,请按启动/
暂停。
要中途停止正在运行的程序,请
按“启动/暂停”使洗衣机暂停
运行。
要重新启动已暂停的程序,请再
次按“启动/暂停”。
如果选择了预约,按启动/暂停
按钮之后,洗衣机将开始倒计
时。
3.12
蜂鸣器响起
程序已完成。
洗衣机发生故障。
蜂鸣器将在以下情况下响起:
如果您想禁用蜂鸣器声响(洗衣
机故障时除外),请同时按“加
强漂洗”和“快洗”触控按钮并
保持 6 秒钟,当听到蜂鸣声蜂
鸣声时即告成功。
要恢复默认配置,请同时按这两
个触控按钮并保持 6 秒钟,等
待洗衣机发出蜂鸣声即可。
3.13
儿童安全锁选项
本机提供儿童安全锁功能,可以
在洗衣机无人看管时保持机门关
闭,从而不必担心洗衣机对儿童
造成伤害或本身发生损坏。
请在选定需要的洗衣程序之后、
按启动/暂停触控按钮之前设定
此选项。
即使已切断洗衣机电源,此功能
仍会保持启用状态。
要启用此功能,请同时按“预洗
”和“加强漂洗”触控按钮,直
到该选项的标志亮起。
设定儿童安全锁选项:
要停用此功能,请同时按“预洗
”和“加强漂洗”触控按钮,直
到该选项的标志熄灭。
Page 74
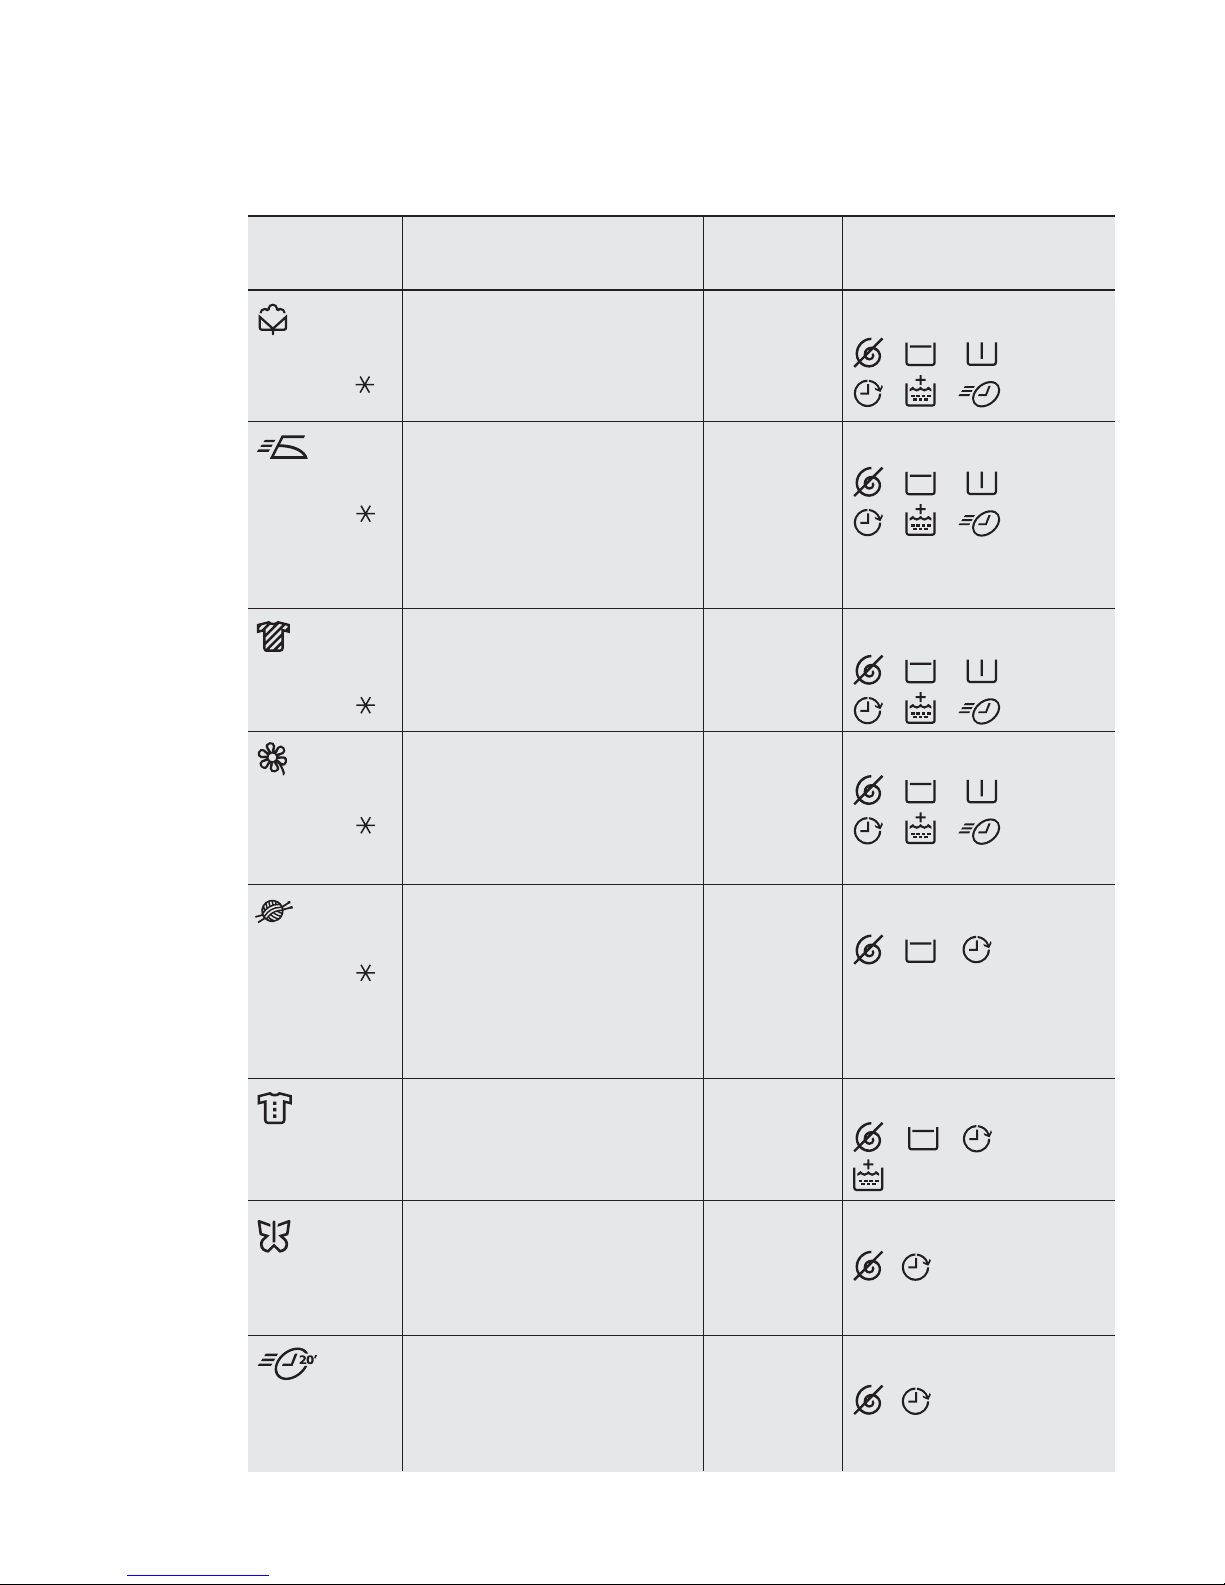
74
www.electrolux.com
3.14
程序 + 选项
程序;
温度
Regular;
90 °C
至
脏污程度严重的白色和彩
色棉质织物;
最大衣物量 7 千克。
Spin (
脱水减速
)/
Easy Iron;
60 °C
至
化纤或混合面料织物、需
要熨烫的内衣、彩色衣物
、防缩水衬衫、上衣;
最大衣物量 3.5 千克。
衣物类型;
最大衣物量
程序说明 可组合使用的选项
Delicates;
40 °C
至
Fast’ 20;
30 °C
脏污程度一般的精致织物
,如腈纶、粘胶纤维聚酯
纤维类衣物;
最大衣物量 3.5 千克
化纤及混合面料织物。
脏污程度较轻及需要清
洁除味的衣物;
最大衣物量 1.5 千克
/ / /
/ /
Spin (
脱水减速
)/
/ / /
/ /
Spin (
脱水减速
)/
/ / /
/ /
Spin (
脱水减速
)/
/ / /
/ /
Spin (
脱水减速
)/
/ / /
Spin (
脱水减速
)/
/
Spin (
脱水减速
)/
/
Spin (
脱水减速
)/
/ /
Color;
60 °C
至
彩色的混合面料衣物;
最大衣物量 3.5 千克。
Wool;
40 °C
至
为带有“纯新羊毛、不
缩水、可机洗”标签的
羊毛衣物专门测试的洗
衣程序;
最大衣物量 2 千克。
Heavy Duty;
90
至
40 °C
脏污程度严重的衣物;
最大衣物量 7 千克
Silk;
30 °C
短时间洗涤丝质窗帘等
精致衣物;
最大衣物量 3 千克。
- 主洗
- 漂洗
- 长时脱水
- 主洗
- 漂洗
- 短时脱水
- 主洗
- 漂洗
- 短时脱水
- 主洗
- 漂洗
- 短时脱水
- 主洗
- 漂洗
- 短时脱水
- 主洗
- 漂洗
- 短时脱水
- 主洗
- 漂洗
- 短时脱水
- 主洗
- 漂洗
- 短时脱水
Page 75
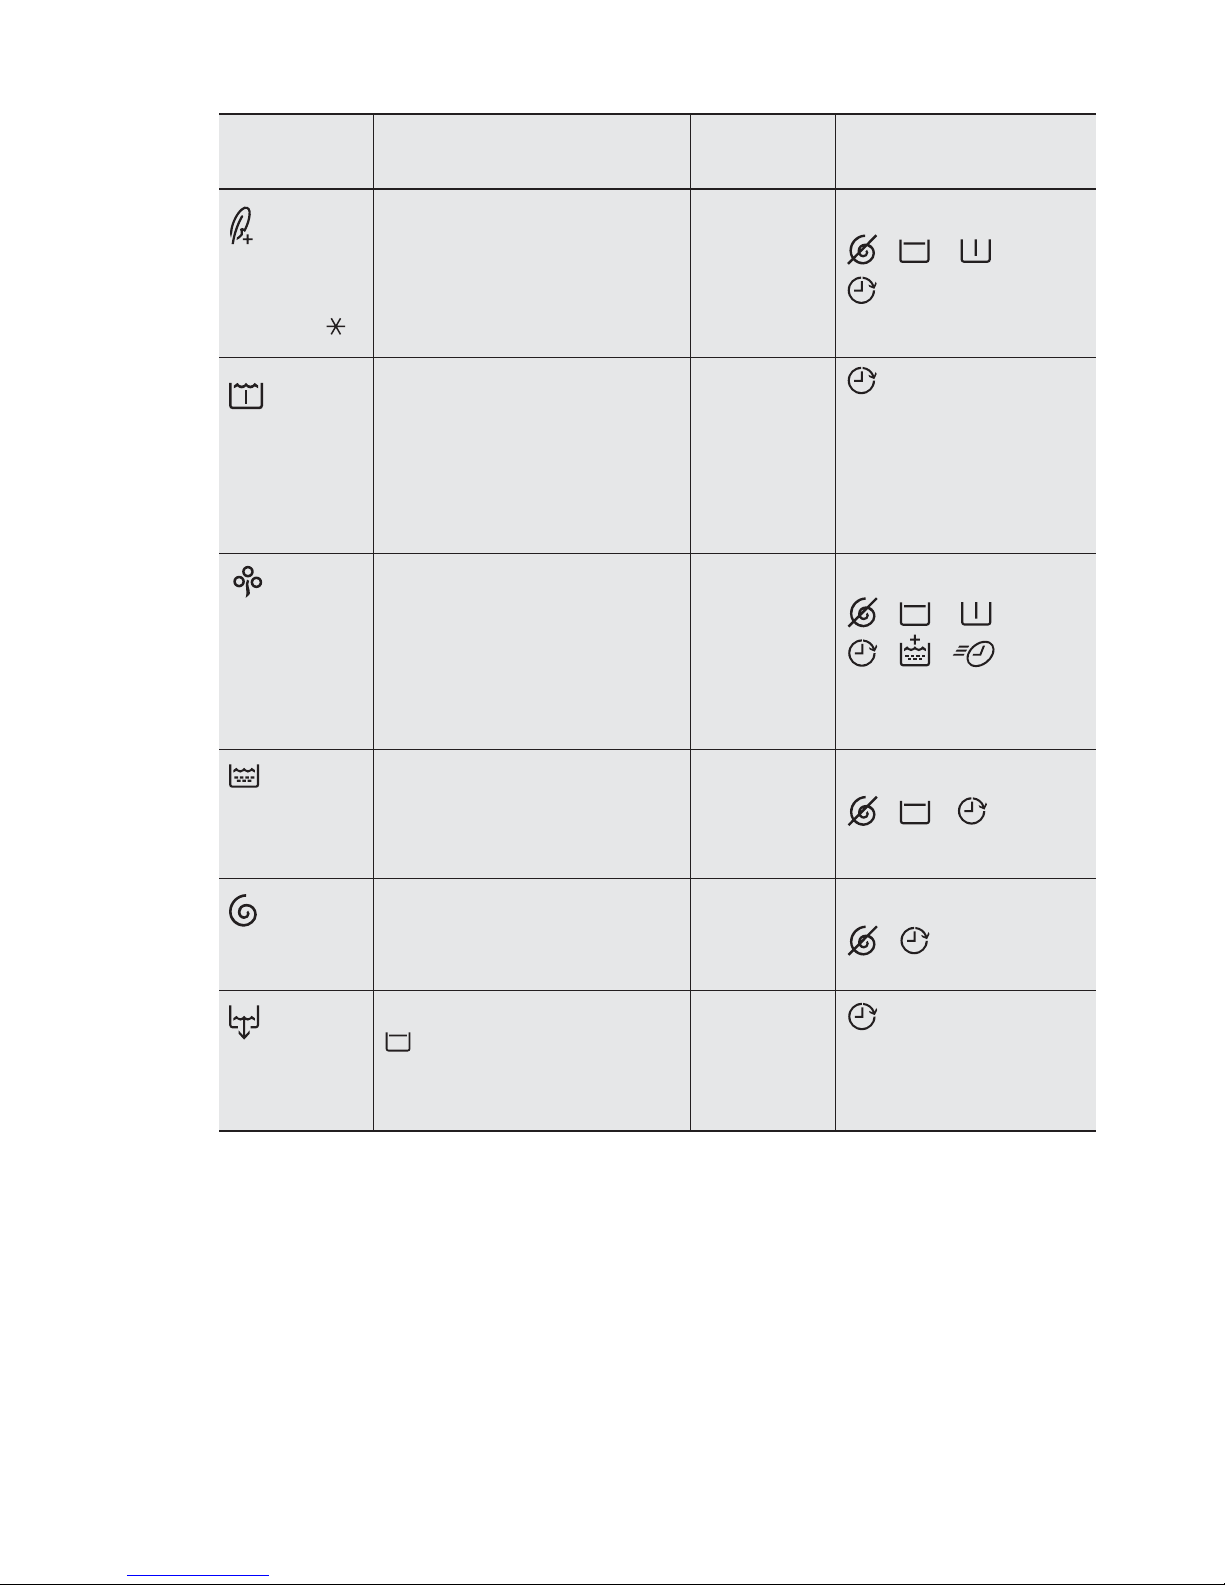
简体中文 75
程序;
温度
衣物类型;
最大衣物量
程序说明 可组合使用的选项
Energy
Saving
60, 40 °C
脏污程度一般的白色和不
褪色棉质衣物。设定此程
序可达到良好洗涤效果并
降低能耗。洗衣程序的时
间将延长;
最大衣物量 7 千克。
Spin
Drain
为衣物脱水并排空滚筒中
的水;
最大衣物量 7 千克
用于排空选择了“延迟脱水
”选项的程序在最后一
次漂洗时留在滚筒内的水;
最大衣物量 7 千克。
Rinse
漂洗衣物并进行脱水;
最大衣物量 7 千克。
适用于皮肤敏感或有过敏症
状的人群,以及需要高漂洗
效率的白色和彩色棉质衣物
,特别是对于固体颗粒;
最大衣物量 5 千克。
此程序可用来浸泡脏污程度
严重的衣物。程序完成时,
滚筒内会留有水。要排出滚
筒内的水,请参见“要进行
排水”一段;
最大衣物量 7 千克。
Sensitive
Plus;
60 °C
至
Soak;
30 °C
- 浸泡
Spin (
脱水减速
)/
/ / /
Spin (
脱水减速
)/
/ / /
/ /
Spin (
脱水减速
)/
/ /
Spin (
脱水减速
)/
/
1)
1)
满符合洗涤脏污程度一般的棉质衣物时,建议使用贴有节能节水能效标签的节能
洗程序,并选择 60°C 的温度选项。
排水
-
- 主洗
- 漂洗
- 短时脱水
- 主洗
- 漂洗
- 长时脱水
使用柔顺
剂进行三
次漂洗
脱水阶段
-
-
- 排水
- 脱水阶段
Page 76
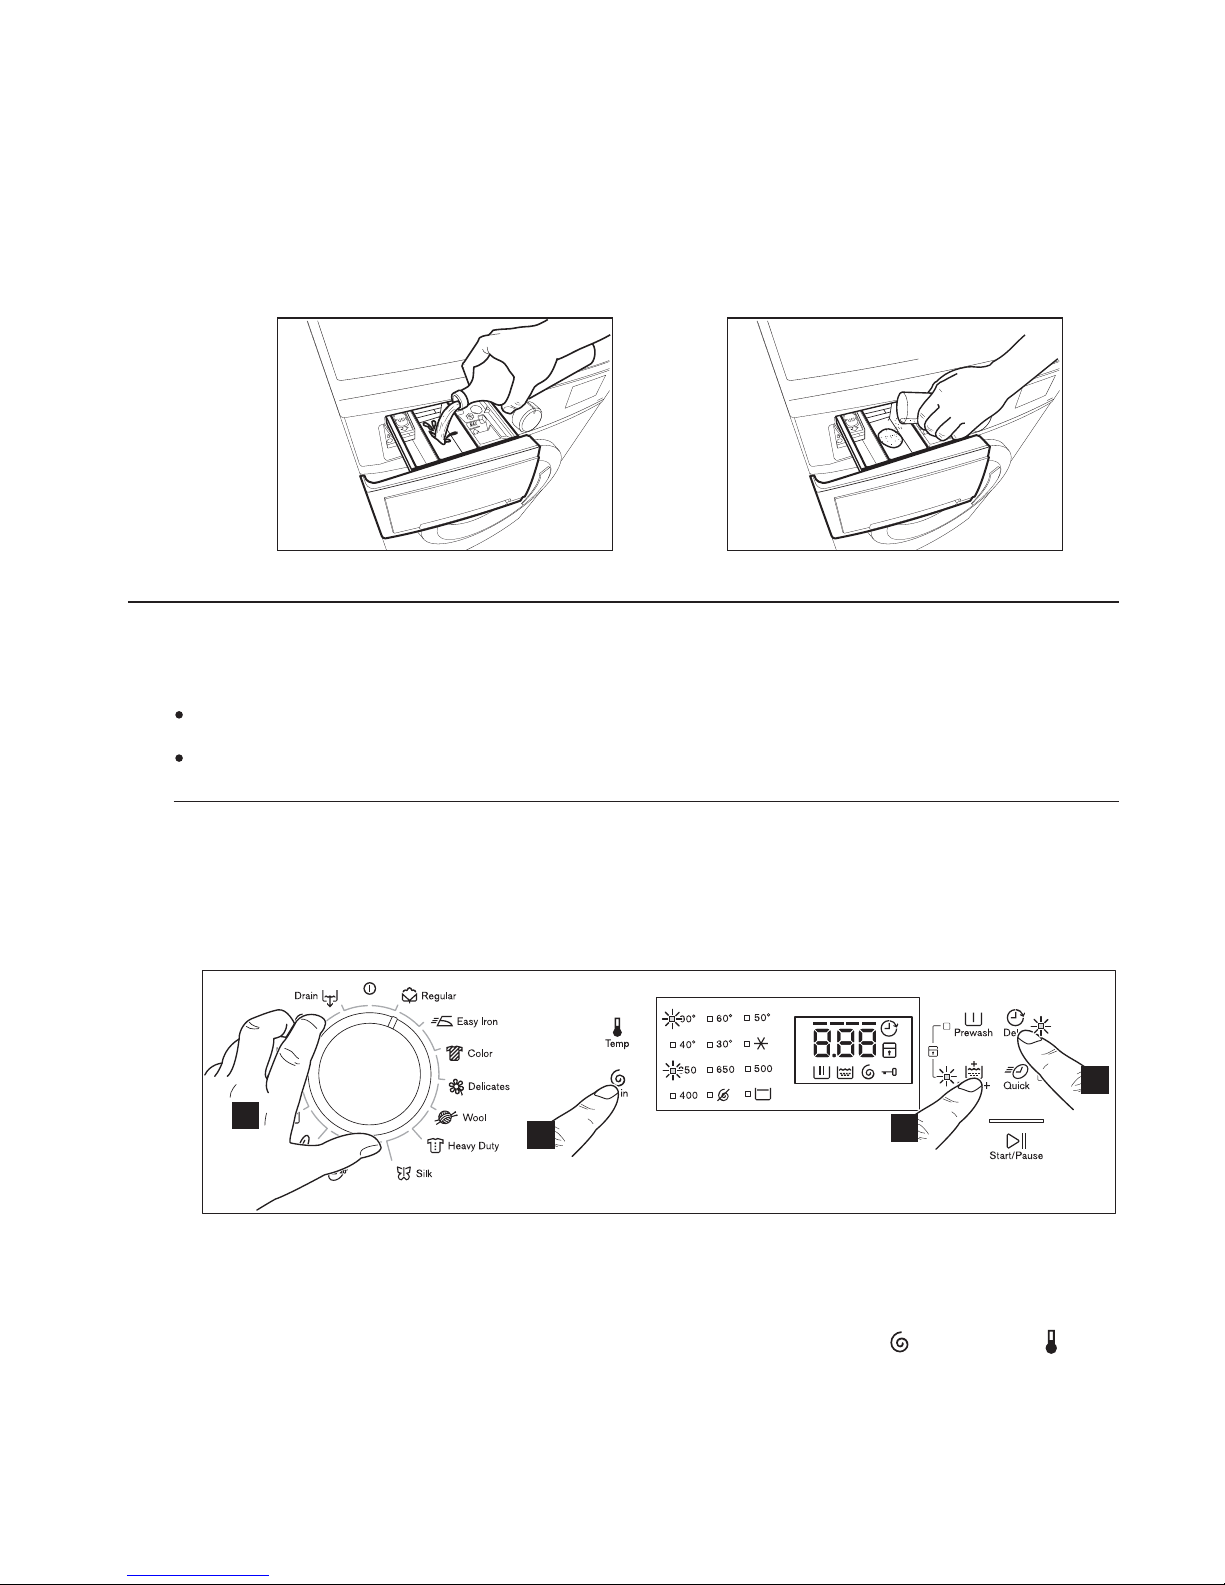
76
www.electrolux.com
3.
洗衣机内不添加衣物,选择棉质织
物程序并将温度设定为 90
°C
,以
去除制造过程中内筒和外筒上的残
留物。 将 1/2 份量的洗涤剂倒入
投放抽屉盒中,然后启动洗衣机。
日常使用
5.
* 型号
: EWP85742
1
2
3
4
1.
将程序选择旋钮旋转至需要的程序。
一旦选择了某个洗衣程序,选
定的程序将在整个洗衣期间保
持原位。
-
选择旋钮可以顺时针或逆时针
旋转。
-
2.
首次使用前
4.
确保电气和水路连接符合安装说明。
向洗涤剂投放格内加入 2 升水用于
主洗阶段。此操作将启动排水系统。
1.
2.
将电源插头插入电源插座。
打开水龙头。
步骤 1 - 设定洗衣程序
5.1
四步使用入门指南
请反复按脱水“ ”和温度“ ”
触控按钮更改脱水速度和温度。
如果希望使用不同于洗衣机建议的
脱水速度和温度洗涤衣物,
Page 77
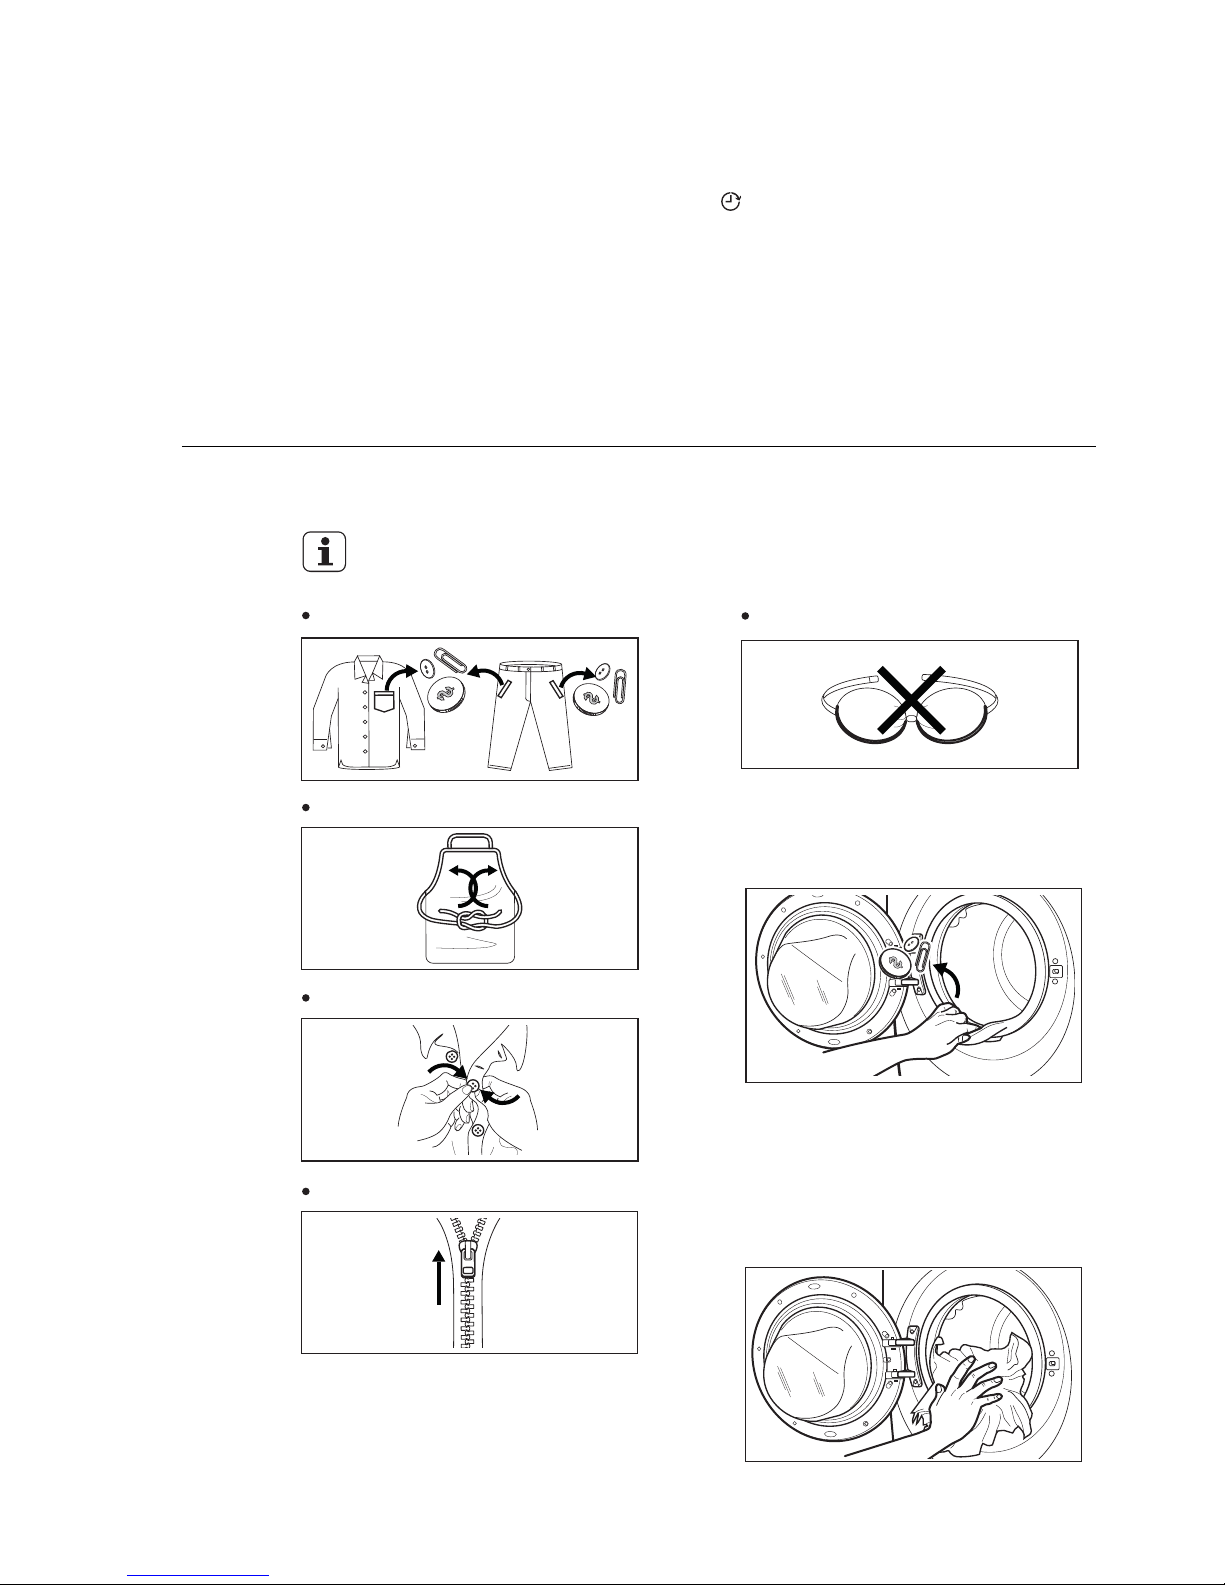
简体中文 77
3.
4.
如果希望预约洗衣程序,按预约
选项触控按钮,选择洗衣机的
预约时间。
如果希望使用特殊功能洗涤衣物,
根据需要按相应的选项触控按钮。
根据选定的洗衣程序的不同,可以
组合使用各种不同的功能。
按下这些触控按钮时,对应的指示
灯将亮起。再次按下,指示灯将熄
灭。
步骤 2 - 放入衣物
1.
放入衣物前,请确保:
清空衣袋。
系好带子。
扣紧纽扣。
拉上拉链。
带钢圈的胸罩不得机洗。
将衣物放入滚筒内,每次放入一
件,并尽量将衣物抖开。
3.
小心地向外拉动机门拉手,打开
机门。
检查并取出可能落入折边处的物
件(如果有的话)。
2.
Page 78
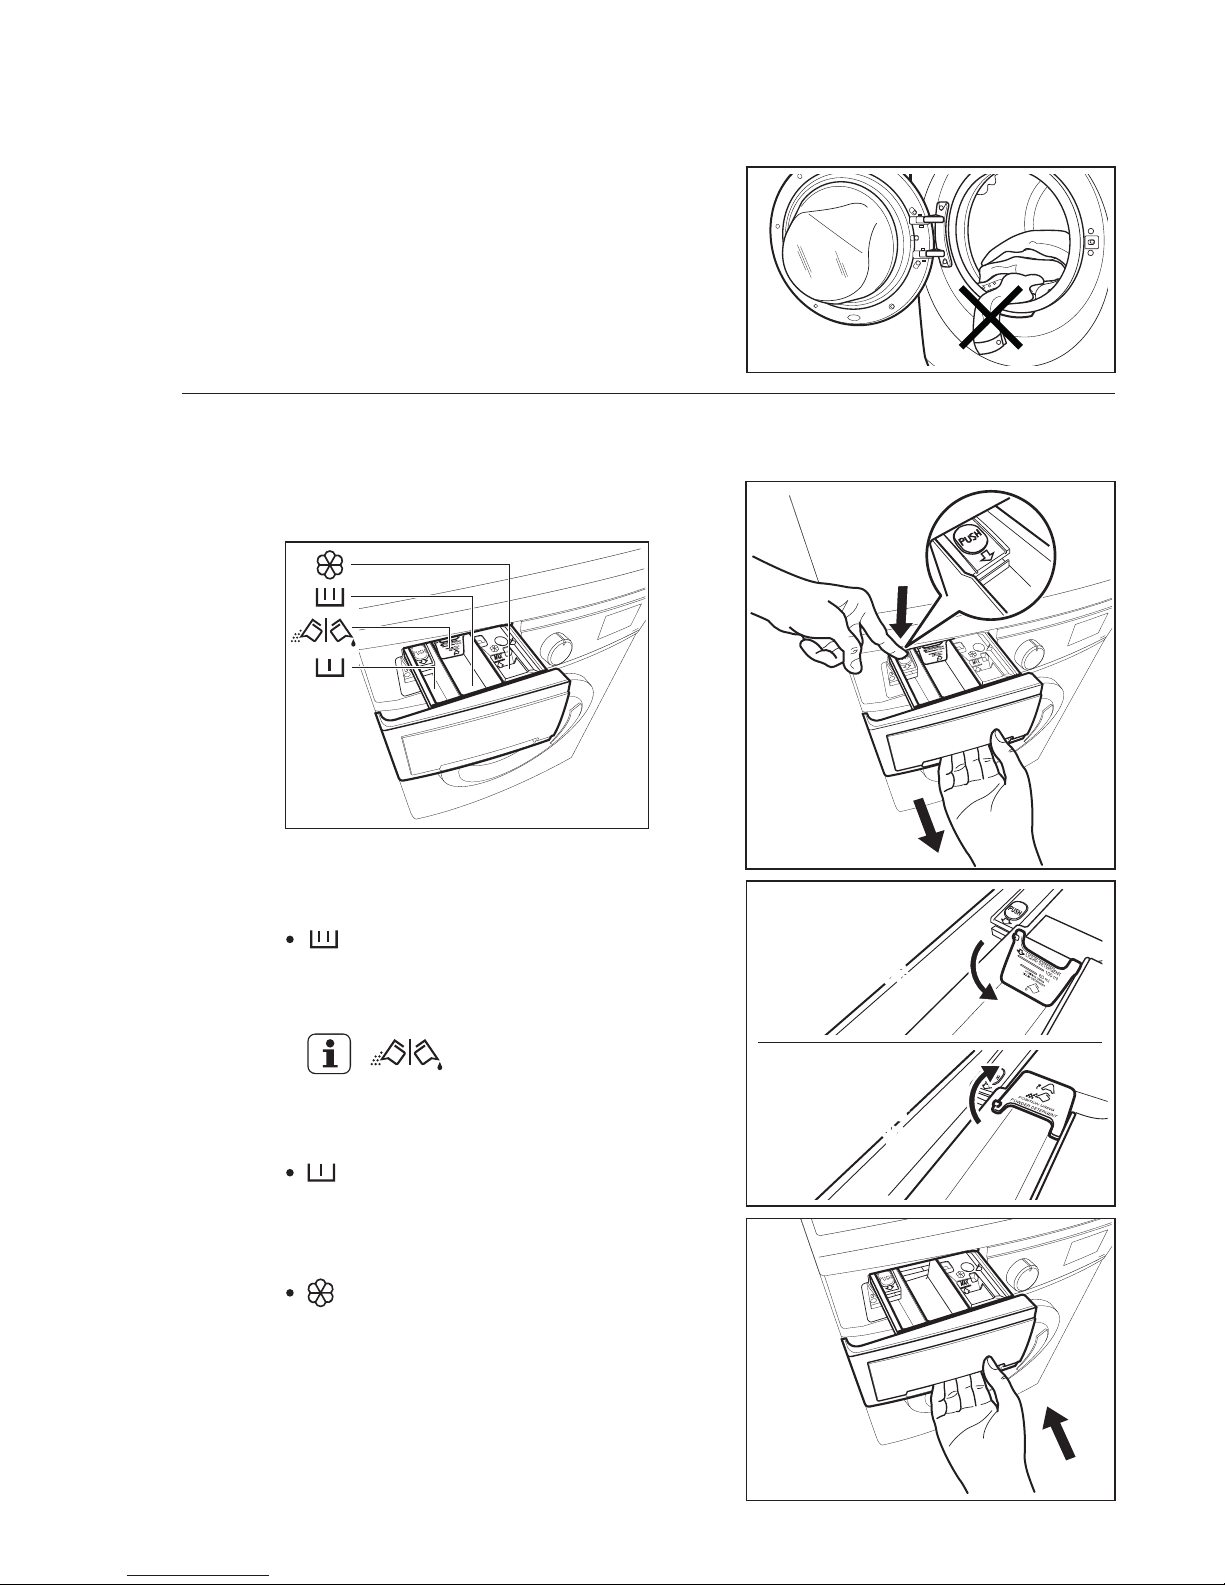
78
www.electrolux.com
粉状或液体洗涤剂。
1
3
2
4
确保门封和机门之间没有夹住
任何衣物。
4.
关闭机门。
5.
步骤 3 - 使用洗涤剂和洗涤助剂
洗涤剂投放抽屉盒
1.
洗涤剂投放抽屉盒分为三个投放
格。
柔顺剂投放格
预洗投放格
此投放格用于投放衣物柔顺剂和
上浆剂。
此投放格仅用于在选择预洗程序
时投放洗涤剂。
主洗投放格
此投放格用于投放所有洗衣程序
使用的洗涤剂。
洗涤剂挡板
用于投放粉状或液体洗涤
剂的挡板。
位置向下:适
合投放液体洗
涤剂。
位置向上:适
合投放粉状洗
涤剂(出厂设
置)。
位置向下:适
合投放液体洗
涤剂。
位置向上:适
合投放粉状洗
涤剂(出厂设
置)。
Page 79
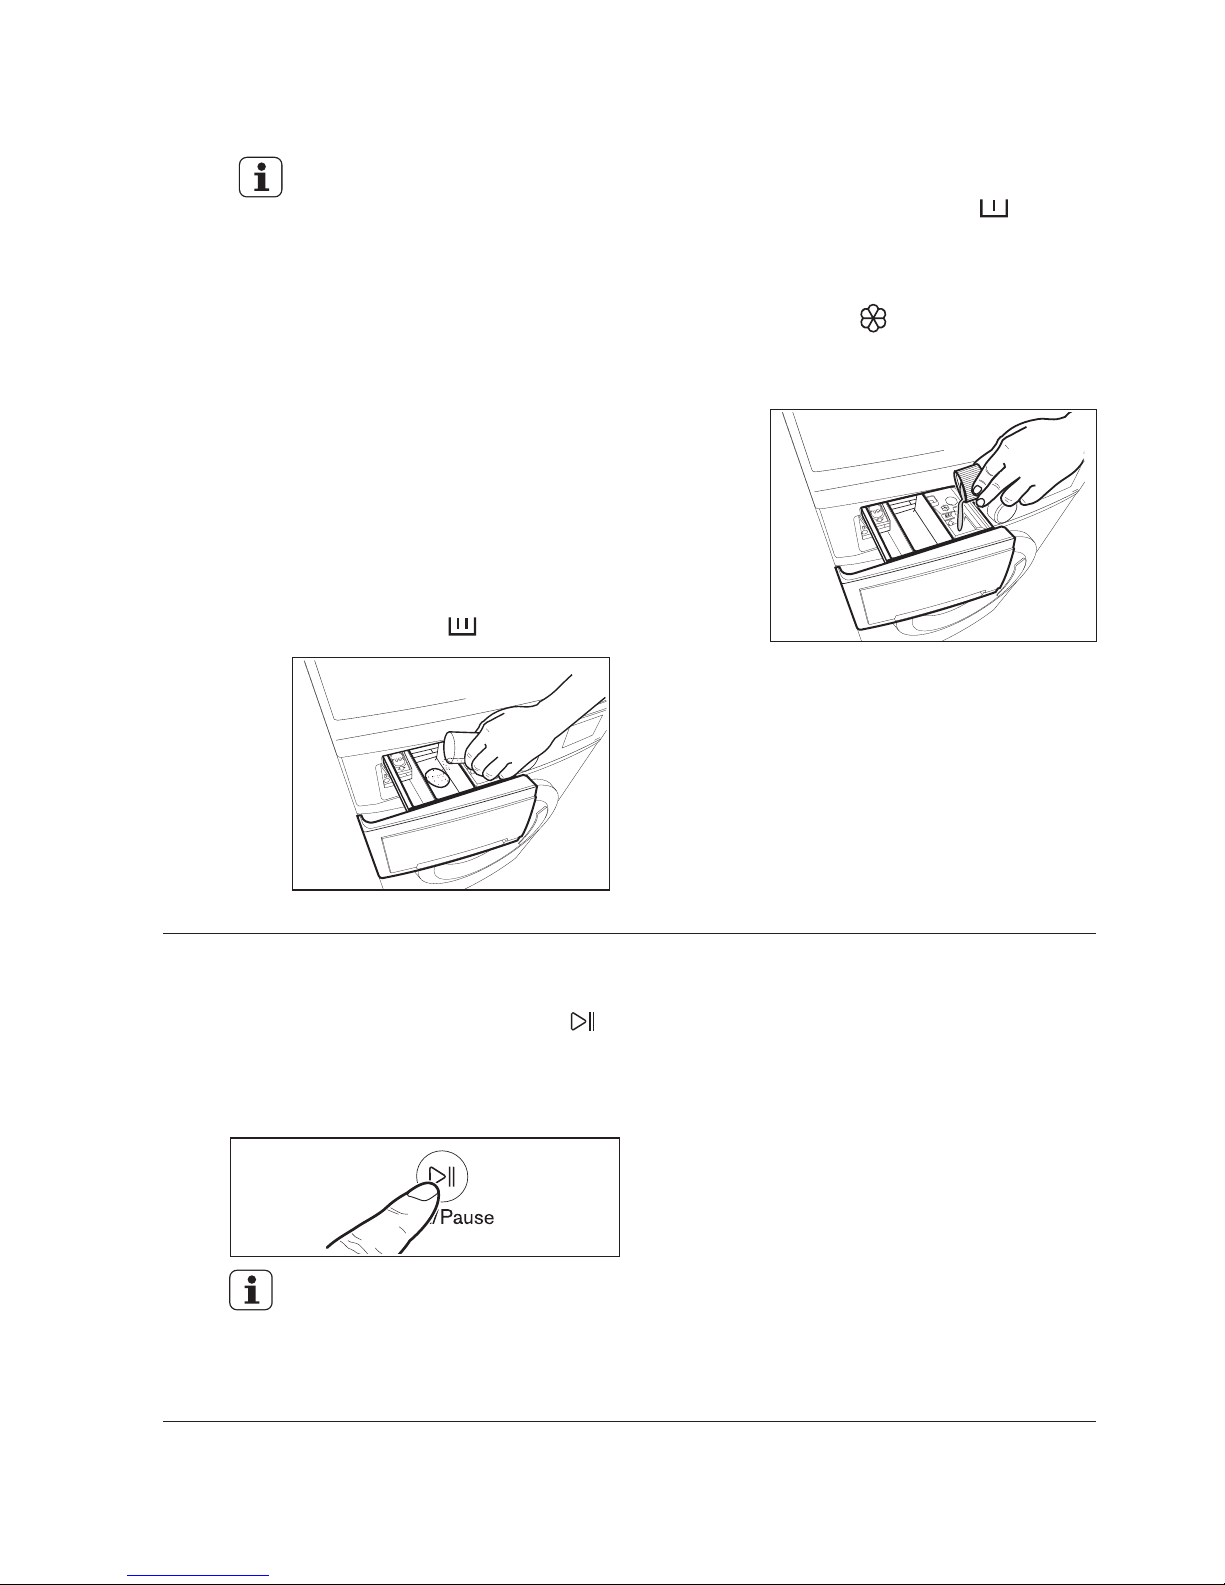
简体中文 79
轻轻关上抽屉盒。
-
注意!
如果您在洗衣机运行期间将程序选择旋
钮旋至其他程序,红色的启动/暂停指
示灯将闪烁 3 次,提示选择错误。此
时洗衣机将不会执行新选定的程序。
洗衣机将根据衣物类型和衣物量自动
调整选定的程序持续时间。
-
步骤 4 - 启动程序
要启动程序,请按启动/暂停 ( )
触控按钮,对应的指示灯将停止闪烁
,显示屏上将显示默认的程序持续时
间(仅限有显示屏的机型)。
程序启动约 15 分钟后:
视需要量取适量洗涤剂,倒入
主洗投放格 ( ) 中。
请勿使用胶状或粘稠的液体洗
涤剂。
-
投放的液体洗涤剂不得超过最
大液位线。
-
请勿设定预约功能。
-
请勿设定预洗阶段。
-
使用液体洗涤剂时:
拉出洗涤剂投放抽屉盒,直到
拉不动为止。
-
-
量取适量的洗涤剂和衣物柔顺
剂;
2.
如果要运行“预洗”阶段,请
将洗涤剂倒入标有 的投
放格中。
-
如果需要,可将衣物柔顺剂倒
入标有 的投放格中(用
量不得超过抽屉盒的最大标记
“MAX”)。
-
Page 80
80
www.electrolux.com
5.3
更改程序
如果无法打开机门,但又需要将其
打开,则必须将程序选择旋钮旋至
“ ”位置,关闭洗衣机。大约
5 分钟后,即可打开机门。
要更改正在运行的程序,只能关闭洗衣
机电源。
将程序选择旋钮旋转至“ ”位
置,取消程序并关闭洗衣机。
1.
将程序选择旋钮旋转至新的程序位
置,设定新的选项,然后再次按“
启动/暂停”触控按钮。
在此期间,洗衣机不会排水。
2.
要暂停程序,请按启动/暂停按钮
。对应的标志将开始闪烁。
-
再次按启动/暂停触控按钮。程序
将继续运行。
-
5.2
中断程序
程序启动后,只能更改部分选项。
按启动/暂停触控按钮。对应的标
志将开始闪烁。
1.
更改选项。
2.
再次按启动/暂停触控按钮。程序
将继续运行。
3.
5.4
更改选项
洗衣程序或预约功能运行时,机门将保
持紧锁状态,同时显示屏显示“ ”
标志。
首先按启动/暂停触控按钮,将洗衣机设
为“PAUSE”(暂停)状态。待门锁标
志“ ”熄灭后,即可将机门打开。
5.5
打开机门
如果门锁标志“ ”没有消失,表
示洗衣机已经在加热,并且水位高出
机门底边,或者滚筒正在转动。这种
情况下,机门将无法打开。
注意水位和水温。
小心!
洗衣机将自动停止运行。
提示声将响起。
显示屏将显示“ ”(有显
示屏机型),或者洗衣结束
“ ”指示灯将亮起(无
显示屏机型)。
启动/暂停触控按钮的标志将熄灭。
-
-
-
-
-
-
-
-
门锁标志“ ”将熄灭。
将衣物从洗衣机内取出。确保滚筒
已完全清空。
保持机门微开,以免滋生霉菌和产
生异味。
关闭水龙头。
5.6
程序结束
洗衣程序已完成,但滚筒
内仍然有水
滚筒将定时转动,以防止衣物起
皱。
您必须将水排空才能打开机门。
门锁标志“ ”将亮起。 机
门保持紧锁状态。
-
-
5.7
1.
3.
2.
要进行排水:
按启动/暂停触控按钮。洗衣机
将排出滚筒内的水并进行脱水。
如有必要,可降低脱水速度。
设置“脱水”或“排水”程序。
Page 81
简体中文 81
程序结束时,门锁标志
“ ”将熄灭,这时可以
打开机门。
4.
将程序选择旋钮旋转至“ ”
位置,停用洗衣机。
5.
洗衣程序结束 5 分钟后,如果
未关闭洗衣机,节能功能将会
开启。
当洗衣机处于待机模式时,节
能功能可以降低能耗。
所有标志将熄灭,同时显示
屏将关闭。
启动/暂停触控按钮的标志将
缓缓闪烁。
按动其中一个触控按钮可停
止节能状态。
待机模式
5.8
Page 82
82
www.electrolux.com
洗衣提示
6.
请遵循每件服装标签上的洗衣代码
符号以及制造商的洗涤说明。对衣
物进行以下分类: 白色织物、彩色
织物、化纤织物、纤幼织物、羊毛
织物。
6.1
对衣物进行分类
6.2
温度
90°C
60°C
50°C
40°C
30°C
冷水
脏污程度一般且不褪色的
棉麻或化纤类衣物(如衬
衫、睡袍、睡衣等)或者
脏污程度较轻的白色棉质
衣物(如内衣裤)。
精致织物(如网眼窗帘)
,混合面料衣物(包括化
纤衣物)以及带“纯新羊
毛、可机洗、不缩水”标
签的羊毛衣物。
脏污程度一般的白色棉麻
类织物(如茶巾、毛巾、
桌布、床单等)。
切勿将白色与彩色衣物一同洗涤。
白色衣物可能会在洗衣过程丧失洁
白度。
新的彩色衣物在初次洗涤时可能
会掉色,因此第一次应单独分开
洗涤。
扣好枕套、拉紧拉链,扣合钩扣和
按扣。系好所有腰带或长带子。
开始洗衣之前,先祛除顽固污渍。
可用专用洗涤剂或膏状洗涤剂擦洗
特别脏污的部位。应小心谨慎地处
理窗帘。可取下钩子或者将它们系
好后放入洗衣袋或洗衣网内。
确保衣物内没有留下任何金属物件
(如发夹、别针、饰针)。
6.3 放入衣物之前
程序表部分给出了建议的最大洗衣
量。 基本原则如下:
按最大衣物量洗涤可以使水和能源
得到高效利用。对于脏污程度严重
的衣物,应适当减少衣物量。
棉麻织物:
装满滚筒,但不能
塞得太满;
化纤织物:
不超过滚筒容量的
一半;
精致织物和
羊毛织物:
不超过滚筒容量的
三分之一。
6.4
最大衣物量
血渍:使用冷水处理新沾染的血
渍。 对于干掉的血渍,先将衣物
放入溶有专用洗涤剂的水中浸泡
一晚,然后再用肥皂和水搓洗。
油性颜料:先用轻油去污剂浸湿,
再将衣物平放在软布上,然后轻轻
擦拭污渍;进行多次处理。
干燥的油污:先用松节油浸湿,再
将衣物平放在柔软表面,然后用指
尖和棉布轻轻擦拭污渍。
只靠水和洗涤剂可能无法去除顽固
污渍。因此在开始洗衣前,建议预
先对顽固污渍进行处理。
6.5
去除污渍
锈迹:在热水中溶解草酸,或者在
冷水中使用除锈产品。处理早先出
现的锈迹时应多加小心,因为此时
衣物的纤维素结构已被破坏,所以
比较容易破洞。
霉斑:用漂白剂处理,然后充分漂
洗(仅限白色和不褪色衣物)。
草渍:用肥皂轻轻擦洗,然后用漂
白剂处理(仅限白色和不褪色衣
物)。
圆珠笔迹和胶水:先用丙酮溶液(*)
浸湿,再将衣物平放在软布上,然
后轻轻擦拭污渍。
Page 83
简体中文 83
唇膏:按上述方法用丙酮溶液
(*) 浸湿,然后用甲基化酒精进
行处理。用漂白剂去除白色织物
上残留的任何痕迹。
开始洗衣程序之前,必须将洗涤剂
和洗涤助剂放入洗涤剂投放抽屉盒
相应的投放格内。
红酒:在溶有洗涤剂的水中浸泡,
漂洗后用醋酸或柠檬酸进行处理,
然后漂洗干净。用漂白剂处理所有
残留痕迹。
墨水:根据墨水类型的不同,先用
丙酮溶液 (*) 浸泡衣物,然后再
用醋酸浸泡;用漂白剂处理白色衣
物上残留的任何痕迹,然后彻底漂
洗干净。
焦油污渍:先用去污剂、甲基化酒
精或轻质汽油进行处理,然后用膏
状洗涤剂擦洗。
选择合适的洗涤剂并采用正确的用
量,不仅能得到良好的洗涤效果,
还可避免浪费,保护环境。
虽然洗涤剂含有的物质可生物降
解,但如果使用过量,也会破坏
脆弱的生态平衡。
洗涤剂的选择取决于织物类型(纤
幼织物、羊毛、棉质织物等)、颜
色、洗涤温度及脏污程度。
本机应仅使用前开门式洗衣机专用
的低泡沫洗涤剂:
(*) 不要对人造丝织物使用丙酮。
6.6
洗涤剂和洗涤助剂
适合所有类型织物的粉状洗涤
剂,
适合精致织物(最高温度
60°C)和羊毛织物的粉状洗涤
剂,
适合所有类型织物的液体洗涤剂
(最好用于不超过 60 °C 的低
温洗衣程序)或羊毛织物专用液
体洗涤剂。
如果使用浓缩型粉状或液体
洗涤剂,必须选择不含预洗
阶段的洗衣程序。
在开启洗衣程序之前,先将液体洗
涤剂倒入标有“ ”的洗涤剂投
放抽屉格内。
洗涤的衣物变灰,
衣物上留有油渍。
易起泡沫,
漂洗不干净。
降低洗涤效果,
衣物柔顺剂或上浆剂必须在开始洗
衣程序前倒入标有“ ”的投放
格内。
请遵循产品制造商建议的用量,不
要超过洗涤剂投放抽屉盒上标记的
最大用量。
洗涤剂的种类和用量取决于织物的
类型、衣物量、脏污程度和用水的
硬度。
不要将用于预处理污渍的产品(如
Preen)喷洒在洗衣机上或其附近,
因为这样会使塑性材料受到破坏,
缩短使用寿命。
有关您当地水质硬度的信息,可
以咨询相关供水公司或当地主管
部门。
请遵循产品制造商的用量说明。
水质软硬程度是按所谓的“硬度”
进行区分的。
6.7
洗涤剂的用量
洗衣粉用量不足 会导致:
洗衣粉用量过多会导致:
Page 84
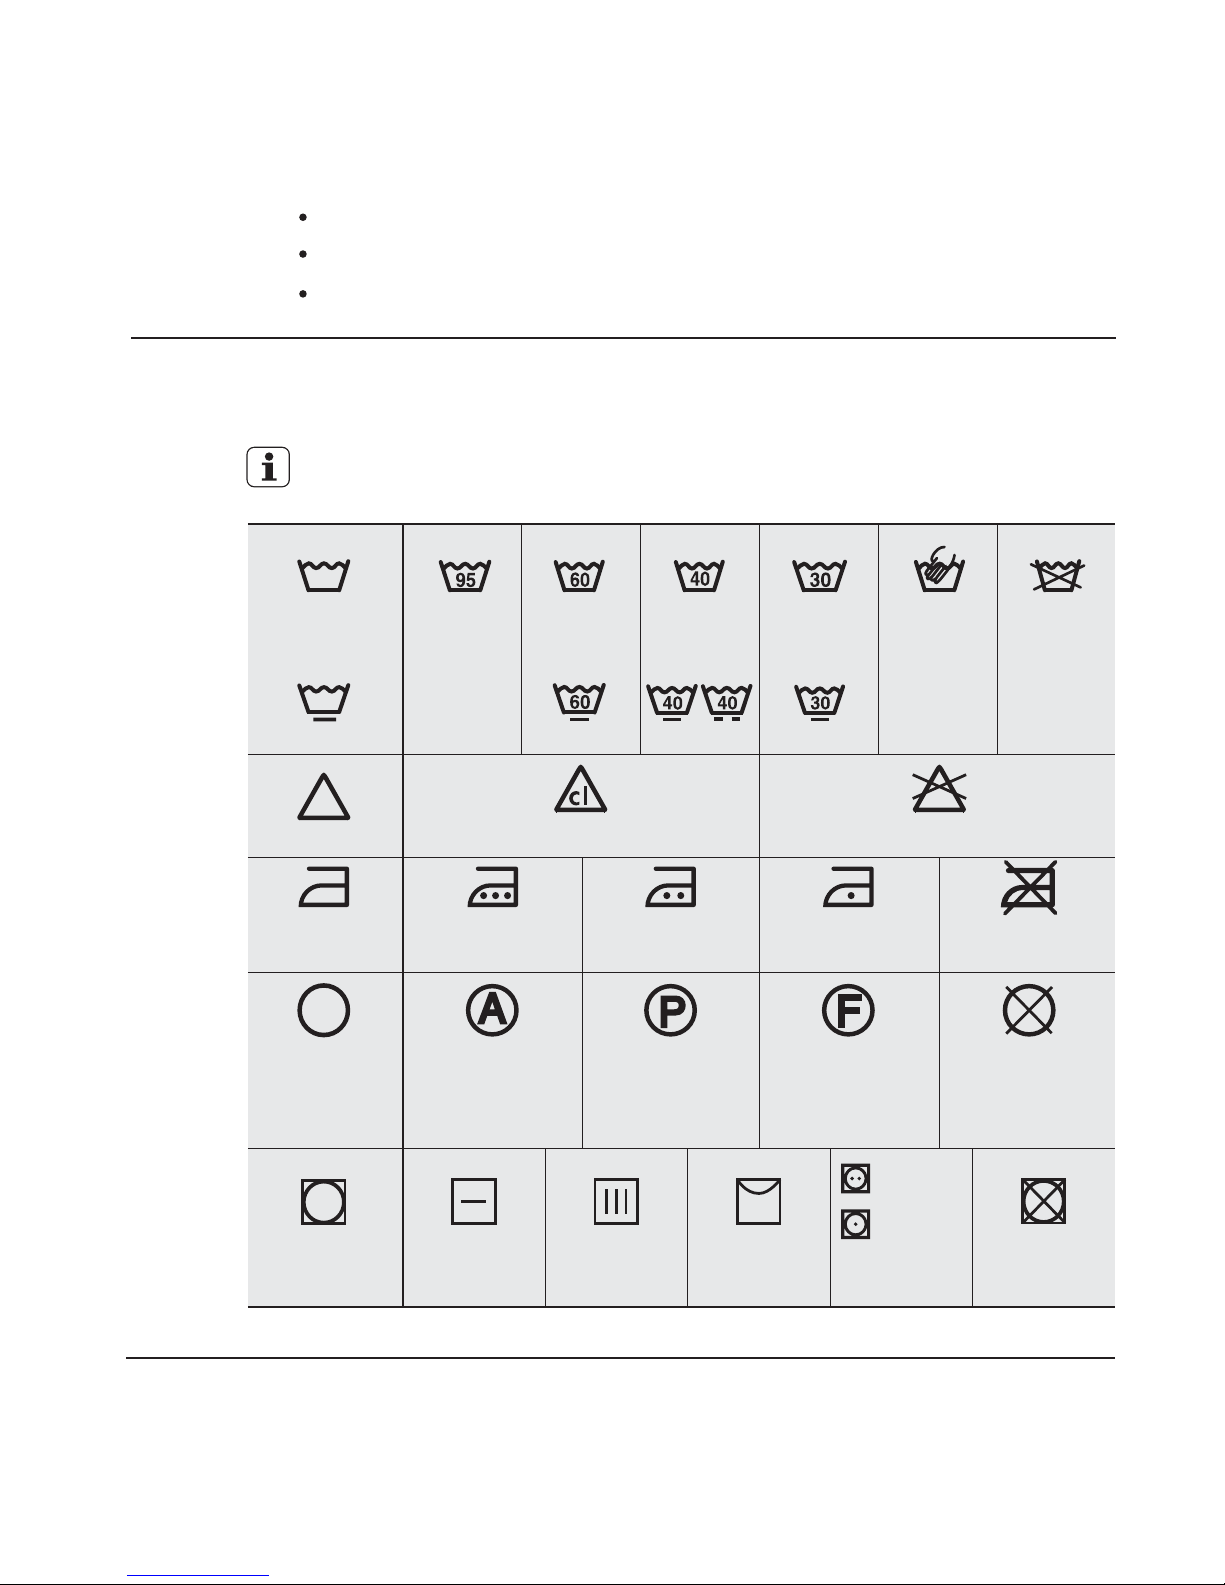
84
www.electrolux.com
洗涤的衣物量较少,
洗衣期间会产生大量泡沫。
衣物的脏污程度较轻,
在以下情况下,应减少洗涤剂用量:
国际洗衣代码符号
7.
织物标签上会带有以下符号,以帮助您选择最佳的衣物护理方式。
冷水漂白 不可漂白
漂白
强力洗
轻柔洗
手洗
最高洗涤
温度
95 °C
高温熨烫最高
200 °C
可用所有溶剂
进行干洗
可用四氯乙烯、
汽油、纯酒精、
R 111 和 R 113
进行干洗
可用汽油、纯酒
精和 R 113 进行
干洗
不可干洗
中温熨烫最高
150 °C
低温熨烫最高
110 °C
不可熨烫
最高洗涤
温度
60 °C
最高洗涤
温度
40 °C
最高洗涤
温度
30 °C
不可洗
熨烫
干洗
干衣 平摊干燥 滚筒干燥 不可滚筒干燥
高温
低温
置于衣架上悬挂干燥
Page 85
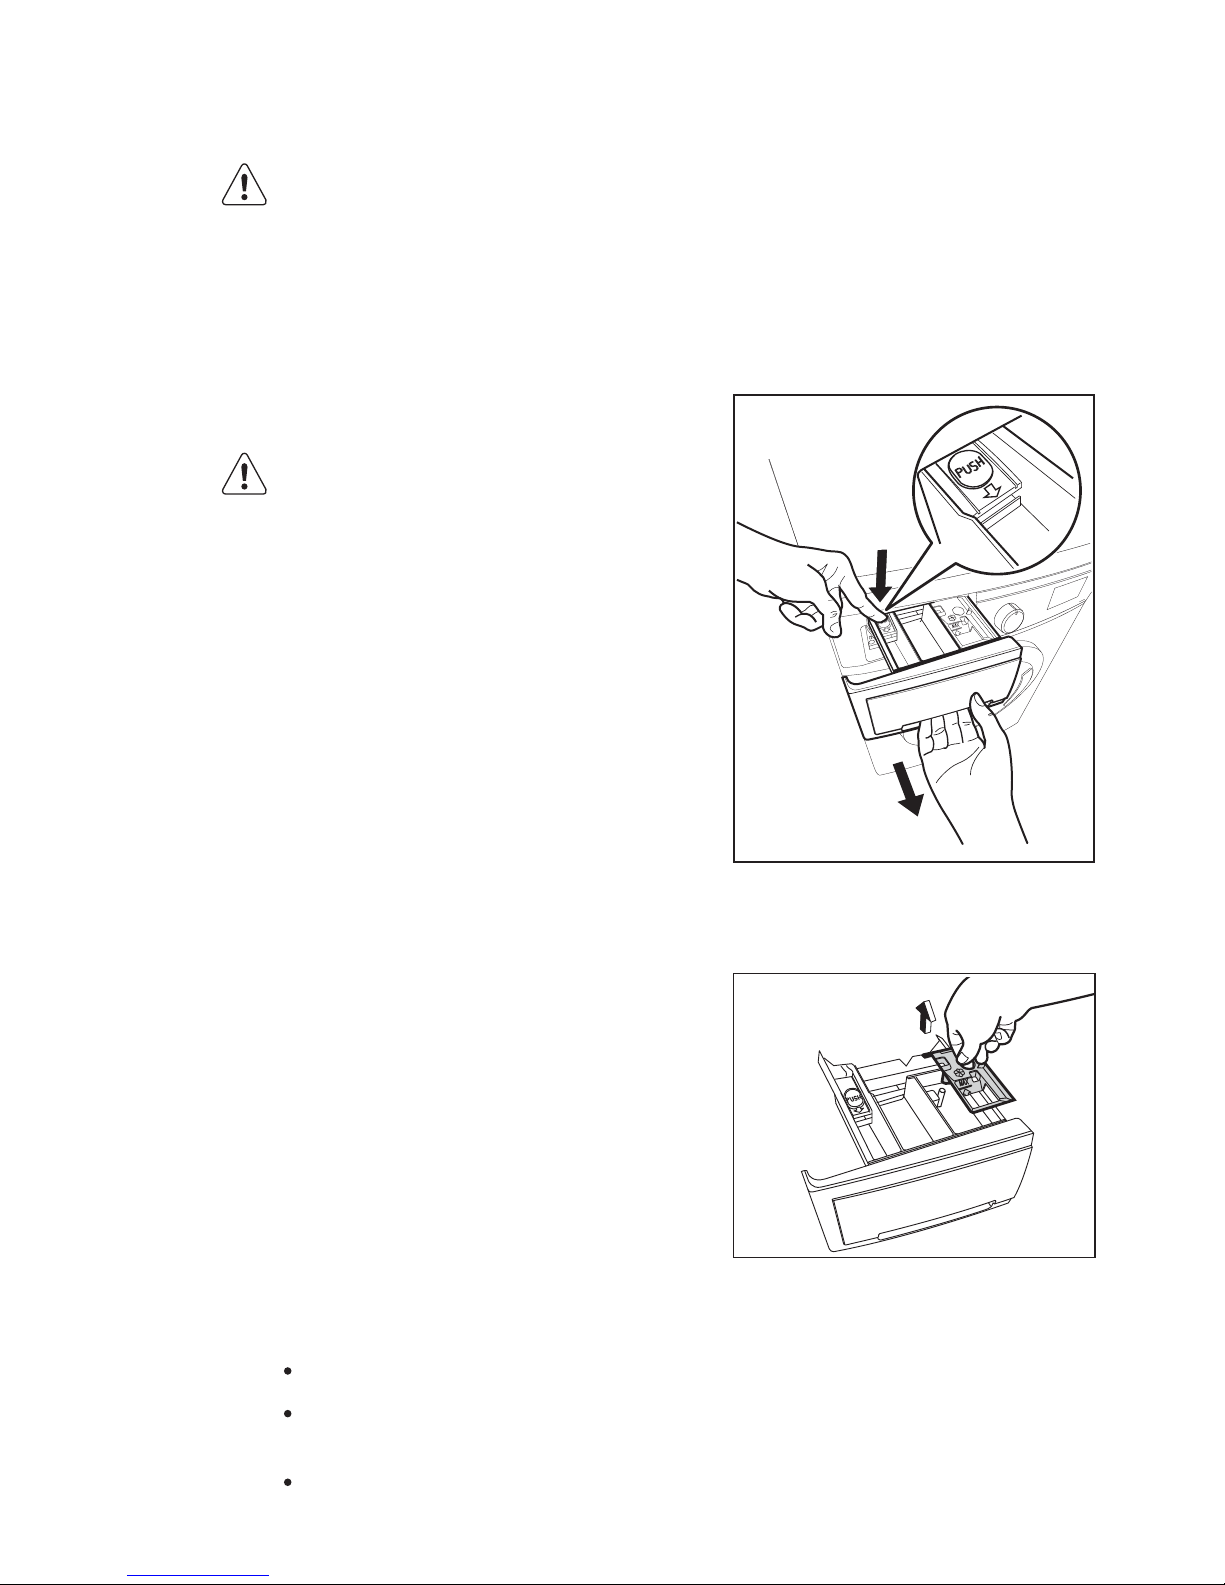
简体中文 85
1
2
保养和清洁
8.
在进行任何清理或维护工作之
前,必须断开洗衣机与电源的
连接。
日常使用的水中通常含有石灰。
因此最好定期在洗衣机内使用水
软化粉剂。
仅使用肥皂和温水清洁洗衣机。请
擦干所有表面。
不要使用酒精、溶剂或化学制
品。
此项工作应与洗衣分开进行,并
应遵照水软化粉剂制造商的使用
说明。
这将有助于防止形成石灰质沉积
物。
8.2
除垢
8.1
外部清洁
警告!
小心!
洗衣粉和洗涤助剂投放抽屉盒应
定期清洁。
向下按压卡钩并向外拉出,取下
抽屉盒。在水龙头下冲洗抽屉盒
内部,清除积聚的任何洗衣粉。
8.5
清洁投放抽屉盒
将机门敞开一会。这样做有助于防
止洗衣机内部发霉和产生异味。在
洗衣后将机门敞开还有利于保持门
封的密封性。
8.3
每次洗衣后
使用低温洗涤时,滚筒内部可能
会存积一些残留物。
我们建议定期进行维护洗涤。
8.4
维护洗涤
应清空滚筒内的衣物。
选择温度最高的棉质织物洗衣
程序。
使用正常用量的洗涤剂,并且
必须是生物性粉状洗涤剂。
要进行维护洗涤:
为了便于清洁,应拆下洗涤助剂投
放格的上部。
Page 86
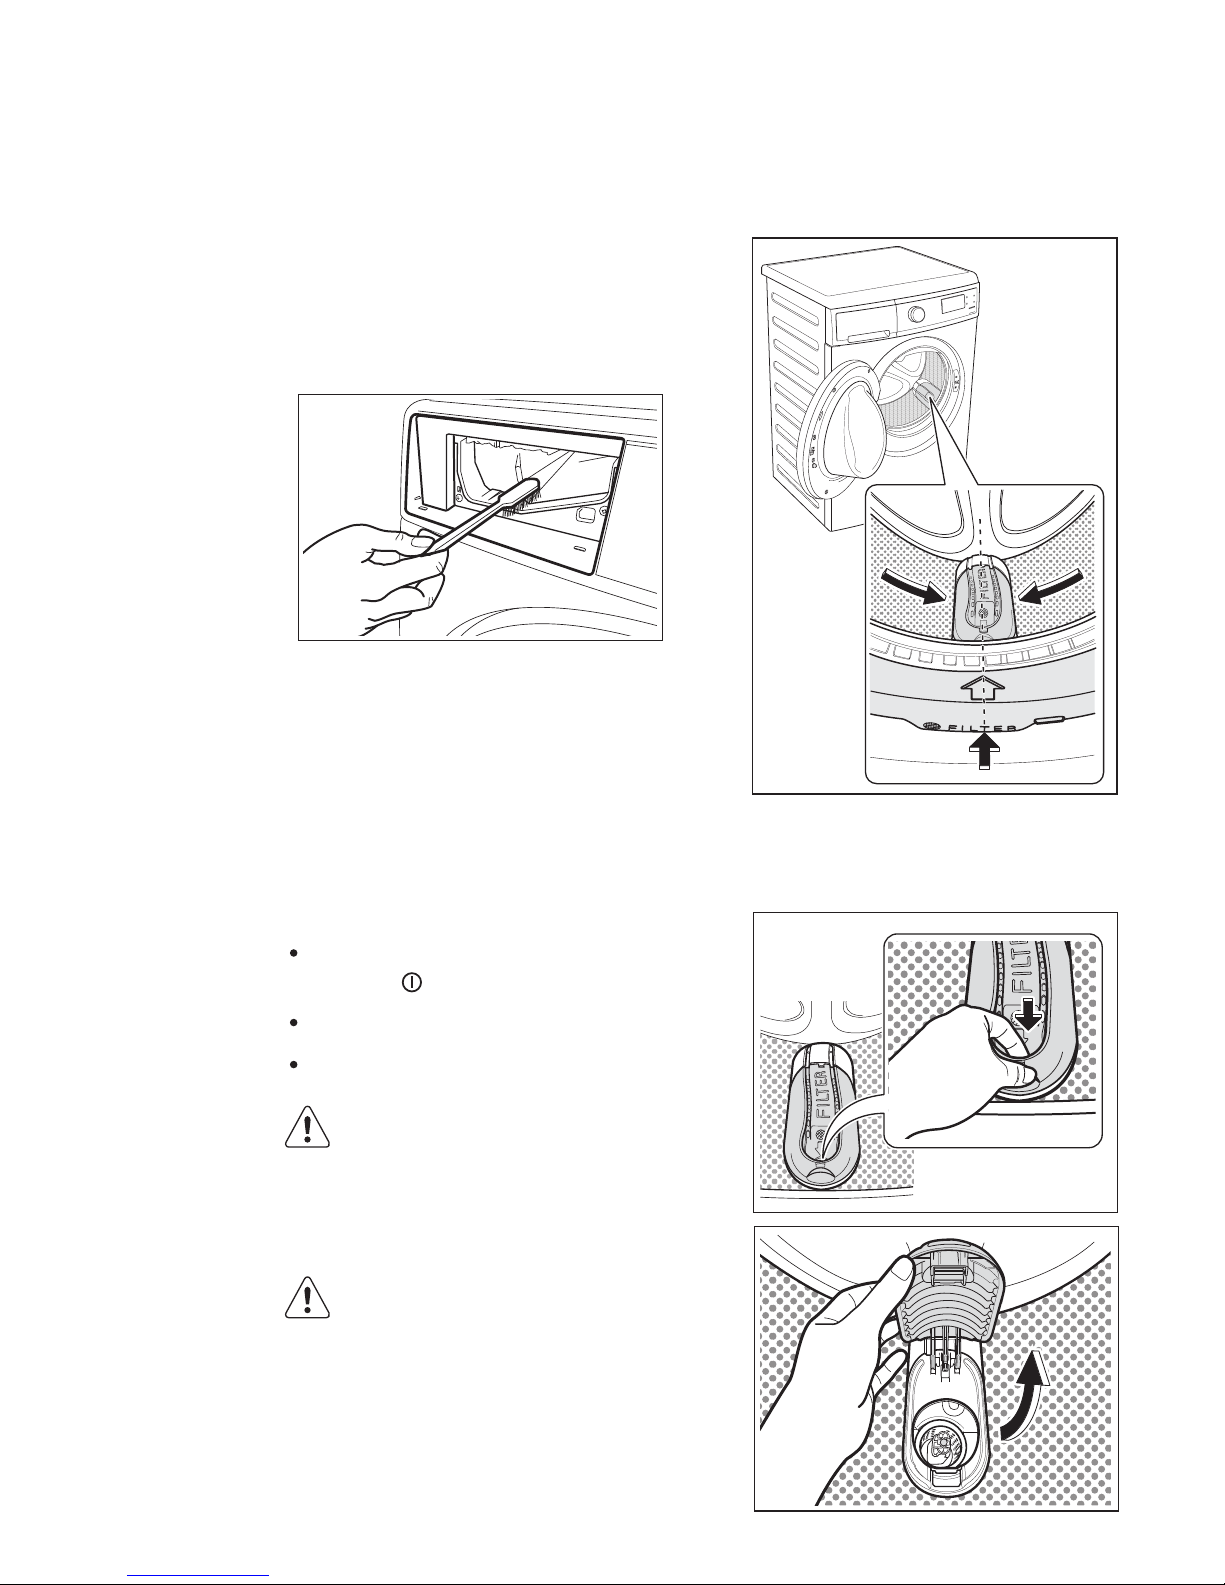
86
www.electrolux.com
2.
按压专用卡钩并向上旋起,打开
过滤器罩。
取下抽屉盒后,使用小刷子清洁
凹槽,确保去除凹槽上部和下部
残留的所有洗衣粉。将抽屉盒放
回原位,然后滚筒内不放衣物,
空机运行一次漂洗程序。
8.6
清洁抽屉盒的凹槽
8.7
清洗排水过滤器
将程序选择旋钮旋转至“关闭”
位置 ( )。
切断洗衣机电源。
打开机门。
要清洁排水过滤器:
从电源插座上拔下电源
插头。
如果洗衣机内的水是热
的,不要清洁排水过滤
器。
1.
转动滚筒,将过滤器罩 (FILTER)
对准门封上的箭头标志。
警告!
警告!
排水过滤器用来收集脏衣服中遗留
的线头或其他物件,以防止水泵堵
塞。
水泵必须定期清洗。要清洗水泵,
请按以下步骤操作:
Page 87
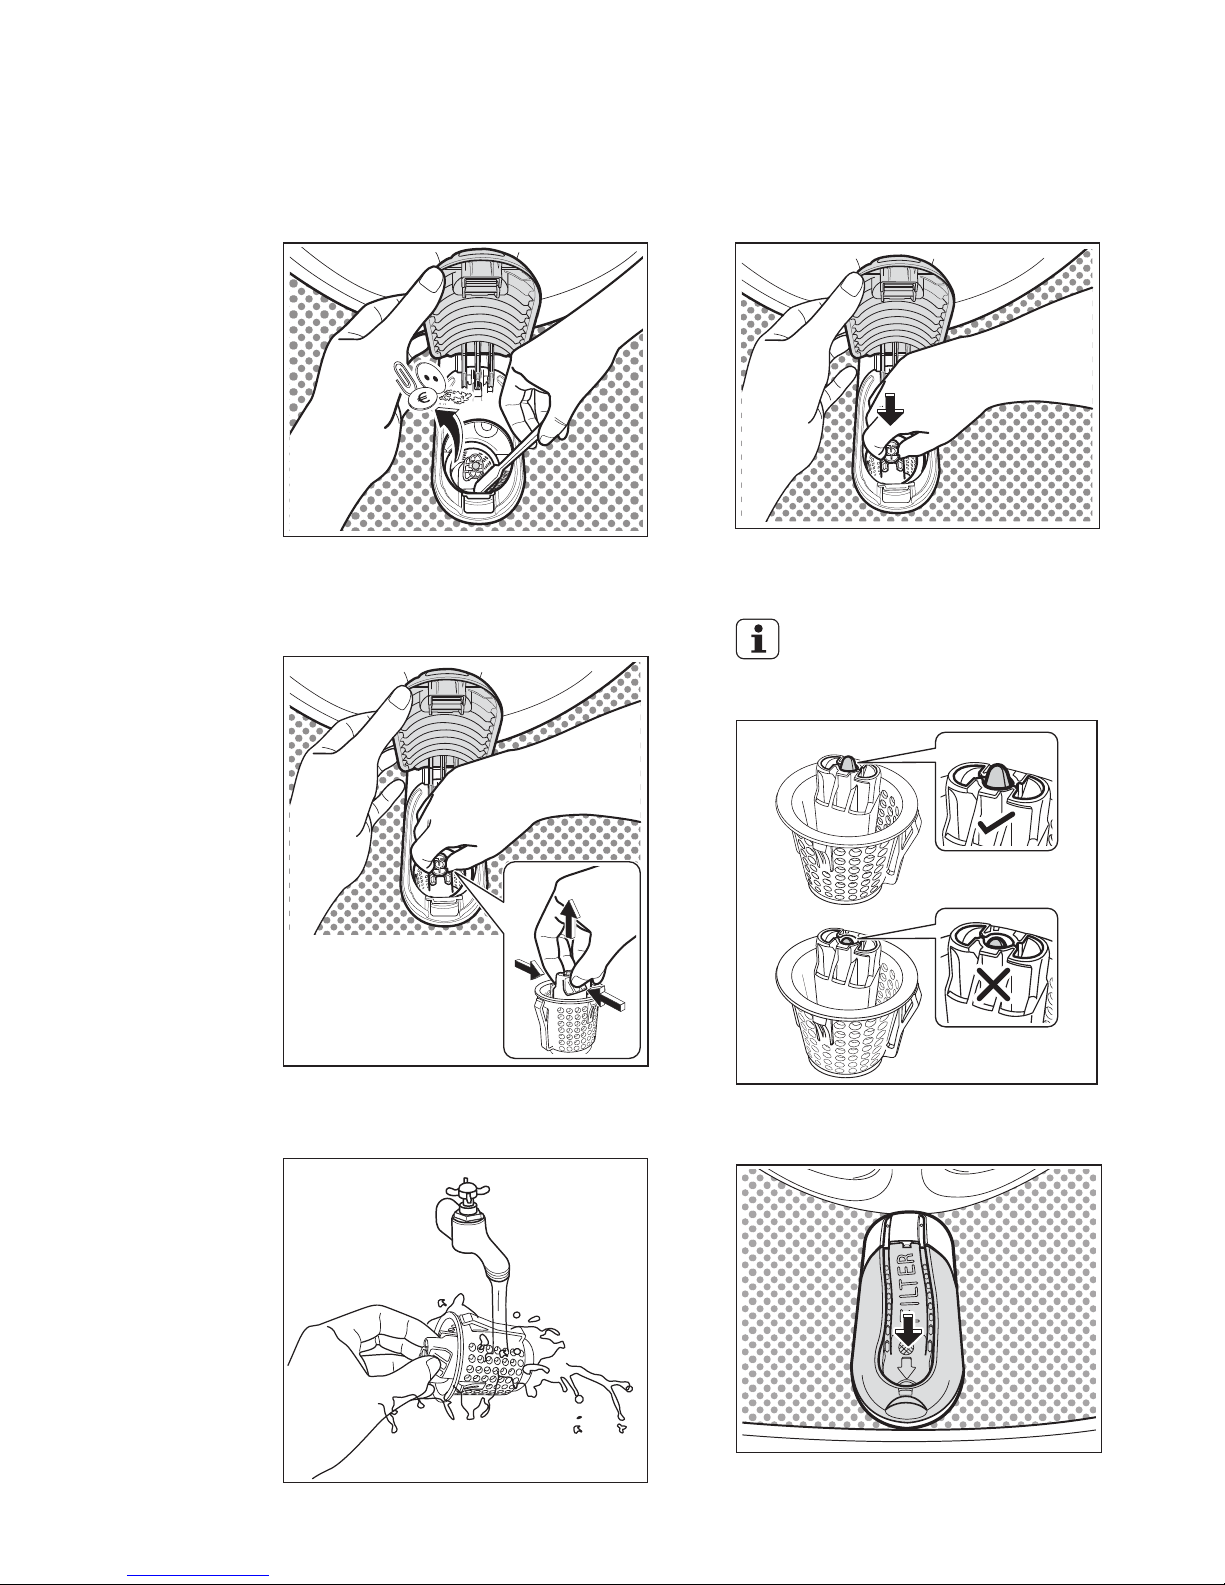
简体中文 87
重要信息!
捏紧过滤器,然后向上拉起将
其取下。
在水龙头下清洗过滤器。
关闭过滤器罩。
过滤器如果装入正确,顶
端的指示装置将露出来,
同时发出“喀嚓”一声。
清洁完过滤器后,打开过滤器
罩,将过滤器装回原位。
4.
5.
6.
7.
8.
清除过滤器周围的絮状物或小
物件(如果有的话)。
3.
Page 88
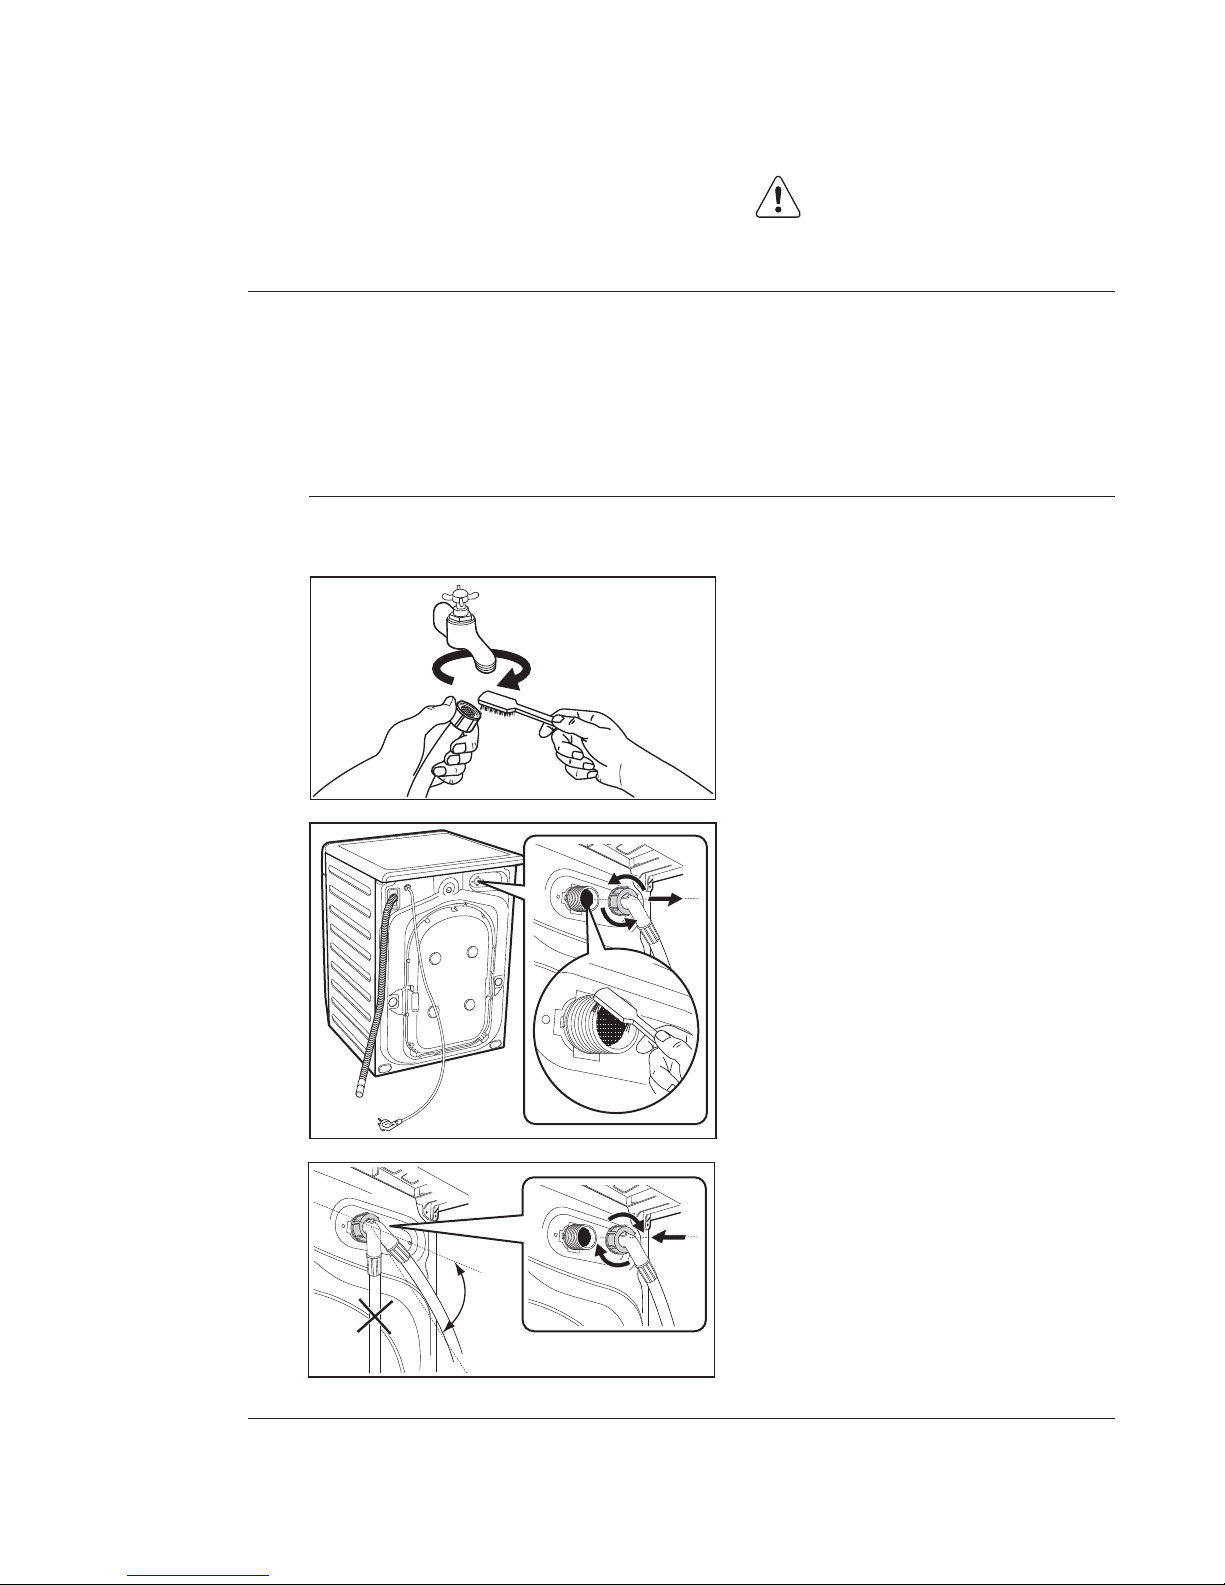
88
www.electrolux.com
重新将电源插头插入电源插
座。
9.
不要在过滤器未安装到位
的情况下开始洗衣程序。
警告!
要清洁进水管过滤器:
1.
关闭水龙头。
2.
从水龙头上卸下进水软管。
3.
使用硬毛刷清洁进水软管过
滤器。
4.
卸下机背的进水软管。
5.
使用硬毛刷或毛巾清洁阀门
中的过滤器。
6.
重新装好进水软管。确保连
接牢固以防止漏水。
7.
打开水龙头。
45°
如果您当地的水质很硬,或者水中含有石灰质沉积物,进水管过滤器可能
会发生堵塞。
因此最好时常清洁进水管过滤器。
8.8
清洁进水管过滤器
Page 89
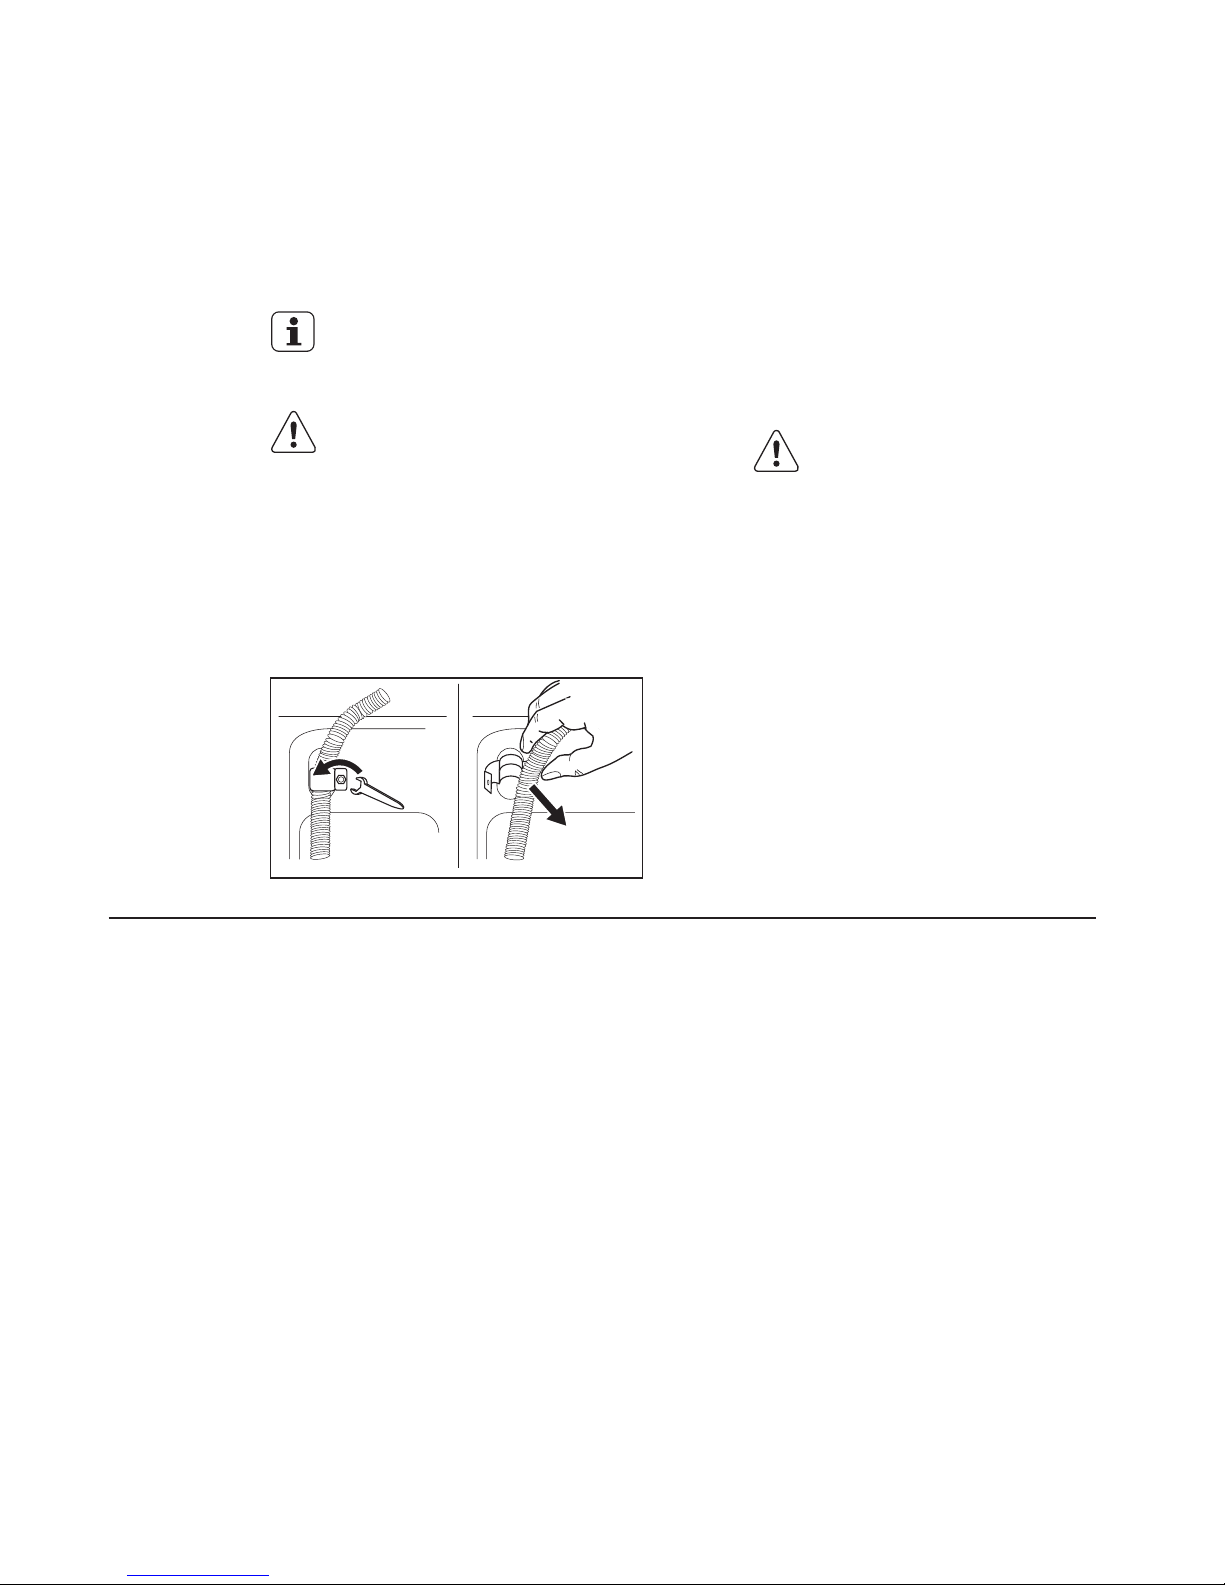
简体中文 89
关闭水龙头。
1.
2.
松开进水软管的螺钉。
3.
将排水软管从后部的管托上
取下,然后从水槽或水龙头
上摘下。
4.
将排水软管和进水软管的末端
放在一个容器内。 让软管内
的水流出。
5.
待不再有水流出时,重新装
好进水软管和排水软管。
从电源插座上拔下电源
插头。
需要紧急排水时,也要按
此步骤操作。
再次使用洗衣机前
,确保周围温度高
于 0 °C。
对于因低温造成的机
器损坏,制造商概不
负责。
如果洗衣机所处温度低于 0°C,
应采取一定的预防措施。
8.9
发生冻结的危险
Page 90
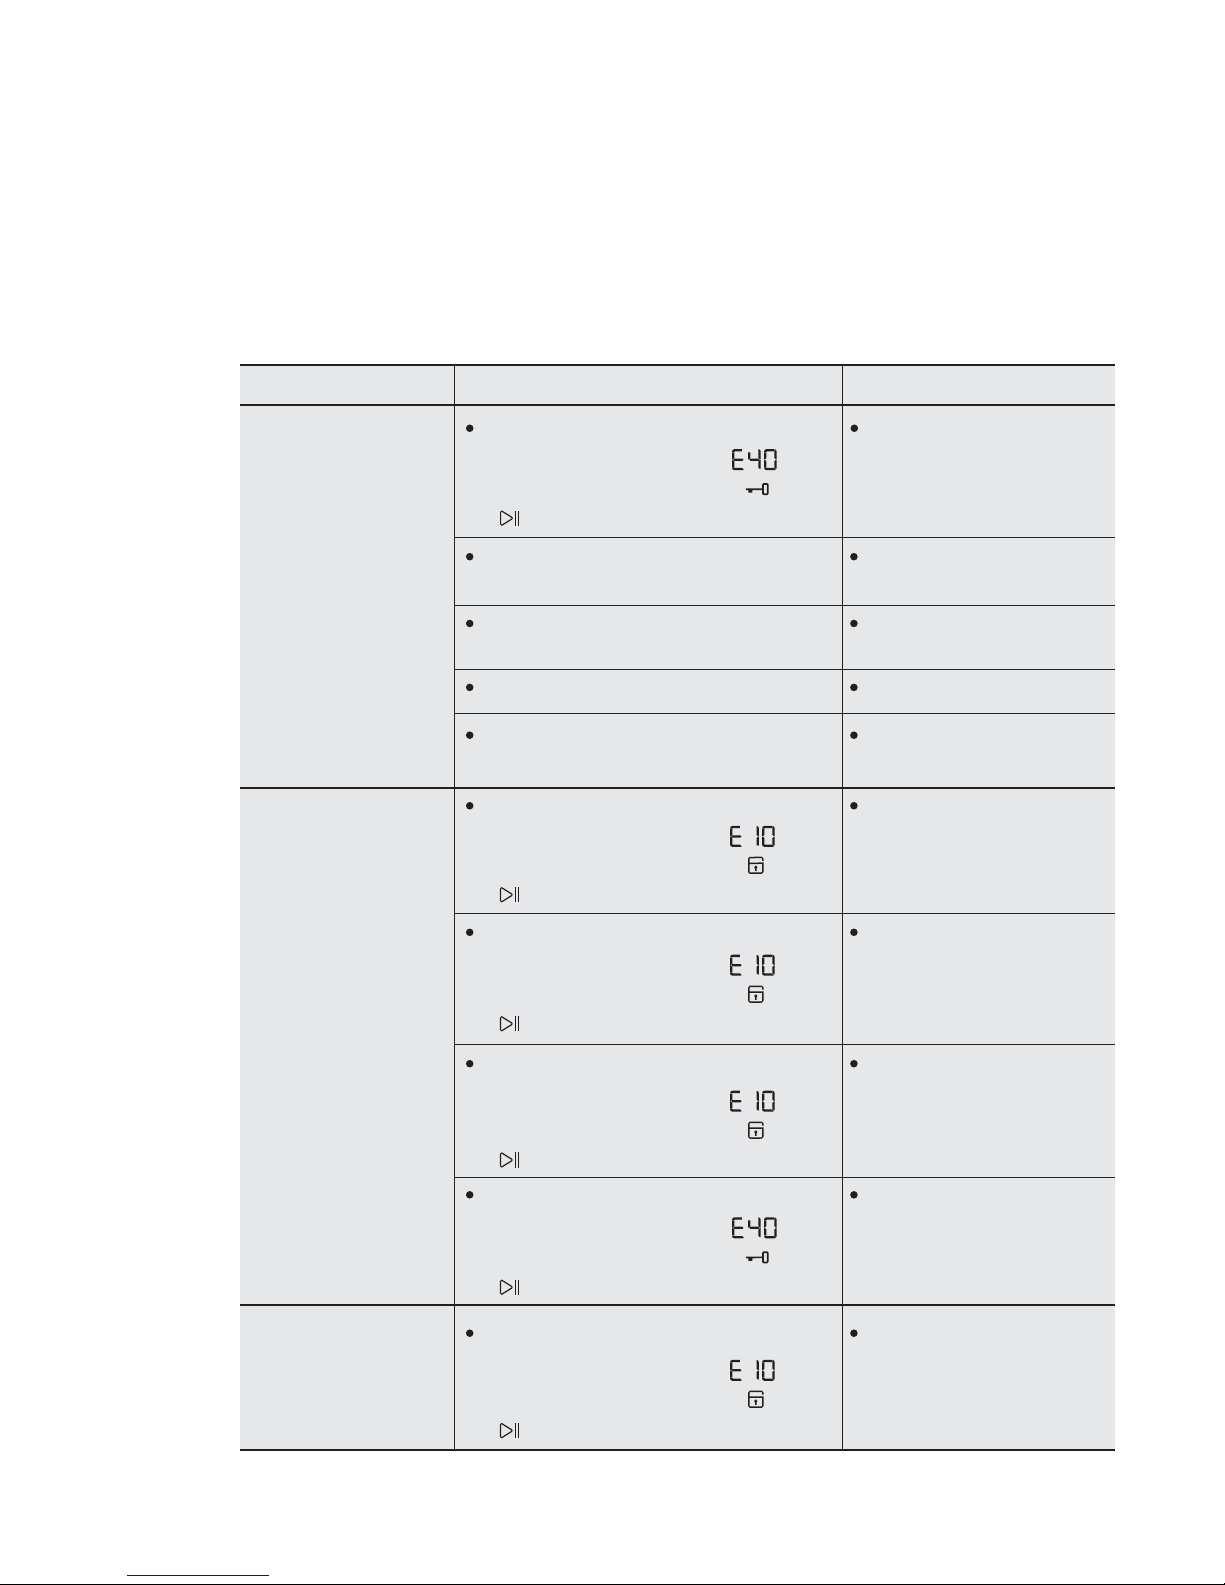
90
www.electrolux.com
机门未关闭。
有显示屏机型:故障代码 。
无显示屏机型:
Door lock ‘ ’ LED
和
‘Start/Pause’ LED
闪烁。
有显示屏机型:故障代码 。
无显示屏机型:
Child lock ‘ ’ LED
和
‘Start/Pause’ LED
闪烁。
插头未正确插入电源插座。
电源插座没电。
将插头正确插入电源
插座。
请检查您的家庭用电
设施。
没有按启动/暂停按钮。 按启动/暂停按钮。
选择了预约程序。
如果要立即洗涤衣物,
取消预约程序。
排水软管被挤压或扭结。
检查排水软管的连接。
排水软管的末端太低。 参阅“排水”一节的
相关段落。
进水软管中的过滤器发生堵塞。
清洁进水软管过滤器。
机门未完全关严。 关紧机门。
水龙头未打开。 打开水龙头。
关紧机门。
某些问题是由于缺乏简单维护或疏忽造成的,这类问题无需求助专业人员,可以自
己轻松解决。在联系当地维修服务中心之前,请先按照下表所列步骤进行检查。
在洗衣机运行期间,红色的启动/暂停指示灯可能会闪烁,表示洗衣机未正常工作。
故障排除后,请按启动/暂停按钮重新启动程序。如果进行全面检查后故障依然存
在,请与当地维修服务中心联系。
洗衣机不启动:
洗衣机不进水:
洗衣机进水,但随
即又将水排出:
故障诊断
9.
故障 可能的原因 解决方法
有显示屏机型:故障代码 。
无显示屏机型:
Door lock ‘ ’ LED
和
‘Start/Pause’ LED
闪烁。
有显示屏机型:故障代码 。
无显示屏机型:
Child lock ‘ ’ LED
和
‘Start/Pause’ LED
闪烁。
有显示屏机型:故障代码 。
无显示屏机型:
Child lock ‘ ’ LED
和
‘Start/Pause’ LED
闪烁。
有显示屏机型:故障代码 。
无显示屏机型:
Child lock ‘ ’ LED
和
‘Start/Pause’ LED
闪烁。
Page 91
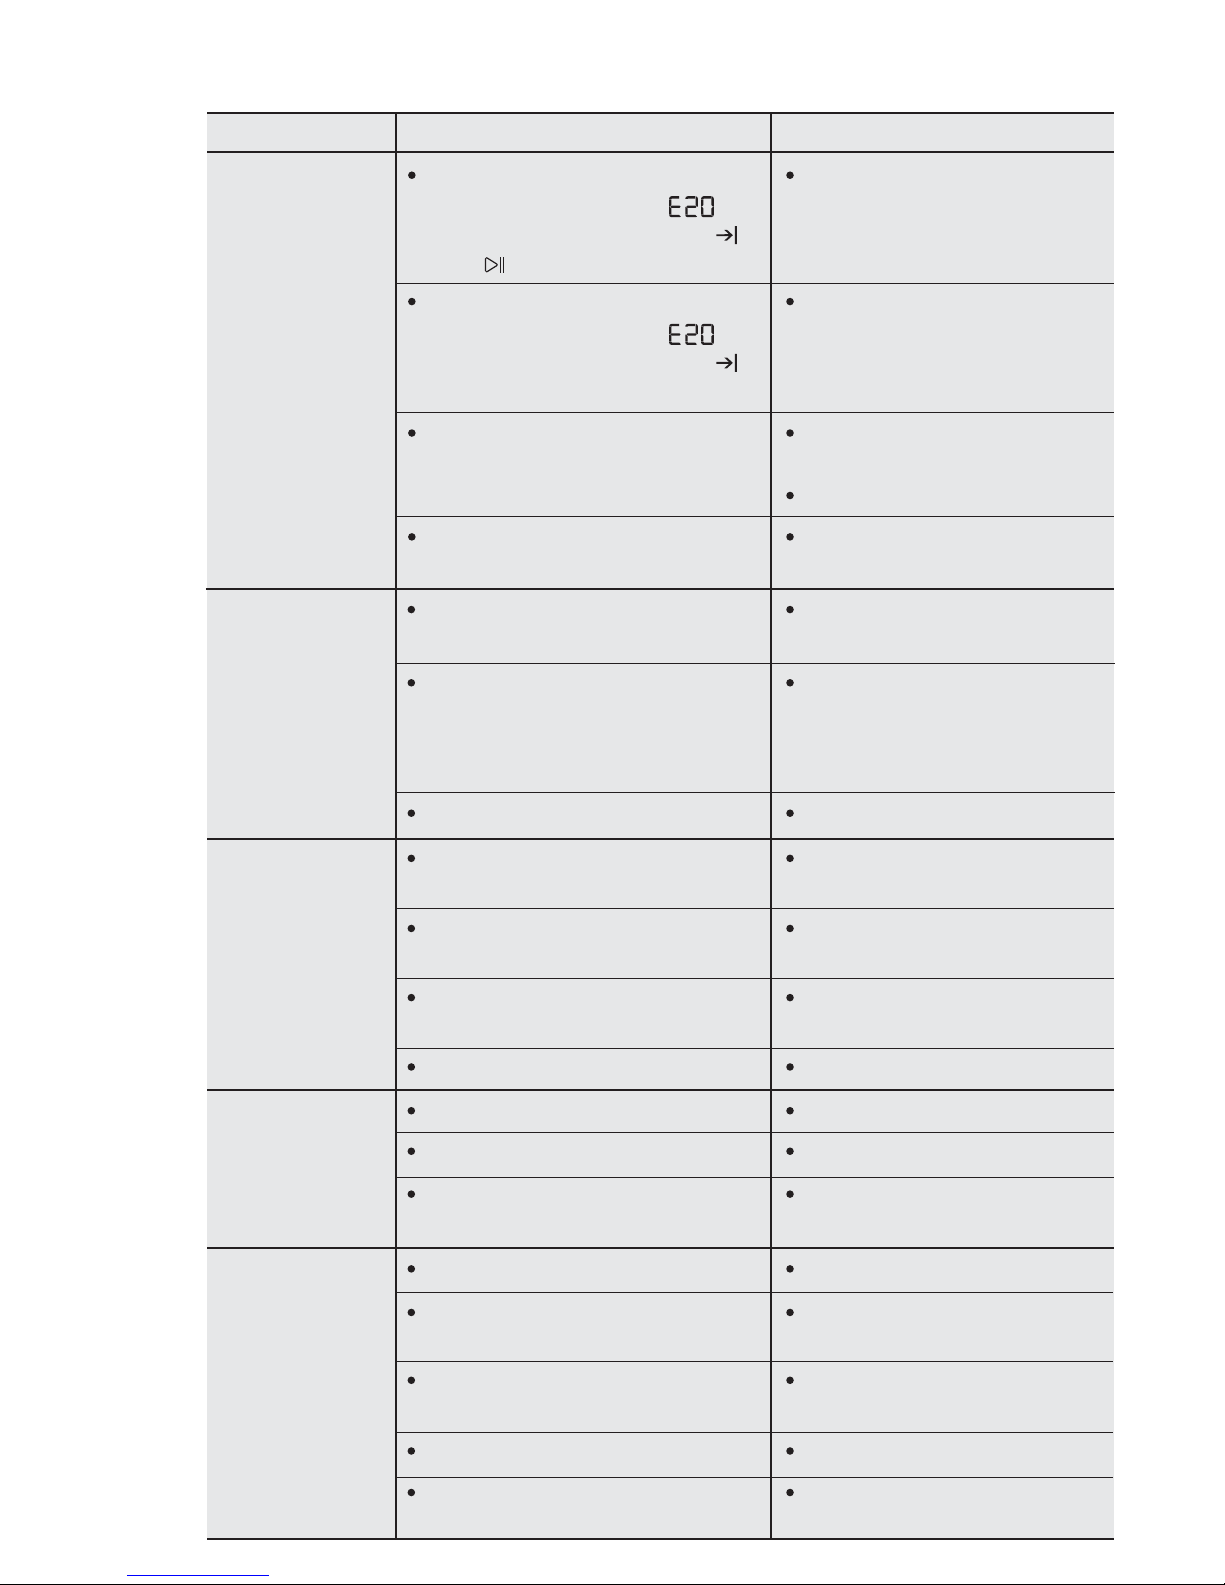
简体中文 91
使用了过量洗涤剂或不适合的洗
涤剂(产生过量泡沫)。
减少洗涤剂用量或使用
其他洗涤剂。
检查进水软管连接处是否漏水。
这种情况有时可能不易察觉,因
为水会沿着进水软管流下;因此
请检查进水软管是否潮湿。
检查进水软管的连接。
使用了过少的洗涤剂或不适合
的洗涤剂。
增加洗涤剂用量或使用其
他洗涤剂。
程序仍在运行。 等待洗衣程序结束。
未拆除运输螺栓和包装材料。 检查洗衣机的安装是否正确。
没有调节支撑脚。
检查洗衣机是否水平放置平
稳。
滚筒内衣物摆放不均匀。
暂停运行洗衣机,重新手
动将衣物摆放均匀。
筒内衣物太少。
装入更多衣物。
地面不平稳,如木质地板。 参阅“洗衣机放置”一节的
相关段落。
门锁尚未解除。
等待 5 分钟。
滚筒内有水。 选择“脱水”程序清空滚筒
内的水。
洗衣前没有预先处理顽固的污
渍。
使用去污产品处理顽固
污渍。
没有选择正确的洗涤温度。
检查是否选择了正确的洗涤
温度。
洗涤的衣物量过多。 减少衣物量。
排水软管破损。 更换新的排水软管。
地面上有水:
洗衣效果不
满意:
机门无法打开:
洗衣机振动或
有噪音:
故障 可能的原因 解决方法
有显示屏机型:故障代码 。
无显示屏机型:
Washing End ‘ ’
LED
和
‘Start/Pause’ LED
闪烁。
排水软管被挤压或扭结。
检查排水软管的连接。
排水泵发生堵塞。
清洗排水过滤器。
洗衣机不排水
或不脱水:
选择了“延迟脱水”或
“不脱水”选项。
禁用“延迟脱水”或
“不脱水”选项。
滚筒内衣物摆放不均匀。
暂停运行洗衣机,重新
手动将衣物摆放均匀。
选择脱水程序。
有显示屏机型:故障代码 。
无显示屏机型:
Washing End ‘ ’
LED
和
‘Start/Pause’ LED
闪烁。
Page 92
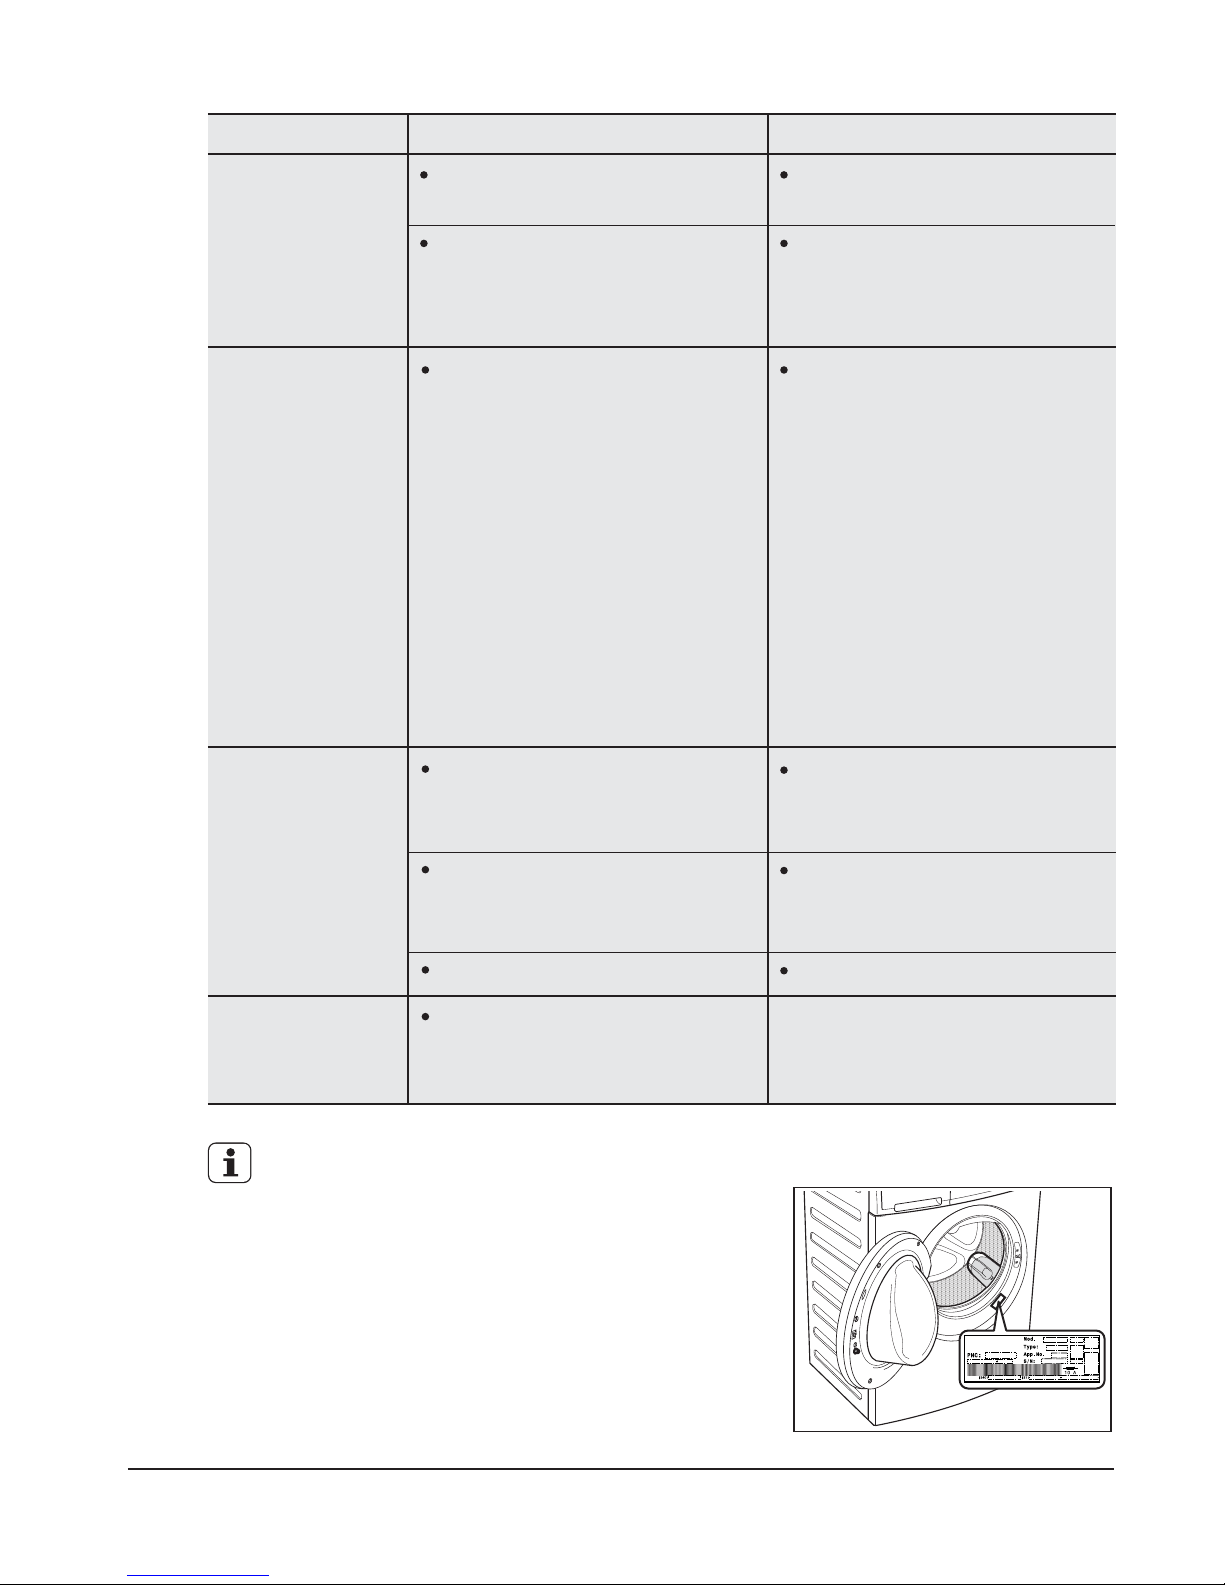
92
www.electrolux.com
如果无法确定或解决问题,请与我们的维修服
务中心联系。
在致电维修服务中心之前,请记下您的洗衣机的
型号、序列号和购买日期: 维修服务中心需要这
些信息来为您解决问题。
故障 可能的原因 解决方法
电子失衡检测装置已断开,因
为滚筒内的衣物摆放不均匀。
滚筒通过反向旋转重新摆放衣
物。
这种情况可能会在失衡情况消
失前重复出现几次,然后才可
以恢复正常脱水。如果 10 分
钟后,滚筒内的衣物仍然无法
摆放均匀,洗衣机将不会进行
脱水。这种情况下,需要手动
重新将衣物摆放均匀,然后再
选择脱水程序。
洗衣机未正确安装。 确保洗衣机水平放置平稳。
请参见“安装”一节的相关
内容。
未拆除运输螺栓或包装物
衣物量可能过少。
确保拆除包装物和/或运输螺
栓。请参见“安装”一节的
相关内容。
洗衣机采用先进技术,非常
经济划算,用水极少又不影
响洗衣性能。
向滚筒内添加更多衣物。
暂停运行洗衣机,重新手动
将衣物摆放均匀。
脱水功能启动
延迟或洗衣机
不脱水:
洗衣机发出异
常噪音:
滚筒内看不
到水:
减少洗涤剂用量或使用其他
洗涤剂。
重新手动摆放好滚筒内的衣物
,然后重新开始脱水阶段。
参见“洗衣机放置”一节的相
关段落。
使用了过量的洗涤剂。
洗衣机放置位置不平。
程序运行时
间超过显示
时间:
Page 93
简体中文 93
技术参数
10.
电源(电压/频率)
吸收的总功率
最小熔断保护
供水压力(最大/最小)
最大衣物量
脱水速度
220-240 V/50 Hz (对于菲律宾为 60 Hz)
2200 W (对于菲律宾为 2000 W)
10 A
Silk
Sensitive Plus
Easy Iron, Color,
Delicates
7.0 Kg
5.0 Kg
Regular, Heavy Duty,
Energy Saving, Rinse,
Spin, Drain
程序 最大衣物量型号
程序 型号
EWP10742, EWP85742,
EWP85752
EWP10742, EWP85742,
EWP85752
EWP10742, EWP85742,
EWP85752
EWP10742, EWP85742,
EWP85752
EWP10742, EWP85742,
EWP85752
EWP10742, EWP85742,
EWP85752
3.0 Kg
Wool 2.0 Kg
Fast’20 1.5 Kg
3.5 Kg
1000 rpm
850 rpm
Regular, Easy Iron,
Color, Delicates,
Wool, Heavy Duty,
Sensitive Plus, Energy
Saving, Rinse, Spin
最大脱水速度
Silk, Fast’20
EWP10742
800 rpm
EWP10742
EWP85742, EWP85752
650 rpm
EWP85742, EWP85752
尺寸(宽/高/深)
59.6 X 84.7 X 55.3 cm
0,8 MPa / 0,05 MPa
Page 94
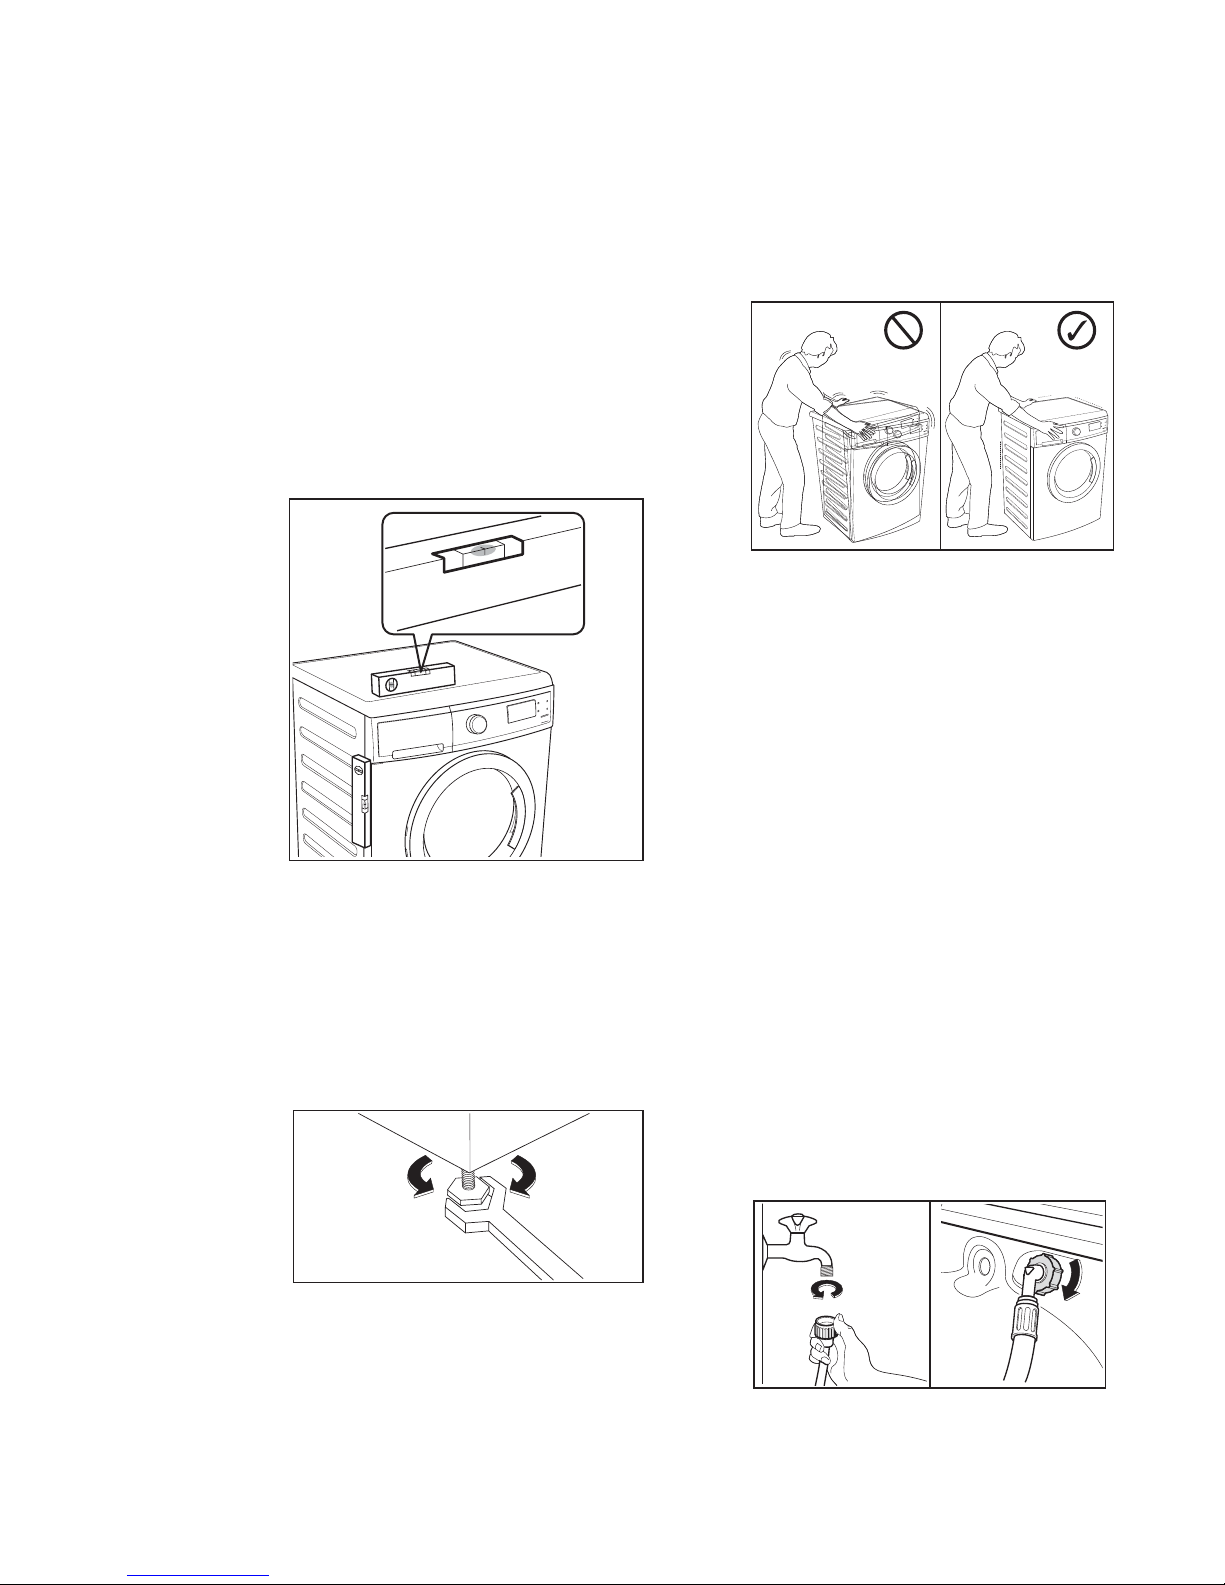
94
www.electrolux.com
安装
11 .
切勿在洗衣机底部放置纸板、木块
或类似物品来调节地面的不平整。
可以松动或收紧底脚来调节水平。
正确调节洗衣机的水平情况,可防
止洗衣机在运行过程中出现振动、
噪音和位移。
调整好洗衣机的水平之后,尝试从
各个边角摇动它。如果洗衣机发生
晃动,请再次调整底脚,直到洗衣
机保持水平并且不再摇晃为止。
11.1
洗衣机放置
在洗衣机顶部和侧面放置水平尺,
检查水平情况。
如果没有水平尺,可利用门框边
缘、纸板或台面作为参照物,检
查洗衣机是否处于水平状态。
为了保证洗衣机能够正常工作,请
务必将洗衣机放置于坚实平坦的地
面。
不得将洗衣机安装在带锁门、推拉
门或合页位置与机门相对从而会限
制机门打开的门后。
将进水软管连接到 3/4″BSP 螺纹
的水龙头。
请使用洗衣机随附的软管。不要
使用旧的软管。
进水软管的另一端连接到洗衣机,
可向任意方向自由转动。
松开接头配件,转动软管,再重新
紧固接头配件,确保不会漏水。
11.2
进水
将洗衣机放置在平整坚实的地面
上。 确保地垫、地毯等不会阻碍
洗衣机周围的空气流通。
检查并确认洗衣机没有接触墙壁或
橱柜。
Page 95
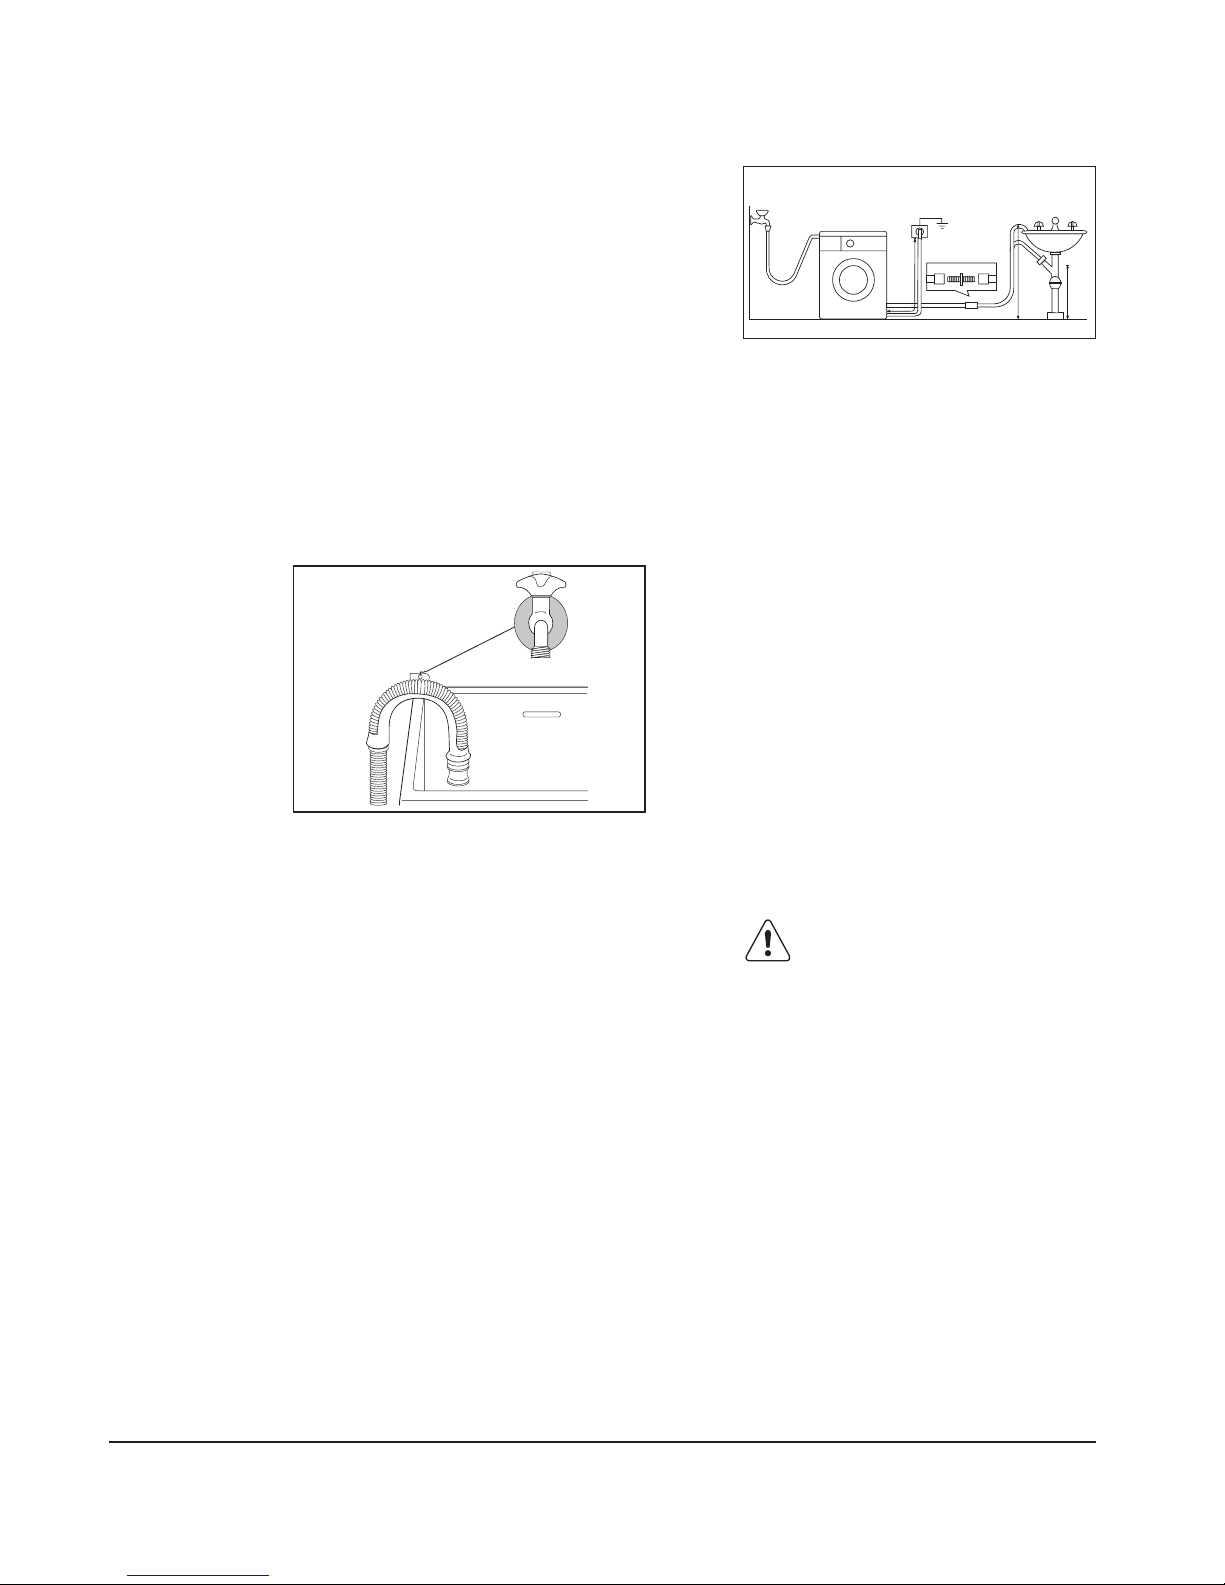
简体中文 95
进水软管不可延长。如果软管太
短而又不想移动水龙头,可另外
购买一根洗衣机进水专用的加长
软管。
要做到这一点,可将排水软管系
在水龙头上或固定在墙上。
连接到洗手池的排水管道分支。
此分支必须位于存水弯上方,从
而使排水软管的弯曲部分至少高
于地面 60 cm。
直接与排水管道相连,高度应在
60 cm 至 90 cm 之间。
排水软管出水端必须保持畅通,
即排水管道的内径必须大于排水
软管的外径。
排水软管不得扭结。请将排水软
管沿地面放置,只有接近排水口
的部分必须提高。
排水软管的末端可采用三种方式
放置:
使用随机附带的塑料软管导向套
吊装在洗手池边缘上方。
为使洗衣机能够正常工作,排水
软管必须卡在机背上部的适当管
托上。
采用这种方式时,请确保出水端
不会在洗衣机排水过程中脱落。
90 cm
60 cm
11.3
排水
“使用不正确的电源可能会使
保修失效。”
请检查您的家庭用电设施是否
可以承受需要的最大负载(2.2
kW,或在菲律宾为 2.0 kW),
同时要考虑正在使用的任何其
他电器。
对于因不遵守上述安全预防措施
而造成的洗衣机损坏或人员伤害,
制造商概不负责。
电源线的更换应由我们的维修服
务中心完成。
安装洗衣机时,必须确保能够轻
松连接电源线。
如果利用接线板或便携式插线装
置为洗衣机供电,必须妥善放置
接线板或便携式插线装置,确保
其不会溅上液体或受潮。
本洗衣机设计使用 220-240 V
单相 50 Hz(对于菲律宾为 60
Hz)的电源。
11.4
电气连接
洗衣机必须连接至接地
插座。
小心!
Page 96
96
www.electrolux.com
标有 符号的材料可以
循环利用。
>PE<=polyethylene
>PS<=polystyrene
>PP<=polypropylene
这表示此类材料如果正确放入适
当回收容器内处理,可以循环利
用。
为了节水节能和保护环境,我们
建议您遵循下列提示:
选择经过授权的废物处理点处置
您的废旧电器。请为保持环境整
洁贡献您的力量!
产品或产品包装上标记的 符
号表示此产品不可作为生活垃圾
处理。
而是应送至适当的收集点,作为
电气电子设备进行回收利用。
确保正确处置本产品将有助于防
止因本产品的不当废物处理而可
能对环境和人体健康造成的负面
影响。
有关回收利用本产品的更多详细
信息,请联系您当地的市政办公
机构、生活垃圾处理服务站或您
购买产品的商店。
12.1
包装材料
12.3
环保提示
12.2
废旧洗衣机
关注环保
12.
为了节省洗涤剂、用水和洗衣
时间(也可以保护环境),脏
污程度一般的衣物可以不进行
预洗。
洗衣机满载衣物运行时会更加
经济。
对衣物进行适当预处理可去除
污渍和轻微的脏污,从而可以
选择较低温度洗涤衣物。
根据水质硬度、衣物脏污程度
和衣物量取用适量的洗涤剂。
Page 97

NOTE / NOTA /
备注
Page 98

NOTE / NOTA /
备注
Page 99

Page 100

www.electrolux.com/shop
807209718-B-062013
 Loading...