

Page 1

user manual
Инструкция по
эксплуатации
manual de instrucciones
Washing machine
Стиральная машина
Lavadora
EWC 1050
EWC 1350
Page 2
2 electrolux
Electrolux. Thinking of you.
Share more of our thinking at www.electrolux.com
Contents
Safety information 2
Product description 3
Control panel 5
Before first use 7
Daily use 7
Helpful hints and tips 10
Washing programmes 11
Subject to change without notice
Care and cleaning 13
What to do if… 15
Technical data 17
Consumption values 17
Installation 18
Environment concerns 21
Safety information
Important! Read carefully & keep for future
reference.
• The safety of Your appliance complies with
the industry standards and with legal requirements on the safety of appliances.
However, as manufacturers, we feel it is
our duty to provide the following safety
notes.
• It is most important that this instruction
book should be retained with the appliance for future reference. Should the appliance be sold or transferred to another
owner, or should you move house and
leave the appliance, always ensure that the
book is supplied with the appliance in order that the new owner can get to know
the functioning of the appliance and the
relevant warnings.
• You MUST read them carefully before installing or using the appliance.
• Before first starting up, check the appliance for any damage incurred during
transport. Never connect up a damaged
appliance . If parts are damaged, contact
your supplier.
• If the appliance is delivered in the winter
months when there are minus temperatures. Store it at room temperature for 24
hours before using for the first time.
General safety
• It is dangerous to alter the specifications or
attempt to modify this product in any way.
• During high temperature wash programmes the door glass may get hot. Do
not touch it!
• Make sure that small pets do not climb into
the drum. To avoid this, please check into
the drum before using.
• Any objects such as coins, safety pins,
nails, screws, stones or any other hard,
sharp material can cause extensive damage and must not be placed into the machine.
• Only use the advised quantities of fabric
softener and detergent. Damage to the
fabric can ensue if you over-fill. Refer to the
manufacturer’s recommendations of
quantities.
• Wash small items such as socks, laces,
washable belts etc in a washing bag or pillow case as it is possible for such items to
slip down between the tub and the inner
drum.
• Do not use your washing machine to wash
articles with whalebones, material without
hems or torn material.
• Always unplug the appliance and turn off
the water supply after use, cleaning and
maintenance.
• Under no circumstances should you attempt to repair the machine yourself. Repairs carried out by inexperienced people
may cause injury or serious malfunctioning. Contact your local Service Centre. Always insist on genuine spare parts.
Page 3

electrolux 3
Installation
• This appliance is heavy. Care should be
taken when moving it.
• When unpacking the appliance, check that
it is not damaged. If in doubt, do not use it
and contact the Service Centre.
• All packing and transit bolts must be removed before use. Serious damage can
occur to the product and to property if this
is not adhered to. See relevant section in
the user manual.
• After having installed the appliance, check
that it is not standing on the inlet and drain
hose and the worktop is not pressing the
electrical supply cable against the wall.
• If the machine is situated on a carpeted
floor, please adjust the feet in order to allow air to circulate freely under the appliance.
• Always be sure, that there is no water leakage from hoses and their connections after
the installation.
• If the appliance is installed in a location
subject to frost, please read the “dangers
of freezing” chapter.
• Any plumbing work required to install this
appliance should be carried out by a qualified plumber or competent person.
• Any electrical work required to install this
appliance should be carried out by a qualified electrician or competent person.
Use
• This appliance is designed for domestic
use. It must not be used for purposes other
than those for which it was designed.
• Only wash fabrics which are designed to
be machine washed. Follow the instructions on each garment label.
• Do not overload the appliance. See the
Washing Programme Table.
• Before washing, ensure that all pockets
are empty and buttons and zips are fastened. Avoid washing frayed or torn articles and treat stains such as paint, ink,
rust, and grass before washing. Underwired bras must NOT be machine washed.
• Garments which have been in contact with
volatile petroleum products should not be
machine washed. If volatile cleaning fluids
are used, care should be taken to ensure
that the fluid is removed from the garment
before placing in the machine.
• Never pull the power supply cable to remove the plug from the socket; always
take hold of the plug itself.
• Never use the appliance if the power supply cable, the control panel, the working
surface or the base are damaged so that
the inside of the washing machine is accessible.
Child safety
• This appliance is not intended for use by
person (including children) with reduced
physical sensory or mental capabilities or
lack of experience and knowledge unless
they have been given supervision or instruction concerning use of the appliance
by a person responsible for their safety.
• Young children should be supervised to
ensure that they do not play with the appliance
• The packaging components (e.g. plastic
film, polystyrene) can be dangerous to children - danger of suffocation! Keep them
out of children’s reach.
• Keep all detergents in a safe place out of
children’s reach.
• Make sure that children or pets do not
climb into the drum.
Product description
Your new appliance meets all modern requirements for effective treatment of laundry
with low water, energy and detergent consumption. Its new washing system allows total
use of detergent and reduces water consumption so saving energy.
Page 4
4 electrolux
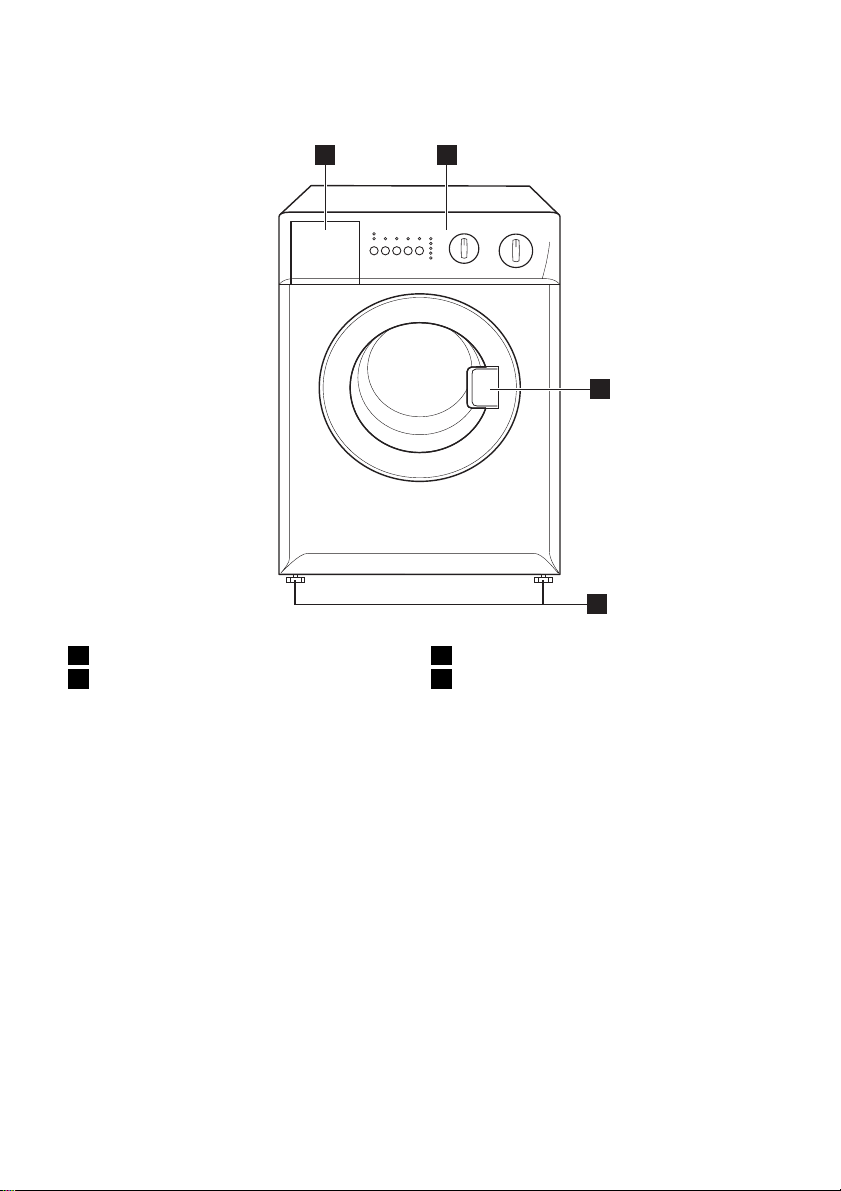
Machine front
1 2
3
4
1 Detergent dispenser drawer
2 Control panel
3 Door opening handle
4 Adjustable feet (front)
Page 5
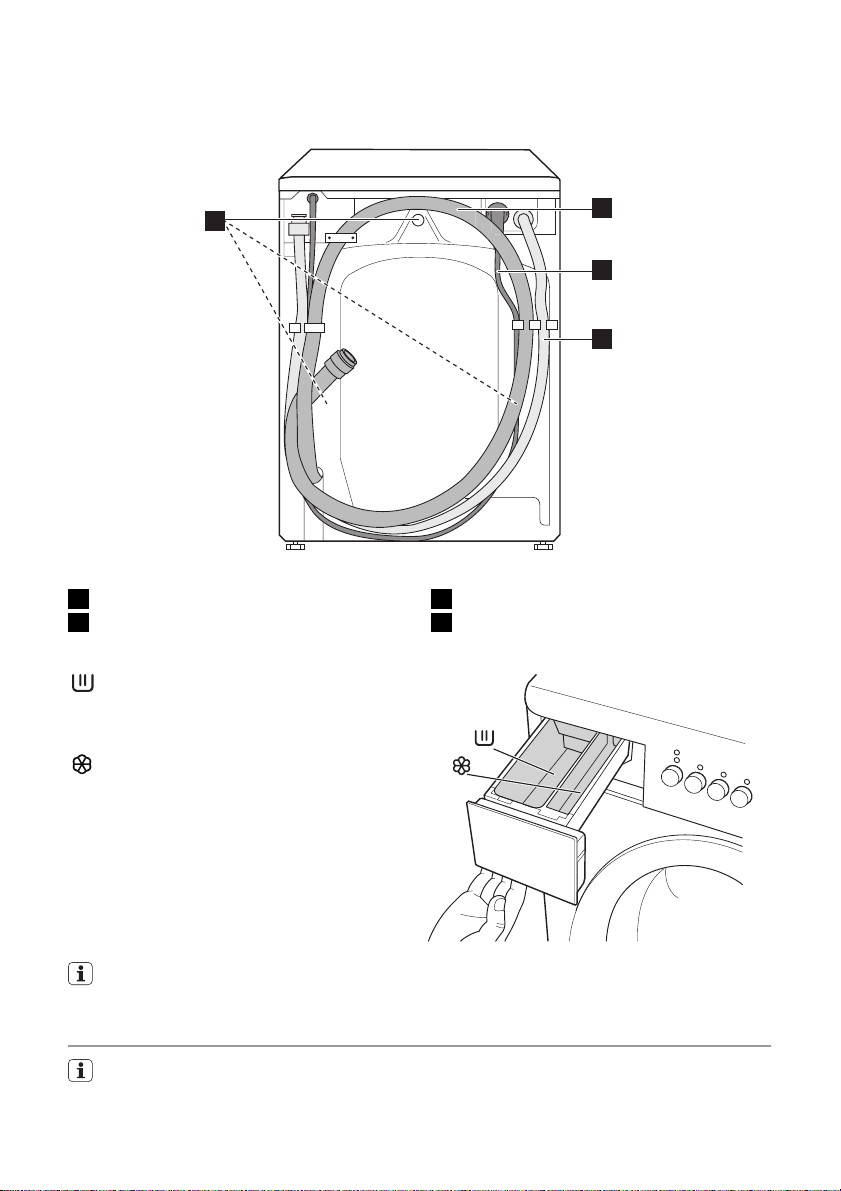
Machine rear
electrolux 5
1
1 Transit locking devices
2 Drain hose
Detergent dispenser drawer
Compartment for powder or liquid detergent used for main wash. If using liquid detergent pour it just before starting the programme.
Compartment for liquid additives (fabric
softener, starch).
Any fabric softener or starching additives
must be poured into the compartment before starting the wash programme.
2
3
4
3 Electrical lead
4 Inlet hose
Prewash detergent is to be added straight into the drum.
Control panel
Henceforth, the programme selector dial, the spin selector dial, programme progress
lights and different buttons will be indicated in all the book with the relevant numbers
given below.
Page 6
6 electrolux
1 2 3 4 5 6 8 97
1 Detergent drawer
2
DELAY START button
3 PREWASH button
4 QUICK button
5
SUPER RINSE button
6 START/PAUSE button
7
Programme progress display
8 SPIN reduction selector
9 Programme selector dial
Detergent drawer
Detergent drawer has 2 separate compartments for detergent and fabric conditioner.
Prewash detergent is to be added
straight into the drum.
Delay Start
The start of the programme can be delayed
by 6 or 3 hours by means of this button.
Prewash
By selecting this option the machine performs a prewash cycle before the main wash
phase. The washing time will be prolonged.
This option is recommended for heavily
soiled laundry.
Quick
By selecting this option the washing time will
be reduced approx. 10 minutes. This option
is recommended for lightly soiled white-/coloured and synthetic laundry.
Super Rinse
This appliance is designed for saving energy.
If it necessary to rinse the laundry using an
extra quantity of water (super rinse), select
this option. Some additional rinses will be
performed. This option is recommended for
people who are allergic to detergents, and in
areas where the water is very soft.
Start Pause
This button allows you to start or to interrupt
the selected programme.
Display
(A)
(B)
(C)
(D)
(E)
The light A illuminates when the machine is
performing the washing phase .
The light B illuminates when the machine is
rinsing .
The light C illuminates when the machine is
spinning .
The light D illuminates at the end of the
washing cycle.
The light E indicates if the door can be
opened:
• The light is lit: the door cannot be opened.
• The light is out: the door can be opened.
• The light is flashing: the door can soon be
opened.
Spin Reduction Dial
By turning the spin speed selector you can
change the spin speed of the selected pro-
Page 7
electrolux 7
gramme or to select «Rinse hold» or «No
spin»option.
Programme Selector Dial
It allows you to switch the appliance on/off
and/or to select a programme.
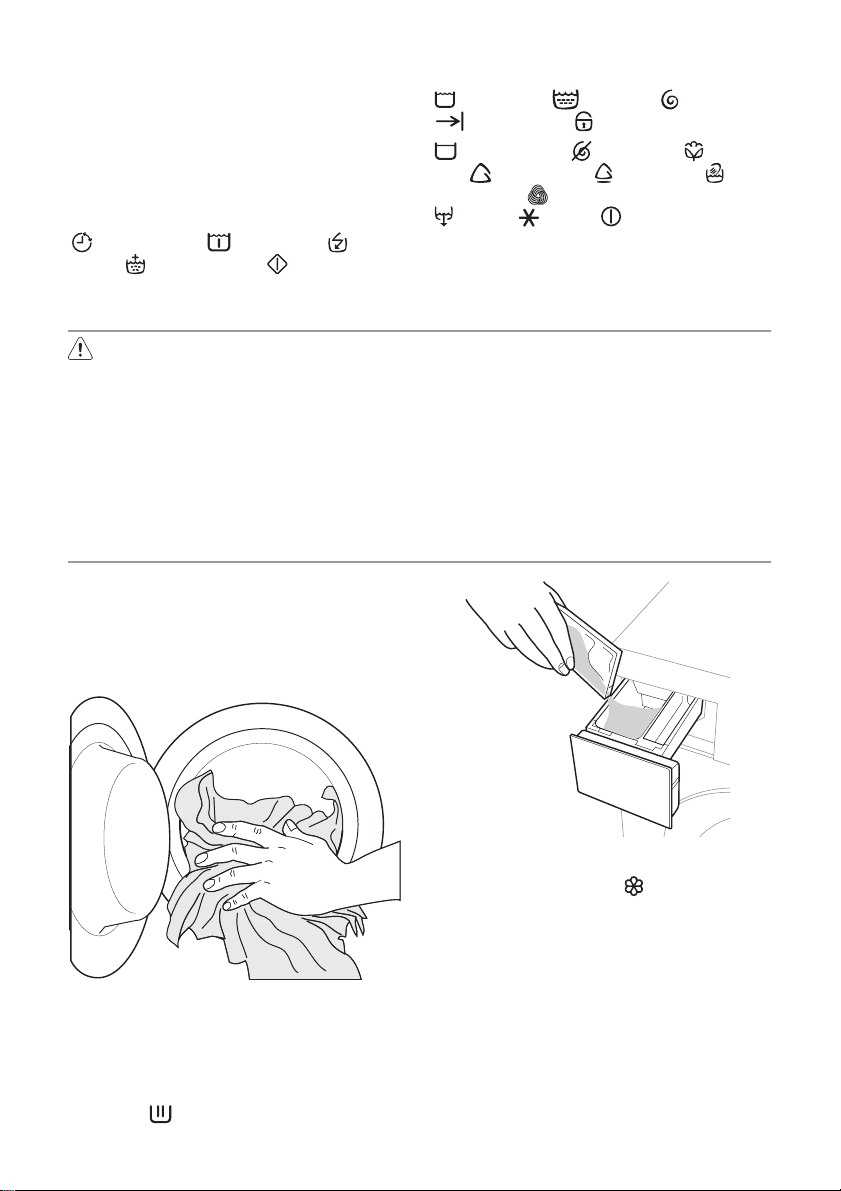
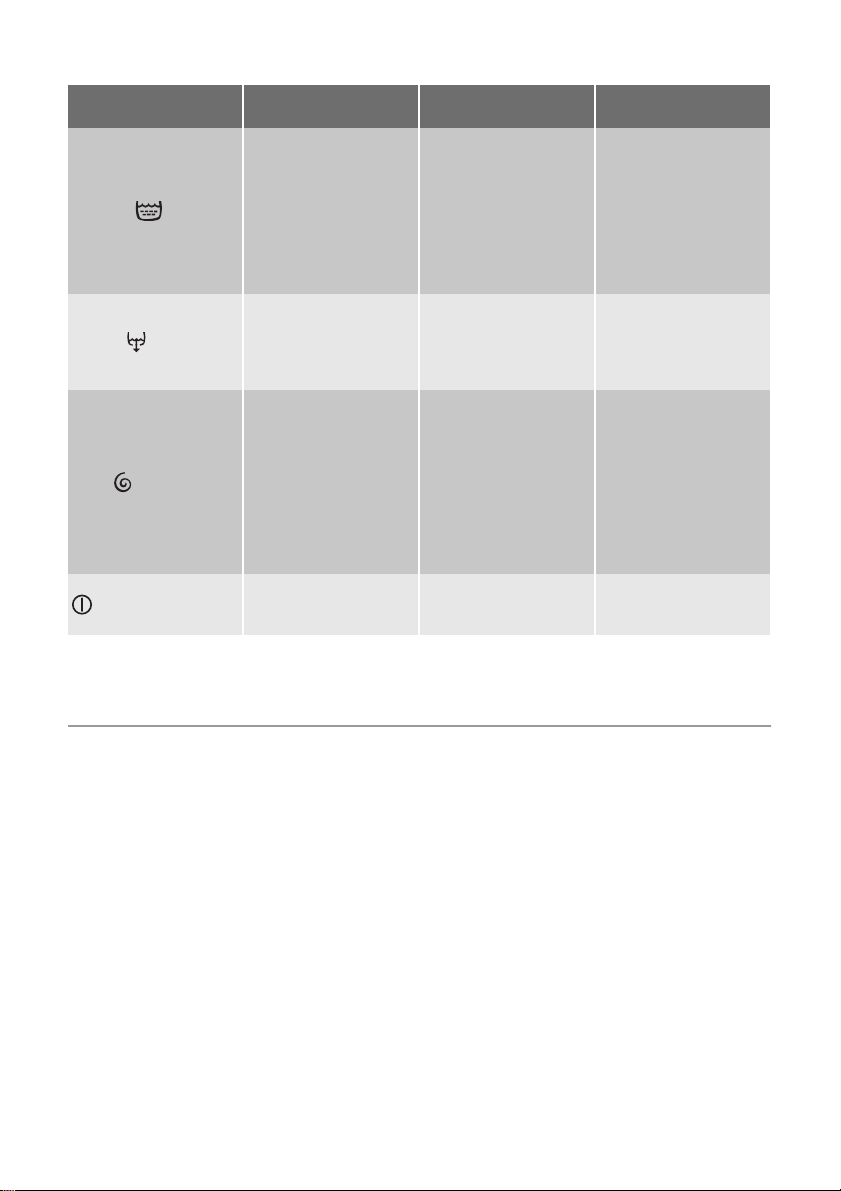
Table of Symbols
= Delay Start, = Prewash, =
Quick,
= Super Rinse, = Start/Pause
Before first use
Warning!
Ensure that the electrical and water connections comply with the installation instructions.
Important! Remove any material from the
drum.
Important! We recommend you to run a
wash programme without any load, to clear
Daily use
Load the laundry
Open the door by carefully pulling the door
handle outwards. Place the laundry in the
drum, one item at a time, shaking them out
as much as possible. Close the door.
= Washing, = Rinses, = Spin,
= Cycle End, = Door Locked
= Rinse Hold, = No Spin, = Cot-
= Synthetic, = Delicate, =
ton,
Handwash,
=Drain, =Cold, = ON/OFF
any residues which may have been left by the
manufacturing process. Pour approx. 100 ml
of detergent straight into the drum and run a
cotton cycle at 60°C. When the programme
is finished the machine will be ready to use.
= Wool, 30 ° = Mini 30 ° ,
Measure out the detergent and the
fabric softener
Pull out the dispenser drawer until it stops.
Measure out the amount of detergent required, pour it into the larger compartment
on the left
.
If required, pour fabric softener into the smaller compartment marked
used must not exceed the «MAX» mark in the
drawer). Close the drawer gently.
(the amount
Page 8
8 electrolux
Select the required programme by
means of the programme selector dial
(9)
Turn the programme selector dial to the required programme. The selector can be
turned either clockwise or anticlockwise.
The green light of button 6 starts to flash
On programme progress display the pilot
lights corresponding to all phases composing the selected programme are lit.
On position
the programme is reset and
the machine is switched OFF.
At the end of the programme the selector dial must be turned to position
to
switch the machine off.
Important! If you turn the programme
selector dial to another programme when the
machine is working, the lights in the
programme progress display will start to
flash to indicate a wrong selection. The
machine will not perform the new selected
programme.
Select the spin speed, Rinse Hold or No
spin option (8)
Select the spin speed, Rinse Hold option or
No Spin option by turning the spin speed selector.
• The position 1300 (or 1000) is equivalent
to 900 rpm for the synthetic and wool programmes and 700 rpm for the delicate
wash programme.
• The position 500 is equivalent to 500 rpm
for the synthetic and wool programmes
and 450 rpm for the delicate wash programme.
Rinse hold
By selecting this option the water of the last
rinse is not emptied out to prevent the fabrics
from creasing. When the programme has finished, the lights "End" and "Door locked" are
lit to indicate that the water must be emptied
out (See: " At the end of the programme").
No spin
By selecting this option all the spinning phases are excluded. To be used for extremely
delicate material. The machine will add some
additional rinses to the cotton and synthetic
programmes.
For the maximum spin speed allowed by
each programme, refer to the chapter
Washing programmes .
Select the Delay Start by pressing
button 2
Before you start the programme, if you wish
to delay the start, press the button 2 repeatedly, to select the desired delay. The corresponding pilot light will light up.
You must select this option after you have set
the programme and before you press button
6 .
You can cancel or modify the delay time at
any moment, before you press button 6 .
Cancelling the delayed start after having
pressed button 6 :
1. Set the washing machine to PAUSE by
pressing button 6 .
2. Press the button 2 once, the light relevant
to the selected delay goes off.
3.
Press button 6 again to start the programme.
Important! The selected delay can be
changed only after selecting the washing
programme again.
The door will be locked throughout the delay
time (door locked light lit).
The Delay Start can not be selected with
DRAIN or SPIN programme.
Page 9
electrolux 9
Select the desired option by means of
buttons 3, 4 and 5
Depending on the programme, different
functions can be combined. These must be
selected after choosing the desired programme and before pressing the button 6.
The relevant light will illuminate.
If an incorrect option is selected, the corresponding indicator lamp flashes for about 2
seconds. For the compatibility of the options
with the washing programmes, refer to the
chapter «Washing programmes» .
Start the programme by pressing button
6
To start the selected programme, press this
button; the corresponding pilot light stops
flashing and remains lit.
On programme progress display the pilot
lights A and E illuminate to indicate that the
appliance starts operating and the door is
locked.
Altering an option or a running
programme
It is possible to change any option before the
programme carries it out.
Before you make any change, you must
pause the washing machine by pressing the
button 6 .
The programme can be changed as long as
the button 6 has not been pressed. Changing
a running programme is possible only by resetting it. Turn the programme selector dial
to
and then to the new programme position. Start the new programme by pressing
the button 6 again.
Interrupting a programme
Press the button 6 to interrupt a programme
which is running, the corresponding light
starts to flash. Press the button again to restart the programme.
Cancelling a programme
Turn the selector dial to
position to cancel
a programme which is running. Now you can
select a new programme.
Opening the door after the programme
has started
First set the machine to pause by pressing
the button 6 .
After some minutes, the door can be
opened, when the following conditions are
observed:
• The water temperature is below 55°C.
• The water level is below the bottom edge
of the door.
• The machine doesn’t spin.
If you cannot open the door but it is absolutely necessary to open it you have to switch
the machine off by turning the selector dial to
. After few minutes the door can be
opened
(Pay attention to the water level and
temperature!).
After this procedure, it will be necessary to
set the programme and the options again
and then press the button 6 .
At the end of the programme
The machine stops automatically.
The pilot light D illuminates to indicate that
the programme has finished. The pilot light
E goes out, the door can be opened and the
laundry can be removed.
If at the end of a programme there is water in
the tub (when "Rinse hold" option has been
selected), to empty out the water follow
the following instructions :
•
turn the programme selector dial to
• select the «Drain» or «Spin» programme
•press button 6
When the pilot light E goes out, the door can
be opened and the laundry can be removed.
At the end of the cycle, turn the programme
selector dial to
to switch the machine off.
Remove the laundry from the drum and carefully check that the drum is empty. If you do
not intend to carry out another wash, close
the water tap.
Leave the door open to prevent the formation
of mildew and unpleasant smells.
Page 10

10 electrolux
Helpful hints and tips
Sorting out the laundry
Follow the wash code symbols on each garment label and the manufacturer’s washing
instructions. Sort the laundry as follows:
whites, coloureds, synthetics, delicates,
woollens.
Temperatures
95° or 90°
60°/50°
40°-30°Cold
Before loading the laundry
Never wash whites and coloureds together.
Whites may lose their «whiteness» in the
wash.
New coloured items may run in the first wash;
they should therefore be washed separately
the first time.
Make sure that no metal objects are left
in the laundry (e.g. hair clips, safety pins,
pins).
Button up pillowcases, close zip fasteners,
hooks and poppers. Tie any belts or long
tapes.
Remove persistent stains before washing.
Rub particularly soiled areas with a special
detergent or detergent paste.
Treat curtains with special care. Remove
hooks or tie them up in a bag or net.
Maximum loads
Recommended loads are indicated in the
washing programme charts.
General rules:
•
Cotton, linen: drum full but not too tightly
packed;
• Synthetics: drum no more than half full;
•
Delicate fabrics and woollens: drum no
more than one third full.
for normally soiled white cottons and linen (e.g. tea cloths,
towels, tablecloths, sheets...)
for normally soiled, colour fast
garments (e.g. shirts, night
dresses, pyjamas....) in linen,
cotton or synthetic fibres and
for lightly soiled white cotton
(e.g. underwear)
for delicate items (e.g. net curtains), mixed laundry including
synthetic fibres and woollens
bearing the label «pure new
wool, machine washable, nonshrink»
Washing a maximum load makes the most
efficient use of water and energy.
For heavily soiled laundry, reduce the load
size.
Laundry weights
The following weights are indicative:
The following weights are indicative:
bathrobe 1200 g
quilt cover 700 g
man’s work shirt 600 g
sheet, man’s pyjamas 500 g
tablecloth 250 g
pillow case, towelling towel,
night dress, man’s shirt
tea cloth, ladies’ briefs, nap-
kin, blouse, men’s underpants
200 g
100 g
Removing stains
Stubborn stains may not be removed by just
water and detergent. It is therefore advisable
to treat them prior to washing.
Blood: treat fresh stains with cold water. For
dried stains, soak overnight in water with a
special detergent then rub in the soap and
water.
Oil based paint: moisten with benzine stain
remover, lay the garment on a soft cloth and
dab the stain; treat several times.
Dried grease stains: moisten with turpentine, lay the garment on a soft surface and
dab the stain with the fingertips and a cotton
cloth.
Rust: oxalic acid dissolved in hot water or a
rust removing product used cold. Be careful
with rust stains which are not recent since the
cellulose structure will already have been
damaged and the fabric tends to hole.
Mould stains: treat with bleach, rinse well
(whites and fast coloureds only).
Grass: soap lightly and treat with bleach
(whites and fast coloureds only).
Ball point pen and glue: moisten with ace-
1)
tone
, lay the garment on a soft cloth and
dab the stain.
Lipstick: moisten with acetone as above,
then treat stains with methylated spirits.
Treat any residual marks with bleach.
1) do not use acetone on artificial silk
Page 11

electrolux 11
Red wine: soak in water and detergent,
rinse and treat with acetic or citric acid, then
rinse. Treat any residual marks with bleach.
Ink: depending on the type of ink, moisten
the fabric first with acetone
1)
, then with acetic acid; treat any residual marks on white
fabrics with bleach and then rinse thoroughly.
Tar stains: first treat with stain remover, methylated spirits or benzine, then rub with detergent paste.
Detergents and additives
Good washing results also depend on the
choice of detergent and use of the correct
quantities to avoid waste and protect the environment.
Although biodegradable, detergents contain
substances which, in large quantities, can
upset the delicate balance of nature.
The choice of detergent will depend on the
type of fabric (delicates, woollens, cottons,
etc.), the colour, washing temperature and
degree of soiling.
All commonly available washing machine detergents may be used in this appliance:
• powder detergents for all types of fabric
• powder detergents for delicate fabrics
(60°C max) and woollens
• liquid detergents, preferably for low tem-
perature wash programmes (60°C max)
for all types of fabric, or special for wool-
lens only.
The detergent and any additives must be
placed in the appropriate compartments of
the dispenser drawer before starting the
wash programme.
Prewash detergent is to be added
straight into the drum
If using liquid detergents, a programme
without prewash must be selected. Pour the
liquid detergent into the detergent compartment immediately before you start the programme.
Your appliance incorporates a recirculation
system which allows an optimal use of the
concentrated detergent.
Follow the product manufacturer’s recommendations on quantities to use and do not
exceed the «MAX» mark in the detergent
dispenser drawer .
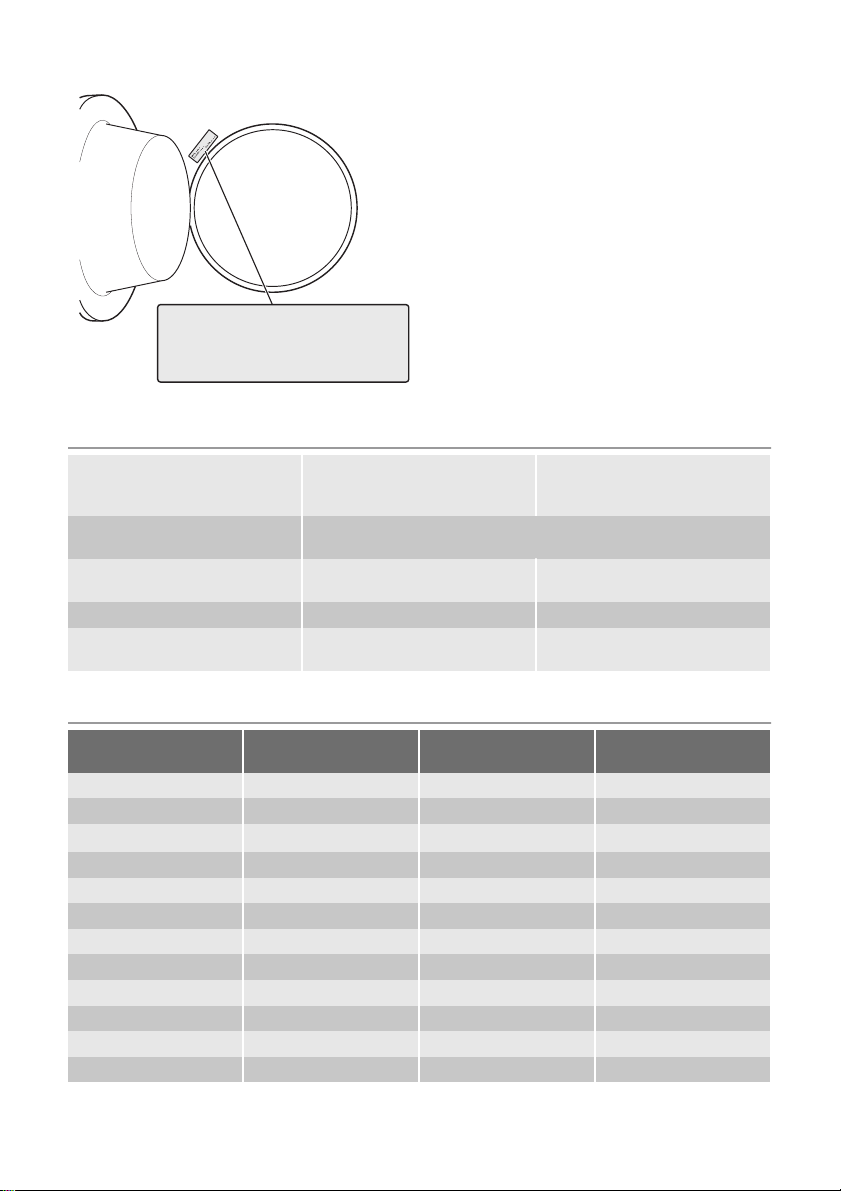
Degrees of water hardness
Water hardness is classified in so-called “degrees” of hardness. Information on hardness
of the water in your area can be obtained
from the relevant water supply company, or
from your local authority.
A water softener must be added when
water has a medium-high degree of
hardness (from degree of hardness II).
Follow the manufacturer’s instructions.
The quantity of detergent can then always be adjusted to degree of hardness
I (= soft).
Degrees of water
Level
Charac-
teristic
1 soft 0-7 0-15
2 medium 8-14 16-25
3 hard 15-21 26-37
4 very hard > 21 > 37
hardness
German
°dH
French
°T.H.
Washing programmes
Programme/ Tem-
perature
COTTON
90°
Type of laundry Options
White cotton (heavily
and normally soiled cotton items)
SPIN REDUCTION/NO
SPIN/RINSE HOLD
DELAY START
PREWASH
1)
QUICK
SUPER RINSE
Description of the
programme
Main wash
Rinses
Long spin max.
1300/1000 rpm
Max load 3 kg
Page 12
12 electrolux
Programme/ Tem-
perature
COTTON E
60°
COTTON
60° - 30°
COTTON E
40°
SYNTHETIC
40°-30°
DELICATE
40°
HANDWASH
30°
WOOL
40°-COLD
MINI
30°
Type of laundry Options
White cotton economy
(This programme can
be selected for slightly
or normally soiled cotton items. The temperature will decrease and
the washing time will be
extended. This allows
SPIN REDUCTION/NO
SPIN/ RINSE HOLD
DELAY START
PREWASH
SUPER RINSE
to obtain a good washing efficiency so saving
energy.)
SPIN REDUCTION/NO
Coloured cotton (normally soiled cotton
items)
SPIN/RINSE HOLD
DELAY START
PREWASH
QUICK
SUPER RINSE
Coloured cotton
economy
(Cotton economy program. See: Cotton 60°
E)
Synthetic or mixed
fabrics: underwear,
coloured garments,
non-shrink shirts, blouses.
SPIN REDUCTION/NO
SPIN/ RINSE HOLD
DELAY START
PREWASH
SUPER RINSE
SPIN REDUCTION/NO
SPIN/RINSE HOLD
DELAY START
PREWASH
QUICK
SUPER RINSE
SPIN REDUCTION/NO
Delicate fabrics:
acrylics, viscose, polyester.
SPIN/ RINSE HOLD
DELAY START
PREWASH
SUPER RINSE
Special programme for
delicate fabrics with
«hand washing» care
symbol.
Washing programme
for machine washable
wool.
For lightly soiled laundry
or for laundry which
needs freshening up.
SPIN REDUCTION/NO
SPIN/RINSE HOLD
DELAY START
SPIN REDUCTION/NO
SPIN/RINSE HOLD
DELAY START
SPIN REDUCTION/NO
SPIN/RINSE HOLD
DELAY START
Description of the
programme
Main wash
Rinses
Long spin max.
1300/1000 rpm
Max load 3 kg
Main wash
Rinses
Long spin max.
1)
1300/1000 rpm
Max load 3 kg
Main wash
Rinses
Long spin max.
1300/1000 rpm
Max load 3 kg
Main wash
Rinses
Short spin max. 900
rpm
Max Load 1,5 kg
Main wash
Rinses
Short spin max. 700
rpm
Max Load 1,5 kg
Main wash
Rinses
Short spin max. 900
rpm
Max Load 1 kg
Main wash
Rinses
Short spin max. 900
rpm
Max Load 1 kg
Main wash
Rinses
Short spin max. 700
rpm
Max Load 1,5 kg
Page 13
electrolux 13
Programme/ Tem-
perature
RINSES
DRAIN
SPIN
/ OFF
1) If you select this option, we recommend that you reduce the maximum load. Recommended load for
cotton is 2 kg.
Type of laundry Options
With this programme it
is possible to rinse and
spin cotton garments
which have been washed by hand. The machine performs 3 rinses, followed by a final
long spin. The spin
speed can be reduced.
For emptying out the
water of the last rinse in
programmes with the
Rinse Hold option selected.
Separate spin for hand
washed garments and
after programmes with
the Rinse Hold option
selected. You can
choose the spin speed
by turning the spin
speed selector to adapt
it to the fabrics to be
spun.
For resetting the programme or switching
the machine off
SPIN REDUCTION/NO
SPIN/RINSE HOLD
SUPER RINSE
SPIN REDUCTION
Description of the
programme
Rinses
Spin max. 1300/1000
rpm
Max Load 3 kg
Draining of water
Max Load 3 kg
Drain and long spin
Max. spin speed
1300/1000 rpm
Max Load 3 kg
Care and cleaning
Important! You must DISCONNECT the
appliance from the electricity supply, before
you can carry out any cleaning or
maintenance work.
Descaling
The water we use normally contains lime. It
is a good idea to periodically use a water
softening powder in the machine. Do this
separately from any laundry washing, and
according to the softening powder manufacturer's instructions. This will help to prevent
the formation of lime deposits.
Maintenance Wash
With the use of low temperature washes it is
possible to get a build up of residues inside
the drum.
We recommend that a maintenance wash be
performed on a regular basis.
To run a maintenance wash:
• The drum should be empty of laundry.
• Select the hottest cotton wash programme.
• Use a normal measure of detergent, must
be a powder with biological properties.
External cleaning
Clean the exterior cabinet of the appliance
with soap and water only, and then dry thoroughly.
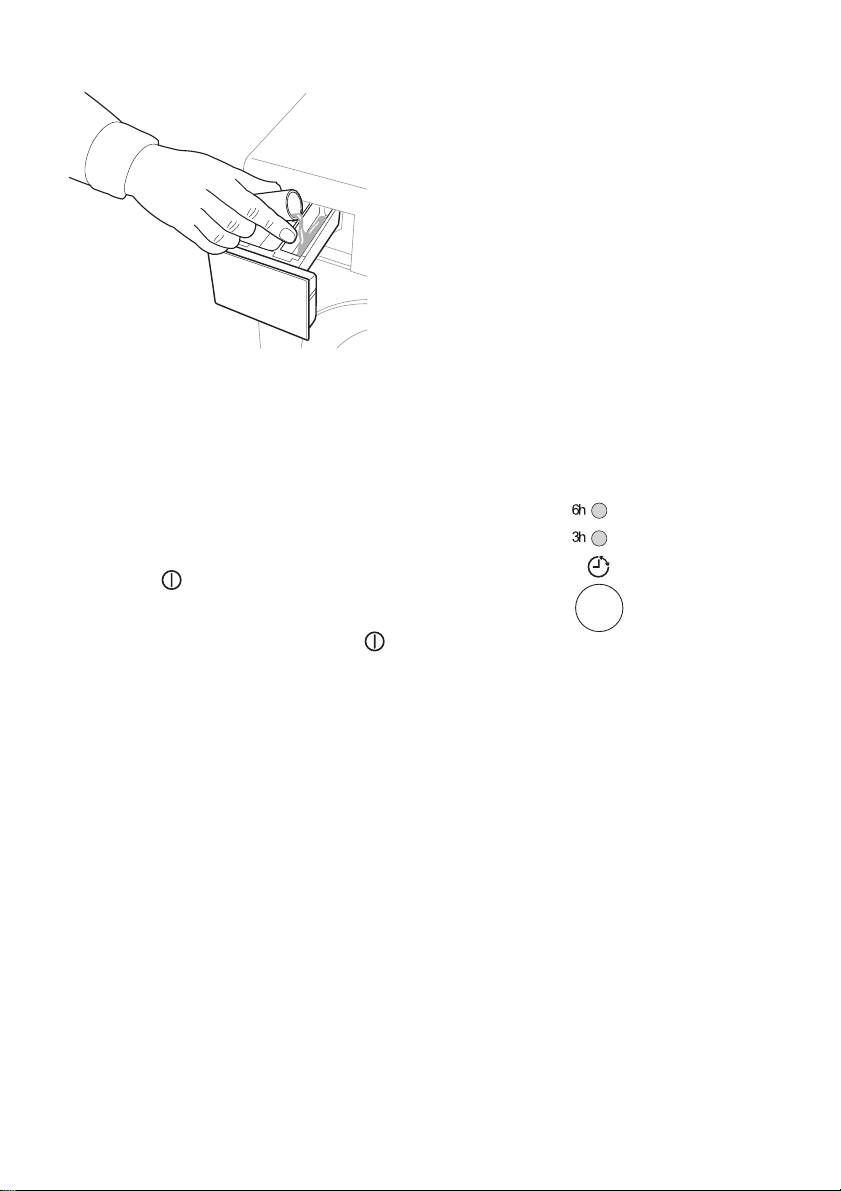
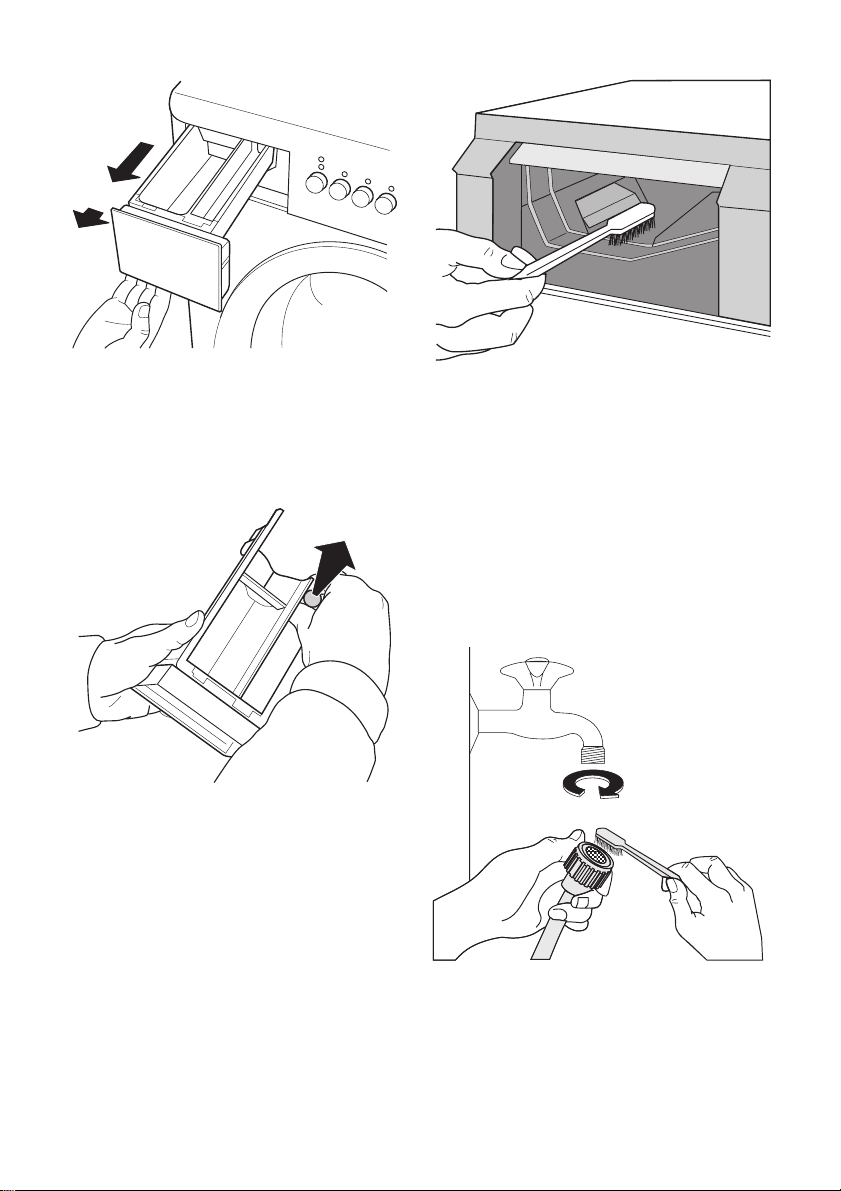
Cleaning the dispenser drawer
The washing powder and additive dispenser
drawer should be cleaned regularly.
1. If necessary, the whole detergent drawer
can be taken out of the machine for
cleaning. You need to pull it firmly outwards, so that it comes free of retaining
stop.
Page 14
14 electrolux
2. To remove the siphon at the inside edge
of the drawer for cleaning, you need to
press it inwards and pull it upwards at the
same time. Flush it out under a tap, to remove any traces of accumulated powder.
When you put it back, press it downwards until you hear a distinct click.
Replace the drawer and run the rinse programme without any clothes in the drum.
Cleaning the water inlet filter
If your water is very hard or contains traces
of lime deposit, the water inlet filter may become clogged. It is therefore a good idea to
clean it from time to time.
Turn off the water tap. Unscrew the water inlet hose. Clean the filter using a hard bristle
brush. Tighten up the inlet hose.
Cleaning the drawer recess
Having removed the drawer, use a small
brush to clean the recess, ensuring that all
washing powder residue is removed from the
upper and lower part of the recess.
The dangers of freezing
If the machine is exposed to temperatures
below 0°C, certain precautions should be
taken.
• Turn off the water supply.
• Unscrew the inlet hose from the supply
tap.
Page 15

electrolux 15
• Select a wash programme, start the machine and let the programme run for a
short time.
• Interrupt the programme by turning the
programme selector to
position.
• Place the end of inlet and drain hoses
down low, into the waste gully (floor drain)
set into the floor. Make sure that the end
of the hose does not go below the water
level in the gully's (drain's) water tap.
What to do if…
Certain problems are due to lack of simple
maintenance or oversights, which can be
solved easily without calling out an engineer.
Before contacting your local Service Centre,
please carry out the checks listed below.
During machine operation it is possible that
the End pilot light blinks to indicate that the
machine is not working:
Problem Possible cause/Solution
The door has not been closed.
•Close the door firmly.
The plug is not properly inserted in the power socket.
• Insert the plug into the power socket.
There is no power at the socket.
• Please check your domestic electrical installation.
The machine does not start:
The machine does not fill:
The machine fills then empties immediately:
The machine does not empty and/or does not spin:
The main fuse has blown.
• Replace the fuse.
The selector dial is not correctly positioned and the button Start has
not been pressed.
• Please turn the selector dial and press the button Start again.
The delay start has been selected.
• If the laundry are to be washed immediately, cancel the delay start.
The water tap is closed.
•Open the water tap.
The inlet hose is squashed or kinked.
• Check the inlet hose connection.
The filter in the inlet hose is blocked.
• Clean the water inlet hose filter.
The door is not properly closed.
•Close the door firmly.
The end of the drain hose is too low.
• Refer to relevant paragraph in «Installation» chapter.
The drain hose is squashed or kinked.
• Check the drain hose connection.
An option or a programme that ends with the water still in the tub or
that eliminates all the spinning phases has been selected.
• Select the draining or spinning programme.
The laundry is not evenly distributed in the drum.
• Redistribute the laundry.
• Select the programme "Drain" and let it run
until it is finished.
•
Turn the programme selector to
position. When you intend to start the machine
up again, make sure that the room temperature is above 0 °C.
The appliance is only to be used and stored
indoors at normal room temperature. The
manufacturer is not responsible for any frost
damage.
• 1 flash: problem with the water supply.
•
2 flashes: problem with the water draining.
•
4 flashes: door open.
Once the problem has been eliminated,
press the button START to restart the programme. If after all checks, the problem persists, contact your local Service Centre.
Page 16

16 electrolux
Problem Possible cause/Solution
Too much detergent or unsuitable detergent (creates too much
foam) has been used.
• Reduce the detergent quantity or use another one.
There is water on the floor:
Unsatisfactory washing results:
The door will not open:
The machine vibrates is
noisy:
Spinning starts late or the
machine does not spin:
No water is visible in the
drum:
Check whether there are any leaks from one of the inlet hose fittings.
It is not always easy to see this as the water runs down the hose;
check to see if it is damp.
• Check the water inlet hose connection.
The drain or inlet hose is damaged.
• Change it with a new one.
Too little detergent or unsuitable detergent has been used.
• Increase the detergent quantity or use another one.
Stubborn stains have not been treated prior to washing.
• Use commercial products to treat the stubborn stains.
The correct temperature was not selected.
• Check if you have selected the correct temperature.
Excessive laundry load.
• Reduce the laundry load.
The programme is still running.
• Wait the end of washing cycle.
The door lock has not been released.
• Wait until the indicator light for door locked has gone out.
There is water in the drum.
• Select drain or spin programme to empty out the water.
The transit bolts and packing have not been removed.
• Check the correct installation of the appliance.
The support feet have not been adjusted
• Check the correct levelling of the appliance.
The laundry is not evenly distributed in the drum.
• Redistribute the laundry.
Maybe there is very little laundry in the drum.
• Load more laundry.
The electronic unbalance detection device has cut in because the
laundry is not evenly distributed in the drum. The laundry is redistributed by reverse rotation of the drum. This may happen several
times before the unbalance disappears and normal spinning can resume. If, after 10 minutes, the laundry is still not evenly distributed
in the drum, the machine will not spin. In this case ,redistribute the
load manually and select the spin programme.
• Redistribute the laundry.
The load is too small.
• Add more items, redistribute the load manually and then select
the spinning programme.
Machines based on modern technology operate very economically
using very little water without affecting performance.
If you are unable to identify or solve the problem, contact our service centre. Before telephoning, make a note of the model, serial
number and purchase date of your machine:
the Service Centre will require this information.
Page 17
electrolux 17
Mod. ... ... ...
Prod. No. ... ... ...
Ser. No. ... ... ...
Technical data
Dimensions Width
Height
Depth
Electrical connection Information on the electrical connection is given on the rating plate,
on the inner edge of the appliance door.
Water supply pressure Minimum
Maximum
Maximum Load Cotton 3 kg
Spin Speed Maximum 1000 rpm (EWC 1050)
49,5 cm
67 cm
51,5 cm
0,05 MPa
0,8 MPa
1300 rpm (EWC 1350)
Consumption values
Programme Energy consumption
White Cottons 90° 1.43 44 ~ 126
Cottons 60° 0.78 44 ~ 107
Cotton 60° ECO
Cotton 40° ECO 0.35 44 ~ 126
Synthetic 40° 0.26 42 ~ 67
Delicate 40° 0.38 45 ~ 61
Hand Wash 30° 0.20 42 ~ 50
Wool 40° 0.35 45 ~ 50
Mini 30° 0.18 35 ~ 30
Rinses 0.03 30 ~ 27
Drain - - ~ 1
Spin - - ~ 5
1) «Cottons Eco» at 60°C with a load of 3 kg is the reference programme for the data entered in the
energy label, in compliance with EEC 92/75 standards.
1)
(KWh)
0.57 39 ~ 130
Water consumption
(litres)
Programme duration
(Minutes)
Page 18
18 electrolux
The consumption data shown on this chart is to be considered purely indicative, as it
may vary depending on the quantity and type of laundry, on the inlet water temperature
and on the ambient temperature.
Installation
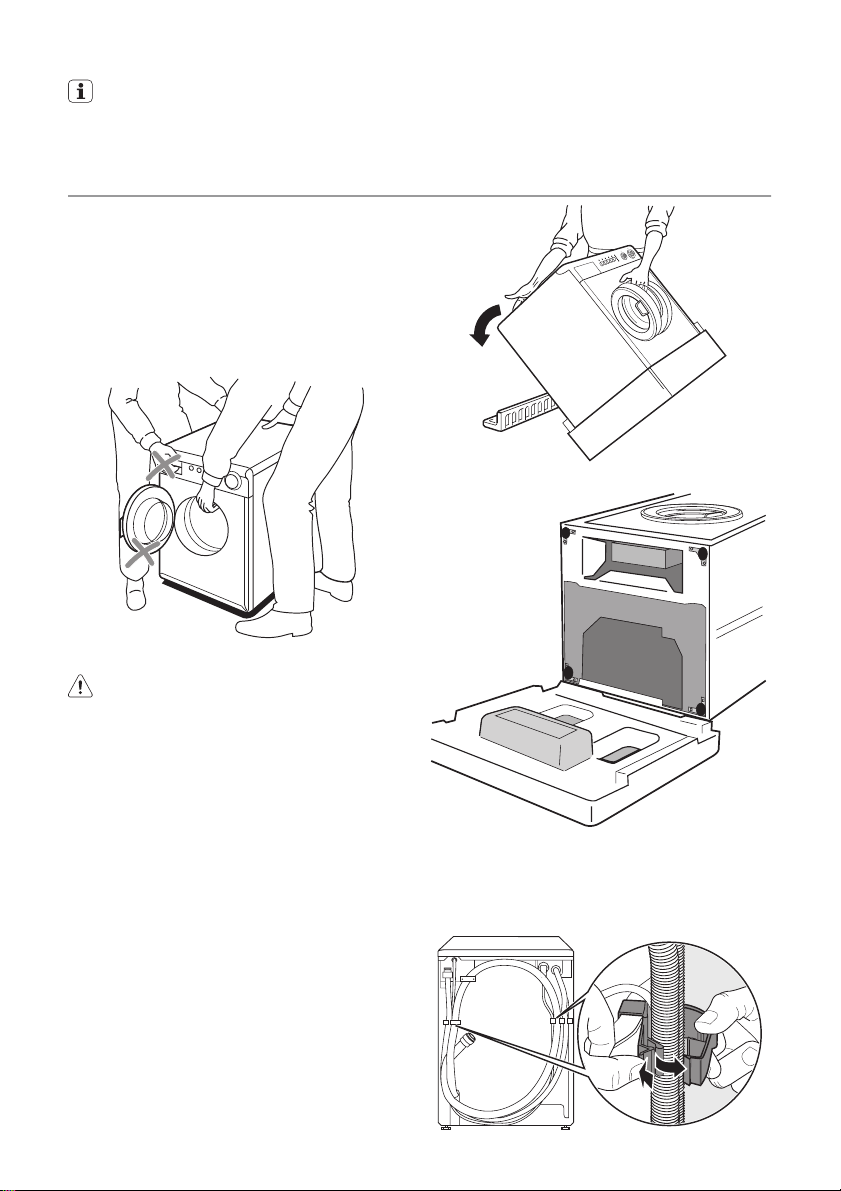
Lifting the machine
Be careful when lifting the machine. Incorrect
methods of lifting can cause physical injuries
and also increase the risk of damage to the
machine. Open the door and take hold of the
top inside of the door opening. You can also
lift the machine by gripping the rear overhang
of the top.
Warning! Never lift the machine by
gripping it’s control panel, door, or
detergent dispenser.
Unpacking
When supplied the washing machine is
packed using a number of locking devices/
packing pieces to prevent drum and motor
from damage in transit All transit bolts and
packing must be removed before using the
appliance.
You are advised to keep all transit devices so
that they can be refitted if the machine ever
has to be transported again.
1. Spread some of the polystyrene packag-
ing materials on the floor behind the machine and then lay the machine carefully
rear side down on them. Make sure that
no hoses are crushed in the process. Remove the polystyrene base and the support bar which the machine rests on.
2. Return machine to it's upright position
and remove the power supply cable and
the draining and inlet hose from the hose
holders on the rear of the appliance.
Page 19
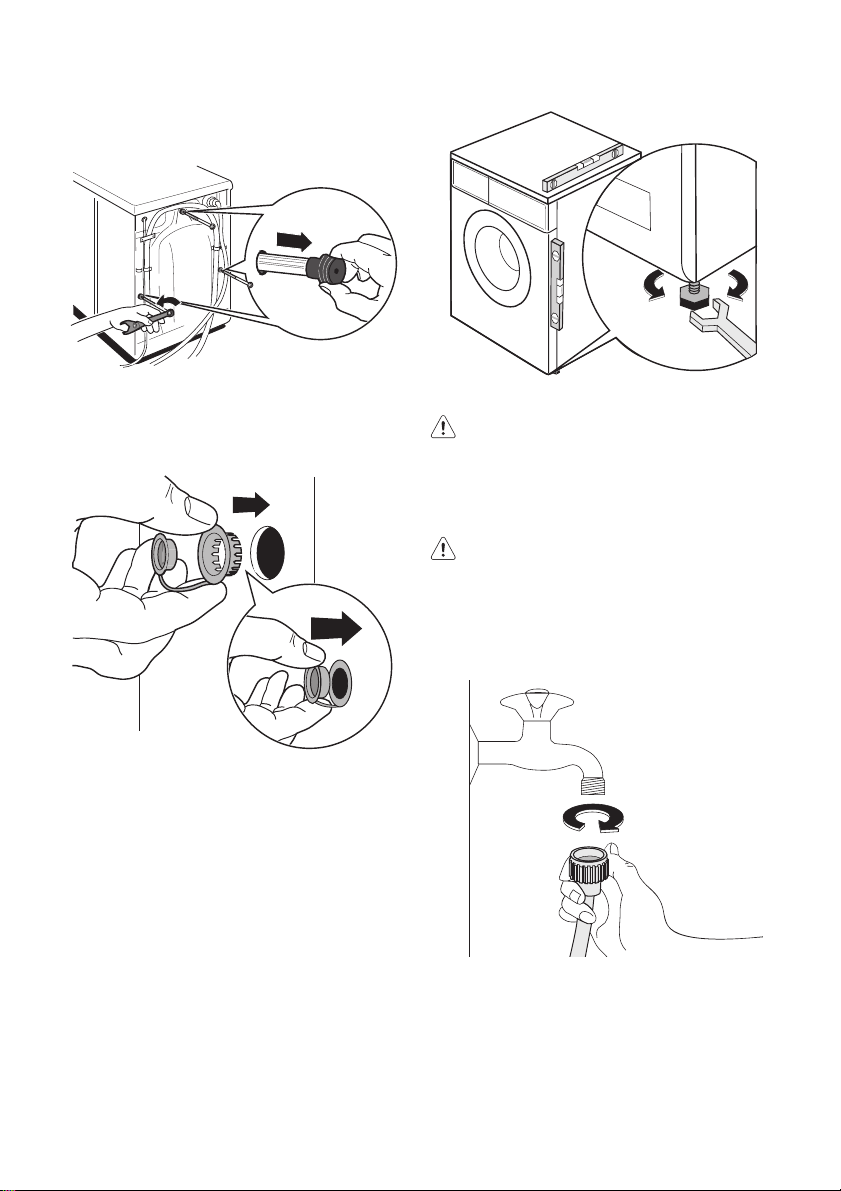
3. With a suitable spanner unscrew and remove the three screws and their spacers
on machine's rear.
4. The three holes must then be plugged
with the plastic plug caps supplied in the
bag containing the instruction booklet,
which can be found inside the drum.
electrolux 19
Caution! Never place cardboard, wood
or similar materials under the machine to
compensate for any unevenness in the
floor.
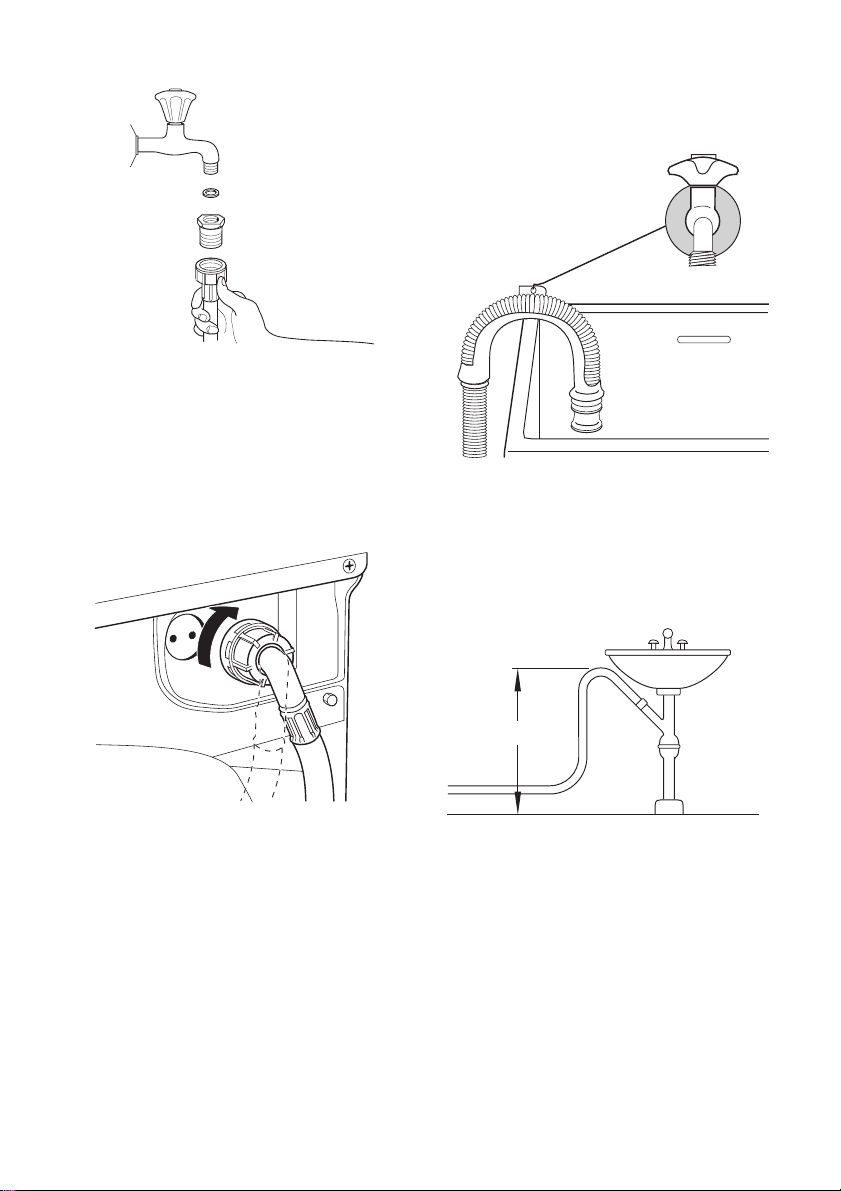
Water inlet
Warning! This appliance must be
connected to a cold water supply.
1. Connect the water inlet hose supplied
with the machine to a tap with a 3/4"
thread. Always use the hose supplied
with the appliance.
Positioning
Install the machine on a flat hard floor. Make
sure that air circulation around the machine
is not impeded by carpets, rugs etc. Check
that the machine does not touch the wall or
furniture. Level the washing machine by raising or lowering the two front feet. If necessary, check the setting with a spirit level. Any
necessary adjustment can be made with a
spanner. Accurate levelling prevents vibration, noise and displacement of the machine
during operation.
If necessary, use the suitable or supplied
restrictor (1/2”).
Page 20
20 electrolux
Important! Do not use the hose from
your previous machine to connect to the
water supply.
2. The machine end of the inlet hose can be
turned in any direction. Set the hose correctly by loosening the ring nut. After positioning the inlet hose, be sure to tighten
the ring nut again to prevent leaks.
Hooked over the edge of a sink using
the plastic hose guide supplied with
the machine.
In this case, make sure the end cannot come
unhooked when the machine is emptying.
This could be done by tying it to the tap with
a piece of string or attaching it to the wall.
In a sink drain pipe with a trap.
The inlet hose must not be lengthened. If it is
too short and you do not wish to move the
tap, you will have to purchase a new, longer
hose specially designed for this type of use.
Important! Before connecting up the
machine to new pipework or to pipework that
has not been used for some time, run off a
reasonable amount of water to flush out any
debris that may have collected in the pipes.
Water drainage
The end of the drain hose can be positioned
in three ways:
650-800 mm
The drain hose can be connected directly into the pipe (e.g. beneath a washtub or sink),
above the water trap. The drain hose must
be arranged so that some part of it’s length
is routed up to a level corresponding to the
top edge of the tub and fixed in place there.
Directly into a drain pipe at a height of not
less than 65 cm and not more than 80 cm.
Their must be an air gap around and below
the end of drain hose. This means that the
internal diameter of the standpipe must be
larger than the outer diameter of the hose.
Page 21
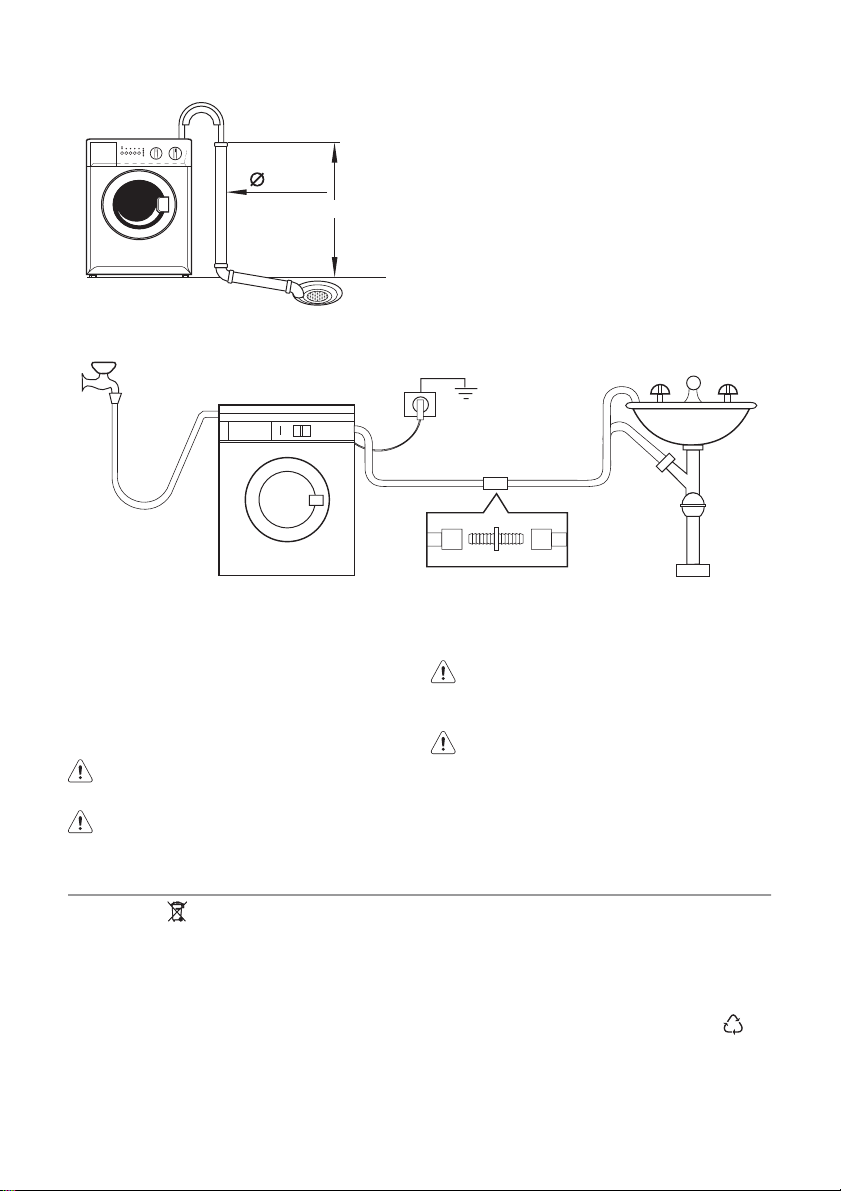
40 mm
650-800 mm
electrolux 21
The hose must not be sticked into the standpipe more than 50 mm and it has to be fixed
in this position. The drain hose must not be
kinked.
The drain hose can be extended up to total
3,5 m. For the extension piece use a hose
with an internal diameter at least as large as
that of the machine's own hose. Use a suitable hose connector.
Information on the electrical connection is
given on the rating plate on the inner edge of
the appliance door.
Check that your domestic electrical installation can take the maximum load required, also taking into account any other appliances
in use.
Connect the machine to an earthed
socket.
The manufacturer does not accept
any responsibility for damage or
Environment concerns
The symbol on the product or on its
packaging indicates that this product may
not be treated as household waste. Instead
it should be taken to the appropriate
collection point for the recycling of electrical
and electronic equipment. By ensuring this
product is disposed of correctly, you will help
prevent potential negative consequences for
the environment and human health, which
could otherwise be caused by inappropriate
waste handling of this product. For more
injury through failure to comply with
the above safety precaution.
The power supply cable must be
easily accessible after installing the
machine.
Should the appliance power supply
cable need to be replaced, this must
be carried out by a Service Centre.
detailed information about recycling of this
product, please contact your local council,
your household waste disposal service or the
shop where you purchased the product.
Packaging materials
The materials marked with the symbol
recyclable.
>PE<=polyethylene
>PS<=polystyrene
>PP<=polypropylene
are
Page 22

22 electrolux
This means that they can be recycled by disposing of them properly in appropriate collection containers.
Ecological hints
To save water, energy and to help protect the
environment, we recommend that you follow
these tips:
• Normally soiled laundry may be washed
without prewashing in order to save detergent, water and time (the environment is
protected too!).
• The machine works more economically if it
is fully loaded.
• With adequate pre-treatment, stains and
limited soiling can be removed; the laundry
can then be washed at a lower temperature.
• Measure out detergent according to the
water hardness, the degree of soiling and
the quantity of laundry being washed.
Page 23

Electrolux. Thinking of you.
Обменяйтесь с нами своими мыслями на
www.electrolux.com
Содержание
Сведения по технике безопасности
Описание изделия 25
Панель управления 26
Перед первым использованием 28
Ежедневное использование 28
Полезные советы 31
Право на изменения сохраняется
Программы мойки 34
Уход и чистка 36
23
Что делать, если ... 38
Технические данные 41
Показатели потребления 41
Установка 42
Охрана окружающей среды 46
Сведения по технике безопасности
ВАЖНО! Внимательно прочитайте и
сохраните для консультаций в будущем.
• Безопасность Вашего прибора соот‐
ветствует действующим промышлен‐
ным стандартам и требованиям зако‐
нодательства в отношении безо‐
пасности приборов. Тем не менее, как
изготовители, мы считаем своим дол‐
гом дать следующие указания по безо‐
пасности.
• Очень важно, чтобы настоящее руко‐
водство хранилось у пользователя ма‐
шины для консультаций в будущем. В
случае продажи или передачи данного
электробытового прибора другому ли‐
цу или, если при переезде на новое
место жительства прибор остается по
старому адресу, обеспечьте передачу
руководства вместе с прибором его
новому владельцу с тем, чтобы он мог
ознакомиться с правилами его
эксплуатации и соответствующими
предупреждениями.
• НЕОБХОДИМО внимательно ознако‐
миться с ними перед тем, как присту‐
пить к установке и эксплуатации ма‐
шины.
• Перед первым включением стираль‐
ной машины проверьте ее на отсут‐
ствие повреждений, вызванных транс‐
портировкой. Никогда не подключайте
к инженерным сетям поврежденную
машину. При обнаружении каких-либо
повреждений обращайтесь к постав‐
щику.
• Если доставка машины произведена
зимой при отрицательных температу‐
рах: Перед первым включением сти‐
ральной машины дайте ей постоять
при комнатной температуре в течение
24 часов.
Общие правила техники безопасности
• Опасно изменять технические харак‐
теристики изделия или каким-либо об‐
разом модифицировать его.
• При стирке с высокой температурой
стекло дверцы может сильно нагре‐
ваться. Не касайтесь его!
• Следите за тем, чтобы домашние жи‐
вотные не забирались в барабан. Что‐
бы избежать этого, проверяйте бара‐
бан перед началом использования ма‐
шины.
• Не допускайте попадания в машину
твердых острых предметов, таких как
монеты, булавки, заколки, винтики,
камни и т.д., так как они могут привести
к ее серьезному повреждению.
• Используйте только рекомендованное
количество смягчителя тканей и мою‐
щего средства. При применении чрез‐
мерного количества моющего сред‐
ства возможно повреждение ткани.
См. рекомендации изготовителя отно‐
сительно количества моющих средств.
electrolux 23
Page 24

24 electrolux
• Мелкие предметы, такие как носки, но‐
совые платки, пояса и т.д., следует по‐
мещать в специальные мешки для
стирки или наволочку, иначе во время
стирки они могут застрять между ба‐
ком и барабаном.
• Не стирайте в машине изделия с пла‐
стинами из китового уса, одежду с не‐
обработанными краями и рваную оде‐
жду.
• После использования и перед чисткой
и техобслуживанием машины всегда
отключайте ее о т электросети и за кры‐
вайте кран подачи воды.
• Ни при каких обстоятельствах не пы‐
тайтесь отремонтировать машину са‐
мостоятельно. Ремонт, выполненный
неопытными лицами, может привести
к серьезной неисправности или трав‐
ме. Обращайтесь в местный сервис‐
ный центр. Всегда настаивайте на ис‐
пользовании оригинальных запчас‐
тей.
Установка
• Этот прибор тяжелый. Будьте осто‐
рожны при его перемещении.
• При распаковке прибора убедитесь в
том, что он не поврежден. В случае
сомнений не пользуйтесь им, а обрат‐
итесь в сервисный центр.
• Перед началом эксплуатации машины
следует удалить всю упаковку и снять
транспортировочные болты. В против‐
ном случае возможно серьезное по‐
вреждение изделия и другого имуще‐
ства. См. соответствующий раздел в
руководстве пользователя.
• После установки прибора убедитесь,
что он не стоит на сливном или налив‐
ном шланге и что верхняя крышка не
прижимает сетевой шнур к стене.
• Если машина устанавливается на ко‐
вровом покрытии, необходимо отрегу‐
лировать ножки таким образом, чтобы
обеспечить свободную циркуляцию
воздуха под машиной.
• После установки обязательно убеди‐
тесь в отсутствии утечки воды из
шлангов и соединительных элемен‐
тов.
• Если прибор установлен в помещении,
температура в котором может опу‐
скаться ниже нуля, ознакомьтесь с
разделом "Опасность замерзания".
• Все сантехнические работы, необхо‐
димые для установки данного прибо‐
ра, должны выполняться квалифици‐
рованным сантехником или компе‐
тентным специалистом.
• Все работы по электрическому под‐
ключению, необходимые для установ‐
ки данного прибора, должны выпол‐
няться квалифицированным электри‐
ком или компетентным специалистом.
Эксплуатация
• Данный прибор предназначен только
для бытового применения. Он не дол‐
жен использоваться в целях, отличных
от тех, для которых он предназначен.
• Стирайте только те изделия, которые
предназначены для машинной стирки.
Следуйте инструкциям, указанным на
этикетке каждой вещи.
• Не перегружайте прибор. См. таблицу
программ стирки.
• Перед стиркой проверьте, чтобы все
пуговицы и застежки-молнии на одеж‐
де были застегнуты, а в карманах ни‐
чего не было. Не стирайте в машине
сильно поношенную или рваную оде‐
жду; удаляйте пятна краски, чернил,
ржавчины и травы перед стиркой. НЕ‐
ЛЬЗЯ стирать в машине бюстгальтеры
с проволочным каркасом.
• Не следует стирать в машине вещи,
испачканные летучими жидкостями
наподобие бензина. Если такие лету‐
чие жидкости использовались для
чистки одежды, необходимо полно‐
стью удалить их с нее перед тем, как
класть вещи в машину.
• Никогда не тяните за кабель, чтобы
вынуть сетевой шнур из розетки; все‐
гда беритесь за саму вилку.
• Ни в коем случае не эксплуатируйте
прибор в случае повреждения сетево‐
го шнура или таких повреждений па‐
нели управления, рабочего стола или
основания, которые открывают доступ
во внутреннюю часть стиральной ма‐
шины.
Безопасность детей
• Данный прибор не предназначен для
эксплуатации лицами (включая детей)
Page 25

electrolux 25
с ограниченными физическими или
сенсорными способностями, с недо‐
статочным опытом или знаниями без
присмотра лица, отвечающего за их
безопасность, или получения от него
соответствующих инструкций, позво‐
ляющих им безопасно эксплуатиро‐
вать прибор.
• Не разрешайте маленьким детям иг‐
могут быть опасными для детей - они
могут стать причиной удушения! Дер‐
жите их вне досягаемости детей.
• Храните все моющие средства в на‐
дежном месте, недоступном для де‐
тей.
• Следите за тем, чтобы дети и домаш‐
ние животные не забирались в бара‐
бан.
рать с машиной
• Упаковочные материалы (например,
полиэтиленовая пленка, пенопласт)
Описание изделия
Ваш новый прибор удовлетворяет всем современным требованиям, предъя‐
вляемым к эффективной стирке белья, при низком расходе воды, энергии и
моющих средств. Новая система стирки обеспечивает полное использование
моющего средства и уменьшает потребление воды, способствуя экономии энер‐
гии.
Вид спереди
1 2
1 Дозатор моющих средств
2 Панель управления
3
4
3 Ручка для открывания дверцы
4 Регулируемые ножки (передние)
Page 26

26 electrolux
Вид сзади
1
1 Стопорные транспортировочные ус‐
тройства
2 Сливной шланг
Дозатор моющих средств
Отделение для порошкового или
жидкого моющего средства, используе‐
мого при основной стирке. При исполь‐
зовании жидкого моющего средства на‐
ливайте его непосредственно перед за‐
пуском программы.
Отделение для жидких добавок (смяг‐
чителя тканей, крахмала).
Смягчитель тканей или добавки для
крахмаления необходимо заливать в от‐
деление дозатора перед запуском про‐
граммы стирки.
2
3
4
3 Электрический шнур
4 Наливной шланг
Моющее средство для предварительной стирки добавляется непосредственно
в барабан.
Панель управления
Селектор программ, селектор скорости отжима, индикаторы хода выполнения
программы и различные кнопки обозначаются во всем дальнейшем тексте на‐
стоящего руководства соответствующими цифрами, указанными ниже.
Page 27

1 2 3 4 5 6 8 97
1 Дозатор моющих средств
2 Кнопка "ЗАДЕРЖКА ПУСКА"
3 Кнопка «ПРЕДВАРИТЕЛЬНАЯ
СТИРКА»
4 Кнопка «БЫСТРАЯ СТИРКА»
5 Кнопка «ДОПОЛНИТЕЛЬНОЕ ПОЛО‐
СКАНИЕ»
6 Кнопка «ПУСК/ПАУЗА»
7 Дисплей хода выполнения програм‐
мы
8 Регулятор снижения скорости отжи‐
ма
9 Переключатель выбора программ
Дозатор моющих средств
Дозатор моющих средств имеет 2 от‐
дельных отсека для моющего средства и
кондиционера для ткани.
Моющее средство для предвари‐
тельной стирки добавляется непос‐
редственно в барабан.
Отсрочка старта
С помощью этой кнопки можно отложить
запуск программы на 6 часов или 3 часа.
Предварительная стирка
При выборе этой функции машина вы‐
полняет предварительную стирку перед
тем, как приступать к основной стирке.
Время стирки будет увеличено. Эта
функция рекомендуется для стирки
сильно загрязненного белья.
electrolux 27
Быстрая стирка
При выборе этой функции время стирки
будет уменьшено приблизительно на 10
минут. Эта функция рекомендуется для
стирки слабозагрязненного белого/цвет‐
ного хлопка и синтетики.
Дополнительное полоскание
Данный прибор разработан для обеспе‐
чения экономии электроэнергии. Если
необходимо прополоскать белье допол‐
нительным количеством воды (дополни‐
тельное полоскание), выберите эту
функцию. Будет выполнено несколько
дополнительных полосканий. Эта функ‐
ция рекомендуется для людей, страдаю‐
щих аллергией на моющие средства, а
также в местностях с очень мягкой во‐
дой.
Старт/Пауза
С помощью этой кнопки можно запустить
или прервать выполнение выбранной
программы.
Дисплей
(A)
(B)
(C)
(D)
(E)
Page 28

28 electrolux
Индикатор A загорается, когда машина
выполняет фазу стирки .
Индикатор B загорается, когда машина
выполняет полоскание .
Индикатор C загорается, когда машина
выполняет отжим .
Индикатор D загорается по окончании
цикла стирки.
Индикатор E указывает, можно ли от‐
крыть дверцу :
• Индикатор включен: невозможно от‐
крыть дверцу.
• Индикатор выключен: дверцу можно
открыть.
• Индикатор включен в мигающем режи‐
ме: дверцу скоро можно будет от‐
крыть.
Регулятор снижения скорости отжима
Поворачивая селектор скорости отжима,
можно изменить скорость отжима в вы‐
бранной программе, либо выбрать функ‐
цию «Остановка с водой в баке» или
«Без отжима».
Перед первым использованием
ВНИМАНИЕ!
Убедитесь в том, что подключение ма‐
шины к электросети, водопроводу и ка‐
нализации выполнено в соответствии с
инструкциями по установке.
ВАЖНО! Извлеките из барабана все
содержимое.
ВАЖНО! Рекомендуется выполнить
программу стирки без белья для
Селектор программ
Селектор программ позволяет выбирать
нужную программу, а также включать и
выключать машину.
Условные обозначения
= Задержка пуска, = Предвари‐
тельная стирка,
= Дополнительное полоскание, =
Пуск/Пауза
= Стирка, = Полоскание, = От‐
жим,
Дверца заблокирована
отжима,
стирка,
грамма 30°,
стирка,
удаления любых загрязнений, которые
могли остаться после процесса
изготовления машины. Залейте
приблизительно 100 мл моющего
средства непосредственно в барабан и
запустите программу стирки при 60°C.
После завершения программы стирки
машина будет готова к эксплуатации.
= Завершение цикла, =
= Остановка с водой в бак е, = Б ез
= Хлопок, = Синтетика,
= Деликатная стирка, = Ручная
= Шерсть, 30 ° = Минипро‐
= ВКЛ/ВЫКЛ
= Быстрая стирка,
= Слив, = Холодная
Ежедневное использование
Загрузка белья
Откройте дверцу, осторожно потянув ее
за ручку. Кладите белье в барабан по од‐
ной вещи, стараясь максимально раз‐
вернуть каждую. Закройте дверцу.
Page 29

Дозирование моющего средства и
смягчителя тканей
Вытяните до упора дозатор моющих
средств. Отмерьте требуемый объем
моющего средства, поместите его в
большее отделение дозатора слева
При наличии такой необходимости по‐
местите смягчитель ткани в меньшее от‐
деление дозатора, помеченное симво‐
лом
(не превышая отметку "MAX").
Осторожно закройте дозатор моющих
средств.
electrolux 29
Выбор нужной программы с помощью
селектора программ (9)
Поверните селектор программ на нуж‐
ную программу. Селектор можно пово‐
рачивать как по часовой, так и против
часовой стрелки.
При этом начнет мигать зеленый инди‐
катор кнопки 6 .
.
На дисплее хода выполнения програм‐
мы загораются индикаторы, соответ‐
ствующие всем фазам выбранной про‐
граммы.
В положении
выполняется отмена
программы и машина выключается.
По окончании программы переключа‐
тель программ необходимо установить в
положение
для выключения машины.
ВАЖНО! Если во время выполнения той
или иной программы вы установите
селектор программ в положение,
соответствующее другой программе,
индикаторы дисплея хода выполнения
программы начнут мигать, указывая на
неправильный выбор. При этом машина
не будет выполнять вновь выбранную
программу.
Выбор скорости отжима, функции
«Остановка с водой в баке» или «Без
отжима» (8)
Скорость отжима и дополнительные
функции «Остановка с водой в баке» или
«Без отжима» выбираются с помощью
регулятора скорости отжима.
• Положение 1300 (или 1000) соответ‐
ствует 900 об/мин в программах стир‐
ки синтетических и шерстяных тканей
Page 30

30 electrolux
и 700 об/мин – в деликатных програм‐
мах стирки белья.
• Положение 500 соответствует 500 об/
мин в программах стирки синтетиче‐
ских и шерстяных тканей и 450 об/мин
– в деликатных программах стирки бе‐
лья.
Остановка с водой в баке
При выборе этой дополнительной функ‐
ции вода после последнего полоскания
не сливается для предотвращения об‐
разования складок на белье. По оконча‐
нии программы включаются индикаторы
«Конец» и «Дверца заблокирована», ука‐
зывая, что необходимо слить воду (см.
раздел «По окончании программы»).
Без отжима
При выборе этой функции все этапы от‐
жима отменяются. Ее следует использо‐
вать для стирки особо деликатных тка‐
ней. Машина добавит несколько допол‐
нительных полосканий в программах для
стирки тканей из хлопка и синтетики.
Максимальная скорость отжима, допу‐
стимая для каждой программы, указана
в разделе Программы стирки .
Выбор дополнительной функции
"Отсрочка старта" с помощью кнопки 2
Если вы хотите отложить старт, перед
запуском программы нажимайте кнопку
2 до тех пор, пока на дисплее не высве‐
тится нужное время отсрочки. Загорится
соответствующий индикатор.
Эту функцию необходимо выбирать по‐
сле установки программы, но до нажатия
кнопки 6 .
Вы можете отменить или изменить вре‐
мя отсрочки старта в любой момент до
нажатия кнопки 6 .
Отмена отсрочки старта после нажатия
кнопки 6 :
1. Переведите стиральную машину в
режимы ПАУЗЫ, нажав кнопку 6 .
2. Нажмите один раз кнопку 2 , при этом
индикатор, соответствующий вы‐
бранной отсрочке, погаснет.
3. Снова нажмите кнопку 6 для начала
выполнения программы.
ВАЖНО! Заданное значение отсрочки
старта можно изменить только после
повторного выбора программы стирки.
В режиме отложенного старта дверца
машины остается заблокированной (го‐
рит индикатор блокирования дверцы).
Выбрать функцию "Отсрочка старта" не‐
льзя , если выбрана программа СЛИВ
или ОТЖИМ .
Выбор нужной функцию с помощью
кнопок 3, 4 и 5
В зависимости от программы возможно
сочетание различных функций. Их сле‐
дует выбирать после выбора нужной
программы и до нажатия кнопки 6. При
этом загорится соответствующий инди‐
катор.
При выборе ошибочной функции соот‐
ветствующий индикатор мигает в тече‐
ние примерно 2 секунд. О совместимо‐
сти различных дополнительных функций
с теми или иными программами стирки
см. в разделе "Программы стирки" .
Запуск программы нажатием кнопки 6
Нажмите эту кнопку для начала выпол‐
нения выбранной программы; соответ‐
ствующий индикатор перестанет мигать
и загорится постоянным светом.
На дисплее хода выполнения програм‐
мы загорятся индикаторы A и E , указы‐
вая, что машина начала работу и ее
дверца заблокирована.
Page 31

electrolux 31
Изменение дополнительной функции
или текущей программы
Любые функции можно изменить до то‐
го, как программа приступит к их выпол‐
нению.
Перед внесением в программу любых
изменений необходимо перевести сти‐
ральную машину в режим паузы, нажав
кнопку 6 .
Пока не была нажата кнопка 6 , в про‐
грамм у мо жно в носи ть из мене ния. Изме ‐
нить выполняемую программу можно
только путем ее отмены. Для этого по‐
верните селектор программ на
тем - на новую программу. Запустите эту
программу, снова нажав кнопку 6 .
Прерывание программы
Для прерывания выполняемой програм‐
мы нажмите кнопку 6 , при этом начнет
мигать соответствующий индикатор. Для
возобновления выполнения программы
нажмите эту кнопку еще раз.
Отмена программы
Поверните селектор программ в положе‐
ние
для отмены выполняемой про‐
граммы. Теперь можно выбрать новую
программу.
Открывание дверцы после начала
выполнения программы
Сначала переведите машину в режим
паузы, нажав кнопку 6 .
Через несколько минут дверцу можно бу‐
дет открыть при выполнении следующих
условий:
• Температура воды ниже 55°C.
• Уровень воды не превышает нижний
край дверцы.
• Барабан не вращается.
, а за‐
Если дверца не открывается, но крайне
необходимо открыть ее, вам придется
выключить машину, повернув селектор
программ на
дверцу можно будет открыть
(Обратите внимание на уровень воды и
температуру!)
После выполнения этой процедуры не‐
обходимо снова установить нужную про‐
гр ам му и ф ун кц ии , а за те м н аж ат ь к но пк у
6 .
Окончание программы
Машина останавливается автоматиче‐
ски.
Горит индикатор D , указывая, что вы‐
полнение программы завершено. Инди‐
катор E гаснет, можно открывать дверцу
и вынимать белье.
Если по окончании программы в баке ос‐
талась вода (когда выбрана функция
"Остановка с водой в баке"), для ее сли‐
ва выполните следующие действия :
•
поверните селектор программ на
• выберите программу "Слив" или "От‐
жим"
•нажмите кнопку 6
Когда индикатор E погаснет, можно от‐
крывать дверцу и вынимать белье.
По окончании цикла стирки селектор
программ следует вернуть в положение
, чтобы выключить машину.
Достаньте белье из барабана и тщатель‐
но проверьте, чтобы барабан был пуст.
Если стирать больше не будете, закрой‐
те кран подачи воды.
Оставьте дверцу открытой для предот‐
вращения образования плесени и непри‐
ятных запахов.
. Через несколько минут
Полезные советы
Сортировка белья
Руководствуйтесь символами на этикет‐
ке каждой вещи и инструкциями по стир‐
ке, данными изготовителями. Рассорти‐
руйте белье следующим образом: белое
белье, цветное белье, синтетика, дели‐
катное белье, изделия из шерсти.
Page 32

32 electrolux
Выбор температуры
для белого хлопчатобумаж‐
ного и льняного белья сред‐
95° или 90°
60°/50°
40°-30°- Хо‐
лодная стир‐
ка
ней степени загрязненности
(кухонных и столовых ска‐
тертей, полотенец, просты‐
ней и т. п.)
для нелиняющего цветного
белья обычной степени за‐
грязненности (например, ру‐
башек, ночных рубашек, пи‐
жам...) из льняных, хлопча‐
тобумажных или синтетиче‐
ских тканей и для слабоз‐
агрязненного хлопчатобу‐
мажного белого белья (на‐
пример, нижнего белья)
для деликатных вещей (на‐
пример, занавесей), сме‐
шанного белья, включающе‐
го синтетику и шерстяные
изделия с этикеткой "новая
шерсть, стирается в маши‐
не, не садится"
Перед загрузкой белья
Никогда не стирайте вместе белое и
цветное белье. Во время стирки белое
белье может потерять свою белизну.
Новое цветное белье может полинять
при первой стирке; поэтому в первый раз
его следует стирать отдельно.
Убедитесь, что в белье не осталось ме‐
таллических предметов (например, зако‐
лок, шпилек, булавок).
Застегните наволочки и молнии, крючки
и кнопки. Завяжите ремешки или длин‐
ные ленты.
Перед стиркой удалите стойкие пятна.
Протрите особо загрязненные участки
специальным моющим средством или
чистящей пастой.
С особой осторожностью обращайтесь с
занавесями. Снимите крючки или зав‐
яжите занавески в мешок или сетку.
Максимальная загрузка
Рекомендованные значения загрузки
приведены в таблице программ.
Общие правила:
• Хлопок, лен: полностью загрузить ба‐
рабан бельем, но не утрамбовывать
его;
• Легкая глажка: загрузить барабан
бельем не более, чем наполовину;
• Деликатные ткани и шерсть: загрузить
барабан бельем не более, чем на одну
треть.
Максимальная загрузка позволяет на‐
иболее эффективно использовать воду
и электроэнергию.
Для сильнозагрязненного белья умень‐
шайте загрузку.
Вес белья
См. ориентировочные значения веса:
См. ориентировочные значения веса:
купальный халат 1200 г
пододеяльник 700 г
толстая мужская рубашка 600 г
простыня, мужская пижама 500 г
скатерть 250 г
наволочка, махровое поло‐
тенце, ночная рубашка,
мужская рубашка
кухонное полотенце, жен‐
ские трусы, салфетки, блуз‐
ки, мужские трусы
200 г
100 г
Выведение пятен
Некоторые пятна могут не отстираться
только водой и моющим средством. По‐
этому рекомендуется обработать их пе‐
ред стиркой.
Кровь: промойте свежие пятна холодной
водой. Засохшие пятна следует замо‐
чить на ночь со специальным моющим
средством, затем потереть их в мыльном
растворе.
Масляные краски: смочите пятновыво‐
дителем на бензиновой основе, положи‐
те вещь на мягкую подстилку и промо‐
кните пятно; выполните обработку не‐
сколько раз.
Засохшие жирные пятна: смочите скипи‐
даром, положите вещь на мягкую под‐
стилку и кончиками пальцев промокните
пятно с помощью хлопчатобумажного
тампона.
Ржавчина: используйте растворенную в
горячей воде щавелевую кислоту или
специальное средство для выведения
пятен ржавчины в холодном виде. Будь‐
те осторожны со старыми пятнами ржав‐
чины, так как структура целлюлозы под
ними повреждена, и ткань может по‐
рваться.
Page 33

electrolux 33
Пятна плесени: обработайте отбелива‐
телем и тщательно сполосните (только
для белого и цветного белья, устойчиво‐
го к хлору).
Травяные пятна: слегка обработайте
мылом, а затем отбеливателем (только
для белого и цветного белья, устойчиво‐
го к хлору).
Шариковая ручка и клей: смочите ацето‐
2)
ном
полож ите вещь на м ягку ю под стил ‐
ку и промокните пятно.
Губная помада: смочите ацетоном, как
указано выше, затем обработайте пятно
денатуратом. Обработайте оставшиеся
следы отбеливателем.
Красное вино: замочите с моющим сред‐
ством, прополощите и обработайте ук‐
сусной или лимонной кислотой, затем
еще раз прополощите. Обработайте ос‐
тавшиеся следы отбеливателем.
Чернила: в зависимости от состава чер‐
нил сначала смочите пятно ацетоном
затем уксусной кислотой; обработайте
оставшиеся на белой ткани следы с по‐
мощью отбеливателя, а затем тщатель‐
но прополощите ее.
Пятна смолы: сначала обработайте пят‐
новыводителем, денатуратом или бен‐
зином, затем потрите, используя чистя‐
щую пасту.
Моющие средства и добавки
Хорошие результаты стирки также зави‐
сят от выбора моющего средства и пра‐
вильности его дозировки, это способ‐
ствует предотвращению излишнего за‐
грязнения окружающей среды.
Несмотря на свою биоразлагаемость,
моющие средства содержат вещества,
которые при попадании в окружающую
среду в большом количестве могут на‐
рушить хрупкое равновесие в природе.
Выбор моющего средства зависит от ти‐
па ткани (тонкие деликатные ткани,
шерсть, хлопок и т.д.), цвета, температу‐
ры стирки и степени загрязненности.
В данной стиральной машине можно ис‐
• стиральные порошки для изделий из
деликатных тканей (макс. температу‐
ра 60°C) и шерсти
• жидкие моющие средства, предпочти‐
тельные для низкотемпературных
программ стирки (макс. температура
60°C) для всех типов тканей или спе‐
циально предназначенные для стирки
шерстяных изделий.
Моющие средства и добавки следует по‐
мещать в соответствующие отделения
дозатора моющих средств перед нача‐
лом выполнения программы стирки.
Моющее средство для предвари‐
тельной стирки добавляется непос‐
редственно в барабан.
При использовании жидких моющих
средств необходимо выбирать програм‐
му без предварительной стирки. Нали‐
вайте жидкое моющее средство в отде‐
2)
ление для моющих средств непосред‐
,
ственно перед запуском программы.
Стиральная машина оборудована систе‐
мой рециркуляции, обеспечивающей оп‐
тимальное использование концентриро‐
ванных моющих средств.
При дозировке моющих средств и доба‐
вок руководствуйтесь указаниями изго‐
товителя и не превышайте отметку
"MAX" на стенке дозатора .
Степень жесткости воды
Жесткость воды измеряется в так назы‐
ваемых градусах жесткости. Информа‐
цию о жесткости воды в вашем районе
можно получить в службе водоснабже‐
ния или от местных органов власти.
Смягчитель воды следует доба‐
влять при стирке в воде со средней
и высокой жесткостью (начиная со
степени жесткости II). Следуйте ука‐
заниям изготовителя. После этого
моющее средство можно дозиро‐
вать согласно степени жесткости во‐
ды I (= мягкая вода).
пользовать все обычно имеющиеся в
продаже моющие средства для машин‐
ной стирки:
• стиральные порошки для всех типов
тканей
2) не используйте ацетон для чистки изделий из искусственного шелка
Page 34

34 electrolux
Степень жесткости
воды
Уро‐
вень
1 мягкая 0-7 0-15
2 средняя 8-14 16-25
3 жесткая 15-21 26-37
Тип
по немец‐
кой шка‐
ле (°dH)
Программы мойки
Программа/Темпера‐
тура
ХЛОПОК
90°
ХЛОПОК ЭКОН. (E)
60°
ХЛОПОК
60° - 30°
Тип ткани
Белый хлопок (силь‐
но- и среднезагряз‐
ненные хлопчатобу‐
мажные ткани)
Белая хлопчатобу‐
мажная ткань, эконо‐
мичный режим стир‐
ки
(Эту программу мож‐
но выбирать для
стирки изделий из
хлопка обычной или
слабой степени за‐
грязнения. Время
стирки будет увели‐
чено, а температура
воды при стирке - по‐
нижена. Это позво‐
лит получить хоро‐
ший результат при
экономии энергии.)
Цветной хлопок (из‐
делия из хлопчатобу‐
мажной ткани обы‐
чной степени загряз‐
нения)
по фран‐
цузской
шкале
(°T.H.)
Уро‐
вень
4 очень
Дополнительные
СНИЖЕНИЕ СКОРО‐
СТИ ОТЖИМА / БЕЗ
ОТЖИМА / ОСТА‐
НОВКА С ВОДОЙ В
БАКЕ
ЗАДЕРЖКА ПУСКА
ПРЕДВАРИТЕЛЬ‐
НАЯ СТИРКА
БЫСТРАЯ СТИРКА
ДОПОЛНИТЕЛЬНОЕ
ПОЛОСКАНИЕ
СНИЖЕНИЕ СКОРО‐
СТИ ОТЖИМА / БЕЗ
ОТЖИМА / ОСТА‐
НОВКА С ВОДОЙ В
БАКЕ
ЗАДЕРЖКА ПУСКА
ПРЕДВАРИТЕЛЬ‐
НАЯ СТИРКА
ДОПОЛНИТЕЛЬНОЕ
ПОЛОСКАНИЕ
СНИЖЕНИЕ СКОРО‐
СТИ ОТЖИМА / БЕЗ
ОТЖИМА / ОСТА‐
НОВКА С ВОДОЙ В
БАКЕ
ЗАДЕРЖКА ПУСКА
ПРЕДВАРИТЕЛЬ‐
НАЯ СТИРКА
БЫСТРАЯ СТИРКА
ДОПОЛНИТЕЛЬНОЕ
ПОЛОСКАНИЕ
Тип
жесткая
функции
Степень жесткости
воды
по немец‐
кой шка‐
ле (°dH)
> 21 > 37
Описание програм‐
Основная стирка
Полоскание
Продолжительный
отжим при макс.
1300/1000 об/мин
Макс. загрузка 3 кг
1)
Основная стирка
Полоскание
Продолжительный
отжим при макс.
1300/1000 об/мин
Макс. загрузка 3 кг
Основная стирка
Полоскание
Продолжительный
отжим при макс.
1300/1000 об/мин
Макс. загрузка 3 кг
1)
по фран‐
цузской
шкале
(°T.H.)
мы
Page 35

electrolux 35
Программа/Темпера‐
тура
ХЛОПОК ЭКОН. (E)
40°
СИНТЕТИКА
40°-30°
ДЕЛИКАТНАЯ СТИР‐
КА
40°
РУЧНАЯ СТИРКА
30°
ШЕРСТЬ
40° - ХОЛОДНАЯ
СТИРКА
МИНИ
30°
Тип ткани
Экономичная про‐
грамма стирки изде‐
лий из цветной хлоп‐
чатобумажной ткани
(программа «хлопок,
экономичный ре‐
жим». см. раздел
«Хлопок 60° ЭКОН.»)
Изделия из синтети‐
ческих или смешан‐
ных тканей: нижнее
белье, цветное
белье, сорочки без
усадки, блузки.
Изделия из деликат‐
ных тканей: акрила,
вискозы, полиэфир‐
ных волокон.
Специальная про‐
грамма для стирки
вещей, требующих
бережного обраще‐
ния, с символом
«ручная стирка».
Программа стирки
для шерстяных изде‐
лий, пригодных для
машинной стирки.
Для слабозагрязнен‐
ных изделий или для
освежения.
Дополнительные
функции
СНИЖЕНИЕ СКОРО‐
СТИ ОТЖИМА / БЕЗ
ОТЖИМА / ОСТА‐
НОВКА С ВОДОЙ В
БАКЕ
ЗАДЕРЖКА ПУСКА
ПРЕДВАРИТЕЛЬ‐
НАЯ СТИРКА
ДОПОЛНИТЕЛЬНОЕ
ПОЛОСКАНИЕ
СНИЖЕНИЕ СКОРО‐
СТИ ОТЖИМА / БЕЗ
ОТЖИМА / ОСТА‐
НОВКА С ВОДОЙ В
БАКЕ
ЗАДЕРЖКА ПУСКА
ПРЕДВАРИТЕЛЬ‐
НАЯ СТИРКА
БЫСТРАЯ СТИРКА
ДОПОЛНИТЕЛЬНОЕ
ПОЛОСКАНИЕ
СНИЖЕНИЕ СКОРО‐
СТИ ОТЖИМА / БЕЗ
ОТЖИМА / ОСТА‐
НОВКА С ВОДОЙ В
БАКЕ
ЗАДЕРЖКА ПУСКА
ПРЕДВАРИТЕЛЬ‐
НАЯ СТИРКА
ДОПОЛНИТЕЛЬНОЕ
ПОЛОСКАНИЕ
СНИЖЕНИЕ СКОРО‐
СТИ ОТЖИМА / БЕЗ
ОТЖИМА / ОСТА‐
НОВКА С ВОДОЙ В
БАКЕ
ЗАДЕРЖКА ПУСКА
СНИЖЕНИЕ СКОРО‐
СТИ ОТЖИМА / БЕЗ
ОТЖИМА / ОСТА‐
НОВКА С ВОДОЙ В
БАКЕ
ЗАДЕРЖКА ПУСКА
СНИЖЕНИЕ СКОРО‐
СТИ ОТЖИМА / БЕЗ
ОТЖИМА / ОСТА‐
НОВКА С ВОДОЙ В
БАКЕ
ЗАДЕРЖКА ПУСКА
Описание програм‐
мы
Основная стирка
Полоскание
Продолжительный
отжим при макс.
1300/1000 об/мин
Макс. загрузка 3 кг
Основная стирка
Полоскание
Короткий отжим при
макс. 900 об/мин
Макс. загрузка 1,5 кг
Основная стирка
Полоскание
Короткий отжим при
макс. 700 об/мин
Макс. загрузка 1,5 кг
Основная стирка
Полоскание
Короткий отжим при
макс. 900 об/мин
Макс. загрузка 1 кг
Основная стирка
Полоскание
Короткий отжим при
макс. 900 об/мин
Макс. загрузка 1 кг
Основная стирка
Полоскание
Короткий отжим при
макс. 700 об/мин
Макс. загрузка 1,5 кг
Page 36

36 electrolux
Программа/Темпера‐
тура
ПОЛОСКАНИЕ
СЛИВ
ОТЖИМ
/ ВЫКЛ
1) При выборе этой функции рекомендуется уменьшить максимальную загрузку.
Рекомендованная загрузка для хлопчатобумажных тканей составляет 2 кг.
Тип ткани
С помощью этой про‐
граммы можно вы‐
полнять полоскание
и отжим изделий из
хлопка, выстиранных
вручную. Машина вы‐
полняет 3 полоска‐
ния, за которыми сле‐
дует заключитель‐
ный продолжитель‐
ный отжим. Скорость
отжима можно умень‐
шить.
Используется для
слива воды из маши‐
ны после последнего
полоскания в про‐
граммах с выбранной
функцией «Останов‐
ка с водой в баке».
Отдельный отжим,
выполняемый для из‐
делий, выстиранных
вр учн ую, и по о кон ча‐
нии программ с функ‐
цией «Остановка с
водой в баке». Можно
выбрать скорость от‐
жима в соответствии
с типом белья, повер‐
нув регулятор скоро‐
сти отжима.
Для отмены програм‐
мы или выключения
машины
Дополнительные
функции
СНИЖЕНИЕ СКОРО‐
СТИ ОТЖИМА / БЕЗ
ОТЖИМА / ОСТА‐
НОВКА С ВОДОЙ В
БАКЕ
ДОПОЛНИТЕЛЬНОЕ
ПОЛОСКАНИЕ
СНИЖЕНИЕ СКОРО‐
СТИ ОТЖИМА
Описание програм‐
Полоскание
Продолжительный
отжим при макс.
1300/1000 об/мин
Макс. загрузка 3 кг
Слив воды
Макс. загрузка 3 кг
Слив воды и продол‐
жительный отжим
Макс. скорость отжи‐
ма 1300/1000 об/мин
Макс. загрузка 3 кг
мы
Уход и чистка
ВАЖНО! Прежде чем приступать к
каким-либо операциям по чистке или
уходу, ОТКЛЮЧИТЕ прибор от
электрической сети.
Удаление накипи
Используемая нами вода обычно содер‐
жит соли кальция. Поэтому рекомен‐
дуется периодически использовать в ма‐
шине порошок для смягчения воды. Вы‐
полняйте такую операцию не во время
стирки и в соответс твии с указаниями из‐
готовителя смягчающего порошка. Это
поможет предотвратить образование из‐
вестковых отложений.
Профилактическая стирка
Выполнение стирки с низкой температу‐
рой может привести к скоплению остат‐
ков внутри барабана.
Мы рекомендуем регулярно выполнять
так называемую профилактическую
стирку.
При выполнении профилактической
стирки:
• В барабане не должно быть белья.
Page 37

• Выберите программу стирки хлопка с
наиболее высокой температурой.
• Используйте обычное количество
моющего средства; им должен быть
стиральный порошок с биологически‐
ми свойствами.
Чистка снаружи
Мойте корпус прибора снаружи только
водой с мылом, затем насухо протрите
его.
Чистка дозатора моющих средств
Дозатор моющих средств и добавок сле‐
дует регулярно чистить.
1. При необходимости очистки дозатор
моющих средств может быть извле‐
чен из машины целиком. Для этого
необходимо сильно потянуть его на‐
ружу, чтобы освободить от стопора.
electrolux 37
Чистка отсека для дозатора моющих
средств
После снятия дозатора с помощью ма‐
ленькой щетки прочистите отсек, в кото‐
ром он находился, тщательно удалив
все остатки моющих средств из его верх‐
ней и нижней части.
2. Чтобы снять для чистки сифон, рас‐
положенный у внутренней кромки до‐
затора, необходимо прижать его
внутрь и одновременно потянуть
вверх. Промойте его под краном, что‐
бы уда лить все о стат ки ско пив шего ся
в нем порошка. При обратной уста‐
новке дозатора прижимайте его вниз,
пока не услышите щелчок.
Установите дозатор на место и выпол‐
ните программу полоскания без белья в
барабане.
Чистка фильтра наливного шланга
Если вода очень жесткая и содержит со‐
ли кальция, фильтр наливного шланга
машины может засориться. Поэтому его
рекомендуется периодически чистить.
Закройте кран подачи воды. Открутите
наливной шланг. Прочистите фильтр
жесткой щеткой. Прикрутите на место
наливной шланг.
Page 38

38 electrolux
Опасность замерзания
Если температура в помещении, в кото‐
ром установлена машина, может опу‐
ститься ниже 0°C, следует предпринять
соответствующие меры предосторожно‐
сти.
• Закройте кран подачи воды.
• Открутите наливной шланг.
• Выберите программу стирки, включи‐
те машину и дайте программе порабо‐
тать в течение короткого времени.
• Остановите программу, повернув се‐
лектор программ в положение
• Опустите концы наливного и сливного
шлангов глубоко в водосток, проло‐
женный под полом (в сливное отвер‐
стие в полу). Следите за тем, чтобы
конец шланга не опускался ниже уров‐
ня воды в водостоке (сливном отвер‐
стии).
• Выберите программу "Слив" и подо‐
ждите, пока она завершится.
• Установите регулятор выбора про‐
грамм в положение
щем включении машины убедитесь,
что температура окружающей среды
выше 0°C.
Эксплуатация и хранение стиральной
машины допускается только в помеще‐
ниях при нормальной комнатной темпе‐
ратуре. Изготовитель не несет ответ‐
ственности за повреждения, вызванные
воздействием низких температур.
. При следую‐
.
Что делать, если ...
Некоторые неисправности, вызванные
отсутствием простого ухода или недо‐
смотром, можно легко устранить самим,
не обращаясь в сервисный центр. Перед
тем, как обращаться в местный автори‐
зованный сервисный центр, пожалуйста,
выполните указанные ниже проверки.
Во время эксплуатации машины может
замигать индикатор Конец , информи‐
рующий о том, что машина не работает:
• 1 раз: неисправность подачи воды.
• 2 раза: неисправность слива воды.
• 4 раза: открыта дверца.
Устранив причину неисправности, на‐
жмите кнопку СТАРТ/ПАУЗА для возоб‐
новления выполнения программы. Если
после всех проверок неисправность ос‐
тается, обратитесь в авторизованный
сервисный центр.
Page 39

Неполадка Возможная причина/способ устранения
Машина не включается:
Машина не заполняется во‐
дой:
Машина наполняется водой,
и сразу же производится
слив:
Машина не выполняет слив
и/или отжим:
Вода на полу:
electrolux 39
Дверца не закрыта.
• Плотно закройте дверцу.
Вилка вставлена в розетку питания неверно.
• Вставьте вилку в розетку.
В розетке отсутствует напряжение.
• Проверьте свою домашнюю электрическую сеть.
Перегорел предохранитель на главном распределительном
щите.
• Замените предохранитель.
Переключатель программ установлен в неверное положение,
и не нажата кнопка «Пуск».
• Поверните переключатель программ и снова нажмите кноп‐
ку «Пуск».
Выбрана задержка пуска.
• Чтобы начать стирку белья немедленно, отмените задерж‐
ку пуска.
Закрыт водопроводный вентиль.
• Откройте водопроводный вентиль.
Наливной шланг передавлен или сильно перегнут.
• Проверьте подсоединение наливного шланга.
Засорен фильтр в наливном шланге.
• Прочистите фильтр наливного шланга.
Неплотно закрыта дверца.
• Плотно закройте дверцу.
Конец сливного шланга расположен слишком низко.
• См. соответствующий параграф в разделе «Установка».
Сливной шланг передавлен или сильно перегнут.
• Проверьте правильность подсоединения сливного шланга.
Выбрана программа или дополнительная функция, по окон‐
чании которой в баке остается вода или в которой исключена
фаза отжима.
• Выберите программу «Слив» или «Отжим».
Белье неравномерно распределено в барабане.
• Перераспределите белье в барабане.
Использовано слишком много моющего средства или непод‐
ходящее средство (вызывающее избыточное пенообразова‐
ние).
• Уменьшите количество моющего средства или используйте
моющее средство другого типа.
Проверьте, нет ли утечек в соединительных деталях налив‐
ного шланга. Утечка воды из шланга не всегда заметна ви‐
зуально; проверьте, не намок ли он.
• Проверьте подсоединение наливного шланга.
Поврежден сливной или наливной шланг.
• Замените его новым.
Page 40

40 electrolux
Неполадка Возможная причина/способ устранения
Слишком мало моющего средства, или использованное сред‐
ство не подходит для данной машины.
• Увеличьте количество моющего средства или используйте
моющее средство другого типа.
Неудовлетворительные ре‐
зультаты стирки:
Дверца не открывается:
Машина вибрирует или шу‐
мит:
Отжим начинается с опозда‐
нием или не выполняется
вообще:
Не видно воды в машине
Стойкие пятна не были обработаны перед стиркой.
• Используйте имеющиеся в продаже средства для выведе‐
ния стойких пятен.
Задана неподходящая температура.
• Проверьте, правильно ли задана температура.
Слишком большая загрузка.
• Следует уменьшить количество загружаемого белья.
Выполнение программы не закончено.
• Дождитесь завершения цикла стирки.
Не сработала система снятия блокировки дверцы.
• Дождитесь выключения индикатора блокировки дверцы.
Вода в барабане.
• Выберите программу слива или отжима, чтобы слить воду.
Не сняты транспортировочные болты и элементы упаковки.
• Проверьте правильность установки машины.
Не отрегулирована высота ножек
• Проверьте правильность установки устройства в горизо‐
нтальной плоскости.
Белье неравномерно распределено в барабане.
• Перераспределите белье в барабане.
Возможно, в барабане слишком мало белья.
• Загрузите больше белья.
Сработало электронное устройство контроля дисбаланса изза неравномерного распределения белья в барабане. Белье
перераспределено равномерно в результате вращения бара‐
бана в обратном направлении. Это может происходить не‐
сколько раз до тех пор, пока дисбаланс не исчезнет, и не ус‐
тановится нормальный отжим. Если по истечении 10 минут
белье в барабане не распределилось равномерно, отжим вы‐
полняться не будет. В этом случае переложите белье вручную
и выберите программу отжима.
• Перераспределите белье в барабане.
Слишком малая загрузка барабана.
• Добавьте белье, перераспределите его в барабане вруч‐
ную, а затем выберите программу отжима.
Машины, разработанные с использованием современных
технологий, работают очень экономично и потребляют мало
воды без снижения качества стирки.
Если определить или устранить причину
неисправности самостоятельно не уда‐
лось, обращайтесь в наш сервисный
центр. Перед тем, как звонить туда, за‐
пишите для себя модель, серийный но‐
мер и дату приобретения машины: эти
сведения потребуются специалистам
сервисного центра.
Page 41

electrolux 41
Mod. ... ... ...
Prod. No. ... ... ...
Ser. No. ... ... ...
Технические данные
Габариты Ширина
Подключение к электросети Информация по электрическому подключению представлена
Давление в водопроводной
системе
Максимальная загрузка Хлопок 3 кг
Скорость отжима Максимум 1000 об/мин (EWC 1050)
Высота
Глубина
на табличке технических данных, расположенной на внут‐
ренней стороне дверцы прибора.
Минимум
Максимум
49,5 см
67 см
51,5 см
0,05 МПа
0,8 МПа
1300 об/мин (EWC 1350)
Показатели потребления
Программа Потребление энер‐
Белый хлопок 90° 1.43 44 ~ 126
Хлопок 60° 0.78 44 ~ 107
Хлопок 60° ЭКО
Хлопок 40° ЭКО 0.35 44 ~ 126
Синтетика 40° 0.26 42 ~ 67
Деликатные ткани
40°
Ручная стирка 30° 0.20 42 ~ 50
Шерсть 40° 0.35 45 ~ 50
Мини 30° 0.18 35 ~ 30
Полоскание 0.03 30 ~ 27
Слив - - ~ 1
1)
гии (кВтч)
0.57 39 ~ 130
0.38 45 ~ 61
Потребление воды
(литры)
Продолжительность
программы (минуты)
Page 42

42 electrolux
Программа Потребление энер‐
гии (кВтч)
Отжим - - ~ 5
1) «Хлопок Эко" при 60°C и при загрузке 3 кг является эталонной программой для расчета
данных, указанных на табличке энергопотребления, в соответствии со стандартом EEC
92/75.
Потребление воды
(литры)
Продолжительность
программы (минуты)
Приведенные в данной таблице данные по расходу являются только ориенти‐
ровочными, так как они могут изменяться в зависимости от количества и типа
белья, температуры водопроводной воды и температуры окружающей среды.
Установка
Поднимание машины
Будьте осторожны, приподнимая сти‐
ральную машину. При неправильном
подъеме можно не только травмировать‐
ся, но и повредить машину. Откройте
дверцу и удерживайте машину за внут‐
реннюю поверхность проема дверцы.
Поднимать машину можно также за вы‐
ступающую часть верхней крышки ма‐
шины.
Рекомендуем сохранить все транспорти‐
ровочные приспособления для того, что‐
бы их можно было снова использовать в
случае новой транспортировки машины.
1. Положите часть полистиролового
упаковочного материала на пол поза‐
ди машины, а затем осторожно поло‐
жите на него машину задней сторо‐
ной. Убедитесь, что при этом не при‐
давливаются шланги. Снимите поли‐
стироловое основание и опорную ра‐
му, на которых лежит машина.
ВНИМАНИЕ! Запрещается
поднимать машину, держась за
панель управления, дверцу или
дозатор моющих средств.
Распаковка
Для предотвращения повреждения ба‐
рабана и электродвигателя во время
транспортировки стиральную машину
снабжают рядом стопорных устройств/
упаковочных деталей. Все транспорти‐
ровочные болты и элементы упаковки
должны быть сняты перед началом
эксплуатации машины.
Page 43

2. Приведите машину в вертикальное
положение и отсоедините шнур пита‐
ния, сливной и наливной шланг от
разъемов на задней панели прибора.
3. С помощью подходящего гаечного
ключа на задней панели машины вы‐
крутите три болта и снимите их вме‐
сте с прокладками.
electrolux 43
дящиеся в полиэтиленовом пакете
вместе с руководством по
эксплуатации внутри барабана.
Размещение
Установите машину на ровный твердый
пол. Убедитесь, что ковры, дорожки и
т.д. не препятствуют циркуляции воздуха
вокруг машины. Проверьте, чтобы маши‐
на не касалась стен или мебели. Выров‐
няйте машину, увеличивая или умень‐
шая высоту двух передних ножек. При
необходимости проверьте точность вы‐
равнивания с помощью уровня. Необхо‐
димые регулировки следует выполнять с
помощью гаечного ключа. Тщательное
выравнивание предотвращает вибра‐
цию, шум и перемещение машины во
время работы.
4. В освободившиеся три отверстия не‐
обходимо вставить входящие в ком‐
плект пластмассовые заглушки, нахо‐
Page 44

44 electrolux
ПРЕДУПРЕЖДЕНИЕ! Никогда не
подкладывайте картон, куски дерева
или подобные материалы для
компенсации неровностей пола.
Подсоединение к водопроводу
ВНИМАНИЕ! Данное устройство
следует подключать к источнику
холодной воды.
1. Подсоедините шланг подачи воды к
водопроводному крану с резьбой
3/4". Всегда используйте шланг, по‐
ставляемый вместе со стиральной
машиной.
При необходимости используйте ог‐
раничитель, подходящий по размеру
или входящий в комплект поставки
(1/2").
2. Конец этого шланга со стороны ма‐
шины можно повернуть в любом на‐
правлении. Отрегулируйте положе‐
ние шланга, ослабив зажимную гайку.
Отрегулировав положение шланга,
не забудьте плотно затянуть зажим‐
ную гайку для предотвращения уте‐
чек.
Наливной шланг не подлежит удлине‐
нию. Если он слишком короткий, а вы не
хотите перемещать водопроводный
кран, придется купить новый, более
длинный шланг, специально предназна‐
ченный для данной цели.
ВАЖНО! Перед подсоединением
машины к новой водопроводной трубе
или к трубе, не использовавшейся в
течение определенного времени,
спустите достаточное количество воды
для того, чтобы удалить загрязнения,
которые могут собираться в трубах.
Слив воды
Конец сливного шланга можно устанав‐
ливать тремя способами:
ВАЖНО! Не используйте для
подключения к водопроводу шланги,
бывшие в употреблении.
Page 45

electrolux 45
Подвесить над краем раковины, ис‐
пользуя пластмассовую направляю‐
щую, входящую в комплект поставки
машины.
В этом случае убедитесь, что шланг не
соскочит во время слива воды. Для обес‐
печения этого шланг можно привязать к
крану куском шпагата или прикрепить к
стене.
Подключить к сливной трубе с водоза‐
твором.
Сливной шланг можно ввести непосред‐
ственно в трубу (например, под ракови‐
ной или кухонной мойкой) над водоза‐
твором. Сливной шланг надо проклады‐
вать так, чтобы часть его была поднята
вверх до уровня верхнего края раковины
и там зафиксирована.
Ввести непосредственно в сливную тру‐
бу на высоте не менее 65 см, но не более
80 см.
Вокруг и ниже конца сливного шланга
должны быть воздушные зазоры. Это оз‐
начает, что внутренний диаметр стояка
должен быть больше наружного диамет‐
ра шланга.
40 mm
650-800 mm
Шланг устанавливается в стояк не глуб‐
же, чем на 50 мм и его необходимо за‐
фиксировать в этом положении. Слив‐
ной шланг не должен иметь перегибов.
650-800 mm
Сливной шланг можно удлинить не бо‐
лее, чем до 3,5 м. В качестве удлини‐
тельного шланга используйте шланг с
внутренним диаметром, не меньшим
внутреннего диаметра собственного
шланга машины. Используйте подходя‐
щий соединитель шлангов.
Page 46

46 electrolux
Информация по электрическому под‐
ключению представлена на табличке
технических данных, расположенной на
внутренней стороне дверцы машины.
Убедитесь, что электрическая сеть у Вас
дома в состоянии выдержать макси‐
мальную мощность, потребляемую ма‐
шиной, при этом следует учесть и другие
эксплуатируемые электроприборы.
Включайте машину в заземленную
розетку.
Изготовитель не несет
ответственности за ущерб или
Охрана окружающей среды
Символ на изделии или на его
упаковке указывает, что оно не подлежит
утилизации в качестве бытовых отходов.
Вместо этого его следует сдать в
соответствующий пункт приемки
электронного и электрооборудования
для последующей утилизации.
Соблюдая правила утилизации изделия,
Вы поможете предотвратить
причинение окружающей среде и
здоровью людей потенциального
ущерба, который возможен в противном
случае, вследствие неподобающего
обращения с подобными отходами. За
более подробной информацией об
утилизации этого изделия просьба
обращаться к местным властям, в
службу по вывозу и утилизации отходов
травмы, полученные в результате
несоблюдения вышеуказанных мер
предосторожности.
После установки машины к сетевому
шнуру должен иметься свободный
доступ.
При необходимости замены
сетевого шнура, все работы должны
выполняться специалистами
авторизованного сервисного
центра.
или в магазин, в котором Вы приобрели
изделие.
Упаковочные материалы
Материалы, помеченные символом
пригодны для повторной переработки.
>PE<=полиэтилен
>PS<=полистирол
>PP<=полипропилен
Это означает, что они могут быть под‐
вергнуты вторичной переработке при ус‐
ловии, что при их утилизации они будут
помещены в специальные контейнеры
для сбора таких отходов.
Экологические рекомендации
Для экономии воды, энергии и с целью
бережного отношения к окружающей
среде придерживайтесь следующих ре‐
комендаций:
• Белье обычной степени загрязненно‐
сти можно стирать без предваритель‐
ной стирки для экономии моющих
средств, воды и времени (это означает
,
Page 47

electrolux 47
и меньшее загрязнение окружающей
среды!).
• Наиболее экономично машина рабо‐
тает при полной загрузке.
• При должной обработке пятна и не‐
большие загрязнения могут быть уда‐
лены перед стиркой; тогда белье мож‐
но стирать при более низкой темпера‐
туре.
• Отмеряйте моющее средство в зави‐
симости от жесткости воды, степени
загрязненности и количества стирае‐
мого белья.
Page 48

48 electrolux
Electrolux. Thinking of you.
Conozca mejor nuestros conceptos en www.electrolux.com
Índice de materias
Información sobre seguridad 48
Descripción del producto 50
Panel de mandos 52
Antes del primer uso 53
Uso diario 53
Consejos útiles 56
Programas de lavado 58
Salvo modificaciones
Mantenimiento y limpieza 60
Qué hacer si… 62
Datos técnicos 64
Valores de consumo 64
Instalación 65
Aspectos medioambientales 69
Información sobre seguridad
Importante Lea las instrucciones
atentamente y téngalas a mano para
consultarlas en caso necesario.
• La seguridad de su aparato cumple las
normas industriales y los requisitos legales
sobre seguridad de los electrodomésticos. No obstante, como fabricantes, nos
sentimos en la obligación de facilitar las siguientes advertencias de seguridad.
• Es muy importante que conserve este manual junto con la lavadora para consultas
futuras. Si vende o transfiere el electrodoméstico a otro propietario, o bien cambia
de domicilio y deja la lavadora en su interior, asegúrese siempre de que el nuevo
propietario recibe el electrodoméstico junto con el manual de instrucciones para que
pueda aprender cómo funciona y conozca
las advertencias pertinentes.
• Es IMPRESCINDIBLE leerlas con atención
antes de instalar o utilizar el electrodoméstico.
• Antes de poner en marcha el aparato por
primera vez, compruebe que no presenta
daños ocasionados durante el transporte.
No conecte nunca un aparato que presente daños. Contacte con su proveedor
si éste tiene componentes dañados.
• Si el electrodoméstico se suministra en invierno, estación en la que se dan temperaturas bajo cero. Almacénelo a temperatura ambiente durante 24 horas antes de
utilizarlo por primera vez.
Seguridad general
• Resulta peligroso alterar las especificaciones o intentar modificar este producto de
alguna manera.
• El cristal de la puerta se puede calentar
durante el uso de programas de lavado a
alta temperatura. ¡No lo toque!
• Impida el acceso de animales domésticos
pequeños al interior del tambor. Para evitarlo, compruebe el interior del tambor antes de utilizar el aparato.
• Cualquier objeto como, por ejemplo, monedas, imperdibles, clavos, tornillos, piedras o cualquier otro material duro y afilado puede provocar daños considerables y
no se debe introducir en la máquina.
• Utilice sólo las cantidades de detergente y
suavizante recomendadas. Los tejidos
pueden dañarse si se sobrecarga la lavadora. Siga las recomendaciones del fabricante acerca de las cantidades.
• Lave las prendas pequeñas, como calcetines, lazos, cinturones, etc., en una bolsa
de lavado o en una funda de almohada
para evitar que se introduzcan entre la cuba y el tambor interno.
• No utilice la lavadora para lavar prendas
con aros, sin dobladillos o desgarradas.
• Desenchufe siempre el electrodoméstico y
cierre el suministro de agua después del
uso, la limpieza o el mantenimiento del
mismo.
• Bajo ninguna circunstancia debe intentar
reparar la máquina por su cuenta. Si las
reparaciones las llevan a cabo personas
Page 49

electrolux 49
sin experiencia, esto puede causar lesiones o un fallo de funcionamiento grave.
Póngase en contacto con su centro de
servicio técnico local. Insista siempre en
que los repuestos sean originales.
Instalación
• Este aparato es pesado. Por tanto, se debe tener cuidado al transportarlo.
• Al desembalar el aparato, compruebe que
no esté dañado. Si tiene alguna duda, no
lo utilice y póngase en contacto con el
centro de servicio técnico.
• Todos los pasadores del embalaje y transporte se deben retirar antes del uso. De lo
contrario, se pueden producir daños graves en el producto y daños materiales.
Véase el apartado correspondiente en el
manual de usuario.
• Una vez instalada la lavadora, asegúrese
de que ésta no descansa sobre la manguera de entrada ni la de desagüe, así como de que la encimera no está presionando el cable de alimentación eléctrica contra la pared.
• Si la máquina está situada sobre un suelo
enmoquetado, ajuste las patas para que
pueda circular libremente el aire por debajo del aparato.
• Una vez realizada la instalación, asegúrese
de que no existen fugas de agua procedentes de las mangueras y sus conexiones.
• Si el electrodoméstico se instala en un lugar sometido a heladas, consulte el capítulo "Riesgos de helada".
• Los trabajos de fontanería necesarios para
instalar el electrodoméstico deberán correr a cargo de un fontanero o técnico especializado.
• Cualquier trabajo eléctrico que sea necesario para instalar este aparato lo debe llevar a cabo un electricista cualificado o una
persona competente.
Uso
• Este aparato se ha diseñado para uso doméstico. No se debe utilizar para otros
propósitos diferentes a los previstos.
• Lave solamente las prendas que estén diseñadas para lavarse a máquina. Consulte
las instrucciones en la etiqueta de la prenda.
• No sobrecargue el aparato. Consulte la tabla de programas de lavado.
• Antes del lavado, asegúrese de que todos
los bolsillos de las prendas están vacíos y
de que todos los botones y cremalleras
están abrochados. Evite lavar prendas
deshilachadas o desgarradas y trate previamente las manchas de pintura, tinta,
óxido y grasa. Los sujetadores con aros
NO deben lavarse a máquina.
• Las prendas que han estado en contacto
con productos de petróleo volátil no deben lavarse a máquina. Si se utilizan líquidos de limpieza volátiles, se debe prestar
atención a eliminar el líquido de la prenda
antes de introducirla en la máquina.
• No tire del cable de corriente eléctrica para
desenchufar el electrodoméstico; sujete
siempre el cable por el enchufe.
• No utilice nunca la lavadora si el cable de
corriente eléctrica, el panel de mandos, o
la superficie de trabajo o la base están dañados y se puede acceder al interior de la
lavadora.
Bloqueo contra la manipulación por
niños
• Este electrodoméstico no está destinado
a personas (incluidos niños) con funciones
físicas o sensoriales reducidas o con experiencia y conocimiento insuficientes, a
menos que una persona responsable de
su seguridad les supervise o les instruya
en el uso del electrodoméstico.
• Es necesario vigilar a los niños pequeños
para que no jueguen con la máquina
• Los componentes del embalaje (por ejemplo, la película de plástico o poliestireno)
pueden ser peligrosos para los niños - ¡peligro de asfixia! Manténgalos fuera del alcance de los niños.
• Mantenga todos los detergentes en un lugar seguro fuera del alcance de los niños.
• Impida el acceso de los niños y los animales domésticos al interior del tambor.
Page 50

50 electrolux
Descripción del producto
Esta moderna lavadora cumple todos los requisitos necesarios para garantizar un lavado
eficaz con bajo consumo de agua, energía y detergente. Su nuevo sistema de lavado
permite utilizar todo el detergente y reduce el consumo de agua con el fin de ahorrar
energía.
Parte delantera de la máquina
1 2
3
1 Depósito dosificador de detergente
2 Panel de mandos
4
3 Palanca de apertura de la puerta
4 Patas ajustables (delanteras)
Page 51

Parte trasera de la máquina
electrolux 51
1
1 Dispositivos de bloqueo para el transpor-
te
2 Manguera de desagüe
Depósito dosificador de detergente
Compartimento del detergente líquido o
en polvo utilizado en el lavado principal. Si se
utiliza detergente líquido, viértalo justo an-
tes de iniciar el programa.
Compartimento para aditivos líquidos
(suavizante, almidón).
El suavizante o el almidón se deben depositar en el compartimento antes de iniciar el
programa de lavado.
2
3
4
3 Cable de conexión
4 Manguera de entrada
El detergente de prelavado se debe añadir directamente en el interior del tambor.
Page 52

52 electrolux
Panel de mandos
El selector de programas, el selector de centrifugado, las luces de evolución del programa y los distintos botones se identifican en el manual mediante los números correspondientes que aparecen a continuación.
1 2 3 4 5 6 8 97
1 Depósito de detergente
2
Botón INICIO DIFERIDO
3 Botón PRELAVADO
4 Botón RÁPIDO
5
Botón SÚPER ACLARADO
6
Tecla INICIO/PAUSA
7 Indicador de progreso del programa
8 Selector de reducción del CENTRI-
FUGADO
9 Selector de programas
Depósito de detergente
El depósito de detergente tiene 2 compartimentos separados para el detergente y el
suavizante.
El detergente de prelavado se debe añadir directamente en el interior del tambor.
Inicio diferido
El inicio del programa se puede retrasar 6 ó
3 horas con este botón.
Prelavado
Cuando se selecciona esta opción, la máquina realiza un ciclo de prelavado antes de
la fase de lavado principal. El tiempo de lavado se prolongará. Esta opción se recomienda para prendas muy sucias.
Rápido
Cuando se selecciona esta opción, el tiempo
de lavado se reduce aprox. 10 minutos. Esta
opción se recomienda para ropa blanca/de
color y sintética poco sucia.
Súper aclarado
Esta lavadora se ha diseñado para funcionar
con poco consumo de energía. Seleccione
esta opción si es necesario aclarar la ropa
utilizando una cantidad adicional de agua
(súper aclarado). Se realizarán algunos aclarados adicionales. Esta opción se recomienda para personas alérgicas al detergente y
en zonas en las que el agua es muy blanda.
Inicio/Pausa
Este botón permite iniciar o interrumpir el
programa seleccionado.
Indicador
(A)
(B)
(C)
(D)
(E)
Page 53

electrolux 53
El piloto A se ilumina cuando la máquina está
realizando la fase de lavado .
El piloto B se ilumina cuando la máquina está
aclarando .
El piloto C se ilumina cuando la máquina está
centrifugando .
El piloto D se ilumina al finalizar el ciclo de
lavado.
El piloto E indica si la puerta se puede abrir:
• El piloto está encendido: no se puede abrir
la puerta.
• El piloto está apagado: se puede abrir la
puerta.
• El piloto parpadea: pronto se podrá abrir
la puerta.
Selector de velocidad del centrifugado
Gire el selector de velocidad de centrifugado
para modificar la velocidad de centrifugado
del programa seleccionado o seleccionar la
opción "Agua en la cuba" o "Sin centrifugado"
Antes del primer uso
Advertencia
Compruebe que las conexiones eléctricas y
de agua cumplen las instrucciones de instalación.
Importante Retire cualquier material del
interior del tambor.
Importante Para eliminar cualquier residuo
del proceso de fabricación, se recomienda
Selector de programas
Permite conectar/desconectar el aparato y/
o seleccionar un programa.
Tabla de símbolos
= Inicio diferido, = Prelavado, =
Rápido,
Pausa
= Lavado, = Aclarado, = Centri-
fugado,
bloqueada
= Agua en la cuba, = Sin centrifugado,
Delicados,
30 ° = Mini 30 °,
vado en frío,
realizar un programa de lavado sin carga de
ropa. Vierta unos 100 ml de detergente
directamente en el tambor y ponga en
marcha un ciclo de algodón a 60 °C. Cuando
el programa haya finalizado, la máquina
estará lista para su uso.
= Súper aclarado, = Inicio/
= Fin de ciclo, = Puerta
= Algodón, = Sintéticos, =
= Lavado a mano, = Lana,
= Descarga, = La-
= Encendido/Apagado
Uso diario
Cargue la colada
Abra la puerta tirando cuidadosamente de la
palanca de la puerta hacia fuera. Sacuda la
ropa cuanto pueda e introdúzcala en el tambor prenda por prenda. Cierre la puerta.
Page 54

54 electrolux
Mida la dosis de detergente y suavizante
Tire del depósito dosificador hasta el tope.
Mida la dosis de detergente necesaria y viértala en el compartimento más grande situado
a la izquierda
.
Si es necesario, vierta suavizante en el compartimento más pequeño con la marca
(la
cantidad utilizada no debe superar la marca
"MAX" del depósito). Cierre el depósito suavemente.
Seleccione el programa que desee
mediante el selector (9)
Gire el selector de programas hasta el programa que desee. El selector de programa
puede girarse hacia la derecha y hacia la izquierda.
El piloto verde del botón 6 empieza a parpadear
En la indicación de progreso del programa,
están encendidos los pilotos correspondientes a todas las fases que componen el programa seleccionado.
Cuando el selector está en posición
, se
restablece el programa y se apaga la máquina.
Al final del programa, el selector debe
situarse en la posición
para apagar la
máquina.
Importante Si gira el selector hasta otro
programa mientras la lavadora está
funcionando, las luces de la indicación de
evolución del programa comenzarán a
parpadear para indicar que la selección es
incorrecta. La máquina no pondrá en marcha
el nuevo programa seleccionado.
Seleccione la velocidad de
centrifugado, la opción Agua en la cuba
o Sin centrifugado (8).
Seleccione la velocidad de centrifugado, la
opción Agua en la cuba o Sin centrifugado
girando el selector de velocidad de centrifugado.
• La posición 1300 (o 1000) es equivalente
a 900 rpm para los programas de prendas
sintéticas y lana, y a 700 rpm para el programa de prendas delicadas.
• La posición 500 es equivalente a 500 rpm
para los programas de prendas sintéticas
Page 55

electrolux 55
y lana, y a 450 rpm para el programa de
prendas delicadas.
Agua en la cuba
Al seleccionar esta opción, el agua del último
aclarado no se descarga para impedir que
los tejidos se arruguen. Una vez finalizado el
programa, los pilotos "Fin" y "Puerta bloqueada" se encienden para indicar que es
necesario descargar el agua (consulte "Al finalizar el programa").
Sin centrifugado
La lavadora no centrifuga cuando se selecciona esta opción. Se debe utilizar para prendas muy delicadas. La máquina añadirá algunos aclarados adicionales a los programas de algodón y sintéticos.
Consulte la máxima velocidad de centrifugado que permite cada programa en el capítulo
Programas de lavado .
Selección del inicio diferido con el botón
2
Antes de iniciar el programa, si desea posponer el inicio, presione el botón 2 repetidas
veces para seleccionar el intervalo de retraso
deseado. El piloto correspondiente se enciende.
Esta opción debe seleccionarse después de
elegir el programa y antes de pulsar el botón
6 .
Es posible cancelar o modificar el tiempo de
retraso en cualquier momento antes de pulsar el botón 6 .
Cancelación del inicio diferido después de
haber presionado el botón 6 :
1. Ajuste la lavadora en PAUSA pulsando el
botón 6 .
2. Pulse el botón 2 una vez, se apagará el
piloto correspondiente al intervalo seleccionado.
3.
Vuelva a pulsar el botón 6 para iniciar el
programa.
Importante El intervalo de retraso
seleccionado sólo se podrá modificar una
vez se haya vuelto a seleccionar el programa
de lavado.
La puerta permanecerá bloqueada el tiempo
que dure el intervalo (piloto de puerta bloqueada encendido).
El inicio diferido no puede seleccionarse
para el programa DESAGUAR o CENTRI-
FUGADO .
Seleccione la opción que desee con los
botones 3, 4 y 5
Existe la posibilidad de combinar distintas
funciones según el programa. Debe seleccionarlas después de elegir el programa y
antes de pulsar el botón 6. Se encenderá el
piloto correspondiente.
Si se selecciona una opción incorrecta, el indicador luminoso correspondiente parpadea
durante unos 2 segundos. Consulte la compatibilidad de los programas de lavado con
las opciones en el capítulo "Programas de
lavado" .
Para iniciar el programa, pulse el botón
6
Para iniciar el programa seleccionado, presione este botón; el piloto correspondiente
deja de parpadear y permanece encendido.
En la indicación de evolución del programa,
los pilotos A y E se encienden para indicar
que el aparato se pone en marcha y la puerta
está bloqueada.
Modificación de una opción o de un
programa en marcha
Es posible cambiar cualquier opción antes
de que el programa la ejecute.
Antes de realizar cambios, es preciso detener momentáneamente la lavadora pulsando
el botón 6 .
El programa se puede modificar siempre y
cuando no se haya pulsado el botón 6 . El
Page 56

56 electrolux
cambio de un programa en marcha sólo puede realizarse reiniciándolo. Gire el selector de
programas hasta
y, a continuación, hasta
la nueva posición. Para poner en marcha el
nuevo programa, vuelva a presionar el botón
6 .
Interrupción de un programa
Pulse el botón 6 para interrumpir el programa
en marcha; el piloto correspondiente empieza a parpadear. Vuelva a pulsar el botón para
reiniciar el programa.
Cancelación de un programa
Gire el selector hasta
para cancelar un
programa una vez que está en marcha. Después puede seleccionar otro programa.
Apertura de la puerta una vez iniciado el
programa
En primer lugar, interrumpa el funcionamiento de la lavadora con el botón 6 .
Transcurridos unos minutos, se puede abrir
la puerta si se tienen en cuenta las siguientes
condiciones:
• La temperatura del agua es inferior a 55°C.
• El nivel del agua está por debajo del borde
inferior de la puerta.
• La máquina no está centrifugando.
Si no puede abrir la puerta pero es indispensable hacerlo, apague la máquina girando el
selector de programas hasta la posición
La puerta se puede abrir una vez trascurridos
unos minutos
(Preste atención al nivel del agua y a la
temperatura.)
Después de este procedimiento, deberá volver a ajustar el programa y las opciones, así
como pulsar otra vez el botón 6 .
Al final del programa
La lavadora se detiene automáticamente.
El piloto D se ilumina para indicar que el programa ha finalizado. El piloto E se apaga; se
puede abrir la puerta y retirar la colada.
Si, al terminar el programa, queda agua en la
cuba (si se ha seleccionado la opción "Agua
en la cuba"), siga las siguientes instruc-
ciones para vaciar el agua :
•
gire el selector de programas hasta
• seleccione el programa de "Desaguar" o
"Centrifugado"
•
pulse el botón 6
Cuando el piloto E se apaga, se puede abrir
la puerta y retirar la colada.
Al final del ciclo, gire el selector de programas
hasta la posición
para apagar la máquina.
Retire las prendas del tambor y cerciórese de
que queda vacío. Si no va a realizar otro lavado, cierre la toma del agua.
Deje la puerta abierta para evitar la aparición
de moho y olores desagradables.
.
Consejos útiles
Clasificación de la ropa sucia
Consulte los símbolos de lavado que aparecen en la etiqueta de la prenda y siga las instrucciones de lavado del fabricante. La ropa
se debe clasificar de la siguiente manera: ropa blanca, ropa de color, ropa sintética,
prendas delicadas y prendas de lana.
Temperaturas
para prendas de algodón y ropa
de cama y mesa de color blan-
95° o 90°
co con suciedad normal (como
paños de cocina, toallas, manteles, sábanas, etc.)
para prendas de color sólido
con suciedad normal (como ca-
60°/50°
40° - 30° Frío
misetas, camisones, pijamas,
etc.) en lino, algodón o fibra sintética y para prendas de algodón blanco no muy sucias (como ropa interior)
para prendas delicadas (como
cortinas), ropa mixta, incluidas
fibras sintéticas, y prendas de
lana cuya etiqueta indique: "pura lana, lavado a máquina, no
encoge"
Antes de introducir la ropa sucia
Separe la ropa blanca de la ropa de color y
lávela por separado. Las prendas blancas
pueden perder su "blancura" al lavarlas.
La ropa de color nueva puede desteñir durante el primer lavado; por lo tanto, es preciso lavarla aparte la primera vez.
Page 57

electrolux 57
Asegúrese de quitar todos los objetos
metálicos de la ropa (como pinzas para
el pelo, imperdibles, alfileres, etc.).
Abotone las fundas de almohada y cierre las
cremalleras, ganchos, broches, etc. Ate las
correas o cintas largas.
Quite las manchas difíciles antes de lavar la
ropa.
Frote las zonas particularmente sucias con
un detergente especial o en pasta.
Tenga cuidado con las cortinas. Lávelas sin
los ganchos o dentro de una bolsa o malla.
Carga máxima
Las cargas máximas recomendadas se indican en los gráficos de programas de lavado.
Normas generales:
•
Algodón, lino: tambor lleno, pero no demasiado;
•
Prendas sintéticas: no más de la mitad
del tambor;
• Tejidos delicados y prendas de lana:
no más de un tercio del tambor.
El lavado con carga máxima garantiza la utilización más eficaz del agua y la energía.
Si la ropa está extremadamente sucia, reduzca la carga.
Peso de la ropa sucia
Los pesos siguientes son indicativos:
Los pesos siguientes son indicativos:
albornoz 1200 g
funda de edredón 700 g
camisa de trabajo de hombre 600 g
sábana, pijama de hombre 500 g
mantel 250 g
funda de almohada, toalla de
felpa, vestido de noche, camisa de hombre
paño, bragas, servilleta, blusa,
calzoncillos
200 g
100 g
Eliminación de manchas
A veces no basta con agua y detergente para
quitar las manchas difíciles. En esos casos
es aconsejable aplicar un tratamiento antes
de lavar las prendas.
Sangre: aplique agua fría a las manchas de
sangre fresca. Si la sangre está seca, debe
dejar la prenda a remojo en agua con un de-
3) no utilice acetona en seda artificial
tergente especial durante la noche y luego
frotar con agua y jabón.
Pintura al aceite: humedezca la mancha
con un quitamanchas a base de disolvente,
extienda la prenda sobre un paño suave y
quite la mancha; repita el procedimiento varias veces.
Grasa seca: humedezca la mancha con
aguarrás, extienda la prenda sobre una superficie suave y quite la mancha con la yema
de los dedos y un trapo de algodón.
Óxido: utilice ácido oxálico disuelto en agua
caliente o un quitamanchas para óxido en
frío. Tenga cuidado con las manchas de óxido que no sean recientes, ya que la estructura de la celulosa se habrá dañado y el tejido
tenderá a perforarse.
Moho: utilice lejía y aclare bien (prendas
blancas y de colores sólidos solamente).
Hierba: utilice un poco de jabón y aplique
lejía (prendas blancas y de colores sólidos
solamente).
Tinta y pegamento: humedezca con ace-
3)
tona
, extienda la prenda sobre un paño
suave y quite la mancha.
Pintalabios: humedezca con acetona, como en el caso anterior, y luego quite la mancha con alcohol desnaturalizado. Utilice lejía
para eliminar las marcas que puedan quedar.
Vino tinto: ponga la prenda a remojo en
agua y detergente, aclare, aplique ácido acético o cítrico y vuelva a aclarar. Utilice lejía
para eliminar las marcas que puedan quedar.
Tinta: dependiendo del tipo de tinta, hume-
dezca la prenda en acetona
3)
y luego en
ácido acético; utilice lejía en los tejidos de
color blanco para eliminar cualquier resto
que pueda quedar y aclare bien.
Alquitrán: primero aplique un quitamanchas, alcohol desnaturalizado o disolvente y
luego frote la mancha con un detergente en
pasta.
Detergentes y aditivos
El resultado del lavado depende también del
detergente y de una dosificación correcta del
mismo que permita aprovechar sus ventajas
y evitar daños al medio ambiente.
Aunque son biodegradables, los detergentes contienen sustancias que, en grandes
cantidades, pueden alterar el delicado equilibrio de la naturaleza.
Page 58

58 electrolux
La elección del detergente depende del tipo
de tejido (delicado, lana, algodón, etc.), color, temperatura de lavado y grado de suciedad de las prendas.
En este aparato se pueden utilizar todos los
detergentes para lavadora de uso habitual:
• detergente en polvo para todo tipo de
prendas
• detergente en polvo para prendas delicadas (60 °C máx.) y lana
• detergente líquido para todo tipo de tejidos o especial para lana, preferiblemente
para programas de lavado a baja temperatura (60 °C máx.).
Coloque el detergente y los aditivos en los
compartimentos correspondientes del depósito dosificador antes de poner en marcha
el programa de lavado.
Ponga el detergente de prelavado directamente en el tambor
Si utiliza detergente líquido, seleccione un
programa sin prelavado. Vierta el detergente
líquido en el compartimento de detergente
justo antes de iniciar el programa.
El aparato incorpora un sistema de recirculación que garantiza un aprovechamiento
óptimo del detergente concentrado.
Programas de lavado
Programa/Tempera-
tura
ALGODÓN
90°
ALGODÓN E
60°
Tipo de prendas Opciones
Algodón blanco
(prendas de algodón
sucias o muy sucias)
Lavado económico
para prendas de algodón blanco
(Se puede seleccionar
este programa para
prendas de algodón
poco sucias o sucias.
La temperatura disminuirá y se ampliará el
tiempo de lavado. Esto
permite obtener buenos resultados de lavado ahorrando energía.)
Siga las instrucciones del fabricante del producto en cuanto a cantidades y r\n> no per-
mita que el detergente supere la marca
"MAX" del depósito dosificador .
Grados de dureza del agua
La dureza del agua se clasifica en "grados".
Para obtener información sobre la dureza del
agua local, puede consultar a la compañía
encargada del suministro o a la administración local.
Añada un ablandador de agua si el grado de dureza de ésta es medio-alto (del
nivel de dureza II). Siga las instrucciones
del fabricante. La cantidad de detergente siempre se puede ajustar al grado de
dureza I (= blanda).
Grados de dureza del
Nivel Tipo
1 blanda 0-7 0-15
2 intermedia 8-14 16-25
3 dura 15-21 26-37
4 muy dura > 21 > 37
REDUCCIÓN DEL
CENTRIFUGADO/SIN
CENTRIFUGADO/
AGUA EN LA CUBA
INICIO DIFERIDO
PRELAVADO
RÁPIDO
SÚPER ACLARADO
REDUCCIÓN DEL
CENTRIFUGADO/SIN
CENTRIFUGADO/
AGUA EN LA CUBA
INICIO DIFERIDO
PRELAVADO
SÚPER ACLARADO
1)
agua
°dH ale-
mán
Descripción del pro-
Lavado principal
Aclarados
Centrifugado largo
máx. 1300/1000 rpm
Carga máxima 3 kg
Lavado principal
Aclarados
Centrifugado largo
máx. 1300/1000 rpm
Carga máxima 3 kg
°T.H.
francés
grama
Page 59

electrolux 59
Programa/Tempera-
tura
ALGODÓN
60° - 30°
ALGODÓN E
40°
SINTÉTICOS
40°-30°
DELICADO
40°
LAVADO A MANO
30°
LANA
40° - Frío
MINI
30°
Tipo de prendas Opciones
REDUCCIÓN DEL
CENTRIFUGADO/SIN
Prendas de algodón
de color (suciedad
normal)
CENTRIFUGADO/
AGUA EN LA CUBA
INICIO DIFERIDO
PRELAVADO
RÁPIDO
1)
SÚPER ACLARADO
Lavado económico
para prendas de algodón de color
(Programa económico
de algodón. Consulte:
Algodón 60° E.)
REDUCCIÓN DEL
CENTRIFUGADO/SIN
CENTRIFUGADO/
AGUA EN LA CUBA
INICIO DIFERIDO
PRELAVADO
SÚPER ACLARADO
REDUCCIÓN DEL
Tejidos sintéticos o
mezclas: ropa interior,
prendas de color, camisas y blusas que no encogen.
CENTRIFUGADO/SIN
CENTRIFUGADO/
AGUA EN LA CUBA
INICIO DIFERIDO
PRELAVADO
RÁPIDO
SÚPER ACLARADO
REDUCCIÓN DEL
CENTRIFUGADO/SIN
Tejidos delicados:
acrílicos, viscosa, poliéster.
CENTRIFUGADO/
AGUA EN LA CUBA
INICIO DIFERIDO
PRELAVADO
SÚPER ACLARADO
Programa especial para tejidos delicados con
el símbolo «lavado a
mano».
REDUCCIÓN DEL
CENTRIFUGADO/SIN
CENTRIFUGADO/
AGUA EN LA CUBA
INICIO DIFERIDO
REDUCCIÓN DEL
Programa especial para lana lavable a máquina.
CENTRIFUGADO/SIN
CENTRIFUGADO/
AGUA EN LA CUBA
INICIO DIFERIDO
Para ropa poco sucia o
para ropa a la que es
preciso quitar quitar las
arrugas y los olores.
REDUCCIÓN DEL
CENTRIFUGADO/SIN
CENTRIFUGADO/
AGUA EN LA CUBA
INICIO DIFERIDO
Descripción del pro-
grama
Lavado principal
Aclarados
Centrifugado largo
máx. 1300/1000 rpm
Carga máxima 3 kg
Lavado principal
Aclarados
Centrifugado largo
máx. 1300/1000 rpm
Carga máxima 3 kg
Lavado principal
Aclarados
Centrifugado corto
máx. 900 rpm
Carga máxima 1,5 kg
Lavado principal
Aclarados
Centrifugado corto
máx. 700 rpm
Carga máxima 1,5 kg
Lavado principal
Aclarados
Centrifugado corto
máx. 900 rpm
Carga máxima 1 kg
Lavado principal
Aclarados
Centrifugado corto
máx. 900 rpm
Carga máxima 1 kg
Lavado principal
Aclarados
Centrifugado corto
máx. 700 rpm
Carga máxima 1,5 kg
Page 60

60 electrolux
Programa/Tempera-
tura
ACLARADOS
DESCARGA
CENTRIFUGADO
/ APAGADO
1) Si selecciona esta opción, se recomienda reducir la carga máxima. La carga recomendada para
prendas de algodón es de 2 kg.
Tipo de prendas Opciones
Permite aclarar y centrifugar prendas de algodón lavadas a mano. La
máquina realiza 3 aclarados, seguidos de un
centrifugado final largo.
Se puede reducir la velocidad de centrifugado.
Para vaciar el agua del
último aclarado en programas con la opción
Agua en cuba seleccionada.
Centrifugado independiente para prendas lavadas a mano y después de usar programas con la opción
Agua en cuba seleccionada. Puede elegir la
velocidad de centrifugado girando el selector de velocidad de
centrifugado para que
se adapte al tejido que
se va a centrifugar.
Para reiniciar el programa o apagar la máquina
REDUCCIÓN DEL
CENTRIFUGADO/SIN
CENTRIFUGADO/
AGUA EN LA CUBA
SÚPER ACLARADO
REDUCCIÓN DEL
CENTRIFUGADO
Descripción del pro-
grama
Aclarados
Centrifugado máx.
1300/1000 rpm
Carga máxima 3 kg
Descarga del agua de
lavado
Carga máxima 3 kg
Descarga y centrifugado largo
Velocidad de centrifugado máx. 1300/1000
rpm
Carga máxima 3 kg
Mantenimiento y limpieza
Importante Es preciso DESCONECTAR el
aparato de la red eléctrica antes de realizar
cualquier tarea de limpieza o mantenimiento.
Desincrustación
El agua corriente que utilizamos suele contener cal. Se recomienda utilizar un producto
en polvo ablandador del agua en la lavadora
periódicamente. Realice esta tarea con independencia de cualquier ciclo de lavado y
de acuerdo con las instrucciones del fabricante del producto ablandador. Esto ayudará a prevenir la formación de depósitos de
cal.
Lavado de mantenimiento
La sucesión de lavados a baja temperatura
favorece la acumulación de residuos en el
interior del tambor.
Se recomienda realizar un lavado de mantenimiento con regularidad.
Para poner en marcha un lavado de mantenimiento:
• El tambor no debe contener ropa.
• Seleccione el programa de lavado de algodón de mayor temperatura.
• Utilice una dosis normal de detergente:
puede ser en polvo con propiedades biológicas.
Limpieza del exterior
Limpie la carcasa exterior del electrodoméstico con agua y jabón únicamente y, a continuación, séquelo completamente.
Page 61

electrolux 61
Limpieza del depósito dosificador
El depósito dosificador del detergente en
polvo y de los aditivos de lavado debe limpiarse con regularidad.
1. Si es necesario, se puede extraer de la
máquina el depósito de detergente completo para su limpieza. Debe tirar de él
firmemente hacia fuera para que quede
libre del tope de retención.
2. Para retirar el sifón situado en el borde
interior del depósito para su limpieza, debe presionarlo hacia dentro y tirar hacia
arriba al mismo tiempo. Enjuáguelo bajo
el grifo para eliminar los restos de detergente en polvo acumulados. Al volver a
colocarlo, presiónelo hacia abajo hasta
que haga claramente clic.
detergente en polvo de la parte superior e
inferior del hueco.
Vuelva a colocar el depósito y ponga en marcha el programa de aclarado sin que el tambor contenga ropa.
Limpieza del filtro de entrada de agua
Si el agua es muy dura o contiene depósitos
de cal, el filtro de entrada de agua puede
obstruirse. Por lo tanto, se recomienda limpiarlo periódicamente.
Cierre la toma de agua. Desconecte la manguera de entrada de agua. Limpie el filtro utilizando un cepillo rígido. Apriete la manguera
de entrada.
Limpieza del hueco del depósito
Después de extraer el depósito, utilice un cepillo pequeño para limpiar el hueco, asegurándose de eliminar todos los residuos de
Page 62

62 electrolux
Riesgos de helada
Si el aparato va a estar expuesto a temperaturas inferiores a 0 °C es necesario tomar una
serie de precauciones.
• Cierre la toma de agua.
• Desconecte la manguera de entrada.
• Seleccione un programa de lavado, ponga
en marcha la máquina y deje funcionar el
programa durante un breve espacio de
tiempo.
• Interrumpa el programa girando el selector
de programas hasta la posición
.
• Coloque el extremo de las mangueras de
entrada y de desagüe abajo, en el interior
del sumidero (desagüe del suelo) instalado
Qué hacer si…
Algunos problemas, que pueden deberse
sencillamente a falta de mantenimiento o a
descuidos, pueden resolverse sin necesidad
de llamar al servicio técnico. Antes de ponerse en contacto con el centro de servicio
técnico local, realice las comprobaciones indicadas en la lista siguiente.
Durante el funcionamiento de la máquina es
posible que la luz del piloto Fin parpadee
para indicar que la máquina no está funcionando:
Problema Causa y soluciones posibles
La puerta no está cerrada.
• Cierre firmemente la puerta.
El enchufe no está correctamente insertado en la toma de corriente.
• Inserte el enchufe en la toma.
No hay tensión en la toma de corriente.
La lavadora no se pone en
funcionamiento:
La lavadora no se llena de
agua:
La lavadora se llena de
agua, pero se vacía de inmediato:
• Compruebe la instalación eléctrica doméstica.
El fusible principal se ha quemado.
• Cambie el fusible.
El selector no está en la posición correcta y no se ha pulsado el
botón Inicio.
• Gire el selector de programas y vuelva a pulsar el botón Inicio.
Se ha presionado el botón de inicio diferido.
• Si el lavado se va a realizar de inmediato, cancele el inicio diferido.
El grifo de agua está cerrado.
• Abra el grifo.
La manguera de entrada de agua está doblada o torcida.
• Compruebe la conexión de la manguera de entrada de agua.
El filtro de la manguera de entrada está obstruido.
• Limpie el filtro de la manguera de entrada de agua.
La puerta no está bien cerrada.
• Cierre firmemente la puerta.
El extremo de la manguera de desagüe está demasiado bajo.
• Consulte el apartado correspondiente en el capítulo «Instalación».
en el suelo. Asegúrese de que el extremo
de la manguera no se encuentra por debajo del nivel de agua en la toma de agua
del sumidero.
• Seleccione el programa "Desaguar" y déjelo funcionar hasta que finalice.
• Gire el selector de programas hasta la posición
. Antes de volver a poner en marcha la lavadora, asegúrese de que la temperatura ambiente es superior a 0 °C.
Este aparato se debe utilizar sólo en interiores y a temperatura ambiente. El fabricante
no se hace responsable de los daños causados por congelación.
• 1 parpadeo: problema con el suministro
de agua.
• 2 parpadeos: problema con el desagüe.
•
4 parpadeos: puerta abierta.
Cuando se haya solucionado el problema,
pulse el botón INICIO para reiniciar el programa. Si no consigue resolver el problema
después de realizar todas las comprobaciones pertinentes, póngase en contacto con el
centro de servicio técnico.
Page 63

Problema Causa y soluciones posibles
La máquina no desagua, no
centrifuga o no hace ninguna de las dos cosas:
Hay agua en el suelo.
Los resultados del lavado no
son satisfactorios:
La puerta no se abre:
El aparato vibra o hace mucho ruido:
electrolux 63
La manguera de desagüe está doblada o torcida.
• Compruebe la conexión de la manguera de desagüe.
Se ha seleccionado una opción o programa que finaliza con agua
dentro de la cuba o uno que elimina todas las fases de centrifugado.
• Seleccione el programa de descarga o de centrifugado.
Las prendas no están uniformemente distribuidas en el tambor.
• Vuelva a distribuir las prendas.
Se ha utilizado demasiado detergente o un detergente inadecuado
(que produce demasiada espuma).
• Reduzca la cantidad de detergente o utilice otro.
Compruebe si hay fugas en alguno de los racores de la manguera
de entrada de agua. No siempre resulta fácil detectar las fugas, ya
que el agua desciende por la manguera; compruebe si el racor está
mojado.
• Compruebe la conexión de la manguera de entrada de agua.
La manguera de desagüe o de entrada está dañada.
• Sustitúyala por una nueva.
Se ha utilizado poco detergente o un detergente inadecuado.
• Aumente la cantidad de detergente o utilice otro.
No se han tratado las manchas difíciles antes de lavar la ropa.
• Emplee productos comerciales para tratar las manchas difíciles.
No se ha seleccionado la temperatura adecuada.
• Compruebe si ha seleccionado la temperatura correcta.
Se han metido demasiadas prendas en la lavadora.
• Reduzca la carga.
El programa todavía no ha terminado.
• Espere hasta que finalice el ciclo de lavado.
No se ha desbloqueado el cierre de la puerta.
• Espere a que el indicador luminoso de puerta bloqueada se haya
apagado.
Hay agua en el tambor.
• Seleccione el programa de descarga o centrifugado para vaciar
el agua.
No se han quitado los pasadores ni el material de embalaje utilizados
para el transporte.
• Compruebe la correcta instalación del electrodoméstico.
No se han ajustado las patas.
• Compruebe que el electrodoméstico está correctamente nivelado.
Las prendas no están uniformemente distribuidas en el tambor.
• Vuelva a distribuir las prendas.
Es posible que haya muy pocas prendas en el tambor.
• Introduzca más prendas.
Page 64

64 electrolux
Problema Causa y soluciones posibles
El dispositivo que detecta desequilibrios en la carga ha interrumpido
el proceso debido a que las prendas no están uniformemente distribuidas en el tambor. La ropa se redistribuye mediante la rotación
inversa del tambor. Es posible que el tambor gire varias veces antes
de que deje de detectarse el problema y se reanude el ciclo de cen-
El centrifugado se retrasa o
la máquina no centrifuga:
No se ve agua en la lavadora:
trifugado normal. Si la carga no se distribuye de manera uniforme
transcurridos 10 minutos, la lavadora no centrifuga. En este caso,
es necesario redistribuirla de forma manual y seleccionar el programa de centrifugado.
• Vuelva a distribuir las prendas.
La carga es insuficiente.
• Añada más prendas, redistribuya la carga de forma manual y seleccione el programa de centrifugado.
Las lavadoras de tecnología moderna están diseñadas para economizar y emplean muy poca agua, sin que ello afecte al rendimiento.
Si no puede identificar o resolver el problema, póngase en contacto con nuestro centro
de servicio técnico. Antes de llamar al centro,
anote el modelo, el número de serie y la fecha
en que adquirió la lavadora: el centro de servicio técnico le pedirá esta información.
Mod. ... ... ...
Prod. No. ... ... ...
Ser. No. ... ... ...
Datos técnicos
Medidas Anchura
Altura
Profundidad
Conexión eléctrica Los datos de la conexión eléctrica se indican en la placa de espe-
cificaciones técnicas, en el borde interno de la puerta de la lavadora.
Presión del suministro de agua Mínima
Máxima
Carga máxima Algodón 3 kg
Velocidad de centrifugado Máxima 1000 rpm (EWC 1050)
49,5 cm
67 cm
51,5 cm
0,05 MPa
0,8 MPa
1300 rpm (EWC 1350)
Valores de consumo
Programa Consumo energético
(KWh)
Algodón blanco 90° 1.43 44 ~ 126
Consumo de agua (li-
tros)
Duración del progra-
ma (minutos)
Page 65

electrolux 65
Programa Consumo energético
Algodón 60° 0.78 44 ~ 107
Algodón 60° Ecológi-
1)
co
Algodón 40° Ecológi-
co
Sintéticos 40° 0.26 42 ~ 67
Delicados 40° 0.38 45 ~ 61
Lavado a mano 30° 0.20 42 ~ 50
Lana 40° 0.35 45 ~ 50
Mini 30° 0.18 35 ~ 30
Aclarados 0.03 30 ~ 27
Descarga - - ~ 1
Centrifugado - - ~ 5
1) «Algodón Eco» a 60°C con una carga de 3 kg es el programa de referencia de los datos incluidos en
la etiqueta energética de conformidad con las normas CEE 92/75.
(KWh)
0.57 39 ~ 130
0.35 44 ~ 126
Consumo de agua (li-
tros)
Duración del progra-
ma (minutos)
Los datos de consumo de este gráfico se indican a título orientativo, ya que pueden
variar dependiendo de la cantidad y del tipo de prendas, de la temperatura del agua de
entrada y de la temperatura ambiente.
Instalación
Levantar la máquina
Tenga cuidado a la hora de levantar la máquina. Un método incorrecto puede causar
lesiones corporales e incrementar el riesgo
de daños en la máquina. Abra la puerta y sujete la parte interior superior de la abertura de
la puerta. También puede levantar la máquina agarrando el saliente trasero de la parte
superior.
Advertencia No levante nunca la
máquina agarrando el panel de mandos,
la puerta o el dosificador de detergente.
Desembalaje
La lavadora se entrega embalada con una
serie de dispositivos de bloqueo/piezas de
embalaje para evitar que el tambor y el motor
sufran daños durante el transporte. Todos
los pasadores del embalaje y transporte se
deben retirar antes de utilizar el aparato.
Se aconseja guardar todo este material para
usarlo de nuevo en caso de que sea necesario transportar el electrodoméstico.
1. Extienda algunos de los materiales de
embalaje de poliestireno en el suelo situado detrás de la máquina y, a continuación, coloque la máquina cuidadosamente con la parte trasera sobre ellos.
Asegúrese de que ninguna manguera se
aplaste en esta operación. Retire la base
de poliestireno y la barra de apoyo sobre
la que descansa la máquina.
Page 66

66 electrolux
4. Los tres agujeros se deben tapar con los
tapones de plástico suministrados en la
bolsa que contiene el manual de instrucciones, situada en el interior del tambor.
2. Vuelva a colocar la máquina en posición
vertical y retire el cable de corriente eléctrica y la manguera de desagüe y de entrada de los portamangueras en la parte
trasera del aparato.
3. Con la llave adecuada, desenrosque y retire los tres tornillos y los separadores en
la parte trasera de la máquina.
Colocación
Instale la máquina en el suelo sobre una superficie plana y rígida. Asegúrese de que el
aire circula correctamente alrededor de la lavadora aunque haya moqueta, alfombras,
etc. Compruebe que la máquina no toca la
pared ni otros muebles. Nivele la lavadora
subiendo o bajando las dos patas delanteras. Si es necesario, compruebe el ajuste con
un nivel de burbuja. Los ajustes necesarios
pueden realizarse con una llave. Un nivelado
correcto evita las vibraciones, el ruido y el
desplazamiento de la lavadora durante el
funcionamiento.
Page 67

Precaución No coloque cartón,
madera ni otros materiales similares bajo
la máquina para compensar los
desniveles del suelo.
Entrada de agua
Advertencia Este aparato se debe
conectar a un suministro de agua
fría.
1. Conecte la manguera de entrada de agua
suministrada con la máquina a un grifo
con rosca de 3/4 pulgadas. Debe utilizar
siempre la manguera suministrada con la
máquina.
electrolux 67
Importante No utilice la manguera de la
máquina anterior para conectar el
aparato al suministro de agua.
2. El extremo de la manguera de entrada en
la máquina se puede girar en cualquier
dirección. Afloje la tuerca anular para colocar la manguera correctamente. Después de situar la manguera, vuelva a
apretar la contratuerca para evitar fugas
de agua.
Si es necesario, utilice el limitador adecuado o suministrado (1/2").
Con la manguera de entrada de agua no se
pueden emplear prolongaciones. Si es demasiado corta y no desea mover la toma de
agua, tendrá que adquirir una manguera más
larga especialmente diseñada para estos casos.
Importante Antes de conectar la lavadora a
tubos nuevos o a tubos que no se hayan
utilizado durante algún tiempo, deje correr
bastante agua para eliminar los restos que
puedan haberse acumulado en los tubos.
Page 68

68 electrolux
Desagüe
El extremo de la manguera de desagüe se
puede instalar de tres maneras distintas:
Sujeto por encima del borde de un fregadero mediante el codo de plástico
suministrado con la lavadora.
En este caso, debe asegurarse de que el extremo de la manguera no se desengancha
cuando la lavadora está desaguando. Para
evitar que ocurra, puede fijarlo a la toma de
agua con un trozo de cuerda o sujetarlo a la
pared.
En un tubo de desagüe en el fregadero
con un sifón.
La manguera de desagüe puede estar conectada directamente al interior del tubo (por
ejemplo, debajo de un deposito o fregadero),
sobre el sifón de agua. La manguera de desagüe debe estar dispuesta de tal forma que
una parte de ella se conduzca hasta el nivel
correspondiente al borde superior del fregadero y se fije allí.
Directamente en un tubo de desagüe a
una altura mínima de 65 cm y máxima de
80 cm.
Debe haber una rendija de aire alrededor y
bajo el extremo de la manguera de desagüe.
Esto significa que el diámetro interior del tubo
de subida debe ser superior al diámetro exterior de la manguera.
40 mm
650-800 mm
La m an gu era no se de be i nt ro du ci r en el tu bo
vertical más de 50 mm y se debe fijar en esta
posición. La manguera de desagüe no debe
estar retorcida.
650-800 mm
La manguera de desagüe se puede prolongar hasta 3,5 m en total. Para la pieza de
prolongación, utilice una manguera con un
diámetro interior que sea como mínimo igual
de grande que la propia manguera de la máquina. Utilice un conector de manguera adecuado.
Page 69

electrolux 69
Los datos de la conexión eléctrica se indican
en la placa de datos técnicos, situada en el
borde interno de la puerta de la lavadora.
Compruebe que la instalación eléctrica de su
hogar está preparada para soportar la potencia máxima necesaria y tenga también en
cuenta el resto de electrodomésticos.
Conecte la lavadora a una toma de
corriente con puesta a tierra.
El fabricante declina toda
responsabilidad por los daños o las
lesiones que puedan producirse si
Aspectos medioambientales
El símbolo que aparece en el aparato o
en su embalaje, indica que este producto no
se puede tratar como un residuo normal del
hogar. Se deberá entregar, sin coste para el
poseedor, bien al distribuidor, en el acto de
la compra de un nuevo producto similar al
que se deshecha, bien a un punto municipal
de recolección selectiva de equipos
eléctricos y electrónicos para su reciclaje. Al
asegurarse de que este producto se
desecha correctamente, usted ayudará a
evitar posibles consecuencias negativas
para el medio ambiente y la salud pública, lo
cual podría ocurrir si este producto no se
gestionara de forma adecuada. Para obtener
información más detallada sobre el reciclaje
de este producto, póngase en contacto con
el Ayuntamiento de su Municipio, ó con la
tienda donde lo compró.
Materiales de embalaje
Los materiales marcados con el símbolo
son reciclables.
no se respetan las indicaciones de
seguridad anteriores.
El cable de corriente eléctrica debe
quedar en una posición fácilmente
accesible una vez instalada la
máquina.
El centro de servicio técnico es el
único autorizado para cambiar el
cable de corriente eléctrica del
electrodoméstico en caso
necesario.
>PE<= polietileno
>PS<= poliestireno
>PP<= polipropileno
Esto significa que se pueden reciclar si se
desechan correctamente en contenedores
específicos.
Consejos ecológicos
A continuación ofrecemos algunos consejos
para ahorrar agua y energía y ayudar a proteger el medio ambiente:
• La ropa que no esté demasiado sucia se
puede lavar con un programa que no incluya prelavado a fin de ahorrar detergente, agua y tiempo (y proteger el medio ambiente).
• El lavado resulta más económico si la la-
vadora se llena por completo.
• Con un tratamiento previo adecuado es
posible eliminar manchas y suciedad moderada; de manera que la ropa se pueda
lavar a menos temperatura.
Page 70

70 electrolux
• Dosifique el detergente en función de la
dureza del agua, el grado de suciedad y la
cantidad de ropa que se va a lavar.
Page 71

electrolux 71
Page 72

www.electrolux.com
www.electrolux.ru
Para comprar accesorios, consumibles y recambios en nuestra tienda online, por favor visite
nuestro site:
www.electrolux.es
192992390-00-482009
 Loading...