

Page 1
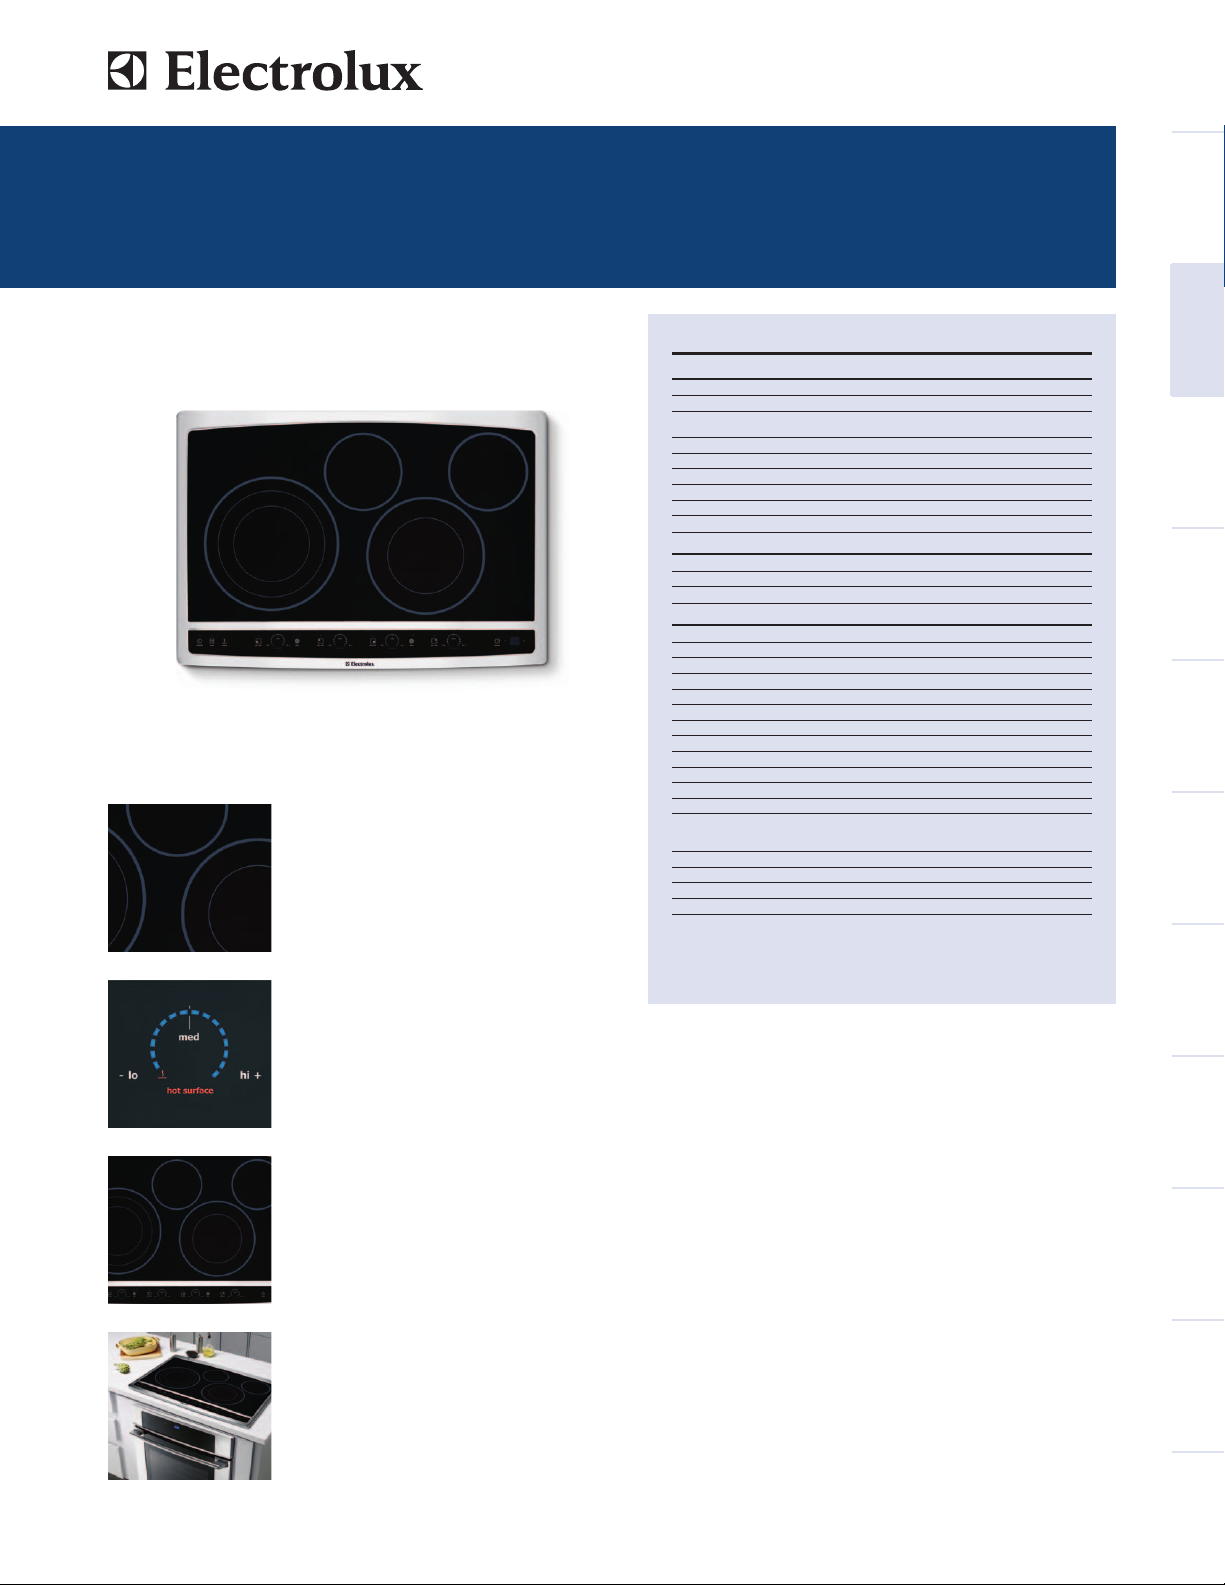
Flex-2-Fit®Elements
Elements adjust up to three sizes, so
the element fits the cookware, not the
other way around.
Glide-2-Set®Control Panel
Heat is controlled by just the touch
of a finger, resulting in a clean look
uncluttered by knobs or dials. These
controls are intuitive, precise and
very stylish.
Easy-to-Clean Cooktop Surface
Smooth glass cooktop makes cleanup
a breeze.
Perfect Over A Wall Oven
Mounts above a single wall oven for
additional installation options.
Electric Cooktops
EW30EC55G S, EW30EC55G W, EW30EC55G B
30" ELECTRIC TOUCH-CONTROL COOKTOPS
Features
Glide-2-Set®Electronic Touch Controls
Ceramic Smoothtop Glass Surface
6" to 9" to 12" Triple Expandable Element –
1000W/ 2000W/ 2700W
6" to 9" Dual Expandable Element – 1600W/ 3000W
6" Electric Element – 1200W
Hot Surface Indicator Lights
Sealed Spill Control Cooktop
Sabbath Mode (Star-K®Certified)
A.D.A. Compliant*
Accessories
Granite Countertop Installation Kit – PN# 903061-9010
Cleaning Sponge
Griddle Plate – PN# 318251611
Specifications
Color –
Stainless Steel
White
Black
Product Dimensions –
Width
Depth
Height (Extreme Bottom to Underside of Cooktop)
Power Supply Connection Location
Connected Load (kW Rating) @ 240/ 208 Volts
Amps@ 240/208 Volts
Minimum Circuit Required (Amps)
Electrical – Single phase 4-wire cable,
120/ 240 Volts or 120/ 208 Volts, 60 Hz,
fused on both sides of line with ground.
Armored Electrical Cable
Approved for Single Oven Combination Installation**
Approved for Downdraft Combination Installation**
Shipping Weight (Approx.)
*When properly installed, meets the appliance standards in the Americans with Disabilities Act
and the Architectural Barriers Act Accessibility Guidelines as published by the United States
Access Board on June 23, 2004, as amended August 5, 2005.
NOTE: Always consult local and national electric codes. Refer to Product Installation Guide
for detailed installation instructions on the web at electroluxappliances.com.
Specifications subject to change.
Yes
Yes
1
1
2
Yes
Yes
Yes
Yes
Optional
Included
Optional
S
W
B
30-3/4"
21-3/4"
7"
Right Center Rear
8.4/ 6.3
35.0/ 30.3
40
Required
Included
Yes
Yes
58 Lbs.
**Approved to be used over any Electrolux Single Wall Oven
OR in combination with any Electrolux 30" Downdraft Vent.
electroluxappliances.com
Wall OvensRefrigerators Warmer DrawersCooktopsBuilt-In Ranges
Freestanding
Ranges
MicrowavesVent HoodsFreezersUnder CounterWashers / Dryers
Dishwashers /
Kitchen Cleanup
Page 2
Electric Cooktops
EW30EC55G S, EW30EC55G W, EW30EC55G B
High standards of quality at Electrolux Home Products, Inc. mean
we are constantly working to improve our products. We reserve the right
to change specifications or discontinue models without notice.
Electrolux Major Appliances, N.A.
USA
•
10200 David Taylor Drive •Charlotte, NC 28262 •1-877-4electrolux (1-877-435-3287)
•
electroluxappliances.com
CANADA
•
5855 Terry Fox Way •Mississauga, ON L5V 3E4 •1-800-265-8352
•
electroluxappliances.ca
EW30EC55G 07/11 © 2011 Electrolux Home Products, Inc. Printed in the U.S.A.
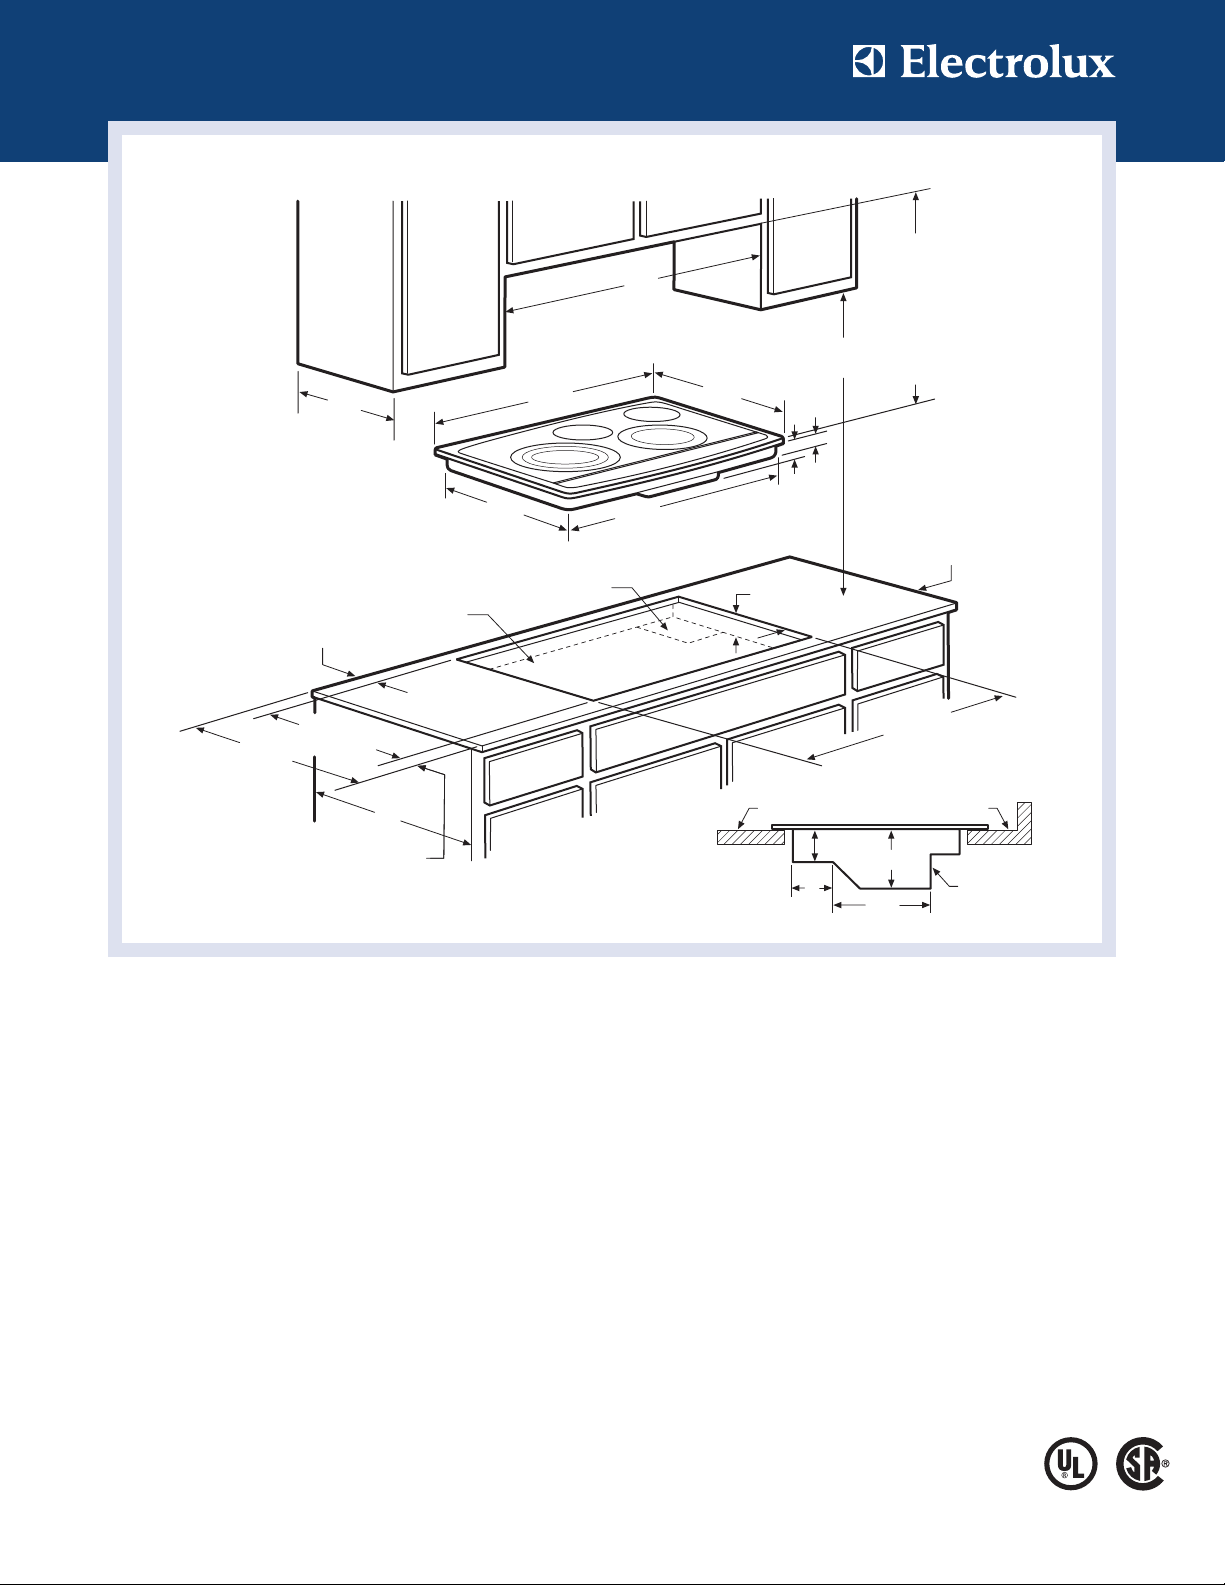
30"
13"
max.
cabinet
depth
18"
min.
30" min.
for
unprotected
cabinet
24" min.
for
protected
surface
285/8"
191/4"
7"
31/8"
303/4"
213/4"
Cooktop
CountertopCountertop
7"
31/2"
71/2"
Front Rear
Side View
31/8"
24"
21/2" min. from
edge of cutout to front
edge of countertop
9" min.
25"min.
71/2" min. to nearest
combustible wall
(either side of unit)
2" min. recommended
distance between rear
edge of cutout and
nearest combustible
surface above countertop
203/8" min.
20
5
/8" max.
29
3
/4" min.
30" max.
4"x 8" opening to
route armoured cable
if base is present
Plywood base
(optional)
30" Electric Touch-Control Cooktop Specifications
•
Product Weight – 50 Lbs.
•
Single phase 3- or 4-wire cable, 120/240 or 120/208 Volt, 60 Hertz AC
only electrical supply with ground required on separate circuit fused on
both sides of line.
•
Connected Load (kW Rating) @ 240/208 Volts = 8.4/6.3kW
•
Amps @ 240/208 Volts = 35.0/30.3 Amps
•
Recommended Circuit Breaker – 40 Amps
•
Always consult local and national electric codes.
•
Allow 2" space beneath cooktop or optional platform to clear electrical
cable and allow space for installation of junction box on wall at back of
cooktop. Position center of junction box 10" inward from right side of
cooktop cutout, and 12" down from underside of countertop.
•
Overhead cabinetry should not exceed a 13" maximum depth.
•
Allow 30" minimum clearance between top of cooktop and bottom of
unprotected wood or metal overhead cabinetry.
•
Absolute minimum horizontal distance between overhead cabinets
installed to either side of appliance must be no less than 30".
•
Allow 24" minimum clearance when bottom of wood or metal overhead
cabinet is protected by not less than 1/8" flame-retardant millboard
covered with not less than No. 28 MSG sheet steel, 0.015" stainless
steel, 0.024" aluminum or 0.020" copper.
•
Allow 2" minimum clearance between rear edge of cutout and nearest
combustible surface above countertop.
•
Allow 7-1/2" minimum clearance from edge of cooktop to nearest
combustible wall on either side of unit.
•
Installation of drawers beneath cooktop requires minimum 10"
clearance beneath countertop surface and assured clearance for
electrical connection.
•
To reduce risk of fire when using overhead cabinetry, install range hood
that projects horizontally a recommended minimum of 5" beyond
bottom of cabinets.
•
Touch-Control Cooktop model EW30EC55G is approved to be used
over any Electrolux Electric Single Wall Oven. (Refer to Electric Cooktop
Installation Over 30"/27" Electric Single Wall Oven Specifications page
on web.)
•
Touch-Control Cooktop model EW30EC55G is approved to
be used in combination with any Electrolux 30" Downdraft Vent.
(Refer to model-specific Downdraft Vent product page on web for
detailed countertop preparation specifications.)
Note: For planning purposes only. Refer to Product Installation Guide
on the web at electroluxappliances.com for detailed instructions.
Optional Accessories
•
Granite Countertop Installation Kit – (PN# 903061-9010).
•
Griddle Plate – (PN# 318251611).
Page 3
30" & 27" Electric Single Wall Ovens
Under-Counter Installation Specifications
•
Product Weights – (EW30EW55G, EI30EW35J and EI30EW35K) 200 Lbs. /
(EW27EW55G, EI27EW35J and EI27EW35K) 150 Lbs.
•
Single phase 3- or 4-wire cable, 120/240 or 120/208 Volt, 60 Hertz
AC only electrical supply with ground required on separate circuit fused
on both sides of line.
•
Connected Load (kW Rating) @ 240/208 Volts =
(30") 4.0/3.0kW / (27") 3.4 / 2.6 kW
•
Amps @ 240/208 Volts = (30")17.0/14.5 Amps / (27") 14.2 / 12.6 Amps
•
Recommended Circuit Breaker – 20 Amps
•
Always consult local and national electric codes.
•
Minimum 21" clearance for oven door depth when open.
•
Minimum 23-1/2" deep cutout dimension is critical for proper installation,
to ensure that oven’s faceplate will fit flush against cabinet front.
•
Full oven base of solid plywood or similar material required, capable
of supporting 200 Lbs. (30" models) or 150 Lbs. (27" models). Install
over two runners and flush with toe plate.
•
Base must be level and cabinet front must be square.
•
Allow 5" maximum height from oven base to floor, if NO cooktop is
installed directly over wall oven.
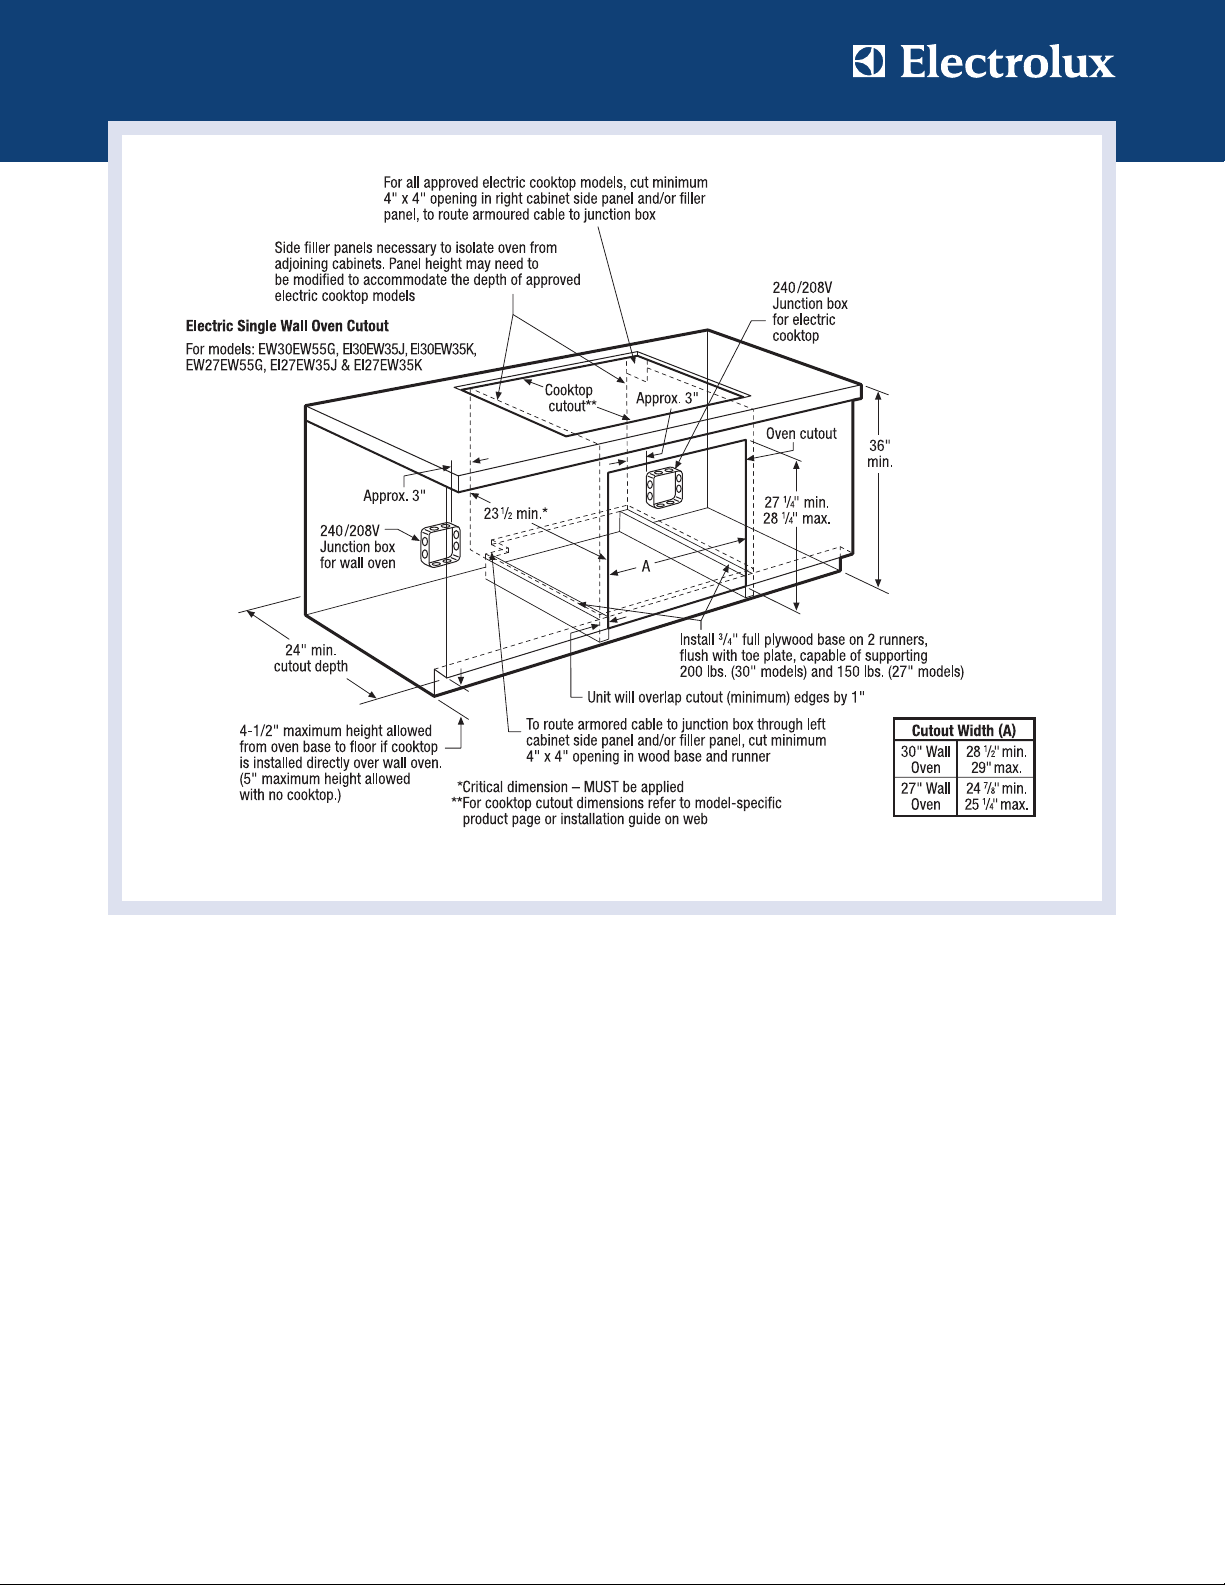
Electric Cooktop Installation Over
30"/27" Electric Single Wall Oven Specifications
Electrolux Single Wall Oven models EW30EW55G, EI30EW35J,
EI30EW35K, EW27EW55G, EI27EW35J and EI27EW35K are approved
to be used beneath Electrolux cooktop models EW36EC55G,
EW30EC55G, EW36IC60I, EW30IC60I, EW36CC55G and EW30CC55G.
For detailed Electric or Induction Hybrid Cooktop installation, refer to
model-specific product page and installation guide on web.
•
Side filler panels necessary to isolate oven from adjoining cabinets.
Panel height may need to be modified to accommodate the depth of
approved electric cooktop models.
•
To route armored cable to junction box, cut minimum 4" x 4" opening
in right cabinet side panel.
•
Allow 4-1/2" maximum height from oven base to floor, if cooktop is
installed directly over wall oven.
Note: For planning purposes only. Refer to Product Installation Guide
on the web at electroluxappliances.com for detailed instructions.
Electric Cooktop Installation
Over 30"/27" Electric Single Wall Oven
High standards of quality at Electrolux Home Products, Inc. mean
we are constantly working to improve our products. We reserve the right
to change specifications or discontinue models without notice.
Electrolux Major Appliances, N.A.
USA
•
10200 David Taylor Drive •Charlotte, NC 28262 •1-877-4electrolux (1-877-435-3287)
•
electroluxappliances.com
CANADA
•
5855 Terry Fox Way •Mississauga, ON L5V 3E4 •1-800-265-8352
•
electroluxappliances.ca
EC_EW INST EL 07/11 © 2011 Electrolux Home Products, Inc. Printed in the U.S.A.
Page 4
Cooktop/Downdraft Vent
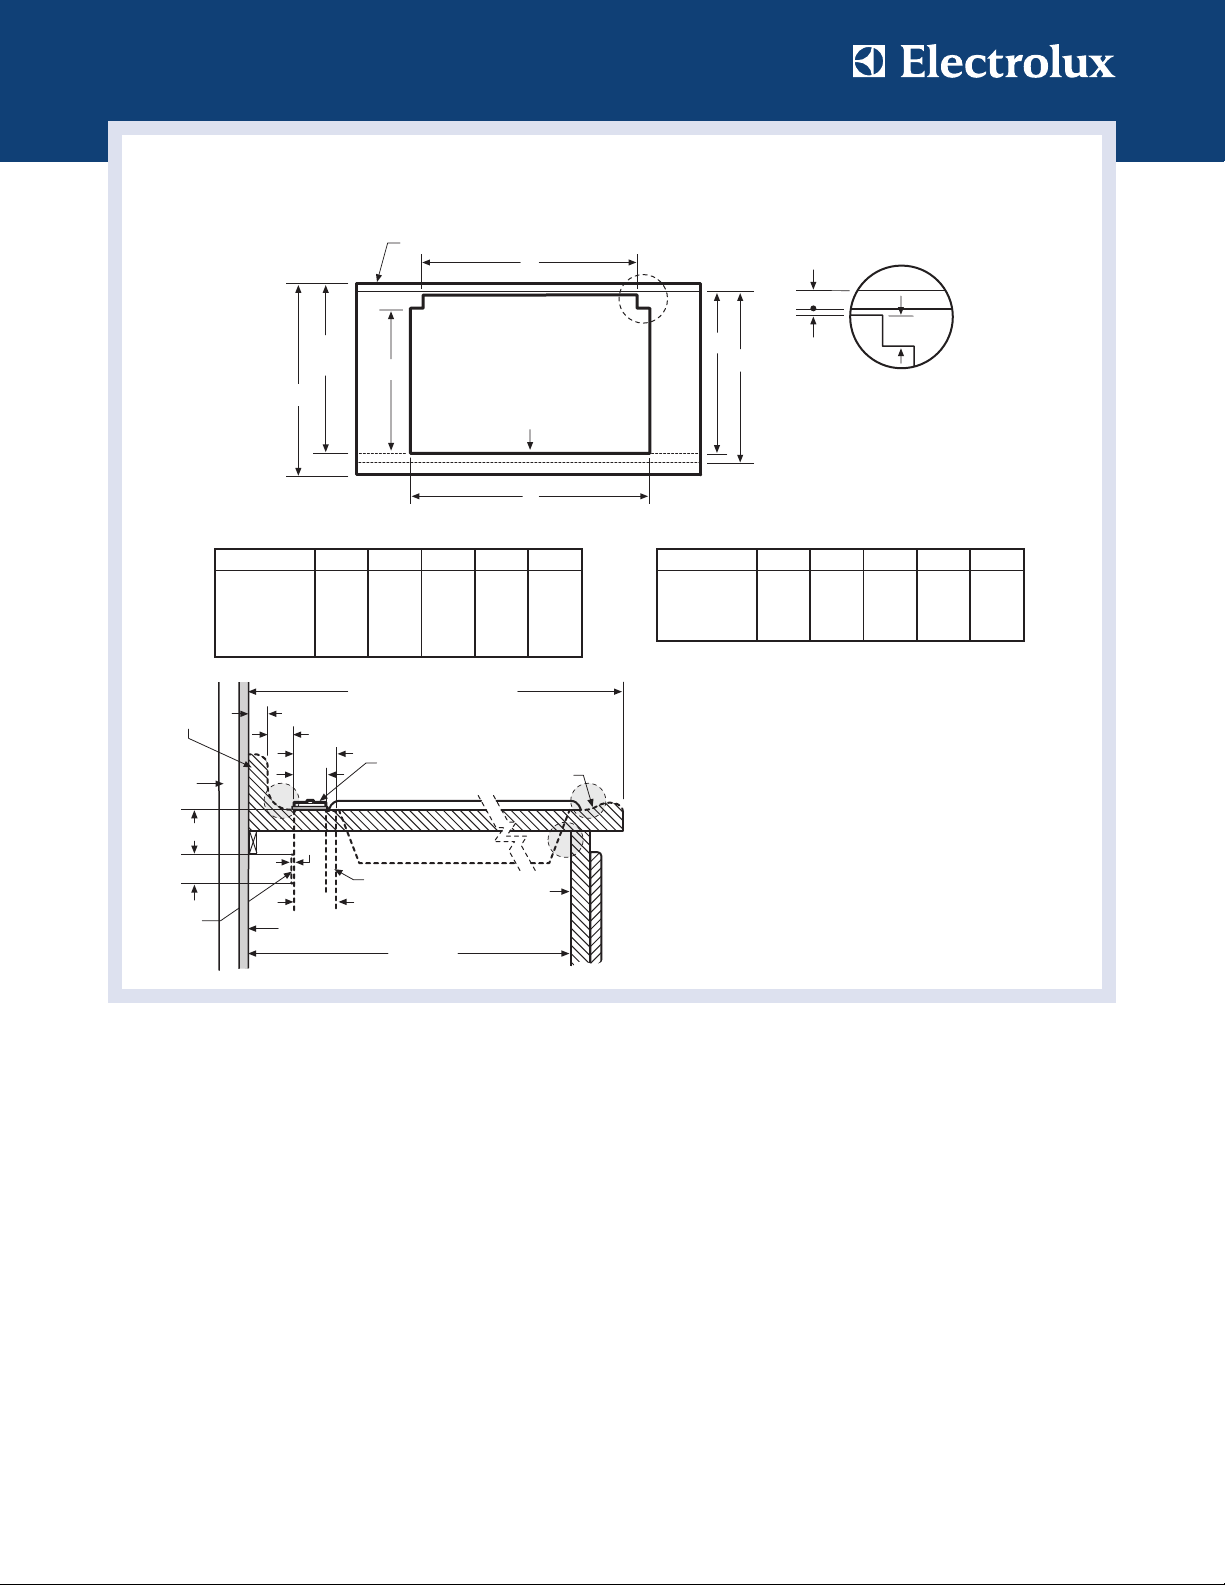
Countertop Preparation Specifications
•
For detailed Cooktop installation, refer to model-specific product page
and installation guide on web. Plan installation so that all required
minimum clearances between cooktop, overhead cabinets and adjacent
vertical walls are provided.
•
Position cooktop/vent cutout so all required minimum clearances are met.
•
Minimum flat countertop area must meet or exceed combined overall
width and depth as shown. Standard 25" countertop depth may NOT be
adequate for some cooktop/vent installations, especially with backsplash.
•
Separate circuits required for cooktop and vent. (Refer to product-specific
electrical specifications.)
•
Always consult local and national electric and gas codes. Check local
building codes for installation requirements, as they may vary per locale.
Downdraft Vent Specifications
•
For detailed Downdraft Vent installations, refer to model-specific
product page and installation guide on web.
•
Voltage Rating –120V / 60Hz/15 Amps
•
Connected Load (kW Rating) @120 Volts = 1.0kW
(For use on adequately wired 120V, dedicated circuit having 2-wire
service with a separate ground wire. Appliance must be grounded
for safe operation.)
•
Amps @120 Volts = 8.0 Amps
•
Vent unit outside of building only.
•
Vent must be installed in vertical orientation only.
•
1,600 CFM remote exhaust blower (PN#5304444802) included with
vent – shipped in separate box.
•
Do not use flexible duct. Round duct instead of rectangular duct
recommended, especially when elbows are required.
•
When multiple elbows are necessary, ensure a minimum of 24" of
straight duct between any two elbows.
•
Thermal breaks such as short section of nonmetallic duct, should
be used in areas of extreme cold.
•
For most efficient airflow exhaust, use a straight run or as few elbows
as possible.
•
Cold weather installations should have additional backdraft damper
installed.
•
Installing a Downdraft Vent in combination with any gas cooking
surface will affect optimum burner efficiency.
Note: For planning purposes only. Refer to Product Installation Guide
on the web at electroluxappliances.com for detailed instructions.
Cooktop/Downdraft Vent
Countertop Preparation
High standards of quality at Electrolux Home Products, Inc. mean
we are constantly working to improve our products. We reserve the right
to change specifications or discontinue models without notice.
Electrolux Major Appliances, N.A.
USA
•
10200 David Taylor Drive •Charlotte, NC 28262 •1-877-4electrolux (1-877-435-3287)
•
electroluxappliances.com
CANADA
•
5855 Terry Fox Way •Mississauga, ON L5V 3E4 •1-800-265-8352
•
electroluxappliances.ca
DIC_DDV_PREP EL 10/10 © 2010 Electrolux Home Products, Inc. Printed in the U.S.A.
Countertop Preparation for 30" & 36" Cooktop/Downdraft Vent Installation
For detailed cooktop and downdraft vent installation specifications, refer to model-specific product page and installation guide on web
29/16"
1
/4" min.
flat ledge
Backsplash
3
/4" max.
* Overall flat ledge behind
backside of cabinet front
** Minimum flat surface
required to fit top surface
of cooktop and downdraft
vent cap
A
Vertical noncombustible surface - rear wall
25"
B
Top
23 1/4"
min.
Flush with
back side of
cabinet front
D*
E**
C
Stiffener
Back side of
cabinet front
Vent unit
21/8"
Countertop
raised lip
Countertop
backsplash
Downdraft
chimney top
Cooktop
25"
(standard countertop)
*
23
1
/4"min.
213/16"
3"
Vertical noncombustible surface - rear wall
Studwall
3
/4" max. backsplash thickness
1
/4" min. flat ledge
115/16"
9
/32"
213/16"
Cooktop Installation Note:
To ensure proper installation, refer to model-specific installation
guide on web for cooktop dimensions, cutout dimensions and
cabinet requirements. Due to varying cooktop depths, tight fit
is possible between cooktop and vent.
Countertop Preparation Note:
Be aware of areas of potential interference called out in
illustration. Countertop with raised lip and/or backsplash may
not allow enough flat area for proper installation, 2-13/16"
of flat countertop required behind cooktop. No gap required
between back of cooktop and front of downdraft trim piece.
*Standard 25" countertop depth may NOT be adequate for
some cooktop/vent installations, especially with backsplash.
E30DD75ESS/30" Cooktop Cutout Dimensions
30" Cooktops A B C D E
EW30IC60I 30" 27
3
/4" 20 1/2" 23 5/16" 24 5/16"
EW30CC55G 30" 27
3
/4" 20 1/2" 23 5/16" 24 5/16"
EW30EC55G 30" 27 3/4" 20 5/8" 23 7/16" 24 7/16"
EW30GC55G 28
1
/2" 27 3/4" 19 3/4" 22 9/16" 23 9/16"
EW30GC60I 28
1
/2" 27 3/4" 19 3/4" 22 9/16" 23 9/16"
E36DD75ESS/36" Cooktop Cutout Dimensions
36" Cooktops A B C D E
EW36IC60I 36
1
/4" 33 3/4" 20 1/2" 23 5/16" 24 5/16"
EW36CC55G 36
1
/4" 33 3/4" 20 1/2" 23 5/16" 24 5/16"
EW36EC55G 36" 33 3/4" 20 5/8" 23 7/16" 24 7/16"
EW36GC55G 34
1
/4" 33 3/4" 19 3/4" 22 9/16" 23 9/16"
 Loading...