

Electrolux EW26SS70IB4, EI26SS30JS1, EW26SS70IW4, EI26SS30JW1, EI26SS30JB1 Installation Instructions Manual
...
B]
Tools Necessary:
Installation Instructions for Side-By-Side Refrigerator This document should only be removed by customer after installation.
1 Pro are TheinstallationSite
Your refrigerator is designedto be part of a built-in kitchen
cabinetsystem. Besure to coordinate site preparationand
installation withyour kitchencontractor.
Includetheseminimum guidelinesin your sitepreparation:
* Choosea placenear agrounded electrical outlet.
Donot use an extensioncord or anadapter plug.
Avoid direct sunlight and close proximity to a range,
dishwasher or other heatsource.
Floorshould be levelandable to support afully loaded
refrigerator.
The refrigerator's Ice& WaterDispenser requires water
supply access.
. Planfor easyaccessto countertops whenremoving food.
Forcomplete accessto drawers and freezer baskets,
doors must be ableto fully open.
Allow thefollowing clearancesfor easeof installation, proper air circulation,and plumbingand electrical
connections: Sides & Top:3/8 inch Rear. 1 inch
Trans ort Un acka ed Refri oratorToSite
Bynow, you havealreadyremovedyourrefrigerator'sshipping carton.You rnaystill need
to usea hand truck tomove it through closespaces orentrances. Ifthe refrigeratoris
largerthan anentrance,considertwo options:
Removethe entrancedoor if oneexists.
Removethe refrigeratordoors (see howin your Use& Care Guide).
Whenusing a hand truck:
* Loadrefrigerator from sideof cabinet only.
Donot run retainingstraps over handles.
Donot over-tighten retaining straps.
Neveruserefrigeratorhandlesto movethe refrigerator.
* Removetapefrom doors only after unit is in place.
ConnectWaterSu !
Before Installing The Water Supply Line, You Will Need:
* BasicTools: adjustable wrench, flat-blade screwdriver,
and PhillipsTMscrewdriver
Access to ahousehold cold water line with water
pressure between30 and 100 psi.
A water supply line made of 1ginch (6.4ram) OD, copper
or stainlesssteeltubing. To determine the length of
tubing needed,measure the distance from the ice maker
inletvalve atthe backof
the refrigerator to your
cold water pipe. Then add
approximately 7 feet (2.1
meters), so the refrigerator
can be moved out for
cleaning (as shown).
A shutoff valve to connect
the water supply lineto your
household water system. DO
NOTuse a self-piercing type
shutoff valve.
A compression nut
and ferrule (sleeve) for
connecting a copper water
supply line to the ice maker
inletvalve.
To Connect Water Supply Line To Ice Maker
Inlet Valve
1. Disconnect refrigerator from electric power
SOUrCe,
2. Place end of water supply line into sink or
bucket. Turn ONwater supply and flush sup-
ply line until water is clear. Turn OFFwater
supply at shutoff valve.
3. Remove plastic capfrom water valve inlet and
discard cap.
4. If you use copper tubing - Slide brass
compression nut, then ferrule (sleeve) onto
water supply line. Push water supply line
into water valve inlet as far as it will go
\I Z
_at_ Vak,e
t (it;elude erlough _ubir;9 it; _op m alk_w
(1Ainch/6.4 mm). Slide ferrule (sleeve) into alve inlet and finger tighten compression nut onto
valve. Tighten another half turn with a wrench; DO NOT over tighten. See Figure 1.
If you use stainless steel tubing - The nut and ferrule are already assembled on the tubing. Slide
compression nut onto valve inlet and finger ghtencompression nut onto valve. Tighten another
half turn with a wrench; DO NOTover tighten. SeeFigure 2.
With steel clamp and screw, secure water supply line (copper tubing only) to rear panelof refrigerator
5.
as shown.
6. Coil excess water supply line (copper tubing
and arrange coils sothey do not vibrate or
7. Turn ON water supply at shutoff valve and
8. Reconnect refrigerator to electrical power
9. Toturn ice maker on, lower wire signal arm (
switch to the "l" position (rear mounted).
_nly), about 2½ turns, behind refrigerator as shown
_ar against any other surface.
hten any connections that leak.
Jrce.
_ide mounted) or set the ice maker's 0n/0ff power
iiii_iiiii_i_!i!_ii_i_i!iiii_ili!_!!iii_i_i!iii!_ili_I_I_ii!i!ii!i!_i;iiii_iiiii_iiiii_iiiiiiiii!iiiii_!iiii!!i;!!i_i_i_i_i_i_i_ii_i;!_iiiiii_i!ii!i_i_!iiiii!i!iiii_iii_i!!i,iii!i_iii!_i:i_i!iiiiii!;ii_!ili;iiii!_!ii!i!_!_i;i!i_i_i_:_:!_!_i!_i_i!_i_i_:i_i_!i_i_!_i_i_i_!_!;!_ii_i_!i_i_!_;_i!i!_:!_!i!_!i_;iii_!i_;_!i_;_!i_;i!_i_!_!!!i_!!;!_:_!_i_!_!JJii_!i!i_!i_i_!_!!i_i!i_!i_!_i_ii!_!!_!i_i;i_!!iii;i_i_i_i_i_i_i_ii!i!_ii!i!_i_!_i_:!!!_:_;i_ii_i_i:_!_i_i!_i!_!_i!_iij!_i_!_!ii__i_i_i:!ii!iii_i!i!_i:ii!_i_i!ii_i!iii_i!i_i!iiii_ill_i_iiii_i:i!i_!,!i!_!,!i_!_i_i_!i!ii
PlaceIn Permanent
tuition
LevelRefrigerator & Adjust Doors(if necessary)
'½.,oo,o,,oo_%,_o,,,,o-_
To install toe grille !io.o"_._,_ _
1 Open both doors. Slide left and right es of toe grille over
lower hinges of refrigerator.
2 While pushing toe grdle firmly against binet, fasten bottom
clips of toe grille to cabinet.
3 Fasten top clips to cabinet.
4 Close the doors. Fasten right and left side clips into groove of bottom hinge.
To remove toe grille
1 With both doors closed, unfasten right and left side clips of toe
grille from bottom hinge grove.
2 Open both doors. Press firmly on top oftoe grille untiltop of toe
grille pops off.
3 Pull toe grille outward towards your bod_ .nd off of lower hinges.
NOTE: Level the unit with the adjustable rollers _fore leveling the doors.
To level the doors using the adjustable lower hinge (some models): _i
1 Before leveling either door, remove set screw that locks door height into posi- _1I_li °_'_
T T
tion. (The door cannot be adjusted without set screw removed.) _ EtCh/
2 If the refrigerator door is lower than the freezer door, raise the refrigerator
door by turning the adjustment screw counterclockwise using a7/l_inch
wrench. (See iflustration.)
3 If the freezer door is lower than the refrigerator door raise the
freezer door byturningthe adjustment screw counterclockwise _1 .....................
using a 7/_ inch wrench. (See dlustration.) ....._!_,!:_!!_!_i........................,_*::;::::........................................
4 After leveling, verify door stop contacts lower hinge and top of door i:_;
does not contact upper hinge through full movement of door (from % i
fully closed to fully open). '_'i
5 Replace the toe grdle by fitting it into _ ce.
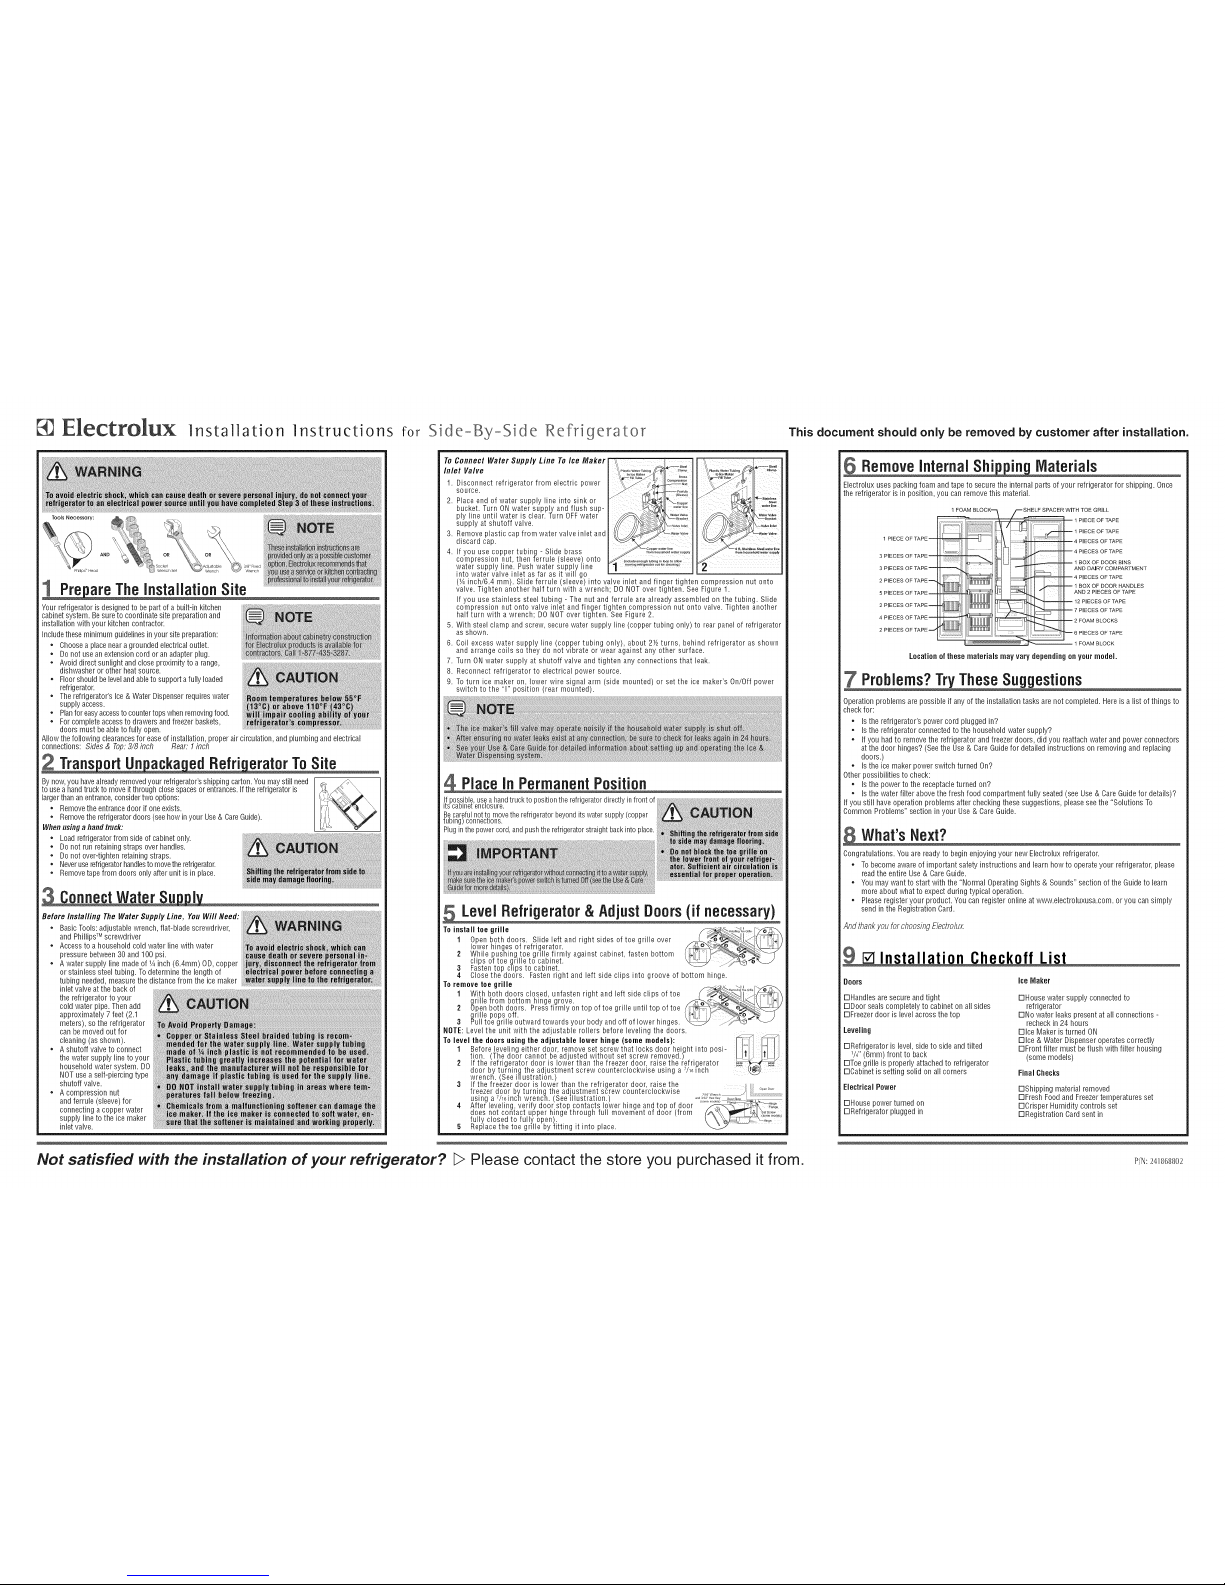
RemoveInternal Shi in Materials
Electrolux uses packing foam and tape to secure the internal parts of your refrigerator for shipping. Once
the refrigerator is in position, you can remove this material.
1 PIECE OF TAPE--
3 PIECES OF TAPE--
3 PIECES OF TAPE--
2 PIECES OF TAPE_
5 PIECES OF TAPE--
2 PIECES OF TAPE_
4 HECES OF TAPE--
2 PIECES OF TAPE _
1 FOAM BLOCK-
....................
_SHELF SPACER WiTH TOE GRILL
_ il-- 4P_ECESOFTAPE
4 PIECES OF TAPE
_ I BOX OF DOOR BINS
AND DAIRY COMPARTMENT
_--_4 P,ECESOFTAPE
i _ . ,---"'t _ 1 BOX OF DOOR HANDLES
X J _ AND 2 PIECES OF TAPE
_--_P,ECESOFTAPE
C_--_ 7 PIECES OF TAPE
FOAMOLOCKS
Location ofthese materials may vary depending onyour model,
7 Problems?TryTheseSuggestions
Operation problems are possible if anyof the installation tasksarenot completed. Here isa list of things to
check for:
Is the refrigerator's power cord pluggedin?
Is the refrigerator connected to the household watersupply?
Ifyou had to removethe refrigerator and freezer doors, did you reattachwater and power connectors
at the door hinges? (See the Use& CareGuide for detailed instructions on removing and replacing
doors.)
Is the ice makerpower switch turned On?
Other possibilities tocheck:
Is the powerto the receptacleturned on?
Is the waterfilter above thefresh food compartment fully seated (see Use& CareGuidefor details)?
Ifyou still have operation problems after checking thesesuggestions, pleasesee the "Solutions To
Common Problems" section in your Use & Care Guide.
, ?
Whats Next.
Congratulations. You are ready to beginenjoying your new Electrolux refrigerator.
* To becomeaware of important safety instructions and learn how to operate your refrigerator, please
readthe entire Use& Care Guide.
* You may want to start with the "Normal Operating Sights & Sounds"section of the Guideto learn
more about what to expectduring typical operation.
Pleaseregister your product. Youcan register online at www.electroluxusa.com, oryou can simply
send in the Registration Card.
Andthankyoufor choosingElectro/ux.
9 I--4In II i n h k ff Li
Doors iceMaker
E]Handlesare secure and tight
E]Door seals completely to cabinet on all sides
E]Freezerdoor is level across the top
Leveling
E]Refrigerator is level, side to side and tilted
W' (6ram) front to back
E]Toegrille isproperly attached to refrigerator
DCabinet is setting solid on all corners
Electrical Power
E]Housepower turned on
E]Refrigerator plugged in
E]House water supply connected to
refrigerator
E]No water leaks present atall connections -
recheck in 24 hours
E]lce Maker is turned ON
E]lce & WaterDispenser operates correctly
E]Front filter must beflush with filter housing
(some models)
Final Checks
E]Shipping material removed
E]Fresh FoodandFreezertemperatures set
E]Crisper Humidity controls set
E]Registration Card sent in
Not satisfied with the installation of your refrigerator? L>Please contact the store you purchased it from.
 Loading...