

Page 1

Page 2
Dear customer,
Please read these operating instructions carefully
and pay particular attention to the safety notes
indicated in the first pages. We recommend that you
keep this instruction booklet for future reference and
pass it on to any future owners.
Transport damages
When unpacking the appliance, check that it is not
damaged. If in doubt, do not use it and contact the
Service Centre.
The symbols you will see on some paragraphs of this booklet have the following meaning:
The warning triangle and/or the key words (Warning!, Caution!) emphasize information that is particularly
important for your safety or correct functioning of the appliance.
The information marked with this symbol provides additional instructions and practical tips on the use of
the appliance.
Tips and information about economical and ecological use of the machine are marked with this symbol.
Our contribution to the protection of the
environment: we use environmentally
friendly paper.
2
Page 3

Contents
Warnings 4-5
Disposal 5
Tips for en vir onmental protection 5
Technical specifications 6
Installation 7
Unpacking 7
Positioning 7
Water inlet 7
Water drainage 8
Electrical connection 8
Your new washing machine 9
Description of the appliance 9
Door locked pilot light 9
Detergent dispenser drawer 9
Maintenance 23
Bodywork 23
Detergent dispenser drawer 23
Drain filter 23
Water inlet filter 23
Emergency emptying out 24
Frost precautions 24
Something not working? 25-26
ENGLISH
Use 10
Control panel 10
Controls 10-13
Functions 13-14
Programme information 14-15
Washing hints 16
Sorting the laundry 16
Temperatures 16
Before loading the laundry 16
Maximum loads 16
Laundry weights 16
Removing stains 16
Detergents and additives 17
Operating sequence 18-19
Washing programmes 20
Special programmes 21
International wash code symbols 22
3
Page 4

Warnings
The following warnings are provided in the interests of overall safety. You must read them carefully before
installing or using the appliance.
Installation
• All internal packing must be removed before using
the appliance. Serious damage may be caused to
the machine or adjacent furniture if the protective
transit devices are not removed or are not
completely removed. Refer to the relevant
paragraph in the instruction book.
• Any electrical work required to install this appliance
must be carried out by a qualified electrician.
• Any plumbing work required to install this
appliance must be carried out by a qualified
plumber.
• After having installed the machine, check that it is
not standing on its electrical supply cable.
• If the appliance is placed on a carpeted floor,
ensure that air can circulate freely between the feet
and the floor.
Use
• This appliance is designed for domestic use. It
must not be used for purposes other than those for
which it was designed.
• Only wash fabrics which are designed to be
machine washed. Follow the instructions on each
garment label.
• Do not overload the appliance. Follow the
instructions in the instruction book.
• Make sure that all pockets are empty. Objects such
as coins, safety pins, pins and screws can cause
extensive damage.
• Do not machine wash garments saturated with
petroleum, methylated spirits, trichlorethylene, etc.
If such fluids have been used to remove stains
prior to washing, wait until they have completely
evaporated from the fabric before placing garments
in the appliance.
• Place small items such as socks, belts, etc. in a
cloth bag or pillowcase to prevent them getting
trapped between the drum and the tub.
• Use only the recommended quantities of fabric
softener. An excessive amount could damage the
laundry.
• Leave the porthole door slightly ajar when the
appliance is not in use. This preserves the door
seal and prevents the formation of musty smells.
• Always check that water has emptied out before
opening the door. If not, drain the water following
the instructions in the instruction book.
• Always unplug the appliance and shut the water
tap after use.
General safety
• Repairs to the machine must be carried out only by
qualified personnel. Repairs carried out by
inexperienced persons could cause serious
danger. Contact your local Service Centre.
• Never pull the power supply cable to remove the
plug from the socket; always take hold of the plug
itself.
• During high temperature wash programmes the
door glass may get hot. Do not touch it!
4
Page 5

Child safety
• Children are often not aware of how dangerous
electrical appliances can be. When the machine is
working, children should be carefully supervised
and not be allowed to play with the appliance.
• The packaging components (e.g. plastic film,
polystyrene) can be dangerous to children - danger
of suffocation! Keep them out of children’s reach.
Disposal
• Keep all detergents in a safe place out of children’s
reach.
• Make sure that children or pets do not climb into
the drum.
• When the appliance is to be scrapped, cut off the
electrical supply cable and destroy the plug with
the remaining cable. Disable the door catch in
order to prevent children from becoming trapped
inside while playing.
ENGLISH
Packaging materials
The materials marked with the symbol are
recyclable.
>PE<=polyethylene
>PS<=polystyrene
>PP<=polypropylene
This means that they can be recycled by disposing of
them properly in appropriate collection containers.
Tips for environmental protection
To save water, energy and to help protect the
environment, we recommend that you follow these
tips:
• Normally soiled laundry may be washed without
prewashing in order to save detergent, water and
time (the environment is protected too!).
• The machine works more economically if it is fully
loaded.
Machine
Use authorised disposal sites for your old appliance.
Help to keep your country tidy!
• With adequate pre-treatment, stains and limited
soiling can be removed; the laundry can then be
washed at a lower temperature.
• Measure out detergent according to the water
hardness, the degree of soiling and the quantity of
laundry being washed.
5
Page 6

Technical specifications
DIMENSIONS Height 85 cm
Width 60 cm
Depth 58 cm
MAXIMUM LOAD Cotton 5.5 kg
Synthetics 2.5 kg
Delicates 2.5 kg
Woollens 2 kg
SPIN SPEED 1400 rpm max.
POWER SUPPLY VOLTAGE/FREQUENCY 220-230 V/50 Hz
TOTAL POWER ABSORBED 2200 W
MINIMUM FUSE PROTECTION 10 A
WATER PRESSURE Minimum 500 kPa
Maximum 800 kPa
This appliance complies with the following EEC Directives:
73/23/EEC of 19/02/73 relating to low voltage
89/336/EEC of 03/05/89 relating to electromagnetic compatibility.
6
Page 7
Installation
P0256
P0255
P0021
P1051
P0020
Unpacking
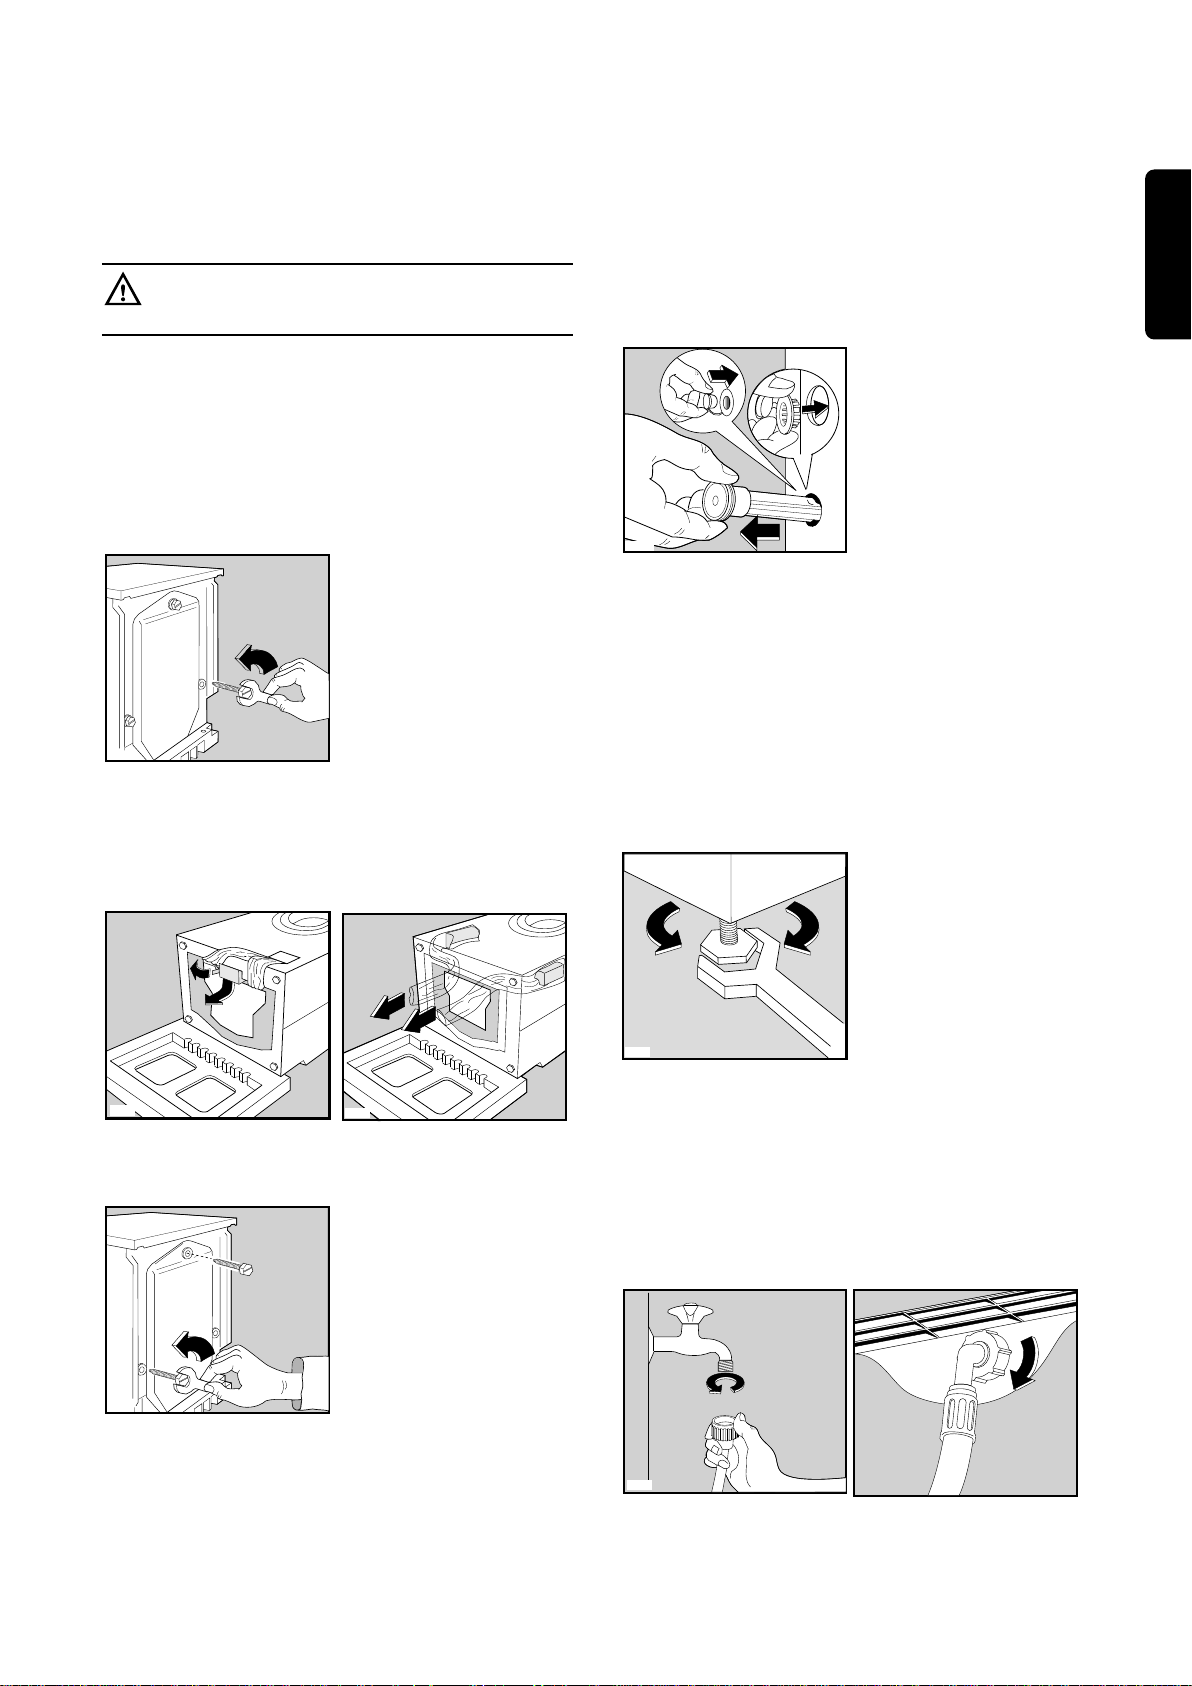
All transit bolts and packing must be removed
before using the appliance.
You are advised to keep all transit devices so that
they can be refitted if the machine ever has to be
transported again.
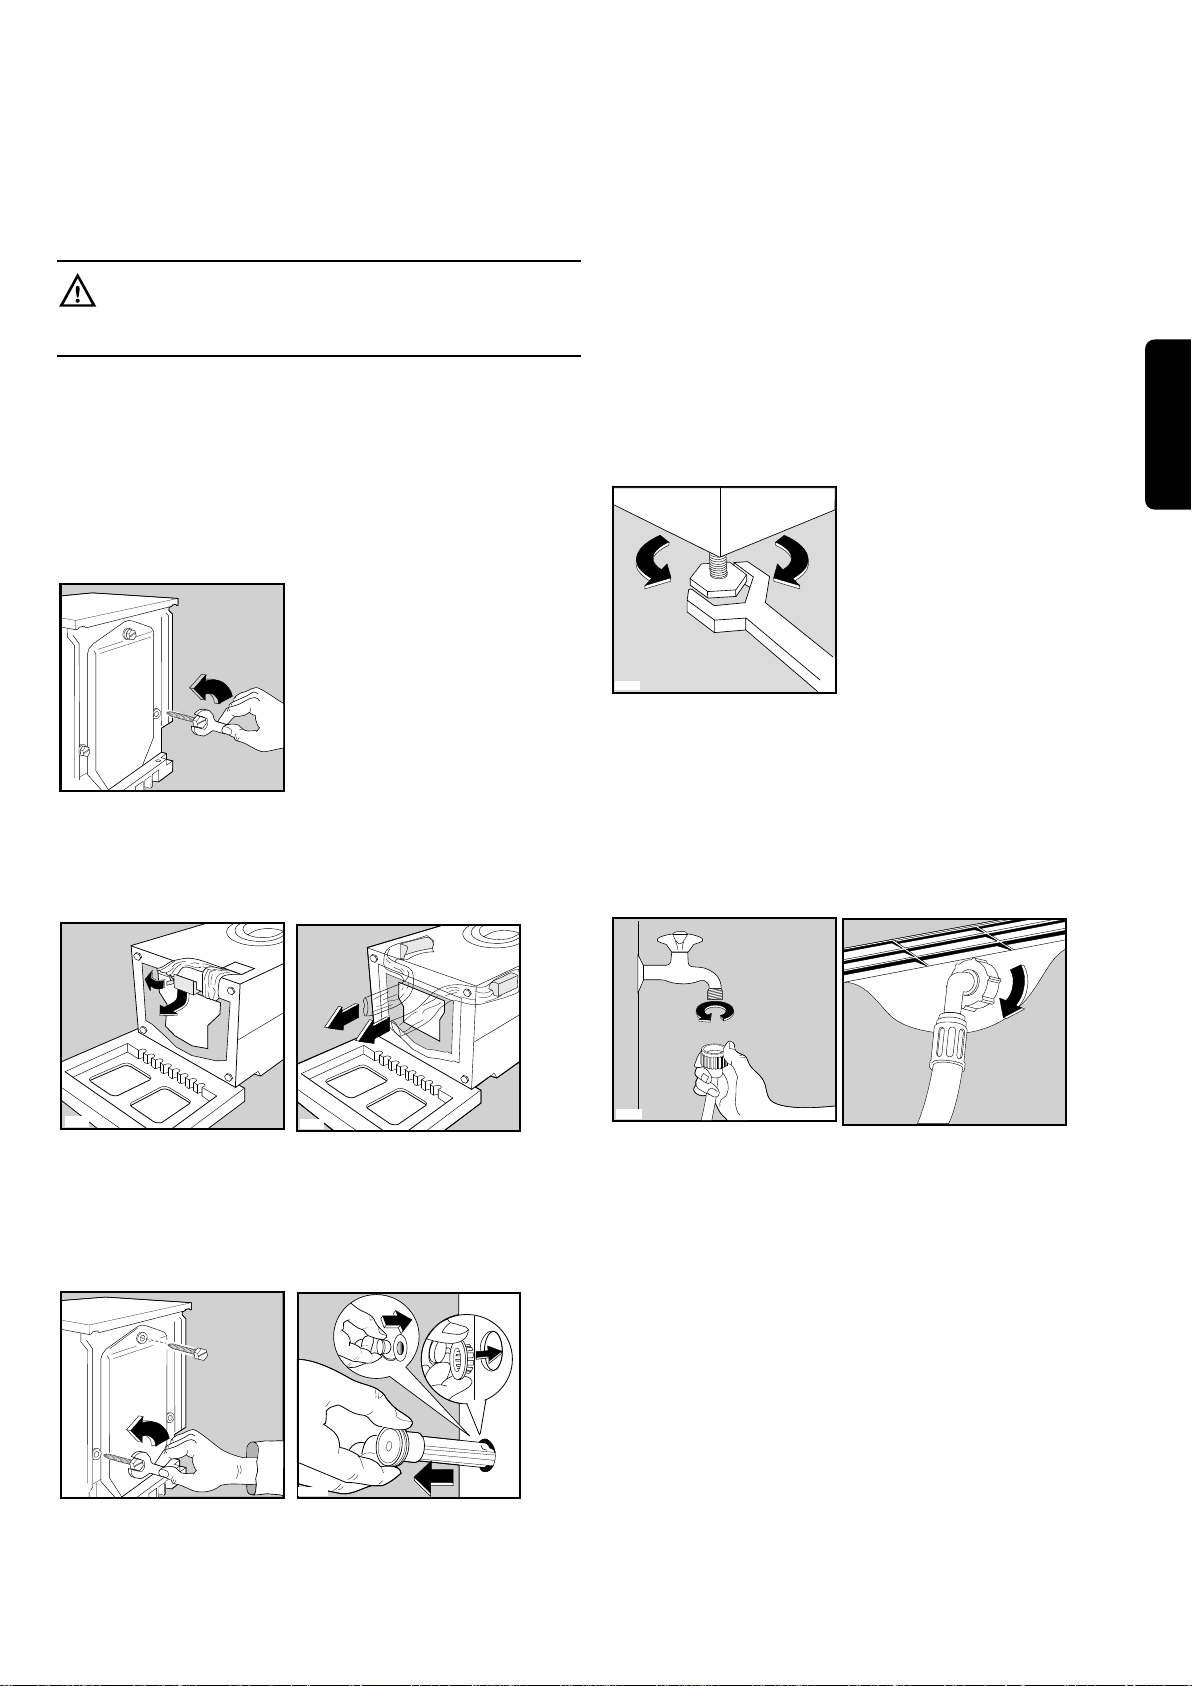
1. Using a spanner, unscrew and remove the rear
right-hand bolt and lay the machine on its back,
taking care not to squash the hoses. This can be
avoided by placing one of the corner packing
pieces between the machine and the floor.
2. Remove the polystyrene block from the underside
of the machine and release the two plastic bags.
3. Carefully remove the right-hand bag (1) then the
left-hand bag (2) by pulling them towards the
centre of the machine.
5. Pull out the three plastic spacers from the holes
into which the bolts were fitted.
6. Plug the open holes with the plugs which you will
find at the back of the appliance.
Positioning
Install the machine on a flat hard floor.
Make sure that air circulation around the machine is
not impeded by carpets, rugs etc. Check that the
machine does not touch the wall or other kitchen
units.
Carefully level by screwing the adjustable feet in or
out. Never place cardboard, wood or similar
materials under the machine to compensate for any
unevenness in the floor.
ENGLISH
2
1
P1068
4. Set the machine upright and remove the two
remaining bolts from the back.
P1066
Water inlet
Connect the water inlet hose to a tap with a 3/4"
thread.
The other end of the inlet hose which connects to the
machine can be turned in any direction. Simply
loosen the fitting, rotate the hose and retighten the
fitting, making sure there are no water leaks.
P1088
7
Page 8

The inlet hose must not be lengthened. If it is too
P0023
P0022
short and you do not wish to move the tap, you will
have to purchase a new, longer hose specially
designed for this type of use.
Water drainage
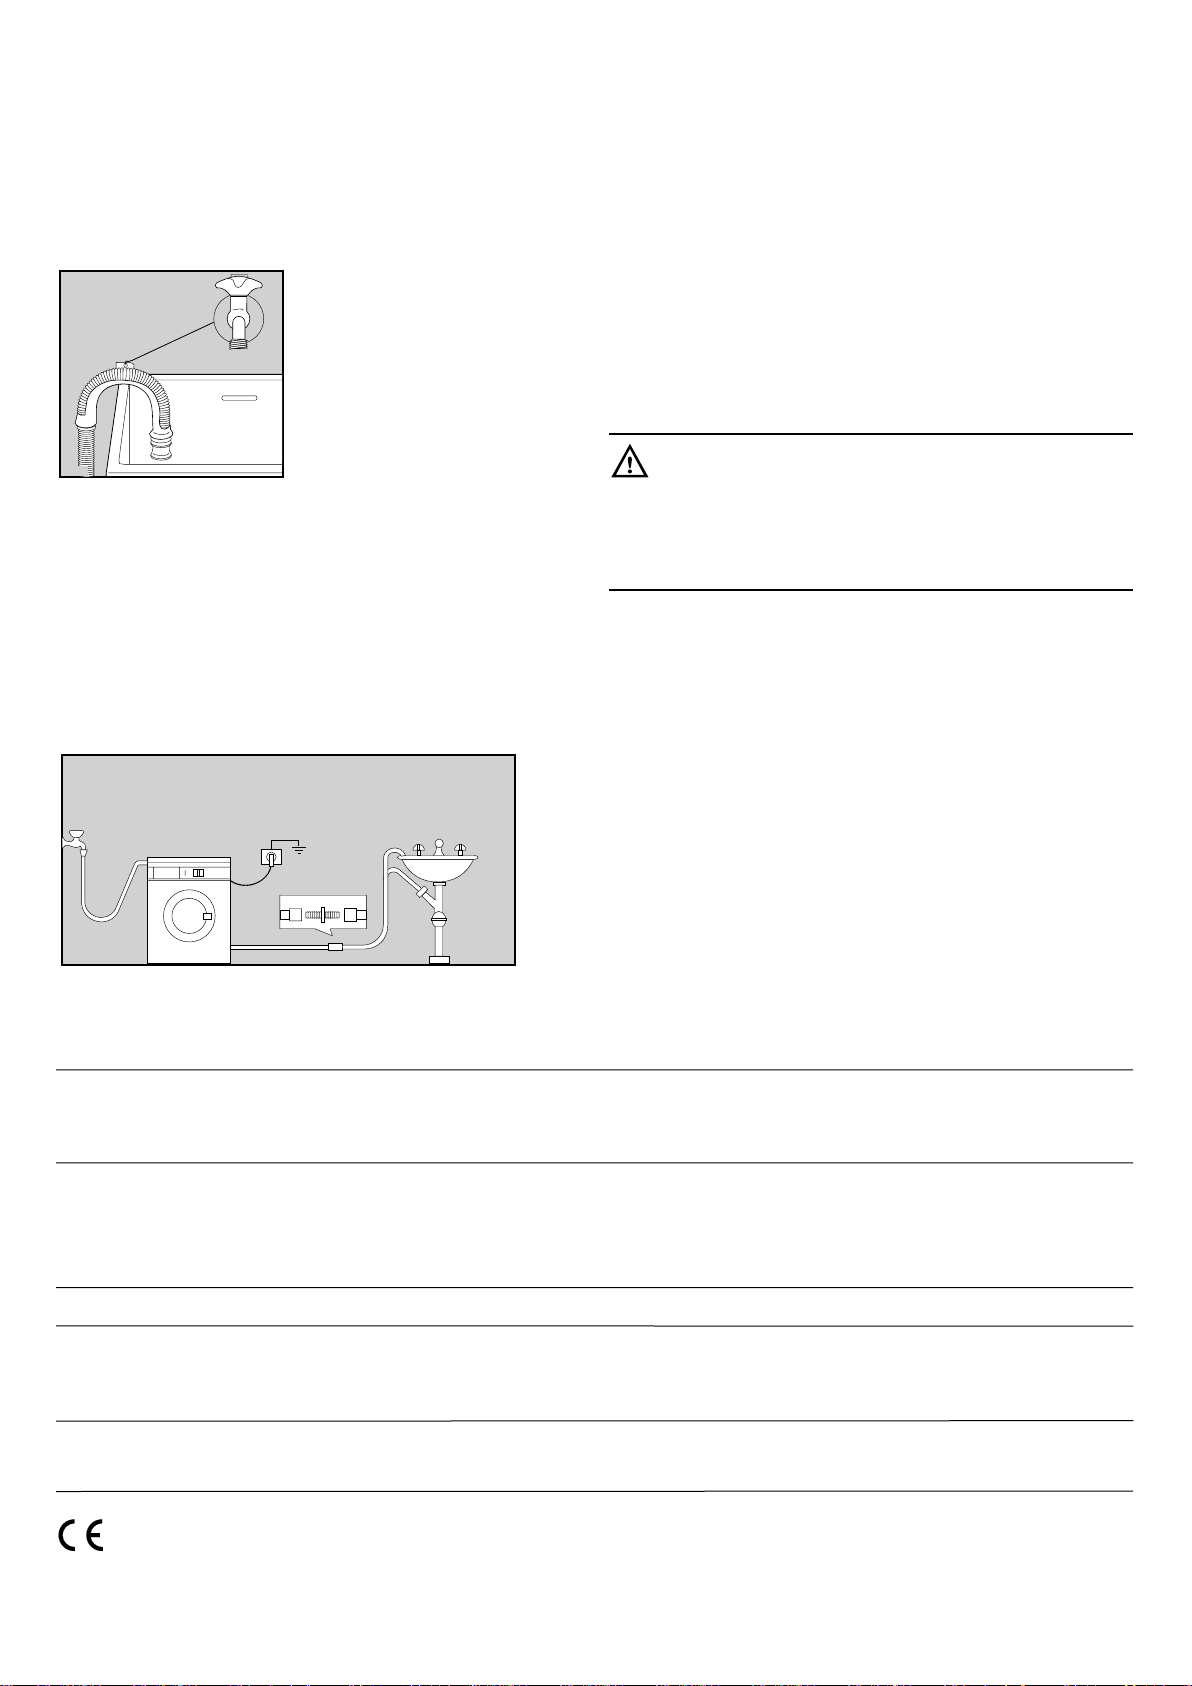
The end of the drain hose can be positioned in three
ways:
Hooked over the edge of a sink using the plastic
hose guide supplied with the machine. In this
case, make sure the end cannot come unhooked
when the machine is emptying.
This could be done by tying it to the tap with a piece
of string or attaching it to the wall.
Electrical connection
This machine is designed to operate on a 220-230 V,
single-phase, 50 Hz supply.
Check that your domestic electrical installation can
take the maximum load required (2.2 kW), also
taking into account any other appliances in use.
Connect the machine to an earthed socket.
The manufacturer declines any responsibility
for damage or injury through failure to comply
with the above safety precaution.
Should the appliance power supply cable
need to be replaced, this should be carried
out by our Service Centre.
Important! The power supply cable must be easily
accessible after installing the machine.
In a sink drain pipe branch. This branch must be
above the trap so that the bend is at least 60 cm
above the ground.
Directly into a drain pipe at a height of not less
than 60 cm and not more than 90 cm.
The end of the drain hose must always be
ventilated, i.e. the inside diameter of the drain pipe
must be larger than the outside diameter of the drain
hose.
The drain hose must not be kinked. Run it along the
floor; only the part near the drainage point must be
raised.
8
Page 9
Your new washing machine
This new machine meets all modern needs for effective treatment of laundry with low water, energy and
detergent consumption.
• The programme selector dial combines the function of programme and temperature selection, making it
easier to set the programme.
• The programme progress display shows the programme steps selected and the programme phase which
is running.
• The special wool programme with its new delicate wash system treats your woollens with extreme care.
• The balance control device ensures the machine is stable during the spin.
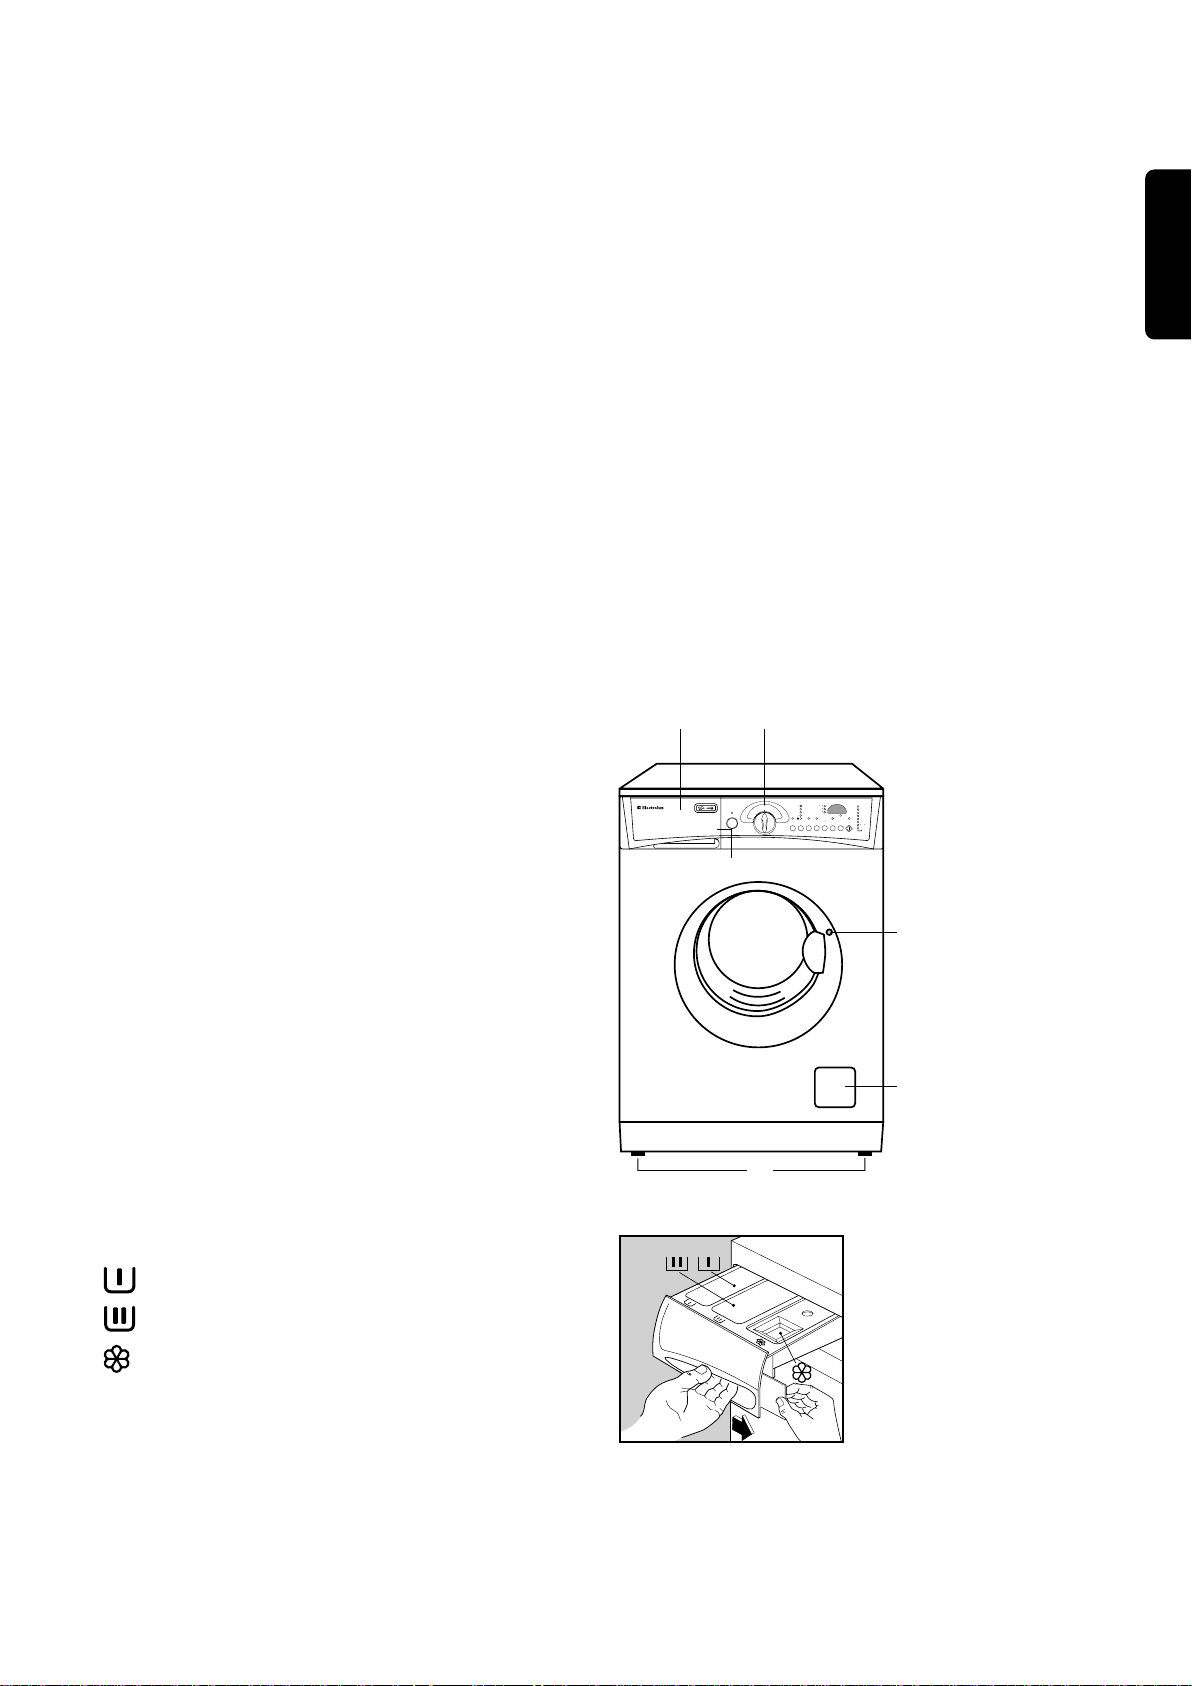
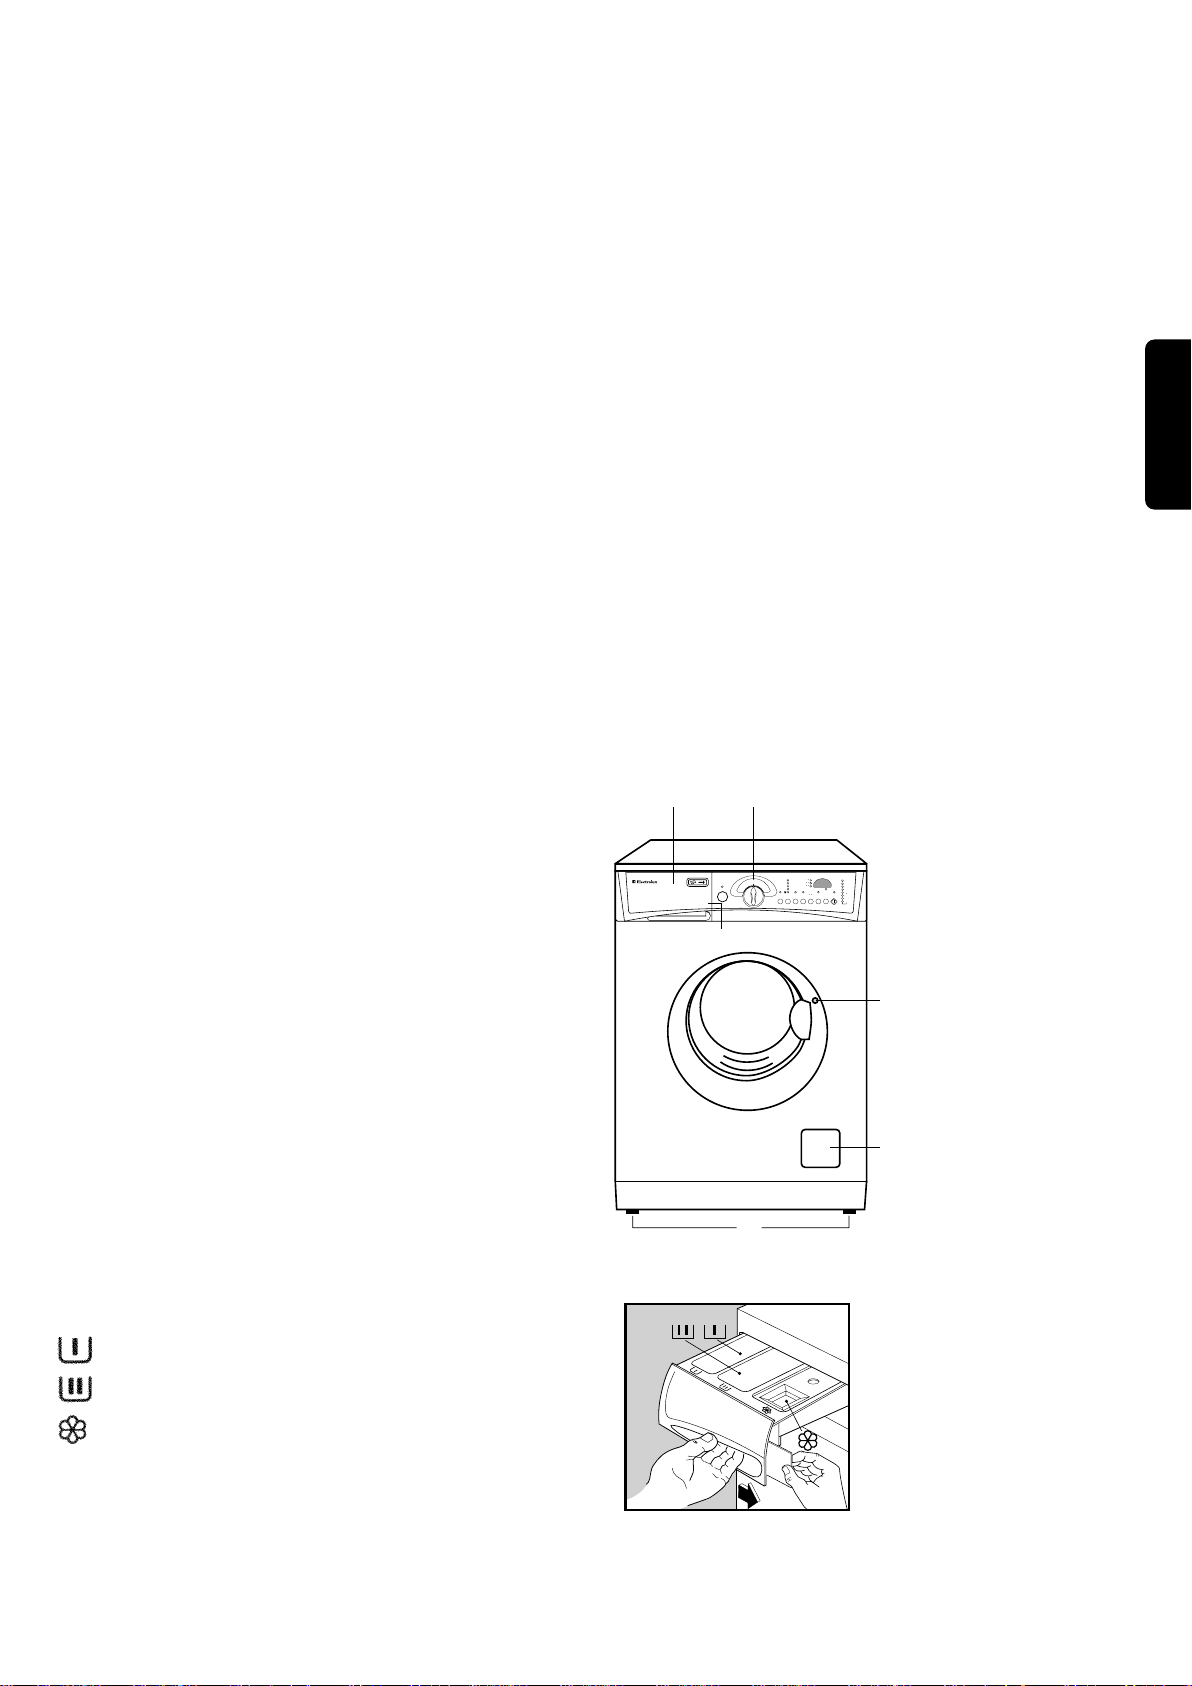
Description of the appliance
ENGLISH
1 Detergent dispenser drawer
2 Programme chart
3 Control panel
4 Door locked pilot light
5 Drain filter
6 Adjustable feet
Door locked pilot light
It stays on during the whole programme indicating
that the door is locked.
When the light goes out, the door can be opened
(see page 14).
Detergent dispenser drawer
Prewash
1
3
1400
ÇOK KIRLI
ÖN YIKAMA
AÇMA
KAPAMA
900
700
500
ÖN
YIKAMA SIKMA
ÖN YIKAMA
NORMAL KIRLI
YIKAMA
YIKAMA
AZ KIRLI
DURULAMA
DURULAMA
SUDA
BEKLETME
BOSALTMBOSALTM
EKSTRA
SUDA
BASLAT
KIRLILIK
SIKMA
BIO
DURULAMA
BEKLETME
BEKLET
GECIK.
DURUMU
FILTRE IKAZ
FILTRE IKAZ
PROGRAM
PROGRAM
SONU
EW 1478 F
2
4
5
6
Main wash
Fabric softener, starch
P0874
9
Page 10

Use
Control panel
AÇMA
KAPAMA
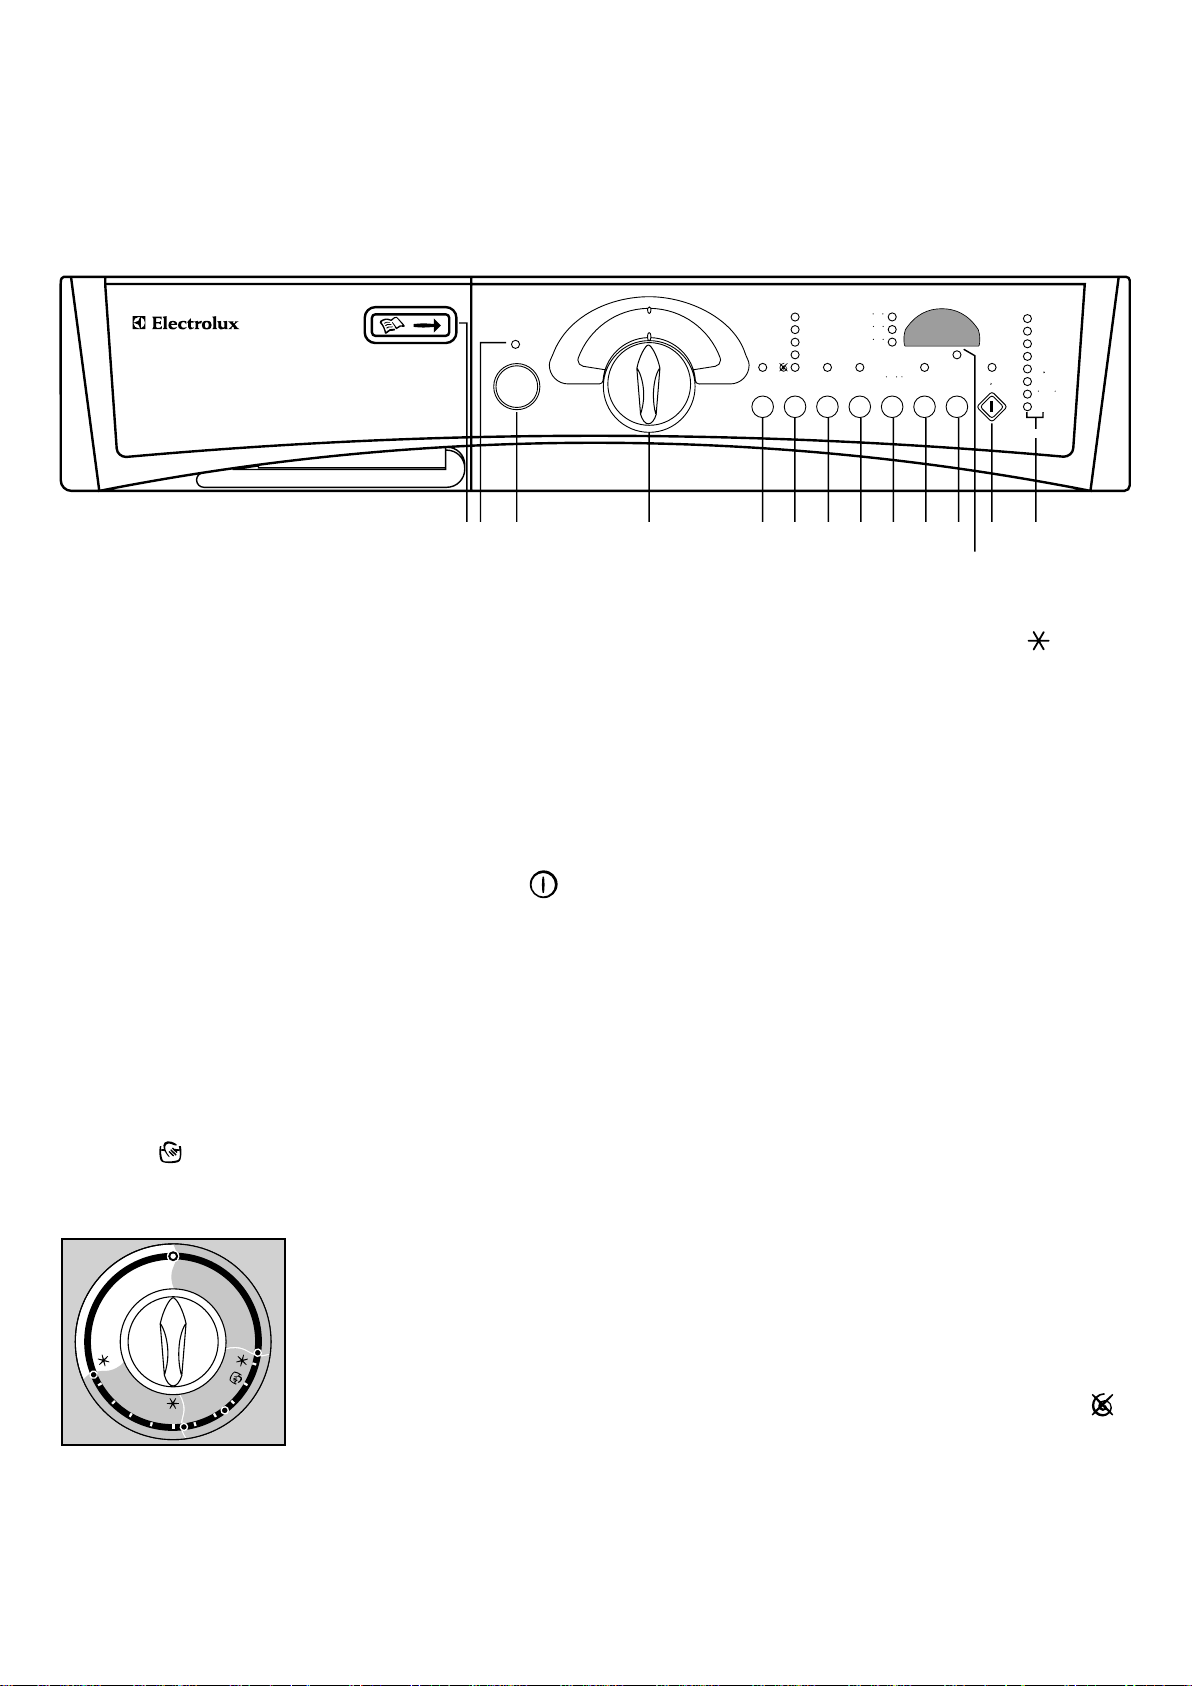
12 3 4 5 6 7 8 9 10 11 13 14
1 Programme chart
A programme chart in Turkish is in the interior part of
the detergent dispenser drawer.
2 Mains-on light
This light comes on when the ON/OFF button is
pressed, and goes out when it is pressed again.
3 ON/OFF button AÇMA KAPAMA
Press this button to switch the machine on. Press it
again to switch the machine off.
4 Programme selector dial
The selector is divided into 5 sections:
• Cotton, linen (light blue section)
• Synthetics (yellow section)
• Delicates (black section)
• Woollens (hand washing) (black section)
• Special programmes A....G
• Reset programme O
G
95°
40°
30°
40°
F
D
C
B
A
30°
40°
30°
40°
30°
6
50°
E
°
0
60°
50°
1400
900
700
500
ÖN
YIKAMA SIKMA
SUDA
BEKLETME
ÇOK KIRLI
NORMAL KIRLI
AZ KIRLI
EKSTRA
DURULAMA
KIRLILIK
DURUMU
ÖN YIKAMA
ÖN YIKAMA
YIKAMA
YIKAMA
DURULAMA
DURULAMA
SUDA
BEKLETME
BOSALTM
BOSALTM
BASLAT
BEKLET
SIKMA
FILTRE IKAZ
FILTRE IKAZ
PROGRAM
PROGRAM
SONU
EW 1478 F
BIO
GECIK.
12
Position E corresponds to the ENERGY SAVING
programme and position to “cold wash”.
At the end of the programme the selector dial
must be turned to position O.
Programme Option buttons
Depending on the programme, different functions
can be combined. These must be selected after
choosing the desired programme and before
depressing the START/PAUSE button
BAÇLAT/BEKLET.
When these buttons are pressed, the corresponding
pilot lights come on. When they are pressed again,
the pilot lights go out.
If an incorrect option is selected, the corresponding
pilot light flashes for about 2 seconds and the
message Err is displayed.
5 Prewash button ÖN YIKAMA
The machine performs a prewash cycle at 30°C max.
The prewash cycle ends with a short spin at 650 r.p.m.
in programmes for Cotton and Synthetics, and with
emptying of the water for Delicates.
This option is not available with the wool programme.
For use when washing heavily soiled laundry.
6 Spin speed button SIKMA
Press this button to reduce the maximum speed of the
final spin proposed by the machine for the selected
programme or to select position (no spin).
The light corresponding to the selected option
illuminates.
The selector dial can be turned either clockwise or
anticlockwise.
10
Page 11

Spin speed
The following speeds are available for the different
fabrics:
• Cotton, linen:
500/700/900 max 1400 r.p.m.
• Synthetics, wool:
500/700 max 900 r.p.m.
• Delicates:
500 max 700 r.p.m.
No spin
By selecting this option the spinning phases are
suppressed.
This function is not available for cotton and linen.
To be selected for extremely delicate items.
7 Anti-crease button SUDA
9 Soil level button KIRLILIK
DURUMU
This button allows you to select the wash
performance according to the degree of soil of you
laundry:
• NORMAL KIRLI (normally soiled): the machine is
pre-set for this position, this means that when you
select a programme, the light corresponding to this
soil level comes on. At this point you can decide to
choose HEAVY SOILED (ÇOK KIRLI) or LIGHTLY
SOILED (AZ KIRLI) depending on how soiled your
laundry is.
•ÇOK KIRLI (heavy soiled): by choosing this option,
the washing time is prolonged by approx. 15
minutes for cottons and 10 minutes for synthetics.
• AZ KIRLI (lightly soiled): this function can be
selected for cotton, synthetics and delicate items,
but not for the ECONOMY programme „E“. The
washing time will be considerably reduced.
ENGLISH
BEKLETME
By selecting this option the last rinse water is not
emptied out, to prevent the fabrics from creasing.
When the programme has finished, the pilot light of
the START/PAUSE button flashes to indicate that
the water must be emptied out.
To empty out water there are 3 possibilities:
• Select programme “D” (draining):
The water is emptied out without spinning.
Attention! Before selecting programme “D” the
selector dial has to be positioned on O (cancelling).
• Depress START/PAUSE button : after
emptying, the machine performs the spin cycle
corresponding to the type of fabric previously
selected.
• Select the spin speed by means of the relevant
button and then depress the START/PAUSE
button.
8 Extra rinse button
EKSTRA DURULAMA
Can be used with all programmes except the wool
programme. The machine performs 4 rinses instead
of 3.
This option is recommended for people who are
allergic to detergents and in areas where the water is
very soft.
10 BIO button
This option can be used for cottons and synthetics
with a temperature of 40°C or more. After reaching
40°C the machine maintains this temperature for
about 10 minutes.
During this period the enzymes contained in the
detergent dissolve the soil on the laundry.
11 DELAY START button GECIK.
The wash programme can be delayed from 1 hour
up to a maximum of 24 hours by means of this
button.
Selecting the delayed start
• Switch the machine on by depressing the ON/OFF
button .
• Select the programme and the required options.
• Select the delay start.
• Depress START/PAUSE button : the machine
starts its hourly countdown.
The programme will start after the selected delay has
expired.
11
Page 12

Altering the delayed start
• Depress START/PAUSE button .
• Depress DELAY START button until the required
time is displayed.
If you wish to cancel the delay, depress the button
only once: the symbol 0 h is displayed.
• Depress START/PAUSE button again.
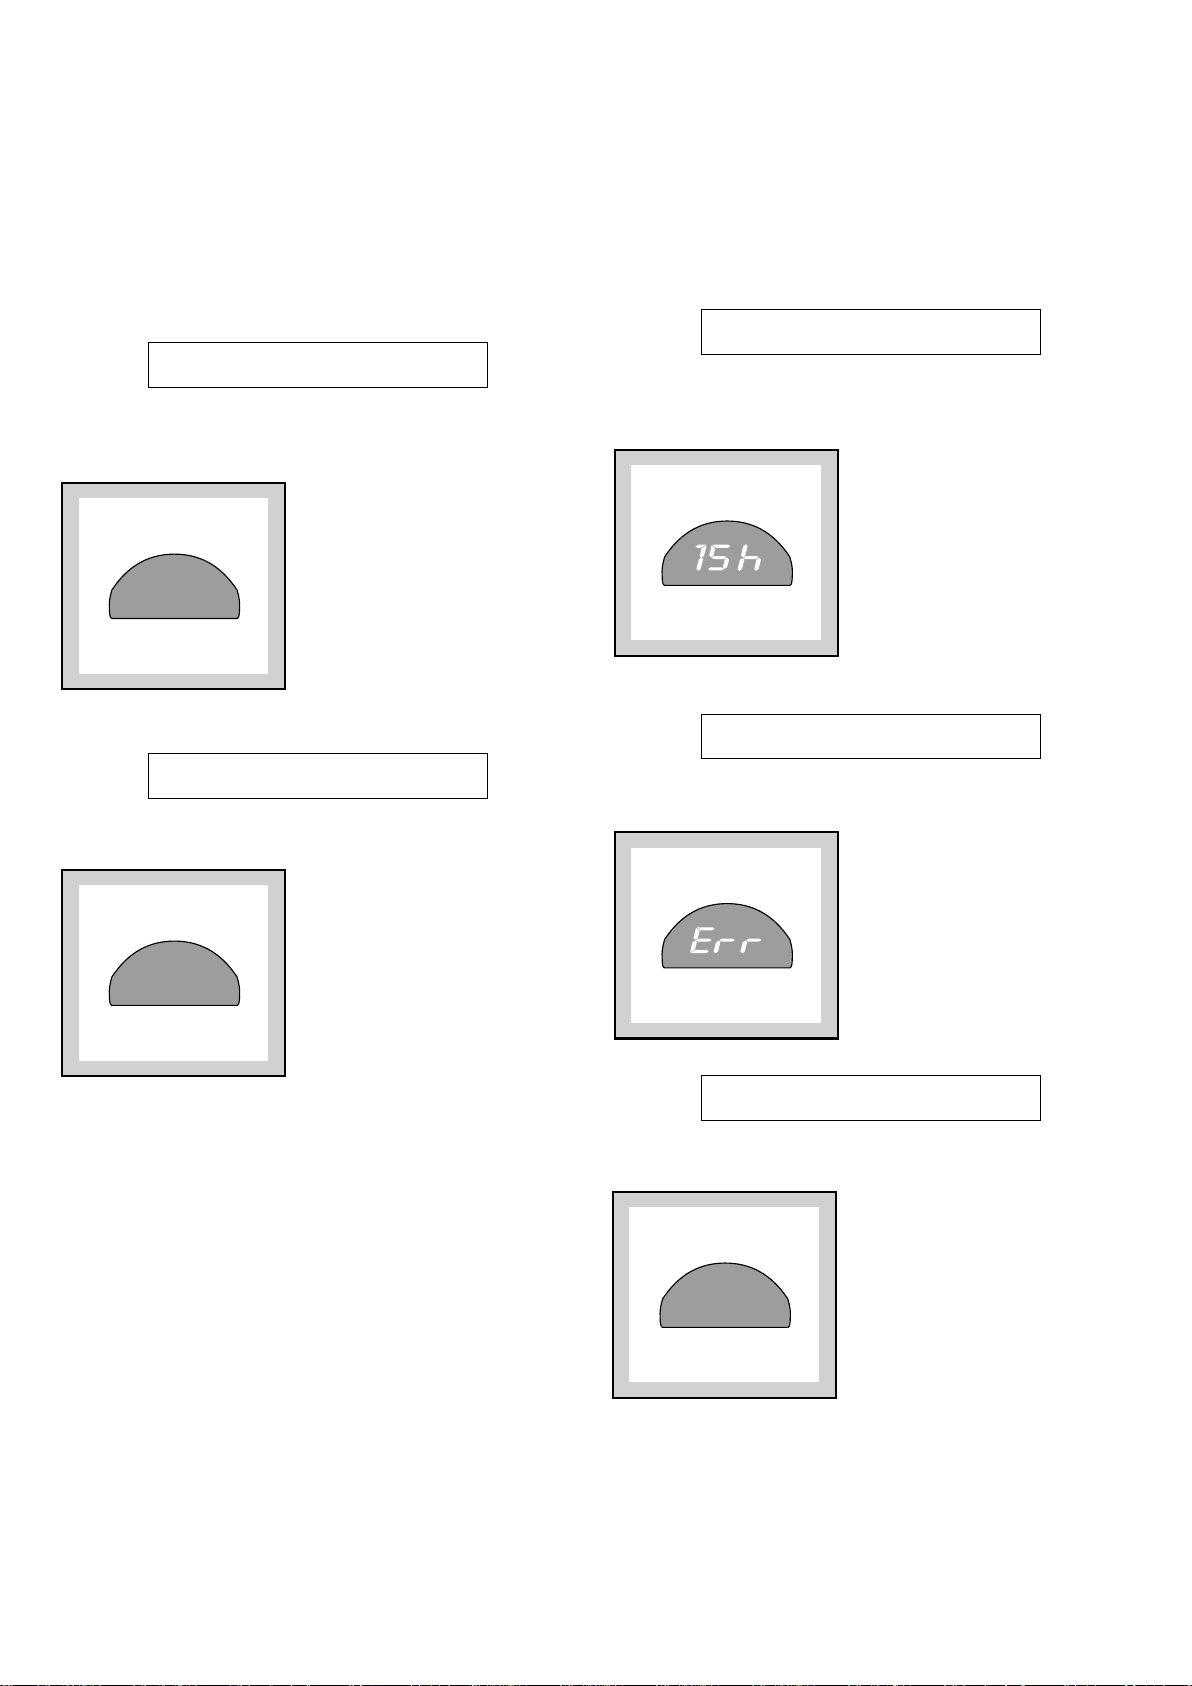
12 DISPLAY
The display shows the following information:
Cancelling - Duration of the programme Delayed start - Incorrect option selection - Alarm
code.
Cancelling
If a programme has been cancelled - programme
selector dial on position O - three flashing dashes
appear on the display.
When the programme has finished a flashing zero
is displayed.
If you have selected the Anti-crease option SUDA
BEKLETME, the zero will not flash.
Delayed start
The selected delay (24 hours max) set by means of
the relevant button appears on the display for 4
seconds, then the duration of the previously selected
programme is displayed.
The countdown is updated every hour.
Incorrect option selection
---
Now you can select a new programme.
Duration of the selected
programme
After selecting a programme, the duration is
displayed in hours and minutes ( for example 2.05).
2.05
The duration is calculated automatically on the basis of
the maximum recommended load for each type of fabric.
After the programme has started, the time remaining
is updated every minute.
If an option which is not compatible with the set wash
programme is selected, the message Err is
displayed.
Alarm codes
In the event of operating problems, some alarm
codes can be displayed, for example E20
(see page 25).
E20
12
Page 13

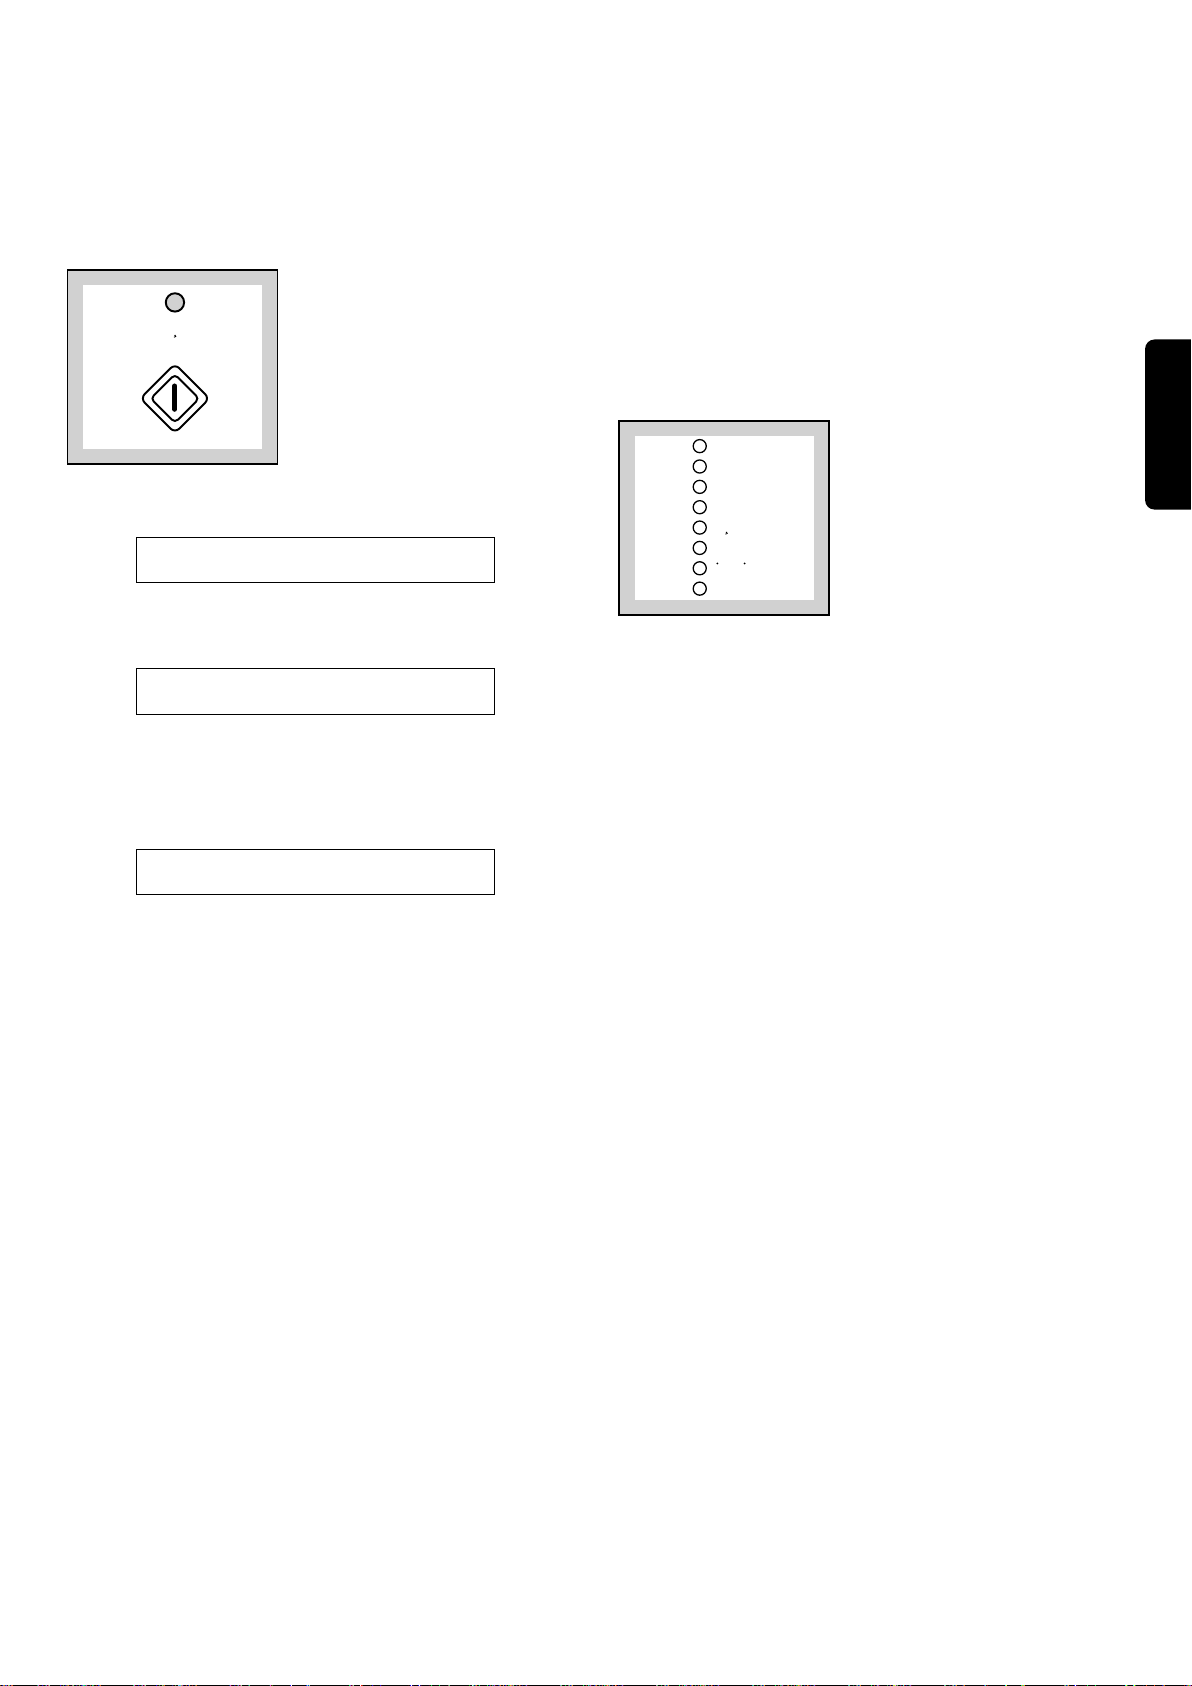
13 START/PAUSE button
14 Programme progress display
BAÇLAT/BEKLET
BASLAT
BEKLET
This button has three functions:
Start - Pause - Draining of water.
Start
After having selected the required programme, press
this button to start the machine; the corresponding
pilot light stops flashing.
If you have selected the delayed start, the machine
begins its countdown. The duration of the
programme or the delay appears on the display.
Pause
To interrupt a programme which is running, depress
the Start/Pause button: the corresponding pilot light
starts to flash.
To restart the programme from the point at which it
was interrupted, press the START/PAUSE button
again.
Draining of water
By depressing the Start/Pause button
• The water of programme “A” (Soak) is emptied out
• The water of the last rinse on programmes with
Anti-crease option SUDA BEKLETME is emptied
out and the laundry is spun.
By selecting the wash programme, the pilot lights
corresponding to the various phases making up the
programme come on.
After the machine has started, only the running
phase pilot light stays on. When the programme has
finished, the End pilot light comes on.
ÖN YIKAMA
YIKAMA
DURULAMA
SUDA
BEKLETME
BOSALTMA
SIKMA
FILTRE IKAZ
PROGRAM
SONU
If the pilot light FILTRE IKAZ flashes at the end of the
programme this means that the drain filter must be
cleaned.
In the event of operating problems one of the
following lights starts to flash and an alarm code
appears on the display.
E10 + SUDA BEKLETME = the machine does not fill
E20 + DURULAMA = the machine does not empty
E40 + YIKAMA = the door has not been closed
To eliminate the problem, see paragraph “Something
not working”.
Functions
Pilot lights
Depending on the programme, different functions
can be combined.
When the relevant buttons are pressed, the
corresponding pilot lights come on.
When they are pressed again, the pilot lights go out.
If an incorrect option is selected, the pilot light
flashes for about 2 seconds and the message Err is
displayed.
ENGLISH
13
Page 14

End of programme
When the door locked light has gone out, the door
can be opened. The light PROGRAM SONU on the
programme progress display illuminates.
A flashing zero appears on the display.
Switch the machine off and remove the laundry.
Turn the programme selector dial to O.
Altering a programme
You can alter the programme before it starts.
When the programme has started, you can only
reset it by turning the programme selector dial to O
and then you can select the new programme.
Start it by depressing the START/PAUSE button.
Interrupting a programme
Depress the START/PAUSE button to interrupt a
programme which is running, the corresponding light
starts to flash.
Cancelling a programme
Turn the selector dial to O to cancel a programme
which is running: three flashing dashes appear on
the display. Now you can select a new programme.
Opening the door after the programme
has started
First set the machine to PAUSE by pressing the
START/PAUSE button.
The door can be opened when the door locked light
has gone out.
If the door does not open, this means that the
machine is already heating, that the water level is
above the bottom edge of the door or that the drum
is turning.
If you cannot open the door but you need to open it
you have to switch the machine off by depressing the
ON/OFF button . After about 2 minutes the door
can be opened (pay attention to the water level!). To
restart the programme depress ON/OFF button
again after closing the door.
Programme information
Wool
Washing programme for machine washable wool as
well as for hand washable woollens and delicate
fabrics with the “hand washing” care symbol.
A = Soak
Select this programme for heavily soiled laundry.
Pour the detergent into the compartment .
This programme is not suitable for wool.
The machine performs a soak at 30°C and stops
with the water in the drum. The water can be
emptied out in 2 ways:
• Draining only by depressing the START/PAUSE
button.
• Draining and spin: turn the programme selector
dial to O, select programme “F” (spin), reduce
eventually the spin speed by means of button
SIKMA and depress START/PAUSE button.
Important!
• If the water is not emptied out within 18 hours, the
machine empties automatically.
• At the end of the soak (after having emptied out the
water) you can select the washing programme. Turn
first the programme selector dial to O, then select the
programme and depress the START/PAUSE button.
B = Rinses
With this programme it is possible to rinse and spin
garments which have been washed by hand.
The machine performs 3 rinses, followed by a final
spin at 1400 r.p.m.
The spin speed can be reduced by depressing
button SIKMA.
C = Softeners
Hand washed garments can be softened with this
programme.
The machine performs 1 rinse, followed by a final
spin at the max. speed, which can be reduced by
depressing button SIKMA.
D = Drain
For emptying out the water of the last rinse in
programmes with the Anti-crease SUDA BEKLETME
option. Turn first the programme selector dial to O,
then select programme “D” and depress the
START/PAUSE button.
14
Page 15

F = Spin
Separate spin at the maximum speed for hand
washed garments. You can reduce the speed by
means of button SIKMA to adapt it to the fabrics to
be spun.
G = Short programme
This is a complete programme that can be
combined with the following options: spin speed
reduction, no spin, anti-crease and delayed start.
To be used for laundry which is lightly soiled or
which needs freshening up.
Max load 2.5 kg.
Washing temperature 30°C
Programme duration 30 minutes
Final spin speed 700 r.p.m.
O = Cancelling
To reset a programme turn the selector dial to O.
Now can a new programme be selected.
ENGLISH
15
Page 16

Washing hints
Sorting the laundry
Follow the wash code symbols on each garment
label and the manufacturer’s washing instructions.
Sort the laundry as follows:
whites, coloureds, synthetics, delicates, woollens.
Temperatures
95° for normally soiled white cottons and linen
(e.g. tea cloths, towels, tablecloths,
sheets...)
60° for normally soiled, colour fast garments
(e.g. shirts, night dresses, pyjamas....) in
linen, cotton or synthetic fibres and for
lightly soiled white cotton (e.g. underwear).
(cold)for delicate items (e.g. net curtains), mixed
30°-40° laundry including synthetic fibres and
woollens.
Laundry weights
The following weights are indicative:
bathrobe 1200 g
napkin 100 g
quilt cover 700 g
sheet 500 g
pillow case 200 g
tablecloth 250 g
towelling towel 200 g
tea cloth 100 g
night dress 200 g
ladies’ briefs 100 g
man’s work shirt 600 g
man’s shirt 200 g
man’s pyjamas 500 g
blouse 100 g
men’s underpants 100 g
Before loading the laundry
Never wash whites and coloureds together. Whites
may lose their “whiteness” in the wash.
New coloured items may run in the first wash; they
should therefore be washed separately the first time.
Make sure that no metal objects are left in the
laundry (e.g. hair clips, safety pins, pins).
Button up pillowcases, close zip fasteners, hooks
and poppers. Tie any belts or long tapes.
Remove persistent stains before washing. Rub
particularly soiled areas with a special detergent or
detergent paste.
Treat curtains with special care. Remove hooks or tie
them up in a bag or net.
Maximum loads
Recommended loads are indicated in the
programme charts.
General rules:
Cotton, linen: drum full but not too tightly packed;
Synthetics: drum no more than half full;
Delicate fabrics and woollens: drum no more than
one third full.
Washing a maximum load makes the most efficient
use of water and energy.
For heavily soiled laundry, reduce the load size.
Removing stains
Stubborn stains may not be removed by just water
and detergent. It is therefore advisable to treat them
prior to washing.
Blood: treat fresh stains with cold water. For dried
stains, soak overnight in water with a special
detergent then rub in the soap and water.
Oil based paint: moisten with benzine stain
remover, lay the garment on a soft cloth and dab the
stain; treat several times.
Dried grease stains: moisten with turpentine, lay
the garment on a soft surface and dab the stain with
the fingertips and a cotton cloth.
Rust: oxalic acid dissolved in hot water or a rust
removing product used cold. Be careful with rust
stains which are not recent since the cellulose
structure will already have been damaged and the
fabric tends to hole.
Mould stains: treat with bleach, rinse well (whites
and fast coloureds only).
Grass: soap lightly and treat with bleach (whites and
fast coloureds only).
Ball point pen and glue: moisten with acetone (*),
lay the garment on a soft cloth and dab the stain.
Lipstick: moisten with acetone as above, then treat
stains with methylated spirits. Remove any residual
marks from white fabrics with bleach.
Red wine: soak in water and detergent, rinse and
treat with acetic or citric acid, then rinse. Treat any
residual marks with bleach.
16
Page 17
Ink: depending on the type of ink, moisten the fabric
first with acetone (*), then with acetic acid; treat any
residual marks on white fabrics with bleach and then
rinse thoroughly.
Tar stains: first treat with stain remover, methylated
spirits or benzine, then rub with detergent paste.
(*) do not use acetone on artificial silk.
Detergents and additives
Good washing results also depend on the choice of
detergent and use of the correct quantities to avoid
waste and protect the environment. Although
biodegradable, detergents contain substances
which, in large quantities, can upset the delicate
balance of nature.
The choice of detergent will depend on the type of
fabric (delicates, woollens, cottons, etc.), the colour,
washing temperature and degree of soiling.
All commonly available washing machine detergents
may be used in this appliance:
– powder detergents for all types of fabric,
– powder detergents for delicate fabrics (60°C max)
and woollens,
– liquid detergents, preferably for low temperature
wash programmes (60°C max) for all types of
fabric, or special for woollens only.
The detergent and any additives must be placed in
the appropriate compartments of the dispenser
drawer before starting the wash programme.
If using concentrated powder or liquid detergents, a
programme without prewash must be selected.
The washing machine incorporates a recirculation
system which allows an optimal use of the
concentrated detergent.
Pour liquid detergent into the dispenser drawer
compartment marked just before starting the
programme.
Any fabric softener or starching additives must be
poured into the compartment marked before
starting the wash programme.
Follow the product manufacturer’s recommendations
on quantities to use and do not exceed the «MAX»
mark in the detergent dispenser drawer.
Quantity of detergent to be used
The type and quantity of detergent will depend on
the type of fabric, load size, degree of soiling and
hardness of the water used.
Water hardness is classified in so-called “degrees” of
hardness. Information on hardness of the water in
your area can be obtained from the relevant water
supply company, or from your local authority.
Follow the product manufacturers’ instructions on
quantities to use.
Use less detergent if:
– you are washing a small load,
– the laundry is lightly soiled,
– large amounts of foam form during washing.
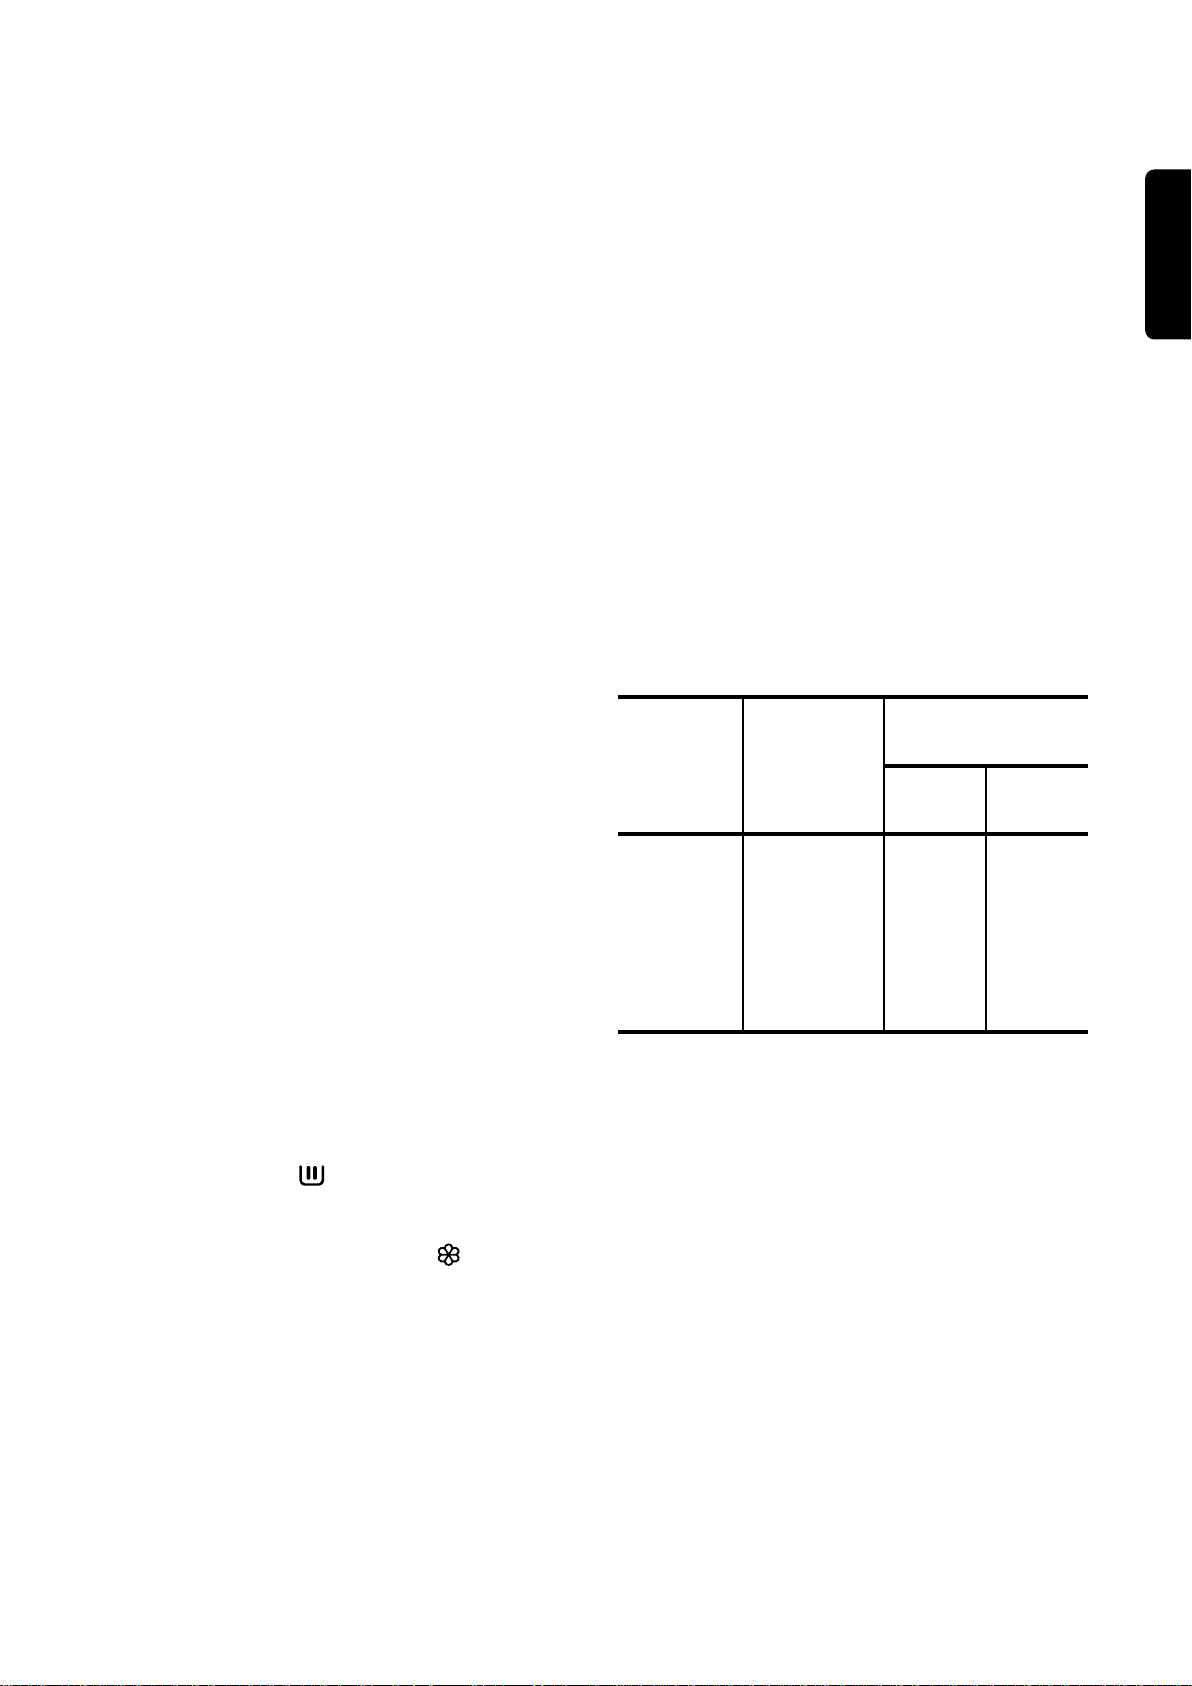
Degrees of water hardness
Degrees
Level Characteristic
1
2
3
4
soft
medium
hard
very hard
German
°dH
0- 7
8-14
15-21
more than
21
French
°T.H.
0-15
16-25
26-37
more than
37
ENGLISH
17
Page 18
1400
900
700
500
SIKMA
Operating sequence
P0877
P0876
P0004
Before washing your first load of laundry, we
recommend that you run a cotton cycle at 60°C, with
the machine empty, in order to remove any
manufacturing residue from the drum and tub.
Pour half a measure of detergent into the main wash
compartment and start up the machine.
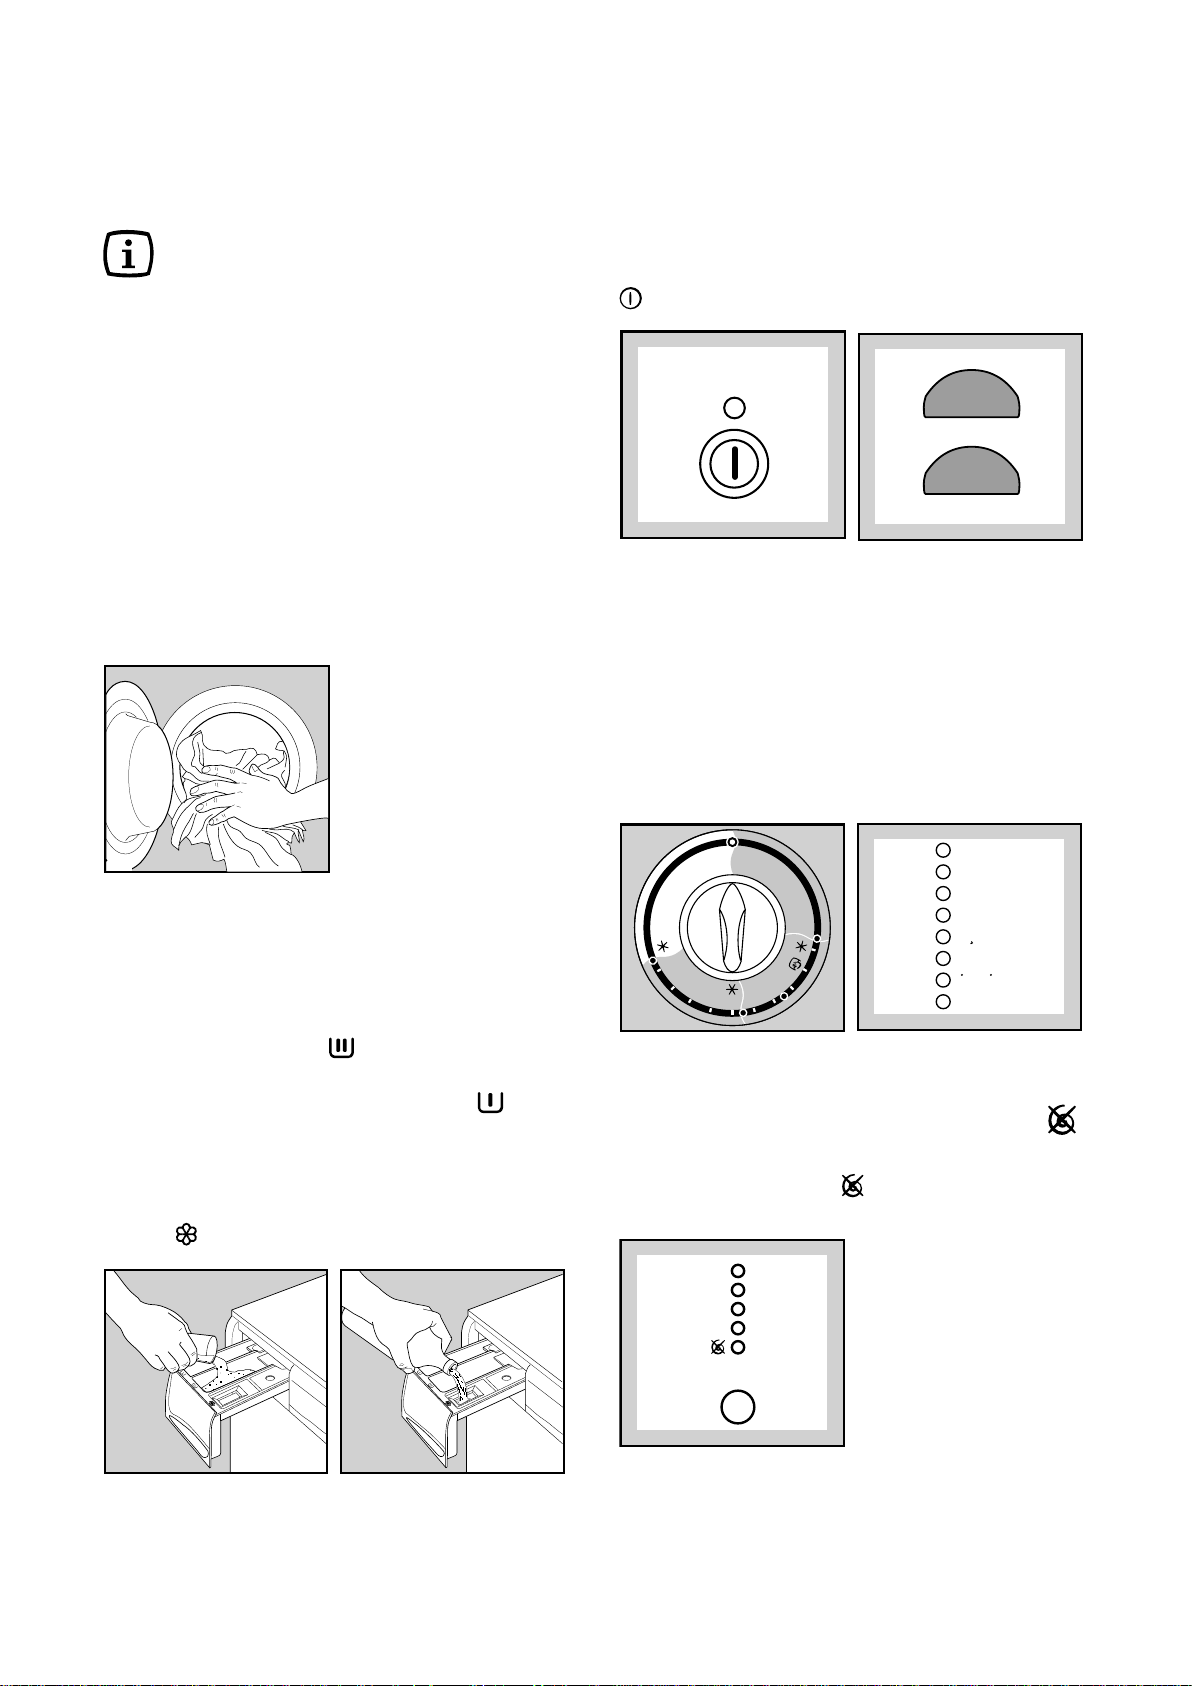
1.Place the laundry in the drum
4.Switch the machine on
To switch the machine on, press the ON/OFF button
: the mains-on light comes on.
AÇMA
KAPAMA
---
0
Open the door.
Place the laundry in the drum, one item at a time,
shaking them out as much as possible.
Close the door.
2.Measure out the detergent
Pull out the dispenser drawer until it stops. Measure
out the amount of detergent recommended by the
manufacturer in a graduated cup and pour it into the
main wash compartment .
If you wish to carry out the prewash, pour detergent
into the appropriate compartment marked .
If the programme selector dial is on the RESET O
position, three flashing dashes will be displayed. If
the programme selector dial is positioned on a wash
programme, a flashing zero will be displayed.
5.Select the desired programme
Turn the programme selector dial to the desired
position: the lights corresponding to the different
phases making up the selected programme light on.
ÖN YIKAMA
YIKAMA
DURULAMA
SUDA
BEKLETME
BOSALTMA
SIKMA
FILTRE IKAZ
PROGRAM
SONU
40°
30°
6
50°
G
95°
40°
30°
40°
F
D
C
B
A
30°
40°
30°
E
°
0
60°
50°
The display shows the duration of the programme.
6. Select the spin speed or option
3.Measure out the additive
If required, pour fabric softener into the compartment
marked , without exceeding the «MAX» mark.
Depress the spin speed button to choose the
required speed or option : the corresponding light
comes on.
18
Page 19
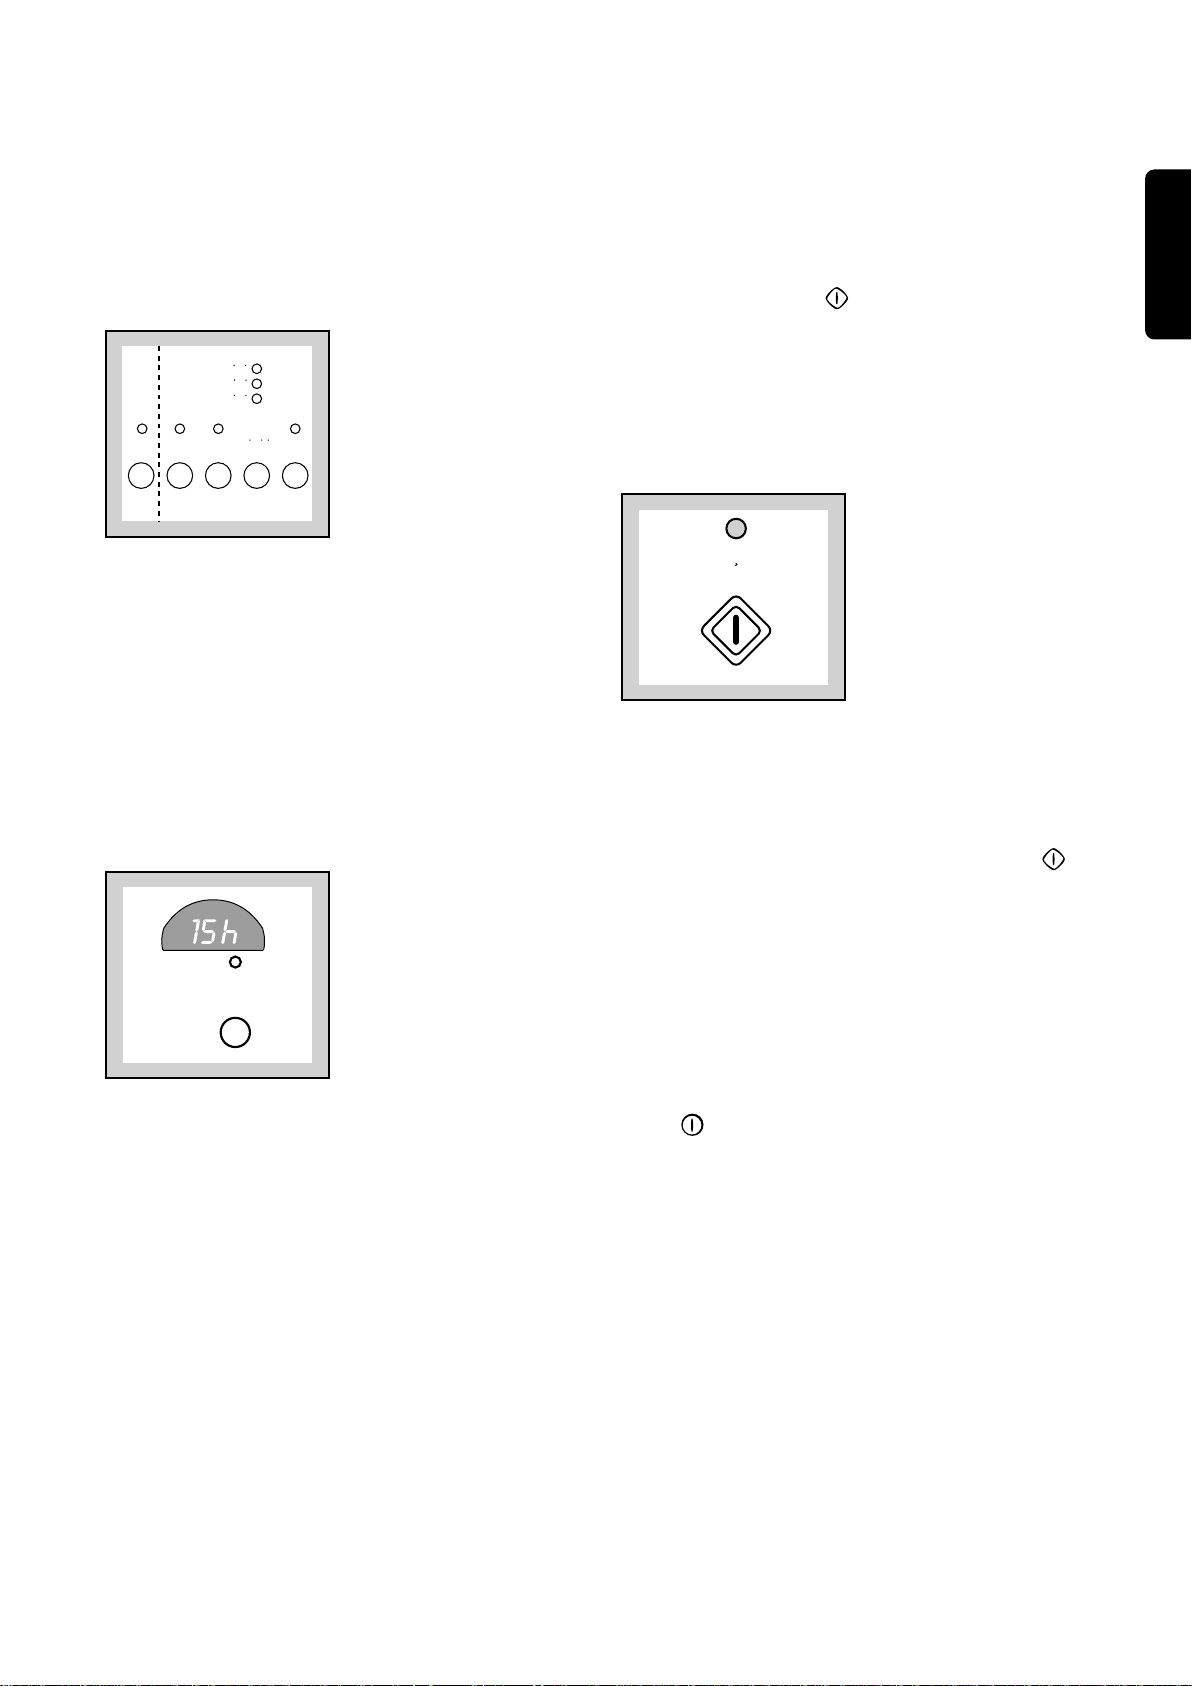
7.Select the required options
GECIK.
.
AZ KIRLI
NORMAL KIRLI
ÇOK KIRLI
KIRLILIK
DURUMU
ÖN
YIKAMA
SUDA
BEKLETME
EKSTRA
DURULAMA
BIO
9.Start the programme
The light corresponding to the depressed button
illuminates.
8. Select the DELA Y START option
To delay starting of a programme, press the DELAY
START button GECIK. The corresponding light
illuminates. The figures corresponding to the
selected delay will be displayed for about 4 seconds,
after which the duration of the selected programme
will appear on the display.
When the START/PAUSE button is pressed, the
selected delay will again appear on the display and
the machine starts its countdown.
During this period it is possible to load other laundry.
To do this: press START/PAUSE button, load the
laundry, close the door and press START/PAUSE
button again.
To start the selected programme, press the
START/PAUSE button ; the corresponding light
stops flashing.
The pilot light corresponding to the wash phase
which is running is on.
The door light comes on to indicate that the door is
locked.
The machine starts operating.
BASLAT
BEKLET
10. At the end of the programme
The machine stops automatically.
If the anti-crease option SUDA BEKLETME has been
selected, the light of the START/PAUSE button
flashes to indicate that the water must be emptied
out before opening the door. A zero appears on the
display.
The door can only be opened after the door locked
light has gone out.
Release of the lock is also indicated by the coming
on of the light PROGRAM SONU.
Turn the programme selector dial to Reset O.
Switch the machine off by pressing the ON/OFF
button .
Remove the laundry from the drum and carefully
check that the drum is empty so as to avoid any
forgotten items being damaged in a subsequent
wash (e.g. shrinking) or their colour running into a
load of whites.
If you do not intend to carry out another wash, close
the water tap.
Leave the door open to prevent the formation of
mildew and unpleasant smells.
ENGLISH
19
Page 20
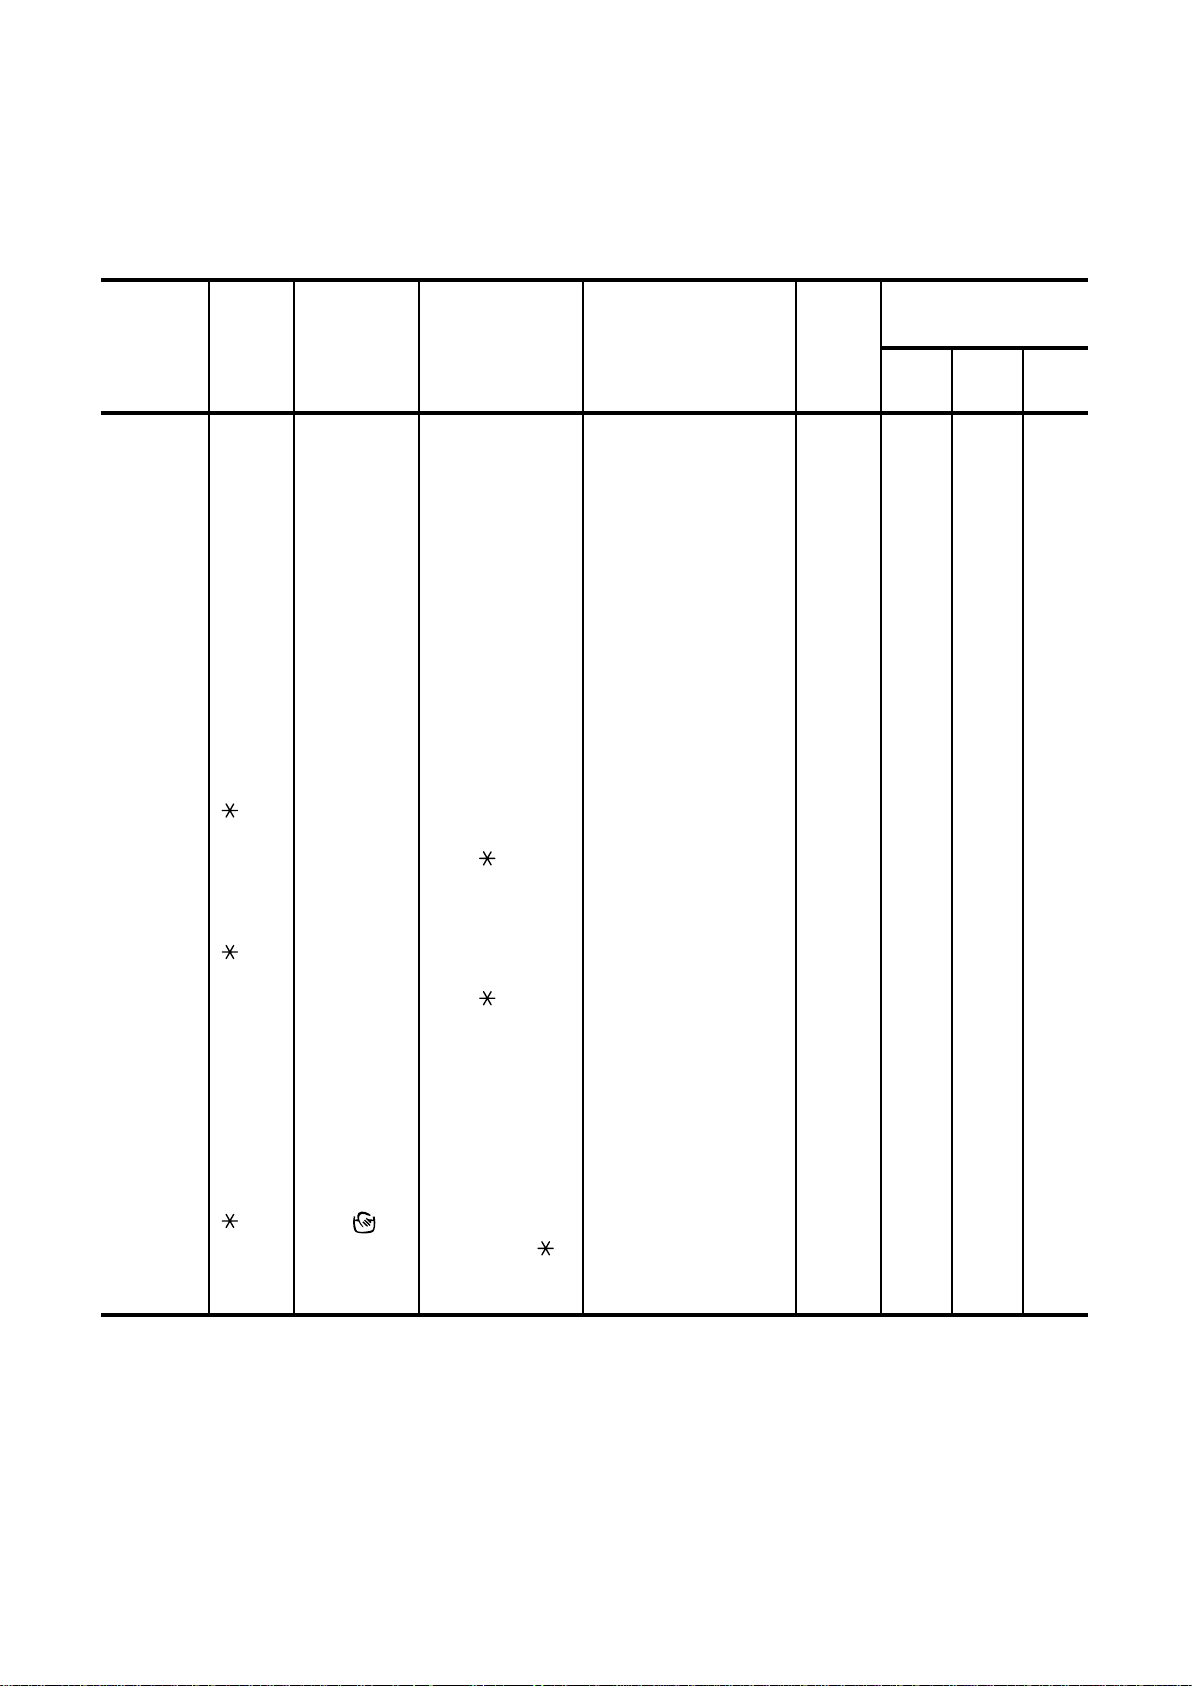
Programme chart
Washing programmes
Section
Temp.
Type of
fabric
Programme
description
Additional functions
Max.
load
Consumption*
Energy
kWh
Water
lt.
Time
min.
light blue
light blue
light blue
light blue
yellow
95°
E
60°**
-30°-
40°-50°
-30°-
40°-
50°-60°
White
cotton
White cotton
economy
Fast
coloureds
Non-fast
coloureds
Synthetics
Wash at 95°C
3 rinses
Normal spin
Wash at 67°C
3 rinses
Normal spin
Wash at 6 0°C
3 rinses
Normal spin
Wash at 30°-40°-
50°C or cold
wash
3 rinses
Normal spin
Wash at 30°-40°-
50°-60°C or cold
wash
3 rinses
Delicate spin
SIKMA
ÖN YIKAMA
KIRLILIK DURUMU
SUDA BEKLETME
EKSTRA DURULAMA
BIO
SIKMA
ÖN YIKAMA
SUDA BEKLETME
EKSTRA DURULAMA
BIO
SIKMA
ÖN YIKAMA
KIRLILIK DURUMU
SUDA BEKLETME
EKSTRA DURULAMA
BIO
SIKMA
ÖN YIKAMA
KIRLILIK DURUMU
SUDA BEKLETME
EKSTRA DURULAMA
BIO
SIKMA
ÖN YIKAMA
KIRLILIK DURUMU
SUDA BEKLETME
EKSTRA DURULAMA
BIO
5.5 kg
5.5 kg
5.5 kg
5.5 kg
2.5 kg
1.9
1.3
0.95
0.85
0.8
48
44
44
44
60
135
130
130
115
85
Wash at 30°-
40°C
3 rinses
Delicate spin
Wash at 30°-40°C
or cold wash
3 rinses
Delicate spin
-30°-
Delicates
Wool
black
black
* The consumption data shown on this chart is to be considered purely indicative, as it may vary depending on
the quantity and type of laundry, on the inlet water temperature and on the ambient temperature. It refers to the
highest temperature for each wash programme and to a wash load of 5 kg of cotton items.
** In compliance with EC directive 92/75, the consumption figures indicated on the energy label refer to the
60°C wash programme for cotton with a load of 5 kg.
30°-40°
40°
SIKMA
ÖN YIKAMA
KIRLILIK DURUMU
SUDA BEKLETME
EKSTRA DURULAMA
SIKMA
SUDA BEKLETME
2.5 kg
2 kg
0.5
0.35
53
40
60
50
ECONOMY
Select the economy programme “E” instead of the 95°C programme when washing normally soiled whites;
the wash is carried out at about 67°C, with consequent energy saving.
20
Page 21
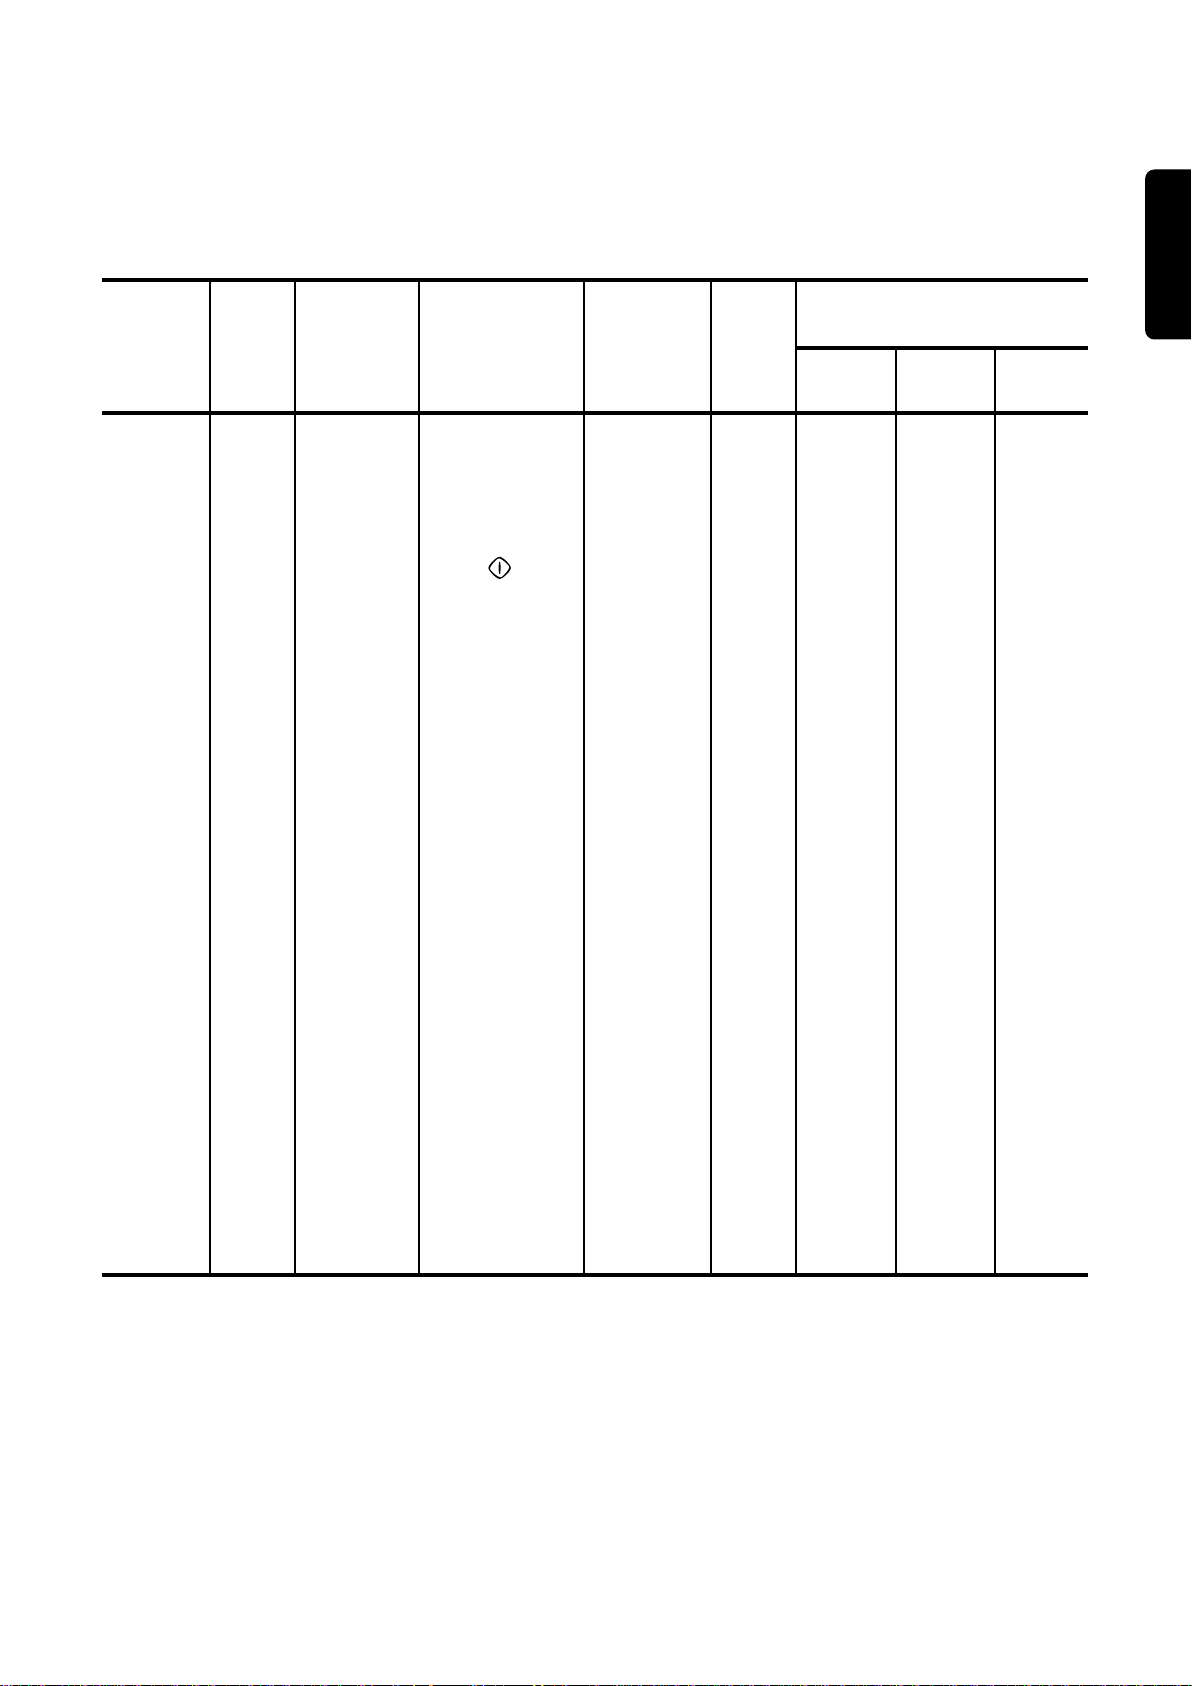
Programme chart
Special programmes
Section
blue
blue
blue
blue
Selector
dial
position
A
B
C
D
Programme
Soak
Rinses
Softeners
Drain
Programme
description
Soak at 30°C
stop with water
in tub.
To drain,
depress
START/PAUSE
button .
The machine
automatically
empties itself
after 18 hours.
3 rinses with
liquid additives if
required
Spin
1 rinse with
softener
Spin
Additional
functions
SIKMA
SUDA
BEKLETME
EKSTRA
DURULAMA
SIKMA
SUDA
BEKLETME
Max.
load
5.5 kg
5.5 kg
5.5 kg
/
Energy
kWh
0.23
0.15
-
-
Consumption*
Water
lt.
19
40
18
-
ENGLISH
Time
min.
20
45
18
3
blue
blue
blue
* The consumption data shown on this chart is to be considered purely indicative, as it may vary depending on
the quantity and type of laundry, on the inlet water temperature and on the ambient temperature. It refers to a
load of 5 kg for cotton items.
F
G
O
Spin
Short
programme
Cancelling
Wash at 30°C
2 rinses
Spin at
700 r.p.m.
For cancelling
the wash
programme
which is running
SIKMA
SIKMA
SUDA
BEKLETME
5.5 kg
2.5 kg
-
0.25
40
-
10
30
21
Page 22
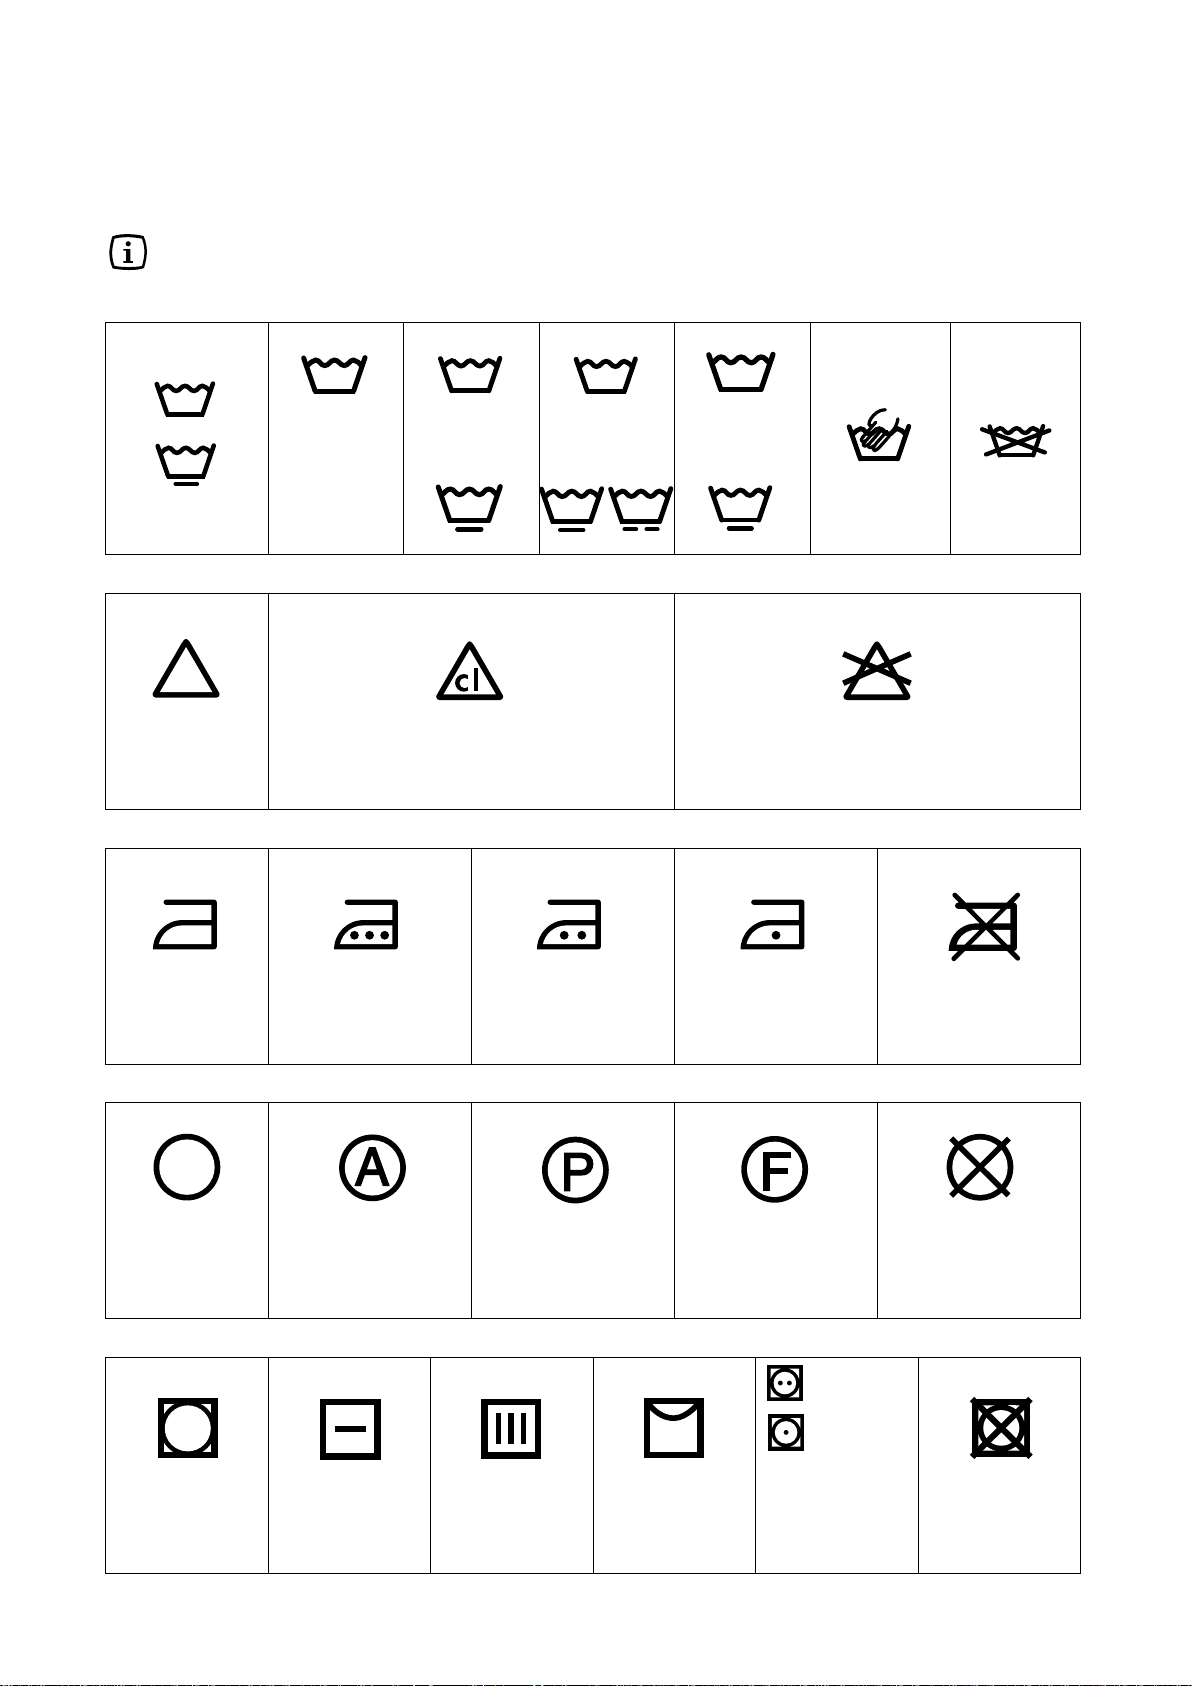
International wash code symbols
95
60
60
40
40
40
30
30
These symbols appear on fabric labels, in order to help you choose the best way to treat your laundry.
Energetic wash
Max. wash
temperature
95°C
Delicate wash
Bleaching Bleach in cold water Do not bleach
Ironing Hot iron
max 200°C
Max. wash
temperature
60°C
Max. wash
temperature
40°C
Warm iron
max 150°C
Max. wash
temperature
30°C
Hand wash Do not
Lukewarm iron
max 110°C
wash
at all
Do not iron
Dry cleaning Dry cleaning
in all solvents
Drying Flat On the line On clothes
Dry cleaning in
perchlorethylene,
petrol, pure alcohol,
R 111 & R 113
hanger
22
Dry cleaning
in petrol,
pure alcohol
and R 113
Tumble dry
Do not
dry clean
high
temperature
low
temperature
Do not
tumble dry
Page 23
Maintenance
P0038
P0878
P0879
P0040
P0859
P0860
P0861
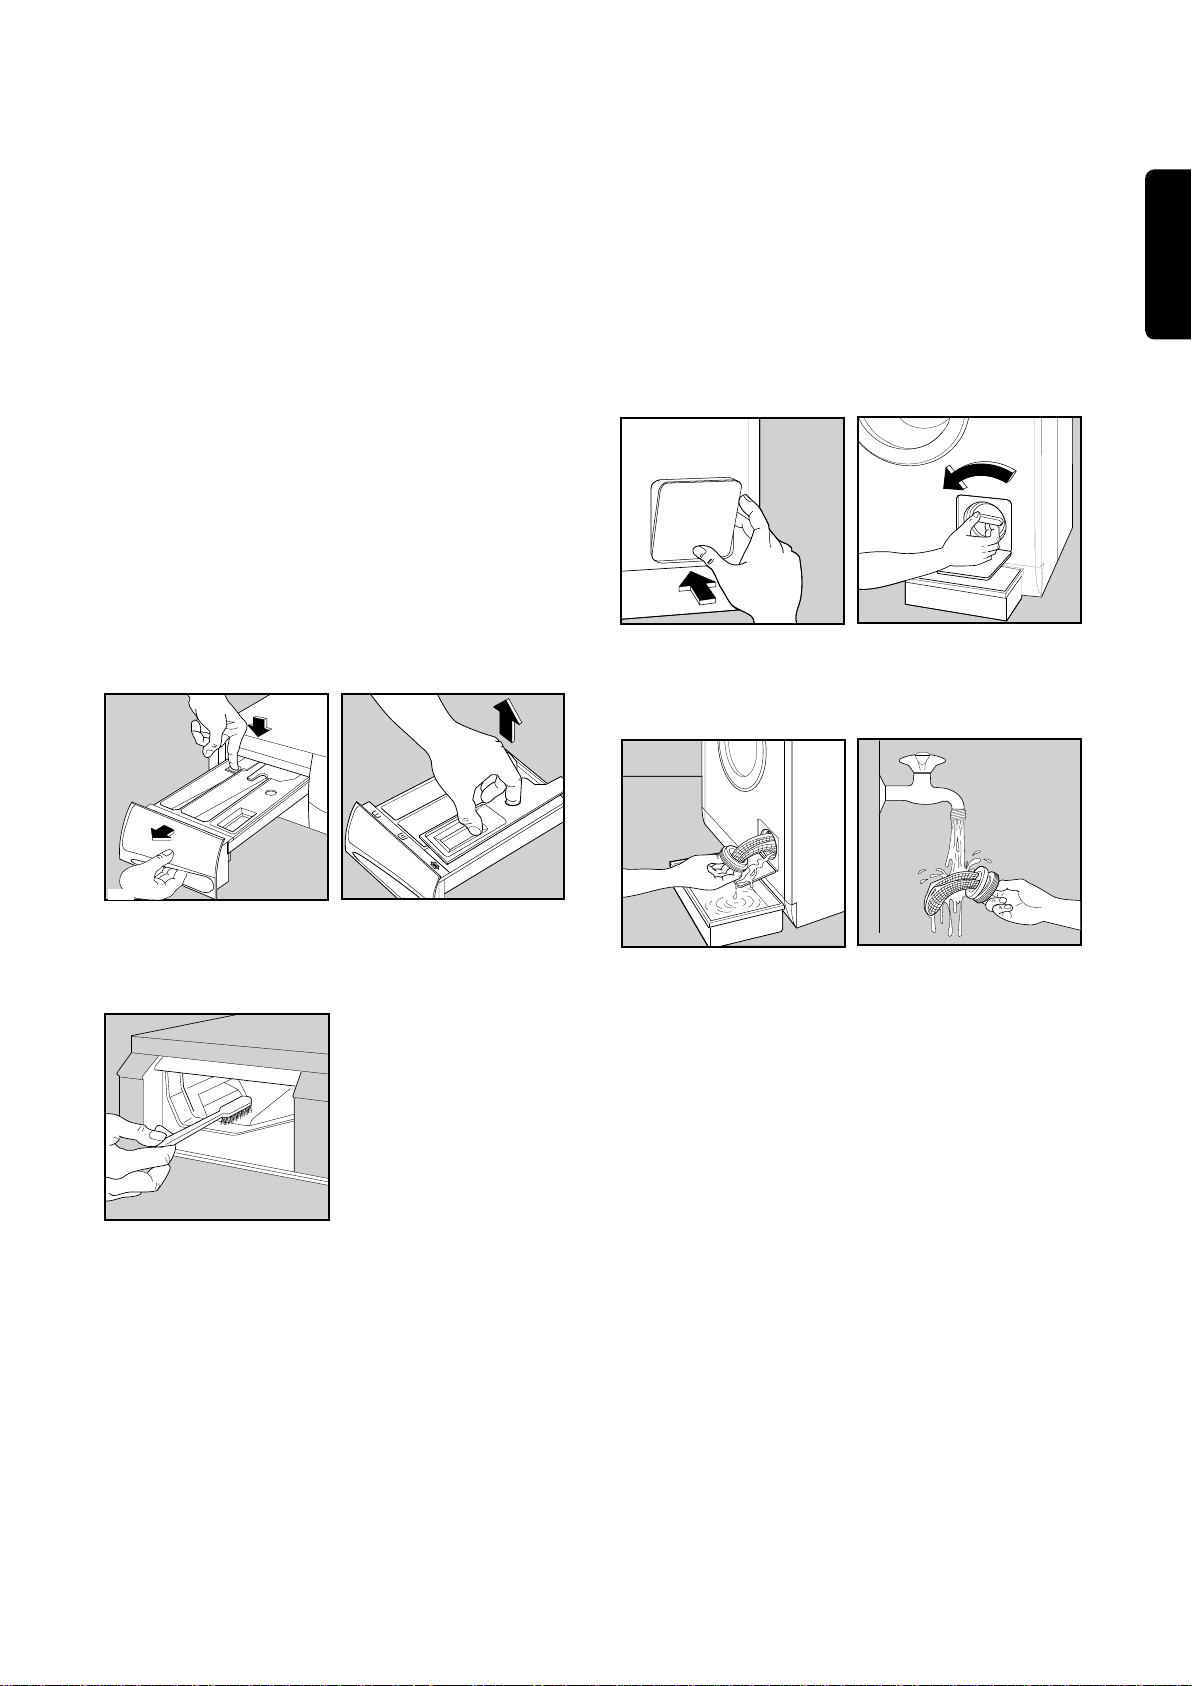
1.Bodywork
Clean the outside of the machine with warm water
and a detergent used to handwash dishes. Rinse
with clean water and dry with a soft cloth.
Important: do not use methylated spirits, solvents or
similar products to clean the bodywork.
2.Detergent dispenser drawer
After a while, detergents and fabric softeners leave
deposits in the drawer.
Clean the drawer from time to time by rinsing it under
a running tap. To remove the drawer from the
machine, press the button in the rear left-hand
corner.
To facilitate cleaning, the top part of the additive
compartments can be removed.
3.Drain filter
The drain filter collects threads and small objects
inadvertently left in the laundry. Check regularly that
the filter is clean.
Open the filter door.
Place a container under the filter and unscrew it.
Pull out the filter.
Clean the filter under a running tap, then refit it,
screwing it fully in.
ENGLISH
Detergent can also accumulate inside the drawer
recess: clean it with an old toothbrush. Refit the
drawer after cleaning.
4.Water inlet filter
If you notice that the machine is taking longer to fill,
check that the filter in the water inlet hose is not
blocked.
Turn off the water tap.
Unscrew the hose from the tap.
Clean the filter in the hose with a stiff brush.
Screw the hose back onto the tap.
23
Page 24

5.Emergency emptying out
If the water is not discharged (outlet pump is
blocked, filter or drain hose are clogged), proceed as
follows to empty out the machine:
• pull out the plug from the power socket;
• close the water tap;
• if necessary, wait until the water has cooled down;
• place a bowl on the floor under the filter;
• slightly loosen the filter to let the water come out
slowly;
• at the end screw the filter again.
6.Frost precautions
If the machine is installed in a place where the
temperature could drop below 0°C, proceed as
follows:
• Close the water tap and unscrew the water inlet
hose from the tap.
• Place the end of the drain hose and that of the inlet
hose in a bowl placed on the floor.
• Select programme “D” (draining) and run it until the
machine stops.
• Turn the programme selector dial to O.
• Switch the machine OFF by depressing button .
• Screw the water inlet hose back on and put the
drain hose back in its place.
By doing this, any water remaining in the machine is
removed, avoiding the formation of ice and,
consequently, breakage of the affected parts.
When you use the machine again, make sure that
the ambient temperature is above 0°C.
24
Page 25
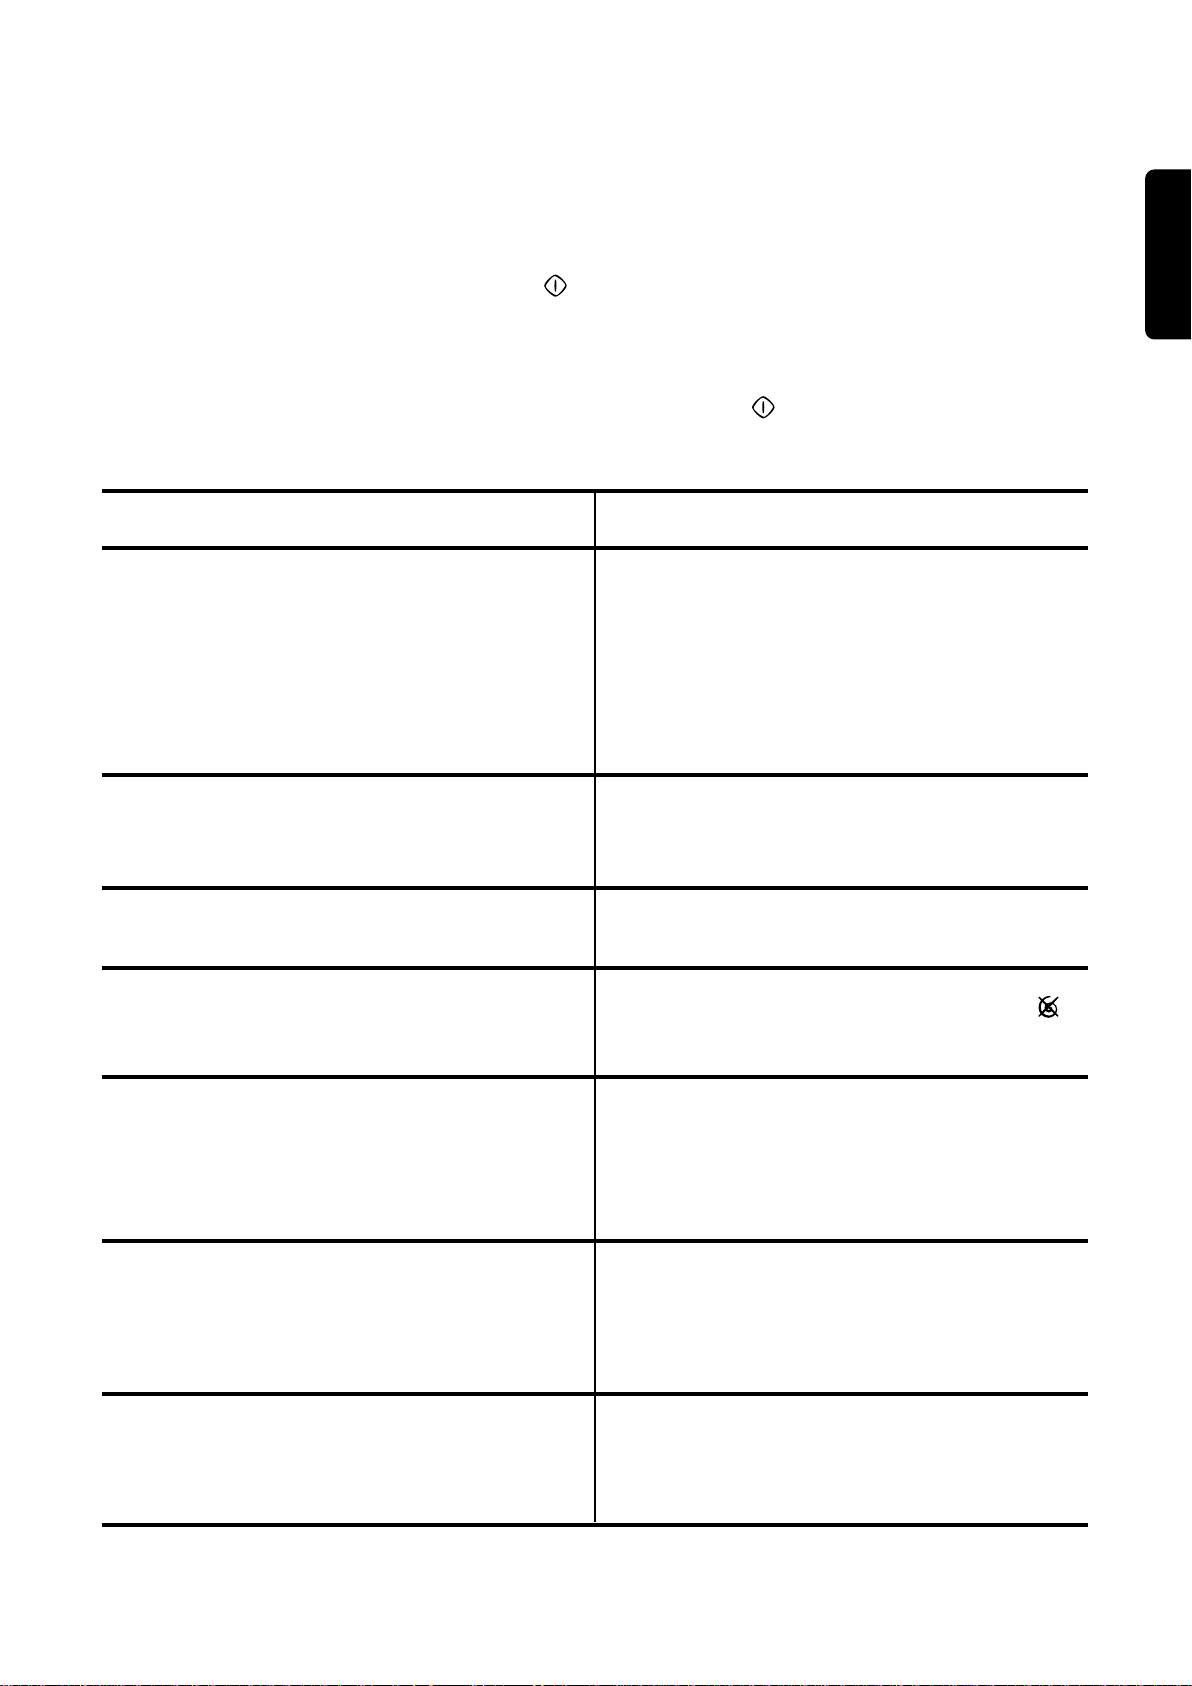
Something not working?
Problems which you can resolve yourself.
During machine operation it is possible that one of the following alarm codes appears on the display and at the
same time, the light of the START/PAUSE button and one of the following lights start to flash:
- E10 + SUDA BEKLETME: problem with the water supply
- E20 + DURULAMA: problem with water draining
- E40 + YIKAMA: door open
Once the problem has been eliminated, press the START/PAUSE button to restart the programme. If after
all checks, the problem persists, contact your local Service Centre.
Problem Possible cause
ENGLISH
• The machine does not start up:
• The machine does not fill:
• The machine fills then empties
immediately:
• The machine does not empty
and/or does not spin:
• There is water on the floor:
• Unsatisfactory washing results:
• The machine vibrates or is
noisy:
• The door is not firmly closed. (E40)
• The machine is not plugged in or there is no power
at the socket.
• The main fuse has blown.
• The programme selector dial is not positioned
correctly.
• The START/PAUSE button has not been
depressed.
• The DELAY START option has been selected.
• The water tap is closed. (E10)
• The inlet hose is squashed or kinked. (E10)
• The filter in the inlet hose is blocked. (E10)
• The door is not properly closed. (E40)
• The end of the drain hose is too low. Refer to
relevant paragraph in “water drainage” section.
• The drain hose is squashed or kinked. (E20)
• The anti-crease option SUDA BEKLETME or
has been selected.
• The drain filter is clogged. (E20)
• Too much detergent or unsuitable detergent
(creates too much foam) has been used.
• Check whether there are any leaks from one of the
inlet hose fittings. It is not always easy to see this
as the water runs down the hose; check to see if it
is damp.
• The drain hose is damaged.
• Too little detergent or unsuitable detergent has
been used.
• Stubborn stains have not been treated prior to
washing.
• The correct temperature was not selected.
• Excessive laundry load.
• The transit bolts and packing have not been
removed.
• The support feet have not been adjusted.
• The laundry is not evenly distributed in the drum.
• Maybe there is very little laundry in the drum.
25
Page 26
Mod. ..........
Prod. No. ...........
Ser. No. .........
M
o
d
.
.
...
.
...
.
.
S
e
r
.
P0042
Problem Possible cause
• The door will not open:
• Spinning starts late or the
laundry is not spun enough:
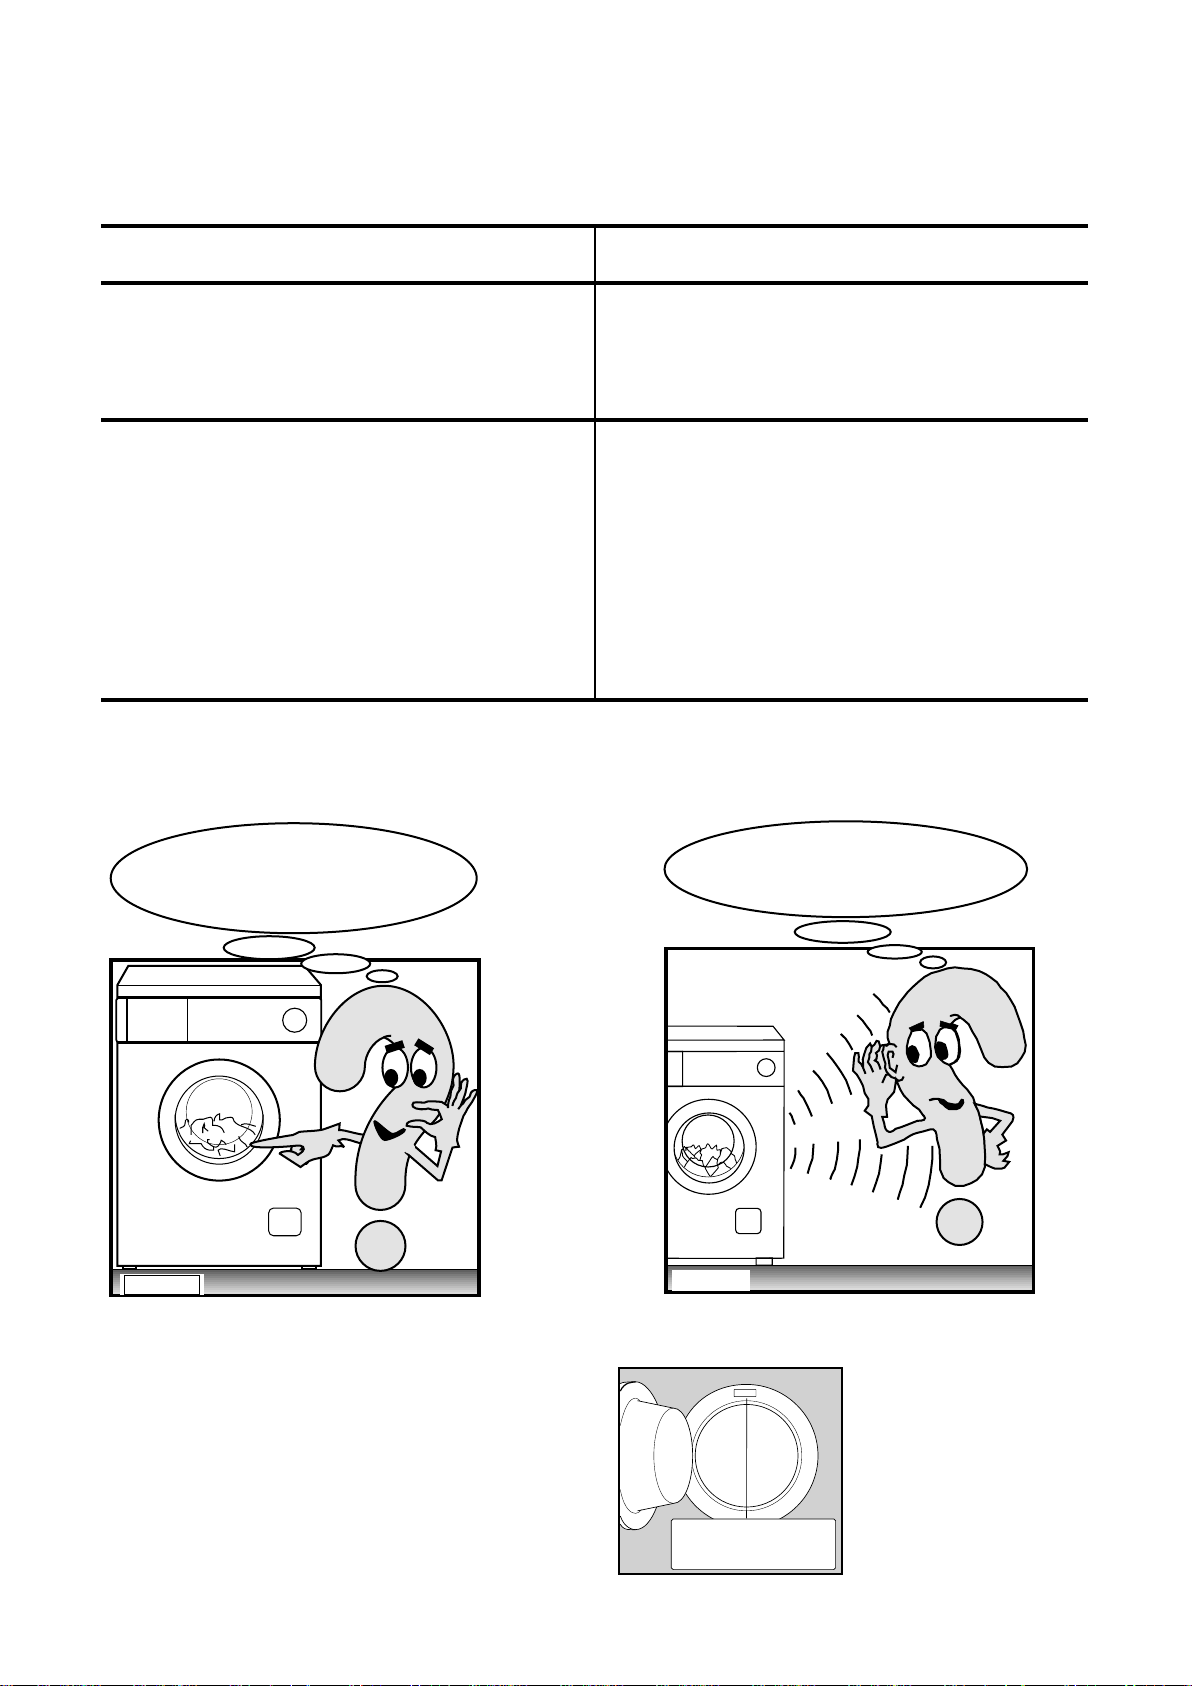
Water is not
visible in the machine. The machine,
which is the result of modern technology , runs
in a very economical way with low water
consumption. Performance is
nevertheless excellent.
• The water level is above the bottom edge of the door.
• The machine is heating the water.
• The drum is turning.
The door can only be opened when the relevant
light has gone out.
• The electronic unbalance detection device has cut
in because the laundry is not evenly distributed in
the drum. The laundry is redistributed by reverse
rotation of the drum. This may happen several
times before the unbalance disappears and normal
spinning can resume. If, after 15 minutes, the
laundry is still not evenly distributed in the drum,
the machine will spin at a lower speed. If at the end
of the programme the laundry is not spun enough,
redistribute the load manually and select the spin
programme.
The machine makes an unusual
noise. The machine is fitted with a commutator
motor which improves machine
performance.
P1035UK
If you are unable to identify or solve the problem,
contact our service centre. Before telephoning, make
a note of the model, serial number and purchase
date of your machine: the Service Centre will require
this information.
P1034UK
26
Page 27
De¤erli müflterimiz,
Bu kullan›m k›lavuzunu dikkatlice okuman›z› ve ilk sayfalarda yer alan güvenlik notlar›na dikkat etmenizi rica
ederiz. Bu kullan›m k›lavuzunu bir baflvuru kayna¤› olarak
saklaman›z› ve makinenin sizden sonraki sahiplerine
iletmenizi öneririz.
Nakliye hasarlar›
Makinenin ambalaj›n›n aç›lmas› s›ras›nda hasarl› olup
olmad›¤›n› kontrol ediniz. Tereddütte kalman›z halinde
makineyi kullanmadan önce Servis Merkezi ile irtibat
kurunuz.
Bu kitapç›kta yer alan simgelerin anlamlar› afla¤›da aç›klanmaktad›r:
Uyar› üçgeni ve/veya uyar› kelimeleri (Uyar›!, Dikkat!) güvenli¤iniz ve makinenin do¤ru çal›flmas› aç›s›ndan büyük
önem tafl›yan bilgileri vurgulamaktad›r.
Bu simge ile verilen bilgiler ilave talimatlar ve makineni kullan›lmas› hakk›nda pratik bilgiler içermektedir.
TÜRKÇE
Bu simge makinenin ekonomik bir flekilde ve çevreye sayg›l› olarak kullan›lmas›na yönelik bilgileri göstermektedir.
Do¤a dostu ka¤›t kullanarak çevrenin
korunmas›na katk›da bulunmaktay›z.
27
Page 28

‹çindekiler
Uyar›lar 29-30
‹mha edilmesi veya elden
ç›kar›lmas› 30
Çevre korunmas› hakk›nda
pratik bilgiler 30
Montaj 31
Ambalajdan ç›kart›lmas› 31
Yerlefltirme 31
Su girifli 31
Su boflaltma ifllemi 31
Elektrik ba¤lant›s› 32
Teknik özellikler 32
Yeni çamafl›r makineniz 33
Makinenizin tan›t›m› 33
Kap› kilidi ikaz lambas› 33
Deterjan çekmecesi 33
Kullan›m 34
Kontrol paneli 34
Kontroller 34-37
Fonksiyonlar 37-38
Program bilgileri 39
Y›kama hakk›nda pratik bilgiler 40
Çamafl›rlar›n ayr›lmas› 40
S›cakl›klar 40
Çamafl›rlar› makineye atmadan önce 40
Azami çamafl›r miktar› 40
Çamafl›r a¤›rl›klar› 40
Lekelerin ç›kart›lmas› 40
Deterjanlar ve katk› maddeleri 41
Çal›flt›rma s›ras› 42-43
Y›kama programlar› 44
Özel programlar 45
Uluslararas› y›kama kodu sembolleri 46
Bak›m 47
Gövde 47
Deterjan çekmecesi 47
Su ç›k›fl filtresi 47
Su girifl filtresi 47
Acil boflaltma 48
Donma tehlikesine karfl› önlemler 48
Servis ça¤›rmadan önce 49-50
28
Page 29

Uyar›lar
Afla¤›da genel güvenlik amaçl› uyar›lar yer almaktad›r. Makinan›z› monte etmeden ya da kullanmadan önce bu uyar›lar›
dikkatle okuman›z› rica ederiz.
Montaj
• Makinenizi kullanmaya bafllamadan önce iç ambalajlar›n
ç›kart›lmas› gerekmektedir. Koruyucu tafl›ma güvenlik
parçalar›n›n ç›kart›lmam›fl ya da tamamen ç›kart›lmam›fl
olmas› halinde makineye ve yak›n›nda bulunan di¤er
eflyalara ciddi bir flekilde hasar verilmesi mümkündür.
Lütfen talimat kitap盤›n›n ilgili bölümüne bak›n›z.
• Makinenin montaj› s›ras›nda yap›lmas› gereken tüm
elektrik iflleri ehliyetli bir elektrik teknisyeni taraf›ndan
gerçeklefltirilmelidir.
• Makinenin montaj› s›ras›nda yap›lmas› gereken tüm su
tesisat› iflleri ehliyetli bir su tesisatç›s› taraf›ndan
gerçeklefltirilmelidir.
• Makinenizin montaj›n› gerçeklefltirdikten sonra elektrik
kablosunun üstüne oturmad›¤›ndan emin olunuz
• Makinenizin montaj› Yetkili Servis taraf›ndan yap›lmal›d›r.
• Makinenizin hal› kapl› bir zemine yerlefltirilmesi halinde
makinenin ayaklar› ile zemin aras›nda hava dolafl›m›
olmas›n› sa¤lay›n›z.
Kullan›m
• Makinenizin tasar›m› ev içi kullan›ma uygun olarak
yap›lm›flt›r. Tasar›m amac› d›fl›nda kullan›lmamal›d›r.
• Makinenizde, sadece makinede y›kanmas› ve kurutulmas› öngörülen çamafl›rlar› y›kay›p kurutunuz. Çamafl›r
etiketlerinde yer alan talimatlara uyunuz.
• Makinenizi afl›r› doldurmay›n›z. Kullan›m k›lavuzundaki
talimatlara uyunuz.
• Çamafl›r ceplerinin boflalt›lm›fl oldu¤undan emin olunuz.
Bozuk para, çengelli i¤ne, i¤ne ve vidalar büyük hasara
yol açabilir.
• Petrol ürünleri, metil alkol, trikloretilen ve benzeri maddeleri çekmifl çamafl›rlar› makinede y›kamay›n›z. Bu tür
s›v›lar, y›kama iflleminden önce çamafl›rdaki lekeleri
ç›kartmak amac› ile kullan›lm›fllarsa, çamafl›r› makineye
atmadan önce bu s›v›lar›n tamamen uçmas›n› bekleyiniz.
• Çorap, kemer gibi küçük kalemleri bir çamafl›r torbas›na
ya da yast›k k›l›f›na yerlefltirerek tambur ile hazne
aras›nda s›k›flmalar›n› önleyiniz.
• Sadece önerilen miktarda yumuflat›c› kullan›n›z. Afl›r›
miktarda yumuflat›c› çamafl›ra zarar verebilir.
• Makineyi kullanmad›¤›n›z zamanlarda kapa¤› aral›k
b›rak›n›z. Böylece kapak lasti¤ini korur ve hofl olmayan
kokular›n oluflmas›n› önlemifl olursunuz.
• Kapa¤› açmadan önce mutlaka suyun boflalm›fl
oldu¤unu kontrol ediniz. Suyun boflalmam›fl olmas›
halinde kullan›m k›lavuzundaki talimatlara uygun flekilde
boflalt›n›z.
• Kulland›ktan sonra mutlaka makinenin fiflini çekiniz ve
muslu¤u kapat›n›z.
Genel Güvenlik
• Makine sadece Yetkili Servis taraf›ndan onar›lmal›d›r.
Deneyimsiz kifliler taraf›ndan gerçeklefltirilen onar›mlar
ciddi tehlikeler do¤urabilmektedir. Bölgenizdeki Servis
Merkezine baflvurunuz.
• Fifli hiçbir zaman kablodan tutarak prizden çekmeyiniz;
daima fiflten tutarak çekiniz.
• Yüksek s›cakl›k y›kama programlar›nda kapak cam›
›s›nabilmektedir. Cama dokunmay›n›z.
TÜRKÇE
29
Page 30

Çocuklar›n güvenli¤i
• Çocuklar genellikle elektrikli cihazlar›n tehlikelerinin
fark›nda de¤illerdir. Makine çal›fl›rken çocuklara dikkat
edilmeli ve makine ile oynamalar›na izin verilmemelidir.
• Kullan›lan ambalaj malzemesi (örne¤in plastik folyo, polistiren) çocuklar için tehlike arz eder (bo¤ulma tehlikesi).
Bu malzemeleri çocuklar›n eriflemeyece¤i bir yerde
muhafaza ediniz.
‹mha edilmesi veya elden ç›kar›lmas›
• Tüm deterjanlar› çocuklar›n ulaflamayaca¤› güvenli bir
yerde muhafaza ediniz.
• Çocuklar›n ve ev hayvanlar›n›n tambura girmemelerine
dikkat ediniz.
• Makineyi ataca¤›n›z zaman elektrik kablosunu keserek
fifli kablo ile birlikte imha ediniz. Çocuklar›n oynarken
içeride kapal› kalmalar›n› önlemek amac› ile kapak kilidini çal›flmaz hale getiriniz.
Ambalaj malzemeleri
Bu üründe kullan›lan iflaretli malzemeler geri
dönüflümlüdür.
>PE<= polietilen
>PS<= polistiren
>PP<= polipropropilen
Bu malzemeleri bu maddelerin at›lmas› için sa¤lanan çöp
kutular›na atarak tekrar kullan›mlar›n› sa¤layabilirsiniz.
Çevre korunmas› hakk›nda pratik bilgiler
Su ve enerjinin tasarruflu kullan›lmas› ve çevrenin
korunmas› amac› ile afla¤›daki önerilere uyman›z› rica
ederiz.
• Çamurlanm›fl çamafl›rlar deterjan, su ve zamandan
tasarruf etmek amac› ile ön y›kama yap›lmaks›z›n
y›kanabilir (çevreyi de korumufl olursunuz!).
• Makine tamamen dolduruldu¤unda daha ekonomik
çal›flacakt›r (hem y›kama hem kurutma çevrimlerinde).
Makine
Eskiyen makinenizi yetkililer taraf›ndan gösterilen uygun
çöp sahalar›na at›n›z.
Ülkenizin temizli¤ine katk›da bulununuz.
• Lekeler ile kirlerin bir k›sm›n› çamafl›rlar› makineye
atmadan önce ç›kartabilirsiniz; böylece çamafl›rlar› daha
düflük bir s›cakl›kta y›kayabilirsiniz.
• Kullanaca¤›n›z deterjan miktar›n› suyun sertli¤ine,
çamafl›r›n kirlilik derecesine ve y›kanacak çamafl›r
miktar›na göre belirleyiniz.
30
Page 31
Montaj
P0021
P1051
P0020
P0256
2
1
P1066
P0255
Ambalajdan ç›kart›lmas›
Makine kullan›lmadan önce makinenin tafl›nmas›
amac› ile kullan›lan tüm c›vatalar ile ambalaj
malzemesinin sökülmesi gerekmektedir.
Tafl›ma güvenlik parçalar›n› ileride baflka tafl›malarda kullanman›z gerekebilece¤inden saklaman›z› öneririz.
1. Makinenin arkas›nda sa¤ tarafta bulunan c›vatay› aç›k
a¤›zl› bir anahtar ile sökünüz ve hortumlar› ezmemeye
özen göstererek makineyi arka üstü yat›r›n›z.
Hortumlar›n ezilmesini önlemek amac› ile makinenin
ambalaj›nda kullan›lan köfle desteklerinden birini
makine ile zeminin aras›na yerlefltiriniz.
2. Makinenin altından polistirol takozu kaldırınız ve iki plastik
torbayı çıkartınız.
3. ‹lk olarak sa¤ taraftaki torbay› (1) daha sonrada sol
taraftaki torbay› (2) makinenin ortas›na do¤ru çekerek
dikkatli bir flekilde ç›kart›n›z.
Yerlefltirme
Makineyi düz ve sert bir zemine yerlefltiriniz.
Makinenin etraf›ndaki hava sirkülasyonunun hal›, kilim gibi
eflyalarla engellenmedi¤inden emin olunuz. Makinenin
duvara ya da di¤er cihazlara temas etmedi¤ini kontrol ediniz.
Ayaklar› içeriye ya da d›flar›ya do¤ru ayarlayarak makinenin düz durmas›n› sa¤lay›n›z. Zemindeki seviye bozuklu¤unu telafi etmek amac› ile makinenin alt›na karton,
tahta parças› ya da benzeri takozlar yerlefltirmeyiniz.
Su girifli
Makinenizin su girifl hortumun, 3/4" ç›k›fl a¤›z›l› bir
muslu¤a ba¤lay›n›z.
Hortumun makineye ba¤lanan di¤er ucu her yöne
dönebilmektedir. Rakoru gevfletiniz, hortumu döndürünüz
ve su s›z›nt›s› olmas›n› önleyecek flekilde rakoru tekrar
s›k›n›z.
TÜRKÇE
P1068
4. Makineyi dik konuma getirerek arka k›s›mda kalan iki
c›vatay› da sökünüz.
5. C›vatalar›n bulundu¤u deliklerdeki plastik ara
parçalar›n› ç›kart›n›z.
6. Aç›kta kalan delikleri torbada yer alan tapalarla
t›kay›n›z.
P1088
Su girifl hortumunu uzatmay›n›z. Hortum k›sa geliyorsa ve
muslu¤un yerini de¤ifltirmek istemiyorsan›z bu tür kullan›m
için üretilmifl daha uzun bir hortum sat›n al›n›z.
Su boflaltma ifllemi
Su boflaltma hortumunun uç k›sm› üç farkl› flekilde yerlefltirilebilmektedir:
Makine ile birlikte verilen plastik hortum k›lavuzunu kullanarak herhangi bir lavabonun kenar›na asabilirsiniz. Bu
durumda makine boflaltma ifllemi yaparken hortumun ucunun
as›l› bulundu¤u yerden kurtulmamas›na özen gösteriniz.
31
Page 32
Bunu sa¤lamak için hortumu bir parça ip ile muslu¤a ba¤-
P0023
P0022
layabilir ya da duvara tutturabilirsiniz.
Lavabo tahliye borusu ba¤lant›s›na. Bu ba¤lant› sifondan, bükümün zeminden en 60 cm yukar›da olmas›n› sa¤layacak kadar yukar›da olmal›d›r.
Do¤rudan yerden yüksekli¤i 60 cm ile 90 cm aras›nda
olan bir tahliye borusuna.
Su boflaltma hortumunun uç k›sm› mutlaka havaland›r›lmal›d›r. Yani ç›k›fl borusunun iç çap› ç›k›fl hortumunun
d›fl çap›ndan genifl olmal›d›r.
Su ç›k›fl hortumu herhangi bir yere dolaflmamal›d›r. Hortumu zeminden geçiriniz.; sadece boflaltma yap›lacak noktaya yak›n k›sm› zeminden yükseltilmelidir.
Elektrik ba¤lant›s›
Makineniz 220-230 V, tek fazl›, 50 Hz frekans›nda elektrik
enerjisi ile çal›fl›r.
Evinizin elektrik tesisat›n›n kulland›¤›n›z di¤er elektrikli cihazlar da göz önünde bulundurularak gereken azami yükü (2.2 Kw) kald›rabilece¤ini kontrol ediniz.
Makinenizi toprakl› bir prize ba¤lay›n›z.
Yukar›daki güvenlik önlemlerine uyulmamas›ndan
kaynaklanacak hasar ya da yaralanmalardan üretici
sorumlu tutulamayacakt›r.
Makinenizin elektrik kablosunun de¤ifltirilmesi
gerekti¤inde, bu ifllem Servis Merkezimiz taraf›ndan
gerçeklefltirilmelidir.
Önemli!
Besleme kablosu, makine kurulduktan sonra, kolay flekilde
ulaflılabilir olmalıdır.
Teknik özellikler
ÖLÇÜLER Yükseklik 85 cm
Genifllik 60 cm
Derinlik 58 cm
AZAM‹ ÇAMAfiIR M‹KTARI Pamuklu 5.5 kg
Sentetik 2.5 kg
Narin 2.5 kg
Yünlü 2 kg
SIKMA DEVR‹ Azami 1400 devir/dak
ELEKTR‹K G‹R‹fi VOLTAJI/FREKANSI 220-230 V/50 Hz
ÇEK‹LEN TOPLAM GÜÇ 2200 W
ASGAR‹ S‹GORTA KORUNMASI 10 A
SU BASINCI Asgari 50 kPa (1 Atm)
Azami 800 kPa (10 Atm)
Bu ürün afla¤›da belirtilen A.E.T. yönetmeliklerine uygundur
- 19.2.73 tarihli 73/23 AET Düflük Voltaj Yönetmeli¤i
- 3.5.89 tarihli 89/336 AET Elektromanyetik Uygunluk Yönetmeli¤i
32
Page 33
Yeni çamafl›r makineniz
Bu yeni çamafl›r makinesi, su, enerji ve deterjandan tasarruf sa¤lad›¤›ndan çamafl›rlar›n modern yöntemler ile y›kanmas›n› ilgilendiren tüm gereksinimlere cevap vermektedir.
• Program seçme dü¤mesi program ve s›cakl›k seçme fonksiyonlar›n› birlikte gerçeklefltirerek program ayarlar›n› daha
kolay bir flekilde yapman›za olanak sa¤lamaktad›r.
• Program ekran› seçilen program basamaklar›n› ve makinan›n çal›flmakta oldu¤u program ad›m›n› gösterir.
• Yeni hassas y›kama sistemini içeren özel yünlü program› yünlü çamafl›rlar›n›z› özenle y›kar.
• Dengesiz Yük Kontrol Sistemi makinenin s›kma ifllemi s›ras›nda sars›nt›s›z çal›flmas›n› sa¤lar.
Makinenizin tan›t›m›
TÜRKÇE
1 Deterjan çekmecesi
2 Program tablosu
3 Kontrol paneli
4 Kapak kilidi ikaz lambas›
5 Boflaltma filtresi
6 Ayarlanabilir ayaklar
Kap› kilidi ikaz lambas›
Program›n çal›flma süresi boyunca yanarak kapa¤›n kilitli
oldu¤unu belirtir.
Kapa¤› ›fl›k söndükten sonra açabilirsiniz (bkz. Sayfa 38).
Deterjan çekmecesi
Ön y›kama
1
3
1400
ÇOK KIRLI
ÖN YIKAMA
AÇMA
KAPAMA
900
700
500
ÖN
YIKAMA SIKMA
ÖN YIKAMA
NORMAL KIRLI
YIKAMA
YIKAMA
AZ KIRLI
DURULAMA
DURULAMA
SUDA
BEKLETME
BOSALTMBOSALTM
EKSTRA
SUDA
BASLAT
KIRLILIK
SIKMA
BIO
DURULAMA
BEKLETME
GECIK.
BEKLET
DURUMU
FILTRE IKAZ
FILTRE IKAZ
PROGRAM
PROGRAM
SONU
EW 1478 F
2
4
5
6
Ana y›kama
Yumuflat›c›, kola
P0874
33
Page 34
Kullan›m
Kontrol paneli
AÇMA
KAPAMA
12 3 4 5 6 7 8 9 10 11 13 14
1) Program tablosu
Deterjan çekmecesinin iç taraf›nda Türkçe bir program
tablosu bulunmaktad›r.
2) Çal›flma lambas›
Bu ›fl›k ON/OFF (AÇMA/KAPAMA) dü¤mesine
bas›ld›¤›nda yanacak, tekrar bas›ld›¤›nda sönecektir.
3) ON/OFF (AÇMA/KAPAMA) dü¤mesi
Makineyi çal›flt›rmak için bu dü¤meye bas›n›z. Yine bu
dü¤meye basarak makineyi durdurabilirsiniz.
4) Program seçme dü¤mesi
Dü¤me 5 bölüme ayr›lm›flt›r
• Pamuklu, keten (aç›k mavi bölüm)
• Sentetikler (sar› bölüm)
• Narin çamafl›rlar (siyah bölüm)
• Yünlüler (elde y›kama)(siyah bölüm)
• Özel programlar A...G
• Program s›f›rlama O
G
95°
40°
30°
40°
F
D
C
B
A
30°
40°
30°
E
°
0
6
50°
40°
30°
60°
50°
Seçme dü¤mesi her iki yöne de çevrilebilmektedir.
1400
900
700
500
ÖN
YIKAMA SIKMA
SUDA
BEKLETME
ÇOK KIRLI
NORMAL KIRLI
AZ KIRLI
EKSTRA
DURULAMA
KIRLILIK
DURUMU
ÖN YIKAMA
ÖN YIKAMA
YIKAMA
YIKAMA
DURULAMA
DURULAMA
SUDA
BEKLETME
BOSALTM
BOSALTM
BASLAT
BIO
GECIK.
BEKLET
SIKMA
FILTRE IKAZ
FILTRE IKAZ
PROGRAM
PROGRAM
SONU
EW 1478 F
12
E konumu ENERJ‹ TASARRUF programlar›n›, konumu
ise "so¤uk y›kama" program›n› çal›flt›rmaktad›r.
Program›n çal›flmas› bitti¤inde seçme dü¤mesi O
konumuna getirilmelidir.
Program seçene¤i dü¤meleri
Kullan›lan programa ba¤l› olarak farkl› fonksiyonlar
birlefltirilebilmektedir. Bu fonksiyonlar, istenilen program
seçildikten sonra ancak START/PAUSE
(BAfiLAT/BEKLET) dü¤mesine bas›lmadan önce
seçilmelidir.
Bu dü¤melere bas›ld›¤›nda ilgili ikaz lambalar› yanacakt›r.
Bu dü¤melere tekrar bas›ld›¤›nda bu ikaz lambalar›
sönecektir.
Yanl›fl bir fonksiyon seçildi¤inde ilgili ikaz lambas› yaklafl›k
2 saniye süre ile yan›p sönecek. Err (hata) mesajı görün-
tülenecektir.
5) Ön y›kama dü¤mesi
Makineniz azami 30°C s›cakl›kta bir ön y›kama çevrimi
gerçeklefltirmektedir. Ön y›kama çevrimi Pamuklu ve
Sentetik programlar› ile Narin çamafl›rlar›n y›kanmas›ndan
sonra su boflaltma ifllemi s›ras›nda 650 devir/dakikal›k
k›sa bir s›kma ifllemi ile sona ermektedir.
Bu fonksiyon yünlü program› ile birlikte kullan›lmamaktad›r.
Bu fonksiyonu çok kirli çamafl›rlar için kullan›n›z.
6) S›kma devri ayar dü¤mesi
Seçti¤iniz program için makine taraf›ndan uygulanacak
azami s›kma devrini düflürmek ya da konum seçmek
(s›kma ifllemi yok) için bu dü¤meye bas›n›z. Seçti¤iniz
fonksiyona ait ›fl›k yanacakt›r.
34
Page 35
S›kma devri
Farkl› kumafllar için farkl› s›kma devirleri uygulanmaktad›r:
• Pamuklu, keten :
500/700/900 azami 1400 devir/dakika
• Sentetikler yünlüler
500/700 azami 900 devir/dakika
• Narin çamafl›rlar
500 azami 700 devir/dakika
S›kmas›z
Bu seçene¤in seçilmesi ile s›kma ifllemi iptal edilir.
Bu seçenek pakumlu ve ketenler için geçerli de¤ildir.
Çok hassas çamafl›rlarda seçilebilir.
7) K›r›fl›k önleyici (suda bekletme)
dü¤mesi
Bu fonksiyonu seçti¤inizde son durulama suyu boflalt›lmayarak çamafl›rlar›n k›r›flmas› önlenir. Program bittikten
sonra BAfiLAT/BEKLET dü¤mesinin ikaz lambas›
yan›p sönerek içerideki suyun boflalt›lmas› gerekti¤ini
belirtir.
Su üç flekilde boflalt›labilmektedir :
•"D" boflaltma program› seçilerek
Su kurutma yapmadan boflalt›l›r.
Dikkat ! "D" program› seçilmeden önce seçme dü¤mesinin
O konumuna getirilmesi gerekmektedir (iptal ifllemi).
• BAfiLAT/BEKLET dü¤mesine bas›n›z : makine
boflaltma iflleminden sonra önceden seçilmifl olan
çamafl›r tipine uygun s›kma çevrimini gerçeklefltirecektir.
• S›kma devrini ilgili dü¤meye basarak seçiniz ve daha
sonra BAfiLAT/BEKLET dü¤mesine bas›n›z
9) Kirlilik Durumu Dügmesi
Bu dügme, yıkayacagınız çamaçırın kirlilik derecesine
baglı olarak yıkama performansını seçmenizi saglar.
• NORMAL KIRLI: Bu pozisyon için makine önceden ayarlanmıçtır, yani bir programı seçtiginizde normal kirlilik
seviyesine iliçkin ıçık yanacaktır.Bu açamada,
yıkayacagınız çamaçırın kirlilik durumuna göre ÇOK
KIRLI veya AZ KIRLI programını seçebilirsiniz.
• ÇOK KIRLI: Bu opsiyonu seçmenizle yıkama süresi, yaklaçık olarak pamuklular için 15 ve sentetikler için 10
dakika uzatılmıç olur.
• AZ KIRLI: Bu içlev, pamuklular, sentetikler ve hassas
çamaçırlar için seçilebilir.Ancak EKONOMIK program “E”
için kullanılamaz.Yıkama süresi önemli ölçüde azalacaktır.
10) BIO Dügmesi
Bu opsiyon, 40°C veya daha fazla su sıcaklıgında, pamuklular ve sentetikler için kullanılabilir. 40°C’ye ulaçtıktan
sonra makine, yaklaçık 10 dakika kadar bu sıcaklıgı muhafaza eder. Bu sürede, deterjan içerisinde mevcut enzimler
çamaçır lekesini çıkarırlar.
11) PROGRAM GECIKTIRME Dügmesi
Bu dügme yardımıyla, yıkama programı 1 saatten maksimum 24 saate kadar geciktirilebilir.
Program geciktirmenin seçilmesi
• AÇMA/KAPAMA dügmesine basarak makineyi
çalıçtırınız.
• Programı ve arzu edilen opsiyonları seçiniz.
• Program geciktirme dügmesine basınız.
•BAÇLAT/BEKLET dügmesine basınız: makine, saat
baçı geri sayımına baçlayacaktır.
Geciktirme süresi sona erdikten sonra program baçlayacaktır.
TÜRKÇE
8) Ekstra durulama dü¤mesi
Yün programı hariç, tüm di¤er programlar için kullanılabilir.
Makine, 3 yerine 4 durulama yapar.
Bu opsiyondan faydalanılması, deterjana karflı alerjisi olan
kifliler için ve suyun çok tatlı oldu¤u bölgelerde tavsiye
olunur.
Program geciktirmenin degiçtirilmesi
• BAÇLAT/BEKLET dügmesine basınız.
• Arzu edilen süre görüntülene kadar PROGRAM
GECIKTIRME dügmesine basınız.
Geciktirmeyi silmek isterseniz dügmeye yalnızca bir defa
basınız: 0h sembolü görüntülenecektir.
• Tekrar BAÇLAT/BEKLET dügmesine basınız.
35
Page 36
12) DISPLAY
Displayde açagıda belirtilen bilgiler belirir:
Silme – Program süresi – Program geciktirme – Dogru
olmayan opsiyon seçimi – Alarm kodu
Silme
Bir program silinmiç ise – program seçme dügmesi O
pozisyonunda- displayde üç adet çizgi içareti yanıp sönecektir.
---
Program bittiginde yanıp sönen bir sıfır görüntülenecektir.
Suda Bekletme opsiyonunun seçilmesi halinde sıfır yanıp
sönmeyecektir.
Program geciktirme
Iliçkin dügmeye basılarak seçilen geciktirme süresi (max.
24 saat), displayde 4 saniye belirir. Daha sonra, önceden
seçilmiç olan program süresi displayde görüntülenir.
Geri sayım her saat baçı güncelleçtirilir.
Çimdi yeni bir program seçebilirsiniz.
Seçilen programın süresi
Bir programı seçtikten sonra, programın süresi saat ve
dakika olarak görüntülenir (örnegin 2.05).
2.05
Programın süresi, her kumaç türü için tavsiye edilen azami
agırlıga baglı olarak otomatik olarak hesaplanır.
Program baçladıktan sonra kalan süre, dakika baçı güncelleçtirilir.
Dogru olmayan opsiyon seçimi
Ayarlanan yıkama programıyla uyuçmayan bir opsiyonunun seçilmesi halinde Err (hata) mesajı görüntülenecektir.
Alarm kodları
Içlemede problem oldugunda, E20 gibi, bazı alar m kodları
displayde görüntülenecektir. (sayfa 49’e bakınız.)
36
E20
Page 37
13) BAfiLAT/BEKLET dü¤mesi
BASLAT
BEKLET
Bu dü¤menin üç fonksiyonu bulunmaktad›r.
Çal›flt›rma-Bekleme-Su boflaltma
Çal›flt›rma
‹stenilen program› seçtikten sonra makineyi çal›flt›rmak
için bu dü¤meye bas›n›z; ilgili ikaz lambas›n›n yan›p sönmesi kesilecektir.
Bekleme
14) Program ekran›
Y›kama program›n› seçti¤inizde program› oluflturan çeflitli
evrelerin ikaz lambalar› yanar.
Makine çal›flt›ktan sonra sadece gerçekleflmekte olan
ad›m›n lambas› yanar. Program bittikten sonra PROGRAM
SONU ikaz lambas› yanar.
ÖN YIKAMA
YIKAMA
DURULAMA
SUDA
BEKLETME
BOSALTMA
SIKMA
FILTRE IKAZ
PROGRAM
SONU
Devir sonunda filtre ikaz lambasının yanıp sönmege
baçlaması, boçaltma filtresinin temizlenmesi gerektigi
anlamına gelir.
TÜRKÇE
Çal›flmakta olan bir program› yar›da kesmek için
BAfiLAT/BEKLET dü¤mesine bas›n›z; ilgili ikaz lambas›
yan›p sönmeye bafllayacakt›r.
Program› yar›da kesildi¤i noktadan tekrar bafllatmak için
BAfiLAT/BEKLET dü¤mesine tekrar bas›n›z.
Su boflaltma
Start/Pause dü¤mesine bast›¤›n›zda;
•"A" program›n›n (Islatma) suyu boflalt›l›r.
• K›r›fl›k önleyici (suda bekletme) fonksiyonunun
kullan›labildi¤i programlarda son durulama suyu boflalt›l›r
ve çamafl›rlar›n s›k›lmas›na bafllan›r.
Içlemede problem oldugunda, açagıdaki ıçıklardan bir
tanesi yanıp sönmeye baçlar ve displayde bir alarm kodu
belirir.
E10 + SUDA BEKLETME = makine dolmam›fl
E20 + DURULAMA = makine boflalmam›fl
E40 + YIKAMA = kap› kapanmam›fl
Problemi çözmek için “Servis ça¤›rmadan önce” bölümüne
bak›n›z.
Fonksiyonlar
‹kaz lambalar›
Kulland›¤›n›z programa ba¤l› olarak çeflitli fonksiyonlar
birlefltirilebilmektedir.
Kullan›lmas›n› istedi¤iniz fonksiyonun dü¤mesine
bast›¤›n›zda ilgili ikaz lambas› yanacakt›r.
Dü¤meye tekrar bast›¤›n›zda, ikaz lambas› sönecektir.
Yanl›fl bir fonksiyon seçildi¤inde ilgili ikaz lambas› yaklafl›k
2 saniye süre ile yan›p sönecek. Err (hata) mesajı görün-
tülenecektir.
37
Page 38

Program sonu
Kapak kapal› uyar› ›fl›¤› söndükten sonra kapa¤› açabilirsiniz. Program sonu ikaz lambas› yanar.
Displayde yanıp sönen bir sıfır belir ir.
Makineyi kapat›p çamafl›rlar›n›z› ç›kartabilirsiniz.
Program seçme dü¤mesini O konumuna getiriniz.
Program de¤ifltirme
Herhangi bir program› bafllamadan önce de¤ifltirebilirsiniz.
Program bafllad›ktan sonra ise program seçme dü¤mesini
O konumuna getirerek program› s›f›rlad›ktan sonra yeni
bir program seçebilirsiniz.
Yeni program› BAfiLAT/BEKLET dü¤mesine basarak
çal›flt›rabilirsiniz.
Program› yar›da kesme
Çal›flmakta olan bir program› yar›da kesmek için
BAfiLAT/BEKLET dü¤mesine bas›n›z, ilgili ikaz lambas›
yan›p sönmeye bafllayacakt›r.
Program›n iptal edilmesi
Çal›flmakta olan bir program› iptal etmek için program seçme dü¤mesini O konumuna getiriniz. Displayde yanıp
sönen üç adet çizgi belirir.Art›k yeni bir program seçebilirsiniz.
Program çal›flmaya bafllad›ktan sonra
kapa¤›n aç›lmas›
‹lk olarak BAfiLAT/BEKLET dü¤mesine bas›p makinenizi
BEKLEME konumuna al›n›z.
Kapak kapal› uyar› ›fl›¤› söndükten sonra kapa¤› açabilirsiniz.
Kapak aç›lmad›¤› taktirde, makine ›s›n›yor, su seviyesi
kapa¤›n alt kenar›n›n üstünde bulunuyor ya da tambur
dönüyor, demektir.
Kap›y› mutlaka açman›z gerekti¤i halde açam›yorsan›z,
AÇMA/KAPAMA dü¤mesine basarak makineyi
kapat›n›z. Dü¤meye bast›ktan yaklafl›k 3 dakika sonra
kapa¤› açabilirsiniz (suyun seviyesine ve ısısına dikkat
ediniz!). Program› tekrar bafllatmak için kapa¤› kapatt›ktan
sonra AÇMA/KAPAMA dü¤mesine bas›n›z.
38
Page 39
Program bilgileri
D = Boflaltma
Yünlüler
Makinede y›kanabilen yünlüler, elde y›kanabilen yünlüler
ve "elde y›kay›n›z" simgesini tafl›yan narin çamafl›rlar için
y›kama program›.
A = Islatma
Çok kirli çamafl›rlar›n›z için bu program› seçiniz. Deterjan›
bölmeye dökünüz.
Bu program yünlü çamafl›rlar›n›z için uygun de¤ildir .
Makine çamafl›rlar›n›z› 30°C'de ›slat›r ve bitti¤inde su tam-
burun içinde kal›r. Su iki türlü boflalt›labilmektedir:
• BAfiLAT/BEKLET dü¤mesine basarak sadece boflaltma
yapt›rabilirsiniz.
• Boflaltma ve S›kma: Program seçme dü¤mesini O
konumuna getiriniz, "F" (s›kma) program›n› seçiniz,
dü¤meye basarak s›kma devrini tercihen azalt›n›z ve
BAfiLAT/BEKLET dü¤mesine bas›n›z.
Önemlidir!
• Su 18 saat içerisinde boflalt›lmazsa makine otomatik
olarak boflaltacakt›r.
• Islatma iflleminin sonunda (suyu boflaltt›ktan sonra)
y›kama program›n› seçebilirsiniz. ‹lk olarak program
seçme dü¤mesini O konumuna getiriniz, daha sonra
program› seçerek BAfiLAT/BEKLET dü¤mesine bas›n›z.
B = Durulama
Bu programla elde y›kanm›fl çamafl›rlar› durulay›p s›kmak
mümkündür.
Makine üç su durulama ifllemi yapt›ktan sonra
çamafl›rlar›n›z› 1400 devirde s›kar.
SIKMA dü¤mesine basarak s›kma devrini düflürebilirsiniz.
K›r›fl›k önleyici (suda bekletme) fonksiyonunun
kullan›labildi¤i programlarda son durulama suyunu
boflaltmak için.
‹lk olarak program seçme dü¤mesini O konumuna
getiriniz, daha sonra "D" program›n› seçerek
BAfiLAT/BEKLET dü¤mesine bas›n›z.
S›kma
TÜRKÇE
Elde y›kanm›fl çamafl›rlar›n›z için azami devirde
gerçeklefltirilen ayr› bir s›kma ifllemi. SIKMA dü¤mesine
bas›p s›kma devrini düflürerek s›kmak istedi¤iniz
çamafl›rlara uygun hale getirebilirsiniz.
K›sa program
Bu afla¤›daki seçeneklerle birlefltirilebilen komple bir
programd›r: S›kma devrinin düflürülmesi, s›kmas›z ifllem,
suda bekletme.
Az kirli ya da elden geçirmek istedi¤iniz çamafl›rlar için
kullan›l›r.
Azami çamafl›r miktar›: 2,5 kg
Y›kama s›cakl›¤› : 30°C
Program süresi : 30 dakika
Nihai s›kma devri : 700 devir/dakika
O = ‹ptal
Herhangi bir program› s›f›rlamak için seçme dü¤mesini O
konumuna getiriniz.
C = Yumuflat›c›
Elde y›kanm›fl çamafl›rlar›n›z› bu program ile yumuflatabilirsiniz.
Makine 1 su durulamadan sonra çamafl›rlar›n›z› azami
devirde s›kar, SIKMA dü¤mesine basarak s›kma devrini
düflürebilirsiniz.
39
Page 40

Y›kama hakk›nda pratik
bilgiler
Çamafl›rlar›n ayr›lmas›
Çamafl›rlar›n›z›n etiketlerinde bulunan uluslararas› y›kama
kodu simgelerine ve üreticilerin y›kama talimatlar›na
dikkat ediniz
Çamafl›rlar›n›z› afla¤›daki flekilde ay›r›n›z
Beyazlar, renkliler, sentetikler, narin çamafl›rlar, yünlüler
S›cakl›klar
95°
60° normal kirli renkli solmaz keten, pamuklu, ya
(so¤uk)
30°-40°
Çamafl›rlar› makineye atmadan önce
Renkli ve beyaz çamafl›rlar› kesinlikle birlikte y›kamay›n›z.
Beyaz çamafl›rlar›n›z y›kanma s›ras›nda "beyazl›klar›n›" yitirebilir.
Yeni renkli çamafl›rlar ilk y›kamada boyas›n› atabilir; bunlar› ilk kez y›karken ayr› y›kay›n›z.
Çamafl›rlar›n ceplerinde madeni parçalar bulunmamas›na dikkat ediniz (örne¤in, firkete, bozuk para, çengelli i¤ne, i¤ne)
Yast›k k›l›flar›n›n dü¤melerini ilikleyiniz, fermuarlar›,
dü¤meleri ve ç›tç›tlar› kapat›n›z. Kemerleri ve uzun kuflaklar› ba¤lay›n›z.
‹natç› lekeleri y›kamadan önce ç›kart›n›z. Kirli ya da lekeli
yerleri özel bir deterjan ya da krem deterjan ile çitileyiniz.
Perdelere itinal› davran›n›z. Perde halkalar›n› ç›kart›n›z ya
da perdeleri bir torbaya veya fileye yerlefltiriniz.
Azami çamafl›r miktar›
Önerilen çamafl›r miktarlar› program tablosunda yer almaktad›r.
Genel kurallar:
Pamuklu, keten: tamburu doldurunuz ancak çok s›k› yer-
lefltirmeyiniz
Sentetikler: tamburu yar›dan fazla doldurmay›n›z
Narin kumafllar ve yünlüler: tamburu üçte bir oran›ndan
fazla doldurmay›n›z.
Makine tamamen dolduruldu¤unda hem suyu hem de
enerjiyi daha verimli kullanacakt›r.
Çok kirli çamafl›rlarda makineye yerlefltirdi¤iniz çamafl›r
miktar›n› azalt›n›z.
normal kirli beyaz pamuklular ve ketenler
(örne¤in: sehpa örtüleri, masa örtüleri, havlu-
lar, çarflaflar)
da sentetik çamafl›rlar (örne¤in gömlekler,
gecelikler, pijamalar) ve hafif kirli beyaz keten
(örne¤in iç çamafl›rlar›)
narin çamafl›rla (örne¤in tül perdeler), sentetikler ve yünlüler de dahil olmak üzere
kar›fl›k çamafl›rlar.
Çamafl›r a¤›rl›klar›
Afla¤›daki a¤›rl›klar bilgi vermesi amac› ile verilmifltir:
Bornoz 1200 g
Peçete 100 g
Yorgan k›l›f› 700 g
Çarflaf 500 g
Yast›k k›l›f› 200 g
Masa örtüsü 250 g
Havlu 200 g
Sehpa örtüsü 100 g
Gecelik 200 g
Kad›n iç çamafl›r› 100 g
Erkek ifl gömle¤i 600 g
Erkek gömle¤i 200 g
Erkek pijamas› 500 g
Fanila 100 g
Erkek iç çamafl›r› 100 g
Lekelerin ç›kart›lmas›
‹natç› lekeler sadece su ve deterjan ile ç›kart›lamayabilir.
Bu nedenle bu lekelerin y›kanmadan önce özel iflleme tabi
tutulmas› önerilir.
Kan lekesi : taze kan lekelerini so¤uk suya bast›r›n›z.
Kurumufl kan lekelerini bir gece öncesinden içinde özel bir
deterjan bulunan suya bast›r›n›z, daha sonra sabunlu su
ile çitileyiniz.
Ya¤l› boya: benzinli leke ç›kart›c› ile nemlendiriniz,
çamafl›r› yumuflak bir kumafl›n üstüne yat›r›n›z ve lekeyi
ovalay›n›z; bu ifllemi birkaç kez uygulay›n›z.
Kurumufl ya¤ lekesi: terebentin ile nemlendiriniz,
çamafl›r› yumuflak bir yüzeye yat›r›n›z ve lekeyi parmak
uçlar›n›z ve pamuklu bir kumafl ile ovalay›n›z.
Pas lekesi: s›cak suda çözünmüfl oksalik asit ya da pas
ç›kar›c› so¤uk olarak uygulanmal›d›r.Yeni olmayan pas
lekelerinde dikkatli olunuz çünkü selüloz yap›s› hasar
görmüfl olaca¤›ndan kumafl kolay y›rt›lacakt›r.
Küf: çamafl›r suyu ile siliniz, iyice durulay›n›z (sadece
beyazlar ve solmayan renkliler)
Ot lekesi: hafifçe sabunlay›n›z ve çamafl›r suyu ile
y›kay›n›z (sadece beyazlar ve solmayan renkliler)
Tükenmez kalem ve yap›flt›r›c›: aseton* ile nemlendiriniz, çamafl›r› yumuflak bir kumafl›n üstüne yat›r›n›z
ve lekeyi ovalay›n›z
Dudak boyas›: yukar›daki maddede oldu¤u gibi aseton
ile nemlendiriniz ve daha sonra metil alkol ile ovalay›n›z.
Beyaz kumafllardaki izleri çamafl›r suyu ile gideriniz.
K›rm›z› flarap: su ve deterjan ile ›slat›n›z, durulad›ktan
sonra asetik ya da sitrik asitle ovalay›p tekrar durulay›n›z.
Kalan lekeleri çamafl›r suyu ile ç›kart›n›z.
40
Page 41
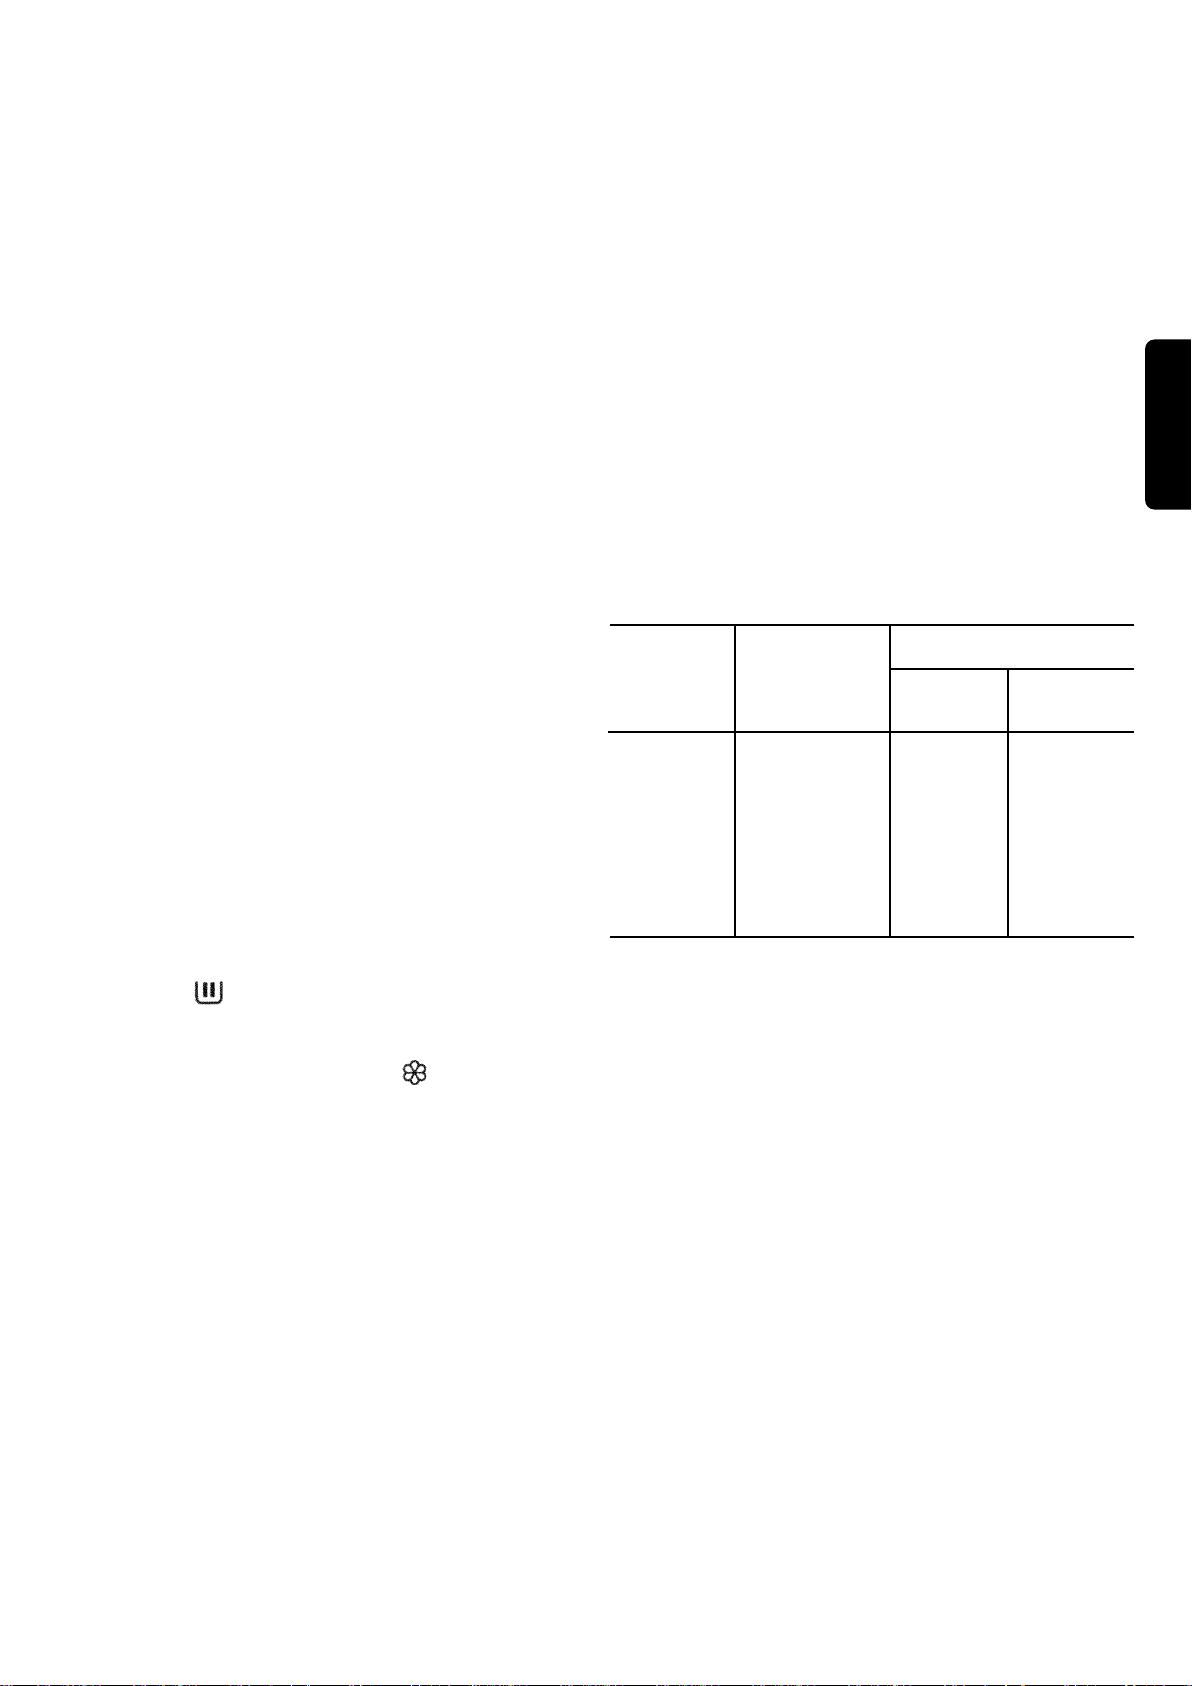
Mürekkep: mürekkebin türüne ba¤l› olarak, kumafl› asetonla (*), daha sonra asetik ile nemlendirin; beyaz kumaflta kalan lekeye beyazlat›c› maddeler uygulay›n ve nazikçe durulay›n.
Katran lekesi: ‹lk önce ya¤ sökücü, metil alkollü s›v›lar veya benzin uygulay›n daha sonra deterjanla ovalay›n.
(*) sentetik ipek üzerinde aseton kullanmay›n
Deterjanlar ve katk› maddeleri
‹yi y›kama sonuçlar› ayr›ca seçilen deterjana ve fazlas›n›n
at›lmas›n› önlemek ve çevreyi korumak için do¤ru miktar›n
seçilmesine ba¤l›d›r. Biyolojik olarak parçalanabilir olduklar› halde, bu tip içeri¤i olan afl›r› miktarlarda deterjan do¤al
dengeyi bozabilir.
Deterjan›n türü kumafl›n türüne (hassas kumafllar, yünlüler,
pamuklular...vb,) rengine, y›kama s›cakl›¤›na ve lekenin
miktar›na ba¤l›d›r.
Bütün mevcut çamafl›r makinesi deterjanlar› flu uygulamalarda kullan›labilir:
- bütün kumafl türleri için toz deterjanlar,
- hassas kumafllar (azami 60° C) ve yünlüler
- s›v› deterjanlar, tercihen düflük s›cakl›ktaki (azami 60°C)
y›kamalar içn bütün kumafl türleri veya özel olarak yünlüler için.
Deterjan ve katk› maddeleri deterjan çekmecesinin uygun
gözlerine y›kama program› bafllat›lmadan önce konmal›d›r.
E¤er konsantre toz veya s›v› deterjan kullan›l›yorsa ön
y›kamas›z bir program seçilmelidir.
Çamafl›r makinesine, konsantre deterjan›n en iyi flartlarda
kullan›lmas› için bir tekrar dolaflt›rma sistemi dahil edilmifltir.
S›v› deterjan› flekliyle iflaretlenmifl deterjan çekmecesinndeki göze programa bafllamadan az önce koyun.
Herhangi bir yumuflat›c› veya kolalama katk› maddesi
y›kama program› bafllamadan önce ile iflaretlenmifl
göze konmal›d›r.
Ürün imalatç›s›n›n tavsiyeleri do¤rultusunda miktarlarda ve
çekmecedeki “MAX” iflaretini geçmeyecek miktarda
deterjan kullan›n.
Kullan›lacak deterjan miktar›
Deterjan›n türü ve miktar› kumafl›n türü, yük miktar›, lekenin
miktar›na ve y›kama suyunun sertli¤ine ba¤l›d›r.
Su sertli¤i sözde sertlik “dereceleri” ile s›n›fland›r›l›r.
Bölgenizdeki suyun sertlik derecesi hakk›ndaki bilgiyi su
sa¤lay›c›n›zdan veya yetkili merci’den alabilirsiniz.
Kullan›lacak olan miktar ürün imalatç›s›n›n talimatlar›n›
takip edin.
Daha az deterjan kullan›n e¤er:
- az miktarlarda çamafl›r y›k›yorsan›z
- çamafl›rlar az kirliyse
- y›kama s›ras›nda afl›r› miktarlarda köpük olufluyorsa.
SU SERTL‹K DERECELER‹
Dereceler
Seviye Karakteristik
Almanya Fransa
°dH °T.H.
1 yumuflak 0-7 0-15
2 orta 8-14 16-25
3 sert 15-21 26-37
4 çok sert 21’den 37’den
fazla fazla
TÜRKÇE
41
Page 42
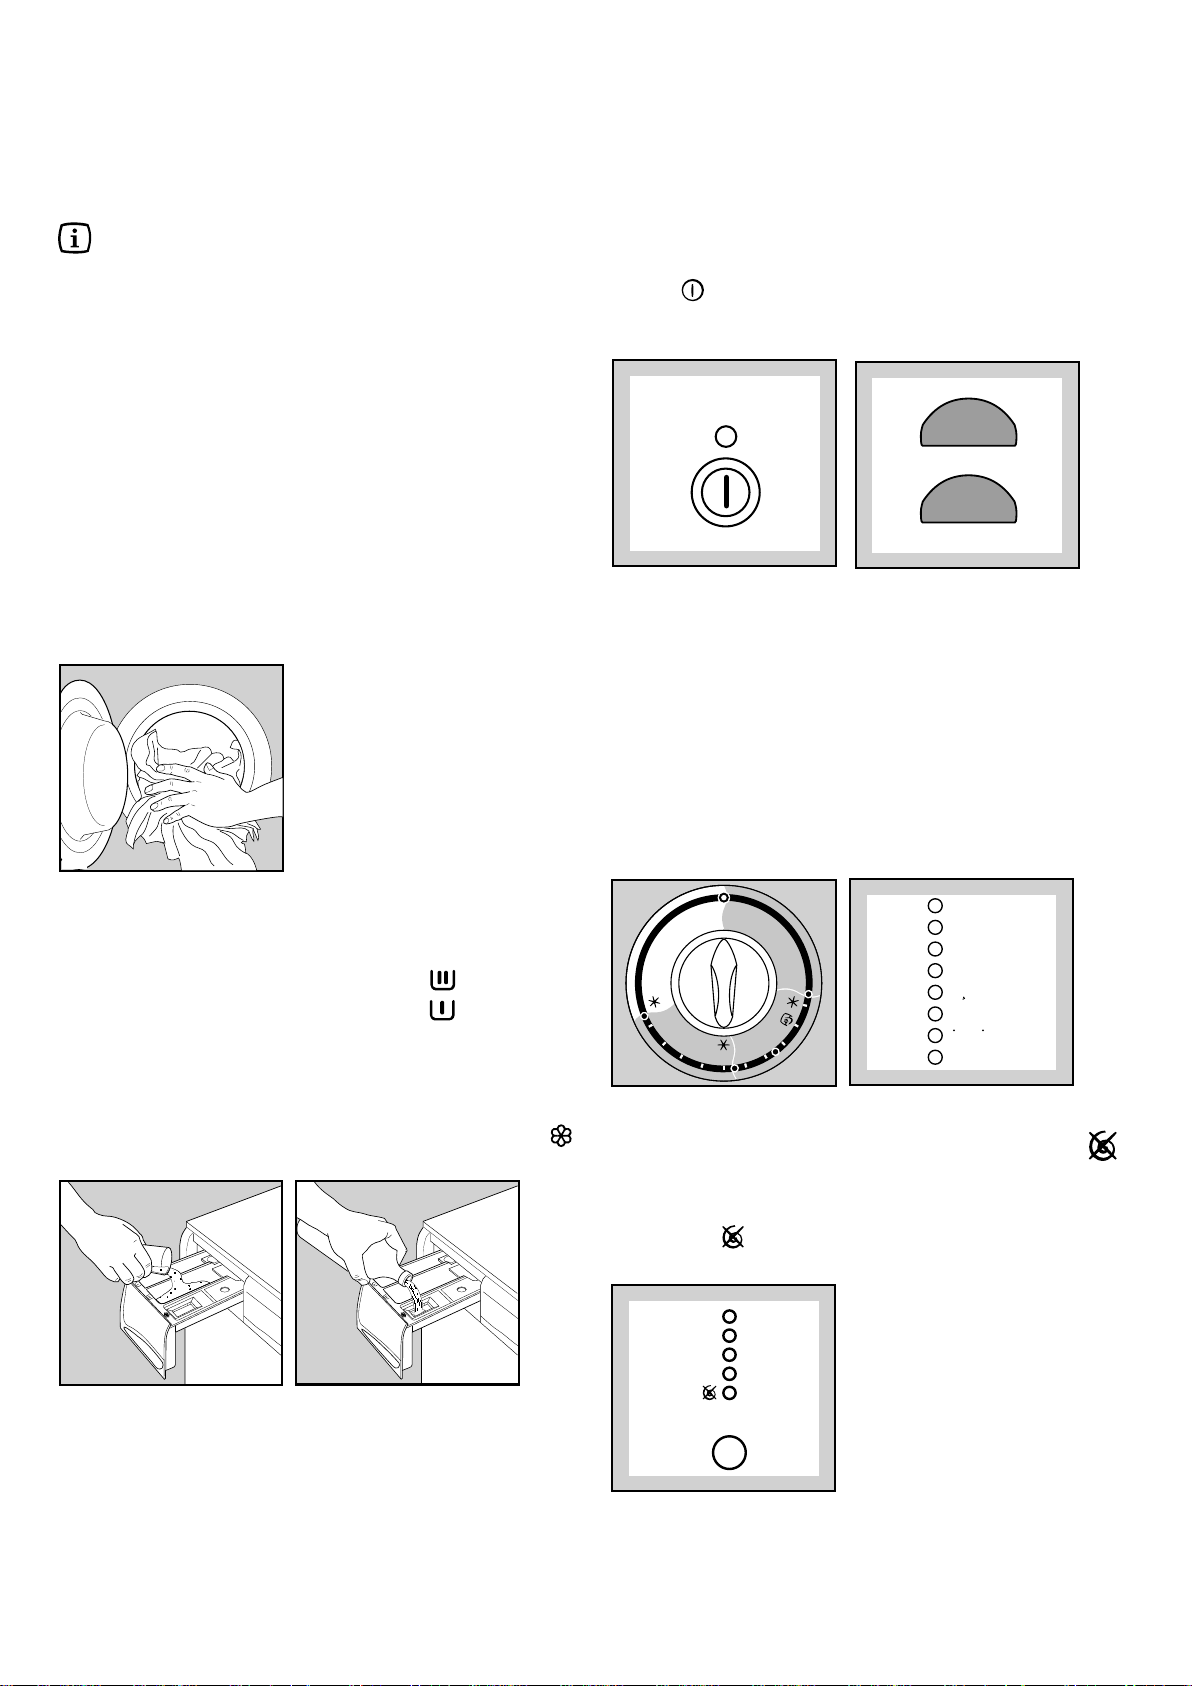
Çal›flt›rma s›ras›
1400
900
700
500
SIKMA
Sadece y›kama
Makinenizde ilk kez çamafl›r y›kamaya bafllamadan önce
tamburda ve haznede bulunabilecek üretimden kalma
kal›nt›lar› gidermek amac› ile makine bofl durumda iken
60°C 'de bir pamuklu program›nda çal›flt›rman›z› öneririz.
Ana y›kama bölmesine yar›m ölçü deterjan boflalt›n›z ve
makineyi çal›flt›r›n›z.
1. Çamafl›rlar›n tambura yerlefltirilmesi
Kapa¤› aç›n›z
Çamafl›rlar› gevflek olarak ve teker teker makineye
yerlefltiriniz.
Kapa¤› kapat›n›z
P0004
4. Makinenin çal›flt›r›lmas›
Makinenizi çal›flt›rmak için AÇMA/KAPAMA dü¤mesine
bas›n›z :
Makinenin çal›flt›¤›n› gösteren ›fl›k yanacakt›r.
AÇMA
KAPAMA
---
0
Program seçici tuçu RESET O pozisyonunda ise, displayde üç adet yanıp sönen çizgi görüntülenecektir.
Program seçici tuçunun bir yıkama programı üzerinde
olması halinde displayde yanıp sönen bir sıfır belirecektir.
5. Kullanmak istedi¤iniz program›n
seçilmesi
Program seçme dü¤mesini kullanmak istedi¤iniz konuma
getiriniz: seçti¤iniz program› oluflturan farkl› ad›mlara ait
›fl›klar yanacakt›r.
2. Deterjan miktar›n›n ölçülmesi
Deterjan çekmecesini duruncaya kadar çekiniz. Üretici
taraf›ndan önerilen miktarda deterjan› ölçekli bir kapta
ölçerek ana y›kama bölmesine boflalt›n›z .
Ön y›kama yapmak istiyorsan›z deterjan› ile iflaretli
bölmeye boflalt›n›z.
3. Yumuflat›c› miktar›n›n ölçülmesi
Gerekti¤i taktirde "MAX" iflaretini aflmamak kayd›yla
ile iflaretli bölmeye yumuflat›c› boflalt›n›z.
P0876
P0877
ÖN YIKAMA
YIKAMA
DURULAMA
SUDA
BEKLETME
BOSALTMA
SIKMA
FILTRE IKAZ
PROGRAM
SONU
40°
30°
6
50°
G
95°
40°
30°
40°
F
D
C
B
A
30°
40°
30°
E
°
0
60°
50°
6. S›kma devrinin ya da kullanmak istedi¤iniz ilave fonksiyonun seçilmesi
SIKMA istedi¤iniz s›kma devrini ya da ilave fonksiyonu
seçmek için s›kma devri dü¤mesine bas›n›z.: ilgili ›fl›k
yanacakt›r.
42
Page 43
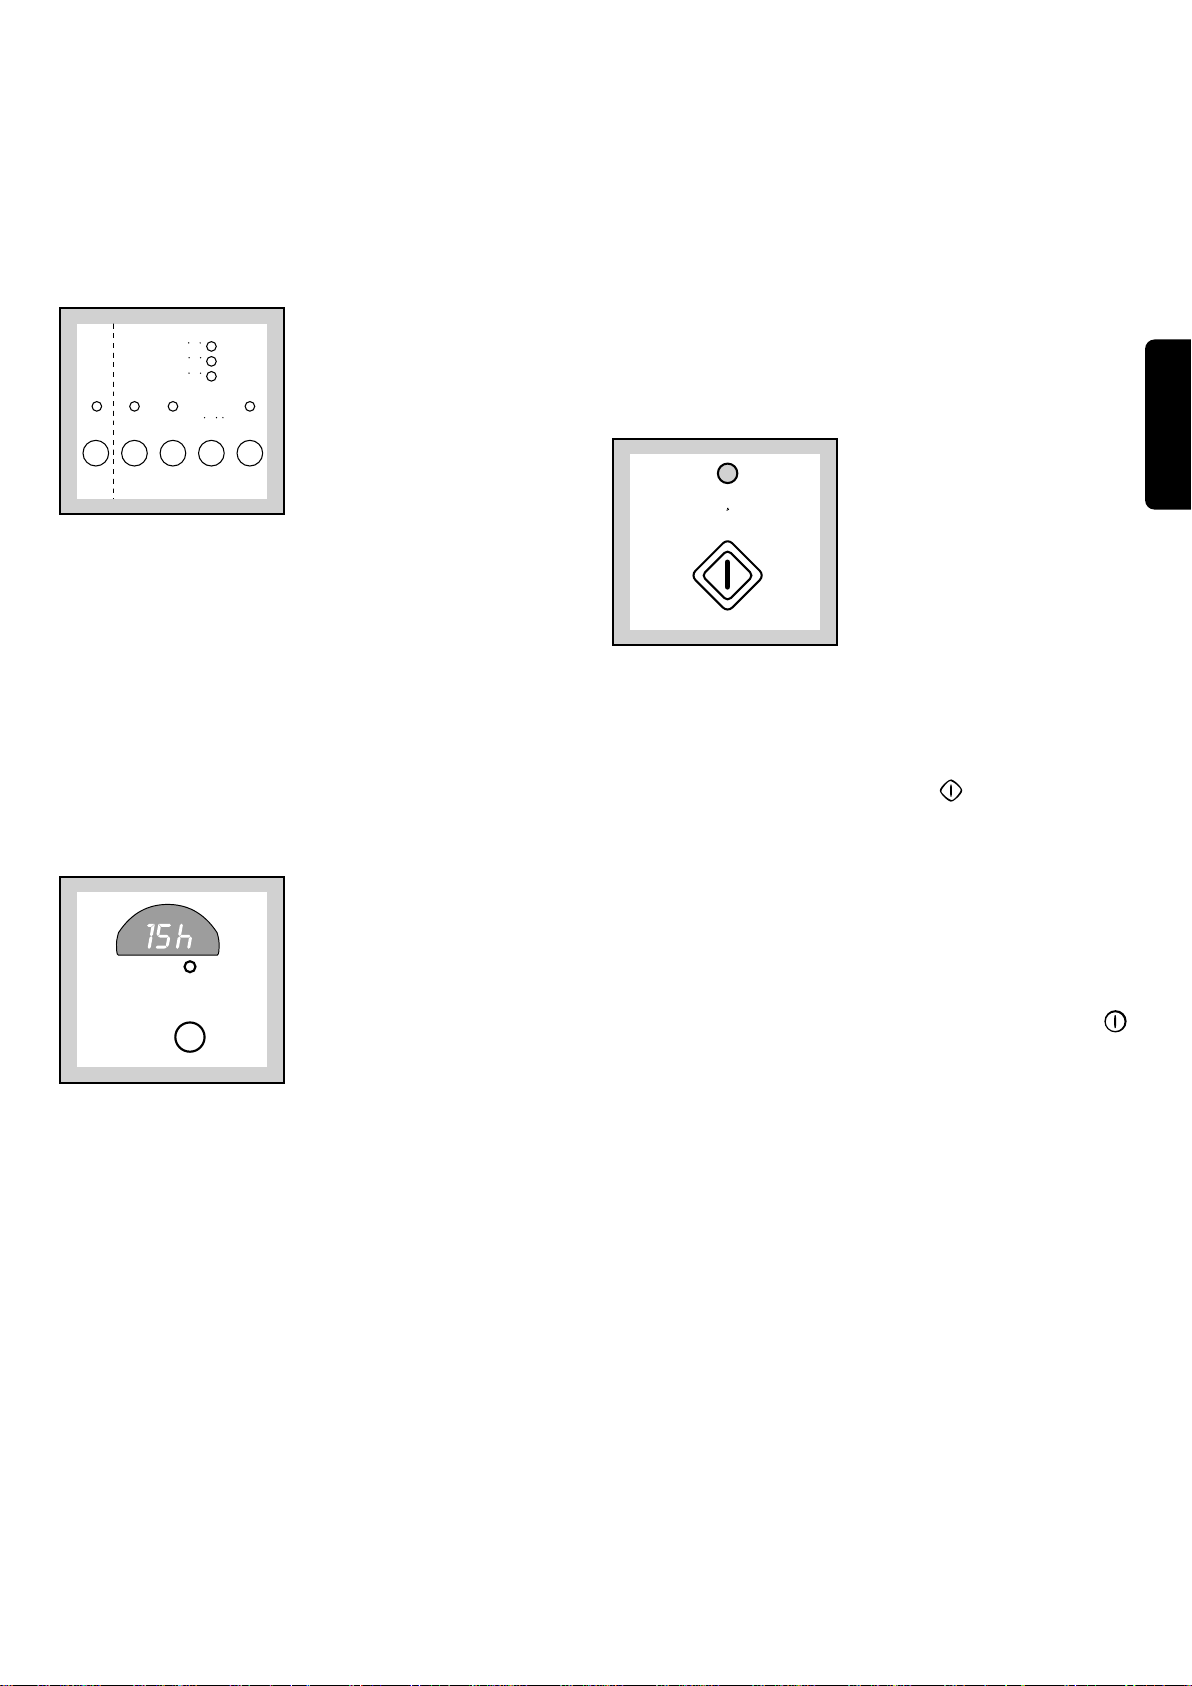
7. ‹stedi¤iniz fonksiyonlar›n seçilmesi
Bast›¤›n›z dü¤meye ait ›fl›k yanacakt›r.
ÇOK KIRLI
NORMAL KIRLI
AZ KIRLI
SUDA
BEKLETME
EKSTRA
DURULAMA
KIRLILIK
DURUMU
BIO
ÖN
YIKAMA
8.PROGRAM GECIKTIRME
opsiyonunun seçilmesi
Bir programın baçlamasını geciktirmek için, PROGRAM
GECIKTIRME tuçuna basınız. Iliçkin lamba yanacaktır.
Seçilen geciktirmeye iliçkin simge, yaklaçık 4 saniye
görüntülenecektir.Bundan sonra displayde seçilen programın süresi belirecektir.
BAÇLAT/BEKLET tuçuna basıldıgında, seçilen geciktirme
tekrar displayde belirecektir ve makine geri sayımına baç-
layacaktır.
.
GECIK.
Bu süre içerisinde baçka çamaçır yüklemek mümkündür.
Bunu yapmak için: BAÇLAT/BEKLET tuçuna basınız,
çamaçırı yükleyiniz, dolum kapagını kapatınız ve tekrar
BAÇLAT/BEKLET tuçuna basınız.
9. Program›n çal›flt›r›lmas›
Seçti¤iniz program› bafllatmak için BAfiLAT/BEKLET
dü¤mesine bas›n›z; bu programa ait ›fl›¤›n yan›p sönmesi
kesilecektir.
Çal›flmakta olan y›kama ad›m›na ait ›fl›k yanacakt›r.
Kapa¤›n kilitlendi¤ini belirten kap› ikaz lambas› yanacakt›r.
Makine çal›flmaya bafllayacakt›r.
BASLAT
BEKLET
9. Program›n bitiminde
Makine otomatik olarak duracakt›r.
Suda bekletme fonksiyonu seçilmiflse, program bittikten
sonra BAfiLAT/BEKLET dü¤mesinin ikaz lambas›
yan›p sönerek kapak aç›lmadan önce içerideki suyun
boflalt›lmas› gerekti¤ini belirtir. Displayde bir sıfır belirir.
Kapak ancak kapa¤›n kilitli oldu¤unu gösteren uyar› ›fl›¤›
söndükten sonra aç›labilir. Displayde yanıp sönen bir sıfır
belirir.
PROGRAM SONU ›fl›¤› da yanarak kilidin aç›ld›¤›n›
belirtecektir.
Program seçme dü¤mesini ‹PTAL O konumuna getiriniz.
AÇMA/KAPAMA dü¤mesine basarak makineyi kapat›n›z .
Çamafl›rlar›n›z tamburdan ç›kart›n›z ve daha sonraki
y›kamalarda zarar görmelerini (örne¤in çekmelerini) ya da
beyaz çamafl›rlara renk vermelerini önlemek amac› ile
içeride çamafl›r kalm›fl olup olmad›¤›n› kontrol ediniz.
Baflka çamafl›r y›kamayacaksan›z su muslu¤unu
kapat›n›z.
Küf ve hofl olmayan kokular›n oluflmas›n› önlemek amac›
ile kapa¤› aç›k b›rak›n›z.
TÜRKÇE
43
Page 44
Program tablosu
Y›kama programlar›
Bölüm S›cakl›k
Kumafl
türü
Program›n
aç›klanmas›
‹lave fonksiyonlar
Azami
yük
Enerji
kWh
Tüketim*
Su
lt.
Süre
dakika
Aç›k mavi 95° Beyazlar 95°C 'de y›kama SIKMA 5.5 kg 1.9 48 135
3 su durulama ÖN YIKAMA
Normal s›kma HIZLI YIKAMA
Aç›k mavi E Beyazlar, 67°C 'de y›kama SIKMA 5.5 kg 1.3 44 130
ekonomi 3 su durulama ÖN YIKAMA
Normal s›kma SUDA BEKLETME
Aç›k mavi 60°** Solmaz 60°C 'de y›kama SIKMA 5.5 kg 0.95 44 130
renkliler 3 su durulama ÖN YIKAMA
Normal s›kma HIZLI YIKAMA
Aç›k mavi 30°- Solan 30°-40°-50°C'de SIKMA 5.5 kg 0.85 44 115
40°-50° renkliler y›kama veya so¤uk ÖN YIKAMA
y›kama HIZLI YIKAMA
3 su durulama SUDA BEKLETME
Normal s›kma EKSTRA DURULAMA
Sar› 30°- Sentetikler
40°- y›kama veya so¤uk ÖN YIKAMA
50°-60° y›kama HIZLI YIKAMA
Siyah 30°- 40° Narin 30°-40°C'de SIKMA 2.5 kg 0.5 53 60
çamafl›rlar y›kama ÖN YIKAMA
30°-40°-50° -60°C'de
3 su durulama SUDA BEKLETME
Hassas s›kma EKSTRA DURULAMA
3 su durulama HIZLI YIKAMA
Hassas s›kma SUDA BEKLETME
SIKMA
ÖN YIKAMA
KIRLILIK DURUMU
SUDA BEKLETME
SUDA BEKLETME
EKSTRA DURULAMA
EKSTRA DURULAMA
BIO
SIKMA
ÖN YIKAMA
SUDA BEKLETME
EKSTRA DURULAMA
EKSTRA DURULAMA
BIO
SIKMA
ÖN YIKAMA
KIRLILIK DURUMU
SUDA BEKLETME
SUDA BEKLETME
EKSTRA DURULAMA
EKSTRA DURULAMA
BIO
SIKMA
ÖN YIKAMA
KIRLILIK DURUMU
SUDA BEKLETME
EKSTRA DURULAMA
BIO
SIKMA
SIKMA
ÖN YIKAMA
KIRLILIK DURUMU
SUDA BEKLETME
EKSTRA DURULAMA
BIO
SIKMA
ÖN YIKAMA
KIRLILIK DURUMU
SUDA BEKLETME
EKSTRA DURULAMA
EKSTRA DURULAMA
2.5 kg 0.8 60 85
Siyah -30°- Yünlüler 30°-40°C'de y›kama SIKMA 2 kg 0.35 40 50
40° veya so¤uk y›kama SUDA BEKLETME
3 su durulama
Hassas s›kma
* Burada belirtilen veriler sadece gösterici anlam taflımakta olup, çamaflır miktarı ve tipine, su girifl ısısı ve ortam ısısına göre
de¤ifltirilebilirler. Bu veriler, her yıkama programı için en yüksek sıcaklı¤a ve 5 kg.lık pamuklu çamaflırlara aittir.
** 92/75 AET yönergesine uygun olarak, enerji etiketi üzerinde belirtilen tüketimler, 5 kiloluk bir yük ile 60º’de Renkliler
programına iliflkindir.
SIKMA
SUDA BEKLETME
TASARRUF (EKONOMI)
Normal kirli beyazlar› y›karken 95°C program› yerine "E" tasarruf program›n› seçiniz ; bu durumda y›kama ifllemi 67°C'de
gerçeklefltirilerek enerji tasarrufu yap›l›r.
44
Page 45
Program tablosu
Özel programlar
Seçici
Bölüm
Mavi A Islatma 30°C 'de kazan-
Mavi B Durulama Gerekirse s›v›
Mavi C
dü¤me
konumu
Program
Yumuflat›c›
Program›n
aç›klanmas›
daki ›slatma
suyunu
Boflaltmak için
BAfiLAT/BEKLET
dü¤mesine
bas›n›z. Boflaltmad›¤›n›z taktirde
18 saat sonra
makine kendisi
boflaltacakt›r.
katk› maddeleri ile
3 su durulama
S›kma
Yumuflat›c› ile 1
su durulama
S›kma
‹lave
fonksiyonlar
SUDA BEKLETME
EKSTRA
DURULAMA
SIKMA
SUDA BEKLETME
Azami
yük
5.5 kgSIKMA
5.5 kg
Enerji
kWh
0.23
0.15
-
Tüketim*
Su
lt.
19
40
18
Süre
dakika
20
TÜRKÇE
45
18
Mavi D
Mavi
Mavi G K›sa
Mavi O ‹ptal Çal›flmakta olan
* Burada belirtilen veriler sadece gösterici anlam taflımakta olup, çamaflır miktarı ve tipine, su girifl ısısı ve ortam ısısına göre
de¤ifltirilebilirler. Bu veriler, her yıkama programı için en yüksek sıcaklı¤a ve 5 kg.lık pamuklu çamaflırlara aittir.
F
Boflaltma
S›kma
program
30°C 'de y›kama
2 su durulama
700 devir/dakika-
da s›kma
y›kama
program›n› iptal
etmek için
5.5 kgSIKMA
2.5 kgSIKMA
SUDA BEKLETME
-
-
0.25
40
-
-
3
10
30
45
Page 46
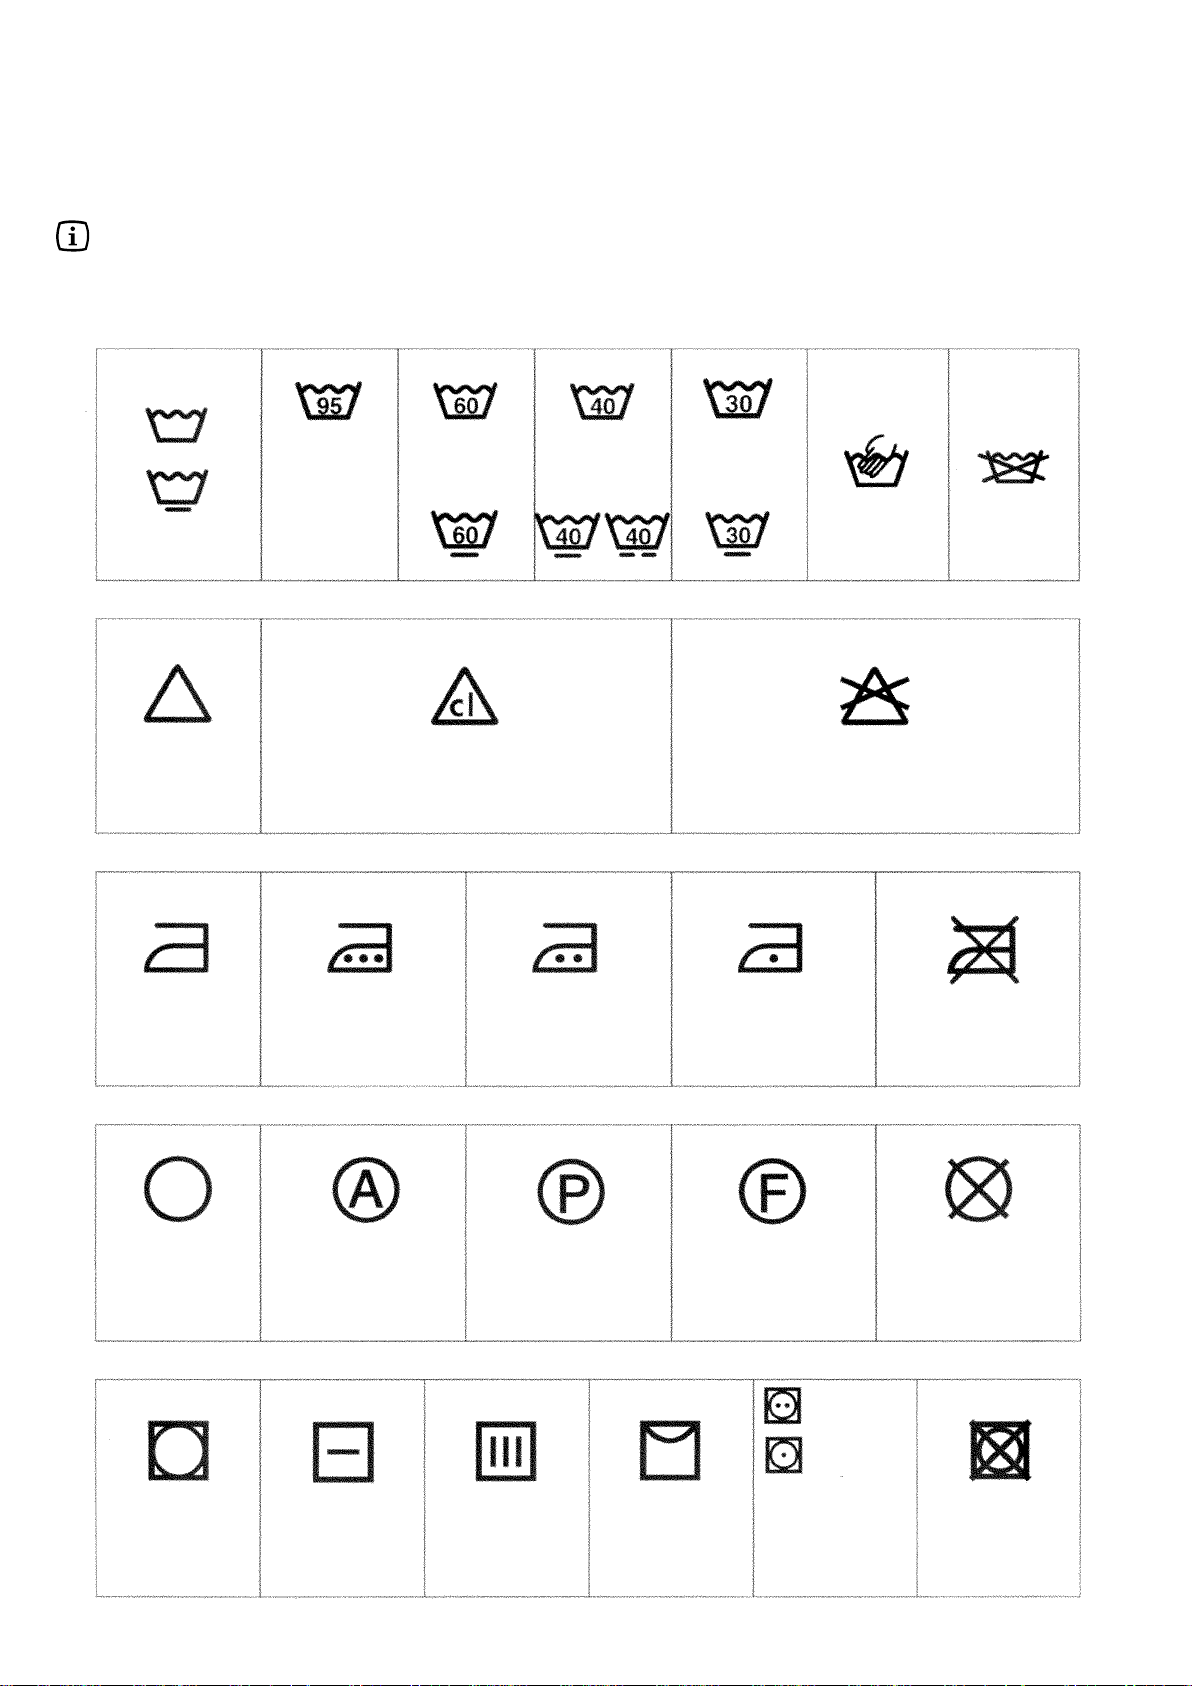
Uluslararas› y›kama kodu sembolleri
Çamafl›rlar›n etiketlerinde yer alan bu simgeler çamafl›rlar›n›za uygulanacak temizlik yöntemleri konusunda size yard›mc›
olacakt›r.
Enerjik y›kama
Hassas y›kama
Çamafl›r suyu
kullan›labilir
Ütülenebilir
Azami y›kama
s›cakl›¤›
95°C
S›cak ütüyle
ütülenebilir azami
200°C
Azami y›kama
s›cakl›¤›
60°C
So¤uk suda çamafl›r
suyu kullan›labilir
Orta s›cak ütüyle
ütülenebilir
Azami 150°C
Azami y›kama
s›cakl›¤›
40°C
Azami y›kama
s›cakl›¤›
30°C
Il›k ütüyle
ütülenebilir
Azami 110°C
Elde y›kama
Çamafl›r suyu
kullan›lamaz
Y›kamay›n›z
Ütülenmez
Kuru temizleme
Kurutma
Her türlü madde ile
kuru temizleme
Düz bir yerde
kurutulmas›
önerilir
Perkloetilen, petrol
ürünleri, saf alkol
R 111& R113 ile kuru
temizleme
S›kmadan asarak
kurutma önerilir
Petrol ürünleri, saf alkol
‹pe asarak
kurutma önerilir
46
ve R 113 ile kuru
temizleme
Yüksek
s›cakl›k
Düflük
s›cakl›k
Santrifüjlü
makinede
kurutulabilir
Kuru temizlemeye
verilmez
Santrifüjlü
makinede
kurutulamaz
Page 47
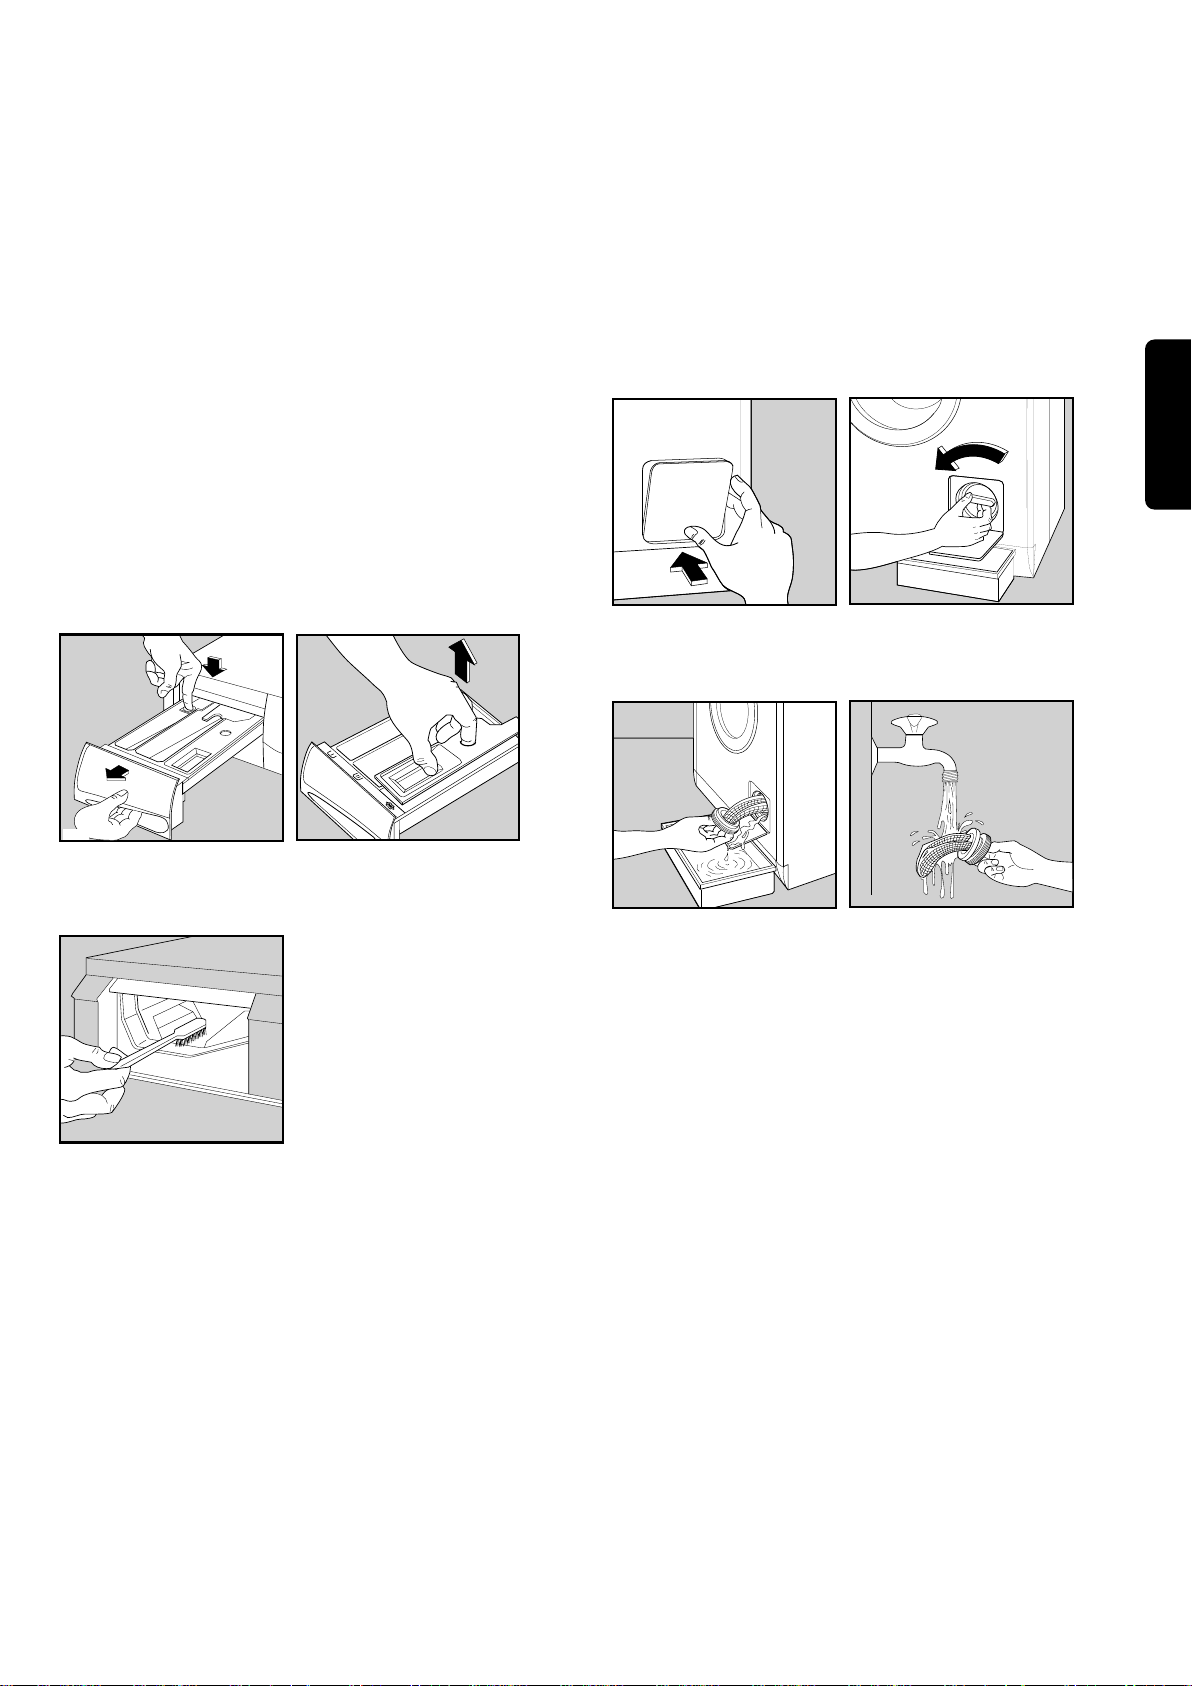
P0040
P0859
P0860
P0861
P0038
P0878
P0879
Bak›m
1. Gövde
Makinenin d›fl›n› ›l›k su ve bulafl›k deterjan› ile temizleyiniz. Temiz su ile durulay›p yumuflak bir bez ile kurulay›n›z.
Önemlidir: Çamafl›r makinenizin gövdesini temizlemek
için metil alkol, solvent ve benzeri maddeler kullanmay›n›z.
2. Deterjan çekmecesi
Bir müddet sonra deterjan çekmecesinde deterjan ve
yumuflat›c› kal›nt›lar› birikir.
Çekmeceyi arada s›rada bir muslu¤un alt›nda su tutarak
temizleyiniz. Çekmeceyi makineden ç›kartmak için, sol
arka köflesindeki dü¤meye bas›n›z.
Deterjan bölmelerinin üst k›s›mlar› ayr›larak daha kolay
temizlemenizi sa¤lar.
3. Su ç›k›fl filtresi
Filtre istenmeden çamafl›rlar›n içerisinde unutulan küçük
nesneleri tutmaktad›r. Filtrenin temizli¤ini düzenli olarak
kontrol ediniz.
Filtre kapa¤›n› aç›n›z.
Filtrenin alt›na bir kap yerlefltirerek filtreyi gevfletiniz.
TÜRKÇE
Filtreyi çekerek ç›kart›n›z.
Filtreyi bir muslu¤un alt›nda su tutarak temizleyiniz, daha
sonra yerine yerlefltirerek iyice s›k›n›z.
Çekmecenin yuvas›nda da deterjan birikebilir; bu kal›nt›lar›
eski bir difl f›rças› ile temizleyiniz. Temizledikten sonra çekmeceyi yerine yerlefltiriniz.
4. Su girifl filtresi
Makinenin su ile dolmas› için gereken sürenin artt›¤›n› farketti¤inizde, su girifl hortumunda bulunan filtrenin t›kanm›fl
olup olmad›¤›n› kontrol ediniz.
Muslu¤u kapat›n›z.
Musluktan hortumu çözünüz.
Bir firça ile hortumun içindeki filtreyi temizleyiniz.
Hortumu tekrar muslu¤a tak›n›z.
47
Page 48

5. Acil boflaltma
Su kendili¤inden boflalt›lam›yorsa (ç›k›fl pompas› engellenmifl, filtre ya da boflaltma hortumu t›kanm›fl olabilir) makinenin içerisindeki suyu afla¤›daki flekilde boflalt›n›z:
• Makinenin fiflini prizden çekiniz
• Muslu¤u kapat›n›z
• Gerekiyorsa suyun so¤umas›n› bekleyiniz
• filtrenin alt›na bir kap yerlefltiriniz
• filtreyi hafifçe gevfleterek suyun yavafl yavafl akmas›n›
sa¤lay›n›z.
• Su boflald›ktan sonra filtreyi tekrar yerine tak›n›z
6. Donma tehlikesine karfl› önlemler
Makineniz hava s›cakl›¤›n›n 0°C'nin alt›na düflme olas›l›¤›
olan bir bölgede kullan›l›yorsa, afla¤›daki önlemleri al›n›z.
• Muslu¤u kapatarak su girifl hortumunu musluktan
çekiniz.
• Boflaltma hortumu ile su girifl hortumunun uçlar›n› zemine koyaca¤›n›z bir kaba yerlefltiriniz.
•"D" (boflaltma) program›n› seçerek makine kendili¤inden
durana kadar çal›flt›r›n›z.
• Program seçme dü¤mesini O konumuna getiriniz.
• dü¤mesine basarak makineyi kapat›n›z.
• Su girifl hortumu tekrar muslu¤a tak›n›z, su boflaltma
hortumunu da yerine yerlefltiriniz.
Bu uygulama ile makinenin içerisinde kalan suyun tamam›
boflalt›larak buzlanmay› ve bundan etkilenen parçalar›n
k›r›lmas›n› önler.
Makineyi tekrar kullanaca¤›n›z zaman ortam s›cakl›¤›n›n
0°C'nin üstünde olmas›na dikkat ediniz.
48
Page 49
Servis ça¤›rmadan önce
Servisimize baçvurmadan çözebileceginiz sorunlar
Makine içlemi esnasında, açagıdaki alarm kodlarından birisi displayde belirebilir ve aynı zamanda BAÇLAT/BEKLET
tuçunun ıçıgı ve açagıda belirtilenler ıçıklardan biri yanıp sönmeye baçlayabilir.
E10 + SUDA BEKLETME: su girifli ile ilgili bir sorun
E20 + DURULAMA: su boflalt›lmas› ile ilgili bir sorun
E40 + YIKAMA: kapak aç›k
Sorunu giderdikten sonra program› yeniden bafllatmak için BAfiLAT/BEKLET dü¤mesine bas›n›z. Tüm kontrollerden
sonra sorun hala giderilmediyse, bölgenizdeki Servis Merkezine baflvurunuz.
Sorun Olas› nedeni
• Makine çal›flm›yor:
• Makine su alm›yor:
• Makine su ald›ktan sonra hemen
boflalt›yor:
• Makine su boflaltm›yor ya da
s›km›yor:
TÜRKÇE
• Kapak iyice kapanmam›flt›r. (E40)
• Fifl prize tak›lmam›flt›r ya da prize elektrik
gelmiyordur
• Ana sigorta atm›flt›r
• Program seçme dü¤mesi do¤ru konumda de¤ildir
• BAfiLAT/BEKLET dü¤mesine bas›lmam›flt›r.
• PROGRAM GECIKTIRME opsiyonu seçilmiç.
• Musluk kapal›d›r. (E10)
• Girifl hortumu ezilmifl ya da dolaflm›flt›r. (E10)
• Girifl hortumunda bulunan filtre t›kanm›flt›r. (E10)
• Kapak düzgün flekilde kapat›lmam›flt›r. (E40)
• Boflaltma hortumunun ucu çok alçakta
konumland›r›lm›flt›r. "Su boflaltma" bölümünde ilgili
paragrafa bak›n›z.
• Boflaltma hortumu ezilmifl ya da dolaflm›flt›r. (E20)
• veya SUDA BEKLETME fonksiyonu seçilmifltir
• Su ç›k›fl filtresi t›kanm›flt›r. (E20)
• Zemine su ak›yor:
• Y›kama sonucu tatminkar de¤il:
• Makine sars›nt›l› çal›fl›yor ya da ses
yap›yor:
• Çok fazla deterjan ya da uygun olmayan türde deterjan
kullan›lm›flt›r (çok köpüklenme yapmaktad›r).
• Girifl hortumu ba¤lant›lar›nda s›z›nt› olup olmad›¤›n›
kontrol ediniz. Hortumdan su akt›¤› için bu her zaman
kolayca görünmeyebilir. ; ba¤lant›n›n ›slanm›fl olup
olmad›¤›n› kontrol ediniz.
• Boflaltma hortumu hasar görmüfltür.
• Çok az deterjan ya da uygun olmayan türde deterjan
kullan›lm›flt›r.
• Çamafl›r makineye yerlefltirilmeden önce inatç› lekeler
ç›kart›lmam›flt›r.
• Do¤ru s›cakl›k seçilmemifltir.
• Çok fazla miktarda çamafl›r yerlefltirilmifltir.
• Tafl›ma güvenlik parçalar› ç›kart›lmam›flt›r
• Destek ayaklar› ayarlanmam›flt›r
• Çamafl›r tamburun içerisinde eflit flekilde yay›lmam›flt›r
• Makinenin içinde gerekenden daha az çamafl›r vard›r
49
Page 50
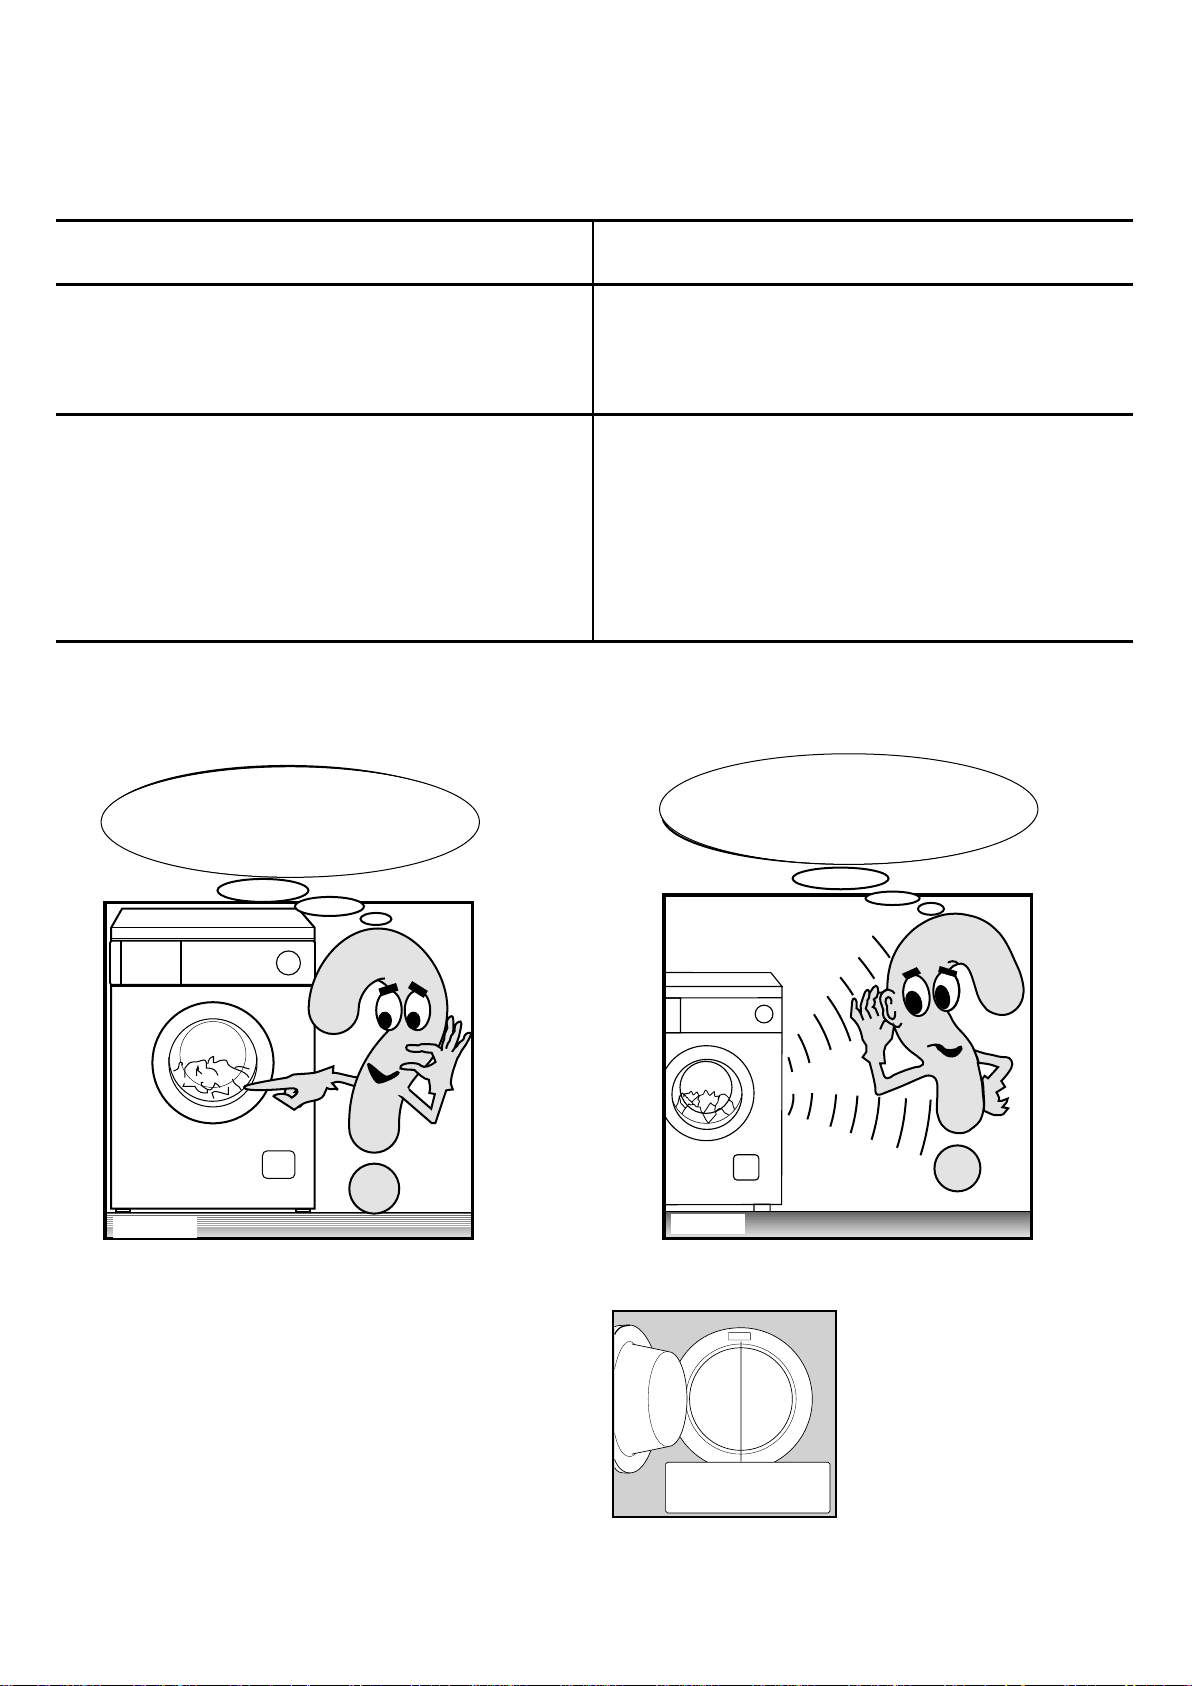
P1035UK
P1034UK
Mod. ..........
Prod. No. ...........
Ser. No. .........
M
o
d
.
..
..
.
...
.
.
S
e
r
.
P0042
Sorun Olas› nedeni
• Kapak aç›lm›yor:
• S›kma ifllemi geç bafll›yor ya da
çamafl›r yeterince s›k›lm›yor:
Makinenin
içerisindeki su görünmüyor. Modern
teknolojinin ürünü olan bu makine çok az su
tüketerek ekonomik çal›fl›yor. Performans›
da mükemmel.
• Su seviyesi kapa¤›n alt kenar›ndan yukar›dad›r
• Makine suyu ›s›tmakta ya da çamafl›rlar› kurutmaktad›r
• Tambur dönmektedir.
Kapak sadece uyar› ›fl›¤› söndükten sonra aç›labilir.
• Çamafl›r makine içerisinde eflit olarak yay›lmad›¤›ndan
elektronik dengesiz yük kontrol sistemi devreye girmifltir.
Tambur tersine çal›flt›r›larak çamafl›rlar tekrar yay›l›r. Bu
ifllem dengesizlik giderilene kadar birkaç kez tekrarlan›r.
Birkaç dakika sonra çamafl›rlar hala eflit flekilde
yay›lmam›flsa makine daha düflük bir devirde s›kacakt›r
veya hiç s›kma yapmayacakt›r. Program bitti¤inde
çamafl›rlar yeteri kadar s›k›lmam›flsa, çamafl›rlar› elinizle tekrar yay›n›z ve s›kma program›n› seçiniz.
Makine
al›fl›k olmad›¤›m›z bir sesle
çal›fl›yor. Bu çamafl›r makinesi performans›n›
artt›ran kollektörlü bir motorla
donat›lm›flt›r.
Sorunu tespit edemez ya da gideremezseniz servis
merkezimizi aray›n›z. Cihaz›n›z garanti kapsam›nda
dahi olsa kullan›m hatas›ndan kaynaklanan ar›zalar
garanti kapsam›na girmez, servis ve iflçilik ücreti tüketici
taraf›ndan karfl›lan›r. Telefon etmeden önce makinenin
modelini, seri numaras›n› ve sat›n al›nma tarihini not
al›n›z: Servis Merkezi bu bilgileri isteyecektir.
50
Page 51

Electrolux’ün mamülleri için verdigi garanti, açagıda yazılı hususları kapsamaz.
Kullanma kılavuzunda belirtilen talimatların dıçındaki kullanımlar,
Tüketiciye teslimden sonra oluçabilecek kırık, çizik ve hasarlar (taçıma, çarpma, düçürme, v.s.)
Mamulü; uygun olmayan elektrik tesisatında veya kullanılması ön görülen voltaj dıçında
kullanma,
Gereken onarım için yetkili servise baçvurmadan önce Electrolux Yetkili Servis Personeli
dıçında bir kimsenin cihazın onarımına, bakımına veya tadiline kalkıçmıç olması durumlarında,
Yukarıda belirtilen maddeler kapsamında olan arızalar ücret karçılıgı yapılır.
Iççilik ve üretim hatalarına karçı cihazın 3 (ÜÇ) YIL SÜRE ILE GARANTI EDILMIÇTIR.
Arızaların giderilmesi konusunda uygulanacak teknik yöntemlerin tespiti ile degiçtirilecek
parçaların saptanması tamamen firmamıza aittir.
Garanti Belgesi üzerinde tahrifat yapıldıgı, mamül üzerindeki orijinal seri numarası kaldırıldıgı
veya tahrip edildigi taktirde bu belge hükümden düçer.
SATICI FIRMANIN:
ÜNVANI :...........................................................
ADRESI :...........................................................
TEL-TELEFAKS :...........................................................
FATURA NO. :...........................................................
TESLIM TARIHI ve YERI :...........................................................
IMZA KAÇE :...........................................................
YETKILI SERVIS :
IMZA KAÇE :...........................................................
GD 3
GD 2
GD 1
Page 52
1.
Garanti süresi malın teslim tarihinden itibaren baçlar ve (3) üç yıldır.
2.
Malın bütün parçaları dahil olmak üzere tamamı firmamızın garantisi kapsamındadır.
3.
Malın garanti süresi içerisinde arızalanması durumunda, tamirde geçen süre garanti süresine eklenir. Malın tamir süresi
en fazla 30 iç günüdür. Bu süre, malın servis istasyonuna, servis istasyonunun olmaması durumunda sırasıyla malın
satıcısı, bayii, acentası, temsilciligi, ithalatçısı veya imalatçısından birisine teslim edildigi tarihten itibaren baçlar.
4.
Malın garanti süresi içerisinde, gerek malzeme ve iççilik gerekse montaj hatalarından dolayı arızalanması halinde, iççi-
lik masrafı, degiçtirilen parça bedeli yada baçka herhangi bir ad altında hiçbir ücret talep etmeksizin tamiri yapılacaktır.
5.
Malın;
*
Teslim tarihinden itibaren garanti süresi içerisinde kalmak kaydıyla bir yıl içerisinde, aynı arızayı ikiden fazla tekrarlaması veya farklı arızaların dörtten fazla ortaya çıkması sonucu, maldan yararlanamamanın süreklilik kazanması,
*
Tamiri için gereken azami sürenin açılması
Servis istasyonunun, mevcut olmaması halinde sırasıyla satıcısı, bayii, acentası, temsilciligi, ithalatçısı veya ima-
*
latçısından birisinin düzenleyecegi raporla arızanın tamirinin mümkün bulunmadıgının belirlenmesi durumlarında, ücretsiz olarak degiçtirme içlemi yapılacaktır.
6.
Malın kullanma kılavuzunda yer alan hususlara aykırı kullanılmasından kaynaklanan arızalar garanti kapsamı
dıçındadır.
7.
Garanti belgesi ile ilgili olarak çıkabilecek sorunlar için Sanayi ve Ticaret Bakanlıgı, Tüketicinin ve Rekabetin
Korunması Genel Müdürlügü’ne baçvurulabilir.
ELECTROLUX Dayanıklı Tüketim Mamülleri Sanayi ve Ticaret A.Ç.
Tarlabaçı Bulvarı No: 35
80080 TAKSIM / ISTANBUL
Tel: 0.212.293 10 20 (Pbx) ÜCRETSIZ TÜKETICI
Fax: 0.212.251 60 94 DANIÇMA SERVISI: 0800211 6032
GARANTI
BELGESI
Yönetim Kurulu Üyesi - Murahhas Aza Bölüm Genel Müdürü
Nevio Pollesel Ercan Çınar Öztürk
Imza Imza
Bu Garanti Belgesinin kullanılmasına 4077 sayılı kanun ile bu kanuna dayanılarak düzenlenen TRKGM-95/116-117
sayılı teblig uyarınca T.C. Sanayi ve Ticaret Bakanlıgı, Tüketicinin ve Rekabetin Korunması Genel Müdürlügü Tarafından
izin verilmiçtir.
Sanayi ve Ticaret Bakanlıgı Garanti Belgesi
Belge Numarası : 1552
Belgenin izin tarihi : 12/08/1996
CIHAZA AIT BILGILER
CINSI : .................................................................
MARKASI : ..................................................................
MODEL : .................................................................
SERI NO : .................................................................
✃
MONTAJ ANINDA YETKILI SERVIS TARAFINDAN DOLDURULACAKTIR.
CIHAZA AIT BILGILER MÜÇTERININ
CINSI : ........................................................... ADI,SOYADI: ...................................................
MODEL : ........................................................... ADRESI : ...................................................
SERI NO : ........................................................... .....................................................
MONTAJ TARIHI .................................................: .....................................................
RAPOR NO : .............................................. TEL NO : ...................................................
 Loading...