

Page 1
EVY7800AA
EVY7805AA
EN Microwave combi-oven User Manual
Page 2

CONTENTS
1. SAFETY INFORMATION....................................................................................3
2. SAFETY INSTRUCTIONS..................................................................................5
3. PRODUCT DESCRIPTION................................................................................ 7
4. CONTROL PANEL............................................................................................. 8
5. BEFORE FIRST USE....................................................................................... 10
6. DAILY USE....................................................................................................... 10
7. MICROWAVE MODE....................................................................................... 13
8. CLOCK FUNCTIONS....................................................................................... 18
9. AUTOMATIC PROGRAMMES......................................................................... 19
10. USING THE ACCESSORIES......................................................................... 19
11. ADDITIONAL FUNCTIONS............................................................................ 20
12. HINTS AND TIPS........................................................................................... 22
13. CARE AND CLEANING..................................................................................40
14. TROUBLESHOOTING....................................................................................41
WE’RE THINKING OF YOU
Thank you for purchasing an Electrolux appliance. You’ve chosen a product that
brings with it decades of professional experience and innovation. Ingenious and
stylish, it has been designed with you in mind. So whenever you use it, you can
be safe in the knowledge that you’ll get great results every time.
Welcome to Electrolux.
Visit our website for:
Get usage advice, brochures, trouble shooter, service information:
www.electrolux.com/webselfservice
Register your product for better service:
www.registerelectrolux.com
Buy Accessories, Consumables and Original spare parts for your appliance:
www.electrolux.com/shop
CUSTOMER CARE AND SERVICE
Always use original spare parts.
When contacting our Authorised Service Centre, ensure that you have the
following data available: Model, PNC, Serial Number.
The information can be found on the rating plate.
Warning / Caution-Safety information
General information and tips
Environmental information
Subject to change without notice.
www.electrolux.com2
Page 3

1. SAFETY INFORMATION
Before the installation and use of the appliance, carefully
read the supplied instructions. The manufacturer is not
responsible if an incorrect installation and use causes
injuries and damages. Always keep the instructions with
the appliance for future reference.
1.1 Children and vulnerable people safety
• This appliance can be used by children aged from 8
years and above and persons with reduced physical,
sensory or mental capabilities or lack of experience
and knowledge if they have been given supervision or
instruction concerning use of the appliance in a safe
way and understand the hazards involved.
• Do not let children play with the appliance.
• Keep all packaging away from children.
• Keep children and pets away from the appliance when
it operates or when it cools down. Accessible parts are
hot.
• If the appliance has a child safety device, we
recommend you activate it.
• Cleaning and user maintenance shall not be made by
children without supervision.
• Children of less than 3 years should be kept away
unless continuously supervised.
1.2 General Safety
• Only a qualified person must install this appliance and
replace the cable.
• Internally the appliance becomes hot when in
operation. Do not touch the heating elements that are
in the appliance. Always use oven gloves to remove or
put in accessories or ovenware.
• Before maintenance cut the power supply.
ENGLISH 3
Page 4

• Ensure that the appliance is switched off before
replacing the lamp to avoid the possibility of electric
shock.
• Do not use a steam cleaner to clean the appliance.
• Do not use harsh abrasive cleaners or sharp metal
scrapers to clean the glass door since they can
scratch the surface, which may result in shattering of
the glass.
• If the supply cord is damaged, it must be replaced by
the manufacturer, its Authorised Service Centre or
similarly qualified persons in order to avoid a hazard.
• Do not activate the appliance when it is empty. Metal
parts inside the cavity can create electric arcing.
• If the door or door seals are damaged, the appliance
must not be operated until it has been repaired by a
qualified person.
• Only a qualified person can carry out any service or
repair operation that involves the removal of a cover
which gives protection against exposure to microwave
energy.
• Do not heat liquids and other foods in sealed
containers. They are liable to explode.
• Only use utensils that are suitable for use in
microwave ovens.
• When heating food in plastic or paper containers, keep
an eye on the appliance due to the possibility of
ignition.
• The appliance is intended for heating food and
beverages. Drying of food or clothing and heating of
warming pads, slippers, sponges, damp cloth and
similar may lead to risk of injury, ignition or fire.
• If smoke is emitted, switch off or unplug the appliance
and keep the door closed in order to stifle any flames.
• Microwave heating of beverages can result in delayed
eruptive boiling. Care must be taken when handling
the container.
www.electrolux.com4
Page 5

• The contents of feeding bottles and baby food jars
shall be stirred or shaken and the temperature
checked before consumption, in order to avoid burns.
• Eggs in their shell and whole hard-boiled eggs should
not be heated in the appliance since they may
explode, even after microwave heating has ended.
• The appliance should be cleaned regularly and any
food deposits removed.
• Failure to maintain the appliance in a clean condition
could lead to deterioration of the surface that could
adversely affect the life of the appliance and possibly
result in a hazardous situation.
2. SAFETY INSTRUCTIONS
2.1 Installation
WARNING!
Only a qualified person must
install this appliance.
• Remove all the packaging.
• Do not install or use a damaged
appliance.
• Obey the installation instruction
supplied with the appliance.
• Always be careful when you move the
appliance because it is heavy. Always
wear safety gloves.
• Do not pull the appliance by the
handle.
• Keep the minimum distance from the
other appliances and units.
• Make sure that the appliance is
installed below and adjacent safe
structures.
• The sides of the appliance must stay
adjacent to appliances or to units with
the same height.
2.2 Electrical connection
WARNING!
Risk of fire and electrical
shock.
• All electrical connections should be
made by a qualified electrician.
• The appliance must be earthed.
• Make sure that the electrical
information on the rating plate agrees
with the power supply. If not, contact
an electrician.
• Always use a correctly installed
shockproof socket.
• Do not use multi-plug adapters and
extension cables.
• Make sure not to cause damage to
the mains plug and to the mains
cable. Should the mains cable need to
be replaced, this must be carried out
by our Authorised Service Centre.
• Do not let mains cables touch or
come near the appliance door,
especially when the door is hot.
• The shock protection of live and
insulated parts must be fastened in
such a way that it cannot be removed
without tools.
• Connect the mains plug to the mains
socket only at the end of the
installation. Make sure that there is
access to the mains plug after the
installation.
• If the mains socket is loose, do not
connect the mains plug.
• Do not pull the mains cable to
disconnect the appliance. Always pull
the mains plug.
• Use only correct isolation devices: line
protecting cut-outs, fuses (screw type
fuses removed from the holder), earth
leakage trips and contactors.
ENGLISH 5
Page 6

• The electrical installation must have
an isolation device which lets you
disconnect the appliance from the
mains at all poles. The isolation
device must have a contact opening
width of minimum 3 mm.
• This appliance complies with the
E.E.C. Directives.
2.3 Use
WARNING!
Risk of injury, burns and
electrical shock or explosion.
• Use this appliance in a household
only.
• Do not change the specification of this
appliance.
• Make sure that the ventilation
openings are not blocked.
• Do not let the appliance stay
unattended during operation.
• Deactivate the appliance after each
use.
• Be careful when you open the
appliance door while the appliance is
in operation. Hot air can release.
• Do not operate the appliance with wet
hands or when it has contact with
water.
• Do not apply pressure on the open
door.
• Do not use the appliance as a work
surface or as a storage surface.
• Open the appliance door carefully.
The use of ingredients with alcohol
can cause a mixture of alcohol and
air.
• Do not let sparks or open flames to
come in contact with the appliance
when you open the door.
• Do not put flammable products or
items that are wet with flammable
products in, near or on the appliance.
• Do not use microwave function to
preheat the oven.
WARNING!
Risk of damage to the
appliance.
• To prevent damage or discoloration to
the enamel:
– do not put aluminium foil directly
on the bottom of the appliance.
– do not put water directly into the
hot appliance.
– do not keep moist dishes and
food in the appliance after you
finish the cooking.
– be careful when you remove or
install the accessories.
• Discoloration of the enamel has no
effect on the performance of the
appliance. It is not a defect in the
sense of the warranty law.
• Use a deep pan for moist cakes. Fruit
juices cause stains that can be
permanent.
• This appliance is for cooking
purposes only. It must not be used for
other purposes, for example room
heating.
• Always cook with the oven door
closed.
• If the appliance is installed behind a
furniture panel (e.g. a door) make
sure the door is never closed when
the appliance is in operation. Heat
and moisture can build up behind a
closed furniture panel and cause
subsequent damage to the appliance,
the housing unit or the floor. Do not
close the furniture panel until the
appliance has cooled down
completely after use.
2.4 Care and cleaning
WARNING!
Risk of injury, fire, or
damage to the appliance.
• Before maintenance, deactivate the
appliance and disconnect the mains
plug from the mains socket.
• Make sure the appliance is cold.
There is the risk that the glass panels
can break.
• Replace immediately the door glass
panels when they are damaged.
Contact the Authorised Service
Centre.
• Make sure the cavity and the door are
wiped dry after each use. Steam
produced during the operation of the
appliance condensates on cavity walls
and can cause corrosion.
www.electrolux.com6
Page 7
• Clean regularly the appliance to
prevent the deterioration of the
surface material.
• Fat and food remaining in the
appliance can cause fire and electric
arcing when the microwave function
operates.
• Clean the appliance with a moist soft
cloth. Only use neutral detergents. Do
not use abrasive products, abrasive
cleaning pads, solvents or metal
objects.
• If you use an oven spray, obey the
safety instructions on the packaging.
• Do not clean the catalytic enamel (if
applicable) with any kind of detergent.
2.5 Internal light
• The type of light bulb or halogen lamp
used for this appliance is only for
household appliances. Do not use it
for house lighting.
WARNING!
Risk of electrical shock.
• Before replacing the lamp, disconnect
the appliance from the power supply.
• Only use lamps with the same
specifications.
2.6 Disposal
WARNING!
Risk of injury or suffocation.
• Disconnect the appliance from the
mains supply.
• Cut off the mains cable and discard it.
2.7 Service
• To repair the appliance contact an
Authorised Service Centre.
• Use original spare parts only.
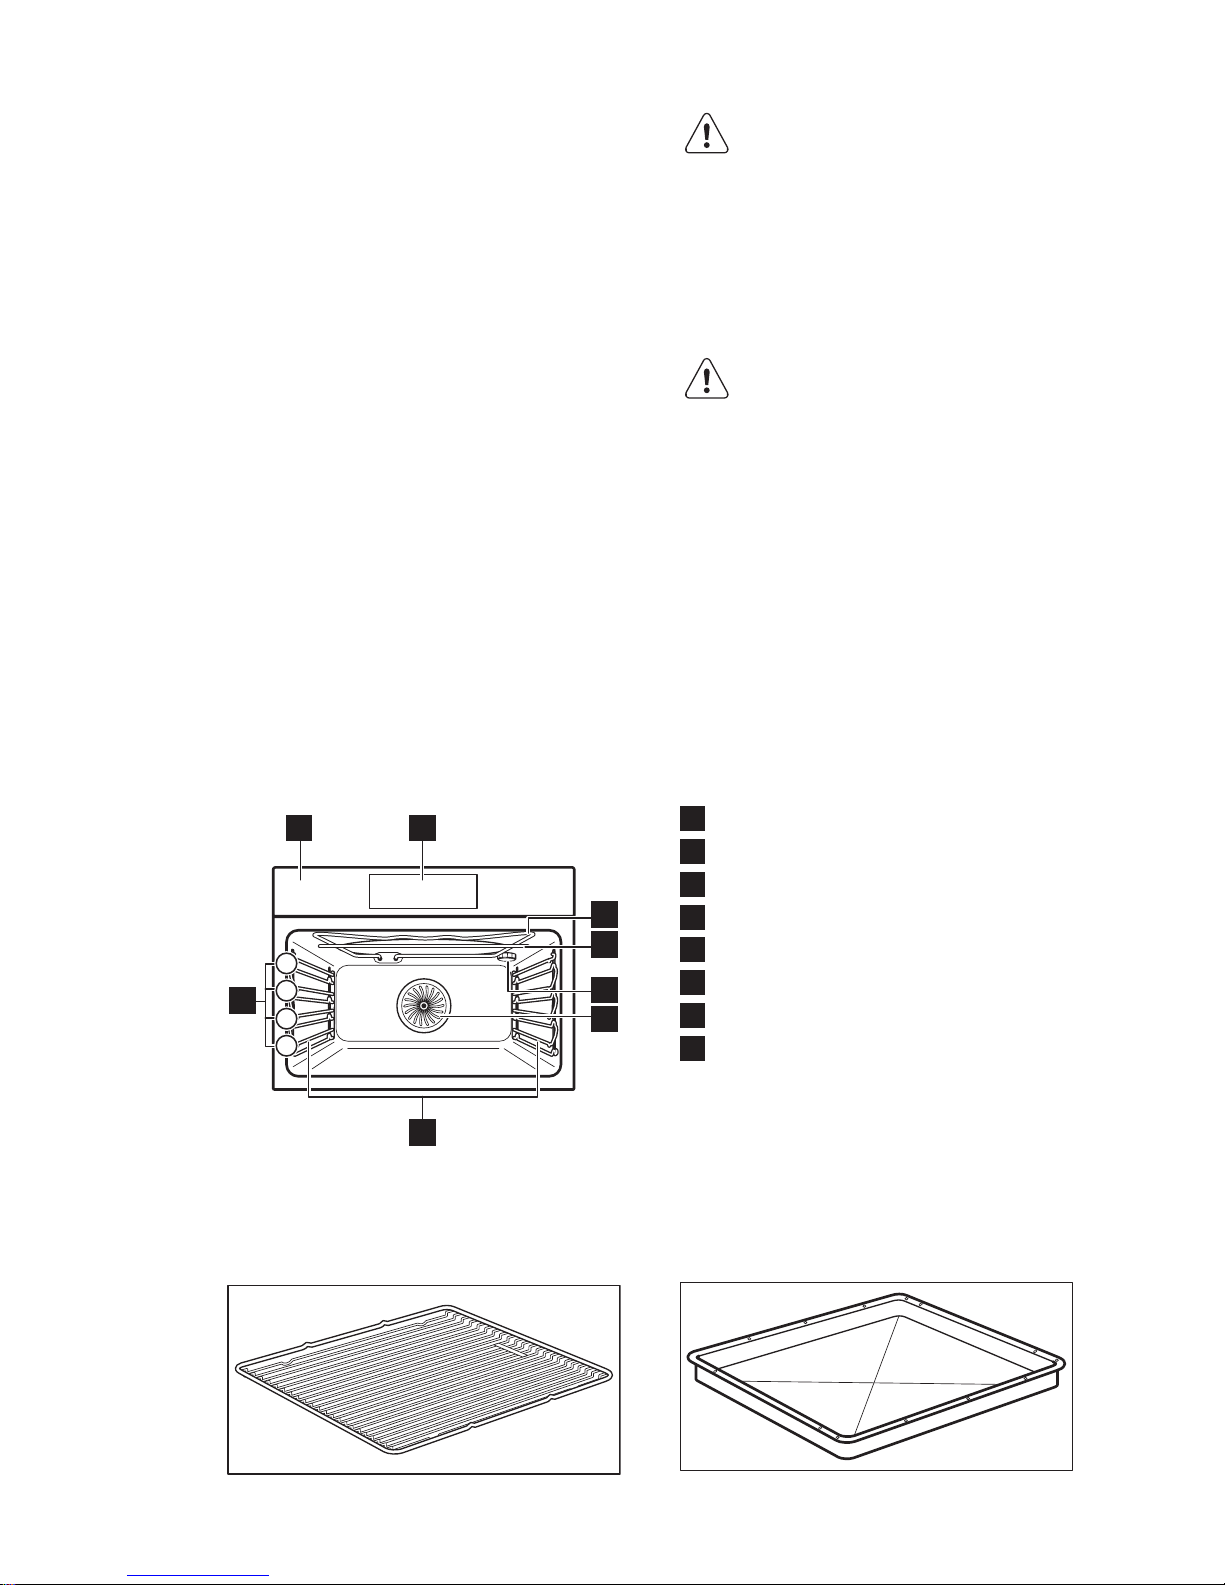
3. PRODUCT DESCRIPTION
3.1 General overview
1 2
8
4
3
1
2
3
6
4
5
7
1
Control panel
2
Electronic programmer
3
Heating element
4
Microwave generator
5
Lamp
6
Fan
7
Shelf support, removable
8
Shelf positions
3.2 Accessories
Wire shelf
For cookware, cake tins, roasts.
Baking tray
ENGLISH 7
Page 8
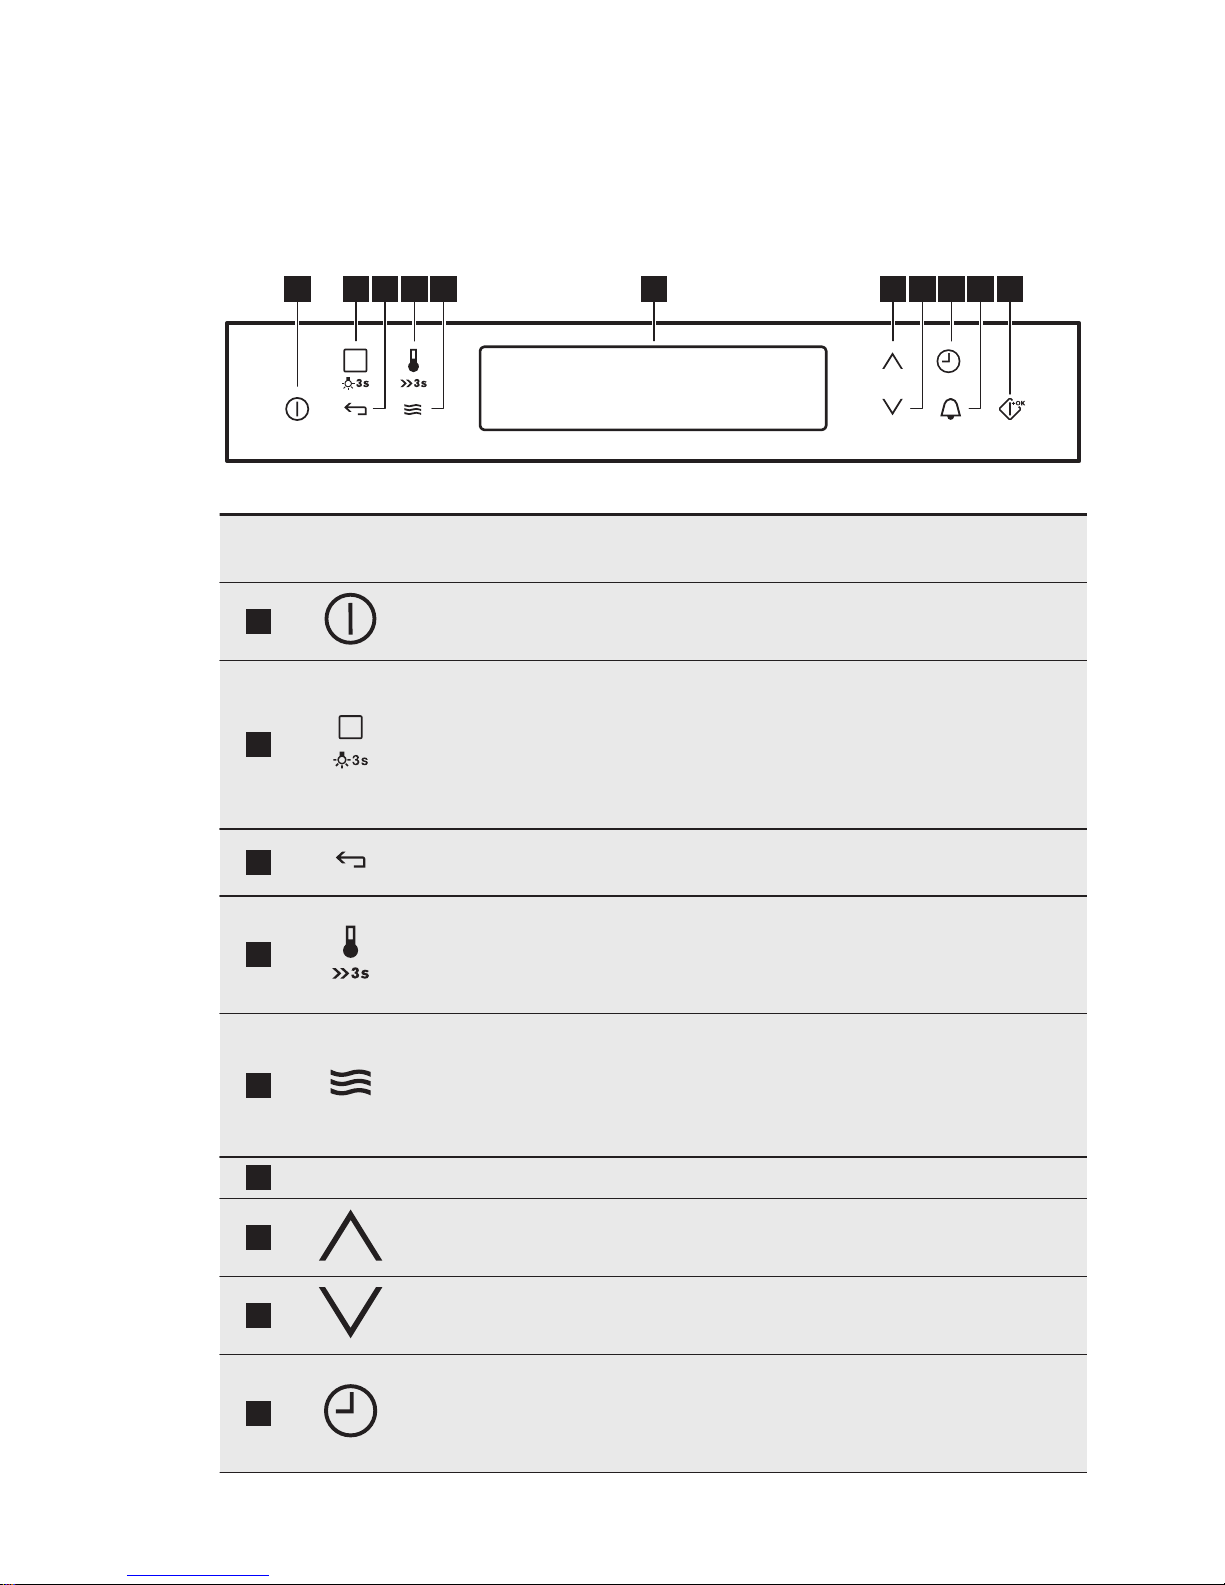
For cakes and biscuits.
4. CONTROL PANEL
4.1 Electronic programmer
1 112 4 63 9 105 7 8
Use the sensor fields to operate the appliance.
Sensor
field
Function Comment
1
ON / OFF To activate and deactivate the appliance.
2
Heating Func‐
tions or Assisted
Cooking
Touch the sensor field once to choose a heat‐
ing function or the menu: Assisted Cooking.
Touch the sensor field again to switch between
the menus: Heating Functions, Assisted Cook‐
ing. To activate or deactivate the light, touch
the field for 3 seconds.
3
Back key To go back one level in the menu. To show the
main menu, touch the field for 3 seconds.
4
Temperature se‐
lection
To set the temperature or show the current
temperature in the appliance. Touch the field
for 3 seconds to activate or deactivate the func‐
tion: Fast heat up.
5
Microwave func‐
tion
To activate the Microwave function. When you
use the Microwave function with the function:
Duration for more than 7 minutes and in Combi
mode, the Microwave power cannot be more
than 600 W.
6
- Display Shows the current settings of the appliance.
7
Up key To move up in the menu.
8
Down key To move down in the menu.
9
Time and addi‐
tional functions
To set different functions. When a heating func‐
tion operates, touch the sensor field to set the
timer or the functions: Function Lock, Favourite
Programme, Heat + Hold, Set + Go.
www.electrolux.com8
Page 9
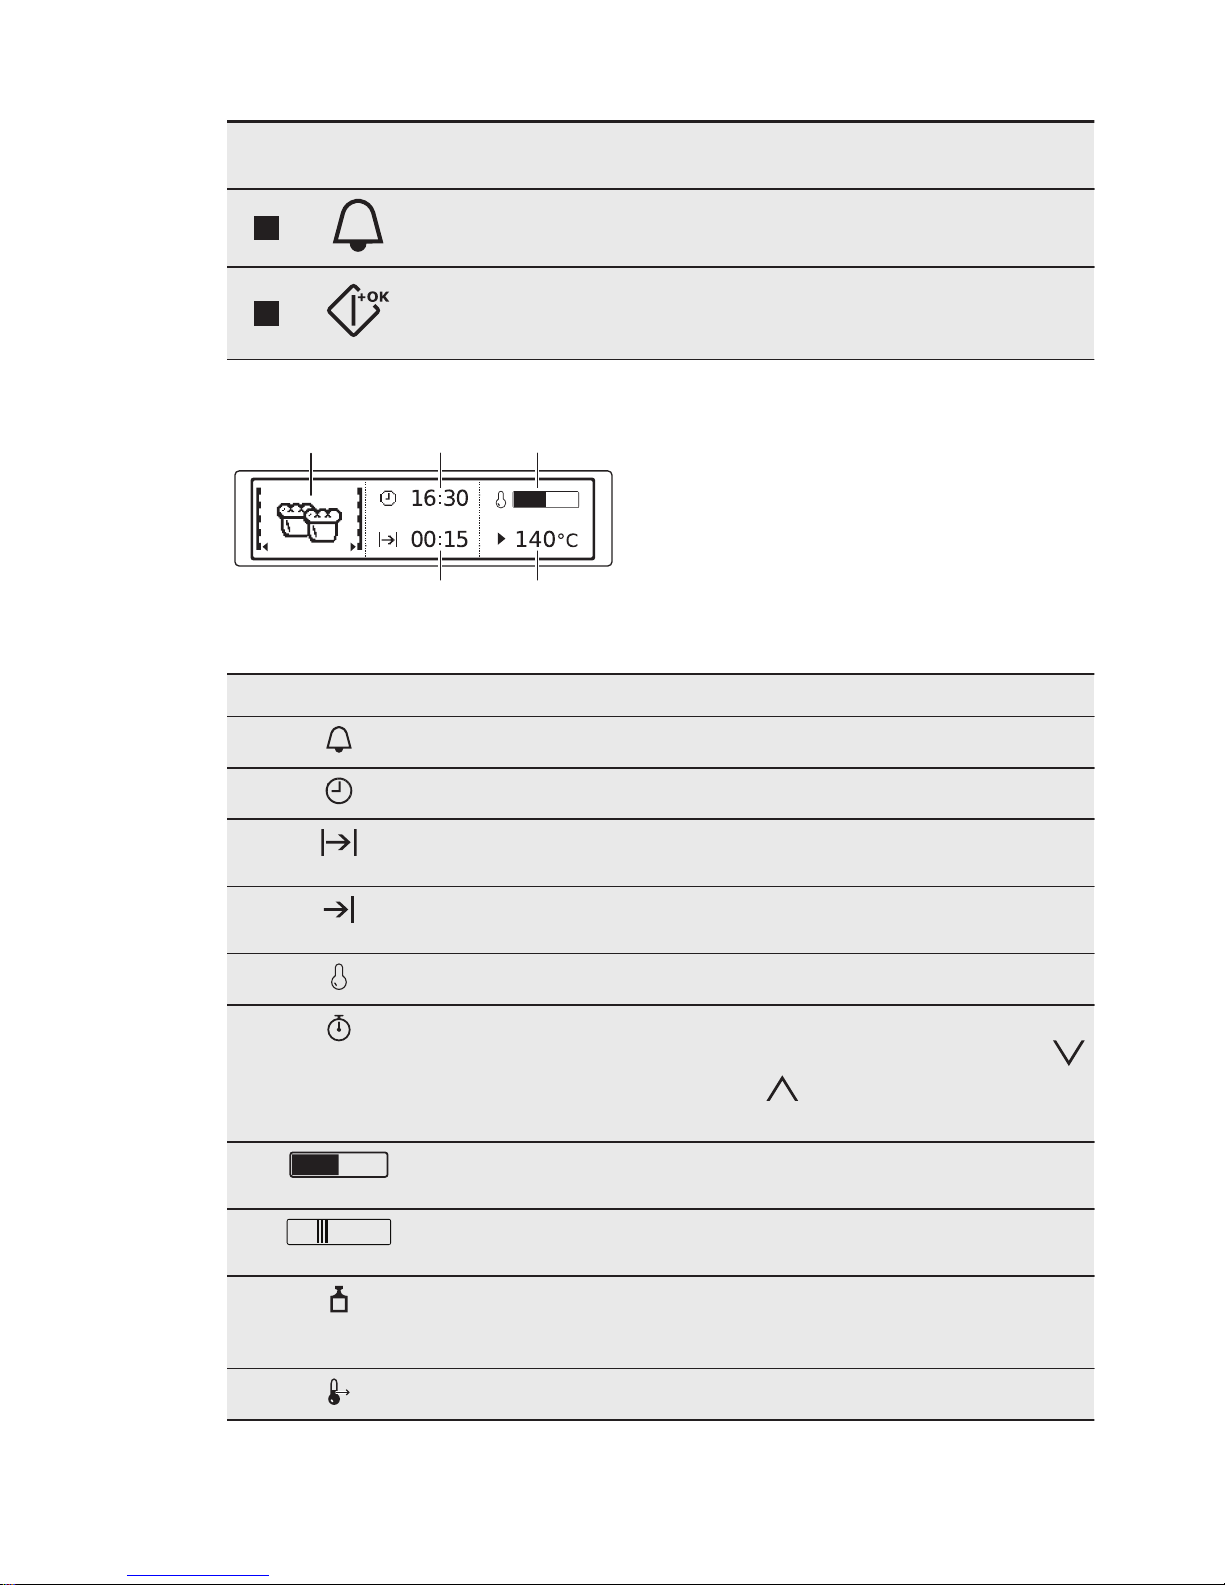
Sensor
field
Function Comment
10
Minute Minder To set the function: Minute Minder.
11
OK / Microwave
Quick Start
To confirm the selection or settings. To activate
the Microwave function. You can use it when
the appliance is deactivated.
4.2 Display
A
DE
B C
A. Heating function or Microwave
function
B. Time of day
C. Heat-up indicator
D. Temperature or power of the
microwave
E. Duration time or end time of a
function
Other indicators of the display:
Symbol Function
Minute Minder The function operates.
Time of day The display shows the current time.
Duration The display shows the necessary
time for cooking.
End Time The display shows when the cook‐
ing time is complete.
Temperature The display shows the temperature.
Time Indication The display shows how long the
heating function operates. Press
and at the same time to reset
the time.
Heat-up Indicator The display shows the temperature
in the appliance.
Fast Heat Up Indicator The function is active. It decreases
the heat up time.
Weight Automatic The display shows that the automat‐
ic weight system is active or that
weight can be changed.
Heat + Hold The function is active.
ENGLISH 9
Page 10
5. BEFORE FIRST USE
WARNING!
Refer to Safety chapters.
5.1 Initial Cleaning
Remove all accessories and removable
shelf supports from the appliance.
Refer to "Care and cleaning"
chapter.
Clean the appliance before first use.
Put the accessories and the removable
shelf supports back to their initial
position.
5.2 First Connection
When you connect the appliance to the
mains or after the power cut, you have to
set the language, the display contrast,
the display brightness and the time of the
day.
1. Press
or to set the value.
2. Press to confirm.
6. DAILY USE
WARNING!
Refer to Safety chapters.
6.1 Navigating the menus
1. Activate the appliance.
2. Press
or to select the menu
option.
3. Press to move to the submenu or
accept the setting.
At each point you can go
back to the main menu with
.
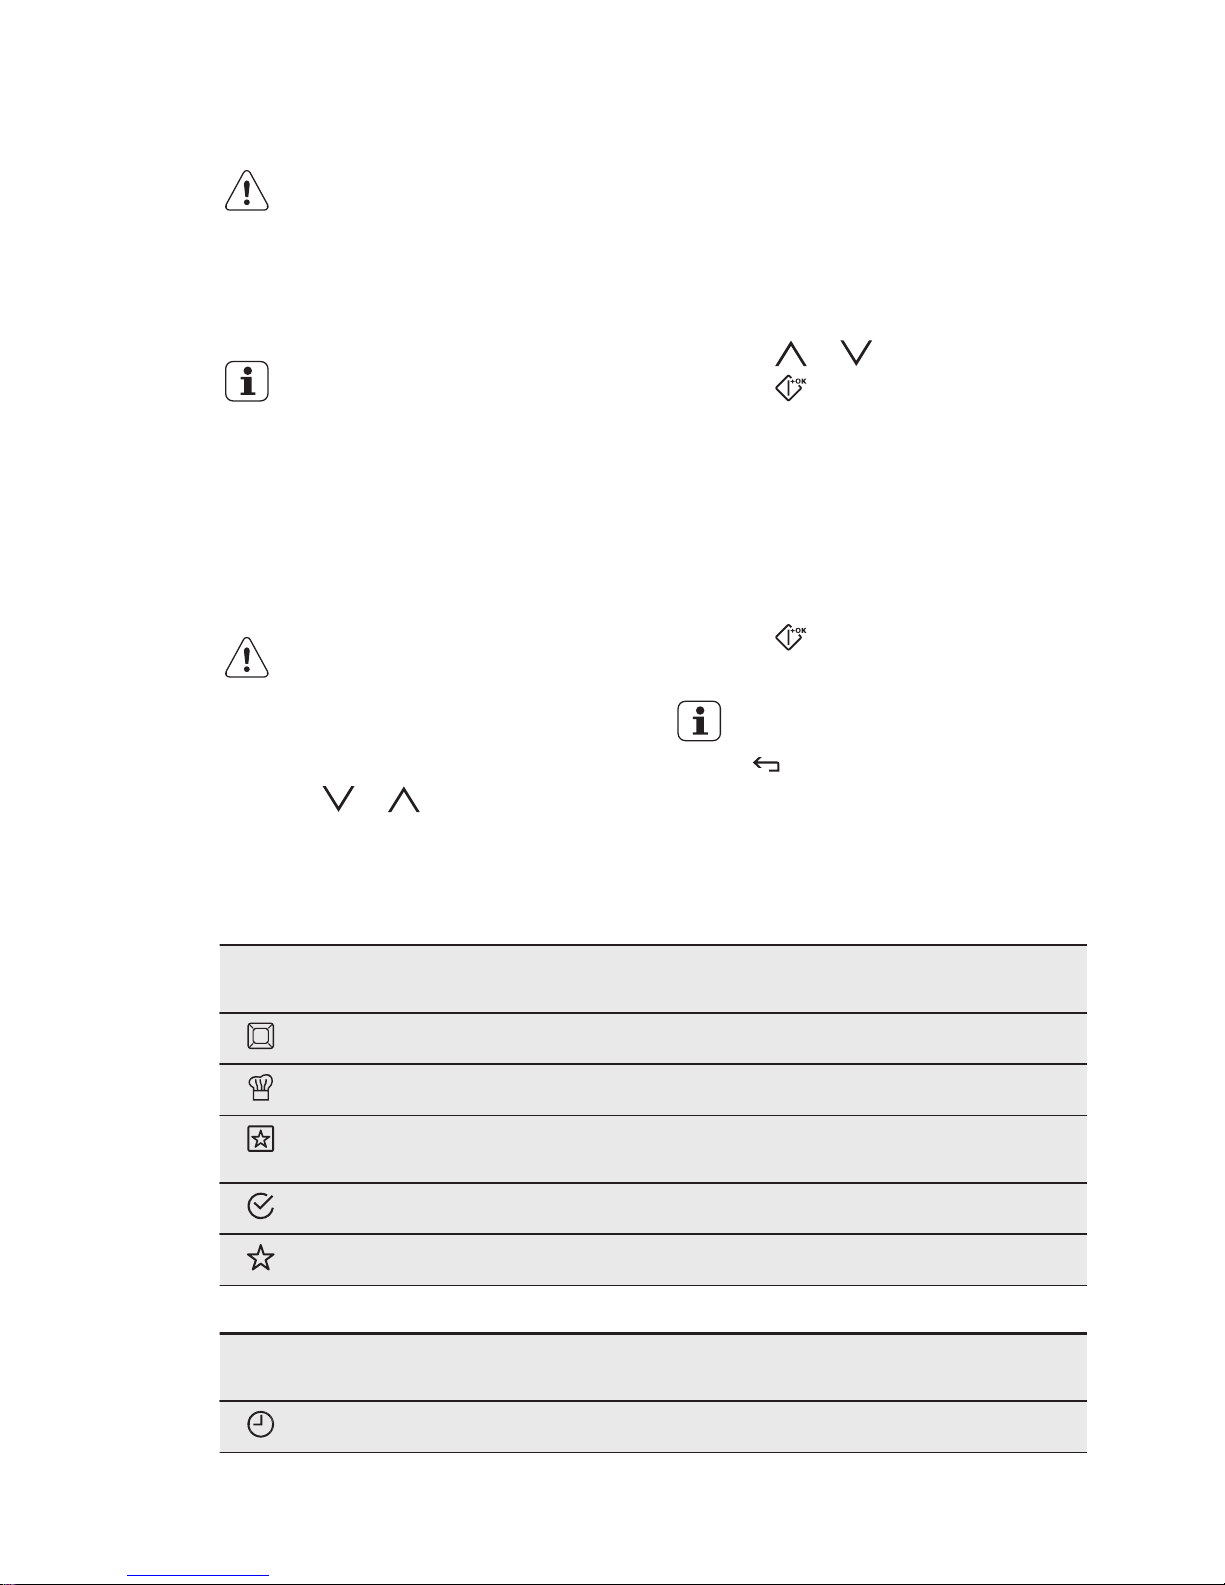
6.2 The menus in overview
Main menu
Sym‐
bol
Menu item Application
Heating Functions Contains a list of heating functions.
Assisted Cooking Contains a list of automatic programmes.
Favourite Programme Contains a list of favourite cooking pro‐
grammes created by the user.
Basic Settings Used to set other settings.
Specials Contains a list of additional heating functions.
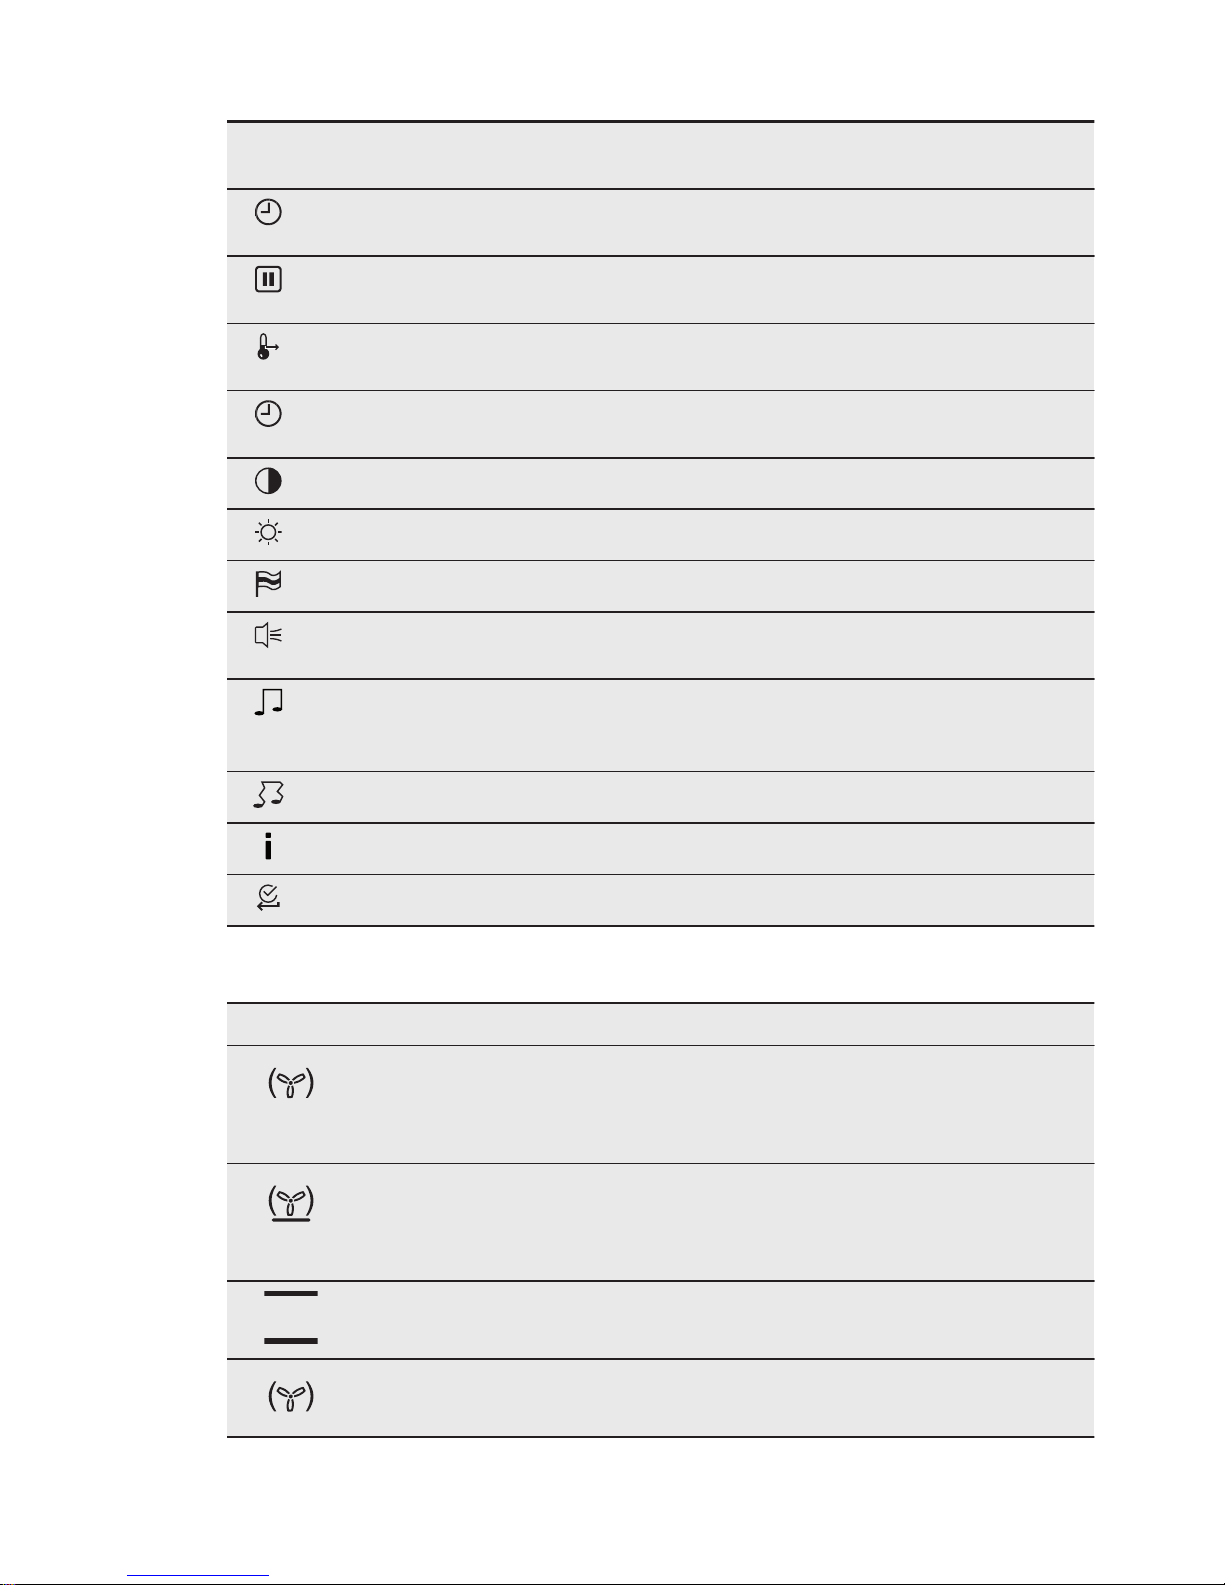
Submenu for: Basic Settings
Sym‐
bol
Submenu Description
Set Time of Day Sets the current time on the clock.
www.electrolux.com10
Page 11
Sym‐
bol
Submenu Description
Time Indication When ON, the display shows the current time
when you deactivate the appliance.
Set + Go To set a function and activate it later with a
press of any symbol on the control panel.
Heat + Hold Keeps the prepared food warm for 30 minutes
after a cooking cycle finished.
Extra Time Activates and deactivates the time extension
function.
Display Contrast Adjusts the display contrast by degrees.
Display Brightness Adjusts the display brightness by degrees.
Set Language Sets the language for the display.
Buzzer Volume Adjusts the volume of press-tones and signals
by degrees.
Key Tones Activates and deactivates the tone of the touch
fields. It is not possible to deactivate the tone
of the ON / OFF touch field.
Alarm/Error Tones Activates and deactivates the alarm tones.
Service Shows the software version and configuration.
Factory Settings Resets all settings to factory settings.
6.3 Heating Functions
Heating function Application
True Fan Cooking To bake on up to 2 shelf positions at the same
time and to dry food. Set the temperature 20 40 °C lower than for the function: Conventional
Cooking.
Pizza Setting To bake food on 1 shelf position for a more in‐
tensive browning and a crispy bottom. Set the
temperature 20 - 40 °C lower than for the func‐
tion: Conventional Cooking.
Conventional Cooking To bake and roast food on 1 shelf position.
Slow Cooking To prepare tender, succulent roasts.
ENGLISH 11
Page 12
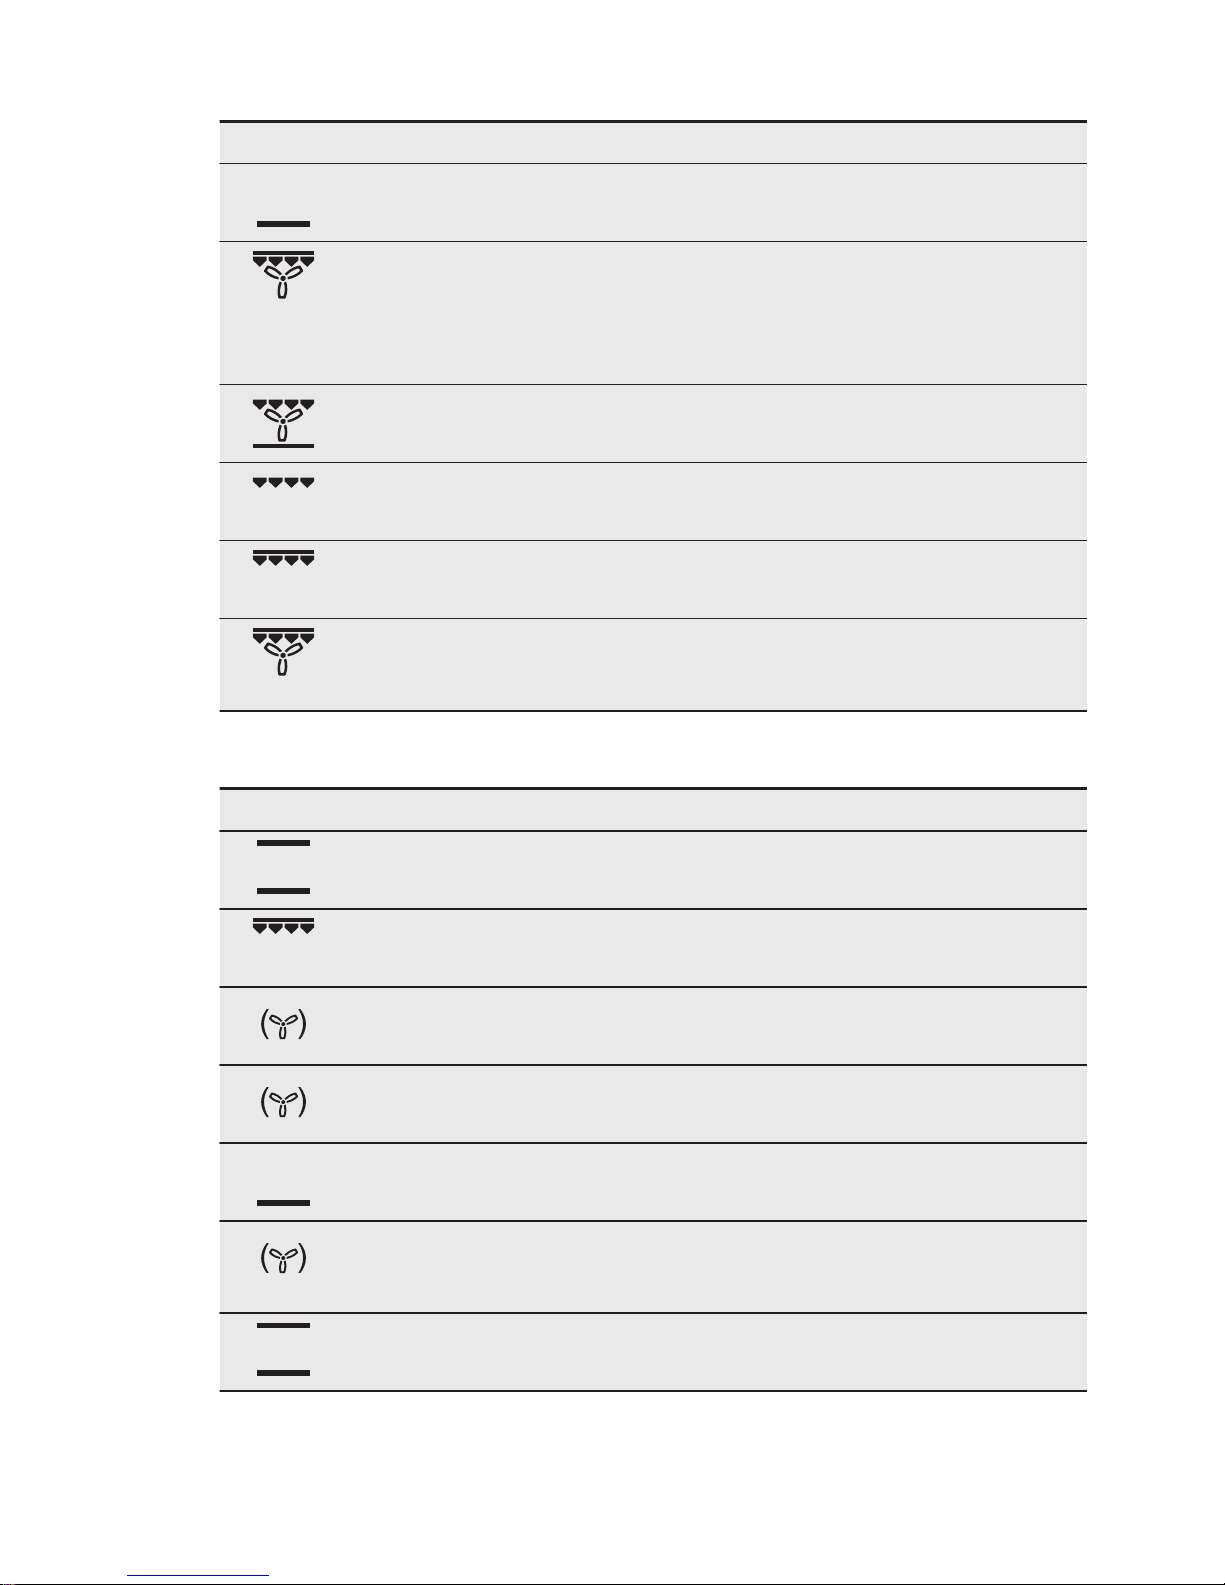
Heating function Application
Bottom Heat To bake cakes with crispy bottom and to pre‐
serve food.
ECO Roasting The ECO functions let you optimize the energy
consumption during cooking. It is necessary to
set the cooking time first. To get more informa‐
tion about the recommended settings, refer to
the cooking tables with the equivalent function.
Frozen Foods To make your convenience food like e.g.
French Fries, Wedges, spring rolls crispy.
Grilling To grill flat food and to toast bread.
Fast Grilling To grill flat food in large quantities and to toast
bread.
Turbo Grilling To roast larger meat joints or poultry with
bones on 1 shelf position. Also to make gratins
and to brown.
6.4 Specials
Heating function Application
Bread Baking To bake bread.
Au Gratin For dishes such as lasagna or potato gratin. Al‐
so to gratinate and brown.
Dough Proving For controlled rising of yeast dough before bak‐
ing.
Plate Warming To preheat your plate for serving.
Preserving To make vegetable preserves such as pickles.
Drying To dry sliced fruit (e.g. apples, plums, peach‐
es) and vegetables (e.g. tomatoes, zucchini,
mushrooms).
Keep Warm To keep food warm.
www.electrolux.com12
Page 13
Heating function Application
Defrost This function can be used for defrosting frozen
foods, such as vegetables and fruits. The de‐
frosting time depends on the amount and size
of the frozen food.
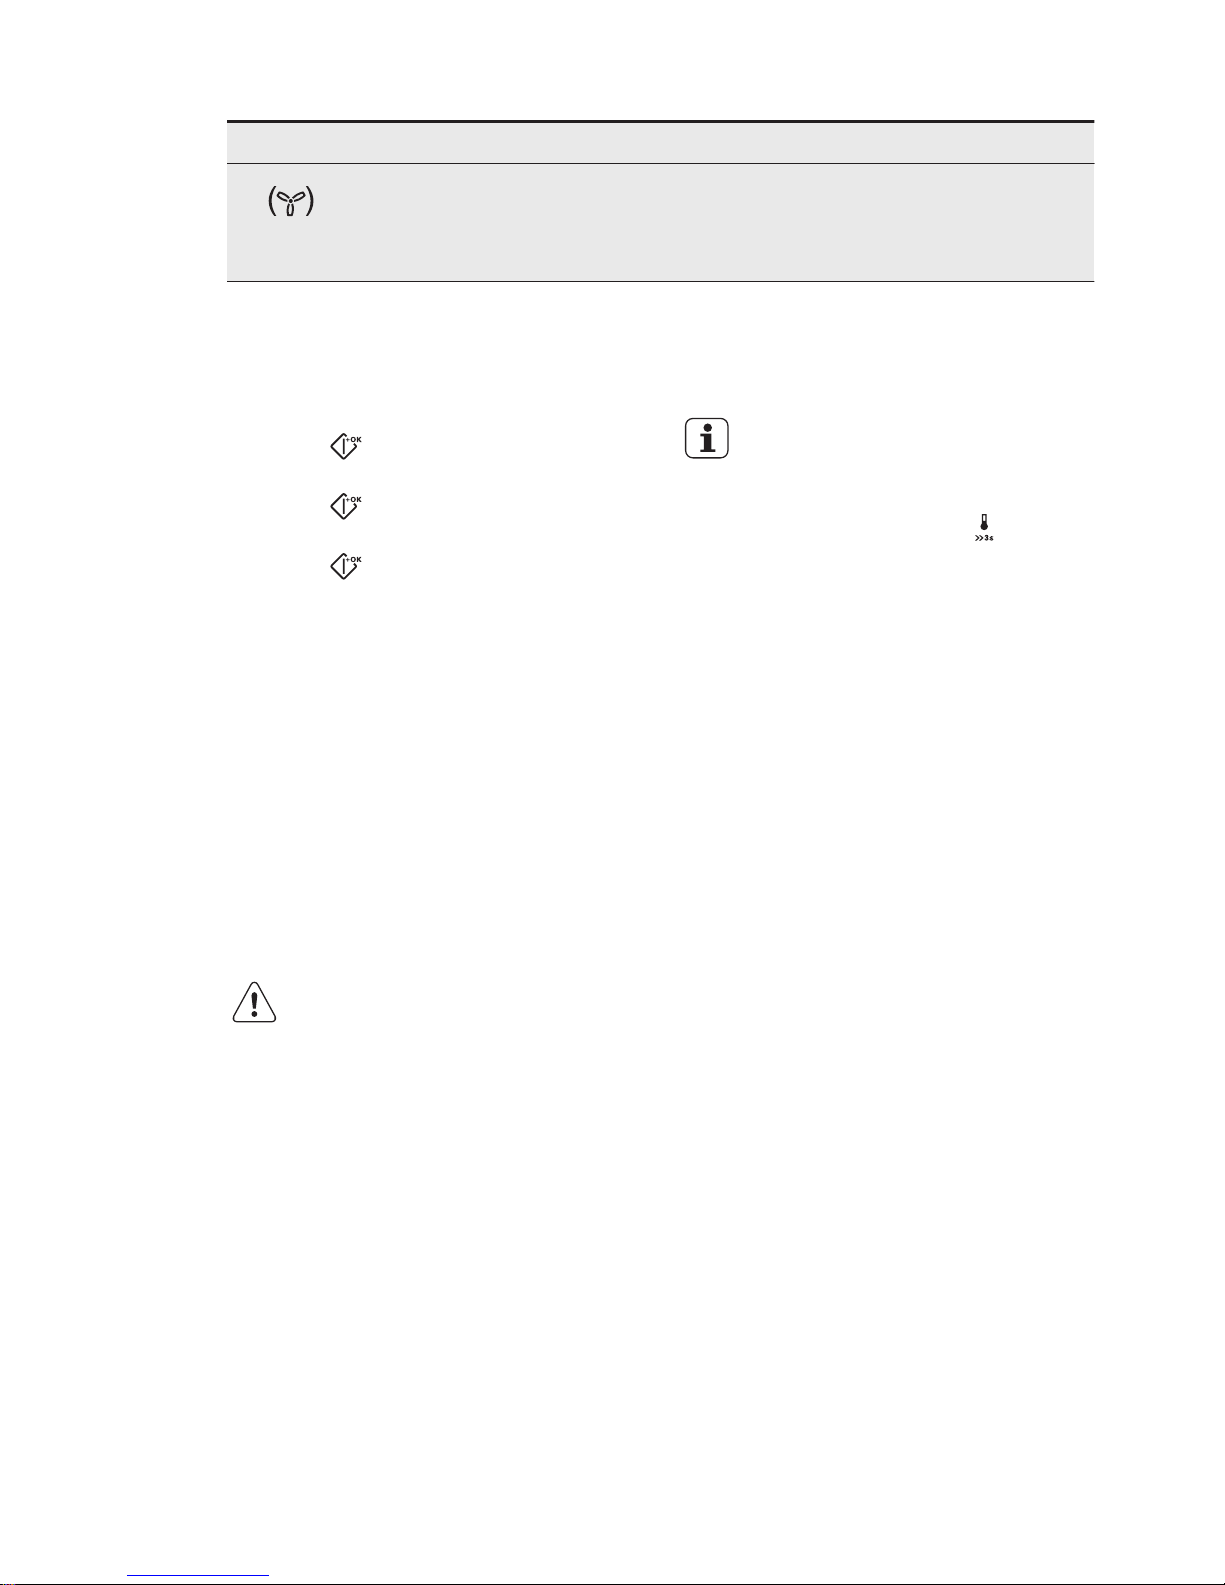
6.5 Activating a heating
function
1. Activate the appliance.
2. Select the menu: Heating Functions.
3. Press
to confirm.
4. Select a heating function.
5. Press to confirm.
6. Set the temperature.
7. Press to confirm.
6.6 Heat-up indicator
When you activate a heating function,
the bar on the display comes on. The bar
shows that the temperature increases.
When temperature is reached the buzzer
sounds 3 times and the bar flashes and
then disappears.
6.7 Fast Heat Up Indicator
This function decreases the heat-up
time.
Do not put food in the oven
when the Fast heat up
function operates.
To activate the function, hold for 3
seconds. The heat-up indicator
alternates.
6.8 Residual heat
When you deactivate the appliance, the
display shows the residual heat. You can
use the heat to keep the food warm.
7. MICROWAVE MODE
7.1 Microwave
General:
CAUTION!
Do not let the appliance
operate when there is no
food in it.
• After you deactivate the appliance, let
the food stand for some minutes.
Refer to the microwave cooking
tables: standing time.
• Remove the aluminium foil packaging,
metal containers, etc. before you
prepare the food.
• It is not recommended to use more
than one level when using the
microwave mode.
• Put the food on a plate on the bottom
of the cavity if not specified differently.
• If possible, always stir the food before
serving.
Cooking:
• If possible, cook food covered with
material suitable for use in the
microwave. Only cook food without a
cover if you want to keep a crust.
• Do not overcook the dishes by setting
the power and time too high. The food
can dry out, burn or catch fire in some
places.
• Do not use the appliance to cook
eggs in their shells and snails,
because they can burst. With fried
eggs, pierce the yolks first.
• Pierce skin or peel of potatoes,
tomatoes, sausages and similar types
of food with a fork several times
before cooking so that the food does
not burst.
• For chilled or frozen food, set a longer
cooking time.
• Dishes which contain sauce must be
stirred from time to time.
ENGLISH 13
Page 14
• Turn larger pieces of food after half
the cooking time.
• If possible, cut vegetables into similarsized pieces.
• Use flat, wide dishes.
• Do not use cookware made of
porcelain, ceramic or earthenware
with unglazed bottoms or small holes,
e.g. on handles . Moisture going into
the holes can cause the cookware to
crack when it is heated.
Defrosting meat, poultry, fish:
• Put the frozen, unwrapped food on a
small upturned plate with a container
below it, or on a defrosting rack or
plastic sieve so that the defrosting
liquid can run off.
• Turn the food after half the defrosting
time. If possible, divide and then
remove the pieces that have started
to defrost.
Defrosting butter, portions of gateau,
quark:
• Do not fully defrost in the appliance,
but let them defrost completely at a
room temperature. This gives a more
even result. Remove all metal or
aluminium packaging or parts before
defrosting.
Defrosting fruit, vegetables:
• If fruit and vegetables should remain
raw, do not defrost them fully in the
appliance but let them defrost
completely at a room temperature.
• To cook fruit and vegetables without
defrosting them first, you can use a
higher microwave power.
Ready meals:
• Ready meals in metal packaging or
plastic trays with metal covers can
only be defrosted or heated in the
microwave if they are expressively
designated as suitable for use in the
microwave.
• You must follow the manufacturer's
instructions printed on the packaging
(e.g. remove the metal cover and
pierce the plastic film).
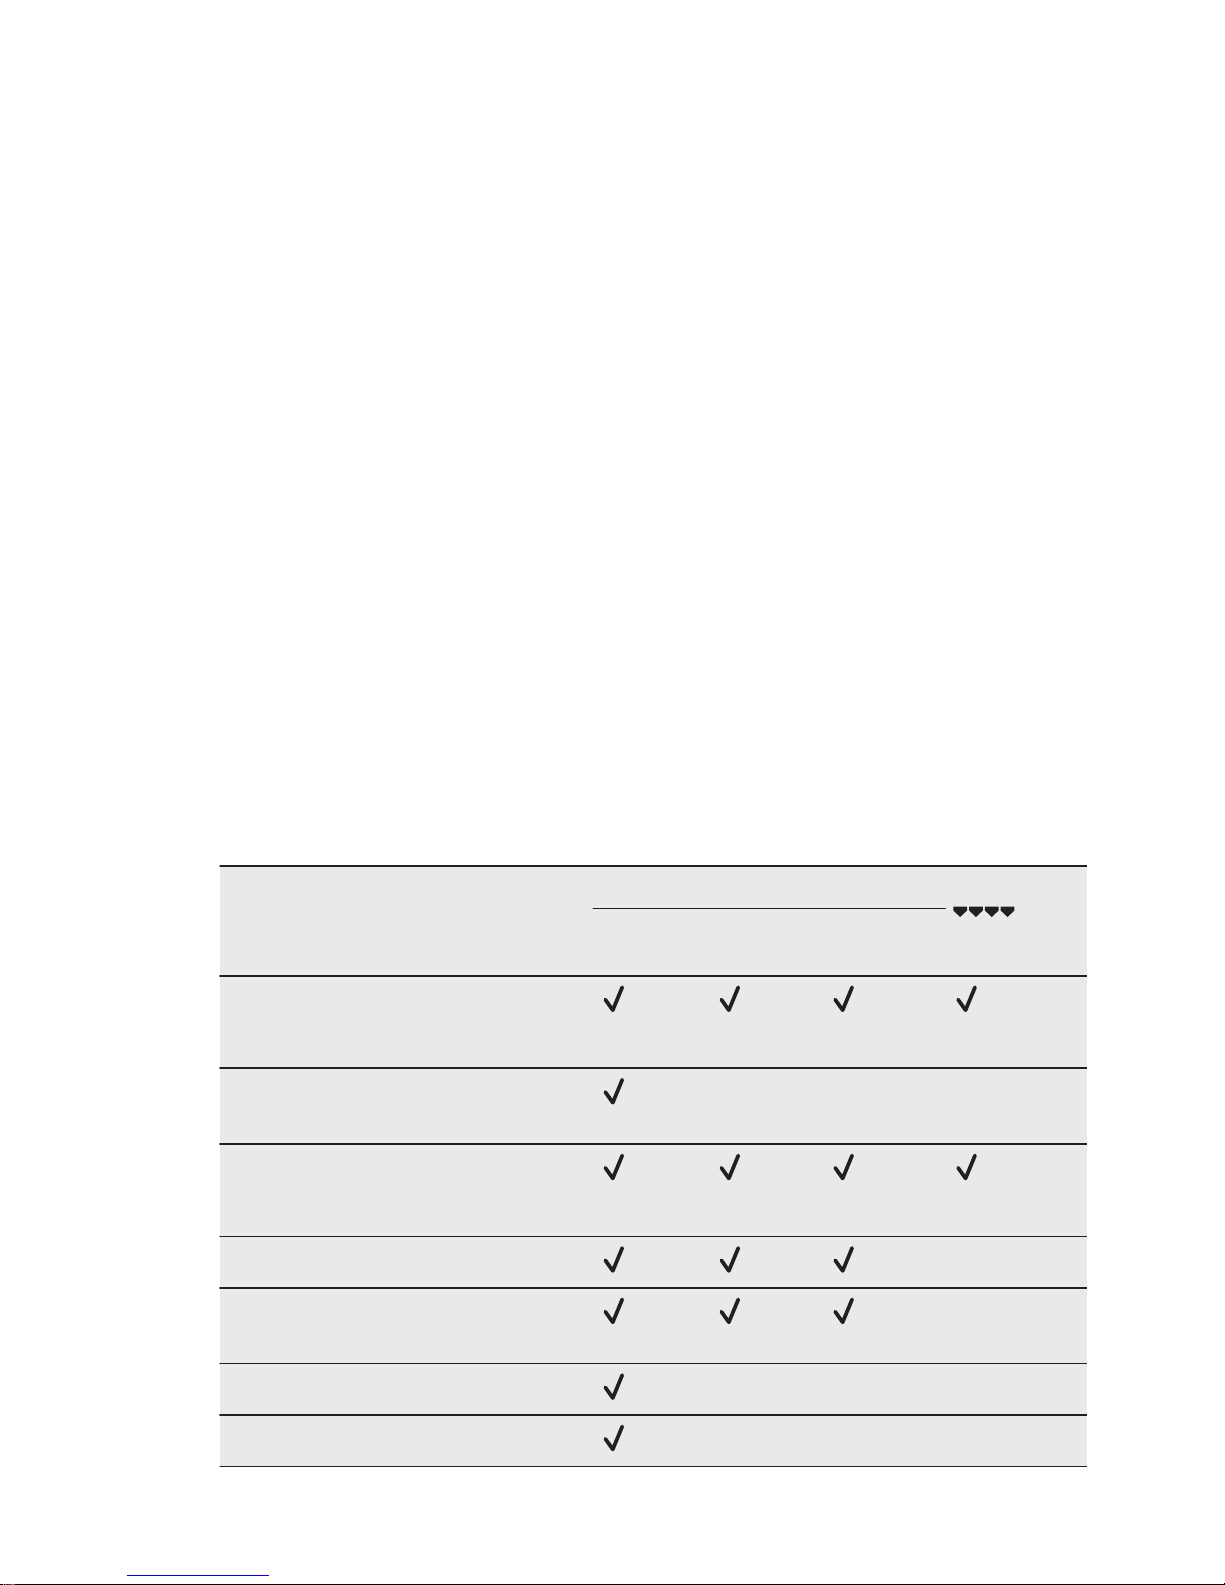
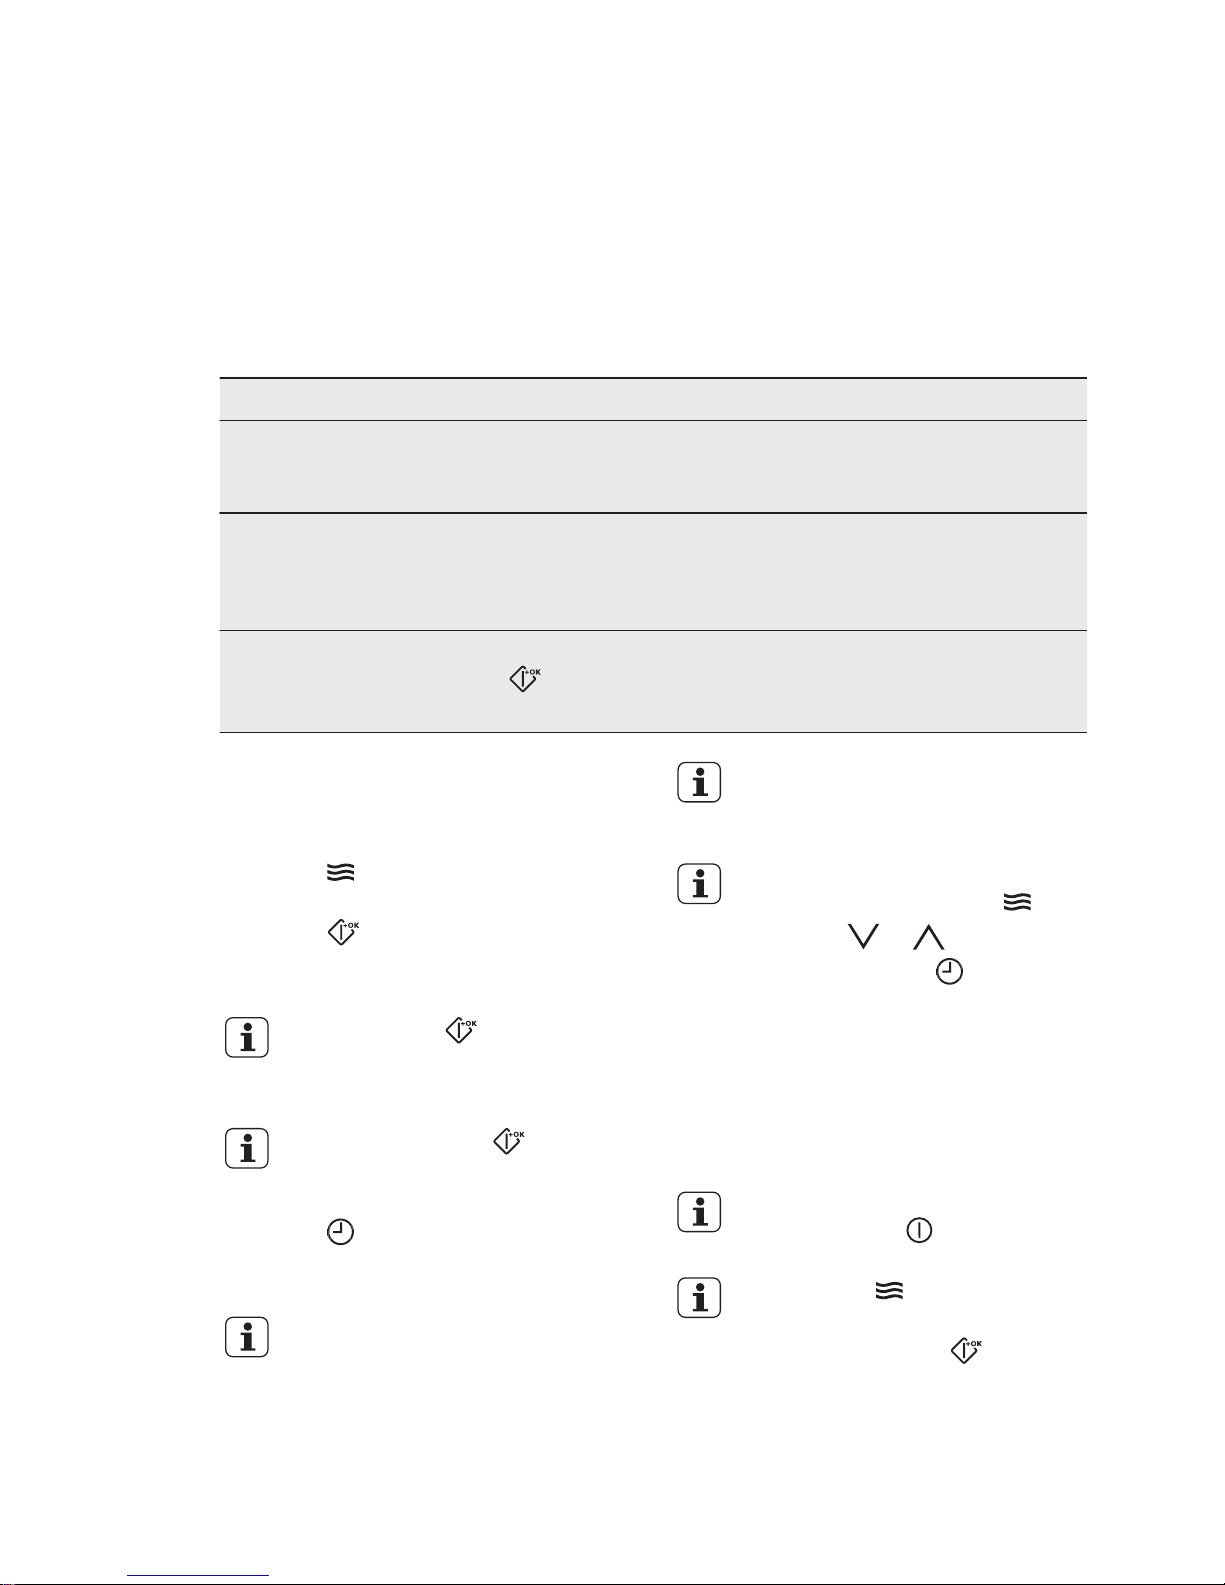
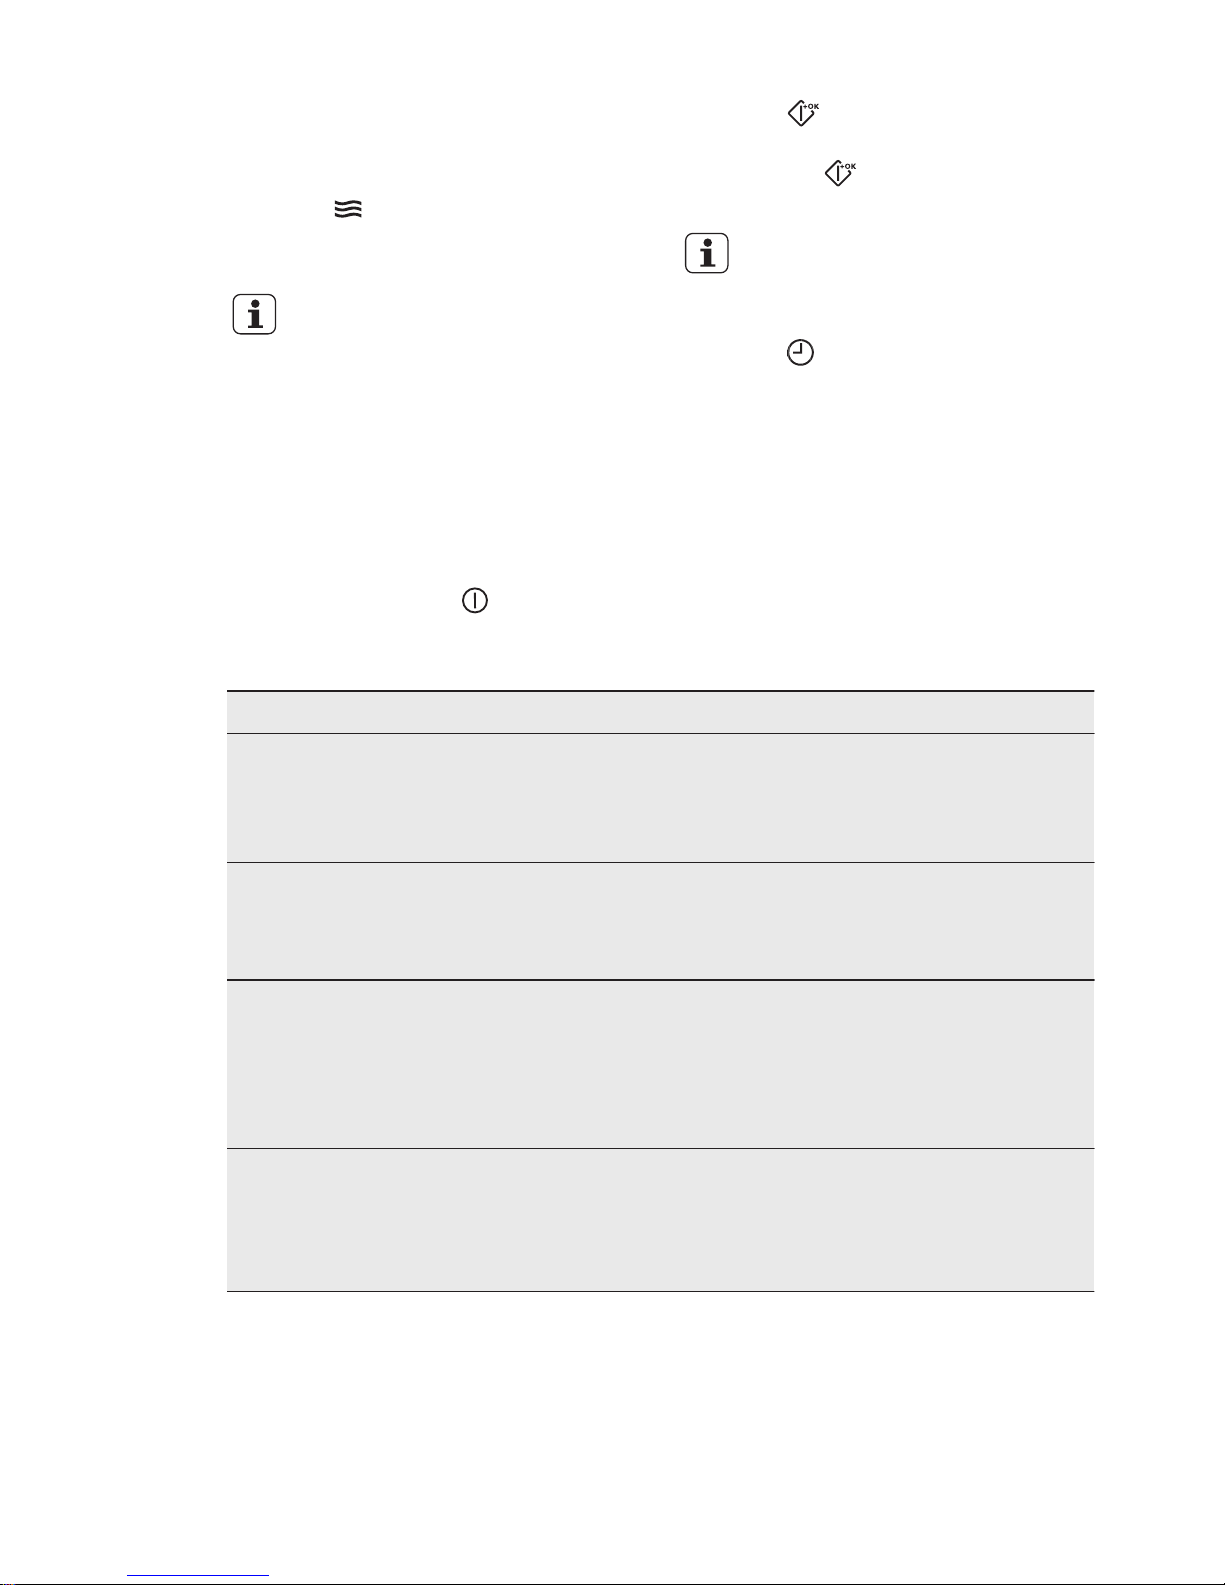
Suitable cookware and materials
Cookware / Material Microwave Grilling
Defrost‐
ing
Heating Cooking
Ovenproof glass and porcelain with
no metal components, e.g. Pyrex,
heat-proof glass
Non-ovenproof glass and porce‐
lain
1)
X X X
Grill shelf, glass and glass ceramic
made of ovenproof / frost-proof ma‐
terial e.g. Arcoflam
Ceramic2), earthenware
2)
X
Heat-resistant plastic up to 200
°C
3)
X
Cardboard, paper X X X
Clingfilm X X X
www.electrolux.com14
Page 15
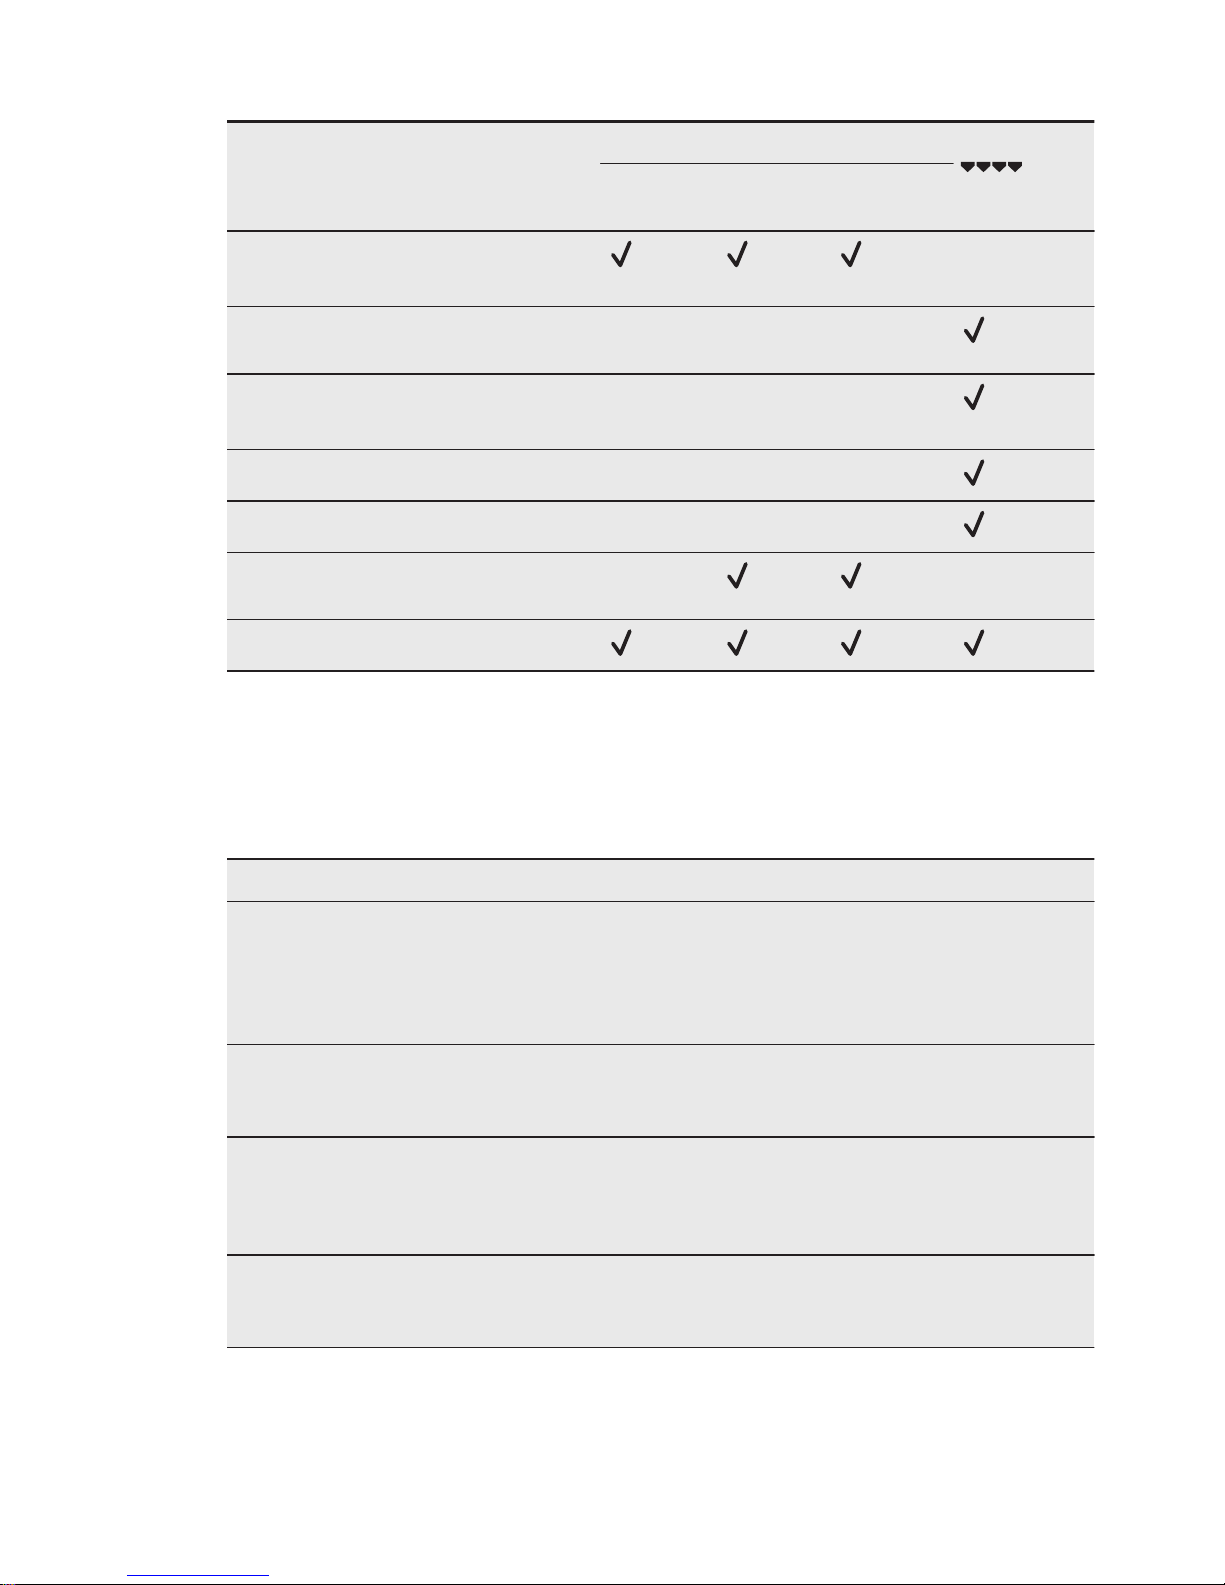
Cookware / Material Microwave Grilling
Defrost‐
ing
Heating Cooking
Roasting film with microwave safe
closure
3)
X
Roasting dishes made of metal,
e.g. enamel, cast iron
X X X
Baking tins, black lacquer or sili‐
con-coated
3)
X X X
Baking tray X X X
Wire shelf X X X
Browning cookware, e.g. crisp pan
or crunch plate
X X
Ready meals in packaging
3)
1)
With no silver, gold, platinum or metal plating / decorations.
2)
Without quartz or metal components, or glazes which contain metals
3)
You must follow the manufacturer’s instructions about the maximum temperatures.
Tips for the microwave
Result Remedy
You cannot find details for the
amount of food prepared.
Find details for similar type of food. Increase or
shorten the length of the cooking time accord‐
ing to the following rule: double the amount almost double the time, half the amount - half
the time.
The food after cooking is too dry. Set shorter cooking time or select lower micro‐
wave power and cover with material suitable
for use in the microwave.
The food is still not defrosted, hot or
cooked after the end of cooking
time .
Set longer cooking time or select higher micro‐
wave power. Note that taller dishes generally
need longer cooking time. Stir or turn food dur‐
ing cooking.
After the end of cooking time the
food is overheated at the edges but
is still not ready in the middle.
Next time select a lower power and a longer
time. Stir liquids, such as soup, halfway
through.
Other things to think about…
• Food items have different shapes and
qualities. They are prepared in
different quantities. Because of this,
the necessary time and power for
defrosting, heating or cooking can
vary. As a rough guide: double the
quantity - almost double the time.
• The microwave creates the heat
directly in the food. Because of this,
ENGLISH 15
Page 16
all places cannot be heated at the
same time. You must stir or turn the
heated dishes, especially when
preparing larger quantities of food.
• The standing time is given in the
tables. Let the food stand, in the
appliance or outside it, so that the
heat is distributed more evenly.
• Adjust the power level according to
food quantity. Using high power level
with small amount of food can burn
the food or generate arcing when you
use the accessories.
• You get better results for rice if you
use flat, wide dishes.
7.2 Microwave functions
Functions Description
Microwave Creates the heat directly in the food. Use it to heat pre-prepared
meals and drinks, to defrost meat or fruit, and to cook vegeta‐
bles and fish.
Combi Use it to operate the heating function and the microwave mode
together. Use it to cook food in a shorter time and brown it simul‐
taneously.
The maximum power for this function is 600 W
Quick Start Use it to activate the Microwave function with one touch of the
symbol with the maximum microwave power. Operating time:
30 seconds.
7.3 Setting the Microwave
function
1. Activate the appliance.
2. Touch
to activate the Microwave
function.
3. Touch . The function: Duration is
set to 30 seconds and the
microwaves starts to operate.
Each touch of adds 30
seconds to the time of the
function: Duration.
If you do not touch , the
appliance deactivates after
20 seconds.
4. Touch to set the function:
Duration. Refer to "Setting the clock
functions".
When the time of the
function: Duration is longer
than 7 minutes the
Microwave power is
decreased to 600 W.
The maximum setting of the
time for the function:
Duration is 90 minutes.
You can change the
microwave power (touch
and then or ) and the
function: Duration any
time when the Microwave
function operates.
5. When the set time ends, an acoustic
signal sounds for 2 minutes. The
Microwave function deactivates
automatically. Touch any symbol to
stop the acoustic signal.
To deactivate the Microwave
function, touch .
If you touch or open the
door, the function stops. To
start it again, touch .
www.electrolux.com16
Page 17
7.4 Setting the Combi function
1. Activate a heating function. Refer to
"Activating a heating function".
2. Touch
and do the same steps as
when you set the Microwave
function.
For some functions the
microwave will start as soon
as the set temperature is
reached.
Functions not available for the Combi
function: Favourite Programme, End
Time, Set + Go, Heat + Hold.
7.5 Setting the Quick Start
function
1. If necessary, touch to deactivate
the appliance.
2. Touch to activate the Quick Start
function.
Each touch of adds 30 seconds to
the Duration time.
You can change the
microwave power (refer to
"Setting the Microwave
function").
3. Touch to set the time for the
function: Duration. Refer to "Setting
the clock functions".
7.6 Examples of cooking
applications for power settings
The data in the table is for guidance only.
Power setting Use
• 1000 Watt
• 900 Watt
• 800 Watt
• 700 Watt
Heating liquids
Searing at the start of the cooking process
Cooking vegetables
Melting gelatine and butter
• 600 Watt
• 500 Watt
Defrosting and heating frozen meals
Heating one-plate meals
Simmering stews
Cooking egg dishes
• 400 Watt
• 300 Watt
• 200 Watt
Continuing to cook meals
Cooking delicate food
Heating baby food
Simmering rice
Heating delicate food
Melting cheese
• 100 Watt Defrosting meat, fish, bread
Defrosting cheese, cream, butter
Defrosting fruit and cakes (gateaux)
Raising yeast dough
Heating up cold dishes and drinks
ENGLISH 17
Page 18
8. CLOCK FUNCTIONS
8.1 Clock functions table
Clock function Application
Minute Minder To set a countdown (max. 2 h 30 min).
This function has no effect on the opera‐
tion of the appliance.
Use to activate the function. Press
or to set the minutes and to start.
Duration To set the length of an operation (max. 23
h 59 min).
End Time To set the switch-off time for a heating
function (max. 23 h 59 min).
If you set the time for a clock function,
the time starts to count down after 5
seconds.
If you use the clock
functions: Duration, End
Time, the appliance
deactivates the heating
elements after 90 % of the
set time. The appliance uses
the residual heat to continue
the cooking process until the
time ends (3 - 20 minutes).
8.2 Setting the clock functions
Before you use the
functions: Duration, End
Time, you must set a heating
function and temperature
first. The appliance
deactivates automatically.
You can use the functions:
Duration and End Time at
the same time if you want to
automatically activate and
deactivate the appliance on
a given time later.
1. Set a heating function.
2. Press again and again until the
display shows the necessary clock
function and the related symbol.
3. Press or to set the necessary
time.
4. Press to confirm.
When the time ends, an acoustic signal
sounds. The appliance deactivates. The
display shows a message.
5. Press any symbol to stop the signal.
8.3 Heat + Hold
Conditions for the function:
• The set temperature is more than 80
°C.
• The function: Duration is set.
The function: Heat + Hold keeps
prepared food warm at 80 °C for 30
minutes. It activates after the baking or
roasting procedure ends.
You can activate or deactivate the
function in the menu: Basic Settings.
1. Activate the appliance.
2. Select the heating function.
3. Set the temperature above 80 °C.
4. Press
again and again until the
display shows: Heat + Hold.
5. Press to confirm.
When the function ends, an acoustic
signal sounds.
The function stays on if you change the
heating functions.
www.electrolux.com18
Page 19
8.4 Extra Time
The function: Extra Time makes the
heating function continue after the end of
Duration.
Applicable to all heating
functions with Duration or
Weight Automatic.
1. When the cooking time ends, an
acoustic signal sounds. Press any
symbol.
The display shows the message.
2. Press to activate or to cancel.
3. Set the length of the function.
4. Press .
9. AUTOMATIC PROGRAMMES
WARNING!
Refer to Safety chapters.
9.1 Recipes online
You can find the recipes for
the automatic programmes
specified for this appliance
on our website. To find the
proper Recipe Book check
the PNC number on the
rating plate on the front
frame of the appliance
cavity.
9.2 Assisted Cooking with
Recipe Automatic
This appliance has a set of recipes you
can use. The recipes are fixed and you
cannot change them.
1. Activate the appliance.
2. Select the menu: Assisted Cooking.
Press to confirm.
3. Select the category and dish. Press
to confirm.
4. Select a recipe. Press to confirm.
When you use the function:
Manual, the appliance uses
the automatic settings. You
can change them as with
other functions.
9.3 Assisted Cooking with
Weight Automatic
This function automatically calculates the
roasting time. To use it, it is necessary to
input the food weight.
1. Activate the appliance.
2. Select the menu: Assisted Cooking.
Press
to confirm.
3. Select the category and dish. Press
to confirm.
4. Touch
or to set the food
weight. Press to confirm.
The automatic programme starts.
5. You can change the weight at any
time. Press or to change the
weight.
6. When the time ends, an acoustic
signal sounds. Press any symbol to
deactivate the signal.
With some programmes turn
over the food after 30
minutes. The display shows
a reminder.
10. USING THE ACCESSORIES
WARNING!
Refer to Safety chapters.
10.1 Inserting the accessories
Use only suitable cookware and material.
ENGLISH 19
Page 20
WARNING!
Refer to "Microwave mode"
chapter.
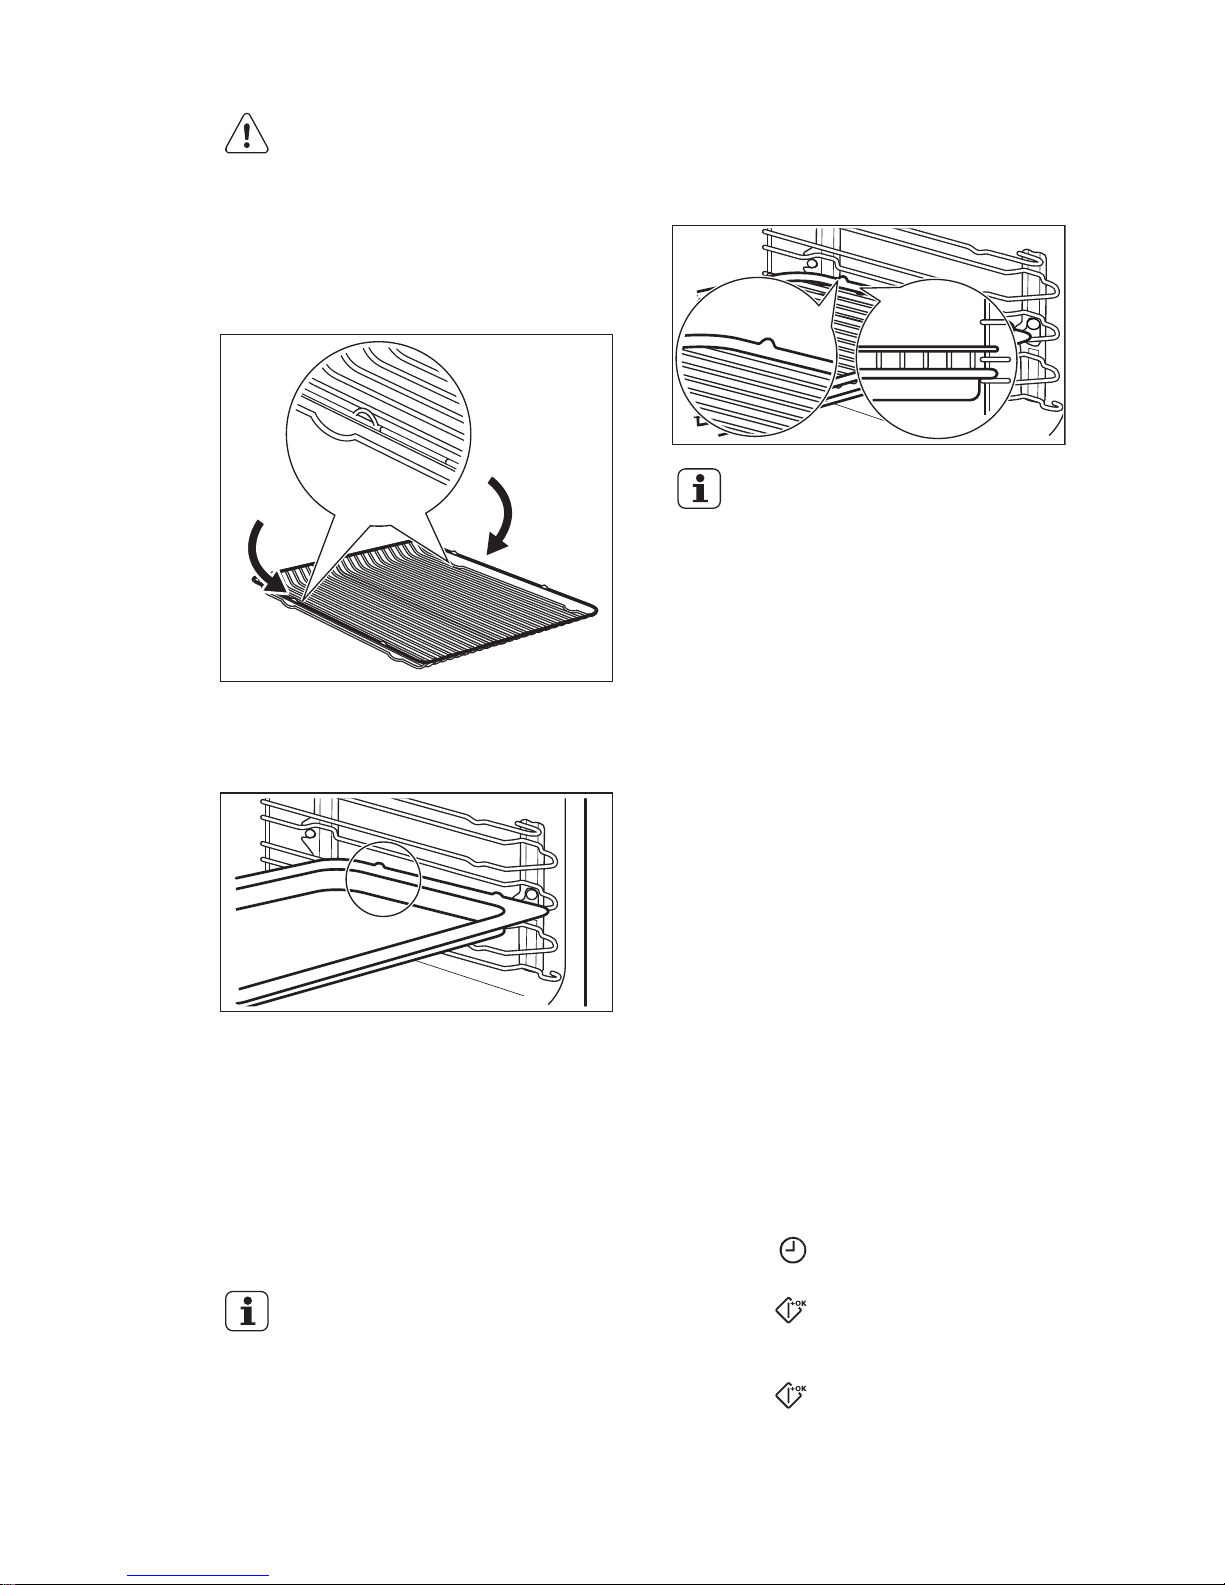
Wire shelf:
Push the shelf between the guide bars of
the shelf support and make sure that the
feet point down.
Baking tray:
Push the baking tray between the guide
bars of the shelf support.
Wire shelf and baking tray together:
Push the baking tray between the guide
bars of the shelf support and the wire
shelf on the guide bars above.
All accessories have small
indentations at the top of the
right and left side to increase
safety. The indentations are
also anti-tip devices.
The high rim around the
shelf is a device which
prevents cookware from
slipping.
11. ADDITIONAL FUNCTIONS
11.1 Favourite Programme
You can save your favourite settings,
such as duration, temperature or heating
function. They are available in the menu:
Favourite Programme. You can save 20
programmes.
You cannot save Microwave
and microwave combi
functions as favourite
programmes.
Saving a programme
1. Activate the appliance.
2. Set a heating function or an
automatic programme.
3. Touch again and again until the
display shows: SAVE.
4. Press to confirm.
The display shows the first free memory
position.
5. Press to confirm.
6. Enter the name of the programme.
www.electrolux.com20
Page 21
The first letter flashes.
7. Touch or to change the letter.
8. Press .
The next letter flashes.
9. Do step 7 again as necessary.
10. Press and hold to save.
You can overwrite a memory position.
When the display shows the first free
memory position, touch
or and
press to overwrite an existing
programme.
You can change the name of a
programme in the menu: Edit
Programme Name.
Activating the programme
1. Activate the appliance.
2. Select the menu: Favourite
Programme.
3. Press to confirm.
4. Select your favourite programme
name.
5. Press to confirm.
11.2 Using the Child Lock
The Child Lock prevents an accidental
operation of the appliance.
1. Activate the appliance.
2. Touch and at the same time
until the display shows a message.
To deactivate the Child Lock function
repeat step 2.
11.3 Function Lock
This function prevents an accidental
change of the heating function. You can
activate it only when the appliance
operates.
1. Activate the appliance.
2. Set a heating function or setting.
3. Press again and again until the
display shows: Function Lock.
4. Press to confirm.
To deactivate the function, press . The
display shows a message. Press
again and then to confirm.
When you deactivate the
appliance, the function also
deactivates.
11.4 Set + Go
The function lets you set a heating
function (or a programme) and use it
later with one press of any symbol.
1. Activate the appliance.
2. Set a heating function.
3. Press again and again until the
display shows: Duration.
4. Set the time.
5. Press
again and again until the
display shows: Set + Go.
6. Press to confirm.
Press any symbol (except for ) to start
the function: Set + Go. The set heating
function starts.
When the heating function ends, an
acoustic signal sounds.
• Function Lock is on when
the heating function
operates.
• The menu: Basic Settings
lets you activate and
deactivate the function:
Set + Go.
11.5 Automatic Switch-off
For safety reasons the appliance
deactivates automatically after some time
if a heating function operates and you do
not change any settings.
Temperature (°C) Switch-off time
(h)
30 - 115 12.5
120 - 195 8.5
200 - 230 5.5
ENGLISH 21
Page 22
The Automatic switch-off
does not work with the
functions: Light, End Time,
Duration.
11.6 Brightness of the display
There are two modes of display
brightness:
• Night brightness - when the appliance
is deactivated, the brightness of the
display is lower between 10 PM and 6
AM.
• Day brightness:
– when the appliance is activated.
– if you touch a symbol during the
night brightness (apart from ON /
OFF), the display goes back to
the day brightness mode for the
next 10 seconds.
– if the appliance is deactivated and
you set the function: Minute
Minder. When the function ends,
the display goes back to the night
brightness.
11.7 Cooling fan
When the appliance operates, the
cooling fan activates automatically to
keep the surfaces of the appliance cool.
If you deactivate the appliance, the
cooling fan can continue to operate until
the appliance cools down.
12. HINTS AND TIPS
WARNING!
Refer to Safety chapters.
The temperature and baking
times in the tables are
guidelines only. They
depend on the recipes and
the quality and quantity of
the ingredients used.
12.1 Advice for special heating
functions of the oven
Keep Warm
Use this function if you want to keep food
warm.
The temperature regulates itself
automatically to 80 °C.
Plate Warming
For warming plates and dishes.
Distribute plates and dishes evenly on
the wire shelf. Move stacks around after
half of the warming time (swap top and
bottom).
The automatic temperature is 70 °C.
Recommended shelf position: 3.
Dough Proving
You can use this automatic function with
any recipe for yeast dough you like. It
gives you a good atmosphere for rising.
Put the dough into a dish that is big
enough for rising and cover it with a wet
towel or plastic foil. Insert a wire shelf on
the first shelf position and put the dish in.
Close the door and set the function:
Dough Proving. Set the necessary time.
12.2 Baking
• Your oven may bake or roast
differently to the appliance you had
before. Adapt your usual settings
(temperature, cooking times) and
shelf positions to the values in the
tables.
• The manufacturer recommends that
you use the lower temperature the
first time.
• If you cannot find the settings for a
special recipe, look for the one that is
almost the same.
• You can extend baking times by 10 –
15 minutes if you bake cakes on more
than one shelf position.
• Cakes and pastries at different
heights do not always brown equally
at first. If this occurs, do not change
the temperature setting. The
www.electrolux.com22
Page 23

differences equalize during the baking
procedure.
• With longer baking times, you can
deactivate the oven approximately 10
minutes before the end of the baking
time and then use the residual heat.
When you cook frozen food, the trays in
the oven can twist during baking. When
the trays become cold again, the
distortions are gone.
12.3 Tips on baking
Baking results Possible cause Remedy
The bottom of the cake is
not browned sufficiently.
The shelf position is incor‐
rect.
Put the cake on a lower
shelf.
The cake sinks and be‐
comes soggy, lumpy or
streaky.
The oven temperature is
too high.
The next time you bake,
set a slightly lower oven
temperature.
The cake sinks and be‐
comes soggy, lumpy or
streaky.
The baking time is too
short.
Set a longer baking time.
You cannot decrease
baking times by setting
higher temperatures.
The cake sinks and be‐
comes soggy, lumpy or
streaky.
There is too much liquid in
the mixture.
Use less liquid. Be careful
with mixing times, espe‐
cially if you use a mixing
machine.
The cake is too dry. The oven temperature is
too low.
The next time you bake,
set a higher oven tempera‐
ture.
The cake is too dry. The baking time is too
long.
The next time you bake,
set a shorter baking time.
The cake browns uneven‐
ly.
The oven temperature is
too high and the baking
time is too short.
Set a lower oven tempera‐
ture and a longer baking
time.
The cake browns uneven‐
ly.
The mixture is unevenly
distributed.
Spread the mixture evenly
on the baking tray.
The cake is not ready in
the baking time given.
The oven temperature is
too low.
The next time you bake,
set a slightly higher oven
temperature.
12.4 Baking on one oven level
Baking in tins
Food Function Temper‐
ature
(°C)
Time (min) Shelf posi‐
tion
Ring cake or brioche True Fan
Cooking
150 - 160 50 - 70 2
ENGLISH 23
Page 24

Food Function Temper‐
ature
(°C)
Time (min) Shelf posi‐
tion
Madeira cake / Fruit
cakes
True Fan
Cooking
140 - 160 70 - 90 2
Sponge cake / Sponge
cake
True Fan
Cooking
140 - 150 35 - 50 2
Sponge cake / Sponge
cake
Conventional
Cooking
160 35 - 50 2
Flan base - short pas‐
try
1)
True Fan
Cooking
170 - 180 10 - 25 2
Flan base - sponge
mixture
True Fan
Cooking
150 - 170 20 - 25 2
Apple pie / Apple pie (2
tins Ø 20 cm, diagonal‐
ly off set)
True Fan
Cooking
160 70 - 90 2
Apple pie / Apple pie (2
tins Ø 20 cm, diagonal‐
ly off set)
Conventional
Cooking
180 70 - 90 1
Cheesecake, tray
2)
Conventional
Cooking
160 - 170 60 - 90 1
1)
Preheat the oven.
2)
Use a deep pan.
Cakes / pastries / breads on baking trays
Food Function Tempera‐
ture (°C)
Time (min) Shelf posi‐
tion
Plaited bread / bread
crown
Conventional
Cooking
170 - 190 30 - 40 2
Christmas stollen
1)
Conventional
Cooking
160 - 180 50 - 70 2
Bread (rye bread)
1)
Conventional
Cooking
2
first 230 20
then 160 - 180 30 - 60
Cream puffs / Eclairs
1)
Conventional
Cooking
190 - 210 20 - 35 2
Swiss Roll
1)
Conventional
Cooking
180 - 200 10 - 20 2
Cake with crumble top‐
ping (dry)
True Fan
Cooking
150 - 160 20 - 40 3
www.electrolux.com24
Page 25

Food Function Tempera‐
ture (°C)
Time (min) Shelf posi‐
tion
Buttered almond cake /
sugar cakes
1)
Conventional
Cooking
190 - 210 20 - 30 2
Fruit flans (made with
yeast dough / sponge
mixture)
2)
True Fan
Cooking
150 - 160 35 - 55 3
Fruit flans (made with
yeast dough / sponge
mixture)
2)
Conventional
Cooking
170 35 - 55 1
Fruit flans made with
short pastry
True Fan
Cooking
160 - 170 40 - 80 3
Yeast cakes with deli‐
cate toppings (e.g.
quark, cream, cus‐
tard)
1)
Conventional
Cooking
160 - 180 40 - 80 2
1)
Preheat the oven.
2)
Use a deep pan.
Biscuits
Food Function Tempera‐
ture (°C)
Time (min) Shelf posi‐
tion
Short pastry biscuits True Fan
Cooking
150 - 160 10 - 20 3
Short bread / Short
bread / Pastry Stripes
True Fan
Cooking
140 20 - 35 3
Short bread / Short
bread / Pastry
Stripes
1)
Conventional
Cooking
160 20 - 30 2
Biscuits made with
sponge mixture
True Fan
Cooking
150 - 160 15 - 20 2
Pastries made with
egg white, meringues
True Fan
Cooking
80 - 100 120 - 150 1
Macaroons True Fan
Cooking
100 - 120 30 - 50 3
Biscuits made with
yeast dough
True Fan
Cooking
150 - 160 20 - 40 3
Puff pastries
1)
True Fan
Cooking
170 - 180 20 - 30 3
Rolls
1)
Conventional
Cooking
190 - 210 10 - 25 2
ENGLISH 25
Page 26

Food Function Tempera‐
ture (°C)
Time (min) Shelf posi‐
tion
Small cakes / Small
cakes
1)
True Fan
Cooking
160 20 - 35 3
Small cakes / Small
cakes
1)
Conventional
Cooking
170 20 - 35 2
1)
Preheat the oven.
12.5 Bakes and gratins
Food Function Temperature
(°C)
Time (min) Shelf position
Pasta bake Conventional
Cooking
180 - 200 45 - 60 1
Lasagne Conventional
Cooking
180 - 200 25 - 40 1
Vegetables au
gratin
1)
Turbo Grilling 1
Baguettes top‐
ped with mel‐
ted cheese
True Fan Cook‐
ing
160 - 170 15 - 30 1
Sweet bakes Conventional
Cooking
180 - 200 40 - 60 1
Fish bakes Conventional
Cooking
180 - 200 30 - 60 1
Stuffed vegeta‐
bles
True Fan Cook‐
ing
160 - 170 30 - 60 1
1)
Preheat the oven.
12.6 Multilevel baking
Use the function: True Fan Cooking.
Cakes / pastries / breads on baking trays
Food Temperature (°C) Time (min) Shelf posi‐
tion
Cream puffs /
Eclairs
1)
160 - 180 25 - 45 1 / 3
Dry streusel cake 150 - 160 30 - 45 1 / 3
1)
Preheat the oven.
www.electrolux.com26
Page 27
Biscuits / small cakes / pastries / rolls
Food Temperature (°C) Time (min) Shelf posi‐
tion
Short pastry biscuits 150 - 160 20 - 40 1 / 3
Short bread / Short
bread / Pastry Stripes
140 25 - 45 1 / 3
Biscuits made with
sponge mixture
160 - 170 25 - 40 1 / 3
Pastries made with
egg white, meringues
80 - 100 130 - 170 1 / 3
Macaroons 100 - 120 40 - 80 1 / 3
Biscuits made with
yeast dough
160 - 170 30 - 60 1 / 3
12.7 Slow Cooking
Use this function to prepare lean, tender
pieces of meat and fish. This function is
not applicable to such recipes as pot
roast or fatty roast pork.
In the first 10 minutes you can set an
oven temperature between 80 °C and
150 °C. The default is 90 °C. After the
temperature is set, the oven continues to
cook at 80 °C. Do not use this function
for poultry.
Always cook without a lid
when you use this function.
1. Sear the meat in a pan on the hob on
a very high setting for 1 - 2 minutes
on each side.
2. Put the meat together with the hot
roasting pan on the wire shelf in the
oven.
3. Select the function: Slow Cooking.
Food Quantity (kg) Temperature
(°C)
Time (min) Shelf posi‐
tion
Roast beef 1 - 1.5 150 120 - 150 1
Fillet of beef 1 - 1.5 150 90 - 110 1
Roast veal 1 - 1.5 150 120 - 150 1
Steak 0.2 - 0.3 120 20 - 40 1
12.8 Pizza Setting
Food Temperature (°C) Time (min) Shelf position
Pizza (thin crust)
1)
200 - 230 15 - 20 3
Pizza (with a lot of top‐
ping)
2)
180 - 200 20 - 30 3
Tarts 180 - 200 40 - 55 3
ENGLISH 27
Page 28

Food Temperature (°C) Time (min) Shelf position
Spinach flan 160 - 180 45 - 60 3
Quiche Lorraine (Sa‐
voury flan)
170 - 190 45 - 55 3
Swiss Flan 170 - 190 45 - 55 3
Cheesecake 140 - 160 60 - 90 3
Apple cake, covered 150 - 170 50 - 60 3
Vegetable pie 160 - 180 50 - 60 3
Unleavened bread
1)
230 10 - 20 3
Puff pastry flan
1)
160 - 180 45 - 55 3
Flammekuchen
1)
230 12 - 20 3
Piroggen (Russian ver‐
sion of calzone)
1)
180 - 200 15 - 25 3
1)
Preheat the oven.
2)
Use a deep pan.
12.9 Roasting
• Use heat-resistant ovenware to roast
(refer to the instructions of the
manufacturer).
• You can roast large roasting joints
directly in the deep pan (if present) or
on the wire shelf above the deep pan.
• Roast lean meats in the roasting tin
with the lid. This keeps the meat more
succulent.
• All types of meat that can be browned
or have crackling can be roasted in
the roasting tin without the lid.
• We recommend that you cook meat
and fish weighing 1 kg and above in
the appliance.
• To prevent the meat juices or fat from
burning onto the pan, put some liquid
into the deep pan.
• If necessary, turn the roast (after 1/2 2/3 of the cooking time).
• Baste large roasts and poultry with
their juices several times during
roasting. This gives better roasting
results.
• You can deactivate the appliance
approximately 10 minutes before the
end of the roasting time, and use the
residual heat.
12.10 Roasting tables
Beef
Food Func‐
tion
Quantity
(kg)
Power
(Watts)
Tempera‐
ture (°C)
Time (min) Shelf po‐
sition
Pot roast Conven‐
tional
Cooking
1 - 1.5 200 230 60 - 80 1
www.electrolux.com28
Page 29

Pork
Food Func‐
tion
Quantity
(kg)
Power
(Watts)
Tempera‐
ture (°C)
Time (min) Shelf po‐
sition
Shoulder,
neck, ham
joint
Turbo
Grilling
1 - 1.5 200 160 - 180 50 - 70 1
Meat loaf Turbo
Grilling
0.75 - 1 200 160 - 170 35 - 50 1
Pork
knuckle
(pre‐
cooked)
Turbo
Grilling
0.75 - 1 200 150 - 170 60 - 75 1
Veal
Food Func‐
tion
Quantity
(kg)
Power
(Watts)
Tempera‐
ture (°C)
Time (min) Shelf po‐
sition
Roast
veal
Turbo
Grilling
1 200 160 - 180 50 - 70 1
Knuckle
of veal
Turbo
Grilling
1.5 - 2 200 160 - 180 75 - 100 1
Lamb
Food Func‐
tion
Quantity
(kg)
Power
(Watts)
Tempera‐
ture (°C)
Time (min) Shelf
position
Leg of
lamb, roast
lamb
Turbo
Grilling
1 - 1.5 200 150 - 170 50 - 70 1
Poultry
Food Func‐
tion
Quantity
(kg)
Power
(Watts)
Tempera‐
ture (°C)
Time (min) Shelf
position
Poultry
portions
Turbo
Grilling
0.2 - 0.25
each
200 200 - 220 20 - 35 1
Chicken
half
Turbo
Grilling
0.4 - 0.5
each
200 190 - 210 25 - 40 1
Chicken
poulard
Turbo
Grilling
1 - 1.5 200 190 - 210 30 - 45 1
Duck Turbo
Grilling
1.5 - 2 200 180 - 200 45 - 65 1
ENGLISH 29
Page 30
Fish (steamed)
Food Func‐
tion
Quantity
(kg)
Power
(Watts)
Tempera‐
ture (°C)
Time (min) Shelf
position
Whole fish Con‐
vention‐
al
Cook‐
ing
1 - 1.5 200 210 - 220 30 - 45 1
Dishes
Food Func‐
tion
Quantity
(kg)
Power
(Watts)
Tempera‐
ture (°C)
Time (min) Shelf
position
Dishes
sweet
True
Fan
Cook‐
ing
- 200 160 - 180 20 - 35 1
Savoury
dishes
with
cooked in‐
gredients
(noodles,
vegeta‐
bles)
True
Fan
Cook‐
ing
- 400 600
160 - 180 20 - 45 1
Savoury
dishes
with raw
ingredients
(potatoes,
vegeta‐
bles)
True
Fan
Cook‐
ing
- 400 600
160 - 180 30 - 45 2
12.11 Grilling
• Always grill with the maximum
temperature setting.
• Set the shelf into the shelf position as
recommended in the grilling table.
• Always set the pan to collect the fat
into the first shelf position.
• Grill only flat pieces of meat or fish.
• Always preheat the empty oven with
the grill functions for 5 minutes.
CAUTION!
Always grill with the oven
door closed.
Grilling
Food Temperature
(°C)
Time (min) Shelf position
1st side 2nd side
Roast beef,
medium
210 - 230 30 - 40 30 - 40 1
Filet of beef,
medium
230 20 - 30 20 - 30 1
www.electrolux.com30
Page 31

Food Temperature
(°C)
Time (min) Shelf position
1st side 2nd side
Back of pork 210 - 230 30 - 40 30 - 40 1
Back of veal 210 - 230 30 - 40 30 - 40 1
Back of lamb 210 - 230 25 - 35 20 - 35 1
Whole Fish,
500 - 1000 g
210 - 230 15 - 30 15 - 30 1
Fast Grilling
Food Time (min) Shelf position
1st side 2nd side
Burgers / Burgers 9 - 13 8 - 10 3
Pork fillet 10 - 12 6 - 10 2
Sausages 10 - 12 6 - 8 3
Fillet steaks / veal
steaks
7 - 10 6 - 8 3
Toast / Toast 1 - 3 1 - 3 3
Toast with topping 6 - 8 - 2
12.12 Frozen foods
• Remove the food packaging. Put the
food on a plate.
• Do not cover it with a bowl or a plate.
This can extend the defrost time.
Food Temperature (°C) Time (min) Shelf position
Pizza, frozen 200 - 220 15 - 25 3
Pizza American, fro‐
zen
190 - 210 20 - 25 3
Pizza, chilled 210 - 230 13 - 25 3
Pizza Snacks, frozen 180 - 200 15 - 30 3
French Fries, thin
1)
210 - 230 20 - 30 3
French Fries, thick
1)
210 - 230 25 - 35 3
Wedges / Cro‐
quettes
1)
210 - 230 20 - 35 3
Hash Browns 210 - 230 20 - 30 3
ENGLISH 31
Page 32

Food Temperature (°C) Time (min) Shelf position
Lasagne / Cannello‐
ni, fresh
170 - 190 35 - 45 2
Lasagne / Cannello‐
ni, frozen
160 - 180 40 - 60 2
Chicken Wings 190 - 210 20 - 30 3
1)
Turn 2 or 3 times during roasting.
Frozen Ready Meals Table
Food Function Tempera‐
ture (°C)
Time (min) Shelf position
Frozen pizza
1)
Conventional
Cooking
as per
manufac‐
turer's in‐
structions
as per manufac‐
turer's instruc‐
tions
2
Chips2) (300 600 g)
Conventional
Cooking or Turbo
Grilling
200 - 220 as per manufac‐
turer's instruc‐
tions
2
Baguettes
3)
Conventional
Cooking
as per
manufac‐
turer's in‐
structions
as per manufac‐
turer's instruc‐
tions
2
Fruit cake Conventional
Cooking
as per
manufac‐
turer's in‐
structions
as per manufac‐
turer's instruc‐
tions
2
1)
Preheat the oven.
2)
Turn 2 or 3 times during cooking.
3)
Preheat the oven.
12.13 Defrost
• Remove the food packaging and put
the food on a plate.
• Use the first shelf position from the
bottom.
• Do not cover the food with a bowl or a
plate, as this can extend the defrost
time.
Food Quantity Defrosting
time (min)
Further de‐
frosting
time (min)
Comments
Chicken 1 kg 100 - 140 20 - 30 Put the chicken on an upturned
saucer in a big plate. Turn half‐
way through.
Meat 1 kg 100 - 140 20 - 30 Turn halfway through.
www.electrolux.com32
Page 33

Food Quantity Defrosting
time (min)
Further de‐
frosting
time (min)
Comments
Meat 500 g 90 - 120 20 - 30 Turn halfway through.
Trout 150 g 25 - 35 10 - 15 -
Straw‐
berries
300 g 30 - 40 10 - 20 -
Butter 250 g 30 - 40 10 - 15 -
Cream 2 x 200 g 80 - 100 10 - 15 Whip the cream when still slight‐
ly frozen in places.
Gateau 1.4 kg 60 60 -
12.14 Preserving
• Use only preserve jars of the same
dimensions available on the market.
• Do not use jars with twist-off and
bayonet type lids or metal tins.
• Use the first shelf from the bottom for
this function.
• Put no more than six one-litre
preserve jars on the baking tray.
• Fill the jars equally and close with a
clamp.
• The jars cannot touch each other.
• Put approximately 1/2 litre of water
into the baking tray to give sufficient
moisture in the oven.
• When the liquid in the jars starts to
simmer (after approximately 35 - 60
minutes with one-litre jars), stop the
oven or decrease the temperature to
100 °C (see the table).
Soft fruit
Food Temperature (°C) Cooking time until
simmering (min)
Continue to cook
at 100 °C (min)
Strawberries / Blue‐
berries / Raspber‐
ries / Ripe goose‐
berries
160 - 170 35 - 45 -
Stone fruit
Food Temperature (°C) Cooking time until
simmering (min)
Continue to cook
at 100 °C (min)
Pears / Quinces /
Plums
160 - 170 35 - 45 10 - 15
Vegetables
Food Temperature (°C) Cooking time until
simmering (min)
Continue to cook
at 100 °C (min)
Carrots
1)
160 - 170 50 - 60 5 - 10
Cucumbers 160 - 170 50 - 60 -
ENGLISH 33
Page 34

Food Temperature (°C) Cooking time until
simmering (min)
Continue to cook
at 100 °C (min)
Mixed pickles 160 - 170 50 - 60 5 - 10
Kohlrabi / Peas /
Asparagus
160 - 170 50 - 60 15 - 20
1)
Leave standing in the oven after it is deactivated.
12.15 Drying
Food Temperature (°C) Time (h) Shelf position
Beans 60 - 70 6 - 8 3
Peppers 60 - 70 5 - 6 3
Vegetables for soup 60 - 70 5 - 6 3
Mushrooms 50 - 60 6 - 8 3
Herbs 40 - 50 2 - 3 3
Plums 60 - 70 8 - 10 3
Apricots 60 - 70 8 - 10 3
Apple slices 60 - 70 6 - 8 3
Pears 60 - 70 6 - 9 3
12.16 Bread Baking
Preheating is not recommended.
Food Temperature (°C) Time (min) Shelf position
White Bread 180 - 200 40 - 60 2
Baguette 200 - 220 35 - 45 2
Brioche 160 - 180 40 - 60 2
Ciabatta 200 - 220 35 - 45 2
Rye Bread 180 - 200 50 - 70 2
Dark Bread 180 - 200 50 - 70 2
All Grain bread 170 - 190 60 - 90 2
www.electrolux.com34
Page 35

12.17 Microwave cooking
tables
Defrosting meat
Food Power
(Watts)
Quantity (g) Time (min) Standing
time (min)
Comments
Whole cuts
of meat
200 500 10 - 12 10 - 15 Turn halfway
through.
Steak 200 200 3 - 5 5 - 10 Turn halfway
through, re‐
move de‐
frosted
parts.
Mixed
minced meat
200 500 10 - 15 10 - 15 Turn halfway
through, re‐
move de‐
frosted
parts.
Goulash 200 500 10 - 15 10 - 15 Turn halfway
through, re‐
move de‐
frosted
parts.
Defrosting poultry
Food Power
(Watts)
Quantity (g) Time (min) Standing
time (min)
Comments
Chicken 200 1000 25 - 30 10 - 20 Turn halfway
through,
cover de‐
frosted parts
with alumini‐
um foil.
Chicken
breast
200 100 - 200 3 - 5 10 - 15 Turn halfway
through,
cover de‐
frosted parts
with alumini‐
um foil.
Chicken
thighs
200 100 - 200 3 - 5 10 - 15 Turn halfway
through,
cover de‐
frosted parts
with alumini‐
um foil.
ENGLISH 35
Page 36

Food Power
(Watts)
Quantity (g) Time (min) Standing
time (min)
Comments
Duck 200 2000 45 - 60 20 - 30 Turn halfway
through,
cover de‐
frosted parts
with alumini‐
um foil.
Defrosting fish
Food Power
(Watts)
Quantity (g) Time (min) Standing
time (min)
Comments
Whole Fish 100 500 10 - 15 15 - 20 Turn halfway
through.
Fish fillets 100 500 10 - 12 15 - 20 Turn halfway
through.
Defrosting sausage
Food Power
(Watts)
Quantity (g) Time (min) Standing
time (min)
Comments
Sliced saus‐
age
100 100 2 - 4 20 - 40 Turn halfway
through.
Defrosting dairy products
Food Power
(Watts)
Quantity (g) Time (min) Standing
time (min)
Comments
Quark 100 250 10 - 15 25 - 30 Remove alu‐
minium
parts, turn
halfway
through.
Butter 100 250 3 - 5 15 - 20 Remove alu‐
minium
parts, turn
halfway
through.
Cheese 100 250 3 - 5 30 - 60 Remove alu‐
minium
parts, turn
halfway
through.
Cream 100 200 7 - 12 20 - 30 Remove alu‐
minium top,
stir halfway
through.
www.electrolux.com36
Page 37

Defrosting cakes / pastries
Food Power
(Watts)
Quantity Time (min) Standing
time (min)
Comments
Yeast dough 100 1 piece 2 - 3 15 - 20 Turn plate
halfway
through.
Cheesecake 100 1 piece 2 - 4 15 - 20 Turn plate
halfway
through.
Cake (ga‐
teau)
100 1 piece 1 - 2 15 - 20 Turn plate
halfway
through.
Dry cake (e.
g. Pound
cake)
100 1 piece 2 - 4 15 - 20 Turn plate
halfway
through.
Fruit cake 100 1 piece 1 - 2 15 - 20 Turn plate
halfway
through.
Bread 100 1000 g 15 - 20 10 - 15 Turn halfway
through.
Sliced bread 100 500 g 8 - 12 10 - 15 Turn halfway
through.
Bread rolls 100 4 rolls 5 - 8 5 - 10 Turn halfway
through.
Defrosting fruit
Food Power
(Watts)
Quantity (g) Time (min) Standing
time (min)
Comments
Strawberries 100 300 8 - 12 10 - 15 Defrost cov‐
ered, stir
halfway
through.
Plums, cher‐
ries, rasp‐
berries,
blackcur‐
rants, apri‐
cots
100 250 8 - 10 10 - 15 Defrost cov‐
ered, stir
halfway
through.
Cooking / melting
Food Power
(Watts)
Quantity (g) Time (min) Standing
time (min)
Comments
Chocolate /
Chocolate
coating
600 150 2 - 3 - Stir halfway
through.
ENGLISH 37
Page 38

Food Power
(Watts)
Quantity (g) Time (min) Standing
time (min)
Comments
Butter 200 100 2 - 4 - Stir halfway
through.
Defrosting heating
Food Power
(Watts)
Quantity Time (min) Standing
time (min)
Comments
Baby food in
jars
300 200 g 2 - 3 - Stir halfway
through,
check tem‐
perature.
Baby milk
(bottle, 180
ml)
1000 200 g 0:20 - 0:40 - Put spoon
into bottle,
stir and
check tem‐
perature.
Conven‐
ience food
600 400 - 500 g 14 - 20 5 Remove any
aluminium
lids, turn
halfway
through.
Frozen
ready meals
400 400 - 500 g 4 - 6 5 Remove any
aluminium
lids, turn
halfway
through.
Milk 1000 1 cup ap‐
prox. 200 ml
1:15 - 1:45 - Put spoon in
the contain‐
er.
Water 1000 1 cup ap‐
prox. 200 ml
1:30 - 2 - Put spoon in
the contain‐
er.
Sauce 600 200 ml 1 - 2 - Stir halfway
through.
Soup 600 300 ml 2 - 4 - Stir halfway
through.
www.electrolux.com38
Page 39

Cooking table
Food Power
(Watts)
Quantity Time (min) Standing
time (min)
Comments
Whole fish 500 500 g 8 - 10 - Cook cov‐
ered, turn
container
several
times during
cooking.
Fish fillets 500 500 g 6 - 8 - Cook cov‐
ered, turn
container
several
times during
cooking.
Vegetables,
short cook‐
ing time,
fresh
1)
600 500 g 12 - 16 - Add approx.
50 ml water,
cook cov‐
ered, stir
halfway
through.
Vegetables,
short cook‐
ing time, fro‐
zen
1)
600 500 g 14 - 18 - Add approx.
50 ml water,
cook cov‐
ered, stir
halfway
through.
Vegetables,
long cooking
time, fresh
1)
600 500 g 14 - 20 - Add approx.
50 ml water,
cook cov‐
ered, stir
halfway
through.
Vegetables,
long cooking
time, fro‐
zen
1)
600 500 g 18 - 24 - Add approx.
50 ml water,
cook cov‐
ered, stir
halfway
through.
Potatoes in
their jacket
1000 800 g + 600ml5 - 7 300 W / 15 -20Cook cov‐
ered, stir
halfway
through.
Rice 1000 300 g + 600ml4 - 6 - Cook cov‐
ered, stir
halfway
through.
ENGLISH 39
Page 40

Food Power
(Watts)
Quantity Time (min) Standing
time (min)
Comments
Popcorn 1000 - 3 - 4 - Put the pop‐
corn on a
plate on the
bottom level.
1)
Cook all vegetables with a cover on the container.
Combi-function table
• For selected models only.
• Use the functions: Grilling and
Microwave.
Food Ovenware Pow‐
er
(Watt
s)
Tem‐
pera‐
ture
(°C)
Time
(min)
Shelf
posi‐
tion
Comments
2 chicken
halves (2 x
600 g)
Glass dish with strain‐er300 220 40 2 Turn after 20
min, standing
time 5 min.
au gratin po‐
tatoes (1 kg)
Gratin dish 300 200 40 2 10 min
standing
time.
Roast pork
neck (1100
g)
Glass dish with strain‐er300 200 70 1 Turn in be‐
tween, 10
min standing
time.
13. CARE AND CLEANING
WARNING!
Refer to Safety chapters.
13.1 Notes on cleaning
• Clean the front of the appliance with a
soft cloth with warm water and a
cleaning agent.
• To clean metal surfaces, use a
dedicated cleaning agent.
• Clean the appliance interior after each
use. Fat accumulation or other food
remains may result in a fire.
• Clean the cavity roof carefully from
food residuals and fat.
• Clean stubborn dirt with a special
oven cleaner.
• Clean all accessories after each use
and let them dry. Use a soft cloth with
warm water and a cleaning agent.
• If you have nonstick accessories, do
not clean them using aggressive
agents, sharp-edged objects or a
dishwasher. It can cause damage to
the nonstick coating.
• Dry the oven when the cavity is wet
after usage.
13.2 Removing the shelf
supports
Before maintenance, make sure that the
appliance is cool. There is a risk of
burns.
To clean the appliance, remove the shelf
supports.
1. Pull carefully the supports up and out
of the front catch.
www.electrolux.com40
Page 41
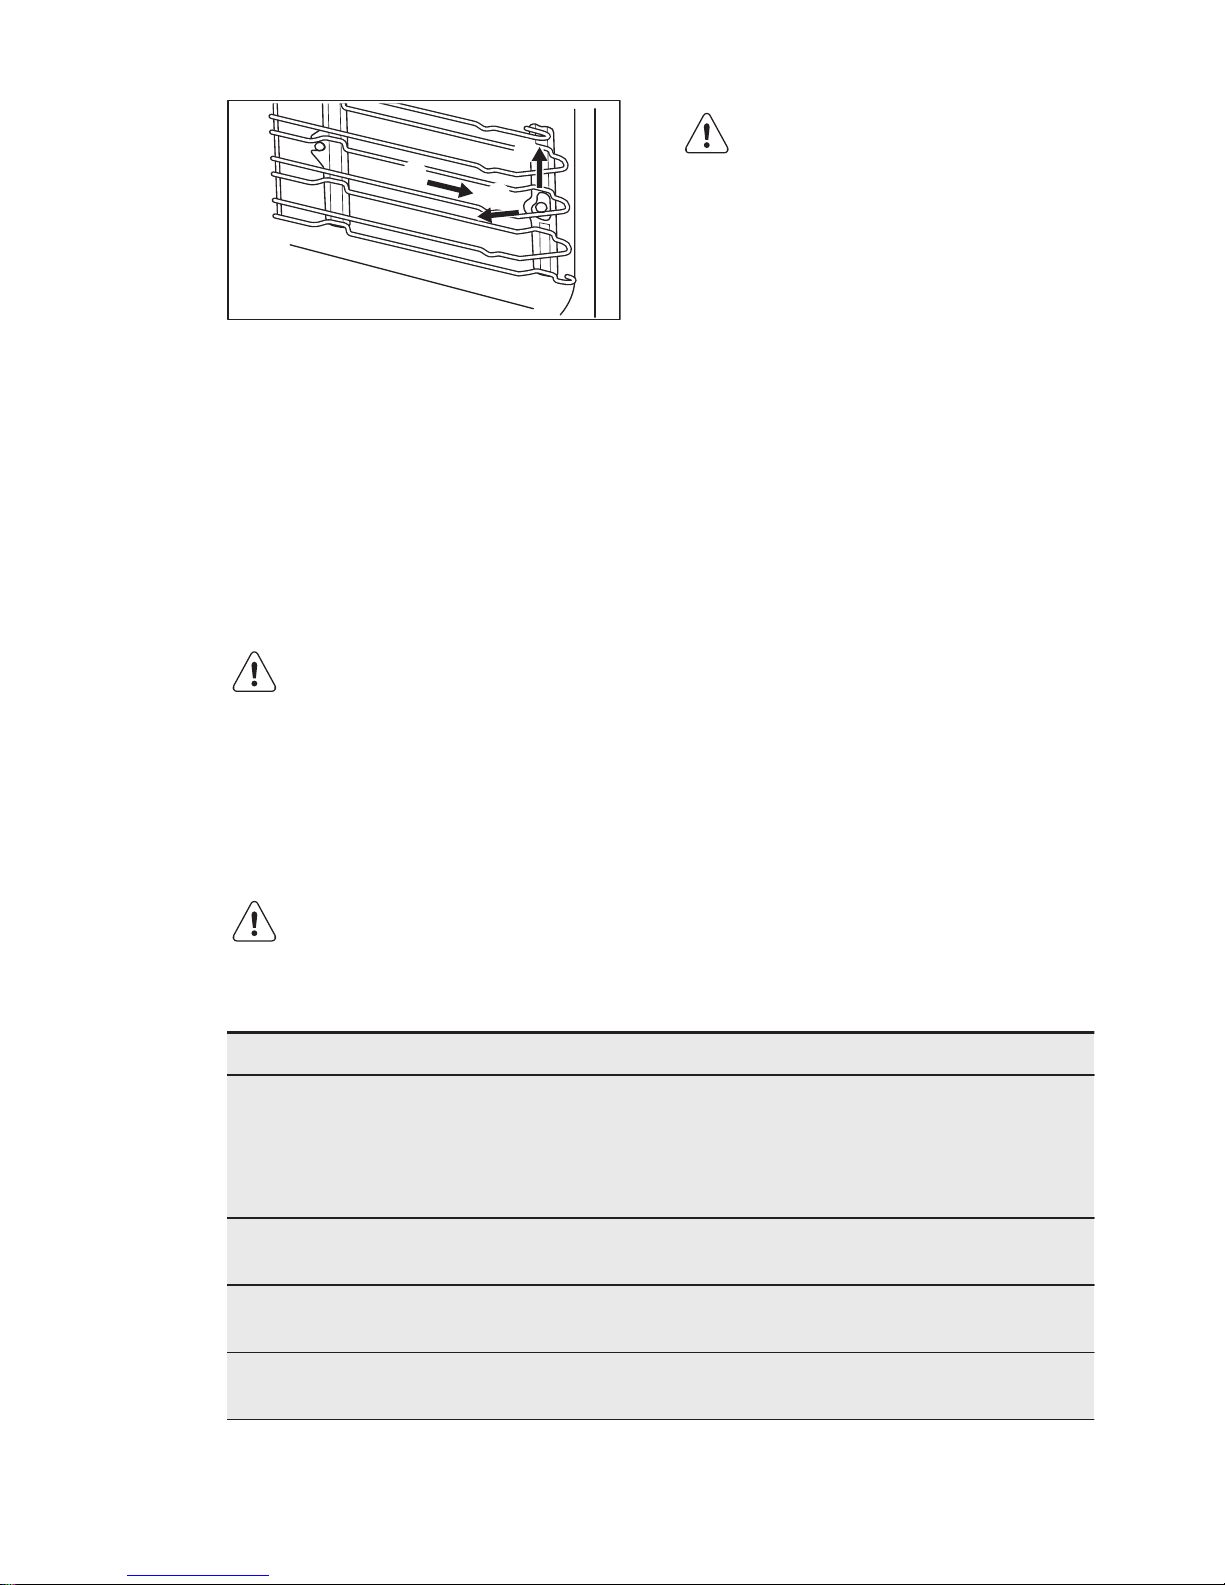
2
3
1
2. Pull the front end of the shelf support
away from the side wall.
3. Pull the supports out of the rear
catch.
Install the shelf supports in the opposite
sequence.
13.3 Replacing the lamp
Put a cloth on the bottom of the interior
of the appliance. It prevents damage to
the lamp glass cover and the cavity.
WARNING!
Danger of electrocution!
Disconnect the fuse before
you replace the lamp.
The lamp and the lamp glass
cover can be hot.
CAUTION!
Always hold the halogen
lamp with a cloth to prevent
grease residue from burning
on the lamp.
1. Deactivate the appliance.
2. Remove the fuses from the fuse box
or deactivate the circuit breaker.
The top lamp
1. Turn the lamp glass cover
counterclockwise to remove it.
2. Clean the glass cover.
3. Replace the lamp with a suitable 300
°C heat-resistant lamp.
4. Install the glass cover.
14. TROUBLESHOOTING
WARNING!
Refer to Safety chapters.
14.1 What to do if...
Problem Possible cause Remedy
You cannot activate or op‐
erate the oven.
The oven is not connected
to an electrical supply or it
is connected incorrectly.
Check if the oven is cor‐
rectly connected to the
electrical supply (refer to
the connection diagram if
available).
The oven does not heat
up.
The oven is deactivated. Activate the oven.
The oven does not heat
up.
The clock is not set. Set the clock.
The oven does not heat
up.
The necessary settings are
not set.
Make sure that the settings
are correct.
ENGLISH 41
Page 42

Problem Possible cause Remedy
The oven does not heat
up.
The automatic switch-off is
activated.
Refer to "Automatic switchoff".
The oven does not heat
up.
The Child Lock is on. Refer to "Using the Child
Lock".
The oven does not heat
up.
The door is not closed cor‐
rectly.
Fully close the door.
The oven does not heat
up.
The fuse is blown. Make sure that the fuse is
the cause of the malfunc‐
tion. If the fuse is blown
again and again, contact a
qualified electrician.
The lamp does not oper‐
ate.
The lamp is defective. Replace the lamp.
The display shows an error
code that is not in this ta‐
ble.
There is an electrical fault. • Deactivate the oven
with the house fuse or
the safety switch in the
fuse box and activate it
again.
• If the display shows the
error code again, con‐
tact the Customer Care
Department.
Steam and condensation
settle on the food and in
the cavity of the oven.
You left the dish in the
oven for too long.
Do not leave the dishes in
the oven for longer than 15
- 20 minutes after the
cooking process ends.
14.2 Service data
If you cannot find a solution to the
problem yourself, contact your dealer or
an Authorised Service Centre.
The necessary data for the service
centre is on the rating plate. The rating
plate is on the front frame of the
appliance cavity. Do not remove the
rating plate from the appliance cavity.
We recommend that you write the data here:
Model (MOD.) .........................................
Product number (PNC) .........................................
Serial number (S.N.) .........................................
www.electrolux.com42
Page 43

15. ENVIRONMENT CONCERNS
Recycle the materials with the symbol
. Put the packaging in applicable
containers to recycle it. Help protect the
environment and human health and to
recycle waste of electrical and electronic
appliances. Do not dispose appliances
marked with the symbol with the
household waste. Return the product to
your local recycling facility or contact
your municipal office.
*
ENGLISH 43
Page 44
www.electrolux.com/shop
867302151-B-382015
 Loading...