

Page 1

EUN2243AOW
................................................ .............................................
EN FREEZER USER MANUAL 2
KK МҰЗДАТҚЫШ ҚОЛДАНУ ТУРАЛЫ
НҰСҚАУЛАРЫ
20
NO FRYSER BRUKSANVISNING 38
ES CONGELADOR MANUAL DE
INSTRUCCIONES
56
Page 2
www.electrolux.com
2
CONTENTS
1. SAFETY INSTRUCTIONS . . . . . . . . . . . . . . . . . . . . . . . . . . . . . . . . . . . . . . . . . . . . . . . . . . 3
2. CONTROL PANEL . . . . . . . . . . . . . . . . . . . . . . . . . . . . . . . . . . . . . . . . . . . . . . . . . . . . . . . 5
3. DAILY USE . . . . . . . . . . . . . . . . . . . . . . . . . . . . . . . . . . . . . . . . . . . . . . . . . . . . . . . . . . . . . 7
4. HELPFUL HINTS AND TIPS . . . . . . . . . . . . . . . . . . . . . . . . . . . . . . . . . . . . . . . . . . . . . . . . 8
5. CARE AND CLEANING . . . . . . . . . . . . . . . . . . . . . . . . . . . . . . . . . . . . . . . . . . . . . . . . . . . . 8
6. WHAT TO DO IF… . . . . . . . . . . . . . . . . . . . . . . . . . . . . . . . . . . . . . . . . . . . . . . . . . . . . . . . 9
7. INSTALLATION . . . . . . . . . . . . . . . . . . . . . . . . . . . . . . . . . . . . . . . . . . . . . . . . . . . . . . . . . 11
8.
NOISES . . . . . . . . . . . . . . . . . . . . . . . . . . . . . . . . . . . . . . . . . . . . . . . . . . . . . . . . . . . . . . 17
9. TECHNICAL DATA . . . . . . . . . . . . . . . . . . . . . . . . . . . . . . . . . . . . . . . . . . . . . . . . . . . . . . 18
WE’RE THINKING OF YOU
Thank you for purchasing an Electrolux appliance. You’ve chosen a product that brings with it
decades of professional experience and innovation. Ingenious and stylish, it has been designed
with you in mind. So whenever you use it, you can be safe in the knowledge that you’ll get great
results every time.
Welcome to Electrolux.
Visit our website for:
Get usage advice, brochures, trouble shooter, service information:
www.electrolux.com
Register your product for better service:
www.electrolux.com/productregistration
Buy Accessories, Consumables and Original spare parts for your appliance:
www.electrolux.com/shop
CUSTOMER CARE AND SERVICE
We recommend the use of original spare parts.
When contacting Service, ensure that you have the following data available.
The information can be found on the rating plate. Model, PNC, Serial Number.
Warning / Caution-Safety information
General information and tips
Environmental information
Subject to change without notice.
Page 3
ENGLISH 3
1.
SAFETY INSTRUCTIONS
In the interest of your safety and to ensure
the correct use, before installing and first
using the appliance, read this user manual
carefully, including its hints and warnings.
To avoid unnecessary mistakes and accidents, it is important to ensure that all
people using the appliance are thoroughly
familiar with its operation and safety features. Save these instructions and make
sure that they remain with the appliance if
it is moved or sold, so that everyone using
it through its life will be properly informed
on appliance use and safety.
For the safety of life and property keep
the precautions of these user's instructions as the manufacturer is not responsible for damages caused by omission.
1.1 Children and vulnerable
people safety
• This appliance is not intended for use
by persons (including children) with reduced physical, sensory or mental capabilities, or lack of experience and
knowledge, unless they have been given supervision or instruction concerning
use of the appliance by a person responsible for their safety.
Children should be supervised to ensure that they do not play with the appliance.
• Keep all packaging well away from children. There is risk of suffocation.
• If you are discarding the appliance pull
the plug out of the socket, cut the connection cable (as close to the appliance
as you can) and remove the door to
prevent playing children to suffer electric shock or to close themselves into it.
• If this appliance featuring magnetic
door seals is to replace an older appliance having a spring lock (latch) on the
door or lid, be sure to make that spring
lock unusable before you discard the
old appliance. This will prevent it from
becoming a death trap for a child.
1.2 General safety
WARNING!
Keep ventilation openings, in the appliance enclosure or in the built-in structure,
clear of obstruction.
• The appliance is intended for keeping
foodstuff and/or beverages in a normal
household and similar applications such
as:
– staff kitchen areas in shops, offices
and other working environments;
– farm houses and by clients in hotels,
motels and other residential type environments;
– bed and breakfast type environ-
ments;
– catering and similar non-retail appli-
cations.
• Do not use a mechanical device or any
artificial means to speed up the thawing
process.
• Do not use other electrical appliances
(such as ice cream makers) inside of refrigerating appliances, unless they are
approved for this purpose by the manufacturer.
• Do not damage the refrigerant circuit.
• The refrigerant isobutane (R600a) is
contained within the refrigerant circuit of
the appliance, a natural gas with a high
level of environmental compatibility,
which is nevertheless flammable.
During transportation and installation of
the appliance, be certain that none of
the components of the refrigerant circuit become damaged.
If the refrigerant circuit should become
damaged:
– avoid open flames and sources of ig-
nition
– thoroughly ventilate the room in
which the appliance is situated
• It is dangerous to alter the specifications or modify this product in any way.
Any damage to the cord may cause a
short-circuit, fire and/or electric shock.
WARNING!
Any electrical component (power
cord, plug, compressor) must be
replaced by a certified service
agent or qualified service personnel to avoid hazard.
Page 4

www.electrolux.com
4
• This appliance is heavy. Care should be
• Do not remove nor touch items from
• Avoid prolonged exposure of the appli-
• Bulb lamps (if foreseen) used in this ap-
1.3 Daily Use
• Do not put hot pot on the plastic parts
• Do not store flammable gas and liquid
• Do not place food products directly
• Frozen food must not be re-frozen once
• Store pre-packed frozen food in ac-
• Appliance's manufacturers storage rec-
• Do not place carbonated or fizzy drinks
1.
Power cord must not be lengthened.
2.
Make sure that the power plug is
not squashed or damaged by the
back of the appliance. A squashed
or damaged power plug may overheat and cause a fire.
3.
Make sure that you can come to
the mains plug of the appliance.
4.
Do not pull the mains cable.
5.
If the power plug socket is loose,
do not insert the power plug. There
is a risk of electric shock or fire.
6.
You must not operate the appliance without the lamp cover (if
foreseen) of interior lighting.
taken when moving it.
the freezer compartment if your hands
are damp/wet, as this could cause skin
abrasions or frost/freezer burns.
ance to direct sunlight.
pliance are special purpose lamps selected for household appliances use
only. They are not suitable for household room illumination.
in the appliance.
in the appliance, because they may explode.
against the air outlet on the rear wall. (If
the appliance is Frost Free)
it has been thawed out.
cordance with the frozen food manufacturer's instructions.
ommendations should be strictly adhered to. Refer to relevant instructions.
in the freezer compartment as it creates
pressure on the container, which may
cause it to explode, resulting in damage
to the appliance.
• Ice lollies can cause frost burns if consumed straight from the appliance.
1.4 Care and cleaning
• Before maintenance, switch off the appliance and disconnect the mains plug
from the mains socket.
• Do not clean the appliance with metal
objects.
• Do not use sharp objects to remove
frost from the appliance. Use a plastic
scraper.
1.5 Installation
For electrical connection carefully
follow the instructions given in
specific paragraphs.
• Unpack the appliance and check if
there are damages on it. Do not connect the appliance if it is damaged. Report possible damages immediately to
the place you bought it. In that case retain packing.
• It is advisable to wait at least four hours
before connecting the appliance to allow the oil to flow back in the compressor.
• Adequate air circulation should be
around the appliance, lacking this leads
to overheating. To achieve sufficient
ventilation follow the instructions relevant to installation.
• Wherever possible the back of the
product should be against a wall to
avoid touching or catching warm parts
(compressor, condenser) to prevent
possible burn.
• The appliance must not be located
close to radiators or cookers.
• Make sure that the mains plug is accessible after the installation of the appliance.
• Connect to potable water supply only (If
a water connection is foreseen).
1.6 Service
• Any electrical work required to do the
servicing of the appliance should be
carried out by a qualified electrician or
competent person.
Page 5
• This product must be serviced by an
authorized Service Centre, and only
genuine spare parts must be used.
1.7 Environment Protection
This appliance does not contain
gasses which could damage the
ozone layer, in either its refrigerant
circuit or insulation materials. The
appliance shall not be discarded
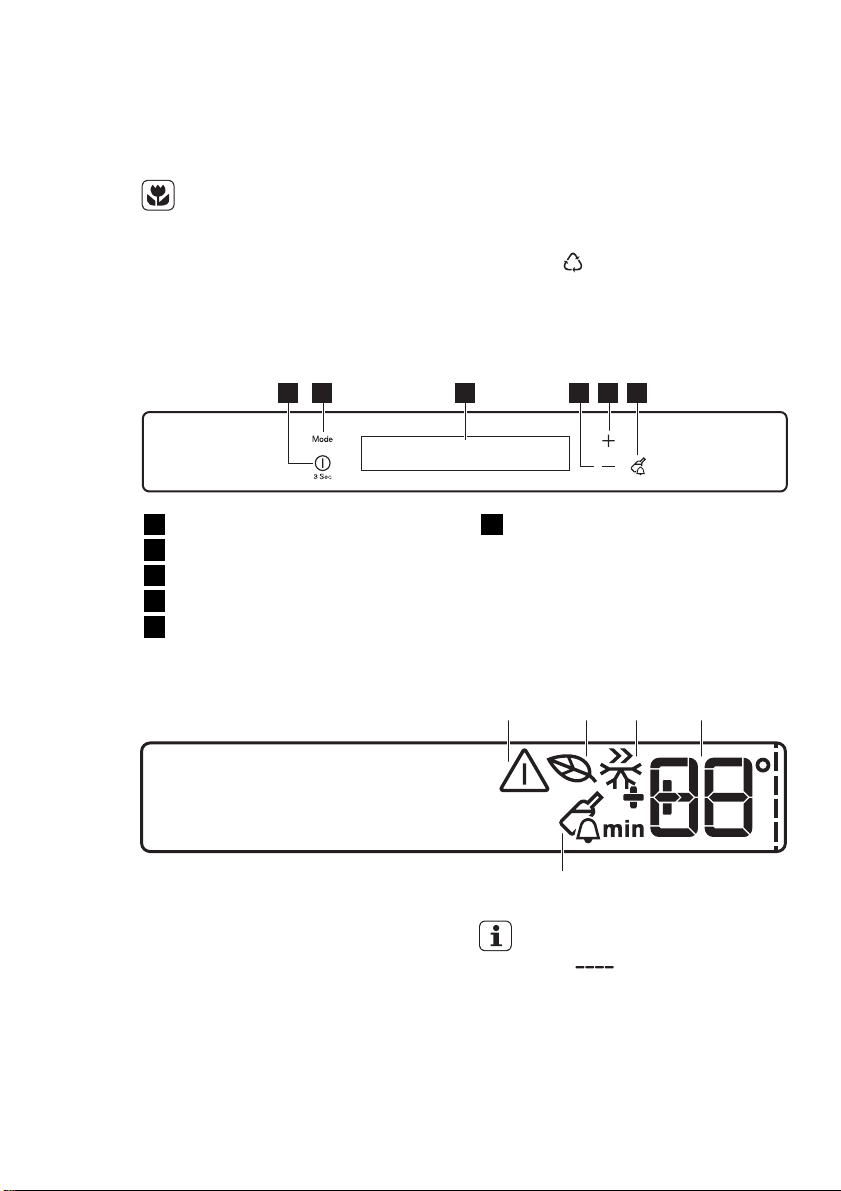
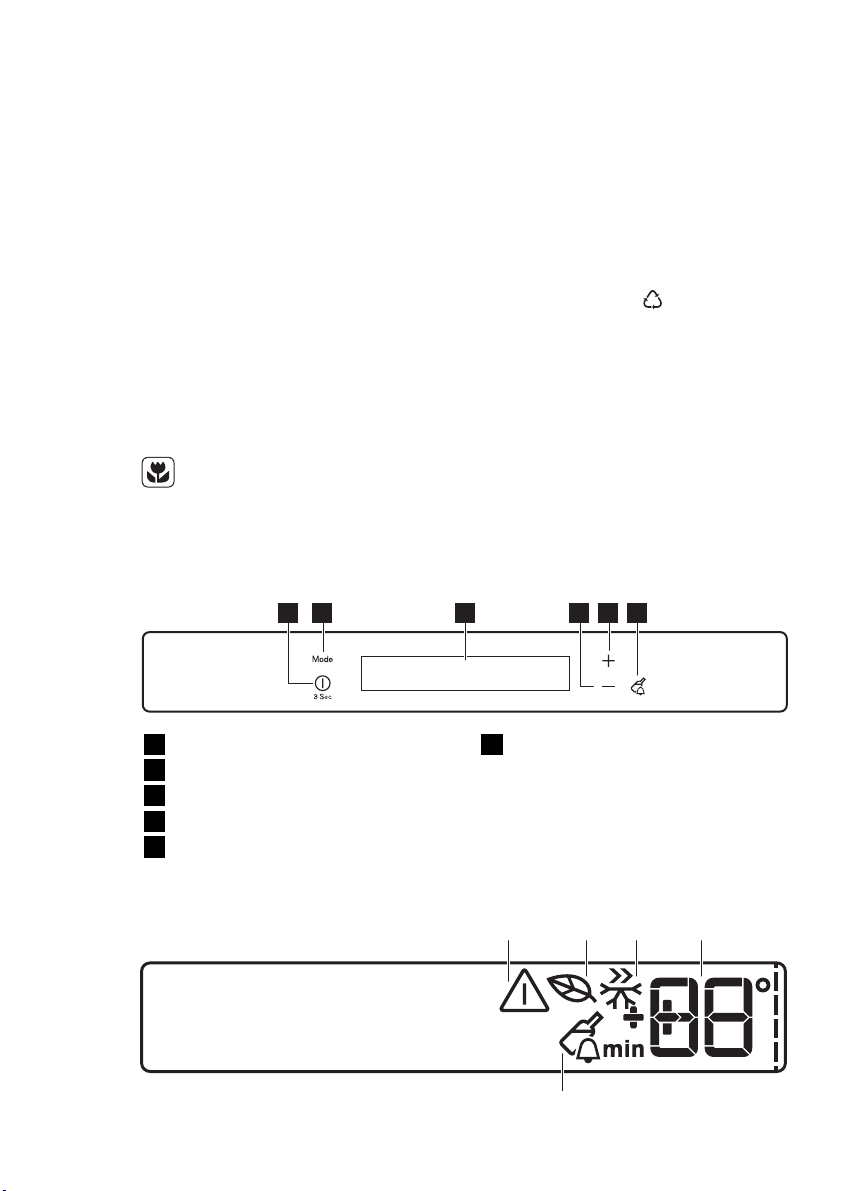
2. CONTROL PANEL
1 2 3 4 5 6
ENGLISH 5
together with the urban refuse and
rubbish. The insulation foam contains flammable gases: the appliance shall be disposed according
to the applicable regulations to
obtain from your local authorities.
Avoid damaging the cooling unit,
especially at the rear near the heat
exchanger. The materials used on
this appliance marked by the sym-
are recyclable.
bol
ON/OFF button
1
Mode button
2
Display
3
Temperature colder button
4
Temperature warmer button
5
2.1 Display
A)
Alarm indicator
B)
EcoMode
C)
FastFreeze mode
D)
DrinksChill and Temperature indicator
E)
DrinksChil mode
Drink Chill button
6
It is possible to change predefined sound
of buttons to a loudly one by pressing together Mode button and Temperature
colder button for some seconds. Change
is reversible.
ABCD
E
After selection of the Mode or the
Temperature button the anima-
tions
After selection of the temperature
the animation flashes for a few minutes.
starts.
2.2 Switching on
To switch on the appliance do these
steps:
Page 6
www.electrolux.com
6
1.
2.
3.
4.
5.
To select a different set temperature refer
to "Temperature regulation".
2.3 Switching off
To switch off the appliance do these
steps:
1.
2.
3.
2.4 Temperature regulation
The set temperature of the freezer may be
adjusted by pressing the temperature button.
Set default temperature:
• -18°C for the freezer
The temperature indicator shows the set
temperature.
The set temperature will be reached within 24 hours.
2.5 EcoMode
For optimal food storage select the EcoMode .
To switch on the function:
1.
To switch off the function:
Connect the mains plug to the power
socket.
Press the ON/OFF button if the display is off.
The alarm buzzer could operate after
few seconds.
To reset the alarm refer to "High temperature alarm".
If DEMO appears on the display, the
appliance is in demonstration mode.
Refer to "What to do if..." paragraph.
The temperature indicators show the
set default temperature.
Press the ON/OFF button for 3 seconds.
The display switches off.
To disconnect the appliance from the
power disconnect the mains plug
from the power socket.
After a power failure the set temperature remains stored.
Press the Mode button until the corresponding icon appears.
The temperature indicator shows the
set temperature:
– for the freezer: -18°C
1.
Press the Mode button to select another function or nothing.
The function switches off by selecting a different set temperature.
2.6 FastFreeze mode
To switch on the function:
1.
Press the Mode button until the cor-
responding icon appears.
This function stops automatically after 52
hours.
To switch off the function before its automatic end:
1.
Press the Mode button to select an-
other function or nothing.
The function switches off by selecting a different freezer set temperature.
2.7 DrinksChill mode
The DrinksChill mode is to be used to set
an acoustic alarm at the preferred time,
useful for example when a recipe requires
to cool down a mixture for a certain period of time, or when a reminder is needed
in order not to forget the bottles placed in
the freezer for fast cooling.
To switch on the function:
1.
Press the DrinkChill button.
The DrinksChill indicator appears.
The Timer shows the set value (30 mi-
nutes).
2.
Press the Temperature colder button
and Temperature warmer button to
change the Timer set value from 1 to
90 minutes.
3.
The Timer start to flash (min).
At the end of the countdown the DrinksChill indicator flashes and an audible
alarm sounds:
1.
Remove any drinks contained in the
freezer compartment.
2.
Press the DrinkChill button to switch
off the sound and terminate the func-
tion.
It is possible to deactivate the function at
any time during the countdown:
1.
Press the DrinkChill button.
2.
The DrinksChill indicator goes off.
It is possible to change the time during
the countdown and at the end by press-
Page 7
ing the Temperature colder button and
the Temperature warmer button.
2.8 High temperature alarm
An increase in the temperature in the
freezer compartment (for example due to
an earlier power failure) is indicated by:
• flashing the alarm and freezer temperature indicators
• sounding of buzzer.
To reset the alarm:
1.
Press any button.
2.
The buzzer switches off.
3.
The freezer temperature indicator
shows the highest temperature
reached for a few seconds. Then
show again the set temperature.
3. DAILY USE
ENGLISH 7
4.
The alarm indicator appears until the
normal conditions are restored.
When the alarm has returned the alarm indicator goes off.
2.9 Door open alarm
An acoustic alarm will sound if the door is
left open for a few minutes. The door
open alarm conditions are indicated by:
• flashing Alarm indicator
• acoustic buzzer
When normal conditions are restored
(door closed), the alarm will stop.
During the alarm, the buzzer can be
switched off by pressing any button.
3.1 Cleaning the interior
Before using the appliance for the first
time, wash the interior and all internal accessories with lukewarm water and some
neutral soap so as to remove the typical
smell of a brand-new product, then dry
thoroughly.
Do not use detergents or abrasive
powders, as these will damage
the finish.
If DEMO appears on the Display, the appliance is in demonstration mode: refer to
“WHAT TO DO IF...” paragraph.
3.2 Freezing fresh food
The freezer compartment is suitable for
freezing fresh food and storing frozen and
deep-frozen food for a long time.
To freeze fresh food activate the Fast
Freeze function at least 24 hours before
placing the food to be frozen in the freezer
compartment.
Place the fresh food to be frozen in the
two top compartments.
The maximum amount of food that can be
frozen in 24 hours is specified on the rat-
ing plate, a label located on the inside of
the appliance.
The freezing process lasts 24 hours: during this period do not add other food to
be frozen.
After 24 hours, when the freezing process
is completed, return to the required temperature (see "Temperature regulation").
3.3 Storage of frozen food
When first starting-up or after a period out
of use, before putting the products in the
compartment let the appliance run at least
2 hours on the higher settings.
In the event of accidental defrosting, for example due to a power
failure, if the power has been off
for longer than the value shown in
the technical characteristics chart
under "rising time", the defrosted
food must be consumed quickly
or cooked immediately and then
re-frozen (after cooling).
3.4 Thawing
Deep-frozen or frozen food, prior to being
used, can be thawed in the refrigerator
compartment or at room temperature, depending on the time available for this operation.
Page 8
www.electrolux.com
8
Small pieces may even be cooked still frozen, directly from the freezer: in this case,
cooking will take longer.
3.5 Ice-cube production
This appliance is equipped with one or
more trays for the production of icecubes. Fill these trays with water, then put
them in the freezer compartment.
4. HELPFUL HINTS AND TIPS
Do not use metallic instruments to
remove the trays from the freezer.
3.6 Cold accumulators
The freezer contains at least one cold accumulator which increases storage time in
the event of a power cut or breakdown.
4.1 Hints for freezing
To help you make the most of the freezing
process, here are some important hints:
• the maximum quantity of food which
can be frozen in 24 hrs. is shown on
the rating plate;
• the freezing process takes 24 hours.
No further food to be frozen should be
added during this period;
• only freeze top quality, fresh and thoroughly cleaned, foodstuffs;
• prepare food in small portions to enable
it to be rapidly and completely frozen
and to make it possible subsequently to
thaw only the quantity required;
• wrap up the food in aluminium foil or
polythene and make sure that the
packages are airtight;
• do not allow fresh, unfrozen food to
touch food which is already frozen, thus
avoiding a rise in temperature of the latter;
• lean foods store better and longer than
fatty ones; salt reduces the storage life
of food;
• water ices, if consumed immediately after removal from the freezer compartment, can possibly cause the skin to be
freeze burnt;
• it is advisable to show the freezing in
date on each individual pack to enable
you to keep tab of the storage time.
4.2 Hints for storage of frozen
food
To obtain the best performance from this
appliance, you should:
• make sure that the commercially frozen
foodstuffs were adequately stored by
the retailer;
• be sure that frozen foodstuffs are transferred from the foodstore to the freezer
in the shortest possible time;
• not open the door frequently or leave it
open longer than absolutely necessary;
• once defrosted, food deteriorates rapidly and cannot be refrozen;
• do not exceed the storage period indicated by the food manufacturer.
5. CARE AND CLEANING
CAUTION!
Unplug the appliance before carrying out any maintenance operation.
This appliance contains hydrocarbons in its cooling unit; maintenance and recharging must there-
fore only be carried out by authorized technicians.
5.1 Periodic cleaning
The equipment has to be cleaned regularly:
Page 9
• clean the inside and accessories with
lukewarm water and some neutral
soap.
• regularly check the door seals and wipe
clean to ensure they are clean and free
from debris.
• rinse and dry thoroughly.
Do not pull, move or damage any
pipes and/or cables inside the
cabinet.
Never use detergents, abrasive
powders, highly perfumed cleaning products or wax polishes to
clean the interior as this will damage the surface and leave a
strong odour.
Clean the condenser (black grill) and the
compressor at the back of the appliance
with a brush. This operation will improve
the performance of the appliance and
save electricity consumption.
Take care of not to damage the
cooling system.
Many proprietary kitchen surface cleaners
contain chemicals that can attack/damage the plastics used in this appliance.
For this reason it is recommended that
the outer casing of this appliance is only
cleaned with warm water with a little
washing-up liquid added.
ENGLISH 9
After cleaning, reconnect the equipment
to the mains supply.
5.2 Defrosting of the freezer
The freezer compartment of this model,
on the other hand, is a "no frost" type.
This means that there is no buildup of
frost when it is in operation, neither on the
internal walls nor on the foods.
The absence of frost is due to the continuous circulation of cold air inside the
compartment, driven by an automatically
controlled fan.
5.3 Periods of non-operation
When the appliance is not in use for long
periods, take the following precautions:
disconnect the appliance from elec-
•
tricity supply
• remove all food
• defrost (if foreseen) and clean the appliance and all accessories
• leave the door/doors ajar to prevent unpleasant smells.
If the cabinet will be kept on, ask somebody to check it once in a while to prevent the food inside from spoiling in case
of a power failure.
6. WHAT TO DO IF…
WARNING!
Before troubleshooting, disconnect the mains plug from the
mains socket.
Only a qualified electrician or competent person must do the troubleshooting that is not in this manual.
Problem Possible cause Solution
The appliance does
not operate.
The mains plug is not con-
The appliance is switched
off.
nected to the mains socket correctly.
Switch on the appliance.
Connect the mains plug to
the mains socket correctly.
Page 10
www.electrolux.com
10
Problem Possible cause Solution
The appliance has no
The buzzer sounds.
The Alarm light
flashing.
The door is not closed
The compressor operates continually.
The door is not closed
The door has been
The product temperature
The room temperature is
The FastFreeze mode is
The temperature in
the freezer is too
low.
The FastFreeze mode is
The temperature in
the freezer is too
high.
Many products are stored
Products are too near to
Upper or lower
square is shown in
the temperature display.
power. There is no voltage
in the mains socket.
The temperature in the
freezer is too high.
correctly.
The temperature is not set
correctly.
correctly.
opened too frequently.
is too high.
too high.
switched on.
The temperature regulator
is not set correctly.
switched on.
The temperature regulator
is not set correctly.
at the same time.
each other.
An error has occurred in
measuring the temperature
Connect a different electrical appliance to the mains
socket.
Contact a qualified electrician.
Refer to "Excessive Temperature Alarm".
Refer to "Door open alarm".
Set a higher temperature.
Refer to "Closing the door".
Do not keep the door open
longer than necessary.
Let the product temperature decrease to room temperature before storage.
Decrease the room temperature.
Refer to "FastFreeze
mode".
Set a higher temperature.
Refer to "FastFreeze
mode".
Set a lower temperature.
Store less products at the
same time.
Store products so that
there is cold air circulation.
Call your service representative (the cooling system
will continue to keep food
products cold, but temperature adjustment will not be
possible).
Page 11
Problem Possible cause Solution
DEMO appears on
the Display.
6.1 Closing the door
1.
Clean the door gaskets.
2.
If necessary, adjust the door. Refer to
"Installation".
7. INSTALLATION
The appliance is in demonstration mode (DEMO).
3.
If necessary, replace the defective
door gaskets. Contact the Service
Center.
ENGLISH 11
Keep pressed approximately 10sec the Mode button
since a long sound of buzzer is heard and the Display
shut off for a short while:
appliance start works regularly.
7.1 Positioning
WARNING!
If you are discarding an old appliance that has a lock or catch on
the door, you must ensure that it
is made unusable to prevent
young children being trapped inside.
The appliance shall have the plug
accessible after installation.
Install this appliance at a location where
the ambient temperature corresponds to
the climate class indicated on the rating
plate of the appliance:
Climate
class
SN +10°C to + 32°C
N +16°C to + 32°C
ST +16°C to + 38°C
Ambient temperature
Cli-
Ambient temperature
mate
class
T +16°C to + 43°C
7.2 Electrical connection
Before plugging in, ensure that the voltage and frequency shown on the rating
plate correspond to your domestic power
supply.
The appliance must be earthed. The power supply cable plug is provided with a
contact for this purpose. If the domestic
power supply socket is not earthed, connect the appliance to a separate earth in
compliance with current regulations, consulting a qualified electrician.
The manufacturer declines all responsibility if the above safety precautions are not
observed.
This appliance complies with the E.E.C.
Directives.
Page 12
www.electrolux.com
12
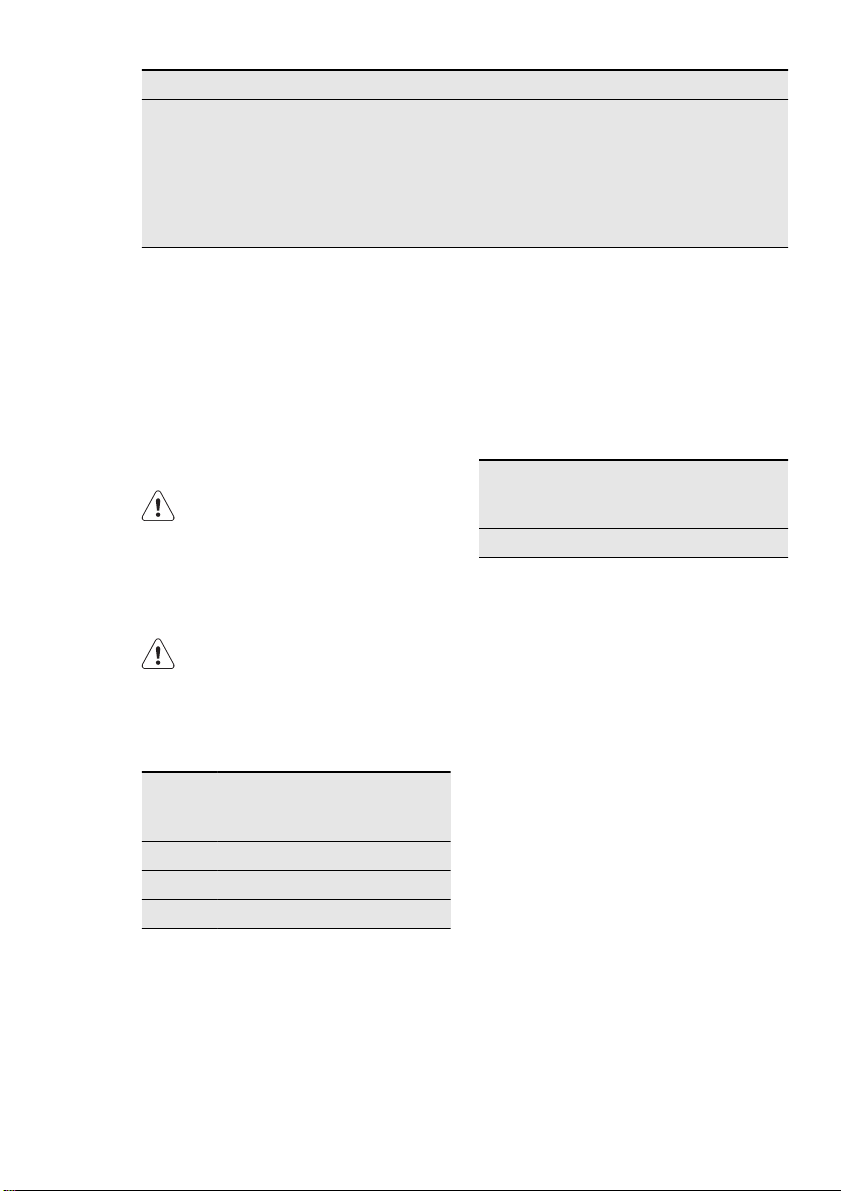
7.3 Door reversibility
The door of the appliance opens to the
right. If you want to open the door to the
left, follow these steps before you install
the appliance:
1.
Loosen and remove the upper pin.
2.
Remove the door.
3.
Remove the spacer.
4.
With a key, loosen the lower pin.
On the opposite side:
1.
Tighten the lower pin.
2.
Install the spacer.
3.
Install the door.
4.
Tighten the upper pin.
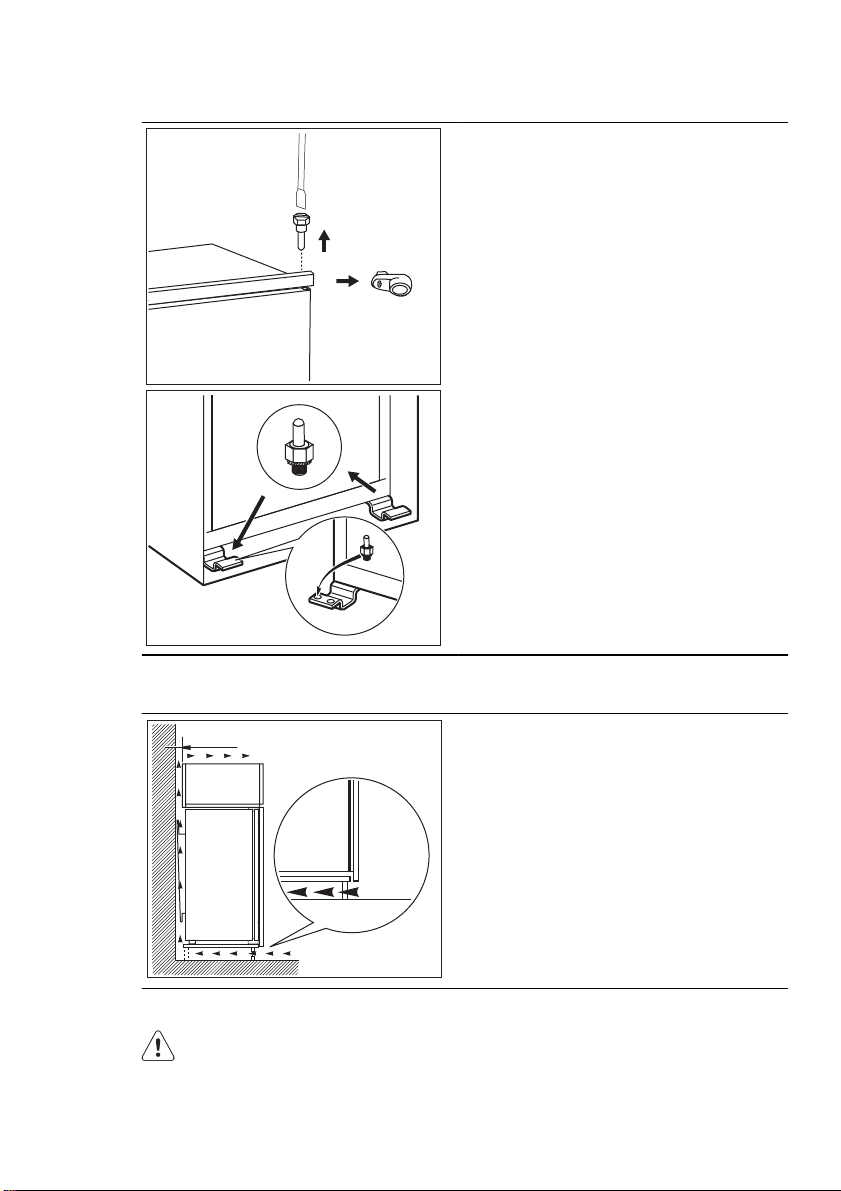
7.4 Ventilation requirements
5 cm
min.
200 cm
2
min.
200 cm
7.5 Installing the appliance
CAUTION!
Make sure that the mains cable
can move freely.
The airflow behind the appliance must be
sufficient.
2
Do the following steps:
Page 13
ENGLISH 13
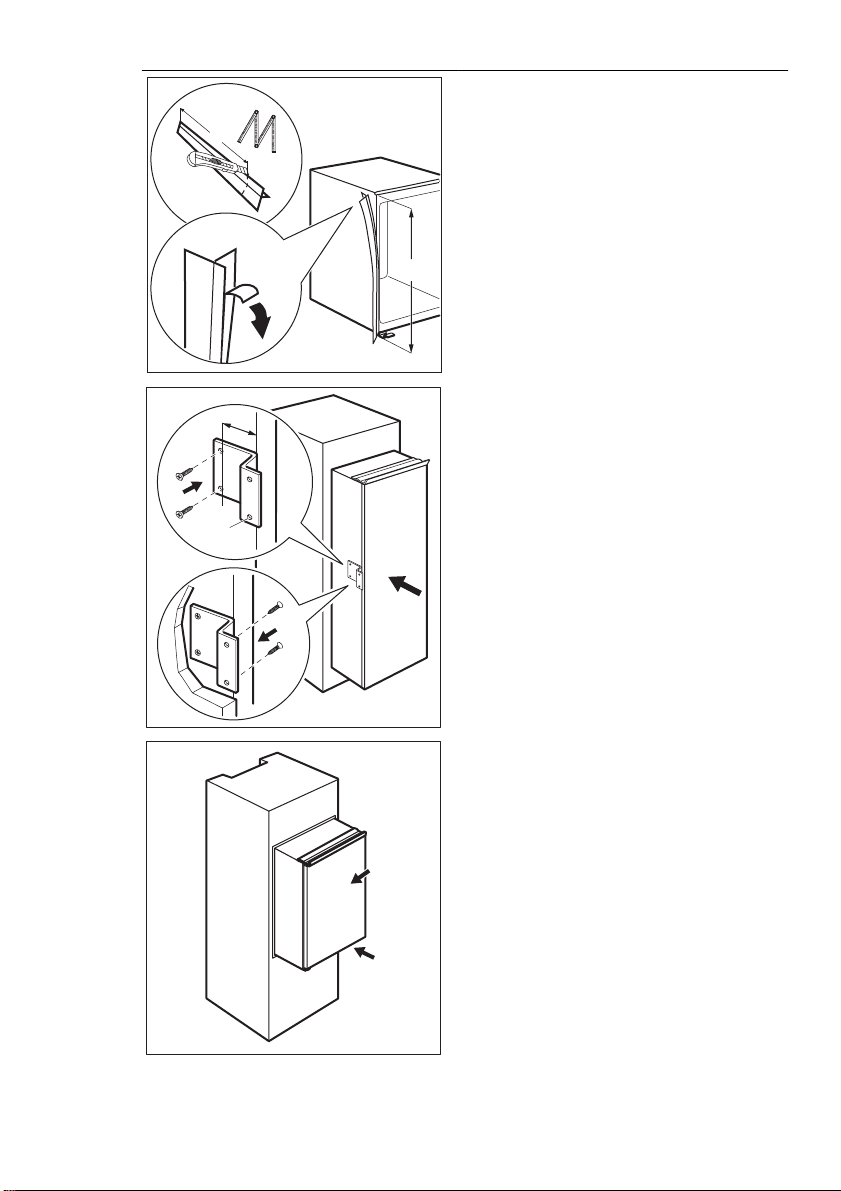
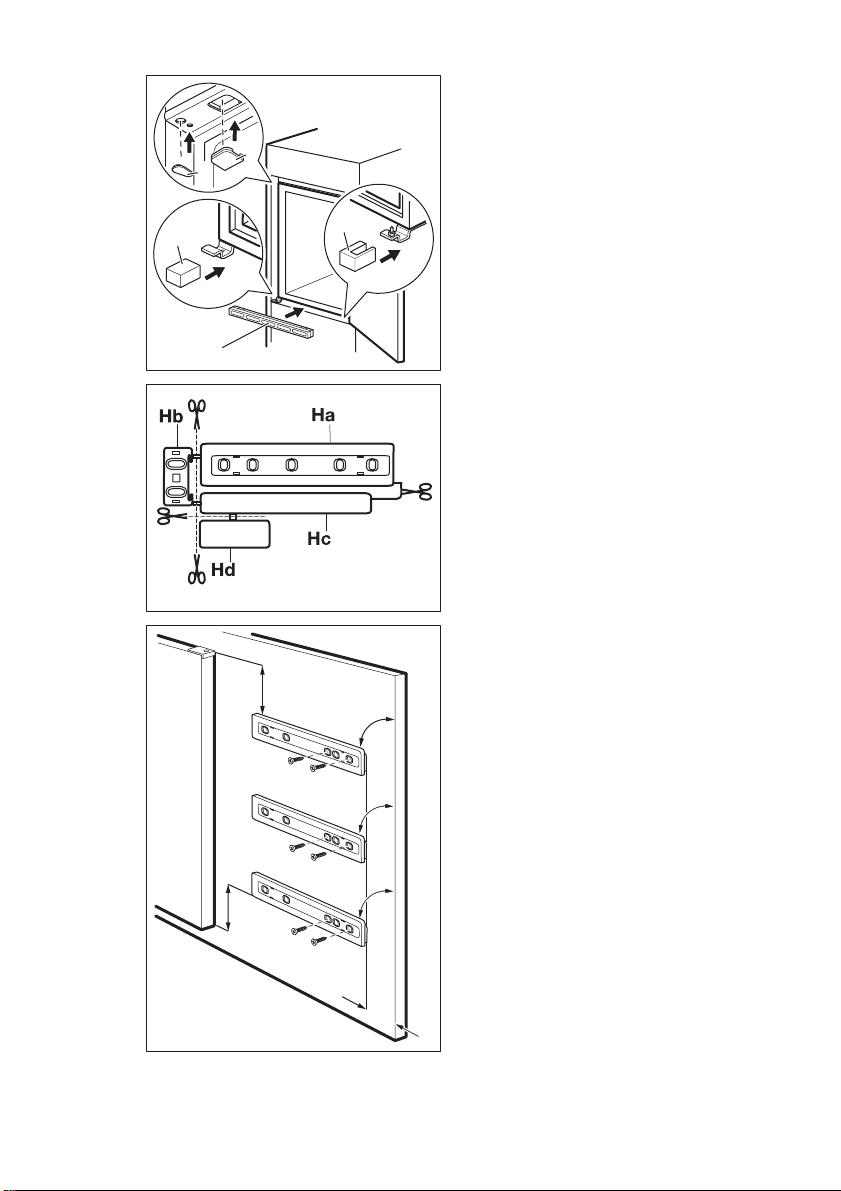
If necessary cut the adhesive sealing strip
and then apply it to the appliance as
x
shown in figure.
x
1
13 mm
Ø 2.5 mm
Drill the appliance using a Ø 2.5 mm drill
(10 mm max. penetration).
Fix the square fitting to the appliance.
2
3
Install the appliance in the niche.
Push the appliance in the direction of the
arrow (1) until the upper gap cover stops
against the kitchen furniture.
Push the appliance in the direction of the
arrow (2) against the cupboard on the op-
2
posite side of the hinge.
1
Page 14
www.electrolux.com
14
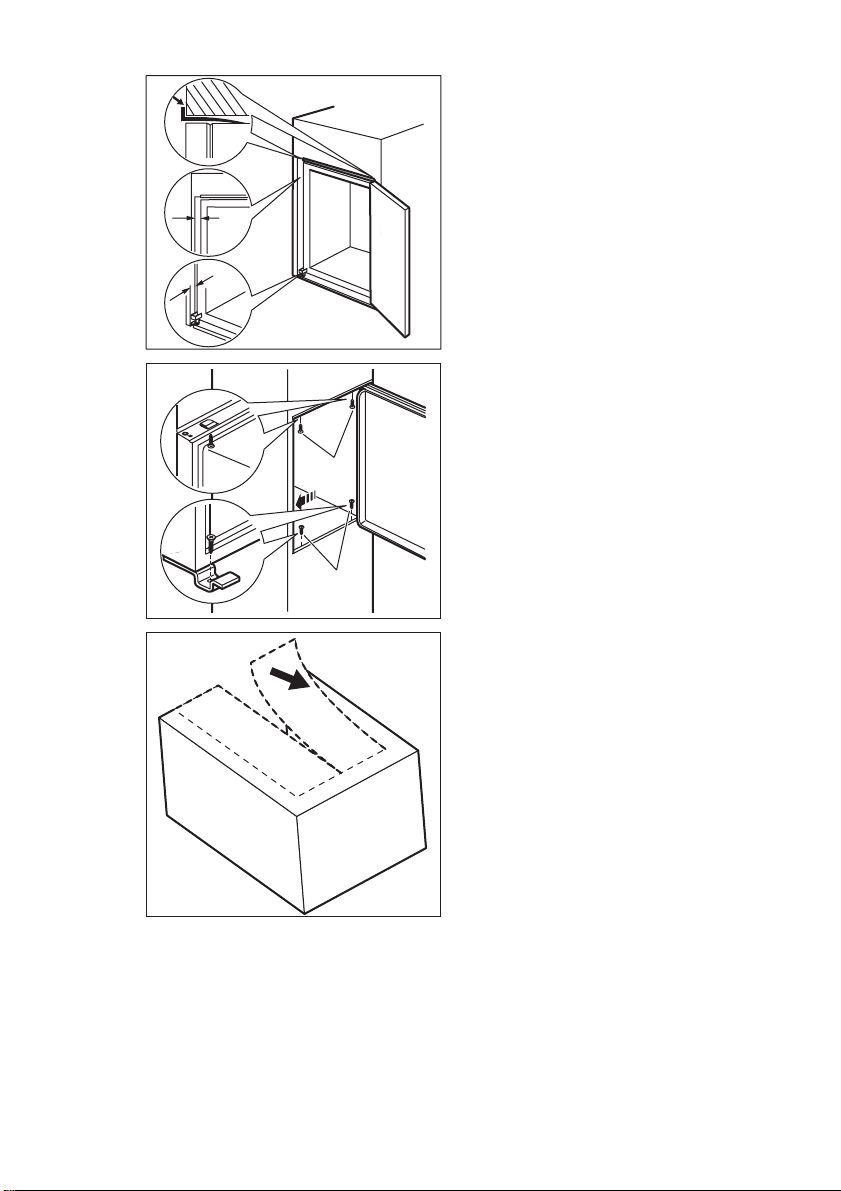
4mm
44mm
Adjust the appliance in the niche.
Make sure that the distance between the
appliance and the cupboard front-edge is
44 mm.
The lower hinge cover (in the accessories
bag) makes sure that the distance between the appliance and the kitchen furniture is correct.
Make sure that the clearance between the
appliance and the cupboard is 4 mm.
Open the door. Put the lower hinge cover
in position.
Attach the appliance to the niche with 4
screws.
I
I
Remove the correct part from the hinge
cover (E). Make sure to remove the part
DX, in the case of right hinge, SX in opposite case.
Page 15
ENGLISH 15
Attach the covers (C, D) to the lugs and
the hinge holes.
Install the vent grille (B).
C
Attach the hinge covers (E) to the hinge.
D
E
E
B
Disconnect the parts (Ha), (Hb), (Hc) and
(Hd).
Install the part (Ha) on the inner side of the
kitchen furniture.
~50 mm
o
90
o
90
~50 mm
21 mm
o
90
Page 16
www.electrolux.com
16
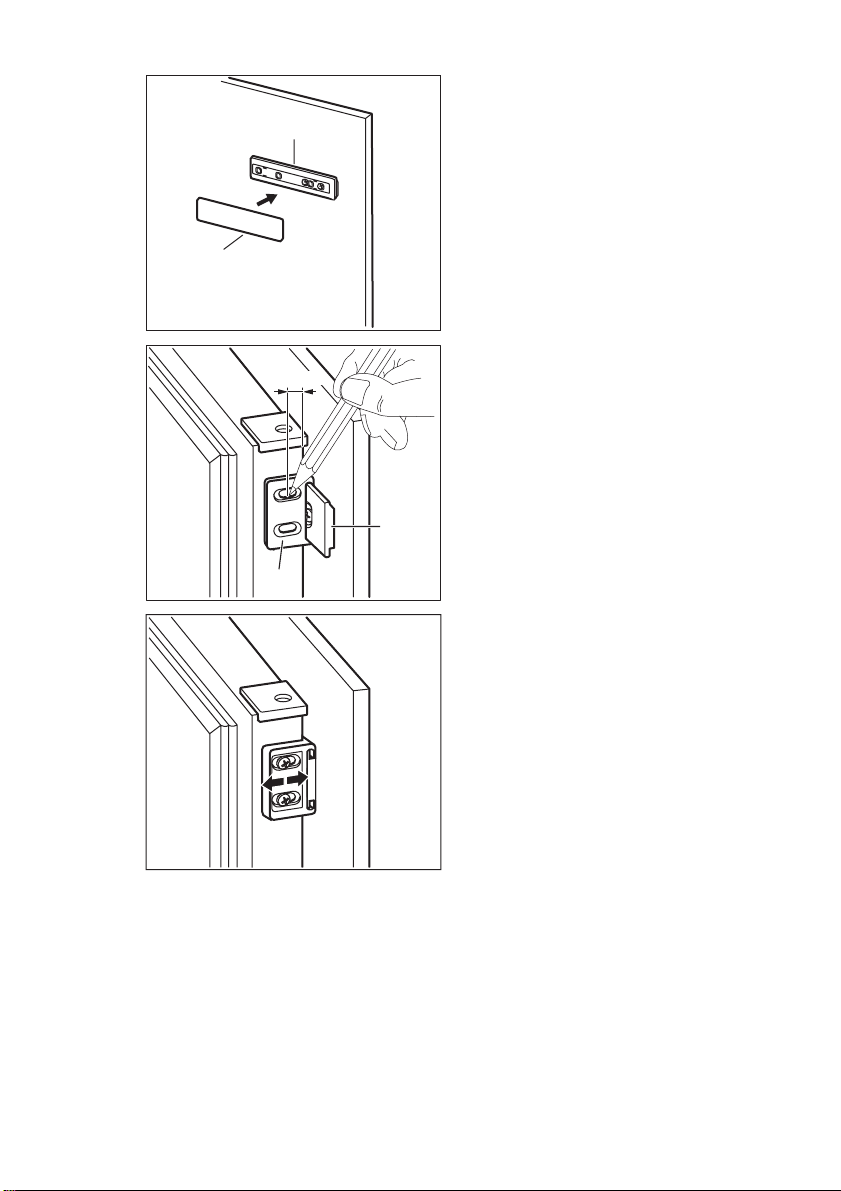
Hc
Ha
8 mm
Hb
Ha
Push the part (Hc) on the part (Ha).
Open the appliance door and the kitchen
furniture door at an angle of 90°.
Insert the small square (Hb) into guide (Ha).
Put together the appliance door and the
furniture door and mark the holes.
Remove the small squares and drill holes
with ø 2 mm at 8 mm from the outer edge
of the door.
Place the small square on the guide again
and fix it with the screws supplied.
Hb
Align the kitchen furniture door and the appliance door by adjusting the part (Hb).
Page 17
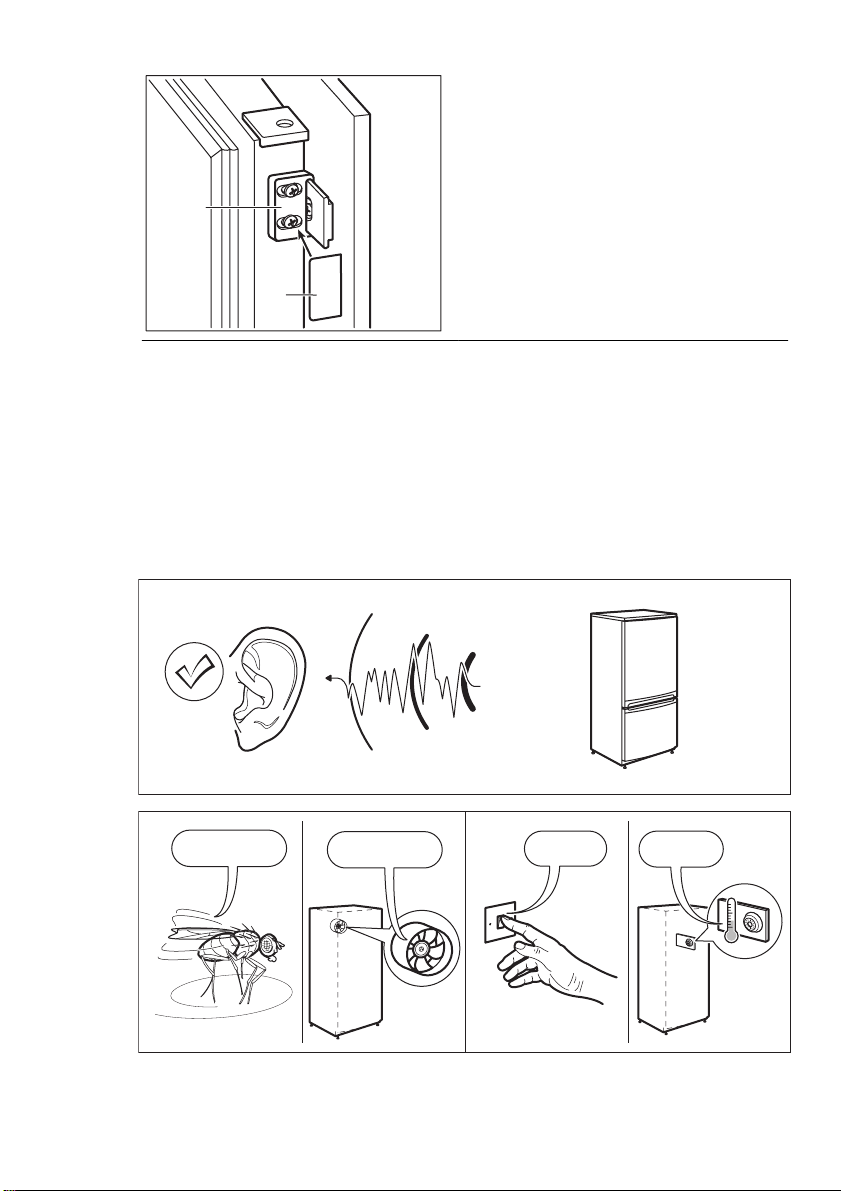
Hb
ENGLISH 17
Press the part (Hd) on the part (Hb).
Hd
Do a final check to make sure that:
• All screws are tightened.
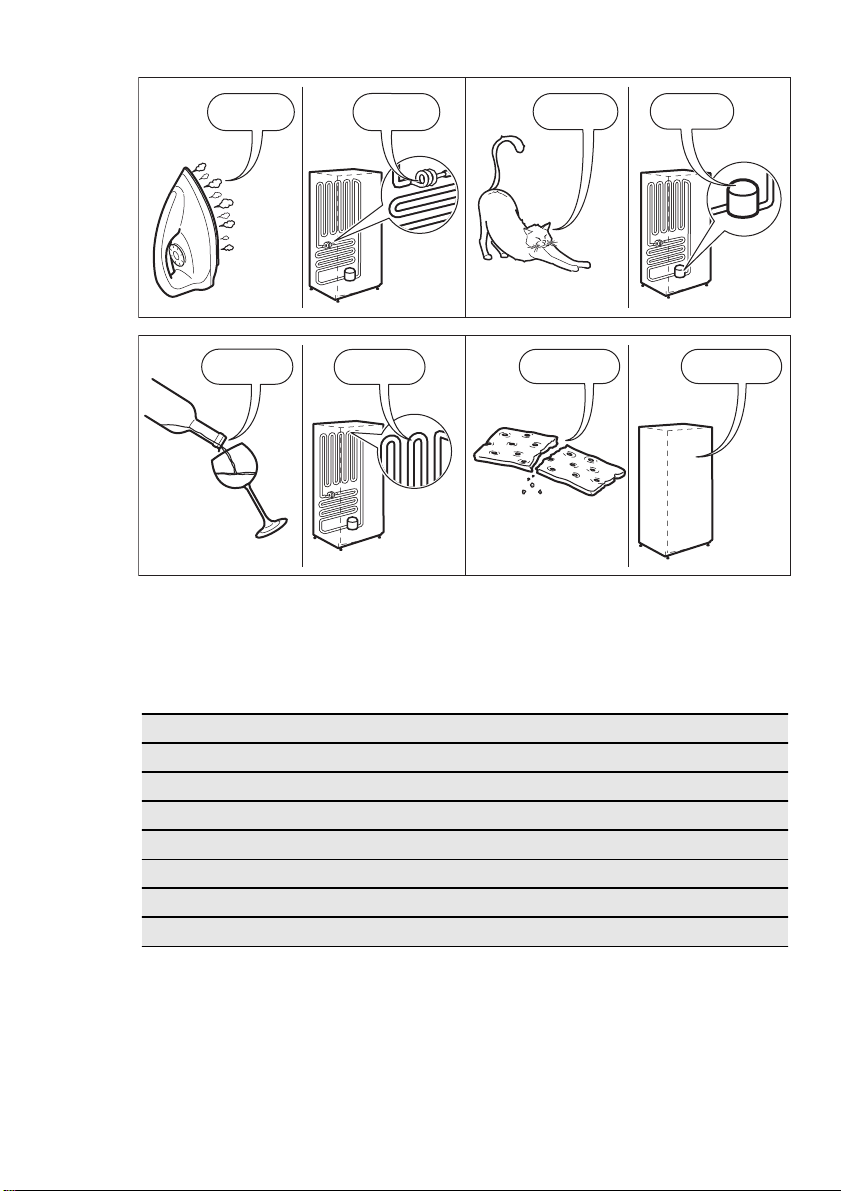
8. NOISES
There are some sounds during normal
running (compressor, refrigerant circulation).
OK
SSSRRR!
SSSRRR!
• The sealing strip is attached tightly to
the cabinet.
• The door opens and closes correctly.
SSSRR
R!
HISSS!
CLICK!
BRRR!
CRACK!
BLUBB!
CLICK!
CLICK!
Page 18
www.electrolux.com
18
HISSS!
BLUBB!
9. TECHNICAL DATA
HISSS!
BLUBB!
BRRR!
BRRR!
CRACK!CRACK!
Dimension of the recess
Height 1780 mm
Width 560 mm
Depth 550 mm
Rising Time 21 h
Voltage 230-240 V
Frequency 50 Hz
The technical information are situated in
the rating plate on the internal left side of
the appliance and in the energy label.
Page 19

10. ENVIRONMENT CONCERNS
ENGLISH 19
Recycle the materials with the symbol
. Put the packaging in applicable
containers to recycle it.
Help protect the environment and human
health and to recycle waste of electrical
and electronic appliances. Do not dispose
appliances marked with the symbol
with the household waste. Return the
product to your local recycling facility or
contact your municipal office.
Page 20

www.electrolux.com
20
МАЗМҰНЫ
1. ҚАУІПСІЗДІК НҰСҚАУЛАРЫ . . . . . . . . . . . . . . . . . . . . . . . . . . . . . . . . . . . . . . . . . . . . . . . . . . . . . . . . . . . 21
2. БАСҚАРУ ПАНЕЛІ . . . . . . . . . . . . . . . . . . . . . . . . . . . . . . . . . . . . . . . . . . . . . . . . . . . . . . . . . . . . . . . . . . . . 23
3. ӘРКҮНДІК ҚОЛДАНУ . . . . . . . . . . . . . . . . . . . . . . . . . . . . . . . . . . . . . . . . . . . . . . . . . . . . . . . . . . . . . . . . . 25
4. АҚЫЛ-КЕҢЕС . . . . . . . . . . . . . . . . . . . . . . . . . . . . . . . . . . . . . . . . . . . . . . . . . . . . . . . . . . . . . . . . . . . . . . . 26
5. КҮТУ МЕНЕН ТАЗАЛАУ . . . . . . . . . . . . . . . . . . . . . . . . . . . . . . . . . . . . . . . . . . . . . . . . . . . . . . . . . . . . . . . 27
6. НЕ ІСТЕРСІҢІЗ, ЕГЕР... . . . . . . . . . . . . . . . . . . . . . . . . . . . . . . . . . . . . . . . . . . . . . . . . . . . . . . . . . . . . . . . 28
7. ОРНАТУ . . . . . . . . . . . . . . . . . . . . . . . . . . . . . . . . . . . . . . . . . . . . . . . . . . . . . . . . . . . . . . . . . . . . . . . . . . . . 29
8. ШУЫЛ ТҮРЛЕРІ . . . . . . . . . . . . . . . . . . . . . . . . . . . . . . . . . . . . . . . . . . . . . . . . . . . . . . . . . . . . . . . . . . . . . 35
9. ТЕХНИКАЛЫҚ СИППАТАМА . . . . . . . . . . . . . . . . . . . . . . . . . . . . . . . . . . . . . . . . . . . . . . . . . . . . . . . . . . . 36
СІЗ ОЙЫМЫЗДА БОЛДЫҢЫЗ
Electrolux құрылғысын сатып алғаныңызға рахмет. Сіз ондаған жылдар бойғы кәсіби тәжірибе мен
инновацияға сүйеніп жасалған құрылғыны таңдадыңыз. Тапқырлықтың туындысы болған, көз тартарлық
бұл құрылғыны жасау барысында сіз ойымызда болдыңыз. Сондықтан, қолданған сайын тамаша нәтижеге
қол жеткізе алатыныңызға сенімді болыңыз.
Electrolux әлеміне қош келдіңіз.
Біздің веб-сайтқа барып келесіні қараңыз:
Қолдануға қатысты кеңестер, кітапшалар, ақаулықты түзету, қызмет көрсету туралы ақпарат:
www.electrolux.com
Сізге барынша жақсы қызмет көрсету үшін өніміңізді мына жерге тіркеңіз:
www.electrolux.com/productregistration
Құрылғыңызға қажетті керек-жарақтарды, шығынды материалдарды және фирмалық қосалқы
бөлшектерді сатып алу үшін:
www.electrolux.com/shop
ТҰТЫНУШЫҒА КӨМЕК, ҚЫЗМЕТ КӨРСЕТУ
Фирмалық заттарды қолдануды ұсынамыз.
Қызмет көрсету орталығына хабарласқанда келесі деректердің дайын болуын қамтамасыз етіңіз.
Деректерді техникалық ақпарат тақтайшасынан табуға болады. Үлгісі, Өнім нөмірі, Сериялық нөмірі
Ескерту / Абайлаңыз - Қауіпсіздік туралы маңызды мағлұмат.
Жалпы мағлұматтар менен кеңестер
Қорғаған ортаға зиян келдірмей пайдалану туралы нұсқаулар
Өндіруші ескертусіз өзгеріс енгізу құқығына ие.
Page 21

ҚАЗАҚ 21
1.
ҚАУІПСІЗДІК НҰСҚАУЛАРЫ
Құрылғыны орнатып, ең алғаш пайдаланбас
бұрын, өз қауіпсіздігіңіз бен құрылғыны дұрыс
қолдану мақсатында, пайдаланушыға
арналған бұл нұсқаулықты, оның ішінде
кеңестері мен ескертулеріне назар салып
оқып шығыңыз. Осы құрылғыны
пайдаланатын адамдардың барлығы, қажетсіз
ақаулықтар мен тұрмыстық апаттардың алдын
алу үшін,оны пайдалану тәсілдерімен және
қауіпсіздікті қамтамасыз ететін
функцияларымен жете таныс болуы керек.
Осы қолдану туралы нұсқаулықты сақтап
қойыңыз және тоңазытқышты басқа
адамдарға бергеніңізде немесе
сатқаныңызда, оны пайдаланатын әрбір
адамның бұйымның қолданыс мерзімі
аяқталғанға дейін оған қатысты пайдалану
және қауіпсіздік шараларынан хабардар
болуы үшін нұсқаулықты да қоса беруді
ұмытпаңыз.
Адам өмірі мен құрылғының қауіпсіздігін
қамтамасыз ету үшін осы пайдаланушы
нұсқаулығындағы ескертулерді орындаңыз,
себебі қадағалаудың жеткіліксіздігінен туған
ақаулық үшін өндіруші жауапкершілік
көтермейді.
1.1 Балалар мен әлсіз адамдардың
қауіпсіздігі
• Бұл құрылғыны физиологиялық, сезімдік не
болмаса ақыл-ой деңгейіне байланысты не
пеш жұмысына қатысты тәжрибиесі мен
білімінің аздығына байланысты пайдалана
алмайтын адамдар (балаларды қоса
алғанда), пешті пайдалану туралы ерекше
нұсқауларды алмайынша не олардың
қауіпсіздігіне ие адамның қадағалауынсыз
пайдаланбауға тиіс.
Балалар құрылғымен ойнамас үшін оларды
қадағалап отыру қажет.
• Машинаның орауыштары мен қорабын
балалардың қолы жетпейтін жерде
сақтаңыз. Тұншығып кету қаупі бар.
• Егер құрылғыны тастасаңыз, оның ашасын
розеткадан суырыңыз да, қорек сымын
қиып(құрылғыға барынша тақата)балалар
ішіне кіріп қамалып не электр тогының
қатерлі әсеріне ұшырамас үшін есігін
ағытып алып тастаңыз.
• Егер есігі магнитті тығыздағышпен
жабдықталған бұл құрылғыны, есігінде не
қақпағында серіппелі құлыбы бар ескі
құрылғының орнына қоймақ болсаңыз, ескі
құрылғыны ең алдымен оның серіппелі
құлыбын жарамсыз етіп барып тастаңыз.
Бұл құрылғыны бала ішіне қамалып
қалатын қауіп көзіне айналудан сақтайды.
1.2 Жалпы қауіпсіздік туралы
мағлұматтар
Назарыңызда болсын!
Құрылғының корпусындағы немесе
кіріктірілген элементіндегі желдеткіш
саңылауларды бітемей, ашық ұстаңыз.
• Бұл құрылғы тағамдар мен/немесе
сусындарды үйде және сол сияқты басқа
жерлерде сақтауға арналған, мысалы:
– дүкендердің, кеңселердің және басқа
жұмыс орындарының қызметкерлерге
арналған ас бөлмелерінде;
– фермадағы үйлерде және қонақ
үйлерде, мотельдер мен басқа да
тұрғынды жерлерде;
– төсек және таңғы аспен қамтамасыз
ететін жерлерде;
– қоғамдық тағам және сол сияқты бөлшек
сауда жасамайтын орындарда.
• Жібіту үдерісін жылдамдату мақсатында
ешқандай механикалық немесе кез келген
басқа жасанды құралды пайдаланушы
болмаңыз.
• Өндіруші рұқсат бермеген болса,
тоңазытқыш құрылғылардың ішіне басқа
электр құрылғыларды (балмұздақ жасайтын
құрылғы сияқты) салып қолданушы
болмаңыз.
• Салқындатқыш зат ағатын жүйеге зақым
келтірмеңіз.
• Құрылғының салқындатқыш зат ағатын
жүйесінде изобутан (R600a) және қоршаған
ортамен сыйысымдылығы жоғары, бірақ
сонда да жанғыш зат болып табылатын,
табиғи газ болады.
Құрылғының тасымалдау және орнату
кезінде салқындатқыш зат жүйесіне зақым
келтірілмейтініне көз жеткізіңіз.
Салқындатқыш зат жүйесі зақымдалса:
– жалын от пен тұтату көздері болмауы
тиіс
Page 22
www.electrolux.com
22
• Осы өнімді немесе оның сипаттарын
• Бұл құрылғы ауыр. Оны жылжытқан кезде
• Қолыңыз сулы болса, мұздатқыш бөліктен
• Құрылғыны ұзақ уақытқа тікелей күн
• Осы құрылғыда тек тұрмыстық
1.3 Күнделікті пайдалану
• Ыстық ыдысты құрылғы ішіндегі пластик
• Құрылғы ішіне тұтанғыш газ бен сұйықты
• Тағамдарды артқы қабырғадағы ауа
– құрылғы орналасқан бөлмені жақсылап
желдетіңіз
өзгерту қауіпті. Кабельге зақым келсе қысқа
тұйықталу, өрт шығу және/немесе тоқ соғу
қаупі төнеді.
Назарыңызда болсын!
Кез келген электрлік бөлшектерін
(қуат сымы, аша, компрессор),
қатерлі жағдай орын алмас үшін,
куәлігі бар қызмет көрсетуші маманы
немесе білікті техник маман
ауыстыруға тиіс.
1.
Қуат кабелін ұзартуға болмайды.
2.
Қуат кабелі құрылғының артқы
жағында мыжылып немесе
зақымдалып қалмағанына көз
жеткізіңіз. Мыжылған немесе
зақымдалған қуат кабелі тым қызып
кетіп, өрт шығуына әкелуі мүмкін.
3.
Құрылғының айыры қол жетерлік
жерде орналасқанына көз жеткізіңіз.
4.
Айырды қуат кабелін ұстап тартпаңыз.
5.
Розетка босап кеткен болса, айырды
оған қоспаңыз. Тоқ соғу немесе өрт
шығу қаупі бар.
6.
Құрылғыны ішкі жарықтама шамының
қақпағы (егер бар болса) жабылмаса
іске қосуға болмайды.
абай болу керек.
заттарды алмаңыз және оларға тимеңіз,
себебі қолыңыздың терісі сыдырылып кетуі
немесе қарылып қалуы мүмкін.
сәулелерінің астына қоймаңыз.
құрылғыларда пайдалануға арналған
арнайы шамдар (егер бар болса) ғана
қолданылған. Олар үйді жарықтандыру
үшін қолдануға жарамайды.
жерлерге қоймаңыз.
қоймаңыз, себебі олар жарылып кетуі
мүмкін.
шығатын саңылауға қарама-қарсы қоюға
болмайды. (Егер құрылғыға мұз қатпайтын
болса)
• Мұздатылған тағамды жібітіп алған соң оны
қайта мұздатуға болмайды.
• Алдын ала оралған тағамды мұздатылған
тағам өндірушінің нұқсауларына сай
сақтаңыз.
• Құрылғы өндірушінің тағам сақтауға
қатысты ұсыныстарын қатаң орындау
керек. Тиісті нұсқауларға қараңыз.
• Көмірқышқылдандырылған не көпіршитін
сусындарды тоңазытқыш камераға
қоймаңыз, себебі ыдысқа түскен қысым
оның жарып, нәтижесінде құрылғыға нұқсан
келуі мүмкін.
• Мұздақтарды тоңазытқыштан алған бетте
пайдаланғанда аяз қарып жіберуі мүмкін.
1.4 Күтім көрсету және тазалау
• Құрылғыны тазалар алдында электр
желісінен ағытып, ашасын розеткадан
суырыңыз.
• Құрылғыны металл заттармен
тазаламаңыз.
• Құрылғы қырауын тазалау үшін өткір
заттарды пайдаланбаңыз. Пластик
қырғышты пайдаланыңыз.
1.5 Орнату
Электр желісіне қосарда, арнайы
бөлімдерде берілген нұсқауларды
мұқият орындаңыз.
• Құрылғы орамын ашып, оның еш жерінің
бүлінбегенін тексеріп алыңыз. Құрылғының
бір жері бүлініп қалса қоспаңыз. Қандай да
бір бүлінушілік орын алғанда, құрылғыны
сатып алған жерге дереу хабарлаңыз.
Бұндай жағдайда қорабын сақтап қойыңыз.
• Құрылғыны қоспас бұрын оның майы
компрессорға ағып құйылу үшін кем
дегенде екі сағат күтіңіз.
• Құрылғы айналасында ауа жеткілікті түрде
айналуға тиіс, ауа айналымы жеткіліксіз
болса құрылғы қызып кетеді. Желдету
жеткілікті болу үшін орнатуға қатысты
нұсқауларды орындаңыз.
• Мүмкін болса, құрылғының жылы тұратын
бөлшектерін (компрессор, конденсатор)
ұстап қалып не оларға қол тигізіп алып
күйіп қалмас үшін тоңазытқыштың арт
жағын әрқашан қабырғаға қаратып
қойыңыз.
Page 23
• Құрылғыны радиатор не пештердің қасына
жақын орналастыруға болмайды.
• Құрылғыны орнатқан соң оның ашасының
қол оңай жететін жерде болуын
қамтамасыз етіңіз.
• Тек ауыз суы жүйесіне ғана қосыңыз (егер
суға қосу қажет болса).
1.6 Қызмет
• Құрылғыны жөндеу үшін қажет электр
жұмыстарын электр маманы не білікті адам
жүзеге асыруға тиіс.
• Бұл өнімге қызмет көрсетуді тек уәкілетті
қызмет көрсету орындары жүзеге асыру
керек және құрылғының нағыз өз
бөлшектері ғана пайдаланылуға тиіс.
1.7 Қоршаған ортаны қорғау
Бұл құрылғының салқындатқыш
сұйығының құрамында да, изоляция
2. БАСҚАРУ ПАНЕЛІ
материалдарында да озон қабатына
зиян келтіретін газдар жоқ. Бұл
құрылғыны тұрмыстық қалдық пен
қоқыстар тасталатын жерге тастауға
болмайды. Оның изоляция
қабаттамасында тұтанғыш газдар
бар: құрылғыны жергілікті құзырлы
мекемелерден алынатын жарамды
ережелерге сай тастау қажет.
Салқындатқыш құралға, әсіресе оның
қызу алмастырғышқа жақын артқы
бөлігіне зиян келтірмеңіз. Құрылғыда
пайдаланылған
белгіленген материалдар қайта
өңдеуден өткізуге жарайды.
1 2 3 4 5 6
ҚАЗАҚ 23
белгішесімен
ON/OFF түймешігі
1
Mode түймешігі
2
Бейнебет
3
Суығырақ температураға қою тетігі
4
Жылырақ температураға қою тетігі
5
2.1 Бейнебет
Drink Chill түймешігі
6
Түймешіктердің алдын ала қойылған
сигналдарын Mode және Суығырақ
температураға қою тетігін бірнеше секунд
бірге басып қатайтуға болады. Осыны қайта
өзгертуге болады.
ABCD
E
Page 24

www.electrolux.com
24
A)
B)
C)
D)
E)
2.2 Іске қосу
Құрылғыны қосу үшін, мына әрекеттерді
орындаңыз:
1.
2.
3.
4.
5.
Орнатылған басқа температураны таңдау
үшін "Температураны реттеу" тарауын
қараңыз.
2.3 Өшіру
Құрылғыны сөндіру үшін мына әрекеттерді
орындаңыз:
1.
2.
3.
2.4 Температураны реттеу
Мұздатқыштың орнатылған температурасын
температура түймешігін басып реттеуге
болады.
Орнатылған әдепкі температура:
•мұздатқыш үшін -18°C
Температура индикаторы орнатылған
температураны көрсетеді.
Ескерту индикаторы
EcoMode
FastFreeze режимі
DrinksChill және Температура индикаторы
DrinksChil режимі
Mode режимін таңдағаннан кейін
немесе Температура түймешігін
басқаннан кейін
бастайды.
Температураны таңдағаннан кейін
жанданған белгі бірнеше минут
жыпылықтайды.
Ашаны розеткаға сұғыңыз.
Бейнебет сөніп қалса, ON/OFF түймешігін
басыңыз.
Бірнеше секундтан кейін ескерту құралы
сигнал береді.
Ескерту құралын бастапқы қалпына
қайтару үшін, "Жоғары температураны
ескерту" тарауын қараңыз.
Егер бейнебетте DEMO көрсетілсе,
құрылғы демо-режимде тұрады. "Келесі
жағдайда не істеу керек..." тарауын
қараңыз.
Температура индикаторы бастапқы
орнатылған температураны көрсетеді.
ON/OFF түймешігін 3 секунд басыңыз.
Бейнебет сөнеді.
Құрылғыны электр желісінен ағыту үшін
ашаны розеткадан суырыңыз.
жандана
Таңдалған температура 24 сағат ішінде
орнайды.
Электр қуаты үзіліп қалса,
орнатылған температура сақтаулы
қалады.
2.5 EcoMode
Тағамды барынша оңтайлы сақтау үшін
EcoMode режимін таңдаңыз.
Функцияны іске қосу үшін:
1.
Mode түймешігін тиісті белгі көрінгенше
басыңыз.
Температура индикаторы орнатылған
температураны көрсетеді:
– мұздатқыш үшін: -18°C
Функцияны ажырату үшін:
1.
Басқа функцияны таңдау немесе
ешнәрсе таңдамау үшін Mode түймешігін
басыңыз.
Функция басқа орнатылған
температураны таңдаған кезде
ажыратылады.
2.6 FastFreeze режимі
Функцияны іске қосу үшін:
1.
Mode түймешігін тиісті белгі көрінгенше
басыңыз.
Бұл функция 52 сағаттан кейін өздігінен
тоқтайды.
Функцияны автоматты түрде сөніп қалмай
тұрып өшіру үшін:
1.
Басқа функцияны таңдау немесе
ешнәрсе таңдамау үшін Mode түймешігін
басыңыз.
Функция мұздатқыштың басқа
орнатылған температурасын таңдау
арқылы ажыратылады.
2.7 DrinksChill режимі
DrinksChill функциясы дыбысты сигналды
қажетті кезде орнату үшін қолданылады,
мысалы, рецепт бойынша пісіргенде қоспаны
белгілі бір уақыт ішінде суытып алу қажет
болса, немесе мұздатқышқа жылдам суыту
үшін қойылған шөлмектерді ұмытып кетпеу
үшін ескерту сигналы қажет болған кезде
қолданылады.
Функцияны іске қосу үшін:
1.
DrinkChill түймешігін басыңыз.
DrinksChill индикаторы көрсетіледі.
Page 25

Таймер орнатылған мәнді көрсетеді (30
минут).
2.
Таймердің орнатылған мәнін 1 мен 90
минут аралығында өзгерту үшін
"Суығырақ температура" түймешігі және
"Жылырақ температура" түймешігін
басыңыз.
3.
Таймер жыпылықтай бастайды (min).
Кері санақ аяқталған кезде DrinksChill
индикаторы жыпылықтайды да, дыбысты
сигнал естіледі:
1.
Мұздатқыш камерадағы сусындарды
алыңыз.
2.
Дыбыстық сигналды сөндіру және
функцияны біржола тоқтату үшін
DrinkChill түймешігін басыңыз.
Функцияны кері санақ орындалып тұрған
кезде, кез келген уақытта ажыратуға болады.
1.
DrinkChillтүймешігін басыңыз.
2.
DrinksChill индикаторы сөнеді.
"Суығырақ температура" түймешігі мен
"Жылырақ температура" түймешігін басып,
уақытты кері санақ орындалып тұрған кезде
және аяқталған кезде өзгертуге болады.
2.8 Жоғары температураны ескерту
сигналы
Мұздатқыш камераның ішіндегі
температураның жоғарылағаны (мысалы,
ҚАЗАҚ 25
электр қуаты өшкен кезде) төмендегідей
көрсетіледі:
• ескерту сигналы мен мұздатқыш
температурасының индикаторлары
жыпылықтайды
• дыбыстық сигнал естіледі.
Ескерту сигналын қалпына келтіру үшін:
1.
Кез келген түймешікті басыңыз.
2.
Дыбыстық сигнал ажыратылады.
3.
Мұздатқыш температурасының
индикаторы ең жоғары температураны
бірнеше секунд көрсетеді. Содан кейін
қайта орнатылған температураны
көрсетеді.
4.
Ескерту индикаторы қалыпты жағдайлар
қалпына келгенше көрсетіліп тұрады.
Ескерту сигналы тоқтаған кезде, ескерту
индикаторы сөнеді.
2.9 “Есік ашық” ескерту сигналы
Есік бірнеше минут ашық қалса, дыбыстық
сигнал естіледі. Есіктің ашық тұрғандығы
төмендегі белгі арқылы көрсетіледі:
• Ескерту индикаторы жыпылықтайды
•дыбыстық сигнал
Қалыпты жұмыс режимі орнағаннан кейін (есік
жабылғанда), дыбыстық сигнал тоқтайды.
Ескерту сатысында кез келген түймешікті
басып ескерту сигналын ажыратуға болады.
3. ӘРКҮНДІК ҚОЛДАНУ
3.1 Пештің ішін тазалау
Құрылғыны ең алғаш пайдаланбас бұрын, іші
мен барлық ішкі керек-жарақтарын, аздап
бейтарап сабын қосылған жылы сумен жуып,
ондағы әдетте жаңа затқа тән келетін иісті
кетіріңіз, содан кейін мұқият құрғатыңыз.
Жуғыш заттарды немесе жеміргіш
ұнтақтарды қолданбаңыз, себебі
бұндай заттар құрылғының
қаптамасын бүлдіреді.
Егер бейнебетте DEMO көрсетілсе, құрылғы
демо-режимде тұрады: "КЕЛЕСІ ЖАҒДАЙДА
НЕ ІСТЕУ КЕРЕК..." тарауын қараңыз.
3.2 Жаңа тағамды мұздату
Мұздатқыш камера жаңа тағамды мұздату
мен тоңазыған және мұздатылған тағамдарды
ұзақ уақыт сақтауға жарайды.
Жаңа тағамды мұздату үшін Fast Freeze
функциясын, мұздатылатын тағамды
мұздатқыш камераға қоярдың алдында, кем
дегенде 24 сағат бұрын қосыңыз.
Мұздатылуға тиіс жаңа тағамды үстіңгі екі
камераға қойыңыз.
24 сағат ішінде мұздатуға болатын тағамның
ең көп мөлшері құрылғының ішіндегі
техникалық ақпарат тақтайшасында
көрсетілген.
Мұздату үрдісі 24 сағатқа созылады: осы
уақыт аралығында тоңазытқыңыз келген
басқа тағамды қосып салмаңыз.
Page 26

www.electrolux.com
26
24 сағаттан кейін мұздату үрдісі аяқталғаннан
кейін қажетті температураға ("Температураны
реттеу" тармағын қараңыз) қайта оралыңыз.
3.3 Мұздатылған тағамды
сақтайтын камера
Құрылғыны ең алғаш қолданғанда не ұзақ
уақыт пайдаланбағаннан кейін қосқан кезде,
камераға тамақ салмас бұрын құрылғыны ең
кем дегенде 2 сағат ең жоғарғы
параметрлерге қойып жұмыс істетіп алыңыз.
3.4 Жібіту
Мұздатылған не тоңазытылған тағамды
қажетке жаратпас бұрын, осы жұмысқа
Кездейсоқ еріп кету, мысалы электр
қуаты өшіп, ток техникалық
сипаттамалар кестесіндедегі "көтеру
уақыты" бөлімінде берілген
мәндерден де ұзақ уақыт бойы
қосылмай тұрса, еріп кеткен тағамды
жылдам пайдаланып не дереу пісіріп
алып барып қайта тоңазыту
(салқындатқан соң) қажет.
арналған уақыттың шамасына қарай отырып,
оны тоңазытқыш ішінде не бөлме
температурасында жылытуға болады.
Тағамның кіші кесектерін тоңазытқыштан
алған бетте мұздаған қалпы пісіре беруге
болады. бұндай жағдайда пісіру уақыты
ұзағырақ болады.
3.5 Мұз текшелерін жасау
Бұл құрылғыда мүз текшелерін жасауға
арналған бір не одан да көп науалар бар. Осы
науаларға су толтырыңыз да, содан соң
оларды мұздатқыш камераға салыңыз.
Науаларды камерадан алу үшін
металл аспаптарды пайдаланбаңыз.
3.6 Суық аккумуляторы
Мұздатқыштың электр қуаты өшіп не қандай
да бір оқыс жағдай орын алғанда тағамды
ұзағырақ сақтай тұруға көмектесетін кем
дегенде бір суық аккумуляторы бар.
4. АҚЫЛ-КЕҢЕС
4.1 Тоңазыту туралы кеңес
Төменде тоңазыту үрдісін барынша тиімді
жүзеге асыру үшін бірнеше маңызды кеңестер
берілген:
• 24 сағат ішінде тоңазытуға болатын ең көп
тағам мөлшері техникалық ақпарат
тақтайшасында берілген;
• мұздату үрдісі 24 сағатқа созылады. Осы
уақыт аралығында тоңазытылуға тиіс ешбір
қосымша тағамды қосып салуға болмайды;
• тек аса жоғары сапалы, жаңа және мұқият
тазаланған тағамдарды ғана тоңазытыңыз;
• тағамды жылдам әрі толықтай мұздатып,
қажетті кезде оның тек қажетті мөлшерін
ғана жібіту үшін кішкене бөлшектерге бөліп
дайындаңыз;
• тағамды алюминий қағазға не полиэтилен
қалтаға орап, орамының ауа
өткізбейтіндігіне көз жеткізіп алыңыз;
• жаңа, мұздамаған тағамды әлдеқашан
мұздаған тағамға, оның температурасы
көтеріле бастамас үшін тигізбеңіз;
• майы аз тағамдар майлы тағамдарға
қарағанда жақсы әрі ұзақ сақталады; тұз
тағамның сақталу уақытын азайтады;
• мұз текшелерін мұздатқыш камерадан
алған бетте тура пайдаланса, аяз теріні
қарып кетуі мүмкін;
• Тағамдарды сақтау уақытының кестесін
жасау үшін, тағамның әрбір жеке
орамасына оның тоңазытылған ай-күнін
жазып қою ұсынылады;
4.2 Тоңазытылған тағамдарды
сақтауға қатысты ақыл-кеңес
Құрылғының барынша жақсы жұмыс істеуін
қамтамасыз ету үшін мына әрекеттерді
орындау керек:
• сатушының мұздаған қалпы сатылатын
тағамдарды тиісті түрде мұздатқанына көз
жеткізіңіз;
• мұздатылған тағамдарды дүкеннен
мұздатқышқа барынша аз уақыт ішінде
жеткізіңіз;
Page 27

• егер аса қажет болмаса есігін жиі ашпаңыз
немесе ұзақ уақыт ашып қалдырмаңыз;
• мұздап тұрған тағамды жібіткеннен кейін
сапасы дереу түсе бастайды және оны
қайта мұздатуға болмайды;
5. КҮТУ МЕНЕН ТАЗАЛАУ
ҚАЗАҚ 27
• тағамды өндіруші көрсеткен жарамдылық
мерзімінен артық уақыт сақтамаңыз.
Сақтандыру туралы ескерту!
Жөндеу жұмысын жүргізбес бұрын
құрылғыны электр желісінен
ағытыңыз.
Бұл құрылғының салқындатқыш
құралында сутегілі көміртек бар;
сондықтан да, жөндеу жұмыстары
мен оны қайта толтыруды тек
уәкілетті маман ғана жүзеге асыруға
тиіс.
5.1 Мезгілімен тазалап отыру
Құрылғыны мезгіл-мезгіл тазалап отыру
қажет:
• іші мен керек-жарақтарын аздап нейтрал
сабын салынған жылы сумен тазалаңыз.
• есік тығыздағышын мезгіл-мезгіл тазалап,
кір тұрып қалмас үшін сүртіп алып
отырыңыз.
• шайып мұқият құрғатыңыз.
Құрылғы ішіндегі түтікшелер және/не
сымдардың ешқайсысын тартпаңыз,
жылжытып не бүлдірмеңіз.
Құрылғының ішін тазалау үшін жуғыш
заттарды, жеміргіш ұнтақтар мен аса
хош иістендірілген тазалағыш
заттарды не балауыз
жылтыратқыштарды пайдаланбаңыз,
себебі бұндай заттар құрылғының
беткі қабатын бүлдіріп, онда ерекше
иіс қалдырады.
Құрылғының артындағы конденсатор (қара
гриль) мен компрессорды шөтке не
шаңсорғышпен тазалаңыз. Бұлай істеу
құрылғы жұмысын жақсартып, электр
шығынын азайтады.
Салқындатқыш жүйеге еш нұқсан
келтірмеуге тырысыңыз.
Ас үй құрылғыларының бетін тазалауға
арналған көпшілік заттардың құрамында осы
құрылғы үшін пайдаланылған пластиктерге
зиянды әсер ететін химикаттар бар.
Сондықтан да осы құрылғы корпусының
сыртын, тек аздаған жуғыш зат салынған
жылы сумен тазалау ұсынылады.
Тазалап болған соң құрылғыны электр
желісіне қайта қосыңыз.
5.2 Тоңазытқыш қырауын еріту
Осы үлгідегі мұздатқыш камера, екінші
жағынан алғанда "еш қырау тұрмайтын" түрге
жатады. Бұл құрылғы пайдаланылып тұрғанда
құрылғының ішкі қабырғаларына да,
тағамдырдың үстіне де еш қырау тұрмайды
дегенді білдіреді.
Қыраудың болмауы автоматты түрде
басқарылатын желдеткіштің көмегімен
құрылғы ішінде үздіксіз айналыстағы суық
ауаның болуына байланысты.
5.3 Ұзақ уақыт бойы пайдаланбау
Құрылғы ұзақ уақыт бойы пайдаланылмайтын
жағдайда мына сақтық шараларын
орындаңыз:
• құрылғыны электр желісінен ажыратыңыз
• барлық тағамдарды шығарыңыз
• мұзын ерітіп (егер бар болса), құрылғыны
және барлық керек-жарақтарын тазалаңыз
• жағымсыз иіс пайда болмас үшін есік/
есіктерді ашық қалдырыңыз.
Егер құрылғы пайдаланылып тұратын болса,
электр қуаты өшіп қалған жағдайда ішіндегі
тағам бұзылып кетпес үшін басқа бір адамның
арасында бір рет бақылап қойып отыруын
сұраңыз.
Page 28

www.electrolux.com
28
6. НЕ ІСТЕРСІҢІЗ, ЕГЕР...
Назарыңызда болсын!
Ақаулықты анықтамас бұрын ашаны
розеткадан суырыңыз.
Осы нұсқаулықта көрсетілмеген
ақаулықты тек электрші маман
немесе білікті адам ғана анықтауға
тиіс.
Ақаулық Ықтимал себебі Шешімі
Құрылғы жұмыс істемей
тұр.
Қуат ашасы розеткаға дұрыс
Құрылғыға электр қуаты
Дыбыстық сигнал
естіледі. Ескерту шамы
жыпылықтап тұр.
Есік дұрыс жабылмаған. "Есік ашық сигналын" қараңыз.
Компрессор үздіксіз
жұмыс істейді.
Есік дұрыс жабылмаған. "Есікті жабу" тарауын қараңыз.
Есік тым жиі ашылған. Есікті қажет кезде ғана
Тағамның температурасы
Бөлме температурасы тым
FastFreeze режимі қосылған. "FastFreeze " режимі тарауын
Мұздатқыштың ішіндегі
температура тым төмен.
FastFreeze режимі қосылған. "FastFreeze " режимі тарауын
Мұздатқыштың ішіндегі
температура тым
жоғары.
Бір мезгілде тым көп тағам
Тағамдар бір-біріне өте
Құрылғы сөндірулі. Құрылғыны қосыңыз.
сұғылмаған.
келмей тұр. Розеткада тоқ
жоқ.
Мұздатқыштың ішіндегі
температура тым жоғары.
Температура дұрыс
орнатылмаған.
тым жоғары.
жоғары.
Температура тетігі дұрыс
мәнге қойылмаған.
Температура тетігі дұрыс
мәнге қойылмаған.
сақтауға қойылған.
жақын қойылған.
Ашаны розеткаға дұрыстап
сұғыңыз.
Розеткаға басқа электр
құрылғысын қосып көріңіз.
Электрші маманға
хабарласыңыз.
"Артық температураны
ескерту сигналы" тарауын
қараңыз.
Жоғарырақ температураға
қойыңыз.
ашыңыз, ұзақ ашып қоймаңыз.
Тағамды сақтардың алдында
температурасын бөлме
температурасына дейін
азайтыңыз.
Бөлменің температурасын
азайтыңыз.
қараңыз.
Жоғарырақ температураға
қойыңыз.
қараңыз.
Төменірек температураға
қойыңыз.
Бір мезгілде сақталатын тағам
мөлшерін азайтыңыз.
Тағамдарды суық ауа айнала
алатындай етіп сақтаңыз.
Page 29

Ақаулық Ықтимал себебі Шешімі
Температура
бейнебетінде үстіңгі
немесе астыңғы текше
көрсетіледі.
DEMO бейнебетте
көрсетіледі.
6.1 Есікті жабыңыз
1.
Есік тығыздағыштарын тазалаңыз.
2.
Қажет болса, есікті реттеңіз. "Орнату"
тарауын қараңыз.
7. ОРНАТУ
Температураны өлшеген
кезде қате пайда болды.
Құрылғы демо-режимде тұр
(DEMO).
3.
Қажет болса, зақым келген
тығыздағыштарды өзгертіңіз. Қызмет
көрсету орталығына хабарласыңыз.
ҚАЗАҚ 29
Қызмет көрсету орталығы
өкіліне хабарласыңыз
(салқындатқыш жүйе тағамды
салқындатуын жалғастырады,
бірақ температураны реттеу
мүмкін емес).
Ұзақ дыбыстық сигнал естіліп,
бейнебет аз уақытқа сөнген
кезде Mode түймешігін
шамамен 10 секунд басып
ұстап тұрыңыз: құрылғы
қалыпты жұмыс істей
бастайды.
7.1 Орналастыру
Назарыңызда болсын!
Есігінде құлпы не ілгегі бар ескі
құрылғыны тастап жатсаңыз, жас
балалар құрылғы ішінде қамалып
қалмас үшін оларды жарамсыз етіп
барып тастаңыз.
Құрылғыны орнатып болған соң оның
ашасы қол жететін жерде тұруға тиіс.
Бұл құрылғыны қоршаған орта температурасы
құрылғының техникалық ақпараттар
тақтайшасында көрсетілген климат санатына
сай келетін жерге орналастыру қажет:
Климат
санаты
SN +10°C бастап + 32°C дейін
N +16°C бастап + 32°C дейін
ST +16°C бастап + 38°C дейін
Қоршаған орта температурасы
Климат
Қоршаған орта температурасы
санаты
T +16°C бастап + 43°C дейін
7.2 Электр желісіне жалғау
Электр желісіне қоспас бұрын техникалық
ақпарат тақтайшасында көрсетілген кернеу
мен жиіліктің үйдегі электр желісінің қуатына
сай келетіндігін тексеріп алыңыз.
Құрылғы жерге қосылуға тиіс. Осы мақсатта
қорек сымы контактпен қатар жеткізілген. Егер
үйдегі розетка жерге қосылмаған болса, білікті
электр маманынан ақыл-кеңес ала отырып,
құрылғыны қолданыстағы ережелерге сай
жерге жекелей қосыңыз.
Жоғарыда айтылып өткен ережелер
сақталмаса, өндіруші қандай да бір
жауапкершілікті өз мойнына алудан бас
тартады.
Бұл құрылғы E.E.C. ережелеріне сай келеді.
Page 30

www.electrolux.com
30
7.3 Есіктің ашылатын жағын өзгерту
Құрылғының есігі оң жаққа қарай ашылады.
Есікті сол жаққа қарай ашылатындай етіп
өзгерткіңіз келсе, құрылғыны орнатпай тұрып
төмендегі әрекеттерді орындаңыз:
1.
Үстіңгі істікті ағытып алыңыз.
2.
Есікті алыңыз.
3.
Аралық шектегішті алыңыз.
4.
Астыңғы істікті кілттің көмегімен
босатыңыз.
Қарама-қарсы жақта:
1.
Астыңғы істікті қатайтып бұраңыз.
2.
Аралық шектегішті орнатыңыз.
3.
Есікті орнатыңыз.
4.
Үстіңгі істікті қатайтып бұраңыз.
7.4 Желдетуге қойылатын талаптар
5 cm
min.
200 cm
2
min.
2
200 cm
7.5 Құрылғыны орнату
Сақтандыру туралы ескерту!
Қорек сымын еркін жылжытуға
болаынына көз жеткізіңіз.
Құрылғының арт жағында ауа жақсы айналып
тұруға тиіс.
Төмендегі қадамдарды орындаңыз:
Page 31

ҚАЗАҚ 31
Қажет болса, жабысқақ тұмшалағыш таспаны
кесіп алып, суретте көрсетілгендей құрылғыға
x
жапсырыңыз.
x
1
13 mm
Ø 2.5 mm
Құрылғыны Ø 2.5 мм бұрғысы бар бұрғымен
тесіңіз (тереңдігі ең көбі 10 мм).
Құрылғыға төртбұрыш тетіктерді салыңыз.
2
3
Құрылғыны жиһаз ойығына орнатыңыз.
Құрылғыны көрсеткі (1) бағытымен үстіңгі
саңылаудың қақпағы ас үй қаптамасына
тірелгенше итеріңіз.
Құрылғыны көрсеткінің (2) бағытымен, ас үй
қаптамасының, топсаның қарсы жағында
2
орналасқан жағына қарай итеріңіз.
1
Page 32

www.electrolux.com
32
4mm
44mm
Құрылғыны ұяға келтіріп орналастырыңыз.
Құрылғы мен ас үй қаптамасынң алдыңғы
жиегінің арасында 44 мм орын қалуын
қамтамасыз етіңіз.
Астыңғы топсаның қақпағы (керек-жарақтар
қалтасында) құрылғы мен ас үй қаптамасының
арасындағы қашықтықтың дұрыс сақталуын
қамтамасыз етеді.
Құрылғы мен ас үй қаптамасының аралығында
4 мм орын қалуын қамтамасыз етіңіз.
Есікті ашыңыз. Астыңғы топсаның қақпағын
орнына қойыңыз.
Құрылғыны жиһаз ойығына 4 бұрандамен
бекітіңіз.
I
I
Топса қақпағының (E) алынуға тиіс бөлшегін
дұрыс тауып алып қойыңыз. Оң жақ топсадан
DX бөлшегін, егер сол жақ топса болса SX
бөлшегін алуды ұмытпаңыз.
Page 33

ҚАЗАҚ 33
Тесіктер мен топса саңылауларын
қақпақтармен (C, D) бітеңіз.
Желдеткіш саңылаудың торкөзін (B)
C
D
орнатыңыз.
Топса қақпақтарын (E) топсаға орнатыңыз.
E
E
B
(Ha), (Hb), (Hc) және (Hd) бөлшектерін
ағытыңыз.
(Ha) бөлшегін ас үй қаптамасының ішкі жағына
орнатыңыз.
~50 mm
o
90
o
90
~50 mm
21 mm
o
90
Page 34

www.electrolux.com
34
Hc
Ha
8 mm
Hb
Ha
(Hc) бөлшегін (Ha) бөлшегінің үстіне қойып
итеріңіз.
Құрылғының есігі мен ас үй қаптамасының
есігін 90° градус бұрыш жасай отырып
ашыңыз.
Кішкене текшені (Hb) бағыттағышқа (Ha)
салыңыз.
Құрылғы мен ас үй қаптамасының есіктерін
бірге ұстап тұрып, тесіктерін белгілеңіз.
Кішкене текшелерді алып, есіктің сыртқы
жиегіне ø 2 мм 8 мм тереңдігі бар тесік
салыңыз.
Кішкене текшені бағыттағышқа қайта
орналастырыңыз да, оларды берілген
бұрандамен бекітіңіз.
Hb
Ас үй қаптамасының есігі мен құрылғының
есігін, (Hb) бөлшегін реттеу арқылы дұрыс
қалыпқа келтіріңіз.
Page 35

Hb
ҚАЗАҚ 35
(Hd) бөлшегін (Hb) бөлшегіне кіріктіре
басыңыз.
Hd
Төмендегілерді тексеріңіз:
• Барлық бұрандалардың қатайтып
бұралғанын.
8. ШУЫЛ ТҮРЛЕРІ
Құрылғы қалыпты жұмыс істеп тұрған кезде
түрлі шуыл естіледі (компрессор,
салқындатқыш сұйықтықтың айналуы).
OK
SSSRRR!
SSSRRR!
• Тығыздағыш таспаның қаптамаға мықтап
бекігенін.
• Есіктің дұрыс ашылып-жабылатынын.
SSSRR
R!
HISSS!
CLICK!
BRRR!
CRACK!
BLUBB!
CLICK!
CLICK!
Page 36

www.electrolux.com
36
HISSS!
BLUBB!
HISSS!
BLUBB!
9. ТЕХНИКАЛЫҚ СИППАТАМА
BRRR!
BRRR!
CRACK!CRACK!
Ұяның өлшемдері
Биіктігі 1780 мм
Ені 560 мм
Тереңдігі 550 мм
Көтерілу уақыты 21 сағ.
Кернеу 230-240 В
Жиілік 50 Гц
Техникалық ақпарат құрылғының сол жақ ішкі
қабырғасындағы техникалық ақпарат
тақтайшасында және электр қуатының
жапсырмасында көрсетілген.
Page 37

10. ҚОРШАҒАН ОРТАҒА ЗИЯН КЕЛДІРМЕУ ТУРАЛЫ
МАҒЛҰМАТТАР
ҚАЗАҚ 37
Белгі
өңдеуден өткізуге тапсырыңыз. Орам
материалдарын қайта өңдеуден өткізу үшін
тиісті контейнерлерге салыңыз.
Электрлік және электроникалық
құрылғылардың қалдығын қайта өңдеуден
өткізу арқылы, қоршаған ортаға және
салынған материалдарды қайта
адамның денсаулығына зиын келтіретін
жағдайларға жол бермеуге өз үлесіңізді
қосыңыз. Белгі
тұрмыстық қалдықтармен бірге тастамаңыз.
Өнімді жергілікті қайта өңдеу орталығына
өткізіңіз немесе жергілікті мекемеге
хабарласыңыз.
салынған құрылғыларды
Page 38

www.electrolux.com
38
INNHOLD
1. SIKKERHETSANVISNINGER . . . . . . . . . . . . . . . . . . . . . . . . . . . . . . . . . . . . . . . . . . . . . . . 39
2. BETJENINGSPANEL . . . . . . . . . . . . . . . . . . . . . . . . . . . . . . . . . . . . . . . . . . . . . . . . . . . . . 41
3. DAGLIG BRUK . . . . . . . . . . . . . . . . . . . . . . . . . . . . . . . . . . . . . . . . . . . . . . . . . . . . . . . . . 43
4. NYTTIGE RÅD OG TIPS . . . . . . . . . . . . . . . . . . . . . . . . . . . . . . . . . . . . . . . . . . . . . . . . . . 44
5. STELL OG RENGJØRING . . . . . . . . . . . . . . . . . . . . . . . . . . . . . . . . . . . . . . . . . . . . . . . . . 44
6. HVA MÅ GJØRES, HVIS... . . . . . . . . . . . . . . . . . . . . . . . . . . . . . . . . . . . . . . . . . . . . . . . . 45
7. MONTERING . . . . . . . . . . . . . . . . . . . . . . . . . . . . . . . . . . . . . . . . . . . . . . . . . . . . . . . . . . 47
8.
STØY . . . . . . . . . . . . . . . . . . . . . . . . . . . . . . . . . . . . . . . . . . . . . . . . . . . . . . . . . . . . . . . . 53
9. TEKNISKE DATA . . . . . . . . . . . . . . . . . . . . . . . . . . . . . . . . . . . . . . . . . . . . . . . . . . . . . . . . 54
VI TENKER PÅ DEG
Takk for at du har kjøpt et produkt fra Electrolux. Du har valgt et produkt bygget på erfaring
gjennom flere tiår. Genial og stilig, og den er designet med tanke på deg. Du kan være trygg på at
du får gode resultater hver gang du bruker den.
Velkommen til Electrolux.
Gå inn på nettstedet vårt for å:
Få råd om bruk, finne brosjyrer, feilsøking, serviceinformasjon:
www.electrolux.com
Registrere produktet ditt for å få bedre service:
www.electrolux.com/productregistration
Kjøpe tilbehør, forbruksvarer og originale reservedeler til produktet ditt:
www.electrolux.com/shop
KUNDESTØTTE OG SERVICE
Vi anbefaler at du bruker originale reservedeler.
Når du kontakter serviceavdelingen, må du sørge for å ha følgende data for hånden.
Informasjonen finner du på typeskiltet. Modell, PNC (produktnummer), serienummer.
Advarsel/Forsiktig - Sikkerhetsinformasjon.
Generelle informasjoner og tips
Miljøinformasjon
Med forbehold om endringer.
Page 39

NORSK 39
1.
SIKKERHETSANVISNINGER
For din egen sikkerhets skyld og for å sikre korrekt bruk, bør du lese denne
bruksanvisningen og dens henvisninger
og advarsler før du installerer og bruker
apparatet for første gang. For å unngå
unødvendige feil og ulykker er det viktig at
du sørger for at alle som skal bruke dette
apparatet er fortrolige med hvordan det
brukes og kjenner til sikkerhetsfunksjonene. Ta vare på denne bruksanvisningen
og pass på at den følger med apparatet
hvis du selger eller flytter det, slik at alle
brukerne får informasjon om bruk og sikkerhet så lenge apparatet benyttes.
Av grunner som angår personsikkerhet eller materiell skade er det viktig at alle instruksjonene i bruksanvisningen blir fulgt.
Produsenten overtar intet ansvar for skader som er forårsaket av at instruksjonene
ikke er blitt fulgt.
1.1 Sikkerhet for barn og
personer med reduserte evner
• Dette apparatet er ikke beregnet på å
bli brukt av personer (også barn) med
redusert fysisk eller psykisk helse eller
som mangler erfaring eller kunnskaper
om bruken, dersom de ikke er gitt innføring eller instruksjon om bruken av
apparatet av en person som er ansvarlig for deres sikkerhet.
Hold øye med barn, slik at de ikke leker
med apparatet.
• Hold all emballasje borte fra barn. Det
foreligger kvelningsfare.
• Når apparatet skal vrakes: Trekk støpselet ut av stikkontakten, kutt av nettkabelen (så nær inntil apparatet som mulig) og fjern døren for å forhindre at lekende barn kan få elektrisk støt eller
kan lukke seg selv inne i apparatet.
• Dersom dette apparatet, som er utstyrt
med magnetiske dørpakninger, skal erstatte et gammelt apparat med fjærlås
(smekklås) på døren eller lokket, er det
viktig at du ødelegger smekklåsen før
du kasserer det gamle apparatet. Dette
forhindrer at det gamle apparatet utgjør
en dødsfelle for et barn.
1.2 Generelt om sikkerhet
ADVARSEL
Hold ventilasjonsåpningene i apparatets
kabinett eller i den innebygde strukturen
fri for hindringer.
• Produktet er beregnet på oppbevaring
av matvarer og/eller drikkevarer i en
vanlig husholdning og lignende steder
som:
– personalkjøkken i butikker, på konto-
rer og andre arbeidsmiljøer;
– gårder og av gjester på hoteller, mo-
teller og andre boligtyper;
– "bed and breakfast"-miljøer;
– catering og lignende ikke-detaljhan-
del.
• Ikke bruk mekanisk verktøy eller ekstra
hjelpemidler for å fremskynde avrimingen.
• Ikke bruk andre elektriske apparater (for
eksempel iskremmaskiner) inne i et kjøleskap, med mindre de er godkjent for
dette av produsenten.
• Ikke skad kjølekretsen.
• Kjølekretsen i skapet er fylt med kjølemiddelet isobutan (R600a), som er en
naturlig og meget miljøvennlig gass,
men som likevel er brennbar.
Pass på at ingen deler av kjølekretsen
blir skadet under transport og installasjon av skapet.
Dersom kjølekretsen skulle bli skadet:
– unngå åpen flamme eller kilder som
avgir gnist
– luft godt ut i rommet der skapet står.
• Det er farlig å endre spesifikasjonene eller foreta noen form for endringer på
produktet. Hvis strømkabelen blir skadet, kan dette forårsake kortslutning,
brann og/eller elektrisk støt.
ADVARSEL
Alle elektriske komponenter
(strømledning, støpsel, kompressor) må skiftes av et autorisert serviceverksted eller en elektriker for
å unngå fare.
Page 40

www.electrolux.com
40
• Dette produktet er tungt. Vær forsiktig
• Ikke ta ut varer fra fryseseksjonen eller
• Ikke utsett produktet for direkte sollys
• Lyspærene (avhengig av modell) som
1.3 Daglig bruk
• Ikke sett varme gryter på plastdelene i
• Ikke oppbevar brannfarlig gass eller
• Ikke plasser matvarer direkte mot venti-
• Frosne matvarer må ikke fryses inn
• Oppbevar frosne ferdigretter i samsvar
• Anbefalingene til oppbevaring fra appa-
• Ikke plasser drikkevarer med kullsyre el-
1.
Strømkabelen må ikke forlenges
med skjøteledning.
2.
Pass på at støpselet ikke ligger i
klem eller kommer i skade på baksiden av produktet. Et støpsel som
ligger i klem eller som kommer i
skade kan bli overopphetet og forårsake brann.
3.
Pass på at produktets hovedstøpsel er tilgjengelig.
4.
Ikke trekk i strømkabelen.
5.
Dersom stikkontakten sitter løst,
må du ikke sette støpselet inn i
den. Det er fare for strømstøt eller
brann.
6.
Du må ikke bruke produktet uten at
lampedekselet (avhengig av modell)
til den innvendige belysningen er
montert.
når du flytter det.
berør dem med våte/fuktige hender, da
dette kan forårsake hudskader eller
frostskader.
over lengre tid.
brukes i dette produktet, er spesialpærer kun beregnet på husholdningsapparater. De egner seg ikke til rombelysning.
apparatet.
væske i apparatet. De kan eksplodere.
lasjonsåpningen på bakveggen. (Hvis
produktet er FrostFree)
igjen når de har vært int.
med instruksjonene fra ferdigrett-produsenten.
ratets produsent må følges nøye. Les
instruksjonene i de gjeldende avsnittene.
ler musserende vin i fryseseksjonen, for
det dannes trykk på beholderen som
kan føre til at den eksploderer, som
igjen kan skade apparatet.
• Ispinner kan forårsake frostskader hvis
de spises like etter at de er tatt ut av
fryseren.
1.4 Rengjøring og stell
• Slå av apparatet og trekk støpselet ut
av stikkontakten før vedlikeholds- eller
rengjøringsarbeid.
• Ikke bruk metallredskaper til rengjøring
av apparatet.
• Ikke bruk skarpe redskaper til å fjerne
rim fra apparatet. Bruk en plastskrape.
1.5 Installasjon
Følg nøye instruksjonene i avsnittene for tilkopling til strømnettet.
• Pakk ut apparatet og kontroller at det
ikke er skadet. Ikke kople til et skadet
apparat. Meld øyeblikkelig fra i butikken
der du kjøpte apparatet om eventuelle
skader. I så fall må du ta vare på emballasjen.
• Vi anbefaler at du venter i minst fire timer før du tilkopler apparatet, slik at
oljen kan samle seg i kompressoren.
• Det må være tilstrekkelig luftsirkulasjon
rundt hele apparatet, ellers kan apparatet overopphetes. Følg instruksjonene
som gjelder installasjonen for å oppnå
tilstrekkelig ventilasjon.
• Så sant mulig bør produktets bakside
stå inn mot en vegg, slik at det unngås
at man kan berøre eller komme i kontakt med varme deler (kompressor,
kondensator) og dermed pådra seg
brannskader.
• Apparatet må ikke oppstilles i nærheten
av en radiator eller komfyr.
• Forsikre deg om at stikkontakten er tilgjengelig etter at apparatet er installert.
• Må kun kobles til drikkevannsforsyning
(hvis produktet har vanntilkopling).
1.6 Service
• Alt elektrisk arbeid som er nødvendig i
forbindelse med vedlikehold av dette
apparatet må utføres av en faglært
elektriker eller annen kompetent person.
Page 41

• Dette produktet må kun repareres av
autorisert servicesenter, og det må kun
brukes originale reservedeler.
1.7 Miljøvern
Dette apparatet inneholder ikke
gasser som skader ozonlaget,
hverken i kjølekretsen eller i isolasjonsmaterialet. Dette apparatet
skal ikke avhendes sammen med
alminnelig husholdningsavfall. Iso-
2. BETJENINGSPANEL
1 2 3 4 5 6
NORSK 41
lasjonsskummet inneholder brennbare gasser: apparatet skal avfallsbehandles i samsvar med gjeldende bestemmelser om avfallsbehandling. Disse får du hos kommunen der du bor. Unngå at kjøleenheten blir skadet, særlig på
baksiden i nærheten av varmeveksleren. Materialene i dette apparatet som er merket med sym-
bolet
, kan gjenvinnes.
ON/OFF-knapp
1
Mode-knapp
2
Display
3
Temperatur, minusknapp
4
Temperatur, plussknapp
5
2.1 Display
A)
Alarmindikator
B)
EcoMode
C)
FastFreeze-modus
D)
DrinksChill og temperaturindikator
E)
DrinksChil -modus
Drink Chill-knapp
6
Det er mulig å skru opp lyden på de forhåndsdefinerte knappelydene ved å holde
Mode-knappen og knappen for senking
av temperatur inne samtidig i noen sekunder. Endringen kan tilbakestilles.
ABCD
E
Valg av Mode eller bruk av temperaturknappen, vil
nen starte.
Etter valg av temperaturen vil animasjonen blinke i et par minutter.
-animasjo-
2.2 Slå på
Gå frem som følger for å slå på produktet:
1.
Sett støpselet inn i stikkontakten.
Page 42

www.electrolux.com
42
2.
3.
4.
5.
For å stille inn en annen temperatur, se
"Regulere temperaturen".
2.3 Slå av
Gå frem som følger for å slå produktet av:
1.
2.
3.
2.4 Regulere temperaturen
Den innstilte temperaturen på fryseren
kan justeres ved å trykke på termostatknappen.
Still inn standardtemperatur:
• -18 °C i fryseren
Temperaturdisplayet viser innstilt temperatur.
Den valgte temperaturen nås innen et
døgn.
2.5 EcoMode
For optimal matlagring, velg EcoMode.
Slå på funksjonen:
1.
Slå av funksjonen:
1.
Trykk på ON/OFF-knappen hvis displayet er av.
Alarmen kan gå etter noen sekunder.
For å nullstille alarmen, se "Alarm ved
høy temperatur".
Hvis DEMO vises på displayet, er pro-
duktet i demofunksjon. Se avsnittet
“Hva må gjøres, hvis…”.
Temperaturindikatorene viser innstilt
standardtemperatur.
Hold ON/OFF-knappen inne i 3 sekunder.
Da slukkes displayet.
Trekk støpselet ut av stikkontakten for
å koble produktet fra strømmen.
Etter strømbrudd gjenopprettes
den innstilte temperaturen.
Trykk på Mode-knappen til tilsvarende ikon vises.
Temperaturindikatoren viser den innstilte temperaturen:
– for fryseren: -18°C
Trykk på knappen Mode for å velge
en annen funksjon eller la den være
blank.
Funksjonen slås av ved å velge en
annen innstilt temperatur.
2.6 FastFreeze-modus
Slå på funksjonen:
1.
Trykk på Mode-knappen til tilsvaren-
de ikon vises.
Denne funksjonen stopper automatisk etter 52 timer.
Slik slår du av funksjonen før den deaktiveres automatisk:
1.
Trykk på knappen Mode for å velge
en annen funksjon eller la den være
blank.
Funksjonen slås av ved å velge en
annen innstilt temperatur på fryseren.
2.7 DrinksChill-modus
DrinksChill-modusen skal brukes til å stille
inn en alarm på et ønsket tidspunkt. Denne funksjonen er nyttig for eksempel når
en oppskrift krever at du avkjøler en blanding en viss tid eller hvis du trenger en påminnelse for ikke å glemme flasker som
du har satt i fryseskapet så de skal bli fort
kalde.
Slå på funksjonen:
1.
Trykk på DrinkChill -knappen.
Indikatoren for DrinksChill vises.
Tidsuret viser en tid (30 minutter).
2.
Trykk på temperatur pluss- og tem-
peratur minus-knappen for å endre
den innstilte tiden fra 1 til 90 minutter.
3.
Tidsuret begynner å blinke (min).
Når nedtellingen er ferdig, blinker DrinksChill-indikatoren og det høres en alarm:
1.
Ta ut eventuelle drikkevarer som står i
fryseseksjonen.
2.
Trykk på DrinkChill-knappen for å slå
av alarmen og avslutte funksjonen.
Det er mulig å deaktivere funksjonen når
som helst under nedtellingen:
1.
Trykk på DrinkChill-knappen.
2.
DrinksChill-indikatoren slokker.
Du kan når som helst endre tidspunktet
under nedtellingen og på slutten, ved å
trykke på minus eller pluss.
2.8 Alarm ved høy temperatur
En temperaturøkning i fryseskapet (for eksempel på grunn av tidligere strømbrudd)
vises ved at:
Page 43

• alarmen og frysertemperaturindikatorene blinker
• det høres et lydsignal.
Slik nullstiller du alarmen:
1.
Trykk på en vilkårlig knapp.
2.
Lydsignalet slås av.
3.
Fryserens temperaturindikator viser
den høyest oppnådde temperaturen i
noen sekunder. Viser deretter den
innstilte temperaturen igjen.
4.
Alarmindikatoren vil vises til normale
forhold gjenopprettes.
Da slutter alarmindikatoren å blinke.
3. DAGLIG BRUK
NORSK 43
2.9 Alarm ved åpen dør
Hvis døren blir stående åpen i noen minutter, aktiveres en alarm. Alarmen ved
åpen dør vises ved:
• Alarmindikator blinker
•lydsignal
Når normale forhold er gjenopprettet (døren er lukket), stopper alarmen.
I løpet av en alarmfase kan lydsignalet
slås av ved å trykke på en hvilken som
helst knapp.
3.1 Innvendig rengjøring
Før du tar produktet i bruk, må du vaske
innsiden samt alt utstyr i lunkent vann tilsatt et nøytralt rengjøringsmiddel, for å
fjerne den typiske lukten som sitter i helt
nye produkter. Husk å tørke nøye.
Ikke bruk kraftige vaskemidler eller
skurepulver, da dette vil skade finishen.
Hvis DEMO vises i displayet, er produktet
i demomodus: se avsnittet “HVA MÅ
GJØRES, HVIS…”.
3.2 Innfrysing av ferske matvarer
Fryseseksjonen er egnet for å fryse inn
ferske matvarer og for å oppbevare frossen og dypfrossen mat over lengre tid.
Når du vil fryse inn ferske matvarer, bør
hurtigfrys Fast Freeze -funksjonen aktiveres minst 24 timer før varene som skal fryses inn, legges i fryseseksjonen.
Plasser de ferske matvarene som skal fryses, i de to øverste seksjonene.
Maksimal mengde mat som kan innfryses
på 24 timer er spesifisert på typeskiltet,
en etikett som sitter på innsiden av apparatet.
Innfrysingsprosessen varer i ett døgn: i løpet av denne perioden må du ikke legge
inn flere matvarer som skal fryses.
Etter ett døgn, når fryseprosessen er ferdig, går du tilbake til ønsket temperatur
igjen (se "Regulere temperaturen").
3.3 Oppbevaring av frosne
matvarer
Når apparatet slås på for første gang eller
etter en periode der det ikke har vært i
bruk, må du la apparatet stå på i minst 2
timer på høyeste innstilling før du legger
inn matvarer.
Dersom det oppstår tining, f.eks.
på grunn av strømbrudd, og hvis
strømmen er borte lengre enn den
verdien som er oppført i tabellen
over tekniske egenskaper under
"stigetid", må den tinte maten brukes opp så raskt som mulig eller
tilberedes øyeblikkelig og så fryses
inn igjen (etter avkjøling)
3.4 Tining
Dypfrosne eller frosne matvarer kan tines i
kjøleseksjonen eller ved romtemperatur
før de skal brukes i forhold til hvor mye tid
du har til rådighet.
Små stykker kan også tilberedes mens de
ennå er frosne, direkte fra fryseren: I så fall
tar tilberedningen lengre tid.
3.5 Isterningproduksjon
Dette apparatet er utstyrt med ett eller flere brett for produksjon av isterninger. Fyll
Page 44

www.electrolux.com
44
brettene med vann og legg dem i fryseseksjonen.
Ikke bruk gjenstander av metall for
å fjerne brettene fra fryseren.
4. NYTTIGE RÅD OG TIPS
3.6 Fryseelementer
Fryseren har minst et fryseelement som
øker oppbevaringstiden i tilfelle strømbrudd.
4.1 Tips til frysing
Her følger noen nyttige tips som gir best
mulig frysing:
• maksimal mengde matvarer som kan
innfryses i løpet av ett døgn er oppført
på typeskiltet;
• innfrysingen tar et døgn. Det bør ikke
legges flere matvarer inn i fryseren i
denne perioden;
• kun ferske matvarer av høy kvalitet og
som er godt renset bør innfryses;
• pakk matvarene i små porsjoner, slik at
de innfryses raskt og helt til kjernen og
slik at det senere blir enklere å tine kun
den mengden du vil bruke;
• pakk maten inn i aluminiumsfolie eller
plast og sørg for at pakkene er lufttette;
• ikke la ferske, ufrosne matvarer komme
i kontakt med matvarer som allerede er
frosne for å hindre at temperaturen øker
i disse;
• magre matvarer har lenger holdbarhet
enn fete; salt reduserer matvarenes
oppbevaringstid;
5. STELL OG RENGJØRING
• saftis som spises like etter at de er tatt
ut av fryseseksjonen, kan forårsake
frostskader på huden;
• det er lurt å merke hver enkelt pakke
med innfrysingsdatoen, slik at du lettere
kan følge med på oppbevaringstiden.
4.2 Tips til oppbevaring av
frosne matvarer
For at produktet skal oppnå best mulig effekt, bør du:
• påse at frosne matvarer har vært oppbevart på riktig måte i butikken;
• påse at frosne matvarer fraktes fra butikken til fryseren din hjemme på kortest
mulig tid;
• døren ikke åpnes for ofte, og at den ikke står åpen lenger enn nødvendig;
• når maten er tint bederves den raskt og
kan ikke fryses inn igjen;
• ikke overskrid oppbevaringstidene som
matvareprodusenten har merket emballasjen med.
OBS
Trekk støpselet ut av stikkontakten før du starter enhver rengjøring av apparatet.
Dette apparatet inneholder hydrokarboner i kjøleenheten: Vedlikehold og påfylling skal derfor kun
utføres av autorisert tekniker.
5.1 Regelmessig rengjøring
Utstyret skal rengjøres regelmessig:
• Rengjør innsiden og tilbehøret med lunkent vann tilsatt litt nøytral såpe.
• Kontrollere dørpakningene regelmessig
og vask dem for å sikre at de er rene og
fri for matrester.
• Skyll og tørk grundig.
Ikke trekk i, flytt eller påfør skade
på rør og/eller kabler inne i kabinettet.
Bruk aldri sterke vaskemidler, skurepulver, sterkt parfymerte rengjøringsprodukter eller vokspoleringsmidler for å rengjøre inne i apparatet. Dette skader overflaten og etterlater sterk lukt.
Page 45

Rengjør kondenseren (sort rist) og kompressoren på baksiden av produktet med
en børste. Dette forbedrer produktets
ytelse og reduserer energiforbruket.
Pass på at du ikke skader kjølesystemet.
Mange kjøkkenrengjøringsprodukter inneholder kjemikalier som angriper/skader
plastdelene som er brukt i dette apparatet. Derfor anbefaler vi at utsiden av dette
apparatet kun rengjøres med varmt vann
tilsatt litt flytende oppvaskmiddel.
Etter rengjøring settes støpselet inn i stikkontakten igjen.
5.2 Avriming av fryseren
Fryseseksjonen på denne modellen er en
"no frost" type. Dette betyr at det ikke
danner seg rim under bruk, hverken på de
indre veggene eller på matvarene.
6. HVA MÅ GJØRES, HVIS...
ADVARSEL
Før feilsøking skal støpselet trekkes ut av stikkontakten.
Feil som ikke er oppført i feilsøkingslisten i denne bruksanvisningen, skal kun utbedres av kvalifisert elektriker eller faglært person.
Feil Mulig årsak Løsning
Produktet virker ik-
ke.
Støpselet sitter ikke or-
Produktet får ikke strøm.
Lydsignalet vil høres. Alarmlampen
blinker.
Døren er ikke skikkelig luk-
Kompressoren arbeider hele tiden.
Produktet er slått av. Slå på produktet.
dentlig i stikkontakten.
Stikkontakten er ikke
spenningsførende.
Temperaturen i fryseskapet er for høy.
ket.
Temperaturen er ikke kor-
rekt innstilt.
NORSK 45
Det faktum at det ikke danner seg rim
skyldes en kontinuerlig sirkulasjon av kald
luft inne i seksjonen, som drives av en vifte som reguleres automatisk.
5.3 Perioder uten bruk
Dersom apparatet ikke skal brukes over et
lengre tidsrom, tas følgende forholdsregler:
trekk støpselet ut av stikkontakten
•
• fjern alle matvarer
• tine (hvis frossen) og rengjør produktet
og alt tilbehøret
• la døren/dørene stå på gløtt for å hindre
at det danner seg ubehagelig lukt.
Dersom du lar apparatet være i drift, bør
du be noen om å kontrollere det fra tid til
annen for å sikre at ikke matevarene blir
ødelagt ved eventuelt strømbrudd.
Sett støpselet ordentlig inn i
stikkontakten.
Koble et annet elektrisk
produkt til stikkontakten.
Kontakt en kvalifisert elektriker.
Se "Alarm ved unormal
temperatur".
Se "Alarmen ved åpen dør".
Still inn en høyere temperatur.
Page 46

www.electrolux.com
46
Feil Mulig årsak Løsning
Døren er ikke skikkelig luk-
Døren har vært åpnet for
Produktets temperatur er
Romtemperaturen er for
FastFreeze -modusen er
Temperaturen i fryseren er for lav.
FastFreeze -modusen er
Temperaturen i fryseskapet er for høy.
Det er lagt inn for mye mat
Matvarene ligger for tett
Det vises en firkant
øverst eller nederst i
temperaturdisplayet.
DEMO vises i displayet.
6.1 Lukke døren
1.
2.
ket.
ofte.
for høy.
høy.
aktivert.
Temperaturregulatoren er
ikke korrekt innstilt.
aktivert.
Temperaturregulatoren er
ikke korrekt innstilt.
på en gang.
inntil hverandre.
Det har oppstått en feil i
temperaturmålingen
Produktet er i demofunksjon (DEMO).
Rengjør dørpakningene.
Om nødvendig, juster døren. Se etter
i "Installering".
Se "Lukke døren".
Ikke la døren stå åpen lenger enn nødvendig.
La maten avkjøle seg til
romtemperatur før du legger den inn i produktet.
Senk romtemperaturen.
Se "FastFreeze -modus".
Still inn en høyere temperatur.
Se "FastFreeze -modus".
Still inn en lavere temperatur.
Legg færre matvarer inn i
produktet på samtidig.
Plasser matvarene slik at
den kalde luften kan sirkulere.
Kontakt et serviceverksted
(kjølesystemet fortsetter å
holde matvarene kalde,
men det vil ikke være mulig
å justere temperaturen).
Hold den nede i ca. 10 sek.
til Mode-knappen til det høres en lyd, og displayet
slukkes en kort stund: produktet begynner å fungere
som det skal.
3.
Skift ut defekte pakninger ved behov.
Kontakt servicesenteret.
Page 47

7. MONTERING
NORSK 47
7.1 Plassering
ADVARSEL
Dersom du vraker et gammelt apparat som er utstyrt med lås eller
smekklås på døren, må du passe
på at låsen blir gjort ubrukelig for å
forhindre at barn kan stenge seg
inne.
Apparatets støpsel må være tilgjengelig også etter at apparatet
er installert.
Installere dette apparatet på et sted der
romtemperaturen samsvarer med den klimaklassen som er oppført på apparatets
typeskilt:
Klimaklasse
SN +10 °C til + 32 °C
N +16 °C til + 32 °C
Rommets temperatur
Klima-
Rommets temperatur
klasse
ST +16 °C til + 38 °C
T +16 °C til + 43 °C
7.2 Elektrisk tilkopling
Før du setter støpselet inn i stikkontakten,
forsikre deg om at spenningen og frekvensen som er oppført på typeskiltet
samsvarer med strømnettet i hjemmet
ditt.
Apparatet skal jordes. Støpslet på nettledningen er utstyrt med jordingskontakt.
Dersom husets stikkontakt ikke er jordet,
skal apparatet koples til en separat jording
i overensstemmelse med gjeldende forskrifter. Kontakt en faglært elektriker.
Produsenten fraskriver seg ethvert ansvar
dersom sikkerhetsreglene ikke blir fulgt.
Dette apparatet er i overensstemmelse
med EU-direktiver.
Page 48

www.electrolux.com
48
7.3 Omhengsling av døren
Døren til produktet åpnes mot høyre. Dersom du ønsker at døren skal åpnes mot
venstre, følg disse trinnene før du monterer
produktet:
1.
Løsne og fjern det øvre hengslet.
2.
Ta av døren.
3.
Fjern avstandsstykket.
4.
Løsne det nedre hengslet med en
skrunøkkel.
På motsatt side:
1.
Stram det nedre hengslet.
2.
Sett inn avstandsstykket.
3.
Monter døren.
4.
Stram det øvre hengslet.
7.4 Krav til ventilasjon
5 cm
min.
200 cm
2
min.
200 cm
7.5 Montering av produktet
OBS
Kontroller at strømledningen kan
beveges fritt.
Luftstrømmen bak produktet må være tilstrekkelig.
2
Gjør slik:
Page 49

NORSK 49
Klipp om nødvendig til den selvklebende
tetningslisten og fest den til produktet som
x
vist i figuren.
x
1
13 mm
Ø 2.5 mm
Bor et hull i produktet med et bor på Ø 2,5
mm (maks. 10 mm hulldybde).
Fest den kvadratiske delen til produktet.
2
3
Monter produktet i nisjen.
Skyv produktet mot pilen (1) til det øvre panelet stopper mot kjøkkenskapet.
Skyv produktet i pilens retning (2) mot skapet på motsatt side for hengselet.
2
1
Page 50

www.electrolux.com
50
4mm
44mm
Juster produktet i nisjen.
Sørg for at avstanden mellom produktet og
fronten av sideveggen er 44 mm.
Det nedre hengseldekselet (finnes i posen
med ekstrautstyr) sørger for at avstanden
mellom produktet og kjøkkenskapene er
riktig.
Sørg for at avstanden mellom produktet og
sideveggene er 4 mm.
Åpne døren. Sett hengseldekselet på
plass.
Fest produktet i nisjen med 4 skruer.
I
I
Fjern den riktige delen fra hengseldekselet
(E). Sørg for å fjerne delen DX for et høyremontert hengsel, SX i motsatt tilfelle.
Page 51

NORSK 51
Fest dekslene (C, D) til sporene og hengselhullene.
Monter ventilasjonsristen (B).
C
Fest dekselet (E) over hengselet.
D
E
E
B
Skru av delen (Ha), (Hb), (Hc) og (Hd).
Monter delen (Ha) på innsiden av kjøkkenskapet.
~50 mm
o
90
o
90
~50 mm
21 mm
o
90
Page 52

www.electrolux.com
52
Hc
Ha
8 mm
Hb
Ha
Skyv delen (Hc) inn på delen (Ha).
Åpne produktets dør og møbeldøren til
90°-vinkel.
Sett den lille firkanten (Hb) inn i skinnen
(Ha).
Legg produktets dør mot møbeldøren og
marker hullene.
Fjern de små firkantene og bor hull med
bor på ø 2 mm ca. 8 mm fra den ytre kanten på døren.
Plasser den lille firkanten på skinnen igjen
og fest den med medfølgende skruer.
Hb
Plasser møbeldøren og døren til produktet
parallelt ved å justere delen (Hb).
Page 53

Hb
NORSK 53
Trykk delen (Hd) på del (Hb).
Hd
Foreta en endelig kontroll for å være sikker på at:
• Alle skruene er strammet.
8. STØY
Fryseren lager lyder under normal drift
(kompressor, sirkulering av kjølevæske).
OK
SSSRRR!
SSSRRR!
• Pakningslisten er godt festet til kabinettet.
• Døren åpnes og lukkes korrekt.
SSSRR
R!
HISSS!
CLICK!
BRRR!
CRACK!
BLUBB!
CLICK!
CLICK!
Page 54

www.electrolux.com
54
HISSS!
BLUBB!
9. TEKNISKE DATA
HISSS!
BLUBB!
BRRR!
BRRR!
CRACK!CRACK!
Nisjens mål
Høyde 1780 mm
Bredde 560 mm
Dybde 550 mm
Tid, temperaturøkning 21 t
Spenning 230-240 V
Frekvens 50 Hz
Den tekniske informasjonen finner du på
typeskiltet til venstre på innsiden av produktet og på energietiketten.
Page 55

10. MILJØVERN
NORSK 55
Resirkuler materialer som er merket med
symbolet
beholdere for å resirkulere det.
Bidrar til å beskytte miljøet, menneskers
helse og for å resirkulere avfall av
elektriske og elektroniske produkter. Ikke
kast produkter som er merket med
. Legg emballasjen i riktige
symbolet
husholdningsavfallet. Produktet kan
leveres der hvor tilsvarende produkt
selges eller på miljøstasjonen i
kommunen. Kontakt kommunen for
nærmere opplysninger.
sammen med
Page 56

www.electrolux.com
56
ÍNDICE DE MATERIAS
1. INSTRUCCIONES DE SEGURIDAD . . . . . . . . . . . . . . . . . . . . . . . . . . . . . . . . . . . . . . . . . . 57
2. PANEL DE MANDOS . . . . . . . . . . . . . . . . . . . . . . . . . . . . . . . . . . . . . . . . . . . . . . . . . . . . 59
3. USO DIARIO . . . . . . . . . . . . . . . . . . . . . . . . . . . . . . . . . . . . . . . . . . . . . . . . . . . . . . . . . . . 61
4. CONSEJOS Y SUGERENCIAS ÚTILES . . . . . . . . . . . . . . . . . . . . . . . . . . . . . . . . . . . . . . . 62
5. MANTENIMIENTO Y LIMPIEZA . . . . . . . . . . . . . . . . . . . . . . . . . . . . . . . . . . . . . . . . . . . . . 63
6. QUÉ HACER SI… . . . . . . . . . . . . . . . . . . . . . . . . . . . . . . . . . . . . . . . . . . . . . . . . . . . . . . . 64
7. INSTALACIÓN . . . . . . . . . . . . . . . . . . . . . . . . . . . . . . . . . . . . . . . . . . . . . . . . . . . . . . . . . 66
8.
RUIDOS . . . . . . . . . . . . . . . . . . . . . . . . . . . . . . . . . . . . . . . . . . . . . . . . . . . . . . . . . . . . . . 72
9. DATOS TÉCNICOS . . . . . . . . . . . . . . . . . . . . . . . . . . . . . . . . . . . . . . . . . . . . . . . . . . . . . . 73
PENSAMOS EN USTED
Gracias por adquirir un producto Electrolux. Ha escogido un producto que contiene décadas de
experiencia e innovación profesionales. Ingenioso y elegante, se ha diseñado pensando en usted.
Así que, siempre que lo utilice puede tener la seguridad de que conseguirá excelentes resultados.
Bienvenido a Electrolux.
Visite nuestro sitio web para:
Obtener consejos, folletos, soluciones a problemas e información de servicio:
www.electrolux.com
Registrar su producto para recibir un mejor servicio:
www.electrolux.com/productregistration
Adquirir accesorios, artículos de consumo y recambios originales para su aparato:
www.electrolux.com/shop
ATENCIÓN Y SERVICIO AL CLIENTE
Le recomendamos que utilice recambios originales.
Al contactar con el Servicio, cerciórese de tener la siguiente información a mano.
La información se puede encontrar en la placa de características. Modelo, PNC, Número de
serie.
Advertencia - Precaución-Información sobre seguridad.
Datos y recomendaciones generales
Información medioambiental
Salvo modificaciones.
Page 57

ESPAÑOL 57
1.
INSTRUCCIONES DE SEGURIDAD
Por su seguridad y para garantizar el funcionamiento correcto del aparato, antes
de instalarlo y utilizarlo por primera vez lea
atentamente este manual del usuario, incluidos los consejos y advertencias. Para
evitar errores y accidentes, es importante
que todas las personas que utilicen el
aparato estén perfectamente al tanto de
su funcionamiento y de las características
de seguridad. Conserve estas instrucciones y no olvide mantenerlas junto al aparato en caso de su desplazamiento o venta para que quienes lo utilicen a lo largo
de su vida útil dispongan siempre de la información adecuada sobre el uso y la seguridad.
Por la seguridad de personas y bienes, siga las normas de seguridad indicadas en
estas instrucciones, ya que el fabricante
no se hace responsable de daños provocados por omisiones.
1.1 Seguridad de niños y
personas vulnerables
• Este electrodoméstico no está diseñado para que lo usen personas (incluidos
niños) con discapacidad física, sensorial o mental, o con experiencia y conocimiento insuficientes, a menos que
una persona responsable de su seguridad les supervise o instruya en el uso
del electrodoméstico.
No permita que los niños jueguen con
el electrodoméstico.
• Mantenga los materiales de embalaje
alejados de los niños. Existe riesgo de
asfixia.
• Si va a desechar el aparato, extraiga el
enchufe de la toma, corte el cable de
conexión (tan cerca del aparato como
pueda) y retire la puerta para impedir
que los niños al jugar puedan sufrir
descargas eléctricas o quedar atrapados en su interior.
• Si este aparato, que cuenta con juntas
de puerta magnéticas, sustituirá a un
aparato más antiguo con cierre de
muelle (pestillo) en la puerta, cerciórese
de inutilizar el cierre de muelle antes de
desechar el aparato antiguo. Evitará así
que se convierta en una trampa mortal
para niños.
1.2 Instrucciones generales de
seguridad
Mantenga libres de obstrucciones las
aberturas de ventilación del alojamiento
del aparato o de la estructura empotrada
• El aparato está diseñado para conservar los alimentos y bebidas de una vivienda normal, como se explica en este
folleto de instrucciones.
– áreas de cocina para el personal en
– granjas y por clientes en hoteles, mo-
– entornos de tipo hostales o pensio-
– servicios de catering y actividades si-
• No utilice dispositivos mecánicos ni
medios artificiales para acelerar el proceso de descongelación.
• No utilice otros aparatos eléctricos (como máquinas para hacer helados) dentro de los aparatos de refrigeración, a
menos que el fabricante haya autorizado su utilización para estos fines.
• No dañe el circuito del refrigerante.
• El circuito del refrigerante del aparato
contiene isobutano (R600a). Se trata de
un gas natural con un alto nivel de
compatibilidad medioambiental, aunque
es inflamable.
Durante el transporte y la instalación del
aparato, cerciórese de no provocar daños en el circuito de refrigeración.
Si el circuito de refrigeración se daña:
– mantenga el aparato alejado de las
– ventile bien la habitación en la que se
• Es peligroso alterar las especificaciones
o modificar este producto en modo alguno. Cualquier daño en el cable de alimentación puede provocar un cortocir-
ADVERTENCIA
tiendas, oficinas y otros entornos de
trabajo;
teles y otros entornos de tipo residencial;
nes;
milares al por mayor.
llamas y de cualquier fuente de encendido
encuentra el aparato
Page 58

www.electrolux.com
58
• Este aparato es pesado. Debe tener
• No retire ni toque elementos del com-
• Evite la exposición prolongada del apa-
• Las bombillas que se utilizan en este
1.3 Uso diario
• No coloque recipientes calientes sobre
• No almacene gas ni líquido inflamable
• No coloque alimentos directamente
cuito, un incendio o una descarga eléctrica.
ADVERTENCIA
Los componentes eléctricos (cable de alimentación, enchufe,
compresor) debe sustituirlos un
técnico autorizado o personal de
reparaciones profesional a fin de
evitar riesgos.
1.
El cable de alimentación no se debe prolongar.
2.
Compruebe que la parte posterior
del aparato no aplaste ni dañe el
enchufe. Un enchufe aplastado o
dañado puede recalentarse y provocar un incendio.
3.
Cerciórese de que tiene acceso al
enchufe del aparato.
4.
No tire del cable de alimentación.
5.
Si la toma de red está floja, no introduzca el enchufe. Existe riesgo
de descarga eléctrica o incendio.
6.
No utilice el aparato sin la tapa de
la bombilla (si está provisto de ella)
de iluminación interior.
precauciones durante su desplazamiento.
partimento congelador con las manos
húmedas o mojadas, ya que podría sufrir abrasión de la piel o quemaduras
por congelación.
rato a la luz solar directa.
aparato (si está provisto de ellas) son
especiales, y se han seleccionado exclusivamente para uso en aparatos domésticos. No pueden utilizarse para la
iluminación de la vivienda.
las piezas plásticas del aparato.
en el aparato, ya que podrían estallar.
contra la salida de aire de la pared posterior. (Si el aparato es No Frost, es decir, no acumula escarcha.)
• Los alimentos que se descongelen no
deben volver a congelarse.
• Guarde los alimentos congelados, que
se adquieren ya envasados, siguiendo
las instrucciones del fabricante.
• Se deben seguir estrictamente las recomendaciones del fabricante del aparato
sobre el almacenamiento. Consulte las
instrucciones correspondientes.
• No coloque bebidas carbonatadas o
con gas en el congelador, ya que se
genera presión en el recipiente, que podría estallar y dañar el aparato.
• Si se consumen polos helados retirados directamente del aparato, se pueden sufrir quemaduras causadas por el
hielo.
1.4 Cuidado y limpieza
• Antes de realizar tareas de mantenimiento, apague el aparato y desconecte el enchufe de la toma de red.
• No limpie el aparato con objetos metálicos.
• No utilice objetos afilados para eliminar
el hielo del aparato. Utilice un raspador
plástico.
1.5 Instalación
Para realizar la conexión eléctrica,
siga atentamente las instrucciones
de los párrafos correspondientes.
• Desembale el aparato y compruebe
que no tiene daños. No conecte el aparato si está dañado. Informe de los posibles daños de inmediato a la tienda
donde lo adquirió. En ese caso, conserve el material de embalaje.
• Es recomendable esperar al menos dos
horas antes de conectar el aparato, para permitir que el aceite regrese al compresor.
• El aparato debe contar con circulación
de aire adecuada alrededor, ya que de
lo contrario se produce recalentamiento. Para conseguir una ventilación suficiente, siga las instrucciones correspondientes a la instalación.
• Siempre que sea posible, la parte posterior del producto debe estar contra
una pared, para evitar que se toquen
Page 59

las partes calientes (compresor, condensador) y se produzcan quemaduras.
• El aparato no debe colocarse cerca de
radiadores ni de hornillas de cocina.
• Asegúrese de que es posible acceder
al enchufe después de instalar el electrodoméstico.
• Realice la conexión sólo a un suministro
de agua potable (si está prevista una
conexión de agua).
1.6 Servicio técnico
• Un electricista homologado deberá realizar las tareas que se requieran para
ejecutar el servicio o mantenimiento de
este electrodoméstico.
• Las reparaciones de este aparato debe
realizarlas un centro de servicio técnico
autorizado y sólo se deben utilizar recambios originales.
2. PANEL DE MANDOS
1 2 3 4 5 6
ESPAÑOL 59
1.7 Protección del medio
ambiente
Este aparato no contiene gases
perjudiciales para la capa de ozono, ni en el circuito de refrigerante
ni en los materiales aislantes. El
aparato no se debe desechar junto con los residuos urbanos. La
espuma aislante contiene gases
inflamables: el aparato se debe
desechar de acuerdo con la normativa vigente, que puede solicitar a las autoridades locales. No
dañe la unidad de refrigeración,
en especial la parte trasera, cerca
del intercambiador de calor. Los
materiales de este aparato marca-
dos con el símbolo
clables.
son reci-
Tecla ON/OFF
1
Tecla Mode
2
Pantalla
3
Tecla de enfriamiento de temperatura
4
Tecla de calentamiento de tempera-
5
tura
2.1 Pantalla
Tecla Drink Chill
6
Se puede cambiar el sonido predefinido
de las teclas a otro más alto manteniendo
pulsadas al mismo tiempo la tecla Mode y
la de enfriamiento de temperatura durante
unos segundos. El cambio es reversible.
ABCD
E
Page 60

www.electrolux.com
60
A)
B)
C)
D)
E)
2.2 Encendido
Para encender el aparato siga los siguientes pasos:
1.
2.
3.
4.
5.
Para programar otra temperatura, consulte la sección "Regulación de la temperatura".
2.3 Apagado
Para apagar el aparato:
1.
2.
3.
2.4 Regulación de la
temperatura
La temperatura programada en el congelador puede ajustarse pulsando la tecla
de temperatura.
Ajuste de la temperatura predeterminada:
• -18°C para el congelador
Indicador de alarma
EcoMode
Modo FastFreeze
DrinksChill e indicador de temperatura
Modo DrinksChil
Después de seleccionar la tecla
de Mode o de temperatura, se ini-
cian las animaciones
Tras seleccionar la temperatura, la
animación parpadea durante unos
minutos.
Conecte el enchufe a la toma de corriente.
Pulse la tecla ON/OFF si la pantalla
está apagada.
Puede que oiga la señal acústica de
alarma tras unos segundos.
Para restaurar la alarma, consulte la
sección "Alarma de temperatura alta".
Si DEMO aparece en la pantalla, el
aparato está en el modo de demostración. Consulte el apartado "Qué
hacer si...".
Los indicadores de temperatura
muestran la temperatura predeterminada programada.
Pulse la tecla ON/OFF durante 3 segundos.
La pantalla se apaga.
Para desconectar el aparato de la co-
rriente, desconecte el enchufe de la
toma de corriente.
.
El indicador de temperatura muestra la
temperatura programada.
La temperatura programada se alcanza
en un plazo de 24 horas.
Después de un corte del suministro eléctrico, se guarda la temperatura ajustada.
2.5 EcoMode
Para una conservación óptima de los alimentos, seleccione EcoMode.
Para activar la función:
1.
Pulse la tecla Mode hasta que aparezca el icono correspondiente.
El indicador de temperatura muestra
la temperatura programada:
– para el congelador: -18 °C
Para desactivar la función:
1.
Pulse la tecla Mode para seleccionar
otra o ninguna función.
La función se apaga seleccionando una temperatura programada
diferente.
2.6 Modo FastFreeze
Para activar la función:
1.
Pulse la tecla Mode hasta que apa-
rezca el icono correspondiente.
La función se detiene automáticamente
después de 52 horas.
Para apagar la función antes de que termine automáticamente:
1.
Pulse la tecla Mode para seleccionar
otra o ninguna función.
La función se apaga seleccionando una temperatura programada
diferente para el congelador.
2.7 Modo DrinksChill
El modo DrinksChill se utiliza para ajustar
una alarma acústica a la hora deseada y
es útil, por ejemplo, para recetas que precisan el enfriamiento de una mezcla durante un tiempo determinado, o cuando
se necesita un recordatorio para no olvidar que se han colocado botellas en el
congelador para que se enfríen rápidamente.
Para activar la función:
1.
Pulse la tecla DrinkChill .
Page 61

Aparece el indicador DrinksChill.
El temporizador muestra el valor ajus-
tado (30 minutos).
2.
Pulse la tecla de enfriamiento o calentamiento de temperatura para cambiar el valor del temporizador entre 1
y 90 minutos.
3.
El Temporizador empieza a parpa-
dear (min).
Al terminar la cuenta atrás, el indicador
DrinksChill parpadea y suena la alarma:
1.
Saque todas las bebidas del compar-
timento congelador.
2.
Pulse la tecla DrinkChill para apagar
el sonido y desactivar la función.
La función se puede desactivar en cualquier momento durante la cuenta atrás:
1.
Pulse la tecla DrinkChill.
2.
El indicador DrinksChill se apaga.
El tiempo puede modificarse durante la
cuenta atrás y al finalizar, pulsando las
teclas de enfriamiento o calentamiento de
temperatura.
2.8 Alarma de temperatura alta
Un aumento de la temperatura del compartimento congelador (por ejemplo, por
falta de energía eléctrica) se indicará mediante:
• indicadores de temperatura del conge-
lador y alarma intermitentes
ESPAÑOL 61
• emisión de una señal acústica
Para reiniciar la alarma:
1.
Pulse cualquier tecla.
2.
El avisador acústico se apaga.
3.
El indicador de temperatura del congelador muestra la temperatura más
alta alcanzada durante unos segundos. A continuación vuelve a mostrar
la temperatura programada.
4.
El indicador de alarma es visible hasta
que se restablecen las condiciones
normales.
Cuando la alarma vuelve, el indicador se
apaga.
2.9 Alarma de puerta abierta
Si la puerta se queda abierta durante
unos minutos, sonará una señal acústica.
Los indicadores de puerta abierta son los
siguientes:
• indicador de alarma intermitente
• señal acústica
Una vez restablecidas las condiciones
normales (puerta cerrada), la alarma acústica se detendrá.
La señal acústica se puede desactivar durante la fase de alarma pulsando para ello
cualquier tecla.
3. USO DIARIO
3.1 Limpieza del interior
Antes de utilizar el aparato por primera
vez, lave el interior y los accesorios internos con agua templada y un jabón neutro
para eliminar el típico olor de los productos nuevos. A continuación seque bien.
No utilice detergentes ni polvos
abrasivos, ya que podrían dañar el
acabado.
Si DEMO aparece en la pantalla, el aparato está en el modo de demostración: consulte el apartado “Qué hacer si….”.
3.2 Congelación de alimentos
frescos
El compartimento congelador está ideado
para la congelación de alimentos frescos
y para la conservación a largo plazo de
alimentos congelados y ultracongelados.
Para congelar alimentos frescos, active la
función Fast Freeze al menos 24 horas
antes de introducir los alimentos en el
compartimento congelador.
Coloque los alimentos frescos que vaya a
congelar en los dos compartimentos superiores.
La cantidad máxima de alimentos que
puede congelarse en 24 horas se indica
en la placa de datos técnicos, una etiqueta situada en el interior del aparato.
Page 62

www.electrolux.com
62
El proceso de congelación dura 24 horas:
durante ese periodo no deben añadirse
otros alimentos para congelación.
Al cabo de 24 horas, cuando haya finalizado el proceso de congelación, vuelva a
ajustar la temperatura adecuada (consulte
"Regulación de la temperatura").
congelar en el compartimento frigorífico o
a temperatura ambiente, dependiendo del
tiempo de que se disponga.
Es posible incluso cocinar piezas pequeñas congeladas, tomadas directamente
del congelador; en tal caso, el tiempo de
cocción será más prolongado.
3.3 Almacenamiento de
alimentos congelados
Al poner en marcha el aparato por primera vez o después de un periodo sin uso,
déjelo en marcha al menos durante 2 horas con un ajuste alto antes de colocar los
productos en el compartimento.
En caso de producirse una descongelación accidental, por ejemplo, por un corte del suministro
eléctrico, si la interrupción ha sido
más prolongada que el valor indicado en la tabla de características
técnicas bajo "tiempo de elevación", los alimentos descongelados deben consumirse cuanto antes o cocinarlos de inmediato y
volverlos a congelar (después de
que se hayan enfriado).
3.5 Producción de cubitos de
hielo
Este aparato cuenta con una o varias
bandejas para la producción de cubitos
de hielo. Llene las bandejas con agua y
colóquelas en el compartimento congelador.
No utilice instrumentos metálicos
para retirar las bandejas del congelador.
3.6 Acumuladores de frío
El congelador contiene al menos un acumulador de frío que alarga el periodo de
conservación en caso de que se produzca un corte de corriente o una avería.
3.4 Descongelación
Los alimentos ultracongelados o congelados, antes de utilizarlos, se pueden des-
4. CONSEJOS Y SUGERENCIAS ÚTILES
4.1 Consejos sobre la
congelación
Estos consejos son importantes para poder aprovechar al máximo el proceso de
congelación:
• la cantidad máxima de alimentos que
puede congelarse en 24 horas se
muestra en la placa de datos técnicos;
• el proceso de congelación requiere 24
horas. Durante ese periodo no deben
añadirse otros alimentos para congelación;
• congele sólo productos alimenticios de
máxima calidad, frescos y perfectamente limpios;
• prepare los alimentos en porciones pequeñas para que se congelen de manera rápida y total, así como para poder descongelar posteriormente sólo
las cantidades necesarias;
• envuelva los alimentos en papel de aluminio o polietileno y compruebe que los
envoltorios quedan herméticamente cerrados;
• no permita que alimentos frescos y sin
congelar entren en contacto con alimentos ya congelados, para evitar el
aumento de temperatura de los segundos;
• los alimentos magros se congelan mejor que los grasos; la sal reduce el tiem-
Page 63

po de almacenamiento de los alimentos;
• el hielo, si se consume inmediatamente
después de retirarlo del compartimento
congelador, puede provocar quemaduras por congelación en la piel;
• es recomendable etiquetar cada paquete con la fecha de congelación para
controlar el tiempo que permanecen almacenados.
4.2 Consejos para el
almacenamiento de alimentos
congelados
Para obtener el máximo rendimiento de
este aparato, deberá:
5. MANTENIMIENTO Y LIMPIEZA
ESPAÑOL 63
• comprobar que el comerciante ha mantenido los productos congelados correctamente almacenados;
• procurar que los alimentos congelados
pasen de la tienda al congelador en el
menor tiempo posible;
• evitar la apertura frecuente de la puerta
o dejarla abierta más del tiempo estrictamente necesario;
• los alimentos descongelados se deterioran con rapidez y no pueden congelarse de nuevo;
• no supere el tiempo de almacenamiento indicado por el fabricante de los alimentos.
PRECAUCIÓN
Antes de realizar tareas de mantenimiento, desenchufe el aparato.
Este equipo contiene hidrocarburos en la unidad de refrigeración;
por tanto, el mantenimiento y la
recarga deben estar a cargo exclusivamente de técnicos autorizados.
5.1 Limpieza periódica
El equipo debe limpiarse de manera habitual:
• Limpie el interior y los accesorios con
agua templada y un jabón neutro.
• Revise y limpie periódicamente las juntas de la puerta para mantenerlas limpias y sin restos.
• Aclare y seque a fondo.
No mueva, dañe ni tire de los conductos o cables del interior del armario.
No utilice detergentes, polvos
abrasivos, productos de limpieza
perfumados ni cera para limpiar el
interior, ya que dañarán la superficie y dejarán un fuerte olor.
rará el rendimiento del aparato y reducirá
el consumo eléctrico.
Tenga cuidado para no dañar el
sistema de refrigeración.
Muchas marcas de limpiadores de superficies de cocina contienen químicos que
pueden atacar o dañar los plásticos del
aparato. Por tal razón, se recomienda que
el exterior del aparato se limpie sólo con
agua templada a la que se añadirá un poco de líquido lavavajillas.
Después de la limpieza, vuelva a conectar
el aparato a la toma de red.
5.2 Descongelación del
congelador
El compartimento congelador de este
modelo es de tipo "no frost" y no produce
escarcha. Esto significa que, durante el
funcionamiento, no se forma escarcha ni
en las paredes internas del aparato ni sobre los alimentos.
La ausencia de escarcha se debe a la
continua circulación del aire frío en el interior del compartimento impulsado por un
ventilador controlado automáticamente.
Limpie el condensador (rejilla negra) y el
compresor de la parte posterior del aparato con un cepillo. Esa operación mejo-
Page 64

www.electrolux.com
64
5.3 Periodos sin funcionamiento
Si el aparato no se utiliza durante un tiempo prolongado, tome las siguientes precauciones:
• desconecte el aparato de la red
eléctrica;
• extraiga todos los alimentos;
• descongele (si así está previsto) y limpie
el aparato y todos sus accesorios.
6. QUÉ HACER SI…
ADVERTENCIA
Antes de solucionar problemas,
desenchufe el enchufe de alimentación de red de la toma principal.
Las medidas de solución de problemas que no se indican en este
manual deben dejarse en manos
de un electricista o profesional
cualificado y competente.
Problema Posible causa Solución
El aparato no fun-
ciona.
El aparato no está correc-
El aparato no recibe sumi-
El aparato emite una
señal acústica. La
luz de alarma parpadea.
La puerta no está bien ce-
El compresor funciona continuamente.
La puerta no está bien ce-
La puerta se ha abierto
• deje la puerta(s) entreabierta para prevenir olores desagradables.
Si va a mantener el armario en marcha,
solicite a alguien que lo inspeccione de
vez en cuando para evitar que los alimentos se echen a perder en caso de un corte de energía.
El aparato está apagado. Encienda el aparato.
Enchufe el aparato correctamente enchufado a la
toma de corriente.
tamente a la toma de co-
rriente.
Enchufe un aparato eléctrinistro eléctrico. No hay
tensión en la toma de corriente.
co diferente a la toma de
corriente.
Llame a un electricista cua-
lificado.
La temperatura del conge-
lador es demasiado alta.
Consulte "Alarma por exce-
so de temperatura"
Consulte la sección "Alarma
rrada.
La temperatura no se ha
ajustado correctamente.
de puerta abierta".
Seleccione una temperatu-
ra más alta.
Consulte la sección "Cierre
rrada.
de la puerta".
No mantenga abierta la
con excesiva frecuencia.
puerta más tiempo del ne-
cesario.
Page 65

Problema Posible causa Solución
La temperatura de los ali-
mentos es demasiado alta.
Deje que la temperatura de
los alimentos descienda a
la temperatura ambiente
antes de guardarlos.
La temperatura ambiente
es demasiado alta.
El modo FastFreeze está
activado.
La temperatura del
congelador es demasiado baja.
El regulador de temperatura no se ha ajustado correctamente.
El modo FastFreeze está
activado.
La temperatura del
congelador es demasiado alta.
El regulador de temperatura no se ha ajustado correctamente.
Se han guardado muchos
alimentos al mismo tiem-
Reduzca la temperatura
ambiente.
Consulte "Modo FastFreeze
".
Seleccione una temperatu-
ra más alta.
Consulte "Modo FastFreeze
".
Seleccione una temperatu-
ra más baja.
Guarde menos productos
al mismo tiempo.
po.
Los alimentos están de-
masiado juntos.
Disponga los alimentos de
modo que el aire frío pueda
circular entre ellos.
En la pantalla de
temperatura aparece un cuadrado superior o inferior.
Se ha producido un error
en la medición de la temperatura
Póngase en contacto con
su servicio técnico (el siste-
ma de refrigeración seguirá
manteniendo fríos los ali-
mentos, pero no podrá
ajustar la temperatura).
DEMO aparece en la
pantalla.
El aparato está en modo
de demostración (DEMO).
Mantenga pulsada aproxi-
madamente 10 s la tecla
Mode; se escucha un largo
sonido del zumbador y la
pantalla se apaga breve-
mente: el aparato empieza
a funcionar con normalidad.
3.
6.1 Cierre de la puerta
1.
Limpie las juntas de la puerta.
2.
Si es necesario, ajuste la puerta. Consulte "Instalación".
Si es necesario, cambie las juntas defectuosas. Póngase en contacto con
el servicio técnico.
ESPAÑOL 65
Page 66

www.electrolux.com
66
7. INSTALACIÓN
7.1 Colocación
ADVERTENCIA
Si va a desechar un aparato antiguo que tiene una cerradura o
cierre en la puerta, deberá asegurarse de su inutilización para impedir que niños pequeños queden
atrapados en su interior.
El enchufe del aparato debe tener
fácil acceso después de la instalación.
Instale el aparato en un punto en el que la
temperatura ambiente se corresponda
con la clase climática indicada en la placa
de datos técnicos del aparato:
Clase
climática
SN De +10°C a +32°C
N De +16°C a +32°C
ST De +16°C a +38°C
Temperatura ambiente
Clase
Temperatura ambiente
climática
T De +16°C a +43°C
7.2 Conexión eléctrica
Antes de conectar el aparato, compruebe
que el voltaje y la frecuencia que aparecen en la placa de datos técnicos se corresponden con el suministro de la vivienda.
El aparato debe tener conexión a tierra. El
enchufe del cable de alimentación se suministra con un contacto para tal fin. Si la
toma de red de la vivienda carece de conexión a tierra, conecte el aparato a una
toma de tierra conforme con la normativa,
después de consultar a un electricista
profesional.
El fabricante rechaza toda responsabilidad si no se toman las precauciones antes indicadas.
Este aparato es conforme con las directivas de la CEE.
Page 67

7.3 Puerta reversible
ESPAÑOL 67
La puerta del aparato se abre hacia la derecha. Si desea abrir la puerta hacia la izquierda, siga estas instrucciones antes de
instalar el aparato:
1.
Afloje y retire el perno superior.
2.
Retire la puerta.
3.
Retire el separador.
4.
Afloje el perno inferior con una llave.
En el lado opuesto:
1.
Apriete el perno inferior.
2.
Coloque el separador.
3.
Instale la puerta.
4.
Apriete el perno superior.
7.4 Requisitos de ventilación
5 cm
min.
200 cm
2
min.
200 cm
7.5 Instalación del aparato
PRECAUCIÓN
Compruebe que el cable de alimentación de red pueda moverse
con facilidad.
El aire debe poder circular libremente por
la parte posterior del aparato.
2
Ejecute los pasos siguientes:
Page 68

www.electrolux.com
68
Si es necesario, corte la cinta selladora adhesiva y péguela al aparato como se
x
muestra en la figura.
x
1
13 mm
Ø 2.5 mm
Taladre el aparato con una broca de Ø 2,5
mm (10 mm de penetración máxima).
Monte el cuadrado de fijación en el aparato.
2
3
Instale el aparato en el hueco.
Empuje el aparato en el sentido de la flecha (1) hasta que la cubierta de la separación superior haga tope contra el mueble
de cocina.
Empuje el aparato en el sentido de la fle-
2
cha (2) contra el mueble en el lado opuesto
de la bisagra.
1
Page 69

4mm
44mm
ESPAÑOL 69
Ajuste el aparato en el hueco.
Asegúrese de que haya una distancia de
44 mm entre el aparato y el borde delantero del mueble.
La tapa de la bisagra inferior (incluida en la
bolsa de accesorios) garantiza que la separación entre el aparato y el mueble de
cocina sea la adecuada.
Asegúrese de que quede un espacio de 4
mm entre el aparato y el mueble.
Abra la puerta. Coloque la tapa de la bisagra inferior en su lugar.
Fije el aparato al hueco con cuatro tornillos.
I
I
Retire la parte correcta de la tapa de la bisagra (E). No olvide extraer la pieza DX, en
el caso de la bisagra derecha, y la pieza
SX en el caso contrario.
Page 70

www.electrolux.com
70
Fije las tapas (C, D) a las lengüetas y a los
orificios de la bisagra.
Instale la rejilla de ventilación (B).
C
Fije las tapas (E) a la bisagra.
D
E
E
B
Desconecte las piezas (Ha), (Hb), (Hc) y
(Hd).
Instale la pieza (Ha) en el lado interno del
mueble de cocina.
~50 mm
o
90
o
90
~50 mm
21 mm
o
90
Page 71

Hc
Ha
8 mm
Hb
Ha
ESPAÑOL 71
Empuje la pieza (Hc) contra la pieza (Ha).
Abra la puerta del aparato y la puerta del
mueble de cocina en un ángulo de 90°.
Introduzca el cuadrado pequeño (Hb) en la
guía (Ha).
Coloque juntas la puerta del aparato y la
puerta del mueble de cocina y marque los
orificios.
Quite los cuadrados pequeños y taladre
orificios con un diámetro (ø) de 2 mm a 8
mm de distancia del borde externo de la
puerta.
Vuelva a colocar el cuadrado pequeño en
la guía y fíjelo con los tornillos suministrados.
Alinee las puertas del mueble de cocina y
del aparato mediante el ajuste de la pieza
(Hb).
Hb
Page 72

www.electrolux.com
72
Presione la pieza (Hd) contra la pieza (Hb).
Hb
Hd
Finalmente, compruebe que:
• Todos los tornillos están apretados.
8. RUIDOS
Durante el funcionamiento normal del
aparato suelen producirse ciertos ruidos
(compresor, circulación del refrigerante).
OK
SSSRRR!
SSSRRR!
• La cinta selladora se ha fijado con firmeza al armario.
• La puerta abre y cierra correctamente.
SSSRR
R!
HISSS!
CLICK!
BRRR!
CRACK!
BLUBB!
CLICK!
CLICK!
Page 73

ESPAÑOL 73
HISSS!
BLUBB!
9. DATOS TÉCNICOS
HISSS!
BLUBB!
BRRR!
BRRR!
CRACK!CRACK!
Medidas de la cavidad
Altura 1780 mm
Anchura 560 mm
Profundidad 550 mm
Tiempo de estabilización 21 h
Voltaje 230-240 V
Frecuencia 50 Hz
La información técnica se encuentra en la
placa de características, situada en el la-
do interior izquierdo del aparato, y en la
etiqueta de consumo energético.
10. ASPECTOS MEDIOAMBIENTALES
contenedores adecuados para su
Recicle los materiales con el símbolo
Coloque el material de embalaje en los
.
reciclaje.
Page 74

www.electrolux.com
74
Ayude a proteger el medio ambiente y la
salud pública, así como a reciclar
residuos de aparatos eléctricos y
electrónicos. No deseche los aparatos
marcados con el símbolo
junto con los
residuos domésticos. Lleve el producto a
su centro de reciclaje local o póngase en
contacto con su oficina municipal.
Page 75

ESPAÑOL 75
Page 76

www.electrolux.com/shop
222366981-A-132013
 Loading...