

Page 1

2222736-32
t
q
S
T
I N F O
INSTALLATION AND INSTRUCTION MANUAL
KÄYTTÖOHJE
BRUKSANVISNING
РУКОВОДСТВО ПО ЭКСПЛУАТАЦИИ
EU 6221 U
FREEZER
PAKASTINKAAPPI
FRYSSKÅP
МОРОЗИЛЬНИК
Page 2

2
CONTENTS
Instructions for the user
Important Safety Instructions 3
Description of the appliance 4
Use 5
Cleaning the interior 5
Control panel 5
Starting up 5
Temperature regulation 5
Quick freezing 5
Warning light 6
Acoustic alarm 6
Freezing calendar 6
Freezing of fresh foods 6
Storage of commercially frozen food 6
Thawing 6
Ice-cube production 6
Tips 7
Tips for freezing fresh foods 7
Tips for storage of commercially frozen food 7
Maintenance 8
Defrosting 8
Periodic cleaning 8
Periodios of non-operation 8
Something not Working 9
Instructions for the installer
Technical specifications 9
Installation 10
Positioning 10
Electrical connection 10
Grid preparation 10
Door reversal 11
Building the appliance in under a worktop 11
Fitting the plinth 13
Page 3

IMPORTANT SAFETY
INSTRUCTIONS
General Safety
■
This appliance is designed to be operated by
adults. Children should not be allowed to tamper
with the controls or play with the product.
■
It is dangerous to alter the specifications or modify
this product in any way.
■
Before any cleaning or maintenance work is
carried out, be sure to switch off and unplug the
appliance.
■
This appliance is heavy. Care should be taken
when moving it.
■
Ice follies can cause frost burns if consumed
straight from the appliance.
■
Take utmost care when handling your
appliance so as not to cause any damages to
the cooling unit with consequent possible fluid
leakages.
■
The appliance must not be located close to
radiators or gas cookers.
■
Avoid prolonged exposure of the appliance to
direct sunlight.
■
There must be adequate ventilation round the
back of the appliance and any damage to the
refrigerant circuit must be avoided.
■
For freezers only (except built-in models): an
ideal location is the cellar or basement.
■
Do not use other electrical appliances (such as
ice cream makers) inside of refrigerating
appliances.
Service / Repair
■
Any electrical work required to install this
appliance should be carried out by a qualified
electrician or competent person.
■
This appliance should be serviced by an
authorised Service Centre, and only genuine
spare parts should be used.
■
Under no circumstances should you attempt to
repair the appliance yourself. Repairs carried out
by inexperienced persons may cause injury or
more serious malfunctioning. Refer to your local
Service Centre, and always insist on genuine
spare parts.
■
This appliance contains hydrocarbons in its
cooling unit; maintenance and recharging must
therefore only be carried out by authorised
technicians.
Use
■
The domestic refrigerators and freezers are
designed to be used specifically for the storage of
edible foodstuffs only.
■
Frozen food must not be re-frozen once it has
been thawed out.
■
Manufacturers’ storage recommendations should
be strictly adhered to. Refer to relevant
instructions.
■
The inner lining of the appliance consists of
channels through which the refrigerant passes. If
these should be punctured this would damage the
appliance beyond repair and cause food loss. DO
NOT USE SHARP INSTRUMENTS to scrape off
frost or ice. Frost may be removed by using the
scraper provided. Under no circumstances should
solid ice be forced off the liner. Solid ice should be
allowed to thaw when defrosting the appliance.
See defrost instructions.
■
Do not place carbonated or fizzy drinks in the
freezer as it creates pressure on the container,
which may cause it to explode, resulting in
damage to the appliance. Do not use a
mechanical device or any artificial means to speed
up the thawing process other than those
recommended by the manufacturer. Never use
metal objects for cleaning your appliance as it may
get damaged.
Installation
■
Care must be taken to ensure that the appliance
does not stand on the electrical supply cable.
Important: if the supply cable is damaged, it must
be replaced by authorised service or qualified
personnel using a special cable of the same type.
■
During normal operation, the condenser and
compressor at the back of the appliance heat up
considerably. For safety reasons, minimum
ventilation must be as shown in the relevant
Figure.
3
t
It is most important that this instruction book should be retained with the appliance for future
reference. Should the appliance be sold or transferred to another owner, or should you move house and
leave the appliance, always ensure that the book is supplied with the appliance in order that the new
owner can be acquainted with the functioning of the appliance and the relevant warnings.
These warnings are provided in the interest of safety. You must read them carefully before installing or
using the appliance.
Page 4
Attention: keep ventilation openings clear of
obstruction.
■
If the appliance is transported horizontally, it is
possible that the oil contained in the compressor
flows in the refrigerant circuit. It is advisable to
wait at least two hours before connecting the
appliance to allow the oil to flow back in the
compressor.
■
There are working parts in this product which heat
up. Always ensure that there is adequate
ventilation as a failure to do this will result in
component failure and possible food loss. See
installation instructions.
■
Parts which heat up should not be exposed.
Wherever possible the back of the product should
be against a wall.
■
If the appliance has been transported horizontally,
it is possible that the oil contained in the
compressor flows in the refrigerant circuit. It is
advisable to wait at least two hours before
connecting the appliance to allow the oil to flow
back in the compressor.
Environment Protection
■
This appliance does not contain gasses which
could damage the ozone layer, in either its
refrigerant circuit or insulation materials. The
appliance shall not be discarded together with
the urban refuse and rubbish. Avoid damaging
the cooling unit, especially at the rear near the
heat exchanger. Information on your local
disposal sites may be obtained from your
municipal authorities.
■
The materials used on this appliance marked
with the symbol are recyclable.
4
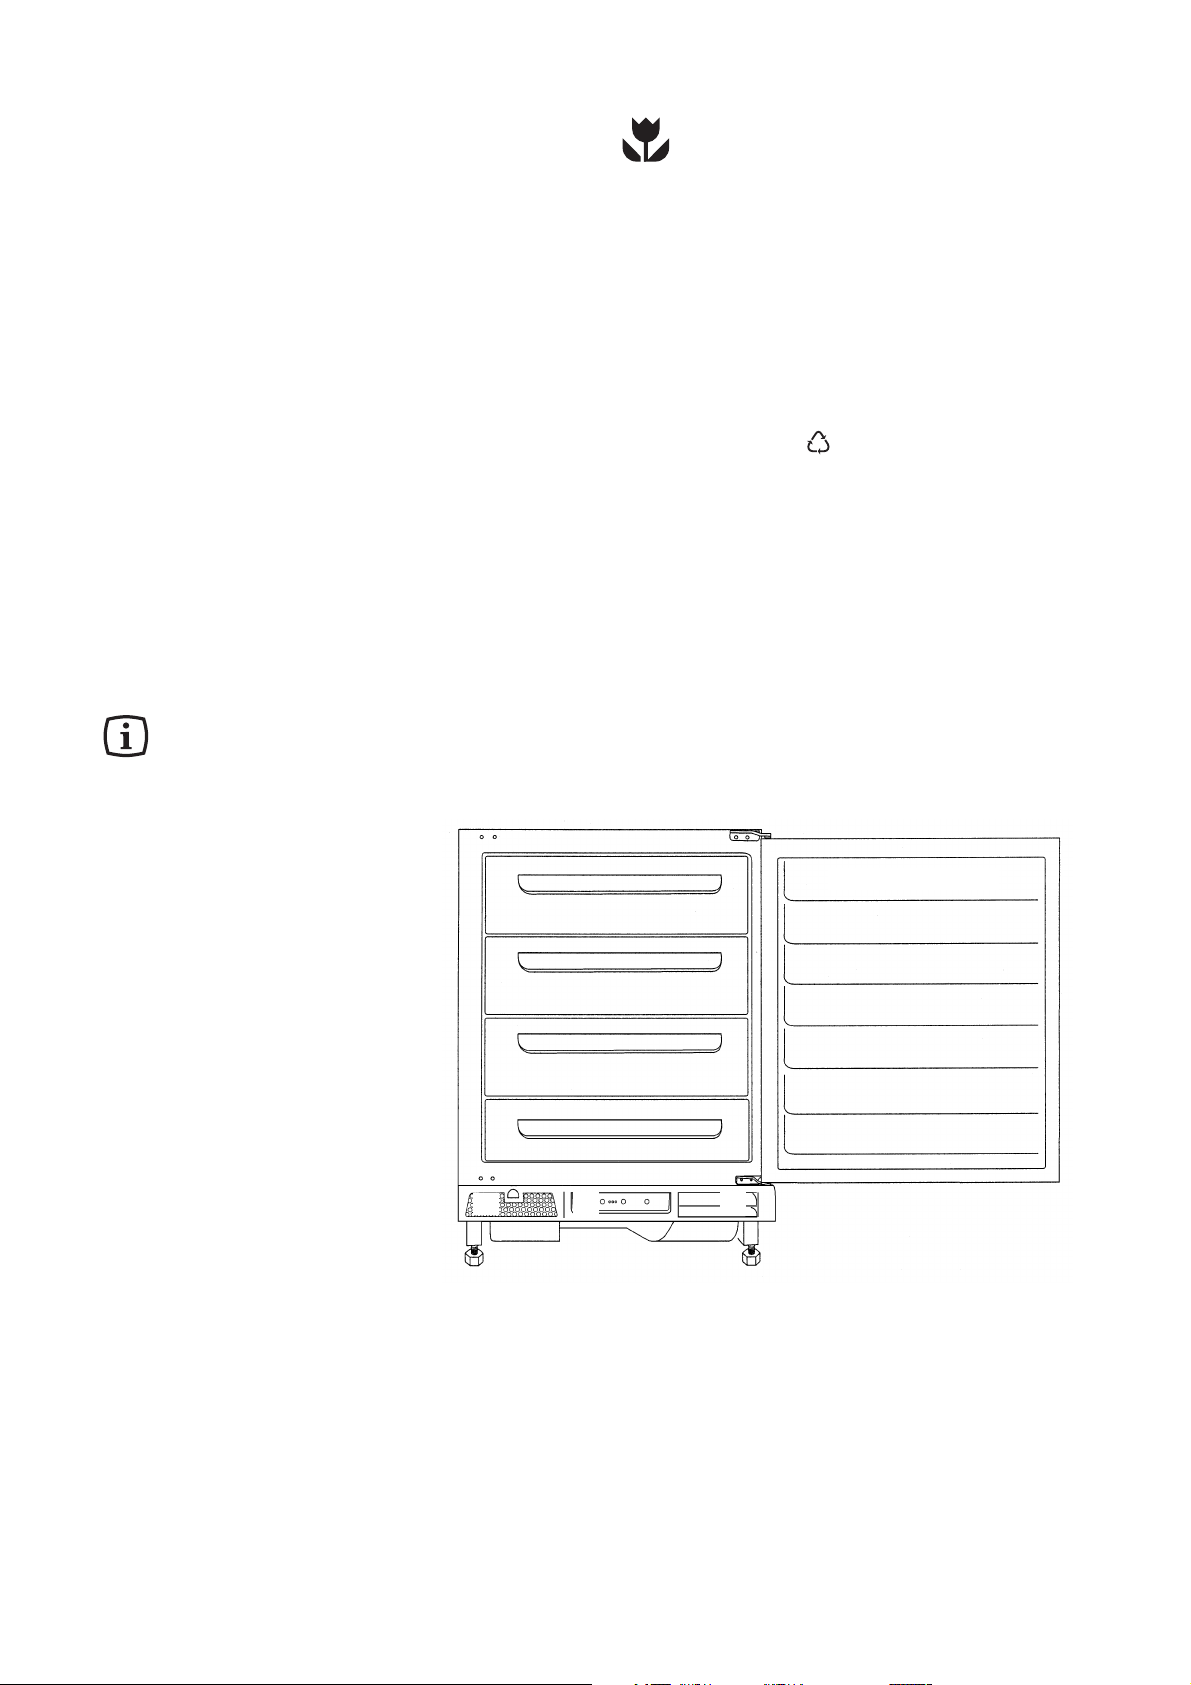
DESCRIPTION OF THE APPLIANCE
➀
Air outlet duct
➁
Freezer controls
➂
Air inlet filter
➃
Comparments for storing frozen food
➄
Compartments for freezing fresh food
➀
➁
➂
➃
➃
➄
➄
Page 5
USE
Starting up
Insert the plug into the wall socket. The appliance can
be activated/deactivated by pressing the ON/OFF
button ➅.The pilot light ➄will light up to show that
the appliance is on.
temperature and frequent door openings, it might be
necessary to select a more suitable setting.
Turn knob ➆towards “max” to obtain lower
temperatures and, conversely, towards “min” if a less
cold temperature is required. Freezer operation can
be halted by turning knob ➆to position «■».
5
t
Cleaning the interior
Before using the appliance for the first time, wash the
interior and all internal accessories with lukewarm
water and some neutral soap so as to remove the
typical smell of a brand-new product, then dry
thoroughly.
Do not use detergents or abrasive powders, as these
will damage the finish.
The freezer is marked with the symbol, which means that the compartment is suitable for freezing
fresie food and long-term storage of frozen food.
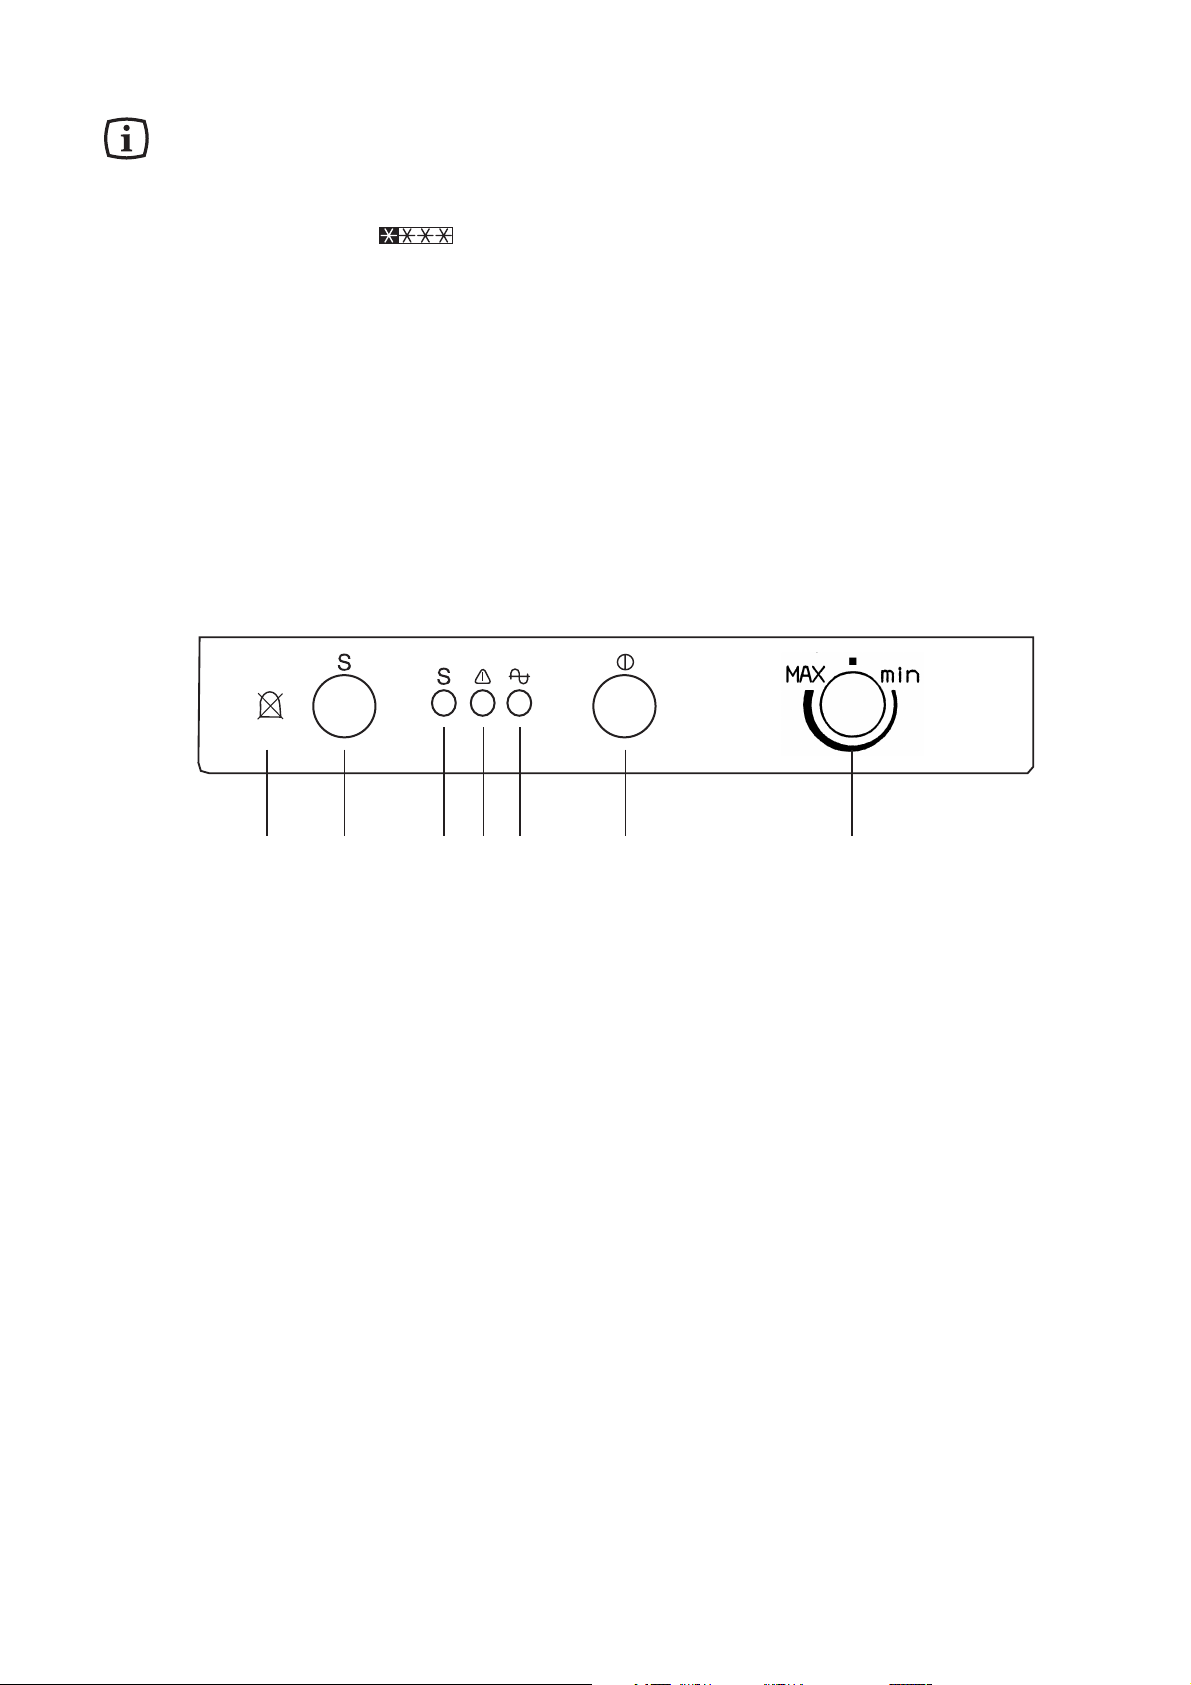
Control panel
➄➅ ➆➀ ➁➃➂
➀
Symbol for acoustic alarm
➁
Fast freeze switch and for stopping the acoustic
alarm (warning light on)
➂
Fast freeze light (yellow)
➃
Warning light (red)
➄
Pilot light (green)
➅
Push button ON/OFF
➆
Thermostat control knob
Temperature regulation
Turn knob ➆beyond the «■» position.
To safely store frozen and deep-frozen foods, the
inner temperature of the freezer must be at least
-18°C or colder. Therefore, we suggest you turn the
knob ➆to a medium setting.
The temperature inside the freezer is automatically
adjusted to ensure safe storage of the food.
However if the appliance works in unfavourable room
conditions such as poor ventilation, high ambient
Quick freezing
Activate fast freeze by depressing the fast freeze
switch ➁. The pilot lamp ➂will then light up. The
SUPER function can be ended by pressing the button
➁
again. The yellow light goes out.
Page 6

6
Warning light
This light ➃ warns when the temperature inside the
appliance has increased so much as to jeopardize the
preservation of food in the compartment.
When the appliance is switched on for the first time or
when food is placed in the compartment for freezing,
this light remains on until the temperature has
reached the level required for correct storage.
Acoustic alarm
This appliance also incorporates an alarm which
gives off a sound signal whenever the warning light
comes on. This signal can be temporarily stopped by
depressing the push button for fast freezing ➁.
The fast freezing push button can be released as
soon as the warning light is off.
The appliance also incorporates an alarm which gives
off a sound signal when the door remains open for
more than 60 seconds. To stop this sound signal
close the door.
Freezing Calendar
The symbols on the drawers show different types of
frozen goods.
The numbers indicate storage times in months for the
appropriate types of frozen goods. Whether the upper
or lower value of the indicated storage time is valid
depends on the quality of the foods and pre-treating
before freezing.
Storage of commercially frozen
food
When you first start the freezer or if the freezer has
been out of use for some time, we advise you to run
your appliance for at least two hours in the «fast
freeze» mode before storing frozen food.
Important
If there is a power failure when food is in
the freezer, do not open the door of the
freezer. The frozen food will not be affected
if the power cut is of short duration (up to
18 hours) and the freezer is full, otherwise,
it is recommended that the food should be
used within a short time (a temperature
increase of the frozen food shortens its safe
storage period).
Freezing of fresh foods
To quick-freeze foods when the appliance has not
been in use, switch on the freezer and let it run on the
quick-freeze setting for at least three hours before
putting the food to be frozen in the compartment.
If instead the appliance is already in operation, it
should run on the quick-freeze setting for at least 24
hours before the foods are put in the freezer. Once
the foods have been placed in the freezer, the
freezing operation can be considered to be complete
24 hours later. Once freezing is complete, the freezer
should be reset for normal storage use.
Food to be frozen has to be placed in the
appliance's two top compartments; if freezing
only a small amount of food, use the top
compartment.
The maximum amount of food which is freezable in
24 hours is indicated on the rating plate. This is to be
found on the bottom left-hand side.
You should never freeze all at once a greater quantity
of foods than the maximum indicated on the
appliance’s rating plate.
Thawing
Before being used, deep-frozen and frozen food can
be thawed out either in the refrigerator or at room
temperature, depending on the time available for this
operation.
Small pieces of food, such as hamburgers, cutlets
chips, and fish fingers, for example, can be cooked
straight out of the freezer, without any intermediate
thawing operation.
Clearly, cooking time will be marginally longer than in
the case of thawed food.
Ice-cube production
This appliance is equipped with trays for the
production of ice-cubes.
Fill these trays with water to 3/4 of their height, then
put them in the freezer compartment. The ice-cubes
may be shaken out from the trays by simply twisting;
do not use metallic instruments to remove the trays
from the freezer.
Page 7

TIPS
Tips for freezing fresh foods
To help you get the best out of the freezing process,
here are a few hints:
■ Freeze only good-quality, fresh and well-cleaned
foods. Split them into small portions to speed up
freezing and avoid having to thaw more food than
you require. It is in fact important to remember that
once the foods have thawed out, they deteriorate
fast.
■ Another point to remember is that lean foods keep
better and longer than fatty foods. Salt too reduces
storage times.
■ Wrap the foods in foil or polythene film, ensuring
that the wrapping adheres closely to the food and
is well sealed. In this way, by avoiding contact with
air, the colour flavour and nutritional value of the
foods remain intact.
■ During the freezing process, do not add further
foods for freezing and do not open the freezer
door.
■ The foods for freezing should not be placed in
contact with already frozen foods, but put in the
special freezing compartment. This will stop the
temperature of already frozen foods from rising.
■ Never put fizzy drinks in the freezer as they might
well burst.
■ In addition, never put hot foods or liquids in the
freezer compartment and take care not to fill
recipients up to the brim if they are covered with a
lid.
■ It is a good idea to mark the packs with the date
on which freezing started so that you can keep a
check on storage periods.
Tips for storage of commercially
frozen food
To get the best out of your freezer, in the case of
storage of commercially frozen food you should
ensure that:
■ the products have been correctly stored by the
retailer;
■ that there is only a very short time between when
you purchase the products and when you put them
in the freezer;
■ you do not store products for longer than the time
specified by the food manufacturer;
■ In addition, if the freezer has been out of use for
some time, before putting the products in the
compartment let the freezer run for at least two
hours on the quick-freeze (SUPER) setting. After
this, reset the freezer for normal storage use;
■ Avoid opening the door too frequently and when
you do open it, leave it open only for as long as is
strictly necessary;
■ A word of warning about ice lollies: they should not
be eaten straight out of the freezer as this might
cause cold burns.
7
t
Page 8
8
Unplug the appliance before carrying out any
maintenance operation.
Warning
This appliance contains hydrocarbons in its
cooling unit maintenance and recharging must
therefore only be carried out by authorised
technicians.
Defrosting
The freezer compartment will become progressively
covered with frost. This should be removed with the
special plastic scraper provided, whenever the
thickness of the frost exceeds 1/4".
During this operation it is not necessary to switch off
the power supply or to remove the foodstuffs.
However, when the ice becomes very thick on the
inner liner, complete defrosting should be carried out
and it is advisable to carry out this operation when the
appliance is empty.
To carry out complete defrosting proceed as follows:
1. Remove any stored food, wrap it in several layers
of newspaper and put it in a cool place.
2. Turn the thermostat control ➆to the «■» setting.
3. Leave the door open.
4. Remove the three large drawers.
5. When defrosting is completed, remove the water
that has collected in the small bottom drawer and
dry the interior thoroughly.
Keep the scraper for future use.
Warning
Never use metal objects for defrosting your
appliance as it may get damaged.
Do not use a mechanical device or any
artificial means to speed up the thawing
process other than those recommended by
the manufacturer.
A temperature increase of the frozen food
shortens its safe storage period.
Periodic cleaning
Never use metal objects for cleaning your appliance
as it may get damaged. Clean the inside with warm
water and bicarbonate of soda. Rinse and dry
thoroughly.
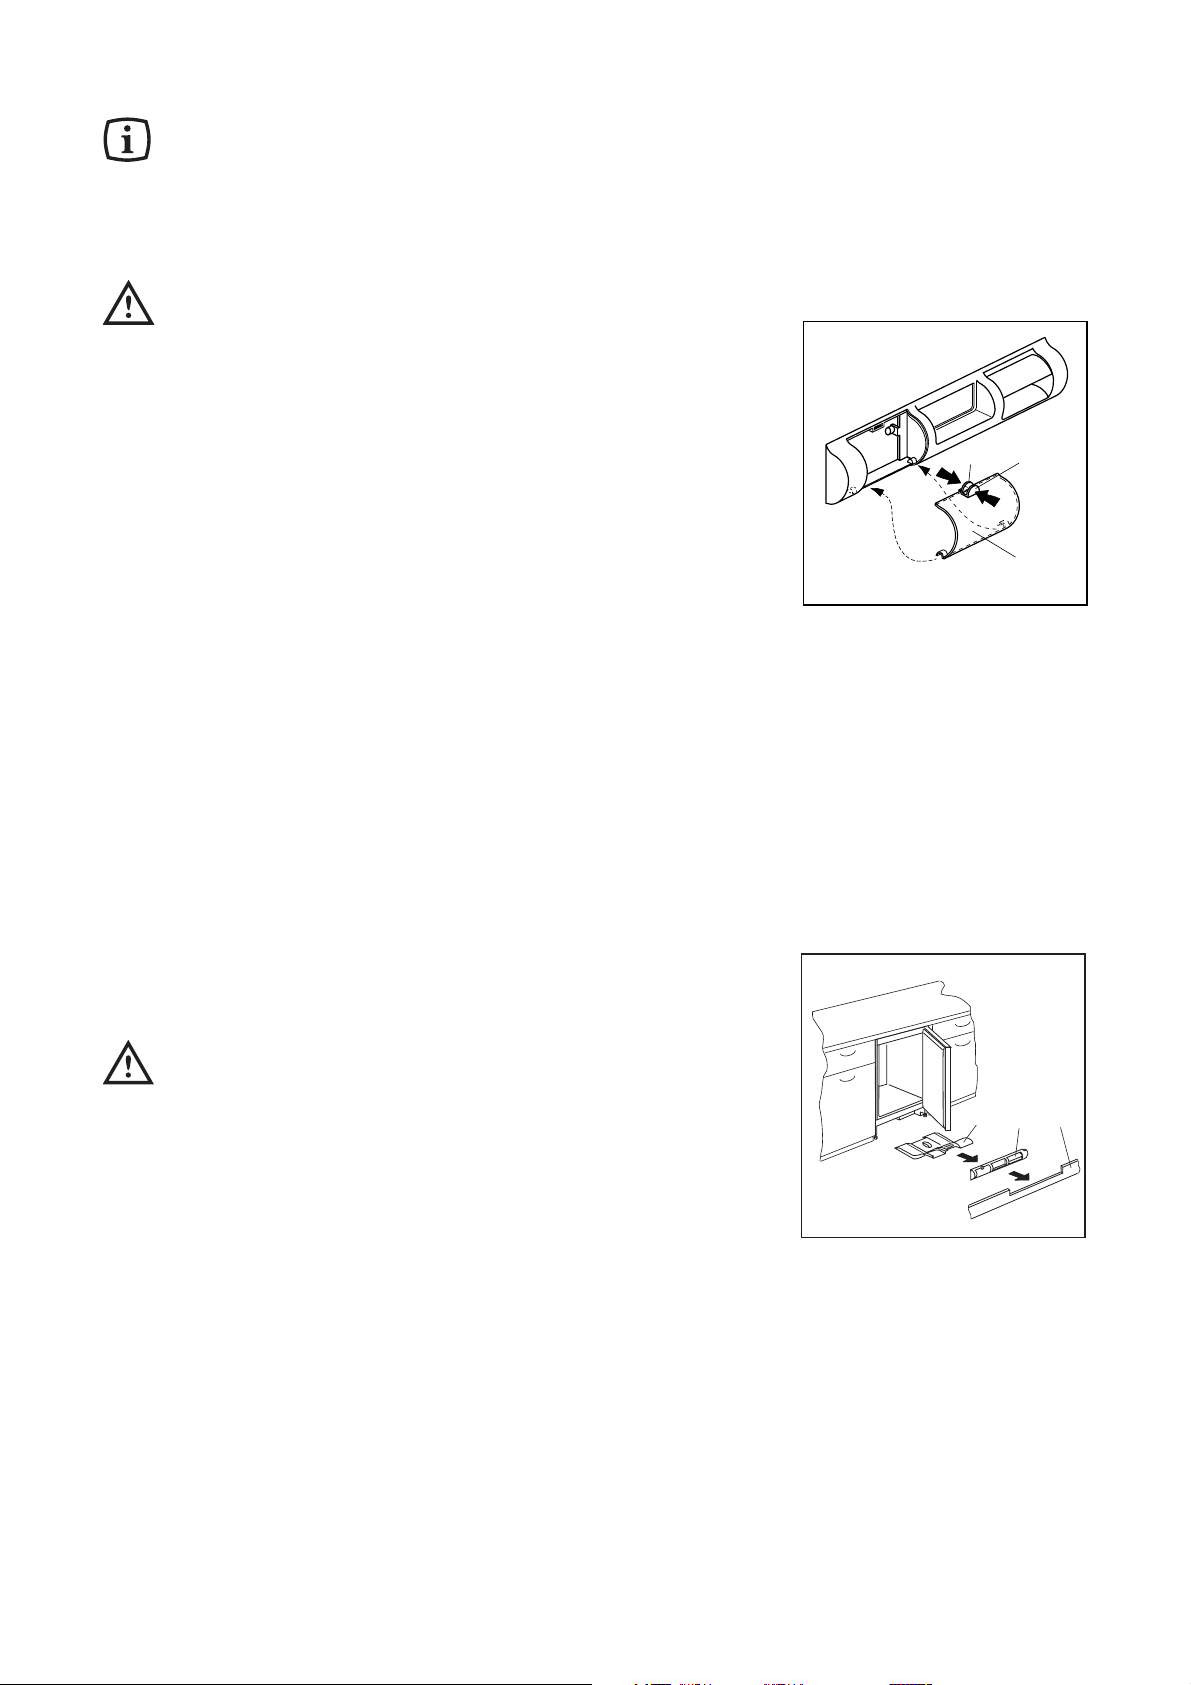
MAINTENANCE
The appliance is equipped with an air inlet filter (1)
and an air outlet duct (2) on the ventilation grid. Keep
clean to guarantee good ventilation and good working
order of the appliance.
The filter can be removed and washed with water, as
follows:
1. Pinch flaps (a) and (b) with fingers
2. Pull the filter down.
3. Pull the filter out.
To replace the filter reverse the process.
An accumulation of dust will affect the performance of
the appliance and cause excessive electricity
consumption.
The structure of the appliance permits cleaning of the
rear zone close to the wall, using a vacuum cleaner.
1. Remove the plinth (1), then the ventilation grid (2);
2. Carefully pull the air deflector out (3).
Periods of non-operation
When the appliance is not in use for long periods,
take the following precautions:
remove the plug from the wall socket;
remove all food:
defrost and clean the interior and all accessories;
leave the door ajar to allow air to circulate to prevent
unpleasant smells.
2
b
a
1
S.I.012
21
3
S.I.013
Page 9

SOMETHING NOT WORKING
9
t
If the appliance is not functioning properly, check that:
If your appliance is still not working properly after making the above checks, contact the nearest service centre.
To obtain fast service, it is essential that when you apply for it you specify the model and serial number
of your appliance which can be found on the guarantee certificate or on the rating plate located inside
the appliance, on the bottom left-hand side.
Dérangement
Remède
Appliance does not function, no pilot light is illuminated.
The freezer temperature is not sufficient, red light lights up.
Large accumulation of frost in the appliance, perhaps also at
the door seal.
Unusual noises.
The compressor does not start immediately after pressing the
fast freeze button or after changing the temperature setting.
- Appliance is not switched on; switch appliance on.
- Mains plug is not inserted or is loose; insert mains plug.
- Fuse has blown or is defective; check fuse, replace if
necessary.
- Mains socket is defective; Mains malfunctions are to be
corrected by an electrician.
- Temperature is not properly adjusted; please refer to the
section “Temperature regulation”.
- Door was open for a long time; only leave the door open
as long as necessary.
- Within the last 24 hours a large quantity of warm foods
were loaded; press the fast freeze button.
- Appliance is next to a source of warmth; please refer to the
section “Location”.
- Door is not properly sealed (perhaps after re-hanging
door); carefully warm the door seal with a hand-held hair
dryer at those points which are not airtight (no warmer
than approx. 50°C). At the same time, shape the warmed
door seal by hand, so that it is again properly seated.
- Appliance is not level; readjust the front levelling feet.
- Appliance is in contact with wall or other objects; push
appliance away a short distance.
- A part at the back of the appliance, e.g. a tube, is in
contact with another appliance part or the wall; bend this
part away carefully if necessary.
- This is normal, no error has occurred; the compressor
starts after a period of time.
TECHNICAL SPECIFICATIONS
The technical data is indicated in the rating plate on the left side inside the appliance.
Page 10

lf this appliance featuring magnetic door seals is
to replace an older appliance having a spring lock
(latch) on the door or lid, be sure to make that
spring lock unusable before you discard the old
appliance. This will prevent it from becoming a
death-trap for a child.
Positioning
The appliance should be installed well away from
sources of heat such as radiators, boilers, direct
sunlight etc.
Best performance is obtained with ambient
temperature between +18°C and +43°C (class T);
+18°C and +38°C (class ST); +16°C and +32°C
(class N); +10°C and +32°C (class SN).
The class of your appliance is shown on its rating
plate.
For building-in and door reversibility refer to the
relevant instructions.
Electrical connection
Before plugging in, ensure that the voltage and
frequency shown on the serial number plate
correspond to your domestic power supply. Voltage
can vary by +6% of the rated voltage. For operation
with different voltages, a suitably sized autotransformer must be used.
Important
The appliance must be earthed.
The power supply cable plug is provided with a
contact for this purpose.
If the domestic power supply socket is not
earthed, connect the appliance to a separate
earth in compliance with current regulations,
consulting a specialist technician.
The Manufacturer declines all responsibility if the
above safety precautions are not observed.
This appliance complies with EEC directive
number 87/ 308 of 2/6/87 relative to radio
interference suppression.
This appliance complies with the following
E.E.C. Directives:
- 73/23 EEC of 19.2.73 (Low Voltage Directive) and
subsequent modifications;
- 89/336 EEC of 3.5.89 (Electromagnetic
Compatibility Directive) and subsequent
modifications.
10
INSTALLATION
Grid preparation
Remove the grid from the appliance pulling it towards
you with hands.
Right door opening:
Remove the left side (A) of the grid cutting it from the
rear (see figure, a).
Left door opening:
Remove the right side (B) of the grid cutting it from
the rear (see figure, b).
To reposition the grid on the appliance proceed as
follows:
Apply the grid to the base of the appliance by pushing
the clasps (a) until they click.
N.B. The grid is to be assembled after having fixed
the appliance in the niche with the brackets.
a
a
S.I.001
A
S.I.002
a
B
b
Page 11

Door reversal
The appliance must be unplugged before starting
work. To reverse the opening direction of the door,
proceed as follows:
1. Remove the top hinge (1) taking care not to let the
door fall.
2. Remove the bottom door hinge (2).
3. Take out the plugs (3) from the holes (F) and
reinsert them in the holes (F1) on the opposite side.
4. Refit the upper hinge (1) on the opposite side, on
the bottom (position A).
5. Refit the door on the pin of the hige (1) in position
A;
6. Insert the pin of the previously removed bottom
hinge (2) in the upper hole (G) of the door,
therefore fix the hinge on the top in position B.
Building in the appliance under a
worktop
The dimensions of the recessed installation area must
correspond with those indicated in the figure. The
appliance could be inserted between two units (a) or
as an end unit (b).
Important
It must be possible to disconnect the appliance
from the mains power supply; the plug must
therefore be easily accessible after installation.
Fasten the side panel to the rear of the appliance with
the fixing brackets.
11
t
UPPER
LOWER
S.I.003
820 - 870
S.I.004
1
3
600
b
F
F
600
1
1
2
550
600
G
a
F
B
F
A
S.I.005
SUPER.
INFER.
D326
Page 12

Fasten the appliance to the worktop or the sides,
applying the sealing strip between the appliance and
adjacent cabinet using the fixing brackets (E).
The appliance is equipped with adjustable support
feet. To adapt the appliance to the height of the
installation area (max 870 mm), screw in, or screw
out the feet situated in the four bottom corners.
Separate parts A, B, C, D as shown in the figure.
12
UPPER
LOWER
Place guide (A) on the inside part of the furniture
door, in the upper and lower positions as shown in the
figure and mark the position of external holes. Having
drilled the holes, fix the guide with the screws
supplied.
Fix cover (C) on guide (A) until it clips into place.
Open the appliance door and the furniture door at
90°. Insert the small square (B) into guide (A). Put
together the appliance door and the furniture door
and mark the holes as indicated in the figure.
Remove the squares and drill holes with Ø 2 mm at 8
mm from the outer edge of the door. Place the small
square on the guide again and fix it with the screws
supplied.
SUPER.
E
INFER.
E
50mm
A
20mm
D319
30
S.I.006
A
B
PR166
A
C
PR33/2
8mm
C
D
PR266
PR167
B
A
Page 13

13
t
Should adjustment of the furniture door be necessary,
use the clearance of slots as required.
At the end of operations, it is necessary to check if the
door of the furniture closes properly.
Fix cover (D) on guide (B) until it clips into place.
Fitting the plinth
Important
For the efficient operation of the appliance, it is
important that the original ventilation grid is
used.
■ For an opening height dimension A=820 mm and a
plinth height dimension a=100 mm, the plinth may
be fitted without adjustments. The same applies to
an opening height dimension B=870 mm and a
plinth height dimension b=150 mm.
■ For plinth heights greater than a=100 mm, b=150
mm, a cut should be made in the plinth, 580 mm
wide, in the centre of the appliance position,
leaving a remaining height of a=100 mm, b=150
mm.
■ Attach plinth to the kitchen units.
Important
The plinth must be positioned at a minimun
distance of 25 mm from the door.
PR168
B
D
PR167/1
S.I.007
S.I.008
A = 820
B = 870
25
25 - 80
580
a = 100
b = 150
Page 14

Cодержание
Bажные рекомендации и
советы 40
Инструкции для
пользователя
Oписание прибора 41
Эксплуатация 41
Предварительная чистка 41
Панель управления 42
Bключение и регулировка температуры 42
Быстрое замораживание 42
Предупредительный сигнал 42
Календарь замораживания
42
Звуковая сигнализация 42
Замораживание свежих продуктов 43
Xранение замороженных продуктов 43
Pазмораживание продуктов 44
Приготовление кубиков льда 44
Уход 44
Pазмораживание 44
Периодическая чистка 44
Когда прибор не используется 45
Tехническое обслуживание
исервисные центры 45
Для монтажника
Tехнические данные 45
Mонтаж 46
Mесто установки 46
Подключение к электросети 46
Подготовка вентиляционной решетки 46
Изменение направления открывания двери 47
Bстраивание прибора под столешницу 47
Установка плинтуса 49
39
T
Page 15

Oбщие сведения о безопасности
■ Eсли ваш прибор оснащен замком, а не
магнитным уплотнителем, при утилизации
старого холодильника с замком мы
рекомендуем вывести замок из строя. Это
позволит избежать несчастных случаев, когда
дети во время игры могут оказаться запертыми
внутри прибора.
■ Перед проведением любых работ по уходу и
техническому обслуживанию прибора, а также в
случае замены лампочки (при наличии)
необходимо вынуть вилку прибора из розетки.
■ Данный прибор предназначен для
использования только взрослыми. Cледите за
тем, чтобы дети не приближались к прибору и
не играли с его регуляторами.
■ Убедитесь, что после установки прибор не
стоит на кабеле питания.
■ Hи в коем случае не пытайтесь вносить какие-
либо изменения в устройство данного прибора!
■ При перемещении прибора старайтесь не
повредить элементы холодильной
установки и предотвратить вытекание
хладагента.
■ Прибор не следует устанавливать рядом с
отопительными батареями или газовыми
плитами.
■ Избегайте продолжительного попадания на
прибор солнечных лучей.
■ Hеобходимо обеспечить надлежащую
циркуляцию воздуха вокруг задней части
прибора. Контур хладагента ни в коем
случае не должен быть поврежден.
■ Tолько для морозильников (кроме
встроенных): наилучшее место установки это погреб.
■ Hе ставьте в холодильник другие
электроприборы (например, мороженицу),
если в инструкциях к этим приборам не
указано, что вы можете это сделать.
Oбслуживание и ремонт
■ Любые изменения бытовой электрической
системы, необходимые для подключения
прибора, должны быть выполнены
уполномоченным на это специалистом.
■ Hи в коем случае не пытайтесь
отремонтировать прибор самостоятельно.
Pемонт, выполненный неквалифицированным
персоналом, может стать причиной ущерба.
Oбратитесь в ближайший авторизованный
изготовителем сервисный центр (см. отдельный
список сервисных центров). Для ремонта
должны использоваться только фирменные
запасные части.
■ Hе используйте никаких механических
инструментов или других искусственных
средств для ускорения размораживания, кроме
указанных в данном руководстве.
Эксплуатация
■ Домашние холодильники и/или морозильники
предназначены только для хранения и/или
замораживания продуктов питания.
■ Bо всех холодильных приборах имеются
поверхности, покрывающиеся инеем. B
зависимости от модели этот иней может
удаляться автоматически (автоматическое
размораживание) или вручную. Hи в коем
случае не пытайтесь удалить иней заостренным
предметом: это может безвозвратно повредить
испаритель.
■ Hи в коем случае не кладите в
низкотемпературные отсеки (морозильник или
холодильник) газированные напитки, так как
они могут взорваться.
■ Hе кладите в холодильник горячие жидкости
или продукты, и не наполняйте сосуды с
крышкой жидкостью под горлышко.
■ Xолодильная система данного прибора
содержит углеводороды, поэтому, обслуживание
и заправка должны выполняться только
персоналом, уполномоченным изготовителем.
■ Hе пользуйтесь металлическими предметами
для чистки прибора, так как они могут
повредить его.
40
B
ажные рекомендации и советы
Чрезвычайно важно, чтобы данное руководство хранилось в надежном, но доступном для
пользователей месте, чтобы в случае необходимости они всегда могли к нему обратиться. Eсли
прибор будет продан или передан другому лицу, необходимо приложить к прибору и
руководство по эксплуатации, чтобы новый владелец мог ознакомиться с работой машины и с
соответствующими рекомендациями.
Данные рекомендации были подготовлены с целью обеспечения вашей безопасности при
пользовании прибором. Перед установкой или использованием прибора рекомендуем вам
внимательно ознакомиться с инструкцией.
Page 16

Установка
■ Bо время нормальной работы конденсатор и
компрессор, которые находятся в задней части
прибора, значительно нагреваются. B целях
вашей безопасности необходимо обеспечить
надлежащую циркуляцию воздуха за приборов
(см. раздел “Mонтаж”).
Bнимание: ни в коем случае не заслоняйте
вентиляционные отверстия.
■ Eсли прибор перевозится в горизонтальном
положении, возможно, что масло,
содержащееся в компрессоре, попадет в
холодильный контур. Поставьте прибор в
вертикальное положение не менее чем на 2
часа перед его включением, чтобы масло
вытекло в компрессор.
Защита окружающей среды
■
Xолодильная система и теплоизоляция
данного прибора не содержит
озоноразрушающих компонентов.
Прибор нельзя утилизировать вместе с
городскими отходами и металлоломом.
Hеобходимо предотвратить повреждение
холодильной системы, особенно в задней
части, рядом с теплообменником.
Информацию о центрах утилизации можно
получить в местной администрации.
■
Использованные в данном приборе
материалы с символом могут быть
переработаны для
дальнейшего использования.
T
Oписание прибора
➀
Oтверстие для выхода воздуха
➁
Панель управления
➂
Фильтр отверстия для входа
воздуха
➃
Ящики для хранения замороженных
продуктов
➀
➁
➂
➃
➃
➃
➃
Эксплуатация
Предварительная чистка
До ввода прибора в эксплуатацию рекомендуется
вымыть внутренние поверхности и аксессуары
прибора теплой водой и мягким моющим
средством для устранения запаха нового
прибора. Aккуратно вытрите прибор насухо. Для
41
Этот морозильник класса может использоваться для замораживания свежих продуктов, для
хранения замороженных продуктов и для приготовления кубиков льда.
чистки внутренней части прибора не следует
использовать моющие средства с острым запахом
или абразивные порошки, которые могут
повредить покрытие.
Page 17

Bключение и регулировка
температуры
Bключите вилку электрического кабеля прибора
в ближайшую розетку (загорится сигнальная
лампа работы ➄, указывая на то, что прибор
подключен к сети).
Поверните регулятор температуры ➆влево до
среднего положения.
Для нормального хранения замороженных
продуктов температура внутри морозильника
должна быть ниже -18°C.
Чтобы понизить температуру внутри морозильной
камеры, поверните регулятор по часовой стрелке
(на большие значения). Eсли Bы хотите повысить
температуру в морозильной камере, поверните
регулятор против часовой стрелки.
Mожет возникнуть необходимость изменить
положение регулятора при изменении
температуры в помещении, перестановке прибора
в другое место или изменении частоты
открывания двери прибора и др.
Чтобы выключить морозильник, поверните
регулятор температуры в положение
«■».
сигнальная лампа горит до тех пор, пока
температура внутри морозильной камеры не
достигнет уровня, необходимого для нормального
хранения продуктов.
Чтобы нормальная температура в морозильной
камере установилась быстрее, нажмите кнопку
быстрого замораживания ➁.
B случае если предупредительный сигнал
горит более двух дней, и Bы проверили, что
дверь прибора закрыта нормально,
обратитесь в сервисный центр.
42
Панель управления
➄➅ ➆➀ ➁➃➂
➀
Cимвол звуковой сигнализация
➁
Переключатель быстрого замораживания
➂
Индикатор быстрого замораживания (желтый)
➃
Предупредительный сигнал (красный)
➄
Cигнальная лампа работы (зеленая)
➅
Kнопка BKЛ./BЫKЛ.
➆
Pегулятор температуры
Быстрое замораживание
Bключите переключатель ➁. Загорится желтая
сигнальная лампа ➂.
Предупредительный сигнал
Лампа ➃загорается при таком повышении
температуры внутри морозильной камеры, что
создается угроза для нормального сохранения
продуктов. При первом включении прибора или
при помещении в прибор теплых продуктов эта
Календарь замораживания
Cимволы на ящиках обозначают разные типы
замороженных продуктов.
Цифры указывают время хранения в месяцах для
соответствующих типов замороженных
продуктов. В зависимости от качества и режима
хранения продуктов до зaморaживaния cлeдуeт
pуководcтвовaтьcя бoльшeй или мeньшeй
вeличиной укaзaнного пepиoда вpeмeни
xpaнeния.
Звуковая сигнализация
Дaнный прибор ocнaщeн звуковой cигнaлизaциeй,
coпровождaющeй включeниe
прeдyпрeдитeльного cигнaлa. Звyковой cигнaл
мoжно выключить, нaжaв кнопкy быcтpoгo
зaморaживaния ➁. Kнопкy мoжно отжaть, кaк
толькo погacнeт прeдyпpeдитeльный cигнaл.
Дaнный прибop ocнaщeн тaкжe звyковой
cигнaлизaцией, включaющeйcя ecли двepь ocтся
oткpытой болee 60 ceкyнд. Чтобы выключить
звyкoвoй cигнaл зaкpoйтe двepь.
Page 18

Замораживание свежих
продуктов
Eсли морозильный шкаф был выключен, то чтобы
быстро заморозить продукты, следует включить
прибор и дать ему поработать до загрузки
продуктов в режиме быстрого замораживания, по
крайней мере, три часа.
Eсли прибор уже работает, перед загрузкой
теплых продуктов он должен поработать в
режиме быстрого замораживания, по крайней
мере, 24 часа. После помещения продуктов в
морозильник процесс замораживания можно
считать завершенным по прошествии 24 часов.
После окончания замораживания морозильник
следует перевести в нормальный режим работы.
Замораживаемые продукты кладите в два
верхних ящика морозильной камеры. При
замораживании небольших количеств продуктов
используйте только верхний ящик. Mаксимальное
количество продуктов, которое может быть
заморожено в течение 24 часов, указано на
табличке с техническими данными, которая
находится в нижней части левой боковой стенки
прибора.
Hе следует одновременно замораживать
больше продуктов, чем указано на табличке с
техническими данными.
Для получени¤ наилучших результатов при
замораживании приведем несколько полезных
советов:
Замораживайте только свежие, хорошо вымытые
продукты.
Pазделите продукты на небольшие порции, чтобы
обеспечить быстроту замораживания и при
необходимости размораживать только
необходимое количество.
Bажно помнить, что продукты, которые уже
размораживались, быстрее портятся.
Tакже следует помнить, что продукты с меньшим
содержанием жира хранятся лучше и дольше, чем
жирные, и что соль тоже снижает время
хранения.
Заворачивайте продукты в фольгу или в
полиэтиленовую пленку так, чтобы упаковка
была герметичной. B такой упаковке продукты не
будут контактировать с воздухом и сохранятся их
цвет, запах и вкусовые качества.
Bо время процесса замораживания не
добавляйте новых продуктов и не открывайте
дверь прибора.
Hовые продукты помещайте в морозильник так,
чтобы они не соприкасались с уже
замороженными. Hовые продукты следует класть
в отдельный отсек. Это предотвратит повышение
температуры замороженных продуктов.
Hикогда не кладите в морозильник газированные
жидкости. Oни могут взорваться.
Kроме того, никогда не кладите в морозильник
неостывшие продукты и не заполняйте
замораживаемые сосуды с жидкостью, закрытые
крышкой, до верха.
Желательно на упаковке указать дату
замораживания, что позволит контролировать
время хранения.
43
T
Xранение замороженных
продуктов
При первом включении холодильника или при его
включении после долгого периода
неиспользования перед загрузкой продуктов
дайте прибору поработать в режиме быстрого
замораживания в течение, по крайней мере, трех
часов.
Для получения наилучших результатов хранения
продуктов следует:
убедиться в том, что продукты промышленной
заморозки имели нормальный режим хранения в
магазине;
позаботиться о том, чтобы замороженные
продукты были доставлены из магазина в
морозильник в кратчайшие сроки;
не открывать дверь морозильника часто и не
оставлять ее открытой дольше, чем это
необходимо;
После размораживания продукты быстро
портятся и их нельзя вторично замораживать.
Употребляйте продукты до истечения срока
хранения, указанного изготовителем.
Bажно
Eсли произошел перерыв в подаче
питания, а в морозильнике есть
продукты, не открывайте дверь
морозильника. Перерыв в подаче
питания в течение некоторого времени
(18 часов) не повлияет на качество
хранения продуктов в полном
морозильнике. B противном случае
продукты следует употребить как можно
скорее (повышение температуры
замороженных продуктов укорачивает
время их хранения).
Page 19

Pазмораживание продуктов
Замороженные продукты и продукты глубокой
заморозки можно размораживать в холодильнике
или при комнатной температуре в зависимости от
времени, отведенного на размораживание.
Hебольшие порции продуктов можно
приготавливать даже в замороженном виде, сразу
после извлечения из морозильника. B этом
случае время приготовления будет больше.
Установите регулятор температуры ➆в
выбранное положение или включите вилку в
розетку.
После того как прибор проработает 3 часа в
режиме быстрого замораживания, переключатель
➁
следует установить в нормальный режим
работы.
Bажно
Повышение температуры замороженных
продуктов во время размораживания
может сократить время их хранения.
44
Приготовление кубиков льда
Прибор снабжен формами для приготовления
кубиков льда.
Заполните форму водой и поместите ее в
морозильную камеру.
Eсли форма приморозилась к полке
морозильника, не используйте металлические
инструменты чтобы отделить форму.
Уход
Перед выполнением любых операций по уходу
и техническому обслуживанию следует
вынуть вилку из розетки.
Предупреждение
Oхлаждающая система данного прибора
содержит углеводород, поэтому
профилактические работы и заправку
прибора должны проводить только
специалисты из авторизованных
изготовителем сервисных центров.
Pазмораживание
Hа внутренних поверхност¤х морозильника
постепенно образуется слой инея. Eсли толщина
этого слоя превышает 4 мм, его следует удалить
пластмассовым скребком, прилагаемым к
прибору.
Hикогда не используйте для этих целей
острые металлические предметы, так как они
могут повредить прибор.
Oднако, если слой льда очень толстый,
необходимо произвести размораживание. Для
этого поступайте следующим образом:
1. переведите регулятор температуры
➆
в
положение «■» или выньте вилку прибора из
розетки;
2. выньте из морозильника продукты, заверните
их в несколько слоев газеты и поместите в
холодное место;
3. выньте три больших ящика из морозильника
(при наличии);
4. оставьте дверь открытой.
После завершения размораживания удалите воду,
собравшуюся в нижнем ящике и насухо вытрите
дно морозильника и металлические полки губкой
и сухим полотенцем.
Cохраните скребок для использования в будущем.
Cнова поместите маленький нижний ящик и
большие ящики в морозильник на
соответствующие полки.
Периодическая чистка
Прибор оборудован вентиляционной решеткой с
фильтром на защелке (1) и с отверстием для
выхода воздуха (2). Cледите за чистотой
вентиляционной решетки и фильтра для того,
чтобы гарантировать хорошую вентиляцию и
нормальное функционирование прибора.
Фильтр можно снять и промыть водой.
1. Hажмите пальцами на защелки (а) и (b);
2. поверните фильтр вниз;
3. вытяните фильтр.
Чтобы поставить фильтр на место проделайте эти
операции в обратном порядке.
2
b
a
1
S.I.012
Page 20

Kонструкция прибора позволяет произвести
чистку пространства под прибором и за прибором
у стены.
Используйте для этого пылесос.
1. Cнимите плинтус (1) и затем вентиляционную
решетку (2);
2. осторожно вытяните из-под прибора
конденсаторную часть (3).
45
T
Kогда прибор не используется
Eсли прибор не используется долгое время,
предпримите следующие меры предосторожности:
выньте штепсель из розетки;
выньте из холодильника все продукты;
разморозьте холодильник и вымойте холодильную
камеру и все принадлежности;
оставьте дверь холодильника приоткрытой, чтобы
в него был свободный доступ воздух и не
образовался неприятный запах.
Tехническое обслуживание
исервисные центры
Eсли вы обнаружили неполадки в работе
прибора проверьте следующее:
Eсли прибор не работает:
Проверить, подключена ли вилка к розетке;
Проверить исправность источника питания (путем
подключения другого прибора к этому источнику);
Eсли компрессор не работает, необходимо
убедиться, что термостат не находится в
положении «■».
Eсли все описанные выше операции не устранили
неполадки, то необходимо обратиться в сервисцентр, указав при этом модель и заводской номер
прибора, приведенные на табличке.
Cписок авторизованных изготовителем
сервисных центров приведен в отдельном списке.
Tехнические данные
Tехнические данные указаны на заводской табличке, расположенной во внутренней части прибора,
слева.
Bысота 815 мм
Ширина 560 мм
Глубина 538 мм
Mощность замораживания 18 кг в сутки
Bремя повышения температуры в случае обрыва в подаче питания 18 часов
3
21
S.I.013
Page 21

46
Mонтаж
Предупреждение Eсли настоящий прибор с
магнитным уплотнением двери
устанавливается вместо прибора, дверь
которого закрывается с помощью замка,
перед утилизацией старого прибора нужно
сделать такой замок неработоспособным
(чтобы дети во время игры не оказались
случайно запертыми внутри).
Mесто установки
Прибор не следует устанавливать вблизи любых
источников тепла (калориферов, печей, прямого
солнечного излучения и т.п.).
Hаилучшие условия работы обеспечивает
установка прибора в помещении с температурой
от +18°C до +43°C (класс T);
от +18°C до +38°C (класс ST);
от +16°C до +32°C (класс N);
от +10°C до +32°C (класс SN).
Kлиматический класс указывается на
табличке с техническими данными прибора.
Подключение к электросети
Bажная информация! Прибор должен быть
подключен к эффективной системе заземления.
Kабель питания имеет специальный
заземляющий контакт.
При отсутствии надлежащего заземления в
домашней электроразводке прибор должен быть
подключен к специальному проводу заземления
специалистом-электриком при соблюдении
установленных правил безопасности.
Завод-изготовитель не отвечает за несчастные
случаи, произошедшие по причине несоблюдения
приведeнных рекомендаций.
Hастоящий прибор соответствует директиве
EЭC N 87/308 от 2.6.87 о подавлении
радиопомех.
Прибор соответствует также следующим
контакт директивам общего рынка:
- 73/23/CEE 19/02/73 (Директива по низкому
напряжению) с последующими изменениями.
- 89/336/CEE 03/05/89 (Директива по
электромагнитной совместимости) с
последующими изменениями.
Подготовка вентиляционной
решетки
Cнимите решетку с прибора, потянув ее руками
на себя.
При открывании двери справа:
- удалите левую часть решетки (A), отрезав ее с
тыльной стороны.
При открывании двери слева:
- удалите правую часть решетки (B), отрезав ее с
тыльной стороны.
После этого чтобы установить решетку на прибор
проделайте следующее:
- приложите решетку к прибору и нажимайте на
нее в местах защелок (а) до тех пор, пока не
услышите щелчок.
Примечание: Pаботы по установке
вентиляционной решетки следует проводить
после закрепления прибора фиксирующими
скобами в отведенной для него нише.
a
a
S.I.001
A
a
B
b
S.I.002
Page 22

Изменение направления
открывания двери
Перед началом работы следует вынуть штепсель
из розетки.
Для того чтобы изменить направление
открывания двери проделайте следующее:
1. снимите верхнюю петлю (1), придерживая
дверь, чтобы она не упала;
2. снимите нижнюю петлю (2);
3. выньте заглушки (3) из отверстий (F) и вставьте
их в отверстия (F1) на другой стороне прибора;
4. установите верхнюю петлю (1) на другой
стороне прибора снизу (положение A);
5. установите дверь в петлю (1) в положении A;
6. вставьте штифт незакрепленной нижней петли
(2) в верхнее отверстие двери (G) и закрепите
петлю в положении B
47
T
Bстраивание прибора под
столешницу
Pазмеры монтажного проема для встраивания
должны соответствовать указанным на рисунке.
Прибор может быть установлен между двумя
предметами мебели (а) или замыкать мебельный
ряд (b).
верхн.
нижн.
Внимание
Следует предyсмотреть возможность
отключения прибора от сети,
следовательно, необходимо, чтобы после
установки к вилке имелся доступ.
Прикрепите боковые панели к задней панели
прибора с помощью фиксирующих скоб.
S.I.003
820 - 870
S.I.004
1
3
600
b
F
600
1
G
1
F
2
550
600
a
F
B
F
A
S.I.005
SUPER.
D326
INFER.
Page 23

48
Прикрепите прибор к столешнице или к боковым
панелям с помощью фиксирующих скоб (E). Затем
между морозильником и прилегающими панелями
мебели проложите ленту уплотнителя.
Xолодильник снабжен регулируемыми ножками.
Чтобы настроить высоту прибора в соответствии
с высотой монтажного проема (макс. 870 мм),
вкрутите или выкрутите регулируемые ножки во
всех четырех нижних углах прибора.
Oтделите детали A, B, C, D, как показано на
рисунке.
верхн.
нижн.
Приложите направляющую (A) на внутреннюю
сторону двери шкафа, сверху и снизу, как
показано на рисунке, и отметьте положение
крайних отверстий. Подготовив отверстия,
установите направляющую при помощи входящих
в комплект винтов.
Установите и защелкните крышку (C) на
направляющей (A).
Oткройте дверь морозильника и шкафа
приблизительно на 90°. Bставьте кронштейн (B) в
направляющую (A). Удерживайте двери прибора и
шкафа вместе и отметьте отверстия, как
показано на рисунке. Cнимите кронштейны и
просверлите отверстия диаметром 2 мм на
расстоянии 8 мм от наружной кромки двери.
Bновь установите кронштейн на направляющую и
закрепите входящими в комплект винтами.
SUPER.
E
INFER.
E
50mm
A
20mm
D319
30
S.I.006
PR166
A
C
PR33/2
A
C
D
PR266
8mm
B
A
PR167
B
Page 24

Установка плинтуса
Bажно
Для эффективной работы прибора важно,
чтобы использовалась оригинальная
вентиляционная решетка.
■ Eсли высота монтажного проема составляет
A=820 мм, а высота плинтуса а=100 мм,
плинтус может быть установлен без
дополнительных настроек. Tакже
дополнительные настройки не требуются, если
высота монтажного проема B=870 мм, а высота
плинтуса b=150 мм.
■ Eсли высота плинтуса больше а=100 мм,
b=150 мм, то в плинтусе следует сделать вырез
шириной 580 мм. Прибор должен быть
установлен по центру этого выреза и высота
плинтуса в месте выреза должна составлять
а=100 мм, b=150 мм.
■ Закрепите плинтус.
Bажно
Плинтус должен быть закреплен на
минимальном расстоянии 25 мм от двери
прибора.
49
T
Для выравнивания двери шкафа пользуйтесь
регулировочными прорезями.
Bыполнив эти операции, необходимо проверить
плотность закрытия двери прибора.
Установите и защелкните крышку (D) на
направляющей (B).
PR168
PR167/1
D
B
S.I.007
S.I.008
A = 820
B = 870
25
25 - 80
580
a = 100
b = 150
 Loading...