

Page 1
Dishwasher
User information
ESI 6231
822 961 649-00-190706-01
g
Page 2

2
Dear Customer,
Please read these user instructions carefully and
keep them to refer to later.
Please pass the user instructions on to any future
owner of the appliance.
The following symbols are used in the
text:
1 Safety instructions
Warning! Information that affects your personal safety.
Important! Information that prevents damage
to the appliance.
3 Useful tips and hints
2 Environmental information
Page 3

3
Contents
Operating Instructions . . . . . . . . . . . . . . . . . . . . . . . . . . . . . . . . . . . . . . . . . . . . . . . . . . . . . . . . . . . . . 4
Safety . . . . . . . . . . . . . . . . . . . . . . . . . . . . . . . . . . . . . . . . . . . . . . . . . . . . . . . . . . . . . . . . . . . . . . . . . . . . . . . 4
Diagram of appliance . . . . . . . . . . . . . . . . . . . . . . . . . . . . . . . . . . . . . . . . . . . . . . . . . . . . . . . . . . . . . . . . . . 6
3Control panel . . . . . . . . . . . . . . . . . . . . . . . . . . . . . . . . . . . . . . . . . . . . . . . . . . . . . . . . . . . . . . . . . . . . . . . . 6
Prior to using for the first time. . . . . . . . . . . . . . . . . . . . . . . . . . . . . . . . . . . . . . . . . . . . . . . . . . . . . . . . . . . 7
Setting the water softener. . . . . . . . . . . . . . . . . . . . . . . . . . . . . . . . . . . . . . . . . . . . . . . . . . . . . . . . . . . . . . . . 8
Adding special salt . . . . . . . . . . . . . . . . . . . . . . . . . . . . . . . . . . . . . . . . . . . . . . . . . . . . . . . . . . . . . . . . . . . . . 9
Filling up with rinse aid . . . . . . . . . . . . . . . . . . . . . . . . . . . . . . . . . . . . . . . . . . . . . . . . . . . . . . . . . . . . . . . . . . 10
In daily use. . . . . . . . . . . . . . . . . . . . . . . . . . . . . . . . . . . . . . . . . . . . . . . . . . . . . . . . . . . . . . . . . . . . . . . . . . . 12
Loading cutlery and dishes. . . . . . . . . . . . . . . . . . . . . . . . . . . . . . . . . . . . . . . . . . . . . . . . . . . . . . . . . . . . . . . 12
Adjusting the height of the upper basket . . . . . . . . . . . . . . . . . . . . . . . . . . . . . . . . . . . . . . . . . . . . . . . . . . . . 15
Adding detergent . . . . . . . . . . . . . . . . . . . . . . . . . . . . . . . . . . . . . . . . . . . . . . . . . . . . . . . . . . . . . . . . . . . . . . 16
Using 3in1 detergents. . . . . . . . . . . . . . . . . . . . . . . . . . . . . . . . . . . . . . . . . . . . . . . . . . . . . . . . . . . . . . . . . . . 17
Selecting the dishwashing cycle (Cycle Table) . . . . . . . . . . . . . . . . . . . . . . . . . . . . . . . . . . . . . . . . . . . . . . . . 18
Starting a dishwashing cycle . . . . . . . . . . . . . . . . . . . . . . . . . . . . . . . . . . . . . . . . . . . . . . . . . . . . . . . . . . . . . 20
Setting the Delay Timer. . . . . . . . . . . . . . . . . . . . . . . . . . . . . . . . . . . . . . . . . . . . . . . . . . . . . . . . . . . . . . . . . . 20
Switching off the dishwasher . . . . . . . . . . . . . . . . . . . . . . . . . . . . . . . . . . . . . . . . . . . . . . . . . . . . . . . . . . . . . 20
Care and cleaning . . . . . . . . . . . . . . . . . . . . . . . . . . . . . . . . . . . . . . . . . . . . . . . . . . . . . . . . . . . . . . . . . . . . . 21
What to do if…. . . . . . . . . . . . . . . . . . . . . . . . . . . . . . . . . . . . . . . . . . . . . . . . . . . . . . . . . . . . . . . . . . . . . . . . 24
Remedying small malfunctions . . . . . . . . . . . . . . . . . . . . . . . . . . . . . . . . . . . . . . . . . . . . . . . . . . . . . . . . . . . . 24
If the dishwashing results are not satisfactory . . . . . . . . . . . . . . . . . . . . . . . . . . . . . . . . . . . . . . . . . . . . . . . . 25
Disposal . . . . . . . . . . . . . . . . . . . . . . . . . . . . . . . . . . . . . . . . . . . . . . . . . . . . . . . . . . . . . . . . . . . . . . . . . . . . . 26
Technical data . . . . . . . . . . . . . . . . . . . . . . . . . . . . . . . . . . . . . . . . . . . . . . . . . . . . . . . . . . . . . . . . . . . . . . . . 27
Notes for Test Institutes . . . . . . . . . . . . . . . . . . . . . . . . . . . . . . . . . . . . . . . . . . . . . . . . . . . . . . . . . . . . . . . . 28
Installation and connection instructions. . . . . . . . . . . . . . . . . . . . . . . . . . . . . . . . . . . . . . . . . . . . 29
Safety information for the installation. . . . . . . . . . . . . . . . . . . . . . . . . . . . . . . . . . . . . . . . . . . . . . . . . . . . . 29
Installing the dishwasher . . . . . . . . . . . . . . . . . . . . . . . . . . . . . . . . . . . . . . . . . . . . . . . . . . . . . . . . . . . . . . . 30
Connecting the dishwasher . . . . . . . . . . . . . . . . . . . . . . . . . . . . . . . . . . . . . . . . . . . . . . . . . . . . . . . . . . . . . 31
Service. . . . . . . . . . . . . . . . . . . . . . . . . . . . . . . . . . . . . . . . . . . . . . . . . . . . . . . . . . . . . . . . . . . . . . . . . . . . . 35
Page 4

4
Operating Instructions
1 Safety
Prior to using for the first time
• Follow the ”Instructions for installation and con-
nection”.
Correct use
• The dishwasher is only intended for washing domestic dishes.
• Additions or modifications to the dishwasher are
not permitted.
• Use only special salt, detergent and rinse aid suitable for domestic dishwashers.
• Do not put any solvents in the dishwasher. This
could cause an explosion.
Child safety
• Keep packaging away from children. There is a risk
of suffocation.
• Children often do not recognise the hazards associated with electrical appliances. Don’t allow children to use the dishwasher unsupervised.
• Make sure that children and pets don’t climb into
the dishwasher. Could endanger life!
• Dishwasher detergents can cause chemical burns
to the eyes, mouth and throat. Could endanger life!
Comply with the safety instructions of the dishwasher detergent manufacturer.
• The water in the dishwasher is not for drinking.
Risk of chemical burns.
General safety
• Repairs to the dishwasher are only to be carried
out by qualified service engineers.
• When the dishwasher is not being used, switch it
off and shut off the water tap.
• Never unplug the appliance by pulling on the cable. Always pull the plug.
• Ensure that the door of the dishwasher is always
closed when it is not being loaded or unloaded. In
this way you will avoid anybody tripping over the
open door and hurting themselves.
• Never sit or stand on the open door.
• If the dishwasher is located in a room where there
may be a frost, remove the connection hose from
the tap after each use of the dishwasher.
Page 5
5
Dishwasher door safety catch
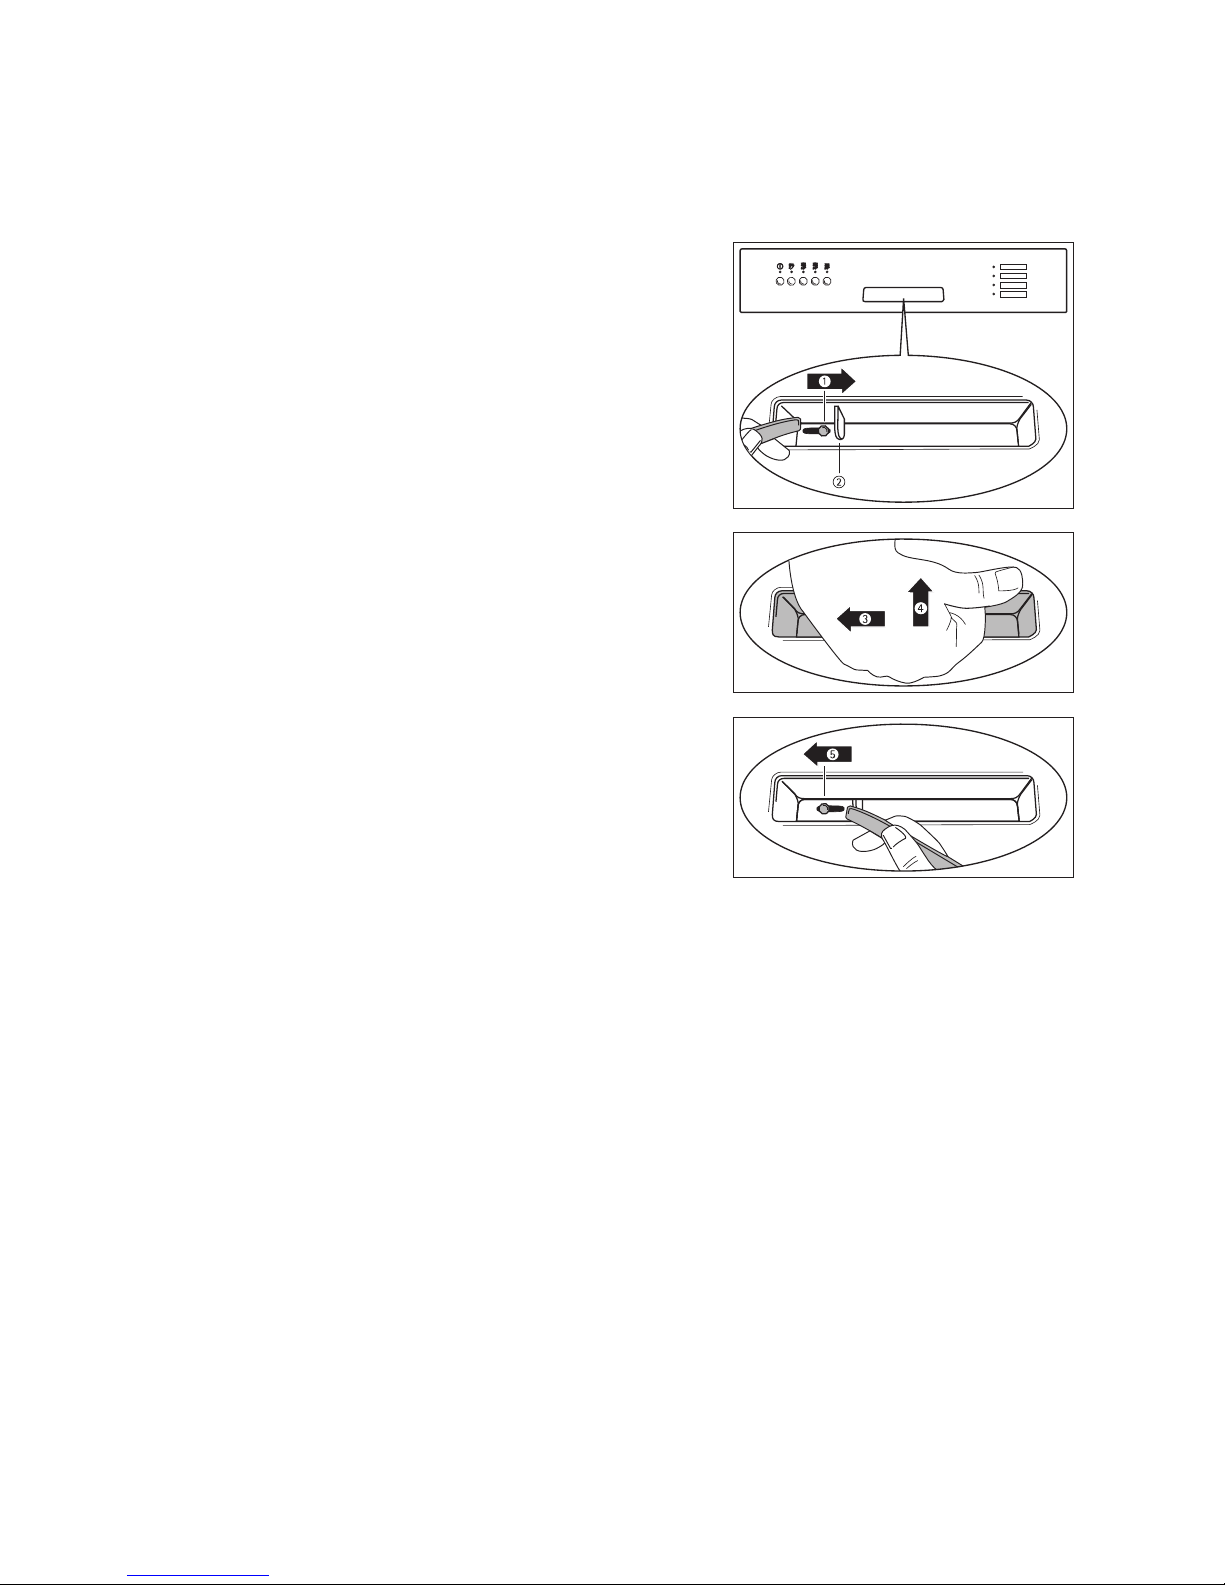
The dishwasher door has a safety catch which prevents children opening the dishwasher door by mistake.
The door safety catch is set as follows:
1. Press the little pin on the left side of the door handle to the right (1)
(e.g. using the handle of a spoon).
2. If the safety catch is engaged, to open the dishwasher you must
– first move the door handle to the left (3) using the
plate (2) until a resistance is felt.
– then pull the door handle forwards (4).
3. You can disengage the dishwasher’s door safety
catch by pressing the pin all the way to the left (5)
using the handle of a spoon.
Page 6
6
Diagram of appliance
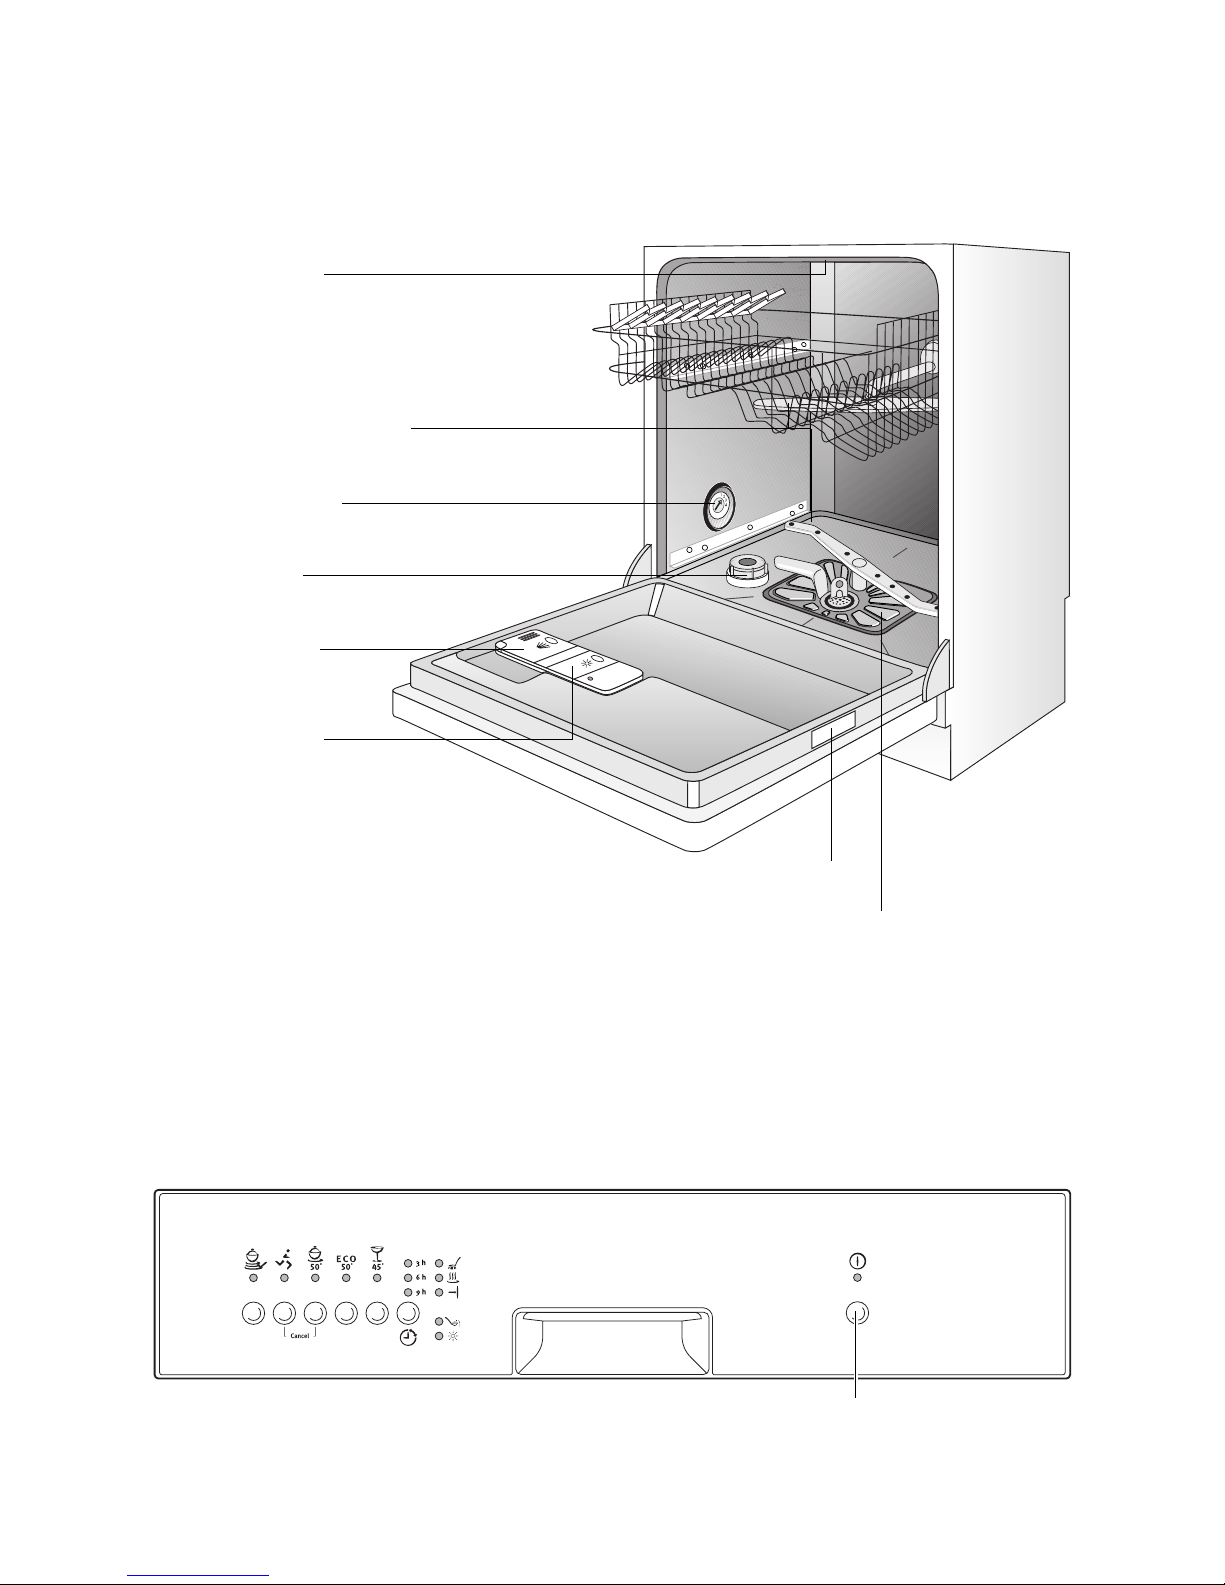
3
Control panel
The ON/OFF button is used to turn the dishwasher
on and off.
Top Spray Nozzle
Upper basket spray arm
and floor spray arm
Water hardness
dial
Dispenser
for special salt
Dispenser
for detergent
Dispenser
for rinse aid
Rating plate
Filters
ON/OFF button
Page 7
7
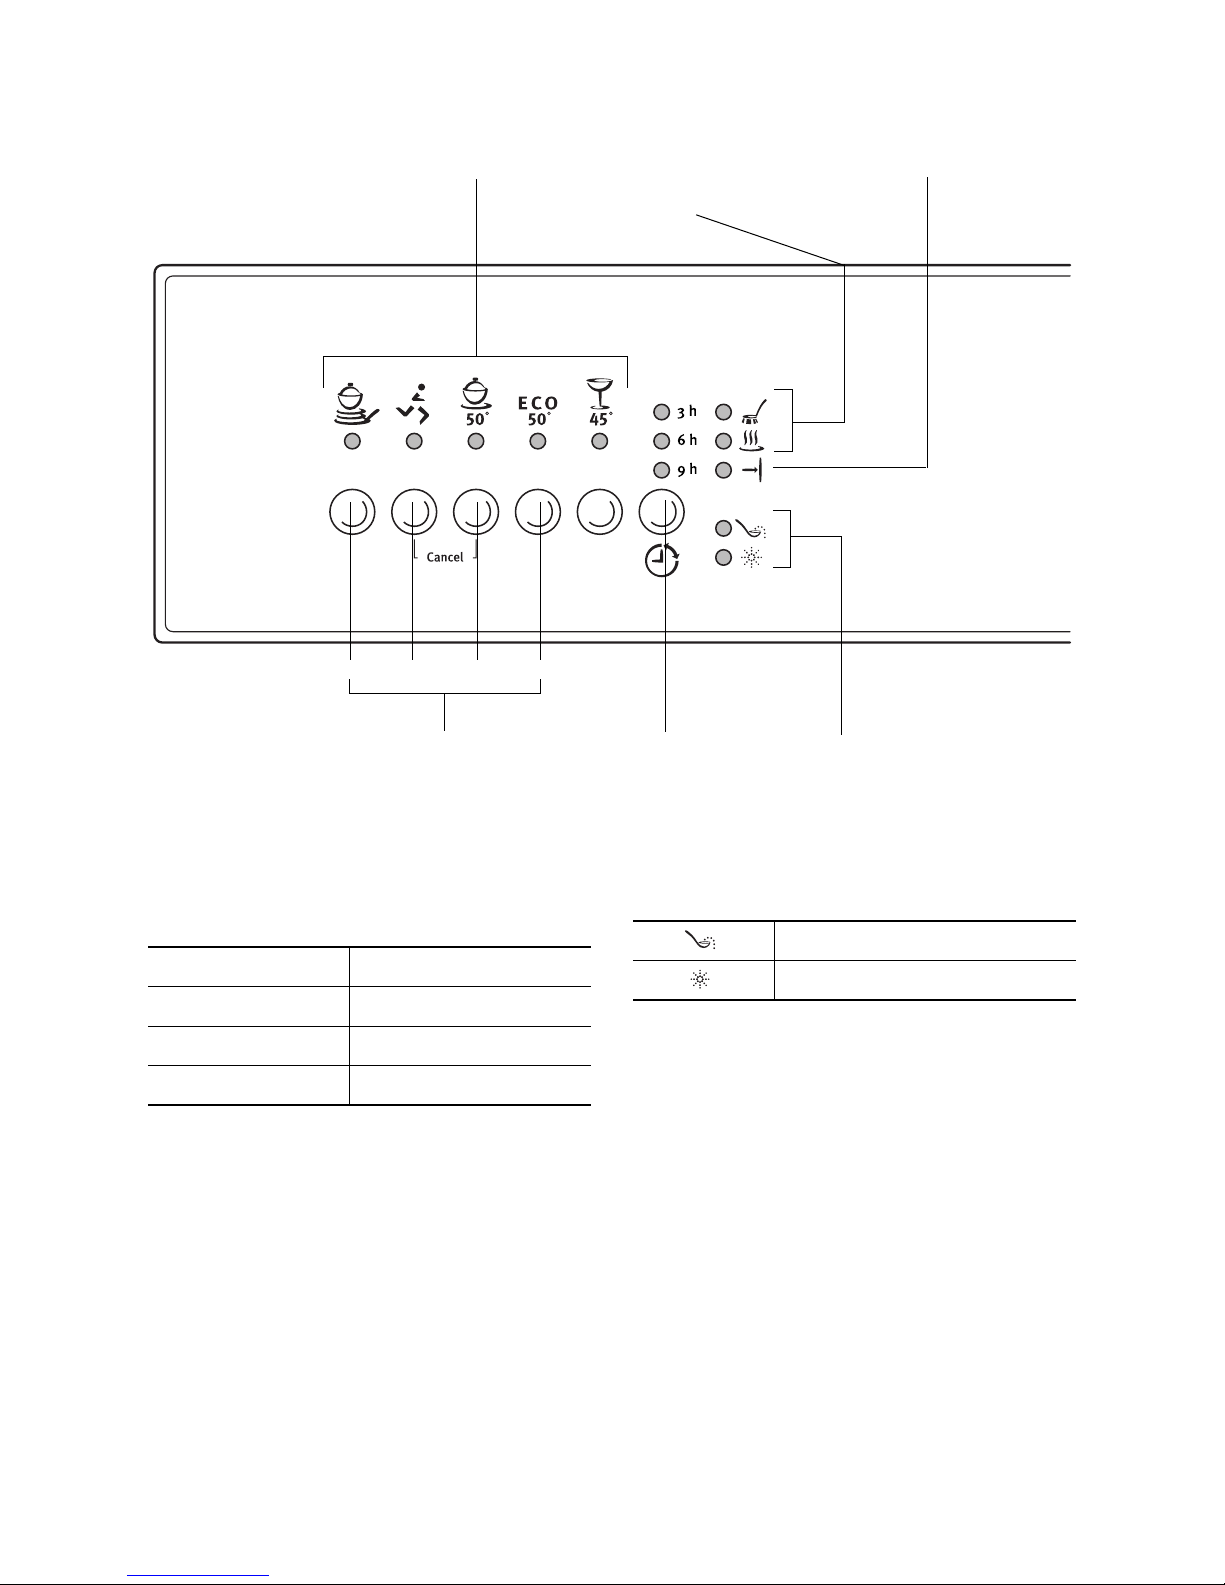
The Programme buttons are used to select the desired dishwashing cycle.
Function buttons: In addition to the pre-set dishwashing cycle, the following functions can also be
set using these buttons:
Programme progress display: The current stage of
the programme is always shown in the programme
progress display.
The control indicators have the following meanings:
Prior to using for the first time
3
If you wish to use 3 in 1 detergent:
– First read the section “Using 3in1 detergents”.
– Do not fill up with special salt or rinse aid.
If you do not use 3in1 detergent, before using for the
first time
1. Set the water softener
2. Fill up with special salt for water softeners
3. Fill up with rinse aid
Function buttons
123
Set delay
timer
Control
indicators
4
Programme buttons
End of cycle indicator
Programme progress display
Function button 1 Sets the water softener
Function button 2 - not programmed -
Function button 3 - not programmed -
Function button 4 - not programmed -
1)
1) These control indicators are never illuminated while a dishwashing cycle is running.
Refill with special salt
1)
Refill with rinse aid
Page 8
8
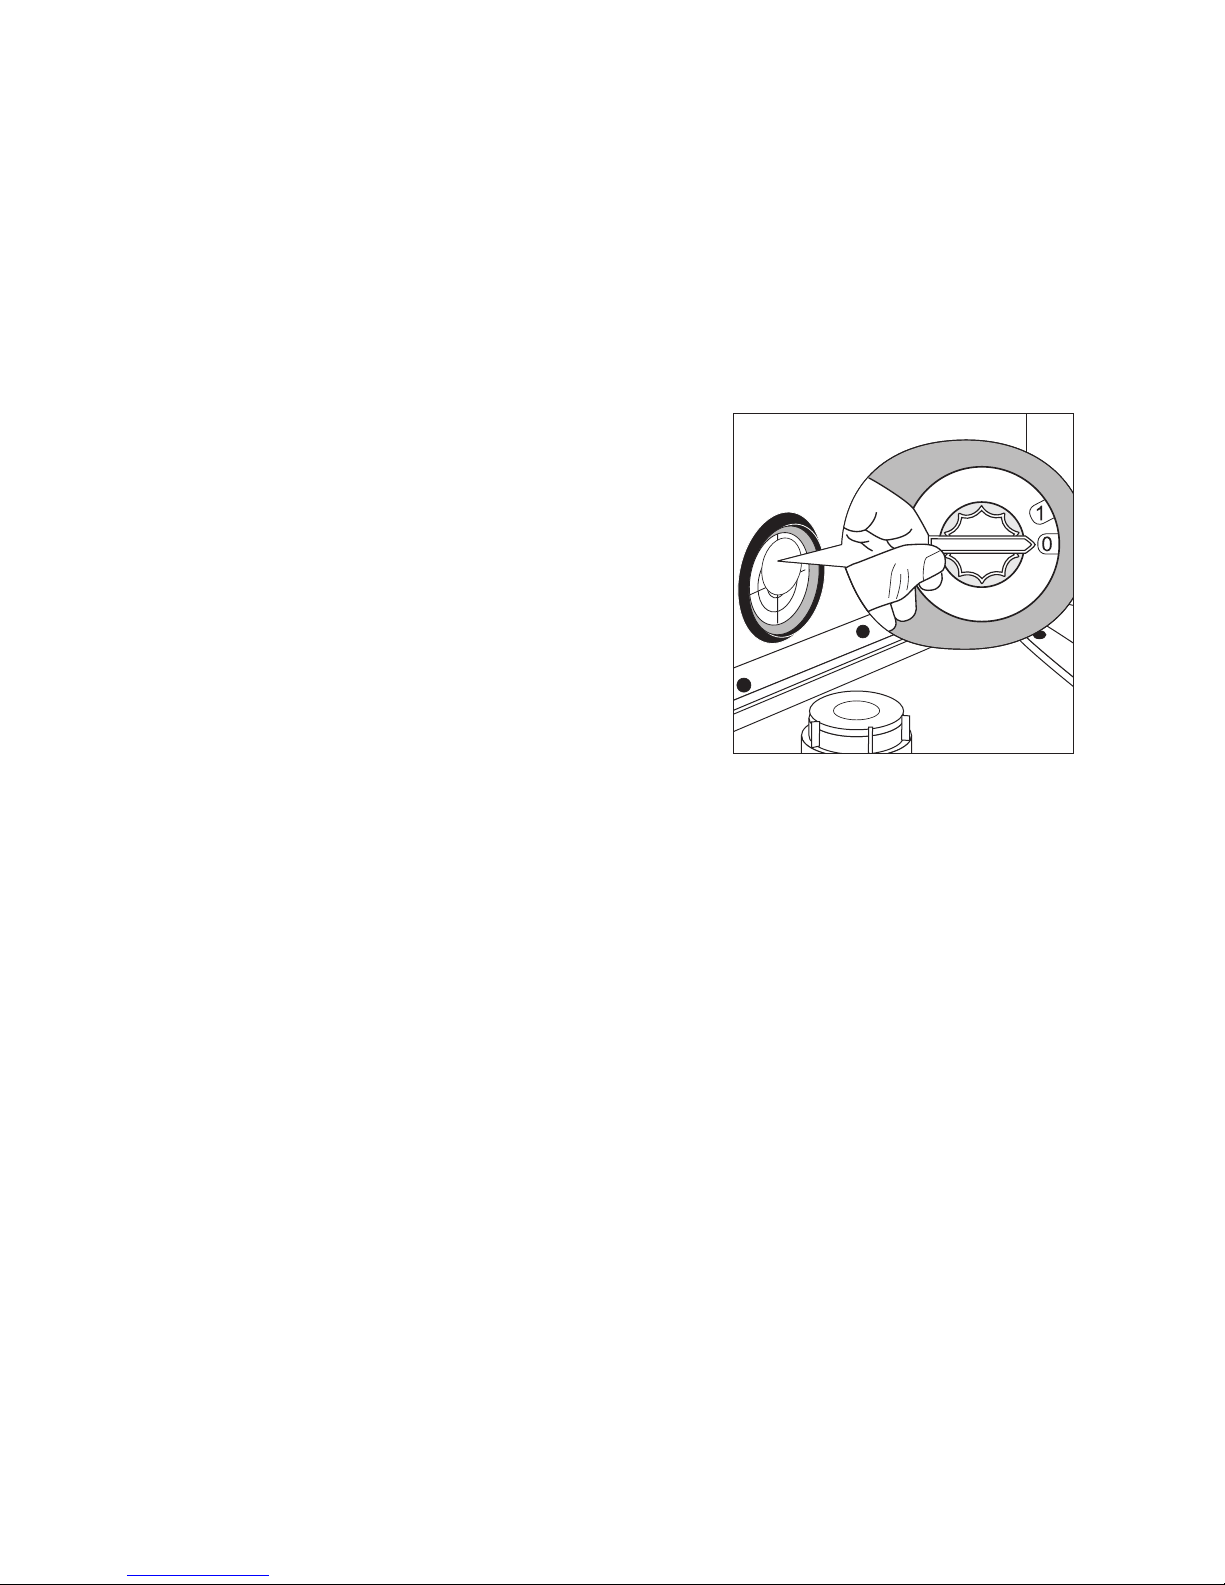
Setting the water softener
The water softener must be set manually and electronically:
3 To avoid scale deposits on the dishes and in
the dishwasher, the dishes must be washed
with soft water, i.e. water with a low lime content. The water softener must be set according
to the table to the water hardness in the area
where you live. Your local water company will
be able to give you information about the water hardness in your area.
The dishwasher must be switched off.
Setting manually:
1. Open the dishwasher door.
2. Remove the lower basket from the dishwasher.
3. Turn water hardness dial on the left wall of the
dishwasher interior to O or 1 (see table).
Setting electronically:
1. Press the ON/OFF button.
3 If indicators for the programme buttons are lit,
a dishwashing cycle is activated. The cycle
must be deactivated:
Press function buttons 2 and 3 simultaneously
for approx. 2 seconds.
All additional wash programme button indicators will go out.
2. Press function buttons 2 and 3 simultaneously and
keep them pressed.
The LED indicators for function buttons 1 to 3 will
flash.
3. Press function button 1.
The LED indicator for function button 1 will flash.
The LED indicator for the end of the dishwashing
cycle will flash simultaneously:
– The number of times that the LED indicator for the
end of the dishwashing cycle flashes corresponds
to the hardness setting.
– This sequence of flashes is repeated several times,
with a 3 second pause in-between.
4. Pressing function button 1 increases the hard-
ness setting by 1 degree.
(Exception: hardness setting 1 follows hardness
setting 10).
5. When the hardness setting is correct, press the
ON/OFF button.
The hardness setting is now saved.
If the water softener is set electronically to “1”, this
switches off the control indicator for special salt.
Page 9
9
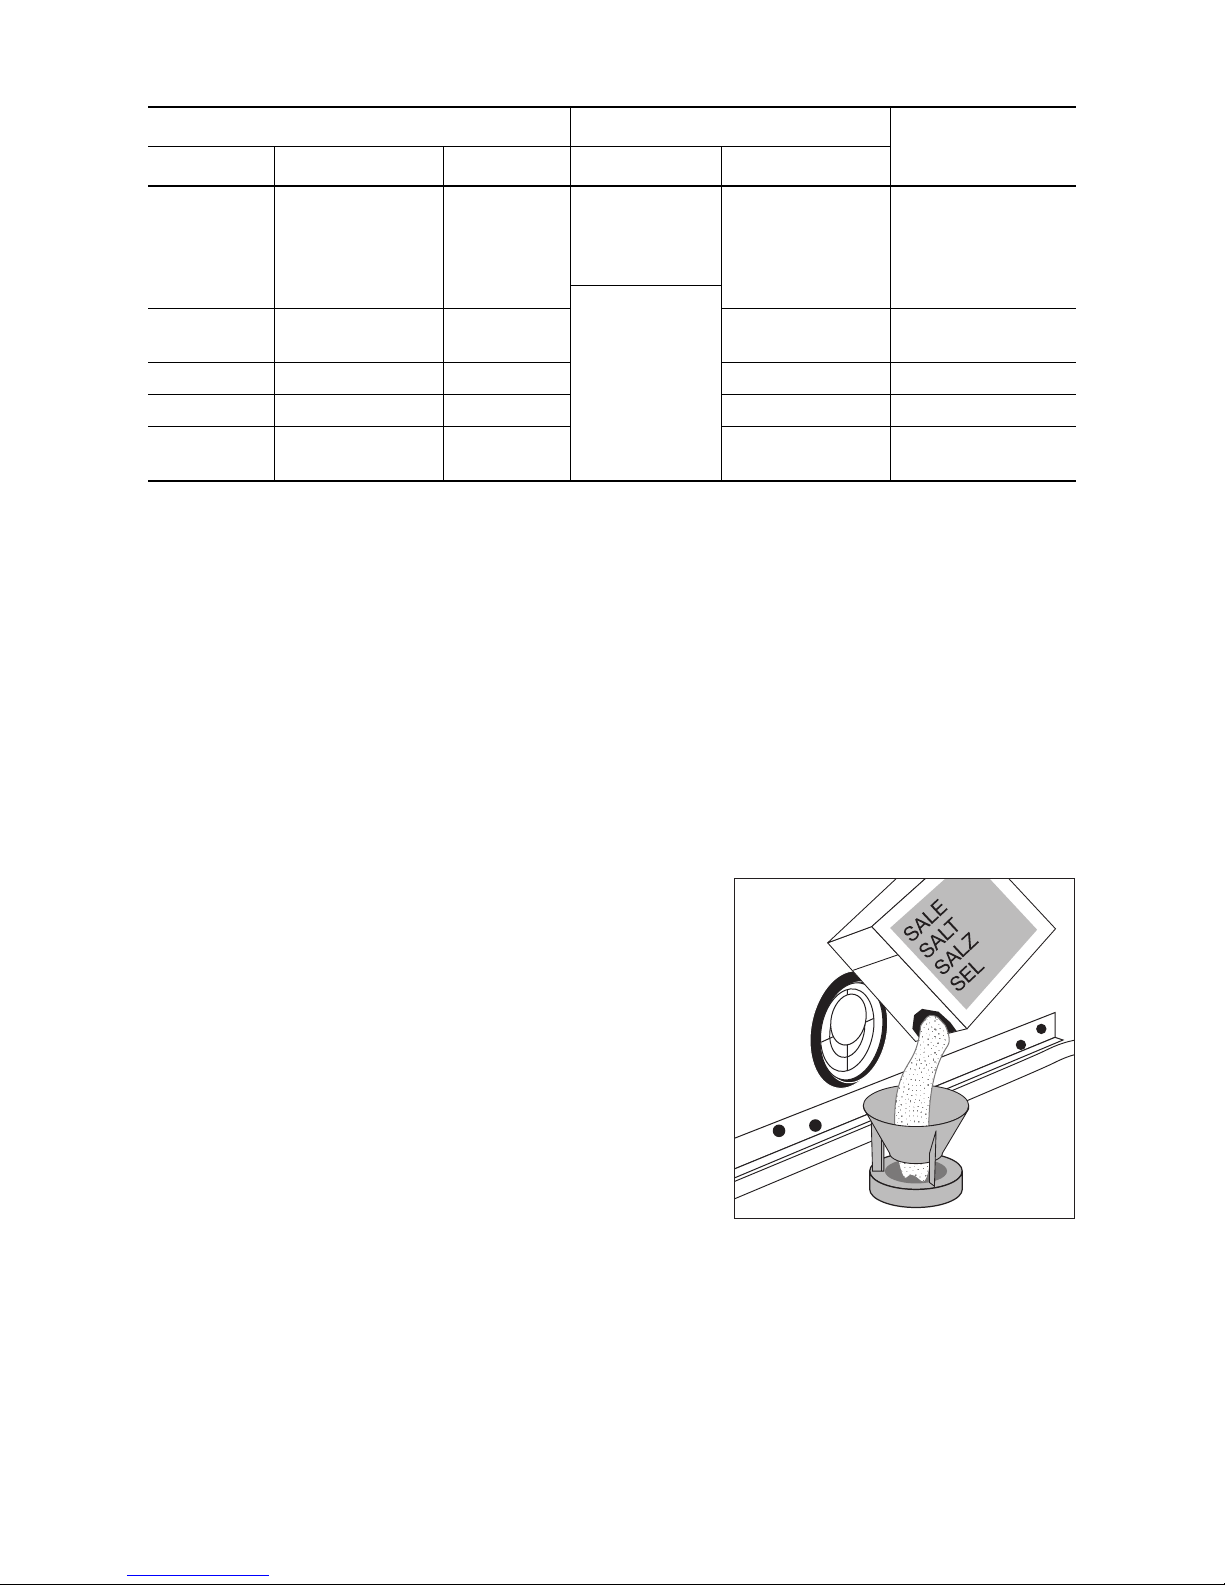
Adding special salt
To decalcify the water softener, it must be filled up
with special salt. Use only special salt suitable for
domestic dishwashers.
If you do not use 3 in1 detergent, fill up with special
salt:
– Before using the dishwasher for the first time.
– When the control indicator for special salt is illumi-
nated on the control panel.
1. Open the door and remove the lower basket.
2. Screw open the lid on the salt dispenser by turning
it anti-clockwise.
3. Only when using the dishwasher for the first
time:
Fill the salt dispenser with water.
4. Place the funnel (supplied) over the dispenser
opening.
Fill the dispenser with special salt; the capacity of
the dispenser is approx. 1.0-1.5 kg, depending on
the size of the grains. Do not overfill the dispenser.
3 If water overflows when filling up with special
salt, this is completely harmless.
5. Clean away any salt remnants from the dispenser
opening.
6. Screw the lid back on in a clockwise direction.
7. Run a dishwashing cycle after filling the salt
dispenser with special salt. This will wash away
salt water and salt crystals that have been spilt.
3 Depending on the size of the salt grains, it can
take several hours for the salt to dissolve in
the water and for the control indicator for special salt to go out.
Water hardness Adjusting the hardness setting
Number of
flashes
in °d
1)
in mmol/l
2)
Range Manual Electronic
51 - 70
43 - 50
37 - 42
29 - 36
23 - 28
9,0 - 12,5
7,6 - 8,9
6,5 - 7,5
5,1 - 6,4
4,0 - 5,0
IV 1
10
3)
9
8
7
6
10
9
8
7
6
0*
19 - 22
15 - 18
3,3 - 3,9
2,6 - 3,2
III
5
4*
5
4
11 - 14 1,9 - 2,5 II 3 3
4 - 10 0,7 - 1,8 I/II 2 2
below 4 below 0.7 I
1
no salt necessary
1
1) (°d) German degree, measure of the hardness of water
2) [mmol/l] millimol per litre, international unit for water hardness
3) On this setting the length of the dishwashing cycle may be slightly longer.
*) factory setting
Page 10
10
Filling up with rinse aid
With rinse aid the rinsing water drains away better
and so you get smear-free, gleaming dishes and
clear glasses.
If you do not use 3in1 detergent, fill up with rinse aid:
– Before using the dishwasher for the first time.
– When the control indicator for rinse aid is illuminat-
ed on the control panel.
Use only special rinse aid for dishwashers and no
other liquid detergents.
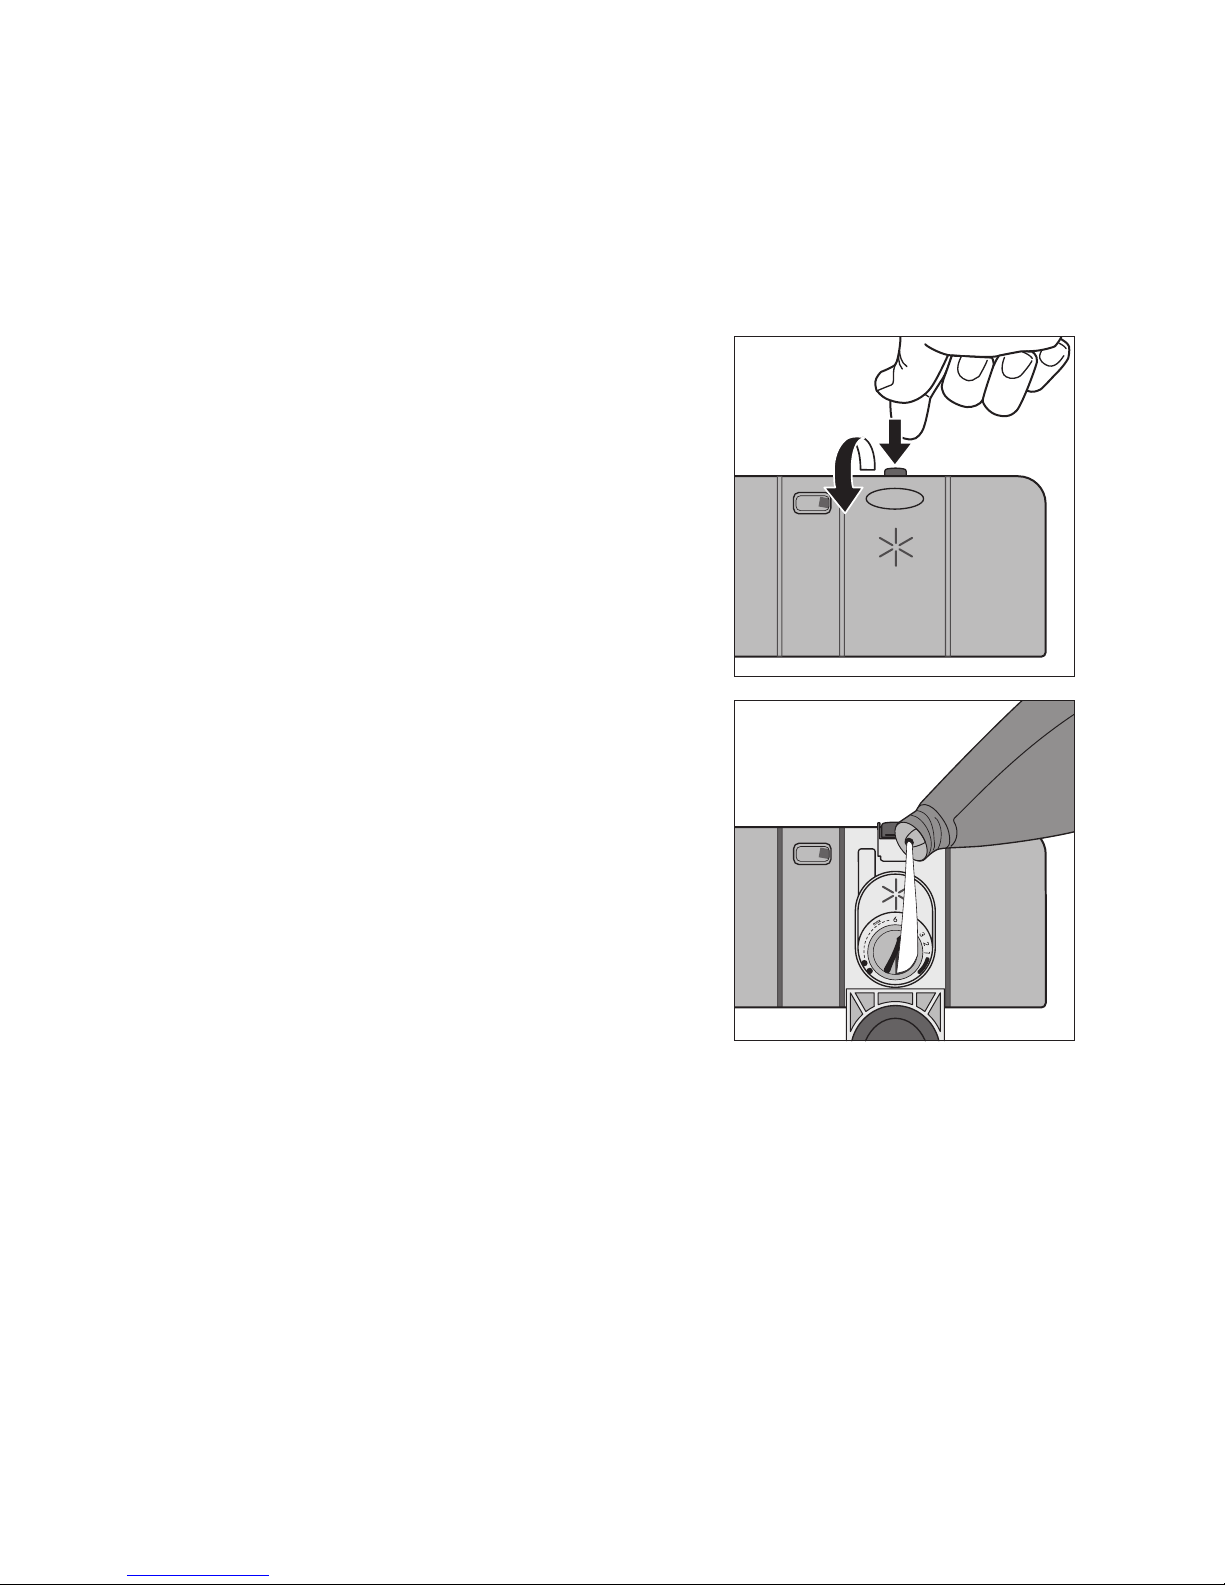
1. Open the door.
The rinse aid compartment is located on the inside
of the dishwasher door.
2. Press the release button on the rinse aid compart-
ment.
3. Open the cover.
4. Pour rinse aid in slowly right up to the broken
“max” line;
this corresponds to a volume of approx. 140 ml
when full.
5. Press the lid shut until it clicks into place.
6. Wipe up any spilt rinse aid with a cloth. Otherwise
there will be too much foam when rinsing.
Page 11

11
Setting the amount of rinse aid required
3 Only change the amount dispensed, if smears,
milky spots (reduce the amount) or dried on
water spots (increase the amount) can be seen
on glasses and dishes. (See section “If dishwashing results are not satisfactory”.) The
dosage can be set from 1-6. The dosage is
pre-set to “4” in the factory.
1. Open the dishwasher door.
2. Press the release button on the rinse aid compart-
ment.
3. Open the cover.
4. Set the dosage level.
5. Press the lid shut until it clicks into place.
6. If rinse aid has leaked out, wipe it away with a
cloth.
Page 12

12
In daily use
Loading cutlery and dishes
1 Sponges, cleaning cloths and any other ob-
jects that can absorb water must not be
washed in the dishwasher. Plastic and Tefloncoated dishes and pans tend to retain water
droplets. These dishes and pans therefore do
not dry as well as those made of china and
stainless steel.
• Before loading the dishes, you should:
– Remove the worst of the food residues.
– Soak pans with burnt-on food residues.
• When loading the dishes and cutlery, please note:
– Dishes and cutlery must not impede the rotation
of the spray arms.
– Load bowls, cups, glasses, pans, etc. with the
opening downwards so that water cannot collect
in them
– Dishes and items of cutlery must not lie inside
one another or cover one another
– To avoid damage to glasses, they must not touch
one another
– Don’t put small items (e.g. lids) in the baskets for
the dishes, but in the cutlery basket, so that they
can’t fall through the holes.
For washing in the dishwasher, the following cutlery/dishes/pots and pans
are not suitable: are of limited suitability:
• Cutlery with wooden, horn, china or mother of pearl handles
• Plastic items that are not heat resistant
• Older cutlery with cement
that is sensitive to temperature
• Dishes or cutlery with glued parts
• Pewter or copper items
• Lead crystal glass
• Steel items that rust
• Wooden boards/platters
• Items made from synthetic materials
• Only wash stoneware in the dishwasher if it is specifically
marked by the manufacturer as being dishwasher-safe.
• Glazed patterns may fade if washed very frequently in the
dishwasher.
• Silver and aluminium parts have a tendency to discolour during washing. Food remains, e.g. egg white, egg yolk and
mustard often cause discoloration and staining on silver.
Therefore always clean food residues from silver immediately,
if it is not to be washed straight after use.
• Glass can become dull after a large number of washes.
Page 13
13
Loading cutlery
1 Warning: Sharp knives and other items of cut-
lery with sharp edges must be laid in the cutlery rack or in the upper basket because of the
risk of injury.
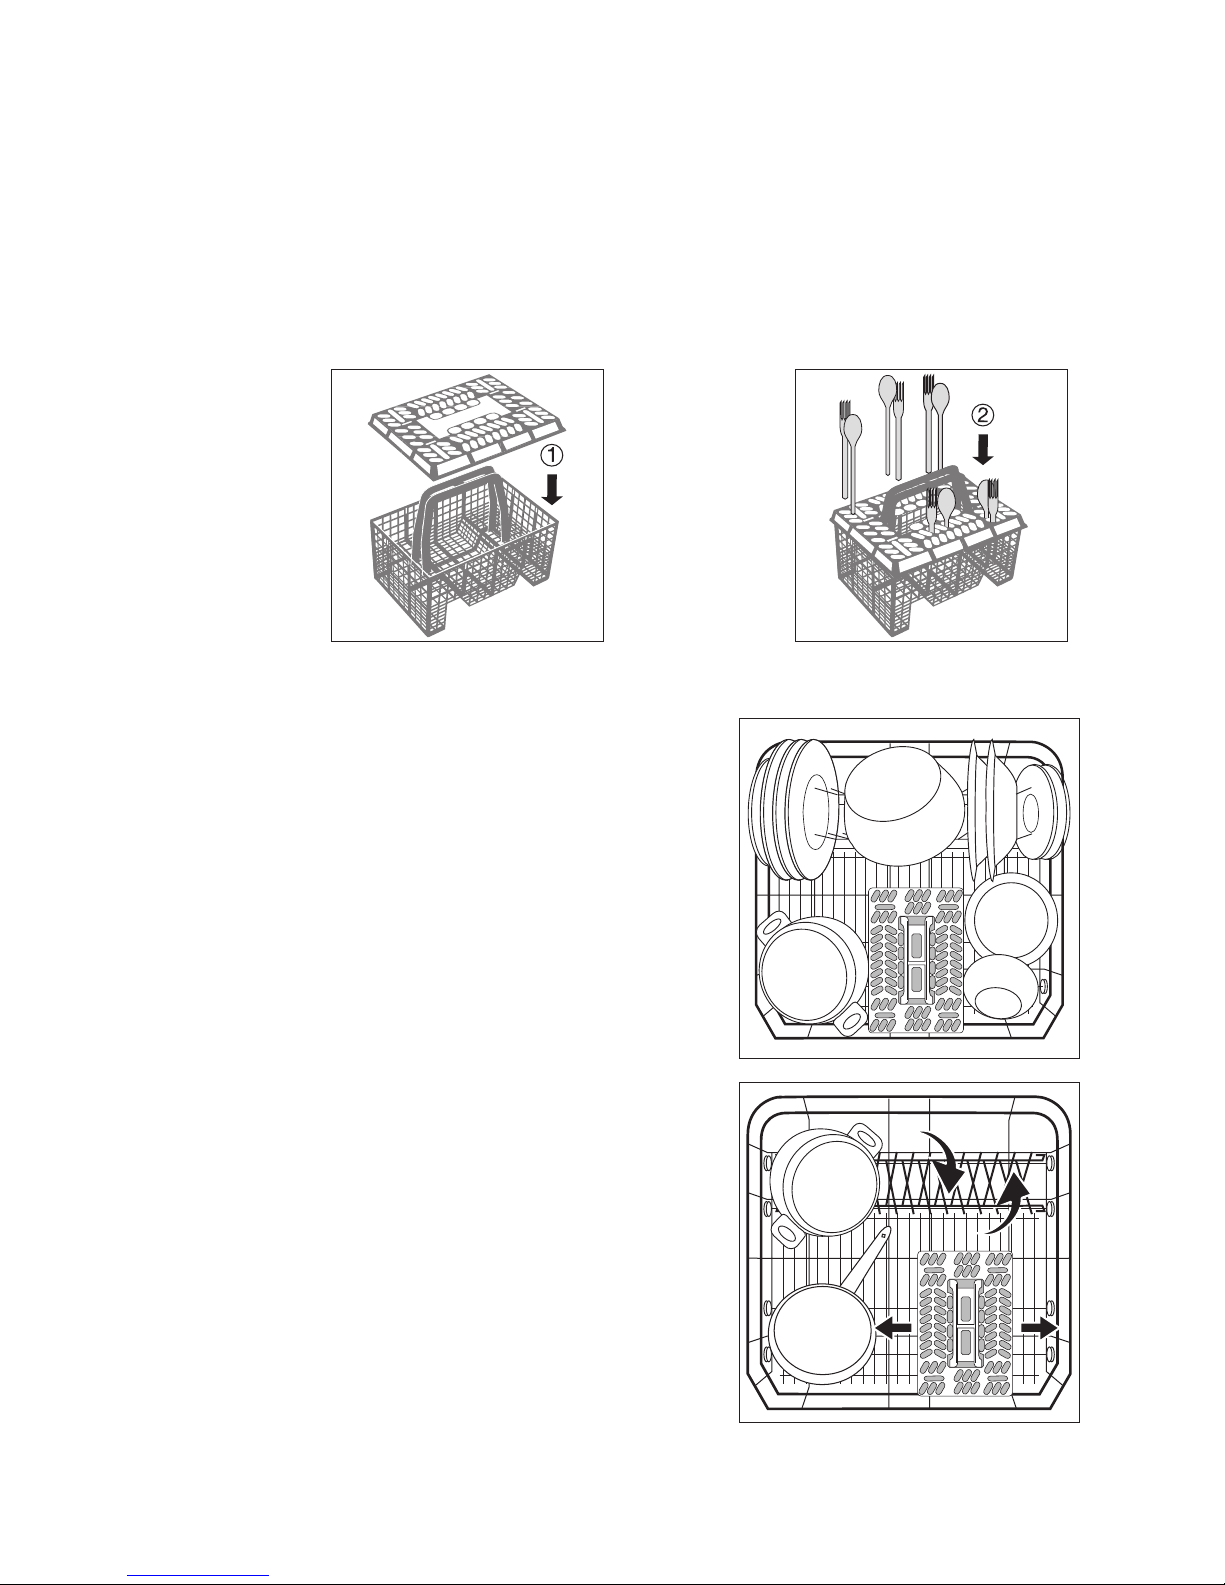
To ensure that all items of cutlery in the cutlery basket can be reached by the water, you should:
Pots, Pans, Large Plates
Load larger and heavily soiled dishes and pans in the
lower basket.
(Max. diameter for plates 29 cm).
To make it easier to load larger dishes, the two rear
plate rests in the lower basket can be folded down
and the cutlery basket in the lower basket can be
moved to the side.
1. Place the grid insert on the cutlery basket 2. Place forks and spoons in the cutlery basket's grid
insert with their handles pointing downwards.
Page 14
14
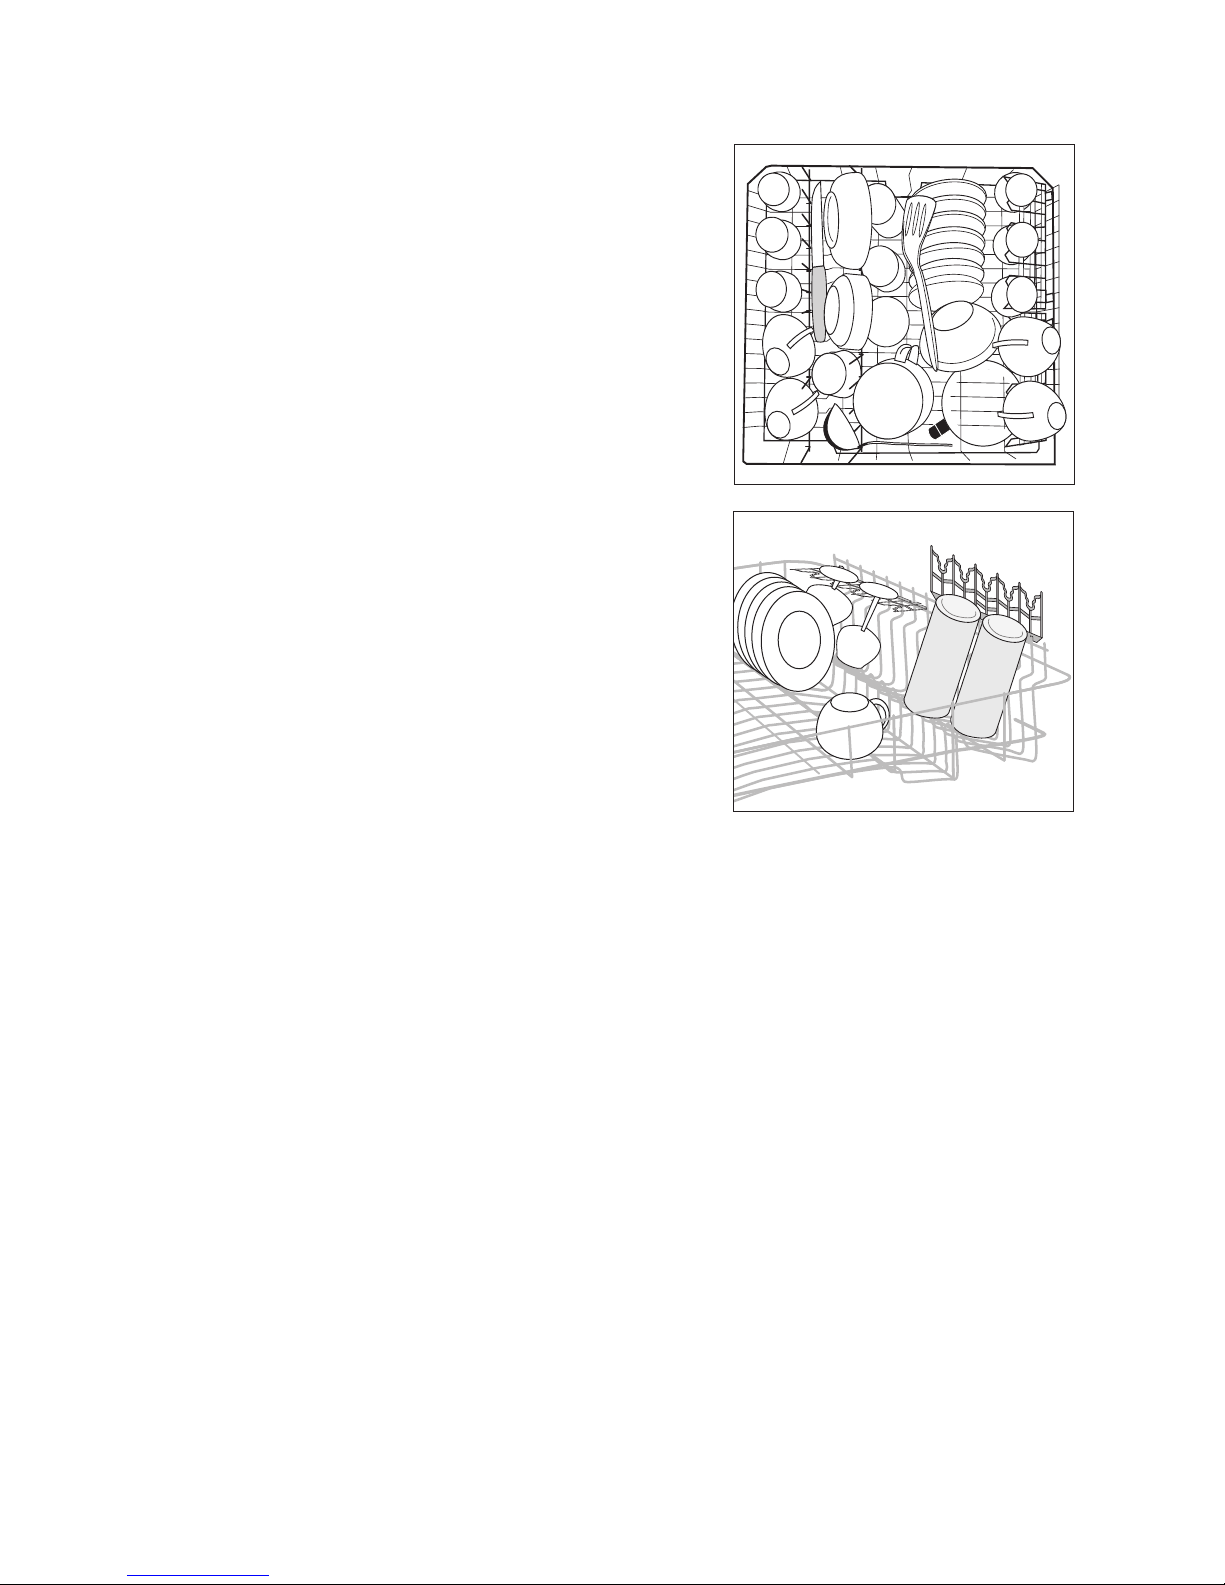
Cups, Glasses, Coffee Service
Load smaller, fragile crockery and long, sharp cutlery
in the upper basket.
• Arrange items of crockery on and under the folding
cup racks so that they are offset from each other
and water can reach all items.
• The cup racks can be folded up out of the way for
tall crockery items.
• Lay or hang wine and brandy glasses in the slots in
the cup racks.
Page 15
15
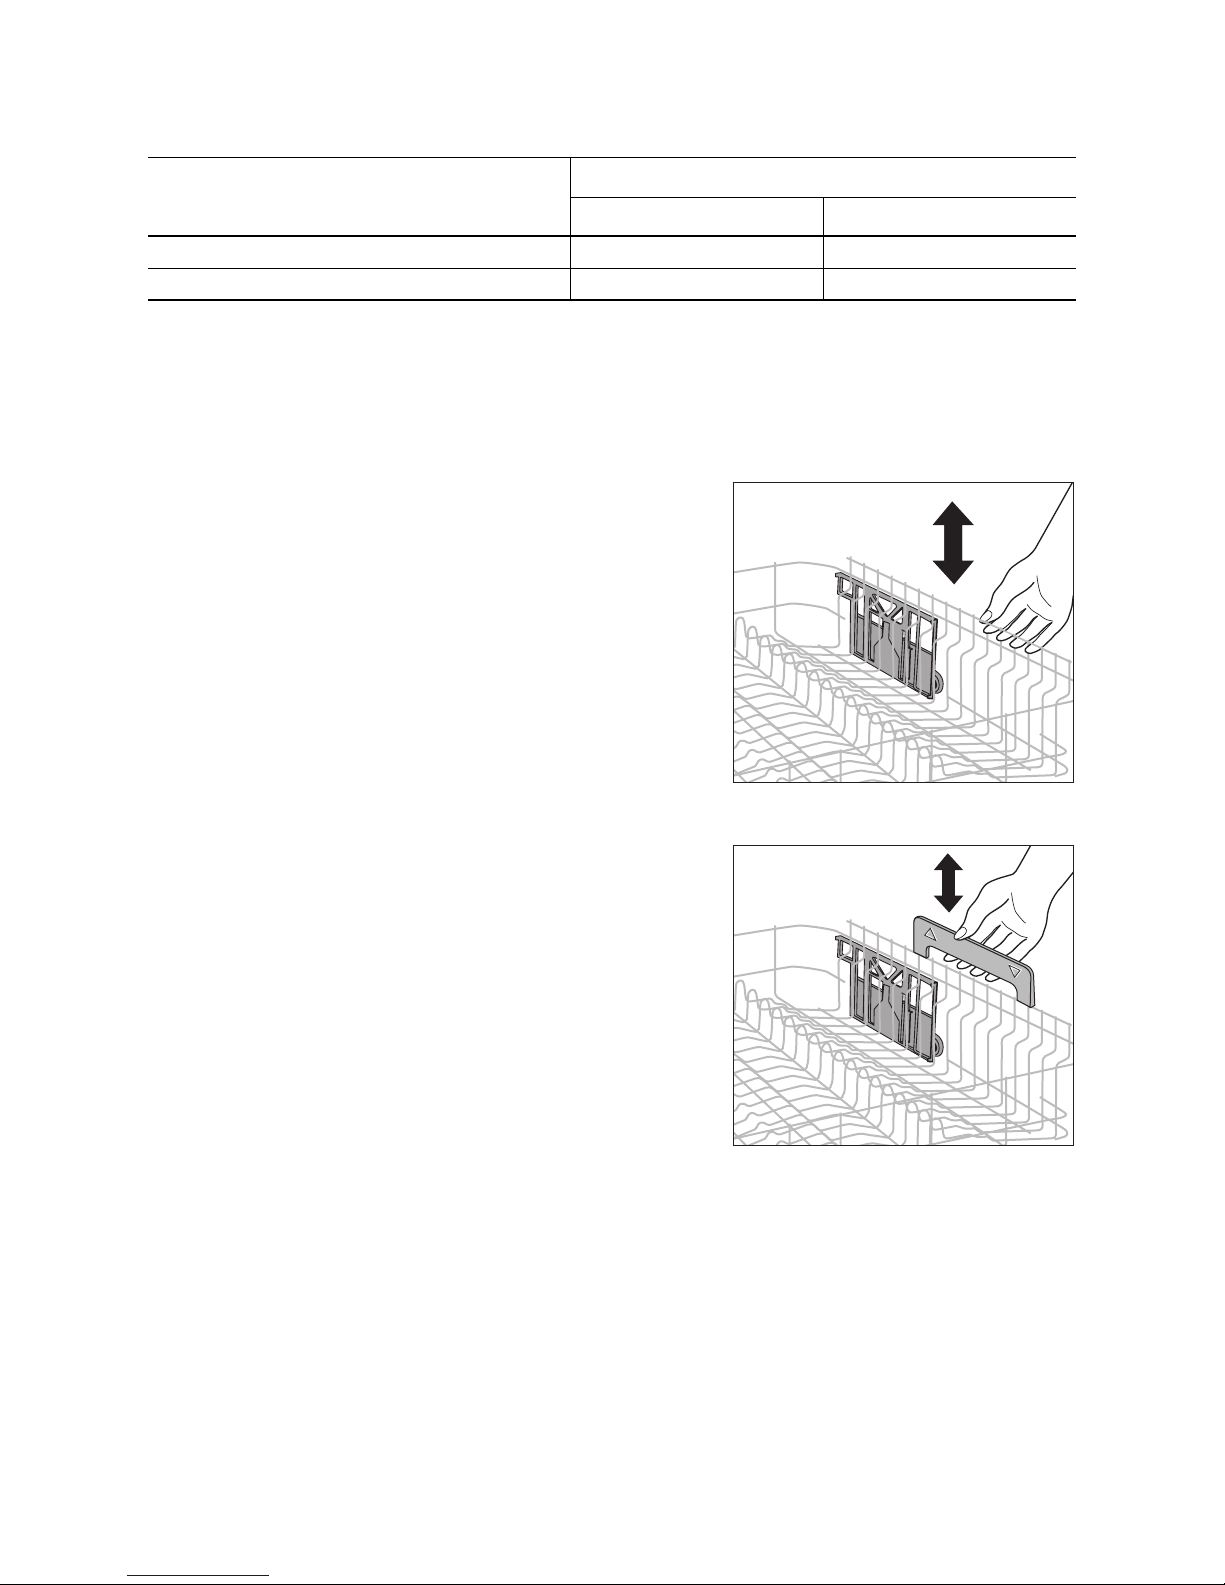
Adjusting the height of the upper basket
3 The height of the baskets can also be adjusted
when they are loaded.
Depending on the model, your appliance is provided
with one of the following types of upper basket:
Type 1
Raising/lowering the upper basket
1. Pull out the upper basket completely.
2. Raise the upper basket as far as it will go and then
lower it vertically.
The upper basket will latch into the lower or the
upper position.
Type 2
Raising / Lowering the upper basket
1. Pull out the upper basket completely.
2. Holding the upper basket by the handle, raise it as
far as it will go and then lower it vertically.
The upper basket will latch into the lower or the
upper position.
Maximum height of dishes in the
Upper basket Lower basket
with upper basket raised 22 cm 30 cm
with upper basket lowered 24 cm 29 cm
Page 16
16
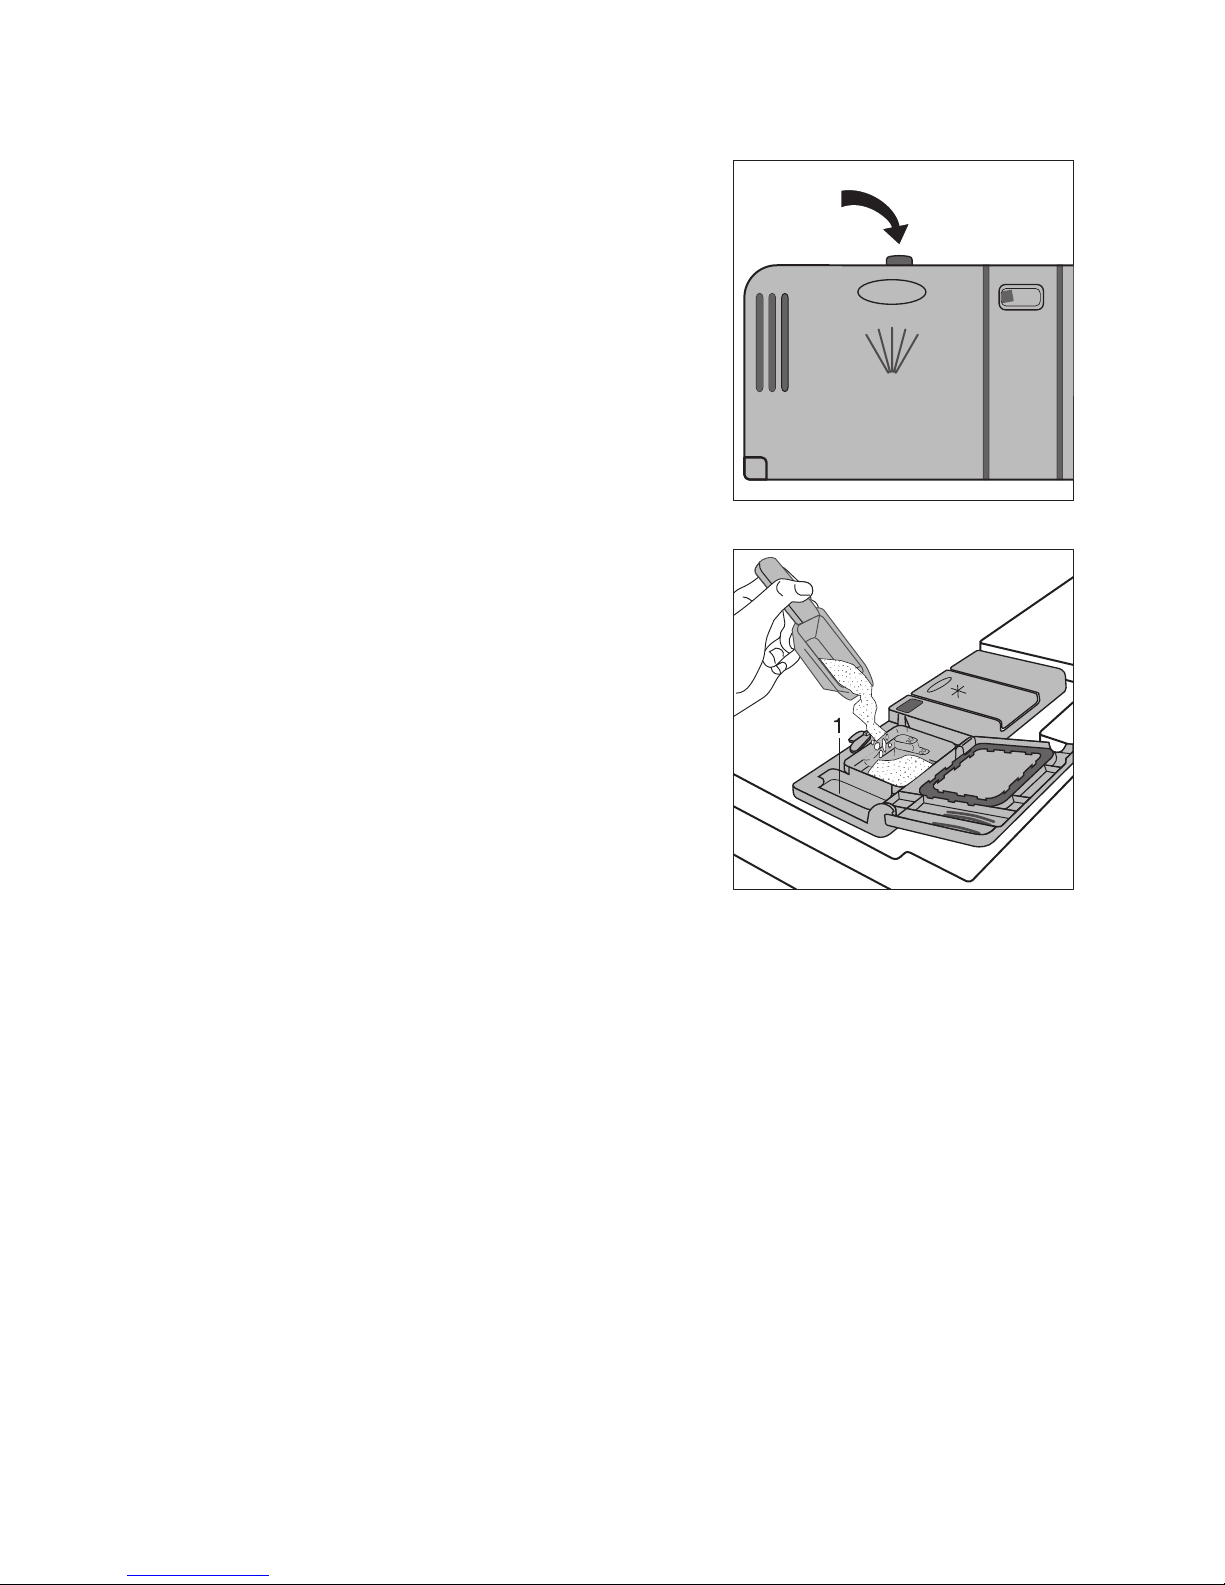
Adding detergent
Detergents remove the dirt from dishes and cutlery.
The detergent must be added before the cycle starts.
1 Only use detergent intended for domestic
dishwashers.
The detergent compartment is located on the inside
of the door.
1. If the lid is closed:
Press the release button.
The lid will spring open.
2. Place the detergent in the detergent dispenser. The
markings indicate the dosing levels for powder detergents: “20/30” corresponds to approx.
20/30 ml of detergent.
Follow the manufacturer’s instructions with regard
to dosing and storage.
3. Close the lid and press until it locks into place.
3 In the case of very heavily soiled dishes, fill the
adjoining compartment (1) with additional detergent. This detergent comes into use during
the pre-wash cycle.
Page 17

17
Concentrated detergents
Today’s detergents for dishwashers are almost exclusively low-alkaline concentrated detergents with
natural enzymes in tablet or powder form.
2 Using 50°C dishwashing cycles in conjunction
with these concentrated detergents reduces
pollution and is good for your dishes, as these
dishwashing cycles are specially matched to
the dirt-dissolving properties of the enzymes
in concentrated detergents. It is for this reason
that using 50 °C dishwashing cycles in conjunction with concentrated detergents can
achieve the same cleaning results that can
otherwise only be achieved using 65 °C cycles.
Detergent tablets
3 Detergent tablets from different manufactur-
ers dissolve at different rates. For this reason,
some detergent tablets do not attain their full
cleaning power during short cycles. Therefore
please use dishwashing cycles with pre-wash
when using detergent tablets.
Using 3in1 detergents
These products are detergents with a combined
cleaning, rinsing and salt function.
If you want to use 3in1 products
1. There is no need to fill up with special salt or rinse
aid.
2. Set the water softener to water hardness range “I”.
3. Set the rinse aid dosage to “1”.
Before the start of the dishwashing cycle put 3in1
detergent in the detergent dispenser.
If you do not want to use 3in1 products
any more
If you want to stop using 3in1 products, please do
the following:
• Fill up the dispensers for salt and rinse aid again.
• Switch the water softener to the highest setting
and perform up to three normal cycles without
loading any dishes.
• Then set the water softener to the water hardness
in your area.
If you want to use 4in1 products
When using "4 in 1" detergents that integrate also
anti- glass corrosion agent into "3 in 1" formula,
please follow the same indication as given for "3 in
1" detergents.
Page 18
18
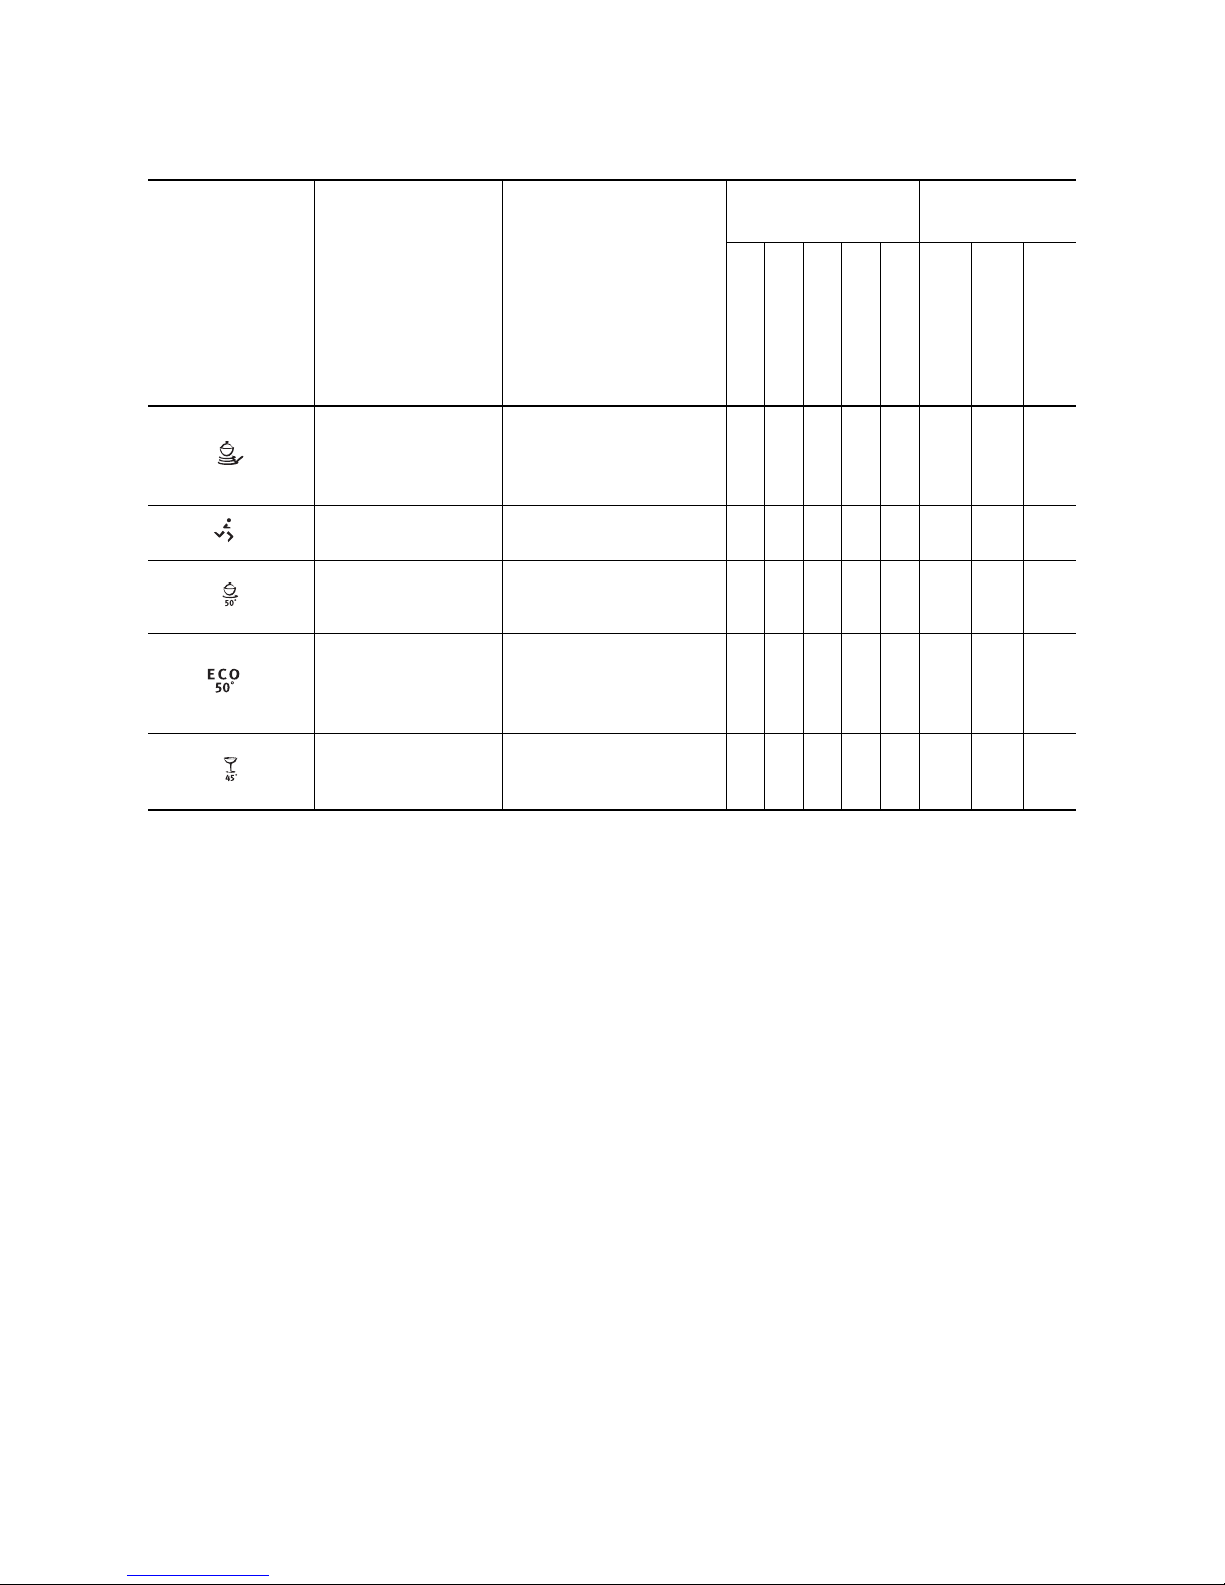
Selecting the dishwashing cycle (Cycle Table)
Dishwashing-
cycle
Suitable
for:
Type of
soiling
Programme
sequence
Consumption
values
1)
Pre-wash
Main wash
Intermediate rinse
Final rinse
Drying
Length (minutes)
Energy (kWh)
Water (litres)
Dinner service and
cookware
heavily soiled,
dried-on food remains, in
particular protein and
starch
• •
2x
• •
110 - 120
1,75 - 1,95
23 - 25
2)
Dishes, excluding
saucepans
just used, lightly to normally soiled
- • - • -
30
0,8
9
Dinner service and
cookware
normally soiled • • • • •
85 - 95
1,1 - 1,2
15 - 17
3)
Dinner service and
cookware, temperature-sensitive crockery
normally soiled • • • • •
130 - 160
0,95 - 1,05
13 - 15
Dessert dishes and
coffee service, delicate glassware
lightly soiled - •
2x
• •
73
0,9
15
1) The consumption values were obtained under standardised conditions. They depend on how full the baskets for the dishes are.
Variations are therefore possible in practice.
2) When using this cycle, only load the dishwasher half full.
3) Test programme for Test Institutes
Page 19
19
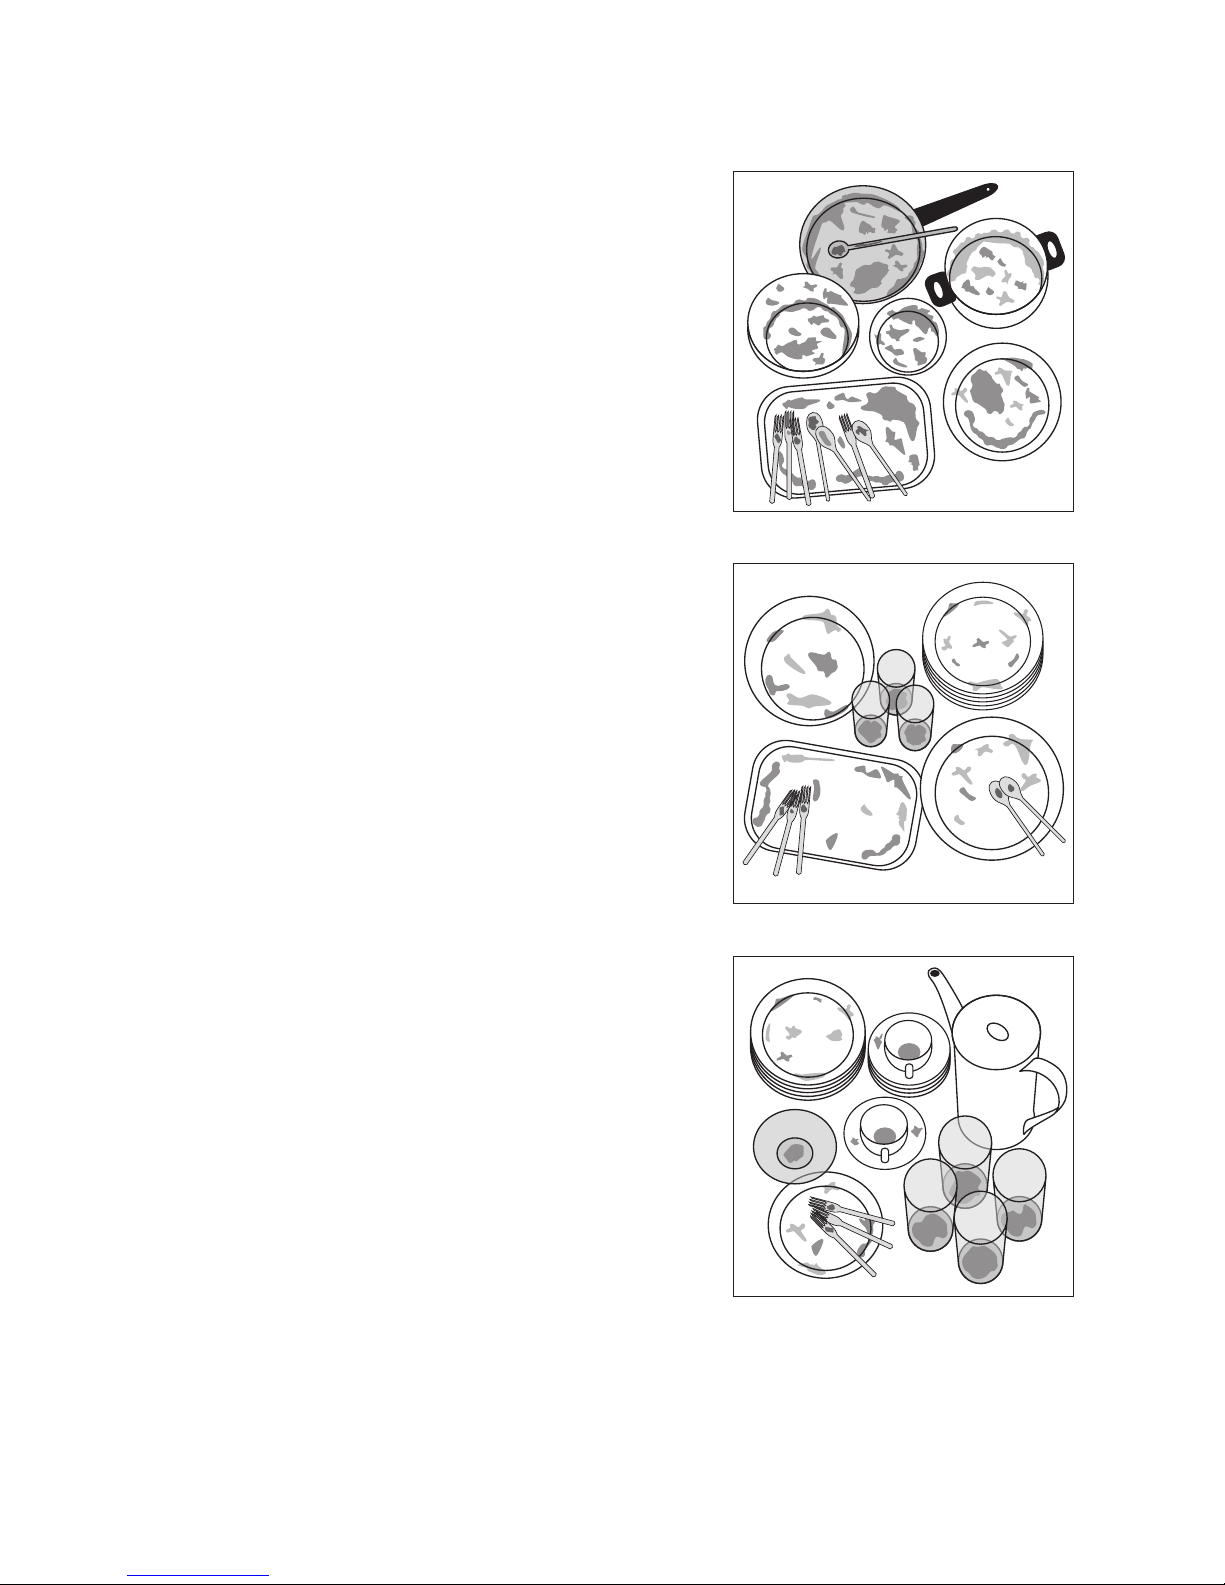
Selecting a programme
When your dishes look like this, select:
an intensive programme.
a normal or energy-saving programme.
a short programme (e.g. 30 minute programme).
Page 20

20
Starting a dishwashing
cycle
1. Check that the spray arms can turn freely.
2. Turn the water tap on fully.
3. Close the door.
4. Press the ON/OFF button.
5. Select the desired cycle.
The programme display lights up. The selected cycle will begin after approximately 3 seconds.
Interrupting or aborting a dishwashing cycle
Only interrupt a dishwashing cycle that is in progress
if it is absolutely necessary.
Interrupting the dishwashing programme by opening the dishwasher door
1 Hot steam may escape when the door is
opened. There is a risk of scalding.
1. Open the door carefully. The dishwashing cycle will
stop.
2. Close the door. The cycle will continue.
Aborting the dishwashing cycle
1. Press function buttons 2 and 3 and keep them
pressed.
The programme display for the current cycle will
flash for several seconds and then go out.
2. Release the function buttons. The dishwashing cycle has been cancelled.
3. If you want to start a new cycle, check whether
there is any detergent in the dispenser.
3 Turning off the dishwasher will only interrupt a
selected dishwashing cycle, not cancel it. The
cycle will recommence after turning the dishwasher back on again.
Setting the Delay Timer
Using the delay timer you can delay the start of a
dishwashing cycle for 3, 6 or 9 hours.
1. Press the ON/OFF button.
2. Press the Delay Timer button repeatedly until the
indicator next to the number of hours for which the
start of the dishwashing cycle is to be delayed
lights up, e. g.
6h, if the cycle is to start in 6 hours.
3. Select dishwashing cycle.
The LED indicator for the programme selected and
the indicator next to the number of hours will light
up.
The dishwashing cycle will start automatically following a countdown of the hours set.
To change the time delay:
As long as the cycle has not yet started, you can still
change the setting by pressing the DELAY TIMER
button.
Cancelling the delay timer:
Press the DELAY TIMER button repeatedly until none
of the three time displays is lit. The selected dishwashing cycle will begin immediately.
To change a dishwashing cycle
As long as the cycle has not yet started, you can still
change the dishwashing cycle. First abort the dishwashing cycle, then re-set the time delay, lastly select the new dishwashing cycle.
Switching off the dishwasher
Do not switch off the dishwasher until the indicator
for the end of the dishwasher cycle is illuminated in
the cycle progress display.
With some dishwashing cycles, the drying fan continues to run even after the end of the cycle.
1.Press the ON/OFF button. All display indicators will
go out.
2.Turn off the water tap.
1 Carefully open the door. Hot steam may es-
cape.
• Hot dishes are sensitive to knocks. Therefore leave
the dishes to cool for about 15 minutes before removing them. You also get a better drying result.
• Dishes dry more quickly if you open the door for a
moment after the cycle has ended and then leave it
slightly open.
Removing the dishes
3 It is normal for the inner door and the dispens-
ers to be damp.
• Empty the lower basket first, then the upper basket. This way you avoid dripping water from the
upper basket onto dishes in the lower basket.
Page 21
21
Care and cleaning
1
Do not use furniture care products or aggressive cleaners.
• When necessary, clean the dishwasher’s controls
with a soft cloth and clean warm water.
• Occasionally check the internal dispensers, door
seal and water inlet filter (if fitted) for dirt and clean
them, if necessary.
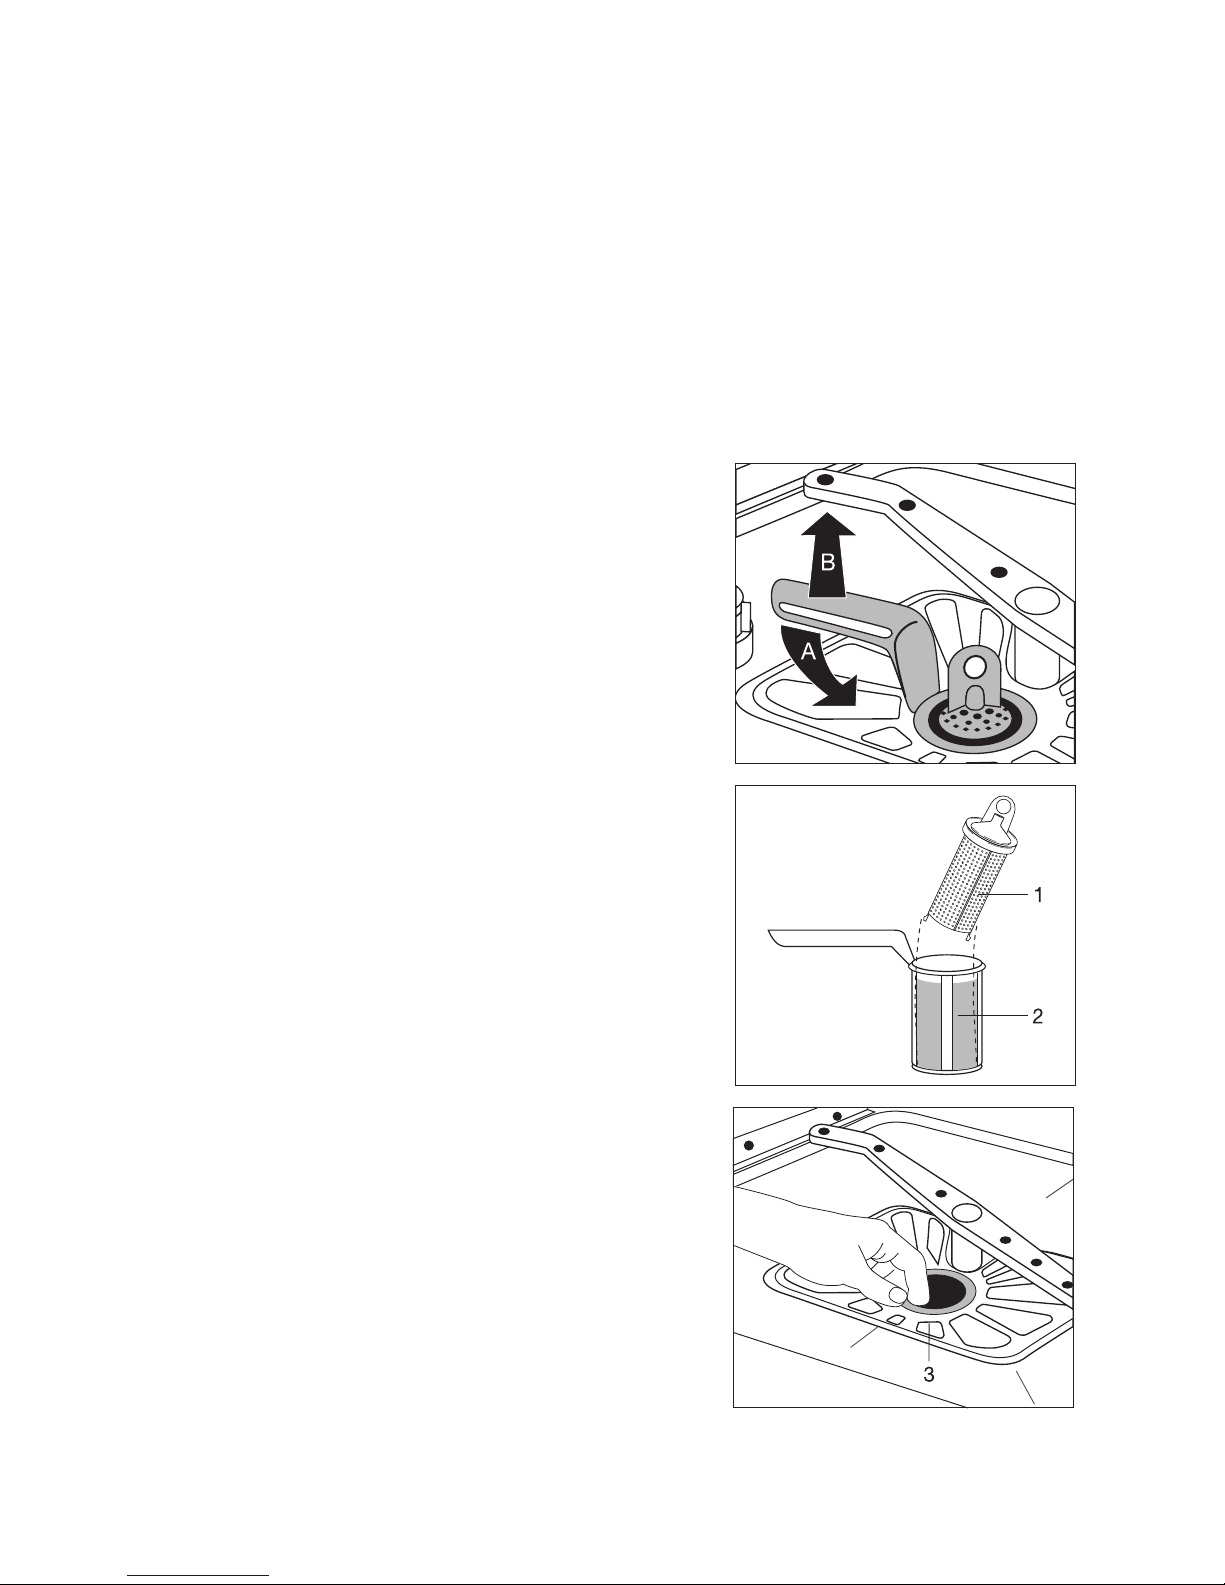
Cleaning the filters
3 The filters must be regularly checked and
cleaned. Dirty filters will spoil the wash results.
1. Open the door and remove the lower basket.
2. Turn the handle about ¼ of a turn anticlockwise (A)
and remove the filter system (B).
3. Grasp the grip hole on the fine filter (1) and remove
it from the micro-filter (2).
4. Clean all filters thoroughly under running water.
5. Remove the flat filter (3) from the base of the wash-
ing compartment and clean both surfaces thoroughly.
6. Re-insert the flat filter.
7. Place the fine filter in the micro-filter and fit the two
together.
8. Insert the filter system in place and lock it by turning the handle clockwise as far as it will go. Ensure
that the flat filter does not protrude above the base
of the washing compartment.
1 Under no circumstances may the dishwasher
be used without its filters.
Page 22
22
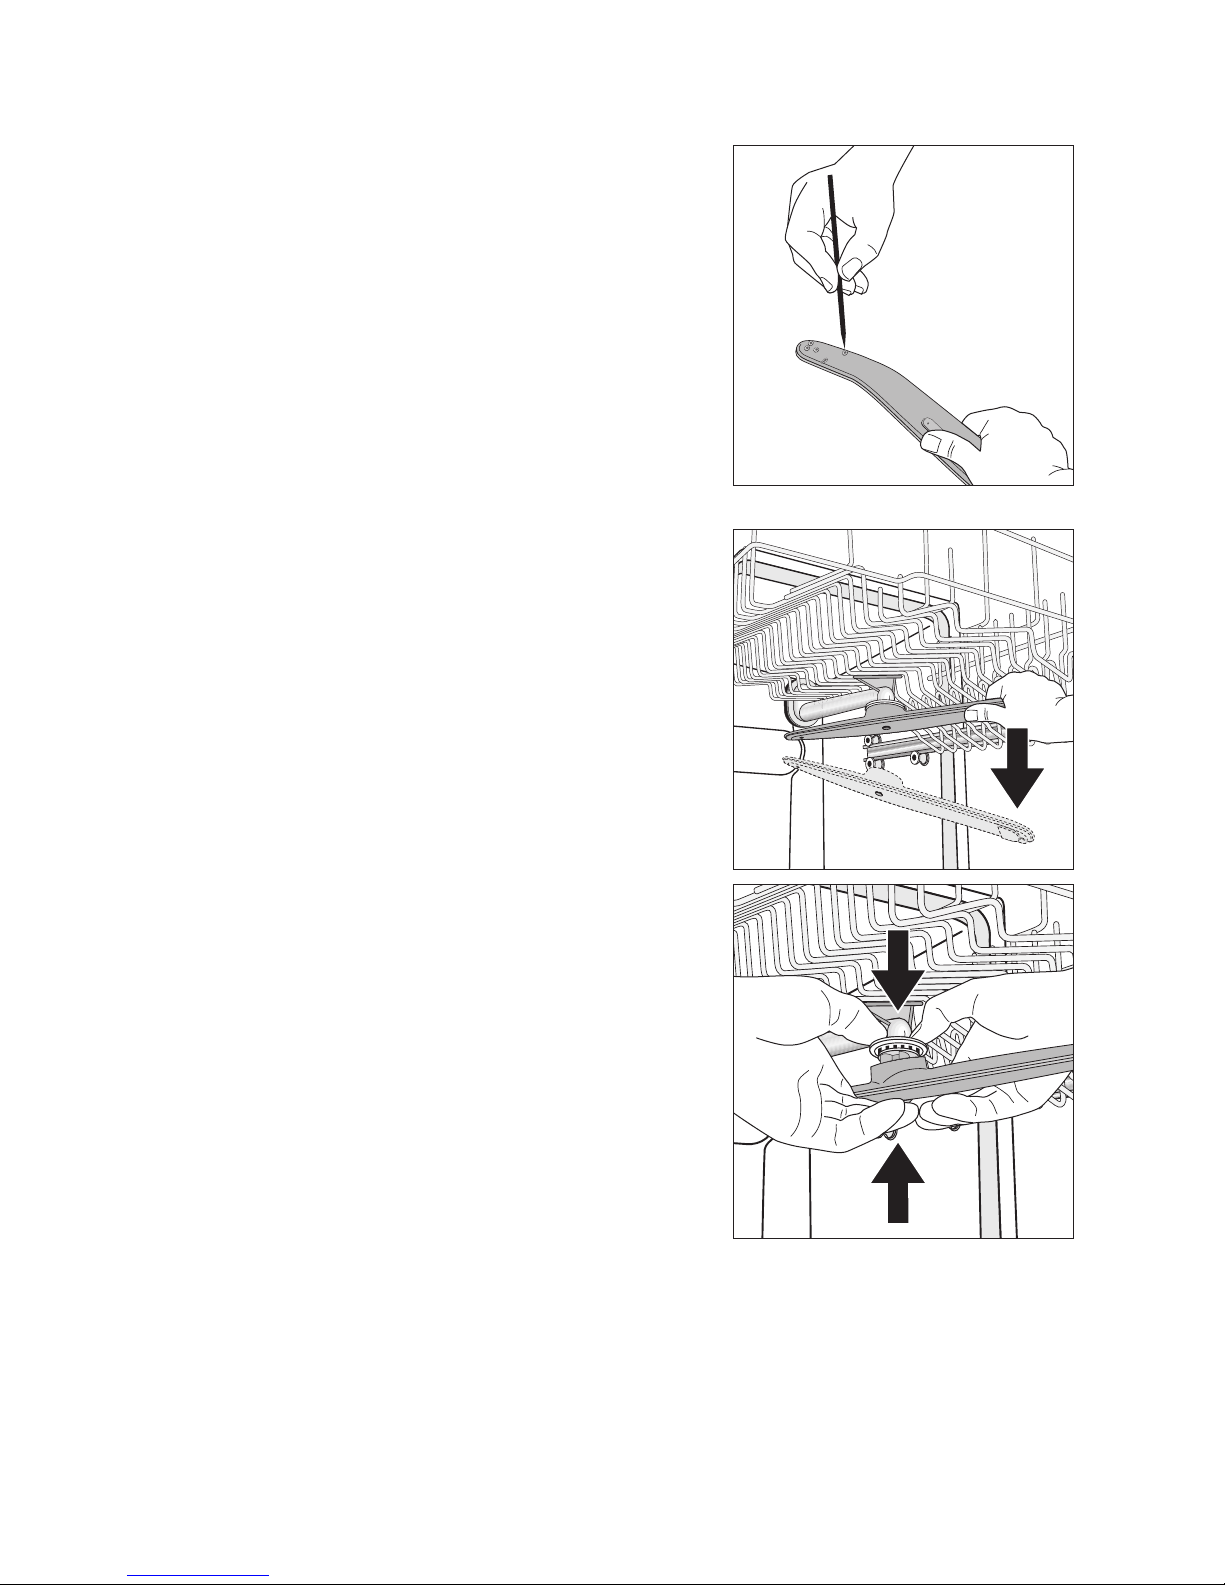
Cleaning the spray arm jets
Regularly check the jets in the spray arms for
blockages. When cleaning is necessary, remove spray arm from the fixture and clean jets
with a pointed object (wire or needle). Then
rinse out the spray arm using a strong jet of
water.
3 Do not damage the jet opening.
Upper basket spray arm
1. To remove upper basket spray arm, tilt it down
hard.
2. Clean spray arms jets.
3. Place cleaned upper basket spray arm back in po-
sition against the connecting piece: press the two
together firmly, until you feel them snap into place.
Page 23
23
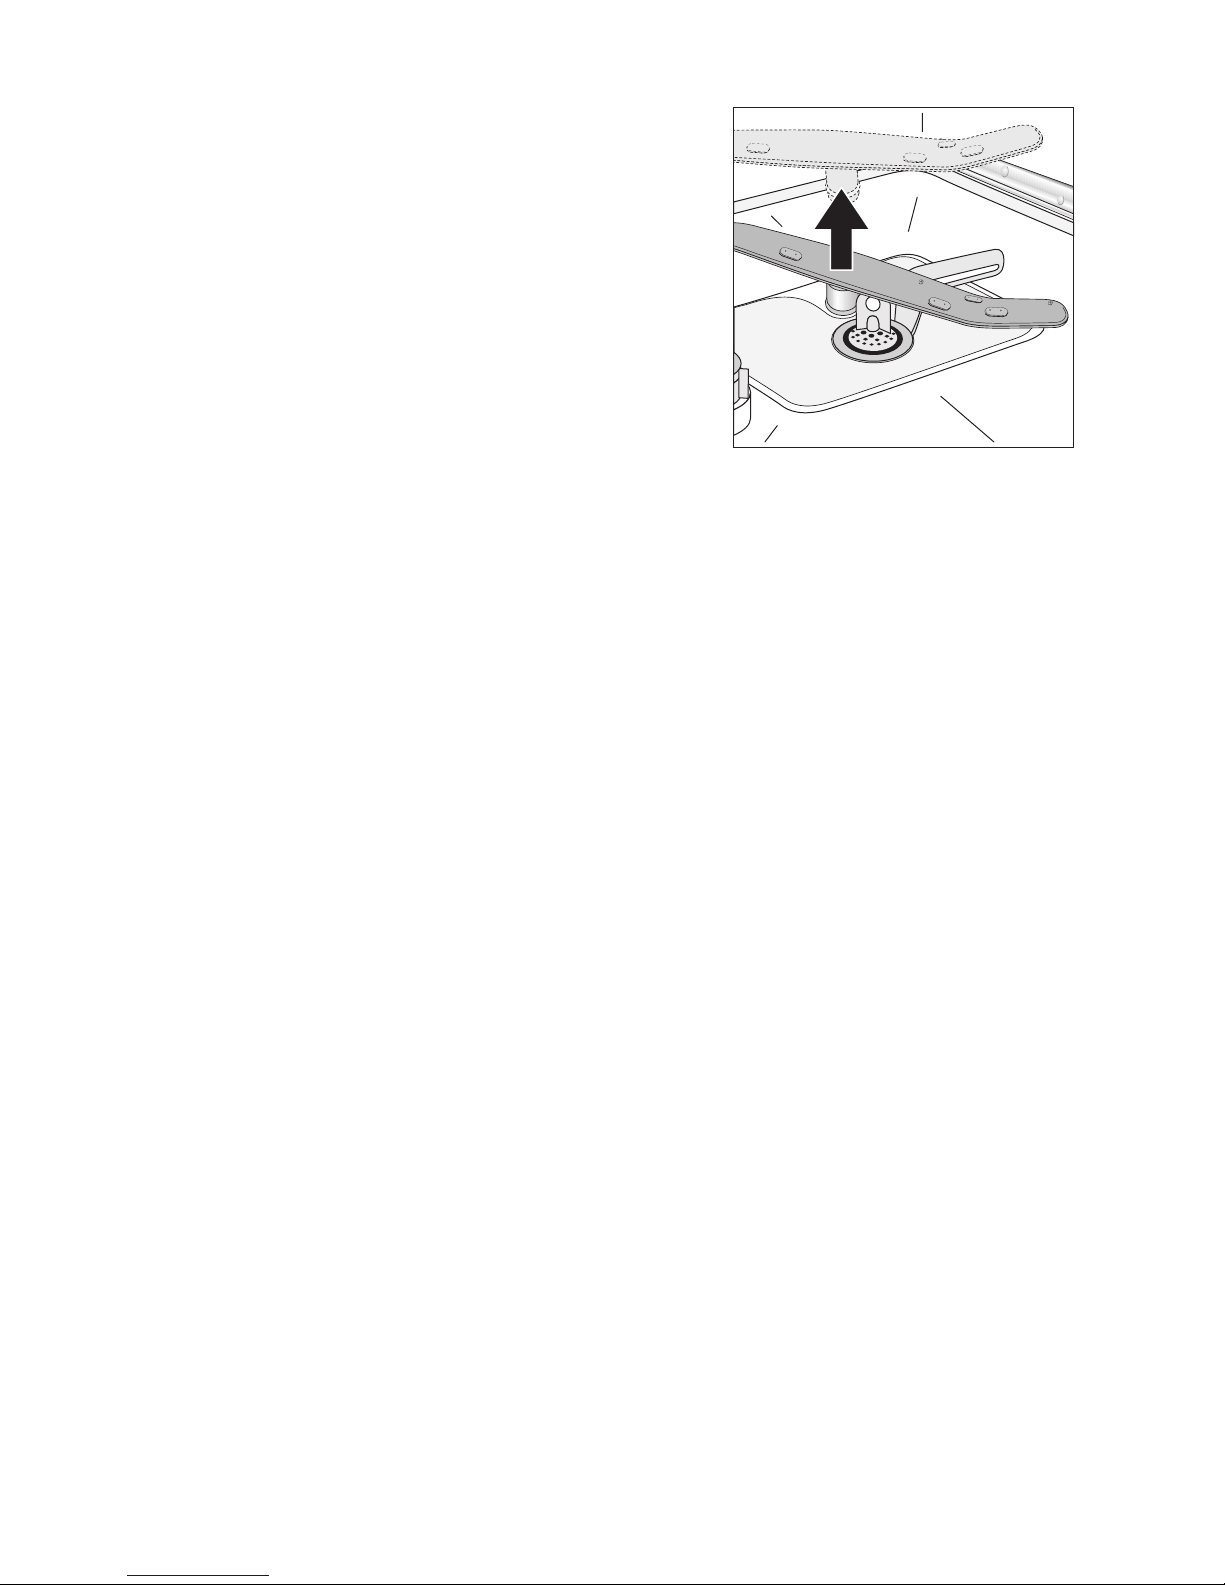
Bottom spray arm
1. To remove bottom spray arm, pull it upwards out of
its catch.
2. Clean spray arm jets.
3. Place bottom spray arm back in position against
connecting piece and press down firmly, until you
feel it snap into place.
Page 24
24
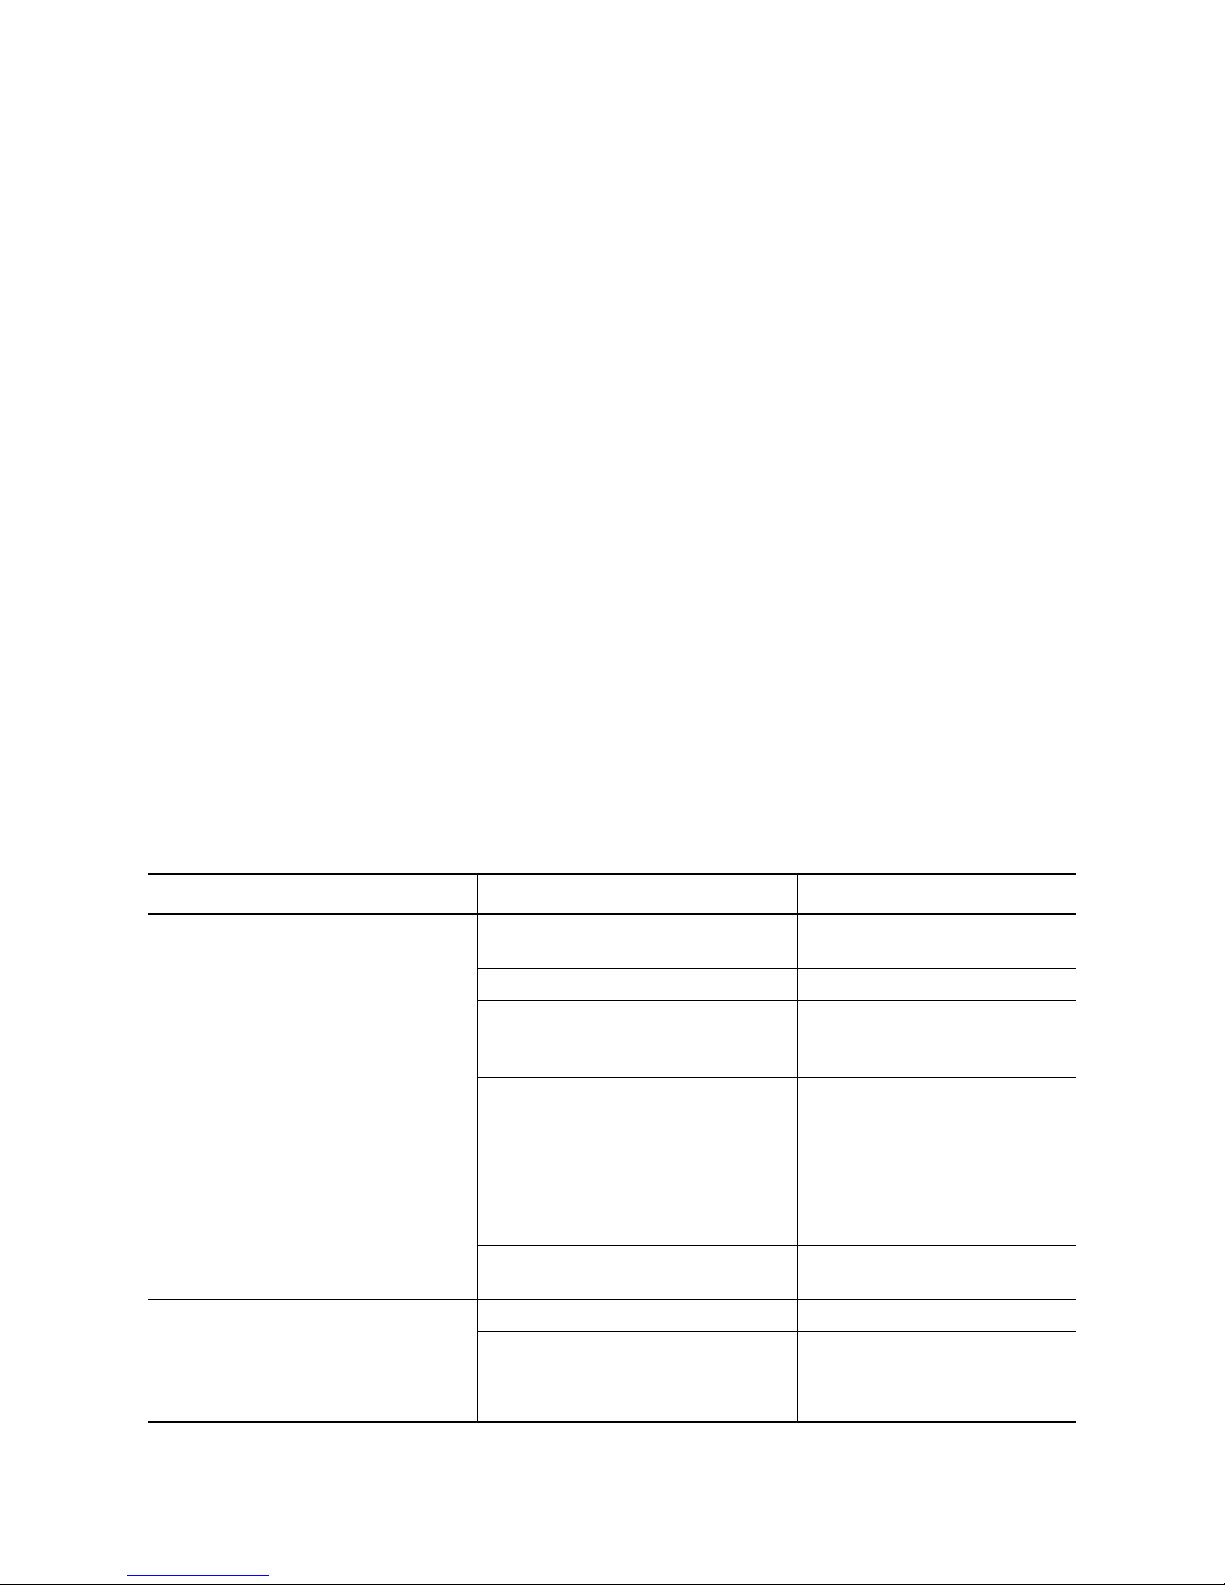
What to do if…
Remedying small malfunctions
Before you call the Customer Care Department,
please check whether
– you cannot remedy the fault yourself with the help
of the following fault table
or
– whether it is caused by faulty, electrical connec-
tions and/or faulty water connections.
In these cases the engineer must make you liable for
the costs of the Customer Service intervention even
during the warranty period.
If while the appliance is operating indicators on the
control panel flash or are lit up as described in the
following table, please consult this to find out how to
remedy the fault.
After remedying the fault that is flashing in the first
or second rhythm in the programme progress display, press the button for the dishwashing cycle that
had already started. The cycle will continue.
In the case of other fault messages:
– Cancel the dishwashing cycle.
– Switch the appliance off and on again.
– Select dishwashing cycle.
If the fault is displayed again, please contact the
Customer Care Department and inform them of the
fault message.
Malfunction Possible cause Remedy
The programme indicator for the selected dishwashing cycle is flashing,
the indicator for the end of the dishwashing cycle is flashing in rhythm 1
short light signal with approx. 3 second pause in-between:
(Problems with water inlet)
The tap is blocked or furred with
lime-scale.
Clean tap.
The tap is turned off. Turn the tap on.
The filter (where present) in the
threaded hose fitting on the tap is
blocked.
Clean the filter in the threaded
hose fitting.
Filters in the base of the washing
compartment are blocked.
Cancel the dishwashing cycle
(see chapter: Starting a dishwashing cycle),
clean filters (see chapter:
Cleaning the filters),
then start the dishwashing cycle again.
Water inflow hose has not been correctly positioned.
Check hose installation.
The programme indicator for the selected dishwashing cycle is flashing,
the indicator for the end of the dishwashing cycle is flashing in rhythm 2
short light signals one after another.
The sink outlet is blocked. Clean out sink outlet.
Water drain hose has not been correctly positioned.
Check hose installation.
Page 25

25
If the dishwashing results
are not satisfactory
The dishes are still dirty.
• The wrong dishwashing cycle was selected.
• The dishes were loaded is such a way that the
dishwashing water did not reach all items. The
baskets for the dishes must not be overloaded.
• Filters in the floor of the dishwasher are not clean
or incorrectly inserted.
• Good quality detergent was not used, or too little
was used.
• In the case of scale deposits on the dishes: The
special salt dispenser is empty or the water softening system has been incorrectly set.
• The drain hose is incorrectly positioned.
• If at the end of the dishwashing cycle there is still
detergent left in the detergent dispenser, either the
spray arm was jammed or the spray arm jets are
blocked with pollutants in the dishwashing water.
You have the option of removing the spray arms
from their fixture for cleaning (see section “Care
and Cleaning”).
The dishes do not dry and are not shining.
• Poor quality rinse aid was used.
• The rinse aid dispenser is empty.
There are smears, streaks, milky spots or
a shiny bluish coating on glasses and
dishes.
• Lower rinse aid dosage.
There are dried water drops on the glasses and dishes.
• Increase rinse aid dosage.
• The detergent may be the cause. Contact the de-
tergent manufacturer's customer advice centre.
Glass corrosion
• Contact the detergent manufacturer's customer
advice centre.
the indicator for the end of the dishwashing cycle is flashing in rhythm 3
short light signals one after another.
The anti-flood system has been triggered.
Turn off the tap and contact the
Customer Care department.
The cycle is not starting.
The mains plug is not
plugged in.
Plug in mains plug.
A fuse in the house’s wiring system
is defective.
Replace fuse.
For dishwasher models with a delay
start timer:
A start time has been selected.
If the dishes are to be washed
immediately, cancel the delay
start.
Rust spots are visible in the dishwashing compartment.
The dishwashing compartment is
made from rust-free stainless steel.
Rust spots in the dishwashing compartment are due to rust particles
from external sources (rust particles
from water pipes, pans, cutlery, etc.).
Remove such spots with a commercially-available stainless steel cleaning product.
Only wash cutlery, dishes and
pans that are suitable for dishwasher use.
A whistling noise can be heard when
washing dishes.
The whistling is not a cause for concern.
Decalcify appliance with commercially available agents for
cleaning dishwashers.
If the noises can still be heard
after decalcifying the machine,
use a different brand of detergent for washing cutlery and
dishes.
Malfunction Possible cause Remedy
Page 26

26
Disposal
2
Packaging material
The packaging materials are environmentally
friendly and can be recycled. The plastic components are identified by markings, e.g. >PE<,
>PS<, etc. Please dispose of the packaging
materials in the appropriate container at the
community waste disposal facilities.
2 Old appliance
The symbol W on the product or on its pack-
aging indicates that this product may not be
treated as household waste. Instead it shall be
handed over to the applicable collection point
for the recycling of electrical and electronic
equipment. By ensuring this product is disposed of correctly, you will help prevent potential negative consequences for the
environment and human health, which could
otherwise be caused by inappropriate waste
handling of this product. For more detailed information about recycling of this product,
please contact your local city office, your
household waste disposal service or the shop
where you purchased the product.
1 Warning! When your appliance has finished
its working life, remove the plug from the
socket. Cut off the cable and plug and dispose
of them.
Break the door lock so that the door no longer
shuts. This prevents children from trapping
themselves inside and endangering their lives.
Page 27
27
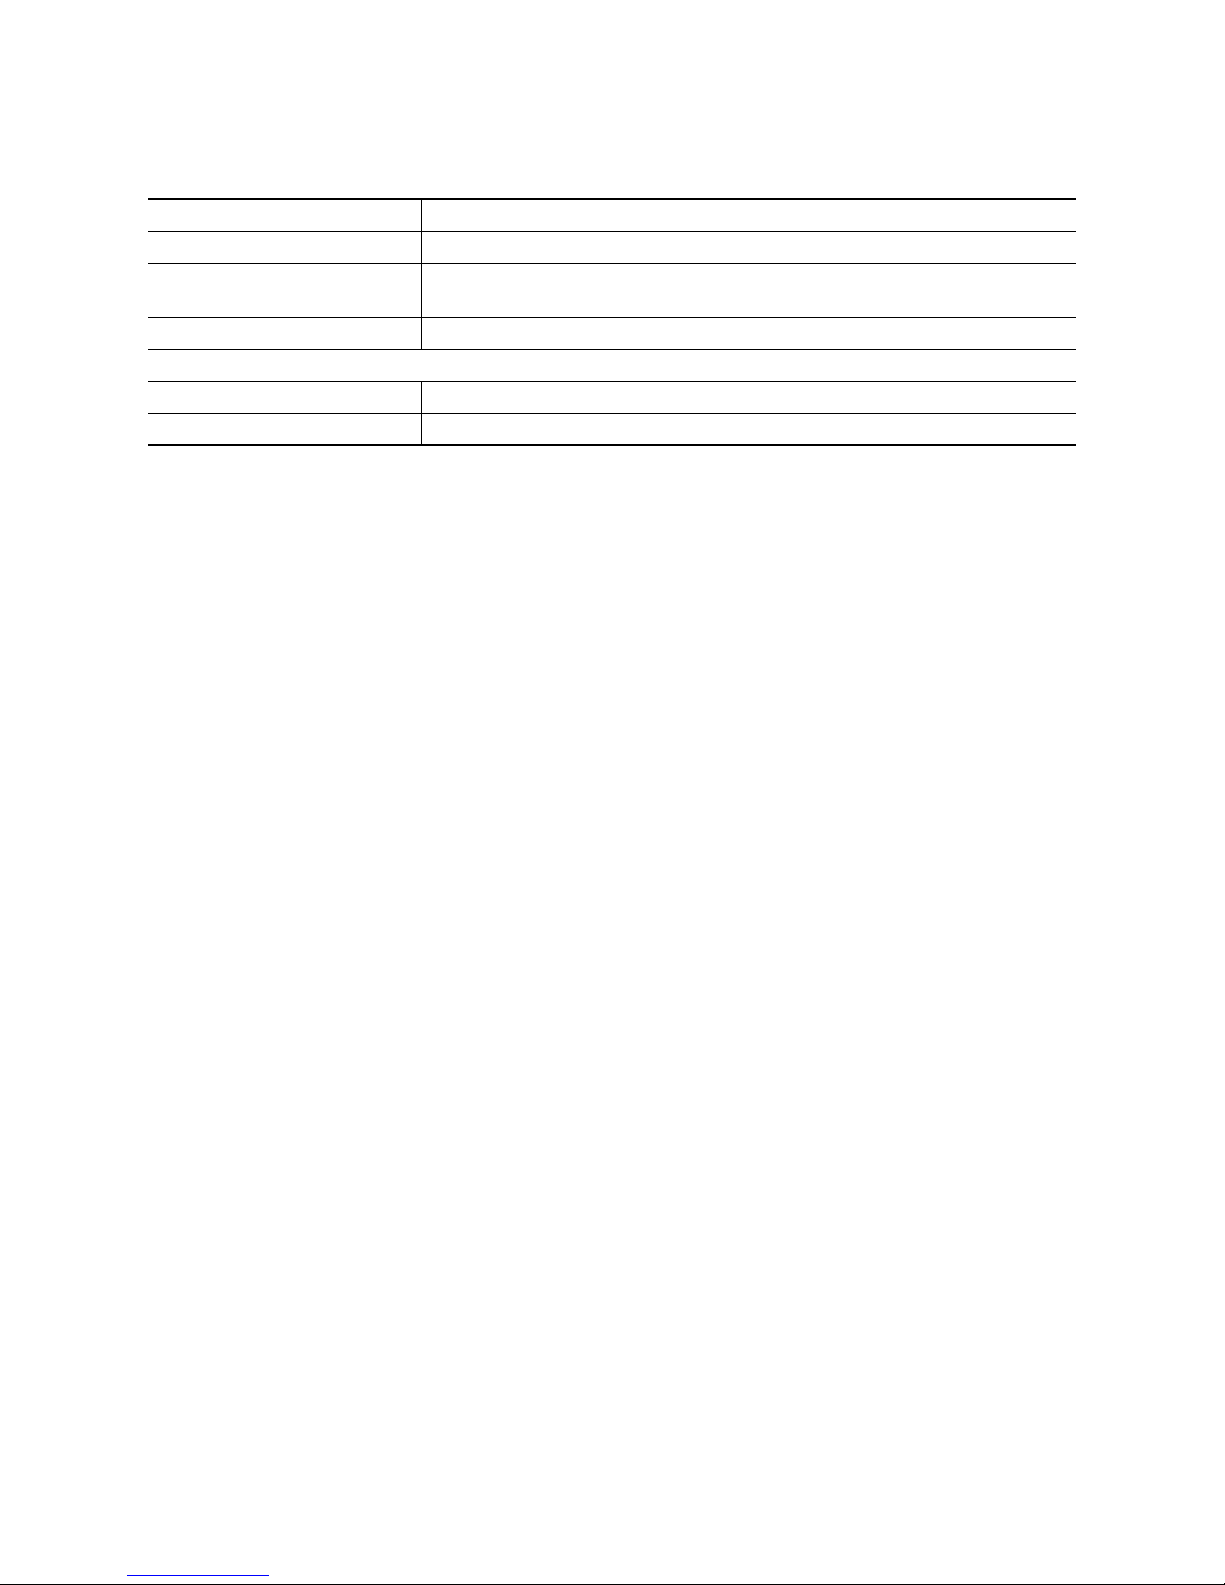
Technical data
5 This appliance conforms with the following EU
Directives:
– 73/23/EEC dated 19.02.1973 Low Voltage Direc-
tive
– 89/336/EEC dated 03.05.1989 EMC Directive in-
clusive of Amending Directive 92/31/EEC
– 93/68/EEC dated 22.07.1993 CE Marking Directive
Capacity: 12 place settings including serving dishes
Permitted water pressure: 1-10 bar (=10-100 N/cm
2
= 0.1-1.0 MPa)
Electrical connection: AC 220 - 240 V, 50 Hz, 10 A; also see the rating plate on the right-hand side
of the dishwasher’s interior door .
Total output 2100 - 2300 W
Dishwashers that can be integrated and built-in
Dimensions: 820 - 880 x 596 x 570 (H x W x D in mm)
Max. weight: 50 kg
Page 28
28
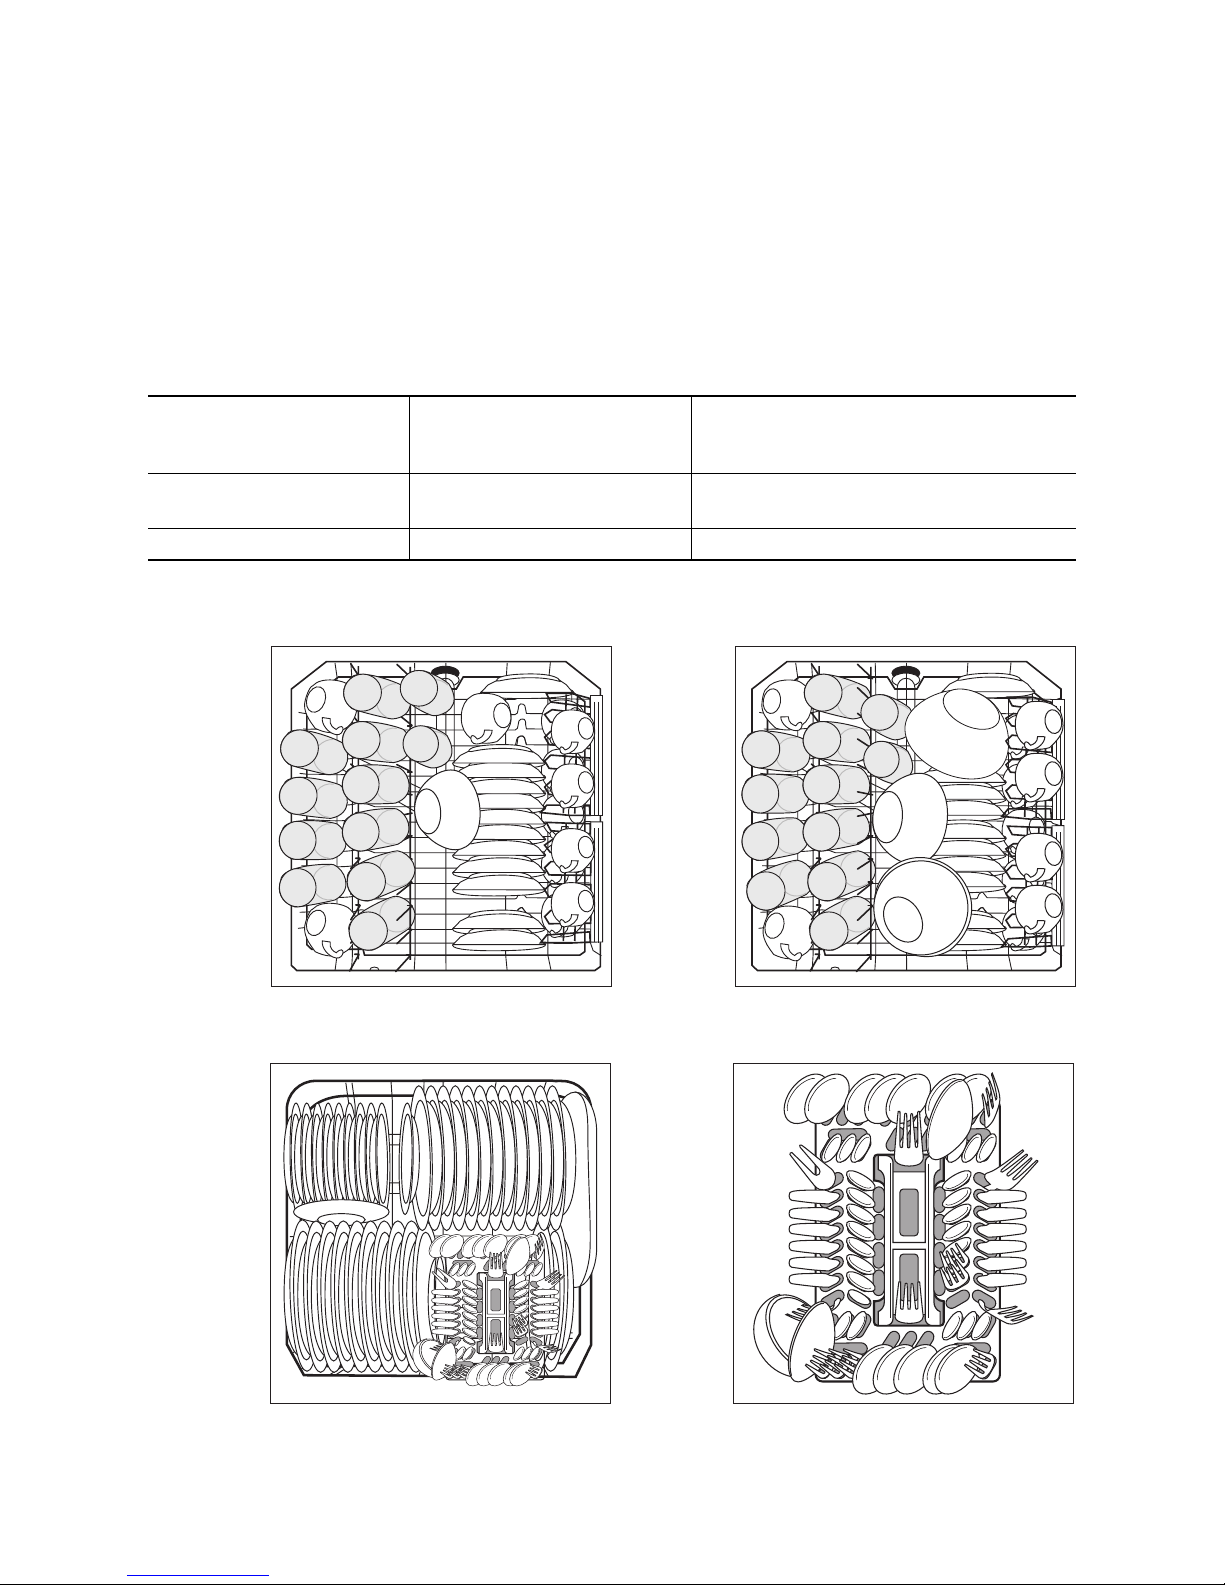
Notes for Test Institutes
Testing in accordance with EN 60704 must be car-
ried out with the appliance fully loaded and using the
test cycle (see “Cycle Table”).
Tests in accordance with EN 50242 must be carried out when the salt dispenser in the water softener
and the rinse aid dispenser have been filled with salt
and rinse aid respectively, and using the test cycle
(see “Cycle Table”).
Sample loading arrangements:
Full load:
12 place settings
including serving dishes
Half load:
6 place settings including serving dishes,
leaving alternate positions in the rack free
Amount of detergent required:
5g + 25g (Type B) 20g (Type B)
Rinse aid setting: 4 (Type III) 4 (Type III)
Upper basket
*)
*) If necessary, you can remove the cup racks on the left-hand side.
Lower basket with cutlery basket
*)
Cutlery basket
*) If necessary, you can remove the cup racks on the left-hand side and/or the beer glass holder.
Page 29

29
Installation and connection instructions
1 Safety information for the installation
• Only transport the dishwasher in an upright position, otherwise salt water may run out.
• Before using the dishwasher for the first time,
check for any damage caused in transport. Do not
under any circumstances connect an appliance
that is damaged. In the case of damage, please
contact your supplier.
• Never use the dishwasher if the mains cable, water
inlet or drain hose are damaged; or if the control
panel, work top or plinth area are damaged such
that the inside of the appliance is freely accessible.
• Always plug the mains plug into a correctly installed shockproof socket.
• Permanent connection: a permanent connection
must only be installed by a trained electrician.
• Prior to using the appliance for the first time, ensure that the rated voltage and type of supply on
the rating plate match that of the supply where the
appliance is to be installed. The fuse rating is also
to be found on the rating plate.
• Multi-way plugs / connectors and extension cables
must not be used. This could constitute a fire hazard through overheating.
• The dishwasher’s cable must only be replaced by
the Customer Care Department or a registered
electrician.
• A water inlet hose with safety valve must only be
replaced by the Customer Care Department.
Page 30
30
Installing the dishwasher
• The dishwasher must be installed on a firm floor
and adjusted to ensure that it is stable and level in
all directions.
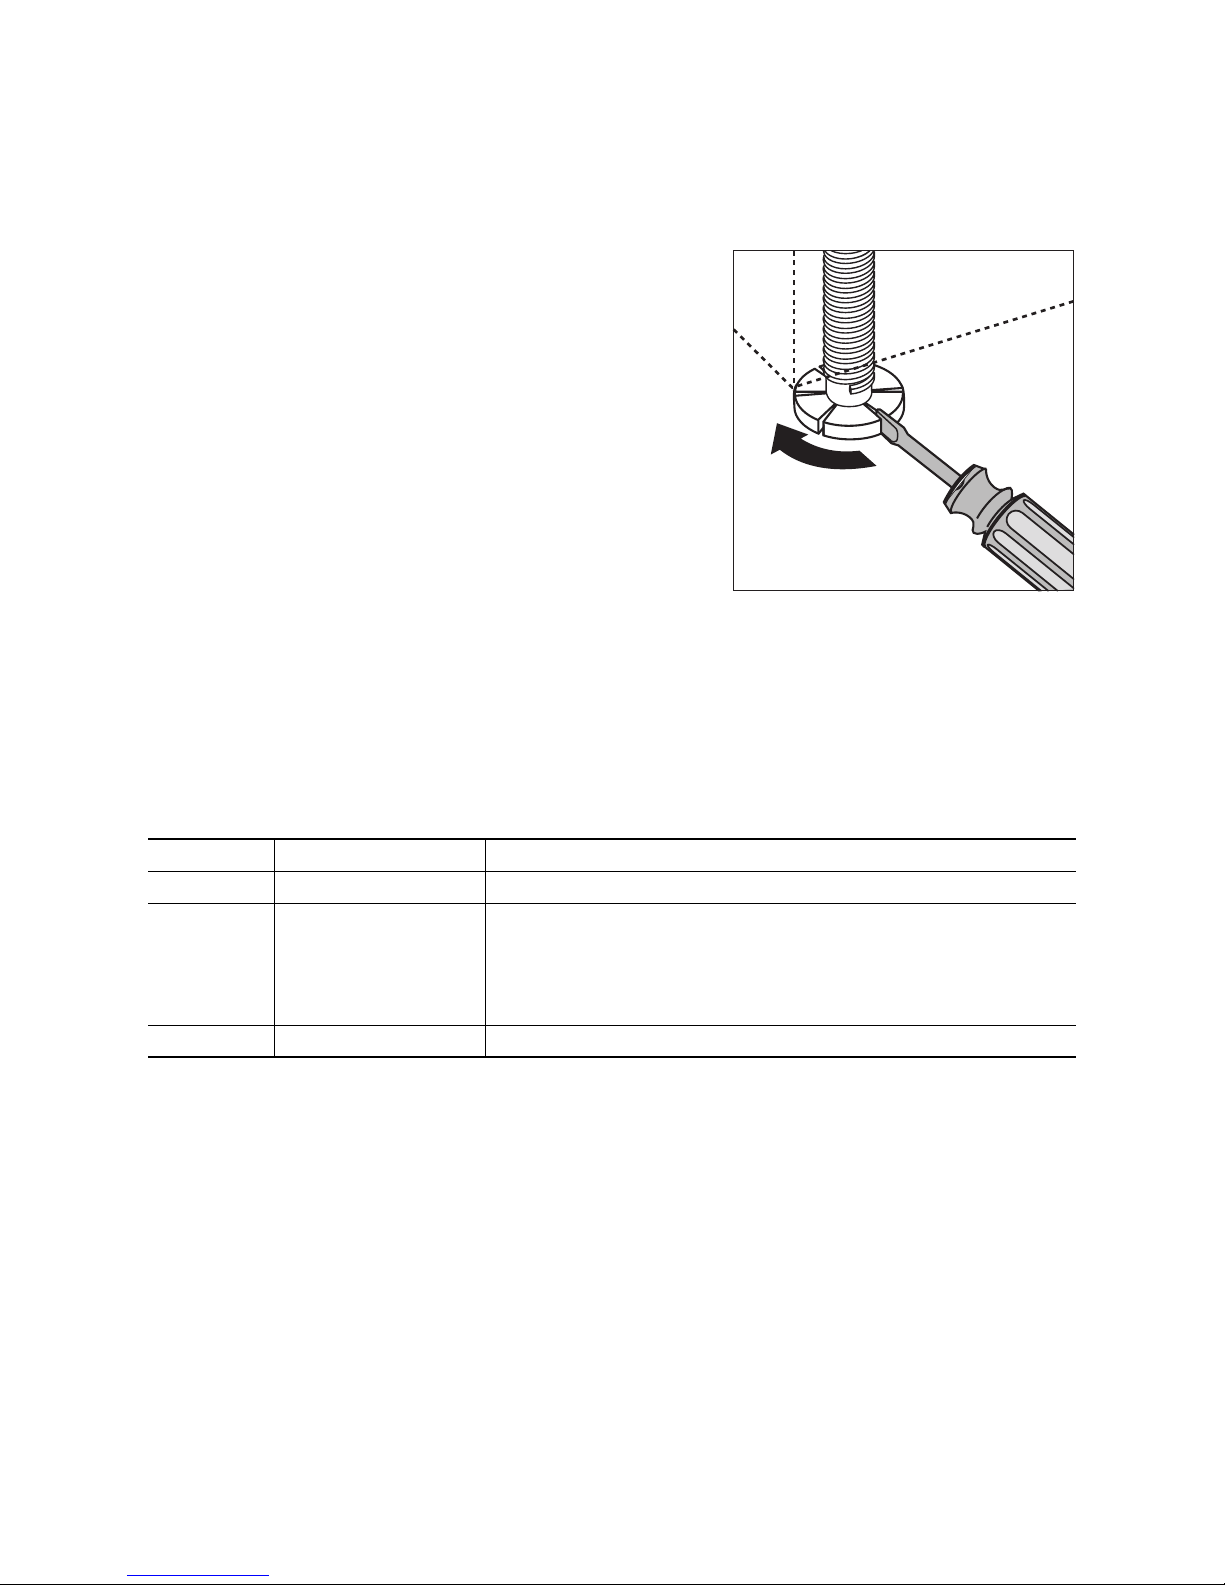
• To compensate for unevenness in the floor and to
match the height of the appliance to that of surrounding units, extend the threaded feet using a
screwdriver.
• Adjust the rear feet of the appliance using a cordless screwdriver from the front of the appliance.
(See installation instructions.)
• The drain hose, inlet hose and mains cable must
be laid so that they are able to move freely within
the plinth area, and so that they are not kinked or
crushed when the dishwasher is in position.
• The dishwasher must also be screwed tightly to
the work surface or to the adjoining units. This is
essential to ensure the dishwasher does not tip up.
Dishwashers that can be integrated
(see installation template supplied)
3 The door of the appliance can be fitted with a
wooden door/cupboard door with the following dimensions:
Width: 591 – 594 mm
Depth: 16 – 24 mm
Height:
(variable)
dependent on – Recess height
– Plinth height
– Adjusting the dishwasher to match the height of adjoining units
The exact height must be measured at the place of installation from
the adjoining units.
Weight: max. 8 kg
Page 31

31
Connecting the dishwasher
Connecting to the water
supply
• The dishwasher can be connected to cold and hot
water supplies up to max. 60°C.
• The dishwasher must not be connected to open
hot water appliances or instantaneous water heaters.
Permitted water pressure
Connecting the inlet hose
1 The water inlet hose must not be kinked,
crushed or entangled when it is being con-
nected.
Connect the threaded hose fitting (ISO 228-1:2000)
on the water inlet hose to a tap with an external
thread (¾ inch). The inlet hose is fitted with either a
plastic or a metal nut:
– Only tighten the nut hand tight.
Then do a visual check for water tightness. (Make
sure that the tap is not dripping.)
3 So that access to the tap in the kitchen is not
restricted by the use of the dishwasher, we
recommend installing an additional tap, or fit-
ting a T-branch to the existing tap.
If you need a longer water inlet hose than that sup-
plied, the following VDE-approved complete hose
sets are to be used. These are available from your local dealer.
– Hose kit “WRflex 100” (Code: 911 239 034)
– Hose kit “WRflex 200” (Code: 911 239 035)
Water drainage
Drain hose
1 The drain hose must not be kinked, crushed or
entangled.
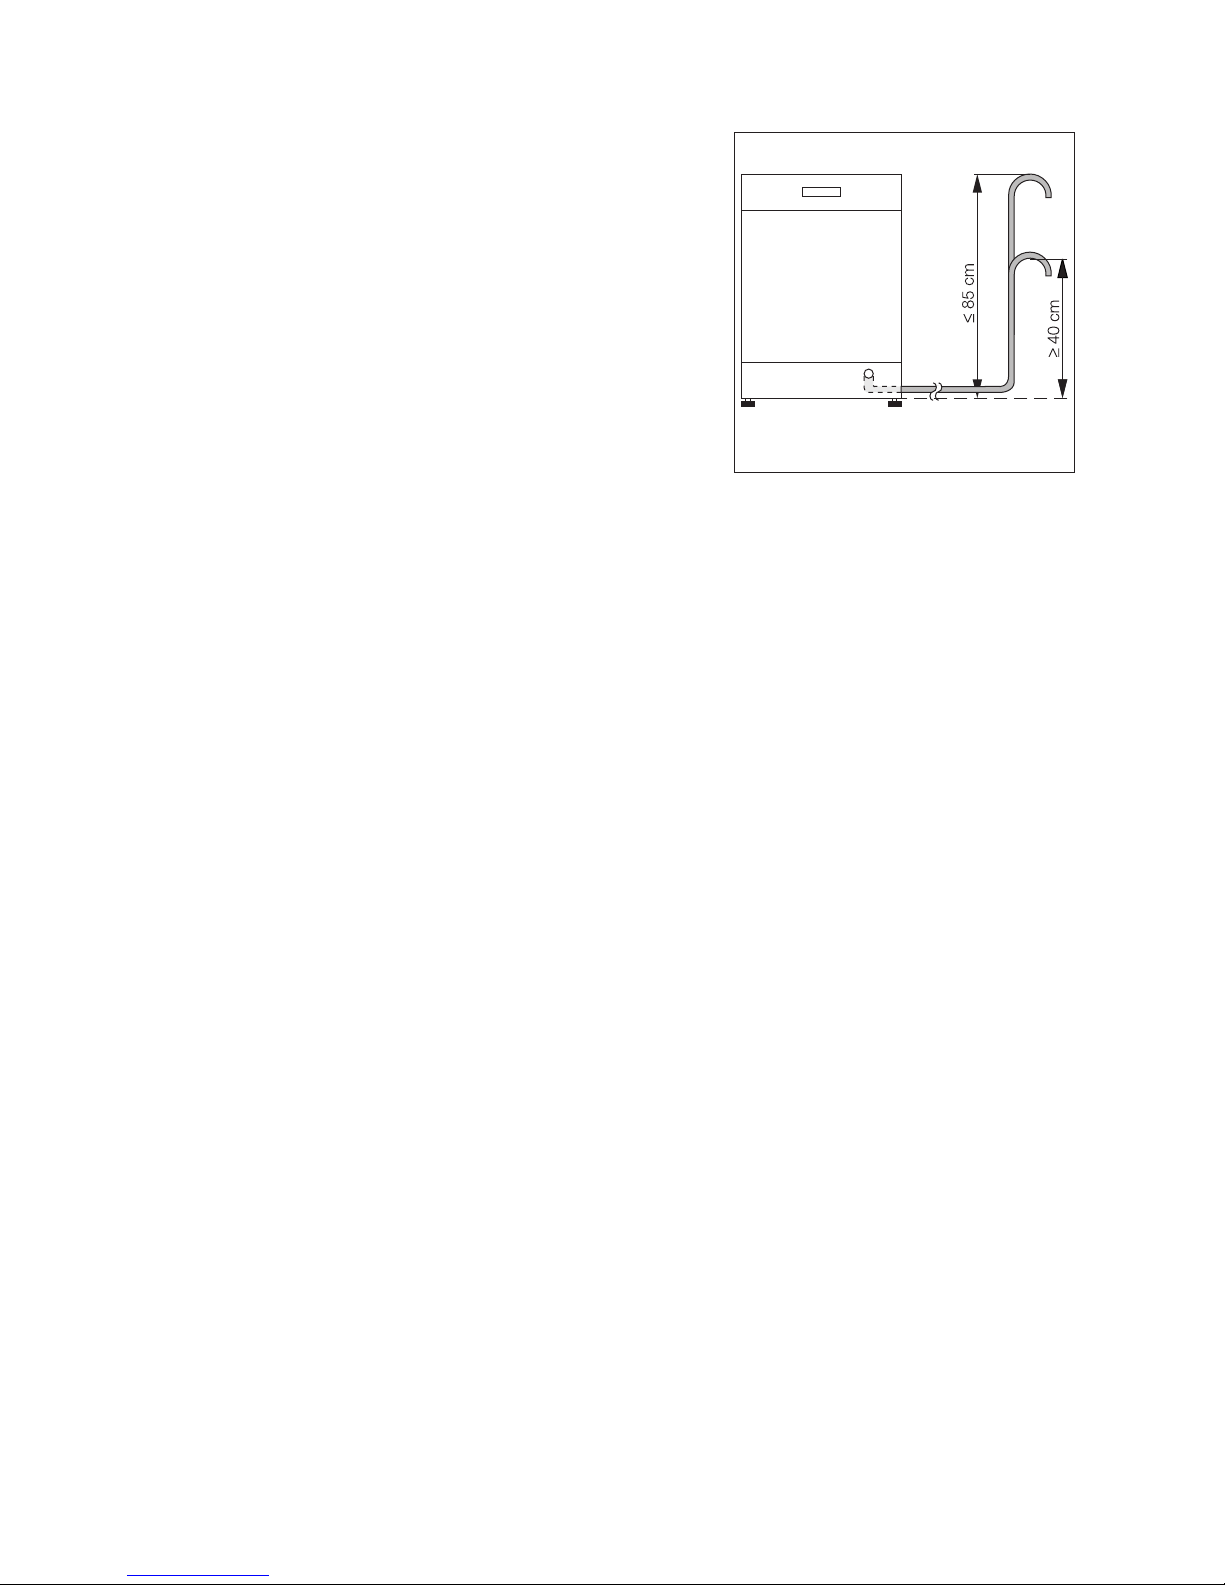
Connecting the drain hose:
– Maximum permitted height: 1 metre.
– Minimum required height: 40 cm above the bot-
tom edge of the appliance.
Lowest permitted water pressure:
0,1 MPa ( = 1 bar = 10 N/cm
2
)
Consult your plumber if the water pressure is less than
0,1 MPa.
Highest permitted water pressure:
1 MPa ( = 10 bar = 100 N/cm
2
)
If the water pressure is greater than
1 MPa, a pressure reduction valve must be used
(available from your dealer).
Page 32
32
Extension hoses
• Extension hoses are available from your dealer or
from our Customer Care Department. To ensure
that the function of the appliance is not impeded,
the internal diameter of extension hoses must be
19 mm.
• Extension hoses must not be laid more than a
maximum distance of 4 metres horizontally; the
maximum permitted height for the connection for
the drain hose is then 85 cm.
Sink outlet connection
• The outlet of the drain hose (ø 19 mm) fits all com-
monly available sink outlet types. The outer diameter of the sink outlet connection must be at least
15 mm.
• The drain hose must be fixed to the sink outlet
connection using the hose clamp supplied.
Water drainage if the dishwasher is builtin at high level
If the dishwasher is installed at a high level, and the
drain hose connection is less than 30 cm from the
lower edge of the appliance, adapter kit
ET 111099520 must be fitted by the Customer Care
Department.
Anti-flood system
For protection from water damage, the dishwasher is
equipped with a anti-flood system.
In the event of a fault, the safety valve immediately
interrupts the supply of water to the appliance and
the drain pump is activated.
In this way water can neither escape nor overflow.
The remaining water in the appliance is automatically
pumped out.
Electrical connection
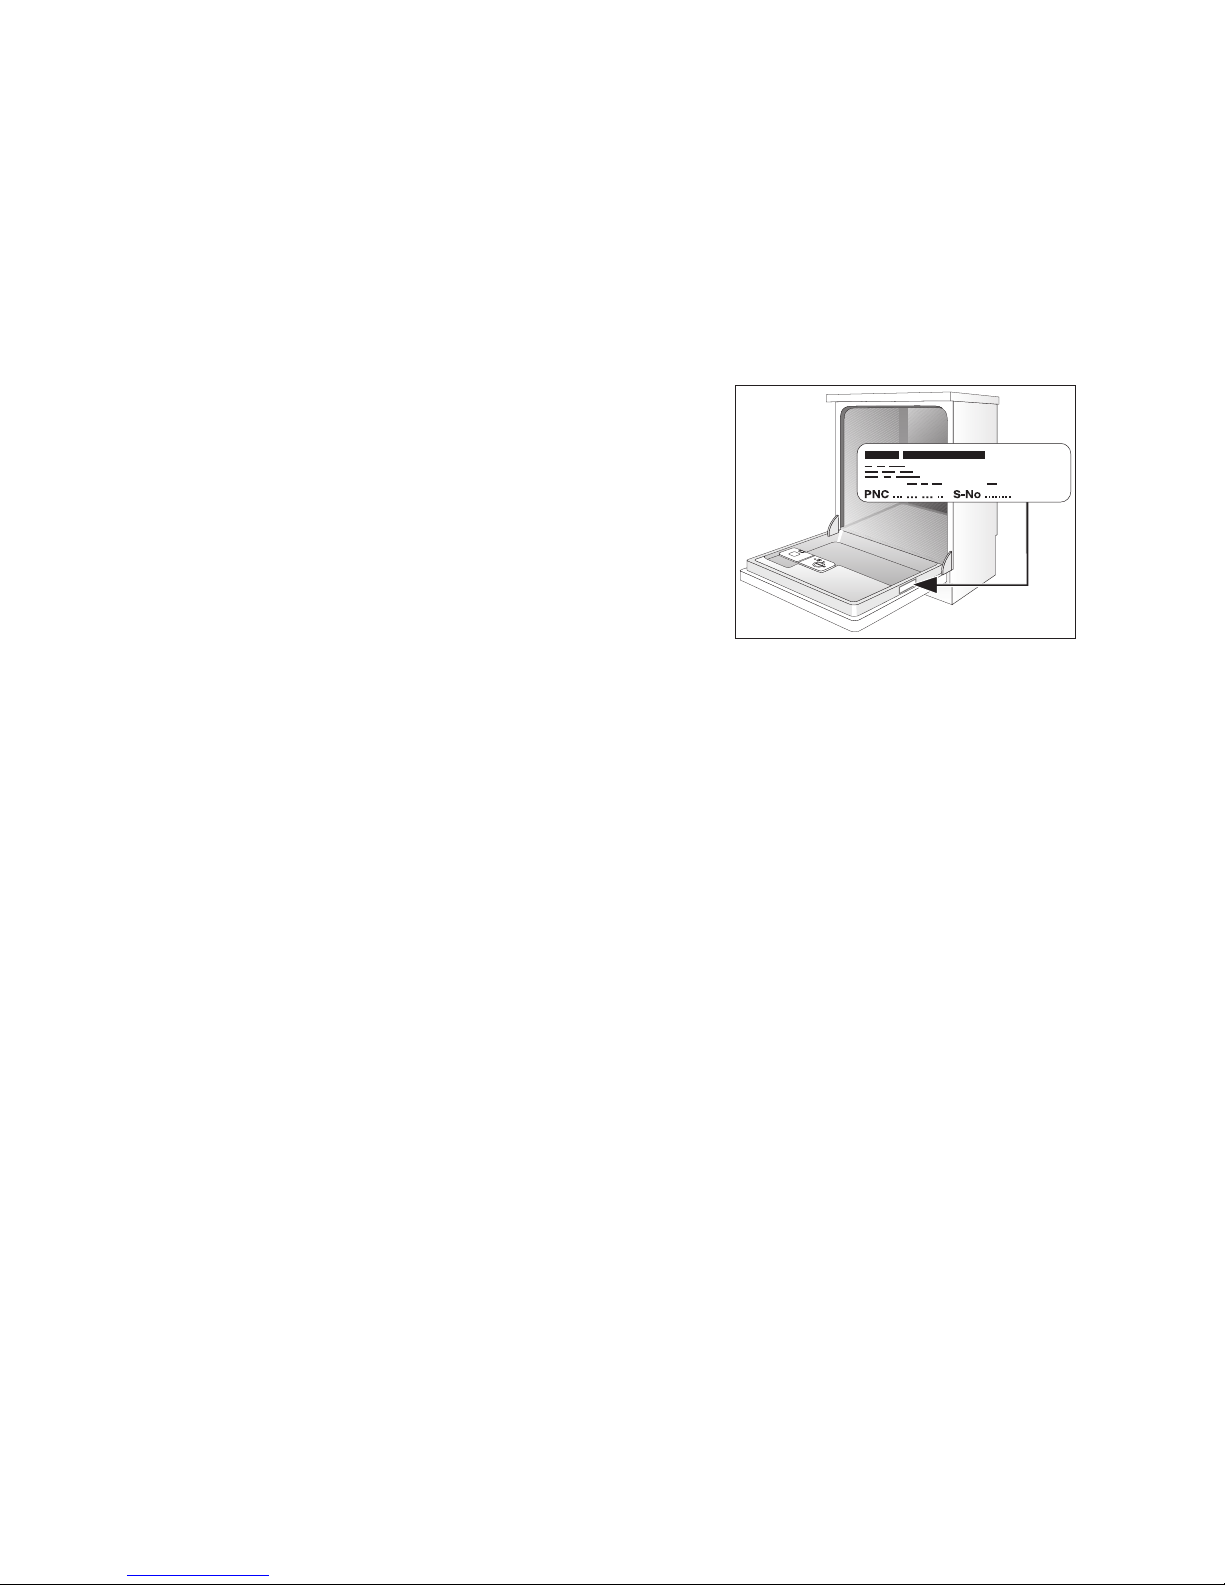
Details about the voltage, type of supply and the fuses required are to be found on the rating plate. The
rating plate is located on the right-hand inner edge of
the dishwasher door.
To isolate the dishwasher from the mains, pull out the
mains plug.
Important:
– The plug must be accessible after the appliance
has been installed.
– Following installation, live parts and insulated wir-
ing must not be accessible to a test finger in accordance with DIN EN 60335-1.
Page 33
33
Connecting systems
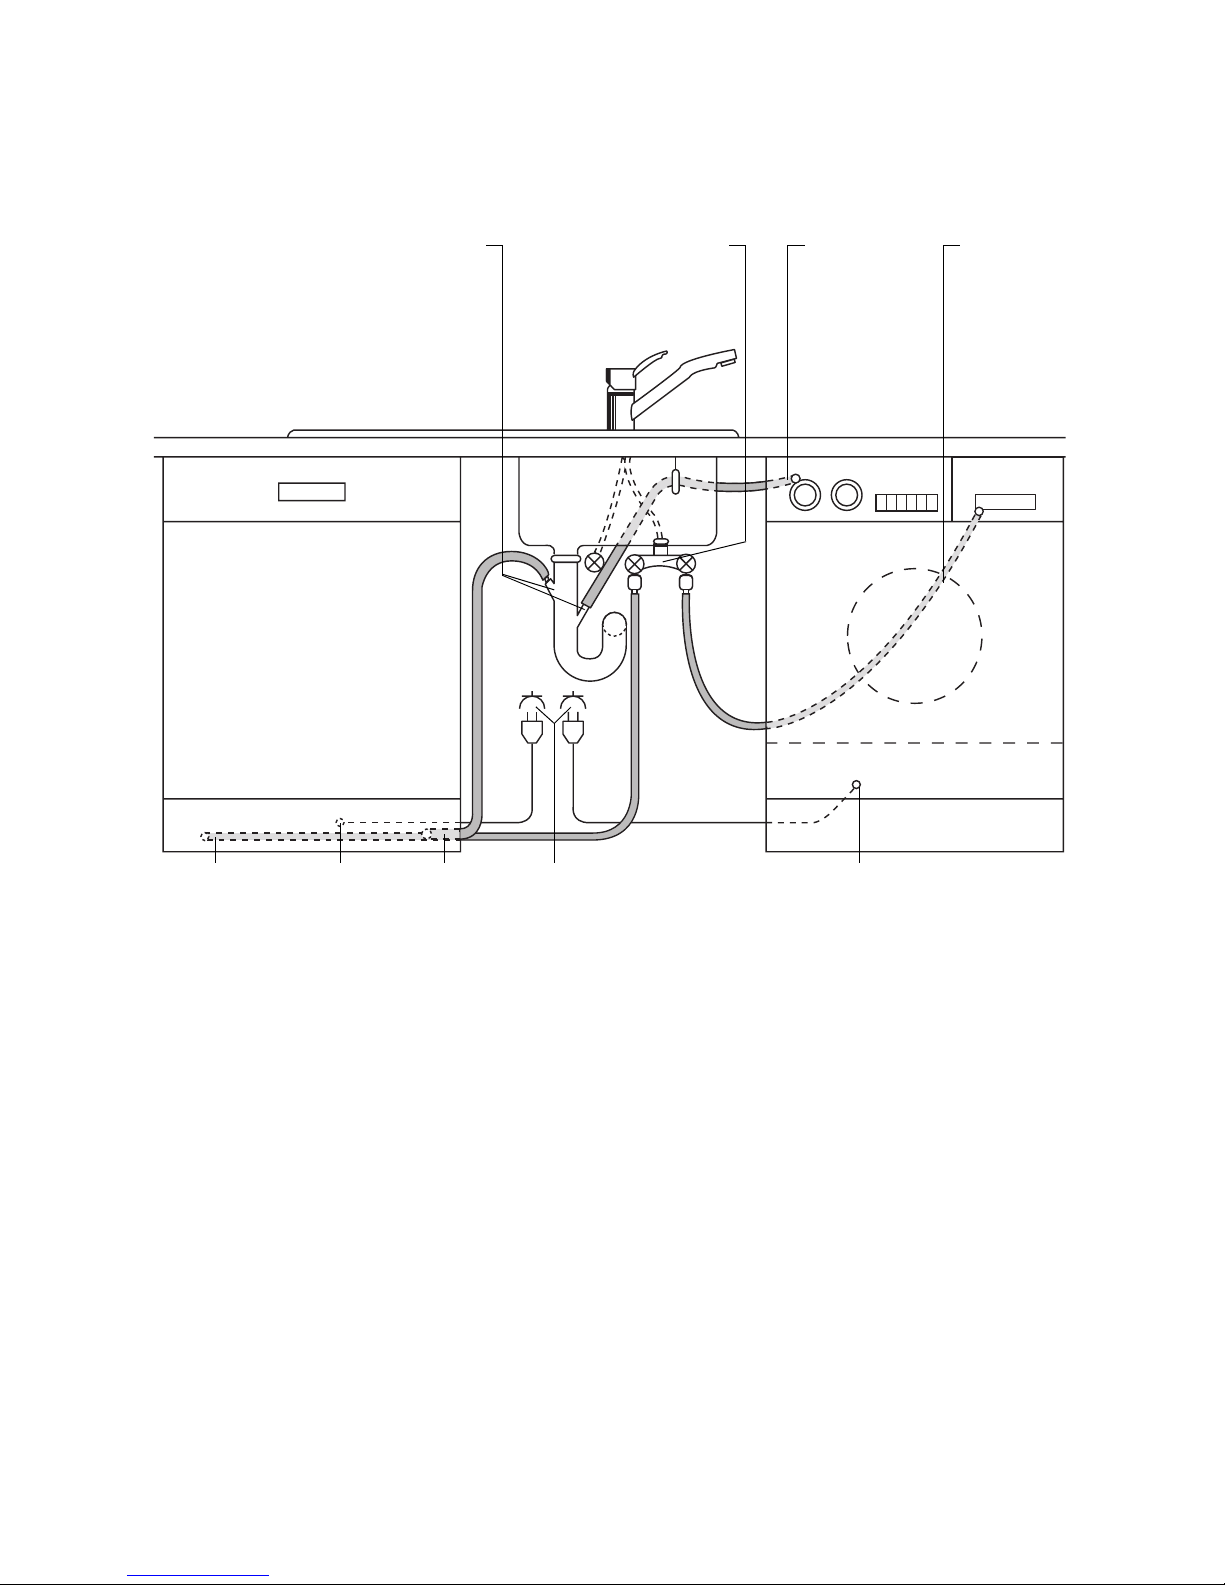
The water inlet hose, drain hose and the mains cable
must all be connected to the side of the dishwasher
as there is no space for them behind the appliance.
2 connection pieces 45° or straight,
outer ø 19 mm, length 30 mm
doublevalve water-
drainage
waterinlet
waterinlet mains
cable
waterdrainage
mains socket mains cable
Page 34

34
Page 35
35
Service
In the event of technical faults, please first check
whether you can remedy the problem yourself with
the help of the operating instructions (section “What
to do if…”).
If you were not able to remedy the problem yourself,
please contact the Customer Care Department or
one of our service partners.
In order to be able to assist you quickly, we require
the following information:
– Model description
– Product number (PNC)
– Serial number (S No.)
(for numbers see rating plate)
– Typ e of f a ult
– Any error messages displayed by the appliance
So that you have the necessary reference numbers
from your appliance at hand, we recommend that
you write them in here:
Model description: .....................................
PNC: .....................................
S No: .....................................
Page 36

The Electrolux Group. The world´s No.1 choice.
The Electrolux Group is the world´s largest producer of powered appliances for kitchen, cleaning and outdoor use. More than 55 million Electrolux Group products
(such as refrigerators, cookers, washing machines, vacuum cleaners, chain saws and lawn mowers) are sold each year to a value of approx. USD 14 billion in more
than 150 countries around the world.
822 961 649-00-190706-01 Subject to change without notice
 Loading...