

Electrolux ESF66810X, ESI 45010 User Manual
user manual
ESF 66810 X
Dishwasher

We were thinking of you
when we made this product

welcome to the world of Electrolux electrolux 3
Thank you for choosing a first class product from Electrolux, which
hopefully will provide you with lots of pleasure in the future. The
Electrolux ambition is to offer a wide variety of quality products
that make your life more comfortable. You find some examples on
the cover in this manual. Please take a few minutes to study this
manual so that you can take advantage of the benefits of your new
machine. We promise that it will provide a superior User
Experience delivering Ease-of-Mind. Good luck!
Welcome to the world of Electrolux

Safety information 5
Product description 7
Control panel 8
First use 12
Daily use 16
Washing programmes 28
Care and cleaning 29
Something not working 31
Technical data 34
Hints for test institutes 36
Installation 37
Environment concerns 42
Guarantee/Customer Service 43
Contents
The following symbols are used in this manual:
Important information concerning your personal safety and information on
how to avoid damaging the appliance.
General information and tips
Environmental information
4 electrolux contents

safety information electrolux 5
In the interest of your safety and to
ensure the correct use, before
installing and first using the
appliance, read this user manual
carefully, including its hints and
warnings. To avoid unnecessary
mistakes and accidents, it is
important to ensure that all people
using the appliance are thoroughly
familiar with its operation and
safety features. Save these
instructions and make sure that
they remain with the appliance if it
is moved or sold, so that everyone
using it through its life will be
properly informed on appliance use
and safety.
Correct use
● This dishwasher is only intended
for washing household utensils
suitable for machine washing.
● Do not put any solvents in the
dishwasher. This could cause an
explosion.
● Knives and other items with sharp
points must be loaded in the
cutlery basket with their points
down or placed in a horizontal
position in the upper basket.
● Only use products (detergent, salt
and rinse aid) suitable for
dishwashers.
● Avoid opening the door whilst the
appliance is in operation, hot
steam may escape.
Safety information
● Do not take any dishes out of the
dishwasher before the end of the
dishwashing cycle.
● After use, isolate the appliance
from the power supply and turn off
the water supply.
● This product should be serviced
only by an authorised service
engineer, and only genuine spare
parts should be used.
● Under no circumstances should
you attempt to repair the machine
yourself. Repairs carried out by
inexperienced persons will cause
injury or serious malfunctioning.
Contact your local Service Force
Centre. Always insist on genuine
spare parts.
General safety
● Dishwasher detergents can cause
chemical burns to eyes, mouth and
throat. Could endanger life!
Comply with the safety instructions
of the dishwasher detergent
manufacturer.
● The water in your dishwasher is
not for drinking. Detergent
residues may still be present in
your machine.
● Ensure that the door of the
dishwasher is always closed when
it is not being loaded or unloaded.
In this way you will avoid anybody
tripping over the open door and
hurting themselves.
● Do not sit or stand on the open
door.

6 electrolux safety information
Child safety
● This appliance is designed to be
operated by adults. Don’t allow
children to use the dishwasher
unsupervised.
● Keep all packaging well away from
children. There is risk of
suffocation.
● Keep all detergents in a safe place
out of children’s reach.
● Keep children well away from the
dishwasher when the door is open.
Installation
● Check your dishwasher for any
transport damage. Never connect
a damaged machine. If your
dishwasher is damaged contact
your supplier.
● All packaging must be removed
before use.
● Any electrical and plumbing work
required to install this appliance
must be carried out by a qualified
and competent person.
● For safety reasons it is dangerous
to alter the specifications or
attempt to modify this product in
any way.
● Never use the dishwasher if the
electrical supply cable and water
hoses are damaged; or if the
control panel, work top or plinth
area are damaged such that the
inside of the appliance is freely
accessible. Contact your local
Service Force centre, in order to
avoid hazard.
● All sides of the dishwasher must
never be drilled to prevent damage
to hydraulic and electric
components.
For electrical and water connection
carefully follow the instructions
given in specific paragraphs.
product description electrolux 7
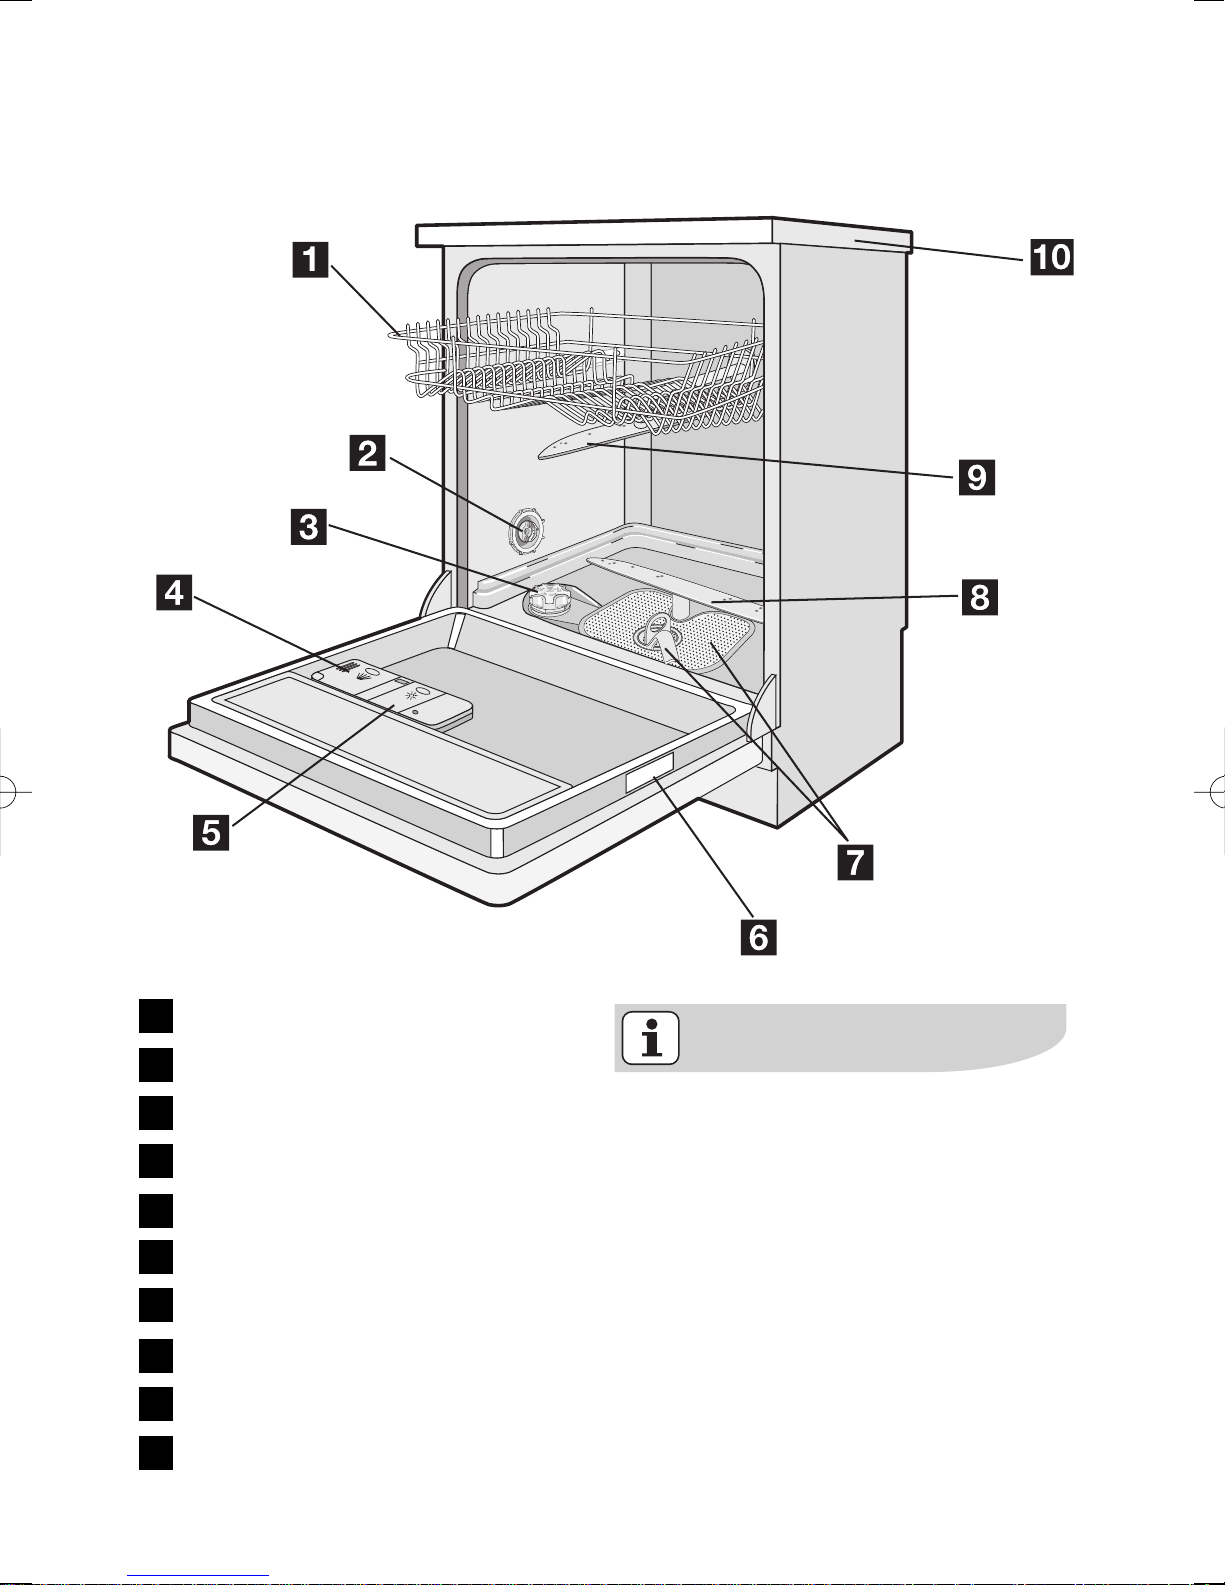
Product description
Upper basket
Water hardness dial
Salt container
Detergent dispenser
Rinse aid dispenser
Rating plate
Filters
Lower spray arm
Upper spray arm
Worktop
1
2
3
4
5
6
7
8
9
10
This dishwasher has an internal
light that turns on and off when
the opening and closing of the
dishwasher’s door occurs.
Internal light equipped with led
lamp CLASS 1 in accordance with
EN 60825-1: 1994 + A1:2002 +
A2:2001
In case that this light has to be
replaced, please contact your local
Service Force Centre.
8 electrolux control panel
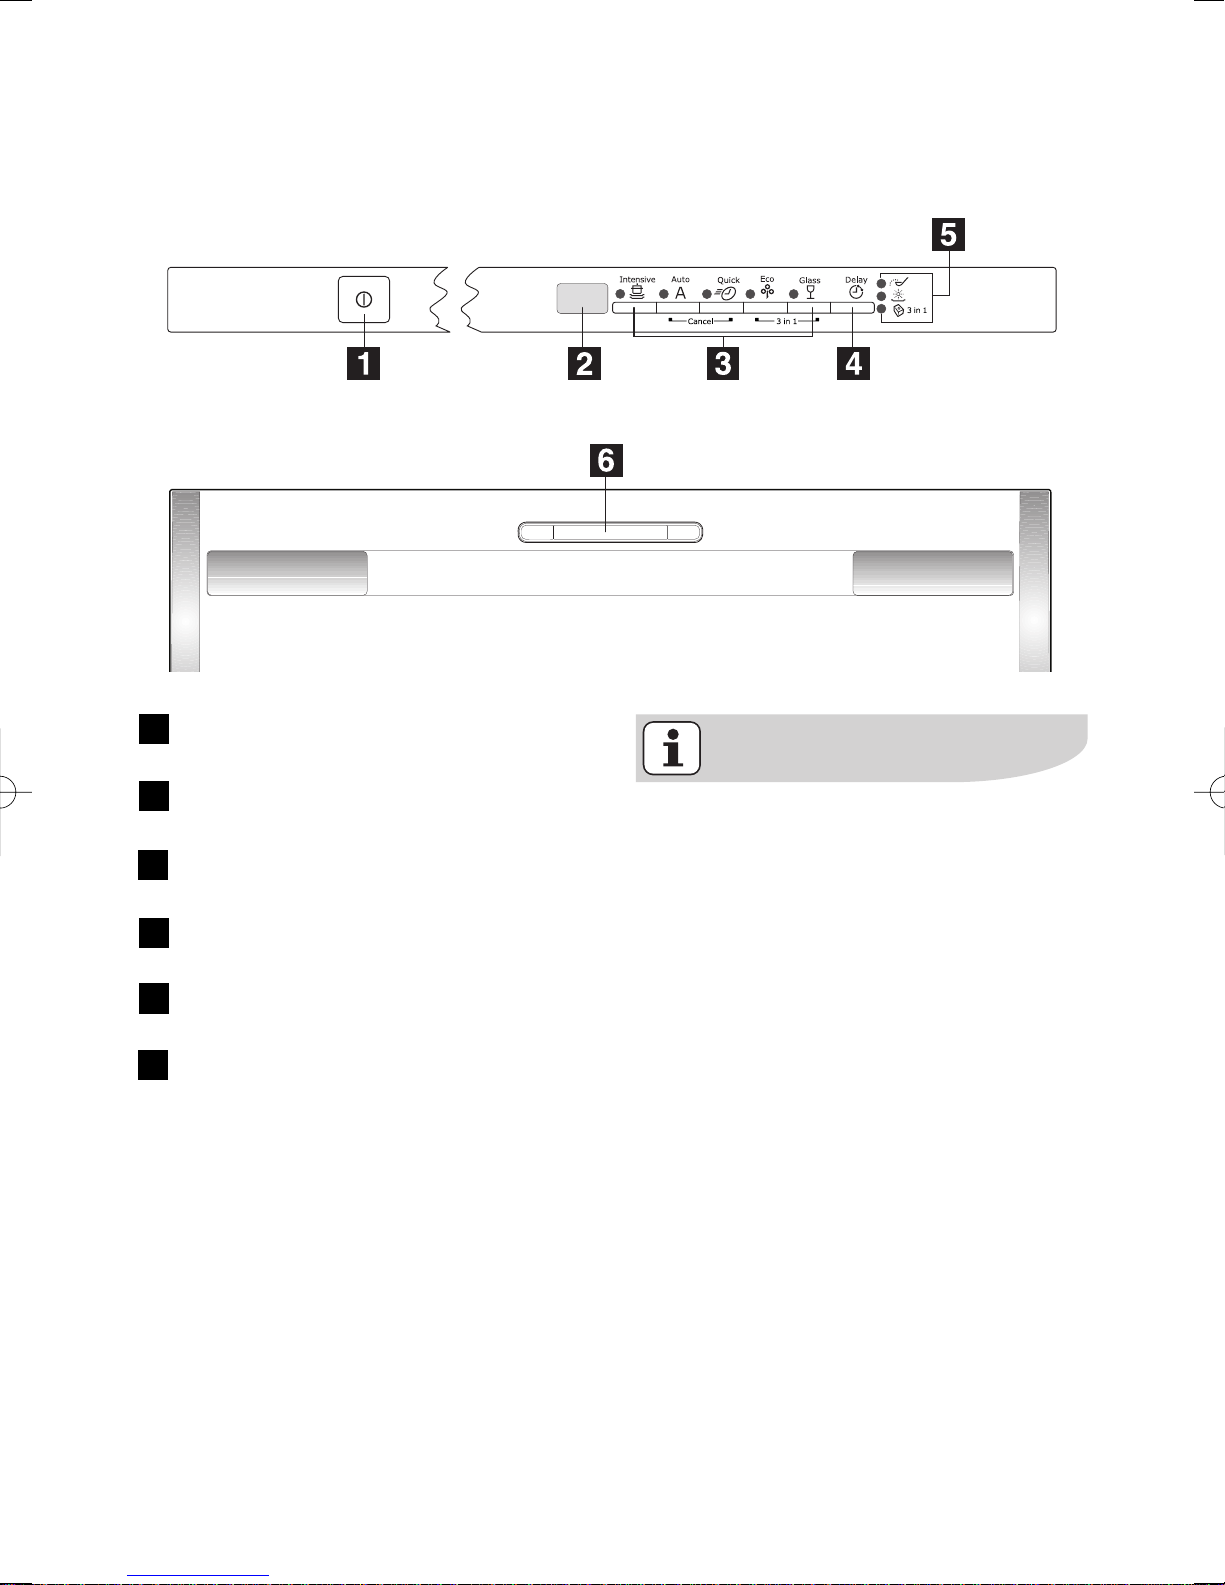
Control panel
The digital display indicates:
- the level of hardness to which the
water softener is set,
- the approximate remaining time of
the running programme,
- activation/deactivation of the rinse
aid dispenser (ONLY with
"3 in 1
function active"),
- the end of a washing programme
(a zero will appear in the digital
display),
- the countdown of the delay start,
- fault codes concerning
malfunction of the dishwasher,
- if the audible signals are
activated/deactivated,
On/Off button
Digital display
Programme selection buttons
Delay start button
Indicator lights
Programme progress display
1
2
3
4
5
6

control panel electrolux 9
The salt and rinse aid indicator
lights are never illuminated while a
washing programme is running
even if filling with salt and/or rinse
aid is necessary.
The salt indicator light on the
control panel can remain
illuminated for 2-6 hours after the
salt has been replenished,
assuming the dishwasher remains
switched on. If you are using salts
that take longer to dissolve then
this can take longer. The function
of the machine is not affected.
Salt
Indicator lights
Rinse aid
Illuminates when the special salt has run out.
Illuminates when the rinse aid has run out.
3 in 1 function
Indicates the activation/deactivation of the "3 in
1 function" (see "3 in 1 function").
Setting mode
Always remember that when:
- setting the water softener,
- activating/deactivating the rinse aid
dispenser,
- activating/deactivating the audible
signals,
the appliance MUST be in setting
mode:
● Press On/Off button, ALL
programme button lights are
illuminated, the programme
progress display is completely
illuminated with blue light =
appliance in setting mode.
● Press On/Off button, ONLY a
programme button light is
illuminated, the programme
progress display is partially
illuminated with blue light = last
performed or selected programme
still set.
In this case, to return to setting
mode, the programme has to be
cancelled.
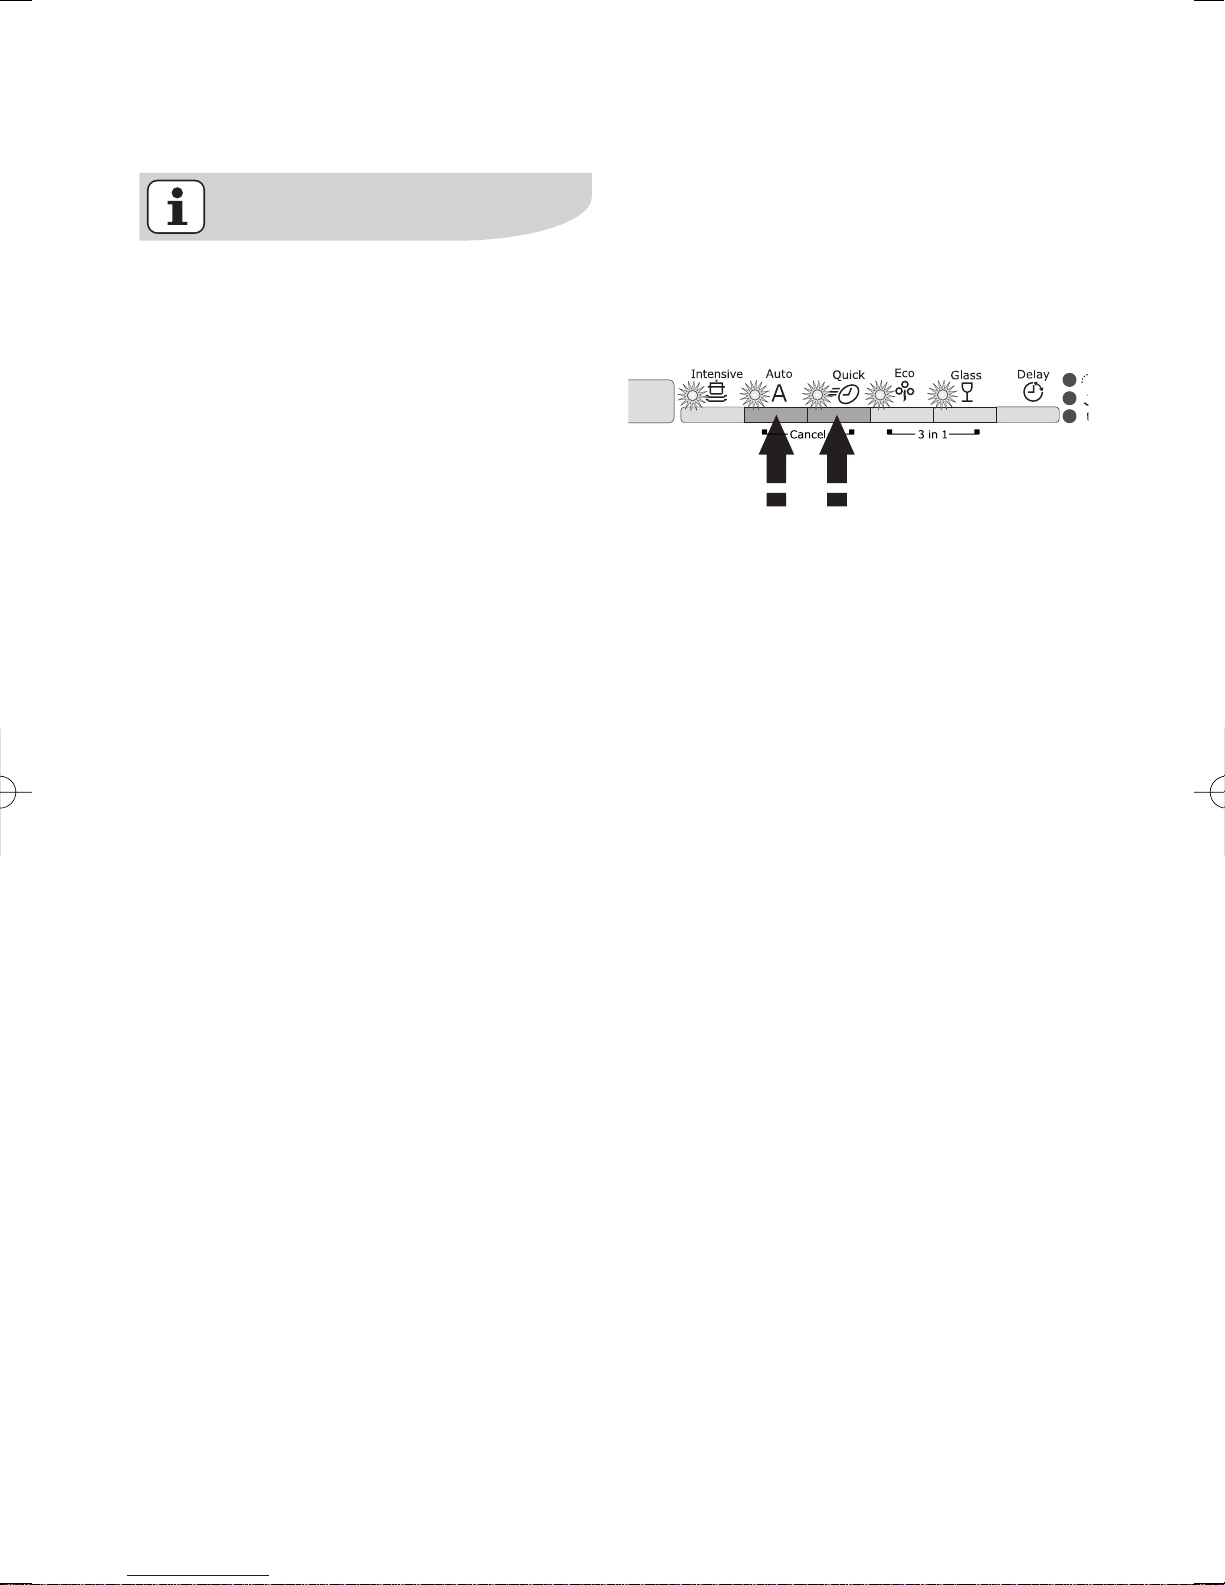
To cancel a set programme or a
programme in progress
Simultaneously press and hold the
two programme buttons positioned
over the word Cancel, until all the
programme button lights will
illuminate.
The programme progress display is
completely illuminated with blue light.
The programme has been cancelled
and the machine is now in setting
mode.
10 electrolux control panel
control panel electrolux 11
Audible signals
Audible signals have been introduced
to help indicate which operations the
dishwasher is performing:
- setting of the water softener
- end of programme
- intervention of an alarm due to
malfunction
It is possible to deactivate the audible
signals, using some of the programme
buttons on the control panel.
Factory setting: audible signals
activated
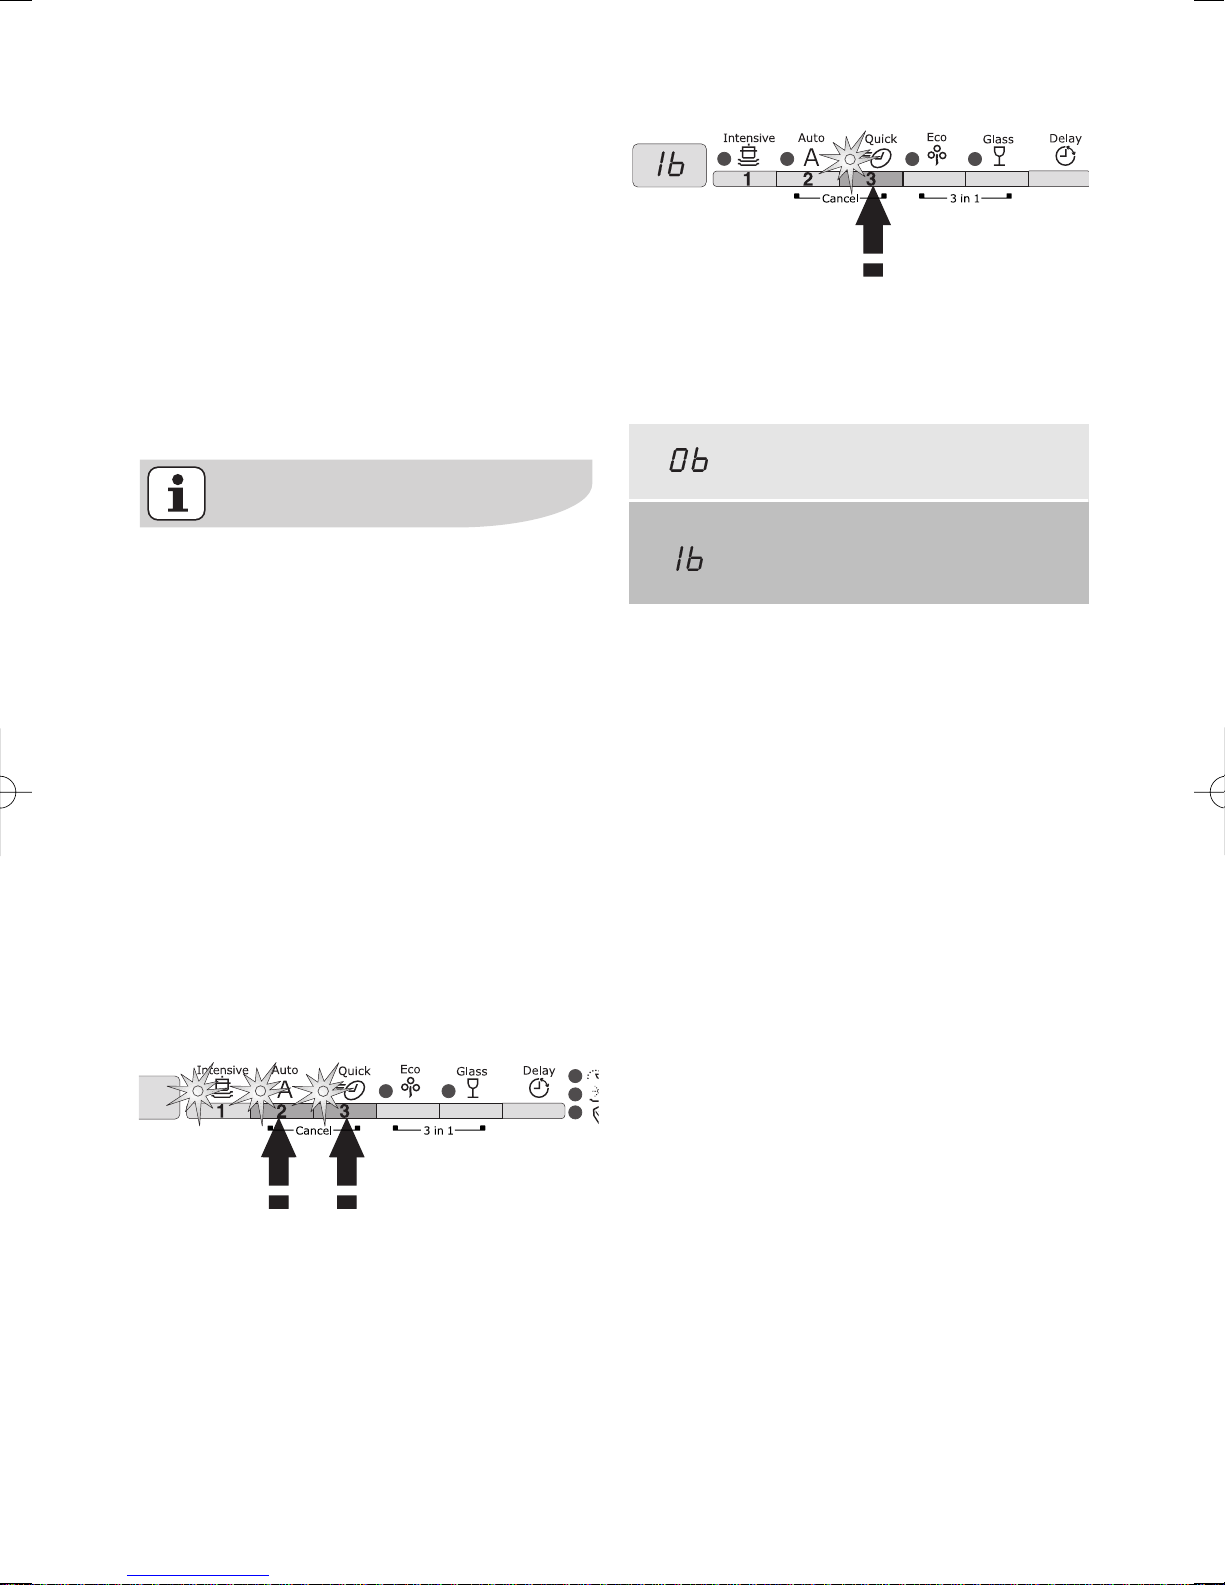
4. To change the current setting,
press again button 3, the digital
display will indicate the new
setting.
5. To memorise the operation, switch
off the dishwasher by pressing the
On/Off button.
Deactivation/activation of the
audible signals
1. Press the On/Off button. The
dishwasher must be in setting
mode.
2. Press simultaneously and keep
pressed buttons 2 and 3 until the
lights of the buttons 1, 2 and 3
start flashing.
3. Press button 3, the lights of
buttons 1 and 2 turn off while the
light of button 3 goes on flashing.
The digital display indicates the
current setting.
Audible signals deactivated
Audible signals activated
(factory set)

12 electrolux first use
Before using your dishwasher for the
first time:
● Ensure that the electrical and
water connections comply with the
installation instructions
● Remove all packaging from inside
the appliance
● Set the water softener
● Pour 1 litre of water inside the salt
container and then fill with
dishwasher salt
● Fill the rinse aid dispenser
If you want to use combi detergent
tablets such as: "3 in 1", "4 in 1",
"5 in 1" etc... set the 3 in 1 function
(see "3 in 1 function").
First use
Set the water softener
The dishwasher is equipped with a
water softener designed to remove
minerals and salts from the water
supply, which would have a
detrimental or adverse effect on the
operation of the appliance.
The higher the content of these
minerals and salts, the harder your
water is.
Water hardness is measured in
equivalent scales, German degrees
(°dH), French degrees (°TH) and
mmol/l (millimol per litre - international
unit for the hardness of water).
The softener should be adjusted
according to the hardness of the
water in your area. Your local Water
Authority can advise you on the
hardness of the water in your area.
*
no salt is necessary
Water hardness
°dH °TH mmol/l manually electronically
Adjusting the water
hardness setting
Use of
salt
51 - 70 91 - 125 9.0 - 12.5 2 level 10 yes
43 - 50 76 - 90 7.6 - 8.9 2 level 9 yes
37 - 42 65 - 75 6.5 - 7.5 2 level 8 yes
29 - 36 51 - 64 5.1 - 6.4 2 level 7 yes
23 - 28 40 - 50 4.0 - 5.0 2 level 6 yes
19 - 22 33 - 39 3.3 - 3.9 2 level 5 yes
15 - 18 26 - 32 2.6 - 3.2 1 level 4 yes
11 - 14 19 - 25 1.9 - 2.5 1 level 3 yes
4 - 10 7 - 18 0.7 - 1.8 1 level 2 yes
< 4 < 7 < 0.7 1 level 1 no
*
first use electrolux 13
The water softener must be set in
both ways: manually, using the water
hardness dial and electronically, using
some of the programme buttons on
the control panel
Setting manually
The dishwasher is factory set at
position 2.
1. Open the dishwasher door.
2. Remove the lower basket from the
dishwasher.
3. Turn the water hardness dial to
position 1 or 2 (see table).
4. Replace the lower basket.
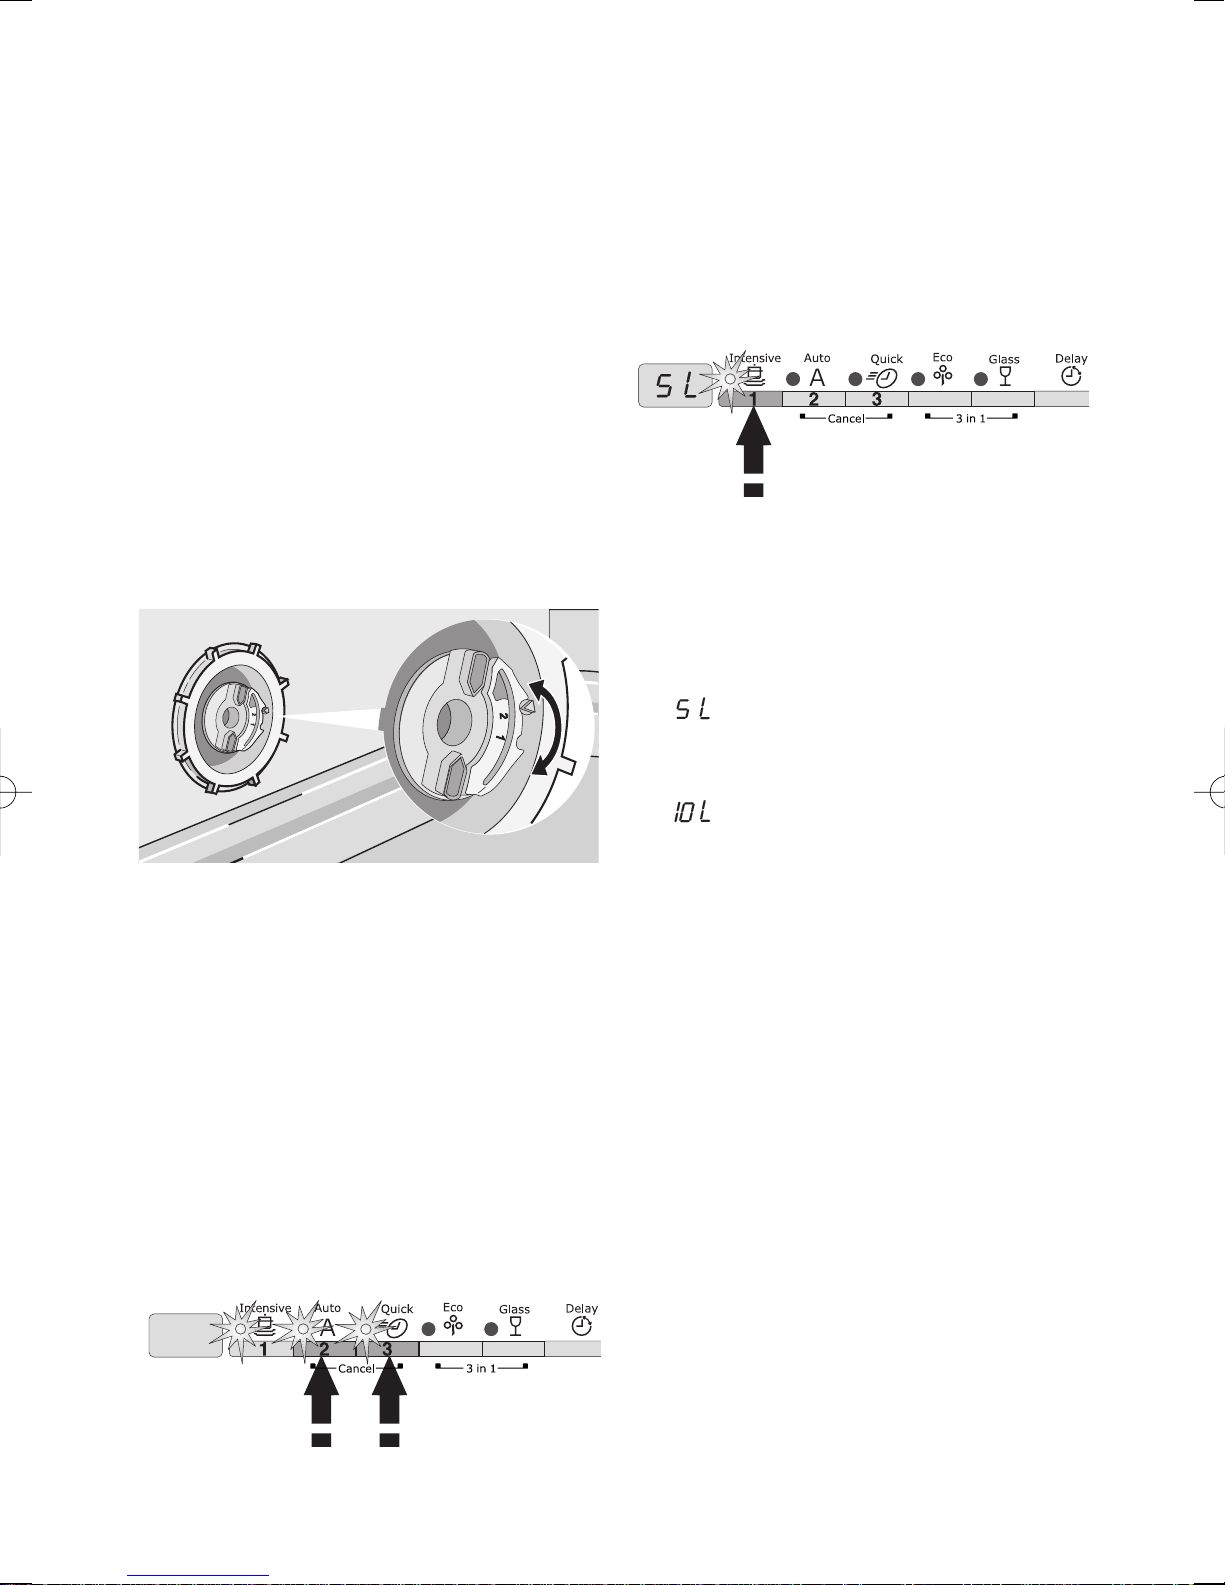
Setting electronically
The dishwasher is factory set at
level 5.
1. Press the On/Off button. The
dishwasher must be in setting
mode.
2. Press simultaneously and keep
pressed buttons 2 and 3, until the
lights of buttons 1, 2 and 3 start
flashing.
3. Press button 1, the lights of
buttons 2 and 3 turn off while the
light of button 1 goes on flashing.
In the digital display is visible the
current level and a sequence of
intermittent audible signals are
heard.
The current level is indicated by
the number visible in the digital
display and the number of
intermittent audible signals.
Examples:
displayed, 5 intermittent
audible signals, pause, etc... =
level 5
displayed, 10 intermittent
audible signals, pause, etc... =
level 10
4. To change the level, press button
1. Each time the button is pressed
the level changes. (For the
selection of the new level see the
chart).
Examples:
if the current level is 5, by pressing
button 1 once, level 6 is selected.
if the current level is 10, by
pressing button 1 once, level 1 is
selected.
5. To memorise the operation, switch
off the dishwasher by pressing the
On/Off button.
14 electrolux first use
Filling with dishwasher salt
Only use salt specifically designed for
use in dishwashers.
All other types of salt not specifically
designed for use in a dishwasher,
especially table salt, will damage the
water softener.
Only fill with salt just before starting
one of the complete washing
programmes.
This will prevent any grains of salt or
salty water, which may have been
spilt, remaining on the bottom of the
machine for any period of time, which
may cause corrosion.
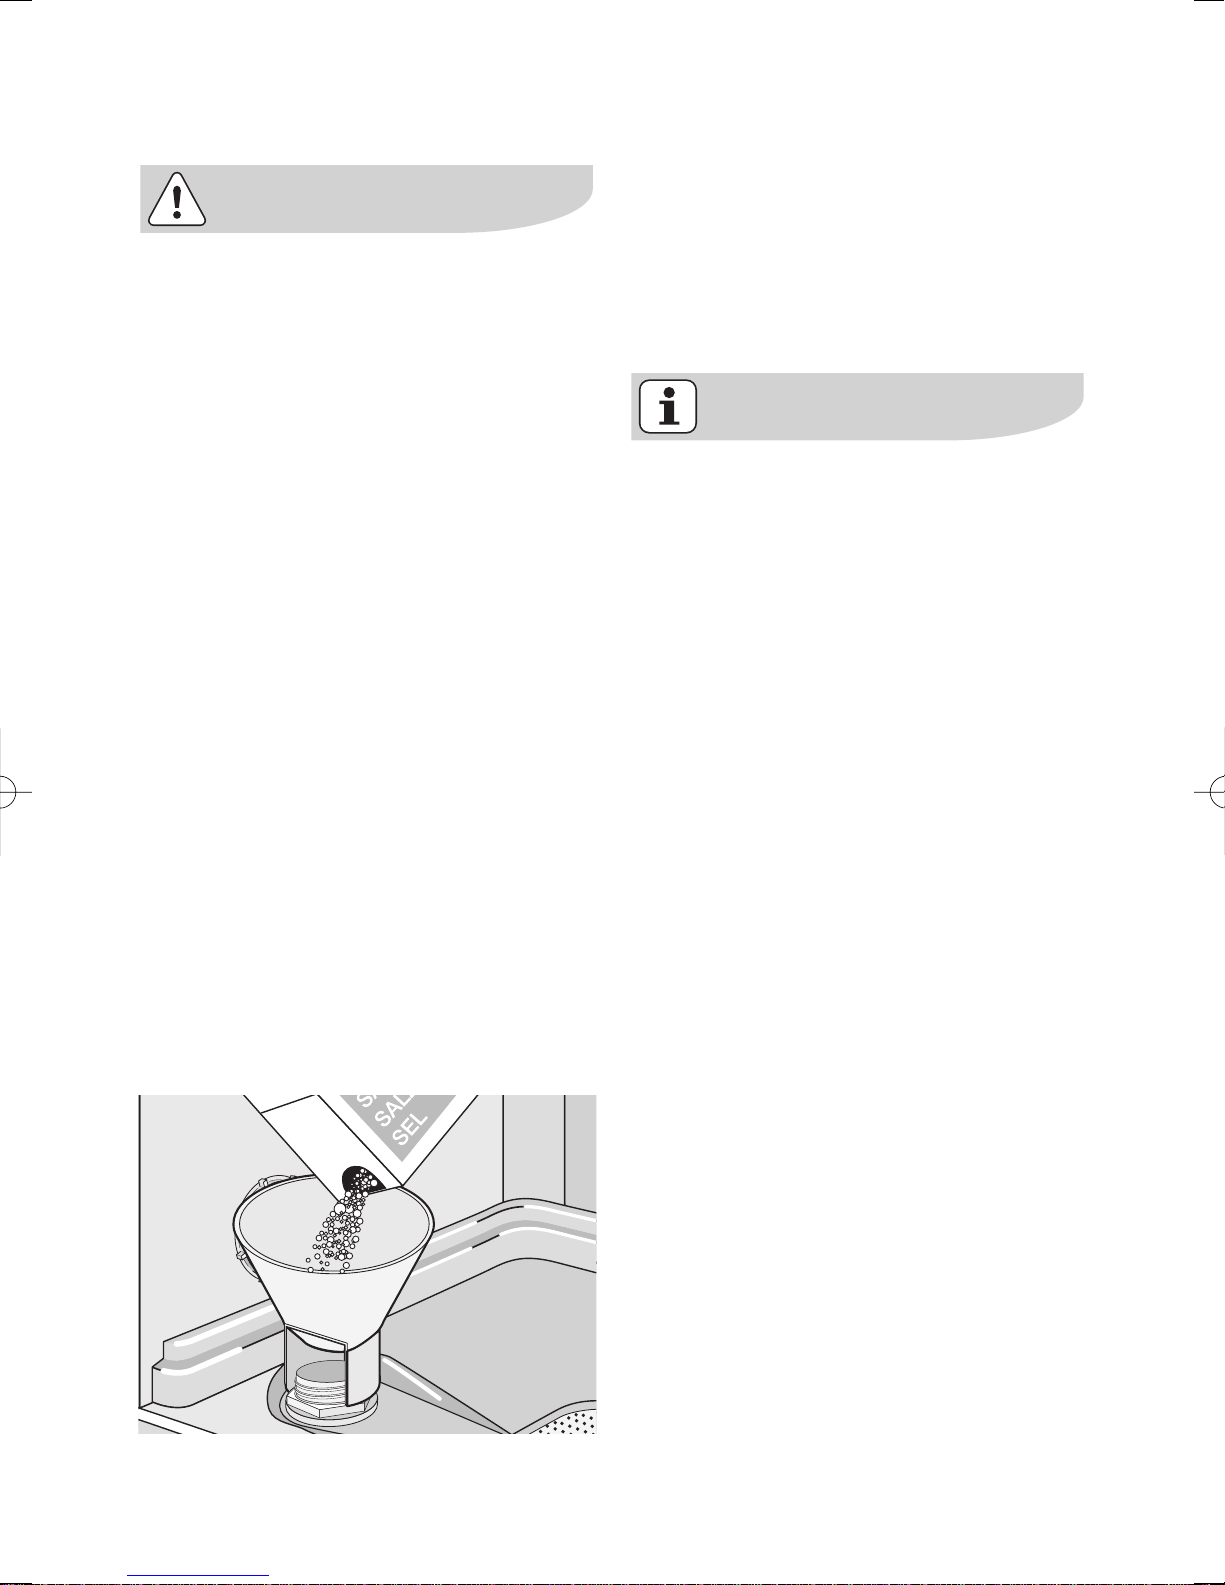
To fill:
1. Open the door, remove the lower
basket and unscrew the cap of the
salt container by turning it
anticlockwise.
2. Pour 1 litre of water inside the
container (this is necessary only
before filling with salt for the
first time).
3. Using the funnel provided, pour in
the salt until the container is full.
4. Replace the cap making sure that
there is no trace of salt on the
screw thread or on the gasket.
5. Replace the cap tightly turning it
clockwise until it stops with a click.
Do not worry if water overflows from
the unit when filling with salt, this is
quite normal.
first use electrolux 15
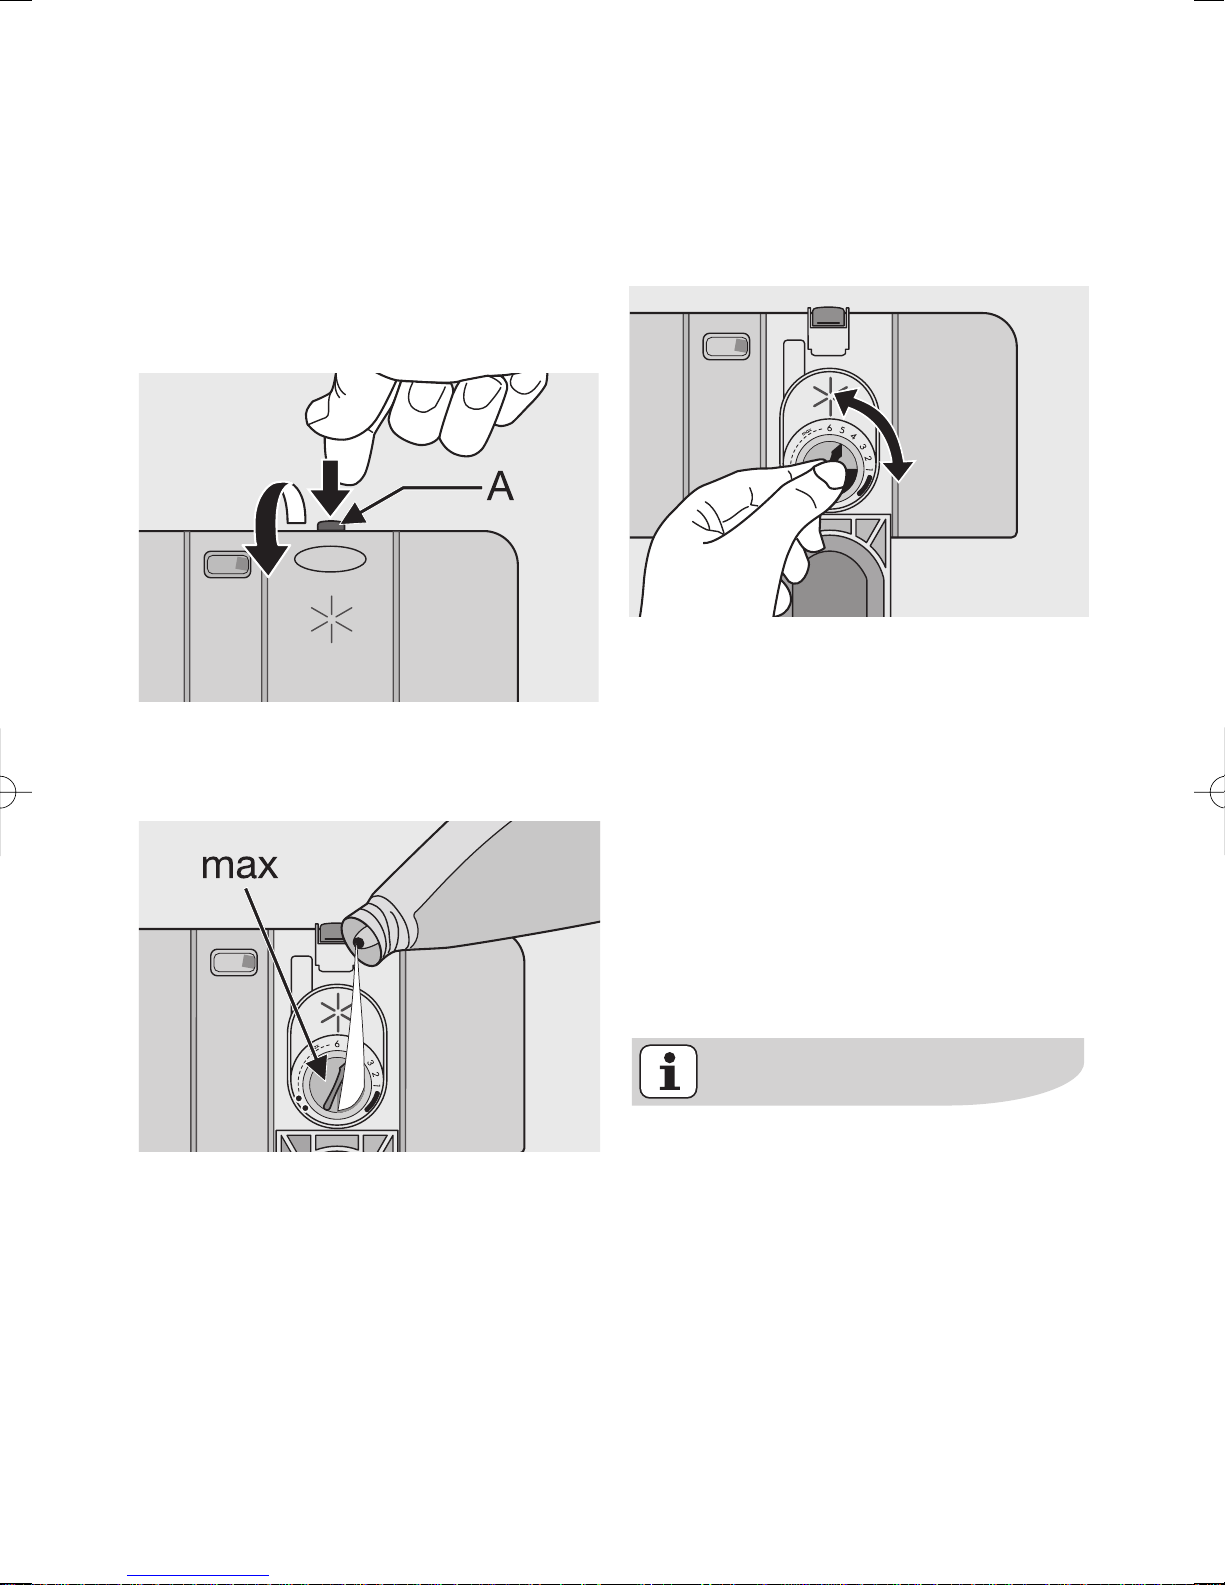
Filling with rinse aid
Rinse aid ensures thorough rinsing,
and spot and streak free drying.
Rinse aid is automatically added
during the last rinse.
1. Open the container by pressing
the release button (A).
2. Add the rinse aid in the container.
The maximum level for filling is
indicated by "max".
The dispenser holds about 110 ml of
rinse aid, which is sufficient for
between 16 and 40 dishwashing
cycles, depending upon the dosage
setting.
According to the finish and drying
results obtained, adjust the dose of
rinse aid by means of the 6 position
selector (position 1 minimum dosage,
position 6 maximum dosage).
The dose is factory set in position 4.
Increase the dose if there are drops of
water or lime spots on the dishes after
washing.
Reduce it if there are sticky whitish
streaks on the dishes or a bluish film
on glassware or knife blades.
3. Ensure that the lid is closed after
every refill.
Clean up any rinse aid spilt during
filling with an absorbent cloth to
avoid excess foaming during the
next wash.
Only use branded rinse aid for
dishwashers.
Never fill the rinse aid dispenser
with any other substances (e.g.
dishwasher cleaning agent, liquid
detergent). This would damage the
appliance.
 Loading...