

Page 1
Dishwasher
User Instructions
ANC 822 945 780 - 00 - 0801
ESF 675
EN
Page 2

2
Dear customer,
Please read these user instructions carefully.
Above all please observe the safety instructions on
the first few pages ofthese user instructions! Please
keep these user instructions for later reference. P ass
them on to anysubsequentowner of the appliance.
1
The warning triangle and/or specific words
(Warning!, Caution!, Important!) are used
to highlight instructions that are important for
your safety or for the function of the appliance. It is imperative that these instructions
are observed.
This symbol or numbered instruction steps
lead you step for step through the operation
of the appliance.
3
Next to this symbol you receive additional
information and practical tips on using the
appliance.
2
Tips and instructions for the economical and
environmentally conscious use of the appliance are marked with a clover leaf.
In the event of a malfunction, these operating instructions contain information on how to rectify faults yourself, see the "What to do, if..." section.
If these instr uctions are insufficient, please contact
your nearest customer service centre.
In this respect please read the "Service" note on the
rear of these user instructions.
Page 3

3
Contents
Safety Instructions ......................................................................4
Securing the door of the dishwasher .........................................................5
Disposal ..............................................................................5
Economical and Ecological Dishwashing ...................................................6
Appliance Features and Control Panel .....................................................7
Control panel ...........................................................................8
Prior to using for the first time ............................................................9
Adjusting the Water S oftener ...............................................................9
Filling with Special Salt for the Water Softener . ...............................................10
Filling with Rinse Aid ....................................................................11
AdjustingRinseAidDosing.............................................................11
In Daily Use ...........................................................................12
Loading cutlery and dishes ...............................................................12
Loading Cutlery ......................................................................13
Loading Pans, Frying Pans and Large Plates ...............................................13
Loading Cups, Glasses and Coffee Services ...............................................14
Adjusting the Height of the Upper Basket . . . ...............................................15
Filling with Detergent ....................................................................16
SelectingtheWashProgramme(ProgrammeTable) ...........................................17
Settingthedishwashingprogramme ........................................................18
Changing/Interrupting/Cancelling the Wash Programme ......................................18
Setting or Changing the Start Delay Timer ...................................................18
SwitchingOfftheDishwasher .............................................................19
Care and Cleaning .....................................................................20
CleaningtheFilter ......................................................................20
CleaningthePanel......................................................................21
ReplacingtheInternalLight ...............................................................22
What to do, when ... ....................................................................23
...there are problems w ith the operation of the dishwasher. ......................................23
...thewashresultisunsatisfactory. .........................................................23
Technical Data ........................................................................24
Notes for Test Institutes ................................................................25
Installation and Connection Instructions ...................................................27
Installing the Dishwasher ...............................................................27
DishwashersThatCanBeIntegrated.....................................................27
Built-InDishwasher...................................................................28
Free-Standing Appliances ..............................................................28
Connecting the Dishwasher .............................................................29
Water Connection ......................................................................29
Permittedwaterpressure ..............................................................29
Connect the inlet hose ................................................................29
Waterdrain .........................................................................30
Leak Prevention System ...............................................................30
Electricalconnection ....................................................................31
Connections . ..........................................................................32
Service ...............................................................................35
Page 4

4
1 Safety Instructions
The safety aspects of ELECTROLUX electrical appliances comply with accepted technical standards and
the German Appliance Safety Law. Nevertheless, as
a manufacturer we consider it our obligation to make
you aware of the following safety information:
Installation, Connection and Placing into Operation
• The dishwasher may only be transported upright.
• Check the dishwasher for transport damage. Do
not in any circumstances connect an appliance
that is damaged. In the case of damage, please
contact your supplier.
• Prior to placing the appliance i n operation, ensure
that the nominal voltage and type of supply on the
rating plate match that of the supply where the
appliance is to be installed. The fuse rating is also
to be found on the rating plate.
• For information on how to correctly install and
connect up your dishwasher, please read the
“Installation“ section. Multiway plugs / connectors
and extension cables must not be used. This
could constitute a safety hazard.
Child Safety
• Children often do not recognise the hazards asso-
ciated with the use of electrical appliances. It is
therefore important that you ensure children are
adequately supervised and that you do not allow
children to play with the dishwasher – there is a
risk that children can shut themselves inside the
appliance (risk of suffocation!).
• Packaging materials (e.g. films, styrofoam) can be
dangerous for children. Risk of suffocation! Keep
packaging away from children.
• Detergents can cause burns to the eyes, mouth,
and throat, or even cause choking! Please
observe the manufacturer's safety instructions for
cleaners and detergents.
• The water in your dishwasher is not suitable for
drinking. If there are still remnants of detergent in
the appliance, there is a risk of burns!
• When disposing of t he dishwasher: unplug from
the mains, cut off and dispose of the mains cable.
Break the door lock so that the door no longer
shuts.
General Safety
• Repairs to the dishwasher are only to be carried
out by qualified service engineers. Improper
repairs can give rise to significant hazards for the
user. If your appliance needs repairing, please
contact customer service or your dealer.
• Never place the dishwasher in operation if the
mains c able, water inlet or drain hose is damaged;
or the control panel, work top or plinth area is
damaged such that the inside of the appliance is
freely accessible.
• If the mains lead is damaged, or is to be replaced
for a longer lead, the cable (obtainable from
ELECTROLUX customer service) must be
changed by a service engineer authorised by
ELECTROLUX.
• Never unplug the appliance by pulling on the
cable, always pull the plug.
• Additions or modifications to the dishwasher are
not permitted for safety reasons.
• Ensure that the door of the dishwasher is always
closed when it is not being loaded or unloaded. In
this way you will avoid anybody tripping over the
open door and hurting themselves.
• Sharp knives and items of cutlery with sharp
edges must be placed in the cutlery tray or in the
upper rack.
Correct Use
• Only wash household dishes using the dishwasher. If the appliance is used for other purposes, or is used incorrectly, the manufacturer
cannot accept any liability for any damage
caused.
• Prior to use, ensure that the manufacturers of the
special salt, detergent, and rinse aid employed
specifically permit the usage of their products in
household dishwashers.
• Do not put any solvents in the dishwasher. There
is a risk of an explosion!
• The anti-flood system provides dependable protection against damage due to leaks. For this system to function correctly, the following
preconditions must be met:
– The appliance must remain connected to the
mains even when it is switched off.
– The dishwasher must be correctly installed.
– Always shut off the water supply at the tap
when the dishwasher is not to be used for
longer periods, e.g. when you are away on hol-
iday.
• Do not sit or stand on the open door, the appliance may tip over.
• In the event of a fault, first close the tap, then
switch off the appliance and unplug it from the
mains. If the appliance is permanently wired to the
mains: switch off the fuse(s) or unscrew them.
Page 5
5
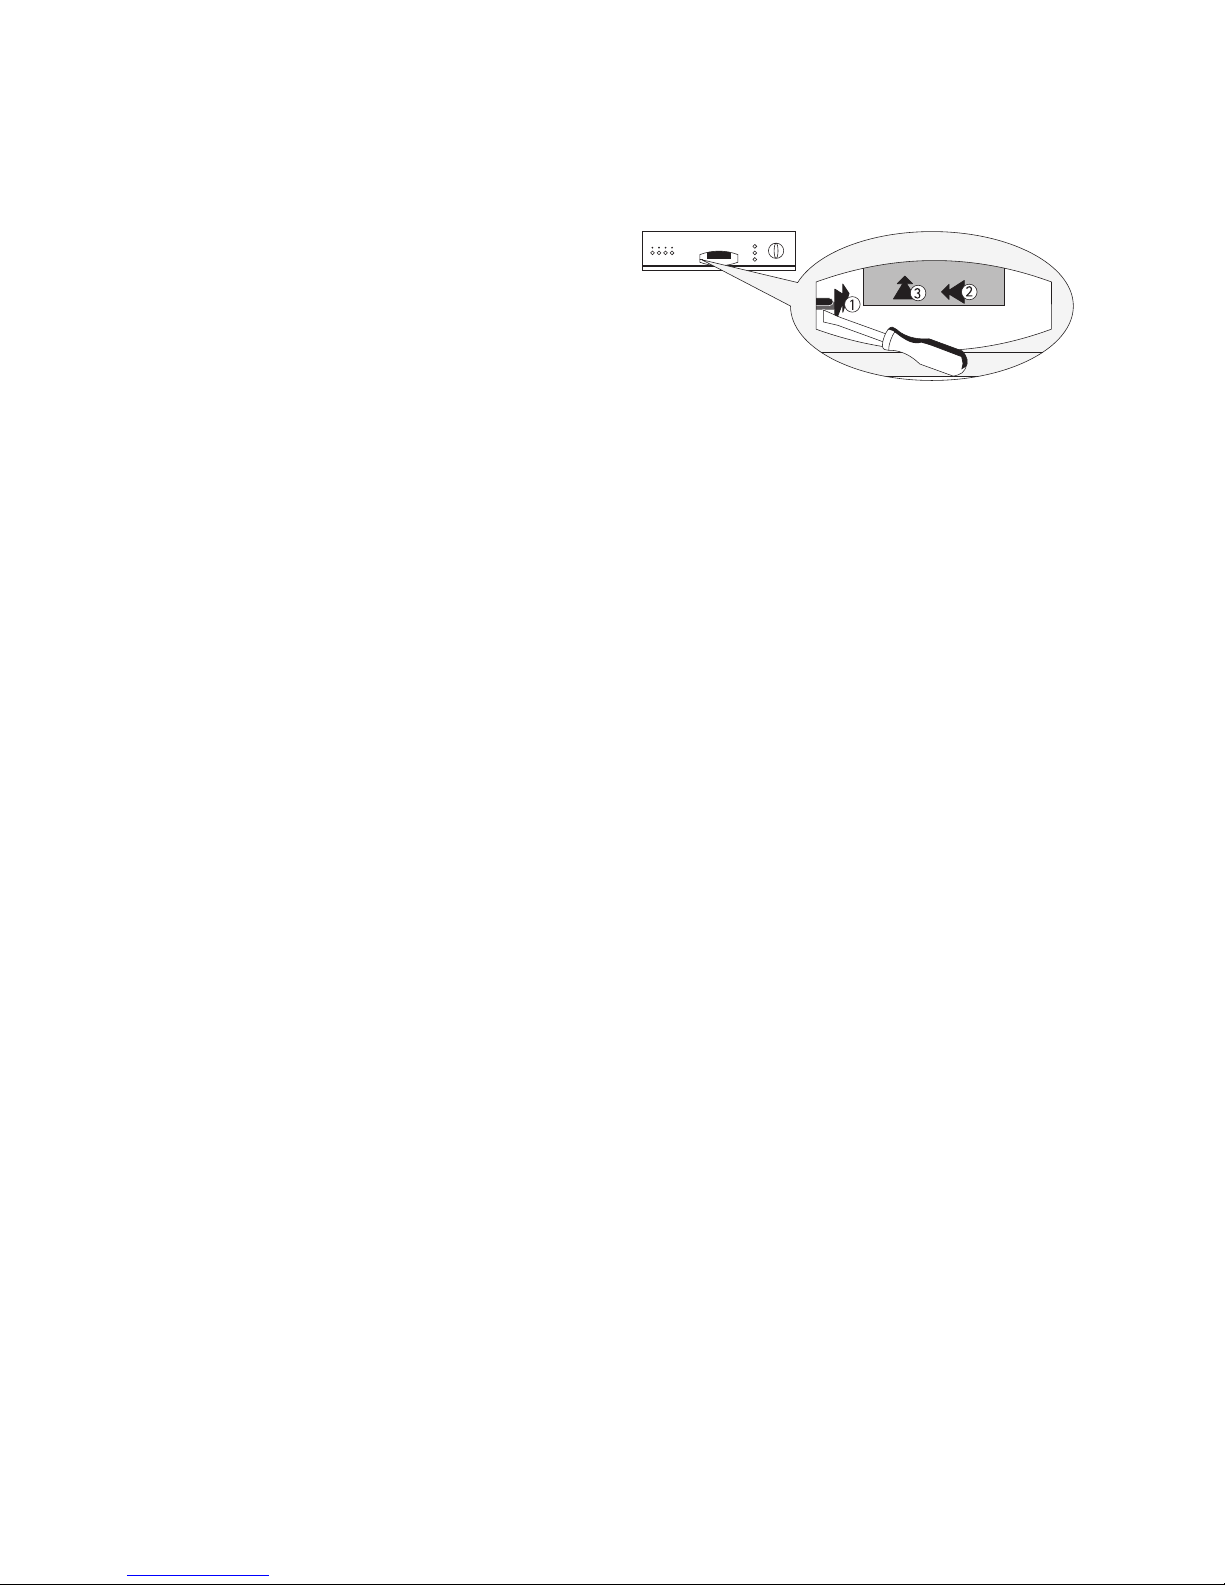
Securing the door of the dishwasher
This way you can ensure that children cannot open
the door of the dishwasher:
1. There is a lever(1) on the left side of the door handle. You can secure the door against being
opened unintentionally by pressing this lever to
the back using a small screwdriver or the handle
of a spoon.
2. Once the lever has been pushed back, you must
first push the door handle to the left (2) and then
push it upwards (3) in order to open the door.
3. Yo u can remove the safety lock from the door
again by pulling the lever forwards again using a
small screwdriver or the handle of a spoon.
2 Disposal
Disposing of the Packaging Material
Dispose of t he dishwasher packaging material correctly. All the packaging materials used are harmless
to the environment and can be recycled.
• Plastic parts are marked with standard international abbreviations:
– >PE< for polyethylene, e.g. sheet wrapping
material
– >PS< for polystyrene, e.g. padding mate-
rial (always CFC-free)
– >POM< for polyoxymethylene, e.g. plastic
clips
• Cardboard packaging is manufactured from recycled paper and should be deposited in the waste
paper collection for recycling.
Disposal of old appliances
As and when you cease to use your dish washer,
please take it to a recycling centre or to your dealer
who will, for a small contribution to the costs, dispose
of it for you.
Page 6

6
2 Economical and Ecological Dishwash-
ing
• Only connect the dishwasher to the hot water supply if your hot water is not electrically heated.
• Ensure that the water softener is correctly
adjusted.
• Do not pre-rinse dishes under running water.
• Select the wash programme to suit the nature and
degree of the soiling on the dishes.
• Do not use more detergent, special salt or rinse
aid than is recommended in these operating
instructions and by the manufacturer of the
respective product.
Page 7
7
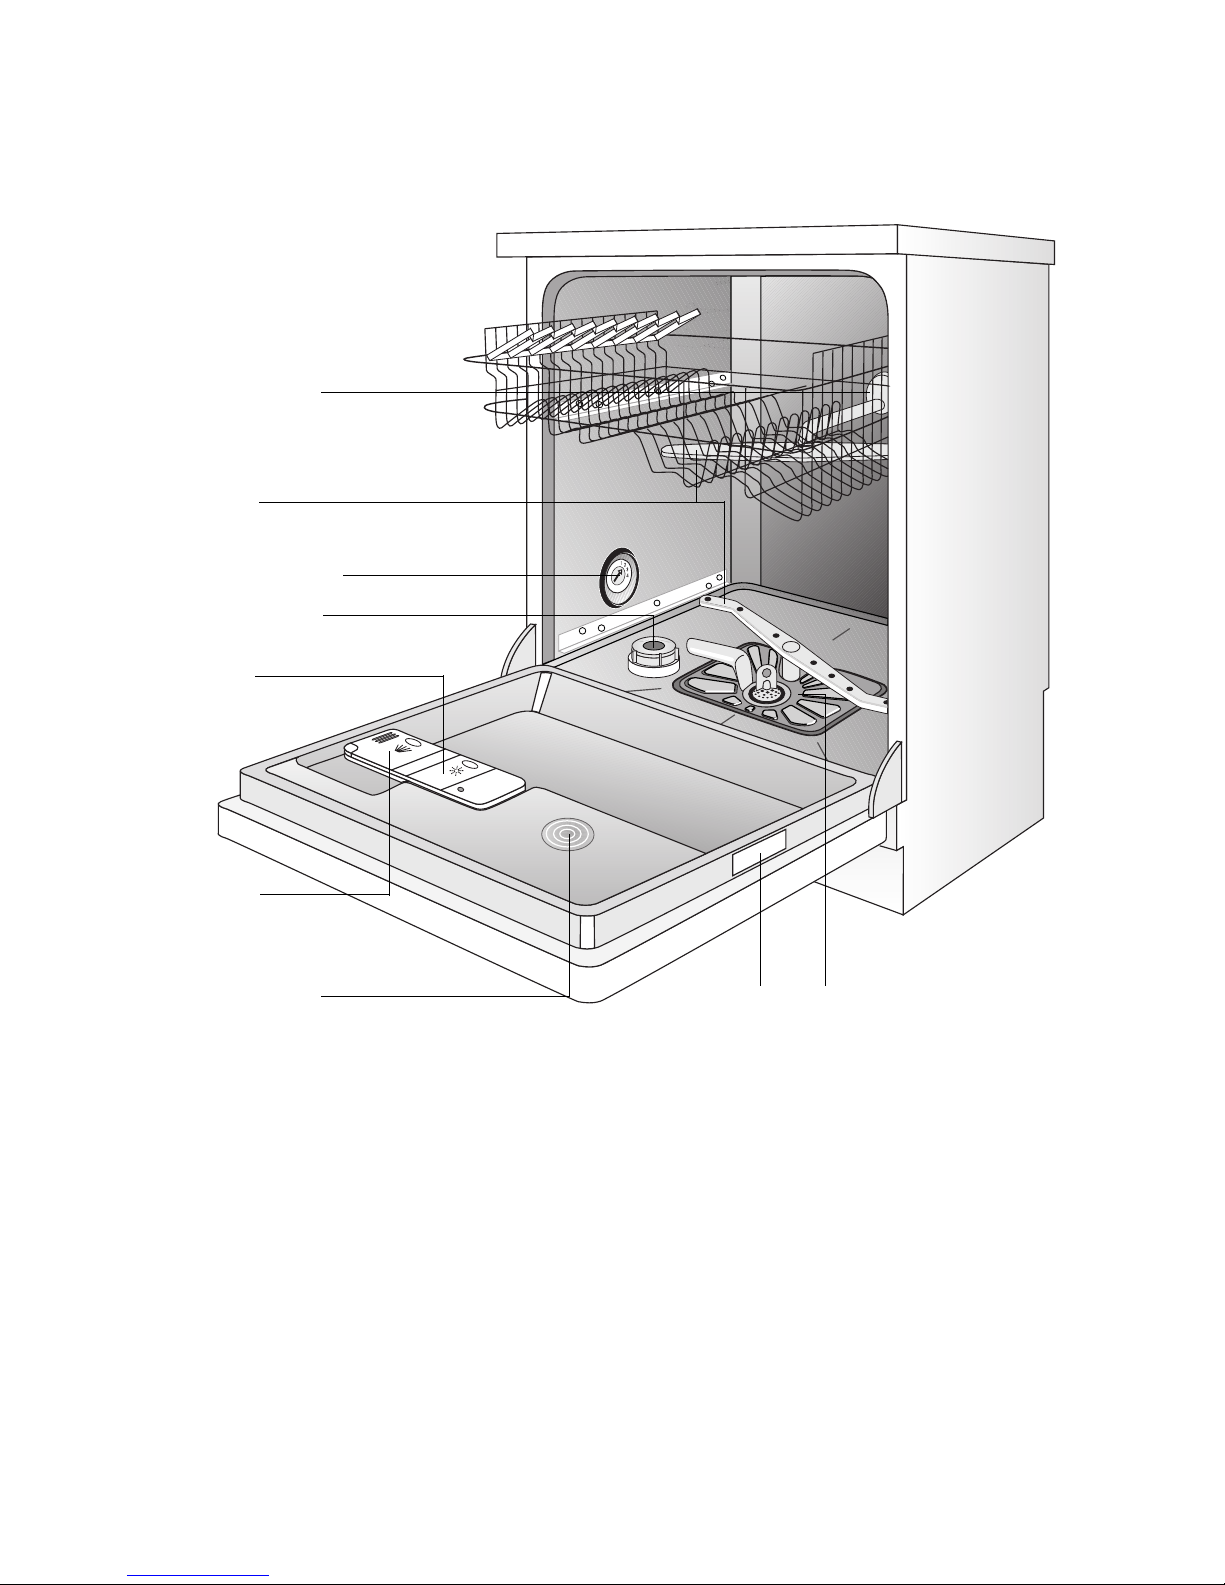
Appliance Features and Control Panel
Spray Arms
Container for Special
Salt
Rating Plate
Container
for Rinse Aid
Container for
Detergent
Filters
Rubber Seal for Connecting the Water
Feed to the Upper
Spray Arm
Water Hardness Switch
Suction Opening for
Fan Assisted Drying
Page 8
8
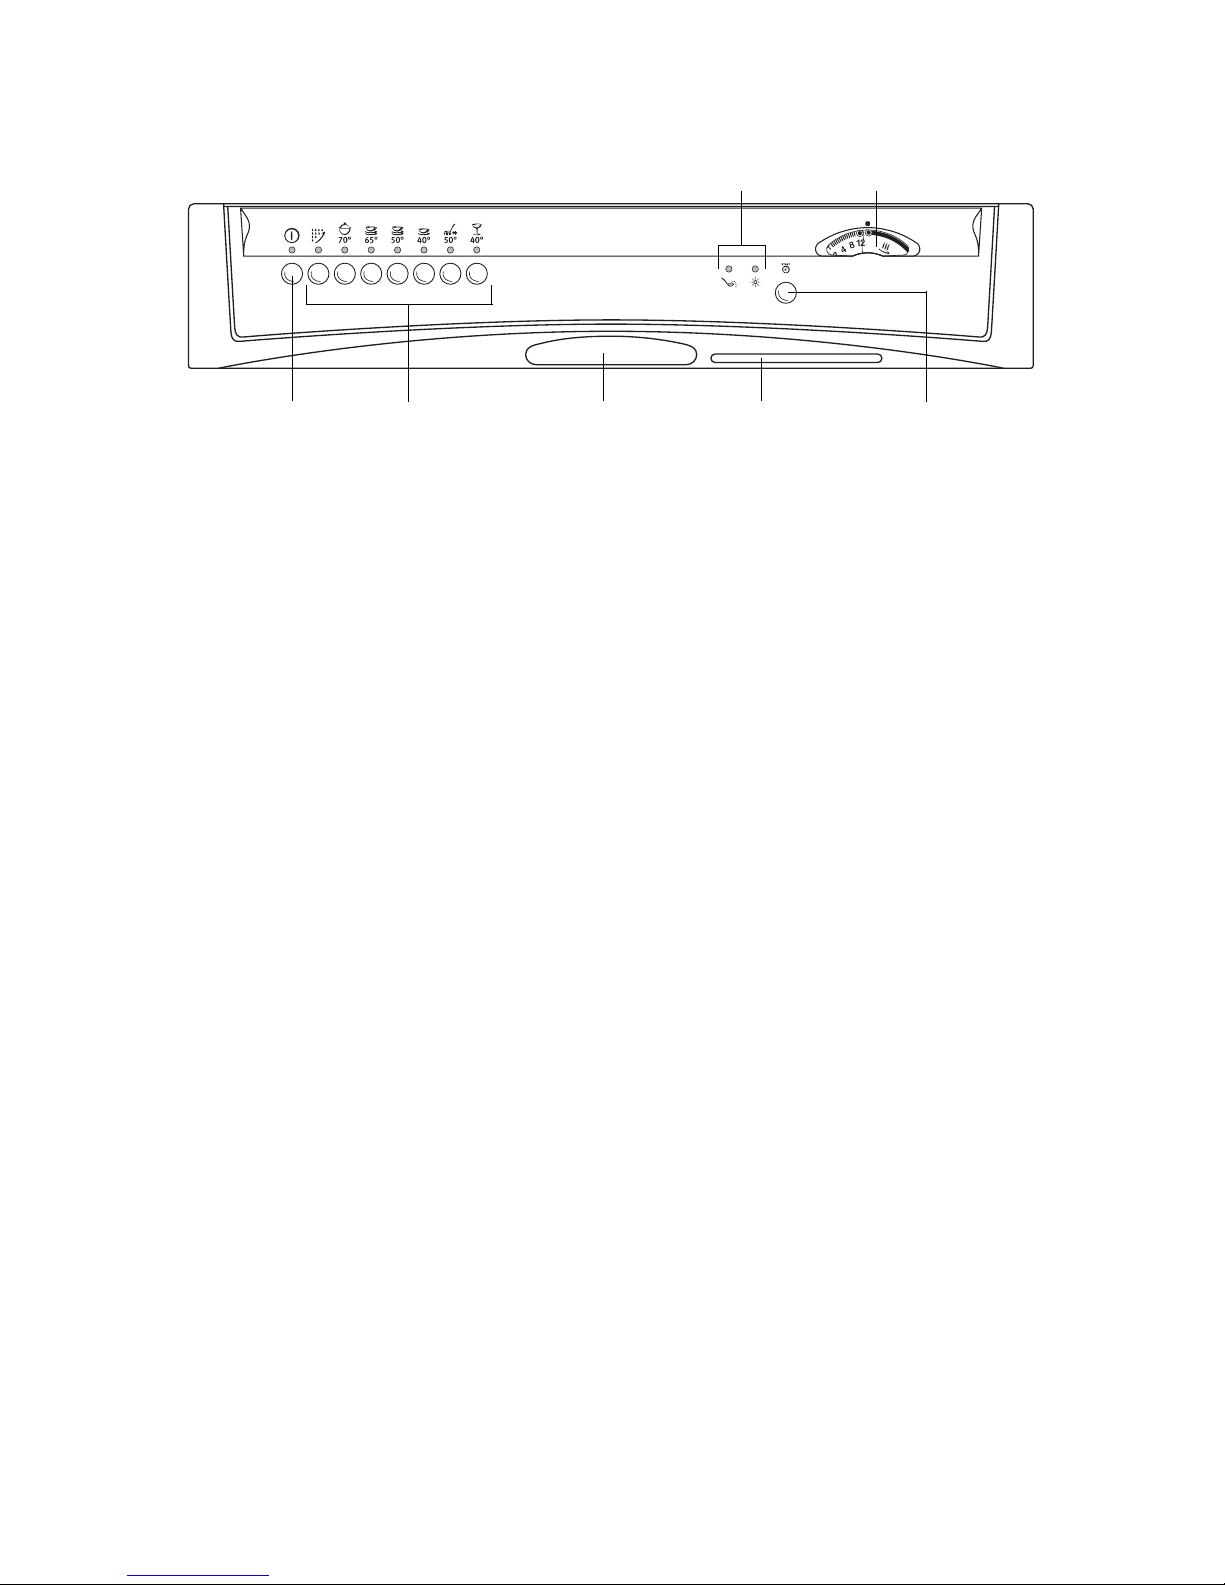
Control panel
ON/OFF button
Programme buttons
Door release
handle
Air outlet for fan
assisted drying
Indicators
Programme cycle indicator
Button for start time
preselection
a
ON/OFF button
Programme buttons
b
Pre Wash
â
Intensive 70 °C
é
Normal 65 °C
è
Normal 50 °C
g
m
Eco 40 °C
å
Quick 50 °C
ç
Glass 40 °C
Indicators
t
Refill with special salt
à
Refill with rinse aid
Å
Button for start time preselection
Programme cycle indicator
• gives you information on any set starting time
• While the programme is running, the indica-
tor disc rotates to show you the respective
programme step.
b
Pre Wash
x
Main Wash
Ö
Intermediate Rinse
u
Final Rinse
z
Drying
Page 9
9
Prior to using for the first time
Prior to using for the first time, remove all the clips
with which the dish racks are secured for transport.
Then perform the following steps:
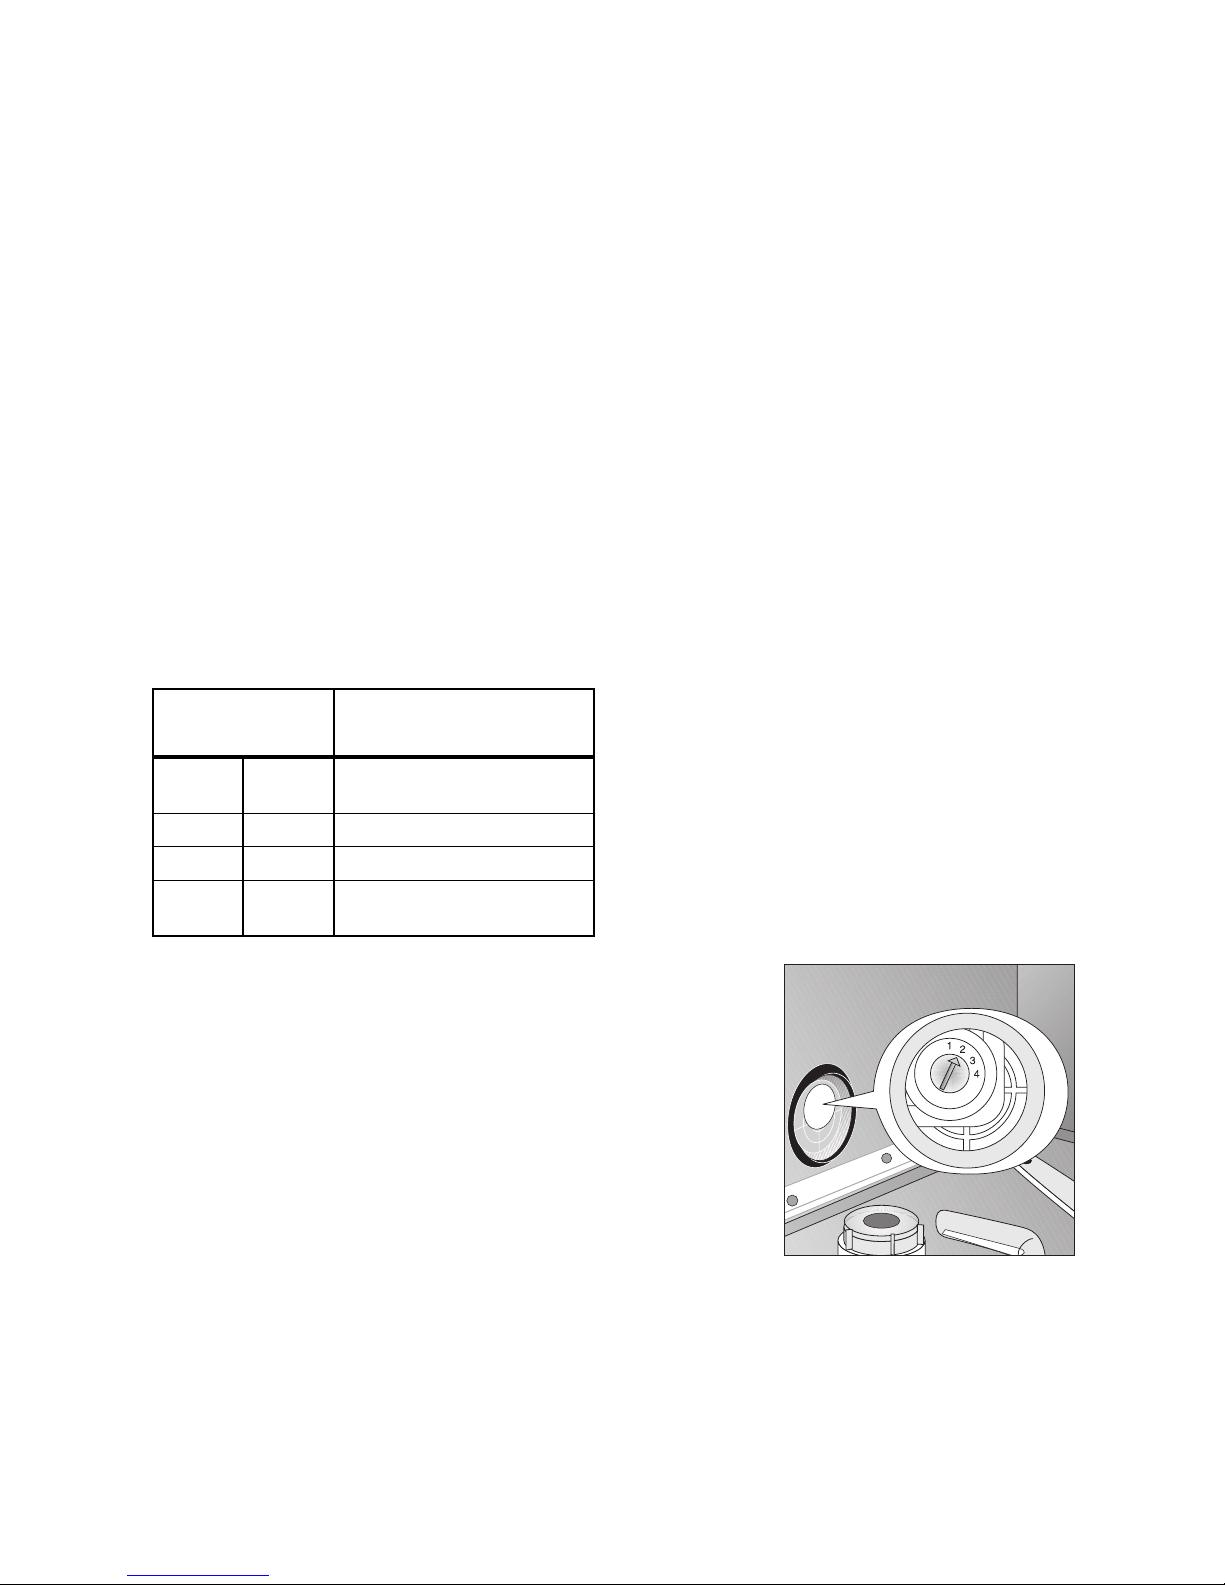
1. Adjust the water softener
2. Filling with Special Sa lt for the Water Softener
3. Filling with Rinse Aid
Adjusting the Water Softener
To prevent the build up of scale on dishes and in the
dishwasher, the dishes must be washed with soft, i.e.
low lime content water. For this reason the dishwasher is fitted with a water softener in which tap
water from a hardness of 4 °d (German degrees) is
softened with the aid of special salt.
3
Your local water authority can advise you on
the hardness of the water in your area.
The water softener has 4 settings.
Adjust the water softener in accordance with the table
to suit your area:
1. Open the door on the dishwasher.
2. Remove the lower rack from the dishwasher.
3. Adjust the water hardness switch with, e.g. a coin.
4. Replace the lower rack and close the door of the
dishwasher.
Water Hardness
in °d
1)
in ppm
2)
1)(°d) German degree, measure of water hardness
2)(ppm) parts per million (CaCO
3
)
*Factory setting
Turn the arrow on the water
hardness switch to number
29-50
22-28
510 - 900
390 - 500
4
3
15-21 260 - 380 2*
4-14 70 - 250 1
under 4 under 70
1
no salt necessary
Page 10
10
Filling with Special Salt for the Water Softener
1
Use only special salt for dishwashers. Never
fill the salt container with any another type of
salt (e.g. culinary salt) or dishwasher detergent. This would irreparably damage the
water softener.
Prior to filling with salt, please check each
time that you really do have a packet of special salt in your hand.
Fill with special salt:
• Prior to using the dishwasher for the first time
• When the SALT indicator
t on the control
panel is illuminated.
3
If the water hardness in your area is less
than 4 °d, you do not need to use special
salt.
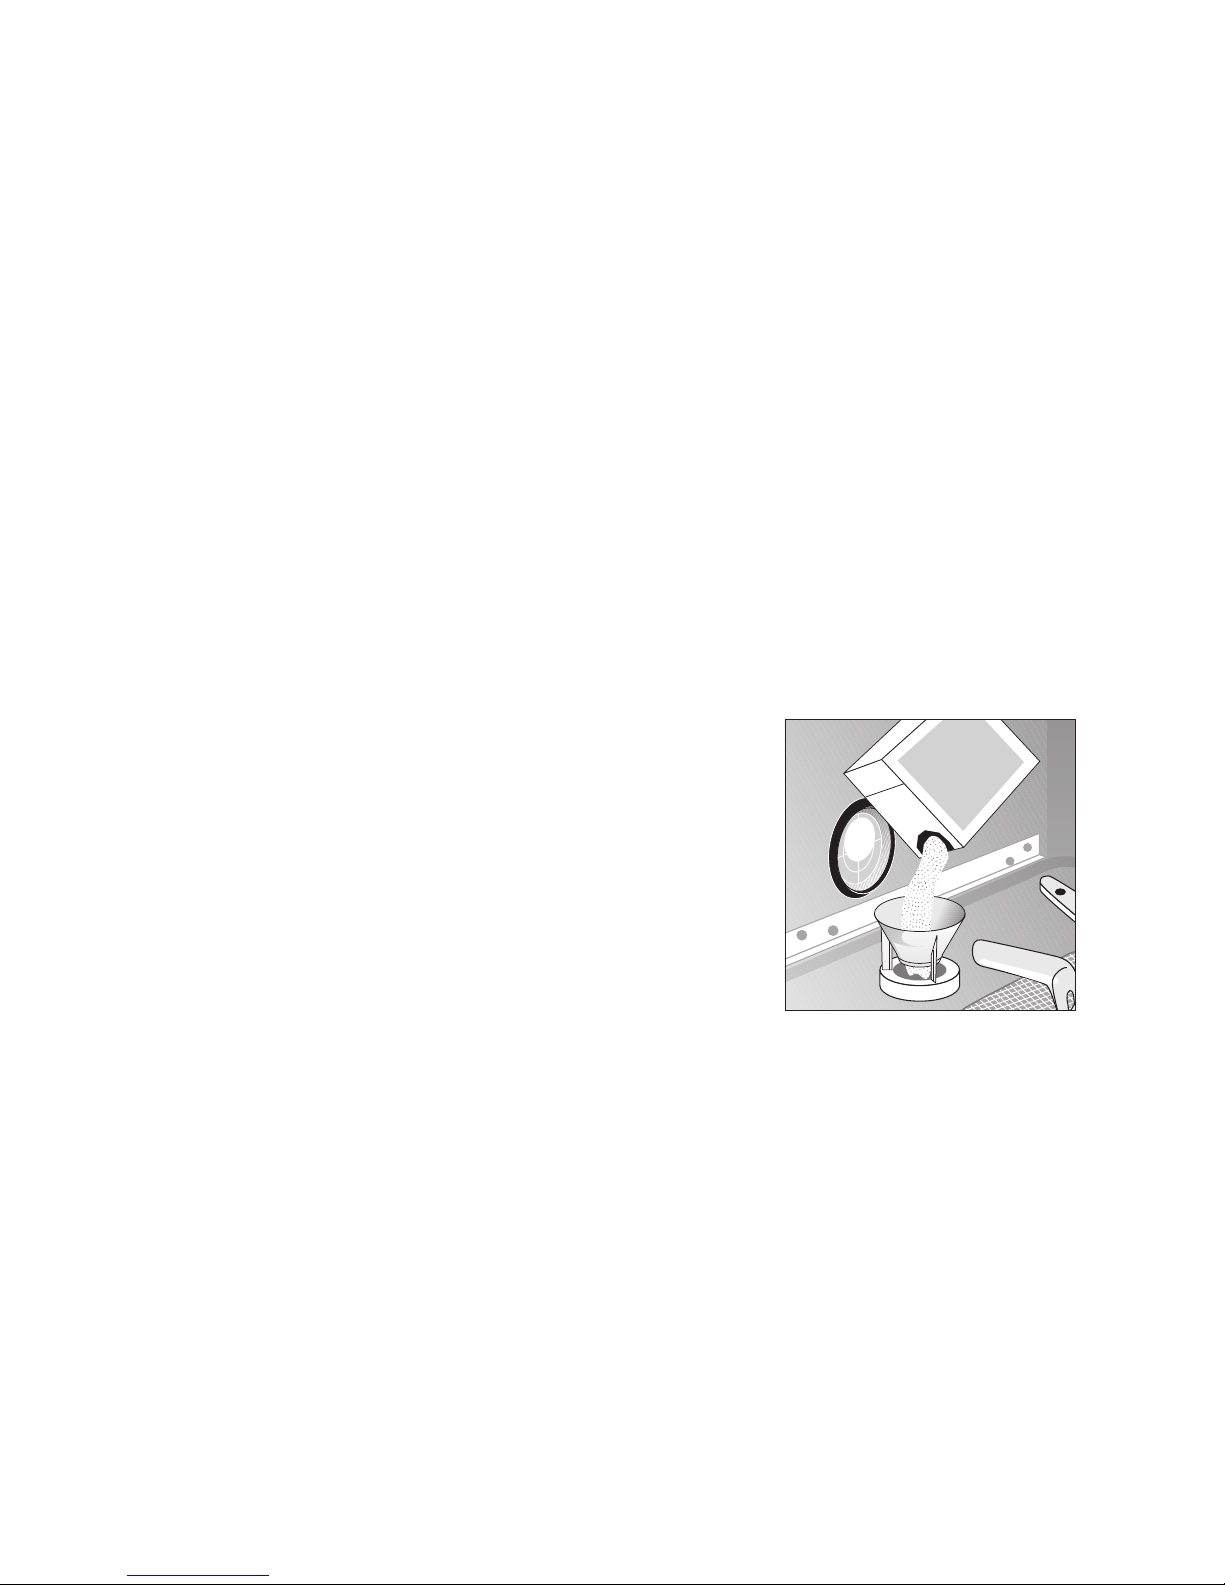
1. Open the door, remove the lower rack.
2. Undo the lid on the salt container by turning it anti-
clockwise.
3. Only when using for the first time:
fill the salt container with water.
4. Place the funnel supplied on the container opening.
Fill the container with special salt through the funnel; the capacity of the container is approx. 1.0-
1.5 kg depending on the grain size. Do not overfill
the salt container with special salt.
3
The water expelled by filling the salt container with special salt runs out of the salt
container onto the base of the washing compartment. This is not a cause for concern,
the water will be pumped out at the start of
the next wash programme.
5. Clean any salt remnants on the container opening.
6. Turn the lid clockwise to the stop, otherwise special salt will leak into the wash water, this could
lead to poor wash results. To avoid this run a rinse
program after filling the salt container with special
salt. This will wash away salt water and any salt
crystals that have been spilt.
3
Depending on the size of the salt grains, it
can take several hours for the salt to dissolve
in the water and the special salt indicator
t to extinguish.
The setting of the water softener and thus
the consumption of salt are dependent on
the hardness of the local water.
SALE
SALT
SALZ
SEL
Page 11
11
Filling with Rinse Aid
Rinse aid ensures that your dishes gleam and are
free from spots, and that you glasses are clear.
1
Use only branded rinse aid for dishwashers.
Never fill the rinse aid container with any
another substance (e.g. concentrated vinegar). This would damage the appliance.
Fill with rinse aid:
• Prior to using the dishwasher for the first time
•
When the RINSE AID indicator H on the control
panel is illuminated.
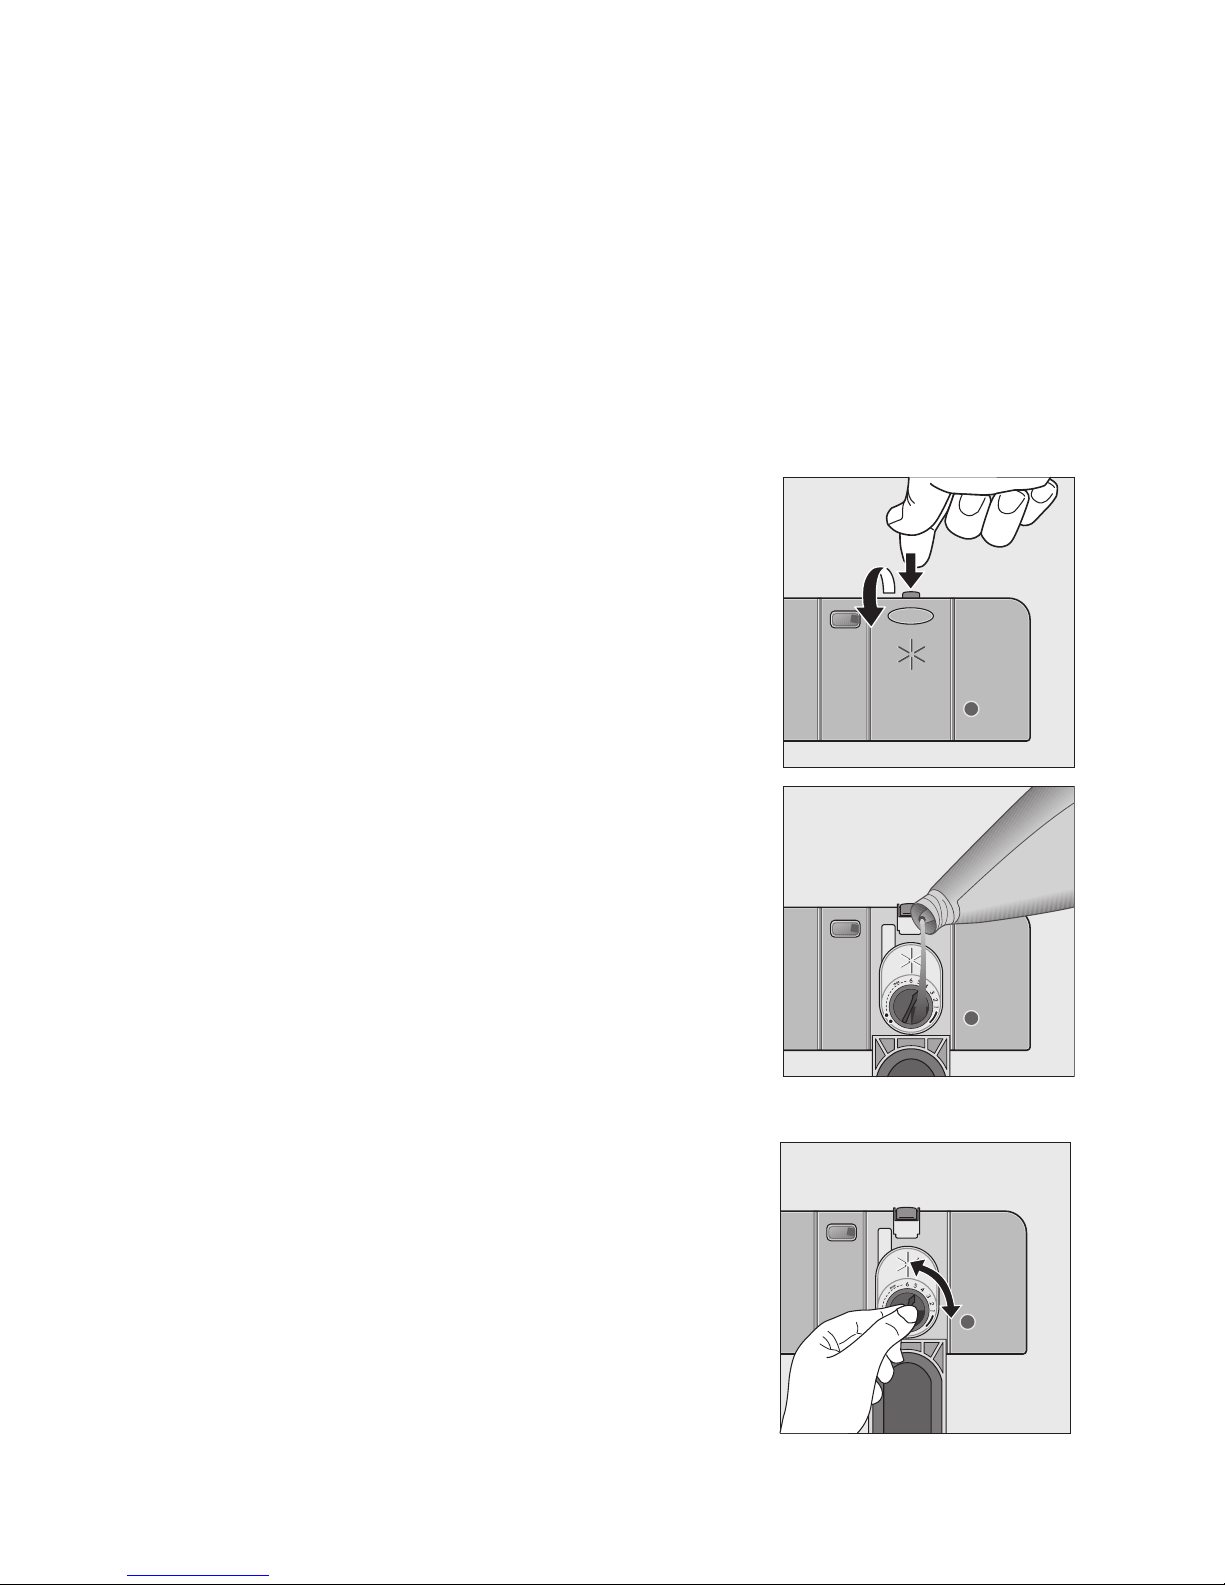
The rinse aid compartment is on the inside of the
dishwasher door.
1. Open the door.
2. Press the rinse aid compartment release button
with your finger.
3. Fully open the rinse aid compartment lid.
4. Fill with rinse aid exactly up to the level marked
“max”; this corresponds to a quantity of approx.
140 ml.
5. Close the lid and press until it locks into place.
6. Wipe up any spilt rinse aid with a cloth. Otherwise
too much foam will be formed during the wash.
Adjusting Rinse Aid Dosing
3
As the dishes are washed rinse aid is
released from the dispenser into the wash
water. The dose is factory set at 4, and can
be adjusted from 1 to 6. Only change the setting if streaks, milky spots or dried on water
marks are visible on glasses or crockery.
1. Open the door of the dishwasher.
2. Press the rinse aid compartment release button
with your finger.
3. Fully open the rinse aid compartment lid.
4. Set the dose level.
5. Close the lid and press until it locks into place.
6. If rinse aid has run out, wipe up with a cloth.
Page 12
12
In Daily Use
• Is it necessary to refill with special salt or rinse
aid?
• Load cutlery and dishes into the dishwasher
• Fill with dishwasher detergent
• Select a wash programme suitable for the cutlery
and dishes
• Start the wash programme
Loading cutlery and dishes
1
Sponges, household cloths and any object
that can absorb water may not be washed in
the dishwasher
.
• Before loading the dishes, you should:
– Remove large left-overs.
– Soften remnants of burnt food in pans.
• When loading the dishes and cutlery,please note:
– Dishes and cutlery must not impede the rota-
tion of the spray arms.
– Load hollow items such as cups, glasses,
pans, etc. with the opening downwards so that
water cannot collect in the container or a deep
base.
– Dishes and items of cutlery must not lie inside
one another, or cover each other
– To avoid damage to glasses, they must not
touch
– Do not lay small objects (e.g. lids) in the cutlery
rack
For washing in the dis hwasher the following cutlery/dishes
are not suitable: are of limited suitability:
– Cutlery with wooden, horn,
china or mother of pearl handles
– Plastic items that are not heat resistant
– Older cutlery with cement that is not tempera-
ture resistant
– Bonded cutlery items or dishes
– Pewter or copper items
– Lead crystal glass
– Steel items subject to rusting
– Wooden platters
– Items made from synthetic fibres
– Only wash stoneware in the dishwasher if it is spe-
cifically marked as being dishwasher-safe by the
manufacturer.
– Glazed patterns may fade if machine washed fre-
quently.
– Silver and aluminium parts have a tendency to dis-
colour during washing. Left-overs, e.g. egg white,
egg yolk and mustard often cause discolouring and
staining on silver. Therefore always clean left-overs
from silver immediately, if it is not to be washed
straight after use.
– Some types of glass can become dull after a large
number of washes.
Page 13
13
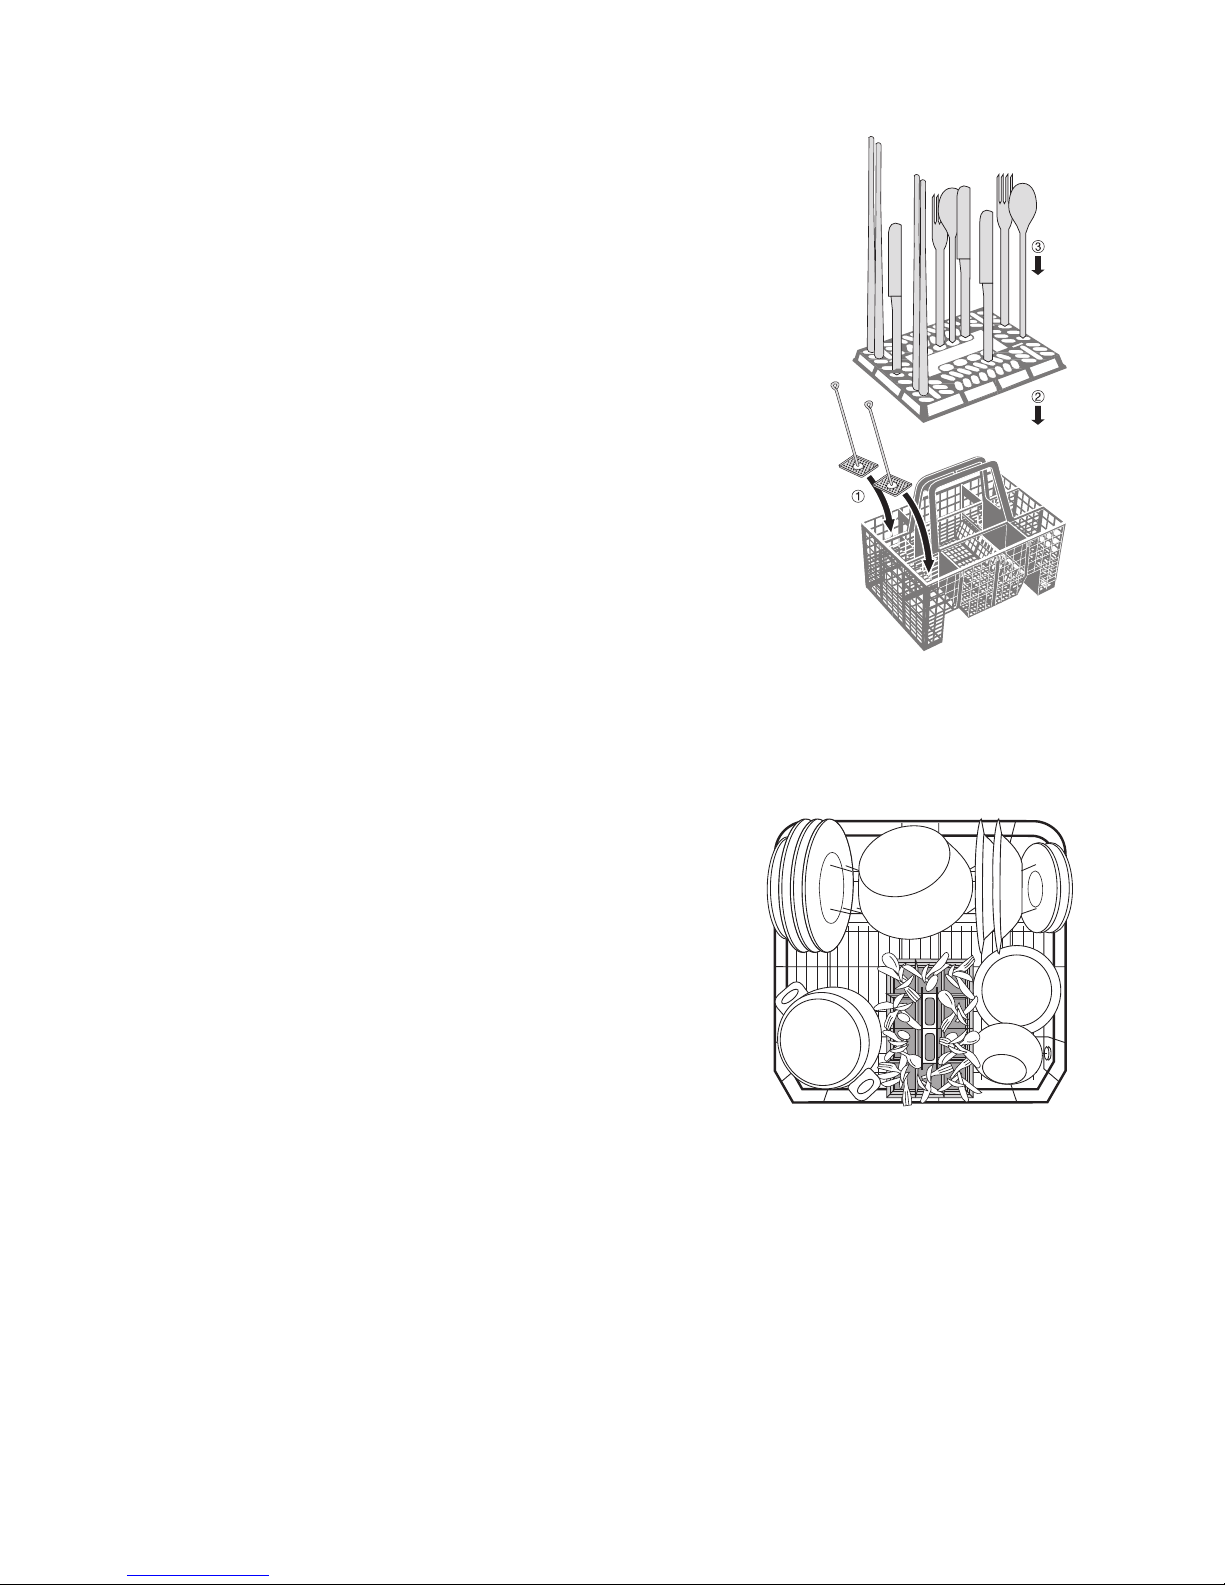
Loading Cutlery
1
If they are placed in the cutlery basket, long,
pointed items of cutlery are a hazard, particularly to children (see Safety Instructions).
They must therefore be laid horizontally in
the upper basket.
To ensure that all cutlery is efficiently washed and
reached by the water you should:
1. position the two chopstick holders in the corners
of the cutlery basket,
2. place the latticed insert on the cutlery basket,
3. place short knives, forks and spoons with the han-
dle downwards and chopsticks into the latticed
insert of the cutlery basket.
3
Chopsticks may only be placed on the chopstick holders in the cutlery basket as otherwise they would fall through the basket and
block the lower spray arm.
Loading Pans, Frying Pans and
Large Plates
Load large and heavily soiled dishes in the lower
rack.
3
To make it easier to load large dishes, it is
possible
- to remove the plate inserts from the lower
rack.
- to move the cutlery basket sideways.
Page 14
14
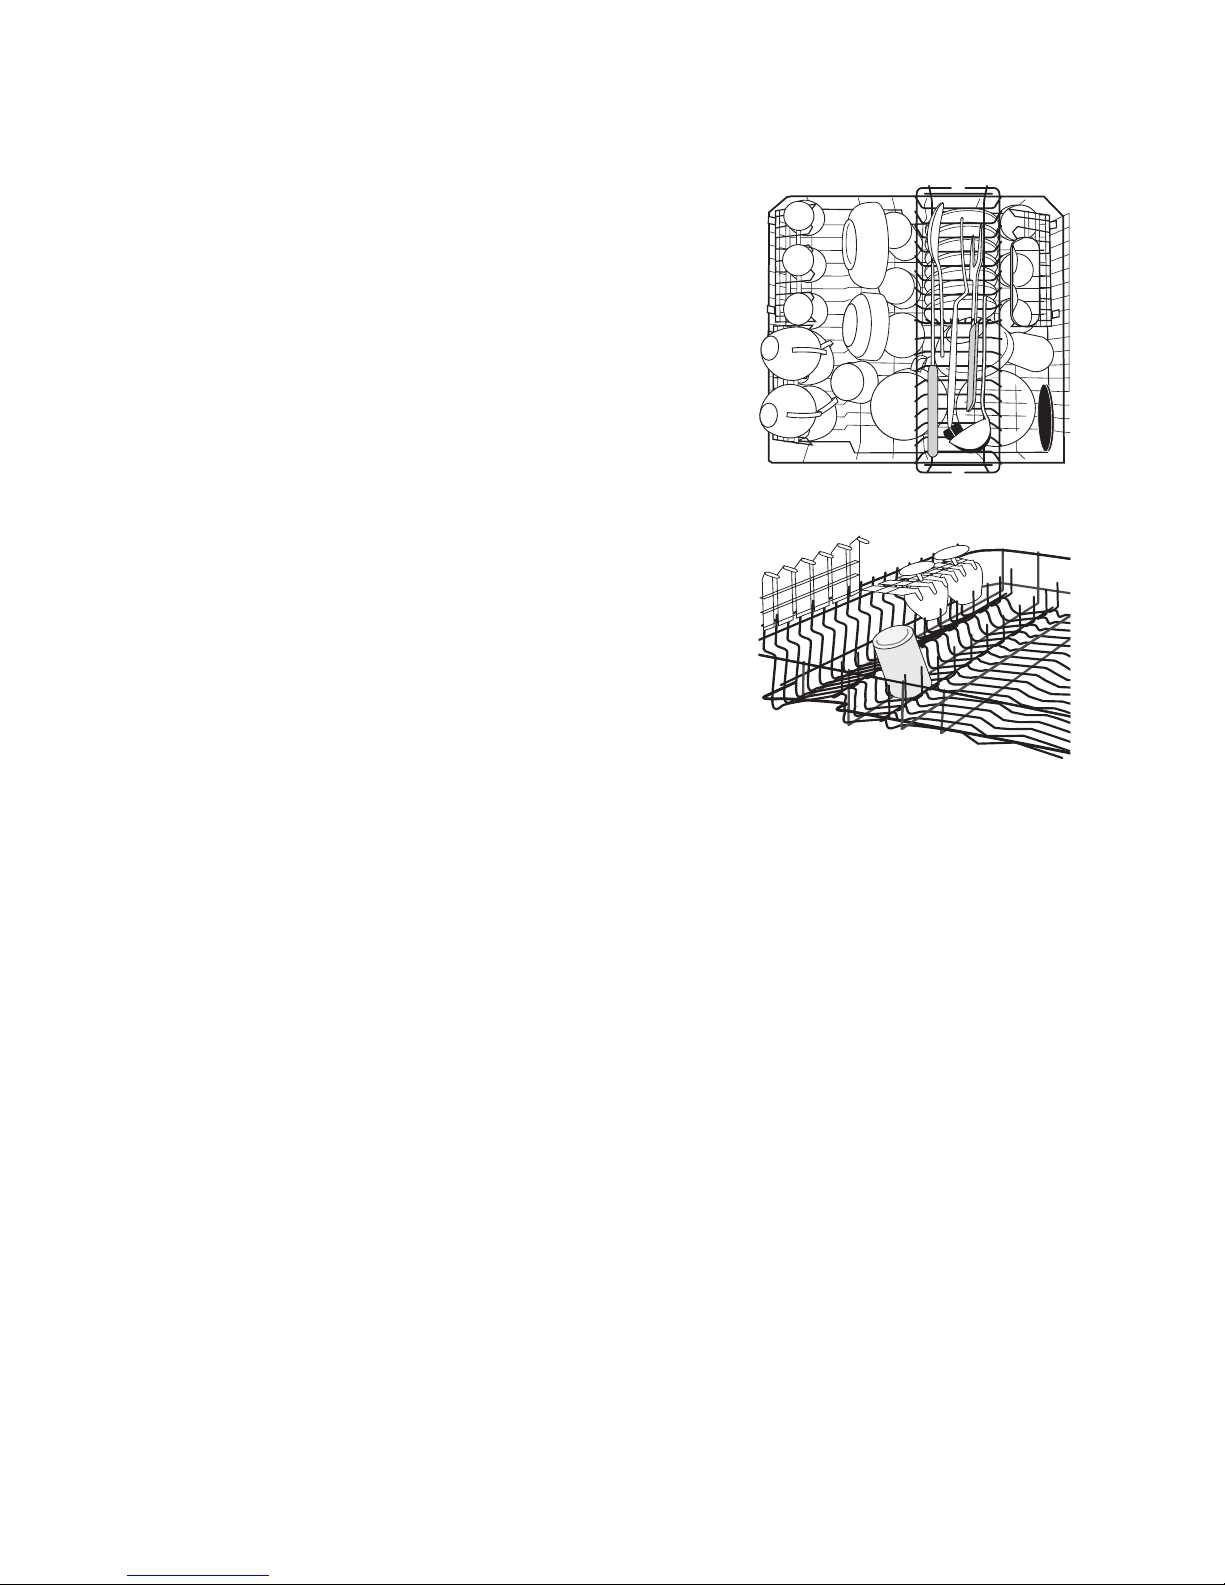
Loading Cups, Glasses and Coffee
Services
Arrange smaller, sensitive items in the lower rack and
place long, pointed items of cutlery in the knife
drawer.
• Arrange plates and dishes offset on and under the
folding cup racks so that washing water can reach
all items.
• The cup racks can be folded up out of the way for
tall items.
• Lay or hang wine, champagne, and brandy
glasses in the cut outs on the cup racks.
• Glasses, beakers, etc. can also be placed on the
two rows of prongs on the left of the upper rack.
Page 15
15
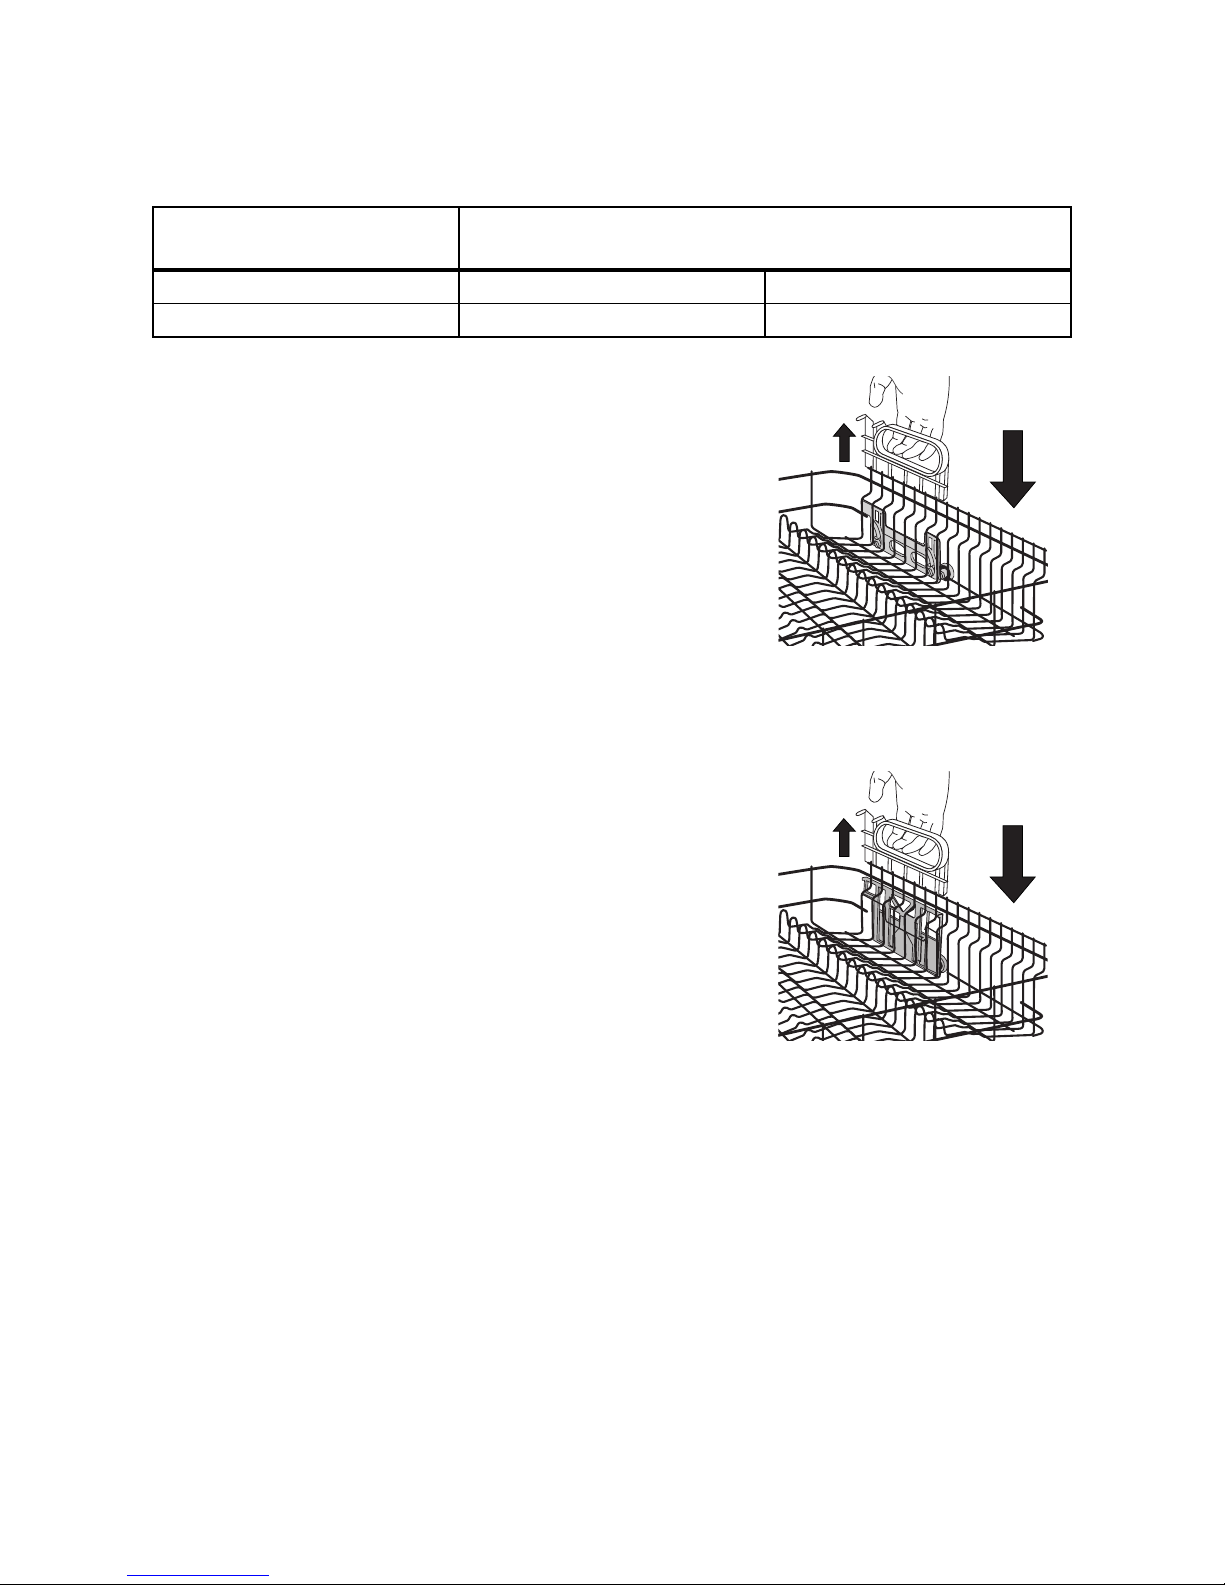
Adjusting the Height of the Upper
Basket
3
The height of the basket can also be
adjusted when it is loaded.
Depending on the model, your appliance is
provided with one of the following types of
upper basket:
Lowering the Upper Basket:
1. Pull the upper basket out completely.
2. Lift and lower the upper basket using the handle at
the rear of the right hand cup basket.
Raising the Upper Basket:
1. Pull the upper basket out completely.
2. Lift the upper basket by the handle, pull gently for-
wards and allow to latch into the upper position.
Lowering the Upper Basket:
1. Pull the upper basket out completely.
2. Holding the upper basket by the handle, lift it as
far as it will go and then lower it vertically. The
upper basket will engage in the lower position.
Raising the Upper Basket:
1. Pull the upper basket out completely.
2. Holding the upper basket by the handle, lift it as
far as it will go and then lower it vertically. The
upper basket will engage in the higher position.
Maximum Height of the Dishes in the
Upper Rack Lower Rack
With upper basket raised 22 cm 31 cm
With upper basket lowered 24 cm 29 cm
Type 1
Type 2
Page 16
16
Filling with Detergent
1
Only use dishwasher detergent.
Fill with detergent:
Prior to the start of a wash programme (not for the
pre wash programme). The detergent is released into
the wash water during the programme.
2
Please observe the manufacturer's dosing
and storage recommendations as stated on
the detergent packaging.
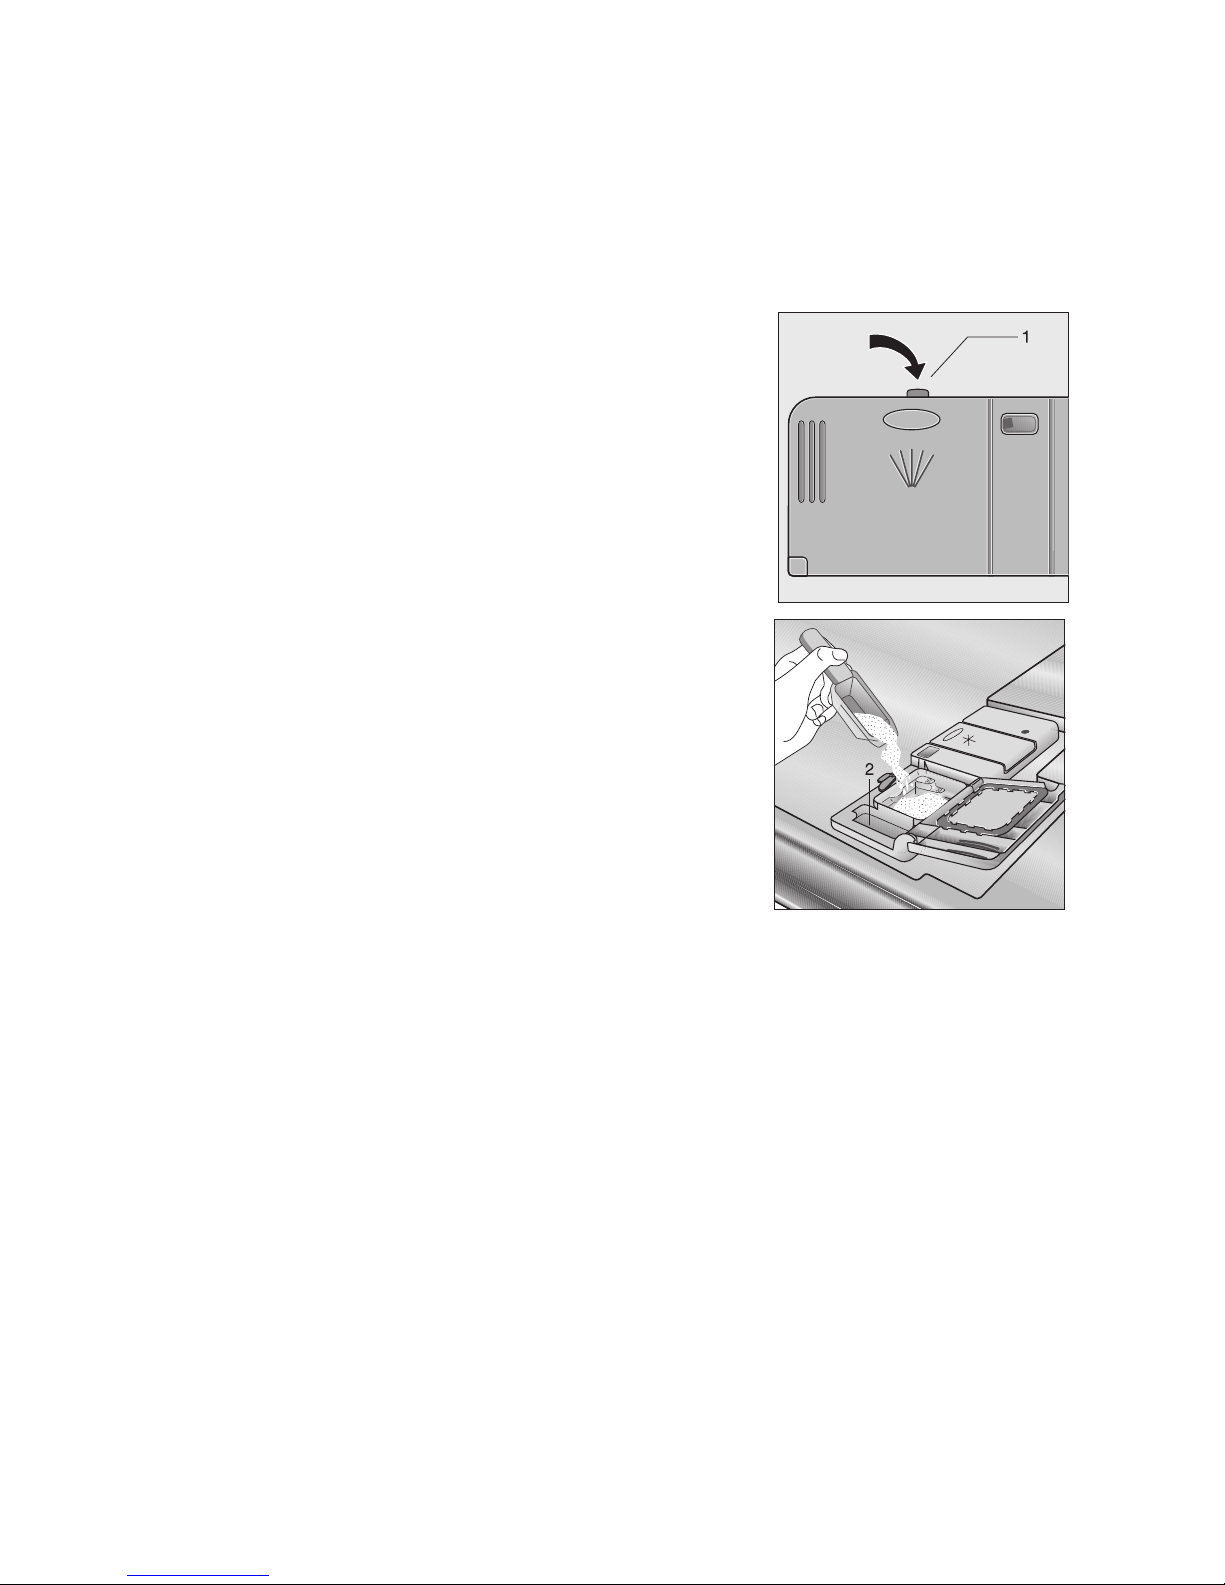
The detergent compartment is on the inside of the
dishwasher door.
1. If the lid is closed:
press release button (1).
The lid springs open.
2. Fill the detergent dispenser with detergent. The
markings indicate the dosing levels:
“20” corresponds to approx. 20 ml of detergent,
“30” corresponds to approx. 30 ml of detergent.
3. Close the lid and press until it locks into place.
3
If the dishes are very heavily soiled put additional detergent into the adjacent chamber
(2). This detergent will take effect during the
pre wash.
Page 17
17
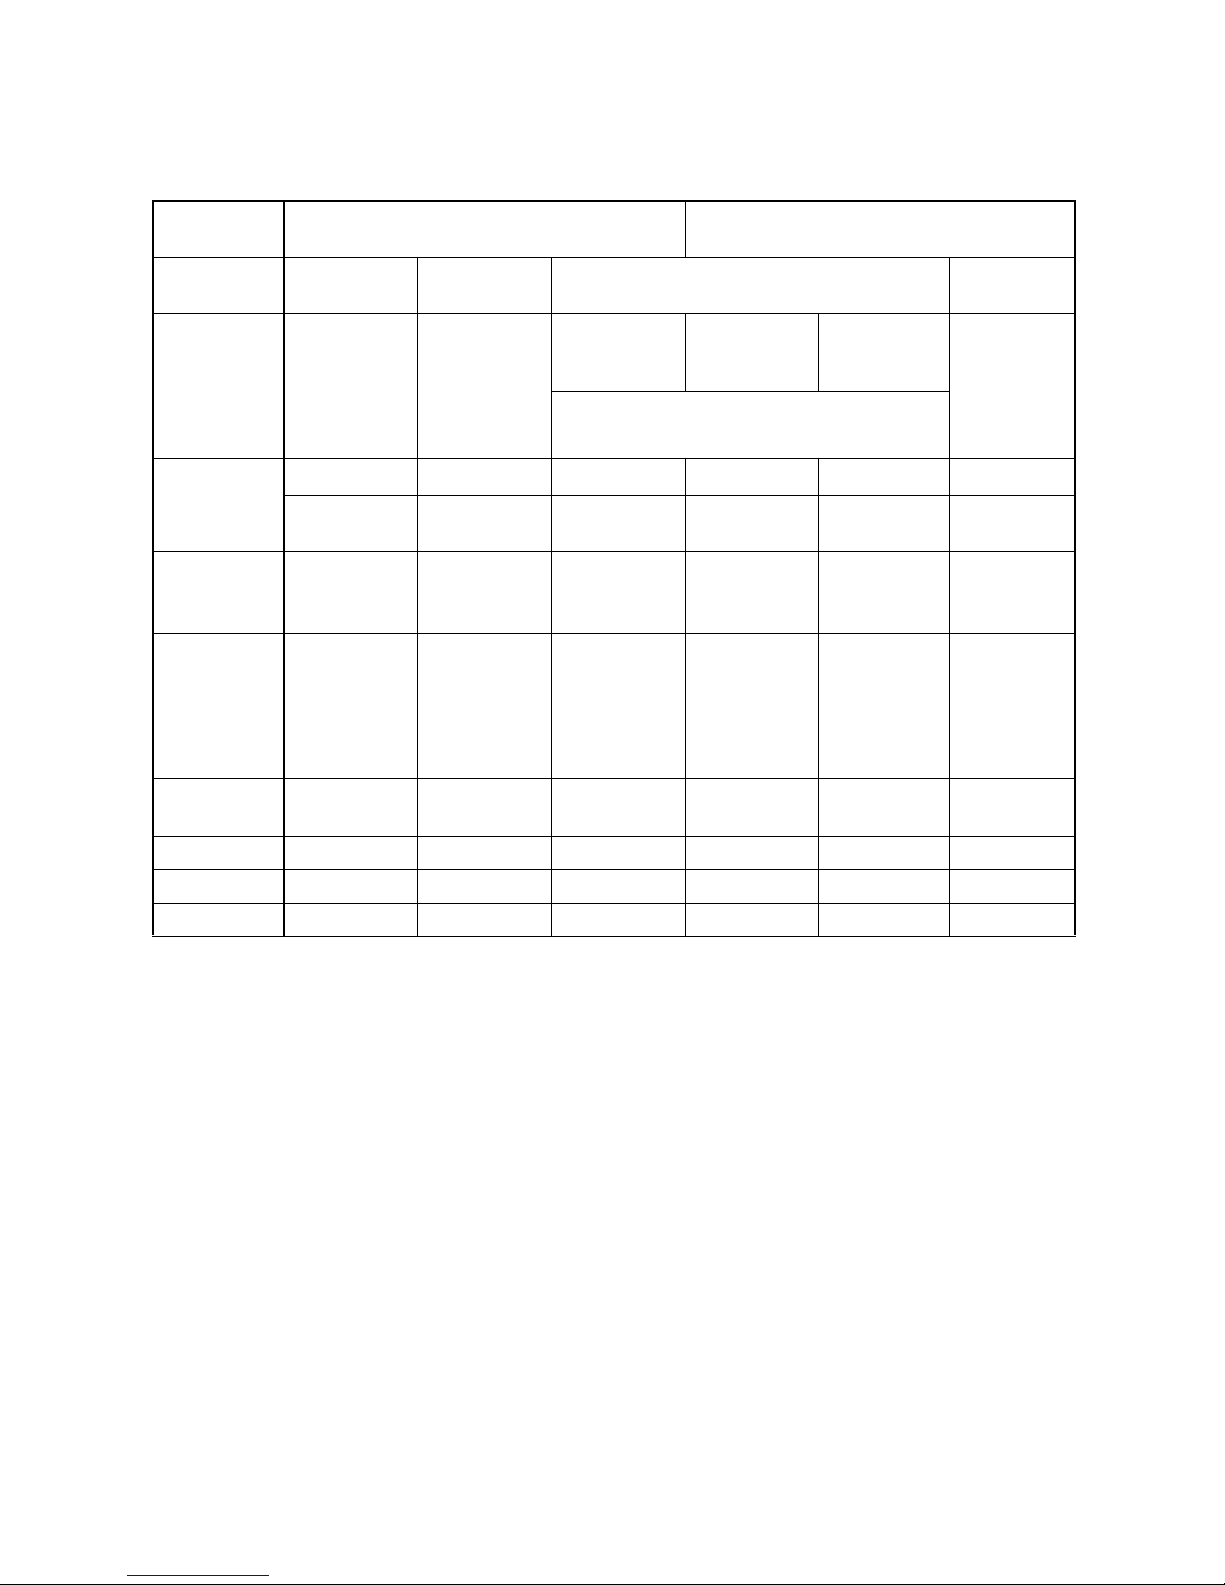
Selecting the Wash Programme (Programme Table)
Choose the most suitable wash programme with the aid of this table:
1)
1)
In addition to the wash programmes listed in this table, there is a special programme: PRE WASH b.Using
this programme you can pre wash used dishes that are being collected in the dishwasher and for washing
later. The special PRE WASH programme
b lasts 10 minutes and consumes 4 litres of water and less than
0.1 kWh of energy.
2)
The consumption figures were recorded under standard conditions. They are dependent on the loading of the
dish racks. Variations are therefore possible in practice.
Type of
Dishes:
Dinner Service and Cooking Utensils Coffee Service and Dessert Dishes
In Addition:
- - with non-temperature resistant dishes
with delicate
glasses
Type of
Soiling:
heavily
soiled
driedonleftovers, particularly egg white
andthickeners
normally
soiled
dried left-overs
normally
soiled
normally to
lightly soiled
lightly
soiled
lightly
soiled
particularly suited
to the use of concentrated detergents.
Suitable
Programme:
тттттт
INTENSIVE
70 °C
NORMAL
65 °C
NORMAL
50 °C
ECO
40 °C
QUICK
50 °C
GLASS
40 °C
Press
Programme
Button:
âéè
g
m
åç
Programme
Sequence:
Pre Wash
Main Wash
2x Intermediate Rinses
Final Rinse
Drying
Pre Wash
Main Wash
Intermediate
Rinse
Final Rinse
Drying
Main Wash
Intermediate
Rinse
Final Rinse
Drying
Main Wash
Intermediate
Rinse
Final Rinse
Drying
Main Wash
Intermediate
Rinse
Final Rinse
-
Main Wash
Intermediate
Rinse
Final Rinse
-
Consumption
Figures:
2)
тттттт
Duration: 103 minutes 97 minutes 83 minutes 73 minutes 51 minutes 48 minutes
Energy: 1,6 kWh 1,35 kWh 1,24 kWh 0.8 kWh 0.9 kWh 0.8 kWh
Water: 22litres 18litres 16litres 14litres 14litres 14litres
Page 18

18
Setting the dishwashing
programme
1. Check that the crockery and cutlery in your dish-
washer are arranged so that the spray arm is not
obstructed.
2. Fully turn on the water tap, if it is off.
3. Close the door.
4. Press the ON/OFFbutton
a. The ON/OFF button
a indicator illuminates.
5. Wait one second, then press the programme button for the programme you require (see „Programme table“). The indicator above the button
you have pressed appears red. The programme
starts.
During the programme cycle, the indicator disc
rotates forward step by step, thereby indicating the
respective washing programme status.
1
If a washing programme has been started
despite the water tap being turned off, switch
off your machine, turn on the water tap, and
reset the washing programme.
Changing/Interrupting/Cancelling
the Wash Programme
3
Only change or interrupt a wash programme
in progress if it is absolutely necessary to do
so. When the appliance is closed again, the
air that has entered is heated and expands
significantly. As result water may penetrate
into the base of the appliance and trigger the
leak prevention system.
Programme correction
Once a washing programme has started, it can be
corrected by pressing another programme button.
Interrupting the wash programme by
opening the door of the dishwasher
1
Hot steam may escape from the appliance
when opening the door. There is a risk of
scolding! Open the door carefully.
1. Open the door of the dishwasher. The wash programme stops.
2. Close the door. The wash programme continues.
Cancelling the Wash Programme
1. Press the ON/OFF button a. The ON/OFF button
a indicator goes off.
2. Press the ON/OFF button
a again. The ON/OFF
button
a indicator illuminates and the wash pro-
gramme will quickly be finished.
Setting or Changing the
Start Delay Timer
With the button Å, you can preprogramme the programme start time in 2-hour steps from 2 to 12 hours
in advance.
1. Switch on the dishwasher: Press the ON/OFF button
a.
2. Press button
Å, until the indicator disk shows the
number of hours after which the programme
should start.
3. Press the programme button for the programme
you require (see „Programme table“).
Shorten the set start time
• Press button Å, until the indicator shows the
number of hours after which the programme
should start.
Prolong the set start time
1. Switch off the dishwasher: Press the ON/OFF but-
ton a.
2. Press the programme buttons
b and â and
keep them pressed.
3. Press the ON/OFF button
a. The dishwasher is
switched on and the indicator disk returns to its
initial position.
4. Press button
Å, until the indicator disk shows the
number of hours after which the programme
should start.
5. Press the programme button for the programme
you require (see „Programme table“).
Page 19

19
Switching Off the Dishwasher
When the wash programme is finished:
1. Press the ON/OFF button
a . Power indicator
light goes out.
1
Hot steam may escape if the door is opened
immediately after the end of the programme.
Therefore:
2. Open the door carefully.
Emptying the Dishwasher
3
• Hot dishes are sensitive to knocks. The dishes
should therefore be allowed to cool down before
removing them from the appliance.
• Leave the dishes in the dishwasher for approx. 15
minutes after the end of the programme so that
they dry better and can cool down.
• Empty the lower rack first, then the upper rack. In
this way you will avoid any water left on the upper
rack dripping onto the dishes in the lower rack and
causing water spots.
1
Please note, that if your dishwasher is
installed under a kitchen worktop, escaping
steam may damage the worktop. Its underside must be protectad against rising steam
with aluminium foil as prescribed.
Page 20
20
Care and Cleaning
1
Do not under any circumstances use furniture care products or aggressive cleaners.
• If necessary, clean the controls only with a soft
cloth and pure warm water.
• The spray arms do not need cleaning.
• Occasionally check the internal containers, door
seal, and water inlet for soiling, clean if necessary.
Cleaning the Filter
3
Thefiltersinthebaseofthewashingcompartment are to a large extent self-cleaning.
Nevertheless the filters should be checked
and cleaned from time to time. Dirty filters
will degrade the washing result.
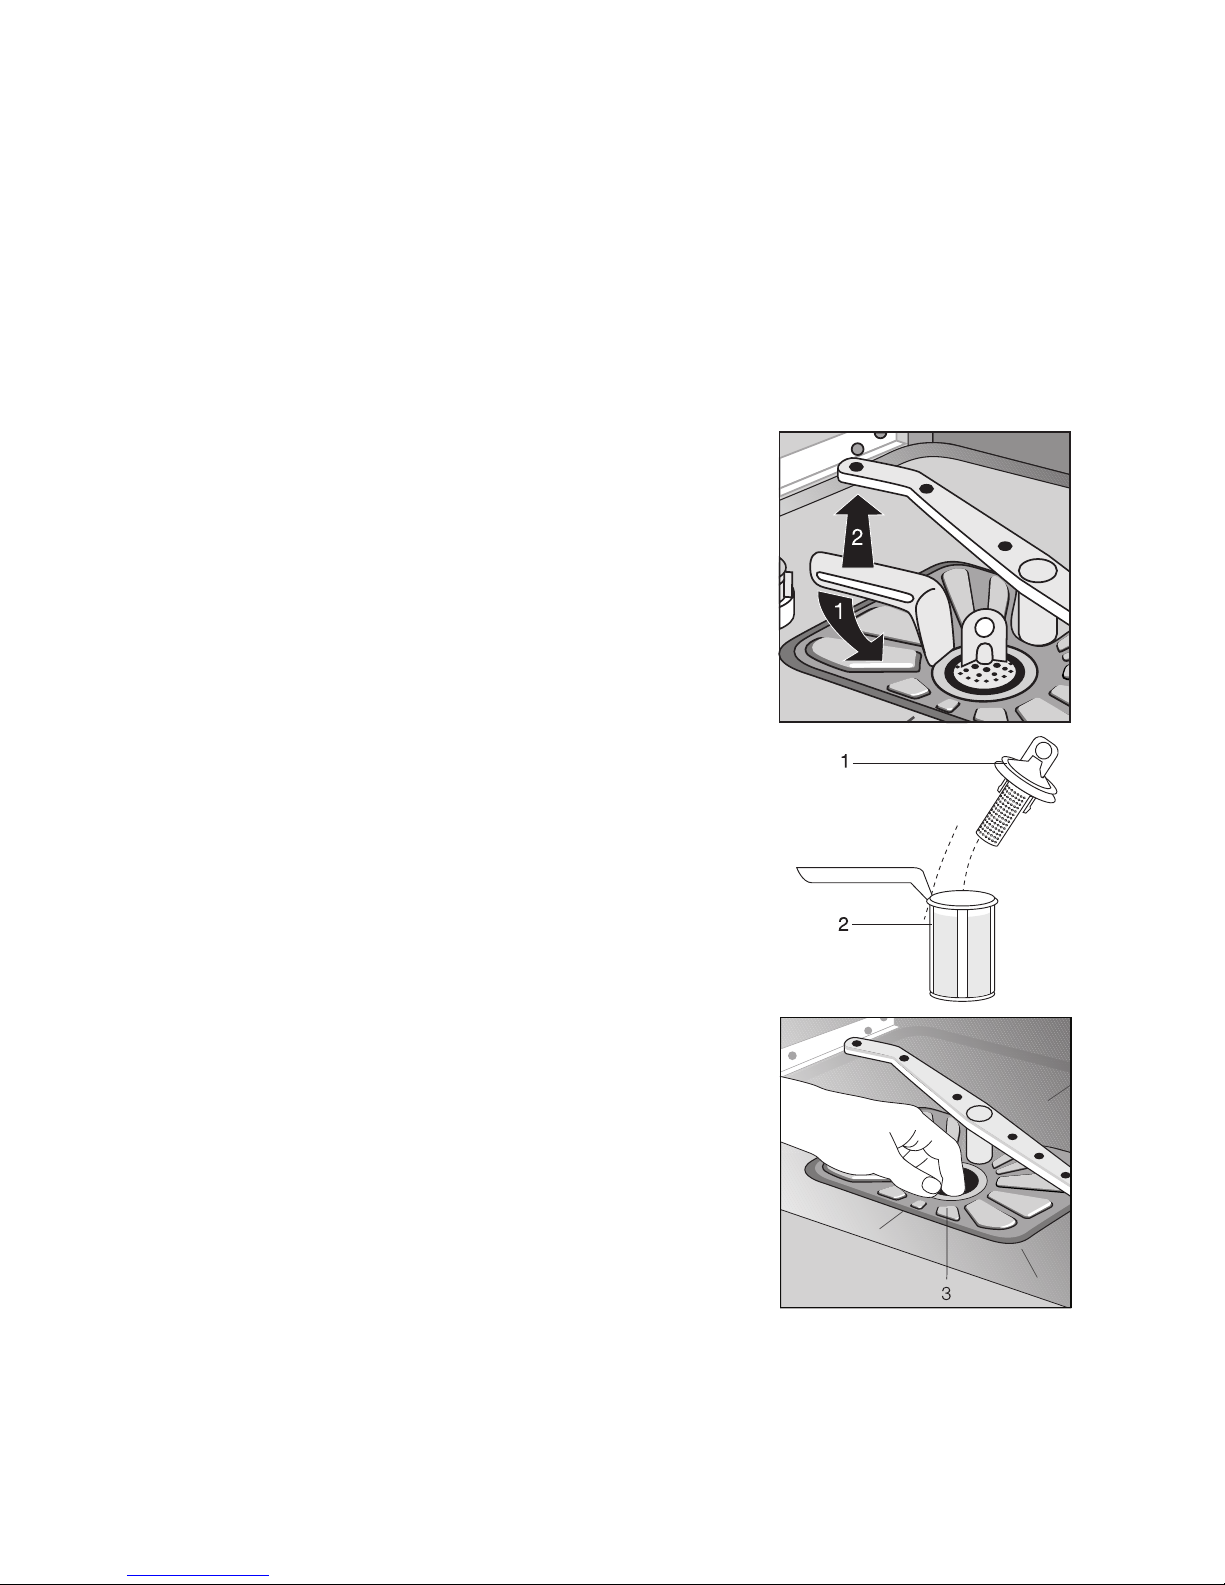
1. Open the door, remove the lower rack.
2. The dishwasher filter system comprises a coarse/
fine filter, microfilter and a flat filter. Unlock the filter system using the handle on the microfilter, and
remove.
3. Turn the handle about ¼ a turn anticlockwise and
remove.
4. Take hold of the coarse/fine filter (1) by the handle
with the hole and remove from the microfilter (2).
5. Clean all filters thoroughly under running water.
6. Remove the flat filter (3) from the base of the
washing compartment and clean both faces thoroughly.
7. Put the flat filter back in the base of the washing
compartment.
8. Place the coarse/fine filter in the microfilter and
press together.
9. Put the filter combination in place and lock by
turning the handle clockwise to the stop. During
this process ensure that the flat filter does not protrude .above the base of the washing compartment.
1
Under no circumstances may the dishwasher
be used without filters.
Page 21
21
Cleaning the Panel
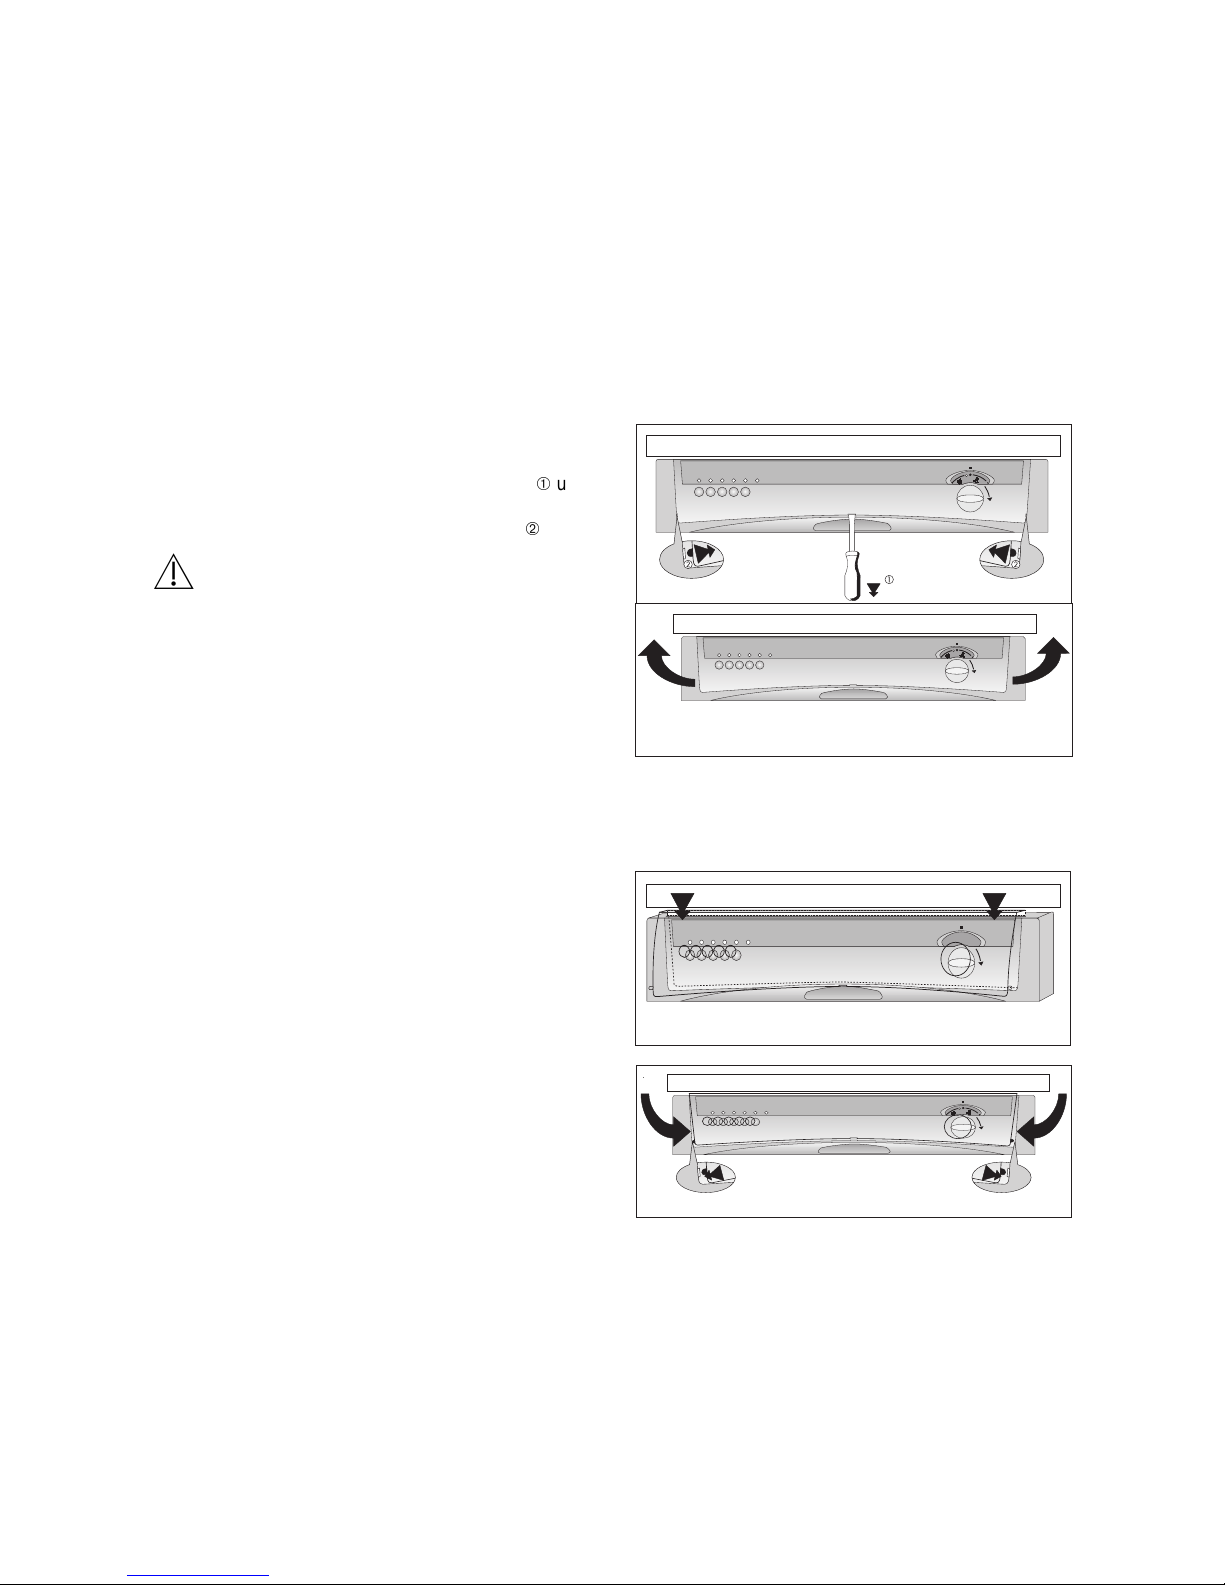
To be able to clean the control panel of the dishwasher, it is possible to remove the Plexiglas cover
from the control panel.
Remove the Plexiglas Cover
1
Pull the mains plug of the dishwasher out of
the socket.
1. Close dishwasher door.
2. In the case of dishwashers with program switches,
set these switches to the horizontal position (only
turn them clockwise!).
3. There is a small recess in the bottom centre of the
Plexiglas cover. Insert a screwdriver into this
recess and carefully lift the Plexiglas cover
until
the hooks on both sides of the Plexiglas cover
spring out of the eyes of the control panel
.
1
Caution: When doing this, do not scratch the
control panel with the screwdriver.
4. Swivel the Plexiglas cover up and remove it.
5. Clean the control panel and the Plexiglas cover
with a cloth and hand detergent. Never use strong
cleaning agents.
Insert the Plexiglas Cover
1
The Plexiglas cover and the control panel
must be dry. The program switch must be
horizontal in the case of units with a program
switch.
1. With the door closed, press the Plexiglas cover up
into the joint of the control panel.
2. Slightly bend the Plexiglas cover so that the two
hooks of the Plexiglas cover fit into the eyes of the
control panel. It is best to begin with the left hook.
3. After pressing again in the upper part, check that
the Plexiglas cover is correctly fitted.
4. Turn the program switch clockwise into the zero
position in the case of units with a program switch.
5. Plug the mains plug back into the socket.
I
I
I
Page 22

22
Replacing the Internal Light
The inside of the dishwasher is lit by a high quality,
low-voltage lamp.
1
A defective lamp may be replaced only by a
trained technician.
1
Before beginning to work , pull the dishwasher power plug out of the socket.
For safety reasons, the lamp is not accessible from
the inside.
A defective lamp is to be replaced as follows:
1. Pull the chassis unit f rom its recess.
2. Remove the side walls.
3. Pinch the lamp holder and pull it from the mount-
ing.
4. Remove the defective lamp.
1
Do not allow the new lamp to touch your
hands when inserting it.
5. Hold the new lamp by the sleeve and cut off the
lower end.
6. Push the lamp into the lamp holder.
7. Press the lamp holder into the mounting until the
hooks lock into place.
8. Re-mount the side walls.
9. Push the chassis unit back into its recess, and re-
screw it to the kitchen appliance.
10.Plug in the power plug for the dishwasher.
11.Check whether the lamp lights when the dish-
washer door open s.
Page 23
23
What to do, when ...
Try to rectify minor faults on the dishwasher with the
aid of the instructions given here. If you call in customer service to resolve one of the malfunctions
listed here, or rectify an error made in the operation
of the appliance, the customer service engineer’s visit
is not free of charge, even during the period of guarantee.
...there are problems with the operation of the dishwasher.
...the wash result is unsatisfactory.
The dishes are still dirty.
• The wrong wash programme was selected.
• The dishes were arranged in such a manner that
water has not reached all parts. The dish racks
must not be overloaded.
• The filter in the base of the washing compartment
is dirty or incorrectly positioned.
• Detergent was not used or too little was used.
• In the case of scale deposits on the dishes: the
special salt container is empty or the water softener is incorrectly adjusted.
• The drain hose is incorrectly laid.
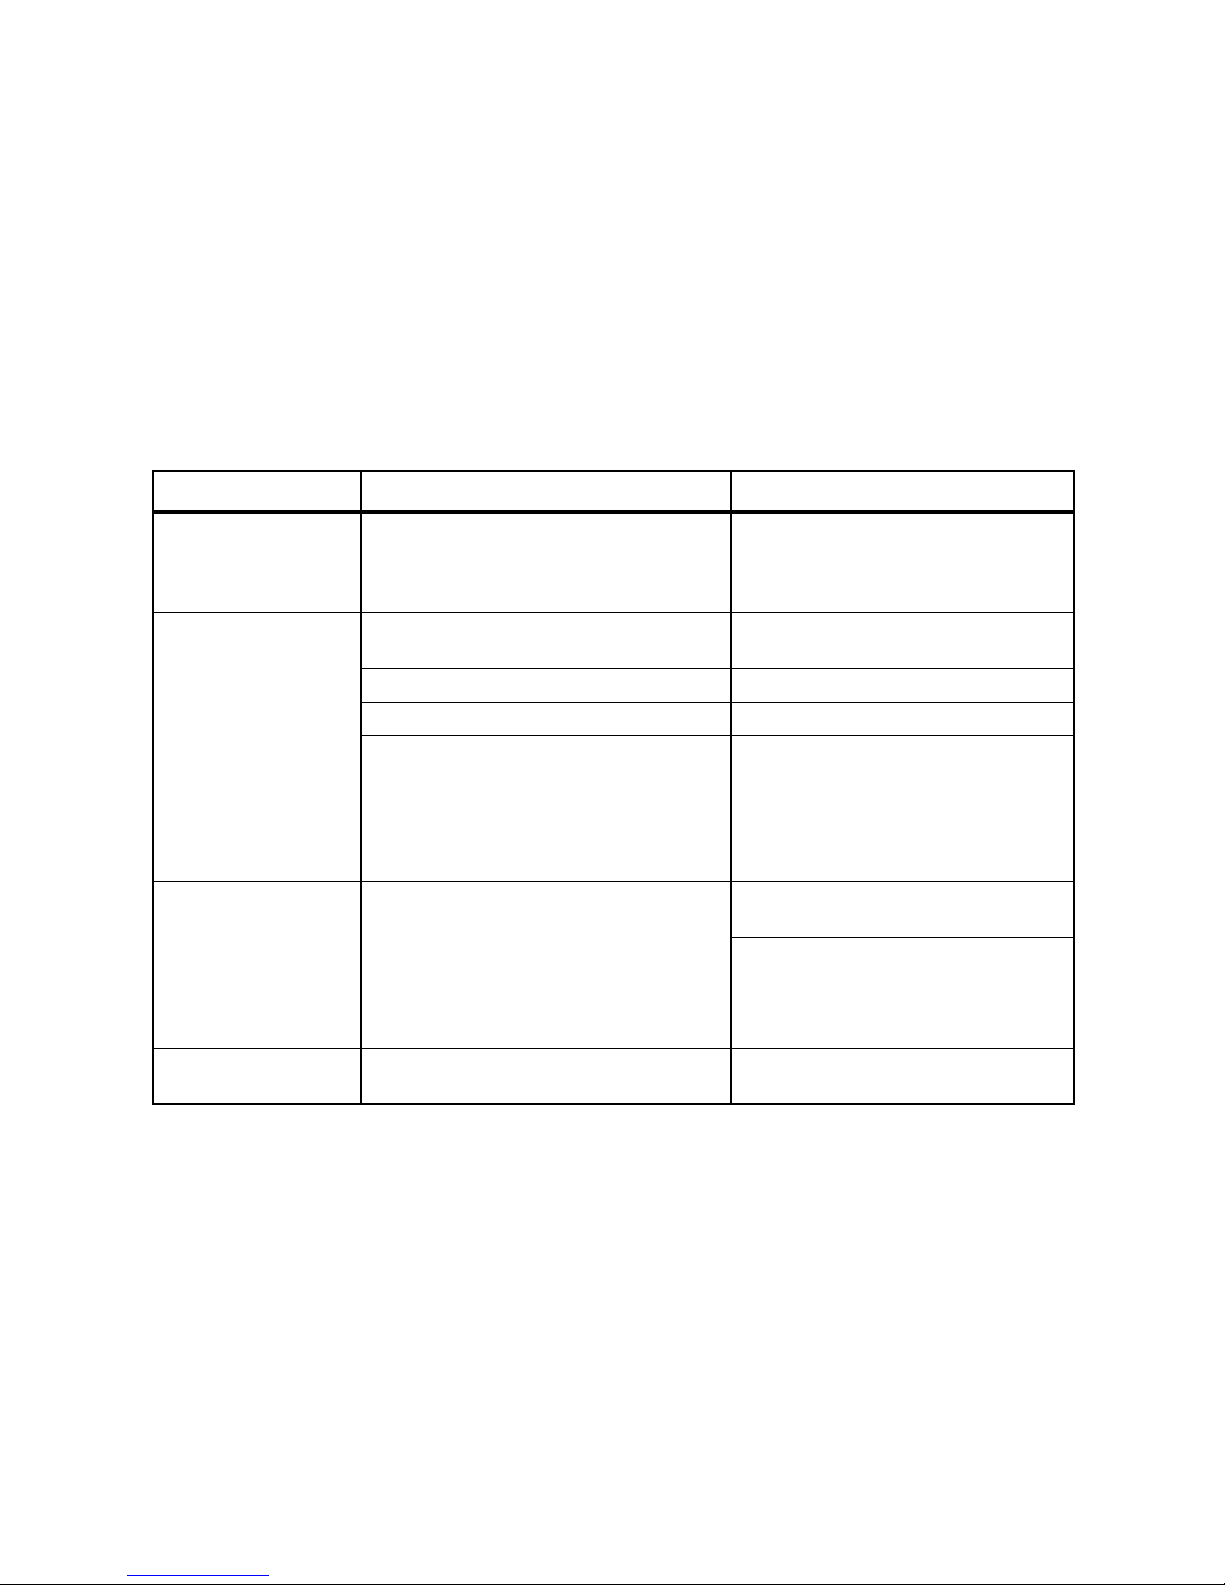
Malfunction Possible Cause Remedy
Thedrainpumpinthe
dishwasher runs continuously - even with the
appliance switched off.
The anti-flood system has been triggered.
Close the tap,
then unplug from the mains and
contact customer service.
The programme does
not start.
The door of the dishwasher is not closed
properly.
Shut the door.
Mains plug is not plugged in. Inser t mains plug.
House fuse in defective. Replace fuse.
In the case of dishwasher models with start
delay timer:
A start delay is selected.
Where dishes are to be washed immediately, for appliances
- with multidisplay, set the delay start
to 0.
- without multidisplay, cancel the delay
start timer.
Rust spots are visible in
the washing compartment.
The washing compartment is made of corrosion-resistant stainless steel. Rust spots
in the washing compartment are from particles from outside the appliance (rust particles from the water pipe,from pans, cutlery,
etc.). Remove such spots with a commercially available stainless steel cleaner.
Only wash cutlery and dishes that are
suitable for dishwasher use.
Close the lid of the special salt container
securely.
There is a whistling
noise during washing.
The whistling is not a cause for concern. Use a different brand of detergent.
Page 24
24
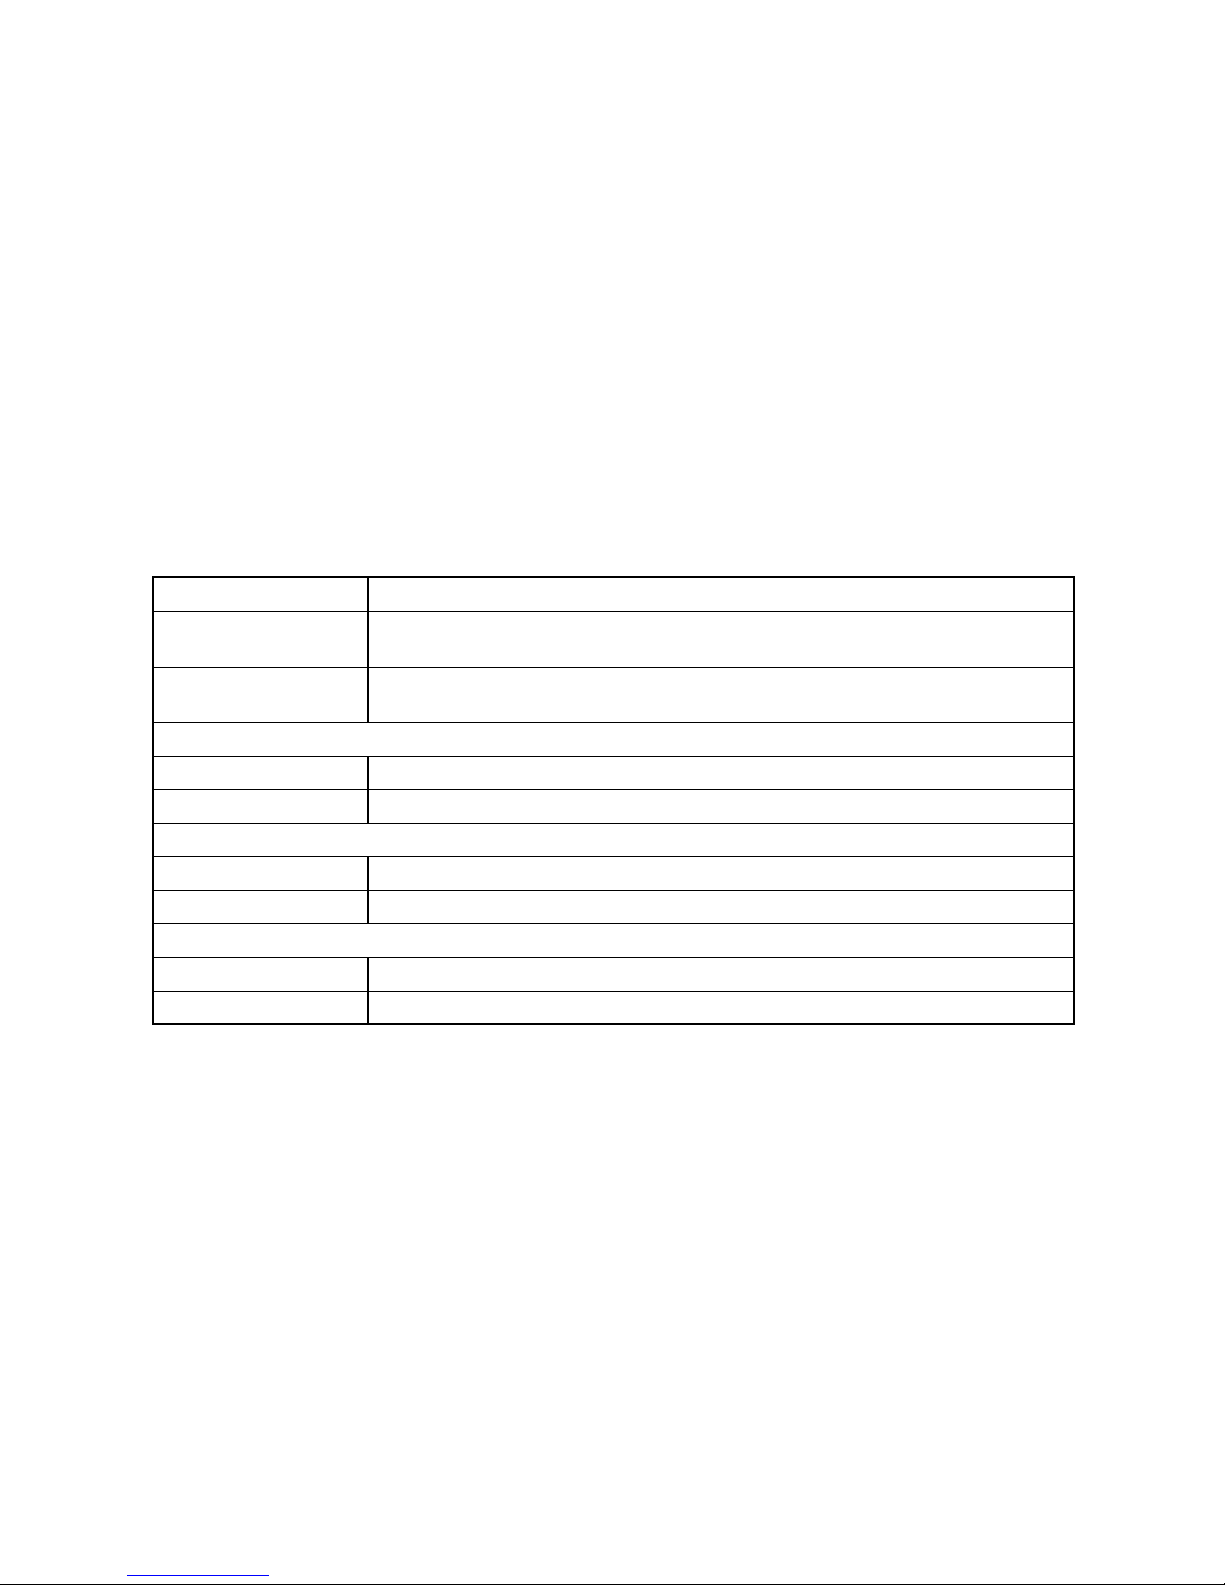
The dishes are wet and dull.
• Rinse aid was not used.
• The rinse aid container is empty.
There are streaks, milky spots or a bluish
coating on glasses and dishes.
• Decrease rinse aid dosing.
There are dried water drops on the
glasses and dishes.
• Increase rinse aid dosing.
• The detergent may be the cause. Contact the
detergent manufacturer's consumer advisor.
Technical Data
Capacity: 12 place settings including serving dishes
Permitted Water
Pressure:
1-10 bar (=10-100 N/cm2= 0.1-1.0 MPa)
Electrical Connection: Information on the electrical connection is given on the rating plate on the inner edge
of the dishwasher door on the right.
Dishwasher: Free-Standing Appliances
Dimensions: 850 x 600 x 600 (H x B x D in mm)
Max. Weight: 54 Kg
Dishwashers that Can Be Integrate d, Built-In Dishwashers
Dimensions: 820 – 880 x 596 x 570 (H x W x D in mm)
Max. Weight: 50 Kg
Dishwashers that Can Be Fully Integrated
Dimensions: 820 – 880 x 596 x 546 - 550 (H x W x D in mm)
Max. Weight: 50 Kg
;
This appliance conforms with the following
EU Directives:
• 73/23/EWG dated 19. 02. 1973 – Low
Voltage Directive
• 89/336/EWG dated 03. 05. 1989
(including Directive Amendment 92/31/
EWG) – EMC Directive
Page 25
25
Notes for Test Institutes
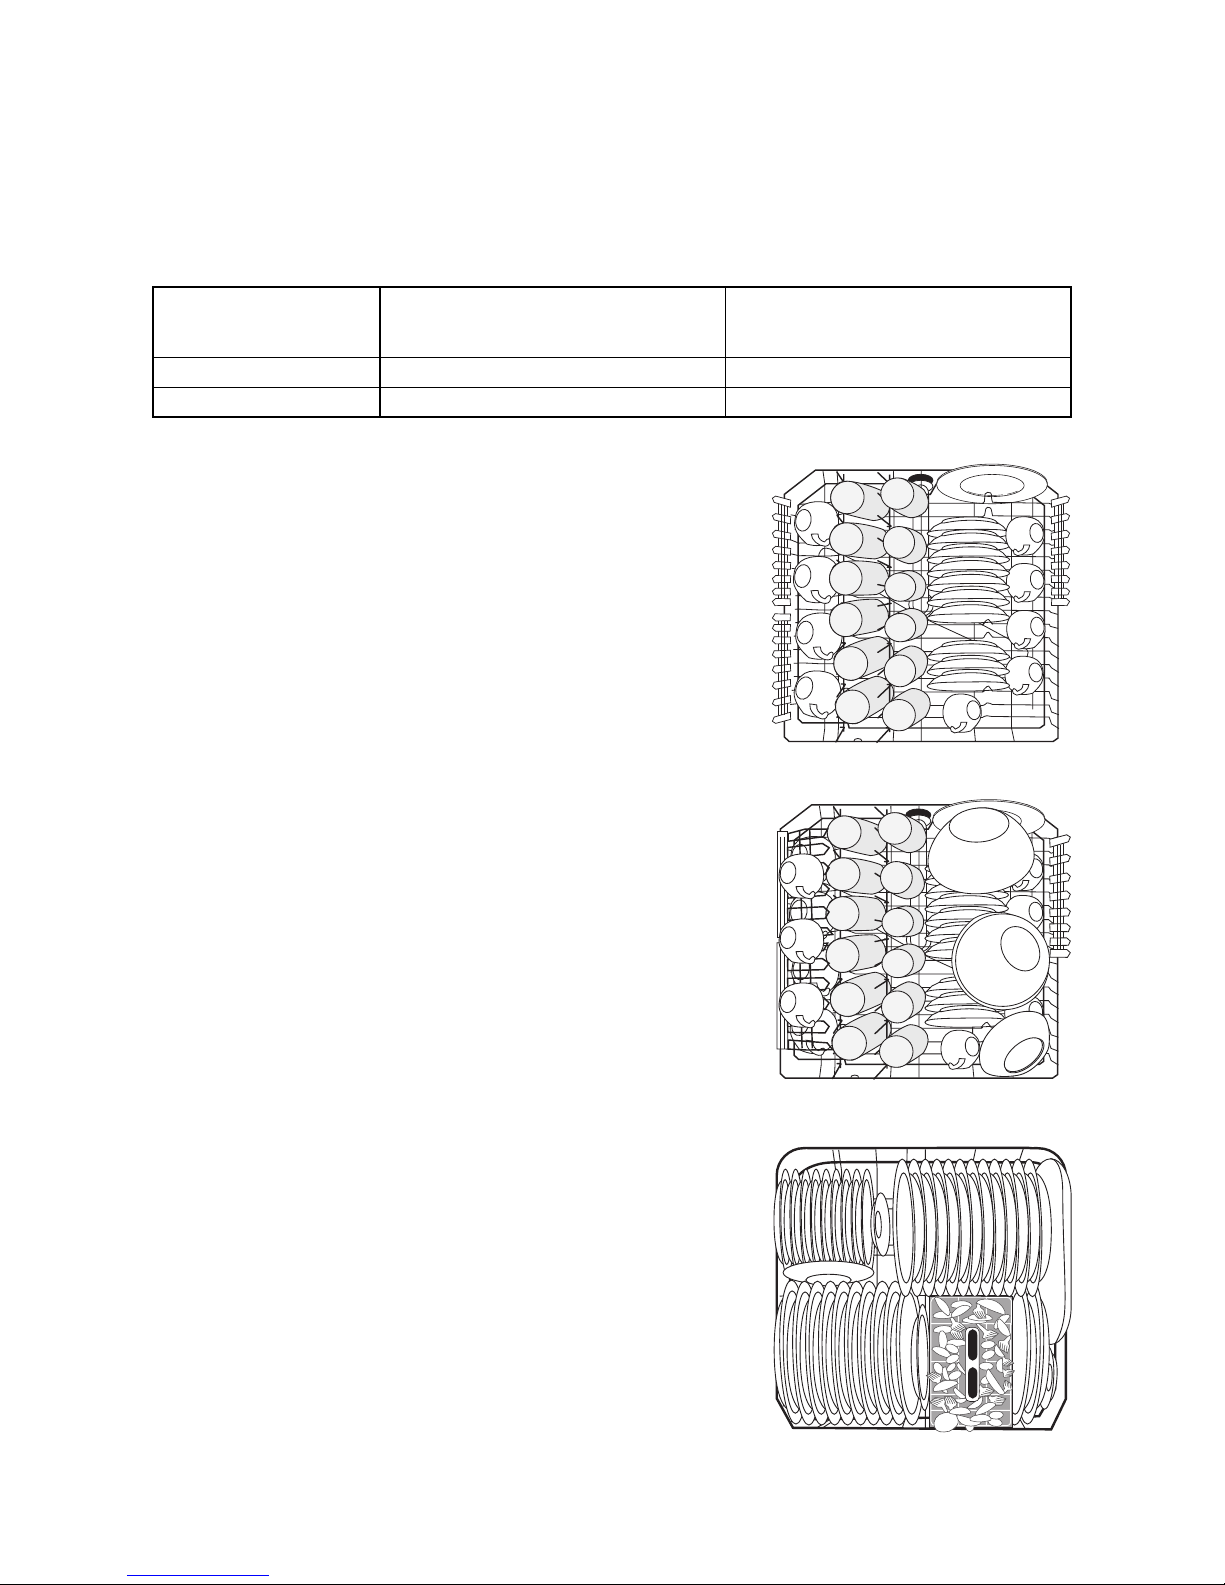
Testing in accordance with EN 60704 must be carried out with the appliance fully loaded and using the test programme (see Programme Table).
Tests in accordance with EN 50242 must be carried out when the salt dispenser and rinse aid container have
been filled with salt and rinse aid respectively and using the test programme Normal 50 °C.
Sample loading arrangement: Upper basket
Sample loading arrangement: Upper basket
Sample loading arrangement: Lower basket
Full Load:
12 place settings incl. serving dishes
Half Load:
6 place settings incl. serving dishes,
leaving alternate positions free
Detergent Dosing: 5g + 25g (TypeB) 20g (Type B)
Rinse Aid Setting: 4 (Type III) 4 (Type III)
Page 26
26
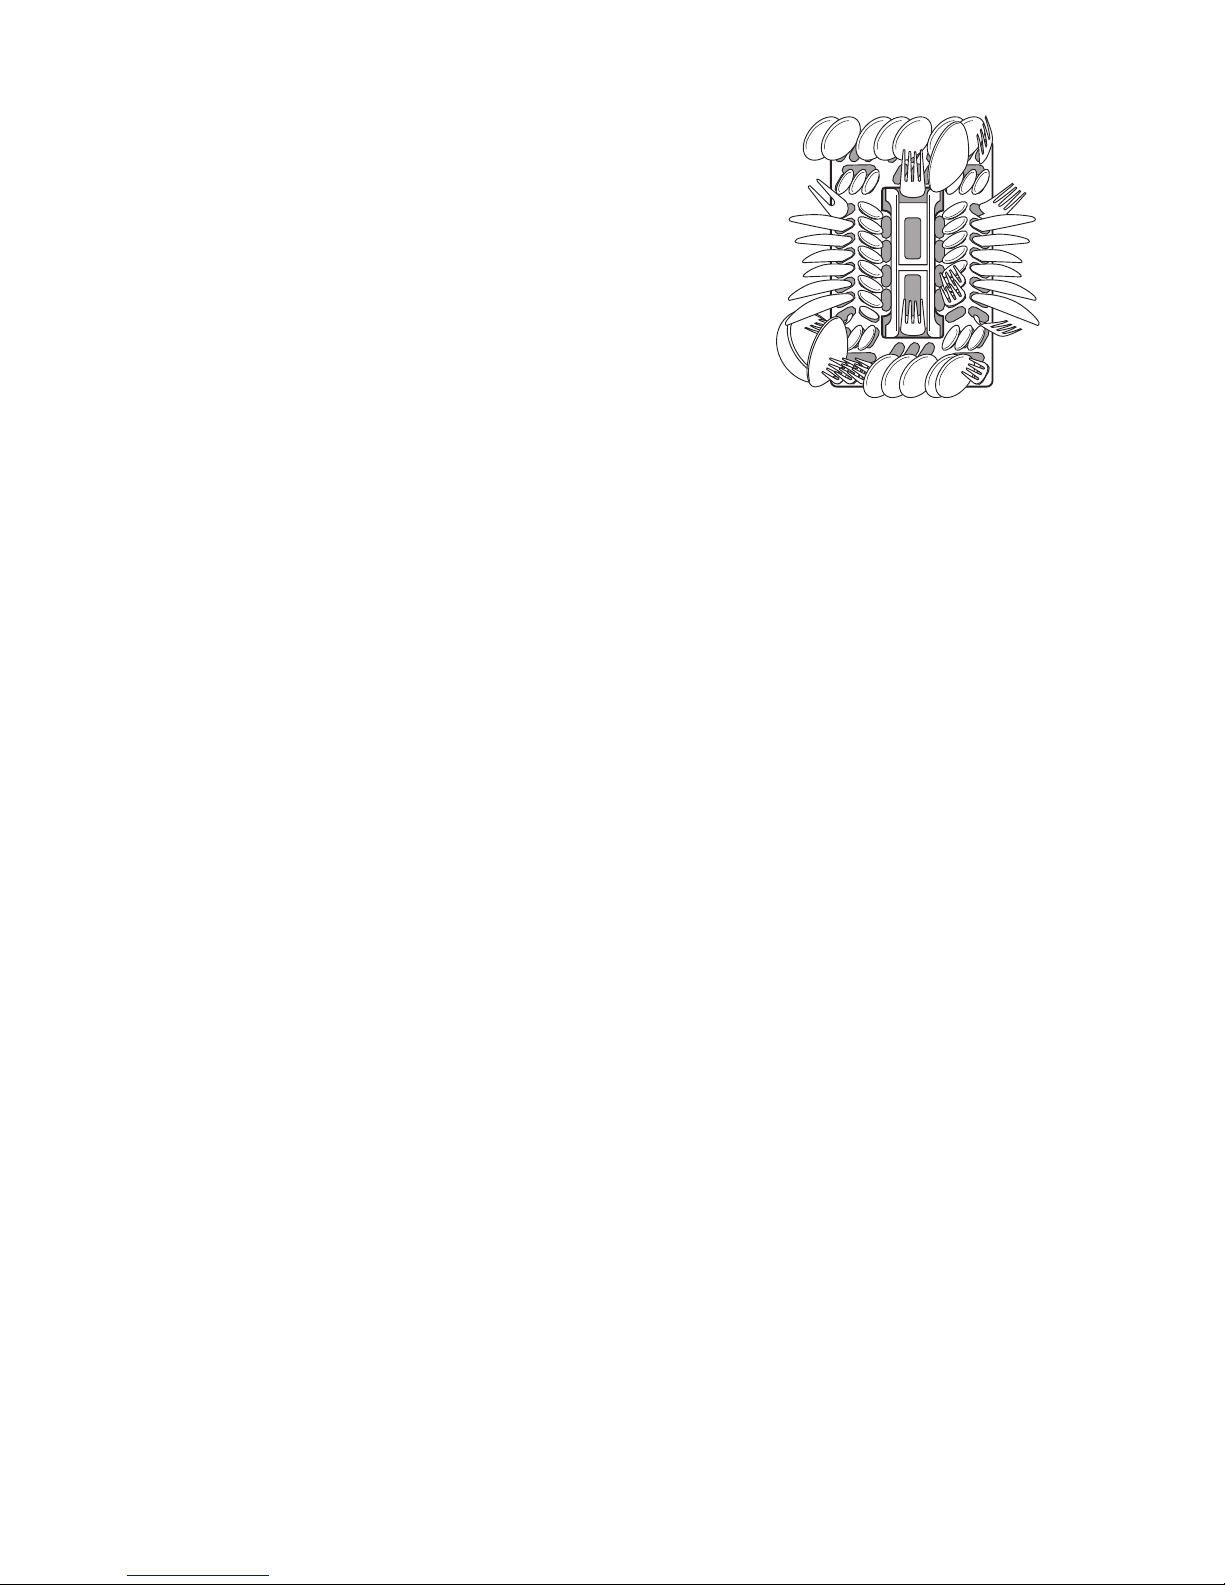
Sample loading arrangement: Cutlery basket
Some dishwasher models have cutlery baskets with-
out a grid insert.
Page 27
27
INSTALLATION AND CONNECTION
INSTRUCTIONS
Installing the Dishwasher
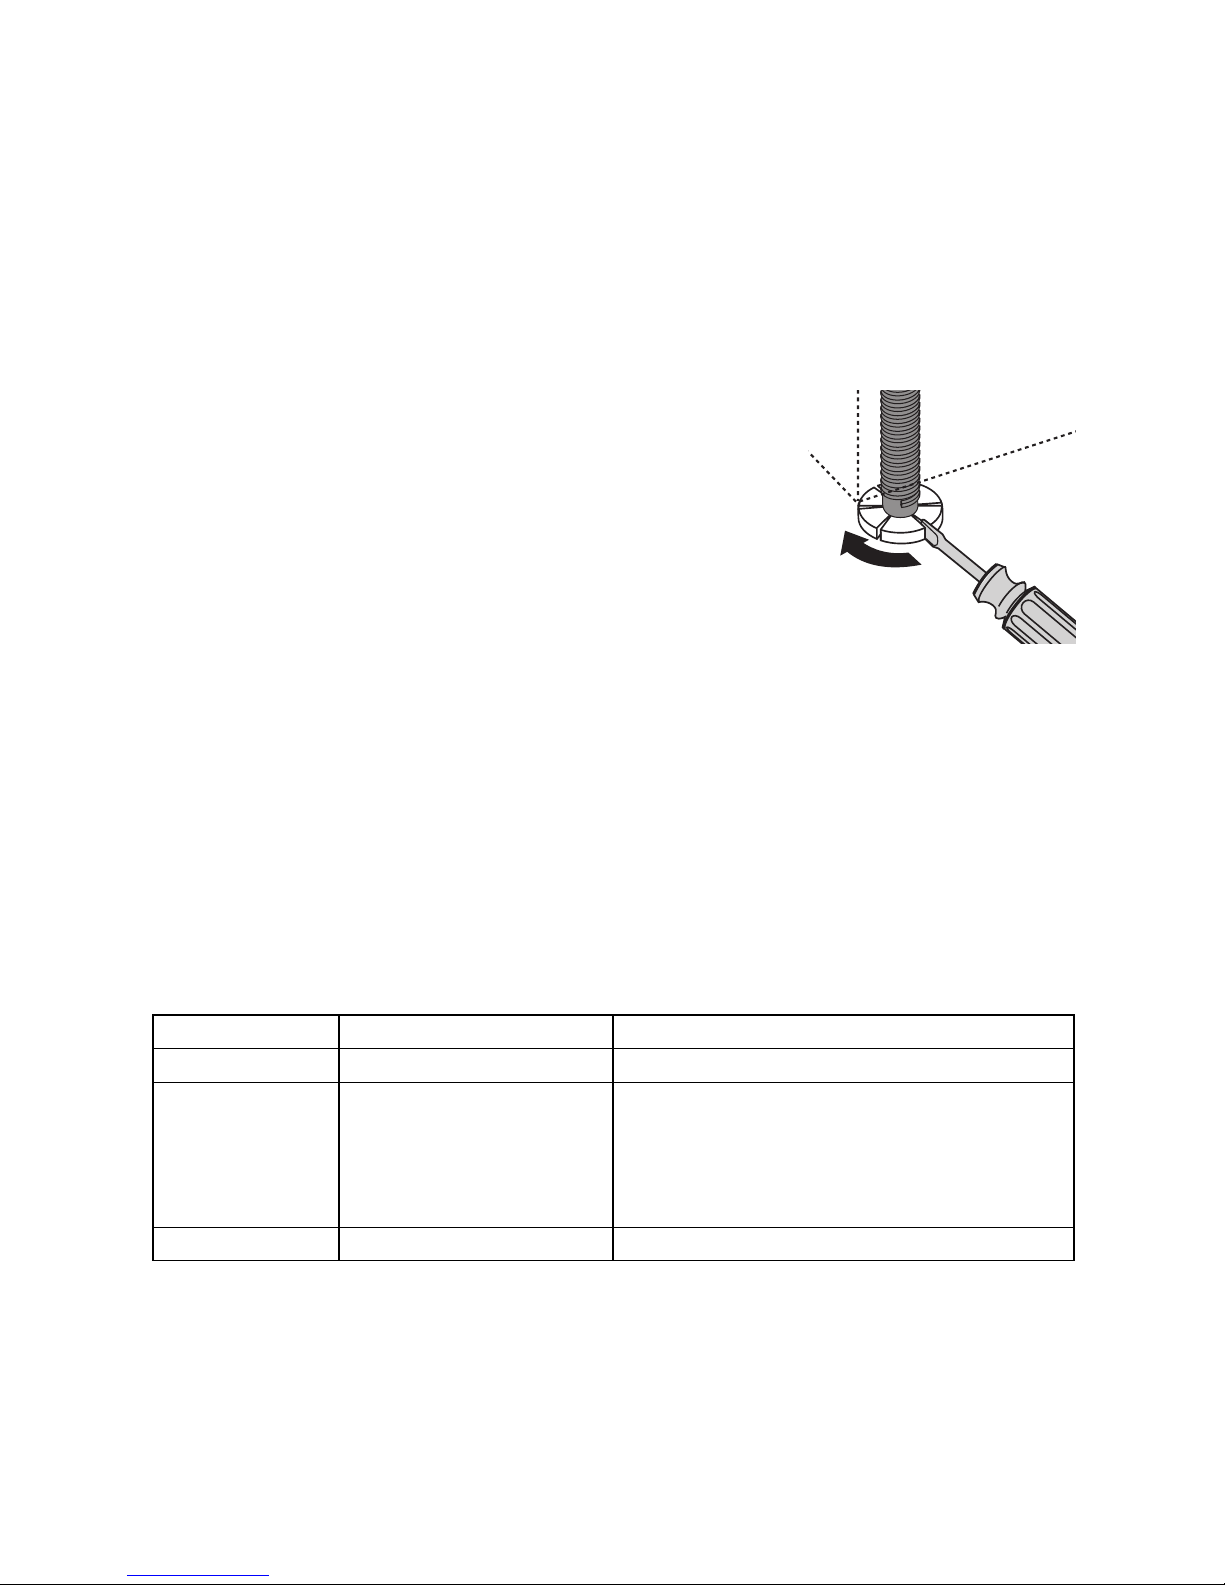
• The dishwasher must be installed on a firm floor
and adjusted to ensure that it is stable and level.
• To compensate for unevenness in the floor and to
match the height of the appliance to that of surrounding units extend the threaded feet by
unscrewing :
– use a screwdriver.
• For built-in, integrated and fully integrated dish-
washers, the rear feet should be adjusted from the
front of the appliance using a screwdriver.
• The drain hose, inlet hose and mains cable must
not be kinked or crushed when the dishwasher is
in position.
• The dishwasher must also be screwedon tightly to
the work surface or to the adjoining units. This is
essential to ensure the diswasher does not tip.
Depending on type, the dishwasher is to be installed as follows:
Dishwashers That Can Be Integrated
(see installation template supplied)
3
The door of the appliance can be fitted with a
wooden furniture door with the following
dimensions
1
If the facing panel is longer than 600 mm, the
door of the appliance cannot be opened
completely (the facing panel bumps against
the plinth).
If this is the case, the plinth must be cut out
(see installation template) or the brace
adapter for the extra long door BLT 60 must
be used. You can obtain this with the E No.
911 239 008.
Width: 591 – 594 mm
Thickness: 16 – 24 mm
Height:
(variable)
dependent on - Recess height
- Plinth height
- The adjustment so that th e unit matches the height
of the adjoining units
The exact height of the adjoining units must be
measured at the place of installation.
Weight: max. 8 kg
Page 28
28
Built-In Dishwasher
(see enclosed installation instructions)
Free-Standing Appliances
1
can be set up as stand-alone without additional installation.
If the dishwasher is set up next to a cooker, a
heat-insulating, non-flammable plate must be
mounted between the dishwasher and the
cooker, flush to the top edge of the work surface (depth 57.5 cm). The plate should have
aluminium foil on the side facing the cooker.
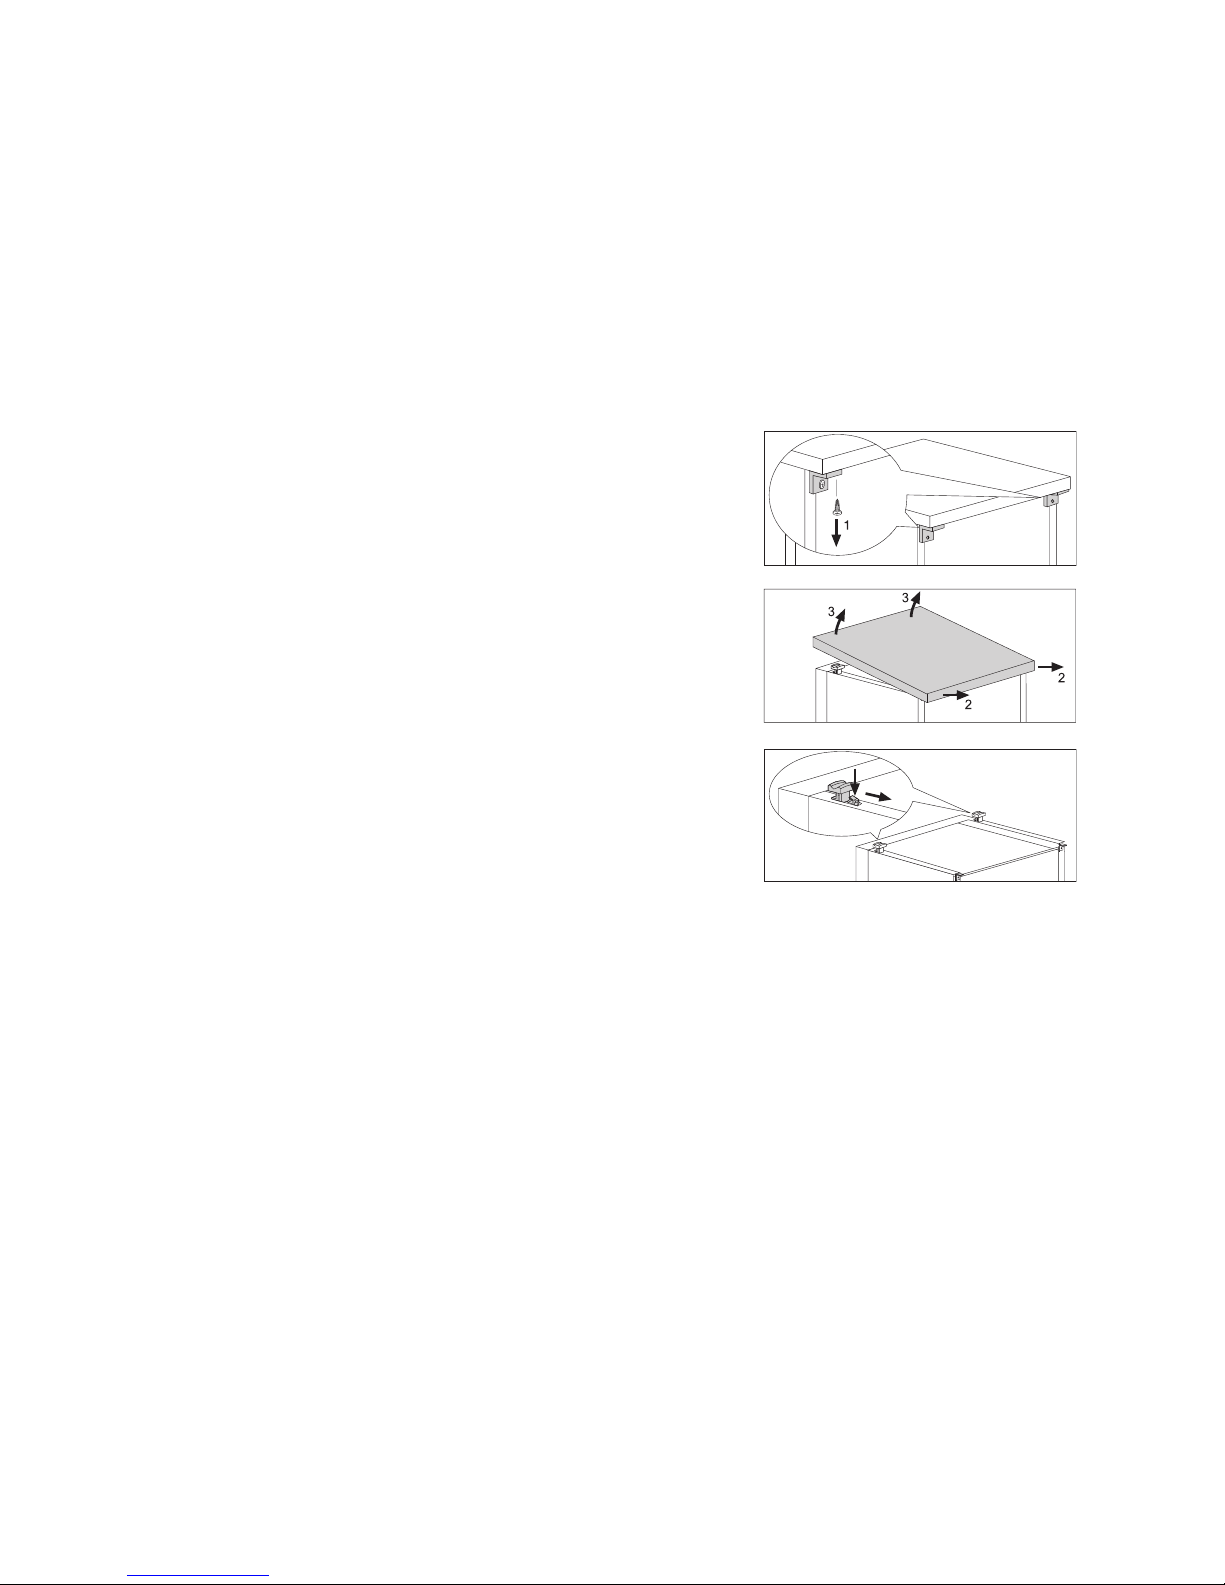
If the dishwasher is installed underneath a kitchen
work surface, the original work surface of the dishwasher is to be removed as follows:
1. Unscrew the screws (1) from the elbows on the
back side.
2. Slide the work surface approx. 1 cm to the rear(2),
lift at the front(3) and remove.
3. Press the work surface retaining brackets at the
position (4) shown in the diagram and remove the
bracket at an angle to the rear (5).
1
If the dishwasher is later used as a freestanding appliance, the original work surface
must be re-mounted.
3
The plinth on free-standing appliances is not
adjustable.
4
5
Page 29
29
Connecting the Dishwasher
Water Connection
The dishwasher is fitted with safety devices that prevent the wash water returning into the drinking water
system and comply with the applicable plumbing regulations.
• The dishwasher can be connected to cold and hot
water supplies up to max. 60 °C.
• The dishwasher must not be connected to open
hot water appliances or instantaneous water heaters.
Permitted water pressure
Connect the inlet hose
1
The water inlet hose must not be kinked,
crushed or entangled when it is being connected up.
Connect the threaded hose fitting (DIN 259)
on the water inlet hose to a tap with an external thread (¾ inch). Tighten the threaded
hose fitting hand tight only.
3
In order that access to the tap in the kitchen
is not limited by the use of the dishwasher,
we recommend the installation of an additional tap, or fitting a two way adapter to the
existing tap.
• If you need a longer water inlet hose than that
supplied, VDE approved complete hose sets are
to be used. These are available from your local
Service Force Centre.
Lowest permitted water pressure:
1 bar (=10 N/cm
2
=100 kPa)
Consult your installer if the water pressure is less than 1 bar.
Highest permitted water pressure:
10 bar (=100 N/cm
2
=1 MPa)
In the case of a water pressure greater than 10 bar, a pressure reduction valve must be used (available from your dealer).
Page 30
30
Water drain
Drain hose
1
The drain hose must not be kinked, crushed
or entangled.
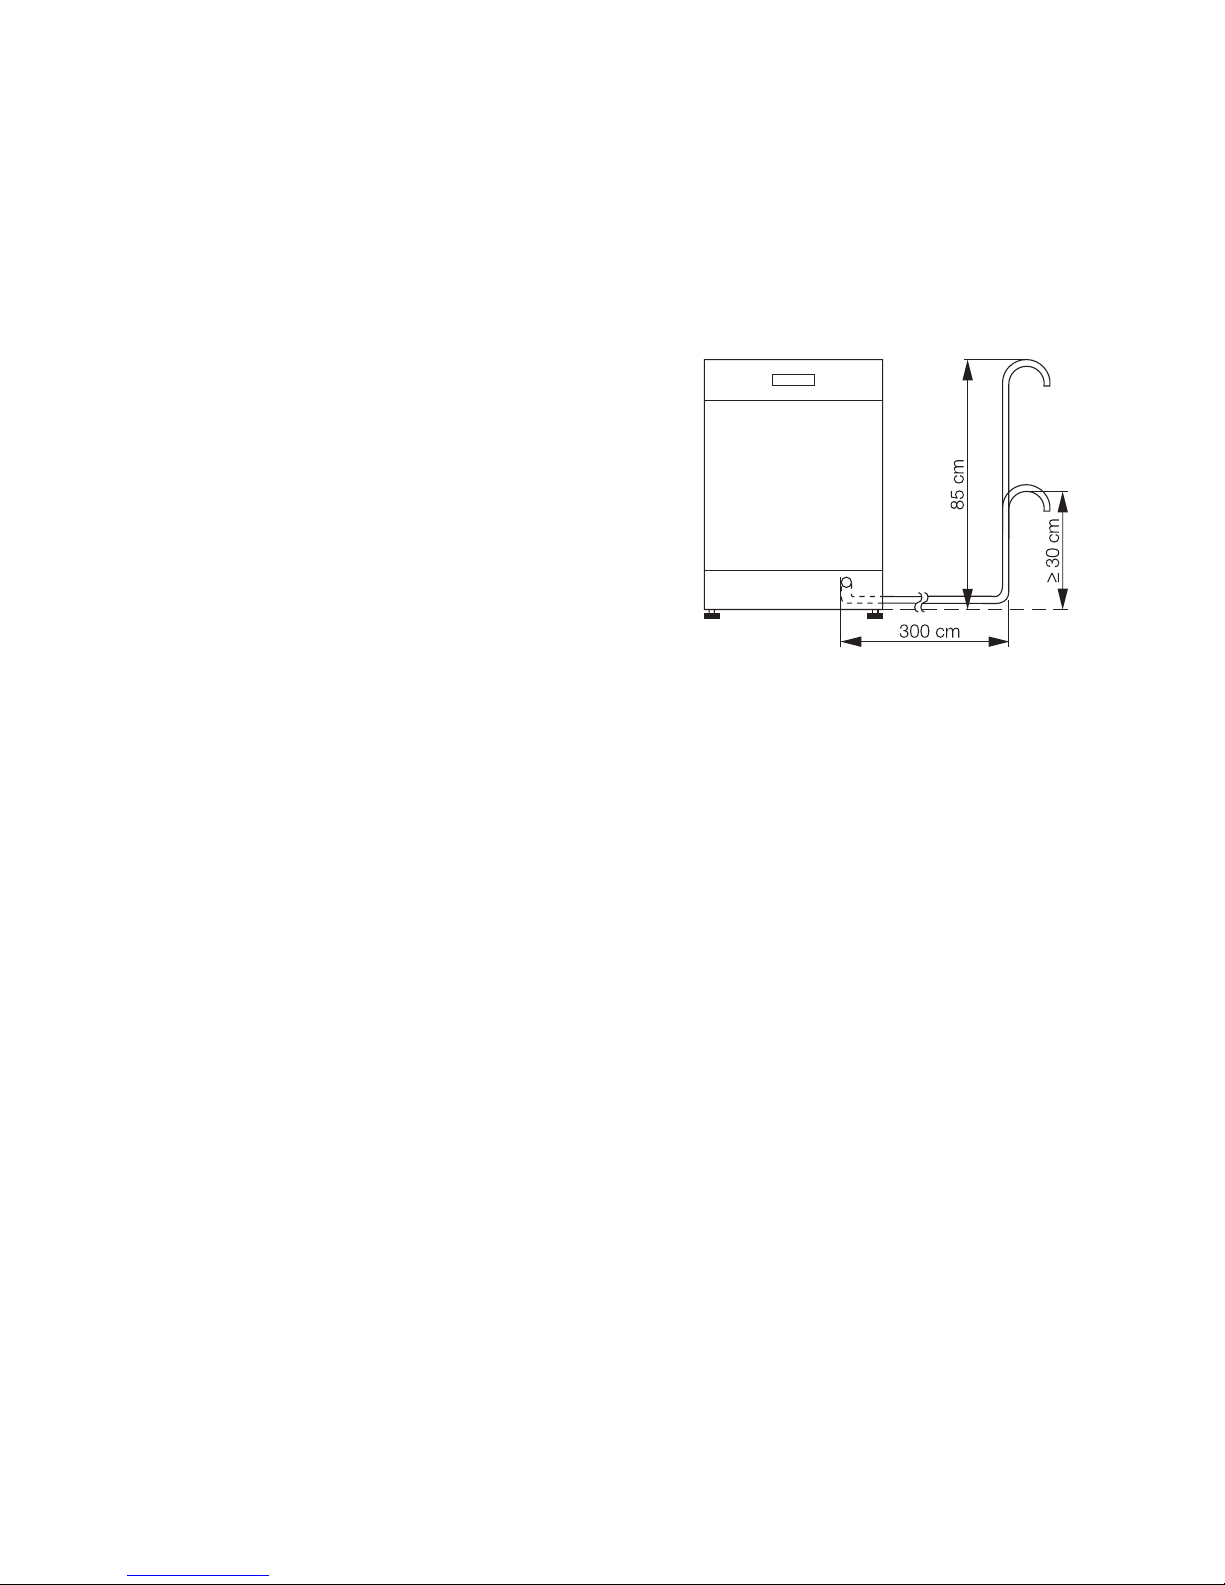
• Connecting the drain hose:
– Maximum permitted height: 1 metre.
– Minimum required height 30 cm above the
lower edge of the machine.
Extension hoses
• Extension hoses are available from your dealer or
customer service. The internal diameter of the
extension hoses must be 19 mm to ensure that
the function of the appliance is not impeded.
• Extension hoses may be laid a maximum of 3
metres horizontally; the maximum per mitted
height for the connection for the drain hose is then
85 cm.
Siphon connection
• The outlet of the drain hose (ø 19 mm) fits all commonly available siphon types. The outer diame ter
of the siphon connection must be at least 15 mm.
• The drain hose must be fixed to the siphon connection using the hose clamp supplied.
Water drain into wash basins (only possible with free-standing appliances)
In the case that you wish to hang the drain hose in a
wash basin, use a detachable hose elbow. You can
obtain this from customer service under spare part
number ET 646 069 190.
1. Fit the elbow to the drain hose.
2. Secure the drain hose against sliding off the edge
of the wash basin.
Pass a piece of cord through the hose elbow and
fix it to the wall or the tap.
Leak Prevention System
For protection from damage due to water leaks, the
dishwasher is equipped with a leak prevention system.
In the event of a fault, the drain pump switches on. By
this means water can neither escape nor overflow.
The remaining water in the appliance is automatically
pumped out.
1
The leak prevention system also works when
the appliance is switched off – the appliance
must however not be disconnected from the
mains.
Page 31

31
Electrical connection
1
In compliance with electric company technical requirements for mains connections,
hard-wired connections to the mains may
only be made by approved electri-cians.
When connecting the appliance, observe the German
VDE regulations and, if applicable, any additional
conditions required by your local electricity supplier.
Following installation, live parts and live insulated wiring must not be accessible using a finger test in
accordance with EN 60335/DIN VDE 0700.
Information on the electrical connection can be found
on the rating plate on the right side of the inner edge
of the dishwasher door. I f the appliance has a
change-over switch, the additional instructions on the
change-over diagram in the mains connector box
must be observed.
Prior to connecting ensure that the mains voltage and
current rating at the site of installation match the
nominal voltage and current rating given on the rating
plate. The required fuse protection is also to be found
on the rating plate.
To isolate the dishwasher from the mains, remove the
mains plug.
Important: The plug must still be accessible after the
appliance has been installed.
If the appliance is hard-wired to the mains supply,
then it must be safely iso-lated from the mains within
the electrical installa-tion with an all-pole (N,L1) isolator (eg. protective cut-out) with a contact gap of > 3
mm.
Page 32
32
Connections
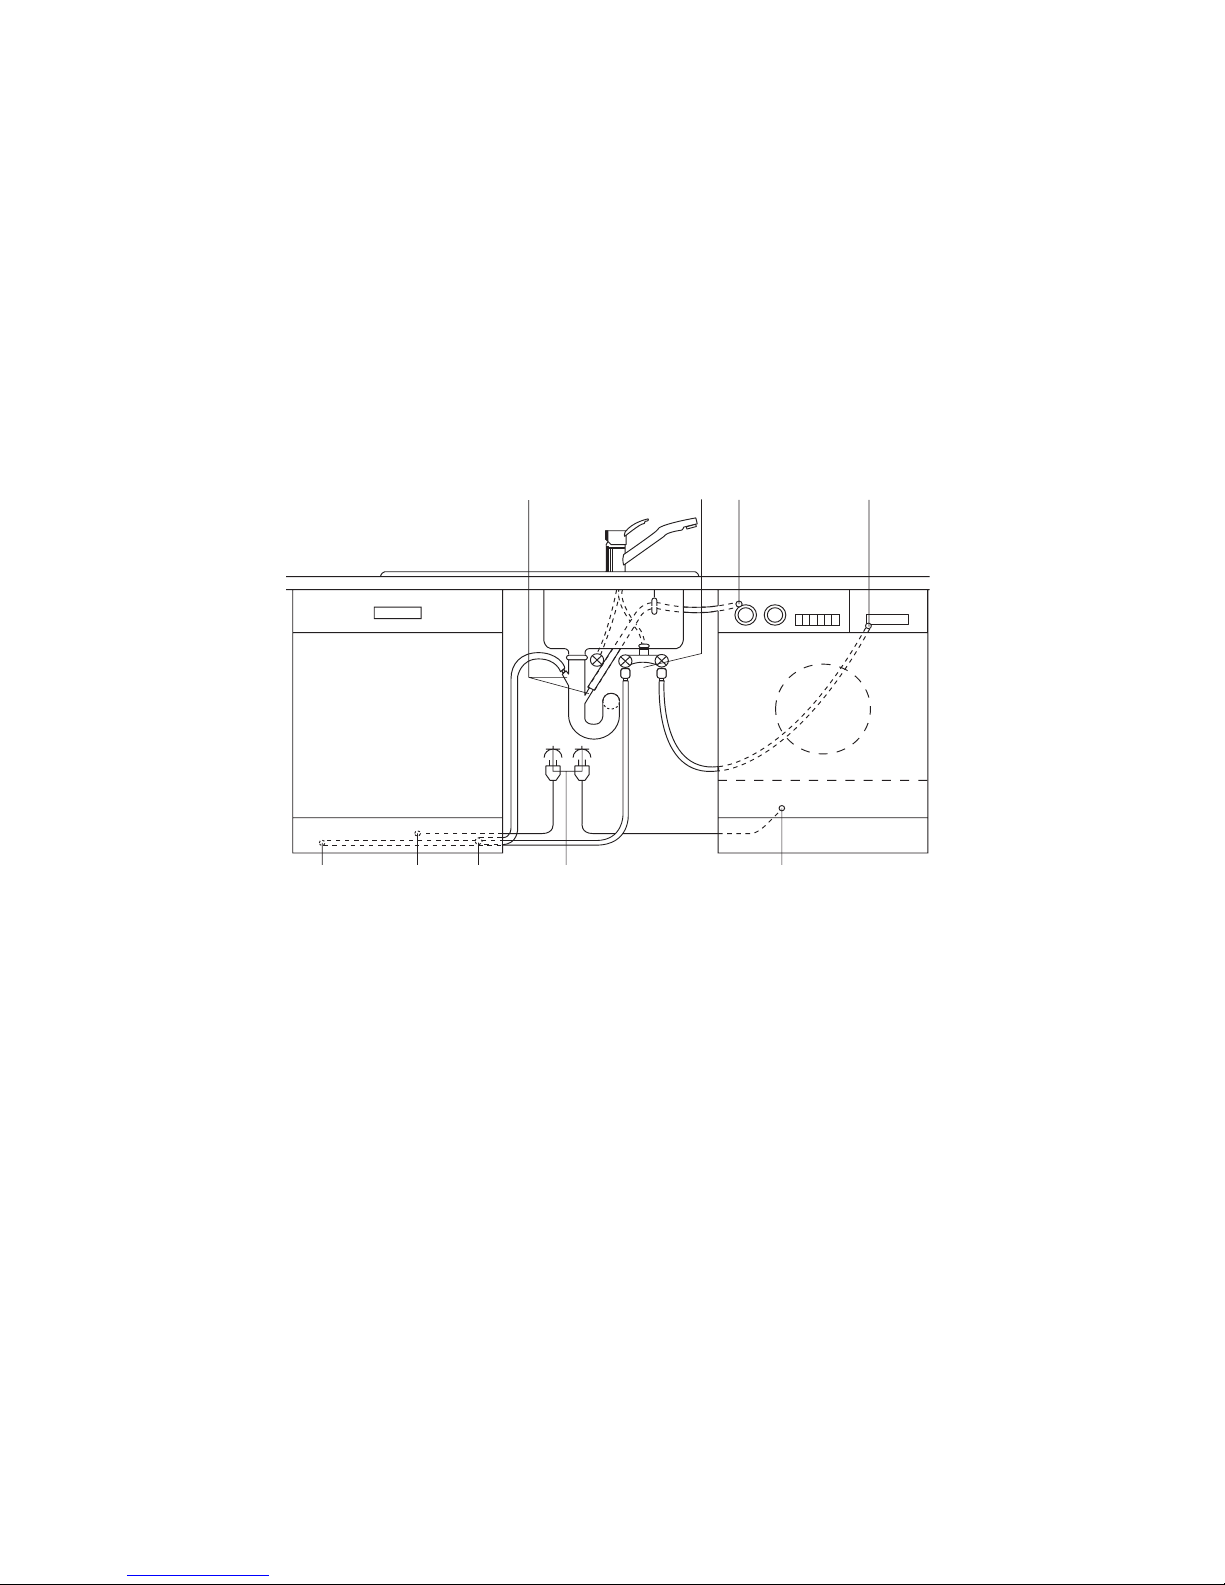
The water inlet and drain hoses, as well as the mains
cable must be connected beside the dishwasher
because there is no space for them behind the appliance.
The example plumbing and electrical installation
given below can only be regarded as a recommendation; the actual situation where the dishwasher is to
be installed will define the exact installation (available
connections, local electricity and water board regulations for connecting up appliances, etc.).
Two 45° or Straight Connections,Outer ø 19 mm, Length 30 mm
Double
tap
Water
drain
Water
inlet
Water
drain
Waterinlet Mains cable
Mains cable
Mains
socket
Page 33

33
Page 34

34
Page 35
35
SERVICE
In the section "What to do, if..." the most important
sources of faults that you can rectify yourself are
summarised.
If, nevertheless, you call in customer service to
resolve a problem listed in these instruction, or
because of an error made in operating the appliance,
the customer service engineer’s visit is not free of
charge, even during the warranty period.
If you can not find any information on a specific malfunction in these operating instructions, please contact customer service.
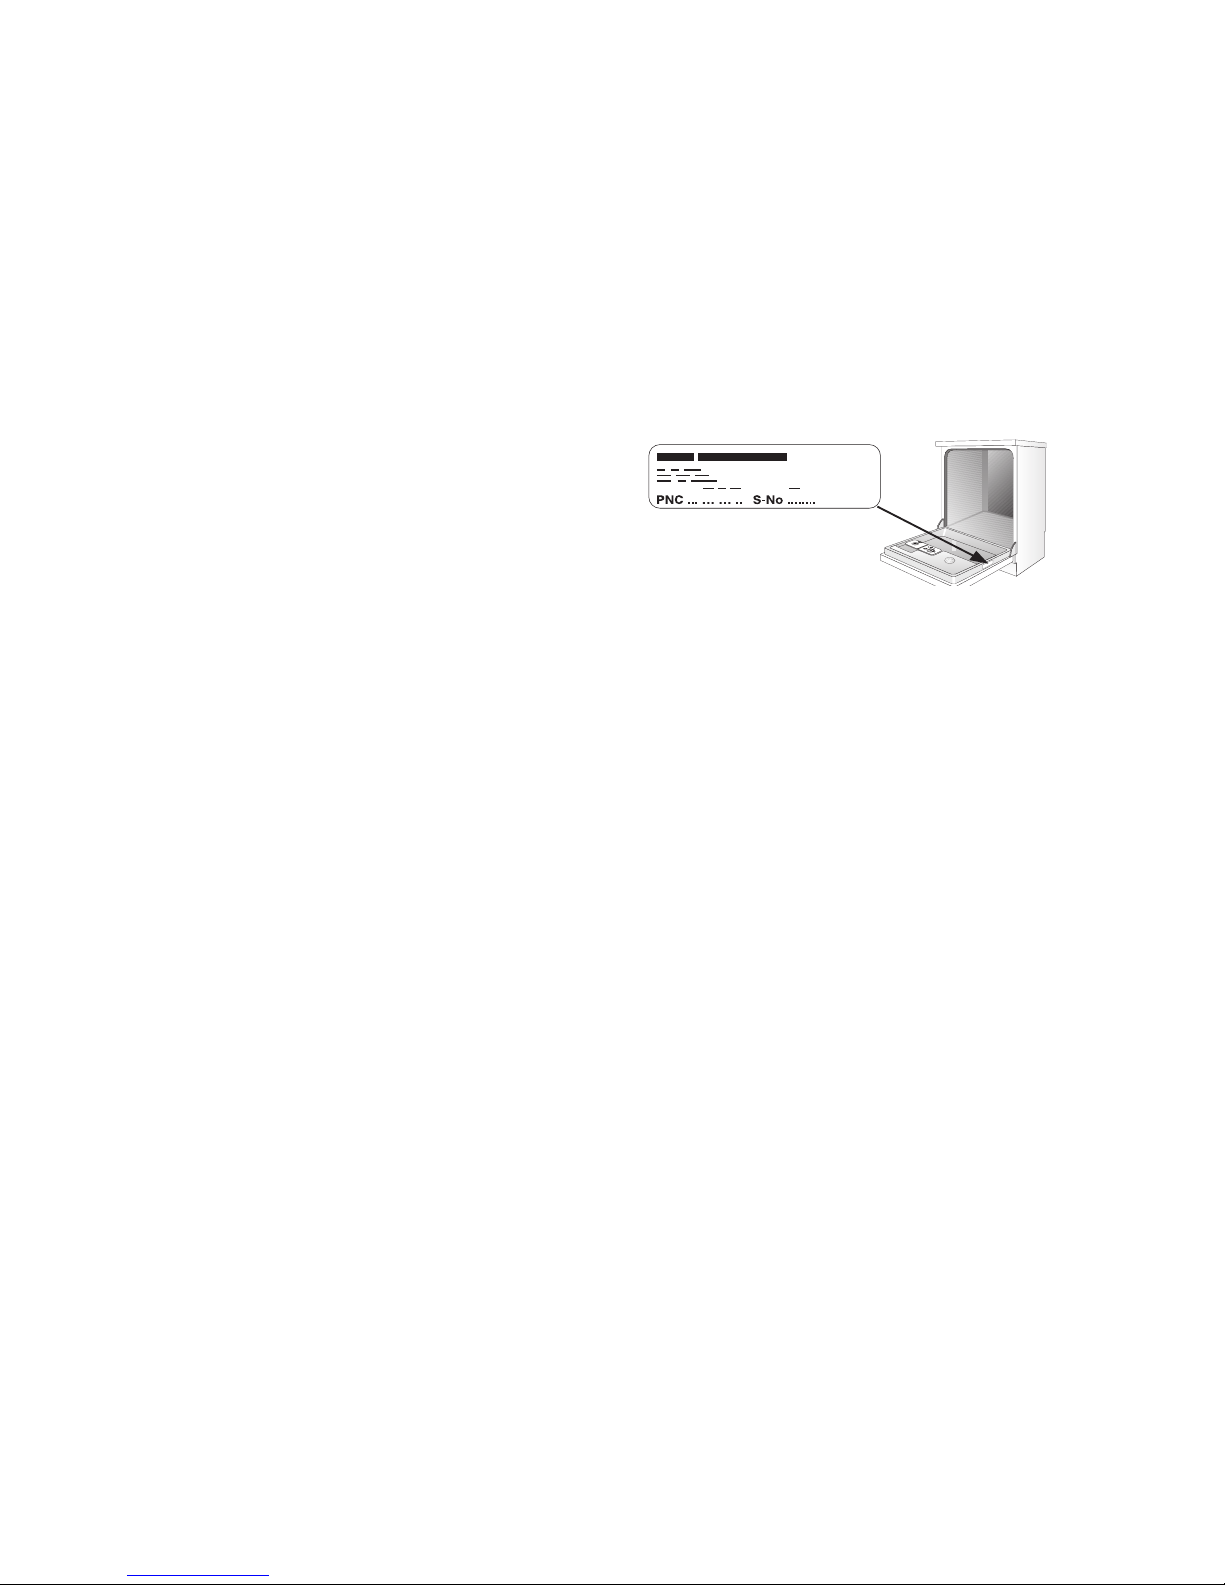
Please provide customer service the PNC number
and the S No. (serial number), you can find these on
the rating plate. The plate is on the inner edge of the
door on the right.
So that you always have these numbers at hand, we
recommend you to make a note of them here:
Model:
............................................................
PNC :
............................................................
S-No :
............................................................
Date of
purchase:
............................................................
Page 36

 Loading...