

Page 1
ESF 6720ROW
................................................ .............................................
EN DISHWASHER USER MANUAL
Page 2

CONTENTS
1. SAFETY INSTRUCTIONS . . . . . . . . . . . . . . . . . . . . . . . . . . . . . . . . . . . . . . . . . . . . . . . . . . 3
2. PRODUCT DESCRIPTION . . . . . . . . . . . . . . . . . . . . . . . . . . . . . . . . . . . . . . . . . . . . . . . . . 5
3. CONTROL PANEL . . . . . . . . . . . . . . . . . . . . . . . . . . . . . . . . . . . . . . . . . . . . . . . . . . . . . . . 6
4. PROGRAMMES . . . . . . . . . . . . . . . . . . . . . . . . . . . . . . . . . . . . . . . . . . . . . . . . . . . . . . . . . 7
5. OPTIONS . . . . . . . . . . . . . . . . . . . . . . . . . . . . . . . . . . . . . . . . . . . . . . . . . . . . . . . . . . . . . . 9
6. BEFORE FIRST USE . . . . . . . . . . . . . . . . . . . . . . . . . . . . . . . . . . . . . . . . . . . . . . . . . . . . . 11
7. DAILY USE . . . . . . . . . . . . . . . . . . . . . . . . . . . . . . . . . . . . . . . . . . . . . . . . . . . . . . . . . . . . 13
8.
HINTS AND TIPS . . . . . . . . . . . . . . . . . . . . . . . . . . . . . . . . . . . . . . . . . . . . . . . . . . . . . . . 14
9. CARE AND CLEANING . . . . . . . . . . . . . . . . . . . . . . . . . . . . . . . . . . . . . . . . . . . . . . . . . . . 15
10.
TROUBLESHOOTING . . . . . . . . . . . . . . . . . . . . . . . . . . . . . . . . . . . . . . . . . . . . . . . . . . . . 16
11. TECHNICAL INFORMATION . . . . . . . . . . . . . . . . . . . . . . . . . . . . . . . . . . . . . . . . . . . . . . . 18
WE’RE THINKING OF YOU
Thank you for purchasing an Electrolux appliance. You’ve chosen a product that brings with it
decades of professional experience and innovation. Ingenious and stylish, it has been designed
with you in mind. So whenever you use it, you can be safe in the knowledge that you’ll get great
results every time.
Welcome to Electrolux.
Visit our website for:
Get usage advice, brochures, trouble shooter, service information:
www.electrolux.com
Register your product for better service:
www.electrolux.com/productregistration
Buy Accessories, Consumables and Original spare parts for your appliance:
www.electrolux.com/shop
CUSTOMER CARE AND SERVICE
We recommend the use of original spare parts.
When contacting Service, ensure that you have the following data available.
The information can be found on the rating plate. Model, PNC, Serial Number.
Warning / Caution-Safety information
General information and tips
Environmental information
Subject to change without notice.
2
www.electrolux.com
Page 3
1.
SAFETY INSTRUCTIONS
Before the installation and use of the appliance, carefully read the supplied instructions. The manufacturer is not responsible if an incorrect installation and
use causes injuries and damages. Always
keep the instructions with the appliance
for future reference.
1.1 Children and vulnerable
people safety
WARNING!
Risk of suffocation, injury or permanent disability.
• Do not let persons, children included,
with reduced physical sensory, reduced
mental functions or lack of experience
and knowledge use the appliance. They
must have supervision or instruction for
the operation of the appliance by a person who is responsible for their safety.
• Do not let children play with the appliance.
• Keep all packaging away from children.
• Keep all detergents away from children.
• Keep children and pets away from the
appliance door when it is open.
1.2 Installation
• Remove all the packaging.
• Do not install or use a damaged appliance.
• Do not install or use the appliance
where the temperature is less than 0
°C.
• Obey the installation instruction supplied with the appliance.
Electrical connection
WARNING!
Risk of fire and electrical shock.
• The appliance must be earthed.
• Make sure that the electrical information
on the rating plate agrees with the power supply. If not, contact an electrician.
• Always use a correctly installed shockproof socket.
• Do not use multi-plug adapters and extension cables.
• Make sure not to cause damage to the
mains plug and to the mains cable.
Should the appliance power supply cable need to be replaced, this must be
carried out by our Service Centre.
• Connect the mains plug to the mains
socket only at the end of the installation. Make sure that there is access to
the mains plug after the installation.
• Do not pull the mains cable to disconnect the appliance. Always pull the
mains plug.
• Do not touch the mains cable or the
mains plug with wet hands.
• Only for UK and Ireland. The appliance has a 13 amp mains plug. If it is
necessary to change the fuse in the
mains plug, use a 13 amp ASTA (BS
1362) fuse.
• This appliance complies with the E.E.C.
Directives.
Water connection
• Make sure not to cause damage to the
water hoses.
• Before you connect the appliance to
new pipes or pipes not used for a long
time, let the water flow until it is clean.
• The first time you use the appliance,
make sure that there is no leakage.
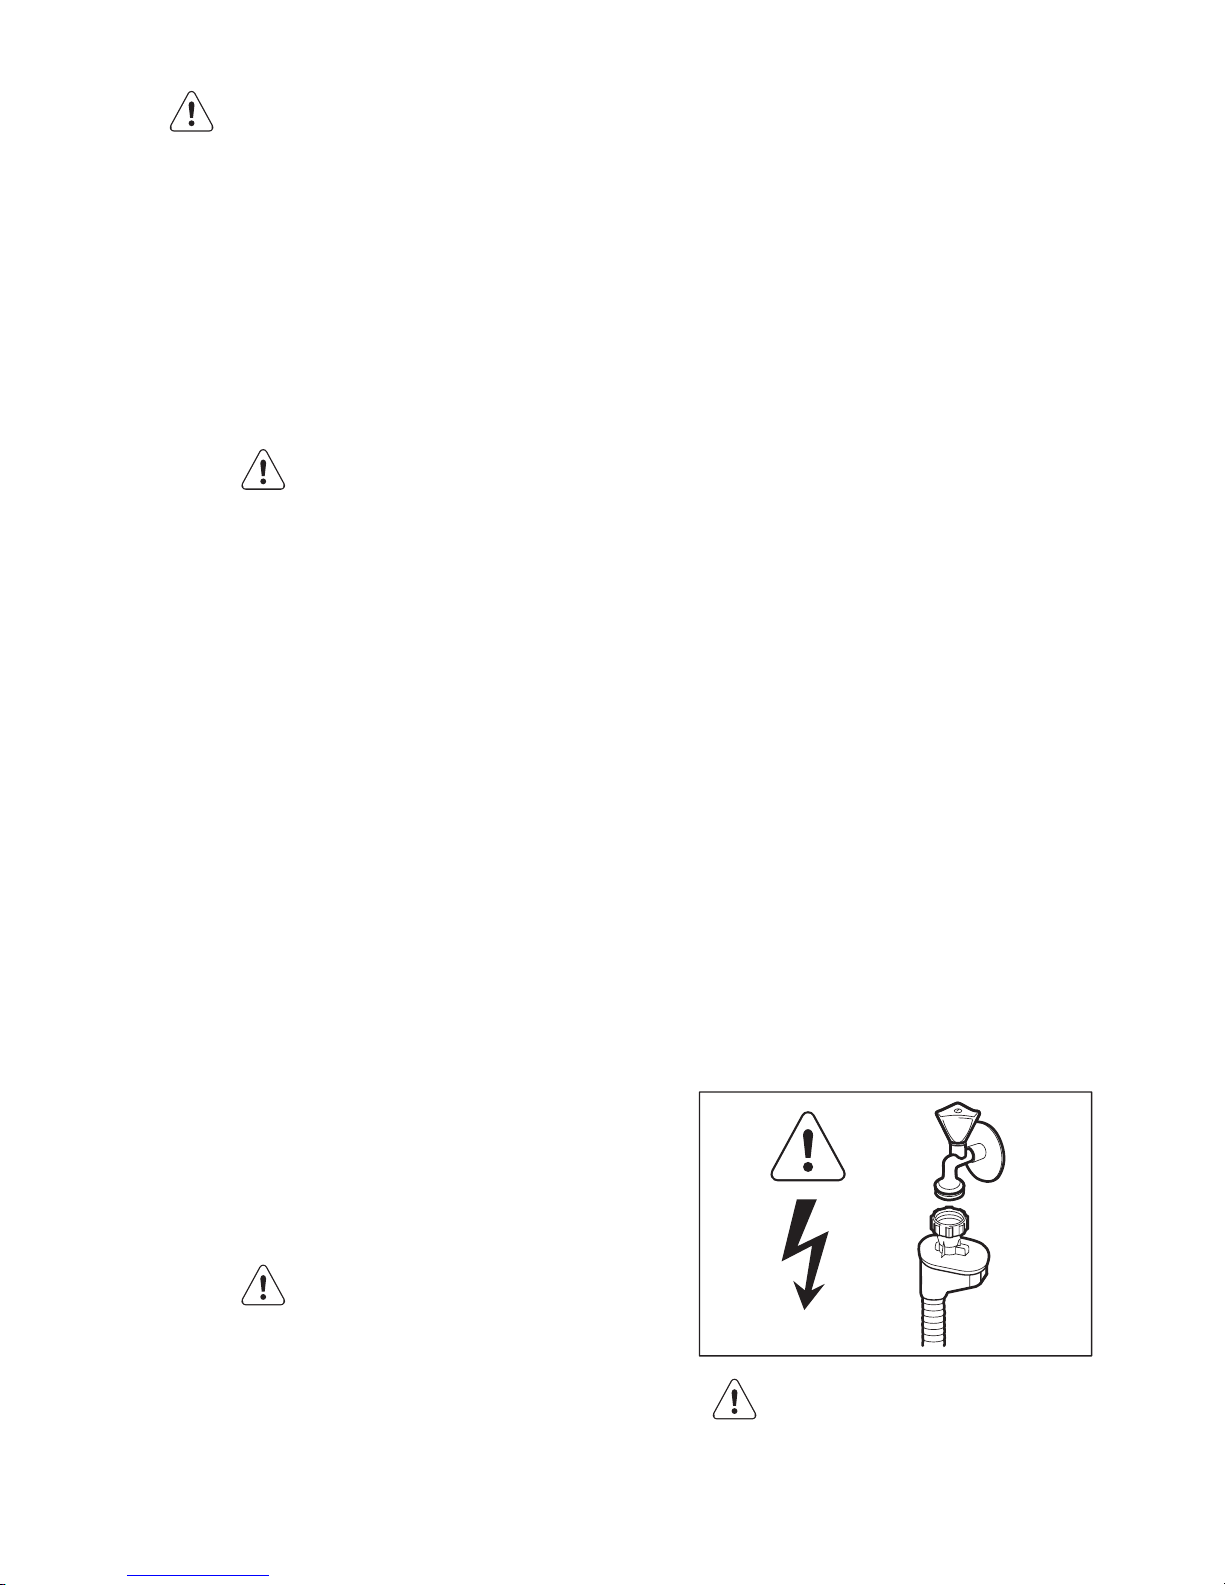
• The water inlet hose has a safety valve
and a sheath with an inner mains cable.
WARNING!
Dangerous voltage.
• If the water inlet hose is damaged, immediately disconnect the mains plug
ENGLISH 3
Page 4

from the mains socket. Contact the
Service to replace the water inlet hose.
1.3 Use
• This appliance is intended to be used in
household and similar applications such
as:
– Staff kitchen areas in shops, offices
and other working environments
– Farm houses
– By clients in hotels, motels and other
residential type environments
– Bed and breakfast type environ-
ments.
WARNING!
Risk of injury, burns, electrical
shock or fire.
• Do not change the specification of this
appliance.
• Put knives and cutlery with sharp points
in the cutlery basket with the points
down or in a horizontal position.
• Do not keep the appliance door open
without supervision to prevent to fall on
it.
• Do not sit or stand on the open door.
• Dishwasher detergents are dangerous.
Obey the safety instructions on the detergent packaging.
• Do not drink and play with the water in
the appliance.
• Do not remove the dishes from the appliance until the programme is completed. There can be detergent on the
dishes.
• The appliance can release hot steam if
you open the door while a programme
operates.
• Do not put flammable products or items
that are wet with flammable products
in, near or on the appliance.
• Do not use water spray and steam to
clean the appliance.
1.4 Internal light
To replace the internal light, contact the
Service.
1.5 Disposal
WARNING!
Risk of injury or suffocation.
• Disconnect the appliance from the
mains supply.
• Cut off the mains cable and discard it.
• Remove the door catch to prevent children and pets to get closed in the appliance.
4
www.electrolux.com
Page 5
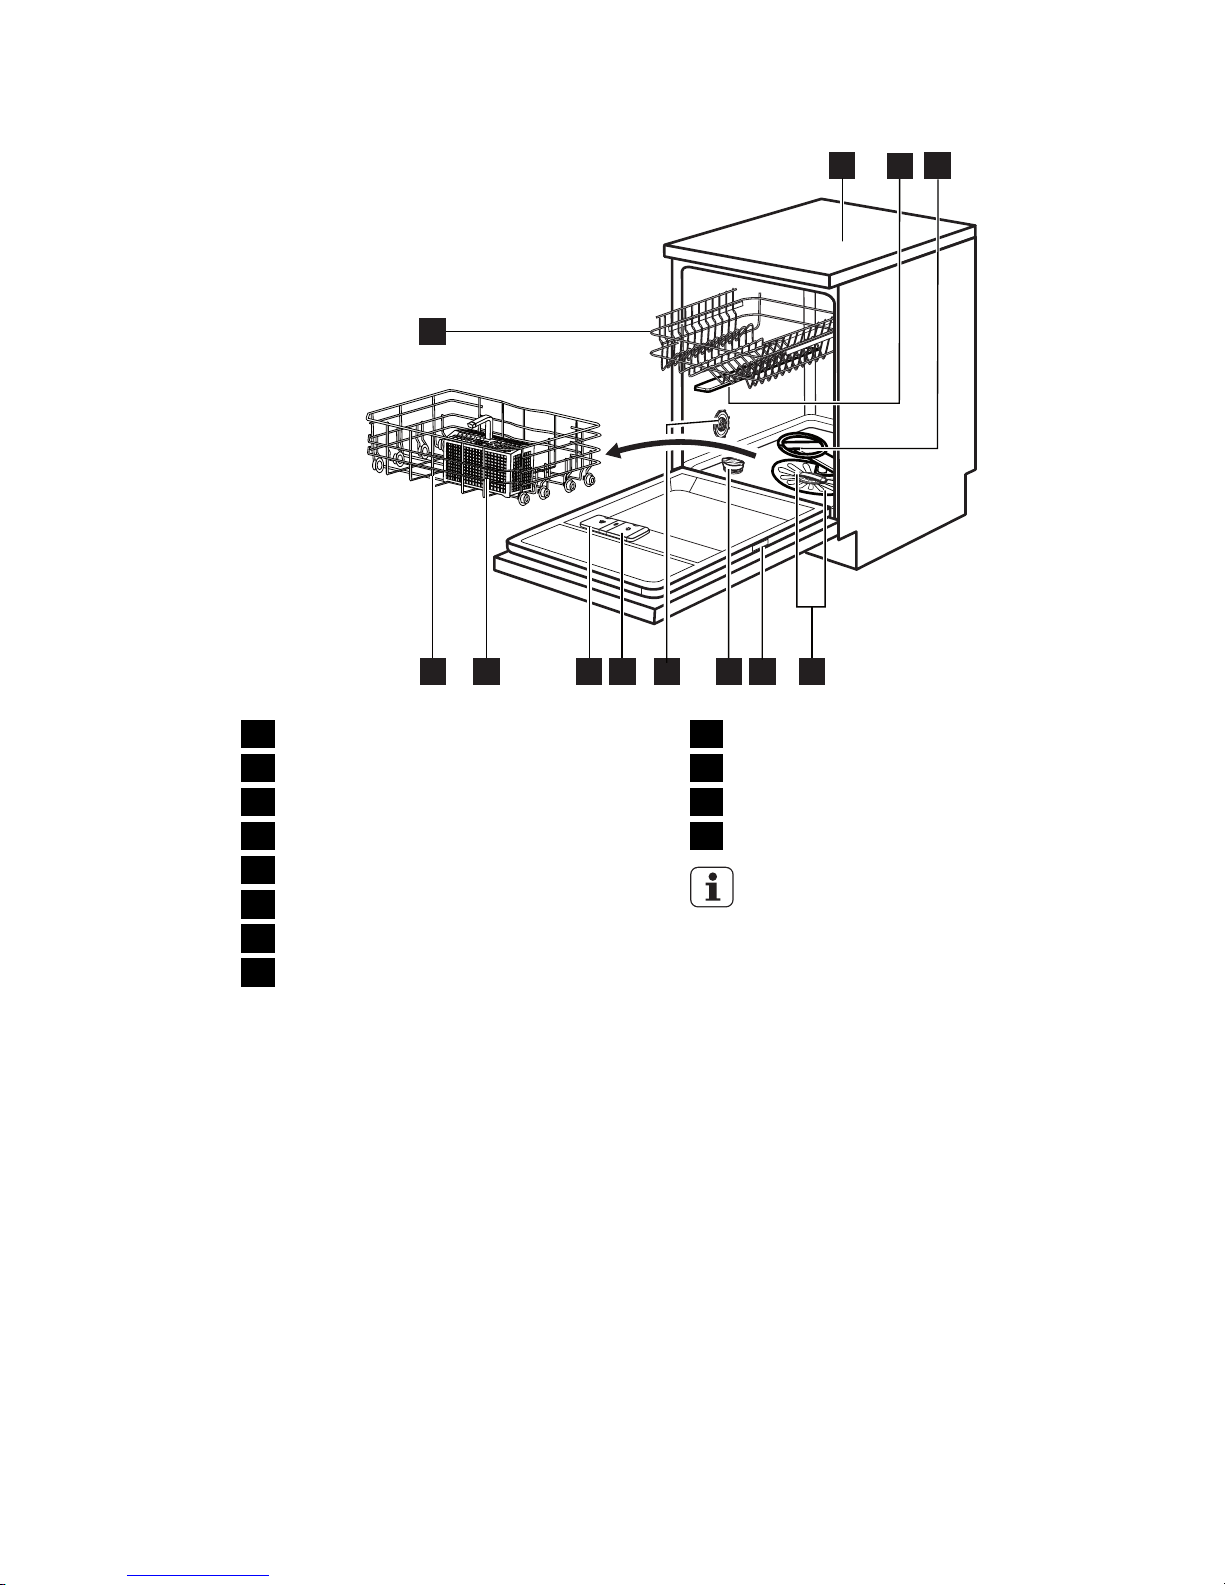
2. PRODUCT DESCRIPTION
1
2
3
4
5
8
6
7
12
9
10 11
1
Worktop
2
Upper spray arm
3
Lower spray arm
4
Filters
5
Rating plate
6
Salt container
7
Water hardness dial
8
Rinse aid dispenser
9
Detergent dispenser
10
Cutlery basket
11
Lower basket
12
Upper basket
This appliance has an internal light
that comes on when you open the
door and goes off when the door
is closed.
ENGLISH 5
Page 6
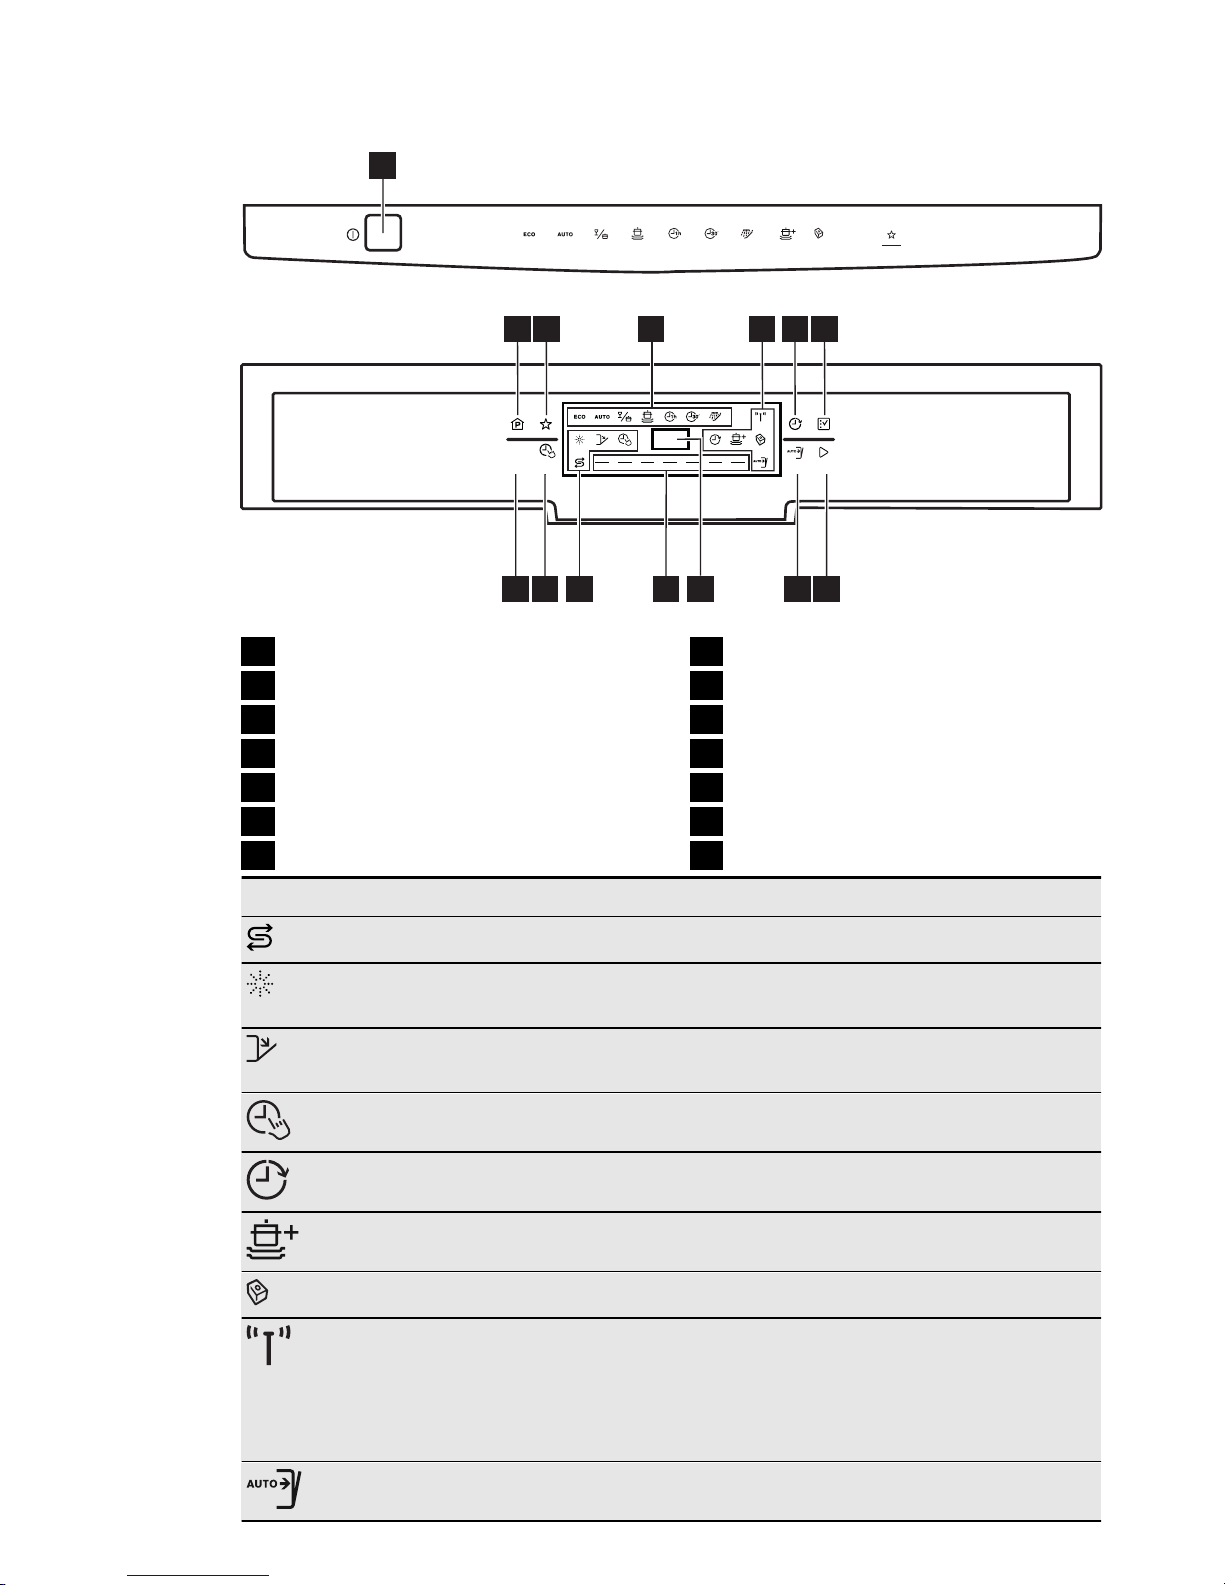
3. CONTROL PANEL
1
2 3 6 7
4
5
8913
14
11
12
MyFavourite
Program
Reset
TimeSaver
OptionDelay
Start
AutoOpen
10
XtraPower
Rinse & Hold
Save MyFavourite
3 sec
Multitab
AutoFlex
45º-70º 55º
1 Hour
Intensive
70º
50º
Auto Off
Quick Plus
60º
FlexiWash
50º-65º
1
On/off button
2
Program touchpad
3
MyFavourite touchpad
4
Programme indicators
5
Indicators
6
Delay touchpad
7
Option touchpad
8
Start touchpad
9
AutoOpen touchpad
10
Display
11
Programme bar
12
Indicators
13
TimeSaver touchpad
14
Reset touchpad
Indicators Description
Salt indicator. It is always off while the programme operates.
Rinse aid indicator. It is always off while the programme operates.
Door indicator. It comes on when the appliance door is open or
is not correctly closed.
TimeSaver indicator.
Delay indicator.
XtraPower indicator.
Multitab indicator.
Turbidity Sensor indicator. It comes on when the sensor for the
AUTO programme operates.
While the sensor operates, only the related indicator is on. All the
other indicators, the display and the programme bar go off. They
come on again when the Turbidity Sensor indicator goes off.
AutoOpen indicator.
6
www.electrolux.com
Page 7
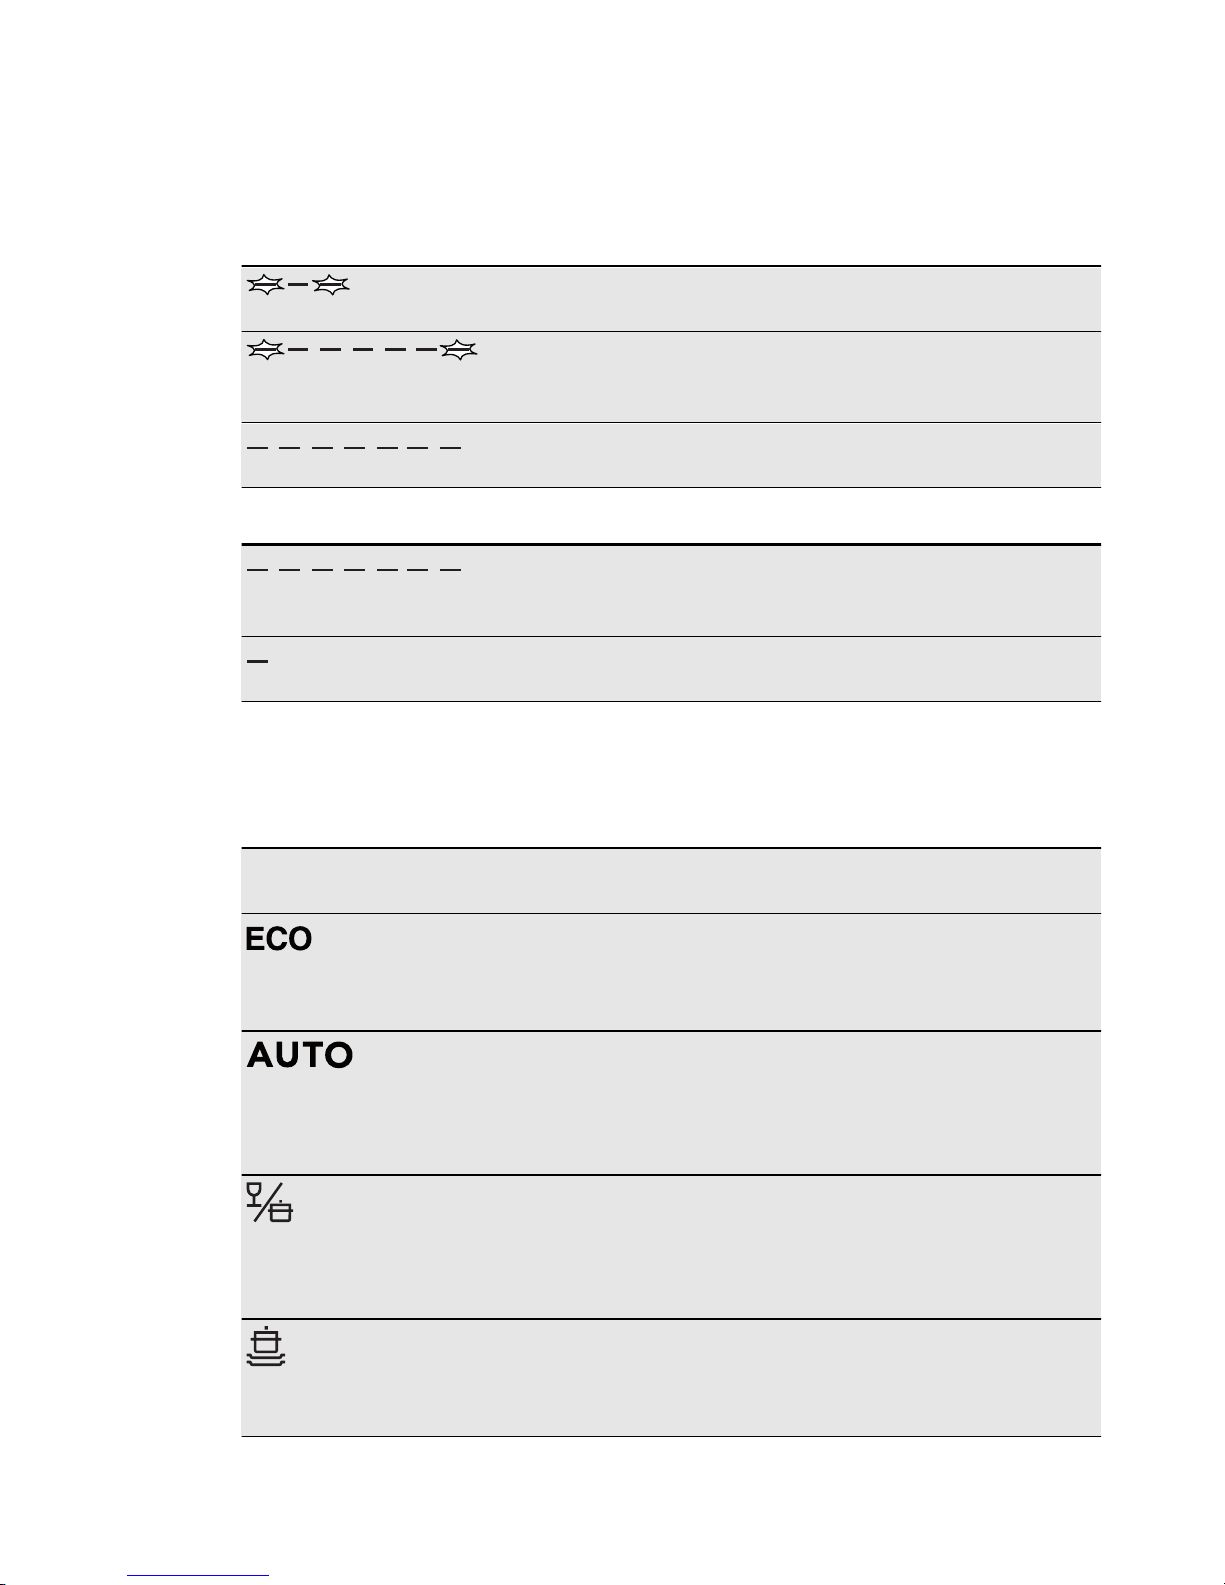
3.1 Programme bar
The programme bar shows you information that is related to the programme and
to the option TimeSaver.
Start and progress of the programme
When the programme starts, the 2 lateral segments
of the programme bar flash.
As the programme is in progress, the middle segments come on with fixed light, while the 2 lateral
segments continue to flash.
When the programme is completed, all the segments come on with fixed light.
Programme bar and TimeSaver option
When you set a programme, that is applicable to
the TimeSaver option, all the segments of the programme bar come on with fixed light.
When you set the TimeSaver option, only the middle segment stays on with fixed light.
4. PROGRAMMES
Programme Degree of soil
Type of load
Programme
phases
Options
1)
Normal soil
Crockery and cutlery
Prewash
Wash 50 °C
Rinses
Dry
TimeSaver
2)
AutoOpen
3)
All
Crockery, cutlery,
pots and pans
Prewash
Wash from 45 °C to
70 °C
Rinses
Dry
4)
Mixed soil
Crockery, cutlery,
pots and pans
Prewash
Wash 50 °C and 65
°C
Rinses
Dry
TimeSaver
5)
Heavy soil
Crockery, cutlery,
pots and pans
Prewash
Wash 70 °C
Rinses
Dry
TimeSaver
6)
XtraPower
6)
ENGLISH 7
Page 8
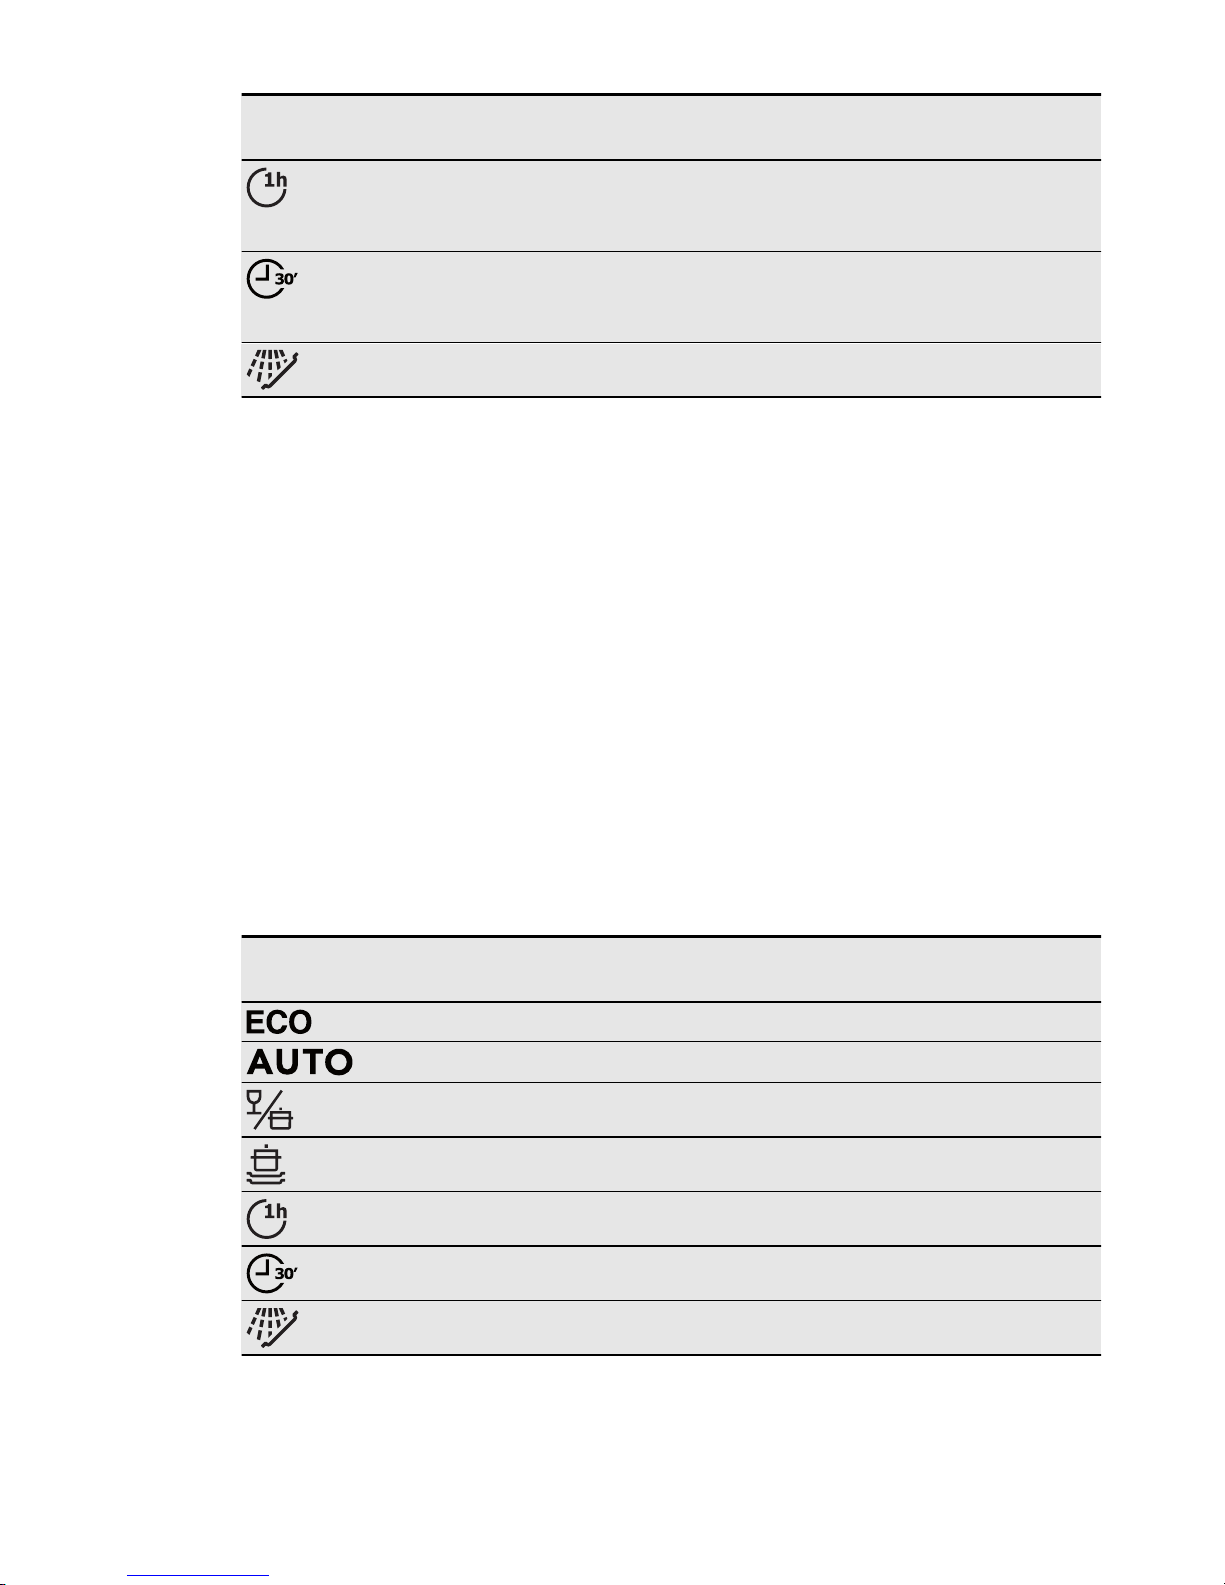
Programme Degree of soil
Type of load
Programme
phases
Options
Normal soil
Crockery and cutlery
Wash 55 °C
Rinses
7)
Fresh soil
Crockery and cutlery
Wash 60 °C
Rinse
8)
All Prewash
1)
With this programme you have the most efficient use of water and energy consumption for
crockery and cutlery with normal soil. (This is the standard programme for test institutes).
2)
It is not possible to set TimeSaver if AutoOpen is active. Deactivate AutoOpen.
3)
The appliance senses the degree of soil and the quantity of items in the baskets. It
automatically adjusts the temperature and quantity of the water, the energy consumption
and the programme duration.
4)
With this programme you can wash different loads with different soil. A higher temperature
and water pressure in the lower basket, to wash items with heavy soil (e.g. pots and pans).
A lower temperature and water pressure in the upper basket, to wash items with normal
soil (e.g. glassware).
5)
This programme has a high temperature rinsing phase for better hygiene results. During the
rinsing phase, the temperature stays at 70 °C for at least 10 minutes.
6)
It is not possible to apply together the options TimeSaver and XtraPower.
7)
With this programme you can wash a load with fresh soil. It gives good washing results in a
short time.
8)
Use this programme to quickly rinse the dishes. This prevents the remaining food to bond
on the dishes and bad odours to come out from the appliance.
Do not use detergent with this programme.
Consumption values
Programme
1)
Duration
(min)
Energy
(kWh)
Water
(l)
195 0.82 10.2
40 - 150 0.6 - 1.4 7 - 14
130 - 140 1.3 - 1.5 14 - 15
150 - 160 1.4 - 1.6 13 - 15
50 - 60 1.0 - 1.1 10 - 11
30 0.8 9
14 0.1 4
1)
The pressure and the temperature of the water, the variations of the mains supply, the
options and the quantity of dishes can change the values.
8
www.electrolux.com
Page 9

Information for test institutes
For all the necessary information for test performance. send an email to:
Write down the product number (PNC) that is on the rating plate.
5. OPTIONS
Activate or deactivate the options
before the start of a programme.
You cannot activate or deactivate
the options while a programme
operates.
If one or more options are set,
make sure that the related indicators are on before the programme
starts.
5.1 MyFavourite
With this option you can set and save the
programme that you use more frequently.
You can only save 1 programme
at a time. A new setting cancels
the previous one.
How to save a programme
1.
Press the on/off button to activate the
appliance.
2.
Set the programme that you want to
save. You can also set applicable options together with the programme. It
is not possible to save the options
Multitab and Delay.
3.
Press and hold MyFavourite until the
programme bar flashes quickly.
How to set the MyFavourite
programme
1.
Press MyFavourite. The indicators
that are related to the MyFavourite
programme and options come on
• The display shows the duration of
the programme.
5.2 TimeSaver
This option increases the pressure and
the temperature of the water. The washing and drying phases are shorter. The total programme duration decreases by approximately 50%.
The washing results are the same as with
the normal programme duration. The drying results can decrease.
How to activate the TimeSaver option
1. Press TimeSaver. The related indica-
tor and the programme bar come on.
In the display you can see the update
of the programme duration.
• If the option is not applicable to the
programme, the related indicator
flashes quickly 3 times and then
goes off. The programme bar does
not come on.
5.3 Multitab
Activate this option only when you use the
combi detergent tablets.
This option deactivates the use of rinse
aid and salt. The related indicators stay
off.
The programme duration can increase.
How to activate the Multitab option
1.
Press the on/off button to activate the
appliance.
2. Press Option until the Multitab indica-
tor comes on.
The option stays on until you deactivate it.
Press Option until the Multitab indicator
goes off.
If you stop to use the combi
detergent tablets, before you start to
use separately detergent, rinse aid
and dishwasher salt, do these steps:
1.
Deactivate the Multitab option.
2. Set the water softener to the highest
level.
3.
Make sure that the salt container and
the rinse aid dispenser are full.
4.
Start the shortest programme with a
rinsing phase, without detergent and
without dishes.
ENGLISH 9
Page 10
5. Adjust the water softener to the water
hardness in your area.
6. Adjust the released quantity of rinse
aid.
5.4 XtraPower
This option increases the water pressure
in the prewash and washing phases by
40%. The washing results are very good
also with heavy soiled loads.
How to activate the XtraPower option
1. Press Option until the XtraPower indi-
cator comes on. In the display you can
see the update of the programme duration.
• If the option is not applicable to the
programme, the related indicator
does not come on.
5.5 AutoOpen
This option gives good drying results with
less energy consumption.
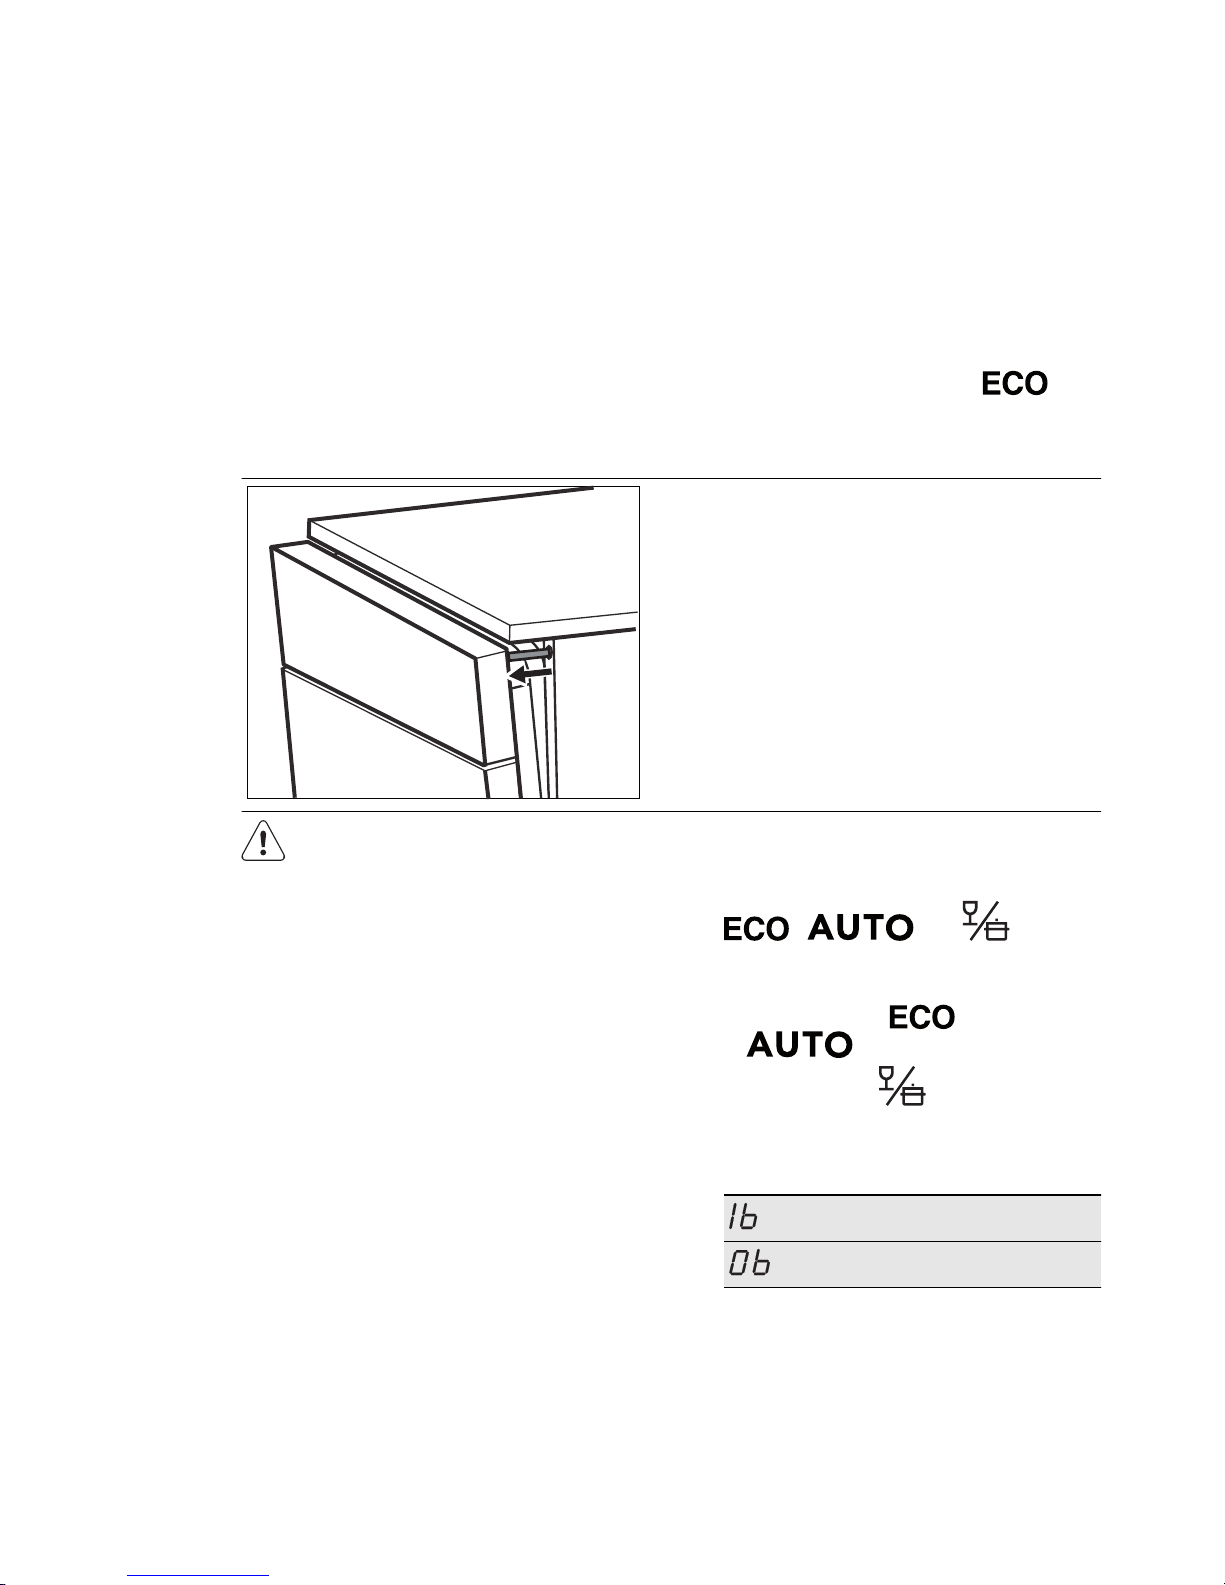
This option is automatically activated
when you set the programme
.
The AutoOpen indicator comes on.
It is not possible to set this option with
other programmes.
• While the drying phase operates, a device opens the appliance door and
keeps it ajar.
• At the end of the programme, the device and the appliance door retract. The
appliance automatically deactivates.
CAUTION!
Do not try to close the appliance
door while the device keeps the
door ajar. This can cause damage
to the appliance.
If you want to deactivate the AutoOpen
option, press AutoOpen. The related indicator goes off.
In this condition, the energy consumption
of the programme increases.
5.6 Acoustic signals
The acoustic signals operate when the
appliance has a malfunction. It is not possible to deactivate these acoustic signals.
There is also an acoustic signal that operates when the programme is completed.
By default, this acoustic signal is off, but it
is possible to activate it.
How to activate the acoustic signal
for the end of programme
1.
Press the on/off button to activate the
appliance.
2. Press Reset for a few seconds.
3.
Press and hold, at the same time, Delay and AutoOpen until the indicators
, and start to
flash.
4.
Press Delay,
•
The indicators
and
go off.
•
The indicator
continues to
flash.
• The display shows the current setting.
Acoustic signal on
Acoustic signal off
5.
Press Delay to change the setting.
6.
Press the on/off button to deactivate
the appliance and to confirm the setting.
10
www.electrolux.com
Page 11
6. BEFORE FIRST USE
1.
Make sure that the set level of the water softener agrees with the water
hardness in your area. If not, adjust
the water softener. Contact your local
water authority to know the water
hardness in your area.
2. Fill the salt container.
3.
Fill the rinse aid dispenser.
4. Open the water tap.
5.
Processing residues can stay in the
appliance. Start a programme to remove them. Do not use detergent and
do not load the baskets.
If you use the combi detergent
tablets, activate the Multitab option.
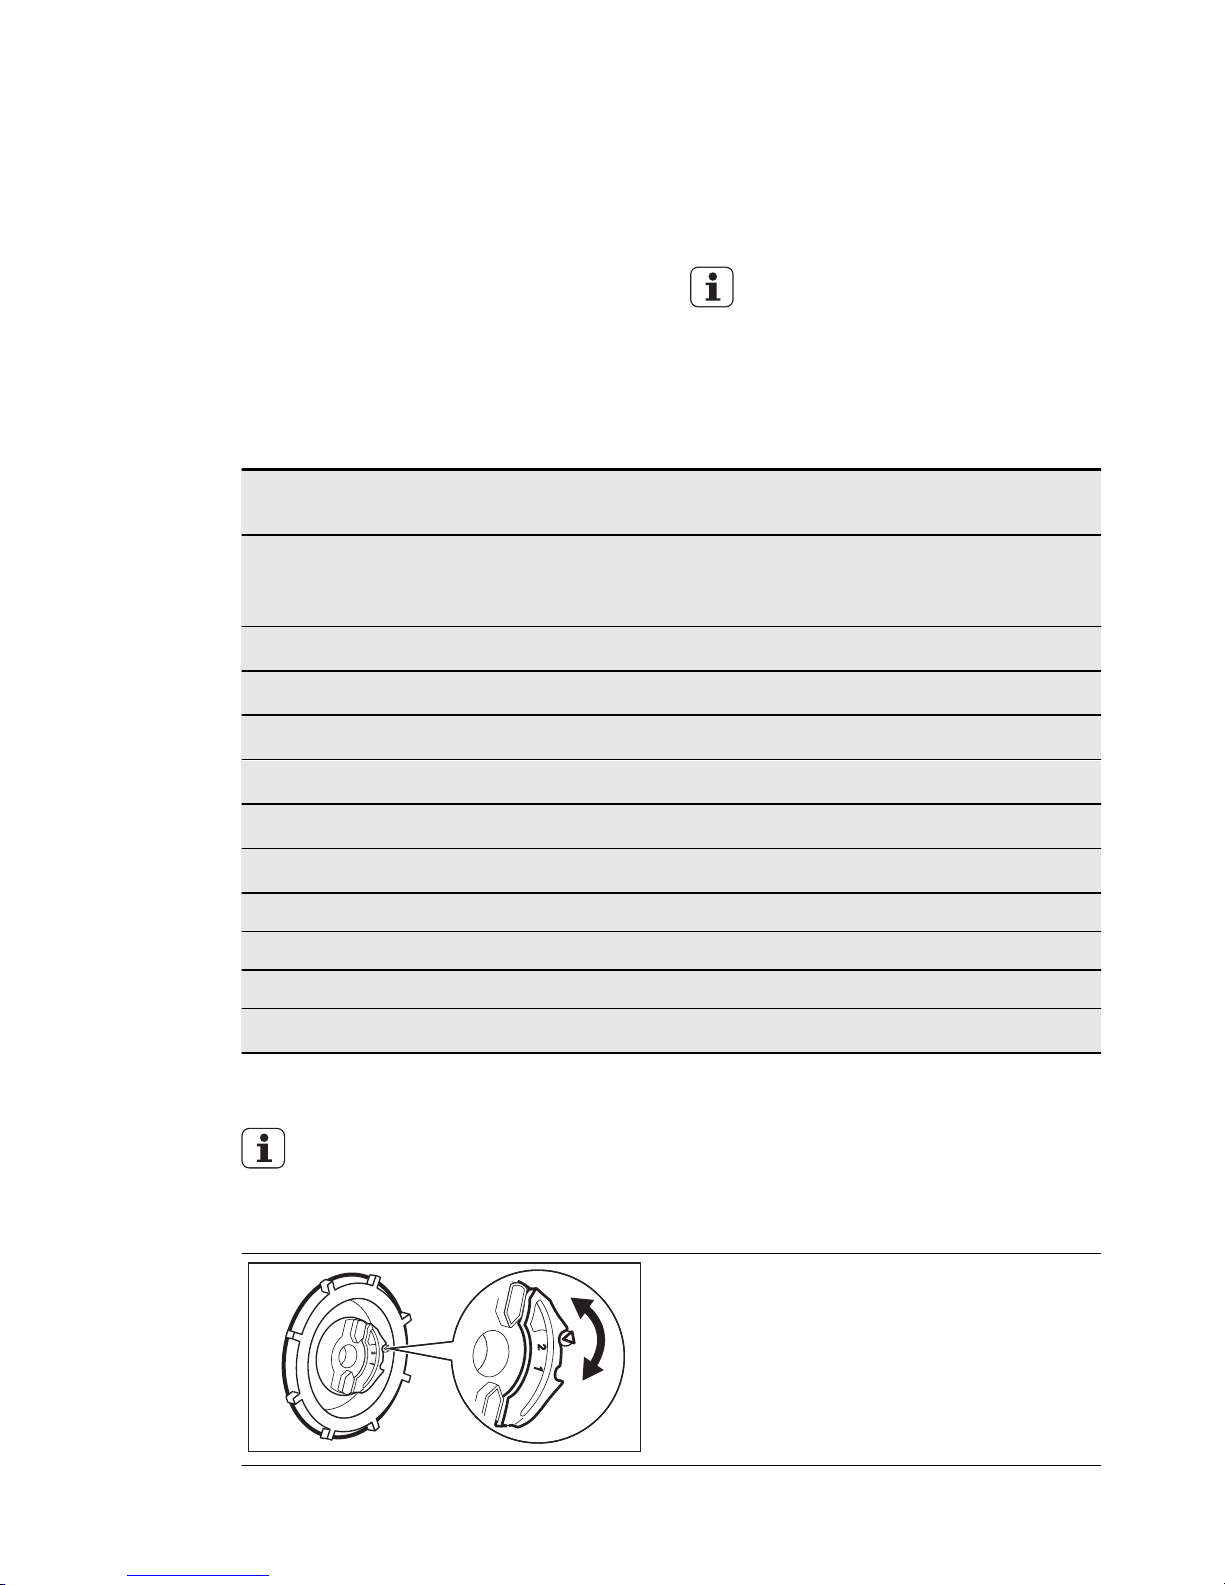
6.1 Adjusting the water softener
Water hardness
Water softener
adjustment
German
degrees
(°dH)
French
degrees
(°fH)
mmol/l Clarke
degrees
Manual Elec-
tronic
51 - 70 91 - 125 9.1 - 12.5 64 - 88
2
1)
10
43 - 50 76 - 90 7.6 - 9.0 53 - 63
2
1)
9
37 - 42 65 - 75 6.5 - 7.5 46 - 52
2
1)
8
29 - 36 51 - 64 5.1 - 6.4 36 - 45
2
1)
7
23 - 28 40 - 50 4.0 - 5.0 28 - 35
2
1)
6
19 - 22 33 - 39 3.3 - 3.9 23 - 27
2
1)
5
1)
15 - 18 26 - 32 2.6 - 3.2 18 - 22 1 4
11 - 14 19 - 25 1.9 - 2.5 13 - 17 1 3
4 - 10 7 - 18 0.7 - 1.8 5 - 12 1 2
< 4 < 7 < 0.7 < 5
1
2)
1
2)
1)
Factory position.
2)
Do not use salt at this level.
You must adjust the water softener manually and electronically.
Manual adjustment
Turn the water hardness dial to the position 1 or 2.
ENGLISH 11
Page 12
Electronic adjustment
1. Press the on/off button to activate the
appliance.
2.
Press Reset for a few seconds.
3.
Press and hold, at the same time, Delay and AutoOpen until the indicators
, and start to
flash.
4. Press MyFavourite,
•
The indicators
and
go off.
•
The indicator
continues to
flash.
• The display shows the current setting of the water softener. E.g.
= level 5.
5.
Press MyFavourite again and again
to change the setting.
6. Press the on/off button to deactivate
the appliance and to confirm the setting.
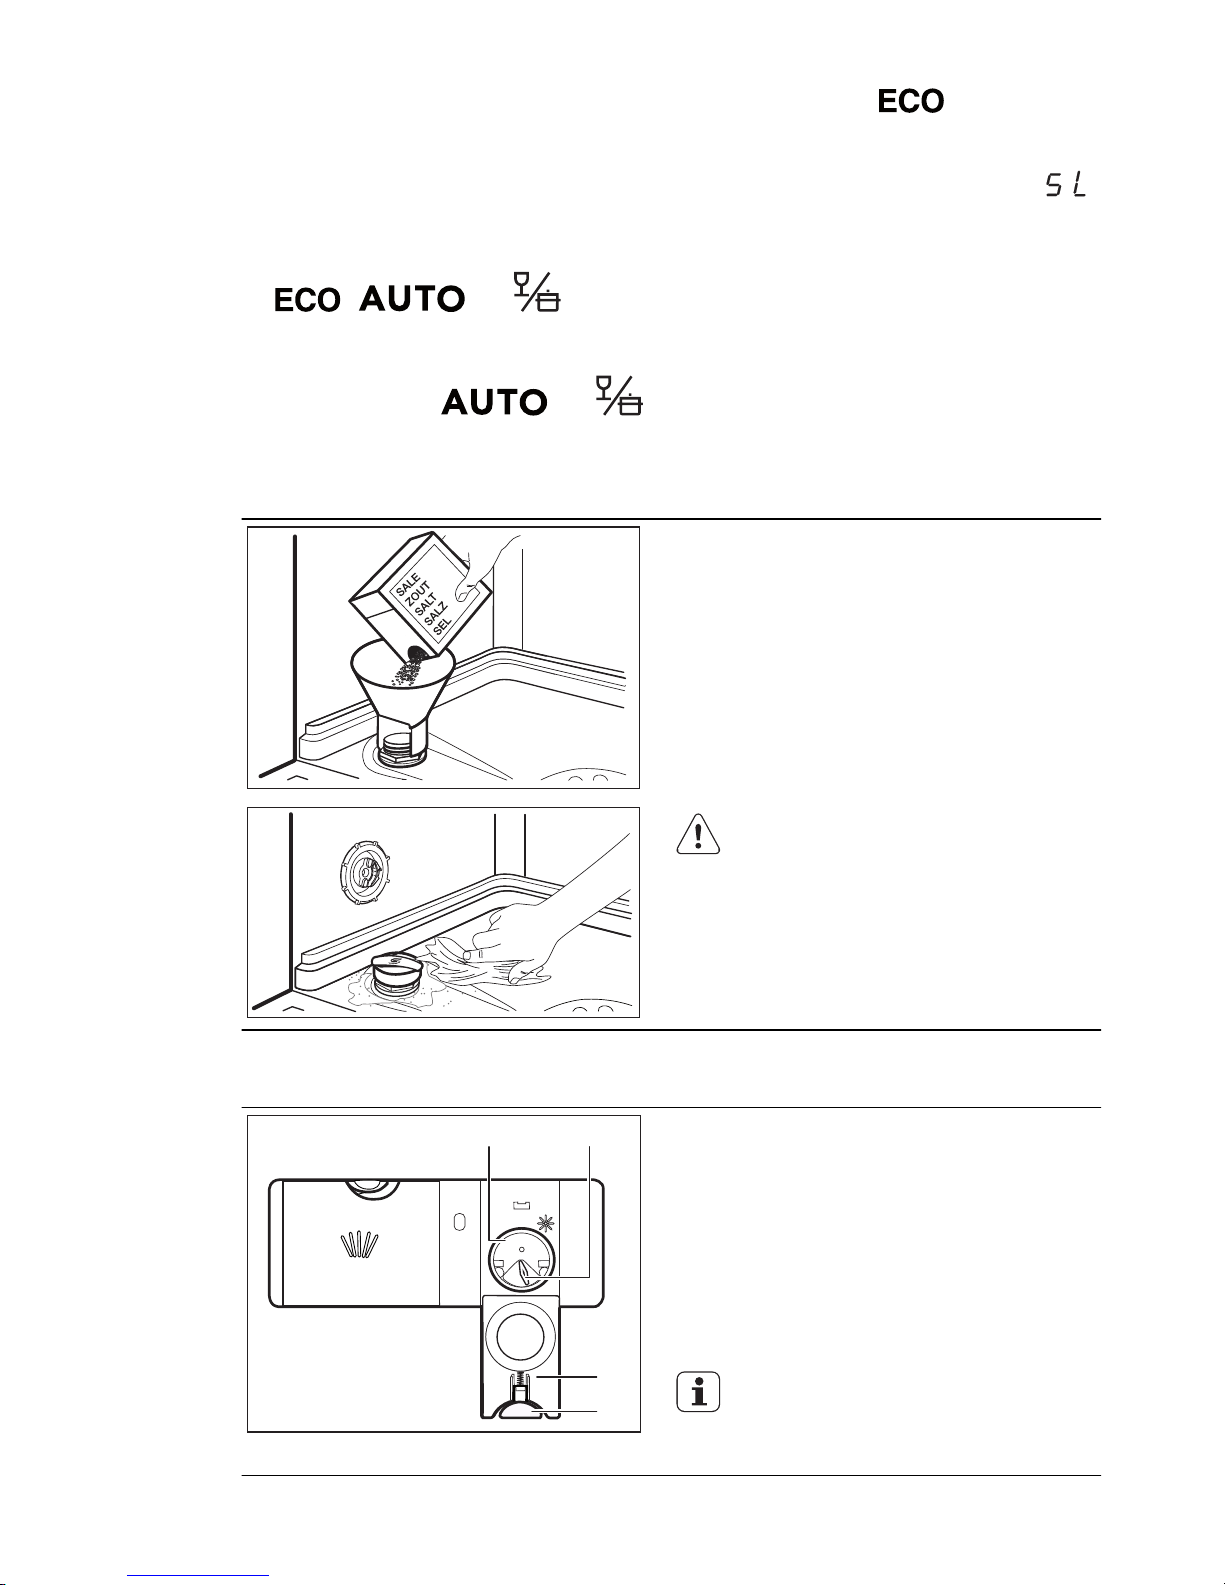
6.2 Filling the salt container
1.
Turn the cap counterclockwise and
open the salt container.
2.
Put 1 litre of water in the salt container (only for the first time).
3.
Fill the salt container with dishwasher
salt.
4.
Remove the salt around the opening
of the salt container.
5.
Turn the cap clockwise to close the
salt container.
CAUTION!
Water and salt can come out from
the salt container when you fill it.
Risk of corrosion. To prevent it,
after you fill the salt container,
start a programme.
6.3 Filling the rinse aid dispenser
M
A
X
1
2
3
4
+
-
A
B
D
C
1.
Press the release button (D) to open
the lid (C).
2.
Fill the rinse aid dispenser (A), no
more than the mark 'max'.
3.
Remove the spilled rinse aid with an
absorbent cloth to prevent too much
foam.
4.
Close the lid. Make sure that the release button locks into position.
You can turn the selector of the
released quantity (B) between position 1 (lowest quantity) and position 4 (highest quantity).
12
www.electrolux.com
Page 13
7. DAILY USE
1.
Open the water tap.
2.
Press the on/off button to activate the
appliance.
• If the salt indicator is on, fill the salt
container.
• If the rinse aid indicator is on, fill the
rinse aid dispenser.
3.
Load the baskets.
4.
Add the detergent.
5.
Set and start the correct programme
for the type of load and the degree of
soil.
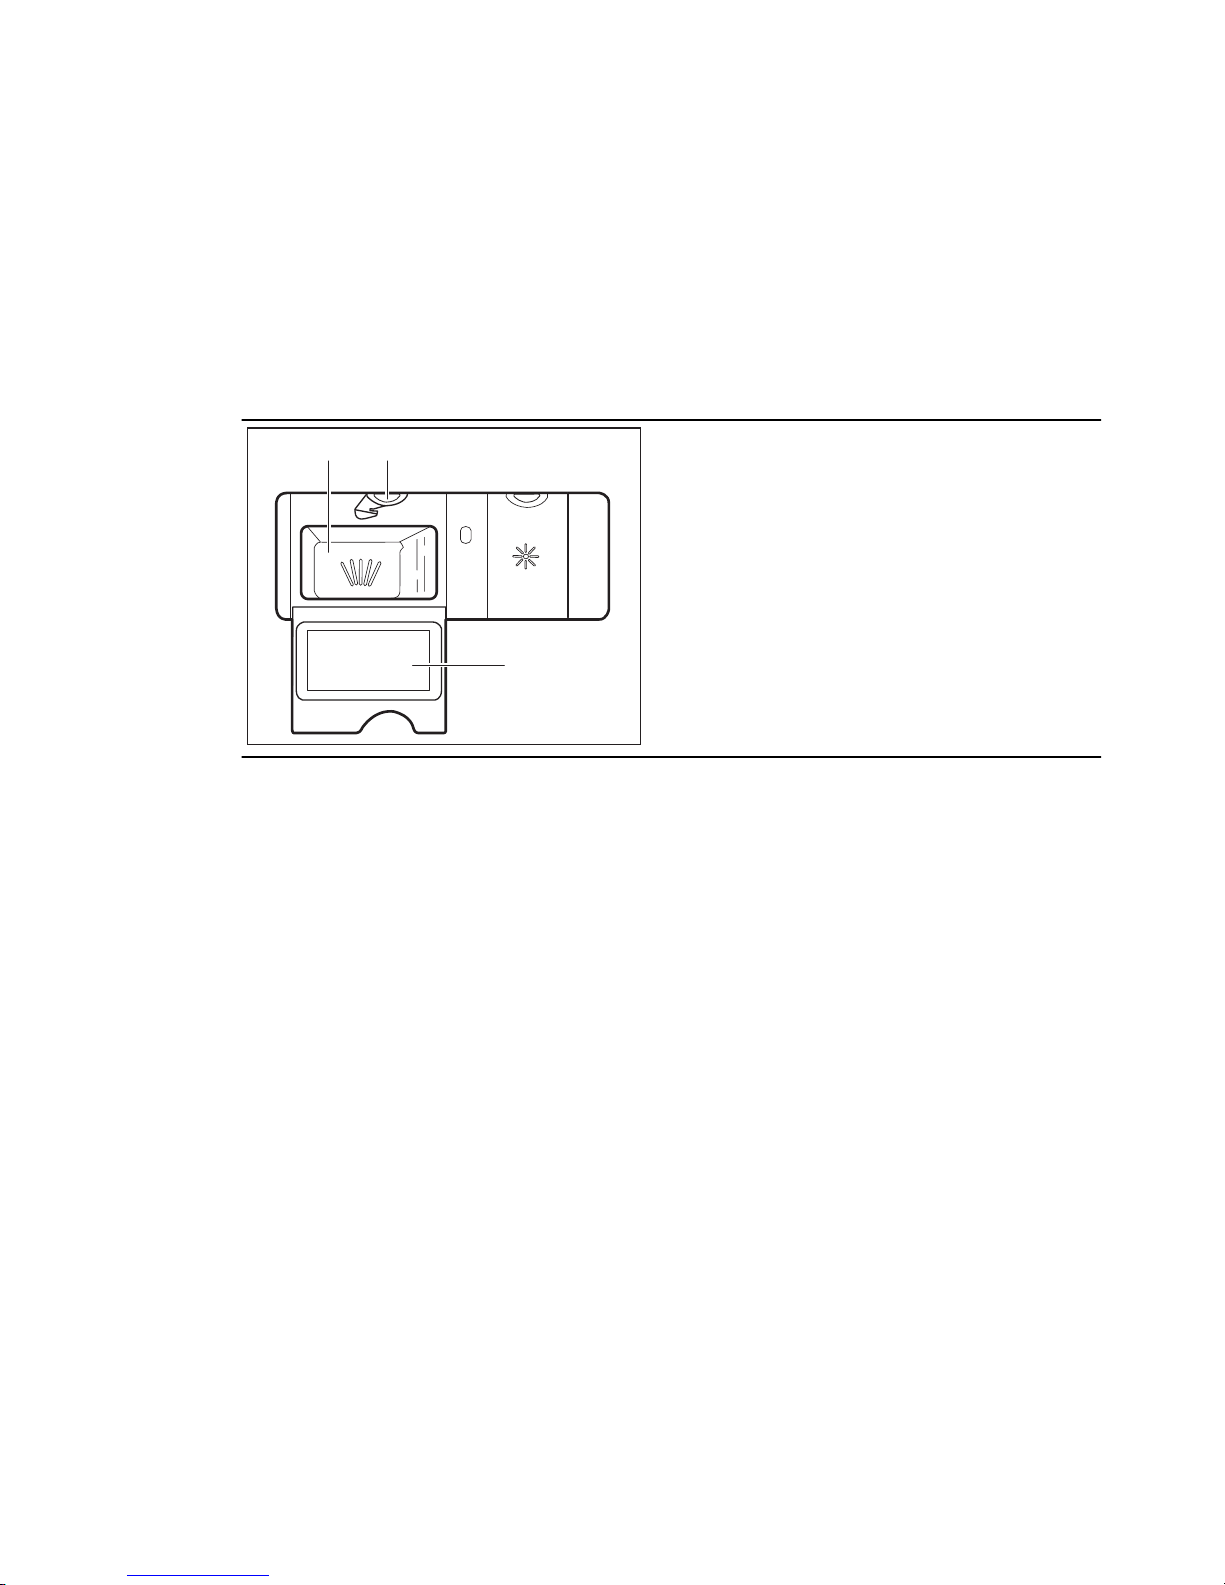
7.1 Using the detergent
20
30
M
A
X
1
2
3
4
+
-
A
B
C
1.
Press the release button (B) to open
the lid (C).
2.
Put the detergent in the compartment
(A) .
3.
If the programme has a prewash
phase, put a small quantity of detergent on the inner part of the appliance door.
4.
If you use detergent tablets, put the
tablet in the compartment (A).
5.
Close the lid. Make sure that the release button locks into position.
7.2 Setting and starting a
programme
The Auto Off function
To decrease the energy consumption, this
function automatically deactivates the appliance a few minutes after:
• You have not closed the door.
• You have not pressed Start to start the
programme.
• The programme is completed.
Starting a programme without
delay start
1. Open the water tap.
2.
Press the on/off button to activate the
appliance. The indicator and the duration of the last set programme come
on.
3.
Close the appliance door.
4. Set a programme.
• If you want to start the last set programme, press Start
• If you want to set the MyFavourite
programme, press MyFavourite.
The indicators that are related to the
MyFavourite programme and options come on.
• If you want to set a different pro-
gramme, press Program again and
again until the indicator of the programme you want to set comes on.
You can also set the applicable op-
tions.
The display shows the duration of the
programme.
5. Press Start to start the programme.
• When the programme starts, only
the programme duration and the
programme bar are visible. If you
want to see which programme and
options are set, press any touchpad
(not Reset). The set programme and
options are visible for a few sec-
onds.
• The programme duration starts to
decrease with steps of 1 minute.
Starting a programme with delay
start
1.
Set the programme.
2.
Press Delay again and again until the
display shows the delay time you want
ENGLISH 13
Page 14

to set (from 1 to 24 hours). The Delay
indicator comes on. The programme
indicator, programme bar and option
indicators are no longer visible.
3. Press Start to start the countdown.
• If you want to see which programme and options are set, press
any touchpad (not Reset). The set
programme and options are visible
for a few seconds.
When the countdown is completed, the
programme starts.
Opening the door while the
appliance operates
If you open the door, the appliance stops.
When you close the door, the appliance
continues from the point of interruption.
Cancelling the delay start while
the countdown operates
1. Press and hold Reset until the dura-
tion of the set programme comes on.
2. Press Start to start the programme.
The cancelling of the delay start
cancels also the set options (except Multitab). Make sure, before
you press Start, to set the options again.
Cancelling the programme
Press and hold Reset for a few seconds.
Make sure that there is detergent
in the detergent dispenser before
you start a new programme.
At the end of the programme
The display shows 0:00.
• The programme indicator goes off.
• All the segments of the programme bar
are on with fixed light.
1. Press the on/off button or wait for the
Auto Off function to automatically deactivate the appliance.
2.
Close the water tap.
Important
• Let the dishes become cold before you
remove them from the appliance. Hot
dishes can be easily damaged.
• First remove the items from the lower
basket, then from the upper basket.
• There can be water on the sides and on
the door of the appliance. Stainless
steel becomes cool more quickly than
the dishes.
8. HINTS AND TIPS
8.1 The water softener
Hard water contains a high quantity of
minerals that can cause damage to the
appliance and bad washing results. The
water softener neutralises these minerals.
The dishwasher salt keeps the water softener clean and in good conditions. It is
important to set the right level of the water
softener. This makes sure that the water
softener uses the correct quantity of dishwasher salt and water.
8.2 Using salt, rinse aid and
detergent
• Only use salt, rinse aid and detergent
for dishwasher. Other products can
cause damage to the appliance.
• The rinse aid helps, during the last rinsing phase, to dry the dishes without
streaks and stains.
• Combi detergent tablets contain detergent, rinse aid and other added agents.
Be sure that these tablets are applicable to the water hardness in your area.
Refer to the instructions on the packaging of the products.
If you want to use these tablets out of
the applicable water hardness, you
must also use dishwasher salt. First activate the Multitab option, then adjust
the water softener to the water hardness in your area and use dishwasher
salt.
• Detergent tablets do not fully dissolve
with short programmes. To prevent de-
14
www.electrolux.com
Page 15
tergent residues on the tableware, we
recommend that you use the tablets
with long programmes.
Do not use more than the correct
quantity of detergent. Refer to the
instructions on the detergent
packaging.
8.3 Loading the baskets
Refer to the supplied leaflet with
examples of the load of the baskets.
• Only use the appliance to wash items
that are dishwasher-safe.
• Do not put in the appliance items made
of wood, horn, aluminium, pewter and
copper.
• Do not put in the appliance items that
can absorb water (sponges, household
cloths).
• Remove remaining food from the items.
• To remove easily remaining burned
food, soak pots and pans in water before you put them in the appliance.
• Put hollow items (cups, glasses and
pans) with the opening down.
• Make sure that cutlery and dishes do
not bond together. Mix spoons with
other cutlery.
• Make sure that glasses do not touch
other glasses.
• Put the small items in the cutlery basket.
• Put the light items in the upper basket.
Make sure that they do not move.
• Make sure that the spray arms can
move freely before you start a programme.
8.4 Before starting a
programme
Make sure that:
• The filters are clean and correctly installed.
• The spray arms are not clogged.
• The position of the items in the baskets
is correct.
• The programme is applicable for the
type of load and for the degree of soil.
• The correct quantity of detergent is
used.
• There is dishwasher salt and rinse aid
(unless you use combi detergent tablets).
• The cap of the salt container is tight.
9. CARE AND CLEANING
WARNING!
Before maintenance, deactivate
the appliance and disconnect the
mains plug from the mains socket.
Dirty filters and clogged spray
arms decrease the washing results.
Make a check regularly and, if
necessary, clean them.
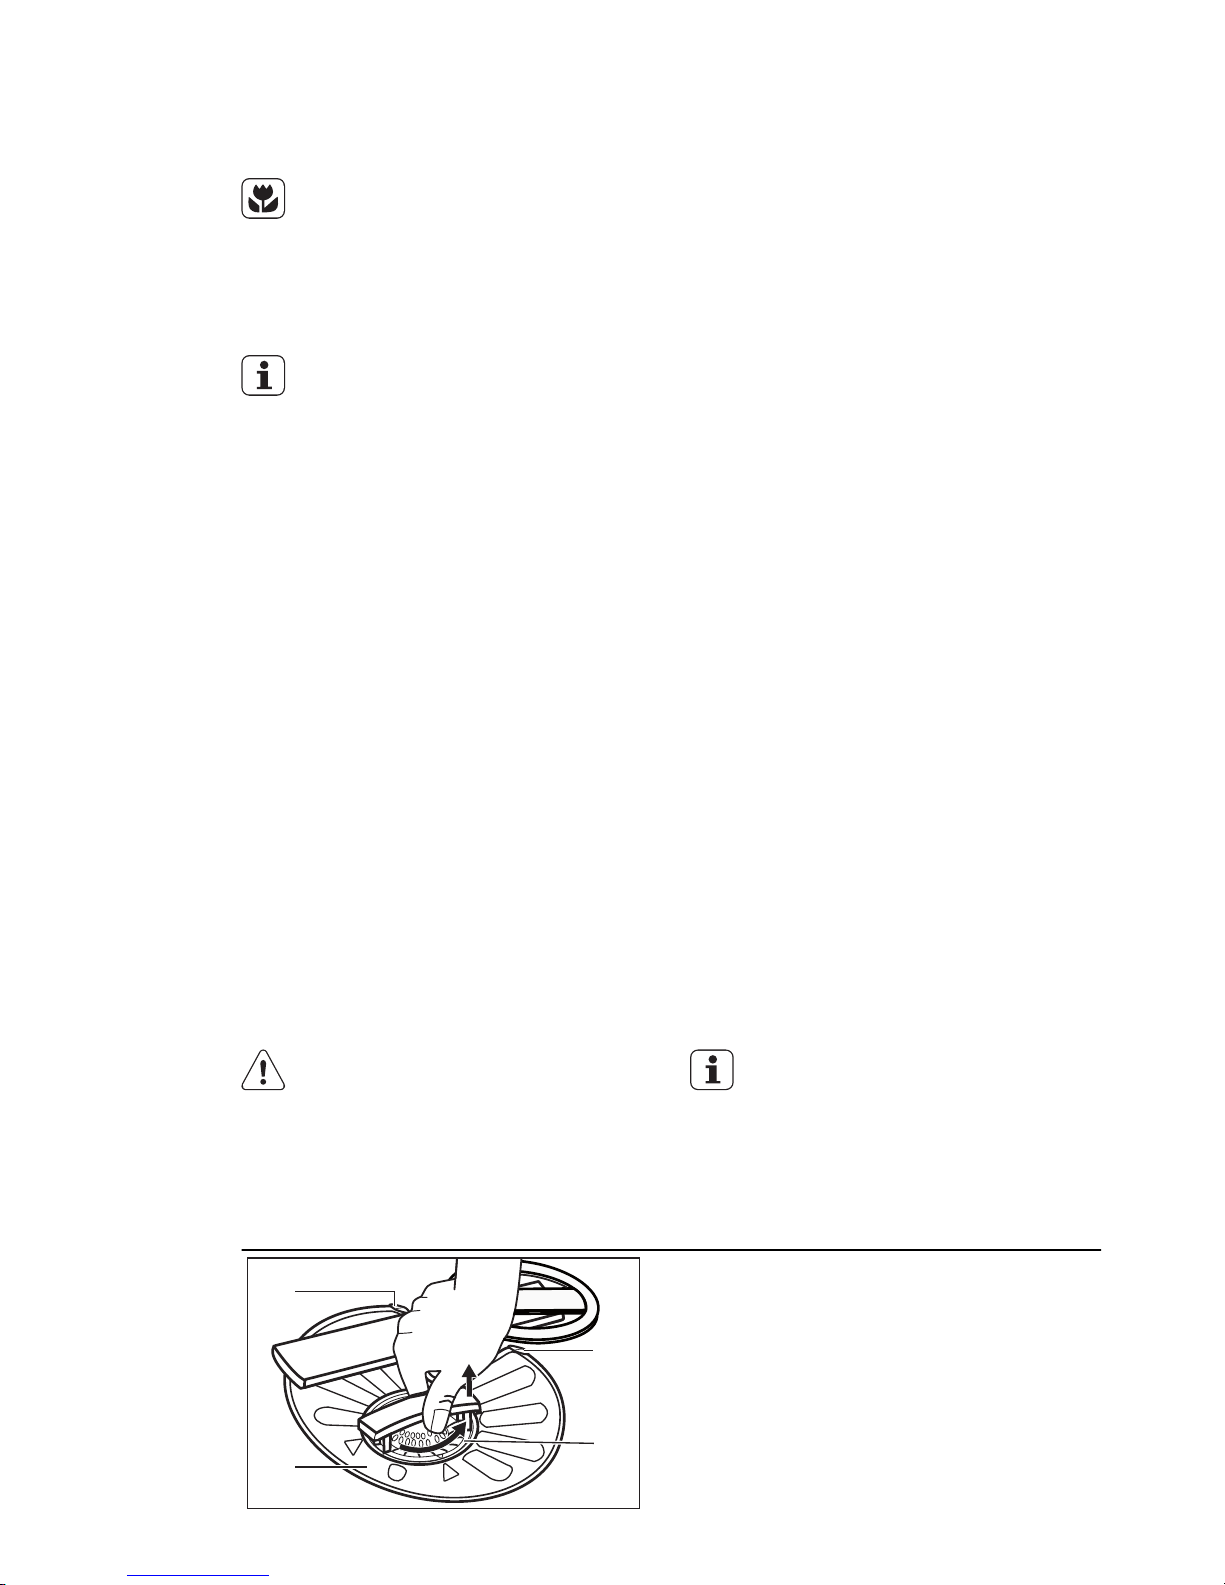
9.1 Cleaning the filters
A
B
C
C
1.
Turn the filter (A) counterclockwise
and remove it.
ENGLISH 15
Page 16
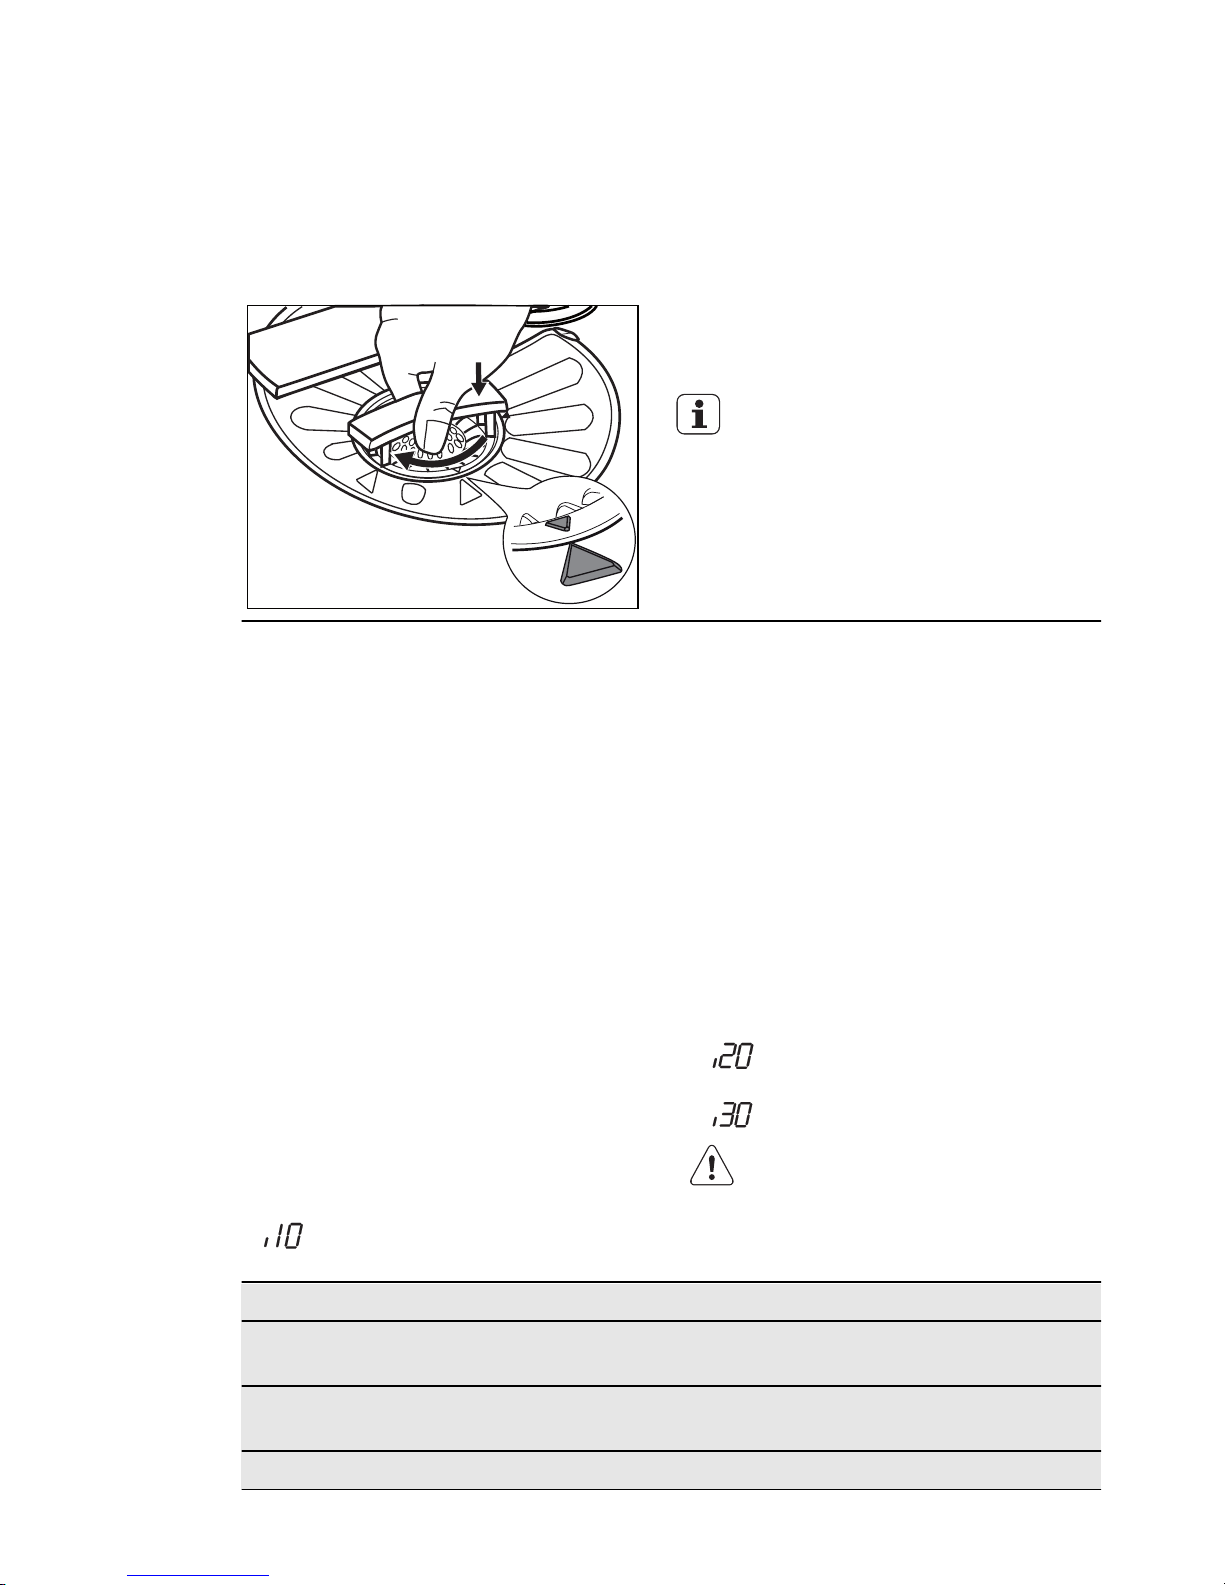
2.
To disassemble the filter (A), pull
apart (A1) and (A2).
3.
Remove the filter (B).
4.
Wash the filters with water.
5.
Put the filter (B) to its initial position.
Make sure that it assembles correctly
under the two guides (C).
6.
Assemble the filter (A) and put it into
position in filter (B). Turn it clockwise
until it locks.
An incorrect position of the filters
can cause bad washing results
and damage to the appliance.
9.2 Cleaning the spray arms
Do not remove the spray arms.
If the holes in the spray arms are clogged,
remove remaining parts of soil with a thin
pointed object.
9.3 External cleaning
Clean the appliance with a moist soft
cloth.
Only use neutral detergents. Do not use
abrasive products, abrasive cleaning pads
or solvents.
10. TROUBLESHOOTING
The appliance does not start or it stops
during operation.
Before you contact the Service, refer to
the information that follows for a solution
to the problem.
With some problems, the display
shows an alarm code:
•
- The appliance does not fill with
water.
•
- The appliance does not drain the
water.
•
- The anti-flood device is on.
WARNING!
Deactivate the appliance before
you do the checks.
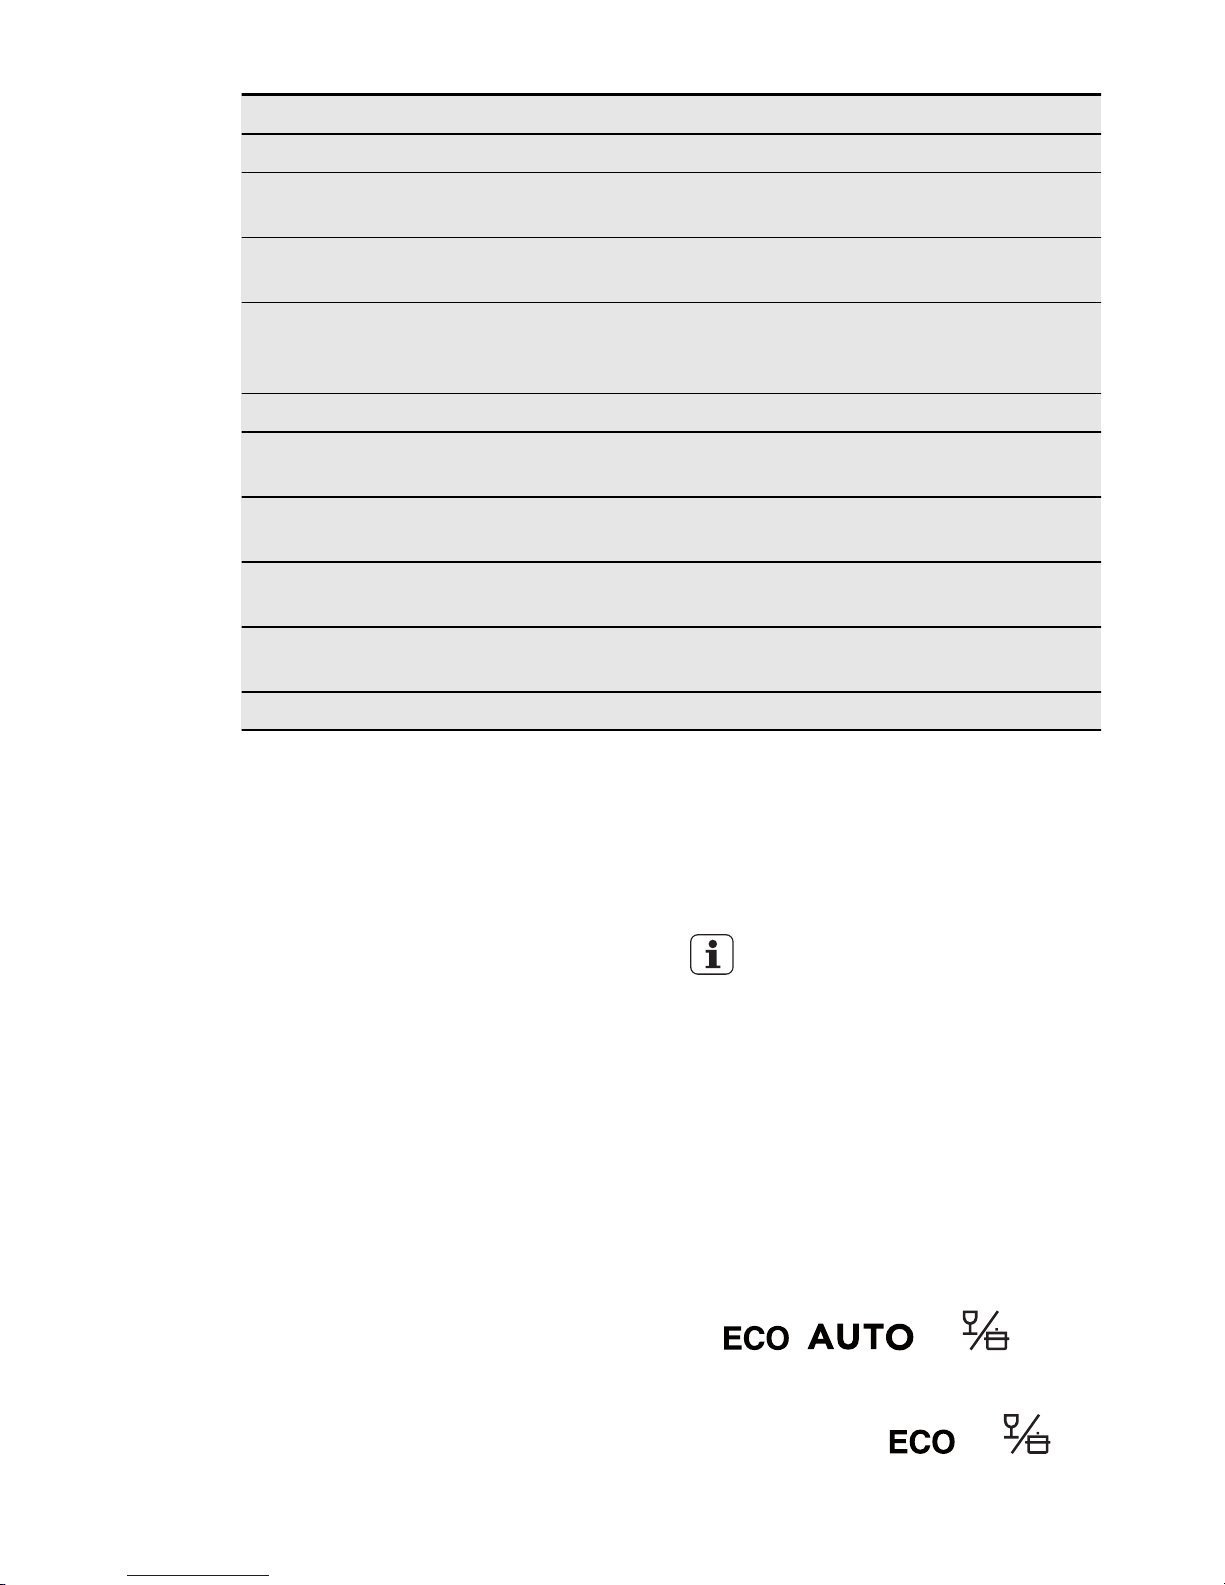
Problem Possible solution
You cannot activate the appliance.
Make sure that the mains plug is connected
to the mains socket.
Make sure that there is not a damaged fuse in
the fuse box.
The programme does not start. Make sure that the appliance door is closed.
16
www.electrolux.com
Page 17
Problem Possible solution
Press Start.
If the delay start is set, cancel the setting or
wait for the end of the countdown.
The appliance does not fill with
water.
Make sure that the water tap is open.
Make sure that the pressure of the water sup-
ply is not too low. For this information, contact your local water authority.
Make sure that the water tap is not clogged.
Make sure that the filter in the inlet hose is not
clogged.
Make sure that the inlet hose has no kinks or
bends.
The appliance does not drain the
water.
Make sure that the sink spigot is not clogged.
Make sure that the drain hose has no kinks or
bends.
The anti-flood device is on. Close the water tap and contact the Service.
After the checks are completed, activate
the appliance. The programme continues
from the point of interruption.
If the problem occurs again, contact the
Service.
If the display shows other alarm codes,
contact the Service.
10.1 If the washing and drying
results are not satisfactory
Whitish streaks or bluish layers on
glasses and dishes
• The released quantity of rinse aid is too
much. Adjust the rinse aid selector to a
lower position.
• The quantity of detergent is too much.
Stains and dry water drops on
glasses and dishes
• The released quantity of rinse aid is not
sufficient. Adjust the rinse aid selector
to a higher position.
• The quality of the detergent can be the
cause.
Dishes are wet
• The programme is without a drying
phase or with a low temperature drying
phase.
• The rinse aid dispenser is empty.
• The quality of the rinse aid can be the
cause.
• The quality of the combi detergent tablets can be the cause. Try a different
brand or activate the rinse aid dispenser and use rinse aid together with the
combi detergent tablets.
Refer to ‘HINTS AND TIPS’ for
other possible causes.
10.2 How to activate the rinse
aid dispenser
The activation of the rinse aid dispenser
can occur only with the Multitab option
activated.
1.
Press the on/off button to activate the
appliance.
2.
Press Reset for a few seconds.
3. Press and hold, at the same time, De-
lay and AutoOpen until the indicators
, and start to
flash.
4.
Press TimeSaver,
•
The indicators
and go
off.
ENGLISH 17
Page 18
•
The indicator
continues
to flash.
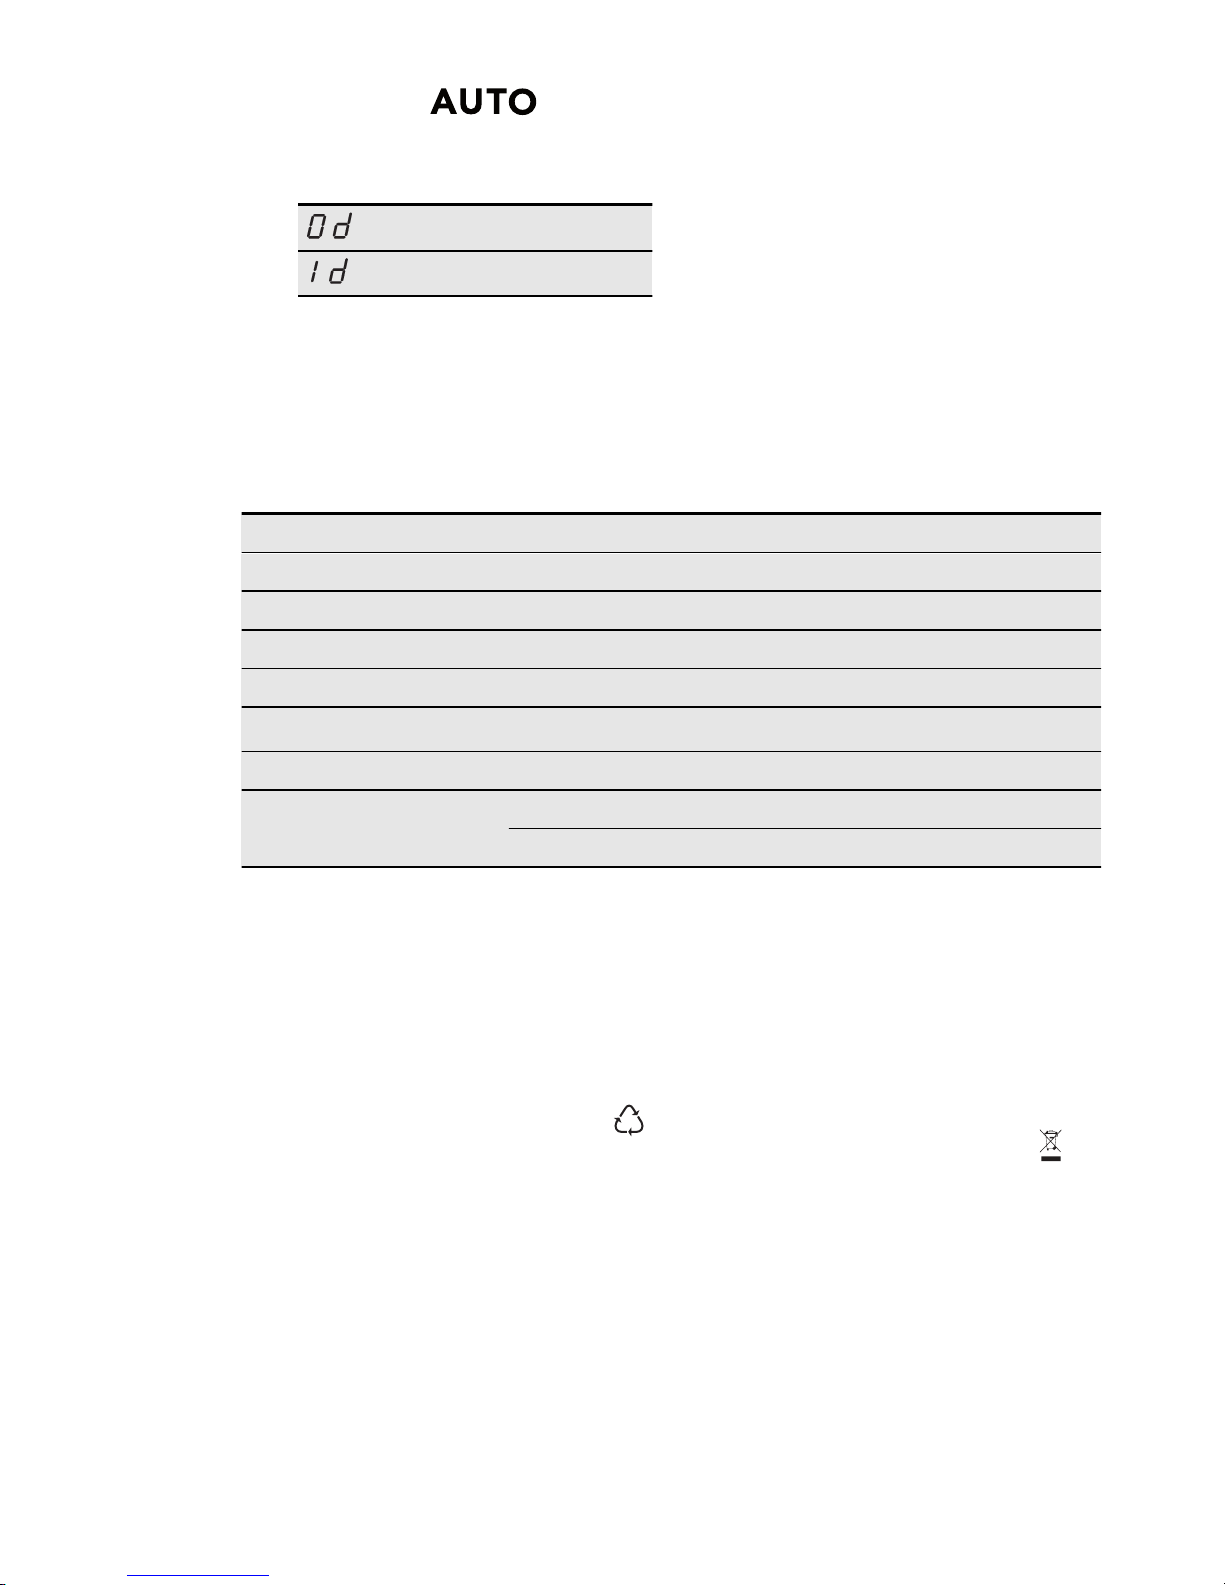
• The display shows the current setting.
Rinse aid dispenser off
Rinse aid dispenser on
5. Press TimeSaver to change the set-
ting.
6. Press the on/off button to deactivate
the appliance and to confirm the setting.
7. Adjust the released quantity of rinse
aid.
8.
Fill the rinse aid dispenser.
11. TECHNICAL INFORMATION
Dimensions Width / Height / Depth (mm) 596 / 850 / 610
Electrical connection Refer to the rating plate.
Voltage 220-240 V
Frequency 50 Hz
Water supply pressure Min. / max. (bar / MPa) (0.5 / 0.05 ) / (8 / 0.8 )
Water supply
1)
Cold water or hot water
2)
max. 60 °C
Capacity Place settings 12
Power consumption Left-on mode 0.10 W
Off-mode 0.10 W
1)
Connect the water inlet hose to a water tap with a 3/4'' thread.
2)
If the hot water comes from alternative sources of energy, (e.g. solar panels, aeolian
energy), use the hot water supply to decrease energy consumption.
12. ENVIRONMENT CONCERNS
Recycle the materials with the symbol
. Put the packaging in applicable
containers to recycle it.
Help protect the environment and human
health and to recycle waste of electrical
and electronic appliances. Do not dispose
appliances marked with the symbol
with the household waste. Return the
product to your local recycling facility or
contact your municipal office.
18
www.electrolux.com
Page 19

ENGLISH 19
Page 20
www.electrolux.com/shop
117918520-A-262012
 Loading...