

Page 1
manuel d’utilisation
user manual
Benutzerhandbuch
manuale d’istruzioni
Réfrigérateur à vin
Wine refrigerator
Weinkühlschrank
Frigorifero per vino
ERT13350WK
Page 2

2 electrolux
Les symboles suivants sont utilisés dans la présente notice d’utilisation:
Informations importantes concernant votre sécurité et consignes pour éviter tout
endommagement de l’appareil.
Conseils et recommandations
Informations liées à la protection de l’environnement
The following symbols are used in this manual:
Important information concerning your personal safety and information on how to avoid
damaging the appliance.
General information and tips
Environmental information
In dem vorliegenden Handbuch werden folgende Symbole verwendet:
Achtung! Unbedingt lesen! Wichtige Hinweise zur Sicherheit von Personen und
Informationen zur Vermeidung von Geräteschäden.
Allgemeine Informationen und Empfehlungen
Umweltinformationen
In questo manuale, sono utilizzati i seguenti simboli:
Informazioni importanti per la sicurezza personale e la prevenzione di danni
all’apparecchiatura.
Informazioni e suggerimenti generali
Informazioni ambientali
Page 3

SOMMAIRE
electrolux 3
Electrolux. Thinking of you.
Partagez notre imagination sur www.electrolux.com
Consignes de sécurité 3
Bandeau de commande 5
Fonctionnement 6
Entretien 7
Caractéristiques techniques 8
Service après-vente et pièces
de rechange 8
CONSIGNES DE SÉCURITÉ
Conservez cette notice d’utilisation avec
votre appareil. Si l’appareil venait à être
vendu ou cédé à une autre personne,
assurez-vous que la notice d’utilisation
l’accompagne. Le nouvel utilisateur pourra
alors être informé du fonctionnement
de l’appareil et des avertissements s’y
rapportant.
Cet appareil est muni de fermetures
magnétiques. S’il remplace l’appareil
équipé d’une fermeture à ressort, nous
vous conseillons de rendre celle-ci
inutilisable avant de vous en débarrasser.
Cela empêchera les enfants de s’enfermer
dans l’appareil et de mettre ainsi leur vie en
danger.
Ces avertissements ont été rédigés pour
votre sécurité. Nous vous prions de bien
vouloir lire attentivement cette notice avant
d’installer et d’utiliser l’appareil.
Consignes générales de sécurité
Votre appareil est destiné à un usage
domestique normal. Cet appareil est conçu
uniquement pour la conservation du vin,
comme indiqué dans la présente notice
d’utilisation.
ATTENTION
Risque de blessures provoquées par des
débris de verre! Si le meuble est transporté
à une altitude de plus de 1100m, les vitres
de la porte risquent de se briser. La porte
peut également se rompre. Les rebords
Branchement électrique 8
Installation 9
En cas d’anomalie de fonctionnement 12
En matière de protection de
l’environnement 12
Sous réserve de modifications
tranchants des fragments peuvent alors
entraîner de graves blessures. Prenez les
mesures de précaution nécessaires.
• Cet appareil n’est pas destiné à
être utilisé par des enfants ou des
personnes dont les capacités physiques,
sensorielles ou mentales, ou le manque
d’expérience et de connaissances les
empêchent d’utiliser l’appareil sans
risque lorsqu’ils sont sans surveillance
ou en l’absence d’instructions d’une
personne responsable qui puisse leur
assurer une utilisation de l’appareil sans
danger. Veiller à ce que les enfants ne
jouent pas avec l’appareil.
• Toute modification de l’appareil ou de
ses spécifications représente un risque
de danger.
• Avant toute opération d’entretien ou de
nettoyage, mettez à l’arrêt l’appareil et
débranchez-le.
• Cet appareil est lourd. Faite attention lors
de son déplacement.
• Lors du transport et de l’installation
de l’appareil, veillez à ce que le circuit
réfrigérant ne soit pas endommagé.
• L’appareil ne doit pas être situé à
proximité de radiateurs ou cuisinières à
gaz.
• Évitez une exposition prolongée de
l’appareil aux rayons solaires.
• L’appareil doit disposer d’un espace
d’aération suffisant pour permettre
une ventilation adéquate et éviter tout
endommagement du circuit frigorifique.
Page 4
4 electrolux
• Ne faites pas fonctionner d’appareils
électriques (sorbetières électriques, etc.)
à l’intérieur de l’appareil réfrigérant.
Service après-vente et réparations
• Ne confiez les travaux électriques
de votre habitation nécessaires à
l’installation de votre appareil qu’à un
électricien qualifié.
• Cet appareil ne doit être entretenu
et réparé que par un S.A.V. agréé,
exclusivement avec des pièces d’origine.
• N’essayez en aucun cas de réparer
l’appareil vous-même. Les réparations
effectuées par du personnel non qualifié
peuvent provoquer des blessures ou le
mauvais fonctionnement de l’appareil.
Contactez le service après-vente de votre
magasin vendeur et exigez des pièces
d’origine.
• Cet appareil contient des hydrocarbures
dans son circuit de réfrigération;
l’entretien et la recharge ne doivent donc
être effectués que par du personnel
qualifié.
Emploi
• Ce réfrigérateur à vins est conçu
exclusivement pour un usage
domestique et pour la conservation de
vin potable.
• Vous obtiendrez un meilleur rendement
en utilisant les températures ambiantes
suivantes:
Classe climatique Température
ambiante
SN +10 °C à +32 °C
N +16 °C à +32 °C
ST +16 °C à +38 °C
T +16 °C à +43 °C
La classe climatique figure sur la plaque
signalétique de votre appareil.
• Avertissement : lorsque la température
ambiante excède la plage de température
correspondant à la classe climatique
de l’appareil, il convient d’observer
les instructions suivantes: lorsque
la température ambiante a atteint le
niveau maximum, la température de
conservation à l’intérieur du réfrigérateur
ne peut alors plus être garantie: il est
donc préférable de consommer les
aliments stockés le plus rapidement
possible.
• Ne posez pas d’éléments chauds sur les
parties en plastique de l’appareil.
• Ne stockez pas de gaz et de liquides
inflammables dans l’appareil car il y a un
risque d’explosion.
• Ne placez pas de bouteilles de vin
directement contre la paroi arrière du
compartiment.
• Suivez scrupuleusement les instructions
de conservation fournies par le fabricant.
Halten Sie sich an die betreffenden
Anweisungen.
• Les parois de l’appareil sont composées
de tuyaux par lesquels s’écoule le fluide
frigorigène. La perforation de l’un de ces
tuyaux endommagerait irréversiblement
l’appareil, le rendant inutilisable et
entraînant la perte éventuelle des
denrées qu’il conserve. N’UTILISEZ PAS
D’OBJETS POINTUS OU TRANCHANTS
pour dégivrer l’appareil. Utilisez de
préférence une spatule ou une raclette.
N’essayez en aucun cas d’éliminer les
couches de givre endurci en cognant
les parois de l’appareil. Laissez-les
plutôt se décongeler afin de dégivrer
convenablement l’appareil.
Instructions d’installation
Attention: Pour le branchement
électrique, suivez attentivement les
instructions fournies dans les chapitres
correspondants.
• Déballez l’appareil et vérifiez qu’il
n’est pas endommagé. Ne branchez
pas l’appareil s’il est endommagé.
Signalez immédiatement au revendeur
de l’appareil les dommages constatés.
Dansce cas, conservez l’emballage.
• Pendant le fonctionnement normal,
le condenseur et/ou le compresseur
à l’arrière de l’appareil s’échauffent
sensiblement. Pour des raisons de
sécurité et comme indiqué dans les
instructions, un minimum d’aération doit
être prévu.
Attention : veillez à ce que les
orices de ventilation ne soient pas
obstrués.
Page 5
electrolux 5
• Veillez à ne pas écraser le cordon
d’alimentation avec l’appareil.
Attention: si le cordon d’alimentation
est endommagé, il doit être remplacé
par un cordon d’alimentation certifié.
Cette opération ne peut être effectuée
que par une personne habilitée, par votre
vendeur ou par le fabricant
• Si l’appareil est transporté
horizontalement, il est possible que
l’huile renfermée dans le compresseur
s’écoule dans le circuit frigorifique. Il
est conseillé d’attendre au moins deux
heures avant de brancher l’appareil pour
que le circuit frigorifique soit stabilisé.
• Certains composants de cet appareil
s’échauffent naturellement. Pour des
raisons de sécurité et pour le bon
fonctionnement de l’appareil, assurezvous qu’une ventilation correcte et
adaptée est prévue. Reportez-vous aux
instructions d’installation.
• Les composants qui s’échauffent
ne doivent pas être exposés. Il est
préférable, dans la mesure du possible,
de positionner l’appareil dos au mur.
Protection de l’environnement
Le circuit frigorifique et l’isolation de
cet appareil ne contiennent pas de gaz
susceptibles d’endommager la couche
d’ozone. L’appareil ne doit pas être mis au
rebut avec les ordures ménagères et les
déchets urbains. La mousse isolante contient
des gaz inflammables: l’appareil sera mis
au rebut conformément à la réglementation
applicable, qui peut être demandée aux
services locaux. Veillez à ne pas détériorer
l’unité réfrigérante, notamment au dos, à
proximité de l’échangeur de chaleur. Les
matériaux utilisés dans la fabrication de cet
appareil et identifiés par le symbole
sont
recyclables.
Emploi
Nettoyer l’intérieur
Avant d’utiliser l’appareil pour la première
fois, nettoyez l’intérieur et tous les
accessoires avec de l’eau tiède et un savon
inodore (produit utilisé pour la vaisselle),
puis séchez soigneusement.
N’utilisez jamais de produits
abrasifs ou caustiques, ni
d’éponges avec grattoir pour
procéder au nettoyage intérieur et
extérieur de votre appareil.
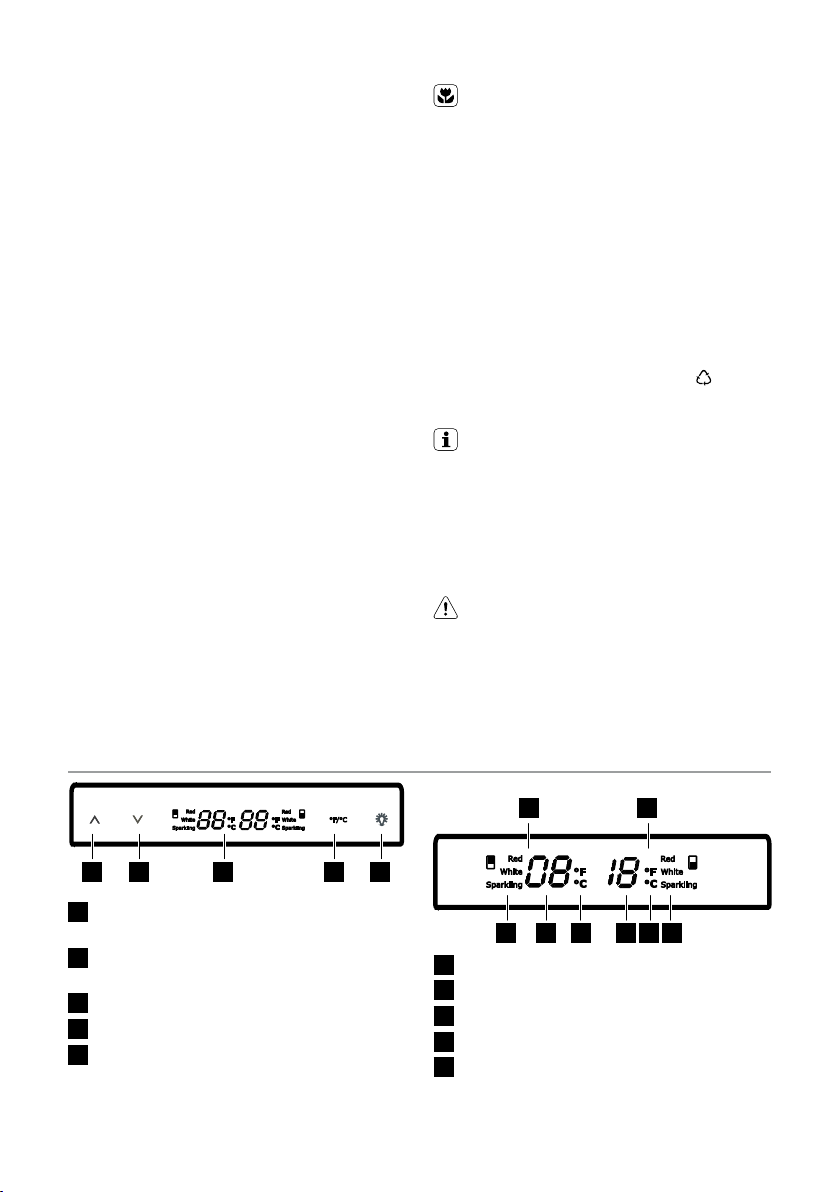
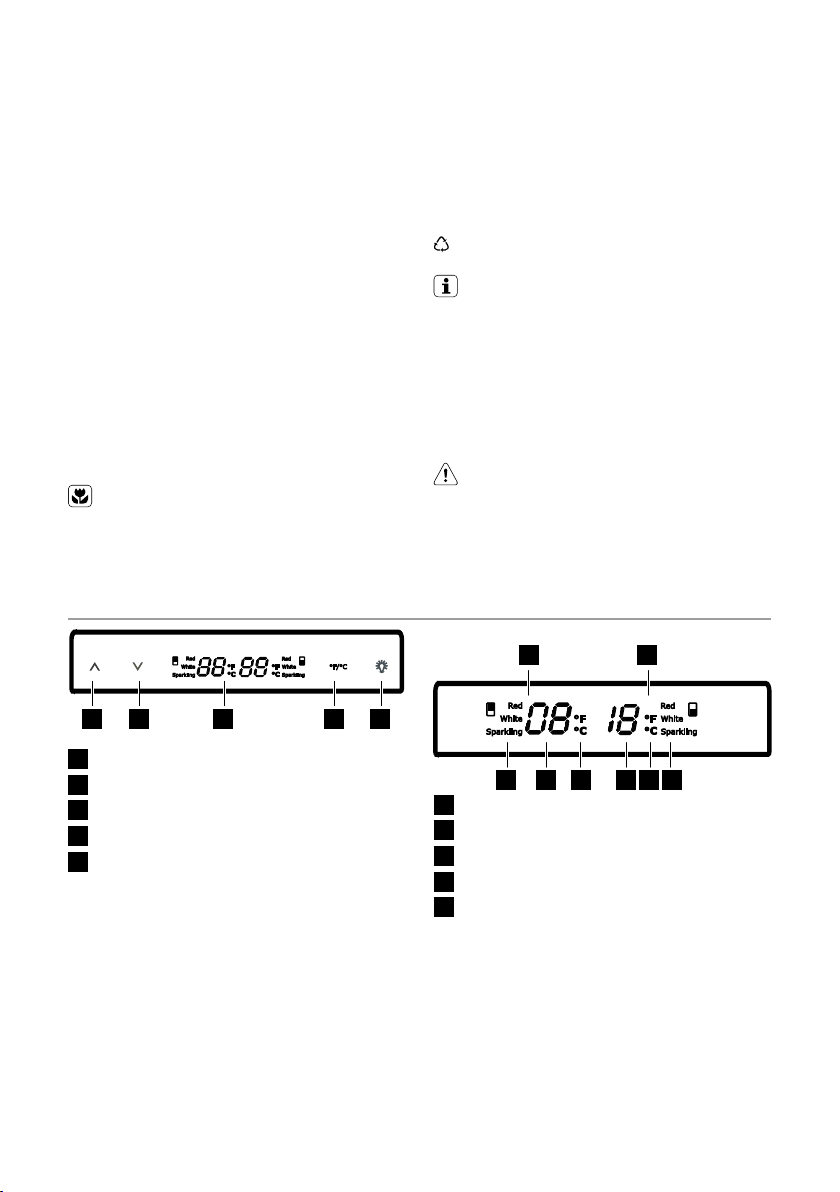
BANDEAU DE COMMANDE
A B C D E
A
Touche de sélection de température de
la zone supérieure
B
Touche de sélection de température de
la zone inférieure
C
Affichage
D
Touche de conversion entre °F et °C
E
Touche d’allumage / d’extinction de la
lumière
Afchage
A B
1 2 3 2 3 1
A
Affichage de la zone supérieure
B
Affichage de la zone inférieure
1
Type de conservation du vin
2
Indicateur de température
3
Indicateur °F ou °C
Page 6

6 electrolux
FONCTIONNEMENT
Le réfrigérateur à vin se met à fonctionner
dès que la prise a été branchée.
Temperaturregelung
Appuyez sur la touche «∧» pour régler la
température de la partie supérieure.
Appuyez sur la touche «∨» pour régler la
température de la partie inférieure.
Pour sélectionner la position correcte,
tenez compte du fait que la température
intérieure dépend des facteurs suivants :
• La température ambiante
• La fréquence d’ouverture de la porte
• La quantité de bouteilles stockées
• L’emplacement de l’appareil
Emploi
Rangement des bouteilles de vin
Veuillez arranger les bouteilles de vin
comme indiqué sur l’illustration.
Respectez scrupuleusement les
recommandations et les conseils qui
vous ont été fournis au moment de
l’achat de votre appareil ou figurant dans
la documentation technique, relatifs à
la qualité, à la durée et à la température
optimale de conservation des vins.
Recommandations en matière de
conservation
La durée de conservation d’un vin dépend
de son vieillissement, du type de raisin,
de sa teneur en alcool et de son taux de
fructose et de tanin. Au moment de l’achat,
vérifiez si le vin est déjà vieilli ou s’il se
bonifiera avec le temps.
Température de conservation
recommandée :
– pour les champagnes et les mousseux,
de 6 à 8°C
– pour les vins blancs, de 10 à 12°C
– pour les vins rosés et rouges légers, de
12 à 16°C
– pour les vins rouges vieillis, de 14 à 16°C
Lorsque vous superposez plusieurs
bouteilles, assurez-vous qu’elles ne
touchent pas la plaque de refroidissement
du réfrigérateur.
Conservez le vin à l’abri de la lumière.
La porte est anti-UV à triple vitrage teinté
pour protéger le vin contre la lumière dans
le cas où le réfrigérateur se trouve dans un
lieu bien éclairé.
Couchez les bouteilles de façon à ce
que les bouchons ne sèchent pas.
Évitez d’allumer trop fréquemment ou
pendant trop longtemps l’éclairage. Le
vin se conserve mieux à l’abri de la lumière.
Manipulez les bouteilles avec soin, de
façon à ne pas remuer le vin.
Bouteille «allumée»
La bouteille peut être allumée par l’éclairage
intérieur comme décrit ci-dessous.
1. L’éclairage intérieur s’allume
automatiquement pendant 5minutes
lors de la mise en marche du
réfrigérateur à vin.
2. L’éclairage intérieur peut être allumé
ou éteint en appuyant sur la touche
Marche/Arrêt de l’éclairage.
3. L’éclairage intérieur s’allume
immédiatement lors de l’ouverture de
la porte. Il s’éteint automatiquement
si la porte reste ouverte pendant dix
minutes.
4. L’éclairage intérieur s’éteint cinq
minutes après la fermeture de la porte.
Page 7
electrolux 7
Conversion °F/°C
La température peut être convertie de
°F en °C en appuyant sur la touche de
conversion °F/°C.
Mise à l’arrêt
Débranchez le réfrigérateur pour le mettre
à l’arrêt.
Clayettes internes avec accessoires
Les clayettes sont amovibles pour
permettre leur nettoyage.
ENTRETIEN
Débranchez l’appareil avant toute opération
d’entretien et de nettoyage.
Attention
Seules les personnes ayant reçu
une formation spécifique aux fluides
inflammables peuvent intervenir sur cet
appareil qui contient des hydrocarbures
dans le circuit frigorifique.
Dégivrage
Le dégivrage du compartiment réfrigérateur
est automatique. L’eau de dégivrage est
collectée dans un récipient situé à l’arrière
de l’appareil, au-dessus du compresseur,
d’où elle s’évapore. Nous vous conseillons
de nettoyer régulièrement la goulotte
d’évacuation de l’eau de dégivrage à l’aide
du «nettoyeur» spécial.
Clayettes portebouteilles
Nettoyez régulièrement la goulotte
d’évacuation de l’eau de dégivrage à l’aide
du «nettoyeur» spécial.
Nettoyez régulièrement le motocompresseur
à l’aide d’une brosse ou d’un aspirateur.
Cette opération permettra d’améliorer
les prestations de votre appareil et de
réduire, en conséquence, la consommation
énergétique. Si vous prévoyez de ne pas
utiliser votre appareil pendant une période
de temps prolongée, il convient de prendre
les précautions suivantes:
– Débranchez l’appareil ;
– dégivrez, nettoyez l’intérieur et tous les
accessoires ;
– laissez la porte entrouverte pour éviter que
des odeurs désagréables ne se forment.
Attention
N’utilisez jamais d’objets métalliques
pour nettoyer votre appareil.
Nettoyage
Après avoir retiré les clayettes, nettoyez
l’intérieur à l’aide d’une solution d’eau tiède
et de détergent doux.
Consignes de sécurité pour le
remplacement des ampoules
Pour des raisons de sécurité, cet appareil
est équipé d’ampoules spéciales,
expressément testées et certifiées pour
l’usage prévu.
Les ampoules doivent être remplacées
uniquement par des ampoules de même
type, présentant des caractéristiques
identiques.
Les ampoules ne doivent être remplacées
que par le service après-vente agréé.
Page 8

8 electrolux
CARACTÉRISTIQUES TECHNIQUES
Capacité nette du réfrigérateur (en l) 108
Consommation énergétique (kWh/24h) 0,551
Consommation énergétique (kWh/an) 201
Dimensions (enmm)
Hauteur 850
Largeur 550
Profondeur 538
Les caractéristiques techniques figurent sur la plaque signalétique située sur le côté
gauche à l’intérieur de l’appareil.
SERVICE APRÈS-VENTE ET PIÈCES DE RECHANGE
Si l’appareil ne fonctionne pas correctement,
procédez aux vérifications suivantes:
• La fiche est branchée à fond dans
la prise murale et l’interrupteur
d’alimentation est en position marche;
• La prise murale est fonctionnelle (vérifiez
si le courant passe en branchant un
autre appareil);
• S’il y a un écoulement d’eau au pied
de l’appareil, vérifiez que la goulotte
d’évacuation de l’eau de givrage n’est
pas obstruée (reportez-vous au chapitre
«Dégivrage»).
• Si, malgré toutes les vérifications
ci-dessus, le problème persiste et
une intervention s’avère nécessaire,
BRANCHEMENT ÉLECTRIQUE
Contrôlez, avant de brancher l’appareil, si
la tension et la fréquence indiquées sur la
plaque signalétique correspondent à celles
de votre réseau. Tolérance admise: ±6%
de la tension nominale. Pour l’adaptation
de l’appareil à des tensions différentes,
l’adjonction d’un autotransformateur d’une
puissance adéquate est indispensable.
L’appareil doit être relié à la terre
La fiche du cordon d’alimentation est
fournie avec un contact à cette fin. Si
contactez le service après-vente de votre
magasin vendeur.
• Si le cordon d’alimentation est
endommagé, remplacez-le par un
cordon ou groupe cordon spécial
disponible auprès du fabricant ou du
service après-vente.
Pour obtenir un service rapide,
il est essentiel qu’au moment où
vous appelez le service après-vente
vous communiquiez le modèle et le
numéro de série de votre appareil.
Ces numéros gurent sur la plaque
signalétique située sur le côté inférieur
gauche de l’appareil.
la prise de courant n’est pas mise à la
terre, branchez l’appareil à une mise
à la terre séparée conformément aux
règlementations en vigueur (prenez conseil
auprès d’un technicien spécialisé).
Le fabricant décline toute
responsabilité en cas d’incident suite
au non-respect des consignes de
sécurité susmentionnées.
Cet appareil est conforme aux
directives communautaires.
Page 9

INSTALLATION
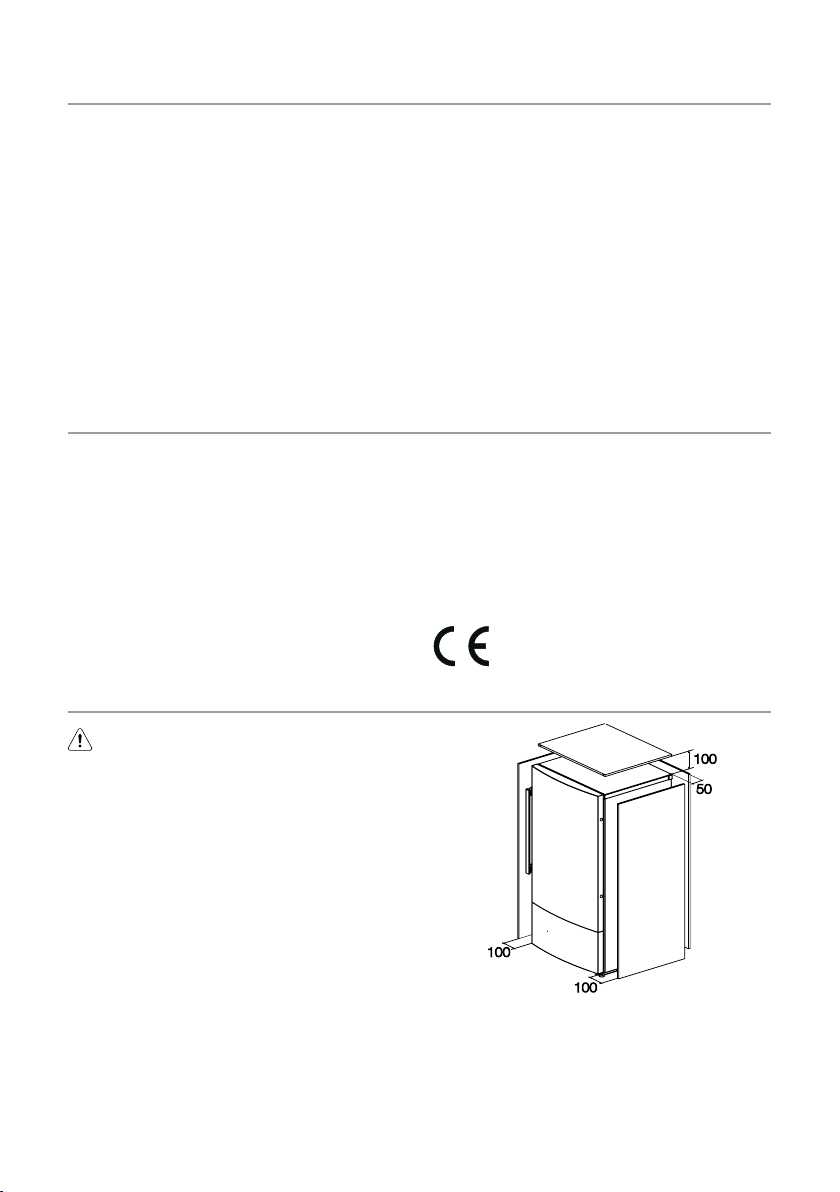
Attention
En vue de maintenir un espace de
ventilation adéquat autour du réfrigérateur,
veuillez garder une distance de 100mm
entre le mur et les deux côtés et le dessus
du réfrigérateur, et une distance de 50mm
entre l’arrière du réfrigérateur et le mur.
Réversibilité de la porte
Avant toute opération, débranchez la prise
de courant. Pour changer le sens d’ouverture
de la porte, procédez comme suit:
electrolux 9
3. Retirez les deux cache-vis.
4. Dévissez les deux vis et retirez la
poignée. Conservez la poignée dans un
endroit sûr.
1. Retirez les deux vis situées à l’arrière du
couvercle supérieur.
2. Appuyez sur le couvercle supérieur
pour le dégager. Puis déplacez la petite
plaque de la gauche vers la droite.
Rangez ensuite le couvercle supérieur à
l’abri pour éviter de l’égratigner.
5. Transférez les caches des orifices de
gauche aux orifices de droite.
Page 10

10 electrolux
6. Dévissez les vis de la charnière de
la porte et enlevez la charnière, puis
soulevez la porte et placez-la sur une
surface rembourrée pour éviter de la
rayer. Rangez la charnière et les vis à
l’abri.
7. Retirez la protection de la porte selon le
sens de rotation illustré ci-dessous. Puis
replacez-la de l’autre côté de la porte.
8. Après avoir tourné la porte, dévissez la
vis et transférez la butée de l’autre côté.
Fixez ensuite la butée à l’aide d’une vis.
9. Fixez la poignée à gauche, puis insérez
le cache en plastique (fourni dans le
sachet de la notice d’utilisation).
10. Posez l’appareil sur un tapis moelleux
ou un article similaire afin de le protéger.
Dévissez et retirez la goupille de la
charnière inférieure et installez-la dans
l’autre orifice.
11. Démontez la charnière inférieure et le
pied de l’appareil en dévissant les vis
fixées dans la charnière inférieure.
Page 11

electrolux 11
12. Déplacez le pied de gauche à droite et
fixez-le dans l’orifice droit tel qu’illustré
ci-dessous.
13. Maintenez la charnière inférieure en
place à l’aide des vis sur l’autre pied.
14. Dévissez et retirez le gond de la
charnière supérieure, et retourner la
charnière supérieure. Puis insérez le
gond dans l’orifice de la charnière
supérieure.
15. Placez la porte sur la charnière
inférieure. Faites adhérer la porte
au meuble et insérez la charnière
supérieure dans l’orifice de la charnière.
Le côté droit et le côté gauche de la
porte doivent être alignés avec les
parois du meuble. Maintenez ensuite la
charnière supérieure en place.
16. Placez le couvercle supérieur sur le
haut du réfrigérateur et poussez-le vers
l’arrière jusqu’à ce qu’il soit accroché
aux blocs fixés.
17. Fixez le couvercle supérieur à l’aide des
deux vis.
Mise à niveau
L’appareil doit être stable et d’aplomb afin
de supprimer toute vibration. La partie
inférieure de l’appareil est dotée de 4
pieds à hauteur réglable (2 à l’avant et 2 à
l’arrière). Avant sa mise à niveau, l’appareil
doit être en position verticale et tous ses
pieds doivent être en contact avec le sol.
Avertissement : Remettez l’appareil en
place, mettez-le d’aplomb, attendez quatre
heures au moins puis branchez-le à la
prise de courant. Si vous ne voulez pas
effectuer personnellement les opérations
décrites ci-dessus, contactez votre service
après-vente le plus proche. Un technicien
du service après-vente procèdera à la
réversibilité des portes à vos frais.
Avertissement : Après avoir changé le
sens d’ouverture des portes, vérifiez que
toutes les vis sont correctement serrées
et que le joint magnétique adhère bien à
l’appareil. Si la température ambiante est
basse (en hiver, par exemple), il se peut que
le joint n’adhère pas parfaitement. Couchez
l’appareil sur le dos.
Page 12

12 electrolux
EN CAS D’ANOMALIE DE FONCTIONNEMENT
Avertissement : Avant toute
intervention sur l’appareil, débranchezle. La résolution des problèmes non
mentionnés dans la présente notice
doit être exclusivement confiée
Mauvais
fonctionnement
Le vin est trop chaud.
L’éclairage intérieur ne
fonctionne pas.
Accumulation de givre,
probablement aussi sur le
joint de porte.
Bruits inhabituels.
Le compresseur
ne démarre pas
immédiatement après la
modification de position
du thermostat.
Il y a de l’eau au pied de
l’appareil.
Cause probable Soluzione
La température n’est pas
correctement réglée.
La porte a été ouverte plus
longtemps que nécessaire.
L’appareil est installé près
d’une source de chaleur.
L’ampoule est défectueuse.
Le joint de porte n’est pas
étanche (peut-être depuis le
transfert des charnières).
L’appareil n’est pas d’aplomb. Réglez les pieds.
L’arrière de l’appareil est
appuyé contre un mur ou
d’autres objets.
Un composant (p. ex. un
tuyau) situé à l’arrière de
l’appareil touche un autre
composant ou le mur.
Ce phénomène est normal, il
ne s’agit pas d’une anomalie.
L’orifice d’évacuation de l’eau
est bouché.
à un électricien qualifié ou à un
professionnel qualifié.
Attention: L’appareil émet certains
bruits pendant son fonctionnement
(compresseur, circuit de réfrigérant).
Veuillez vous reporter au chapitre
«Emploi».
Ne laissez la porte ouverte que le
temps nécessaire.
Veuillez vous reporter au chapitre
«Installation».
Veuillez vous reporter au chapitre
«Entretien ».
Chauffez la partie concernée à
l’aide d’un sèche-cheveux (sans
excéder les 50 °C). Ce faisant, aidez
manuellement le joint à reprendre sa
position naturelle.
Déplacez légèrement l’appareil.
Si nécessaire, pliez le tuyau avec
précaution pour le dégager.
Le compresseur démarre au bout
d’un certain temps.
Reportez-vous au chapitre
«Nettoyage».
EN MATIÈRE DE PROTECTION DE L’ENVIRONNEMENT
Le symbole qui figure sur le produit ou
son emballage indique que ce produit ne
peut être traité comme déchet ménager.
L’appareil doit par conséquent être remis
à un centre de collecte spécialisé dans
le recyclage des appareils électriques
et électroniques. En éliminant l’appareil
comme il se doit, l’utilisateur contribue
à atténuer les conséquences négatives
qu’une mauvaise gestion des déchets peut
avoir sur l’environnement et la santé. Pour
obtenir de plus amples détails à propos du
recyclage de cet appareil, veuillez contacter
le service compétent de votre commune,
la société locale de collecte des ordures
ménagères ou le magasin où vous avez
acheté l’appareil.
Page 13

CONTENTS
electrolux 13
Electrolux. Thinking of you.
Share more of our thinking at www.electrolux.com
Safety information 13
Control panel 15
Operation 15
Maintenance 17
Technical information 17
SAFETY INFORMATION
It is most important that this instruction
book should be retained with the appliance
for future reference. Should the appliance
be sold or transferred to to another owner,
or should you move house and leave the
appliance, always ensure that the book is
supplied with the appliance in order that
the new owner can be acquainted with
the functioning of the appliance and the
relevant warnings.
If this appliance featuring magnetic
door seals is to replace an older
appliance having a spring lock (latch)
on the door or lid, be sure to make
that spring lock unusable before
you discard the old appliance. This
willpreventitfrombecomingadeath-trap for
a child.
These warning are provided in the interest
of safety. You must read them carefully
before installing or using the appliance.
General Safety
The appliance is designed exclusively for
domestic use. The appliance is intended
to be used exclusively for the storage of
the wine as explained in this instruction
booklet.
WARNING
Risk of injury due to broken glass! In case
of transport at an altitude of over 1100m
the glass panes of the door may break. The
door may break. The fragments have sharp
edges and may cause serious injury. Take
appropriate protective action.
Customer service and spare parts 18
Electrical connection 18
Installation 18
What to do if... 22
Environmental concerns 22
Subject to change without notice
• This appliance is not intended for use
by persons (including children) with
reduced physical, sensory or mental
capabilities, or lack of experience and
knowledge, unless they have been given
supervision or instruction concerning use
of the appliance by a person responsible
for their safety. Children should be
supervised to ensure that they do not
play with the appliance.
• It is dangerous to alter the specifications
or modify this product in any way.
• Before any cleaning or maintenance
work is carried out, be sure to switch off
and unplug the appliance.
• This appliance is heavy. Care should be
taken when moving it.
• Take utmost care when handling
your appliance so as not to cause
any damages to the cooling unit with
consequent possible fluid leakages.
• The appliance must not be located close
to radiators or gas cookers.
• Avoid prolonged exposure of the
appliance to direct sunlight.
• There must be adequate ventilation
round the the appliance and any damage
to the refrigerant circuit must be avoided.
• Do not use other electrical appliances
(suchas ice cream makers) inside of
refrigerant appliance.
Service/Repair
• Any electrical work required to install this
appliance should be carried out by a
qualified electrician or competent person.
Page 14

14 electrolux
• This product should be serviced by an
authorized Service Center, and only
genuine spare parts should be used.
• Under no circumstances should you
attempt to repair the appliance yourself.
Repairs carried out by inexperienced
persons may cause injury or more
serious malfunctioning. Refer to your
local Service Centre, and always insist on
genuine spare parts.
• This appliance contains hydrocarbons
in its cooling unit; maintenance and
recharging must therefore only be carried
out by authorized technicians.
Use
• The domestic wine refrigerator is
designed to be used specifically for the
storage of potable wine only.
• Best performance is obtained with
ambient temperature as follows:
Climate class Ambient temperature
SN +10°C to +32°C
N +16°C to +32°C
ST +16°C to +38°C
T +16°C to +43°C
The class of your appliance is shown on
its rating plate.
• Warning: when the ambient temperature
is not included within the range indicated
for the class of this appliance, the
following instructions must be observed:
when the ambient temperature rises
up the maximum level, the storage
temperature in the refrigerator cannot
be guaranteed, it is advisable to use the
food stored as soon as possible.
• Do not put hot pot on the plastic parts of
the appliance.
• Do not store flammable gas and liquid
in the appliance, because they may
explode.
• Do not place wine directly against the real
wall of compartment.
• The appliance’s manufactures storage
recommendations should be strictly
adhered to. Refer to relevant instructions.
• The inner lining of the appliance consists
channels through which the refrigerant
passes. If these should be punctured this
would damage the appliance beyond
repair and cause food loss. DO NOT
USE SHARP INSTRUMENTS to scrape
of frost or ice. Frost may be removed by
using a scraper. Under no circumstances
should be solid ice be forced off the liner.
Solid ice should be allowed to thaw when
defrosting the appliance.
Installation
Important: For electrical connection
carefully follow the instructions given in
specific paragraphs.
• Unpack the appliance and check if there
are damages on it. Do not connect
the appliance if it is damaged. Report
possible damages immediately to the
place you bought it. In that case retain
packing.
• During normal operation, the compressor
and/or condenser at the back of the
appliance heat up considerably. For
safety reasons, minimum ventilation must
be as shown in the instructions.
Attention: keep ventilation openings
clear of obstruction.
• Care must be taken to ensure that
the appliance does not stand on the
electrical supply cable.
Important: if the supply cord is
damaged, it must be replaced by a
special cord or assembly available from
the manufacture or its service agent.
• If the appliance is transported
horizontally, it is possible that the oil
contained in the compressor flows in the
refrigerant circuit. It is advisable to wait
at least two hours before connecting the
appliance to allow the oil to flow back in
the compressor.
• There are working parts in this product
which heat up. Always ensure that there
is adequate ventilation as a failure to
do this will result in component failure
and possible loss. See installation
instructions.
• Parts which heat up should not be
exposed. Wherever possible the back of
the product should be against a wall.
Page 15

electrolux 15
Environment Protection
This appliance does not contain gasses which
could damage the ozone layer, in either its
refrigerant circuit or insulation materials. The
appliance shall not be discarded together with
the urban refuse and rubbish. The insulation
foam contains flammable gasses: the
appliance shall be disposed according to the
applicable regulations to obtain from your local
authorities. Avoid damaging the cooling unit,
especially at the rear near the heat exchanger.
The materials used on this appliance marked
by the symbol
are recyclable.
CONTROL PANEL
A B C D E
A
Temperature circle key of upper zone
B
Temperature circle key of lower zone
C
Display
D
°F and°C exchanging key
E
Light On/Off key
Use
Cleaning the interior
Before using the appliance for the first
time, wash the interior and all internal
accessories with lukewarm water and
some neutral soap so as to remove the
typical smell of a brand-new product, and
then dry naturally and thoroughly.
Do not use detergents or abrasive
powders, as these will damage the
nish.
Display
A B
1 2 3 2 3 1
A
Display of upper zone
B
Display of lower zone
1
Wine storage type
2
Temperature indicator
3
°F or°C indicator
OPERATION
After inserting the plug in the socket, the
wine refrigerator will run immediately.
Temperature regulation
Press “∧” key to circularly regulate the
temperature of upper zone.
Press “∨” key to circularly regulate the
temperature of lower zone.
The correct position must in any case be
determined bearing in mind that the inside
temperature depends on these factors:
• Room temperature
• How often the door is opened
• The quantity of bottles stored
• The position of the appliance
Use
Wine arrangement
Please place the wine bottles as the below
picture.
Page 16

16 electrolux
Keep the wine in the dark. The door is in
anti-UV darkened triple glass to protect the
wine from the light in case the refrigerator is
located in well-lit place.
Lay the bottles down in such a way that
the corks do not dry.
Avoid switching the appliance light
on too often or for too long. Wine keeps
better in dark.
Handle the bottles with care, to avoid
agitating the wine.
Follow the recommendations and
advice received at the time of purchase
or given in the technical documentation
regarding the quality, duration and optimum
storage temperature of the wine.
Storage advice
The storage time for wine depends on
ageing, the type of grapes, alcoholic
content and level of fructose and tannin
contained in it. At the time of purchase,
check if the wine is already aged or if it will
improve over time.
Recommended storage temperature:
– For champagne and sparkling wines,
between 6 and 8°C
– For white wines, between 10 and 12°C
– For rose and light red wines, between 12
and 16°C
– Aged red wines, 14-16°C
When placing various bottles on top of
each other, make sure they do not touch
the refrigerator cooling plate.
Bottle “Light On”
The bottle can be lighted on by the interior
light as below ways.
1. The interior light will be on automatically
for 5 minutes when the wine refrigerator
is powered on.
2. The interior light can be turned on or off
by press the light On/Off key.
3. Interior light will be switched on
immediately when the door is open.
And it will be off automatically after the
door has been open for ten minutes.
4. Interior light will be switched off after the
door is close for 5 minutes.
°F/°C exchange
The temperature can exchanged from °F
to°C by press °F/°C exchanging key.
Switching off
Unplug the refrigerator to switch it off.
Inside accessories Shelves
The shelves can be removed for cleaning.
Bottle
shelves
Page 17

MAINTENANCE
electrolux 17
Unplug the appliance before carrying out
any operation.
Important
This appliance contains hydrocarbons
in the refrigerant circuit; therefore
maintenance and recharging must only be
carried out by personnel authorized by the
manufacturer.
Defrosting
Defrosting in the refrigerator compartment
occurs automatically. The defrost water is
run into a bowl located at the back of the
appliance, above the compressor, where it
evaporates. Make sure to periodically clean
the defrost water drain hole, using the
special “cleaner”.
Cleaning
Cleaning the inside, removing the shelves,
with lukewarm water and a mild detergent.
Periodically clean the defrost water drain
hole, using a special “cleaner”.
Periodically clean motor compressor with
a brush or vacuum cleaner. This operation
will improve operation, with consequent
energy saving. During periods when the
appliance is not being used, take the
following precautions:
– unplug the appliance;
– defrost and clean the inside and all the
accessories;
– leave the door ajar to prevent the
formation of unpleasant odours.
Important
Never use metal objects to clean the
appliance.
Lamp replacement safety instructions
For safety reasons this appliance is
provided with special lamps specifically
tested and certified for the foreseen use.
They can only be replaced with lamps
of the same type and having the same
characteristics.
Replacement lamps must be done only
from authorized customer service.
TECHNICAL INFORMATION
Net Fridge Capacity lt. 108
Energy Consumption kWh/24h 0.551
Energy Consumption kWh/year 201
Dimensionsmm
High 850
Width 550
Depth 538
The technical information are situated in the rating plate on the internal left side of the
appliance.
Page 18
18 electrolux
CUSTOMER SERVICE AND SPARE PARTS
If the appliance is not functioning properly,
check that:
• The plug is firmly in the wall socket and
the mains power switch is on;
• There is an electricity supply (find out by
plugging in another appliance);
• If there are water drops on the bottom of
the cabinet, check that the defrost water
drain opening is not obstructed (see
“Defrosting” section).
• If your appliance is still not working
properly after making the above checks,
contact the nearest service centre.
ELECTRICAL CONNECTION
Before plugging in, ensure that the voltage
and frequency shown on the serial number
plate correspond to your domestic power
supply. Voltage can vary by ±6% of the
rated voltage. For operation with different
voltages, a suitably sized auto-transformer
must be used.
The appliance must be earthed
The power supply cable plug is provided
with a contact for this purpose. If the
INSTALLATION
• If the power cable is damaged, it must
be replaced with a special cable or
assembly available from the manufacture
or the technical assistance service.
To obtain fast service, it is essential
that when you apply for it you specify
the model and serial number of your
appliance which can be found on the
guarantee certicate or on the rating
plate located inside the appliance, on
the bottom left-hand side.
domestic power supply socket is not
earthed, connect the appliance to a
separate earth in compliance with current
regulations, consulting a specialist
technician.
The Manufacturer declines all
responsibility if the above safety
precautions are not observed.
This appliance complies with the
E.E.C. Directives.
Important
In order to reserve the required space
around the refrigerator for ventilation,
please keep 100mm distance between 2
sides and top of the wine refrigerator and
the wall and 50mm distance between rear
of refrigerator and the wall.
Page 19

electrolux 19
Door reversibility
Before carrying out any operations, remove
the plug from the power socket. To change
the opening direction fo the door, proceed
as follows:
1. Remove the two screws at the rear of
the top cover.
2. Push the top cover forward until it is
free. And move the small plate from left
to right. Then put the top cover on a
safe place to avoid scratch.
3. Remove the two screw covers.
4. Remove the two screws and take the
handle off. Put the handle at a safe
place.
5. Move the hole covers from the left side
to the right side.
6. Unscrew the hinge screws and remove
the hinge, then lift the door and put it
on a padded surface to avoid scratch.
Put the hinge and the screws in a safe
place.
7. Remove the cover of door as the
rotation direction shown in the below
Page 20

20 electrolux
picture. And then put it on the other
side of the door.
8. Rotate the door, then unscrew the
screw and transfer the stopper to other
side. Then securely fix the stopper with
screw.
10. Lay the appliance on a soft rug or
similar article to protect it. Unscrew and
remove the lower hinge pin and install it
to other hole.
11. Unscrew the screws that fix the lower
hinge and take the lower hinge with foot
off.
12. Move the foot from left to right and fix it
in right hole show in below picture.
13. Fix the lower hinge with screws on the
other.
9. Fix the handle on the left side, insert the
plastic cover that can be found in bag
for use instruction.
14. Unscrew and remove the upper hinge
pin and then turn the upper hinge over.
Then reinstall the pin to the hole in the
upper hinge.
Page 21

electrolux 21
15. Put the door on the lower hinge. Keep
the door cling the cabinet and put the
upper hinge into the hinge hole. The
right and left side of the door must aline
with the sides of the cabinet. And then
securely fix the upper hinge.
16. Place the top cover on the top of the
refrigerator and push it to back side until
it is hooked by the fixed blocks.
Levelling
The appliance should be level in order
to eliminate vibration. There are 4 height
adjustable feet at bottom of the appliance,
2 feet in the front and 2 feet in the back.
To make the appliance level, it should
be upright and all feet should be firmly
contacted with the floor.
Warning: Reposition, level the appliance,
wait for at least four hours and then
connect it to the power socket. In case
you do not want to carry out the above
mentioned operations, contact the nearest
After Sales Service Force.The After
Sales Service specialist will carry out the
reversibility of the doors at your cost.
Warning: After having reversed the
opening direction of the door check that all
the screws are properly tightened and that
the magnetic seal adheres to the cabinet.
If the ambient temperature is cold (i.e. in
Winter), the gasket may not fit perfectly
to the cabinet. In that case, wait for the
natural fitting of the gasket. Lay down the
appliance back side down.
17. Fixed the top cover by the two screws.
Page 22

22 electrolux
WHAT TO DO IF...
Warning: Before troubleshooting,
disconnect the power supply. Only a
qualified electrician of competent person
Important: There are some sounds
during normal use (compressor, refrigerant
circulation).
must do the troubleshooting that is not in
this manual.
Malfunction Possible cause Remedy
Temperature is not properly
adjusted.
The wine is too warm.
Interior lighting does not
work.
Heavy build up of the
frost, possibly also on the
door seal.
Unusual noises.
The compressor does not
start immediately after
changing the temperature
setting.
Water on the floor. Water drain hole is blocked. See the “Cleaning” section.
Door was open for an
extended period.
The appliance is near a heat
source.
Light bulb is defective.
Door seal is not air tight
(possibly after changing over
the hinges).
Appliance is not level. Readjust the feet.
The appliance is touching the
wall or other objects.
A component, e.g. a pipe,
on rear of the appliance is
touching another part of the
appliance or the wall.
This is normal, no error has
occurred.
Please look in the “Use” section.
Open the door only as long as
necessary.
Please look in the “Installation”
section.
Please look in the “Maintenance”
section.
Carefully warm the leaking sections
of the door seal with a hair dryer (not
hotter than approx. 50°C). At the
same time shape the warmed door
seal by hand such that it sits correctly.
Move the appliance slightly.
If necessary, carefully bend the
component out of the way.
The compressor starts after a period
of time.
ENVIRONMENTAL CONCERNS
The symbol on the product or on its
packaging indicates that this product may
not be treated as household waste. Instead
it shall be handed over to the applicable
collection point for the recycling of electrical
and electronic equipment. By ensuring
this product is disposed of correctly,
you will help prevent potential negative
consequences for the environment and
human health, which could otherwise be
caused by inappropriate waste handling
of this product. For more detailed
information about recycling of this product,
please contact your local city office, your
household waste disposal service or the
shop where you purchased the product.
Page 23

INHALT
electrolux 23
Electrolux. Thinking of you.
Mehr zu unserem Denken finden Sie unter www.electrolux.com
Sicherheitshinweise 23
Bedienfeld 25
Betrieb 26
Wartung 27
Technische Daten 28
SICHERHEITSHINWEISE
Bewahren Sie die Gebrauchsanleitung
zum Nachschlagen immer in der Nähe
des Gerätes auf. Bei einem Weiterverkauf
des Geräts oder sollten Sie bei einem
Umzug das Gerät zurücklassen, muss
das vorliegende Handbuch immer bei
dem Gerät verbleiben, so dass sich der
neue Besitzer mit dem Gebrauch und den
Warnhinweisen vertraut machen kann.
Wenn dieses Gerät mit magnetischer
Türdichtung ein älteres Modell mit
Schnappverschluss (Türlasche) an der
Tür oder auf dem Deckel ersetzt, machen
Sie den Schnappverschluss vor dem
Entsorgen des Altgerätes unbrauchbar. So
verhindern Sie, dass das Gerät zu einer
Todesfalle für Kinder wird.
Alle Warnhinweise dienen stets Ihrer
Sicherheit. Lesen Sie daher die Hinweise
sorgfältig, bevor Sie das Gerät installieren
und in Betrieb nehmen.
Allgemeine Sicherheit
Das Gerät ist ausschließlich zur
Verwendung im Haushalt bestimmt.
Dieses Gerät ist ausschließlich für die
Lagerung von Wein gedacht, wie in dieser
Gebrauchsanweisung beschrieben.
WARNUNG
Verletzungsgefahr durch Glasscherben! Im
Falle eines Transports des Geräts in einer
Höhe von über 1.100m besteht die Gefahr,
dass die Glasscheiben der Tür zerbrechen.
Die Tür kann zerbrechen. Die Scherben
haben scharfe Kanten und können zu
Kundendienst und Ersatzteile 28
Elektrischer Anschluss 28
Installation 29
Was tun, wenn... 32
Umwelttipps 33
Änderungen vorbehalten
ernsthaften Verletzungen führen. Treffen Sie
entsprechende Vorsichtsmaßnahmen.
• Personen (einschließlich Kinder), die
aufgrund ihrer physischen, sensorischen
oder geistigen Fähigkeiten oder ihrer
Unerfahrenheit oder Unkenntnis nicht
in der Lage sind, das Gerät sicher zu
bedienen, sollten dieses Gerät nicht ohne
Aufsicht oder Anweisung durch eine
verantwortliche Person benutzen. Kinder
müssen beaufsichtigt werden, damit sie
nicht am Gerät herumspielen können.
• Technische und anderweitige
Änderungen am Gerät sind gefährlich.
• Schalten Sie vor Reinigungs- oder
Wartungsarbeiten immer das Gerät aus
und ziehen Sie den Netzstecker.
• Dieses Gerät ist schwer. Vorsicht beim
Transport.
• Beim Transport Ihres Geräts sollten Sie
äußerste Vorsicht walten lassen, damit
Sie das Kühlaggregat nicht beschädigen,
aus dem dann möglicherweise
Flüssigkeit austreten kann.
• Das Gerät darf nicht in der Nähe von
Heizkörpern oder Gaskochern installiert
werden.
• Das Gerät nicht über eine längere Zeit
direkter Sonneneinstrahlung aussetzen.
• Im Umkreis um das Gerät muss eine
angemessene Belüftung gewährleistet
werden und der Kältekreislauf darf nicht
beschädigt werden.
• Verwenden Sie keine anderen
Elektrogeräte (wie Speiseeisbereiter)
innerhalb des Kühlgeräts.
Page 24

24 electrolux
Kundendienst/Reparaturen
• Der elektrische Anschluss des Gerätes
darf nur von einem qualifizierten Elektriker
oder einer Fachkraft ausgeführt werden.
• Wenden Sie sich für Reparaturen
und Wartung nur an Fachkräfte der
autorisierten Kundendienststellen und
verlangen Sie stets Original-Ersatzteile.
• Versuchen Sie unter keinen Umständen,
das Gerät selbst zu reparieren.
Reparaturen durch unerfahrene Personen
können zu Verletzungen und schweren
Funktionsstörungen führen. Wenden Sie
sich an Ihre örtliche Kundendienststelle
und verlangen Sie stets OriginalErsatzteile.
• Dieses Gerät enthält Kohlenwasserstoffe
in seinem Kältekreislauf. Aus diesem
Grund dürfen die Wartung und das
Nachfüllen ausschließlich durch
autorisiertes Fachpersonal erfolgen.
Gebruik
• Der Weinkühlschrank für den
Hausgebrauch ist speziell für die
Lagerung von Wein, der zum Verzehr
bestimmt ist, entwickelt worden.
• Die optimale Leistung wird bei folgenden
Umgebungstemperaturen erzielt:
Klimaklasse Umgebungstemperatur
SN +10 °C bis +32 °C
N +16 °C bis +32 °C
ST +16 °C bis +38 °C
T +16 °C bis +43 °C
Die Klimaklasse Ihres Geräts ist auf dem
Typenschild angegeben.
• Warnung: Wenn die
Umgebungstemperatur nicht in dem
Bereich liegt, der für die Klimaklasse
dieses Geräts angegeben ist, müssen
die folgenden Hinweise befolgt werden:
Wenn die Umgebungstemperatur
über der Höchstgrenze liegt, kann die
Lagertemperatur im Kühlschrank nicht
gewährleistet werden. In diesem Fall
sollten die gelagerten Lebensmittel so
schnell wie möglich verzehrt werden.
• Stellen Sie keine heißen Töpfe auf die
Kunststoffteile des Gerätes.
• Lagern Sie keine feuergefährlichen Gase
oder Flüssigkeiten in dem Gerät, weil
diese Explosionsgefahren verursachen.
• Lagern Sie Wein niemals direkt an der
Rückwand des Innenraums.
• Die Lagerempfehlungen des
Geräteherstellers sollten strikt eingehalten
werden. Halten Sie sich an die
betreffenden Anweisungen.
• In der Innenauskleidung des Geräts sind
die Kanäle, durch die das Kältemittel
fließt. Falls diese durch ein Leck
beschädigt werden, würde dies zu einen
irreparablen Geräteschaden führen und
die Lebensmittel würden verderben.
KEINE SCHARFEN GEGENSTÄNDE zum
Entfernen von Reif und Eis verwenden.
Reif kann mit einem Schaber entfernt
werden. Unter keinen Umständen darf
festes Eis von der Auskleidung unter
Kraftanwendung entfernt werden. Festes
Eis muss von selber tauen, wenn das
Gerät abgetaut wird.
Installation
Wichtig: Halten Sie sich für den
elektrischen Anschluss strikt an die
Anweisungen der betreffenden Abschnitte.
• Kontrollieren Sie nach dem
Auspacken das Gerät auf eventuelle
Beschädigungen. Nehmen Sie das Gerät
nicht in Betrieb, wenn es beschädigt
ist. Melden Sie die Schäden umgehend
dem Händler, bei dem Sie es erworben
haben. Bewahren Sie in diesem Fall die
Verpackung auf.
• Während das Gerät in Betrieb ist,
werden der Kondensator und der
Kompressor, die sich auf der Rückseite
des Gerätes befinden, heiß. Für eine
optimale Belüftung des Gerätes müssen
aus Sicherheitsgründen die minimalen
Lüftungsfreiräume (Abb.) eingehalten
werden.
Wichtig: Die Lüftungsöffnungen
müssen immer sauber gehalten
werden.
• Achten Sie bei der Montage darauf, dass
das Gerät nicht auf dem Netzkabel steht.
Wichtig: Eine beschädigte Netzzuleitung
muss durch ein Spezialkabel bzw. einen
Kabelsatz ersetzt werden, die beim
Page 25
electrolux 25
Hersteller oder den Kundendienststellen
erhältlich sind.
• Wenn das Gerät in der Waagerechten
transportiert wird, besteht die
Möglichkeit, dass das im Kompressor
enthaltene Öl in den Kältekreislauf fließt.
Lassen Sie das Gerät mindestens zwei
Stunden stehen, bevor Sie es elektrisch
anschließen, damit das Öl in den
Kompressor zurückfließen kann.
• Das Gerät hat Bauteile, die sich erhitzen.
Eine ausreichende Belüftung muss
jederzeit sichergestellt sein, denn wenn
dies nicht der Fall ist, führt dies zum
Ausfall von Bauteilen und möglicher
Zerstörung. Siehe Montageanleitung.
• Teile, die sich erhitzen, dürfen nicht
frei zugänglich sein. Das Gerät sollte
möglichst mit der Rückseite gegen eine
Wand aufgestellt werden.
Umweltschutz
Das Gerät enthält im Kältekreislauf oder in
dem Isoliermaterial keine ozonschädigenden
Gase. Das Gerät darf nicht mit dem normalen
BEDIENFELD
Hausmüll entsorgt werden. Die Isolierung
enthält entzündliche Gase: Das Gerät muss
gemäß den geltenden Vorschriften entsorgt
werden, die Sie bei Ihrer Gemeinde-/
Stadtverwaltung erhalten. Nicht das
Kälteaggregat beschädigen, insbesondere
nicht in der Nähe des Wärmetauschers. Die
Werkstoffe des Geräts, die mit dem Symbol
gekennzeichnet sind, sind recyclingfähig.
Gebruik
Reinigung des Innenraums
Bevor Sie das Gerät in Betrieb nehmen,
beseitigen Sie den typischen „Neugeruch“
am besten durch Reinigen der Innenteile
mit lauwarmem Wasser und einer neutralen
Seife. An der Luft vollständig trocknen
lassen.
Verwenden Sie keine
Reinigungsmittel oder
Scheuerpulver, da hierdurch die
Oberäche beschädigt wird.
Anzeige
A B
A B C D E
A
Temperaturkreistaste der oberen Zone
B
Temperaturkreistaste der unteren Zone
C
Anzeige
D
°F- und°C-Wechseltaste
E
Licht An/Aus-Taste
1 2 3 2 3 1
A
Anzeige der oberen Zone
B
Anzeige der unteren Zone
1
Weinlagerungstyp
2
Temperaturanzeige
3
°F- oder°C-Anzeige
Page 26

26 electrolux
BETRIEB
Nach dem Einstecken des Netzsteckers
beginnt der Weinkühlschrank sofort zu
arbeiten.
Temperaturregelung
Drücken Sie die „∧”-Taste, um die
Temperatur der oberen Zone zu regeln.
Drücken Sie die „∨”-Taste, um die
Temperatur der unteren Zone zu regeln.
Für eine korrekte Einstellung ist zu
berücksichtigen, dass die Innentemperatur
von den folgenden Faktoren abhängt:
• Raumtemperatur
• Häufigkeit der Türöffnung
• Anzahl der eingelagerten Flaschen
• Standort des Gerätes
Gebruik
Lagerung des Weins
Bitte lagern Sie die Weinflaschen wie im
unteren Bild gezeigt.
Gehen Sie vorsichtig mit den Flaschen
um, damit der Wein nicht zu sehr
geschüttelt wird.
Befolgen Sie die Empfehlungen und
Ratschläge, die Sie beim Kauf erhalten
haben oder die Sie den Unterlagen über die
Qualität, die Haltbarkeit und die optimale
Lagertemperatur entnehmen können.
Hinweise zur Lagerung
Die Lagerungszeit des Weins hängt von
der Reife, der Rebsorte, dem Alkohol-,
Fruchtzucker- und Tanningehalt ab. Achten
Sie beim Kauf darauf, ob der Wein bereits
abgelagert ist oder noch im Laufe der Zeit
reifen kann.
Empfohlene Lagertemperaturen:
– Champagner und Schaumweine
zwischen 6 und 8 °C
– Weißweine zwischen 10 und 12 °C
– Rosé- und leichte Rotweine zwischen 12
und 16 °C
– Ältere Rotweine zwischen 14 und 16 °C
Falls Sie die Flaschen übereinander
legen, vergewissern Sie sich, dass sie
nicht die Kühlplatte des Kühlschranks
berühren.
Lagern Sie den Wein im Dunklen.
Die Tür besteht aus dreifach UV
absorbierendem Mattglas, das den Wein
vor Licht schützt, falls der Kühlschrank in
einem hell beleuchteten Raum steht.
Lagern Sie die Flaschen so, dass die
Korken nicht austrocknen.
Vermeiden Sie, die Gerätebeleuchtung
zu oft oder zu lange einzuschalten. Wein
hält sich besser im Dunklen.
Beleuchtung der Flaschen
Eine Flasche kann in den folgenden Fällen
vom Licht der Innenbeleuchtung beleuchtet
werden.
1. Die Innenbeleuchtung wird automatisch
5 Minuten lang eingeschaltet sein, wenn
der Kühlschrank eingeschaltet wird.
2. Die Innenbeleuchtung kann durch
Drücken der Licht-An/Aus-Taste anoder ausgeschaltet werden.
3. Die Innenbeleuchtung schaltet sich
sofort ein, wenn die Tür geöffnet
ist. Bleibt die Tür 10 Minuten lang
geöffnet, schaltet sich die Beleuchtung
automatisch aus.
Page 27

4. Die Innenbeleuchtung schaltet sich
nach Ablauf von 5 Minuten, nachdem
die Tür geschlossen wurde, aus.
°F/°C-Wechsel
Die Temperatur kann von°F zu°C
durch Drücken der°F/°C-Wechseltaste
gewechselt werden.
Ausschalten des Geräts
Ziehen Sie den Netzstecker, um den
Kühlschrank auszuschalten.
Regalablagen (Innenzubehör)
Die Regalablagen können zur Reinigung
herausgenommen werden.
WARTUNG
electrolux 27
Flaschenabstellfächer
Vor jeder Reinigungs- und Wartungsarbeit
den Netzstecker ziehen.
Wichtig
Dieses Gerät enthält Kohlenwasserstoffe
in seinem Kältekreislauf. Die Wartung und
das Nachfüllen dürfen ausschließlich durch
vom Hersteller autorisiertes Fachpersonal
erfolgen.
Abtauen
Das Abtauen des Kühlfachs erfolgt
automatisch. Das Abtauwasser wird in
einem Behälter auf der Rückseite über
dem Kompressor aufgefangen, in dem
es verdunstet. Reinigen Sie deshalb
regelmäßig die Abflussöffnung des
Tauwassers mit dem speziellen „Werkzeug”.
Reinigung
Die Regalablagen und Flaschenhalter
entfernen und das Innere mit lauwarmem
Wasser und einem milden Reinigungsmittel
reinigen.
Regelmäßig die Abflussöffnung des
Tauwassers mit einem speziellen
„Werkzeug” reinigen.
Regelmäßig den Kompressor an der
Geräterückseite mit einem Staubsauger
oder einer Bürste reinigen. Damit
verbessern Sie die Funktion des Geräts
und sparen Energie. Halten Sie bei
längeren Stillstandzeiten des Geräts die
folgenden Vorsichtsmaßnahmen ein:
– Ziehen Sie den Netzstecker aus der
Steckdose;
– Tauen Sie das Gerät ab; reinigen Sie den
Innenraum und das Zubehör;
– Lassen Sie die Türen angelehnt, um das
Entstehen unangenehmer Gerüche zu
vermeiden.
Wichtig
Verwenden Sie zur Reinigung des
Geräts niemals Metallgegenstände.
Sicherheitshinweise für das
Auswechseln der Lampen
Aus Sicherheitsgründen ist das Gerät mit
Speziallampen ausgestattet, die für den
vorgesehenen Zweck besonders getestet
und zertifiziert worden sind.
Page 28

28 electrolux
Die Lampen dürfen nur durch solche
des gleichen Typs und mit denselben
Merkmalen ersetzt werden.
Die Ersatzlampen dürfen nur vom
autorisierten Kundendienst eingebaut
werden.
TECHNISCHE DATEN
Netto-Fassungsvermögen (Liter) 108
Energieverbrauch in kWh/24 Std. 0,551
Energieverbrauch in kWh/Jahr 201
Abmessungen inmm:
Hoch 850
Breite 550
Tiefe 538
Die technischen Informationen befinden sich auf dem Typenschild auf der linken Innenseite
des Geräts.
KUNDENDIENST UND ERSATZTEILE
Im Falle einer Störung des Geräts ist
Folgendes zu überprüfen:
• Der Netzstecker muss fest in die
Steckdose eingesteckt sein und der
Strom muss eingeschaltet sein.
• Die Stromversorgung muss funktionieren
(überprüfen Sie dies, indem Sie ein
anderes Gerät anschließen).
• Falls sich Wassertropfen auf der
Unterseite des Geräts befinden, muss
sichergestellt werden, dass die Öffnung
für den Wasserablauf nicht verstopft ist
(siehe Abschnitt „Abtauen”).
• Wenn Ihr Gerät noch immer nicht
korrekt arbeitet, nachdem Sie die oben
genannten Prüfungen durchgeführt
haben, kontaktieren Sie bitte den
nächsten Kundendienst.
• Ein eventuell beschädigtes Netzkabel
darf nur durch ein gleichwertiges
Spezialkabel ersetzt werden, das
Sie vom Hersteller oder über den
Kundendienst beziehen können.
Bitte geben Sie beim Kundendienst
Modell und Seriennummer Ihres Geräts
an. Sie nden diese Daten entweder
auf der Garantiekarte oder auf dem
Typenschild innen links unten am Gerät.
ELEKTRISCHER ANSCHLUSS
Kontrollieren Sie vor der ersten
Inbetriebnahme des Geräts, dass die
Netzspannung und -frequenz Ihres
Hausanschlusses mit den auf dem
Typenschild angegebenen Anschlusswerten
übereinstimmen. Die Spannung kann um
±6 % von der Nennspannung abweichen.
Für die Anpassung des Geräts an andere
Spannungen muss ein Spartransformator
angemessener Leistung vorgeschaltet
werden.
Das Gerät muss geerdet sein.
Zu diesem Zweck ist der Netzkabelstecker
mit einem Schutzkontakt ausgestattet. Falls
die Steckdose Ihres Hausanschlusses nicht
geerdet sein sollte, lassen Sie das Gerät
gemäß den geltenden Vorschriften von
einem qualifizierten Elektriker erden.
Der Hersteller übernimmt keinerlei
Haftung bei Missachtung der
vorstehenden Sicherheitshinweise.
Das Gerät entspricht den ECRichtlinien.
Page 29

INSTALLATION
electrolux 29
Wichtig
Damit ausreichend Platz für die Belüftung
des Kühlschranks vorhanden ist, muss
ein Abstand von 100mm zwischen den
zwei Seitenwänden und der Oberseite des
Weinkühlschranks und der Wand und 50mm
Abstand zwischen der Geräterückseite und
der Wand eingehalten werden.
Wechsel des Türanschlags
Vor der Durchführung von Arbeiten am
Gerät ist stets der Netzstecker aus der
Steckdose zu ziehen. Beim Wechsel des
Türanschlags ist wie folgt vorzugehen:
3. Die zwei Schraubenabdeckungen
entfernen.
4. Die zwei Schrauben entfernen und
den Griff abnehmen. Den Griff sicher
verwahren.
1. Die zwei Schrauben an der Rückseite
der oberen Abdeckung entfernen.
2. Die obere Abdeckung nach vorne
schieben, bis sie lose ist. Die kleine
Platte von links nach rechts schieben.
Die obere Abdeckung dann sicher
verwahren, um sie nicht zu verkratzen.
5. Die Bohrungsabdeckungen von der
linken Seite nun auf der rechten Seite
anbringen.
Page 30

30 electrolux
6. Die Scharnierschrauben abschrauben
und das Scharnier entfernen, dann
die Tür anheben und auf eine weiche
Unterlage stellen, damit sie nicht
verkratzt wird. Das Scharnier und die
Schrauben sicher verwahren.
7. Die Türabdeckung gemäß der
Drehrichtung im unteren Bild entfernen.
Dann an der anderen Seite der Tür
anbringen.
9. Den Griff an der linken Seite befestigen
und die Kunststoffabdeckung, die sich
im Beutel mit der Anleitung befindet,
einstecken.
10. Das Gerät zum Schutz auf einem
weichen Teppich oder Ähnlichem
ablegen. Den unteren Scharnierbolzen
lösen und an dem anderen Loch
montieren.
8. Die Tür drehen, dann die Schrauben
lösen und den Türanschlag an der
anderen Seite anbringen. Dann den
Türanschlag mit den Schrauben
befestigen.
11. Die Schrauben des unteren Scharniers
lösen und das untere Scharnier mit dem
Stellfuß entfernen.
12. Den Stellfuß von der linken Seite an
der rechten Seite anbringen und, wie
im unteren Bild gezeigt, in der rechten
Bohrung befestigen.
Page 31

electrolux 31
13. Das untere Scharnier mit den
Schrauben an der gegenüberliegenden
Seite befestigen.
14. Den oberen Scharnierbolzen
abschrauben und entfernen, dann
das obere Scharnier umdrehen. Dann
den Bolzen wieder in der Bohrung des
oberen Scharniers montieren.
15. Die Tür in das untere Türscharnier
einhängen. Die Tür geschlossen
halten und das obere Scharnier in
der Scharnierbohrung anbringen. Die
rechte und linke Seite der Tür müssen
bündig mit den Seiten des Gerätes
abschließen. Dann das obere Scharnier
sicher befestigen.
16. Die obere Abdeckung auf die
Oberseite des Gerätes legen und zur
Geräterückseite schieben, bis sie in die
angebrachten Blöcke einhakt.
17. Die obere Abdeckung mit den beiden
Schrauben befestigen.
Ausrichten
Das Gerät sollte waagerecht ausgerichtet
sein, um Vibrationen zu vermeiden. An
der Unterseite des Geräts befinden sich
4 verstellbare Füße, 2 vorne und 2 hinten.
Um das Gerät waagerecht auszurichten,
muss es aufrecht stehen und alle Stellfüße
müssen Kontakt zum Boden haben.
Warnung: Rücken Sie das Gerät wieder
an die richtige Stelle und richten Sie es
waagerecht aus. Warten Sie mindestens
vier Stunden, bevor Sie es wieder an die
Stromversorgung anschließen. Wenden Sie
sich bitte an den nächsten Kundendienst,
falls Sie die oben beschriebenen Tätigkeiten
nicht selbst durchführen möchten. Ein
Kundendiensttechniker wird die Türen dann
auf Ihre Kosten umbauen.
Warnung: Überprüfen Sie nach dem
Wechsel des Türanschlags, dass alle
Schrauben fest angezogen sind und die
Magnetdichtung am Schrank anliegt. Bei
niedrigen Umgebungstemperaturen (z. B.
im Winter) kann es vorkommen, dass die
Türdichtung nicht richtig am Gerät anliegt.
Warten Sie in diesem Fall auf die natürliche
Anpassung der Dichtung. Legen Sie das
Gerät auf seine Rückseite.
Page 32

32 electrolux
WAS TUN, WENN...
Warnung: Ziehen Sie vor der
Fehlersuche immer den Netzstecker
aus der Steckdose. Wenn ein Fehler
Wichtig: Während das Gerät in Betrieb
ist, entstehen bestimmte Geräusche
(Kompressor und Kältekreislauf).
auftritt, der in der vorliegenden
Benutzerinformation nicht beschrieben
ist, darf die Fehlersuche nur von einem
qualifizierten Elektriker oder einer
Fachkraft durchgeführt werden.
Störung Mögliche Ursache Abhilfe
Der Wein ist zu warm.
Die Innenbeleuchtung
funktioniert nicht.
Starke Reifbildung,
möglicherweise auch an
der Türdichtung.
Ungewöhnliche
Geräusche.
Der Kompressor
startet nicht sofort
nach dem Ändern der
Temperatureinstellung.
Wasser fließt auf den
Boden.
Die Temperatur ist nicht richtig
eingestellt.
Die Tür war für einen längeren
Zeitraum offen.
Das Gerät steht in der Nähe
einer Wärmequelle.
Die Glühlampe ist defekt.
Die Türdichtung ist nicht
luftdicht (möglicherweise nach
dem Anschlagwechsel der
Tür).
Das Gerät ist nicht
ausgerichtet.
Das Gerät berührt die Wand
oder andere Gegenstände.
Ein Bauteil, z. B. ein Rohr auf
der Rückseite des Geräts
berührt einen anderen Teil des
Geräts oder die Wand.
Das ist keine Störung,
sondern normal.
Der Wasserablauf ist blockiert. Siehe Abschnitt „Reinigung”.
Lesen Sie bitte den Abschnitt
„Gebrauch”.
Öffnen Sie die Tür nur so lange wie
erforderlich.
Lesen Sie bitte den Abschnitt
„Montage”.
Lesen Sie bitte den Abschnitt
„Wartung”.
Erwärmen Sie die undichten
Abschnitte der Türdichtung mit einem
Haartrockner (nicht heißer als ca.
50°C). Formen Sie gleichzeitig die
erwärmte Türdichtung von Hand, bis
sie richtig sitzt.
Stellen Sie die Stellfüße ein.
Bewegen Sie das Gerät etwas.
Biegen Sie ggf. das Bauteil vorsichtig
auf die Seite.
Der Kompressor schaltet sich nach
einer Weile ein.
Page 33

UMWELTTIPPS
electrolux 33
Das Symbol auf dem Produkt oder
seiner Verpackung weist darauf hin,
dass dieses Produkt nicht als normaler
Haushaltsabfall zu behandeln ist. Es
muss stattdessen an die entsprechende
Sammelstelle für das Recycling von
elektrischen und elektronischen
Geräten übergeben werden. Durch eine
vorschriftsmäßige Entsorgung tragen Sie
zum Umweltschutz bei und vermeiden
potentielle Unfallgefahren, die bei einer
unsachgemäßen Entsorgung des
Produktes entstehen können. Wenden Sie
sich für weitere Informationen hinsichtlich
Wiederverwertung und Recycling des
Gerätes an die zuständigen lokalen
Behörden, an die städtische Müllabfuhr
oder an Ihren Fachhändler, bei dem Sie das
Gerät erworben haben.
Page 34

34 electrolux
Electrolux. Thinking of you.
Per conoscere meglio il nostro modo di pensare, visitate il sito www.electrolux.com
SOMMARIO
Informazioni per la sicurezza 34
Pannello dei comandi 36
Uso dell’apparecchio 37
Manutenzione 38
Dati tecnici 39
Informazioni soggette a modifica senza obbligo di preavviso
INFORMAZIONI PER LA SICUREZZA
È molto importante che questo libretto
di istruzioni venga conservato insieme
all’apparecchiatura per poter essere
consultato in futuro. In caso di vendita
o cessione dell’apparecchiatura ad
altre persone, ad esempio a causa di
un trasloco, il libretto di istruzioni deve
rimanere unito all’apparecchiatura in modo
che il nuovo utente possa essere informato
sul suo funzionamento e sulle relative
avvertenze.
Qualora questa apparecchiatura, dotata
di guarnizioni porta magnetiche, venisse
usata in sostituzione di una con chiusura
a scatto, si raccomanda di rendere
quest’ultima inservibile prima di smaltire
la vecchia apparecchiatura. Si eviterà così
che i bambini, giocando, possano rimanervi
intrappolati.
Queste avvertenze sono fornite a tutela
della vostra sicurezza. È assolutamente
necessario leggere il libretto con
attenzione prima di installare o utilizzare
l’apparecchiatura.
Avvertenze di sicurezza generali
Questa apparecchiatura è destinata solo
all’uso domestico. L’apparecchiatura
è stata progettata unicamente per la
conservazione del vino come spiegato nel
presente libretto di istruzioni.
AVVERTENZA
Rischio di lesioni a causa della presenza di
vetri rotti! In caso di trasporto ad altitudini
superiore a 1.100m, i vetri della porta
potrebbero rompersi. La porta potrebbe
Assistenza clienti e ricambi 39
Collegamento elettrico 39
Installazione 40
Cosa fare se... 43
Considerazioni ambientali 44
rompersi. I frammenti hanno spigoli vivi
e potrebbero provocare serie lesioni.
Proteggersi adeguatamente.
• Questa apparecchiatura non è destinata
all’uso da parte di bambini o adulti
con limitate capacità fisiche, sensoriali
o mentali o con scarsa esperienza o
conoscenza sull’uso dell’apparecchiatura
stessa, a meno che non siano sorvegliati
o istruiti da una persona responsabile
della loro sicurezza. È consigliabile
controllare che i bambini non giochino
con l’apparecchiatura.
• È pericoloso cambiare le specifiche
o modificare il prodotto in qualunque
modo.
• Prima di eseguire interventi di
pulizia o manutenzione, spegnere
l’apparecchiatura e disinserire la spina.
• Questo apparecchio è pesante. Prestare
attenzione quando occorre spostarla.
• Prestare particolare attenzione nel
maneggiare l’apparecchiatura, in modo
da non danneggiare l’unità refrigerante
con conseguente possibile fuoriuscita di
liquido.
• L’apparecchiatura non deve essere posta
vicino a radiatori o piani di cottura a gas.
• Evitare un’esposizione prolungata
dell’apparecchiatura alla luce solare
diretta.
• Garantire un’adeguata ventilazione
intorno all’apparecchiatura ed evitare
danni al circuito refrigerante.
• Non utilizzare altre apparecchiature
elettriche (come gelatiere) all’interno
dell’apparecchiatura refrigerante.
Page 35

electrolux 35
Assistenza/Riparazione
• Se si rendesse necessaria una modifica
all’impianto elettrico per l’installazione
dell’apparecchiatura, l’intervento dovrà
essere effettuato da personale qualificato
e competente.
• Gli interventi di assistenza sul prodotto
devono essere eseguiti esclusivamente
da un Centro di assistenza autorizzato e
utilizzando solo componenti di ricambio
originali.
• Non cercare in nessun caso di modificare
o riparare l’apparecchiatura da soli.
Le modifiche o riparazioni eseguite da
persone non esperte possono causare
lesioni o malfunzionamenti più gravi.
Contattare Centro di assistenza locale
e richiedere sempre l’uso di ricambi
originali.
• Questa apparecchiatura contiene
idrocarburi nell’unità di raffreddamento:
pertanto le operazioni di manutenzione
e ricarica devono essere eseguite
esclusivamente da personale autorizzato.
Utilizzare
• Il frigorifero domestico per vino è
progettato per essere utilizzato
specificatamente ed esclusivamente per
la conservazione del vino.
• Migliori prestazioni vengono ottenute
con le temperature ambiente indicate di
seguito:
Classe climatica Temperatura ambiente
SN +10°C – +32°C
N +16°C – +32°C
ST +16°C – +38°C
T +16°C – +43°C
La classe dell’apparecchiatura è indicata
sulla relativa targhetta.
• Avvertenza: quando la temperatura
ambiente non rientra nell’intervallo
indicato per la classe di questa
apparecchiatura, osservare le istruzioni
seguenti: quando la temperatura
ambiente è superiore al livello massimo,
non è possibile garantire la temperatura
di conservazione all’interno del frigorifero,
pertanto si consiglia di consumare gli
alimenti ivi contenuti prima possibile.
• Non appoggiare pentole calde sulle parti
in plastica dell’apparecchiatura.
• Non riporre contenitori di gas o liquidi
infiammabili nell’apparecchiatura perché
potrebbero esplodere.
• Non appoggiare il vino direttamente alla
parete posteriore del comparto.
• Osservare rigorosamente le
raccomandazioni del produttore riguardo
alla conservazione degli alimenti. Leggere
attentamente le relative istruzioni.
• La parete interna dell’apparecchiatura
è composta da canali attraverso i
quali passa il refrigerante. In caso di
perforazione, l’apparecchiatura verrà
danneggiata in modo irreparabile
oltre a conservare gli alimenti in modo
inappropriato. NON USARE OGGETTI
APPUNTITI per rimuovere la brina o il
ghiaccio. È possibile rimuovere la brina
utilizzando un raschietto. Non rimuovere
mai forzatamente il ghiaccio solido dalle
pareti. Far sciogliere il ghiaccio durante lo
scongelamento dell’apparecchiatura.
Installazione
Importante: Per le operazioni di
collegamento elettrico, seguire
attentamente le istruzioni dei paragrafi
corrispondenti.
• Estrarre l’apparecchiatura dall’imballaggio
e assicurarsi che non sia danneggiata.
Se l’apparecchiatura è danneggiata, non
collegarla. Segnalare immediatamente
eventuali danni al punto vendita. In tal
caso, conservare l’imballaggio originale.
• Durante il normale funzionamento, il
compressore e/o condensatore nella parte
posteriore dell’apparecchiatura si scaldano
considerevolmente. Per motivi di sicurezza,
garantire una ventilazione minima come
quella indicata nelle istruzioni.
Attenzione: Assicurarsi che le
aperture di ventilazione non siano
ostruite.
• Controllare che l’apparecchiatura non sia
appoggiata sul cavo dell’alimentazione
elettrica.
Importante: Qualora il cavo di
alimentazione sia danneggiato, deve
Page 36

36 electrolux
essere sostituito con un cavo speciale
o un assieme disponibili presso il
produttore o i rivenditori autorizzati.
• Se l’apparecchiatura viene trasportata
orizzontalmente, è possibile che l’olio
contenuto nel compressore fluisca
nel circuito refrigerante. Si consiglia
di attendere almeno due ore prima
di collegare l’apparecchiatura per
consentire all’olio di defluire nel
compressore.
• In questo prodotto sono presenti
parti in funzioni che si surriscaldano.
Garantire sempre che vi sia una
ventilazione adeguata; in caso contrario,
i componenti non funzioneranno in
maniera corretta e la conservazione degli
alimenti potrebbe essere inappropriata.
Vedere le istruzioni di installazione.
• I componenti che tendono a riscaldarsi
non devono essere esposti. Ove
possibile, il retro del prodotto deve
poggiare a una parete.
Protezione dell’ambiente
Questa apparecchiatura non contiene, né nel
circuito refrigerante né nei materiali isolanti,
gas che possano danneggiare lo strato di
ozono. L’apparecchiatura non deve essere
smaltita insieme ai normali rifiuti urbani. Il
materiale isolante contiene gas infiammabili:
lo smaltimento dell’apparecchiatura deve
essere eseguito secondo le norme vigenti,
da richiedere alle autorità locali. Evitare
di danneggiare l’unità di raffreddamento,
specialmente nella parte posteriore vicino
allo scambiatore di calore. I materiali usati su
questa apparecchiatura contrassegnati dal
simbolo
sono riciclabili.
Utilizzare
Pulizia dell’interno
Prima di utilizzare l’apparecchiatura
per la prima volta, lavare l’interno e e
i relativi accessori con acqua tiepida
e sapone neutro per eliminare il tipico
odore dei prodotti nuovi, quindi asciugare
accuratamente.
Non usare detergenti corrosivi
o polveri abrasive che possano
danneggiare la nitura.
PANNELLO DEI COMANDI
A B C D E
A
Tasto di regolazione temperatura della
zona superiore
B
Tasto di regolazione temperatura della
zona inferiore
C
Display
D
Tasto di commutazione °F e°C
E
Tasto di accensione/spegnimento luce
Display
A
1 2 3
A
Display della zona superiore
B
Display della zona inferiore
1
Tipo di conservazione vino
2
Indicatore della temperatura
3
Indicatore °F o°C
2 3 1
B
Page 37

USO DELL’APPARECCHIO
Dopo aver inserito la spina nella
presa, il frigorifero per vino si azionerà
immediatamente.
Regolazione della temperatura
Premere il tasto “∧” per regolare la
temperatura della zona superiore.
Premere il tasto “∨” per regolare la
temperatura della zona inferiore.
La posizione corretta, comunque, va
individuata tenendo conto che la temperatura
interna dipende dai seguenti fattori:
• Temperatura ambiente
• Frequenza di apertura della porta
• Quantità di bottiglie conservate
• Collocazione dell’apparecchiatura
Utilizzare
Disposizione del vino
Posizionare le bottiglie di vino come
mostrato nella figura seguente.
electrolux 37
Maneggiare le bottiglie con cura, per
evitare di agitare il vino.
Seguire le raccomandazioni e i consigli
ricevuti al momento dell’acquisto o riportati
nella documentazione tecnica relativa
alla qualità, alla durata e alla temperatura
ottimale di conservazione del vino.
Suggerimenti di conservazione
Il tempo di conservazione del vino dipende
dall’invecchiamento, dal tipo d’uva, dal
contenuto alcolico e dal livello di fruttosio
e tannino in esso contenuti. Al momento
dell’acquisto, controllare se il vino è già
invecchiato o se migliorerà col passare del
tempo.
Temperatura di conservazione
consigliata:
– Per champagne e vini frizzanti, tra 6 e
8°C
– Per vini bianchi, tra 10 e 12°C
– Per vini rosé e rossi leggeri, tra 12 e
16°C
– Vini rossi stagionati, 14 – 16°C
In caso di disposizione sovrapposta
delle bottiglie, accertarsi che queste non
tocchino la piastra di raffreddamento del
frigorifero.
Conservare il vino al buio. La porta
è in triplo vetro offuscato e anti UV per
proteggere il vino dalla luce nel caso in
cui il frigorifero si trovi in un luogo molto
illuminato.
Disporre le bottiglie orizzontalmente in
modo che i tappi non si secchino.
Evitare di accendere troppo
spesso o per troppo tempo la luce
dell’apparecchitura. Il vino si conserva
meglio al buio.
“Illuminazione” delle bottiglie
È possibile illuminare le bottiglie tramite la
luce interna nei modi seguenti.
1. La luce interna si accende
automaticamente per 5 minuti quando il
frigorifero per vino viene acceso.
2. La luce interna può essere accesa o
spenta premendo il tasto di accensione/
spegnimento luce.
3. La luce interna si accende
immediatamente dopo l’apertura della
porta. E si spegne automaticamente
dopo che la porta è stata aperta per
dieci minuti.
4. La luce interna si spegne cinque minuti
dopo la chiusura della porta.
Page 38

38 electrolux
Commutazione °F/°C
È possibile commutare la temperatura da
°F a°C premendo il tasto di commutazione
°F/°C.
Spegnimento
Per spegnere il frigorifero, scollegarlo dalla
presa elettrica.
Accessori interni Ripiani
Per pulire i ripiani è possibile rimuoverli dal
frigorifero.
MANUTENZIONE
Ripiani
bottiglie
Scollegare la spina dalla presa di corrente
prima di eseguire qualsiasi operazione.
Importante
Questa apparecchiatura contiene
idrocarburi all’interno del circuito
refrigerante; pertanto le operazioni di
manutenzione e ricarica devono essere
eseguite esclusivamente dal personale
autorizzato dal produttore.
Sbrinamento
Lo sbrinamento nel vano frigorifero avviene
automaticamente. L’acqua derivante
dallo sbrinamento, viene raccolta in una
bacinella, posta nella parte posteriore
sopra il compressore, dove evapora. Si
raccomanda di pulire periodicamente il
foro di scarico dell’acqua di sbrinamento
utilizzando l’apposito “pulitore”.
Pulizia
Pulire l’interno, togliendo i ripiani, con
acqua tiepida e detergente delicato.
Pulire periodicamente il foro di scarico
dell’acqua di sbrinamento, utilizzando un
“pulitore” apposito.
Pulire periodicamente il motocompressore
con una spazzola o un aspirapolvere.
Questa operazione migliorerà il
funzionamento con conseguente
risparmio energetico. Durante i periodi in
cui l’apparecchiatura non è in funzione,
osservare le seguenti precauzioni:
– staccare la spina dalla presa di corrente;
– sbrinare e pulire l’interno e tutti gli
accessori;
– lasciare la porta socchiusa per evitare la
formazione di odori sgradevoli.
Importante
Non usare mai oggetti metallici per
pulire l’apparecchiatura.
Avvertenze di sicurezza per la
sostituzione delle lampade
Per motivi di sicurezza,
quest’apparecchiatura è provvista di
lampade speciali espressamente collaudate
e certificate per l’uso previsto.
La sostituzione è ammessa solo con
lampade aventi stesso tipo e caratteristiche.
La sostituzione delle lampade deve essere
eseguita esclusivamente dal personale
addetto all’assistenza clienti.
Page 39

electrolux 39
DATI TECNICI
Capacità netta del frigorifero lt. 108
Consumo energetico kWh/24h 0,551
Consumo energetico kWh/anno 201
Dimensionimm
Altezza 850
Larghezza 550
Profondità 538
I dati tecnici sono riportati sulla targhetta del modello, applicata sul lato interno sinistro
dell’apparecchiatura.
ASSISTENZA CLIENTI E RICAMBI
Se l’apparecchiatura non funziona
correttamente, controllare che:
• La spia sia collegata correttamente alla
presa e che l’interruttore generale della
rete elettrica sia attivato;
• Ci sia corrente elettrica (provare
collegando un’altra apparecchiatura);
• Se sul fondo del frigorifero sono presenti
gocce d’acqua, controllare che l’apertura
di scarico acqua di sbrinamento
non sia ostruita (vedere la sezione
“Sbrinamento”).
• Se le soluzioni precedentemente indicate
non consentono di risolvere il problema,
COLLEGAMENTO ELETTRICO
Prima di effettuare il collegamento elettrico,
controllare che la tensione nominale e la
frequenza dell’apparecchiatura dichiarate
sulla targhetta coincidano con quelle
domestiche. La tensione può variare
di ±6% dalla tensione nominale. Per
l’uso con tensioni differenti, utilizzare un
autotrasformatore di dimensioni adatte.
L’apparecchiatura deve essere
collegata a terra
La spina del cavo di alimentazione è dotata
di un apposito contatto. Se la presa di
rivolgersi al centro di assistenza più
vicino.
• Se il cavo di alimentazione dovesse
danneggiarsi, sostituirlo con un cavo
speciale o un assieme disponibili presso
il produttore o il servizio di assistenza
tecnica.
Per accelerare i tempi di intervento,
è essenziale specicare al momento
della richiesta il modello e il numero di
serie dell’apparecchiatura, riportati sul
certicato di garanzia o sulla targhetta
del modello applicata sul lato inferiore
sinistro dell’apparecchiatura.
corrente non è messa a terra, collegare
l’apparecchiatura ad un dispositivo
di terra separato conformemente alle
normative vigenti, consultando un tecnico
specializzato.
Il produttore declina ogni
responsabilità qualora le suddette
precauzioni di sicurezza non vengano
rispettate.
Questa apparecchiatura è
conforme alle direttive CEE.
Page 40

40 electrolux
INSTALLAZIONE
Importante
Per garantire lo spazio richiesto che
consenta la ventilazione del frigorifero,
tenere una distanza di 100mm tra la parete
e i due lati e la parte superiore del frigorifero
per vino e una distanza di 50mm tra la
parete e il retro del frigorifero.
Possibilità di invertire la porta
Prima di eseguire le operazioni descritte,
estrarre la spina dalla presa di corrente.
Per modificare la direzione di apertura della
porta, procedere come segue:
3. Rimuovere le coperture delle due viti.
4. Estrarre le due viti e rimuovere la
maniglia. Porre la maniglia in un posto
sicuro.
1. Rimuovere le due viti sul retro della
copertura superiore.
2. Spingere la copertura superiore in avanti
fino a liberarla. Spostare la piastra
piccola da sinistra a destra. Quindi
porre la copertura superiore in un posto
sicuro per evitare che si graffi.
5. Spostare i coprifori dal lati sinistro al lato
destro.
Page 41

electrolux 41
6. Svitare le viti della cerniera e rimuovere
la cerniera, quindi sollevare la porta e
porla su una superficie imbottita per
evitare che si graffi. Posizionare la
cerniera e le viti in un luogo sicuro.
7. Rimuovere la copertura della porta nella
direzione mostrata nella figura in basso.
Quindi porla sull’altro lato della porta.
9. Fissare la maniglia sul lato sinistro e
inserire la copertura in plastica che si
trova nel sacchetto con le istruzioni
d’uso.
10. Poggiare l’apparecchiatura su uno
straccio morbido o qualcosa di simile
per proteggerla. Svitare e rimuovere
il perno della cerniera inferiore, quindi
installarlo nell’altro foro.
8. Ruotare la porta, svitare la vite e
spostare il fermo sull’altro lato. Quindi
fissare saldamento il fermo con la vite.
11. Svitare le viti di fissaggio della cerniera
inferiore ed estrarre la cerniera inferiore
insieme al piede.
Page 42

42 electrolux
12. Spostare il piede da sinistra a destra e
fissarlo nel foro a destra mostrato nella
figura in basso.
13. Fissare la cerniera inferiore con le viti
sull’altro lato.
14. Svitare e rimuovere il perno della
cerniera superiore, quindi capovolgere
la cerniera superiore. Quindi reinstallare
il perno nel foro della cerniera superiore.
15. Posizionare la porta sulla cerniera
inferiore. Tenere la porta aderente al
frigorifero e inserire la cerniera superiore
nel relativo foro. Il lato destro e sinistro
della porta devono essere allineati
con i lati del frigorifero. Quindi, fissare
saldamente la cerniera superiore.
16. Posizionare la copertura superiore sulla
parte superiore del frigorifero e spingerla
verso dietro fino a farla agganciare
tramite i blocchi fissi.
17. Fissare la copertura superiore con le
due viti.
Livellamento
L’apparecchiatura deve essere a livello per
eliminare le vibrazioni. L’apparecchiatura è
dotata di 4 piedi inferiori regolabili in altezza,
2 avanti e 2 dietro. Affinché l’apparecchiatura
sia a livello, deve essere posizionata
verticalmente e tutti i piedi devono essere
saldamente a contatto con il pavimento.
Avvertenza: Riposizionare l’elettrodomestico,
metterlo a livello, attendere almeno quattro
ore ed inserire la spina nella presa di corrente.
Nel caso in cui non desideri eseguire le
operazioni suddette, contattare il Centro di
assistenza più vicino. Un tecnico si occuperà
dell’inversione della porta a carico dell’utente.
Avvertenza: Una volta invertita la direzione
di apertura delle porte, controllare che
tutte le viti siano serrate correttamente e
che la guarnizione magnetica sia aderente
al mobile. Se la temperatura ambiente
è bassa (ad esempio in inverno), è
possibile che la guarnizione non aderisca
perfettamente. In tal caso, attendere
che aderisca naturalmente. Poggiare
nuovamente l’elettrodomestico su un lato.
Page 43
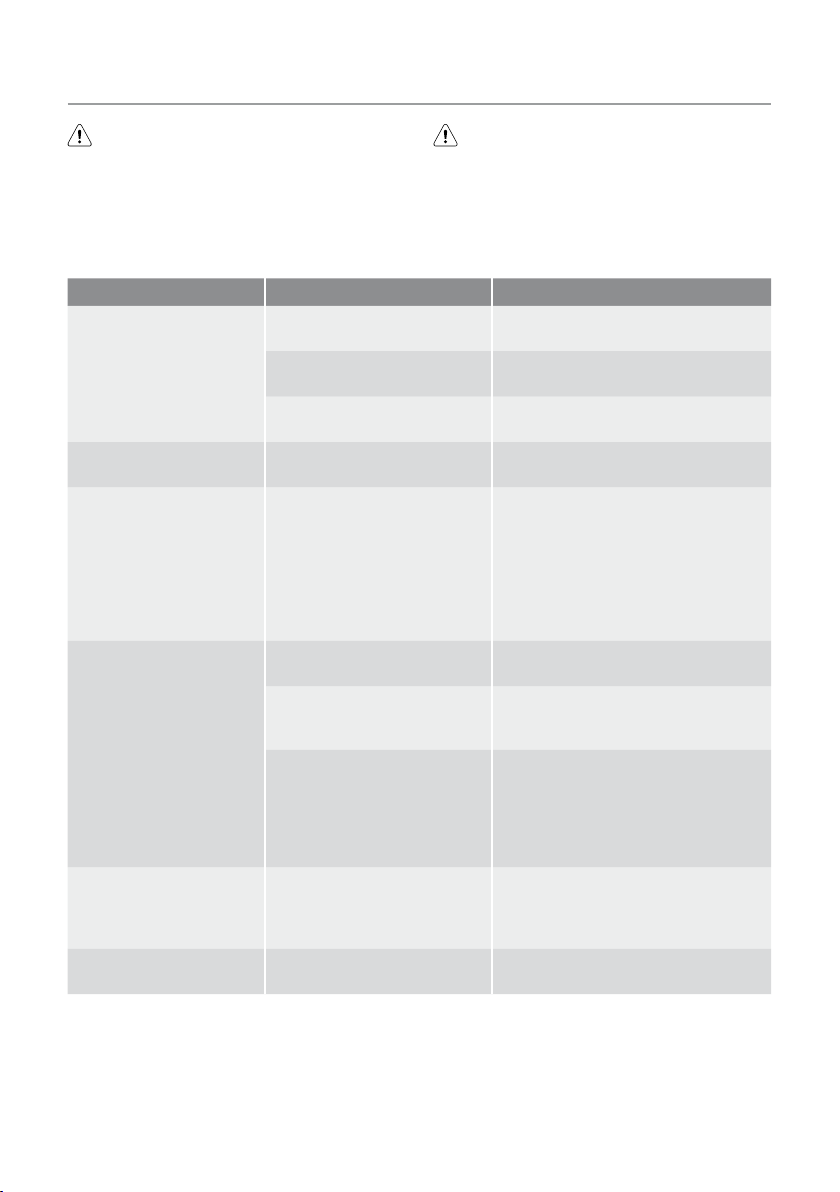
COSA FARE SE...
electrolux 43
Avvertenza: Prima della ricerca
guasti, estrarre la spina dalla presa.
Le operazioni di ricerca guasti non
descritte nel presente manuale devono
Importante: Durante l’uso alcuni
rumori di funzionamento (come
quelli del compressore o del circuito
refrigerante).
essere eseguite esclusivamente da
elettricisti qualificati o da personale
competente.
Malfunzionamento Possibile causa Soluzione
Il vino è troppo caldo.
L’illuminazione interna non
funziona.
Consistente accumulo di
ghiaccio, probabilmente
anche sulla guarnizione
della porta.
Rumorosità insolita.
Il compressore non si
avvia immediatamente
dopo la modifica della
temperatura impostata.
Presenza di acqua sul
pavimento.
La temperatura non è regolata
correttamente.
La porta è rimasta aperta per
un periodo prolungato.
L’apparecchiatura è vicina ad
una fonte di calore.
La lampadina è difettosa.
La guarnizione della porta
non è a tenuta stagna
(probabilmente dopo lo
scambio delle cerniere).
L’apparecchiatura non è a
livello.
L’apparecchiatura è a contatto
con la parete o con altri
oggetti.
Un componente, ad
es. un tubo, sul retro
dell’apparecchiatura è a
contatto con un’altra parte
dell’apparecchiatura o della
parete.
Si tratta di una situazione del
tutto normale che non indica
alcun errore.
Il foro di scarico dell’acqua è
ostruito.
Fare riferimento alla sezione
“Utilizzare”.
Aprire la porta solo il tempo
necessario.
Fare riferimento alla sezione
“Installazione”.
Fare riferimento alla sezione
“Manutenzione”.
Scaldare con cura le sezioni della
guarnizione della porta che mostrano
perdite usando un asciugacapelli
(ad una temperatura non superiore
a ca. 50°C) Contemporaneamente
sagomare la guarnizione scaldata
della porta con le mani in modo che
vada correttamente in sede.
Regolare nuovamente i piedi.
Spostate leggermente
l’apparecchiatura.
Se necessario, flettere con cura il
componente allontanandolo.
Il compressore si avvia dopo un certo
periodo di tempo.
Vedere la sezione “Pulizia”.
Page 44

44 electrolux
CONSIDERAZIONI AMBIENTALI
Il simbolo riportato sul prodotto o
sull’imballo indica che il prodotto non
può essere smaltito insieme ai normali
rifiuti domestici. Consegnarlo al punto
di raccolta appropriato per consentire
il riciclaggio dei componenti elettrici ed
elettronici. Lo smaltimento corretto del
prodotto contribuisce a prevenire potenziali
conseguenze negative per l’ambiente e per
la salute delle persone. Per informazioni
più dettagliate sul riciclaggio di questo
prodotto, rivolgersi all’ufficio locale
competente, al servizio di smaltimento dei
rifiuti domestici o al negozio presso il quale
avete acquistato il prodotto.
Page 45

electrolux 45
Page 46

46 electrolux
Page 47

electrolux 47
Page 48

www.electrolux.com/shop
042011
 Loading...