

Page 1
ERCP3215AW
EN REFRIGERATOR USER MANUAL 2
FR RÉFRIGÉRATEUR NOTICE D'UTILISATION 17
DE KÜHLSCHRANK BENUTZERINFORMATION 33
IT FRIGORIFERO ISTRUZIONI PER L’USO 50
Page 2
CONTENTS
1. SAFETY INFORMATION...................................................................................... 3
2. SAFETY INSTRUCTIONS.....................................................................................4
3. OPERATION........................................................................................................ 5
4. DAILY USE.......................................................................................................... 7
5. HINTS AND TIPS................................................................................................. 9
6. CARE AND CLEANING........................................................................................9
7. TROUBLESHOOTING........................................................................................11
8. INSTALLATION..................................................................................................13
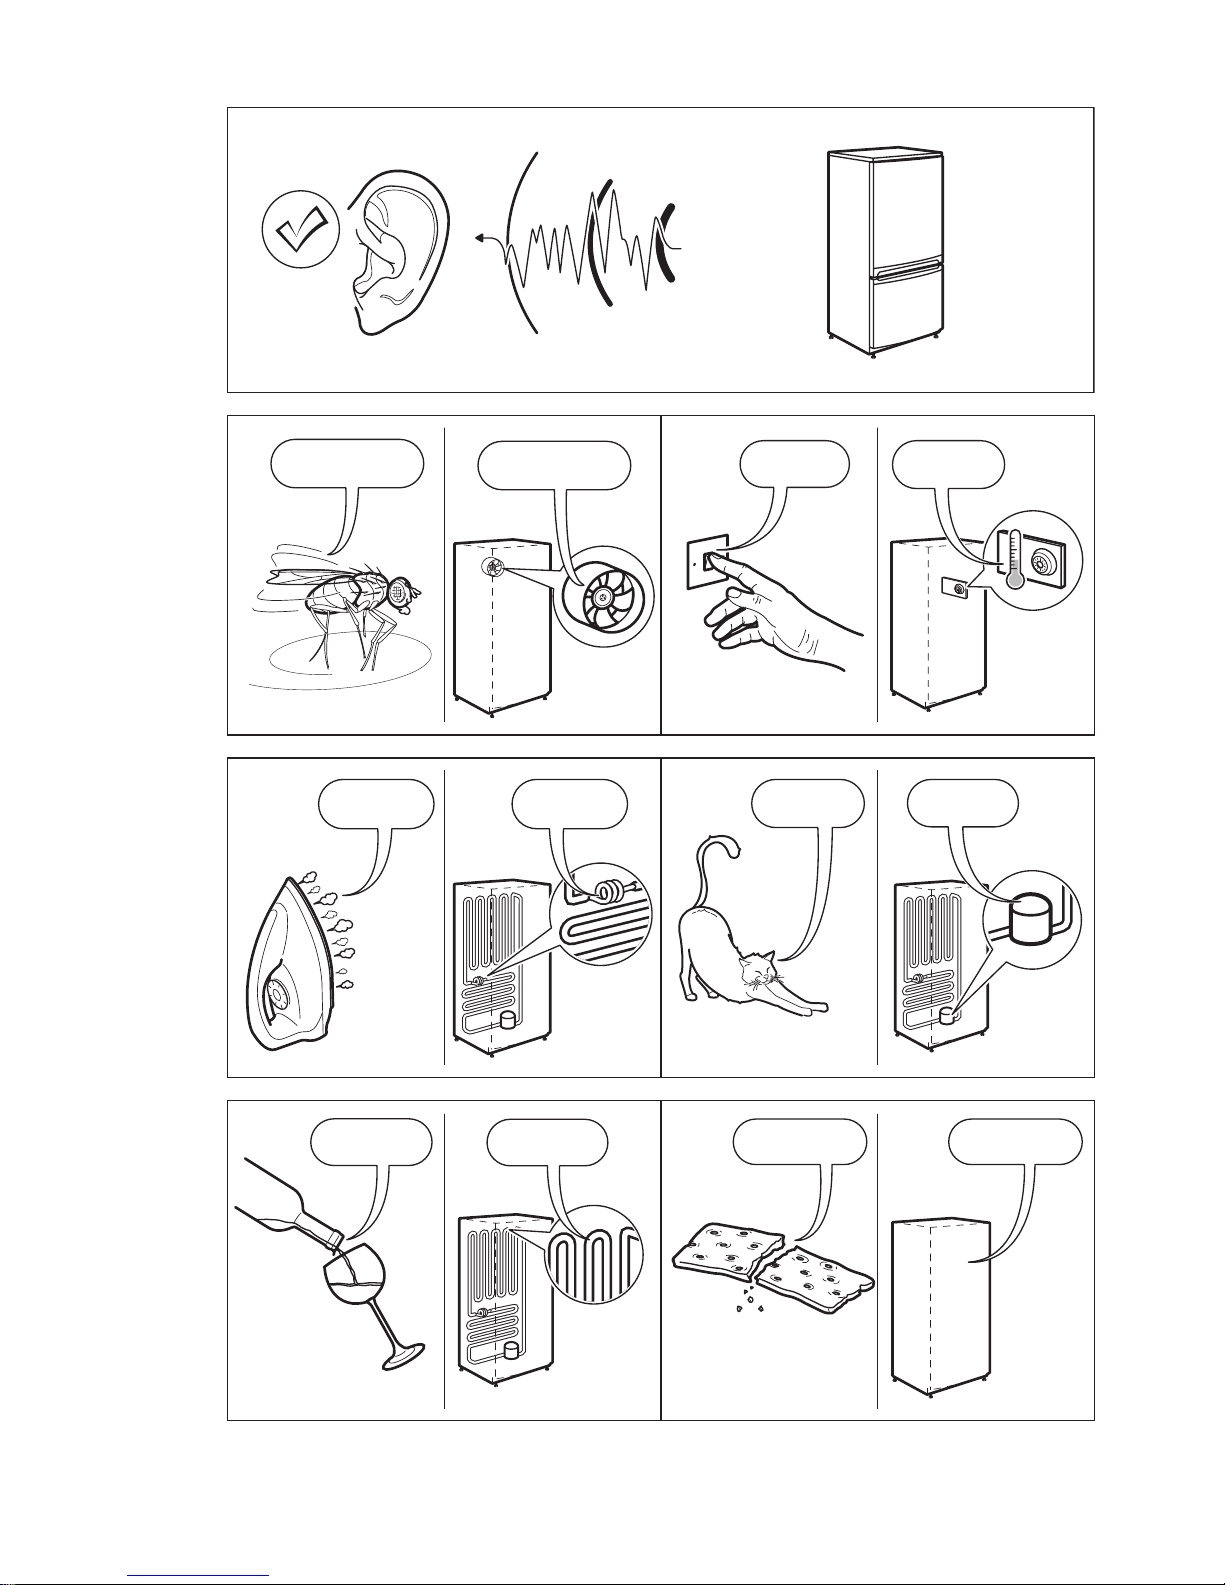
9. NOISES............................................................................................................. 14
10. TECHNICAL INFORMATION............................................................................16
WE’RE THINKING OF YOU
Thank you for purchasing an Electrolux appliance. You’ve chosen a product that
brings with it decades of professional experience and innovation. Ingenious and
stylish, it has been designed with you in mind. So whenever you use it, you can be
safe in the knowledge that you’ll get great results every time.
Welcome to Electrolux.
Visit our website for:
Get usage advice, brochures, trouble shooter, service information:
www.electrolux.com
Register your product for better service:
www.registerelectrolux.com
Buy Accessories, Consumables and Original spare parts for your appliance:
www.electrolux.com/shop
CUSTOMER CARE AND SERVICE
Always use original spare parts.
When contacting our Authorised Service Centre, ensure that you have the following
data available: Model, PNC, Serial Number.
The information can be found on the rating plate.
Warning / Caution-Safety information
General information and tips
Environmental information
Subject to change without notice.
www.electrolux.com2
Page 3

1. SAFETY INFORMATION
Before the installation and use of the appliance, carefully
read the supplied instructions. The manufacturer is not
responsible if an incorrect installation and use causes
injuries and damages. Always keep the instructions with
the appliance for future reference.
1.1 Children and vulnerable people safety
• This appliance can be used by children aged from 8
years and above and persons with reduced physical,
sensory or mental capabilities or lack of experience and
knowledge if they have been given supervision or
instruction concerning use of the appliance in a safe
way and understand the hazards involved.
• Do not let children play with the appliance.
• Cleaning and user maintenance shall not be made by
children without supervision.
•
Keep all packaging away from children.
1.2 General Safety
• This appliance is intended to be used in household and
similar applications such as:
– Farm houses; staff kitchen areas in shops, offices
and other working environments
– By clients in hotels, motels, bed and breakfast and
other residential type environments
• Keep ventilation openings, in the appliance enclosure or
in the built-in structure, clear of obstruction.
• Do not use mechanical devices or other means to
accelerate the defrosting process, other than those
recommended by the manufacturer.
• Do not damage the refrigerant circuit.
• Do not use electrical appliances inside the food storage
compartments of the appliance, unless they are of the
type recommended by the manufacturer.
• Do not use water spray and steam to clean the
appliance.
ENGLISH
3
Page 4
• Clean the appliance with a moist soft cloth. Only use
neutral detergents. Do not use abrasive products,
abrasive cleaning pads, solvents or metal objects.
• Do not store explosive substances such as aerosol
cans with a flammable propellant in this appliance.
• If the supply cord is damaged, it must be replaced by
the manufacturer, its Authorised Service Centre or
similarly qualified persons in order to avoid a hazard.
2. SAFETY INSTRUCTIONS
2.1 Installation
WARNING!
Only a qualified person must
install this appliance.
• Remove all the packaging.
• Do not install or use a damaged
appliance.
• Obey the installation instruction
supplied with the appliance.
• Always be careful when you move the
appliance because it is heavy. Always
wear safety gloves.
• Make sure the air can circulate around
the appliance.
• Wait at least 4 hours before connecting
the appliance to the power supply. This
is to allow the oil to flow back in the
compressor.
• Do not install the appliance close to
radiators or cookers, oven or hobs.
• The rear of the appliance must stand
against the wall.
• Do not install the appliance where
there is direct sunlight.
• Do not install this appliance in areas
that are too humid or too colds, such
as the construction appendices,
garages or wine cellars.
• When you move the appliance, lift it by
the front edge to avoid scratching the
floor.
2.2 Electrical connection
WARNING!
Risk of fire and electrical
shock.
• The appliance must be earthed.
• Make sure that the electrical
information on the rating plate agrees
with the power supply. If not, contact
an electrician.
• Always use a correctly installed
shockproof socket.
• Do not use multi-plug adapters and
extension cables.
• Make sure not to cause damage to the
electrical components (e.g. mains plug,
mains cable, compressor). Contact the
Authorised Service Centre or an
electrician to change the electrical
components.
• The mains cable must stay below the
level of the mains plug.
• Connect the mains plug to the mains
socket only at the end of the
installation. Make sure that there is
access to the mains plug after the
installation.
• Do not pull the mains cable to
disconnect the appliance. Always pull
the mains plug.
2.3 Use
WARNING!
Risk of injury, burns, electrical
shock or fire.
• Do not change the specification of this
appliance.
• Do not put electrical appliances (e.g.
ice cream makers) in the appliance
unless they are stated applicable by
the manufacturer.
• Be careful not to cause damage to the
refrigerant circuit. It contains isobutane
(R600a), a natural gas with a high level
www.electrolux.com4
Page 5
of environmental compatibility. This gas
is flammable.
• If damage occurs to the refrigerant
circuit, make sure that there are no
flames and sources of ignition in the
room. Ventilate the room.
• Do not let hot items to touch the plastic
parts of the appliance.
• Do not store flammable gas and liquid
in the appliance.
• Do not put flammable products or
items that are wet with flammable
products in, near or on the appliance.
• Do not touch the compressor or the
condenser. They are hot.
2.4 Care and cleaning
WARNING!
Risk of injury or damage to
the appliance.
• Before maintenance, deactivate the
appliance and disconnect the mains
plug from the mains socket.
• This appliance contains hydrocarbons
in the cooling unit. Only a qualified
person must do the maintenance and
the recharging of the unit.
• Regularly examine the drain of the
appliance and if necessary, clean it. If
the drain is blocked, defrosted water
collects in the bottom of the appliance.
2.5 Disposal
WARNING!
Risk of injury or suffocation.
• Disconnect the appliance from the
mains supply.
• Cut off the mains cable and discard it.
• Remove the door to prevent children
and pets to be closed inside of the
appliance.
• The refrigerant circuit and the insulation
materials of this appliance are ozonefriendly.
• The insulation foam contains flammable
gas. Contact your municipal authority
for information on how to discard the
appliance correctly.
• Do not cause damage to the part of
the cooling unit that is near the heat
exchanger.
3. OPERATION
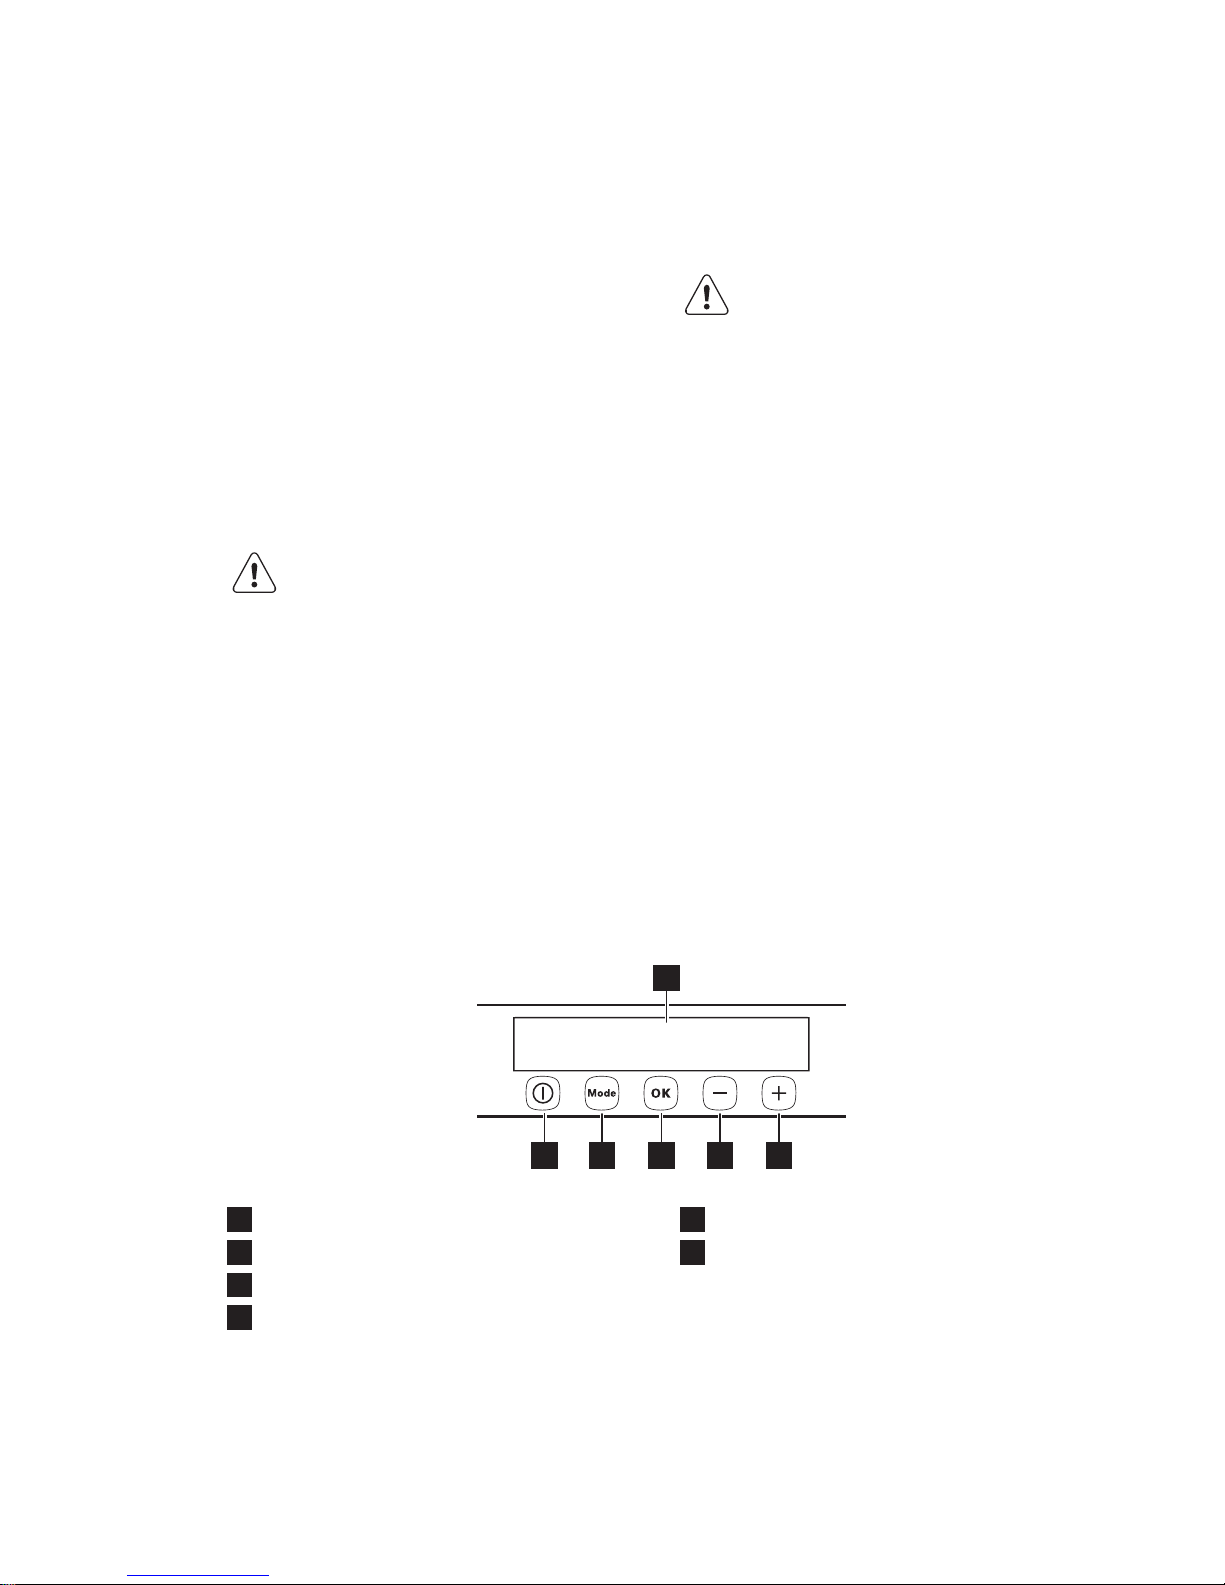
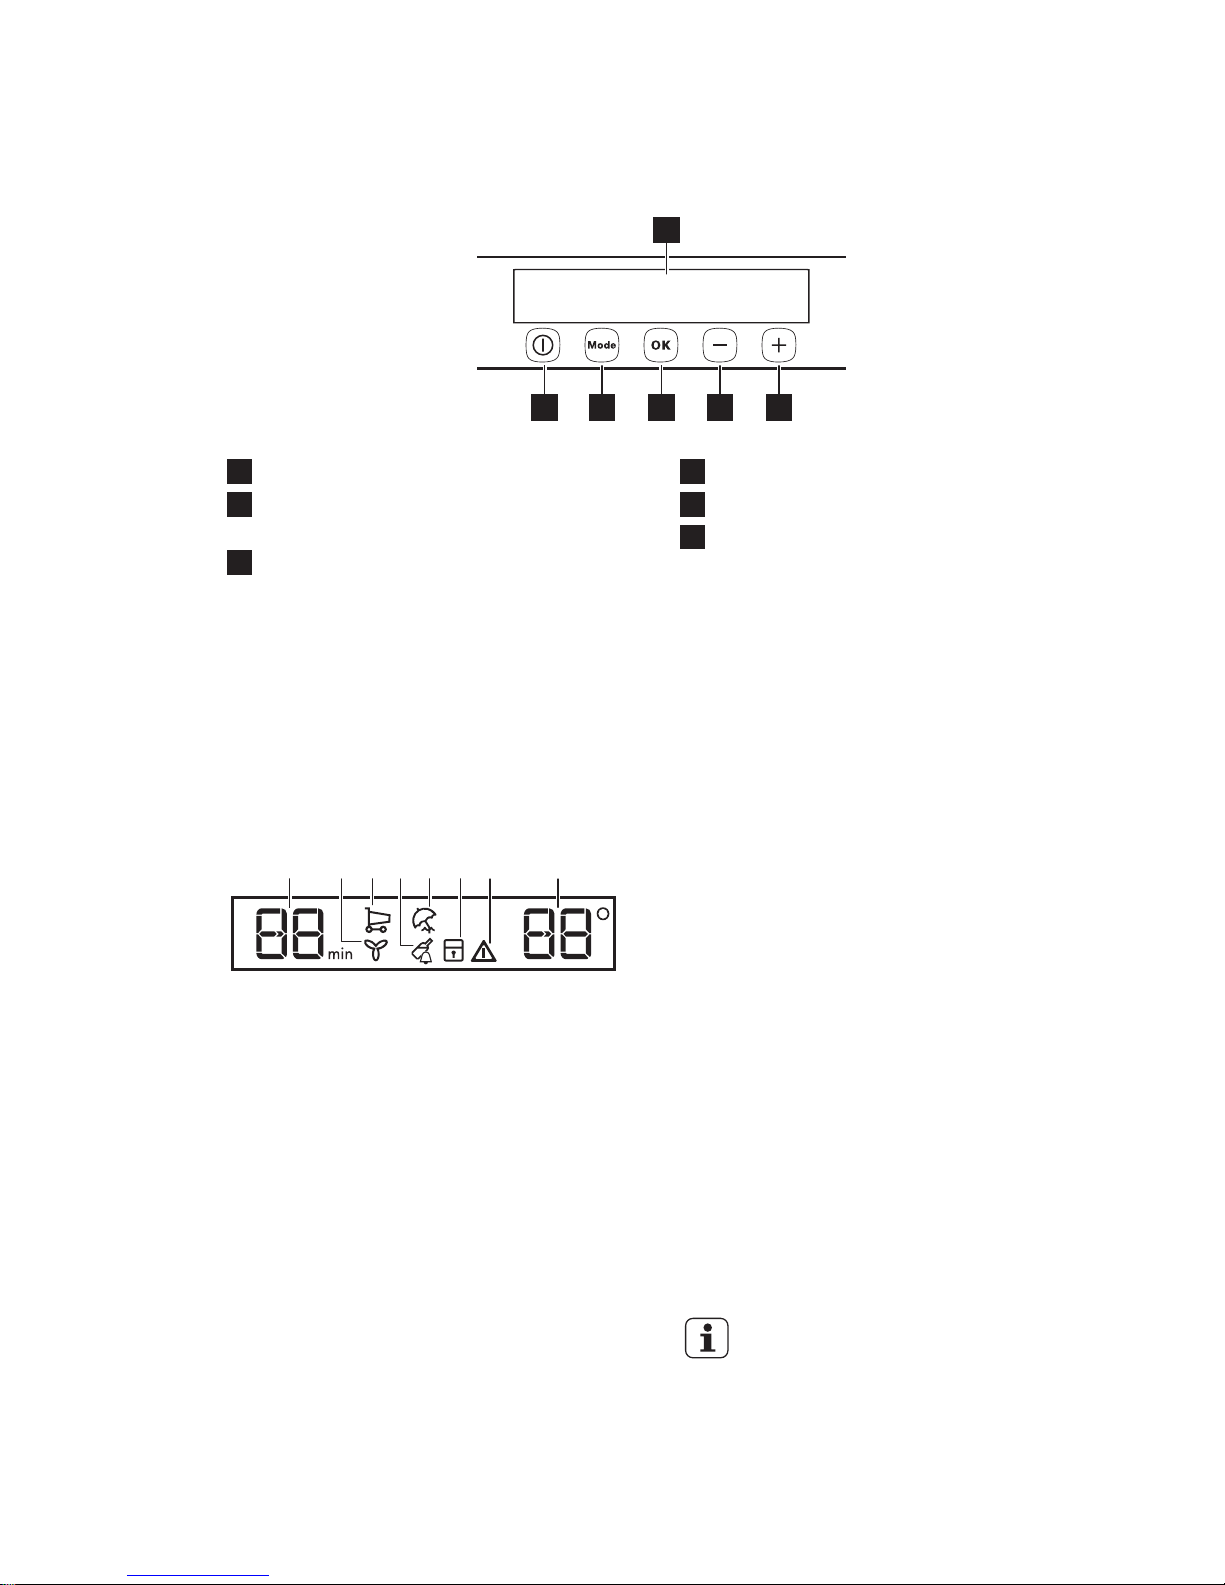
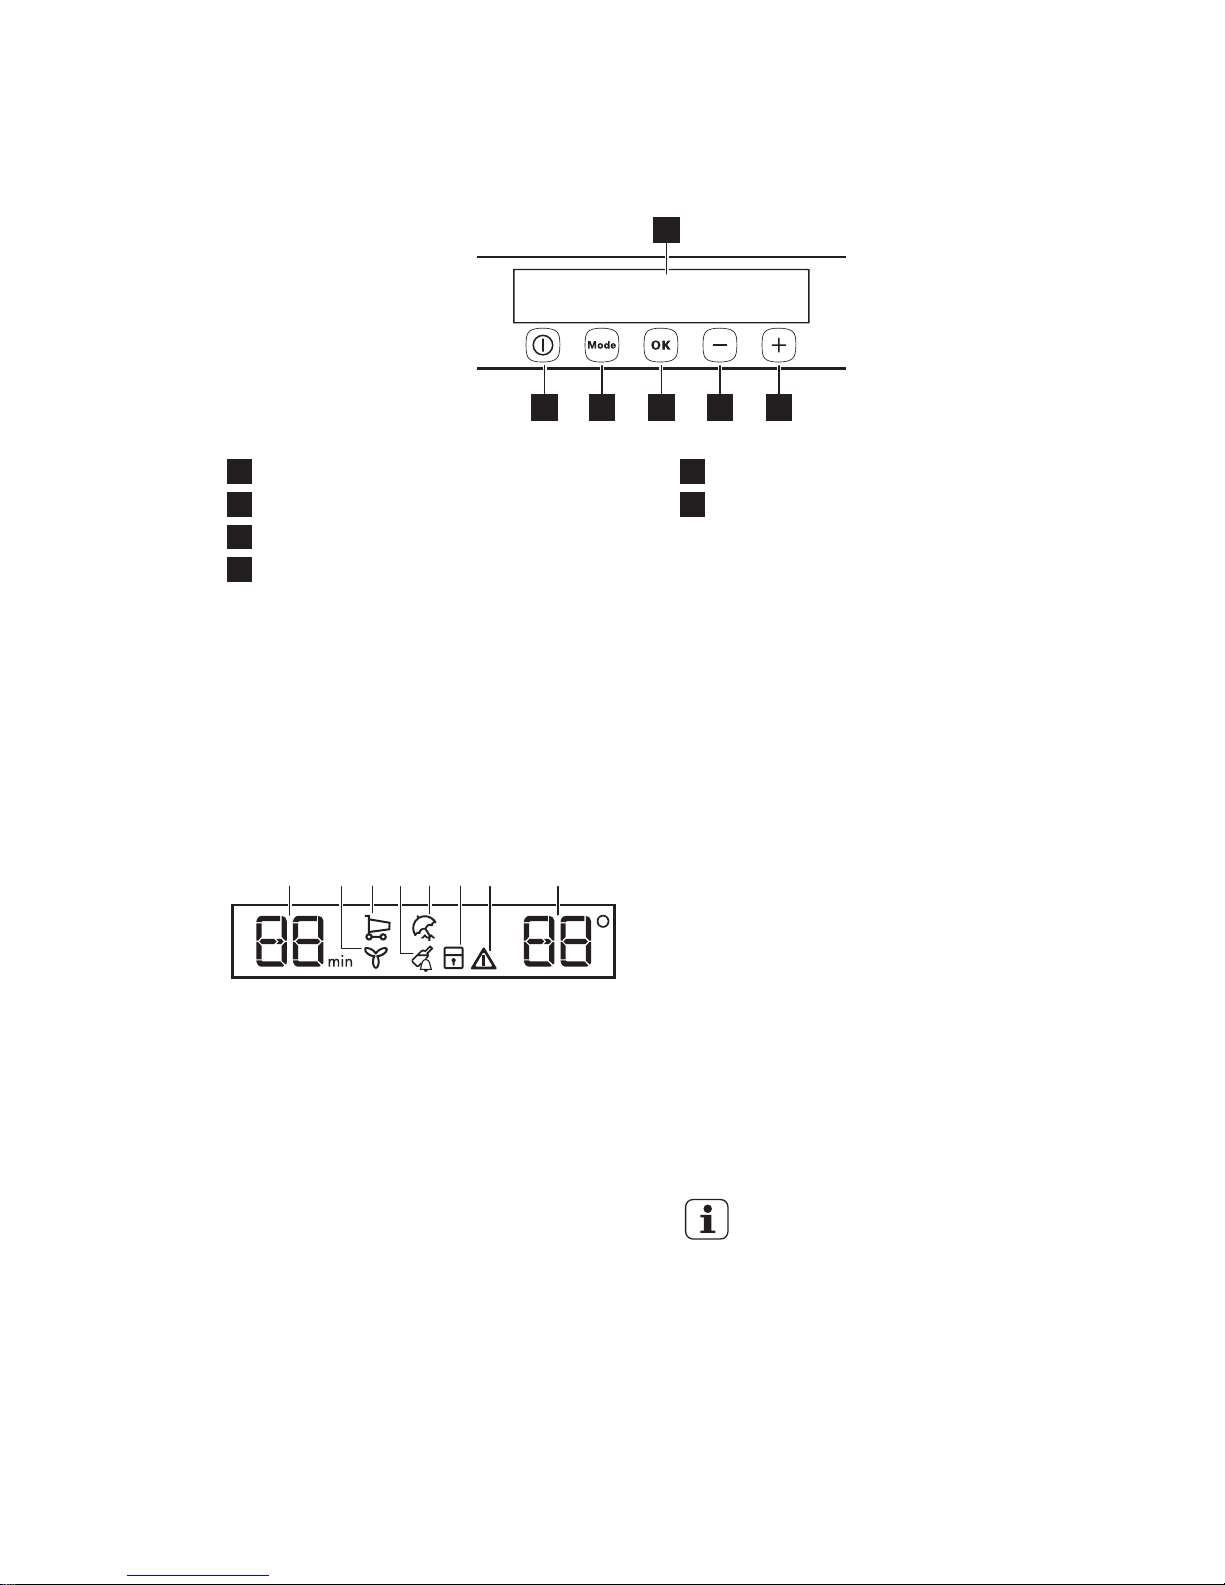
3.1 Control Panel
1
23456
1
Display
2
Temperature warmer button
3
Temperature colder button
4
OK
5
Mode
6
ON/OFF
It is possible to change predefined sound
of buttons to a loudly one by pressing
together Mode and temperature colder
button for some seconds. Change is
reversible.
ENGLISH
5
Page 6
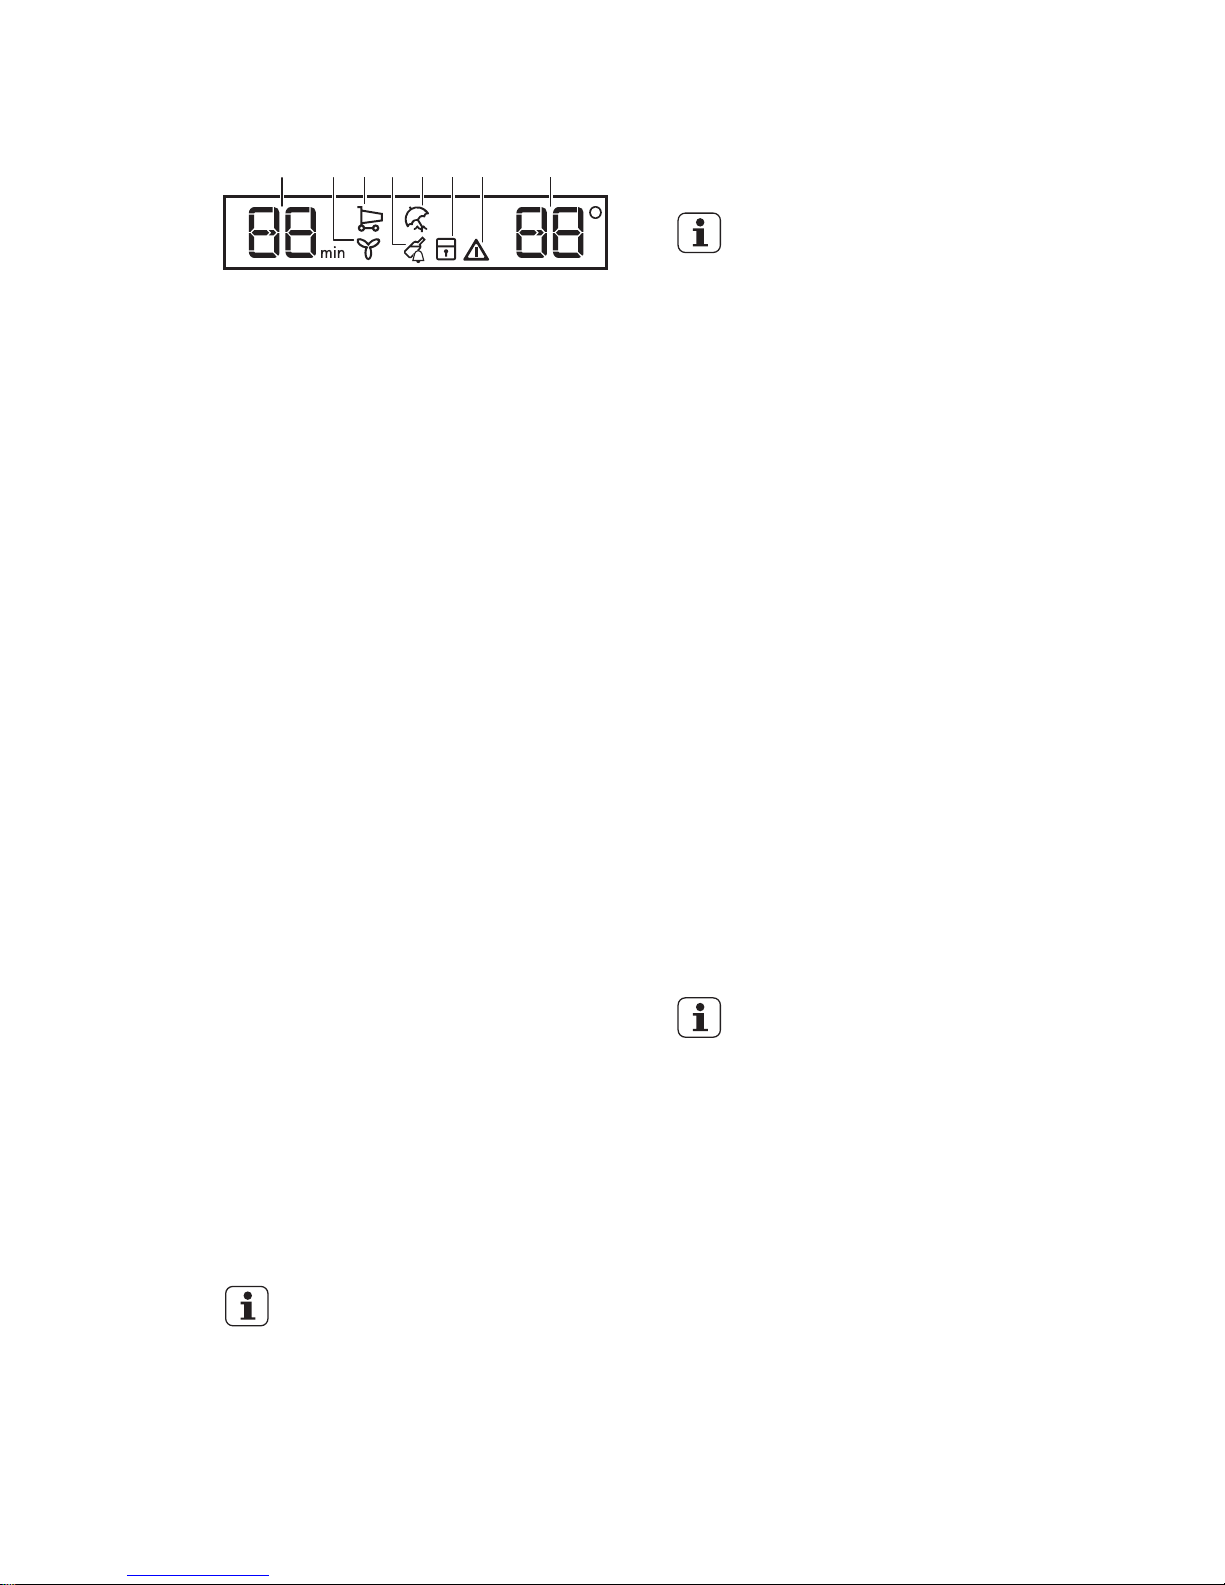
3.2 Display
A HE F GCB D
A) Timer function
B) FreeStore function
C) Shopping function
D) DrinksChill function
E) Holiday function
F) ChildLock function
G) Alarm indicator
H) Temperature indicator
3.3 Switching on
Connect the mains plug to the power
socket.
Press the ON/OFF button if the display is
off.
If DEMO appears on the display, the
appliance is in demonstration mode. Refer
to "Troubleshooting" section.
The temperature indicators show the set
default temperature.
To set a different temperature refer to
"Temperature regulation".
3.4 Switching off
Press the ON/OFF button for 5 seconds.
The display turns off.
To disconnect the appliance from the
power, disconnect the mains plug from
the power socket.
3.5 Temperature regulation
The default set temperature for the fridge
is +5°C.
Set the temperature of the fridge by
pressing the temperature button.
The temperature indicator shows the set
temperature.
The set temperature will be
reached within 24 hours.
After a power failure the set
temperature remains stored.
3.6 FreeStore function
The activation of the FreeStore function
increases the energy consumption.
If the function is activated
automatically the FreeStore
indicator is not shown (refer
to "Daily use").
1. To switch on the function press Mode
until the corresponding icon appears.
2. To switch off the function press Mode
in order to select an other function or
press Mode until you can see none of
the special icons.
3.7 Shopping function
If you need to insert a large amount of
warm food, for example after doing the
grocery shopping, we suggest activating
the Shopping function to chill the products
more rapidly and to avoid warming the
other food which is already in the
refrigerator.
1. Press the Mode until the
corresponding icon appears.
The Shopping indicator flashes.
2. Press the OK to confirm.
The Shopping indicator is shown.
The Shopping function shuts off
automatically after approximately 6 hours.
To switch off the function before its
automatic end, repeat the procedure.
The function switches off by
selecting a different fridge set
temperature.
3.8 DrinksChill function
The DrinksChill function is to be used to
set an acoustic alarm at the preferred
time, useful for example when a recipe
requires to cool down a mixture for a
certain period of time, or when a reminder
is needed in order not to forget the bottles
placed in the freezer for fast cooling.
1. Press Mode until the corresponding
icon appears.
The DrinksChill indicator flashes.
www.electrolux.com6
Page 7

The Timer shows the set value (30
minutes) for a few seconds.
2. Press the Timer regulator to change
the Timer set value from 1 to 90
minutes.
3. Press OK to confirm.
The DrinksChill indicator is shown.
The Timer start to flash (min).
At the end of the countdown the
DrinksChill indicator flashes and an audible
alarm sounds that indicates that any
drinks contained in the freezer
compartment should be removed and it is
necessary to press OK to switch off the
sound and terminate the function.
To switch off the function repeat the
procedure until the DrinksChill goes off.
It is possible to change the
time during the countdown
and at the end by pressing
the Temperature colder
button and the Temperature
warmer button.
3.9 Holiday mode
This function allows you to keep the
refrigerator closed and empty during a
long holiday period without the formation
of a bad smell.
Empty the fridge
compartment before turning
the Holiday mode on.
1. Press the Mode until the Holiday
indicator icon appears.
The Holiday icon flashes.
The fridge temperature indicator shows
the set temperature.
2. Press the OK to confirm.
The Holiday icon appears.
To turn off the Holiday mode, repeat the
procedure until the Holiday indicator icon
goes off.
3.10 Door open alarm
An acoustic alarm will sound if the door is
left open for a few minutes. The door open
alarm conditions are indicated by:
• a flashing Alarm indicator;
• an acoustic buzzer.
When normal conditions are restored
(door closed), the alarm will stop. The
buzzer can also be switched off by
pressing any button.
4. DAILY USE
WARNING!
Refer to Safety chapters.
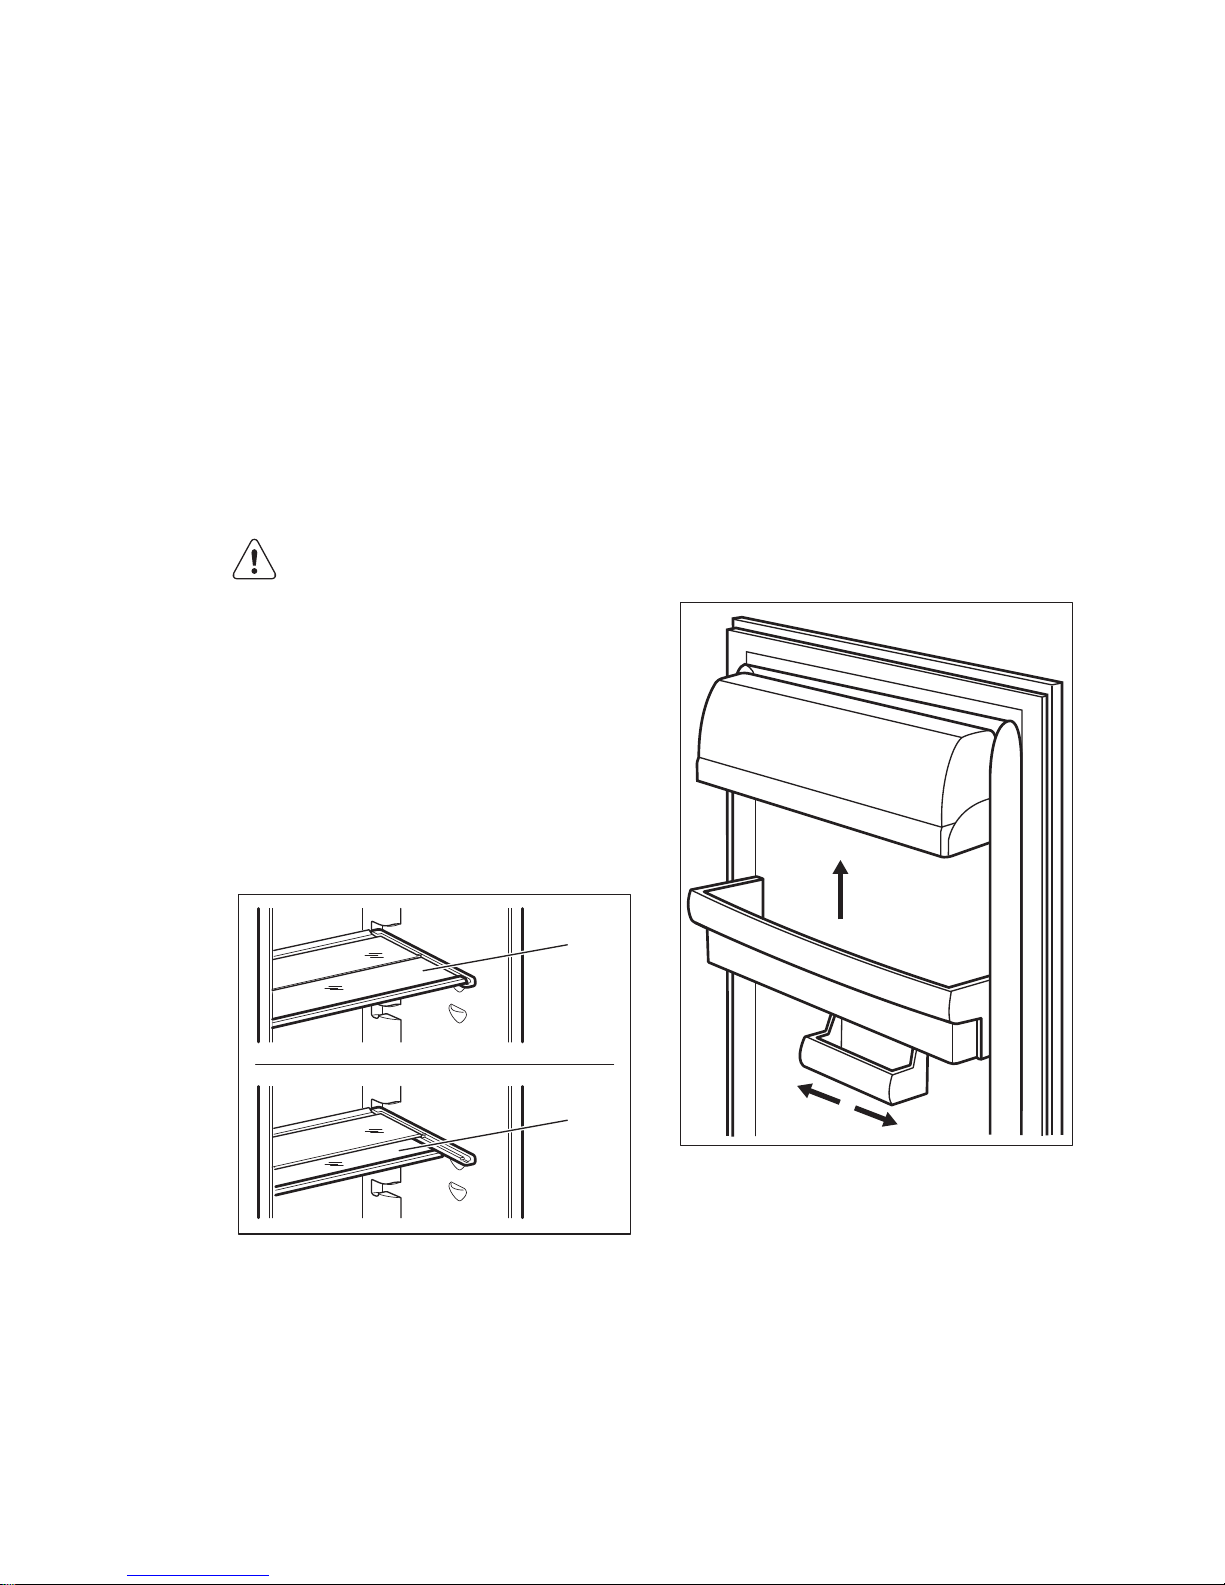
4.1 Movable shelves
The walls of the refrigerator are equipped
with a series of supports so that the
shelves can be positioned as desired.
For better use of space, the front halfshelves (A) can be placed under the rear
ones. (B)
A
B
4.2 Positioning the door shelves
To permit storage of food packages of
various sizes, the door shelves can be
placed at different heights.
ENGLISH
7
Page 8
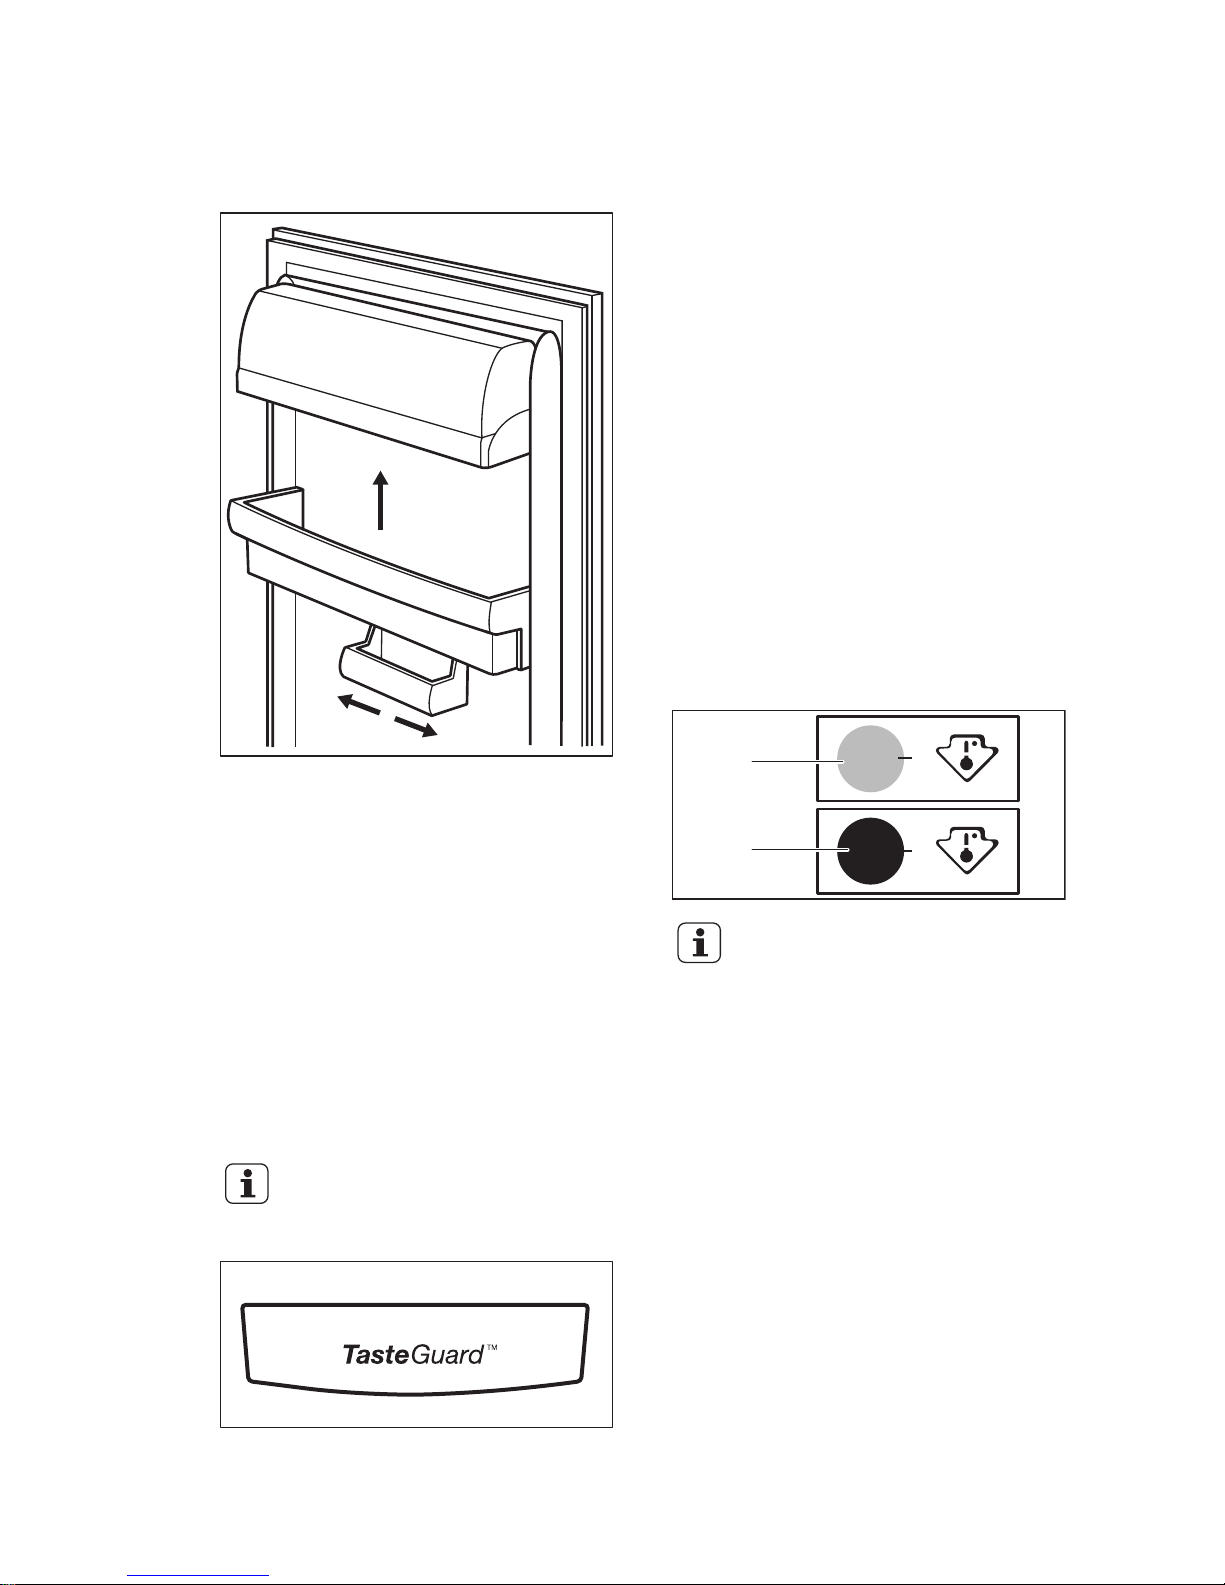
To make these adjustments proceed as
follows:
1. Gradually pull the shelf in the direction
of the arrows until it comes free.
2.
Reposition the shelf as required.
The model is equipped with a variable
storage box which is fitted under a door
shelf compartment and can be slide
sideways.
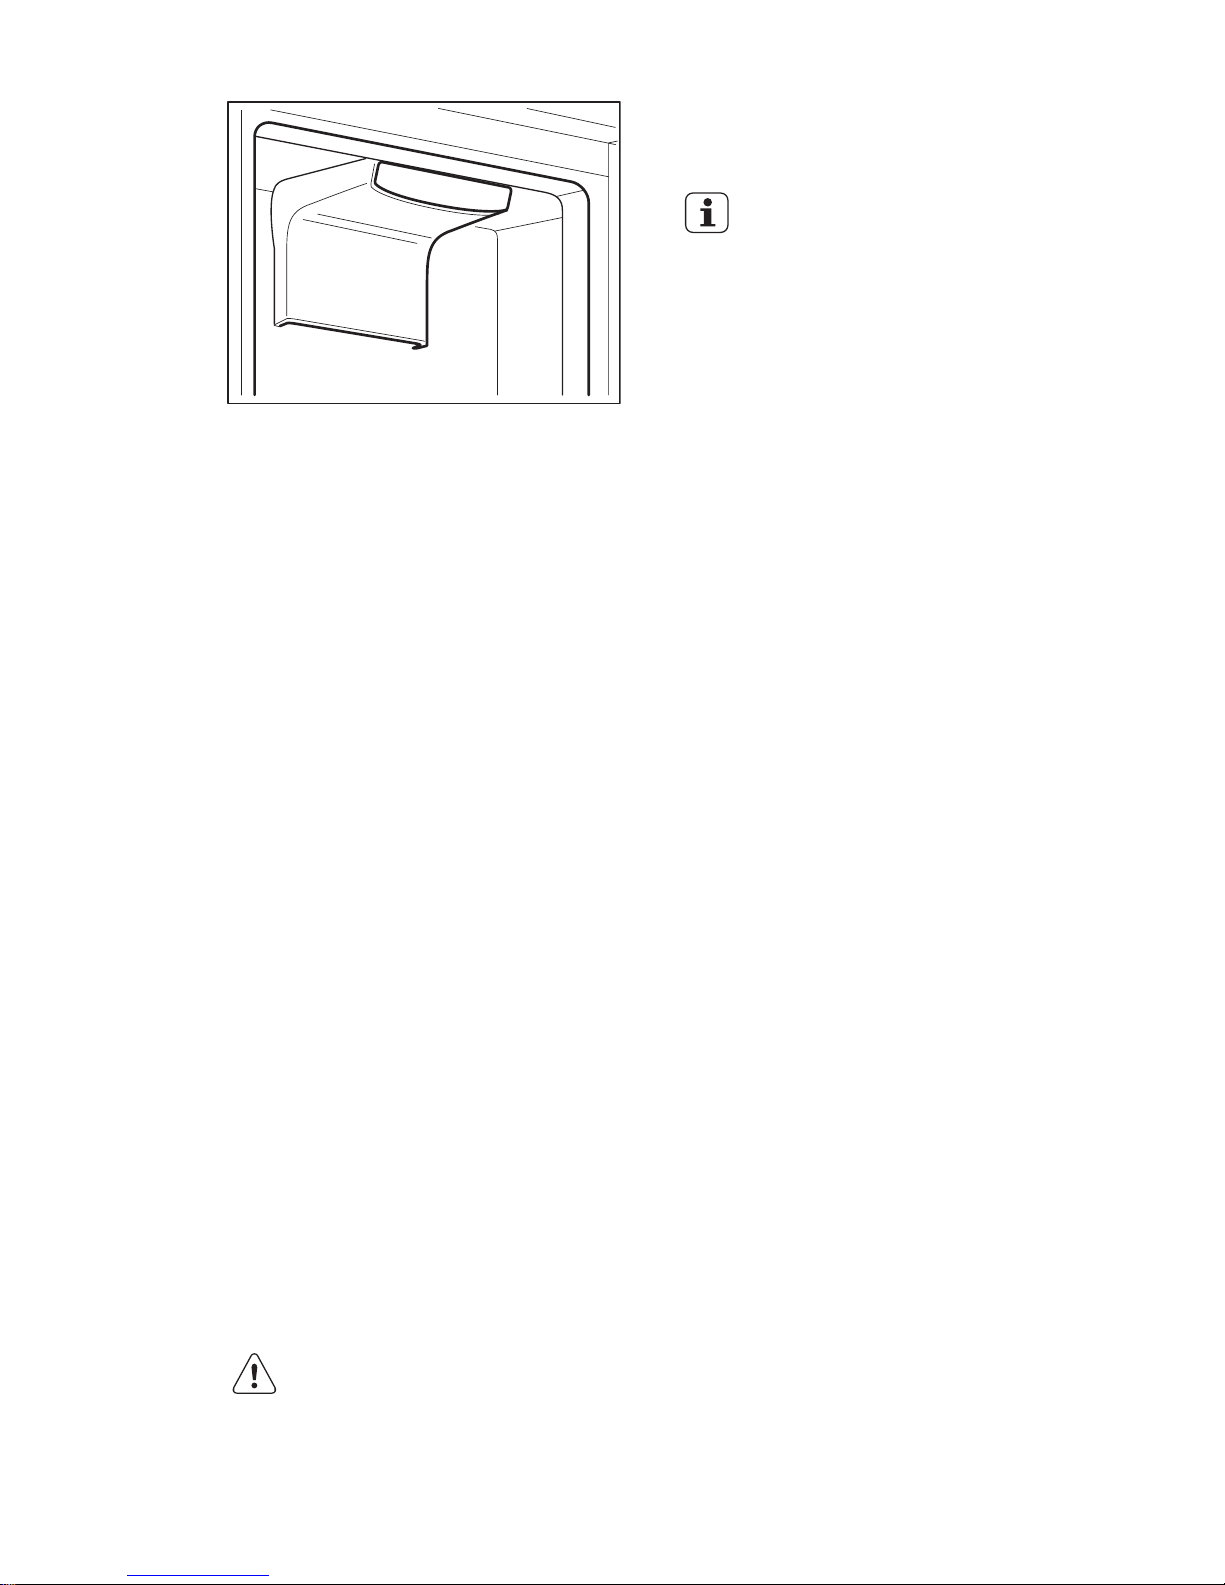
4.3 Carbon Air Filter
our appliance is equipped with a carbon
filter TASTEGUARD in a drawer in the rear
wall of the fridge compartment.
The filter purifies the air from unwanted
odours in the fridge compartment
meaning that the storage quality will be
further improved.
During the operation, always
keep the air ventilation drawer
closed.
4.4 Low Temperature
compartment
In models equipped with this feature in the
fridge part, it is intended for a best
conservation of fresh foods like fish, meat,
seafood, etc.
It is located in the lower part, directly
above of the vegetable conservation
drawer.
4.5 Temperature indicator
For proper storage of food the refrigerator
is equipped with the temperature
indicator. The symbol on the side wall of
the appliance indicates the coldest area in
the refrigerator.
If “OK” is displayed (A), put fresh food into
area indicated by symbol, if not (B), adjust
the temperature controller to a colder
setting and wait 12 hours before checking
the temperature indicator again.
OK
OK
A
B
After putting fresh food into
the appliance or after opening
the door repeatedly or for a
long period, it is normal for
the indicator not to show
"OK"; wait at least 12 hours
before readjusting the
temperature controller.
4.6 FreeStore
The refrigerator compartment is equipped
with a device that allows for rapid cooling
of foods and more uniform temperature in
the compartment.
This device activates by itself when
needed, for example for a quick
temperature recovering after door opening
or when the ambient temperature is high.
www.electrolux.com8
Page 9
It is possible to switch on the device
manually when needed (refer to "FreeStore
function").
The FreeStore device stops
when the door is open and
restarts immediately after the
door closing.
5. HINTS AND TIPS
5.1 Normal operating sounds
The following sounds are normal during
operation:
• A faint gurgling and bubbling sound
from coils sound when refrigerant is
pumped.
• A whirring and pulsating sound from
the compressor when refrigerant is
pumped.
• A sudden cracking noise from inside
appliance caused by thermic dilatation
(a natural and not dangerous physical
phenomenon).
• A faint click noise from the temperature
regulator when the compressor
switches on or off.
5.2 Hints for energy saving
• Do not open the door frequently or
leave it open longer than absolutely
necessary.
5.3 Hints for fresh food
refrigeration
To obtain the best performance:
• do not store warm food or evaporating
liquids in the refrigerator
• do cover or wrap the food, particularly
if it has a strong flavour
• position food so that air can circulate
freely around it
5.4 Hints for refrigeration
Useful hints:
• Meat (all types) : wrap in polythene
bags and place on the glass shelf
above the vegetable drawer.
• For safety, store in this way only one or
two days at the most.
• Cooked foods, cold dishes, etc..: these
should be covered and may be placed
on any shelf.
• Fruit and vegetables: these should be
thoroughly cleaned and placed in the
special drawer(s) provided.
• Butter and cheese: these should be
placed in special airtight containers or
wrapped in aluminium foil or polythene
bags to exclude as much air as
possible.
• Bottles: these need a cap and should
be stored on the door bottle shelf, or (if
equipped) on the bottle rack.
• Bananas, potatoes, onions and garlic,
if not packed, must not be kept in the
refrigerator.
6. CARE AND CLEANING
WARNING!
Refer to Safety chapters.
ENGLISH
9
Page 10
6.1 General warnings
CAUTION!
Unplug the appliance before
carrying out any maintenance
operation.
This appliance contains
hydrocarbons in its cooling
unit; maintenance and
recharging must therefore
only be carried out by
authorized technicians.
The accessories and parts of
the appliance are not suitable
for washing in a dishwasher.
6.2 Periodic cleaning
CAUTION!
Do not pull, move or damage
any pipes and/or cables
inside the cabinet.
CAUTION!
Take care of not to damage
the cooling system.
CAUTION!
When moving the cabinet, lift
it by the front edge to avoid
scratching the floor.
The equipment has to be cleaned
regularly:
1. Clean the inside and accessories with
lukewarm water and some neutral
soap.
2. Regularly check the door seals and
wipe clean to ensure they are clean
and free from debris.
3. Rinse and dry thoroughly.
4. If accessible, clean the condenser and
the compressor at the back of the
appliance with a brush.
This operation will improve the
performance of the appliance and
save electricity consumption.
6.3 Defrosting of the refrigerator
Frost is automatically eliminated from the
evaporator of the refrigerator
compartment every time the motor
compressor stops, during normal use. The
defrost water drains out through a trough
into a special container at the back of the
appliance, over the motor compressor,
where it evaporates.
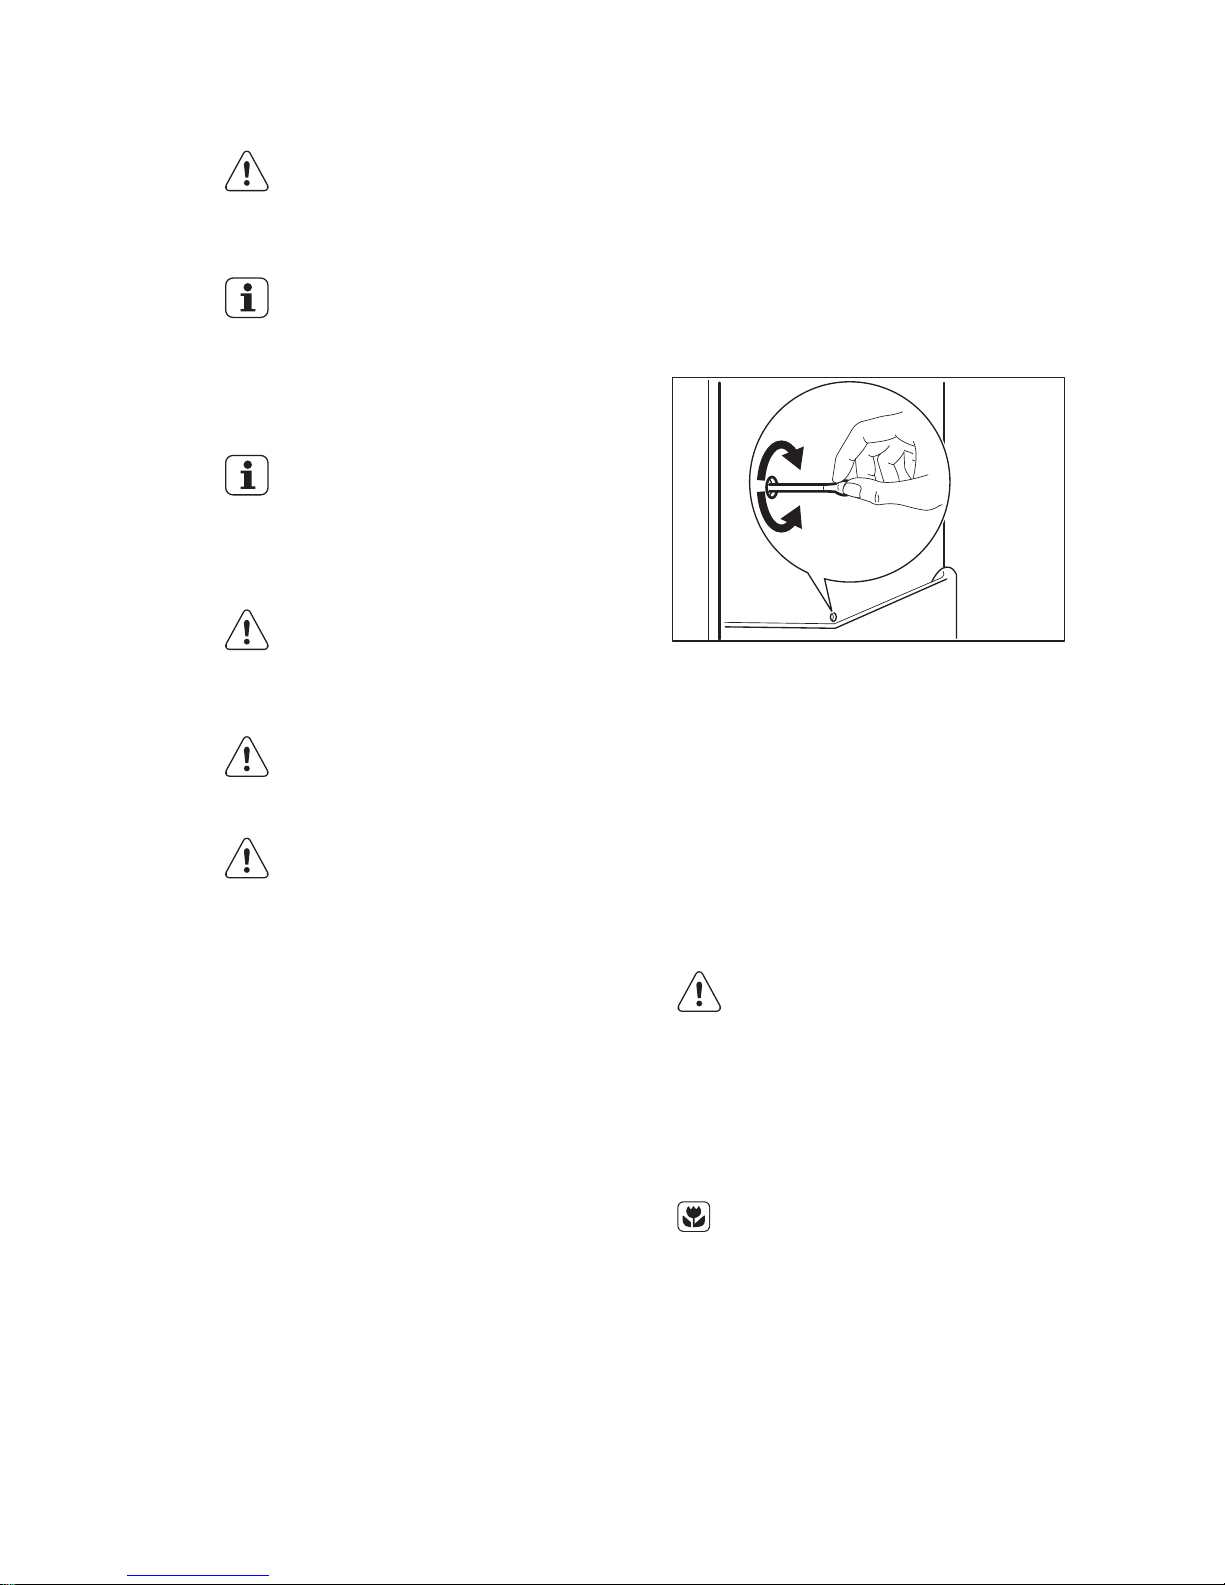
It is important to periodically clean the
defrost water drain hole in the middle of
the refrigerator compartment channel to
prevent the water overflowing and
dripping onto the food inside.
6.4 Periods of non-operation
When the appliance is not in use for long
periods, take the following precautions:
1. Disconnect the appliance from
electricity supply.
2. Remove all food.
3. Clean the appliance and all
accessories.
4. Leave the door/doors open to prevent
unpleasant smells.
WARNING!
If the cabinet will be kept on,
ask somebody to check it
once in a while to prevent the
food inside from spoiling in
case of a power failure.
6.5 Replacing the carbon filter
The air filter is a consumable
accessory and as such is not
covered by the guarantee.
To get best performance the carbon air
filter should be changed once every year.
New active air filters can be purchased
from your local dealer.
Refer to “Installation of the carbon air filter”
for the instructions.
www.electrolux.com10
Page 11
7. TROUBLESHOOTING
WARNING!
Refer to Safety chapters.
7.1 What to do if...
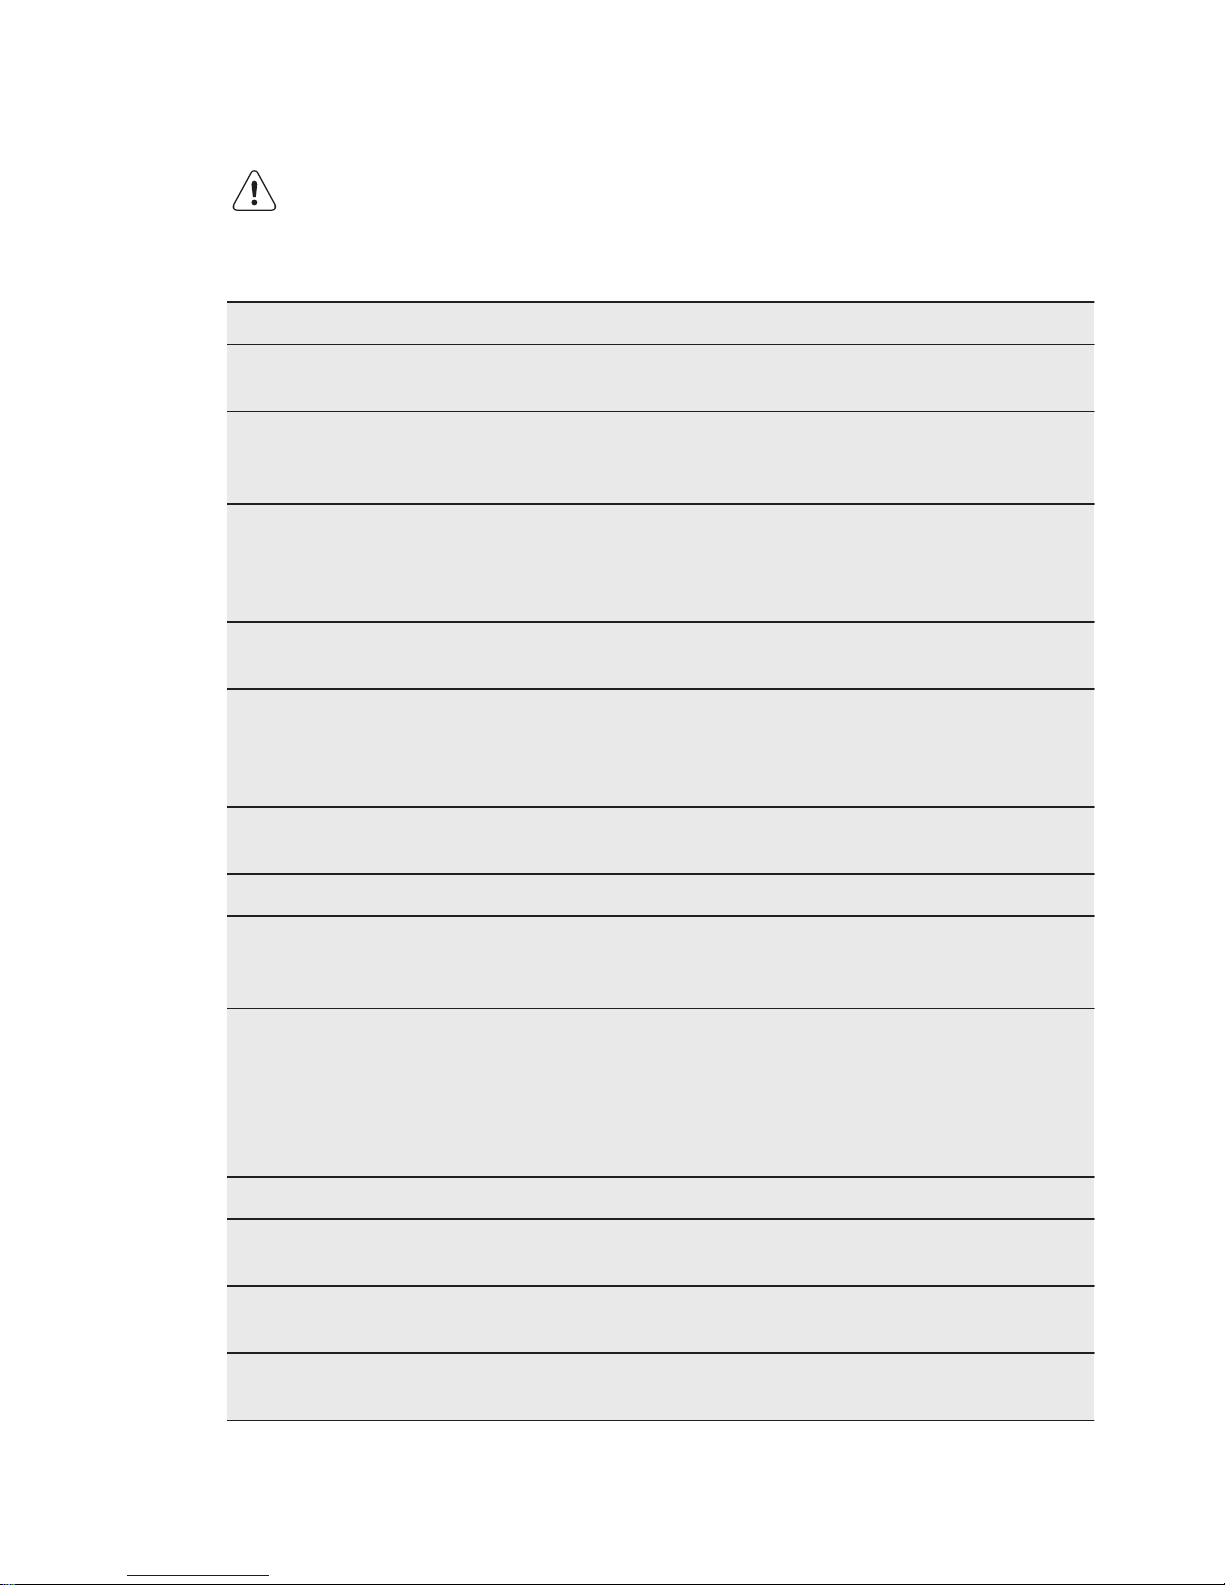
Problem Possible cause Solution
The appliance does not operate.
The appliance is switched
off.
Switch on the appliance.
The mains plug is not
connected to the mains
socket correctly.
Connect the mains plug to
the mains socket correctly.
There is no voltage in the
mains socket.
Connect a different electrical
appliance to the mains socket. Contact a qualified electrician.
The appliance is noisy. The appliance is not sup-
ported properly.
Check if the appliance stands
stable.
Audible or visual alarm is
on.
The cabinet has been recently switched on or the
temperature is still too
high.
Refer to "Door Open Alarm"or
"High Temperature Alarm".
The temperature in the
appliance is too high.
Refer to "Door Open Alarm"or
"High Temperature Alarm".
The door is left open. Close the door.
The temperature in the
appliance is too high.
Contact a qualified electrician
or contact the nearest Authorised Service Centre.
A rectangular symbol is
shown instead of numbers
on the Temperature Display.
Temperature sensor problem.
Contact the nearest Authorised Service Centre (the cooling system will continue to
keep food products cold, but
temperature adjustment will
not be possible).
The lamp does not work. The lamp is in stand-by. Close and open the door.
The lamp does not work. The lamp is defective. Contact the nearest Author-
ised Service Centre.
The compressor operates
continually.
Temperature is set incorrectly.
Refer to "Operation" chapter.
Many food products were
put in at the same time.
Wait some hours and then
check the temperature again.
ENGLISH
11
Page 12
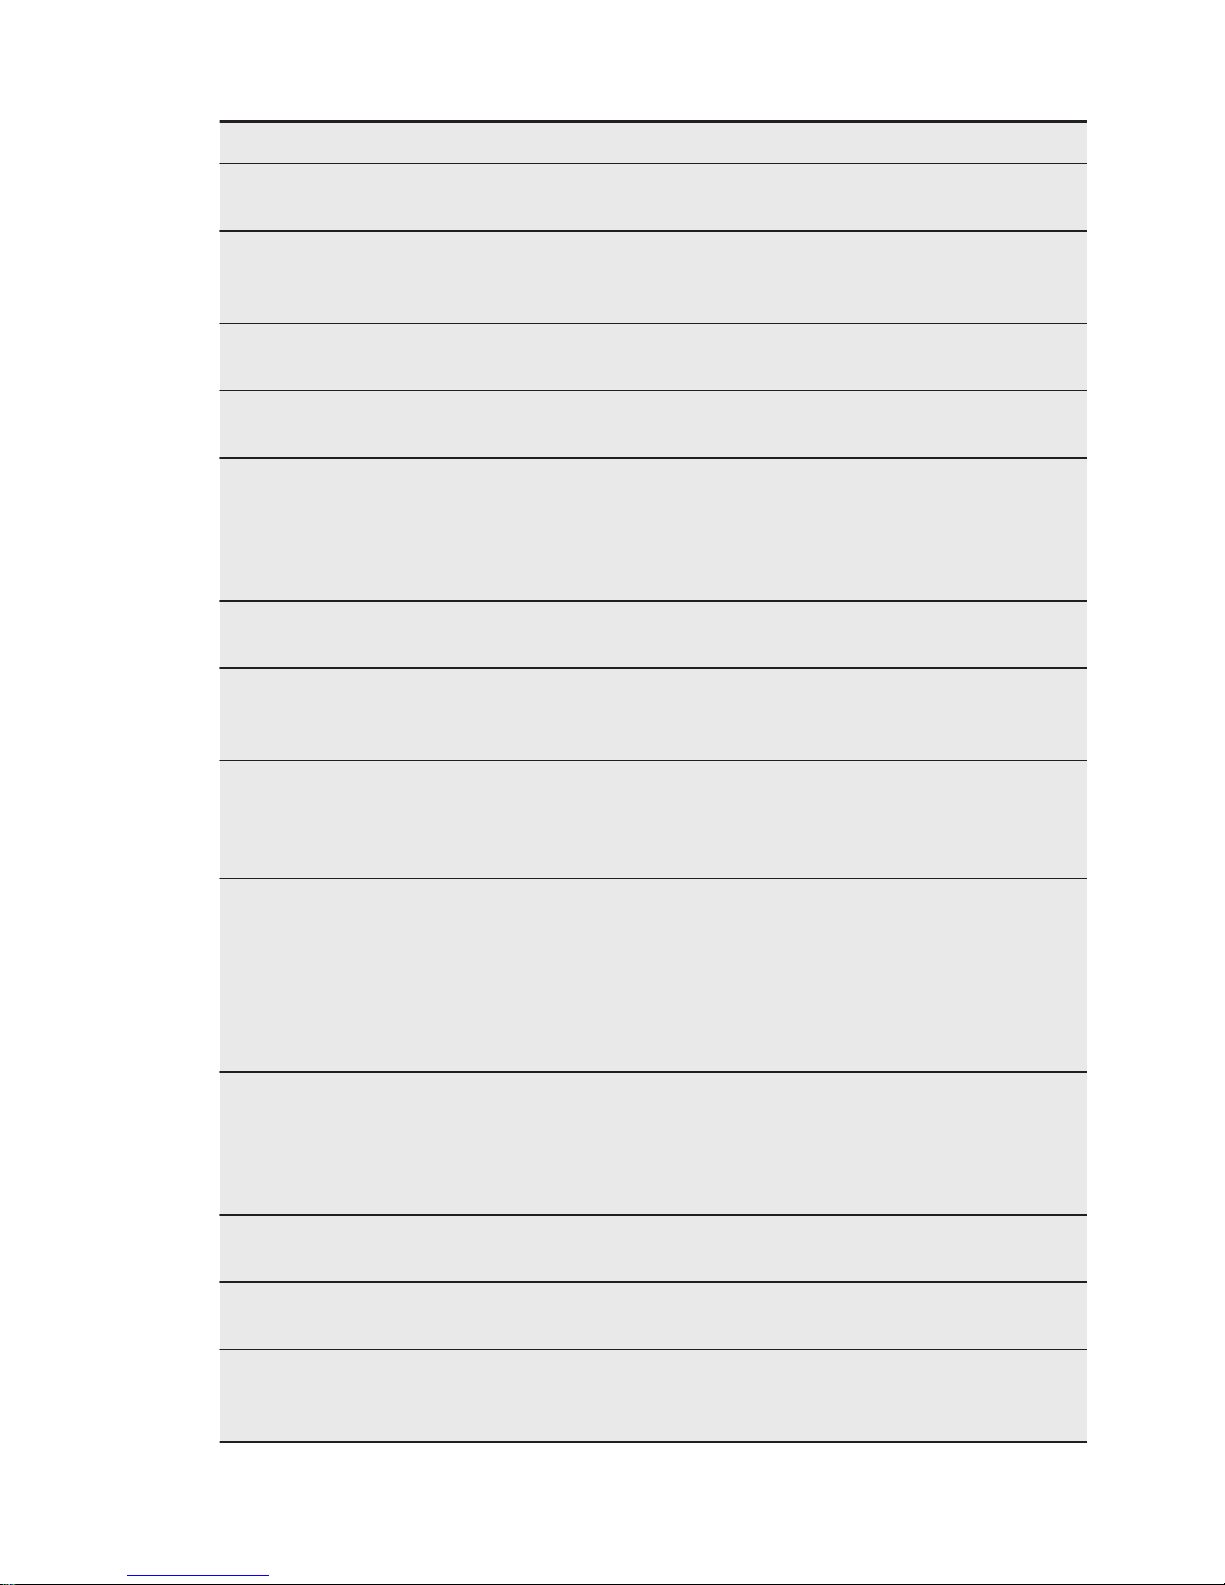
Problem Possible cause Solution
The room temperature is
too high.
Refer to climate class chart
on the rating plate.
Food products placed in
the appliance were too
warm.
Allow food products to cool
to room temperature before
storing.
The door is not closed
correctly.
Refer to "Closing the door".
The Shopping Function
function is switched on.
Refer to "Shopping Function
function".
The compressor does not
start immediately after
pressing the Shopping
Function, or after changing
the temperature.
This is normal, no error
has occurred.
The compressor starts after a
period of time.
Water flows inside the refrigerator.
The water outlet is clogged.
Clean the water outlet.
Food products prevent
that water flows into the
water collector.
Make sure that food products
do not touch the rear plate.
Water flows on the floor. The melting water outlet is
not connected to the
evaporative tray above the
compressor.
Attach the melting water outlet to the evaporative tray.
Temperature cannot be set. The ActionFreeze or
Shopping Function function is switched on.
Switch off ActionFreeze or
Shopping Function manually,
or wait until the function resets automatically to set the
temperature. Refer to "ActionFreeze or Shopping Function function".
DEMO appears on the display.
The appliance is in demonstration mode.
Keep the OK pressed for approximately 10 seconds until
a long sound is heard and
display shuts off for a short
time.
The temperature in the appliance is too low/too high.
The temperature regulator
is not set correctly.
Set a higher/lower temperature.
The door is not closed
correctly.
Refer to "Closing the door".
The food products' temperature is too high.
Let the food products temperature decrease to room
temperature before storage.
www.electrolux.com12
Page 13
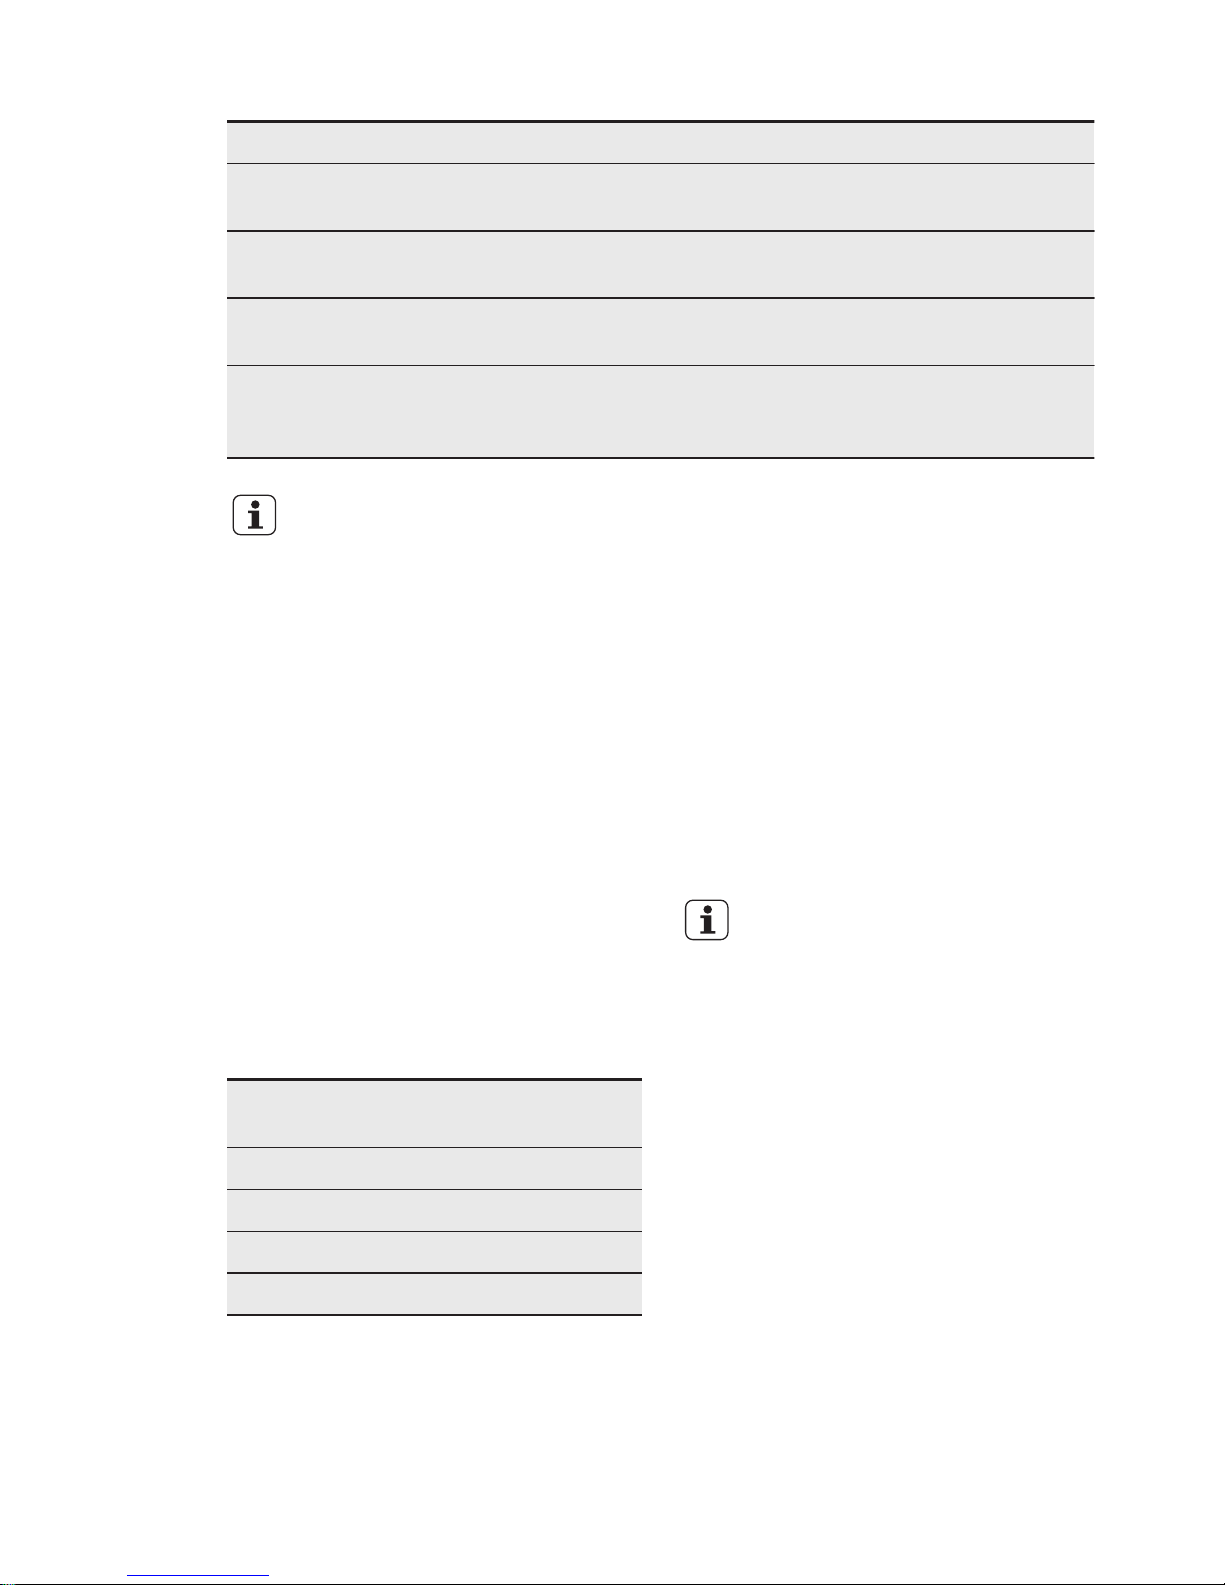
Problem Possible cause Solution
Many food products are
stored at the same time.
Store less food products at
the same time.
The door has been
opened often.
Open the door only if necessary.
The Shopping Function
function is switched on.
Refer to "Shopping Function
function".
There is no cold air circulation in the appliance.
Make sure that there is cold
air circulation in the appliance.
If the advice does not lead to
the desired result, contact the
nearest Authorised Service
Centre.
7.2 Replacing the lamp
The appliance is equipped with a longlife
LED interior light.
Only service is allowed to replace the
lighting device. Contact your Authorised
Service Centre.
7.3 Closing the door
1. Clean the door gaskets.
2. If necessary, adjust the door. Refer to
"Installation".
3. If necessary, replace the defective
door gaskets. Contact the Authorised
Service Centre.
8. INSTALLATION
8.1 Positioning
This appliance can be installed in a dry,
well ventilated indoor where the ambient
temperature corresponds to the climate
class indicated on the rating plate of the
appliance:
Climate
class
Ambient temperature
SN +10°C to + 32°C
N +16°C to + 32°C
ST +16°C to + 38°C
T +16°C to + 43°C
Some functional problems
might occur for some types
of models when operating
outside of that range. The
correct operation can only be
guaranteed within the
specified temperature range.
If you have any doubts
regarding where to install the
appliance, please turn to the
vendor, to our customer
service or to the nearest
Authorised Service Centre.
8.2 Electrical connection
• Before plugging in, ensure that the
voltage and frequency shown on the
rating plate correspond to your
domestic power supply.
• The appliance must be earthed. The
power supply cable plug is provided
with a contact for this purpose. If the
domestic power supply socket is not
ENGLISH
13
Page 14
earthed, connect the appliance to a
separate earth in compliance with
current regulations, consulting a
qualified electrician.
• The manufacturer declines all
responsibility if the above safety
precautions are not observed.
• This appliance complies with the E.E.C.
Directives.
8.3 Installation of the
TASTEGUARD filter
The TASTEGUARD filter is an active
carbon filter which absorbs bad odors and
permits to maintain the best flavour and
aroma for all foodstuffs without risk of
odor cross contamination.
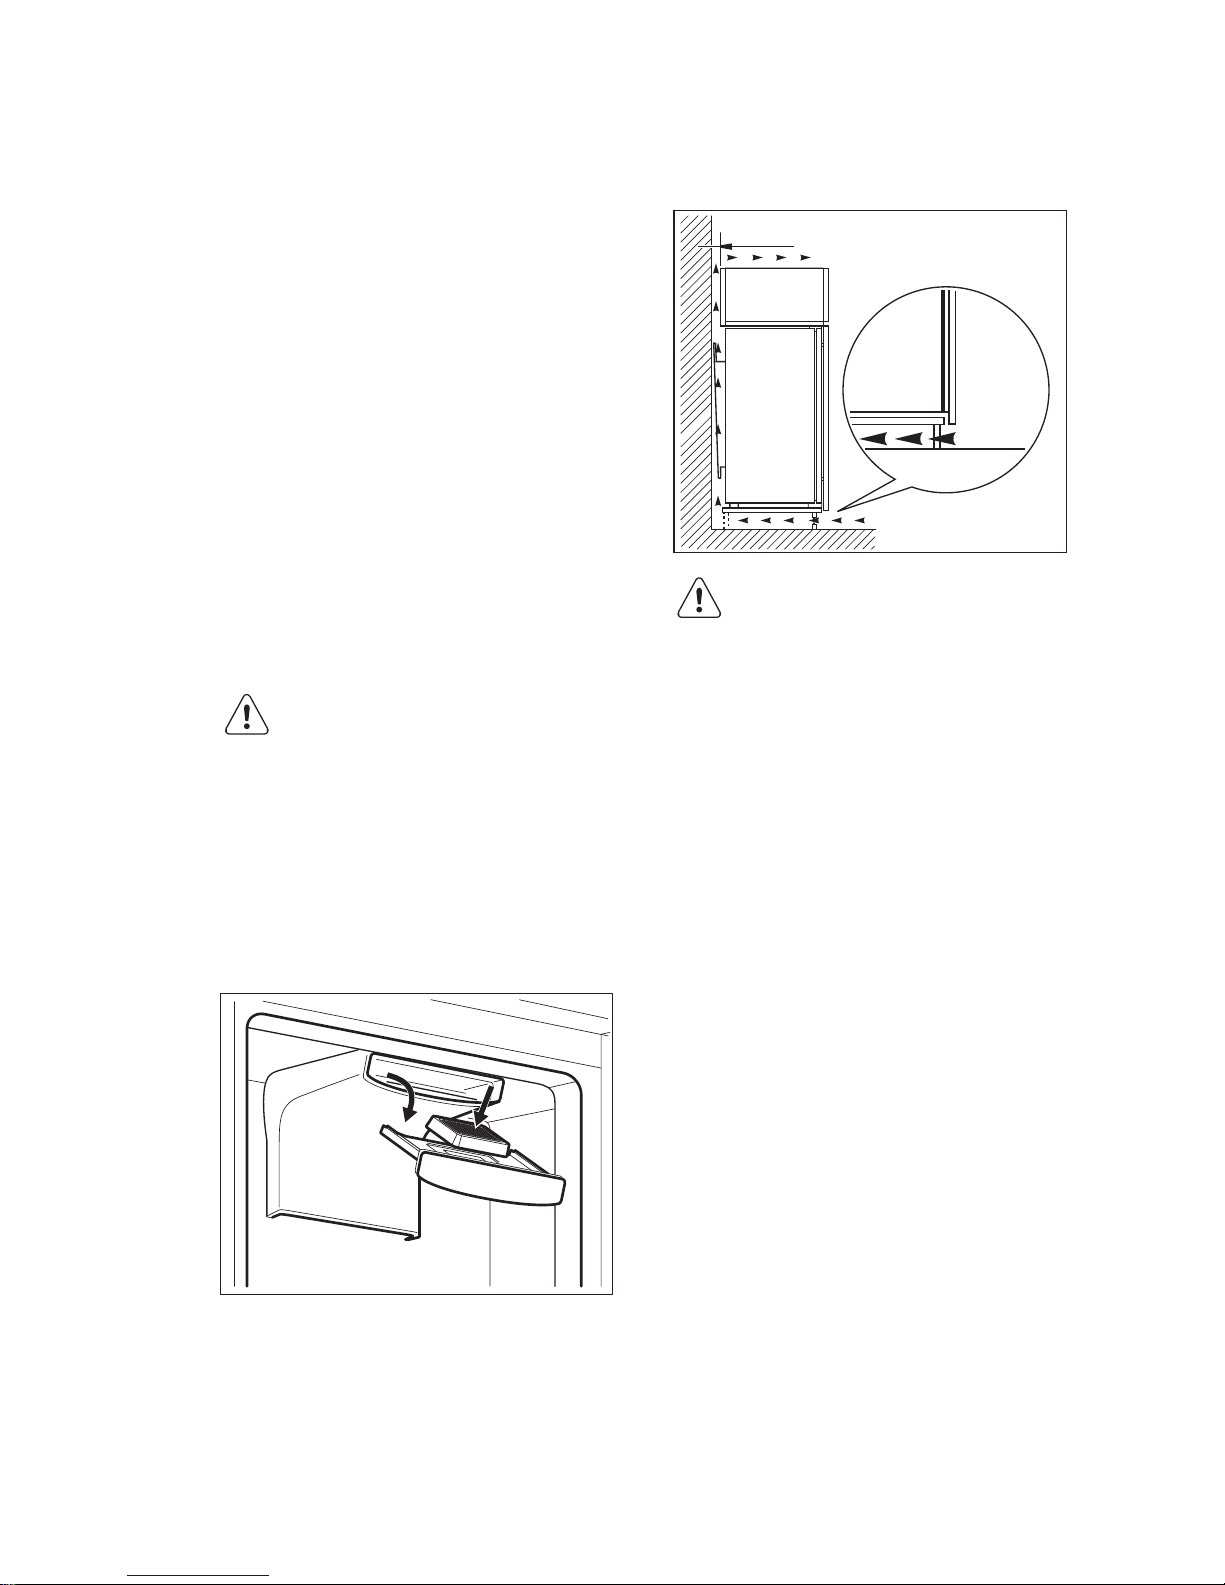
On delivery the carbon filter is in a plastic
bag to preserve performance.
The filter should be placed in the drawer
before the appliance is turned on.
CAUTION!
Make sure that the air lever
drawer is closed to obtain
proper function.
Handle the filter carefully so
fragments do not loosen from
the surface.
1. Open the drawer.
2. Remove the filter from the plastic bag.
3. Insert the filter in the drawer.
4. Close the drawer.
8.4 Ventilation requirements
The airflow behind the appliance must be
sufficient.
5 cm
min.
200 cm
2
min.
200 cm
2
CAUTION!
Refer to the assembly
instructions for the
installation.
9. NOISES
There are some sounds during normal running (compressor, refrigerant circulation).
www.electrolux.com14
Page 15
BRRR!
HISSS!
CLICK!
BLUBB!
CRACK!
SSSRR
R!
OK
CLICK!
CLICK!
SSSRRR!
SSSRRR!
BRRR!
BRRR!
HISSS!
HISSS!
BLUBB!
BLUBB!
CRACK!CRACK!
ENGLISH
15
Page 16
10. TECHNICAL INFORMATION
10.1 Technical data
Dimensions of the recess
Height mm 1780
Width mm 560
Depth mm 550
Voltage Volts 230 - 240
Frequency Hz 50
The technical information are situated in
the rating plate, on the external or internal
side of the appliance and in the energy
label.
11. ENVIRONMENT CONCERNS
Recycle the materials with the symbol .
Put the packaging in applicable containers
to recycle it. Help protect the environment
and human health and to recycle waste of
electrical and electronic appliances. Do
not dispose appliances marked with the
symbol with the household waste.
Return the product to your local recycling
facility or contact your municipal office.
www.electrolux.com16
Page 17
TABLE DES MATIÈRES
1. CONSIGNES DE SÉCURITÉ.............................................................................. 18
2. INSTRUCTIONS DE SÉCURITÉ......................................................................... 19
3. FONCTIONNEMENT..........................................................................................21
4. UTILISATION QUOTIDIENNE............................................................................. 23
5. CONSEILS.........................................................................................................25
6. ENTRETIEN ET NETTOYAGE............................................................................ 25
7. EN CAS D'ANOMALIE DE FONCTIONNEMENT................................................ 27
8. INSTALLATION..................................................................................................29
9. BRUITS............................................................................................................. 31
10. CARACTÉRISTIQUES TECHNIQUES...............................................................32
NOUS PENSONS À VOUS
Merci d'avoir choisi ce produit Electrolux. Avec ce produit, vous bénéficiez de
dizaines d'années d'expérience professionnelle et d'innovation. Ingénieux et
élégant, il a été conçu sur mesure pour vous. Grâce à cet appareil, vous savez que
chaque utilisation vous apportera satisfaction.
Bienvenue chez Electrolux.
Visitez notre site Internet pour :
Obtenir des conseils d'utilisation, des brochures, de l'aide, des informations :
www.electrolux.com
Enregistrer votre produit pour obtenir un meilleur service :
www.registerelectrolux.com
Acheter des accessoires, consommables et pièces de rechange d'origine pour
votre appareil :
www.electrolux.com/shop
SERVICE APRÈS-VENTE
N'utilisez que des pièces de rechange d'origine.
Avant de contacter le service, assurez-vous de disposer des informations
suivantes : Modèle, PNC, numéro de série.
Vous trouverez ces informations sur la plaque signalétique.
Avertissement/Attention : consignes de sécurité.
Informations générales et conseils.
Informations en matière de protection de l'environnement.
Sous réserve de modifications.
FRANÇAIS
17
Page 18

1. CONSIGNES DE SÉCURITÉ
Avant d'installer et d'utiliser cet appareil, lisez
soigneusement les instructions fournies. Le fabricant ne
peut être tenu pour responsable des dommages et
blessures liés à une mauvaise installation ou utilisation.
Conservez toujours cette notice avec votre appareil pour
vous y référer ultérieurement.
1.1 Sécurité des enfants et des personnes
vulnérables
• Cet appareil peut être utilisé par des enfants âgés d'au
moins 8 ans et par des personnes ayant des capacités
physiques, sensorielles ou mentales réduites ou
dénuées d’expérience ou de connaissance, s’ils (si
elles) sont correctement surveillé(e)s ou si des
instructions relatives à l’utilisation de l'appareil en toute
sécurité leur ont été données et si les risques encourus
ont été appréhendées.
• Les enfants ne doivent pas jouer avec l’appareil.
• Le nettoyage et l’entretien par l'usager ne doivent pas
être effectués par des enfants sans surveillance.
• Ne laissez pas les emballages à la portée des enfants.
1.2 Consignes générales de sécurité
• Cet appareil est conçu uniquement pour un usage
domestique et des utilisations telles que :
– dans les bâtiments de ferme, dans des cuisines
réservées aux employés dans des magasins, bureaux
et autres lieux de travail ;
– pour une utilisation privée, par les clients, dans des
hôtels et autres lieux de séjour.
• Veillez à ce que les orifices de ventilation, situés dans
l'enceinte de l'appareil ou dans la structure intégrée, ne
soient pas obstrués.
• N'utilisez aucun dispositif mécanique ou autre appareil
pour accélérer le processus de dégivrage que ceux
recommandés par le fabricant.
www.electrolux.com18
Page 19
• N'endommagez pas le circuit frigorifique.
• N'utilisez pas d'appareils électriques à l'intérieur des
compartiments de conservation des aliments de
l'appareil, sauf s'ils sont du type recommandé par le
fabricant.
• Ne pulvérisez pas d'eau ni de vapeur pour nettoyer
l'appareil.
• Nettoyez l'appareil avec un chiffon doux humide. Utilisez
uniquement des produits de nettoyage neutres.
N'utilisez pas de produits abrasifs, de tampons à
récurer, de solvants ni d'objets métalliques.
• Ne conservez aucune substance explosive dans cet
appareil, comme des aérosols contenant un produit
inflammable.
• Si le câble d'alimentation est endommagé, il doit être
remplacé par le fabricant, son service après-vente ou
des personnes de qualification similaire afin d'éviter un
danger.
2. INSTRUCTIONS DE SÉCURITÉ
2.1 Installation
AVERTISSEMENT!
L'appareil doit être installé
uniquement par un
professionnel qualifié.
• Retirez l'intégralité de l'emballage
• N'installez pas et ne branchez pas un
appareil endommagé.
• Suivez scrupuleusement les
instructions d'installation fournies avec
l'appareil.
• Soyez toujours vigilants lorsque vous
déplacez l'appareil car il est lourd.
Portez toujours des gants de sécurité.
• Assurez-vous que l'air circule autour de
l'appareil.
• Attendez au moins 4 heures avant de
brancher l'appareil sur le secteur. Cela
permet à l'huile de refouler dans le
compresseur.
• N'installez pas l'appareil à proximité
d'un radiateur, d'une cuisinière, d'un
four ou d'une table de cuisson.
• La surface arrière de l'appareil doit être
positionnée contre un mur.
• N'installez pas l'appareil dans un
endroit exposé à la lumière directe du
soleil.
• N'installez pas l'appareil dans un
endroit trop humide ou trop froid,
comme une dépendance extérieure, un
garage ou une cave.
• Lorsque vous déplacez l'appareil,
veillez à le soulever par l'avant pour
éviter de rayer le sol.
2.2 Connexion électrique
AVERTISSEMENT!
Risque d'incendie ou
d'électrocution.
• L'appareil doit être relié à la terre.
• Vérifiez que les données électriques
figurant sur la plaque signalétique
correspondent à celles de votre
réseau. Si ce n'est pas le cas,
contactez un électricien.
FRANÇAIS
19
Page 20
• Utilisez toujours une prise de courant
de sécurité correctement installée.
• N'utilisez pas d'adaptateurs multiprises
ni de rallonges.
• Veillez à ne pas endommager les
composants électriques tels que la
fiche secteur, le câble d'alimentation
ou le compresseur. Contactez le
service après-vente agréé ou un
électricien pour changer les
composants électriques.
• Le câble d'alimentation doit rester en
dessous du niveau de la fiche secteur.
• Ne connectez la fiche d'alimentation
secteur à la prise de courant secteur
qu'à la fin de l'installation. Assurezvous que la fiche d'alimentation est
accessible une fois l'appareil installé.
• Ne tirez jamais sur le câble
d'alimentation électrique pour
débrancher l'appareil. Tirez toujours
sur la fiche.
2.3 Usage
AVERTISSEMENT!
Risque de blessures, de
brûlures, d'électrocution ou
d'incendie.
• Ne modifiez pas les caractéristiques de
cet appareil.
• Ne placez aucun appareil électrique
(sorbetière, etc.) dans l'appareil, en
l'absence d'indications du fabricant.
• Veillez à ne pas endommager le circuit
frigorifique. Il contient de l'isobutane
(R600a), un gaz naturel ayant un niveau
élevé de compatibilité
environnementale. Ce gaz est
inflammable.
• Si le circuit frigorifique est endommagé,
assurez-vous de l'absence de flammes
et de sources d'ignition dans la pièce.
Aérez la pièce.
• Évitez tout contact d'éléments chauds
avec les parties en plastique de
l'appareil.
• Ne stockez jamais de gaz ou de liquide
inflammable dans l'appareil.
• Ne placez pas de produits
inflammables ou d'éléments imbibés
de produits inflammables à l'intérieur
ou à proximité de l'appareil, ni sur
celui-ci.
• Ne touchez pas le compresseur ni le
condenseur. Ils sont chauds.
2.4 Entretien et nettoyage
AVERTISSEMENT!
Risque de blessure corporelle
ou de dommages matériels.
• Avant toute opération d'entretien,
éteignez l'appareil et débranchez la
fiche de la prise secteur.
• Cet appareil contient des
hydrocarbures dans son circuit de
réfrigération. L'entretien et la recharge
du circuit de réfrigération doivent être
effectués par un professionnel qualifié.
• Examinez régulièrement l'écoulement
de l'appareil et si nécessaire, nettoyezle. Si l'orifice est bouché, l'eau
provenant du dégivrage s'écoulera en
bas de l'appareil.
2.5 Mise au rebut
AVERTISSEMENT!
Risque de blessure ou
d'asphyxie.
• Débranchez l'appareil de l'alimentation
électrique.
• Coupez le câble d'alimentation et
mettez-le au rebut.
• Retirez la porte pour empêcher les
enfants et les animaux de s'enfermer
dans l'appareil.
• Le circuit frigorifique et les matériaux
d'isolation de cet appareil préservent la
couche d'ozone.
• La mousse isolante contient un gaz
inflammable. Contactez votre service
municipal pour obtenir des
informations sur la marche à suivre
pour mettre l'appareil au rebut.
• N'endommagez pas la partie du circuit
de réfrigération située à proximité du
condenseur thermique.
www.electrolux.com20
Page 21
3. FONCTIONNEMENT
3.1 Panneau de commande
1
23456
1
Affichage
2
Touche d'augmentation de la
température
3
Touche de diminution de la
température
4
OK
5
Mode
6
ON/OFF
Pour augmenter le volume de la tonalité
des touches, appuyez simultanément sur
la touche Mode et la touche de diminution
de la température pendant quelques
secondes. Ce changement est réversible.
3.2 Affichage
A HE F GCB D
A) Fonction minuteur
B) Fonction FreeStore
C) Fonction Shopping
D) Fonction DrinksChill
E) Fonction holiday
F) Fonction ChildLock
G) Voyant d'alarme
H) Indicateur de température
3.3 Mise en marche
Branchez la fiche électrique de l'appareil à
la prise de courant.
Appuyez sur la touche Marche/Arrêt si
l'affichage est éteint.
Si DEMO s'affiche, l'appareil est en mode
démonstration. Reportez-vous au
paragraphe « En cas d'anomalie de
fonctionnement ».
Les indicateurs de température/voyants
du thermostat indiquent la température
programmée par défaut.
Pour sélectionner une température
différente, reportez-vous au paragraphe
« Réglage de la température ».
3.4 Mise à l'arrêt
Appuyez sur la touche ON/OFF pendant
5 secondes.
L'affichage s'éteint.
Pour mettre l'appareil hors tension,
débranchez la fiche d'alimentation de la
prise électrique.
3.5 Réglage de la température
La température programmée par défaut
pour le réfrigérateur est de +5°C.
Réglez la température du réfrigérateur en
appuyant sur touche de réglage de la
température.
L'indicateur de température/voyant du
thermostat indique la température
programmée.
La température programmée
sera atteinte sous 24 heures.
Après une coupure de
courant, la température
programmée reste
enregistrée.
FRANÇAIS
21
Page 22
3.6 Fonction FreeStore
L'activation de la fonction FreeStore
augmente la consommation d'électricité.
Si la fonction est activée
automatiquement, le voyant
FreeStore reste éteint
(reportez-vous à la section
« Utilisation quotidienne »).
1. Pour activer la fonction, appuyez sur la
touche Mode jusqu'à ce que le
symbole correspondant s'affiche.
2. Pour désactiver la fonction, appuyez
sur la touche Mode pour sélectionner
une autre fonction, ou appuyez sur la
touche Mode jusqu'à ce que tous les
symboles spéciaux disparaissent.
3.7 Fonction Shopping
Si vous devez ranger une grande quantité
d'aliments dans votre réfrigérateur, par
exemple après avoir fait vos courses, nous
vous suggérons d'activer la
fonctionShopping : elle permet de refroidir
rapidement les aliments tout en évitant le
réchauffement des denrées déjà stockées
dans le réfrigérateur.
1. Appuyez sur la touche Mode jusqu'à
ce que le symbole correspondant
s'affiche.
L'indicateur Shopping clignote.
2. Appuyez sur la touche OK pour
confirmer.
L'indicateur Shopping s'affiche.
La fonction Shopping se désactive
automatiquement au bout d'environ
6 heures.
Pour désactiver la fonction avant son arrêt
automatique, répétez l'opération.
La fonction se désactive
lorsque vous sélectionnez
une température différente
pour le réfrigérateur.
3.8 Fonction DrinksChill
La fonction DrinksChill sert à régler une
alarme sonore à une heure souhaitée, ce
qui est utile, par exemple, si vous
souhaitez refroidir une préparation
pendant un certain temps dans le cadre
d'une recette de cuisine, ou pour refroidir
rapidement des bouteilles dans le
congélateur.
1. Appuyez sur la touche Mode jusqu'à
ce que le symbole correspondant
s'affiche.
L'indicateur DrinksChill clignote.
Le minuteur indique pendant quelques
secondes la valeur programmée
(30 minutes).
2. Appuyez sur la touche de réglage du
minuteur pour modifier la valeur
programmée (de 1 à 90 minutes).
3. Appuyez sur la touche OK pour
confirmer.
L'indicateur DrinksChill s'affiche.
Le minuteur se met à clignoter (min).
À la fin du décompte, la touche DrinksChill
clignote et une alarme sonore retentit qui
indique que toutes les boissons
contenues dans le compartiment
congélateur doivent être retirées et il est
nécessaire d'appuyer sur OK pour
désactiver le signal sonore et mettre fin à
la fonction.
Pour désactiver la fonction, répétez la
procédure jusqu'à ce que DrinksChill
s'éteigne.
Il est possible de modifier la
durée pendant et à la fin du
décompte en appuyant sur
les touches de diminution et
d'augmentation de la
température.
3.9 Mode Holiday
Cette fonction vous permet de laisser le
compartiment réfrigérateur vide et fermé
pendant une longue période sans
formation de mauvaises odeurs.
Videz le compartiment de
réfrigération avant d'activer le
mode Holiday.
1. Appuyez sur la touche Mode jusqu'à
ce que le voyant du mode Holiday
s'allume.
L'icône Holiday clignote.
www.electrolux.com22
Page 23
L'indicateur de température du
réfrigérateur indique la température
programmée.
2. Appuyez sur la touche OK pour
confirmer.
L'icône Holiday apparaît.
Pour désactiver le mode Holiday, répétez
les mêmes opérations jusqu'à ce que
l'icône Holiday disparaisse.
3.10 Alarme de porte ouverte
Une alarme sonore se déclenche si la
porte reste ouverte pendant quelques
minutes. Les conditions d'alarme de porte
ouverte sont indiquées par :
• un voyant d'alarme clignotant ;
• une alarme sonore.
Au rétablissement des conditions
normales (porte fermée), l'alarme s'arrête.
Vous pouvez également éteindre le signal
sonore en appuyant sur n'importe quelle
touche.
4. UTILISATION QUOTIDIENNE
AVERTISSEMENT!
Reportez-vous aux chapitres
concernant la sécurité.
4.1 Clayettes amovibles
Les parois du réfrigérateur sont équipées
d'une série de supports afin que les
clayettes puissent être positionnées
comme vous le souhaitez.
Pour exploiter au mieux l'espace, vous
pouvez placer les demi-clayettes avant (A)
sous les clayettes arrière. (B)
A
B
4.2 Mise en place des
balconnets de la porte
En fonction de la taille des emballages des
aliments conservés, les balconnets de la
porte peuvent être positionnés à
différentes hauteurs.
Pour les ajuster, procédez comme suit :
1. Faites glisser le balconnet dans le
sens des flèches jusqu'à ce qu'il se
libère.
2. Repositionnez le balconnet selon les
besoins.
Le modèle est équipé d'un bac de
rangement réglable, qui est fixé sous un
balconnet de porte et qui peut glisser
latéralement.
4.3 Filtre à air à charbon
notre appareil est équipé d'un filtre à
charbon TASTEGUARD situé dans un
tiroir dans la paroi arrière du compartiment
réfrigérateur.
FRANÇAIS
23
Page 24
Le filtre purifie l'air en éliminant les odeurs
des aliments du compartiment
réfrigérateur, ce qui améliore la qualité de
leur conservation.
Pendant le fonctionnement,
veillez à toujours laisser le
tiroir d'aération fermé.
4.4 Compartiment basse
température
Pour les modèles qui en sont dotés, ce
compartiment situé dans le réfrigérateur
est recommandé pour une meilleure
conservation des aliments frais comme le
poisson, la viande, les fruits de mer, etc.
Il se trouve en bas du réfrigérateur, juste
au-dessus du bac à légumes.
4.5 Indicateur de température
Pour un bon stockage des aliments, le
réfrigérateur est doté d'un indicateur de
température. Le symbole sur la paroi
latérale de l'appareil indique la zone la plus
froide du réfrigérateur.
Si « OK » s'affiche (A), placez les aliments
frais dans la zone indiquée par le symbole.
Si ce n'est pas le cas (B), réglez le
thermostat sur une température inférieure
et attendez 12 heures avant de vérifier à
nouveau.
OK
OK
A
B
Après chargement de
denrées fraîches dans
l'appareil ou après des
ouvertures répétées (ou une
ouverture prolongée) de la
porte, il est normal que
l'inscription « OK »
n'apparaisse pas dans
l'indicateur de température ;
attendez au moins 12 heures
avant d'ajuster le thermostat.
4.6 FreeStore
Le compartiment réfrigérateur est équipé
d'un dispositif qui permet le
refroidissement rapide des aliments et qui
maintient une température plus homogène
dans le compartiment.
Ce dispositif s'active automatiquement en
cas de besoin, par exemple pour rafraîchir
rapidement le réfrigérateur lorsque la porte
est laissée ouverte ou si la température
ambiante est élevée.
Il est possible de mettre manuellement le
dispositif en fonctionnement si nécessaire
(reportez-vous au chapitre « Fonction
FreeStore »).
FreeStore se met à l'arrêt si la
porte est ouverte et
redémarre sitôt la porte
refermée.
www.electrolux.com24
Page 25
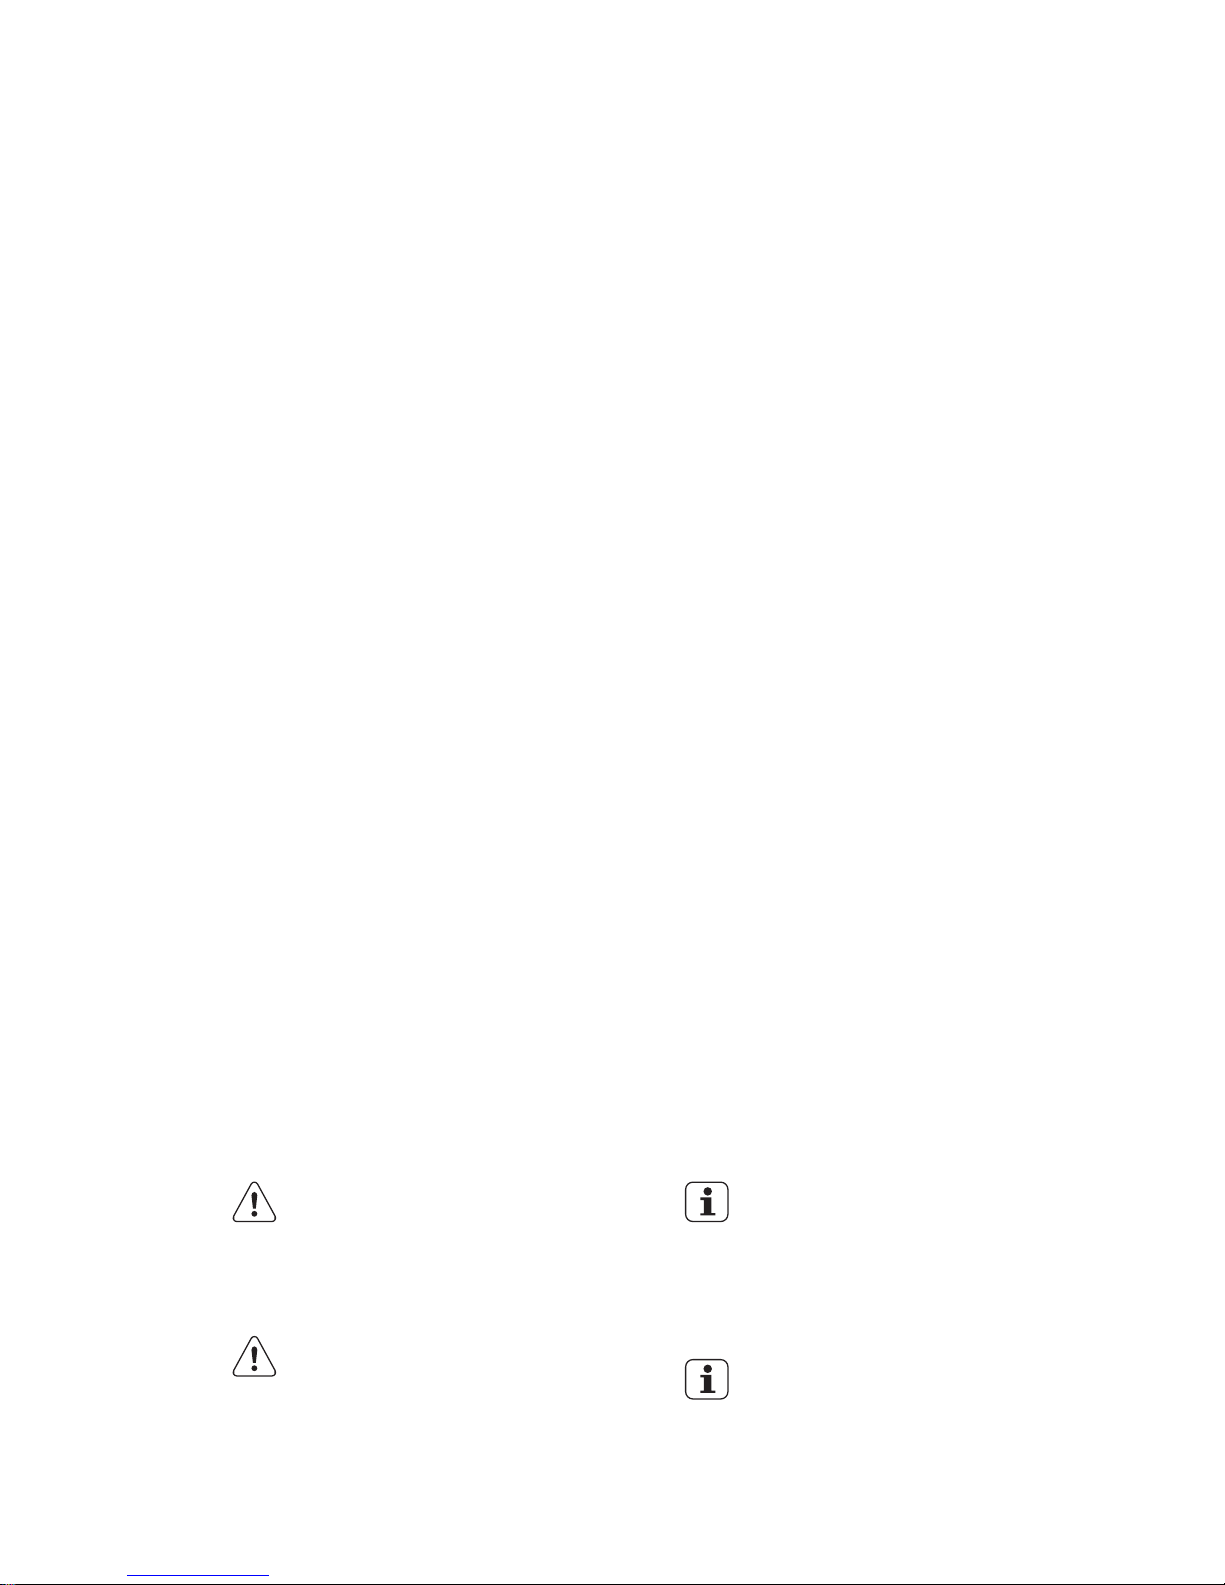
5. CONSEILS
5.1 Bruits normaux de
fonctionnement
Les bruits suivants sont normaux lorsque
l'appareil est en cours de fonctionnement :
• Un léger gargouillis lorsque le liquide
réfrigérant est pompé.
• Un ronronnement et un bruit de
pulsation provenant du compresseur
lorsque le liquide réfrigérant est
pompé.
• Un bruit de craquement soudain
provenant de l'intérieur de l'appareil
provoqué par une dilatation thermique
(un phénomène naturel et inoffensif).
• Un léger cliquetis du thermostat
lorsque le compresseur s'active ou se
désactive.
5.2 Conseils d'économie
d'énergie
• Évitez d'ouvrir trop souvent la porte du
congélateur et ne la laissez ouverte que
le temps nécessaire.
5.3 Conseils pour la réfrigération
des aliments frais
Pour obtenir les meilleurs résultats :
• n'introduisez pas d'aliments encore
chauds ou de liquides en évaporation
dans le réfrigérateur
• couvrez ou enveloppez soigneusement
les aliments, surtout s'ils sont
aromatiques
• placez correctement les aliments pour
que l'air puisse circuler librement
autour
5.4 Conseils pour la réfrigération
Conseil utiles :
• Viande (tous types de viande) :
enveloppez-la dans des sachets en
plastique et placez-la sur la clayette en
verre au-dessus du bac à légumes.
• Pour des raisons de sécurité, ne la
conservez de cette manière que
pendant un ou deux jours maximum.
• Aliments cuits, plats froids, etc. : ils
doivent être couverts et peuvent être
placés sur n'importe quelle clayette.
• Fruits et légumes : placez-les une fois
nettoyés dans le bac à légumes.
• Beurre et fromage : placez-les dans
des récipients étanches spéciaux ou
enveloppez-les soigneusement dans
des feuilles d'aluminium ou des
sachets en plastique, afin que le
volume d'air avec lesquels ils sont en
contact soit réduit autant que possible.
• Bouteilles : elles nécessitent un
bouchon et doivent être stockées sur
l'étagère à bouteilles de la porte ou (si
équipé) sur la grille à bouteilles.
• Bananes, pommes de terre, oignons et
ail ne doivent pas être mis dans le
réfrigérateur, s'ils ne sont pas
emballés.
6. ENTRETIEN ET NETTOYAGE
AVERTISSEMENT!
Reportez-vous aux chapitres
concernant la sécurité.
6.1 Avertissements généraux
ATTENTION!
Débranchez l'appareil avant
toute opération d'entretien et
de nettoyage.
Cet appareil contient des
hydrocarbures dans son
circuit de réfrigération ;
l'entretien et la recharge ne
doivent donc être effectués
que par du personnel qualifié.
Les pièces et accessoires de
l'appareil ne doivent pas être
lavés au lave-vaisselle.
FRANÇAIS
25
Page 26
6.2 Nettoyage périodique
ATTENTION!
Ne tirez pas, ne déplacez
pas, n'endommagez pas les
tuyaux et/ou câbles qui se
trouvent à l'intérieur de
l'appareil.
ATTENTION!
Attention à ne pas
endommager le système de
réfrigération.
ATTENTION!
Lorsque vous déplacez
l'appareil, veillez à le soulever
par l'avant pour éviter de
rayer le sol.
L'appareil doit être nettoyé régulièrement :
1. Nettoyez l'intérieur et les accessoires
avec de l'eau tiède et un détergent
doux.
2. Vérifiez régulièrement les joints de
porte et essuyez-les pour vous
assurer qu'ils sont propres et ne
contiennent pas de résidus.
3. Rincez et séchez soigneusement.
4. S'ils sont accessibles, nettoyez le
condenseur et le compresseur situés
à l'arrière de l'appareil avec une
brosse.
Cette opération améliore les
performances de l'appareil et permet
des économies d'électricité.
6.3 Dégivrage du réfrigérateur
En fonctionnement normal, le givre est
automatiquement éliminé de l'évaporateur
du compartiment réfrigérateur à chaque
fois que le compresseur s'arrête. L'eau de
dégivrage est collectée dans un récipient
spécial situé à l'arrière de l'appareil, audessus du compresseur, d'où elle
s'évapore.
Il est important de nettoyer régulièrement
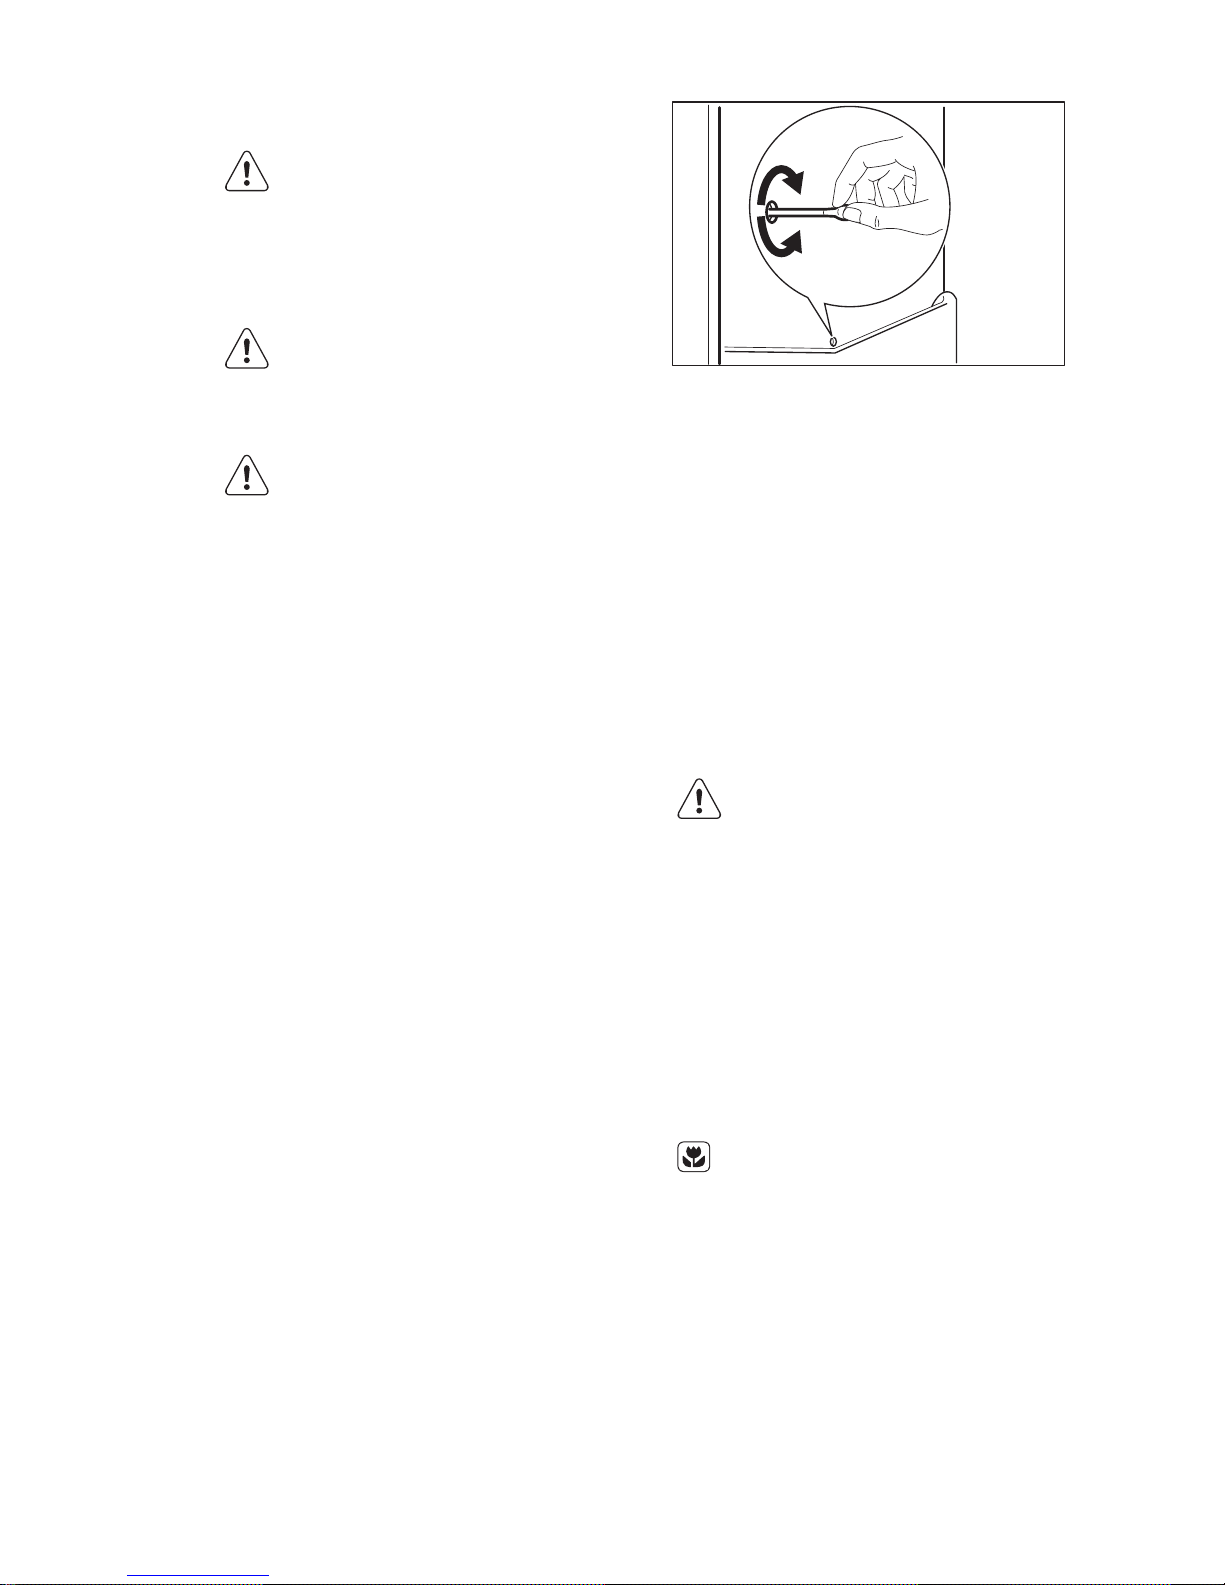
l'orifice d'écoulement de la goulotte
d'évacuation de l'eau de dégivrage située
au milieu du compartiment réfrigérateur
pour empêcher l'eau de déborder et de
couler à l'intérieur de l'appareil.
6.4 En cas de non-utilisation
prolongée
Si l'appareil n'est pas utilisé pendant de
longues périodes, prenez les précautions
suivantes :
1. Débranchez l'appareil de l'alimentation
électrique.
2. Retirez tous les aliments.
3. Nettoyez l'appareil et tous les
accessoires.
4. Laissez la porte/les portes ouverte(s)
pour éviter la formation d'odeurs
désagréables.
AVERTISSEMENT!
Si, toutefois, vous n'avez pas
la possibilité de débrancher
et de vider l'appareil, faites
vérifier régulièrement le bon
de fonctionnement de celui-ci
et ceci en tenant compte de
sa charge et de son
autonomie de
fonctionnement.
6.5 Remplacement du filtre à
charbon
Le filtre à air étant un
accessoire consommable, il
n'est pas couvert par la
garantie.
Pour obtenir les meilleures performances
possibles, il est recommandé de changer
le filtre à air à charbon une fois par an.
Vous pouvez vous procurer ces filtres
auprès de votre distributeur local.
Reportez-vous aux instructions fournies au
chapitre « Installation du filtre à air à
charbon ».
www.electrolux.com26
Page 27
7. EN CAS D'ANOMALIE DE FONCTIONNEMENT
AVERTISSEMENT!
Reportez-vous aux chapitres
concernant la sécurité.
7.1 En cas d'anomalie de fonctionnement
Problème Cause probable Solution
L'appareil ne fonctionne
pas du tout.
L'appareil est éteint. Mettez l'appareil en marche.
La fiche du câble d'ali-
mentation n'est pas correctement insérée dans la
prise de courant.
Branchez correctement la fiche du câble d'alimentation
dans la prise de courant.
La prise de courant n'est
pas alimentée.
Branchez un autre appareil
électrique à la prise de courant. Contactez un électricien
qualifié.
L'appareil est bruyant. L'appareil n'est pas sta-
ble.
Assurez-vous de la stabilité
de l'appareil.
Les signaux sonores et visuels sont activés.
L'appareil a récemment
été mis en marche ou la
température est toujours
trop élevée.
Consultez le paragraphe
« Alarme porte ouverte » ou
« Alarme haute température ».
La température à l'intérieur de l'appareil est trop
élevée.
Consultez le paragraphe
« Alarme porte ouverte » ou
« Alarme haute température ».
La porte est laissée ouverte.
Fermez la porte.
La température à l'intérieur de l'appareil est trop
élevée.
Contactez un électricien qualifié ou le service après-vente
agréé le plus proche.
Un symbole rectangulaire
apparaît à la place des
chiffres sur l'écran de température.
Problème de capteur de
température.
Contactez le service aprèsvente agréé le plus proche (le
système de réfrigération continuera de maintenir les aliments au froid, mais le réglage de la température n'est
pas possible).
L'éclairage ne fonctionne
pas.
L'éclairage est en mode
veille.
Fermez puis ouvrez la porte.
L'éclairage ne fonctionne
pas.
L'éclairage est défectueux.
Contactez le service aprèsvente agréé le plus proche.
FRANÇAIS
27
Page 28
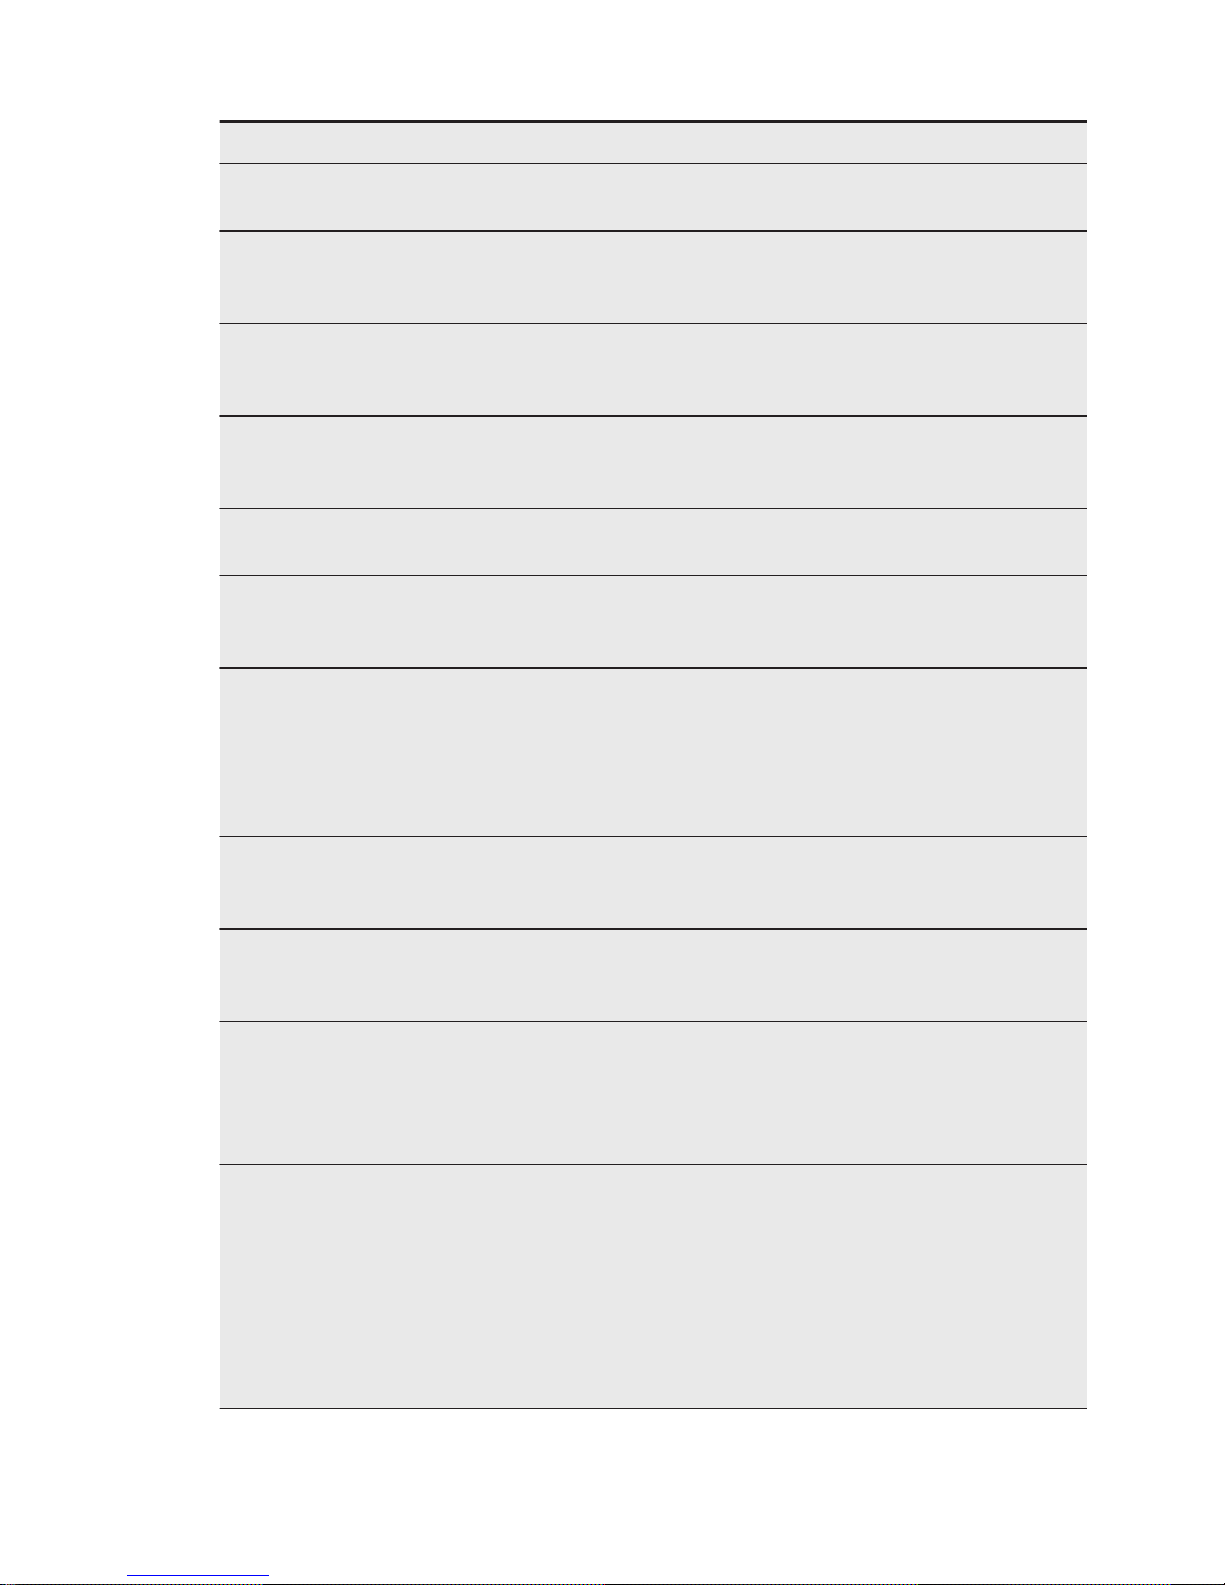
Problème Cause probable Solution
Le compresseur fonctionne
en permanence.
Il y a une erreur dans le
réglage de la température.
Reportez-vous au chapitre
« Fonctionnement ».
Trop de produits ont été
introduits simultanément.
Attendez quelques heures et
vérifiez de nouveau la température.
La température ambiante
est trop élevée.
Reportez-vous au tableau
des classes climatiques de la
plaque signalétique.
Les aliments introduits
dans l'appareil étaient
trop chauds.
Laissez refroidir les aliments à
température ambiante avant
de les mettre dans l'appareil.
La porte n'est pas fermée
correctement.
Reportez-vous au chapitre
« Fermeture de la porte ».
La fonction Shopping
Function est activée.
Consultez le paragraphe
« Fonction Shopping Function ».
Le compresseur ne démarre pas immédiatement
après avoir appuyé sur la
touche Shopping Function,
ou après avoir changé la
température.
Ce phénomène est normal, il ne s'agit pas d'une
anomalie.
Le compresseur démarre au
bout d'un certain temps.
De l'eau s'écoule à l'intérieur du réfrigérateur.
L'orifice d'écoulement de
l'eau de dégivrage est obstrué.
Nettoyez l'orifice d'écoulement de l'eau de dégivrage.
Des aliments empêchent
l'eau de s'écouler dans le
réservoir d'eau.
Assurez-vous que les produits ne touchent pas la plaque arrière.
De l'eau coule sur le sol. Le tuyau d'évacuation de
l'eau de dégivrage n'est
pas raccordé au bac
d'évaporation situé audessus du compresseur.
Fixez le tuyau d'évacuation
de l'eau au bac d'évaporation
de l'eau de dégivrage.
Il est impossible de régler la
température.
La fonction ActionFreeze
ou Shopping Function est
activée.
Désactivez manuellement la
fonction ActionFreeze ou
Shopping Function, ou attendez que la fonction se réinitialise automatiquement
avant de régler la température. Reportez-vous au chapitre « FonctionActionFreeze ou
Shopping Function ».
www.electrolux.com28
Page 29
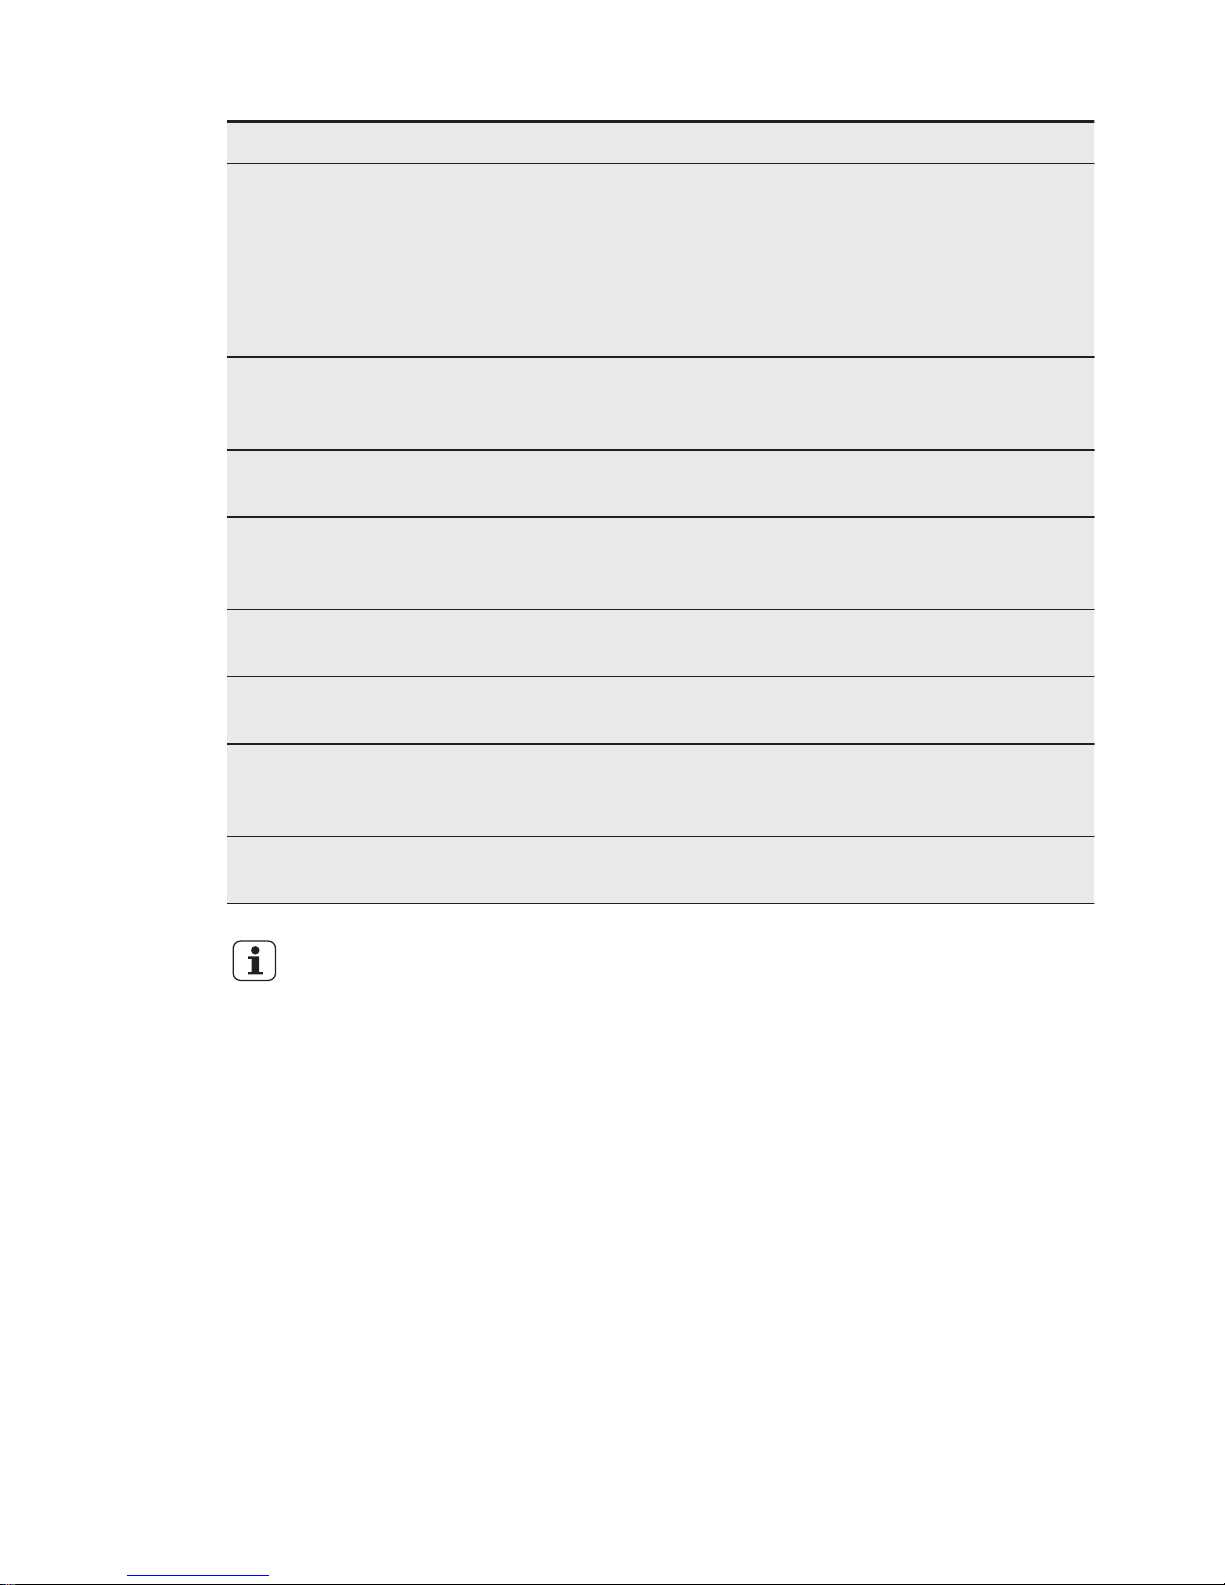
Problème Cause probable Solution
DEMO s'affiche sur le panneau.
L'appareil est en mode
démonstration.
Maintenez la touche OK enfoncée pendant environ
10 secondes, jusqu'à ce
qu'un long signal sonore retentisse et que l'affichage
s'éteigne pendant un court
instant.
La température à l'intérieur
de l'appareil est trop basse/
élevée.
Le thermostat n'est pas
réglé correctement.
Augmentez/réduisez la température.
La porte n'est pas fermée
correctement.
Reportez-vous au chapitre
« Fermeture de la porte ».
La température des produits est trop élevée.
Laissez les aliments refroidir à
température ambiante avant
de les placer dans l'appareil.
Trop de produits ont été
introduits simultanément.
Introduisez moins de produits
en même temps.
La porte a été ouverte
trop souvent.
N'ouvrez la porte qu'en cas
de nécessité.
La fonction Shopping
Function est activée.
Consultez le paragraphe
« Fonction Shopping Function ».
L'air froid ne circule pas
dans l'appareil.
Assurez-vous que de l'air
froid circule dans l'appareil.
Si ces conseils n'apportent
pas de solution à votre
problème, veuillez contacter
votre service après-vente
agréé.
7.2 Remplacement de l'éclairage
L'appareil est équipé d'un éclairage à DEL
longue durée.
Le remplacement du dispositif d'éclairage
doit uniquement être effectué par un
technicien du service après-vente.
Contactez votre service après-vente
agréé.
7.3 Fermeture de la porte
1. Nettoyez les joints de la porte.
2. Si nécessaire, ajustez la porte.
Reportez-vous au chapitre
« Installation ».
3. Si nécessaire, remplacez les joints de
porte défectueux. Contactez le service
après-vente agréé.
8. INSTALLATION
8.1 Installation
Cet appareil peut être installé dans une
pièce intérieure sèche et bien ventilée où
la température ambiante correspond à la
classe climatique indiquée sur la plaque
signalétique de l'appareil :
FRANÇAIS
29
Page 30

Classe
climatique
Température ambiante
SN +10°C à + 32°C
N +16°C à + 32°C
ST +16°C à + 38°C
T +16°C à + 43°C
Des problèmes fonctionnels
peuvent se produire sur
certains types de modèles
fonctionnant hors de cette
plage de températures. Seul
le respect de la plage de
températures spécifiée peut
garantir un bon
fonctionnement de l'appareil.
En cas de doute concernant
l'emplacement d'installation
de l'appareil, veuillez
contacter le vendeur, notre
service après-vente agréé le
plus proche.
8.2 Branchement électrique
• Avant de brancher l'appareil, assurezvous que la tension et la fréquence
indiquées sur la plaque signalétique
correspondent à celles de votre réseau
électrique domestique.
• L'appareil doit être relié à la terre. La
fiche du cordon d'alimentation est
fournie avec un contact à cette fin. Si la
prise de courant n'est pas mise à la
terre, branchez l'appareil à une mise à
la terre séparée conformément aux
réglementations en vigueur, en
consultant un électricien spécialisé.
• Le fabricant décline toute
responsabilité en cas de non-respect
de ces consignes de sécurité.
• Cet appareil est conforme aux
directives CEE.
8.3 Installation du filtre
TASTEGUARD
Ce filtre TASTEGUARD est un filtre à
charbon actif qui réduit les odeurs et les
empêche d'imprégner les aliments et
d'altérer leur arôme et saveur naturels
sans risque de contamination croisée.
Le filtre est livré dans un sac plastique
pour préserver son efficacité.
Le filtre doit être placé dans le tiroir avant
la mise en fonction de l'appareil.
ATTENTION!
Assurez-vous que le tiroir est
fermé pour un
fonctionnement correct.
Manipulez le filtre avec
précaution afin d'éviter que
sa surface ne soit
endommagée.
1. Ouvrez le tiroir.
2. Sortez le filtre du sachet en plastique.
3. Installez le filtre dans le tiroir.
4. Fermez le tiroir.
8.4 Exigences en matière de
ventilation
Veillez à garantir une circulation d'air
suffisante à l'arrière de l'appareil.
5 cm
min.
200 cm
2
min.
200 cm
2
www.electrolux.com30
Page 31
ATTENTION!
Consultez la notice de
montage lors de l'installation.
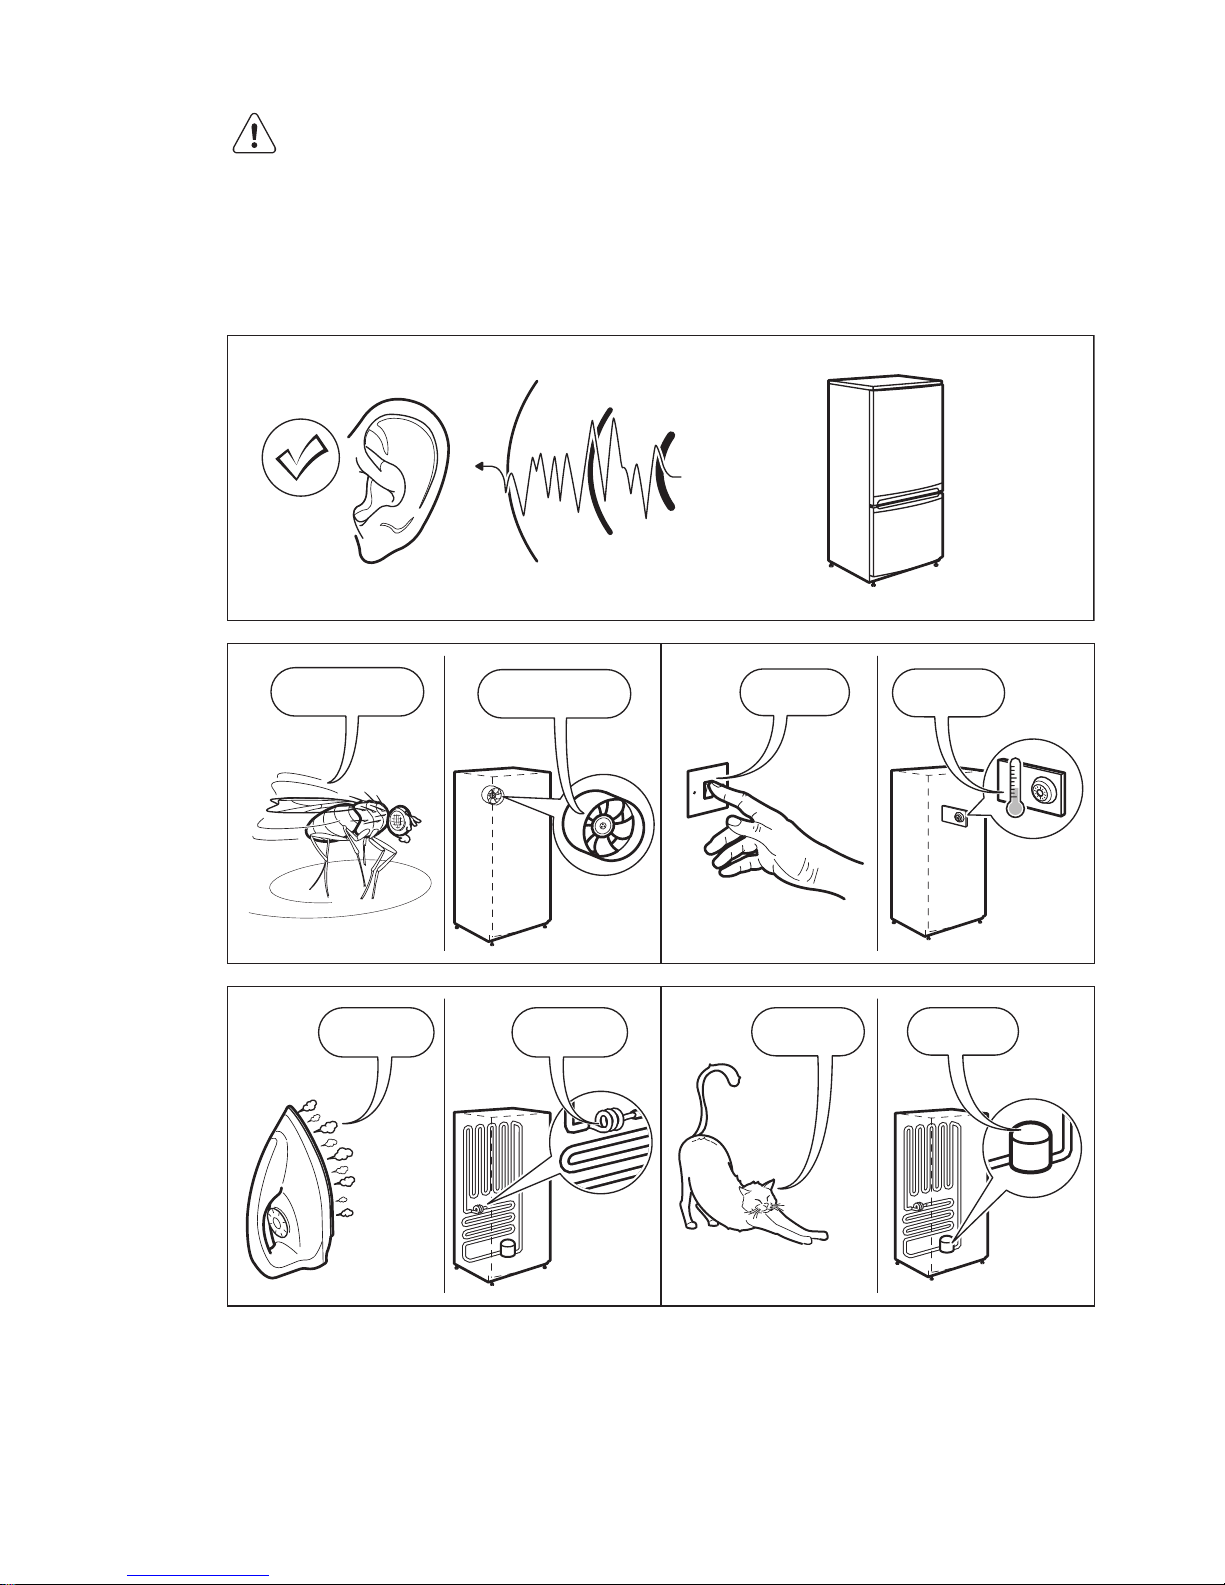
9. BRUITS
L'appareil émet certains bruits pendant son fonctionnement (compresseur, circuit
frigorifique).
BRRR!
HISSS!
CLICK!
BLUBB!
CRACK!
SSSRR
R!
OK
CLICK!
CLICK!
SSSRRR!
SSSRRR!
BRRR!
BRRR!
HISSS!
HISSS!
FRANÇAIS
31
Page 32
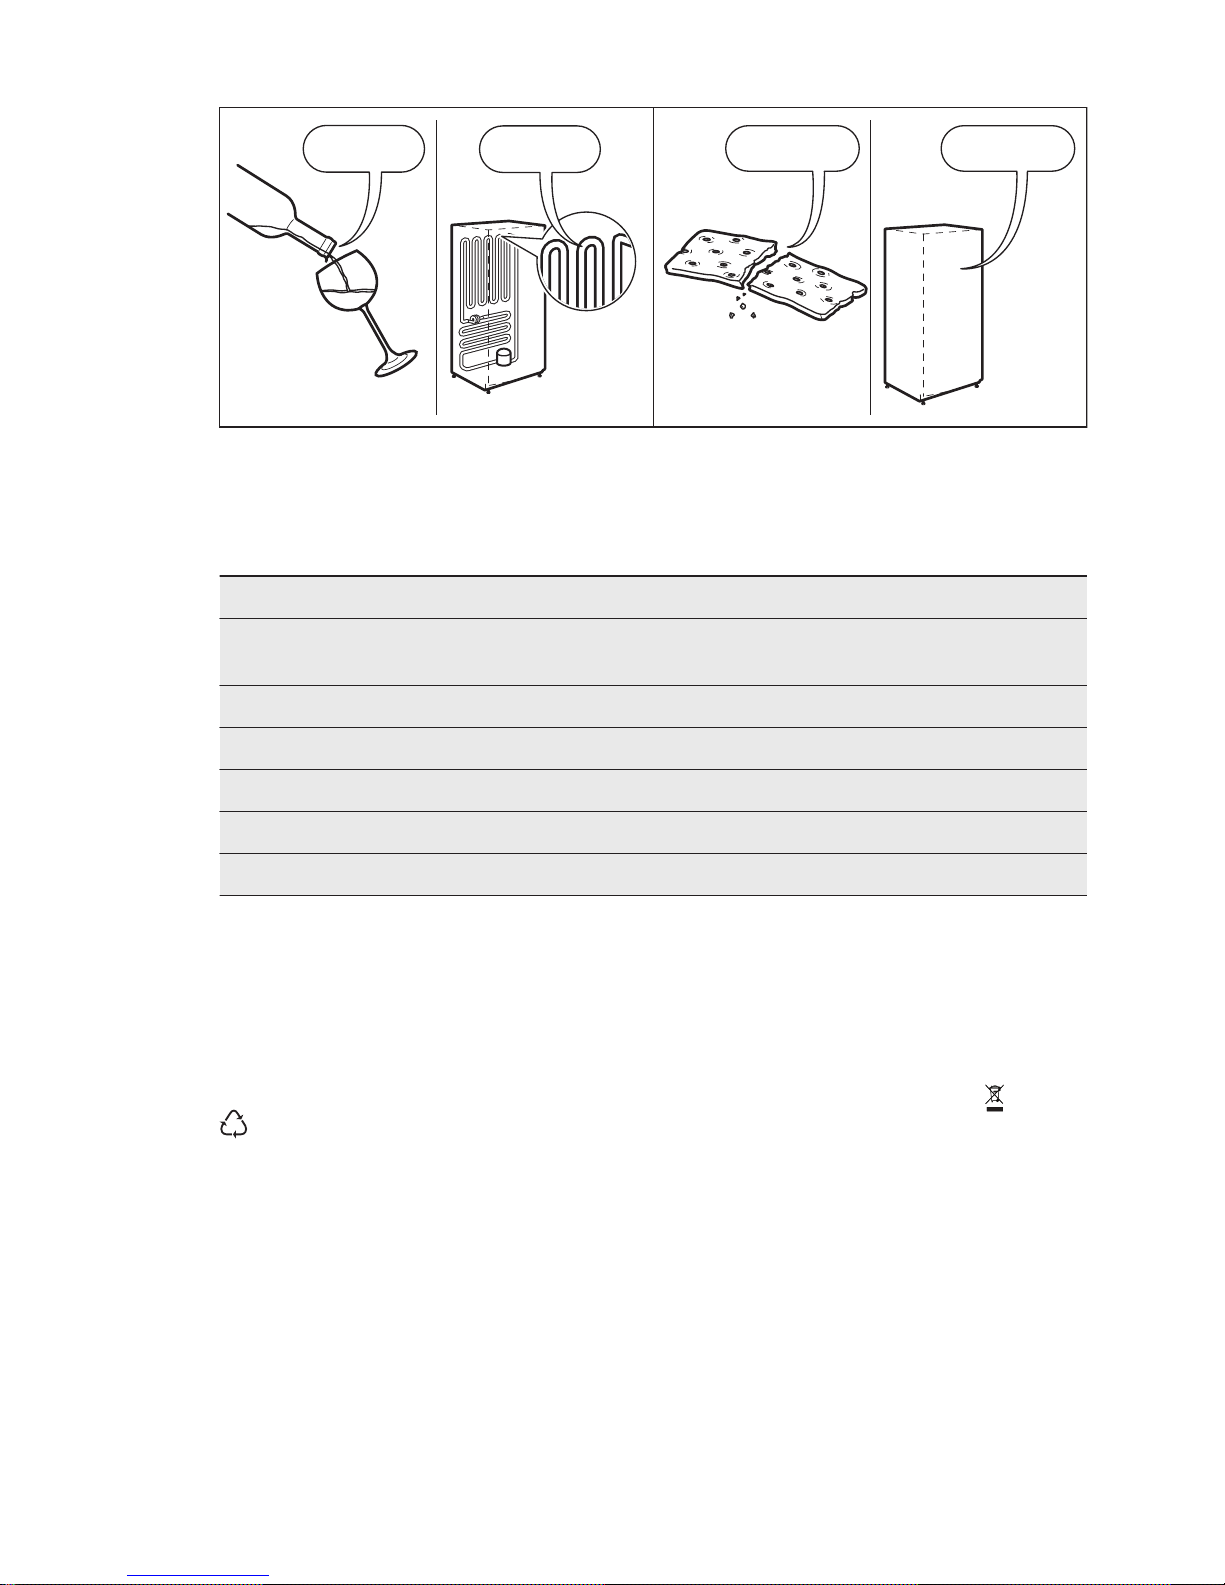
BLUBB!
BLUBB!
CRACK!CRACK!
10. CARACTÉRISTIQUES TECHNIQUES
10.1 Caractéristiques techniques
Dimensions de la niche d'encastrement
Hauteur mm 1780
Largeur mm 560
Profondeur mm 550
Tension Volts 230 - 240
Fréquence Hz 50
Les caractéristiques techniques figurent
sur la plaque signalétique située sur le
côté intérieur ou extérieur de l'appareil et
sur l'étiquette énergétique.
11. EN MATIÈRE DE PROTECTION DE
L'ENVIRONNEMENT
Recyclez les matériaux portant le symbole
. Déposez les emballages dans les
conteneurs prévus à cet effet. Contribuez
à la protection de l'environnement et à
votre sécurité, recyclez vos produits
électriques et électroniques. Ne jetez pas
les appareils portant le symbole avec
les ordures ménagères. Emmenez un tel
produit dans votre centre local de
recyclage ou contactez vos services
municipaux.
www.electrolux.com32
Page 33
INHALTSVERZEICHNIS
1. SICHERHEITSINFORMATIONEN....................................................................... 34
2. SICHERHEITSANWEISUNGEN..........................................................................35
3. BETRIEB............................................................................................................37
4. TÄGLICHER GEBRAUCH.................................................................................. 39
5. TIPPS UND HINWEISE...................................................................................... 41
6. REINIGUNG UND PFLEGE................................................................................ 41
7. FEHLERSUCHE.................................................................................................43
8. MONTAGE.........................................................................................................45
9. GERÄUSCHE.................................................................................................... 47
10. TECHNISCHE DATEN..................................................................................... 48
WIR DENKEN AN SIE
Vielen Dank, dass Sie sich für ein Gerät von Electrolux entschieden haben. Sie
haben ein Produkt gewählt, hinter dem jahrzehntelange professionelle Erfahrung und
Innovation stehen. Bei der Entwicklung dieses großartigen und eleganten Geräts
haben wir an Sie gedacht. So haben Sie bei jedem Gebrauch die Gewissheit, dass
Sie stets großartige Ergebnisse erzielen werden.
Willkommen bei Electrolux.
Besuchen Sie uns auf unserer Website, um:
Anwendungshinweise, Prospekte, Fehlerbehebungs- und Service-Informationen
zu erhalten:
www.electrolux.com
Ihr erworbenes Produkt zu registrieren, um den besten Service dafür zu
gewährleisten:
www.registerelectrolux.com
Zubehör, Verbrauchsmaterial und Original-Ersatzteile für Ihr Gerät zu erwerben:
www.electrolux.com/shop
REPARATUR- UND KUNDENDIENST
Bitte verwenden Sie ausschließlich Original-Ersatzteile für Ihre Produkte.
Halten Sie folgende Angaben bereit, wenn Sie sich an den Kundendienst wenden
Modell, Produktnummer (PNC), Seriennummer.
Diese Informationen finden Sie auf dem Typenschild.
Warnungs-/ Sicherheitshinweise
Allgemeine Informationen und Empfehlungen
Informationen zum Umweltschutz
Änderungen vorbehalten.
DEUTSCH
33
Page 34

1. SICHERHEITSINFORMATIONEN
Lesen Sie vor der Montage und dem Gebrauch des
Geräts zuerst die Gebrauchsanleitung. Der Hersteller
übernimmt keine Verantwortung für Verletzungen und
Beschädigungen durch unsachgemäße Montage.
Bewahren Sie die Gebrauchsanleitung griffbereit auf.
1.1 Sicherheit von Kindern und schutzbedürftigen
Personen
• Das Gerät kann von Kindern ab 8 Jahren und Personen
mit eingeschränkten physischen, sensorischen oder
geistigen Fähigkeiten oder mit mangelnder Erfahrung
und/oder mangelndem Wissen nur dann verwendet
werden, wenn sie durch eine für ihre Sicherheit
zuständige Person beaufsichtigt werden oder in die
sichere Verwendung des Geräts eingewiesen wurden
und die mit dem Gerät verbundenen Gefahren
verstanden haben.
• Kinder dürfen nicht mit dem Gerät spielen.
• Wartung oder Reinigung des Geräts dürfen nicht von
Kindern ohne Aufsicht erfolgen.
• Alle Verpackungsmaterialien von Kindern fernhalten.
1.2 Allgemeine Sicherheit
• Dieses Gerät ist für die Verwendung im Haushalt und
ähnliche Zwecke vorgesehen, wie z. B.:
– Bauernhöfe, Personalküchenbereiche in Geschäften,
Büros und anderen Arbeitsumfeldern
– Für Gäste in Hotels, Motels, Pensionen und anderen
wohnungsähnlichen Räumlichkeiten
• Achten Sie darauf, dass die Belüftungsöffnungen im
Gehäuse, um das Gerät und in der Einbaunische nicht
blockiert sind.
• Versuchen Sie nicht, den Abtauvorgang durch andere
als vom Hersteller empfohlene mechanische oder
sonstige Hilfsmittel zu beschleunigen.
• Beschädigen Sie nicht den Kältekreislauf.
www.electrolux.com34
Page 35
• Betreiben Sie in den Lebensmittelfächern des Geräts
keine anderen als die vom Hersteller empfohlenen
Elektrogeräte.
• Reinigen Sie das Gerät nicht mit einem Wasser- oder
Dampfstrahl.
• Reinigen Sie das Gerät mit einem weichen, feuchten
Tuch. Verwenden Sie ausschließlich Neutralreiniger.
Benutzen Sie keine Scheuermittel, scheuernde
Reinigungsschwämmchen, Lösungsmittel oder
Metallgegenstände.
• Bewahren Sie in dem Gerät keine explosiven
Substanzen, wie Spraydosen mit entzündlichen
Treibgasen auf.
• Wenn das Netzkabel beschädigt ist, muss es vom
Hersteller, seinem autorisierten Kundenservice oder
einer gleichermaßen qualifizierten Person ausgetauscht
werden, um Gefahrenquellen zu vermeiden.
2. SICHERHEITSANWEISUNGEN
2.1 Montage
WARNUNG!
Nur eine qualifizierte
Fachkraft darf den
elektrischen Anschluss des
Geräts vornehmen.
• Entfernen Sie das
Verpackungsmaterial.
• Stellen Sie ein beschädigtes Gerät
nicht auf und benutzen Sie es nicht.
• Halten Sie sich an die mitgelieferte
Montageanleitung.
• Seien Sie beim Umsetzen des Geräts
vorsichtig, denn es ist schwer. Tragen
Sie stets Sicherheitshandschuhe.
• Stellen Sie sicher, dass die Luft um das
Gerät zirkulieren kann.
• Warten Sie mindestens 4 Stunden,
bevor Sie das Gerät an das Stromnetz
anschließen. Dies ist erforderlich, damit
das Öl in den Kompressor
zurückfließen kann.
• Stellen Sie das Gerät nicht in der Nähe
von Heizkörpern, Herden, Backöfen
oder Kochfeldern auf.
• Die Geräterückseite muss gegen die
Wand gestellt werden.
• Stellen Sie das Gerät nicht dort auf, wo
es direktem Sonnenlicht ausgesetzt
sein könnte.
• Stellen Sie das Gerät nicht an zu
feuchten oder kalten Orten auf, wie z.
B. in Nebengebäuden, Garagen oder
Weinkellern.
• Wenn Sie das Gerät verschieben
möchten, heben Sie es bitte an der
Vorderkante an, um den Fußboden
nicht zu verkratzen.
2.2 Elektrischer Anschluss
WARNUNG!
Brand- und
Stromschlaggefahr.
• Das Gerät muss geerdet sein.
• Stellen Sie sicher, dass die elektrischen
Daten auf dem Typenschild den Daten
Ihrer Stromversorgung entsprechen.
Wenden Sie sich andernfalls an eine
Elektrofachkraft.
DEUTSCH
35
Page 36
• Schließen Sie das Gerät nur an eine
ordnungsgemäß installierte
Schutzkontaktsteckdose an.
• Verwenden Sie keine
Mehrfachsteckdosen oder
Verlängerungskabel.
• Achten Sie darauf, elektrische Bauteile
(wie Netzstecker, Netzkabel und
Kompressor) nicht zu beschädigen.
Wenden Sie sich an den autorisierten
Kundendienst oder einen Elektriker, um
die elektrischen Bauteile
auszutauschen.
• Das Netzkabel muss unterhalb des
Netzsteckers verlegt werden.
• Stecken Sie den Netzstecker erst nach
Abschluss der Montage in die
Steckdose. Stellen Sie sicher, dass der
Netzstecker nach der Montage noch
zugänglich ist.
• Ziehen Sie nicht am Netzkabel, wenn
Sie das Gerät von der
Stromversorgung trennen möchten.
Ziehen Sie stets am Netzstecker.
2.3 Verwendung
WARNUNG!
Es besteht Verletzungs-,
Verbrennungs-, Stromschlagund Brandgefahr.
• Nehmen Sie keine technischen
Änderungen am Gerät vor.
• Stellen Sie keine elektrischen Geräte (z.
B. Eisbereiter) in das Gerät, wenn
solche Geräte nicht ausdrücklich vom
Hersteller für diesen Zweck zugelassen
sind.
• Achten Sie darauf, den Kältekreislauf
nicht zu beschädigen. Er enthält
Isobutan (R600a), ein Erdgas mit einem
hohen Grad an Umweltverträglichkeit.
Dieses Gas ist brennbar.
• Wird der Kältekreislauf beschädigt,
stellen Sie bitte sicher, dass es keine
Flammen und Zündquellen im Raum
gibt. Belüften Sie den Raum.
• Stellen Sie keine heißen Gegenstände
auf die Kunststoffteile des Geräts.
• Bewahren Sie keine entzündbaren
Gase und Flüssigkeiten im Gerät auf.
• Platzieren Sie keine entflammbaren
Produkte oder Gegenstände, die mit
entflammbaren Produkten benetzt
sind, im Gerät, auf dem Gerät oder in
der Nähe des Geräts.
• Berühren Sie nicht den Kompressor
oder den Kondensator. Sie sind heiß.
2.4 Reinigung und Pflege
WARNUNG!
Verletzungsgefahr sowie
Risiko von Schäden am
Gerät.
• Schalten Sie das Gerät immer aus und
ziehen Sie den Netzstecker aus der
Steckdose, bevor Reinigungsarbeiten
durchgeführt werden.
• Der Kältekreis des Gerätes enthält
Kohlenwasserstoffe. Das Gerät muss
von einer qualifizierten Fachkraft
gewartet und nachgefüllt werden.
• Prüfen Sie regelmäßig den
Wasserabfluss des Geräts und reinigen
Sie ihn gegebenenfalls. Bei verstopftem
Wasserabfluss sammelt sich das
Abtauwasser am Boden des Geräts
an.
2.5 Entsorgung
WARNUNG!
Verletzungs- und
Erstickungsgefahr.
• Trennen Sie das Gerät von der
Stromversorgung.
• Schneiden Sie das Netzkabel ab, und
entsorgen Sie es.
• Entfernen Sie die Tür, um zu
verhindern, dass sich Kinder oder
Haustiere in dem Gerät einschließen.
• Der Kältekreislauf und die
Isolierungsmaterialien dieses Gerätes
sind ozonfreundlich.
• Die Isolierung enthält entzündliches
Gas. Für Informationen zur korrekten
Entsorgung des Gerätes wenden Sie
sich an Ihre kommunale Behörde.
• Achten Sie darauf, dass die Kühleinheit
in der Nähe des Wärmetauschers nicht
beschädigt wird.
www.electrolux.com36
Page 37
3. BETRIEB
3.1 Bedienfeld
1
23456
1
Display
2
Taste zum Erhöhen der Temperatur
3
Taste zum Senken der Temperatur
4
OK
5
Mode
6
ON/OFF
Der vordefinierte Tastenton kann lauter
gestellt werden, indem die Taste Mode
und die Taste zum Senken der
Temperatur einige Sekunden lang
gleichzeitig gedrückt werden. Die
Änderung lässt sich rückgängig machen.
3.2 Anzeige
A HE F GCB D
A) Uhrfunktion
B) Funktion FreeStore
C) Funktion Shopping
D) Funktion DrinksChill
E) Urlaubsfunktion
F) Funktion ChildLock
G) Alarmanzeige
H) Temperatur kontrolllampe
3.3 Einschalten des Geräts
Stecken Sie den Netzstecker in die
Netzsteckdose.
Drücken Sie die Taste EIN/AUS, wenn das
Display ausgeschaltet ist.
Wenn auf dem Display DEMO angezeigt
wird, befindet sich das Gerät im DemoModus. Siehe hierzu „Fehlersuche“.
Die Temperaturanzeigen zeigen die jeweils
eingestellte Standardtemperatur an.
Näheres zum Einstellen einer anderen
Temperatur siehe „Temperaturregelung“.
3.4 Ausschalten des Geräts
Halten Sie die Taste ON/OFF 5 Sekunden
lang gedrückt.
Das Display wird ausgeschaltet.
Ziehen Sie den Gerätestecker aus der
Steckdose, um das Gerät vom Netz zu
trennen.
3.5 Temperaturregelung
Die Standardtemperatur für den
Kühlschrank beträgt +5 °C.
Stellen Sie die Kühlschranktemperatur
durch Drücken der Temperaturtaste ein.
Die Temperaturanzeige zeigt die
eingestellte Temperatur an.
Die eingestellte Temperatur
wird innerhalb von 24
Stunden erreicht.
Nach einem Stromausfall
bleibt die eingestellte
Temperatur gespeichert.
DEUTSCH
37
Page 38

3.6 Funktion FreeStore
Durch das Einschalten der Funktion
FreeStore erhöht sich der
Energieverbrauch.
Wird die Funktion
automatisch eingeschaltet,
leuchtet die Anzeige
FreeStore nicht (siehe
„Täglicher Gebrauch“).
1. Drücken Sie zum Einschalten der
Funktion Mode, bis das
entsprechende Symbol leuchtet.
2. Drücken Sie zum Ausschalten der
Funktion Mode, um eine andere
Funktion zu wählen oder drücken Sie
Mode, bis kein Symbol angezeigt wird.
3.7 Funktion Shopping
Wenn Sie zum Beispiel nach einem
Einkauf größere Mengen warmer
Lebensmittel einlegen möchten,
empfehlen wir die Funktion Shopping
einzuschalten, um die Produkte schneller
zu kühlen und zu vermeiden, dass die
bereits im Kühlschrank befindlichen
Lebensmittel erwärmt werden.
1. Drücken Sie Mode, bis das
entsprechende Symbol angezeigt
wird.
Die Shopping-Anzeige blinkt.
2. Mit OK bestätigen.
Die Shopping-Anzeige erscheint.
Die Funktion Shopping wird nach etwa 6
Stunden automatisch abgeschaltet.
Zum Ausschalten der Funktion vor ihrer
automatischen Abschaltung, wiederholen
Sie die obigen Schritte.
Die Funktion wird durch die
Auswahl einer anderen
Temperatur für den Kühlraum
ausgeschaltet.
3.8 Funktion DrinksChill
Mit der Funktion DrinksChill lässt sich ein
Alarmton einstellen, der zu der
gewünschten Zeit ertönt. Dies ist zum
Beispiel praktisch, wenn ein Gericht eine
gewisse Zeit abkühlen muss oder Sie die
Flaschen, die Sie für eine schnellere
Kühlung in den Gefrierraum gelegt haben,
nicht vergessen möchten.
1. Drücken Sie Mode, bis das
entsprechende Symbol angezeigt
wird.
Die Anzeige DrinksChill blinkt.
Der Timer zeigt den eingestellten Wert (30
Minuten) einige Sekunden lang an.
2. Drücken Sie den Timerregler, um den
eingestellten Wert des Timers auf 1 bis
90 Minuten zu ändern.
3. Mit OK bestätigen.
Die DrinksChill-Anzeige erscheint.
Der Timer beginnt zu blinken (min)..
Am Ende des Countdowns blinkt die
Anzeige DrinksChill und es ertönt ein
akustisches Signal, um Sie darauf
hinzuweisen, dass die Getränke aus dem
Gefrierfach genommen werden müssen.
Schalten Sie das akustische Signal und
die Funktion durch Drücken von OK aus.
Wiederholen Sie zum Ausschalten der
Funktion die obigen Schritte, bis
DrinksChill erlischt.
Die Zeit kann während des
Countdowns geändert
werden, indem Sie die Tasten
zur Erhöhung und
Verringerung der Temperatur
drücken.
3.9 Holiday-Modus
Mit dieser Funktion können Sie den
Kühlschrank über längere Zeit mit
geschlossener Tür leer stehen lassen,
ohne dass sich ein unangenehmer Geruch
entwickelt.
Leeren Sie den Kühlraum,
bevor Sie den Holiday-Modus
einschalten.
1. Drücken Sie Mode, bis die HolidayAnzeige erscheint.
Das Holiday-Symbol blinkt.
Die Kühlraum-Temperaturanzeige zeigt die
eingestellte Temperatur an.
2. Mit OK bestätigen.
Das Holiday-Symbol erscheint.
Wiederholen Sie zum Ausschalten des
Holiday-Modus die obigen Schritte, bis die
Holiday-Anzeige erlischt.
www.electrolux.com38
Page 39

3.10 Alarm „Tür offen“
Es ertönt ein Alarmsignal, wenn die Tür
einige Minuten lang offen steht. Der Alarm
„Tür offen“ wird wie folgt angezeigt:
• Blinkende Alarmanzeige
• Akustisches Signal.
Sobald der Normalzustand
wiederhergestellt ist (Tür geschlossen),
wird der Alarm ausgeschaltet. Der
Summer kann auch durch Drücken einer
beliebigen Taste ausgeschaltet werden.
4. TÄGLICHER GEBRAUCH
WARNUNG!
Siehe Kapitel
Sicherheitshinweise.
4.1 Verstellbare Ablagen
Die Wände des Kühlschranks sind mit
einer Anzahl von Führungsschienen
ausgestattet, die verschiedene
Möglichkeiten für das Einsetzen der
Ablagen bieten.
Zur besseren Raumnutzung können die
vorderen Hälften (A) der Ablagen unter
den rückwärtigen Hälften eingesetzt
werden. (B)
A
B
4.2 Positionierung der
Türablagen
Die Türablagen können in verschiedener
Höhe positioniert werden; damit
ermöglichen sie das Lagern verschieden
großer Lebensmittelpackungen.
Gehen Sie dazu wie folgt vor:
1. Ziehen Sie die Ablage langsam in
Pfeilrichtung, bis sie sich löst.
2. Setzen Sie die Ablage in gewünschter
Höhe ein.
Das Modell ist mit einem variablen
Lagerfach ausgerüstet, das unter einer
Türablage befestigt ist und sich seitlich
verschieben lässt.
4.3 Kohlefilter
Unser Gerät ist mit einem TASTEGUARD
Kohlefilter in einer Schublade in der
Rückwand des Kühlraums ausgerüstet.
Der Filter reinigt die Luft von
unerwünschten Gerüchen im Kühlraum
und verbessert so die Qualität der
gelagerten Lebensmittel.
Die Lüftungsschublade muss
während des Betriebs stets
geschlossen sein.
DEUTSCH
39
Page 40
4.4 Niedertemperaturfach
Wir empfehlen bei Geräten mit diesem
Fach im Kühlraum, dort frische
Lebensmittel wie Fisch, Fleisch und
Meeresfrüchte aufzubewahren, da diese
sich dort länger halten.
Es befindet sich im unteren Teil des
Kühlraums, direkt über der
Gemüseschublade.
4.5 Temperaturanzeige
Um eine korrekte Lagerung der
Lebensmittel zu gewährleisten, verfügt
dieser Kühlschrank über eine
Temperaturanzeige. Das Symbol an der
Seitenwand des Geräts zeigt den
kältesten Bereich im Kühlraum an.
Legen Sie bei der Anzeige von „OK“ (A)
frische Lebensmittel in den durch das
Symbol angezeigten Bereich; sollte kein
„OK“ angezeigt werden (B), dann stellen
Sie eine niedrigere Temperatur ein und
warten Sie 12 Stunden, bevor Sie die
Temperaturanzeige erneut prüfen.
OK
OK
A
B
Nachdem frische
Lebensmittel eingelagert
wurden oder nach häufigem
oder langem Öffnen der Tür,
ist es normal, wenn die
Anzeige nicht „OK“ anzeigt.
Warten Sie mindestens 12
Stunden, bevor Sie den
Temperaturregler neu
einstellen.
4.6 FreeStore
Der Kühlschrank ist mit einer Vorrichtung
ausgestattet, die für eine rasche Kühlung
der Lebensmittel und eine gleichmäßigere
Temperatur im Innenraum sorgt.
Bei Bedarf schaltet sich diese Vorrichtung
selbsttätig ein, z. B. zur raschen
Wiederherstellung der Temperatur,
nachdem die Tür geöffnet wurde, oder
wenn die Umgebungstemperatur hoch ist.
Sie können die Funktion bei Bedarf
manuell einschalten (siehe „Funktion
FreeStore“).
Die Funktion FreeStore
schaltet sich ab, wenn die Tür
geöffnet wird, und schaltet
sich wieder ein, sobald die
Tür geschlossen wird.
www.electrolux.com40
Page 41
5. TIPPS UND HINWEISE
5.1 Normale Betriebsgeräusche
Folgende Geräusche sind während des
normalen Gerätebetriebs normal:
• Ein leichtes Gurgeln und Blubbern,
wenn das Kältemittel durch die
Leitungen gepumpt wird.
• Ein Surren und ein pulsierendes
Geräusch vom Kompressor, wenn das
Kältemittel durch die Leitungen
gepumpt wird.
• Ein plötzliches Knackgeräusch aus
dem Geräteinneren, verursacht durch
thermische Ausdehnung (eine
natürliche und nicht gefährliche
physikalische Erscheinung).
• Leises Klicken des Temperaturreglers,
wenn sich der Kompressor ein- oder
ausschaltet.
5.2 Energiespartipps
• Öffnen Sie die Tür nicht zu häufig, und
lassen Sie diese nicht länger offen als
notwendig.
5.3 Hinweise für die Kühlung
frischer Lebensmittel
So erzielen Sie die besten Ergebnisse:
• Legen Sie keine warmen Lebensmittel
oder dampfende Flüssigkeiten in den
Kühlschrank.
• Decken Sie die Lebensmittel ab oder
verpacken Sie diese entsprechend,
besonders wenn sie stark riechen.
• Legen Sie die Lebensmittel so hinein,
dass um sie Luft frei zirkulieren kann.
5.4 Hinweise für die Kühlung
Tipps:
• Fleisch (alle Sorten): Verpacken Sie
Fleisch in einem Frischhaltebeutel und
legen Sie diesen auf die Glasablage
über der Gemüseschublade.
• Bitte lagern Sie Fleisch aus
Sicherheitsgründen nur einen oder
maximal zwei Tage auf diese Weise.
• Gekochte Lebensmittel, kalte Gerichte
usw.: Diese sollten abgedeckt auf eine
der Ablagen gelegt werden.
• Obst und Gemüse: Gründlich reinigen
und in die dafür vorgesehene(n)
Schublade(n) legen.
• Butter und Käse: Diese sollten stets in
speziellen luftdichten Behältern
verpackt sein oder in Aluminiumfolie
bzw. in lebensmittelechte Tüten
eingepackt werden, um so wenig Luft
wie möglich in der Verpackung zu
haben.
• Flaschen: Sie sollten mit Deckel in der
Flaschenablage in der Tür oder im
Flaschenhalter (falls vorhanden)
aufbewahrt werden.
• Bananen, Kartoffeln, Zwiebeln und
Knoblauch sollten im Kühlschrank nicht
unverpackt aufbewahrt werden.
6. REINIGUNG UND PFLEGE
WARNUNG!
Siehe Kapitel
Sicherheitshinweise.
6.1 Allgemeine Warnhinweise
ACHTUNG!
Ziehen Sie vor jeder
Wartungsmaßnahme immer
den Netzstecker aus der
Steckdose.
Dieses Gerät enthält
Kohlenwasserstoffe in seinem
Kältekreislauf. Aus diesem
Grund dürfen die Wartung
und das Nachfüllen
ausschließlich durch
autorisiertes Fachpersonal
erfolgen.
Das Zubehör des Geräts und
die Innenteile eignen sich
nicht für die Reinigung im
Geschirrspüler.
DEUTSCH
41
Page 42
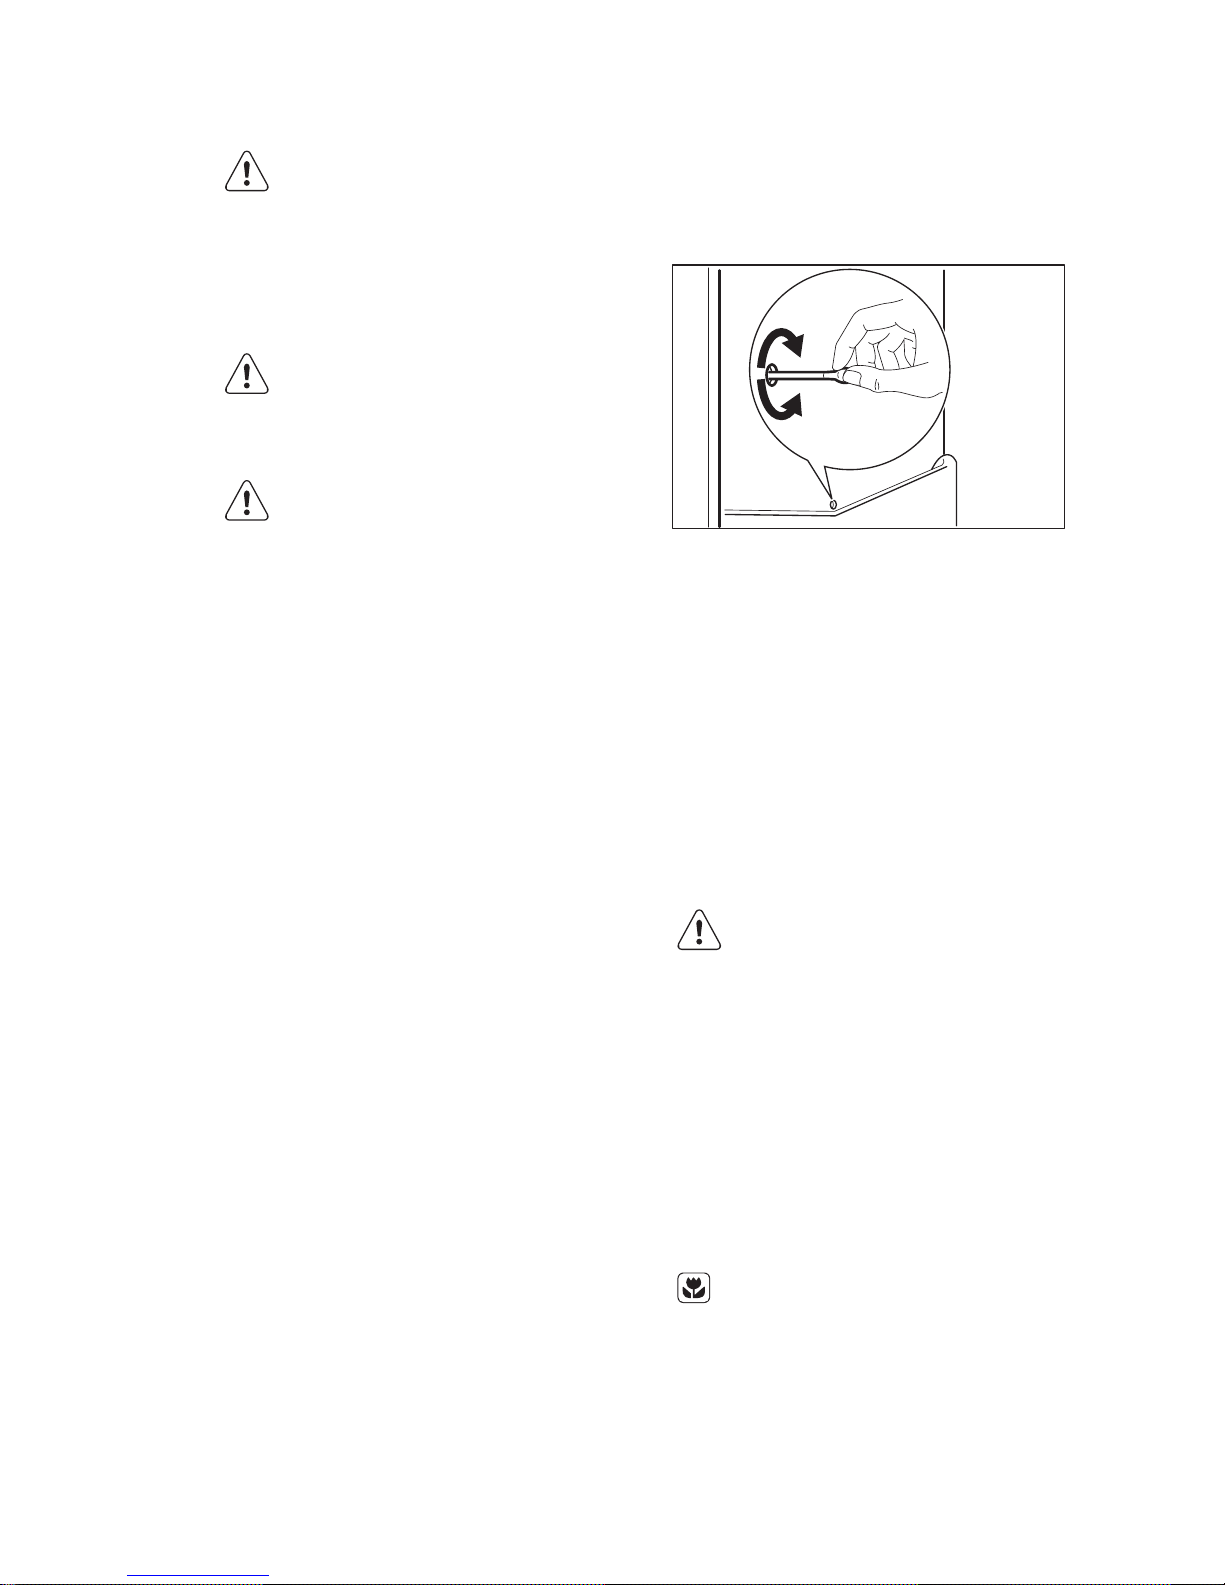
6.2 Regelmäßige Reinigung
ACHTUNG!
Ziehen Sie nicht an Leitungen
und/oder Kabeln im Innern
des Geräts und achten Sie
darauf, diese nicht zu
verschieben oder zu
beschädigen.
ACHTUNG!
Bitte achten Sie darauf, das
Kühlsystem nicht zu
beschädigen.
ACHTUNG!
Wenn Sie das Gerät
verschieben möchten, heben
Sie es bitte an der
Vorderkante an, um den
Fußboden nicht zu
verkratzen.
Das gesamte Gerät muss regelmäßig
gereinigt werden:
1. Reinigen Sie die Innenseiten und die
Zubehörteile mit lauwarmem Wasser
und etwas Neutralseife.
2. Prüfen und säubern Sie die
Türdichtungen in regelmäßigen
Abständen, um zu gewährleisten,
dass diese sauber und frei von
Fremdkörpern sind.
3. Spülen und trocknen Sie diese
sorgfältig ab.
4. Reinigen Sie den Kondensator und
den Kompressor auf der
Geräterückseite, falls diese zugänglich
sind, mit einer Bürste.
Dadurch verbessert sich die Leistung
des Geräts und es verbraucht weniger
Strom.
6.3 Abtauen des Kühlschranks
Bei normalem Betrieb wird Reif bei jedem
Anhalten des Kompressors automatisch
vom Verdampfer des Kühlschranks
entfernt. Das Tauwasser sammelt sich in
einer Auffangrinne und läuft durch eine
Abflussöffnung in einen speziellen Behälter
an der Rückseite des Geräts über dem
Kompressor, wo es verdampft.
Reinigen Sie deshalb regelmäßig die
Abflussöffnung in der Mitte der
Auffangrinne an der Rückwand des
Kühlraums, damit das Tauwasser nicht
überläuft und auf die gelagerten
Lebensmittel tropft.
6.4 Stillstandszeiten
Bei längerem Stillstand des Geräts
müssen Sie folgende Vorkehrungen
treffen:
1. Trennen Sie das Gerät von der
Netzstromversorgung.
2. Entnehmen Sie alle Lebensmittel.
3.
Reinigen Sie das Gerät und alle
Zubehörteile.
4. Lassen Sie die Tür(en) offen, um das
Entstehen unangenehmer Gerüche zu
vermeiden.
WARNUNG!
Möchten Sie bei einer
längeren Abwesenheit das
Gerät weiterlaufen lassen,
bitten Sie jemanden,
gelegentlich die Temperatur
zu prüfen, damit das Kühlgut
bei einem möglichen
Stromausfall nicht im Inneren
des Geräts verdirbt.
6.5 Ersetzen des Aktivkohle-
Filters
Bei dem Luftfilter handelt es
sich um Verbrauchsmaterial,
das nicht unter die Garantie
fällt.
Das beste Ergebnis wird erzielt, wenn Sie
den Kohlefilter einmal jährlich wechseln.
Neue Aktivkohle-Filter erhalten Sie bei
Ihrem Händler vor Ort.
www.electrolux.com42
Page 43
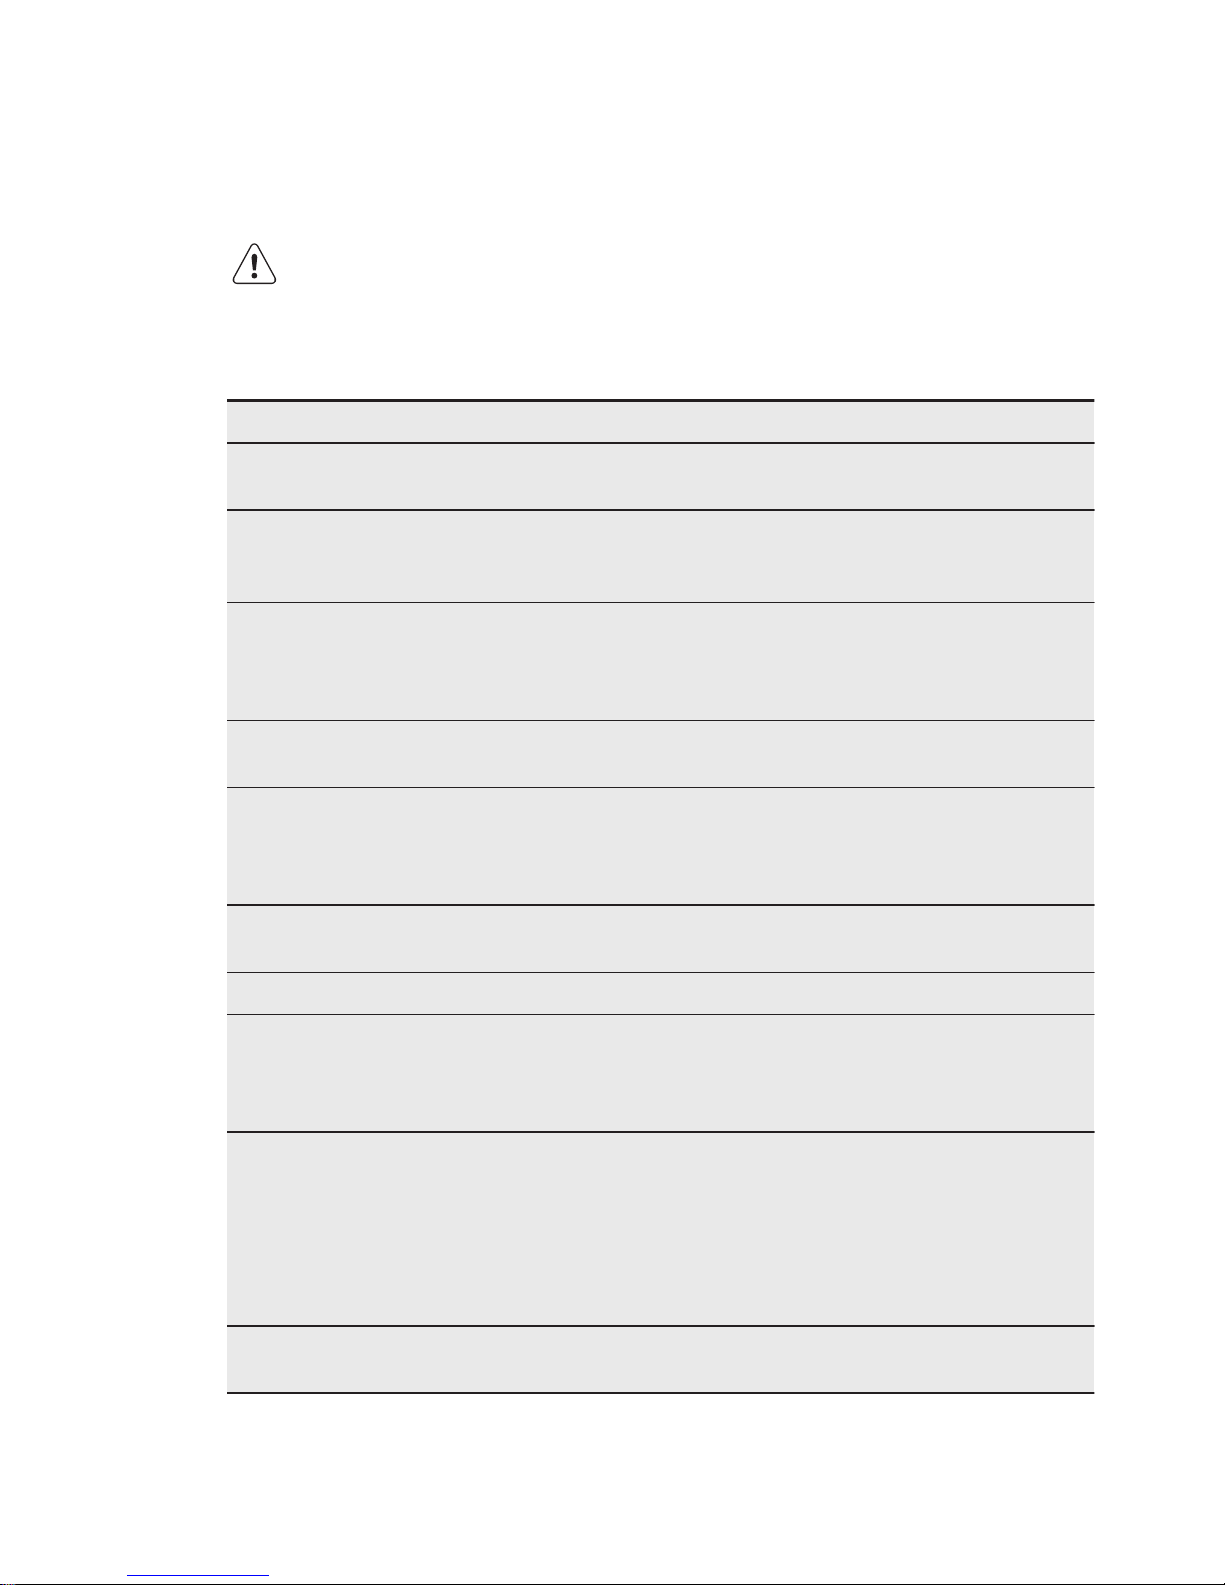
Beachten Sie die Anleitung unter
„Einsetzen des Kohlefilters“.
7. FEHLERSUCHE
WARNUNG!
Siehe Kapitel
Sicherheitshinweise.
7.1 Was tun, wenn ...
Problem Mögliche Ursache Abhilfe
Das Gerät funktioniert nicht. Das Gerät ist ausgeschal-
tet.
Schalten Sie das Gerät ein.
Der Netzstecker wurde
nicht richtig in die Steckdose gesteckt.
Stecken Sie den Netzstecker
korrekt in die Steckdose.
Es liegt keine Spannung
an der Steckdose an.
Testen Sie, ob ein anderes
Gerät an dieser Steckdose
funktioniert. Wenden Sie sich
an eine Elektrofachkraft.
Das Gerät erzeugt Geräusche.
Das Gerät ist nicht ordnungsgemäß aufgestellt.
Kontrollieren Sie, ob das Gerät stabil steht.
Es wird ein akustisches
oder optisches Alarmsignal
ausgelöst.
Das Gerät wurde erst kürzlich eingeschaltet oder
die Temperatur ist noch
zu hoch.
Siehe „Alarm Tür offen“ oder
„Temperaturwarnung“.
Die Temperatur im Gerät
ist zu hoch.
Siehe „Alarm Tür offen“ oder
„Temperaturwarnung“.
Die Tür ist geöffnet. Schließen Sie die Tür.
Die Temperatur im Gerät
ist zu hoch.
Wenden Sie sich an einen
qualifizierten Elektriker oder
die nächste autorisierte Kundendienststelle.
In der Temperaturanzeige
ist ein rechteckiges Symbol
anstatt der Zahlen zu sehen.
Problem mit dem Temperaturfühler.
Bitte wenden Sie sich an die
nächste autorisierte Kundendienststelle (das Kühlsystem
hält zwar die eingelagerten
Lebensmittel weiterhin kühl,
doch eine Temperatureinstellung ist nicht mehr möglich).
Die Lampe funktioniert
nicht.
Die Lampe befindet sich
im Standby-Modus.
Schließen und öffnen Sie die
Tür.
DEUTSCH
43
Page 44
Problem Mögliche Ursache Abhilfe
Die Lampe funktioniert
nicht.
Die Lampe ist defekt. Wenden Sie sich an die
nächste autorisierte Kundendienststelle.
Der Kompressor arbeitet
ständig.
Die Temperatur ist nicht
richtig eingestellt.
Siehe Kapitel „Betrieb“.
Es wurden zu viele Leben-
smittel gleichzeitig eingelegt.
Warten Sie einige Stunden
und prüfen Sie dann die Temperatur erneut.
Die Raumtemperatur ist
zu hoch.
Siehe Klimaklasse auf dem
Typenschild.
In das Gerät eingelegte
Lebensmittel waren noch
zu warm.
Lassen Sie die Lebensmittel
vor dem Einlagern auf Raumtemperatur abkühlen.
Die Tür ist nicht richtig
geschlossen.
Siehe „Schließen der Tür“.
Die Funktion Shopping
Function ist eingeschaltet.
Siehe „Funktion Shopping
Function“.
Der Kompressor schaltet
sich nicht sofort ein, nachdem Sie Shopping Function
gedrückt oder die Solltemperatur auf einen anderen
Wert eingestellt haben.
Dies ist normal, keine
Störung.
Der Kompressor schaltet sich
erst nach einer Weile ein.
Wasser fließt in den Kühlschrank.
Der Wasserablauf ist verstopft.
Reinigen Sie den Wasserablauf.
Die eingelagerten Lebensmittel verhindern, dass
das Wasser zum Wassersammler fließt.
Stellen Sie sicher, dass die
Lebensmittel nicht die Rückwand berühren.
Wasser läuft auf den Boden.
Der Tauwasserablauf ist
nicht mit der Verdampferschale über dem Kompressor verbunden.
Verbinden Sie den Tauwasserablauf mit der Verdampferschale.
Eine Temperatureinstellung
ist nicht möglich.
Die Funktion ActionFreeze
oder Shopping Function
ist eingeschaltet.
Schalten Sie die Funktion ActionFreeze oder Shopping
Function manuell aus, oder
warten Sie mit dem Einstellen
der Temperatur, bis die Funktion automatisch abgeschaltet wurde. Siehe Funktion
„ActionFreeze oder Shopping
Function“.
www.electrolux.com44
Page 45
Problem Mögliche Ursache Abhilfe
Das Display zeigt DEMO
an.
Das Gerät befindet sich
im Demo-Betrieb.
Halten Sie OK etwa 10 Sekunden gedrückt, bis ein
langer Signalton ertönt und
das Display für kurze Zeit
ausgeschaltet wird.
Die Temperatur im Gerät ist
zu hoch/niedrig.
Der Temperaturregler ist
nicht richtig eingestellt.
Stellen Sie eine höhere/niedrigere Temperatur ein.
Die Tür ist nicht richtig
geschlossen.
Siehe „Schließen der Tür“.
Die Temperatur der zu
kühlenden Lebensmittel
ist zu hoch.
Lassen Sie die Lebensmittel
auf Raumtemperatur abkühlen, bevor Sie sie in das Gerät
stellen.
Es wurden zu viele Lebensmittel gleichzeitig eingelegt.
Legen Sie weniger Lebensmittel gleichzeitig ein.
Die Tür wurde zu häufig
geöffnet.
Öffnen Sie die Tür nur, wenn
es notwendig ist.
Die Funktion Shopping
Function ist eingeschaltet.
Siehe „Funktion Shopping
Function“.
Die Kaltluft kann im Gerät
nicht zirkulieren.
Kaltluftzirkulation im Gerät sicherstellen.
Bitte wenden Sie sich an den
nächsten autorisierten
Kundendienst, wenn alle
genannten
Abhilfemaßnahmen nicht zum
gewünschten Erfolg führen.
7.2 Austauschen der Lampe
Das Gerät ist mit einer langlebigen LEDInnenbeleuchtung ausgestattet.
Die Beleuchtung darf nur von einer
Fachkraft ausgetauscht werden. Wenden
Sie sich an Ihren autorisierten
Kundendienst.
7.3 Schließen der Tür
1. Reinigen Sie die Türdichtungen.
2. Stellen Sie die Tür nach Bedarf ein.
Siehe hierzu „Montage“.
3. Ersetzen Sie die defekten
Türdichtungen, falls erforderlich.
Wenden Sie sich an den autorisierten
Kundendienst.
8. MONTAGE
8.1 Standort
Installieren Sie dieses Gerät in einem
trockenen, gut belüfteten Raum, in dem
die Umgebungstemperatur mit der
Klimaklasse übereinstimmt, die auf dem
Typenschild des Geräts angegeben ist:
Klimaklasse
Umgebungstemperatur
SN +10 °C bis +32 °C
N +16 °C bis +32 °C
DEUTSCH
45
Page 46
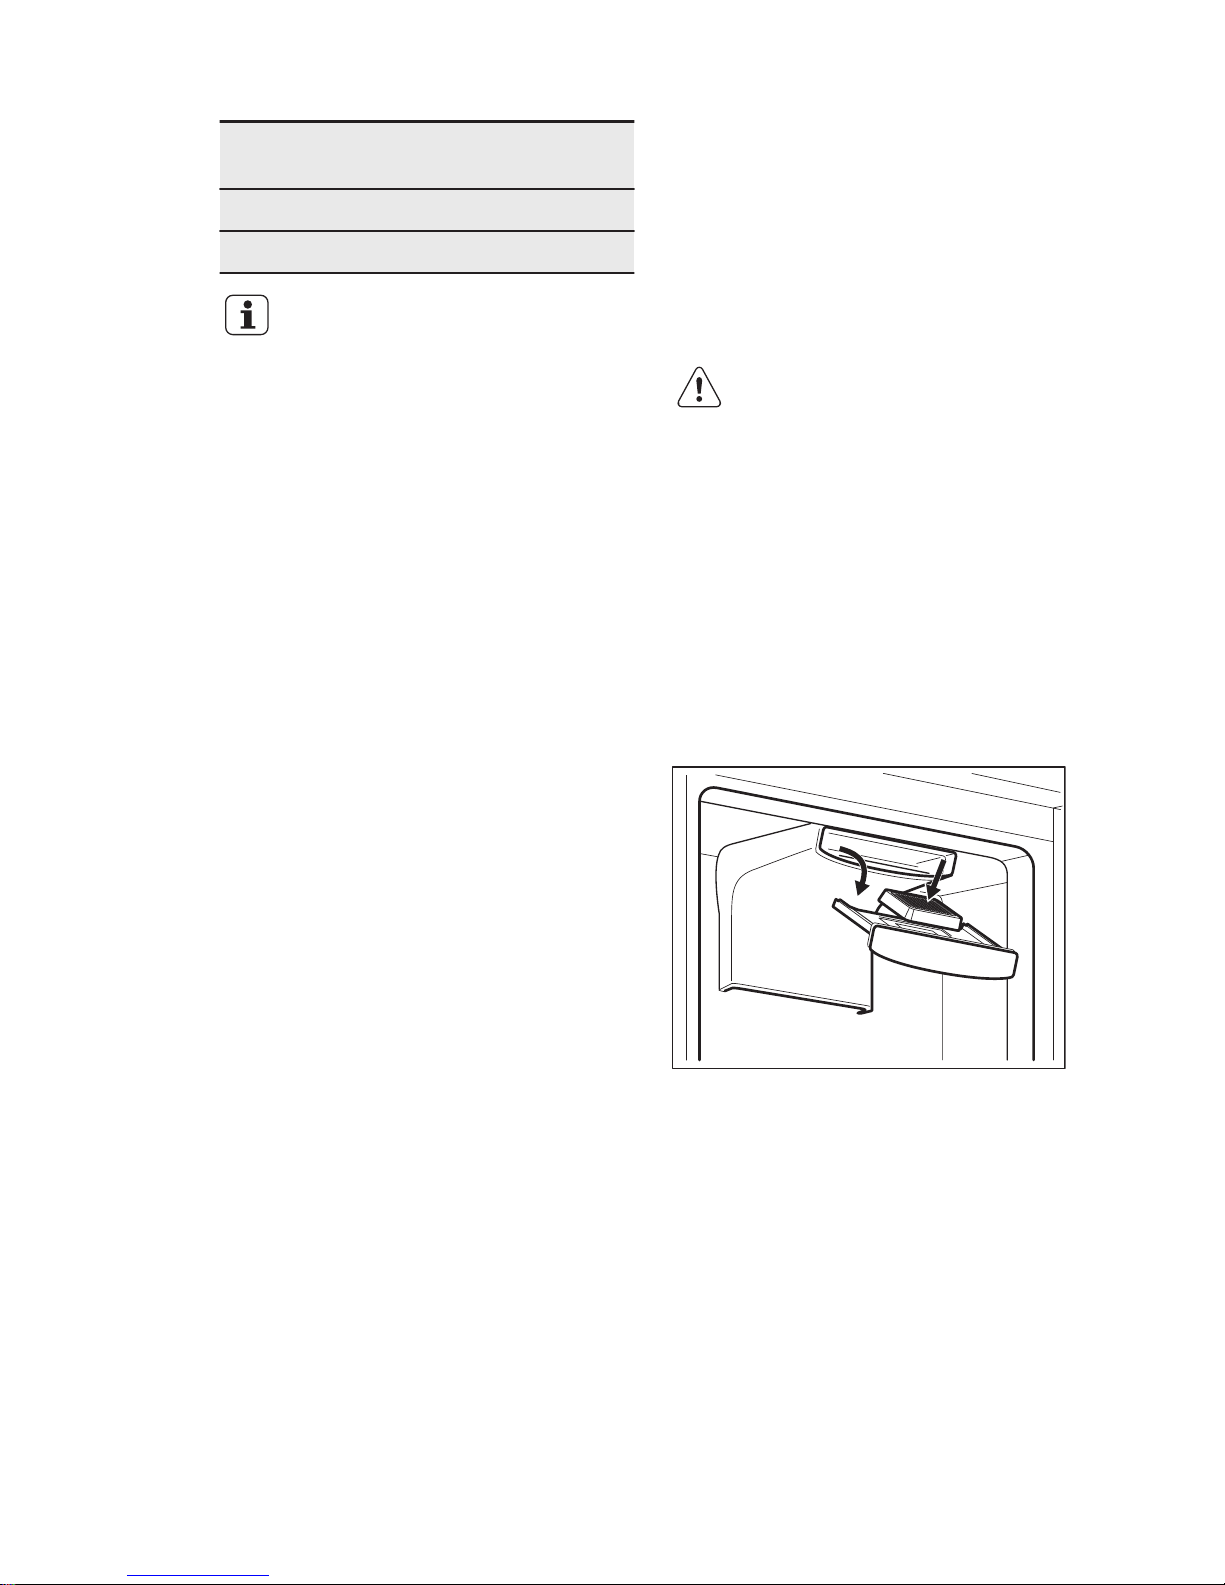
Klimaklasse
Umgebungstemperatur
ST +16 °C bis +38 °C
T +16 °C bis +43 °C
Bei einigen Modellen können
Funktionsstörungen auftreten,
wenn sie außerhalb dieses
Temperaturbereichs
betrieben werden. Der
ordnungsgemäße Betrieb
wird nur innerhalb des
angegebenen
Temperaturbereichs
gewährleistet. Bei Fragen
zum Aufstellungsort des
Geräts wenden Sie sich an
den Verkäufer, unseren
Kundendienst oder
nächstgelegenen
autorisierten Service-Partner.
8.2 Elektrischer Anschluss
• Kontrollieren Sie vor der ersten
Benutzung des Geräts, ob die
Netzspannung und -frequenz Ihres
Hausanschlusses mit den auf dem
Typenschild angegebenen
Anschlusswerten übereinstimmen.
• Das Gerät muss geerdet sein. Zu
diesem Zweck ist der Netzstecker mit
einem Schutzkontakt ausgestattet.
Falls die Steckdose Ihres
Hausanschlusses nicht geerdet sein
sollte, lassen Sie das Gerät gemäß den
geltenden Vorschriften von einem
qualifizierten Elektriker erden.
• Der Hersteller übernimmt keinerlei
Haftung bei Missachtung der
vorstehenden Sicherheitshinweise.
• Das Gerät entspricht den EWGRichtlinien.
8.3 Einsetzen des
TASTEGUARD Filters
Der TASTEGUARD Filter ist ein
Aktivkohlefilter, der schlechte Gerüche
absorbiert und so den Geschmack und
das Aroma der Lebensmittel ohne Risiko
von Geruchsübertragung optimal aufrecht
erhält.
Der Filter ist dem Gerät in einem
Kunststoffbeutel beigelegt, damit seine
Leistungsfähigkeit nicht beeinträchtigt
wird.
Der Filter muss in die Schublade
eingesetzt werden, bevor das Gerät
eingeschaltet wird.
ACHTUNG!
Achten Sie darauf, dass die
Lüftungsschublade
geschlossen ist, um eine
einwandfreie Funktion zu
gewährleisten.
Behandeln Sie den Filter
sorgfältig, damit sich keine
Partikel von der Oberfläche
ablösen.
1. Öffnen Sie die Schublade.
2. Entnehmen Sie den Filter aus der
Kunststoffverpackung.
3. Setzen Sie den Filter in die Schublade.
4. Schließen Sie die Schublade.
8.4 Anforderungen an die
Belüftung
Hinter dem Gerät muss genug Platz für
eine ausreichende Luftzirkulation sein.
www.electrolux.com46
Page 47
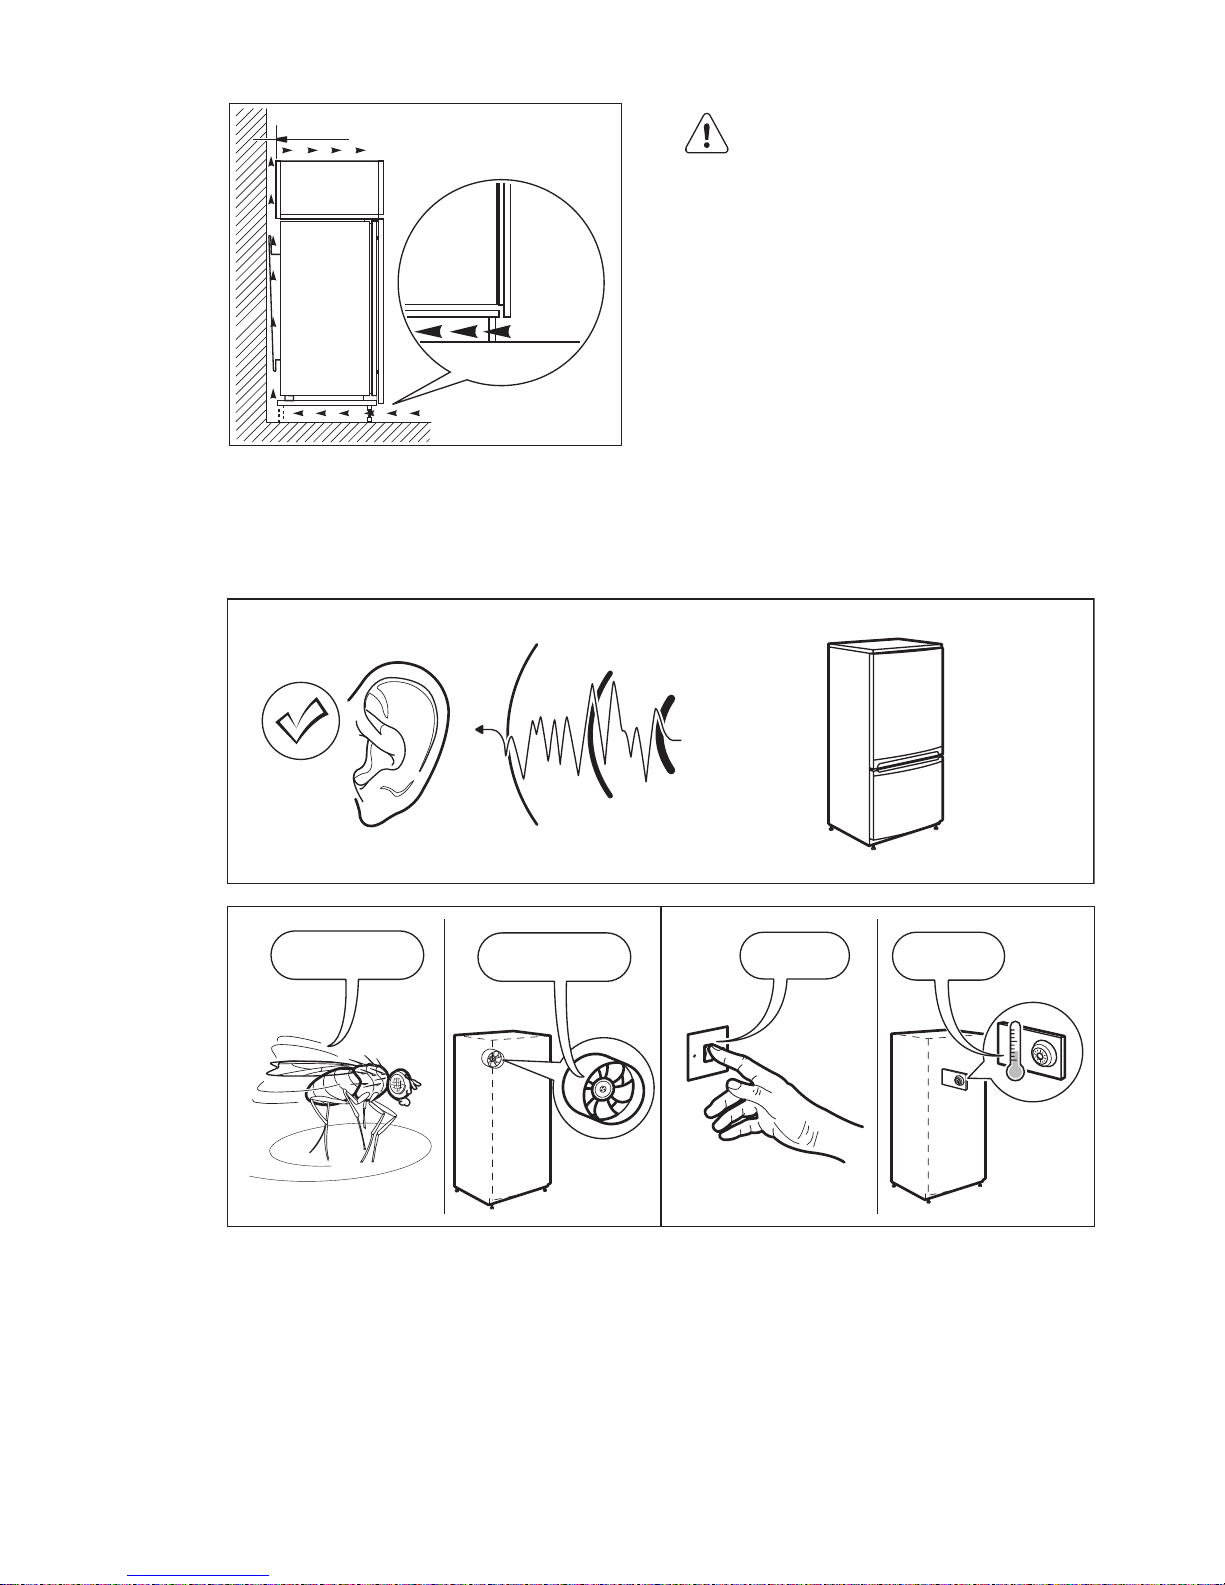
5 cm
min.
200 cm
2
min.
200 cm
2
ACHTUNG!
Beachten Sie bei der
Installation die
Montageanleitung.
9. GERÄUSCHE
Während das Gerät in Betrieb ist, entstehen bestimmte Geräusche (Kompressor und
Kühlkreislauf).
BRRR!
HISSS!
CLICK!
BLUBB!
CRACK!
SSSRR
R!
OK
CLICK!
CLICK!
SSSRRR!
SSSRRR!
DEUTSCH
47
Page 48

BRRR!
BRRR!
HISSS!
HISSS!
BLUBB!
BLUBB!
CRACK!CRACK!
10. TECHNISCHE DATEN
10.1 Technische Daten
Abmessungen der Einbaunische
Höhe mm 1780
Breite mm 560
Tiefe mm 550
Spannung Volt 230 - 240
Frequenz Hz 50
Die technischen Daten befinden sich auf
dem Typenschild auf der Außen- oder
Innenseite des Geräts sowie auf der
Energieplakette.
11. UMWELTTIPPS
Recyceln Sie Materialien mit dem Symbol
. Entsorgen Sie die Verpackung in den
entsprechenden Recyclingbehältern.
Recyceln Sie zum Umwelt- und
Gesundheitsschutz elektrische und
elektronische Geräte. Entsorgen Sie
Geräte mit diesem Symbol nicht mit
dem Hausmüll. Bringen Sie das Gerät zu
www.electrolux.com48
Page 49

Ihrer örtlichen Sammelstelle oder wenden
Sie sich an Ihr Gemeindeamt.
DEUTSCH
49
Page 50
INDICE
1. INFORMAZIONI PER LA SICUREZZA................................................................ 51
2. ISTRUZIONI DI SICUREZZA...............................................................................52
3. USO DELL'APPARECCHIATURA.......................................................................54
4. UTILIZZO QUOTIDIANO.....................................................................................56
5. CONSIGLI E SUGGERIMENTI UTILI...................................................................58
6. PULIZIA E CURA............................................................................................... 58
7. RISOLUZIONE DEI PROBLEMI.......................................................................... 60
8. INSTALLAZIONE................................................................................................62
9. RUMORI............................................................................................................ 64
10. DATI TECNICI..................................................................................................65
PENSATI PER VOI
Grazie per aver acquistato un'apparecchiatura Electrolux. Avete scelto un prodotto
che ha alle spalle decenni di esperienza professionale e innovazione. Ingegnoso ed
elegante, è stato progettato pensando a voi. Quindi, in qualsiasi momento
desiderate utilizzarlo, potete esser certi di ottenere sempre i migliori risultati.
Benvenuti in Electrolux.
Visitate il nostro sito web per:
Ricevere consigli, scaricare i nostri opuscoli, eliminare eventuali anomalie,
ottenere informazioni sull'assistenza:
www.electrolux.com
Registrare il vostro prodotto e ricevere un servizio migliore:
www.registerelectrolux.com
Acquistare accessori, materiali di consumo e ricambi originali per la vostra
apparecchiatura:
www.electrolux.com/shop
SERVIZIO CLIENTI E MANUTENZIONE
Consigliamo sempre l’impiego di ricambi originali.
Quando si contatta il Centro di Assistenza autorizzato, accertarsi di disporre dei
seguenti dati: Modello, PNC, numero di serie.
Le informazioni si trovano sulla targhetta dei dati.
Avvertenza/Attenzione - Importanti Informazioni per la sicurezza
Informazioni e suggerimenti generali
Informazioni sull'ambiente
Con riserva di modifiche.
www.electrolux.com50
Page 51

1. INFORMAZIONI PER LA SICUREZZA
Leggere attentamente le istruzioni fornite prima di
installare e utilizzare l'apparecchiatura. Il produttore non è
responsabile se un'installazione ed un uso non corretto
dell'apparecchiatura provocano lesioni e danni. Tenere
sempre le istruzioni a portata di mano come riferimento
futuro.
1.1 Sicurezza dei bambini e delle persone vulnerabili
• Questa apparecchiatura può essere usata da bambini a
partire dagli 8 anni e da adulti con limitate capacità
fisiche, sensoriali o mentali o con scarsa esperienza o
conoscenza sull'uso dell'apparecchiatura, solamente se
sorvegliati o se istruiti relativamente all'uso
dell'apparecchiatura e se hanno compreso i rischi
coinvolti.
• Non consentire ai bambini di giocare con
l'apparecchiatura.
• La pulizia e gli interventi di manutenzione non devono
essere eseguiti dai bambini senza supervisione.
• Tenere i materiali di imballaggio al di fuori della portata
dei bambini.
1.2 Avvertenze di sicurezza generali
• L'apparecchiatura è destinata all'uso domestico e
applicazioni simili, tra cui:
– case di campagna; cucine di negozi, uffici e altri
ambienti di lavoro
– clienti di hotel, motel, bed and breakfast e altri
ambienti residenziali
• Verificare che le aperture di ventilazione, sia
sull'apparecchiatura che nella struttura da incasso, non
siano ostruite.
• Non usare dispositivi elettrici o altri mezzi artificiali non
raccomandati dal produttore allo scopo di accelerare il
processo di sbrinamento.
• Non danneggiare il circuito refrigerante.
ITALIANO
51
Page 52
• Non utilizzare apparecchiature elettriche all'interno dei
comparti di conservazione degli alimenti, ad eccezione
di quelli consigliati dal costruttore.
• Non nebulizzare acqua né utilizzare vapore per pulire
l'apparecchiatura.
• Pulire l'apparecchiatura con un panno inumidito e
morbido. Utilizzare solo detergenti neutri. Non usare
prodotti abrasivi, spugnette abrasive, solventi od oggetti
metallici.
• Non conservare in questa apparecchiatura sostanze
esplosive come bombolette spray contenenti un
propellente infiammabile.
• Se il cavo di alimentazione è danneggiato, deve essere
sostituito dal produttore, da un tecnico autorizzato o da
una persona qualificata per evitare situazioni di pericolo.
2. ISTRUZIONI DI SICUREZZA
2.1 Installazione
ATTENZIONE!
L’installazione
dell'apparecchiatura deve
essere eseguita da personale
qualificato.
• Rimuovere tutti i materiali di
imballaggio.
• Non installare o utilizzare
l'apparecchiatura se è danneggiata.
• Attenersi alle istruzioni fornite insieme
all'apparecchiatura.
• Prestare sempre attenzione in fase di
spostamento dell'apparecchiatura,
dato che è molto pesante. Indossare
sempre guanti di sicurezza.
• Assicurarsi che l'aria possa circolare
liberamente attorno
all'apparecchiatura.
• Attendere almeno 4 ore prima di
collegare l'apparecchiatura
all'alimentazione. Questo serve a
consentire all'olio di fluire nuovamente
nel compressore.
• Non installare l'apparecchiatura in
prossimità di radiatori, fornelli, forni o
piani di cottura.
• La superficie posteriore
dell'apparecchiatura deve essere
appoggiata alla parete.
• Non installare l'apparecchiatura dove
sia esposta alla luce solare diretta.
• Non installare questa apparecchiatura
in luoghi troppo umidi o freddi, come
aggiunte strutturali, garage o cantine.
• Quando si sposta l'apparecchiatura,
sollevarla dal bordo anteriore, così da
non graffiare il pavimento.
2.2 Collegamento elettrico
ATTENZIONE!
Rischio di incendio e scossa
elettrica.
• L'apparecchiatura deve disporre di una
messa a terra.
• Verificare che i dati elettrici riportati
sulla targhetta dei dati corrispondano a
quelli dell'impianto. In caso contrario,
contattare un elettricista.
• Utilizzare sempre una presa elettrica
con contatto di protezione
correttamente installata.
• Non utilizzare prese multiple e
prolunghe.
www.electrolux.com52
Page 53
• Accertarsi di non danneggiare i
componenti elettrici (ad es. la spina di
alimentazione, il cavo di alimentazione,
il compressore). Contattare il Centro di
Assistenza Autorizzato o un elettricista
per sostituire i componenti elettrici.
• Il cavo di alimentazione deve rimanere
sotto il livello della spina di
alimentazione.
• Inserire la spina di alimentazione nella
presa solo al termine dell'installazione.
Verificare che la spina di alimentazione
rimanga accessibile dopo
l'installazione.
• Non tirare il cavo di alimentazione per
scollegare l’apparecchiatura. Tirare
sempre dalla spina.
2.3 Utilizzo
ATTENZIONE!
Rischio di lesioni, scottature o
scosse elettriche.
• Non apportare modifiche alle specifiche
di questa apparecchiatura.
• Non introdurre apparecchiature
elettriche (ad es. gelatiere)
nell'apparecchiatura se non
specificamente consentito dal
produttore.
• Fare attenzione a non danneggiare il
circuito refrigerante. Esso contiene
isobutano (R600a), un gas naturale con
un alto livello di compatibilità
ambientale, tuttavia il gas è
infiammabile.
• Nel caso di danno al circuito
refrigerante, assicurarsi che non si
sviluppino fiamme libere e scintille nel
locale. Aerare bene l'ambiente.
• Non appoggiare oggetti incandescenti
sulle parti in plastica
dell'apparecchiatura.
• Non conservare gas e liquidi
infiammabili nell'apparecchiatura.
• Non appoggiare o tenere liquidi o
materiali infiammabili, né oggetti
facilmente incendiabili
sull'apparecchiatura, al suo interno o
nelle immediate vicinanze.
• Non toccare il compressore o il
condensatore. Sono incandescenti.
2.4 Pulizia e cura
ATTENZIONE!
Vi è il rischio di ferirsi o
danneggiare
l'apparecchiatura.
• Prima di eseguire qualunque intervento
di manutenzione, spegnere
l'apparecchiatura ed estrarre la spina
dalla presa.
• L'unità refrigerante di questa
apparecchiatura contiene idrocarburi.
L’unità deve essere ricaricata ed
ispezionata esclusivamente da
personale qualificato.
• Controllare regolarmente lo scarico
dell'apparecchiatura e, se necessario,
pulirlo. L'ostruzione dello scarico può
causare un deposito di acqua di
sbrinamento sul fondo
dell'apparecchiatura.
2.5 Smaltimento
ATTENZIONE!
Rischio di lesioni o
soffocamento.
• Staccare la spina dall'alimentazione
elettrica.
• Tagliare il cavo di rete e smaltirlo.
• Rimuovere la porta per evitare che
bambini e animali domestici rimangano
chiusi all’interno dell’apparecchiatura.
• Il circuito refrigerante e i materiali di
isolamento di questa apparecchiatura
rispettano l'ozono.
• La schiuma isolante contiene gas
infiammabili. Contattare le autorità
locali per ricevere informazioni su come
smaltire correttamente
l'apparecchiatura.
• Non danneggiare i componenti
dell'unità refrigerante che si trovano
vicino allo scambiatore di calore.
ITALIANO
53
Page 54
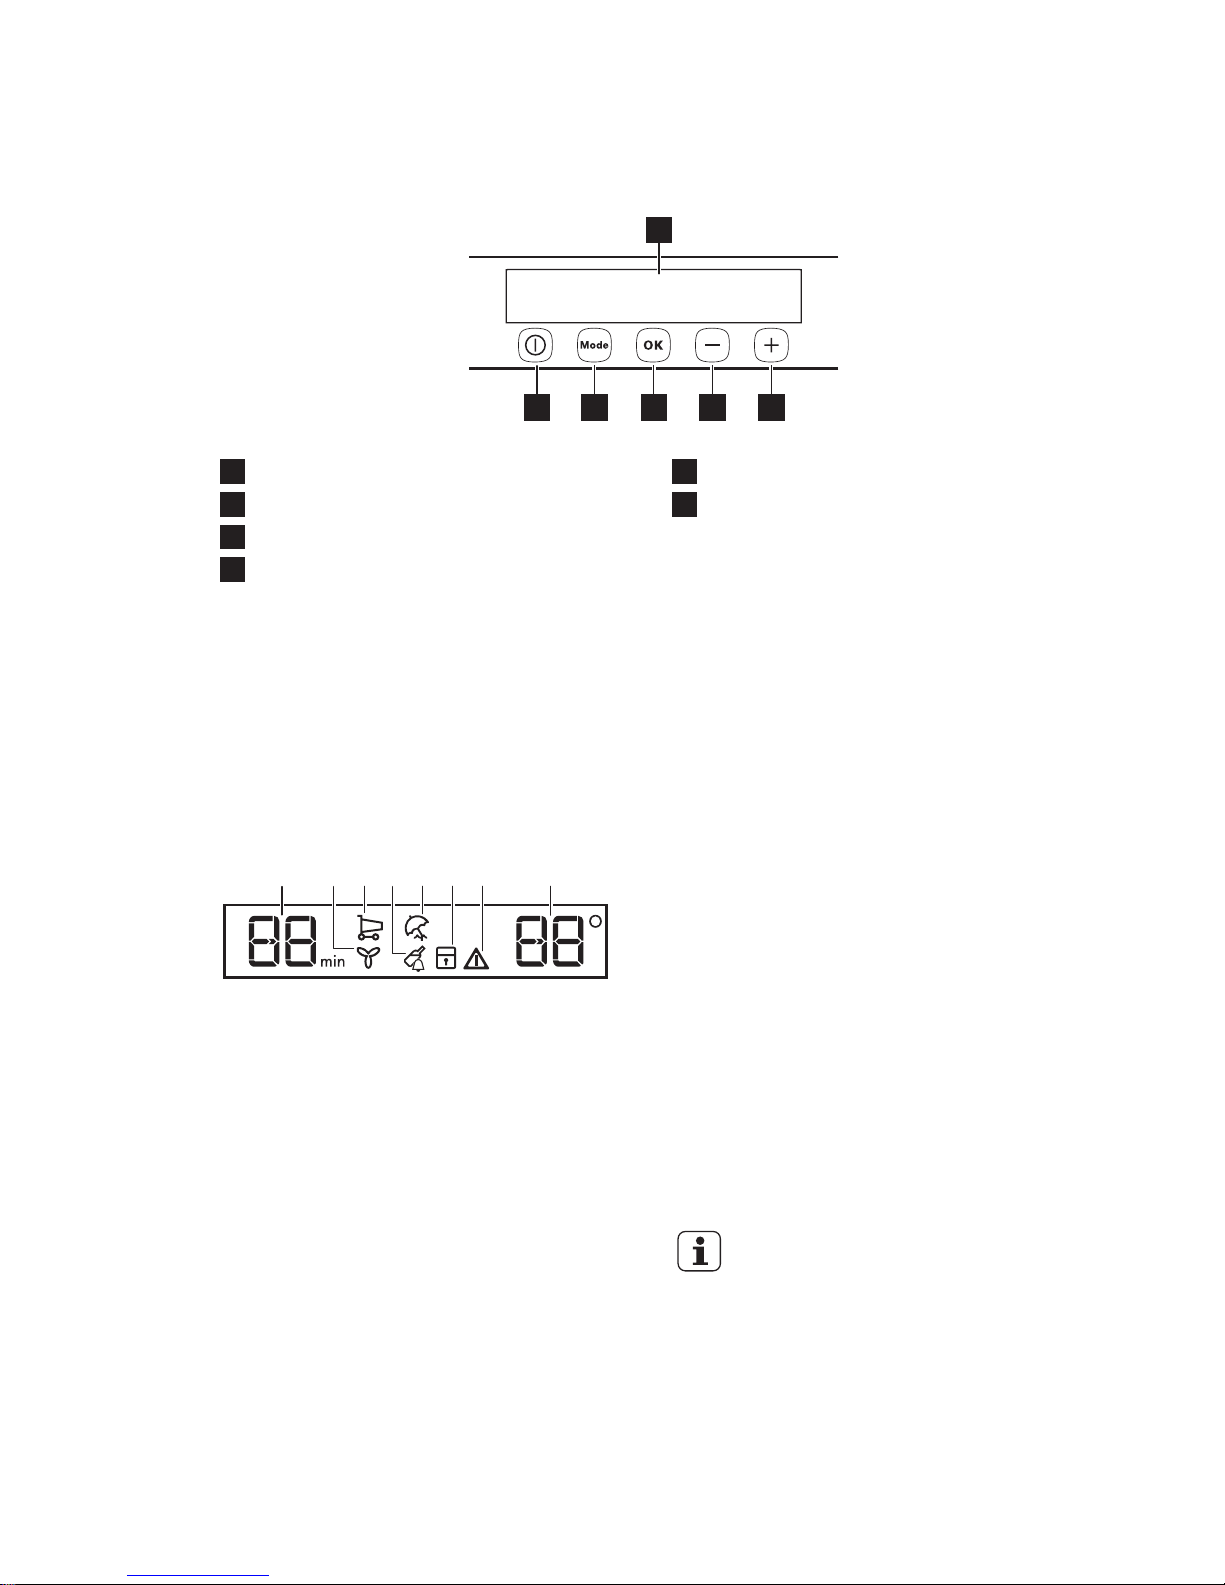
3. USO DELL'APPARECCHIATURA
3.1 Pannello dei comandi
1
23456
1
Display
2
Tasto Temperatura più calda
3
Tasto Temperatura più fresca
4
OK
5
Mode
6
ON/OFF
È possibile modificare le impostazioni
audio predefinite dei tasti e impostarle con
un volume più alto, premendo
contemporaneamente Mode e il tasto
Temperatura più fresca per alcuni secondi.
La modifica è reversibile.
3.2 Display
A HE F GCB D
A) Funzione timer
B) Funzione FreeStore
C) Funzione Shopping
D) Funzione DrinksChill
E) Funzione holiday
F) Funzione ChildLock
G) Spia allarme
H) Indicatore della temperatura
3.3 Accensione
Inserire la spina nella presa di
alimentazione.
Premere il tasto ON/OFF se il display è
spento.
Se DEMO appare sul display,
l'apparecchiatura si trova in modalità
dimostrazione. Fare riferimento alla
sezione "Risoluzione dei problemi".
Gli indicatori di temperatura visualizzano la
temperatura impostata predefinita.
Per impostare una temperatura diversa
fare riferimento alla sezione "Regolazione
della temperatura".
3.4 Spegnimento
Premere il tasto ON/OFF per 5 secondi.
Il display si spegne.
Per scollegare l’apparecchiatura dalla
corrente elettrica, staccare la spina dalla
presa di alimentazione.
3.5 Regolazione della
temperatura
La temperatura predefinita per il frigorifero
è +5°C.
Impostare la temperatura del frigorifero
premendo il tasto temperatura.
L'indicatore della temperatura visualizza la
temperatura impostata.
La temperatura impostata
verrà raggiunta entro 24 ore.
Dopo un'interruzione di
corrente la temperatura
impostata rimane in memoria.
www.electrolux.com54
Page 55
3.6 Funzione FreeStore
L'attivazione della funzione FreeStore
aumenta il consumo di energia.
Se la funzione è attivata
automaticamente, la spia
FreeStore non viene
visualizzata (fare riferimento a
"Utilizzo quotidiano").
1. Per attivare la funzione premere Mode
finché non appare l’icona
corrispondente.
2. Per disattivare la funzione premere
Mode per selezionare un'altra funzione
o premere Mode finché scompaiono
tutte le icone speciali.
3.7 Funzione Shopping
Se occorre inserire una grande quantità di
alimenti nel frigorifero, per esempio al
ritorno dalla spesa, è consigliabile attivare
la funzione Shopping per raffreddare più
rapidamente gli alimenti introdotti nel
frigorifero e non far intiepidire i cibi già
presenti al suo interno.
1. Premere Mode finché non appare
l'icona corrispondente.
La spia Shopping lampeggia.
2. Premere OK per confermare.
La spia Shopping viene visualizzata.
La funzione Shopping si disattiva
automaticamente dopo circa 6 ore.
Per disattivare la funzione prima dello
spegnimento automatico, ripetere la
procedura:
La funzione si disattiva
selezionando
un'impostazione di
temperatura per il frigorifero
diversa.
3.8 Funzione DrinksChill
La funzione DrinksChill deve essere usata
per impostare un segnale acustico in un
preciso momento, utile per esempio
quando una ricetta richiede il
raffreddamento di alimenti misti per un
certo periodo di tempo o quando è
necessario un promemoria per non
dimenticare le bottiglie messe in frigorifero
per un raffreddamento rapido.
1. Premere Mode finché non appare
l'icona corrispondente.
La spia DrinksChill lampeggia.
Il timer visualizza il valore impostato (30
minuti) per alcuni secondi.
2. Premere il tasto Regolatore timer per
modificare il valore impostato da 1 a
90 minuti.
3. Premere OK per confermare.
La spia DrinksChill viene visualizzata.
Il Timer inizia a lampeggiare (min).
Al termine del conto alla rovescia,
l'indicatore DrinksChill lampeggia e viene
emesso un segnale acustico a indicare
che le bevande contenute nel vano
congelatore devono essere rimosse e che
è necessario premere OK per spegnere il
segnale acustico e terminare la funzione.
Per terminare la funzione, ripetere la
procedura finché DrinksChill si spegne.
È possibile modificare l'ora in
qualsiasi momento e prima
della fine premendo il tasto
Temperatura più fresca ed il
tasto Temperatura più calda.
3.9 Modalità Holiday
Questa funzione consente di mantenere il
frigorifero chiuso e vuoto durante un lungo
periodo di vacanza senza che si formino
odori sgradevoli.
Svuotare il vano frigorifero
prima di attivare la modalità
Holiday.
1. Premere il tasto Mode finché non
appare l'icona Holiday.
L'icona Holiday lampeggia.
L'indicatore della temperatura del
frigorifero visualizza la temperatura
impostata.
2. Premere OK per confermare.
Appare l'icona Holiday.
Per disattivare la modalità Holiday, ripetere
la procedura finché l'icona Holiday non si
spegne.
ITALIANO
55
Page 56
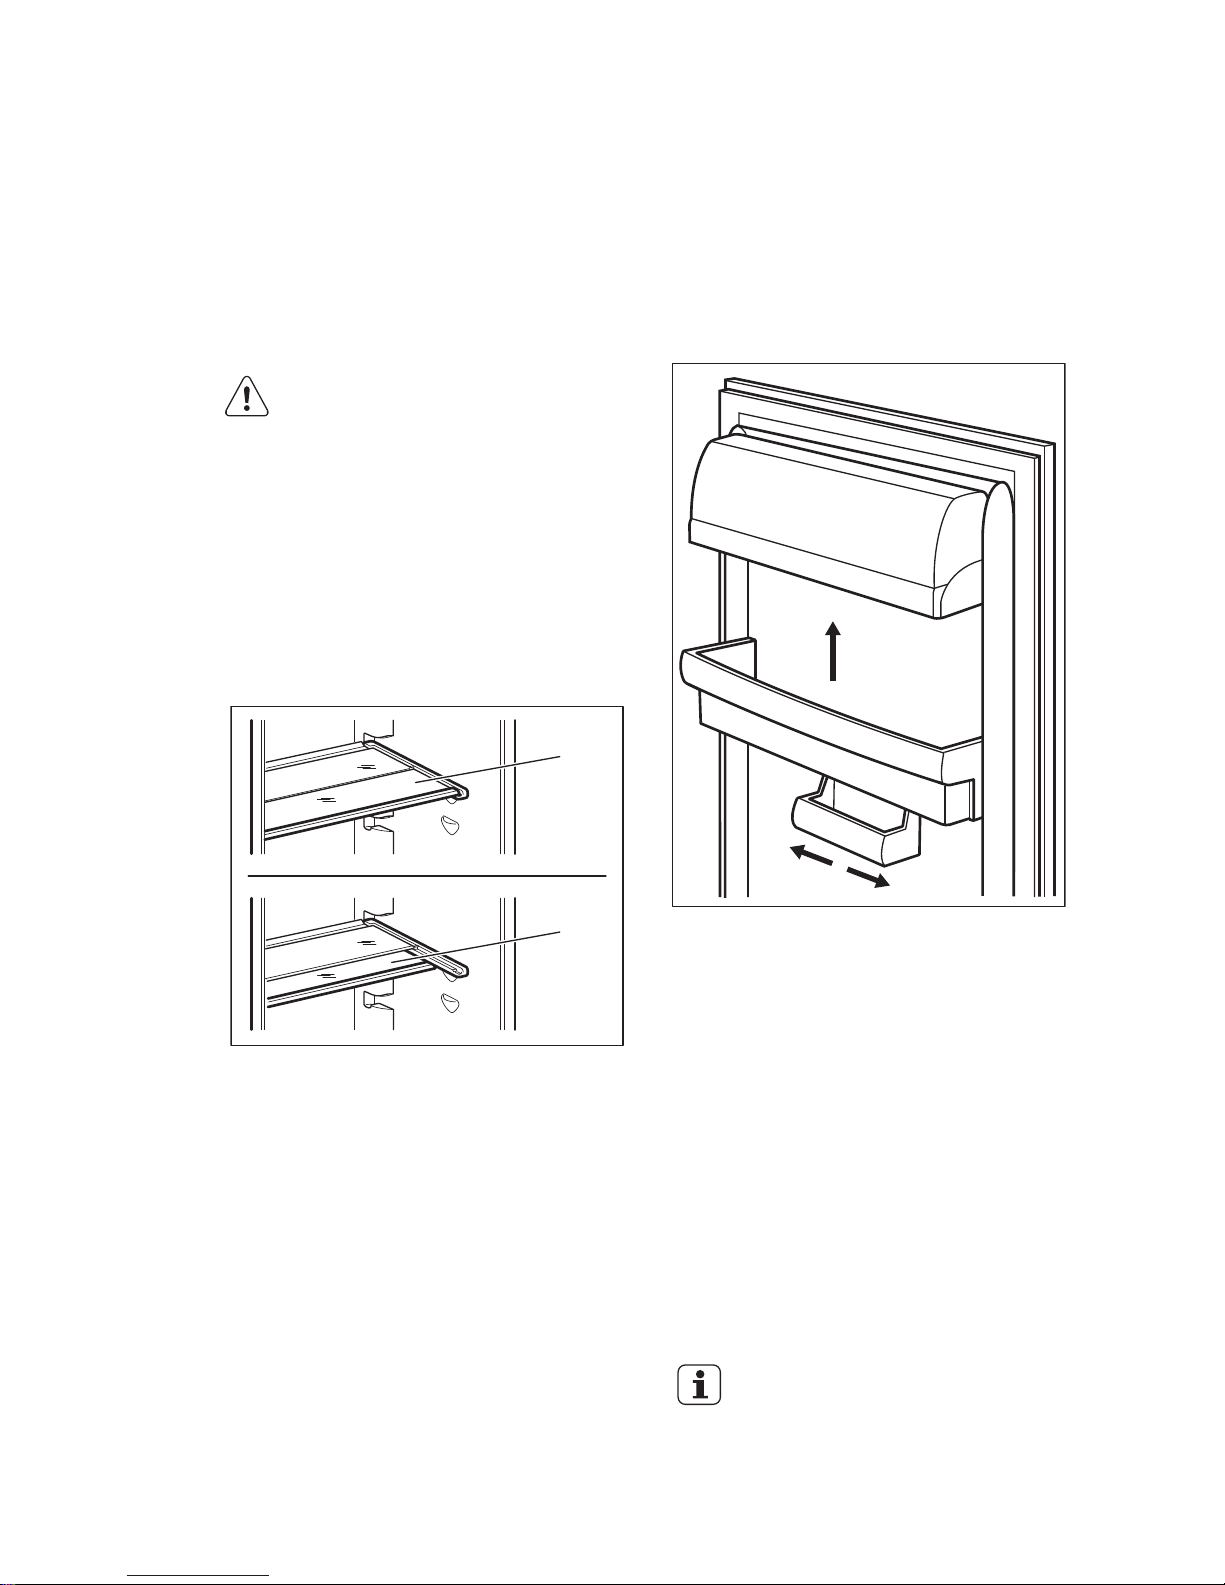
3.10 Allarme porta aperta
Se la porta è lasciata aperta per alcuni
minuti, viene emesso un segnale acustico.
Le condizioni di allarme della porta aperta
sono indicate da:
• indicatore allarme lampeggiante;
• segnale acustico.
Al ripristino delle condizioni normali (porta
chiusa), l'allarme si interrompe. È possibile
disattivare il segnale acustico premendo
qualsiasi tasto.
4. UTILIZZO QUOTIDIANO
ATTENZIONE!
Fare riferimento ai capitoli
sulla sicurezza.
4.1 Ripiani rimovibili
Le guide presenti sulle pareti del frigorifero
permettono di posizionare i ripiani a
diverse altezze.
Per un migliore uso dello spazio, i
semiripiani anteriori (A) possono essere
collocati sotto a quelli posteriori (B).
A
B
4.2 Posizionamento dei ripiani
della porta
Per facilitare l'introduzione di alimenti di
diverse dimensioni, i ripiani della porta
possono essere posizionati ad altezze
differenti.
Per regolare l'altezza dei ripiani, procedere
come segue:
1. Tirare gradualmente il ripiano nella
direzione indicata dalle frecce fino a
sbloccarlo.
2. Riposizionare il ripiano secondo
necessità
Il modello è dotato di un contenitore
variabile per la conservazione, applicato
sotto un ripiano della porta, che è
possibile far scorrere lateralmente.
4.3 Filtro dell'aria al carbone
la nostra apparecchiatura è dotata di un
filtro al carbone TASTEGUARD
posizionato all'interno di un cassetto sulla
parete posteriore del vano frigorifero.
Il filtro purifica l'aria eliminando gli odori
sgradevoli nel vano del frigorifero,
migliorando ulteriormente la qualità di
conservazione.
Durante il funzionamento,
tenere sempre chiuso il
cassetto di ventilazione aria.
www.electrolux.com56
Page 57
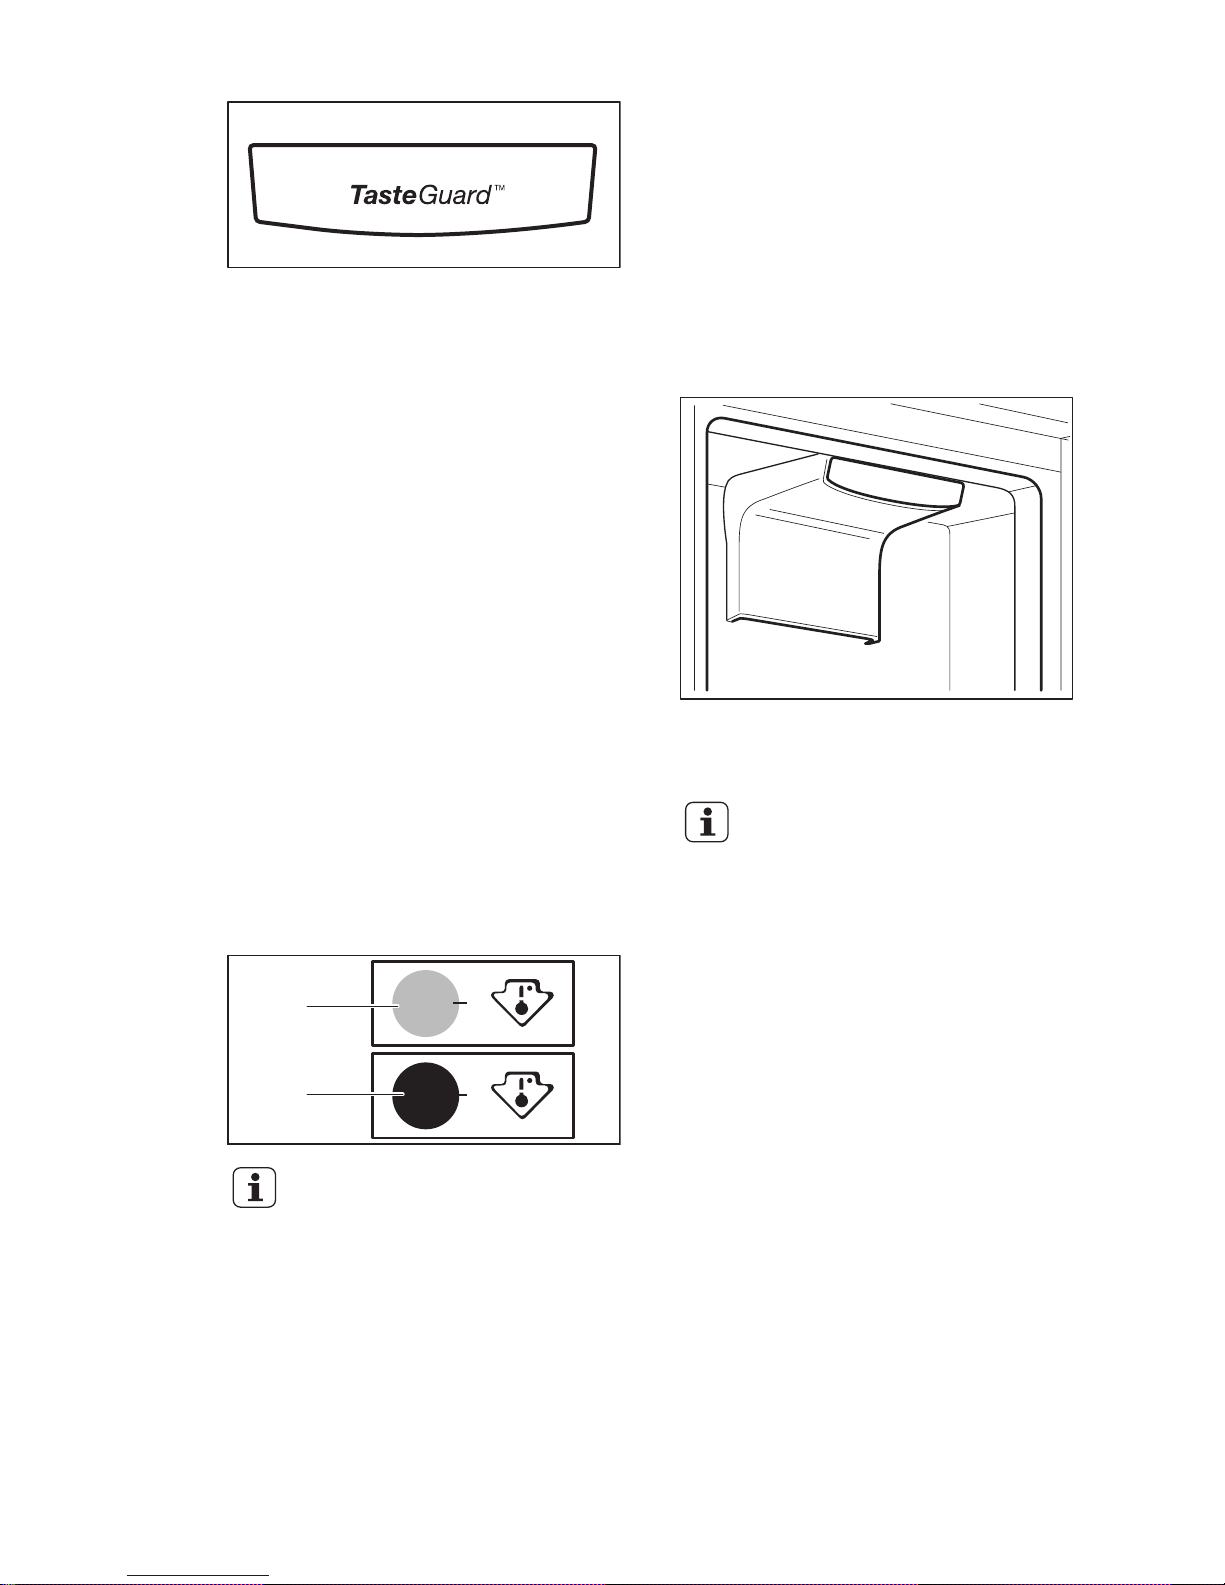
4.4 Vano a bassa temperatura
I modelli dotati di questa caratteristica
all'interno del vano frigorifero, sono ideali
per una migliore conservazione di alimenti
freschi quali pesce, carne, frutti di mare,
ecc.
Si trova nella parte inferiore,
immediatamente sopra il cassetto per le
verdure.
4.5 Indicatore della temperatura
Per una corretta conservazione del cibo, il
frigorifero è corredato di un indicatore di
temperatura. Il simbolo sulla parete
laterale dell'apparecchiatura indica la zona
più fredda del frigorifero.
Se appare “OK” (A), introdurre il cibo
fresco nello spazio indicato dal simbolo,
se al contrario appare (B), portare la
manopola di regolazione della temperatura
a un livello più basso e attendere 12 ore
prima di controllare di nuovo l'indicatore
della temperatura.
OK
OK
A
B
Dopo aver introdotto del cibo
fresco nell'apparecchiatura o
dopo aver aperto
ripetutamente o a lungo la
porta, è normale che
l'indicatore non visualizzi
"OK"; attendere almeno 12
ore prima di regolare
nuovamente la manopola di
regolazione della
temperatura.
4.6 FreeStore
Il vano frigorifero è dotato di un dispositivo
che consente un rapido raffreddamento
degli alimenti e una temperatura più
uniforme nello scomparto.
Il suddetto si avvia automaticamente
quando necessario, ad esempio per un
rapido recupero della temperatura dopo
l'apertura della porta o quando la
temperatura ambiente è elevata.
Il dispositivo può essere acceso
manualmente se necessario (fare
riferimento alla "funzione FreeStore").
Il dispositivo FreeStore si
interrompe quando si apre la
porta e si riavvia
immediatamente dopo la
chiusura della suddetta.
ITALIANO
57
Page 58
5. CONSIGLI E SUGGERIMENTI UTILI
5.1 Rumori normali durante il
funzionamento
I seguenti rumori sono da considerarsi
normali:
• Un gorgoglio o borbottio dalle
serpentine quando viene pompato il
refrigerante.
• Un ronzio o un rumore pulsante dal
compressore quando viene pompato il
refrigerante.
• Uno schiocco improvviso dall'interno
dell'apparecchiatura causato dalla
dilatazione termica (fenomeno fisico
naturale e non pericoloso).
• Un lieve scatto dal regolatore della
temperatura quando il compressore si
accende e si spegne.
5.2 Consigli per il risparmio
energetico
• Non aprire frequentemente la porta e
limitare il più possibile i tempi di
apertura.
5.3 Consigli per la refrigerazione
dei cibi freschi
Per ottenere risultati ottimali:
• non introdurre alimenti o liquidi caldi nel
vano frigorifero
• coprire o avvolgere gli alimenti, in
particolare quelli con un gusto o un
aroma forte
• disporre gli alimenti in modo da
garantire un'adeguata circolazione
dell'aria
5.4 Consigli per la refrigerazione
Consigli utili:
• Carne (tutti i tipi): deve essere avvolta in
sacchetti di polietilene e collocata sul
ripiano di vetro, sopra il cassetto delle
verdure.
• La carne conservata in questo modo
deve essere consumata entro uno o
due giorni.
• Alimenti cotti, piatti freddi, ecc.: devono
essere coperti e possono essere
disposti su qualsiasi ripiano.
• Frutta e verdura: devono essere pulite
accuratamente e poste negli appositi
cassetti.
• Burro e formaggio: devono essere
chiusi in contenitori ermetici o in
sacchetti di polietilene oppure avvolti
con pellicola di alluminio, per limitare il
più possibile il contatto con l'aria.
• Bottiglie: devono essere chiuse
mediante tappo e conservate sul
ripiano portabottiglie della porta, o (se
presente) sulla griglia portabottiglie.
• Non conservare in frigorifero banane,
patate, cipolle o aglio non confezionati.
6. PULIZIA E CURA
ATTENZIONE!
Fare riferimento ai capitoli
sulla sicurezza.
6.1 Avvertenze generali
AVVERTENZA!
Prima di qualsiasi intervento
di manutenzione, estrarre la
spina dalla presa.
Questa apparecchiatura
contiene idrocarburi nell’unità
di raffreddamento, pertanto le
operazioni di manutenzione e
ricarica devono essere
eseguite esclusivamente da
personale autorizzato.
Gli accessori e i componenti
dell’apparecchiatura non
sono lavabili in lavastoviglie.
www.electrolux.com58
Page 59
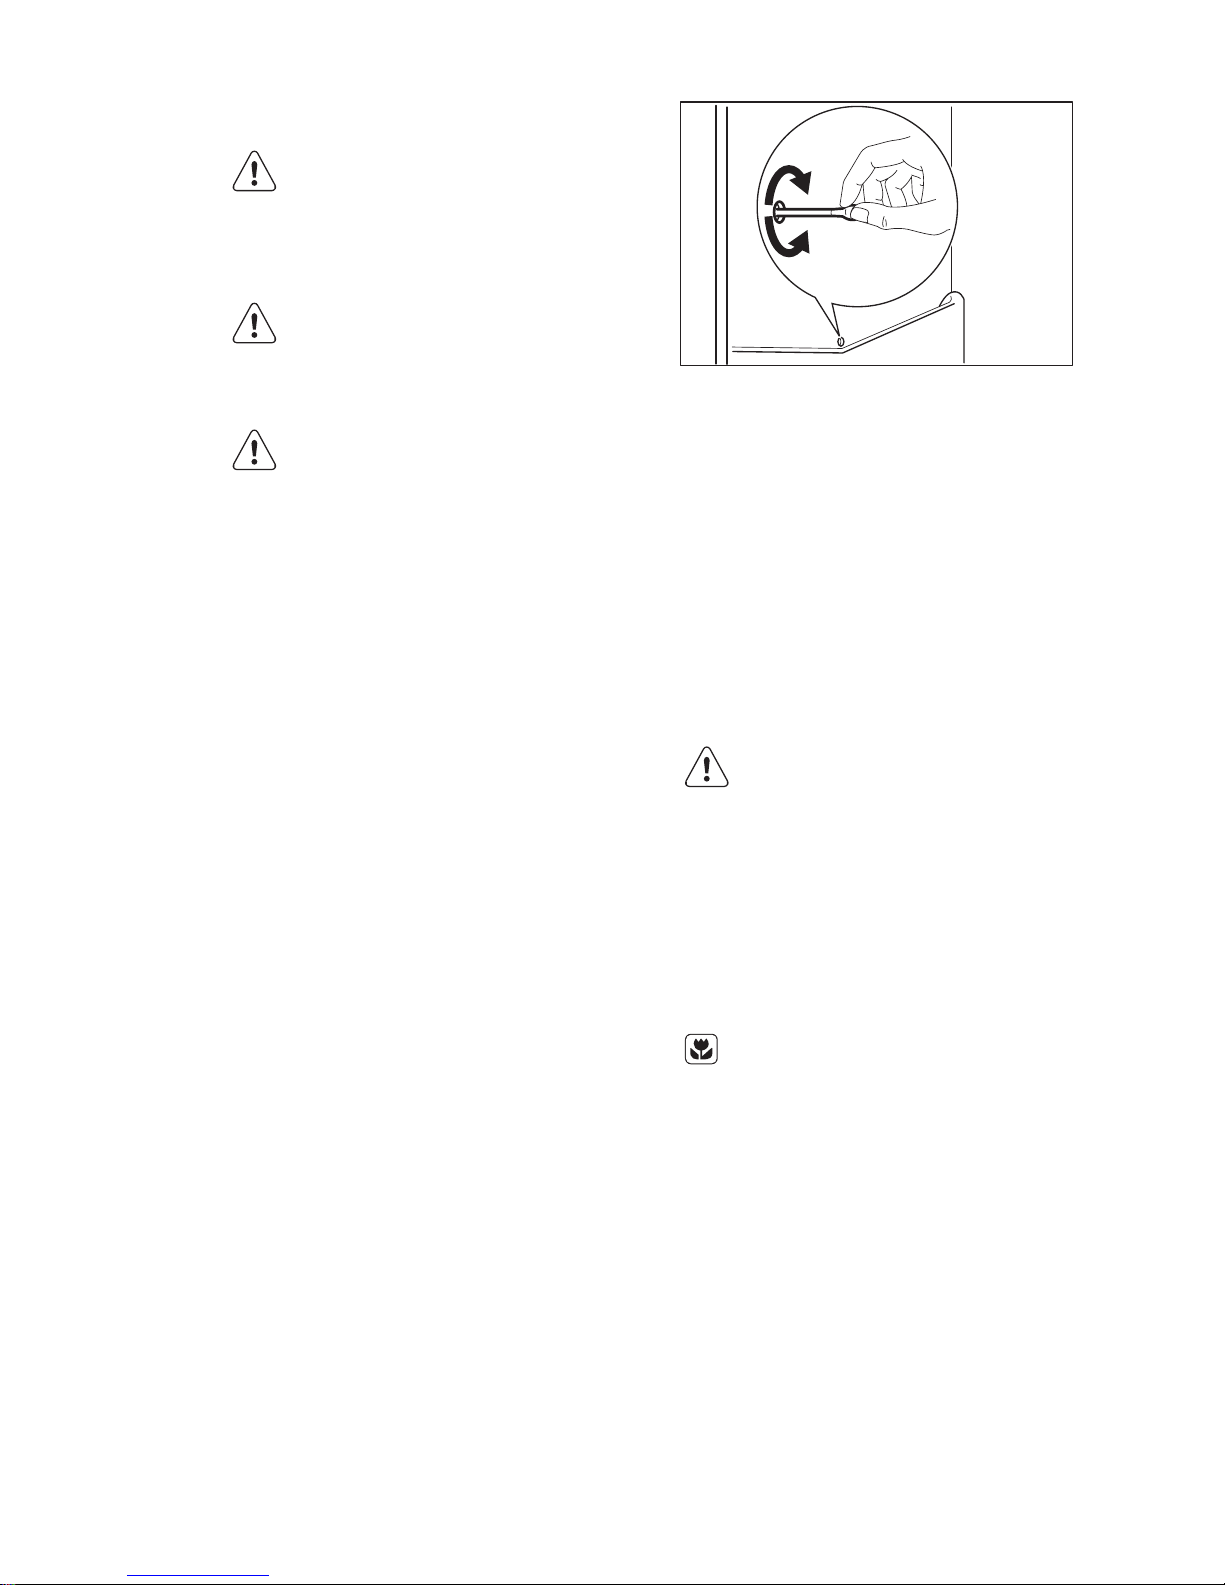
6.2 Pulizia periodica
AVVERTENZA!
Evitare di tirare, spostare o
danneggiare tubi e/o cavi
all'interno
dell'apparecchiatura.
AVVERTENZA!
Prestare attenzione a non
danneggiare il sistema
refrigerante.
AVVERTENZA!
Quando si sposta
l'apparecchiatura, sollevarla
per il bordo anteriore, così da
non graffiare il pavimento.
L'apparecchiatura deve essere pulita
regolarmente:
1. Lavare l'interno e gli accessori con
acqua tiepida e sapone neutro.
2. Ispezionare regolarmente le
guarnizioni della porta ed eliminare
con un panno umido tracce di sporco
e residui.
3. Risciacquare e asciugare
accuratamente.
4. Pulire il condensatore e il compressore
sul retro dell'apparecchiatura con una
spazzola.
Questa operazione migliorerà le
prestazioni dell'apparecchiatura
riducendone i consumi di energia.
6.3 Sbrinamento del frigorifero
Durante l'uso normale, la brina viene
eliminata automaticamente
dall'evaporatore del vano frigorifero ogni
volta che il motocompressore si arresta.
L'acqua di sbrinamento giunge attraverso
un condotto in un apposito recipiente
posto sul retro dell'apparecchiatura, sopra
il motocompressore, dove evapora.
È importante pulire periodicamente il foro
di scarico dell'acqua di sbrinamento,
situato al centro del canale sulla parete
posteriore, per evitare che l'acqua
fuoriesca sugli alimenti.
6.4 Periodi di non utilizzo
Se l'apparecchiatura non viene utilizzata
per un lungo periodo, adottare le seguenti
precauzioni:
1. Scollegare l'apparecchiatura dalla rete
elettrica.
2. Estrarre tutti gli alimenti
3. Pulire l'apparecchiatura e tutti gli
accessori.
4. Lasciare la porta/le porte socchiusa/e
per evitare la formazione di odori
sgradevoli.
ATTENZIONE!
Se l'apparecchiatura rimane
accesa, farla controllare
periodicamente per evitare
che gli alimenti si deteriorino
in caso di interruzione della
corrente elettrica.
6.5 Sostituzione del filtro a
carbone
Il filtro dell'aria è un materiale
di consumo e come tale non
è coperto da garanzia.
Per garantire il massimo rendimento,
sostituire il filtro dell'aria al carbone una
volta all'anno.
I filtri di ricambio possono essere
acquistati presso il distributore di zona.
Per le istruzioni, fare riferimento alla
sezione "Installazione del filtro dell'aria al
carbone".
ITALIANO
59
Page 60
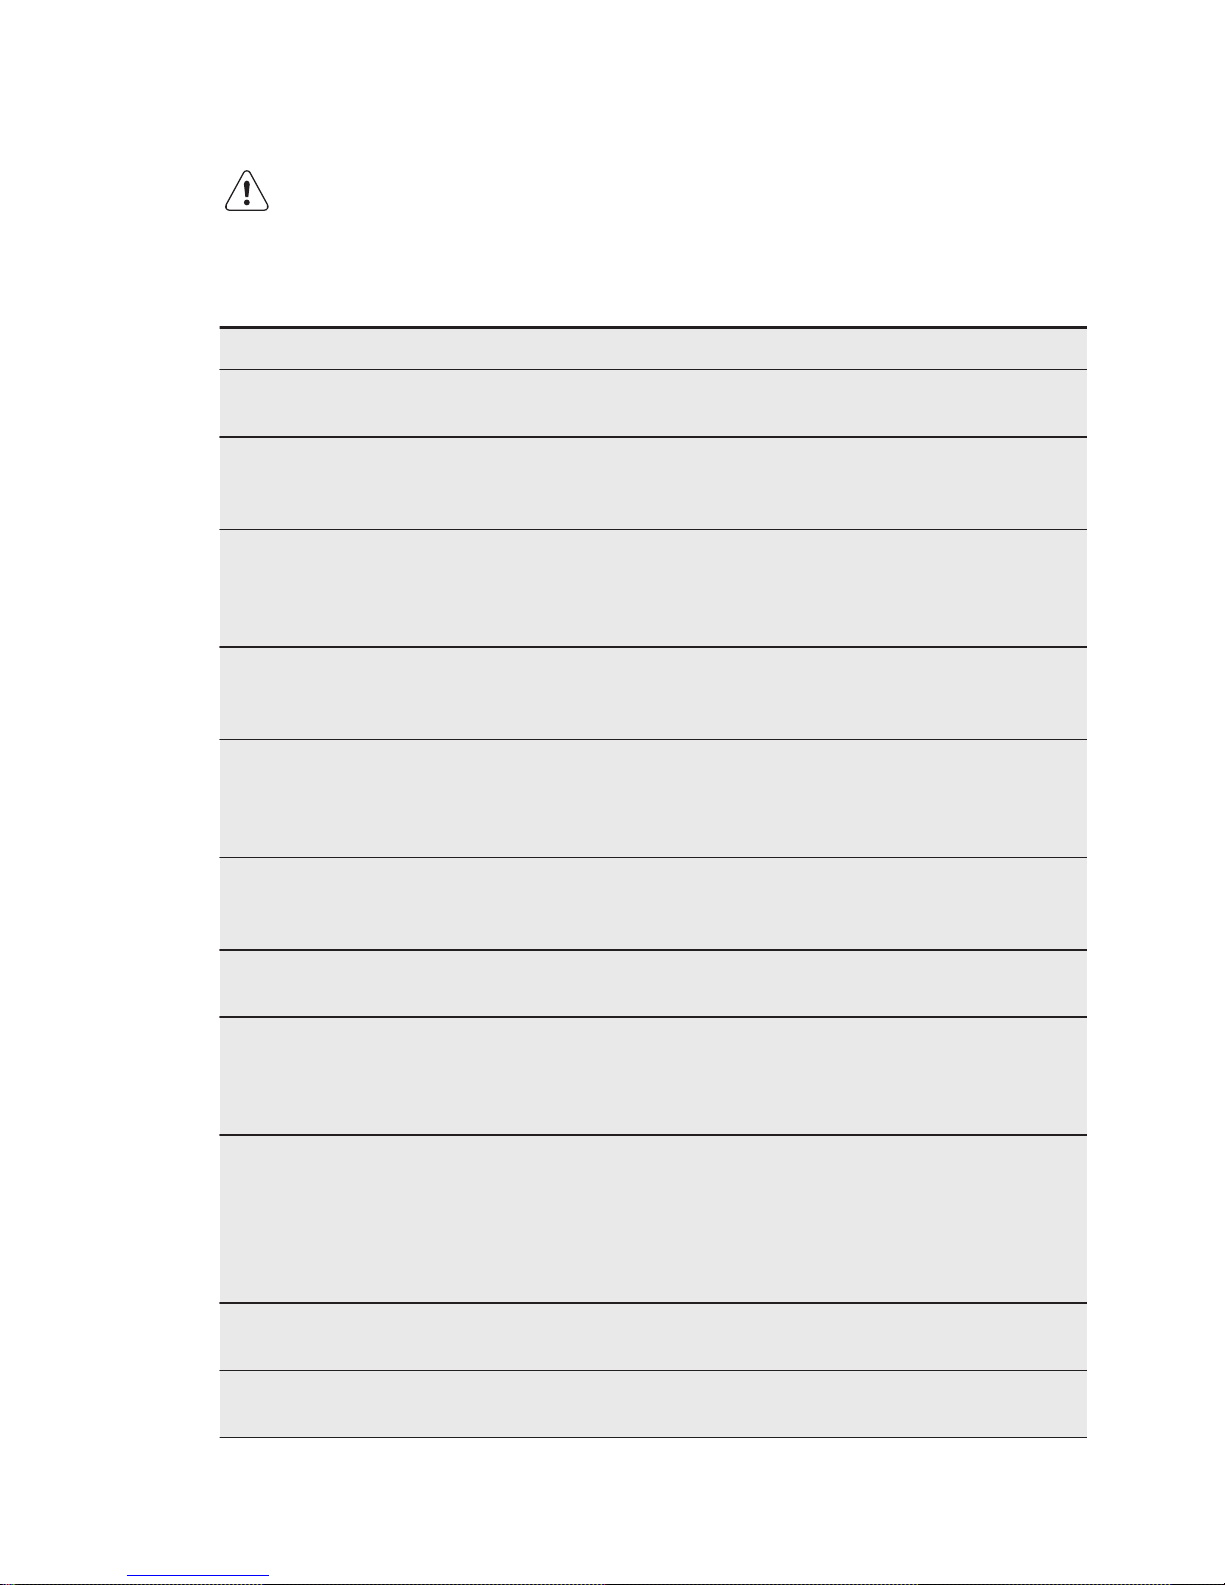
7. RISOLUZIONE DEI PROBLEMI
ATTENZIONE!
Fare riferimento ai capitoli
sulla sicurezza.
7.1 Cosa fare se...
Problema Causa possibile Soluzione
L'apparecchiatura non funziona.
L'apparecchiatura è spenta.
Accendere l’apparecchiatura.
La spina non è inserita
correttamente nella presa
di alimentazione.
Inserire correttamente la spina nella presa di alimentazione.
Assenza di tensione nella
presa di alimentazione.
Collegare alla presa di alimentazione un'altra apparecchiatura elettrica. Rivolgersi ad un
elettricista qualificato.
L'apparecchiatura è rumorosa.
L'apparecchiatura non è
appoggiata in modo corretto.
Controllare se l'apparecchiatura è appoggiata in modo
stabile.
L'allarme acustico o visivo è
attivo.
L'apparecchiatura è stata
accesa da poco e la temperatura è ancora troppo
alta.
Fare riferimento alla sezione
"Allarme porta aperta" o "Allarme di alta temperatura".
La temperatura all'interno
dell'apparecchiatura è
troppo alta.
Fare riferimento alla sezione
"Allarme porta aperta" o "Allarme di alta temperatura".
La porta viene lasciata
aperta.
Chiudere la porta.
La temperatura all'interno
dell'apparecchiatura è
troppo alta.
Contattare un elettricista
qualificato o il Centro di Assistenza Autorizzato più vicino.
Compare un simbolo rettangolare invece dei numeri sul Display della Temperatura.
Problema al sensore della
temperatura.
Contattare il Centro di Assistenza Autorizzato più vicino (il
sistema refrigerante continuerà a mantenere gli alimenti
freddi, ma non sarà possibile
regolare la temperatura).
La lampadina non si accende.
La lampadina è in modalità stand-by.
Chiudere e riaprire la porta.
La lampadina non si accende.
La lampadina è difettosa. Contattare il Centro di Assis-
tenza Autorizzato più vicino.
www.electrolux.com60
Page 61
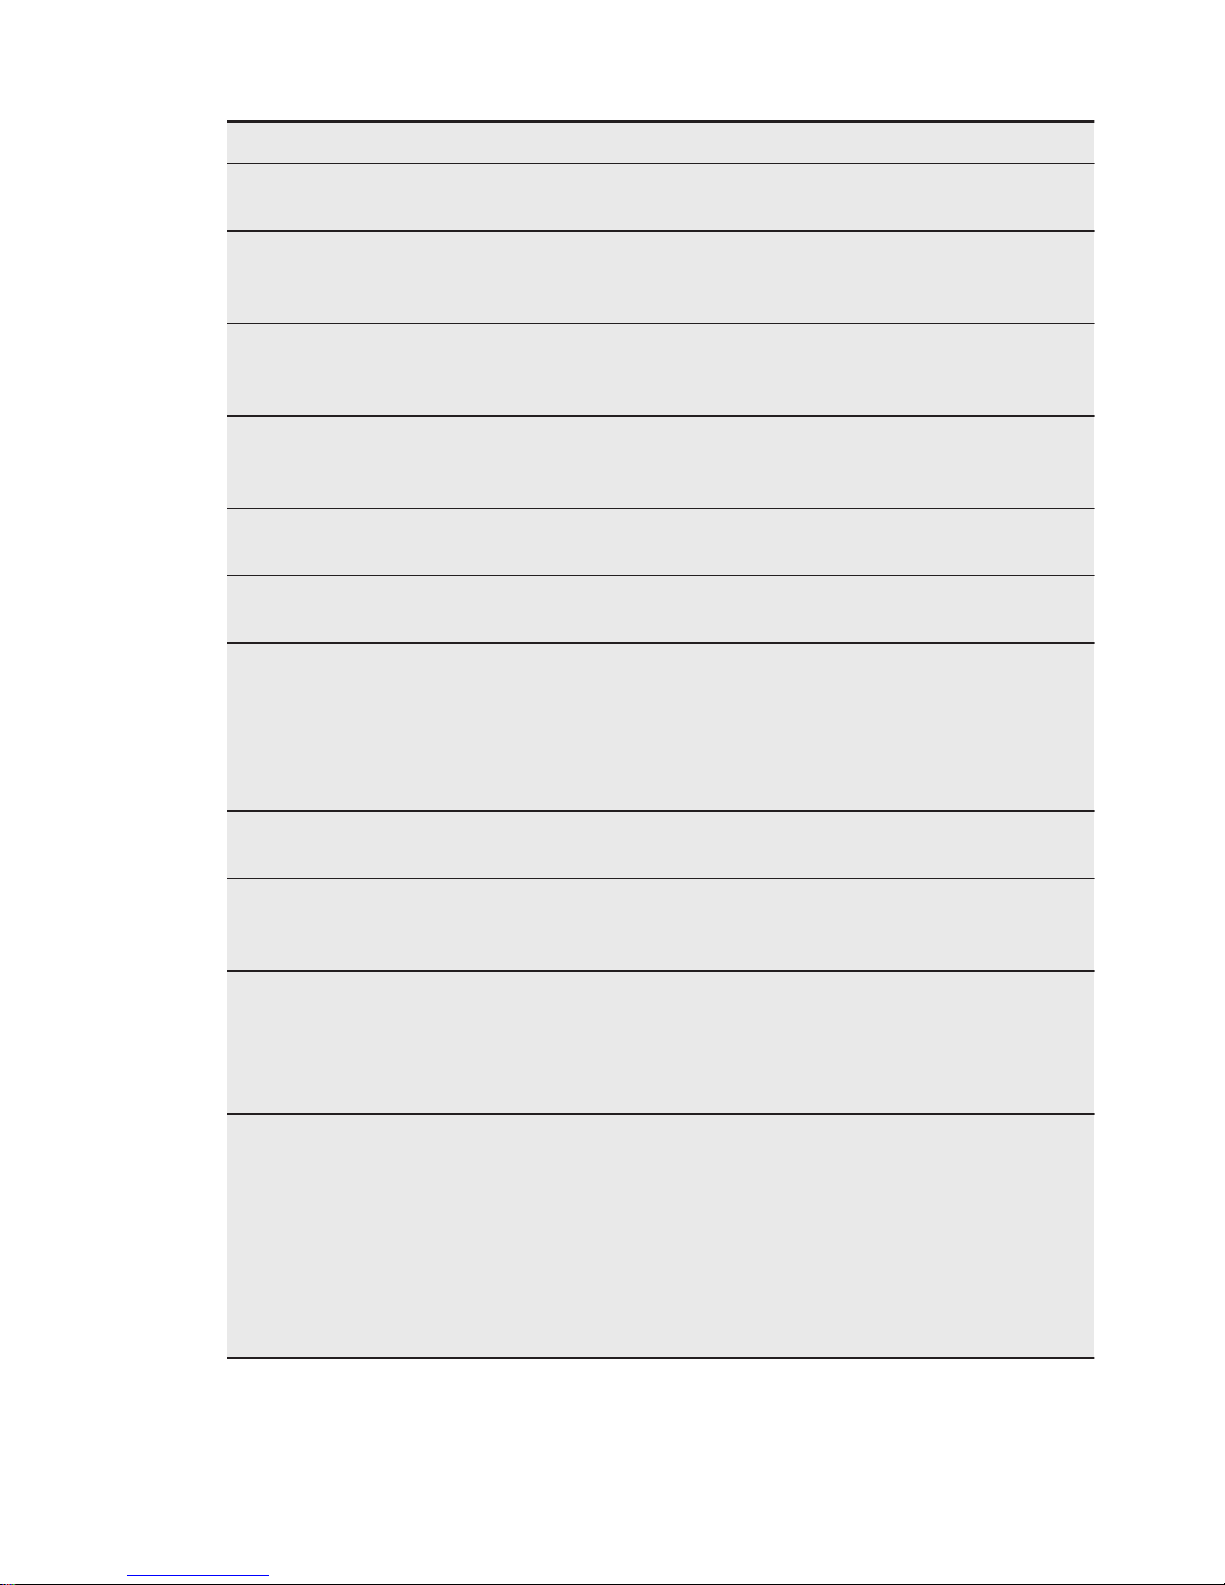
Problema Causa possibile Soluzione
Il compressore rimane
sempre in funzione.
La temperatura impostata
non è corretta.
Fare riferimento al capitolo
"Uso dell'apparecchiatura".
Sono stati introdotti molti
alimenti contemporaneamente.
Attendere alcune ore e ricontrollare la temperatura.
La temperatura ambiente
è troppo alta.
Fare riferimento al grafico della classe climatica sulla targhetta dei dati.
Gli alimenti introdotti
nell'apparecchiatura erano troppo caldi.
Lasciar raffreddare gli alimenti
a temperatura ambiente prima di introdurli.
La porta non è chiusa
correttamente.
Consultare la sezione "Chiusura della porta".
La funzione Shopping
Function è attiva.
Fare riferimento a "funzione
Shopping Function".
Il compressore non si avvia
immediatamente dopo
avere premuto il tasto
Shopping Function, oppure
dopo avere cambiato la
temperatura.
Ciò è normale, non si è
verificato alcun errore.
Il compressore si avvia dopo
un certo periodo di tempo.
Scorre acqua all'interno del
frigorifero.
Lo scarico dell'acqua è
ostruito.
Pulire lo scarico dell'acqua.
Gli alimenti impediscono
all'acqua di scorrere
nell'apposito collettore.
Evitare di disporre gli alimenti
direttamente contro la parete
posteriore.
Presenza di acqua sul pavimento.
L'acqua di sbrinamento
non viene scaricata nella
bacinella di evaporazione
posta sopra il compressore.
Collegare lo scarico dell'acqua di sbrinamento alla bacinella di evaporazione.
Impossibile impostare la
temperatura.
La funzione ActionFreeze
o Shopping Function è attiva.
Disattivare manualmente la
funzione ActionFreeze o
Shopping Function oppure
aspettare a impostare la temperatura finché la funzione si
disattiva automaticamente.
Far riferimento alla "funzione
ActionFreeze o Shopping
Function".
ITALIANO
61
Page 62
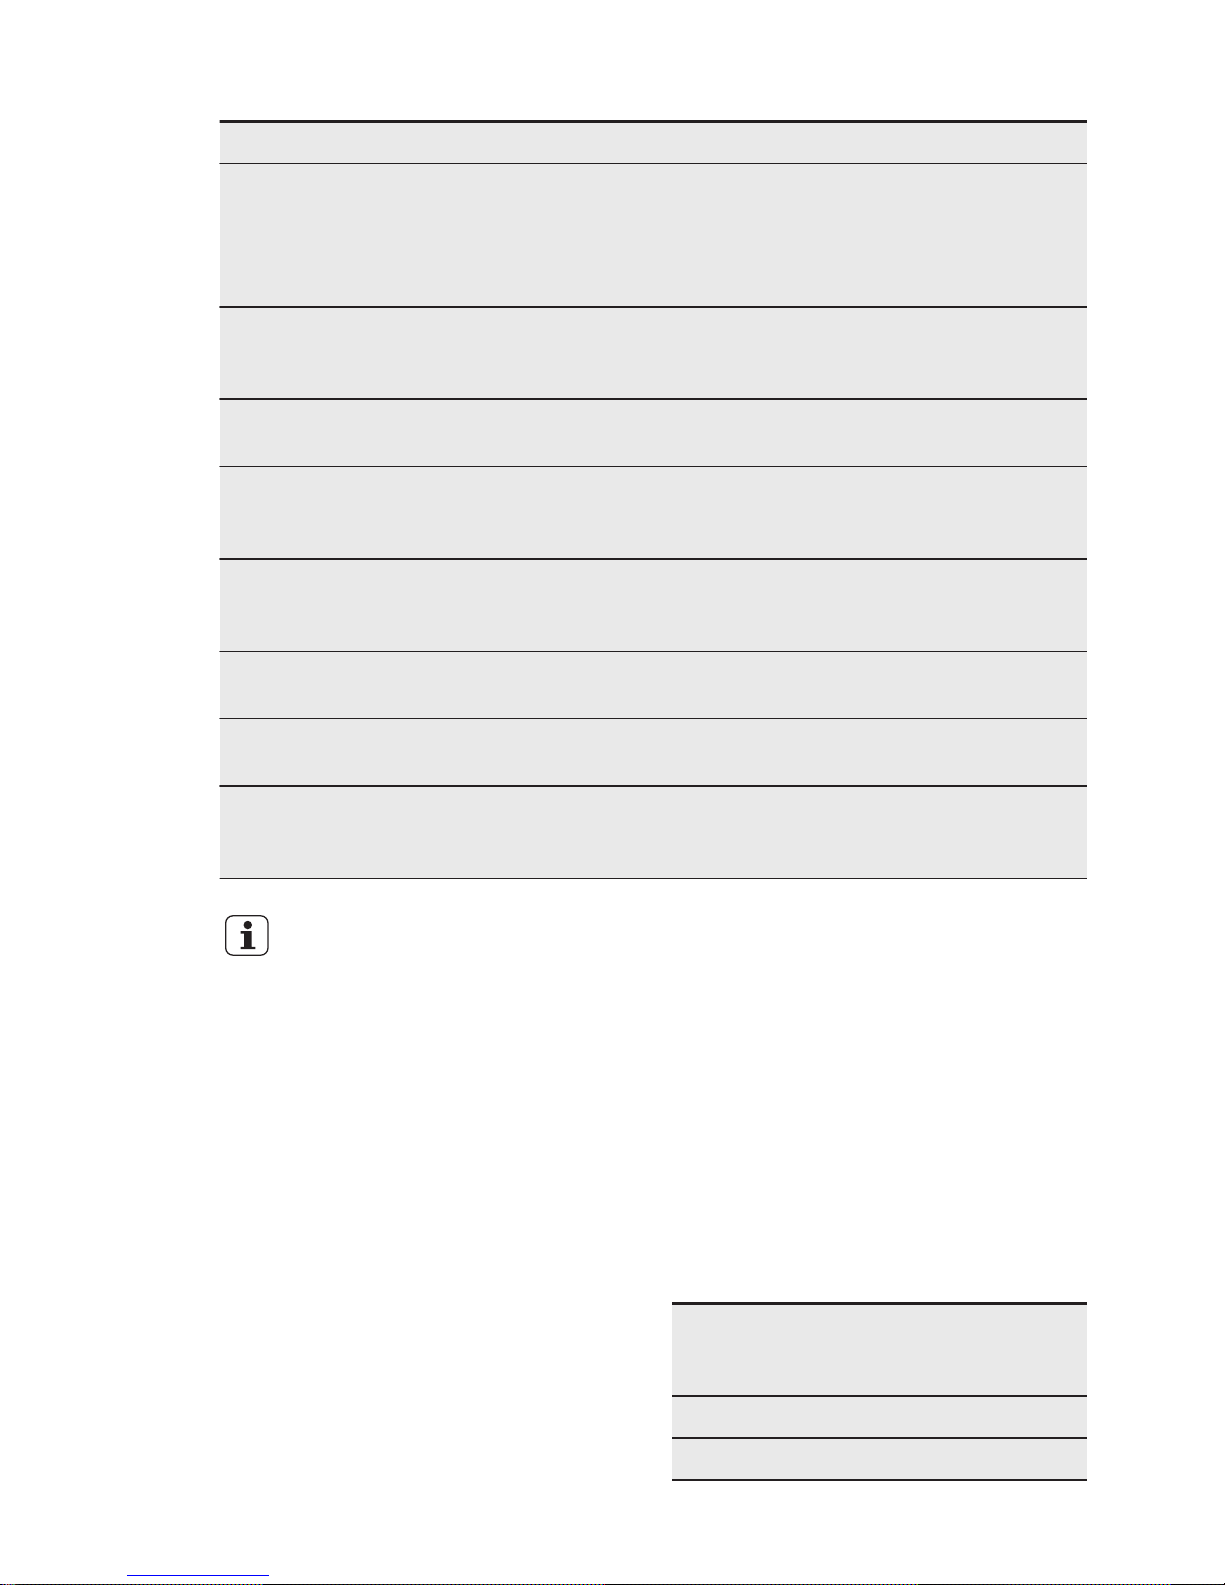
Problema Causa possibile Soluzione
DEMO compare sul display. L'apparecchiatura è in
modalità demo.
Mantenere premuto OK per
circa 10 secondi finché non
viene emesso un lungo suono
e il display si spegne per
qualche istante.
La temperatura all'interno
dell'apparecchiatura è troppo bassa/troppo alta.
Il regolatore della temperatura non è impostato
correttamente.
Impostare una temperatura
superiore/inferiore.
La porta non è chiusa
correttamente.
Consultare la sezione "Chiusura della porta".
La temperatura degli alimenti è troppo alta.
Prima di introdurre gli alimenti, lasciarli raffreddare a temperatura ambiente.
Sono stati introdotti molti
alimenti contemporaneamente.
Introdurre gli alimenti un poco
alla volta.
La porta viene aperta frequentemente.
Aprire la porta solo se necessario.
La funzione Shopping
Function è attiva.
Fare riferimento a "funzione
Shopping Function".
L'aria fredda non circola
correttamente all'interno
dell'apparecchiatura.
Adottare le misure necessarie
per garantire una corretta circolazione dell'aria fredda.
Se il consiglio non da risultati,
contattare il Centro di
Assistenza Autorizzato più
vicino.
7.2 Sostituzione della lampadina
L'apparecchiatura è dotata di una
lampadina interna a LED a lunga durata.
Solo al Centro di Assistenza è permesso
sostituire l'impianto d'illuminazione.
Contattare un Centro Assistenza
autorizzato.
7.3 Chiusura della porta
1. Pulire le guarnizioni della porta.
2. Se necessario, regolare la porta. Fare
riferimento alla sezione "Installazione".
3. Se necessario, sostituire le guarnizioni
difettose. Contattare il Centro di
Assistenza autorizzato.
8. INSTALLAZIONE
8.1 Luogo d'installazione
Installare l'apparecchiatura in un luogo
asciutto, ben ventilato, la cui temperatura
ambiente corrisponda alla classe climatica
indicata sulla targhetta dei dati del
modello:
Classe
climatica
Temperatura ambiente
SN Da +10°C a +32°C
N Da +16°C a +32°C
www.electrolux.com62
Page 63
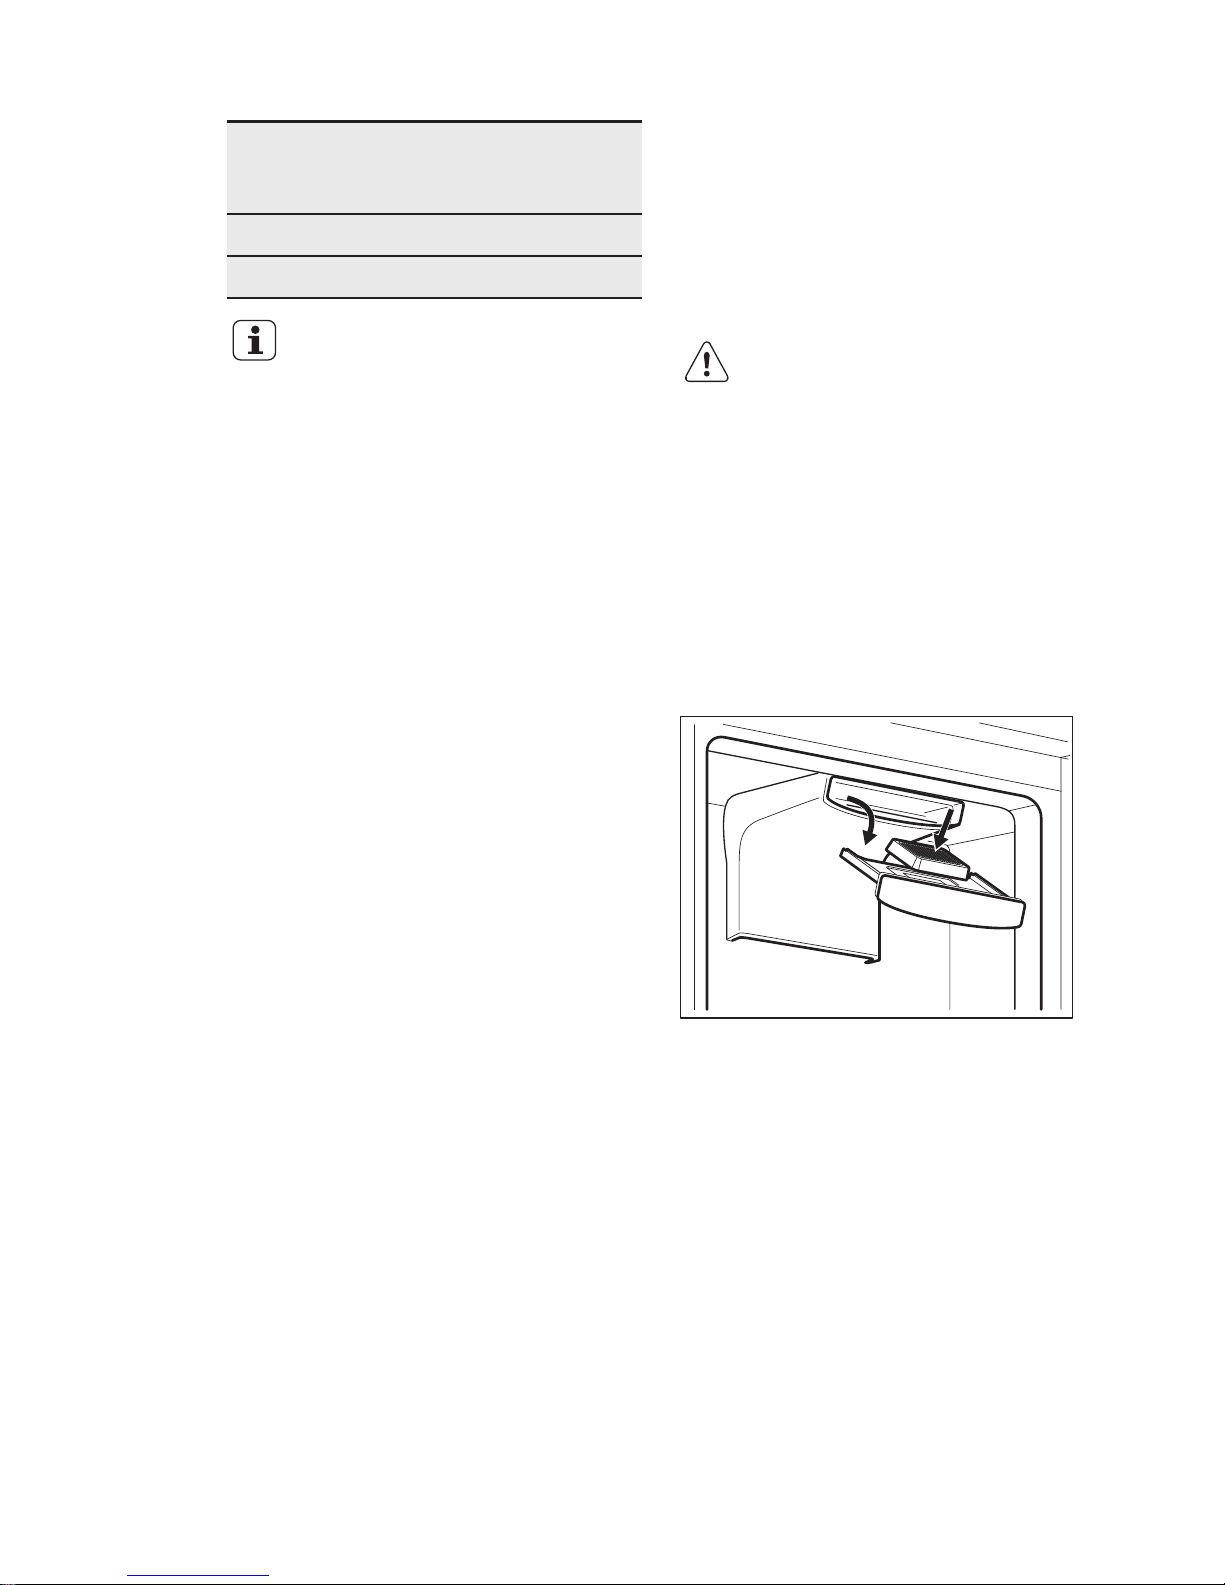
Classe
climatica
Temperatura ambiente
ST Da +16°C a +38°C
T Da +16°C a +43°C
In alcuni modelli potrebbero
verificarsi delle anomalie se
non si rispettano le
temperature indicate. Il
corretto funzionamento può
essere garantito solo nel
rispetto delle temperature
indicate. In caso di dubbi sul
luogo di installazione
dell'apparecchiatura,
contattare il venditore, il
nostro Centro di Assistenza o
il rivenditore autorizzato più
vicino.
8.2 Collegamento elettrico
• Prima di inserire la spina, verificare che
la tensione e la frequenza riportate sulla
targhetta dei dati corrispondano a
quelle dell'impianto domestico.
• L'apparecchiatura deve disporre di una
messa a terra. La spina del cavo di
alimentazione è dotata di un apposito
contatto. Se la presa di corrente
dell'impianto domestico non è
collegata a terra, allacciare
l'apparecchiatura a una presa di terra
separata in conformità alle norme in
vigore, rivolgendosi a un elettricista
qualificato.
• Il produttore declina ogni responsabilità
qualora le suddette precauzioni di
sicurezza non vengano rispettate.
• Questa apparecchiatura è conforme
alle direttive CEE.
8.3 Installazione del filtro
TASTEGUARD
Il filtro TASTEGUARD è un filtro a carbone
attivo che assorbe i cattivi odori e
permette a tutti gli alimenti conservati di
mantenere le proprie proprietà
organolettiche senza il rischio di
contaminazione di odori.
Alla consegna, il filtro è contenuto in una
confezione di plastica, al fine di
preservarne le prestazioni.
Il filtro deve essere posizionato all'interno
del cassetto prima dell'accensione
dell'apparecchiatura.
AVVERTENZA!
Accertarsi che il cassetto
della leva dell'aria sia chiuso
per assicurare il corretto
funzionamento.
Maneggiare il filtro con
attenzione per evitare che
eventuali frammenti si
stacchino dalla superficie.
1. Aprire il cassetto.
2. Rimuovere il filtro dalla confezione di
plastica.
3. Inserire il filtro nel cassetto.
4. Chiudere il cassetto.
8.4 Requisiti di ventilazione
Il flusso d'aria dietro l'apparecchiatura
deve essere sufficiente.
ITALIANO
63
Page 64
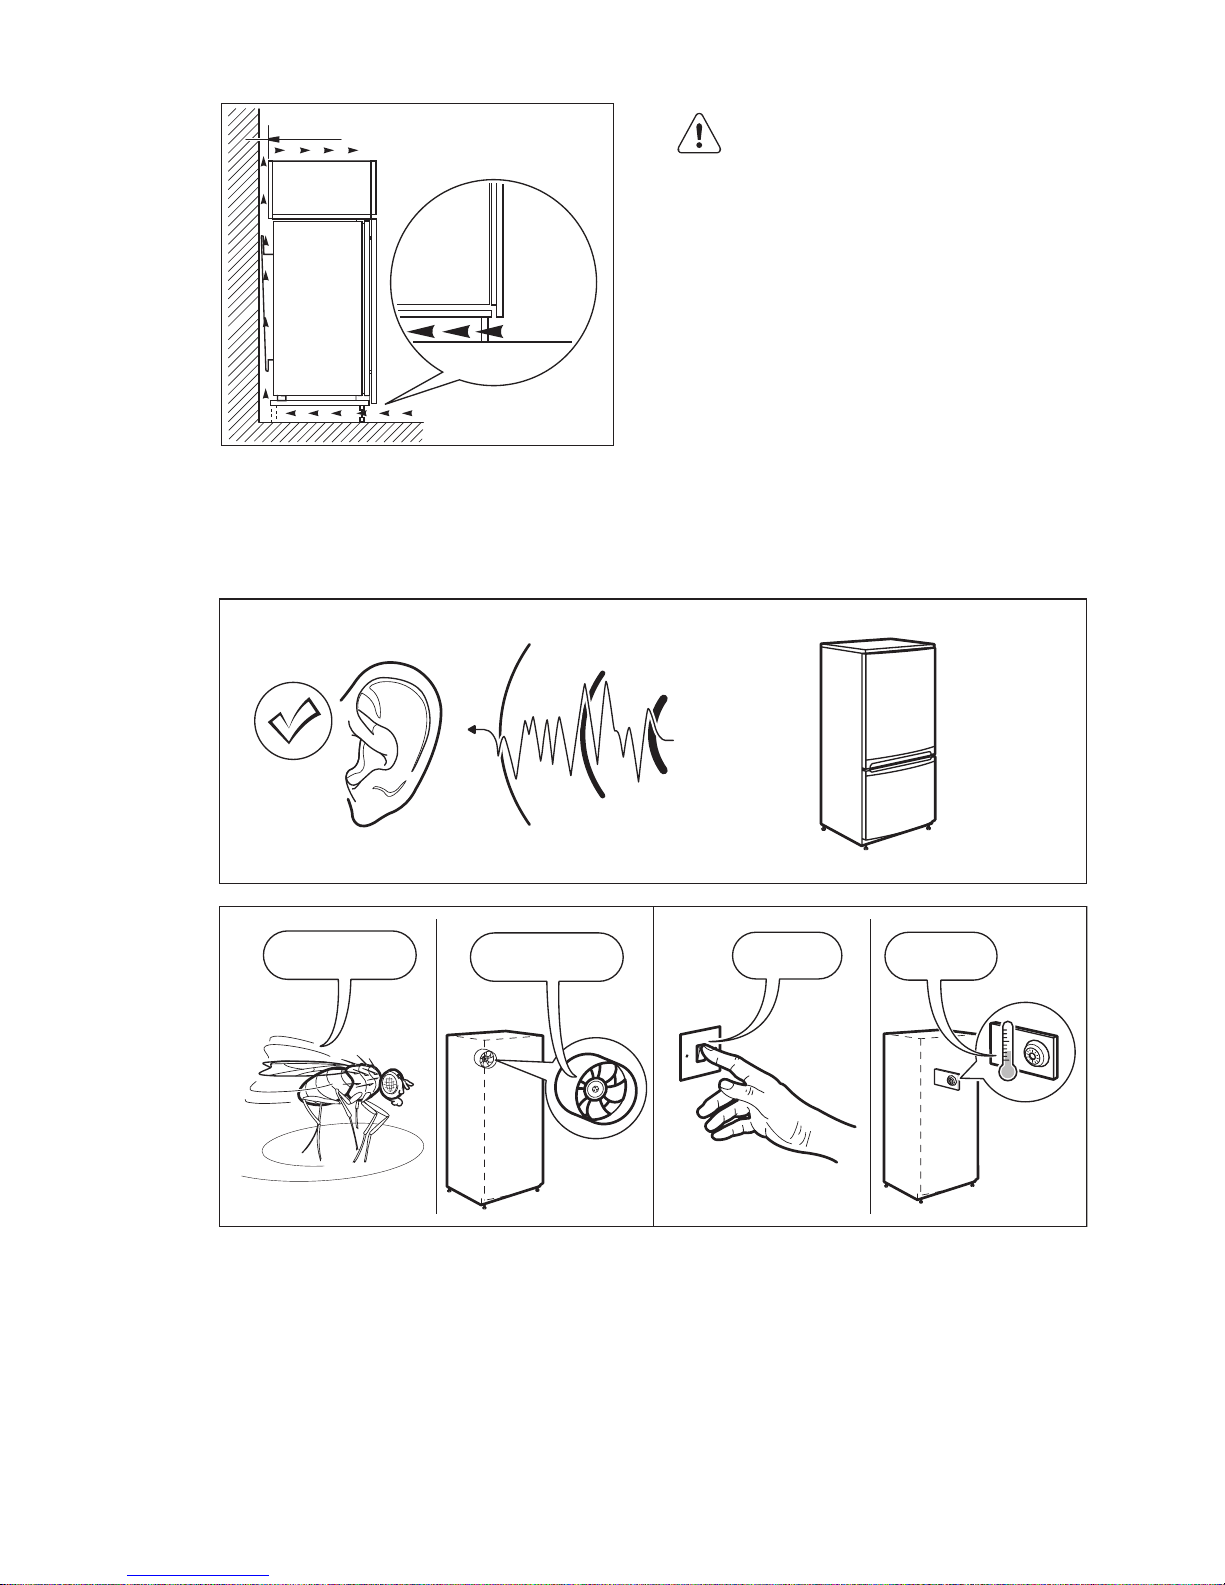
5 cm
min.
200 cm
2
min.
200 cm
2
AVVERTENZA!
Consultare le istruzioni di
montaggio per l'installazione.
9. RUMORI
Durante l'uso, alcuni rumori di funzionamento (come quelli del compressore o del circuito
refrigerante) sono da considerarsi normali.
BRRR!
HISSS!
CLICK!
BLUBB!
CRACK!
SSSRR
R!
OK
CLICK!
CLICK!
SSSRRR!
SSSRRR!
www.electrolux.com64
Page 65
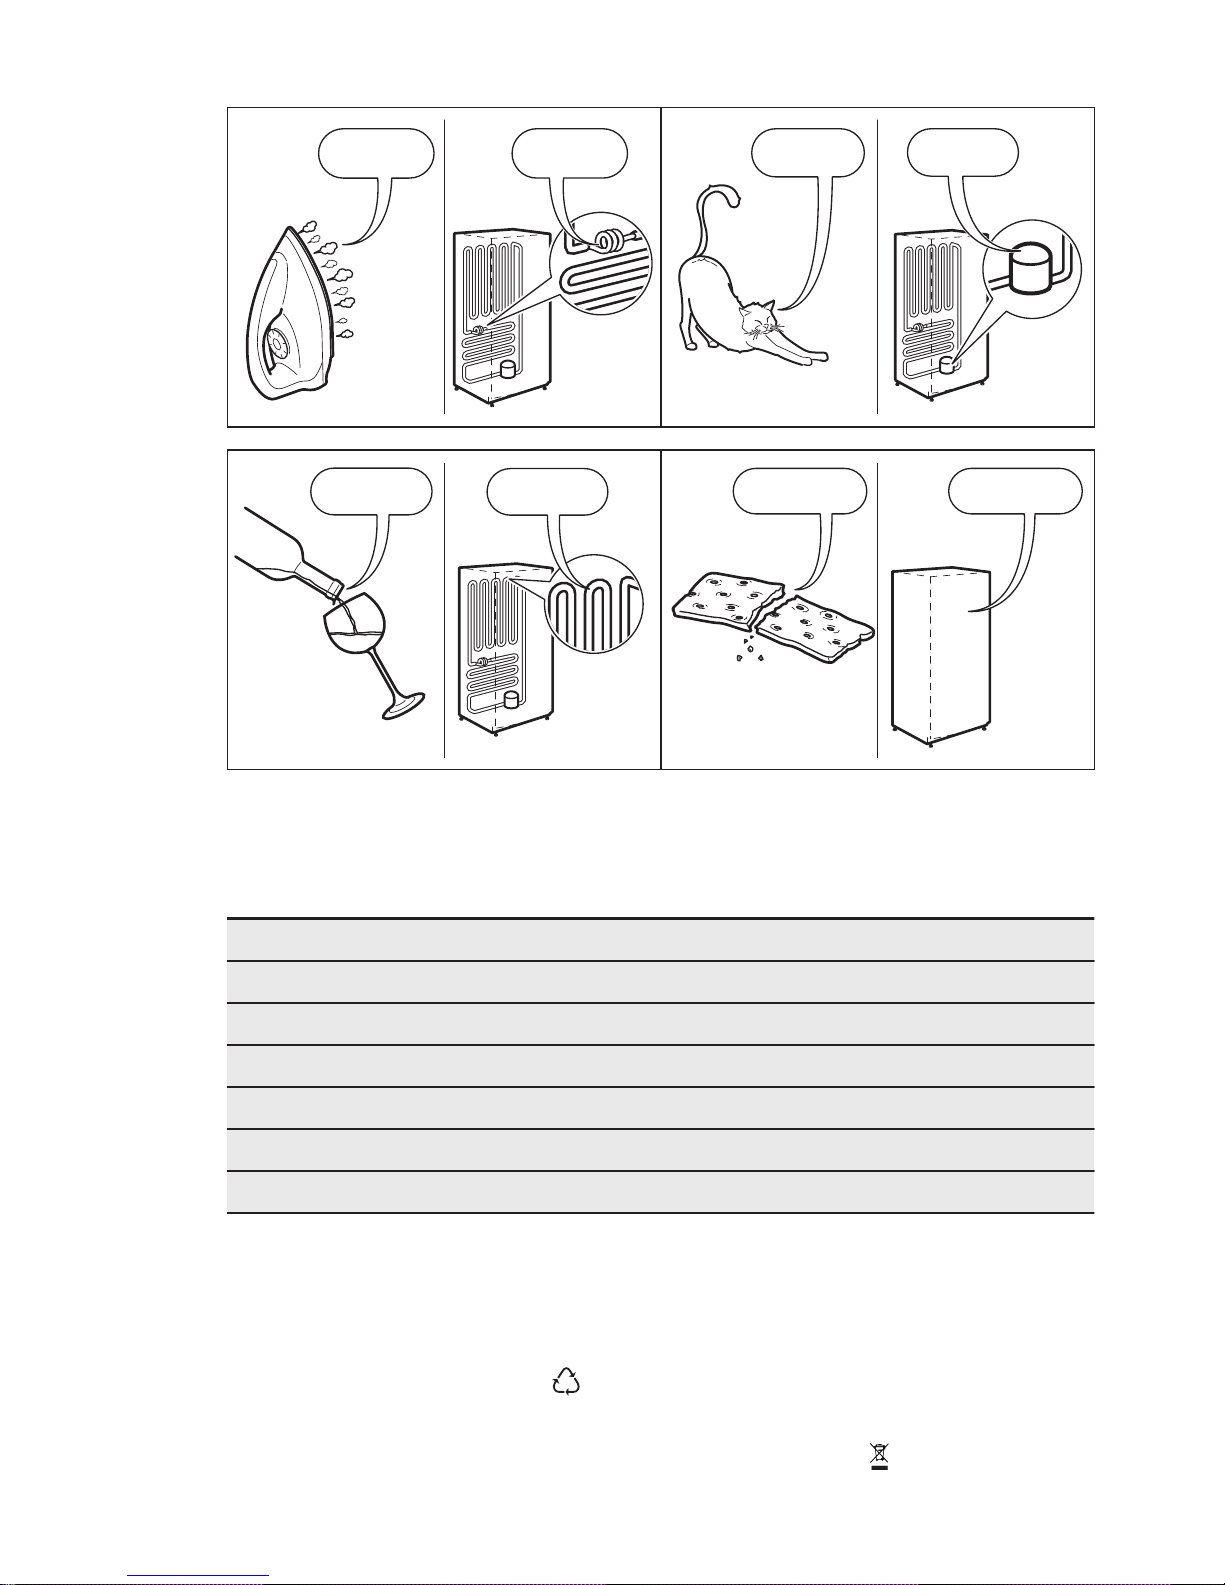
BRRR!
BRRR!
HISSS!
HISSS!
BLUBB!
BLUBB!
CRACK!CRACK!
10. DATI TECNICI
10.1 Dati tecnici
Dimensioni nicchia di incasso
Altezza mm 1780
Larghezza mm 560
Profondità mm 550
Tensione Volt 230 - 240
Frequenza Hz 50
I dati tecnici sono riportati sulla targhetta
dei dati applicata sul lato esterno o interno
dell'apparecchiatura e sull'etichetta dei
valori energetici.
11. CONSIDERAZIONI SULL'AMBIENTE
Riciclare i materiali con il simbolo .
Buttare l'imballaggio negli appositi
contenitori per il riciclaggio. Aiutare a
proteggere l’ambiente e la salute umana e
a riciclare rifiuti derivanti da
apparecchiature elettriche ed elettroniche.
Non smaltire le apparecchiature che
riportano il simbolo insieme ai normali
ITALIANO
65
Page 66

rifiuti domestici. Portare il prodotto al
punto di riciclaggio più vicino o contattare
il comune di residenza.
*
www.electrolux.com66
Page 67

ITALIANO
67
Page 68
www.electrolux.com/shop
222371601-A-122015
 Loading...