

Page 1
WineCooler
INSTRUCTION BOOKLET
818 35 40--00/7
ERC3711WS
GB
Page 2

Important Safety Instructions
Your new Wine cooler may have other functions compared to your previous one.
These warnings are provided in the interests of your safety. Ensure that you understand them all before
installing or using the appliance. Your safety is of paramount importance. If you are unsure about any of the
meanings or warnings contact the Customer Care Department.
Keep the instruction booklet. It will come in handy if you later sell the appliance or give it to somebody else.
Prior to Installation
· Check the appliance for transport damage. Under
no circumstances should a damaged appliance be
installed. In the event of damage please contact
your retailer.
Installation
· This appliance is heavy. Care should be taken
when moving it.
· It is dangerous to alter the specifications or
attempt to modify this product in any way.
· Ensure that the appliance does not stand on the
electrical supply cable. If the supply cable is
damaged, it must be replaced by a cable
avaliable from your local Service Force C entre.
· Any electrical work required to install this
appliance should be carried out by a qualified
electrician or competent person.
· Parts which heat up should not be exposed.
Whenever possible, the back of the appliance
should be close to a wall, but leaving the
required distance for ventilation, as stated in the
installation instructions.
The appliance should be left for 2 hours after
installation before it is turned on, in order to
allow the refrigerant to settle.
Child Safety
· Do not allow children to tamper with the controls
or play with the product.
· There is a risk of suffocation! Keep packaging
material away from children.
Do not let sharp objects come into contact with
the refrigerating system on the back of and inside
the cabinet. If the refrigerating system is
punctured, the cabinet will be damaged and
foodstuff inside may spoil.
If the refrigerant circuit should become
damaged:
avoid open flames and sources of ignition
thoroughly ventillate the room in which the
appliance is placed
The refrigerant isobutane (R600a) is contained
within the refrigerant circuit of the appliance, a
natural gas with a high level of environmental
compatibility, which is nevertheless flammable.
· Do not place carbonated or fizzy drinks in the
freezer compartment. Bottles and cans must not
be placed in the frezeer compartment as they can
burst when the contents freeze.
Maintenance and Cleaning
· Before cleaning, always switch off the apppliance
and disconnect from the electrical supply
· When unplugging always pull the plug from the
mains socket, do not pull on the cable
.
Servicing
· This product should be serviced by an
authorised engineer and only genuine spare
parts should be used.
· Under no circumstances should you attempt to
repair the appliance yourself. Repairs carried out
by inexperienced persons may cause injury or
serious malfunctioning. Contact your local
Service Force Centre.
During Use
· This appliance is designed for domestic use only,
specifically for the storage of edible foodstuffs.
It is not intended for commercial or industrial
use.
· Containers with flammable gases or liquids can
leak at low temperatures. Do not store any
containers with flammable materials, such as
spray cans, fire extinguisher refill cartridges etc.
in the refrigerator or freezer.
At the end of the Appliance Life
· When disposing of your appliance use an
authorised disposal site.
· Remove the plug and ensure that any locks or
catches are removed, to prevent young children
being trapped inside.
Scrapping old cabinets
When discarding the cabinet, hand it over to a
recycling station. For more information, contact your
local Council or Environmental Health office.
Electrolux 818 35 40-00/7
2
Page 3
Contents
Important Safety Instructions 2.......
Scrapping old cabinets 2.......................
Contents 3..........................
Description of the Appliance 4........
Control Panel 4..............................
Before use 4.........................
Using the wine cooler 5..............
To start the wine cooler and set the
correct temperature 5......................
Temperature inside the wine cooler 5............
Wine Placement
Storage tips 5.......................
Measuring the temperature 6...................
Switching off 6..............................
Alarms and other features 6....................
Lighting 6..................................
Cabinet interior 6............................
Hints and Tips 6.....................
Energy Saving Advic e 6.......................
Food Storage 6..............................
Protect the environment 7......................
Maintenance and Cleaning 7..........
Removing the ventilation grille 7................
Internal Cleaning 7...........................
External Cleaning 7..........................
Defrosting the wine cooler 7...................
To change the light bulb 8.....................
When the appliance is not in use 8...............
Something Not Working 8............
ServiceandSpareParts 9............
Customer Care Department 9...................
Guarantee Conditions 9..............
Standard Guarantee Conditions 9................
Technical Specification 9.............
Installation 9........................
Electrical cord 9.............................
Unpacking 10................................
Removing the transport supports 10..............
Cleaning 10..................................
Installing the appliance 10......................
Door Reversal 11.............................
Electrical connection 12........................
Guide to use the instruction book
The following Symbols will be found in the text to guide you through the instructions
Safety instructions
1, 2, 3 ...
Step by step instructions for an operation
Hints and tips
Electrolux 818 35 40-00/7
3
Page 4
Description of the Appliance
1
1
1
1
1
2
3
4
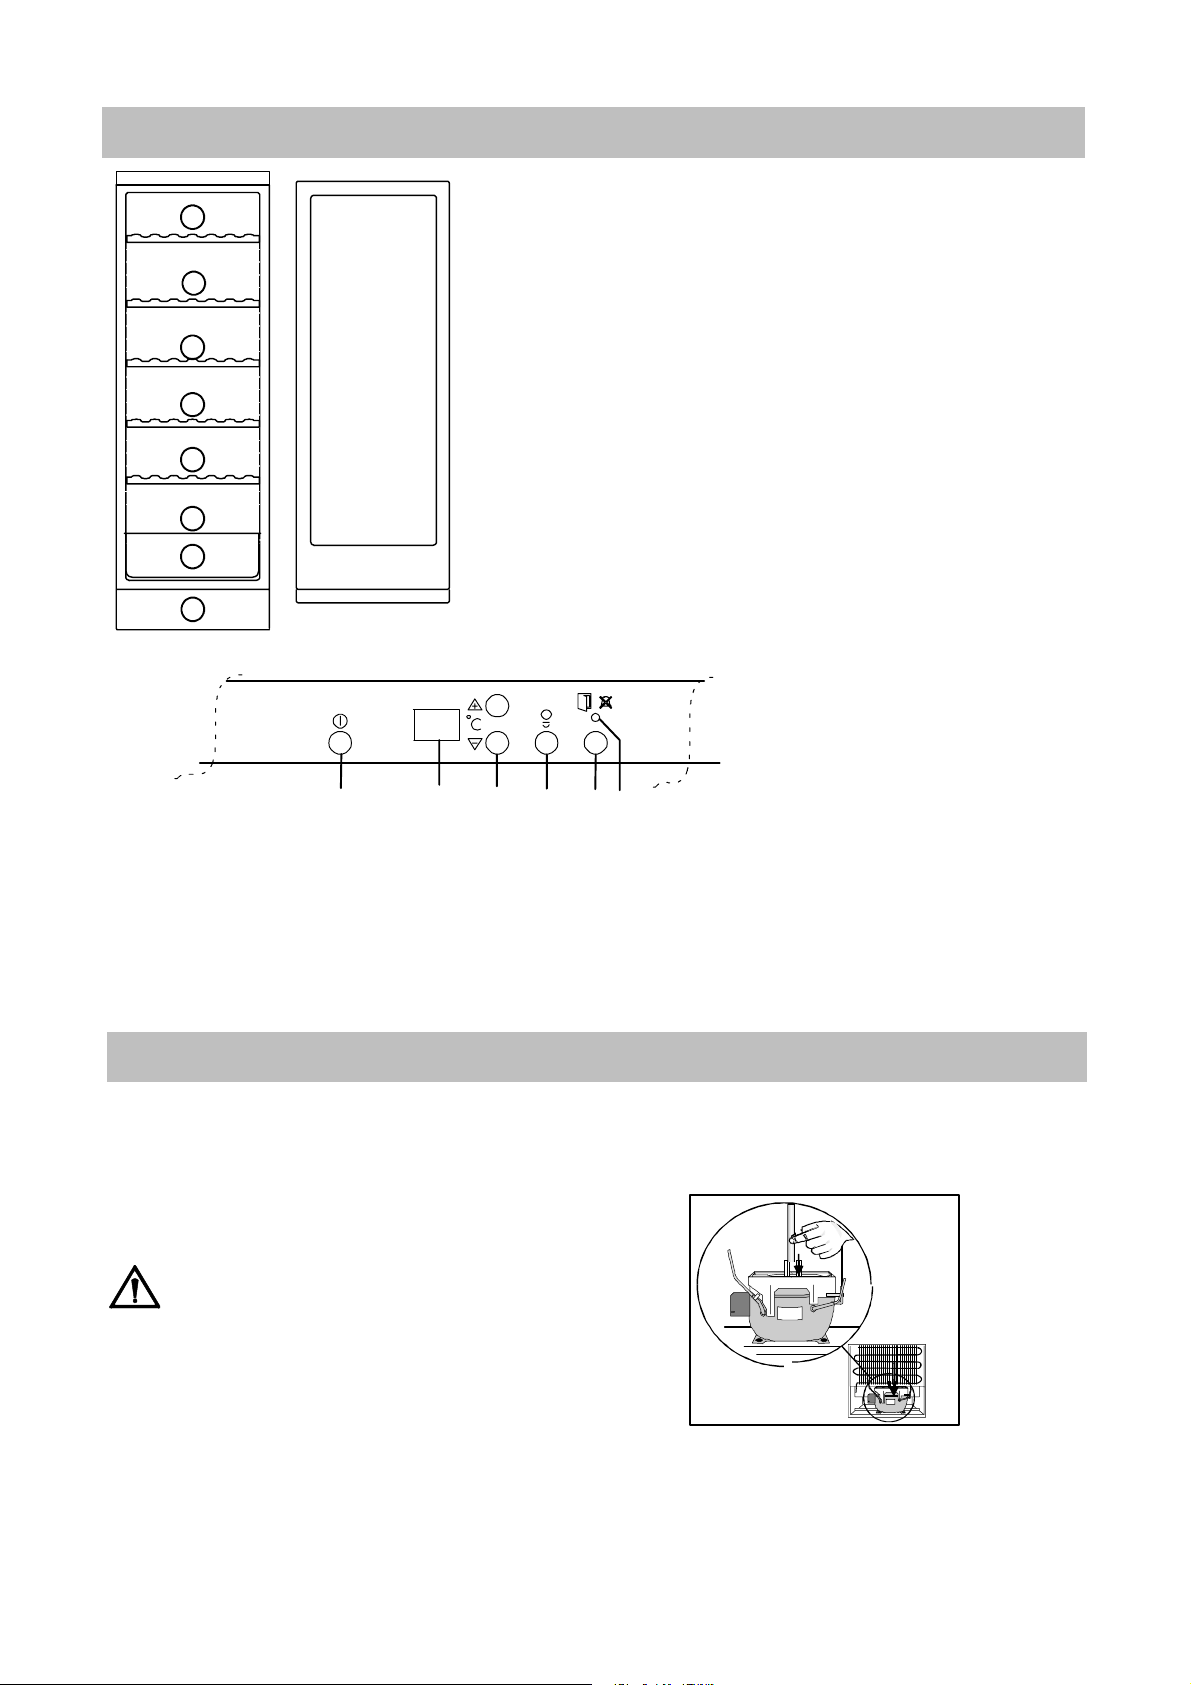
Control Panel
Modell ERC3711WS
1. Shelf
2. Cover
3. Drawer
4. Ventilationgrille
12
A BCDEF
A. Wine cooler power switch
Switches the wine cooler on and off.
B. Temperature display
Shows the average temperature in the middle of the
wine cooler.
C. Temperature adjustment buttons/thermostat
Used to set the temperature.
Before use
·Remove all securing tapes.
·Wash the inside of the appliance with lukewarm
water with a little bicarbonate of soda added (5ml to
0,5 litre of water). Do not use soap or detergent as
the smell may linger. Dry the appliance thoroughly.
Do not use detergents, abrasive powders,
highly perfumed cleaning products, wax,
polishes or products containing alcohol.
·Check that the drain hose at the rear of the cabinet
discharges into the drip tray.
·Before inserting the power plug into the socket and
switching on the appliance for the first time, leave it
standing upright for about 30 minutes, or for 2 hours
if it was transported horizontally. Otherwise the compressor may sustain damage. This time will allow the
oil sufficient time to return to the compressor.
D. Lighting
E. Alarm off button
Used to turn the audible alarm off.
F. Red warning lamp
Flashes when the alarm in the cabinet has been
triggered.
Electrolux 818 35 40-00/7
4
Page 5
Using the wine cooler
To start the wine cooler and set the
correct temperature
Switching on:
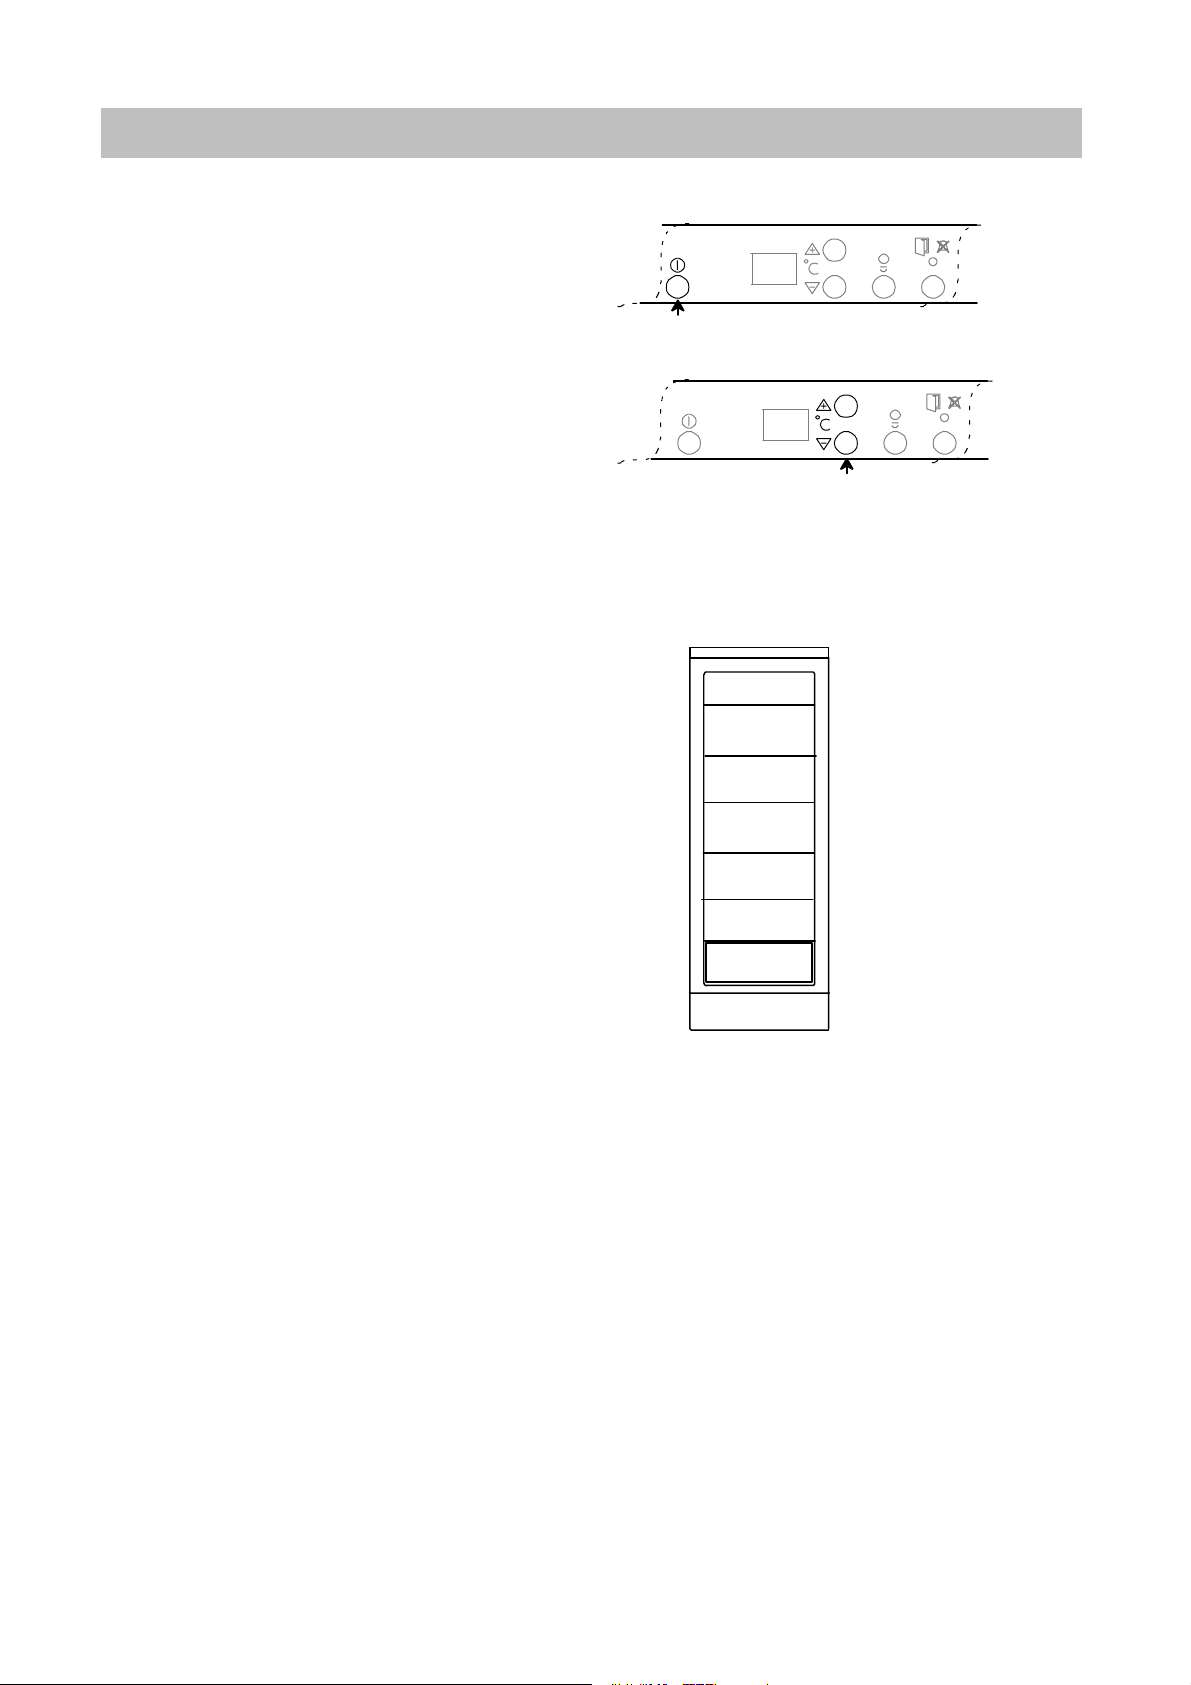
Switch on the wine cooler by pressing the power
switch.
Setting the temperature
Press the buttons until the desired temperature
flashes in the temperature display (The temperature
can be set between +6°C and +17°C.)
"+" raises the temperature.
"-" lowers the temperature.
Once set, the temperature display shows the current
temperature inside the cabinet.
NOTE: The controllable area is limited by a
room temperature of 17°C or below.
Allow the appliance to run for a period of 24 hours
whenever the temperature setting i s changed. This
will allow the temperature to stabilise inside the
appliance.
It is not necessary to reset the temperature when the
cabinet is switched on after it has been out of use.
The thermostat recalls the previously set
temperature.
Temperature inside the wine cooler
NOTE: The picture shows the coldest and warmest
places inside the fridge. (+ warm, - cold)
Wine Placement
Storage tips
The amount of time to store wine depends on its
maturity, type of grape, alcohol content, and
dissolved fructose and tannins. When purchasing
your wine, find out whether it is mature or if it will
improve over time.
In the lower part of the cooler. Cold air prolongs
the time to maturity. Accordingly, store old and
mature wine as well as wine you would like to store
for a long time in the lower portion of the cooler.
The lower part should also be used to store wine that
is to be served cold.
In the upper part of the cooler. In the upper part,
store wine that you wish to let further mature, wines
that are served at a warmer temperature, and those
wines you intend to consume relatively soon.
Store the b ottles lying down so that the corks do
not dry out.
Store the wine in the dark. The cooler doors are
made with double-paned glass with a dark coating.
This will protect the wine against light damage if the
cooler is placed in a well-lit area.
12
12
+
+
+
-
-
+
Avoid turning on the light in the cooler too often
or for too long. The wine should be stored in the
dark.
Handle the bottles with care, so that the wine is
not agitated.
Heed any advice and recommendations given at
the time of purchase or in the professional literature
concerning the wine's quality, durability and optimal
storage temperature.
Recommended storage temperatures:
- for white wines +10 to +12°C
- for rosé wines and light red wines +12 to +16°C
- for champagne and sparkling wines +6 to +8°C
If you stack several bottles on top of one another,
make sure they do not touch the cabinet's cooling
plate.
Electrolux 818 35 40-00/7
5
Page 6
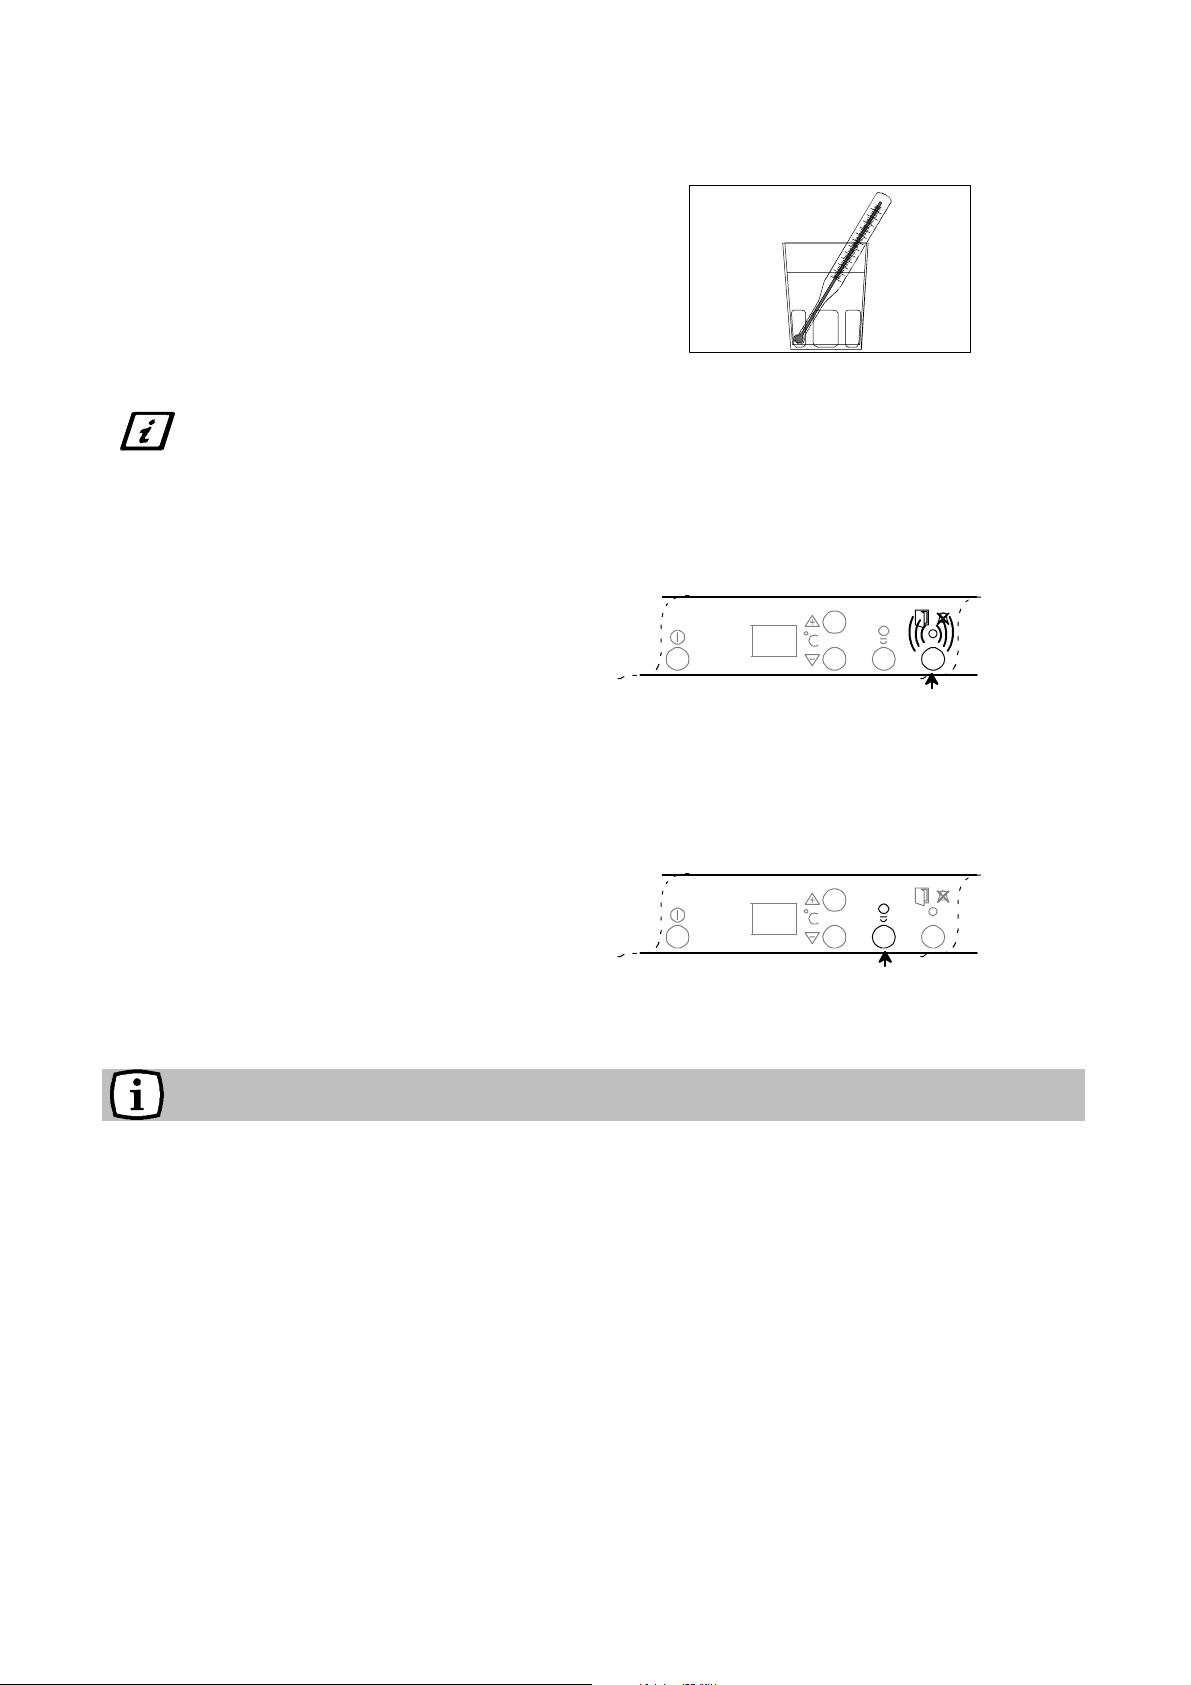
Measuring the temperature
If the temperature is measured using a standard,
single thermometer, this should be put in a glass of
water centrally placed inside the appliance. This will
reflect the temperature inside the food products. Do
not place the thermometer hanging or lying directly
on the shelf.
Switching off
Switch off the cabinet by pressing the power switch.
Keep the button pressed for approx. 1 second.
Power to the cabinet is completely
interrupted only when the power plug is
disconnected.
Alarms and other features
Door open alarm
If the fridgedoor remains open for more than 5
minutes, the red warning lamp starts flashing and an
audible alarm sounds.
To switch off the alarm:
Press the "alarm shut-off button". The red warning
lamp goes out when the door is closed.
12
Lighting
The cooler lighting may be turned on with the door
closed. This makes it easy to survey the contents of
the cooler without opening the door. The cooler
lighting should normally be off, so that the wine is
not unduly exposed to light. The lighting turns off
automatically after about 5 minutes.
Cabinet interior
The shelves may be placed flat or at an angle.
Angle the shelf by placing the front pegs in a lower
set of tracks. You can store already opened bottles on
the shelf in this position.
Hints and Tips
Energy Saving Advice
· Pay careful attention to where the cabinet is
placed. See the section "Installation". When
installed correctly, the cabinet will consume less
energy.
· Try to avoid keeping the door open for long
periods, or opening the door too frequently as
warm air will enter the cabinet, and cause the
compressor to switch on unnecessarily often.
· Ensure there are no obstructions preventing the
door from closing properly.
· It is advisable to periodically clean the
refrigeration system at the back of the appliance
with a duster or vacuum cleaner.
· Make sure the door gasket is complete and
always clean.
12
Food Storage
· To obtain the best results from your appliance,
neither hot foods nor liquids which may
evaporate, should be placed in the larder
compartment.
· Keep the time between buying chilled food and
placing it in your fridge as short as possible.
· Do not push food together too much, try to allow
air to circulate around each item.
· Do not store food uncovered.
Remove suspect food from you refrigerator and
clean, refer to cleaning and maintenance.
Electrolux 818 35 40-00/7
6
Page 7
washing-up detergent.
Protect the environment
· Hand over the cabinet packaging and discarded
fridges and freezers to a recycling station.
Contact your local city office or your closest
dealer for more information.
· When cleaning the cabinet, use a mild
· Follow the advice in the section "Saving energy"
· The door gasket and coolant used in this
cabinet will not harm the ozone layer.
· All parts in the packaging can be recycled.
· The cabinet has been designed for easy
dismantling and subsequent recycling.
Maintenance and Cleaning
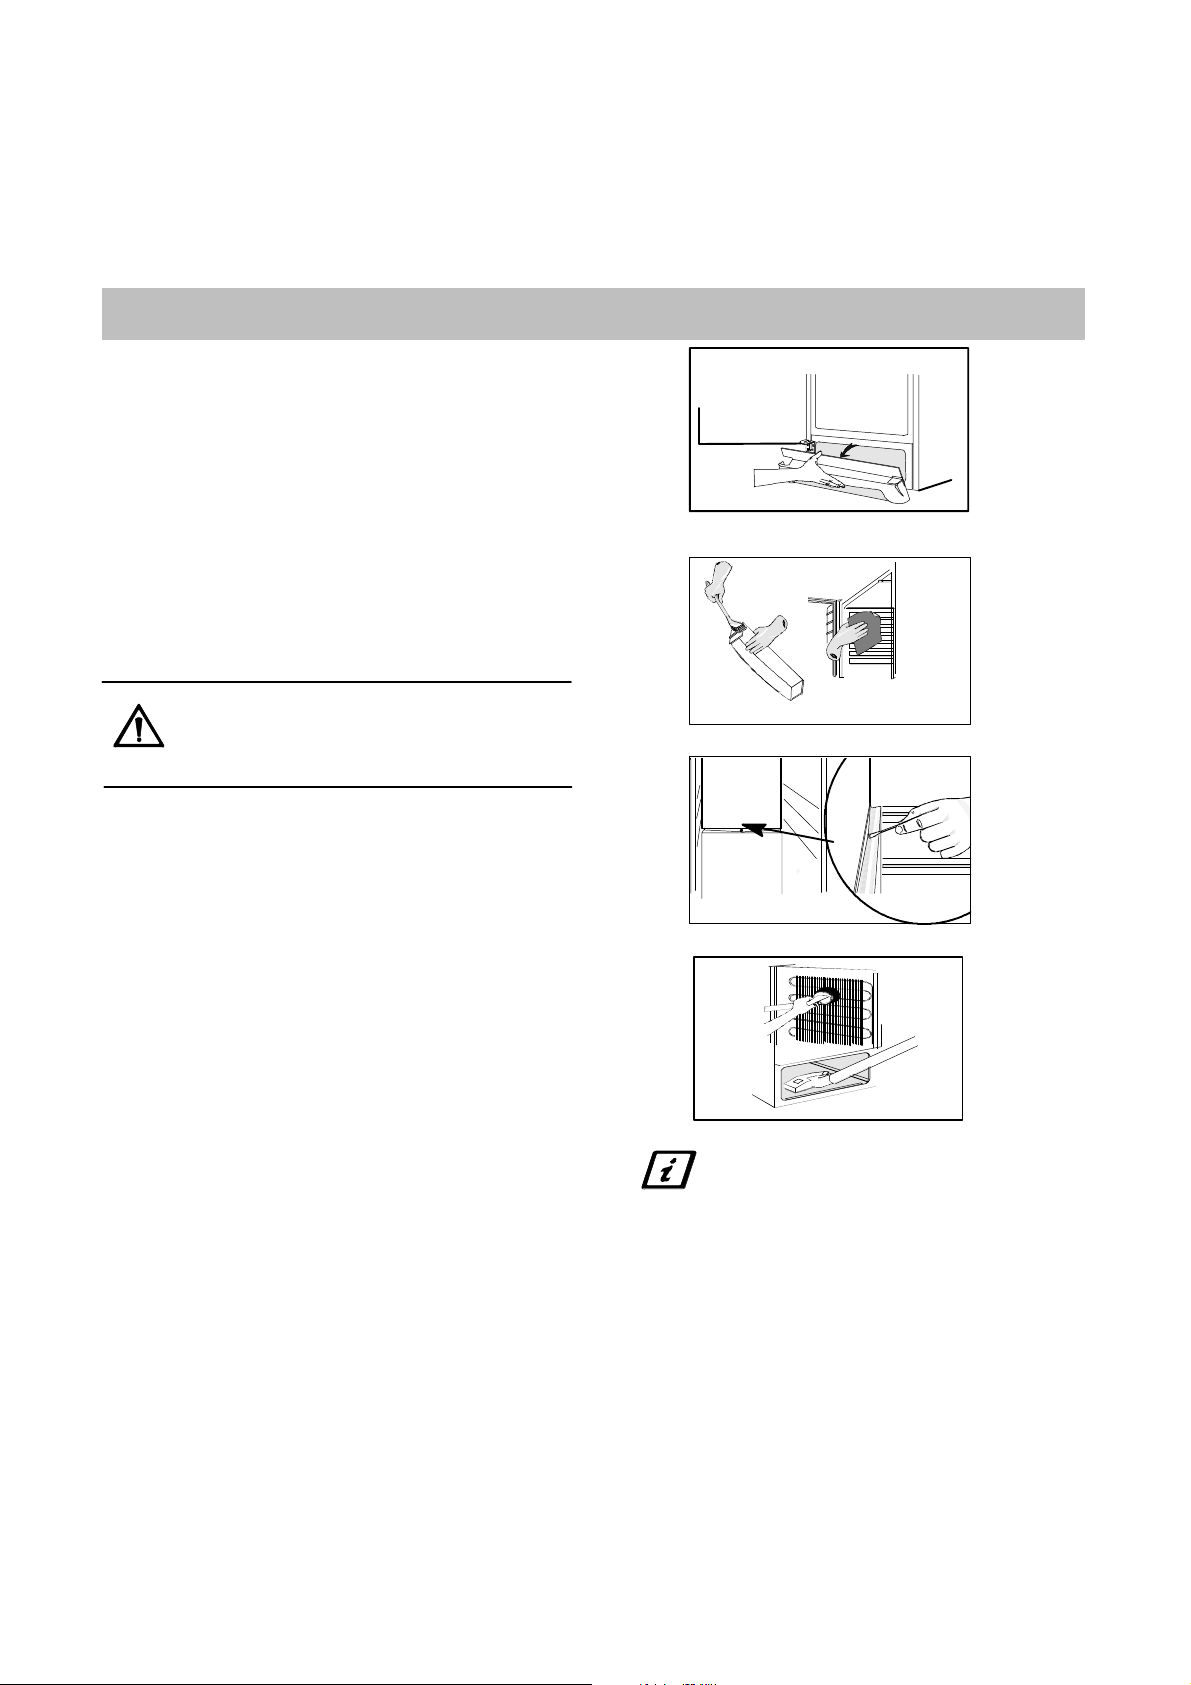
Removing the ventilation grille
The ventilation grille can be removed, e.g. to wash
the grille.
Make sure the door is open when removing the
ventilation grille. Unsnap the upper edge of the grille
by pulling outward/downward. Then pull the grille
straight out to completely remove it.
Internal Cleaning
Clean the inside and the accessories with warm
water and bicarbonate of soda (5 ml to 0,5 litre of
water).
Rinse and dry t horoughly.
Do not use detergents, abrasive
powders, high perfumed cleaning
products, wax polishes or cleaning
products containing bleach or alcohol .
Regulary check the door seals and wipe clean to
ensure they are clean and free from debris.
Disconnect the appliance from electricity supply.
Clean out the drip channel inside the wine cooler at
regular intervals and ensure that the drip channel is
clear at all times. If blocked carefully clear using a
piece of flexible curtain wire inserted into the drain
outlet to remove the blockage.
Internal Cleaning
Clean the inside and accessories with warm water
and bicarbonate of soda (5ml to 0,5 litre water)
Rinse and dry thoroughly.
Regularly check the door seals and wipe clean to
ensure they are clean and free from debris.
Clean off the interior wooden details with a moist
rag and mild kitchen soap. Do not soak the wood.
External Cleaning
Wash the outer cabinet with warm soapy water.
Remove the ventilation grille (see the section
"Removing the ventilation grille") and vacuum-clean
under the cabinet. Once or twice a year dust the
condenser (black grille) and the compressor at the
back of the appliance, with a brush or vacuum
cleaner, as an accumulation of dust will affect the
performance of the appliance and cause excessive
electricity consumption.
When moving the cabinet, lift it by
the front edge to avoid scratching
the floor.
Defrosting the wine cooler
The wine cooler is defrosted automatically every
time the compressor stops. Frost formation can be
prevented by:
· not putting warm foodstuff inside the cabinet.
· avoiding frequently opening the door or keeping
it open too long.
Electrolux 818 35 40-00/7
7
Page 8
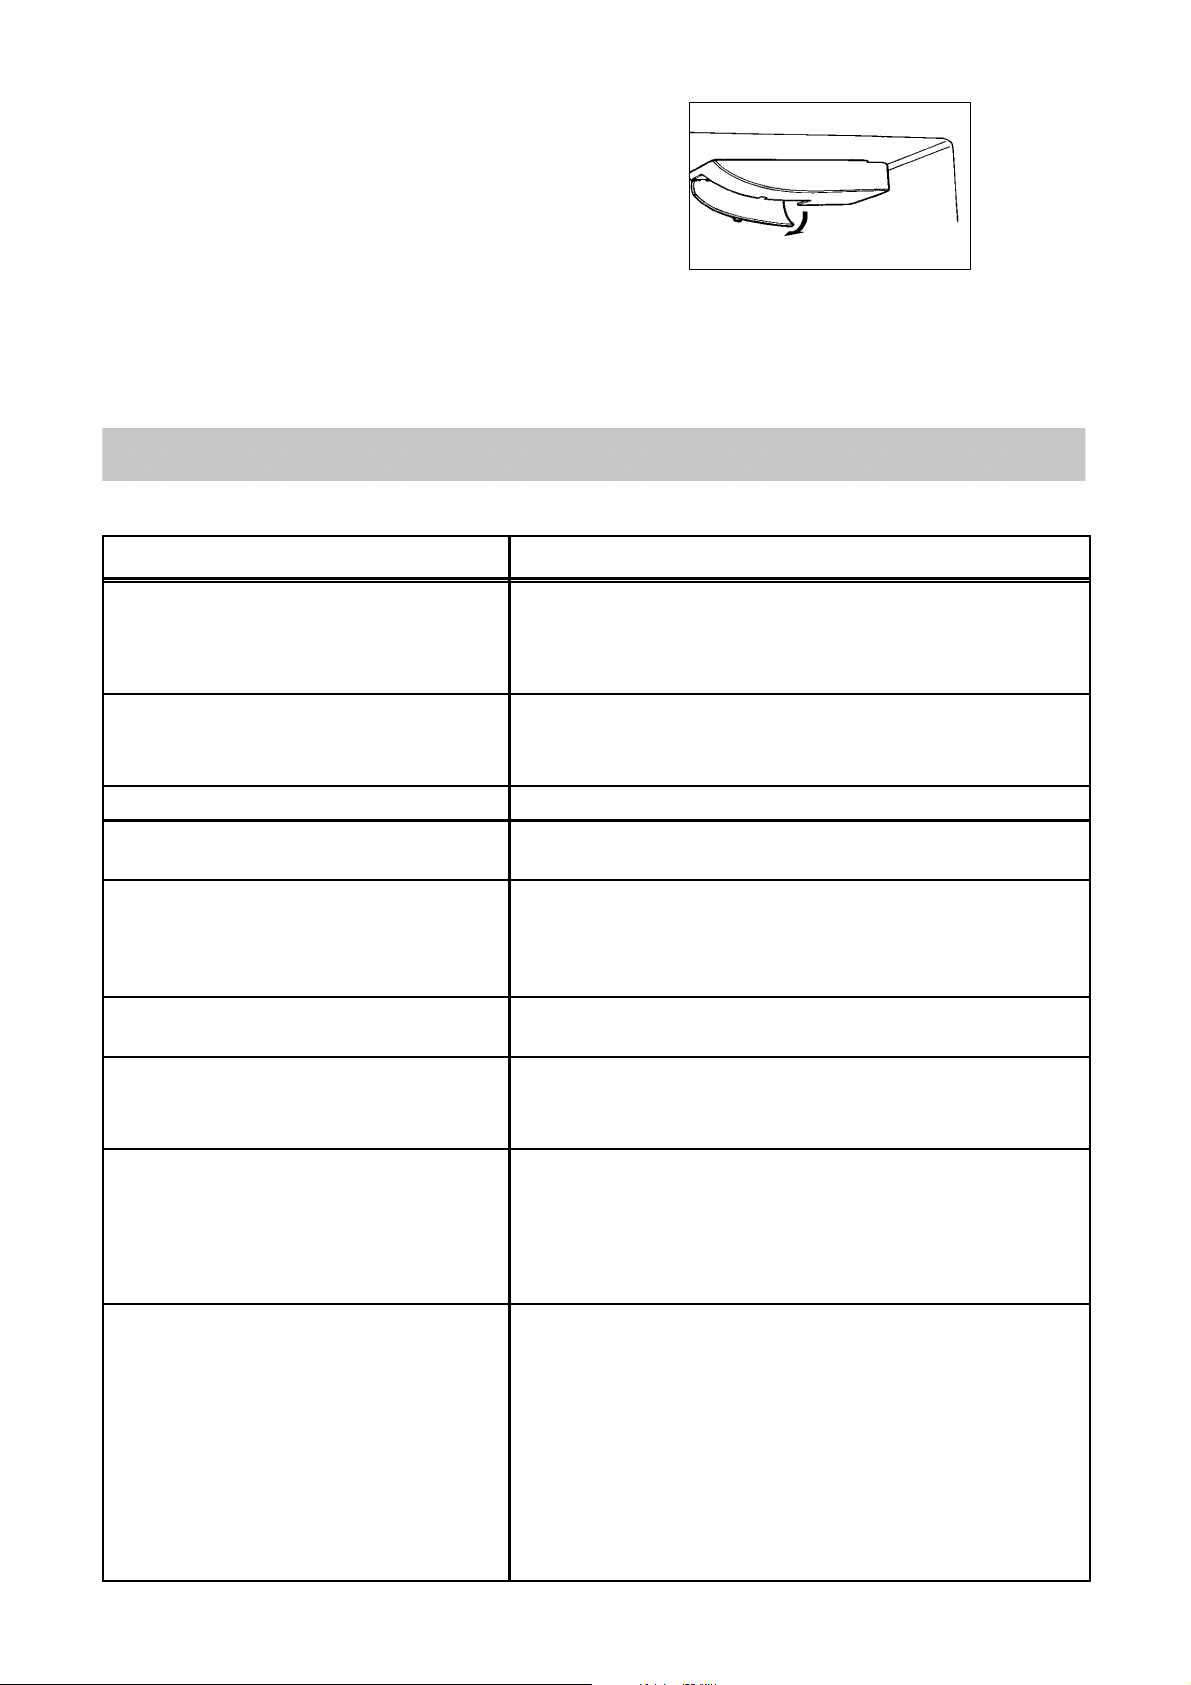
To change the light bulb
Before replacing the light bulb, disconnect the power
plug from the outlet.
Fold the grille backward by unsnapping the front
edge.
Use a bulb of the same type, E14 socket, maximum
ratingof15W.
When the appliance is not in use
Disconnect the appliance from electricity supply.
Empty all foods and clean the appliance, leaving the
doors ajar to prevent unpleasant smells.
If the appliance is left on, e.g. while on holiday, ask
somebody to check it once in a while to prevent the
food inside from spoiling in case of a power failure.
Something Not Working
Before contacting your local Service Force Centre check the following points:
Symptom Solution
"" is displayed in the temperature
display.
It is too warm inside the wine cooler. Set a lower temperature.
It is too cold inside the wine cooler. Set a warmer temperature.
There is water on the cooling plate inside
thewinecooler.
Water is running inside the wine cooler. Clean the water drain and drain hole inside the wine cooler
An error has occurred in measuring the temperature. Call your
service representative. (The cooling system will continue to
keep food products cold, but temperature adjustment will not
be possible.)
Make sure that the door is completely closed and that the
rubber door seal is complete and clean.
This is normal. During automatic defrosting, frost thaws on the
cooling plate.
using e.g. cotton swabs or a bottle cleaner brush.
Food products could have been placed near the rear of the
appliance, preventing the water from running into the drain.
Water comes out on the floor. Place the drain hose at the back of the appliance above the
drain bowl. See the chapter "Before use"
The compressor operates continuously. Set a warmer temperature.
Make sure that the door is completely closed and that the
rubber door seal is complete and clean.
The cabinet does not operate at all.
Cooling or interior light does not
operate. No indicator lamps light.
Noise
Carefully follow the instructions in the
chapter "Installing the cabinet".
The appliance is not switched on.
Power does not reach the appliance. (Try connecting another
electrical device to the power outlet.)
The fuse has blown.
The power plug is not properly connected.
The refrigerating system will always produce some sounds. A
pulsing sound is heard when coolant is pumped inside the
cooling pipes. A ticking sound from the thermostat can be
heard when the compressor switches on and off. The sound
level varies depending on the operation of the cabinet.
If you feel the sound level is incorrect:
Make sure the pipes at the back of the cabinet not touch each
other. Carefully bend them if they do.
If the cushion spacers (between the cabinet wall and pipes)
come loose, put them back in place again.
Electrolux 818 35 40-00/7
8
Page 9
Service and Spare Parts
In the event of your appliance requiring service, or if you wish to purchase spare parts please contact your
local Electrolux Service Force Centre by telephoning:
08705-929929
Your call be routed the Service Force Centre covering your post code area.
For the address of your local Service Force Centre and further information about Service Force, please visit the
website at www.serviceforce.co.uk
Before calling out an engineer, please ensure you have read the details under the heading "Something Not
Working"
When you contact the S ervice Force Centre you will need to give the following information:
1. Your name, address and post code
2. Your telephone number
3. Clear and concise details of the faults
4. The model and serial number of t he appliance (found on the rating plate)
5. Purchase date.......................................................
Customer Care Department
For general enquiries concerning your Electrolux appliance or further information on Electrolux products, you
are invited t o contact our Customer Care Department by letter or phone as follows or visit our website at
www .electrolux.co.uk
Customer Care Department
Electrolux
55-77 High Street
Slough
Berkshire
SL1 1DZ
Tel: 08705 950950*
* calls to this number may be recorded for training purposes.
Guarantee Conditions
Standard Guarantee Conditions
See Guarantee Conditions on the Registration Card.
Technical Specification
Model ERC3711WS
Vol um e 361 l
Width 595 mm
Height 1800 mm
Depth 600 mm
Rated power 110W
Installation
Electrical cord
Do not remove the power cord by pulling on its lead, particulary when the product is being pulled out of
its niche.
· Damage to the cord may cause a short-circuit, fire and/or electric shock.
· In the event of damage to the appliance's main cable, only an authorised service company recommended by
the manufacturer or a similarly qualified person may adjust it in order to avoid shock hazard for the user.
Electrolux 818 35 40-00/7
9
Page 10
Unpacking
Unpack the appliance and check that it is in good
condition and free of any transport damage. Notify
the dealer immediately of any damage. Hand the
packaging over for recycling.
Do not allow children to play with the
packaging. The plastic film can cause
suffocation.
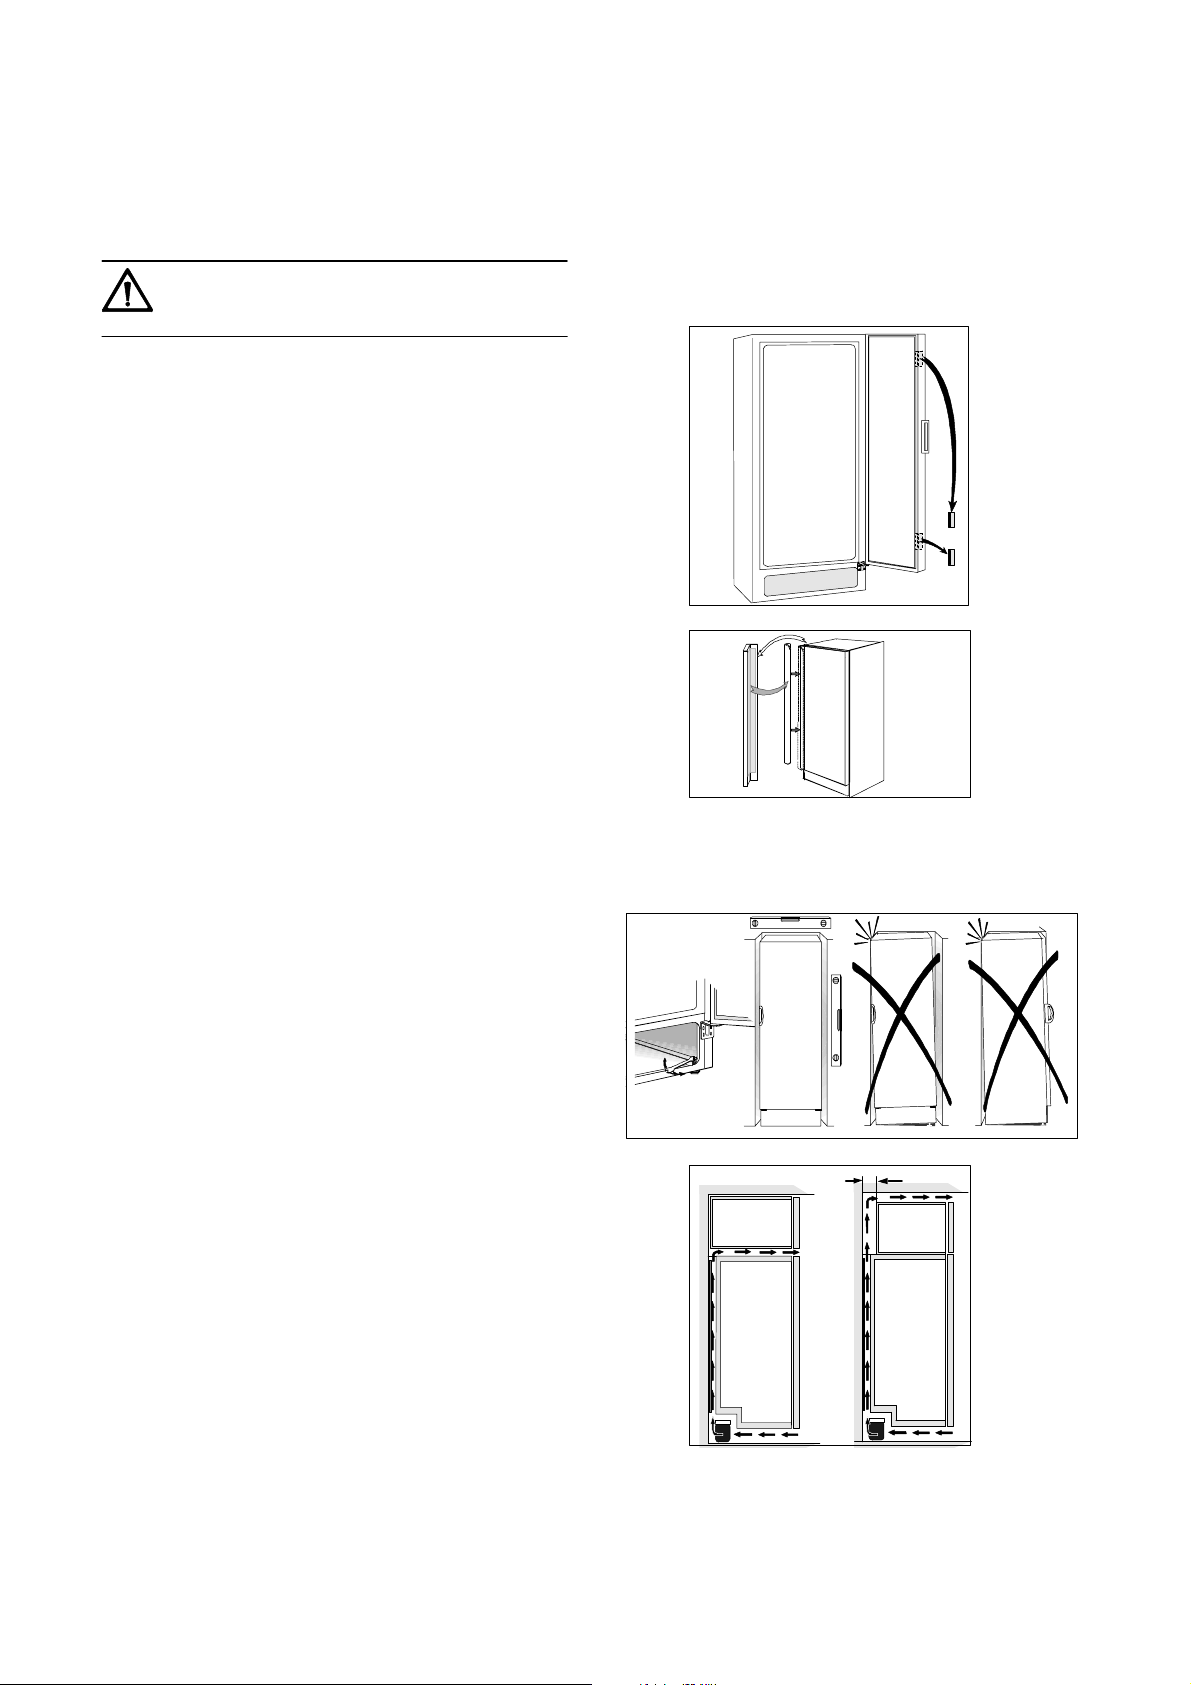
Removing the transport supports
Remove the tape and the transport supports from
· the door sides
· inside the door hinges
· the shelves
Remove the transport hinge.
Mounting the handle
The handle is included in the packaging material of
the cabinet.
Secure the handle.
Cleaning
Wash the inside of the cabinet using lukewarm
water, a mild washing-up detergent and a soft cloth.
Clean off the interior wooden details with a moist
rag and mild kitchen soap. Do not soak the wood.
Installing the appliance
Make sure that the power plug is not squashed or
damaged by back of the product.
· A damaged power plug may overheat and cause a
fire.
Do not place heavy articles or the product itself on
the power cord.
· there is a risk of a short circuit and fire.
If the power plug socket is loose, do not insert the
power plug.
· there is a risk of electric shock or fire.
To obtain the best performance from the appliance,
ensure :
· the appliance is placed in a dry, cool place and
is not exposed to direct sunlight.
· the appliance is not placed close to a source of
heat, e.g. a cooker or dishwasher.
· the appliance is level. The appliance should not
lean
against any wall. If necessary adjust the
feet using the adjustment spanner supplied.
· there is good air circulation around the appliance
and that the air channels below and behind
the appliance are not blocked. The ventilation
space above the appliance must be at least 4 cm.
The ventilation space can either be
a) directly above the appliance, or
b) behind and above the top cupboard. In this case,
the space behind the cupboard must be at least
50 mm deep.
10
a)
b)
Electrolux 818 35 40-00/7
50mm
Page 11
The appliance must be placed at a location whose
ambient temperature corresponds to the climate
classification*, for which the appliance is designed.
* See on the rating plate on the inside of the
appliance.
The following table shows which ambient
temperature is correct for each climate classification.
Climate
classification
SN
N
for an ambient temperature of
+10°C to +32°C
+16°C to +32°C
Check that the drain hose at the rear of the appliance
discharges into the drip tray.
If the appliance is placed in a corner and the side
with the hinges facing the wall, the distance between
the wall and the appliance must be at least 230 mm
to allow the door to open enough so that the shelves
can be removed.
The power plug must be accessible after installation
of the appliance.
ST
T
+18°C to +38°C
+18°C to +43°C
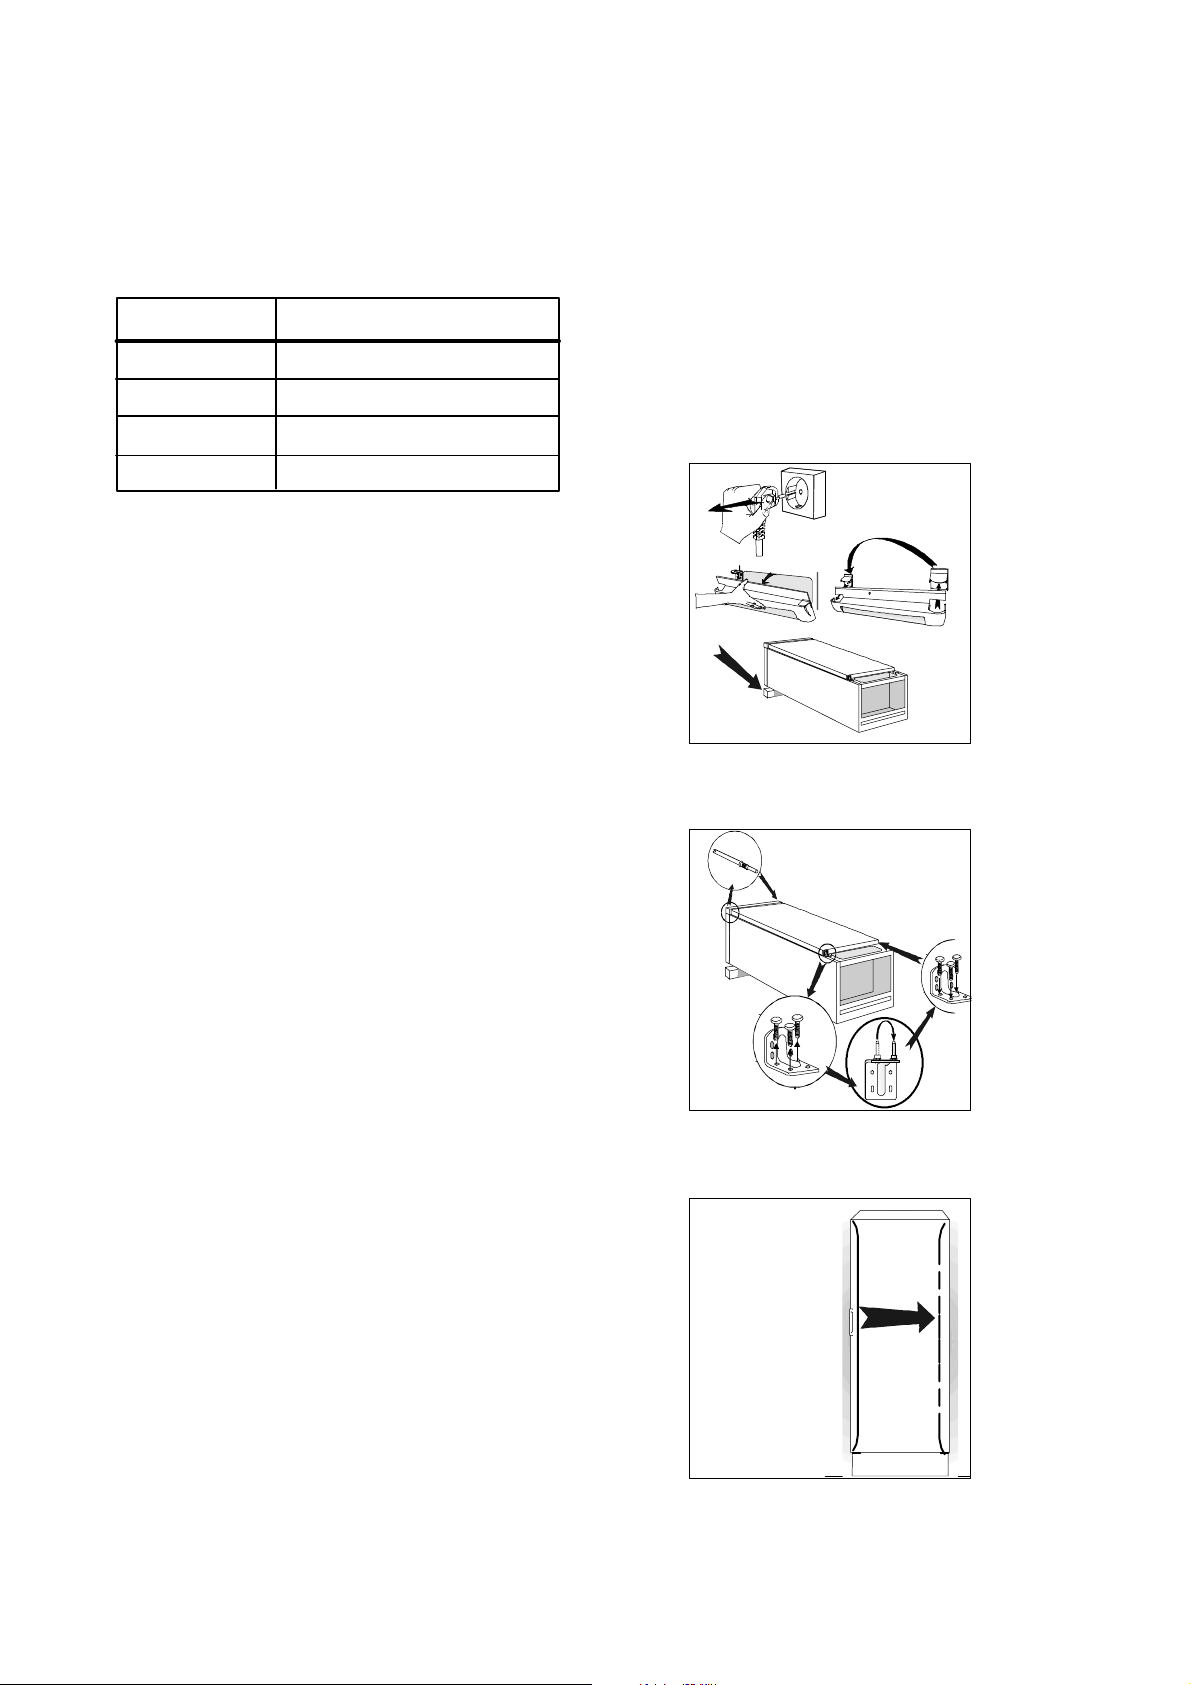
Door Reversal
1. Close the appliance and disconnect the appliance
from the electricity socket.
2. Remove the ventilation grille. There is a part on
the grille that can be removed. Remove and
reposition it on the opposite side.
3. Support the appliance on a wooden block when it
is laid down. This will make it easier to grip under
the appliance when returning to an upright position.
4. On the upper part of the appliance. Remove the
hinge pin and replace on the other side.
On the lower part of the appliance. Unscrew the
hinge. Move the hinge pin and plastic cover. Secure
the hinge on the other side.
Remove any play in the door by adjusting the height
of the lower hinge with the supplied s panner. Secure
with the lock-nut.
1
2
3
4
5. Raise the appliance and replace the ventilation
grille.
6. Move the handle.
Unscrew the handle and secure it to the other side.
Press the supplied plastic plugs into the holes to
which the handle was previously fitted.
7. Put the appliance in position. Check that the
appliance is level. See the section "Positioning the
appliance".
6
Electrolux 818 35 40-00/7
11
Page 12
Electrical connection
Any electrical work required to install this
appliance should be carried out by a
qualified electrician or competent person.
This appliance must be earthed.
The manufacturer declines any liability should
these safety measures not be observed.
Electrical Requirements
Before switching on, make sure the electricity
supply voltage is the same as that i ndicated on the
appliance rating plate.
The appliance is supplied with a 13amp plug fitted.
In the event of having to change the fuse in the plug
supplied, a 13amp ASTA approved (BS1362) fuse
must be used.
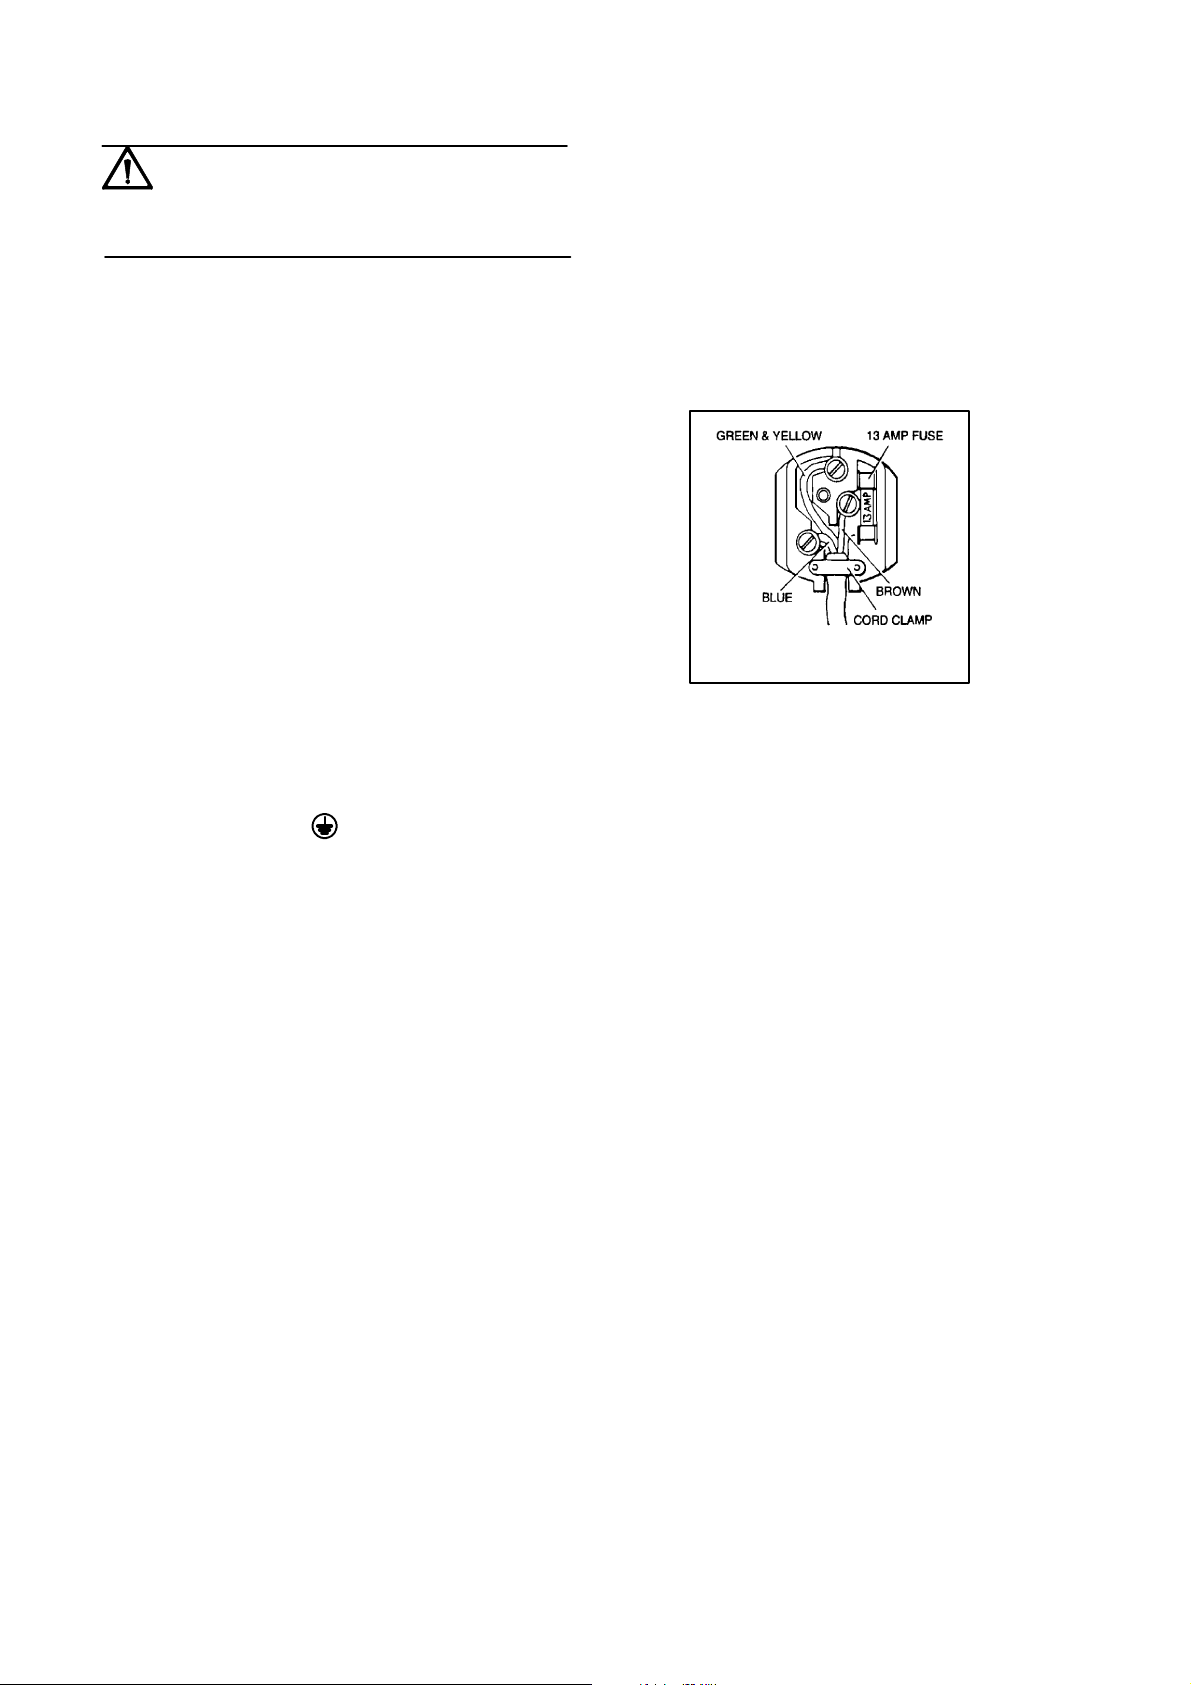
Should the plug need to be replaced for any reason.
The wires in the mains lead are coloured in
accordance with the following code:
Green and yellow -Earth
Blue -Neutral
Brown -Live
The wire coloured green and yellow must be
connected to the terminal marked with the letter "E"
or by the earth symbol
yellow.
The wire coloured blue must be connected to the
terminal marked "N" or coloured black
The wire coloured brown must be connected to the
terminal marked "L" or coloured red.
Upon completion there must be no cut, or stray
strands of wire present and the cord clamp must be
secure over the outer sheath.
or coloured green and
12
Electrolux 818 35 40-00/7
Page 13

13
Electrolux 818 35 40-00/7
Page 14

14
Electrolux 818 35 40-00/7
Page 15

15
Electrolux 818 35 40-00/7
Page 16
qЬЙ=bдЙЕнкздмс=dкзмй=бл=нЬЙ=пзкдЗDл=д~кЦЙлн=йкзЗмЕЙк=зС=йзпЙкЙЗ=~ййдб~еЕЙл=Сзк=вбнЕЬЙеI=ЕдЙ~ебеЦ=~еЗ=змнЗззк=млЙK
jзкЙ=нЬ~е=RR=гбддбзе=bдЙЕнкздмс=dкзмй=йкзЗмЕнл=EлмЕЬ=~л=кЙСкбЦЙк~нзклI=ЕззвЙклI=п~лЬбеЦ=г~ЕЬбеЙлI=о~Еммг=ЕдЙ~еЙклI
ЕЬ~бе=л~пл=~еЗ=д~пе=гзпЙклF=~кЙ=лздЗ=Й~ЕЬ=уЙ~к=нз=~=о~дмЙ=зС=~ййкзсK=rpa=NQ=Дбддбзе=бе=гзкЙ=нЬ~е=NRM=ЕзменкбЙл
~кзмеЗ=нЬЙ=пзкдЗK
MAR IESTAD /AV
 Loading...