

Page 1

EOL5821
EOR5821
................................................ .............................................
EN OVEN USER MANUAL 2
DE BACKOFEN BENUTZERINFORMATION 33
Page 2

www.electrolux.com
2
CONTENTS
1. SAFETY INFORMATION . . . . . . . . . . . . . . . . . . . . . . . . . . . . . . . . . . . . . . . . . . . . . . . . . . . 3
2. SAFETY INSTRUCTIONS . . . . . . . . . . . . . . . . . . . . . . . . . . . . . . . . . . . . . . . . . . . . . . . . . . 4
3. PRODUCT DESCRIPTION . . . . . . . . . . . . . . . . . . . . . . . . . . . . . . . . . . . . . . . . . . . . . . . . . 6
4. BEFORE FIRST USE . . . . . . . . . . . . . . . . . . . . . . . . . . . . . . . . . . . . . . . . . . . . . . . . . . . . . . 6
5. CONTROL PANEL . . . . . . . . . . . . . . . . . . . . . . . . . . . . . . . . . . . . . . . . . . . . . . . . . . . . . . . 7
6. DAILY USE . . . . . . . . . . . . . . . . . . . . . . . . . . . . . . . . . . . . . . . . . . . . . . . . . . . . . . . . . . . . . 9
7. CLOCK FUNCTIONS . . . . . . . . . . . . . . . . . . . . . . . . . . . . . . . . . . . . . . . . . . . . . . . . . . . . 12
8.
AUTOMATIC PROGRAMMES . . . . . . . . . . . . . . . . . . . . . . . . . . . . . . . . . . . . . . . . . . . . . . 13
9. USING THE ACCESSORIES . . . . . . . . . . . . . . . . . . . . . . . . . . . . . . . . . . . . . . . . . . . . . . . 14
10.
ADDITIONAL FUNCTIONS . . . . . . . . . . . . . . . . . . . . . . . . . . . . . . . . . . . . . . . . . . . . . . . . 15
11. HELPFUL HINTS AND TIPS . . . . . . . . . . . . . . . . . . . . . . . . . . . . . . . . . . . . . . . . . . . . . . . 17
12.
CARE AND CLEANING . . . . . . . . . . . . . . . . . . . . . . . . . . . . . . . . . . . . . . . . . . . . . . . . . . . 26
13. WHAT TO DO IF… . . . . . . . . . . . . . . . . . . . . . . . . . . . . . . . . . . . . . . . . . . . . . . . . . . . . . . 29
14.
TECHNICAL DATA . . . . . . . . . . . . . . . . . . . . . . . . . . . . . . . . . . . . . . . . . . . . . . . . . . . . . . 30
15. INSTALLATION . . . . . . . . . . . . . . . . . . . . . . . . . . . . . . . . . . . . . . . . . . . . . . . . . . . . . . . . . 30
WE’RE THINKING OF YOU
Thank you for purchasing an Electrolux appliance. You’ve chosen a product that brings with it
decades of professional experience and innovation. Ingenious and stylish, it has been designed
with you in mind. So whenever you use it, you can be safe in the knowledge that you’ll get great
results every time.
Welcome to Electrolux.
Visit our website for:
Get usage advice, brochures, trouble shooter, service information:
www.electrolux.com
Register your product for better service:
www.electrolux.com/productregistration
Buy Accessories, Consumables and Original spare parts for your appliance:
www.electrolux.com/shop
CUSTOMER CARE AND SERVICE
We recommend the use of original spare parts.
When contacting Service, ensure that you have the following data available.
The information can be found on the rating plate. Model, PNC, Serial Number.
Warning / Caution-Safety information
General information and tips
Environmental information
Subject to change without notice.
Page 3

1. SAFETY INFORMATION
Before the installation and use of the appliance, carefully
read the supplied instructions. The manufacturer is not
responsible if an incorrect installation and use causes injuries and damages. Always keep the instructions with
the appliance for future reference.
1.1 Children and vulnerable people safety
WARNING!
Risk of suffocation, injury or permanent disability.
• This appliance can be used by children aged from 8
years and above and persons with reduced physical,
sensory or mental capabilities or lack of experience and
knowledge if they are supervised by an adult or a person who is responsible for their safety.
• Do not let children play with the appliance.
• Keep all packaging away from children.
• Keep children and pets away from the appliance when
it operates or when it cools down. Accessible parts are
hot.
• If the appliance has a child safety device, we recommend that you activate it.
• Cleaning and user maintenance shall not be made by
children without supervision.
ENGLISH 3
1.2 General Safety
• Only a qualified person must install this appliance and
replace the cable.
• Internally the appliance becomes hot when in operation. Do not touch the heating elements that are in the
appliance. Always use oven gloves to remove or put in
accessories or ovenware.
• Do not use a steam cleaner to clean the appliance.
• Before maintenance cut the power supply.
Page 4

www.electrolux.com
4
• Do not use harsh abrasive cleaners or sharp metal
• Only use the core temperature sensor recommended
• To remove the shelf supports first pull the front of the
• If the supply cord is damaged, it must be replaced by
• Ensure that the appliance is switched off before replac-
scrapers to clean the glass door since they can scratch
the surface, which may result in shattering of the glass.
for this appliance.
shelf support and then the rear end away from the side
walls. Install the shelf supports in the opposite sequence.
the manufacturer, an authorized Service or similarly
qualified persons in order to avoid a hazard.
ing the lamp to avoid the possibility of electric shock.
2.
SAFETY INSTRUCTIONS
2.1 Installation
WARNING!
Only a qualified person must install this appliance.
• Remove all the packaging.
• Do not install or use a damaged appli-
ance.
• Obey the installation instruction sup-
plied with the appliance.
• Always be careful when you move the
appliance because it is heavy. Always
wear safety gloves.
• Do not pull the appliance by the handle.
• Keep the minimum distance from the
other appliances and units.
• Make sure that the appliance is installed
below and adjacent safe structures.
• The sides of the appliance must stay
adjacent to appliances or to units with
the same height.
Electrical connection
WARNING!
Risk of fire and electrical shock.
• All electrical connections should be
made by a qualified electrician.
• The appliance must be earthed.
• Make sure that the electrical information
on the rating plate agrees with the power supply. If not, contact an electrician.
• Always use a correctly installed shockproof socket.
• Do not use multi-plug adapters and extension cables.
• Make sure not to cause damage to the
mains plug and to the mains cable.
Contact the Service or an electrician to
change a damaged mains cable.
• Do not let mains cables to come in
touch with the appliance door, specially
when the door is hot.
• The shock protection of live and insulated parts must be fastened in such a
way that it cannot be removed without
tools.
Page 5

• Connect the mains plug to the mains
socket only at the end of the installation. Make sure that there is access to
the mains plug after the installation.
• If the mains socket is loose, do not
connect the mains plug.
• Do not pull the mains cable to disconnect the appliance. Always pull the
mains plug.
• Use only correct isolation devices: line
protecting cut-outs, fuses (screw type
fuses removed from the holder), earth
leakage trips and contactors.
• The electrical installation must have an
isolation device which lets you disconnect the appliance from the mains at all
poles. The isolation device must have a
contact opening width of minimum 3
mm.
2.2 Use
WARNING!
Risk of injury, burns or electric
shock or explosion.
• Use this appliance in a household environment.
• Do not change the specification of this
appliance.
• Make sure that the ventilation openings
are not blocked.
• Do not let the appliance stay unattended during operation.
• Deactivate the appliance after each
use.
• Be careful when you open the appliance door while the appliance is in operation. Hot air can release.
• Do not operate the appliance with wet
hands or when it has contact with water.
• Do not apply pressure on the open
door.
• Do not use the appliance as a work
surface or as a storage surface.
• Always keep the appliance door closed
when the appliance is in operation.
• Open the appliance door carefully. The
use of ingredients with alcohol can
cause a mixture of alcohol and air.
• Do not let sparks or open flames to
come in contact with the appliance
when you open the door.
ENGLISH 5
• Do not put flammable products or items
that are wet with flammable products
in, near or on the appliance.
WARNING!
Risk of damage to the appliance.
• To prevent damage or discoloration to
the enamel:
– do not put ovenware or other objects
in the appliance directly on the bottom.
– do not put aluminium foil directly on
the bottom of the appliance.
– do not put water directly into the hot
appliance.
– do not keep moist dishes and food in
the appliance after you finish the cooking.
– be careful when you remove or install
the accessories.
• Discoloration of the enamel has no effect on the performance of the appliance. It is not a defect in the sense of
the warranty law.
• Use a deep pan for moist cakes. Fruit
juices cause stains that can be permanent.
2.3 Care and Cleaning
WARNING!
Risk of injury, fire or damage to
the appliance.
• Before maintenance, deactivate the appliance and disconnect the mains plug
from the mains socket.
• Make sure the appliance is cold. There
is the risk that the glass panels can
break.
• Replace immediately the door glass
panels when they are damaged. Contact the Service.
• Be careful when you remove the door
from the appliance. The door is heavy!
• Clean regularly the appliance to prevent
the deterioration of the surface material.
• Remaining fat or food in the appliance
can cause fire.
• Clean the appliance with a moist soft
cloth. Only use neutral detergents. Do
not use abrasive products, abrasive
cleaning pads, solvents or metal objects.
Page 6
www.electrolux.com
6
• If you use an oven spray, obey the safety instructions on the packaging.
• Do not clean the catalytic enamel (if applicable) with any kind of detergent.
2.4 Internal light
• The type of light bulb or halogen lamp
used for this appliance, is only for
household appliances. Do not use it for
house lighting.
WARNING!
Risk of electrical shock.
• Before replacing the lamp, disconnect
the appliance from the power supply.
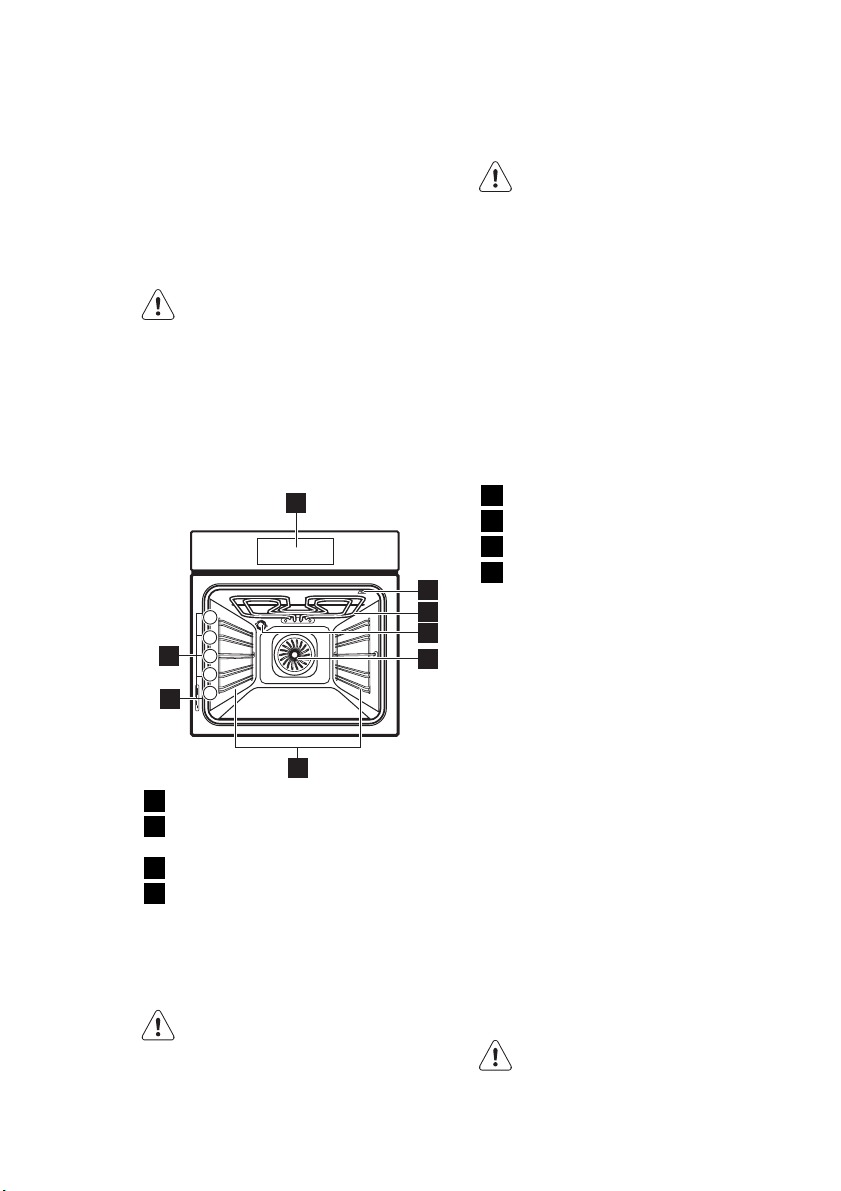
3. PRODUCT DESCRIPTION
1
5
4
3
8
2
1
7
6
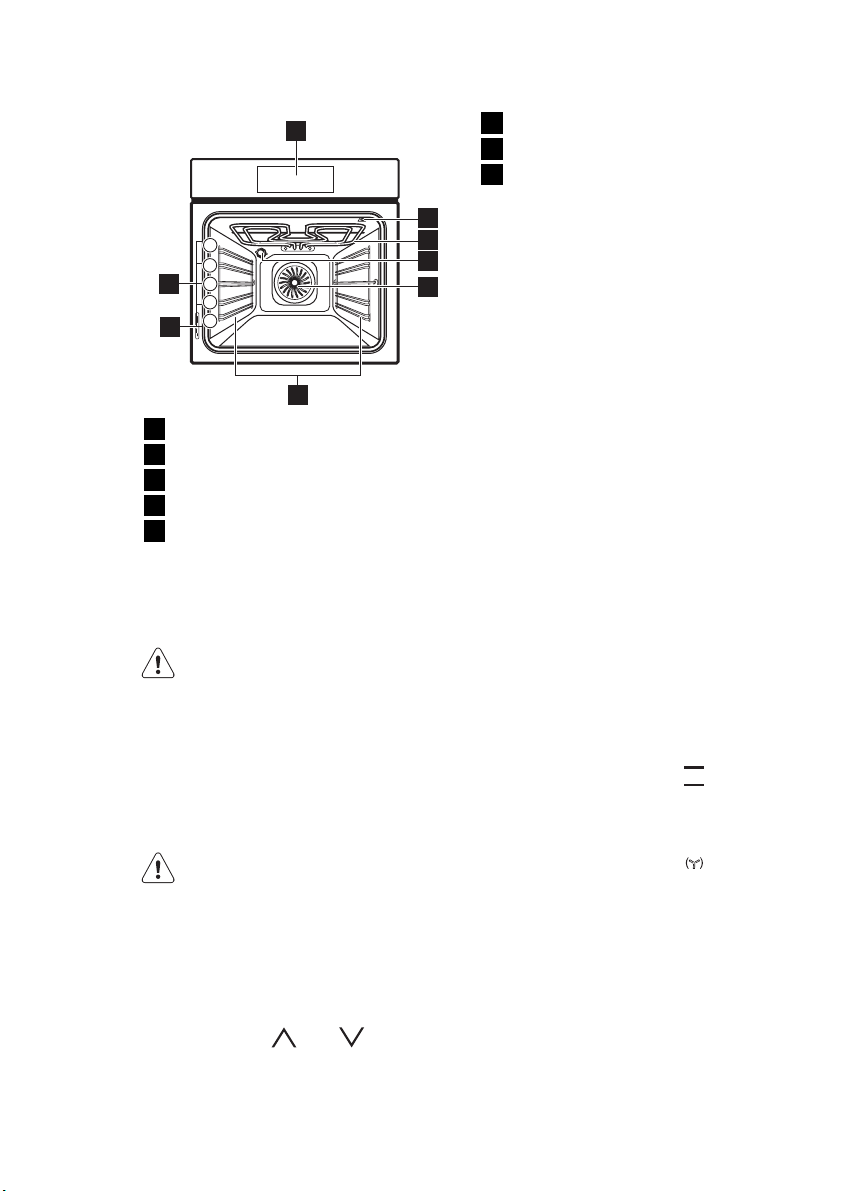
Electronic programmer
1
Socket for the core temperature sen-
2
sor
Grill
3
Oven lamp
4
• Only use lamps with the same specifications.
2.5 Disposal
WARNING!
Risk of injury or suffocation.
• Disconnect the appliance from the
mains supply.
• Cut off the mains cable and discard it.
• Remove the door catch to prevent children and pets to get closed in the appliance.
Fan
5
Shelf support, removable
6
Rating plate
7
Shelf positions
2
3
4
5
8
3.1 Oven accessories
Wire shelf
•
For cookware, cake tins, roasts.
Baking tray
•
For cakes and biscuits.
Grill- / Roasting pan
•
To bake and roast or as pan to collect
fat.
Core temperature sensor
•
To measure how far the food is cooked.
Telescopic runners
•
For shelves and trays.
4. BEFORE FIRST USE
WARNING!
Refer to the Safety chapters.
4.1 Initial cleaning
• Remove all accessories and removable
shelf supports (if applicable).
• Clean the appliance before first use.
Refer to the chapter "Care and
cleaning".
Page 7
4.2 First connection
When you connect the appliance to the
mains, or after a power cut, you must set
the language, display contrast, display
brightness and time of day.
1.
Touch or to set the value.
2.
Touch OK to confirm.
4.3 Preheating
Preheat the empty appliance to burn off
the remaining grease.
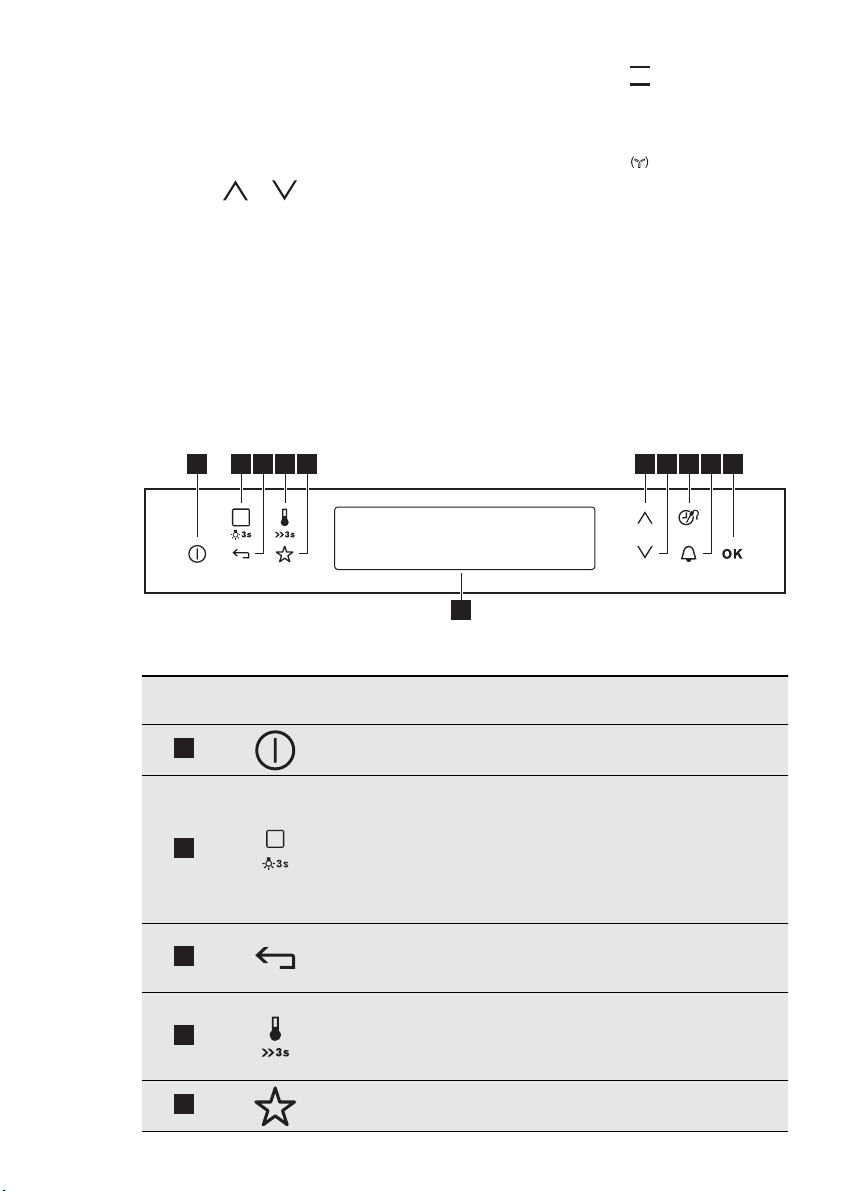
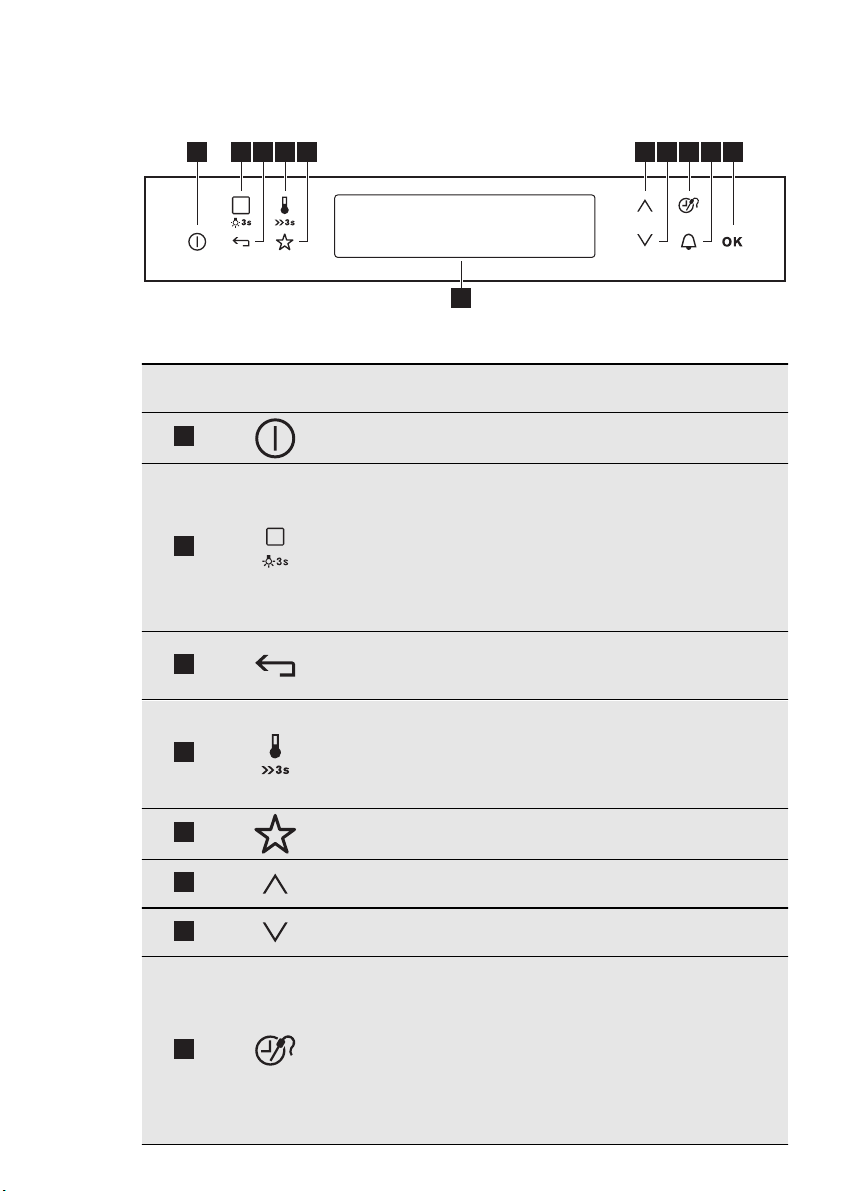
5. CONTROL PANEL
Electronic programmer
1 10
2 43 8 95 6 7
ENGLISH 7
1.
Set the function and the maximum
temperature.
2.
Let the appliance operate for 45 minutes.
3.
Set the function and the maximum
temperature.
4.
Let the appliance operate for 15 mi-
nutes.
Accessories can become hotter than usually. The appliance can emit an odour and
smoke. This is normal. Make sure that the
airflow is sufficient.
11
Use the sensor fields to operate the appliance
Number
1
2
Sensor
field
Function Comment
On / off To activate and deactivate the appli-
ance.
Heating Functions or Assisted Cooking
To choose a heating function or an Assisted Cooking function. To have access to the necessary function, touch
the field once or twice when the appliance is activated. To activate or deactivate the light, touch the field for 3 seconds.
Home key To go back one level in the menu. To
3
show the main menu, touch the field for
3 seconds.
Temperature
4
selection
To set the temperature or show the current temperature in the appliance. To
activate or deactivate the Fast Heat Up
function, touch the field for 3 seconds.
5
Favourite Programme
To save and have access to your favourite programmes.
Page 8
www.electrolux.com
8
Number
6
7
8
9
10
11
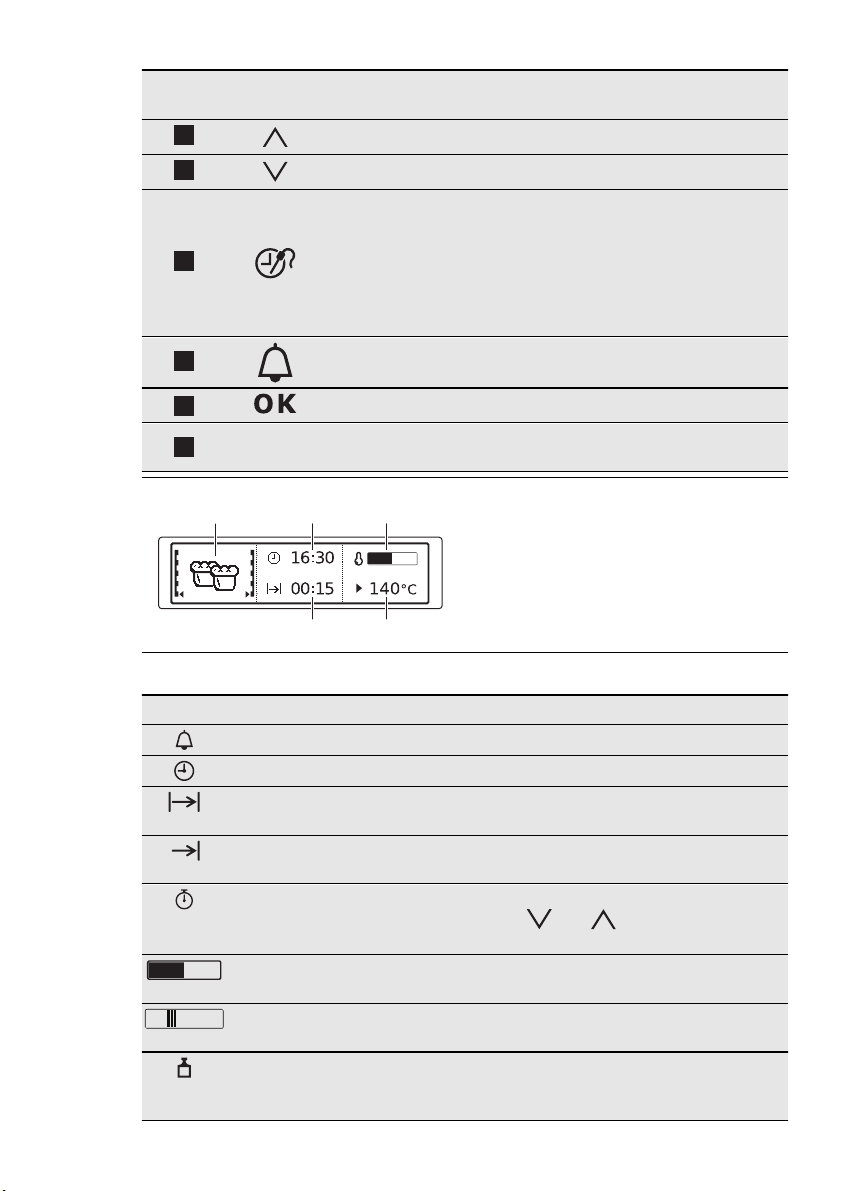
Display
A
Sensor
field
—
Function Comment
Up key To move up in the menu.
Down key To move down in the menu.
Time and additional functions
To set different functions. When a heating function operates, touch the sensor
field to set the timer, Child Lock, Favourite Programme memory, Heat +
Hold or Set + Go or to change the settings of the core temperature sensor
(for selected models only).
Minute Minder To set the Minute Minder .
OK To confirm the selection or setting.
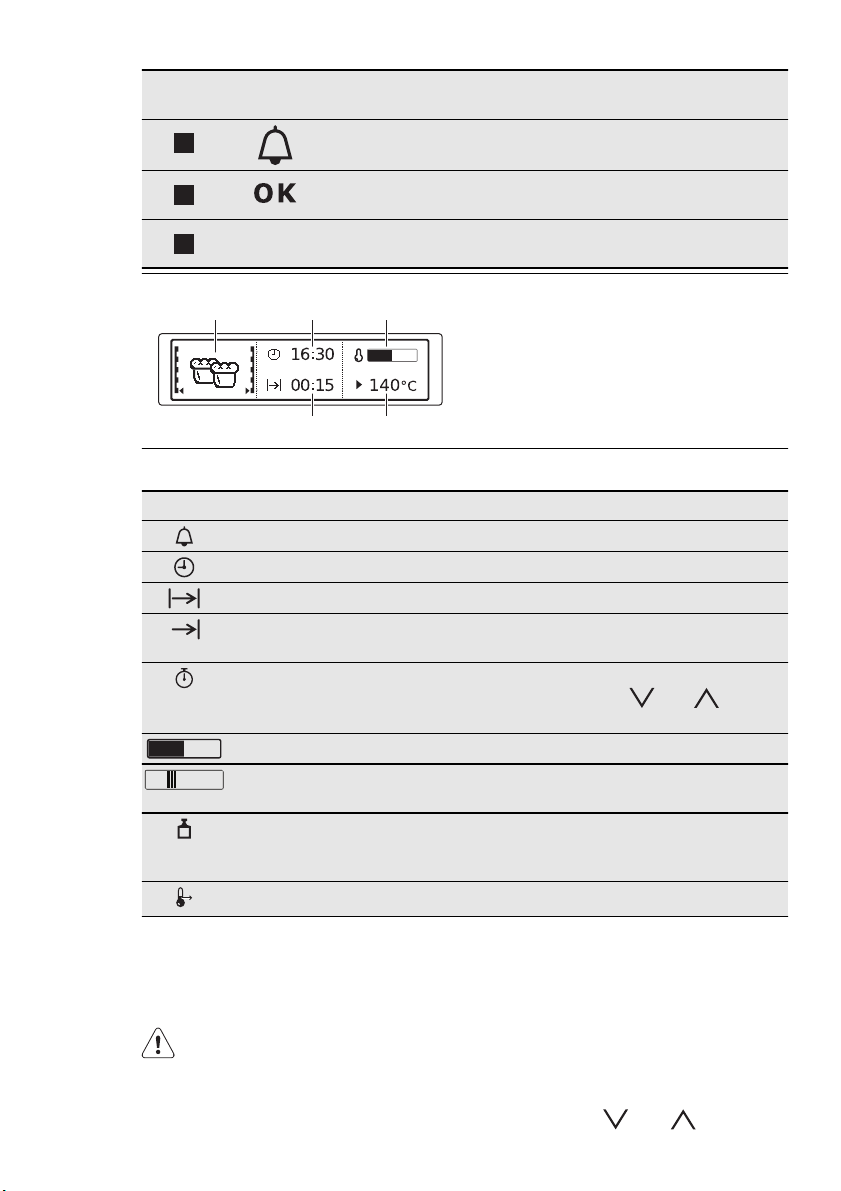
Display Shows the current settings of the appli-
ance.
A)
Heating function
B)
B C
Time of day
C)
Heat-up indicator
D)
Temperature
E)
Duration and End Time functions
DE
Other indicators in the display
Symbol Function
Minute Minder The function operates.
Time of day The display shows the time of day.
Duration The display shows the necessary time for cook-
ing.
End Time The display shows when the cooking time is
completed.
Time Indication The display shows how long a heating function
operates. Press
have the time go back to zero.
Heat-up indicator The display shows the temperature in the appli-
ance.
Fast Heat Up indicator
The function operates. This function decreases
the heat-up time.
Weight Automatic The display shows that the automatic weight
system operates or that you can change the
weight.
and at the same time to
Page 9
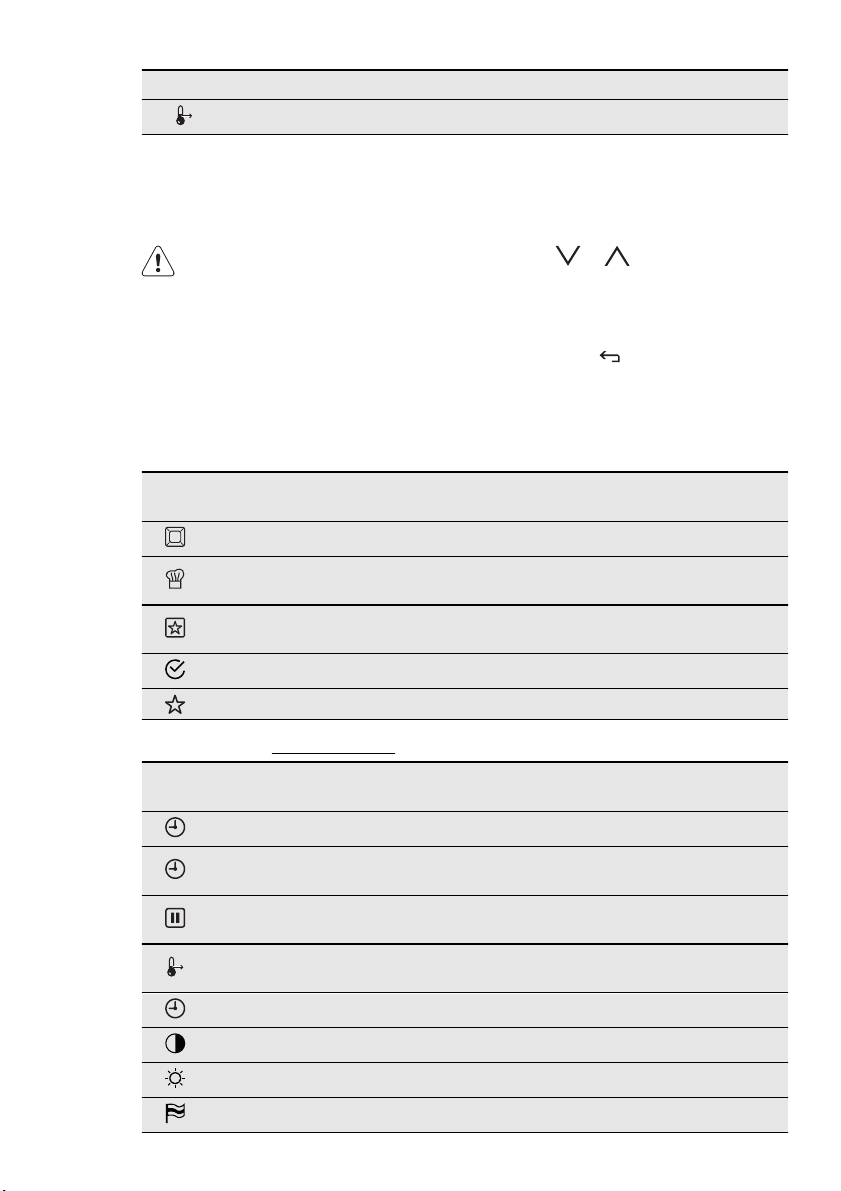
Symbol Function
6. DAILY USE
ENGLISH 9
Heat + Hold The function operates.
WARNING!
Refer to the Safety chapters.
6.1 Navigating the menus
Operation of the menus:
1.
Activate the appliance.
6.2 The menus in overview
Main menu
Sym-
Submenus for: Basic Settings
Sym-
Menu item Application
bol
Heating Functions Contains a list of heating functions.
Assisted Cooking
Favourite Programme
Basic Settings Contains a list of other settings.
Specials Contains a list of additional heating functions.
Submenu Description
bol
Set Time of Day Sets the current time on the clock.
Time Indication
SET + GO
Heat + Hold
Extra time Activates and deactivates the function.
2.
Press or to select the menu
option.
3.
Press OK to move to submenu or ac-
cept setting.
At every point you can get back to the
main menu with
Contains a list of automatic cooking programmes.
Contains a list of favourite cooking programmes
stored by user.
When ON, the display shows the current time
when you deactivate the appliance.
When ON, you can activate the functions when
you activate the heating function.
When ON, you can activate this function when
you activate the heating function.
Display Contrast Adjusts the display contrast by degrees.
Display Brightness Adjusts the display brightness by degrees.
Set Language Sets the language for the display.
Page 10
www.electrolux.com
10
Sym-
Submenu Description
bol
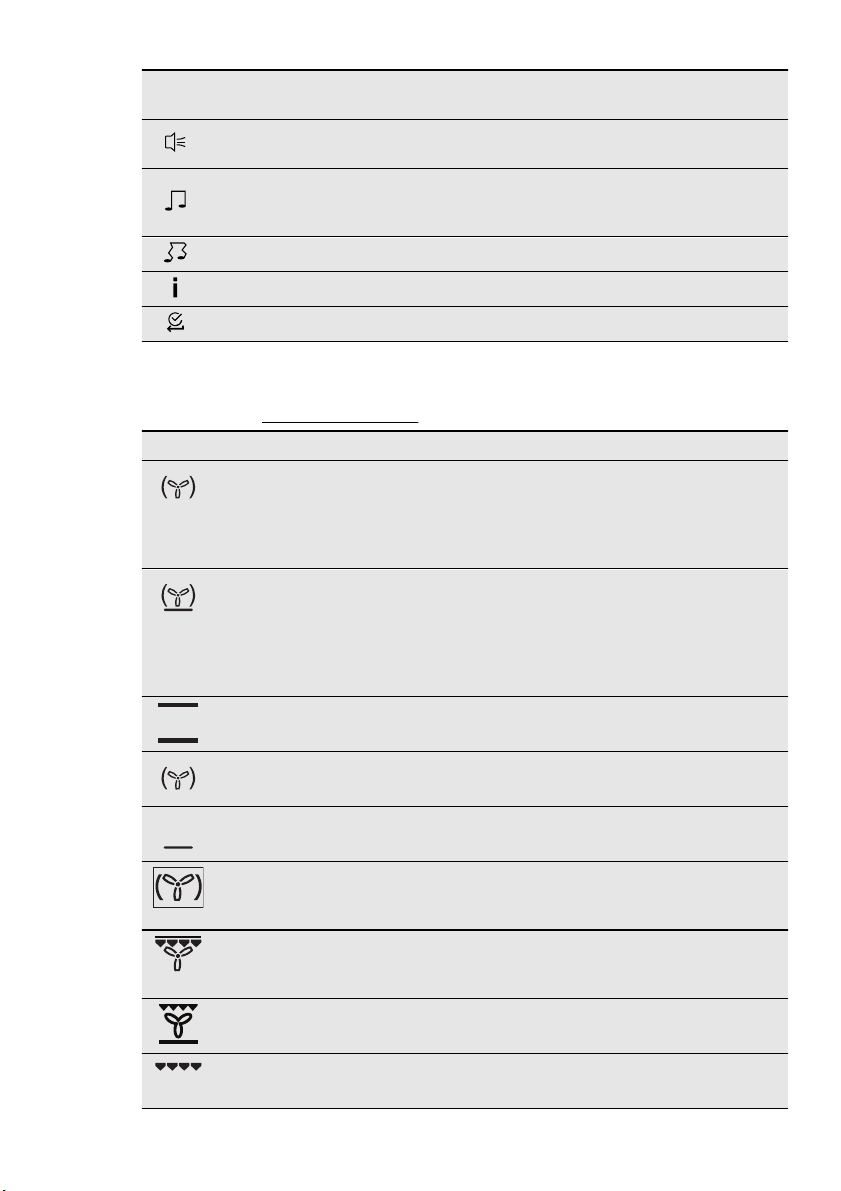
Buzzer Volume
Adjusts the volume of press-tones and signals
by degrees.
Activates and deactivates the tone of the touch
Key Tones
fields. It is not possible to deactivate the tone of
the ON / OFF touch field.
Alarm/Error Tones Activates and deactivates the alarm tones.
Service Shows the software version and configuration.
Factory Settings Resets all settings to factory settings.
6.3 Heating functions
Submenu for: Heating Functions
Heating function Application
True Fan Cooking To bake maximum on three shelf positions at
Pizza Setting To bake food on one oven level for a more in-
Conventional Cooking To bake and roast food on one shelf position.
the same time. When you use this function,
decrease the oven temperature by 20 - 40 °C
from the standard temperatures you use for
Conventional Cooking . Also to dry food.
tensive browning and a crispy bottom. When
you use this function, decrease the oven temperature by 20 - 40 °C from the standard
temperatures you use for Conventional Cooking . .
Slow Cook To prepare very lean and tender roasted food.
Bottom Heat To bake cakes with crispy bottoms.
Moist Fan Baking To save energy when you bake and cook dry
baked goods. Also to bake baked goods in
tins on one shelf position.
ECO Roasting The ECO functions let you optimize the ener-
gy consumption during cooking. It is necessary to set the cooking time first.
Frozen Foods To make convenience food such as chips,
wedges or spring rolls crispy.
Grilling To grill flat food in the middle of the grill and
to toast bread.
Page 11
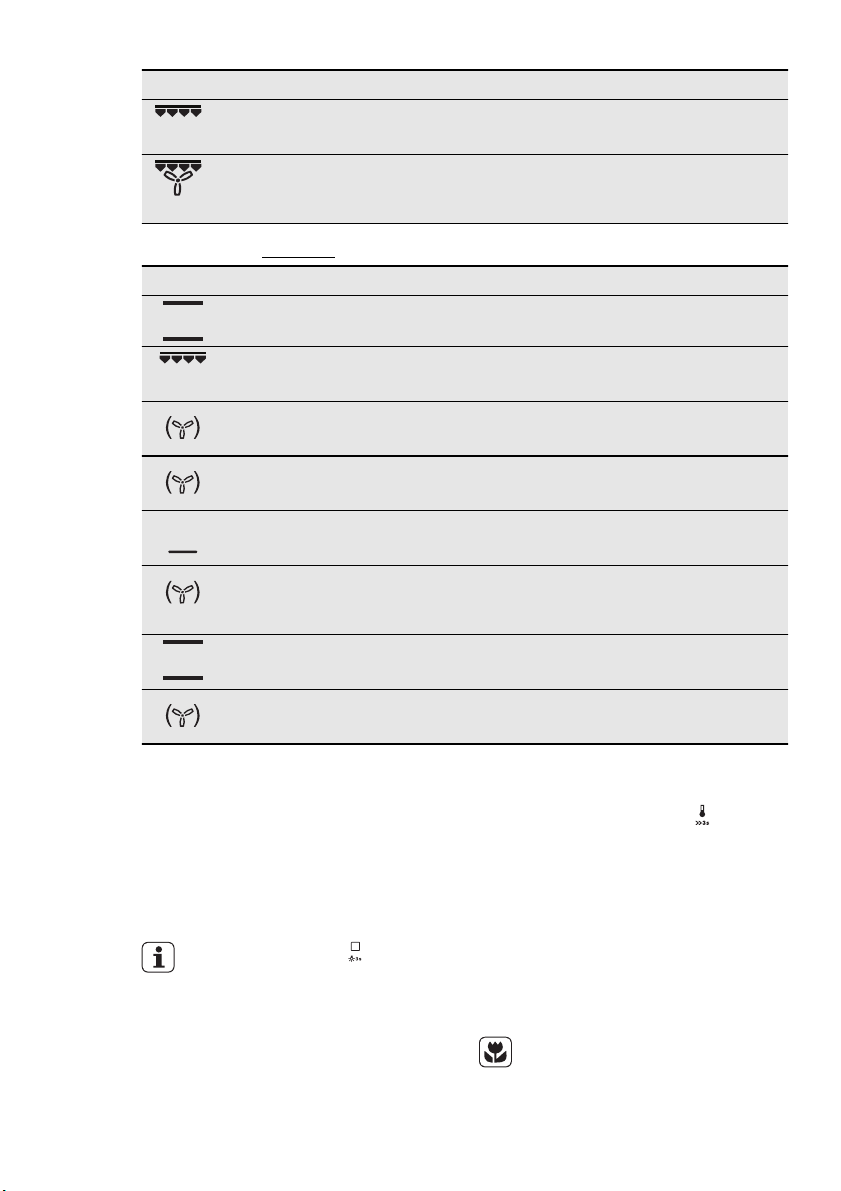
Heating function Application
Fast Grilling To grill flat food in large quantities and to
toast bread.
ENGLISH 11
Turbo Grilling To roast larger meat joints or poultry with
bones on one shelf position. Also to gratinate
and to brown.
Submenu for: Specials
Heating function Application
Bread Baking To bake bread.
Au Gratin To prepare dishes such as lasagna or pota-
to gratin. Also to gratinate and to brown.
Dough Proving To raise the yeast dough before baking.
Plate Warming To preheat a plate for serving.
Preserving To preserve vegetables in glasses and liquid
(e.g. mixed pickles).
Drying To dry sliced fruit such as apples, plums or
peaches and vegetables such as tomatoes,
zucchini or mushrooms.
Keep Warm To keep cooked food warm.
Defrost To defrost frozen food.
6.4 Activating a heating function
1.
Activate the appliance.
2. Select the Heating Functions menu.
Press OK to confirm.
3.
Set the heating function. Press OK to
confirm.
4.
Set the temperature. Press OK to
confirm.
Press once or twice to go directly to the Heating Functions
menu (when the appliance is activated).
6.5 Heat-up indicator
When you activate a heating function, the
bar on the display comes on. The bar
shows that the temperature increases.
6.6 Fast Heat Up indicator
This function decreases the heat-up time.
To activate the function, hold
onds. You will see the heat-up indicator
alternates.
for 3 sec-
6.7 Residual heat
When you deactivate the appliance, the
display shows the residual heat. You can
use the heat to keep the food warm.
6.8 Energy saving
The appliance contains features which help you save energy during everyday cooking:
Residual heat:
•
Page 12

www.electrolux.com
12
– When the heating function or pro-
gramme operates, the heating elements are deactivated 10 % earlier
(the lamp and fan continue to operate). For this feature to operate, the
cooking time must be longer than 30
minutes or you must use the clock
functions ( Duration , End Time ).
– When the appliance is off, you can
use the heat to keep food warm. The
display shows the remaining temperature.
• Cooking with the lamp off - Touch
and hold
the lamp during cooking.
for 3 seconds to deactivate
7. CLOCK FUNCTIONS
7.1 Clock functions
Symbol Function Description
Minute Minder
Duration
End Time
If you set the time for a clock function, the
time starts to count down after 5 seconds.
If you use the clock functions Duration
the appliance deactivates the
heating elements after 90 % of the
set time. The appliance uses the
residual heat to continue the
cooking procedure until the time
ends (3 - 20 minutes).
Setting the clock functions
1.
Set a heating function.
2.
Press again and again until the
display shows the necessary clock
function and the related symbol.
3.
Press or to set the necessary
time. Press OK to confirm.
and End Time ,
• When you use the Moist Fan Baking
function, the lamp deactivates after 30
seconds. The lamp activates again
when you touch
When you use the Eco functions, the
lamp deactivates after 30 seconds. The
lamp activates again when you touch
for 3 seconds.
• Eco functions - refer to " Heating
Functions ".
for 3 seconds.
To set a countdown (max 2 h 30 min). This function
has no effect on the operation of the appliance. You
can also activate it when the appliance is off. Use
to activate the function. Press or to set the
minutes and OK to start.
To set how long the appliance has to be in operation (max. 23 h 59 min).
To set the switch-off time for a heating function
(max. 23 h 59 min).
When the time ends, an acoustic signal sounds. The appliance deactivates. The display shows a message.
4.
Press a sensor field to stop the signal.
•
With Duration
Time
heating function and the temperature first. Then you can set
the clock function. The appliance deactivates automatically.
•
You can use Duration
End Time
if you want to automatically activate and deactivate the appliance at a given time later.
• When you use the Core temperature sensor (if applicable),
the Duration
you must set the
functions do not operate.
and End
and
at the same time
and End Time
Page 13

7.2 Heat + Hold
The Heat + Hold function keeps prepared
food warm at 80 °C for 30 minutes. It activates after the baking or roasting procedure ends.
• You can activate or deactivate
the function in the Basic Settings menu.
• Conditions for the function:
– The set temperature is more
than 80 °C.
– The function Duration is set.
Activating the function
1.
Activate the appliance.
2.
Select the heating function.
3.
Set the temperature above 80 °C.
4.
Press again and again until the
display shows Heat + Hold . Press
OK to confirm.
When the function ends, an acoustic signal sounds.
8. AUTOMATIC PROGRAMMES
ENGLISH 13
The Heat + Hold function operates for 30
minutes.
The Heat + Hold function stays on if you
change the heating functions.
7.3 Extra Time
The Extra Time function makes the heating function continue after the Duration
ends.
• Applicable for all heating functions with
Duration or Weight Automatic.
• Not applicable for heating functions
with CT Sensor .
Activating the function:
1.
When the cooking time ends, an
acoustic signal sounds. Press a sensor field.
2.
The display shows the message for
Extra Time for five minutes.
3.
Press to activate (or to cancel).
4.
Set the length of the Extra Time .
Press OK to confirm.
8.1 Assisted Cooking with
Recipe Automatic
This appliance has a set of recipes you
can use. Recipes are fixed and you cannot change them.
Activating the function:
1.
Activate the appliance.
2.
Select the Assisted Cooking menu.
Press OK to confirm.
3.
Select the category and dish. Press
OK to confirm.
4.
Select Recipe Automatic . Press OK
to confirm.
When you use the Manual function, the appliance uses automatic
settings. You can change them as
with other functions.
8.2 Assisted Cooking with
Weight Automatic
This function automatically calculates the
roasting time. To use it, it is necessary to
input the food weight.
Activating the function:
1.
Activate the appliance.
2.
Select Assisted Cooking . Press OK
to confirm.
3.
Select the category and dish. Press
OK to confirm.
4.
Select the Weight Automatic . Press
OK to confirm.
5.
Touch or to set the food
weight. Press OK to confirm.
The automatic programme starts. You
can change the weight at any time. Press
or to change the weight. When
the time ends, an acoustic signal sounds.
Press a sensor field to deactivate the signal.
Page 14
www.electrolux.com
14
With some programmes turn over
the food after 30 minutes. The
display shows a reminder.
9. USING THE ACCESSORIES
WARNING!
Refer to the Safety chapters.
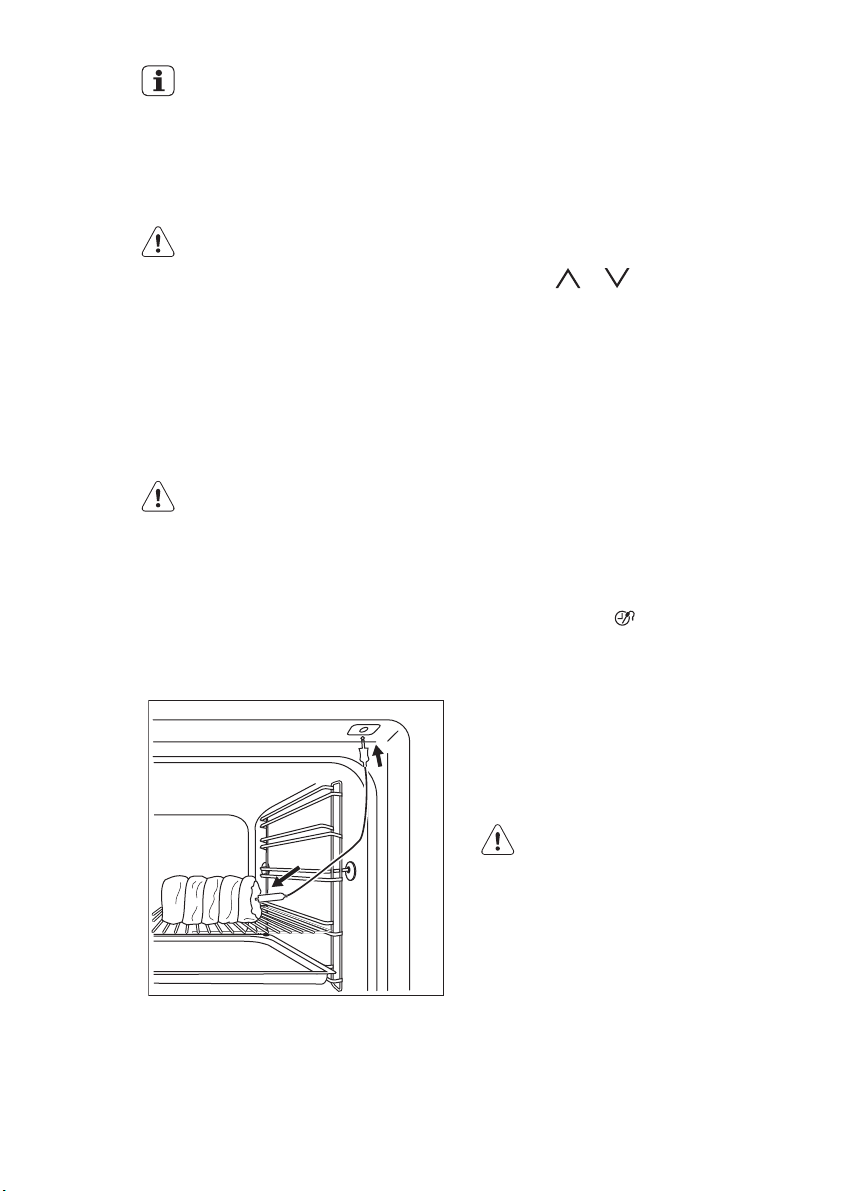
9.1 Core temperature sensor
The core temperature sensor measures
the core temperature of the meat. When
the meat is at the set temperature, the
appliance deactivates.
There are two temperatures to be set:
• The oven temperature.
• The core temperature.
Only use the core temperature
sensor supplied with the appliance or genuine replacement
parts.
1.
Put the tip of the core temperature
sensor into the centre of the meat.
2.
Activate the appliance.
3.
Put the core temperature sensor plug
into the socket on the front of the appliance.
The display shows the core temperature sensor symbol.
4.
Press or in less than 5 seconds to set the core temperature.
5.
Set the oven function and, if necessary, the oven temperature.
The appliance calculates an approximate end time. The end time is different for different quantities of food, the
set oven temperature (minimum 120
°C) and the operating mode. The appliance calculates the end time in approximately 30 minutes.
6.
Make sure that the core temperature
sensor stays in the meat and in the
core temperature sensor socket during the cooking.
7.
If necessary, you can set a new core
temperature during the cooking. To
do this, touch
8.
When the meat is at the set core temperature, an acoustic signal sounds.
The appliance deactivates automatically.
Touch a sensor field to stop the signal.
9.
Remove the core temperature sensor
plug from the socket . Remove the
meat from the appliance.
WARNING!
The core temperature sensor is
hot. There is a risk of burns. Be
careful when you remove the tip
and plug of the core temperature
sensor.
.
Page 15
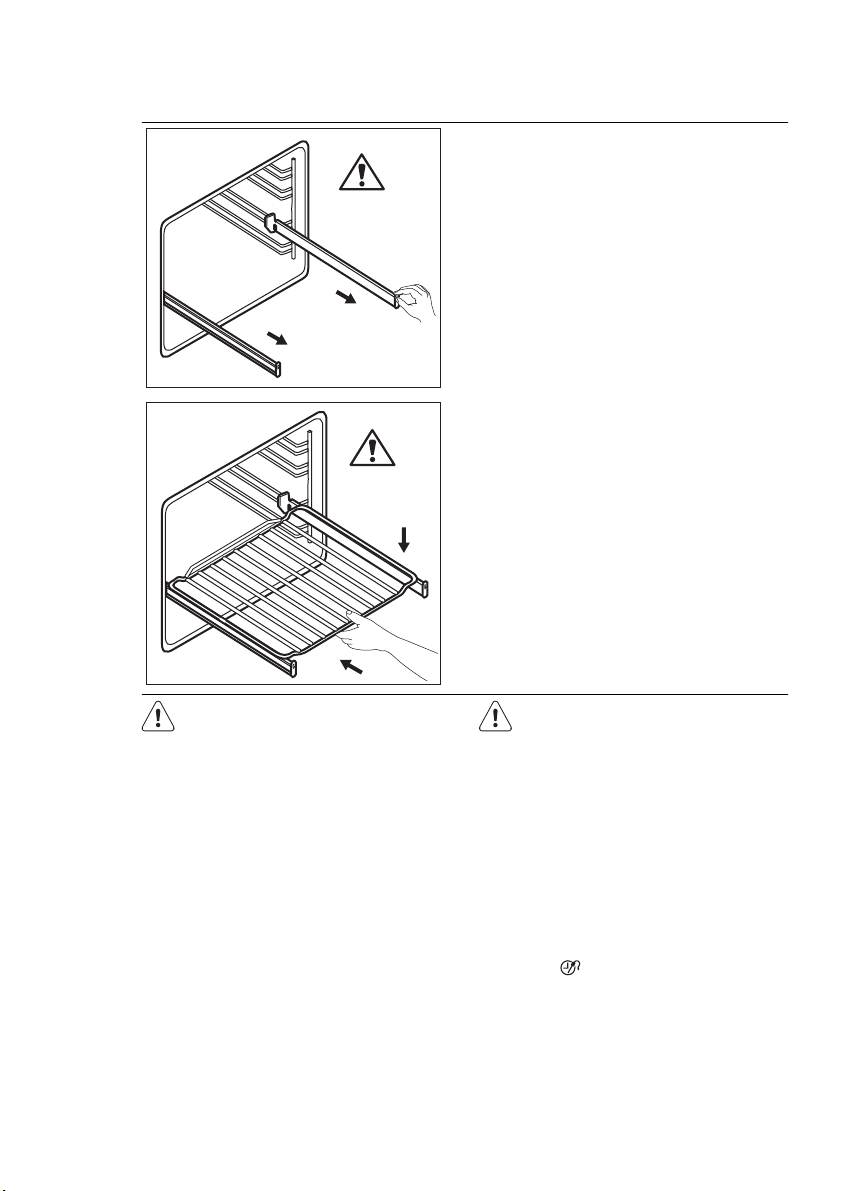
9.2 Telescopic runners
°C
°C
ENGLISH 15
1.
Pull out the right and left hand telescopic runners.
2.
Put the wire shelf on the telescopic
runners and carefully push them into
the appliance.
Make sure you push back the telescopic runners fully in the appliance
before you close the oven door.
Keep the installation instructions
for the telescopic runners for future use.
With telescopic runners you can put in
and remove the shelves more easily.
10. ADDITIONAL FUNCTIONS
10.1 Favourite Programme
menu
You can save your favourite settings, like
duration, temperature or heating function.
They are available in the Favourite Programme menu. You can save 20 programmes.
Saving a programme
1.
Activate the appliance.
CAUTION!
Do not clean the telescopic runners in the dishwasher. Do not lubricate the telescopic runners.
2.
Set a heating function or an Assisted
Cooking function.
3.
Touch again and again until the
display shows SAVE . Press OK to
confirm.
4.
The display shows the first free memory position.
Press OK to confirm.
5.
Enter the name of the programme.
The first letter flashes.
Page 16
www.electrolux.com
16
6.
7.
• You can overwrite a memory position.
• You can change the name of a pro-
Activating the programme
1.
2.
3.
Press
directly.
Touch or to change the letter.
Press OK.
Touch or to move the cursor
to the right or to the left. Press OK.
The next letter flashes. Do steps 5
and 6 again as necessary.
Press and hold OK to save.
Useful information:
When the display shows the first free
memory position, touch
press OK to overwrite an existing programme.
gramme in the menu Edit Programme
Name .
Activate the appliance.
Select the Favourite Programme
menu. Press OK to confirm.
Select your favourite programme
name. Press OK to confirm.
to go to Favourite Programme
or and
2.
Touch and at the same time
until the display shows a message.
To unlock the appliance, touch
at the same time again until the display
shows a message.
and
10.4 SET + GO
The SET + GO function lets you set a
heating function (or programme) and use
it later with one press of the sensor field.
Activating the function:
1.
Activate the appliance.
2.
Set the heating function.
3.
Press again and again until the
display shows Duration .
4.
Set the time.
5.
Press again and again until the
display shows SET + GO .
6.
Press OK to confirm.
To start SET + GO , press any sensor field
(except for
starts.
When the heating function ends, an
acoustic signal sounds.
). The set heating function
Useful information:
10.2 Function Lock
The Function Lock prevents an accidental
change of the heating function. You can
activate the Function Lock only when the
appliance operates.
Activating the Function Lock :
1.
Activate the appliance.
2.
Set a heating function or setting.
3.
Press again and again until the
display shows Function Lock.
4.
Press OK to confirm.
Deactivating the Function Lock :
1.
Press . The display shows a message.
2.
Press and then OK to confirm.
10.3 Child Lock
The Child Lock prevents an accidental
operation of the appliance .
Activating and deactivating the Child
Lock function:
1.
Activate the appliance.
• When the heating function operates,
the Function Lock is on.
• You can activate and deactivate the
SET + GO function in the Basic Settings menu.
10.5 Automatic switch-off
For safety reasons the appliance deactivates after some time:
• If an oven function operates.
• If you do not change the oven temperature.
Oven tempera-
ture
30 °C - 115 °C 12.5 h
120 °C - 195 °C 8.5 h
200 °C - 245 °C 5.5 h
250 °C - maxi-
mum °C
Switch-off time
3.0 h
Page 17

The automatic switch-off works
with all functions, except Light ,
Duration , End Time and Core
Temperature Sensor.
10.6 Cooling fan
When the appliance operates, the cooling
fan activates automatically to keep the
surfaces of the appliance cool. If you deactivate the appliance, the cooling fan
continues to operate until the temperature
in the appliance cools down.
11. HELPFUL HINTS AND TIPS
ENGLISH 17
10.7 Safety thermostat
Incorrect operation of the appliance or defective components can cause dangerous
overheating. To prevent this, the oven has
a safety thermostat which interrupts the
power supply. The oven activates again
automatically when the temperature
drops.
11.1 Inner side of the door
In some models, on the inner side of
the door you can find:
• The numbers of the shelf positions.
• Information about the heating functions,
recommended shelf positions and temperatures for typical dishes.
The temperature and baking times
in the tables are guidelines only.
They depend on the recipes and
the quality and quantity of the ingredients used.
• The appliance has five shelf levels.
Count the shelf levels from the bottom
of the appliance floor.
• The appliance has a special system
which circulates the air and constantly
recycles the steam. With this system
you can cook in a steamy environment
and keep the food soft inside and crusty outside. It decreases the cooking
time and energy consumption to a minimum.
• Moisture can condense in the appliance
or on the door glass panels. This is normal. Always stand back from the appliance when you open the appliance
door while cooking. To decrease the
condensation, operate the appliance for
10 minutes before cooking.
• Clean the moisture after each use of
the appliance.
• Do not put the objects directly on the
appliance floor and do not put alumini-
um foil on the components when you
cook. This can change the baking results and cause damage to the enamel.
11.2 Baking cakes
• Do not open the oven door before 3/4
of the set cooking time is up.
• If you use two baking trays at the same
time, keep one empty level between
them.
11.3 Cooking meat and fish
• Use a deep pan for very fatty food to
prevent the oven from stains that can
be permanent.
• Leave the meat for approximately 15
minutes before carving so that the juice
does not seep out.
• To prevent too much smoke in the oven
during roasting, add some water into
the deep pan. To prevent the smoke
condensation, add water each time after it dries up.
11.4 Cooking times
Cooking times depend on the type of
food, its consistency, and volume.
Initially, monitor the performance when
you cook. Find the best settings (heat setting, cooking time, etc.) for your cookware, recipes and quantities when you
use this appliance.
Page 18

www.electrolux.com
18
11.5 Baking and roasting table
CAKES
Whisked
recipes
Shortbread
dough
Buttermilk
cheesecake
Apple cake
(Apple pie)
Strudel 3 175 2 150 60 - 80 In a baking
Jam-tart 2 170 2 (left and
Sponge
cake
Christmas
cake / Rich
fruit cake
Plum cake 1 175 2 160 50 - 60 In a bread
Small cakes
- one level
Small cakes
- two levels
Small cakes
- three levels
Biscuits /
pastry
stripes - one
level
Biscuits /
pastry
stripes - two
levels
TYPE OF
DISH
Conventional
Cooking
Shelf po-
sition
Temp
[°C]
True Fan Cook-
ing
Shelf po-
sition
Tem
p
[°C]
Cooking
time
[min]
2 170 3 (1 and 4) 160 45 - 60 In a cake
2 170 3 (1 and 4) 160 20 - 30 In a cake
1 170 2 165 60 - 80 In a 26 cm
cake mould
2 170 1 (left and
160 80 - 100 In two 20
right)
moulds on a
wire shelf
165 30 - 40 In a 26 cm
right)
cake mould
2 170 2 160 50 - 60 In a 26 cm
cake mould
2 160 1 or 2 140
90 - 120 In a 20 cm
–
150
3 170 3 150 -
20 - 30 In a baking
160
- - 2 and 4 150 -
25 - 35 In a baking
160
- - 1, 3 and 5 150 -
30 - 45 In a baking
160
3 140 3 140 -
30 - 35 In a baking
150
- - 2 and 4 140 -
35 - 40 In a baking
150
Notes
mould
mould
cm cake
tray
cake
mould
1)
tin
tray
tray
tray
tray
tray
1)
1)
Page 19

ENGLISH 19
TYPE OF
DISH
Biscuits /
pastry
Conventional
Cooking
Shelf po-
Temp
sition
- - 1, 3 and 5 140 -
[°C]
True Fan Cook-
ing
Shelf po-
sition
Tem
p
[°C]
150
Cooking
time
Notes
[min]
35 - 45 In a baking
tray
stripes three levels
Meringues one level
Meringuestwo levels
Buns 3 190 3 170
Eclairs - one
level
Eclairs - two
levels
3 120 3 120 80 - 100 In a baking
tray
- - 2 and 4 120 80 - 100 In a baking
1)
tray
12 - 20 In a baking
–
190
tray
1)
3 190 3 170 25 - 35 In a baking
tray
- - 2 and 4 170 35 - 45 In a baking
tray
Plate tarts 2 180 2 170 45 - 70 In a 20 cm
cake mould
Rich fruit
cake
Victoria
sandwich
1)
Preheat for 10 minutes.
1 160 2 150 110 - 120 In a 24 cm
cake mould
1 170 2 160 50 - 60 In a 20 cm
cake mould
BREAD AND PIZZA
TYPE OF
DISH
Conventional
Cooking
Shelf po-
sition
Temp
[°C]
True Fan Cook-
ing
Shelf po-
sition
Tem
p
[°C]
Cooking
time
[min]
Notes
White bread 1 190 1 190 60 - 70 1 - 2 pieces,
500 gr per
1)
piece
Rye bread 1 190 1 180 30 - 45 In a bread tin
Bread rolls 2 190 2 (2 and 4) 180 25 - 40 6 - 8 rolls in
a baking
1)
tray
Pizza 1 200 -
210
1 200 -
210
10 - 20 In a baking
tray or a
deep pan
1)
Page 20

www.electrolux.com
20
TYPE OF
DISH
Conventional
Cooking
Shelf po-
sition
Temp
[°C]
True Fan Cook-
ing
Shelf po-
sition
Tem
p
[°C]
Cooking
time
[min]
Notes
Scones 3 200 3 190 10 - 20 In a baking
1)
tray
1)
Preheat for 10 minutes.
FLANS
TYPE OF
DISH
Conventional
Cooking
Shelf po-
sition
Tem
True Fan Cook-
Shelf po-
p
[°C]
sition
ing
Tem
p
[°C]
Cooking
time
[min]
Notes
Pasta flan 2 200 2 180 40 - 50 In a mould
Vegetable
2 200 2 175 45 - 60 In a mould
flan
Quiches 1 180 1 180 50 - 60
Lasagne 2 180 -
190
Cannelloni 2 180 -
190
1)
Preheat for 10 minutes.
2 180 -
190
2 180 -
190
25 - 40
25 - 40
In a mould
In a mould
In a mould
1)
1)
1)
MEAT
TYPE OF
DISH
Conventional
Cooking
Shelf po-
sition
Tem
p
[°C]
True Fan Cook-
ing
Shelf po-
sition
Tem
p
[°C]
Cooking
time [min]
Notes
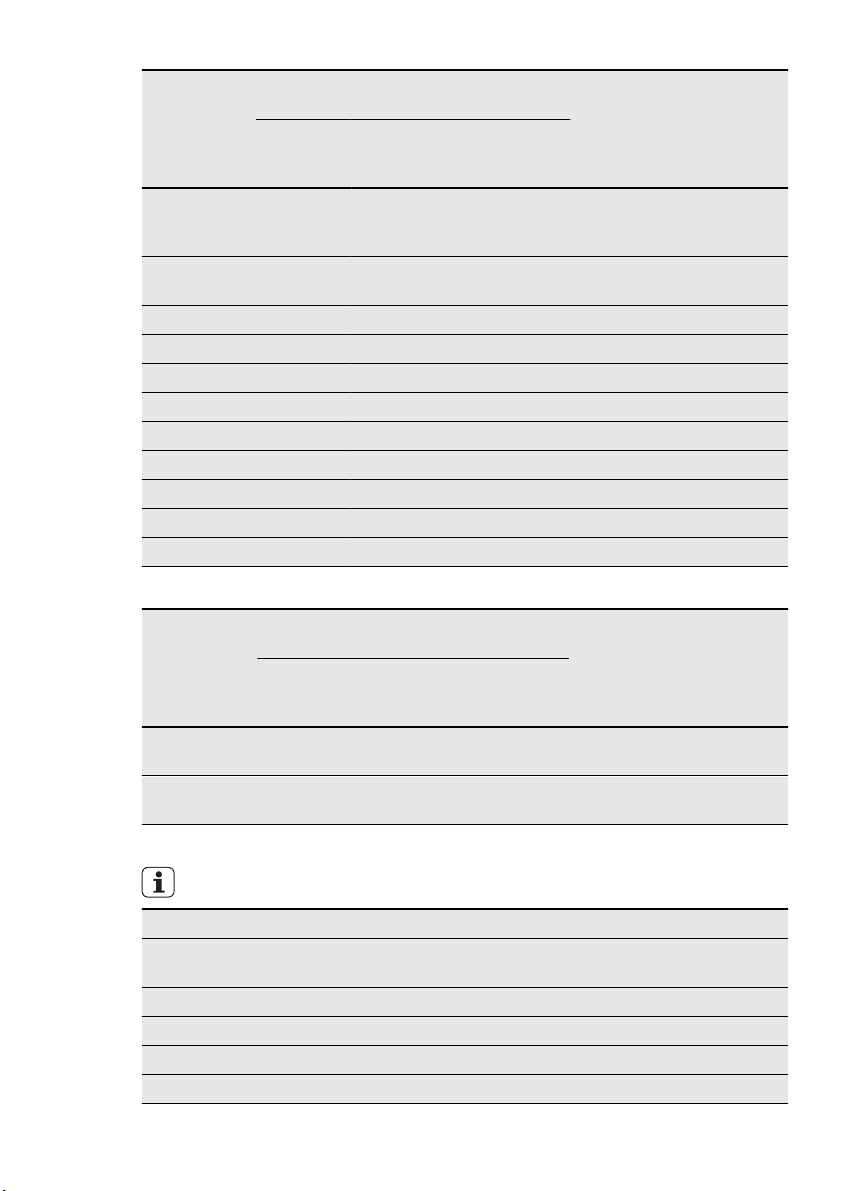
Beef 2 200 2 190 50 - 70 On a wire
shelf
Pork 2 180 2 180 90 - 120 On a wire
shelf
Veal 2 190 2 175 90 - 120 On a wire
shelf
English roast
beef, rare
English roast
beef, medi-
2 210 2 200 50 - 60 On a wire
shelf
2 210 2 200 60 - 70 On a wire
shelf
um
Page 21
ENGLISH 21
TYPE OF
DISH
English roast
beef, well
Conventional
Cooking
Shelf po-
Tem
sition
2 210 2 200 70 - 75 On a wire
p
[°C]
True Fan Cook-
ing
Shelf po-
sition
Tem
p
[°C]
Cooking
time [min]
Notes
shelf
done
Shoulder of
2 180 2 170 120 - 150 With rind
pork
Shin of pork 2 180 2 160 100 - 120 2 pieces
Lamb 2 190 2 175 110 - 130 Leg
Chicken 2 220 2 200 70 - 85 Whole
Turkey 2 180 2 160 210 - 240 Whole
Duck 2 175 2 220 120 - 150 Whole
Goose 2 175 1 160 150 - 200 Whole
Rabbit 2 190 2 175 60 - 80 Cut in pieces
Hare 2 190 2 175 150 - 200 Cut in pieces
Pheasant 2 190 2 175 90 - 120 Whole
FISH
TYPE OF
DISH
Trout / Sea
Conventional
Cooking
Shelf po-
Tem
sition
2 190 2 175 40 - 55 3 - 4 fish
p
[°C]
Shelf po-
True Fan Cook-
ing
Tem
sition
p
[°C]
Cooking
time [min]
Notes
bream
Tuna fish /
2 190 2 175 35 - 60 4 - 6 fillets
Salmon
11.6 Grilling
Preheat the empty oven for 10 minutes, before cooking.
Quantity Grilling Cooking time [min]
TYPE OF DISH Pieces [g] Shelf po-
sition
Fillet steaks 4 800 4 max. 12 - 15 12 - 14
Beef steaks 4 600 4 max. 10 - 12 6 - 8
Sausages 8 - 4 max. 12 - 15 10 - 12
Pork chops 4 600 4 max. 12 - 16 12 - 14
Temp
[°C]
1st side 2nd side
Page 22

www.electrolux.com
22
TYPE OF DISH Pieces [g] Shelf po-
Chicken (cut in
2)
Kebabs 4 - 4 max. 10 - 15 10 - 12
Breast of chick-
en
Hamburger 6 600 4 max. 20 - 30 Fish fillet 4 400 4 max. 12 - 14 10 - 12
Toasted sand-
wiches
Toast 4 - 6 - 4 max. 2 - 4 2 - 3
11.7 Turbo Grilling
Beef
Roast beef or fillet, rare
Roast beef or fillet, medium
Roast beef or fillet, well done
1)
Quantity Grilling Cooking time [min]
sition
Temp
[°C]
1st side 2nd side
2 1000 4 max. 30 - 35 25 - 30
4 400 4 max. 12 - 15 12 - 14
4 - 6 - 4 max. 5 - 7 -
TYPE OF DISH Quantity
per cm of
thickness
per cm of
thickness
per cm of
thickness
Preheat the oven.
Shelf posi-
tion
1
1
1
Tempera-
ture [°C]
190 - 200
180 - 190
170 - 180
1)
1)
1)
Time [min]
5 - 6
6 - 8
8 - 10
Pork
TYPE OF DISH Quantity
Shoulder, neck,
ham joint
1 - 1.5 kg 1 160 - 180 90 - 120
Shelf posi-
tion
Tempera-
ture [°C]
Time [min]
Chop, spare rib 1 - 1.5 kg 1 170 - 180 60 - 90
Meat loaf 750 g - 1 kg 1 160 - 170 50 - 60
Pork knuckle
(precooked)
750 g - 1 kg 1 150 - 170 90 - 120
Veal
TYPE OF
DISH
Quantity Shelf posi-
tion
Temperature
[°C]
Time [min]
Roast veal 1 kg 1 160 - 180 90 - 120
Knuckle of
1.5 - 2 kg 1 160 - 180 120 - 150
veal
Page 23

ENGLISH 23
Lamb
TYPE OF
DISH
Leg of lamb,
Quantity Shelf posi-
tion
Temperature
[°C]
Time [min]
1 - 1.5 kg 1 150 - 170 100 - 120
roast lamb
Saddle of
1 - 1.5 kg 1 160 - 180 40 - 60
lamb
Poultry
TYPE OF
DISH
Poultry portions
Chicken , half 400 - 500 g
Quantity Shelf posi-
tion
200 - 250 g
1 200 - 220 30 - 50
each
1 190 - 210 35 - 50
Temperature
[°C]
Time [min]
each
Chicken, pou-
1 - 1.5 kg 1 190 - 210 50 - 70
lard
Duck 1.5 - 2 kg 1 180 - 200 80 - 100
Goose 3.5 - 5 kg 1 160 - 180 120 - 180
Turkey 2.5 - 3.5 kg 1 160 - 180 120 - 150
Turkey 4 - 6 kg 1 140 - 160 150 - 240
Fish (steamed)
TYPE OF
DISH
Quantity Shelf posi-
tion
Temperature
[°C]
Time [min]
Whole fish 1 - 1.5 kg 1 210 - 220 40 - 60
Moist Fan Baking
Type of food Shelf posi-
Temperature (°C) Time (min.)
tion
Pasta bake 2 180 - 200 45 - 60
Lasagne 2 180 - 200 45 - 60
Potato gratin 2 190 - 210 55 - 80
Sweet dishes 2 180 - 200 45 - 60
Ring cake or brioche 1 160 - 170 50 - 70
Plaited bread / bread
2 170 - 190 40 - 50
crown
Cake with crumble topping
3 160 - 170 20 - 40
(dry)
Biscuits made with yeast
2 160 - 170 20 - 40
dough
Page 24

www.electrolux.com
24
During cooking, open the appliance door
only when necessary.
11.8 Defrosting
TYPE OF
DISH
[g]
Defrosting
time [min]
Further de-
frosting time
[min]
Notes
Place the chicken on
an upturned saucer
Chicken 1000 100 - 140 20 - 30
placed on a large
plate. Turn halfway
through.
Meat 1000 100 - 140 20 - 30 Turn halfway through.
Meat 500 90 - 120 20 - 30 Turn halfway through.
Trout 150 25 - 35 10 - 15 Strawberries 300 30 - 40 10 - 20 Butter 250 30 - 40 10 - 15 -
Cream can also be
Cream 2 x 200 80 - 100 10 - 15
whipped when still
slightly frozen in pla-
ces.
Gateau 1400 60 60 -
11.9 Preserving
Soft fruit
PRESERVE
Strawberries, blueberries, raspberries, ripe gooseberries
Temperature
[°C]
Cooking time
until simmering
[min]
160 – 170 35 – 45 –
Further cooking
time at 100 °C
[min]
Stone fruit
PRESERVE
Pears, quinces,
plums
Temperature
[°C]
Cooking time
until simmering
[min]
Further cooking
time at 100 °C
[min]
160 – 170 35 – 45 10 – 15
Page 25

ENGLISH 25
Vegetables
PRESERVE
Carrots
Temperature
[°C]
1)
160 – 170 50 – 60 5 – 10
Cooking time
until simmering
[min]
Further cooking
time at 100 °C
[min]
Cucumbers 160 – 170 50 – 60 –
Mixed pickles 160 – 170 50 – 60 5 – 10
Kohlrabi, peas, as-
paragus
1)
After you deactivate the appliance, leave the preserve in the oven.
160 – 170 50 – 60 15 – 20
11.10 Drying
Cover the oven shelves with baking
parchment.
VEGETABLES
TYPE OF
DISH
Beans 3 1/4 60 - 70 6 - 8
Peppers 3 1/4 60 - 70 5 - 6
Vegetables for
soup
Mushrooms 3 1/4 50 - 60 6 - 8
Herbs 3 1/4 40 - 50 2 - 3
Shelf position
1 level 2 levels
Temperature
[°C]
3 1/4 60 - 70 5 - 6
Time [hr]
FRUIT
TYPE OF
DISH
Shelf position
1 level 2 levels
Temperature
[°C]
Time [hr]
Plums 3 1/4 60 - 70 8 - 10
Apricots 3 1/4 60 - 70 8 - 10
Apple slices 3 1/4 60 - 70 6 - 8
Pears 3 1/4 60 - 70 6 - 9
11.11 Core temperature sensor table
TYPE OF DISH Core temperature [°C]
Roast veal 75 - 80
Veal knuckle 85 - 90
English roast beef, rare 45 - 50
English roast beef, medium 60 - 65
English roast beef, well done 70 - 75
Page 26

www.electrolux.com
26
TYPE OF DISH Core temperature [°C]
Shoulder of pork 80 - 82
Shin of pork 75 - 80
Lamb 70 - 75
Chicken 98
Hare 70 - 75
Trout / Sea bream 65 - 70
Tuna fish / Salmon 65 - 70
12. CARE AND CLEANING
WARNING!
Refer to the Safety chapters.
• Clean the front of the appliance with a
soft cloth with warm water and a cleaning agent.
• To clean metal surfaces use a usual
cleaning agent.
• Clean the oven interior after each use.
Then you can remove dirt more easily
and it does not burn on.
• Clean stubborn dirt with a special oven
cleaner.
• Clean all oven accessories after each
use and let them dry. Use a soft cloth
with warm water and a cleaning agent.
• If you have nonstick accessories, do
not clean them using aggressive
agents, sharp-edged objects or a dishwasher. It can destroy nonstick coating.
Stainless steel or aluminium
appliances:
Clean the oven door with a wet
sponge only. Dry it with a soft
cloth.
Do not use steel wool, acids or
abrasive materials, as they can
cause damage to the oven surface. Clean the oven control panel
with the same precautions.
12.1 Cleaning the door gasket
• Regularly do a check of the door gasket. The door gasket is around the
frame of the oven cavity. Do not use the
appliance if the door gasket is damaged. Contact the Service Centre.
• To clean the door gasket, refer to the
general information about cleaning.
12.2 Shelf supports
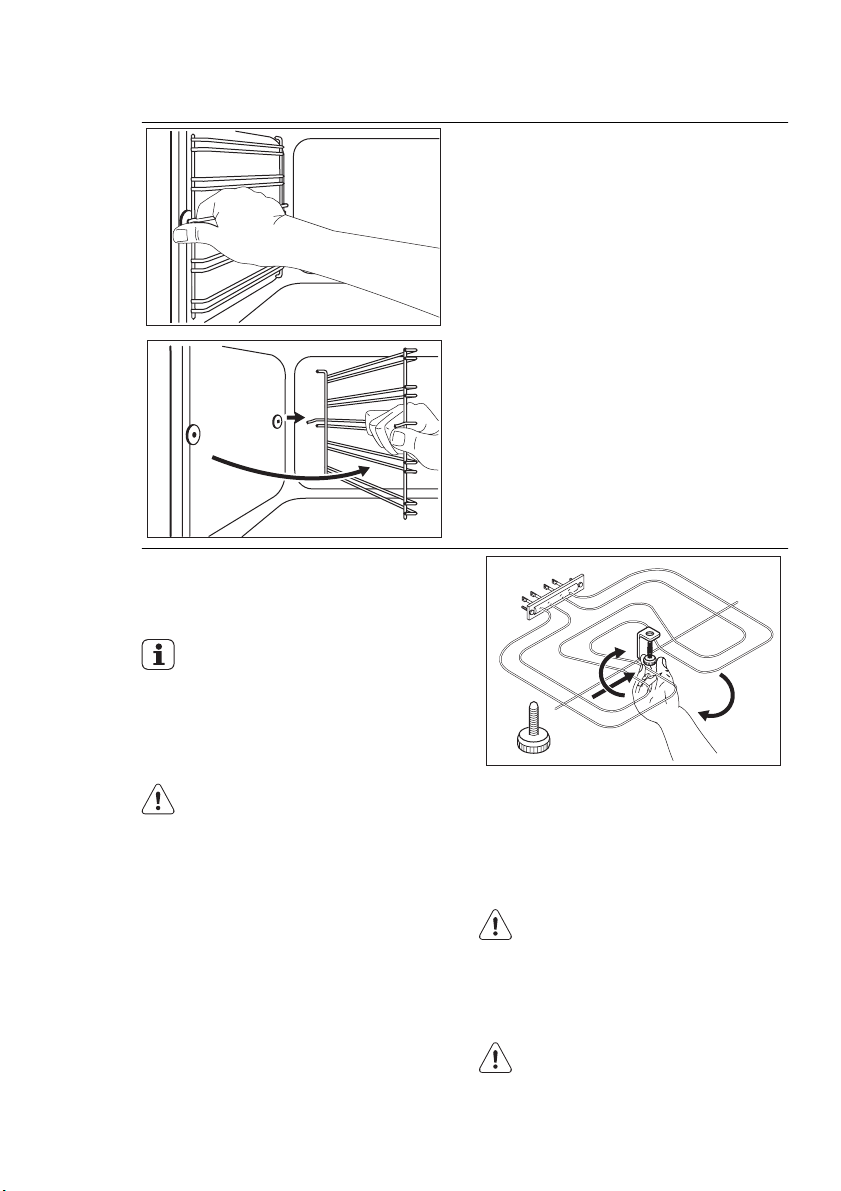
You can remove the shelf supports to
clean the side walls.
Page 27
Removing the shelf supports
ENGLISH 27
1.
Pull the front of the shelf support away
from the side wall.
2.
Pull the rear end of the shelf support
away from the side wall and remove
it.
1
2
Installing the shelf supports
Install the shelf supports in the opposite
sequence.
The rounded ends of the shelf
supports must point to the front.
12.3 Oven ceiling
You can remove the grill to clean the oven
ceiling more easily.
WARNING!
Deactivate the appliance before
you remove the grill. Make sure
that the appliance is cold. There is
a risk of burns.
1.
Remove the screw which holds the
grill. For the first time, use a screwdriver.
2.
Carefully pull the grill down.
3.
Clean the oven ceiling with a soft
cloth with warm water and a cleaning
agent, and let it dry.
4.
Install the grill in the opposite sequence.
WARNING!
Make sure that the grill is correctly
installed and that it does not fall
down.
12.4 Oven lamp
WARNING!
Be careful when you change the
oven lamp. There is a risk of electrical shock.
Page 28
www.electrolux.com
28
Before you change the oven lamp:
• Deactivate the oven.
• Remove the fuses in the fuse box or
1.
2.
3.
Removing the oven door and the glass panels
deactivate the circuit breaker.
Put a cloth on the bottom of the
oven to prevent damage to the
oven light and glass cover.
Always hold the halogen lamp
with a cloth to prevent grease residue from burning on the lamp.
Turn the glass cover counterclockwise to remove it.
Clean the glass cover.
Replace the oven light bulb with an
applicable 300 °C heat-resistant oven
light bulb.
Use the same oven lamp type.
A
4.
Install the glass cover.
12.5 Cleaning the oven door
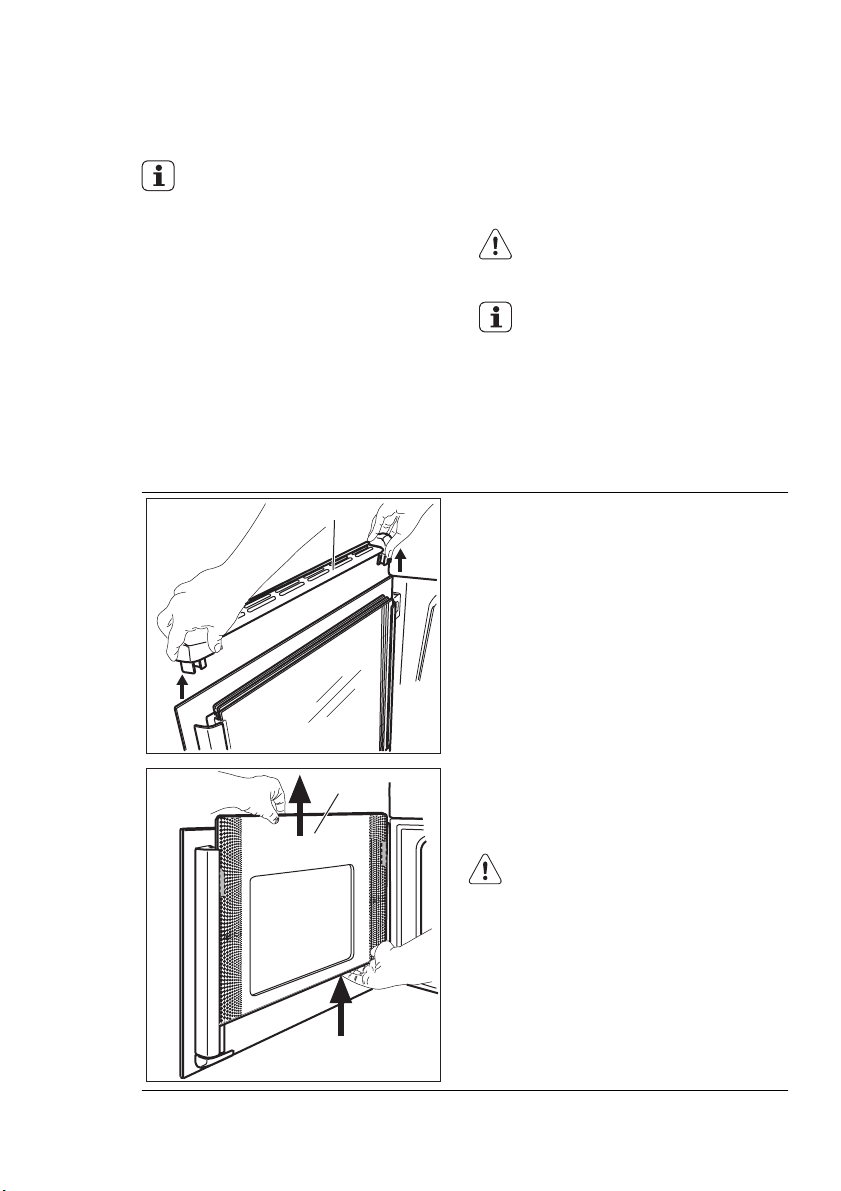
The oven door has four panels of glass installed one behind the other. You can remove the oven door and the internal glass
panels to clean them.
CAUTION!
Do not use the appliance without
the glass panels.
The direction in which you open
the door depends on your oven
model. You open the door from
the right side in some models and
from the left side in others.
1.
Press the buttons at the sides of the
door trim (A) on the upper cover and
pull it upwards to remove it.
B
Clean the door with a wet sponge and rub
it dry with a soft cloth. Do not use steel
2.
Hold the inner glass B tightly with
both hands and slide it upwards to
remove it from its initial position. Do
the same with the other glass panels.
CAUTION!
Make sure that you tightly hold the
glasses to prevent them from falling.
wool, acids or abrasive cleaning agents
because they can damage the surface.
Page 29
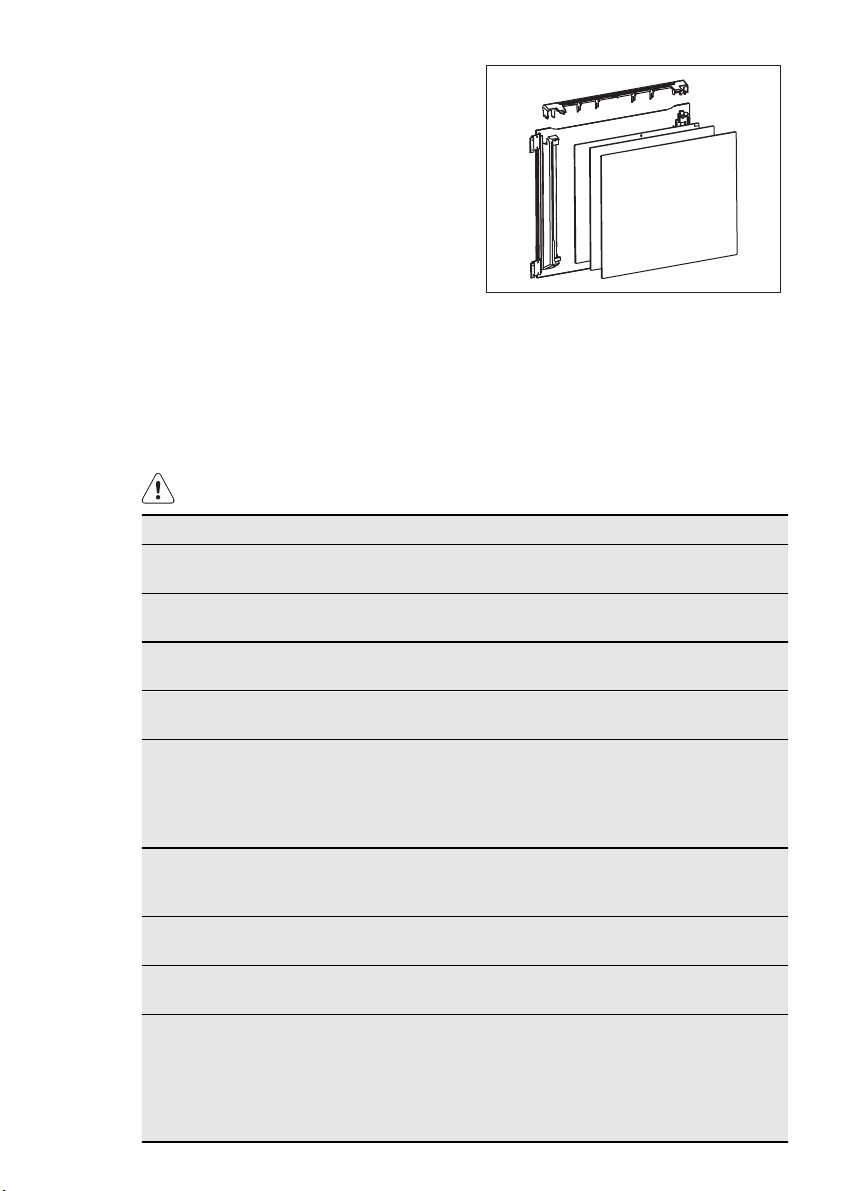
Installing the door and the glass
panels
When the oven door is clean, install the
glass panels in the opposite sequence.
Make sure that you put the glass panels
back in the correct order.
The middle glass panels have a graphic
located on the top. The third glass panel
has screen printings. In others, it is transparent.
The screen-printing zone must face the
inner side of the door. Make sure that after the installation the surface of the glass
panel frame is not rough when you touch
it.
13. WHAT TO DO IF…
WARNING!
Refer to the Safety chapters.
Problem Possible cause Remedy
The appliance does
not heat up.
The appliance does
not heat up.
The appliance does
not heat up.
The appliance does
not heat up.
The appliance does
not heat up.
There is water inside
the appliance.
The steam cooking
does not operate.
The steam cooking
does not operate.
It takes more than
three minutes to
empty the water
tank or the water
leaks from the
steam inlet opening.
ENGLISH 29
The appliance is deactiva-
Activate the appliance.
ted.
The clock is not set. Set the clock.
The necessary settings are
not set.
Make sure that the settings
are correct.
The Child Lock is activated. Refer to "Deactivating the
Child Lock".
The fuse is released. Make sure that the fuse is
the cause of the malfunction. If the fuse releases
again and again, contact an
authorized electrician.
There is too much water in
the tank.
Deactivate the appliance
and remove the water with a
cloth or sponge.
There is no water in the
Fill the water tank.
tank.
Lime obstructs the hole. Check the steam inlet open-
ing. Remove the lime.
There are lime deposits in
the appliance.
Check the water tank. Refer
to “Cleaning the water
tank”.
Page 30
www.electrolux.com
30
Steam and condensation settle on the
food and in the appliance.
The display shows
F111.
The lamp does not
operate.
The display shows
“Demo”. The appliance does not heat
up. The fan does
not operate.
If you cannot find a solution to the problem yourself, contact your dealer or the
service centre.
We recommend that you write the data here:
Model (MOD.) .........................................
Product number (PNC) .........................................
Serial number (S.N.) .........................................
Problem Possible cause Remedy
You left the dish in the appliance for too long.
Do not keep the dishes in
the appliance for longer
than 15 — 20 minutes after
the cooking ends.
You did not correctly install
the CT Sensor into the
socket.
Put the plug of core temperature sensor as far as possible into the socket.
The lamp is defective. Replace the lamp.
The test mode is activated.
1.
Deactivate the appliance.
2.
Touch and hold until
the appliance activates
and deactivates. The
sensor field is illuminated.
3.
Touch and hold and
at the same time until an acoustic signal
sounds and the sensor
field is off. “Demo” goes
out.
The necessary data for the service centre
is on the rating plate. The rating plate is
on the front frame of the appliance cavity.
14. TECHNICAL DATA
Voltage 230 V
Frequency 50 Hz
15. INSTALLATION
WARNING!
Refer to the Safety chapters.
Page 31
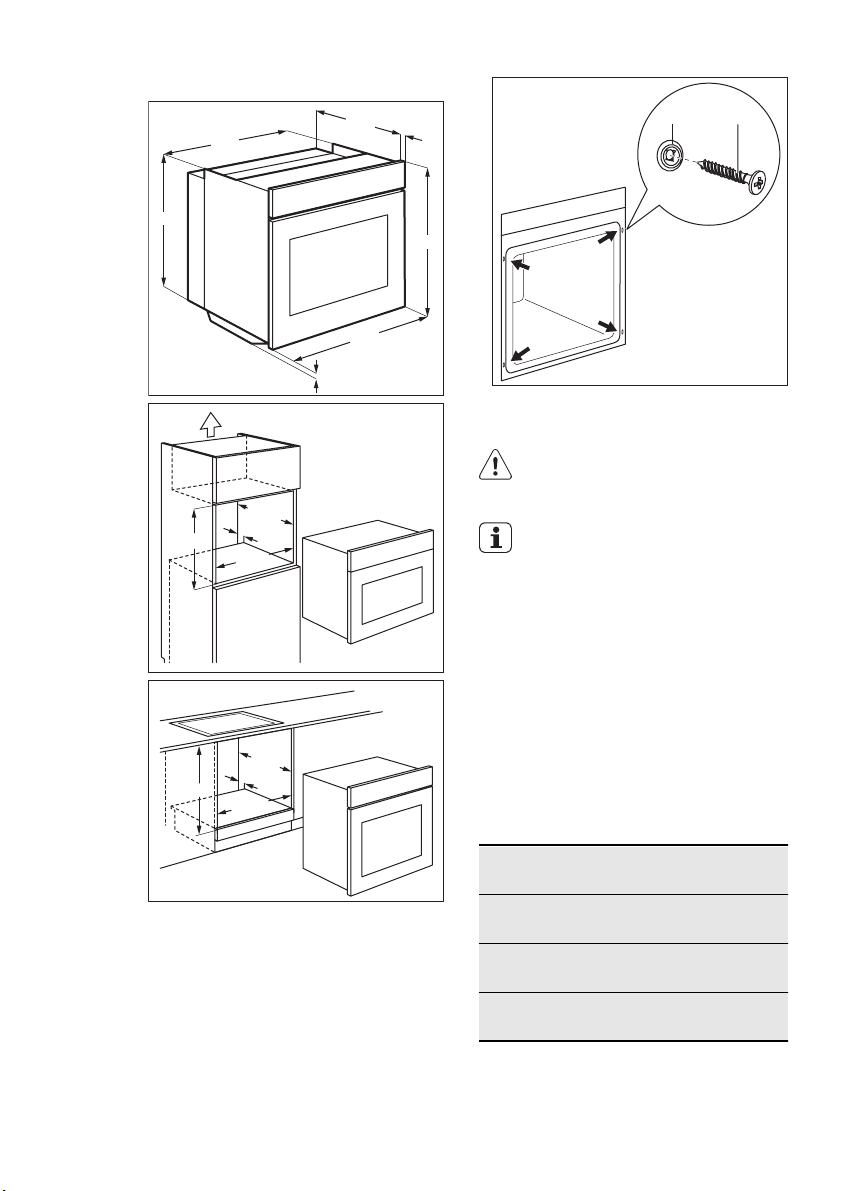
15.1 Building In
ENGLISH 31
573
590
600
558
min. 560
min. 560
min. 550
20
min. 550
20
548
20
589
594
5
AB
15.3 Electrical installation
WARNING!
Only a qualified person must do
the electrical installation.
The manufacturer is not responsible if you do not follow the safety
precautions from the chapter
"Safety Information".
This appliance is supplied with a main
plug and a main cable.
15.4 Cable
Cable types applicable for installation or
replacement: H07 RN-F, H05 RN-F, H05
RRF, H05 VV-F, H05 V2V2-F (T90), H05
BB-F.
For the section of the cable refer to the
total power (on the rating plate) and to the
table:
Total power
maximum 1380W3 x 0.75 mm²
Section of the ca-
ble
15.2 Securing the appliance to
the cabinet
1.
Open the appliance door.
2.
Fasten the appliance to the cabinet.
Put the four distance holders (A) into
the holes in the frame and then tighten the four screws (B) supplied with
the appliance.
maximum 2300W3 x 1 mm²
maximum 3680W3 x 1.5 mm²
The earth cord (green / yellow cable) must
be 2 cm longer than phase and neutral
cables (blue and brown cables).
Page 32

www.electrolux.com
32
16. ENVIRONMENT CONCERNS
Recycle the materials with the symbol
. Put the packaging in applicable
containers to recycle it.
Help protect the environment and human
health and to recycle waste of electrical
and electronic appliances. Do not dispose
appliances marked with the symbol
with the household waste. Return the
product to your local recycling facility or
contact your municipal office.
Page 33

DEUTSCH 33
INHALT
1. SICHERHEITSINFORMATIONEN . . . . . . . . . . . . . . . . . . . . . . . . . . . . . . . . . . . . . . . . . . . 34
2. SICHERHEITSHINWEISE . . . . . . . . . . . . . . . . . . . . . . . . . . . . . . . . . . . . . . . . . . . . . . . . . 35
3. GERÄTEBESCHREIBUNG . . . . . . . . . . . . . . . . . . . . . . . . . . . . . . . . . . . . . . . . . . . . . . . . 38
4. VOR DER ERSTEN INBETRIEBNAHME . . . . . . . . . . . . . . . . . . . . . . . . . . . . . . . . . . . . . . 38
5. BEDIENFELD . . . . . . . . . . . . . . . . . . . . . . . . . . . . . . . . . . . . . . . . . . . . . . . . . . . . . . . . . . 39
6. TÄGLICHER GEBRAUCH . . . . . . . . . . . . . . . . . . . . . . . . . . . . . . . . . . . . . . . . . . . . . . . . . 40
7. UHRFUNKTIONEN . . . . . . . . . . . . . . . . . . . . . . . . . . . . . . . . . . . . . . . . . . . . . . . . . . . . . . 44
8.
AUTOMATIKPROGRAMME . . . . . . . . . . . . . . . . . . . . . . . . . . . . . . . . . . . . . . . . . . . . . . . 45
9. VERWENDUNG DES ZUBEHÖRS . . . . . . . . . . . . . . . . . . . . . . . . . . . . . . . . . . . . . . . . . . . 46
10.
ZUSATZFUNKTIONEN . . . . . . . . . . . . . . . . . . . . . . . . . . . . . . . . . . . . . . . . . . . . . . . . . . . 48
11. PRAKTISCHE TIPPS UND HINWEISE . . . . . . . . . . . . . . . . . . . . . . . . . . . . . . . . . . . . . . . . 49
12.
REINIGUNG UND PFLEGE . . . . . . . . . . . . . . . . . . . . . . . . . . . . . . . . . . . . . . . . . . . . . . . . 59
13. WAS TUN, WENN … . . . . . . . . . . . . . . . . . . . . . . . . . . . . . . . . . . . . . . . . . . . . . . . . . . . . 62
14.
TECHNISCHE DATEN . . . . . . . . . . . . . . . . . . . . . . . . . . . . . . . . . . . . . . . . . . . . . . . . . . . . 64
15. MONTAGE . . . . . . . . . . . . . . . . . . . . . . . . . . . . . . . . . . . . . . . . . . . . . . . . . . . . . . . . . . . . 64
WIR DENKEN AN SIE
Vielen Dank, dass Sie sich für ein Electrolux Gerät entschieden haben. Sie haben ein Produkt
gewählt, hinter dem eine jahrzehntelange professionelle Erfahrung und Innovation steht. Bei der
Entwicklung dieses großartigen und eleganten Geräts haben wir an Sie gedacht. So haben Sie
bei jedem Gebrauch die Gewissheit, dass Sie stets großartige Ergebnisse erzielen werden.
Willkommen bei Electrolux.
Besuchen Sie uns auf unserer Website, um:
Anwendungshinweise, Prospekte, Fehlerbehebungs- und Service-Informationen zu
erhalten:
www.electrolux.com
Ihr erworbenes Produkt zu registrieren, um den besten Service dafür zu gewährleisten:
www.electrolux.com/productregistration
Zubehör, Verbrauchsmaterial und Original-Ersatzteile für Ihr Gerät zu erwerben:
www.electrolux.com/shop
KUNDENDIENST UND -BETREUUNG
Bitte verwenden Sie ausschließlich Original-Ersatzteile für Ihre Produkte.
Halten Sie folgende Angaben bereit, wenn Sie sich an den Kundendienst wenden
(diese Informationen finden Sie auf dem Typenschild): Modell, Produktnummer (PNC),
Seriennummer.
Warnungs-/ Sicherheitshinweise.
Allgemeine Hinweise und Ratschläge
Hinweise zum Umweltschutz
Änderungen vorbehalten.
Page 34

www.electrolux.com
34
1. SICHERHEITSINFORMATIONEN
Lesen Sie vor der Montage und Verwendung des Geräts
sorgfältig die mitgelieferte Anleitung. Der Hersteller haftet
nicht für Verletzungen oder Schäden, die durch eine fehlerhafte Montage entstehen. Bewahren Sie die Anleitung
zum Nachschlagen auf.
1.1 Sicherheit von Kindern und schutzbedürftigen
Personen
WARNUNG!
Es besteht Erstickungsgefahr, das Risiko von Verletzungen oder permanenten Behinderungen.
• Dieses Gerät kann dann von Kindern ab 8 Jahren, von
Personen mit eingeschränkten körperlichen, sensorischen oder geistigen Fähigkeiten sowie von Personen
ohne bisherige Erfahrung im Umgang mit solchen Geräten bedient werden, wenn sie dabei von einer Person, die für ihre Sicherheit verantwortlich ist, beaufsichtigt werden.
• Kinder dürfen nicht mit dem Gerät spielen.
• Halten Sie das Verpackungsmaterial von Kindern fern.
• Halten Sie Kinder und Haustiere vom Gerät fern, wenn
es in Betrieb oder in der Abkühlphase ist. Berührbare
Teile sind heiss.
• Falls Ihr Gerät mit einer Kindersicherung ausgestattet
ist, empfehlen wir, diese einzuschalten.
• Reinigung und Wartung des Geräts darf nicht von Kindern ohne Aufsicht erfolgen.
1.2 Allgemeine Sicherheit
• Nur eine qualifizierte Fachkraft darf den elektrischen
Anschluss des Geräts vornehmen und das Kabel austauschen.
• Der Geräteinnenraum wird während des Betriebs heiß.
Berühren Sie nicht die Heizelemente im Geräteinnern.
Page 35

DEUTSCH 35
Verwenden Sie zum Anfassen des Zubehörs und der
Töpfe wärmeisolierende Handschuhe.
• Benutzen Sie zum Reinigen des Geräts keinen Dampfreiniger.
• Trennen Sie vor Wartungsarbeiten das Gerät von der
Stromversorgung.
• Benutzen Sie keine Scheuermittel oder Metallschwämmchen zum Reinigen der Ofenglastür; sie können die Glasfläche verkratzen und zum Zersplittern der
Scheibe führen.
• Verwenden Sie ausschließlich den für dieses Gerät
empfohlenen KT Sensor.
• Ziehen Sie die Einhängegitter erst vorne und dann hinten von der Seitenwand weg und nehmen Sie sie heraus. Führen Sie zum Einsetzen der Einhängegitter die
obigen Schritte in umgekehrter Reihenfolge durch.
• Wenn das Netzkabel beschädigt ist, muss es vom Hersteller, seinem Kundenservice oder einer gleichermaßen qualifizierten Person ausgetauscht werden, um Gefahrenquellen zu vermeiden.
• Vergewissern Sie sich, dass das Gerät ausgeschaltet
ist, bevor Sie die Lampe austauschen, um einen
Stromschlag zu vermeiden.
2.
SICHERHEITSHINWEISE
2.1 Montage
WARNUNG!
Nur eine qualifizierte Fachkraft darf
den Elektroanschluss des Geräts
vornehmen.
• Entfernen Sie das Verpackungsmaterial.
• Stellen Sie ein beschädigtes Gerät nicht
auf und benutzen Sie es nicht.
• Halten Sie sich an die mitgelieferte
Montageanleitung.
• Seien Sie beim Umsetzen des Geräts
vorsichtig, denn es ist schwer. Tragen
Sie stets Sicherheitshandschuhe.
• Ziehen Sie das Gerät nicht am Türgriff.
• Die Mindestabstände zu anderen Geräten und Küchenmöbeln sind einzuhalten.
• Stellen Sie sicher, dass das Gerät unterhalb von bzw. zwischen sicheren
Konstruktionen montiert wird.
• Die Seiten des Geräts dürfen nur an
Geräte oder Einheiten in gleicher Höhe
angrenzen.
Page 36

www.electrolux.com
36
Elektrischer Anschluss
• Alle elektrischen Anschlüsse sind von
• Das Gerät muss geerdet werden.
• Stellen Sie sicher, dass die elektrischen
• Das Gerät darf ausschließlich an eine
• Verwenden Sie keine Mehrfachsteckdo-
• Achten Sie darauf, Netzstecker und
• Achten Sie darauf, dass das Netzkabel
• Alle Teile, die gegen direktes Berühren
• Stecken Sie den Netzstecker erst nach
• Falls die Steckdose lose ist, schließen
• Ziehen Sie nicht am Netzkabel, um das
• Verwenden Sie immer die richtigen
• Die elektrische Installation muss eine
WARNUNG!
Brand- und Stromschlaggefahr.
einem geprüften Elektriker vorzunehmen.
Daten auf dem Typenschild den Daten
Ihrer Stromversorgung entsprechen.
Wenden Sie sich andernfalls an eine
Elektrofachkraft.
ordnungsgemäß installierte Schutzkontaktsteckdose angeschlossen werden.
sen oder Verlängerungskabel.
Netzkabel nicht zu beschädigen. Wenden Sie sich zum Austausch des beschädigten Netzkabels an den Kundendienst oder einen Elektriker.
die Gerätetür nicht berührt, insbesondere wenn die Tür heiß ist.
schützen sowie die isolierten Teile müssen so befestigt werden, dass sie nicht
ohne Werkzeug entfernt werden können.
Abschluss der Montage in die Steckdose. Stellen Sie sicher, dass der Netzstecker nach der Montage noch zugänglich ist.
Sie den Netzstecker nicht an.
Gerät von der Spannungsversorgung
zu trennen. Ziehen Sie dazu immer direkt am Netzstecker.
Trenneinrichtungen: Überlastschalter,
Sicherungen (Schraubsicherungen
müssen aus dem Halter entfernt werden können), Fehlerstromschutzschalter und Schütze.
Trenneinrichtung aufweisen, mit der Sie
das Gerät allpolig von der Stromversorgung trennen können. Die Trenneinrichtung muss mit einer Kontaktöffnungs-
breite von mindestens 3 mm ausgeführt
sein.
2.2 Gebrauch
WARNUNG!
Es besteht Verletzungs-, Verbrennungs-, Stromschlag- oder Explosionsgefahr.
• Das Gerät ist für die Verwendung im
Haushalt vorgesehen.
• Nehmen Sie keine technischen Änderungen am Gerät vor.
• Die Lüftungsöffnungen dürfen nicht abgedeckt werden.
• Lassen Sie das Gerät bei Betrieb nicht
unbeaufsichtigt.
• Das Gerät nach jedem Gebrauch ausschalten.
• Gehen Sie beim Öffnen der Tür vorsichtig vor, wenn das Gerät in Betrieb ist.
Es kann heiße Luft austreten.
• Bedienen Sie das Gerät nicht mit feuchten oder nassen Händen oder wenn es
mit Wasser in Kontakt gekommen ist.
• Üben Sie keinen Druck auf die geöffnete Gerätetür aus.
• Benutzen Sie das Gerät nicht als Arbeits- oder Abstellfläche.
• Halten Sie die Tür immer geschlossen,
wenn das Gerät in Betrieb ist.
• Öffnen Sie die Gerätetür vorsichtig. Bei
der Verwendung von Zutaten, die Alkohol enthalten, kann ein Alkohol-Luftgemisch entstehen.
• Achten Sie beim Öffnen der Tür darauf,
dass keine Funken oder offenen Flammen in das Geräts gelangen.
• Platzieren Sie keine entflammbaren
Produkte oder Gegenstände, die mit
entflammbaren Produkten benetzt sind,
im Gerät, auf dem Gerät oder in der
Nähe des Geräts.
WARNUNG!
Das Gerät könnte beschädigt werden.
• Um Beschädigungen oder Verfärbungen der Emailbeschichtung zu vermeiden:
– Stellen Sie feuerfestes Geschirr oder
andere Gegenstände nicht direkt auf
den Boden des Gerätes.
Page 37

– Legen Sie keine Alufolie direkt auf den
Boden des Geräts.
– Stellen Sie kein Wasser in das heiße
Gerät.
– Lassen Sie nach dem Abschalten des
Geräts kein feuchtes Geschirr oder
feuchte Speisen im Backofeninnenraum
stehen.
– Gehen Sie beim Herausnehmen oder
Einsetzen der Innenausstattung sorgfältig vor.
• Verfärbungen der Emailbeschichtung
haben keine Auswirkung auf die Leistung des Geräts. Sie stellen keinen
Mangel im Sinne des Gewährleistungsrechtes dar.
• Verwenden Sie für feuchte Kuchen das
tiefe Blech. Fruchtsäfte können bleibende Flecken verursachen.
2.3 Reinigung und Pflege
WARNUNG!
Risiko von Verletzungen, Brand
oder Beschädigungen am Gerät.
• Schalten Sie vor Reinigungsarbeiten immer das Gerät aus und ziehen Sie den
Netzstecker aus der Steckdose.
• Vergewissern Sie sich, dass das Gerät
abgekühlt ist. Zusätzlich besteht die
Gefahr, dass die Glasscheiben brechen.
• Ersetzen Sie die Glasscheiben der Tür
umgehend, wenn sie beschädigt sind.
Wenden Sie sich hierzu an den Kundendienst.
• Gehen Sie beim Aushängen der Tür
sorgsam vor. Die Tür ist schwer!
• Reinigen Sie das Gerät regelmäßig, um
eine Abnutzung des Oberflächenmaterials zu verhindern.
• Fett- oder Speisereste im Gerät können
einen Brand verursachen.
DEUTSCH 37
• Reinigen Sie das Geräts mit einem weichen, feuchten Tuch. Verwenden Sie
nur neutrale Reinigungsmittel. Benutzen
Sie keine Scheuermittel, scheuernde
Reinigungsschwämmchen, Lösungsmittel oder Metallgegenstände.
• Falls Sie ein Backofenspray verwenden,
befolgen Sie bitte unbedingt die Anweisungen auf der Verpackung.
• Reinigen Sie die katalytische Emailbeschichtung (falls vorhanden) nicht mit
Reinigungsmitteln.
2.4 Innenbeleuchtung
• Die Leuchtmittel in diesem Gerät sind
nur für Haushaltsgeräte geeignet. Benutzen Sie sie nicht für die Raumbeleuchtung.
WARNUNG!
Stromschlaggefahr.
• Trennen Sie das Gerät von der Stromversorgung, bevor Sie die Lampe austauschen.
• Verwenden Sie dazu eine Lampe mit
der gleichen Leistung.
2.5 Entsorgung
WARNUNG!
Verletzungs- und Erstickungsgefahr.
• Trennen Sie das Gerät von der Stromversorgung.
• Schneiden Sie das Netzkabel ab und
entsorgen Sie es.
• Entfernen Sie das Türschloss, um zu
verhindern, dass sich Kinder oder
Haustiere in dem Gerät einschließen.
Page 38
www.electrolux.com
38
3. GERÄTEBESCHREIBUNG
Einhängegitter, herausnehmbar
1
2
5
4
3
8
2
1
7
3
4
5
6
Typenschild
7
Einschubebenen
8
3.1 Backofenzubehör
• Kombirost
Für Geschirr, Kuchenformen, Braten.
Backblech
•
Für Kuchen und Plätzchen.
Brat- und Fettpfanne
•
Zum Backen und Braten oder zum Auf-
6
Elektronischer Programmspeicher
1
Buchse für den KT Sensor
2
Grill
3
Backofenlampe
4
Ventilator
5
fangen von austretendem Fett.
• KT Sensor
Zum Messen des Garzustands.
• Teleskopauszüge
Für Roste und Backbleche.
4. VOR DER ERSTEN INBETRIEBNAHME
WARNUNG!
Siehe Sicherheitshinweise.
4.1 Erste Reinigung
• Entfernen Sie alle Zubehörteile und die
herausnehmbaren Einhängegitter (falls
vorhanden).
• Reinigen Sie das Gerät vor der ersten
Inbetriebnahme.
Siehe Kapitel „Reinigung und Pflege“.
4.2 Erstanschluss
Nach dem Netzanschluss oder nach einem Stromausfall müssen die Sprache,
der Kontrast und die Helligkeit des Displays sowie die Uhrzeit eingestellt werden.
1.
Berühren Sie oder , um die
Option einzustellen.
2.
Berühren Sie zur Bestätigung OK.
4.3 Aufheizen
Heizen Sie das leere Gerät vor, um Fettreste zu verbrennen.
1.
Stellen Sie die Funktion und die
Höchsttemperatur ein.
2.
Lassen Sie das Gerät 45 Minuten
lang eingeschaltet.
3.
Stellen Sie die Funktion und die
Höchsttemperatur ein.
4.
Lassen Sie das Gerät 15 Minuten
lang eingeschaltet.
Das Zubehör kann heißer werden als beim
normalen Gebrauch. Das Gerät kann Geruch und Rauch verströmen. Das ist normal. Sorgen Sie für eine ausreichende Belüftung.
Page 39
5. BEDIENFELD
Elektronischer Programmspeicher
1 10
Bedienen Sie das Gerät über die Sensorfelder.
Nummer
1
2 43 8 95 6 7
11
Sensor-
feld
Funktion Kommentar
Ein/Aus Ein- und Ausschalten des Geräts.
DEUTSCH 39
Ofenfunktionen
oder Koch-Assistent
2
Auswählen einer Ofenfunktion oder der
Funktion Koch-Assistent . Zum Auswählen der gewünschten Funktion das
Feld ein- oder zweimal berühren, wenn
das Gerät eingeschaltet ist. Zum Einoder Ausschalten der Backofenbeleuchtung das Feld 3 Sekunden lang
berühren.
Home-Taste Menünavigation eine Ebene zurück.
3
Zum Anzeigen des Hauptmenüs das
Feld 3 Sekunden lang berühren.
Temperaturauswahl
4
Zum Einstellen der Temperatur oder zur
Anzeige der aktuellen Temperatur im
Gerät. Zum Ein- oder Ausschalten der
Funktion Schnellaufheizung das Feld 3
Sekunden lang berühren.
5
6
7
Bevorzugtes
Programm
„Nach oben“Taste
„Nach unten“Taste
Zeit- und Zusatzfunktionen
Zum Speichern und Aufrufen der bevorzugten Programme.
Menünavigation nach oben.
Menünavigation nach unten.
Zum Einstellen verschiedener Funktionen. Wenn eine Ofenfunktion in Betrieb
ist, berühren Sie das Sensorfeld, um die
Uhr, die Kindersicherung, den Speicher
8
Bevorzugtes Programm , Heat + Hold
oder Set + Go einzustellen oder die Einstellungen des Kerntemperatursensors
zu ändern (nur bei ausgewählten Modellen).
Page 40
www.electrolux.com
40
A
Sensor-
feld
—
Funktion Kommentar
Kurzzeit-Wecker
OK Bestätigung der Auswahl oder Einstel-
Display Anzeige der aktuellen Geräteeinstellun-
B C
Nummer
9
10
11
Display
DE
Weitere Anzeigen auf dem Display
Symbol Funktion
Kurzzeit-Wecker Die Funktion ist eingeschaltet.
Tageszeit Das Display zeigt die Tageszeit an.
Dauer Das Display zeigt die erforderliche Garzeit an.
Ende Das Display zeigt an, wann der Garvorgang ab-
geschlossen sein wird.
Zeitanzeige Das Display zeigt an, wie lange eine Ofenfunkti-
on in Betrieb ist. Drücken Sie
zeitig, um diese Anzeige auf Null zu stellen.
Aufheiz-Anzeige Das Display zeigt die Temperatur im Gerät an.
Kontrolllampe
Schnellaufheizung
Die Funktion ist eingeschaltet. Diese Funktion
verkürzt die Aufheizzeit.
Gewichtsautomatik Das Display zeigt an, dass die Gewichtsautoma-
tik in Betrieb ist oder dass Sie das Gewicht än-
dern können.
Heat + Hold Die Funktion ist eingeschaltet.
Einstellen von Kurzzeit-Wecker .
lung.
gen.
A)
Ofenfunktion
B)
Tageszeit
C)
Aufheiz-Anzeige
D)
Temperatur
E)
Funktionen Dauer und Ende
und gleich-
6. TÄGLICHER GEBRAUCH
WARNUNG!
Siehe Sicherheitshinweise.
6.1 Navigation in den Menüs
Bedienung der Menüs:
1.
Schalten Sie das Gerät ein.
2.
Drücken Sie oder , um die
Menüoption einzustellen.
Page 41
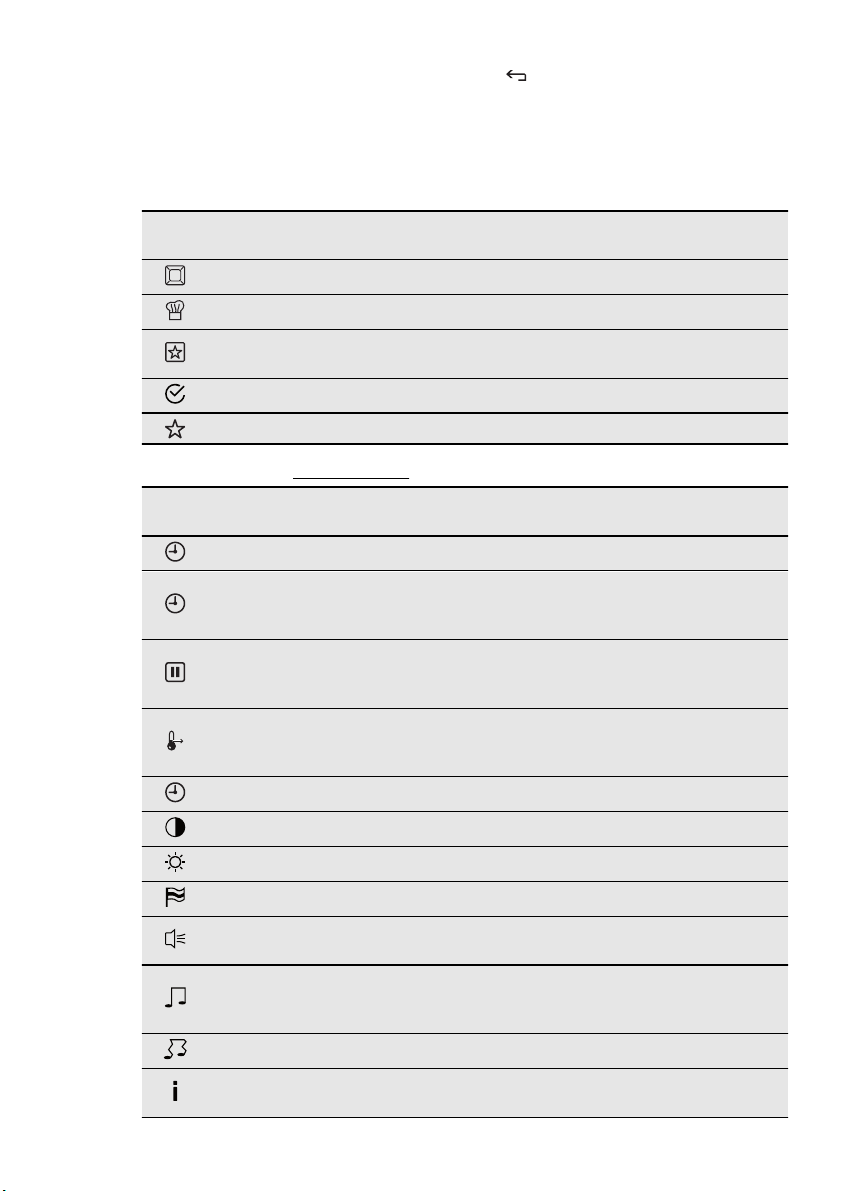
3.
Drücken Sie OK, um das Untermenü
aufzurufen oder die Einstellung zu bestätigen.
6.2 Überblick über die Menüs
Hauptmenü
Sym-
Untermenüs von: Einstellungen
Sym-
Menüpunkt Anwendung
bol
Ofenfunktionen Liste der Ofenfunktionen.
Koch-Assistent Liste mit automatischen Garprogrammen.
Bevorzugtes Pro-
gramm
Liste der bevorzugten Garprogramme, die vom
Benutzer gespeichert wurden.
Einstellungen Liste mit weiteren Einstellungen.
Sonderfunktionen Liste der zusätzlichen Ofenfunktionen.
Untermenü Beschreibung
bol
Tageszeit einstellen Einstellen der aktuellen Uhrzeit.
Steht diese Funktion auf EIN, wird die aktuelle
Zeitanzeige
Uhrzeit angezeigt, sobald das Gerät ausge-
schaltet wird.
Steht diese Funktion auf EIN, können Sie diese
SET + GO
Funktionen wählen, wenn Sie die Ofenfunktion
einschalten.
Steht diese Funktion auf EIN, können Sie diese
Heat + Hold
Funktionen wählen, wenn Sie die Ofenfunktion
einschalten.
Zeitverlängerung Ein- und Ausschalten der Funktion.
DEUTSCH 41
können Sie von jedem Punkt aus
Mit
zurück in das Hauptmenü springen.
Kontrast Einstellen des Kontrastes der Anzeige.
Helligkeit Einstellen der Helligkeit der Anzeige.
Sprache einstellen Einstellen der Sprache für die Anzeige.
Lautstärke
Einstellen der Lautstärke für Tastentöne und
Signale.
Ein- und Ausschalten der Töne der SensorfelTastentöne
der. Der Ton des Sensorfelds „Ein/Aus“ lässt
sich nicht ausschalten.
Alarmsignale Ein- und Ausschalten der Alarmsignale.
Service
Zeigt die Softwareversion und die Konfiguration
an.
Page 42
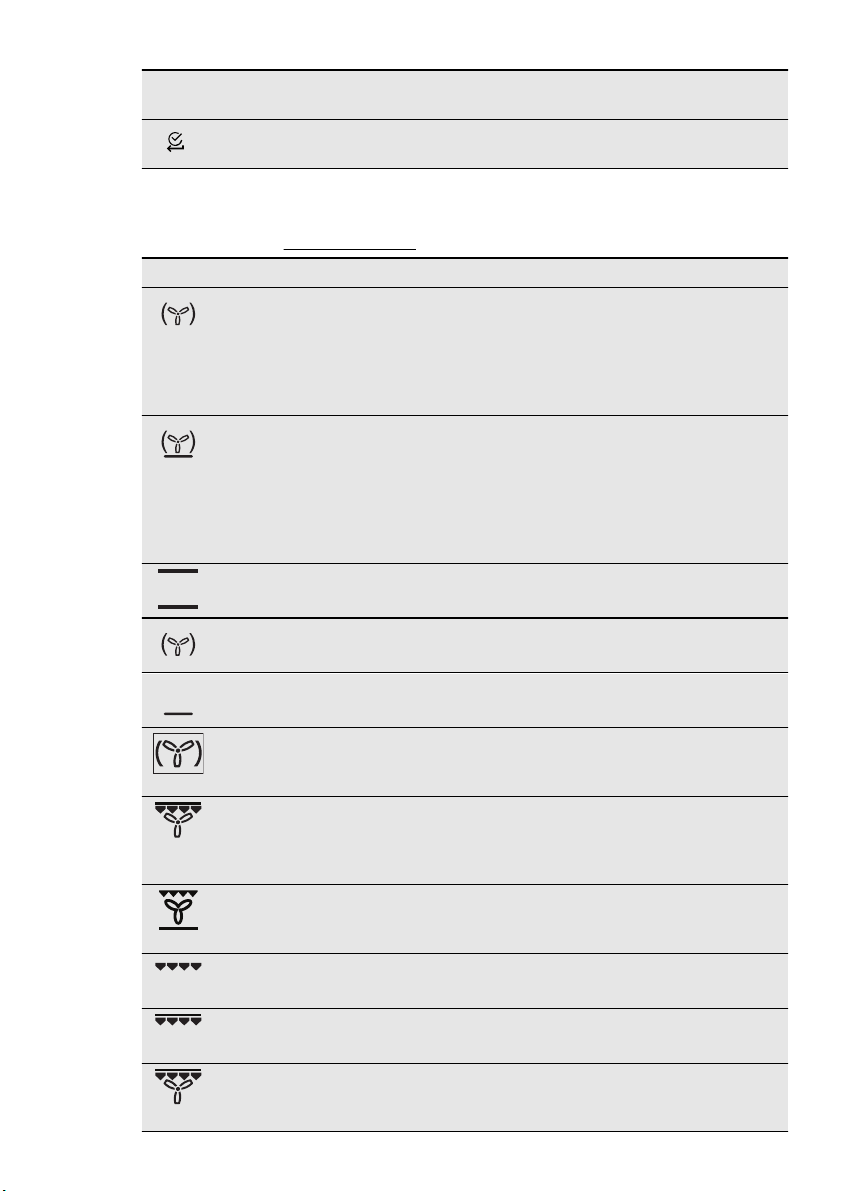
www.electrolux.com
42
Sym-
Untermenü Beschreibung
bol
Werkseinstellungen
Zurücksetzen aller Einstellungen auf die Werks-
einstellungen.
6.3 Ofenfunktionen
Untermenü von: Ofenfunktionen
Ofenfunktion Anwendung
Heißluft mit Ringheizkörper
Pizzastufe Zum Backen auf einer Ebene für Gerichte mit
Ober-/Unterhitze Zum Backen und Braten auf einer Ebene.
Bio-Garen Zum Braten von besonders magerem und
Zum Backen auf bis zu drei Ebenen gleichzeitig. Wenn Sie diese Funktion einschalten, stellen Sie die Backofentemperatur um 20-40 °C
niedriger ein als die Standardtemperatur, die
Sie bei Ober-/Unterhitze verwenden. Auch
zum Dörren von Lebensmitteln.
einer intensiveren Bräunung und einem
knusprigen Boden. Wenn Sie diese Funktion
einschalten, stellen Sie die Backofentemperatur um 20-40 °C niedriger ein als die Standardtemperatur, die Sie bei Ober-/Unterhitze
verwenden. .
zartem Gargut.
Unterhitze Zum Backen von Kuchen mit knusprigen Bö-
den.
Feuchte Heißluft Zum energiesparenden Backen und Garen
von trockenem Gebäck. Auch für Backwaren
in Backformen auf einer Einschubebene.
ÖKO Braten Mit den ÖKO-Funktionen optimieren Sie den
Energieverbrauch während des Garvorgangs.
Sie müssen jedoch zuerst die Gardauer festlegen.
Tiefkühlgerichte Zur Zubereitung knuspriger Fertiggerichte wie
Pommes frites, Kroketten oder Frühlingsrollen.
Grillstufe 1 Zum Grillen flacher Lebensmittel in der Mitte
des Rostes und zum Toasten.
Grillstufe 2 Zum Grillen flacher Lebensmittel in größeren
Mengen und zum Toasten von Brot.
Heißluftgrillen Zum Braten größerer Fleischstücke oder von
Geflügel mit Knochen auf einer Einschubebene. Auch zum Gratinieren und Überbacken.
Page 43
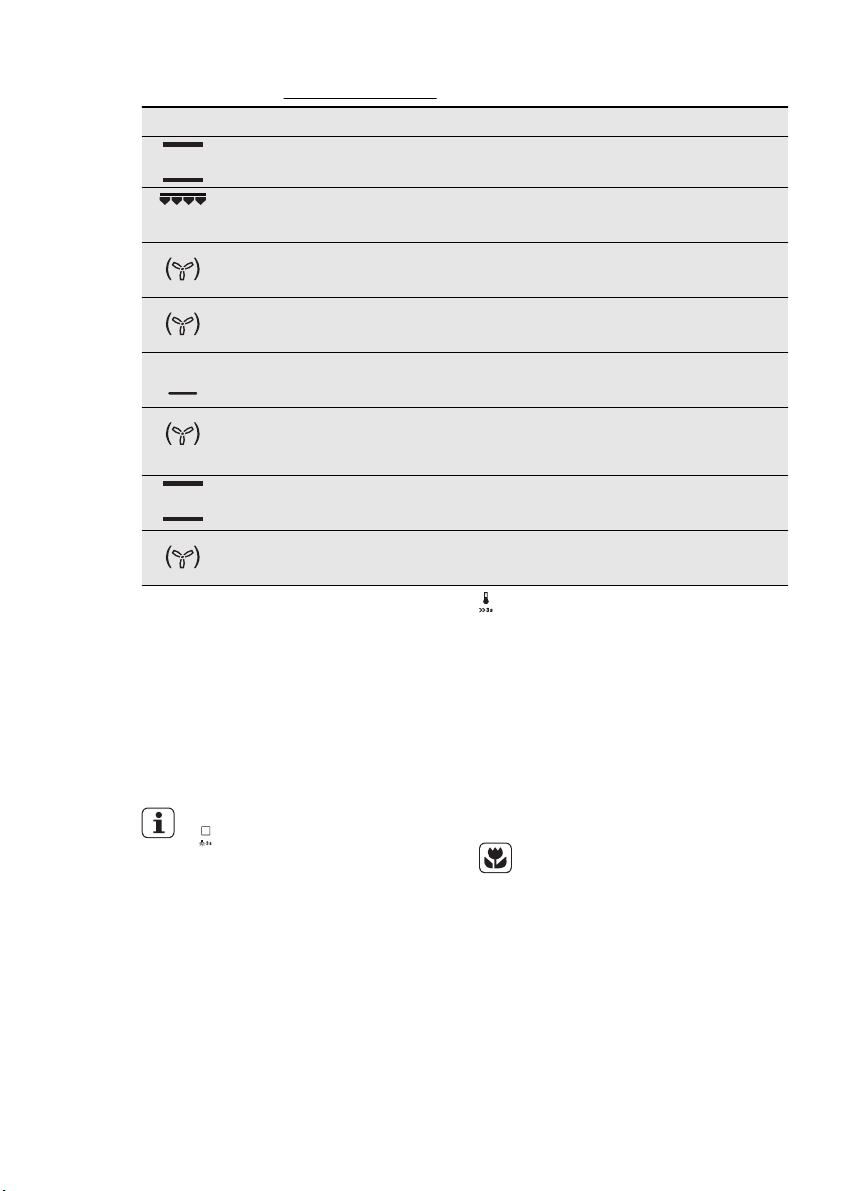
Untermenü von: Sonderfunktionen
Ofenfunktion Anwendung
Brot Backen Zum Backen von Brot.
DEUTSCH 43
Überbacken Für Speisen wie Lasagne oder Kartoffelgra-
Gärstufe Zum Gehen lassen von Hefeteig vor dem
Teller wärmen Zum Vorwärmen der Teller vor dem Servie-
Einkochen Zum Einkochen von Gemüse in Gläsern mit
Dörren Zum Dörren von Obst und Gemüse in
Warmhalten Zum Warmhalten von bereits zubereiteten
Auftauen Zum Auftauen von tiefgefrorenen Lebens-
6.4 Einschalten einer
Ofenfunktion
1. Schalten Sie das Gerät ein.
2.
Wählen Sie das Menü Ofenfunktionen . Mit OK bestätigen.
3. Wählen Sie die Ofenfunktion. Mit OK
bestätigen.
4.
Stellen Sie die Temperatur ein. Mit OK
bestätigen.
Drücken Sie einmal oder zweimal
, um direkt zum Menü Ofenfunktionen zu gelangen (sofern
das Gerät eingeschaltet ist).
6.5 Aufheiz-Anzeige
Der Balken leuchtet im Display auf, sobald
Sie eine Ofenfunktion einschalten. Der
Balken zeigt an, dass die Temperatur ansteigt.
6.6 Kontrolllampe
Schnellaufheizung
Diese Funktion verkürzt die Aufheizzeit.
Zum Einschalten der Funktion halten Sie
tin. Auch zum Gratinieren und Überbacken.
Backen.
ren.
Flüssigkeit, wie z. B. Mixed Pickles.
Scheiben, z. B. Äpfeln, Pflaumen, Pfirsichen
sowie Tomaten, Zucchini und Pilzen.
Speisen.
mitteln.
3 Sekunden lang gedrückt. Sie können
dann beobachten, wie sich die AufheizAnzeige verändert.
6.7 Restwärme
Das Display zeigt die Restwärme an, sobald Sie das Gerät ausschalten. Sie können die Restwärme zum Warmhalten der
Speisen benutzen.
6.8 Energie sparen
Das Gerät verfügt über Funktionen, mit deren Hilfe Sie beim
täglichen Kochen Energie sparen können:
• Restwärme:
– Die Heizelemente werden bei laufen-
der Ofenfunktion/laufendem Programm 10 % vor dem Garzeitende
ausgeschaltet (die Lampe und der
Ventilator bleiben eingeschaltet). Damit diese Funktion funktioniert, muss
die Gardauer mehr als 30 Minuten
betragen oder Sie müssen die Uhrfunktionen ( Dauer , Ende ) verwenden.
Page 44
www.electrolux.com
44
– Nach dem Ausschalten des Geräts
kann die Restwärme für das Warmhalten von Speisen verwendet werden. Im Display wird die verbleibende
Temperatur angezeigt.
• Garen bei ausgeschalteter Back-
ofenbeleuchtung - Berühren Sie 3 Se-
kunden lang
leuchtung während des Garvorgangs
auszuschalten.
• Wenn Sie die Funktion Feuchte Heiß-
luft verwenden, erlischt die Backofen-
, um die Backofenbe-
7. UHRFUNKTIONEN
7.1 Uhrfunktionen
Symbol Funktion Beschreibung
Kurzzeit-Wecker
Dauer
Ende
5 Sekunden nachdem Sie die Zeit für eine
Uhrfunktion eingestellt haben wird diese
Zeit heruntergezählt.
Bei der Auswahl der Uhrfunktionen Dauer
schaltet das Gerät die Heizelemente nach Ablauf von 90 % der
eingestellten Zeit aus. Mit der vorhandenen Restwärme wird der
Garvorgang fortgesetzt, bis die
eingestellte Zeit abgelaufen ist (3
bis 20 Minuten).
Zum Einstellen eines Countdowns (max. 2 Std. 30
Min.). Diese Funktion hat keine Auswirkung auf den
Gerätebetrieb. Sie können die Funktion auch einschalten, wenn das Gerät ausgeschaltet ist. Schalten Sie die Funktion mit
Starten.
Zum Einstellen der Betriebszeitdauer des Geräts
(max. 23 Std. 59 Min.).
Zum Einstellen der Abschaltzeit einer Ofenfunktion
(max. 23 Std. 59 Min.).
und Ende
lampe nach 30 Sekunden. Berühren Sie
3 Sekunden, um die Lampe wieder
einzuschalten.
Wenn Sie die Öko-Funktionen ver-
wenden, erlischt die Backofenlampe
nach 30 Sekunden. Berühren Sie
Sekunden, um die Lampe wieder einzuschalten.
• Öko-Funktionen - schlagen Sie unter
„ Ofenfunktionen “ nach.
ein. Drücken Sie oder
, um die Minuten einzustellen, und OK zum
3.
Drücken Sie oder , um die
gewünschte Zeit einzustellen. Mit OK
bestätigen.
Nach Ablauf der Zeit ertönt ein akustisches Signal. Das Gerät wird ausgeschaltet. Das Display zeigt eine Meldung an.
4.
Berühren Sie ein Sensorfeld, um den
Signalton abzuschalten.
3
Einstellen der Uhrfunktionen
1.
Stellen Sie eine Ofenfunktion ein.
2.
Drücken Sie wiederholt, bis im
Display die gewünschte Uhrfunktion
und das entsprechende Symbol anzeigt werden.
Page 45
•
Für die Funktionen Dauer
und Ende müssen Sie zu-
erst die Ofenfunktion und die
Temperatur einstellen. Erst danach können Sie die Uhrfunktion einstellen. Das Gerät wird
automatisch ausgeschaltet.
• Sie können die Funktionen Dau und Ende gleich-
er
zeitig verwenden, wenn das
Gerät zu einem bestimmten
späteren Zeitpunkt automatisch
ein- und ausgeschaltet werden
soll.
• Bei Verwendung des KT Sen-
sors (falls verfügbar) können die
Funktionen Dauer
de
nicht eingestellt wer-
den.
und En-
7.2 Heat + Hold
Die Funktion Heat + Hold hält zubereitete
Speisen 30 Minuten bei 80 °C warm. Sie
wird nach Ablauf des Back- oder Bratvorgangs eingeschaltet.
• Sie können die Funktion im Me-
nü Einstellungen einschalten
und ausschalten.
• Voraussetzungen für die Funkti-
on:
– Die eingestellte Temperatur
beträgt mehr als 80 °C.
– Die Funktion Dauer ist einge-
stellt.
DEUTSCH 45
Einschalten der Funktion
1.
Schalten Sie das Gerät ein.
2.
Wählen Sie die Ofenfunktion.
3.
Stellen Sie eine höhere Temperatur
als 80 °C ein.
4.
Drücken Sie wiederholt, bis im
Display Heat + Hold angezeigt wird.
Mit OK bestätigen.
Nach Ablauf der Funktion ertönt ein akustisches Signal.
Die Funktion Heat + Hold wird für 30 Minuten eingeschaltet.
Die Funktion Heat + Hold bleibt eingeschaltet, wenn Sie zu anderen Ofenfunktionen wechseln.
7.3 Zeitverlängerung
Die Funktion Zeitverlängerung lässt die
Ofenfunktion nach Ablauf der Dauer eingeschaltet.
• Anwendbar auf allen Ofenfunktionen mit
Dauer oder Gewichtsautomatik.
• Nicht anwendbar auf Ofenfunktionen
mit KT Sensor .
Einschalten der Funktion:
1.
Nach Ablauf der Garzeit ertönt ein
Signal. Berühren Sie ein Sensorfeld.
2.
Das Display zeigt die Meldung Zeitverlängerung fünf Minuten an.
3.
Drücken Sie zur Bestätigung (oder
zum Abbrechen).
4.
Stellen Sie die Dauer der Zeitverlängerung ein. Mit OK bestätigen.
8. AUTOMATIKPROGRAMME
8.1 Koch-Assistent mit
Rezeptautomatik
Das Gerät stellt eine Reihe von Rezepten
zur Verfügung, die Sie verwenden können. Die Rezepte sind fest einprogrammiert und können nicht geändert werden.
Einschalten der Funktion:
1.
Schalten Sie das Gerät ein.
2.
Wählen Sie das Menü Koch-Assistent . Mit OK bestätigen.
3.
Wählen Sie die Kategorie und die
Speise. Mit OK bestätigen.
4.
Wählen Sie Rezeptautomatik . Mit OK
bestätigen.
Wenn Sie die Funktion Manuell
verwenden, benutzt das Gerät automatische Einstellungen. Diese
können Sie ändern. Gehen Sie dazu wie für andere Funktionen beschrieben vor.
Page 46
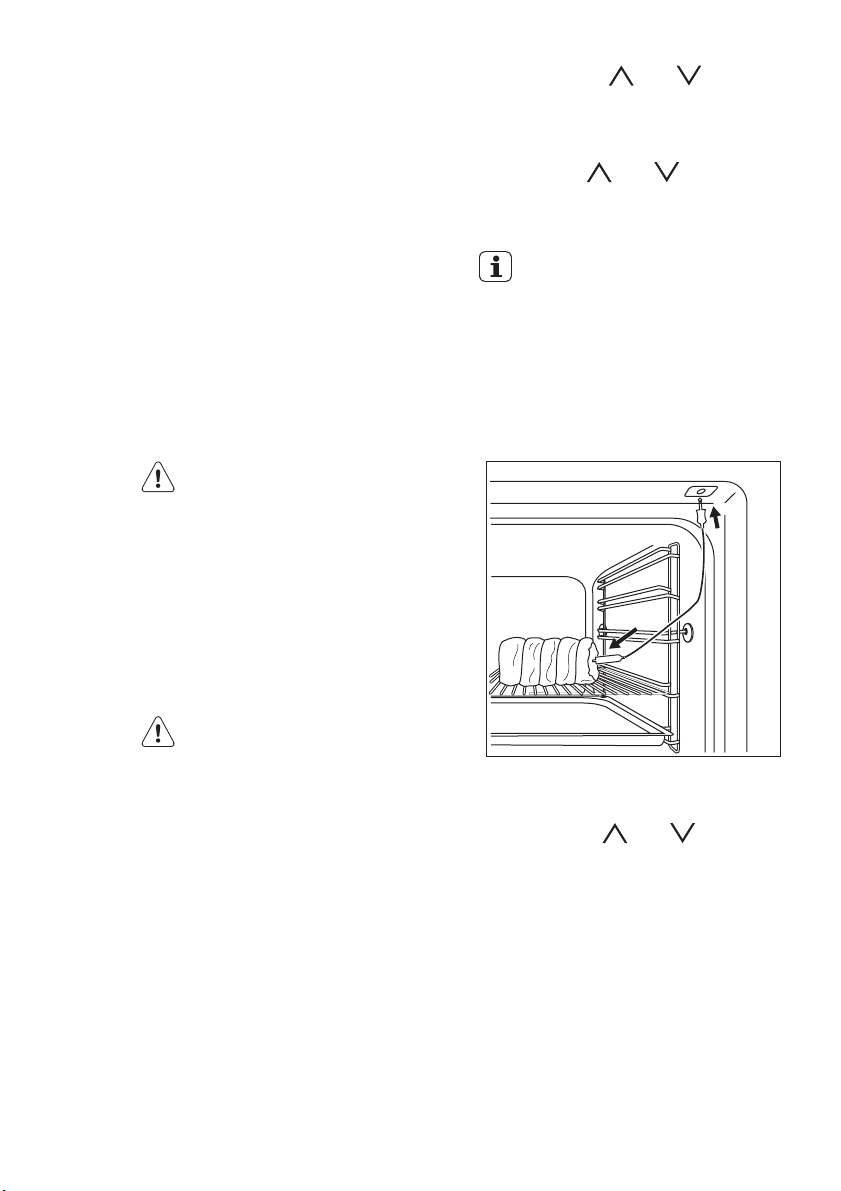
www.electrolux.com
46
8.2 Koch-Assistent mit
5.
Gewichtsautomatik
Bei dieser Funktion wird die Gardauer automatisch berechnet. Dazu muss das Gewicht des Garguts eingegeben werden.
Einschalten der Funktion:
1.
Schalten Sie das Gerät ein.
2.
Wählen Sie Koch-Assistent . Mit OK
bestätigen.
3.
Wählen Sie die Kategorie und die
Speise. Mit OK bestätigen.
4.
Wählen Sie Gewichtsautomatik . Mit
OK bestätigen.
Das Automatikprogramm startet. Sie können das Gewicht jederzeit ändern. Drü-
cken Sie dazu
der Zeit ertönt ein akustisches Signal.
Drücken Sie ein Sensorfeld, um es abzuschalten.
9. VERWENDUNG DES ZUBEHÖRS
WARNUNG!
Siehe Sicherheitshinweise.
9.1 KT Sensor
Der KT Sensor misst die Temperatur im
Inneren des Fleisches. Das Gerät wird
ausgeschaltet, sobald das Fleisch die eingestellte Temperatur erreicht hat.
Zwei Temperaturen sind einzustellen:
• Die Backofentemperatur
• Die Kerntemperatur
Verwenden Sie nur den mitgelie-
ferten KT Sensor oder ein Originalersatzteil.
1.
Führen Sie die Spitze des KT Sensors
mittig in das vorbereitete Fleischstück
ein.
2.
Schalten Sie das Gerät ein.
3.
Stecken Sie den Stecker des KT Sensors in die Buchse an der Vorderseite
des Geräts.
4.
5.
6.
Berühren Sie oder , um das
Gewicht des Garguts einzustellen. Mit
OK bestätigen.
oder . Nach Ablauf
Bei einigen Programmen muss
das Gargut nach 30 Minuten gewendet werden. Im Display wird
eine Erinnerungsmeldung angezeigt.
Im Display wird das Symbol für den
KT Sensor angezeigt.
Drücken Sie innerhalb von weniger als
5 Sekunden
Kerntemperatur einzustellen.
Stellen Sie die Backofenfunktion ein
und, falls notwendig, die Backofentemperatur.
Das Gerät berechnet das voraussichtliche Ende. Der ermittelte Wert variiert
je nach Speisemenge, eingestellter
Backofentemperatur (mindestens 120
°C) und ausgewählter Funktion. Das
voraussichtliche Ende wird nach ca.
30 Minuten berechnet.
Stellen Sie sicher, dass der KT Sensor während des gesamten Garvorgangs im Fleisch und in der Buchse
verbleibt.
oder , um die
Page 47
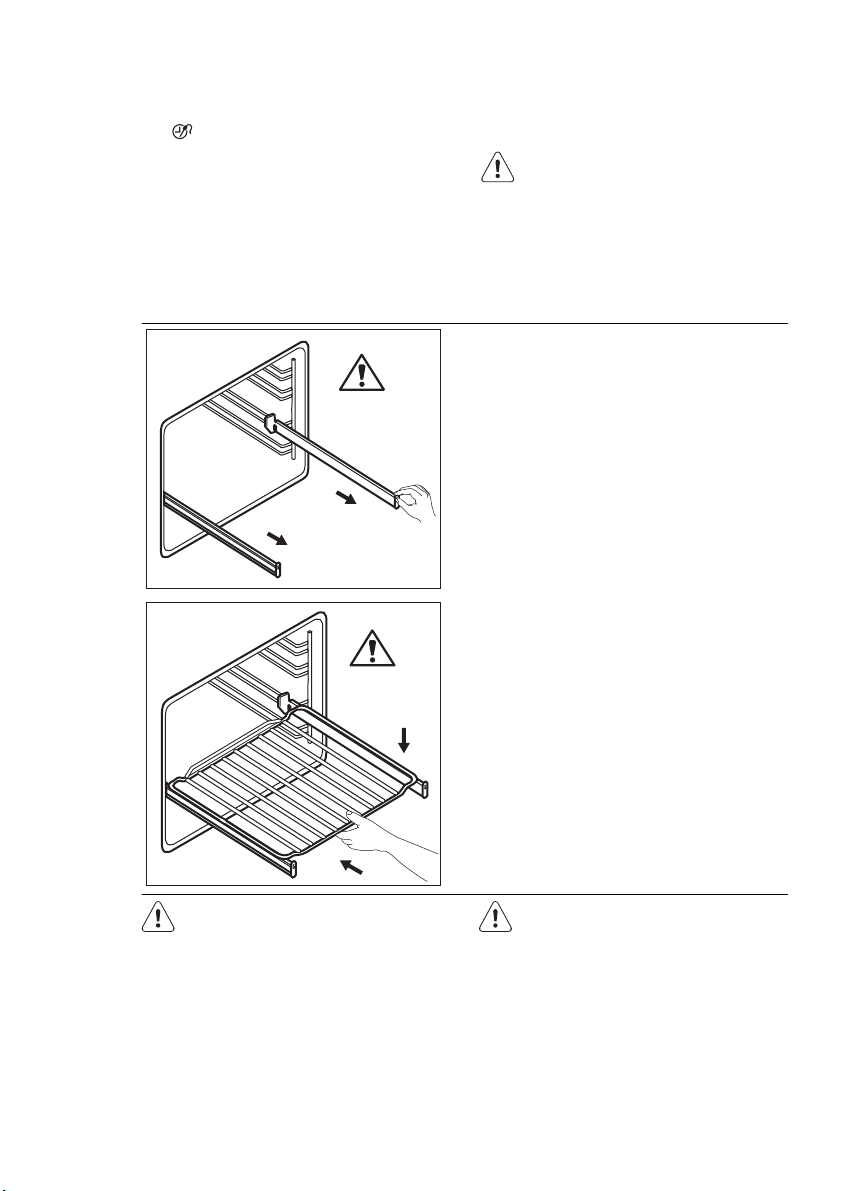
7.
Gegebenenfalls können Sie während
des Garvorgangs eine neue Kerntemperatur einstellen. Hierzu berühren Sie
.
8.
Sobald das Fleisch die eingestellte
Kerntemperatur erreicht hat, ertönt
ein akustisches Signal. Das Gerät
wird automatisch ausgeschaltet.
Berühren Sie ein Sensorfeld, um den
Signalton abzuschalten.
9.2 Auszüge
°C
°C
DEUTSCH 47
9.
Ziehen Sie den Stecker des Kerntemperatursensors aus der Buchse. Nehmen Sie das Fleischstück aus dem
Gerät.
WARNUNG!
Der KT Sensor ist heiß. Es besteht
Verbrennungsgefahr! Seien Sie
vorsichtig, wenn Sie die Spitze
des KT Sensors herausnehmen
und den Stecker ziehen.
1.
Ziehen Sie den rechten und den linken Auszug heraus.
2.
Setzen Sie den Kombirost auf die
Auszüge, und schieben Sie diese
vorsichtig in das Gerät.
Achten Sie darauf, die Auszüge ganz
in das Gerät zu schieben, bevor Sie
die Backofentür schließen.
Bewahren Sie die Montageanleitung der Auszüge für die zukünftige Verwendung auf.
Die Auszüge erleichtern das Einsetzen
und Herausnehmen der Roste.
VORSICHT!
Reinigen Sie die Auszüge nicht im
Geschirrspüler. Ölen oder fetten
Sie die Auszüge nicht.
Page 48
www.electrolux.com
48
10. ZUSATZFUNKTIONEN
10.1 Menü Bevorzugtes
Programm
Sie können Ihre bevorzugten Einstellungen wie Dauer, Temperatur oder Ofenfunktion speichern. Diese können Sie über
das Menü Bevorzugtes Programm abrufen. Sie können 20 Programme speichern.
Speichern eines Programms
1.
Schalten Sie das Gerät ein.
2.
Wählen Sie die Ofenfunktion oder die
Funktion Koch-Assistent .
3.
Berühren Sie wiederholt, bis das
Display SPEICHERN anzeigt. Mit OK
bestätigen.
4.
Im Display wird der erste freie Speicherplatz angezeigt.
Mit OK bestätigen.
5.
Geben Sie den Namen für das Programm ein. Der erste Buchstabe
blinkt.
Berühren Sie
Buchstaben zu ändern. Weiter mit
OK.
6.
Berühren Sie oder , um den
Cursor nach rechts oder links zu bewegen. Weiter mit OK.
Der nächste Buchstabe blinkt. Wiederholen Sie die Schritte 5 und 6
nach Bedarf.
7.
Zum Speichern halten Sie OK gedrückt.
Nützliche Informationen:
• Sie können einen Speicherplatz auch
überschreiben. Wenn im Display der
erste freie Speicherplatz angezeigt wird,
drücken Sie
Sie dann OK, um ein bestehendes Programm zu überschreiben.
• Den Namen des Programms können
Sie im Menü Programm umbenennen
ändern.
Einschalten des Programms
1.
Schalten Sie das Gerät ein.
2.
Wählen Sie das Menü Bevorzugtes
Programm . Mit OK bestätigen.
oder , um den
oder , und drücken
3.
Wählen Sie den Namen Ihres bevorzugten Programms aus. Mit OK bestätigen.
Drücken Sie
tes Programm zu gelangen.
, um direkt zu Bevorzug-
10.2 Tastensperre
Die Tastensperre verhindert ein versehentliches Verstellen der Ofenfunktion. Die
Tastensperre lässt sich nur bei eingeschaltetem Gerät einschalten.
Einschalten der Tastensperre :
1.
Schalten Sie das Gerät ein.
2.
Stellen Sie eine Ofenfunktion ein oder
nehmen Sie eine sonstige Einstellung
vor.
3.
Drücken Sie wiederholt, bis im
Display Tastensperre angezeigt wird.
4.
Mit OK bestätigen.
Ausschalten der Tastensperre :
1.
Drücken Sie . Im Display erscheint
eine Meldung.
2.
Mit und OK bestätigen.
10.3 Kindersicherung
Die Kindersicherung verhindert ein versehentliches Bedienen des Geräts.
Ein- und Ausschalten der
Kindersicherung:
1.
Schalten Sie das Gerät ein.
2.
Berühren Sie und gleichzeitig,
bis eine Meldung im Display angezeigt wird.
Um die Funktion auszuschalten, berühren
Sie gleichzeitig
eine Meldung angezeigt wird.
und , bis im Display
10.4 SET + GO
Mit der Funktion SET + GO können Sie eine Ofenfunktion (oder ein Programm) einstellen und diese später durch Berühren
eines einzigen Sensorfelds einschalten.
Einschalten der Funktion:
1.
Schalten Sie das Gerät ein.
2.
Wählen Sie die Ofenfunktion.
Page 49
3.
Drücken Sie wiederholt, bis im
Display Dauer angezeigt wird.
4.
Stellen Sie die Zeit ein.
5.
Drücken Sie wiederholt, bis im
Display SET + GO angezeigt wird.
6.
Mit OK bestätigen.
Zum Starten von SET + GO berühren Sie
ein beliebiges Sensorfeld (außer
eingestellte Ofenfunktion wird gestartet.
Nach Ablauf der Ofenfunktion ertönt ein
akustisches Signal.
Nützliche Informationen:
). Die
DEUTSCH 49
Backofentem-
Abschaltzeit
peratur
120 °C - 195 °C 8,5 Stunden
200 °C - 245 °C 5,5 Stunden
250 °C - maxima-
3,0 Stunden
le Temperatur
Die Abschaltautomatik funktioniert
bei allen Ofenfunktionen außer
Backofenbeleuchtung , Dauer ,
Ende und KT Sensor.
• Während die Ofenfunktion in Betrieb ist,
ist die Tastensperre eingeschaltet.
• Sie können die Funktion SET + GO im
Menü Einstellungen ein- und ausschalten.
Wenn das Gerät in Betrieb ist, wird automatisch das Kühlgebläse eingeschaltet,
um die Geräteflächen zu kühlen. Nach
dem Abschalten des Geräts läuft das
Kühlgebläse weiter, bis das Gerät abgekühlt ist.
10.5 Automatische Abschaltung
10.6 Kühlventilator
Das Gerät wird aus Sicherheitsgründen
nach einiger Zeit automatisch ausgeschaltet, wenn:
• Eine Backofenfunktion eingestellt ist.
• Sie die Backofentemperatur nicht än-
dern.
Backofentem-
Abschaltzeit
peratur
30 °C - 115 °C 12,5 Stunden
10.7 Sicherheits-Thermostat
Ein unsachgemäßer Gebrauch des Geräts
oder defekte Bauteile können zu einer gefährlichen Überhitzung führen. Um dies zu
verhindern, ist der Backofen mit einem Sicherheitsthermostat ausgestattet, der die
Stromzufuhr unterbrechen kann. Die Wiedereinschaltung erfolgt automatisch bei
einen Temperaturabfall.
11. PRAKTISCHE TIPPS UND HINWEISE
11.1 Innenseite der Tür
Bei einigen Modellen finden Sie an
der Innenseite der Tür:
• Die Nummerierung der Einschubebe-
nen.
• Informationen über die Backofenfunkti-
onen, Empfehlungen für Einschubebenen und Temperaturen für die Zubereitung üblicher Gerichte.
Die Temperaturen und Backzeiten
in den Tabellen sind nur Richtwerte. Sie sind abhängig von den Rezepten, der Qualität und der Menge der verwendeten Zutaten.
• Das Gerät hat fünf Einschubebenen.
Die Einschubebenen werden vom Boden des Backofens aus gezählt.
• Das Gerät ist mit einem exklusiven Umluft- und Dampfsystem zur Regelung
der Luftzirkulation und des Dampfkreislaufs ausgerüstet. Das Garen mit
Dampf macht Ihre Speisen innen weich
und außen knusprig. Gardauer und
Energieverbrauch werden dabei auf ein
Minimum reduziert.
• Es kann sich Feuchtigkeit im Gerät oder
an den Glastüren niederschlagen. Das
ist normal. Stehen Sie beim Öffnen der
Tür während des Betriebs stets in sicherer Entfernung zum Gerät. Um die
Page 50

www.electrolux.com
50
• Wischen Sie das Gerät nach jedem Ge-
• Stellen Sie keine Gegenstände direkt
Kondensation zu reduzieren, heizen Sie
vor dem Garen den Backofen immer 10
Minuten vor.
brauch mit einem Tuch trocken.
auf den Backofenboden und bedecken
Sie das Kochgeschirr nicht mit Alu-Folie. Dies könnte das Garergebnis beeinträchtigen und die Emailbeschichtung
beschädigen.
pfanne ein, damit keine dauerhaften
Flecken im Backofen verbleiben.
• Das Fleisch vor dem Anschneiden mindestens 15 Minuten ruhen lassen, damit der Fleischsaft nicht ausläuft.
• Um Rauchentwicklung beim Braten zu
vermindern, geben Sie etwas Wasser in
die Brat- und Fettpfanne. Um Kondensierung des Rauchs zu vermeiden,
Wasser zugeben, wenn die Brat- und
Fettpfanne ausgetrocknet ist.
11.2 Backen von Kuchen
• Die Backofentür nicht öffnen, bevor 3/4
der Backzeit abgelaufen ist
• Wenn Sie zwei Backbleche gleichzeitig
nutzen, lassen Sie eine Ebene dazwischen frei.
11.3 Garen von Fleisch und
Fisch
• Setzen Sie beim Garen von Speisen mit
hohem Fettgehalt eine Brat- und Fett-
11.4 Garzeiten
Die Garzeiten hängen von der Art des
Garguts, seiner Konsistenz und der Menge ab.
Achten Sie beim Garen anfangs immer
auf das Gargut. Finden Sie selbst die besten Einstellungen (Garstufe, Garzeit, usw.)
für Kochgeschirr, Rezepte und Mengen
bei der Verwendung dieses Geräts heraus.
11.5 Back- und Brattabelle
KUCHEN
Ober-/Unterhitze
GERICHT
Ein-
schub-
ebene
Tem-
pera-
tur
[°C]
Rührteig 2 170 3 (1 und 4) 160 45 - 60 In einer Ku-
Mürbeteig 2 170 3 (1 und 4) 160 20 - 30 In einer Ku-
Buttermilch-
1 170 2 165 60 - 80 In einer Ku-
Käsekuchen
Apfelkuchen 2 170 1 (links
Strudel/Stol-
3 175 2 150 60 - 80 Auf dem
len
Heißluft mit
Ringheizkörper
Tem
Einschub-
ebene
ratur
[°C]
160 80 - 100 2 Kuchenfor-
und rechts)
pe-
Garzeit
[Min.]
Anmerkun-
gen
chenform
chenform
chenform
(26 cm)
men (20 cm)
auf dem
Kombirost
Backblech
1)
Page 51

DEUTSCH 51
Heißluft mit
Ringheizkörper
Tem
Einschub-
ebene
ratur
[°C]
165 30 - 40 In einer Ku-
und rechts)
pe-
Garzeit
[Min.]
Anmerkun-
gen
chenform
GERICHT
Marmeladenkuchen
Ober-/Unterhitze
Ein-
schub-
ebene
Tem-
pera-
tur
[°C]
2 170 2 (links
(26 cm)
Biskuit 2 170 2 160 50 - 60 In einer Ku-
chenform
(26 cm)
Stollen/üppiger Früchtekuchen
Rosinenkuchen
Kleine Kuchen – eine
2 160 1 oder 2 140
90 - 120 In einer Ku-
–
150
1 175 2 160 50 - 60
3 170 3 150 -
20 - 30 Auf dem
160
chenform
1)
(20 cm)
Brotform
Backblech
1)
Ebene
Kleine Ku-
chen – zwei
- - 2 und 4 150 160
25 - 35 Auf dem
Backblech
Ebenen
Kleine Ku-
chen – drei
- - 1, 3 und 5 150 160
30 - 45 Auf dem
Backblech
Ebenen
Plätzchen/
Feingebäck
3 140 3 140 -
150
30 - 35 Auf dem
Backblech
– eine Ebene
Plätzchen/
Feingebäck
- - 2 und 4 140 150
35 - 40 Auf dem
Backblech
– zwei Ebenen
Plätzchen/
Feingebäck
- - 1, 3 und 5 140 150
35 - 45 Auf dem
Backblech
– drei Ebenen
Baisers – eine Ebene
Baisers –
zwei Ebenen
Rosinenbrötchen
Eclairs – eine Ebene
3 120 3 120 80 - 100 Auf dem
Backblech
- - 2 und 4 120 80 - 100 Auf dem
Backblech
3 190 3 170
190
12 - 20 Auf dem
–
Backblech
3 190 3 170 25 - 35 Auf dem
Backblech
1)
1)
Page 52

www.electrolux.com
52
Heißluft mit
Ringheizkörper
Tem
Einschub-
ebene
ratur
[°C]
pe-
Garzeit
[Min.]
Anmerkun-
gen
Backblech
GERICHT
Eclairs –
zwei Ebenen
Ober-/Unterhitze
Ein-
schub-
ebene
Tem-
pera-
tur
[°C]
- - 2 und 4 170 35 - 45 Auf dem
Törtchen 2 180 2 170 45 - 70 In einer Ku-
chenform
(20 cm)
Obstkuchen
mit hohem
Fettgehalt
Englischer
Sandwichkuchen à la
1 160 2 150 110 - 120 In einer Ku-
chenform
(24 cm)
1 170 2 160 50 - 60 In einer Ku-
chenform
(20 cm)
Victoria
1)
Backofen 10 Minuten vorheizen.
BROT UND PIZZA
GERICHT
Ober-/Unterhit-
ze
Ein-
schub-
ebene
Tem-
pera-
tur
[°C]
Heißluft mit
Ringheizkörper
Tem
Einschub-
ebene
pe-
ratur
[°C]
Garzeit
[Min.]
Anmerkun-
gen
Weißbrot 1 190 1 190 60 - 70 1 - 2 Stück,
500 g pro
1)
Stück
Roggenbrot 1 190 1 180 30 - 45 Brotform
Brötchen 2 190 2 (2 und 4) 180 25 - 40 6 - 8 Bröt-
chen auf
Backblech
Blechpizza 1 200 -
210
1 200 -
210
10 - 20 Backblech
oder Brat-
und Fett-
1)
pfanne
Scones
(Teegebäck)
1)
Backofen 10 Minuten vorheizen.
3 200 3 190 10 - 20 Auf dem
Backblech
1)
1)
Page 53

DEUTSCH 53
AUFLÄUFE
GERICHT
Ober-/Unterhit-
ze
Ein-
schub-
ebene
Tempera-
tur
[°C]
Heißluft mit
Ringheizkörper
Tem
Einschub-
ebene
pe-
ratur
[°C]
Garzeit
[Min.]
Anmerkun-
gen
Nudelauflauf 2 200 2 180 40 - 50 Auflaufform
Gemüseauf-
2 200 2 175 45 - 60 Auflaufform
lauf
Quiche 1 180 1 180 50 - 60
Lasagne 2 180 -
190
Cannelloni 2 180 -
190
1)
Backofen 10 Minuten vorheizen.
2 180 -
190
2 180 -
190
25 - 40
25 - 40
Auflaufform
Auflaufform
Auflaufform
FLEISCH
GERICHT
Ober-/Unterhit-
ze
Ein-
schub-
ebene
Tempera-
tur
[°C]
Heißluft mit
Ringheizkörper
Ein-
schubebe-
ne
Tem
ratur
pe-
[°C]
Garzeit
[Min.]
Anmerkun-
gen
Rindfleisch 2 200 2 190 50 - 70 Kombirost
Schweine-
2 180 2 180 90 - 120 Kombirost
fleisch
Kalbfleisch 2 190 2 175 90 - 120 Kombirost
Roastbeef,
2 210 2 200 50 - 60 Kombirost
englisch, rosa
Roastbeef,
2 210 2 200 60 - 70 Kombirost
englisch,
medium
Roastbeef,
2 210 2 200 70 - 75 Kombirost
englisch,
durch
Schweine-
2 180 2 170 120 - 150 mit Schwarte
schulter
Schweinsha-
2 180 2 160 100 - 120 2 Stk.
xe
Lamm 2 190 2 175 110 - 130 Keule
Hähnchen 2 220 2 200 70 - 85 ganz
1)
1)
1)
Page 54
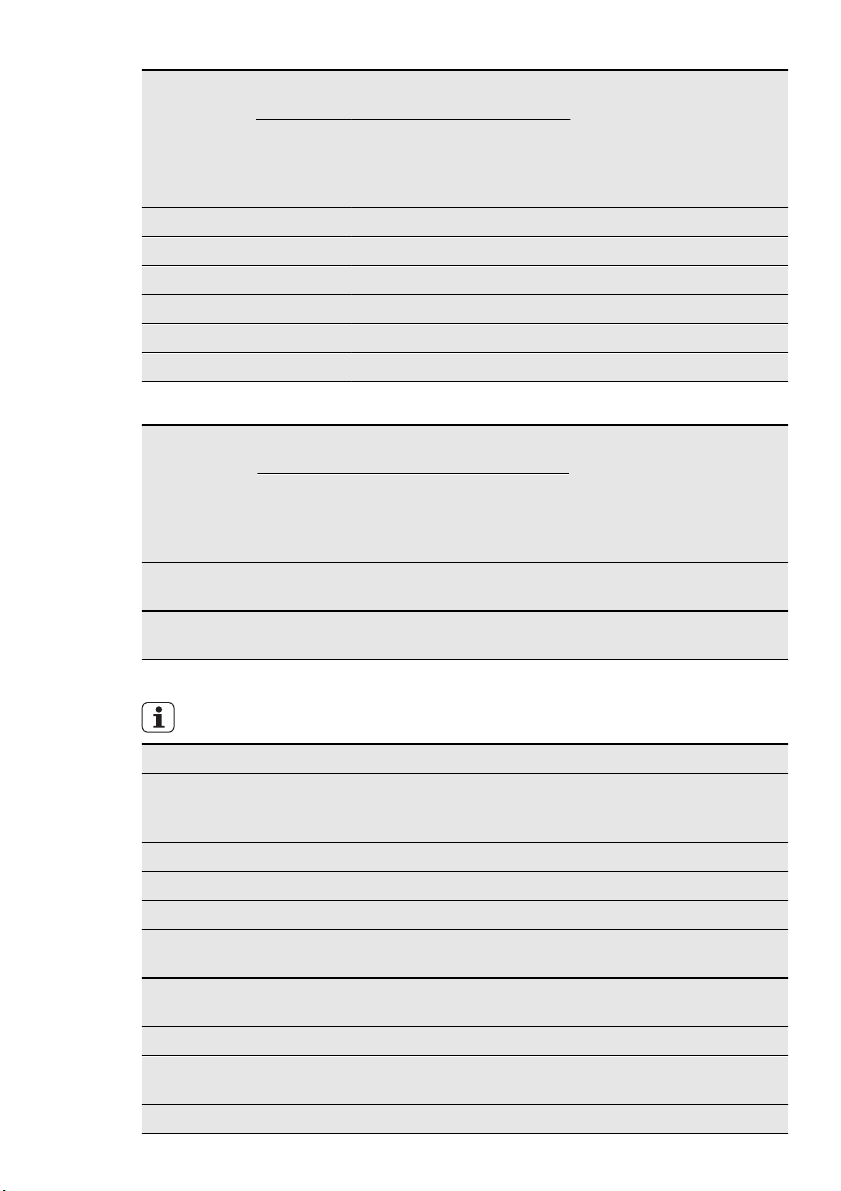
www.electrolux.com
54
GERICHT
Ober-/Unterhit-
ze
Ein-
schub-
ebene
Tempera-
tur
[°C]
Heißluft mit
Ringheizkörper
Ein-
schubebe-
ne
Tem
ratur
pe-
[°C]
Garzeit
[Min.]
Anmerkun-
gen
Pute 2 180 2 160 210 - 240 ganz
Ente 2 175 2 220 120 - 150 ganz
Gans 2 175 1 160 150 - 200 ganz
Kaninchen 2 190 2 175 60 - 80 zerlegt
Hase 2 190 2 175 150 - 200 zerlegt
Fasan 2 190 2 175 90 - 120 ganz
FISCH
GERICHT
Forelle/See-
Ober-/Unterhit-
ze
Ein-
schub-
ebene
Tempera-
tur
[°C]
2 190 2 175 40 - 55 3-4 Fische
Heißluft mit
Ringheizkörper
Ein-
schubebe-
ne
Tem
ratur
pe-
[°C]
Garzeit
[Min.]
Anmerkun-
gen
brasse
Thunfisch/
2 190 2 175 35 - 60 4-6 Filets
Lachs
11.6 Grillstufe 1
Den leeren Backofen 10 Minuten
vorheizen.
Menge Grillstufe 1 Garzeit [Min.]
GERICHT Stü-
cke
Filetsteaks 4 800 4 max. 12-15 12-14
Beefsteaks 4 600 4 max. 10-12 6-8
Bratwürste 8 - 4 max. 12-15 10-12
Schweinskote-
4 600 4 max. 12-16 12-14
lett
Hähnchen (in
2 1000 4 max. 30-35 25-30
zwei Hälften)
Spieße 4 - 4 max. 10-15 10-12
Hähnchenbrust-
4 400 4 max. 12-15 12-14
filet
Hamburger 6 600 4 max. 20-30 -
[g] Ein-
schub-
ebene
Tem-
peratur
[°C]
1. Seite 2. Seite
Page 55

DEUTSCH 55
Menge Grillstufe 1 Garzeit [Min.]
GERICHT Stü-
cke
[g] Ein-
schub-
ebene
Tem-
peratur
[°C]
1. Seite 2. Seite
Fischfilet 4 400 4 max. 12-14 10-12
Belegte Toast-
4-6 - 4 max. 5-7 -
brote
Toast 4-6 - 4 max. 2-4 2-3
11.7 Heißluftgrillen
Rindfleisch
GERICHT Menge
Roastbeef oder
Filet, Englisch
Roastbeef oder
Filet, medium
Roastbeef oder
Filet, durch
1)
Backofen vorheizen.
je cm Dicke 1
je cm Dicke 1
je cm Dicke 1
Einschub-
ebene
Schweinefleisch
GERICHT Menge
Einschub-
ebene
Schulter, Nacken, Schinken-
1-1,5 kg 1 160-180 90-120
stück
Kotelett, Spare
Ribs
1-1,5 kg 1 170-180 60-90
Hackbraten 750 g - 1 kg 1 160-170 50-60
Schweinshaxe
(vorgegart)
750 g - 1 kg 1 150-170 90-120
Temperatur
[°C]
190-200
180-190
170-180
1)
1)
1)
Temperatur
[°C]
Dauer [min.]
5-6
6-8
8-10
Dauer [min.]
Kalb
GERICHT Menge Einschub-
ebene
Temperatur
[°C]
Dauer [min.]
Kalbsbraten 1 kg 1 160-180 90-120
Kalbshaxe 1,5 - 2 kg 1 160-180 120-150
Page 56

www.electrolux.com
56
Lamm
Lammkeule,
Lammbraten
Lammrücken 1-1,5 kg 1 160-180 40-60
Geflügel
Geflügelteile je 200 - 250 g 1 200-220 30-50
Hähnchenhälf-
ten
Hähnchen,
Poularde
Ente 1,5-2 kg 1 180-200 80-100
Gans 3,5-5 kg 1 160-180 120-180
Pute 2,5-3,5 kg 1 160-180 120-150
Pute 4-6 kg 1 140-160 150-240
Fisch, gedünstet
Fisch, ganz 1-1,5 kg 1 210-220 40-60
GERICHT Menge Einschub-
ebene
1-1,5 kg 1 150-170 100-120
GERICHT Menge Einschub-
ebene
je 400 - 500 g 1 190-210 35-50
1-1,5 kg 1 190-210 50-70
GERICHT Menge Einschub-
ebene
Temperatur
[°C]
Temperatur
[°C]
Temperatur
[°C]
Dauer [min.]
Dauer [min.]
Dauer [min.]
Feuchte Heißluft
Lebensmittel Einschub-
Temperatur (°C) Zeit (Min.)
ebene
Nudelauflauf 2 180 - 200 45 - 60
Lasagne 2 180 - 200 45 - 60
Kartoffelgratin 2 190 - 210 55 - 80
Süßer Auflauf 2 180 - 200 45 - 60
Gugelhupf oder Brioche 1 160 - 170 50 - 70
Hefezopf/Hefekranz 2 170 - 190 40 - 50
Streuselkuchen (trocken) 3 160 - 170 20 - 40
Hefekleingebäck 2 160 - 170 20 - 40
Öffnen Sie während des Gerätebetriebs
die Tür nur, wenn es notwendig ist.
Page 57

11.8 Auftauen
DEUTSCH 57
GERICHT [g]
Hähnchen 1000 100-140 20-30
Fleisch 1000 100-140 20-30
Fleisch 500 90-120 20-30
Forelle 150 25-35 10-15 Erdbeeren 300 30-40 10-20 Butter 250 30-40 10-15 -
Sahne 2 x 200 80-100 10-15
Kuchen 1400 60 60 -
Auftauzeit
[Min.]
Zusätzliche
Auftauzeit
[Min.]
Raum für Notizen
Legen Sie das Hähnchen auf eine umge-
drehte Untertasse auf
einem größeren Teller.
Nach der Hälfte der
Zeit wenden.
Nach der Hälfte der
Zeit wenden.
Nach der Hälfte der
Zeit wenden.
Sahne lässt sich auch
mit noch leicht gefro-
renen Stellen gut auf-
schlagen.
11.9 Einkochen
Beerenobst
EINKOCHEN Temperatur [°C]
Erdbeeren, Blaubeeren, Himbeeren, reife Stachelbeeren
160 – 170 35 – 45 –
Einkochen bis
Perlbeginn [Min.]
Weiteres Einko-
chen bei 100 °C
[Min.]
Steinobst
EINKOCHEN Temperatur [°C]
Birnen, Quitten,
Zwetschgen
160 – 170 35 – 45 10 – 15
Einkochen bis
Perlbeginn [Min.]
Weiteres Einko-
chen bei 100 °C
[Min.]
Page 58

www.electrolux.com
58
Gemüse
Karotten
Gurken 160 – 170 50 – 60 –
Mixed Pickles 160 – 170 50 – 60 5 – 10
Kohlrabi, Erbsen,
Spargel
1)
11.10 Dörren
Backbleche mit Backpapier abdecken.
GEMÜSE
Bohnen 3 1/4 60 - 70 6 - 8
Paprika 3 1/4 60 - 70 5 - 6
Suppengemü-
se
Pilze 3 1/4 50 - 60 6 - 8
Kräuter 3 1/4 40 - 50 2 - 3
EINKOCHEN Temperatur [°C]
1)
160 – 170 50 – 60 5 – 10
Einkochen bis
Perlbeginn [Min.]
Weiteres Einko-
chen bei 100 °C
160 – 170 50 – 60 15 – 20
Lassen Sie die eingekochten Nahrungsmittel im Ofen, nachdem Sie das Gerät
ausgeschaltet haben.
GERICHT
Einschubebene
1 Ebene 2 Ebenen
Temperatur
[°C]
Dauer [Std]
3 1/4 60 - 70 5 - 6
[Min.]
OBST
GERICHT
Einschubebene
1 Ebene 2 Ebenen
Temperatur
[°C]
Dauer [Std]
Pflaumen 3 1/4 60 - 70 8 - 10
Aprikosen 3 1/4 60 - 70 8 - 10
Apfelscheiben 3 1/4 60 - 70 6 - 8
Birnen 3 1/4 60 - 70 6 - 9
11.11 KT Sensor-Tabelle
GERICHT Kerntemperatur [°C]
Kalbsbraten 75 - 80
Kalbshaxe 85 - 90
Roastbeef, englisch, rosa 45 - 50
Roastbeef, englisch, medium 60 - 65
Roastbeef, englisch, durch 70 - 75
Page 59

GERICHT Kerntemperatur [°C]
Schweineschulter 80 - 82
Schweinshaxe 75 - 80
Lamm 70 - 75
Hähnchen 98
Hase 70 - 75
Forelle/Seebrasse 65 - 70
Thunfisch/Lachs 65 - 70
12. REINIGUNG UND PFLEGE
DEUTSCH 59
WARNUNG!
Siehe Sicherheitshinweise.
• Feuchten Sie ein weiches Tuch mit warmem Wasser und etwas Reinigungsmittel an, und reinigen Sie damit die Vorderseite des Geräts.
• Reinigen Sie die Metalloberflächen mit
einem handelsüblichen Reinigungsmittel.
• Reinigen Sie den Innenraum des Backofens nach jedem Gebrauch. So lassen
sich Verschmutzungen leichter entfernen und es kann nichts einbrennen.
• Entfernen Sie hartnäckige Verschmutzungen mit speziellen Backofenreinigern.
• Reinigen Sie alle Zubehörteile nach jedem Gebrauch und lassen Sie sie
trocknen. Feuchten Sie ein weiches
Tuch mit warmem Wasser und etwas
Spülmittel an.
• Zubehörteile mit Antihaftbeschichtung
dürfen nicht mit aggressiven Reinigungsmitteln, scharfkantigen Gegenständen oder im Geschirrspüler gereinigt werden. Die Antihaftbeschichtung
kann dadurch zerstört werden.
Geräte mit Edelstahl- oder Aluminiumfront:
Reinigen Sie die Backofentür nur
mit einem nassen Schwamm und
trocknen Sie sie mit einem weichen Tuch ab.
Verwenden Sie keine Stahlwolle,
Säuren oder Scheuermittel, da
diese die Oberflächen beschädigen können. Reinigen Sie das Bedienfeld auf gleiche Weise.
12.1 Reinigen der Türdichtung
• Die Türdichtung muss regelmäßig überprüft werden. Die Türdichtung ist im
Rahmen des Garraums angebracht.
Nehmen Sie das Gerät nicht in Betrieb,
wenn die Türdichtung beschädigt ist.
Wenden Sie sich an den Kundendienst.
• Für die Reinigung der Türdichtung lesen
Sie bitte in den allgemeinen Informationen zur Reinigung nach.
12.2 Einhängegitter
Die Einhängegitter können zur Reinigung
der Seitenwände entfernt werden.
Page 60
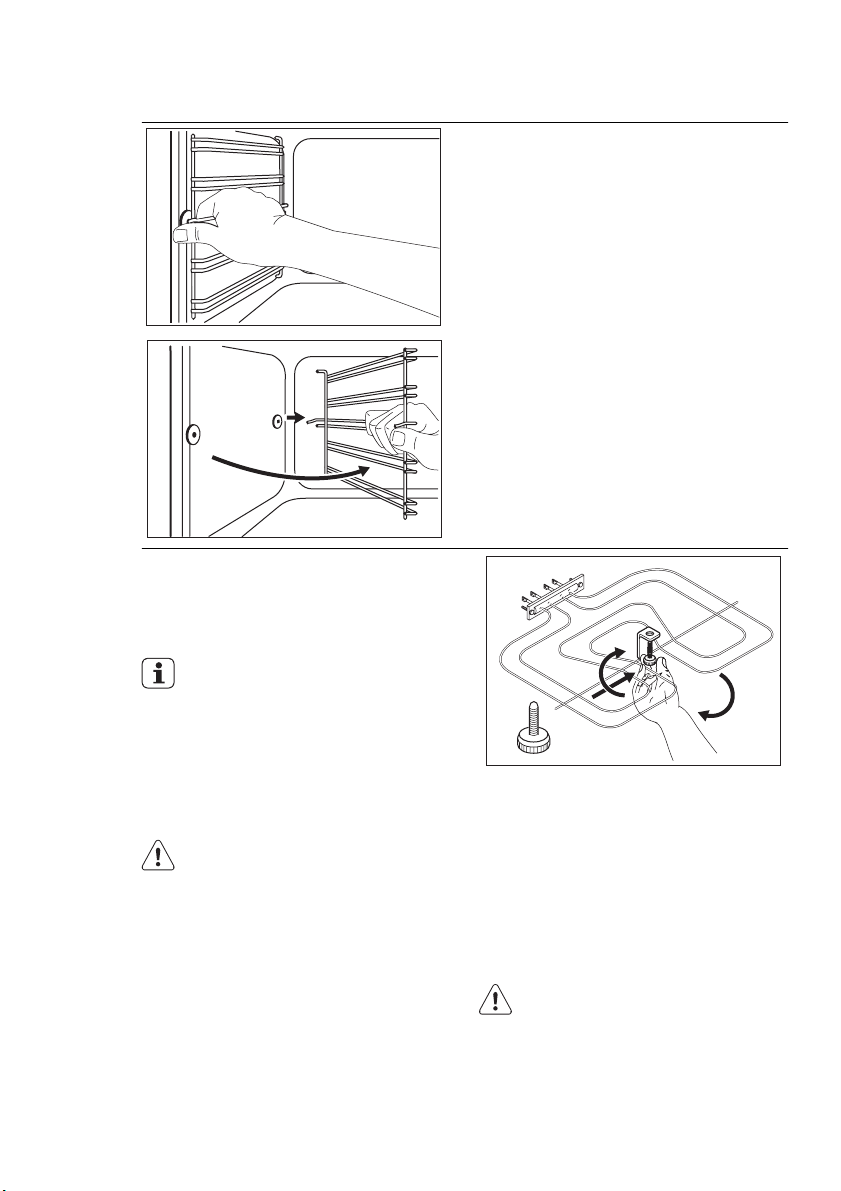
www.electrolux.com
60
Abnehmen der Einhängegitter
Einsetzen der Einhängegitter
Führen Sie zum Einsetzen der Einhängegitter die oben beschriebenen Schritte in
umgekehrter Reihenfolge durch.
1
Die abgerundeten Enden der Einhängegitter müssen nach vorn
zeigen.
2
1.
Ziehen Sie das vordere Ende des Einhängegitters von der Seitenwand weg.
2.
Ziehen Sie das hintere Ende des Einhängegitters von der Seitenwand
weg, und nehmen Sie das Einhängegitter heraus.
12.3 Backofendecke
Sie können das Grillelement herausnehmen, um die Backofendecke leichter reinigen zu können.
WARNUNG!
Schalten Sie das Gerät aus, bevor
Sie das Grillelement herausnehmen. Vergewissern Sie sich, dass
das Gerät abgekühlt ist. Es besteht Verbrennungsgefahr!
1.
Lösen Sie die Befestigungsschraube
des Grillelements. Wenn Sie das Grillelement zum ersten Mal herausnehmen, benutzen Sie zum Lösen der
Schraube einen Schraubendreher.
2.
Ziehen Sie das Grillelement vorsichtig
nach unten.
3.
Reinigen Sie die Backofendecke mit
einem weichen Tuch, warmem Wasser und einem Reinigungsmittel, und
lassen Sie sie trocknen.
4.
Führen Sie zum Einsetzen des Grilllements die oben beschriebenen
Schritte in umgekehrter Reihenfolge
durch.
WARNUNG!
Stellen Sie sicher, dass das Grillelement ordnungsgemäß eingesetzt ist und nicht herunterfallen
kann.
Page 61
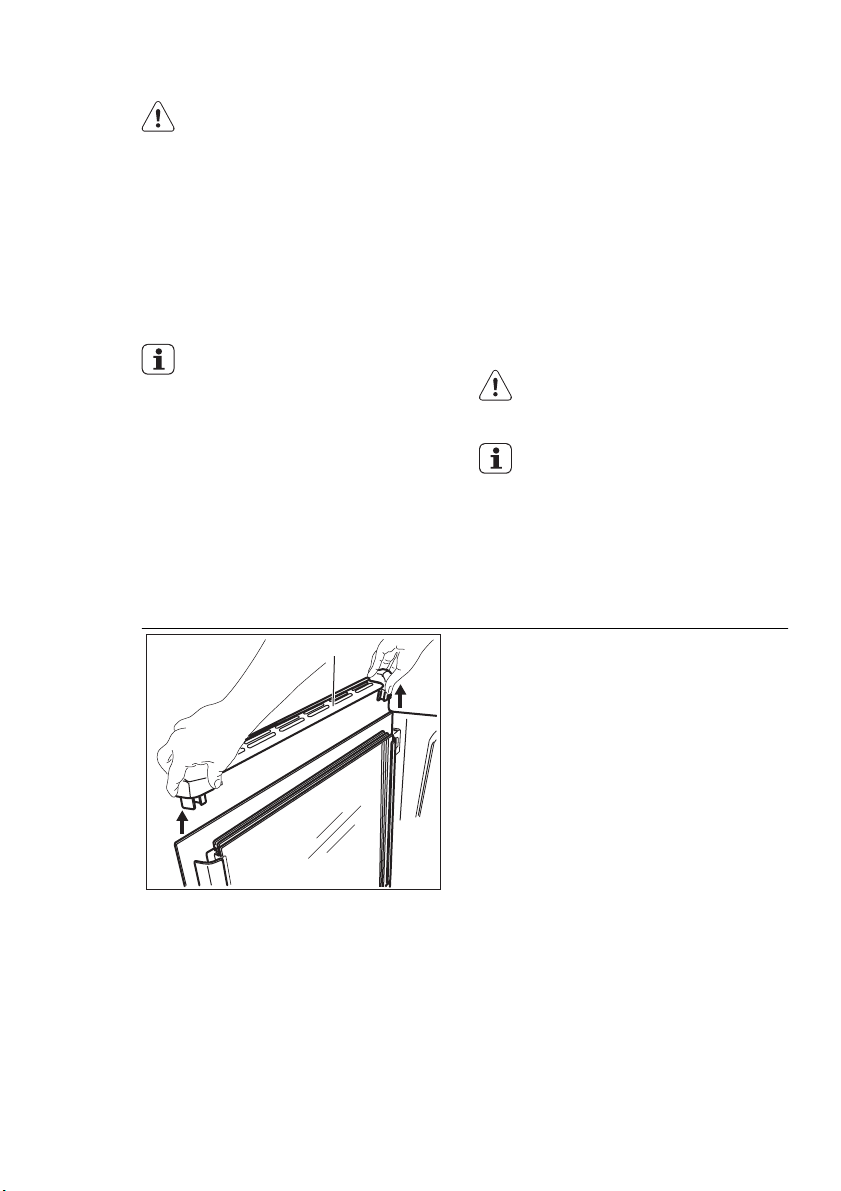
DEUTSCH 61
3.
12.4 Backofenlampe
WARNUNG!
Gehen Sie beim Austauschen der
Backofenlampe sorgsam vor. Es
besteht die Gefahr eines elektrischen Schlags.
Bevor Sie die Backofenlampe
austauschen:
• Schalten Sie den Backofen aus.
• Entfernen Sie die Sicherungen aus dem
Sicherungskasten, oder schalten Sie
den Schutzschalter aus.
Legen Sie ein Tuch auf den Backofenboden, um die Lampe und
das Glas zu schützen.
Halogenlampen immer mit einem
Tuch anfassen, um ein Einbrennen von Fett (Fingerabdrücke) zu
vermeiden.
1.
Drehen Sie die Glasabdeckung gegen
den Uhrzeigersinn und nehmen Sie
sie ab.
2.
Reinigen Sie die Glasabdeckung.
Ersetzen Sie die Backofenlampe
durch eine geeignete 300 °C hitzebeständige Backofenlampe.
Verwenden Sie eine Ofenlampe mit
der gleichen Leistung.
4.
Bringen Sie die Glasabdeckung wieder an.
12.5 Reinigen der Backofentür
Die Backofentür ist mit vier hintereinander
angebrachten Glasscheiben ausgestattet.
Die Backofentür und die inneren Glasscheiben können zur Reinigung herausgenommen werden.
VORSICHT!
Verwenden Sie das Gerät nicht
ohne die Glasscheiben.
Die Seite des Türanschlags variiert
je nach Backofenmodell. Bei manchen Modellen befindet sich der
Türanschlag auf der rechten Seite,
bei anderen auf der linken.
Abnehmen der Backofentür und Herausnehmen der Glasscheiben
1.
A
Drücken Sie die Tasten an beiden
Seiten der Türabdeckung (A) an der
oberen Abdeckung, und ziehen Sie
sie nach oben heraus.
Page 62
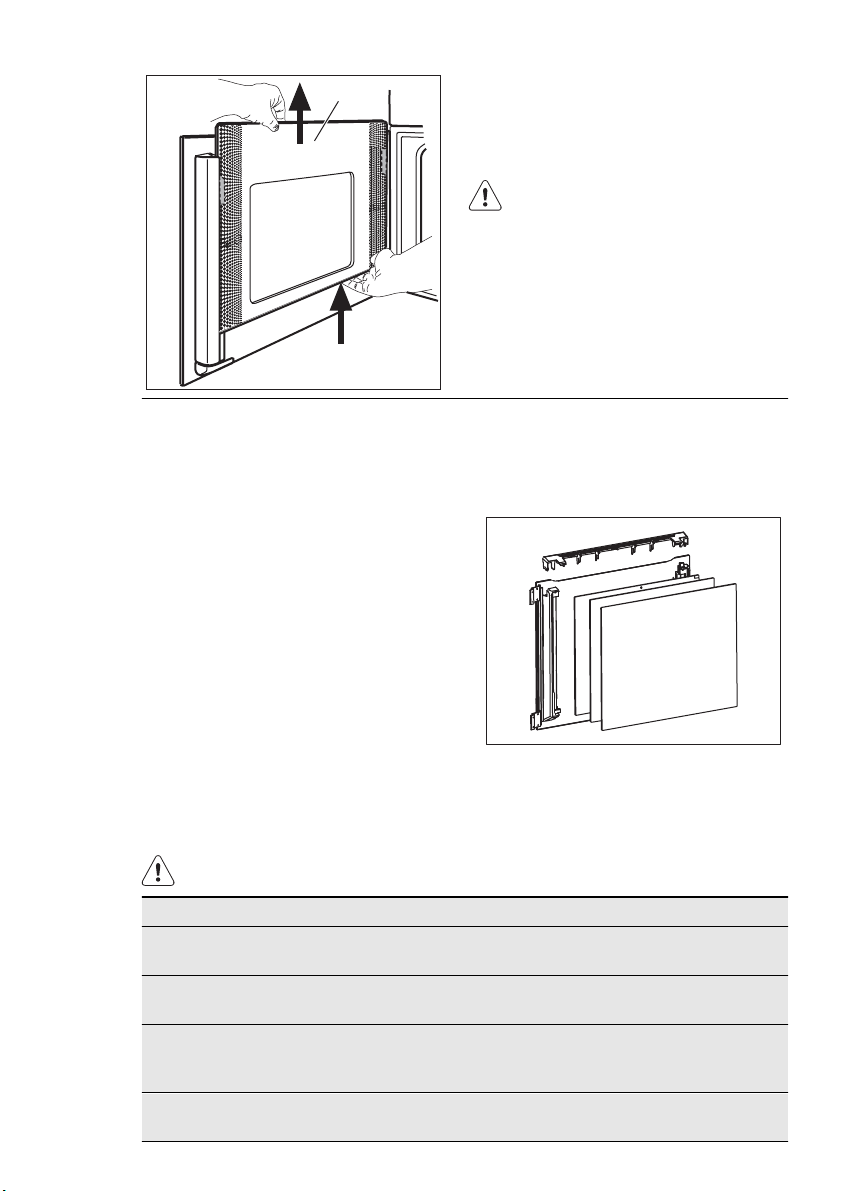
www.electrolux.com
62
2.
B
Halten Sie die innere Glasscheibe (B)
mit beiden Händen fest und ziehen
Sie sie vorsichtig nach oben heraus.
Gehen Sie mit den anderen Glasscheiben auf dieselbe Weise vor.
VORSICHT!
Halten Sie die Glasscheiben gut
fest, damit sie nicht herunterfallen.
Reinigen Sie die Tür mit einem nassen
Schwamm, und reiben Sie sie mit einem
weichen Tuch trocken. Verwenden Sie
keine Stahlwolle, Säuren oder Scheuermittel, da diese die Oberflächen beschädigen können.
Einsetzen der Backofentür und
der Glasscheiben
Wenn die Backofentür sauber ist, führen
Sie die Schritte oben in umgekehrter Reihenfolge durch, um die Glasscheiben wieder einzusetzen. Achten Sie darauf, dass
die Glasscheiben in der richtigen Reihenfolge wieder eingesetzt werden.
Die mittleren Glasscheiben sind oben mit
einer Grafik gekennzeichnet. Die dritte
13. WAS TUN, WENN …
WARNUNG!
Siehe Sicherheitshinweise.
Problem Mögliche Ursache Abhilfe
Das Gerät heizt
nicht.
Das Gerät heizt
nicht.
Das Gerät heizt
nicht.
Das Gerät heizt
nicht.
Das Gerät ist ausgeschaltet. Schalten Sie das Gerät ein.
Die Uhr ist nicht eingestellt. Stellen Sie die Uhrzeit ein.
Die erforderlichen Einstellungen wurden nicht vorgenommen.
Die Kindersicherung ist eingeschaltet.
Scheibe besitzt einen bedruckten Bereich.
Bei anderen ist sie transparent.
Der bedruckte Bereich muss zur Innenseite der Tür zeigen. Überprüfen Sie, dass
sich die Glasoberfläche nach dem Einsetzen nicht rau anfühlt.
Vergewissern Sie sich, dass
die Einstellungen richtig
sind.
Siehe hierzu „Ausschalten
der Kindersicherung“.
Page 63

Problem Mögliche Ursache Abhilfe
Das Gerät heizt
nicht.
Die Sicherung hat ausgelöst. Vergewissern Sie sich, dass
die Sicherung der Grund für
die Störung ist. Lösen die
Sicherungen wiederholt aus,
wenden Sie sich an eine
Elektrofachkraft.
Wasser im Gerät. Der Wasserbehälter ist zu
voll.
Schalten Sie das Gerät aus
und entfernen Sie das Wasser mit einem Schwamm
oder einem Tuch.
Das Dampfgaren
funktioniert nicht.
Das Dampfgaren
funktioniert nicht.
Das Entleeren des
Wasserbehälters
dauert länger als
Im Wasserbehälter ist kein
Wasser.
Die Dampfeinlassöffnung
wird durch Kalkablagerungen blockiert.
Im Gerät befinden sich Kalkablagerungen.
Füllen Sie den Wasserbehälter.
Überprüfen Sie die Dampfeinlassöffnung. Entfernen
Sie die Kalkablagerungen.
Prüfen Sie den Wasserbehälter. Siehe „Reinigen des
Wasserbehälters“.
drei Minuten, oder
es tritt Wasser aus
der Dampfeinlassöffnung aus.
Dampf und Kondenswasser schlagen sich auf Speisen und im Backofen nieder.
Im Display erscheint
F111.
Die Speisen standen zu lange im Gerät.
Der KT Sensor ist nicht richtig in die Buchse eingesteckt.
Speisen nach Beendigung
des Gar- oder Backvor-
gangs nicht länger als 15 -
20 Minuten im Backofen
stehen lassen.
Stecken Sie den Stecker
des Kerntemperatursensors
so weit wie möglich in die
Buchse ein.
Die Lampe funktio-
niert nicht.
Das Display zeigt
„Demo“ an. Das Gerät heizt nicht. Der
Die Lampe ist defekt. Tauschen Sie die Lampe
aus.
Der Prüfmodus ist einge-
1.
schaltet.
2.
Ventilator funktioniert nicht.
3.
Wenn Sie das Problem nicht selbst lösen
können, wenden Sie sich an Ihren Fachhändler oder Kundendienst.
Die vom Kundendienst benötigten Daten
finden Sie auf dem Typenschild. Das Typenschild befindet sich am Frontrahmen
des Garraums.
DEUTSCH 63
Schalten Sie das Gerät
aus.
Halten Sie gedrückt,
bis sich das Gerät einund ausschaltet. Das
Sensorfeld leuchtet.
Halten Sie und
gleichzeitig gedrückt,
bis ein Signalton ertönt
und das Sensorfeld erlischt. „Demo“ erlischt.
Page 64
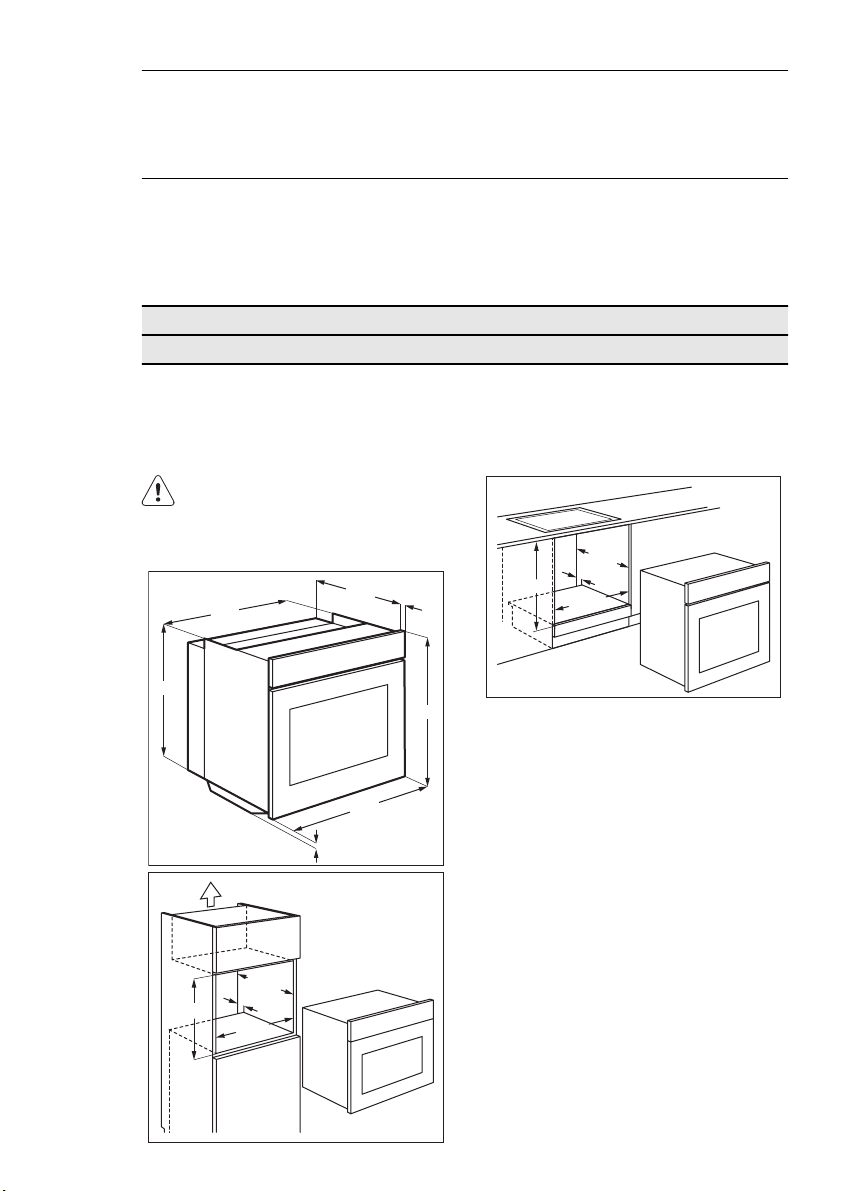
www.electrolux.com
64
Wir empfehlen, dass Sie folgende Daten hier notieren:
Modell (MOD.) .........................................
Produktnummer (PNC) .........................................
Seriennummer (S.N.) .........................................
14. TECHNISCHE DATEN
Spannung 230 V
Frequenz 50 Hz
15. MONTAGE
WARNUNG!
Siehe Sicherheitshinweise.
15.1 Einbau
558
573
590
min. 560
min. 550
20
min. 550
20
548
20
589
600
min. 560
15.2 Befestigung des Geräts im
Möbel
1.
594
5
Öffnen Sie die Gerätetür.
2.
Befestigen Sie das Gerät im Möbel.
Setzen Sie die vier Abstandshalter (A)
in die Öffnungen im Rahmen und ziehen Sie die vier mitgelieferten Schrauben (B) fest.
Page 65
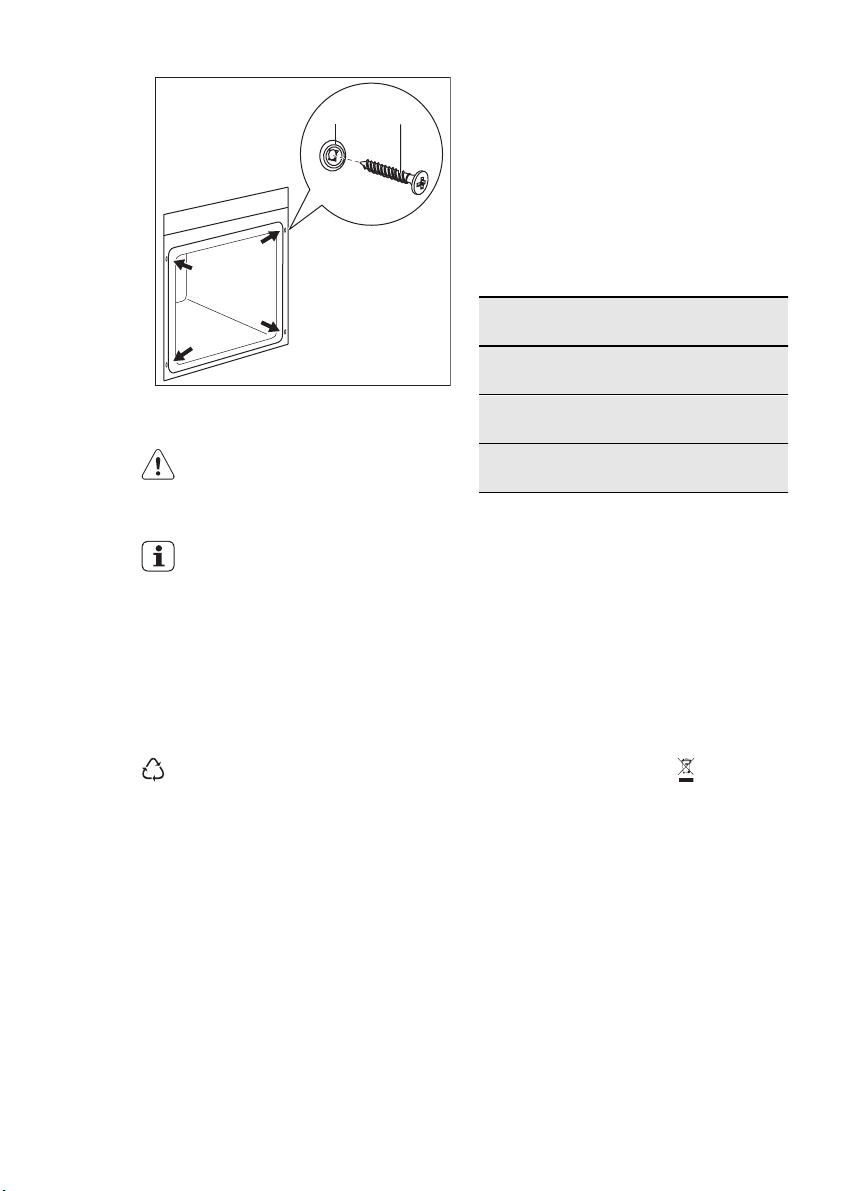
AB
DEUTSCH 65
Das Gerät wird mit einem Netzstecker
und Netzkabel geliefert.
15.4 Netzkabel
Einsetzbare Kabeltypen für Einbau oder
Austausch: H07 RN-F, H05 RN-F, H05
RRF, H05 VV-F, H05 V2V2-F (T90), H05
BB-F.
Näheres zum Kabelquerschnitt siehe Gesamtleistung (auf dem Typenschild) und in
der Tabelle:
Gesamtleis-
tung
maximal 1380W3 x 0,75 mm²
Kabelquerschnitt
15.3 Elektroinstallation
WARNUNG!
Der elektrische Anschluss muss
von einer qualifizierten Fachkraft
vorgenommen werden.
Der Hersteller haftet nicht für
Schäden, die aufgrund der Nichtbeachtung der Sicherheitsvorkehrungen des Kapitels „Sicherheitshinweise“ entstehen.
16. UMWELTTIPPS
Recyceln Sie Materialien mit dem Symbol
. Entsorgen Sie die Verpackung in den
entsprechenden Recyclingbehältern.
Recyceln Sie zum Umwelt- und
Gesundheitsschutz elektrische und
maximal 2300W3 x 1 mm²
maximal 3680W3 x 1,5 mm²
Die Erdleitung (gelb/grünes Kabel) muss 2
cm länger sein als die Phasenleitung und
der Nullleiter (blaues und braunes Kabel).
elektronische Geräte. Entsorgen Sie
Geräte mit diesem Symbol nicht mit
dem Hausmüll. Bringen Sie das Gerät zu
Ihrer örtlichen Sammelstelle oder wenden
Sie sich an Ihr Gemeindeamt.
Page 66

www.electrolux.com
66
Page 67

DEUTSCH 67
Page 68

www.electrolux.com/shop
397280862-A-192013
 Loading...