

Page 1
EON6001S
Built-in Undercounter Oven
User Information
PNC Number: 949000101
EHE6001S
Built-in Solid Plate Hob
PNC Number: 949000102
Page 2
Page 3
TABLE OF CONTENTS
User instruction 1-2
Installation instruction 3-8
Control panel 9
Minute minder 10
Oven and hob functions 11-12
Cooking table 13
How to use the grill 14
Replacing the oven bulb 15
Removing the oven door 15
Cleaning and maintenance 16
Technical support 16
Warranty 17
Contact information 17
Page 4

Page 5

DECLARATION OF CE COMPLIANCE
These appliances are in compliance with the following European Directives:
93/68/EEC : general regulations
2006/95/EEC : concerning low tensions
2004/108/EEC : electromagnetic compatibility
1935/2004/EEC : this appliance is suitable to come in contact with food products
2002/95/EEC : RoHS directive compliance.
INSTRUCTIONS FOR THE USER
Unplug the appliance before undertaking any sort of intervention on it.
Attention: earth connection is required by law.
During oven operation, keep children away.
During operation the oven becomes very hot: do not touch heating elements on the inside.
Do not use steam cleaners to clean the appliances.
Do not use the appliance to heat the room.
The manufacturer will not be held liable for damage to persons or property caused
by improper installation, or by improper, wrong or senseless use.
The manufacturer reserves the right to make any changes to the product which are felt to
be useful or necessary without any advance notice.
Preparation of the oven and pre-use
Attention: the oven must be unplugged from the electrical mains.
Before using the oven, carefully clean the interior, the racks and the drip pan with nonabrasive
soap and warm water.
Insert the racks and the drip pan into their respective runners.
When this operation is complete, plug the oven into the electrical mains and bring it up to
maximum temperature for at least 20 minutes in order to eliminate any residual grease, oil
or resins from manufacturing which may cause unpleasant odours during cooking;
Then ventilate the room.
Once completed this simple operation, the oven is ready to cook for the first time.
INSTRUCTIONS FOR THE USER
Packaging materials (sheets, polystyrene) may be hazardous to children (danger of
suffocation). Keep packaging materials out of the reach of children.
The appliance is designed for adult users who are familiar with these instructions.
Children are often not able to recognize the risk involved with the use of the appliance.
Please supervise properly and do not let children play with the appliance.
The physically impaired must be assisted by capable adults.
Heat is generated during cooking; the door of the oven and the plates of the hob
may get very hot. There is the risk of burns; do not touch and keep children away.
Do not carry out any modifications, tampering or repair attempts, especially
with tools such as screwdrivers on the inside or outside of the appliance.
Installation, electric connections and repair work must be performed only by a qualified
technician in accordance with the manufacturer's instructions and in full compliance with
current laws and safety regulations. Improper repair work can cause serious accidents,
damage the appliance and equipment as well as impair proper operation.
Appliances repaired in technical service centres must undergo routine tests,
especially a continuity test of the earh circuit.
1
Page 6

This appliance is intended solely for domestic use and is designed for cooking and reheating food;
Any other use is considered as improper.
After using the oven or the hob, ensure the indicator on the knob is turned to the "off" position.
Should you decide not to use the appliance any longer, before scrapping it make it unusable in
accordance with current environmental health and safety laws, ensuring any parts which might
constitute a danger to children are rendered harmless.
In case of a failure in operation or an indispensable repair job, ask for the intervention of
the customer technical service centre. If the appliances show visible signs of damage,
do not use them. Unplug it and contact the customer technical service centre.
The appliances must be unplugged as soon as an operating problem is discovered.
Make sure the power cord of the oven is not crushed by the door as this may
damage the electrical insulation.
If the power cord has been damaged, it must be replaced by the technical service centre in
order to avoid the creation of hazardous situations.
Before closing the oven door, make sure there are no foreign bodies or pets inside the oven.
Do not place heat-sensitive or flammable materials in the oven or
over the hob, such as detergents, sprays, and so on. Fire hazard!
The cooking appliances gets extremely hot during operation. Them remains hot for a long time,
even after it has been turned off, and cools off only very slowly until reaching room
temperature. Wait for a suitable period of time before carrying out work such as cleaning
When opening the oven door, steam and water droplets may come out.
If the oven contains steam, it is not advisable to insert the hands.
Superheated grease and oil may easily catch fire. Never use water in an attempt to extinguish
burning grease or oil (there is the danger of explosion). Suffocate the fire with wet cloths
The rack, the plates and the cooking containers become extremely hot.
Use insulated glove or pot holders
When using and maintaining the oven, be careful not to get fingers caught in the door
hinges to avoid crushing or other injuries. This is specially important when children are
around. Leave the door open only in an ajar position. If the door is open there is the
hazard of tripping or crushing the fingers.
Do not sit or lean on the door and do not use it as a work surface.
Warning: in case of disassembly, maintenance and cleaning of the appliance, be careful.
Please use suitable prevention and protection equipment
Do not use aluminium foil, plastic containers or protective films in the oven or on the hob;
The cooking hob electric plates and pan bottom must always be dry and clean.
The hob surface could be damaged. Use only stainless steel pots and pans
Do not use the cooktop with empty pan, especially if it is an enamelled or aluminium pan.
The following damages will not affect the correct functioning or the stability of the appliance:
The formation of gelatinous residues due to melted sugar or food with a high sugar content;
Scratches due to salt, sugar or sand grains or rough pan bottoms; metal colour from pan stands.
Only use warm water with a mild detergent. Do not use corrosive or abrasive products, as they
could damage the surfaces. Warning: a steam cleaner is not to be used to clean the appliance.
This manual constitutes an integral part of the appliance. It must be kept intact and
within easy reach during the entire life of the appliance. Please carefully read this
manual and all the instructions contained herein before using the appliance
Sugar and other food with high sugar content could damage the hob surface.
Any spilt food must be removed immediately;
The label with technical specifications of the hob is placed under the bottom. Do not remove it.
2
Page 7

INSTALLATION OF HOB AND OVEN
Only qualified personnel must carry out installation.
Contact Electrolux Customer Service on 0800 222 825 for details of an accredited
Electrolux service technician in your area.
All care must be taken to ensure the installation is properly earthed and conforms to local
laws. Connection is Y-type for the hob, whereas for the oven it is X-type.
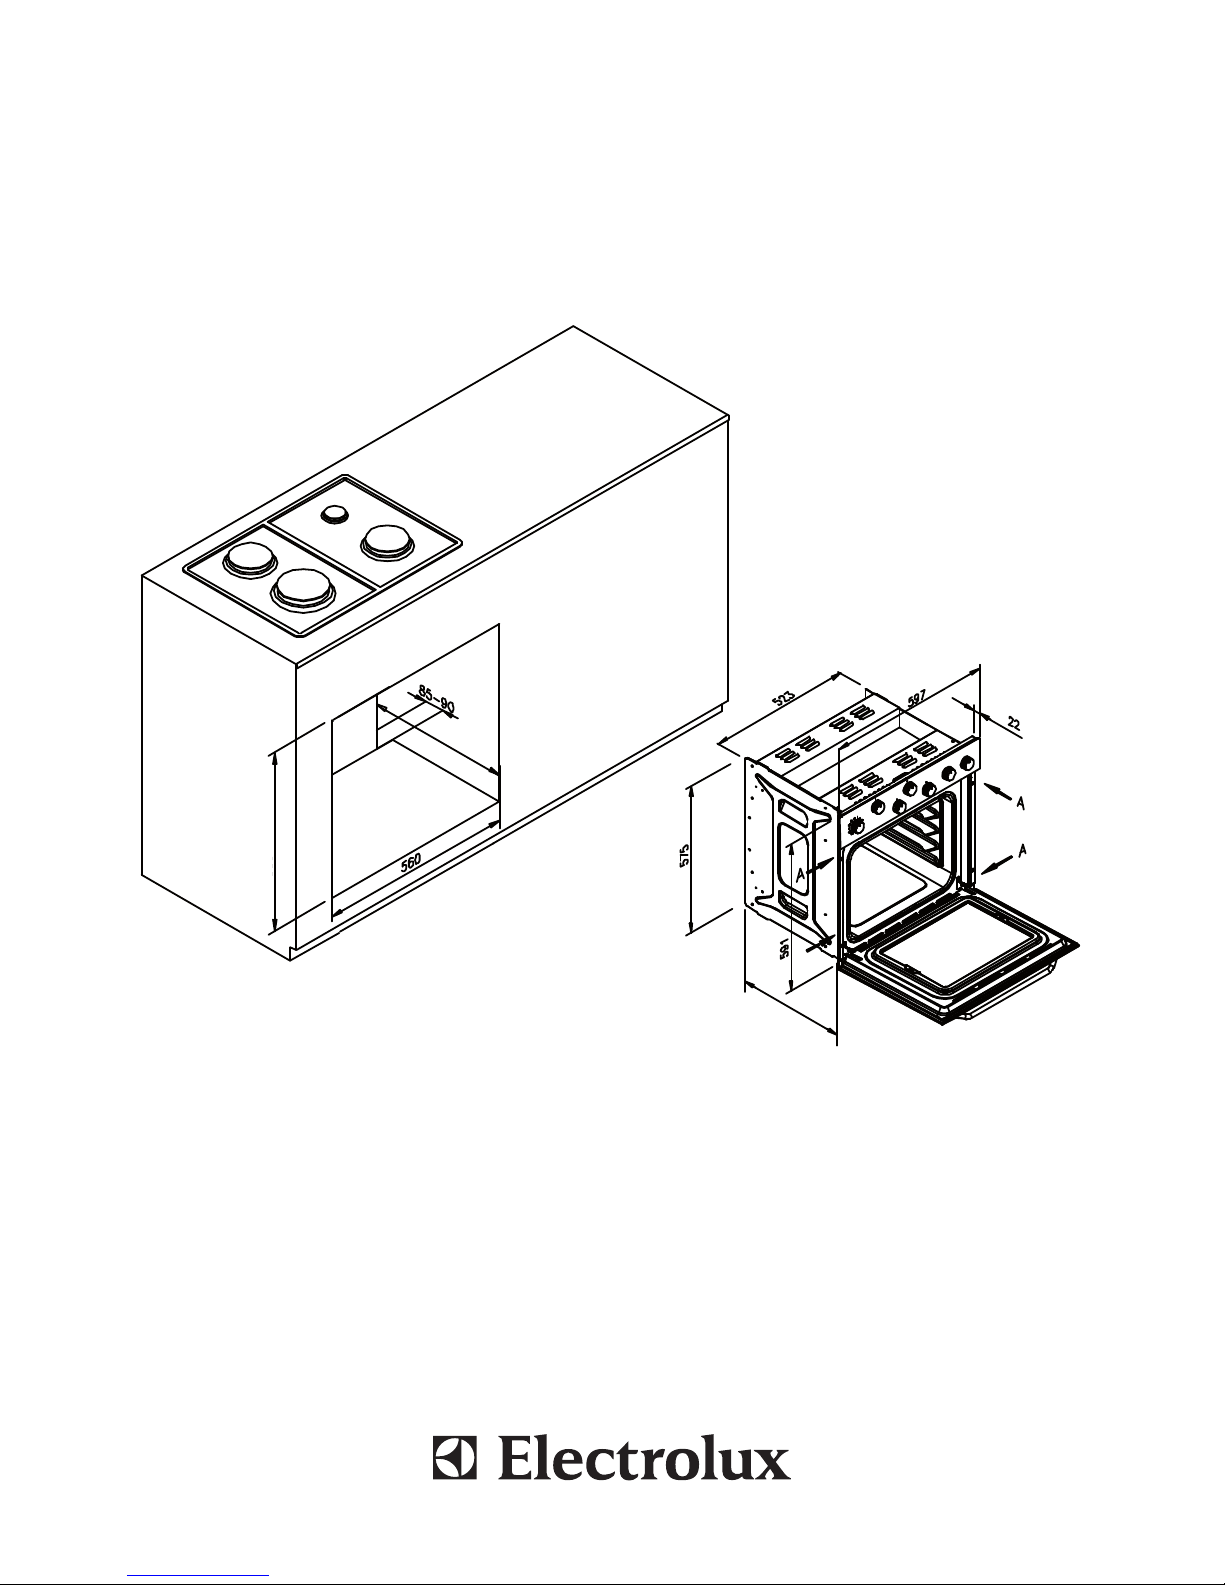
The hob and oven can be installed in all furniture units, as long as they are resistant to
temperatures of up to 100°C.
It is necessary to maintain a distance of 55mm from the back edge and 120mm from the
left-hand side, as shown in figure 1 on page 5.
Any work for adjustment, maintenance, etc. must be carried out with the appliance
unplugged from the electrical mains.
Positioning the hob
The appliance was designed to be built into a worktop and with dimensions above the
appliance, as shown in images 1, 2 and 3 (pp. 5-6).
Electrical connection of the hob is carried out by inserting the connectors provided for this
purpose into the housing placed on the oven (see figure on page 8).
The product is equipped with a special seal to avoid leaks into the furniture unit.
It must be carefully positioned in its place as shown in figure 4 (page 6).
Secure the hob with the braces provided for this purpose as shown in figure 4.
Oven installation
The oven can be installed only after the hob, and it must be placed in a standard opening
(see figure on page 4). The oven is secured to the furniture unit by means of 4 screws "A",
located in the special holes of the frame.
When the oven is being placed in the housing cavity, make sure not to use the door as a
lever. Also, do not subject the door to excessive pressure when it is open.
Technical support
Should you require any further information, please contact Electrolux Customer
Service on 0800 222 825.
Please note: incorrect installation will void all warranty.
A certified Electrician is required for the installation of Electrolux "Built-in" appliances.
Failure here, will render Guarantee void.
3
Page 8
465
580-583
470 min.
A
4
OVEN INSTALLATION
Page 9
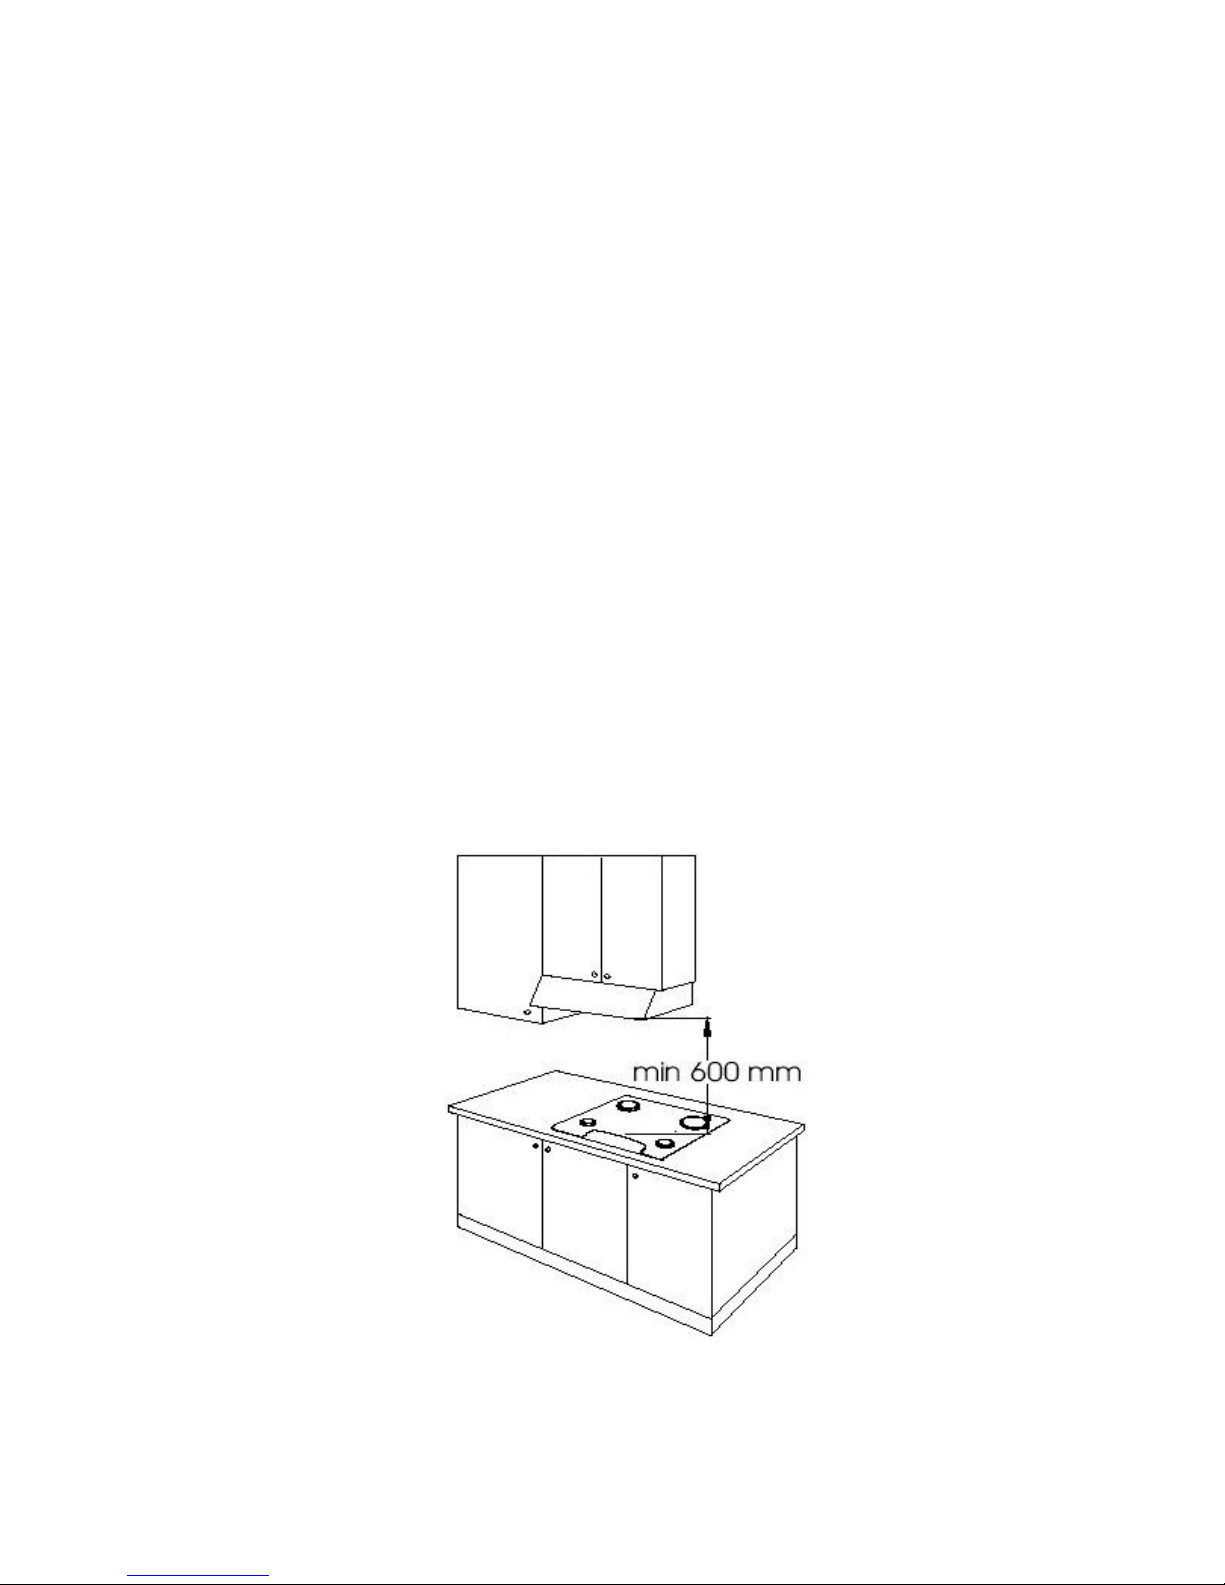
Fig. 2
5
Fig. 1
Page 10
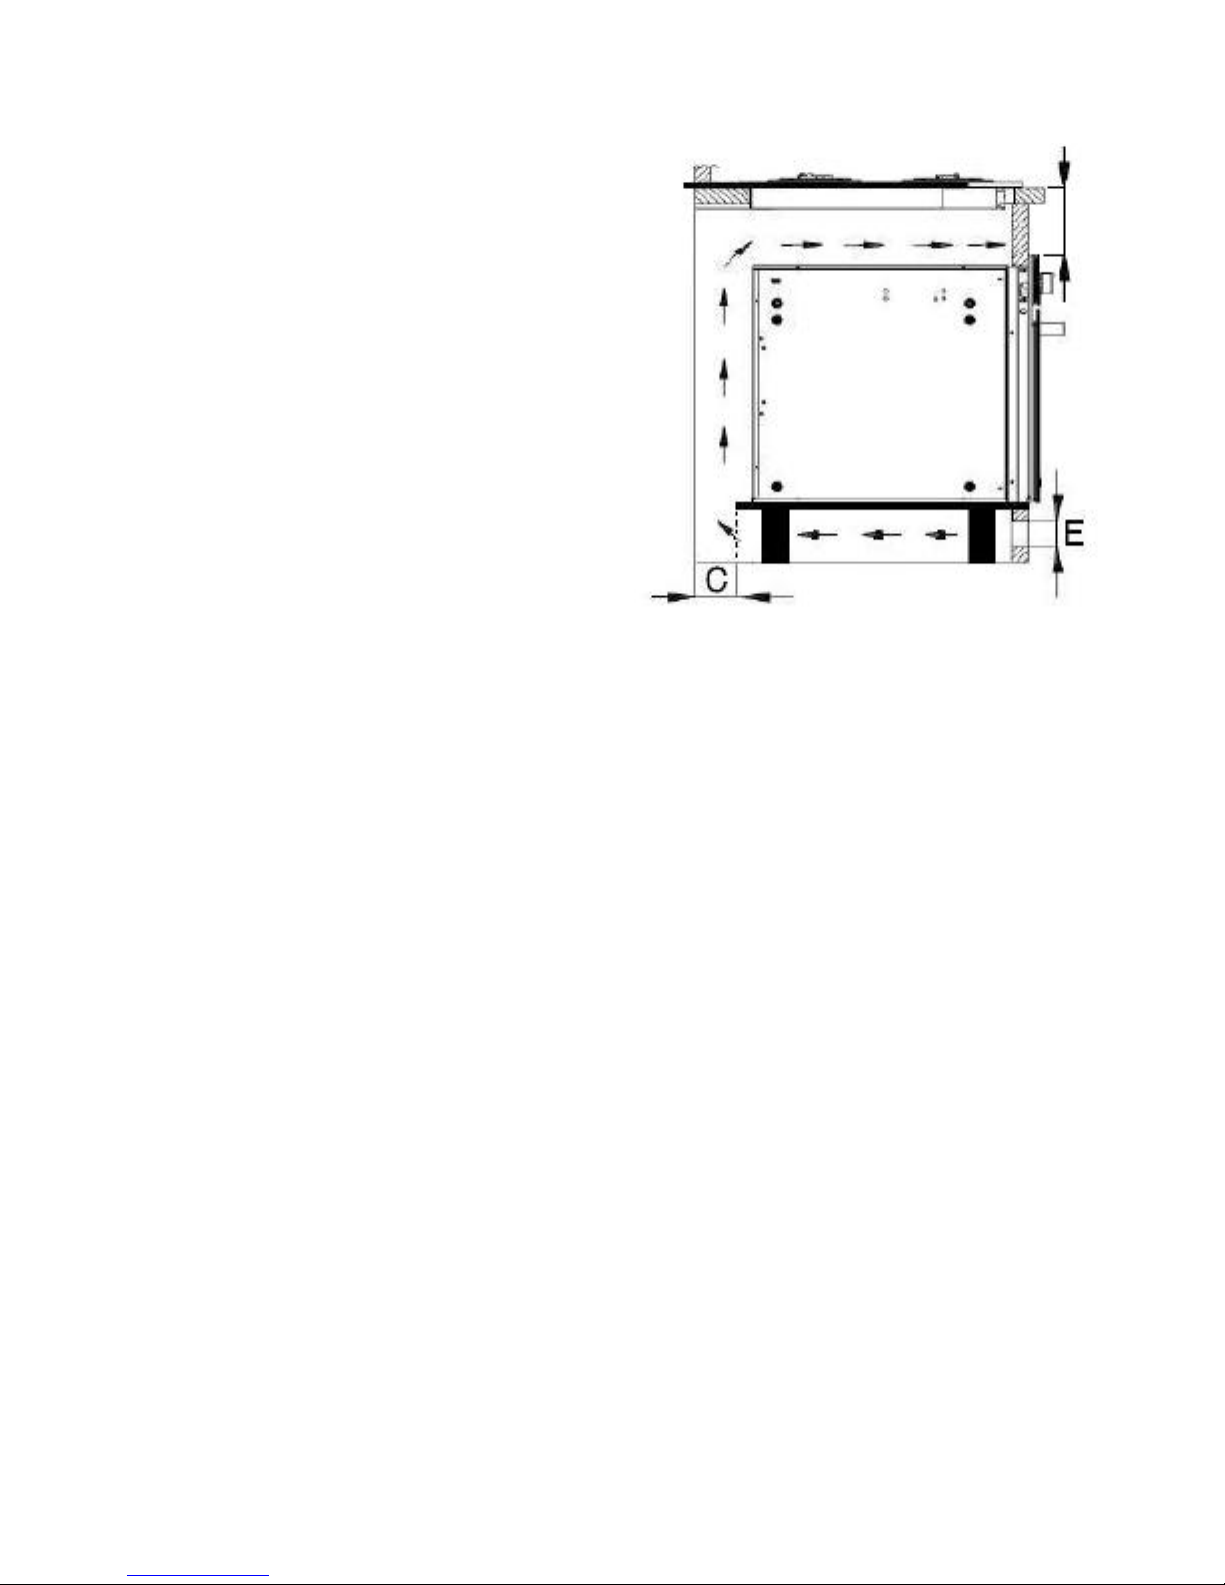
This hob is made to be installed above a built-in oven;
The supply wires must be placed in such a way as to
ensure they do not come into contact with the hot
parts of the oven in order to avoid overheating.
Suitable air inlets (E) should be foreseen
only if there are
not enough air circulation below the oven,
to allow for
the proper ventilation around the piece of furniture,
as illustrates; For the correct working of the hob,
it is vital that the minimum distances
(C and D) shown
in the picture be respected. All surfaces adjacent to
the cabinet and the back panel should be made of
materials resistant to a temperature of 90°C
C:
85mm
D:
50mm
E:
30x40mm
To fix the cooktop in the housing, proceed as follows:
1)
Position the special gasket supplied [C] along the outer perimeter of the
worktop, so that the ends of the gasket meet exactly without overlapping.
2) Position the cooktop into the worktop, taking care to ensure it is placed exactly in the centre.
3)
Fix the cooktop to the worktop using the special brackets supplied [A], as shown.
A correct installation of the sealing gasket ensures complete protection against infiltration of liquids
6
Fig. 3
Fig. 4
D
Page 11

7
ELECTRICAL CONNECTION
Electrical connection must be carried out by qualified personnel.
Ensure that the nominal voltage corresponds to the voltage indicated on the identification
plate on the oven.
The oven and the hob must have a working earth system as set forth by pertinent legal
requirements.
The oven is provided with an electrical power cord which meets related standards.
The terminal block is located on the rear of the oven.
Connection to the mains must be carried out by means of an omni-polar switching device
with aperture between contacts equal to or greater than 3mm and it must be accessible
after the appliance has been installed.
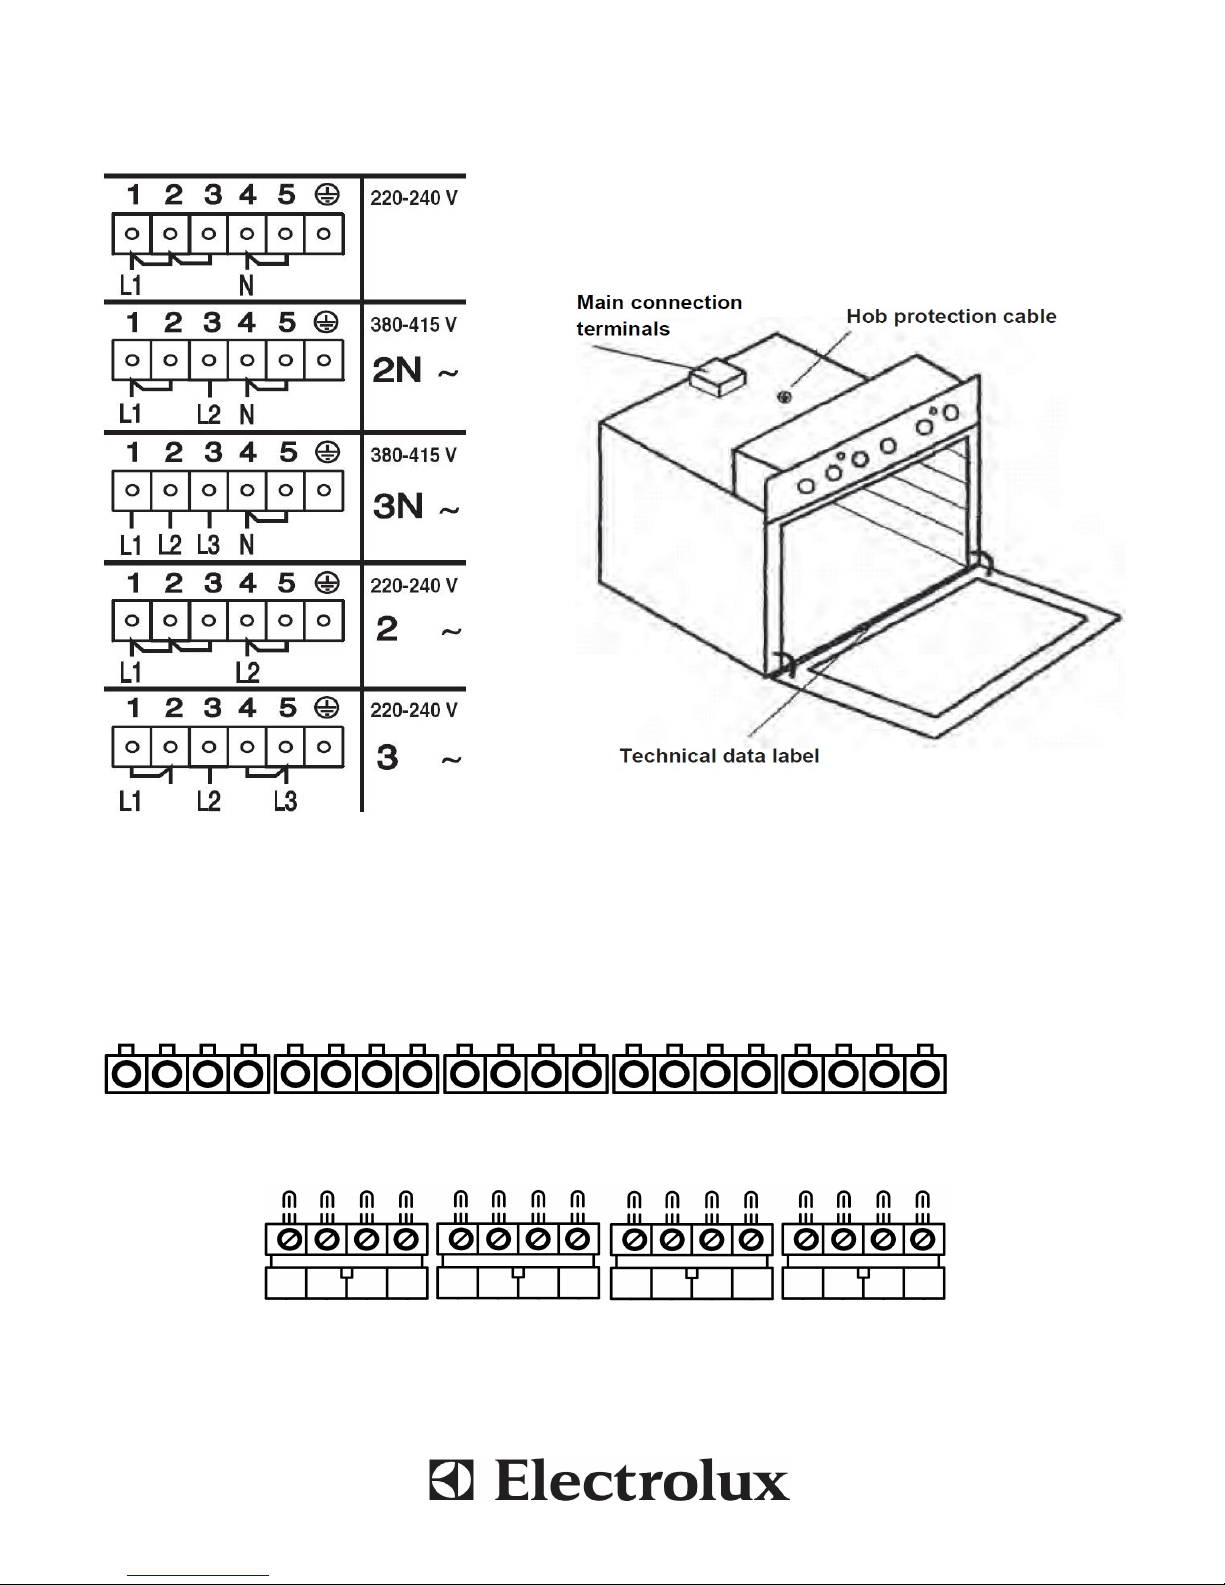
The hob must be electrically connected by inserting the five plugs in the corresponding
connectors located on the oven, following the colour combinations (see next page).
Attention: only the related hob must be connected to the control panel on the oven.
Page 12
green
blue
white
black
green
blue
ELECTRICAL CONNECTION
8
Electrical connection scheme
On the oven
On the hob
Connecting terminals
Not
connected
white
black
Page 13
9
3 9
1 2 4 5 6 7 8
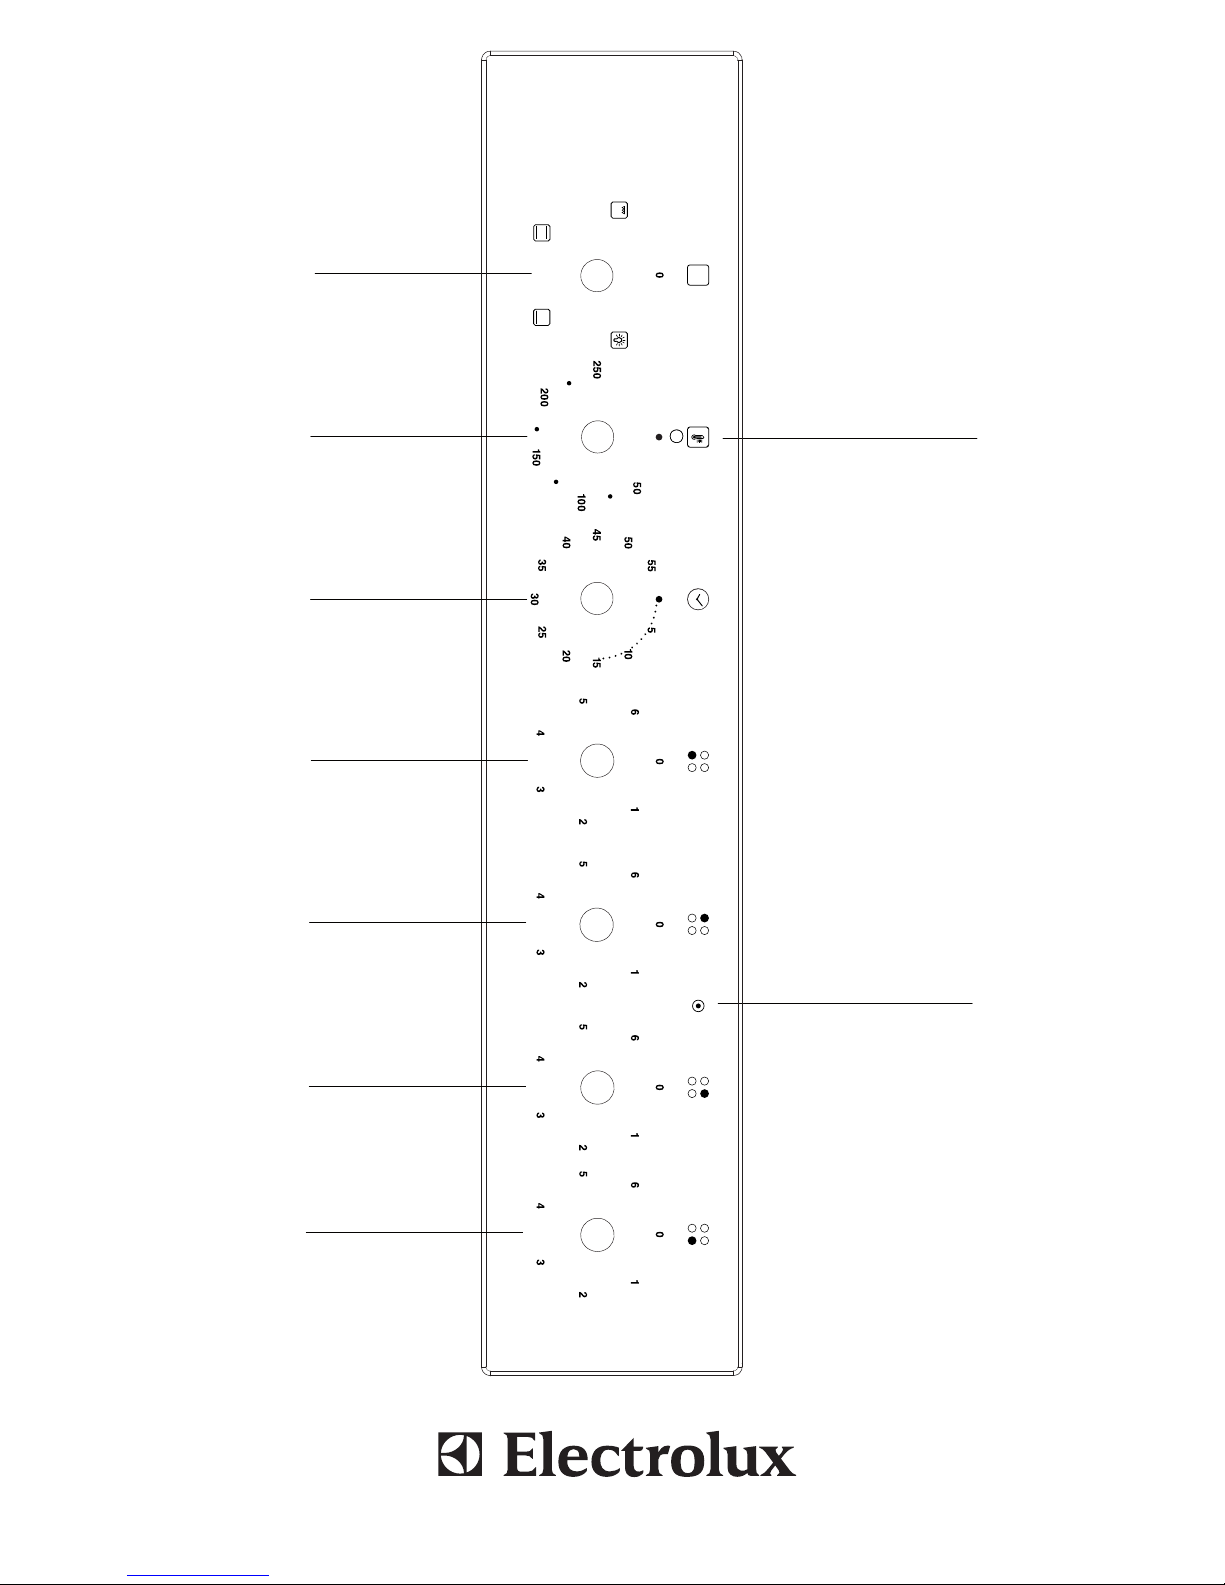
CONTROL PANEL
1. Function selector knob
2. Thermostat
3. Thermostat light
4. Minute minder
5-6-7-8. Hob control knobs
9. Hob light
Page 14
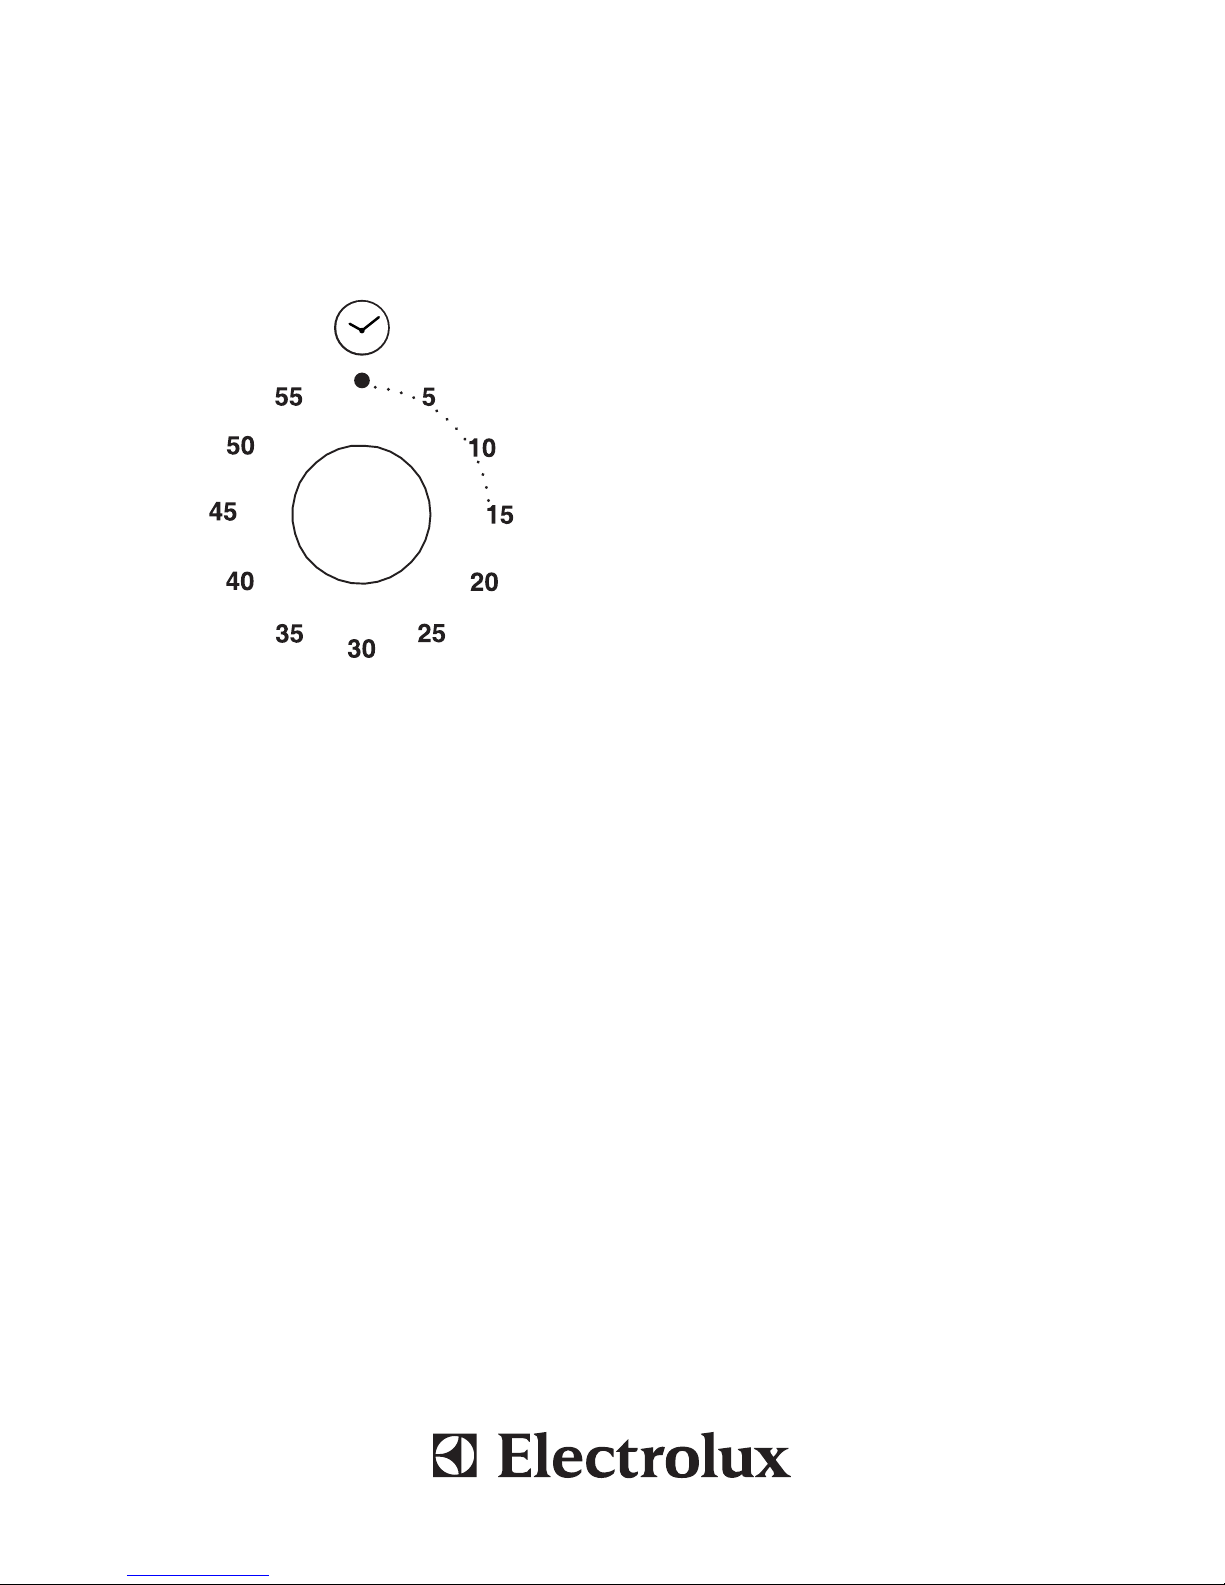
10
The minute minder knob must be turned completely in a clockwise direction;
then turn it in an anti-clockwise direction up to the desired time of cooking.
The oven will not be turned off automatically.
A minute counter ringing will advise that the cooking time is over.
PROGRAMMING THE OVEN WITH THE 60 MINUTES TIMER
Page 15
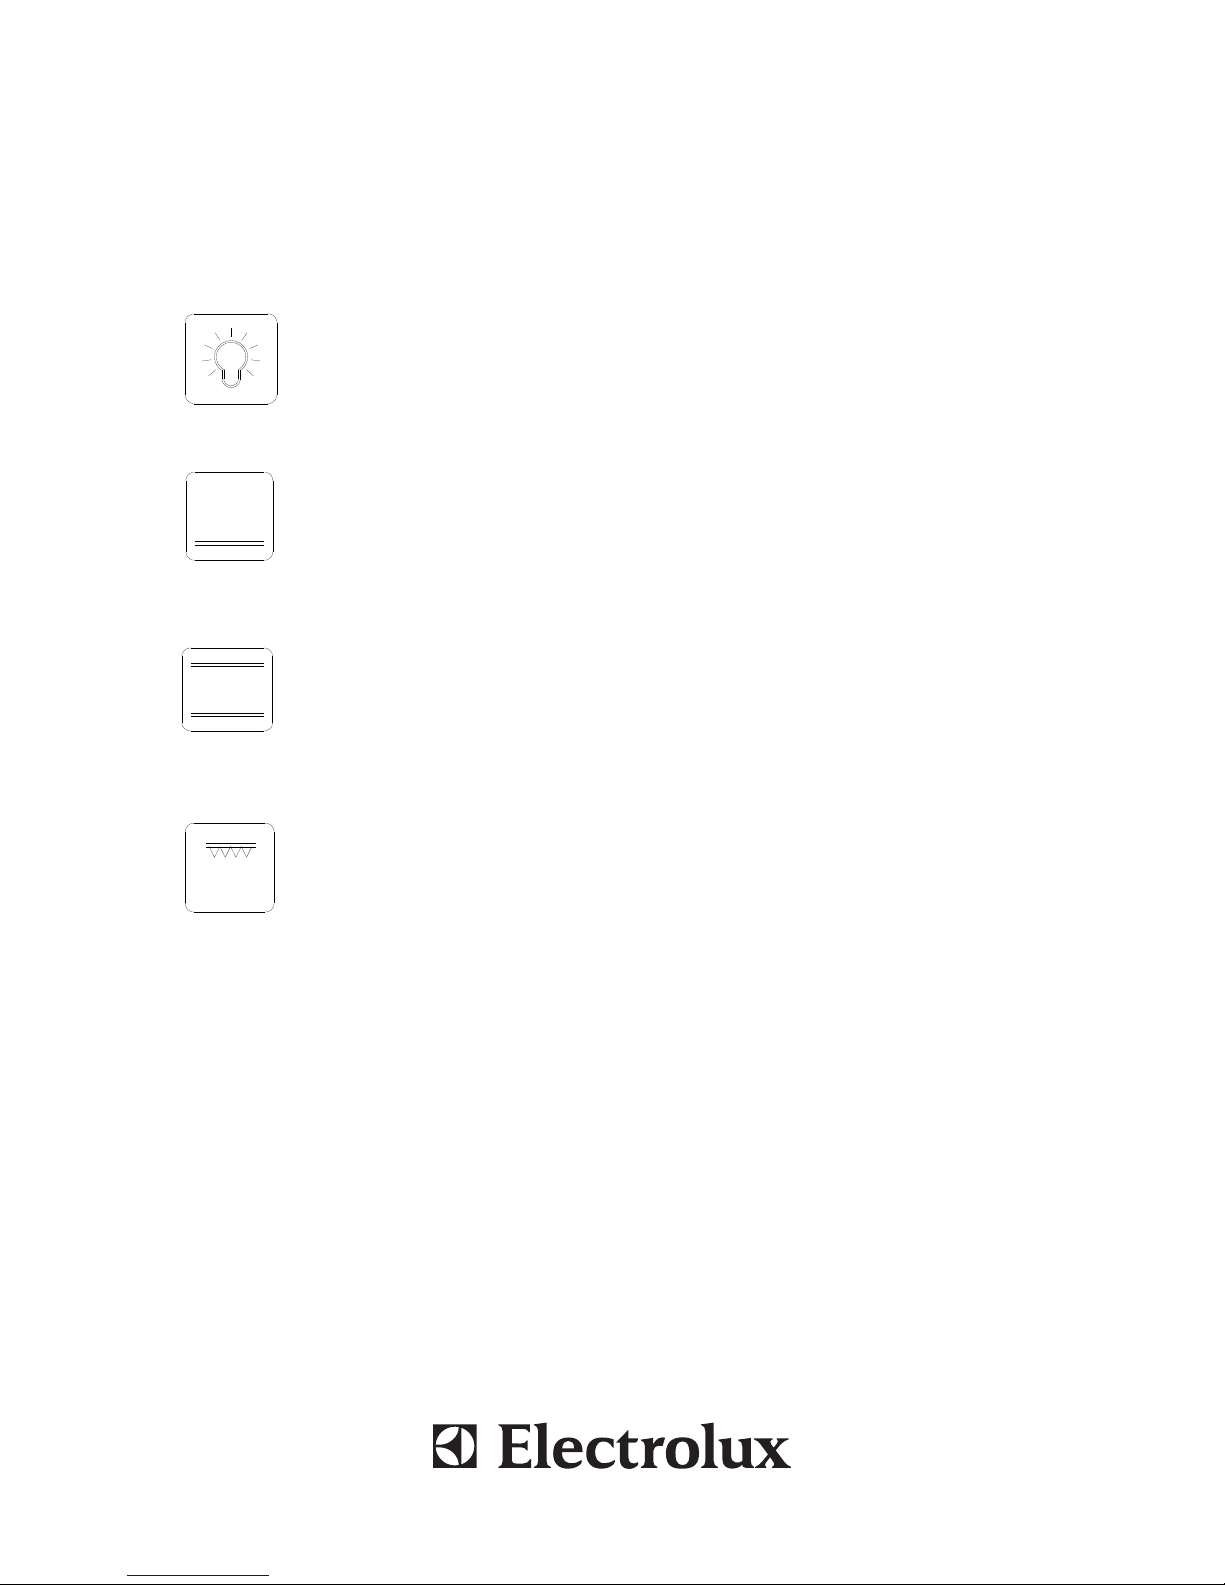
11
OVEN LIGHT
LOWER ELEMENT MODE
Select the desired temperature between 50°C and 250°C.
It is suitable for very slow cooking and warming up of food.
TRADITIONAL OVEN COOKING
This function provides traditional cooking with heat from
the top and bottom elements.
GRILL MODE
Select the required temperature between 50°C and 250°C.
See instructions on page 14.
OVEN FUNCTIONS
Page 16
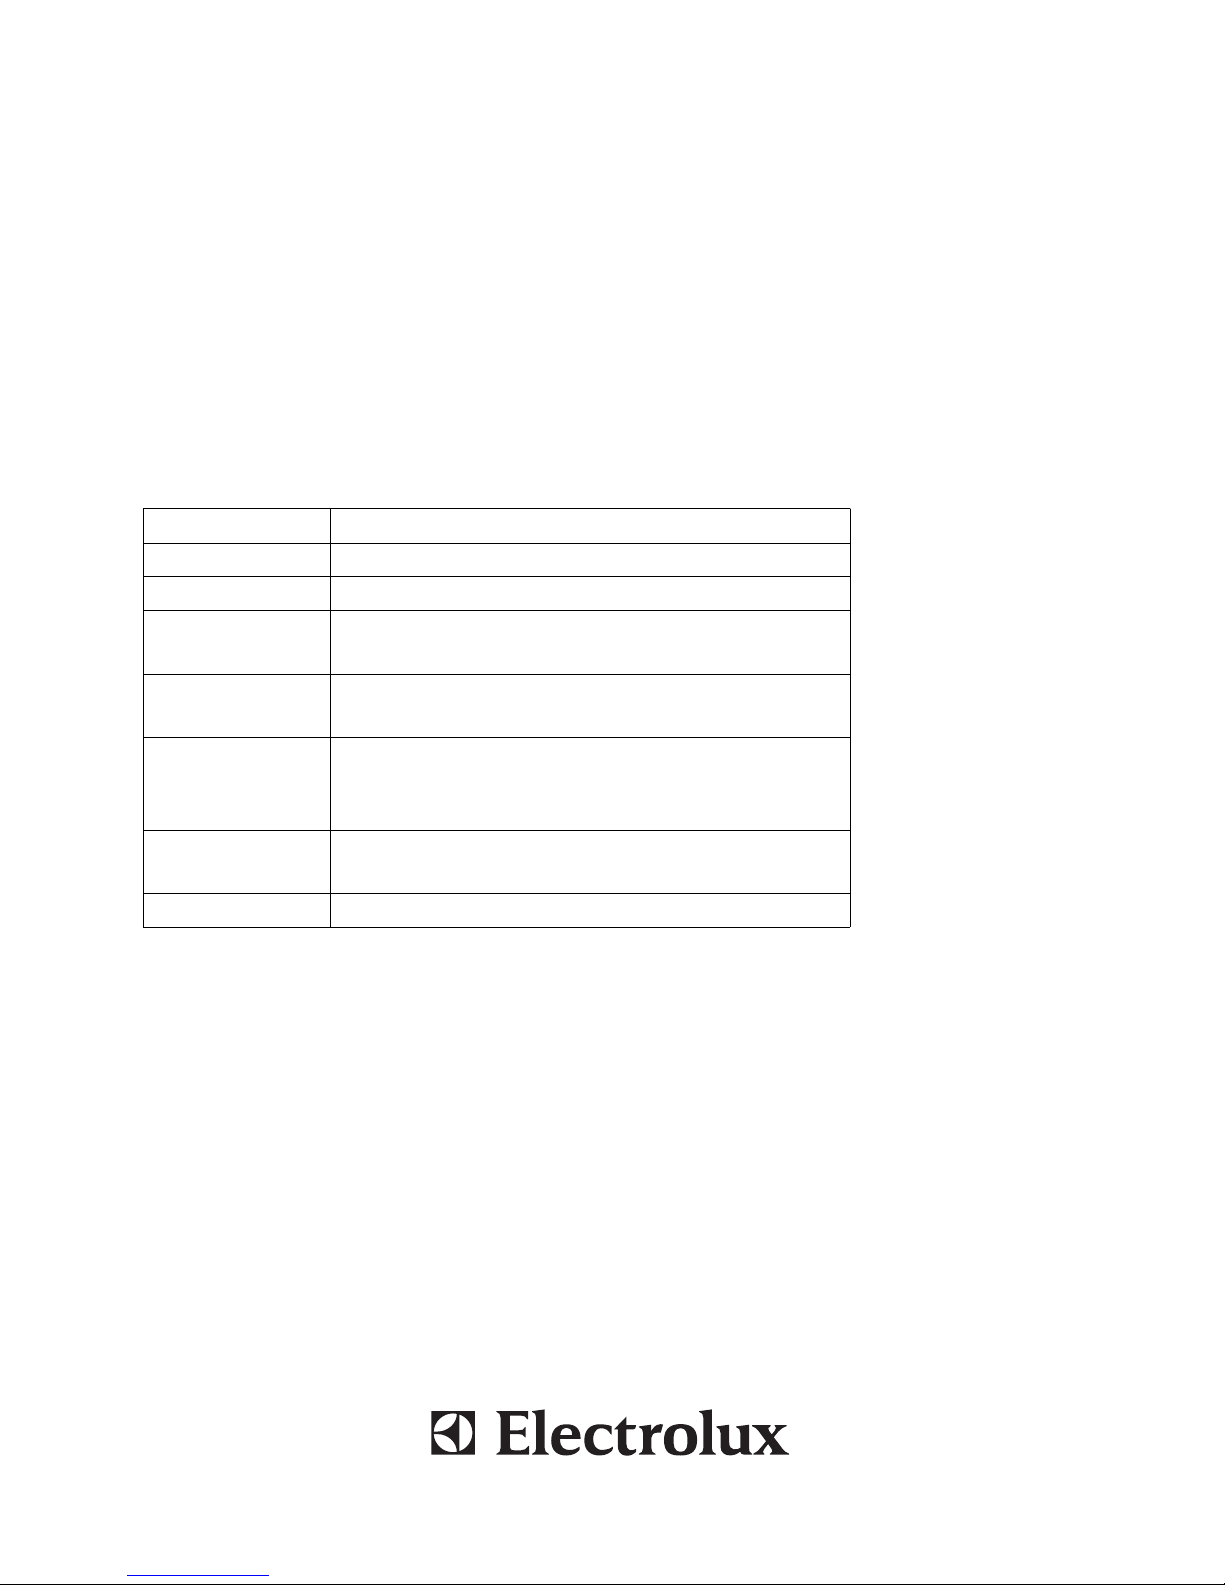
HOB SELECTOR FUNCTIONS
The hob is provided with 4 electrical cooking plates.
The cooking areas are controlled by 4 commutators with 7 positions, located on the oven
control panel.
The intensity of heating of the zones is adjusted gradually from "0" (off) to "6" (max).
When the hob is operating, the indicator light is on.
Knob setting Cooking operation
0
Off
1
Melting processes
2
3
4
5
6
Quick frying, char-grilled steaks, etc.
Keeping foods hot;
Heating small amounts of liquid
Heating larger amounts of liquid;
Beating custards and sauces
Slow boiling, soups, pasta, rice;
Continuing steaming processes;
Cooking steaks and friend foods in general
Browning meat, roasted potatoes, fried fish;
Bringing large amounts of water to the boil
12
Page 17
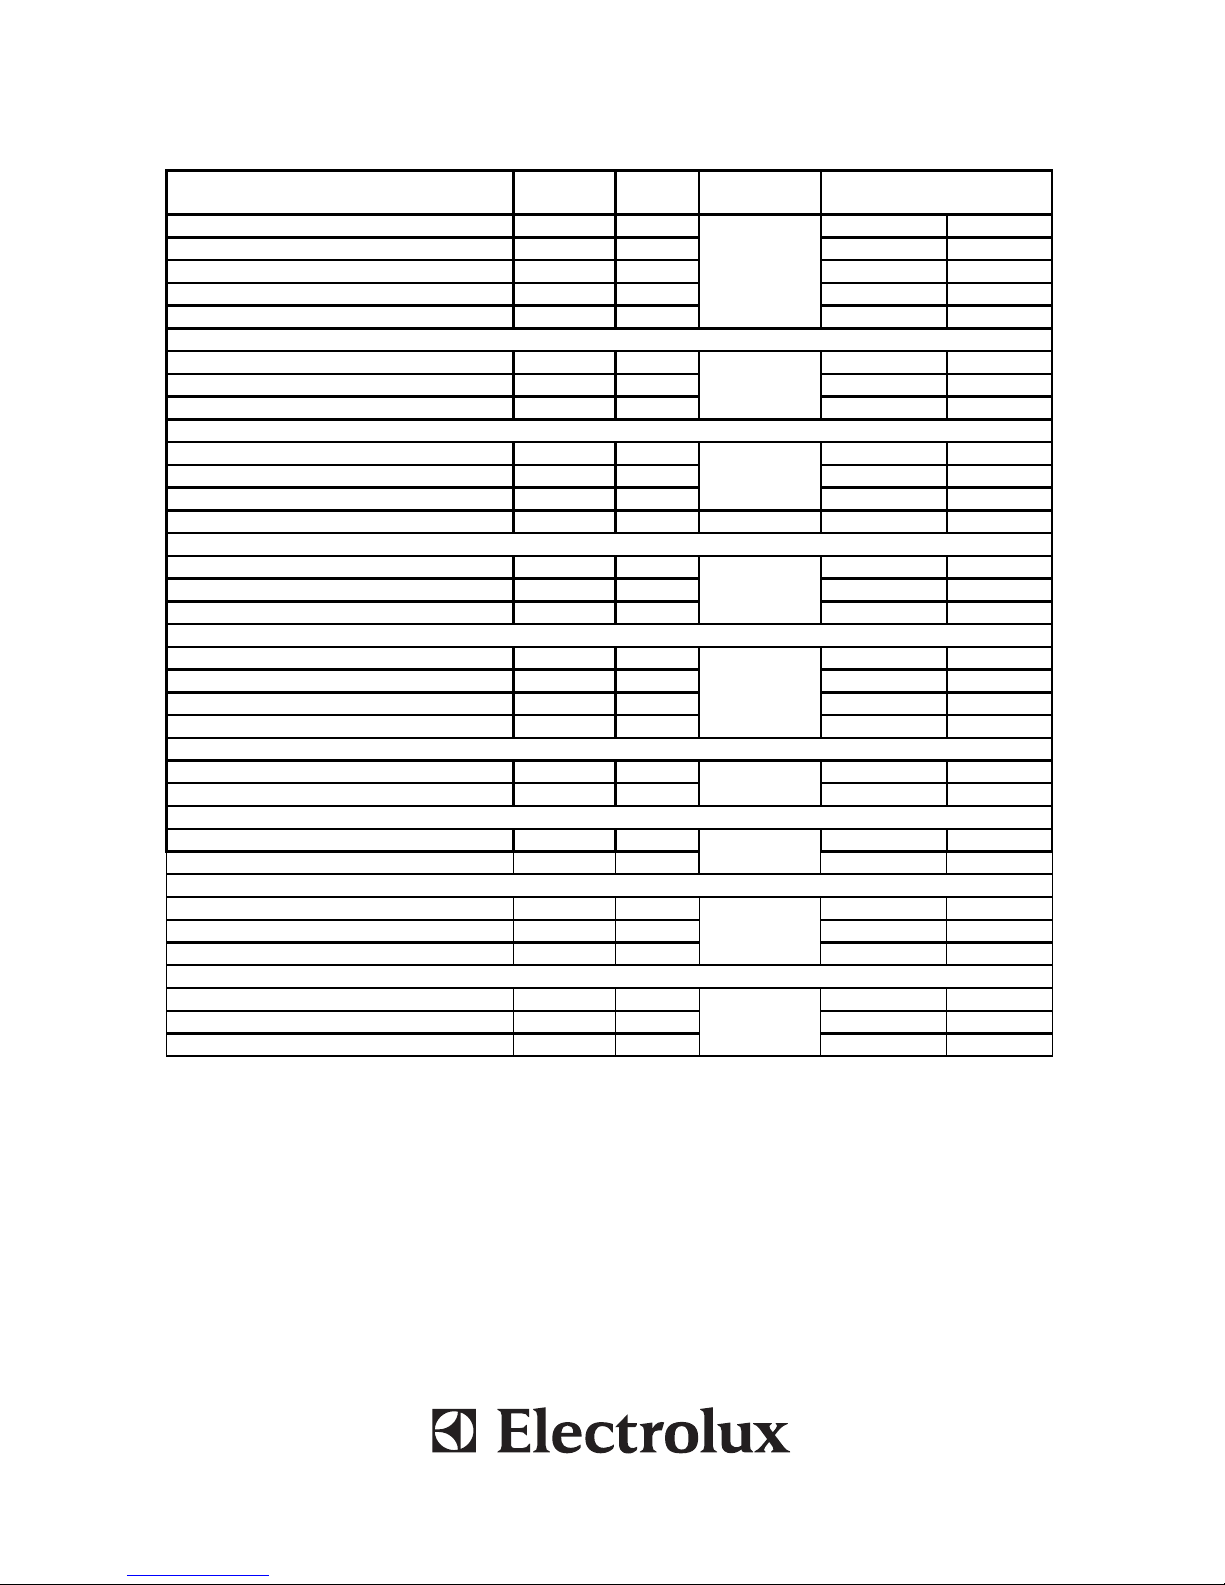
COOKING TABLE
Type of food Temp. °C
Shelf
level*
Cooking
function
Cooking time in minutes
Bake in tin
Traditional
Suggested Personal
Panettone or focaccia 175 2 55 - 65
Focaccia 175 3 60 - 70
Cake 175 3 60 - 70
White bread (1kg of flour) 200 3 25 - 35
Short pastry in tin
Pie base 200 3
Traditional /
lower heating
8 - 10
Pie base with ricotta cheese 200 3 25 - 35
Pie base with fruit 200 3 25 - 35
Small pastries
Puff pastry 200 3
Traditional /
lower heating
10 - 15
Choux pastry 200 2 35 - 45
Biscuit pastry 200 3 15 - 20
Lasagne 225 2 Traditional 40 - 50
Meat
Slowly cooked roast (ex. roast veal) 200 2
Traditional
120 - 150
Fast cooked roast (ex. roast beef) 200 2 60 - 90
Meatloaf 200 2 30 - 40
Poultry
Duck 1,5kg 200 2
Traditional
120 - 180
Goose 3kg 200 2 150 - 210
Roast chicken 200 2 60 - 90
Turkey 5kg 175 2 about 240
Game
Hare 200 2
Traditional
60 - 90
Leg of venison 175 2 90 - 180
Vegetable
Baked potatoes 220 2
Traditional
30 - 40
Vegetable pudding 200 2 40 - 50
Fish
Trout 200 2
Traditional
40 - 50
Grey mullet 200 2 40 - 50
Pizza 240 3 10 - 20
Grill
Pork chops 4
Grill
8 - 12
Sausages 4 10 - 12
Grilled chicken 2 25 - 35
* For the "Shelf Level", 1 is the lowest runner possible in the oven.
The information in the chart above is given as a guide only because the cooking
type and time varies with the food quantity and quality.
13
Page 18
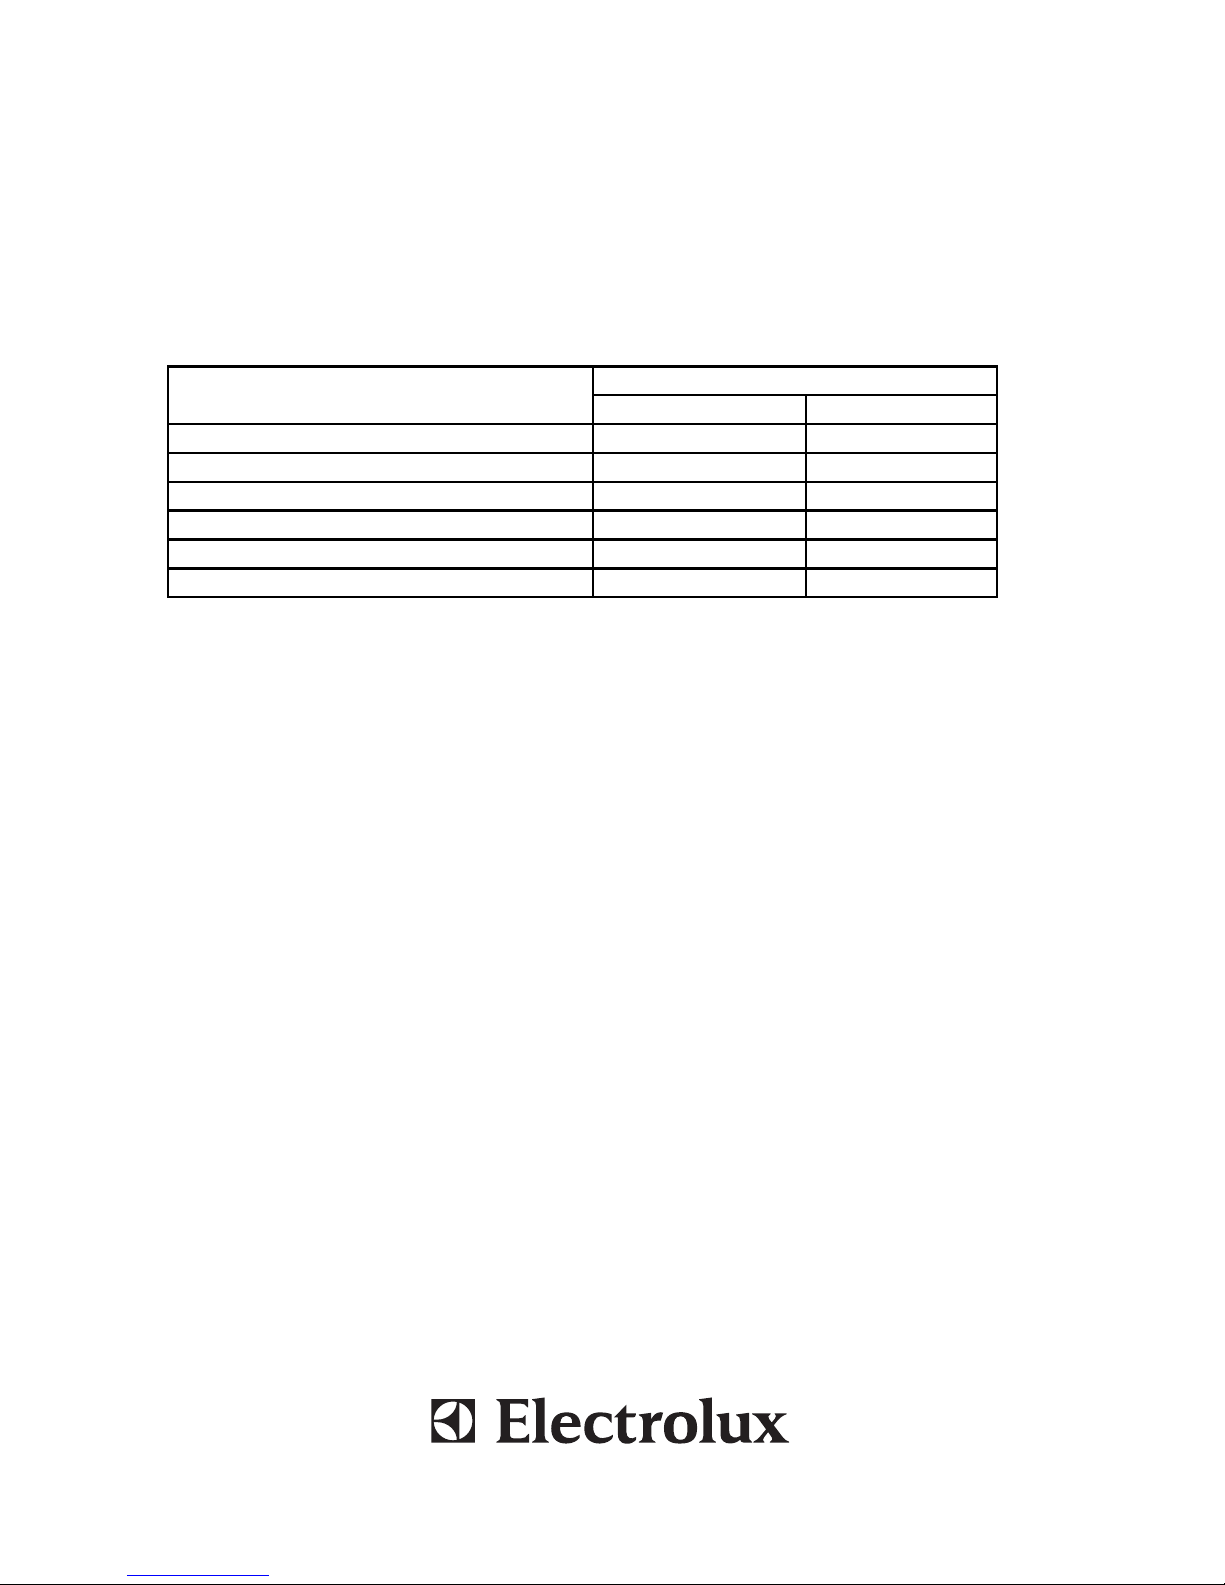
HOW TO USE THE GRILL
Lay the food in the wire shelf or in a tray in case of small pieces.
The rack must be positioned in the highest runner possible and the grease drip pan
in the runner below. Close the door and adjust the selector on position .
Dishes for grilling Grilling time in minutes
1st side 2nd side
Slices of thin meat 6 4
Slices of meat of medium thickness 8 5
Slices of thin descaled fish 10 8
Fish (e.g. trout, salmon) 15 12
Sausages 12 10
Toast 5 2
14
Page 19
REPLACING THE BULB
Important: Unplug the appliance from the electrical power supply.
Check that the oven is at room temperature, otherwise wait for it to cool.
Remove the side rack.
To replace the oven bulb B (fig. 1), remove the protective cover A by turning it anti-
clockwise. Replace the burnt-out bulb and fit the protective cover back in place A.
Note: Use only 25 W, E-14 type, T 300°C bulbs.
The lamp used in this appliance is a ‘special purpose lamp’ intended only for the
usage with this appliance; is not intended for household room illumination.
REMOVING THE OVEN DOOR
To aid cleaning and make access to the oven interior easier, both oven doors can
be simply removed. To make the cleaning operation easier, the door
can be removed from the hinges as follows:
The hinges A (fig. 2) are provided with two movable bolts B.
When bolt B is raised, the hinge is released from its housing. Having done this,
the door must be lifted upwards and removed, sliding it towards the outside;
grip the sides of the door near the hinges when performing these operations.
To refit the door, firstly slide the hinges into their slots.
Before closing the door, remember to rotate the two movable bolts B used to hook
the two hinges. Do not soak the door in water.
Door glass
The door glass can easily be removed and cleaned by unscrewing the side screws.
Fig. 1 Fig. 2
A
B
15
Page 20

OVEN CLEANING AND MAINTENANCE
Important: before performing maintenance on the oven, always remove the electrical plug
and disconnect the power supply by means of the main switch of the electrical system.
Cleaning the oven: cleaning the oven must be done after use and when the oven is off,
but still warm, not hot, so that the layer of grease produced by steam from cooking on the
sides is easy to remove. Also, grease drops and splashes will not have a hard, consistent
crust.
Clean the oven with a soft cloth soaked in a weak solution of ammonia, then rinse and dry.
If there are still stains or drips, close the door and after a few hours wash the oven with
warm water and liquid detergent, rinse and dry carefully. For the external parts in polished
metal, use a soft cloth with soap and water. Never use powder products that contain
abrasive ingredients.
Do not use steam cleaners to clean the oven.
HOB CLEANING AND MAINTENANCE
To extend the life of the hob, it has to be cleaned periodically. Follow these instructions:
Electric plates
To clean a plate, heat it up for a few moments so as to burn any products that may have
been left during manufacture.
Turn off the hob at the mains and leave the hob to cool; then clean with a damp cloth and
lubricate with oil while it is still warm.
Control panel
To keep the control panel in pristine condition, you must not clean it with abrasive products
or dirty, dry cloths. To make cleaning easier, the knobs can be removed by pulling them
upwards, but do not use the control panel as a lever; if the knob is difficult to remove, place
a cloth under the knob and lever it off carefully.
Stainless steel parts
Use products that are available in shops.
TECHNICAL SUPPORT
If the oven does not operate correctly, you are advised to check the following before calling
the Electrolux Customer Service Center:
Check that the circuit breaker or fuse is intact.
If the cause of the fault is not identified, switch the appliance off, do not tamper with it and
call the Electrolux Customer Service Center on 0800 222 825, specifying the model
indicated on the identification plate at the bottom of the front of the oven.
16
Page 21
17
WARRANTY CONDITIONS:
This product is covered by an Electrolux two year warranty for domestic use only.
For the two year warranty conditions please contact Electrolux Customer Helpline:
0800 222 825.
Electrolux waives all liability for failure to observe the instructions for the appropriate
installation, maintenance and use of this appliance.
SPARES & SERVICE REQUIREMENTS:
N.B.
Please make reference to cover page, to obtain PNC number necessary for Servicing
and Spare parts requirements.
If you need any technical help, have spares and service requirements or would like more
information on any of our products, please do not hesitate to contact our Customer
Helpline, details below:
Telephone: 0800 222 825 (Toll free in South Africa)
Address: Electrolux SA
3rd Floor, DBM Gardens Building
Golf Park, Raapenberg Road,
Mowbray, 7700
Cape Town
Page 22
18
Page 23
Page 24
Part No: 14826-000
12300171811
Electrolux reserves the right to make improvements or modifications to the product
from time to time and consequently details given in this book are subject to alteration
without notice.
 Loading...