

Page 1

electrolux 1
user manual
Built-in oven
EOB 66714
Page 2

Page 3

electrolux 3
Welcome to the world of Electrolux
Thank you for choosing a first class product from Electrolux, which hopefully will
provide you with lots of pleasure in the future.
The Electrolux ambition is to offer a wide variety of quality products that make
your life more comfortable.
You find some examples on the cover in this manual.
Please take a few minutes to study this manual so that you can take advantage
of the benefits of your new machine.
We promise that it will provide a superior User Experience delivering Ease-of-
Mind.
Good luck!
Page 4

4 electrolux
Contents
Important Safety Information .............................................................................. 5
Description of the Oven ...................................................................................... 7
The Electronic Oven Controls .......................................................................... 10
Before the First Use of the Oven ...................................................................... 12
Using the Oven ............................................................................................... 14
The menu Assisted Cooking............................................................................. 18
The menu My Programmes .............................................................................. 24
The menu Basic Settings ................................................................................. 26
Hints and Tips ................................................................................................. 37
Cleaning and Maintenance .............................................................................. 38
Care of catalytic liners ..................................................................................... 42
Something not Working ................................................................................... 45
Technical Data ................................................................................................ 46
Instructions for the Installer .............................................................................. 47
Building In ....................................................................................................... 49
Guarantee/Customer Service ........................................................................... 50
Service and Spare Parts .................................................................................. 51
European Guarantee ....................................................................................... 52
Guide to using the instructions
Safety instructions
Step by step instructions
!
Hints and Tips
This appliance conforms with the following ECC Directives:
- 2006/95 (Low Voltage Directive);
- 89/336 (EMC Directive);
- 93/68 (General Directive);
and subsequent modifications.
MANUFACTURER:MANUFACTURER:
MANUFACTURER:
MANUFACTURER:MANUFACTURER:
ELECTROLUX HOME PRODUCTS ITALY S.p.A.
Viale Bologna, 298
47100 FORLÌ (Italy)
Page 5

electrolux 5
Important Safety Information
These warnings are provided for the safety of the users and those living
with them. So read them carefully before installing and using the appliance.
This will allow you to obtain best performance, avoid improper actions,
use the appliance in complete safety and also respect the environment.
If you need assistance, contact our Customer Care Department on 08705
950 950.
Installation
• This oven must be installed by
qualified personnel to the relevant
British Standards.
• This oven is heavy. Take care when
moving it.
• Remove all packaging, both inside
and outside the oven, before using
the oven.
• Do not attempt to modify the oven
in any way.
During use
• This oven is intended for domestic
cooking only. It is not designed for
commercial or industrial purposes.
• Always stand back from the oven
when opening the oven door during cooking or at the end of it to
allow any build up of steam or heat
to release.
• Appliances become very hot with
use, and retain their heat for long
periods after use. Care should be
taken to avoid touching heating elements inside the oven.
• Never line any part of the oven with
aluminium foil.
• Do not allow heatproof cooking ma-
terial, e.g. roasting bags, to come
into contact with oven elements.
• Never place plastic or any other
material which may melt in or on
the oven.
• Do not place sealed cans or aero-
sols inside the oven. They may explode if they are heated.
• Do not hang towels, dishcloths or
clothes from the oven or its handle.
• Do not use this oven if it is in con-
tact with water and never operate
it with wet hands.
• Take great care when heating fats
and oils as they will ignite if they
become too hot.
• Always use oven gloves to remove
and replace food in the oven.
• Before cleaning the oven, either turn
the power off or pull the mains plug
out.
• Ensure that all controls are in the
OFF position when not in use.
• Do not leave cookware containing
foodstuffs, e.g. fat or oil in or on the
oven in case it is inadvertently
switched ON.
• When using other electrical appli-
ances, ensure the cable does not
come into contact with the hot surfaces of the oven.
• Do not use abrasive cleaners or sharp
metal scrapers. These can scratch the
glass in the oven door, which may result in the shattering of the glass.
Page 6

6 electrolux
People Safety
• This oven is designed to be operated
by adults. Do not allow children to
play near or with the oven.
• The oven gets hot when it is in use.
Children should be kept away until it
has cooled.
• This appliance is not intended for use
by children or other persons whose
physical, sensory or mental capabilities or lack of experience and knowledge prevents them from using the
appliance safely without supervision
or instruction by a responsible person to ensure that they can use the
appliance safely.
Maintenance and Cleaning
• Only clean this oven in accordance
with the instructions.
• The oven should be kept clean at all
times. A build-up of fats or other
foodstuffs could result in a fire,
especially in the grill pan.
• Never use steam or high pressure
steam cleaners to clean the
appliance.
• Always allow the oven to cool down
and switch off the electrical supply
before carrying out any cleaning or
maintenance work.
Environmental Information
• After installation, please dispose of
the packaging with due regard to
safety and the environment.
• When disposing of an old appliance,
make it unusable, by cutting off the
cable. Remove any door catches, to
prevent small children being trapped
inside.
The symbol on the product or on its
packaging indicates that this product
may not be treated as household waste.
Instead it shall be handed over to the
applicable collection point for the
recycling of electrical and electronic
equipment. By ensuring this product is
disposed of correctly, you will help prevent
potential negative consequences for the
environment and human health, which
could otherwise be caused by
inappropriate waste handling of this
product.
For more detailed information about
recycling of this product, please contact
your local city office, your household
waste disposal service or the shop where
you purchased the product.
Service
• This oven should only be repaired or
serviced by an authorised Service
Engineer and only genuine approved
spare parts should be used.
Always keep these user instructions
with the appliance. Should the
appliance be passed on to third
persons or sold, or if you leave this
appliance behind when you move
house, it is very important that the
new user has access to these user
instructions and the accompanying
information.
Page 7
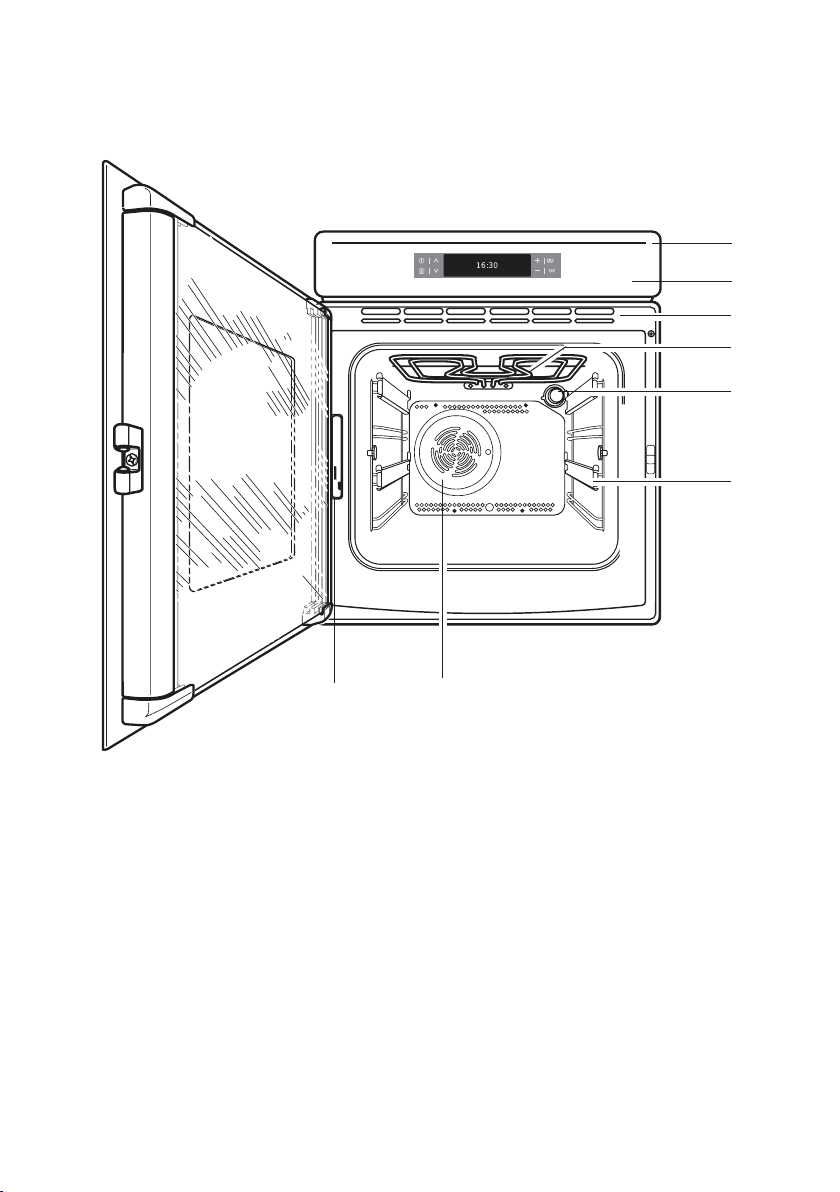
Description of the Oven
electrolux 7
11
1
11
22
2
22
33
3
33
44
4
44
55
5
55
66
6
66
1. Light bar
2. Control panel
3. Air vents for cooling fan
4. Grill
5. Oven light
6. Telescopic shelf supports
7. Oven fan
8. Rating plate
77
88
8
88
7
77
Page 8
8 electrolux
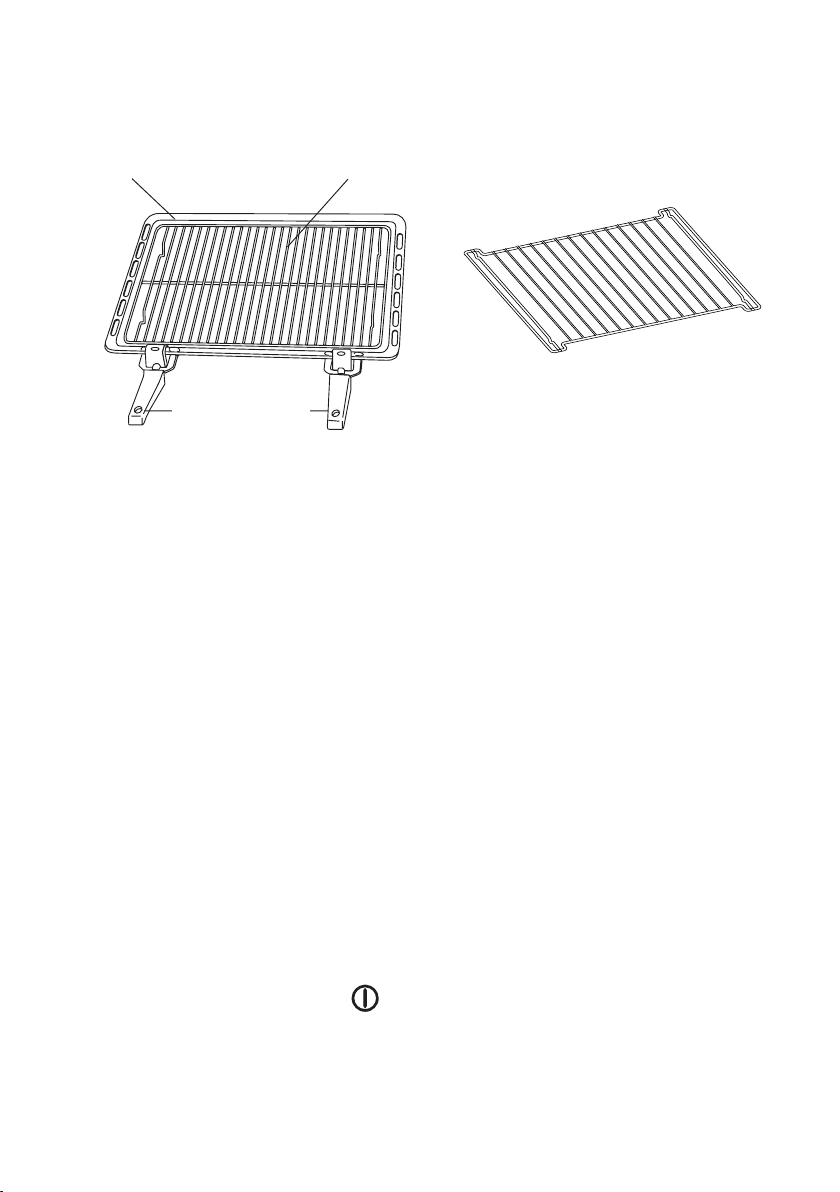
Oven accessories
Grill/roasting pan
Removable
handles
Grill trivet
How the electronic Touch
Controls on the oven
work
The Touch Control buttons
All the oven functions are controlled
electronically. You can select any
combination of cooking function,
cooking temperature and automatic
timing using the touch controls.
Make sure you touch just one control
button at a time. If you touch the cooking
function control for a longer time, the next
cooking function will be selected.
Shelf
The light bar
The light bar is located right above the
display and can be activated/deactivated
by touching the “On/Off” control .
Page 9

Safety Thermostat
To prevent dangerous overheating
(through incorrect use of the appliance
or defective components), the oven is
fitted with a safety thermostat, which
interrupts the power supply. The oven
switches back on again automatically,
when the temperature drops.
Should the safety thermostat trigger due
to incorrect use of the appliance, it is
enough to remedy the error after the oven
has cooled down; if on the other hand,
the thermostat triggers because of a
defective component, please contact
Customer Service.
Cooling fan
This oven is provided with a cooling fan,
meant to keep the front panel and the
oven door handle cool. The fan switches
on automatically after a few minutes of
cooking. Warm air is blown out through
vents between the oven door and the
control panel, as shown in the diagram.
When the oven is switched off, the fan
will remain on in order to to keep the
controls cool, after which it switches off
automatically. This is quite normal.
electrolux 9
In the event of a power failure, the
programmer will keep some of the
the settings (e.g. time of day,
language setting, the menu "My
Programmes").
The display switches off
automatically after two minutes if
no function is selected and none
of the touch controls are used. The
display shows the time of day, if
set.
Page 10
10 electrolux
The Electronic Oven Controls
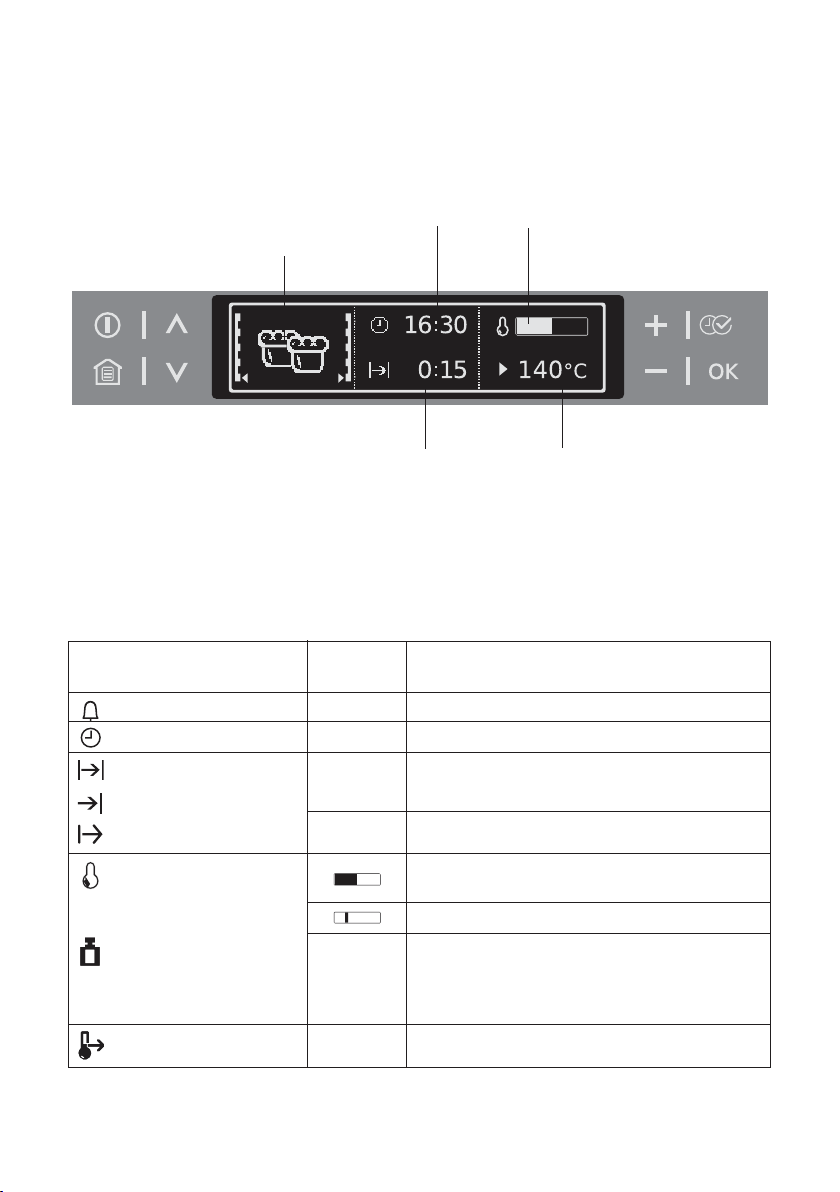
Indicators
Menu option symbol
(with oven shelf level)
Time functions Temperature
Symbols
Various symbols will now be shown
in the display depending on the selected
function.
SymbolSymbol
Symbol
SymbolSymbol
Minute minder 2:30:00 The minute minder is active.
Time 10:00 Shows the set time.
DurationDuration
Duration 1:00 Shows the time required for the cooking cycle.
DurationDuration
End TimeEnd Time
End Time 14:05 Shows when the cooking cycle will finish.
End TimeEnd Time
Start 0:45 Shows when the cooking cycle started.
DisplayDisplay
Display
DisplayDisplay
(examples)(examples)
(examples)
(examples)(examples)
Clock Heat indicator
Weight
FunctionFunction
Function
FunctionFunction
Temperature Shows the temperature the oven has reached.
Quick heat is active (reduced heating-up time).
Weight 1.5 kg Possibilities:
– Automatic weight system is active.
– Weight can be changed.
Heat+HoldHeat+Hold
Heat+Hold 80°C
Heat+HoldHeat+Hold
Heat+HoldHeat+Hold
Heat+Hold is activated.
Heat+HoldHeat+Hold
Page 11
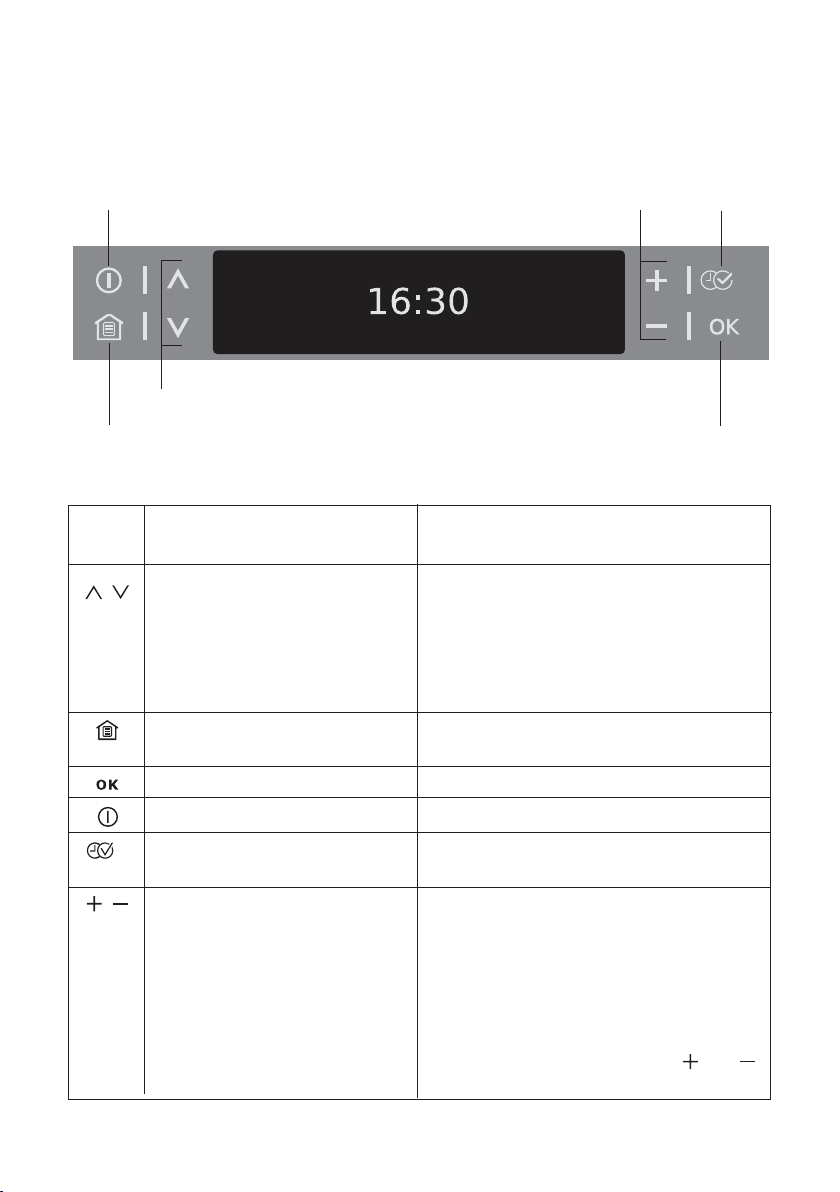
Touch Control sensor fields
electrolux 11
Set values
On/Off
Scroll
Main menu
Sensor Function Comment
field
, To move down and up in the When a function is active:
menu. • Press once: Change to the higher menu
(function remains active), after 5 seconds
move again into the active menu option
•Press twice: Up and down in the higher
menu (function switches off).
To display main menu. Functions set switch off
(except for countdown timer).
To confirm.
To switch appliance on or off.
Set
values
Select
options
Confirm
To select time functions,
additional functions.
, To set values (e.g. temperature, • To activate value:
time, weight, degree of cooking). – Press once: Present symbol flashes.
– Press twice: Value can be set.
• To set values:
– Press once: To set value in single steps.
– Hold down key: To set value in fast steps.
• When setting a cook time or time the
display can be re-set to zero if
are pressed at the same time.
and
Page 12
12 electrolux
Before the First Use of the Oven
If you would like to changeIf you would like to change
If you would like to change
If you would like to changeIf you would like to change
one of these base settings atone of these base settings at
one of these base settings at
one of these base settings atone of these base settings at
a later date, please refer to thea later date, please refer to the
a later date, please refer to the
a later date, please refer to thea later date, please refer to the
chapter Basic Settings.chapter Basic Settings.
chapter Basic Settings.
chapter Basic Settings.chapter Basic Settings.
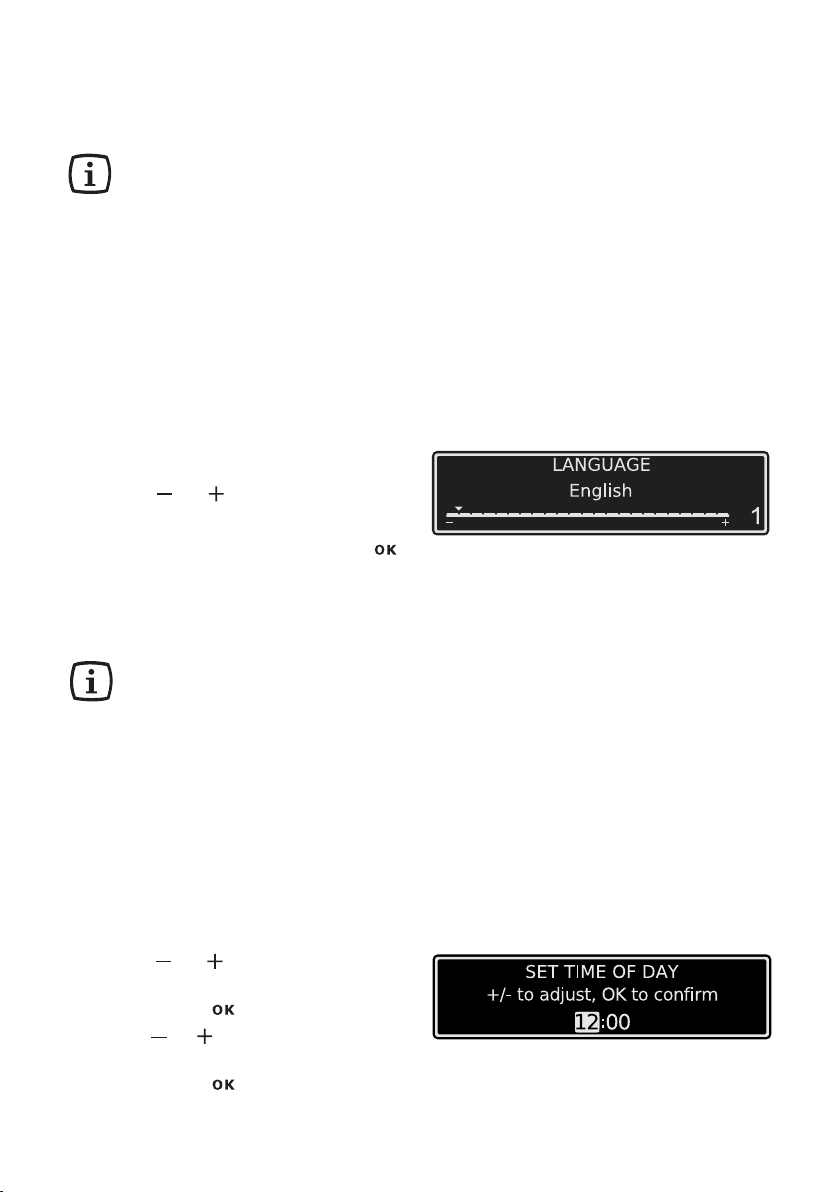
Setting the language
1. When the appliance has been
connected to the electrical supply,
the following is shown in the display.
– the company logo
– the version of the software and the
period of operation
– the message ”Language”
2. Using or , select the desired
language.
3. Confirm selected language with .
From now on the texts in the
display appear in the language set.
Setting contrast and brightness
After you have set theAfter you have set the
After you have set the
After you have set theAfter you have set the
language, the messages “Setlanguage, the messages “Set
language, the messages “Set
language, the messages “Setlanguage, the messages “Set
contrast” and “Setcontrast” and “Set
contrast” and “Set
contrast” and “Setcontrast” and “Set
brightness” are displayed.brightness” are displayed.
brightness” are displayed.
brightness” are displayed.brightness” are displayed.
The contrast and theThe contrast and the
The contrast and the
The contrast and theThe contrast and the
brightness are set accordingbrightness are set according
brightness are set according
brightness are set accordingbrightness are set according
to the language set (seeto the language set (see
to the language set (see
to the language set (seeto the language set (see
section “Setting language”).section “Setting language”).
section “Setting language”).
section “Setting language”).section “Setting language”).
Setting the clock
After you have set the contrast and
the brightness, the message ”Set Time
of Day” is displayed.
4. Using or set the hour of the
current time.
5. Confirm with .
6. Using or set the minutes of the
current time.
7. Confirm with .
The appliance is now ready to use.
Page 13
The time only has to be set if theThe time only has to be set if the
The time only has to be set if the
The time only has to be set if theThe time only has to be set if the
appliance is disconnected fromappliance is disconnected from
appliance is disconnected from
appliance is disconnected fromappliance is disconnected from
the power supply for a longthe power supply for a long
the power supply for a long
the power supply for a longthe power supply for a long
time.time.
time.
time.time.
Initial cleaning
Clean the oven before using it for the first
time.
Important: Do not use caustic orImportant: Do not use caustic or
Important: Do not use caustic or
Important: Do not use caustic orImportant: Do not use caustic or
abrasive cleaning agents! Theseabrasive cleaning agents! These
abrasive cleaning agents! These
abrasive cleaning agents! Theseabrasive cleaning agents! These
can damage the oven surfaces.can damage the oven surfaces.
can damage the oven surfaces.
can damage the oven surfaces.can damage the oven surfaces.
For the metal surfaces, use
commercially available cleaning
agents.
Remove all packaging, both inside
and outside the oven, before using
the oven.
The oven will work only if the time of
day has been set.
Before using for the first time, the
oven should be heated up without
food.
During this time, an unpleasant
odour may be emitted. This is
absolutely normal. It is caused by
manufacturing residues.
To do this, proceed as follows:
!
1. press to switch on the oven.
2
. Select the "Conventional Cooking"
function.
3. Set the temperature to 250°C.
4. Allow the oven to run
approximately 45 minutes.
5. Open a window for ventilation.
This procedure should be repeated with the
"Fan Cooking" and "Dual Grill" function for
approximately 5-10 minutes.
Once this operation is carried out, let the
oven cool down, then clean the oven cavity
with a soft cloth soaked in warm soapy
water.
Before cooking for the first time, carefully
wash the oven accessories.
emptyempty
empty for
emptyempty
electrolux 13
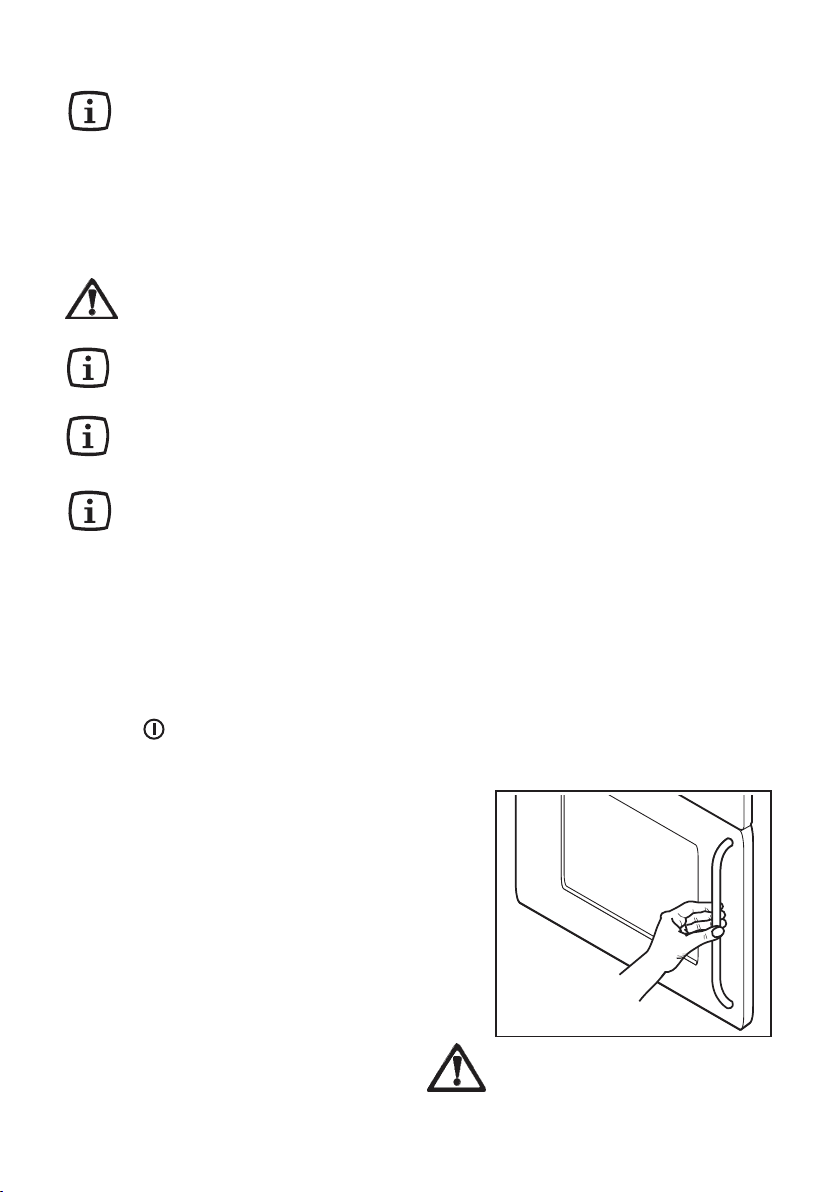
To open the oven door,
always hold the handle in the
centre.
Page 14
14 electrolux
Using the Oven
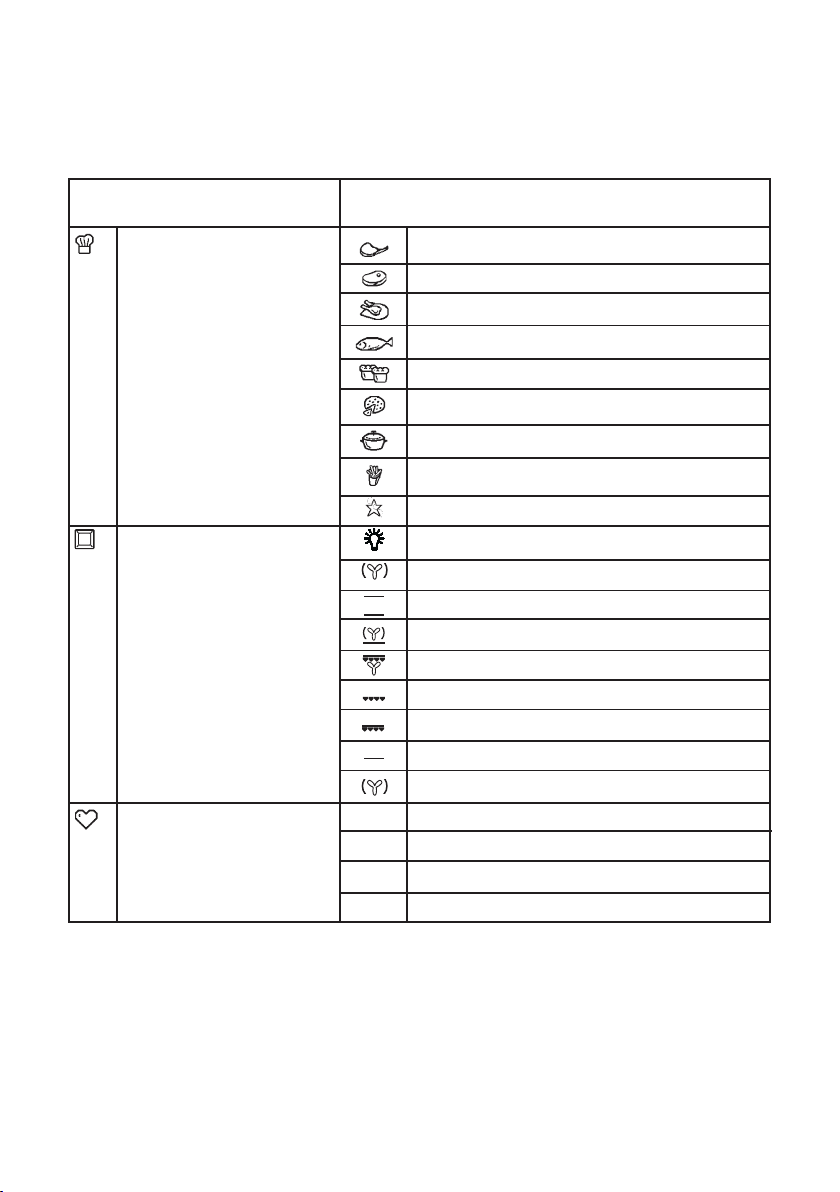
The menus in overview
Main menuMain menu
Main menu
Main menuMain menu
Assisted Cooking Pork/Veal
Heating Functions Light
My Programmes 1-My Program
Sub-menuSub-menu
Sub-menu
Sub-menuSub-menu
Beef/Game/Lamb
Poultry
Fish
Cake
Pizza/Pie/Bread
Casseroles/Gratins
Convenience
Specials
Fan Cooking
Conventional Cooking
Pizza Setting
Turbo Grill
Economy Grill
Dual Grill
Bottom Heat
Slow Cook
2- My Program
...
Edit Programme Name
Page 15
electrolux 15
Main menuMain menu
Main menu
Main menuMain menu
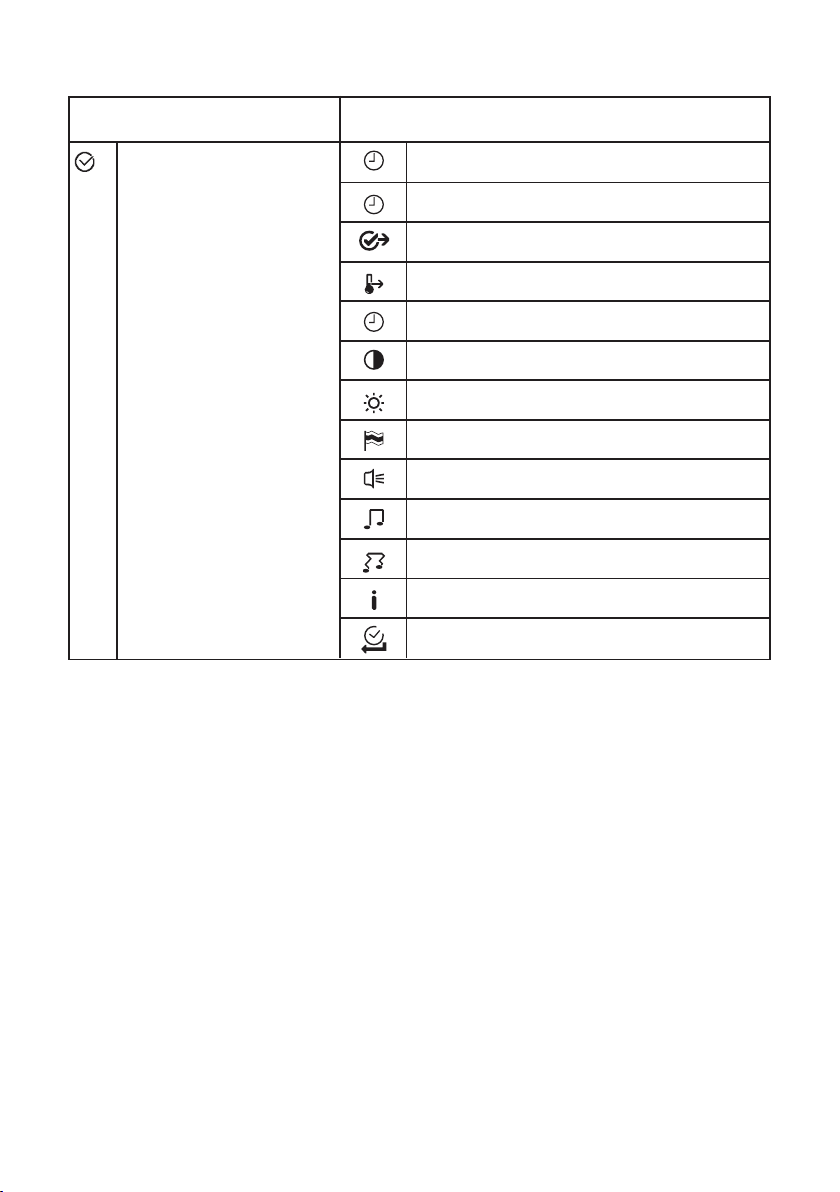
Basic Settings Set Time of Day
Sub-menuSub-menu
Sub-menu
Sub-menuSub-menu
Time Indication
Set+Go
Heat+Hold
Extra Time Menu
Display Contrast
Display Brightness
Set Language
Buzzer Volume
Key Tones
Alarm/Error Tones
Service
Factory Settings
Page 16
16 electrolux
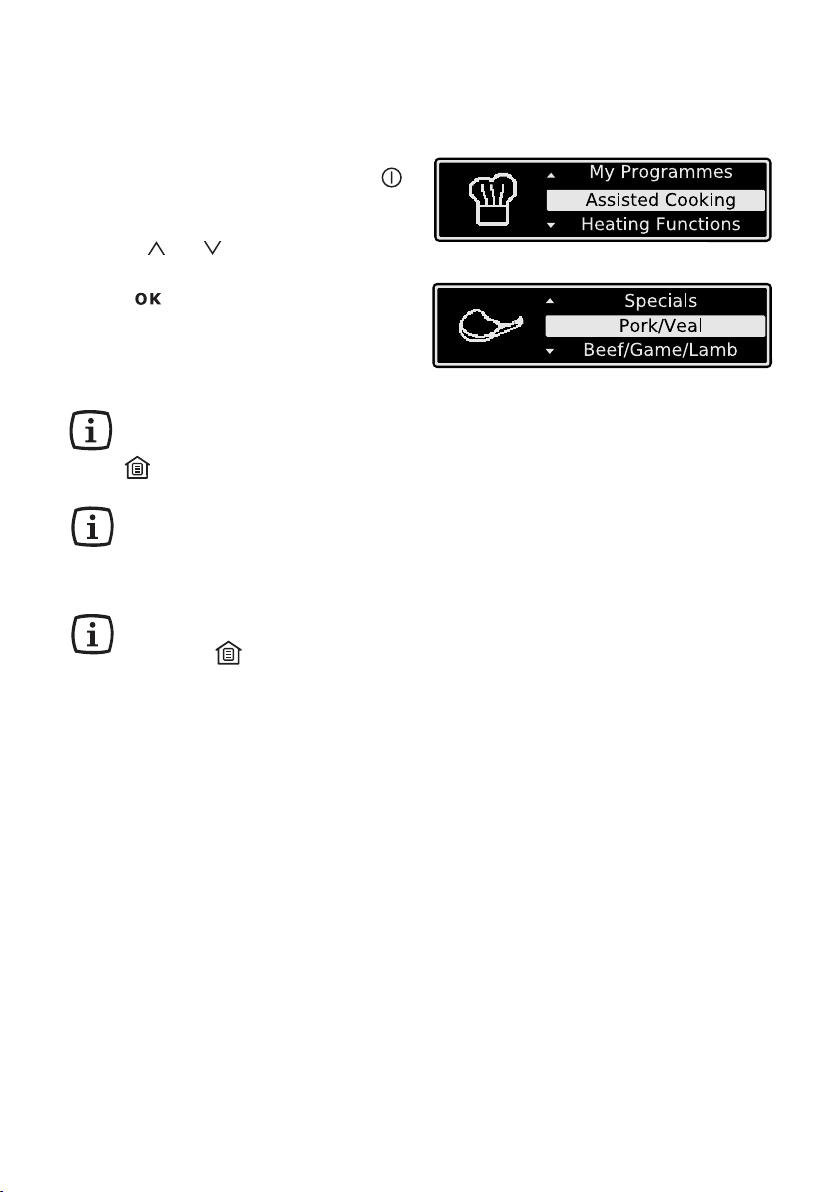
Operation of the menus
Example
1. Switch the appliance on with .
You will find yourself in the main
menu.
2. With or select the desired
main menu.
3. Use to move to the appropriated
sub-menus.
The sub-menu selected is displayed.
At every point you can get
back to the main menu with
.
At the end of most menus
there is the menu option Back.
You use this to go back to the
higher menu.
You can cancel a procedure by
pressing .
Then you will find yourself
back in the main menu.
Page 17
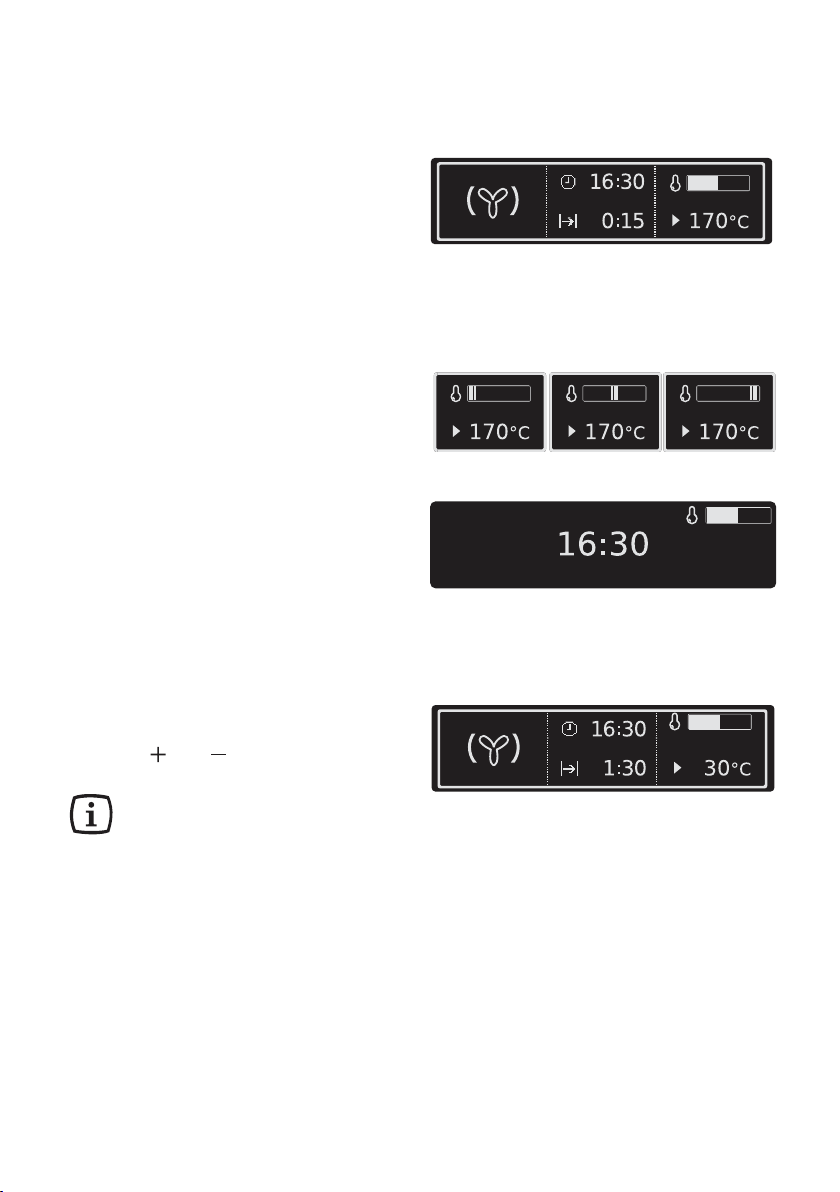
Heat indicator
Heating up indicator
4. When an oven function has been
switched on the bar that keeps
getting longer indicates how far the
oven has heated up.
Fast heating indicator
With some oven functions the
heating up time is shortened by the
automatic function Fast heating.
5. Until the set temperature is reached,
a stiped bar goes from left to right in
the heat indicator.
Residual heat indicator
6. After
Displaying temperature to the degree
degree instead of the bar of the heating
up indicator for 5 seconds during the
heating up time.
switching offswitching off
switching off the oven, the
switching offswitching off
residual heat is displayed to the
degree.
The temperature is displayed to the
electrolux 17
7. Press and at the same time.
When the temperature set is
reached, an audible signal
sounds.
Page 18
18 electrolux
The menu Assisted Cooking
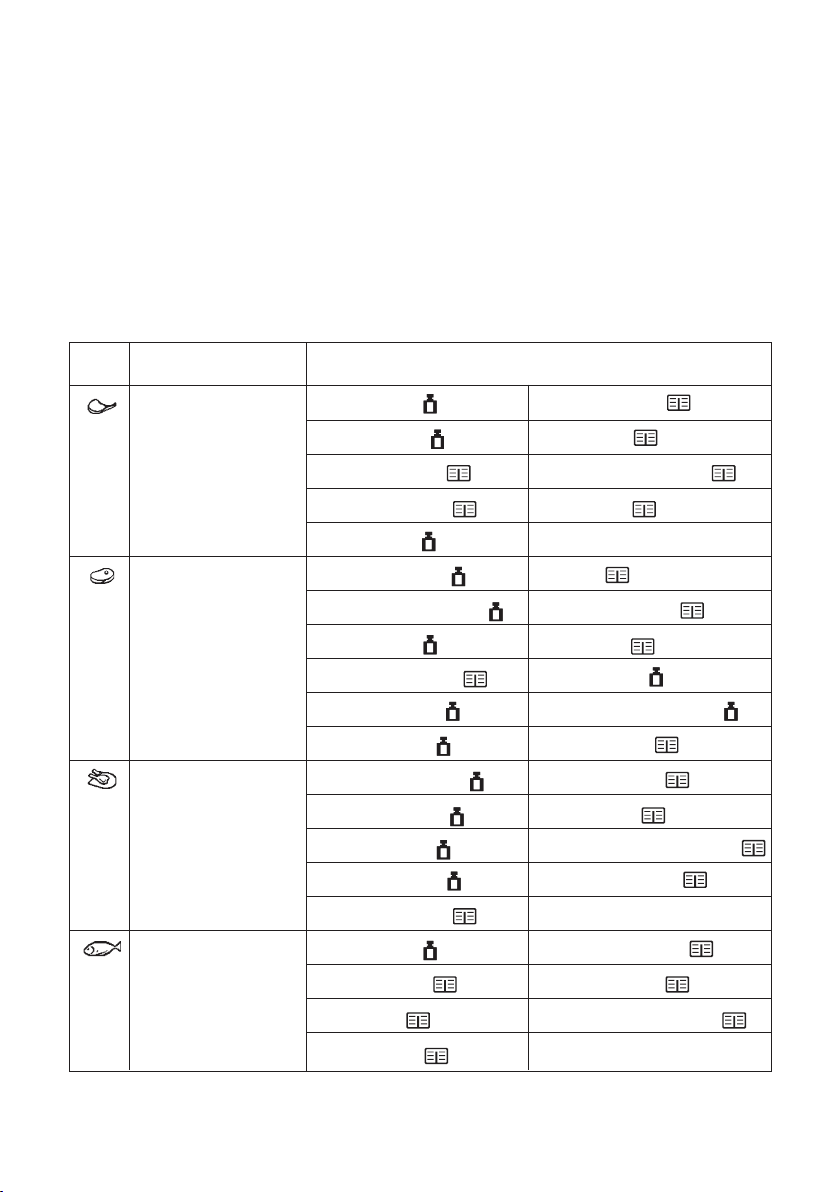
The Assisted Cooking in overview
The dishes in the Kitchen Assistant
(except for Specials) are prepared with
automatic systems.
The automatic systems offer the
optimum settings (oven functions, temperature, cook time) for the respective
dish.
Category Dish
Pork/Veal Roast Pork Veal Knuckle
Loin of Pork Ossobuco
Pork Knuckle Stuffed Veal Breast
Pork Shoulder Meat Loaf
Roast Veal
Beef/Game/Lamb Top Side Beef Rabbit
Scandinavian Beef Mustard Rabbit
Roast Beef Wild Boar
Marinated Beef Roast Lamb
Loin of Game Lamb Joint, medium
Roast Game Leg of Lamb
Poultry Chicken, whole Chicken Legs
Turkey, whole Coq au Vin
Duck, whole Roast Duck with orange
Goose, whole Stuffed Chicken
Boned Poultry
Fish Whole Fish Stuffed Calamari
Fillet of Fish Steamed Fish
Cod Fish Jansons Temptation
Fish in salt
Page 19
electrolux 19
CategoryCategory
Category
CategoryCategory
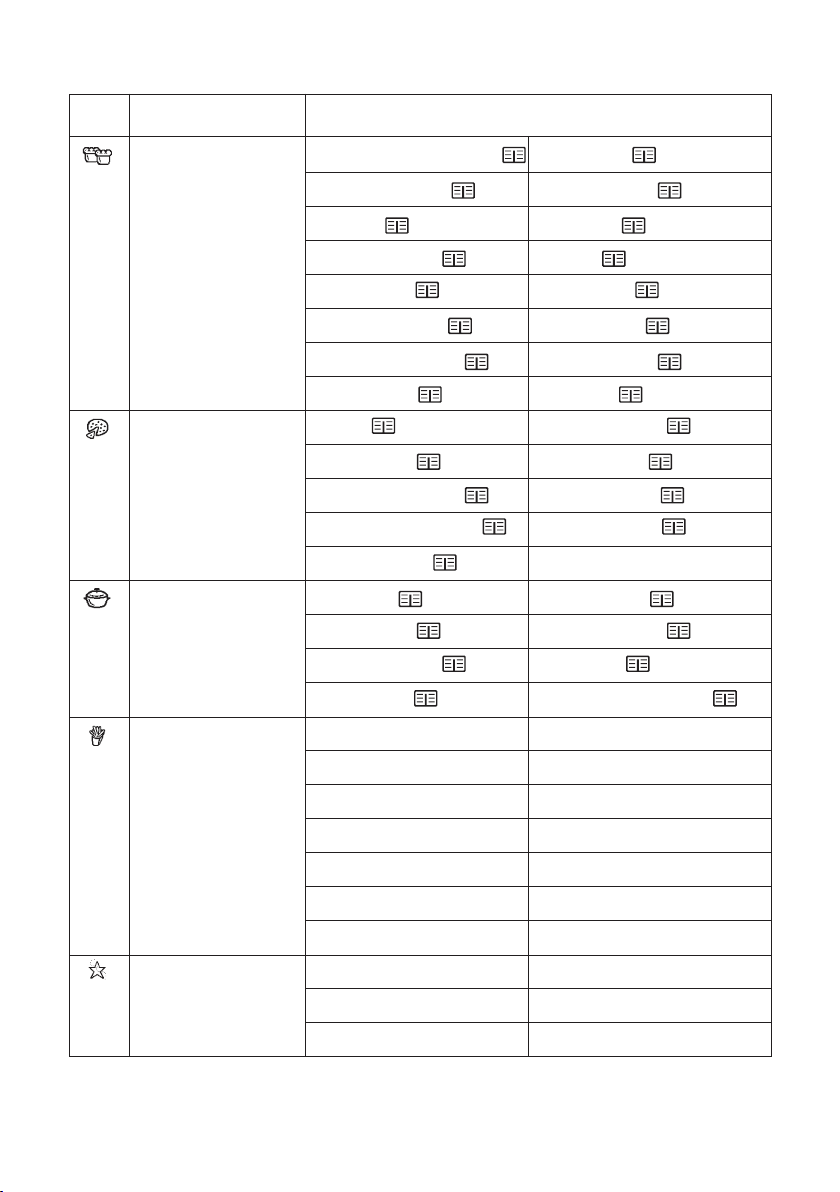
Cake Lemon Sponge Cake Ring Cake
Swedish Cake Savarin Cake
Biscuit Brownies
Cheese Cake Muffins
Fruit Cake Sweet Tart
Streusel Cake Carrot Cake
Rich Yeast Plait Almond Cake
Yeast Plait Fruit Tart
Pizza/Pie/Bread Pizza Cheese Pastry
Onion Tart White Bread
Quiche Lorraine Farmer Bread
Goatscheese Flan Russian Cake
Cheese Flan
Casseroles/Gratins Lasagne Pasta Gratin
Cannelloni Chicory Gratin
Potato Gratin Casserole
DishDish
Dish
DishDish
Moussaka Cabbage Casserole
Convenience Pizza, frozen Bread/Rolls
Pizza American, frozen Bread/Rolls, frozen
Pizza, chilled Apple Strudel, frozen
Pizza Snacks, frozen Fillet of Fish, frozen
French Fries Chicken Wings
Wedges/Croquettes Lasagne/Cannelloni, frozen
Hash Browns
Specials Defrost Preserving
Drying Plate Warming
Keep Warm
You will find practical information on the various automatic systems,
recipes and oven functions in the accompanying booklet.
Page 20
20 electrolux
Operation of the Assisted
Cooking
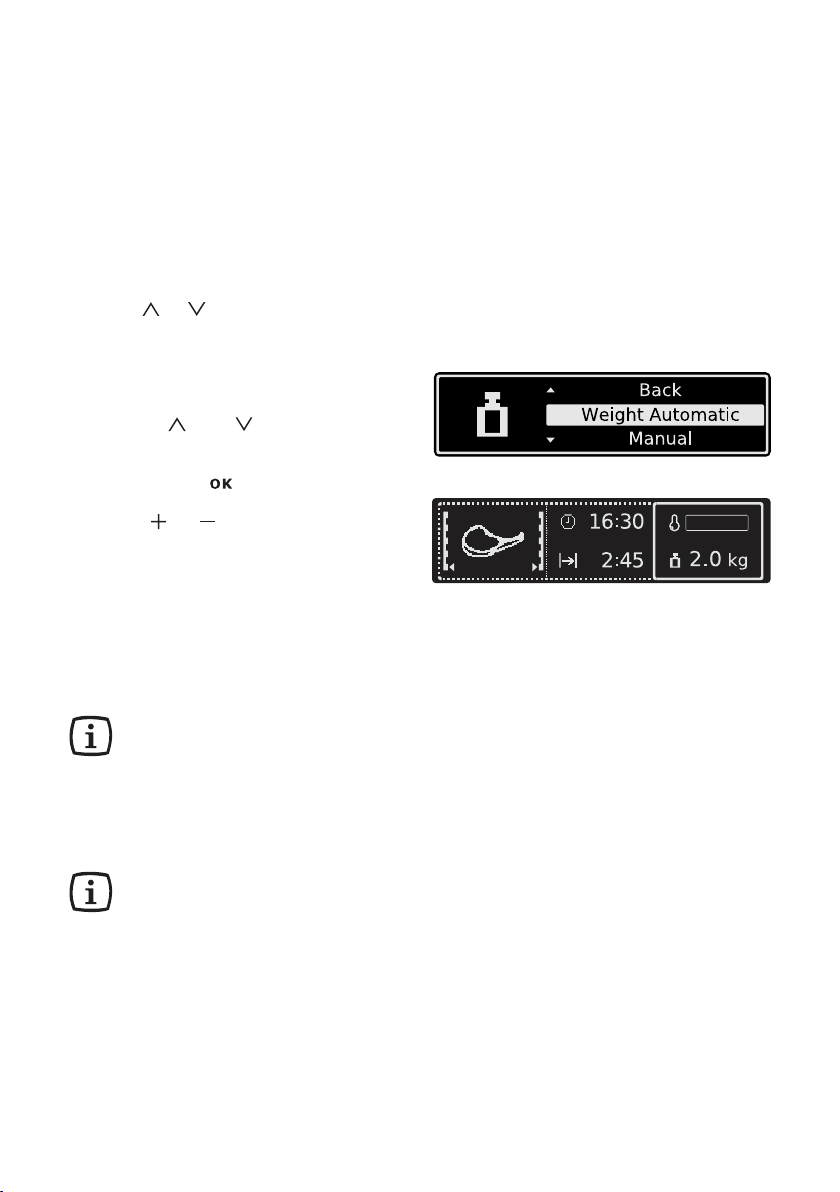
Assisted Cooking with Weight
Automatic
The roasting time is automatically
determined by inputting the weight.
Example
1. Using or select the menu option
Assisted Cooking, the desired
category and the dish.
2. Confirm each one with .
3. Using or select Weight
Automatic.
4. Confirm with
5. Using or set the weight of the
food. The setting changes in 0.1 kg
steps.
The automatic programme is started.
As soon as the automatic programme
has finished, an audible signal sounds.
6. Press any key to switch off the signal.
If the suggested weight is not
changed within approx. 5
seconds, the programme
starts automatically.
The weight can be altered at
any time.
With all poultry programmes
turn the food after 30 minutes.
A reminder is displayed.
Page 21
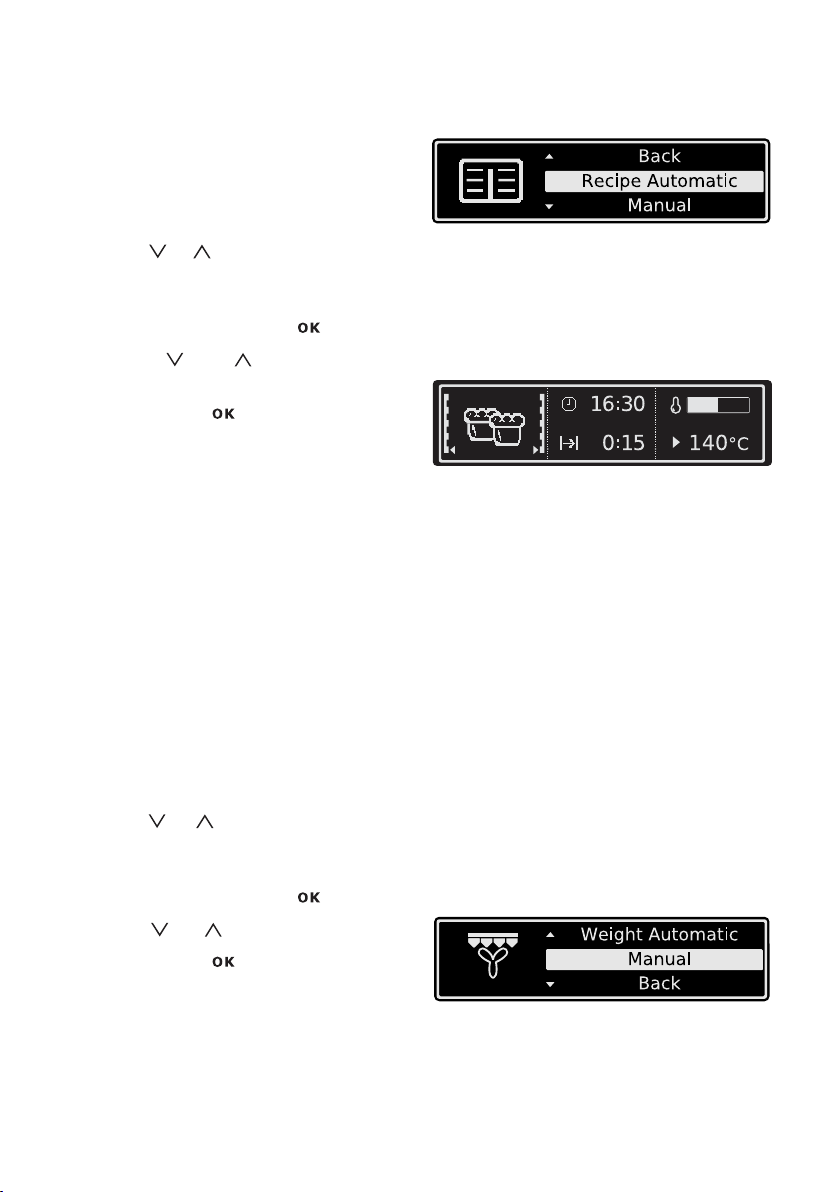
Assisted Cooking with Recipe
Automatic
All settings are fixed and cannot be
changed.
Example
1. Using or select the menu option
Assisted Cooking, the desired
category and the dish.
2. Confirm each one with .
3. Using or select Recipe
Automatic.
4. Confirm with .
The automatic programme is started.
As soon as the automatic programme
has finished, an audible signal sounds.
5. Press any key to switch off the signal.
Manual
With Manual the optimum settings
(oven function and temperature) for the
respective dish are taken, but you can
change them.
This may be the case if you don’t
want to use the Meatprobe,you don’t
know the weight of your food or have
your own recipe.
Example
1. Using or select the menu option
Assisted Cooking, the desired
category and the dish.
2. Confirm each one with .
3. Using or select Manual.
4. Confirm with .
You are now in the corresponding
oven function and can carry out the
setting you want (see section “Operating
the oven functions”).
electrolux 21
Page 22
22 electrolux
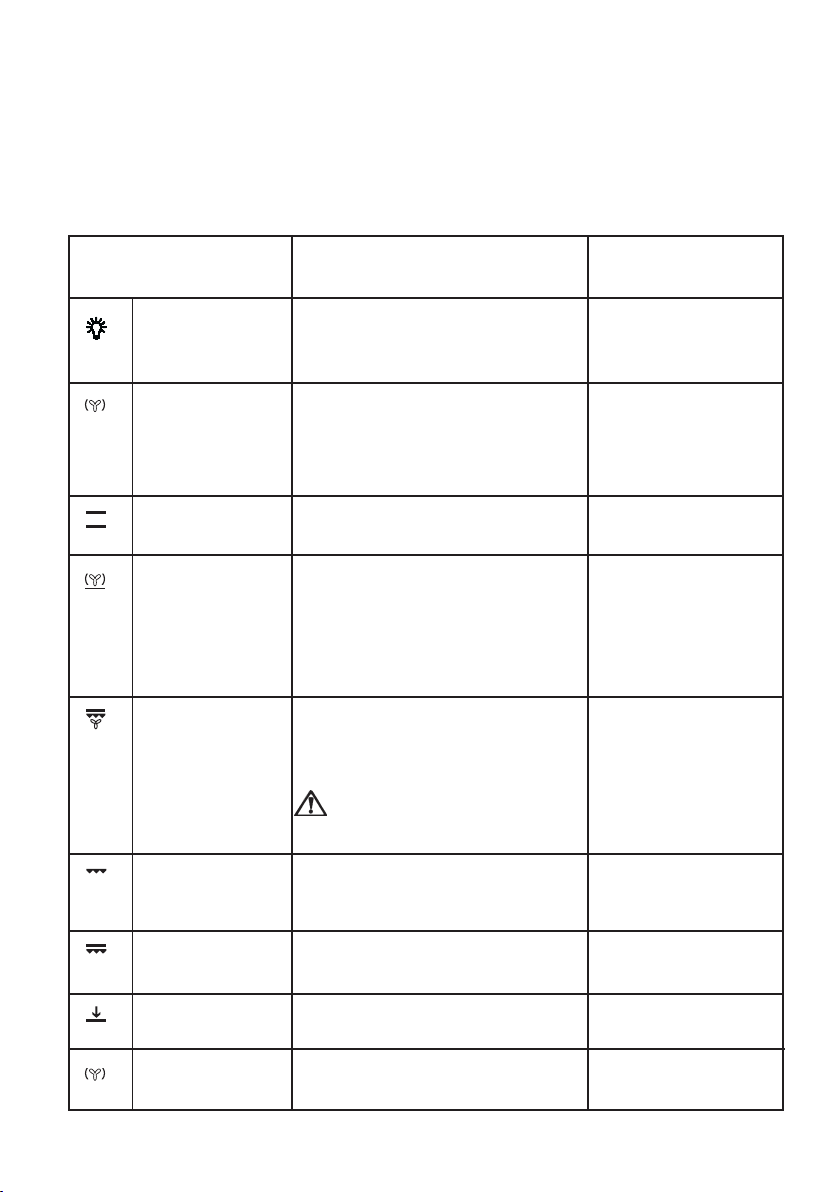
The Oven Functions menu
The oven functions in overview
Using the oven functions you can set
baking and roasting sessions to suit your
requirements.
Oven function Application Heating
element/fan
Light
Fan Cooking
Conventional
Cooking
Pizza Setting
Turbo Grill
Economy Grill
The oven light is on when a function
is selected, the oven light function
included.
For baking on up to
levels at the same time.
Set the oven temperatures 20-40°C
lower than when using
Conventional.
For baking and roasting on one
oven level.
For baking on one oven level dishes
that require more intensive
browning and a crispy base.
Set the oven temperatures
20-40 °C lower than when using
Conventional.
For roasting larger joints of meat
or poultry on one level.
The function is also suitable for
gratinating and browning.
When using the turbo grill,
set a maximum temperature
of 200°C.
For grilling flat foodstuffs placed in
the middle of the grill and for
toasting.
two oven
rear wall heating
element, fan, light
Top heat, bottom heat,
light
Bottom heat, rear wall
heating element, fan,
light
Grill, top heat, fan, light
Grill, light
Dual Grill
Bottom Heat
Slow Cook
For grilling flat foodstuffs in large
quantities and for toasting.
For baking cakes with crispy or
crusty bases.
For preparing especially tender,
succulent roasts.
Grill, top heat, light
Bottom heat, light
Rear heating element,
fan, light
Page 23
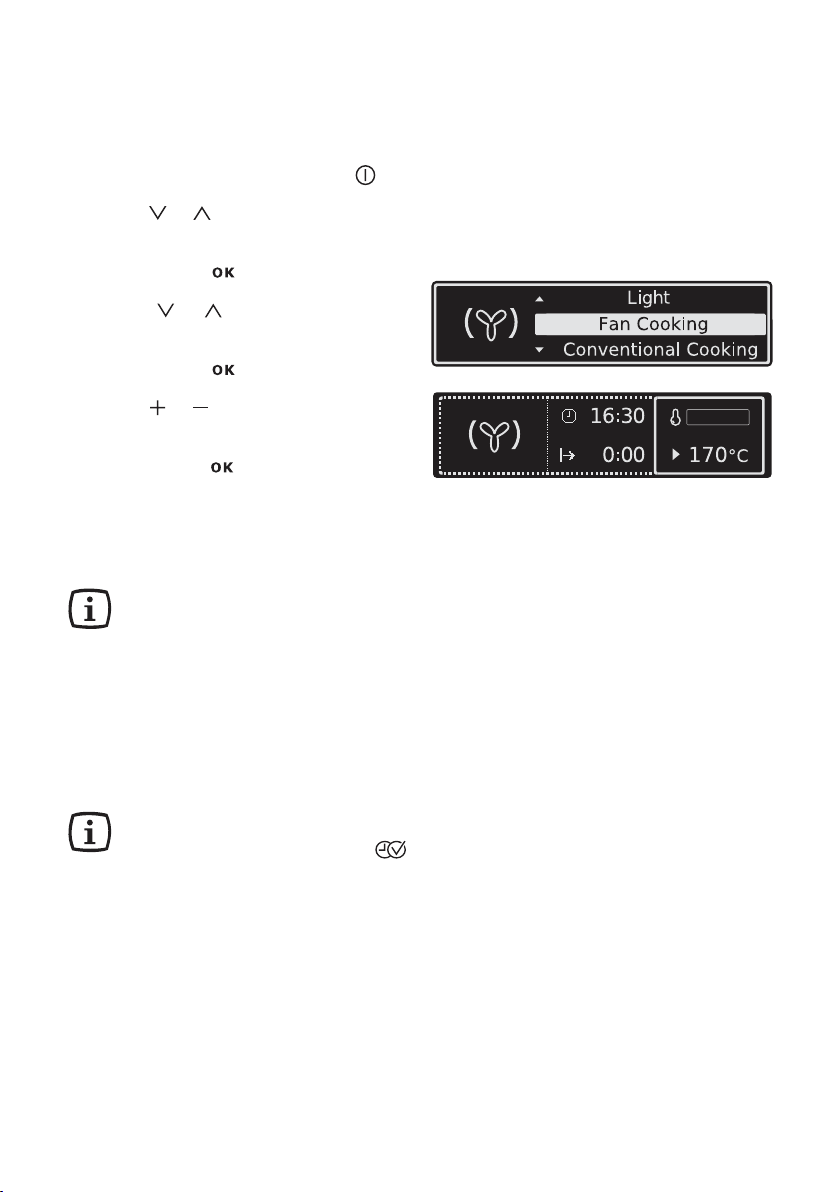
Operating the oven functions
Example
1. Switch the appliance on with .
2. Using or select the menu option
oven function.
3. Confirm with .
4. Using or select oven function
Fan Cooking.
5. Confirm with .
6. Using or set the desired temperature.
7. Confirm with or wait 5 seconds.
The oven starts to heat up.
When the temperature set is
reached, an acoustic signal sounds.
The oven is starting to heat up
if:
• the symbol for the oven function
is animated.
• the oven light is switched on.
• the corresponding heating
element (e.g. fan) is switched
on.
electrolux 23
Besides the temperature other
functions can be set using
(see section Additional
functions).
Page 24
24 electrolux
The menu My Programmes
My Programmes in overview
Sub menuSub menu
Sub menu
Sub menuSub menu
1- My Program To save optimum settings for your own recipes.
2- My Program
...
Edit Programme Name To rename stored programmes.
You can store 20 programmes.
Operation of My Programmes
Storing a programme
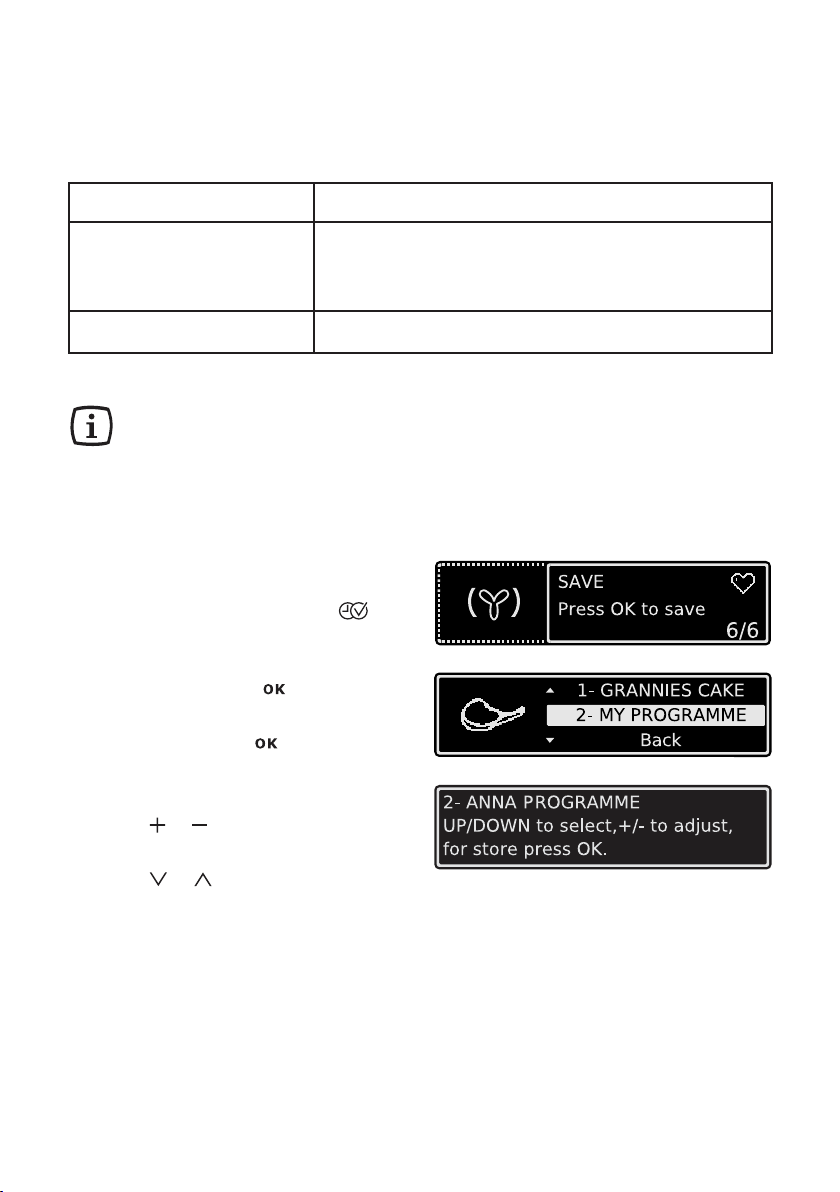
1. Select oven function or Assisted
Cooking with the desired settings.
2. During or after the oven function or
the Assisted Cookingpress key
repeatedly until the ”SAVE” window
appears.
3. Confirm using the key. The next
free memory position is displayed.
4. Confirm using the key.
5. You can now write the name of your
programme. The first letter flashes.
6. Using or select the desired letter
in alphabetical order.
7. Using or move the writing mark
to the right or left.
DescriptionDescription
Description
DescriptionDescription
The next letter flashes and can be
changed, and so on.
Page 25
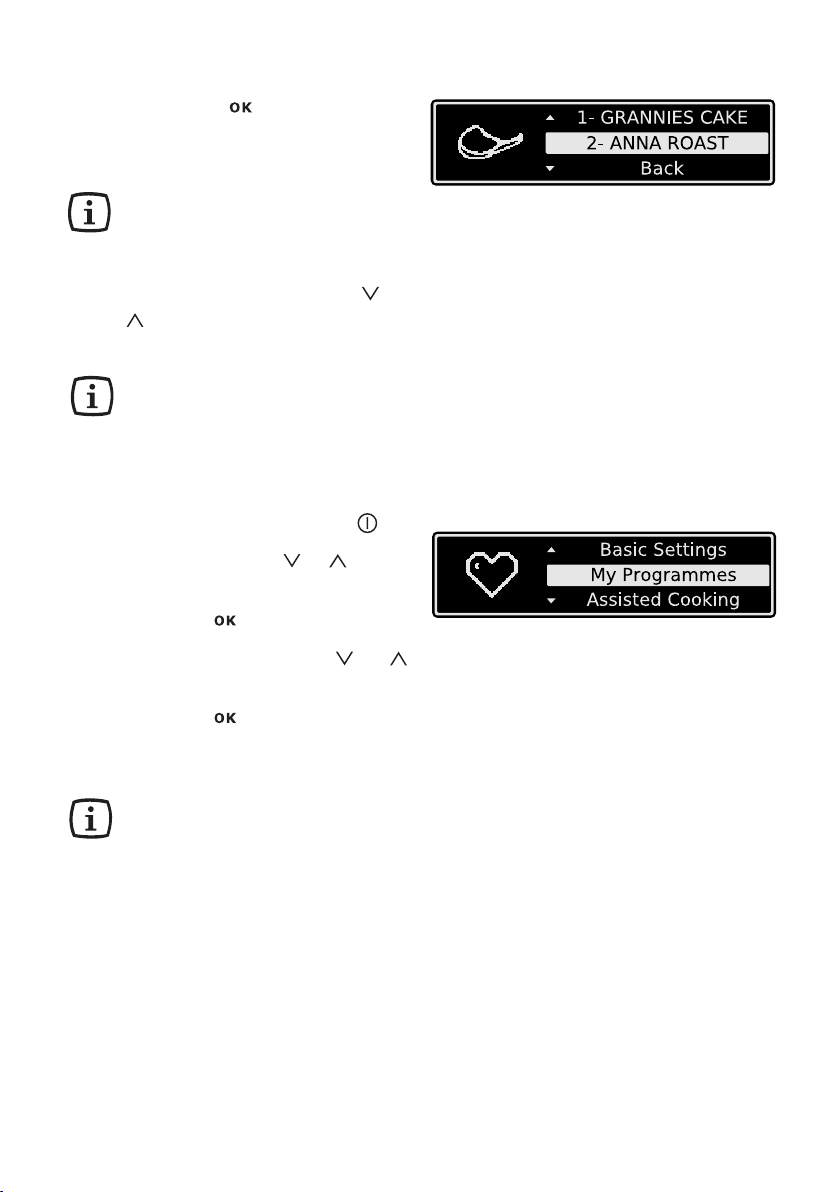
8. Confirm with when you have
written your programme name.
Your programme is stored.
Memory positions that are
already filled can be
overwritten at any time.
Instead of the suggested free
memory position, with or
select the programme that
you would like to overwrite.
Programmes can be renamed
at any time in the menu ”Edit
Programme Name”.
Calling up a programme
1. Switch the appliance on with .
2. Using the arrow keys or select
the menu option My Programmes.
3. Confirm with .
electrolux 25
4. Using the direction keys or
select the stored programme.
5. Confirm with .
The stored programme with its settings
starts.
If no programmes have been
stored, a message appears to
say how programmes are
stored.
Page 26
26 electrolux
The menu Basic Settings
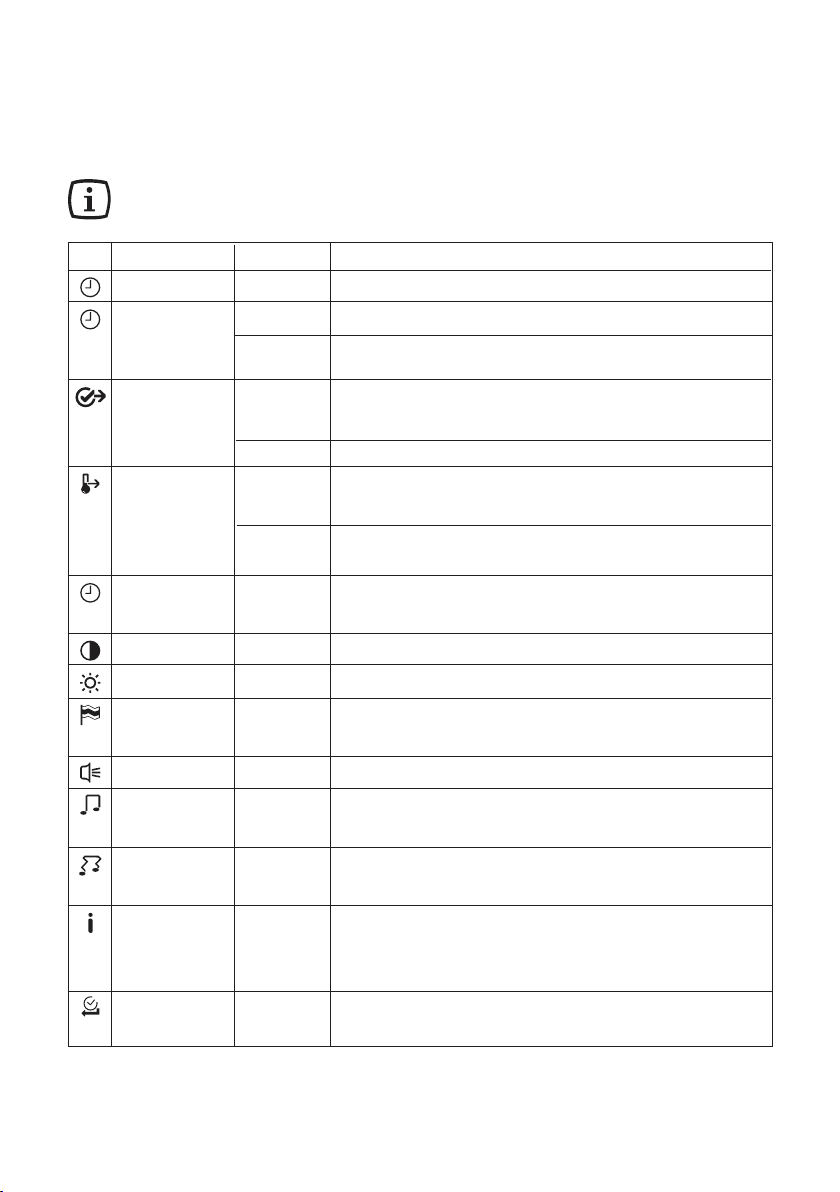
The Basic Settings in overview
You can change certain basic settings regardless of the task the
oven is performing.
Setting Display Description
Set Time of Day 12:15 Set the current time on the clock.
Time Indication – On Time is shown when appliance is switched off.
– Off Time is not shown when appliance is switched off,
Set+Go – On Set+Go function is shown in the Select Options window
– Off Set+Go function is not shown in the Select Options window.
Heat+Hold – On Heat+Hold function is shown in the Select Options window
– Off Heat+Hold function is not shown in the Select Options
Extra Time Menu – On Switch Extra Time function on/off.
– Off
Display Contrast 1 ... 10 Adjust display contrast by degrees.
Display Brightness 1 ... 10 Adjust display brightness by degrees.
Set language – English Select and set language for display.
– ....
Buzzer Volume 1 ... 10 Adjust volume of touch-tones and signals by degrees.
Key Tones – On Touch-tones confirm each time a key is pressed by
– Off emitting a sound. Switch touch-tones on/off.
Alarm/Error Tones – On Alarm tones sound if a step cannot be carried out.
– Off Switch alarm tones on/off.
Service ECAIA207 Shows the software version and configuration.
V03IA003
24
Factory Settings Reset all settings to factory settings (including My
because display is switched off completely to save energy.
and can be activated.
and can be activated.
window.
Programmes).
Page 27
Between 22:00 and 6:00 the
display reduces its brightness
when the appliance is
switched off to save energy.
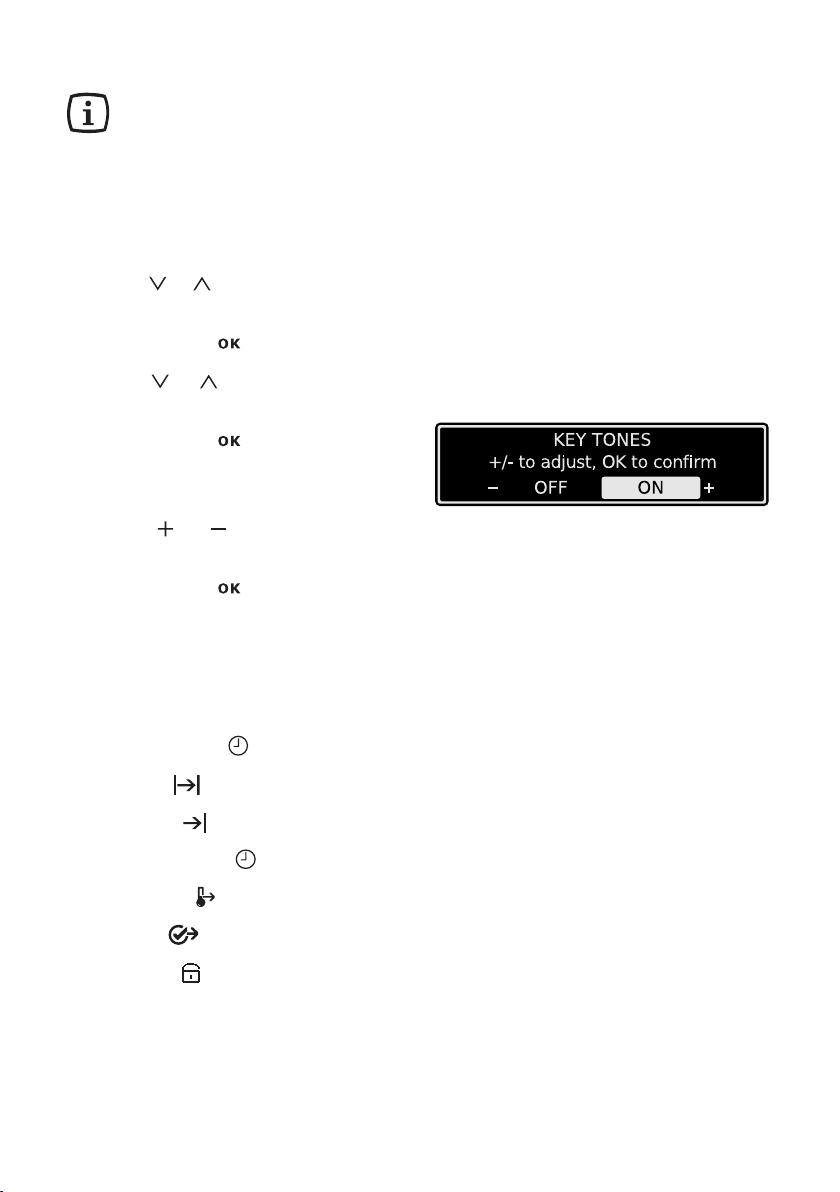
Operation of the Basic Settings
Example
1. Using or select the menu option
Basic Settings.
2. Confirm with .
3. Using or go to the setting that
you want to adjust.
4. Confirm with .
The value currently set appears in the
display.
5. Using or select the desired
value.
6. Confirm with .
The setting is changed.
electrolux 27
Additional functions
Your oven is equipped with the
following additional functions:
• Minute Minder
• Duration
• End Time
• Time Extension
• Heat+Hold
• Set+Go
• Key Lock
• Child Lock
• Automatic shut-off
Page 28
28 electrolux
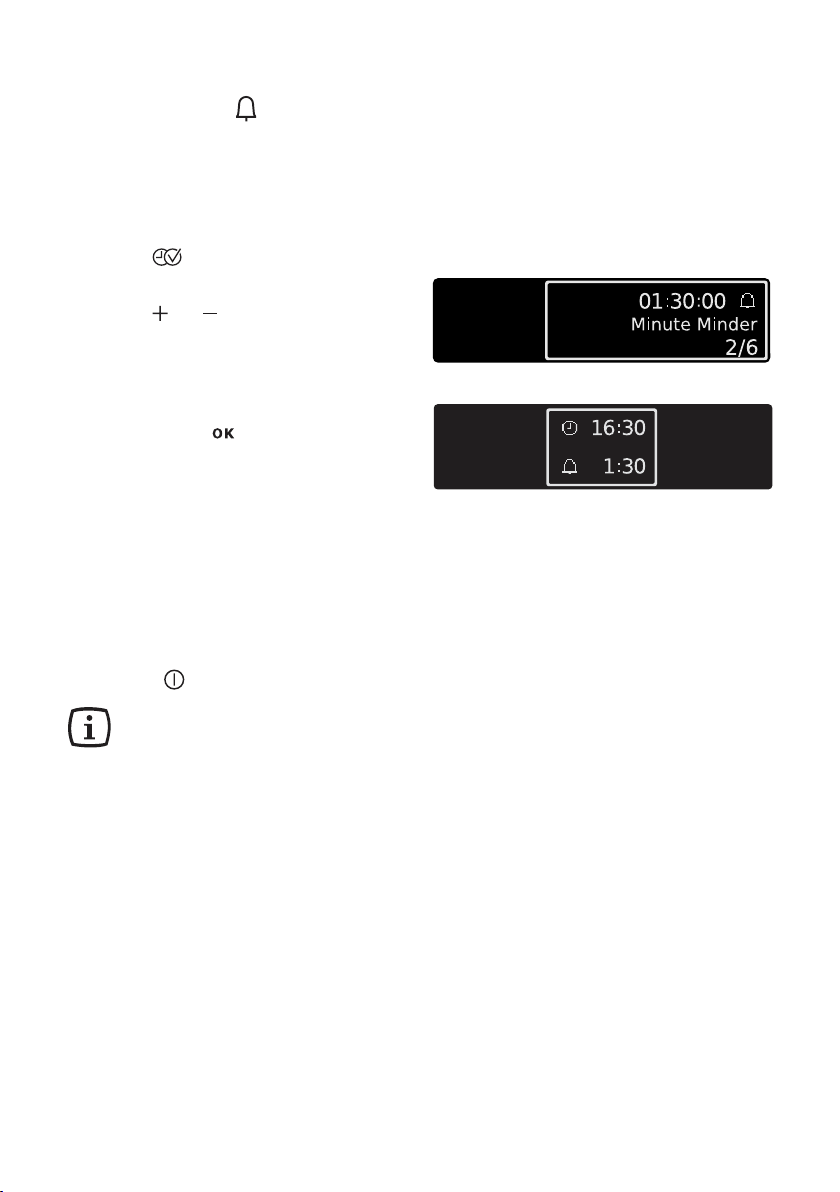
Minute Minder
To set a countdown. When it has
counted down, an audible signal sounds.
This function has no effect on the
operation of the oven.
1. Press key repeatedly until the
”Minute Minder” window appears.
Using or key, set the desired
countdown (max. 2 hours 30
minutes).
2. Confirm with or wait 5 seconds.
The last menu option visited and the
remaining time are displayed.
When the time has counted down to
10%, a short signal sounds.
When the time has elapsed, an
acoustic signal sounds for 2 minutes and
a message is displayed.
3. Press any key to stop the signal
(except ).
The Minute Minder remains
active if you change to
another function or the
appliance is switched off.
Page 29
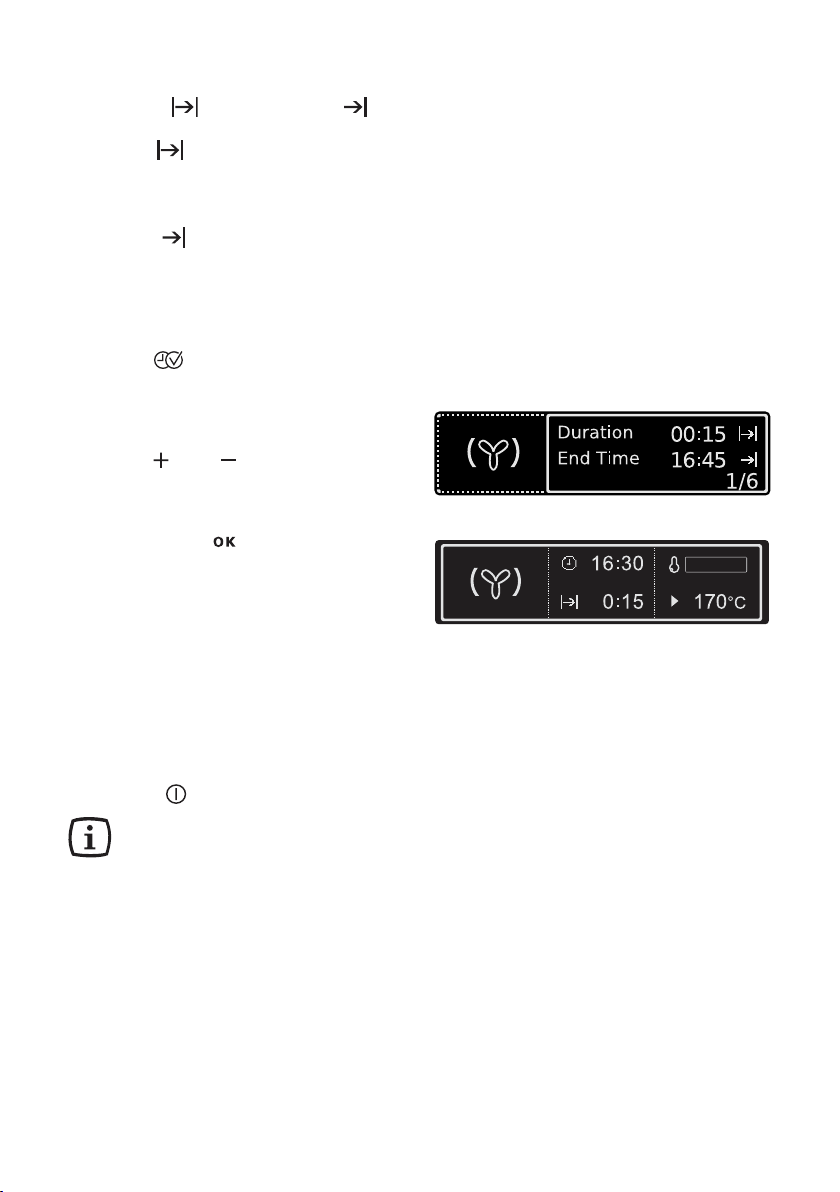
Duration or End Time
Duration
For setting how long the oven is to
operate.
End Time
For setting when the oven is to switch
itself off again.
1. Select oven function.
2. Press key repeatedly until the
”Duration/End Time” window
appears.
3. Using or key, set the desired cooking
time or switch-off time
(max. 23 hours 59 minutes).
4. Confirm with or wait 5 seconds.
The settings of the selected oven
function are displayed with the
cooking time or switch-off time set.
electrolux 29
When the time has elapsed, an
acoustic signal sounds for 2 minutes and
a message is displayed.
The oven switches itself off.
5. Press any key to stop the signal
(except ).
Irrespective of the oven
function set the fixed cook
time remains. You can move
between the oven functions.
Condition: The oven function
to which you move has no
fixed cook time.
Page 30
30 electrolux
Using residual heat with
the Duration and End
Time clock functions
When the Duration and End Time
clock functions are used, the oven
switches the heating elements off, when
90% of the time set or calculated has
elapsed. The residual heat present is
used to continue the cooking process
until the time set has elapsed (3 to 20
mins.).
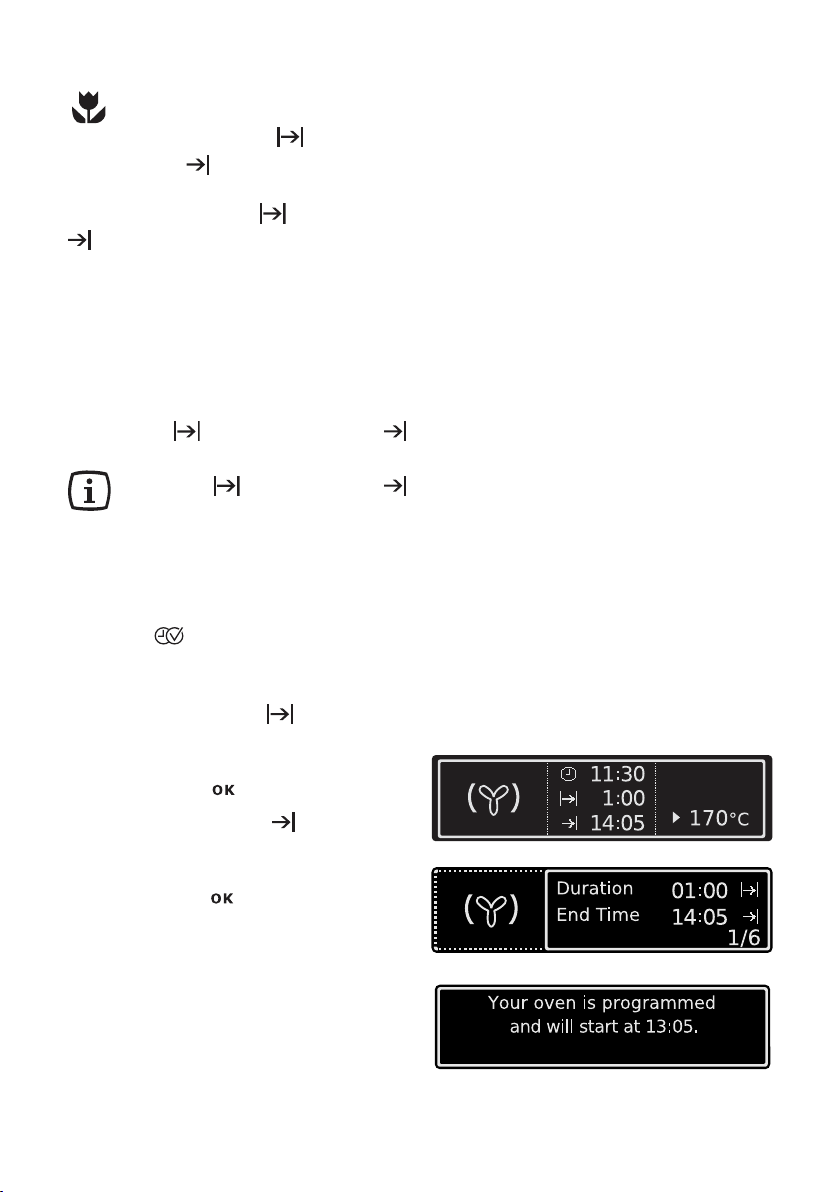
Duration and End Time
combined
Duration and End Time
can be used simultaneously,
if the oven is to be switched
on and off automatically at a
later time.
1. Select oven function.
2. Press key repeatedly until the
”Duration/End Time” window
appears.
3. Using the Duration function, set
the time required for cooking the
dish, e.g.: 1 hour.
4. Confirm with .
5. Using the End Time function, set
the time at which the dish is to be
ready, e.g.: 14:05.
6. Confirm with or wait 5 seconds.
7. The selected oven function is
displayed with the cooking time and
switch-off time set for a few seconds.
A message is displayed when the
programme starts.
Page 31

Extra Time
Allows the last oven function to con-
tinue after a certain time has elapsed.
Precondition:
• All oven functions with Duration or
Weight Automatic.
The Extra Time can be switched on
and off in the Basic Settings menu.
To switch on Extra Time
Oven function is completed. Signal
sounds and message appears.
1. Press any key.
2. Message for Extra Time appears for
approx. 5 minutes.
3. Activate with Extra Time.
4. Set period of the Extra Time using
or .
5. Start Extra Time using or let it start
automatically after 5 seconds.
electrolux 31
The settings of the oven funtion are
displayed with the new cook time.
The rest of the procedure is
the same as a normal oven
function. The Extra Time can
be set repeatedly.
Page 32
32 electrolux
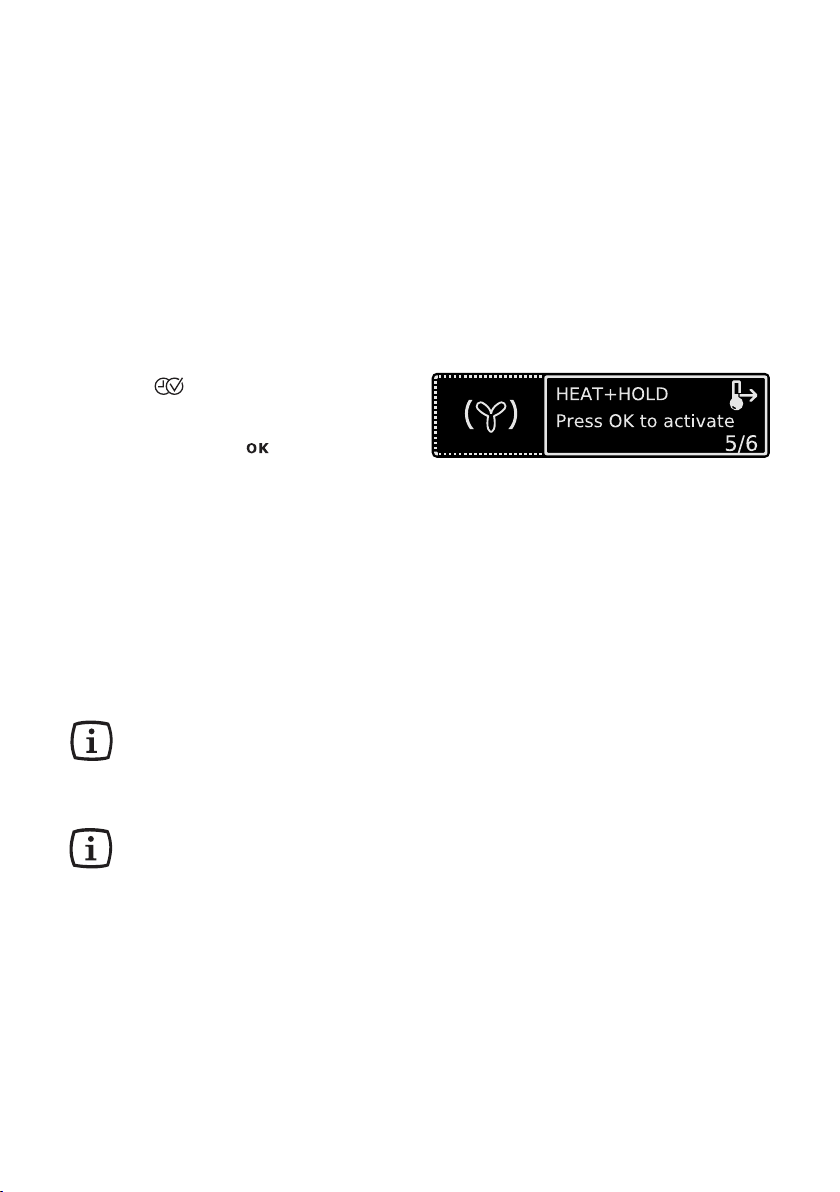
Heat+Hold
The function Heat+Hold keeps your
prepared dish warm for 30 minutes, after
the baking or roasting has ended.
This is helpful, for example, when
your guests are late.
Condition for Heat+Hold:
• Fixed temperatur is above 80°C
To switch on Heat+Hold
1. Select oven function.
2. Press key repeatedly until the
”Heat+Hold” window appears.
3. Confirm with .The function
Heat+Hold is now switched on.
4. As soon as the oven function is
completed, a signal sounds and
Heat+Hold starts.
The oven function runs at 80°C for 30
minutes.
As soon as the 30 minutes with
Heat+Hold are over, the oven switches
itself off.
Irrespective of the oven
function set Heat+Hold
remains active. You can move
between the oven functions.
Heat+Hold can be activated or
deactivated in the Basic
Settings menu.
Page 33
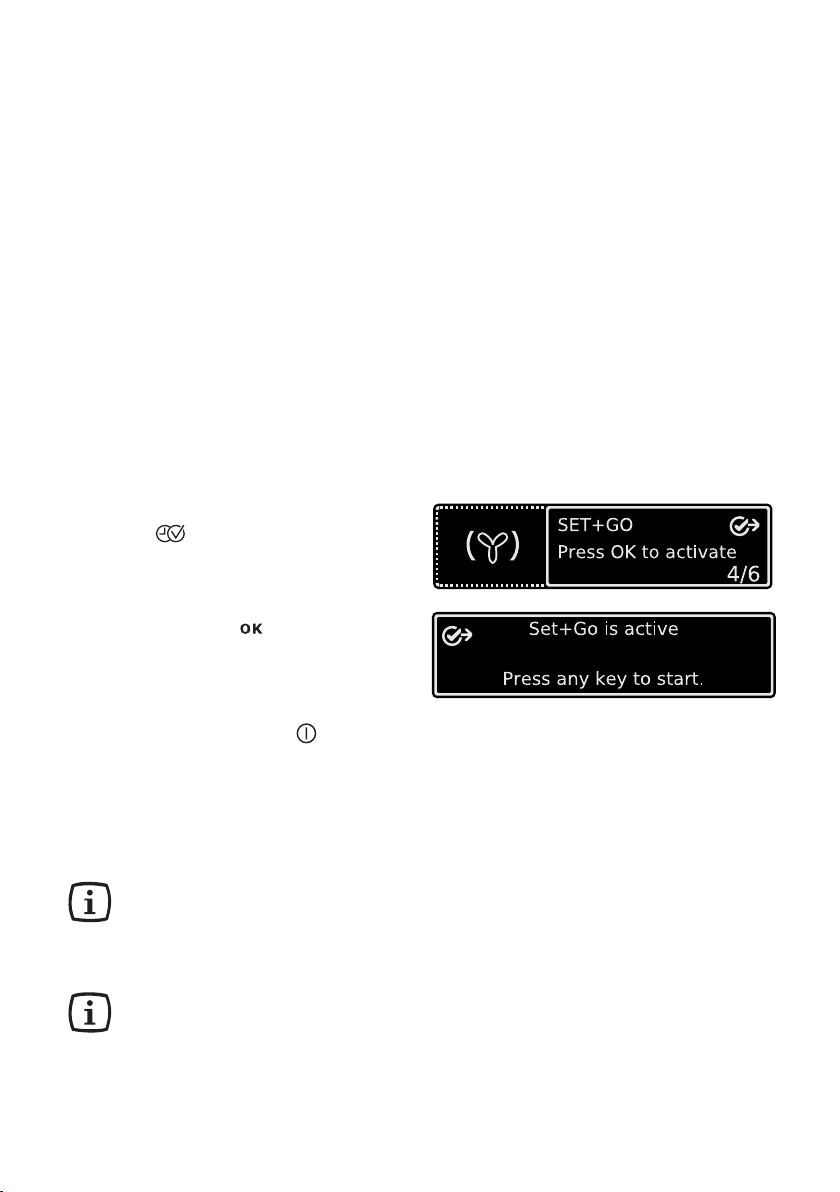
Set+Go
The function Set+Go means you can
set all settings for an oven function and
then start it later.
Example application:
You prepare a dish in the morning
and enter all necessary settings in the
oven.
Your child comes home at lunchtime,
puts the dish in the oven, presses any
key and the oven starts with your
settings.
Condition:
• Fixed switch-Duration
To switch on Set+Go
1. Select oven function with desired
settings.
2. Press key repeatedly until the
”Set+Go” window appears.
3. Confirm with . The function
Set+Go is now switched on.
electrolux 33
To start Set+Go
1. Press any key (except ). Selected
oven function starts.
As soon as the oven function is
completed, a signal sounds.
2. Press any key to switch off the signal.
While the selected oven
function with is operating
Set+Go, the Key Lock is active
(see section Key Lock).
Set+Go can be activated or
deactivated in the Basic
Settings menu.
Page 34
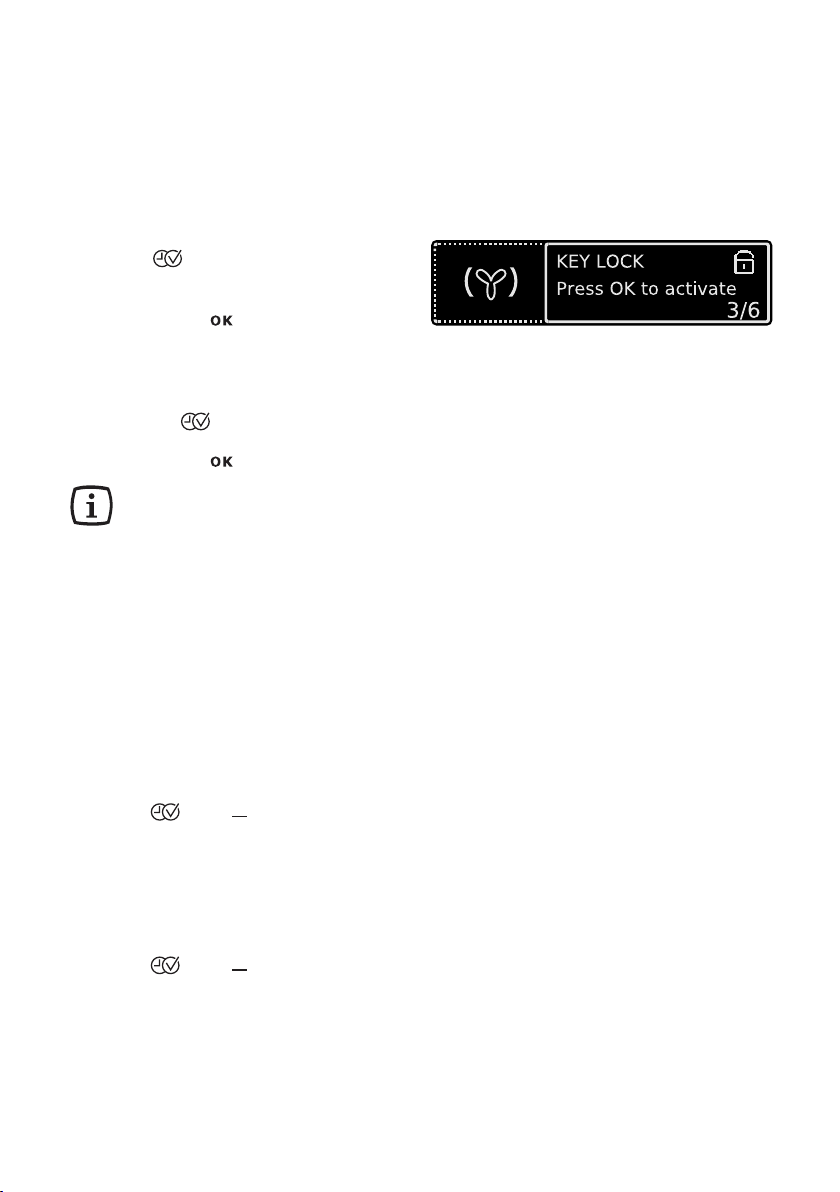
34 electrolux
Key Lock
The key lock protects all functions set
from accidental changes.
To switch on Key Lock
1. Select oven function.
2. Press key repeatedly until the
”Key Lock” window appears.
3. Confirm with .
The Key Lock is now activated.
To switch off Key Lock
1. Press the key.
2. Confirm with .
The Key Lock does not protect
the appliance from being
accidentally switched off.
After the appliance is switched
off, the Key Lock is
automatically cancelled.
Child Lock for the oven
As soon as the Child Lock device is
activated, the oven cannot be operated.
Switching on the Child Lock
No Oven Function must be selected.
1. Press and keys at the same
time until a message appears in the
display.
The key lock Child Lock is in operation.
Switching off the Child Lock
1. Press and keys at the same
time until a message appears in the
display.
The Child Lock is now deactivated
and the oven is again ready for use.
Page 35

Oven automatic shut-off
If the oven is not switched off
after a certain time, or if the
heat setting is not modified,
the oven switches off
automatically.
The oven switches off at an oven
temperature of:
30 - 115°C after 12.5 hours
120 - 195°C after 8.5 hours
200 - 245°C after 5.5 hours
250°C after 3 hours
Switching on again after automatic
shut-off
Press the button .
electrolux 35
Page 36
36 electrolux
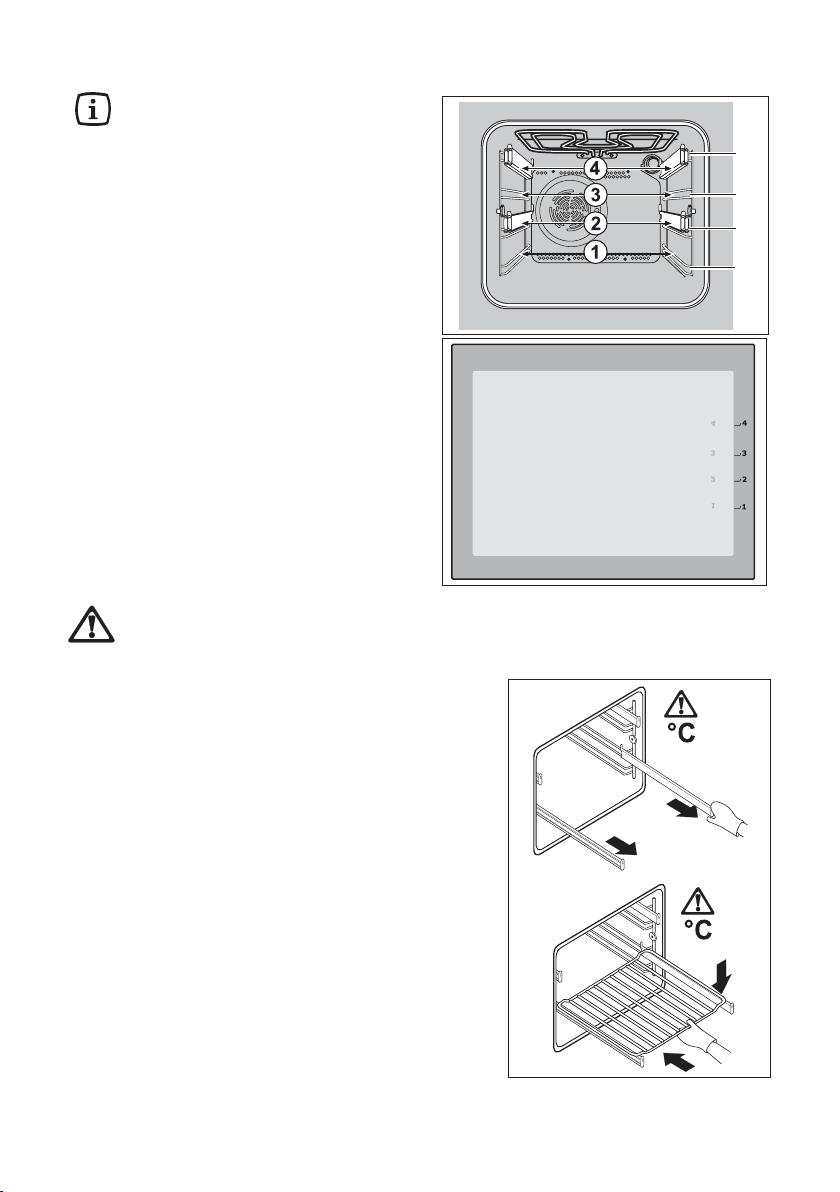
The oven has four shelf levels.
The shelf positions are counted
from the bottom of the oven as
shown in the diagram.
Inside of door
On the inside of the oven door you will find
the numbers of the different oven shelves.
Telescopic shelf supports
Important: Telescopic shelf
supports and other accessories get very hot! Use oven
gloves or similar!
The oven has four shelf levels. The shelf
positions are counted from the bottom
of the oven as shown in the diagram.
Shelf levels 2 and 4 are fitted with telescopic shelf supports, to allow en easier operation when inserting or removing the shelves.
Pull the right and left hand telescopic
shelf supports completely out.
Place the shelf or the grill pan on the
telescopic shelf supports, then gently
push them all inside the oven (see diagram).
Do not attempt to close the oven
door if the telescopic shelf supports
are not completely inside the oven.
This could damage the door enamel
and glass.
4
3
2
1
Page 37

Hints and Tips
Always keep the oven door
closed while cooking.
This oven is equipped with an exclusive
cooking system that creates a natural air
stream and keeps the cooking vapours
circulating.
Food is therefore cooked in a constantly
moist atmosphere, which cooks the food
so that it is tender inside and crispy
outside. The cooking times and the
energy consumption are reduced to a
minimum. Steam is created during
cooking, which can escape when the
door is opened.
This is normal.
When opening the oven door during
or at the end of cooking, be careful
of the stream of hot air, which comes
out of the oven.
When food is heated, steam is
created, like in a kettle. When the
steam comes into contact with the
glass in the oven door, it
condenses and creates water
droplets.
To reduce condensation, always
preheat the empty oven for 10
minutes.
We recommend you wipe the water
droplets away after every cooking
process.
Caution!
Do not line the oven with aluminium foil and do not place a
roasting pan or baking tray on
the floor, as otherwise the oven
enamel will be damaged by the
heat build-up.
electrolux 37
Page 38

38 electrolux
Cleaning and Maintenance
Before cleaning always allow
the cooling fan to cool the oven
down before switching off at
the electricity supply.
This appliance cannot be
cleaned with steam or with a
steam cleaning machine.
The oven should be kept clean
at all times. A build-up of fats
or other foodstuffs could result
in a fire, especially in the grill
pan.
Important: Before carrying out any
cleaning operation, the appliance must
be disconnected from the power supply.
To ensure a long life for your appliance,
it is necessary to perform the following
cleaning operations regularly:
- Only perform when the oven has
cooled down.
- Clean the enamelled parts with soapy
water.
- Cleaners that contain bleach should
NOT be used as they may dull the
surface finishes. Harsh abrasives
should also be avoided.
- Dry the stainless steel parts and glass
with a soft cloth.
- If there are stubborn stains, use
commercially available for stainless
steel or warm vinegar.
The oven’s enamel is extremely durable
and highly impermeable. The action of
hot fruit acids (from lemons, plums or
similar) can however leave permanent,
dull, rough marks on the surface of the
enamel. However such marks in the
brightly polished surface of the enamel
does not affect the operation of the oven.
Clean the oven thoroughly after every
use. This is the easiest way to clean dirt
off. It prevents dirt being burnt on.
Page 39
Cleaning the oven door
These instructions refer to the oven door
as supplied by the manufacturer.
If the oven door has been
reversed on your request or
due to the requirements of the
installation, the use of right/
left must also be transferred
to the other side.
We recommend you
door panes before cleaning.
Please follow the instructions below.
remove both inner
BB
B
BB
electrolux 39
AA
A
AA
Fig. 1 Fig. 1
Fig. 1
Fig. 1 Fig. 1
AA
A
AA
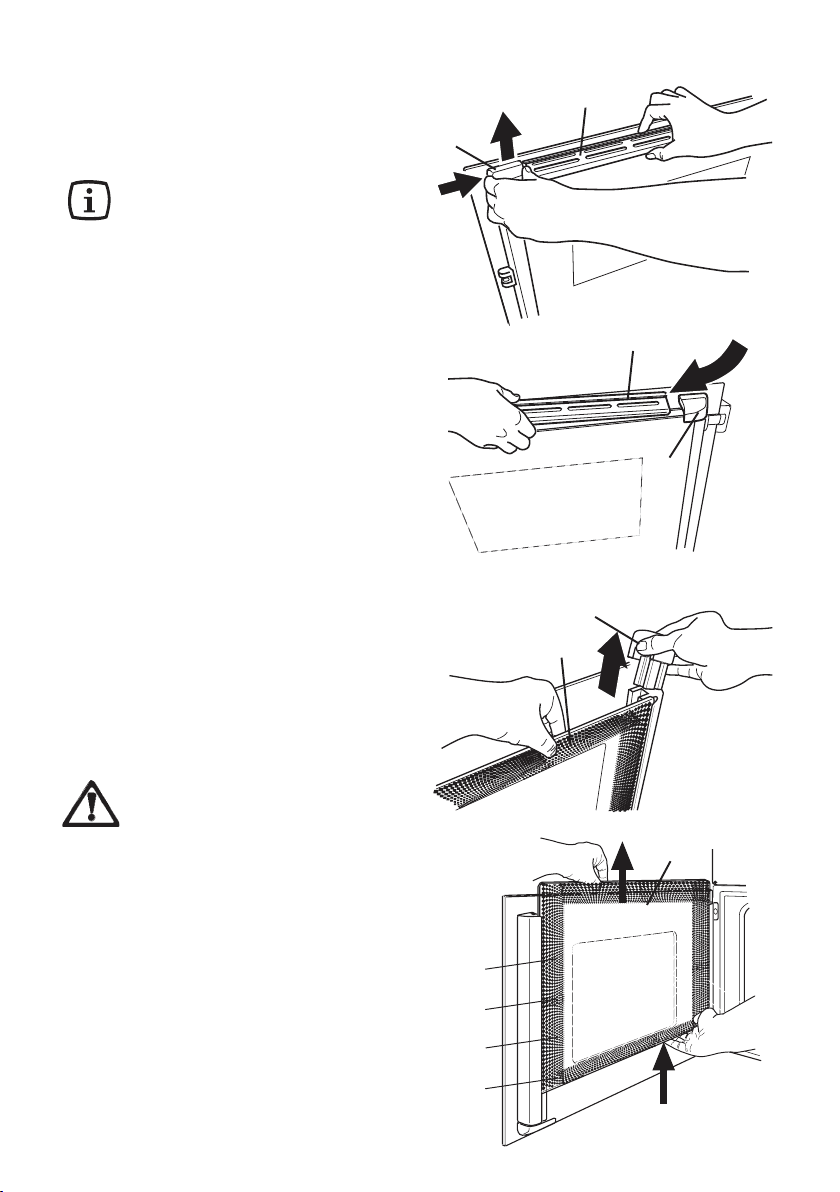
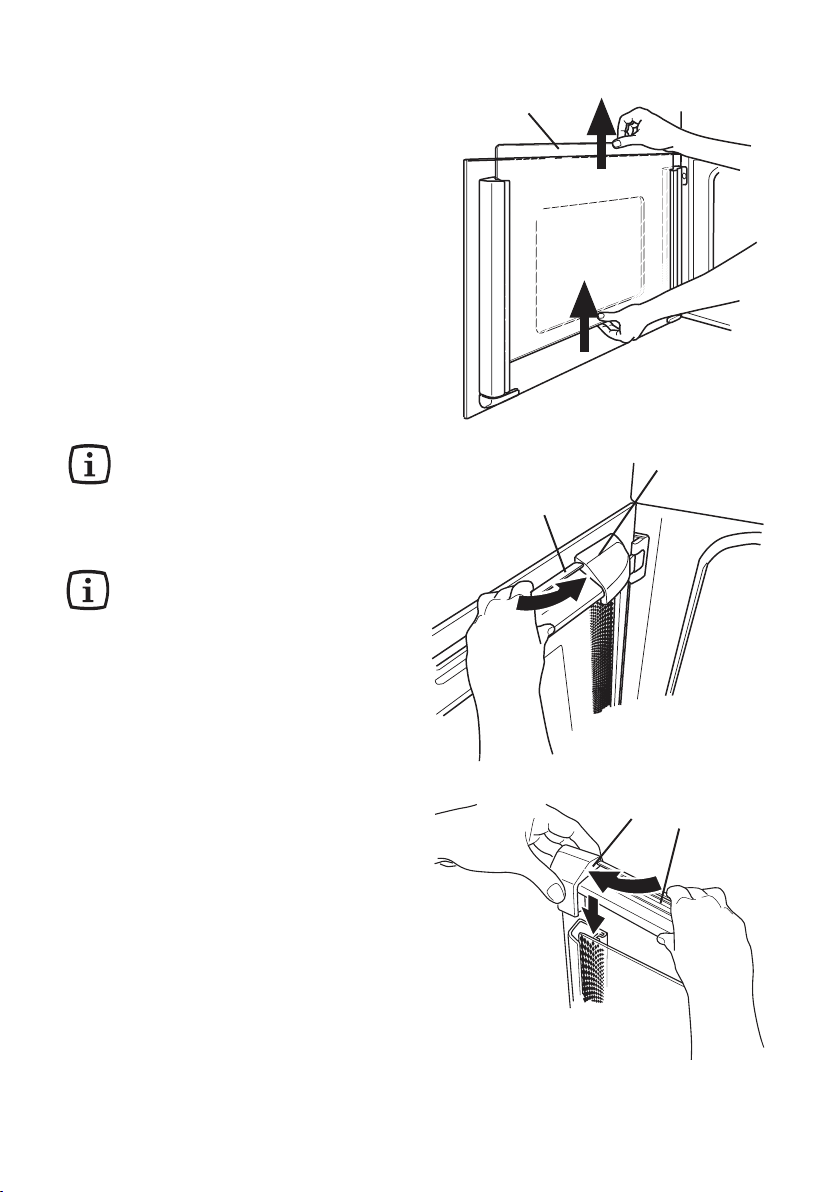
Fig. 1: With the right hand hold the
perforated aluminium plate A in position
and with the left hand remove the
retainer B of the inner pane. Then to
unlock the retainer, press it to the right
and then pull it upwards.
Fig. 2: Pull the perforated aluminium
plate A out of the retainer C.
Fig. 3: With the left hand hold the inner
pane D in position and pull out the
retainer C.
Hold onto the pane D tightly,
so that it does not tilt and fall
out.
Fig. 4: Then take hold of the inner pane
D securely with both hands and push it
out upwards.
CC
C
CC
Fig. 2 Fig. 2
Fig. 2
Fig. 2 Fig. 2
CC
C
CC
DD
D
DD
Fig. 3 Fig. 3
Fig. 3
Fig. 3 Fig. 3
DD
D
DD
4
3
2
1
Fig. 4 Fig. 4
Fig. 4
Fig. 4 Fig. 4
Page 40
40 electrolux
Fig. 25: Then take hold of the second
inner pane E securely with both hands
and push it out upwards.
Once the inner panes have been
removed, clean the door and the panes.
Clean the glass panes with warm water
only. Do not use rough cloths, scouring
pads, steel wool, acids or abrasive
products, so that the surfaces of the
glass panes and the door are not
damaged.
After cleaning, re-insert the inner
panes.
The inner pane E (without side
decors) must be positioned so
that the small printed circle on
the upper lefthand side is visible
when the door is closed.
The inner pane D (with side
decors and numbers of the shelf
levels) must be positioned in a
way that the shelf levels numbers
are correctly displayed when
watching the oven door from the
front side.
After reinserting the inner panes, adjust
the retainer C, then:
E
Fig. 5
C
A
Fig. 6
Fig. 6: insert the right end of the
perforated aluminium plate ”A” into the
recess in the retainer C.
Fig. 7: Then insert the left end of the
perforated aluminium plate A into the
recess in the retainer B. Insert the retainer
B at this point and check that everything
is securely fastened and firm.
B
A
Fig. 7
Page 41

electrolux 41
Appliances in stainless steel or aluminium
We recommend you only clean the oven
door with a wet sponge and then dry it
afterwards with a soft cloth. Never use
scourers, acids or harsh abrasives, as these
can damage the surface. Clean the panel
with the same care.
DO NOT clean the oven door while
the glass panels are warm. If this
precaution is not observed the glass
panel may shatter.
If the door glass panel becomes
chipped or has deep scratches, the
glass will be weakened and must
be replaced to prevent the possibility of the panel shattering. Contact your local Repair agent who
will be pleased to advise further.
If necessary, it is possible to reverse
the oven door. This operation should
be carried out by authorized personnel ONLY.
This will be a chargeable visit.
The Oven door gasketThe Oven door gasket
The Oven door gasket
The Oven door gasketThe Oven door gasket
The correct operation of the oven is
ensured by a gasket placed round the
edge of the oven cavity.
• Periodically
this gasket. If necessary, clean it
without using abrasive cleaning
products.
•
If the gasket shows to be
call you local Service Centre. Do not
use the oven until it has been repaired.
checkcheck
check the condition of
checkcheck
damageddamaged
damaged,
damageddamaged
Customers are recommended not
to carry out this operation themselves.
Oven Shelves and Shelf Supports
Clean the oven shelf support before
proceeding to the catalytic cleaning
of the oven.
To clean the oven shelves and the shelf
supports, soak in warm soapy water and
remove stubborn marks with a well
wetted soap impregnated pad. Rinse
well and dry with a soft cloth.
Page 42
42 electrolux
Shelf Supports and Catalytic
Panels
The shelf supports and the catalytic
panels can be removed for easy cleaning.
Make sure that the appliance
is completely cooled before
carrying out this operation.
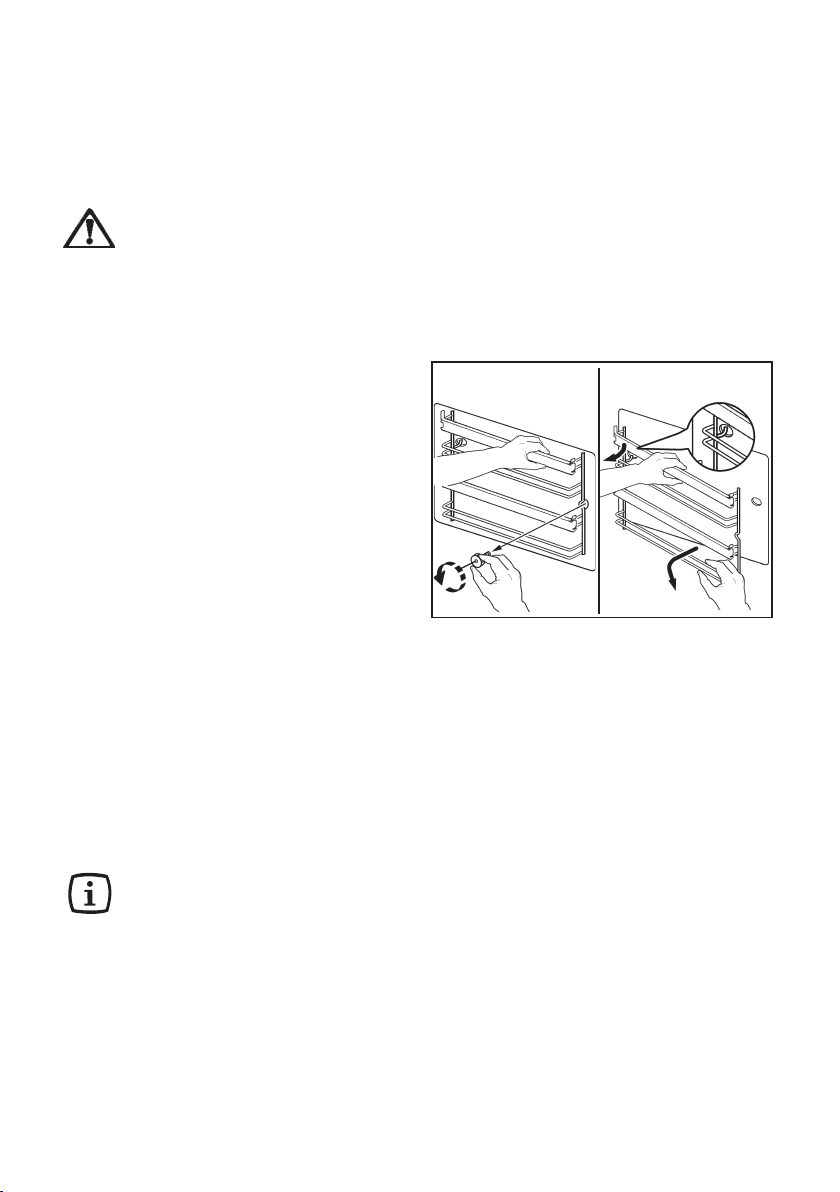
Proceed as follows:
1) remove the front screw while keeping
the shelf support and the catalytic
panel in position with the other hand
(see diagram step 1);
2) keep the shelf support and the
catalytic panel in position and lift
them with a hand while disengaging
the rear hook. Take off the shelf
support and the catalytic panel (see
diagram step 2);
Care of Catalytic Liners
3) once the cleaning is carried out, fit
the shelf support and the catalytic
panel together and mount them
following the procedure in reverse.
Please, ensure the retaining nuts are
secure when refitting the shelf support
and the catalytic panel. To clean the
oven shelves, soak in warm soapy water
and remove stubborn marks with a well
wetted soap impregnated pad. Rinse
well and dry with a soft cloth.
11
1
11
22
2
22
Catalytic liners (except for the oven base)
destroy splashes of food and fats when
the oven temperature is raised to around
220°C. To aid this process it is a good
idea to run the oven for an hour or two
per week, without food, to ensure
continued good performance from the
catalytic liners.
Hints and TipsHints and Tips
Hints and Tips
Hints and TipsHints and Tips
• Manual cleaning of the catalytic liner
is not recommended. Damage will
occur if soap impregnated steel wool
pads, aerosol cleaners and any other
abrasives are used.
• Slight discolouration and polishing of
the catalytic surface may occur in
time. This does not affect the catalytic
properties in any way.
• Follow the recommendations in
“Cooking to reduce soilage”.
Cooking to reduce soilageCooking to reduce soilage
Cooking to reduce soilage
Cooking to reduce soilageCooking to reduce soilage
Cook at the recommended temperatures.
Higher temperatures during roasting will
increase soilage. Try cooking at lower
temperatures for an increased length of
time, you will save energy and often the
joint is more tender.
Use minimal, if any, extra oil or fat when
roasting meat; potatoes only require
brushing with fat before cooking. Extra
fat in the oven during roasting will
increase splashing and soilage. It is NOT
necessary to add water to the meat tin
when roasting. The water and the fat
juices from the joint create excessive
Page 43

splattering during cooking, even at
normal temperatures, as well as causing
condensation.
Covering joints during cooking will also
prevent splashing onto the interior
surfaces; removing the covering for the
last 20-30 minutes will allow extra
browning, if required. Some large joints
and turkeys especially benefit from this
method of cooking, allowing the joint to
cook through before the outside is
overbrowned.
Do useDo use
Do use the roasting tin. During roasting,
Do useDo use
the fat from the joint will be contained
beneath the trivet and therefore prevent
it from splattering onto the catalytic liner.
Cleaning the hinged grill
This model has been fitted with a hinged
grill element to make the roof of the oven
especially easy to clean.
Before proceeding ensure the
oven is cool and disconnected from the electricity
supply.
1. Undo the screw fastening the grill element. When carrying out this operation for the first time, we recommend
using a screwdriver.
2. Then gently pull the grill downwards
to allow access to the oven roof.
3. Clean the oven roof with a suitable
cleaner and wipe dry before returning
the hinged grill element to its original
position.
4. Carefully push the grill element up
into its original position and retighten the retaining nut.
Ensure the retaining nut on the
grill element is properly
tightened so that it does not
fall down when in use.
electrolux 43
Page 44
44 electrolux
Replacing the Oven Light
If the oven bulb needs replacing, the
new bulb must have the following
specifications:
- Electric power: 25 W,
- Voltage: 230 V (50 Hz),
- Resistant to temperatures of 300 °C,
- Connection type: E14.
These bulbs can be purchased from your
local Service Force Centre.
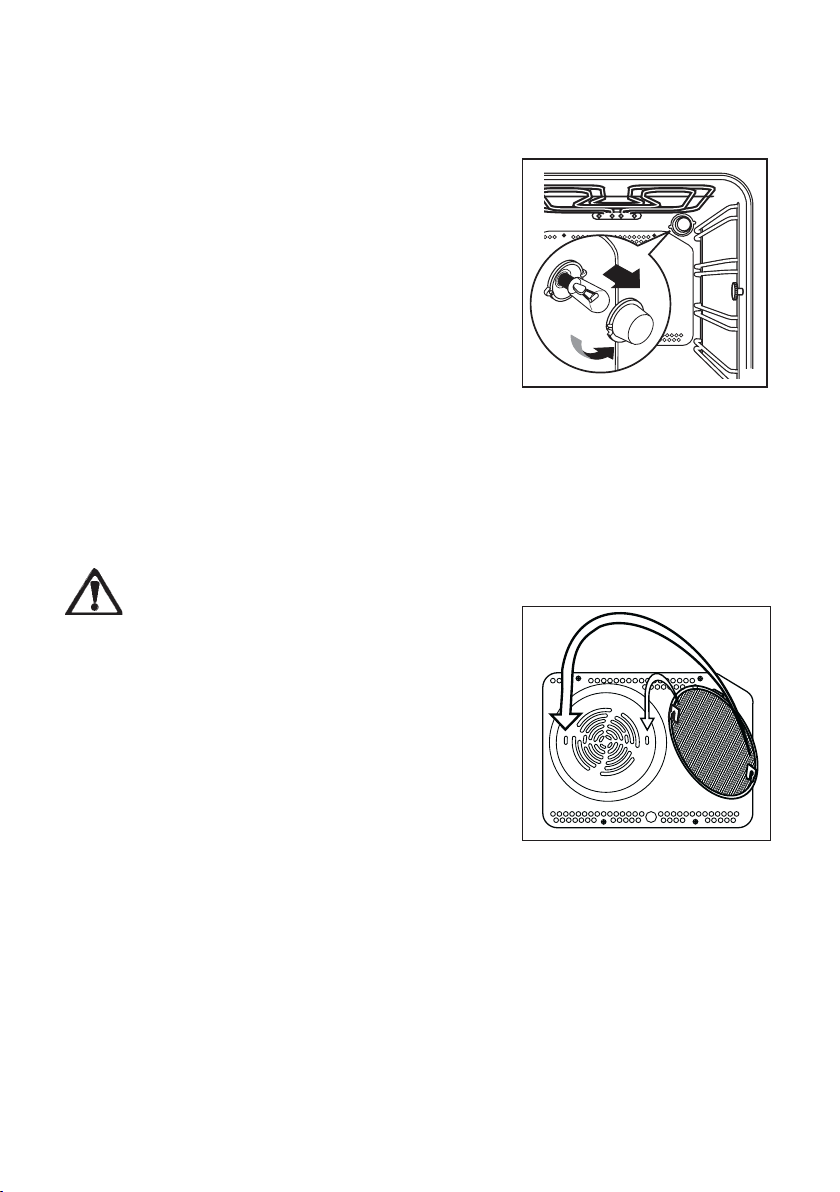
To replace the faulty bulb:
!
1. Ensure the oven is disconnected
from the power supply.
2. Turn the glass cover anti-clockwise.
3. Remove the faulty bulb and replace
with the new one.
4. Refit the glass cover.
5. Reconnect to the electrical supply.
The Grease Filter
Make sure that the power
supply is switched off before
this action is performed.
When roasting, the special grease filter
must be inserted to minimise the
contamination of the fan wheel in the
back wall of the oven. When the roasting
process is completed, the grease filter
is to be removed as follows and
thoroughly cleaned.
Press the filter spring upwards and
remove the filter.
Important! The filter must be taken out
when baking.
Page 45
electrolux 45
Something not Working
If the oven is not working correctly, please carry out the following checks, before
contacting your local customer care department.
IMPORTANT: If you call out an engineer to a fault listed below, or to repair a fault caused by
incorrect use or installation, a charge will be made even if the appliance is under guarantee.
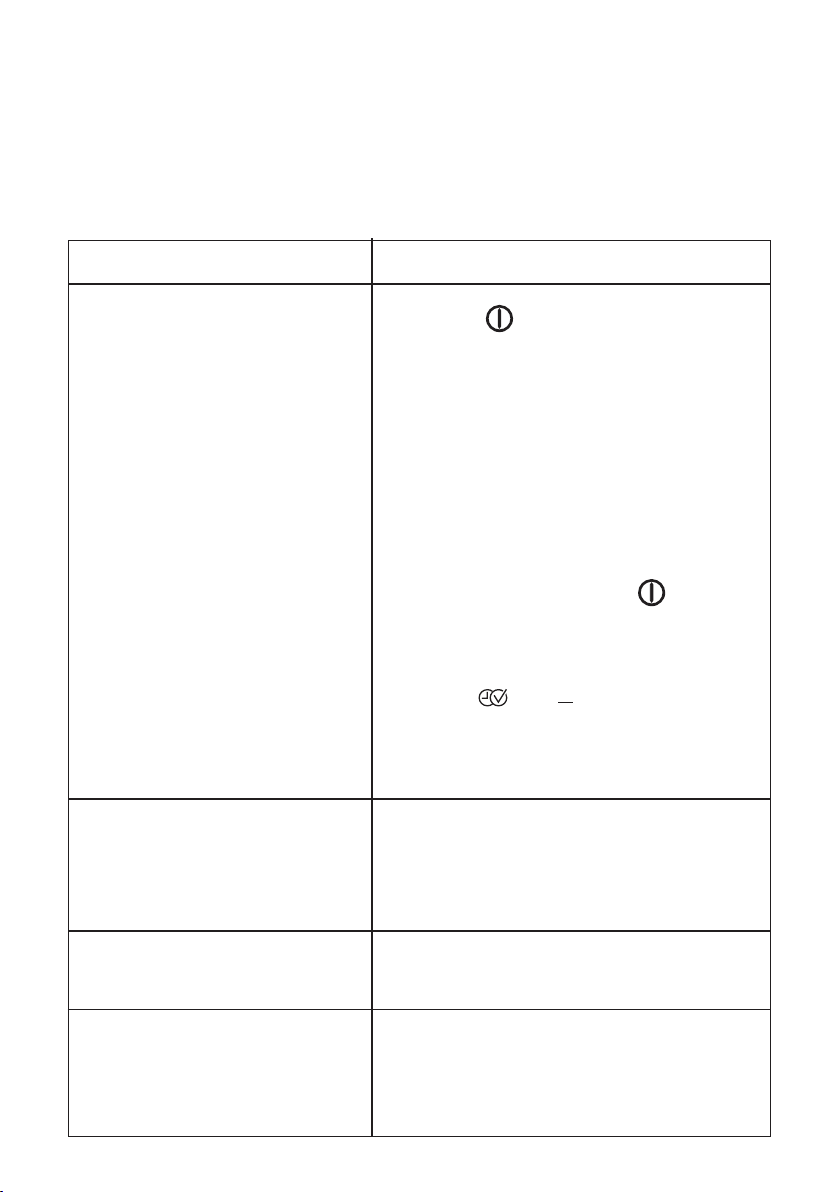
PROBLEM
#
The oven is not heating up.
#
The oven light does not come
on.
#
Steam and condensation
settle on the food and in the
oven cavity.
#
A fault code (letter F followed
by digits) appears in the clock
display.
SOLUTION
"
Touch key
, then select a cooking function.
or
"
Has the fuse in the domestic electrical
installation been tripped?
or
"
Check whether the appliance is correctly
connected and the socket switch or the
mains supply to the oven is ON.
or
"
The "Demo" function has been accidentally
activated. To deactivate it proceed as follows:
1. In the Off position press key for about
5 seconds. The oven turns to stand by and
off again. A sound signal will be emitted.
2.
Within 5 seconds press at the same time
the keys and keys and hold them
pressed until a sound signal will be emitted.
If the “Demo” word disappears at the next
switch then operation is successfull.
"
Select a cooking function.
or
"
Buy a new oven light bulb; if necessary, order
from the Electrolux Service Centre and install
according to the instructions in this user manual.
"
When the cooking process is completed,
do not leave the dishes standing in the
oven for longer than 15-20 minutes.
"
Switch the appliance off and on again via the
house fuse or the safety switch in the fuse box.
If it is displayed again, please take note of the
fault code and contact the nearest customer
care department.
Page 46

46 electrolux
Technical Data
Heating element ratings
Bottom Heat 1000 W
Coventional cooking (Top+Bottom)1800 W
Economy Grill 1650 W
Dual Grill 2450 W
Fan Cooking 2000 W
Pizza Setting 2075 W
Turbo Grill 2475 W
Slow Cook 2025 W
Defrost 25 W
Drying 2025 W
Keep Warm 1800 W
Preserving 1000 W
Plate Warming 2025 W
Oven Light 25 W
Hot Air Fan Motor 25 W
Cooling Fan Motor 25 W
Total rating 2500 W
Operating voltage (50 Hz)
230 V
Dimensions of the recess
Height under top: 593 mm
in column: 580 mm
Width 560 mm
Depth 550 mm
Oven
Height 335 mm
Width 395 mm
Depth 400 mm
Oven capacity 53 l
Oven thermostat 30°C - 250°C
Page 47

Instructions for the Installer
Electrical Requirements
Any permanent electrical installation must
comply with the latest I.E.E. Regulations
and local Electricity Board regulations.
For your own safety this should be
undertaken by a qualified electrician, e.g.
your local Electricity Board, or a
contractor who is on the roll of the
National Inspection Council for Electrical
Installation Contracting (NICEIC).
Electrical Connection
The oven is designed to be connected to
230 V (50 Hz) electricity supply.
The oven has an easily accessible
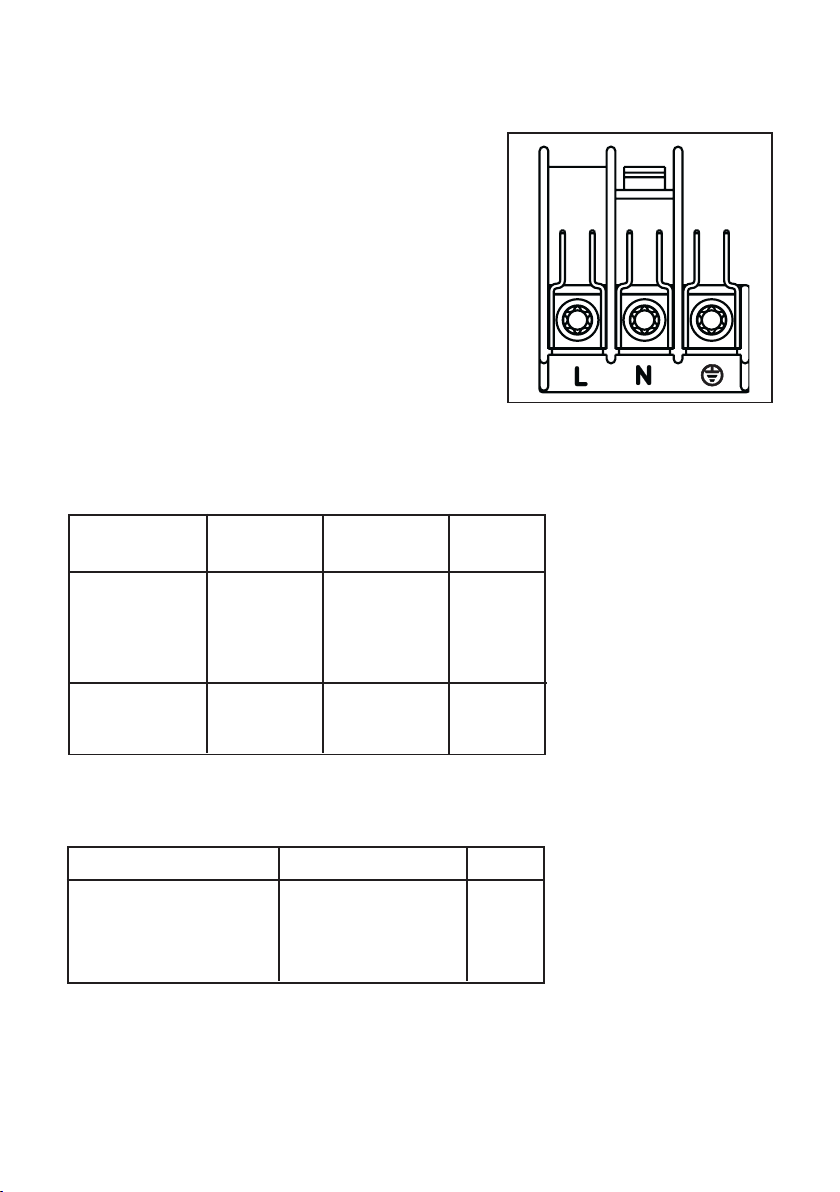
terminal block which is marked as follows:
Letter L - Live terminal
Letter N - Neutral terminal
electrolux 47
or E - Earth terminal
THIS OVEN MUST BETHIS OVEN MUST BE
THIS OVEN MUST BE
THIS OVEN MUST BETHIS OVEN MUST BE
EARTHED.EARTHED.
EARTHED.
EARTHED.EARTHED.
The cable used to connect the oven to
the electrical supply must comply to the
specifications given below.
It is necessary that you install a double
pole switch between the oven and the
electricity supply (mains), with a
minimum gap of 3mm between the
switch contacts and of a type suitable
for the required load in compliance with
the current rules.
The switch must not break the yellow and
green earth cable at any point.
Page 48
48 electrolux
Important
After installation and connecting, the
cable must be placed so that it cannot
at any point reach a temperature of more
than 60°C above the ambient temperature. Before the oven is connected,
check that the main fuse and the
domestic installation can support the
load; and that the power supply is
properly earthed.
The manufacturer disclaims any
responsibility should these safety
measures not be carried out.
For Uk use only
ConnectionConnection
Connection
ConnectionConnection
viavia
via
viavia
• 13 A socket 2.5 mm
Min. sizeMin. size
Min. size
Min. sizeMin. size
Cable/flexCable/flex
Cable/flex
Cable/flexCable/flex
2
Cable / flexCable / flex
Cable / flex
Cable / flexCable / flex
typetype
type
typetype
FuseFuse
Fuse
FuseFuse
3 core 13 A min.
outlet butyl insulated
• 13 A
spur box
• Oven 2.5 mm
2
PVC/PVC 15 A min.
Control twin and 20 A max.
Circuit earth
For Europe use onlyFor Europe use only
For Europe use only
For Europe use onlyFor Europe use only
Min. size Cable/flexMin. size Cable/flex
Min. size Cable/flex
Min. size Cable/flexMin. size Cable/flex
1.5 mm
2
Cable / flex typeCable / flex type
Cable / flex type
Cable / flex typeCable / flex type
H07 RN-F, H05 RN-F, 13 A
H05 RR-F, H05 VV-F,
H05 V2V2-F (T90),
H05 BB-F
FuseFuse
Fuse
FuseFuse
Page 49
Building In
Please ensure that when the oven isPlease ensure that when the oven is
Please ensure that when the oven is
Please ensure that when the oven isPlease ensure that when the oven is
installed it is easily accessible forinstalled it is easily accessible for
installed it is easily accessible for
installed it is easily accessible forinstalled it is easily accessible for
the engineer in the event of athe engineer in the event of a
the engineer in the event of a
the engineer in the event of athe engineer in the event of a
breakdown.breakdown.
breakdown.
breakdown.breakdown.
Building InBuilding In
Building In
Building InBuilding In
The surround or cabinet into which the
oven will be built must comply with these
specifications:
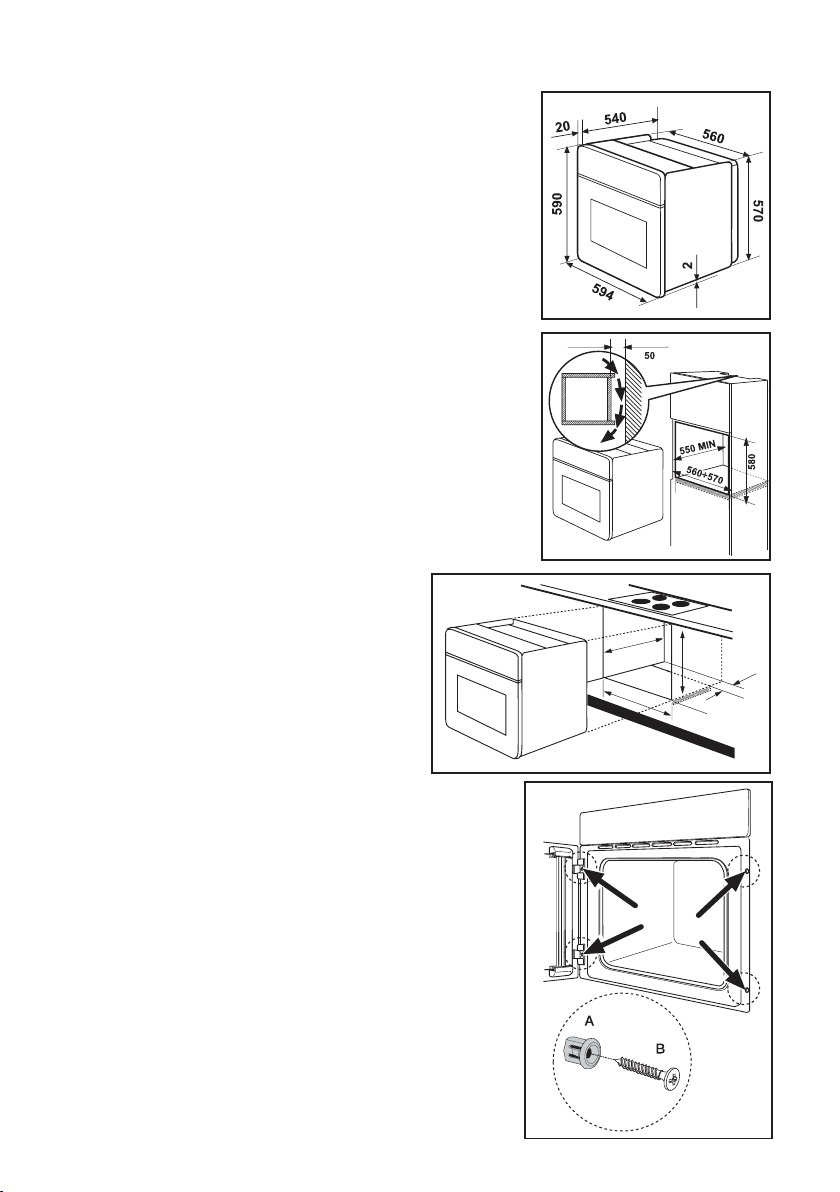
$ the dimensions must be as shown in
the relevant diagrams;
$ the materials must withstand a tem-
perature increase of at least 60°C
above ambient;
$ proper arrangements must be made
of a continuous supply of air to the
oven to prevent the oven overheating.
Dimensions of the oven and recess
required are given in the relevant diagrams.
electrolux 49
IN
550 M
560 - 570
593
80÷100
Securing The Oven To The
Cabinet
1. Fit the oven into the cabinet recess.
2. Open the oven door.
3. Secure the oven to the kitchen
cabinet with the four distance holders
AA
A which fit the holes in the oven fra-
AA
me and then fit the four wood screws
BB
B.
BB
Page 50

50 electrolux
Guarantee/Customer Service
Standard guarantee conditions
We, Electrolux, undertake that if within 12 months of the date of the purchase
this Electrolux appliance or any part thereof is proved to be defective by reason
only of faulty workmanship or materials, we will, at our option repair or replace the
same FREE OF CHARGE for labour, materials or carriage on condition that:
• The appliance has been correctly installed and used only on the electricity supply
stated on the rating plate.
• The appliance has been used for normal domestic purposes only, and in
accordance with the manufacturer’s instructions.
• The appliance has not been serviced, maintained, repaired, taken apart or
tampered with by any person not authorised by us.
• Electrolux Service Force Centre must undertake all service work under this
guarantee
• Any appliance or defective part replaced shall become the Company’s property.
• This guarantee is in addition to your statutory and other legal rights.
Exclusions
• Damage or calls resulting from transportation, improper use or neglect, the
replacement of any light bulbs or removable parts of glass or plastic.
• Costs incurred for calls to put right an appliance which is improperly installed or
calls to appliances outside the United Kingdom.
• Appliances found to be in use within a commercial environment, plus those
which are subject to rental agreements.
• Products of Electrolux manufacturer that are not marketed by Electrolux
Service and Spare Parts
In the event of your appliance requiring service, or if you wish to purchase spare
parts, please contact your local Service Force Centre by telephoning 0870 5 929
929
Your telephone call will be automatically routed to the Service Force Centre covering
your postcode area.
For the address of your local Service Force Centre and further information about
Service Force, please visit the website at
www.serviceforce.co.uk
Before calling out an engineer, please ensure you have read the details under the
heading “Something not working” When you contact the Service Force Centre you
will need to give the following details:
1.Your name, address and postcode.
2.Your telephone number.
3. Clear concise details of the fault.
Page 51
electrolux 51
4. The model and Serial number of the
appliance (found on the rating plate).
5.The purchase date.
Please note a valid purchase receipt or guarantee documentation is required for in
guarantee service calls.
Customer Care
For general enquiries concerning your Electrolux appliance, or for further information
on Electrolux products please contact our Customer Care Department by letter or
telephone at the address below or visit our website at
www.electrolux.co.uk
Customer Care Department
Electrolux Major Appliances
Addington Way
Luton
Bedfordshire, LU4 9QQ
Tel: 08705 950 950 (*)
(*) Calls may be recorded for training purposes
Service and spare parts
If after the checks listed in the chapter
"Something not working", the appliance
still does not work correctly, contact your
local Service Centre, specifying the type
of malfunctioning, the appliance model
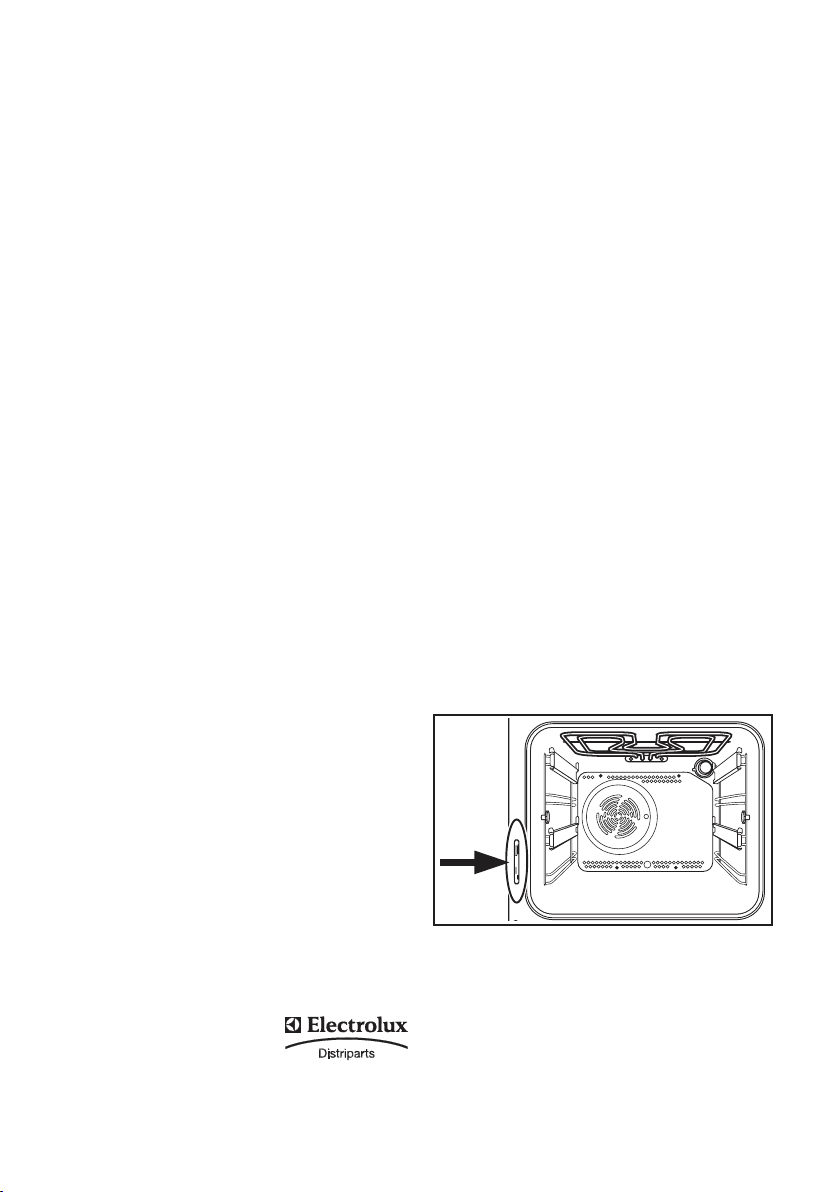
(Mod.), the product number (Prod. No.)
and the serial number (Ser. No.) marked
on the rating plate. This plate is placed
on the front external edge of the oven
cavity.
Original spare parts, certified by the
product manufacturer and carrying this
symbol, are only available at our Service
Centre and authorized spare parts
shops.
RatingRating
Rating
RatingRating
plateplate
plate
plateplate
Page 52

52 electrolux
European Guarantee
This appliance is guaranteed by Electrolux in each of the countries listed at the
back of this user manual, for the period specified in the appliance guarantee or
otherwise by law. If you move from one of these countries to another of the countries
listed below the appliance guarantee will move with you subject to the following
qualifications:
• The appliance guarantee starts from the date you first purchased the appliance
which will be evidenced by production of a valid purchase document issued by
the seller of the appliance.
• The appliance guarantee is for the same period and to the same extent for la-
bour and parts as exists in your new country of residence for this particular model
or range of appliances.
• The appliance guarantee is personal to the original purchaser of the appliance
and cannot be transferred to another user.
• The appliance is installed and used in accordance with instructions issued by
Electrolux and is only used within the home, i.e. is not used for commercial pur-
poses.
• The appliance is installed in accordance with all relevant regulations in force
within your new country of residence.
The provisions of this European Guarantee do not affect any of the rights granted to
you by law.
Page 53
electrolux 53
Page 54
54 electrolux
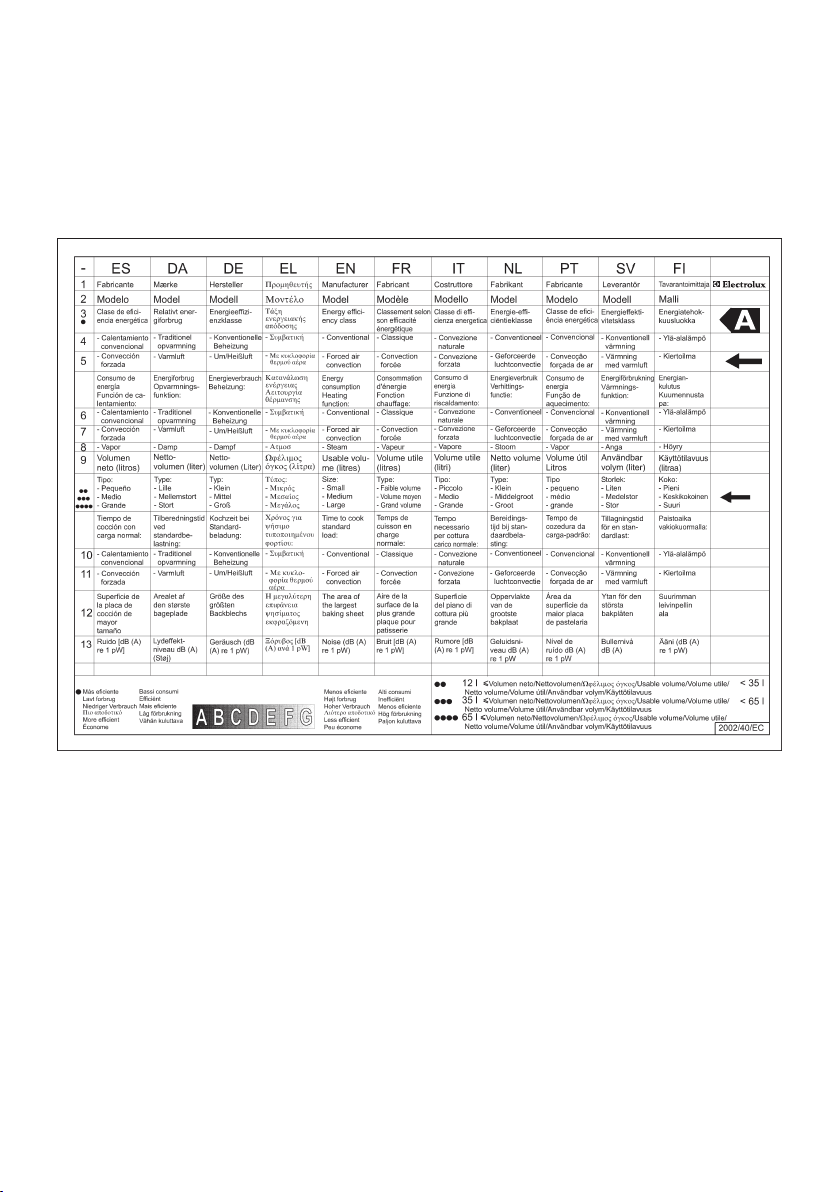
EOB 66714
0.79 kWh
0.78 kWh
53
43 min.
41 min.
1130 cm²
Page 55

electrolux 55
Page 56

56 electrolux
www.electrolux.co.uk
35696-9701 07/07 R.0
 Loading...