

Page 1

EOB6631
STEAM OVEN
AURUAHI
EN
ET
USER MANUAL 2
KASUTUSJUHEND 36
Page 2

CONTENTS
1. SAFETY INFORMATION...................................................................................... 3
2. SAFETY INSTRUCTIONS.....................................................................................4
3. PRODUCT DESCRIPTION................................................................................... 6
4. BEFORE FIRST USE............................................................................................7
5. DAILY USE.......................................................................................................... 7
6. CLOCK FUNCTIONS......................................................................................... 11
7. USING THE ACCESSORIES.............................................................................. 12
8. ADDITIONAL FUNCTIONS.................................................................................16
9. HINTS AND TIPS............................................................................................... 17
10. CARE AND CLEANING....................................................................................29
11. TROUBLESHOOTING......................................................................................32
12. INSTALLATION................................................................................................34
WE’RE THINKING OF YOU
Thank you for purchasing an Electrolux appliance. You’ve chosen a product that
brings with it decades of professional experience and innovation. Ingenious and
stylish, it has been designed with you in mind. So whenever you use it, you can be
safe in the knowledge that you’ll get great results every time.
Welcome to Electrolux.
Visit our website for:
Get usage advice, brochures, trouble shooter, service information:
www.electrolux.com
Register your product for better service:
www.registerelectrolux.com
Buy Accessories, Consumables and Original spare parts for your appliance:
www.electrolux.com/shop
CUSTOMER CARE AND SERVICE
Always use original spare parts.
When contacting our Authorised Service Centre, ensure that you have the following
data available: Model, PNC, Serial Number.
The information can be found on the rating plate.
Warning / Caution-Safety information
General information and tips
Environmental information
Subject to change without notice.
www.electrolux.com2
Page 3

1. SAFETY INFORMATION
Before the installation and use of the appliance, carefully
read the supplied instructions. The manufacturer is not
responsible if an incorrect installation and use causes
injuries and damages. Always keep the instructions with
the appliance for future reference.
1.1 Children and vulnerable people safety
• This appliance can be used by children aged from 8
years and above and persons with reduced physical,
sensory or mental capabilities or lack of experience and
knowledge if they have been given supervision or
instruction concerning use of the appliance in a safe
way and understand the hazards involved.
• Do not let children play with the appliance.
• Keep all packaging away from children.
• Keep children and pets away from the appliance when it
operates or when it cools down. Accessible parts are
hot.
• If the appliance has a child safety device, we
recommend you activate it.
• Cleaning and user maintenance shall not be made by
children without supervision.
• Children of less than 3 years should be kept away
unless continuously supervised.
1.2 General Safety
• Only a qualified person must install this appliance and
replace the cable.
• Internally the appliance becomes hot when in operation.
Do not touch the heating elements that are in the
appliance. Always use oven gloves to remove or put in
accessories or ovenware.
• Before maintenance cut the power supply.
• Ensure that the appliance is switched off before
replacing the lamp to avoid the possibility of electric
shock.
ENGLISH 3
Page 4

• Do not use a steam cleaner to clean the appliance.
• Do not use harsh abrasive cleaners or sharp metal
scrapers to clean the glass door since they can scratch
the surface, which may result in shattering of the glass.
• If the supply cord is damaged, it must be replaced by
the manufacturer, its Authorised Service Centre or
similarly qualified persons in order to avoid a hazard.
• To remove the shelf supports first pull the front of the
shelf support and then the rear end away from the side
walls. Install the shelf supports in the opposite
sequence.
• Only use the core temperature sensor recommended
for this appliance.
2. SAFETY INSTRUCTIONS
2.1 Installation
WARNING!
Only a qualified person must
install this appliance.
• Remove all the packaging.
• Do not install or use a damaged
appliance.
• Obey the installation instruction
supplied with the appliance.
• Always be careful when you move the
appliance because it is heavy. Always
wear safety gloves.
• Do not pull the appliance by the
handle.
• Keep the minimum distance from the
other appliances and units.
• Make sure that the appliance is
installed below and adjacent safe
structures.
• The sides of the appliance must stay
adjacent to appliances or to units with
the same height.
2.2 Electrical connection
WARNING!
Risk of fire and electrical
shock.
• All electrical connections should be
made by a qualified electrician.
• The appliance must be earthed.
• Make sure that the electrical
information on the rating plate agrees
with the power supply. If not contact
an electrician.
• Always use a correctly installed
shockproof socket.
• Do not use multi-plug adapters and
extension cables.
• Make sure not to cause damage to the
mains plug and to the mains cable.
Should the mains cable need to be
replaced, this must be carried out by
our Authorised Service Centre.
• Do not let mains cables to come in
touch with the appliance door,
specially when the door is hot.
• The shock protection of live and
insulated parts must be fastened in
such a way that it cannot be removed
without tools.
• Connect the mains plug to the mains
socket only at the end of the
installation. Make sure that there is
access to the mains plug after the
installation.
• If the mains socket is loose, do not
connect the mains plug.
• Do not pull the mains cable to
disconnect the appliance. Always pull
the mains plug.
• Use only correct isolation devices: line
protecting cut-outs, fuses (screw type
www.electrolux.com4
Page 5

fuses removed from the holder), earth
leakage trips and contactors.
• The electrical installation must have an
isolation device which lets you
disconnect the appliance from the
mains at all poles. The isolation device
must have a contact opening width of
minimum 3 mm.
• This appliance complies with the E.E.C.
Directives.
2.3 Use
WARNING!
Risk of injury, burns and
electrical shock or explosion.
• Use this appliance in a household only.
• Do not change the specification of this
appliance.
• Make sure that the ventilation openings
are not blocked.
• Do not let the appliance stay
unattended during operation.
• Deactivate the appliance after each
use.
• Be careful when you open the
appliance door while the appliance is in
operation. Hot air can release.
• Do not operate the appliance with wet
hands or when it has contact with
water.
• Do not apply pressure on the open
door.
• Do not use the appliance as a work
surface or as a storage surface.
• Open the appliance door carefully. The
use of ingredients with alcohol can
cause a mixture of alcohol and air.
• Do not let sparks or open flames to
come in contact with the appliance
when you open the door.
• Do not put flammable products or
items that are wet with flammable
products in, near or on the appliance.
WARNING!
Risk of damage to the
appliance.
• To prevent damage or discoloration to
the enamel:
– do not put ovenware or other
objects in the appliance directly on
the bottom.
– do not put aluminium foil directly
on the bottom of the appliance.
– do not put water directly into the
hot appliance.
– do not keep moist dishes and food
in the appliance after you finish the
cooking.
– be careful when you remove or
install the accessories.
• Discoloration of the enamel has no
effect on the performance of the
appliance. It is not a defect in the
sense of the warranty law.
• Use a deep pan for moist cakes. Fruit
juices cause stains that can be
permanent.
• This appliance is for cooking purposes
only. It must not be used for other
purposes, for example room heating.
• Always cook with the oven door
closed.
2.4 Steam Cooking
WARNING!
Risk of burns and damage to
the appliance.
• Do not open the appliance door during
steam cooking. Steam can release.
2.5 Care and cleaning
WARNING!
Risk of injury, fire, or damage
to the appliance.
• Before maintenance, deactivate the
appliance and disconnect the mains
plug from the mains socket.
• Make sure the appliance is cold. There
is the risk that the glass panels can
break.
• Replace immediately the door glass
panels when they are damaged.
Contact the Service.
• Be careful when you remove the door
from the appliance. The door is heavy!
• Clean regularly the appliance to
prevent the deterioration of the surface
material.
• Remaining fat or food in the appliance
can cause fire.
• Clean the appliance with a moist soft
cloth. Only use neutral detergents. Do
not use abrasive products, abrasive
ENGLISH 5
Page 6
cleaning pads, solvents or metal
objects.
• If you use an oven spray, obey the
safety instructions on the packaging.
• Do not clean the catalytic enamel (if
applicable) with any kind of detergent.
2.6 Internal light
• The type of light bulb or halogen lamp
used for this appliance is only for
household appliances. Do not use it for
house lighting.
WARNING!
Risk of electrical shock.
• Before replacing the lamp, disconnect
the appliance from the power supply.
• Only use lamps with the same
specifications.
2.7 Disposal
WARNING!
Risk of injury or suffocation.
• Disconnect the appliance from the
mains supply.
• Cut off the mains cable and discard it.
• Remove the door catch to prevent
children and pets to get closed in the
appliance.
3. PRODUCT DESCRIPTION
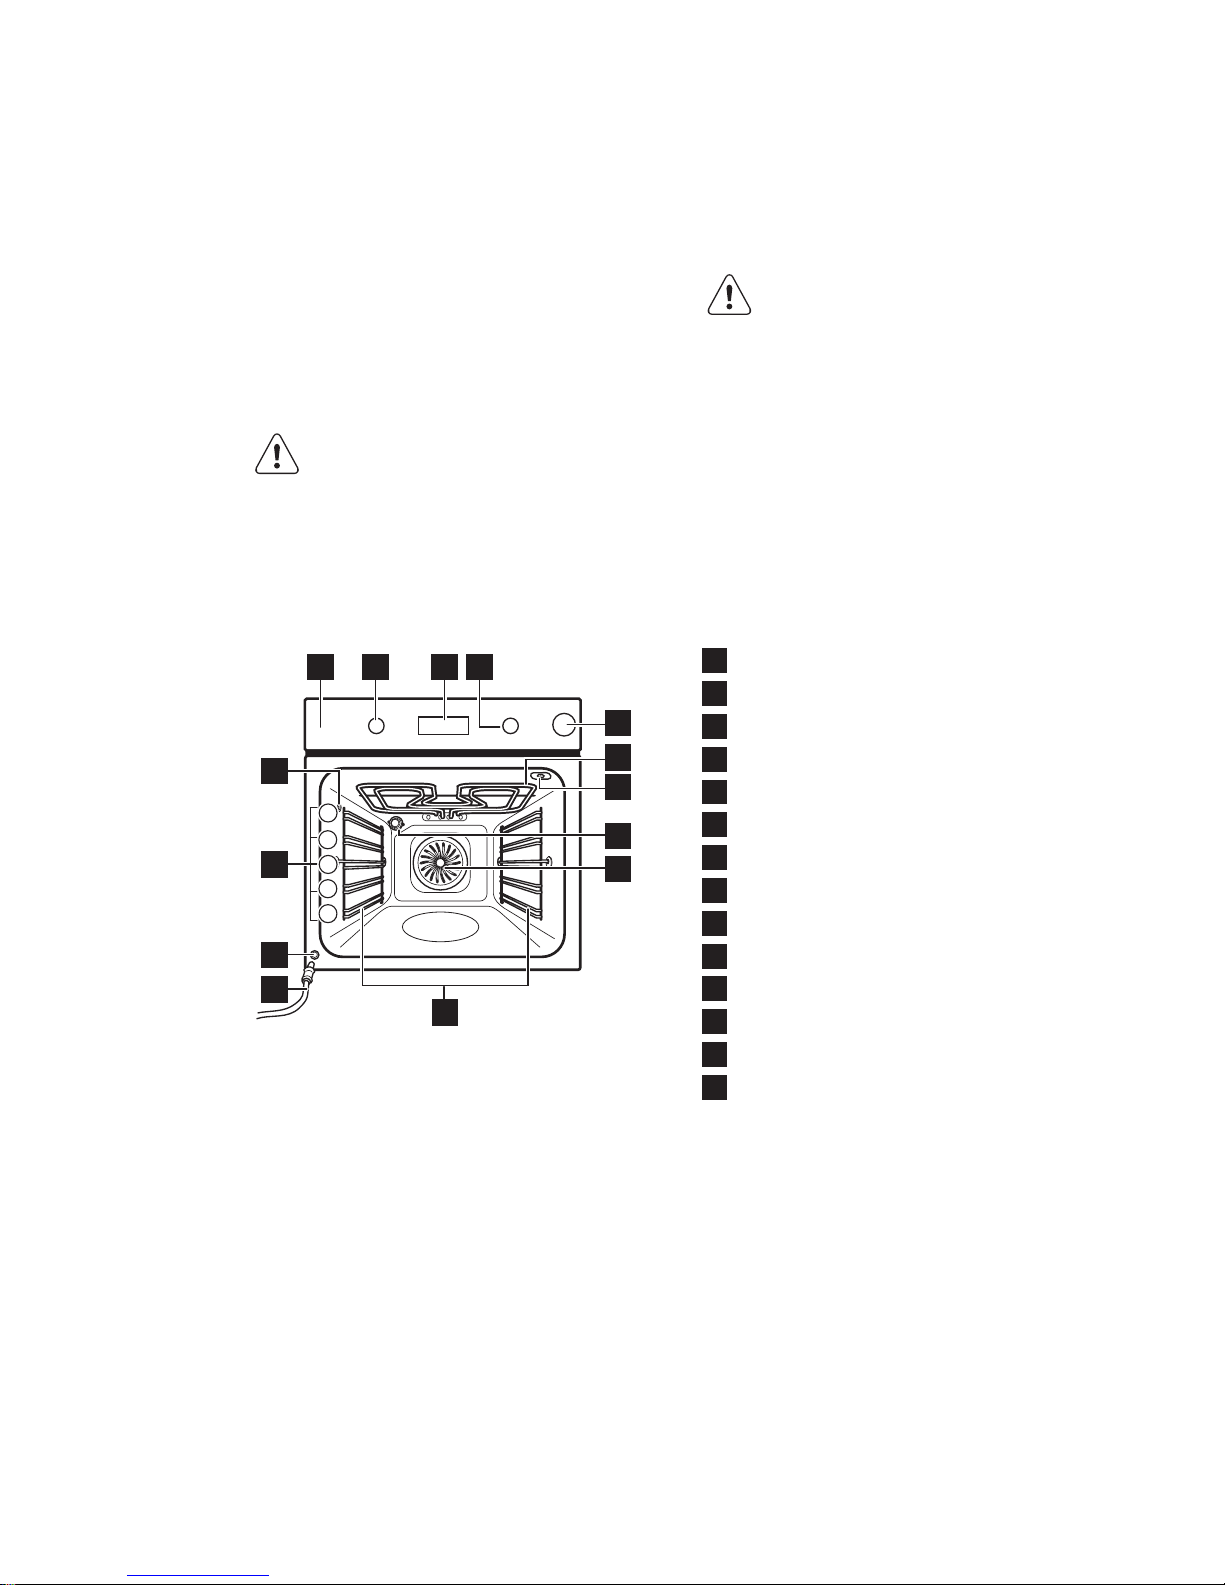
3.1 General overview
8
5
6
14
13
11
12
10
5
4
1
2
3
32 41
9
7
1
Control panel
2
Knob for the oven functions
3
Electronic programmer
4
Knob for the temperature
5
Water drawer
6
Heating element
7
Socket for the core temperature
sensor
8
Lamp
9
Fan
10
Shelf support, removable
11
Draining pipe
12
Water outlet valve
13
Shelf positions
14
Steam inlet
3.2 Accessories
• Wire shelf
For cookware, cake tins, roasts.
• Baking tray
For cakes and biscuits.
• Grill- / Roasting pan
To bake and roast or as pan to collect
fat.
• Core temperature sensor
To measure how far the food is
cooked.
• Telescopic runners
For shelves and trays.
www.electrolux.com6
Page 7
4. BEFORE FIRST USE
WARNING!
Refer to Safety chapters.
4.1 Initial Cleaning
Remove all accessories and removable
shelf supports from the appliance.
Refer to "Care and cleaning"
chapter.
1. Clean the appliance before first use.
2. Put the accessories and the
removable shelf supports back to their
initial position.
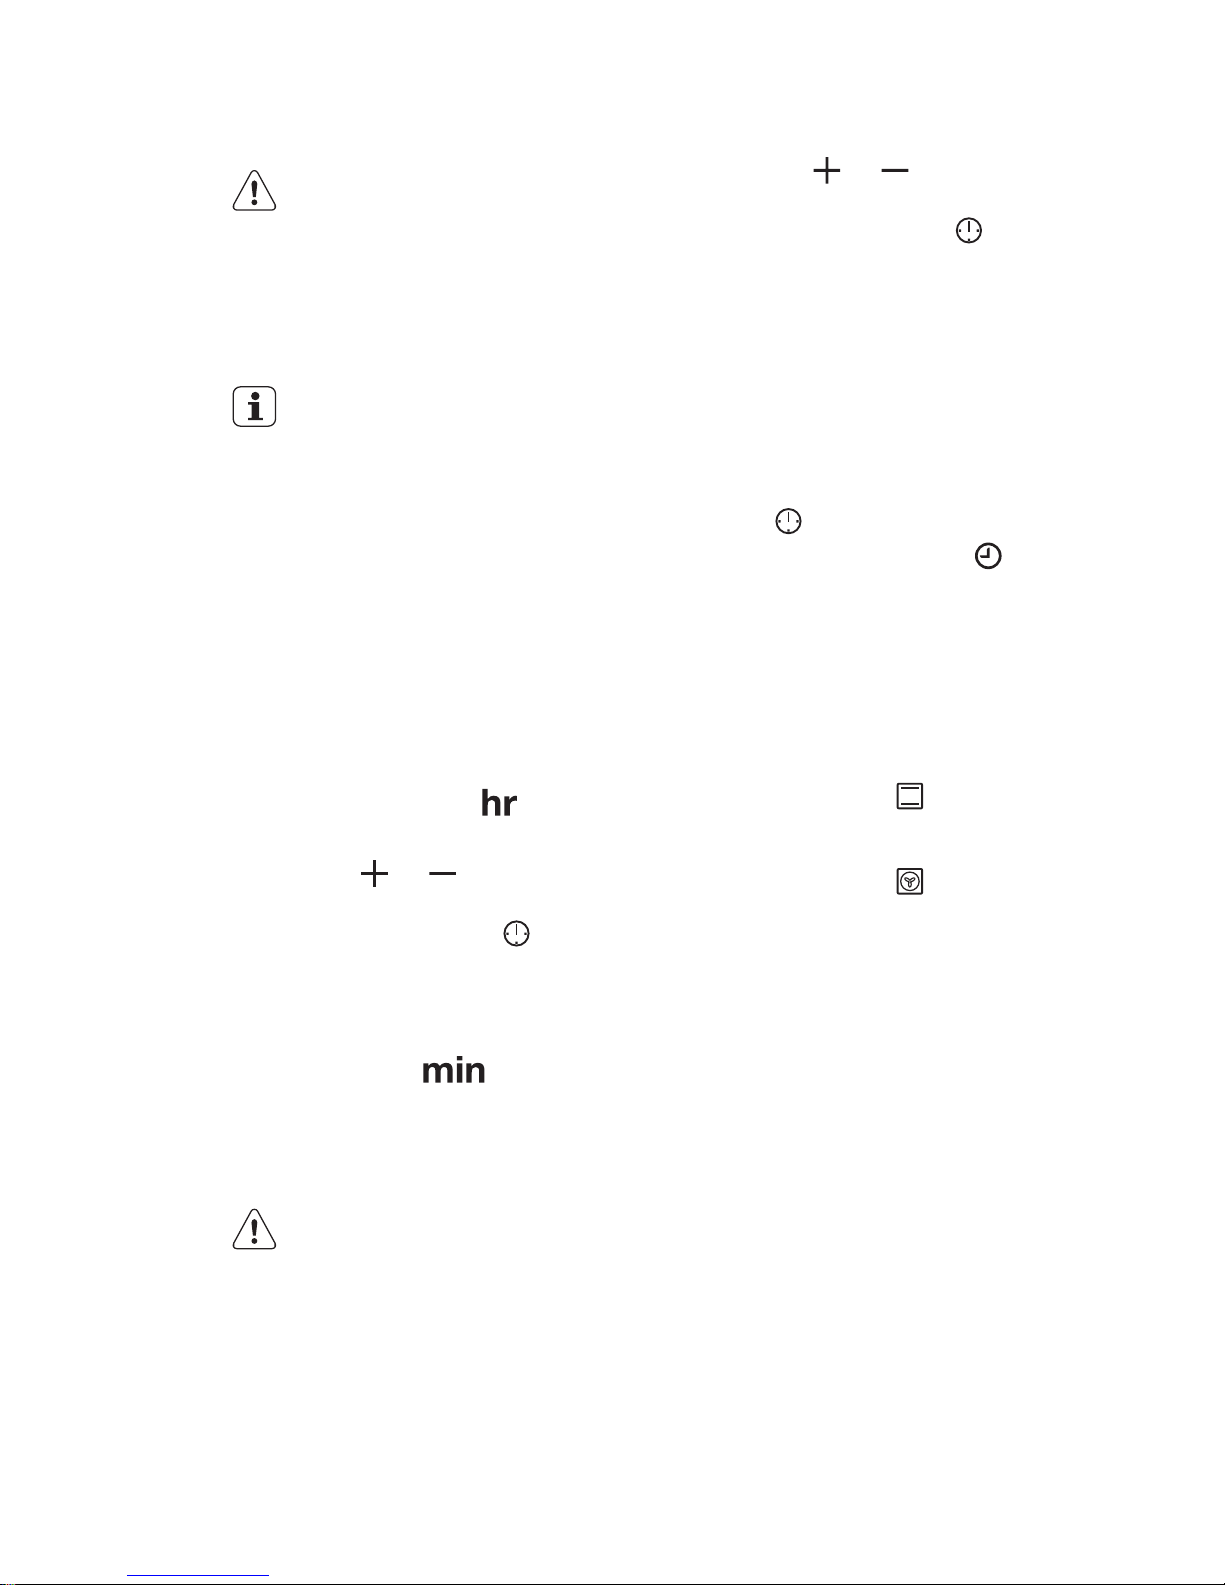
4.2 Setting the time
After the first connection to the mains, all
symbols in the display are on for some
seconds. For the subsequent few seconds
the display shows the software version.
After the software version goes off, the
display shows and "12:00". "12"
flashes.
1. Press or to set the current hour.
2. Press to confirm. This is necessary
only when you set the time for the first
time. Later the new time will be saved
automatically after 5 seconds.
The display shows and the set
hour. "00" flashes.
3. Press or to set the current
minutes.
4. Press to confirm. This is necessary
only when you set the time for the first
time. Later the new time will be saved
automatically after 5 seconds.
The display shows the new time.
4.3 Changing the time
You can change the time of day only if the
oven is off.
Press
.
The set time and symbol flash in the
display.
To set a new time, refer to "Setting the
time".
4.4 Preheating
Preheat the empty appliance to burn off
the remaining grease.
1. Set the function and the maximum
temperature.
2. Let the appliance operate for 1 hour.
3. Set the function
and the maximum
temperature.
4. Let the appliance operate for 15
minutes.
Accessories can become hotter than
usual. The appliance can emit an odour
and smoke. This is normal. Make sure that
the airflow is sufficient.
5. DAILY USE
WARNING!
Refer to Safety chapters.
5.1 Retractable knobs
To use the appliance, press the control
knob. The control knob comes out.
ENGLISH 7
Page 8
5.2 Activating and deactivating
the appliance
It depends on the model if
your appliance has knob
symbols, indicators or
lamps:
• The indicator comes on
when the oven heats up.
• The lamp comes on when
the appliance operates.
• The symbol shows whether
the knob controls one of the
cooking zones, the oven
functions or the
temperature.
1. Turn the knob for the oven functions
to select an oven function.
2. Turn the knob for the temperature to
select a temperature.
3. To deactivate the appliance turn the
knobs for the oven functions and
temperature to the off position.
5.3 Oven functions
Oven function Application
Fast Heat Up To decrease the heat-up time.
True Fan Cooking
To bake on up to 3 shelf positions at the same time
and to dry food. Set the temperature 20 - 40 °C lower
than for Conventional Cooking.
Pizza Setting To bake food on 1 shelf position for a more intensive
browning and a crispy bottom. Set the temperature
20 - 40 °C lower than for Conventional Cooking.
Conventional
Cooking
To bake and roast food on 1 shelf position.
Bottom Heat To bake cakes with crispy bottom and to preserve
food.
Defrost To defrost frozen food.
Grilling To grill flat food and to toast bread.
Fast Grilling To grill flat food in large quantities and to toast bread.
Turbo Grilling To roast larger meat joints or poultry with bones on 1
shelf position. Also to make gratins and to brown.
True Fan +
Steam
To steam dishes.
www.electrolux.com8
Page 9
5.4 Fast heat up function
The fast heat up function decreases the
heat up time.
1. Set the fast heat up function. Refer to
the Oven functions table.
2. Turn the knob for the temperature to
set the temperature.
An acoustic signal sounds when the
appliance is at the set temperature.
The fast heat up function does
not deactivate after the
acoustic signal. You must
deactivate the function
manually.
3. Set an oven function.
5.5 Display
A B C
D
EFG
A) Timer
B) Heat-up and residual heat indicator
C) Water drawer (selected models only)
D) Core temperature sensor (selected
models only)
E) Door lock (selected models only)
F) Hours / minutes
G) Clock functions
5.6 Buttons
Button Function Description
CLOCK To set a clock function.
MINUS To set the time.
MINUTE MINDER To set the MINUTE MINDER. Hold the
button for more than 3 seconds to activate or deactivate the oven lamp.
PLUS To set the time.
TEMPERATURE To check the oven temperature or the
temperature of the Core Temperature
Sensor (if applicable). Use only while an
oven function is in operation.
5.7 Heat-up indicator
When you activate an oven function, the
bars in the display come on one by
one. The bars show that the oven
temperature increases or decreases.
5.8 Steam Cooking
1. Set the function .
2. Press the cover of the water drawer to
open it. Fill the water drawer with
water until the Tank Full indicator
comes on.
The maximum capacity of the tank is 900
ml. It is sufficient for approximately 55 - 60
minutes of cooking.
ENGLISH 9
Page 10
Use only water as the liquid.
Do not use filtered
(demineralised) or distilled
water. Do not use other liquids.
Do not put flammable or
alcoholic liquids (grappa,
whisky, cognac, etc.) into the
water drawer.
3. Push the water drawer into its initial
position.
4. Prepare the food in the correct
cookware.
5. Set the temperature between 130 °C
and 230 °C.
Steam cooking does not give good results
in temperatures above 230 °C.
WARNING!
Wait a minimum of 60 minutes
after each use of the steam
function in order to prevent hot
water from exiting the water
outlet valve.
Empty the water tank after the steam
cooking is completed.
5.9 Water Tank indicator
When the steam cooking operates, the
display shows water tank indicator. Water
tank indicator shows the level of the water
in the tank.
• - Water tank is full. An acoustic
signal sounds when the tank is full.
Press any button to stop the acoustic
signal.
• - Water tank is half full.
• - Water tank is empty. An acoustic
signal sounds when the tank must be
refilled.
If you put too much water into
the tank, the safety outlet
moves the excess water to the
bottom of the oven. Remove
the water with a sponge or a
cloth.
5.10 Emptying the water tank
CAUTION!
Make sure that the appliance is
cool before you start to empty
the water tank.
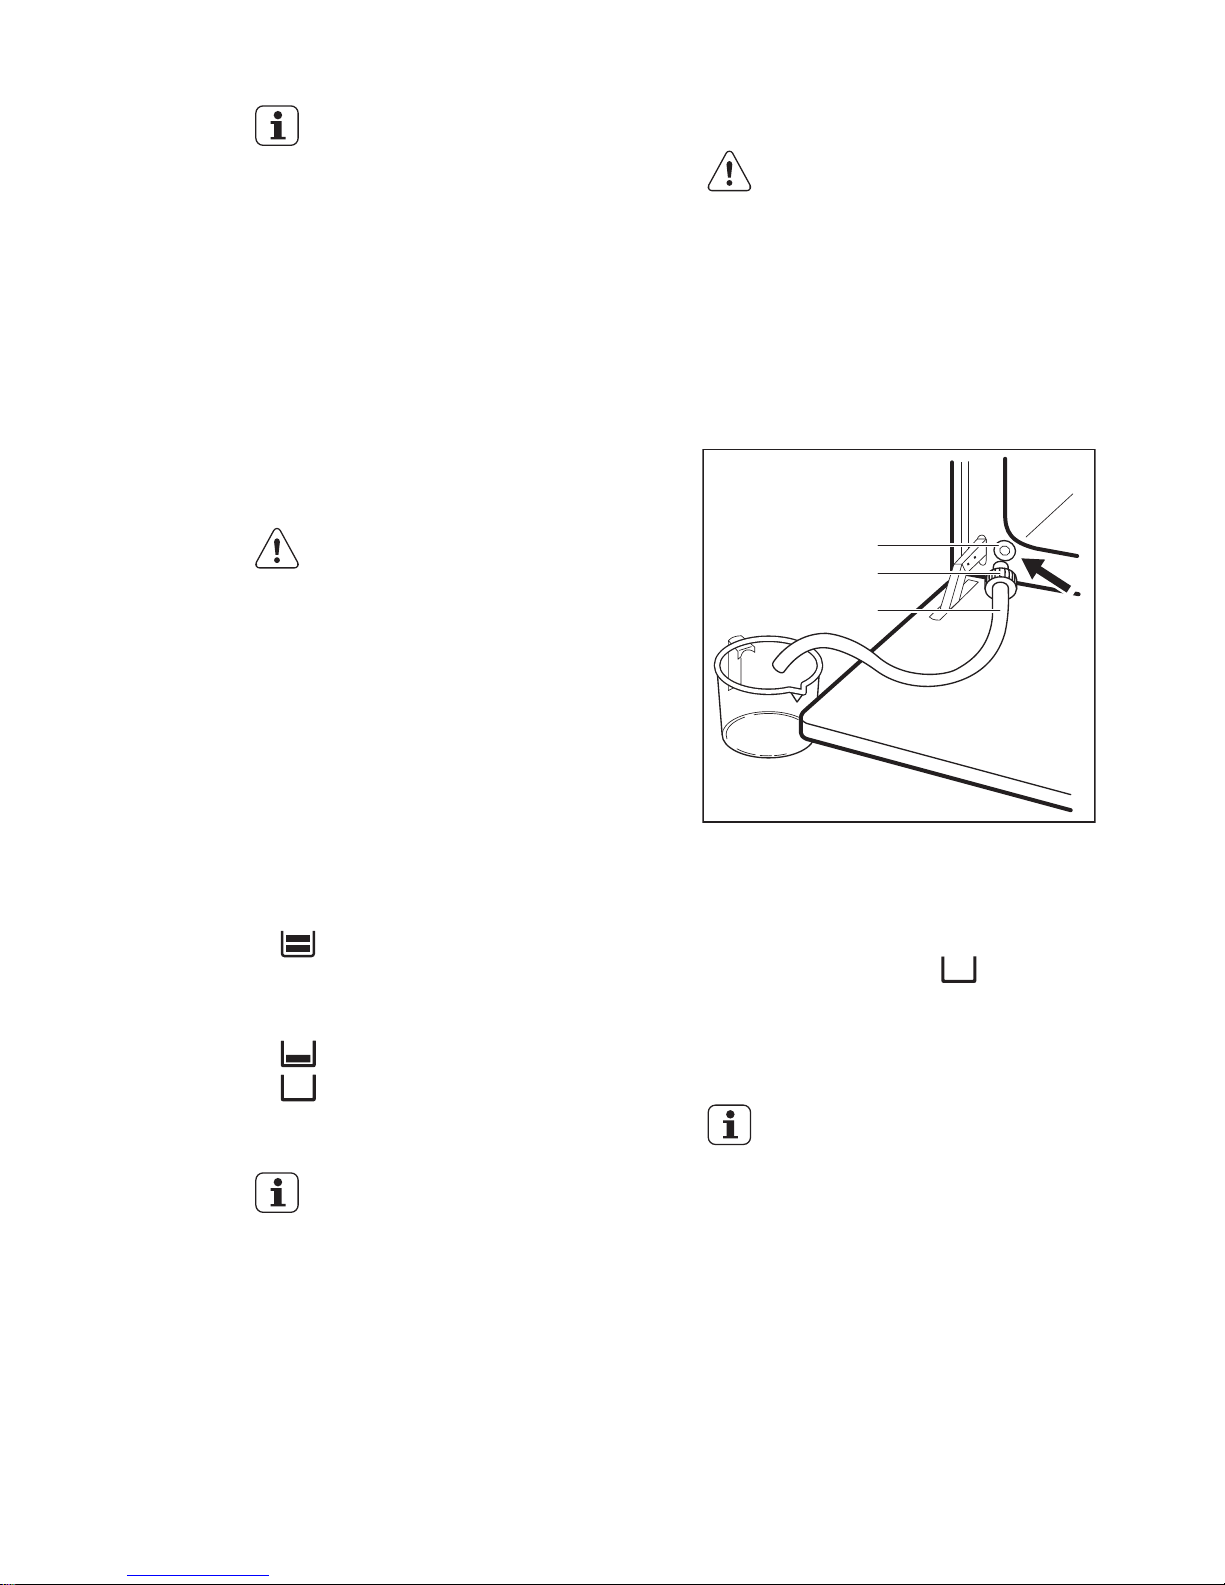
1. Prepare the draining pipe (C), included
in the same package with the user
manual. Put the connector (B) onto
one of the ends of the draining pipe.
2. Put the second end of the draining
pipe (C) into a container. Put it at a
lower position than the outlet valve (A).
B
C
A
3. Open the oven door and put the
connector (B) into the outlet valve (A).
4. Push the connector again and again
when you empty the water tank.
The water tank can have some water
when the display shows symbol.
Wait until the water flow from the water
outlet valve stops.
5. Remove the connector from the valve
when the water stops flowing.
Do not use the drained water
to fill the water tank again.
www.electrolux.com10
Page 11
6. CLOCK FUNCTIONS
6.1 Clock functions table
Clock function Application
TIME OF DAY To set, change or check the time of day. Refer to
"Setting the time".
MINUTE MINDER Use to set a countdown time (maximum 23 h 59 min).
This function has no effect on the operation of the appliance. You can set the MINUTE MINDER at any
time, also if the appliance is off.
DURATION To set how long the appliance operates. Use only
when an oven function is set.
END To set when the appliance must deactivate. Use only
when an oven function is set. You can use Duration
and End at the same time (time delay), if the appliance
is to be activate and deactivate automatically later.
Press again and again to
switch between the clock
functions.
To confirm the settings of the
clock functions, press or
wait 5 seconds for an
automatic confirmation.
6.2 Setting the DURATION or
END
1. Press again and again until the
display shows or .
or flashes in the display.
2. Press or to the set the values
and press to confirm.
For Duration
first you set the minutes
and then the hours, for End first you
set the hours and then the minutes.
An acoustic signal sounds for 2 minutes
after the time ends. or symbol and
time setting flash in the display. The oven
stops.
3. Press any button to stop the acoustic
signal.
If you press when you set
the hours for DURATION ,
the appliance goes to setting of
the END function.
6.3 Setting the MINUTE MINDER
1. Press .
and "00" flash in the display.
2. Press
or to set the MINUTE
MINDER. At first, the time is calculated
in minutes and seconds. When the
time you set is longer than 60 minutes,
the symbol comes on in the
display.
The appliance now calculates the time in
hours and minutes.
3. The MINUTE MINDER starts
automatically after five seconds.
After 90% of the set time, an acoustic
signal sounds.
4. When the set time ends, an acoustic
signal sounds for two minutes.
"00:00" and flash in the display.
Press any button to stop the acoustic
signal.
ENGLISH 11
Page 12
If you set the MINUTE MINDER
when the DURATION or END
function operates, the symbol
comes on in the display.
6.4 Count Up Timer
Use the Count Up Timer to monitor how
long the oven operates. It is on
immediately when the oven starts to heat.
To reset the Count Up Timer, press and
hold and . The timer starts to count
up again.
The Count Up Timer cannot be
used with the functions:
Duration , End , Core
Temperature Sensor.
7. USING THE ACCESSORIES
WARNING!
Refer to Safety chapters.
7.1 Using the Core temperature
sensor
The core temperature sensor measures
the core temperature of the meat. When
the meat is at the set temperature, the
appliance deactivates.
There are two temperatures to be set:
• The oven temperature. Refer to the
table for roasting.
• The core temperature. Refer to the
table for the core temperature sensor.
CAUTION!
Only use the core temperature
sensor supplied with the
appliance, or genuine
replacement parts.
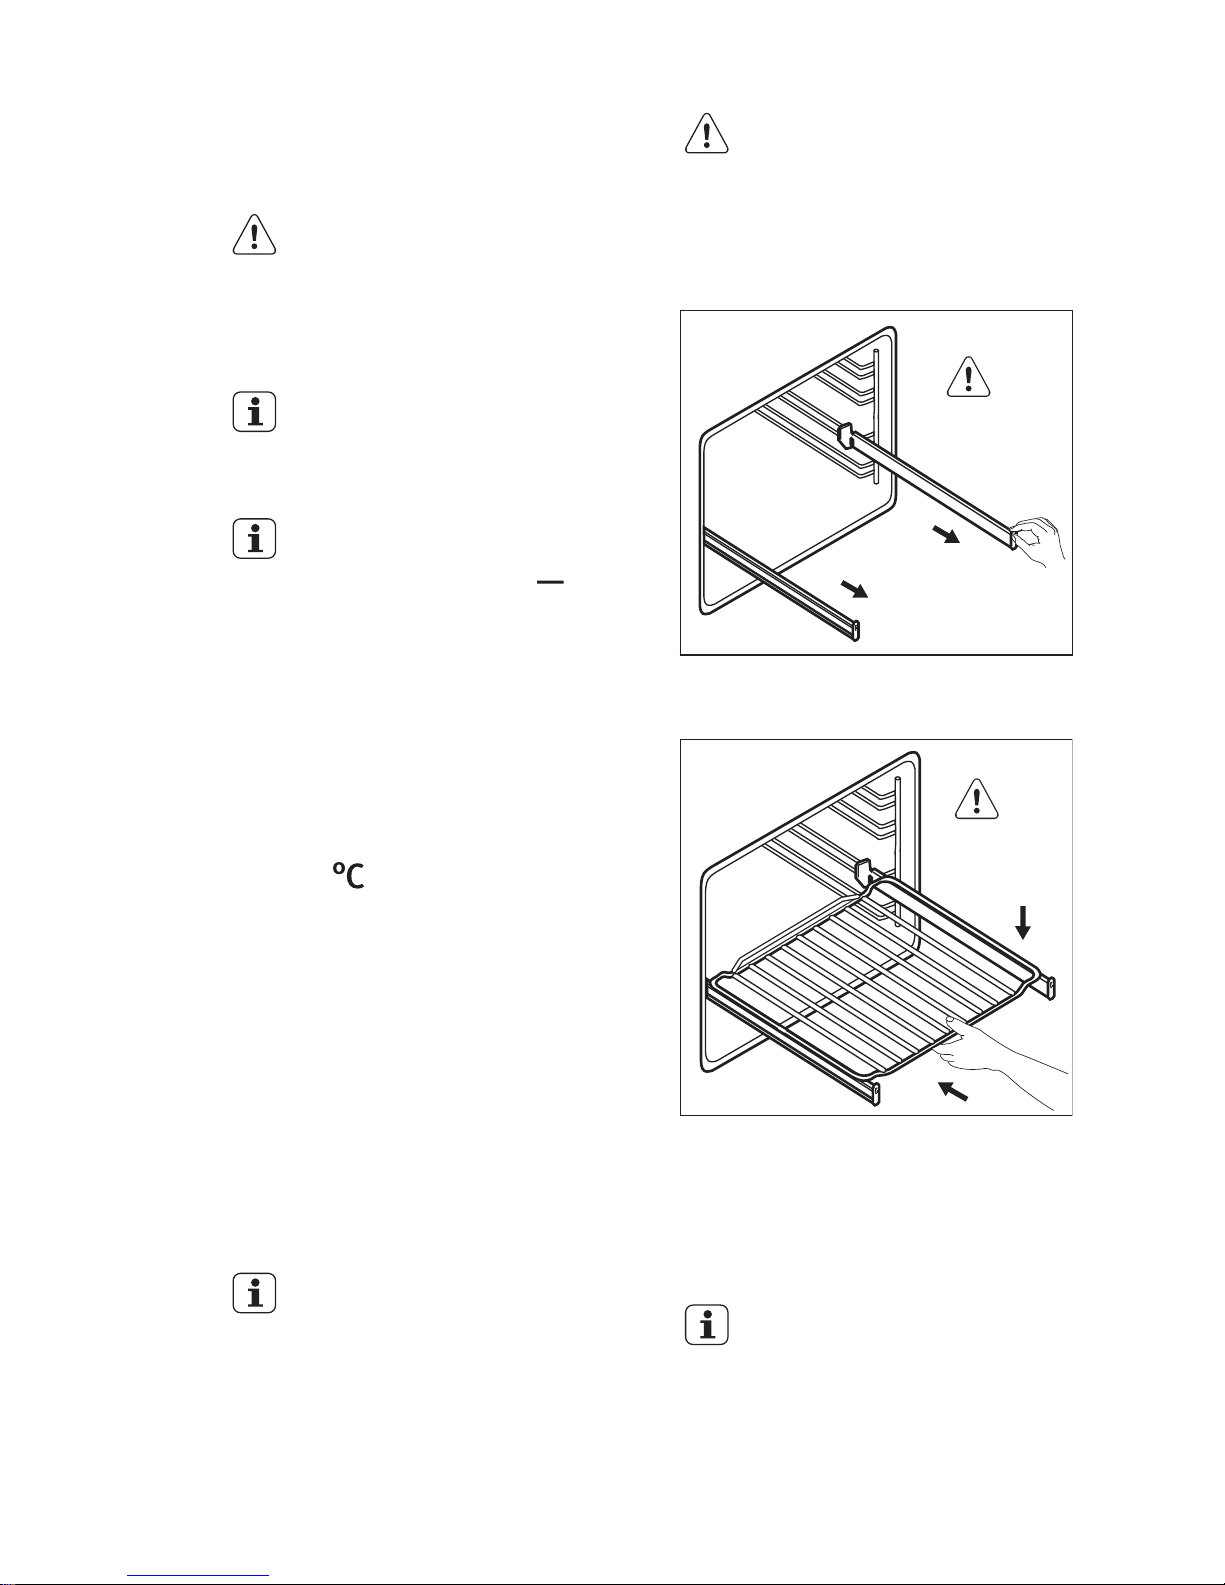
1. Set the oven function and the oven
temperature.
2. Put the point of the core temperature
sensor (with the symbol on the
handle) into the centre of the meat.
3. Put the plug of the core temperature
sensor into the socket on the top of
the cavity.
Make sure that the core temperature
sensor stays in the meat and in the socket
during the cooking.
When you use the core temperature
sensor for the first time, the default core
temperature is 60 °C. While
flashes,
you can use the knob for the temperature
to change the default core temperature.
The display shows the symbol of the core
temperature sensor and the default core
temperature.
4. Press to save the new core
temperature, or wait 10 seconds for
the setting to be saved automatically.
The new default core temperature is
displayed during the next use of the core
temperature sensor.
When the meat is at the set core
temperature, the symbol for the core
temperature sensor
and the default
core temperature flash. An acoustic signal
sounds for two minutes.
5. Press any button to stop the acoustic
signal.
www.electrolux.com12
Page 13
6. Remove the plug of the core
temperature sensor from the socket.
Remove the meat from the appliance.
7. Deactivate the appliance.
WARNING!
Be careful when you remove
the tip and plug of the core
temperature sensor. The core
temperature sensor is hot.
There is a risk of burns.
Every time you put the core
temperature sensor in the
socket, you need to set the
duration and end time again.
When the appliance calculates
the provisional duration time for
the first time, the symbol
flashes in the display. When the
calculation ends, the display
shows the duration of the
cooking. Calculations run in the
background during the cooking
and the duration value in the
display is updated if necessary.
You can change the core temperature at
any time during the cooking:
1. Press: :
• One time - the display shows the
set core temperature which
changes every 10 seconds to the
current core temperature.
• Two times - the display shows the
current oven temperature which
changes every 10 seconds to the
set oven temperature.
• Three times - the display shows
the set oven temperature.
2. Use the knob for the temperature to
change the temperature.
7.2 Telescopic Runners
Keep the installation
instructions for the telescopic
runners for future use.
With telescopic runners you can put in
and remove the shelves more easily.
CAUTION!
Do not clean the telescopic
runners in the dishwasher. Do
not lubricate the telescopic
runners.
1. Pull out the right and left hand
telescopic runners.
°C
2. Put the wire shelf on the telescopic
runners and carefully push them into
the appliance.
°C
Make sure you push back the telescopic
runners fully in the appliance before you
close the oven door.
7.3 Accessories for steam
cooking
The steam kit accessories are
not supplied with the
appliance. For more
information, please contact
your local supplier.
The dietary baking dish for steam
cooking functions
ENGLISH 13
Page 14
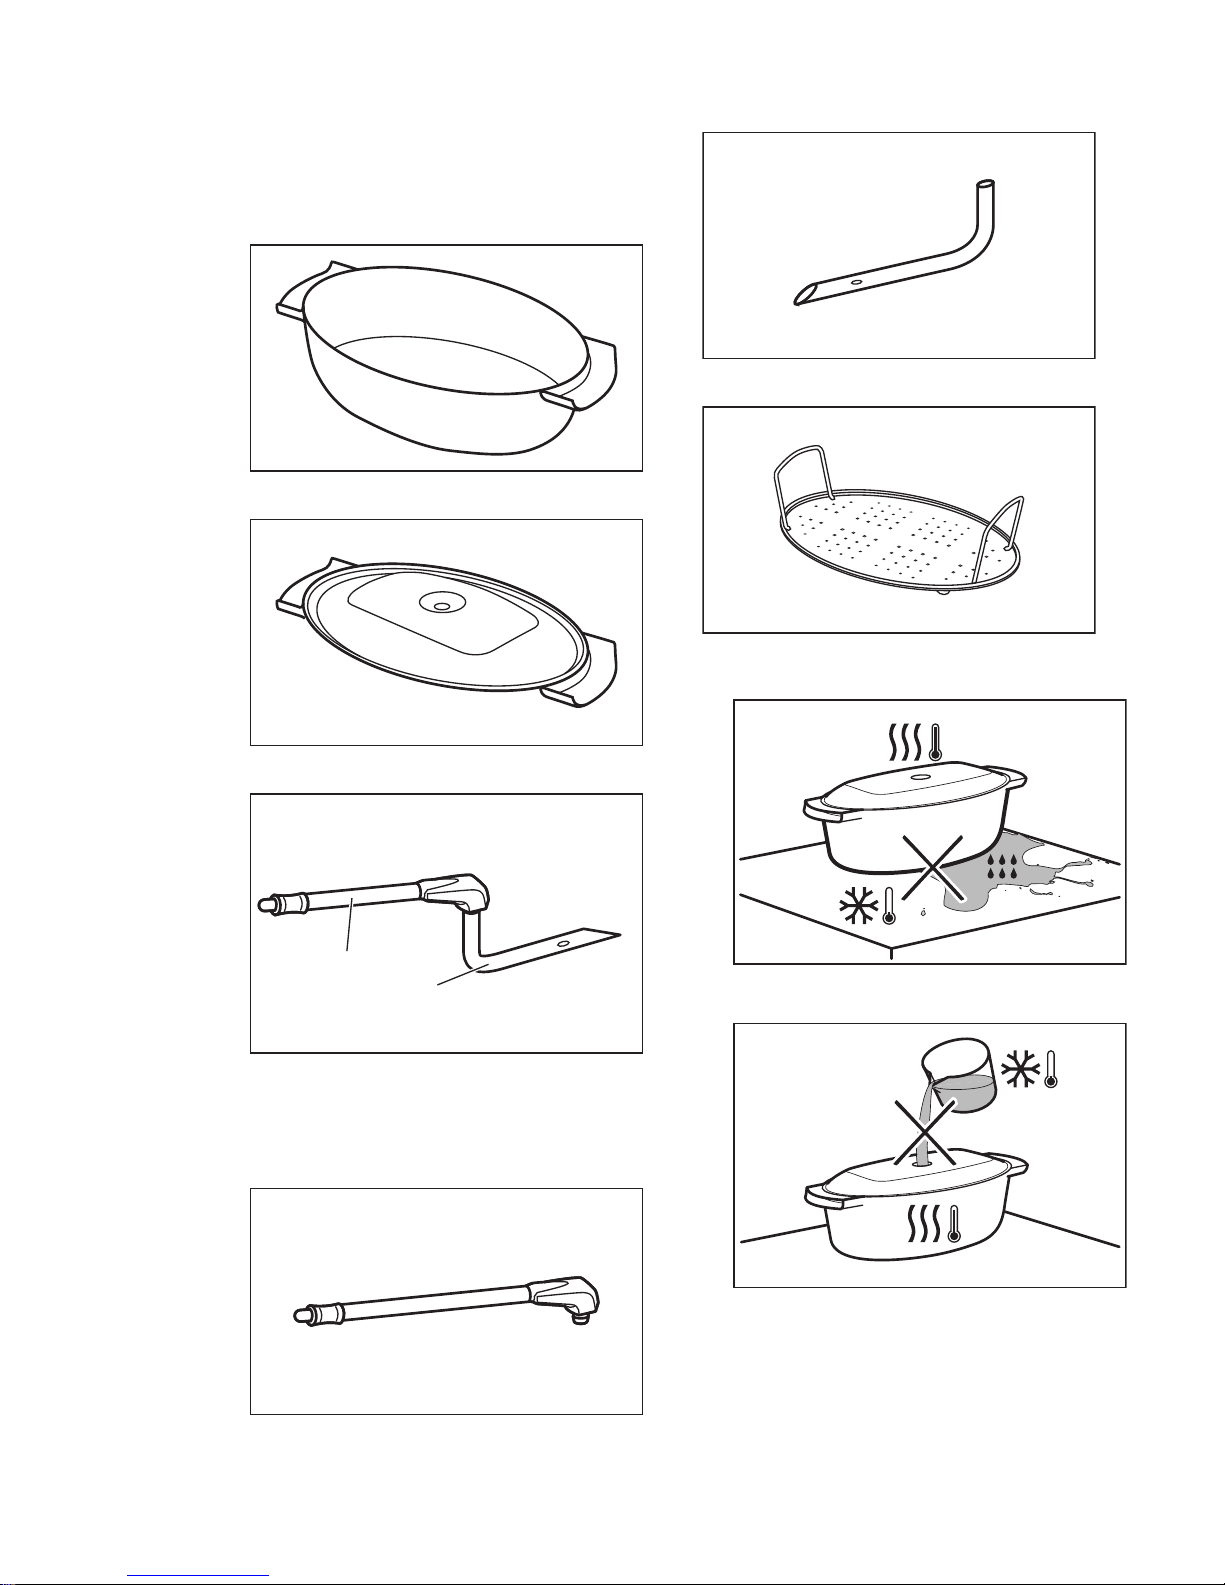
The dish consists of a glass bowl, a lid
with a hole for the injector tube (C) and a
steel grill to put at the bottom of the
baking dish.
Glass bowl (A)
Lid (B)
The injector and the injector tube
C
D
"C" is the injector tube for steam cooking,
"D" is the injector for direct steam
cooking.
Injector tube (C)
Injector for direct steam cooking (D)
Steel grill (E)
• Do not put the hot baking dish on
cold / wet surfaces.
• Do not put cold liquids in the baking
dish when it is hot.
• Do not use the baking dish on a hot
cooking surface.
www.electrolux.com14
Page 15
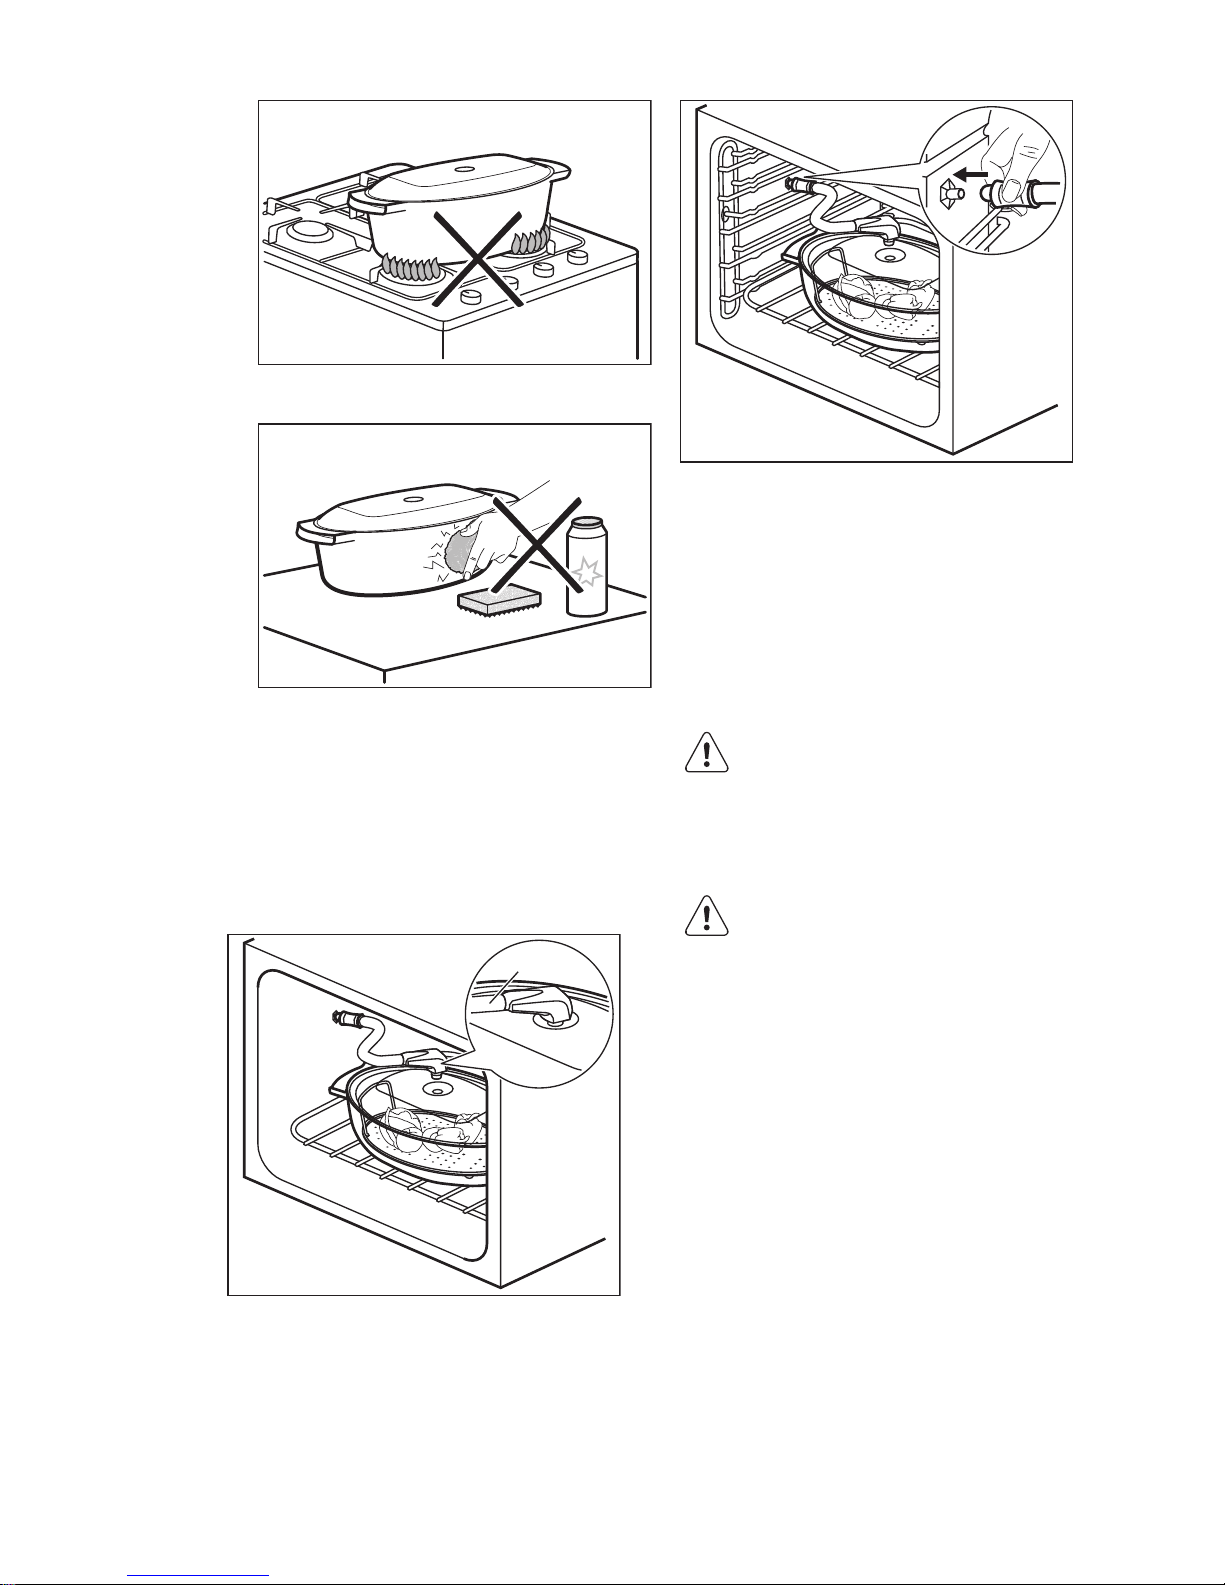
• Do not clean the baking dish with
abrasives, scourers and powders.
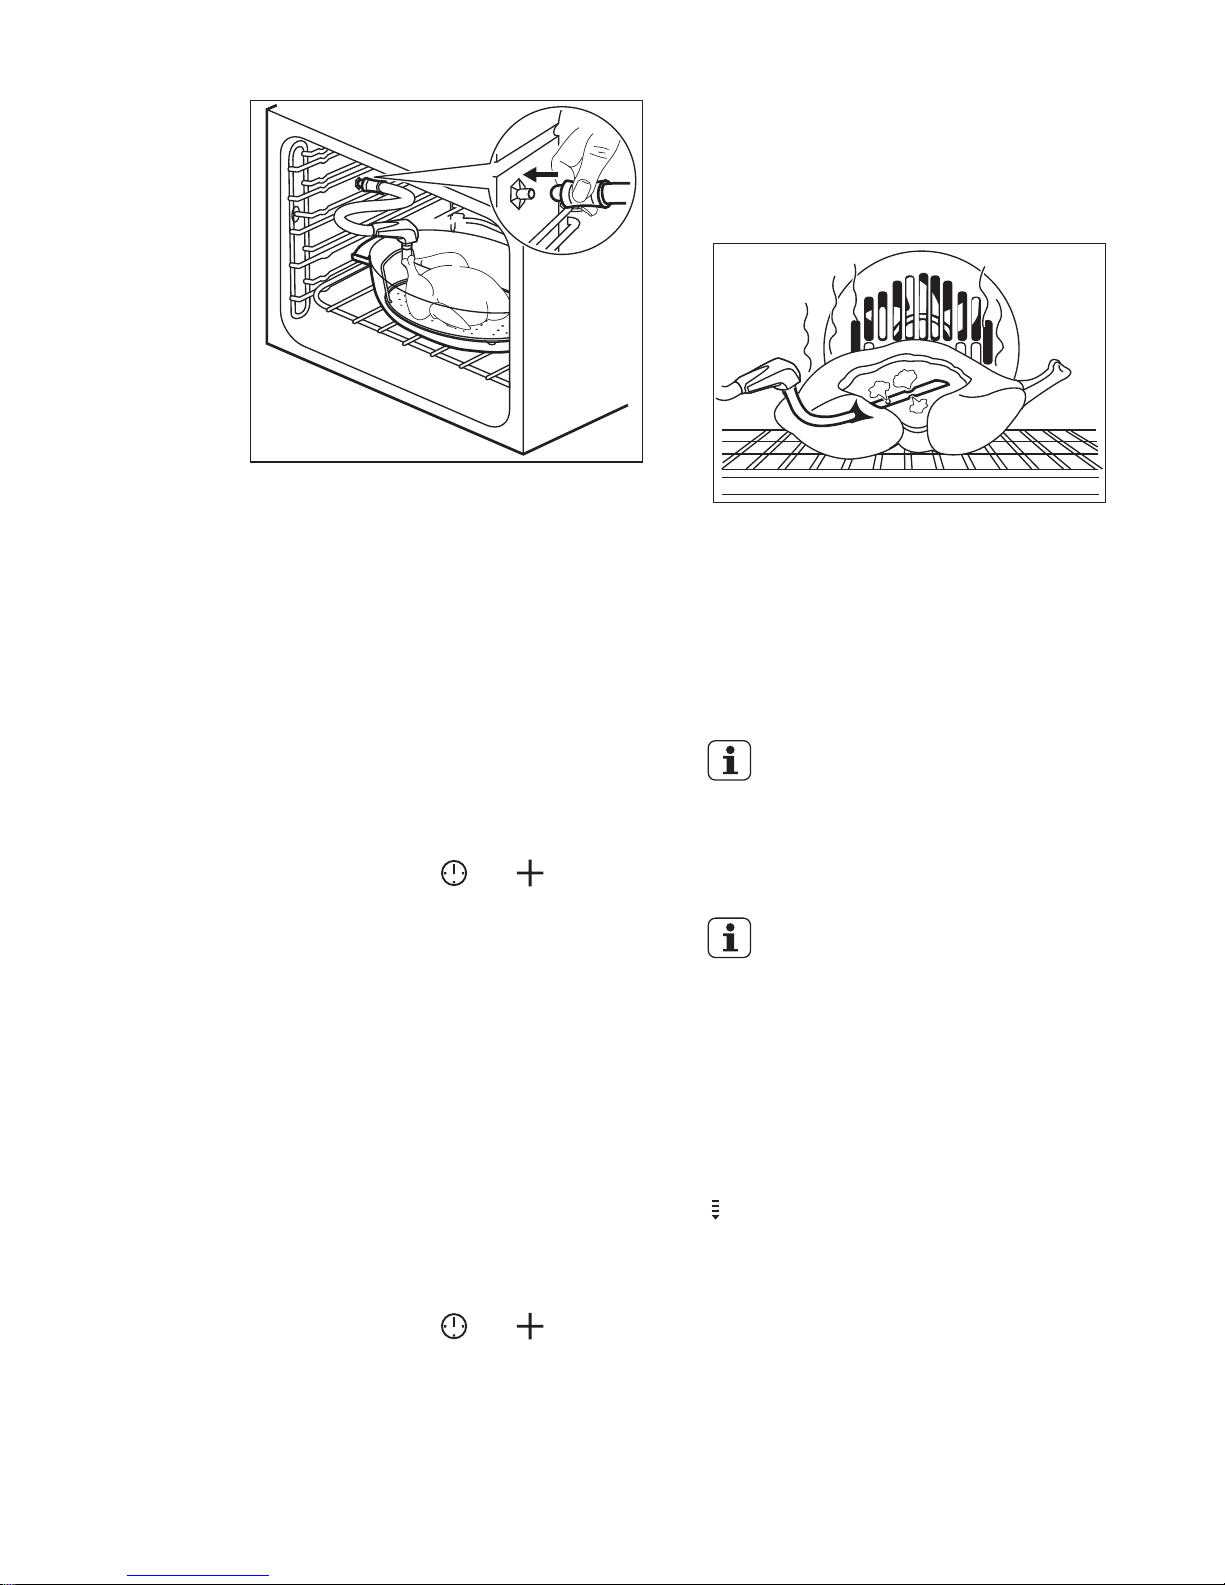
7.4 Steam cooking in a dietary
baking dish
Put the food onto the steel grill in the
baking dish and put the lid on it.
1. Put the injector tube into the special
hole in the lid of the dietary baking
dish.
C
2. Put the baking dish onto the second
shelf position from the bottom.
3. Put the other end of the injector tube
into the steam inlet.
Make sure that you do not crush the
injector tube or let it touch a heating
element on the top of the oven.
4. Set the oven for the steam cooking
function.
7.5 Direct steam cooking
Put the food onto the steel grill in the
baking dish. Add some water.
CAUTION!
Do not use the lid of the dish.
The injector tube is specially made for
cooking and does not contain dangerous
materials.
WARNING!
Be careful when you use the injector when
the oven operates. Always use oven
gloves to touch the injector when the oven
is hot. Always remove the injector from the
oven when you do not use a steam
function.
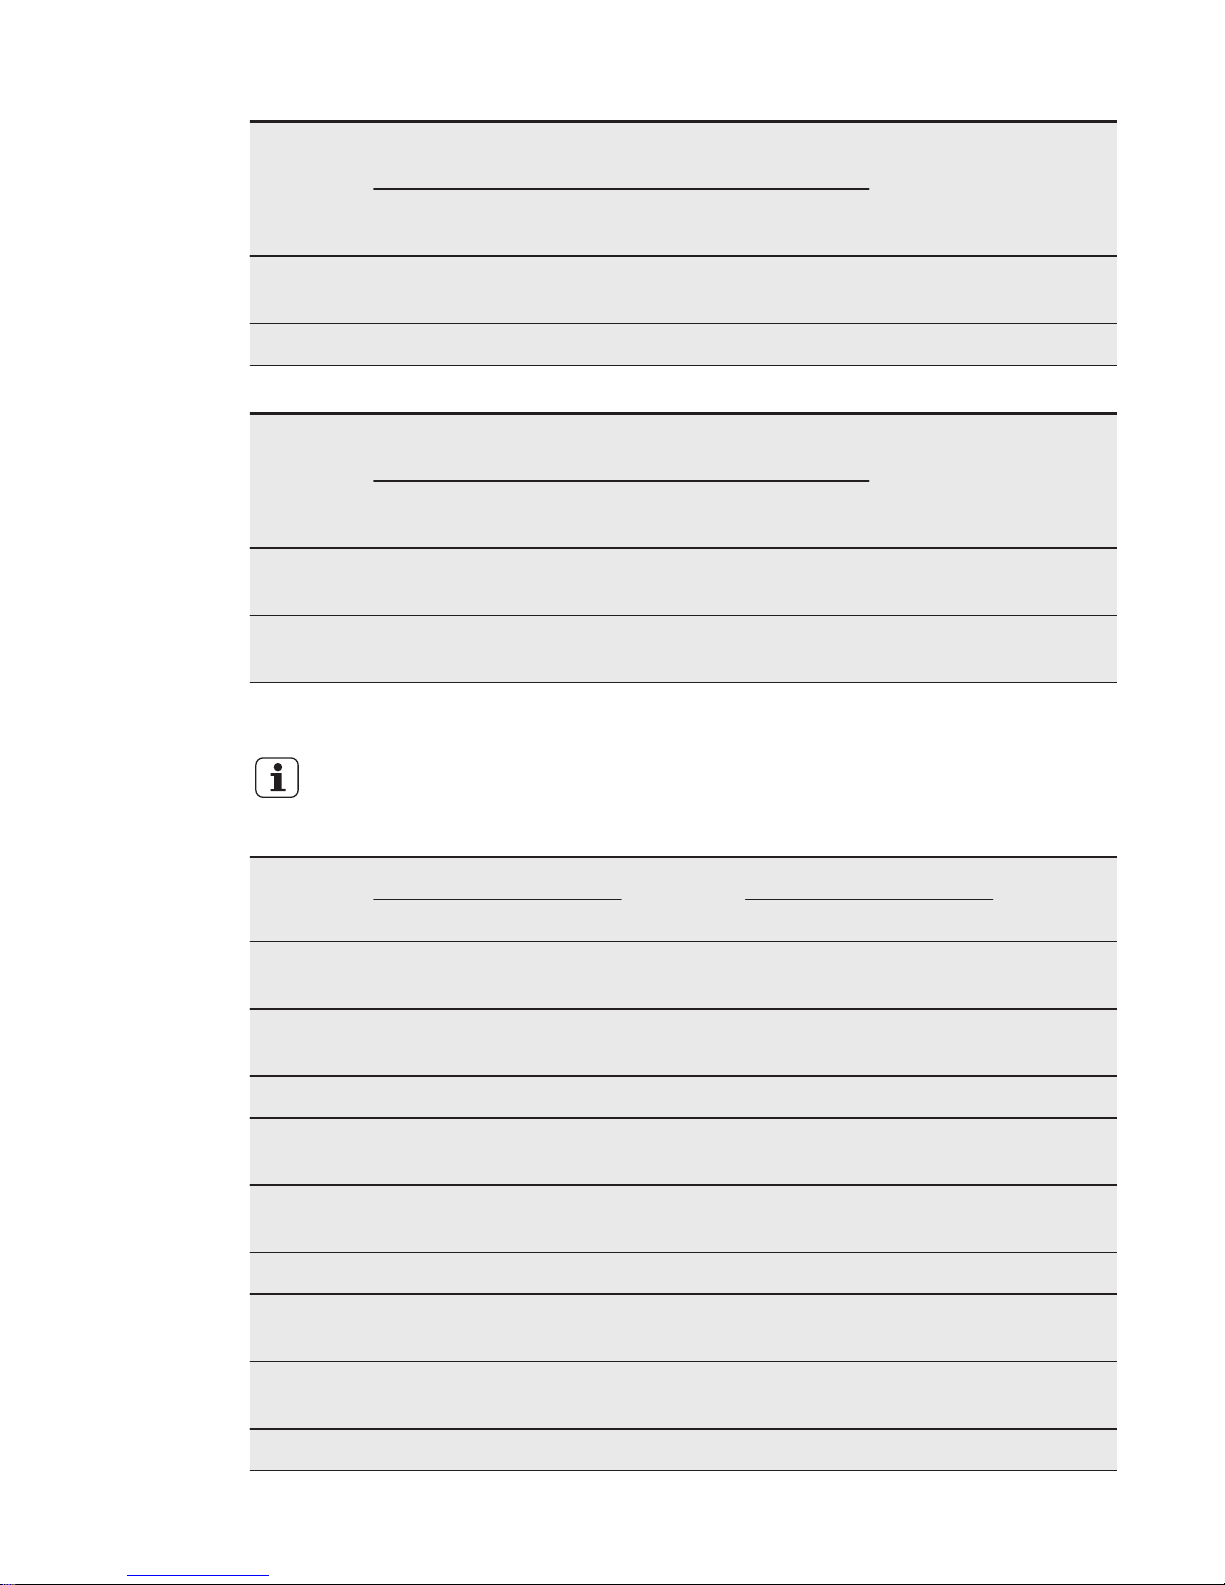
1. Put the injector (D) into the injector
tube (C). Connect the other end into
the steam inlet.
ENGLISH 15
Page 16
2. Put the baking dish onto the first or
second shelf position from the bottom.
Make sure that you do not crush the
injector tube or let it touch a heating
element on the top of the oven.
3. Set the oven for the steam cooking
function.
When you cook food such as chicken,
duck, turkey, kid or large fish, put the
injector (D) directly into the empty part of
the meat. Make sure that you do not
cause a blockage of the holes.
For more information about steam
cooking, refer to the cooking tables for
steam cooking in the chapter "Hints and
Tips".
8. ADDITIONAL FUNCTIONS
8.1 Using the Child Lock
The Child Lock prevents an accidental
operation of the appliance.
1. Do not set an oven function.
2. Press and hold and at the same
time for 2 seconds.
An acoustic signal sounds. SAFE comes
on in the display.
To deactivate the Child Lock, repeat step
2.
8.2 Using the Function Lock
You can activate the Function Lock
function only when the appliance
operates.
The Function Lock prevents an accidental
change of the temperature and time
settings of a running oven function.
1. Select an oven function and set it
according your preferences
2. Press and hold and at the same
time for 2 seconds.
An acoustic signal sounds. Loc comes on
in the display.
To deactivate the Function Lock, repeat
step 2.
Loc comes on in the display
when you turn the knob for the
temperature or press a button.
When you turn the knob for the
oven functions, the appliance
deactivates.
When you deactivate the
appliance while the Function
Lock is on, the Function Lock
switches automatically to the
Child Lock. Refer to "Using the
Child Lock".
8.3 Residual heat indicator
When you deactivate the appliance, the
display shows the residual heat indicator
if the temperature in the oven is more
than 40 °C. Turn the knob for the
temperature left or right to show the oven
temperature.
8.4 Automatic Switch-off
For safety reasons the appliance
deactivates automatically after some time
if an oven function operates and you do
not change any settings.
www.electrolux.com16
Page 17

Temperature (°C) Switch-off time
(h)
30 - 115 12.5
120 - 195 8.5
200 - 245 5.5
250 - maximum 3
After an automatic switch-off, press a any
button to operate the appliance again.
The Automatic switch-off does
not work with the functions:
Core temperature sensor,
Light, Duration, End.
8.5 Cooling fan
When the appliance operates, the cooling
fan activates automatically to keep the
surfaces of the appliance cool. If you
deactivate the appliance, the cooling fan
can continue to operate until the appliance
cools down.
8.6 Safety thermostat
Incorrect operation of the appliance or
defective components can cause
dangerous overheating. To prevent this,
the oven has a safety thermostat which
interrupts the power supply. The oven
activates again automatically when the
temperature drops.
9. HINTS AND TIPS
WARNING!
Refer to Safety chapters.
The temperature and baking
times in the tables are
guidelines only. They depend
on the recipes and the quality
and quantity of the ingredients
used.
9.1 Inner side of the door
In some models, on the inner side of
the door you can find:
• the numbers of the shelf positions.
• information about the oven functions,
recommended shelf positions and
temperatures for typical dishes.
9.2 General information
• The appliance has five shelf positions.
Count the shelf positions from the
bottom of the appliance floor.
• The appliance has a special system
which circulates the air and constantly
recycles the steam. With this system
you can cook in a steamy environment
and keep the food soft inside and
crusty outside. It decreases the
cooking time and energy consumption
to a minimum.
• Moisture can condense in the
appliance or on the door glass panels.
This is normal. Always stand back from
the appliance when you open the
appliance door while cooking. To
decrease the condensation, operate
the appliance for 10 minutes before
cooking.
• Clean the moisture after each use of
the appliance.
• Do not put the objects directly on the
appliance floor and do not put
aluminium foil on the components
when you cook. This can change the
baking results and cause damage to
the enamel.
9.3 Baking cakes
• Do not open the oven door before 3/4
of the set cooking time is up.
• If you use two baking trays at the same
time, keep one empty level between
them.
9.4 Cooking meat and fish
• Use a deep pan for very fatty food to
prevent the oven from stains that can
be permanent.
• Leave the meat for approximately 15
minutes before carving so that the juice
does not seep out.
• To prevent too much smoke in the
oven during roasting, add some water
into the deep pan. To prevent the
ENGLISH 17
Page 18

smoke condensation, add water each
time after it dries up.
9.5 Cooking times
Cooking times depend on the type of
food, its consistency, and volume.
Initially, monitor the performance when
you cook. Find the best settings (heat
setting, cooking time, etc.) for your
cookware, recipes and quantities when
you use this appliance.
9.6 Baking and roasting table
Cakes
Food Conventional Cook-
ing
True Fan Cooking Time
(min)
Comments
Temperature (°C)
Shelf position
Temperature (°C)
Shelf position
Whisked
recipes
170 2 160 3 (2 and 4) 45 - 60 In a cake
mould
Shortbread
dough
170 2 160 3 (2 and 4) 20 - 30 In a cake
mould
Buttermilk
cheesecake
170 1 165 2 60 - 80 In a 26 cm
cake
mould
Apple
cake (Ap-
ple pie)
1)
170 2 160 2 (left and
right)
80 - 100 In two 20
cm cake
moulds on
a wire shelf
Strudel 175 3 150 2 60 - 80 In a baking
tray
Jam-tart 170 2 165 2 (left and
right)
30 - 40 In a 26 cm
cake
mould
Sponge
cake
170 2 160 2 50 - 60 In a 26 cm
cake
mould
Christmas
cake /
Rich fruit
cake
1)
160 2 150 2 90 - 120 In a 20 cm
cake
mould
Plum
cake
1)
175 1 160 2 50 - 60 In a bread
tin
Small
cakes one level
170 3 140 - 150 3 20 - 30 In a baking
tray
www.electrolux.com18
Page 19

Food Conventional Cook-
ing
True Fan Cooking Time
(min)
Comments
Temperature (°C)
Shelf position
Temperature (°C)
Shelf position
Small
cakes two levels
- - 140 - 150 2 and 4 25 - 35 In a baking
tray
Small
cakes three levels
- - 140 - 150 1, 3 and 5 30 - 45 In a baking
tray
Biscuits /
pastry
stripes one level
140 3 140 - 150 3 30 - 35 In a baking
tray
Biscuits /
pastry
stripes two levels
- - 140 - 150 2 and 4 35 - 40 In a baking
tray
Biscuits /
pastry
stripes three levels
- - 140 - 150 1, 3 and 5 35 - 45 In a baking
tray
Meringues
- one level
120 3 120 3 80 - 100 In a baking
tray
Meringues- two
levels
1)
- - 120 2 and 4 80 - 100 In a baking
tray
Buns
1)
190 3 190 3 12 - 20 In a baking
tray
Eclairs one level
190 3 170 3 25 - 35 In a baking
tray
Eclairs two levels
- - 170 2 and 4 35 - 45 In a baking
tray
Plate tarts 180 2 170 2 45 - 70 In a 20 cm
cake
mould
Rich fruit
cake
160 1 150 2 110 - 120 In a 24 cm
cake
mould
ENGLISH 19
Page 20

Food Conventional Cook-
ing
True Fan Cooking Time
(min)
Comments
Temperature (°C)
Shelf position
Temperature (°C)
Shelf position
Victoria
sandwich
170 1 160 2 50 - 60 In a 20 cm
cake
mould
1)
Preheat for 10 minutes.
Bread and pizza
Food Conventional Cook-
ing
True Fan Cooking Time
(min)
Comments
Temperature (°C)
Shelf position
Temperature (°C)
Shelf position
White
bread
1)
190 1 190 1 60 - 70 1 - 2
pieces,
500 gr per
piece
Rye bread 190 1 180 1 30 - 45 In a bread
tin
Bread
rolls
1)
190 2 180 2 (2 and 4) 25 - 40 6 - 8 rolls
in a baking
tray
Pizza
1)
230 - 250 1 230 - 250 1 10 - 20 In a baking
tray or a
deep pan
Scones
1)
200 3 190 3 10 - 20 In a baking
tray
1)
Preheat for 10 minutes.
Flans
Food Conventional Cook-
ing
True Fan Cooking Time
(min)
Comments
Temperature (°C)
Shelf position
Temperature (°C)
Shelf position
Pasta flan 200 2 180 2 40 - 50 In a mould
Vegetable
flan
200 2 175 2 45 - 60 In a mould
Quiches
1)
180 1 180 1 50 - 60 In a mould
Lasagne
1)
180 - 190 2 180 - 190 2 25 - 40 In a mould
www.electrolux.com20
Page 21

Food Conventional Cook-
ing
True Fan Cooking Time
(min)
Comments
Temperature (°C)
Shelf position
Temperature (°C)
Shelf position
Cannelloni
1)
180 - 190 2 180 - 190 2 25 - 40 In a mould
1)
Preheat for 10 minutes.
Meat
Food Conventional Cook-
ing
True Fan Cooking Time
(min)
Comments
Temperature (°C)
Shelf position
Temperature (°C)
Shelf position
Beef 200 2 190 2 50 - 70 On a wire
shelf
Pork 180 2 180 2 90 - 120 On a wire
shelf
Veal 190 2 175 2 90 - 120 On a wire
shelf
English
roast beef,
rare
210 2 200 2 50 - 60 On a wire
shelf
English
roast beef,
medium
210 2 200 2 60 - 70 On a wire
shelf
English
roast beef,
well done
210 2 200 2 70 - 75 On a wire
shelf
Shoulder
of pork
180 2 170 2 120 - 150 With rind
Shin of
pork
180 2 160 2 100 - 120 2 pieces
Lamb 190 2 175 2 110 - 130 Leg
Chicken 220 2 200 2 70 - 85 Whole
Turkey 180 2 160 2 210 - 240 Whole
Duck 175 2 220 2 120 - 150 Whole
Goose 175 2 160 1 150 - 200 Whole
Rabbit 190 2 175 2 60 - 80 Cut in
pieces
ENGLISH 21
Page 22
Food Conventional Cook-
ing
True Fan Cooking Time
(min)
Comments
Temperature (°C)
Shelf position
Temperature (°C)
Shelf position
Hare 190 2 175 2 150 - 200 Cut in
pieces
Pheasant 190 2 175 2 90 - 120 Whole
Fish
Food Conventional Cook-
ing
True Fan Cooking Time
(min)
Comments
Temperature (°C)
Shelf position
Temperature (°C)
Shelf position
Trout /
Sea bream
190 2 175 2 40 - 55 3 - 4 fish
Tuna fish /
Salmon
190 2 175 2 35 - 60 4 - 6 fillets
9.7 Grilling
Preheat the empty oven for 3
minutes before cooking.
Food Quantity Tempera-
ture (°C)
Time (min) Shelf po-
sition
Pieces (g) 1st side 2nd side
Fillet
steaks
4 800 max. 12 - 15 12 - 14 4
Beef
steaks
4 600 max. 10 - 12 6 - 8 4
Sausages 8 - max. 12 - 15 10 - 12 4
Pork
chops
4 600 max. 12 - 16 12 - 14 4
Chicken
(cut in 2)
2 1000 max. 30 - 35 25 - 30 4
Kebabs 4 - max. 10 - 15 10 - 12 4
Breast of
chicken
4 400 max. 12 - 15 12 - 14 4
Hamburger
6 600 max. 20 - 30 - 4
Fish fillet 4 400 max. 12 - 14 10 - 12 4
www.electrolux.com22
Page 23

Food Quantity Tempera-
ture (°C)
Time (min) Shelf po-
sition
Pieces (g) 1st side 2nd side
Toasted
sandwiches
4 - 6 - max. 5 - 7 - 4
Toast 4 - 6 - max. 2 - 4 2 - 3 4
9.8 Turbo Grilling
Beef
Food Quantity Temperature
(°C)
Time (min) Shelf position
Roast beef or fillet,
rare
per cm of
thickness
190 - 200 5 - 6 1 or 2
Roast beef or fillet,
medium
per cm of
thickness
180 - 190 6 - 8 1 or 2
Roast beef or fillet,
well done
per cm of
thickness
170 - 180 8 - 10 1 or 2
Pork
Food Quantity Temperature
(°C)
Time (min) Shelf position
Shoulder, neck,
ham joint
1 - 1.5 kg 160 - 180 90 - 120 1 or 2
Chop, spare rib 1 - 1.5 kg 170 - 180 60 - 90 1 or 2
Meat loaf 750 g - 1 kg 160 - 170 50 - 60 1 or 2
Pork knuckle (precooked)
750 g - 1 kg 150 - 170 90 - 120 1 or 2
Veal
Food Quantity (kg) Temperature
(°C)
Time (min) Shelf position
Roast veal 1 160 - 180 90 - 120 1 or 2
Knuckle of veal 1.5 - 2 160 - 180 120 - 150 1 or 2
Lamb
Food Quantity (kg) Temperature
(°C)
Time (min) Shelf position
Leg of lamb,
roast lamb
1 - 1.5 kg 150 - 170 100 - 120 1 or 2
Saddle of lamb 1 - 1.5 kg 160 - 180 40 - 60 1 or 2
ENGLISH 23
Page 24

Poultry
Food Quantity Temperature
(°C)
Time (min) Shelf position
Poultry portions 200 - 250 g
each
200 - 220 30 - 50 1 or 2
Chicken, half 400 - 500 g
each
190 - 210 35 - 50 1 or 2
Chicken, poulard
1 - 1.5 kg 190 - 210 50 - 70 1 or 2
Duck 1.5 - 2 kg 180 - 200 80 - 100 1 or 2
Goose 3.5 - 5 kg 160 - 180 120 - 180 1 or 2
Turkey 2.5 - 3.5 kg 160 - 180 120 - 150 1 or 2
Turkey 4 - 6 kg 140 - 160 150 - 240 1 or 2
Fish
Food Quantity Temperature
(°C)
Time (min) Shelf position
Whole fish 1 - 1.5 kg 210 - 220 40 - 60 1 or 2
9.9 Defrost
Food Quantity
(g)
Defrosting
time (min)
Further defrosting time (min)
Comments
Chicken 1000 100 - 140 20 - 30 Place the chicken on an
upturned saucer placed
on a large plate. Turn
halfway through.
Meat 1000 100 - 140 20 - 30 Turn halfway through.
Meat 500 90 - 120 20 - 30 Turn halfway through.
Trout 150 25 - 35 10 - 15 -
Strawberries 300 30 - 40 10 - 20 -
Butter 250 30 - 40 10 - 15 -
Cream 2 x 200 80 - 100 10 - 15 Cream can also be
whipped when still
slightly frozen in places.
Gateau 1400 60 60 -
9.10 Drying - True Fan Cooking
• Cover trays with grease proof paper or
baking parchment.
• For a better result, stop the oven
halfway through the drying time, open
the door and let it cool down for one
night to complete the drying.
www.electrolux.com24
Page 25

Vegetables
Food Temperature
(°C)
Time (h) Shelf position
1 position 2 positions
Beans 60 - 70 6 - 8 3 1 / 4
Peppers 60 - 70 5 - 6 3 1 / 4
Vegetables for
sour
60 - 70 5 - 6 3 1 / 4
Mushrooms 50 - 60 6 - 8 3 1 / 4
Herbs 40 - 50 2 - 3 3 1 / 4
Fruit
Food Temperature
(°C)
Time (h) Shelf position
1 position 2 positions
Plums 60 - 70 8 - 10 3 1 / 4
Apricots 60 - 70 8 - 10 3 1 / 4
Apple slices 60 - 70 6 - 8 3 1 / 4
Pears 60 - 70 6 - 9 3 1 / 4
9.11 True Fan + Steam
Cakes and pastries
Food Tempera-
ture (°C)
Time (min) Shelf po-
sition
Comments
Apple cake
1)
160 60 - 80 2 In a 20 cm cake mould
Tarts 175 30 - 40 2 In a 26 cm cake mould
Fruit cake 160 80 - 90 2 In a 26 cm cake mould
Sponge cake 160 35 - 45 2 In a 26 cm cake mould
Panettone
1)
150 - 160 70 - 100 2 In a 20 cm cake mould
Plum cake
1)
160 40 - 50 2 In a bread tin
Small cakes 150 - 160 25 - 30 3 (2 and4)In a baking tray
Biscuits 150 20 - 35 3 (2 and4)In a baking tray
Sweet buns
1)
180 - 200 12 - 20 2 In a baking tray
Brioches
1)
180 15 - 20 3 (2 and4)In a baking tray
1)
Preheat the oven for 10 minutes.
ENGLISH 25
Page 26

Bread and pizza
Food Quantity (g) Tempera-
ture (°C)
Time (min) Shelf posi-
tion
Comments
White
bread
1)
1000 180 - 190 45 - 60 2 1 - 2 pieces,
500 g for
each piece
Rolls
1)
500 190 - 210 20 - 30 2 (2 and 4) 6 - 8 rolls in
a baking tray
Pizza
1)
- 200 - 220 20 - 30 2 In a baking
tray
1)
Preheat the oven for 10 minutes.
Flans
Food Tempera-
ture (°C)
Time
(min)
Shelf position
Comments
Vegetables filled 170 - 180 30 - 40 1 In a mould
Lasagne 170 - 180 40 - 50 2 In a mould
Potato gratin 160 - 170 50 - 60 1 (2 and 4) In a mould
Meat
Food Quantity (g) Temper-
ature
(°C)
Time
(min)
Shelf position
Comments
Roast pork 1000 180 90 - 110 2 On a wire shelf
Veal 1000 180 90 - 110 2 On a wire shelf
Roast beef rare
1000 210 45 - 50 2 On a wire shelf
Roast beef medium
1000 200 55 - 65 2 On a wire shelf
Roast beef well done
1000 190 65 - 75 2 On a wire shelf
Lamb 1000 175 110 - 130 2 Leg
Chicken 1000 200 55 - 65 2 Whole
Turkey 4000 170 180 - 240 2 Whole
Duck 2000 - 2500 170 - 180 120 - 150 2 Whole
Goose 3000 160 - 170 150 - 200 1 Whole
Rabbit - 170 - 180 60 - 90 2 Cut in pieces
www.electrolux.com26
Page 27

Fish
Food Quanti-
ty (g)
Temperature (°C)
Time
(min)
Shelf position
Comments
Trout 1500 180 25 - 35 2 3 - 4 fish
Tuna 1200 175 35 - 50 2 4 - 6 fillets
Hake - 200 20 - 30 2 -
Steam reheating
Food Tempera-
ture (°C)
Time (min) Shelf po-
sition
Comments
Casserole / Gratin 140 15 - 25 2 Reheat on a plate
Pasta and sauce 140 10 - 15 2 Reheat on a plate
Side dishes (e.g.
rice, potatoes,
pasta)
140 10 - 15 2 Reheat on a plate
One-plate dishes 140 10 - 15 2 Reheat on a plate
Meat 140 10 - 15 2 Reheat on a plate
Vegetables 140 10 - 15 2 Reheat on a plate
9.12 Cooking in the dietary
baking dish
Use the function True Fan + Steam.
Vegetables
Food Temperature (°C) Time (min) Shelf position
Broccoli florets 150 20 - 25 2
Aubergine 150 15 - 20 2
Cauliflower florets 150 25 - 30 2
Tomatoes 150 15 2
White asparagus 150 35 - 45 2
Green asparagus 150 25 - 35 2
Courgette slices 150 20 - 25 2
Carrots 150 35 - 40 2
Fennel 150 30 - 35 2
Kohlrabi 150 25 - 30 2
Pepper strips 150 20 - 25 2
Celery slices 150 30 - 35 2
ENGLISH 27
Page 28

Meat
Food Temperature (°C) Time (min) Shelf position
Cooked ham 150 55 - 65 2
Poached chicken
breast
150 25 - 35 2
Kasseler (smoked
loin of pork)
150 80 - 100 2
Fish
Food Temperature (°C) Time (min) Shelf position
Trout 150 25 - 30 2
Salmon filet 150 25 - 30 2
Side dishes
Food Temperature (°C) Time (min) Shelf position
Rice 150 35 - 40 2
Unpeeled potatoes,
medium
150 50 - 60 2
Boiled potatoes,
quartered
150 35 - 45 2
Polenta 150 40 - 45 2
9.13 Core temperature sensor table
Food Food Core Temperature (°C)
Roast veal 75 - 80
Veal knuckle 85 - 90
English roast beef, rare 45 - 50
English roast beef, medium 60 - 65
English roast beef, well done 70 - 75
Shoulder of pork 80 - 82
Shin of pork 75 - 80
Lamb 70 - 75
Chicken 98
Hare 70 - 75
Trout / Sea bream 65 - 70
Tuna fish / Salmon 65 - 70
www.electrolux.com28
Page 29
10. CARE AND CLEANING
WARNING!
Refer to Safety chapters.
10.1 Notes on cleaning
• Clean the front of the appliance with a
soft cloth with warm water and a
cleaning agent.
• To clean metal surfaces, use a usual
cleaning agent.
• Clean the appliance interior after each
use. Fat accumulation or other food
remains may result in a fire. The risk is
higher for the grill pan.
• Clean stubborn dirt with a special oven
cleaner.
• Clean all accessories after each use
and let them dry. Use a soft cloth with
warm water and a cleaning agent.
• If you have nonstick accessories, do
not clean them using aggressive
agents, sharp-edged objects or a
dishwasher. It can cause damage to
the nonstick coating.
10.2 Stainless steel or aluminium
appliances
Clean the oven door with a wet
sponge only. Dry it with a soft
cloth. Do not use steel wool,
acids or abrasive materials as
they can damage the oven
surface. Clean the oven control
panel with the same
precautions.
10.3 Cleaning the door gasket
• Regularly do a check of the door
gasket. The door gasket is around the
frame of the oven cavity. Do not use
the appliance if the door gasket is
damaged. Contact an Authorised
Service Centre.
• To clean the door gasket, refer to the
general information about cleaning.
10.4 Removing the shelf
supports
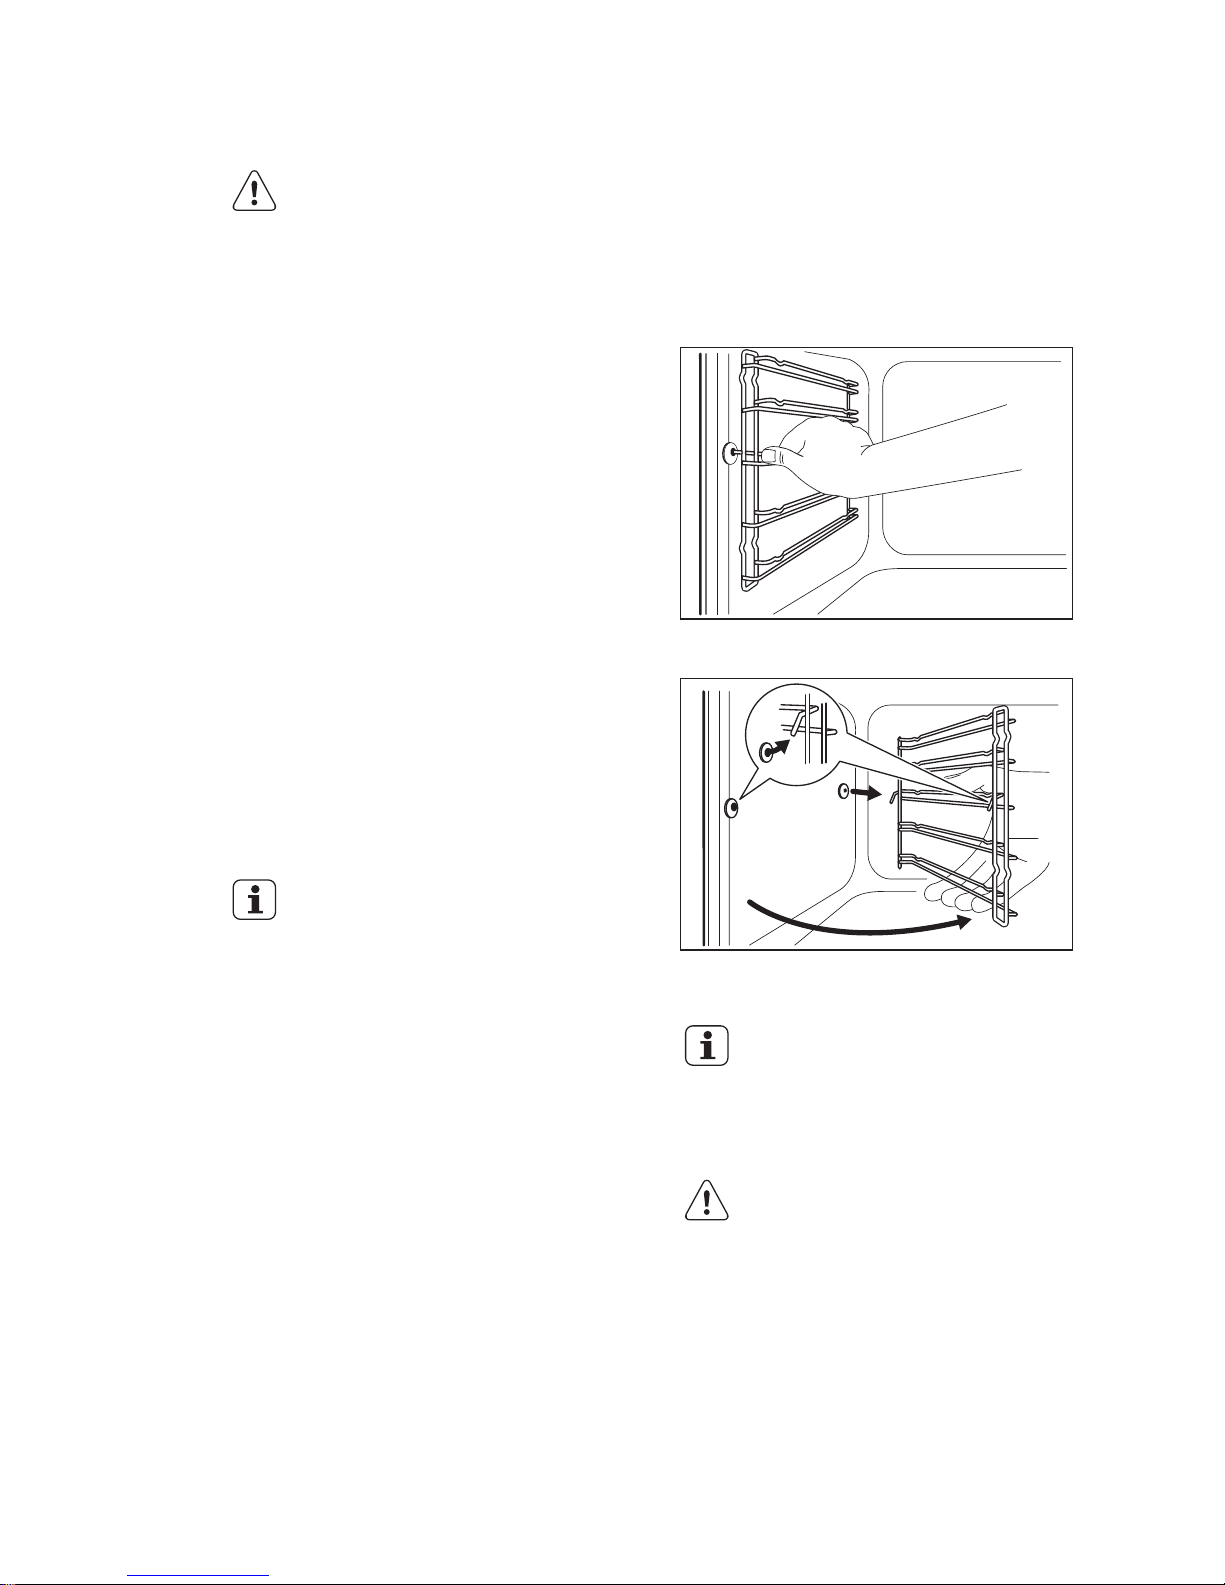
To clean the oven, remove the shelf
supports.
1. Pull the front of the shelf support away
from the side wall.
2. Pull the rear end of the shelf support
away from the side wall and remove it.
1
2
Install the shelf supports in the opposite
sequence.
The retaining pins on the
telescopic runners must point
to the front.
10.5 Cleaning the water tank
WARNING!
Do not put water into the water
tank during the cleaning
procedure.
ENGLISH 29
Page 30
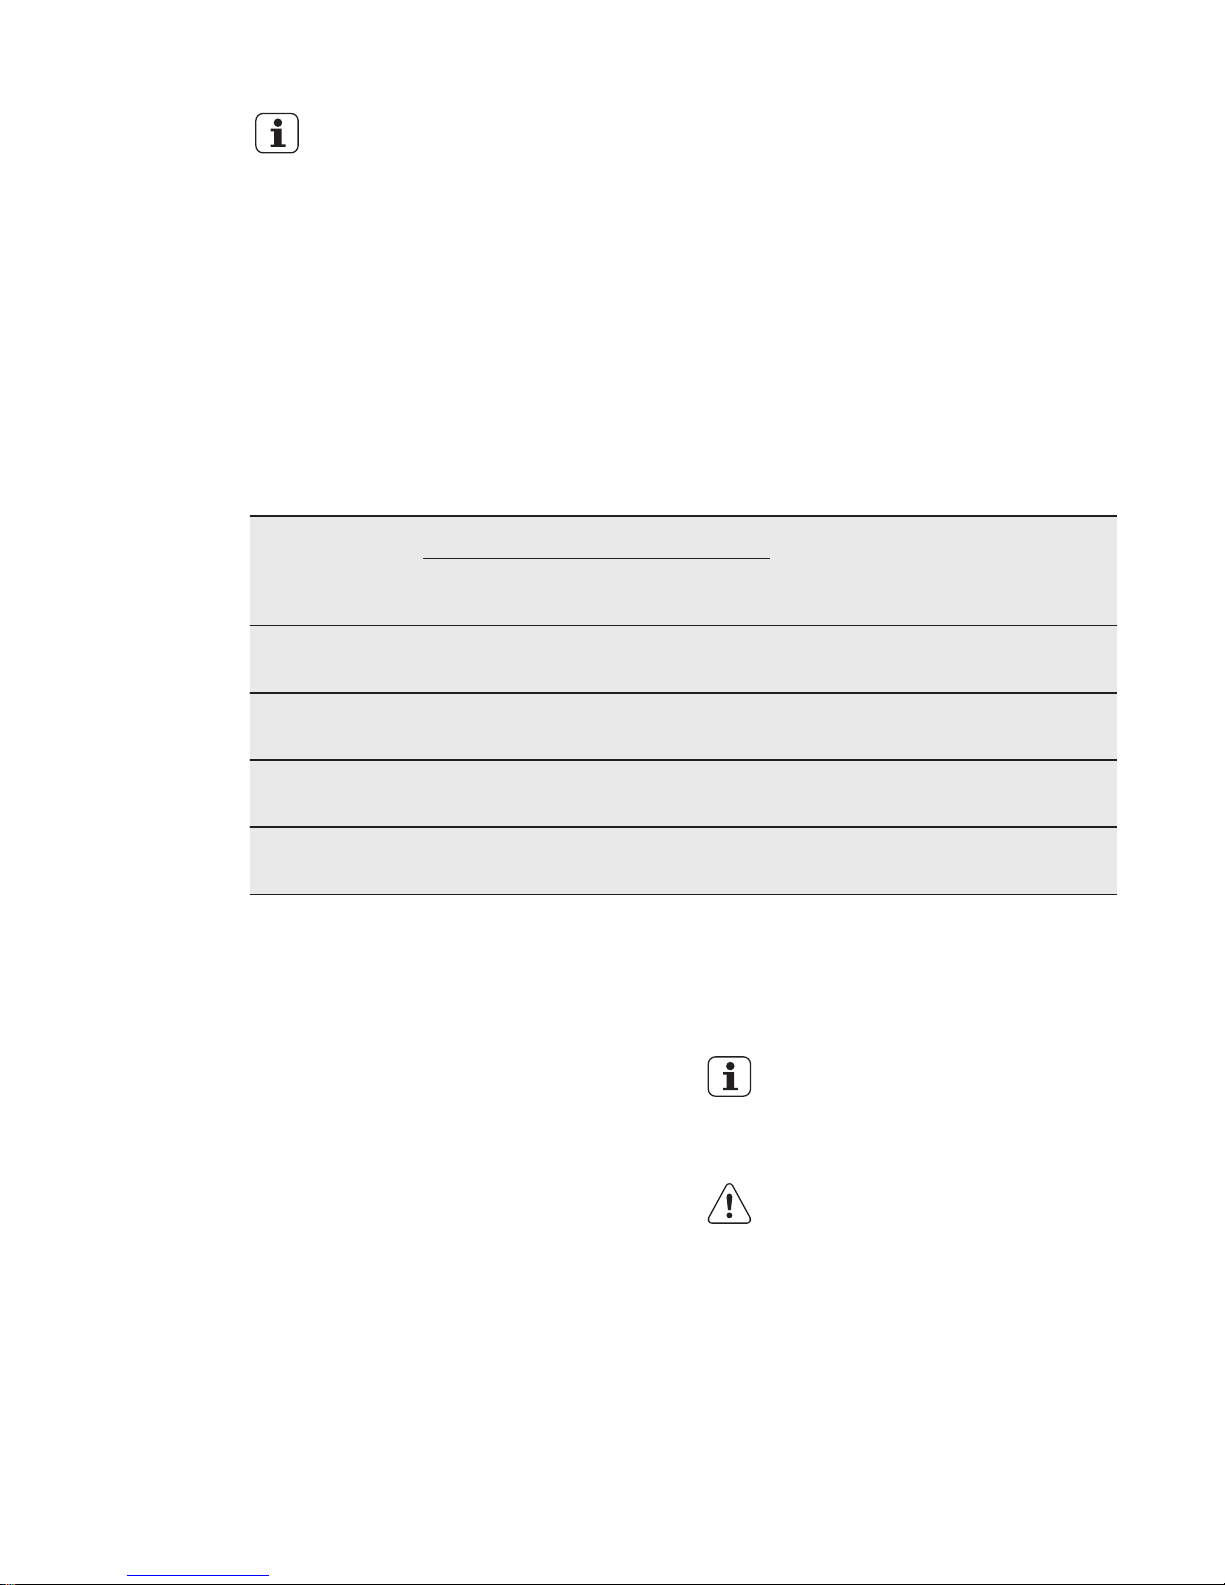
During the cleaning procedure,
some water can drip from the
steam inlet onto the cavity of
the oven. Put a dripping pan
on the shelf level directly below
the steam inlet to prevent
water from falling onto the
bottom of the oven cavity.
After some time, you can have lime
deposits in your oven. To prevent this,
clean the parts of the oven that generate
the steam. Empty the tank after each
steam cooking.
Types of water
• Soft water with low lime content -
the manufacturer recommends this
because it decreases the quantity of
cleaning procedures.
• Tap water - you can use it if your
domestic water supply has purifier or
water sweetener.
• Hard water with high lime content -
it does not have an effect on the
performance of the appliance but it
increases the quantity of cleaning
procedures.
CALCIUM QUANTITY TABLE INDICATED FROM W.H.O. (World Health Organization)
Calcium deposit
Water hardness Water classifi-
cation
Run decalcification every
(French degrees)
(German degrees)
0 - 60 mg/l 0 - 6 0 - 3 Sweet of soft 75 cycles - 2.5
months
60 - 120 mg/l 6 - 12 3 - 7 Medium hard-
ness
50 cycles - 2
months
120 - 180 mg/l 12 - 18 8 - 10 Hard or calca-
reous
40 cycles - 1.5
months
over 180 mg/l over 18 over 10 Very hard 30 cycles - 1
month
1. Fill in the water tank with 850 ml of
water and 50 ml of citric acid (five
teaspoons). Deactivate the oven and
wait for approximately 60 minutes.
2. Activate the oven and set the function
True Fan + Steam. Set the
temperature 230 °C. Deactivate it after
25 minutes and let it cool down for 15
minutes.
3. Activate the oven and set the function
True Fan + Steam. Set the
temperature between 130 and 230
°C. Deactivate it after 10 minutes.
Let it cool down and continue with the
removal of the tank contents. Refer to
"Emptying the water tank".
4. Rinse the water tank and clean the
remaining lime residue in the oven with
a cloth.
5. Clean the drain pipe by hand in warm
water with soap. To prevent damage,
do not use acids, sprays or similar
cleaning agents.
10.6 Cleaning the oven door
The oven door has three glass panels.You
can remove the oven door and the internal
glass panels to clean them.
The oven door can close if you
try to remove the glass panels
before you remove the oven
door.
CAUTION!
Do not use the appliance
without the glass panels.
1. Open the door fully and hold the two
door hinges.
www.electrolux.com30
Page 31
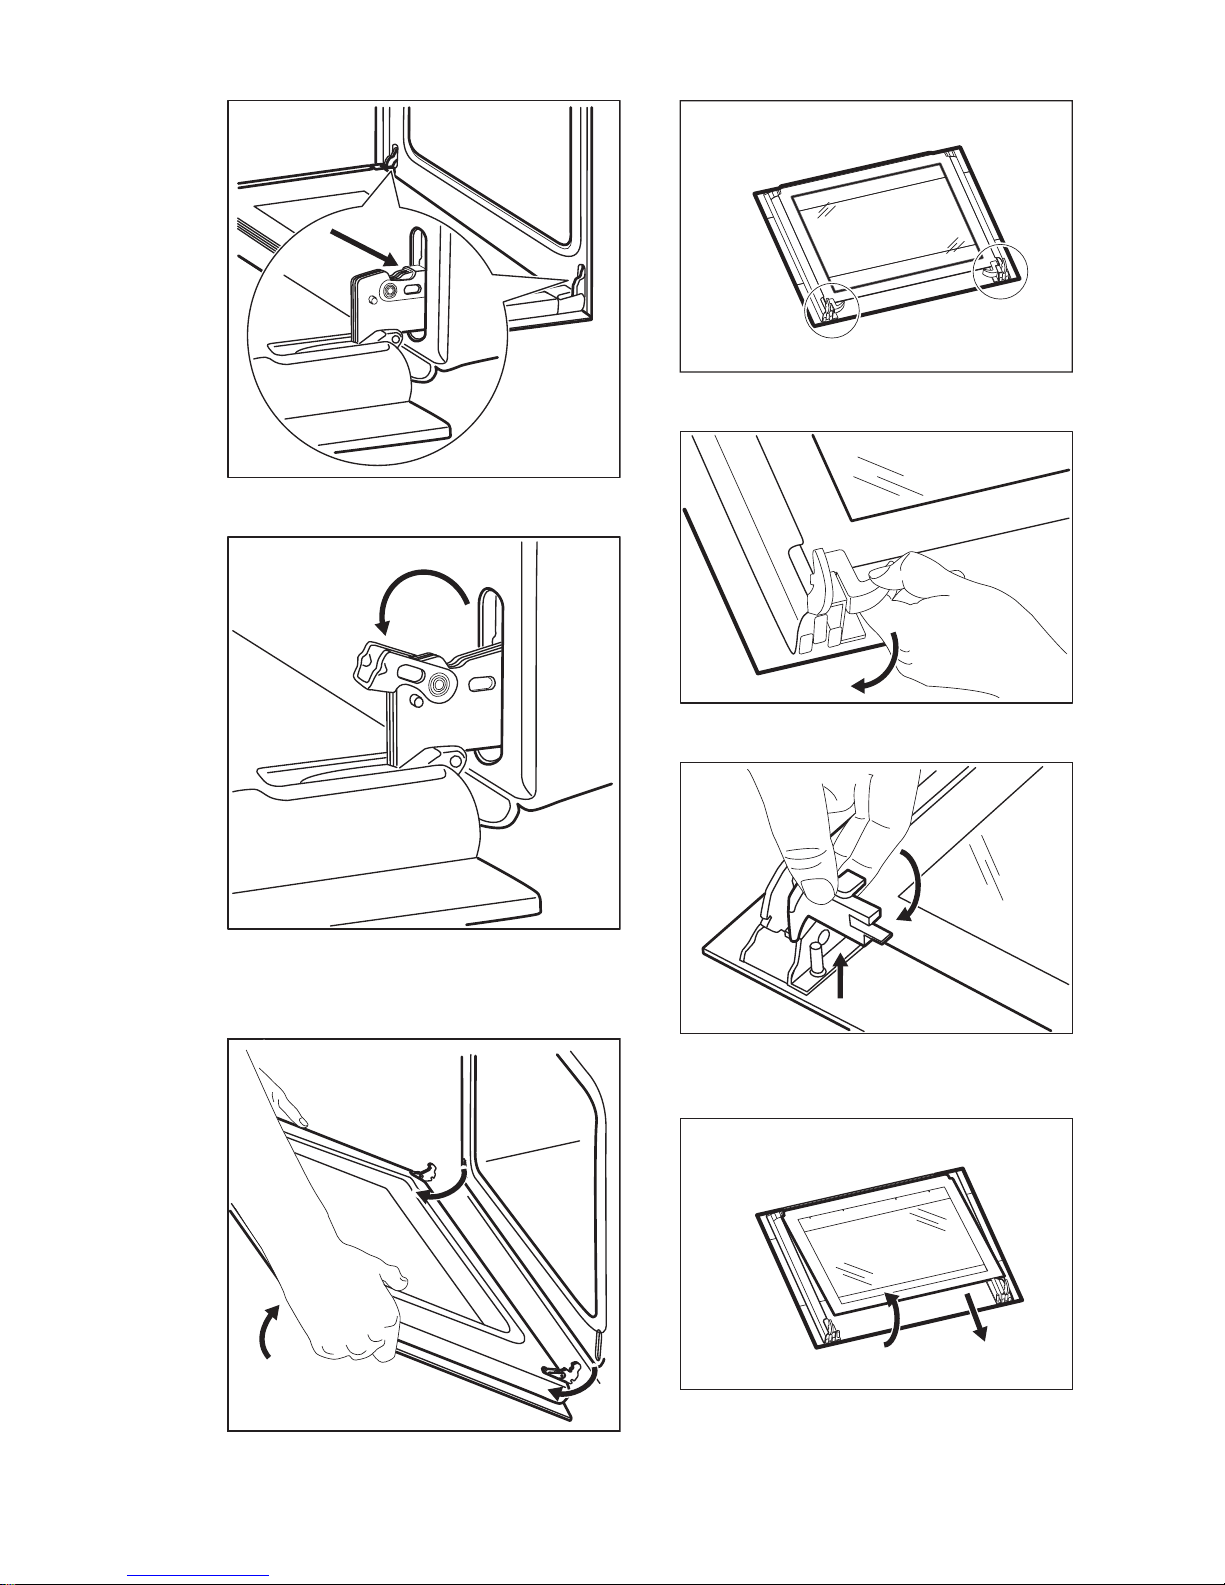
2. Lift and turn the levers on the two
hinges.
3. Close the oven door halfway to the
first opening position. Then pull
forward and remove the door from its
seat.
4. Put the door on a soft cloth on a
stable surface.
5. Release the locking system to remove
the glass panels.
6. Turn the two fasteners by 90° and
remove them from their seats.
90°
7. First lift carefully and then remove the
glass panels one by one. Start from
the top panel.
1
2
8. Clean the glass panels with water and
soap. Dry the glass panels carefully.
ENGLISH 31
Page 32
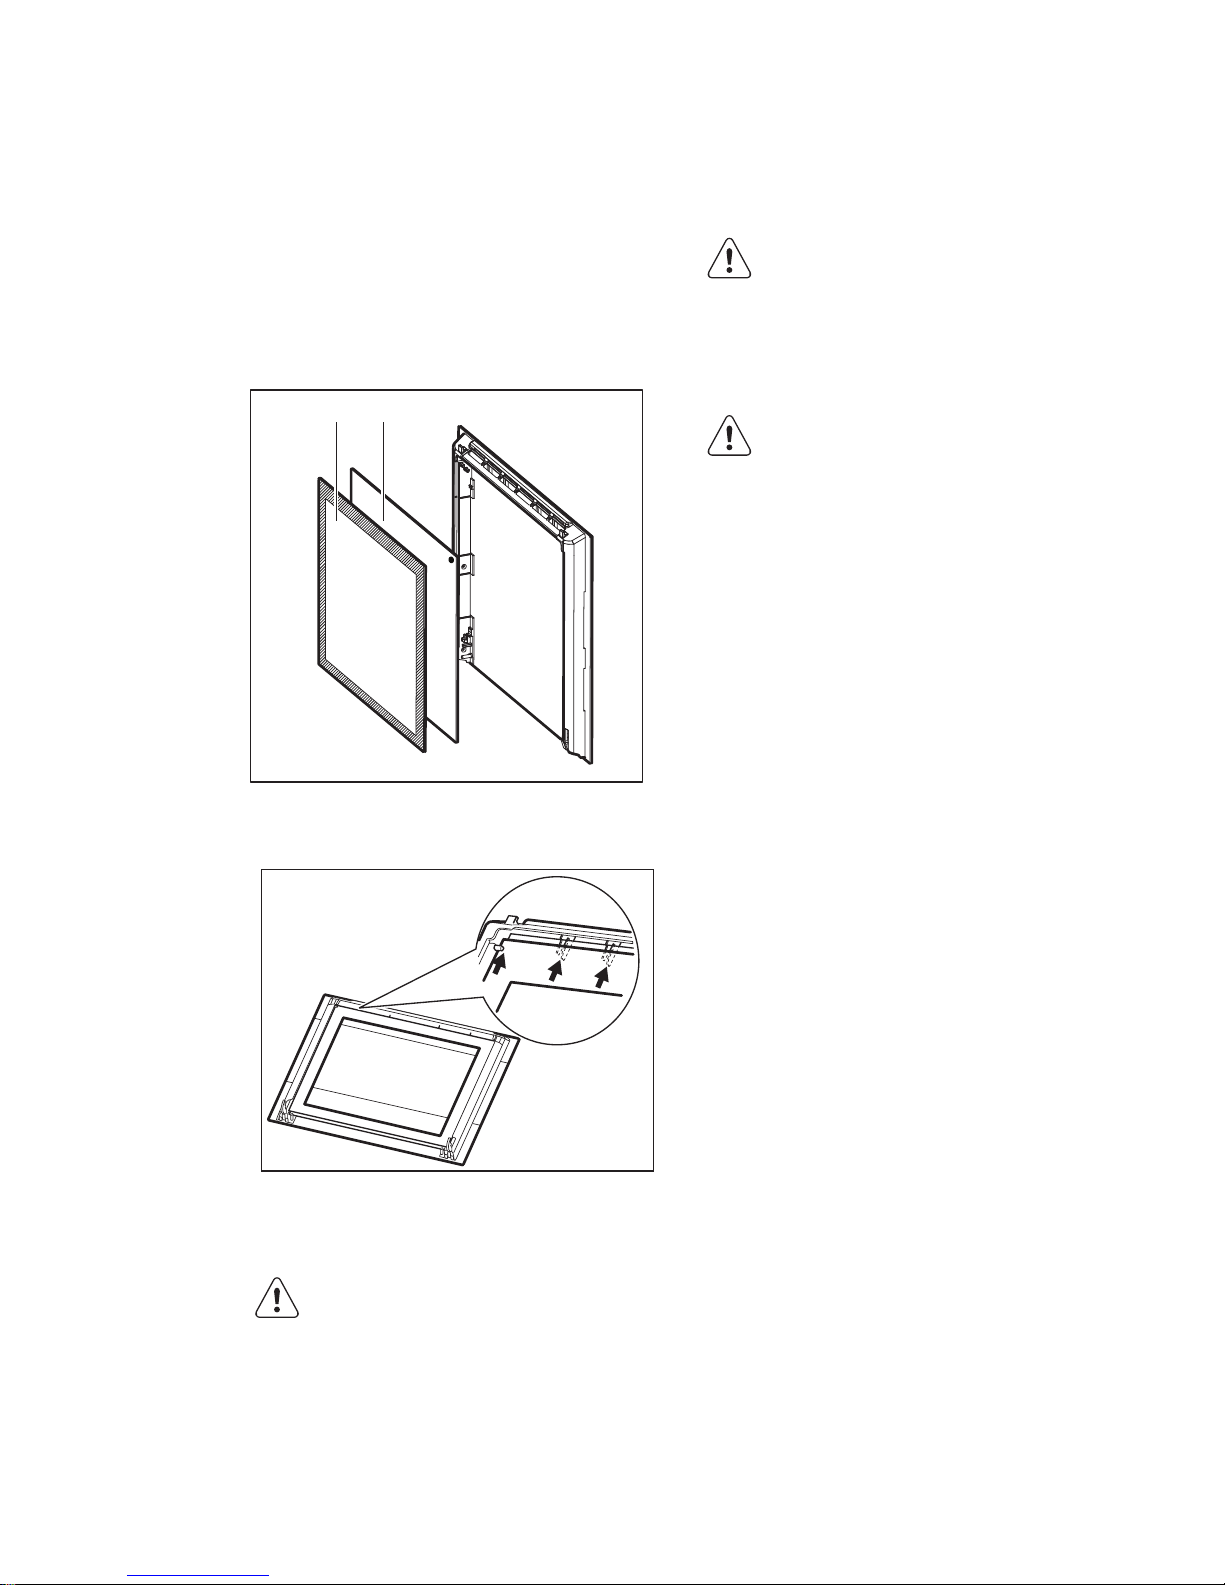
When the cleaning is completed, install the
glass panels and the oven door. Do the
above steps in the opposite sequence.
Make sure that you put the glass panels (A
and B) back in the correct sequence. The
first panel (A) has a decorative frame. The
screen-printing zone must face the inner
side of the door. Make sure that after the
installation the surface of the glass panel
frame (A) on the screen-printing zones is
not rough when you touch it.
A B
Make sure that you install the middle panel
of glass in the seats correctly.
10.7 Replacing the lamp
Put a cloth on the bottom of the interior of
the appliance. It prevents damage to the
lamp glass cover and the cavity.
WARNING!
Danger of electrocution!
Disconnect the fuse before you
replace the lamp. The lamp
and the lamp glass cover can
be hot.
CAUTION!
Always hold the halogen lamp
with a cloth to prevent grease
residue from burning on the
lamp.
1. Deactivate the appliance.
2. Remove the fuses from the fuse box
or deactivate the circuit breaker.
The back lamp
1. Turn the lamp glass cover
counterclockwise to remove it.
2. Clean the glass cover.
3. Replace the lamp with a suitable 300
°C heat-resistant lamp.
4. Install the glass cover.
11. TROUBLESHOOTING
WARNING!
Refer to Safety chapters.
www.electrolux.com32
Page 33

11.1 What to do if...
Problem Possible cause Remedy
The oven does not heat up. The oven is deactivated. Activate the oven.
The oven does not heat up. The clock is not set. Set the clock.
The oven does not heat up. The necessary settings are
not set.
Make sure that the settings
are correct.
The oven does not heat up. The automatic switch-off is
activated.
Refer to "Automatic switchoff".
The oven does not heat up. The Child Lock is on. Refer to "Using the Child
Lock".
The oven does not heat up. The fuse is released. Make sure that the fuse is
the cause of the malfunction. If the fuse releases
again and again, contact a
qualified electrician.
The lamp does not operate. The lamp is defective. Replace the lamp.
The core temperature sensor does not operate.
The plug of the core temperature sensor is not correctly installed into the
socket.
Put the plug of the core
temperature sensor as far
as possible into the socket.
There is water inside the
oven.
There is too much water in
the tank.
Deactivate the oven and
wipe the water with a cloth
or sponge.
The steam cooking does
not work.
Lime obstructs the hole. Check the steam inlet
opening. Remove the lime.
The steam cooking does
not work.
There is no water in the
tank.
Fill the water tank.
It takes more than three minutes to empty the water
tank or the water leaks from
the steam inlet opening.
There are lime deposits in
the oven.
Clean the water tank. Refer
to "Cleaning the water
tank".
It takes too long to cook the
dishes or they cook too
quickly.
The temperature is too low
or too high.
Adjust the temperature if
necessary. Follow the advice in the user manual.
Steam and condensation
settle on the food and in the
cavity of the oven.
You left the dish in the oven
for too long.
Do not leave the dishes in
the oven for longer than 15
- 20 minutes after the cooking process ends.
The display shows "C2". You want to start the De-
frost function, but you did
not remove the core temperature sensor plug from
the socket.
Remove the core temperature sensor plug from the
socket.
ENGLISH 33
Page 34
Problem Possible cause Remedy
The display shows an error
code that is not in this table.
There is an electrical fault. • Deactivate the oven with
the house fuse or the
safety switch in the fuse
box and activate it again.
• If the display shows the
error code again, contact the Customer Care
Department.
The appliance is activated
and does not heat up. The
fan does not operate. The
display shows "Demo".
The demo mode is activated.
1. Deactivate the oven.
2. Press and hold the but-
ton .
3. When an acoustic sig-
nal sounds, turn the
knob for the oven functions to the first function. "Demo" flashes in
the display.
4. Turn the knob for the
oven functions to the off
position.
5. Release the button .
6. Turn the knob for the
temperature clockwise
and hold it for three
seconds. The acoustic
signal sounds three
times. The demo mode
is deactivated.
11.2 Service data
If you cannot find a solution to the
problem yourself, contact your dealer or
an Authorised Service Centre.
The necessary data for the service centre
is on the rating plate. The rating plate is on
the front frame of the appliance cavity. Do
not remove the rating plate from the
appliance cavity.
We recommend that you write the data here:
Model (MOD.) .........................................
Product number (PNC) .........................................
Serial number (S.N.) .........................................
12. INSTALLATION
WARNING!
Refer to Safety chapters.
www.electrolux.com34
Page 35
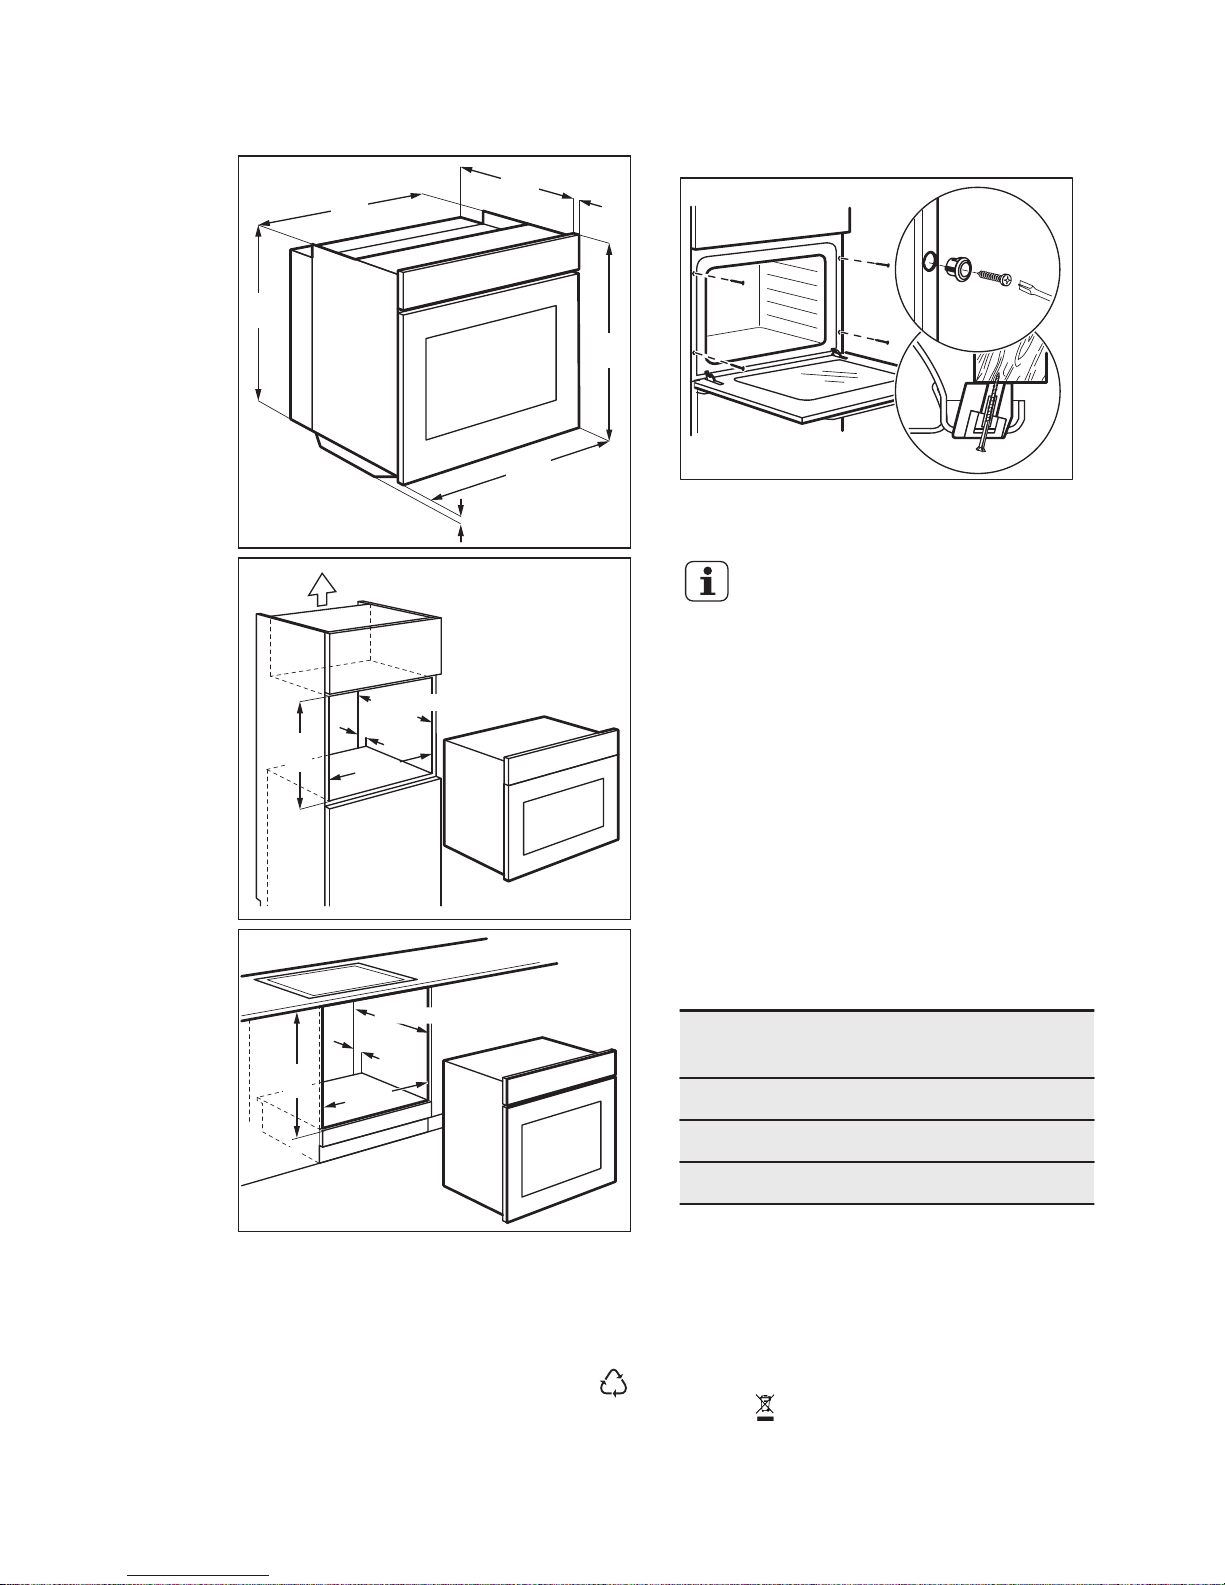
12.1 Building In
573
mm
594
mm
589
mm
558
mm
548
mm
20
mm
5 mm
min. 550 mm
20 mm
590
mm
min. 560
mm
600
mm
min. 560
mm
20 mm
min. 550 mm
12.2 Securing the appliance to
the cabinet
A
B
12.3 Electrical installation
The manufacturer is not
responsible if you do not follow
the safety precautions from the
Safety chapters.
This appliance is supplied with a main plug
and a main cable.
12.4 Cable
Cable types applicable for installation or
replacement: H07 RN-F, H05 RN-F, H05
RRF, H05 VV-F, H05 V2V2-F (T90), H05
BB-F.
For the section of the cable refer to the
total power on the rating plate and to the
table:
Total power (W) Section of the
cable (mm²)
maximum 1380 3 x 0.75
maximum 2300 3 x 1
maximum 3680 3 x 1.5
The earth cord (green / yellow cable) must
be 2 cm longer than phase and neutral
cables (blue and brown cables).
13. ENVIRONMENTAL CONCERNS
Recycle the materials with the symbol .
Put the packaging in applicable containers
to recycle it. Help protect the environment
and human health and to recycle waste of
electrical and electronic appliances. Do
not dispose appliances marked with the
symbol with the household waste.
Return the product to your local recycling
facility or contact your municipal office.
ENGLISH 35
Page 36

SISUKORD
1. OHUTUSINFO.................................................................................................. 37
2. OHUTUSJUHISED........................................................................................... 38
3. SEADME KIRJELDUS......................................................................................40
4. ENNE ESIMEST KASUTAMIST....................................................................... 41
5. IGAPÄEVANE KASUTAMINE.......................................................................... 41
6. KELLA FUNKTSIOONID.................................................................................. 45
7. TARVIKUTE KASUTAMINE............................................................................. 46
8. LISAFUNKTSIOONID.......................................................................................50
9. VIHJEID JA NÄPUNÄITEID..............................................................................51
10. PUHASTUS JA HOOLDUS............................................................................ 63
11. VEAOTSING...................................................................................................67
12. PAIGALDAMINE.............................................................................................69
SULLE MÕELDES
Täname teid selle Electroluxi seadme ostmise eest. Olete valinud toote, mille
loomisel on rakendatud pikaaegset asjatundlikku kogemust ja uuenduslikkust.
Nutika ja stiilse disaini kõrval ei ole unustatud ka teid. Ükskõik, millal te seda ka ei
kasuta – suurepärastes tulemustes võite te alati kindel olla.
Teretulemast Electroluxi.
Külastage meie veebisaiti:
Kasutusnõuanded, brošüürid, veaotsing, teave teeninduse kohta:
www.electrolux.com
Registreerige oma toode parema teeninduse saamiseks:
www.registerelectrolux.com
Ostke lisaseadmeid, tarvikuid ja originaalvaruosi:
www.electrolux.com/shop
KLIENDITEENINDUS
Soovitame alati kasutada originaalvaruosi.
Teenindusse pöördumisel peaksid teil olema varuks järgmised andmed. Mudel,
tootenumber (PNC), seerianumber.
Andmed leiate andmesildilt.
Hoiatus / oluline ohutusinfo.
Üldine informatsioon ja nõuanded
Keskkonnateave
Jäetakse õigus teha muutusi.
www.electrolux.com36
Page 37

1. OHUTUSINFO
Enne seadme paigaldamist ja kasutamist lugege
kaasasolev juhend tähelepanelikult läbi. Tootja ei
vastuta vale paigaldamise või ebaõige kasutuse tõttu
tekkinud vigastuste ja kahjude eest. Hoidke juhend alles,
et saaksite seda ka edaspidi kasutada.
1.1 Laste ja ohustatud inimeste turvalisus
• Seda seadet võivad kasutada vähemalt 8-aastased
lapsed ning füüsilise, sensoorse või vaimse puudega
inimesed või kogemuste ja teadmisteta isikud juhul,
kui nende tegevuse üle on järelvalve ja neid
juhendatakse seadme turvalise kasutamise osas ning
nad mõistavad seadme kasutamisega kaasnevaid
ohte.
• Ärge lubage lastel seadmega mängida.
• Hoidke pakendid lastele kättesaamatuna.
• Hoidke lapsed ja lemmikloomad seadmest eemal, kui
see töötab või jahtub. Katmata osad on kuumad.
• Kui seadmel on lapselukk, on soovitatav seda
kasutada.
• Ilma järelvalveta ei tohi lapsed seadet puhastada ega
hooldustoiminguid läbi viia.
• Alla 3-aastased lapsed tohivad olla seadme läheduses
ainult siis, kui täiskasvanu nende tegevust jälgib.
1.2 Üldine ohutus
• Seadet tohib paigaldada ja kaablit vahetada ainult
kvalifitseeritud elektrik!
• Seade läheb kasutamisel seest kuumaks. Ärge
puudutage kütteelemente seadmes. Tarvikute või
ahjunõude eemaldamisel või sisestamisel kasutage
alati pajakindaid.
• Enne hooldustöid eemaldage seade vooluvõrgust.
• Elektrilöögi ärahoidmiseks tuleb seade enne
ahjuvalgusti vahetamist kindlasti välja lülitada.
• Ärge kasutage seadme puhastamiseks aurupuhastit.
EESTI 37
Page 38

• Ärge kasutage ukseklaasi puhastamiseks karedaid,
abrasiivseid puhasteid ega teravaid metallist
kaabitsaid, sest need võivad klaasi pinda kriimustada,
mille tagajärjel võib klaas puruneda
• Kui toitejuhe on vigastatud, laske see ohutuse mõttes
välja vahetada tootja, selle volitatud hooldekeskuses
või lihtsalt kvalifitseeritud isiku poolt.
• Ahjuriiuli tugede eemaldamiseks tõmmake esmalt
riiulitoe esiots ja seejärel tagumine ots külgseina
küljest lahti. Paigaldage ahjuriiuli toed tagasi
vastupidises järjekorras.
• Kasutage ainult selle seadme jaoks ette nähtust
toidutermomeetrit.
2. OHUTUSJUHISED
2.1 Paigaldamine
HOIATUS!
Seadet tohib paigaldada ainult
kvalifitseeritud elektrik!
• Eemaldage kõik pakkematerjalid.
• Kahjustatud seadet ei tohi paigaldada
ega kasutada.
• Järgige seadmega kaasas olevaid
paigaldusjuhiseid.
• Olge seadme teise kohta viimisel
ettevaatlik, sest see on raske.
Kasutage alati kaitsekindaid.
• Ärge kunagi tõmmake seadet
käepidemest.
• Tagage minimaalne kaugus muudest
seadmetest ja mööbliesemetest.
• Veenduge, et seade on paigaldatud
kindlate konstruktsioonide alla ja
kõrvale.
• Seadme küljed peavad jääma vastu
teiste sama kõrgusega seadmete
külgi.
2.2 Elektriühendus
HOIATUS!
Tulekahju- ja elektrilöögioht!
• Kõik elektriühendused peab teostama
kvalifitseeritud elektrik.
• Seade peab olema maandatud.
• Kontrollige, kas andmesildil toodud
elektrilised parameetrid vastavad
vooluvõrgu näitajatele. Vastasel juhul
võtke ühendust elektrikuga.
• Kasutage alati nõuetekohaselt
paigaldatud ohutut pistikupesa.
• Ärge kasutage mitmikpistikuid ega
pikenduskaableid.
• Veenduge, et te ei vigastaks
toitepistikut ega -juhet. Kui seadme
toitekaabel tuleb välja vahetada, siis
pöörduge meie hoolduskeskusse.
• Jälgige, et toitejuhe ei jääks vastu
seadme ust, eriti siis, kui uks on
kuum.
• Isoleeritud ja isoleerimata osad
peavad olema kinnitatud nii, et neid ei
saaks eemaldada ilma tööriistadeta.
• Ühendage toitepistik seinakontakti
alles pärast paigalduse lõpuleviimist.
Veenduge, et pärast paigaldamist
säilib juurdepääs toitepistikule.
• Kui seinakontakt logiseb, ärge sinna
toitepistikut pange.
• Seadet välja lülitades ärge tõmmake
toitekaablist. Hoidke alati kinni
toitepistikust.
• Kasutage ainult õigeid
isolatsiooniseadiseid: kaitselüliteid,
kaitsmeid (keermega kaitsmed tuleb
pesast eemaldada), maalekkevoolu
kaitsmeid ja kontaktoreid.
www.electrolux.com38
Page 39

• Seadme ühendus vooluvõrguga tuleb
varustada mitmepooluselise
isolatsiooniseadisega.
Isolatsiooniseadise lahutatud
kontaktide vahemik peab olema
vähemalt 3 mm.
• See seade vastab EÜ direktiividele.
2.3 Kasutamine
HOIATUS!
Vigastuse, põletuse,
elektrilöögi või plahvatuse oht!
• Kasutage seda seadet ainult kodustes
tingimustes.
• Ärge muutke seadme tehnilisi
omadusi.
• Veenduge, et ventilatsiooniavad ei
oleks tõkestatud.
• Ärge jätke töötavat seadet
järelevalveta.
• Lülitage seade välja pärast igakordset
kasutamist.
• Olge töötava seadme ukse avamisel
ettevaatlik. Välja võib paiskuda tulist
õhku.
• Ärge kasutage seadet märgade
kätega või juhul, kui seade on
kontaktis veega.
• Äge suruge avatud uksele.
• Ärge kasutage seadet tööpinna ega
hoiukohana.
• Seadme ust avades olge ettevaatlik.
Alkoholi sisaldavate komponentide
kasutamise tagajärjel võib alkohol
õhuga seguneda.
• Kui avate ukse, vältige seadme
läheduses sädemeid või lahtist leeki.
• Ärge pange süttivaid või süttiva
ainega määrdunud esemeid
seadmesse, selle lähedusse või
peale.
HOIATUS!
Seadme vigastamise või
kahjustamise oht!
• Et ära hoida emaili kahjustumist või
värvi muutumist:
– ärge asetage ahjunõusid ega teisi
esemeid vahetult seadme põhjale.
– ärge asetage alumiiniumfooliumit
vahetult seadme põhjale.
– ärge pange tulist vett vahetult
kuuma seadmesse.
– ärge hoidke niiskeid nõusid ja
toitu seadmes pärast
toiduvalmistamise lõppu.
– olge tarvikute eemaldamisel ja
paigaldamisel ettevaatlik.
• Emaili värvi muutumine ei mõjuta
seadme tööd. Tegemist ei ole
defektiga garantii seisukohast.
• Vedelikke sisaldavate kookide puhul
kasutage sügavat panni.
Puuviljamahlad tekitavad püsivaid
plekke.
• See seade on ette nähtud ainult
toiduvalmistamiseks. Muul otstarbel,
näiteks ruumide soojendamiseks,
seda kasutada ei tohi.
• Küpsetamisel peab ahjuuks olema
alati suletud.
2.4 Auruküpsetus
HOIATUS!
Põletuse ja seadme
kahjustamise oht!
• Ärge avage seadme ust
auruküpsetuse ajal. Aur võib
seadmest välja paiskuda.
2.5 Puhastus ja hooldus
HOIATUS!
Vigastuse, tulekahju või
seadme kahjustamise oht!
• Enne hooldust lülitage seade välja ja
ühendage toitepistik pistikupesast
lahti.
• Veenduge, et seade on maha
jahtunud. Klaaspaneelid võivad
puruneda.
• Kui ukse klaaspaneeli tekib mõra,
tuleb see kohe välja vahetada.
Pöörduge teeninduskeskusse.
• Olge ukse seadmest eemaldamisel
ettevaatlik. Uks on raske!
• Puhastage seadet regulaarselt, et
vältida pinnamaterjali kahjustumist.
• Seadmesse jäänud rasv või toit võib
põhjustada tulekahju.
• Puhastage seadet pehme niiske
lapiga. Kasutage ainult neutraalseid
pesuaineid. Ärge kasutage
abrasiivseid tooteid, küürimisšvamme,
lahusteid ega metallist esemeid.
EESTI 39
Page 40
• Ahjupihusti kasutamisel järgige
pakendil olevaid ohutusjuhiseid.
• Katalüütilise emaili (kui see on
olemas) puhastamisel ärge kasutage
mingeid pesuaineid.
2.6 Sisevalgusti
• Selles seadmes kasutatav valgustipirn
või halogeenlamp on mõeldud
kasutamiseks ainult kodumasinates.
Ärge kasutage seda ruumide
valgustamiseks.
HOIATUS!
Elektrilöögi oht!
• Enne lambi asendamist ühendage
seade vooluvõrgust lahti.
• Kasutage ainult ühesuguste tehniliste
näitajatega lampe.
2.7 Jäätmekäitlus
HOIATUS!
Lämbumis- või vigastusoht!
• Eemaldage seade vooluvõrgust.
• Lõigake toitekaabel seadme küljest
lahti ja visake ära.
• Eemaldage seadme ukse fiksaator, et
vältida laste ja loomade seadmesse
lõksujäämist.
3. SEADME KIRJELDUS
3.1 Ülevaade
8
5
6
14
13
11
12
10
5
4
1
2
3
32 41
9
7
1
Juhtpaneel
2
Ahju funktsioonide nupp
3
Elektronprogrammeerija
4
Temperatuuri nupp
5
Veesahtel
6
Kütteelement
7
Toidutermomeetri pesa
8
Valgusti
9
Ventilaator
10
Ahjuriiuli tugi, eemaldatav
11
Äravoolutoru
12
Vee väljalaskeklapp
13
Ahjuriiuli tasandid
14
Auru sisselaskeava
3.2 Tarvikud
• Traatrest
Keedunõudele, koogivormidele,
praadidele.
• Küpsetusplaat
Kookidele ja küpsistele.
• Grill/küpsetuspann
Küpsetamiseks ja röstimiseks või
rasva kogumiseks.
• Toidutermomeeter
Toidu küpsetusastme mõõtmiseks.
• Teleskoopsiinid
Restidele ja plaatidele.
www.electrolux.com40
Page 41
4. ENNE ESIMEST KASUTAMIST
HOIATUS!
Vt ohutust käsitlevaid
peatükke.
4.1 Esmane puhastamine
Eemaldage kõik tarvikud ja
eemaldatavad ahjuriiuli toed.
Vt jaotist "Puhastus ja
hooldus".
1. Enne esmakordset kasutamist tuleb
seade puhastada.
2. Pange kõik tarvikud ja eemaldatavad
ahjuresti toed oma kohale tagasi.
4.2 Kellaaja seadmine
Pärast esmakordset vooluvõrku
ühendamist põlevad mõni sekund
ekraanil kõik sümbolid. Järgmiste
sekundite jooksul kuvab ekraan
tarkvaraversiooni.
Kui tarkvaraversiooni kuva ekraanilt
kaob, kuvatakse ekraanil
ja "12:00".
"12" vilgub.
1. Vajutage või käesoleva
tunninäidu määramiseks.
2. Kinnitamiseks vajutage . See
toiming on vajalik ainult kellaaja
esmakordsel määramisel. Hiljem
salvestatakse uus kellaaeg
automaatselt 5 sekundi pärast.
Ekraanil kuvatakse
ja seadistatud
tunninäit. "00" vilgub.
3. Vajutage või käesoleva
minutinäidu määramiseks.
4. Kinnitamiseks vajutage . See
toiming on vajalik ainult kellaaja
esmakordsel määramisel. Hiljem
salvestatakse uus kellaaeg
automaatselt 5 sekundi pärast.
Ekraanil kuvatakse uus kellaaeg.
4.3 Kellaaja muutmine
Te saate kellaaega muuta ainult siis, kui
ahi on välja lülitatud.
Vajutage .
Määratud kellaaeg ja sümbol
vilguvad
ekraanil.
Uue kellaaja seadistamist vt jaotisest
"Kellaaja seadmine".
4.4 Eelkuumutus
Eelkuumutage tühja seadet, et põletada
ära allesjäänud rasv.
1. Valige funktsioon ja maksimaalne
temperatuur.
2. Laske seadmel tund aega töötada.
3. Valige funktsioon ja maksimaalne
temperatuur.
4. Laske seadmel 15 minutit töötada.
Tarvikud võivad tavalisest kuumemaks
minna. Seade võib väljastada lõhna ja
tossu. See on normaalne. Veenduge, et
õhk saab piisavalt liikuda.
5. IGAPÄEVANE KASUTAMINE
HOIATUS!
Vt ohutust käsitlevaid
peatükke.
5.1 Sisselükatavad nupud
Seadme kasutamiseks vajutage nuppu.
Nupp tõuseb esile.
EESTI 41
Page 42
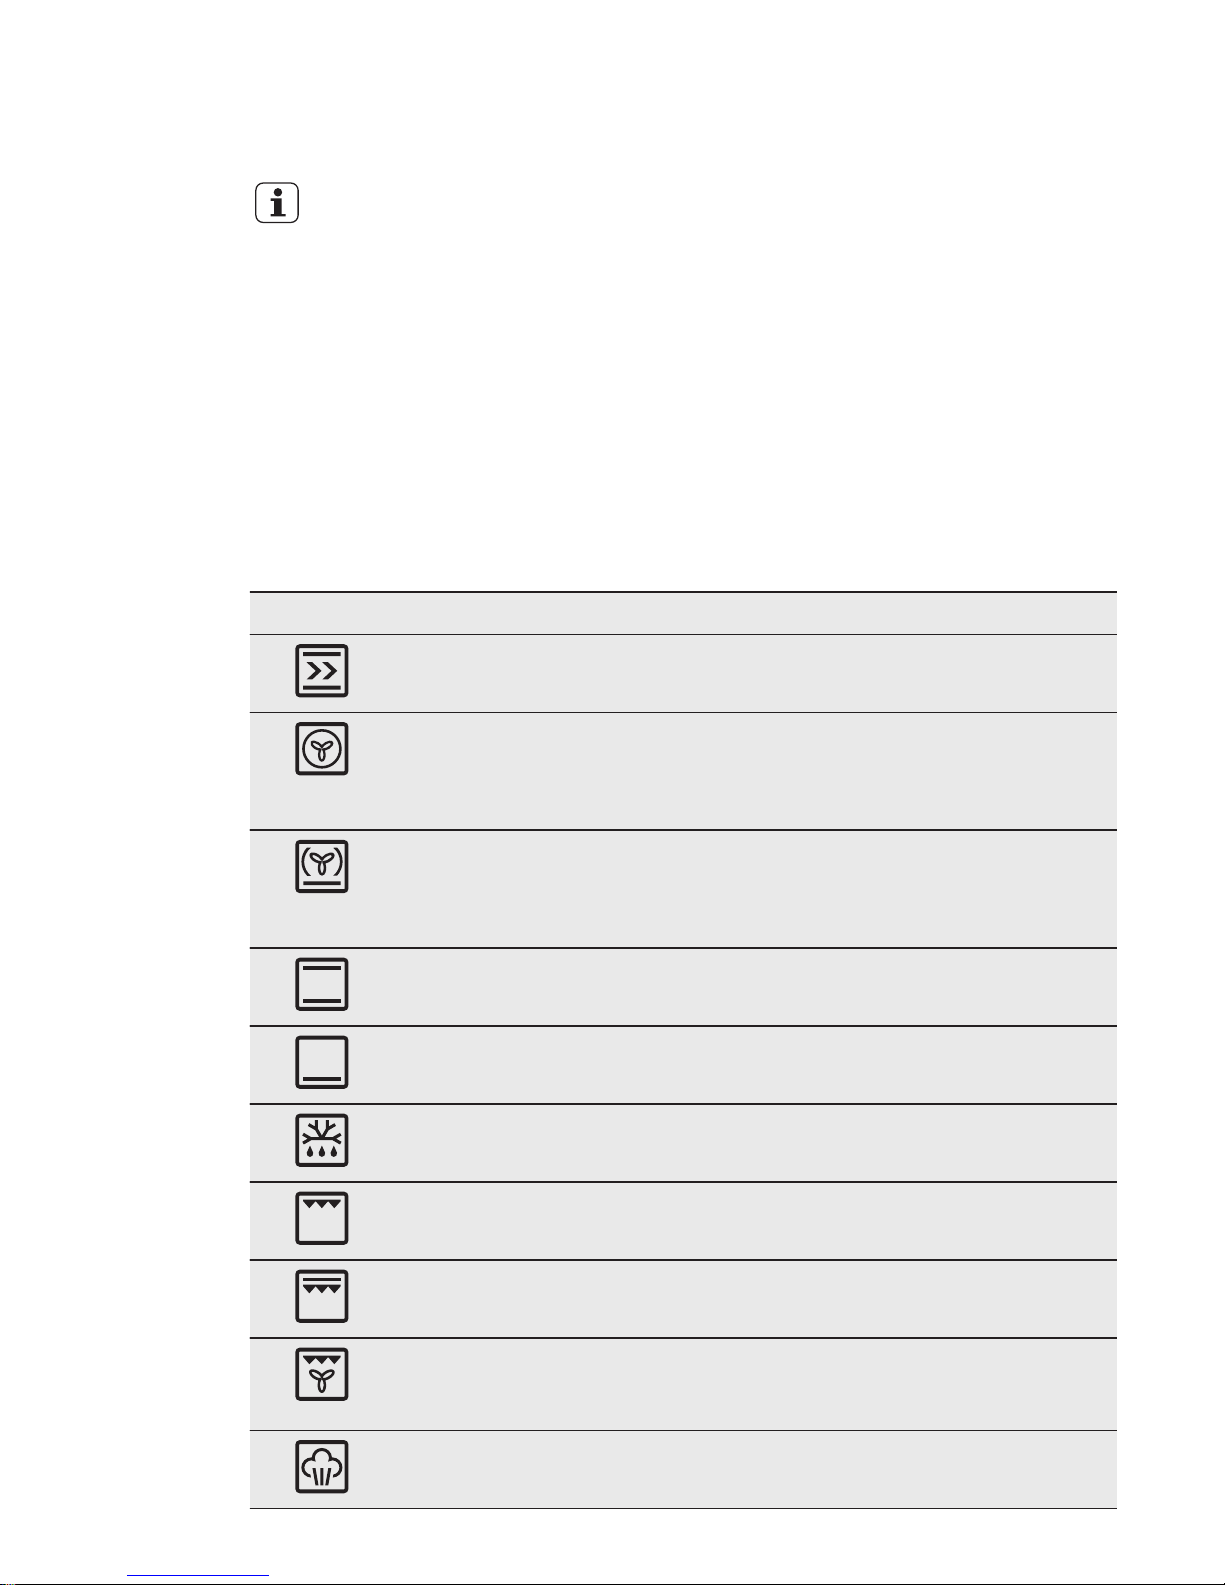
5.2 Seadme sisse- ja
väljalülitamine
Oleneb mudelist, kas
seadmel on nuppude
sümbolid, indikaatorid või
tuled:
• Indikaator süttib, kui ahi
kuumeneb.
• Tuli süttib, kui seade
töötab.
• Sümbol näitab, kas nupuga
on mõni keeduväljadest
sisse lülitatud, ahju
funktsioone või
temperatuuri.
1. Ahju funktsiooni valimiseks keerake
ahjufunktsioonide nuppu.
2. Temperatuuri valimiseks keerake
temperatuuri nuppu.
3. Seadme väljalülitamiseks keerake
ahjufunktsioonide ja temperatuuri
nupud väljas-asendisse.
5.3 Ahju funktsioonid
Ahju funktsioon Rakendus
Kiirkuumutus Kuumutusaja lühendamiseks.
Pöördõhk Küpsetamiseks korraga kuni kolmel tasandil ja toidu
kuivatamiseks.Seadke ahju temperatuur 20–40 °C
madalamaks kui funktsiooniga Ülemine + alumine
kuumutus.
Pitsarežiim Ühel ahjutasandil toitude küpsetamiseks, mis vaja‐
vad intensiivsemat pruunistamist ja krõbedat põhja.
Seadke ahju temperatuur 20 - 40 °C madalamaks
kui funktsiooniga Ülemine + alumine kuumutus.
Ülemine + alu‐
mine kuumutus
Ahju ühel tasandil küpsetamiseks ja röstimiseks.
Alumine kuumu‐
tus
Krõbeda põhjaga kookide küpsetamiseks ja toidu
hoidistamiseks.
Sulatamine Külmutatud toidu sulatamiseks.
Grill Õhemate toitude grillimiseks ja leiva/saia röstimi‐
seks.
Kiirgrill Lamedate toiduainete suures koguses grillimiseks ja
röstimiseks.
Turbogrill Suuremate kondiga liha- või linnulihatükkide röstimi‐
seks ühel riiulitasandil. Ka gratineerimiseks ja pruu‐
nistamiseks.
Pöördõhk + aur‐
utus
Toitude aurutamiseks.
www.electrolux.com42
Page 43
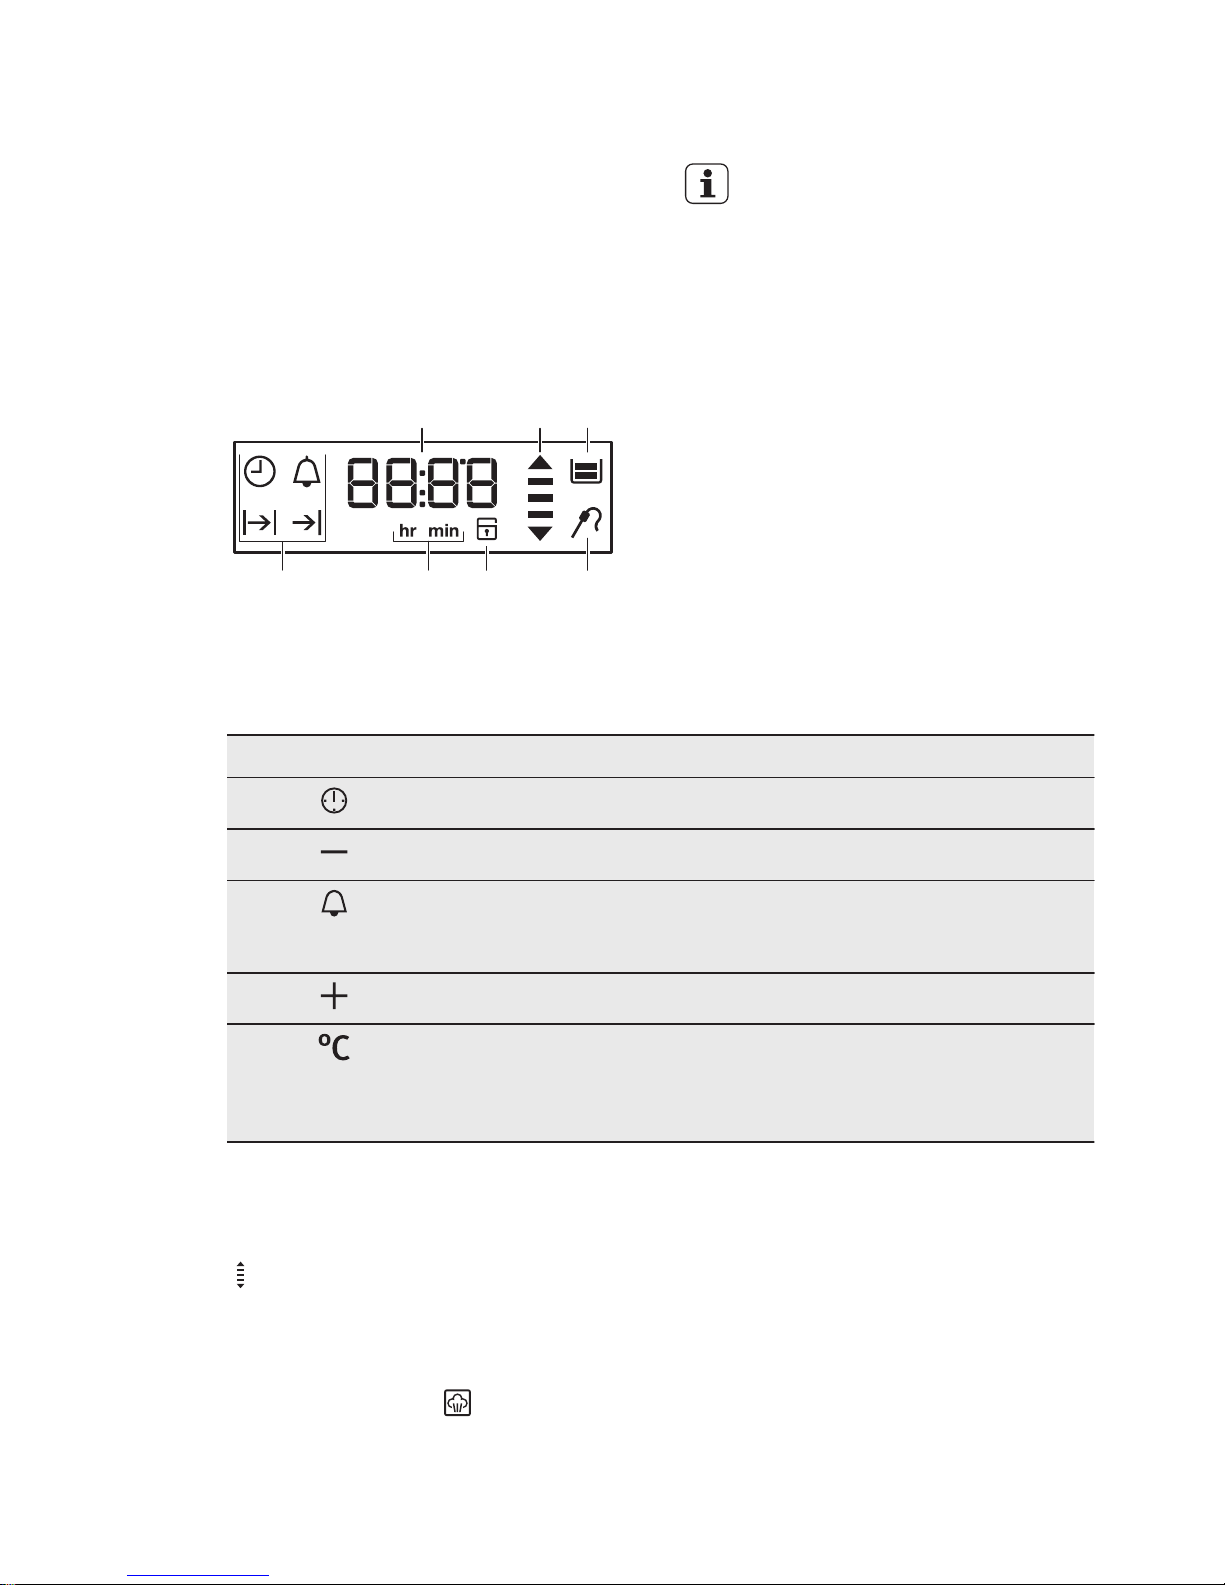
5.4 Kiirkuumutuse funktsioon
Kiirkuumutuse funktsioon lühendab
kuumutusaega.
1. Valige kiirkuumutuse funktsioon. Vt
ahjufunktsioonide tabelit.
2. Temperatuuri valimiseks keerake
temperatuurinuppu.
Helisignaal kõlab, kui seade saavutab
valitud temperatuuri.
Pärast helisignaali
kiirkuumutuse funktsioon välja
ei lülitu. Funktsioon tuleb
käsitsi välja lülitada.
3. Valige ahju funktsioon.
5.5 Ekraan
A B C
D
EFG
A) Taimer
B) Kuumutuse ja jääkkuumuse
indikaator
C) Veesahtel (ainult mõnel mudelil)
D) Toidutermomeeter (ainult mõnel
mudelil)
E) Ukselukk (ainult mõnel mudelil)
F) Tunnid/minutid
G) Kella funktsioonid
5.6 Nupud
Nupp Funktsioon Kirjeldus
KELL Kella funktsiooni määramiseks.
MIINUS Kellaaja valimiseks.
MINUTILUGEJA MINUTILUGEJA valimiseks. Ahjuval‐
gusti sisse- või väljalülitamiseks vajut‐
age nuppu vähemalt 3 sekundit.
PLUSS Kellaaja valimiseks.
TEMPERATUUR Ahju temperatuuri või toidutermomeetri
(kui see on olemas) temperatuuri kon‐
trollimiseks. Kasutage ainult töötava
ahjufunktsiooni puhul.
5.7 Kuumutusindikaator
Ahju funktsiooni sisselülitamisel
kuvatakse ekraanil üksteise järel tulbad
. Tulbad näitavad ahju temperatuuri
alanemist või tõusmist.
5.8 Auruküpsetus
1. Valige funktsioon .
2. Veesahtli avamiseks vajutage
kattele. Kallake veepaaki vett, kuni
süttib täis veepaagi indikaator.
Veepaagi maksimaalne maht on 900 ml.
Sellest piisab umbes 55 - 60 minutiliseks
küpsetamiseks.
EESTI 43
Page 44
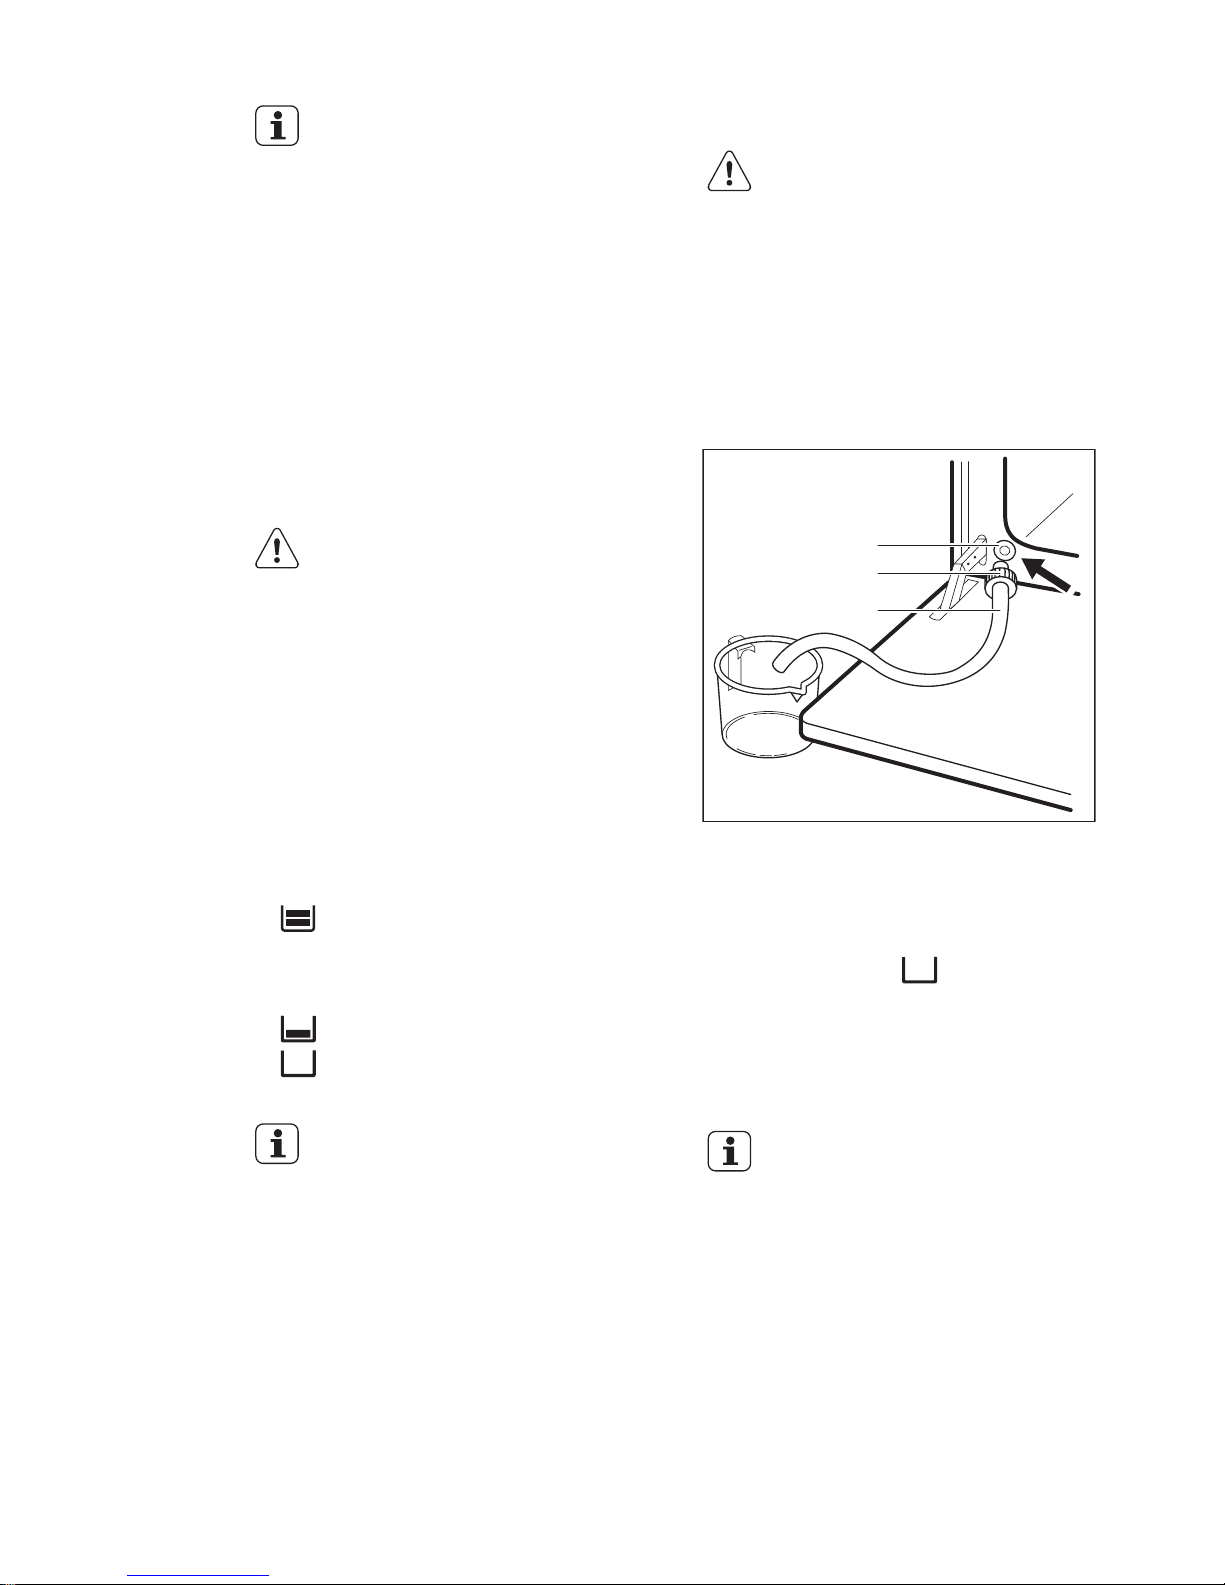
Kasutage vedelikuna ainult
vett. Ärge kasutage filtreeritud
(demineraliseeritud) ega
destilleeritud vett. Ärge
kasutage muid vedelikke!
Ärge valage veesahtlisse
süttivaid alkohoolseid
vedelikke (grappat, viskit,
konjakit vms).
3. Lükake veesahtel oma kohale.
4. Pange toiduained õigesse
küpsetusnõusse.
5. Seadke temperatuur vahemikus 130
°C kuni 230 °C.
Üle 230 °C jääva temperatuuri juures
auruküpsetus häid tulemusi ei anna.
HOIATUS!
Pärast iga auruküpsetust
tuleks vähemalt 60 minutit
oodata, et hoida ära kuuma
vee sattumine vee
väljalaskeavasse.
Tühjendage veepaak pärast iga
auruküpsetust.
5.9 Veepaagi indikaator
Auruküpsetuse kasutamisel kuvatakse
ekraanil veepaagi indikaator. Veepaagi
indikaator näitab vee taset paagis.
• – veepaak on täis. Kui veepaak
saab täis, kõlab helisignaal. Vajutage
suvalist nuppu, et helisignaal välja
lülitada.
•
– veepaak on pooltäis.
• – veepaak on tühi. Kui kõlab
helisignaal, tuleb veepaaki täita.
Kui kallate veepaaki liiga palju
vett, juhib turvaväljalaskeava
liigse vee ahju põhjale.
Eemaldage liigne vesi lapi või
käsnaga.
5.10 Veepaagi tühjendamine
ETTEVAATUST!
Enne veepaagi tühjendamist
veenduge, et seade on
jahtunud.
1. Valmistage ette äravoolutoru (C),
mille leiate kasutusjuhendiga samast
pakendist. Kinnitage konnektor (B)
äravoolutoru ühe otsa külge.
2. Asetage äravoolutoru (C) teine ots
anumasse. Paigutage see
väljalaskeklapist (A) allapoole.
B
C
A
3. Avage ahju uks ja kinnitage
konnektor (B) väljalaskeklapi (A)
külge.
4. Veepaagi tühjendamisel suruge
konnektorit pidevalt klapi suunas.
Vaatamata sümboli kuvamisele võib
veepaagis olla siiski veidi vett.
Oodake, kuni vee väljavool
väljalaskeklapi kaudu lõpeb.
5. Kui vett enam ei voola, võtke
konnektor klapi küljest lahti.
Ärge kasutage väljalastud vett
veepaagi uuesti täitmiseks.
www.electrolux.com44
Page 45
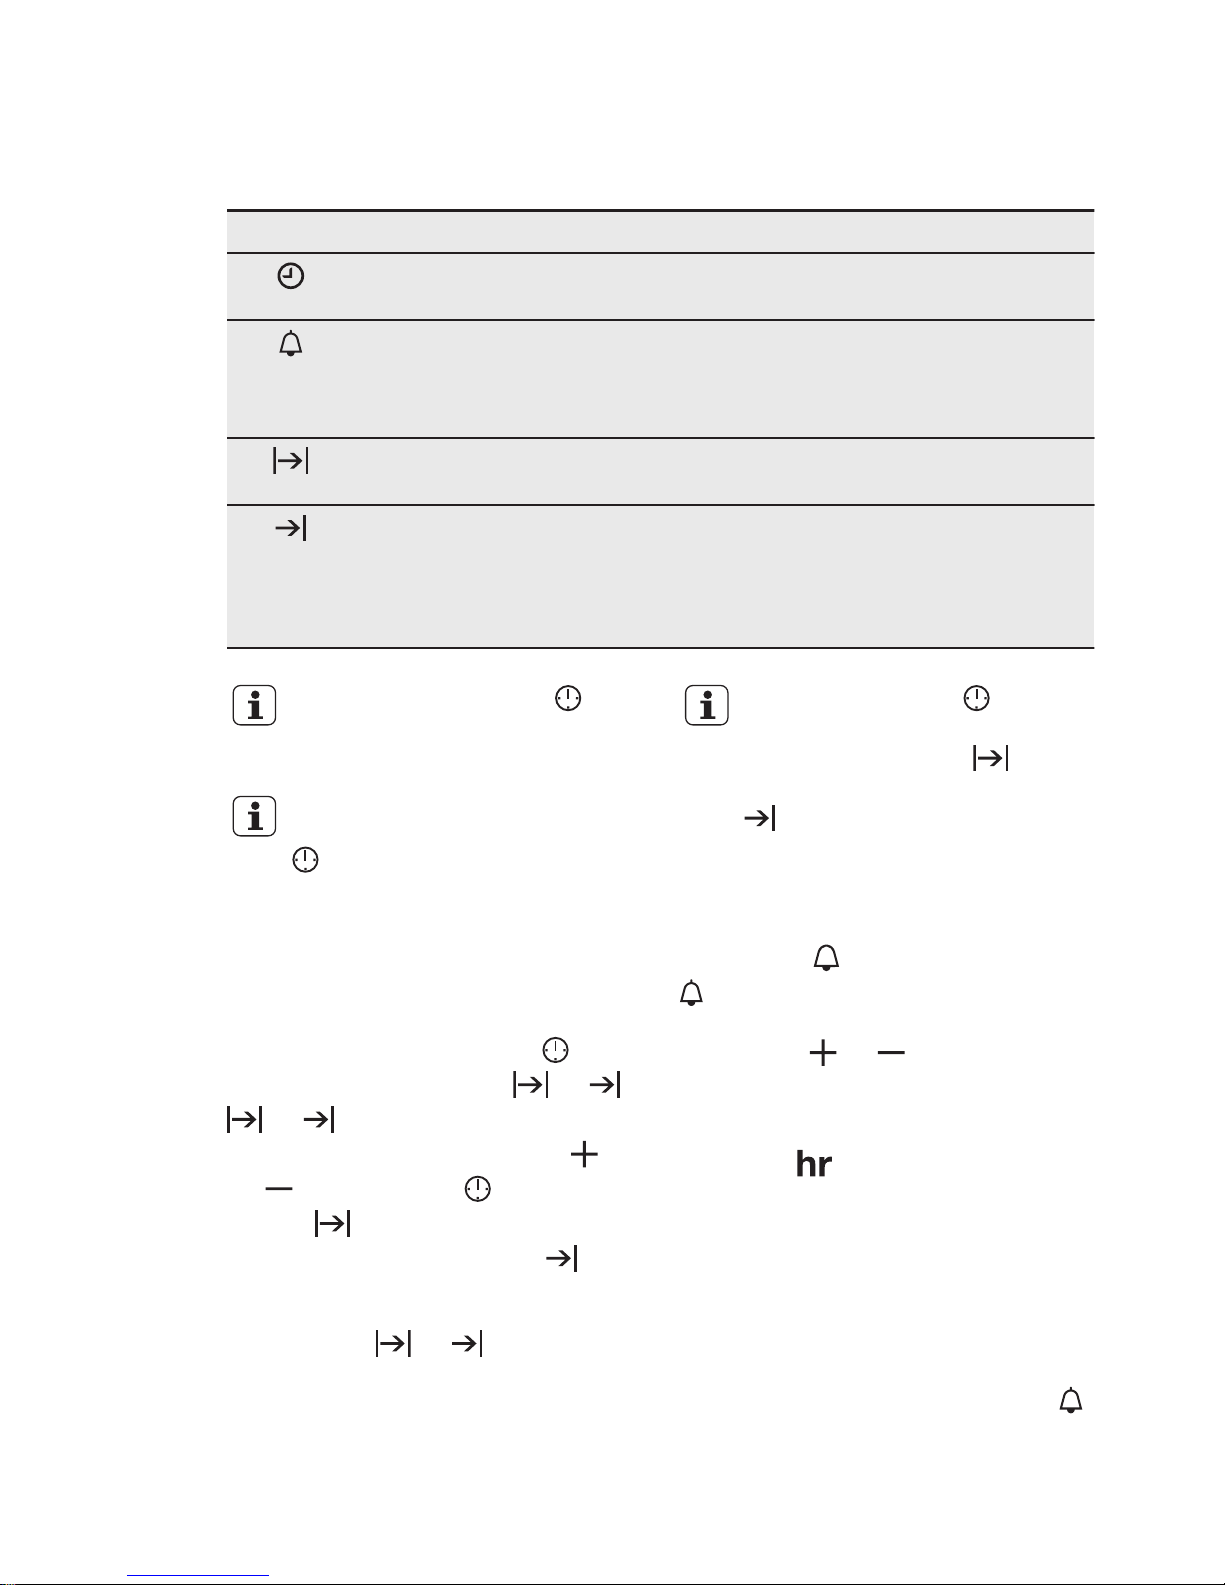
6. KELLA FUNKTSIOONID
6.1 Kellafunktsioonide tabel
Kellafunktsioon Rakendus
KELLAAEG Kellaaja määramiseks, muutmiseks või kontrollimi‐
seks. Vt jaotist "Kellaaja määramine".
MINUTILUGEJA Pöördloendusaja valimiseks (maksimaalselt 23 h 59
min). See funktsioon ei mõjuta seadme tööd. MINU‐
TILUGEJA saab määrata igal ajal, ka siis, kui seade
on välja lülitatud.
KESTUS Seadme tööaja kestuse määramiseks. Kasutage ai‐
nult siis, kui ahju funktsioon on määratud.
LÕPP Seadme väljalülitusaja määramiseks. Kasutage ai‐
nult siis, kui ahju funktsioon on määratud. Funkt‐
sioone Kestus ja Lõpp saate kasutada samaaegselt
(edasilükkamine), kui seade lülitatakse hiljem auto‐
maatselt sisse ja välja.
Vajutage korduvalt nuppu ,
et teha ümberlülitusi kella
funktsioonide vahel.
Kella funktsioonide seadete
kinnitamiseks vajutage nuppu
või oodake 5 sekundit,
mille järel toimub automaatne
kinnitamine.
6.2 Funktsioonide KESTUS ja
LÕPP seadmine
1. Vajutage mitu korda nuppu , kuni
ekraanil kuvatakse tekst või .
või vilgub ekraanil.
2. Väärtuste valimiseks vajutage või
ja kinnitamiseks .
Kestuse jaoks valige kõigepealt
minutid ja seejärel tunnid; Lõpu jaoks
kõigepealt tunnid ja siis minutid.
Aja lõppedes kostab helisignaal 2 minuti
vältel. Sümbol või ning ajaseade
vilguvad ekraanil. Ahi lülitub välja.
3. Vajutage suvalist nuppu, et
helisignaal välja lülitada.
Kui te vajutate nuppu
tunninäidu seadistamise ajal
funktsioonile KESTUS ,
läheb seade funktsiooni LÕPP
seadele.
6.3 MINUTILUGEJA
määramine
1. Vajutage .
ja "00" vilguvad ekraanil.
2. MINUTILUGEJA määramiseks
vajutage või . Alguses
arvestatakse aega minutites ja
sekundites. Kui valitud aeg on pikem
kui 60 minutit, ilmub ekraanile
sümbol
.
Nüüdsest arvestab seade aega tundides
ja minutites.
3. MINUTILUGEJA hakkab
automaatselt tööle viie sekundi
pärast.
Pärast 90% määratud aja möödumist
kõlab helisignaal.
4. Kui määratud aeg saab täis, kõlab
kaks minutit helisignaal. "00:00 ja
vilguvad ekraanil. Helisignaali
seiskamiseks vajutage mis tahes
nuppu.
EESTI 45
Page 46
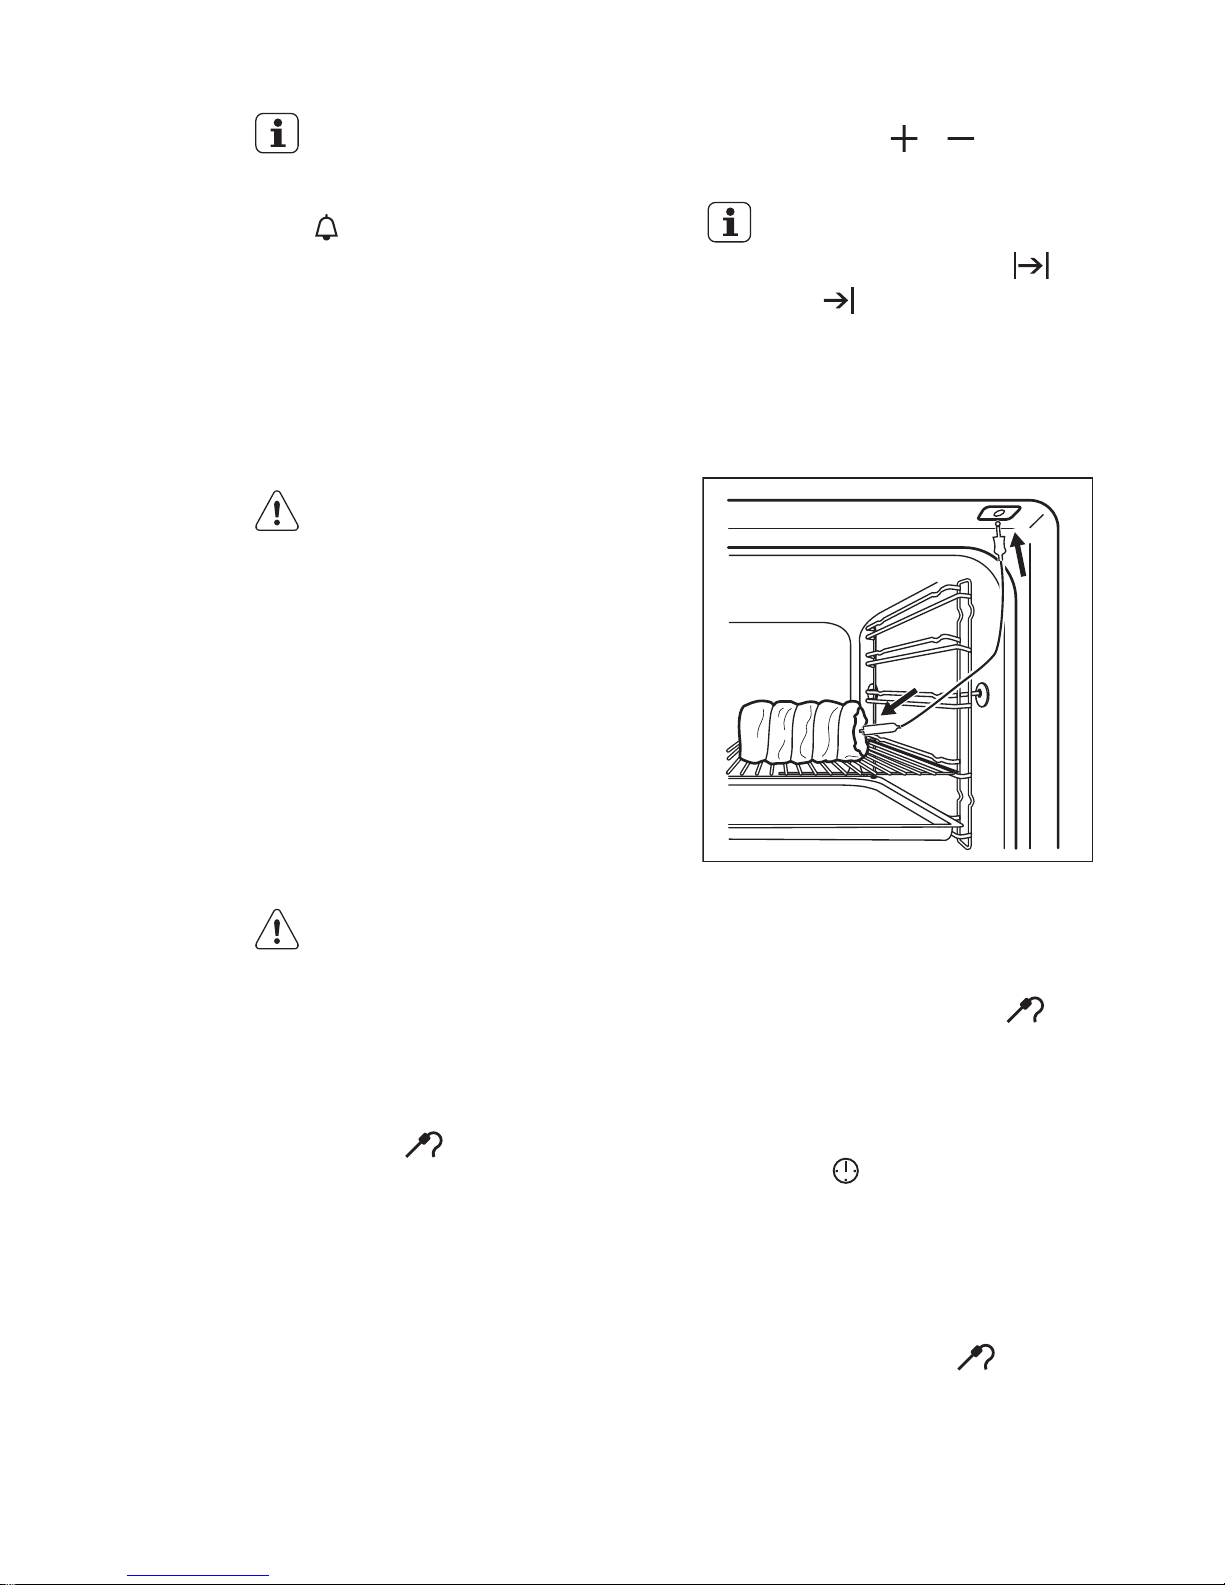
Kui määrate MINUTILUGEJA
siis, kui on kasutusel
funktsioonid KESTGB või
LÕPP, ilmub ekraanile sümbol
.
6.4 Loenduse taimer
Kasutage loenduse taimerit, et jälgida,
kui kaua ahi töötab. See hakkab tööle
niipea, kui ahi hakkab soojenema.
Loenduse taimeri lähtestamiseks
vajutage ja hoidke ja . Taimeri aeg
hakkab jälle jooksma
Loendustaimerit ei saa
kasutada koos
funktsioonidega: Kestus ,
Lõpp , Toidutermomeeter.
7. TARVIKUTE KASUTAMINE
HOIATUS!
Vt ohutust käsitlevaid
peatükke.
7.1 Toidutermomeetri
kasutamine
Toidutermomeeter mõõdab liha
sisetemperatuuri. Kui liha saavutab
määratud temperatuuri, siis lülitub seade
välja.
Silmas tuleb pidada kahte temperatuuri:
• Ahju temperatuur. Vt küpsetustabelit.
• Toidu sisetemperatuur. Vt
toidutermomeetri tabelit.
ETTEVAATUST!
Kasutage ainult seadmega
kaasasolevat
toidutermomeetrit ja
originaaltarvikuid.
1. Määrake ahju funktsioon ja ahju
temperatuur.
2. Suruge toidutermomeetri ots
(sümboliga käepidemel) liha
keskele.
3. Pange toidutermomeetri pistik ahju
ülaosas olevasse pessa.
Küpsetusprotsessi ajal peab
toidutermomeeter olema liha sees ja
teine ots vastavas pesas.
Toidutermomeetri esmakordsel
kasutamisel on vaikimisi valitud
sisetemperatuuriks 60 °C. Kui vilgub,
võite temperatuurinupu abil
sisetemperatuuri muuta.
Ekraanile ilmub toidutermomeetri sümbol
ja vaike-sisetemperatuur.
4. Uue sisetemperatuuri salvestamiseks
vajutage või oodake 10 sekundit,
kuni seade salvestatakse
automaatselt.
Uus sisetemperatuur kuvatakse ekraanil
järgmisel toidutermomeetri kasutamisel.
Kui liha saavutab määratud
sisetemperatuuri, hakkavad
toidutermomeetri sümbol
ja
sisetemperatuuri näit vilkuma.
Helisignaal kostab kaks minutit.
5. Vajutage suvalist nuppu, et
helisignaal välja lülitada.
www.electrolux.com46
Page 47
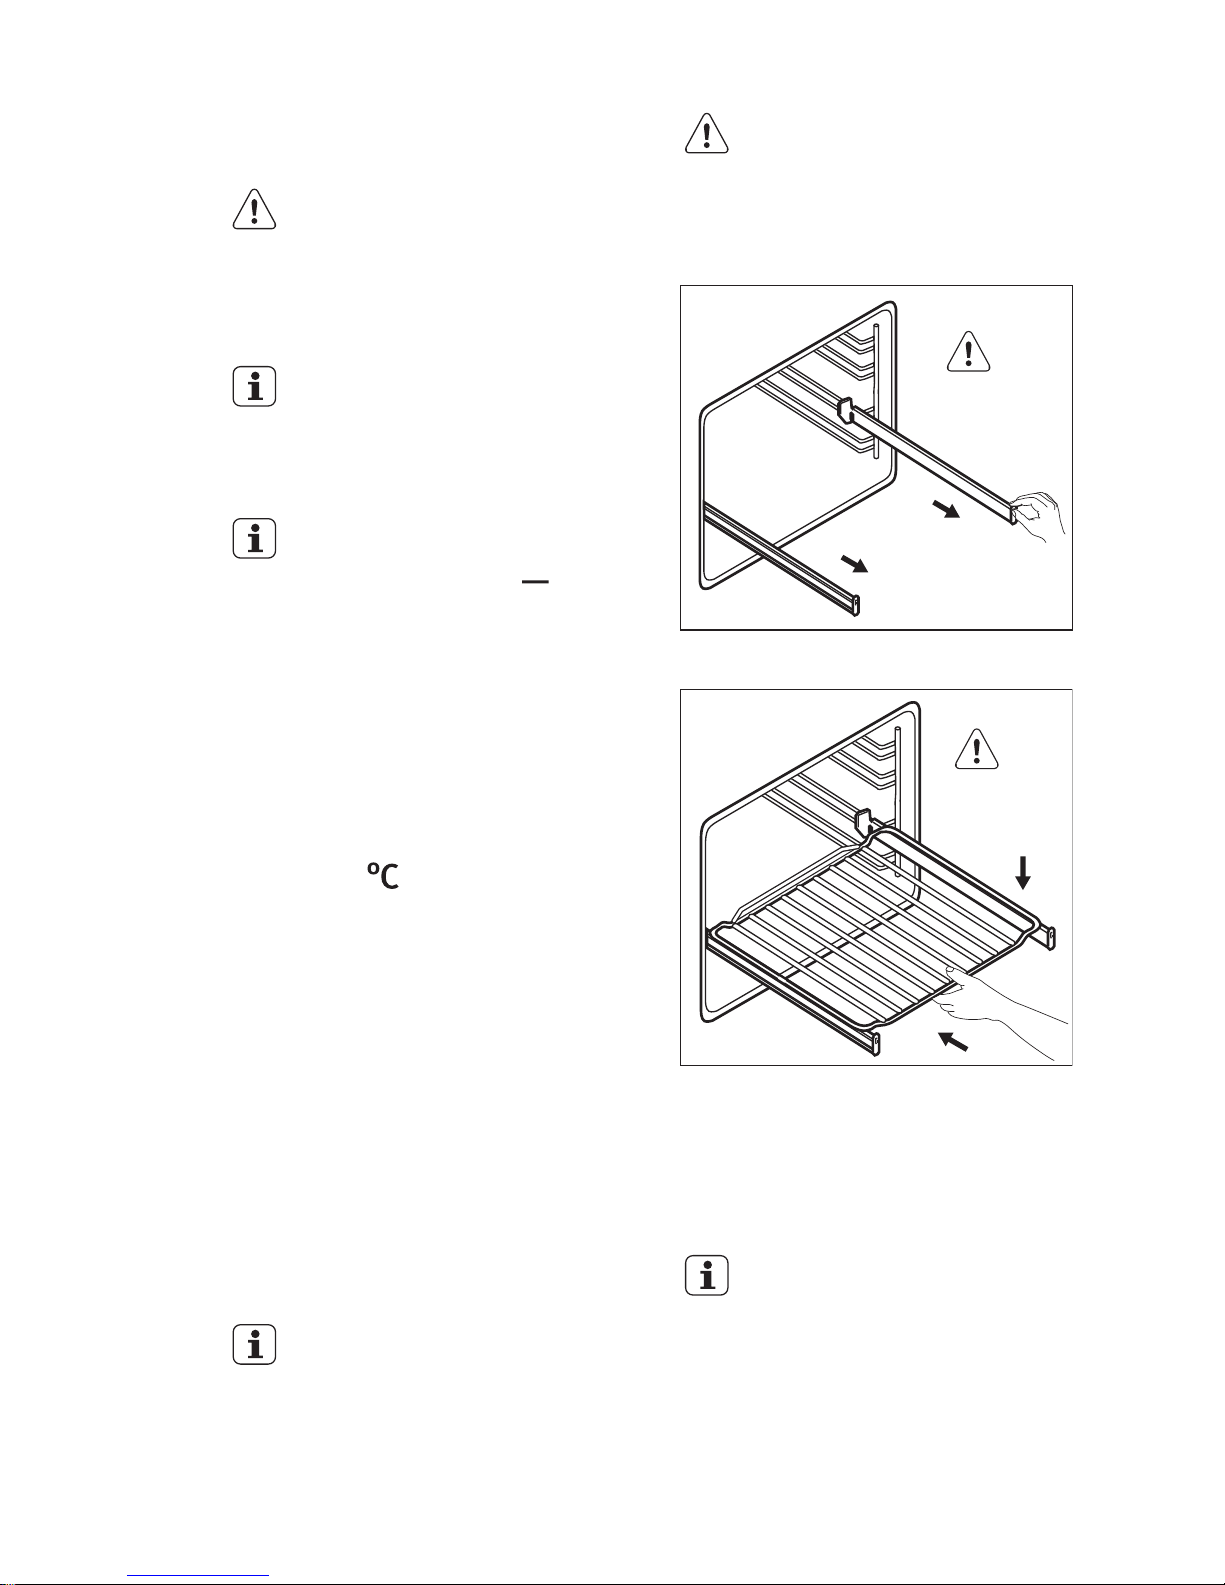
6. Eemaldage toidutermomeetri pistik
pesast. Võtke liha ahjust välja.
7. Lülitage seade välja.
HOIATUS!
Olge ettevaatlik, kui
eemaldate toidutermomeetri
otsa ja pistikut.
Toidutermomeeter on tuline.
Põletusoht!
Iga kord, kui te
toidutermomeetri otsa
pesasse panete, tuleb teil
uuesti valida kestus ja
lõpuaeg.
Kui seade arvutab eeldatavat
kestusaega esimest korda,
vilgub ekraanil sümbol .
Arvutamise lõppedes
kuvatakse ekraanil küpsetuse
kestus. Küpsetamise ajal
arvutatakse aega pidevalt
ümber ja vajadusel
uuendatakse ekraanil olevat
kestuse väärtust.
Küpsetamise ajal võite te
sisetemperatuuri alati muuta:
1. Vajutage: :
• Üks kord – ekraanil kuvatakse
valitud sisetemperatuur, mis
muutub vastavalt olemasolevale
sisetemperatuurile iga 10 sekundi
järel.
• Kaks korda – ekraanil kuvatakse
olemasolev ahju temperatuur, mis
muutub vastavalt valitud
ahjutemperatuurile iga 10 sekundi
järel.
• Kolm korda – ekraanil kuvatakse
valitud ahjutemperatuur.
2. Temperatuuri muutmiseks keerake
temperatuurinuppu.
7.2 Teleskoopsiinid
Teleskoopsiinide
paigaldusjuhised hoidke
tuleviku tarbeks alles.
Teleskoopsiinide abil saab ahjuriiuleid
mugavamalt sisse lükata ja välja võtta.
ETTEVAATUST!
Ärge peske teleskoopsiine
nõudepesumasinas. Ärge
teleskoopsiine õlitage.
1. Tõmmake mõlemad teleskoopsiinid
välja.
°C
2. Asetage traatrest teleskoopsiinidele
ja lükake siinid ettevaatlikult sisse.
°C
Enne ahju ukse sulgemist peavad
teleskoopsiinid olema täielikult
seadmesse sisse lükatud.
7.3 Auruküpsetamisel
kasutatavad nõud
Aurukomplekti tarvikud ei ole
seadmega kaasas. Lisateabe
saamiseks pöörduge palun
kohaliku edasimüüja poole.
Dieettoiduvorm auruküpsetusega
funktsioonidele
Nõu koosneb klaasnõust, kaanest, milles
on avaus injektori toru jaoks (C) ja
EESTI 47
Page 48
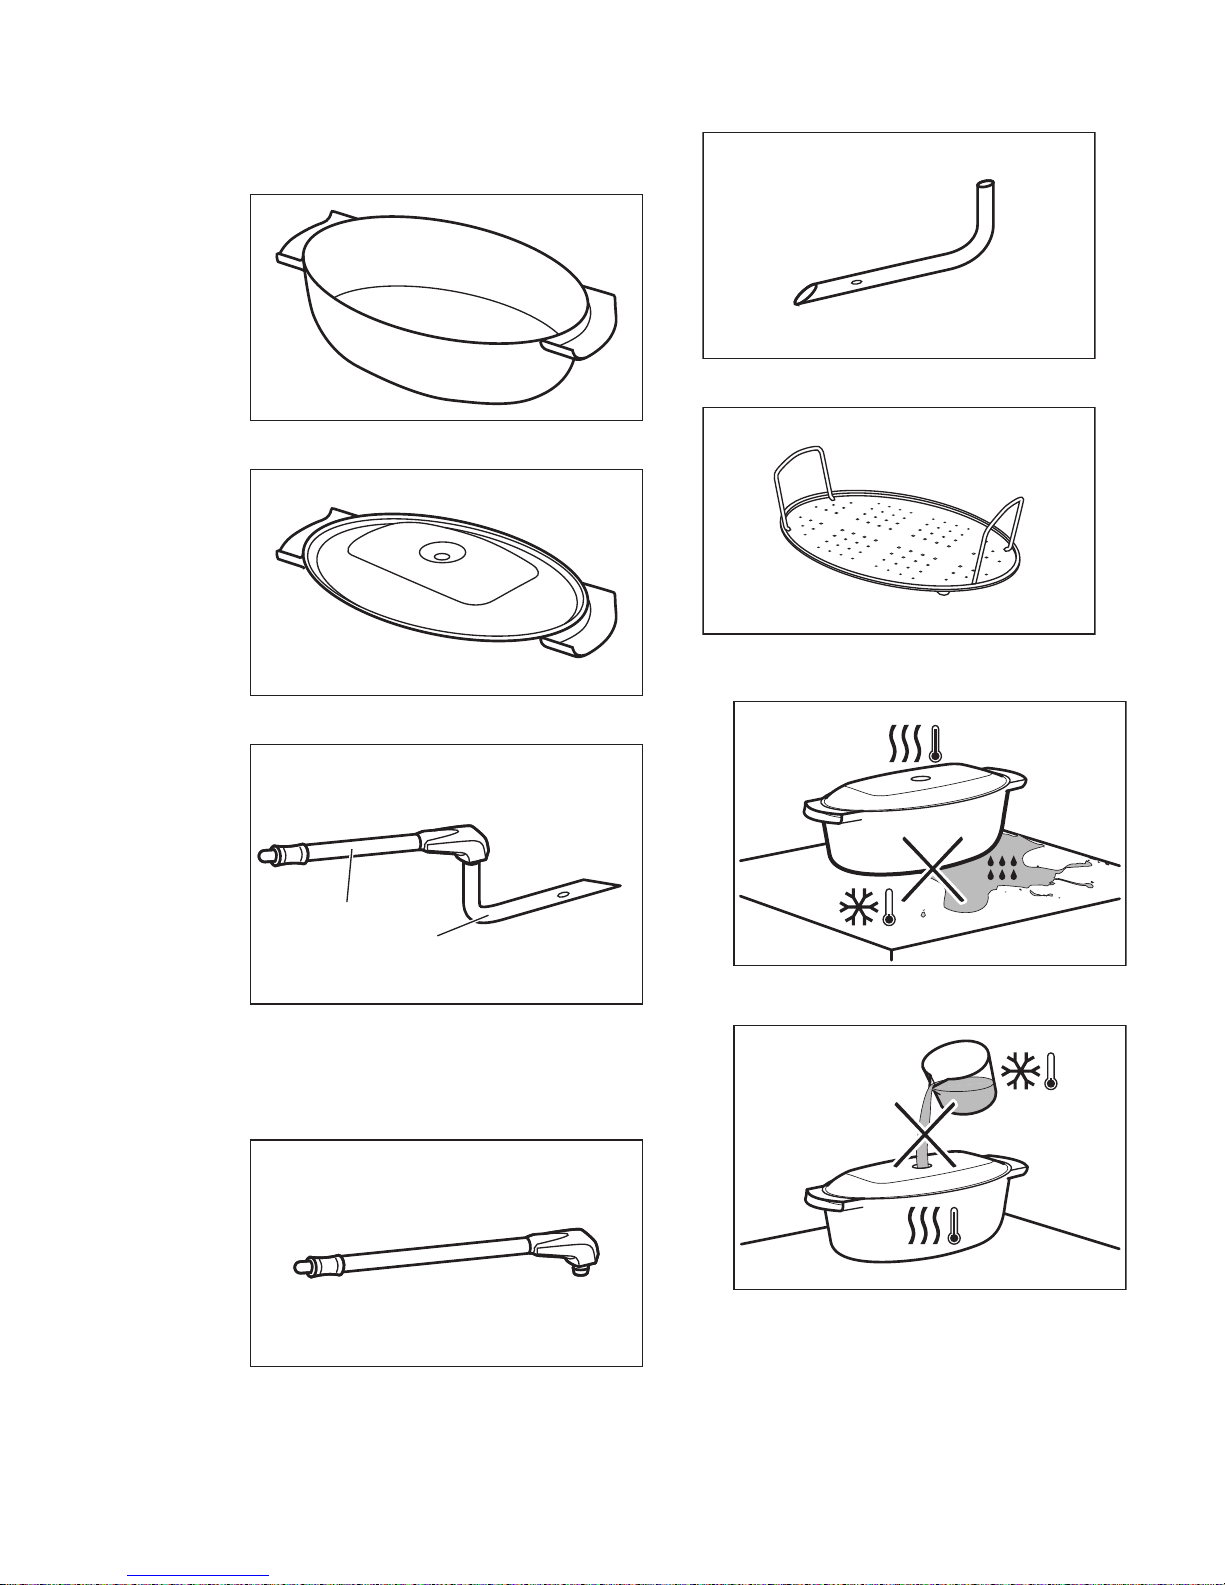
terasrestist, mis asetatakse küpsetusnõu
põhjale.
Klaasnõu (A)
Kaas (B)
Injektor ja injektori toru
C
D
"C" on injektori toru auruküpsetuseks,
"D" on injektor otseseks
auruküpsetuseks.
Injektori toru (C)
Injektor otseseks auruküpsetuseks (D)
Terasrest (E)
• Ärge asetage kuuma küpsetusnõud
külmale või märjale pinnale.
• Ärge kallake kuuma küpsetusnõusse
külma vedelikku.
• Ärge kasutage küpsetusnõud tulisel
pliidipinnal.
www.electrolux.com48
Page 49
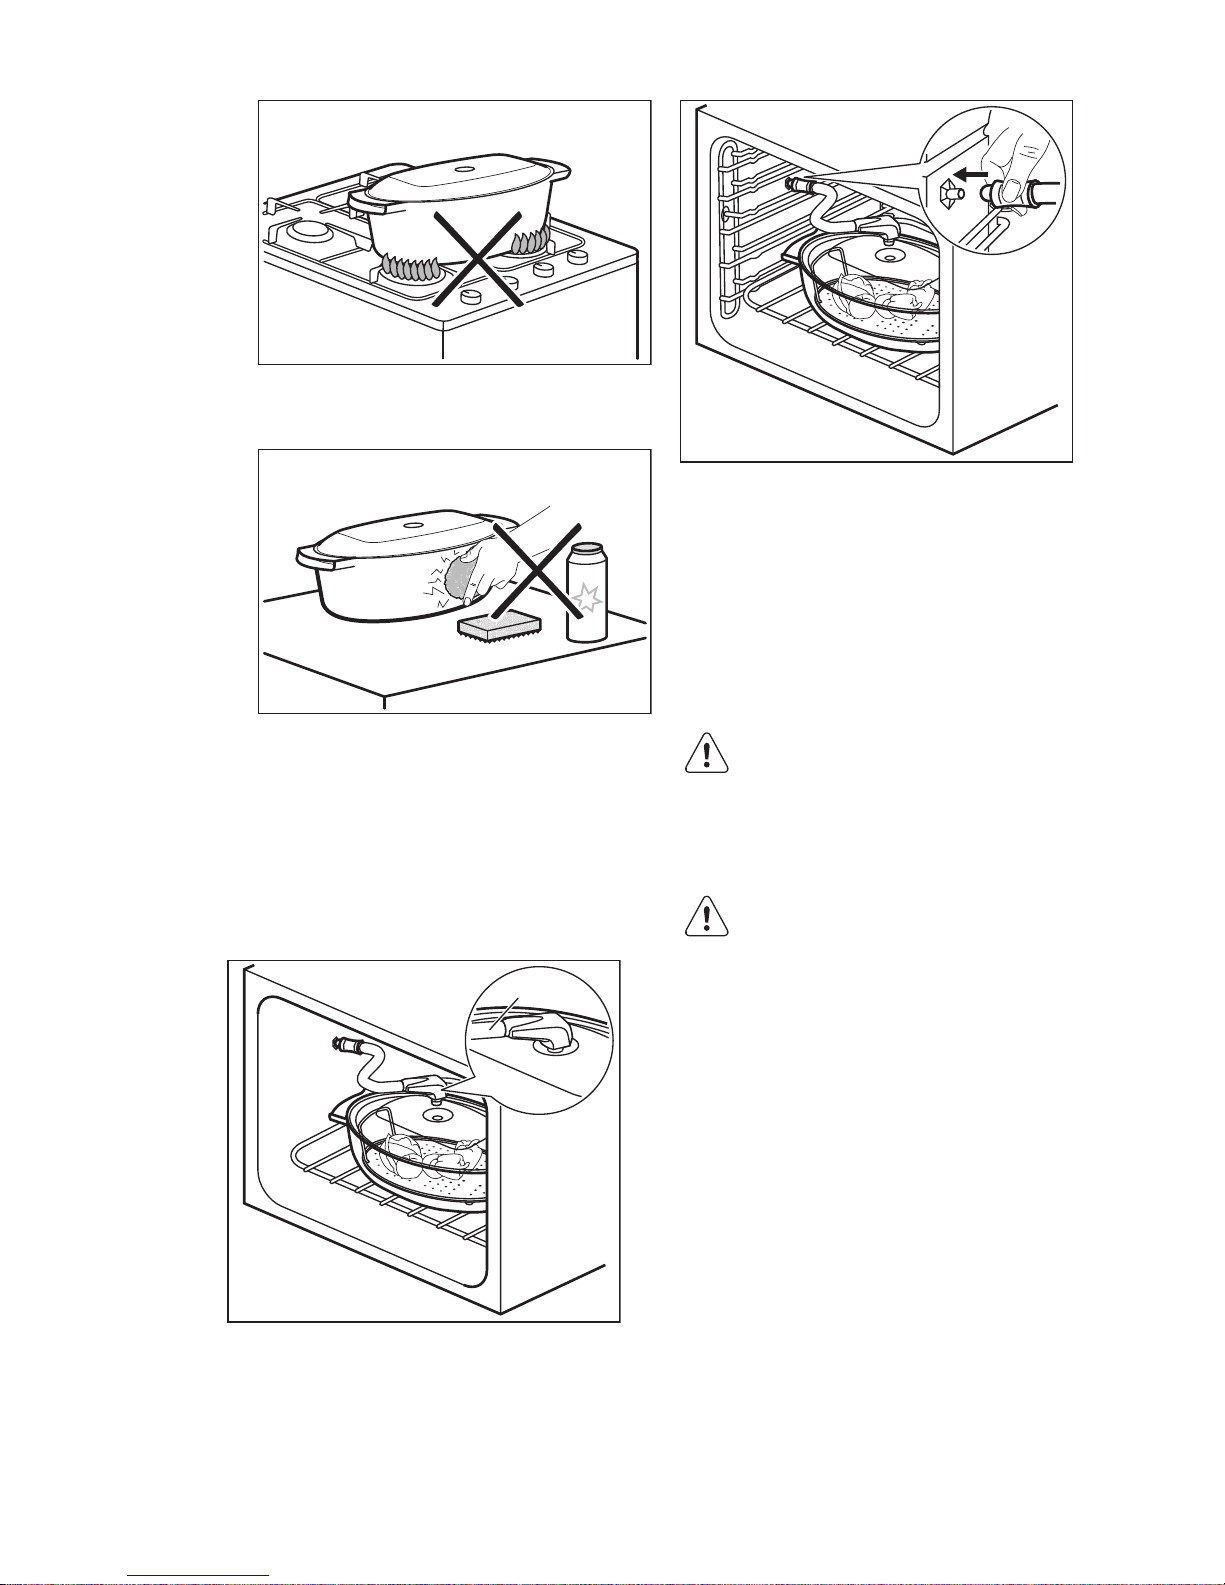
• Ärge puhastage küpsetusnõud
abrasiivsete ainete või
küürimispastadega.
7.4 Auruküpsetus
dieettoiduvormis
Pange toit küpsetusnõus olevale
terasrestile ja pange kaas peale.
1. Lükake injektori toru spetsiaalsesse
dieettoiduvormi kaanes olevasse
avasse.
C
2. Pange küpsetusvorm altpoolt
lugedes teisele ahjutasandile.
3. Pange injektoritoru teine ots
auruväljalaskeavasse.
Jälgige, et injektori toru ei oleks
tõkestatud ega puutuks vastu ahju laes
olevat kuumutuselementi.
4. Seadke ahi auruküpsetuse
funktsioonile.
7.5 Otsene auruküpsetus
Pange toit küpsetusnõus olevale
terasrestile. Lisage veidi vett.
ETTEVAATUST!
Ärge kasutage nõu kaant.
Injektori toru on mõeldud spetsiaalselt
küpsetamiseks ega sisalda ohtlikke
materjale.
HOIATUS!
Olge ettevaatlik, kui kasutate injektorit
ahju töötamise ajal. Kui ahi on kuum,
kasutage injektori käsitsemisel alati
pajakindaid. Kui te aurufunktsiooni ei
kasuta, eemaldage injektorid alati ahjust.
1. Pange injektor (D) injektori toru (C)
otsa. Ühendage teine ots auru
sisselaskeavasse.
EESTI 49
Page 50
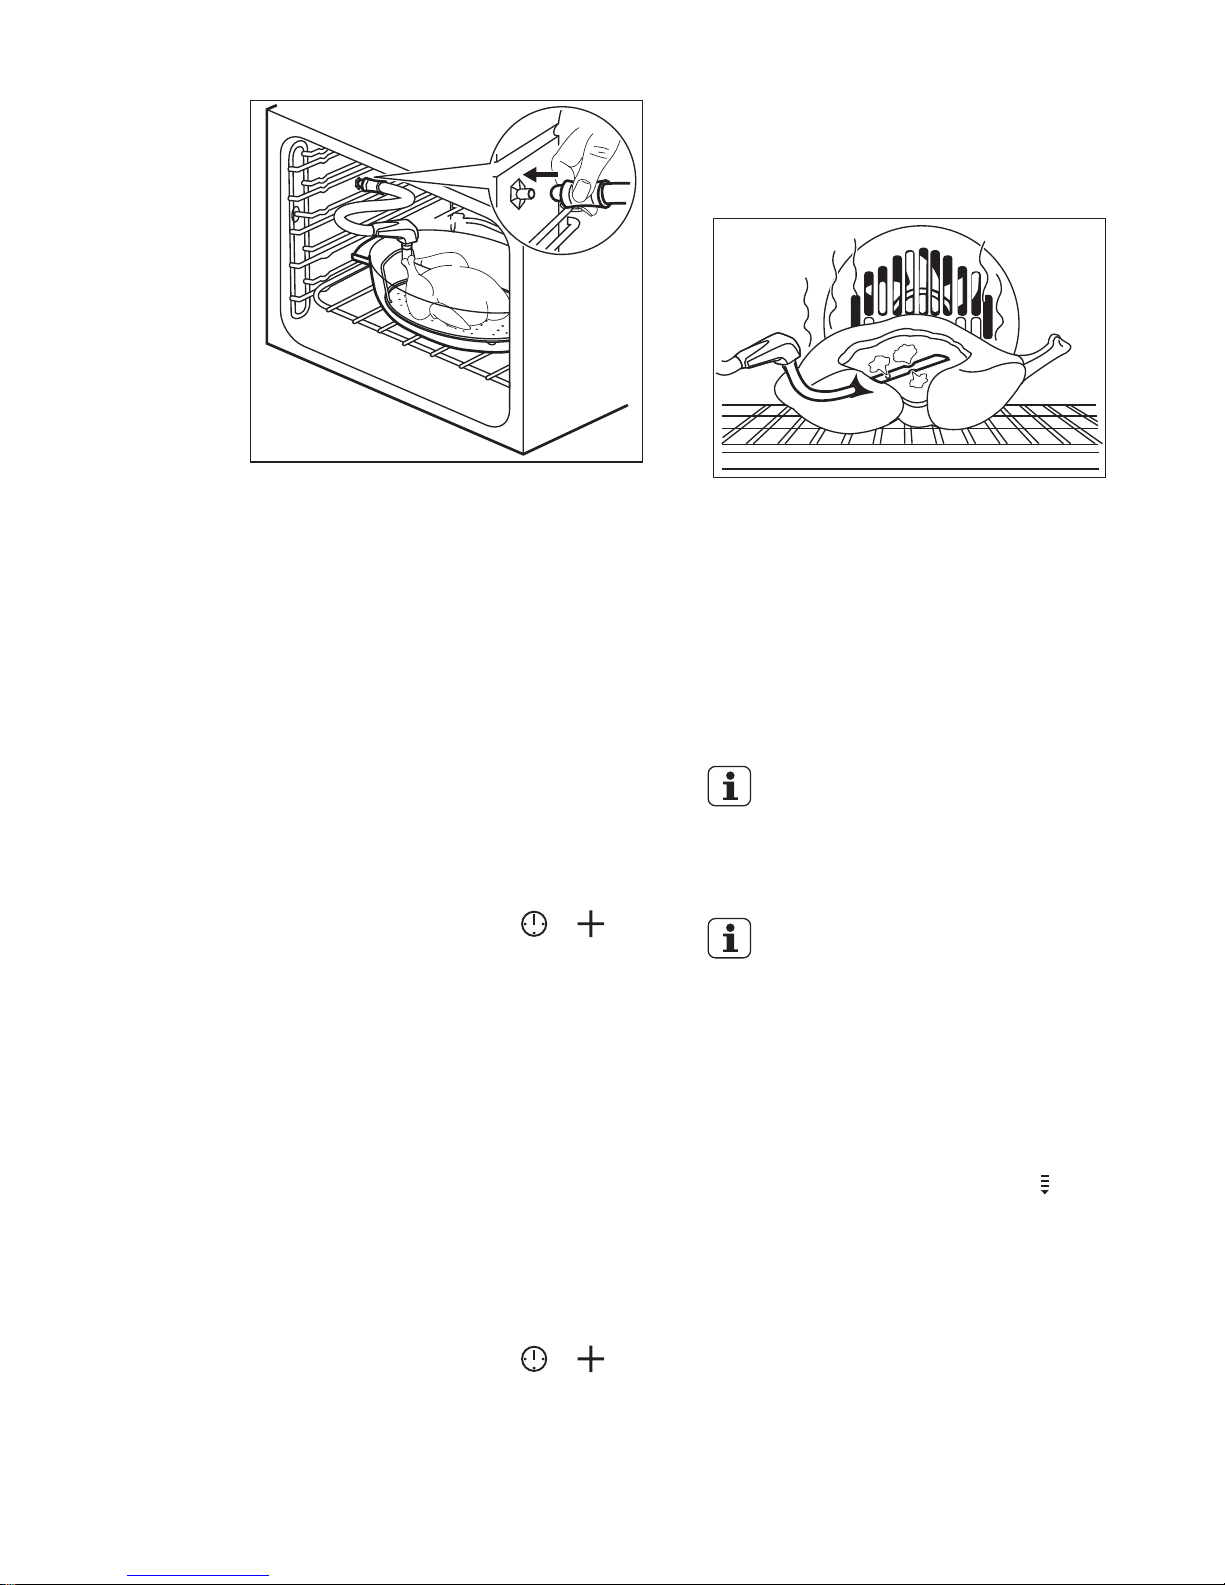
2. Pange küpsetusvorm altpoolt
lugedes esimesele või teisele
ahjutasandile.
Jälgige, et injektori toru ei oleks
tõkestatud ega puutuks vastu ahju laes
olevat kuumutuselementi.
3. Seadke ahi auruküpsetuse
funktsioonile.
Kui küpsetate kana, parti, kalkunit,
talleliha, suuremat kala vms, pange
injektor (D) otse liha õõnsusse. Jälgige,
et avad ei oleks blokeeritud.
Lisateavet auruküpsetuse kohta leiate
jaotisest "Vihjeid ja näpunäiteid"
auruküpsetuse tabelitest.
8. LISAFUNKTSIOONID
8.1 Lapseluku kasutamine
Lapselukk hoiab ära seadme kogemata
töölehakkamise.
1. Ärge ahju funktsiooni valige.
2. Vajutage ja hoidke 2 sekundit
samaaegselt all nuppu
ja .
Kõlab helisignaal. Ekraanile ilmub SAFE.
Lapseluku väljalülitamiseks korrake 2.
sammu.
8.2 Nuppude lukustuse
kasutamine
Nuppude lukustust saab sisse lülitada
ainult seadme töötamise ajal.
Nuppude lukustus hoiab ära kasutatava
funktsiooni temperatuuri ja ajaseadete
kogemata muutmise.
1. Valige ahju funktsioon ja reguleerige
seda vastavalt soovile.
2. Vajutage ja hoidke 2 sekundit
samaaegselt all nuppu
ja .
Kõlab helisignaal. Ekraanile ilmub Loc.
Nuppude lukustuse väljalülitamiseks
korrake 2. sammu.
Kui keerate või vajutate
temperatuuri nuppu, süttib
ekraanil sümbol Loc. Kui
keerate ahjufunktsioonide
nuppu, lülitub seade välja.
Kui lülitate seadme välja ajal,
mil nuppude lukustus on sees,
lülitub nuppude lukustuse
funktsioon automaatselt
lapselukufunktsioonile. Vt
"Lapseluku kasutamine".
8.3 Jääkkuumuse indikaator
Seadme väljalülitamisel kuvatakse
ekraanil jääkkuumuse indikaator
, kui
ahju temperatuur on üle 40 °C. Ahju
temperatuuri nägemiseks keerake
temperatuurinuppu vasakule või
paremale.
8.4 Automaatne väljalülitus
Turvakaalutlustel lülitub seade mõne aja
pärast automaatselt välja, kui ahju
funktsioon töötab ja te ühtegi seadet ei
muuda.
www.electrolux.com50
Page 51

Temperatuur (°C) Väljalülituse aeg
(h)
30 - 115 12.5
120 - 195 8.5
200 - 245 5.5
250 - maksimaalne 3
Pärast automaatset väljalülitust vajutage
mis tahes nuppu seadme uuesti
kasutamiseks.
Automaatne väljalülitus ei
tööta funktsioonidega:
Toidutermomeeter,
Sisevalgustus, Kestus, Lõpp.
8.5 Jahutusventilaator
Seadme töö ajal lülitub jahutusventilaator
automaatselt sisse, et hoida seadme
pinnad jahedana. Kui lülitate seadme
välja, jääb jahutusventilaator tööle, kuni
seade on maha jahtunud.
8.6 Ohutustermostaat
Seadme vale kasutamine või katkised
osad võivad põhjustada ohtlikku
ülekuumenemist. Selle ärahoidmiseks on
ahjul olemas ohutustermostaat, mis
katkestab toitevarustuse. Ahi lülitub
uuesti automaatselt sisse, kui
temperatuur on langenud.
9. VIHJEID JA NÄPUNÄITEID
HOIATUS!
Vt ohutust käsitlevaid
peatükke.
Tabelites esitatud
temperatuurid ja küpsetusajad
on ainult soovituslikud.
Täpsemalt sõltuvad need
retseptist ning kasutatava
tooraine kvaliteedist ja
kogustest.
9.1 Ukse sisekülg
Mõne mudeli puhul leiate ukse
siseküljelt:
• ahjutasandite numbrid.
• andmed ahju funktsioonide kohta ning
levinumate toitude soovitatavad
ahjutasandid ja temperatuurid.
9.2 Üldine teave
• Seadmes on viis riiulitasandit.
Alustage tasandite arvestamist alati
seadme põhjast.
• Seadmes on õhuringlust ja pidevat
aururinglust tekitav erisüsteem. See
võimaldab toitu valmistada
aurukeskkonnas, mis hoiab toidu
seest pehme ja pealt krõbedana.
Ahjus ringlev õhk kiirendab toidu
küpsemist ja vähendab energiatarvet
miinimumini.
• Niiskus võib kondenseeruda
seadmesse või selle
klaaspaneelidele. See on normaalne.
Kui avate ahju ukse toidu
valmistamise ajal, hoiduge alati
tahapoole. Kondenseerumise
vähendamiseks laske ahjul enne
küpsetamise alustamist 10 minutit
töötada.
• Kuivatage ahjust niiskus iga kord
pärast seadme kasutamist.
• Küpsetades ärge pange nõusid otse
ahju põhjale ega katke ahju osi
fooliumiga kinni. See võib muuta
küpsetamise tulemusi ja kahjustada
ahjuemaili.
9.3 Kookide küpsetamine
• Ärge avage ahjuust enne kui ¾
küpsetusajast on möödunud.
• Kui kasutate samaaegselt kahte
küpsetusplaati, hoidke nende vahele
jääv ahjutasand tühi.
9.4 Liha ja kala küpsetamine
• Väga rasvaste toitude küpsetamisel
kasutage sügavat panni, et vältida
ahju püsivate plekkide tekkimist.
EESTI 51
Page 52

• Et mahl lihast välja ei valguks, laske
prael enne lahtilõikamist umbes 15
minutit seista.
• Et ahjust küpsetamise ajal liiga palju
suitsu ei tuleks, kallake sügavasse
panni veidi vett. Suitsu
kondenseerumise vältimiseks lisage
vett kohe, kui see on ära auranud.
9.5 Toiduvalmistamise ajad
Toiduvalmistamise ajad sõltuvad toidu
tüübist, konsistentsist ja mahust.
Esialgu jälgige toiduvalmistamisel
seadme tööd. Leidke selle seadme
kasutamisel parimad seaded
(soojusaste, toiduvalmistamise aeg jne)
oma keedunõudele, retseptidele ja
kogustele.
9.6 Küpsetamise ja röstimise tabel
Koogid
Toit Ülemine + alumine
kuumutus
Pöördõhk Aeg
(min.)
Märkusi
Tempera‐
tuur (°C)
Ahju ta‐
sand
Tempera‐
tuur (°C)
Ahju ta‐
sand
Vahusta‐
tud road
170 2 160 3 (2 ja 4) 45 - 60 Koogivor‐
mis
Muretai‐
nas
170 2 160 3 (2 ja 4) 20 - 30 Koogivor‐
mis
Peti-juus‐
tukook
170 1 165 2 60 - 80 26 cm koo‐
givormis
Õunakook
(õunapiru‐
kas)
1)
170 2 160 2 (vasak
ja parem)
80 - 100 Kahes 20
cm koogi‐
vormis
traatrestil
Struudel 175 3 150 2 60 - 80 Küpsetus‐
plaadil
Keedise‐
kook
170 2 165 2 (vasak
ja parem)
30 - 40 26 cm koo‐
givormis
Keeks 170 2 160 2 50 - 60 26 cm koo‐
givormis
Jõulu‐
kook / rik‐
kaliku
puuvilja‐
täidisega
kook
1)
160 2 150 2 90 - 120 20 cm koo‐
givormis
Ploomi‐
kook
1)
175 1 160 2 50 - 60 Leivavor‐
mis
www.electrolux.com52
Page 53

Toit Ülemine + alumine
kuumutus
Pöördõhk Aeg
(min.)
Märkusi
Tempera‐
tuur (°C)
Ahju ta‐
sand
Tempera‐
tuur (°C)
Ahju ta‐
sand
Väikesed
koogid ühel ta‐
sandil
170 3 140 - 150 3 20 - 30 Küpsetus‐
plaadil
Väikesed
koogid kahel ta‐
sandil
- - 140 - 150 2 ja 4 25 - 35 Küpsetus‐
plaadil
Väikesed
koogid kolmel ta‐
sandil
- - 140 - 150 1, 3 ja 5 30 - 45 Küpsetus‐
plaadil
Küpsised/
soolapul‐
gad - ühel
tasandil
140 3 140 - 150 3 30 - 35 Küpsetus‐
plaadil
Küpsised/
soolapul‐
gad - ka‐
hel tasan‐
dil
- - 140 - 150 2 ja 4 35 - 40 Küpsetus‐
plaadil
Küpsised/
soolapul‐
gad - kol‐
mel tasan‐
dil
- - 140 - 150 1, 3 ja 5 35 - 45 Küpsetus‐
plaadil
Beseed ühel ta‐
sandil
120 3 120 3 80 - 100 Küpsetus‐
plaadil
Beseed kahel ta‐
sandil
1)
- - 120 2 ja 4 80 - 100 Küpsetus‐
plaadil
Kuklid
1)
190 3 190 3 12 - 20 Küpsetus‐
plaadil
Ekleerid ühel ta‐
sandil
190 3 170 3 25 - 35 Küpsetus‐
plaadil
Ekleerid kahel ta‐
sandil
- - 170 2 ja 4 35 - 45 Küpsetus‐
plaadil
EESTI 53
Page 54

Toit Ülemine + alumine
kuumutus
Pöördõhk Aeg
(min.)
Märkusi
Tempera‐
tuur (°C)
Ahju ta‐
sand
Tempera‐
tuur (°C)
Ahju ta‐
sand
Plaadi‐
koogid
180 2 170 2 45 - 70 20 cm koo‐
givormis
Rikkaliku
puuvilja‐
täidisega
kook
160 1 150 2 110 - 120 24 cm koo‐
givormis
Victoria
kook
170 1 160 2 50 - 60 20 cm koo‐
givormis
1)
Eelsoojendage 10 minutit.
Leib ja pitsa
Toit Ülemine + alumine
kuumutus
Pöördõhk Aeg
(min.)
Märkusi
Tempera‐
tuur (°C)
Ahju ta‐
sand
Tempera‐
tuur (°C)
Ahju ta‐
sand
Sai
1)
190 1 190 1 60 - 70 1-2 tk, 500
g/tk
Rukkileib 190 1 180 1 30 - 45 Leivavor‐
mis
Kuklid,
saia‐
kesed
1)
190 2 180 2 (2 ja 4) 25 - 40 6-8 saia
küpsetus‐
plaadil
Pitsa
1)
230 - 250 1 230 - 250 1 10 - 20 Küpsetus‐
plaadil või
sügaval
pannil
Kuklid
1)
200 3 190 3 10 - 20 Küpsetus‐
plaadil
1)
Eelsoojendage 10 minutit.
Tarretised
Toit Ülemine + alumine
kuumutus
Pöördõhk Aeg
(min.)
Märkusi
Tempera‐
tuur (°C)
Ahju ta‐
sand
Tempera‐
tuur (°C)
Ahju ta‐
sand
Pastavorm 200 2 180 2 40 - 50 Vormis
Juurvilja‐
vorm
200 2 175 2 45 - 60 Vormis
www.electrolux.com54
Page 55

Toit Ülemine + alumine
kuumutus
Pöördõhk Aeg
(min.)
Märkusi
Tempera‐
tuur (°C)
Ahju ta‐
sand
Tempera‐
tuur (°C)
Ahju ta‐
sand
Quiche
1)
180 1 180 1 50 - 60 Vormis
Lasanje
1)
180 - 190 2 180 - 190 2 25 - 40 Vormis
Cannello‐
ni
1)
180 - 190 2 180 - 190 2 25 - 40 Vormis
1)
Eelsoojendage 10 minutit.
Liha
Toit Ülemine + alumine
kuumutus
Pöördõhk Aeg
(min.)
Märkusi
Tempera‐
tuur (°C)
Ahju ta‐
sand
Tempera‐
tuur (°C)
Ahju ta‐
sand
Veiseliha 200 2 190 2 50 - 70 Traatrestil
Sealiha 180 2 180 2 90 - 120 Traatrestil
Vasikaliha 190 2 175 2 90 - 120 Traatrestil
Inglise
rostbiif,
väheküps
210 2 200 2 50 - 60 Traatrestil
Inglise
rostbiif,
poolküps
210 2 200 2 60 - 70 Traatrestil
Inglise
rostbiif,
täisküps
210 2 200 2 70 - 75 Traatrestil
Sea aba‐
tükk
180 2 170 2 120 - 150 Kamaraga
Sea säär‐
etükk
180 2 160 2 100 - 120 2 tükki
Lambaliha 190 2 175 2 110 - 130 Kints
Kana 220 2 200 2 70 - 85 Terve
Kalkun 180 2 160 2 210 - 240 Terve
Part 175 2 220 2 120 - 150 Terve
Hani 175 2 160 1 150 - 200 Terve
Küülikuli‐ha190 2 175 2 60 - 80 Tükkideks
lõigatuna
EESTI 55
Page 56
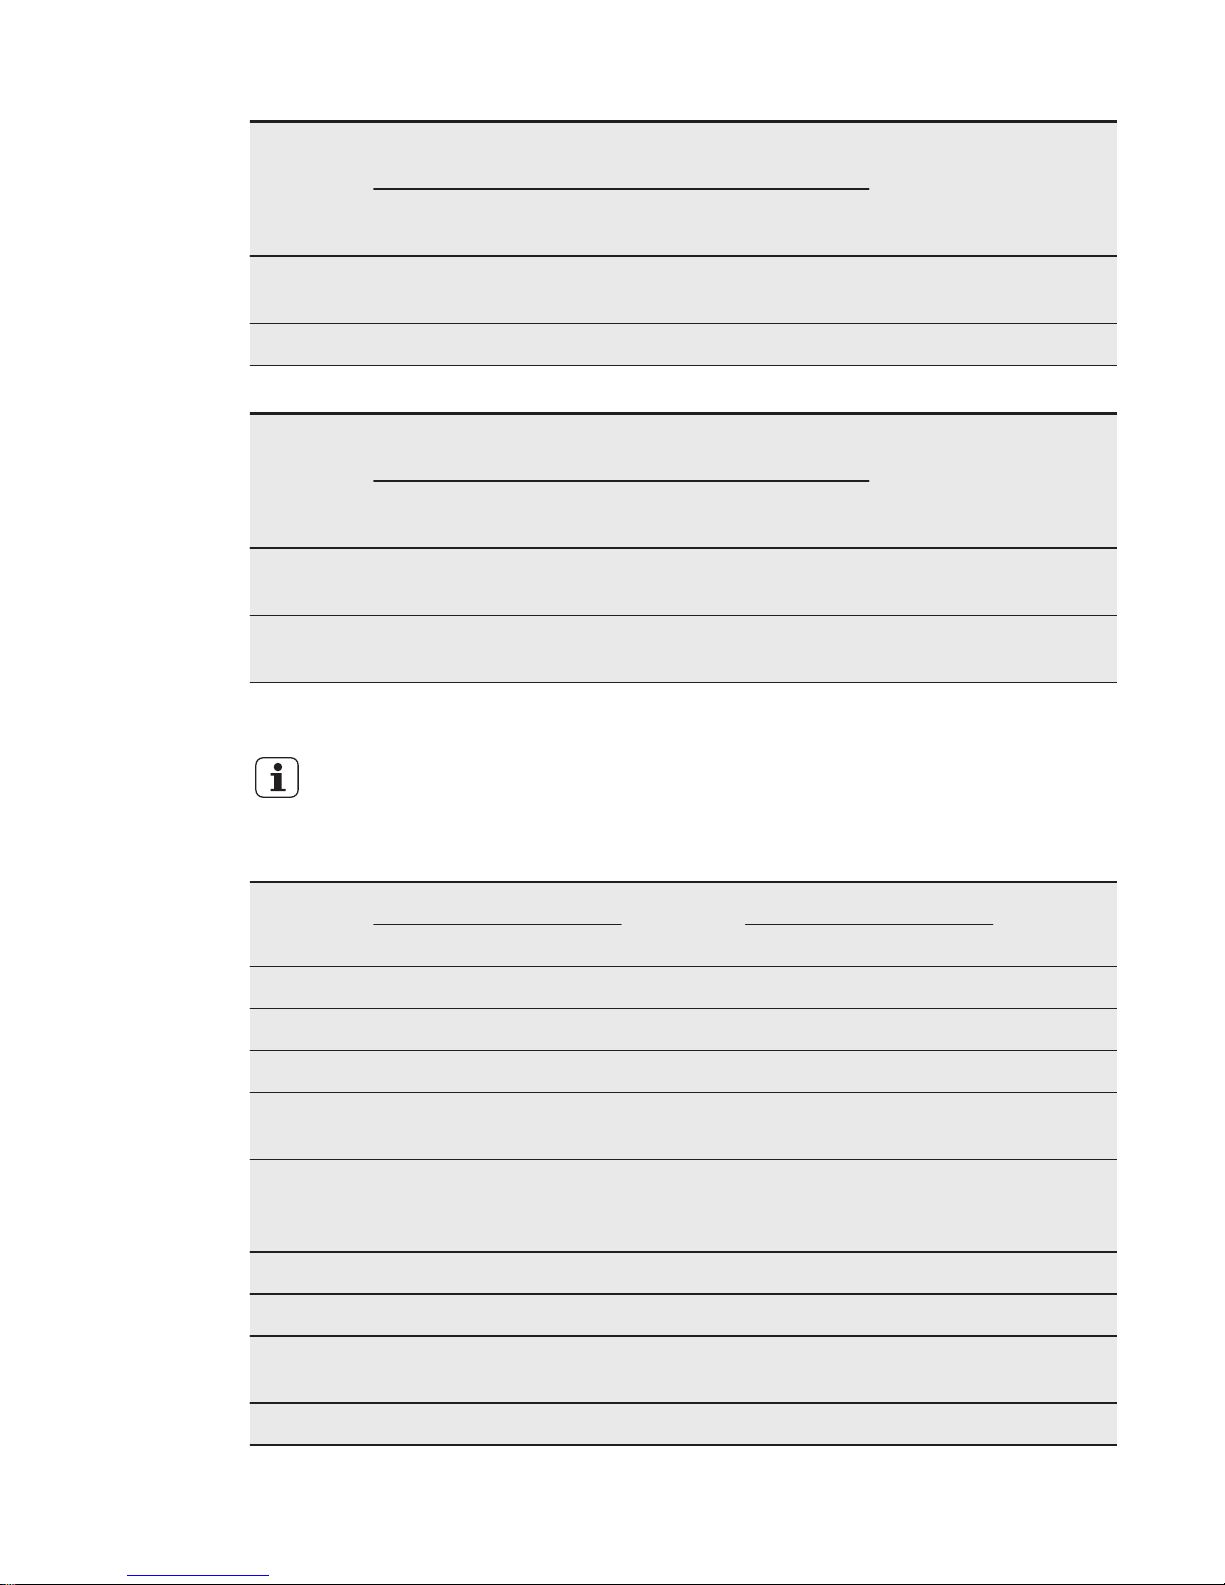
Toit Ülemine + alumine
kuumutus
Pöördõhk Aeg
(min.)
Märkusi
Tempera‐
tuur (°C)
Ahju ta‐
sand
Tempera‐
tuur (°C)
Ahju ta‐
sand
Jänes 190 2 175 2 150 - 200 Tükkideks
lõigatuna
Faasan 190 2 175 2 90 - 120 Terve
Kala
Toit Ülemine + alumine
kuumutus
Pöördõhk Aeg
(min.)
Märkusi
Tempera‐
tuur (°C)
Ahju ta‐
sand
Tempera‐
tuur (°C)
Ahju ta‐
sand
Forell/
merilatikas
190 2 175 2 40 - 55 3-4 kala
Tuunikala/
lõhe
190 2 175 2 35 - 60 4-6 fileed
9.7 Grill
Enne küpsetamist
eelkuumutage tühja ahju
umbes 3 minutit.
Toit Kogus Tempera‐
tuur (°C)
Aeg (min.) Ahju ta‐
sand
Tükki (g) 1. külg 2. külg
Sisefilee 4 800 maks. 12 - 15 12 - 14 4
Biifsteek 4 600 maks. 10 - 12 6 - 8 4
Vorstid 8 - maks. 12 - 15 10 - 12 4
Seakarbo‐
naad
4 600 maks. 12 - 16 12 - 14 4
Kana
(pooleks
lõigatuna)
2 1000 maks. 30 - 35 25 - 30 4
Kebabid 4 - maks. 10 - 15 10 - 12 4
Kanarind 4 400 maks. 12 - 15 12 - 14 4
Hambur‐
ger
6 600 maks. 20 - 30 - 4
Kalafilee 4 400 maks. 12 - 14 10 - 12 4
www.electrolux.com56
Page 57

Toit Kogus Tempera‐
tuur (°C)
Aeg (min.) Ahju ta‐
sand
Tükki (g) 1. külg 2. külg
Röstitud
sändvitšid
4 - 6 - maks. 5 - 7 - 4
Röstleib/sai
4 - 6 - maks. 2 - 4 2 - 3 4
9.8 Turbogrill
Veiseliha
Toit Kogus Temperatuur
(°C)
Aeg (min.) Ahju tasand
Rostbiif või filee,
väheküps
paksuse cm
kohta
190 - 200 5 - 6 1 või 2
Rostbiif või filee,
poolküps
paksuse cm
kohta
180 - 190 6 - 8 1 või 2
Rostbiif või filee,
täisküps
paksuse cm
kohta
170 - 180 8 - 10 1 või 2
Sealiha
Toit Kogus Temperatuur
(°C)
Aeg (min.) Ahju tasand
Abatükk, kael,
kints
1 - 1,5 kg 160 - 180 90 - 120 1 või 2
Karbonaad, ribi‐
praad
1 - 1,5 kg 170 - 180 60 - 90 1 või 2
Pikkpoiss 750 g - 1 kg 160 - 170 50 - 60 1 või 2
Seakoot (eelval‐
mistatud)
750 g - 1 kg 150 - 170 90 - 120 1 või 2
Vasikaliha
Toit Kogus (kg) Temperatuur
(°C)
Aeg (min.) Ahju tasand
Vasikapraad 1 160 - 180 90 - 120 1 või 2
Vasikakoot 1.5 - 2 160 - 180 120 - 150 1 või 2
Lambaliha
Toit Kogus (kg) Temperatuur
(°C)
Aeg (min.) Ahju tasand
Lambakoot,
lambapraad
1 - 1,5 kg 150 - 170 100 - 120 1 või 2
EESTI 57
Page 58

Toit Kogus (kg) Temperatuur
(°C)
Aeg (min.) Ahju tasand
Lamba selja‐
tükk
1 - 1,5 kg 160 - 180 40 - 60 1 või 2
Linnuliha
Toit Kogus Temperatuur
(°C)
Aeg (min.) Ahju tasand
Linnuliha ports‐
jonitükid
200–250 g/tk 200 - 220 30 - 50 1 või 2
Pool kana 400–500 g/tk 190 - 210 35 - 50 1 või 2
Kana, broiler 1 - 1,5 kg 190 - 210 50 - 70 1 või 2
Part 1,5 - 2 kg 180 - 200 80 - 100 1 või 2
Hani 3,5 - 5 kg 160 - 180 120 - 180 1 või 2
Kalkun 2,5 - 3,5 kg 160 - 180 120 - 150 1 või 2
Kalkun 4 - 6 kg 140 - 160 150 - 240 1 või 2
Kala
Toit Kogus Temperatuur
(°C)
Aeg (min.) Ahju tasand
Kala, terve 1 - 1,5 kg 210 - 220 40 - 60 1 või 2
9.9 Sulatamine
Toit Kogus
(g)
Sulatamise
aeg (min.)
Täiendav sula‐
tamisaeg (min)
Märkusi
Kana 1000 100 - 140 20 - 30 Asetage kana suurele
taldrikule kummulikeer‐
atud alustassi peale.
Pöörake poole aja möö‐
dudes.
Liha 1000 100 - 140 20 - 30 Pöörake poole aja möö‐
dudes.
Liha 500 90 - 120 20 - 30 Pöörake poole aja möö‐
dudes.
Forell 150 25 - 35 10 - 15 -
Maasikad 300 30 - 40 10 - 20 -
Või 250 30 - 40 10 - 15 -
www.electrolux.com58
Page 59

Toit Kogus
(g)
Sulatamise
aeg (min.)
Täiendav sula‐
tamisaeg (min)
Märkusi
Koor 2 x 200 80 - 100 10 - 15 Rõõska koort saab va‐
hustada ka siis, kui
selles on külmunud
tükke.
Kreemikook 1400 60 60 -
9.10 Kuivatamine - Pöördõhk
• Katke ahjuplaadid pärgamendi või
küpsetuspaberiga.
• Paremate tulemuste saamiseks
lülitage ahi poole kuivatamise peal
välja, tehke uks lahti ja jätke üheks
ööks jahtuma.
Juurvili
Toit Temperatuur
(°C)
Aeg (h) Ahju tasand
1. tasand 2 tasandit
Oad 60 - 70 6 - 8 3 1 / 4
Piprad 60 - 70 5 - 6 3 1 / 4
Köögivili ha‐
pendamiseks
60 - 70 5 - 6 3 1 / 4
Seened 50 - 60 6 - 8 3 1 / 4
Ürdid 40 - 50 2 - 3 3 1 / 4
Puuviljad
Toit Temperatuur
(°C)
Aeg (h) Ahju tasand
1. tasand 2 tasandit
Ploomid 60 - 70 8 - 10 3 1 / 4
Aprikoosid 60 - 70 8 - 10 3 1 / 4
Õunaviilud 60 - 70 6 - 8 3 1 / 4
Pirnid 60 - 70 6 - 9 3 1 / 4
9.11 Pöördõhk + aurutus
Koogid ja küpsetised
Toit Tempera‐
tuur (°C)
Aeg (min.) Ahju ta‐
sand
Märkusi
Õunakook
1)
160 60 - 80 2 20 cm koogivormis
Puuviljakoogid 175 30 - 40 2 26 cm koogivormis
EESTI 59
Page 60

Toit Tempera‐
tuur (°C)
Aeg (min.) Ahju ta‐
sand
Märkusi
Puuviljakook 160 80 - 90 2 26 cm koogivormis
Keeks 160 35 - 45 2 26 cm koogivormis
Panettonekeeks
1)
150 - 160 70 - 100 2 20 cm koogivormis
Ploomikook
1)
160 40 - 50 2 Leivavormis
Väikesed koogid 150 - 160 25 - 30 3 (2 ja 4) Küpsetusplaadil
Küpsised 150 20 - 35 3 (2 ja 4) Küpsetusplaadil
Magusad kuklid
1)
180 - 200 12 - 20 2 Küpsetusplaadil
Brioche-kuklid
1)
180 15 - 20 3 (2 ja 4) Küpsetusplaadil
1)
Eelsoojendage ahju 10 minutit.
Leib ja pitsa
Toit Kogus (g) Tempera‐
tuur (°C)
Aeg (min.) Ahju tasand Märkusi
Sai
1)
1000 180 - 190 45 - 60 2 1 - 2 tükki,
kumbki 500
g
Saia‐
kesed
1)
500 190 - 210 20 - 30 2 (2 ja 4) 6-8 saia kü‐
psetusplaa‐
dil
Pitsa
1)
- 200 - 220 20 - 30 2 Küpsetus‐
plaadil
1)
Eelsoojendage ahju 10 minutit.
Tarretised
Toit Tempera‐
tuur (°C)
Aeg
(min.)
Ahju ta‐
sand
Märkusi
Köögiviljatäidise‐ga170 - 180 30 - 40 1 Vormis
Lasanje 170 - 180 40 - 50 2 Vormis
Kartuligratään 160 - 170 50 - 60 1 (2 ja 4) Vormis
Liha
Toit Kogus (g) Temper‐
atuur
(°C)
Aeg
(min.)
Ahju ta‐
sand
Märkusi
Seapraad 1000 180 90 - 110 2 Traatrestil
www.electrolux.com60
Page 61

Toit Kogus (g) Temper‐
atuur
(°C)
Aeg
(min.)
Ahju ta‐
sand
Märkusi
Vasikaliha 1000 180 90 - 110 2 Traatrestil
Rostbiif – vä‐
heküps
1000 210 45 - 50 2 Traatrestil
Rostbiif –
poolküps
1000 200 55 - 65 2 Traatrestil
Rostbiif – täisk‐
üps
1000 190 65 - 75 2 Traatrestil
Lambaliha 1000 175 110 - 130 2 Kints
Kana 1000 200 55 - 65 2 Terve
Kalkun 4000 170 180 - 240 2 Terve
Part 2000 - 2500 170 - 180 120 - 150 2 Terve
Hani 3000 160 - 170 150 - 200 1 Terve
Küülikuliha - 170 - 180 60 - 90 2 Tükkideks lõiga‐
tuna
Kala
Toit Kogus
(g)
Tempera‐
tuur (°C)
Aeg
(min.)
Ahju ta‐
sand
Märkusi
Forell 1500 180 25 - 35 2 3-4 kala
Tuunikala 1200 175 35 - 50 2 4-6 fileed
Heik - 200 20 - 30 2 -
Auruga kuumutamine
Toit Temperatuur
(°C)
Aeg (min.) Ahju ta‐
sand
Märkusi
Vormiroad/
gratäänid
140 15 - 25 2 Kuumutage taldrikul
Pasta ja kaste 140 10 - 15 2 Kuumutage taldrikul
Lisandid (nt riis,
kartulid, pasta)
140 10 - 15 2 Kuumutage taldrikul
Ühe-taldriku-road 140 10 - 15 2 Kuumutage taldrikul
Liha 140 10 - 15 2 Kuumutage taldrikul
Juurvili 140 10 - 15 2 Kuumutage taldrikul
EESTI 61
Page 62

9.12 Küpsetamine
dieettoiduvormis
Kasutage funktsiooni Pöördõhk +
aurutus.
Juurvili
Toit Temperatuur (°C) Aeg (min.) Ahju tasand
Brokkoli, õisikud 150 20 - 25 2
Baklažaan 150 15 - 20 2
Lillkapsas, õisikud 150 25 - 30 2
Tomatid 150 15 2
Valge spargel 150 35 - 45 2
Roheline spargel 150 25 - 35 2
Suvikõrvits, viilud 150 20 - 25 2
Porgandid 150 35 - 40 2
Apteegitill 150 30 - 35 2
Nuikapsas 150 25 - 30 2
Paprikaribad 150 20 - 25 2
Selleriribad 150 30 - 35 2
Liha
Toit Temperatuur (°C) Aeg (min.) Ahju tasand
Keedusink 150 55 - 65 2
Pošeeritud kanarind 150 25 - 35 2
Suitsu-seaseljatükk 150 80 - 100 2
Kala
Toit Temperatuur (°C) Aeg (min.) Ahju tasand
Forell 150 25 - 30 2
Lõhefilee 150 25 - 30 2
Lisandid
Toit Temperatuur (°C) Aeg (min.) Ahju tasand
Riis 150 35 - 40 2
Koorimata kartulid,
keskmised
150 50 - 60 2
www.electrolux.com62
Page 63

Toit Temperatuur (°C) Aeg (min.) Ahju tasand
Keedetud kartulid,
sektorid
150 35 - 45 2
Polenta 150 40 - 45 2
9.13 Toidutermomeetri tabel
Toit Toidu sisetemperatuur (°C)
Vasikapraad 75 - 80
Vasikakoot 85 - 90
Inglise rostbiif, väheküps 45 - 50
Inglise rostbiif, poolküps 60 - 65
Inglise rostbiif, täisküps 70 - 75
Sea abatükk 80 - 82
Sea sääretükk 75 - 80
Lambaliha 70 - 75
Kana 98
Jänes 70 - 75
Forell/merilatikas 65 - 70
Tuunikala/lõhe 65 - 70
10. PUHASTUS JA HOOLDUS
HOIATUS!
Vt ohutust käsitlevaid
peatükke.
10.1 Juhised puhastamiseks
• Puhastage seadme esikülge pehme
lapiga ning sooja vee ja
pesuvahendiga.
• Kasutage metallpindade
puhastamiseks tavalist puhastusainet.
• Puhastage seadme sisemust pärast
igakordset kasutamist. Rasva või
muude toidujääkide kogunemine võib
kaasa tuua tulekahju. Grillpanni puhul
on oht suurem.
• Eemaldage tugev mustus spetsiaalset
ahjupuhastit kasutades.
• Pärast iga kasutuskorda puhastage
kõik ahjutarvikud ja laske neil kuivada.
Kasutage pehmet lappi sooja vee ja
puhastusvahendiga.
• Kui kasutate teflonkattega tarvikuid,
siis ärge puhastage neid intensiivsete
puhastusainetega või teravaservaliste
esemetega ega nõudepesumasinas.
See võib teflonpinda kahjustada.
10.2 Roostevabast terasest või
alumiiniumist seadmed
Puhastage ahjuust ainult
niiske käsnaga. Kuivatage
pehme lapiga. Ärge kasutage
terasvilla, happeid ega
abrasiivseid materjale, kuna
need võivad ahju pinda
kahjustada. Puhastage ahju
juhtpaneeli, järgides samu
ettevaatusabinõusid.
EESTI 63
Page 64
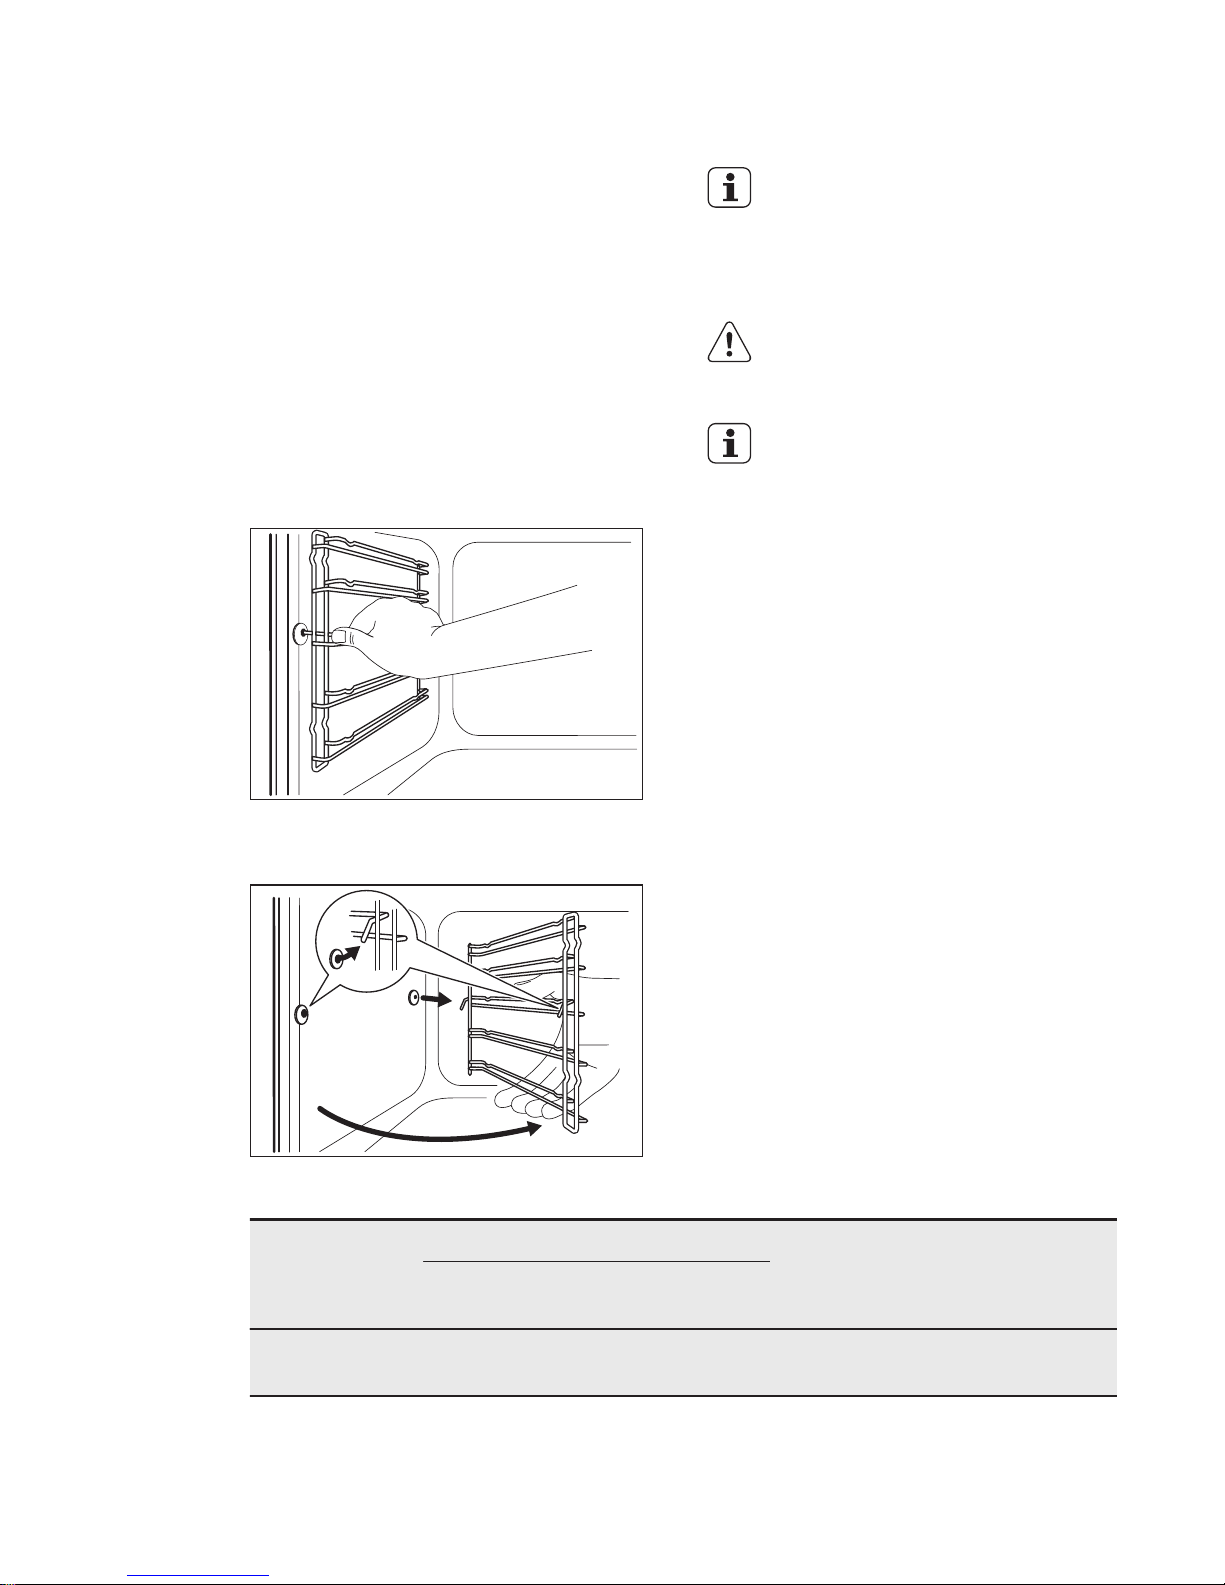
10.3 Uksetihendi puhastamine
• Kontrollige uksetihendit korrapäraselt.
Uksetihend asub ahjuõõne raami
ümber. Ärge kasutage seadet, kui
uksetihend on kahjustatud. Võtke
ühendust hoolduskeksusega.
• Teavet uksetihendi puhastamise
kohta lugege puhastamise üldteabe
osast.
10.4 Restitugede eemaldamine
Ahju puhastamiseks eemaldage ahjuresti
toed.
1. Tõmmake ahjuriiuli toe esiosa
külgseina küljest lahti.
2. Tõmmake ahjuriiuli toe tagaosa
külgseina küljest lahti ja eemaldage
tugi.
1
2
Paigaldage ahjuriiuli toed tagasi
vastupidises järjekorras.
Teleskoopsiinide tõkked
peavad olema suunatud
ettepoole.
10.5 Veepaagi puhastamine
HOIATUS!
Ärge valage vett veepaaki
puhastustsükli ajal.
Puhastustoimingu ajal võib
auru sisselaskeavast ahju
tilkuda veidi vett. Et vesi ei
tilguks ahju põhjale, asetage
auru sisselaskeava alla
rasvakogumispann.
Aja jooksul koguneb ahju katlakivi. Selle
ärahoidmiseks tuleb auru tekitavaid ahju
osi puhastada. Tühjendage veepaak
pärast iga auruküpsetust.
Vee tüüp
• Vähese lubjasisaldusega pehme
vesi – tootja soovitab sellist vett, sest
puhastusvajadus on sel juhul
väiksem.
• Kraanivesi – võite seda kasutada, kui
kasutate veepuhastit või
veepehmendit.
• Kare vesi suure lubjasisaldusega –
see ei mõjuta küll seadme tööd, kuid
puhastada tuleb sagedamini
WHO (Maailma Tervishoiuorganisatsiooni) KALTSIUMIKOGUSTE TABEL
Kaltsiumisade Vee karedus Vee klassifi‐
katsioon
Eemaldada
kaltsiumisade
iga
(Prantsuse
kraadid)
(Saksa kraa‐
did)
0 - 60 mg/l 0 - 6 0 - 3 Pehme 75 tsüklit - 2,5
kuu järel
www.electrolux.com64
Page 65
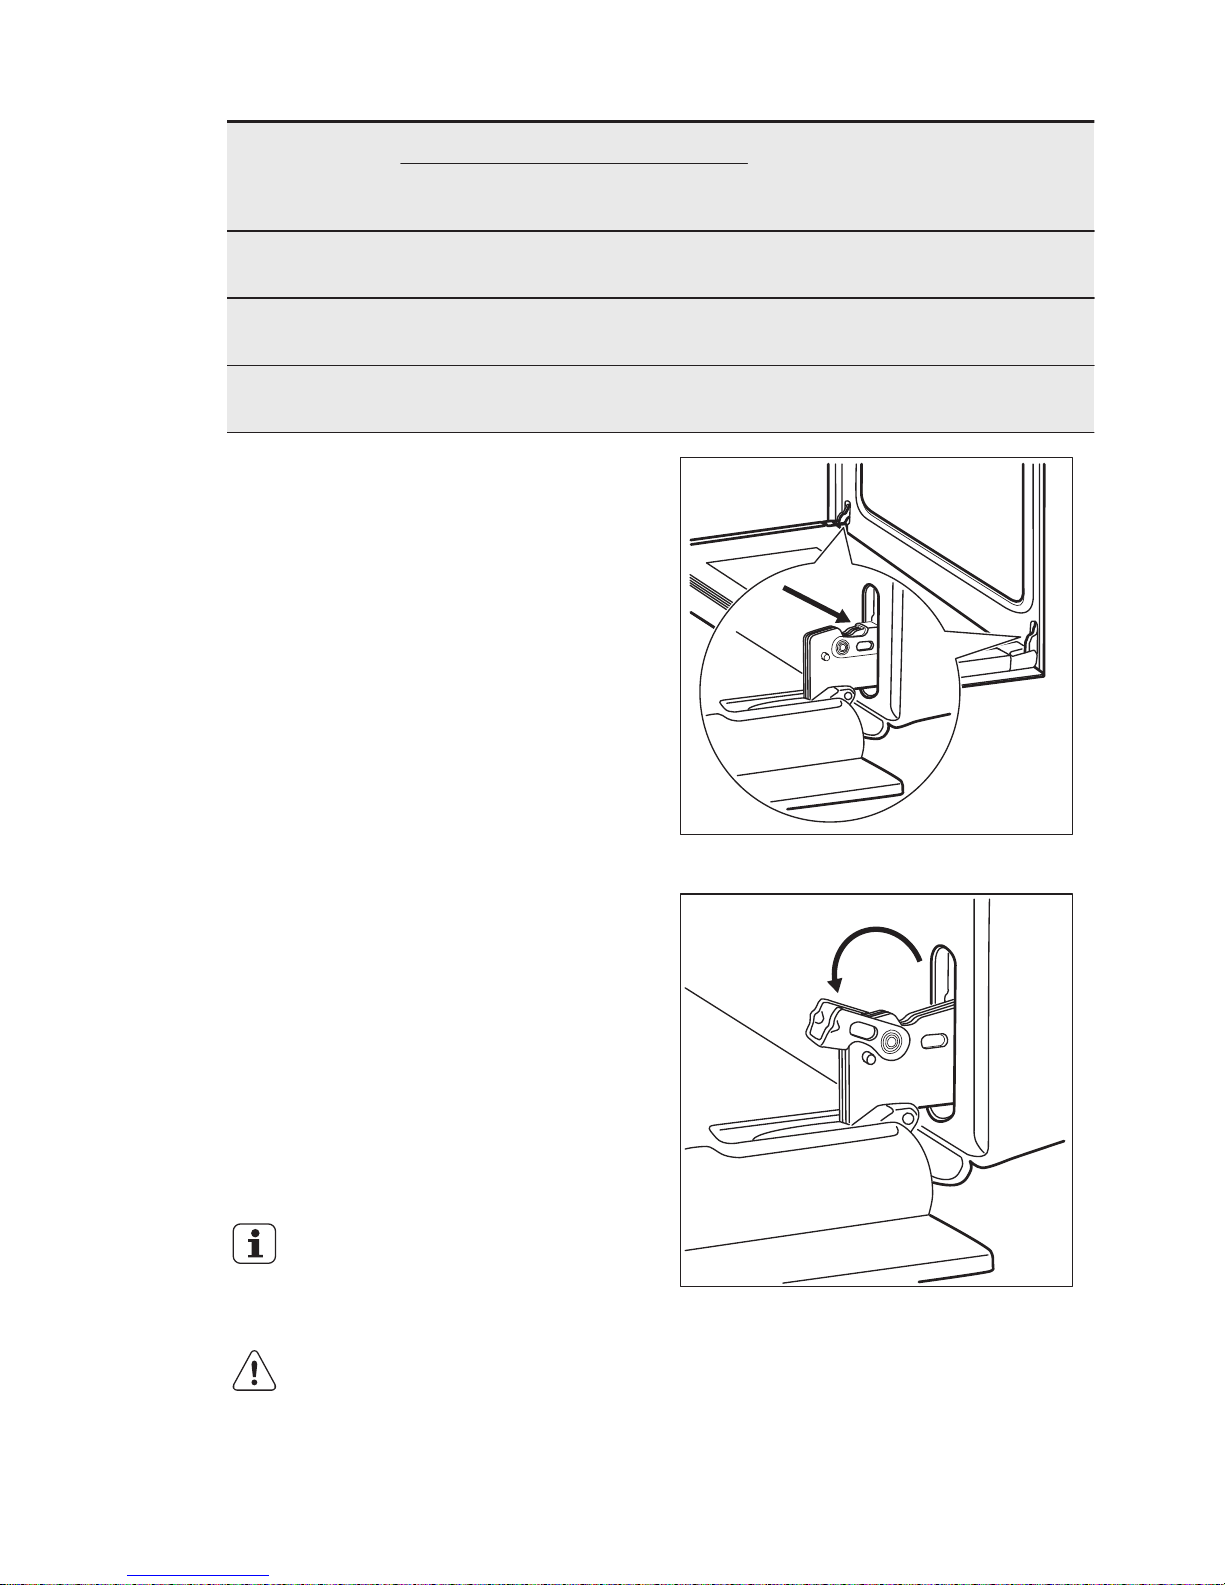
Kaltsiumisade Vee karedus Vee klassifi‐
katsioon
Eemaldada
kaltsiumisade
iga
(Prantsuse
kraadid)
(Saksa kraa‐
did)
60 - 120 mg/l 6 - 12 3 - 7 Keskmine kare‐
dus
50 tsüklit - 2
kuu järel
120 - 180 mg/l 12 - 18 8 - 10 Kare või lubjari‐
kas
40 tsüklit - 1.5
kuu järel
üle 180 mg/l üle 18 üle 10 Väga kare 30 tsüklit - 1
kuu järel
1. Kallake veepaaki 850 ml vett ja 50
grammi sidrunhapet (viis
teelusikatäit). Lülitage ahi välja ja
oodake umbes 60 minutit.
2. Lülitage ahi sisse ja valige funktsioon
Pöördõhk + Aurutus. Seadke
temperatuuriks 230 °C. Lülitage ahi
25 minuti pärast välja ja laske 15
minutit jahtuda.
3. Lülitage ahi sisse ja valige funktsioon
Pöördõhk + Aurutus. Seadke ahju
temperatuur vahemikku 130 kuni 230
°C. Lülitage 10 minuti pärast välja.
Laske sel jahtuda ja jätkake paagi sisu
eemaldamisega. Vt jaotist "Veepaagi
tühjendamine".
4. Loputage veepaak ja eemaldage
ahjust ülejäänud jäägid lapiga.
5. Peske vee väljalasketoru käsitsi
sooja vee ja seebiga. Kahjustuste
ärahoidmiseks vältige hapete,
pihustite jms puhastusvahendite
kasutamist.
10.6 Ahjuukse puhastamine
Ahjuuksel on kolm
klaaspaneeli.Puhastamiseks saate
ahjuukse ja sisemised klaaspaneelid
eemaldada.
Kui te üritate klaaspaneele
eemaldada ajal, mil ust pole
eest ära võetud, võib see
sulguda.
ETTEVAATUST!
Ärge kasutage seadet ilma
klaaspaneelideta.
1. Tehke uks täielikult lahti ja võtke
ukse hingedest kinni.
2. Tõstke hingede hoovad üles ja
keerake neid.
3. Sulgege ahjuuks poole peale
esimesse avamisasendisse. Seejärel
tõmmake ust ettepoole ja tõstke
välja.
EESTI 65
Page 66
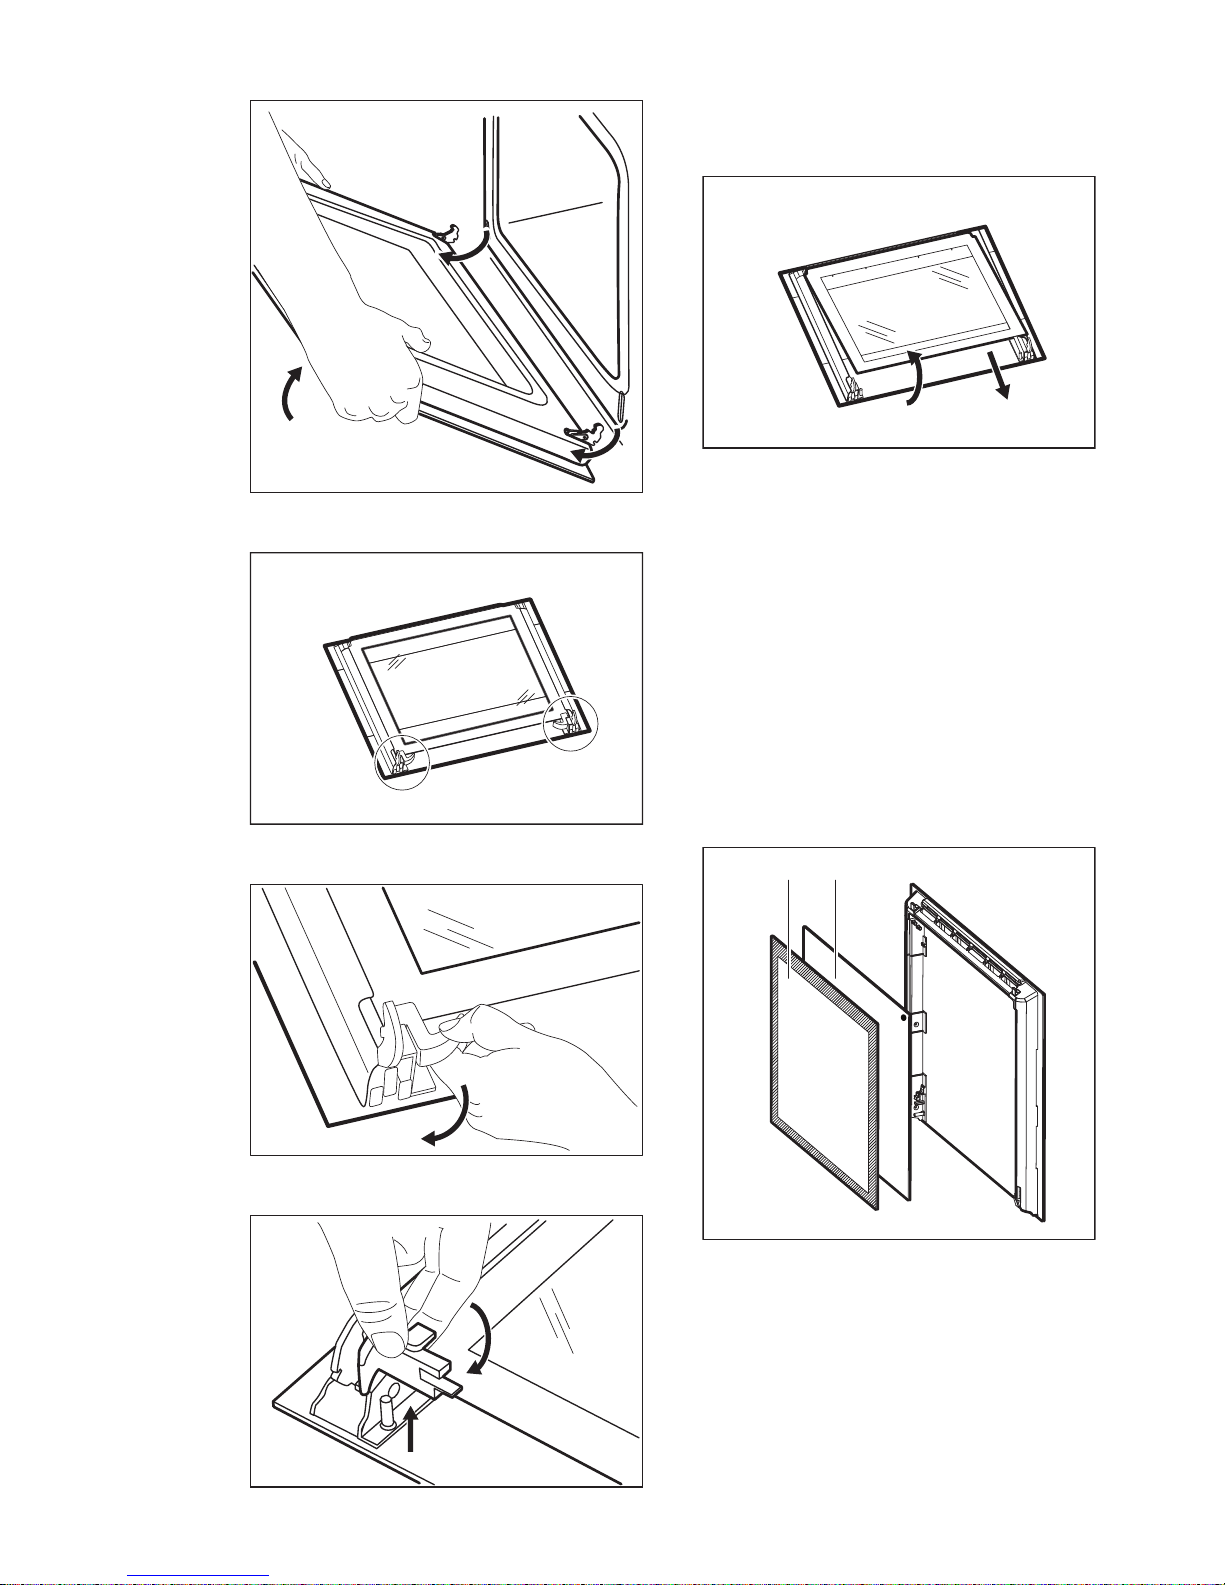
4. Asetage uks tasasele pehme riidega
kaetud pinnale.
5. Vabastage lukustussüsteem
klaaspaneelide eemaldamiseks.
6. Keerake mõlemat fiksaatorit 90°
võrra ja võtke need pesadest välja.
90°
7. Tõstke klaaspaneelid ükshaaval
ettevaatlikult üles ja eemaldage
need. Alustage pealmisest paneelist.
1
2
8. Puhastage klaaspaneele
nõudepesuvahendi ja veega.
Kuivatage klaaspaneelid hoolikalt.
Pärast puhastamist paigutage
klaaspaneelid ja ahjuuks tagasi kohale.
Korrake ülaltoodud samme vastupidises
järjestuses.
Veenduge, et asetate klaaspaneelid
tagasi õiges järjekorras (A ja B).
Esimesel paneelil (A) on dekoratiivne
raam. Trükitud pind peab jääma ukse
sisemisele poolele. Pärast paigaldamist
veenduge, et klaaspaneeli raami (A) pind
ei oleks trükitud kirja piirkonnas
puudutades kare.
A B
Veenduge, et paigaldate keskmise
klaaspaneeli oma kohale õigesti.
www.electrolux.com66
Page 67
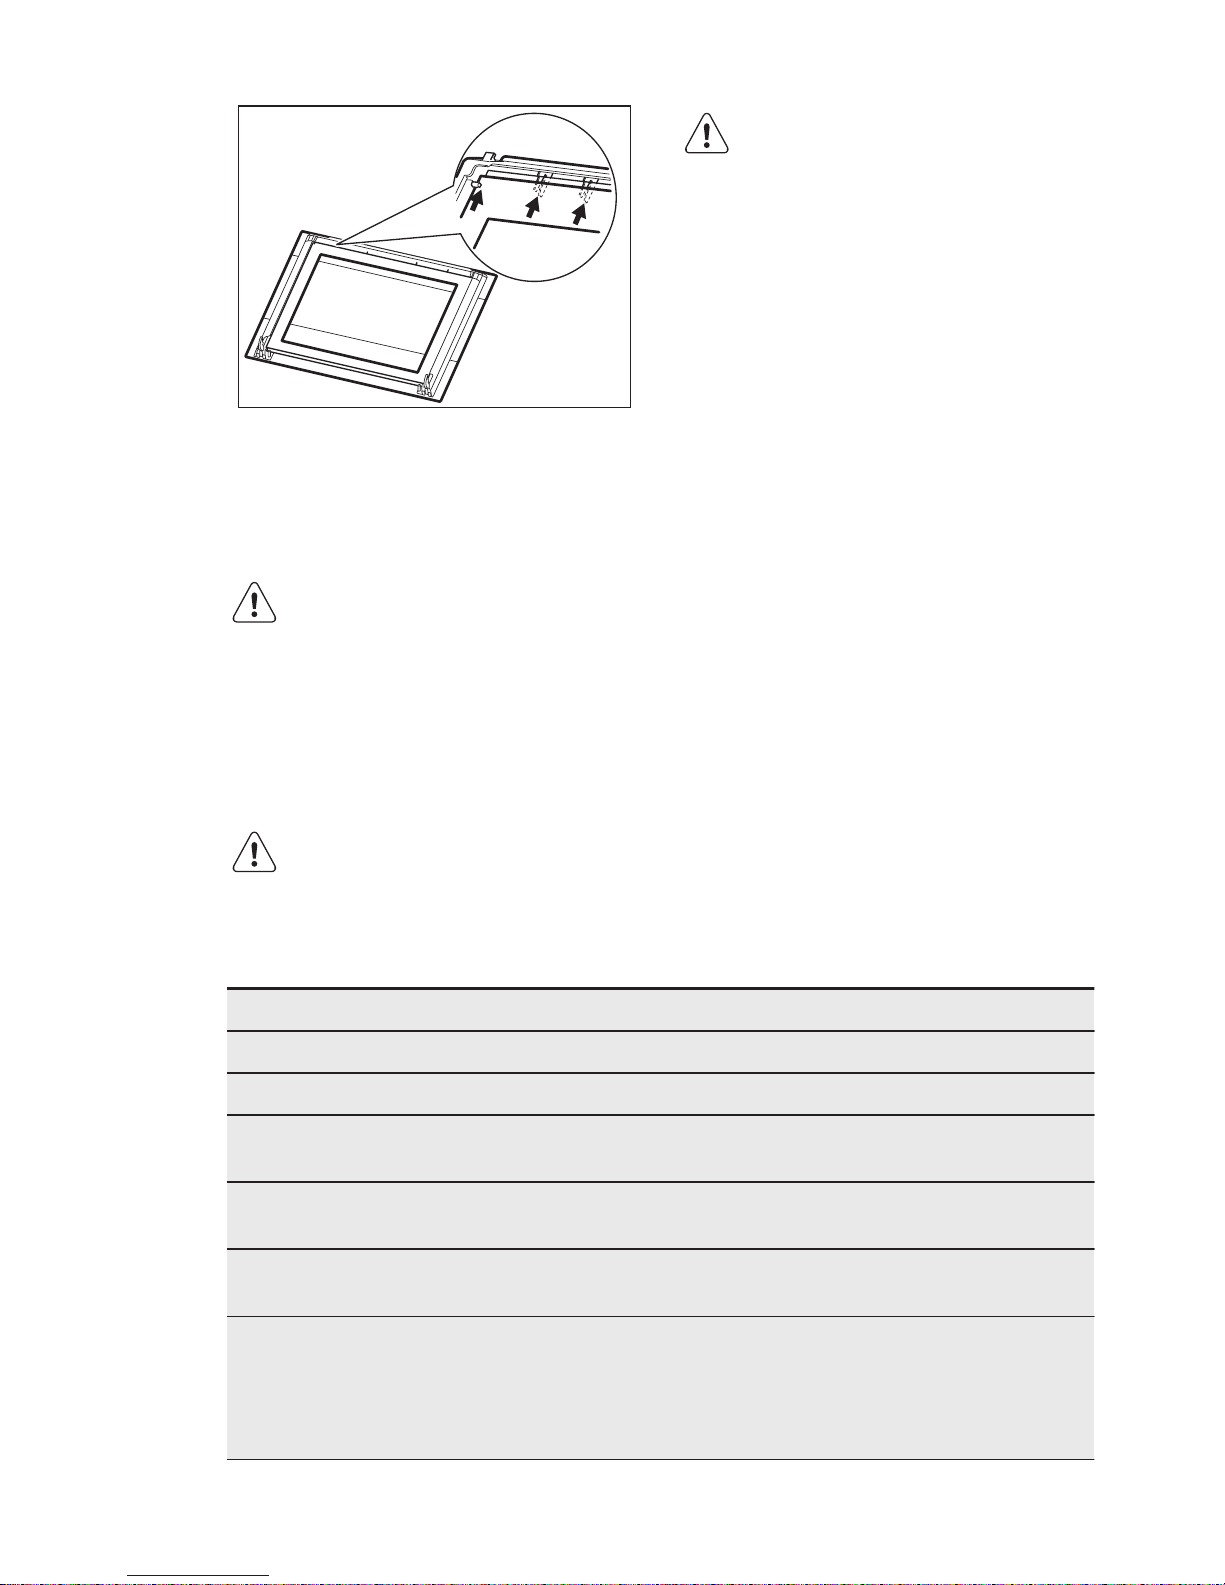
10.7 Lambi asendamine
Asetage seadme põhjale riidest lapp.
See hoiab ära lambi klaasist katte ja
ahjuõõne purunemise.
HOIATUS!
Surmava elektrilöögi oht!
Enne lambi asendamist
ühendage kaitse lahti.
Ahjuvalgusti ja selle klaasist
kate võivad olla kuumad.
ETTEVAATUST!
Hoidke halogeenlampi alati
riidelapiga, et lambile ei
sattuks rasvajääke.
1. Lülitage seade välja.
2. Eemaldage kaitsmed kaitsekilbist või
lülitage kaitselüliti välja.
Tagumine valgusti
1. Valgusti klaaskatte eemaldamiseks
keerake seda vastupäeva.
2. Puhastage klaaskate.
3. Asendage lamp sobiva 300 °C taluva
kuumakindla lambiga.
4. Paigaldage klaaskate.
11. VEAOTSING
HOIATUS!
Vt ohutust käsitlevaid
peatükke.
11.1 Mida teha, kui...
Probleem Võimalik põhjus Lahendus
Ahi ei kuumene. Ahi on välja lülitatud. Lülitage ahi sisse.
Ahi ei kuumene. Kella pole seadistatud. Seadistage kell.
Ahi ei kuumene. Vajalikud seaded pole
määratud.
Veenduge, et seadistused
on õiged.
Ahi ei kuumene. Automaatne väljalülitus on
sees.
Vt "Automaatne väljalüli‐
tus".
Ahi ei kuumene. Lapselukk on sisse lülita‐
tud.
Vt "Lapseluku kasuta‐
mine".
Ahi ei kuumene. Kaitse on vallandunud. Tehke kindlaks, kas tõrke
põhjustas kaitse. Kui kaitse
korduvalt uuesti vallandub,
võtke ühendust elektriku‐
ga.
EESTI 67
Page 68

Probleem Võimalik põhjus Lahendus
Valgusti ei põle. Lamp on rikkis. Asendage valgusti uue
vastu.
Toidutermomeeter ei tööta. Toidutermomeetri pistik ei
ole korralikult pesasse si‐
sestatud.
Suruge toidutermomeetri
pistik võimalikult sügavale
pessa.
Ahjus on vett. Veepaagis on liiga palju
vett.
Lülitage ahi välja ja kuivat‐
age lapi või käsnaga.
Auruküpsetus ei tööta. Katlakivi ummistab ava. Kontrollige auru sisselas‐
keava. Eemaldage katlaki‐
vi.
Auruküpsetus ei tööta. Veepaagis pole vett. Täitke veepaak.
Veepaagi tühjendamiseks
kulub üle kolme minuti või
valgub auru sisselaskeava
kaudu ahju vett.
Seadmesse on kogunenud
lubjasetet.
Puhastage veepaak. Vt
jaotist "Veepaagi puhasta‐
mine".
Toidu valmimiseks kulub
liiga palju aega või toit val‐
mib liiga kiiresti.
Temperatuur on liiga ma‐
dal või liiga kõrge.
Reguleerige vajadusel
temperatuuri. Järgige ju‐
hendis toodud nõuandeid.
Toidule ja ahjuõõnde kogu‐
neb auru ja kondensvett.
Toit on jäänud liiga kauaks
ahju.
Kui küpsetamine on lõppe‐
nud, tuleb toit ahjust vähe‐
malt 15 - 20 minuti pärast
välja võtta.
Ekraan näitab "C2". Soovite käivitada sulata‐
mise funktsiooni, kuid ei
eemaldanud toidutermo‐
meetri pistikut pesast.
Eemaldage toidutermo‐
meetri pistik pesast.
Ekraanil kuvatakse vea‐
kood, mida tabelis ei leidu.
Elektritõrge. • Lülitage ahi välja ja taas
sisse, kasutades elektri‐
kilbis olevat peakaitset
või -lülitit.
• Kui ekraanil kuvatakse
uuesti veateade, pöörd‐
uge klienditeenindusse.
www.electrolux.com68
Page 69
Probleem Võimalik põhjus Lahendus
Ahi on sisse lülitatud, kuid
ei kuumene. Ventilaator ei
tööta. Ekraanil kuvatakse
"Demo".
Demorežiim on sisse lülita‐
tud.
1. Lülitage ahi välja.
2. Vajutage ja hoidke
nuppu .
3. Kui kõlab helisignaal,
keerake ahjufunktsioo‐
nide nupp esimesele
funktsioonile. Ekraanil
hakkab vilkuma
"Demo".
4. Keerake ahjufunktsioo‐
nide nupp väljas-asen‐
disse.
5. Laske nupp lahti.
6. Keerake temperatuuri‐
nuppu päripäeva ja
hoidke kolm sekundit
paigal. Helisignaal kõ‐
lab kolm korda. Demor‐
ežiim on välja lülitatud.
11.2 Hooldusteave
Kui te ei suuda probleemile ise lahendust
leida, siis võtke ühendust edasimüüja või
teeninduskeskusega.
Teeninduskeskuse andmed leiate
andmesildilt. See andmesilt asub ees
ahjuõõne raami esiküljel. Ärge andmesilti
seadme küljest eemaldage.
Soovitame märkida siia järgmised andmed:
Mudel (MOD.) .........................................
Tootenumber (PNC) .........................................
Seerianumber (S.N.) .........................................
12. PAIGALDAMINE
HOIATUS!
Vt ohutust käsitlevaid
peatükke.
EESTI 69
Page 70
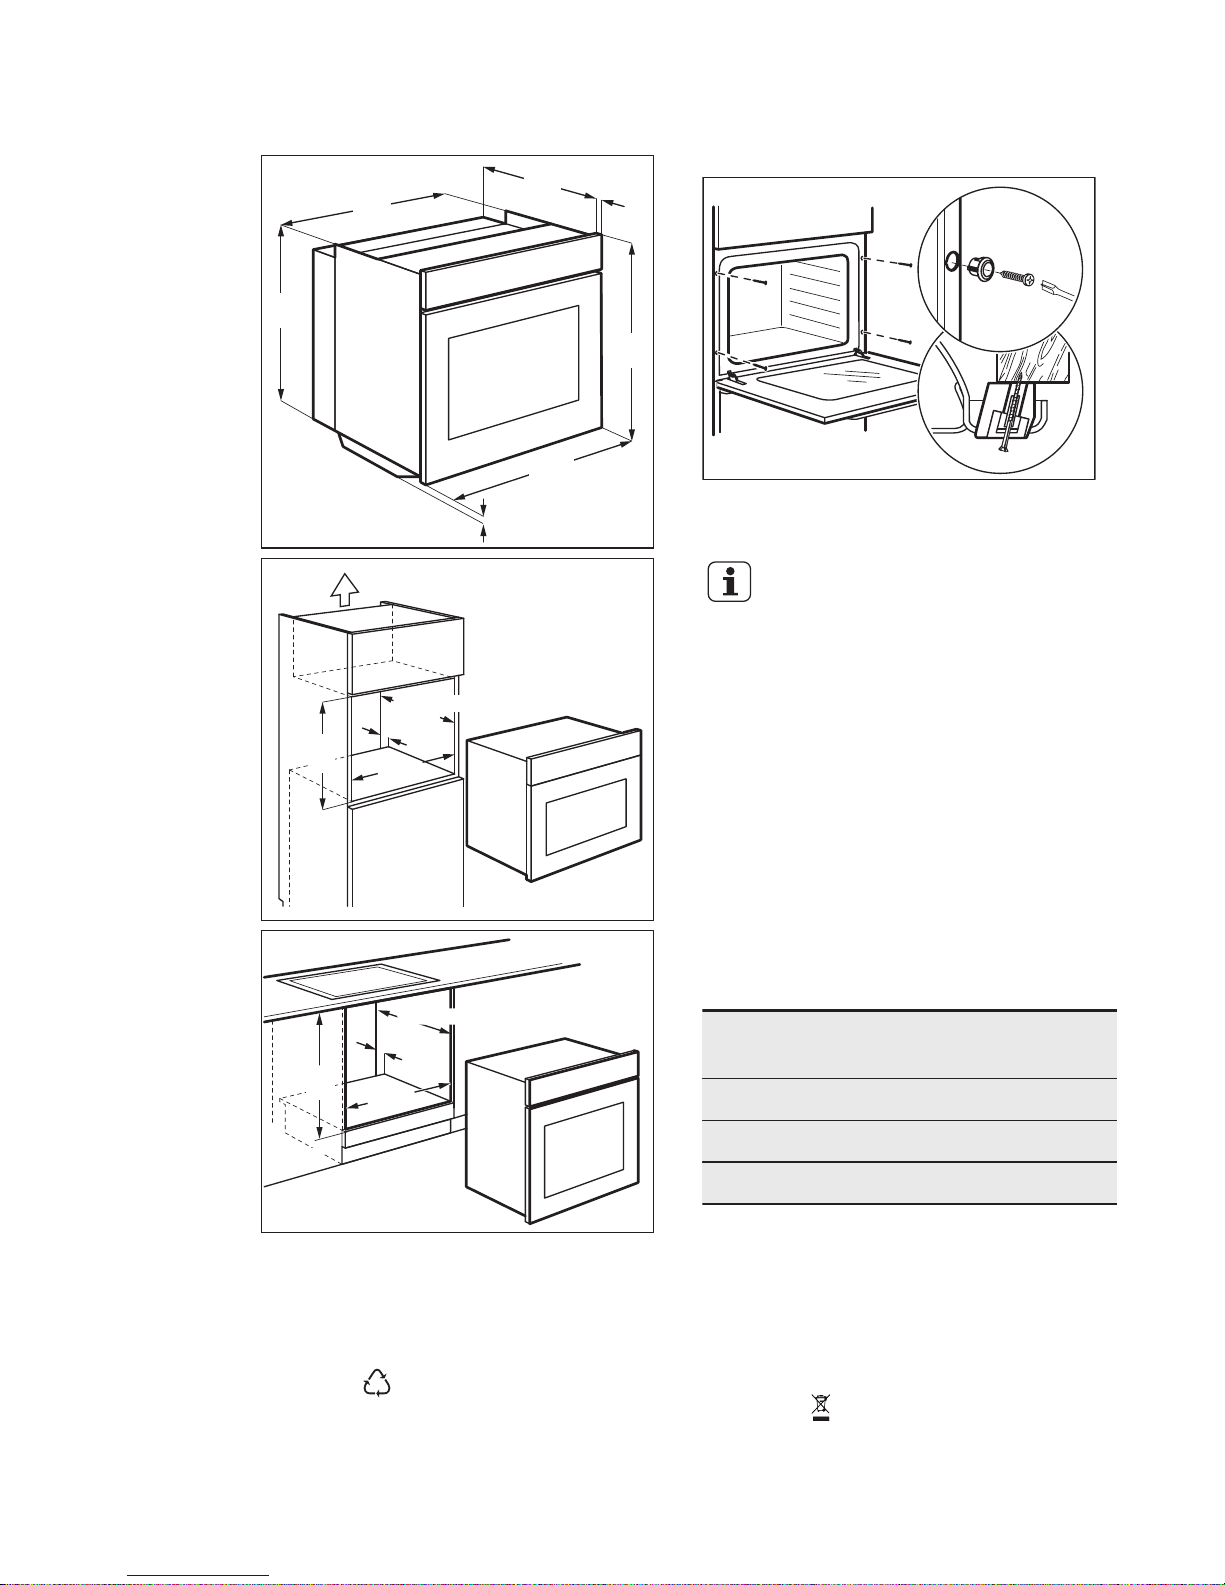
12.1 Paigutamine mööblisse
573
mm
594
mm
589
mm
558
mm
548
mm
20
mm
5 mm
min. 550 mm
20 mm
590
mm
min. 560
mm
600
mm
min. 560
mm
20 mm
min. 550 mm
12.2 Seadme kinnitamine
köögimööblisse
A
B
12.3 Elektriühendus
Tootja ei vastuta tagajärgede
eest, kui te ei järgi jaotises
"Ohutusinfo" toodud
ettevaatusabinõusid.
Seadme juurde kuulub toitekaabel ja
toitepistik.
12.4 Kaabel
Kaablitüübid, mis sobivad
paigaldamiseks või asendamiseks: H07
RN-F, H05 RN-F, H05 RRF, H05 VV-F,
H05 V2V2-F (T90), H05 BB-F.
Teabe saamiseks kaabli ristlõike kohta vt
koguvõimsust andmesildil ja järgmist
tabelit.
Koguvõimsus (W) Kaabli ristlõige
(mm²)
maksimaalne 1380 3 x 0,75
maksimaalne 2300 3 x 1
maksimaalne 3680 3 x 1,5
Maandusjuhe (roheline/kollane kaabel)
peab olema 2 cm pikem kui faasi- ja
nullkaablid (sinine ja pruun kaabel).
13. JÄÄTMEKÄITLUS
Sümboliga tähistatud materjalid
saatke ringlusse. Selleks viige pakendid
vastavatesse konteineritesse. Aidake
hoida keskkonda ja inimeste tervist ja
suunake elektri- ja elektroonilised
jäätmed ringlusse. Ärge visake
sümboliga tähistatud seadmeid muude
majapidamisjäätmete hulka. Viige seade
kohalikku ringluspunkti või pöörduge abi
saamiseks kohalikku omavalitsusse.
*
www.electrolux.com70
Page 71

EESTI 71
Page 72
www.electrolux.com/shop
867304081-A-032014
 Loading...