

Page 1

Built-in oven
EOB 31010
user information
UK
Page 2

2 electrolux
Page 3

electrolux 3
Thank you for selecting our appliance
We wish you lots of enjoyment with your new appliance and we
hope that you will consider our brand again when purchasing
household appliances.
Please read this user manual carefully and keep it throughout the
product life cycle as a reference document. The user manual should
be passed on to any future owner of the appliance.
Page 4

4 electrolux
Important Safety Information .............................................................................. 5
Description of the Oven ...................................................................................... 7
Controls............................................................................................................. 8
Before the First Use ......................................................................................... 10
Using the Oven ............................................................................................... 11
Cooking Chart ................................................................................................. 16
Cleaning and Maintenance .............................................................................. 18
Care of Catalytic Liners.................................................................................... 19
Something not Working ................................................................................... 24
Technical Data ................................................................................................ 25
Electrical Connection ...................................................................................... 26
Instructions fo Building In ................................................................................. 27
Guarantee/Customer Service ........................................................................... 28
European Guarantee ....................................................................................... 30
Safety instructions
Step by step instructions
Hints and Tips
Guide to using the user instructions
)
Contents
This appliance conforms with the following ECC Directives:
- 2006/95 (Low Voltage Directive);
- 89/336 (EMC Directive);
- 93/68 (General Directive);
and subsequent modifications.
MANUFACTURER:
ELECTROLUX HOME PRODUCTS ITALY S.p.A.
Viale Bologna 298
47100 FORLI’ (Italy)
Page 5

electrolux 5
Important Safety Information
These warnings are provided for the safety of the users and those living
with them. So read them carefully before installing and using the appliance.
This will allow you to obtain best performance, avoid improper actions,
use the appliance in complete safety and also respect the environment.
If you need assistance, contact our Customer Care Department on 08705
727 727
Installation
· This oven must be installed by
qualified personnel to the relevant
British Standards.
· This oven is heavy. Take care when
moving it.
· Remove all packaging, both inside
and outside the oven, before using
the oven.
· Do not attempt to modify the oven
in any way.
During use
· This oven is intended for domestic
cooking only. It is not designed for
commercial or industrial purposes.
· Always stand back from the oven when
opening the oven door during cooking
or at the end of it to allow any build up
of steam or heat to release.
· Appliances become very hot with
use, and retain their heat for long
periods after use. Care should be
taken to avoid touching heating elements inside the oven.
· Never line any part of the oven with
aluminium foil.
· Do not allow heatproof cooking ma-
terial, e.g. roasting bags, to come
into contact with oven elements.
· Never place plastic or any other
material which may melt in or on
the oven.
· Do not place sealed cans or aero-
sols inside the oven. They may explode if they are heated.
· Do not hang towels, dishcloths or
clothes from the oven or its handle.
· Do not use this oven if it is in con-
tact with water and never operate
it with wet hands.
· Take great care when heating fats
and oils as they will ignite if they
become too hot.
· Always use oven gloves to remove
and replace food in the oven.
· Before cleaning the oven, either turn
the power off or pull the mains plug
out.
· Ensure that all controls are in the
OFF position when not in use.
· Do not leave cookware containing
foodstuffs, e.g. fat or oil in or on the
oven in case it is inadvertently
switched ON.
· When using other electrical appli-
ances, ensure the cable does not
come into contact with the hot surfaces of the oven.
Page 6

6 electrolux
People Safety
· This oven is designed to be operated
by adults. Do not allow children to
play near or with the oven.
· The oven gets hot when it is in use.
Children should be kept away until it
has cooled.
· This appliance is not intended for use
by children or other persons whose
physical, sensory or mental capabilities or lack of experience and knowledge prevents them from using the
appliance safely without supervision
or instruction by a responsible person to ensure that they can use the
appliance safely.
Maintenance and Cleaning
· Only clean this oven in accordance
with the instructions.
· Always allow the oven to cool down
and switch off the electrical supply
before carrying out any cleaning or
maintenance work.
· The oven should be kept clean at all
times. A build-up of fats or other
foodstuffs could result in a fire,
especially in the grill pan.
· Never use steam or high pressure
steam cleaners to clean the
appliance.
· Do not use abrasive cleaners or sharp
metal scrapers. These can scratch
the glass in the oven door, which may
result in the shattering of the glass.
Service
· This oven should only be repaired or
serviced by an authorised Service
Engineer and only genuine approved
spare parts should be used.
Environmental Information
· After installation, please dispose of
the packaging with due regard to
safety and the environment.
· When disposing of an old appliance,
make it unusable, by cutting off the
cable. Remove any door catches, to
prevent small children being trapped
inside.
The symbol on the product or on its
packaging indicates that this product
may not be treated as household waste.
Instead it shall be handed over to the
applicable collection point for the
recycling of electrical and electronic
equipment. By ensuring this product is
disposed of correctly, you will help prevent
potential negative consequences for the
environment and human health, which
could otherwise be caused by
inappropriate waste handling of this
product.
For more detailed information about
recycling of this product, please contact
your local city office, your household
waste disposal service or the shop where
you purchased the product.
Always keep these user instructions
with the appliance. Should the
appliance be passed on to third
persons or sold, or if you leave this
appliance behind when you move
house, it is very important that the
new user has access to these user
instructions and the accompanying
information.
Page 7
electrolux 7
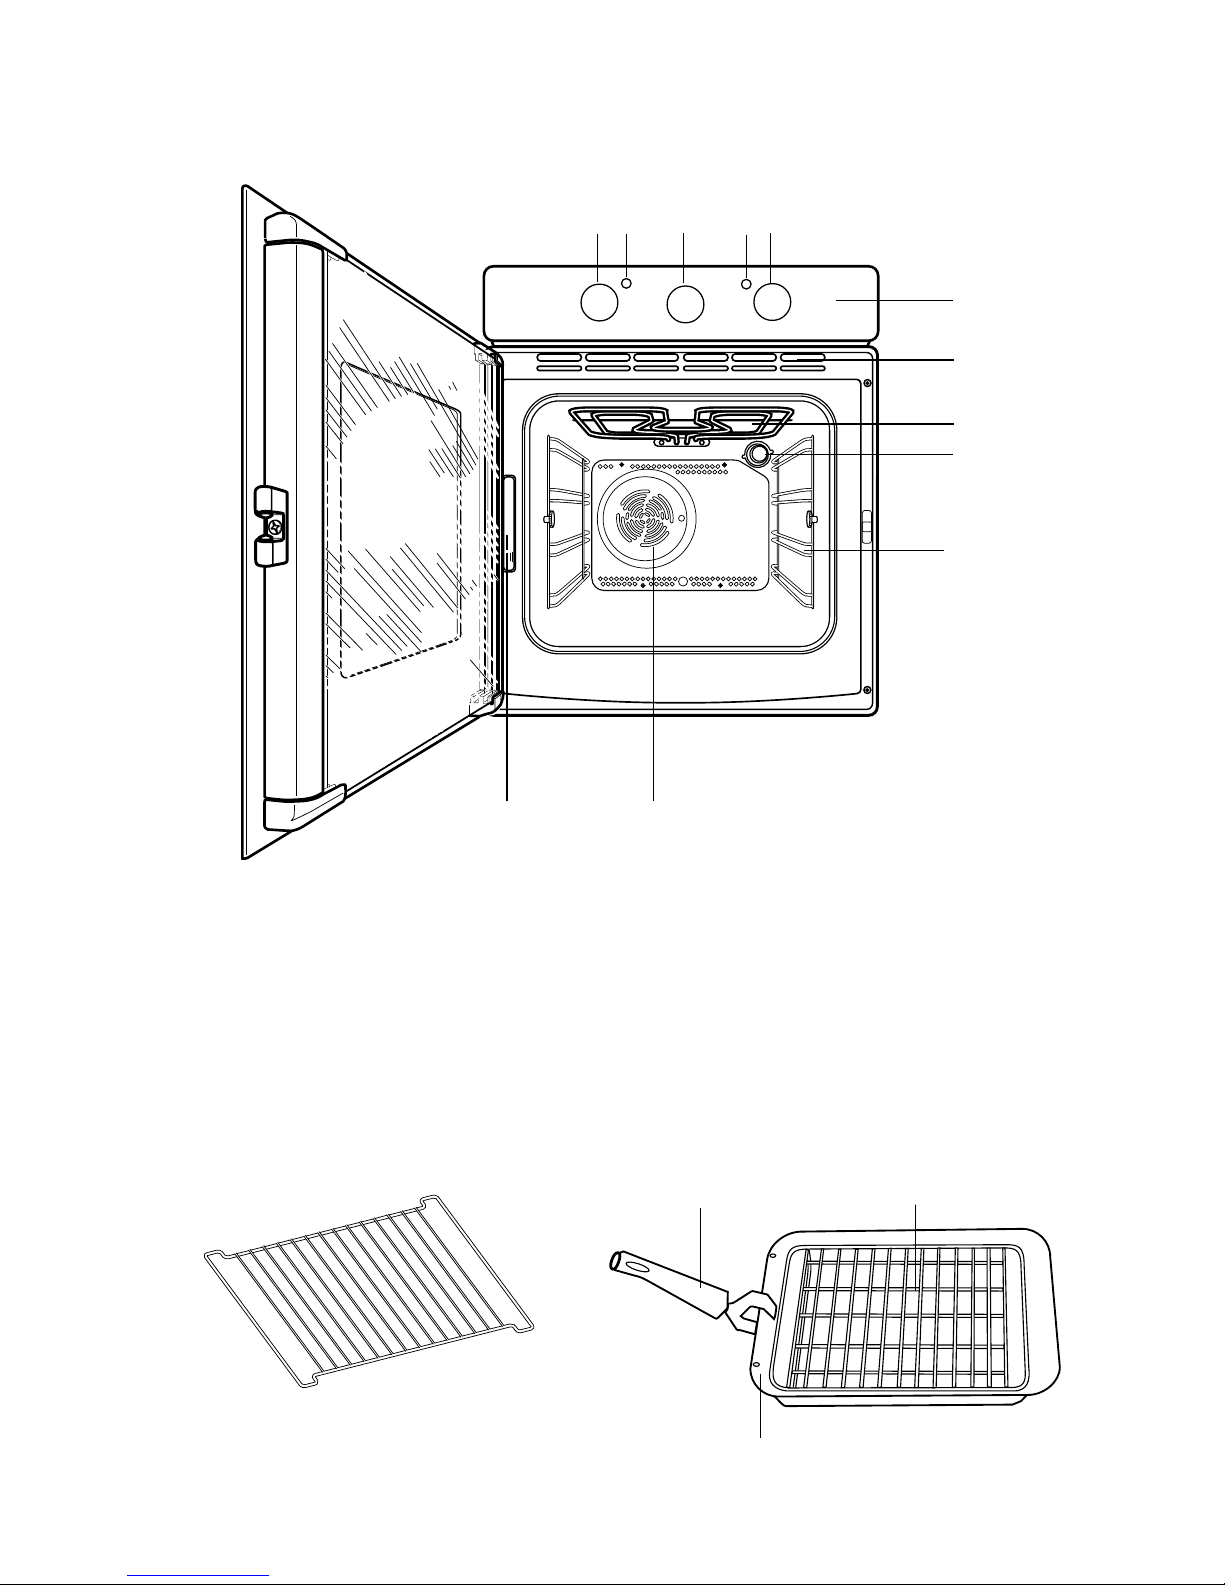
Description of the Oven
1. Control Panel
2. Oven Function Control Knob
3. End of Cooking Programmer
4. Thermostat Control Knob
5. Thermostat Control Light
6. Mains On Light
7. Air Vents for Cooling Fan
8. Grill
9. Oven light
10.Shelf supports
11.Oven Fan
12.Rating plate
Oven accessories
Anti-tip shelf
2
4
1
9
5
8
12
7
3
11
6
10
12
3
Page 8
8 electrolux
Controls
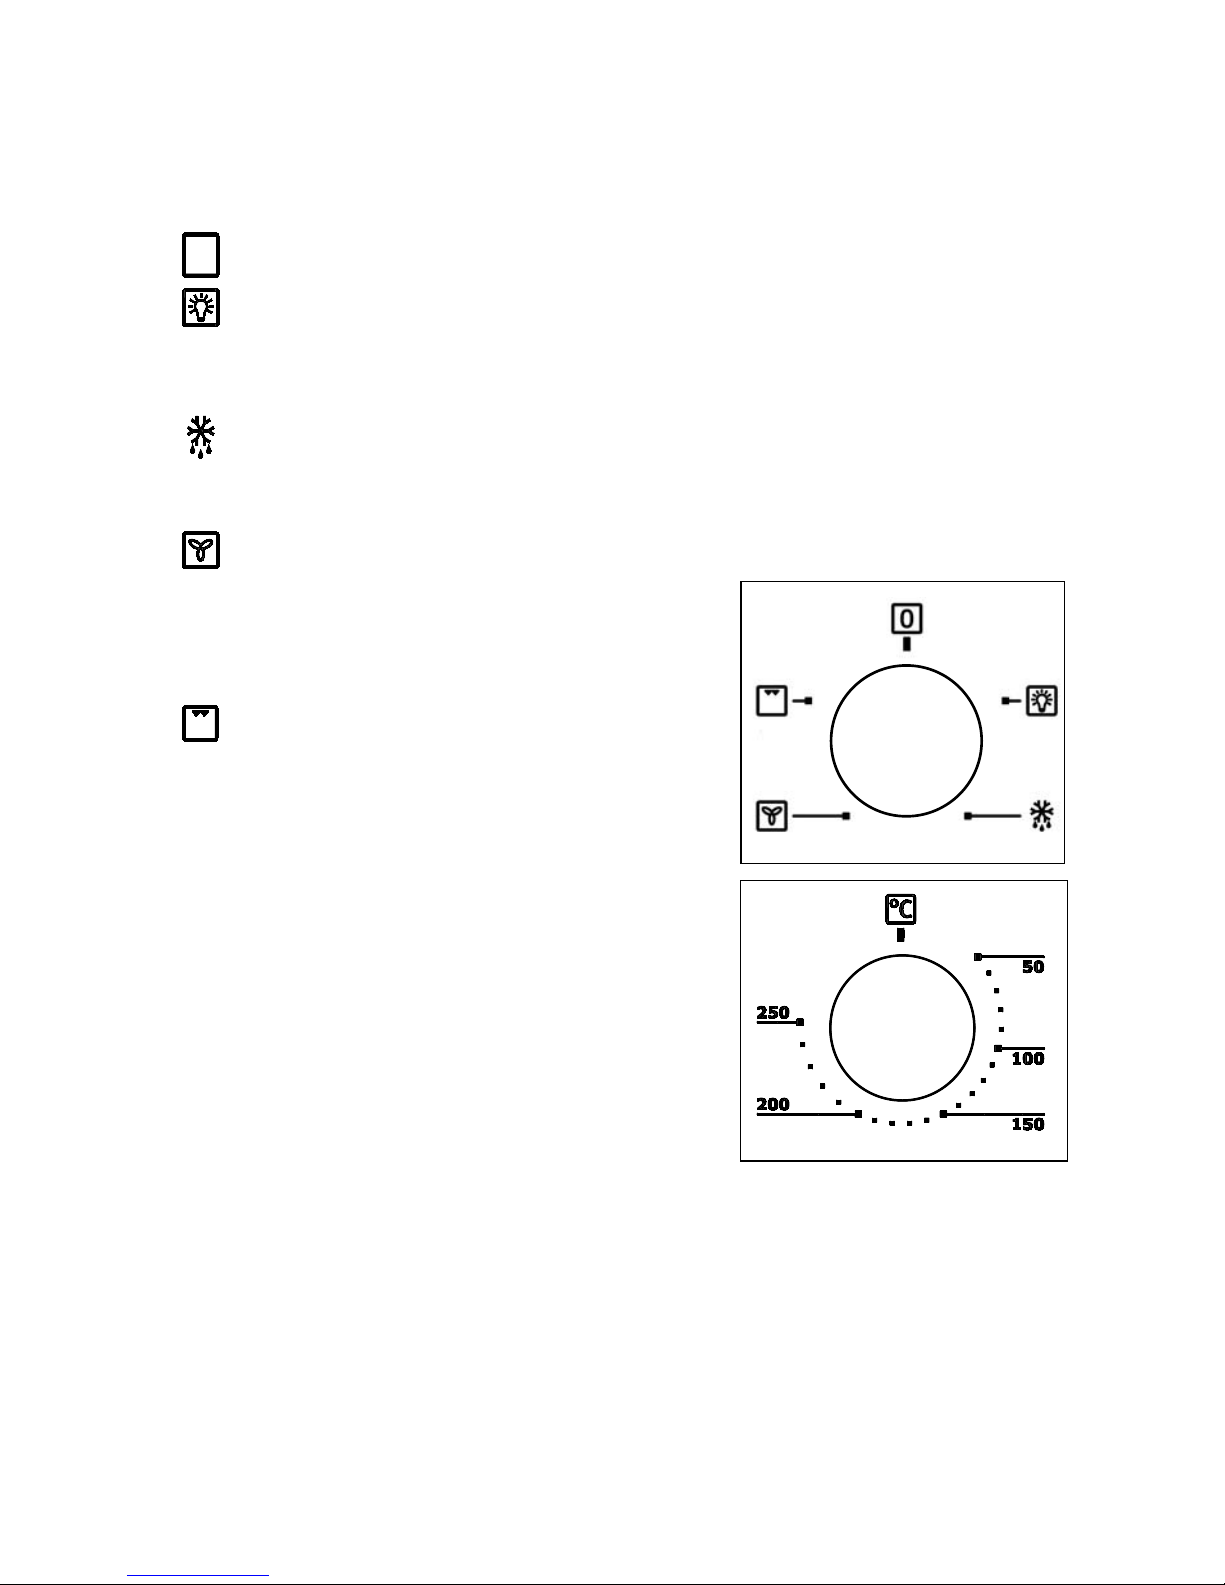
Oven Function Control Knob
0
The oven is off.
Oven light - The oven light
will be on without any cooking
function.
Defrost Setting - This setting
is intended to assist in thawing
of frozen food.
Fan cooking - This allows you
to roast or roast and bake
simoultaneously using any
shelf, without flavour
transference.
Inner grill element only - It
can be used for grilling small
quantities.
Mains on Light
The mains on light will come on when the
oven function control knob is set.
Thermostat Control Knob
Turn the thermostat control knob
clockwise to select temperatures
between 50°C and 250°C.
Thermostat Control Light
The thermostat control indicator will come
on when the thermostat control knob is
turned. The indicator will remain on until
the correct temperature is reached.
It will then cycle on and off to show the
temperature is being maintained.
Page 9

electrolux 9
End of cooking programmer
This device allows you to make the oven
switch off automatically once the preset
time is over. An acousitic signal will be
heard when the cooking is
completed.The cooking duration can be
set up to 90 minutes maximum.
Place food in the oven and turn the oven
function control knob and the thermostat
control knob on the required settings.
Turn the timer knob to maximum time
position ("90"), then turn it back to set
the required cooking time. When the
cooking time is over, an acoustic alarm
will sound and the oven will switch off
automatically.
Turn the timer knob on to set the oven
on manual operation.
Safety Thermostat
To prevent dangerous overheating
(through incorrect use of the appliance or
defective components), the oven is fitted
with a safety thermostat, which interrupts
the power supply. The oven switches
back on again automatically, when the
temperature drops.
Should the safety thermostat trigger due
to incorrect use of the appliance, it is
enough to remedy the error after the oven
has cooled down; if on the other hand, the
thermostat triggers because of a defective
component, please contact Customer
Service.
The cooling fan
The oven is provided with a cooling fan,
meant to keep the front panel, the knobs
and the oven door handle cool.The fan
switches on automatically when the oven
is activated. Warm air is blown out
through the aperture near the oven door
handle.
When the oven is switched off,the fan may
run on after the oven isswitched off to
keep the controls cool.This is quite
normal.The action of the cooling fan will
de-pend on how long the oven has
beenused and at what temperature.
Itmay not switch in at all at
lowertemperature settings nor run
onwhere the oven has only been usedfor
a short time.
The fan switches off when, after cooking,
the oven function control knob is set to
OFF position .
Page 10
10 electrolux
Before the First Use
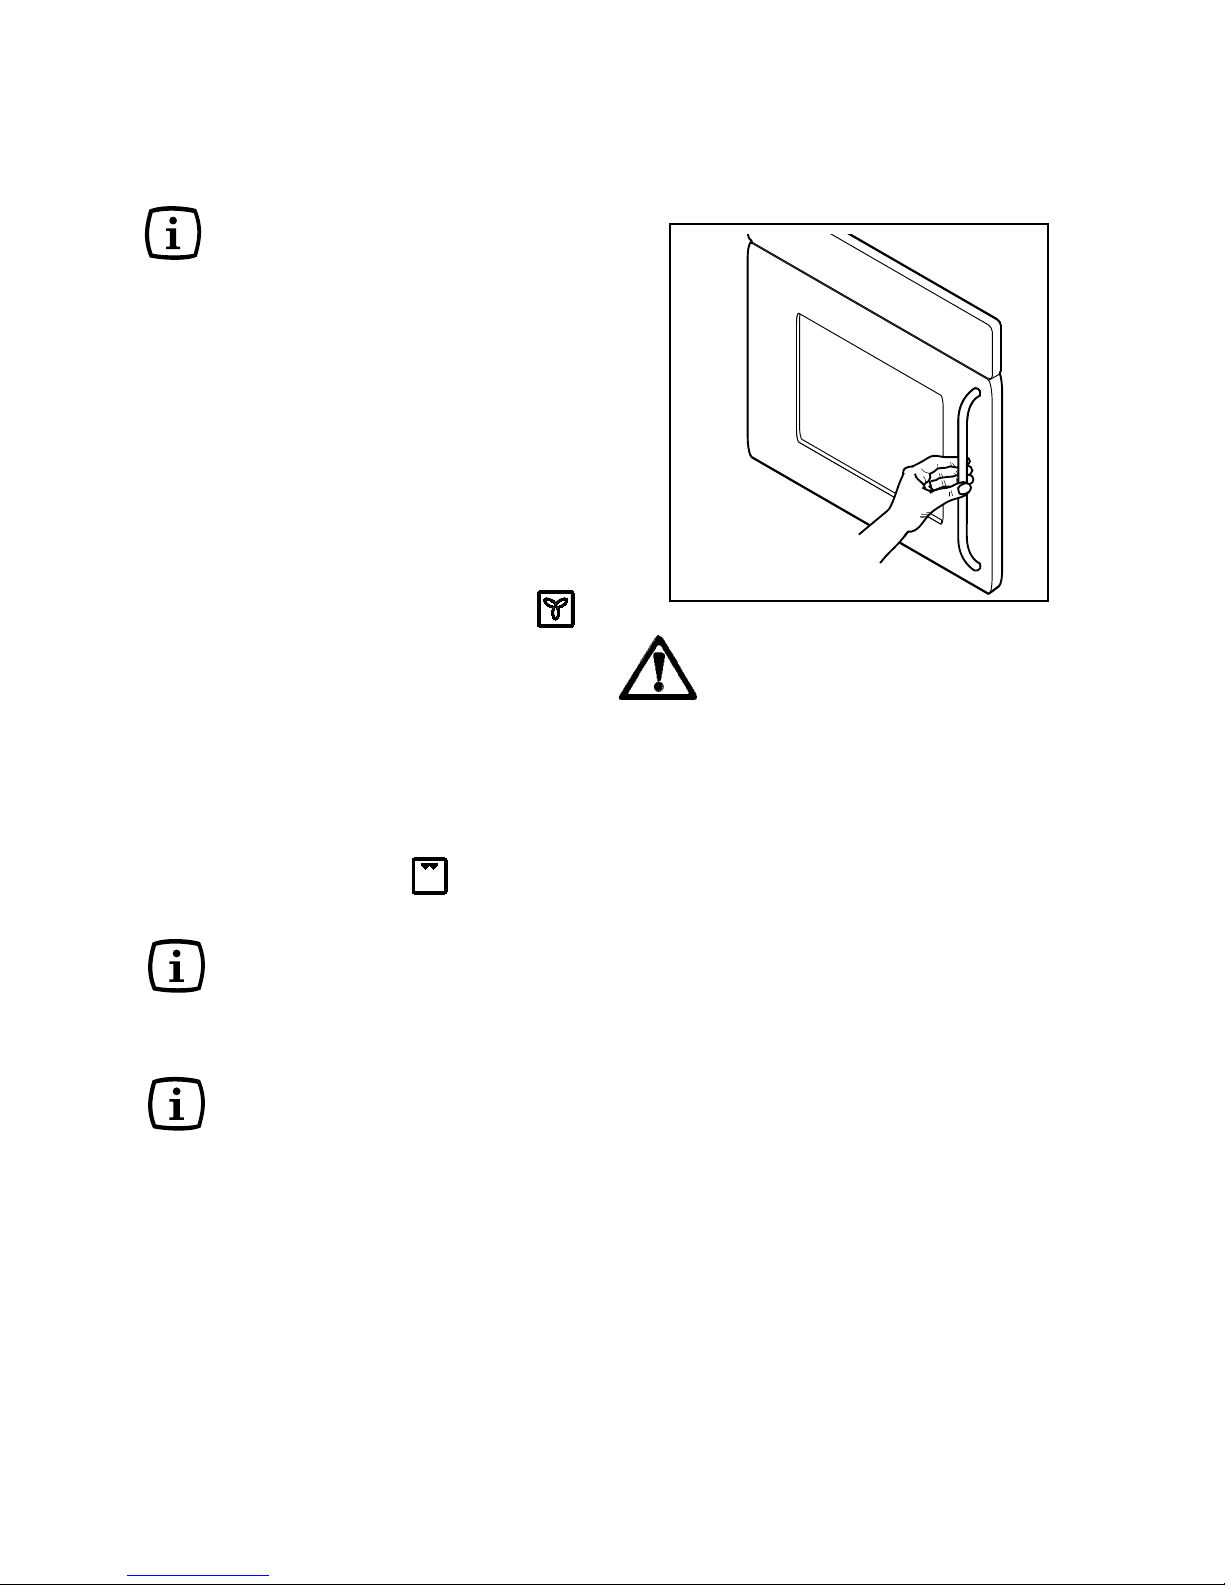
To open the oven door,
always hold the handle in the
centre.
Remove all packaging, both
inside and outside the oven, before using the oven.
Before using for the first time, the oven
should be heated up without food.
During this time, an unpleasant odour
may be emitted. This is absolutely normal. It is caused by manufacturing residues.
Ensure the room is well ventilated.
1. Switch the oven function control knob to fan cooking .
2. Set the thermostat control
knob to 250°C.
3. Open a window for ventilation.
4. Allow the oven to run empty
for approximately 45 minutes.
This procedure should be repeated with
the inner grill function for approximately 5-10 minutes.
Then let the oven cool down. Then
dampen a soft cloth with warm
water and a little mild washingup liquid and use this to clean the
oven cavity.
Before using for the first time,
carefully wash the oven accessories as well.
)
Page 11
electrolux 11
Using the Oven
The oven is supplied with an exclusive
system which produces a natural
circulation of air and the constant
recycling of steam.
This system makes it possible to cook in
a steamy environment and keep the
dishes soft inside and crusty outside.
Moreover, the cooking time and energy
consumption are reduced to a minimum.
During cooking steam may be produced
which can be released when opening the
oven door. This is absolutely normal.
However, always stand back
from the oven when opening the
oven door during cooking or at
the end of it to allow any build
up of steam or heat to release.
When food is heated, steam is
created, like in a kettle. When the
steam comes into contact with the
glass in the oven door, it
condenses and creates water
droplets.
To reduce condensation, always
preheat the empty oven for 10
minutes.
We recommend you wipe the water
droplets away after every cooking
process.
Always cook with the oven
door closed. Stand clear when
opening the drop down oven door.
Do not allow it to fall open support the door using the door
handle, until it is fully open.
Attention! - Do not place objects
on the oven base and do not cover
any part of the oven with
aluminium foil while cooking, as
this could cause a heat build-up
which would affect the baking
results and damage the oven
enamel. Always place pans, heatresisting pans and aluminium trays
on the shelf which has been
inserted in the shelf runners.
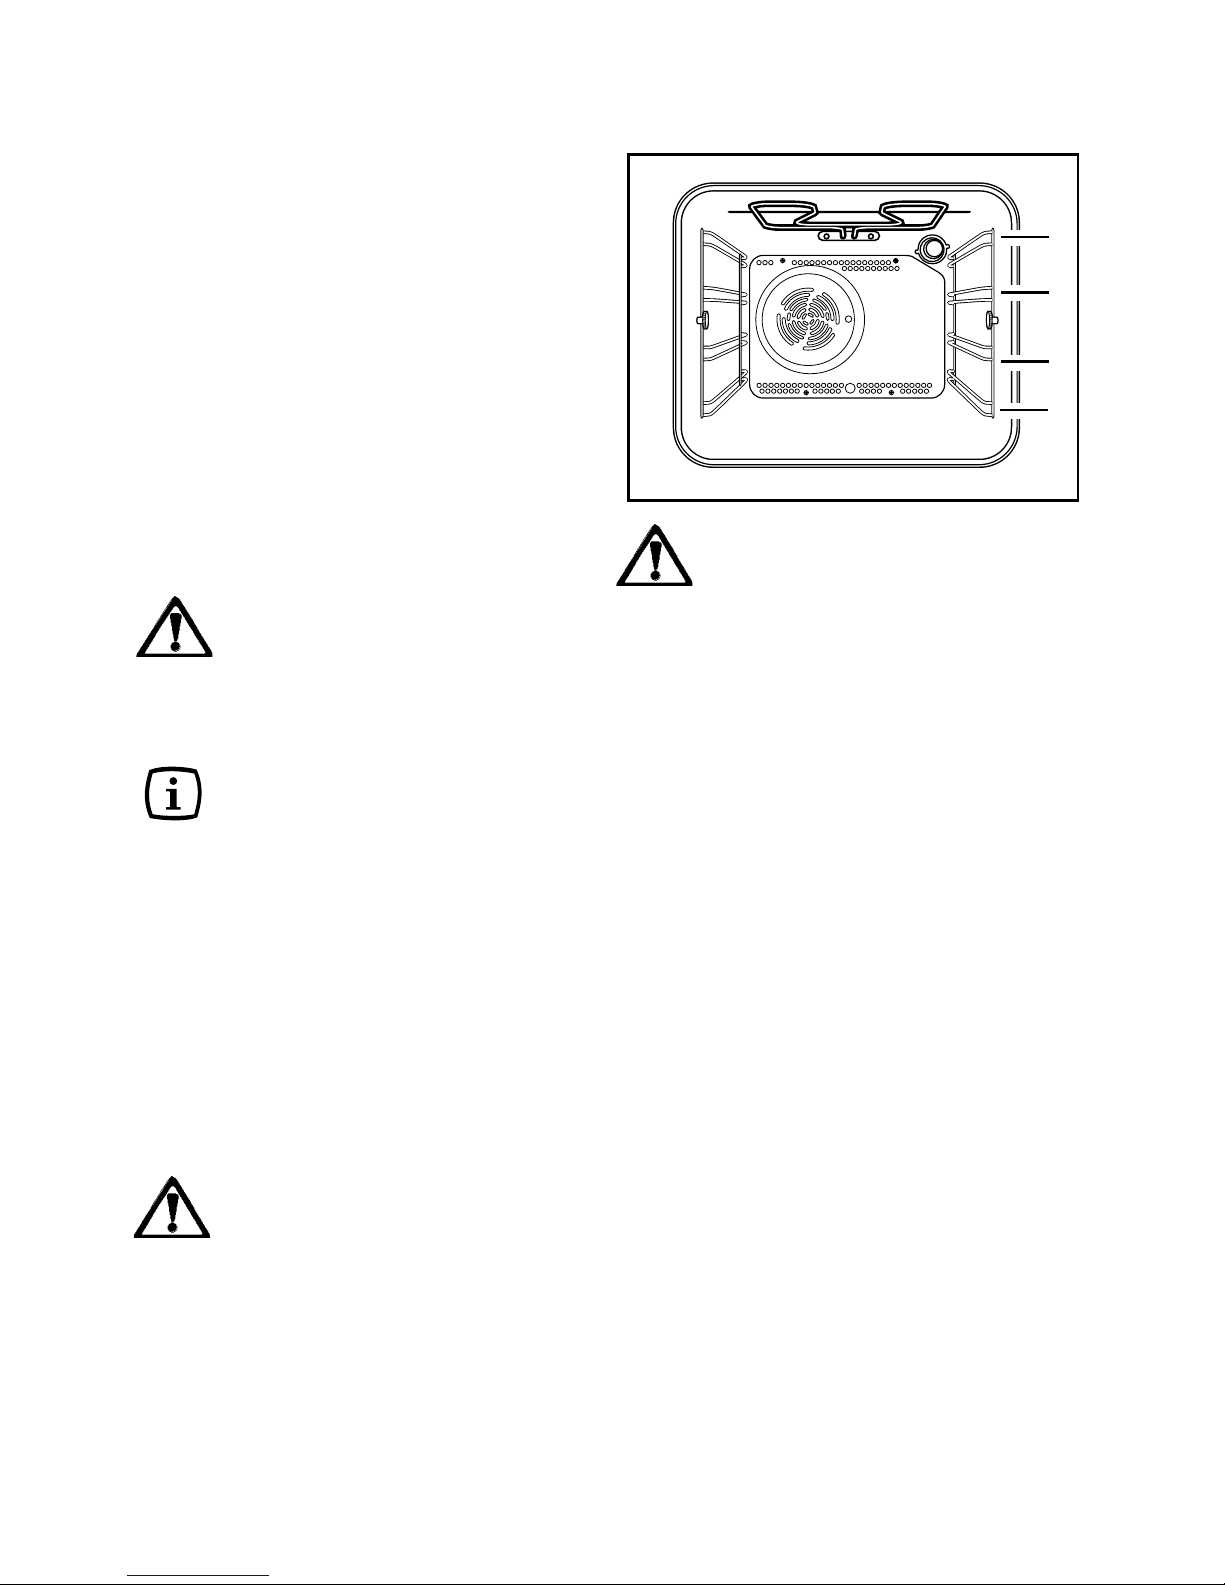
The oven has four shelf levels.
The shelf positions are counted
from the bottom of the oven as
shown in the diagram.
It is important that these shelves
are correctly positioned as shown
in the diagram.
Do not place cookware directly
on the oven base.
4
3
2
1
Page 12

12 electrolux
Fan Cooking
The air inside the oven is heated by the
element around the fan situated behind
the back panel. The fan circulates hot
air to maintain an even temperature inside
the oven.
The advantage of cooking with this
function is energy saving through:
z Faster Preheating
As the fan oven quickly reaches
temperature, it is not usually
necessary to preheat the oven
although you may find that you need
to allow an extra 5-7 minutes on
cooking times. For recipes which
require higher temperatures, best
results are achieved if the oven is
preheated first, e.g. bread, pastries,
scones, souffles, etc.
z Lower Temperatures
Fan oven cooking generally requires
lower temperatures than conventional
cooking.
Follow the temperatures
recommended in the cooking chart.
Remember to reduce temperatures
by about 20-25°C for your own
recipes which use conventional
cooking.
z Even Heating for Baking
The fan oven has uniform heating on
all shelf positions. This means that
batches of the same food can be
cooked in the oven at the same time.
However, the top shelf may brown
slightly
quicker than the lower one. This is
quite usual. There is no mixing of
flavours between dishes.
- Shelf positions are not critical, but
make sure the shelves are evenly
spaced.
- When cooking more than one dish in
the fan oven, place dishes centrally
on the shelves rather than several
dishes on one shelf.
- When the oven is full, you may need
to allow slightly longer cooking time.
- When the oven is full of the same food,
e.g. equal trays of small cakes or
equal size victoria sandwich cakes,
then they will be cooked in the same
time and removed from the oven
together. When different sizes of trays
or types of food, e.g. biscuits and
cakes are cooked, they will not
necessarily be ready together.
- The fan oven can be used to heat
foods through without thawing first,
e.g. fruit tarts, mince pies, sausage
rolls, and other small pastry items.
Use a temperature of 190-200°C and
allow 20-40 minutes (depending on
the quantity of food in the oven).
- The use of too high temperatures can
cause uneven browning. Check with
the recommendations for oven
temperatures given in the cooking
charts, but be prepared to adjust the
temperature, if necessary. Remember
to reduce temperatures by about 2025°C for your own conventional
recipes.
- When roasting do use the trivet in the
meat tin. Fat and meat juices will
drain into the meat tin below and can
be used to make gravy. The trivet also
prevents splashes of fat from soiling
the oven interior.
- The meat tin should not be placed
on a heated hotplate as this may
cause the enamel to crack.
Page 13

electrolux 13
Grilling
- Most foods should be placed on the
grid in the grill pan to allow maximum
circulation of air and to lift the food
out of the fats and juices. Food such
as fish, liver and kidneys may be
placed directly on the grill pan, if
preferred.
- Food should be thoroughly dried
before grilling to minimise splashing.
Brush lean meats and fish lightly with
a little oil or melted butter to keep
them moist during cooking.
- Accompaniments such as tomatoes
and mushrooms may be placed
underneath the grid when grilling
meats
- When toasting bread, we suggest that
the top runner position is used.
- The food should be turned over during
cooking, as required.
How to use the Inner Grill
Element
The inner grill provides quick direct heat
to the central area of the grill pan. By
using the inner grill element for cooking
small quantities, it can help to save
energy.
1. Turn the oven control function knob
on .
2. Turn the thermostat control knob on
the required temperature.
3. Adjust the grid and grill pan runner
position to allow for different
thicknesses of food and follow the
instructions for grilling.
The grill element is controlled by the
thermostat. During cooking, the grill
cycles on and off to prevent overheating.
Hints and Tips
Prepare foods in the same way as for
conventional grilling. Brush lean meats
and fish lightly with a little oil or butter to
keep them moist during cooking.
How to Use Defrosting
The oven fan operates without heat and
circulates the air, at room temperature,
inside the oven. This increases the speed
of defrosting. However, please note that
the temperature of the kitchen will
influence the speed of defrosting.
This function is particularly suitable for
delicate food which could be damaged
by heat, e.g. cream filled gateaux, iced
cakes, pastries, bread and other yeast
products.
1. Turn the oven function control knob to
.
2. Ensure the thermostat control knob
is in the OFF position.
How to use the Fan Oven
1. Turn the oven function control knob to
.
2. Turn the thermostat control to the
required temperature.
Things to note
• The oven light will come on when the
oven function control knob is set.
• The oven fan will operate continually
during cooking.
• The thermostat control light will
remain on until the correct
temperature is reached. It will then
cycle on and off to show the
temperature is being maintained.
Page 14

14 electrolux
Hints and Tips
• Cover food with a lid, aluminium foil or
plastic film to prevent drying out during
defrosting.
• ALWAYS COOK THOROUGHLY
IMMEDIATELY AFTER THAWING.
• Frozen food should be placed in a
single layer when ever possible and
turned over half way through the
defrosting process.
• Only joints of meat and poultry up to
2 kg. (4 lb.) are suitable for defrosting
in this way.
Hints and Tips
On baking:
Cakes and pastries usually require a
medium temperature (150°C-200°C) and
therefore it is necessary to preheat the
oven for about 10 minutes.
Do not open the oven door before 3/4 of
the baking time has elapsed.
Shortcrust pastry is baked in a springform
tin or on a tray for up to 2/3 of the baking
time and then garnished before being fully
baked. This further baking time depends
on the type and amount of topping or
filling. Sponge mixtures must separate
with difficulty from the spoon. The baking
time would be unnecessarily extended
by too much liquid.
If two baking trays with pastries or
biscuits are inserted into the oven at the
same time, a shelf level must be left free
between the trays.
If two baking trays with pastries or
biscuits are inserted into the oven at the
same time, the trays must be swapped
and turned around after about 2/3 of the
baking time.
On Roasting:
Do not roast joints smaller than 1 kg.
Smaller pieces could dry out when roasting. Dark meat, which is to be well done
on the outside but remain medium or rare
inside, must be roasted at a higher temperature (200°C-250°C).
White meat, poultry and fish, on the other
hand, require a lower temperature
(150°C-175°C). The ingredients for a
sauce or gravy should only be added to
the roasting pan right at the beginning if
the cooking time is short. Otherwise add
them in the last half hour.
You can use a spoon to test whether the
meat is cooked: if it cannot be depressed, it is cooked through. Roast beef
and fillet, which is to remain pink inside,
must be roasted at a higher temperature in a shorter time.
If cooking meat directly on the oven shelf,
insert the roasting pan in the shelf level
below to catch the juices.
Leave the joint to stand for at least 15
minutes, so that the meat juices do not
run out.
To reduce the build up of smoke in the
oven, it is recommended to pour a little
water in the roasting pan. To prevent
condensation forming, add water several
times. The plates can be kept warm in
the oven at minimum temperature until
serving.
Page 15

electrolux 15
Caution!
Do not line the oven with aluminium foil and do not place a
roasting pan or baking tray on
the floor, as otherwise the oven
enamel will be damaged by the
heat build-up.
Cooking times
Cooking times can vary according to the
different composition, ingredients and
amounts of liquid in the individual dishes.
Note the settings of your first cooking or
roasting experiments to gain experience
for later preparation of the same dishes.
Based upon your own experiences you
will be able to alter the values given in
the tables.
Page 16
16 electrolux
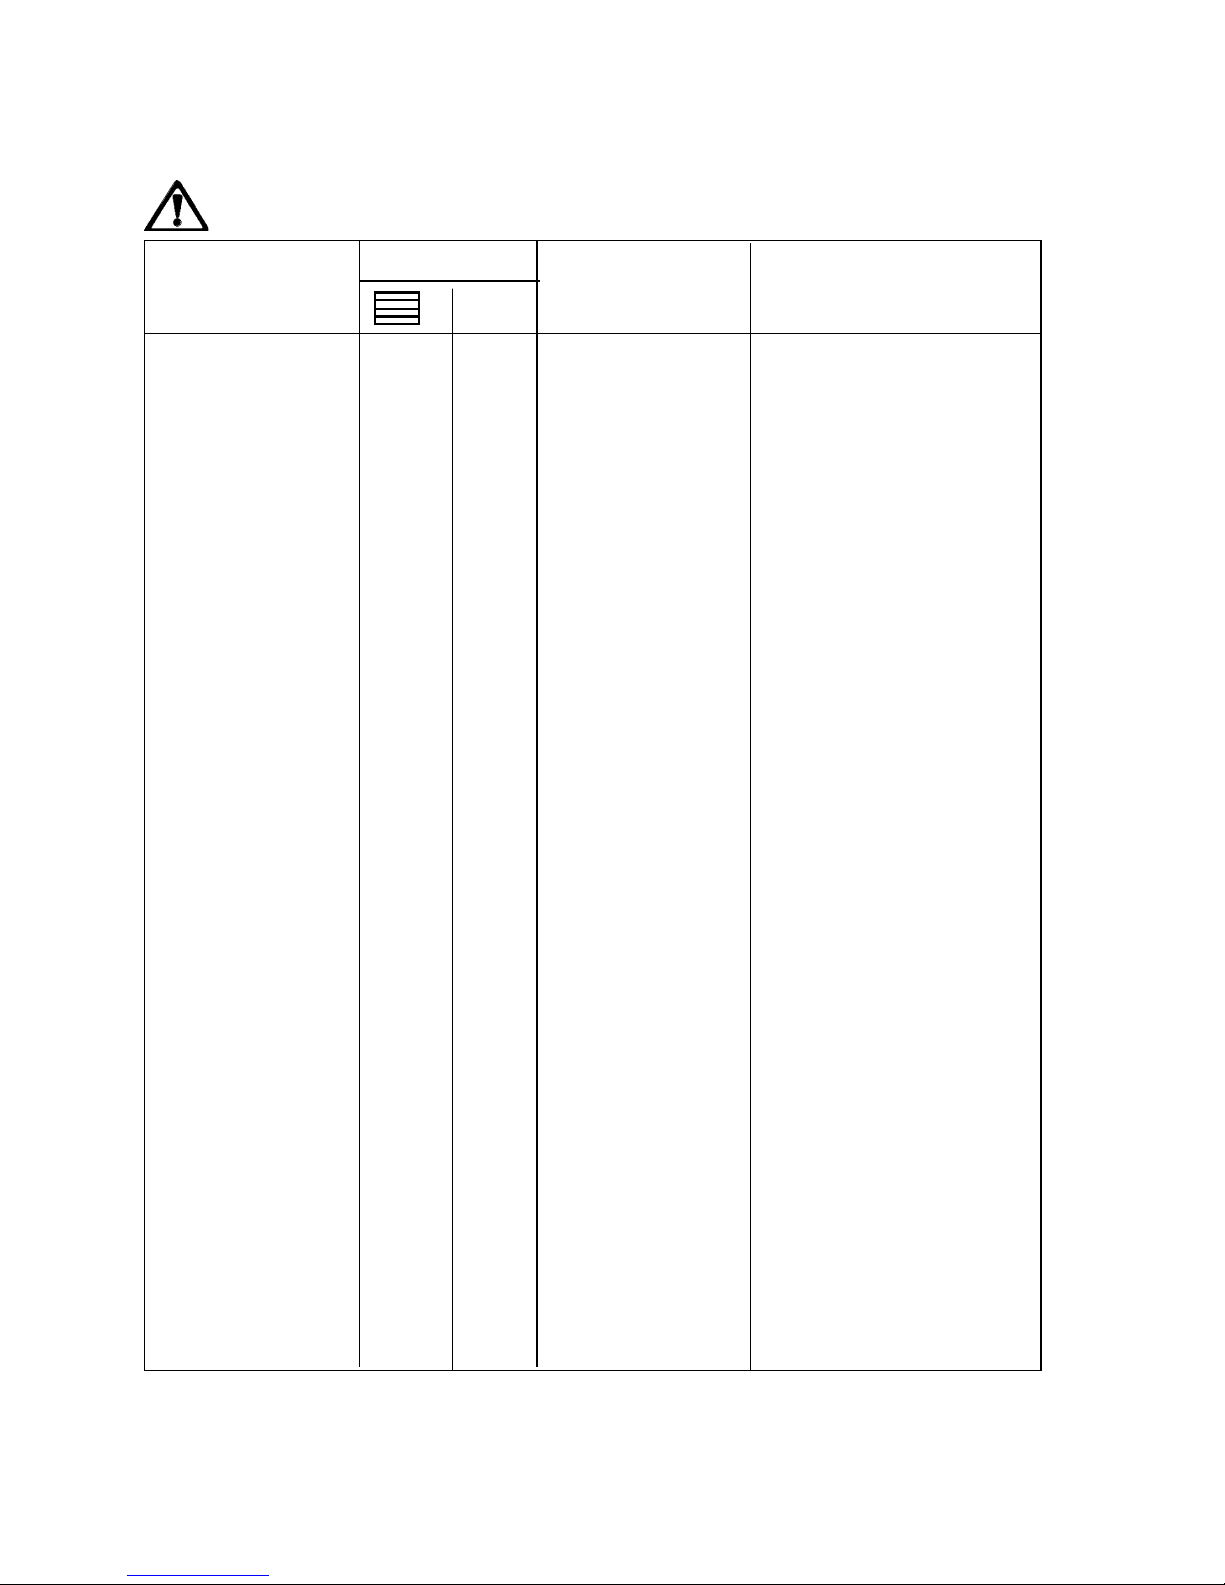
Cooking Charts
If you wish to cook more than one dish at the same time, we suggest that you change the cooking levels
of your dishes during the last 5-10 minutes in order to obtain a more uniform colour of your dishes.
(*)
If you need to cook more than one dish at the same time, we recommend you to place them on the
levels quoted between brackets. Shelf positions are counted from bottom of the oven.
Cooking times in the table do not include pre-heating. We
recommend to pre-heat the oven for about 10 minutes before cooking.
CAKES
Whisked recipies
2 (1 and 3)*
160 45-60 In cake mould
Shortbread dough
2 (1 and 3)*
160 20-30 In cake mould
Butter-milk cheese cake 2 165 60-80 In cake mould
Apple cake (Apple pie) 2 160 90-120 In cake mould
Strudel 2 160 60-80 In baking tray
Jam- tart 2 180 40-45 In cake mould
Fruit cake 2 150 60-70 In cake mould
Sponge cake
2 (1 and 3)*
165 30-40 In cake mould
Christmas cake 2 150 120-150 In cake mould
Plum cake 2 160 50-60 In bread tin
Small cake
2 (1 and 3)*
170 20-35 In baking tray
Biscuits
2 (1 and 3)*
150 20-30 In baking tray
Meringues
2 (1 and 3)*
150 60-90 In baking tray
Buns
2 (1 and 3)*
190 12~20 In baking tray
Pastry: Choux
2 (1 and 3)*
170 25-35 In braking tray
Plate tarts 2 170 45-70 In cake mould
Rich fruit cake 2 150 110-120 In cake mould
Victoria sandwich 2 170 40-55 In cake mould
BREAD AND PIZZA
White bread 2 185 60-70
Rye bread 1 180 30-45 In bread tin
Bread rolls
2 (1 and 3)*
175 25-40 In baking tray
Pizza 2 200 20-30 In baking tray
Scones 2 190 10~20 In baking tray
FLANS
Pasta flan
2 (1 and 3)*
175 40-50 In mould
Vegetable flan
2 (1 and 3)*
175 45-60 In mould
Quiches
2 (1 and 3)*
180 35-45 In mould
Lasagne 2 200 25-35 In mould
Cannelloni 2 200 25-35 In mould
Yorkshire pudding 2 210 20-25 6 pudding mould
MEAT
Beef 2 175 50-70 On grid
Pork 2 175 100-130 On grid
Veal 2 175 90-120 On grid
English roast beef
rare 2 200 50-60 On grid
medium 2 200 60-70 On grid
well done 2 200 70-80 On grid
Shoulder of pork 2 170 120-150 With rind
Shin of pork 2 160 100-120 2 pieces
Lamb 2 175 110-130 Leg
Chicken 2 200 70-85 Whole
Turkey 2 160 210-240 Whole
Duck 2 175 120-150 Whole
Goose 1 160 150-200 Whole
Rabbit 2 175 60-80 Cut in pieces
Hare 2 175 150-200 Cut in pieces
Pheasant 2 175 90-120 Whole
Meat loaf 2 170 150 in bread pan
FISH
Trout/Sea bream
2 (1 and 3)*
175 40-55 3-4 fishes
Tuna fish/Salmon
2 (1 and 3)*
175 35-60 4-6 fillets
TYPE OF DISH
Fan Cooking
temp °C
4
3
2
1
NOTES
Cooking time in
minutes
Page 17
electrolux 17
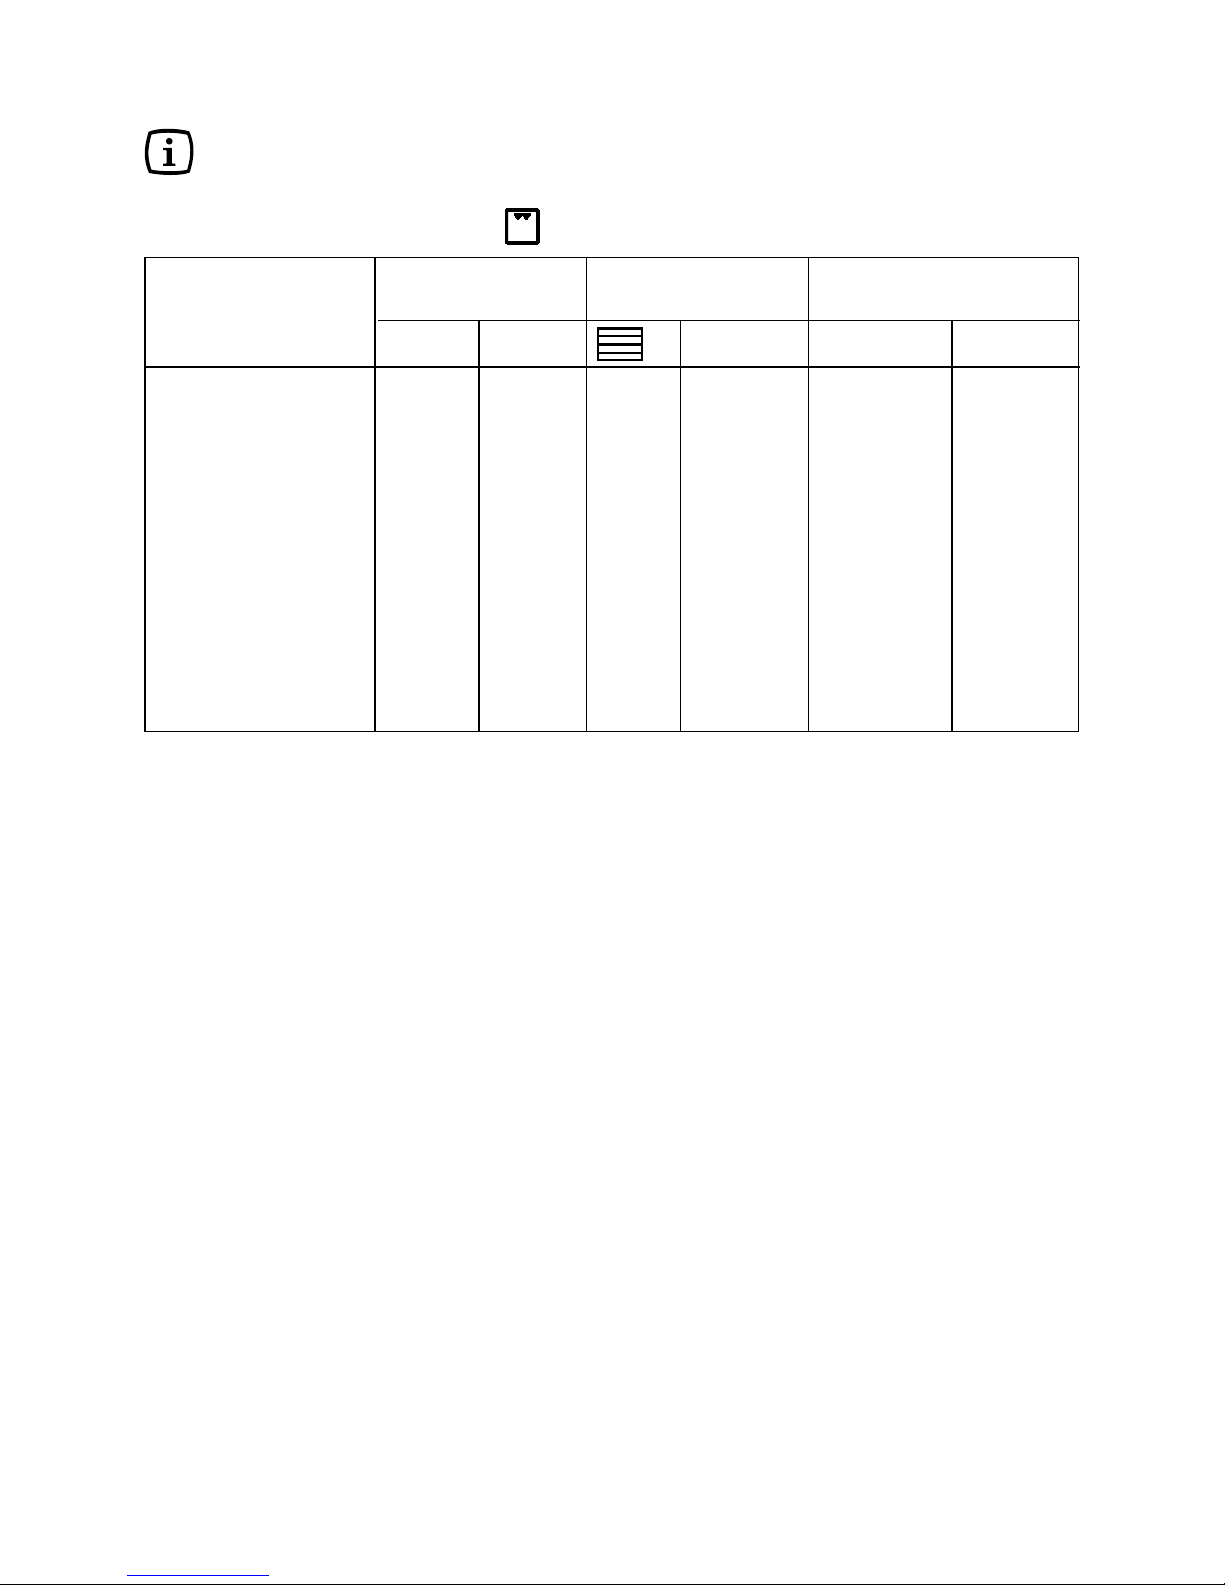
Cooking Chart- Grilling
Cooking times in the tables do not include pre-heating. We recommend
to pre-heat the oven for about 10 minutes before cooking.
1st side
temp.°CPieces g.
Quantity
Cooking time in
minutes
2nd side
Grilling
4
3
2
1
TYPE OF DISH
Fillet steaks 4 800 3 250 12~15 12~14
Beef-steaks 4 600 3 250 10~12 6~8
Sausages 8 / 3 250 12~15 10~12
Pork chops 4 600 3 250 12~16 12~14
Chicken (cut in two) 2 1000 3 250 30~35 25~30
Kebabs 4 / 3 250 10~15 10~12
Chicken (breast) 4 400 3 250 12~15 12~14
Hamburger* 6 600 2 250 20-30
*
Preheat 5’00'’
Fish (fillets) 4 400 3 250 12~14 10~12
Sandwiches 4~6 / 3 250 5~7 /
Toast 4~6 / 3 250 2~4 2~3
Page 18

18 electrolux
Before cleaning always allow
the cooling fan to cool the oven
down before switching off at
the electricity supply.
This appliance cannot be
cleaned with steam or with a
steam cleaning machine.
The oven should be kept clean
at all times. A build-up of fats
or other foodstuffs could
result in a fire, especially in the
grill pan.
Important: Before carrying out any
cleaning operation, the appliance must
be disconnected from the power supply.
External cleaning
Regularly wipe over the control panel,
oven door and door seal using a soft cloth
well wrung out in warm water to which a
little mild washing-up liquid has been
added.
To prevent damaging or weakening the
door glass panels avoid the use of the
following:
• Household detergent and
bleaches
• Impregnated pads unsuitable for
non-stick saucepans
• Brillo/Ajax pads or steel wool pads
• Chemical oven pads or aerosols
• Rust removers
• Bath/Sink stain removers
Clean the outer and inner door glass using
warm soapy water. Should the inner door
glass become heavily soiled it is
recommended that a cleaning product
such as Hob Brite is used. Do not use
paint scrapers to remove soilage.
Cleaning and Maintenance
Cleaning materials
Before using any cleaning materials on
your oven, check that they are suitable
and that their use is recommended by
the manufacturer.
Cleaners that contain bleach should NOT
be used as they may dull the surface
finishes. Harsh abrasives should also be
avoided.
Oven Cavity
The enamelled base of the oven cavity is
best cleaned whilst the oven is still warm.
Wipe the oven over with a soft cloth
soaked in warm soapy water after each
use. From time to time it will be
necessary to do a more thorough
cleaning, using a proprietary oven
cleaner.
Do not attempt to clean catalytic
liners.
Page 19

electrolux 19
As cooking produces oil, fats, splashes
of food, etc., catalytic enamel destroys
them. To aid this process it is a good idea
to run the oven for an hour or two per
week, without food, to ensure continued
good performance from the Catalytic
liners.
To clean the oven cavity, proceed as
follows:
1. remove the oven accessories, if
present (e.g. pans, grids, baking tray,
dripping pan, etc.). Do not leave
anything inside the oven.
2. Turn the oven function control knob
to the fan cooking function .
3. Turn the thermostat control to 250°C.
4. Allow the oven to run empty for
approximately 45 minutes.
5. Open a window for ventilation.
This procedure should be repeated with
the inner grill cooking function for
approximately 5 minutes.
If the oven cavity is cold, let the oven run
for 60 minutes.
Do not attempt to clean
catalytic enamel.
Hints and Tips
• Manual cleaning of the Catalytic liner
is not recommended. Damage will
occur if soap impregnated steel wool
pads, aerosol cleaners and any other
abrasives are used.
Care of Catalytic Liners
• Slight discolouration and polishing of
the Catalytic surface may occur in time.
This does not affect the Catalytic
properties in any way.
• Follow the recommendations in
“Cooking to reduce soilage”.
Cooking to reduce soilage
Cook at the recommended temperatures.
Higher temperatures during roasting will
increase soilage. Try cooking to lower
temperatures for an increased length of
time, you will save energy and often the
joint is more tender.
Use minimal, if any, extra oil or fat when
roasting meat; potatoes only require
brushing with fat before cooking. Extra fat
in the oven during roasting will increase
splashing and soilage. It is NOT necessary
to add water to the meat tin when roasting.
The water and the fat juices from the joint
create excessive splattering during
cooking, even at normal temperatures, as
well as causing condensation.
Covering joints during cooking will also
prevent splashing onto the interior
surfaces; removing the covering for the last
20-30 minutes will allow extra browning,
if required. Some large joints and turkeys
especially benefit by this method of
cooking, allowing the joint to cook through
before the outside is overbrowned.
Do use the roasting tin. During roasting,
the fat from the joint will be contained
beneath the trivet and therefore prevent
it from splattering onto the 'Catalytic' liner.
Page 20
20 electrolux
Shelf Supports and Catalytic
Panels
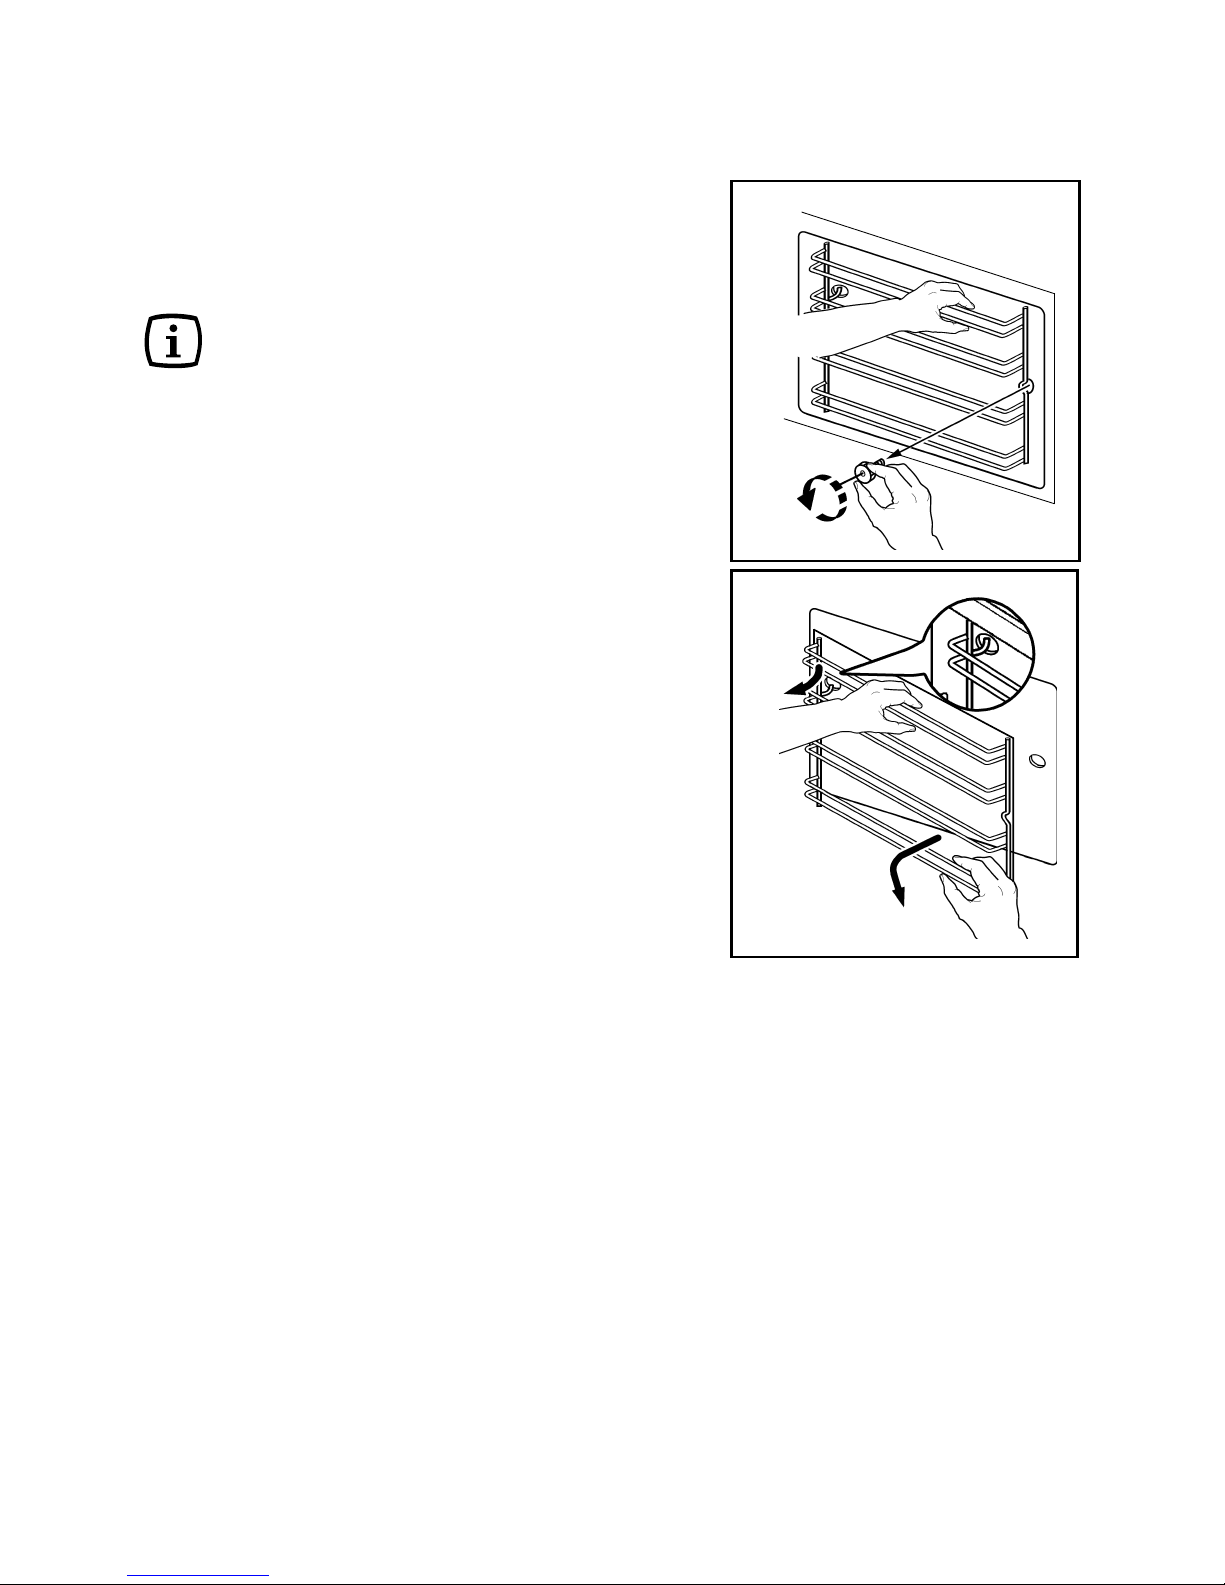
The shelf supports and the catalytic
panels can be removed for easy
cleaning.
Make sure the appliance is
completely cooled before
carrying out this operation.
Proceed as follows:
1) remove the front screw while keeping
the shelf support and the catalytic
panel in position with the other hand
(see diagram 1);
2) keep the shelf support and the
catalytic panel in position and lift
them with a hand while disengaging
the rear hook. Take off the shelf
support and the catalytic panel (see
diagram 2);
Clean the telescopic shelf supports
on the outside only with commercially
available detergents.
3) once the cleaning is carried out, fit
the shelf support and the catalytic
panel together and mount them
following the procedure in reverse.
Please, ensure the retaining nuts are
secure when refitting the shelf support
and the catalytic panel.
1
2
)
Page 21
electrolux 21
Cleaning the oven door
The following instructions explain how to
disassemble the oven door as it is
supplied by the Manufacturer.
If your oven door has been
reversed, please note that the
references to the right or left
side have to be switched.
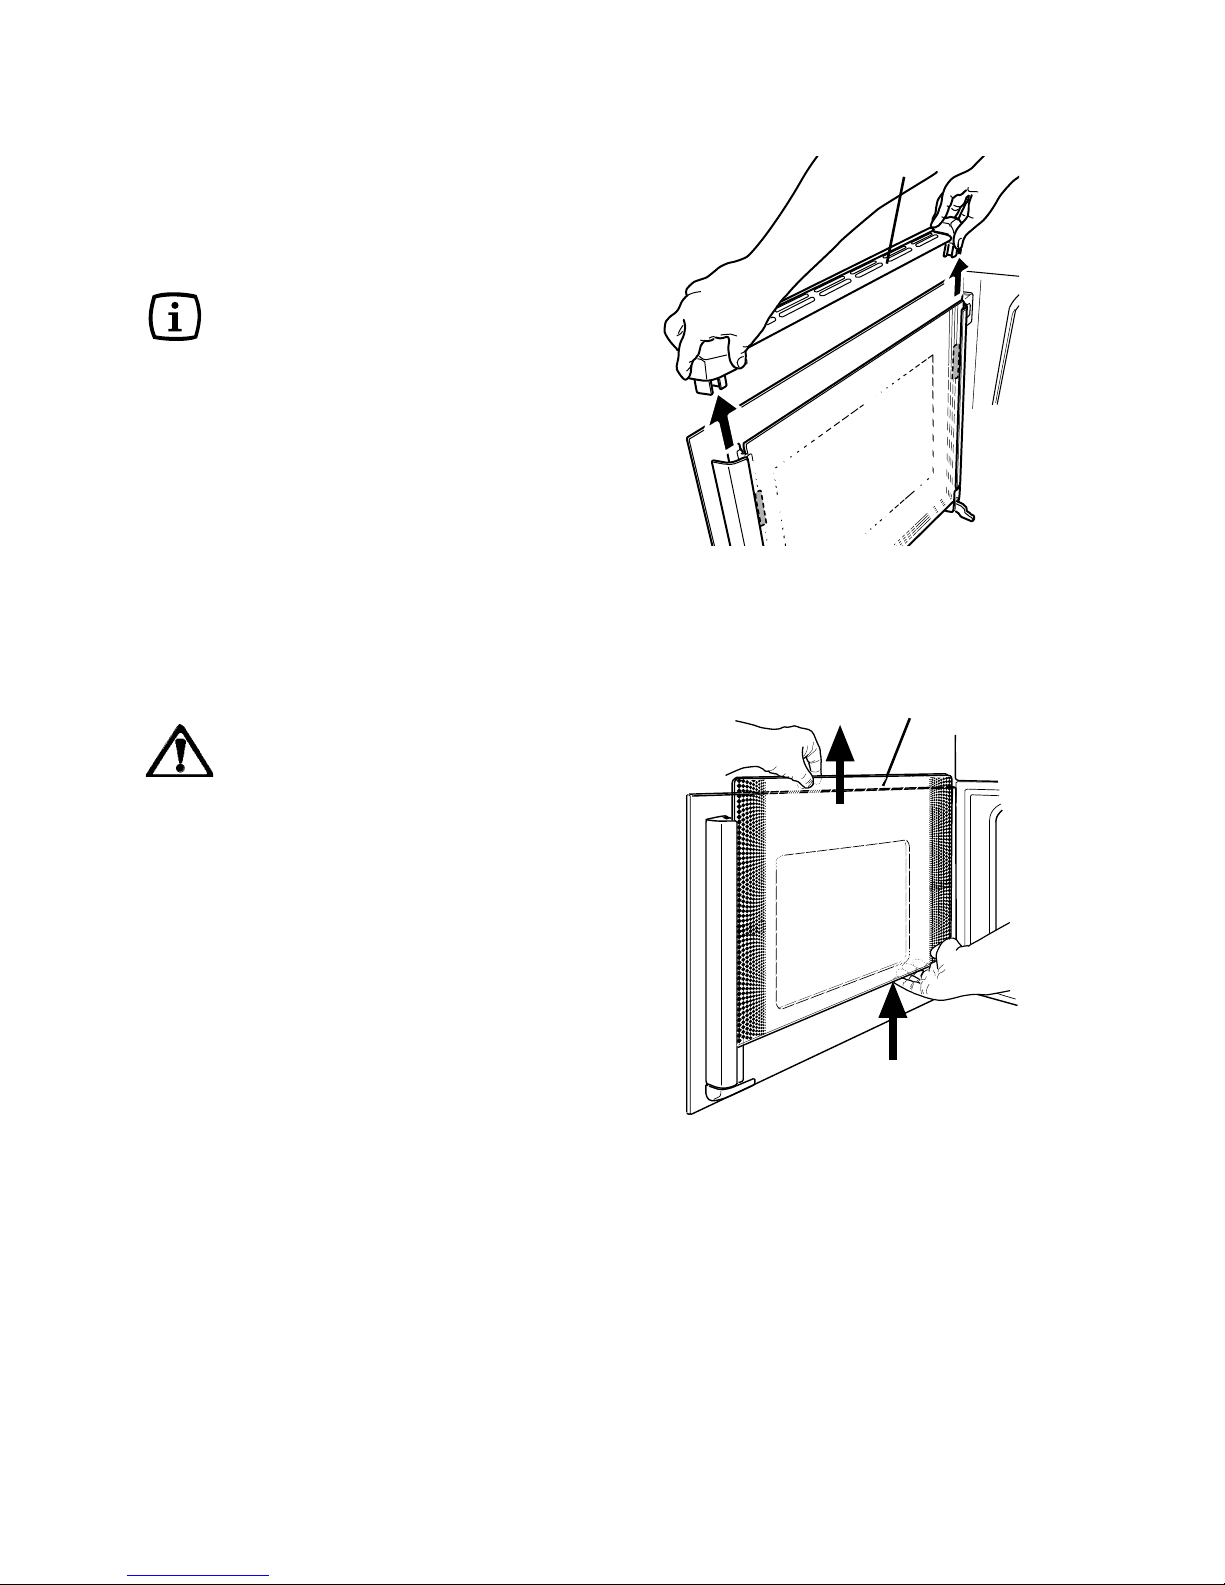
Figure 1. With both hands hold the
perforated plate A in position and
push it out upwards.
Figure 2. Hold the inner glass B tightly
with both hands and remove it from
its original position by sliding it
upwards.
Make sure that glass B is
firmly held to avoid that the
glass heel over and fall down.
After removing the inner glass, clean the
oven door and the glass.
We recommend to clean the oven door
using only a wet sponge and dry it after
cleaning with a soft cloth. Never use steel
wool, acids or abrasive products as they
can damage the surface.
Fig. 1
Fig. 2
B
A
Page 22
22 electrolux
A
C
C
Fig. 3
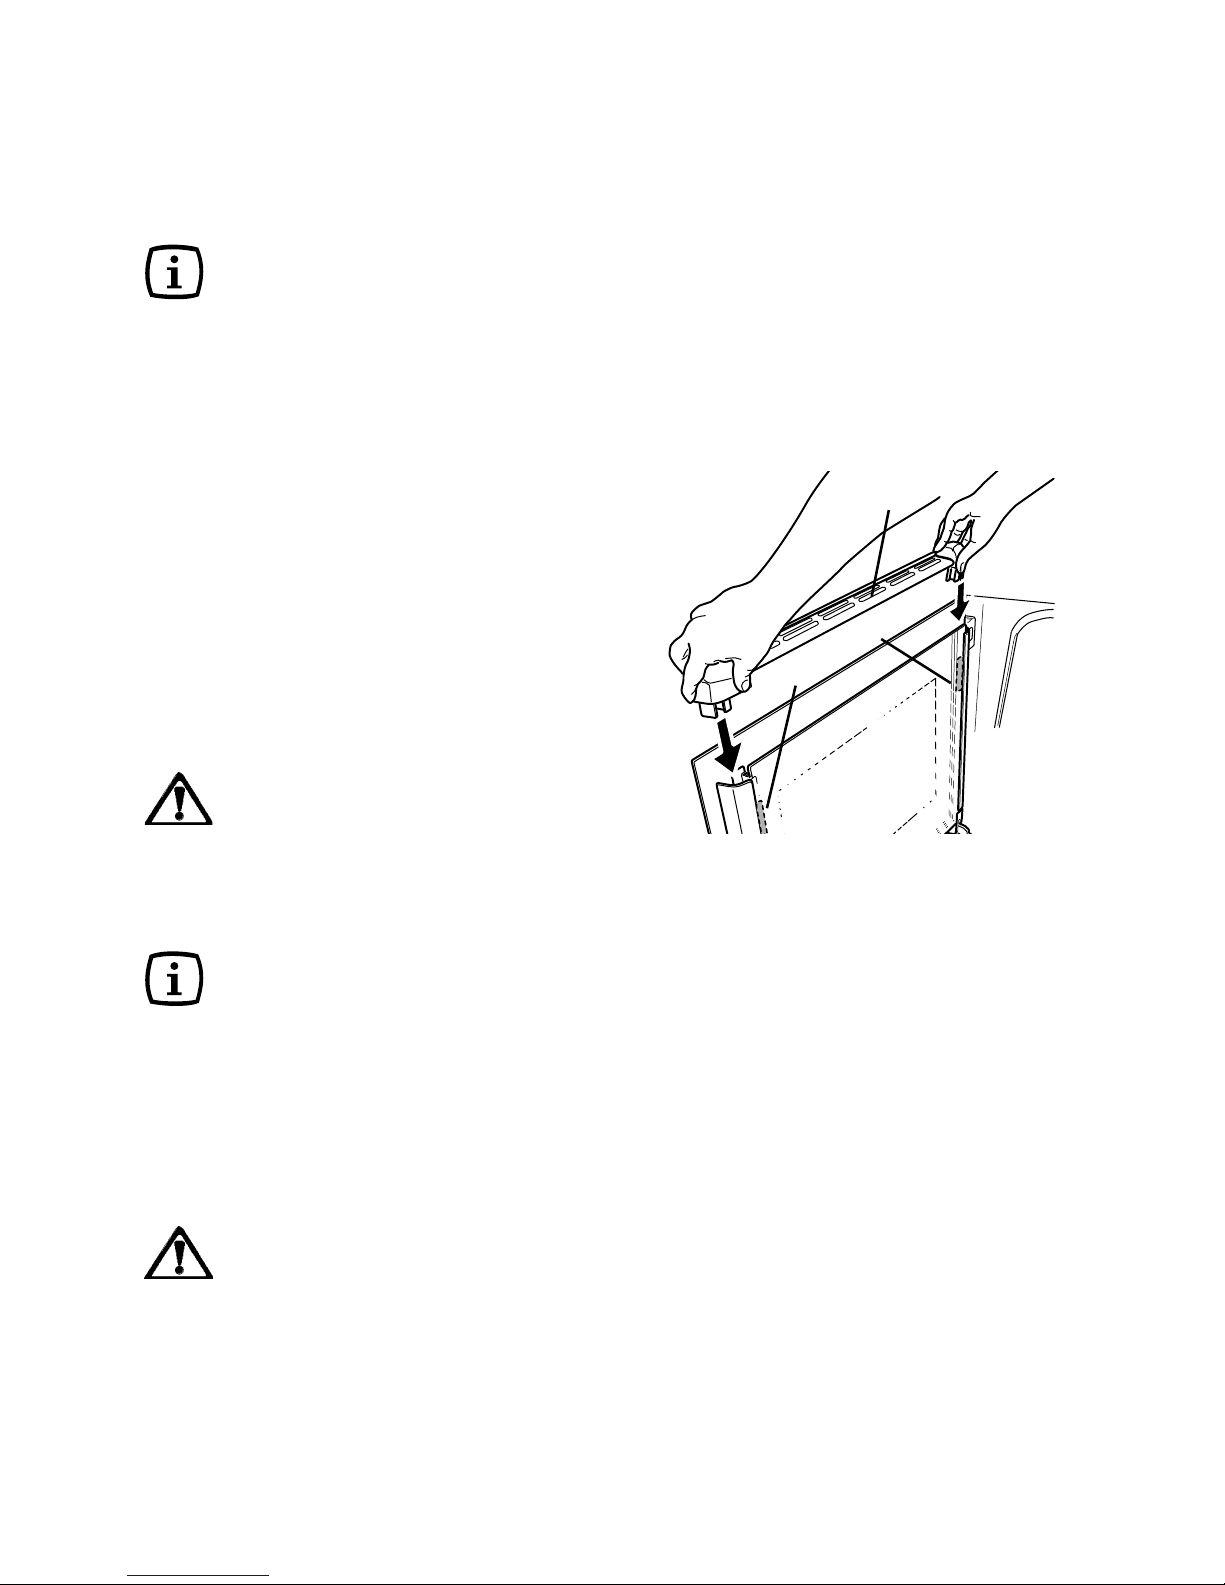
After cleaning, place the inner glass back
in its original position by inserting it in
the rubber distance holders C.
The inner pane B (with side
decors) must be arranged with
the decorated surface to the
inner side of the door. The
slight roughness of the
printing must not be
discernible when you stroke
your fingers over the visible
surface.
After placing the inner glass back:
Figure 3. Insert the perforated plate A
back in its original position and check
that everything is securely fastened
and firm.
DO NOT clean the oven door
while the glass panels are
warm. If this precaution is not
observed the glass panel may
shatter.
If the door glass panel becomes
chipped or has deep scratches,
the glass will be weakened and
must be replaced to prevent the
possibility of the panel shattering.
Contact your local Service Force
Centre who will be pleased to
advise further.
The side swing door reversal
must be carried out by
qualified installers only or by
an authorized Electrolux After
Sales technician. Do not
attempt to reverse the Side
Swing Door yourself.
Page 23
electrolux 23
Replacing The Oven Light
Disconnect the appliance
If the oven bulb needs replacing, it must
comply with the following specifications:
- Electric power: 15 W/25 W,
- Electric rate: 230 V (50 Hz),
- Resistant to temperatures of 300°C,
- Connection type: E14.
These bulbs are available from your local
Service Force Centre.
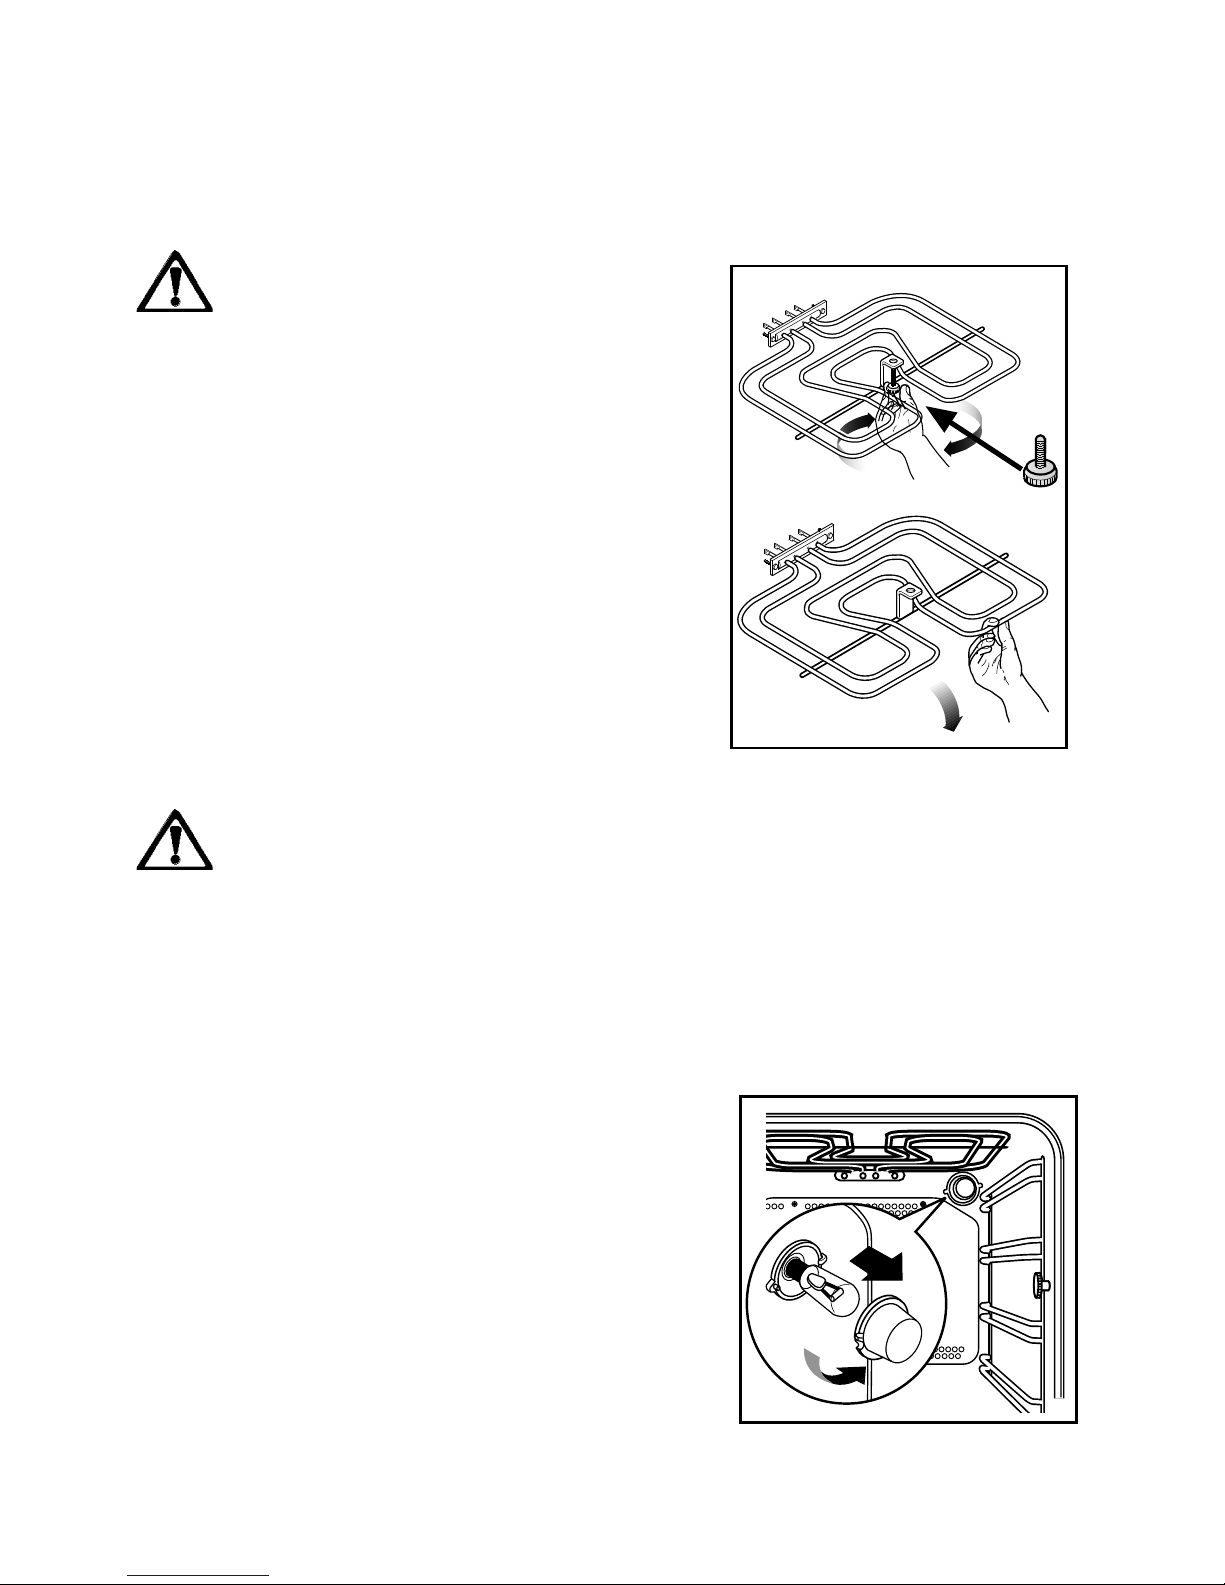
To replace the faulty bulb:
1. Ensure the oven is isolated from the
electrical supply.
2. Push in and turn the glass cover
anticlockwise.
3. Remove the faulty bulb and replace
with the new one.
4. Refit the glass cover and restore the
electrical supply.
)
Grill heating element
This model has been fitted with a hinged
grill element to make the roof of the oven
especially easy to clean.
Before proceeding ensure the
oven is cool and disconnected from the electricity
supply.
Proceed as follows:
1. Undo the screw fastening the grill element. When carrying out this operation for the first time, we recommend
using a screwdriver.
2. Then gently pull the grill downwards
to allow access to the oven roof.
3. Clean the oven roof with a suitable
cleaner and wipe dry before returning the hinged grill element to its
original position.
4. Gently push up the grill element
into place and firmly screw into place
the holding nut.
Ensure the holding nut on the
grill element is properly
)
Page 24
24 electrolux
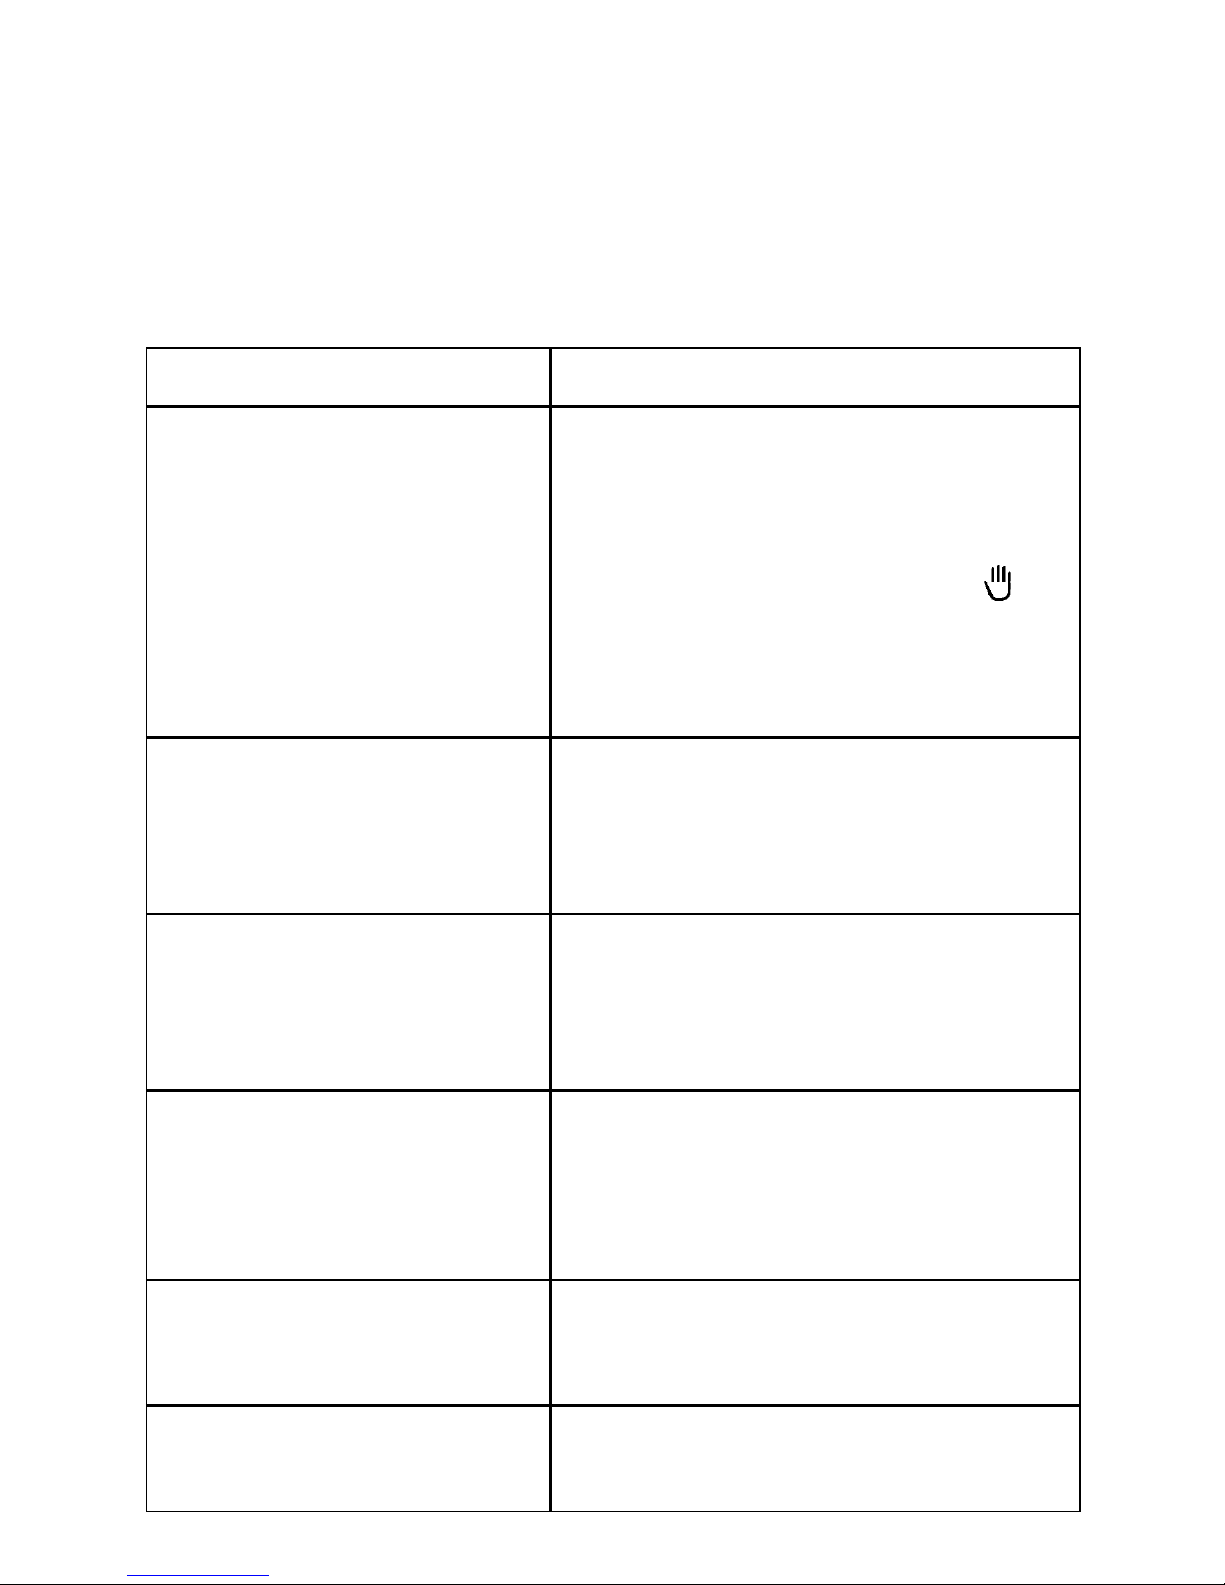
If the oven is not working correctly, please carry out the following checks, before
contacting your local Service Centre.
IMPORTANT: If you call out an engineer to a fault listed below, or to repair a fault
caused by incorrect use or installation, a charge will be made even if the appliance
is under guarantee.
Something not Working
SOLUTION
Check that both a cooking function and
temperature have been selected
or
Check that the end of cooking program-
mer is set on "manual operation"
or
Check whether the appliance is correctly
connected and the socket switch or the
mains supply to the oven is ON.
Select a temperature with the thermostat
control knob
or
Select a function with the oven function
control knob.
Select a function with the oven function
control knob.
or
Check the light bulb, and replace it if
necessary (see "Cleaning the Oven")
The temperature may need adjusting
or
Following the advice contained in these
instructions, especially the section “Using
the Oven“.
When the cooking process is completed,
do not leave the dishes standing in the
oven for longer than 15-20 minutes.
Check that shelves and bakeware are not
vibrating in contact with the oven back
panel.
PROBLEM
The oven is not switching on.
The oven temperature light
does not come on.
The oven light does not come
on.
It takes too long to cook the
dishes or they cook too
quickly.
Steam and condensation
settle on the food and in the
oven cavity.
The oven fan is noisy.
Page 25

electrolux 25
Technical Data
Heating element ratings
Convection element 2,000 W
Inner Grill element 1,650 W
Oven Light 25 W
Cooling Fan 25 W
Convection Fan 25 W
Total Rating 2,075 W
Supply voltage (50 Hz) 230 V
Dimensions of the recess
Height under top mm 593
in column mm 580
Width mm 560
Depth mm 550
Oven
Height mm 335
Width mm 395
Depth mm 400
Oven capacity 53 l
The oven must be installed
according to the instructions
supplied.
This oven must be installed by
qualified personnel to the
relevant British Standards.
Page 26
26 electrolux
Electrical Connection
The oven is designed to be connected to
230 V (50 Hz) electricity supply.
The oven has an easily accessible terminal
block which is marked as follows:
Letter L - Live terminal
Letter N - Neutral terminal
or E-Earth terminal
THIS OVEN MUST BE
EARTHED
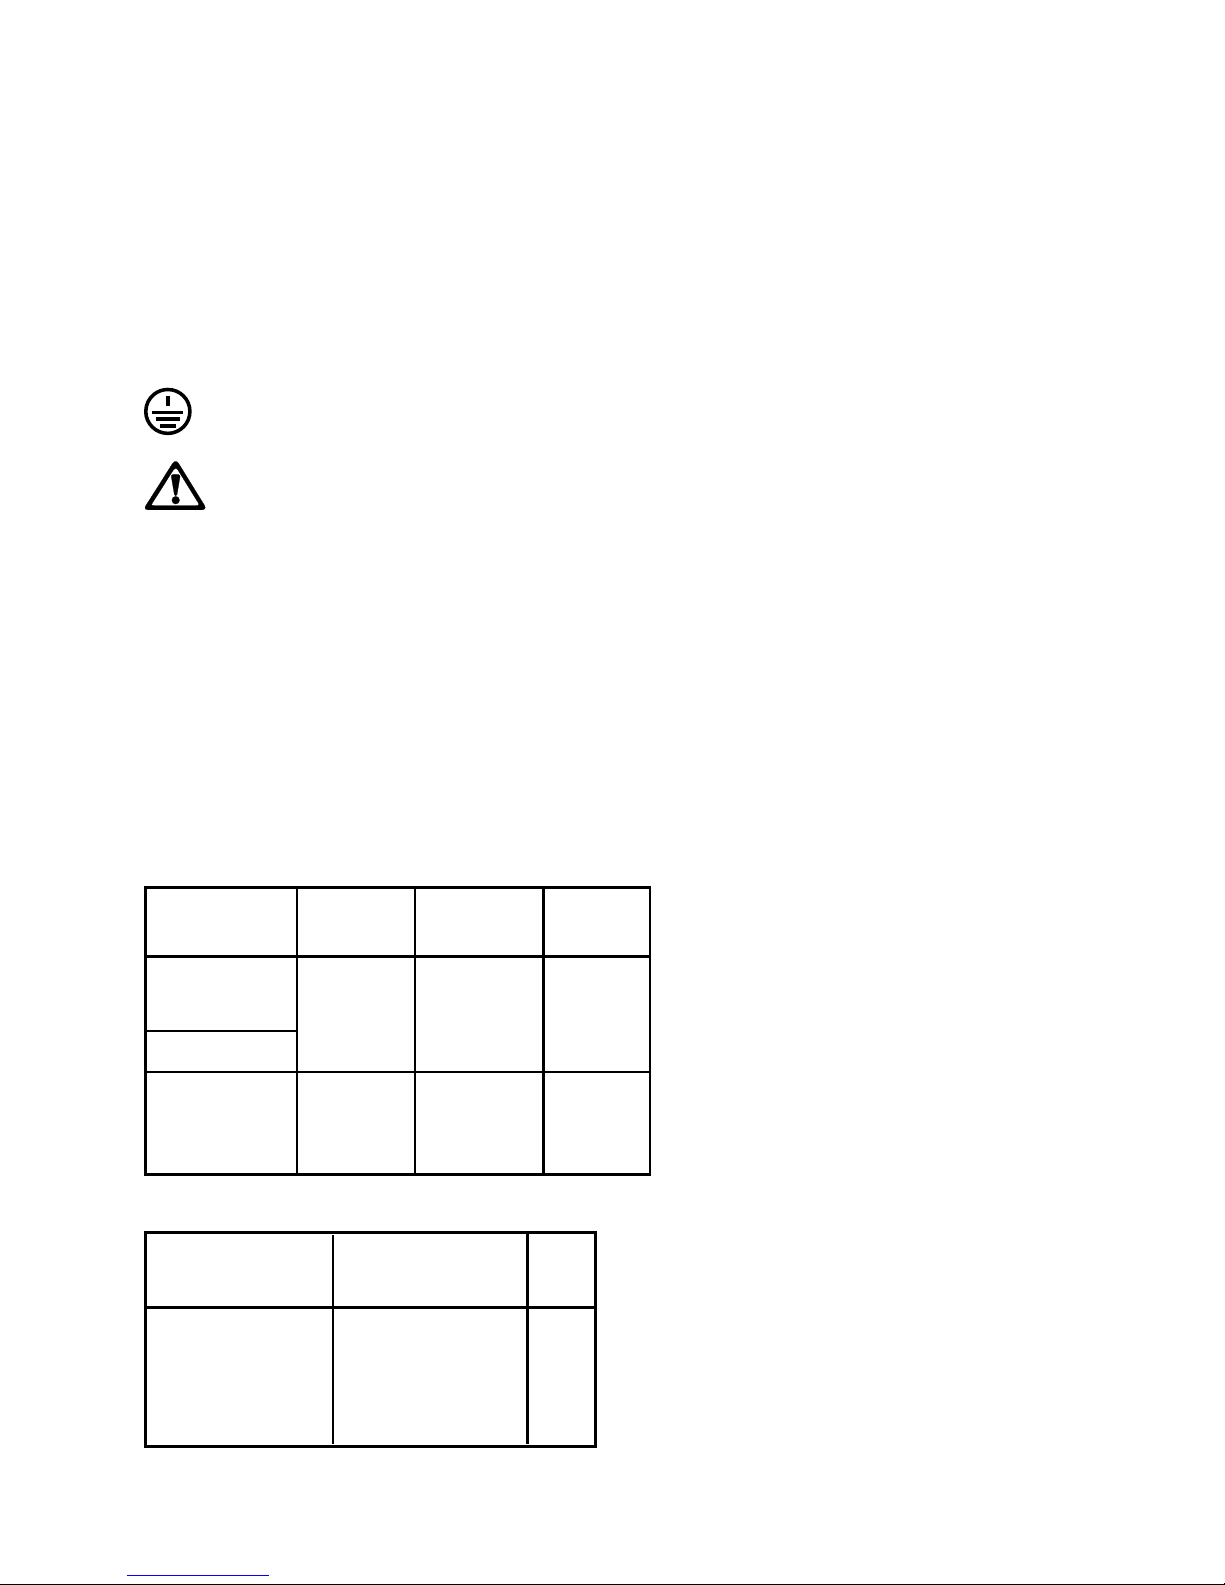
The cable used to connect the oven to
the electrical supply must comply to the
specifications given below.
It is necessary that you install a double
pole switch between the oven and the
electricity supply (mains), with a minimum
gap of 3mm between the switch contacts
and of a type suitable for the required load
in compliance with the current rules.
The switch must not break the yellow and
green earth cable at any point.
the yellow and green earth cable should
be 2-3 cm longer than the other cables.
Important
After installation and connecting, the cable
must be placed so that it cannot at any
point reach a temperature of more than
50°C above the ambient temperature.
Before the oven is connected, check that
the main fuse and the domestic installation
can support the load and that the power
supply is properly earthed.
The manufacturer declines any
responsibility should these safety
measures not be carried out.
For Europe use only
Min. size Cable/ Cable / flex type Fuse
flex
2.5 mm
2
H07 RN-F, H05 RN-F,
15 A
H05 RR-F, H05 VV-F,
H05 V2V2-F (T90),
H05 BB-F
Connection Min. size Cable / flex Fuse
via Cable/flex type
13 A socket 2.5 mm
2
3 core 13 A min.
outlet butyl
13 A spur box
insulated
Oven 2.5 mm
2
PVC/PVC
15 A min.
Control twin and
Circuit earth
20 A max.
For UK use only
Page 27
electrolux 27
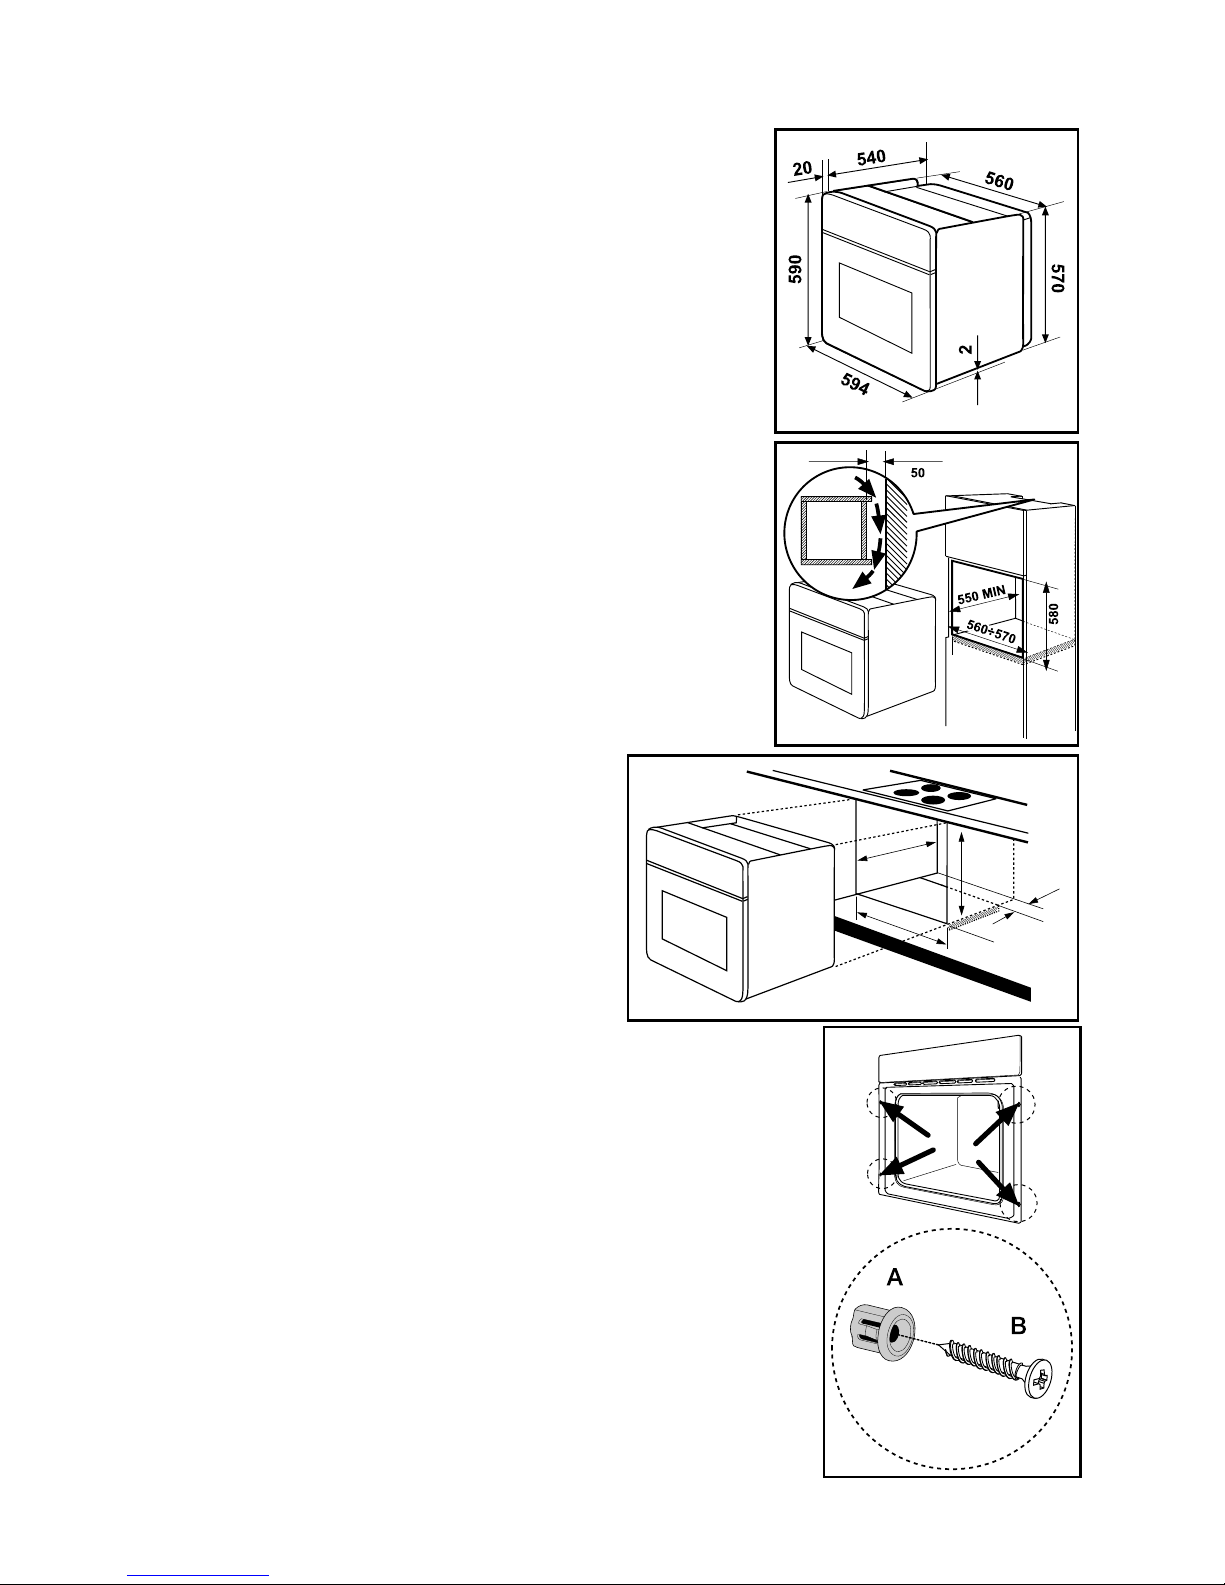
Securing the Appliance to the
Cabinet
1. Open the oven door.
2. Fasten the oven to the cabinet placing
the four distance holders (letter A)
which fit exactly into the holes in the
frame and then fit the four wood
screws (letter B) provided.
Instructions for Building In
Please ensure that when the oven is
installed it is easily accessible for
the engineer in the event of a
breakdown.
Building In
The surround or cabinet into which the
oven will be built must comply with these
specifications:
z the dimensions must be as shown in
the relevant diagrams;
z the materials must withstand a tem-
perature increase of at least 60 °C
above ambient;
z proper arrangements must be made
of a continuous supply of air to the
oven to prevent the oven overheating.
Dimensions of the oven and recess
required are given in the relevant diagrams.
550 M
IN
593
560 - 570
80÷100
Page 28

28 electrolux
Guarantee/Customer Service
Standard guarantee conditions
We, Zanussi-Electrolux, undertake that if within 12 months of the date of the
purchase this Zanussi-Electrolux appliance or any part thereof is proved to be
defective by reason only of faulty workmanship or materials, we will, at our
option repair or replace the same FREE OF CHARGE for labour, materials or
carriage on condition that:
· The appliance has been correctly installed and used only on the electricity
supply stated on the rating plate.
· The appliance has been used for normal domestic purposes only, and in
accordance with the manufacturer’s instructions.
· The appliance has not been serviced, maintained, repaired, taken apart or
tampered with by any person not authorised by us.
· Electrolux Service Force Centre must undertake all service work under this
guarantee
· Any appliance or defective part replaced shall become the Company’s
property.
· This guarantee is in addition to your statutory and other legal rights.
Exclusions
· Damage or calls resulting from transportation, improper use or neglect, the
replacement of any light bulbs or removable parts of glass or plastic.
· Costs incurred for calls to put right an appliance which is improperly installed
or calls to appliances outside the United Kingdom.
· Appliances found to be in use within a commercial environment, plus those
which are subject to rental agreements.
· Products of Electrolux manufacturer that are not marketed by Electrolux
Service and Spare Parts
In the event of your appliance requiring service, or if you wish to purchase spare
parts, please contact your local Service Force Centre by telephoning
0870 5 929 929
Your telephone call will be automatically routed to the Service Force Centre covering
your postcode area.
Page 29

electrolux 29
For the address of your local Service Force Centre and further information about
Service Force, please visit the website at www.serviceforce.co.uk
Before calling out an engineer, please ensure you have read the details under the
heading “Something not working”.
When you contact the Service Force Centre you will need to give the following
details:
1.Your name, address and postcode.
2.Your telephone number.
3. Clear concise details of the fault.
4. The model and Serial number of the appliance (found on the rating plate).
5.The purchase date.
Please note a valid purchase receipt or guarantee documentation is required for in
guarantee service calls.
Customer Care
For general enquiries concerning your Electrolux appliance, or for further information
on Electrolux products please contact our Customer Care Department by letter or
telephone at the address below or visit our website at www.electrolux.co.uk
Customer Care Department
Electrolux Major Appliances
Addington Way
Luton
Bedfordshire, LU4 9QQ
Tel: 08705 727 727 (*)
(*) Calls may be recorded for training purposes
Page 30

30 electrolux
This appliance is guaranteed by Electrolux in each of the countries listed at the
back of this user manual, for the period specified in the appliance guarantee or
otherwise by law. If you move from one of these countries to another of the countries
listed below the appliance guarantee will move with you subject to the following
qualifications:
• The appliance guarantee starts from the date you first purchased the appliance
which will be evidenced by production of a valid purchase document issued by
the seller of the appliance.
• The appliance guarantee is for the same period and to the same extent for labour and parts as exists in your new country of residence for this particular model
or range of appliances.
• The appliance guarantee is personal to the original purchaser of the appliance
and cannot be transferred to another user.
• The appliance is installed and used in accordance with instructions issued by
Electrolux and is only used within the home, i.e. is not used for commercial purposes.
• The appliance is installed in accordance with all relevant regulations in force
within your new country of residence.
The provisions of this European Guarantee do not affect any of the rights granted to
you by law.
European Guarantee
Page 31
electrolux 31
Page 32

Page 33

Page 34

Page 35

Page 36

35698-7403 08/08 R.A
 Loading...