

Page 1

EOB2200BAX
EOB2200COX
................................................ .............................................
EN OVEN USER MANUAL 2
TR FIRIN KULLANMA KILAVUZU 20
Page 2
www.electrolux.com
2
CONTENTS
1. SAFETY INFORMATION . . . . . . . . . . . . . . . . . . . . . . . . . . . . . . . . . . . . . . . . . . . . . . . . . . . 3
2. SAFETY INSTRUCTIONS . . . . . . . . . . . . . . . . . . . . . . . . . . . . . . . . . . . . . . . . . . . . . . . . . . 4
3. PRODUCT DESCRIPTION . . . . . . . . . . . . . . . . . . . . . . . . . . . . . . . . . . . . . . . . . . . . . . . . . 6
4. BEFORE FIRST USE . . . . . . . . . . . . . . . . . . . . . . . . . . . . . . . . . . . . . . . . . . . . . . . . . . . . . . 6
5. DAILY USE . . . . . . . . . . . . . . . . . . . . . . . . . . . . . . . . . . . . . . . . . . . . . . . . . . . . . . . . . . . . . 7
6. CLOCK FUNCTIONS . . . . . . . . . . . . . . . . . . . . . . . . . . . . . . . . . . . . . . . . . . . . . . . . . . . . . 7
7. ADDITIONAL FUNCTIONS . . . . . . . . . . . . . . . . . . . . . . . . . . . . . . . . . . . . . . . . . . . . . . . . . 8
8.
HELPFUL HINTS AND TIPS . . . . . . . . . . . . . . . . . . . . . . . . . . . . . . . . . . . . . . . . . . . . . . . . 8
9. CARE AND CLEANING . . . . . . . . . . . . . . . . . . . . . . . . . . . . . . . . . . . . . . . . . . . . . . . . . . . 13
10.
WHAT TO DO IF… . . . . . . . . . . . . . . . . . . . . . . . . . . . . . . . . . . . . . . . . . . . . . . . . . . . . . . 17
11. INSTALLATION . . . . . . . . . . . . . . . . . . . . . . . . . . . . . . . . . . . . . . . . . . . . . . . . . . . . . . . . . 18
WE’RE THINKING OF YOU
Thank you for purchasing an Electrolux appliance. You’ve chosen a product that brings with it
decades of professional experience and innovation. Ingenious and stylish, it has been designed
with you in mind. So whenever you use it, you can be safe in the knowledge that you’ll get great
results every time.
Welcome to Electrolux.
Visit our website for:
Get usage advice, brochures, trouble shooter, service information:
www.electrolux.com
Register your product for better service:
www.electrolux.com/productregistration
Buy Accessories, Consumables and Original spare parts for your appliance:
www.electrolux.com/shop
CUSTOMER CARE AND SERVICE
We recommend the use of original spare parts.
When contacting Service, ensure that you have the following data available.
The information can be found on the rating plate. Model, PNC, Serial Number.
Warning / Caution-Safety information
General information and tips
Environmental information
Subject to change without notice.
Page 3

1. SAFETY INFORMATION
Before the installation and use of the appliance, carefully
read the supplied instructions. The manufacturer is not
responsible if an incorrect installation and use causes injuries and damages. Always keep the instructions with
the appliance for future reference.
1.1 Children and vulnerable people safety
WARNING!
Risk of suffocation, injury or permanent disability.
• This appliance can be used by children aged from 8
years and above and persons with reduced physical,
sensory or mental capabilities or lack of experience and
knowledge if they are supervised by an adult or a person who is responsible for their safety.
• Do not let children play with the appliance.
• Keep all packaging away from children.
• Keep children and pets away from the appliance when
it operates or when it cools down. Accessible parts are
hot.
• If the appliance has a child safety device, we recommend that you activate it.
• Cleaning and user maintenance shall not be made by
children without supervision.
ENGLISH 3
1.2 General Safety
• Only a qualified person must install this appliance and
replace the cable.
• Internally the appliance becomes hot when in operation. Do not touch the heating elements that are in the
appliance. Always use oven gloves to remove or put in
accessories or ovenware.
• Do not use a steam cleaner to clean the appliance.
• Before maintenance cut the power supply.
Page 4
www.electrolux.com
4
• Do not use harsh abrasive cleaners or sharp metal
• To remove the shelf supports first pull the front of the
scrapers to clean the glass door since they can scratch
the surface, which may result in shattering of the glass.
shelf support and then the rear end away from the side
walls. Install the shelf supports in the opposite sequence.
2.
SAFETY INSTRUCTIONS
2.1 Installation
WARNING!
Only a qualified person must install this appliance.
• Remove all the packaging.
• Do not install or use a damaged appli-
ance.
• Obey the installation instruction sup-
plied with the appliance.
• Always be careful when you move the
appliance because it is heavy. Always
wear safety gloves.
• Do not pull the appliance by the handle.
• Keep the minimum distance from the
other appliances and units.
• Make sure that the appliance is installed
below and adjacent safe structures.
• The sides of the appliance must stay
adjacent to appliances or to units with
the same height.
Electrical connection
WARNING!
Risk of fire and electrical shock.
• All electrical connections should be
made by a qualified electrician.
• The appliance must be earthed.
• Make sure that the electrical information
on the rating plate agrees with the power supply. If not, contact an electrician.
• Always use a correctly installed shock-
proof socket.
• Do not use multi-plug adapters and extension cables.
• Make sure not to cause damage to the
mains plug and to the mains cable.
Contact the Service or an electrician to
change a damaged mains cable.
• Do not let mains cables to come in
touch with the appliance door, specially
when the door is hot.
• The shock protection of live and insulated parts must be fastened in such a
way that it cannot be removed without
tools.
• Connect the mains plug to the mains
socket only at the end of the installation. Make sure that there is access to
the mains plug after the installation.
• If the mains socket is loose, do not
connect the mains plug.
• Do not pull the mains cable to disconnect the appliance. Always pull the
mains plug.
• Use only correct isolation devices: line
protecting cut-outs, fuses (screw type
fuses removed from the holder), earth
leakage trips and contactors.
• The electrical installation must have an
isolation device which lets you disconnect the appliance from the mains at all
poles. The isolation device must have a
contact opening width of minimum 3
mm.
2.2 Use
WARNING!
Risk of injury, burns or electric
shock or explosion.
Page 5

• Use this appliance in a household environment.
• Do not change the specification of this
appliance.
• Make sure that the ventilation openings
are not blocked.
• Do not let the appliance stay unattended during operation.
• Deactivate the appliance after each
use.
• Be careful when you open the appliance door while the appliance is in operation. Hot air can release.
• Do not operate the appliance with wet
hands or when it has contact with water.
• Do not apply pressure on the open
door.
• Do not use the appliance as a work
surface or as a storage surface.
• Always keep the appliance door closed
when the appliance is in operation.
• Open the appliance door carefully. The
use of ingredients with alcohol can
cause a mixture of alcohol and air.
• Do not let sparks or open flames to
come in contact with the appliance
when you open the door.
• Do not put flammable products or items
that are wet with flammable products
in, near or on the appliance.
WARNING!
Risk of damage to the appliance.
ENGLISH 5
• Use a deep pan for moist cakes. Fruit
juices cause stains that can be permanent.
2.3 Care and Cleaning
WARNING!
Risk of injury, fire or damage to
the appliance.
• Before maintenance, deactivate the appliance and disconnect the mains plug
from the mains socket.
• Make sure the appliance is cold. There
is the risk that the glass panels can
break.
• Replace immediately the door glass
panels when they are damaged. Contact the Service.
• Be careful when you remove the door
from the appliance. The door is heavy!
• Clean regularly the appliance to prevent
the deterioration of the surface material.
• Remaining fat or food in the appliance
can cause fire.
• Clean the appliance with a moist soft
cloth. Only use neutral detergents. Do
not use abrasive products, abrasive
cleaning pads, solvents or metal objects.
• If you use an oven spray, obey the safety instructions on the packaging.
• Do not clean the catalytic enamel (if applicable) with any kind of detergent.
• To prevent damage or discoloration to
the enamel:
– do not put ovenware or other objects
in the appliance directly on the bottom.
– do not put aluminium foil directly on
the bottom of the appliance.
– do not put water directly into the hot
appliance.
– do not keep moist dishes and food in
the appliance after you finish the cooking.
– be careful when you remove or install
the accessories.
• Discoloration of the enamel has no effect on the performance of the appliance. It is not a defect in the sense of
the warranty law.
2.4 Internal light
• The type of light bulb or halogen lamp
used for this appliance, is only for
household appliances. Do not use it for
house lighting.
WARNING!
Risk of electrical shock.
• Before replacing the lamp, disconnect
the appliance from the power supply.
• Only use lamps with the same specifications.
2.5 Disposal
WARNING!
Risk of injury or suffocation.
Page 6
www.electrolux.com
6
• Disconnect the appliance from the
mains supply.
• Cut off the mains cable and discard it.
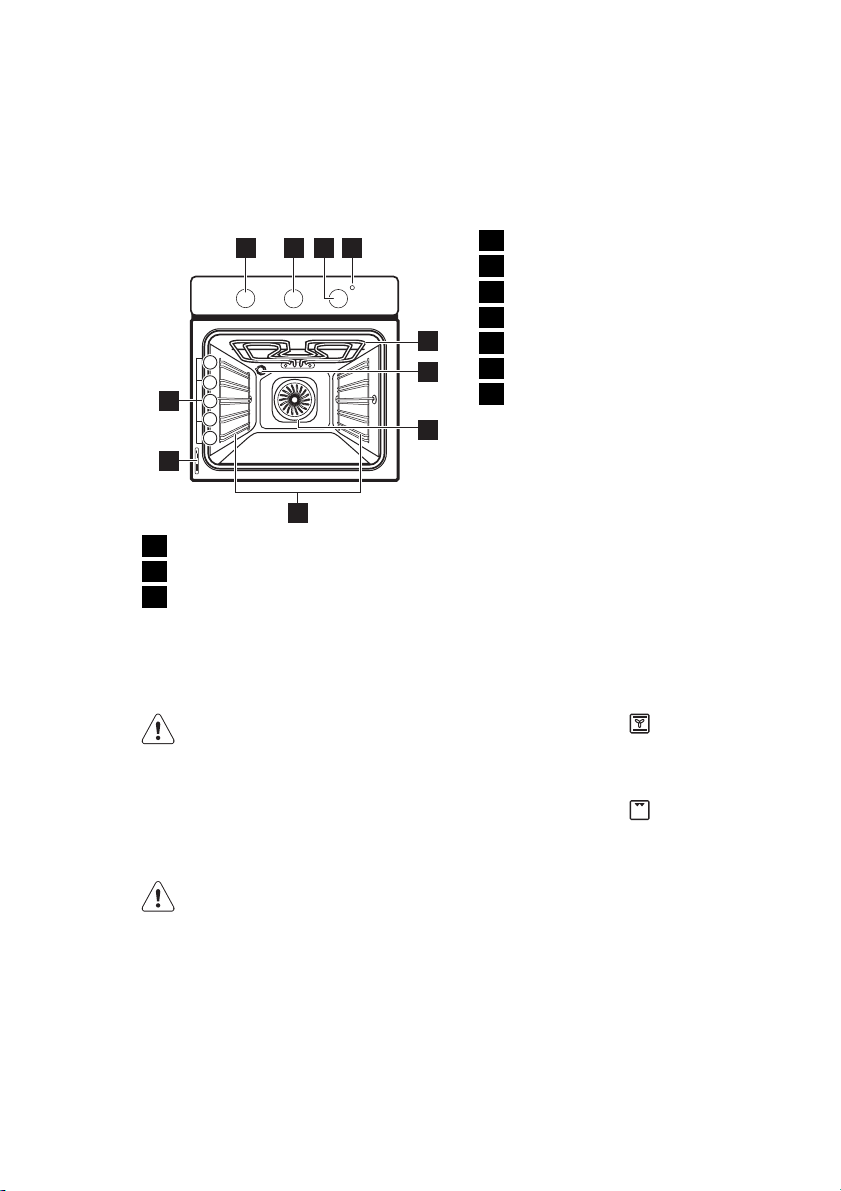
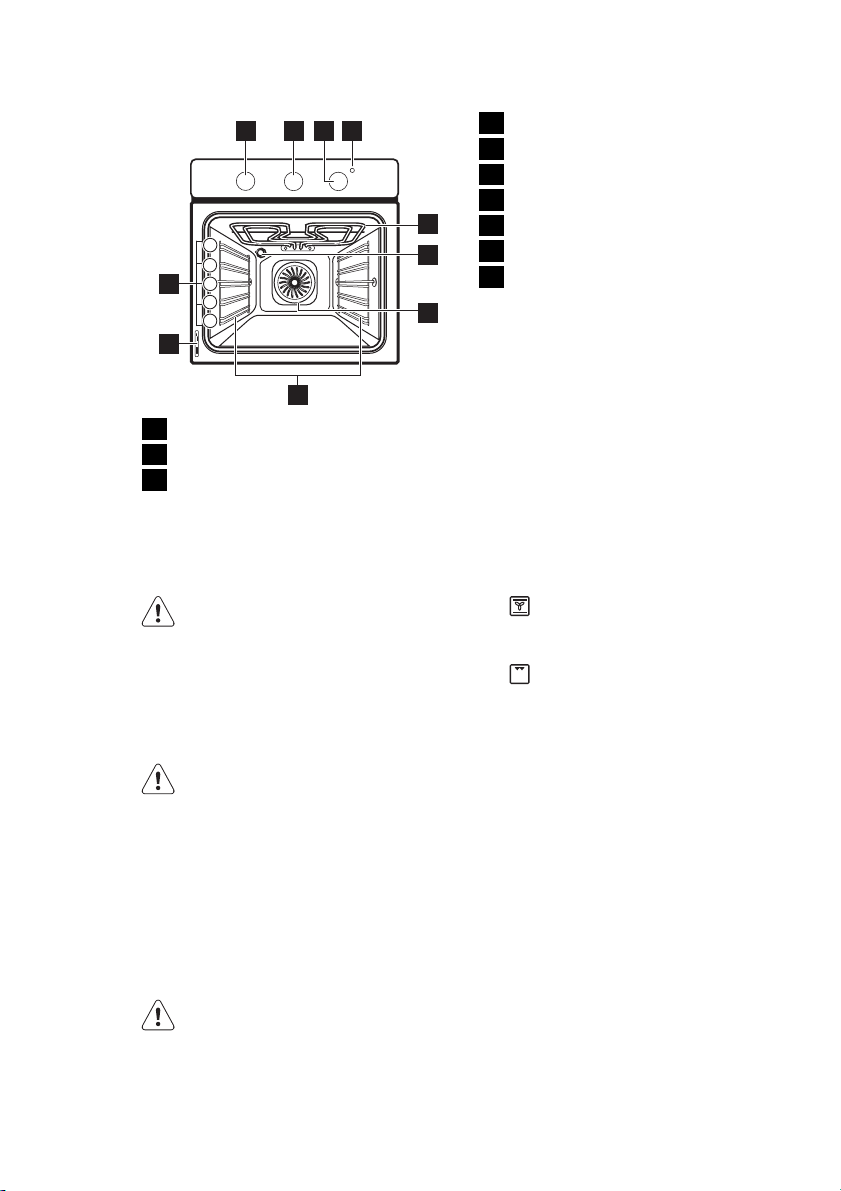
3. PRODUCT DESCRIPTION
1 42 3
5
4
3
10
2
1
9
8
Knob for the oven functions
1
Knob for the timer
2
Knob for the temperature
3
• Remove the door catch to prevent children and pets to get closed in the appliance.
Temperature indicator
4
Grill
5
Oven lamp
6
Fan
7
5
6
7
Shelf support
8
Rating plate
9
Shelf positions
10
3.1 Oven accessories
• Wire shelf
For cookware, cake tins, roasts.
Grill- / Roasting pan
•
To bake and roast or as pan to collect
fat.
4. BEFORE FIRST USE
WARNING!
Refer to the Safety chapters.
4.1 Initial cleaning
• Remove all accessories and removable
shelf supports (if applicable).
• Clean the appliance before first use.
Refer to the chapter "Care and
cleaning".
4.2 Preheating
Preheat the empty appliance to burn off
the remaining grease.
1.
Set the function and the maximum
temperature.
2.
Let the appliance operate for 45 minutes.
3.
Set the function and the maximum
temperature.
4.
Let the appliance operate for 15 mi-
nutes.
Accessories can become hotter than usually. The appliance can emit an odour and
smoke. This is normal. Make sure that the
airflow is sufficient.
Page 7
5. DAILY USE
ENGLISH 7
WARNING!
Refer to the Safety chapters.
5.1 Activating and deactivating
the appliance
1.
Turn the oven functions control knob
to an oven function.
2.
Turn the temperature control knob to
a temperature.
The temperature indicator comes on
while the temperature in the appliance
increases.
3.
To deactivate the appliance, turn the
oven functions control knob and the
temperature control knob to the Off
position.
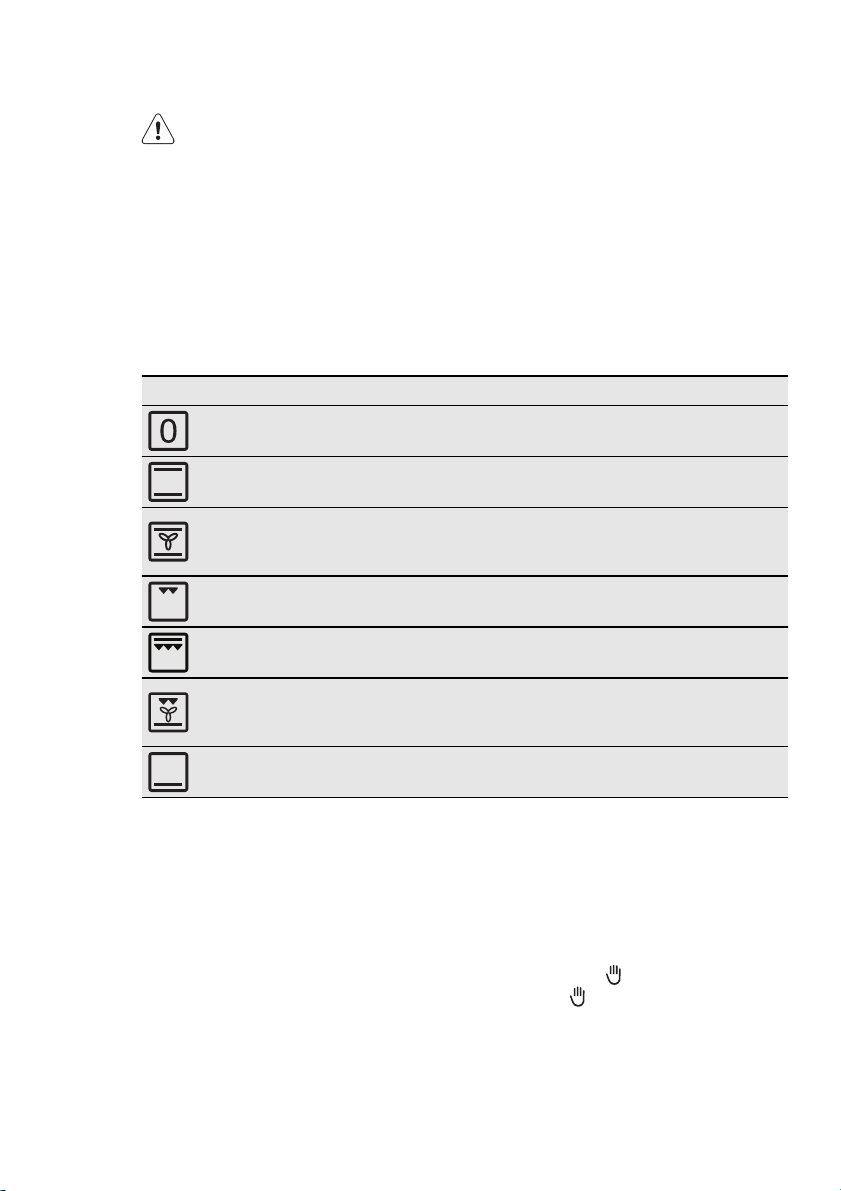
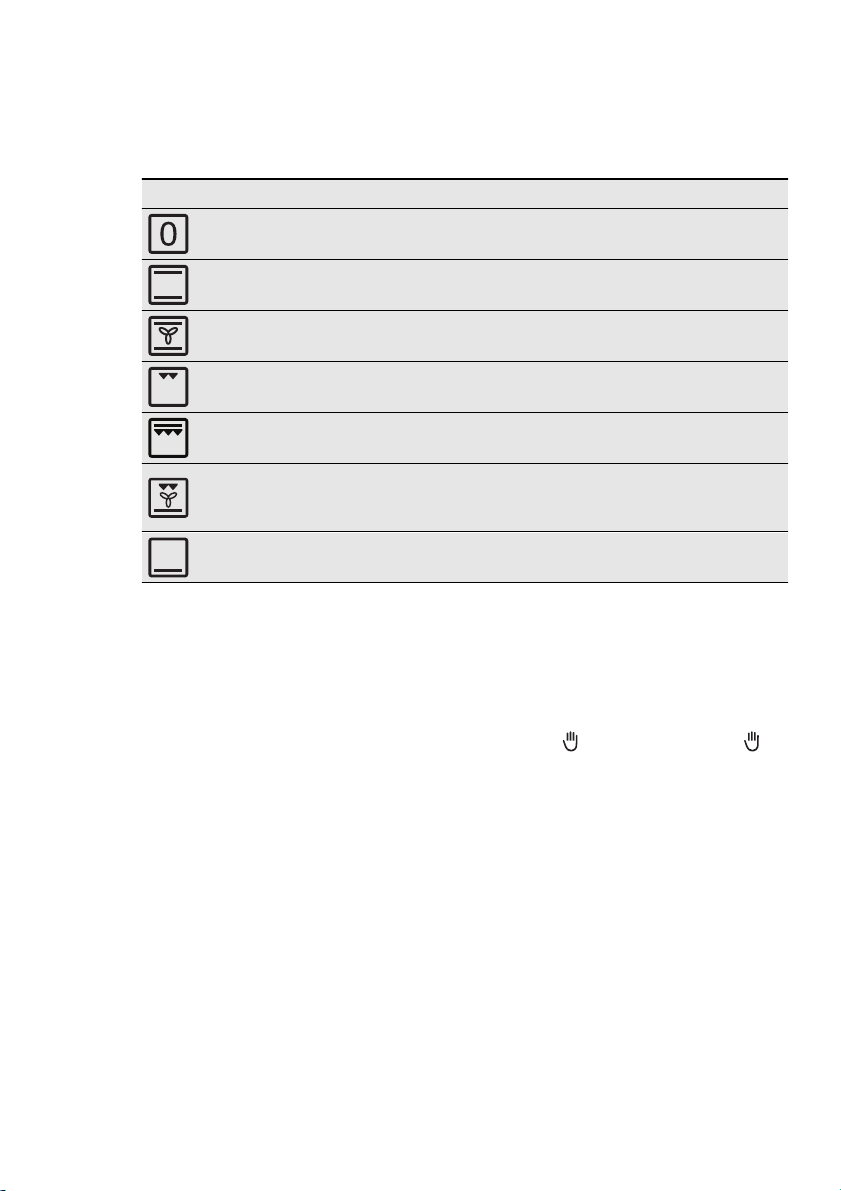
5.2 Oven functions
Oven function Application
Off position The appliance is off.
Conventional
Cooking
Fan Cooking
Grilling
Fast Grilling
Pizza Setting
Bottom Heat
To bake and roast on one oven level. The top and bot-
tom heating elements operate at the same time.
To roast or roast and bake food with the same cooking
temperature, on more than one shelf, without flavour
transference.
To grill flat food items in small quantities in the middle of
the shelf. To make toast.
To grill flat food items in large quantities. To make toast.
The full grill element operates.
To make pizza, quiche or pie. The grill and bottom ele-
ment provide direct heat and the fan circulates the hot
air to cook the pizza toppings or pie filling.
To bake cakes with crispy or crusty bottom. Only the
bottom heating element operates.
6. CLOCK FUNCTIONS
6.1 Minute Minder + End of
Cooking
Use it to set an automatic switch-off time
for an oven function.
1.
Set an oven function and the temperature.
2.
Turn the knob for the timer as far as it
goes, then turn it to necessary time
period.
3.
After the time period is completed, an
acoustic signal sounds. The appliance
deactivates.
Normal setting
the timer to
ate the appliance manually. The Minute
Minder + End of Cooking is off.
: Turn the knob for
. In this position you oper-
Page 8

www.electrolux.com
8
7. ADDITIONAL FUNCTIONS
7.1 Cooling fan
When the appliance operates, the cooling
fan activates automatically to keep the
surfaces of the appliance cool. If you deactivate the appliance, the cooling fan
continues to operate until the temperature
in the appliance cools down.
7.2 Safety thermostat
Incorrect operation of the appliance or defective components can cause dangerous
8. HELPFUL HINTS AND TIPS
• The appliance has five shelf levels.
Count the shelf levels from the bottom
of the appliance floor.
• The appliance has a special system
which circulates the air and constantly
recycles the steam. With this system
you can cook in a steamy environment
and keep the food soft inside and crusty outside. It decreases the cooking
time and energy consumption to a minimum.
• Moisture can condense in the appliance
or on the door glass panels. This is normal. Always stand back from the appliance when you open the appliance
door while cooking. To decrease the
condensation, operate the appliance for
10 minutes before cooking.
• Clean the moisture after each use of
the appliance.
• Do not put the objects directly on the
appliance floor and do not put aluminium foil on the components when you
cook. This can change the baking results and cause damage to the enamel.
8.1 Baking cakes
• Do not open the oven door before 3/4
of the set cooking time is up.
overheating. To prevent this, the oven has
a safety thermostat which interrupts the
power supply. The oven activates again
automatically when the temperature
drops.
• If you use two baking trays at the same
time, keep one empty level between
them.
8.2 Cooking meat and fish
• Use a deep pan for very fatty food to
prevent the oven from stains that can
be permanent.
• Leave the meat for approximately 15
minutes before carving so that the juice
does not seep out.
• To prevent too much smoke in the oven
during roasting, add some water into
the deep pan. To prevent the smoke
condensation, add water each time after it dries up.
8.3 Cooking times
Cooking times depend on the type of
food, its consistency, and volume.
Initially, monitor the performance when
you cook. Find the best settings (heat setting, cooking time, etc.) for your cookware, recipes and quantities when you
use this appliance.
Page 9

ENGLISH 9
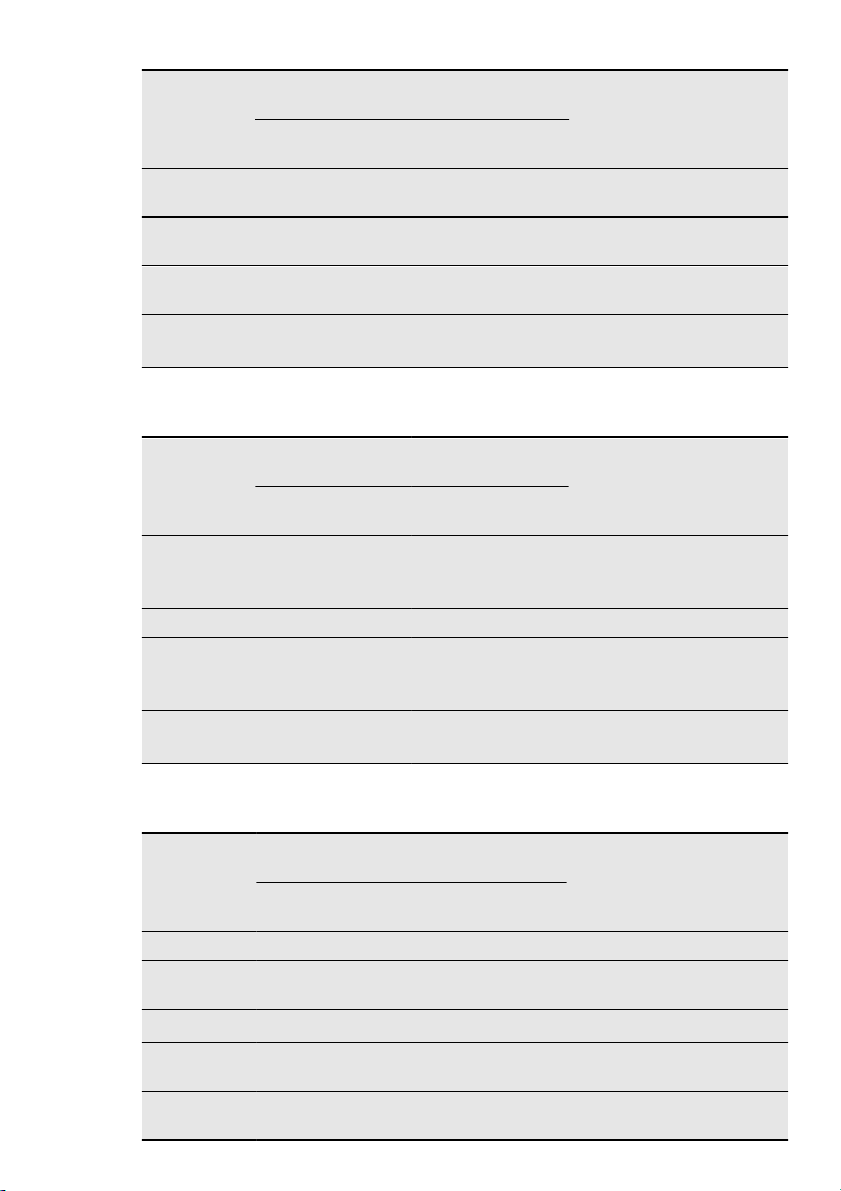
8.4 Baking and roasting table
CAKES
Conventional
TYPE OF
DISH
Whisked
Cooking
Shelf po-
sition
Temp
[°C]
2 170 3 160 45 - 60 In a cake
recipes
Shortbread
2 170 3 160 20 - 30 In a cake
dough
Buttermilk
1 170 1 160 70 - 80 In a 26 cm
cheesecake
Apple cake
2 170 2 (left and
(Apple pie)
Strudel 3 175 2 150 60 - 80 In a baking
Jam-tart 2 170 2 (left and
Sponge
2 170 2 160 50 - 60 In a 26 cm
cake
Christmas
2 160 2 150 90 - 120 In a 20 cm
cake / Rich
fruit cake
Plum cake 1 175 2 160 50 - 60 In a bread tin
Fan Cooking
Shelf po-
sition
right)
right)
Cooking
Temp
[°C]
time
[min]
Notes
mould
mould
cake mould
on a wire shelf
160 80 - 100 In two 20 cm
cake moulds
on a wire
1)
shelf
tray
165 30 - 40 In a 26 cm
cake mould
cake mould
cake mould
1)
1)
Small cakes
- one level
Small cakes
- two levels
Biscuits /
pastry strips
3 170 3 140 -
150
- - 2 and 4 140 150
3 140 3 140 -
150
20 - 30 In a baking
tray
25 - 35 In a baking
tray
30 - 35 In a baking
tray
- one level
Biscuits /
pastry strips
- - 2 and 4 140 150
35 - 40 In a baking
tray
- two levels
Meringues 3 120 3 120 80 - 100 In a baking
tray
Buns 3 190 3 180 15 - 20 In a baking
1)
tray
Page 10
www.electrolux.com
10
TYPE OF
DISH
Conventional
Cooking
Shelf po-
sition
Temp
[°C]
Fan Cooking
Shelf po-
sition
Temp
[°C]
Cooking
time
[min]
Notes
Eclairs 3 190 3 170 25 - 35 In a baking
tray
Plate tarts 2 180 2 170 45 - 70 In a 20 cm
cake mould
Rich fruit
cake
Victoria
sandwich
1)
Preheat the oven for 10 minutes.
1 160 2 150 110 - 120 In a 24 cm
cake mould
1 170 1 160 50 - 60 In a 20 cm
cake mould
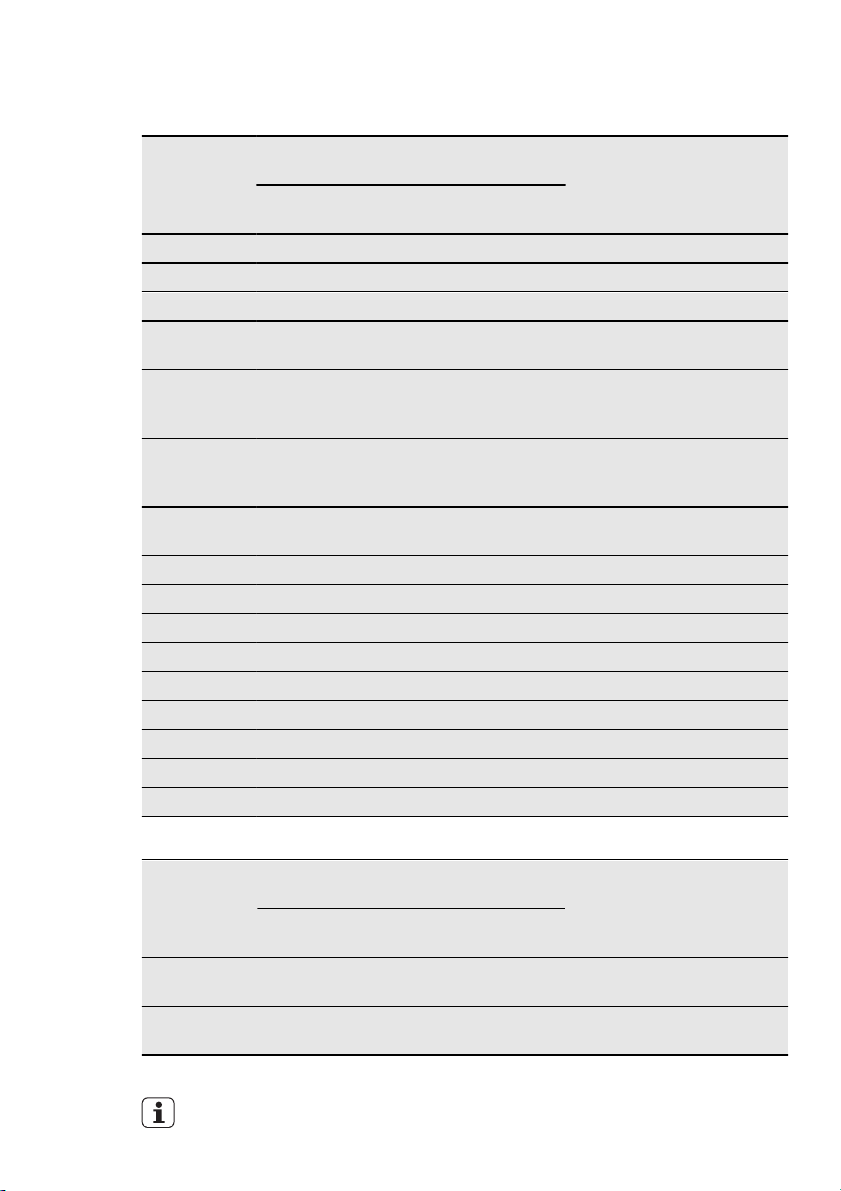
BREAD AND PIZZA
TYPE OF
DISH
Conventional
Cooking
Shelf po-
sition
Temp
[°C]
Fan Cooking
Shelf po-
sition
Temp
[°C]
Cooking
time
[min]
Notes
White bread 1 190 1 190 60 - 70 1 - 2 pieces,
500 gr per
1)
piece
Rye bread 1 190 1 180 30 - 45 In a bread tin
Pizza 1 230 -
250
1 230 -
250
10 - 20 In a baking
tray or a deep
1)
pan
Scones 3 200 3 190 10 - 20 In a baking
1)
tray
1)
Preheat for 10 minutes.
1)
FLANS
TYPE OF
DISH
Conventional
Cooking
Shelf
position
Temp
[°C]
Fan Cooking
Shelf po-
sition
Temp
[°C]
Cooking
time
[min]
Notes
Pasta flan 2 200 2 180 40 - 50 In a mould
Vegetable
2 200 2 175 45 - 60 In a mould
flan
Quiches 1 180 1 180 50 - 60
Lasagne 2 180 -
190
Cannelloni 2 180 -
190
2 180 -
190
2 180 -
190
25 - 40
25 - 40
In a mould
In a mould
In a mould
1)
1)
1)
Page 11
ENGLISH 11
1)
Preheat for 10 minutes.
MEAT
TYPE OF
DISH
Conventional
Cooking
Shelf
position
Temp
[°C]
Fan Cooking
Shelf
position
Temp
[°C]
Cooking
time
[min]
Notes
Beef 2 200 2 190 50 - 70 On a wire shelf
Pork 2 180 2 180 90 - 120 On a wire shelf
Veal 2 190 2 175 90 - 120 On a wire shelf
English roast
2 210 2 200 50 - 60 On a wire shelf
beef, rare
English roast
2 210 2 200 60 - 70 On a wire shelf
beef, medium
English roast
2 210 2 200 70 - 75 On a wire shelf
beef, well
done
Shoulder of
2 180 2 170 120 - 150 With rind
pork
Shin of pork 2 180 2 160 100 - 120 Two pieces
Lamb 2 190 2 175 110 - 130 Leg
Chicken 2 220 2 200 70 - 85 Whole
Turkey 2 180 2 160 210 - 240 Whole
Duck 2 175 2 220 120 - 150 Whole
Goose 2 175 1 160 150 - 200 Whole
Rabbit 2 190 2 175 60 - 80 Cut in pieces
Hare 2 190 2 175 150 - 200 Cut in pieces
Pheasant 2 190 2 175 90 - 120 Whole
FISH
Conventional
TYPE OF
DISH
Cooking
Shelf
position
Trout / Sea
2 190 2 175 40 - 55 3 - 4 fish
bream
Tuna fish /
2 190 2 175 35 - 60 4 - 6 fillets
Salmon
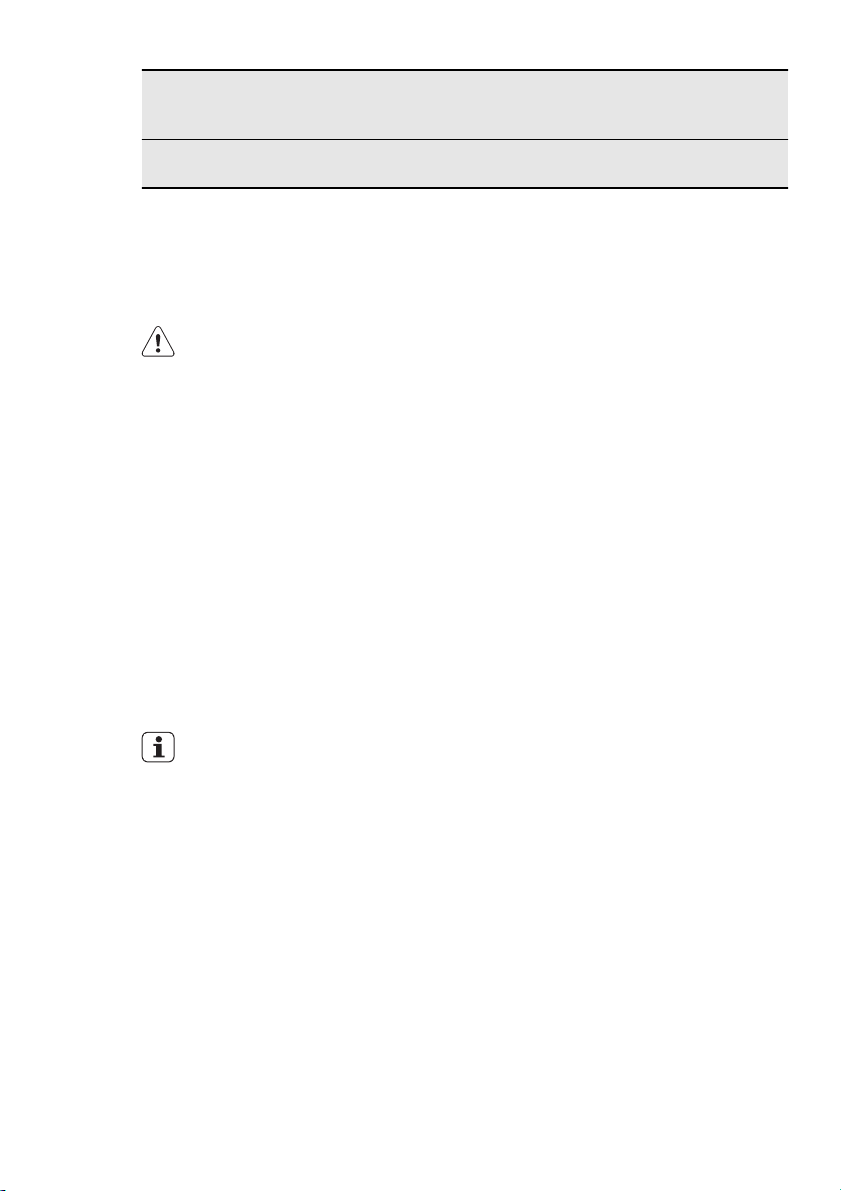
8.5 Grilling
Preheat the empty oven for 10 minutes, before cooking.
Temp
[°C]
Fan Cooking
Shelf
position
Temp
[°C]
Cooking
time
[min]
Notes
Page 12

www.electrolux.com
12
TYPE OF DISH Pieces [g] Shelf po-
Fillet steaks 4 800 4 max. 12 - 15 12 - 14
Beef steaks 4 600 4 max. 10 - 12 6 - 8
Sausages 8 - 4 max. 12 - 15 10 - 12
Pork chops 4 600 4 max. 12 - 16 12 - 14
Chicken (cut in
2)
Kebabs 4 - 4 max. 10 - 15 10 - 12
Breast of chicken
Hamburger 6 600 4 max. 20 - 30 -
Fish fillet 4 400 4 max. 12 - 14 10 - 12
Toasted sandwiches
Toast 4 - 6 - 4 max. 2 - 4 2 - 3
8.6 Preserving - Bottom Heat
Soft fruit
Strawberries, blueberries, raspberries, ripe gooseberries
Quantity Grilling Cooking time [min]
sition
Temp
[°C]
1st side 2nd side
2 1000 4 max. 30 - 35 25 - 30
4 400 4 max. 12 - 15 12 - 14
4 - 6 - 4 max. 5 - 7 -
PRESERVE
Temperature
[°C]
Cooking time
until simmering
[min]
Further cooking
time at 100 °C
[min]
160 – 170 35 – 45 –
Stone fruit
PRESERVE
Pears, quinces,
plums
Temperature
[°C]
Cooking time
until simmering
[min]
160 – 170 35 – 45 10 – 15
Further cooking
time at 100 °C
[min]
Vegetables
PRESERVE
Carrots
Temperature
[°C]
1)
160 – 170 50 – 60 5 – 10
Cooking time
until simmering
[min]
Further cooking
time at 100 °C
[min]
Cucumbers 160 – 170 50 – 60 –
Mixed pickles 160 – 170 50 – 60 5 – 10
Page 13
ENGLISH 13
PRESERVE
Kohlrabi, peas, asparagus
1)
After you deactivate the appliance, leave the preserve in the oven.
Temperature
160 – 170 50 – 60 15 – 20
9. CARE AND CLEANING
WARNING!
Refer to the Safety chapters.
• Clean the front of the appliance with a
soft cloth with warm water and a cleaning agent.
• To clean metal surfaces use a usual
cleaning agent.
• Clean the oven interior after each use.
Then you can remove dirt more easily
and it does not burn on.
• Clean stubborn dirt with a special oven
cleaner.
• Clean all oven accessories after each
use and let them dry. Use a soft cloth
with warm water and a cleaning agent.
• If you have nonstick accessories, do
not clean them using aggressive
agents, sharp-edged objects or a dishwasher. It can destroy nonstick coating.
Stainless steel or aluminium
appliances:
Clean the oven door with a wet
sponge only. Dry it with a soft
cloth.
Do not use steel wool, acids or
abrasive materials, as they can
cause damage to the oven surface. Clean the oven control panel
with the same precautions.
[°C]
Cooking time
until simmering
[min]
Further cooking
time at 100 °C
[min]
9.1 Cleaning the door gasket
• Regularly do a check of the door gasket. The door gasket is around the
frame of the oven cavity. Do not use the
appliance if the door gasket is damaged. Contact the Service Centre.
• To clean the door gasket, refer to the
general information about cleaning.
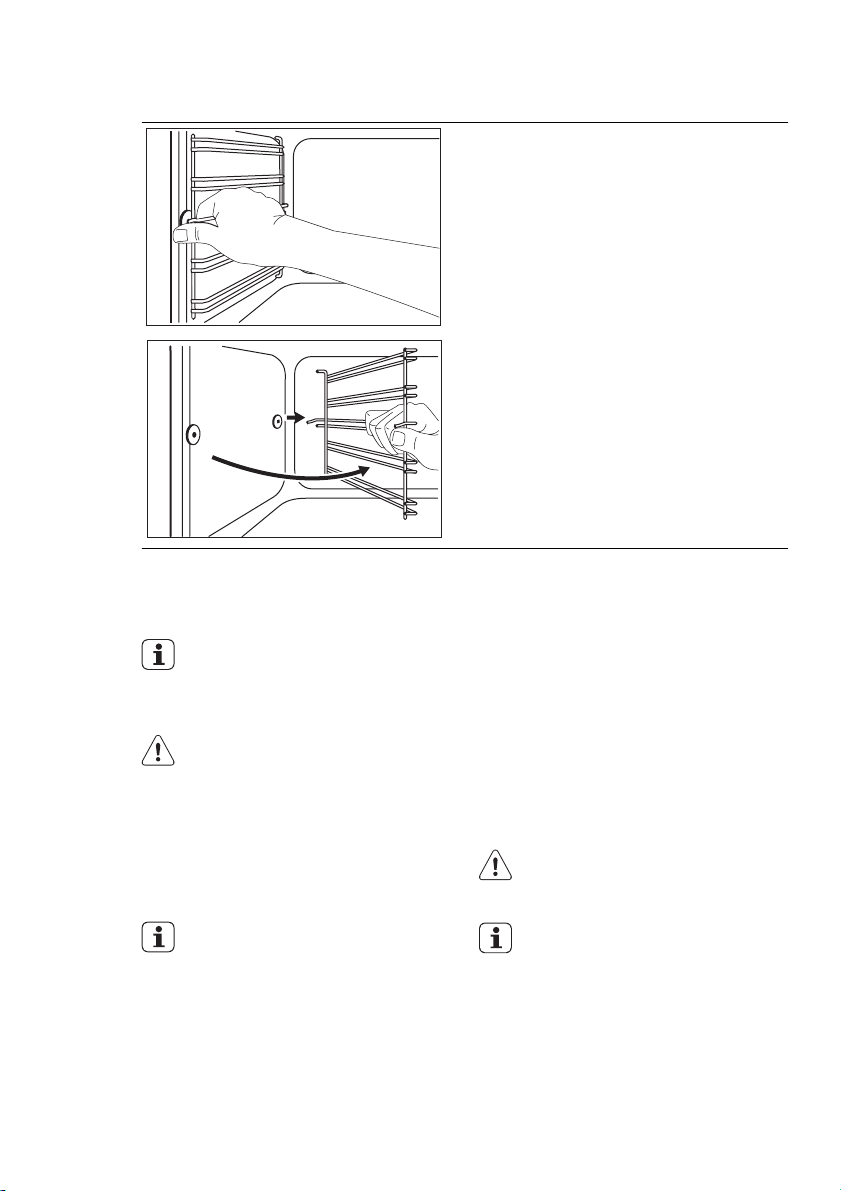
9.2 Shelf supports
You can remove the shelf supports to
clean the side walls.
Page 14
www.electrolux.com
14
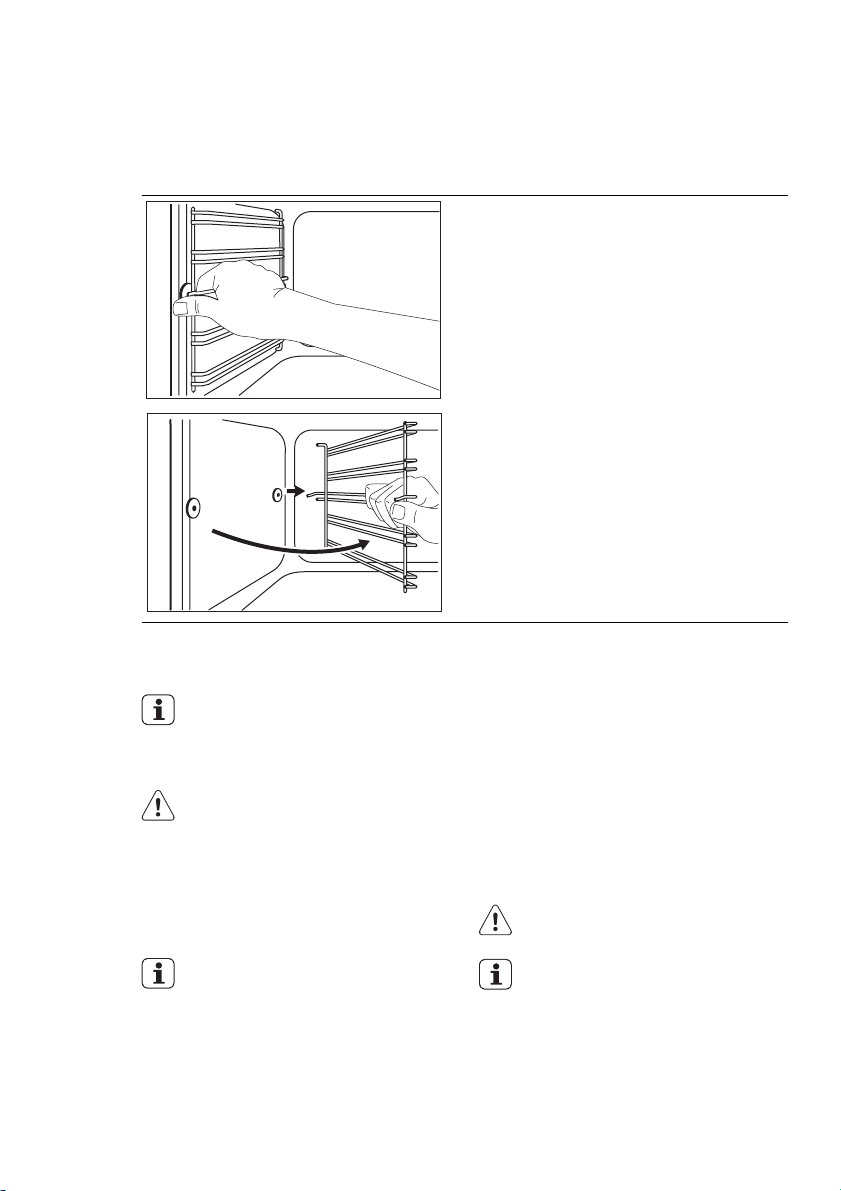
Removing the shelf supports
1.
Pull the front of the shelf support away
from the side wall.
2.
Pull the rear end of the shelf support
away from the side wall and remove
it.
1
2
Installing the shelf supports
Install the shelf supports in the opposite
sequence.
The rounded ends of the shelf
supports must point to the front.
9.3 Oven lamp
WARNING!
Be careful when you change the
oven lamp. There is a risk of electrical shock.
Before you change the oven lamp:
• Deactivate the oven.
• Remove the fuses in the fuse box or
deactivate the circuit breaker.
Put a cloth on the bottom of the
oven to prevent damage to the
oven light and glass cover.
Always hold the halogen lamp
with a cloth to prevent grease residue from burning on the lamp.
1.
Turn the glass cover counterclockwise to remove it.
2.
Clean the glass cover.
3.
Replace the oven light bulb with an
applicable 300 °C heat-resistant oven
light bulb.
Use the same oven lamp type.
4.
Install the glass cover.
9.4 Cleaning the oven door
The oven door has two glass panels. You
can remove the oven door and the internal glass panel to clean it.
CAUTION!
Do not use the appliance without
the glass panel.
The oven door can close if you try
to remove the internal glass panel
before you remove the oven door.
Page 15
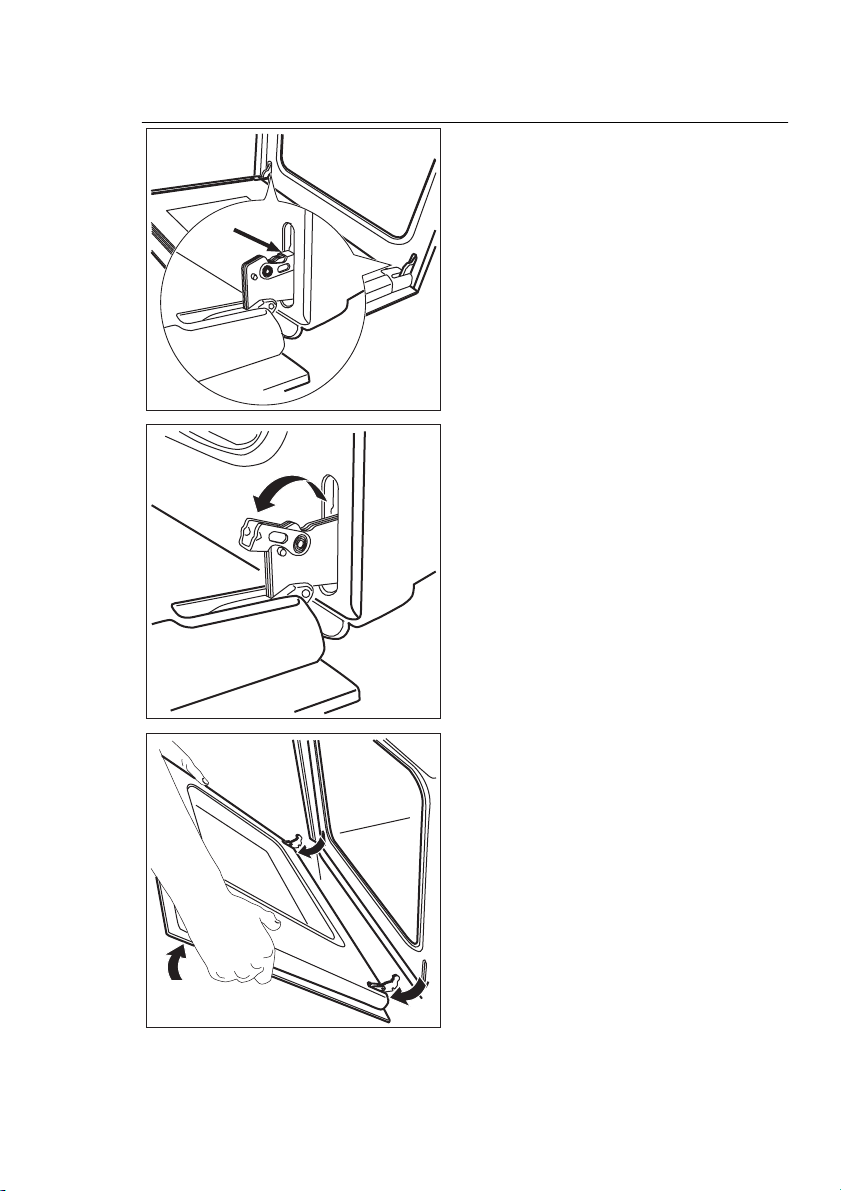
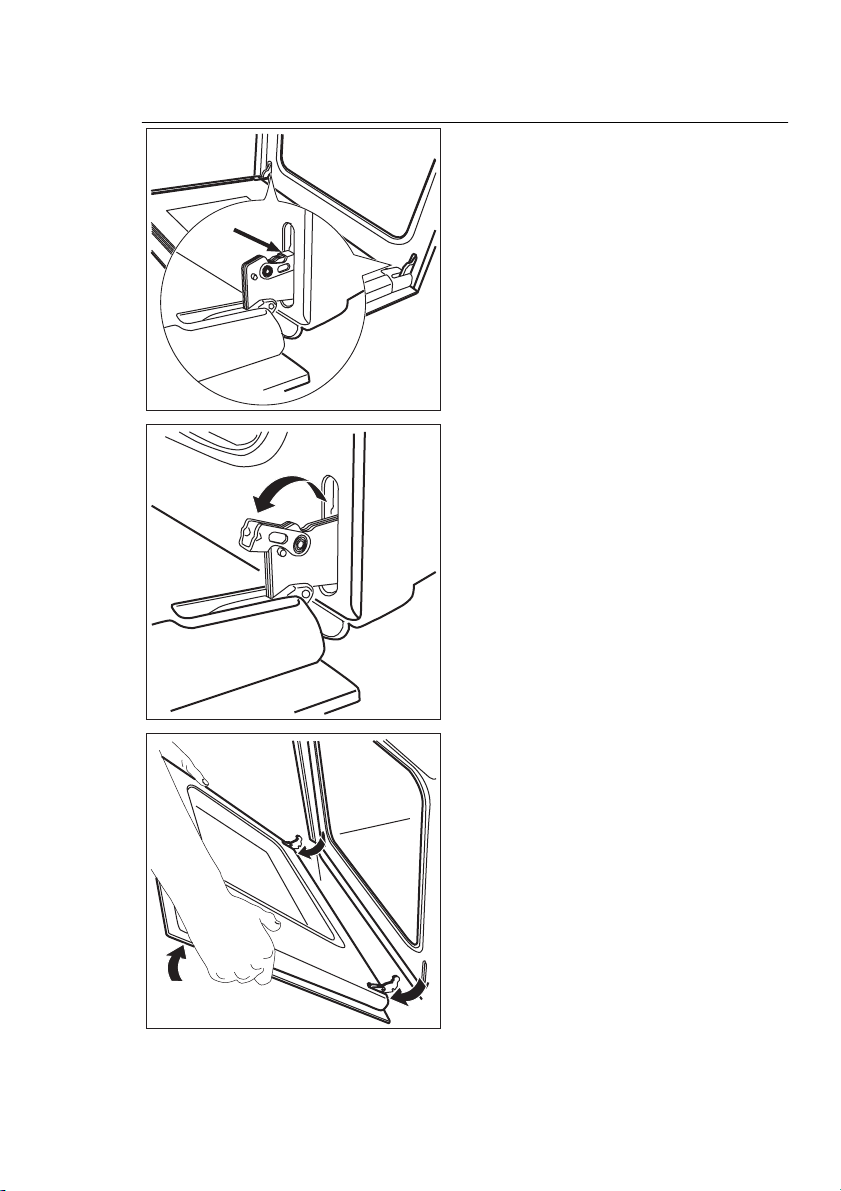
Removing the oven door and the glass panel
1.
Open the door fully and hold the two
door hinges.
2.
Lift and turn the levers on the two
hinges.
ENGLISH 15
3.
Close the oven door to the first opening position (halfway). Then pull forward and remove the door from its
seat.
Page 16
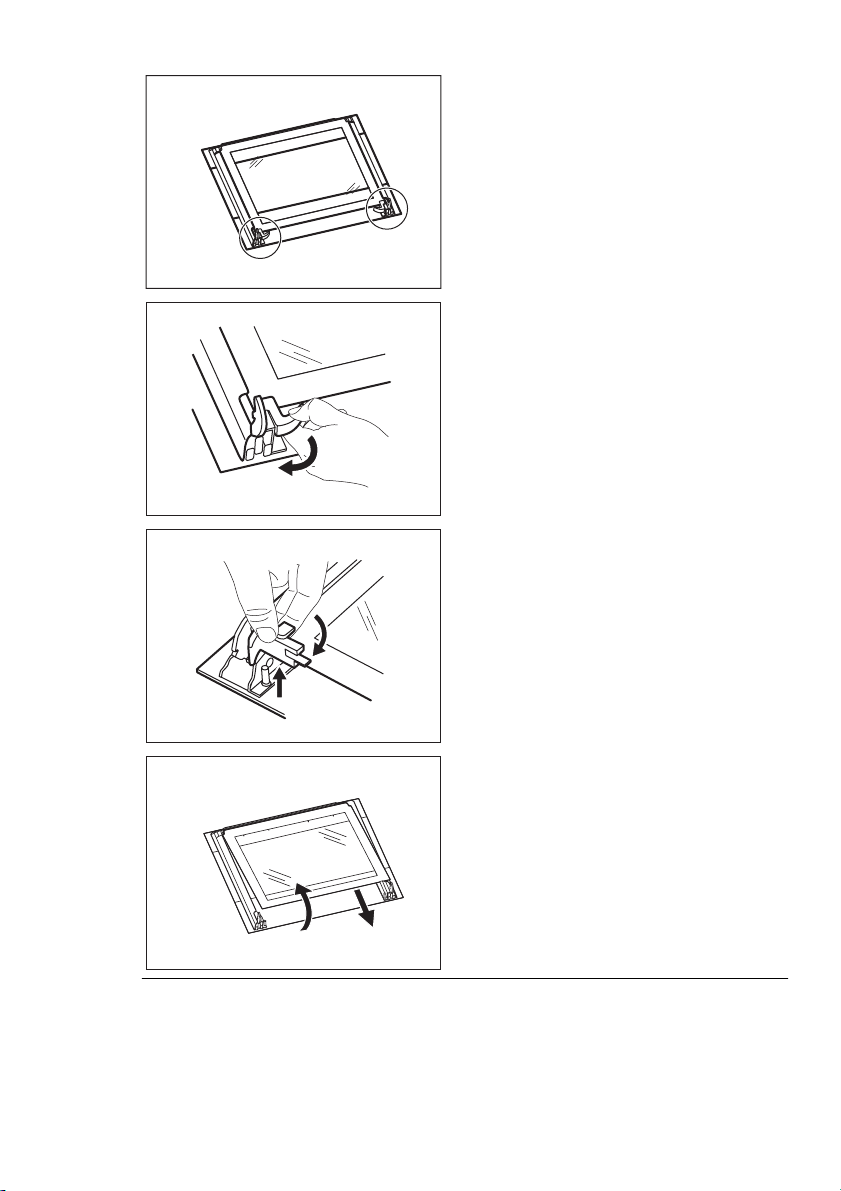
www.electrolux.com
16
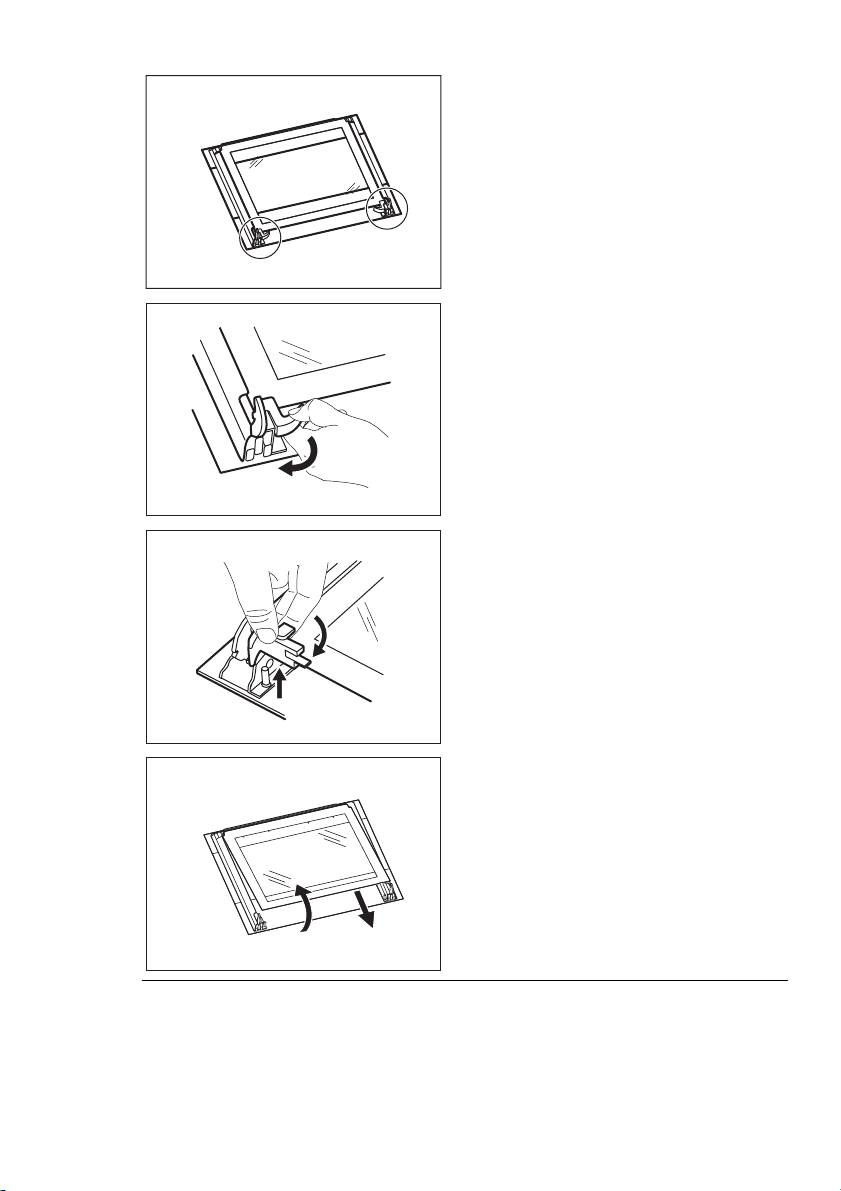
4.
Put the door on a soft cloth on a stable surface.
5.
Release the locking system to remove the internal glass panel.
6.
Turn the two fasteners by 90° and remove them from their seats.
90°
7.
Carefully lift (step 1) and remove (step
2) the glass panel.
8.
Clean the glass panel with water and
soap. Dry the glass panel carefully.
2
1
Page 17
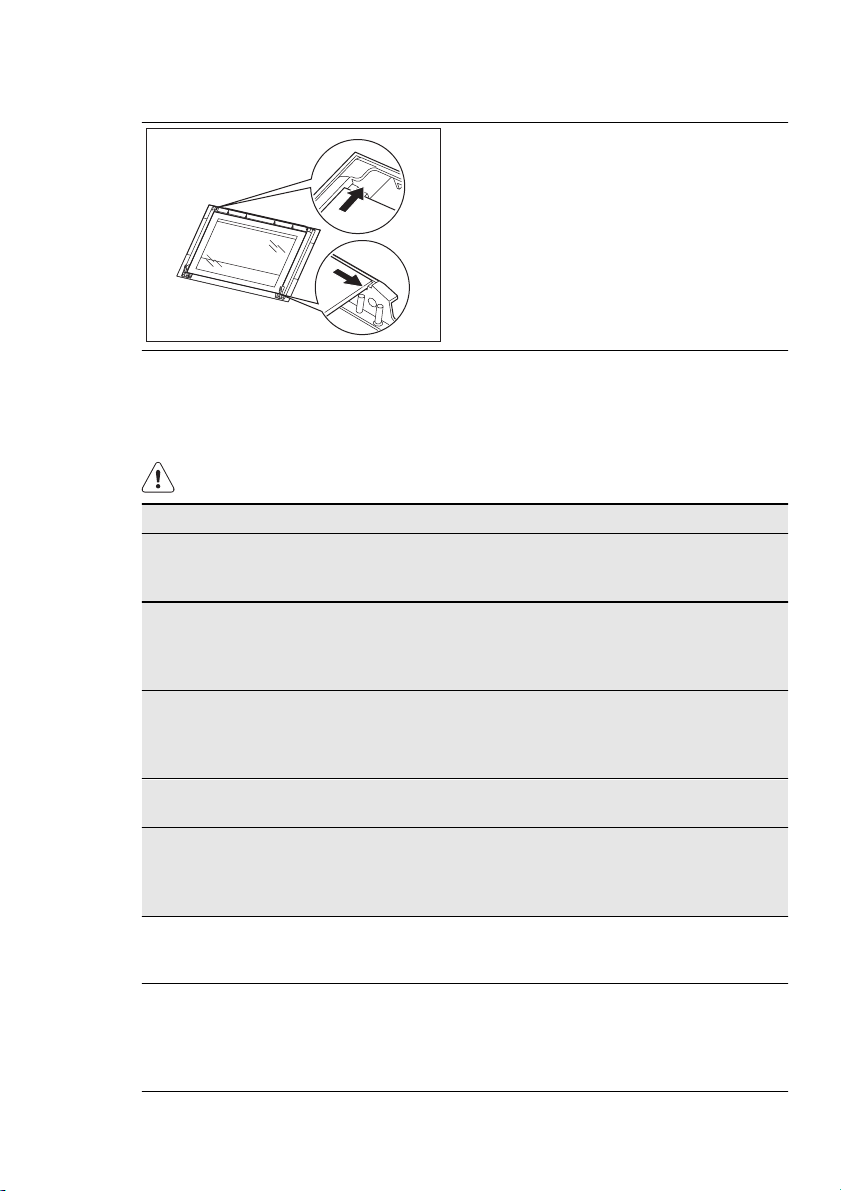
Installing the door and the glass panel
10. WHAT TO DO IF…
WARNING!
Refer to the Safety chapters.
Problem Possible cause Remedy
The appliance does not
operate.
The appliance does not
operate.
The appliance does not
operate.
The oven lamp does not
operate.
Steam and condensation
collect on the food and in
the oven.
If you cannot find a solution to the problem yourself, contact your dealer or the
service centre.
We recommend that you write the data here:
Model (MOD.) .........................................
Product number (PNC) .........................................
Serial number (S.N.) .........................................
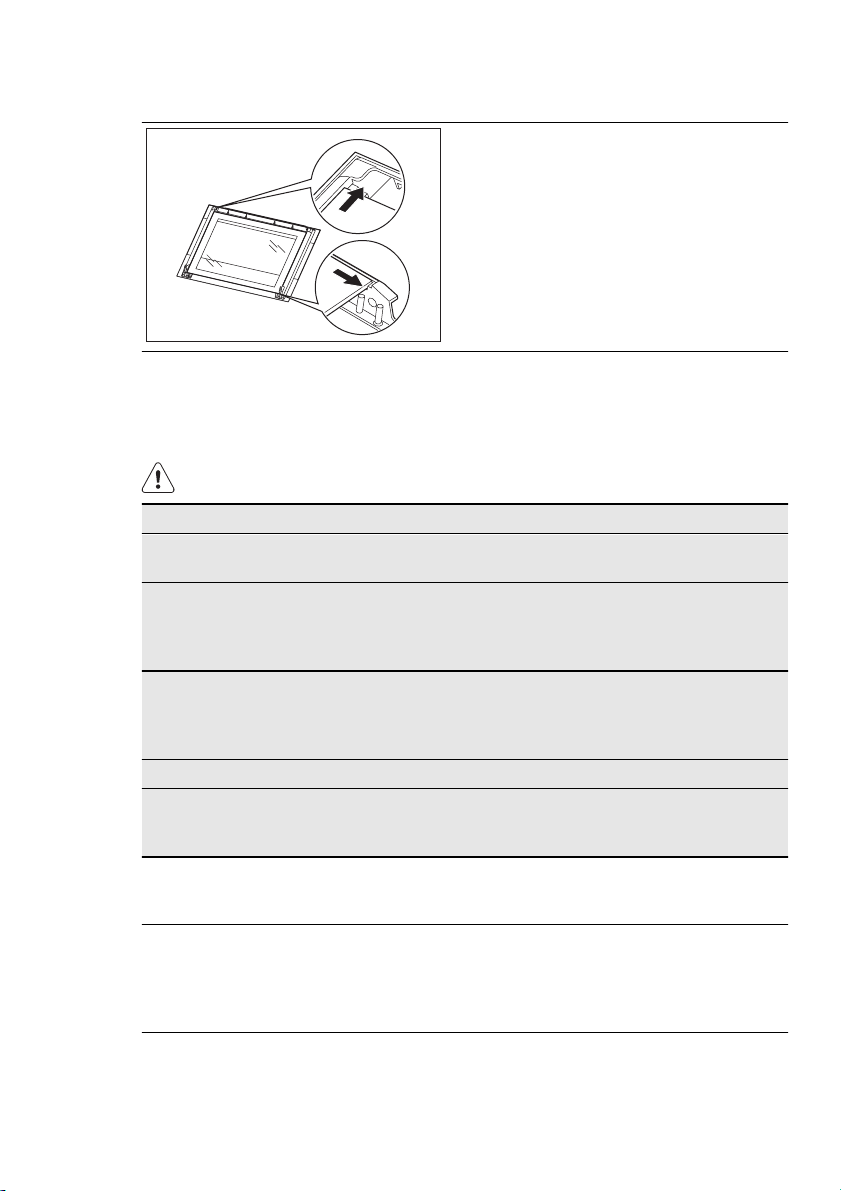
When the cleaning is completed, install
the glass panel and the oven door. Do the
above steps in the opposite sequence.
The screen-printing zone must face the
inner side of the door. Make sure that after the installation the surface of the glass
panel frame on the screen-printing zones
is not rough when you touch it.
Make sure that you install the internal
glass panel in the seats correctly. Refer to
the illustration.
The appliance is not activated.
The Minute Minder + End
of Cooking programmer
is not set.
The fuse in the fuse box
is released.
The oven lamp is defective.
You left the dish in the
oven for too long.
The necessary data for the service centre
is on the rating plate. The rating plate is
on the front frame of the appliance cavity.
ENGLISH 17
Activate the appliance.
Refer to the chapter "Daily Use".
Set the Minute Minder +
End of Cooking programmer. Refer to the chapter
"Clock functions".
Do a check of the fuse. If
the fuse is released more
than one time, contact a
qualified electrician.
Replace the oven lamp.
Do not keep the dishes in
the oven for longer than
15 - 20 minutes after the
cooking ends.
Page 18
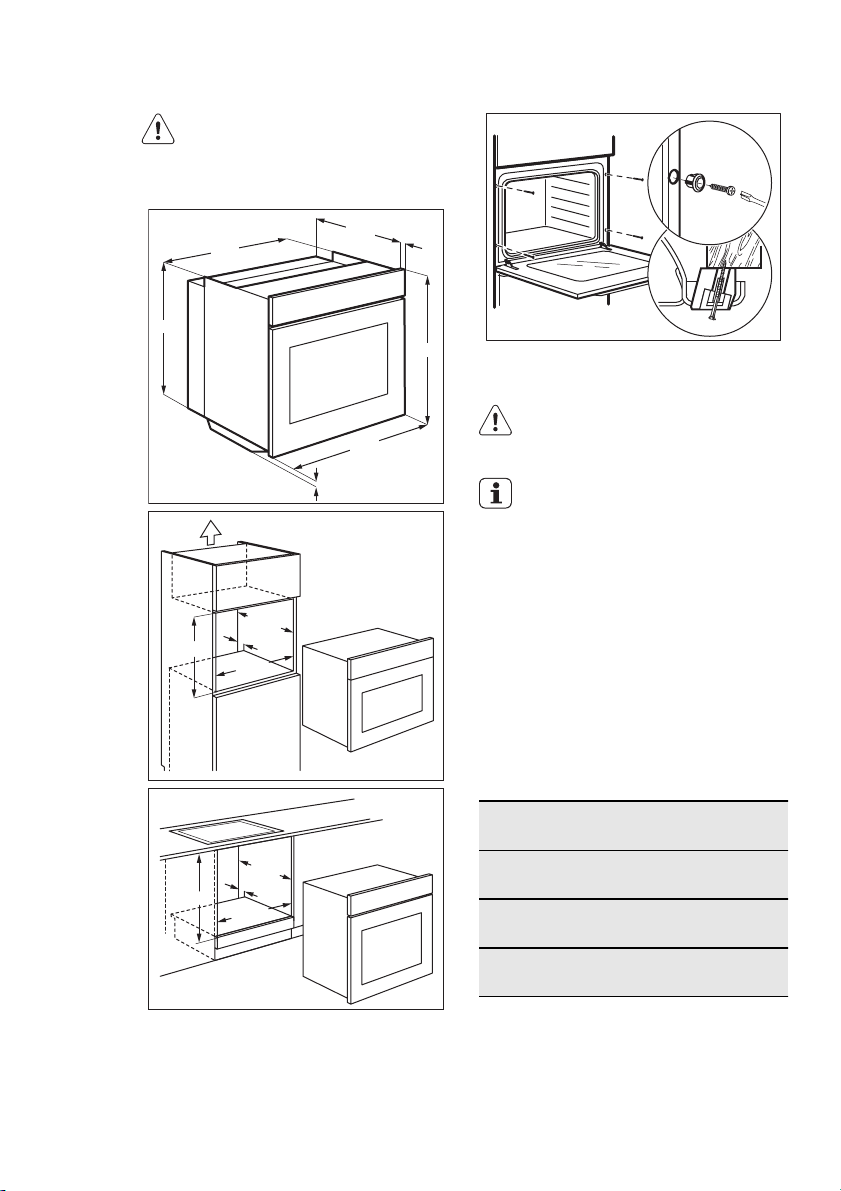
www.electrolux.com
18
11. INSTALLATION
WARNING!
Refer to the Safety chapters.
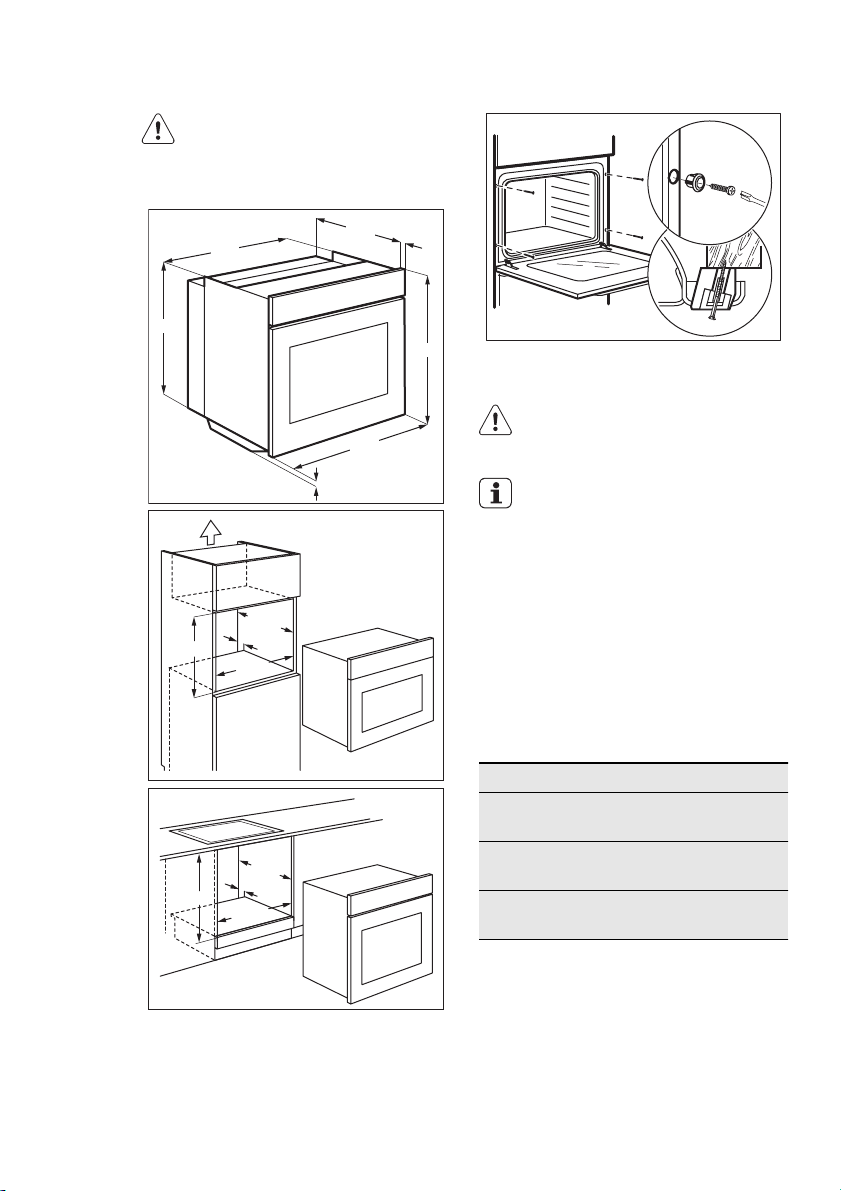
11.1 Building In
558
573
548
594
20
589
A
11.2 Electrical installation
WARNING!
Only a qualified person must do
the electrical installation.
B
590
600
min. 550
20
min. 560
min. 550
20
min. 560
5
The manufacturer is not responsible if you do not follow the safety
precautions from the chapter
"Safety Information".
This appliance is supplied with a main
plug and a main cable.
11.3 Cable
Cable types applicable for installation or
replacement: H07 RN-F, H05 RN-F, H05
RRF, H05 VV-F, H05 V2V2-F (T90), H05
BB-F.
For the section of the cable refer to the
total power (on the rating plate) and to the
table:
Total power
maximum 1380W3 x 0.75 mm²
maximum 2300W3 x 1 mm²
maximum 3680W3 x 1.5 mm²
The earth cord (green / yellow cable) must
be 2 cm longer than phase and neutral
cables (blue and brown cables).
Section of the ca-
ble
Page 19

12. ENVIRONMENT CONCERNS
ENGLISH 19
Recycle the materials with the symbol
. Put the packaging in applicable
containers to recycle it.
Help protect the environment and human
health and to recycle waste of electrical
and electronic appliances. Do not dispose
appliances marked with the symbol
with the household waste. Return the
product to your local recycling facility or
contact your municipal office.
Page 20

www.electrolux.com
20
İÇINDEKILER
1. GÜVENLIK BILGILERI . . . . . . . . . . . . . . . . . . . . . . . . . . . . . . . . . . . . . . . . . . . . . . . . . . . . . . . . . . . . . . . . . 21
2. GÜVENLIK TALIMATLARI . . . . . . . . . . . . . . . . . . . . . . . . . . . . . . . . . . . . . . . . . . . . . . . . . . . . . . . . . . . . . . 22
3. ÜRÜN TANIMI . . . . . . . . . . . . . . . . . . . . . . . . . . . . . . . . . . . . . . . . . . . . . . . . . . . . . . . . . . . . . . . . . . . . . . . 24
4. İLK KULLANIMDAN ÖNCE . . . . . . . . . . . . . . . . . . . . . . . . . . . . . . . . . . . . . . . . . . . . . . . . . . . . . . . . . . . . . . 24
5. GÜNLÜK KULLANIM . . . . . . . . . . . . . . . . . . . . . . . . . . . . . . . . . . . . . . . . . . . . . . . . . . . . . . . . . . . . . . . . . . 24
6. SAAT FONKSIYONLARI . . . . . . . . . . . . . . . . . . . . . . . . . . . . . . . . . . . . . . . . . . . . . . . . . . . . . . . . . . . . . . . 25
7. EK FONKSIYONLAR . . . . . . . . . . . . . . . . . . . . . . . . . . . . . . . . . . . . . . . . . . . . . . . . . . . . . . . . . . . . . . . . . . 25
8. YARARLI IPUÇLARI VE BILGILER . . . . . . . . . . . . . . . . . . . . . . . . . . . . . . . . . . . . . . . . . . . . . . . . . . . . . . . 26
9. BAKIM VE TEMIZLIK . . . . . . . . . . . . . . . . . . . . . . . . . . . . . . . . . . . . . . . . . . . . . . . . . . . . . . . . . . . . . . . . . . 30
10. SERVISI ARAMADAN ÖNCE . . . . . . . . . . . . . . . . . . . . . . . . . . . . . . . . . . . . . . . . . . . . . . . . . . . . . . . . . . . . 34
11. MONTAJ . . . . . . . . . . . . . . . . . . . . . . . . . . . . . . . . . . . . . . . . . . . . . . . . . . . . . . . . . . . . . . . . . . . . . . . . . . . . 35
SİZİ DÜŞÜNÜR
Bir Electrolux ürünü aldığınız için teşekkür ederiz. Size onlarca yıllık profesyonel deneyim ve yenilik sunan bir
ürün tercih ettiniz. Sizi düşünerek tasarlanan yaratıcı ve şık bir ürün. Bu ürünü her kullandığınızda, daima en iyi
sonuçları alacağınızdan emin olabilirsiniz.
Electrolux'e hoş geldiniz.
Web sitemizi aşağıdakiler için ziyaret edin:
Kullanım önerileri, broşürler, sorun giderme bilgileri, servis bilgileri alın:
www.electrolux.com
Ürününüzü daha iyi servis için kaydedin:
www.electrolux.com/productregistration
Cihazınız için Aksesuarlar, Sarf Malzemeleri ve Orijinal yedek parçalar satın alın:
www.electrolux.com/shop
MÜŞTERİ HİZMETLERİ VE SERVİS
Orijinal yedek parça kullanılmasını tavsiye ederiz.
Servis ile iletişim sırasında, aşağıdaki verilerin bulunduğunu kontrol edin.
Bilgiler, bilgi etiketinde yazılıdır. Model, PNC, Seri Numarası.
Uyarı / Dikkat-Güvenlik bilgileri.
Genel bilgiler ve ipuçları
Çevresel bilgiler
Önceden haber verilmeksizin değişiklik yapma hakkı saklıdır.
Page 21

1. GÜVENLİK BİLGİLERİ
Cihazın montaj ve kullanımından önce, verilen talimatları dikkatlice
okuyun. Üretici, yanlış bir montaj ve kullanımın hasara neden olma‐
sı durumunda sorumluluk kabul etmez. Kullanma kılavuzunu daha
sonra kullanmak için daima cihazın yakınında bulundurun.
1.1 Çocukların ve tehlikeye açık kişilerin güvenliği
UYARI
Boğulma, yaralanma ya da kalıcı sakatlık riski vardır.
• Bu cihaz, güvenliklerinden sorumlu bir yetişkin ya da kişi tarafın‐
dan gözetim altında tutuldukları sürece 8 yaş ve üzeri çocuklar
ve fiziksel, duyumsal veya zihinsel kapasitesi düşük veya bilgi ve
deneyimi olmayan kişiler tarafından kullanılabilir.
• Çocukların cihazla oynamalarına izin vermeyin.
• Tüm ambalaj malzemelerini çocuklardan uzak tutun.
• Cihaz çalışırken veya soğuma aşamasındayken çocukları ve ev‐
cil hayvanları cihazdan uzak tutun. Erişilebilir parçalar sıcaktır.
• Cihazda çocuk güvenliği aygıtı varsa bu aygıtı etkinleştirmenizi
tavsiye ederiz.
• Temizlik ve kullanıcı bakımı çocuklar tarafından, gözetim altında
bulunmadıkları müddetçe, yapılmamalıdır.
TÜRKÇE 21
1.2 Genel Güvenlik
• Yalnızca kalifiye bir kişi cihazın montajını gerçekleştirmelidir ve
kabloyu değiştirmelidir.
• Çalışır konumdayken cihazın içi sıcak hale gelir. Cihazın ısıtıcı
elemanlarına dokunmayın. Cihazdan aksesuar veya fırın kabı
alırken ya da bunları cihaza koyarken her zaman fırın eldiveni
kullanın.
• Cihazı temizlemek için buharlı bir temizleyici kullanmayın.
• Bakım yapmadan önce cihazın fişini prizden çekin.
• Kapağın camını silmek için sert aşındırıcı temizleyiciler veya
keskin metal kazıyıcılar kullanmayınız, çünkü bunlar yüzeyi çize‐
bilir ve camın kırılmasına neden olabilir.
Page 22
www.electrolux.com
22
• Raf desteklerini çıkartmak için öncelikle yan duvarda bulunan ön
raf desteğini ve ardından arka raf desteğini çekip çıkarın. Ray
desteklerini ters sırayla takın.
2.
GÜVENLİK TALİMATLARI
2.1 Montaj
UYARI
Cihazın montajı sadece kalifiye bir kişi
tarafından yapılmalıdır.
• Tüm ambalajları çıkarın.
• Hasarlı bir cihazı monte etmeyin ya da kullan‐
mayın.
• Cihazla birlikte verilen montaj talimatına uyun.
• Ağır olduğundan, cihazı taşırken daima dikkat
edin. Her zaman güvenlik eldivenleri kullanın.
• Cihazı kulpundan çekmeyin.
• Diğer cihazlar ve üniteler arasında olması ge‐
reken minimum mesafeyi koruyun.
• Cihazın güvenli yapıların altına ve yanına ku‐
rulmasını sağlayın.
• Cihazın her iki yanı aynı boydaki düğer cihaz
ve ünitelerle yan yana olmalıdır.
Elektrik bağlantısı
UYARI
Yangın ve elektrik çarpması riski vardır.
• Tüm elektrik bağlantıları kalifiye bir elektrikçi
tarafından yapılmalıdır.
• Cihaz topraklanmalıdır.
• Bilgi etiketindeki elektriksel verilerin elektrik
beslemesine uygun olduğundan emin olun.
Aksi durumda, bir elektrikçiyi arayın.
• Her zaman doğru monte edilmiş, darbelere
dayanıklı bir priz kullanın.
• Priz çoğaltıcıları ve uzatma kabloları kullan‐
mayın.
• Elektrik fişine ve kablosuna zarar vermemeye
özen gösterin. Hasarlı bir kabloyu değiştirmek
için yetkili servise ya da bir elektrikçiye başvu‐
run.
• Özellikle kapak sıcak olduğunda, elektrik kab‐
lolarının cihazın kapağına temas etmesini en‐
gelleyin.
• Akım taşıyan ve izole edilmiş parçaların şok
koruması araç kullanılmaksızın çıkarılamaya‐
cak şekilde takılmalıdır.
• Fişi prize sadece montaj tamamlandıktan son‐
ra takın. Montajdan sonra elektrik fişine erişi‐
lebildiğinden emin olun.
• Priz gevşemişse fiş takmayın.
• Cihazın fişini prizden çıkarmak için elektrik
kablosunu çekmeyiniz. Her zaman fişten tuta‐
rak çekin.
• Sadece doğru yalıtım malzemelerini kullanın:
hat koruyucu devre kesiciler, sigortalar (yuva‐
sından çıkarılan vidalı tip sigortalar), toprak
kaçağı kesicileri ve kontaktörler.
• Elektrik tesisatı cihazın ana şebeke bağlantısı‐
nı tüm kutuplardan kesebilmenize olanak
sağlayan bir yalıtım malzemesine sahip olma‐
lıdır. Yalıtım malzemesinin kontak açıklığının
genişliği en az 3 mm olmalıdır.
2.2 Kullanım
UYARI
Yaralanma, yanık ya da elektrik çarp‐
ması veya patlama riski vardır.
• Bu cihazı ev ortamında kullanın.
• Bu cihazın teknik özelliklerini değiştirmeyin.
• Havalandırma boşluklarının kapalı olmadığın‐
dan emin olun.
• Cihaz çalışır durumdayken denetimsiz bırak‐
mayın.
• Her kullanımdan sonra cihazı kapatın.
• Çalışır konumdayken cihaz kapısını dikkatli
şekilde açın. Sıcak hava çıkabilir.
• Cihazı ıslak eller ile ya da su ile temas halin‐
deyken kullanmayın.
• Açık cihaz kapağına baskı uygulamayın.
• Cihazı bir çalışma tezgahı veya bir eşya koy‐
ma masası gibi kullanmayın.
• Cihaz çalışırken cihaz kapağını her zaman ka‐
palı tutun.
Page 23

• Cihaz kapağını dikkatlice açın. Alkollü malze‐
meler kullanılması, alkol ve havanın karışma‐
sına neden olabilir.
• Kapağını açarken cihaza kıvılcım veya çıplak
alev temas etmemesine dikkat edin.
• Cihazın içine, üzerine veya yakınına yanıcı
ürünler ya da yanıcı ürünlerle ıslanmış eşyalar
koymayın.
UYARI
Cihazın zarar görme riski vardır.
• Emaye kısmın hasar görmesini veya renginin
solmasını önlemek için:
– Fırın kabı veya diğer cisimleri doğrudan ci‐
hazın alt kısmına koymayın.
– Alüminyum folyoyu doğrudan cihazın alt kıs‐
mına koymayın.
– sıcak cihaza doğrudan su koymayın.
– yemek pişirmeyi bitirdikten sonra ıslak tabak
ve yiyecekleri cihaza koymayın.
– aksesuarları çıkarırken ve koyarken dikkatli
olun.
• Emaye kısmın renginin solması cihazın perfor‐
mansını etkilemez. Garanti şartları uyarınca
bu bir kusur değildir.
• Yaş pasta için pişirme kabı kullanın. Meyve
suları kalıcı paslanmalara neden olabilir.
2.3 Bakım ve Temizlik
UYARI
Yaralanma, yangın veya cihazın zarar
görme riski söz konusudur.
• Bakım işleminden önce, cihazı devre dışı bıra‐
kın ve elektrik fişini prizden çekin.
• Cihazın soğuk olduğundan emin olun. Cam
panellerin kırılma riski vardır.
• Hasar gördüklerinde kapı cam panellerini he‐
men değiştirin. Yetkili servisi arayın.
• Kapağı cihazdan çıkarırken dikkatli olun. Ka‐
pak ağırdır!
• Yüzey malzemesinin bozulmasını önlemek
için cihazı düzenli olarak temizleyin.
• Cihazda yağ veya yiyecek bırakılması yangına
neden olabilir.
TÜRKÇE 23
• Cihazı yumuşak nemli bir bezle temizleyin.
Sadece nötr deterjanlar kullanın. Aşındırıcı
ürünleri, aşındırıcı temizleme bezlerini, çözü‐
cüleri veya metal cisimleri kullanmayın.
• Fırın spreyi kullanıyorsanız ambalajdaki gü‐
venlik talimatlarına uyun.
• Katalitik emayeyi (mümkünse) deterjanla te‐
mizlemeyin.
2.4 Fırın içi aydınlatma
• Bu cihaz için kullanılan halojen lamba veya fı‐
rın içi aydınlatma lambası türü, sadece ev ci‐
hazları içindir. Evin aydınlatılması için kullan‐
mayın.
UYARI
Elektrik çarpması riski.
• Lambayı değiştirmeden önce cihaz fişini priz‐
den çekin.
• Sadece aynı özelliklerdeki lambaları kullanın.
2.5 Elden çıkarma
UYARI
Yaralanma ya da boğulma riski.
• Cihazın fişini prizden çekin.
• Elektrik kablosunu kesin ve atın.
• Çocukların ve hayvanların cihazda kapalı kal‐
masını önlemek için kapı kilit dilini çıkarın.
Üretici / İhracatçı :
ELECTROLUX APPLIANCES AB
BUSINESS SECTOR EMA-EMEA (SEE)
ST GÖRANSGATAN 143
SE-105 45 STOCKHOLM
SWEDEN
TEL: +46 (8) 738 60 00
FAX: +46 (8) 738 63 35
www.electrolux.com
Kullanım Ömrü Bilgisi :
Kullanım ömrü küçük ev aletlerinde 7 yıl, diğer
beyaz eşya ürünlerinde ise 10 yıldır. Kullanım
ömrü, üretici ve/veya ithalatçı firmanın
cihazınızla ilgili yedek parça temini ve bakım
süresini ifade eder.
Page 24
www.electrolux.com
24
3. ÜRÜN TANIMI
1 42 3
5
4
3
10
2
1
9
8
Fırın fonksiyonları düğmesi
1
Zamanlayıcı düğmesi
2
Sıcaklık düğmesi
3
4. İLK KULLANIMDAN ÖNCE
Sıcaklık göstergesi
4
Izgara
5
Fırın lambası
6
Fan
7
5
6
7
Raf desteği
8
Bilgi etiketi
9
Raf konumları
10
3.1 Fırın aksesuarları
• Tel raf
Pişirme kapları, kek kalıpları, kızartmalar için.
• Izgara / Kızartma tavası
Pişirmek, kızartmak veya yağ tepsisi olarak
kullanmak için.
UYARI
Güvenlik bölümlerine bakın.
4.1 İlk temizleme
• Tüm aksesuarları ve çıkarılabilir raf destekleri‐
ni çıkarın (varsa).
• Cihazı ilk kullanım öncesinde temizleyin.
"Bakım ve temizlik" bölümüne bakın.
4.2 Ön ısıtma
Kalan yağ kalıntılarının yanması için boş cihazı
önceden ısıtın.
5. GÜNLÜK KULLANIM
UYARI
Güvenlik bölümlerine bakın.
1.
fonksiyonunu ve maksimum sıcaklığı
ayarlayın.
2.
Cihazı 45 dakika çalıştırın.
3.
fonksiyonunu ve maksimum sıcaklığı
ayarlayın.
4.
Cihazı 15 dakika çalıştırın.
Aksesuarlar normalden daha fazla ısınabilir. Ci‐
hazdan koku ve duman yayılabilir. Bu normal bir
durumdur. Hava akışının yeterli olduğundan
emin olun.
5.1 Cihazın etkinleştirilmesi ve devre
dışı bırakılması
1.
Fırın fonksiyonları kontrol düğmesini bir fırın
fonksiyonuna çevirin.
2.
Sıcaklık kontrol düğmesini bir sıcaklığa
ayarlayın.
Page 25
Cihazın içindeki sıcaklık artarken sıcaklık
göstergesi yanar.
3.
Cihazı devre dışı bırakmak için, fırın fonksi‐
yonları kontrol düğmesini ve sıcaklık kontrol
düğmesini Kapalı (Off) konumuna getirin.
5.2 Fırın fonksiyonları
Fırın fonksiyonu Kullanıldığı işlemler
Kapalı konum Cihaz kapalıdır.
TÜRKÇE 25
Üst + Alt Isıtma
Fanlı Pişirme
Izgara
Hızlı Izgara
Pizza Konumu
Alt Isıtma
6. SAAT FONKSİYONLARI
6.1 Mekanik Zaman Ayarı + Pişirme
Bitişi
Bir fırın fonksiyonunun otomatik kapanma süresi‐
ni ayarlamak için kullanın.
1.
Fırın fonksiyonunu ve fırın sıcaklığını ayar‐
layın.
2.
Zamanlayıcı düğmesini saat yönünde sonu‐
na kadar çevirin, ardından gerekli süre
değerine çevirin.
Bir fırın seviyesinde pişirme ve kızartma yapmak içindir. Üst ve alt
ısıtma elemanları aynı anda çalışır.
Yiyecekleri aynı sıcaklıkta, birden fazla rafta ve kokuları karışma‐
dan kızartmak veya kızartmak ve pişirmek içindir.
Az miktardaki yassı yiyecekleri rafın orta kısmında ızgara yapmak
içindir. Kızartmak içindir.
Çok miktarda yassı yiyeceği ızgara yapmak içindir. Kızartmak
içindir. Tüm ızgara rezistansı çalışır.
Pizza, kiş veya turta yapmak içindir. Izgara ve alt ısıtma elemanı
doğrudan ısı verir ve fan sıcak havayı pizzanın üst kısmında veya
turtanın dolgu kısmında dolaştırır.
Çıtır çıtır veya gevrek tabanlı kekler pişirmek içindir. Yalnızca alt
ısıtma elemanı çalışır.
3.
Ayarlanan süre sona erdiğinde bir sesli ikaz
duyulur. Cihaz kapanır.
Normal ayar
numuna çevirin. Bu konumda cihazı elle çalıştı‐
rırsınız. Mekanik Zaman Ayarı + Pişirme Bitişi
kapalıdır.
: Zamanlayıcı düğmesini ko‐
7. EK FONKSİYONLAR
7.1 Soğutma fanı
Cihaz çalışırken, cihaz yüzeyinin soğuk kalması
için soğutma fanı otomatik olarak çalışır. Cihazı
kaparsanız, cihaz içindeki sıcaklık soğuyana ka‐
dar soğutma fanı çalışmaya devam eder.
7.2 Güvenlik termostatı
Cihazın hatalı kullanılması veya kusurlu bileşen‐
ler tehlikeli şekilde aşırı ısınmaya neden olabilir.
Bunun önüne geçmek için, fırında gücü kesen bir
güvenlik termostatı bulunur. Sıcaklık düştüğünde
fırın otomatik olarak tekrar çalışmaya başlar.
Page 26

www.electrolux.com
26
8. YARARLI İPUÇLARI VE BİLGİLER
• Cihazda beş adet raf seviyesi bulunmaktadır.
Raf seviyelerini cihazın altından başlayarak
sayın.
• Cihaz, hava sirkülasyonu sağlayan ve buharı
sürekli olarak yeniden kullanılır hale getiren
özel bir sistemle donatılmıştır. Bu sistem sa‐
yesinde buharlı bir ortamda pişirebilir ve yiye‐
ceklerin içinin yumuşak ve dışının gevrek ol‐
masını sağlayabilirsiniz. Pişirme süresini ve
enerji tüketimini en aza indirir.
• Cihazın içinde veya cam kapı panellerinde
nemden buğulanma oluşabilir. Bu normal bir
durumdur. Pişirme sırasında fırın kapısını
açarken mutlaka fırından uzakta durun.
Yoğunlaşmayı azaltmak için, pişirmeye başla‐
madan önce cihazı 10 dakika çalıştırın.
• Her kullanımdan sonra cihazdaki buğulanmayı
temizleyin.
• Pişirme sırasında doğrudan cihaz zeminine
herhangi bir nesne ve bileşenlerin üzerine alü‐
minyum folyo koymayın. Bu, pişirme sonuçla‐
rının değişmesine ve emaye kaplamasının za‐
rar görmesine neden olabilir.
8.1 Kek pişirme
• Fırın kapısını, pişirme süresinin 3/4'ü geçme‐
den açmayın.
8.4 Pişirme ve kızartma tablosu
• Aynı anda birden fazla tepsi kullanıyorsanız,
aralarında bir raf boşluk bırakın.
8.2 Et ve balık pişirme
• Fırında kalıcı lekelerin oluşmasını önlemek
için, çok yağlı yemekler pişirirken derin tava/
pişirme kabı kullanın.
• İçindeki suyun sızıp kurumaması için, eti kes‐
meden önce 15 dakika bekletin.
• Kızartma esnasında fırının içinde aşırı duman
oluşmasını önlemek için, derin tava/pişirme
kabına biraz su koyun. Duman birikmesini ön‐
lemek için, kuruduktan sonra her seferinde su
ekleyin.
8.3 Pişirme süreleri
Pişirme süreleri, yiyeceğin türüne, kıvamına ve
hacmine göre değişiklik gösterir.
Başlangıçta, pişirme esnasındaki performansı
gözlemleyin. Cihazda pişirme yaparken kullan‐
dığınız pişirme kaplarına, tariflere ve miktarlara
göre en iyi ayarları (ısı ayarı, pişirme süresi, vs.)
tespit edin.
KEKLER
YEMEĞİN TÜ‐
RÜ
Çırpma usulü
Üst + Alt Isıtma Fanlı Pişirme
Raf konu‐muSıcak‐
Raf konu‐muSıcak‐
lık [°C]
lık [°C]
Pişirme sü‐
resi [dk.]
2 170 3 160 45 - 60 Kek kalıbında
Notlar
tarifler
Kurabiye ha‐
2 170 3 160 20 - 30 Kek kalıbında
muru
Yağlı sütlü
cheese cake
1 170 1 160 70 - 80 Tel raf üzerinde
26 cm'lik bir kek
kalıbında
Elmalı kek (El‐
malı turta)
2 170 2 (sol ve
sağ)
160 80 - 100 Tel raf üzerinde
20 cm'lik iki kek
kalıbında
1)
Strudel 3 175 2 150 60 - 80 Pişirme tepsisin‐
de
Page 27

TÜRKÇE 27
YEMEĞİN TÜ‐
RÜ
Reçelli tart 2 170 2 (sol ve
Üst + Alt Isıtma Fanlı Pişirme
Raf konu‐muSıcak‐
Raf konu‐muSıcak‐
lık [°C]
sağ)
lık [°C]
Pişirme sü‐
resi [dk.]
Notlar
165 30 - 40 26 cm'lik bir kek
kalıbında
Sünger kek 2 170 2 160 50 - 60 26 cm'lik bir kek
kalıbında
Yılbaşı keki /
Bol meyveli
kek
2 160 2 150 90 - 120 20 cm'lik bir kek
kalıbında
1)
Erikli kek 1 175 2 160 50 - 60 Bir ekmek kalı‐
1)
bında
Küçük kekler tek seviye
Küçük kekler iki seviye
Bisküviler / ha‐
mur çubukları
3 170 3 140 -
150
- - 2 ve 4 140 150
3 140 3 140 -
150
20 - 30 Pişirme tepsisin‐
de
25 - 35 Pişirme tepsisin‐
de
30 - 35 Pişirme tepsisin‐
de
- bir seviye
Bisküviler / ha‐
mur çubukları
- - 2 ve 4 140 150
35 - 40 Pişirme tepsisin‐
de
- iki seviye
Bezeler 3 120 3 120 80 - 100 Pişirme tepsisin‐
de
Çörekler 3 190 3 180 15 - 20 Pişirme tepsisin‐
1)
de
Ekler 3 190 3 170 25 - 35 Pişirme tepsisin‐
de
Kaplama turta‐
lar
Bol meyveli
kek
Victoria sand‐
viçi
1)
Fırını önceden 10 dakika ısıtın.
2 180 2 170 45 - 70 20 cm'lik bir kek
kalıbında
1 160 2 150 110 - 120 24 cm'lik bir kek
kalıbında
1 170 1 160 50 - 60 20 cm'lik bir kek
kalıbında
1)
EKMEK VE PİZZA
YEMEĞİN TÜ‐
RÜ
Üst + Alt Isıtma Fanlı pişirme
Raf konu‐muSıcak‐
Raf konu‐muSıcak‐
lık [°C]
lık [°C]
Pişirme sü‐
resi [dk.]
Notlar
Beyaz ekmek 1 190 1 190 60 - 70 Parça başına
500 gr, 1 - 2 par‐
1)
ça
Page 28

www.electrolux.com
28
YEMEĞİN TÜ‐
RÜ
Çavdar ek‐
meği
Pizza 1 230 -
Üst + Alt Isıtma Fanlı pişirme
Raf konu‐muSıcak‐
Raf konu‐muSıcak‐
lık [°C]
lık [°C]
Pişirme sü‐
resi [dk.]
1 190 1 180 30 - 45 Bir ekmek kalı‐
250
1 230 -
250
10 - 20 Pişirme tepsisin‐
de veya derin ta‐
Notlar
bında
vada
Yağlı çörekler 3 200 3 190 10 - 20
1)
Önceden 10 dakika ısıtın.
Kek tepsisinde
TURTALAR / BÖREKLER
YEMEĞİN TÜ‐
RÜ
Üst + Alt Isıtma Fanlı pişirme
Raf konu‐muSıcak‐
Raf konu‐muSıcak‐
lık [°C]
lık [°C]
Pişirme sü‐
resi [dk.]
Notlar
Börek 2 200 2 180 40 - 50 Bir kalıpta
Sebzeli tart 2 200 2 175 45 - 60 Bir kalıpta
Kiş 1 180 1 180 50 - 60
Lazanya 2 180 -
190
Cannelloni (içi
malzemeli bo‐
2 180 -
190
2 180 -
190
2 180 -
190
25 - 40
25 - 40
Bir kalıpta
Bir kalıpta
Bir kalıpta
ru makarna)
1)
Önceden 10 dakika ısıtın.
1)
1)
1)
1)
1)
ET
YEMEĞİN TÜ‐
RÜ
Üst + Alt Isıtma Fanlı pişirme
Raf konu‐muSıcak‐
Raf konu‐muSıcak‐
lık [°C]
lık [°C]
Pişirme sü‐
resi [dk.]
Notlar
Sığır eti 2 200 2 190 50 - 70 Tel raf üzerinde
Keçi Eti 2 180 2 180 90 - 120 Tel raf üzerinde
Dana eti 2 190 2 175 90 - 120 Tel raf üzerinde
Az pişmiş roz‐
2 210 2 200 50 - 60 Tel raf üzerinde
bif
Orta pişmiş
2 210 2 200 60 - 70 Tel raf üzerinde
rozbif
İyi pişmiş roz‐
2 210 2 200 70 - 75 Tel raf üzerinde
bif
Keçi omzu 2 180 2 170 120 - 150 Derili
Keçi incik 2 180 2 160 100 - 120 İki parça
Kuzu Eti 2 190 2 175 110 - 130 But
Page 29
TÜRKÇE 29
YEMEĞİN TÜ‐
RÜ
Üst + Alt Isıtma Fanlı pişirme
Raf konu‐muSıcak‐
Raf konu‐muSıcak‐
lık [°C]
lık [°C]
Pişirme sü‐
resi [dk.]
Notlar
Tavuk 2 220 2 200 70 - 85 Bütün
Hindi 2 180 2 160 210 - 240 Bütün
Ördek 2 175 2 220 120 - 150 Bütün
Kaz 2 175 1 160 150 - 200 Bütün
Tavşan 2 190 2 175 60 - 80 Parçalar halinde
Yaban tavşanı 2 190 2 175 150 - 200 Parçalar halinde
Sülün 2 190 2 175 90 - 120 Bütün
BALIK
YEMEĞİN TÜ‐
RÜ
Alabalık / Çi‐
Üst + Alt Isıtma Fanlı pişirme
Raf konu‐muSıcak‐
Raf konu‐muSıcak‐
lık [°C]
lık [°C]
Pişirme sü‐
resi [dk.]
2 190 2 175 40 - 55 3 - 4 balık
Notlar
pura
Ton balığı /
2 190 2 175 35 - 60 4 - 6 fileto
Somon
8.5 Izgara
Pişirmeye başlamadan önce, fırını 10
dakika boş olarak ısıtın.
Miktar Izgara Pişirme süresi [dk.]
YEMEĞİN TÜRÜ Adet [g] Raf konu‐muSıcaklık
[°C]
Bonfile 4 800 4 maks. 12-15 12-14
Biftek 4 600 4 maks. 10-12 6-8
Sosisler 8 - 4 maks. 12-15 10-12
Pirzola 4 600 4 maks. 12-16 12-14
Tavuk (2 parça ha‐
2 1000 4 maks. 30-35 25-30
linde)
Kebaplar 4 - 4 maks. 10-15 10-12
Tavuk göğsü 4 400 4 maks. 12-15 12-14
Hamburger 6 600 4 maks. 20-30 Balık filetoları 4 400 4 maks. 12-14 10-12
Tost sandviçler 4-6 - 4 maks. 5-7 Kızartma 4-6 - 4 maks. 2-4 2-3
1. taraf 2. taraf
Page 30
www.electrolux.com
30
8.6 Konserve yapma - Alt Isıtma
Yumuşak meyveler
Çilek, böğürtlen, ahu‐
dudu, bektaşi üzümü
Sert çekirdekli meyveler
Armut, ayva, erik 160 – 170 35 – 45 10 – 15
Sebzeler
Havuç
Salatalık 160 – 170 50 – 60 –
Karışık turşular 160 – 170 50 – 60 5 – 10
Yer lahanası, bezel‐
ye, kuşkonmaz
1)
KONSERVE Sıcaklık [°C]
kadar pişirme süresi
[dk.]
160 – 170 35 – 45 –
Kaynama noktasına
Kaynama noktasına
KONSERVE Sıcaklık [°C]
kadar pişirme süresi
[dk.]
Kaynama noktasına
KONSERVE Sıcaklık [°C]
kadar pişirme süresi
[dk.]
1)
160 – 170 50 – 60 5 – 10
160 – 170 50 – 60 15 – 20
Cihazı devre dışı bıraktıktan sonra konserveyi fırın içerisinde bırakın.
100°C'de ilave pişir‐
me süresi [dk.]
100°C'de ilave pişir‐
me süresi [dk.]
100°C'de ilave pişir‐
me süresi [dk.]
9. BAKIM VE TEMİZLİK
UYARI
Güvenlik bölümlerine bakın.
• Cihazın ön kısmını yumuşak bir bez ve deter‐
janlı sıcak su ile temizleyin.
• Metal yüzeyleri temizlemek için her zamanki
temizlik maddesini kullanın.
• Her kullanımdan sonra fırın tepsisini temizle‐
yin. Bu sayede kirleri daha kolay temizleyebilir
ve bunların yanmasını önleyebilirsiniz.
• Zorlu kirleri özel fırın temizleyici ile çıkarın.
• Tüm fırın aksesuarlarını her kullanımdan son‐
ra temizleyin ve kurumaya bırakın. Ilık su, de‐
terjan ve yumuşak bir bez kullanın.
• Yapışmaz aksesuarlarınız varsa, bunları te‐
mizlemek için aşındırıcı temizlik maddeleri,
keskin cisimler veya bulaşık makinesi kullan‐
mayın. Yapışmaz kaplamaya zarar verebilir.
Paslanmaz çelik ve alüminyum cihazlar:
Fırın kapısını sadece ıslak bir süngerle
temizleyin. Yumuşak bir bezle kurula‐
yın.
Fırın yüzeyine zarar verebileceklerinden
bulaşık teli, asit veya aşındırıcı madde‐
ler kullanmayın. Fırının kontrol panelini
aynı uyarıları dikkate alarak temizleyin.
9.1 Kapı contalarının temizlenmesi
• Kapı contasını düzenli olarak kontrol edin. Ka‐
pı contası, fırın boşluğunun kasası çevresinde
bulunur. Kapı contası hasarlıysa, cihazı kul‐
lanmayın. Yetkili servisi arayın.
Page 31
• Kapı contasını temizlemek için temizlik hak‐
kındaki genel bilgilere başvurun.
Raf desteklerinin çıkarılması
TÜRKÇE 31
9.2 Raf destekleri
Yan duvarları temizlemek için teleskobik ray des‐
teklerini çıkarabilirsiniz.
1.
Raf desteğinin ön kısmını yan duvardan
uzağa çekin.
2.
Raf desteğinin arka kısmını yan duvardan
uzağa çekip çıkarın.
1
2
Raf desteklerinin takılması
Raf desteklerini ters sırayla takın.
Raf desteklerinin yuvarlatılmış kenarları
öne doğru bakmalıdır.
9.3 Fırın lambası
UYARI
Fırın lambasını değiştirirken dikkatli
olun. Elektrik çarpması riski vardır.
Fırın lambasını değiştirmeden önce:
• Fırını kapayın.
• Sigorta kutusundaki sigortaları çıkarın veya
devre kesiciyi devre dışı bırakın.
Fırın lambasının ve cam kapağın hasar
görmesini önlemek için fırının altına bir
bez serin.
Yağ kalıntısının lamba üzerinde yanma‐
sını önlemek için halojen lambayı daima
bir bezle tutun.
1.
Çıkarmak için cam kapağı saatin tersi yönde
çevirin.
2.
Cam kapağı temizleyin.
3.
Fırın lambası ampulünü uygun 300°C ısıya
dayanıklı bir fırın lambası ampulüyle değişti‐
rin.
Aynı tip fırın lambası kullanın.
4.
Cam kapağı takın.
9.4 Fırın kapısının temizlenmesi
Fırın kapısı iki cam panelden oluşur. Temizlemek
için fırın kapısını ve iç cam paneli çıkarabilirsiniz.
DİKKAT
Cihazı cam panel olmadan kullanmayın.
Fırın kapısını sökmeden iç cam panelle‐
ri çıkarmaya çalışırsanız fırın kapısı ka‐
panabilir.
Page 32
www.electrolux.com
32
Fırın kapısının ve cam panelin sökülmesi
1.
Kapıyı tamamen açın ve iki kapı menteşesi‐
ni tutun.
2.
Menteşelerin üstündeki kolları kaldırın ve
çevirin.
3.
Fırın kapısını ilk açılma pozisyonuna getirin
(yarı yarıya). Daha sonra ileri doğru çekip
kapıyı yuvasından çıkarın.
Page 33
TÜRKÇE 33
4.
Kapıyı yumuşak bir bez üzerinde sağlam bir
yüzeye koyun.
5.
Dahili cam paneli çıkarmak için kilitleme si‐
temini açın.
6.
Sabitleyicilerin ikisini de 90° döndürüp, yu‐
valarından çıkarın.
90°
7.
Cam paneli dikkatlice kaldırıp (adım 1) ye‐
rinden çıkarın (adım 2).
8.
Cam paneli sabunlu suyla temizleyin. Cam
paneli dikkatlice kurutun.
2
1
Page 34
www.electrolux.com
34
Kapının ve cam panelin takılması
10. SERVİSİ ARAMADAN ÖNCE
UYARI
Güvenlik bölümlerine bakın.
Sorun Olası neden Çözüm
Cihaz çalışmıyor. Cihaz etkinleştirilmemiştir. Cihazı açın. "Günlük Kulla‐
Cihaz çalışmıyor. Mekanik Zaman Ayarı + Pişir‐
Cihaz çalışmıyor. Sigorta kutusundaki sigorta
Fırın lambası çalışmıyor. Fırın lambası arızalıdır. Fırın lambasını değiştirin.
Buhar ve buğular, yemeklerin
üstünde ve fırının içinde topla‐
nıyor.
Sorunu gideremediğiniz takdirde, satıcınıza veya
yetkili servise başvurun.
Bu verileri aşağıya yazmanızı öneriyoruz:
Model (MOD.) .........................................
Ürün numarası (PNC) .........................................
Seri numarası (S.N.) .........................................
me Bitiş programlayıcısı ayarlı
değildir.
atmıştır.
Yemek fırında çok uzun süre
bırakılmıştır.
Temizleme işlemi bittikten sonra, cam paneli ve
fırın kapısını takın. Yukarıdaki adımları tersine sı‐
rayla izleyin.
Ekran baskı bölgesi kapının iç kısmına bakmalı‐
dır. Montajın ardından ekran baskı bölgesindeki
cam panel çerçevesine ait yüzeyin, dokun‐
duğunuzda pürüzsüz olduğundan emin olun.
İç cam paneli yuvasına doğru şekilde oturt‐
tuğunuzdan emin olun. Resme bakın.
nım" bölümüne bakın.
Mekanik Zaman Ayarı + Pişir‐
me Bitiş programlayıcısını
ayarlayın. "Saat fonksiyonları"
bölümüne bakın.
Sigortayı kontrol edin. Sigor‐
tanın birkaç defa atması duru‐
munda, kalifiye bir elektrikçi
çağırın.
Pişirme bittikten sonra, ye‐
mekleri fırının içerisinde 15-20
dakikadan fazla tutmayın.
Servisler için gerekli bilgiler bilgi etiketinde bulun‐
maktadır. Bilgi etiketi cihazın pişirme bölümünün
ön tarafındadır.
Page 35
11. MONTAJ
11.1 Ankastre Montaj
573
UYARI
Güvenlik bölümlerine bakın.
548
558
594
20
589
11.2 Elektrik bağlantısı
UYARI
Elektrik bağlantısı sadece kalifiye bir ki‐
şi tarafından yapılmalıdır.
TÜRKÇE 35
A
B
590
600
min. 550
20
min. 560
min. 550
20
min. 560
5
"Güvenlik Bilgileri" bölümünde açıkla‐
nan güvenlik önlemlerine uymamanız
halinde üretici firma sorumluluk kabul
etmez.
Bu cihaz, bir elektrik fişi ve elektrik kablosu ile
birlikte teslim edilir.
11.3 Kablo
Montaj ve değişime uygun kablo tipleri: H07 RNF, H05 RN-F, H05 RRF, H05 VV-F, H05 V2V2-F
(T90), H05 BB-F.
Kablo bölümü için (bilgi etiketindeki) toplam güce
ve tabloya bakın:
Toplam güç Kablo bölümü
maksimum 1380W3 x 0,75 mm²
maksimum 2300W3 x 1 mm²
maksimum 3680W3 x 1,5 mm²
Fırın kablosu (yeşil/sarı kablo) faz kablolarından
ve nötr bağlantı kablolarından (mavi ve kahve‐
rengi kablolar) 2 cm uzun olmalıdır.
Page 36

www.electrolux.com
36
12. ÇEVREYLE İLGİLİ BİLGİLER
Şu sembole sahip malzemeler geri
dönüştürülebilir
uygun konteynerlere koyun.
Elektrikli ve elektronik cihaz atıklarının geri
dönüşümüne ve çevre ve insan sağlığının
. Ambalajı geri dönüşüm için
korunmasına yardımcı olun. Ev atığı sembolü
bulunan cihazları atmayın. Ürünü yerel geri
dönüşüm tesislerinize gönderin ya da belediye ile
irtibata geçin.
AEEE Yönetmeliğine Uygundur.
Page 37

TÜRKÇE 37
Page 38

www.electrolux.com
38
Page 39

TÜRKÇE 39
Page 40
www.electrolux.com/shop
397278302-D-142013
 Loading...