

Page 1
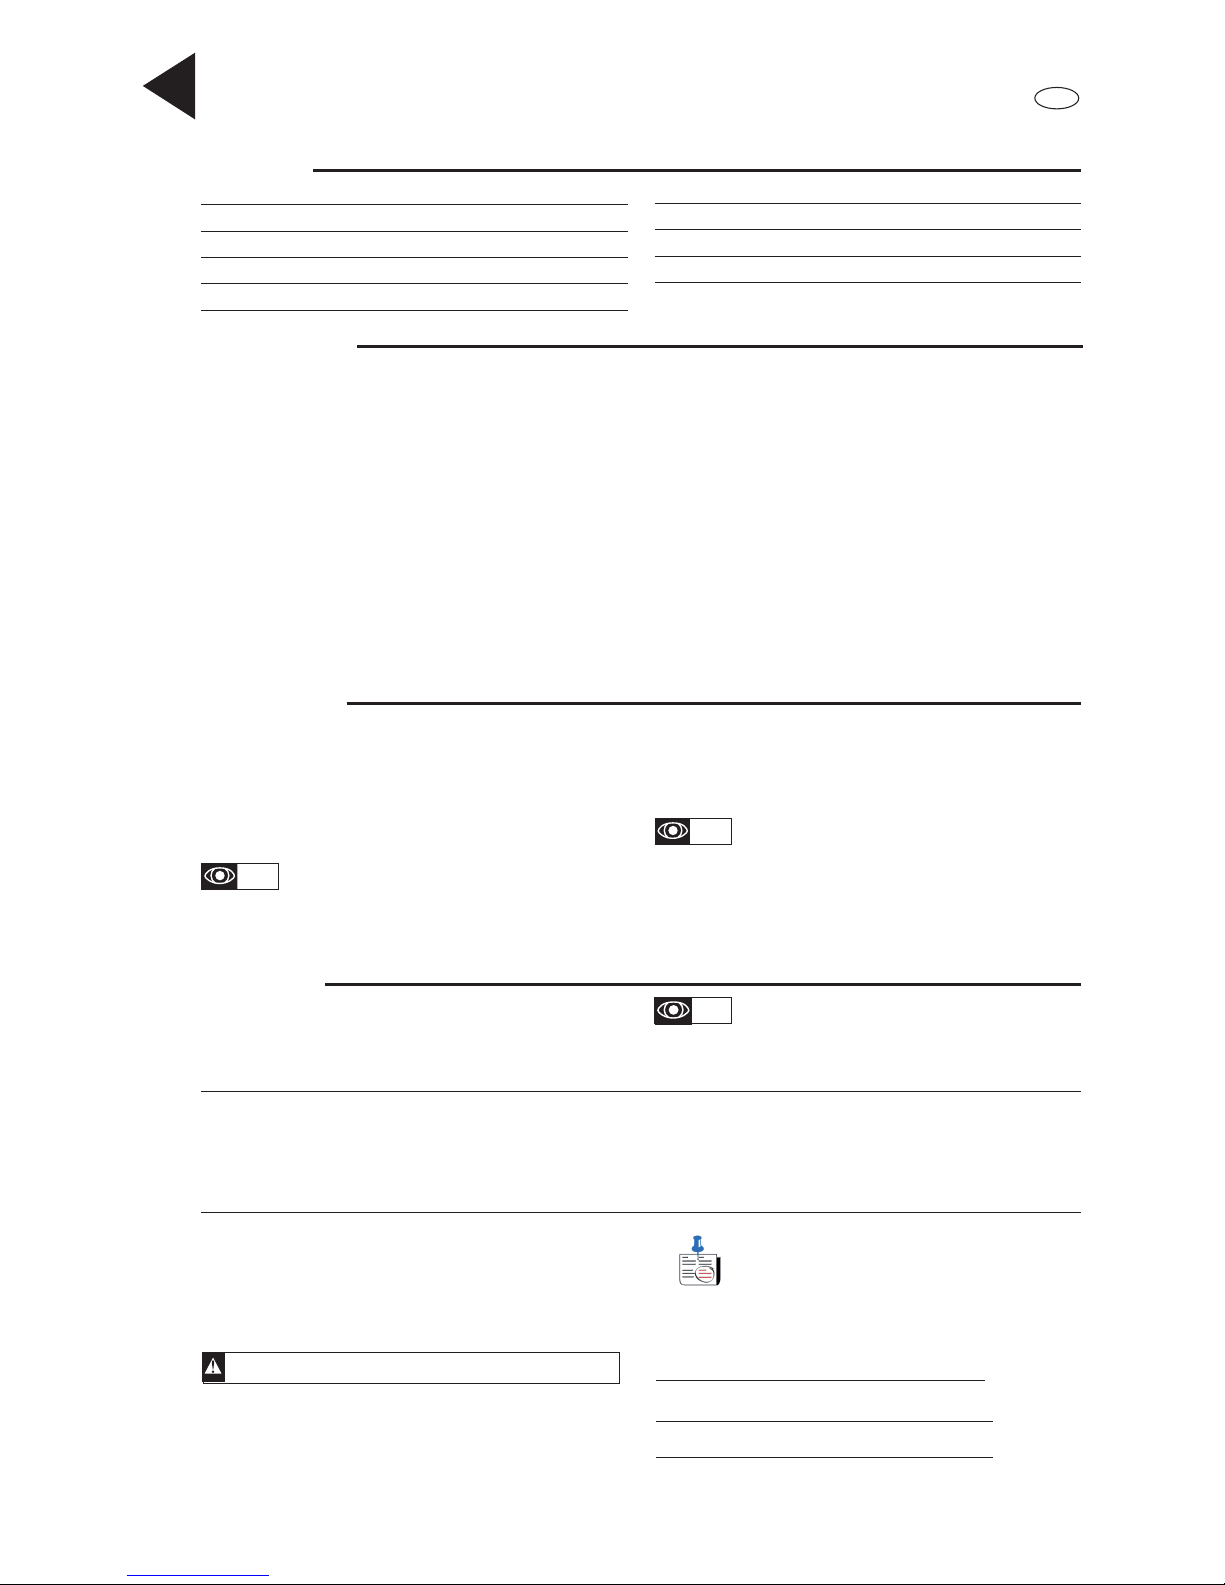
• Standard all stainless steel equipment :
X Hook for kneading dough.
Y Paddle for mixing.
Z Whisk for emulsifying
1.1 DESCRIPTION
• This electronic beater-mixer is a small appliance for bakerypatisserie and cooking designed for kneading, mixing and whipping all kinds of food products all kinds of pastry ,stulling ,cream
,emulsions ,etc. The power take-off drives accessories (with
conical push-fi t and square shaft of 12, type K). It is lightweight
and compact and easy to handle.
2.2 LOCATION
This beater mixer is designed to be fi tted on a stable, non-vibrating
worktop between 600 and 900 mm in height.
2.1 DIMENSIONS – WEIGHT (FOR INFORMATION ONLY)
A Stainless steel bowl, 5.5 litre capacity
B Bowl cradle
C Safety guard
D Built-in accessories hub
•
Electrical specifi cations of machine:
Introduction
Installation
- Gross weight packaged : 15 Kg
- Net weight with equipment : 12.6 Kg with tools
- Dimensions of packaging : 450 x 350 x 490 mm
- Machine overall dimensions : 388 x 280 x 438 mm
1.1b
2.3 ELECTRICAL CONNECTION
• This beater is to be supplied with single-phase current.
• A 2 pin + earth standardised wall socket with a 10-16A fuse
is required, that is easily accessible.
• Check that the voltage of the electrical system is the same as
that marked on the rating plate.
NO EARTH PLUG = NO PROTECTION = RISK OF
BREAKDOWN.
Voltage Rating Frequency Current
(V) (W) (Hz) (A)
220/240 500 50/60 2,3
Refer to the numbered drawings
that go with the numbered paragraphs in the instructions.
Introduction 1
Installation 1
Use, safety 2
Cleaning and hygiene 3
Fault fi nding 4
Maintenance 4
Conformity with regulations 5
Parts lists - exploded view A
Electrical diagrams N
Contents
GB
1
Electromix 5 GB 02 2015
2.1
1.1a
The machine must be earthed using the green and yellow wire
Note: The earth values are defi ned according to the
residual differential current. Non-compliance with
these instructions may result in invalidation of the
warranty.
• The machine must be protected by a differential circuit breaker
and a 16A fuse.
E Cover
F Head
G On/Off/Speed variation button
H Base
Introduction
The Operating Manual provides the user with useful information
in order to work correctly and in complete safety. It is designed
to facilitate use of the machine (hereinafter referred to as “machine” or “appliance”).
The following should not under any circumstances be considered
as a long list of restrictive warnings, but rather as a set of instructions aimed at improving the performance of the machine in all
respects and particularly at preventing bodily injury or material
damage resulting from improper use and management.
It is essential that all the people responsible for transporting,
installing, commissioning, using, maintaining, repairing or
dismantling the machine should consult this manual and read it
carefully before proceeding with the various operations, in order
to avoid any incorrect or inappropriate handling likely to result in
damage to the machine or putting people’s safety at risk.
It is also important for the Manual to be ever available to the
operator and carefully kept at the workplace of the machine in
order to be easily and immediately consulted in the event of a
doubt or, in any case, as required.
If, after reading this Manual, you still have doubts or uncertainties
as to the use of the machine, please do not hesitate to contact the
Manufacturer or approved After-Sales Service who remain at your
disposal in order to guarantee a quick and thorough service with
a view to optimum operation and effi ciency of your machine.
As a reminder, the safety, hygiene and environmental protection
standards currently applicable in the country where the machine
is installed must always be applied during use of the machine.
Consequently, it is the user’s responsibility to ensure that the
machine is operated and used solely under the optimum safety
conditions laid down for people, animals and property.
The machine can be transported holding it either side of the cradle
with the guard shut. Do not use the control button as a handle.
02/2015
Use the machine in a sufficiently lit room (see technical
standard currently applicable in the country of use, for
Europe, refer to standard EN 12464-1)
THE REFERENCE LANGUAGE FOR THESE INSTRUCTIONS IS FRENCH.
Page 2
- Never operate the appliance without its safety guard.
- Never operate the appliance without its bowl.
- KEEP THESE INSTRUCTIONS
• The safety of the user is guaranteed by:
- The safety guide which stops the appliance when it is lifted.
- The machine only starting when the cradle is in the work position
and the safety guard lowered.
- A time of less than three seconds for the beater to stop regardless of the speed.
- A no-volt release system requiring for the speed button to be
at 0 to start back up.
- Protection from current and voltage overloads and the motor
from heating.
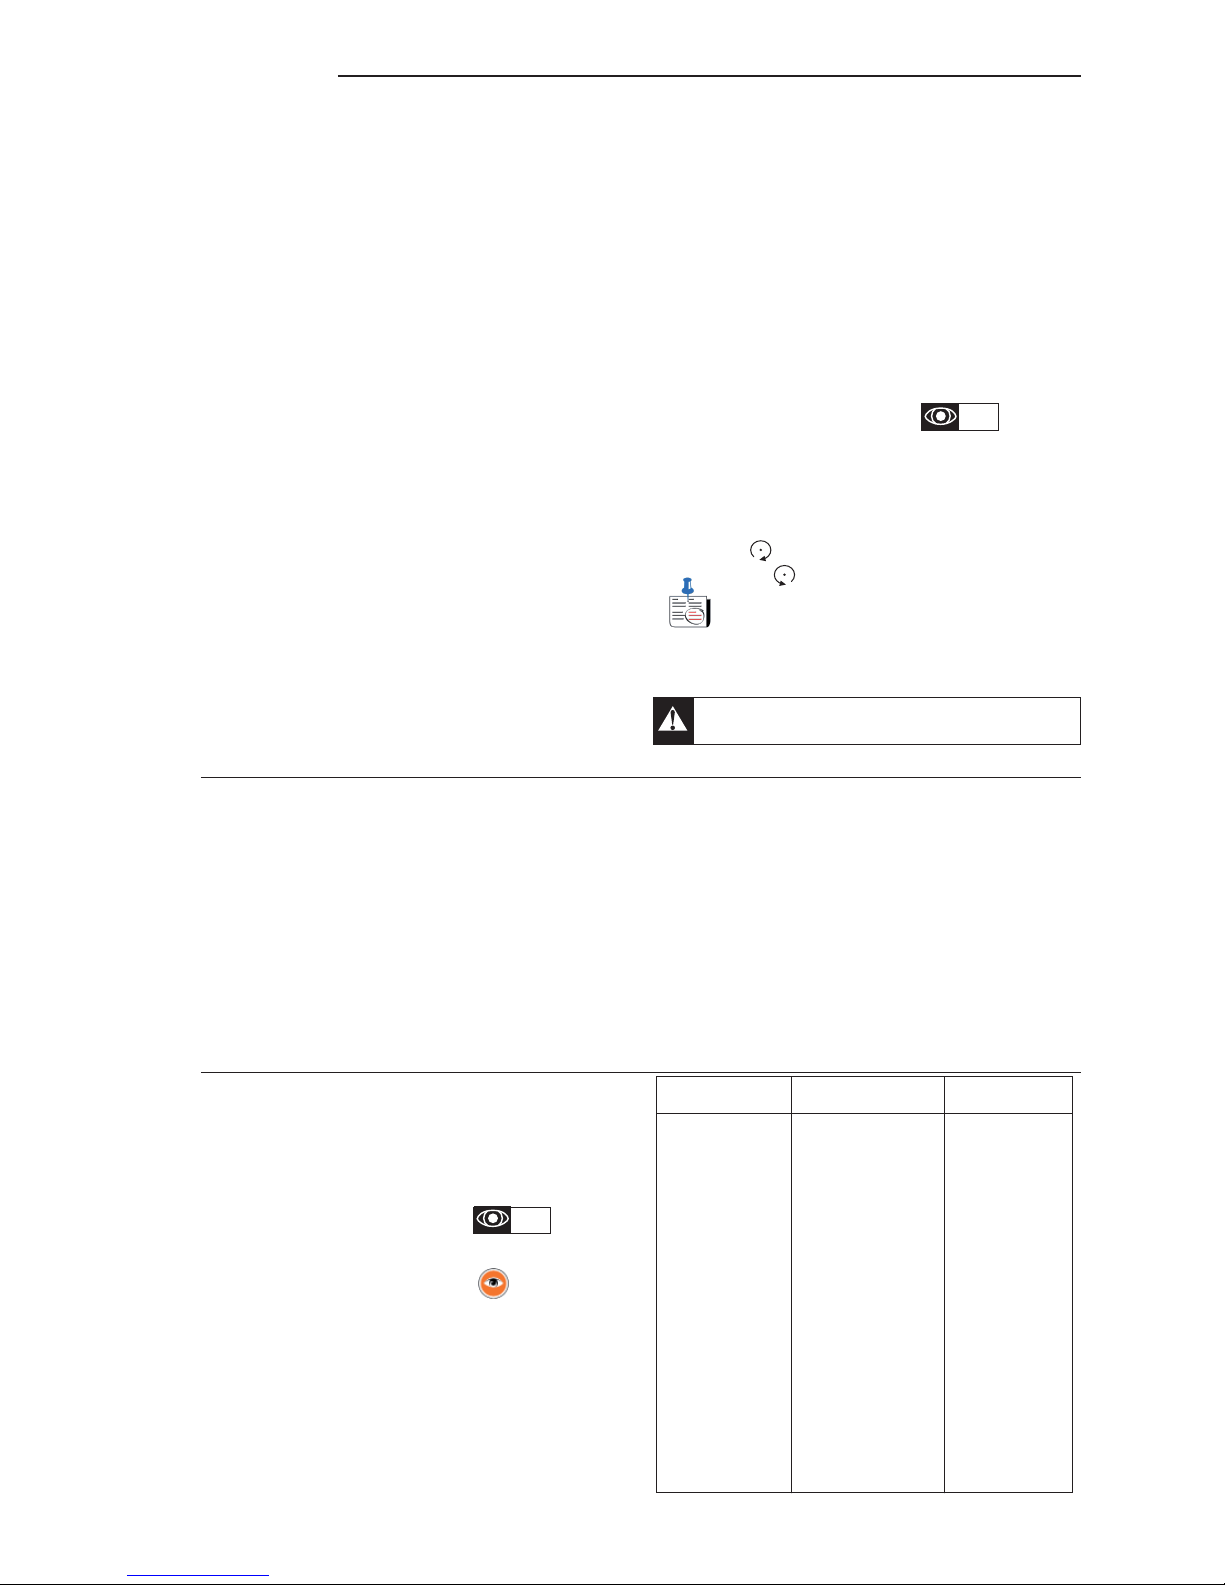
G Rotary ON/OFF/VARIATION button
O Position 0 : OFF
I Position 1 to 12 . SPEED ADJUSTMENT
a) Electronic speed variation
- Turn the variation button:
Clockwise to increase speed.
Anticlockwise to reduce speed.
Note: Do not force the min. - max. stops of the button,
as this may damage the potentiometer.
b) Braked stop
- By bringing the variation button back to 0.
Electromix 5 GB 10 2012
2
3.1 OPERATION - SAFETY
Use, safety
Read all the instructions.
- The appliance must be used by professional personnel.
- Do not put machine in water or any other liquid to avoid any
risk of electric discharge.
- Disconnect the plug of the appliance when not in use or before
any maintenance operation or cleaning.
- Check that the appliance is in position 0 when:
- it is not in use
- before attaching or removing tools, accessories
- before cleaning.
- Remove accessories and tools from beater before washing
- Never touch moving parts.
- Keep hands, hair, clothing, spatulas and other utensils away
from the tools when in operation to reduce any risk of injury
and/or damaging the appliance.
- Do not use the machine if:
- the cable or plug is damaged
- the safety component (guard) is faulty.
- the appliance has fallen or shows signs of damage.
- The use of accessories not recommended or not sold by
the manufacturer could lead to fi re, electrical discharge or
injury.
- Do not use the appliance outdoors.
- Do not allow the cable to hang over the edge of the table or
a worktop.
- Do not allow the cable to touch a hot surface, including an
oven.
Do not lift the safety guard up until the mixer has stopped
completely to prevent splashes
3.1
3.2 LOADING INGREDIENTS INTO THE BOWL
It is easier to put the ingredients into the bowl before putting
it on to the appliance. This is strongly recommended for fl our
(when preparing various dough mixtures). To avoid a cloud of
fl our from forming when loading the bowl, you are advised to:
- Empty the bag or container of fl our without shaking it.
- Put the water in before the fl our if possible.
- Do not shake the contents once the fl our has gone into the
bowl.
- Place the tool gently into the bowl before placing it on to the
appliance.
These simple precautions will limit a cloud of fl our from forming and consequently, reduce the risk of dust-related allergies.
However, some mixtures call for products to be added during
the process. This is made easier thanks to the funnel guard
which channels any products added after. Avoid adding products by dropping them onto the tool to prevent splashing
related to the rotation speed of the tool.
Do not add frozen products, ice cubes or any other hard matter such as sugar cubes or chocolate for instance which risks
blocking the appliance or at the worst, damaging the bowl and
tools.
Always adhere to the maximum recommended quantities to
avoid overfl ows and splashing when working.
• The working capacity of a beater depends upon:
- the tool used
- the nature, quantity and density of the mass to be worked
- the optimum speed for quality results.
• Too large a quantity is always detrimental to the quality of
the work and the life of the mechanical parts of the beater
and may lead to abrupt stoppage (See § 5.1).
• The table opposite gives an indication of the maximum quanti-
ties to be used for quality work.
3.3 MAXIMUM CAPACITIES
WHISK PADDLE HOOK
Meringue: Crème pâtissière: Croissant:
350g egg whites 500g of powder mix 750g of fl our
Genoese sponge: Choux pastry: Brioche:
400g egg whites 600g of fl our 750g of fl our
Stiff egg white: Shortcrust pastry: Choux pastry:
400g egg whites 500g of fl our 600g of fl our
Whipped cream: Sweet pastry: Sweet pastry:
1L of single cream 500g of fl our 750g of fl our
Chocolate mousse: Bread dough 60%
500g of powder mix 750g of fl our
Pancake batter Pizza
1.5L of milk 400g of fl our
1 kg of fi lling
1 kg of sausage
meat
1 kg of pâté
3.3
Page 3
3
Electromix 5 GB 10 2012
Cleaning and hygiene
4.1 IN BETWEEN USE
• Remove the bowl, tool and guard.
• Using hot water and detergent - disinfectant, immerse and
wash the inside of the bowl, tool and guard, then rinse in clean
water and dry.
• Clean the planetary gear housing, tool holder spindle and guard
with a damp sponge and a detergent - disinfectant.
Note: use cleaning products that are compatible with
the aluminium and plastic parts.
3.7 ACCESSORIES HUB
• This beater is fi tted with a variable speed accessories hub (square
dimension 12 mm, type K) to drive the optional accessories:
• To fi t one of the accessories, proceed as follows:
- The beater must be stopped.
- Fit the accessory which corresponds to the work to be carried
out.
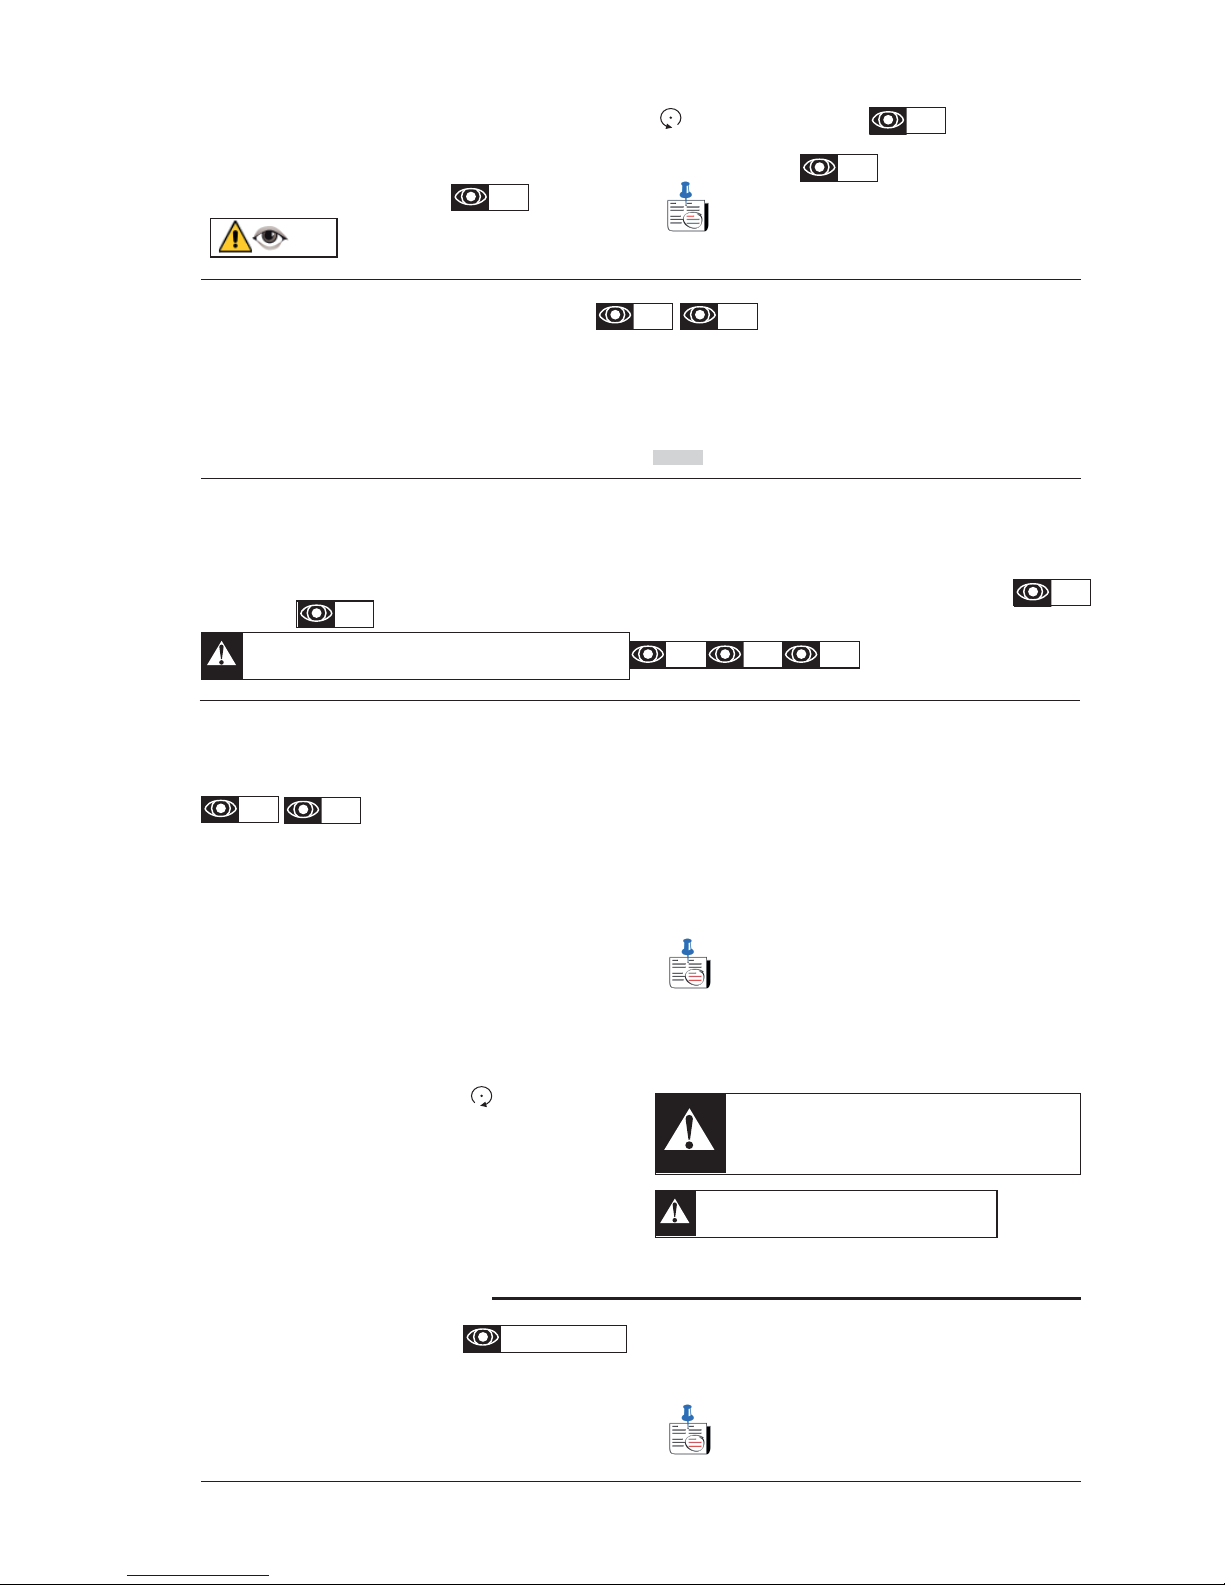
- Turn the cover L.
- Position the accessory and insert the conical endpiece N of
accessory P into the accessories hub M of the beater.
- Engage the square S into the drive shaft of the hub M by
pivoting accessory P.
- Position the pin R into the groove (T) and drive the accessory
home into the hub M.
- Tighten the lock screw U (clockwise ).
- Recommendations for using the meat mincer
- Prepare the meat before inserting it into the mincer:
- Remove all bones and gristle.
- Cut the meat into long, thin pieces (about the same size
as your thumb).
- Put part of the meat in the cup of the mincer.
The machine must be stopped, before fi tting or
removing an accessory.
3.7a
These optional accessories are designed to perform
accompanying work and not industrial quantities. Heavy
duty and forced use would damage your beater.
- Start up the beater by positioning button G between 7
and 9.
- Slide the pieces of meat into the chute one at a time. They
will get caught by the screw.
- Use the pusher (and only the pusher) if the piece of meat
does not get taken up by the screw. Do not fi ll up the
chute and subsequently force with the pusher as this
does not accelerate the mincing process but damages
the machine.
Note: Using the mincer heats up the motor and the
thermal safety device could cut out the appliance. In this
case, you must wait for a few minutes for the motor to
cool down before starting the appliance back up.
To prevent sudden heating up, you are advised to follow the instructions given above. The operating time is approximately 8 to 10
minutes which corresponds to processing roughly 3 kg of meat.
3.6 FITTING/REMOVING THE SAFETY GUARD
• To remove the guard:
1) Raise the safety guard to its upper stop.
2) Using your 2 index fi ngers, push on the two rods J of the
safety guard with your thumbs applied against the pivot axis
of the guard.
• To fi t the guard:
1) Engage the 2 rods J of the guard in the rotating shaft K.
2) Using your thumbs, press down on the lower part of the safety
guard rods, applied against the pivot axis of the guard.
3.6a
3.6b
• Raise the safety guard and the cradle will be lowered automatically.
• Place the tool inside the bowl.
• Position the bowl in front of the cradle and engage the handles
of the bowl in the pins of the cradle.
• Push the tool into the tool holder spindle, then turn it anticlockwise
to lock it in position.
• Push the safety guard back and the bowl will be automatically
locked into position.
Note: If the bowl is not fi tted correctly, it will not be
possible to close the safety guard completely. Do not
force and ensure the bowl is correctly fi tted.
3.4 FITTING THE BOWL AND TOOLS
3.5 START UP AND CHOICE OF SPEED
The electronic variation system provides the user with a wide
range of variable speeds.
• Start the beater by turning button G from the stop position
O to the position between 1 and 12 according to the speed at
which the appliance is to operate.
• Always start in slow speed 1 to avoid splashing or clouds of
fl our, and then progressively increase the speed.
V Speed of planetary gears (rpm)
S D Soft dough
H D Hard dough
Normal range recommended.
3.3
3.4c
3.4b
3.4a
§5.3
3.1
Never assemble the guard in a different position than that
shown on this manual.
1.1a 2.1 3.4c
3.7b
3.4 a -b -c 3.6a - b
Page 4
Electromix 5 GB 03 2013
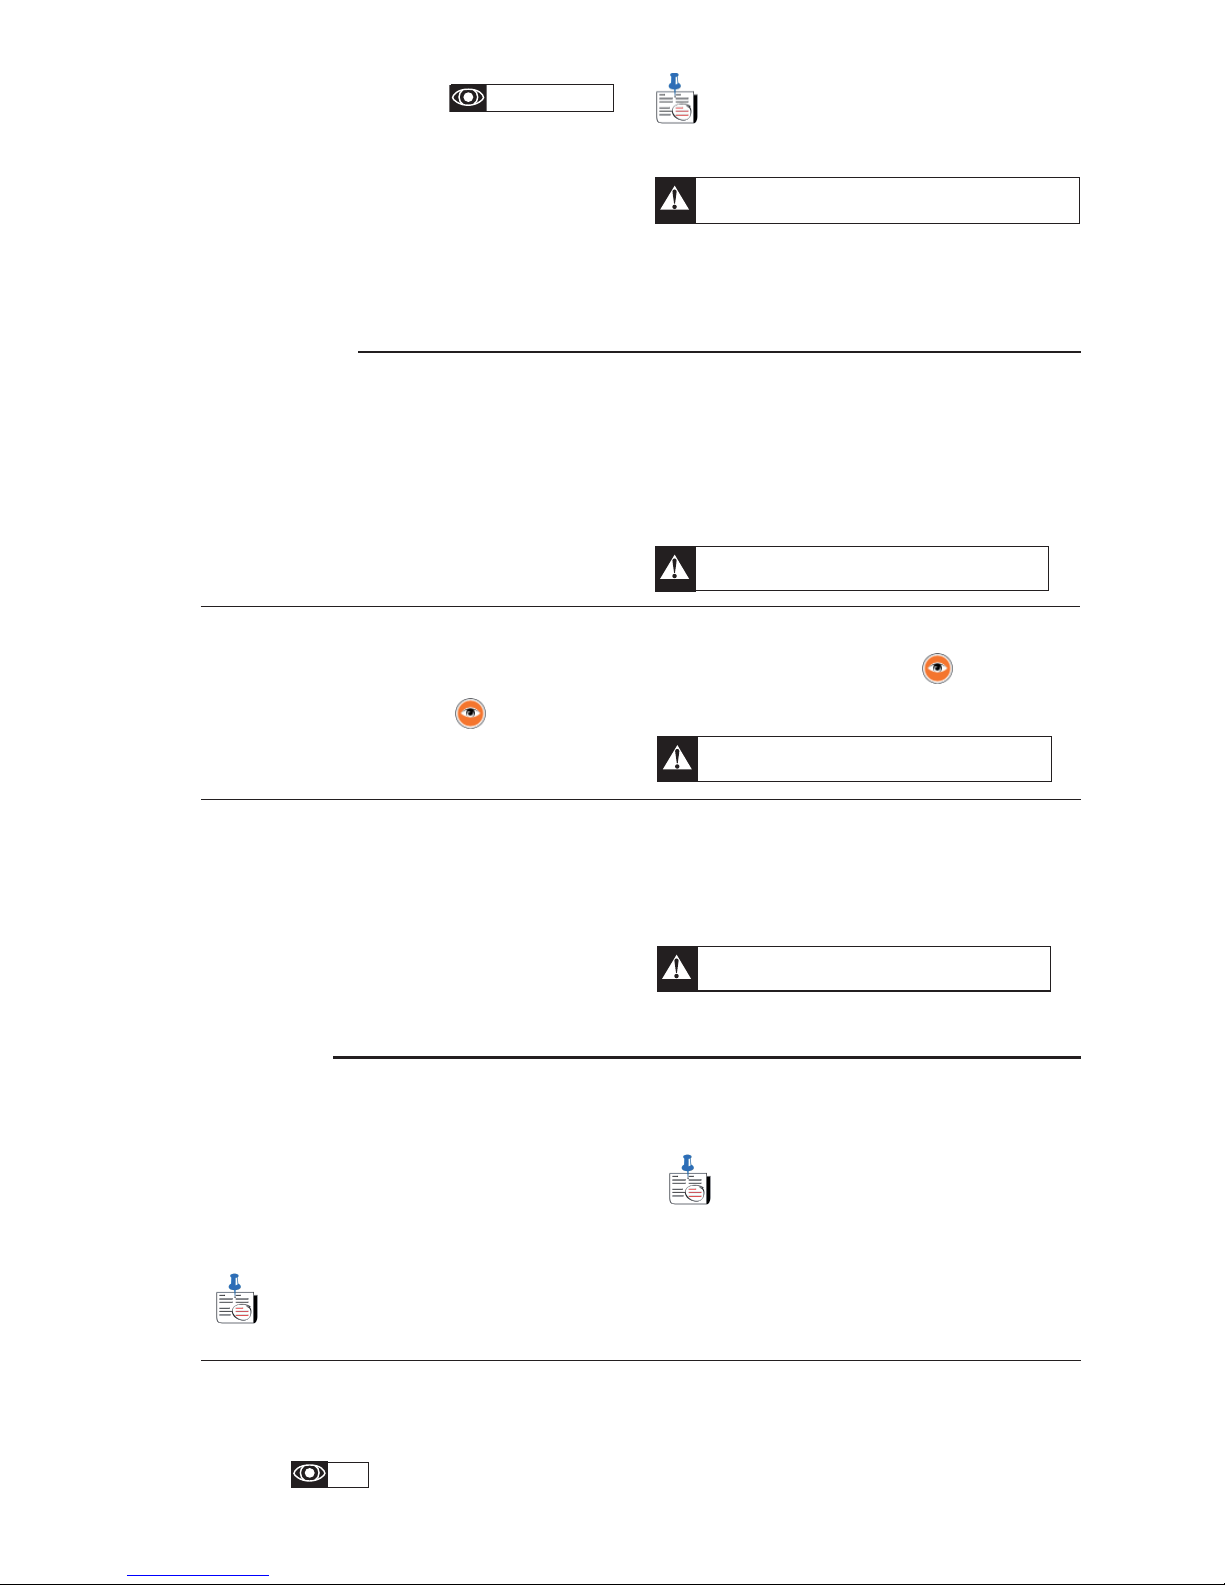
6.2 VERIFICATION OF THE SAFETY DEVICES
• Frequent checks for the correct operation of the safety devices
should be made. The motor should stop when the distance
between the guard and the bowl exceeds 8mm on opening
the guard.
• If this is not the case:
- Do not use the machine.
-
Have it adjusted by the service department of your local dealer.
4
6.1 MECHANICAL PARTS
• The beater requires only a minimum amount of maintenance (the
bearings, motor and mechanical parts are greased for life).
• You are advised to check the tension and wear of the belt at
least once a year.
In order to check it, proceed as follows:
- Disconnect the beater from the mains.
- Take down the top cover (rear screws + front tab)
ATTENTION: do not force on the tab when dismantling. Just rotate the appliance forwards slightly to
release the cover.
- If the belt needs retightening, unscrew the 3 fi xing screws from
the motor in order to move it.
Note: the notched belt should be moderately tightened.
- If the belt requires changing, the speed reader must fi rst
be cleared, then slide the belt outside the driven pulley, then
remove it from the drive pulley without changing the position
of the motor.
- Check the electrical connections, clean and reassemble in
reverse order.
Maintenance
• Generally due to poor cleaning or a distorted tool caused by
a shock.
• If the tool begins to block, do not force it. Apply some oil
or release fl uid and wait for a few minutes until the product
works.
• Work it progressively, applying efforts:
- Rotationally in a back and forth motion.
- By tapping the tool with a mallet, after clearing the pin from
the bayonet.
- Using fi ne abrasive paper, smooth off the deformed part if
necessary.
5.3 BLOCKING OF A TOOL ON THE TOOL-HOLDER SPINDLE
If the problem persists, contact the service department
of your local dealer.
5.2 ABNORMAL NOISE OR OPERATION
a) Metallic noise
- Distorted tool that is rubbing.
- Bowl damaged, not in place (See § 3 and § 4).
b) The tool is not or insuffi ciently driven but the motor is
running, check:
- the tension and wear of the belt (See § 6.1).
- The connection between the motor and variable speed
drive.
If the problem persists, contact the service department
of your local dealer.
• Check that :
- The beater is plugged in.
- The electrical power supply to the socket is correct.
- The safety guard is duly lowered.
• If the appliance does not restart:
- Unplug the appliance and reconnect it after a few seconds.
• If the beater stops in mid cycle:
Fault fi nding
5.1 THE BEATER WILL NOT START
- The temperature probe of the motor has been triggered or
the electronic system has detected an overload. Wait an extra
few minutes in the event of overheating before starting back up.
Reduce the load in the bowl and disconnect the appliance for
at least one minute before reinitialising. Put the speed variation
button back to zero before starting back up.
If the problem persists, contact the service department
of your local dealer.
• Unplug the machine.
• Remove the bowl, tool and guard.
• Clean the bowl, tools and guard by immersing them in hot
water and detergent - disinfectant then rinse in clean water and
dry.
The bowl and tools can be washed in a dishwasher.
• Clean the planetary gear, tool holder shaft and cradle paying
particular attention to the bowl handles and the outside of the
whisk if necessary using a damp sponge and a detergent product,
then rinse.
• Check that the different parts have been cleaned correctly.
Note: Check that the products used for cleaning are
compatible with the machine equipment.
• Do not use abrasive detergents, which could scratch the
surfaces.
Periodically: (at least once a month)
• Wipe and lightly grease the lifting and lowering pins with Vaseline
and the pins of the guard.
4.2 AFTER USE
Never clean the machine with a hose or high pressure cleaner
Do not put the machine in the dishwasher.
6.2
3.4 a -b -c 3.6a - b
Page 5
Conformity with regulations
5
Electromix 5 GB 02 2015
Supplier’s stamp
Date of purshase : ...............................................
You are advised to contact the seller of the machine fi rst of all.
6.4 ADDRESS FOR MAINTENANCE REQUIREMENTS
The manufacturer reserves the right to modify and make improvements to the products without giving prior notice.
For any information or orders for spare parts, specify the
type of machine, its serial number and the electrical specifi cations.
6.3 ELECTRICAL COMPONENTS
See electrical diagram.
• Check the condition of the power cable and the electrical
components regularly.
• Identifi cation of the colours of the wires:
- Motor : Black
- Earth : (B/C) Yellow-Green (230V) - Green (230V)
- Neutral : (N) Blue (230V) -
- Phase : (L) Brown (230V) -
6.3
- S : Red
- X : Power supply cord
• Identifi cation of components:
- C : Power supply card
- S : Safety guard safety device
- R : Speed drive
- M : Motor
- F : Motor temperature probe.
The machine has been designed and manufactured in
compliance with:
- Machine directive 2006/42 EEC,
- EMC directive 2004/108EC.
- 2011/65/EU Directive on the restriction of the use of certain
hazardous substances
- ‘WEEE’ Directive 2002/96/EC
The “ ” symbol on the products indicates that it should not
be considered as household waste. Alternatively, it should be
taken to the waste electrical and electronic equipment site.
By ensuring that the product is duly disposed of correctly,
you are contributing to the prevention of harmful effects on
the environment and human health which could occur due
to uncontrolled scrapping of this product. For more detailed
information about recycling this product, please contact the
sales department or dealer for your product, the after-sales
service or the appropriate waste disposal service.
- “Waste” 2006/12/EC
The machine is designed so as to reduce the amount of waste or
its harmfulness and risks of pollution as much as possible.
Make sure the recycling conditions are adhered to.
- «Packaging and packaging waste» 94/62/EC
The machine packaging is designed so as to reduce the
amount of waste or its harmfulness and risks of pollution as
much as possible.
Make sure to dispose of the different parts of the packaging
at the suitable recycling sites.
- The European standards :
EN 454 beaters - mixers. Safety and hygiene regulations.
This conformity is certifi ed by:
- The CE conformity mark, attached to the machine,
- The corresponding EC certifi cate of conformity.
- This instruction manual, which must be given to the operator.
Acoustic specifi cations:
- the acoustic pressure level measured in compliance with the EN
ISO 11201.1-EN ISO 3744 test code is less than 72,1 dBA
Protection indices as per the EN 60529-2000 standard:
- IP55 electrical controls
- IP23 overall machine
Electromagnetic compatibility in compliance with the fol-
lowing standards:
- EN55014-1: Emission.
- EN55014-2: Immunity.
Integrated safety:
- The machine has been designed and manufactured in compliance with the relevant standards and regulations, mentioned
above.
- Before using the machine, the operator must be trained to use
the machine and informed of any possible residual risks.
Food hygiene:
The machine is made from materials that conform to the following
regulations and standards:
- directive 1935/2004/EC: materials and articles intended to come
into contact with food.
- Standard EN 601-2004: cast aluminium objects in contact
with food.
The surfaces of the food area are smooth and easy to clean. Use
detergents that are approved for food hygiene and respect
the instructions for their use.
 Loading...