

Page 1
Product number (PNC) .........................................
Serial number (S.N.) .........................................
14. INSTALLATION
WARNING!
Refer to Safety chapters.
14.1 Location of the appliance
You can install your freestanding
appliance with cabinets on one or two
sides and in the corner.
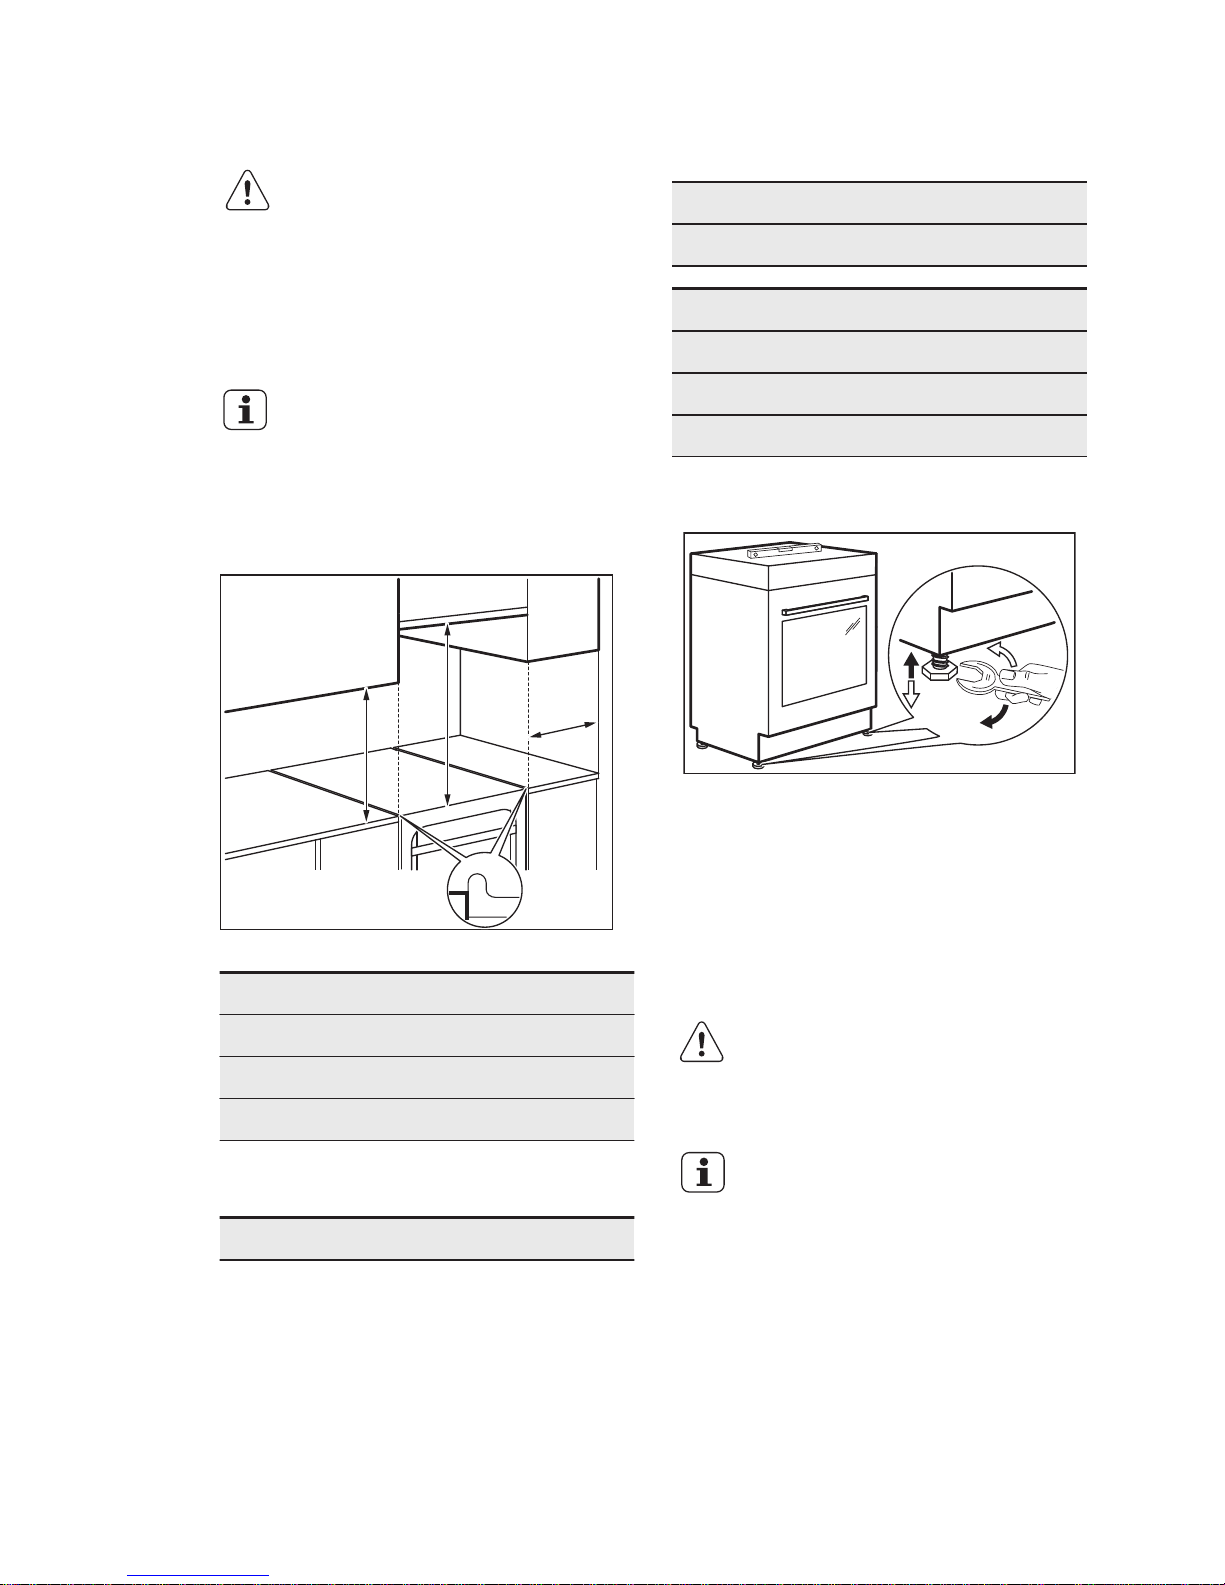
Keep a distance of about 1
cm between the appliance
and the back wall to make
sure that the lid opens.
For minimal distances for fitting check
the table.
A
C
B
Minimum distances
Dimension mm
A 400
B 650
C 150
14.2 Technical data
Voltage 220 - 240 V
Frequency 50 / 60 Hz
Appliance class 1
Dimension mm
Height 855
Width 600
Depth 600
14.3 Levelling of the appliance
Use small feet on the bottom of
appliance to set the appliance top
surface level with other surfaces.
14.4 Anti-tilt protection
Set the correct height and area for the
appliance before you attach the anti-tilt
protection.
CAUTION!
Make sure you install the
anti-tilt protection at the
correct height.
Make sure that the surface
behind the appliance is
smooth.
Page 2
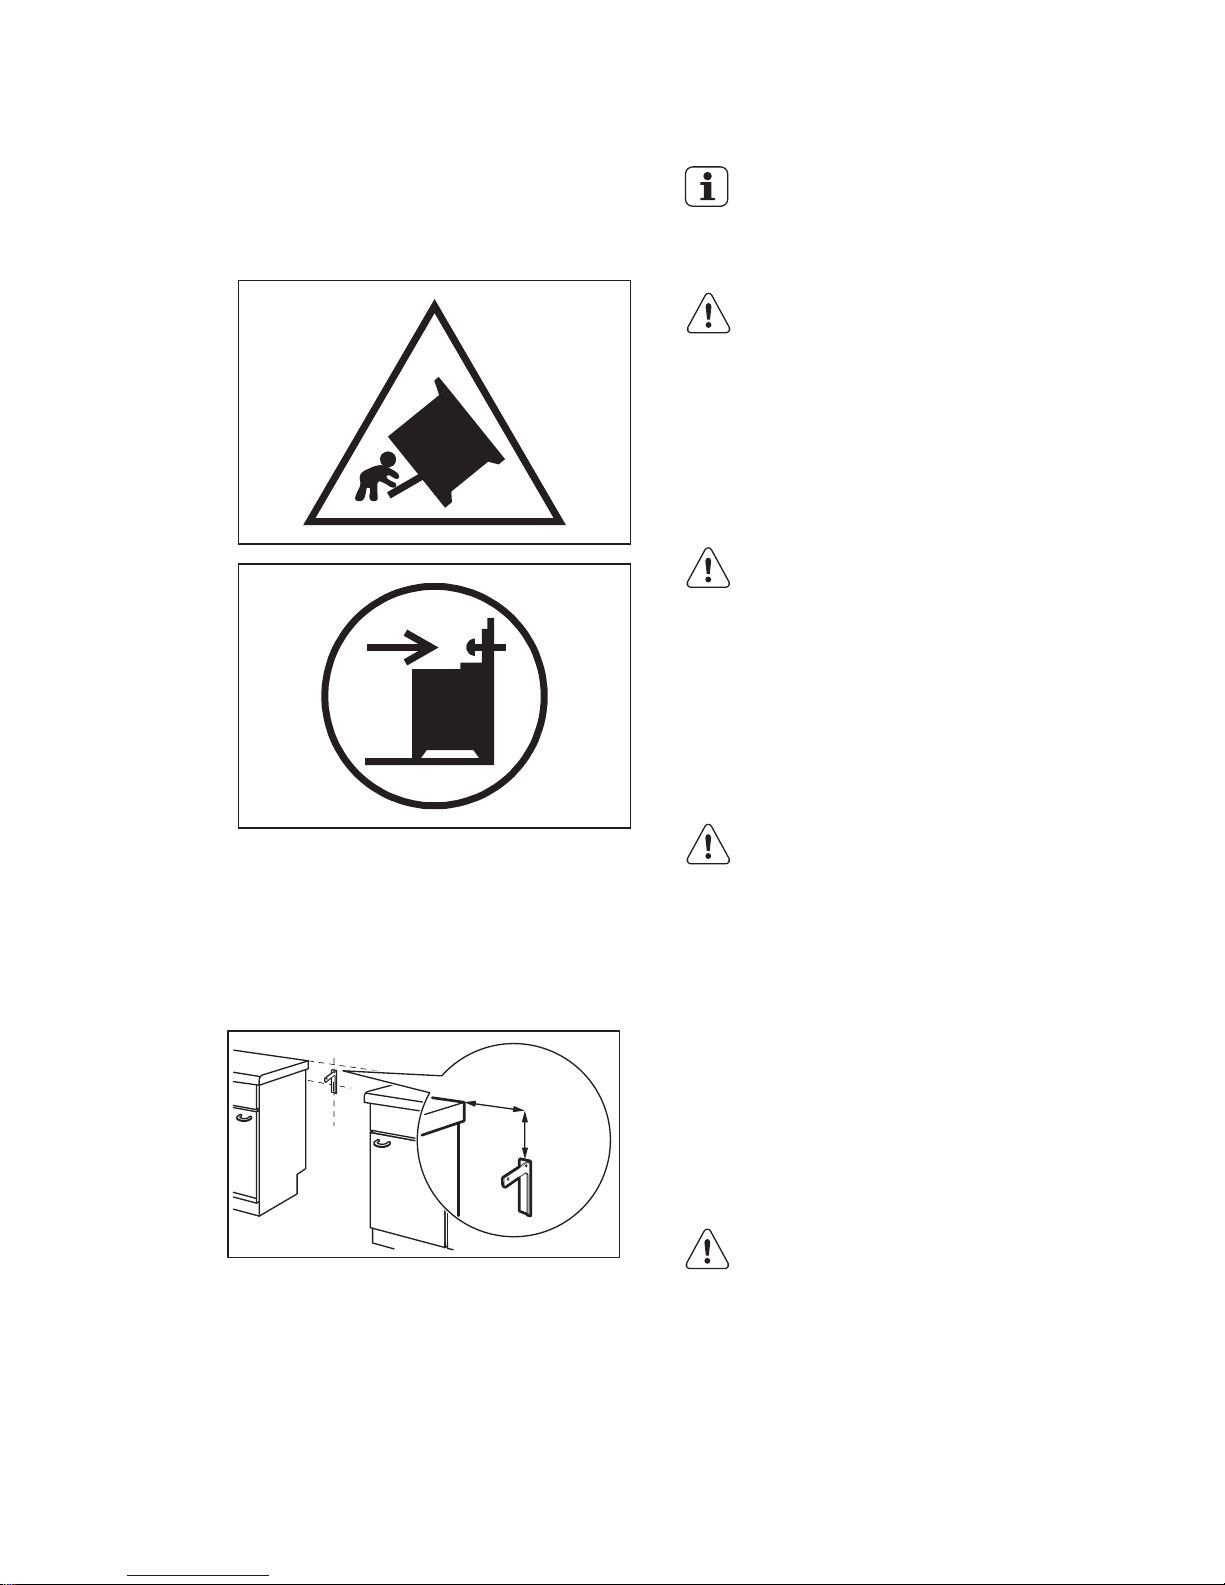
You must install the anti-tilt protection. If
you do not install it, the appliance can tilt.
Your appliance has the symbol shown on
the picture (if applicable) to remind you
about the installation of the anti-tilt
protection.
1. Install the anti-tilt protection 232 237 mm down from the top surface of
the appliance and 110 - 115 mm from
the side of the appliance into the
circular hole on a bracket. Screw it
into the solid material or use
applicable reinforcement (wall).
110-115
mm
232- 237
mm
2. You can find the hole on the left side
at the back of the appliance. Lift the
front of the appliance and put it in the
middle of the space between the
cupboards. If the space between the
bench cupboards is larger than the
width of the appliance, you must
adjust the side measurement to
centre the appliance.
If you changed the
dimensions of the cooker,
you must align the non-tip
device correctly.
CAUTION!
If the space between the
bench cupboards is larger
than the width of the
appliance, you must adjust
the side measurement to the
centre of the appliance.
14.5 Electrical installation
WARNING!
The manufacturer is not
responsible if you do not
follow the safety precautions
from Safety chapters.
This appliance is supplied without a main
plug or a main cable.
Applicable cable type: H05 RR-F with
adequate cross-section.
WARNING!
Before you connect the
mains cable to the terminal,
measure the voltage
between phases in the
house network. Then, refer
to the connection label at the
back of the appliance to use
the correct electrical
installation. This order of
steps prevents from
installation errors and
damage to the electrical
components of the
appliance.
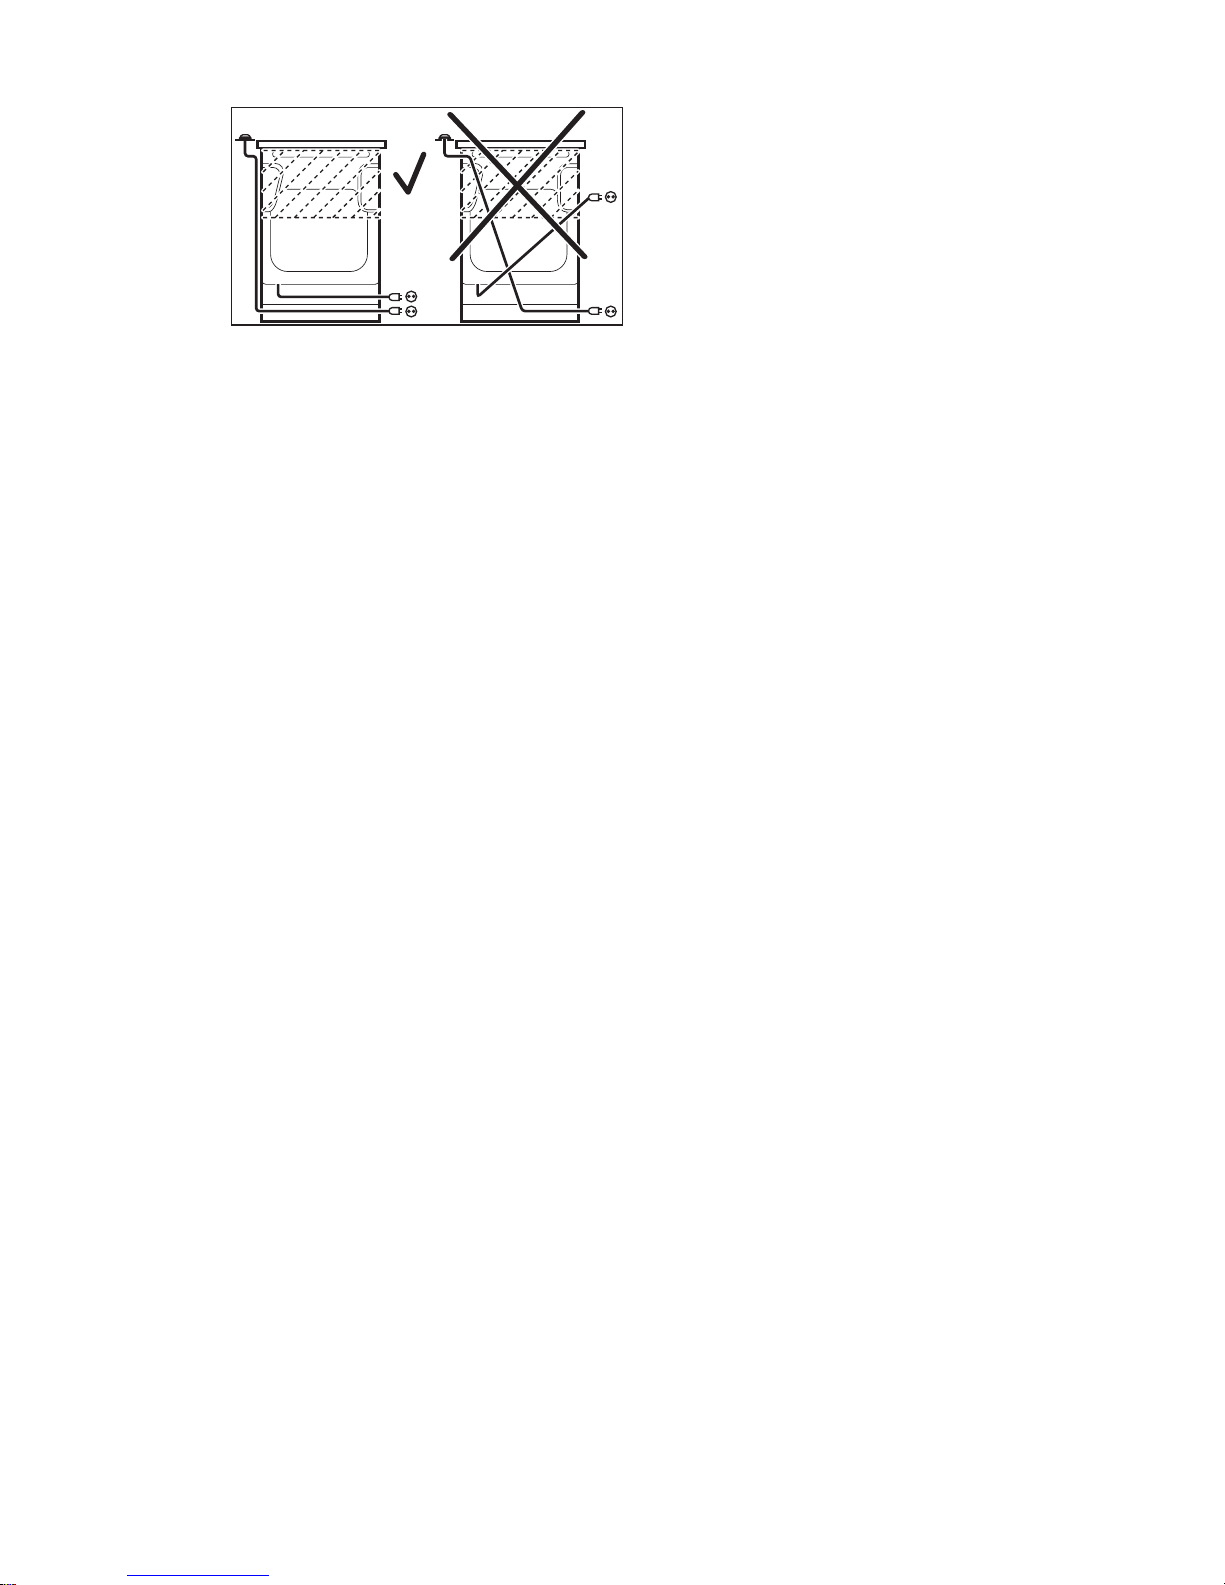
WARNING!
The power cable must not
touch the part of the
appliance shown in the
illustration.
ENGLISH 23
Page 3
15. ENERGY EFFICIENCY
15.1 Product information for hob according to EU 66/2014
Model identifi‐
cation
EKS61300OX
Type of hob Hob inside Freestanding Cooker
Number of
cooking zones
4
Heating tech‐
nology
Solid Hot Plate
Diameter of
circular cook‐
ing zones (Ø)
Left rear
Right rear
Right front
Left front
14.5 cm
18.0 cm
14.5 cm
18.0 cm
Energy con‐
sumption per
cooking zone
(EC electric
cooking)
Left rear
Right rear
Right front
Left front
197.6 Wh/kg
206.1 Wh/kg
203.3 Wh/kg
191.1 Wh/kg
Energy consumption of the hob (EC electric hob) 199.5 Wh/kg
EN 60350-2 - Household electric cooking
appliances - Part 2: Hobs - Methods for
measuring performance.
15.2 Hob - Energy saving
You can save energy during everyday
cooking if you follow below hints.
• When you heat up water, use only the
amount you need.
•
If it is possible, always put the lids on
the cookware.
• Before you activate the cooking zone
put the cookware on it.
• The cookware bottom should have the
same diameter as the cooking zone.
•
Put the smaller cookware on the
smaller cooking zones.
• Put the cookware directly in the centre
of the cooking zone.
• Use the residual heat to keep the food
warm or to melt it.
www.electrolux.com24
 Loading...