

Page 1
Use Care Guide
European Wine Tower
Guia de Uso y Cuidado
European Wine Tower
Guide D'utilisation et D'entretien
European Wine Tower
ii!iiii!i!!!iiiliiiili!iiii!!ililiiliiiiiiiiiiililiiiiiiiiiiif!ilili!iiii!iiiiili!iiii!ililliiliiliiiili!!iiiii!iiiliiliii!!iiili!iiiliilili!!iiiii!ililiiliii!!iilli!iliiiiiiii!!ilili!ililiiiili!!iiili!iiiliilili!!iiiii!ililiiliii!!iilli!iliiiiiiii!!ilili!ililiiiili!!iiili!iiiliilili!!iiiii!ililiiliii!!iilli!iliiiiiiii!!ilili!ililiiiili!!iiili!iiiliilili!!iiiii!ililiiliii!!iilli!iliiiiiiii!!ilili!ililiiiili!!iiili!iiiliilili!!iiiii!ililiiliii!!iilli!iliiiiiiii!!ilili!ililiiiili!!iiili!iiiliilili!!iiiii!ililiiliii!!iilli!iliiiiiiii!!ilili!ililiiiili!!iiili!iiiliilili!!iiiii!ililiiliii!!iilli!iliiiiiiii!!ilili!ililiiiili!!iiili!iiiliilili!!iiiii!ililiiliii!!iilli!iliiiiiiii!!ilili!ililiiiili!!iiili!iiiliilili!!iiiii!ililiiliii!!iilli!iliiiiiiii!!ilili!ililiiiili!!iiili!iiiliilili!!iiiii!ililiiliii!!iilli!iliiiiiiii!!ilili!ilili!il ilil !i!!ilili iil!iiiii!iiiii!iiiii!iiiiiiii!i!iiii!ii!ilili!iiili!iliii!ili!i!ili!i!!i!!i!!i!i!iilli!iiiii!ii!i!iii!i!iiiil!iliii!iiiii!iliif!iiif!!!i!ii!!i!!i!!i!ii!ilili!ilili!i!iiiiii!iiii!!iii!iii!iiiii!ilill!i!!ii!i!!i!!i!!ii!iiiiili!iiiii!i!ii!ili!i!ii!ii!!i!iii!iiiii!iliii!i!ii!!i!ii!!ii!if!i!iiilili!ilili!i!!i!ii!!i!ii!iii!i!ili!ilili!ilili!i!ili!i!ill!ii!ii!i!!iliili!iiili!i!!i!ili!i!il!!ii!i!iii!iliii!ilili!i!ili!i!iii!iiii!i!!iiili!iiili!i!!i!ili!i!il!!ii!i!iii!iliii!ilili!i!ili!i!iii!iiii!i!!iiili!iiili!i!!i!ili!i!il!!ii!i!iii!iliii!ilili!i!ili!i!iii!iiii!i!!iiili!iiili!i!!i!ili!i!il!!ii!i!iii!iliii!ilili!i!ili!i!iii!iiii!i!!iiili!iiili!i!!i!ili!i!il!!ii!i!iii!iliii!ilili!i!ili!i!iii!iiii!i!!iiili!iiili!i!!i!ili!i!il!!ii!i!iii!iliii!ilili!i!ili!i!iii!iiii!i!!iiili!iiili!i!!i!ili!i!il!!i!iliiii!!ii
Page 2
_i_i_i_ii_ii!_!_i_i_ii_ii_ii;_i_i_i_i_!_i_i_!_ii_i!_!_ii!_!_ii_!_!ii_!_ii_i!_!!_!i_ii_i!ii_iiii_iiii_!_!_i_i_!_!!i_ii_i_i_i_i_iii_i_ii
indi information
Table of Contents Make a Record for Quick
iiiiiiiii!iiiiiiiiiiiiiiii!!!i!iiiiiiiiilFinaingInformation..............................................2 Reference
Safety 3
Installation ............................................................ 4
:_:_:_:_i_:_iiiiiii_i_!_ii!_!i!!!!i_!!i_!!!!_ii_!_!i_i_!i!iii!_!_!i!!_!i_i!i_!!i_!_!_!_ii!Start U- and Tem-erature Control 8 you will need to know your model number and senal
J:i:i:ii:iiiiiiii____i!__!_!___!i__!_i!_i_ii:!i_i_!_!ii__ii_ii!!i!_____ii_i__!iii!!^ ".._' _' ...................... ^ number You can f nd th s nformat on on the ser a
i_:i_ii:i_ii:ii:iiiii:i:_;!iii___!_!__!__!!!!i__i_i___i_i!_i!_____!_i_!____!!____iii_ii_!i__!i__!__!__!__!_i___!!i_!^,_g_'_ .......................................................... _n product reg straton card
_;_i_i_i_i_iiii_:i_:i_:i_:i_:i_!!i!i_ii_!_!_!_!;_i!i_!i_i_!i_i_i!i_!ii!_i_!_i!!i!!i!_!_i_!!_iTroubleshooting 12 Pr t R i tr ti n r
:_i_:_iii_i_i_i!ii_ii_ii!_ii!!!_!_!iii!ii!!i_!!_!i!_i!_i!_i!_i!i_:!Jii_i_i_!i!i_!i!i_i!_i_!i_ The package containing this manual also includes
uperal[|on ...............................................................
Stora e 10 plate located on the ceiling of your unit and on the
M_._L_ct_.,_ .......................................................... • v
Warranty information ........................................... 13
iiiiiiiiiiiiiiiiiiiiiiiii!_!:!i!:i_!!ii_!i!i_!!!iii!i_ii!i_i_!_i_i!_!i!i!i!i_i!i!i_i!i!i_i!i!_i!!i_i!i_i!_i_ii_i_i!i_i_i_i_i_!_i_i_i_!i_!PI.... R.... ' -n _ _-v-Thi_ yourproductregistrationinformation.Warranty
:_iii_!ii_!ii!i_!i_!!ii!!_ii_i!_ii_ii_ii_!_iii_;!i!!_i_i_iii_ii:_ii_!i;i:_ coverage begins at the time your Electrolux wine
iiii_i_:_i_:_i_:_iiiiiiiiiiiiiii_iiii_ii_i!_i!i!_!i!i!_!_i_iii_!_i_i_i_i!!_i_ii!_!_ii_!_i_!_i_i_i_i_!i!_i!_!_!ii_i_!_!_ii!iii_!_iiiGuide keeperwaspurchased.
iiiiiiiiiiiiiiiiiiiiiiiiiiiiiiiii_!_iii_!_!_!i_i_i_!i!i!i!!__!i!i!i!__iii____!i!i!_!_!i!!!!__i_iii_Thankyouforchoosing Electrolux, the newpremium
i_i:_:_:iiii:iiiiiiiiiiiii_iiii_iiii_iiii_iiii_i_i!!!!_i_ii___i_!_!_!!i!i!i!i_!:i_i!_iii_!_iii_!!i_!iii__!i_i_!_i_i_!_i_i_!_i_i_!_!_brand in homeappliances. This Use &Care Guide is
:__i_ii_i_ii_i_iiii_ii_iiiiiiiiiiiiiii!iii!ii____!!i__i!__i!!:__i!!_i_ii___i__ii_!__i__ii_!_!__i!!_partofourcommitmenttocustomersatisfaction and
i_:i_ii:i_ii:ii:iiiii!ii!i!!i!!_i!i!!!i_!!i_!!i_!!i_!_!_!i!!i!!i!!i!!__ii!ii_i!!!ii!__i!i!__i!_!i_i_!_i_!__i__!!__product qualitythroughoutthe service life ofyournew
:i_iiiiiiiiiiii_iiii!_!_i!Ji_!_!_!i!_i_i!_i_i!_i_i!_i_i!_i_i!_i_i!_:i_!_i!iii!i_!_i_!_!i_!i_i_i!ii_i_!i!_i_!i!_iii!_i_i_i!!_!!i!!_!!i!!_wine keeper.
"":................................................................. Whenever you ca to request nformat on or serv ce
....................................................oduc eg s a o Ca d
iiiiiiiiiiiii:_!:ii!iii_iii__!iii_i:iii!!i_ii!i_i_!__i!_ii___ii_ii_iiiii_ii!_!i_!i__i__!!_ii_!i!__i!!_!__!_!_!i_i!Weviewyourpurchaseasthebeginningofa
i_:_:_:ii!i`!i`!ii!i!!!i_i!i_i!ii_ii_iiii_i_!ii!i_!i_!_!_ii_i_!i!i_i!ii!i!i!i_!iirelationship. To ensure our ability to continue serving
:__i_ii_i_ii_i_!ii_!ii_!ii_!ii!!i_!_i!i__!i__!i__!i__!i__!!__!__!__i!_ii!i_!____!_i!!:_i!i!!__i!i!_you, please usethis pageto record keyproduct
_!_:_!_i_!_!_!i_i_!!_!_!_!_!_!_!_i!;!_i_i!i_i!i_i!!_i_i!i_i_!i!_i_!i!_i_!i!:_!i!:_!i_i_i_i_iii_i_i!_!i_i_i!ii!_i!ii_i_!ii_!_!i_!ii_!i_i!i!i!information.
.......................................................... Please record the purchase date of your Electrolux
i!_!_i!i:ii_!i!_!_i!i:ii_!i!_!_i!i:ii_!i!_!_i!i:ii_!i!_!_i!i:ii_!i!_!_i!i:ii_!i!_!_i!i:ii_!i!_!_i!i:ii_!i!_!_i!i:ii_!i!_!_i_iunit and your dealer's name, address and telephone
i!_!_i!i_ii_!i!_!_i!i_ii_!i!_!_i!i_ii_!i!_!_i!i_ii_!i!_!_i!i_ii_!i!_!_i!i_ii_!i!_!_i!i_ii_!i!_!_i!i_ii_!i!_!_i!i_ii_!i!_!_ii_i
Page 3

Important Safety Instructions General Precautions
safetyPrecautions
Donotattemptto_nstat_oroperateyourun_tunt_t
you have readthe safety precautions inthis manual.
Safetyitemsthroughoutthis manualare labeledwitha
Danger, WarningorCautionbasedonthe risktype.
Definitions
_Thisisthesafetyalertsymbol. ltisusedtoalert
youto potential personal injury hazards. Obeyall
safetymessagesthatfol!owthissymboltoavoid
possible injuryordeath.
ii_;!i!_iii_!i_i_i:_!_i:_!_i:_i_i_;_i_;_i_;_i_iiSi!i;i!_i_i_ii_ii_ii_i_i!_i!i:i_!i_!_i!_!!_i!ii!_!!ii!
Page 4
stallation
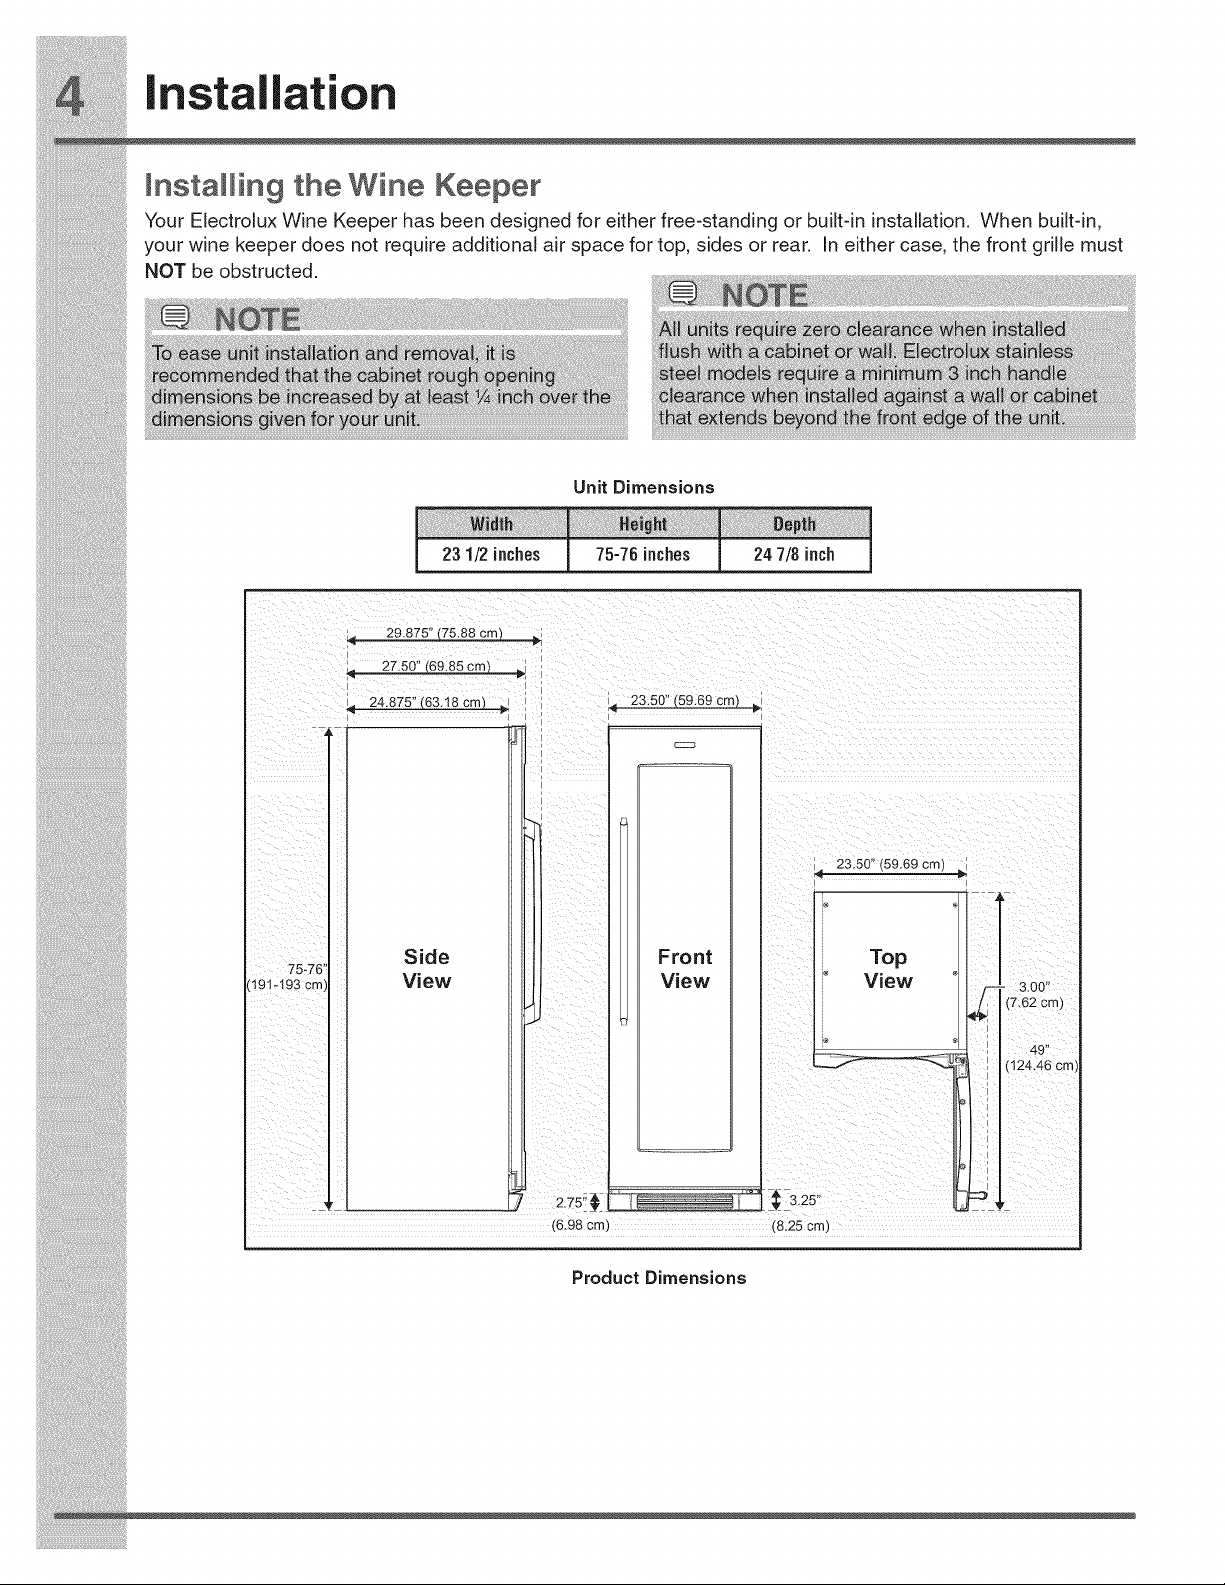
Instamling the Wine Keeper
Your Electrolux Wine Keeper has been designed for either free-standing or built-in installation. When built-in,
your wine keeper does not require additional air space for top, sides or rear. in either case, the front grille must
NOT be obstructed.
Unit Dimensions
231/2inches _ 75-76inches j 247/8inch
29.875" (75.88 cm)
o 27.50" ,69.85 cm
4 24.875" (63.18 cm)
23.50" (59.69 cm)
i!_!_i!i_ii_!i!_!_i!i_ii_!i!_!_i!i_ii_!i!_!_i!i_ii_!i!_!_i!i_ii_!i!_!_i!i_ii_!i!_!_i!i_ii_!i!_!_i@ii_i
Page 5

Site Preparation
1 Position the unit on a flat, level surface capable
of supporting the entire weight of the unit.
Remember the unit will be significantly heavier
once it is fully loaded.
2 This unit requires a grounded and polarized
115 VAC, 60Hz, 15A circuit (normal household
current).
3 Avoid connecting the unit to a Ground Fault
Interruptor (GFI). GFIs are prone to nuisance
tripping which will cause the unit to shut down.
GFIs are generally not used on circuits which
power equipment that must run unattended for
long periods of time.
4 The unit must be installed according to your
state and local laws and regulations.
Installation
Installation clearances
• Allow the following clearances for ease of
installation, proper air circulation, and plumbing
and electrical connections:
Sides & Top ¾ inch
Back 1 inch
Leve ing the Unit
5 Positionthe. unittoallowfreeairflowthrough Yourwinekeepershouldbepositionedtoalloweasy
thefront grille, accesstoacounterwhen removing wine. Thewine ::
"r" __--_'----==- keepershouldbeinapositionwherethedoorcanbe
1 _ _ fully opened.
L , • Positiontheunitonaflat, levelsuffacecapable
li i ........ _? of supporting the entire weight of the unit when
L _...... _ z _....... _
6 Wipeout insideofunitwithadampcloth, toback(toensurethatdoorclosesandseals
7 Besureto installthe Anti-Tip bracket. Followthe properly).
tnstruchons provtded wtththe Anb-Ttp bracket This unit contains four (4) adjustable leveling legs
k,t. and two (2)adjustable rollers located near the front
|Jl' • A four corners of the cab net must rest f rm on
l _ _ the floor.
• The cabinet should be level at the front and rear.
m • The sides should tilt _Ainch (6 mm)from front
leveling legs.
y
i
Page 6

stallation
All of these conditions can be met by raising or
lowering the adjustable leveling legs.
To level the cabinet using the leveling legs:
Open the door and remove the toe grille by
gently pressing down on top edge to release
snaps and pull forward.
Close the door and use a flat-blade screwdriver
or 3/8inch socket wrench to raise or lower the
front rollers enough so you can use them to
help guide the wine keeper in position. Once in
position, raise the front rollers so they are not
touching the floor.
Level
Raise
3 Turnthefrontleveling legsclockwisetoraise
and counterclockwise to lower.
:: 3 Ensurethe doordoes not bindandthe seal
: touchesthe cabinetonallfoursides.
4 Replacethetoegrillebyaligninghookswith
;; opening infrontpaneland snappingit intoplace.
Page 7

Door Handle Mounting Instructions
1 Remove handle from carton and any other protective packaging.
2 Position handle end caps over upper and lower pre-installed
shoulder bolts (A) that are fastened into door, ensuring the holes
for the set screws are facing towards the outside edge of the door.
3 While holding handle firmly against door, fasten upper and lower
Allen set screws (B) with supplied Allen wrench.
Upper End Cap
Installation
are Facing to the outside
Ensure Handle Set Screws
edge of door.
Page 8

Start-Up and Temperature Control
Starting the Unit
Your wine keeper is shipped in the ON position; however, you may turn it ON or OFF by pressing the ON/OFF
for three (3) seconds.
Adjusting the Temperature
To accurately check the temperature, insert a reliable thermometer into a
plastic (non-breakable) bottle, partially filled with water. Tighten the bottle
cap securely.
Place the bottle in the desired area for 24 hours. Refrain from opening the
unit during the testing period. After 24 hours, check the temperature of the
water.
Press the (+) or (-) indicator to adjust the temperature to the desired
setting. The temperature display will begin to blink with the first touch.
Adjust the temperature by touching the key. After three (3) seconds of
inactivity, the display will beep to accept the new temperature. The internal
temperature can be controlled between 45°F to 65°F (7°C to 18°C).
i!_!_i!i_ii_!i!_!_i!i_ii_!i!_!_i!i_ii_!i!_!_i!i_ii_!i!_!_i!i_ii_!i!_!_i!i_ii_!i!_!_i!i_ii_!i!_!_i!i_ii_!i!_!_i!i_ii_!i!_!_ii_i
i!_!_i!i_ii_!i!_!_i!i_ii_!i!_!_i!i_ii_!i!_!_i!i_ii_!i!_!_i!i_ii_!i!_!_i!i_ii_!i!_!_i!i_ii_!i!_!_i!i_ii_!i!_!_i!i_ii_!i!_!_ii_i
Page 9

displaylight
on off
air filter
Manually activatesthe lights, regardlessof
whetherthe door is closed. Eachsucces-
sive keypress will advancethe interior lights
from "Off" to "Low Intensity" to "Maximum
Intensity" then to "Off" again. Interior lighting
is automatically disabled after 120 minutes,
at which point the lights may be manually
activatedagain if desired.
Pressing and holding for three (3) seconds
allows the user to turn off the cooling system.
Thetemperature displaywill display "OFF".
THIS DOESNOTREMOVEPOWERFROMTHE
UNIT.
After six months of usethe display will show
AF. This isa reminder that it istime to change
the PureAdvantageTM air filter. The product will
continue to function normally. Pressingany
keywill resetthe reminderfor 10 minutes.
Oncethe PureAdvantageTM air filter is replaced,
powerfail
will blink. Themute sounds indicatorwill
blink. Pressingthe mute sounds key will
acknowledgethe alarm and disablethe audible
portion. All other modesare turned off until the
alarm is acknowledged. Thehigh tempera-
ture indicatorand "HI" will stay illuminated until
a normalsaferangeoperatingtemperature has
beenreached,atwhich time the temperature
displaywill show the actual temperature.
Inthe eventofa powerfailure or initial power-up,
anaudiblealarmwill soundand the power fail
indicatoronthe right sideofthe displaywill blink.
Themute sounds indicatorwill blink. Pressing
the mute sounds keywill acknowledgethe
alarmand disabletheaudibleportion. All other
functions aredisabled untilthealarm isacknowl-
edged,atwhich pointthe power fail indicator
isturned off andthe unit will resumenormal
operation.The high temp alarm (beverage
centeronly) mayalsobe illuminateduntil a safe
temperaturehasbeenreached.
Sabbath Mode
Sabbath mode disables portions of the unit and its controls in accordance with the
observed within the Orthodox Jewish community.
Sabbath mode is enabled and disabled by pressing and holding the vacation mode key for five (5) seconds.
Temperature display shows "Sb" while in Sabbath mode.
The customer may open or close the door at any time without concern of directly turning on or off any lights,
digital readouts, solenoids, fans, valves, compressor, icons, tones or alarms. After power failure, the unit will
immediately return to Sabbath mode.
While in Sabbath mode, alarm indicators will not illuminate, nor be accompanied by audible alarms.
For further assistance, guidelines for proper usage and a complete list of models with the Sabbath feature, please visit the
web at http:\\www.star-k.org.
weekly Sabbath and religious holidays
i_i!_!_i!i_ii_!i!_!_i!i_ii_!i!_!_i!i_ii_!i!_!_i!i_ii_!i!_!_i!i_ii_!i!_!_i!i_ii_!i!_!_i!i_ii_!i!_!_i!i_ii_!i!_!_i!i_ii_!i!_!_iii_
Page 10

Storage /
aintenance
Proper Storage
The wine keeper can accommodate more than 160
bottles (typical 750 ml size). There are thirteen (13)
upper racks that will hold ten (10) bottles each and
one lower display rack that will hold six (6) bottles.
Specially designed wine racks allow for proper
horizontal storage of the wine. The cork remains moist
which keeps air from entering the bottle.
Maintaining Your Wine
Keeper
Periodic cleaning and proper maintenance will ensure
efficiency, top performance, and long life. The mainte-
nance intervals listed are based on normal conditions.
You may want to shorten the intervals if you have pets
or other special considerations.
Exterior Cleaning for Your Stainless Steel
Optional shelf kits may be purchased if you prefer to
have sliding shelves extend all the way to the bottom
of the cabinet.
Order kit # 5304469473 for 2 full size shelves.
Order kit # 5304469474 for 2 short shelves. (fits in the
two lowest positions in cabinet)
Your wine keeper can be set to maintain temperature
between 45 and 65° R Although the storage and
serving temperature is a personal preference, the
general recommended temperature for chilling various
wines are listed in the chart below.
Red Wines 58-65° F
i!_!_i!i_ii_!i!_!_i!i_ii_!i!_!_i!i_ii_!i!_!_i!i_ii_!i!_!_i!i_ii_!i!_!_i!i_ii_!i!_!_i!i_ii_!i!_!_i!i_ii_!i!_!_i!i_ii_!i!_!_ii_i
Dry/White Wines 48-57° F
Rose Wines 49-52° F
Model
Your stainless steel model may discolor when
exposed to chlorine gas, pool chemicals, salt
water, or cleaners with bleach.
Keep your stainless unit looking new by cleaning
with a high quality, all-in-one stainless steel
cleaner/polish on a monthly basis. Frequent
cleaning will remove surface contamination that
could lead to rust. Some installations will require
cleaning on a weekly basis.
DO NOT CLEAN WITH STEEL WOOL PADS.
DO NOT USE CLEANERS THAT ARE NOT
SPECIFICALLY INTENDED FOR STAINLESS
STEEL (this includes glass, tile and counter
cleansers).
If any surface discolors or rusting appears, clean
i!_!_i!i_ii_!i!_!_i!i_ii_!i!_!_i!i_ii_!i!_!_i!i_ii_!i!_!_i!i_ii_!i!_!_i!i_ii_!i!_!_i!i_ii_!i!_!_i!i_ii_!i!_!_i!i_ii_!i!_!_ii_i
Page 11

aintenance
interior Cleaning - as Required Air fiJt@r
1 Dtsconnect power to the wtne keeper• The air filter is located at the top of the cabinet just
2 Remove racks if desired, see WINE RACK above the top shelf. It removes odors and impurities
REMOVAL/INSTALLATION below, from the wine storage compartment and helps to
3 Wipe down the interior with a solution of non- control humidity.
abrasve m d detergent and warm water R I in th ir flit r
4 Rtnse wtth clear water• In general, you should change the air filter every six
5 Reconnect power to the unit. months (AF will show in the display to prompt you to
.............. rep ace the f ter after s x months) to ensure opt ma
WEne Rack Remova /Insta latmon filtering of odors• To replace your PureAdvantage TMair
1 Open door fully, filter:
2 Extend wine rack fully. 1 Pull the air filter cartridge straight out.
3 Ball bearing slide features plastic release 2 Remove the old filter and discard it.
latches on each side Push release latches on 3 Un ack the new filter and lace it inside the
each side then pull wine rack out. (Press LH ca_r d-e P
latch down and RH latch up) .Y " .
................... 4 Slide the cartridge back into the housing located
4 io re_nstalt pusn uaHueanng sHaes tn Tutty. in to- of the liner
Slide rack into ball bearing slide ensuring each P " ,, ,,
s de enqaqes proper V 5 Press and hold the on/off and - keys on the
..... " electronic control panel for three seconds to
• epac g ea e
reset the reminder for another six months.
Page 12

Troubleshooting
Before You Carolfor Service
If the unit appears to be malfunctioning, read
through this manual first. If the problem persists,
check the Troubleshooting Guide below. Locate
the problem in the guide and refer to the cause
and its remedy before calling for service. The
problem may be something very simple that
can be solved without a service call. However,
consulting or contracting a qualified service
technician may be necessary.
Unit not cold enough.
Adjust temperatures (see "Adjusting
the Temperature" in the "Start-Up
and Temperature Control" section).
i!_!_i!i_ii_!i!_!_i!i_ii_!i!_!_i!i_ii_!i!_!_i!i_ii_!i!_!_i!i_ii_!i!_!_i!i_ii_!i!_!_i!i_ii_!i!_!_i!i_ii_!i!_!_i!i_ii_!i!_!_ii_i
• Control set too warm.
• Light staying on.
• Airflow to front grille blocked.
• Door gasket not sealing properly.
If Service is Required
Contact the dealer where you purchased the unit if
service is required. State the model and serial number
and explain the problem. The model and serial number
plate is located on the ceiling of your unit.
If you do not know the name of the selling dealer or a
local service company, you can check online at www.
electroluxappliances.com or call 1=877=435-3287.
• Adjust temperature colder. Allow 24 hours
for temperature to stabilize.
Turn off manual light control. See
"Operation" section.
Airflow must not be obstructed to front
grille. See "Installation" section.
Adjust door gasket.
i!_!_i!i_ii_!i!_!_i!i_ii_!i!_!_i!i_ii_!i!_!_i!i_ii_!i!_!_i!i_ii_!i!_!_i!i_ii_!i!_!_i!i_ii_!i!_!_i!i_ii_!i!_!_i!i_ii_!i!_!_ii_i
Page 13

WarrantyInformation
Major Appliance Warranty Information
Your appliance is covered by a one year limited warranty. For one year from your original date of purchase, Electrolux will repair or
replace any parts of this appliance that prove to be defective in materials or workmanship when such appliance is installed, used, and
maintained in accordance with the provided instructions. In addition, the cabinet liner and sealed refrigeration system (compressor,
condenser, evaporator, dryer or tubing) of your appliance is covered by a two through five year limited warranty. During the 2rid through
5th years from your original date of purchase, Electrolux will repair or replace any parts in the cabinet liner and sealed refrigeration
system which prove to be defective in materials or workmanship when such appliance is installed, used, and maintained in accordance
with the provided instructions.
Exclusions
This warranty does not cover the following:
1. Products with original serial numbers that have been removed, altered or cannot be readily determined.
2. Product that has been transferred from its original owner to another party or removed outside the USA or Canada.
3. Rust on the interior or exterior of the unit.
4. Products purchased "as-is" are not covered by this warranty.
5. Food loss due to any refrigerator or freezer failures.
6. Products used in a commercial setting.
7. Service calls which do not involve malfunction or defects in materials or workmanship, or for appliances not in ordinary
8. Service calls to correct the installation of your appliance or to instruct you how to use your appliance.
9. Expenses for making the appliance accessible for servicing, such as removal of trim, cupboards, shelves, etc., which are not a
household use or used other than in accordance with the provided instructions.
part of the appliance when it is shipped from the factory.
10. Service calls to repair or replace appliance light bulbs, air filters, water filters, other consumables, or knobs, handles, or other
cosmetic parts.
11. Pickup and delivery costs; your appliance is designed to be repaired in the home.
12. Surcharges including, but not limited to, any after hour, weekend, or holiday service calls, tolls, ferry trip charges, or mileage
expense for service calls to remote areas, including the state of Alaska.
13. Damages to the finish of appliance or home incurred during transportation or installation, including but not limited to floors,
cabinets, walls, etc.
14. Damages caused by: services performed by unauthorized service companies; use of parts other than genuine Electrolux
iiiiiiii!iiiii!iiiii!iii_!!iiii!!i!i!_i_ii'iiii_I_ii_i_i_!i!i!_ii_!ii!i!_i_i!_!_i!_!_i;:_i_i;:_iii_!_iii_!_iii!:!_ii!_!_i!_!_i_ii;_Jii;_Jii;_Jii_!_!_i:!_
 Loading...