

Electrolux EI23CS65KS3A, EW26SS85KS3, EW26SS85KS2, EW26SS75QS0, EW23CS75QS1 Owner’s Manual
...
Electrolux
EN FREEZER ,' REFRIGERATOR
FR REFRIGERATEUR,,' CONGELATEUR
ES REFRIGERADOR CON CONGELADOR
USE AND CARE GUIDE
GUIDE D'UTILISATION ET D'ENTRETIEN
GUIA DE USO Y CUIDADO
808733401 September 2013
Finding information
iiiiiiiiiiiiiiiiiiiiiiiiiiiiiiiiiiiiiiiiiiiiiiiiiiiiiillPlease read and save this Table of contents
::::::::::::::::::::::::::::::::::::::::::::::::::::::::
.......................................................guide
::::::::::::::::::::::::::::::::::::::::::::::::::::::::
[ Thank you for choosing Electrolux, our new
[ throughout the service life of your new
premium brand in home appliances. This
Use & Care Guide is part of our commitment
to customer satisfaction and product quality
appliance.
i
ElectroluxElectroluxPurchasereferenceKeepdateaserialmOdelreCordnumbernumber for quick
ii
Finding Information .................................... 2
Safety .......................................................... 3
Installation .................................................. 5
Removing The Doors .................................. 8
Installing Door Handles ............................ 11
Connecting The Water Supply ................. 12
Feature Overview ...................................... 14
Controls .................................................... 15
Storage Features ...................................... 20
Automatic ice & Water
Maker/Dispenser .................................... 28
Changing The Filter .................................. 31
Storing Food & Saving Energy ................. 33
Normal Operating Sounds & Sights ......... 34
Care & Cleaning ........................................ 35
Warranty .................................................... 38
Before You Call ......................................... 39
Questions?
For toll-free telephone support in the U.S. and
Canada: 1-877-4ELECTROLUX
(1-877-435-3287)
For online support and product information
visit http://www.electroluxappliances.com
Safety
Important Safety Instruc- GeneralSafety
tions -- DOnot store or use gasoline, or other
flammable liquids, near this or any
other appliance. Read product labels
for warnings regarding flammability and
other hazards.
• Do not operate the refrigerator inthe
presence of explosive fumes.
• Avoid contact with any moving parts of
Safety Precautions the automatic ice maker.
Do not attempt to install or operate your unit • Remove all staples from the carton
until you have read the safety precautions to avoid cut injuries. Staples can also
in this manual. Safety items throughout this damage finishes if they come in contact
manual are labeled with a Danger, Warning or with other appliances or furniture.
Caution based on the risk type. Child Safety
Definitions Packing Materials,
This isthe safety alert symbol. It is used to • Packing cartons covered with rugs,
alert you to potential personal injury hazards, bedspreads, plastic sheets or stretch
Obey all safety messages that follow this
symbol to avoid possible injury or death, can quickly cause suffocation.
wrap may become airtight chambers and
• Destroy or recycle the product's carton,
plastic bags, and any other exterior
wrapping material immediately after the
refrigerator is unpacked. Children should
never play with these items.
ChildEntra rnentAndSuffocation:
• These problems are not limited to the
past. Whether junked, abandoned or
temporarily stored (even for a few hours),
unattended refrigerators and freezers are
dangerous. Please take the precautions
listed below.
Proper Disposal Of Refrigeratorsl
Free,ers
We strongly encourage responsible appliance
recycling/disposal methods. Check with your
utility company or visit
www.eoergystar.gov/recycleformore
information on recycling your old refrigerator.
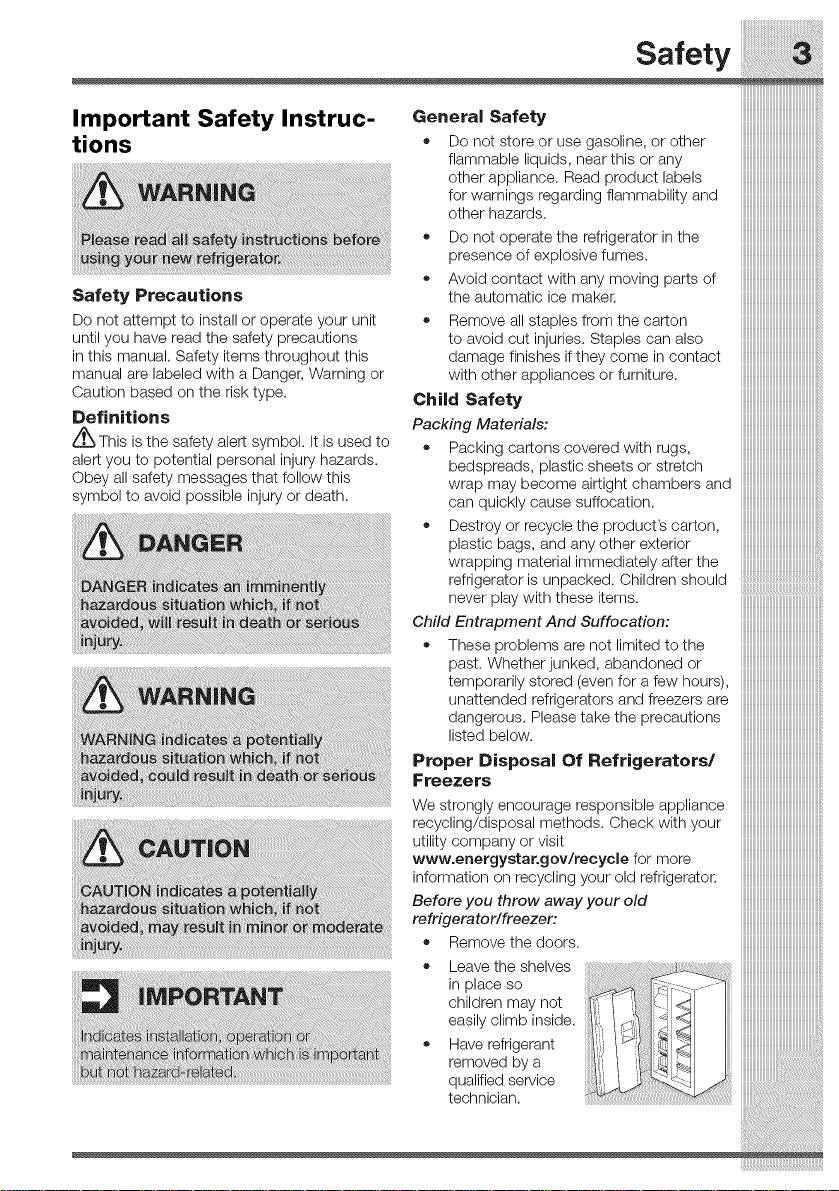
Before you throw away your old
refrigeratorlfreezer,
• Removethedoors.
• Leave the shelves
in place so
children may not
easily climb inside.
• Have refrigerant
removed by a
qualified service
technician .......................................................................................................
iiiiiiiiiiiiiiiiiiiiiiiiiiiiiiiiiiiiiiiiiiiiiiiiiiiiii!!!i
i!iiiiilSafety
iiiiiiiiiiiiiiiiiiiiiiiiiiiiiiiiiiiiiiiiiiiiiiiiiiiiii!,Electrical information
iiiiiiiiiiiiiiiiiiiiiiiiiiiiiiiiiiiiiiiiiiiiiiiiiiiiii!_
_i_i
iiiiiiiiiiiiiiiiiiiiiiiiiiiiiiiiiiiiiiiiiiiii
iiiiiiiiiiiiiiiiiiiiiiiiiiiiiiiiiiiiiiiiiiiii_
iiiiiiiiiiiiiiiiiiiiiiiiiiiiiiiiiiiiiiiiiiiiiiii_
iiiiiiiiiiiiiiiiiiiiiiiiiiiiiiiiiiiiiiiiiiiiiiiiL
iiiiiiiiiiiiiiiiiiiiiiiiiiiiiiiiiiiiiiiiiiiiiiiiiiiii
iiiiiiiiiiiiiiiiiiiiiiiiiiiiiiiiiiiiiiiiiiiiiiiiiiiii•
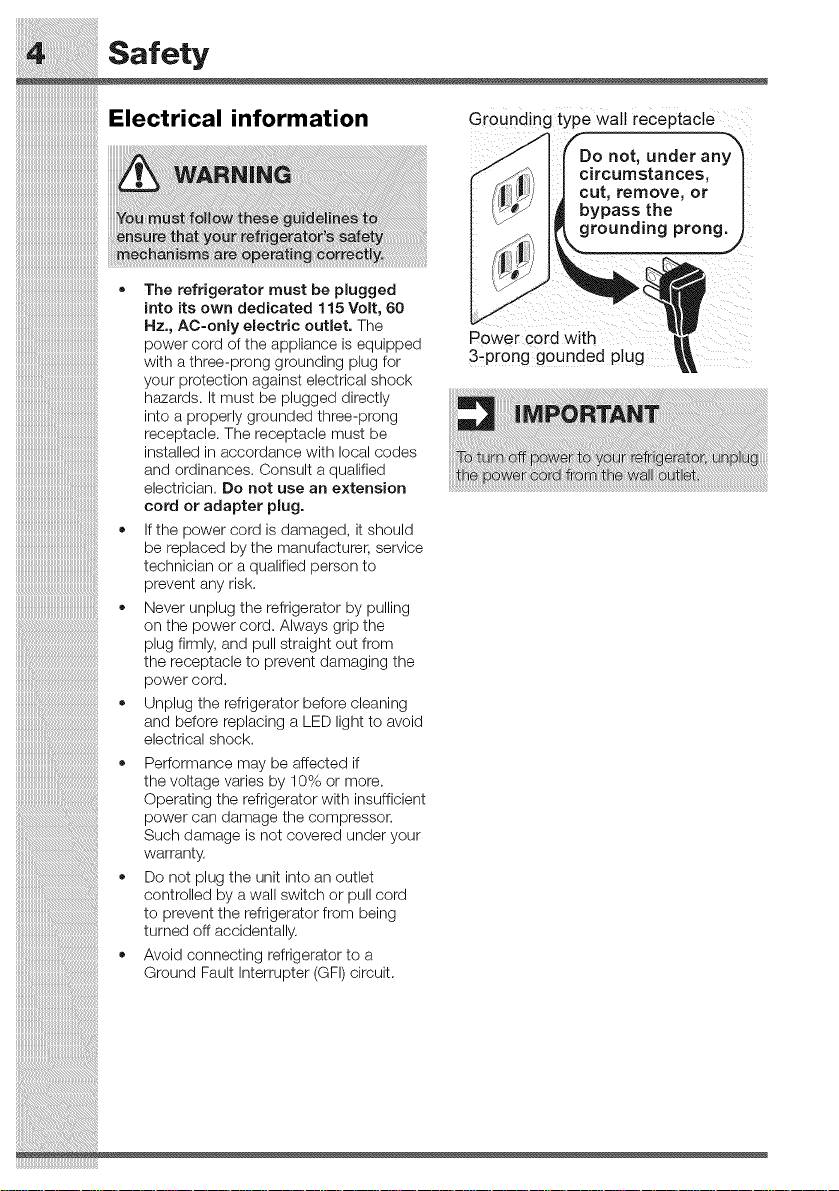
The refrigerator must be plugged
into its own dedicated 115 Volt, 60
Hz., AC-only electric out_et. The
power cord of the appliance is equipped
with a three-prong grounding plug for
your protection against electrical shock
hazards. It must be plugged directly
into a properly grounded three-prong
receptacle. The receptacle must be
installed in accordance with local codes
and ordinances. Consult a qualified
electrician. Do not use an extension
cord or adapter plug.
If the power cord is damaged, it should
be replaced by the manufacturer, service
technician or a qualified person to
prevent any risk.
Never unplug the refrigerator by pulling
on the power cord, Always grip the
plug firmly, and pull straight out from
the receptacle to prevent damaging the
power cord.
Unplug the refrigerator before cleaning
and before replacing a LED light to avoid
electrical shock.
Performance may be affected if
the voltage varies by 10% or more.
Operating the refrigerator with insufficient
power can damage the compressor.
Such damage is not covered under your
warranty.
Do not plug the unit into an outlet
controlled by a wall switch or pull cord
to prevent the refrigerator from being
turned off accidentally.
Avoid connecting refrigerator to a
Ground Fault Interrupter (GFI) circuit.
Grounding type Walt receptacle
Power cord with
3-p[0ng gounded p!ug
Installation
This Use & Care Guide provides general
operating instructionsfor your model. Use the
refrigerator only as instructed in this Use &
Care Guide. Before starting the refrigerator,
follow these important first steps.
Location
= Choose a place that is near a grounded
electrical outlet. Do Not use an
extension cord or an adapter plug.
• If possible, place the refrigerator out of
direct sunlight and away from the range,
dishwasher or other heat sources.
• The refrigerator must be installed on a
floor that is level and strong enough to
support a fully loaded refrigerator.
Consider water supply availability for
models equipped with an automatic ice
maker.
installation
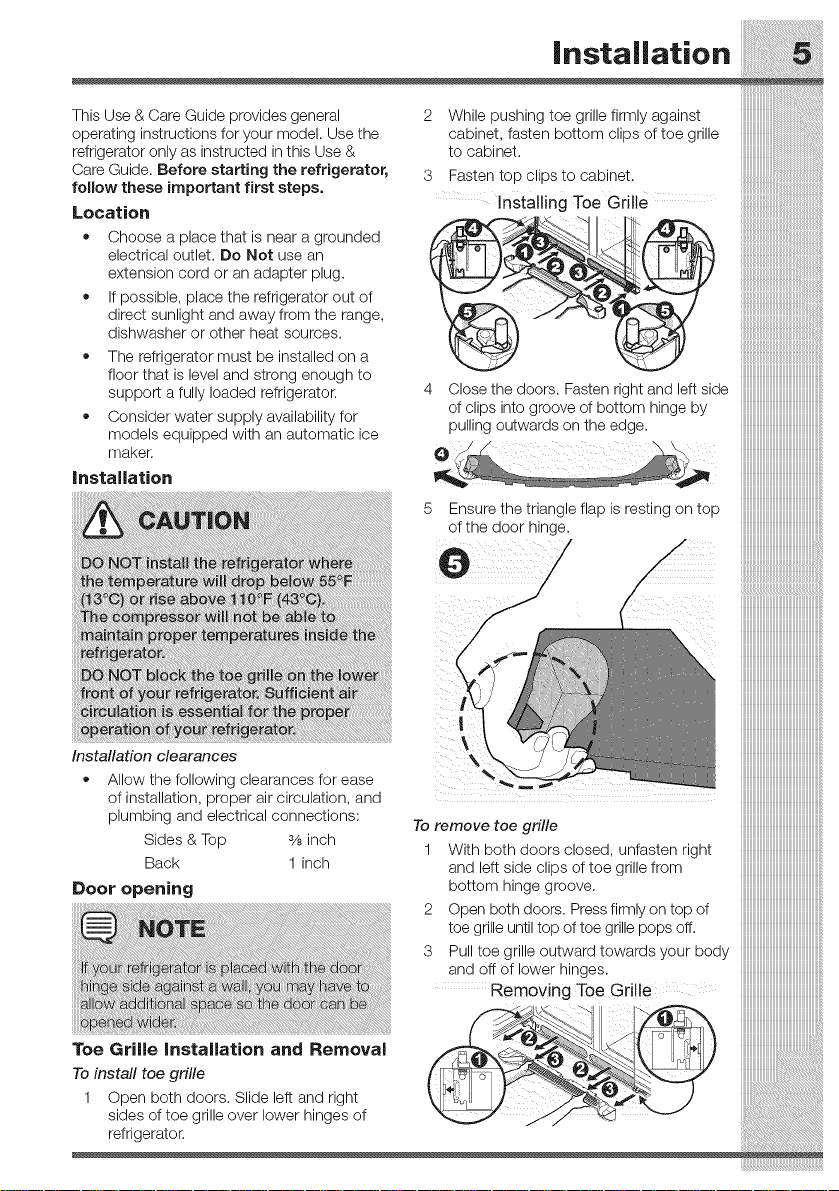
2 While pushing toe grille firmly against
cabinet, fasten bottom clips of toe grille
to cabinet.
3 Fasten top clips to cabinet.
Installing Toe Grille
iiiiiiiiiiiiiiiiiiiiiiiiiiiiiiiiiiiiiiiiiiiiiiiiiiiiiiii_
iiiiiiiiiiiiiiiiiiiiiiiiiiiiiiiiiiiiiiiiiiiiiiiiiiiiiiii_
4 Close the doors. Fasten right and left side iiiiiiiiiiiiiiiiiiiiiiiiiiiiiiiiiiiiiiiiiiiiiiiiiiiiiiiiii
ofclipsintogrooveofbottom hingeby iiiiiiiiiiiiiiiiiiiiiiiiiiiiiiiiiiiiiiiiiiiiiiiiiiiiiiiii
pulling outwards on the edge. iiiiiiiiiiiiiiiiiiiiiiiiiiiiiiiiiiiiiiiiiiiiiiiiiiiiiiiii
iiiiiiiiiiiiiiiiiiiiiiiiii
5 Ensurethetriangleflapisrestingontop iiiiiiiiiiiiiiiiiiiiiiiiiiiiiiiiiiiiiiiiiiiiiiiiiiiiiiiiii
ofthedoorhinge, iiiiiiiiiiiiiiiiiiiiiiiiiiiiiiiiiiiiiiiiiiiiiiiiiiiiiiiiii
iiiiiiiiiiiiiiiiiiiiiiiiiiiiiiiiiiiiiiiiiiiiiiiiiiiiiiiiii
Installation clearances
Allow the following clearances for ease
of installation, proper air circulation, and
plumbing and electrical connections:
Sides & Top s/sinch
Back 1 inch
Door opening
Toe Grille installation and Removal
To install toe grille
1 Open both doors. Slide left and right
sides of toe grille over lower hinges of
refrigerator.
I iiiiiiiiiiiiiiiiiiiiiiiiiiiiiiiiiiiiiiiiiiiiiiiiiiiiiiiiii
:\ iiiiiiiiiiiiiiiiiiiiiiiiiiiiiiiiiiiiiiiiiiiiiiiiiiiiiiiiii
iiiiiiiiiiiiiiiiiiiiiiiiiiiiiiiiiiiiiiiiiiiiiiiiiiiiiiiiii
iiiiiiiiiiiiiiiiiiiiiiiiiiiiiiiiiiiiiiiiiiiiiiiiiiiiiiiiii
Toremovetoegrille iiiiiiiiiiiiiiiiiiiiiiiiiiiiiiiiiiiiiiiiiiiiiiiiiiiiiiiiii
1 With both doorsclosed, unfasten right iiiiiiiiiiiiiiiiiiiiiiiiiiiiiiiiiiiiiiiiiiiiiiiiiiiiiiiiii
and leftsideclipsoftoegrillefrom iiiiiiiiiiiiiiiiiiiiiiiiiiiiiiiiiiiiiiiiiiiiiiiiiiiiiiiiii
bottomhingegroove, iiiiiiiiiiiiiiiiiiiiiiiiiiiiiiiiiiiiiiiiiiiiiiiiiiiiiiiiii
2 Open bothdoors. Pressfirmlyontopof iiiiiiiiiiiiiiiiiiiiiiiiiiiiiiiiiiiiiiiiiiiiiiiiiiiiiiiiii
toe grille until top of toe grille pops off. iiiiiiiiiiiiiiiiiiiiiiiiiiiiiiiiiiiiiiiiiiiiiiiiiiiiiiiiii
3 Pull toe grille outward towards your body iiiiiiiiiiiiiiiiiiiiiiiiiiiiiiiiiiiiiiiiiiiiiiiiiiiiiiiiii
andoffoflowerhinges, iiiiiiiiiiiiiiiiiiiiiiiiiiiiiiiiiiiiiiiiiiiiiiiiiiiiiiiiii
RemovingToeerille iiiiiiiiiiiiiiiiiiiiiiiiiiiiiiiiiiiiiiiiiiiiiiiiiiiiiiiiii
ii
iiiiiiiiiiiiiiiiiiiiiiiiiiiiiiiiiiiiiiiiiiiiiiiiiiiiiiii!i
|nstallation
iiiiiiiiiiiiiiiiiiiiiiiiiiiiiiiiiiiiiiiiiiiiiiiiiiiiiiii
iiiiiiiiiiiiiiiiiiiiiiiiiiiiiiiiiiiiiiiiiiiiiiiiiiiiii!_ Your refrigerator should be positioned
iiiiiiiiiiiiiiiiiiiiiiiiiiiiiiiiiiiiiiiiiiiiiiiiiiiiiiii
iiiiiiiiiiiiiiiiiiiiiiiiiiiiiiiiiiiiiiiiiiiiiiiiiiiiiii[ito allow easy access to a counter when
iiiiiiiiiiiiiiiiiiiiiiiiiiiiiiiiiiiiiiiiiiiiiiiiiiiiii!iremoving food. Forbest useofdrawers and
freezer baskets, the refrigerator should be
in a position where both the refrigerator and
freezer doors can be fully opened.
Guidelines for final positioning of your
refrigerator:
o All four corners of the cabinet must rest
firmly on the floor.
The cabinet should be level at the front
and rear.
The sides should tilt 1Ainch (6 ram) from
front to back (to ensure that doors close
and seal properly).
Doors should align with each other and
be level.
All of these conditions can be met by
raising or lowering the adjustable front
rollers.
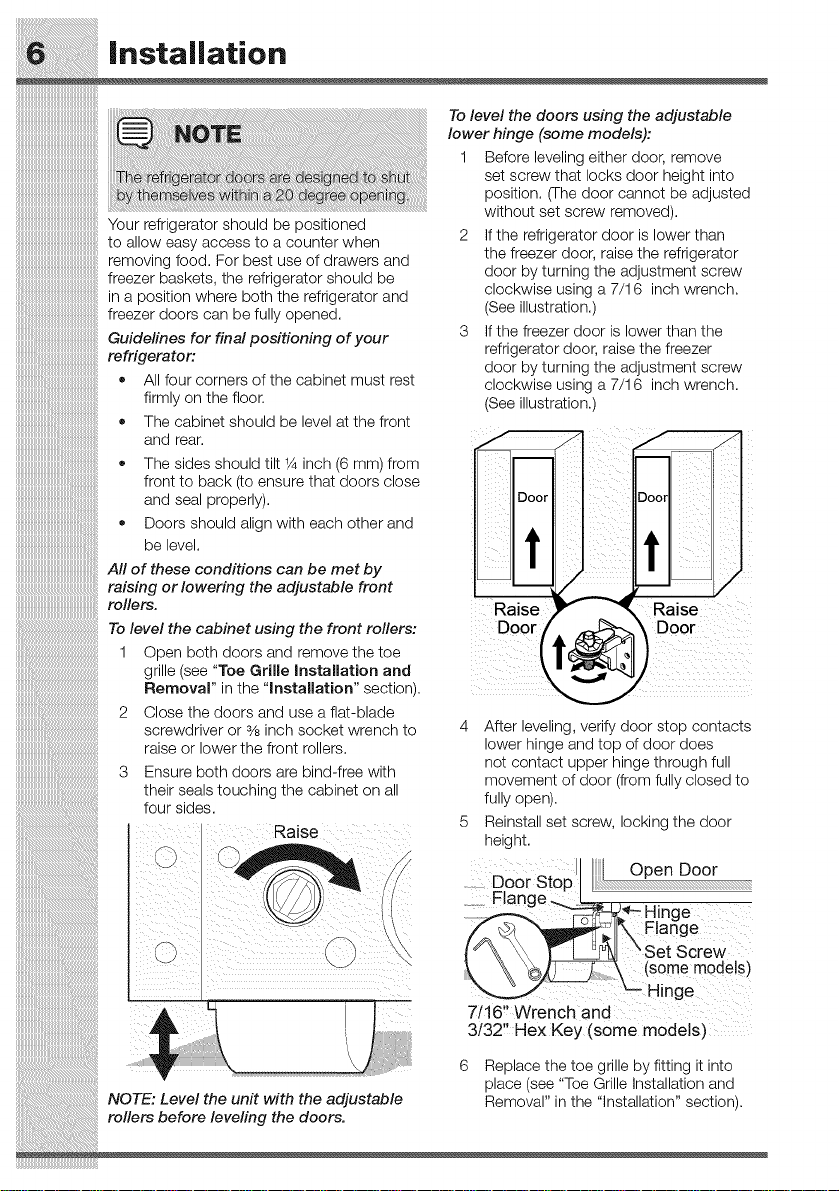
To level the cabinet using the front rollers:
1 Open both doors and remove the toe
grille (see "Toe Grille Installation and
Removal" in the "Installation" section).
2 Close the doors and use a flat-blade
screwdriver or _,tinch socket wrench to 4 After leveling, verify door stop contacts
raise or lower the front rollers, lower hinge and top of door does
3 Ensure both doors are bind-free with movement of door (from fully closed to
their seals touching the cabinet on all fully open).
four sides.
Raise height.
To level the doors using the adjustable
lower hinge (some models):
1 Before leveling either door, remove
set screw that locks door height into
position. (The door cannot be adjusted
without set screw removed).
2 If the refrigerator door is lower than
the freezer door, raise the refrigerator
door by turning the adjustment screw
clockwise using a 7/16 inch wrench.
(See illustration.)
3 If the freezer door is lower than the
refrigerator door, raise the freezer
door by turning the adjustment screw
clockwise using a 7/16 inch wrench.
(See illustration.)
Raise
Door } Door
Door__Door TA "
not contact upper hinge through full
5 Reinstall set screw, locking the door
.... }J
Flange.._ _L-_.-
\_ (( -Hinge
I _\ \\ r _1 set Screw
_ (some models)
'-- Hinge
7/16" Wrench and
3/32" Hex Key (some models)
6 Replace the toe grille by fitting it into
place (see "Toe Grille Installation and
NOTE: Level the unit with the adjustable Removal" in the "installation" section).
rollers before leveling the doors.

installation
Installing Shelves 4 Relock shelf by pushing the slide
Your refrigerator was shipped with the shelf mechanism away from you.
hanger and shelf locking clip installed in their
shipping position, Below are the instructions IFH
to install the shelves in your desired locations.
1 Remove shelf from its locked position by J
pulling the slide mechanism toward you.
5 While holding shelf at a 45-degree angle
wltn tne gray nanale facing you, ousn tne
shelf nto the back of the nanger.
2 Lift the hanger directly upwards and pull
toward you to remove itfrom the ladder,
3 Place top hooks of the hanger into the
desired slot, and lower straight down
until lower hooks rest on the ladder.
6 Gentl_ 3etthe shelf onto tne nanger
once tne IOaCKISsecurea Dy tne nanger.
iiiiillRemoving The Doors
iiiiiiiiiiiiiiiiiiiiiiiiiiiiiiiiiiiiiiiiiiiiiiiiiiiiiiii
iiiiiiiiiiiiiiiiiiiiiiiiiiiiiiiiiiiiiiiiiiiiiiiiiiiiii!_Getting through narrow 3 Remove any food from the door shelves,
:::::::::::::::::::::::::::::::::::::::::::::::::::::::
4 Close the doors.
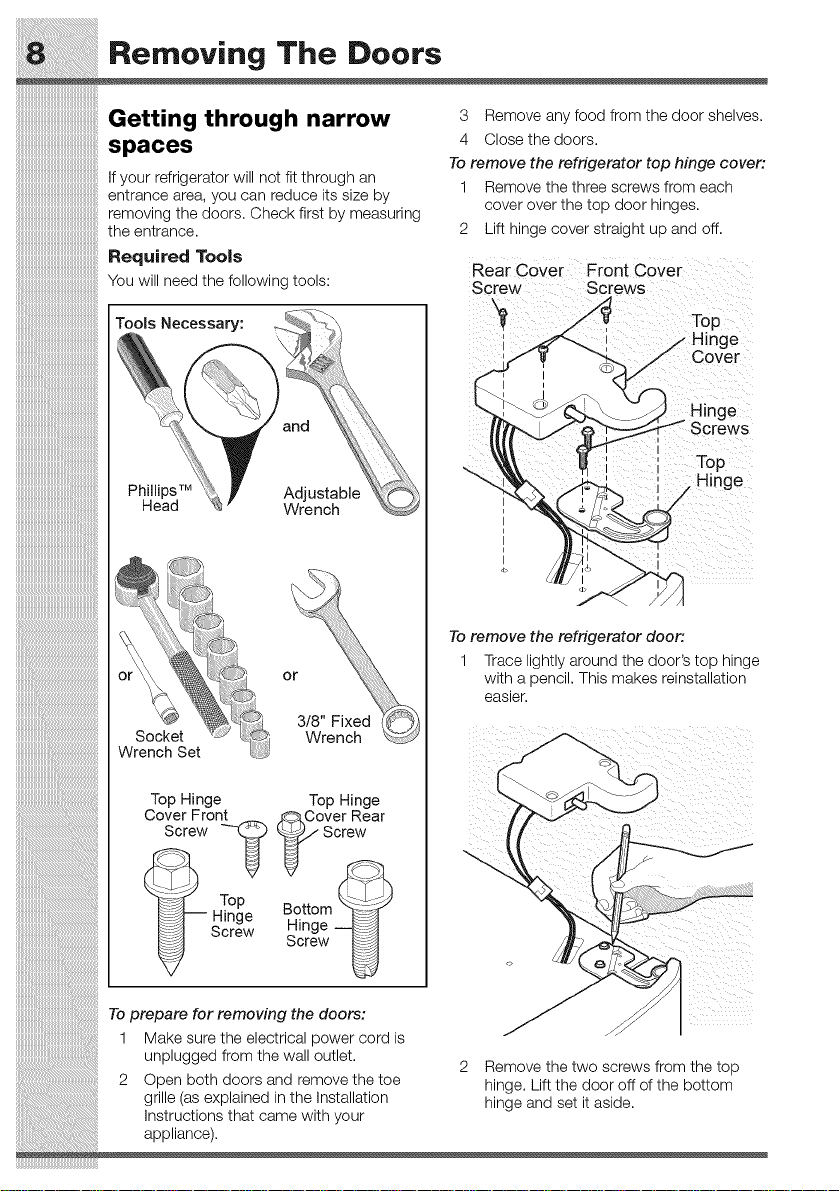
To remove the refrigerator top hinge coven
1 Remove the three screws from each
cover over the top door hinges.
2 Lift hinge cover straight up and off.
To remove the refrigerator door'.
1 Trace lightly around the door's top hinge
with a pencil. This makes reinstallation
easier.
2 Remove the two screws from the top
hinge. Lift the door off of the bottom
hinge and set it aside,
Removing The Doors
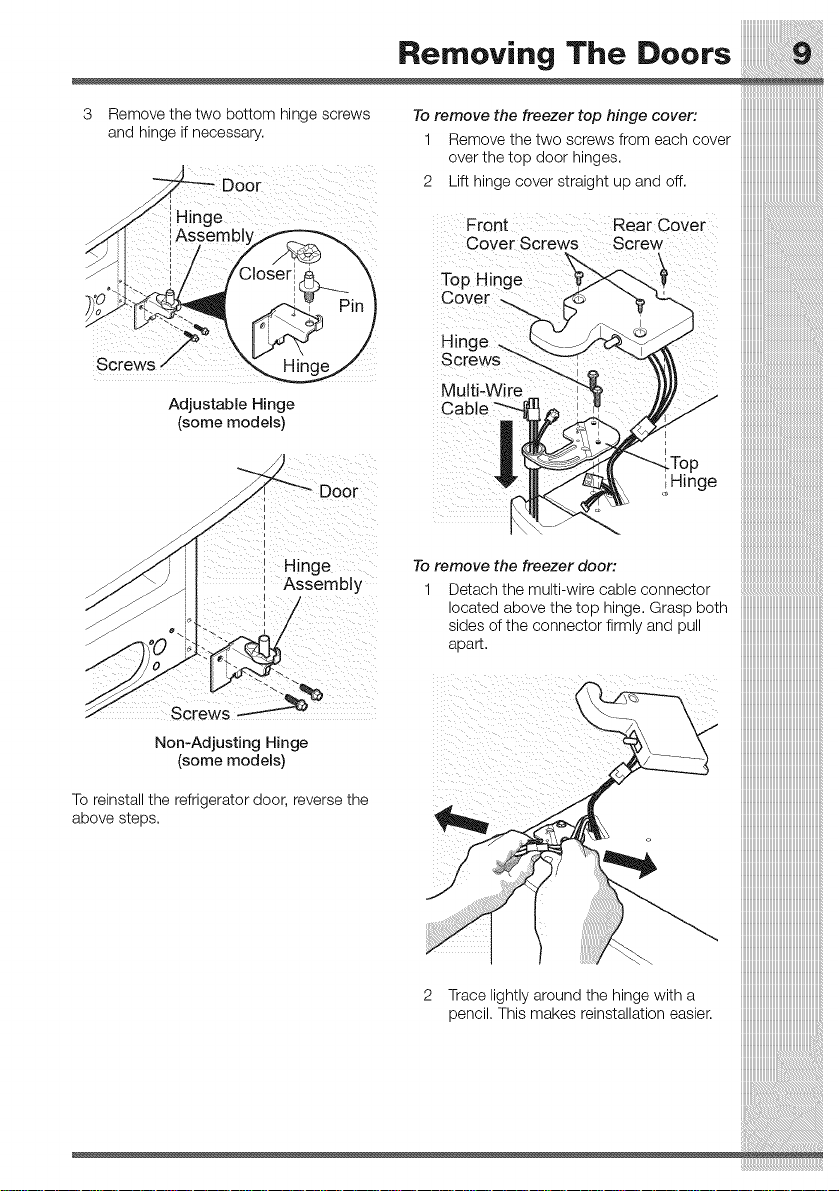
3 Remove the two bottom hinge screws To remove the freezer top hinge cover:
and hinge if necessary. 1
Remove the two screws from each cover
over the to_) uoor ninges.
2 Lift nlnge cover stralgnt up ana Dff.
Screws /
Hinge
Adjustable Hinge
(some models)
Screws
Non-Adjusting Hinge
(some models)
Front Rear Cover
Cover Screws Screw
Top Hinge
Cover ..
Hinge ..
Multi-Wire
!
Hinge
To remove the freezer door:
1 Detach the multi-wire ca_)le connector
iocatea above IRe ICp nlnge. Grasp ootr
sides of the connector firrr y and ou
aoai'[.
To reinstall the refrigerator door, reverse the
above steps.
2 Trace lightly around the hinge with a
pencil. This makes reinstallation easier.
iiiiiiiiiiiiiiiiiiiiiiiiiiiiiiiiiiiiiiiiiiiiiiiiiiiiiiii!i
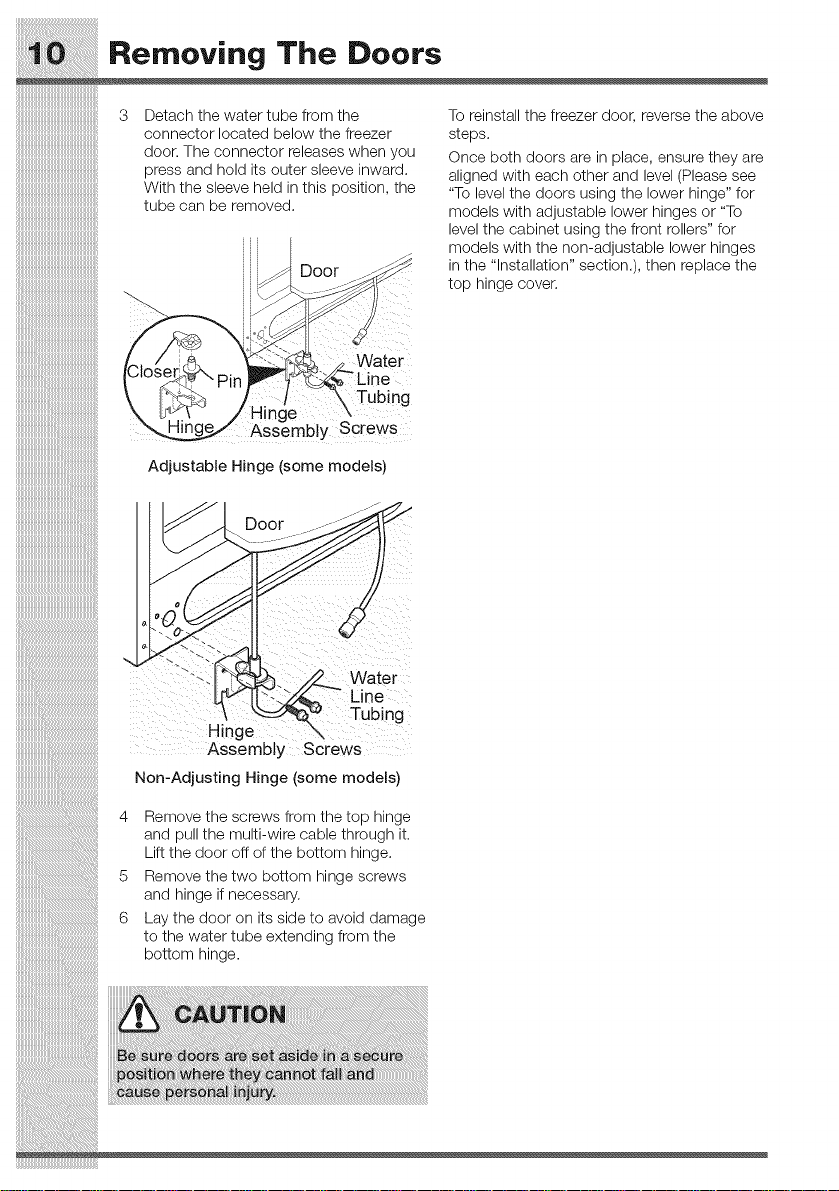
Detach the water tube from the
connector located below the freezer
door. The connector releases when you
press and hold its outer sleeve inward.
With the sleeve held in this position, the
tube can be removed.
mmmmmmmmmmmmmmmmmm,_
iiiiiiiiiiiiiiiiiiiiiiiiiiiiiiiiiiiiiiiiiiiiiiiiiiiiii_i
71717171717171717171717171717171717171717171717171717i_i
To reinstall the freezer door, reverse the above
steps.
Once both doors are in place, ensure they are
aligned with each other and level (Please see
"To level the doors using the lower hinge" for
models with adjustable lower hinges or "To
level the cabinet using the front rollers" for
models with the non-adjustable lower hinges
in the "Installation" section.), then replace the
top hinge cover.
e
Tubing
Hinge \
Assembly Screws
Non-Adjusting Hinge (some models)
4 Remove the screws from the top hinge
and pull the multi-wire cable through it.
Lift the door off of the bottom hinge.
5 Remove the two bottom hinge screws
and hinge if necessary.
6 Lay the door on its side to avoid damage
to the water tube extending from the
bottom hinge.
|nstalling Door Handles
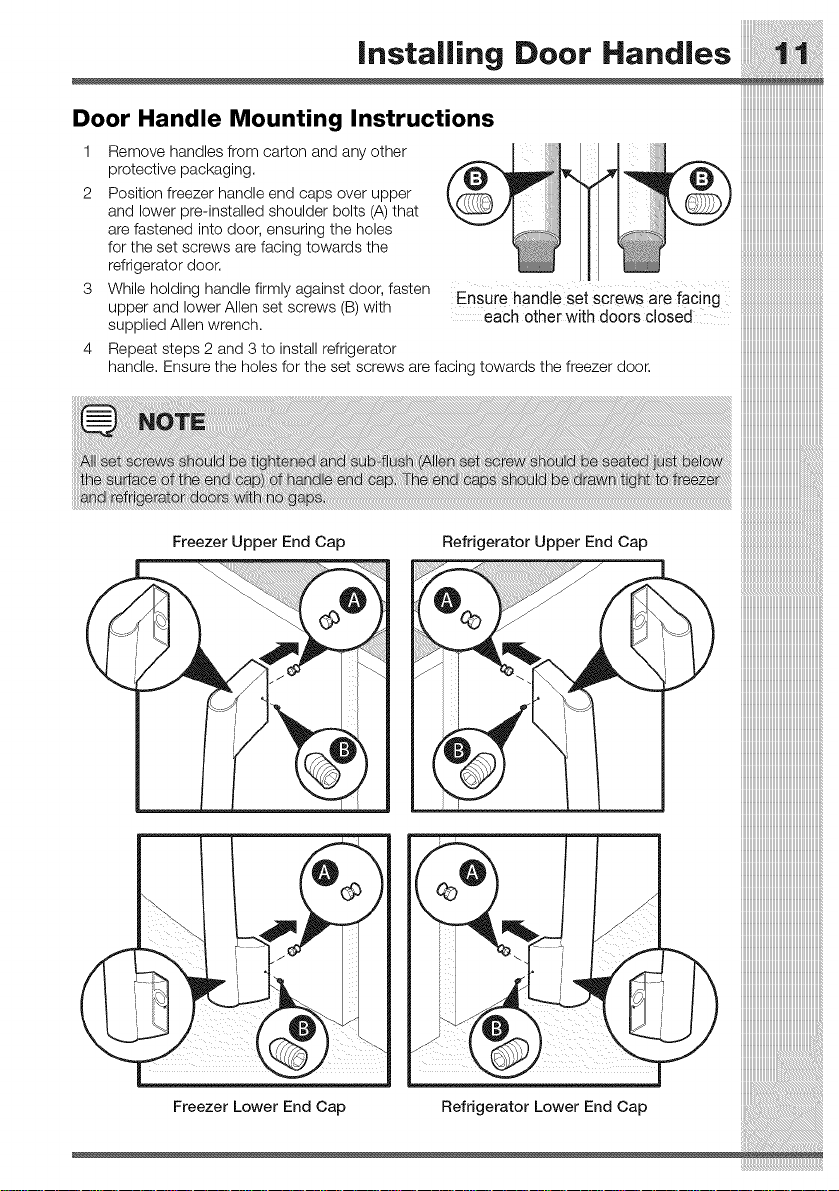
Door Handle Mounting Instructions
1 Remove handles from carton and any other
protective packaging.
2 Position freezer handle end caps over upper
and lower pre-installed shoulder bolts (A) that
are fastened into door, ensuring the holes
for the set screws are facing towards the
refrigerator door.
3 While holding handle firmly against door, fasten
upperand IowerAIlen set screws (B) with Ensure hand!esetscrewsare facing
supplied Allen wrench, each other with doors closed
Repeat steps 2 and 3 to install refrigerator
handle. Ensure the holes for the set screws are facing towards the freezer door.
Freezer Upper End Cap Refrigerator Upper End Cap
Freezer Lower End Cap Refrigerator Lower End Cap
iiiiiiiiiiiiiiiiiiiiiiiiiiiiiiiiiiiiiiiiiiiiiiiiiiiiiiii!i
Connecting The Water Supply
needed, measure the distance from the
ice maker inletvalve at the back of the
refrigerator to your cold water pipe. Then
add approximately 7 feet (2.1 meters),
so the refrigerator can be moved out for
cleaning (as shown).
A shutoff valve to connect the water
supply line to your household water
system. DO NOT use a self-piercing type
shutoff valve.
o
Do not reuse compression fitting or use
thread seal tape.
A compression nut and ferrule (sleeve)
for connecting a copper water supply
line to the ice maker inlet valve.
Before Installing The Water Supply Line,
You Will Need:
Basic Tools: adjustable wrench,
flat-blade screwdriver, and PhillipsTM
screwdriver
Access to a household cold water line
with water pressure between 30 and
100 psi.
A water supply line made of 1Ainch
(6.4mm) OD, copper or stainless steel
tubing. To determine the length of tubing
To Connect Water Supply Line To Ice
Maker Inlet Valve
1. Disconnect refrigerator from electric
power source.
2. Place end of water supply line into sink
or bucket. Turn ON water supply and
flush supply line until water isclear. Turn
OFF water supply at shutoff valve.
3. Remove plastic cap from water valve
inlet and discard cap.
4. If you use copper tubing - Slide brass
compression nut, then ferrule (sleeve)
onto water supply line. Push water
supply line into water valve inlet as far as
it will go (1Ainch/6.4 mm). Slide ferrule
(sleeve) into valve inlet and finger tighten
compression nut onto valve. Tighten
another half turn with a wrench; DO NOT
over tighten. See Figure 1.
Connecting The Water Supply il
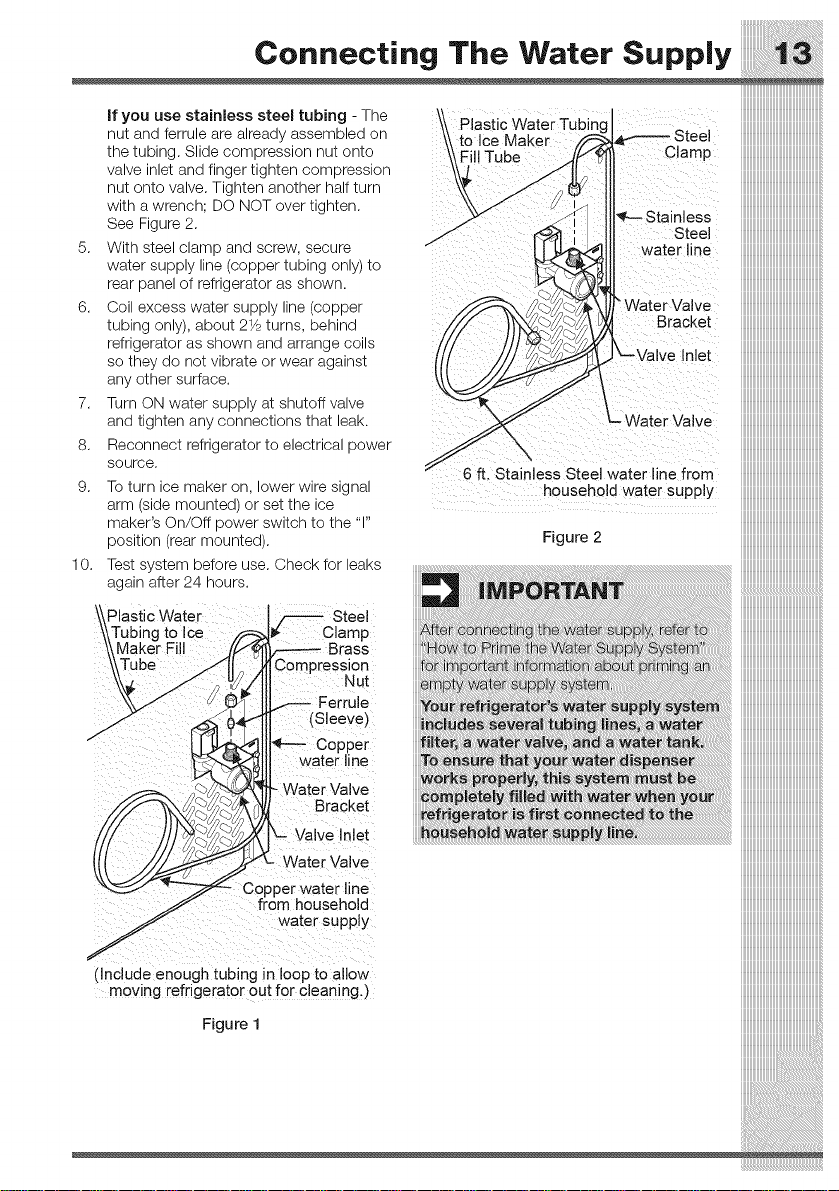
If you use stainless steel tubing - The
nut and ferrule are already assembled on
the tubing. Slide compression nut onto
valve inlet and finger tighten compression
nut onto valve. Tighten another half turn
with a wrench; DO NOT over tighten.
See Figure 2. Steel
5. With steel clamp and screw, secure /" water line
water supply line (copper tubing only) to
rear panel of refrigerator as shown.
6. Coil excess water supply line (copper "Water Valve
tubing only), about 21/_turns, behind Bracket
refrigerator as shown and arrange coils
so they do not vibrate or wear against
any other surface.
7. Turn ON water supply at shutoff valve L
and tighten any connections that leak. -- Water Valve
8. Reconnect refrigerator to electrical power
source. 6 ft. Stainless Steel water line from
9. To turn ice maker on, lower wire signal household water supply
arm (side mounted) or set the ice
maker's On/Off power switch to the "1"
position (rear mounted).
10.
Test system before use. Check for leaks
again after 24 hours.
Plastic Water
Maker Fill
Tube
p
ut
Plastic
Figure 2
iiiiiiiiiiiiiiiiiiiiiiiiiiiiiiiiiiiiiiiiiiiiiiiiiiiiiiiiii
np
Inlet
iiiiiiiiiiiiiiiiiiiiiiiiiiiiiiiiiiiiiiiiiiiiiiiiiiiiiiii_
CCCCCCCCCCC:I
!!!!!!!!!!!!!!!!!!!!!!!!!!!!!!!!!!!!!!!!!!!!!!!!!!!!!!ill!
iiiiiiiiiiiiiiiiiiiiiiiiiiiiiiiiiiiiiiiiiiiiiiiiiiiiiiii_i
(Sleeve)
water line
Bracket
• Water Valve
)er water line
from household
(!nclude enough tubing in loop to allow
moving refrigerator out fOr cleaning:)
Figure 1
iiiiiiiiiiiiiiiiiiiiiiiiiiiiiiiiiiiiiiiiiiiiiiiiiiiiiiiiii
iiiiiiiiiiiiiiiiiiiiiiiiiiiiiiiiiiiiiiiiiiiiiiiiiiiiiiii!i
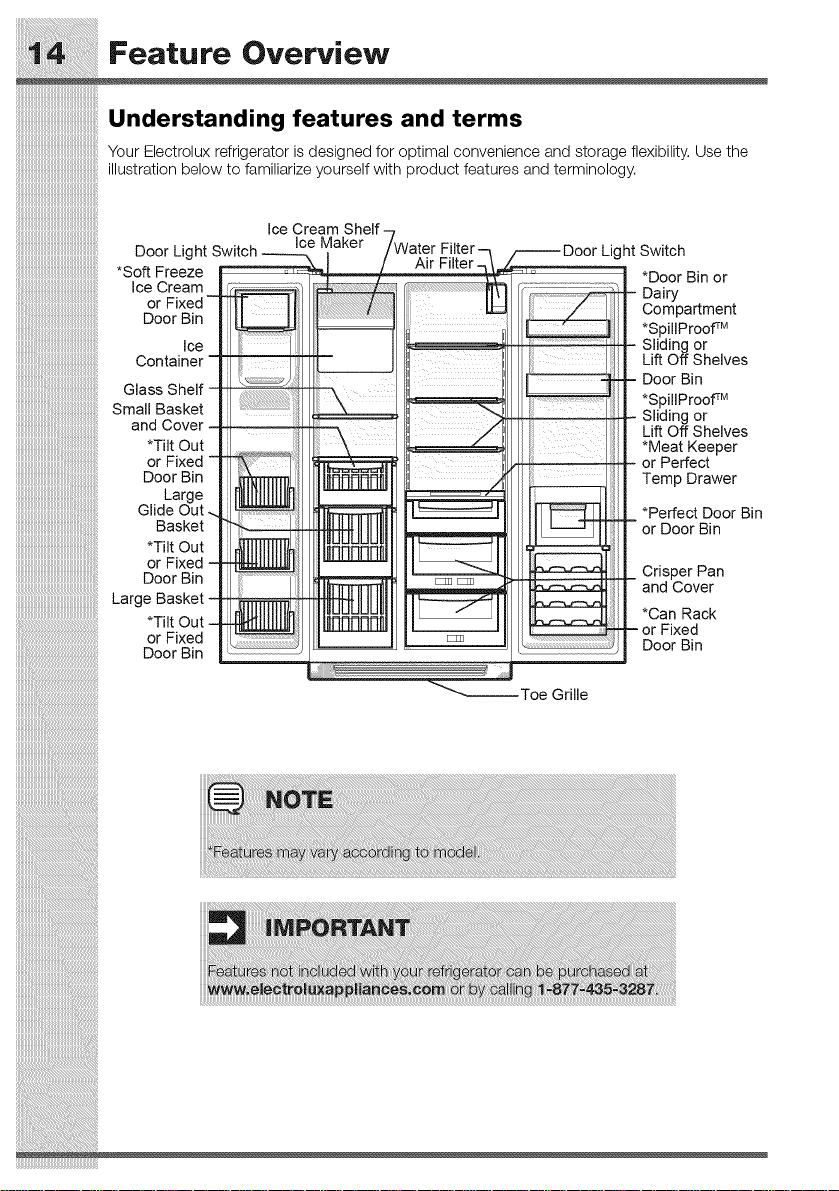
,ii i4 !!!!!ii!i;iFeature Overview
iiiiiiiiiiiiiiiiiiiiiiiiiiiiiiiiiiiiiiiiiiiiiiiiiiiiii!,Understanding features and terms
iiiiiiiiiiiiiiiiiiiiiiiiiiiiiiiiiiiiiiiiiiiiiiiiiiiiii!i Your Electrolux refrigerator is designed for optimal convenience and storage flexibility. Use the
iiiiiiiiiiiiiiiiiiiiiiiiiiiiiiiiiiiiiiiiiiiiiiiiiiiiiii:iillustration below to familiarize yourself with product features and terminology.
iiiiiiiiiiiiiiiiiiiiiiiiiiiiiiiiiiiiiiiiiiiiiiiiiiiiii!_
iiiiiiiiiiiiiiiiiiiiiiiiiiiiiiiiiiiiiiiiiiiiiiiiiiiiii!_
iiiiiiiiiiiiiiiiiiiiiiiiiiiiiiiiiiiiiiiiiiiiiiiiiiiiiiii
iiiiiiiiiiiiiiiiiiiiiiiiiiiiiiiiiiiiiiiiiiiiiiiiiiiiiii:i IceCream
iiiiiiiiiiiiiiiiiiiiiiiiiiiiiiiiiiiiiiiiiiiiiiiiiiiiii!i DoorLightSwitch Ice Maker _ghtSwitch
iiiiiiiiiiiiiiiiiiiiiiiiiiiiiiiiiiiiiiiiiiiiiiiiiiiiiiii
.....................................................Door Bin
*Soft Freeze
Ice
Container
Glass Shelf
Small Basket
and Cover
*Tilt Out
or Fixed
Door Bin
Large
IceCreamDoorOrBin
Glide Out
Basket
*Tilt Out
or Fixed
Large Basket
*Tilt Out
or Fixed
Door Bin
*Door Bin or
Dairy
Compartment
*SpilIProoff M
Sliding or
Lift Off Shelves
Door Bin
*SpilIProoffM
Sliding or
Lift Off Shelves
*Meat Keeper
or Perfect
Temp Drawer
*Perfect Door Bin
or Door Bin
Crisper Pan
and Cover
*Can Rack
or Fixed
Door Bin
 Loading...