

Electrolux EI23CS35KB0, EI23CS35KB1, EI23CS35KB2, EI23CS35KS0, EI23CS35KS1 Installation Guide
...
B]
Installation Instructions for Side-By-Side Refrigerator This document should only be removed by customer after installation.
Tools Necessary:
reTheinstallationSite
Your refrigerator is designedto be part of a built-in kitchen
cabinet system. Be sureto coordinate site preparation and
installation with your kitchen contractor.
Includethese minimum guidelines in your site preparation:
* Choosea placenearagrounded electrical outlet.
Donot use anextensioncord or an adapter plug.
Avoid direct sunlight and close proximity to a range,
dishwasher or other heat source.
Floorshould be level andableto support afully loaded
refrigerator.
The refrigerator's Ice& Water Dispenserrequires water
supply access.
Planfor easyaccessto counter tops when removingfood.
* Forcomplete accessto drawers and freezer baskets
doors must be ab eto fu y open.
Allow the following clearancesfor easeof installation proper air
c rcu at on,and p umb ngand e ectr ca connect ons: Sides & Top.3/8 inch
Rear. 1inch
Trans oft Un acka ed Refri orator ToSite
By now,you have already removed your refrigerator's shipping carton. You may
sti,II needto use a hand truck to move it through close spaces or entrances. If the
refrigerator is larger than an entrance, consiaer two options:
Removethe entrancedoor if one exists.
Removethe refrigeratordoors (see howinyour Use& CareGuide).
When using a hand truck:
* Loadrefrigerator from sideof cabinet only.
Donot run retainingstraps over handles.
Donot overtighten retaining straps.
Neveruserefrigeratorhandlestomove the refrigerator.
Removetapefrom doors only after unit is in place.
ConnectWaterSupply
Before Installing The Water Supply Line, You Will Need:
* BasicTools: adjustable wrench, flat-blade screwdriver,
and PhillipsTM screwdriver
Access to a household cold water line with water
pressure between30 and 100 psi.
A water supply line made of 1Ainch (6 mm) OD,copper
or stainless steel tubing. To determine the length of
tubing needed,measure the distance from the ice maker
inletvalve atthe back of
the refrigerator to your
cold water pipe. Then add
approximately 7 feet (2.1
meters), so the refrigerator
can be moved outfor
cleaning (asshown).
A shutoff valve to connect
the water supply lineto your
household water system. DO
NOTuse a self-piercing type
shutoff valve.
A compression nut
and ferrule (sleeve) for
connecting a copper water
supply line to the ice maker
inletvalve.
ToConnectWaterSupplyLine ToIce Maker Inlet Valve
1. Disconnectrefrigeratorfrom electricpowersource. _ _ ....
TurnONwatersupplyandflush supplylineuntil .......... t_,i
2. Placeendofwatersupplylineinto sinkor bucket. _,ff_,_;;2:p,o _','_'_
waterisclear.TurnOFFwatersupplyat shutoff \_ _""
valve. _ _ili_'d:_
3. Removeplasticcapfromwatervalveinletand Pp::
discardcap. _ ........
4. Ifyou usecoppertubing- Slidebrasscompression __"_ii ....
nut,then ferrule (sleeve)onto watersupplyline. i _ '_'_'"_
Pushwatersupplyline intowatervalveinletas far ...........
asit will g° (1AInch/64 mm) Slideferrule (sleeve)_iii
intovalveinlet andfingertightencompresstonnut ...............
ontovalve.Tightenanotherhalfturn with awrench; _ "_!_
DONOToverttghten.SeeFigure1.......................................
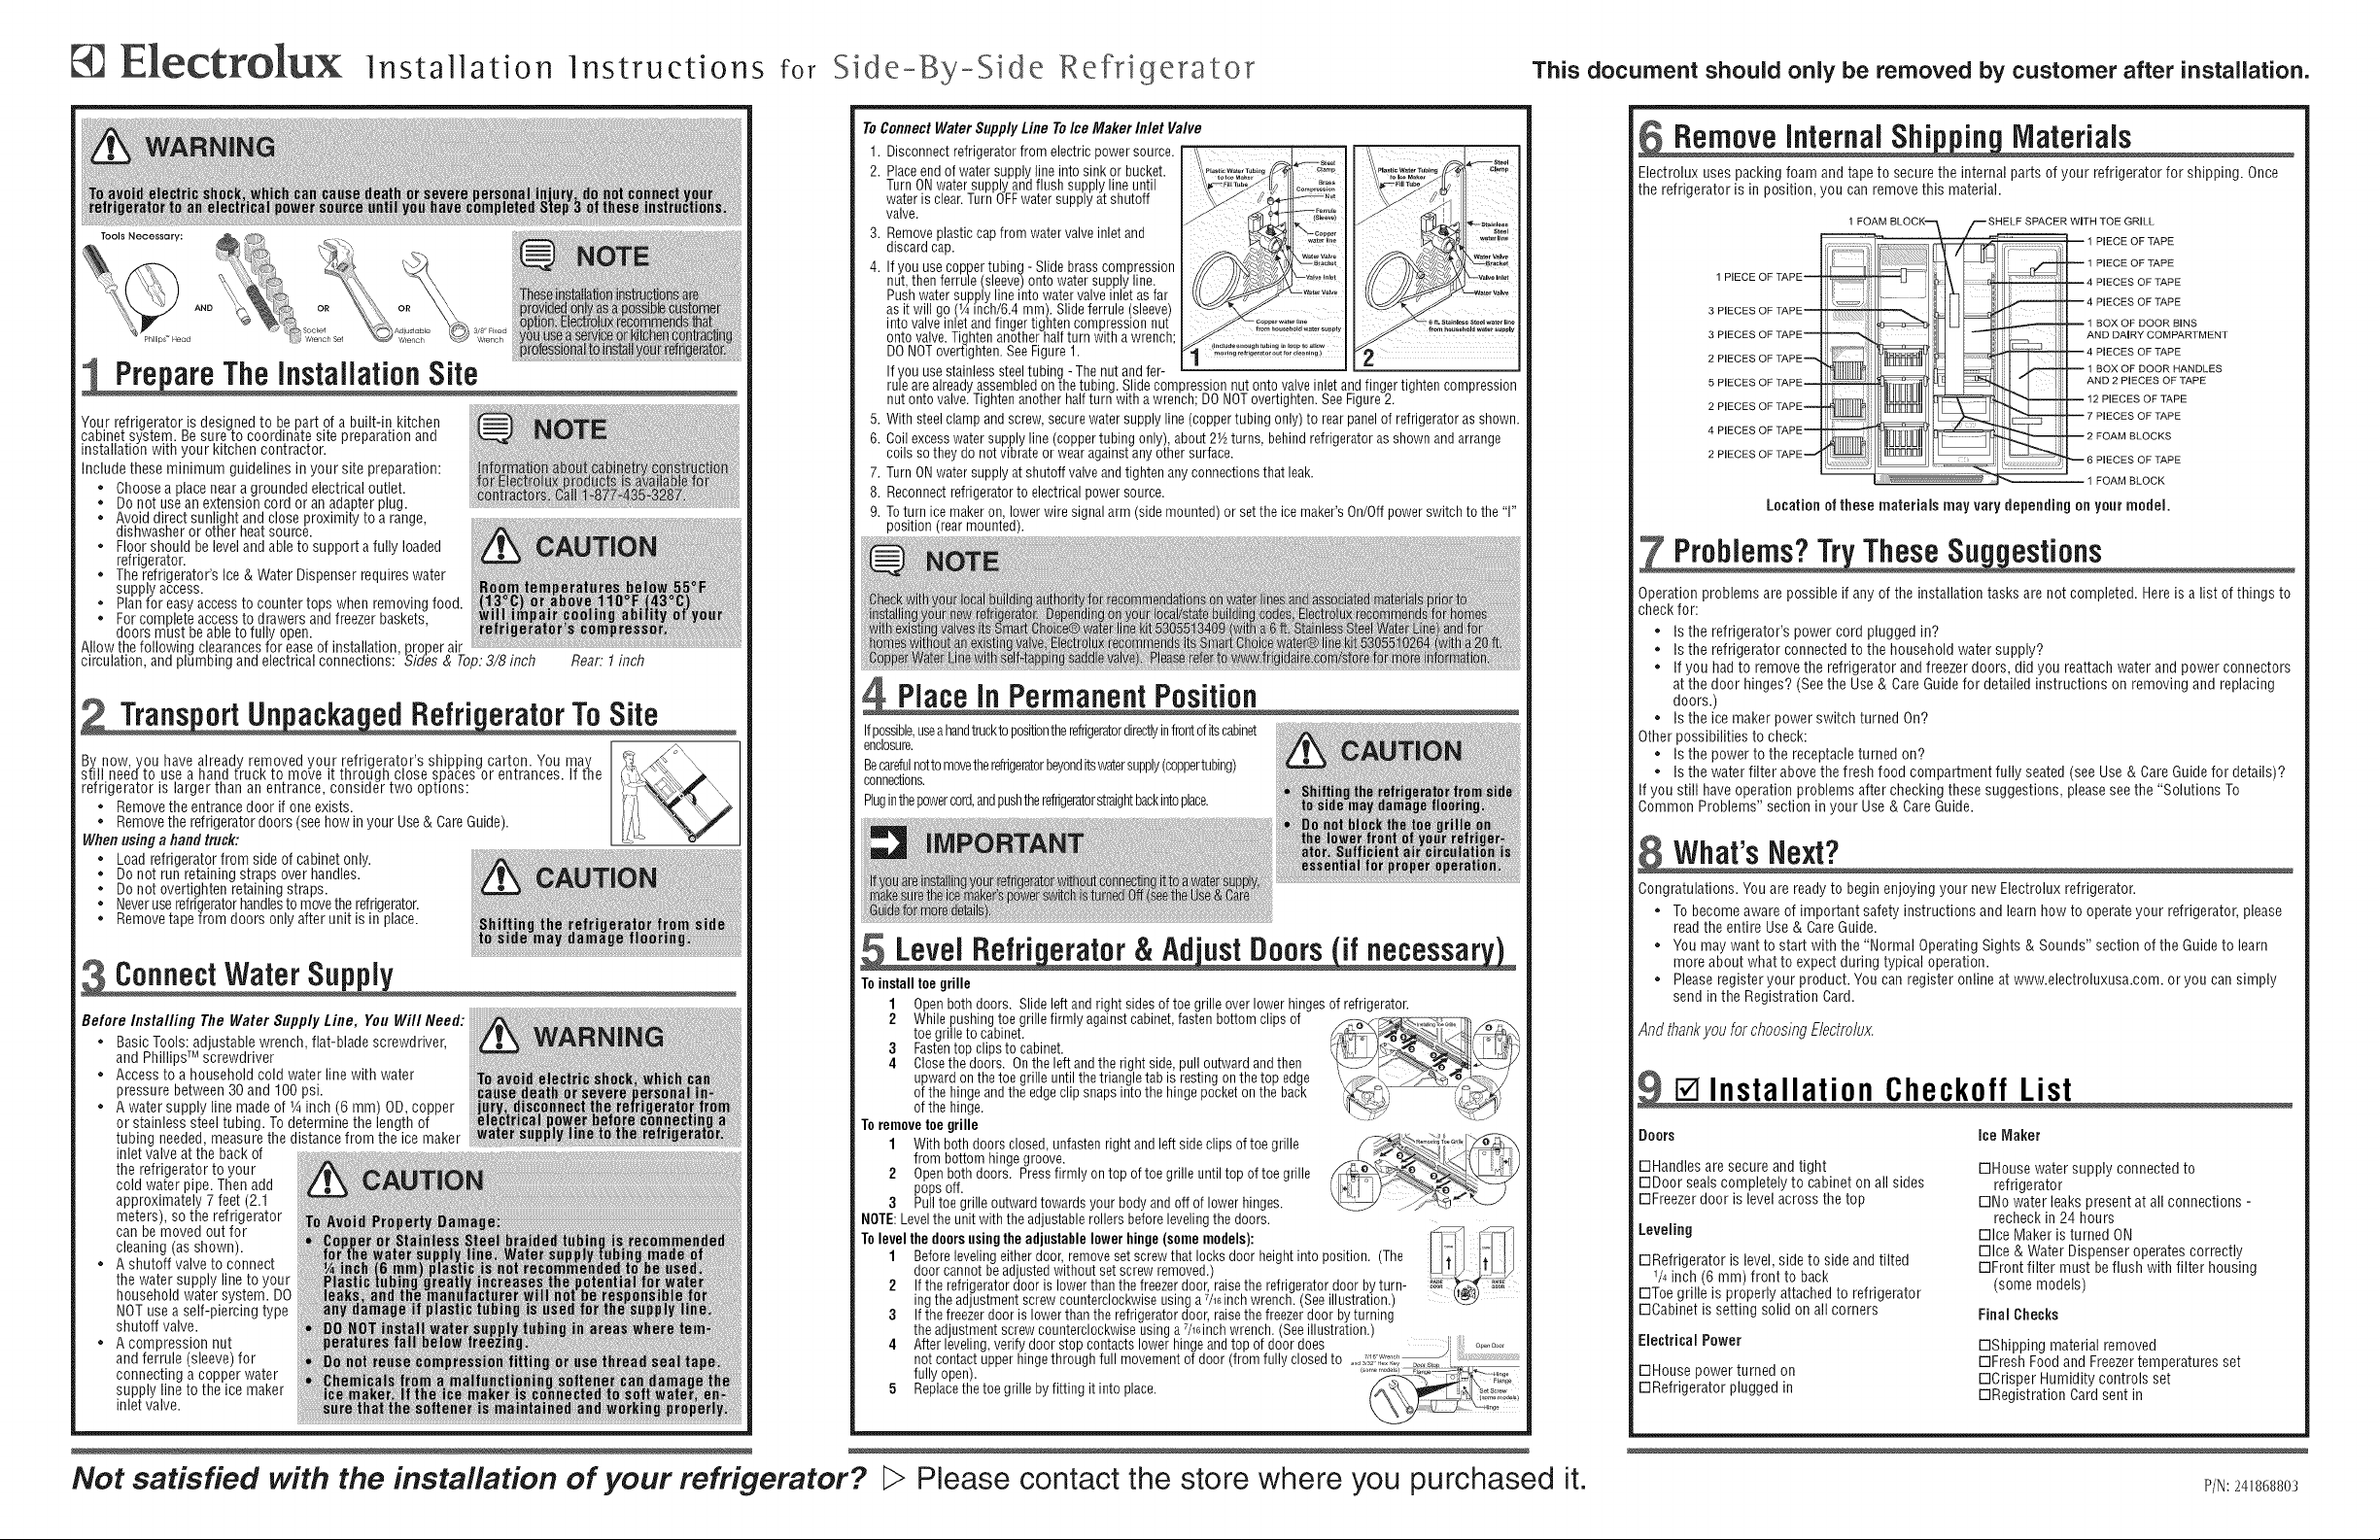
RemoveInternal Shi in Materials
Electrolux uses packing foam and tape to secure the internal parts of your refrigerator for shipping. Once
the refrigerator is in position, you can remove this material.
1 FOAM BLOCK-- --SHELF SPACER WiTH TOE GRKL
1 PIECE OF TAPE--
3 PIECES OF TAPE-- _
3 PIECES OF TAPE--
2 PIECES OF TAPE_
5 PIECES OF TAPE--
2 PIECES OF TAPE_
4 HECES OF TAPE--
2 PIECES OF TAPE _ ...........................
Location ofthese materials may vary depending on your model,
!
L4PI_OESOF_APE
-- .CESOF A
_ A.oOA,R_OOMPA_ME.T
_ _ _ 12 PIECES OFTAPE
&___--_P,EOESOF_APE
_ -_ FOAM_OOKS
...._........................................_ _ ! _e P,EOESOF_APE
-- BO OPOOORB,.S
Problems?Tr TheseSu estions
Operation problems are possible if any of the installation tasks are not completed. Hereis a list of things to
check for:
Is the refrigerator's power cord plugged in?
Is the refrigerator connected to the household water supply?
Ifyou had to remove the refrigerator and freezer doors, did you reattachwater and power connectors
at the door hinges? (Seethe Use& CareGuidefor detailed instructions on removing and replacing
doors.)
Is the ice maker power switch turned On?
Other possibilities to check:
Is the power to the receptacleturned on?
Is the water filter above the fresh food compartment fully seated (see Use& CareGuidefor details)?
Ifyou still haveoperation problems after checking thesesuggestions, please seethe "Solutions To
Common Problems" section in your Use & Care Guide.
What's Next?
Congratulations. You are ready to beginenjoying your newElectrolux refrigerator.
To becomeaware of important safety instructions and learn how to operate your refrigerator, please
readthe entire Use & CareGuide.
You may want to start with the "Normal Operating Sights & Sounds" section of the Guideto learn
more about what to expect during typical operation.
Pleaseregister your product. Youcan register onlineat www.electroluxusa.com, or you can simply
send in the Registration Card.
AndthankyouforchoosingElectro/ux.
Installation Checkoff List
Doors ice Maker
E]Handlesare secure and tight
E]Door seals completely to cabinet on all sides
E]Freezerdoor is level across the top
Leveling
E]Refrigerator is level,side to side and tilted
1/4inch (6 mm) front to back
E]Toegrille is properly attached to refrigerator
E]Cabinetis setting solid on all corners
Electrical Power
E]Housepower turned on
E]Refrigerator plugged in
E]House water supply connected to
refrigerator
E]No water leaks present at all connections -
recheck in 24 hours
E]lce Maker is turned ON
E]lce & WaterDispenser operates correctly
E]Front filter must beflush with filter housing
(some models)
FinalChecks
E]Shipping material removed
E]Fresh Foodand Freezertemperatures set
E]Crisper Humidity controls set
E]Registration Card sent in
Not satisfied with the installation of your refrigerator? L>Please contact the store where you purchased it.
P/N:241868803
 Loading...