

Page 1

X
user manual
notice d’utilisation
gebruiksaanwijzing
Ceramic glass hob
Table de cuisson vitro-
céramique
Glaskeramische kook-
plaat
EHS6646
Page 2

We were thinking of you
when we made this product
Page 3

electrolux 3
Welcome to the world of Electrolux
Thank you for choosing a first class
product from Electrolux, which hopefully
will provide you with lots of pleasure in
the future. The Electrolux ambition is to
offer a wide variety of quality products
that make your life more comfortable.
You will find some examples on the cover in this manual. Please take a few minutes to study this manual so that you
can take advantage of the benefits of
your new machine. We promise that it
will provide a superior User Experience
delivering Ease-of-Mind. Good luck!
Page 4

4 electrolux
T
1
Contents
Safety instructions 5
Description of the Appliance 7
Operating the appliance 10
Tips on Cooking and Frying 19
Cleaning and Care 22
What to do if … 24
Disposal 26
Installation Instructions 27
Guarantee/Customer Service 28
Service 30
Assembly 92
Rating Plate 95
he following symbols are used in this user information:
Warning! This must be read! Important advice for the safety of persons and
information on avoiding damage to the appliance
3 General information and advice
2 Information on environmental protection
z Dangerous voltage
Page 5

safety instructions electrolux 5
Safety instructions
Please comply with these instructions. If
you do not, any damage resulting is not
covered by the warranty.
Correct use
• This appliance is not intended for
use by children or other persons
whose physical, sensory or mental
capabilities or lack of experience and
knowledge prevents them from using the appliance safely without supervision or instruction by a
responsible person to ensure that
they can use the appliance safely.
• Do not leave the appliance unattended during operation.
• This appliance should be used only
for normal domestic cooking and frying of food.
• The appliance must not be used as a
work surface or as a storage surface.
• Additions or modifications to the appliance are not permitted.
• Do not place or store flammable liquids, highly inflammable materials or
fusible objects (e.g. plastic film, plastic, aluminium) on or near the appliance.
Children’s safety
• Small children must be kept away
from the appliance.
• Only let bigger children work on the
appliance under supervision.
• To avoid small children and pets unintentionally switching the appliance
on, we recommend activation of the
child safety device.
General safety
• The appliance may only be installed
and connected by trained, registered
service engineers.
• Built-in appliances may only be used
after they have built in to suitable
built-in units and work surfaces that
meet standards.
• In the event of faults with the appliance or damage to the glass ceramic
(cracks, scratches or splits), the appliance must be switched off and
disconnected from the electrical
supply, to prevent the possibility of
an electric shock.
• Repairs to the appliance must only
be carried out by trained registered
service engineers.
Safety during use
• Overheated fats and oils can ignite
very quickly. Warning! Fire hazard!
• There is the risk of burns from the
appliance if used carelessly.
• Remove stickers and film from the
glass ceramic.
• Cables from electrical appliances
must not touch the hot surface of the
appliance or hot cookware.
• Switch the cooking zones off after
each use.
Safety when cleaning
• For cleaning, the appliance must be
switched off and cooled down.
• For safety reasons, the cleaning of
the appliance with steam jet or highpressure cleaning equipment is not
permitted.
Page 6

6 electrolux safety instructions
How to avoid damage to the appliance
• The glass ceramic can be damaged
by objects falling onto it.
• The edge of the glass ceramic can
be damaged by being knocked by
the cookware.
• Cookware made of cast iron, cast
aluminium or with damaged bottoms
can scratch the glass ceramic if
pushed across the surface.
• Objects that melt and things that boil
over can burn onto the glass ceramic
and should be removed straightaway.
• To avoid damaging cookware and
glass ceramics, do not allow saucepans or frying pans to boil dry.
• Do not use the cooking zones with
empty cookware or without cookware.
Page 7
description of the appliance electrolux 7
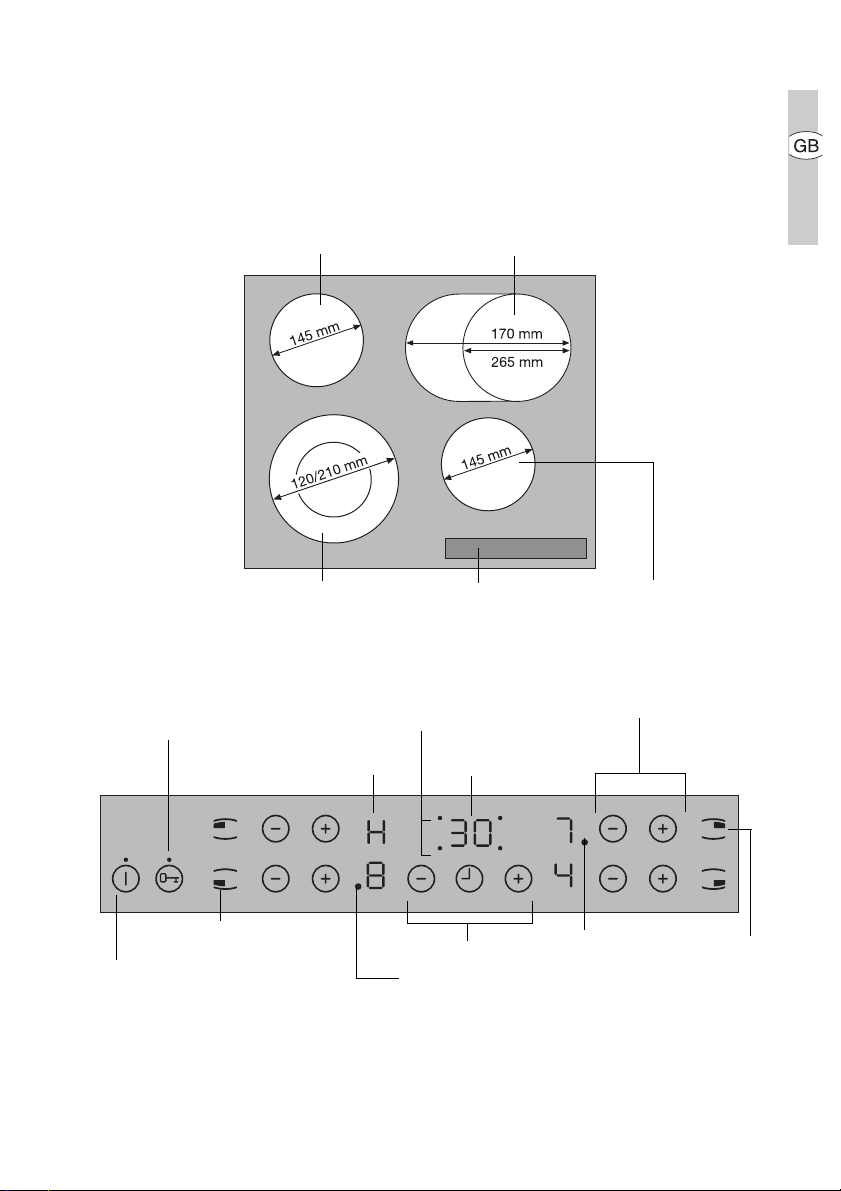
Description of the Appliance
Cooking surface layout
Single cooking zone
1200W
Double ring cooking zone
750/2200W
Control panel layout
Multi-purpose zone
1500/2400W
Control panel Single cooking zone
1200W
Lock
with pilot light
Outside ring
On/Off
On/Off
with power indicator
Cooking zone indicators
Timer function
Display
Double ring pilot light
Timer display
Timer
Heat setting selection
Multi-purpose
zone pilot light
Outside ring
On/Off
Page 8
8 electrolux description of the appliance
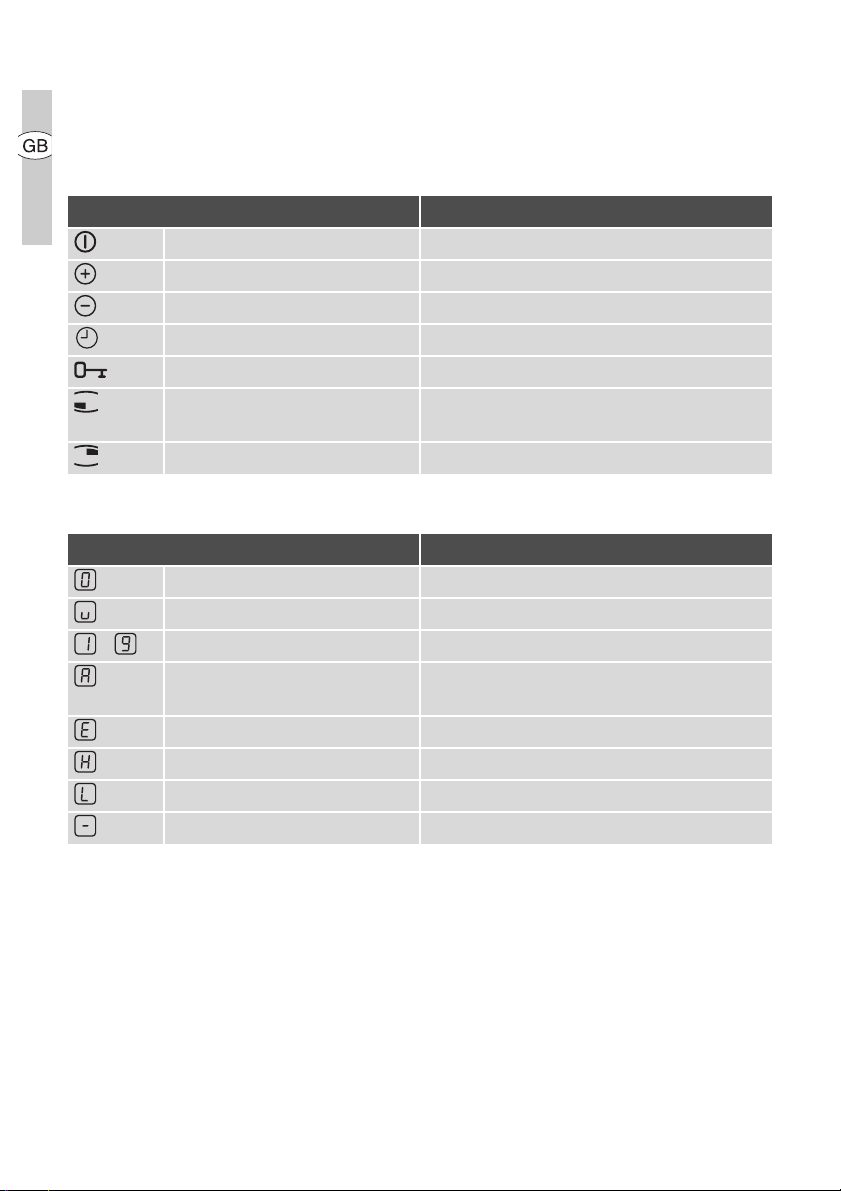
Touch Control sensor fields
The appliance is operated using Touch
Control sensor fields. Functions are
controlled by touching sensor fields and
Sensor field Function
On / Off To switch the appliance on and off
Increase settings Increasing heat setting/ time
Decrease settings Decreasing heat setting/time
confirmed by displays and acoustic signals.
Touch the sensor fields from above,
without covering other sensor fields.
Timer Timer selection
Lock Locking/unlocking the control panel
Double ring switch Switches outside ring
on and off
Multi-purpose zone switch To switch the outside ring on and off
Displays
Display Description
Cooking zone is switched off
Keep warm setting Keep warm setting is set
- Heat settings Heat setting is set
Automatic warm up function Automatic warm-up function is activat-
ed
Fault Malfunction has occurred
Residual heat Cooking zone is still hot
Child safety device Lock/child safety device is engaged
Automatic switch off Switch off is active.
Page 9

description of the appliance electrolux 9
Residual heat indicator
Warning! Risk of burns from residual heat. After being switched off, the
cooking zones need some time to
cool down. Look at the residual heat
indicator
.
Residual heat can be used for melting and keeping food warm.
Page 10
10 electrolux operating the appliance
Operating the appliance
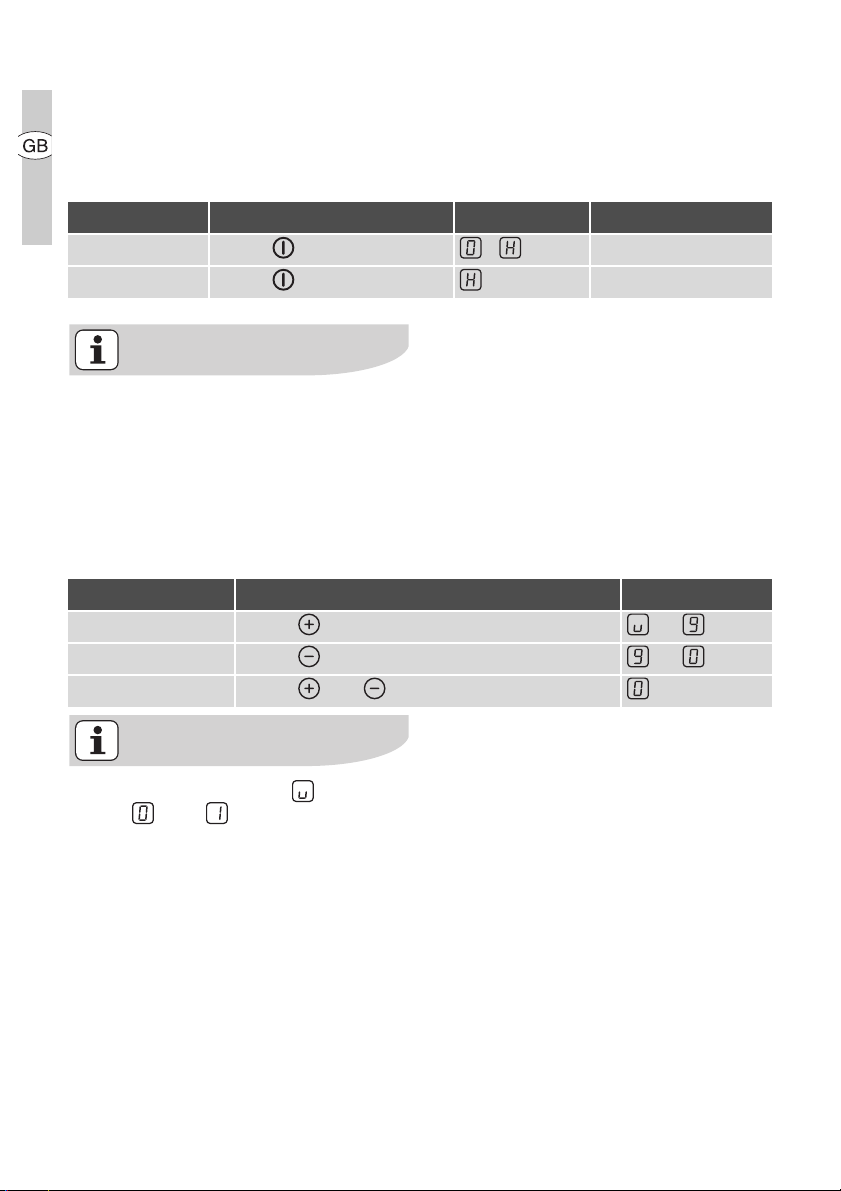
Switching the appliance on and off
Control panel Display Pilot light
Switch on Touch for 2 seconds / lights up
Switch off Touch for 1 second / none goes out
After switching on, within approx.
10 seconds a heat setting or a function must be set, otherwise the appliance automatically switches
itself off.
Setting the heat setting
Control panel Indicator
To increase To uc h to
To decrease To uc h to
To switch off Touch and at the same time
The keep warm setting lies between and . It is used to keep
food warm.
Page 11

operating the appliance electrolux 11
Switching the outside ring on and
off
By switching the outside rings on or off,
the effective heating surface can be
matched to the size of the cookware.
Before an outside ring can be
switched on, the inside ring must be
switched on.
Double ring cooking
zone
To switch on outside ring Touch for 1-2 seconds is lit
To switch off outside ring Touch for 1-2 seconds goes out
Roasting zone
To switch on outside ring Touch for 1-2 seconds is lit
To switch off outside ring Touch for 1-2 seconds goes out
Sensor field Pilot light
Sensor panel Power indicator
Locking/unlocking the control panel
The control panel, with the exception of
the “On/Off” sensor field, can be locked
at any time in order to prevent the settings being changed e.g. by wiping over
the panel with a cloth.
Control panel Display
Switch on Touch (for 5 seconds)
Switch off Touch previously set heat setting
When you switch the appliance off,
the locking function is automatically
switched off.
Page 12
12 electrolux operating the appliance
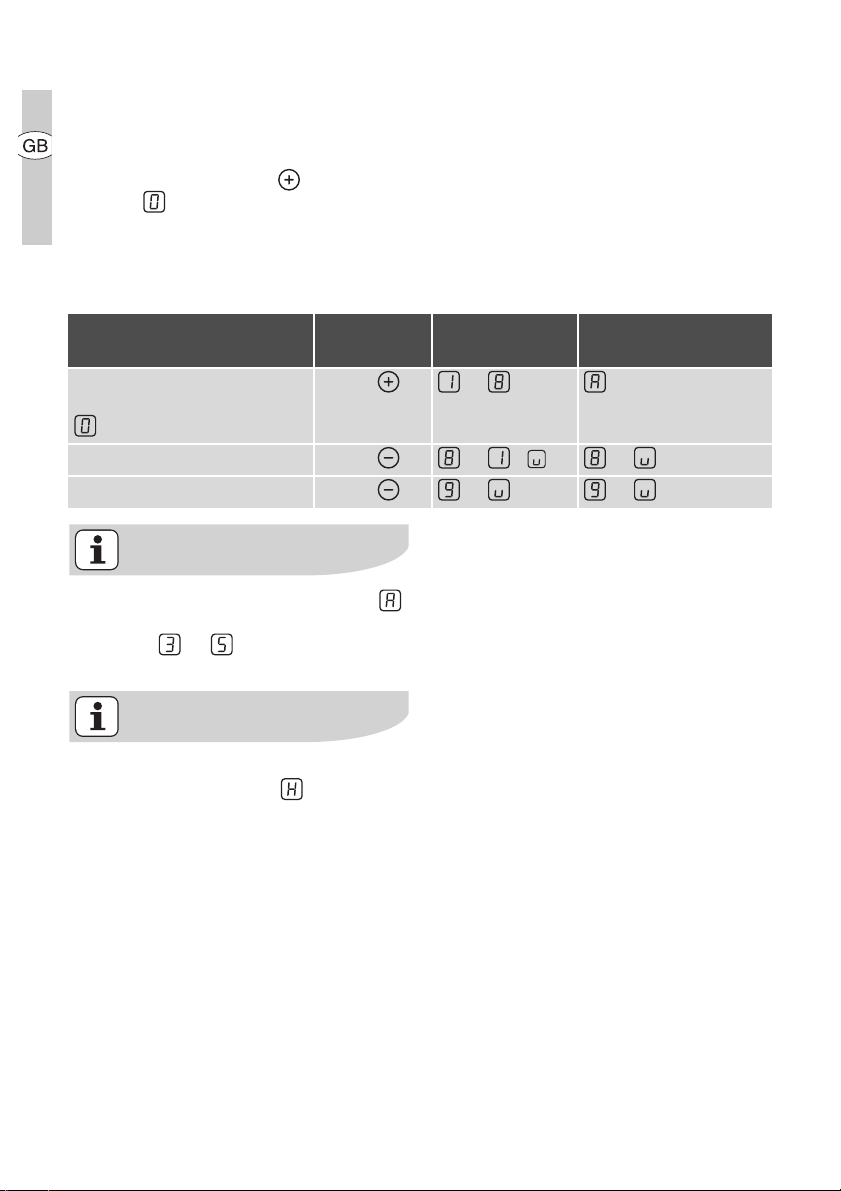
Using the automatic warm-up function
All cooking zones are equpped with an
automatic warm up function When setting a heat setting using , when starting from , the cooking zone switches
to full power for a certain amount of time
and then automatically switches back to
the heat setting set.
Switch on
Control
panel
Touch to (after 5 seconds)
possible heat
settings
Display
(only when starting at
)
Switch off Touch to / to
Not used Touch to to
If during the automatic warm up
a higher heat setting is selected,
e.g. from to , the automatic
warm up is adjusted.
If there is still residual heat on the
cooking zone (display ), the automatic warm up is not performed.
Page 13
operating the appliance electrolux 13
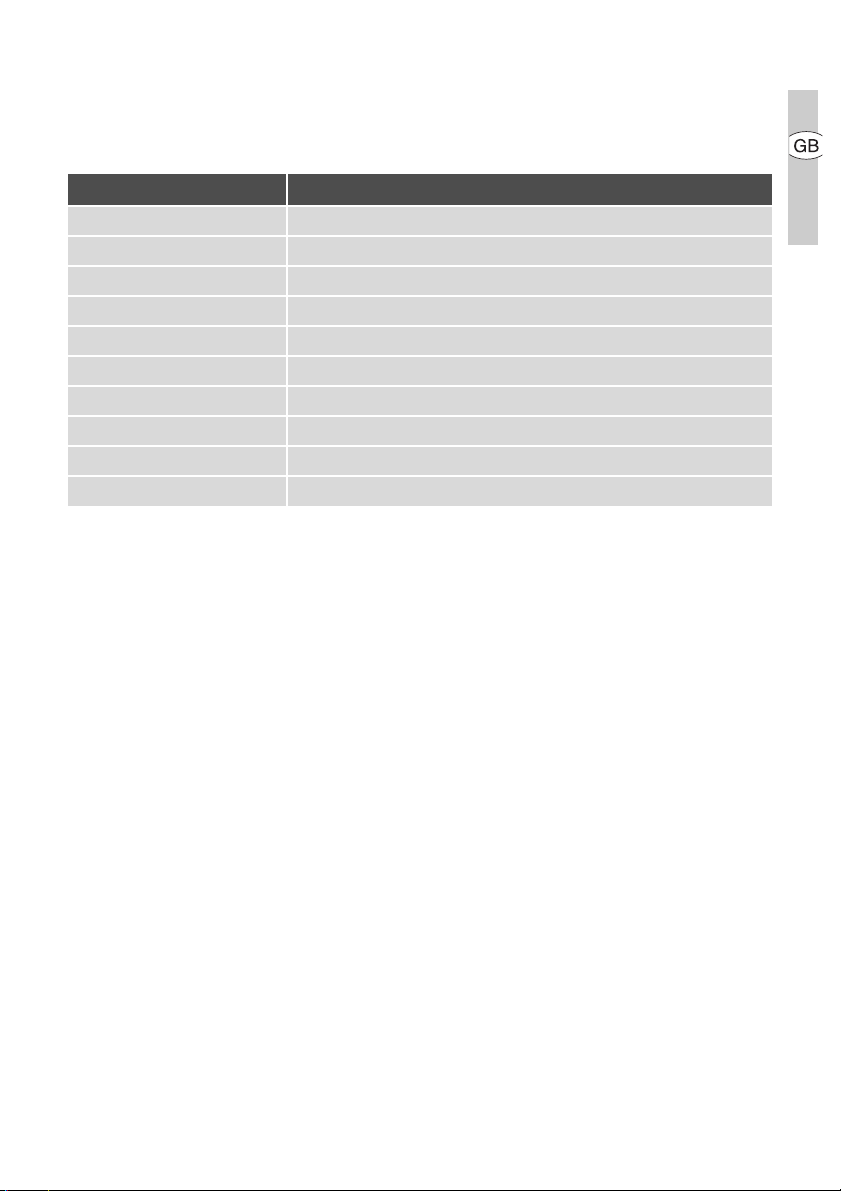
The length of time that the automatic
warm up function operates depends on
the heat setting selected.
Heat setting Length of the automatic warm up [min:sec]
v
1
2
3
4
5
6
7
8
9
0:30
1:00
1:40
4:50
6:30
10:10
2:00
3:30
4:30
---
Page 14
14 electrolux operating the appliance
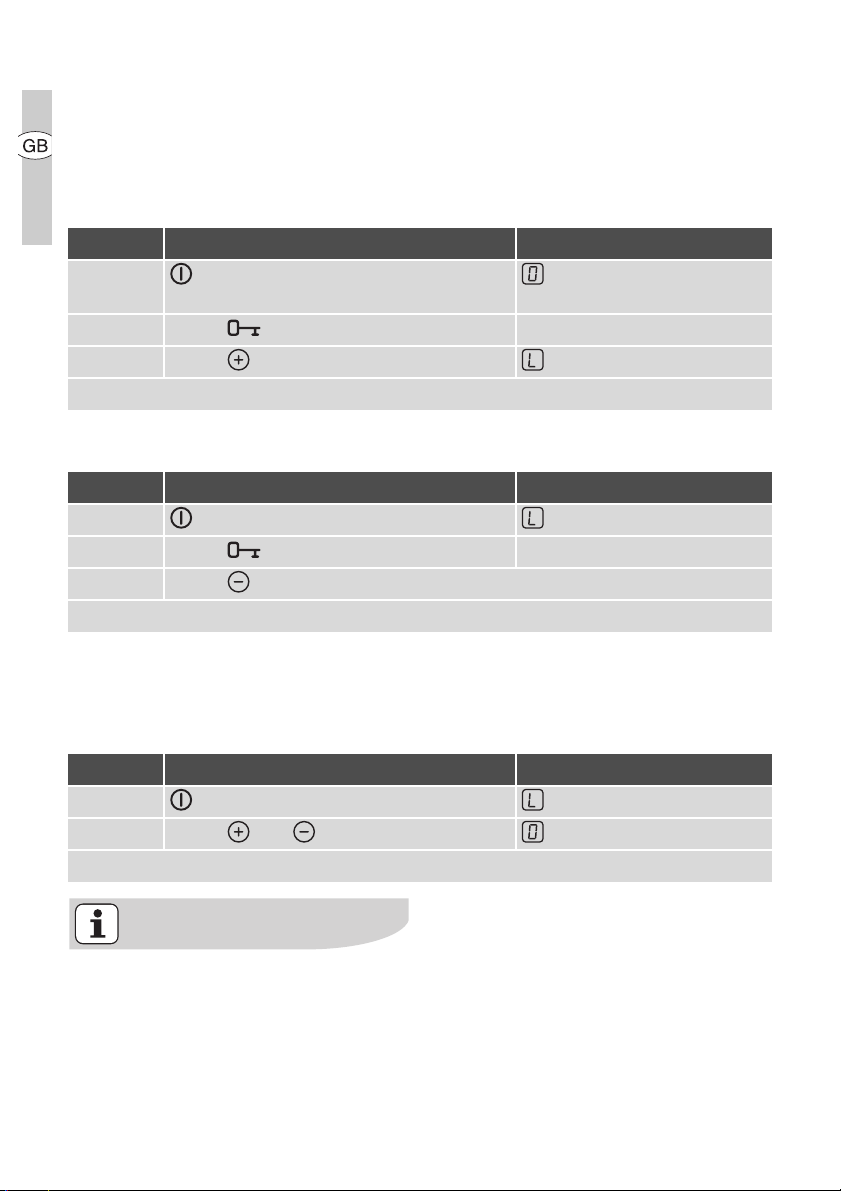
Using the child safety device
The child safety device prevents unintentional use of the appliance.
Setting the child safety device
Step Control panel Display/Signal
1. Switch on the appliance
(Do not set a heat setting)
2. Touch until the signal sounds Acoustic signal
3. Touch
Appliance switches off. The child safety device is engaged.
Releasing the child safety device
Step Control panel Display/Signal
1. Switch on the appliance
2. Touch until the signal sounds Acoustic signal
3. Touch
Appliance switches off. The child safety device is released.
Overriding the child safety device
The child safety device can be released
in this way for a single cooking session;
it remains activated afterwards.
Step Control panel Display/Signal
1. Switch on the appliance
2. Touch and at the same time / acoustic signal
Until the appliance is next switched off, it can be used as normal.
After overriding the child safety device, a heat setting or a function
must be set within
approx. 10 seconds, otherwise the
appliance automatically switches itself off.
Page 15

operating the appliance electrolux 15
Using the timer
Function Condition Outcome after the
time has elapsed
Automatic cut-out a heat setting is set acoustic signal
00 flashes
Cooking zone switches
off
Countdown timer cooking zones not in use acoustic signal
00 flashes
If a heat setting is set on this cooking zone in addition to a countdown
timer, the cooking zone is switched
off after the time set has elapsed.
If a cooking zone is switched off, the
timer function set is also switched
off.
Page 16

16 electrolux operating the appliance
Selecting a cooking zone
Step Control panel Display
1. Touch once Pilot light of the first cooking
zone flashes
2. Touch once Pilot light of the second cook-
ing zone flashes
3. Touch once Pilot light of the third cooking
zone flashes
4. Touch once Pilot light of the fourth cooking
zone flashes
If the pilot light is flashing more
slowly, the heat setting can be set or
modified.
If other timer functions are set, after
a few seconds the shortest remaining time of all the timer functions is
displayed and the corresponding pilot light flashes.
Page 17
operating the appliance electrolux 17
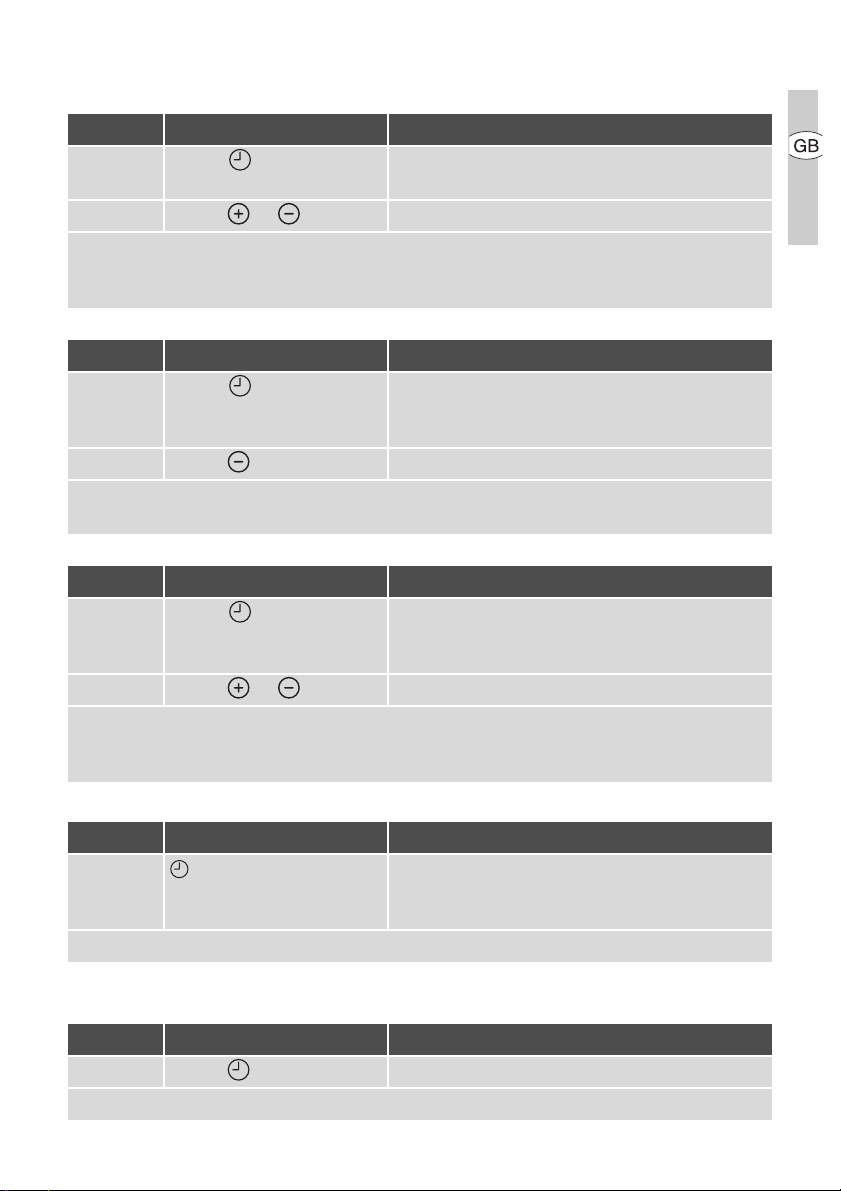
Setting the time
Step Control panel Indicator
1. Select cooking zone Pilot light for the cooking zone selected
flashes
2. Touch or 00 to 99 minutes
After a few seconds the pilot light flashes more slowly.
The time is set.
The time counts down.
Switching off the timer function
Step Control panel Indicator
1. Select cooking zone Pilot light of cooking zone selected flashes
faster
Time remaining is displayed
2. Touch The time remaining counts backwards to 00.
The pilot light goes out.
The Timer function for the selected cooking zone is switched off.
Changing the time
Step Control panel Indicator
1. Select cooking zone Pilot light of the selected cooking zone
flashes faster
Time remaining is displayed
2. Touch or 01 to 99 minutes
After a few seconds, the pilot light flashes more slowly.
The time is set.
The time counts down.
Displaying the time remaining for a cooking zone
Step Control panel field Display
1. Select cooking zone Pilot light of the cooking zone selected
flashes faster
The time remaining is displayed
After a few seconds the pilot light flashes more slowly.
Switching off the acoustic signal
Step Control panel field Acoustic signal
1. Touch Acoustic signal to acknowledge.
Acoustic signal stops.
Page 18
18 electrolux operating the appliance
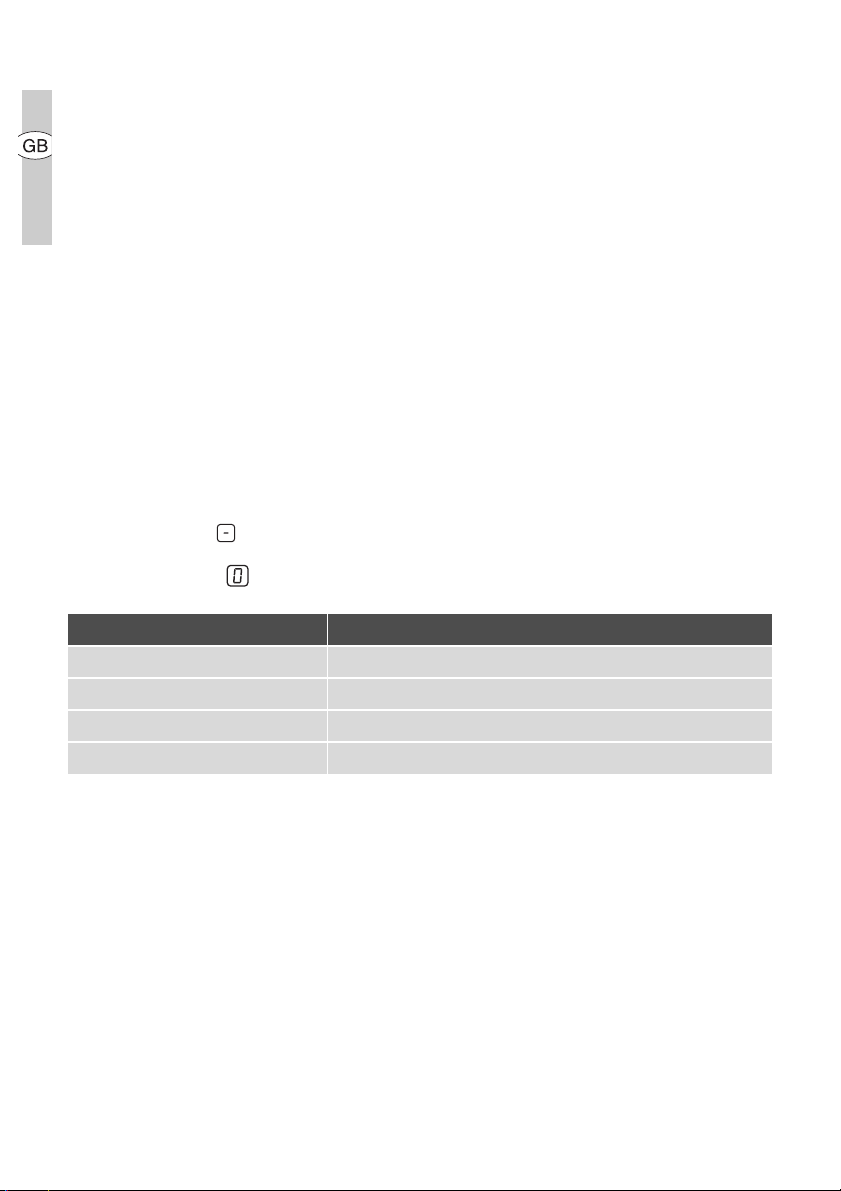
Automatic switch off
• If all cooking zones are switched off,
the cooking surface automatically
Cooking surface
• If after switching on the cooking surface, a heat setting is not set for a
cooking zone within approx. 10 seconds, the cooking surface automatically switches itself off.
• If one or more sensor fields are covered by objects (a pan, cloths, etc.)
for longer than approx. 10 seconds,
a signal sounds and the cooking surface switches off automatically.
switches itself off after approx. 10
seconds.
Control panel
• When the appliance is switched off, if
one or more of the sensor fields on
the control panel are covered for
more that 10 seconds, an acoustic
signal sounds. The acoustic signal
switches itself off automatically when
the sensor fields are no longer covered.
Cooking zones
• If one of the cooking zones is not
switched off after a certain time, or if
the heat setting is not modified, the
relevant cooking zone switches off
automatically. is displayed. Before
being used again, the cooking zone
must be set to .
Heat setting Switches off after
v, 1 - 2 6 hours
3 - 4 5 hours
5 4 hours
6 - 9 1.5 hours
Page 19

tips on cooking and frying electrolux 19
Tips on Cooking and Frying
Information on acrylamides
According to the latest scientific
knowledge, intensive browning of
food, especially in products containing starch, can constitute a
health risk due to acrylamides.
Therefore we recommend cooking
at the lowest possible temperatures
and not browning foods too much.
Cookware
• You can recognise good cookware
from the bottoms of the pans. The
bottom should be as thick and flat as
possible.
• Cookware made of enamelled steel
or with aluminium or copper bottoms
can leave discolorations on the glass
ceramic surface which are difficult or
impossible to remove.
Page 20
20 electrolux tips on cooking and frying
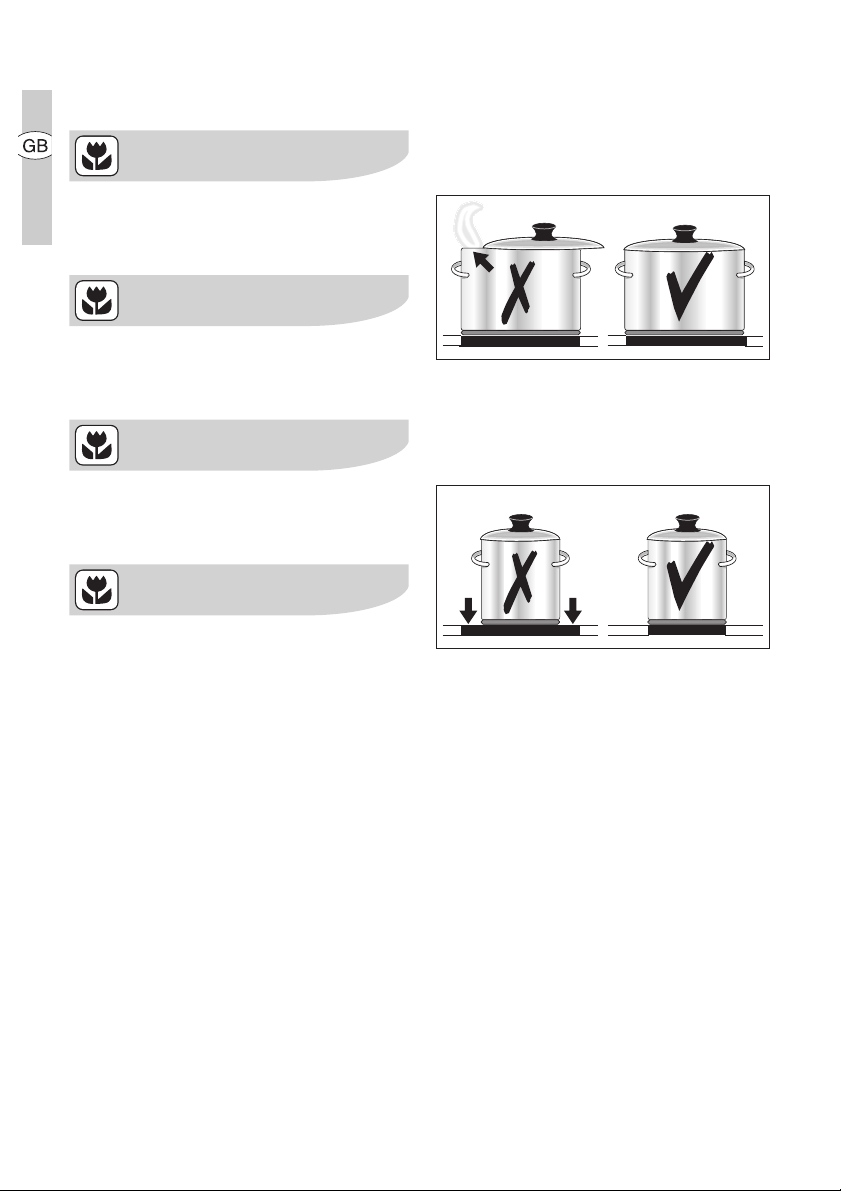
Energy saving
Always place cookware on the
cooking zone before it is switched
on.
If possible, always place lids on the
pans.
Switch cooking zones off before the
end of the cooking time, to take advantage of residual heat.
Bottom of pans and cooking zones
should be the same size.
Page 21
tips on cooking and frying electrolux 21
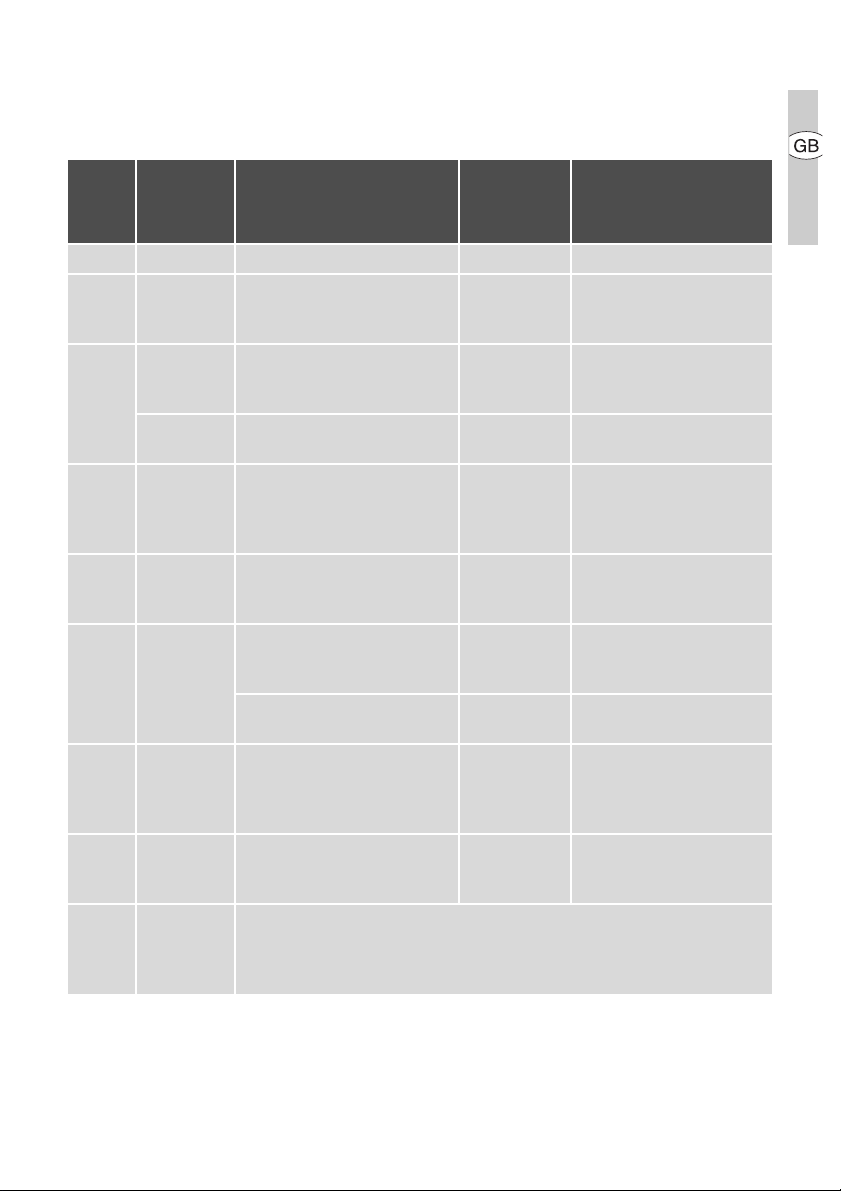
Examples of cooking applications
The information given in the following table is for guidance only.
Heat
Cooking-
setting
process
0 Residual heat, Off position
Keeping
V
1-2
2-3
3-4
4-5
6-7
7-8
9
food
warm
Melting
Solidi-
fying
Simmer-
ing on low
heat
Steaming
Braising
Boiling
Gentle
Frying
Heavy
Frying
Boiling
Searing
Deep
frying
suitable for
Keeping cooked foods warm as required Cover
Hollandaise sauce,
melting butter, chocolate,
gelatine
Fluffy omelettes, baked eggs 10-40 mins. Cook with lid on
Simmering rice and milk-
based dishes
Heating up ready-cooked
meals
Steaming vegetables, fish
braising meat
Steaming potatoes 20-60 mins.
Cooking larger quantities of
food, stews and soups
Frying escalopes, veal cor-
don bleu, cutlets, rissoles,
sausages, liver, roux, eggs,
pancakes, doughnuts
Hash browns, loin steaks,
steaks, Flädle (pancakes for
garnishing soup)
Boiling large quantities of water, cooking pasta, searing meat (goulash,
pot roast), deep frying chips
Cooking
time
5-25 mins. Stir occasionally
25-50 mins.
20-45 mins.
60-150 mins.
Steady frying
5-15 mins.
per pan
much liquid as rice, stir
With vegetables add only
a little liquid (a few table-
Use only a little liquid, e.
g.: max.
Up to 3 l liquid plus ingre-
Tips/Hints
Add at least twice as
milk dishes part way
through cooking
spoons)
¼
l water for
750 g potatoes
dients
Turn halfway through
cooking
Turn halfway through
cooking
Page 22
22 electrolux cleaning and care
Cleaning and Care
Take care! Risk of burns from residual heat.
Warning! Sharp objects and abrasive cleaning materials will damage
the appliance. Clean with water and
washing up liquid.
Warning! Residues from cleaning
agents will damage the appliance.
Remove residues with water and
washing up liquid.
Cleaning the appliance after each use
1. Wipe the appliance with a damp
cloth and a little washing up liquid.
2. Rub the appliance dry using a clean
cloth.
Page 23
cleaning and care electrolux 23
Removing deposits
1. Place a scraper on the glass ceramic
surface at an angle.
2. Remove residues by sliding the
blade over the surface.
3. Wipe the appliance with a damp
cloth and a little washing up liquid.
4. Rub the appliance dry using a clean
cloth.
im-
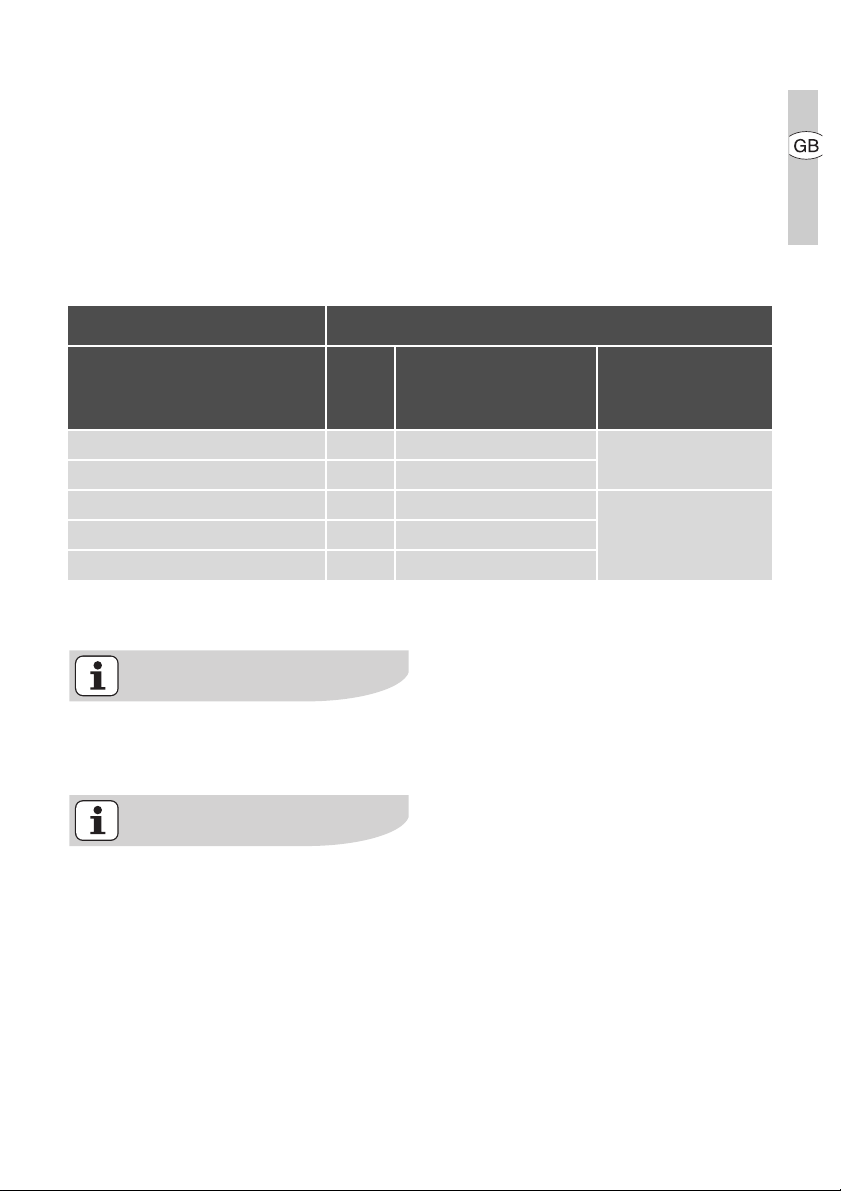
Type of dirt
medi-
ately
sugar, food containing sugar yes --plastics, tin foil yes --limescale and water rings --- yes
fat splashes --- yes
shiny metallic discolouration --- yes
*Scrapers and cleaners for glass ceramic and
stainless steel can be purchased in specialized
shops
when the appliance
has cooled down
Remove
using
a scraper*
cleaner for glass ce-
ramic or stainless
steel*
Remove stubborn residues with a
cleaner for glass ceramic or stainless steel.
Scratches or dark stains on the
glass ceramic that cannot be removed do not however affect the
functioning of the appliance.
Page 24
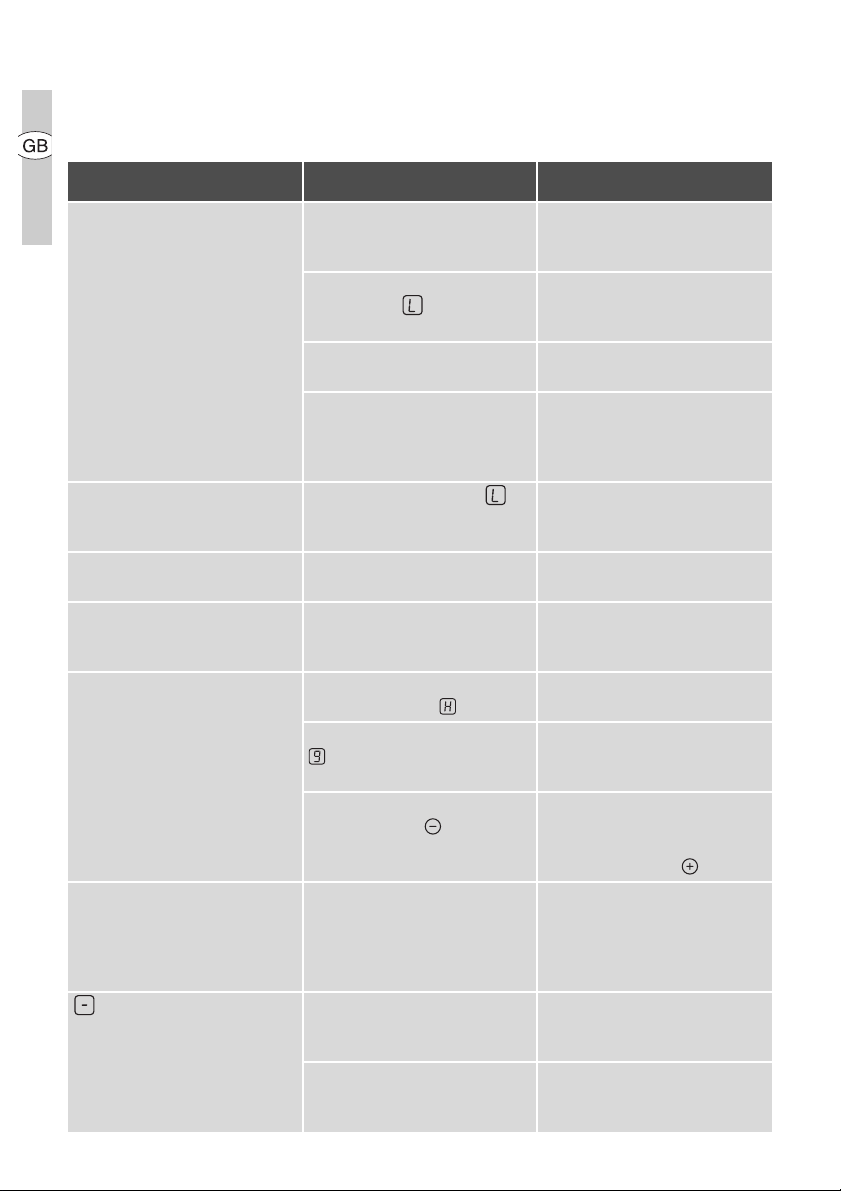
24 electrolux what to do if …
What to do if …
Problem Possible cause Remedy
The cooking zones will not
switch on or are not functioning
Acoustic signal sounds when
appliance is switched off
The residual heat indicator is
not displaying anything
The automatic warm up function is not switching itself on
Acoustic signal sounds and
appliance switches itself on
and then off again; after 5 seconds another acoustic signal
sounds
is lit Overheating protection for the
More than 10 seconds have
passed since the appliance
was switched on
The child safety device is
switched on
Several sensor fields were
touched at the same time
Automatic switch off has been
triggered
The lock is switched on Switch off the lock (See the
The control panel is wholly or
partly covered by objects.
The cooking zone was only on
for a short time and is therefore
not hot
There is still residual heat on
the cooking zone
The highest heat setting is set The highest heat setting has
The heat setting was set using
the sensor field
The On/Off sensor field has
been covered up, e.g. by a
cloth
cooking zone has been triggered
Automatic switch off has been
triggered
Switch the appliance on again.
Deactivate the child safety device (See the section “Child
safety device”)
Only touch one sensor field
Remove any objects (pan,
cloths, etc.) that are lying on
the control panel. Switch the
appliance on again
section “Locking/unlocking
the control panel”)
Remove objects.
If the cooking zone is supposed to be hot, call the Customer Service Department.
Let the cooking zone cool
down
the same power as the automatic warm up function
1.
Switching off the cooking
zone
1.
Set the cooking zone using
the sensor field
Do not place any objects on
the control panel
Switch off the cooking zone.
Switch the cooking zone on
again
Switch off the cooking zone.
Switch the cooking zone on
again
Page 25
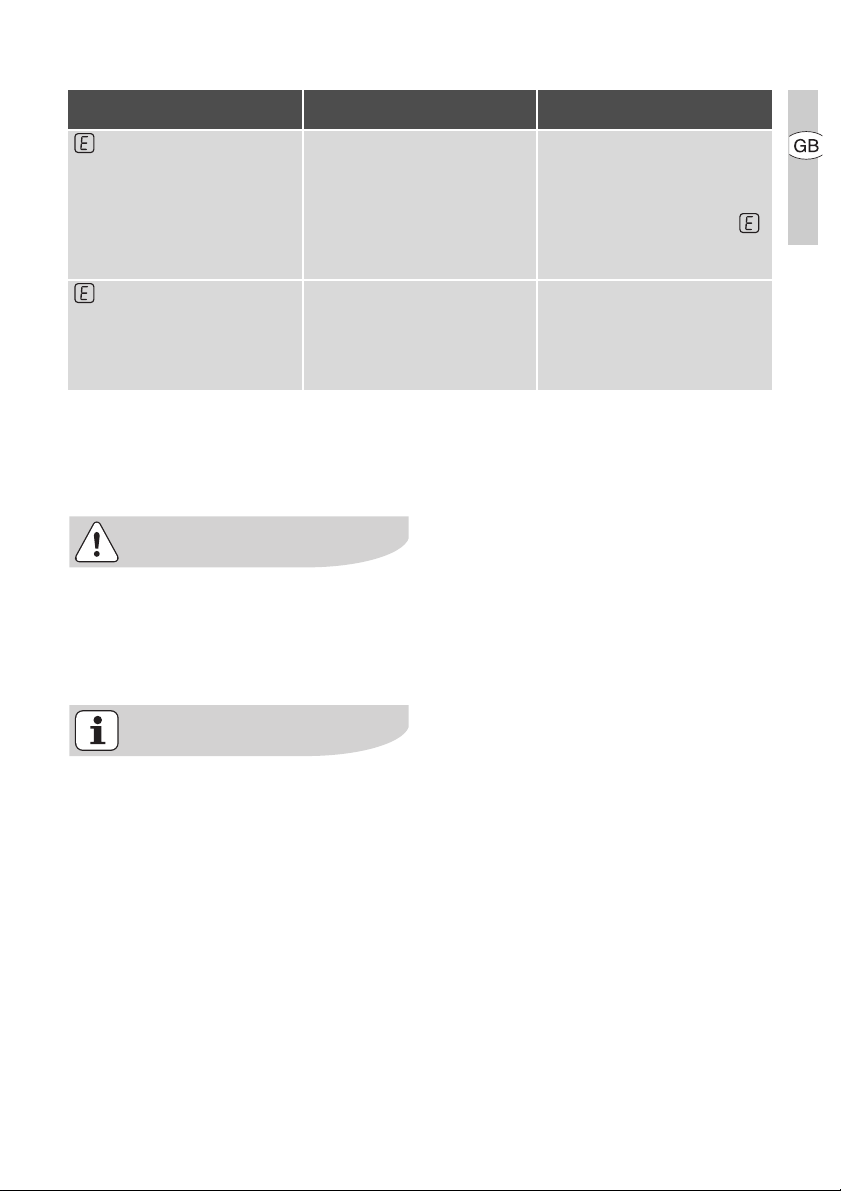
what to do if … electrolux 25
Problem Possible cause Remedy
and number are displayed Electronics fault Disconnect the appliance from
and minus are displayed Light rays that are too strong
on the control panel, for example bright sunlight
the electrical supply for a few
minutes (Take the fuse out of
the house’s wiring system)
If after switching on again,
is displayed again, call the
customer service department
Briefly shade the control panel,
for example with the hand
Acoustic signal sounds, appliance switches itself off Switch
appliance on (again)
If you are unable to remedy the
problem by following the above
suggestions, please contact your
dealer or the Customer Care Department.
Warning! Repairs to the appliance
are only to be carried out by qualified service engineers. Considerable danger to the user may result
from improper repairs.
If the appliance has been wrongly
operated, the visit from the customer service technician or dealer may
not take place free of charge, even
during the warranty period.
Page 26

26 electrolux disposal
Disposal
Packaging material
The packaging materials are envi-
ronmentally friendly and can be recycled. The plastic components are
identified by markings, e.g. >PE<,
>PS<, etc. Please dispose of the
packaging materials in the appropriate container at the community
waste disposal facilities.
Old appliance
The symbol
its packaging indicates that this
product may not be treated as
household waste. Instead it shall be
handed over to the applicable collection point for the recycling of
electrical and electronic equipment.
By ensuring this product is disposed of correctly, you will help prevent potential negative
consequences for the environment
and human health, which could otherwise be caused by inappropriate
waste handling of this product. For
more detailed information about recycling of this product, please contact your local city office, your
household waste disposal service
or the shop where you purchased
the product.
W on the product or on
Page 27

installation instructions electrolux 27
Installation Instructions
Safety instructions
Warning! This must be read!
The laws, ordinances, directives and
standards in force in the country of use
are to be followed (safety regulations,
proper recycling in accordance with the
regulations, etc.)
Installation may only be carried out by a
qualified electrician.
The minimum distances to other appliances and units are to be observed.
Anti-shock protection must be provided
by the installation, for example drawers
may only be installed with a protective
floor directly underneath the appliance.
The cut surfaces of the worktop are to
be protected against moisture using a
suitable sealant.
The sealant seals the appliance to the
work top with no gap.
Do not use silicon sealant between the
appliance and the work top.
Avoid installing the appliance next to
doors and under windows. Otherwise
hot cookware may be knocked off the
rings when doors and windows are
opened.
z
Risk of injury from electrical current.
• The electrical mains terminal is live.
• Make electrical mains terminal free of
voltage.
• Follow connection schematic.
• Observe electrical safety rules.
• Ensure anti-shock protection by in-
stalling correctly.
• The appliance must be connected to
the electrical supply by a qualified
electrician.
z
Risk of injury from electrical current.
• Loose and inappropriate plug and
socket connections can make the
terminal overheat.
• Have the clamping connections correctly installed by a qualified electrician.
• Use strain relief clamp on cable.
• In the event of single-phase or two-
phase connection, the appropriate
mains cable of type H05BB-F Tmax
90°C(or higher) must be used.
• If this appliance’s mains cable is
damaged, it must be replaced by a
special cable (type H05BB-F Tmax
90°C; or higher). The latter is available from the Customer Care Department.
A device must be provided in the electrical installation which allows the appliance to be disconnected from the mains
at all poles with a contact opening width
of at least 3 mm.
Suitable isolation devices include line
protecting cut-outs, fuses (screw type
fuses are to be removed from the holder), earth leakage trips and contactors.
Page 28

28 electrolux guarantee/customer service
Guarantee/Customer Service
European Guarantee
This appliance is guaranteed by Electrolux in
each of the countries listed at the back of this
user manual, for the period specified in the appliance guarantee or otherwise by law. If you move
from one of these countries to another of the
countries listed below the appliance guarantee
will move with you subject to the following qualifications:
• The appliance guarantee starts from the date
• The appliance guarantee is for the same pe-
• The appliance guarantee is personal to the
• The appliance is installed and used in ac-
• The appliance is installed in accordance with
The provisions of this European Guarantee do
not affect any of the rights granted to you by law.
you first purchased the appliance which will
be evidenced by production of a valid purchase document issued by the seller of the
appliance.
riod and to the same extent for labour and
parts as exists in your new country of residence for this particular model or range of
appliances.
original purchaser of the appliance and cannot be transferred to another user.
cordance with instructions issued by Electrolux and is only used within the home, i.e. is
not used for commercial purposes.
all relevant regulations in force within your
new country of residence.
Page 29

guarantee/customer service electrolux 29
Page 30
30 electrolux service
Service
In the event of technical faults, please
first check whether you can remedy the
problem yourself with the help of the operating instructions (section “What to do
if…”).
If you were not able to remedy the problem yourself, please contact the Customer Care Department or one of our
service partners.
In order to be able to assist you quickly,
we require the following information:
– Model description
– Product number (PNC)
– Serial number (S No.)
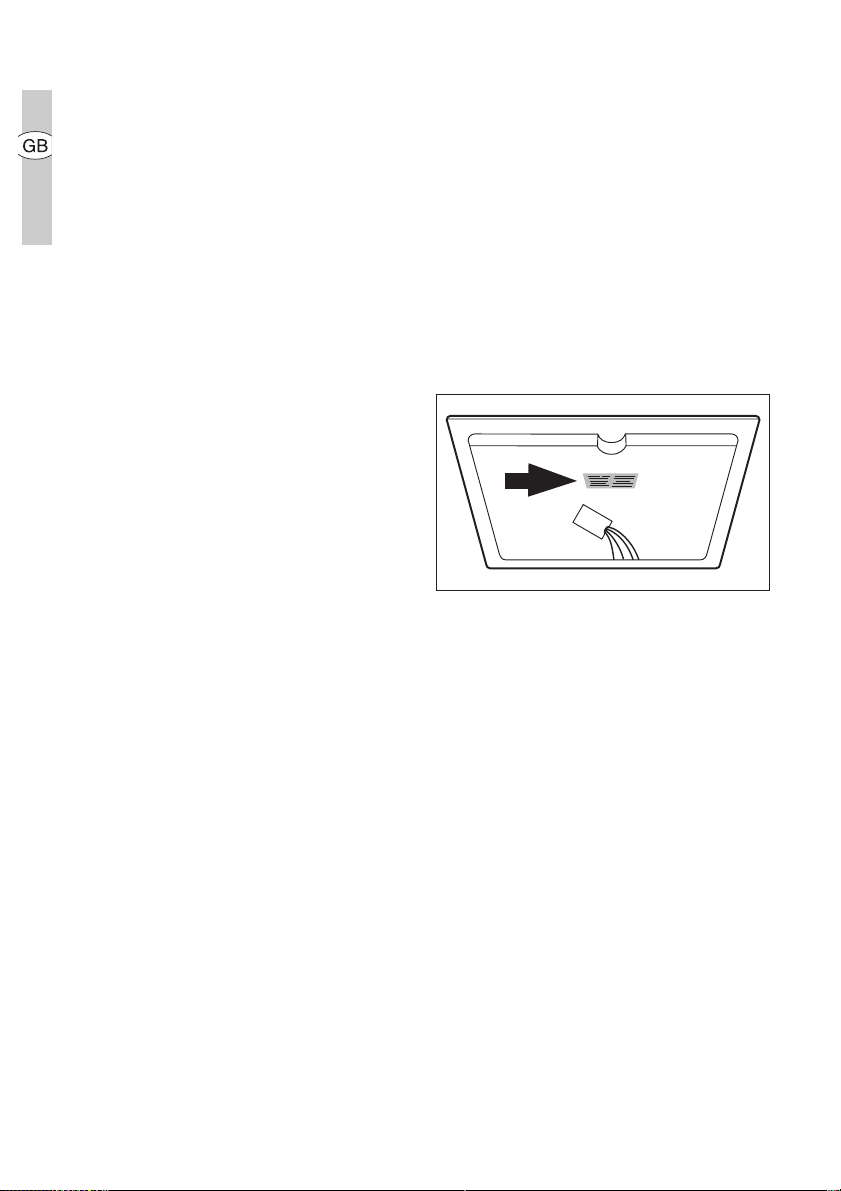
(for numbers see rating plate)
– Typ e o f f au lt
– Any error messages displayed by the
appliance
– three digit letter-number combina-
tion for glass ceramic
So that you have the necessary reference numbers from your appliance at
hand, we recommend that you write
them in here:
Model description: ..........................
...........
PNC: ..........................
...........
S No: ..........................
...........
Page 31

Bienvenue dans le monde d’Electrolux
Nous vous remercions de la confiance
que vous nous témoignez en choisissant un appareil Electrolux qui, nous
l'espérons, vous accompagnera agréablement au fil du temps. Au travers
d’une large gamme de produits de qualité, la volonté d’Electrolux est de vous
rendre la vie plus agréable. Vous pouvez
en voir quelques exemples sur la couverture de cette notice. Nous vous invitons à prendre quelques minutes pour
découvrir ce guide qui vous permettra
de profiter au mieux de tous les avantages de votre nouvel appareil.
Nous vous assurons que son utilisation
vous offrira jour après jour satisfaction et
sérénité.
A bientôt.
electrolux 31
Page 32

32 electrolux
1
Sommaire
Avertissements importants 33
Description de l'appareil 35
Utilisation de l’appareil 38
Conseils de cuisson 49
Nettoyage et entretien 51
Que faire si … 53
Protection de l’environnement 55
Instructions d'installation 56
Garantie/Si vous devez nous
contacter 57
Service après-vente 59
Montage 92
Plaque signalétique 95
Les symboles suivants sont utilisés dans ce guide d'utilisateur :
Attention ! A lire impérativement ! Remarques importantes relatives à la
sécurité des personnes et informations destinées à prévenir les dommages
causés à l'appareil
3 Remarques générales et recommandations
2 Remarques relatives à la protection de l'environnement
z Risque dû à l'alimentation électrique
Page 33

Avertissements importants
Pour ne pas perdre le bénéfice de la garantie en cas de panne, veuillez observer ces recommandations.
Utilisation réglementaire
• Les personnes (y compris les enfants) qui, en raison de leurs capacités physiques, sensorielles ou
mentales, de leur inexpérience ou de
leur méconnaissance, ne sont pas
en mesure d’utiliser l’appareil en toute sécurité, doivent uniquement se
servir de l’appareil sous la surveillance ou avec les instructions d’une
personne responsable.
• Ne jamais laisser l’appareil sans surveillance pendant le fonctionnement.
• Cet appareil est uniquement destiné
à l’usage domestique habituel et
pour faire cuire et rôtir des aliments.
• L’appareil ne peut en aucun cas servir de plan de travail ou de support.
• Ne pas procéder à des transformations ou à modifications de l’appareil.
• Ne pas placer de liquides susceptibles de brûler, de matériaux facilement inflammables ou d’objets
susceptibles de fondre (par ex. du
papier aluminium, des matières synthétiques ou de l’aluminium) sur ou à
promité de l’appareil.
Sécurité enfants
• Eviter systématiquement que les enfants en bas âge s’approchent de
l’appareil.
avertissements importants electrolux 33
• Les enfants plus âgés ne doivent
être autorisés à utiliser l’appareil
qu’accompagnés et sous surveillance.
• Afin d’éviter une mise en marche involontaire par des enfants en bas
âge ou des animaux domestiques,
nous vous conseillons d’activer le
verrouillage parental.
Consignes générales de sécurité
• Le montage et le branchement de
l’appareil sont du ressort exclusif de
spécialistes agréés.
• Les appareils encastrables ne peuvent être mis en fonctionnement
qu’après avoir été montés dans des
armoires et des plans de travail homologués et adaptés.
• En cas de panne de l’appareil ou de
dommages à la vitrocéramique (cassures, fêlures ou déchirures), mettre
l’appareil hors et débranchez-le pour
éviter un éventuel choc électrique.
• Le montage et le branchement de
l’appareil sont du ressort exclusif de
spécialistes agréés.
Précautions d’utilisation.
• La graisse et l’huile trop chaudes
sont facilement inflammables.
Attention! Danger d’incendie!
• Attention aux risques de brûlures lors
de l’utilisation de l’appareil.
• Retirer les étiquettes et les films protecteurs de la vitrocéramique.
• S’assurer que les câbles d’appareils
électriques n’entrent pas en contact
avec les surfaces brûlantes de l’appareil ou les récipients brûlants.
• Mettre les foyers hors fonctionnement après chaque utilisation.
Page 34

34 electrolux avertissements importants
Précautions de nettoyage
• Mettre l’appareil hors fonctionnement et le laisser refroidir avant de le
nettoyer.
• Pour des raisons de sécurité, il est
interdit de nettoyer l’appareil avec un
jet à vapeur ou un appareil à haute
pression.
Comment éviter d’endommager
l’appareil
• Des objets peuvent endommager la
vitrocéramque en tombant.
• Les plats de cuisson peuvent endommager la vitrocéramique en
heurtant le bord.
• Les plats de cuisson en fonte ou
pourvus d’un fonds abîmé peuvent
érafler la vitrocéramique lorsqu’on
les déplace.
• Les objets susceptibles de fondre ou
les produits ayant débordé peuvent
se consumer sur la vitrocéramique et
doivent par conséquent être immédiatement enlevés.
• Eviter de faire chauffer à vide les casseroles et les poêles. Cela peut endommager l'ustensile de cuisson ou
la vitrocéramique.
• Ne pas placer de plats de cuisson vides sur les zones de cuisson et ne
pas mettre ces dernières en fonctionnement sans récipient.
Page 35
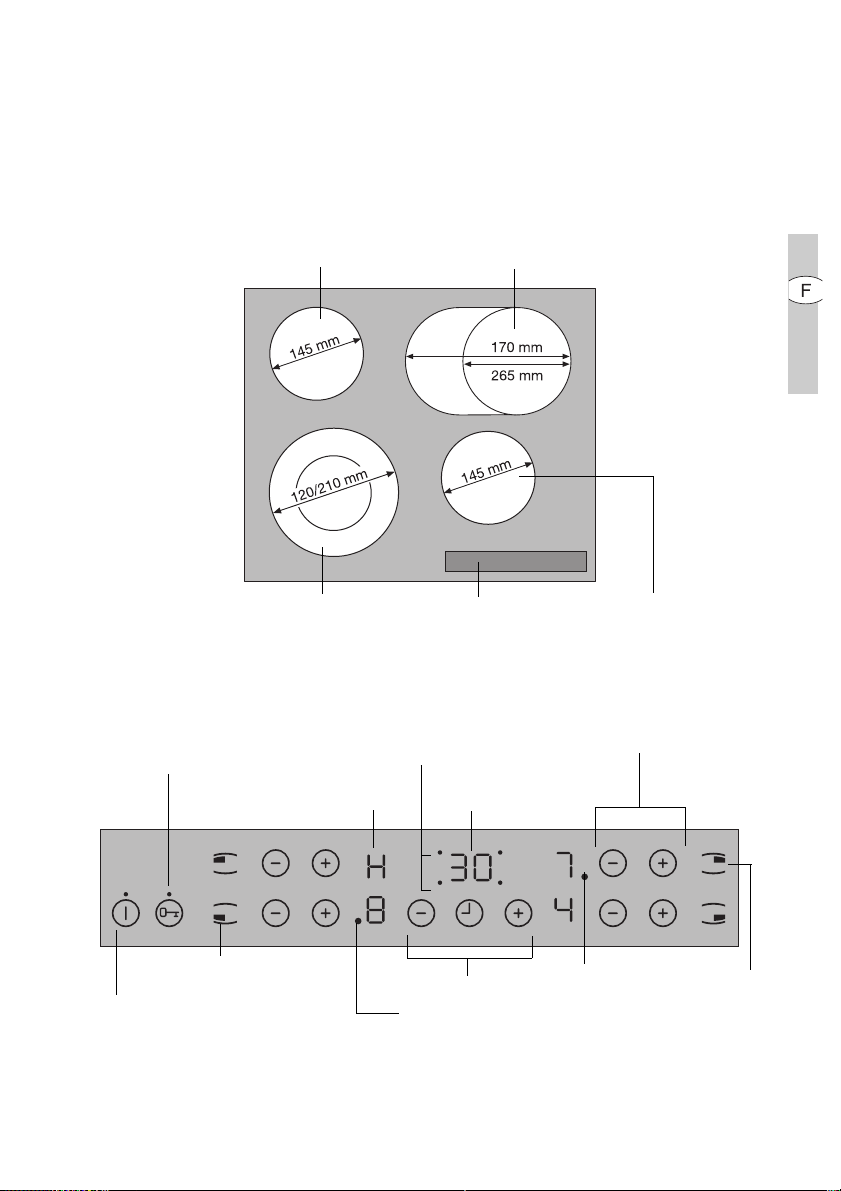
Description de l'appareil
Equipement du plan de cuisson
description de l'appareil electrolux 35
Zone de cuisson
1200W
Zone de cuisson double circuit
750/2200W
Bandeau de commande
Verrouillage
avec voyant de contrôle
Zone de rôtissage
1500/2400W
Bandeau de comman-
Indicateurs zones de cuisson
Fonction Minuteur
Voyant
Affichage Minuteur
de
Zone de cuisson
Sélection du niveau
1200W
de cuisson
Circuit de cuisson extérieur
Marche/Arrêt
Marche/Arrêt
avec voyant de contrôle
Minuteur
Voyant de contrôle
zone de rôtissage
Voyant de contrôle
double zone de cuisson
Circuit de
cuisson extérieur Marche/
Arrêt
Page 36
36 electrolux description de l'appareil
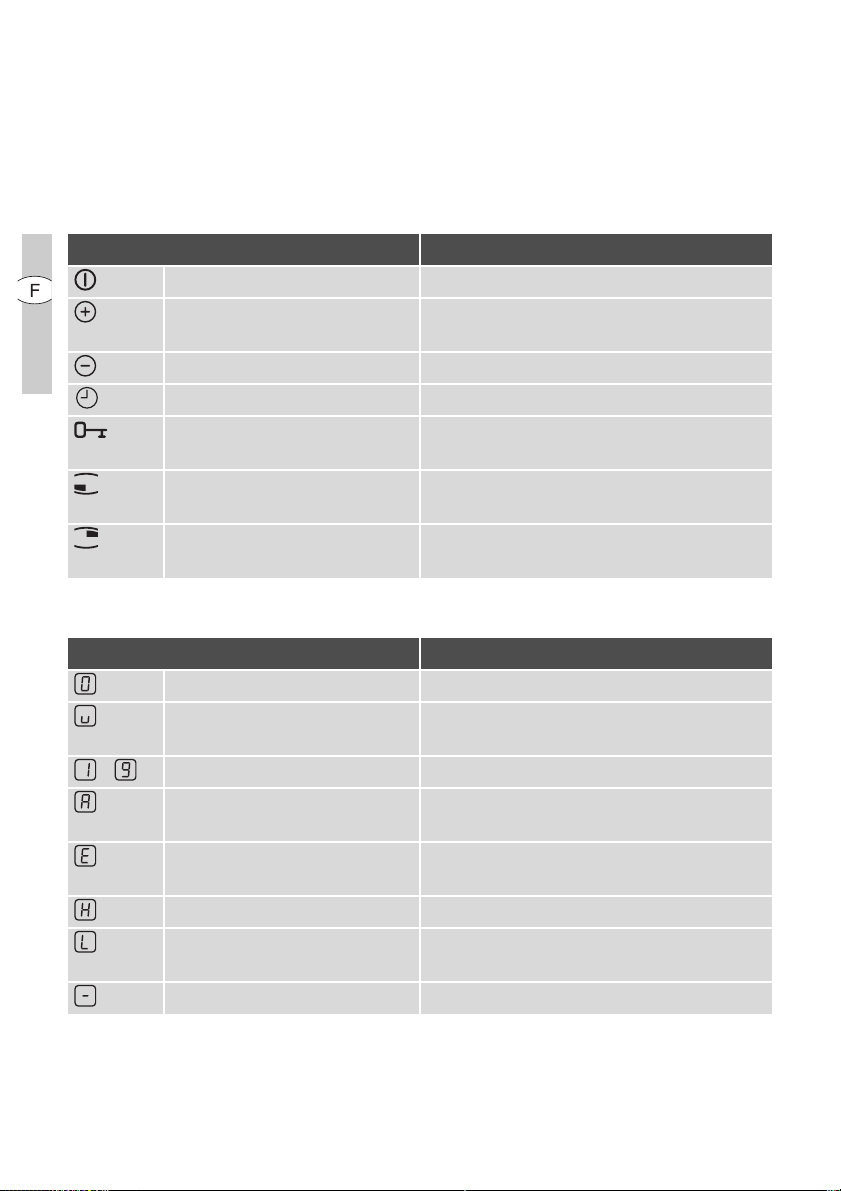
Touche sensitive “Touch Control”
Les touches sensitives Touch Control
permettent de commander l’appareil.
Une pression sur les touches sensitives
permet d’activer les fonctions et le fonctionnement de ces dernières est confir-
Touche sensitive Fonction
Marche / Arrêt Mettre l’appareil sous/hors tension
Augmenter les réglages Augmenter la durée /le niveau de cuis-
Réduire les réglages Réduire la durée /le niveau de cuisson
mé par des voyants ou par des signaux
sonores.
Appuyez sur les touches sensitives par
un mouvement de haut en bas, en évitant de recouvrir les autres touches.
son
Minuteur Sélection du Minuteur
Verrouillage Verrouillage/déverrouillage du bandeau
de commande
Activation de la zone de
cuisson double circuit
Zone de rôtissage Activation et désactivation de la
Voyants
Activer et désactiver
le circuit extérieur
zone de cuisson extérieure
Voyant Description
La zone de cuisson est désactivée
Position de maintien au
chaud
- Niveaux de cuisson Le niveau de cuisson est sélectionné
Commande de démarrage
automatique de la cuisson
Erreur Apparition d’une anomalie de fonction-
Chaleur résiduelle La zone de cuisson est encore chaude
Sécurité enfants Verrouillage/la sécurité enfants est acti-
arrêt automatique Arrêt activé
La position de maintien au chaud est
sélectionnée
La commande de démarrage automatique de la cuisson est activée
nement
vée
Page 37
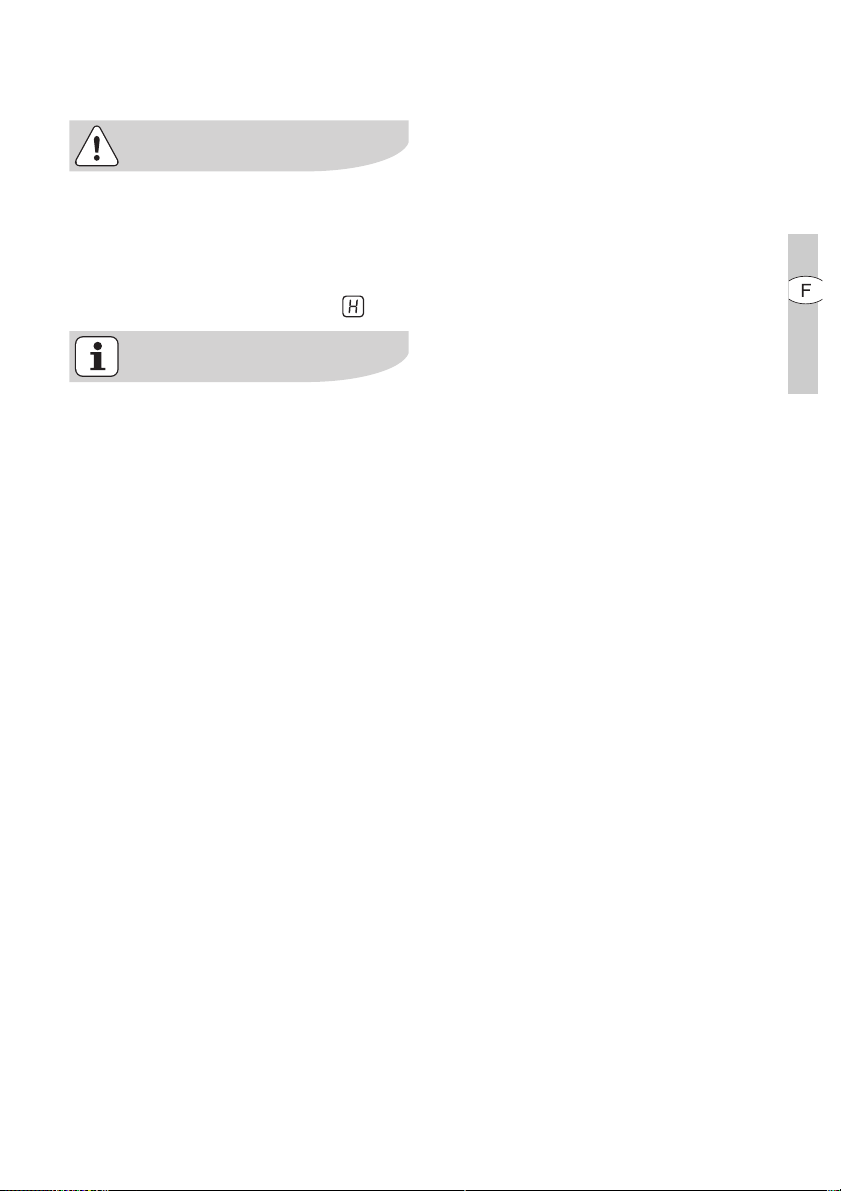
Indicateur de chaleur résiduelle
Avertissement ! Danger de brûlures
dû à la chaleur résiduelle ! Les zones de cuisson mettent un peu de
temps à se refroidir après avoir été
désactivées. Surveillez le voyant indiquant la chaleur résiduelle
.
La chaleur résiduelle peut être utilisée pour faire fondre un ingrédient
et pour conserver les plats au
chaud.
description de l'appareil electrolux 37
Page 38
38 electrolux utilisation de l’appareil
Utilisation de l’appareil
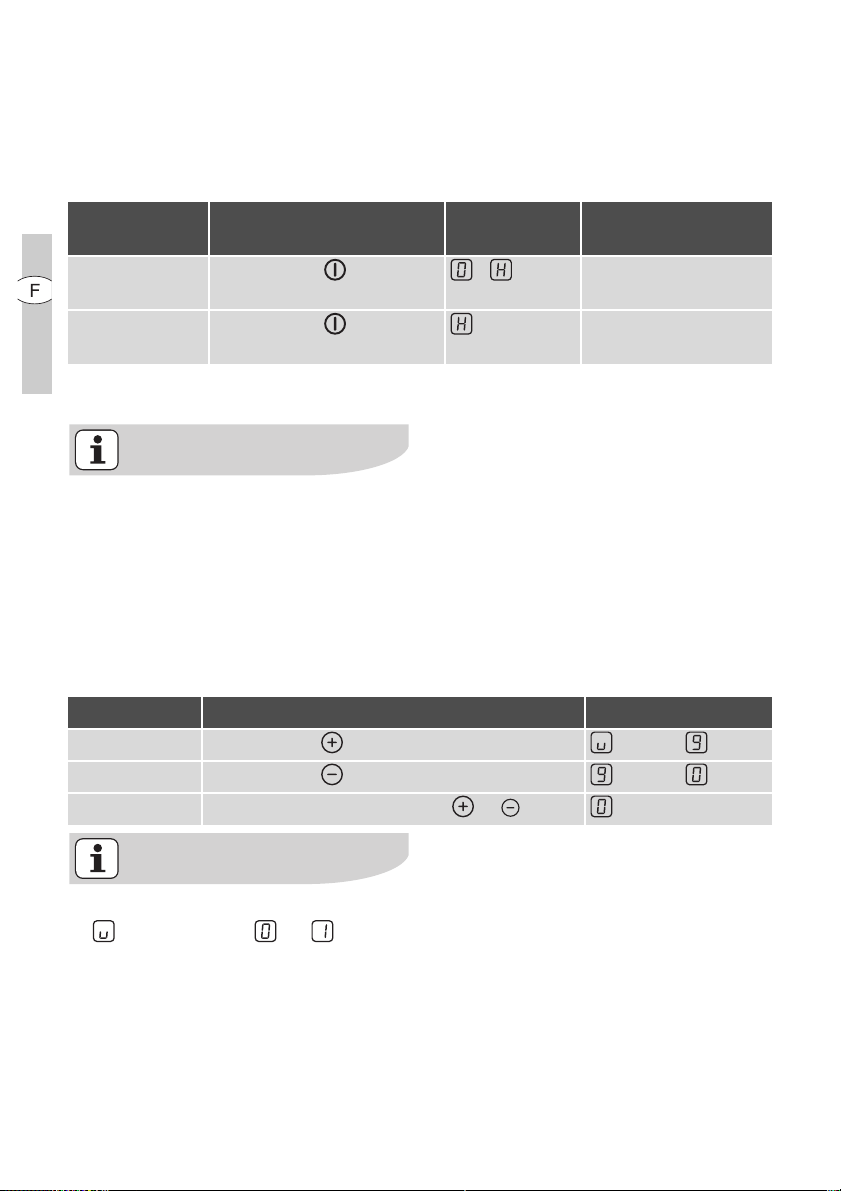
Mettre l’appareil sous/hors tension
Bandeau de comman-deAffichage Voyant de contrôle
Activer Appuyez sur pendant 2
/ s’allume
secondes
Désactiver Appuyez sur pendant 1
/ aucun s’éteint
seconde
Après la mise sous tension, il est nécessaire d’activer un niveau de
cuisson ou une fonction dans les
10 secondes environ qui suivent
dans le cas contraire l’appareil se
déconnecte automatiquement.
Sélectionner le niveau de cuisson
Bandeau de commande Affichage
Augmenter Appuyez sur . jusqu’à
Réduire Appuyez sur . jusqu’à
Désactiver Appuyez simultanément sur et .
Le niveau de maintien à température se situe entre et . Cette
fonction permet de maintenir des
aliments à température.
Page 39
utilisation de l’appareil electrolux 39
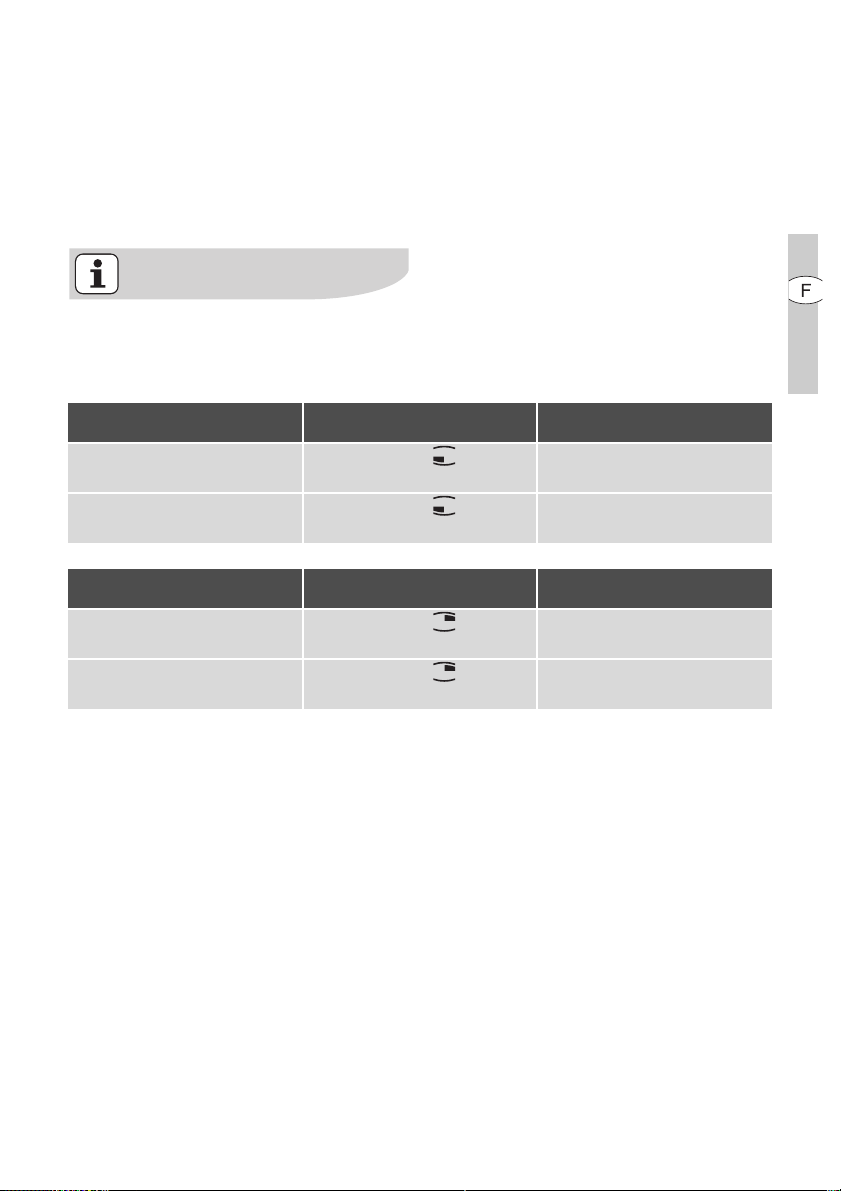
Activer et désactiver les zones de cuisson extérieures
La possibilité de pouvoir activer ou désactiver les zones de cuisson extérieures permet d’adapter la superficie de
cuisson à la dimension du récipient de
cuisson.
Avant d’activer la zone de cuisson
extérieure, activez d’abord la zone
de cuisson correspondante.
Zone de cuisson
Activation de la zone de cuis-
son extérieure
Désactivation de la zone de
cuisson extérieure
Zone de cuisson
Activation de la zone de cuis-
son extérieure
Désactivation de la zone de
cuisson extérieure
Touche sensitive Voyant de contrôle
Si vous effleurez pendant
1-2 secondes
Si vous effleurez pendant
1-2 secondes
elle s’allume
elle s’éteint
Touche sensitive Voyant de contrôle
Si vous effleurez pendant
1-2 secondes
Si vous effleurez pendant
1-2 secondes
elle s’allume
elle s’éteint
Page 40
40 electrolux utilisation de l’appareil
Verrouiller/déverrouiller le bandeau de commande
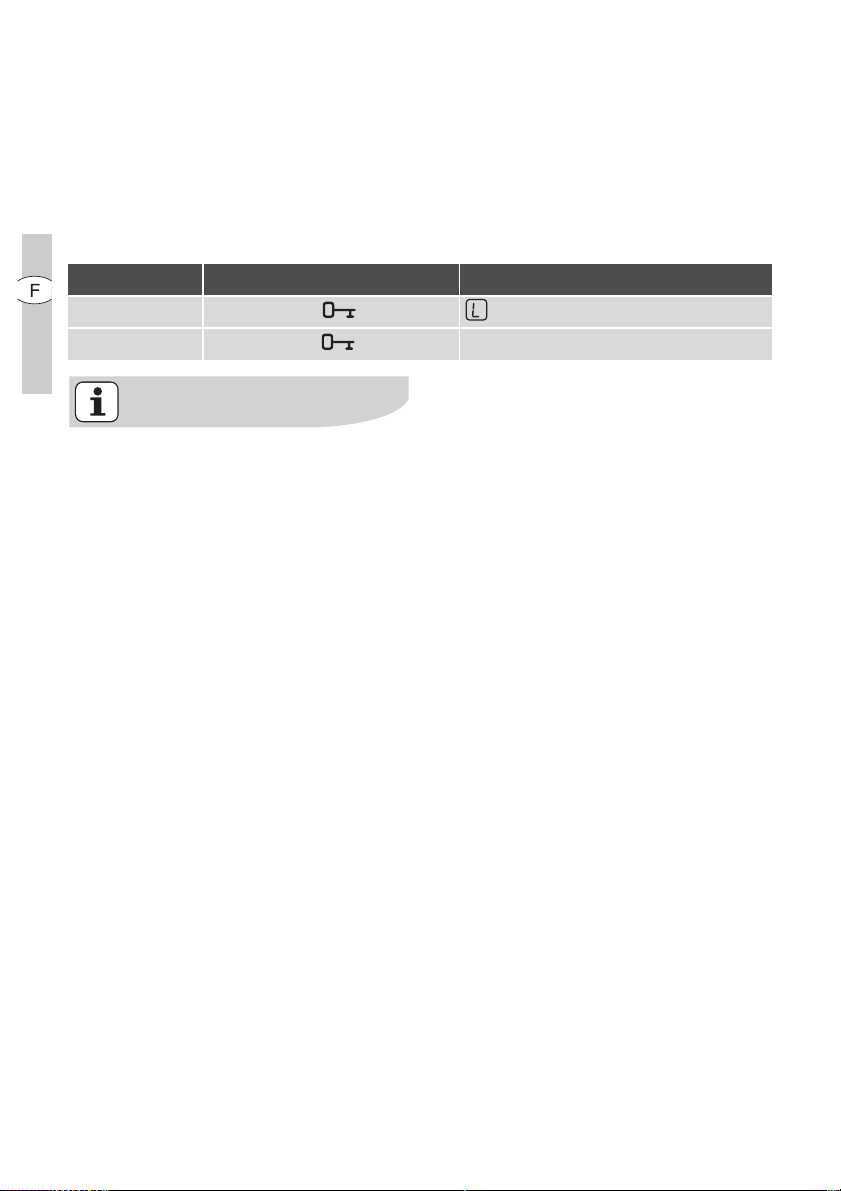
Il est possible à tout moment de verrouiller le bandeau de commande à l’exception de la touche sensitive „Marche/
Arrêt“, ce qui permet d’éviter de modifier
une sélection, par ex. en le nettoyant
avec un chiffon.
Bandeau de commande Affichage
Activation Appuyez sur (pendant 5 secondes)
Désactivation Appuyez sur le niveau de cuisson précédent
La désactivation de l’appareil déclenche automatiquement le verrouillage.
Page 41
utilisation de l’appareil electrolux 41
Utilisation de la commande de démarrage automatique de la cuisson
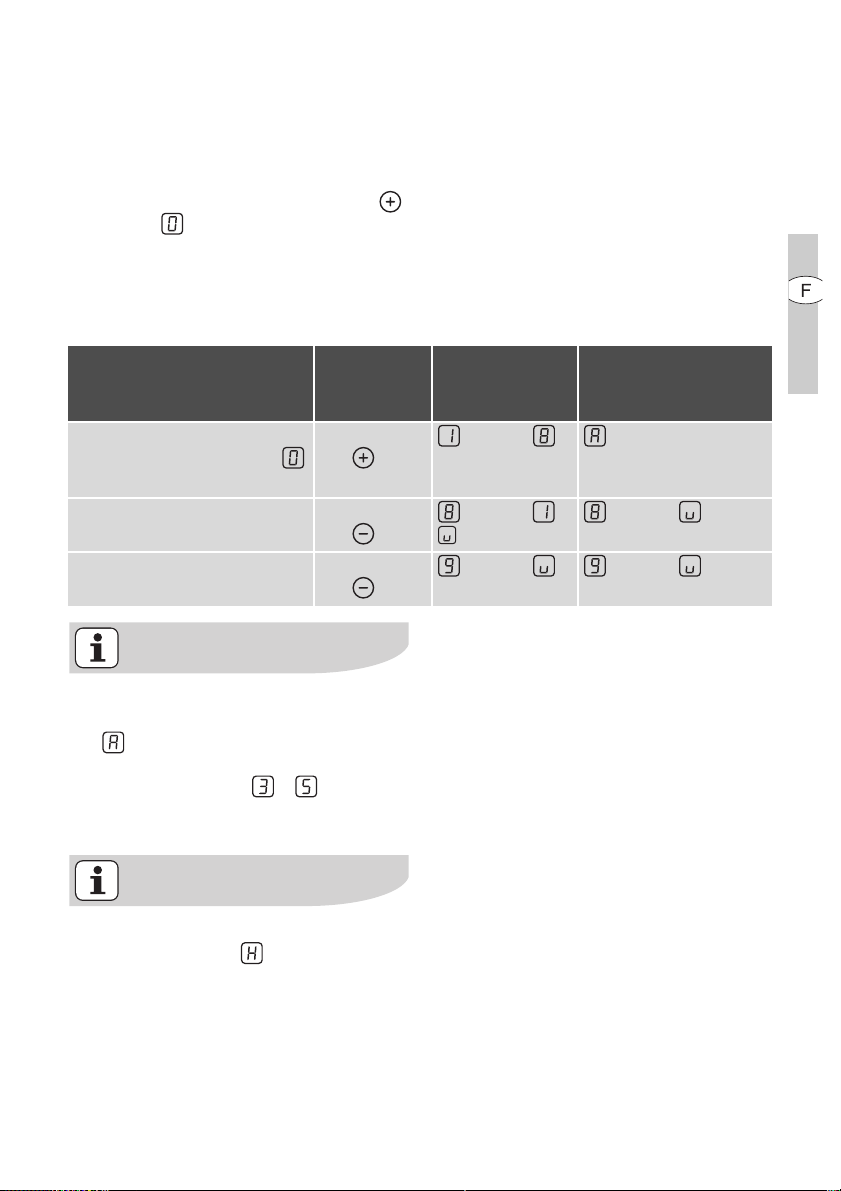
Toutes les zones de cuisson sont dotées d’une commande automatique de
démarrage de la cuisson. Lors de la sélection d’un niveau de cuisson avec
à partir de , la zone de cuisson se
met en marche à pleine puissance pendant un certain temps puis s’enclenche
automatiquement sur le niveau de cuisson sélectionné.
Bandeau
de commande
Activer
(seulement à partir de
Appuyez
sur .
)
Désactiver Appuyez
sur .
Ne pas utiliser Appuyez
sur .
Si, au cours du démarrage automatique de la cuisson à pleine puissance, un niveau de cuisson
supérieur est sélectionné, par ex.
lors du passage de à , la durée
de démarrage automatique de la
cuisson s’adapte en conséquence.
Si l’indicateur de chaleur résiduelle
est visible (voyant ), le démarrage
automatique de la cuisson ne s’enclenche pas.
niveaux de
Affichage
cuisson utilisables
jusqu’à (au bout de
5secondes)
jusqu’à / jusqu’à
jusqu’à jusqu’à
Page 42
42 electrolux utilisation de l’appareil
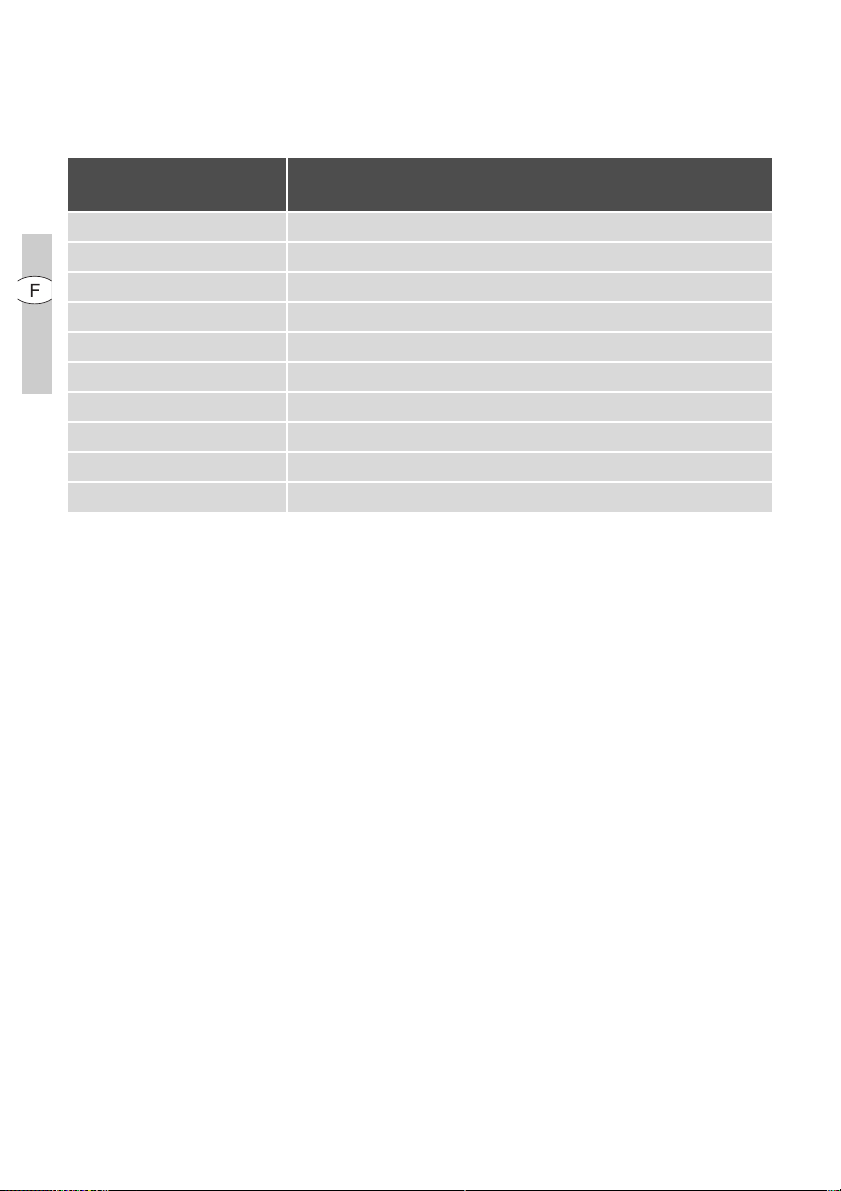
La durée du démarrage automatique de
la cuisson dépend du niveau cuisson
sélectionné.
Niveau de cuisson Durée du démarrage automatique de la cuisson
[min : sec]
v
1
2
3
4
5
6
7
8
9
0:30
1:00
1:40
4:50
6:30
10:10
2:00
3:30
4:30
---
Page 43
utilisation de l’appareil electrolux 43
Utilisation de la sécurité enfants
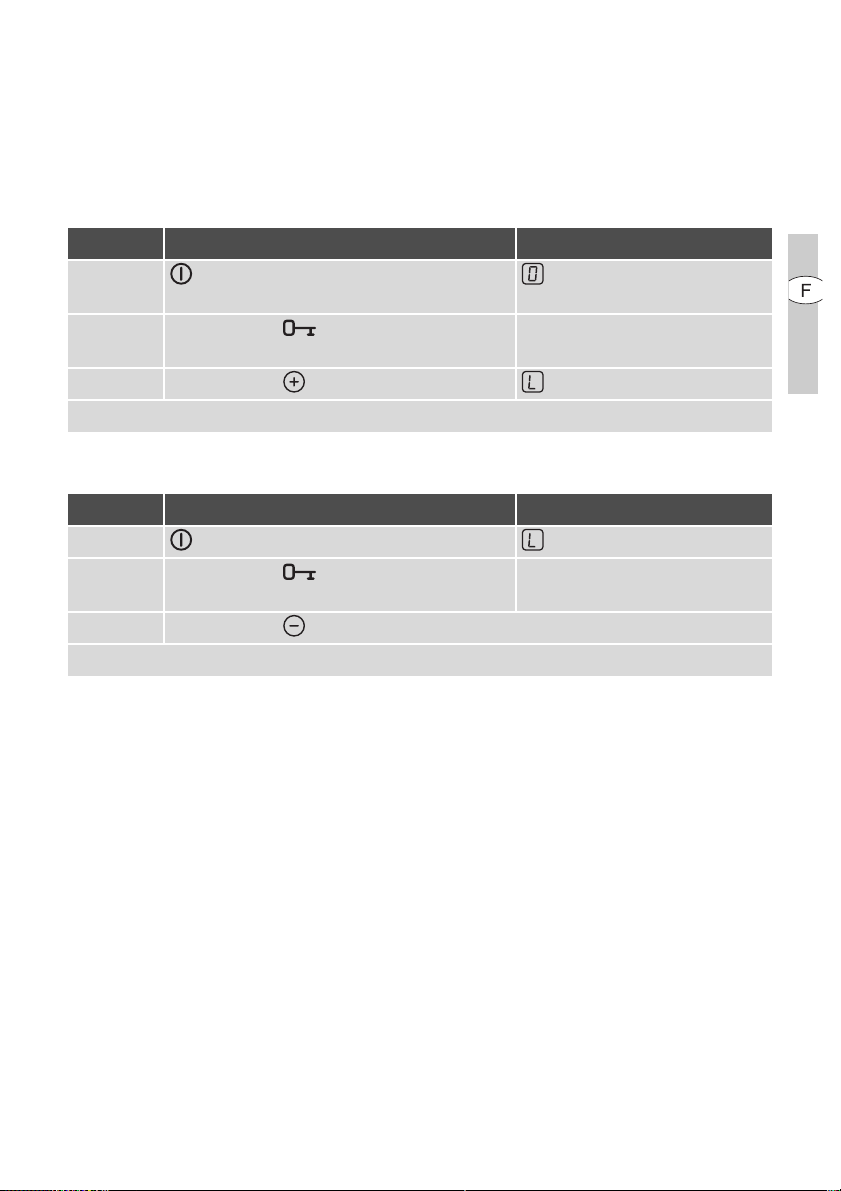
La sécurité enfants évite toute activation
non souhaitée de l’appareil.
Activer la sécurité enfants
Etape Bandeau de commande Voyant/Signal
1. Mettre l’appareil sous tension (sans
activer de niveau de cuisson)
2. Appuyez sur jusqu’à ce que le si-
gnal retentisse
3. Appuyez sur .
L’appareil se déconnecte. La sécurité enfants est activée.
Désactiver la sécurité enfants
Etape Bandeau de commande Voyant/Signal
1. Mettre l’appareil sous tension
2. Appuyez sur jusqu’à ce que le si-
gnal retentisse
3. Appuyez sur .
L’appareil se déconnecte. La sécurité enfants est désactivée.
Signal sonore
Signal sonore
Page 44
44 electrolux utilisation de l’appareil
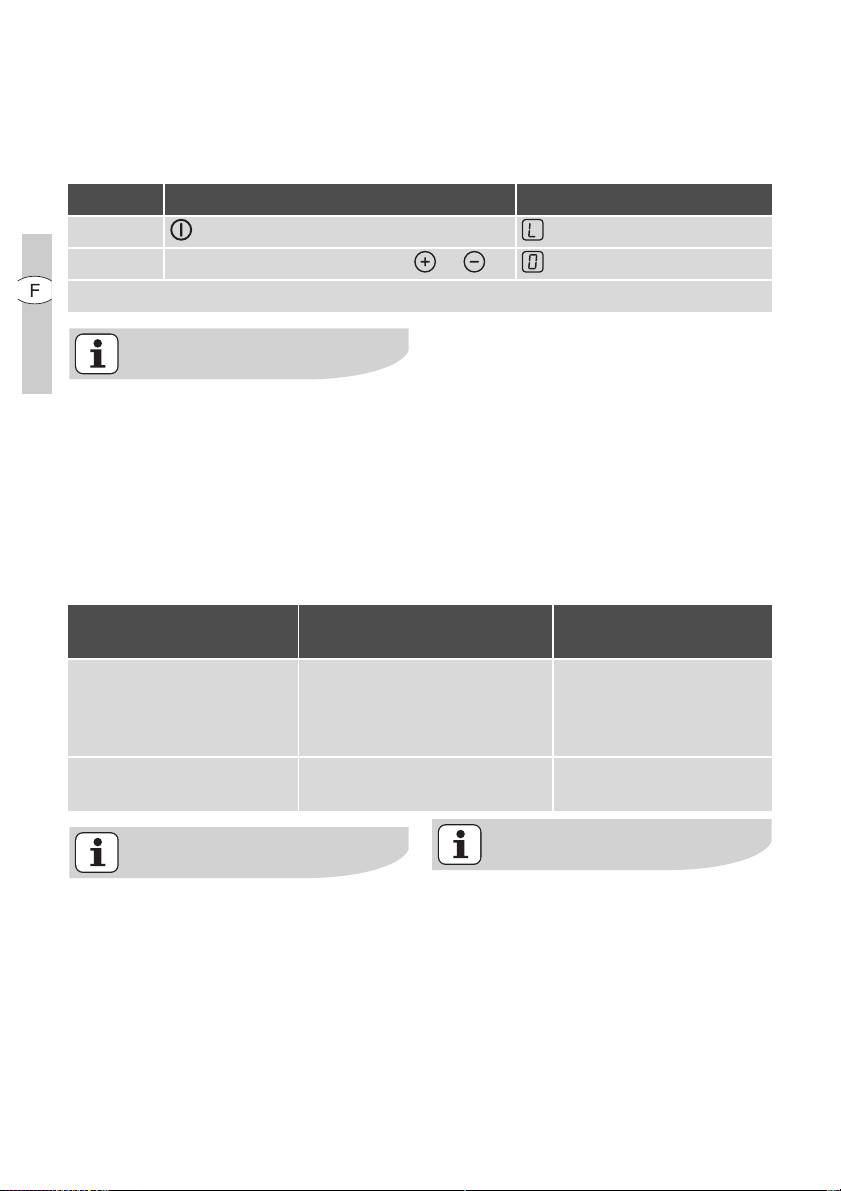
Brider la sécurité enfants
Cette touche permet de désactiver la
sécurité enfants le temps d’une cuisson
seulement, elle reste active ensuite.
Etape Bandeau de commande Voyant/Signal
1. Mettre l’appareil sous tension
2. Appuyez simultanément sur et / signal sonore
Peut être utilisé normalement jusqu’à la prochaine mise hors tension de l’appareil.
Après le bridage de la sécurité enfants, un niveau de cuisson ou une
fonction doit être réglé dans un délai approximatif de 10 secondes.
Dans le cas contraire, l’appareil
s’éteindra automatiquement.
Utilisation du minuteur
Fonction Condition de mise en
Désactivation automa-
tique
d’une zone de cuisson sé-
lectionnée
Minuteur pour zones de cuisson non
utilisées
Lorsqu’un niveau de cuisson est sélectionné en plus du minuteur pour
cette même zone de cuisson, cette
dernière se désactive après écoulement de la durée programmée.
Résultat après
oeuvre
écoulement du délai
le signal sonore
00 clignote
La zone de cuisson se
désactive
le signal sonore
00 clignote
La désactivation d’une zone de
cuisson entraîne la désactivation de
la fonction Minuteur.
Page 45
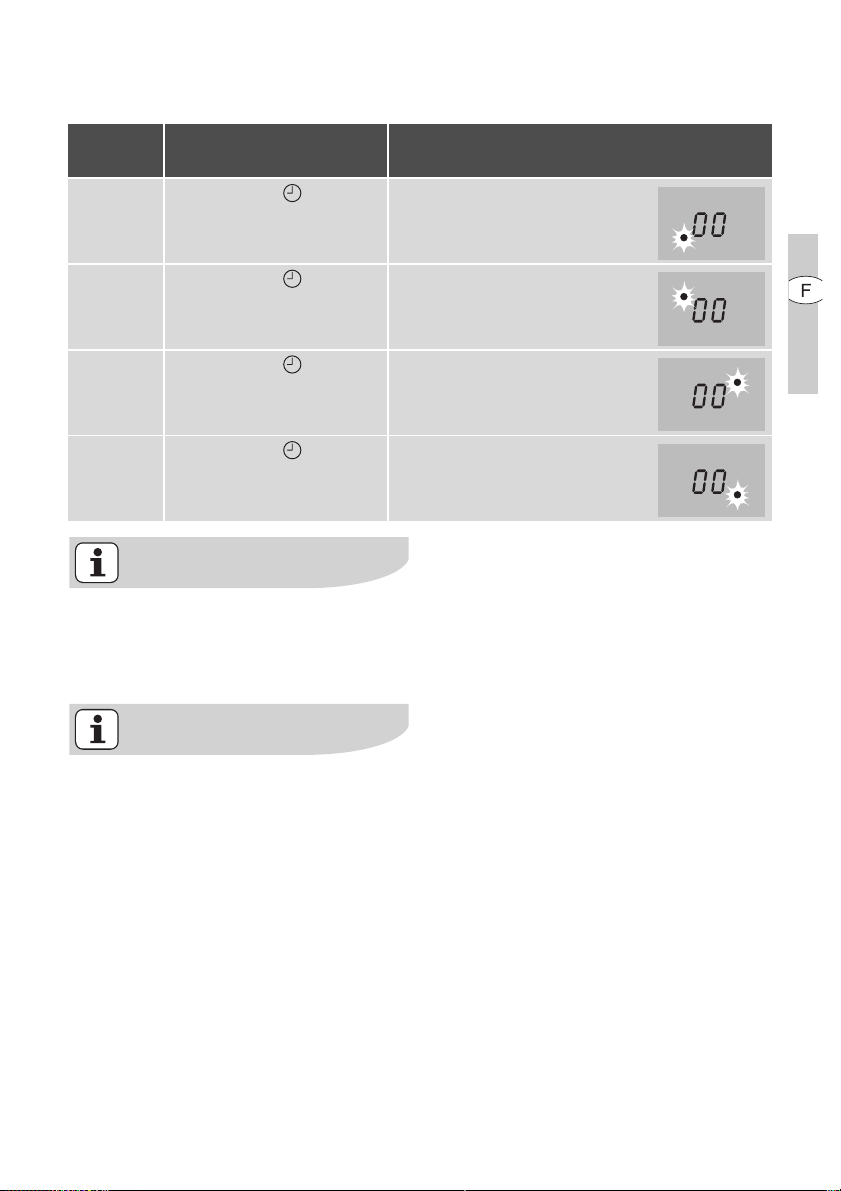
Sélection d’une zone de cuisson
utilisation de l’appareil electrolux 45
Etape Bandeau de comman-
de
1. Appuyez sur
1fois
2. Appuyez sur
1fois
3. Appuyez sur
1fois
4. Appuyez sur
1fois
Lorsque le clignotement du voyant
de contrôle ralentit, vous pouvez sélectionner ou modifier un niveau de
cuisson.
Affichage
Le voyant de contrôle de la
première zone de cuisson clignote
Le voyant de contrôle de la seconde zone de cuisson clignote
Le voyant de contrôle de la
troisième zone de cuisson clignote
Le voyant de contrôle de la
quatrième zone de cuisson clignote
Lorsque la fonction Minuteur est sélectionnée sur plusieurs zones de
cuisson, le temps restant le plus
court de l’ensemble de ces fonctions s'affiche au de quelques secondes et le voyant de contrôle
correspondant clignote.
Page 46
46 electrolux utilisation de l’appareil
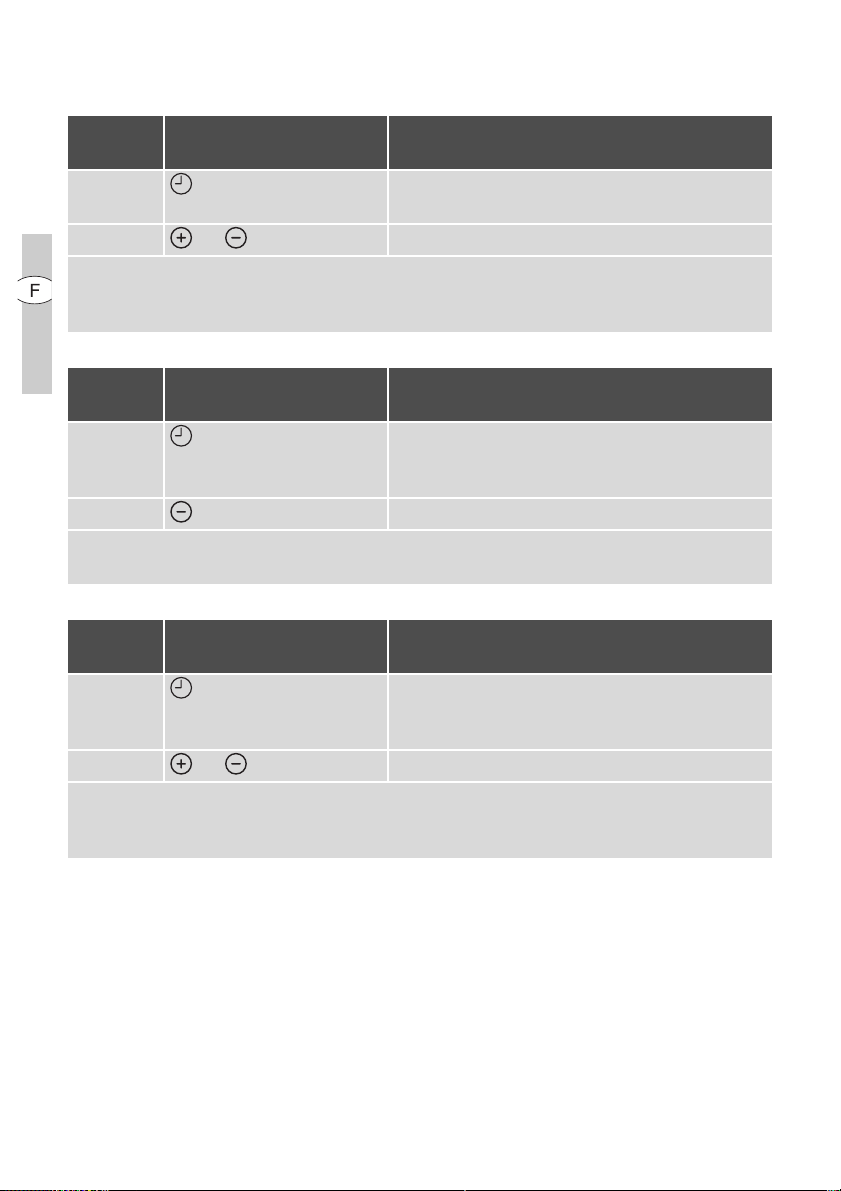
Régler l’heure
Etape Bandeau de comman-deVoyant
1. Sélectionner une
zone de cuisson
Le voyant de contrôle de la zone de cuisson
sélectionnée clignote
2. ou effleurer 00 à 99 minutes
Au bout de quelques secondes, le voyant de contrôle clignote plus lentement.
Le temps est à présent réglé.
Le temps est désormais décompté.
Désactiver la fonction minuteur
Etape Bandeau de comman-deVoyant
1. Sélectionner une
zone de cuisson
Le voyant de contrôle de la zone de cuisson
sélectionnée clignote plus rapidement
Le temps restant s’affiche
2. Effleurer Le temps restant sera décompté jusqu’à 00.
Le voyant de contrôle s’éteint.
La fonction minuteur s’éteint pour la zone de cuisson sélectionnée.
Modifier la durée
Etape Bandeau de comman-deVoyant
1. Sélectionner une
zone de cuisson
Le voyant de contrôle de la zone de cuisson
sélectionnée clignote plus rapidement.
Le temps restant s’affiche
2. ou effleurer 01 à 99 minutes
Au bout de quelques secondes, le voyant de contrôle clignote plus lentement.
Le temps est à présent réglé.
Le temps est désormais décompté.
Page 47
utilisation de l’appareil electrolux 47
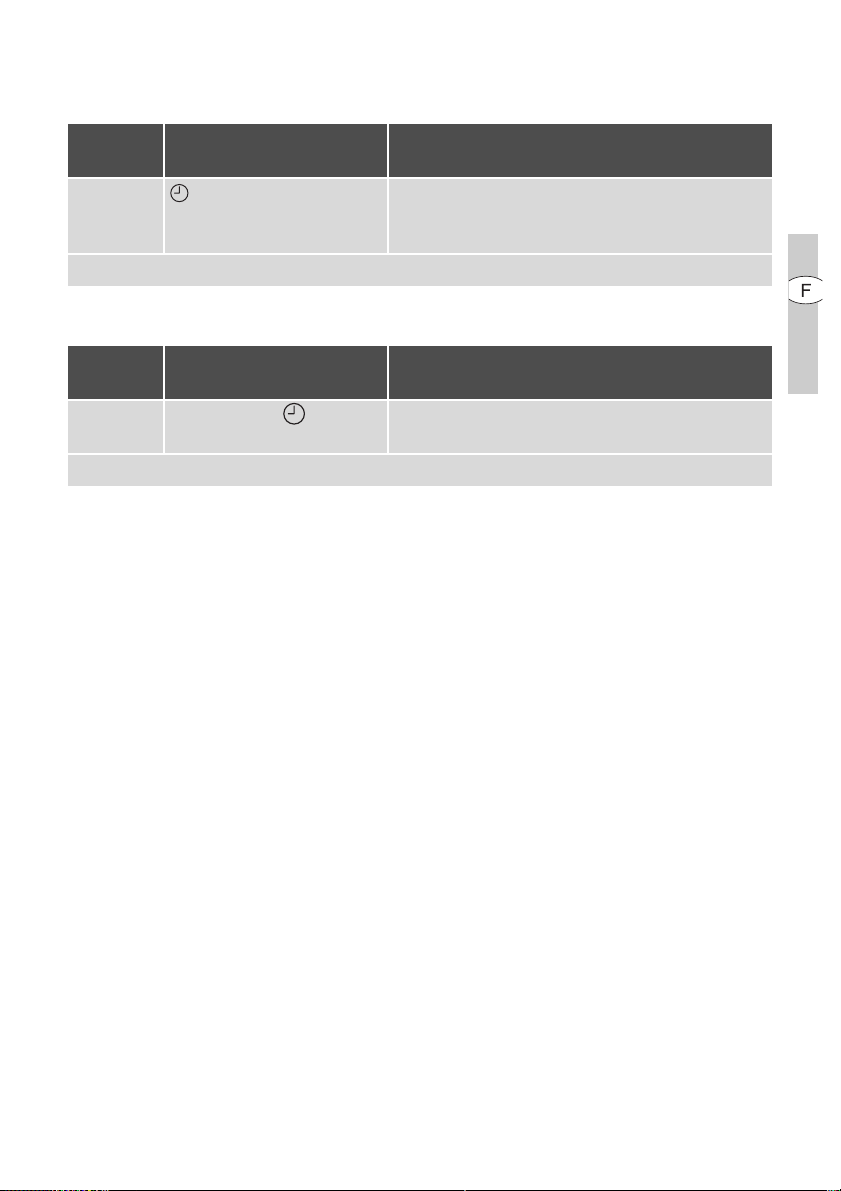
Affichage du temps restant d’une zone de cuisson
Etape Bandeau de comman-deAffichage
1. sélection d’une zone
de cuisson
Le voyant de contrôle de la zone de cuisson
sélectionnée clignote plus rapidement
Le temps restant s’affiche
Après quelques secondes, le clignotement du voyant de contrôle ralentit
Désactivation du signal sonore
Etape Bandeau de comman-deSignal sonore
1. Appuyez sur Confirmation signal sonore
Neutralisation du signal sonore
Page 48
48 electrolux utilisation de l’appareil
Arrêt automatique
Table de cuisson
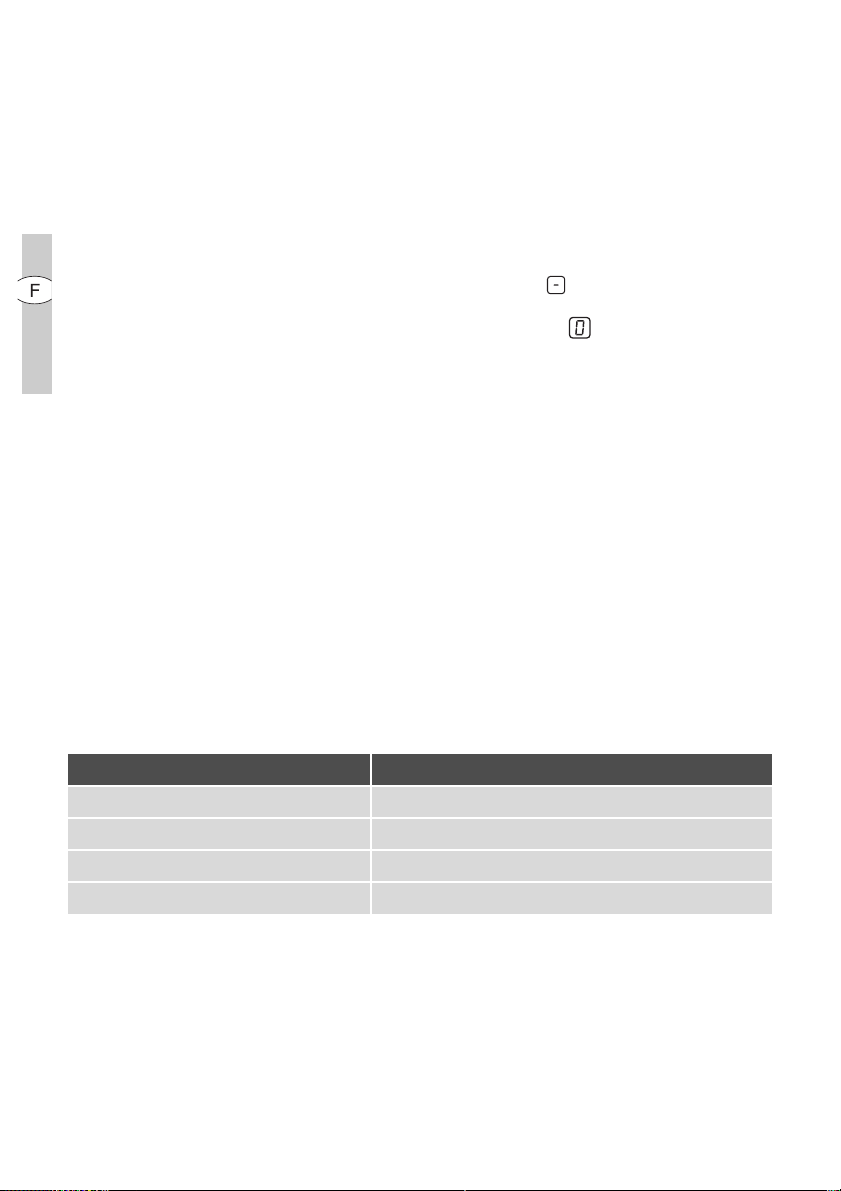
• Si, après activation de la table de
cuisson, une zone de cuisson ou un
niveau de cuisson n’est pas sélectionné dans les 10 secondes environ
qui suivent, la table de cuisson se
désactive automatiquement.
• Si un ou plusieurs champs de sonde
sont couverts pendant plus de
10 secondes par des objets (casserole, manique etc), un signal retentit
et la plaque de cuisson s’éteint automatiquement.
• Lorsque toutes les zones de cuisson
sont désactivées, la table de cuisson
se désactive automatiquement au
bout de 10 secondes environ.
Bandeau de commande
• Si lors de la mise à l’arrêt un ou plusieurs champs de capteur du pupitre
de commande est couvert pendant
plus de 10 secondes, un signal sonore retentit. Le signal sonore s’arrête automatiquement dès que les
champs des capteurs ne sont plus
couverts.
Zones de cuisson
• Si, après quelques instants, l’une
des zones de cuisson n’est pas désactivée ou si le niveau de cuisson
n’est pas modifié, la zone de cuisson
en question se désactive automatiquement. s’affiche. Avant de réutiliser la zone de cuisson, il faut la
remettre sur .
Niveau de cuisson Désactivation après
v, 1 - 2 6 heures
3 - 4 5 heures
5 4 heures
6 - 9 1 heure 30
Page 49
Conseils de cuisson
Plats de cuisson
• Le type de fond des plats de cuisson
détermine ou non leur bonne qualité.
Le fond doit être aussi plat et épais
que possible.
• Les plats de cuisson avec fond en
émail, en aluminium ou en cuivre
peuvent laisser des traces sur les
plaques en vitrocéramique difficilement nettoyables ou même impossibles à enlever.
Economie d’énergie
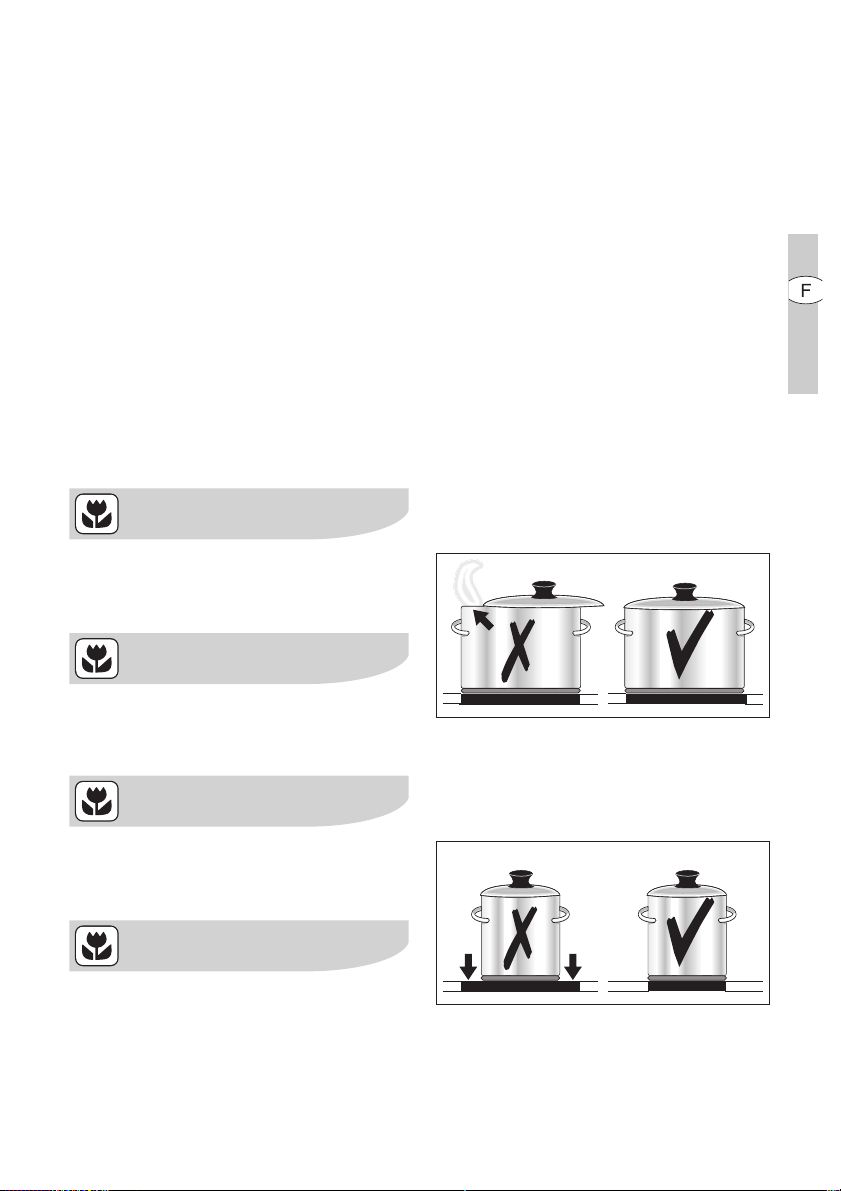
Il est impératif de placer les plats de
cuisson avant d’activer la zone de
cuisson.
conseils de cuisson electrolux 49
Si possible, recouvrez toujours les
récipients avec leur couvercle.
Eteignez la zone de cuisson avant la
fin de la cuisson afin de bénéficier
de la chaleur résiduelle.
Veillez à ce que le fond du plat de
cuisson corresponde à la dimension
de la zone de cuisson.
Page 50

50 electrolux conseils de cuisson
Exemples d’utilisation pour la cuisson
Les valeurs indiquées dans le tableau suivant sont indicatives.
Niveau
de
cuisson
0 Chaleur restante, en position
V
1-2
2-3
3-4
4-5
6-7
7-8
9
Type d e
cuisson
Conser-
ver au
chaud
Faire fon-
dre
Conser-
ver
Faire
gonfler
Cuire à
l’étuvée
Cuire à la
vapeur
Cuire à
l’eau
Faire
cuire
à feu
doux
Faire
cuire
à tempé-
rature
élevée
Porter à
ébullition
Faire re-
venir
Faire frire
adapté à Durée Remarques/conseils
Conserver des plats cuits au
:
de la sauce hollandaise,
faire fondre du beurre, du
chocolat, de la gélatine
une omelette norvégienne,
Faire gonfler du riz ou des
Faire réchauffer des plats
Cuire des légumes ou du
Cuire de la viande à l’étouffée
Faire cuire des pommes de
Faire cuire des quantités as-
sez importantes d’aliments,
des escalopes, des cordons
bleus, des steaks de viande
hâchée, des saucisses, du
foie, des roux, des œufs, des
gâteaux aux œufs, faire frire
des beignets de pommes de
terre, des rognons, des
Porter des quantités importantes d’eau à ébullition, faire revenir de la
chaud
royale
plats à base de riz
cuisinés
poisson à la vapeur
terre à l’étuvée
ragoûts et soupes
des beignets.
steaks, des galettes
viande (goulasch, bœuf brais), faire frire des pommes frites
si nécessai-
re
5-25 min
10-40 min
25-50 min
20-45 min
20-60 min
60-150 min
cuisson
continue
5-15 min
poêle pro
les recouvrir
Remuez de temps en
temps
Couvrez-la avec un cou-
Versez au moins le double
de quantité d’eau que de
riz, remuez le riz au lait de
Pour les légumes, utilisez
juste un peu d’eau (quel-
ques cuillères à soupe)
d’eau, par ex. max.
Jusqu’à 3 l d’eau plus les
Retournez de temps en
Retournez de temps en
vercle
temps en temps.
Utilisez juste un peu
¼
d’eau pour 750 g de
pommes de terre
ingrédients
temps
temps
l
Page 51

Nettoyage et entretien
nettoyage et entretien electrolux 51
Attention ! Risque de brûlure dû à la
chaleur résiduelle.
Attention ! Les produits de nettoyage agressifs ou abrasifs endommagent l’appareil. Nettoyez l’appareil
avec de l’eau et de la lessive.
Attention ! Les restes de produits de
nettoyage endommagent l’appareil.
Nettoyez les restes avec de l’eau et
un produit de nettoyage.
Nettoyez l’appareil après chaque utilisation
1. Nettoyez l’appareil à l’aide d’un chiffon humide et un peu de produit de
nettoyage.
2. Séchez l’appareil avec un chiffon
propre.
Page 52
52 electrolux nettoyage et entretien
Enlever les salissures
1. Placez le grattoir de nettoyage obliquement par rapport à la surface de
la vitrocéramique.
2. Enlevez les salissures en faisant glisser la lame.
3. Nettoyez l’appareil à l’aide d’un chiffon humide et un peu de produit de
nettoyage.
4. Séchez l’appareil avec un chiffon
propre.
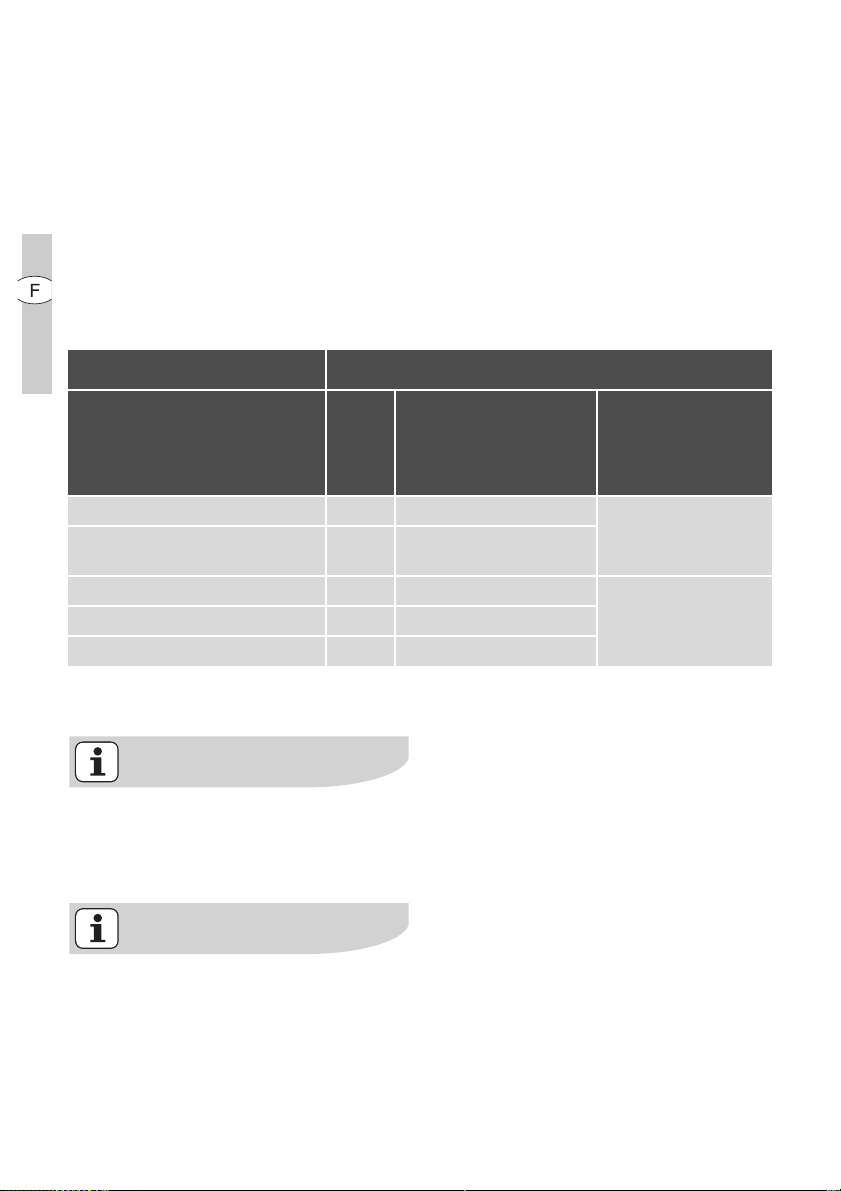
im-
Type de salissure
médiate
ment
enlevez
lorsque l’appareil a
refroidi
avec
Sucre, mets contenant du sucre oui --Matériaux en plastique, feuilles en
aluminium
Bords calcaires et d’eau --- oui
Burette à graisse --- oui
Colorations métalliques luisantes --- oui
*grattoir de nettoyage, produit de nettoyage de vi-
trocéramique ou d’acier inoxydable sont
disponibles dans les magasins spécialisés.
oui ---
Nettoyez les salissures tenaces à
l’aide d’un produit de nettoyage
pour vitrocéramique ou acier inoxydable.
Même s’il n’est plus possible de faire disparaître les égratignures ou
les taches sombres sur la vitrocéramique, cela n’a aucune influence
sur le fonctionnement de l’appareil.
Grattoir de
nettoyage*
Produit de nettoyage
de vitrocéramique ou
d’acier inoxydable*
Page 53
Que faire si …
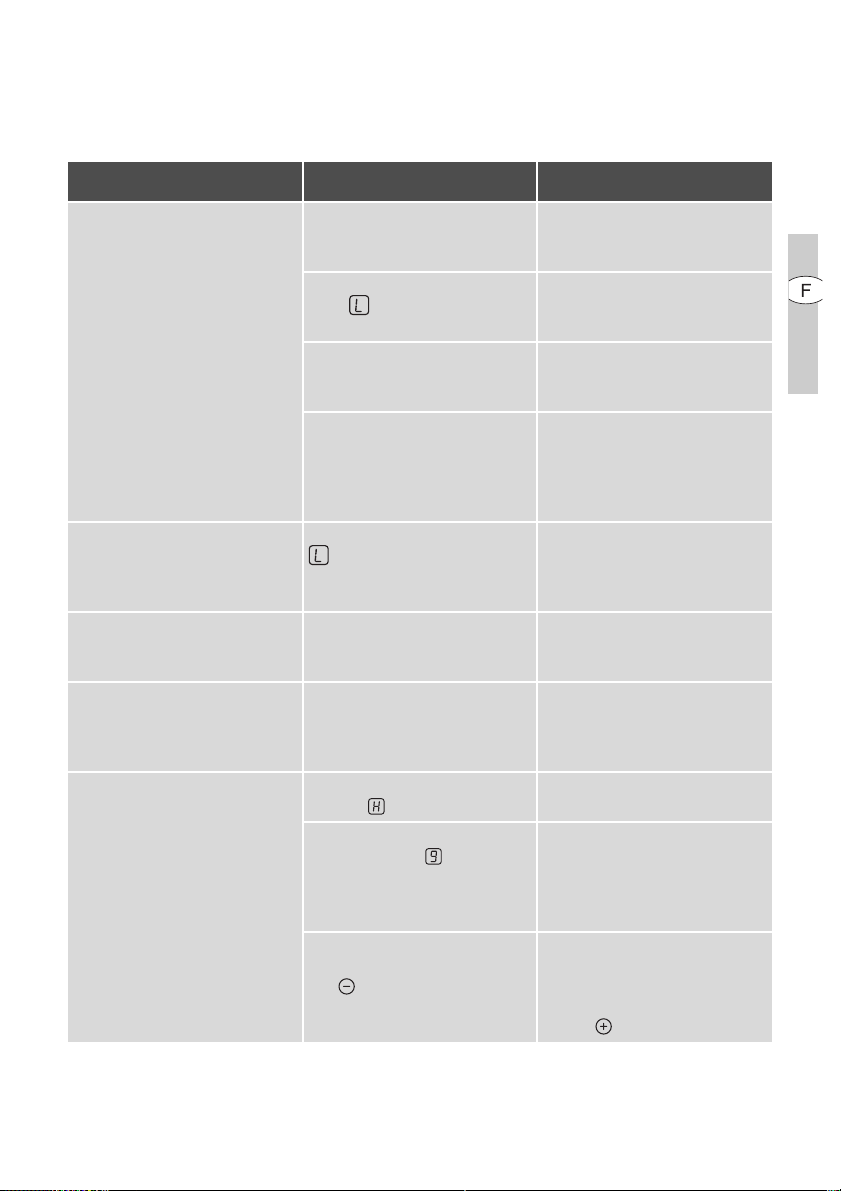
Symptôme Cause possible Solution
que faire si … electrolux 53
Il est impossible d’activer les
zones de cuisson ou ces dernières ne fonctionnent pas
L’appareil est hors tension et
un signal sonore retentit.
L’indicateur de chaleur résiduelle ne s'affiche pas
La commande de démarrage
automatique de la cuisson ne
s’enclenche pas
Plus de 10 minutes se sont
écoulées depuis que l’appareil
Remettez l’appareil sous tension.
est sous tension
La sécurité enfants est enclen-
chée
Désactivez la sécurité enfants
(voir chapitre „Sécurité enfants“)
Plusieurs touches sensitives
ont été activées simultané-
Activez une seule touche sensitive à la fois
ment
Le système d’arrêt automati-
que s’est enclenché
Retirez éventuellement des
objets se trouvant sur le
champ de commande. casseroles, maniques etc.). Remettez l’appareil sous tension.
Le verrouillage est enclenché Déclenchez le verrouillage (voir
chapitre „Verrouiller/déverrouiller le bandeau de commande“)
Des objets recouvrent partiellement ou complètement le
Éloignez les objets du champ
de commande.
champ de commande.
La zone de cuisson fonctionne
seulement depuis peu et n’est
par conséquent pas encore
chaude
La zone de cuisson est encore
chaude
Le niveau de cuisson mamimum est activé
Si la zone de cuisson est chaude, contactez le service aprèsvente.
Laissez refroidir la zone de
cuisson
Le niveau de cuisson maximum présente une puissance
équivalente à celle de la commande de démarrage automatique de la cuisson.
Le niveau de cuisson a été activé à l’aide de la touche sensitive
1.
Désactivez la zone de cuisson
1.
Activez la zone de cuisson
à l’aide de la touche sensitive
Page 54
54 electrolux que faire si …
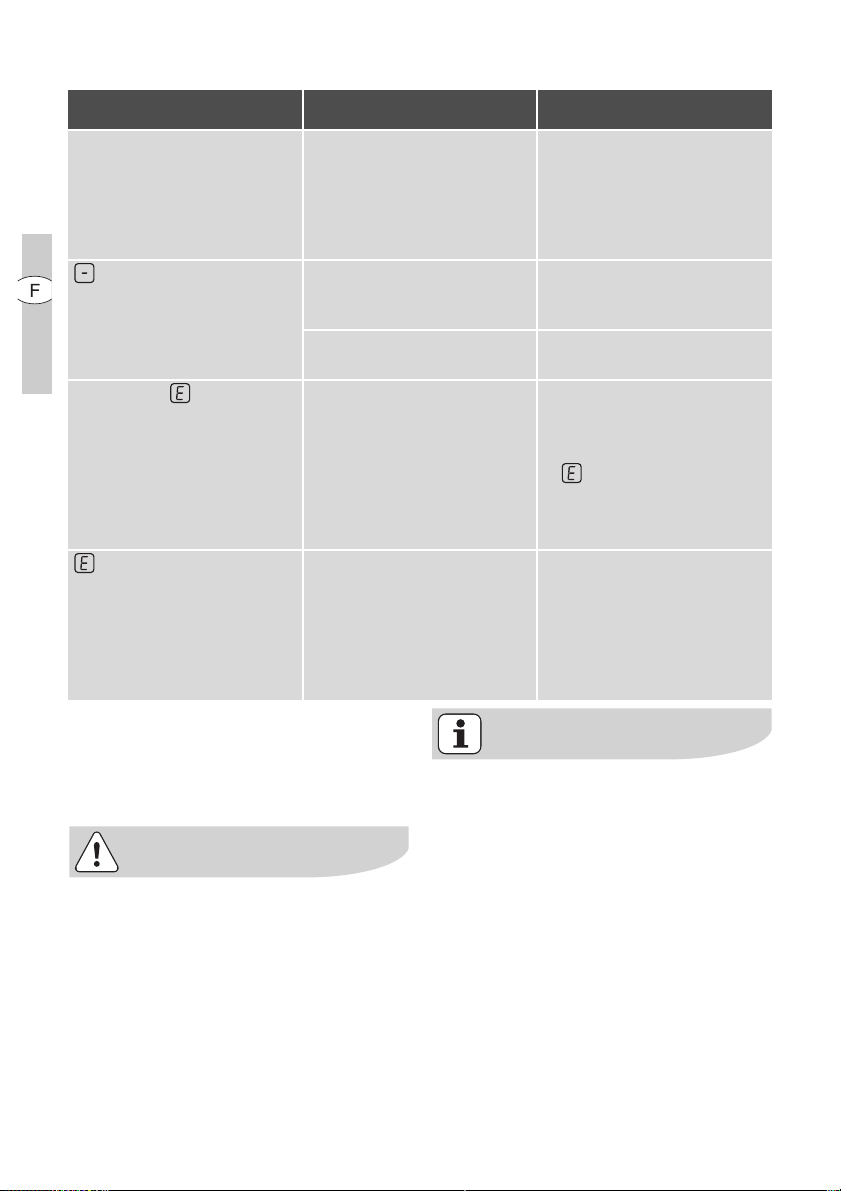
Symptôme Cause possible Solution
Un signal sonore retentit, l’appareil se met sous tension puis
de nouveau hors tension au
bout de 5 secondes ; au bout
de 5 autres secondes, un nouveau signal sonore retentit
s’allume La protection contre le risque
Affichage de et d’un chiffre Erreur du système électroni-
et un signe moins s’affi-
chent.
La touche sensitive Marche/
Arrêt est recouverte, par
exemple par un chiffon
de surchauffe s’est enclenchée
Le système d’arrêt automatique s’est enclenché
que
Le champ de commande reçoit une lumière trop intense,
le rayonnement solaire par
exemple.
Si les indications ci-dessus ne vous
permettent pas de remédier au problème, veuillez vous adresser au
service après-vente de votre magasin vendeur.
En cas d’erreur de manipulation de
la part de l’utilisateur, le déplacement du technicien du service
après-vente ou du vendeur peut être
facturé même en cours de garantie.
Avertissement ! L'installation, le
branchement et les réparations doivent être effectuées uniquement par
des professionnels qualifiés. Des
réparations non effectuées dans les
règles peuvent s’avérer très dangereuses pour l’utilisateur.
Ne déposez aucun objet sur le
bandeau de commande
Désactivez la zone de cuisson
Réactivez la zone de cuisson
Désactivez la zone de cuisson
Réactivez la zone de cuisson
Débranchez l’appareil pendant
quelques minutes (enlevez le
fusible de l’installation domestique).
Si s’affiche de nouveau
après avoir rebranché l’appareil, contactez le service aprèsvente
Protégez le champ de commande pendant une courte
période en faisant de l’ombre
avec vos mains, par exemple.
Un signal sonore retentit, l’appareil se désactive. (Re)mettez
l’appareil en marche.
Page 55

Protection de l’environnement
Elimination du matériel d’emballage
Les matériaux d’emballage sont
écologiques et recyclables. Les matières plastiques portent un signe
distinctif, par ex. >PE<, >PS<, etc.
Déposez les matériaux d’emballage
en fonction de leur signe distinctif
dans les containeurs prévus à cet
effet (renseignez-vous auprès des
services de votre commune).
Appareils usagés
protection de l’environnement electrolux 55
Le symbole
emballage indique que ce produit ne
peut être traité comme déchet ménager. Il doit être remis au point de
collecte dédié à cet effet (collecte et
recyclage du matériel électrique et
électronique). En procédant à la
mise au rebut de l'appareil dans les
règles de l'art, nous préservons
l'environnement et notre sécurité,
s'assurant ainsi que le déchets seront traités dans des conditions optimum. Pour obtenir plus de détails
sur le recyclage de ce produit,
veuillez prendre contact avec les
services de votre commune ou le
magasin où vous avez
effectué l’achat.
W sur le produit ou son
Page 56

56 electrolux instructions d'installation
Instructions d'installation
Conseils de sécurité
Attention! A lire impérativement!
L’utilisateur est tenu de respecter la législation, la réglementation, les directives et les normes en vigueur dans le
pays de destination de l’appareil (dispositions réglementaires en matière de sécurité, de recyclage, etc.)
Le montage doit être exclusivement effectué par un spécialiste.
La distance minimum requise par rapport aux autres appareils et aux meubles adjacents doit être respectée.
La protection contre les contacts doit
être garantie par l’installation ; par
exemple, des tiroirs peuvent être montés uniquement avec un fond de protection directement sous l’appareil.
Il faut protéger l’appareil contre l’humidité avec du mastic pour joints au niveau
des découpes sur le plan de travail.
Le joint comble les fentes entre le plan
de travail et l’appareil.
N’utilisez pas de masse d’étanchéité en
silicone entre le plan de travail et l’appareil.
Eviter de monter l’appareil à proximité
d’une porte ou sous une fenêtre. Autrement, l’ouverture d’une porte ou d’un
battant de fenêtre peuvent arracher le
plat de cuisson posé sur la plaque de
cuisson.
zRisque de blessure par courant
électrique.
• La borne de raccordement au réseau est sous tension.
• Mettre la borne de raccordement au
réseau hors tension.
• Respecter le schéma de raccordement.
• Respecter les consignes de sécurité
du domaine électrotechnique.
• Assurer une protection contre les
contacts électriques par une installation conforme.
• Le raccordement électrique doit exclusivement être effectué par un
électricien qualifié.
zDommages matériels par courant
électrique.
• Des connecteurs à fiche mal fixés ou
non conformes peuvent provoquer
une surchauffe de la borne.
• Fixer les raccords boulonnés de manière adéquate.
• Procéder à la décharge de traction
des câbles.
• Pour les raccordements 1 ou 2 phases, utilisez respectivement un câble
approprié de type H05BB-F T de
max. 90°C (ou de plus grande capacité).
• En cas d’endommagement du câble
de raccordement de l’appareil, remplacez impérativement ce dernier
par un câble spécifique (de type
H05BB-F Tmax. 90°C ou de plus
grande capacité). Ce type de câble
est disponible auprès du service
après-vente.
Au niveau de l'installation électrique,
prévoir un dispositif qui permette de
couper cet appareil du secteur sur tous
les pôles avec une ouverture des contacts d'au moins 3 mm.
Des dispositifs de protection appropriés
sont par exemple les disjoncteurs, les
fusibles (les fusibles vissés doivent être
retirés de leur socle), les disjoncteurs
différentiels et les contacteurs.
Page 57
garantie/si vous devez nous contacter electrolux 57
Garantie/Si vous devez nous
contacter
Garantie
France
Conformément à la Législation en vigueur, votre
Vendeur est tenu, lors de l'acte d'achat de votre
appareil, de vous communiquer par écrit les conditions de garantie et sa mise en œuvre appliquées sur celui-ci.
Sous son entière initiative et responsabilité, votre
Vendeur répondra à toutes vos questions concernant l'achat de votre appareil et les garanties qui y
sont attachées.
N'hésitez pas à le contacter.
Si vous devez nous contacter
Pour tenir nos engagements, nous écoutons
les Consommateurs
Info Conso Electrolux est le lien privilégié entre la
marque et ses Consommateurs. Il assure en permanence une double mission : satisfaire au mieux
vos exigences et tirer parti de cette proximité pour
améliorer sans cesse les produits que nous vous
proposons.
AVANT L’ACHAT
Toute une équipe répond avec clarté et précision
à vos sollicitations concernant l’éventail de nos
gammes de produits et vous apporte des infos
pour vous aider dans votre choix en fonction de
vos propres besoins.
APRÈS L’ACHAT
Exprimez-vous sur la perception que vous avez de
nos produits et votre satisfaction à l’usage. Mais
interrogez aussi nos spécialistes sur l’utilisation et
l’entretien de vos appareils. C’est alors que notre
mission prend tout son sens. Ecouter, comprendre, agir : trois temps essentiels pour tenir l’engagement de la marque dans le plus grand respect
du Consommateur.
BP 50142 – 60307 SENLIS CEDEX
Tél. : 08 90 71 03 44 (0,15 h TTC/mn)
Permanence téléphonique du lundi au vendredi
Electrolux Home Products France S.A.S. au capital de 67 500 000 h - 552 042 285 RCS SENLIS
Fax : 03 44 62 21 54
E-MAIL : [email protected]
Pour toute question technique :
Centre Contact Consommateurs
BP 20139 – 60307 SENLIS CEDEX
Tél. : 08 92 68 24 33 (0,34 h TTC/mn)
E-MAIL : ehp.consommateur@elec-
Permanence téléphonique du lundi au
trolux.fr
vendredi
A bientôt !
Dans le souci d’une amélioration constante de nos
produits, nous nous réservons le droit d’apporter
à leurs caractéristiques toutes modifications liées
à l’évolution technique (décret du 24.03.78).
Page 58

58 electrolux garantie/si vous devez nous contacter
Page 59
Service après-vente
En cas de problèmes techniques, vérifiez d’abord s’il ne vous est pas possible
de réparer vous-même le dysfonctionnement à l’aide de la notice d’utilisation
(chapitre „Que faire, si...“).
Si vous ne parvenez pas à réparer le
dysfonctionnement, veuillez contacter
notre Consumer Services.
Pour pouvoir vous dépanner dans les
plus brefs délais, nous nécessitons les
informations suivantes :
– Désignation du modèle
– Numéro du produit (PNC)
– Numéro de série (S-No.)
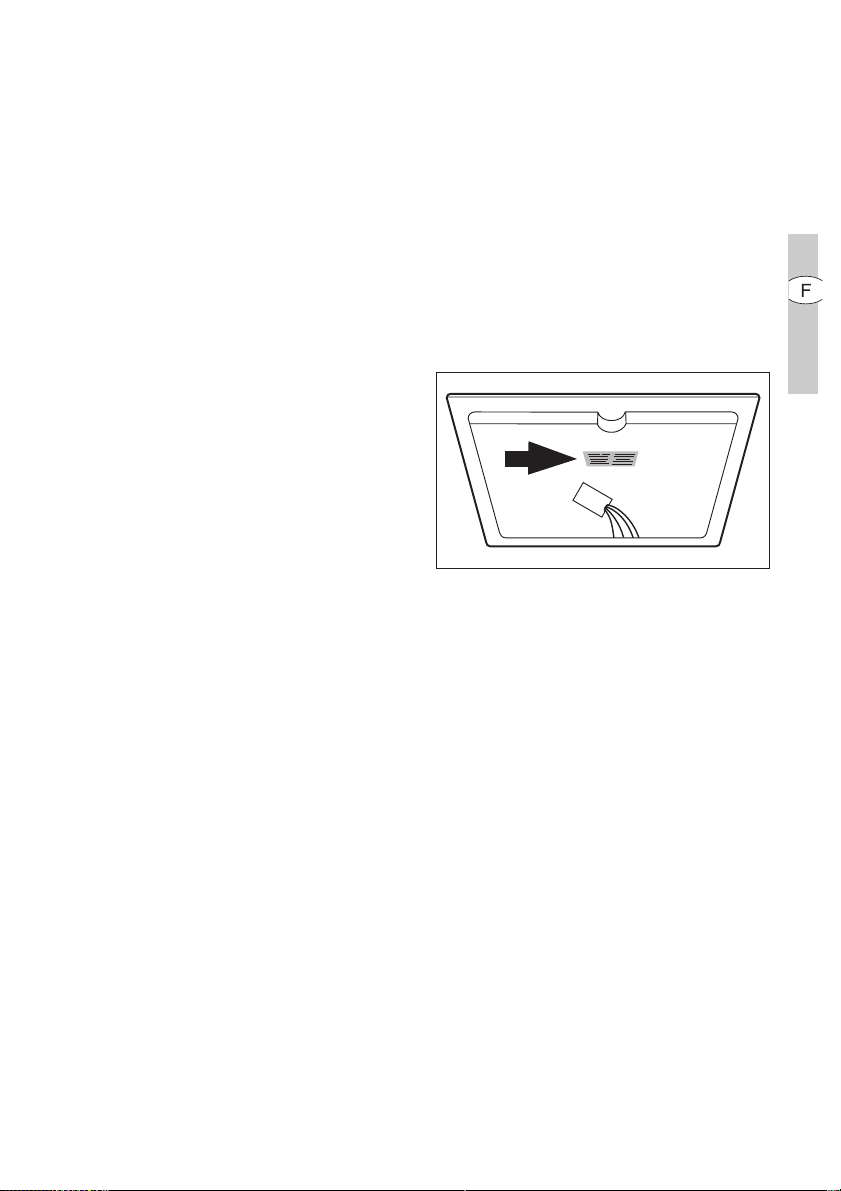
(ces chiffres se trouvent sur la plaque
signalétique)
– Type de dysfonctionnement
– eventuellement le message d’erreur
affiché par l’appareil
– Vitrocéramique avec une combinai-
son de lettres et de trois chiffres
Pour pouvoir accéder rapidement aux
numéros d’identification de l’appareil,
nous vous recommandons de les consigner à cet endroit.
service après-vente electrolux 59
Désignation du modèle
..........................
...........
PNC : ..........................
...........
S-No : ..........................
...........
Page 60

60 electrolux
Welkom in de wereld van Electrolux!
Gefeliciteerd, u hebt gekozen voor een
eersteklas product van Electrolux. U zult
hier jarenlang plezier aan beleven. Het is
de ambitie van Electrolux om het huishouden voor u gemakkelijker te maken
door middel van een breed assortiment
kwaliteitsapparatuur. U vindt enkele
voorbeelden hiervan op de voorzijde van
deze gebruiksaanwijzing. Neem de tijd
om deze gebruiksaanwijzing te bestuderen zodat u kunt profiteren van de
voordelen van uw nieuwe apparaat. Wij
beloven u een superieure gebruikerservaring en dus meer gemoedsrust. Veel
succes!
Page 61

Inhoud
1
electrolux 61
Veiligheidsvoorschriften 62
Beschrijving van het apparaat 64
Bediening van het apparaat 67
Tips voor koken en braden 77
Reiniging en onderhoud 80
Wat is er aan de hand als … 82
Afvalverwerking 84
Montageaanwijzing 85
Garantie/Adres service-afdeling 86
Adres service-afdeling 88
Service 91
Montage 92
Typeplaatje 95
In deze informatie voor gebruikers worden de volgende symbolen gebruikt:
Let op! Lees deze informatie! Belangrijke aanwijzingen voor de veiligheid van
personen en informatie ter voorkoming van schade aan apparaten
3 Algemene aanwijzingen en adviezen
2 Aanwijzingen ten behoeve van het milieu
z Gevaarlijke spanning
Page 62

62 electrolux veiligheidsvoorschriften
Veiligheidsvoorschriften
Neem deze aanwijzingen in acht, omdat
anders bij eventuele schade het recht
op garantie vervalt.
Gebruik volgens de voorschriften
• Personen (waaronder begrepen kinderen) die op grond van hun fysieke,
sensorische of verstandelijke vermogens, dan wel op grond van onervarenheid of onkunde niet in staat zijn
het apparaat veilig te gebruiken, dienen dit apparaat niet zonder het toezicht of zonder de instructies van een
verantwoordelijke persoon te gebruiken.
• Laat het apparaat tijdens het gebruik
niet zonder toezicht achter.
• Dit apparaat mag alleen in het huishouden worden gebruikt voor het
koken, braden en bakken van levensmiddelen.
• Het apparaat mag niet worden gebruikt als werkblad of aanrecht.
• Het is niet toegestaan het appaat om
te bouwen of te veranderen.
• Brandbare vloeistoffen, licht ontvlambare materialen of smeltbare
voorwerpen (bijv. folie, kunststof, aluminium) niet op het apparaat of in de
direct omgeving daarvan plaatsen of
opbergen.
Veiligheid voor kinderen
• Houd kleine kinderen altijd uit de
buurt van het apparaat.
• Grotere kinderen mogen alleen onder begeleiding en toezicht met het
apparaat werken.
• Om onbedoeld inschakelen door
kleine kinderen of huisdieren te voorkomen, is het aan te bevelen de kinderbeveiliging te activeren.
Algemene veiligheid
• Het apparaat mag alleen worden gemonteerd en aangesloten door een
erkend elektro-installateur.
• Inbouwapparaten mogen alleen
worden gebruikt nadat deze zijn ingebouwd in voorgeschreven, passende inbouwkasten en werkbladen.
• Bij storingen aan het apparaat of beschadiging van het glaskeramiek
(breuken, sprongen resp. scheuren)
moet het apparaat worden uitgeschakeld en worden losgekoppeld
van het elektriciteitsnet, om gevaar
op elektrische schokken te voorkomen.
• Reparaties aan het apparaat mogen
alleen worden uitgevoerd door vakmensen.
Veiligheid tijdens het gebruik
• Oververhitte vetten en oliën vatten
zeer snel vlam Let op! Brandgevaar!
• Wanneer u onoplettend bent tijdens
het werken met het apparaat, bestaat er risico op verbranding.
• Verwijder stickers en folies van het
glaskeramiek.
• De snoeren van elektrische apparaten mogen niet tegen het hete apparaatoppervlak resp. hete pannen
aankomen.
• De kookzones moeten na ieder gebruik worden uitgeschakeld.
Page 63

Veiligheid bij het schoonmaken
• Voor het schoonmaken moet het apparaat zijn uitgeschakeld en afgekoeld.
• Uit veiligheidsoverwegingen is het
niet toegestaan het apparaat met
een stoom- of een hogedrukreiniger
schoon te maken.
Voorkoming van beschadiging van
het apparaat
• Het glaskeramiek kan worden beschadigd door vallende voorwerpen.
• Door stoten met pannen kan de rand
van het glaskeramiek beschadigd raken.
• Pannen van gietijzer of gietaluminium
of pannen met een beschadigde bodem kunnen bij het verschuiven het
glaskeramiek bekrassen.
• Voorwerpen die kunnen smelten en
gerechten die kunnen overkoken,
kunnen inbranden op het glaskeramiek en moeten direct worden verwijderd.
• Het droogkoken van pannen moet
worden voorkomen. Hierdoor kan
het kookgerei of glaskeramiek worden beschadigd.
• De kookzones mogen niet worden
gebruikt als er geen pan of een lege
pan op staat.
veiligheidsvoorschriften electrolux 63
Page 64
64 electrolux beschrijving van het apparaat
Beschrijving van het apparaat
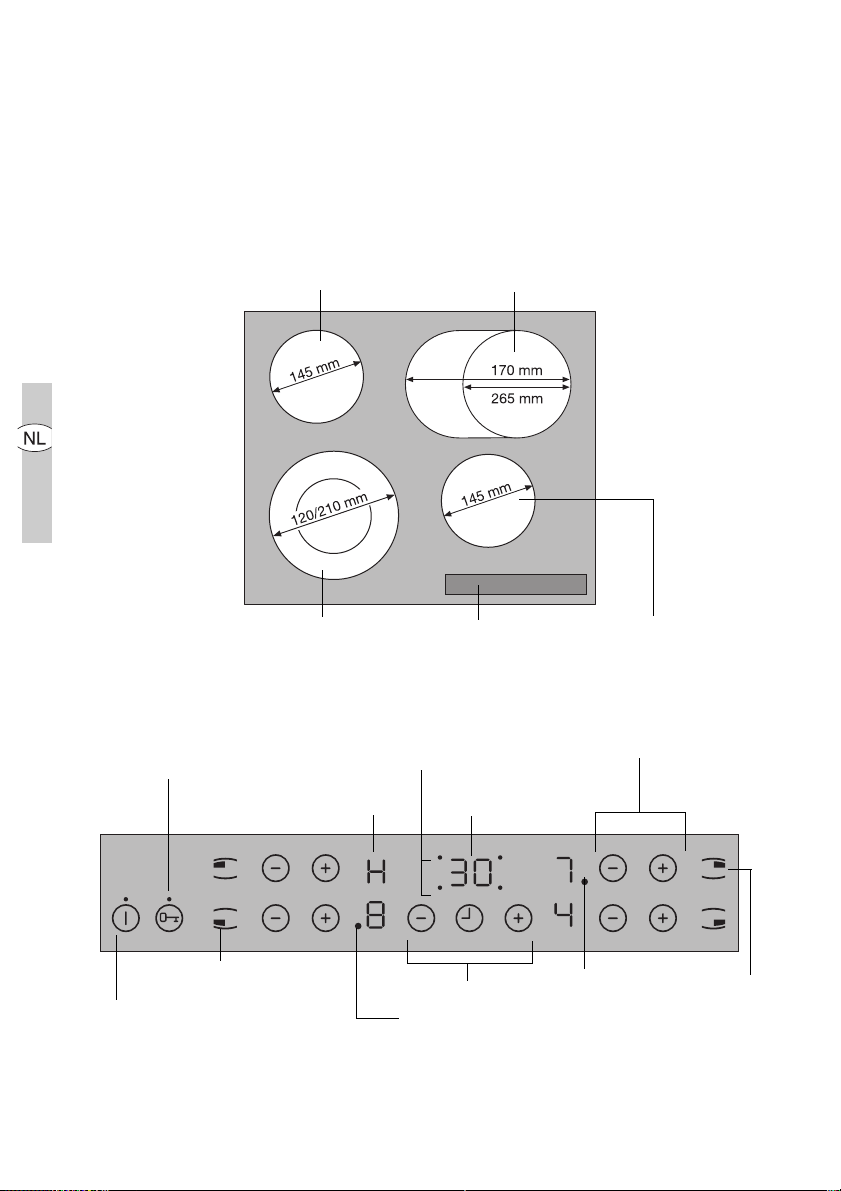
Uitrusting kookplaat
Eénkringskookzone
1200W
Braadzone
1500/2400W
Tweekrings-kookzone
750/2200W
Uitrusting bedieningsveld
Vergrendeling
met controlelampje
Buitenste kring
aan/uit
Aan/uit
met controlelampje
Kookzone-indicaties
Timerfunctie
Indicatie
Bedieningsveld Eénkringskookzone
1200W
Kookstandkeuze
Timer-indicatie
Timer
Controlelampje tweekring
Controlelampje
braadzone
Buitenste
kring
aan/uit
Page 65
beschrijving van het apparaat electrolux 65
Touch-control-sensorvelden
Het apparaat wordt bediend door middel van touch-control-sensorvelden.
Functies worden door het aanraken van
de sensorvelden gestuurd en door indicaties en akoestische signalen bevestigd.
De sensorvelden moeten van bovenaf
worden aangeraakt, zonder andere sensorvelden te bedekken.
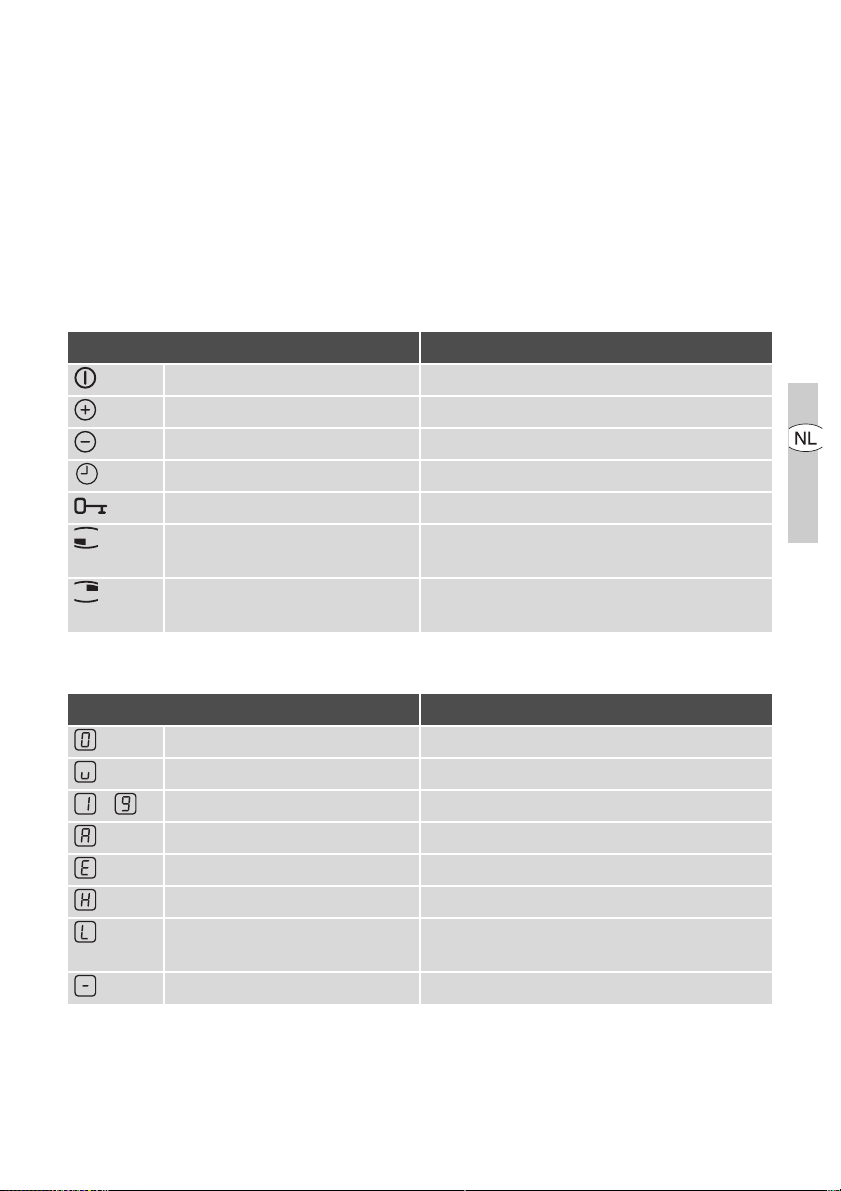
Sensorveld Functie
Aan/uit Apparaat in- en uitschakelen
Instellingen verhogen Kookstand/Tijd verhogen
Instellingen verlagen Kookstand/Tijd verlagen
Timer Timerkeuze
Vergrendeling Bedieningsveld ver-/ ontgrendeld
Inschakeling tweekrings-
kookzone
Buitenste verwarmingskring
in- en uitschakelen
Braadzone Buitenste verwarmingskring in- en uit-
schakelen
Indicaties
Indicatie Beschrijving
Kookzone is uitgeschakeld
Warmhoudstand Warmhoudstand is ingesteld.
- Kookstanden Kookstand is ingesteld
Automatisch kooksysteem Automatische kooksysteem is actief
Fout Er is een storing opgetreden
Restwarmte Kookzone is nog warm
Kinderbeveiliging Vergrendeling/kinderbeveiliging is inge-
schakeld
automatische uitschakeling Uitschakeling is actief
Page 66
66 electrolux beschrijving van het apparaat
Restwarmte-indicatie
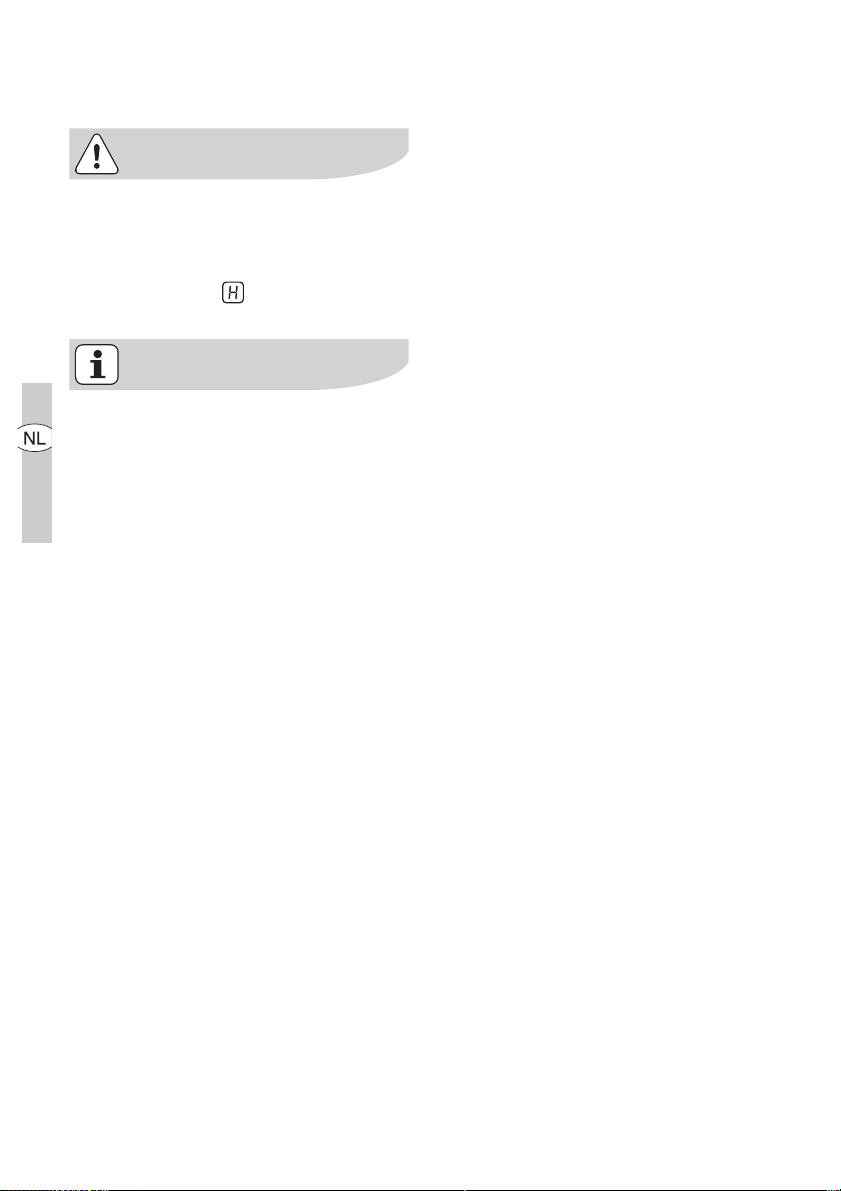
Waarschuwing! Verbrandingsgevaar door restwarmte. Na het uitschakelen duurt het nog enige tijd
voordat de kookzones zijn afgekoeld. Let op de
catie.
Restwarmte kan worden gebruikt
voor het smelten en warmhouden
van gerechten.
restwarmte-indi-
Page 67
bediening van het apparaat electrolux 67
Bediening van het apparaat
Apparaat in- en uitschakelen
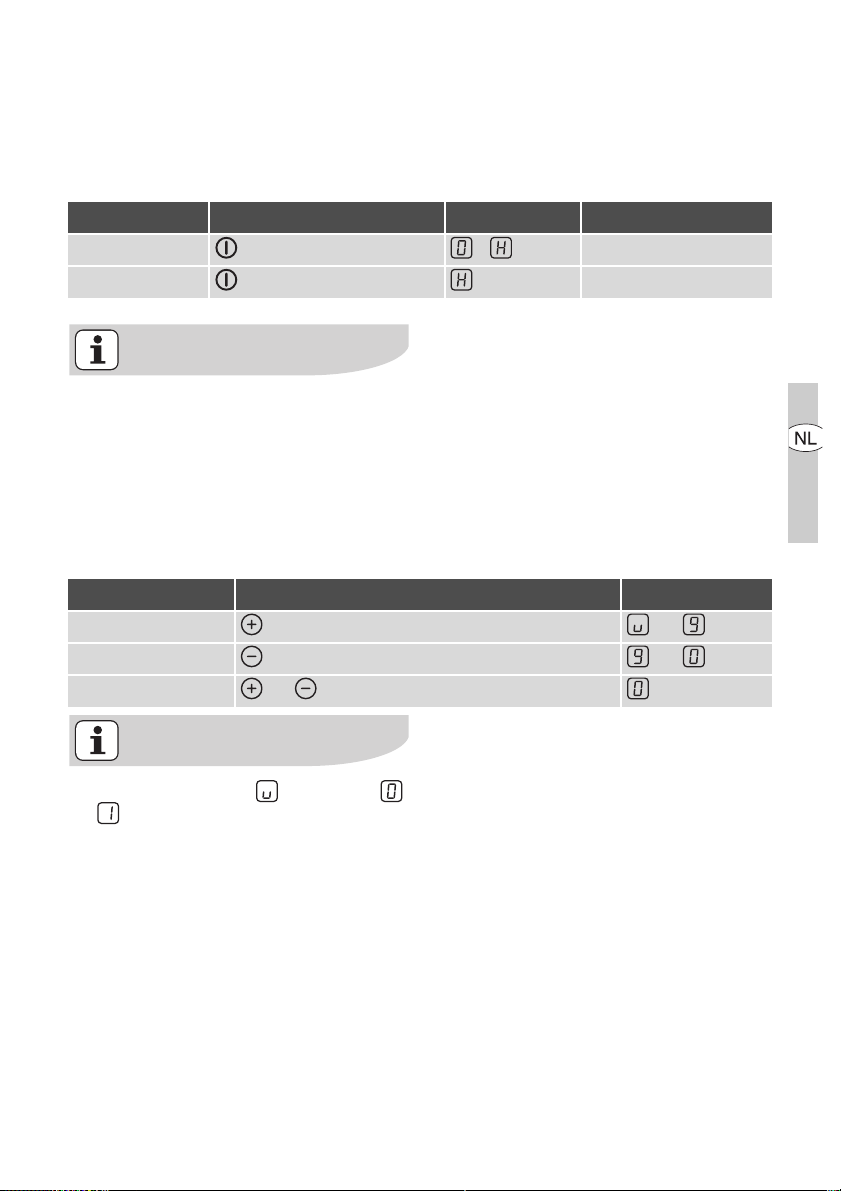
Bedieningsveld Indicatie Controlelampje
Inschakelen 2 seconden aanraken / brandt
Uitschakelen 1 seconde aanraken / geen gaat uit
Na het inschakelen moet binnen ca.
10 seconden een kookstand of een
functie worden ingesteld, anders
schakelt het apparaat automatisch
uit.
Kookstand instellen
Bedieningsveld Indicatie
Verhogen aanraken tot
Verlagen aanraken tot
Uitschakelen en tegelijk aanraken
De warmhoudstand ligt tussen
en . Deze stand dient voor het
warmhouden van eten.
Page 68
68 electrolux bediening van het apparaat
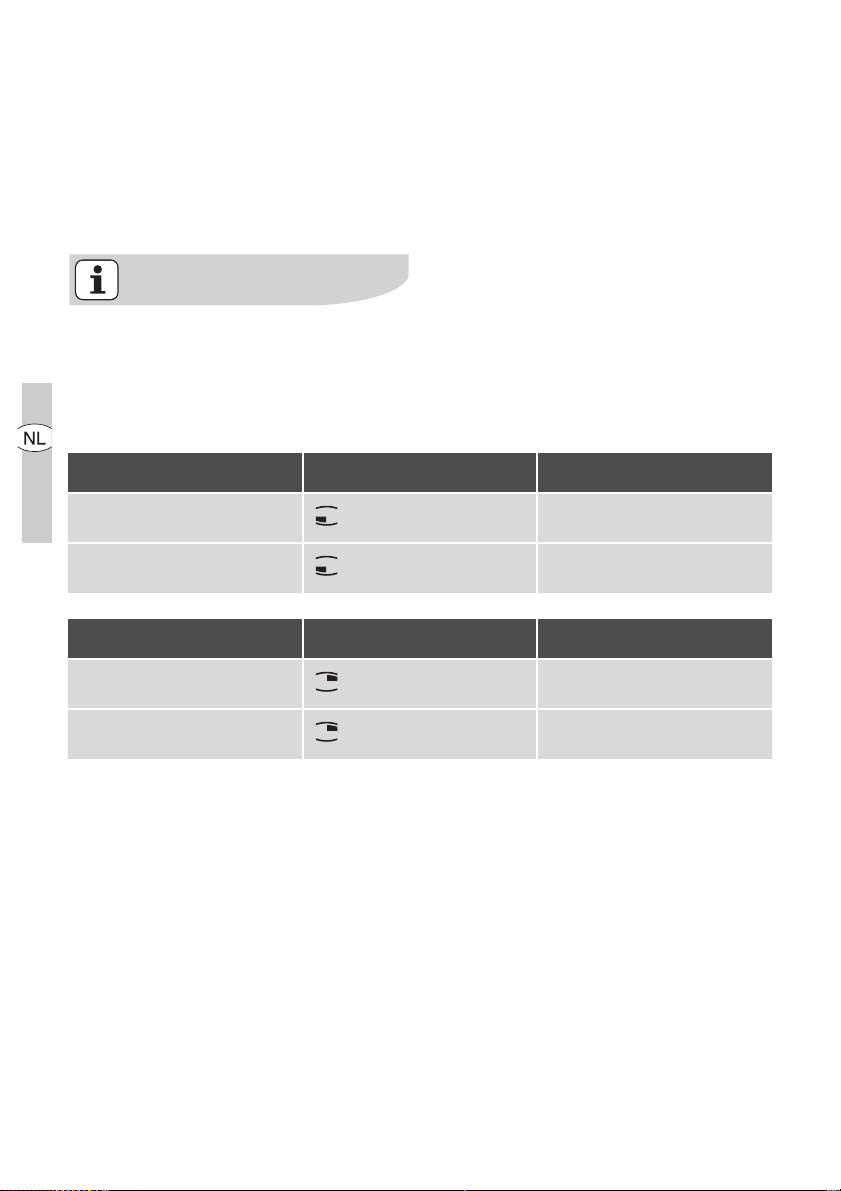
Buitenste verwarmingskringen inen uitschakelen
Door de buitenste verwarmingskringen
in of uit te schakelen kunnen de verwarmingsvlakken worden aangepast aan
de grootte van de pannen.
Voordat een van de buitenste verwarmingskringen kan worden ingeschakeld, moet altijd eerst de
binnenste verwarmingskring zijn ingeschakeld.
Tweekringskookzone
Buitenste verwarmingskring
inschakelen
Buitenste verwarmingskring
uitschakelen
Braadzone
Buitenste verwarmingskring
inschakelen
Buitenste verwarmingskring
uitschakelen
Sensorveld Controlelampje
1-2 seconden aanraken brandt
1-2 seconden aanraken gaat uit
Sensorveld Controlelampje
1-2 seconden aanraken brandt
1-2 seconden aanraken gaat uit
Page 69
bediening van het apparaat electrolux 69
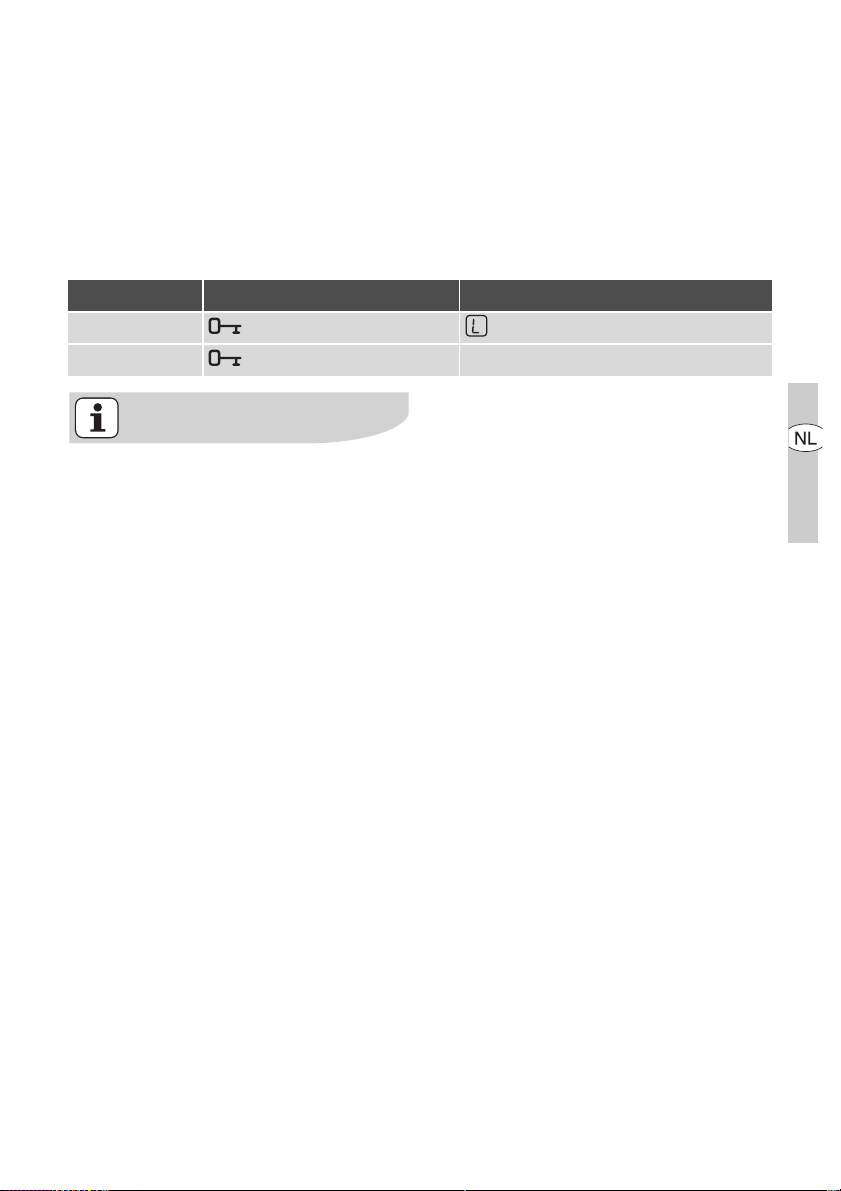
Bedieningsveld vergrendelen / ontgrendelen
Het bedieningsveld kan met uitzondering van het sensorveld ”Aan/Uit“ op ieder gewenst moment worden
vergrendeld, bijv. om het wijzigen van de
instellingen als gevolg van het met een
lap afnemen, te voorkomen.
Bedieningsveld Indicatie
Inschakelen aanraken (na 5 seconden)
Uitschakelen aanraken eerder ingestelde kookstand
Als u het apparaat uitschakelt,
wordt de vergrendeling automatisch uitgeschakeld.
Page 70
70 electrolux bediening van het apparaat
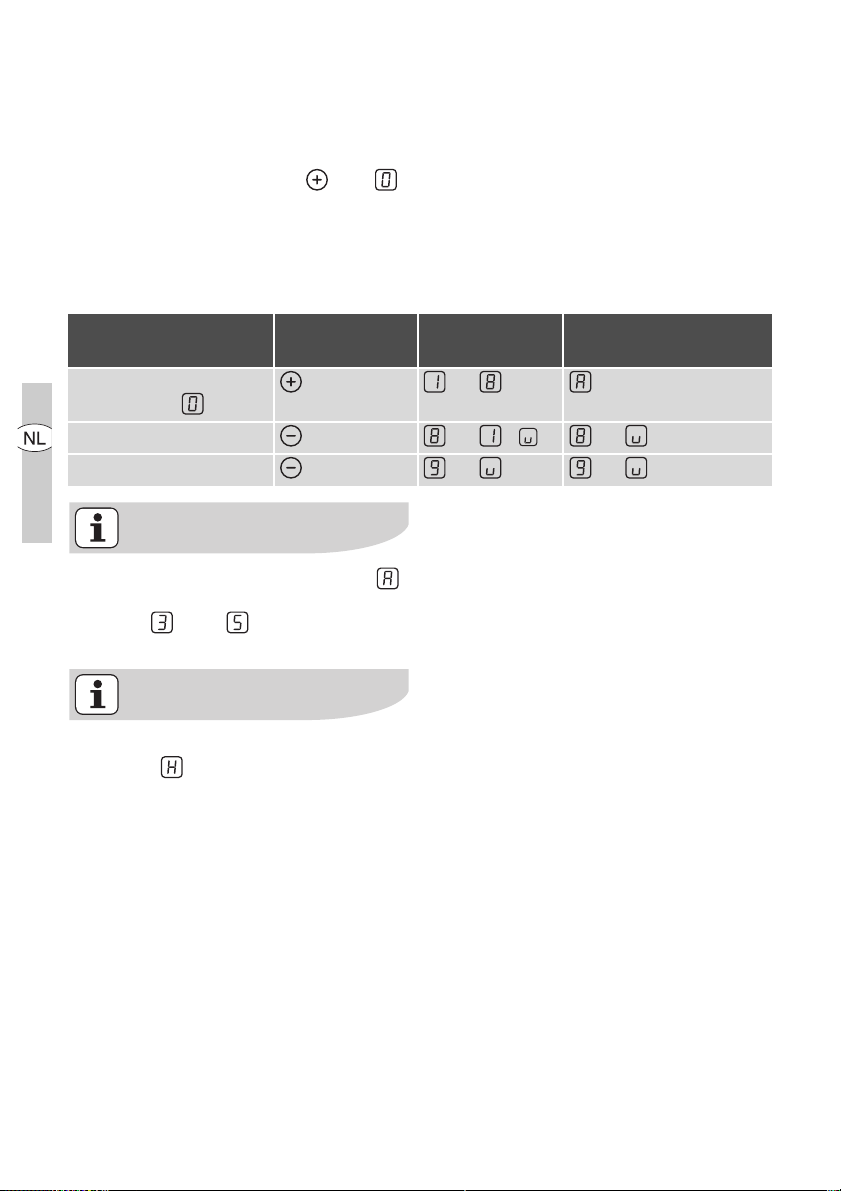
Automatisch kooksysteem gebruiken
Alle kookzones zijn met een autmatisch
kooksysteem uitgevoerd. Bij het instellen van een kookstand met , van
uitgaand, schakelt de kookzone voor
een bepaalde tijd op vol vermogen en
schakelt vervolgens automatisch op de
ingestelde kookstand terug.
Inschakelen
Bedieningsveld
aanraken tot (na 5 seconden)
Mogelijke
kookstanden
Indicatie
(alleen van uit)
Uitschakelen aanraken tot / tot
niet gebruiken aanraken tot tot
Wordt tijdens de kookactivering
een hogere kookstand gekozen,
bijv. van naar , wordt de kooktijd aangepast.
Heeft de kookzone nog restwarmte
(indicatie ), wordt de kookactivering niet uitgevoerd.
Page 71
bediening van het apparaat electrolux 71
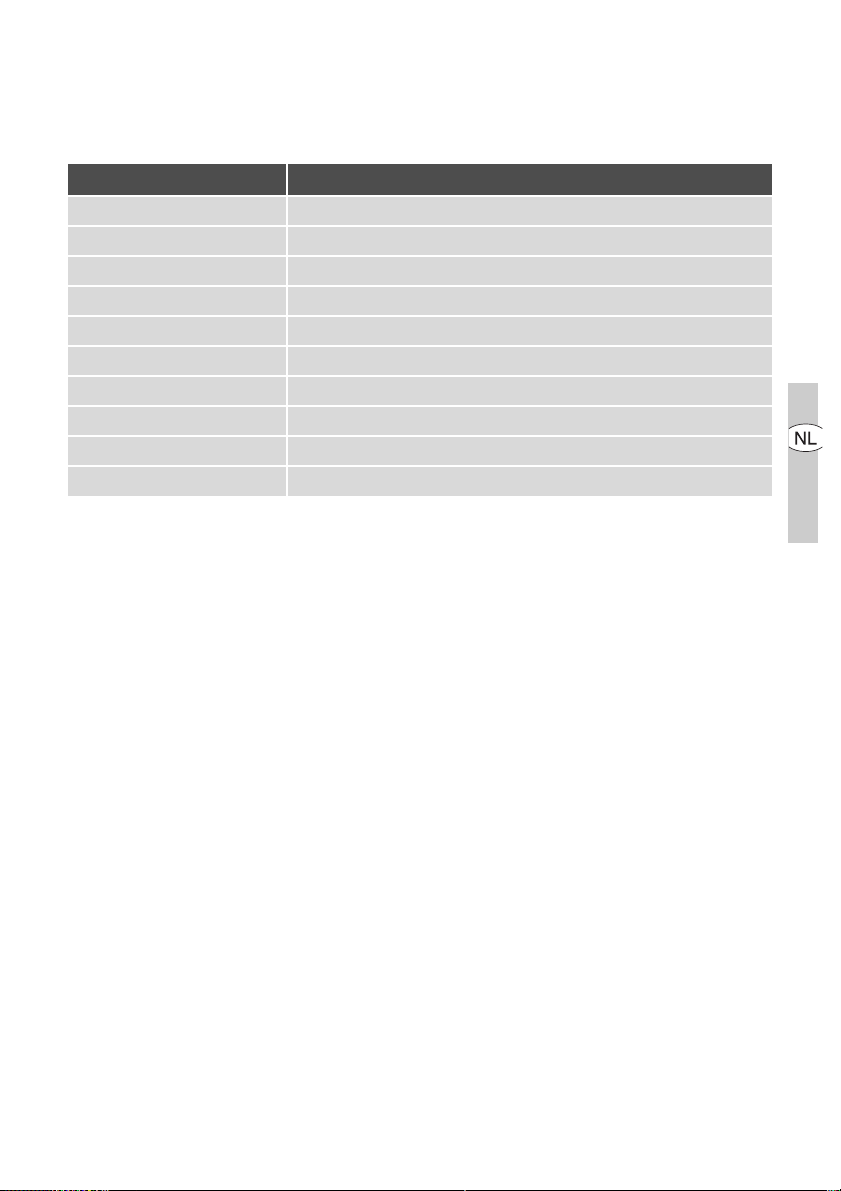
De duur van de automatische kookactivering is afhankelijk van de ingestelde
kookstand.
Kookstand Duur van de kookactivering [min:sec]
v
1
2
3
4
5
6
7
8
9
0:30
1:00
1:40
4:50
6:30
10:10
2:00
3:30
4:30
---
Page 72
72 electrolux bediening van het apparaat
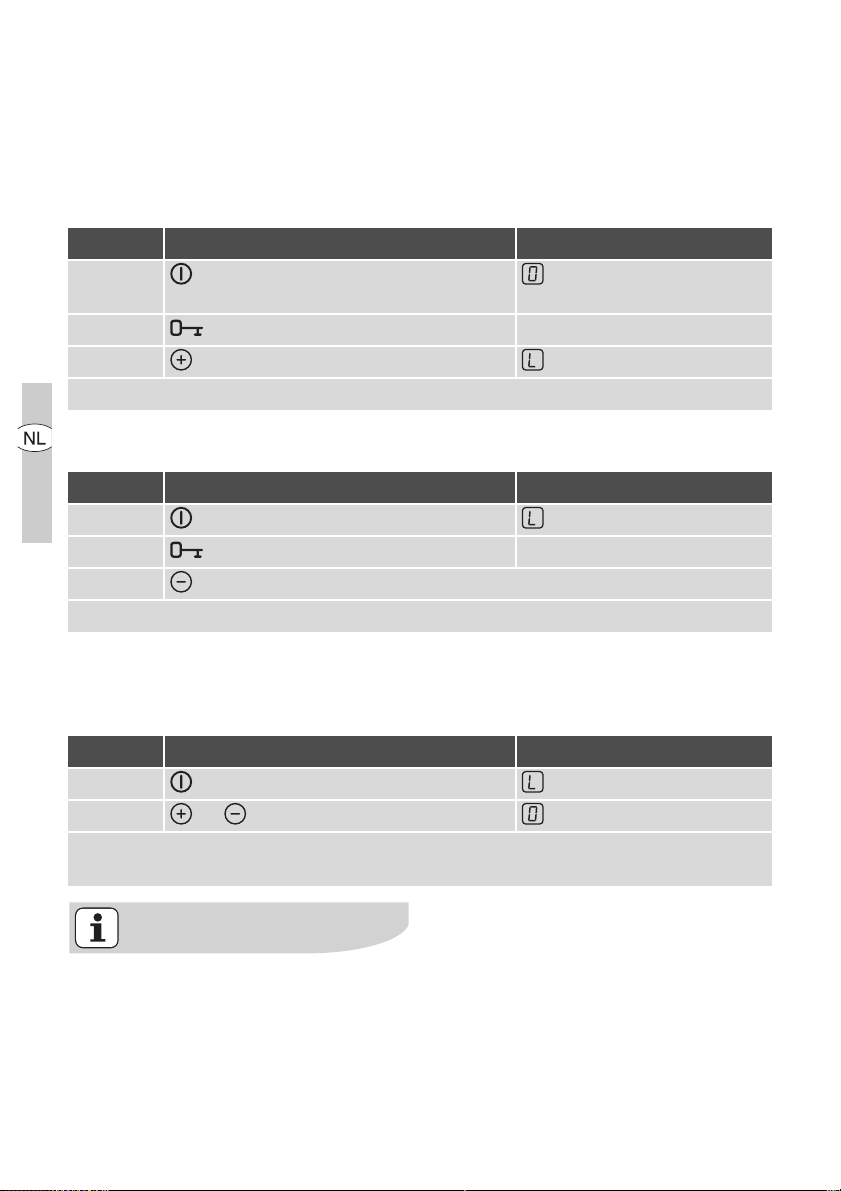
Kinderbeveiliging gebruiken
De kinderbeveiliging voorkomt ongewenst gebruik van het apparaat.
Kinderbeveiliging inschakelen
Stap Bedieningsveld Indicatie/signaal
1. apparaat inschakelen
(geen kookstand instellen)
2. aanraken tot het signaal klinkt akoestisch signaal
3. aanraken
Apparaat wordt uitgeschakeld. Kinderbeveiliging is ingeschakeld.
Kinderbeveiliging uitschakelen
Stap Bedieningsveld Indicatie/signaal
1. apparaat inschakelen
2. aanraken tot het signaal klinkt akoestisch signaal
3. aanraken
Apparaat wordt uitgeschakeld. De kinderbeveiliging is uitgeschakeld.
Kinderbeveiliging tijdelijk uitschakelen
De kinderbeveiliging kan op deze manier
eenmalig worden uitgeschakeld; bij het
volgende gebruik is de kinderbeveiliging
weer actief.
Stap Bedieningsveld Indicatie/signaal
1. apparaat inschakelen
2. en tegelijk aanraken / akoestisch signaal
Tot de volgende keer dat het apparaat wordt uitgeschakeld, kan dit normaal wor-
den gebruikt.
Na het uitschakelen van de kinderbeveiliging moet binnen ca.
10 seconden een kookstand of een
functie worden ingesteld, anders
schakelt het apparaat automatisch
uit.
Page 73
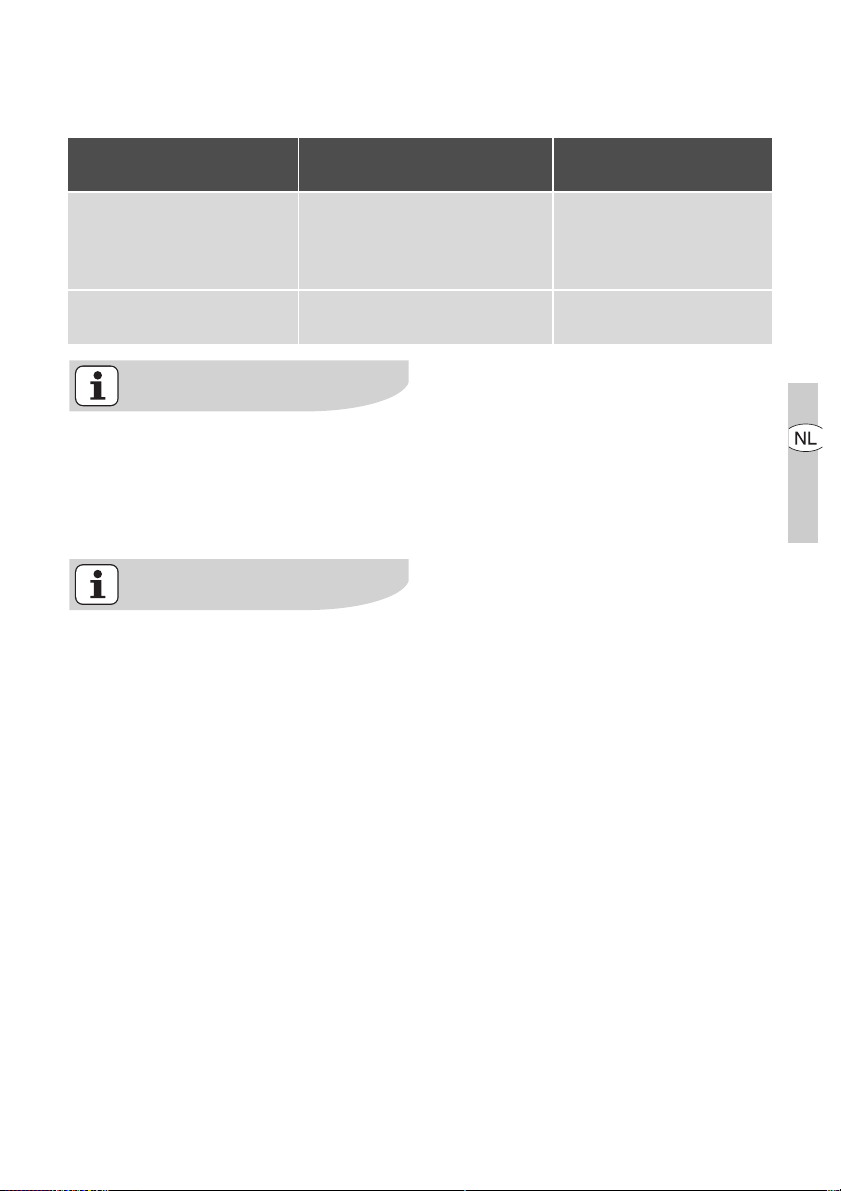
bediening van het apparaat electrolux 73
Timer gebruiken
Functie Vereisten Resultaat na verloop
van de tijd
Automatische uitscha-
keling
bij een ingestelde kookstand akoestisch signaal
00 knippert
kookzone wordt uitge-
Kookwekker bij niet gebruikte kookzones akoestisch signaal
00 knippert
Als additioneel bij een ingestelde
kookwekker bij deze kookzone een
kookstand wordt ingesteld, dan
wordt de kookzone na afloop van de
ingestelde tijd uitgeschakeld.
schakeld
Als een kookzone wordt uitgeschakeld, dan wordt tevens de ingestelde Timerfunctie uitgeschakeld.
Page 74
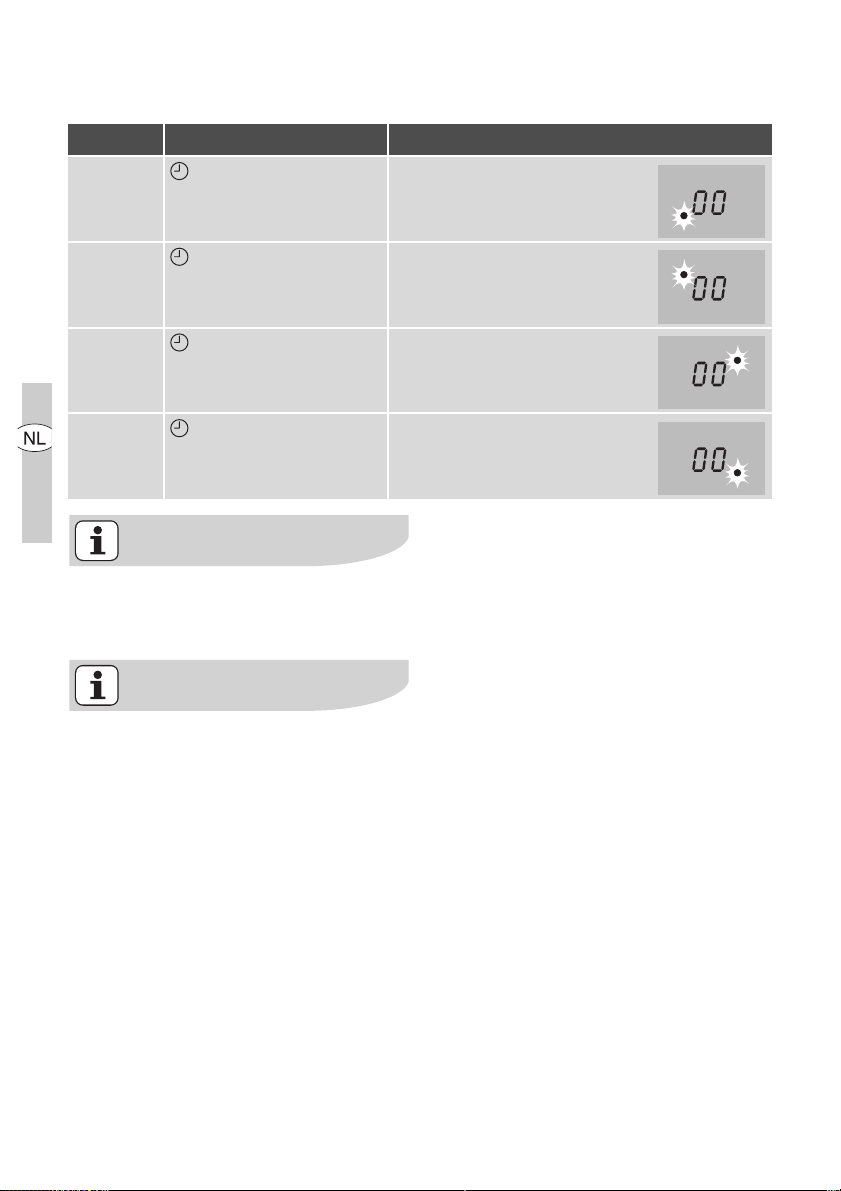
74 electrolux bediening van het apparaat
Kookzone kiezen
Stap Bedieningsveld Indicatie
1. 1xaanraken Controlelampje van de eerste
kookzone knippert
2. 1xaanraken Controlelampje van de tweede
kookzone knippert
3. 1xaanraken Controlelampje van de derde
kookzone knippert
4. 1xaanraken Controlelampje van de vierde
kookzone knippert
Knippert het controlelampje langzamer dan kan de kookstand ingesteld of gewijzigd worden.
Als meerdere Timerfuncties zijn ingesteld, dan wordt na een aantal seconden de kortste resterende tijd
van alle Timerfuncties aangegeven
en knippert het bijbehorende controlelampje.
Page 75
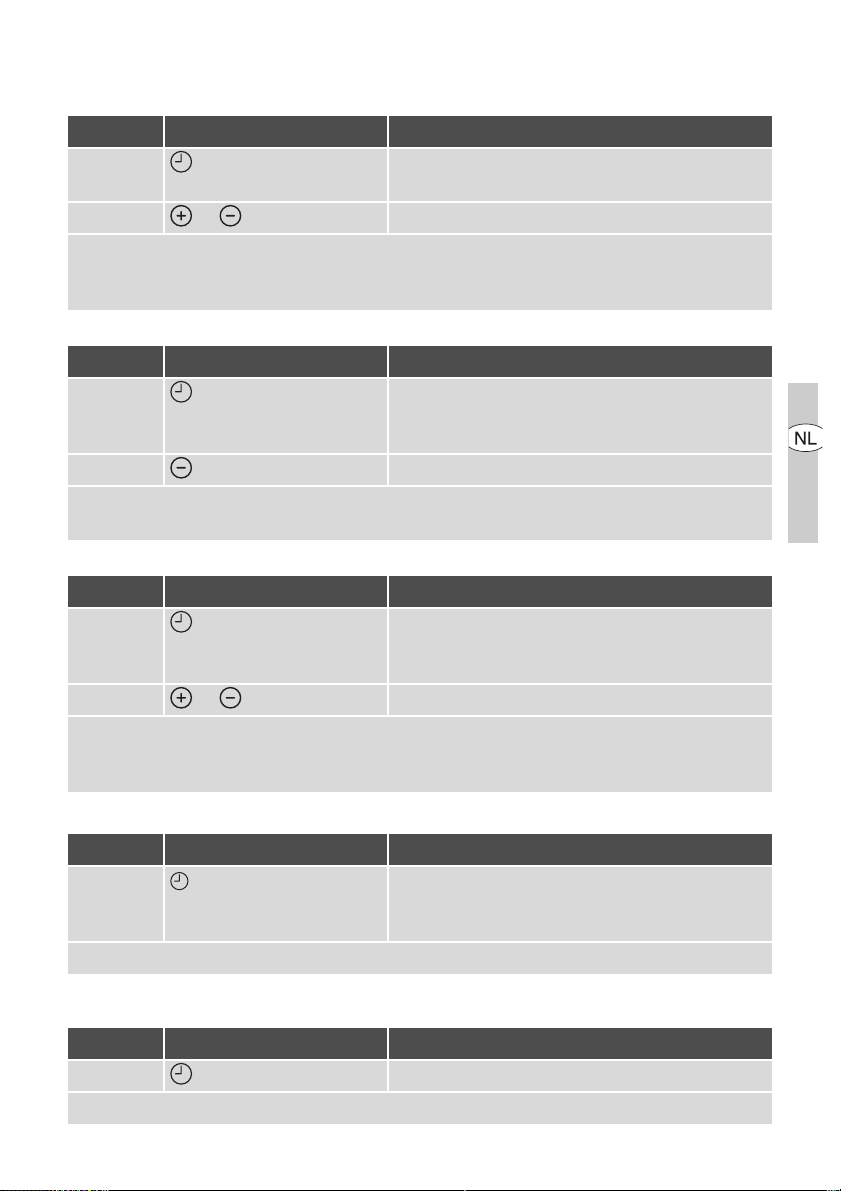
bediening van het apparaat electrolux 75
Tijd instellen
Stap Bedieningsveld Indicatie
1. Kookzone kiezen Controlelampje van de gekozen kookzone
knippert
2. of aanraken 00 tot 99 minuten
Na een aantal seconden knippert het controlelampje langzamer.
De tijd is ingesteld.
De tijd telt terug.
Timerfunctie uitschakelen
Stap Bedieningsveld Indicatie
1. Kookzone kiezen Controlelampje van de gekozen kookzone
knippert sneller.
Resterende tijd wordt aangegeven
2. aanraken De resterende tijd telt terug tot 00.
Het controlelampje gaat uit.
De Timerfunctie voor de gekozen kookzone is uitgeschakeld.
Tijd wijzigen
Stap Bedieningsveld Indicatie
1. Kookzone kiezen Controlelampje van de gekozen kookzone
knippert sneller.
Resterende tijd wordt aangegeven
2. of aanraken 01 tot 99 minuten
Na een aantal seconden knippert het controlelampje langzamer.
De tijd is ingesteld.
De tijd telt terug.
Resterende tijd van een kookzone aangeven
Stap Bedieningsveld Indicatie
1. kookzone selecteren Controlelampje van de geselecteerde kook-
zone knippert sneller
Resterende tijd wordt aangegeven
Na een aantal seconden knippert het controlelampje langzamer.
Akoestisch signaal uitschakelen
Stap Bedieningsveld Akoestisch signaal
1. aanraken Akoestische uitschakeling.
Akoestisch signaal gaat uit
Page 76
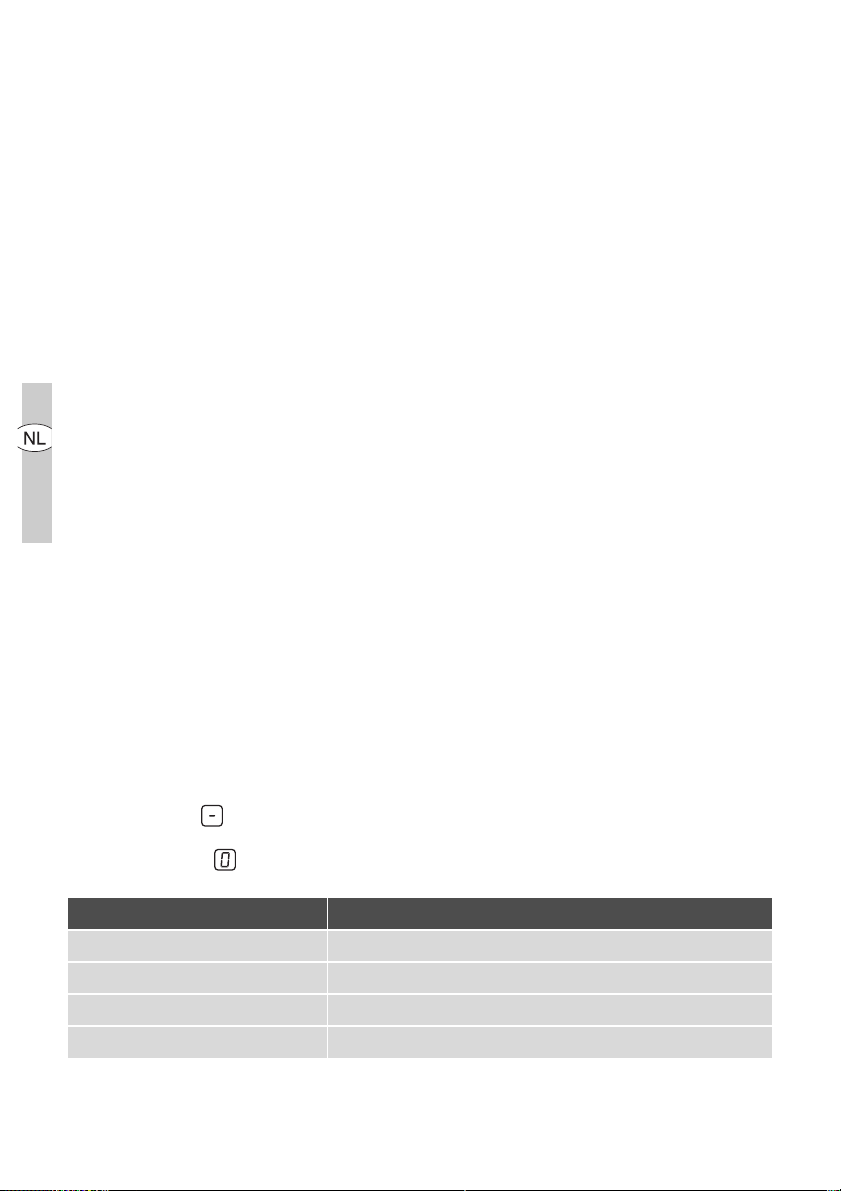
76 electrolux bediening van het apparaat
Schakelt automatisch uit
Kookplaat
• Als na het inschakelen van de kookplaat niet binnen ca. 10 seconden bij
een kookzone een kookstand wordt
ingesteld, schakelt de kookplaat automatisch uit.
• Als een of meerdere sensorvelden
langer dan circa 10 seconden door
voorwerpen (pan, vatdoek enz.) worden bedekt, krijgt u een signaal te
horen en wordt de kookzone automatisch uitgeschakeld.
• Wanneer alle kookzones worden uitgeschakeld, schakelt de kookplaat
na ca. 10 seconden automatisch uit.
Bedieningsveld
• Indien bij uitgeschakeld apparaat
een of meer sensorvelden van het
bedieningsveld langer dan tien seconden worden afgedekt, klinkt een
akoestisch signaal. Het signaal
schakelt automatisch uit als de sensorvelden niet meer zijn afgedekt.
Kookzones
• Als een van de kookzones na een
bepaalde tijd niet is uitgeschakeld of
als de kookstand niet wijzigt, schakelt de betreffende kookzone automatisch uit. wordt aangegeven.
Voor het opnieuw gebruiken moet de
kookzone op gesteld worden.
Kookstand Uitschakeling na
v, 1 - 2 6 uur
3 - 4 5 uur
5 4 uur
6 - 9 1,5 uur
Page 77

Tips voor koken en braden
Aanwijzing met betrekking tot
acrylamide
Volgens de laatste wetenschappelijke inzichten kan een intensieve
bruining van levensmiddelen, met
name bij zetmeelhoudende producten, een gevaar voor de gezondheid
door acrylamide veroorzaken. Om
die reden adviseren wij levensmiddelen zoveel mogelijk bij lage temperaturen te bereiden en de
gerechten niet te veel te bruinen.
Pannen
• Goede pannen herkent u aan de
panbodem. Die moet zo dik en vlak
mogelijk zijn.
• Pannen van email of met een aluminium of koperen bodem kunnen verkleuringen op het glaskeramische
vlak achterlaten. Deze verkleuringen
kunnen slechts met moeite of helemaal niet meer worden verwijderd.
tips voor koken en braden electrolux 77
Page 78
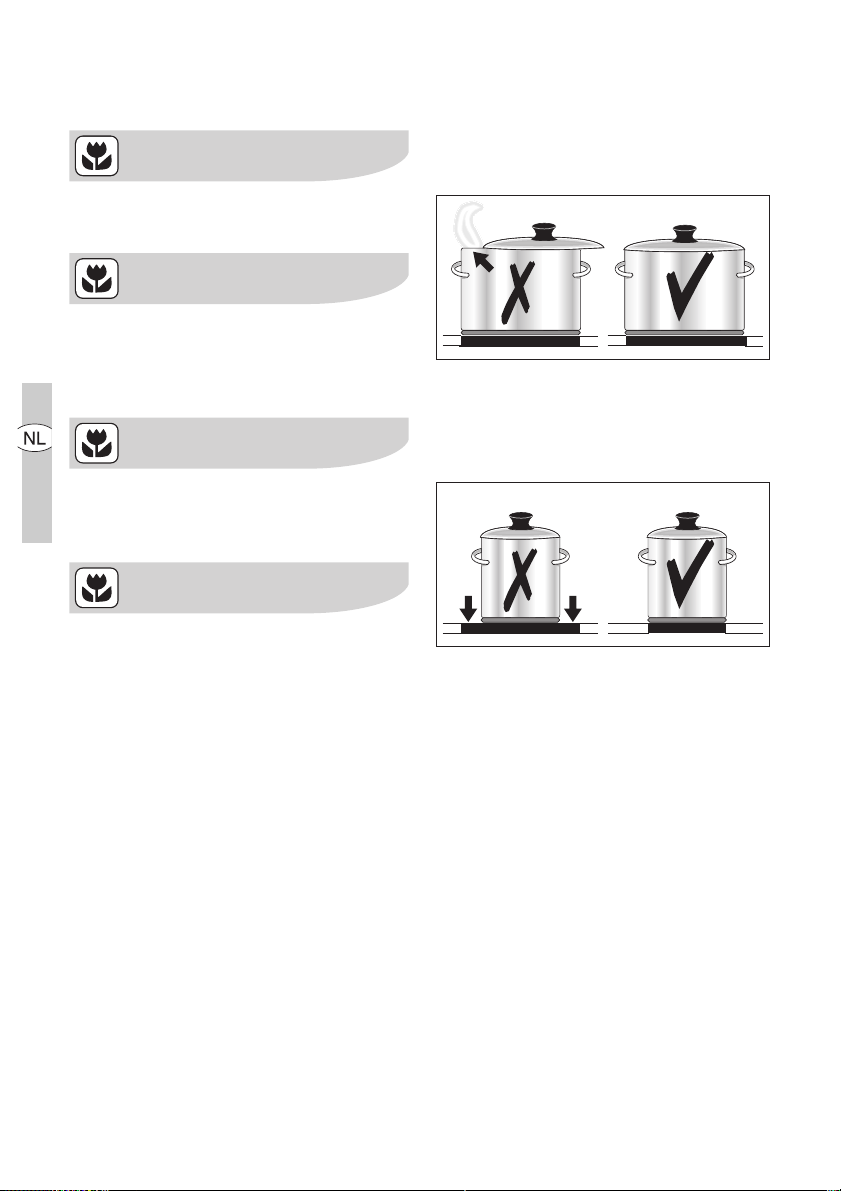
78 electrolux tips voor koken en braden
Energiebesparing
Plaats de pan al voor het inschakelen op de kookzone.
Sluit pannen, indien mogelijk, altijd
af met een deksel.
Schakel de kookzones al voor het
einde van de kooktijd uit, om gebruik te maken van de restwarmte.
De grootte van de panbodem moet
overeenkomen met de grootte van
de kookzone.
Page 79
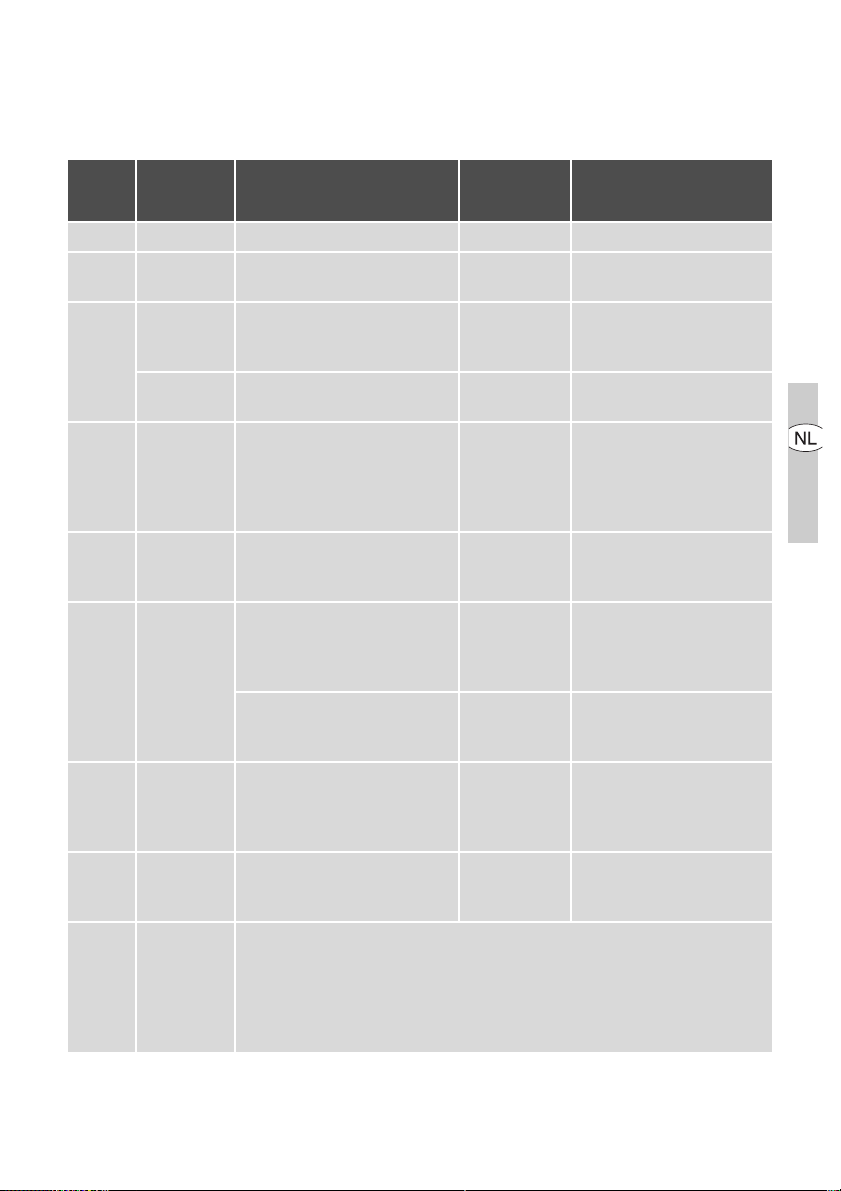
tips voor koken en braden electrolux 79
Toepassingsvoorbeelden voor het koken
De gegevens in de volgende tabel dienen slechts als richtlijn.
Kook-
stand
Kook-
proces
Geschikt voor Duur Aanwijzingen/tips
0 nawarmte, uit-stand
V
Warm
houden
Warm houden van gare ge-
rechten
Hollandaisesaus,
Smelten
1-2
Stollen
smelten van boter,
chocolade, gelatine
Schuimomelet, bouillon met
ei
Wellen van rijst en melkge-
2-3
Wellen
Verhitten van kant-en-klaar-
rechten
gerechten
3-4
Stomen
Stoven
Stoven van groente, vis
Vlees sudderen
Koken van aardappels 20-60 min.
4-5
Koken
Koken van grotere hoeveel-
heden, eenpansgerechten en
soep
Schnitzel, cordon bleu, kar-
6-7
Zacht
braden
bonade, gehaktballen,
braadworst, lever, roux, eie-
ren, omelets, oliebollen
7-8
Sterk
braden
Aardappel koekjes, lende-
stukken, steaks, pannenkoe-
ken
Aan de
kook
9
brengen
Aanbra
Aan de kook brengen van grotere hoeveelheden water, pasta koken,
aanbraden van vlees (goulash, stoofvlees), frituren van patates frites
den
Frituren
Naar behoef-
te
Afdekken
5-25 min. Tussendoor omroeren
10-40 min. Met deksel bereiden
Minimaal dubbele hoe-
veelheid vloeistof aan de
25-50 min.
rijst toevoegen, melkge-
rechten tussendoor roe-
ren
Bij groente weinig vocht
20-45 min.
toevoegen (een paar eet-
lepels)
Weinig vloeistof
gebruiken, bijvoorbeeld:
¼
max.
l water per
750 g aardappels
60-150 min.
Voortdurend
bakken
5-15 min.
per pan
Tot 3 l vloeistof plus ingre-
diënten
Tussen d oor keren
Tussen d oor keren
Page 80

80 electrolux reiniging en onderhoud
Reiniging en onderhoud
Voorzichtig! Verbrandingsgevaar
door restwarmte.
Let op! Bijtende en schurende
schoonmaakmiddelen beschadigen het apparaat. Schoonmaken
met water en handafwasmiddel.
Let op! Resten van schoonmaakmiddelen beschadigen het apparaat. Verwijder resten met water en
handafwasmiddel.
Reinig het apparaat na ieder gebruik
1. Maak het apparaat schoon met een
vochtige doek en een klein beetje
handafwasmiddel.
2. Wrijf het apparaat droog met een
schone doek.
Page 81
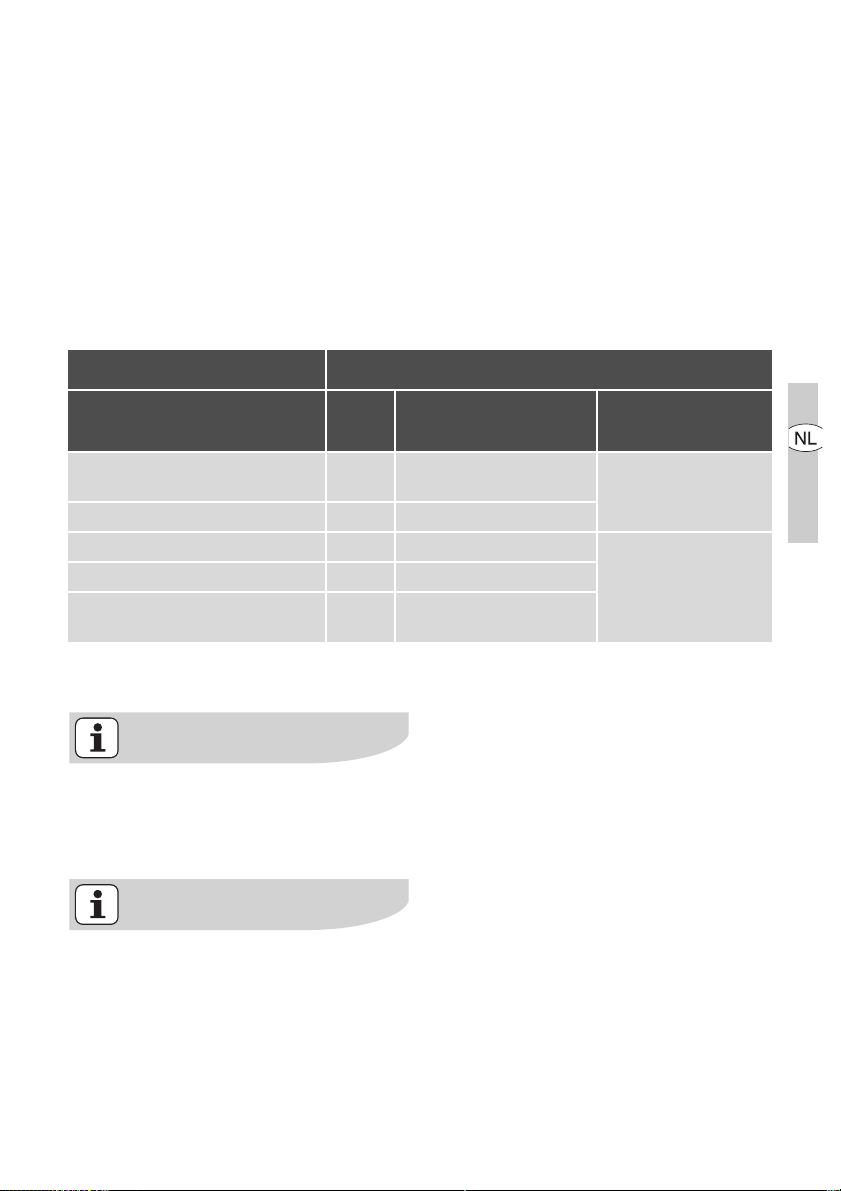
Verwijder verontreinigingen
1. Plaats een glasschraper schuin op
het glaskeramische vlak.
2. Verwijder verontreinigingen door de
schraper over het oppervlak te laten
glijden.
3. Maak het apparaat schoon met een
vochtige doek en een klein beetje
handafwasmiddel.
4. Wrijf het apparaat droog met een
schone doek.
reiniging en onderhoud electrolux 81
Soort vervuiling direct
Suiker, suikerhoudende gerechten
Kunststoffen, aluminiumfolies ja --Kalk- en watersporen --- ja
Vetspatten --- ja
metaalachtig glanzende
verkleuringen
*Glasschrapers en speciale schoonmaakmidde-
len voor glaskeramiek of roestvrij staal zijn verkrijgbaar in de vakhandel.
bij afgekoeld appa-
raat
ja ---
--- ja
Hardnekkige verontreinigingen verwijderen met een speciaal schoonmaakmiddel voor glaskeramiek of
roestvrij staal.
verwijderen
met
Glasschraper*
Speciaal schoonmaakmiddel voor
glaskeramiek of roest-
vrij staal*
Krassen of donkere vlekken in het
glaskeramiek kunnen niet meer
worden verwijderd, zij hebben echter geen invloed op het functioneren
van het apparaat.
Page 82
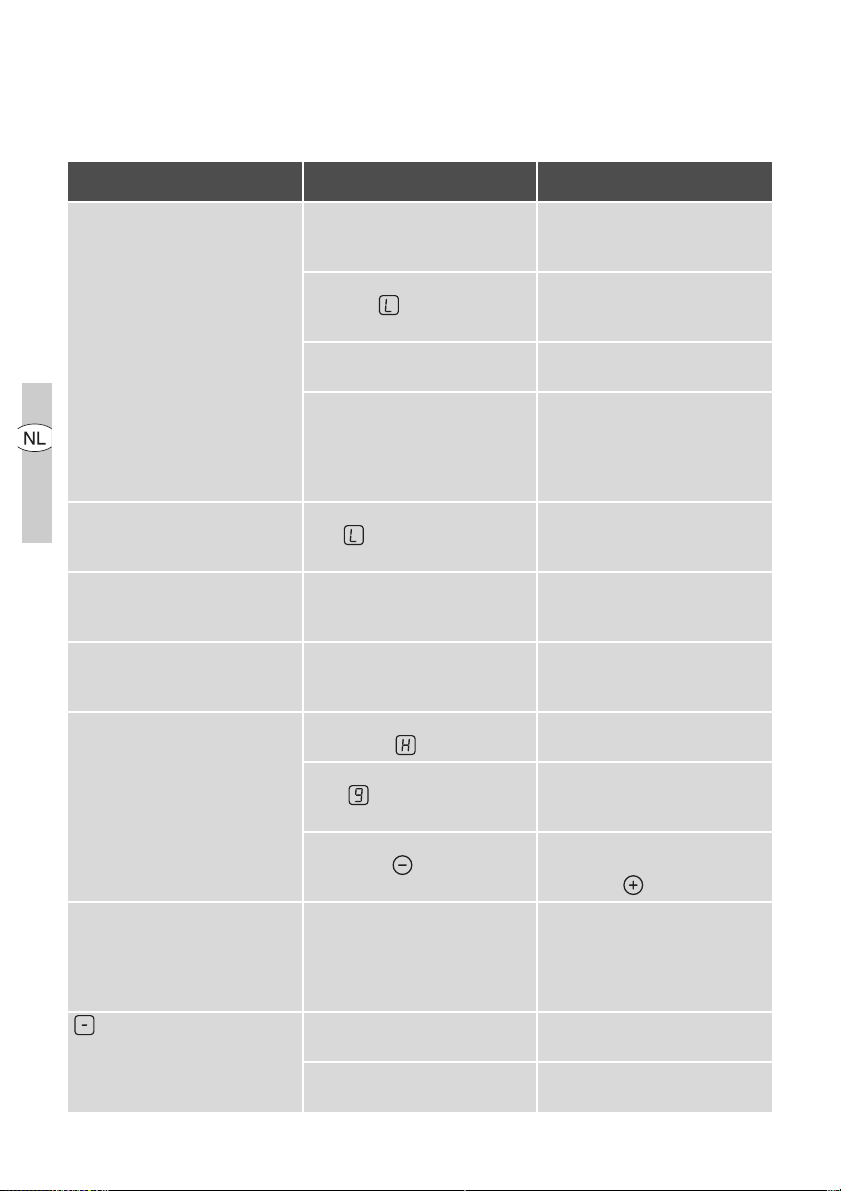
82 electrolux wat is er aan de hand als …
Wat is er aan de hand als …
Storing Mogelijke oorzaak Oplossing
De kookzones kunnen niet ingeschakeld worden of functioneren niet
Er gaat een geluidssignaal af
als het apparaat is uitgeschakeld
De restwarmte-indicatie geeft
niets aan
De automatische kookactivering schakelt niet in
Een zoemer is hoorbaar en het
apparaat wordt automatisch
ingeschakeld en na 5 sec.
weer uitgeschakeld, na 5 sec.
klinkt nogmaals een zoemer.
brandt Oververhittingbeveiliging van
Na het inschakelen van het apparaat zijn meer dan 10 seconden verstreken
De kinderbeveiliging is ingeschakeld
Er zijn meerdere sensorvelden
tegelijk aangeraakt
Schakelt automatisch uit is geactiveerd
De vergrendeling is ingeschakeld
Het bedieningspaneel wordt
geheel of deels door voorwerpen afgedekt
De kookzone is slechts kort
gebruikt en is daarom nog niet
heet
De kookzone heeft nog een
restwarmte
De hoogste kookstand is ingesteld
De kookstand wordt met het
sensorveld ingesteld
Het sensorveld Aan/Uit wordt
geblokkeerd, bijv. door een
doek
de kookzone is geactiveerd
Schakelt automatisch uit is ge-
activeerd
Apparaat nogmaals inschakelen
Kinderbeveiliging deactiveren
(zie het hoofdstuk ”Kinderbeveiliging“)
Raak slechts één sensorveld
tegelijk aan
Eventueel op het bedieningsveld liggende voorwerpen
(pan, vaatdoek o.i.d.) verwijderen. Apparaat nogmaals inschakelen.
De vergrendeling uitschakelen
(zie hoofdstuk ”Bedieningsveld
vergrendelen/ontgrendelen“)
Verwijder de voorwerpen
Neem contact op met de klantenservice wanneer de kookzone toch heet is.
De kookzone laten afkoelen
De hoogste kookstand heeft
hetzelfde vermogen als het automatische kooksysteem
1.
Kookzone uitschakelen
1.
De kookzone via het sensorveld instellen
Geen voorwerpen op het bedieningsveld leggen
Kookzone uitschakelen Kookzone nogmaals inschakelen
Kookzone uitschakelen Kookzone nogmaals inschakelen
Page 83
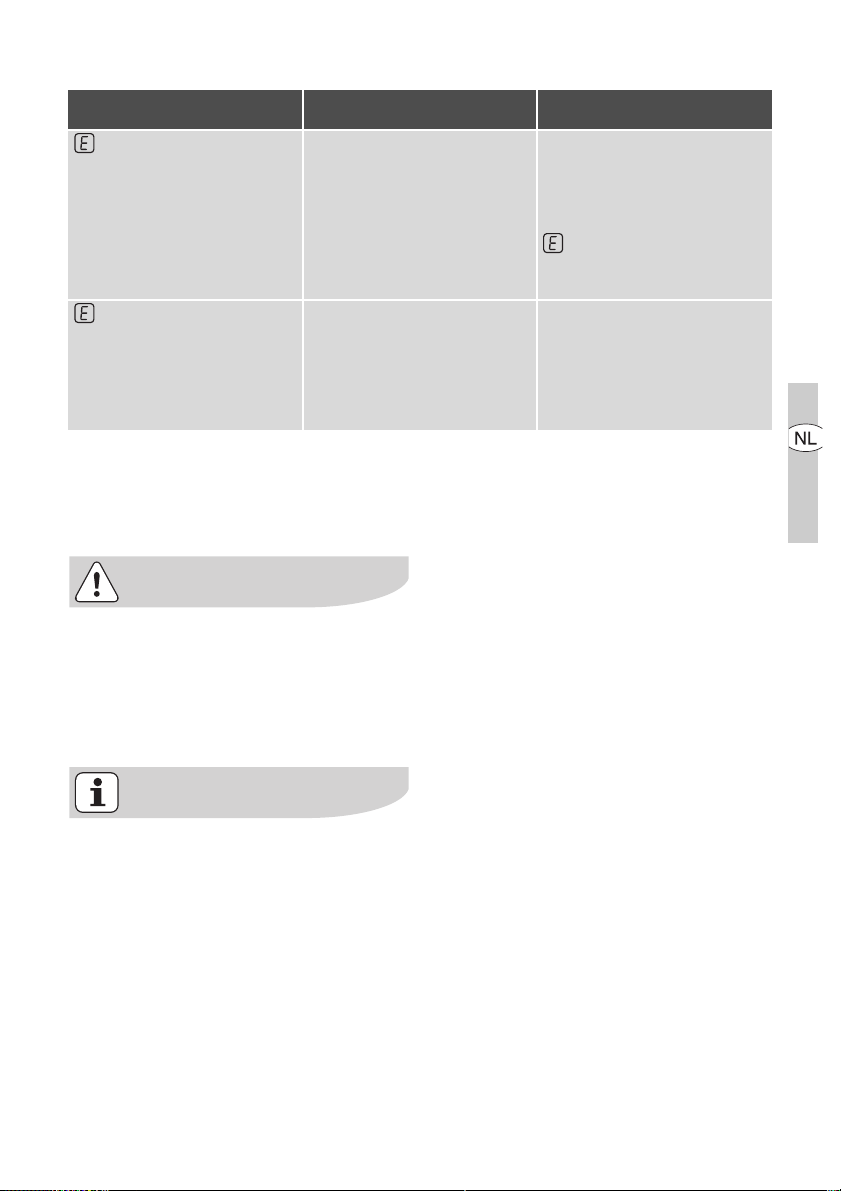
wat is er aan de hand als … electrolux 83
Storing Mogelijke oorzaak Oplossing
en nummer wordt aange-
geven
en een minteken wordt
weergegeven
Fout in de elektronica Apparaat een aantal minuten
Te sterke lichtinval op het bedieningspaneel, bijvoorbeeld
fel zonlicht
Wanneer u de storing niet kunt verhelpen met de hierboven gegeven
aanwijzingen, neem dan contact op
met uw vakhandel of met onze service-afdeling.
Waarschuwing! Reparaties aan het
apparaat mogen alleen door vakmensen worden uitgevoerd. Onvakkundige reparaties kunnen tot
aanzienlijke risico's voor de gebruiker leiden.
van de voeding scheiden (zekering uit de huisinstallatie nemen)
Als na het inschakelen de fout
nogmaals wordt aangegeven, contact opnemen met de
servicedienst
Verduister kort het bedieningspaneel, bijvoorbeeld met de
hand. Er gaat een geluidssignaal af en het apparaat wordt
uitgeschakeld. Schakel het
apparaat weer in.
Bij een onjuiste bediening wordt het
bezoek van de servicetechnicus
ook tijdens de garantieperiode in rekening gebracht.
Page 84

84 electrolux afvalverwerking
Afvalverwerking
Verpakkingsmateriaal
De verpakkingsmaterialen zijn niet
schadelijk voor het milieu en herbruikbaar. De kunststoffen hebben
de volgende aanduidingen, bijv.
>PE<, >PS<, enz. Verwijder de verpakkingsmaterialen in overeenstemming met de aanduiding bij de
gemeentelijke inzamelplaatsen in
de daarvoor bestemde containers.
Oud apparaat verwijderen
Het symbool
op de verpakking wijst erop dat dit
product niet als huishoudafval mag
worden behandeld. Het moet echter
naar een plaats worden gebracht
waar elektrische en elektronische
apparatuur wordt gerecycled. Als u
ervoor zorgt dat dit product op de
correcte manier wordt verwijderd,
voorkomt u mogelijk voor mens en
milieu negatieve gevolgen die zich
zouden kunnen voordoen in geval
van verkeerde afvalbehandeling.
Voor meer details in verband met
het recyclen van dit product, neemt
u het best contact op met de gemeentelijke instanties, het bedrijf of
de dienst belast met de verwijdering
van huishoudafval of de winkel waar
u het product hebt gekocht.
W op het product of
Page 85

montageaanwijzing electrolux 85
Montageaanwijzing
Veiligheidsaanwijzingen
Let op! Lees deze informatie!
De in het land van gebruik geldende
wetgeving, verordeningen, richtlijnen en
normen dienen te worden nageleefd
(veiligheidsvoorschriften, vakkundige recycling volgens de voorschriften, enz.).
De montage mag slechts door een gekwalificeerd technicus worden uitgevoerd.
De minimumafstanden tot andere apparaten en meubelen dienen in acht te
worden genomen.
De aanraakbeveiliging dient met de inbouw te zijn gewaarborgd; lades mogen
bijvoorbeeld alleen met beschermplaat
direct onder het apparaat worden gemonteerd.
De naden op het werkblad dienen met
een geschikt afdichtingsmateriaal tegen
vocht te worden beschermd.
De dichting zorgt voor een naadloze
aansluiting tussen apparaat en werkblad.
Tussen het apparaat en het werkblad
mag geen siliconendichtmiddel worden
aangebracht.
Voorkom het plaatsen van het apparaat
direct naast deuren of onder ramen.
Openklappende deuren en openspringende ramen kunnen anders het kookgerei van de kookplaat stoten.
z
Verwondingsgevaar door elektrische stroom.
• De netaansluitklem staat onder
spanning.
• Netaansluitklem spanningsvrij maken.
• Aansluitschema in acht nemen.
• Veiligheidsvoorschriften van de elek-
trotechniek in acht nemen.
• Aanraakbeveiliging door vakkundige
inbouw waarborgen.
• Elektrische aansluiting laten uitvoeren door een erkend elektrotechnisch installateur.
z
Schade door elektrische stroom.
• Losse en verkeerde stekkerverbindingen kunnen de klemmen oververhitten.
• Klemverbindingen vakkundig uitvoeren.
• Kabels voorzien van trekontlasting.
• Bij een aansluiting met 1- of met 2-
fasen dient steeds de juiste en passende netaansluitng van het type
H05BB-F Tmax 90°C (of hoger) te
worden ingezet.
• Als de aansluitkabel van dit apparaat
beschadigd is, moet deze door een
speciale aansluitkabel (type H05BBF Tmax 90°C; of hoger) worden vervangen. Deze is verkrijgbaar bij de
service-dienst.
In de elektrische installatie moet een inrichting worden aangebracht, die het
mogelijk maakt het apparaat met een
contactopeningswijdte van min. 3 mm
met alle polen van het net te scheiden.
Geschikte scheidingsinrichtingen zijn
bijv. automatische zekeringen (schroefzekeringen moeten uit de fitting geschroefd worden), aardlekschakelaar en
veiligheidsschakelaars.
Page 86

86 electrolux garantie/adres service-afdeling
Garantie/Adres service-afdeling
Nederland
Onze producten worden met de grootst mogelijke
zorgvuldigheid geproduceerd. Desondanks kan
het voorkomen dat er een defect optreedt. Onze
servicedienst zal dit op verzoek herstellen, zowel
binnen als buiten de garantietermijn. De levensduur van het product wordt daardoor niet negatief
beïnvloed.
Onderstaande garantievoorwaarden zijn gestoeld
op de EU Richtlijn 99/44/EG en het Burgerlijk Wetboek. De daaruit voortvloeiende rechten blijven
onverlet.
Ook de garantieverplichtingen van de verkoper
naar de eindgebruiker blijven onaangetast.
Voor dit product verlenen wij garantie volgens onderstaande voorwaarden:
1. Wij verhelpen kosteloos met inachtneming
van de voorwaarden 2 tot en met 15 gebreken
aan het product die zich openbaren binnen 24
maanden vanaf de datum van levering aan de
eindgebruiker. In geval van professioneel of
daarmee gelijk te stellen gebruik is de garantie
beperkt tot 12 maanden. Voor tweedehands
producten geldt eveneens een termijn van 12
maanden.
2. De garantieprestatie houdt in dat het product
kosteloos wordt teruggebracht in de toestand
die het had voor het defect optrad. Gebrekkige onderdelen worden hersteld of vervangen.
Kosteloos vervangen onderdelen worden ons
eigendom.
3. Het gebrek moet terstond gemeld worden om
mogelijke verdere schade te voorkomen. De
garantieaanspraak vervalt indien het gebrek
niet binnen twee maanden na vaststelling is
gemeld.
4. Voor een beroep op garantie dient het aankoopbewijs met aankoop- en/of leveringsdatum te worden overlegd. Bij ontbreken
daarvan dient ander overtuigend bewijs te
worden overlegd.
5. De garantie heeft geen betrekking op schade
aan kwetsbare onderdelen, zoals (vitrokeramisch) glas, kunststof, rubber, die ontstaan is
door onzorgvuldig gebruik.
6. De garantie heeft geen betrekking op kleine
afwijkingen van de gestelde kwaliteit die voor
de waarde en deugdelijkheid van het product
onbeduidend zijn.
7. De garantie geldt evenmin voor schade veroorzaakt door:
a. chemische en elektrochemische inwerking
van water,
b. abnormale milieuomstandigheden in het algemeen,
c. voor het product oneigenlijke bedrijfsom-
standigheden,
d. contact met agressieve stoffen.
8. De garantie heeft geen betrekking op gebreken door transportschade die buiten onze
verantwoordelijkheid is ontstaan, niet-vakkundige installatie of montage, verkeerd gebruik,
gebrekkig onderhoud, of het niet in acht nemen van de gebruiks- of montageaanwijzingen.
9. Het recht op garantie vervalt wanneer het defect werd veroorzaakt door herstelling of ingrepen door derden die niet bevoegd of niet
deskundig zijn, of wanneer het product voorzien werd van toebehoren of onderdelen die
niet origineel zijn en daardoor een defect veroorzaken.
10. Producten die gemakkelijk kunnen worden
vervoerd dienen te worden overhandigd aan
of gezonden naar onze servicedienst. Herstelling ter plaatse kan slechts worden gevraagd
voor grote of ingebouwde producten.
11. Indien het product zodanig is ingebouwd, ondergebouwd, opgehangen of geplaatst dat de
benodigde tijd voor het in- en uitbouwen samen meer dan 30 minuten bedraagt, worden
de hierdoor ontstane extra kosten aan de gebruiker in rekening gebracht. Schade die ontstaat door abnormale in- of uitbouw komt ten
laste van de gebruiker.
12. Indien binnen de garantieperiode de herstelling van hetzelfde defect herhaaldelijk mislukt
of de herstellingkosten disproportioneel zijn
wordt in overleg met de gebruiker een gelijkwaardige vervanging geleverd. In geval van
vervanging behouden we ons het recht voor
om een vergoeding te rekenen naar rato van
de verstreken gebruiksperiode.
13. Herstelling onder garantie heeft geen verlenging van de garantietermijn noch aanvang van
een nieuwe garantietermijn tot gevolg.
14. Op herstellingen geven wij een garantie van
12 maanden, uitsluitend op hetzelfde gebrek.
15. Verdere of andere aanspraken, in het bijzonder vergoeding van schade ontstaan buiten
het product, zijn uitgesloten voor zover een
aansprakelijkheid niet wettelijk is vastgelegd.
16. In geval van aansprakelijkheid zal een vergoeding de aankoopwaarde van het product niet
overtreffen, tenzij wettelijk anders is bepaald.
Deze garantievoorwaarden gelden voor in Nederland gekochte en/of in gebruik zijnde producten.
Indien een product naar het buitenland wordt gebracht dient de gebruiker na te gaan of het product voldoet aan de technische voorwaarden (
o.a. spanning, frequentie, installatievoorschriften,
gassoort, klimaatomstandigheden) in het betreffende land. Voor in het buitenland aangeschafte
producten dient de gebruiker zich te vergewissen
van de bepalingen in Nederland. Noodzakelijke of
gewenste aanpassingen vallen niet onder de garantie, en kunnen niet altijd worden aangebracht.
Ook na afloop van de garantietermijn staat onze
servicedienst u ter beschikking.
Page 87

garantie/adres service-afdeling electrolux 87
Adres Servicedienst:
Electrolux Service
Vennootsweg 1
2404 CG ALPHEN AAN DEN RIJN
Reparatievoorwaarden
Onze reparatievoorwaarden zijn conform de
afspraak tussen de Consumentenbond en
Vlehan*.
Art. 1 Aan de consument zal na een melding van
een storing zo mogelijk direct, doch uiterlijk binnen
één werkdag worden medegedeeld op welke dag
het bezoek van de technicus zal plaatsvinden. De
reparatie zal als regel binnen zeven werkdagen na
de melding zijn uitgevoerd.
Art. 2
a) Alvorens de reparatie wordt verricht zal de technicus een onderzoek uitvoeren naar de vermoedelijke oorzaak van de gemelde storing. Aan de hand
hiervan zal hij een zo nauwkeurig mogelijke, gespecificeerde begroting maken van de totale reparatiekosten inclusief voorrijkosten en diagnosekosten. Desgevraagd zal deze begroting door de
technicus schriftelijk worden vastgelegd.
b) Indien de consument met het begrote bedrag
niet akkoord gaat, zal op verzoek het te repareren
toestel worden teruggebracht in de staat waarin
het aan de technicus werd aangeboden. Nadat dit
is geschied, zullen alleen de kosten van voorrijden
en arbeidsloon in rekening worden gebracht op
basis van de werkelijke bestede tijd, danwel van
een vooraf vastgesteld tarief.
Art. 3 Indien tijdens het uitvoeren van de reparatie
duidelijk wordt dat:
a) de oorspronkelijke reparatie door redelijkerwijs
niet te voorziene omstandigheden niet tegen het
begrote bedrag kan worden uitgevoerd, of
b) ook andere dan in de begroting voorziene reparaties noodzakelijk zijn, zal overleg met de consument plaatsvinden en een herziene
kostenbegroting worden gemaakt.
In geval de consument daarmee alsnog niet akkoord gaat, geldt eveneens het in artikel 2b bepaalde.
Art. 4 De reparatie zal zoveel mogelijk tijdens het
eerste bezoek worden uitgevoerd. Indien om het
toestel in werkende staat te brengen een tweede
bezoek noodzakelijk is, zal:
a) direct, doch uiterlijk binnen één werkdag door
de betreffende service-organisatie of door de
technicus met de consument de datum voor een
tweede bezoek worden afgesproken.
b) een herhalingsbezoek zal als regel binnen tien
werkdagen na de melding plaatsvinden.
c) voor een tweede of daaropvolgend bezoek zal
geen voorrijtarief in rekening worden gebracht,
tenzij de noodzaak voor een herhalingsbezoek
aan de consument is toe te schrijven.
Art. 5 De consument ontvangt een gespecificeerde rekening met vermelding van type en serienummer van het apparaat, omschrijving van de
diagnose, toegepaste tarieven, gebruikte onderdelen en materialen en een korte omschrijving van
de verrichte werkzaamheden. De betaling van de
rekening dient tegen afgifte van een reparatienota
direct contant of door middel van een gegarandeerd betaalmiddel plaats te vinden.
Art. 6 Op elke uitgevoerde en betaalde reparatie
zal bij normaal huishoudelijk gebruik een volledige
garantie van minimaal 3 maanden worden gegeven. Deze garantie omvat het kosteloos uitvoeren
van een hernieuwde reparatie. Op de uitgewisselde en betaalde onderdelen geldt een garantietermijn van 12 maanden. Bij een beroep op garantie
op de reparatie dient de consument op verzoek de
gespecificeerde rekening van de voorgaande reparatie aan de technicus te overleggen.
Art. 7 Indien na driemaal uitvoeren van eenzelfde
reparatie hetzelfde defect bij normaal huishoudelijk
gebruik opnieuw optreedt binnen de onder art. 6
bedoelde garantietermijn en redelijkerwijs een afdoend resultaat bij het opnieuw uitvoeren van de
reparatie niet verwacht kan worden, zal aan de
consument een nieuw exemplaar of soortgelijk
toestel van hetzelfde merk worden aangeboden
tegen bijbetaling op basis van een per product te
bepalen jaarlijks afschrijvingspercentage.
Art. 8 Vervangen onderdelen stelt de technicus
weer ter beschikking van de consument, met uitzondering van de onder garantie of tegen een gereduceerde prijs vervangen onderdelen.
Art. 9 Een reparatie dient op zodanige wijze te
worden uitgevoerd, dat een toestel daarna weer
volledig voldoet aan de veiligheidsvoorschriften,
die op grond van een van fabriekswege aangebracht veiligheidskeurmerk gelden, danwel bij het
ontbreken daarvan, aan de wettelijke vereisten terzake. Dit houdt ondermeer in, dat reparaties moeten worden uitgevoerd met originele en door de
fabrikant ook terzake van veiligheidskeurmerken
en -voorschriften gegarandeerde onderdelen.
*) Vereniging Leveranciers van Huishoudelijke Apparaten in Nederland
Page 88
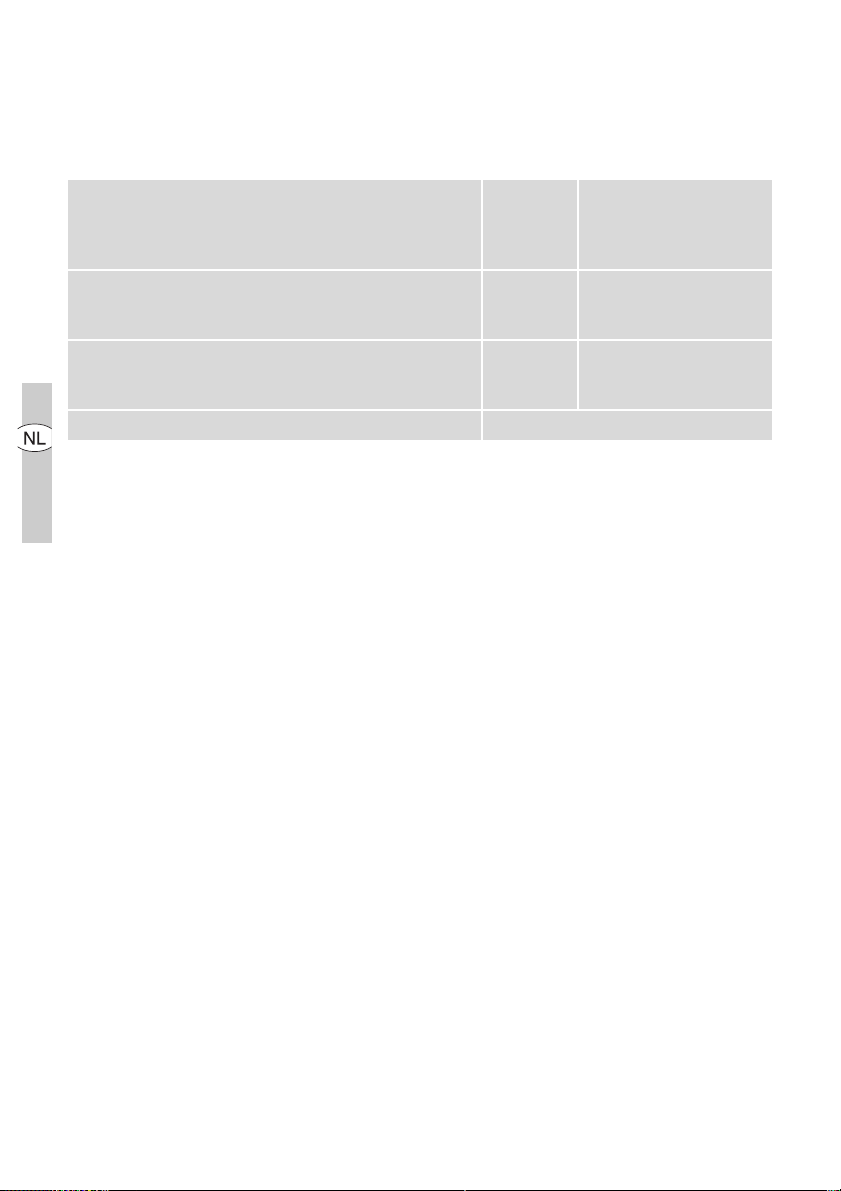
88 electrolux adres service-afdeling
Adres service-afdeling
Nederland
AEG fabrieksservice
Postbus 120
2400 AC Alphen aan den Rijn
Service-informatielijn
(voor bezoek servicetechnicus en onderdelen)
Consumentenbelangen
(voor algemene, product- of
gebruiksinformatie)
tel. 0172-468 300
tel. 0172-468 172
www.aeg.nl
Page 89

Europese Garantie
Dit apparaat wordt door Electrolux in elk van de
achter in deze handleiding genoemde landen
gedurende de in het bij het apparaat behorende
garantiebewijs genoemde periode of anderszins
bij de wet gegarandeerd. Als u van een van deze
landen verhuist naar een ander van de hieronder
genoemde landen, verhuist de garantie op het
apparaat met u mee. De volgende beperkingen
zijn hierop van toepassing:
• De garantie op het apparaat begint op de da-
tum van eerste aankoop van het apparaat.
Deze datum dient te worden aangetoond
door overlegging van een geldig, door de
verkoper van het apparaat afgegeven aankoopbewijs.
• De garantie op het apparaat geldt voor de-
zelfde periode en in dezelfde mate voor arbeidsloon en onderdelen als van toepassing
in uw nieuwe land van vestiging op dit specifieke model of deze specifieke serie apparaten.
• De garantie op het apparaat is persoonlijk,
geldt dus voor de oorspronkelijke koper van
het apparaat en kan niet worden overgedragen op een andere gebruiker.
• Het apparaat wordt geïnstalleerd en gebruikt
in overeenstemming met de door Electrolux
afgegeven instructies en wordt alleen in huis
gebruikt, dat wil zeggen, het apparaat wordt
niet gebruikt voor commerciële doeleinden.
• Het apparaat wordt geïnstalleerd in overeen-
stemming met alle relevante voorschriften die
in uw nieuwe land van vestiging van kracht
zijn.
De voorwaarden van deze Europese garantie
tasten geen van de aan u bij de wet verleende
rechten aan.
adres service-afdeling electrolux 89
Page 90

90 electrolux adres service-afdeling
Page 91
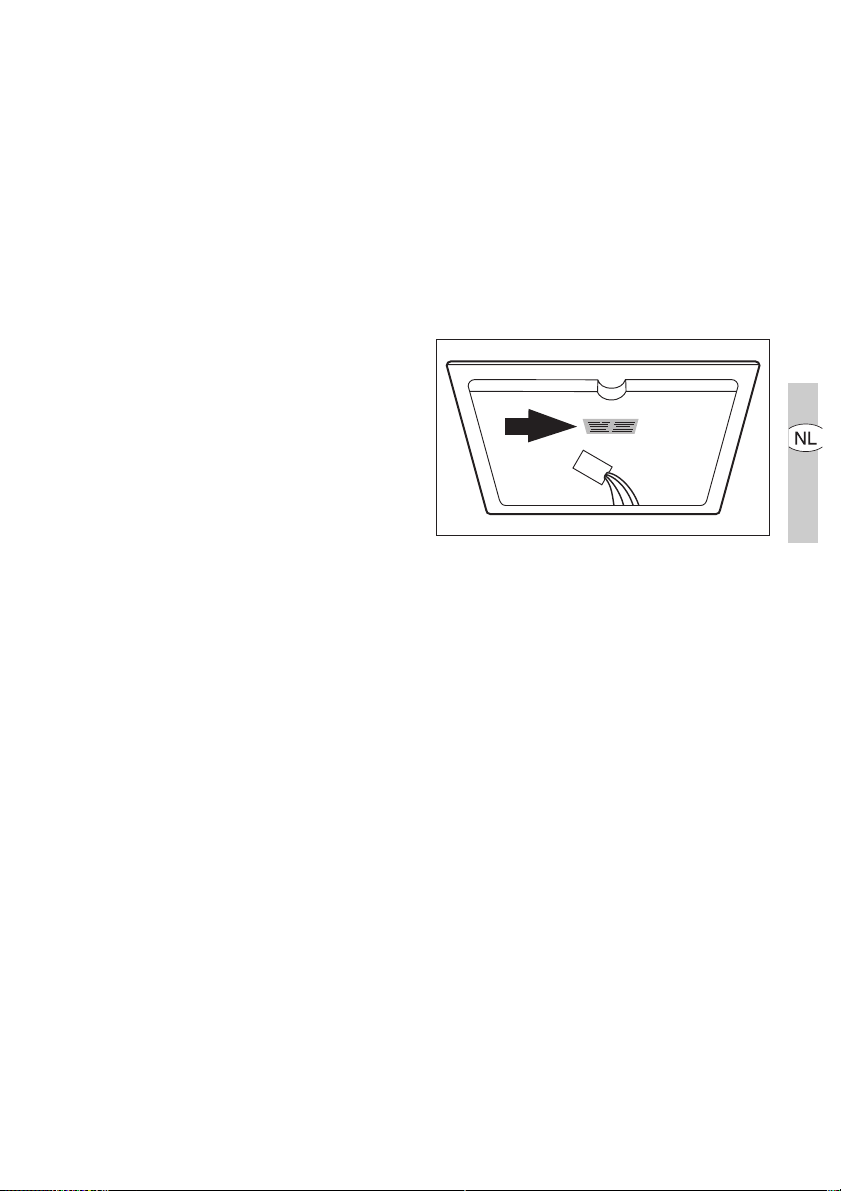
Service
Controleer bij technische storingen
eerst of u met behulp van de gebruiksaanwijzing (hoofdstuk ”Wat u moet doen
als…“) het probleem zelf kunt oplossen.
Wanneer u het probleem niet kunt oplossen, neemt u contact op met onze
klantenservice of met een van onze servicepartners.
Om u snel te kunnen helpen, hebben wij
de volgende gegevens nodig:
– Modelaanduiding
– Productnummer (PNC)
– Serienummer (S-No.)
(u vindt deze nummers op het typeplaatje)
– Soort storing
– Eventuele foutmelding die het appa-
raat weergeeft
– cijfer- of lettercombinatie bestaande
uit drie posities, van de glaskeramische industrie
Om ervoor te zorgen dat u de benodigde identificatienummers van uw apparaat bij de hand heeft, raden wij u aan
deze hier te noteren:
service electrolux 91
Modelaanduiding: ..........................
...........
PNC: ..........................
...........
S-No: ..........................
...........
Page 92
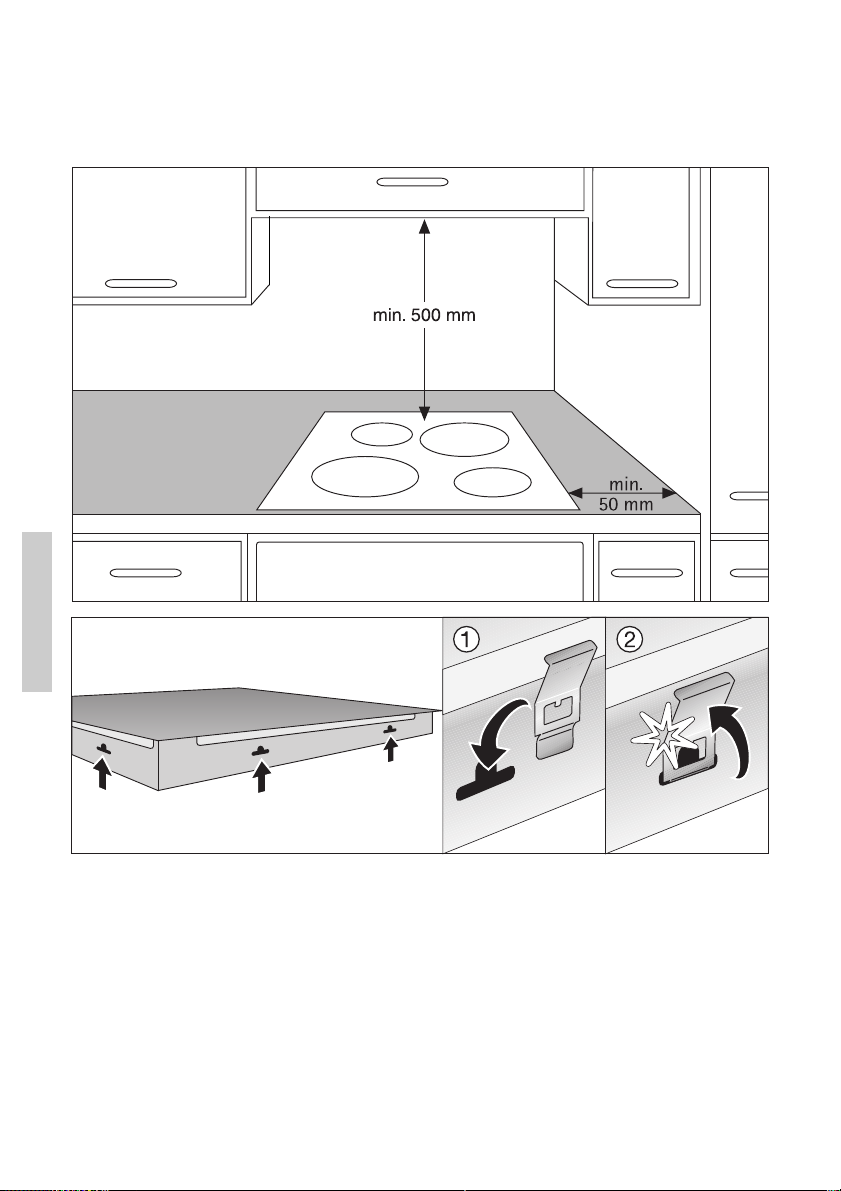
92 electrolux assembly / montage
Assembly / Montage
Page 93
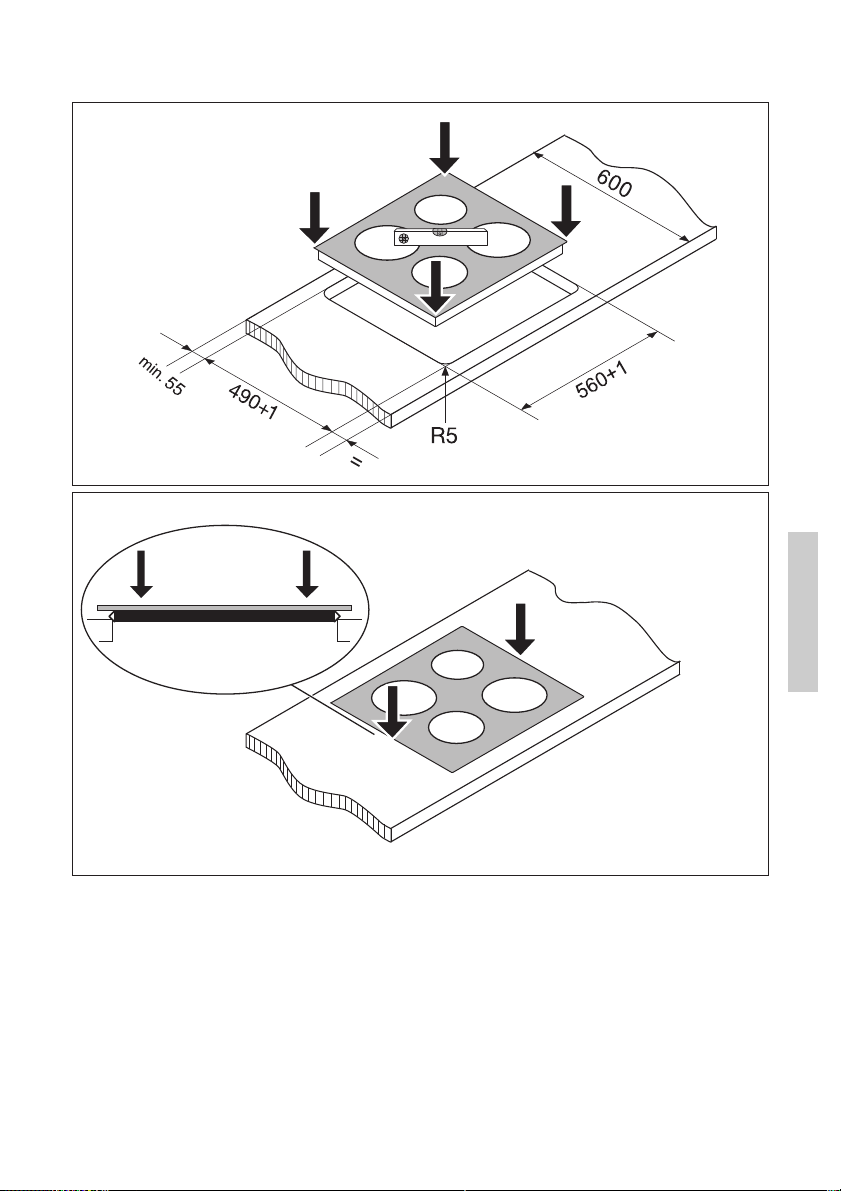
assembly / montage electrolux 93
Page 94
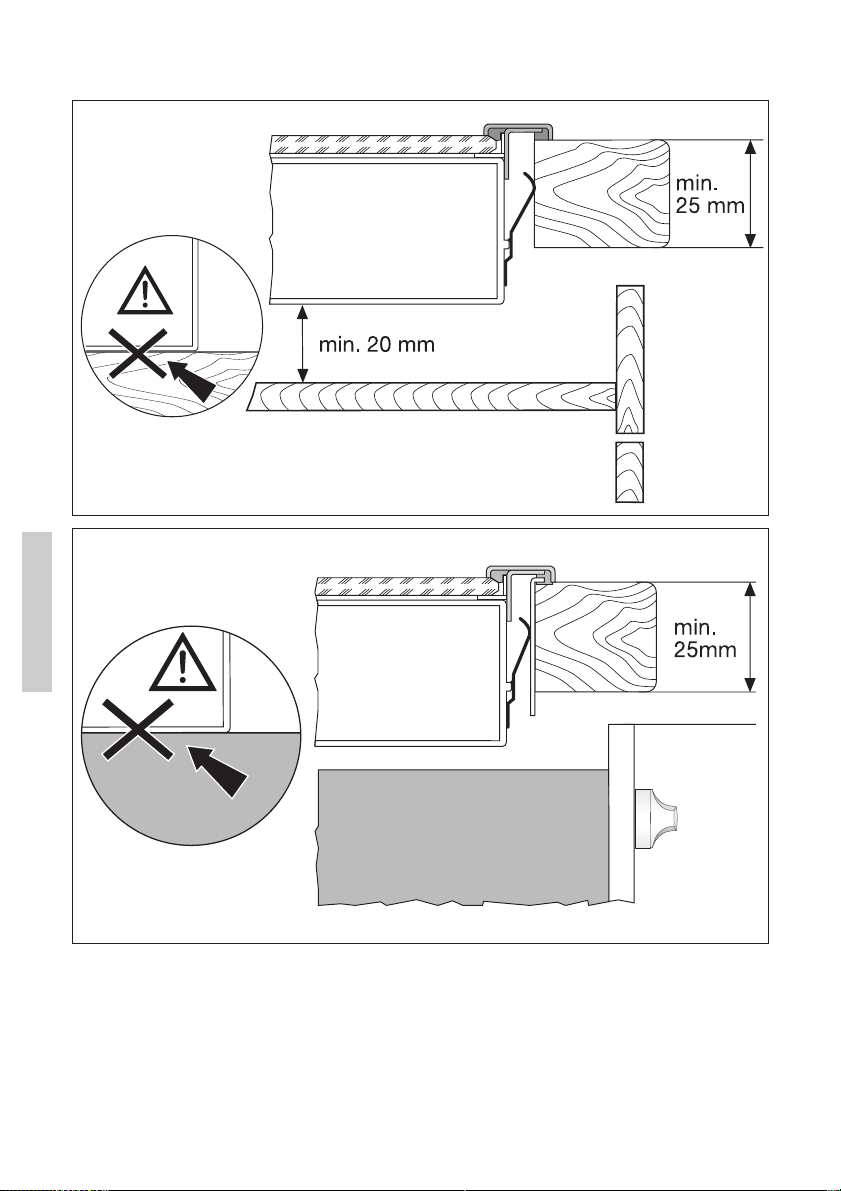
94 electrolux assembly / montage
Page 95

Rating Plate / Plaque signalétique / Typeplaatje
EHS6646X
55HAD47AO
ELECTROLUX
230 V 50 Hz
949 592 972
7,0 kW
electrolux 95
Page 96
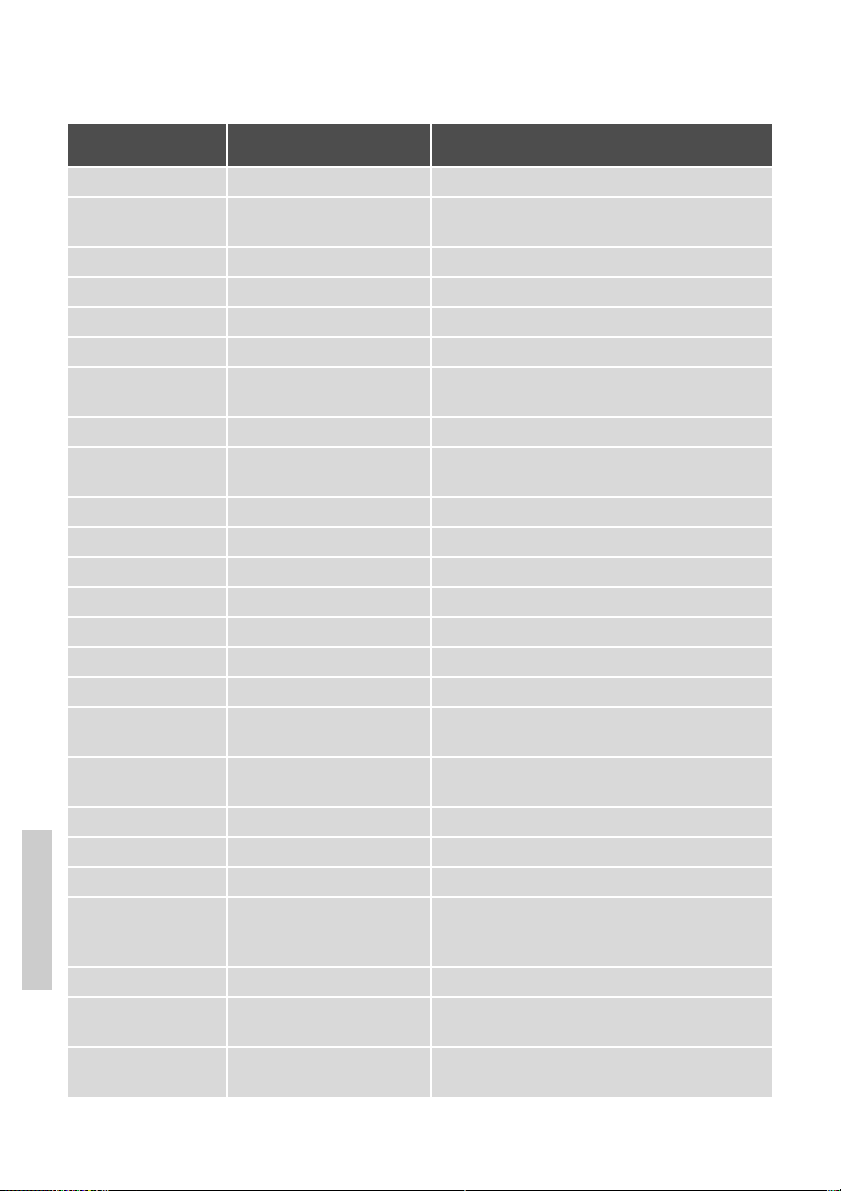
96 electrolux
www.electrolux.com
p t b
Albania
Belgique/België/
Belgien
Èeská republika
Danmark
Deutschland
Eesti
España
France
Great Britain
Hellas
Hrvatska
Ireland
Italia
Latvija
Lithuania +3702780607
Luxembourg
Magyarország
Nederland
Norge
Österreich
Polska
Portugal
Romania
Schweiz/Suisse/
Svizzera
Slovenija
+35 5 4 261 450
+32 2 363 04 44
+420 2 61 12 61 12
+45 70 11 74 00
+49 180 32 26 622
+37 2 66 50 030
+34 902 11 63 88
www.electrolux.fr
+44 8705 929 929
+30 23 10 56 19 70
+385 1 63 23 338
+353 1 40 90 753
+39 (0) 434 558500
+37 17 84 59 34
+352 42 431 301
+36 1 252 1773
+31 17 24 68 300
+47 81 5 30 222
+43 18 66 400
+48 22 43 47 300
+35 12 14 40 39 39
+40 21 451 20 30
+41 62 88 99 111
+38 61 24 25 731
Rr. Pjeter Bogdani Nr. 7 Tirane
Bergensesteenweg 719, 1502 Lembeek
Budìjovická 3, Praha 4, 140 21
Sjællandsgade 2, 7000 Fredericia
Muggenhofer Str. 135, 90429 Nürnberg
Mustamäe tee 24, 10621 Tallinn
Carretera M-300, Km. 29,900
Alcalá de Henares Madrid
Addington Way, Luton, Bedfordshire
LU4 9QQ
4 Limnou Str., 54627 Thessaloniki
Slavonska avenija 3, 10000 Zagreb
Long Mile Road Dublin 12
C.so Lino Zanussi, 26 - 33080 Porcia (PN)
Kr. Barona iela 130/2, LV-1012, Riga
Žirmūnų 67, LT-09001 Vilnius
Rue de Bitbourg, 7, L-1273 Hamm
H-1142 Budapest XIV,
Erzsébet királyné útja 87
Vennootsweg 1, 2404 CG Alphen aan den Rijn
Risløkkvn. 2 , 0508 Oslo
Herziggasse 9, 1230 Wien
ul. Kolejowa 5/7, Warszawa
Quinta da Fonte - Edificio Gonçalves Zarco - Q
35
2774 - 518 Paço de Arcos
Str. Garii Progresului 2, S4, 040671 RO
Industriestrasse 10, CH-5506 Mägenwil
Electrolux Ljubljana d.o.o.
Gerbièeva 98, 1000 Ljubljana
Page 97

p t b
electrolux 97
Slovensko
Suomi
Sverige
Türkiye
Россия
Óêðà¿íà
+421 2 43 33 43 22
www.electrolux.fi
+46 (0)771 76 76 76
+90 21 22 93 10 25
+7 495 937 7837
+380 44 586 20 60
Electrolux Slovakia s.r.o., Electrolux Domáce
spotrebièe SK, Seberíniho 1, 821 03 Bratislava
Electrolux Service, S:t Göransgatan 143,
S-105 45 Stockholm
Tarlabaþý caddesi no : 35 Taksim
Istanbul
129090 Москва, Олимпийский проспект, 16,
БЦ „Олимпик“
04074 Ки¿в, вул.Автозаводська,
2a, БЦ „Алкон“
Page 98

98 electrolux
Page 99

Page 100

www.electrolux.com
www.electrolux.be
-
-
-
 Loading...