

Page 1
EHS6140HOX
EN HOB USER MANUAL
Page 2
CONTENTS
1. SAFETY INFORMATION............................................................................................ 3
2. SAFETY INSTRUCTIONS.......................................................................................... 4
3. PRODUCT DESCRIPTION.........................................................................................6
4. DAILY USE................................................................................................................ 6
5. HINTS AND TIPS.......................................................................................................6
6. CARE AND CLEANING............................................................................................. 7
7. TROUBLESHOOTING............................................................................................... 7
8. INSTALLATION......................................................................................................... 9
9. TECHNICAL INFORMATION....................................................................................10
10. ENERGY EFFICIENCY...........................................................................................10
WE’RE THINKING OF YOU
Thank you for purchasing an Electrolux appliance. You’ve chosen a product that brings
with it decades of professional experience and innovation. Ingenious and stylish, it has
been designed with you in mind. So whenever you use it, you can be safe in the
knowledge that you’ll get great results every time.
Welcome to Electrolux.
Visit our website for:
Get usage advice, brochures, trouble shooter, service information:
www.electrolux.com
Register your product for better service:
www.registerelectrolux.com
Buy Accessories, Consumables and Original spare parts for your appliance:
www.electrolux.com/shop
CUSTOMER CARE AND SERVICE
Always use original spare parts.
When contacting our Authorised Service Centre, ensure that you have the following
data available: Model, PNC, Serial Number.
The information can be found on the rating plate.
Warning / Caution-Safety information
General information and tips
Environmental information
Subject to change without notice.
2 www.electrolux.com
Page 3

1. SAFETY INFORMATION
Before the installation and use of the appliance, carefully
read the supplied instructions. The manufacturer is not
responsible if an incorrect installation and use causes
injuries and damages. Always keep the instructions with
the appliance for future reference.
1.1 Children and vulnerable people safety
• This appliance can be used by children aged from 8
years and above and persons with reduced physical,
sensory or mental capabilities or lack of experience and
knowledge if they have been given supervision or
instruction concerning use of the appliance in a safe
way and understand the hazards involved.
• Do not let children play with the appliance.
• Keep all packaging away from children.
• Keep children and pets away from the appliance when it
operates or when it cools down. Accessible parts are
hot.
• If the appliance has a child safety device, we
recommend you activate it.
• Cleaning and user maintenance shall not be made by
children without supervision.
• Children of less than 3 years should be kept away
unless continuously supervised.
1.2 General Safety
• The appliance and its accessible parts become hot
during use. Do not touch the heating elements.
• Do not operate the appliance by means of an external
timer or separate remote-control system.
• Unattended cooking on a hob with fat or oil can be
dangerous and may result in fire.
• Never try to extinguish a fire with water, but switch off
the appliance and then cover flame e.g. with a lid or a
fire blanket.
• Do not store items on the cooking surfaces.
ENGLISH
3
Page 4

• Metallic objects such as knives, forks, spoons and lids
should not be placed on the hob surface since they can
get hot.
• Do not use a steam cleaner to clean the appliance.
• If the supply cord is damaged, it must be replaced by
the manufacturer, an authorized Service or similarly
qualified persons in order to avoid a hazard.
2. SAFETY INSTRUCTIONS
2.1 Installation
WARNING!
Only a qualified person must
install this appliance.
• Remove all the packaging.
• Do not install or use a damaged
appliance.
• Obey the installation instruction
supplied with the appliance.
• Keep the minimum distance from the
other appliances and units.
• Always be careful when you move the
appliance because it is heavy. Always
wear safety gloves.
• Seal the cut surfaces with a sealant to
prevent moisture to cause swelling.
• Protect the bottom of the appliance
from steam and moisture.
• Do not install the appliance adjacent to
a door or under a window. This
prevents hot cookware to fall from the
appliance when the door or the
window is opened.
• If the appliance is installed above
drawers make sure that the space,
between the bottom of the appliance
and the upper drawer, is sufficient for
air circulation.
• The bottom of the appliance can get
hot. Make sure to install a noncombustile separation panel under the
appliance to prevent access to the
bottom.
2.2 Electrical Connection
WARNING!
Risk of fire and electrical
shock.
• All electrical connections should be
made by a qualified electrician.
• The appliance must be earthed.
• Before carrying out any operation make
sure that the appliance is disconnected
from the power supply.
• Make sure that the electrical
information on the rating plate agrees
with the power supply. If not, contact
an electrician.
• Make sure the appliance is installed
correctly. Loose and incorrect
electricity mains cable or plug (if
applicable) can make the terminal
become too hot.
• Use the correct electricity mains cable.
• Do not let the electricity mains cable
tangle.
• Make sure that a shock protection is
installed.
• Use the strain relief clamp on the cable.
• Make sure the mains cable or plug (if
applicable) does not touch the hot
appliance or hot cookware, when you
connect the appliance to the near
sockets
• Do not use multi-plug adapters and
extension cables.
• Make sure not to cause damage to the
mains plug (if applicable) or to the
mains cable. Contact our Authorised
Service Centre or an electrician to
change a damaged mains cable.
• The shock protection of live and
insulated parts must be fastened in
such a way that it cannot be removed
without tools.
• Connect the mains plug to the mains
socket only at the end of the
installation. Make sure that there is
access to the mains plug after the
installation.
www.electrolux.com4
Page 5

• If the mains socket is loose, do not
connect the mains plug.
• Do not pull the mains cable to
disconnect the appliance. Always pull
the mains plug.
• Use only correct isolation devices: line
protecting cut-outs, fuses (screw type
fuses removed from the holder), earth
leakage trips and contactors.
• The electrical installation must have an
isolation device which lets you
disconnect the appliance from the
mains at all poles. The isolation device
must have a contact opening width of
minimum 3 mm.
2.3 Use
WARNING!
Risk of injury, burns and
electrical shock.
• Remove all the packaging, labelling
and protective film (if applicable) before
first use.
• Use this appliance in a household
environment.
• Do not change the specification of this
appliance.
• Make sure that the ventilation openings
are not blocked.
• Do not let the appliance stay
unattended during operation.
• Set the cooking zone to “off” after each
use.
• Do not put cutlery or saucepan lids on
the cooking zones. They can become
hot.
• Do not operate the appliance with wet
hands or when it has contact with
water.
• Do not use the appliance as a work
surface or as a storage surface.
• When you place food into hot oil, it
may splash.
WARNING!
Risk of fire and explosion
• Fats and oil when heated can release
flammable vapours. Keep flames or
heated objects away from fats and oils
when you cook with them.
• The vapours that very hot oil releases
can cause spontaneous combustion.
• Used oil, that can contain food
remnants, can cause fire at a lower
temperature than oil used for the first
time.
• Do not put flammable products or
items that are wet with flammable
products in, near or on the appliance.
WARNING!
Risk of damage to the
appliance.
• Do not keep hot cookware on the
control panel.
• Do not let cookware to boil dry.
• Be careful not to let objects or
cookware fall on the appliance. The
surface can be damaged.
• Do not activate the cooking zones with
empty cookware or without cookware.
• Do not put aluminium foil on the
appliance.
• This appliance is for cooking purposes
only. It must not be used for other
purposes, for example room heating.
• Do not let acid liquids, for example
vinegar, lemon juice or limescale
remover, touch the hob. This can
cause matt patches.
2.4 Care and cleaning
• Clean regularly the appliance to
prevent the deterioration of the surface
material.
• Deactivate the appliance and let it cool
down before you clean it.
• Disconnect the appliance from the
electrical supply before maintenance.
• Do not use water spray and steam to
clean the appliance.
• Clean the appliance with a moist soft
cloth. Only use neutral detergents. Do
not use abrasive products, abrasive
cleaning pads, solvents or metal
objects.
2.5 Disposal
WARNING!
Risk of injury or suffocation.
• Contact your municipal authority for
information on how to discard the
appliance correctly.
• Disconnect the appliance from the
mains supply.
ENGLISH
5
Page 6
• Cut off the mains cable and discard it.
3. PRODUCT DESCRIPTION
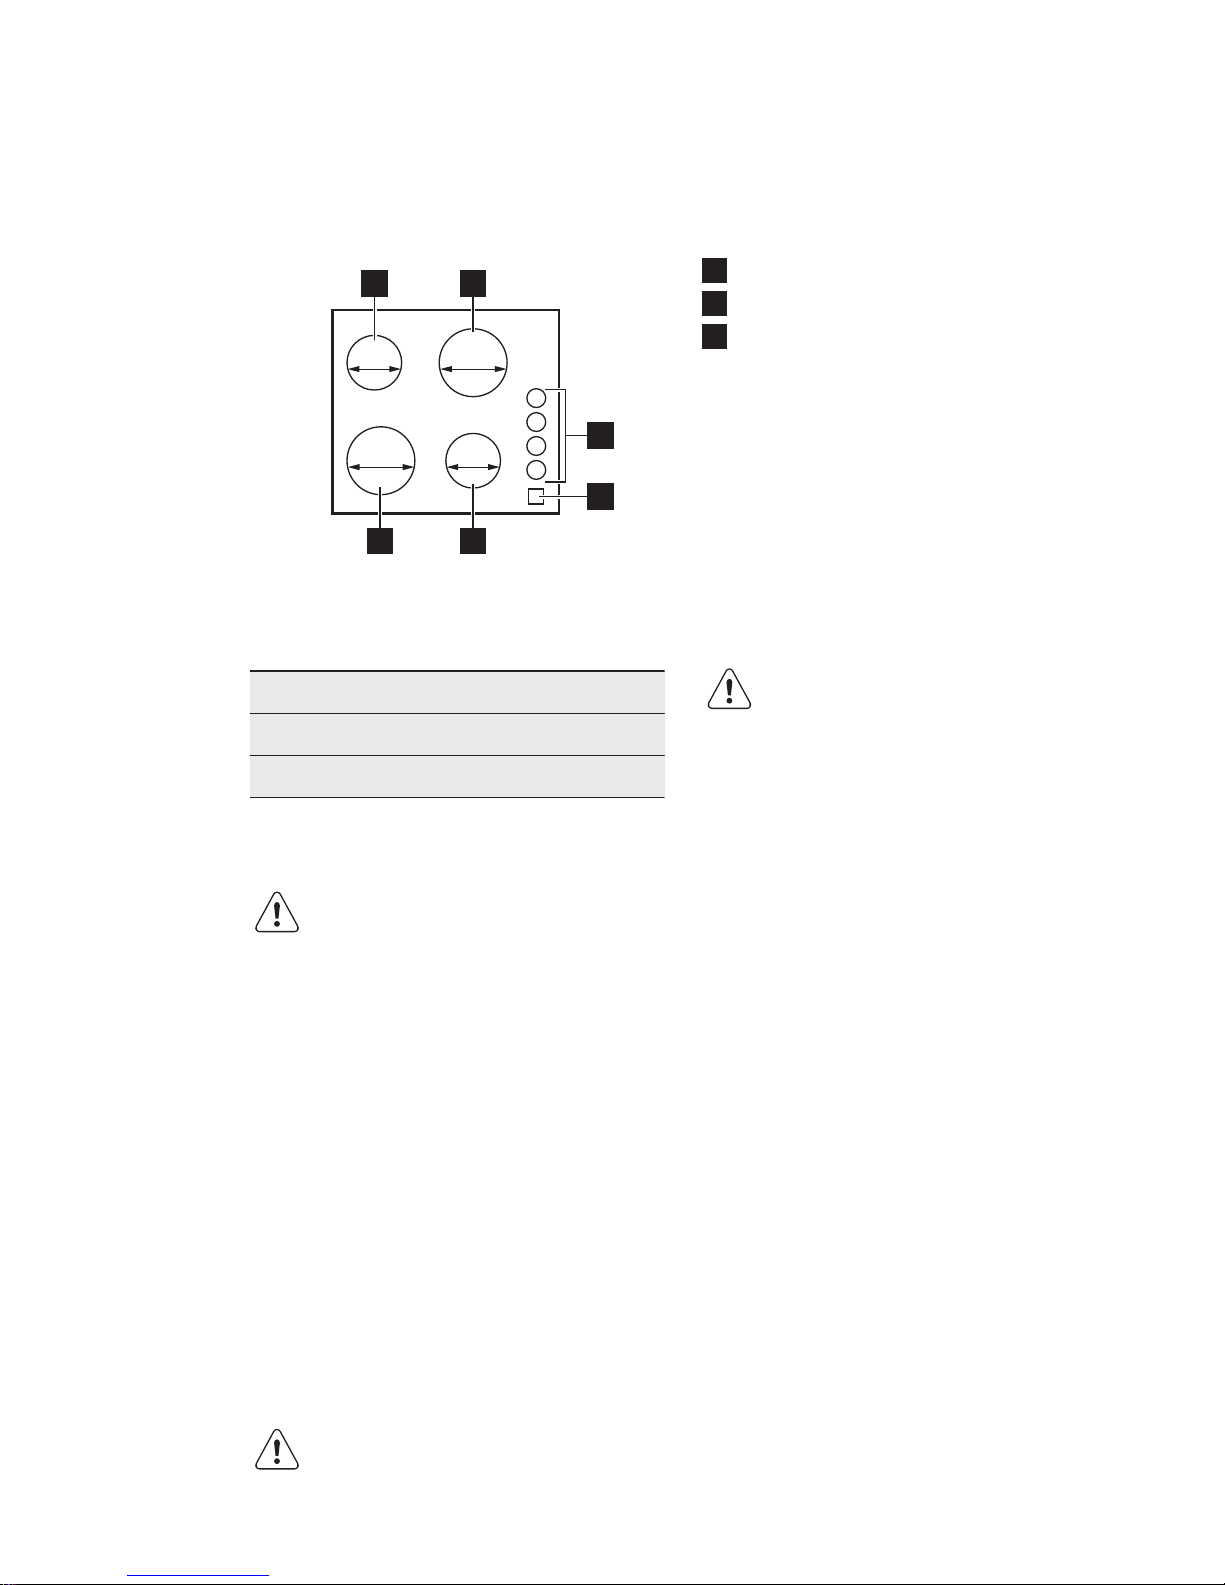
3.1 Cooking surface layout
145 mm
180 mm145 mm
180 mm
3
2
11
1 1
1
Cooking zone
2
Control knobs
3
Power indicator
3.2 Control knob
Symbol Function
0
Off position
1 - 6
Heat settings
3.3 Residual heat
WARNING!
There is a risk of burns from
residual heat.
4. DAILY USE
WARNING!
Refer to Safety chapters.
4.1 Before first use
Put cookware containing water on each
cooking zone, set the maximum position
and operate the hob for 10 min. This is to
burn off the residue in the appliance. After
that, operate the hob at minimum position
for 20 min. During this period, an odour
and smoke can occur. This is normal.
Make sure that the airflow is sufficient.
4.2 Using the rapid hot plate
A red dot in the middle of the plate shows
a rapid hot plate. A rapid hot plate heats
up faster than usual plates. The red dots
are painted on the plates. They can
deteriorate during use and even disappear
completely after a period of time. It does
not have an effect on the performance of
the hob.
4.3 The heat setting
To set or change the heat setting turn the
knob to the correct heat setting. To
deactivate turn the knob to off position.
Power indicator activates when one or
more cooking zones are activated. When
you deactivate the cooking zones the
indicator deactivates.
5. HINTS AND TIPS
WARNING!
Refer to Safety chapters.
www.electrolux.com6
Page 7
5.1 Cookware
The bottom of the cookware
must be as thick and flat as
possible.
CAUTION!
Do not use cast iron pans,
potstones, earthenware, grill
or toaster plates. The
stainless steel can become
tarnished if it is too much
heated.
5.2 Examples of cooking
applications
Heat
setting:
Application:
1 Keeping warm
Heat
setting:
Application:
2 Gentle simmering
3 Simmering
4 Frying / browning
5 Bringing to the boil
6 Bringing to the boil / quick fry-
ing / deep-frying
6. CARE AND CLEANING
WARNING!
Refer to Safety chapters.
6.1 General information
• Clean the hob after each use.
• Always use cookware with clean
bottom.
• Scratches or dark stains on the surface
have no effect on how the hob
operates.
Stainless steel
• For stainless steel edges of the hob
use a special cleaner applicable for the
stainless steel.
• The stainless steel edge of the plate
can change the colour as a result of
high temperature.
• Wash stainless steel parts with water,
and then dry them with a soft cloth.
6.2 Cleaning the electric hotplate
1. Use the cleaning powder or the
cleaning pad.
2. Clean the hob with a moist cloth and
some detergent.
3. Heat the hotplate to a low temperature
and let it dry.
4. To keep the hotplates in good shape,
rub in a sewing machine oil regularly.
Polish off the oil with absorbent paper.
7. TROUBLESHOOTING
WARNING!
Refer to Safety chapters.
ENGLISH
7
Page 8
7.1 What to do if...
Problem Possible cause Remedy
You cannot activate or operate the hob.
The hob is not connected
to an electrical supply or it
is connected incorrectly.
Check if the hob is correctly
connected to the electrical
supply. Refer to the connection diagram.
The fuse is released. Make sure that the fuse is
the cause of the malfunction. If the fuse releases
again and again, contact a
qualified electrician.
7.2 If you cannot find a
solution...
If you cannot find a solution to the
problem yourself, contact your dealer or
an Authorised Service Centre. Give the
data from the rating plate. Make sure, you
operated the hob correctly. If not the
servicing by a service technician or dealer
will not be free of charge, also during the
warranty period. The instructions about
the Service Centre and conditions of
guarantee are in the guarantee booklet.
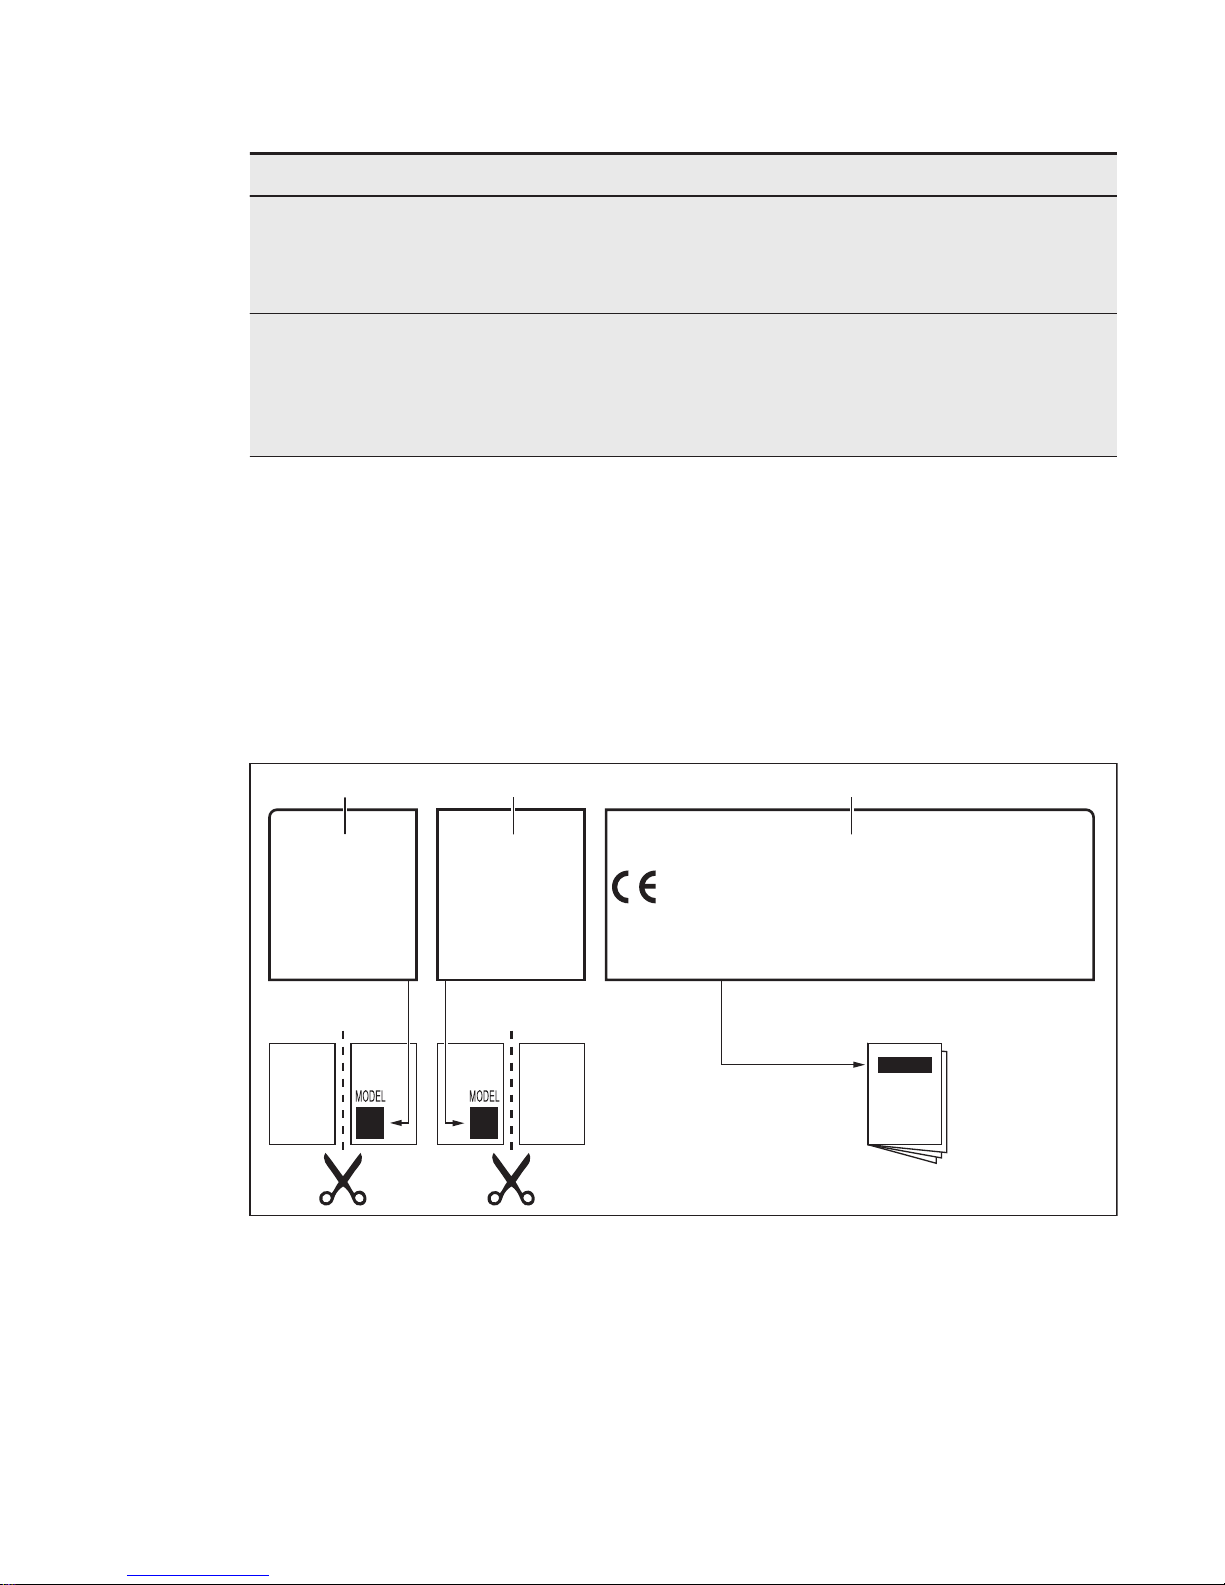
7.3 Labels supplied with the
accessories bag
Stick the adhesive labels as indicated
below:
MOD.
PROD.NO.
SER.NO
DATA
MOD.
PROD.NO.
SER.NO
DATA
MOD.
PROD.NO.
SER.NO.
03 IT
MADE IN ITALY
TYPE
IP20
0049
A B C
A) Stick it on Guarantee Card and send
this part (if applicable).
B) Stick it on Guarantee Card and keep
this part (if applicable).
C) Stick it on instruction booklet.
www.electrolux.com8
Page 9
8. INSTALLATION
WARNING!
Refer to Safety chapters.
8.1 Before the installation
Before you install the hob, write down the
information bellow from the rating plate.
The rating plate is on the bottom of the
hob.
Model .......................................
PNC .........................................
Serial number ...........................
8.2 Built-in hobs
Only use the built-in hobs after you
assemble the hob into correct built-in units
and work surfaces that align to the
standards.
8.3 Connection cable
• For a single phase or two phase
connection use the following (or higher)
mains cable type: H05BB-F Tmax
90°C.
• To replace the damaged mains cable
use the following (or higher) mains
cable type: H05BB-F Tmax 90°C.
Speak to your local Service Centre.
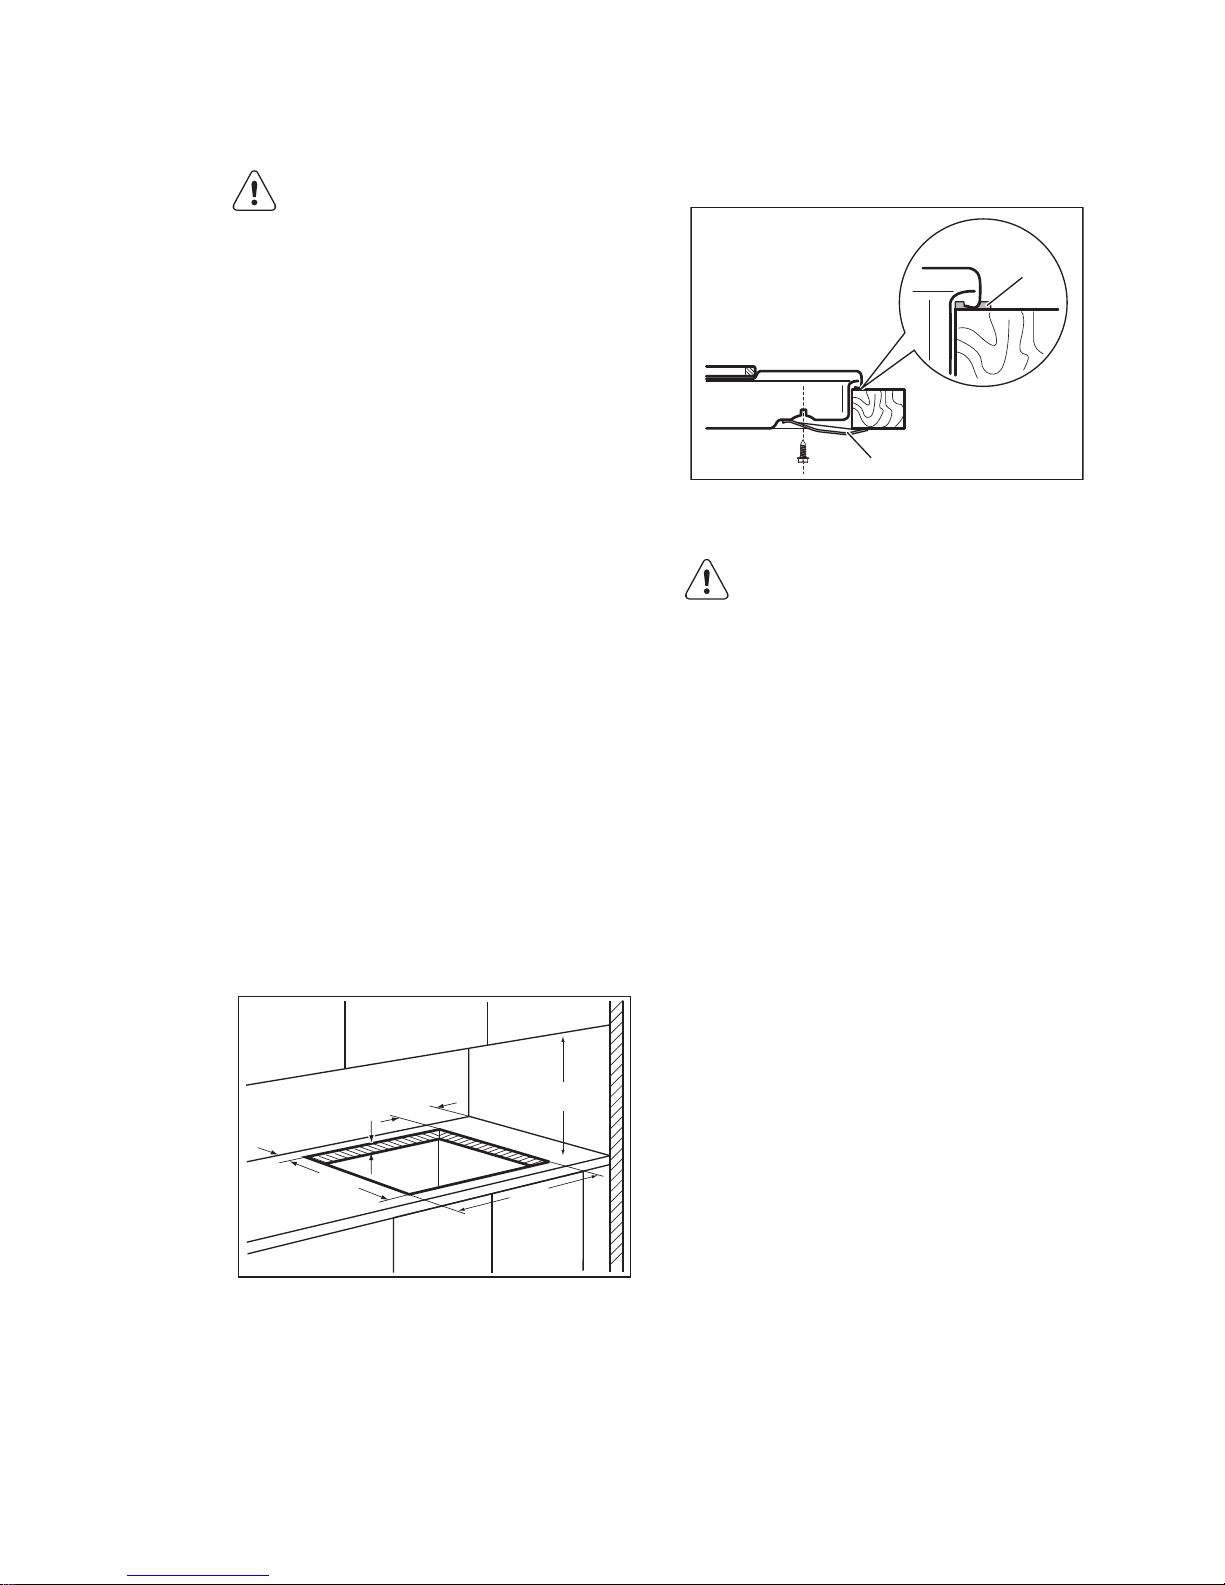
8.4 Building In
min. 55 mm
min. 650 mm
550 mm
min. 100 mm
30 mm
470 mm
A
B
A) supplied seal
B) supplied brackets
CAUTION!
Install the appliance only on a
worktop with flat surface.
ENGLISH
9
Page 10

9. TECHNICAL INFORMATION
9.1 Cooking zones specification
Cooking zone
Nominal Power (Max heat set-
ting) [W]
Cooking zone diameter [mm]
Left front 2000 180
Left rear 1500 145
Right front 1500 145
Right rear 2000 180
For optimal cooking results use cookware
not larger than the diameter of the cooking
zone.
10. ENERGY EFFICIENCY
10.1 Product information according to EU 66/2014
Model identification EHS6140HOX
Type of hob Built-In Hob
Number of cooking zones 4
Heating technology Solid Hot Plate
Diameter of circular cooking zones (Ø) Left front
Left rear
Right front
Right rear
18.0 cm
14.5 cm
14.5 cm
18.0 cm
Energy consumption per cooking zone (ECelectric cooking)
Left front
Left rear
Right front
Right rear
210.0 Wh / kg
210.0 Wh / kg
210.0 Wh / kg
195.0 Wh / kg
Energy consumption of the hob (ECelectric
hob)
206.3 Wh / kg
EN 60350-2 - Household electric cooking
appliances - Part 2: Hobs - Methods for
measuring performance
10.2 Energy saving
You can save energy during everyday
cooking if you follow bellow hints.
• Put the cookware on the cooking zone
before you activate it.
• The bottom of the cookware and the
cooking zones should have the same
dimension.
• Put smaller cookware on smaller
cooking zones.
• Put the cookware directly in the centre
of the cooking zone.
• When you heat up water use only the
amount you need.
• If it is possible, put the lids on the
cookware.
• Use the residual heat to keep the food
warm or to melt it.
www.electrolux.com10
Page 11

11. ENVIRONMENT CONCERNS
Recycle the materials with the symbol .
Put the packaging in applicable containers
to recycle it. Help protect the environment
and human health and to recycle waste of
electrical and electronic appliances. Do
not dispose appliances marked with the
symbol with the household waste.
Return the product to your local recycling
facility or contact your municipal office.
*
ENGLISH
11
Page 12
www.electrolux.com/shop
867311226-A-322014
 Loading...