

Page 1

EGG7253
EN HOB USER MANUAL 2
DE KOCHFELD BENUTZERINFORMATION 17
IT PIANO COTTURA ISTRUZIONI PER L’USO 34
Page 2
www.electrolux.com2
CONTENTS
1. SAFETY INFORMATION...................................................................................... 3
2. SAFETY INSTRUCTIONS.....................................................................................4
3. PRODUCT DESCRIPTION................................................................................... 7
4. DAILY USE.......................................................................................................... 7
5. HINTS AND TIPS................................................................................................. 8
6. CARE AND CLEANING........................................................................................9
7. TROUBLESHOOTING........................................................................................10
8. INSTALLATION..................................................................................................12
9. TECHNICAL INFORMATION..............................................................................15
WE’RE THINKING OF YOU
Thank you for purchasing an Electrolux appliance. You’ve chosen a product that
brings with it decades of professional experience and innovation. Ingenious and
stylish, it has been designed with you in mind. So whenever you use it, you can be
safe in the knowledge that you’ll get great results every time.
Welcome to Electrolux.
Visit our website for:
Get usage advice, brochures, trouble shooter, service information:
www.electrolux.com
Register your product for better service:
www.registerelectrolux.com
Buy Accessories, Consumables and Original spare parts for your appliance:
www.electrolux.com/shop
CUSTOMER CARE AND SERVICE
Always use original spare parts.
When contacting our Authorised Service Centre, ensure that you have the following
data available: Model, PNC, Serial Number.
The information can be found on the rating plate.
Warning / Caution-Safety information
General information and tips
Environmental information
Subject to change without notice.
Page 3

1. SAFETY INFORMATION
Before the installation and use of the appliance, carefully
read the supplied instructions. The manufacturer is not
responsible if an incorrect installation and use causes
injuries and damages. Always keep the instructions with
the appliance for future reference.
1.1 Children and vulnerable people safety
• This appliance can be used by children aged from 8
years and above and persons with reduced physical,
sensory or mental capabilities or lack of experience and
knowledge if they have been given supervision or
instruction concerning use of the appliance in a safe
way and understand the hazards involved.
• Do not let children play with the appliance.
• Keep all packaging away from children.
• Keep children and pets away from the appliance when it
operates or when it cools down. Accessible parts are
hot.
• If the appliance has a child safety device, we
recommend you activate it.
• Cleaning and user maintenance shall not be made by
children without supervision.
• Children of less than 3 years should be kept away
unless continuously supervised.
ENGLISH
3
1.2 General Safety
• The appliance and its accessible parts become hot
during use. Do not touch the heating elements.
• Do not operate the appliance by means of an external
timer or separate remote-control system.
• Unattended cooking on a hob with fat or oil can be
dangerous and may result in fire.
• Never try to extinguish a fire with water, but switch off
the appliance and then cover flame e.g. with a lid or a
fire blanket.
• Do not store items on the cooking surfaces.
Page 4
www.electrolux.com4
• Metallic objects such as knives, forks, spoons and lids
should not be placed on the hob surface since they can
get hot.
• Do not use a steam cleaner to clean the appliance.
• Remove any spillage from the lid before opening. Let
the hob surface cool down before closing the lid.
• If the supply cord is damaged, it must be replaced by
the manufacturer, an authorized Service or similarly
qualified persons in order to avoid a hazard.
• Where the appliance is directly connected to the power
supply, an all-pole isolating switch with a contact gap is
required. Complete disconnection in compliance with
the conditions specified in overvoltage category III must
be guaranteed. The earth cable is excluded from this.
• When you route the mains cable, make sure that the
cable doesn't come into direct contact (for example
using insulating sleeving) with parts that can reach
temperatures of more than 50°C above room
temperature.
2. SAFETY INSTRUCTIONS
This appliance is suitable for the following
markets: IT
2.1 Installation
WARNING!
Only a qualified person must
install this appliance.
• Remove all the packaging.
• Do not install or use a damaged
appliance.
• Obey the installation instruction
supplied with the appliance.
• Keep the minimum distance from the
other appliances and units.
• Always be careful when you move the
appliance because it is heavy. Always
wear safety gloves.
• Seal the cut surfaces with a sealant to
prevent moisture to cause swelling.
• Protect the bottom of the appliance
from steam and moisture.
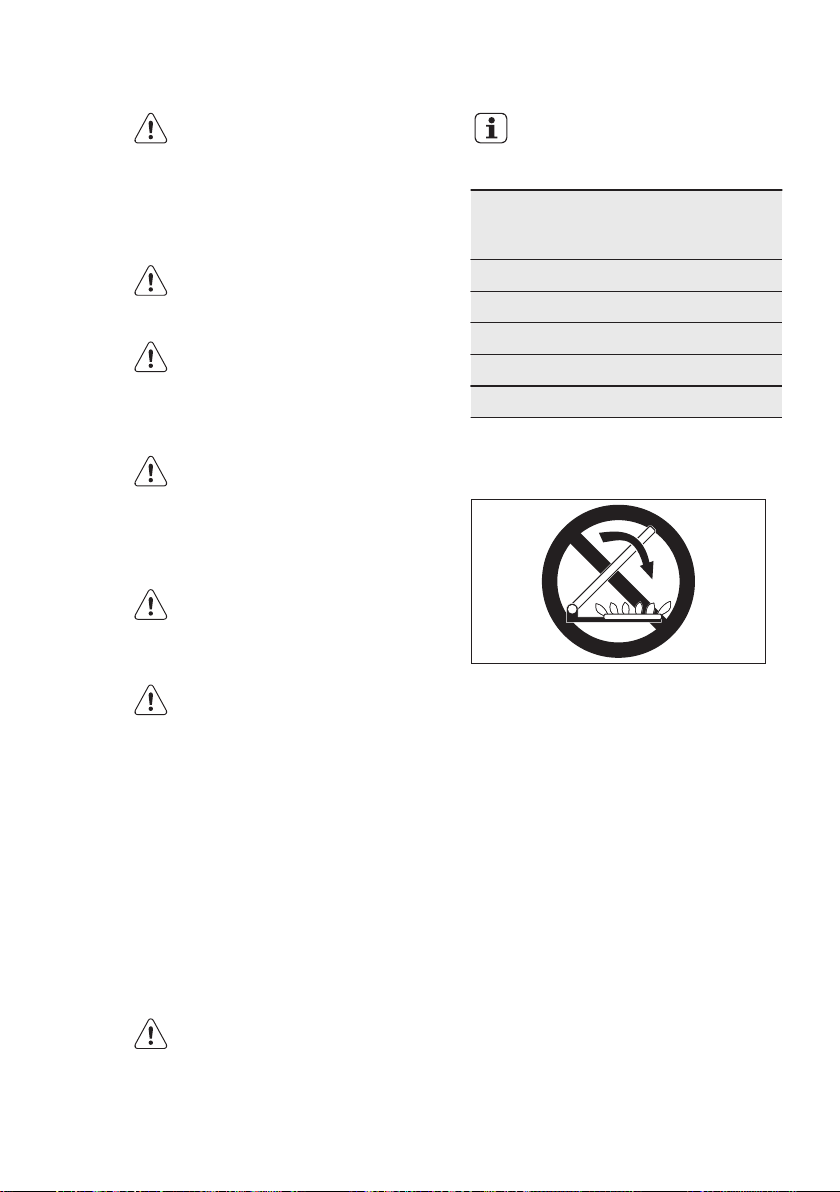
• Do not install the appliance adjacent to
a door or under a window. This
prevents hot cookware to fall from the
appliance when the door or the
window is opened.
• If the appliance is installed above
drawers make sure that the space,
between the bottom of the appliance
and the upper drawer, is sufficient for
air circulation.
• The bottom of the appliance can get
hot. Make sure to install a noncombustile separation panel under the
appliance to prevent access to the
bottom.
2.2 Electrical Connection
WARNING!
Risk of fire and electrical
shock.
• All electrical connections should be
made by a qualified electrician.
Page 5
• The appliance must be earthed.
• Before carrying out any operation make
sure that the appliance is disconnected
from the power supply.
• Make sure that the electrical
information on the rating plate agrees
with the power supply. If not, contact
an electrician.
• Make sure the appliance is installed
correctly. Loose and incorrect
electricity mains cable or plug (if
applicable) can make the terminal
become too hot.
• Use the correct electricity mains cable.
• Do not let the electricity mains cable
tangle.
• Make sure that a shock protection is
installed.
• Use the strain relief clamp on the cable.
• Make sure the mains cable or plug (if
applicable) does not touch the hot
appliance or hot cookware, when you
connect the appliance to the near
sockets
• Do not use multi-plug adapters and
extension cables.
• Make sure not to cause damage to the
mains plug (if applicable) or to the
mains cable. Contact an Authorised
Service Centre or an electrician to
change a damaged mains cable.
• The shock protection of live and
insulated parts must be fastened in
such a way that it cannot be removed
without tools.
• Connect the mains plug to the mains
socket only at the end of the
installation. Make sure that there is
access to the mains plug after the
installation.
• If the mains socket is loose, do not
connect the mains plug.
• Do not pull the mains cable to
disconnect the appliance. Always pull
the mains plug.
• Use only correct isolation devices: line
protecting cut-outs, fuses (screw type
fuses removed from the holder), earth
leakage trips and contactors.
• The electrical installation must have an
isolation device which lets you
disconnect the appliance from the
mains at all poles. The isolation device
must have a contact opening width of
minimum 3 mm.
ENGLISH
2.3 Gas connection
• All gas connections should be made by
a qualified person.
• Before installation, make sure that the
local distribution conditions (nature of
the gas and gas pressure) and the
adjustment of the appliance are
compatible.
• Make sure that there is air circulation
around the appliance.
• The information about the gas supply is
on the rating plate.
• This appliance is not connected to a
device, which evacuates the products
of combustion. Make sure to connect
the appliance according to current
installation regulations. Pay attention to
requirements regarding adequate
ventilation.
2.4 Use
WARNING!
Risk of injury, burns and
electrical shock.
• Remove all the packaging, labelling
and protective film (if applicable) before
first use.
• Use this appliance in a household
environment.
• Do not change the specification of this
appliance.
• Make sure that the ventilation openings
are not blocked.
• Do not let the appliance stay
unattended during operation.
• Set the cooking zone to “off” after each
use.
• Do not put cutlery or saucepan lids on
the cooking zones. They can become
hot.
• Do not operate the appliance with wet
hands or when it has contact with
water.
• Do not use the appliance as a work
surface or as a storage surface.
• When you place food into hot oil, it
may splash.
WARNING!
Risk of fire and explosion
• Fats and oil when heated can release
flammable vapours. Keep flames or
5
Page 6
www.electrolux.com6
heated objects away from fats and oils
when you cook with them.
• The vapours that very hot oil releases
can cause spontaneous combustion.
• Used oil, that can contain food
remnants, can cause fire at a lower
temperature than oil used for the first
time.
• Do not put flammable products or
items that are wet with flammable
products in, near or on the appliance.
WARNING!
Risk of damage to the
appliance.
• Do not keep hot cookware on the
control panel.
• Do not let cookware to boil dry.
• Be careful not to let objects or
cookware fall on the appliance. The
surface can be damaged.
• Do not activate the cooking zones with
empty cookware or without cookware.
• Do not put aluminium foil on the
appliance.
• Use only stable cookware with the
correct shape and diameter larger than
the dimensions of the burners.
• Make sure the flame does not go out
when you quickly turn the knob from
the maximum to the minimum position.
• Use only the accessories supplied with
the appliance.
• Do not install a flame diffuser on the
burner.
• The use of a gas cooking appliance
results in the production of heat and
moisture. Provide good ventilation in
the room where the appliance is
installed.
• Prolonged intensive use of the
appliance may call for additional
ventilation, for example opening of a
window, or more effective ventilation,
for example increasing the level of
mechanical ventilation where present.
• This appliance is for cooking purposes
only. It must not be used for other
purposes, for example room heating.
• Do not let acid liquids, for example
vinegar, lemon juice or limescale
remover, touch the hob. This can
cause matt patches.
2.5 Care and cleaning
• Clean regularly the appliance to
prevent the deterioration of the surface
material.
• Deactivate the appliance and let it cool
down before you clean it.
• Disconnect the appliance from the
electrical supply before maintenance.
• Do not use water spray and steam to
clean the appliance.
• Clean the appliance with a moist soft
cloth. Only use neutral detergents. Do
not use abrasive products, abrasive
cleaning pads, solvents or metal
objects.
• Do not clean the burners in the
dishwasher.
2.6 Disposal
WARNING!
Risk of injury or suffocation.
• Contact your municipal authority for
information on how to discard the
appliance correctly.
• Disconnect the appliance from the
mains supply.
• Cut off the mains cable and discard it.
• Flat the external gas pipes.
Page 7

3. PRODUCT DESCRIPTION
3
4
5
2
1
A
B
D
C
C
D
A
B
3.1 Cooking surface layout
Semi-rapid burner
1
Triple Crown burner
2
Rapid burner
3
Auxiliary burner
4
Control knobs
5
ENGLISH
7
3.2 Control knob
Symbol Description
4. DAILY USE
4.1 Burner overview
no gas supply / off position
WARNING!
Refer to Safety chapters.
Symbol Description
ignition position / maximum gas supply
minimum gas supply
A) Burner cap
B) Burner crown
C) Ignition candle
D) Thermocouple
4.2 Ignition of the burner
Always light the burner before
you put on the cookware.
Page 8
www.electrolux.com8
WARNING!
Be very careful when you use
open fire in the kitchen
environment. The
manufacturer declines any
responsibility in case of the
flame misuse.
1. Push the control knob down and turn
it counterclockwise to the maximum
gas supply position ( ).
2. Keep the control knob pushed for
equal or less than 10 seconds. This
lets the thermocouple warm up. If not,
the gas supply is interrupted.
3. Adjust the flame after it is regular.
If after some tries the burner
does not light, check if the
crown and its cap are in
correct positions.
WARNING!
Do not keep the control knob
pushed for more than 15
seconds. If the burner does
not light after 15 seconds,
release the control knob, turn
it into off position and try to
light the burner again after
minimum 1 minute.
If the burner accidentally
goes out, turn the control
knob to the off position and
try to light the burner again
after minimum 1 minute.
The spark generator can start
automatically when you
switch on the mains, after
installation or a power cut. It
is normal.
4.3 Turning the burner off
To put the flame out, turn the knob to the
off position .
WARNING!
Always turn the flame down
or switch it off before you
remove the pans from the
burner.
CAUTION!
In the absence of electricity
you can ignite the burner
without electrical device; in
this case approach the
burner with a flame, turn the
control knob counterclockwise to maximum gas
supply position and push it
down. Keep the control knob
pushed for equal or less than
10 seconds to let the
thermocouple warm up.
5. HINTS AND TIPS
WARNING!
Refer to Safety chapters.
Page 9
ENGLISH
9
5.1 Cookware
CAUTION!
Do not use cast iron pans,
potstones, earthenware, grill
or toaster plates. The
stainless steel can become
tarnished if it is too much
heated.
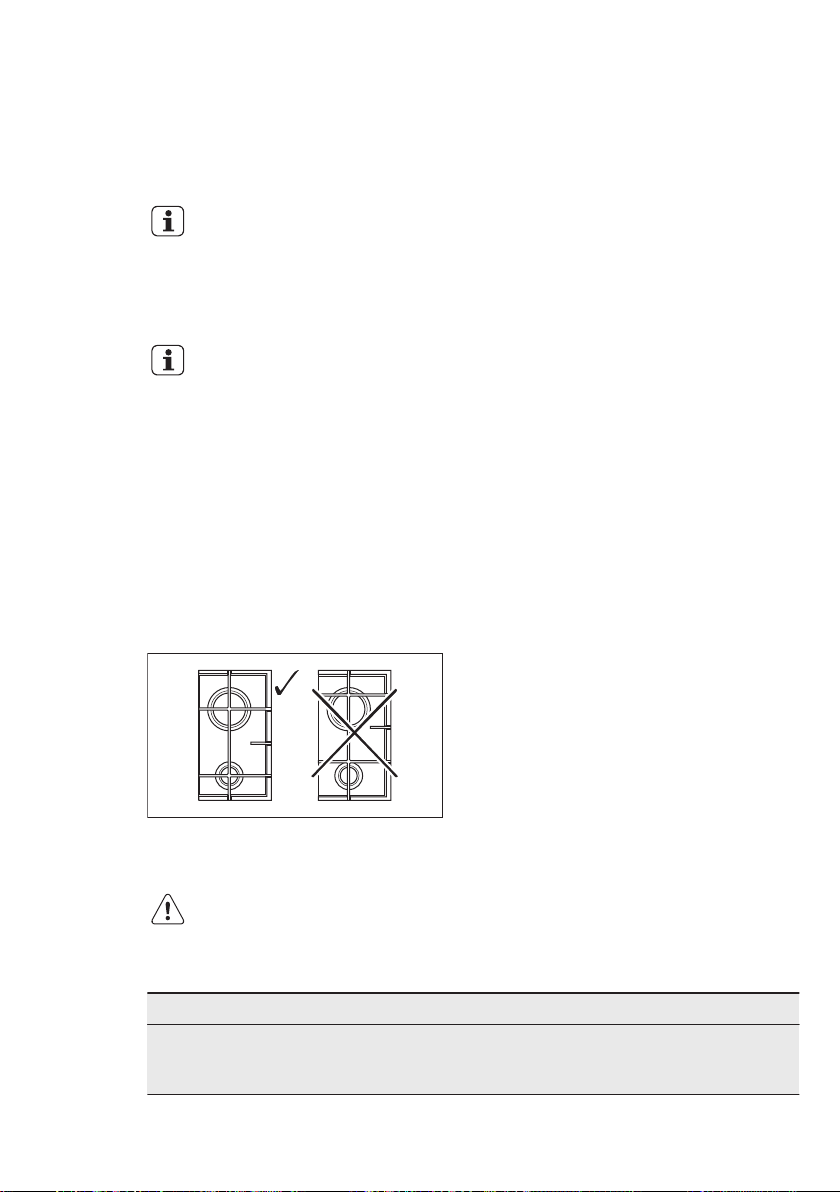
WARNING!
Do not put the same pan on
two burners.
WARNING!
Do not put unstable or
damaged pots on the burners
to prevent from spill and
injury.
CAUTION!
Make sure that the bottoms
of pots do not stand above
the control knobs, otherwise
the flame heats the control
knobs up.
CAUTION!
Make sure that pot handles
are not above the front edge
of the cooktop.
CAUTION!
Make sure that the pots are
placed centrally on the
burners in order to get
maximum stability and to get
lower gas consumption.
5.2 Energy saving
• If it is possible, always put the lids on
the cookware.
• When the liquid starts to boil, turn
down the flame to barely simmer the
liquid.
5.3 Diameters of cookware
Use cookware with diameters
applicable to the size of
burners.
Burner Diameter of
cookware
(mm)
Triple Crown 180 - 260
Rapid 180 - 260
Semi-rapid (rear left) 120 - 220
Semi-rapid (front left) 120 - 180
Auxiliary 80 - 180
5.4 Lid (separated kit only for predisposed hobs)
• The lid protects the hob from dust
when closed and collects splashes of
grease when opened. Do not use it for
other functions.
• Keep the lid clean all the time.
• Make sure that the hob is cold before
you close the lid.
• Glass lids can shatter when hot.
6. CARE AND CLEANING
WARNING!
Refer to Safety chapters.
6.1 General information
• Clean the hob after each use.
• Always use cookware with clean
bottom.
• Scratches or dark stains on the surface
have no effect on how the hob
operates.
Page 10
www.electrolux.com10
• Use a special cleaner applicable for the
surface of the hob.
• Wash stainless steel parts with water,
and then dry them with a soft cloth.
6.2 Pan supports
The pan supports are not
resistant to washing in a
dishwasher. They must be
washed by hand.
1. Remove the pan supports to easily
clean the hob.
Be very careful when you
replace the pan supports
to prevent the hob top
from damage.
2. The enamel coating occasionally can
have rough edges, so be careful when
you wash the pan supports by hand
and dry them. If necessary, remove
stubborn stains with a paste cleaner.
3. After you clean the pan supports,
make sure that they are in correct
positions.
4. For the burners to operate correctly
make sure that the arms of the pan
supports are aligned with the centre of
the burner.
6.3 Cleaning the hob
• Remove immediately: melted plastic,
plastic foil, and food with sugar. If not,
the dirt can cause damage to the hob.
• Remove when the hob is
sufficiently cool: limescale rings,
water rings, fat stains, shiny metallic
discoloration. Clean the hob with a
moist cloth and some detergent. After
cleaning, rub the hob dry with a soft
cloth.
• To clean the enamelled parts, cap and
crown, wash them with warm soapy
water and dry them carefully before
you put them back.
6.4 Cleaning the spark plug
This feature is obtained through a ceramic
ignition candle with a metal electrode.
Keep these components well clean to
prevent difficult lighting and check that the
burner crown holes are not obstructed.
6.5 Periodic maintenance
Speak to your local Authorised Service
Centre periodically to check the conditions
of the gas supply pipe and the pressure
adjuster, if fitted.
7. TROUBLESHOOTING
WARNING!
Refer to Safety chapters.
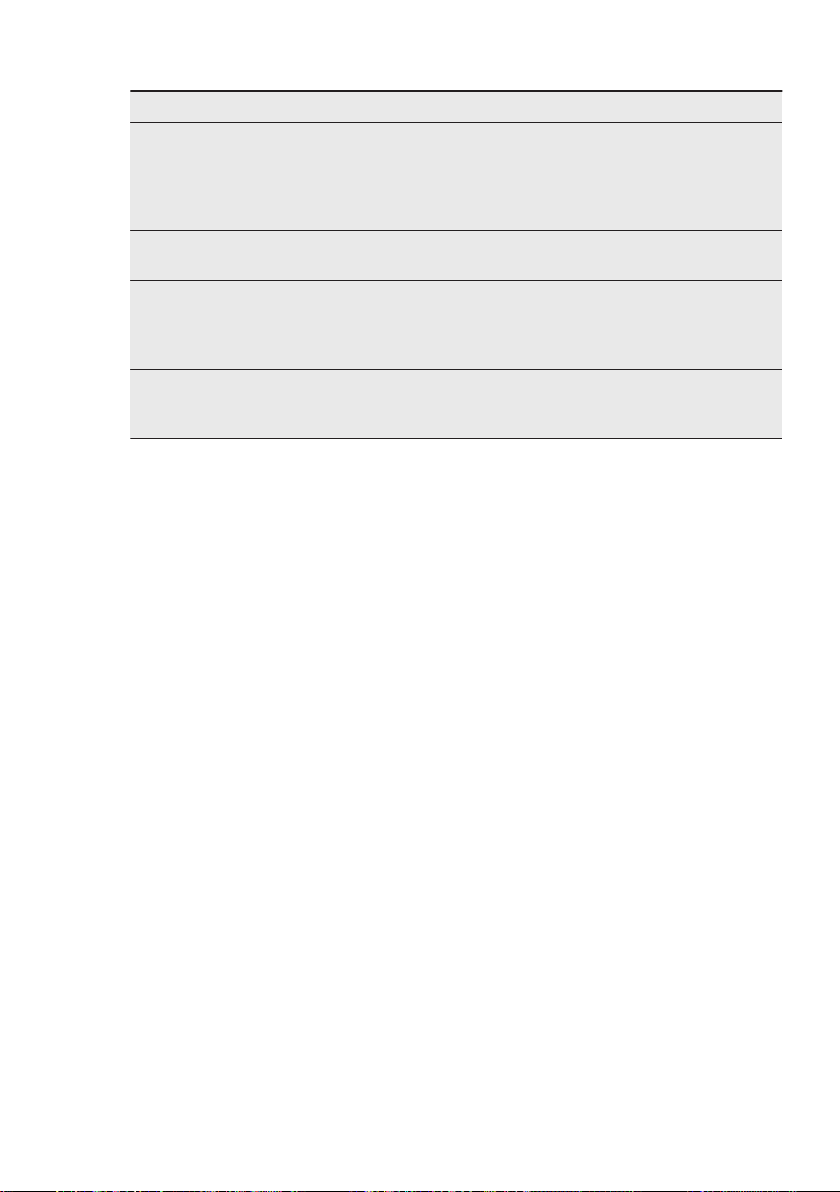
7.1 What to do if...
Problem Possible cause Remedy
There is no spark when you
try to activate the spark
generator.
The hob is not connected
to an electrical supply or it
is connected incorrectly.
Check if the hob is correctly
connected to the electrical
supply.
Page 11
ENGLISH
Problem Possible cause Remedy
The fuse is released. Make sure that the fuse is
Burner cap and crown are
The flame extinguishes immediately after ignition.
The flame ring is uneven. Burner crown is blocked
placed incorrectly.
Thermocouple is not heated
up sufficiently.
with food residues.
the cause of the malfunction. If the fuse releases
again and again, contact a
qualified electrician.
Place the burner cap and
crown correctly.
After lightning the flame,
keep the knob pushed for
equal or less than 10 seconds.
Make sure that the injector
is not blocked and the
burner crown is clean.
11
7.2 If you cannot find a
solution...
If you cannot find a solution to the
problem yourself, contact your dealer or
an Authorised Service Centre. Give the
data from the rating plate. Make sure, you
operated the hob correctly. If not the
servicing by a service technician or dealer
will not be free of charge, also during the
warranty period. The instructions about
the Service Centre and conditions of
guarantee are in the guarantee booklet.
Page 12
MOD.
PROD. NO.
SER.N O
DATA
MOD.
PROD. NO.
SER.N O
DATA
MOD.
PROD.NO.
SER.NO.
03 IT
MADE IN ITALY
TYPE
IP20
0049
A B C
www.electrolux.com12
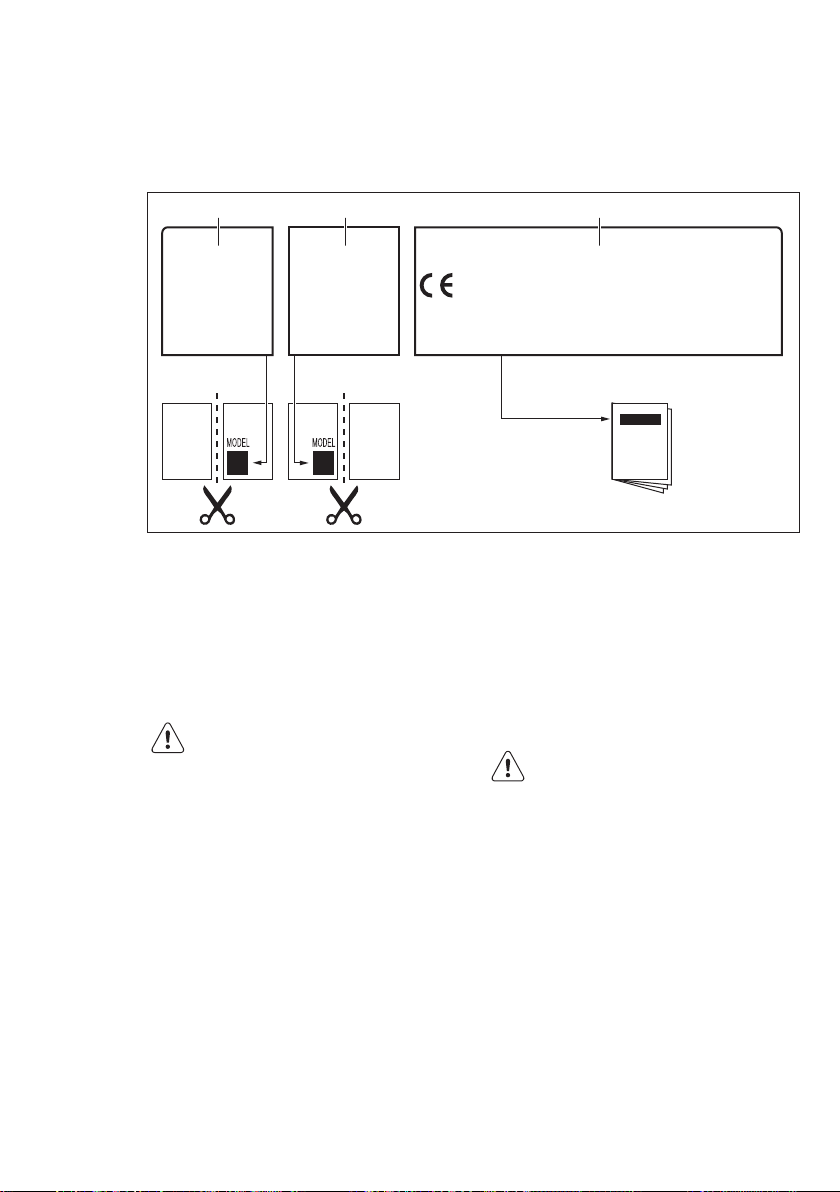
7.3 Labels supplied with the
accessories bag
Stick the adhesive labels as indicated
below:
A) Stick it on Guarantee Card and send
this part (if applicable).
B) Stick it on Guarantee Card and keep
this part (if applicable).
8. INSTALLATION
WARNING!
Refer to Safety chapters.
8.1 Before the installation
Before you install the hob, write down the
information bellow from the rating plate.
The rating plate is on the bottom of the
hob.
Model .......................................
PNC .........................................
Serial number ...........................
C) Stick it on instruction booklet.
8.2 Gas Connection
WARNING!
The following instructions
about installation,
maintenance and ventilation
must be carried out by
qualified personnel in
compliance with the
regulation in force (UNI-CIG
7129 - 7131). Make sure that
the kitchen is well ventilated:
keep natural ventilation holes
open (at least 100 cm²) or
install a mechanical extractor
hood.
Choose fixed connections or use a flexible
pipe in stainless steel in compliance with
the regulation in force. If you use flexible
metallic pipes, be careful they do not
Page 13

A B C
A
13
come in touch with mobile parts or they
are not squeezed. Also be careful when
the hob is put together with an oven.
Make sure that the gas
supply pressure of the
appliance obeys the
recommended values.
If the supplied pressure has not the
specified value, it is necessary to
assemble a proper pressure regulator in
compliance with the standard UNI EN 88.
For Liquid Gas (LPG) the use of pressure
regulator is allowed only if they are in
compliance with UNI EN 12864. The
adjustable connection is fixed to the
comprehensive ramp by means of a
threaded nut G 1/2". Screw the parts
without force, adjust the connection in the
necessary direction and tighten
everything.
ENGLISH
8.3 Injectors replacement
1. Remove the pan supports.
2. Remove the caps and crowns of the
burner.
3. With a socket spanner 7 remove the
injectors and replace them with the
ones which are necessary for the type
of gas you use (see table in "Technical
Information" chapter).
4. Assemble the parts, follow the same
procedure backwards.
5. Replace the rating plate (it is near the
gas supply pipe) with the one for the
new type of gas supply. You can find
this plate in the package supplied with
the appliance.
If the supply gas pressure is changeable
or different from the necessary pressure,
you must fit an applicable pressure
adjuster on the gas supply pipe.
8.4 Adjustment of minimum level
To adjust the minimum level of the
burners:
1. Light the burner.
Turn the knob on the minimum
2.
position.
3. Remove the knob.
4. With a thin screwdriver, adjust the
bypass screw position (A).
A) End of shaft with nut
B) Washer
C) Elbow (if needed)
Rigid connection:
Carry out connection by using metal rigid
pipes (copper with mechanical end) (UNICIG 7129).
Flexible connection:
Use a flexible pipe in stainless steel (UNICIG 9891) with a maximum length 2 m.
WARNING!
When installation is complete,
make sure that the seal of
each pipe fitting is correct.
Use a soapy solution, not a
flame!
5. If you change:
• from natural gas G20 20 mbar to
liquid gas, fully tighten the bypass
screw in.
• from liquid gas to natural gas G20
20 mbar, undo the bypass screw
approximately 1/4 of a turn (1/2 of
a turn for Triple Crown burner).
Page 14
A
min.
55 mm
min.
650 mm
560 mm
480 mm
min.
200 mm
30 mm
10 mm
86 mm
86 mm
A
3 mm
A
B
www.electrolux.com14
WARNING!
Make sure the flame does not
go out when you quickly turn
the knob from the maximum
position to the minimum
position.
8.5 Electrical connection
• Make sure that the rated voltage and
type of power on the rating plate agree
with the voltage and the power of the
local power supply.
• This appliance is supplied with a mains
cable. It has to be supplied with a
correct plug which can hold the load
that the rating plate rates. Make sure
that you install the plug in a correct
socket.
• Always use a correctly installed
shockproof socket.
• Make sure that there is an access to
the mains plug after the installation.
• Do not pull the mains cable to
disconnect the appliance. Always pull
the mains plug.
• There is a risk of fire when the
appliance is in connection with an
extension cable, an adapter or a
multiple connection. Make sure that the
ground connection agrees with the
standards and regulations.
• Do not let the power cable to heat up
to a temperature higher than 90° C.
To prevent contact between the cable and
the appliance below the hob use the
clamps which are on the side of the
cabinet.
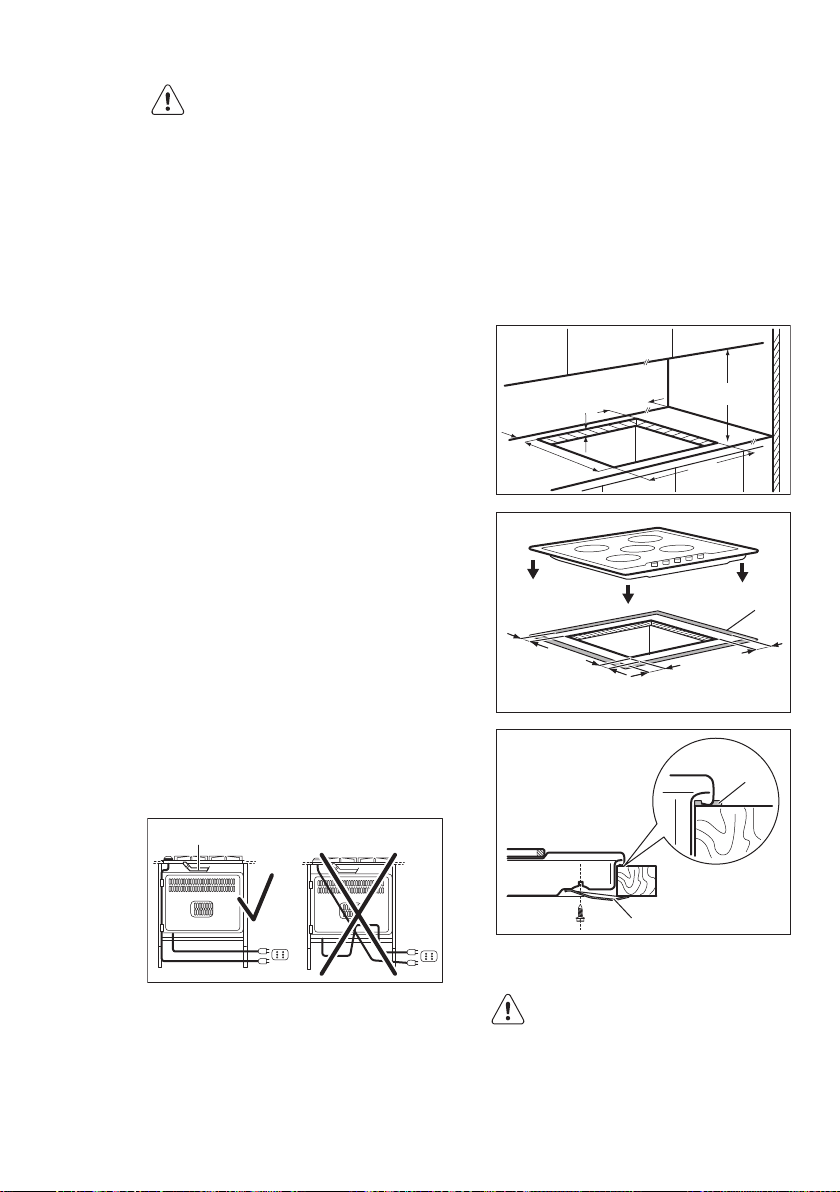
8.6 Connection cable
To replace the connection cable use only
the special cable or its equivalent. The
cable type is: H05V2V2-F T90.
Make sure that the cable section is
applicable to the voltage and the working
temperature. The yellow / green earth wire
must be approximately 2 cm longer than
the brown (or black) phase wire.
8.7 Building In
A) supplied seal
B) supplied brackets
A) Rigid copper pipe or flexible pipe of
stainless steel
CAUTION!
Install the appliance only on a
worktop with flat surface.
Page 15
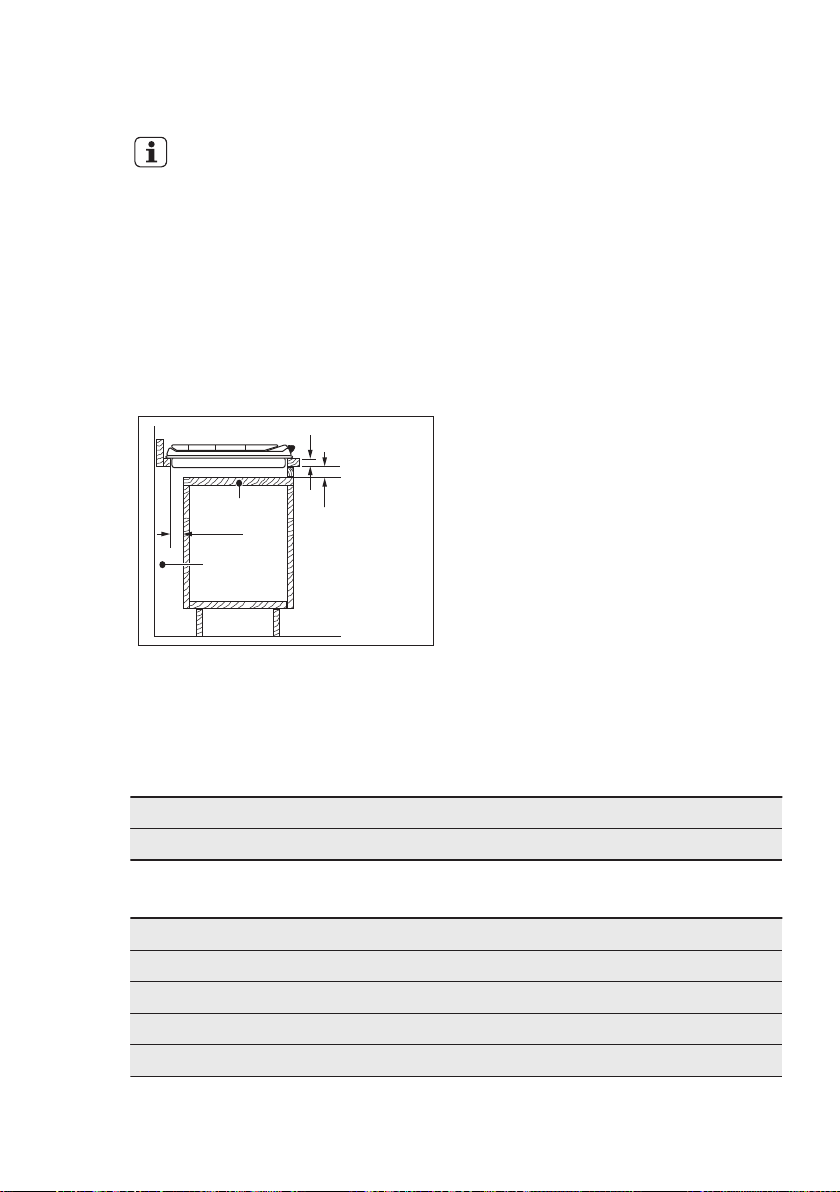
8.8 Installing hob under the
min 20 mm
(max 150 mm)
30 mm
60 mm
B
A
hood
If you install the hob under a
hood, please see the
installation instructions of the
hood for the minimum
distance between the
appliances.
8.9 Possibilities for insertion
The panel installed below the hob must be
easy to remove and let an easy access in
case a technical assistance intervention is
necessary.
Kitchen unit with door
ENGLISH
Kitchen unit with oven
The electrical connection of the hob and
the oven must be installed separately for
safety reasons and to let easy remove
oven from the unit.
15
A) Removable panel
B) Space for connections
9. TECHNICAL INFORMATION
9.1 Hob dimensions
Width 744 mm
Depth 510 mm
9.2 Bypass diameters
BURNER Ø BYPASS 1/100 mm
Triple Crown 56
Rapid 42
Semi-rapid 32
Auxiliary 28
Page 16

www.electrolux.com16
9.3 Other technical data
Gas original: G20 (2H) 20 mbar = 12 kW
TOTAL POWER:
Electric supply: 230 V ~ 50 Hz
Appliance category: II2H3+
Gas connection: G 1/2"
Appliance class: 3
Gas replacement: G30 (3+) 28-30 mbar = 887 g/h
9.4 Gas burners for NATURAL GAS G20 20 mbar
G31 (3+) 37 mbar = 871 g/h
BURNER NORMAL POWERkWMINIMUM POWERkWINJECTOR MARK
Triple Crown 4,0 1,4 146
Rapid 3,0 0,75 119
Semi-rapid 2,0 0,45 96
Auxiliary 1,0 0,33 70
9.5 Gas burners for LPG G30/G31 28-30/37 mbar
BURNER NORMAL
Triple
Crown
Rapid 3,0 0,75 88 233 229
Semi-rapid 2,0 0,45 71 145 143
Auxiliary 1,0 0,33 50 73 71
POWER
kW
4,0 1,4 98 291 286
MINIMUM
POWER
kW
10. ENVIRONMENT CONCERNS
Recycle the materials with the symbol .
Put the packaging in applicable containers
to recycle it. Help protect the environment
and human health and to recycle waste of
electrical and electronic appliances. Do
1/100 mm
INJECTOR
MARK
1/100 mm
not dispose appliances marked with the
symbol with the household waste.
Return the product to your local recycling
facility or contact your municipal office.
NOMINAL GAS FLOW g/h
G30 28-30
mbar
G31 37 mbar
Page 17

DEUTSCH
INHALTSVERZEICHNIS
1. SICHERHEITSINFORMATIONEN....................................................................... 18
2. SICHERHEITSANWEISUNGEN..........................................................................19
3. GERÄTEBESCHREIBUNG.................................................................................22
4. TÄGLICHER GEBRAUCH.................................................................................. 23
5. TIPPS UND HINWEISE...................................................................................... 24
6. REINIGUNG UND PFLEGE................................................................................ 25
7. FEHLERSUCHE.................................................................................................26
8. MONTAGE.........................................................................................................28
9. TECHNISCHE DATEN....................................................................................... 31
WIR DENKEN AN SIE
Vielen Dank, dass Sie sich für ein Gerät von Electrolux entschieden haben. Sie
haben ein Produkt gewählt, hinter dem jahrzehntelange professionelle Erfahrung und
Innovation stehen. Bei der Entwicklung dieses großartigen und eleganten Geräts
haben wir an Sie gedacht. So haben Sie bei jedem Gebrauch die Gewissheit, dass
Sie stets großartige Ergebnisse erzielen werden.
Willkommen bei Electrolux.
Besuchen Sie uns auf unserer Website, um:
Anwendungshinweise, Prospekte, Fehlerbehebungs- und Service-Informationen
zu erhalten:
www.electrolux.com
Ihr Produkt für einen besseren Service zu registrieren:
www.registerelectrolux.com
17
Zubehör, Verbrauchsmaterial und Original-Ersatzteile für Ihr Gerät zu kaufen:
www.electrolux.com/shop
REPARATUR- UND KUNDENDIENST
Bitte verwenden Sie ausschließlich Original-Ersatzteile für Ihre Produkte.
Halten Sie folgende Angaben bereit, wenn Sie sich an den Kundendienst wenden
Modell, Produktnummer (PNC), Seriennummer.
Die Informationen finden Sie auf dem Typenschild.
Warn-/ Sicherheitshinweise
Allgemeine Informationen und Empfehlungen
Umweltinformationen
Änderungen vorbehalten.
Page 18

www.electrolux.com18
1. SICHERHEITSINFORMATIONEN
Lesen Sie vor der Montage und dem Gebrauch des
Geräts zuerst die Gebrauchsanleitung. Der Hersteller
übernimmt keine Verantwortung für Verletzungen und
Beschädigungen durch unsachgemäße Montage.
Bewahren Sie die Gebrauchsanleitung griffbereit auf.
1.1 Sicherheit von Kindern und schutzbedürftigen
Personen
• Das Gerät kann von Kindern ab 8 Jahren und Personen
mit eingeschränkten physischen, sensorischen oder
geistigen Fähigkeiten oder mit mangelnder Erfahrung
und/oder mangelndem Wissen nur dann verwendet
werden, wenn sie durch eine für ihre Sicherheit
zuständige Person beaufsichtigt werden oder in die
sichere Verwendung des Geräts eingewiesen wurden
und die mit dem Gerät verbundenen Gefahren
verstanden haben.
• Kinder dürfen nicht mit dem Gerät spielen.
• Alle Verpackungsmaterialien von Kindern fernhalten.
• Halten Sie Kinder und Haustiere während des Betriebs
oder der Abkühlphase vom Gerät fern. Zugängliche
Teile sind heiß.
• Falls Ihr Gerät mit einer Kindersicherung ausgestattet
ist, empfehlen wir, diese einzuschalten.
• Wartung oder Reinigung des Geräts dürfen nicht von
Kindern ohne Aufsicht erfolgen.
• Halten Sie Kinder unter 3 Jahren vom Gerät fern, wenn
sie nicht ständig beaufsichtigt werden.
1.2 Allgemeine Sicherheit
• Das Gerät und die zugänglichen Geräteteile werden
während des Betriebs heiß. Berühren Sie nicht die
Heizelemente.
• Schalten Sie das Gerät nicht über eine externe
Zeitschaltuhr oder eine separate Fernsteuerung ein.
Page 19

DEUTSCH
• Kochen mit Fett oder Öl auf einem unbeaufsichtigten
Kochfeld ist gefährlich und kann zu einem Brand führen.
• Versuchen Sie nicht einen Brand mit Wasser zu
löschen, sondern schalten Sie das Gerät aus und
bedecken Sie die Flamme mit einem Deckel oder einer
Feuerlöschdecke.
• Legen Sie keine Gegenstände auf dem Kochfeld ab.
• Legen Sie keine Metallgegenstände wie Messer,
Gabeln, Löffel oder Topfdeckel auf die Oberfläche des
Kochfelds, da diese heiß werden können.
• Benutzen Sie zum Reinigen des Geräts keinen
Dampfreiniger.
• Entfernen Sie ggf. Spritzer oder ausgelaufene
Flüssigkeiten vom Abdeckblech, bevor Sie es öffnen.
Lassen Sie das Kochfeld vollständig abkühlen, bevor
Sie das Abdeckblech zuklappen.
• Wenn das Netzkabel beschädigt ist, muss es vom
Hersteller, seinem autorisierten Kundenservice oder
einer gleichermaßen qualifizierten Person ausgetauscht
werden, um Gefahrenquellen zu vermeiden.
• Ist das Gerät direkt an die Stromversorgung
angeschlossen, wird ein allpoliger Netztrennschalter mit
einem Kontaktabstand benötigt. Es muss eine
vollständige Trennung entsprechend der
Überspannungskategorie III gewährleistet sein. Dies gilt
nicht für das Erdungskabel.
• Wenn Sie das Netzkabel verlegen, achten Sie darauf,
dass es keinen direkten Kontakt mit Teilen hat, die
Temperaturen erreichen können, die mehr als 50 °C
über der Raumtemperatur liegen. Verwenden Sie
ansonsten Isolierschläuche.
19
2. SICHERHEITSANWEISUNGEN
Dieses Gerät ist für folgende Märkte
geeignet: IT
Page 20

www.electrolux.com20
2.1 Montage
WARNUNG!
Nur eine qualifizierte
Fachkraft darf den
elektrischen Anschluss des
Geräts vornehmen.
• Entfernen Sie das
Verpackungsmaterial.
• Stellen Sie ein beschädigtes Gerät
nicht auf und benutzen Sie es nicht.
• Halten Sie sich an die mitgelieferte
Montageanleitung.
• Die Mindestabstände zu anderen
Geräten und Küchenmöbeln sind
einzuhalten.
• Seien Sie beim Umsetzen des Geräts
vorsichtig, denn es ist schwer. Tragen
Sie stets Sicherheitshandschuhe.
• Dichten Sie die Ausschnittskanten mit
einem Dichtungsmittel ab, um ein
Aufquellen durch Feuchtigkeit zu
verhindern.
• Schützen Sie die Geräteunterseite vor
Dampf und Feuchtigkeit.
• Installieren Sie das Gerät nicht direkt
neben einer Tür oder unter einem
Fenster. So kann heißes Kochgeschirr
nicht herunterfallen, wenn die Tür oder
das Fenster geöffnet wird.
• Wird das Gerät über Schubladen
eingebaut, achten Sie darauf, dass
zwischen dem Geräteboden und der
oberen Schublade ein ausreichender
Abstand für die Luftzirkulation
vorhanden ist.
• Der Boden des Geräts kann heiß
werden. Achten Sie darauf eine
feuerfeste Trennplatte unter dem Gerät
anzubringen, damit der Boden nicht
zugänglich ist.
2.2 Elektrischer Anschluss
WARNUNG!
Brand- und
Stromschlaggefahr.
• Alle elektrischen Anschlüsse sind von
einem geprüften Elektriker
vorzunehmen.
• Das Gerät muss geerdet sein.
• Vor der Durchführung jeglicher Arbeiten
muss das Gerät von der elektrischen
Stromversorgung getrennt werden.
• Stellen Sie sicher, dass die elektrischen
Daten auf dem Typenschild den Daten
Ihrer Stromversorgung entsprechen.
Wenden Sie sich andernfalls an eine
Elektrofachkraft.
• Achten Sie darauf, dass das Gerät
ordnungsgemäß montiert wird. Wenn
freiliegende oder ungeeignete
Netzkabel oder Netzstecker (fall
vorhanden) verwendet werden, kann
der Anschluss überhitzen.
• Stellen Sie sicher, dass Sie das richtige
Kabel für den elektrischen
Netzanschluss verwenden.
• Achten Sie darauf, dass das Netzkabel
nicht lose hängt oder sich verheddert.
• Sorgen Sie dafür, dass ein
Berührungsschutz installiert wird.
• Verwenden Sie die Zugentlastung für
das Kabel.
• Stellen Sie beim elektrischen Anschluss
des Gerätes sicher, dass das
Netzkabel oder ggf. der Netzstecker
nicht mit dem heißen Gerät oder
heißem Kochgeschirr in Berührung
kommt.
• Verwenden Sie keine
Mehrfachsteckdosen oder
Verlängerungskabel.
• Achten Sie darauf, Netzstecker (falls
vorhanden) und Netzkabel nicht zu
beschädigen. Wenden Sie sich zum
Austausch des beschädigten
Netzkabels an den autorisierten
Kundendienst oder eine
Elektrofachkraft.
• Alle Teile, die gegen direktes Berühren
schützen sowie die isolierten Teile
müssen so befestigt werden, dass sie
nicht ohne Werkzeug entfernt werden
können.
• Stecken Sie den Netzstecker erst nach
Abschluss der Montage in die
Steckdose. Stellen Sie sicher, dass der
Netzstecker nach der Montage noch
zugänglich ist.
• Falls die Steckdose lose ist, schließen
Sie den Netzstecker nicht an.
• Ziehen Sie nicht am Netzkabel, wenn
Sie das Gerät von der
Stromversorgung trennen möchten.
Ziehen Sie stets am Netzstecker.
• Verwenden Sie nur geeignete
Trennvorrichtungen: Überlastschalter,
Sicherungen (Schraubsicherungen
Page 21

müssen aus dem Halter entfernt
werden können),
Fehlerstromschutzschalter und
Schütze.
• Die elektrische Installation muss eine
Trenneinrichtung aufweisen, mit der Sie
das Gerät allpolig von der
Stromversorgung trennen können. Die
Trenneinrichtung muss mit einer
Kontaktöffnungsbreite von mindestens
3 mm ausgeführt sein.
2.3 Gasanschluss
• Der Gasanschluss muss von einer
Fachkraft ausgeführt werden.
• Vergewissern Sie sich vor der Montage
des Geräts, dass das von Ihrem
Gaswerk gelieferte Gas (Gasart und
Gasdruck) mit der Einstellung des
Geräts kompatibel ist.
• Stellen Sie sicher, dass die Luft um das
Gerät zirkulieren kann.
• Informationen über die Gasversorgung
finden Sie auf dem Typenschild.
• Das Gerät darf nicht an einen Abzug
für Verbrennungsprodukte
angeschlossen werden. Das Gerät
muss gemäß der aktuell geltenden
Installationsbestimmungen
angeschlossen werden. Halten Sie die
Bestimmungen hinsichtlich der
Belüftung ein.
2.4 Verwendung
WARNUNG!
Verletzungs-, Verbrennungsund Stromschlaggefahr.
• Entfernen Sie vor dem ersten
Gebrauch das gesamte
Verpackungsmaterial, die Aufkleber
und Schutzfolie (falls vorhanden).
• Das Gerät ist für die Verwendung im
Haushalt vorgesehen.
• Nehmen Sie keine technischen
Änderungen am Gerät vor.
• Die Lüftungsöffnungen dürfen nicht
abgedeckt werden.
• Lassen Sie das Gerät bei Betrieb nicht
unbeaufsichtigt.
• Schalten Sie die Kochzonen nach
jedem Gebrauch aus.
DEUTSCH
• Legen Sie kein Besteck und keine
Topfdeckel auf die Kochzonen. Sie
werden heiß.
• Bedienen Sie das Gerät nicht mit
feuchten oder nassen Händen oder
wenn es mit Wasser in Kontakt
gekommen ist.
• Benutzen Sie das Gerät nicht als
Arbeits- oder Abstellfläche.
• Wenn Sie Nahrungsmittel in heißes Öl
geben, kann dieses spritzen.
WARNUNG!
Brand- und Explosionsgefahr!
• Erhitzte Öle und Fette können
brennbare Dämpfe freisetzen. Halten
Sie Flammen und erhitzte
Gegenstände beim Kochen mit Fetten
und Ölen von diesen fern.
• Die von sehr heißem Öl freigesetzten
Dämpfe können eine Selbstzündung
verursachen.
• Bereits verwendetes Öl kann
Lebensmittelreste enthalten und schon
bei niedrigeren Temperaturen eher
einen Brand verursachen als frisches
Öl.
• Platzieren Sie keine entflammbaren
Produkte oder Gegenstände, die mit
entflammbaren Produkten benetzt
sind, im Gerät, auf dem Gerät oder in
der Nähe des Geräts.
WARNUNG!
Das Gerät könnte beschädigt
werden.
• Stellen Sie kein heißes Kochgeschirr
auf das Bedienfeld.
• Lassen Sie das Kochgeschirr nicht
leerkochen.
• Lassen Sie keine Gegenstände oder
Kochgeschirr auf das Gerät fallen. Die
Oberfläche könnte beschädigt werden.
• Schalten Sie die Kochzonen niemals
ein, wenn sich kein Kochgeschirr
darauf befindet, oder wenn das
Kochgeschirr leer ist.
• Legen Sie keine Alufolie auf das Gerät.
• Verwenden Sie nur standfestes
Kochgeschirr mit der richtigen Form
und einem Durchmesser, der größer
als der der Brenner ist.
• Vergewissern Sie sich, dass die
Flamme nicht erlischt, wenn Sie den
21
Page 22

3
4
5
2
1
www.electrolux.com22
Einstellknopf schnell von der höchsten
zur niedrigsten Stufe drehen.
• Verwenden Sie ausschließlich das mit
dem Gerät gelieferte Zubehör.
• Setzen Sie keinen Wärmeverteiler auf
den Brenner.
• Beim Gebrauch eines Gaskochfelds
entsteht Wärme und Feuchtigkeit.
Sorgen Sie für eine ausreichende
Belüftung in dem Raum, in dem das
Gerät aufgestellt ist.
• Bei längerer Benutzung des Geräts
kann eine zusätzliche Belüftung
erforderlich werden (Öffnen eines
Fensters oder Erhöhung der
Absaugleistung der Abzugshaube, falls
vorhanden).
• Dieses Gerät ist nur zum Kochen
bestimmt. Jeder andere Gebrauch ist
als bestimmungsfremd anzusehen,
zum Beispiel das Beheizen eines
Raums.
• Lassen Sie keine säurehaltigen
Flüssigkeiten wie Essig, Zitronensaft
oder kalklösende Reinigungsmittel mit
dem Kochfeld in Berührung kommen.
Diese könnten matte Flecken
verursachen.
2.5 Reinigung und Pflege
• Reinigen Sie das Gerät regelmäßig, um
eine Abnutzung des
Oberflächenmaterials zu verhindern.
• Schalten Sie das Gerät vor dem
Reinigen aus und lassen Sie es
abkühlen.
• Trennen Sie das Gerät vor
Wartungsarbeiten von der
Spannungsversorgung.
• Reinigen Sie das Gerät nicht mit einem
Wasser- oder Dampfstrahl.
• Reinigen Sie das Gerät mit einem
weichen, feuchten Tuch. Verwenden
Sie ausschließlich Neutralreiniger
Benutzen Sie keine Scheuermittel,
scheuernde Reinigungsschwämmchen,
Lösungsmittel oder Metallgegenstände.
• Reinigen Sie die Brenner nicht im
Geschirrspüler.
2.6 Entsorgung
WARNUNG!
Verletzungs- und
Erstickungsgefahr.
• Für Informationen zur
ordnungsgemäßen Entsorgung des
Geräts wenden Sie sich an die
zuständige kommunale Behörde vor
Ort.
• Trennen Sie das Gerät von der
Stromversorgung.
• Schneiden Sie das Netzkabel ab, und
entsorgen Sie es.
• Drücken Sie die äußeren Gasrohre
flach.
3. GERÄTEBESCHREIBUNG
3.1 Kochfeldanordnung
Normalbrenner
1
Dreikronen-Brenner
2
Starkbrenner
3
Hilfsbrenner
4
Einstellknöpfe
5
Page 23

A
B
D
C
C
D
A
B
DEUTSCH
23
3.2 Einstellknopf
Symbol Beschreibung
Keine Gaszufuhr / ausgeschaltet
4. TÄGLICHER GEBRAUCH
WARNUNG!
Siehe Kapitel
Sicherheitshinweise.
4.1 Brennerübersicht
Symbol Beschreibung
Zündstellung / maximale
Gaszufuhr
minimale Gaszufuhr
4.2 Zünden des Brenners
Brenner stets vor dem
Aufsetzen des Kochgeschirrs
zünden.
WARNUNG!
Seien Sie bei der
Verwendung von offenem
Feuer in der Küche
besonders vorsichtig. Der
Hersteller übernimmt bei
Missachtung der
Sicherheitsbestimmungen
beim Umgang mit offenem
Feuer keinerlei Haftung.
1. Drücken Sie den Einstellknopf hinein
und drehen Sie ihn gegen den
Uhrzeigersinn auf die Position für die
maximale Gaszufuhr ( ).
2. Halten Sie den Einstellknopf bis zu 10
Sekunden lang gedrückt. In dieser Zeit
wird das Thermoelement erwärmt.
Andernfalls wird die Gaszufuhr
unterbrochen.
3. Stellen Sie die Flamme ein, sobald sie
ruhig brennt.
Falls sich der Brenner nach
einigen Versuchen nicht
zünden lässt, überprüfen Sie,
ob die Brennerkrone und der
zugehörige Brennerdeckel
korrekt sitzen.
A) Brennerdeckel
B) Brennerkrone
C) Zündkerze
D) Thermoelement
Page 24

www.electrolux.com24
WARNUNG!
Halten Sie den Knopf nicht
länger als 15 Sekunden
gedrückt. Sollte der Brenner
nach 15 Sekunden nicht
zünden, lassen Sie den Knopf
los, und drehen Sie ihn in die
Aus-Position. Warten Sie
dann mindestens eine
Minute, bevor Sie den
Brenner erneut zünden.
ACHTUNG!
Wenn kein Strom zur
Verfügung steht, können Sie
den Brenner auch ohne
Strom zünden. Bringen Sie
eine Flamme in die Nähe des
Brenners, drehen Sie den
entsprechenden Knopf
entgegen dem Uhrzeigersinn
auf die höchste Stufe und
drücken Sie ihn dann hinein.
Halten Sie den Einstellknopf
höchstens 10 Sekunden
gedrückt, um das
Thermoelement zu erwärmen.
5. TIPPS UND HINWEISE
Sollte der Brenner zufällig
ausgehen, drehen Sie den
Knopf in die Aus-Position und
versuchen Sie ihn nach einer
Minute erneut zu zünden.
Nach dem Einschalten der
Stromversorgung, nach der
Installation oder nach einem
Stromausfall wird der
Funkengenerator
möglicherweise automatisch
eingeschaltet. Das ist normal.
4.3 Abschalten des Brenners
Drehen Sie zum Abschalten des Brenners
den Knopf in die Aus-Position .
WARNUNG!
Bevor Sie das Kochgeschirr
vom Brenner nehmen, drehen
Sie die Flamme herunter oder
drehen Sie sie ganz ab.
WARNUNG!
Siehe Kapitel
Sicherheitshinweise.
5.1 Kochgeschirr
ACHTUNG!
Verwenden Sie kein
Kochgeschirr aus Gusseisen,
Speckstein oder Steingut und
keine Grill- oder
Sandwichplatten. Edelstahl
kann anlaufen, wenn es zu
stark erhitzt wird.
WARNUNG!
Kochen Sie nicht mit einem
Kochgeschirrteil auf zwei
Brennern gleichzeitig.
WARNUNG!
Stellen Sie keine
beschädigten Töpfe oder
solche, die nicht standfest
sind, auf die Brenner, um ein
Verschütten und
Verletzungen zu vermeiden.
ACHTUNG!
Achten Sie darauf, dass sich
die Topfböden nicht über den
Einstellknöpfe befinden, da
sie anderenfalls die
Einstellknöpfe erhitzen
könnten.
ACHTUNG!
Achten Sie darauf, dass die
Topfgriffe nicht über den
vorderen Rand des Kochfelds
hinausragen.
Page 25

DEUTSCH
25
ACHTUNG!
Stellen Sie zur Reduzierung
des Gasverbrauchs und im
Interesse einer größeren
Stabilität die Töpfe mittig auf
die Brenner.
5.2 Energie sparen
• Decken Sie Kochgeschirr, wenn
möglich, mit einem Deckel ab.
• Drehen Sie, sobald die Flüssigkeit zu
kochen beginnt, die Flamme so weit
zurück, dass die Flüssigkeit nur leicht
köchelt.
5.3 Durchmesser des
Kochgeschirrs
Verwenden Sie nur
Kochgeschirr mit einem
Durchmesser, der der Größe
der Brenner entspricht.
Brenner Durchmesser
Dreikronen-Brenner 180 - 260
Starkbrenner 180 - 260
Normalbrenner (hinten
links)
des Kochgeschirrs (mm)
120 - 220
Brenner Durchmesser
Normalbrenner (vorne
links)
Hilfsbrenner 80 - 180
des Kochgeschirrs (mm)
120 - 180
5.4 Deckel (separater Bausatz für vorbereitete Kochfelder)
• Der Deckel schützt das Kochfeld vor
Staub, wenn er geschlossen ist, und
fängt Fettspritzer auf, wenn er geöffnet
ist. Benutzen Sie ihn für keinen
anderen Zweck.
• Halten Sie den Deckel stets sauber.
• Vergewissern Sie sich, dass das
Kochfeld abgekühlt ist, bevor der
Deckel geschlossen wird.
• Glasdeckel können zerbrechen, wenn
sie erhitzt werden.
6. REINIGUNG UND PFLEGE
WARNUNG!
Siehe Kapitel
Sicherheitshinweise.
6.1 Allgemeine Informationen
• Reinigen Sie das Kochfeld nach jedem
Gebrauch.
• Achten Sie immer darauf, dass der
Boden des Kochgeschirrs sauber ist.
• Kratzer oder dunkle Flecken auf der
Oberfläche beeinträchtigen die
Funktionsfähigkeit des Kochfelds nicht.
• Verwenden Sie einen Spezialreiniger
zur Reinigung der Kochfeldoberfläche.
• Reinigen Sie Edelstahlteile mit Wasser
und wischen Sie sie mit einem weichen
Tuch trocken.
6.2 Topfträger
Die Topfträger sind nicht
spülmaschinenfest. Sie
müssen von Hand gereinigt
werden.
1. Entfernen Sie die Topfträger, um die
Reinigung des Kochfelds zu
erleichtern.
Page 26

www.electrolux.com26
Seien Sie beim
Wiederaufsetzen der
Topfträger vorsichtig, um
Beschädigungen der
Oberseite des Kochfelds
zu vermeiden.
2. Wenn Sie die Topfträger von Hand
spülen und trocknen, seien Sie
vorsichtig, da durch das Emaillieren
gelegentlich raue Kanten entstehen
können. Entfernen Sie hartnäckige
Flecken ggf. mit einer
Reinigungspaste.
3. Vergewissern Sie sich, dass Sie die
Topfträger nach der Reinigung wieder
ordnungsgemäß eingesetzt haben.
4. Damit die Brenner korrekt
funktionieren, stellen Sie sicher, dass
sich die Arme der Topfträger in der
Mitte des Brenners befinden.
6.3 Reinigen des Kochfelds
• Folgendes muss sofort entfernt
werden: geschmolzener Kunststoff,
Plastikfolie, zuckerhaltige Lebensmittel.
Andernfalls können die
Verschmutzungen das Kochfeld
beschädigen.
• Folgendes kann nach
ausreichender Abkühlung des
Kochfelds entfernt werden: Kalk-
und Wasserränder, Fettspritzer und
metallisch schimmernde Verfärbungen.
Reinigen Sie das Kochfeld mit einem
feuchten Tuch und etwas Spülmittel.
Wischen Sie das Kochfeld nach der
Reinigung mit einem weichen Tuch
trocken.
• Reinigen Sie die emaillierten Teile, den
Brennerdeckel und die Brennerkrone
mit warmen Seifenwasser und
trocknen Sie diese sorgfältig ab, bevor
Sie sie wieder einsetzen.
6.4 Reinigen der Zündkerze
Diese Funktion erfolgt über eine
Keramikzündkerze mit Metallelektrode.
Halten Sie zur Vermeidung von
Zündschwierigkeiten diese Bauteile immer
sauber; kontrollieren Sie außerdem, ob die
Düsen der Brennerkrone verstopft sind.
6.5 Regelmäßige Wartung
Lassen Sie regelmäßig vom Ihrem
autorisierten Kundendienst den Zustand
des Gasversorgungsrohrs und, falls
installiert, die Funktionstüchtigkeit des
Druckreglers überprüfen.
7. FEHLERSUCHE
WARNUNG!
Siehe Kapitel
Sicherheitshinweise.
7.1 Was tun, wenn ...
Problem Mögliche Ursache Abhilfe
Es wird kein Funke erzeugt,
wenn Sie den Funkenerzeuger betätigen.
Das Kochfeld ist nicht oder
nicht ordnungsgemäß an
die Spannungsversorgung
angeschlossen.
Prüfen Sie, ob das Kochfeld
ordnungsgemäß an die
Spannungsversorgung angeschlossen ist.
Page 27

Problem Mögliche Ursache Abhilfe
Die Sicherung hat ausge-
Brennerdeckel und Bren-
Die Flamme erlischt gleich
nach der Zündung wieder.
Der Flammenring ist ungleichmäßig.
löst.
nerkrone sitzen nicht richtig.
Das Thermoelement ist
nicht ausreichend erwärmt.
Die Brennerkrone ist mit
Speiseresten verstopft.
Vergewissern Sie sich, dass
die Sicherung der Grund für
die Störung ist. Löst die Sicherung wiederholt aus,
wenden Sie sich an eine zugelassene Elektrofachkraft.
Bringen Sie die Brennerkrone und den Brennerdeckel in die richtige Position.
Halten Sie den Knopf nach
dem Entzünden etwa 10
Sekunden lang gedrückt.
Sorgen Sie dafür, dass die
Düse nicht blockiert und die
Brennerkrone sauber ist.
DEUTSCH
27
7.2 Wenn Sie das Problem nicht
lösen können...
Wenn Sie das Problem nicht selbst lösen
können, wenden Sie sich an den Händler
oder einen autorisierten Kundendienst.
Geben Sie die Daten an, die Sie auf dem
Typenschild finden. Vergewissern Sie sich,
dass Sie das Kochfeld richtig bedient
haben. Wenn Sie das Gerät falsch bedient
haben, fällt auch während der Garantiezeit
für die Reparatur durch einen Techniker
oder Händler eine Gebühr an. Die
Informationen zum Kundendienst und die
Garantiebedingungen finden Sie im
Garantieheft.
Page 28

MOD.
PROD. NO.
SER.N O
DATA
MOD.
PROD. NO.
SER.N O
DATA
MOD.
PROD.NO.
SER.NO.
03 IT
MADE IN ITALY
TYPE
IP20
0049
A B C
www.electrolux.com28
7.3 Im Zubehörbeutel
mitgelieferte Aufkleber
Bringen Sie die Aufkleber, wie unten
gezeigt, an:
A) Kleben Sie ihn auf die Garantiekarte
und verschicken Sie diesen Teil (falls
vorhanden).
B) Kleben Sie ihn auf die Garantiekarte
und behalten Sie diesen Teil (falls
vorhanden).
8. MONTAGE
WARNUNG!
Siehe Kapitel
Sicherheitshinweise.
8.1 Vor der Montage
Notieren Sie vor der Montage des
Kochfelds folgende Daten, die Sie auf dem
Typenschild finden. Das Typenschild ist
auf dem Boden des Kochfelds
angebracht.
Modell ...........................
Produktnummer
(PNC) ........................................
Seriennummer ............
C) Kleben Sie ihn auf die
Gebrauchsanleitung.
8.2 Gasanschluss
WARNUNG!
Die in nachstehender
Anleitung beschriebenen
Installations-,Wartungs- und
Belüftungsarbeiten müssen
von Fachpersonal unter
Beachtung der geltenden
Bestimmungen (UNI-CIG
7129 - 7131) ausgeführt
werden. Stellen Sie sicher,
dass die Küche gut belüftet
ist: Halten Sie natürliche
Belüftungsöffnungen von
mindestens 100 cm² offen
oder installieren Sie eine
mechanische Abzugshaube.
Page 29

Je nach geltenden Bestimmungen kann
A B C
der Anschluss fest oder durch
Verwendung eines flexiblen Edelstahlrohrs
erfolgen. Bei Verwendung flexibler
Metallrohre muss darauf geachtet werden,
dass sie nicht mit beweglichen Teilen in
Kontakt kommen oder eingeklemmt
werden können. Wenn das Kochfeld mit
einem Backofen installiert wird, muss
ebenfalls vorsichtig vorgegangen werden.
Achten Sie darauf, dass der
Gasdruck des Geräts den
empfohlenen Werten
entspricht.
Entspricht der gelieferte Druck nicht dem
angegebenen Wert, muss ein geeigneter
Druckregler gemäß der Norm UNI EN 88
installiert werden. Im Fall von Flüssiggas
(LPG) ist die Verwendung eines
Druckreglers nur erlaubt, wenn er UNI EN
12864 entspricht. Das verstellbare
Anschlussstück wird an dem
Gasanschluss mit einer G 1/2"
Gewindemutter befestigt. Verschrauben
Sie die Teile ohne Kraftanwendung,
bringen Sie das Anschlussstück in die
benötigte Richtung und schrauben Sie alle
Teile fest.
DEUTSCH
WARNUNG!
Überprüfen Sie nach der
Installation, ob alle
Anschlussstücke dicht sind.
Verwenden Sie eine
Seifenlösung und keine
Flamme!
8.3 Austauschen der Düsen
1. Nehmen Sie die Topfträger ab.
2. Nehmen Sie Brennerdeckel und
Brennerkronen ab.
3. Entfernen Sie die Düsen mit einem
Steckschlüssel 7 und ersetzen Sie sie
durch für die verwendete Gasart
geeignete Düsen (siehe Tabelle im
Abschnitt „Technische Daten“).
4. Bringen Sie die Teile wieder an (führen
Sie dazu die obigen Schritte in
umgekehrter Reihenfolge aus).
5. Ersetzen Sie das Typenschild (in der
Nähe der Gasversorgungsleitung)
durch das Typenschild für die neue
Gasart. Das Typenschild ist im
Beipack des Geräts enthalten.
Wenn der Gasdruck der Gasversorgung
schwankt oder nicht dem erforderlichen
Druckwert entspricht, muss ein geeigneter
Druckregler im Gaszufuhrrohr montiert
werden.
29
A) Schaftende mit Mutter
B) Beilagscheibe
C) Rohrbogen (falls erforderlich)
Fester Anschluss:
Führen Sie den Anschluss mit festen
Metallrohren aus (Kupfer mit
mechanischem Endstück) (UNI-CIG 7129).
Flexibler Anschluss:
Verwenden Sie ein flexibles Edelstahlrohr
(UNI-CIG 9891) mit einer maximalen
Länge von 2 m.
8.4 Einstellen der niedrigsten
Stufe
So stellen Sie die niedrigste Stufe der
Brenner ein:
1. Zünden Sie den Brenner.
2. Drehen Sie den Knopf auf die kleinste
Flamme.
3. Ziehen Sie den Einstellknopf ab.
4. Stellen Sie mit einem kleinen
Schraubendreher die BypassSchraube (A) ein.
Page 30

A
A
min.
55 mm
min.
650 mm
560 mm
480 mm
min.
200 mm
30 mm
www.electrolux.com30
Erdverbindung den Normen und
Vorschriften entspricht.
• Das Netzkabel darf nicht heißer als 90
°C werden.
Um einen Kontakt des Kabels mit dem
Gerät unter dem Kochfeld zu vermeiden,
verwenden Sie die Haken auf den Seiten
des Gehäuses.
5. Bei Umstellung:
• Von Erdgas G20 20 mbar zu
Flüssiggas, ziehen Sie die BypassSchraube bis zum Anschlag an.
• Von Flüssiggas zu Erdgas G20 20
mbar, drehen Sie die BypassSchraube ca. 1/4 Umdrehung
zurück (1/2 Umdrehung für den
Dreikronen-Brenner).
WARNUNG!
Vergewissern Sie sich, dass
die Flamme nicht erlischt,
wenn Sie den Einstellknopf
schnell von der höchsten zur
niedrigsten Stufe drehen.
A) Festes Kupferrohr oder flexibles
Edelstahlrohr
8.6 Anschlusskabel
Ersetzen Sie das Anschlusskabel
ausschließlich durch das spezielle Kabel
oder ein gleichwertiges Kabel. Kabeltyp:
H05V2V2-F T90.
8.5 Elektrischer Anschluss
• Vergewissern Sie sich, dass die
Netzspannung und -frequenz in Ihrer
Region mit den auf dem Typenschild
angegebenen Anschlusswerten
übereinstimmen.
Vergewissern Sie sich, dass der
Kabelquerschnitt für die Spannung und
Betriebstemperatur geeignet ist. Der gelbgrüne Erdleiter muss ca. 2 cm länger als
der braune (bzw. schwarze) Phasenleiter
sein.
• Das Gerät wird mit einem Netzkabel
geliefert. Dazu muss ein passender
8.7 Montage
Stecker verwendet werden, der für die
auf dem Typenschild angegebene
Gesamtstromaufnahme ausgelegt ist.
Achten Sie darauf, den Stecker in eine
passende Steckdose zu stecken.
• Schließen Sie das Gerät nur an eine
ordnungsgemäß installierte
Schutzkontaktsteckdose an.
• Stellen Sie sicher, dass der
Netzstecker nach der Montage noch
zugänglich ist.
• Ziehen Sie nicht am Netzkabel, wenn
Sie das Gerät von der
Stromversorgung trennen möchten.
Ziehen Sie stets am Netzstecker.
• Es besteht Brandgefahr, wenn das
Gerät mit einem Verlängerungskabel,
Adapter oder an eine
Mehrfachsteckdose angeschlossen
wird. Stellen Sie sicher, dass die
Page 31

10 mm
86 mm
86 mm
A
3 mm
A
B
A) mitgelieferte Dichtung
min 20 mm
(max 150 mm)
30 mm
60 mm
B
A
B) mitgelieferte Halterungen
ACHTUNG!
Montieren Sie das Gerät nur
in einer flachen Arbeitsplatte.
8.8 Montage des Kochfelds unter der Dunstabzugshaube
DEUTSCH
8.9 Einbaumöglichkeiten
Die unter dem Kochfeld eingebaute Platte
muss sich leicht entfernen lassen und
einen einfachen Zugang ermöglichen, falls
eine Reparatur erforderlich wird.
Unterbaumöbel mit Tür
A) Entfernbare Platte
B) Raum für Anschlüsse
Unterbaumöbel mit Backofen
Kochfeld und Backofen müssen aus
Sicherheitsgründen über separate
elektrische Anschlüsse verfügen. Der
Backofen muss sich leicht aus dem
Unterbauschrank entfernen lassen.
31
Wird das Kochfeld unter einer
Abzugshaube montiert,
sehen Sie in der
Montageanleitung der
Abzugshaube nach, welcher
Mindestabstand zwischen
den Geräten eingehalten
werden muss.
9. TECHNISCHE DATEN
9.1 Abmessungen des Kochfelds
Breite 744 mm
Tiefe 510 mm
Page 32

www.electrolux.com32
9.2 Bypassdurchmesser
TYP Ø BYPASS 1/100 mm
Dreikronen-Brenner 56
Starkbrenner 42
Normalbrenner 32
Hilfsbrenner 28
9.3 Sonstige technische Daten
Gas – Original: G20 (2H) 20 mbar = 12 kW
GESAMTLEISTUNG:
Netzanschluss: 230 V ~, 50 Hz
Gerätekategorie: II2H3+
Gasanschluss: G 1/2"
Geräteklasse: 3
Gas – Ersatz: G30 (3+) 28-30 mbar = 887 g/Std.
9.4 Gasbrenner für ERDGAS G20 20 mbar
G31 (3+) 37 mbar = 871 g/Std.
TYP NORMALLEISTUNGkWMINDESTLEISTUNGkWINJEKTOR-
DreikronenBrenner
Starkbrenner 3,0 0,75 119
Normalbrenner 2,0 0,45 96
Hilfsbrenner 1,0 0,33 70
4,0 1,4 146
MARKE 1/100
mm
9.5 Gasbrenner für LPG G30/G31 28-30/37 mbar
TYP NORMAL-
DreikronenBrenner
Starkbrenner
LEISTUNG
kW
4,0 1,4 98 291 286
3,0 0,75 88 233 229
MINDESTLEISTUNG kW
INJEKTORMARKE
1/100 mm
NENNGASDURCHFLUSS g/
Std.
G30 28-30
mbar
G31 37 mbar
Page 33

DEUTSCH
33
TYP NORMAL-
Normalbrenner
Hilfsbrenner 1,0 0,33 50 73 71
LEISTUNG
kW
2,0 0,45 71 145 143
10. UMWELTTIPPS
Recyceln Sie Materialien mit dem Symbol
. Entsorgen Sie die Verpackung in den
entsprechenden Recyclingbehältern.
Recyceln Sie zum Umwelt- und
Gesundheitsschutz elektrische und
elektronische Geräte. Entsorgen Sie
MINDESTLEISTUNG kW
INJEKTORMARKE
1/100 mm
Geräte mit diesem Symbol nicht mit
dem Hausmüll. Bringen Sie das Gerät zu
Ihrer örtlichen Sammelstelle oder wenden
Sie sich an Ihr Gemeindeamt.
NENNGASDURCHFLUSS g/
Std.
G30 28-30
mbar
G31 37 mbar
Page 34

www.electrolux.com34
INDICE
1. INFORMAZIONI PER LA SICUREZZA................................................................ 35
2. ISTRUZIONI DI SICUREZZA...............................................................................36
3. DESCRIZIONE DEL PRODOTTO....................................................................... 39
4. UTILIZZO QUOTIDIANO.....................................................................................40
5. CONSIGLI E SUGGERIMENTI UTILI...................................................................41
6. PULIZIA E CURA............................................................................................... 42
7. RISOLUZIONE DEI PROBLEMI.......................................................................... 43
8. INSTALLAZIONE................................................................................................44
9. DATI TECNICI....................................................................................................47
PENSATI PER VOI
Grazie per aver acquistato un'apparecchiatura Electrolux. Avete scelto un prodotto
che ha alle spalle decenni di esperienza professionale e innovazione. Ingegnoso ed
elegante, è stato progettato pensando a voi. Quindi, in qualsiasi momento
desiderate utilizzarlo, potete esser certi di ottenere sempre i migliori risultati.
Benvenuti in Electrolux.
Visitate il nostro sito web per:
Ricevere consigli, scaricare i nostri opuscoli, eliminare eventuali anomalie,
ottenere informazioni sull'assistenza:
www.electrolux.com
Registrare il vostro prodotto e ricevere un servizio migliore:
www.registerelectrolux.com
Acquistare accessori, materiali di consumo e ricambi originali per la vostra
apparecchiatura:
www.electrolux.com/shop
SERVIZIO CLIENTI E MANUTENZIONE
Consigliamo sempre l’impiego di ricambi originali.
Quando si contatta il Centro di Assistenza, accertarsi di disporre dei seguenti dati:
Modello, PNC, numero di serie.
Le informazioni si trovano sulla targhetta dei dati.
Avvertenza/Attenzione - Importanti Informazioni per la sicurezza
Informazioni e suggerimenti generali
Informazioni sull'ambiente
Con riserva di modifiche.
Page 35

1. INFORMAZIONI PER LA SICUREZZA
Leggere attentamente le istruzioni fornite prima di
installare e utilizzare l'apparecchiatura. Il produttore non è
responsabile se un'installazione ed un uso non corretto
dell'apparecchiatura provocano lesioni e danni. Tenere
sempre le istruzioni a portata di mano come riferimento
futuro.
1.1 Sicurezza dei bambini e delle persone vulnerabili
• Questa apparecchiatura può essere usata da bambini a
partire dagli 8 anni e da adulti con limitate capacità
fisiche, sensoriali o mentali o con scarsa esperienza o
conoscenza sull'uso dell'apparecchiatura, solamente se
sorvegliati o se istruiti relativamente all'uso
dell'apparecchiatura e se hanno compreso i rischi
coinvolti.
• Non consentire ai bambini di giocare con
l'apparecchiatura.
• Tenere i materiali di imballaggio al di fuori della portata
dei bambini.
• Tenere i bambini e gli animali domestici lontano
dall'apparecchiatura durante il funzionamento o
raffreddamento. Le parti accessibili sono incandescenti.
• Se l’apparecchiatura dispone di un dispositivo di
sicurezza per i bambini, consigliamo di attivarlo.
• La pulizia e gli interventi di manutenzione non devono
essere eseguiti dai bambini senza supervisione.
• Tenere lontani i bambini al di sotto dei 3 anni se non
costantemente supervisionati.
ITALIANO
35
1.2 Avvertenze di sicurezza generali
• L'apparecchiatura e le parti accessibili si riscaldano
molto durante l'uso. Non toccare le resistenze.
• Non utilizzare un timer esterno o un sistema di controllo
remoto distinto per mettere in funzione
l'apparecchiatura.
Page 36

www.electrolux.com36
• Non lasciare mai il piano di cottura incustodito durante
la preparazione di cibi in quanto olio e grassi potrebbero
provocare un incendio.
• Non tentare mai di spegnere un incendio con
dell'acqua; spegnere l'apparecchiatura e coprire le
fiamme ad es. con un coperchio o una coperta di
protezione dal fuoco.
• Non conservare nulla sulle superfici di cottura.
• Oggetti metallici quali coltelli, forchette, cucchiai e
coperchi non dovrebbero essere posti sulla superficie
del piano di cottura in quanto possono diventare caldi.
• Non usare una pulitrice a vapore per pulire
l'apparecchiatura.
• Rimuovere qualsiasi residuo dal coperchio prima di
aprirlo. Lasciar raffreddare la superficie del piano di
cottura prima di chiudere il coperchio.
• Se il cavo di alimentazione è danneggiato, deve essere
sostituito dal produttore, da un tecnico autorizzato o da
una persona qualificata per evitare situazioni di pericolo.
• Quando l'apparecchiatura è collegata direttamente
all'alimentazione elettrica, è necessario un interruttore
isolante onnipolare. È necessario che l’apparecchiatura
si scolleghi completamente dalla rete conformemente
alle condizioni della categoria III relativa alla
sovratensione. Il cavo di terra è escluso.
• Quando si collega il cavo di alimentazione, assicurarsi
che non sia a contatto diretto (ad es. mediante
l'impiego di manicotti di isolamento) con parti che
possono raggiungere temperature superiori ai 50°C.
2. ISTRUZIONI DI SICUREZZA
Questa apparecchiatura è adatta ai
seguenti mercati: IT
2.1 Installazione
ATTENZIONE!
L’installazione
dell'apparecchiatura deve
essere eseguita da personale
qualificato.
• Rimuovere tutti i materiali di
imballaggio.
Page 37

• Non installare o utilizzare
l'apparecchiatura se è danneggiata.
• Attenersi alle istruzioni fornite insieme
all'apparecchiatura.
• È necessario rispettare la distanza
minima dalle altre apparecchiature.
• Prestare sempre attenzione in fase di
spostamento dell'apparecchiatura,
dato che è molto pesante. Indossare
sempre guanti di sicurezza.
• Proteggere le superfici di taglio con un
materiale di tenuta per evitare che
l'umidità causi dei rigonfiamenti.
• Proteggere la base
dell'apparecchiatura da vapore e
umidità.
• Non installare l'apparecchiatura
accanto ad una porta o sotto una
finestra, per evitare che pentole calde
cadano dall'apparecchiatura quando la
porta o la finestra sono aperte.
• Se l'apparecchiatura viene installata
sopra dei cassetti, assicurarsi che lo
spazio, tra la base dell'apparecchiatura
e il cassetto superiore, sia sufficiente
per il ricircolo d'aria.
• La base dell'apparecchiatura può
surriscaldarsi. Si consiglia di prevedere
un pannello divisorio in materiale non
infiammabile al di sotto
dell'apparecchiatura per rendere
inaccessibile la base.
2.2 Collegamento elettrico
ATTENZIONE!
Rischio di incendio e scossa
elettrica.
• Tutti i collegamenti elettrici devono
essere realizzati da un elettricista
qualificato.
• L'apparecchiatura deve disporre di una
messa a terra.
• Prima di qualsiasi intervento, è
necessario verificare che
l'apparecchiatura sia disinserita dalla
rete elettrica.
• Verificare che i dati elettrici riportati
sulla targhetta dei dati corrispondano a
quelli dell'impianto. In caso contrario,
contattare un elettricista.
• Verificare che l'apparecchiatura sia
installata correttamente. Un
collegamento elettrico o una spia lenti
ITALIANO
(ove previsti) potrebbe far diventare il
terminale incandescente.
• Utilizzare il cavo di alimentazione
appropriato.
• Evitare che i collegamenti elettrici si
aggroviglino.
• Assicurarsi che la protezione da scosse
elettriche sia installata.
• Utilizzare il morsetto fermacavo sul
cavo.
• Assicurarsi che il cavo di alimentazione
o la spina (ove prevista) non sfiori
l'apparecchiatura calda o pentole calde
quando si collega l'apparecchiatura alle
prese vicine
• Non utilizzare prese multiple e
prolunghe.
• Accertarsi di non danneggiare la spina
e il cavo (ove previsti). Contattare il
Centro di Assistenza autorizzato o un
elettricista qualificato per sostituire un
cavo danneggiato.
• I dispositivi di protezione da scosse
elettriche devono essere fissati in modo
tale da non poter essere disattivati
senza l'uso di attrezzi.
• Inserire la spina di alimentazione nella
presa solo al termine dell'installazione.
Verificare che la spina di alimentazione
rimanga accessibile dopo
l'installazione.
• Nel caso in cui la spina di corrente sia
allentata, non collegarla alla presa.
• Non tirare il cavo di alimentazione per
scollegare l’apparecchiatura. Tirare
sempre dalla spina.
• Servirsi unicamente di dispositivi di
isolamento adeguati: interruttori
automatici, fusibili (quelli a tappo
devono essere rimossi dal
portafusibile), sganciatori per correnti di
guasto a terra e relè.
• L'impianto elettrico deve essere dotato
di un dispositivo di isolamento che
consenta di scollegare
l'apparecchiatura dalla presa di
corrente a tutti i poli. Il dispositivo di
isolamento deve avere una larghezza
dell'apertura di contatto non inferiore ai
3 mm.
2.3 Collegamento gas
• Tutti i collegamenti del gas devono
essere eseguiti da una persona
qualificata.
37
Page 38

www.electrolux.com38
• Prima di procedere con l’installazione,
verificare che le condizioni di
distribuzione locale (pressione e tipo di
gas) e i valori preimpostati
dell’apparecchiatura siano compatibili.
• Adottare le misure necessarie per
garantire una corretta circolazione
d'aria intorno all'apparecchiatura.
• Le informazioni relative
all'alimentazione del gas si trovano
sulla targhetta dei dati.
• La presente apparecchiatura non è
collegata a un dispositivo per
l’evacuazione dei residui di
combustione. Assicurarsi di collegare
l'apparecchiatura conformemente alle
disposizioni vigenti sull'installazione.
Fare attenzione ai requisiti relativi ad
un'adeguata ventilazione.
2.4 Utilizzo
ATTENZIONE!
Rischio di lesioni, ustioni o
scosse elettriche.
• Rimuovere tutti i materiali di
imballaggio, le etichette e la pellicola
protettiva (ove presente) prima del
primo utilizzo.
• Utilizzare l’apparecchiatura in un
ambiente domestico.
• Non apportare modifiche alle specifiche
di questa apparecchiatura.
• Accertarsi che le fessure di ventilazione
non siano ostruite.
• Non lasciare mai l'apparecchiatura
incustodita durante il funzionamento.
• Spegnere la zona di cottura dopo ogni
utilizzo.
• Non appoggiare posate o coperchi
sulle zone di cottura. Possono
diventare roventi.
• Non mettere in funzione
l'apparecchiatura con le mani umide o
quando c'è un contatto con l'acqua.
• Non utilizzare l'apparecchiatura come
superficie di lavoro o come piano di
appoggio.
• Un alimento immerso nell'olio molto
caldo può provocare degli schizzi.
ATTENZIONE!
Pericolo di incendio ed
esplosioni.
• Grassi e olio caldi possono rilasciare
vapori infiammabili. Mantenere fiamme
o oggetti caldi lontani da grassi e olio
quando li si utilizza per cucinare.
• I vapori rilasciati da un olio molto caldo
possono provocare una combustione
spontanea.
• L'olio usato, che può contenere residui
di cibo, può liberare delle fiamme ad
una temperatura inferiore rispetto ad
un olio utilizzato per la prima volta.
• Non appoggiare o tenere liquidi o
materiali infiammabili, né oggetti
facilmente incendiabili
sull'apparecchiatura, al suo interno o
nelle immediate vicinanze.
ATTENZIONE!
Vi è il rischio di danneggiare
l'apparecchiatura.
• Non poggiare pentole calde sul
pannello dei comandi.
• Non esporre al calore pentole vuote.
• Fare attenzione a non lasciar cadere
oggetti o pentole sull'apparecchiatura.
La superficie si potrebbe danneggiare.
• Non mettere in funzione le zone di
cottura in assenza di pentole o con
pentole vuote.
• Non appoggiare la pellicola di alluminio
direttamente sull'apparecchiatura.
• Utilizzare solo pentole stabili, di forma
corretta e con un diametro superiore
alle dimensioni dei bruciatori.
• Accertarsi che la fiamma non si spenga
quando si gira rapidamente la
manopola dalla posizione massima a
quella minima.
• Usare esclusivamente gli accessori in
dotazione con l'apparecchiatura.
• Non utilizzare un diffusore di fiamma
sul bruciatore.
• Un'apparecchiatura per cottura a gas
produce calore e umidità. Provvedere
ad un'adeguata ventilazione
nell'ambiente in cui si trova
l'apparecchiatura.
• Se si prevede un impiego prolungato e
intenso dell’apparecchiatura, può
essere necessaria un’ulteriore fonte di
aerazione, per esempio l’apertura di
una finestra o un sistema più efficace,
come l’aumento del livello di
ventilazione meccanica, ove presente.
Page 39

• L'apparecchiatura è destinata solo alla
3
4
5
2
1
cottura. Non deve essere utilizzata per
altri scopi, come per esempio il
riscaldamento di un ambiente.
• Non lasciare che sostanze acide, come
per esempio aceto, succo di limone od
anticalcari vengano a contatto con il
piano di cottura. Si potrebbero formare
delle macchie opache.
2.5 Pulizia e cura
• Pulire regolarmente l'apparecchiatura
per evitare il deterioramento dei
materiali che compongono la
superficie.
• Disattivare l'apparecchiatura e lasciarla
raffreddare prima di procedere con la
pulizia.
• Scollegare l’apparecchiatura dalla rete
elettrica prima di eseguire le operazioni
di manutenzione.
3. DESCRIZIONE DEL PRODOTTO
3.1 Disposizione della superficie di cottura
ITALIANO
• Non nebulizzare acqua né utilizzare
vapore per pulire l'apparecchiatura.
• Pulire l'apparecchiatura con un panno
inumidito e morbido. Utilizzare solo
detergenti neutri. Non usare prodotti
abrasivi, spugnette abrasive, solventi
od oggetti metallici.
• Non pulire i bruciatori in lavastoviglie.
2.6 Smaltimento
ATTENZIONE!
Rischio di lesioni o
soffocamento.
• Contattare le autorità locali per ricevere
informazioni su come smaltire
correttamente l'apparecchiatura.
• Staccare la spina dall'alimentazione
elettrica.
• Tagliare il cavo di rete e smaltirlo.
• Appiattire i tubi del gas esterni.
Bruciatore semirapido
1
Bruciatore a tripla corona
2
Bruciatore rapido
3
Bruciatore ausiliario
4
Manopole di regolazione
5
39
3.2 Manopola di regolazione
Simbolo Descrizione
Simbolo Descrizione
manca l’alimentazione del
gas/posizione di spento
posizione di accensione/
alimentazione massima
del gas
alimentazione minima del
gas
Page 40

A
B
D
C
C
D
A
B
www.electrolux.com40
4. UTILIZZO QUOTIDIANO
ATTENZIONE!
Fare riferimento ai capitoli
sulla sicurezza.
4.1 Panoramica bruciatore
ATTENZIONE!
Fare attenzione in fase di
utilizzo di fiamme libere
all'interno della cucina. Il
costruttore declina qualsiasi
responsabilità in caso di
cattivo utilizzo delle fiamme.
1. Premere la manopola di regolazione e
ruotarla in senso antiorario fino alla
posizione massima ( ).
2. Tenere premuta la manopola di
regolazione per circa 10 secondi.
Questo consentirà il riscaldamento
della termocoppia. In caso contrario,
l'alimentazione del gas verrà interrotta.
3. Regolare la fiamma, dopo che si è
stabilizzata.
Se il bruciatore non si
accende dopo alcuni tentativi,
controllare che la corona e lo
spartifiamma siano
correttamente posizionati.
ATTENZIONE!
Non tenere la manopola di
regolazione premuta per oltre
15 secondi. Se il bruciatore
non si accende dopo 15
secondi, rilasciare la
manopola di regolazione,
ruotarla in posizione off e
attendere almeno 1 minuto
prima di tentare di
riaccendere il bruciatore.
A) Spartifiamma bruciatore
B) Corona bruciatore
C) Candela di accensione
D) Termocoppia
4.2 Accensione del bruciatore
Accendere sempre il
bruciatore prima di
posizionare una pentola.
Page 41

ITALIANO
41
AVVERTENZA!
In assenza di elettricità è
possibile accendere il
bruciatore senza utilizzare il
dispositivo elettrico; in tal
caso sarà sufficiente
avvicinarsi al bruciatore con
una fiamma, premere verso il
basso la relativa manopola e
ruotarla in senso antiorario
verso la posizione di massimo
rilascio del gas. Mantenere
premuta la manopola di
regolazione per circa 10
secondi per far riscaldare la
termocoppia.
Nel caso in cui il bruciatore si
dovesse spegnere, ruotare la
manopola di regolazione in
posizione Off per cercare di
riaccendere il bruciatore dopo
almeno 1 minuto.
4.3 Spegnimento del bruciatore
Per spegnere la fiamma, ruotare la
manopola in posizione di spento .
5. CONSIGLI E SUGGERIMENTI UTILI
ATTENZIONE!
Fare riferimento ai capitoli
sulla sicurezza.
5.1 Pentole
AVVERTENZA!
Non usare pentole in ghisa,
teglie in terracotta, grill o
piastre tostapane. L’acciaio
inox può brunire se
sottoposto ad eccessivo
riscaldamento.
Il generatore di scintille si
avvia in modo automatico
all'accensione delle prese,
dopo l'installazione o dopo
un'interruzione di corrente. È
normale.
ATTENZIONE!
Ridurre o spegnere sempre la
fiamma prima di rimuovere le
pentole dal bruciatore.
AVVERTENZA!
Assicurarsi che i basamenti
delle pentole non siano
poggiati sulle manopole di
regolazione, altrimenti la
fiamma potrebbe
surriscaldarle.
AVVERTENZA!
Assicurarsi che i manici delle
pentole non si trovino al di
sopra del bordo anteriore del
piano di cottura.
ATTENZIONE!
Non mettere la stessa
pentola su due bruciatori.
ATTENZIONE!
Evitare di posare sui
bruciatori pentole instabili o
deformate per prevenire
versamenti e lesioni.
AVVERTENZA!
Assicurarsi che le pentole
siano ben centrate sui
bruciatori per ottenere la
massima stabilità e per un
consumo ridotto di gas.
5.2 Risparmio energetico
• Se possibile, coprire sempre le pentole
con il coperchio.
• Quando il liquido inizia a bollire,
abbassare la fiamma per provocare
una lenta ebollizione del liquido.
Page 42

www.electrolux.com42
5.3 Diametro delle pentole
Usare pentole con diametro
adatto alle dimensioni dei
bruciatori.
Bruciatore Diametro
Tripla corona 180 - 260
Rapido 180 - 260
Semirapido (posteriore
sinistro)
Semirapido (anteriore
sinistro)
Ausiliario 80 - 180
6. PULIZIA E CURA
ATTENZIONE!
Fare riferimento ai capitoli
sulla sicurezza.
6.1 Informazioni generali
• Pulire il piano di cottura dopo ogni
impiego.
• Usare sempre pentole con il fondo
pulito.
• I graffi o le macchie scure sulla
superficie non compromettono il
funzionamento del piano di cottura.
• Usare un prodotto di pulizia speciale
adatto alla superficie del piano di
cottura.
• Lavare le parti in acciaio inox con
acqua e asciugarle con un panno
morbido.
delle pentole
(mm)
120 - 220
120 - 180
5.4 Coperchio (kit separato solo per i piani di cottura predisposti)
• Il coperchio serve solamente a riparare
il piano di cottura dalla polvere, quando
è chiuso, o a raccogliere gli schizzi di
grasso, quando è aperto. Non usarlo
per altre funzioni.
• Tenere sempre pulito il coperchio.
• Accertarsi che il piano di cottura sia
freddo prima di chiudere il coperchio.
• I coperchi in vetro possono rompersi
quando vengono riscaldati.
6.2 Supporti pentole
I supporti pentole non
possono essere lavati in
lavastoviglie. Devono essere
lavati a mano.
1. È possibile rimuovere i supporti
pentole e pulire in modo facile il piano
di cottura.
Fare molta attenzione
quando si sostituiscono i
supporti pentole: il piano
di cottura si potrebbe
danneggiare.
2. Il rivestimento smaltato a volte può
presentare dei bordi ruvidi, quindi
prestare attenzione nel lavare ed
asciugare i supporti pentole a mano.
Se necessario, rimuovere le macchie
più ostinate servendosi di un apposito
prodotto in pasta.
3. Dopo aver pulito i supporti pentole,
assicurarsi che siano riposizionati
correttamente.
4. Per fare in modo che i bruciatori
funzionino correttamente, verificare
che le braccia dei supporti delle
Page 43

pentole si trovino al centro del
bruciatore.
6.3 Pulizia del piano di cottura
• Togliere immediatamente: plastica
fusa, pellicola in plastica, e alimenti
contenenti zucchero. Se non vengono
eliminati, potrebbero danneggiare il
piano di cottura.
• Quando il piano di cottura è
sufficientemente raffreddato, è
possibile rimuovere: i segni di
calcare e d'acqua, le macchie di
grasso e le macchie opalescenti. Pulire
7. RISOLUZIONE DEI PROBLEMI
ATTENZIONE!
Fare riferimento ai capitoli
sulla sicurezza.
ITALIANO
il piano di cottura con un panno umido
e una piccola quantità di detergente. Al
termine della pulizia, asciugare il piano
di cottura con un panno morbido.
• Per pulire gli elementi smaltati, lo
spartifiamma e la corona, lavarli con
acqua calda saponata e asciugarli
attentamente prima di riporli.
6.4 Pulizia della candela
Questa caratteristica viene ottenuta
tramite una candela ceramica ed un
elettrodo di metallo. Tenere questi
componenti ben puliti per evitare difficoltà
di accensione e controllare che i fori
spartifiamma non siano ostruiti.
6.5 Manutenzione periodica
Consultare periodicamente il Centro di
Assistenza autorizzato locale per verificare
le condizioni del tubo della fornitura di gas
e del regolatore di pressione, se presente.
43
7.1 Cosa fare se...
Problema Causa possibile Soluzione
Il gas non si accende quando si preme il pulsante di
accensione.
È scattato il fusibile. Verificare se l'anomalia di
Lo spartifiamma del brucia-
La fiamma si spegne immediatamente dopo l'accensione.
Il piano di cottura non è collegato a una fonte di alimentazione elettrica o non
è collegato correttamente.
tore e la corona non sono
posizionati correttamente.
La termocoppia non si è riscaldata a sufficienza.
Accertarsi che il piano di
cottura sia collegato correttamente alla rete elettrica.
funzionamento sia dovuta al
fusibile. Nel caso in cui il fusibile continui a scattare,
rivolgersi ad un elettricista
qualificato.
Posizionarli adeguatamente.
Dopo aver acceso la fiamma, tenere premuta la manopola per circa 10 secondi.
Page 44

MOD.
PROD. NO.
SER.N O
DATA
MOD.
PROD. NO.
SER.N O
DATA
MOD.
PROD.NO.
SER.NO.
03 IT
MADE IN ITALY
TYPE
IP20
0049
A B C
www.electrolux.com44
Problema Causa possibile Soluzione
L'anello della fiamma non è
omogeneo.
La corona del bruciatore è
bloccata da residui di cibo.
Controllare che l'iniettore
principale non sia ostruito e
che la corona del bruciatore
sia pulita.
7.2 Se non è possibile trovare una soluzione...
Qualora non sia possibile trovare una
soluzione al problema, contattare il
rivenditore o il Centro di Assistenza
autorizzato. Fornire i dati riportati sulla
targhetta dei dati. Assicurarsi di aver
attivato il piano di cottura in modo
corretto. In caso di azionamento errato
dell'apparecchiatura, l'intervento del
tecnico del Centro di Assistenza o del
rivenditore potrà essere effettuato a
pagamento anche durante il periodo di
garanzia. Le istruzioni relative al Centro di
Assistenza e alle condizioni di garanzia
sono contenute nel libretto della garanzia.
7.3 Etichette fornite con il sacchetto degli accessori
Attaccare le etichette adesive come
indicato di seguito:
A) Attaccarla sul Foglietto di garanzia ed
inviare questa parte (ove prevista).
B) Attaccarla sul Foglietto di garanzia e
8. INSTALLAZIONE
conservare questa parte (ove
prevista).
ATTENZIONE!
Fare riferimento ai capitoli
sulla sicurezza.
C) Attaccarla sul libretto di istruzioni.
8.1 Prima dell'installazione
Prima di installare il piano di cottura,
annotare l'informazione riportata di seguito
presente sulla targhetta dei dati. La
Page 45

targhetta dei dati è applicata sul lato
A B C
inferiore del piano di cottura.
Modello ...........................
PNC .........................................
Numero di
serie ...........................
8.2 Collegamento gas
ITALIANO
45
ATTENZIONE!
Le seguenti istruzioni
d'installazione, manutenzione
e ventilazione devono essere
eseguite da personale
qualificato conformemente
alle disposizioni vigenti (UNICIG 7129 - 7131). Accertarsi
che la cucina sia
adeguatamente ventilata:
tenere aperti i fori di
ventilazione naturali (almeno
100 cm²) o installare una
cappa meccanica.
Scegliere dei collegamenti fissi o usare un
tubo flessibile in acciaio inossidabile
conforme alle disposizioni vigenti. Se si
utilizzano tubi in metallo flessibili, fare
attenzione che non entrino in contatto con
parti mobili o non siano schiacciati.
Ulteriore attenzione è richiesta qualora al
piano di cottura fosse abbinato il forno.
Accertarsi che la pressione
del gas di alimentazione
dell'apparecchiatura sia
conforme ai valori consigliati.
Se la pressione fornita non ha il valore
specificato, è necessario montare un
adeguato regolatore di pressione in
conformità allo standard UNI EN 88. Per il
gas liquido (GPL), l'utilizzo di un regolatore
di pressione è consentito solo in
conformità allo standard UNI EN 12864. Il
collegamento regolabile è fissato alla
rampa per mezzo di un dado filettato G
1/2". Avvitare le parti senza forzare,
regolare il raccordo nella direzione voluta e
serrare il tutto.
A) Estremità dell'albero con dado
B) Rondella
C) Gomito (se necessario)
Collegamento rigido:
Eseguire il collegamento mediante tubi in
metallo rigidi (rame con finecorsa
meccanico) (UNI-CIG 7129).
Collegamento flessibile:
Utilizzare un tubo flessibile in acciaio inox
(UNI-CIG 9891) con una lunghezza
massima di 2 m.
ATTENZIONE!
Al termine dell'installazione,
verificare la tenuta di ciascun
raccordo dei tubi. Usare una
soluzione saponata, non una
fiamma!
8.3 Sostituzione degli iniettori
1. Rimuovere i supporti pentole.
2. Rimuovere gli spartifiamma e le
corone del bruciatore.
3. Con una chiave a bussola N. 7,
togliere gli iniettori e sostituirli con
quelli richiesti per il tipo di gas
utilizzato (vedere la tabella della
sezione "Dati tecnici").
4. Rimontare i componenti, seguendo la
stessa procedura in senso inverso.
5. Sostituire la targhetta dei dati
(posizionata vicino al tubo di
alimentazione del gas) con quella
corrispondente al nuovo tipo di gas.
Questa targhetta è presente
nell’imballo fornito con
l’apparecchiatura.
Se la pressione del gas di alimentazione è
variabile o differente da quella prevista,
montare un adattatore di pressione
adeguato nel tubo di alimentazione del
gas.
Page 46

A
A
min.
55 mm
min.
650 mm
560 mm
480 mm
min.
200 mm
30 mm
www.electrolux.com46
8.4 Regolazione del livello
minimo
Per regolare il livello minimo dei bruciatori:
1. Accendere il bruciatore.
2. Ruotare la manopola al minimo della
fiamma.
3. Togliere la manopola.
4. Regolare la vite di by-pass con un
cacciavite sottile (A).
• Non tirare il cavo di alimentazione per
scollegare l’apparecchiatura. Tirare
sempre dalla spina.
• Collegando l'apparecchiatura a una
prolunga, adattatore o presa multipla
esiste il rischio di incendio. Accertarsi
che il collegamento di messa a terra sia
in linea con le disposizioni e le norme in
vigore.
• Il cavo di alimentazione non deve
riscaldarsi ad una temperatura
superiore a 90°C.
Per evitare il contatto tra il cavo e
l'apparecchiatura al di sotto del piano di
cottura, utilizzare dei morsetti sul lato
dell'unità.
5. Se si passa da:
• gas naturale G20 a 20 mbar a gas
liquido, serrare a fondo la vite di
by-pass.
• gas liquido a gas naturale G20 a
20 mbar, svitare la vite by-pass di
circa 1/4 di giro (1/2 giro per il
bruciatore a tripla corona).
ATTENZIONE!
Accertarsi che la fiamma non
si spenga quando si gira
rapidamente la manopola
dalla posizione massima a
quella minima.
A) Condotto rigido in rame o tubo
flessibile in acciaio inox
8.6 Cavo di collegamento
Sostituire il cavo di collegamento solo con
un cavo speciale o uno identico. Il tipo di
cavo è: H05V2V2-F T90.
Accertarsi che il cavo sia di sezione idonea
alla tensione e alla temperatura di
8.5 Collegamento elettrico
• Verificare che la tensione nominale e il
tipo di corrente della rete di
distribuzione corrispondano ai valori
indicati sulla targhetta dei dati
esercizio. Il cavo di terra giallo/verde deve
essere circa 2 cm più lungo del cavo di
fase marrone (o nero).
8.7 Incasso
dell'apparecchiatura.
• L'apparecchiatura è provvista di cavo
di collegamento alla rete. Deve essere
dotato di una spina in grado di
supportare il carico indicato sulla
targhetta dei dati. Accertarsi di inserire
la spina nella presa corretta.
• Utilizzare sempre una presa elettrica
con contatto di protezione
correttamente installata.
• Verificare che la spina di alimentazione
rimanga accessibile dopo
l'installazione.
Page 47

10 mm
86 mm
86 mm
A
3 mm
A
B
A) guarnizione in dotazione
min 20 mm
(max 150 mm)
30 mm
60 mm
B
A
B) staffe in dotazione
AVVERTENZA!
Installare l'apparecchiatura
esclusivamente su un piano
di lavoro dalla superficie
piatta.
ITALIANO
8.9 Possibilità di inserimento
Il pannello installato sotto il piano di
cottura deve essere facilmente rimovibile e
altrettanto facilmente deve consentire
l'accesso in caso di interventi
dell'assistenza tecnica.
Mobile da incasso con porta
A) Pannello rimovibile
B) Spazio per gli allacciamenti
Mobile da incasso con forno
Il collegamento elettrico del piano di
cottura e del forno deve essere eseguito
separatamente per questioni di sicurezza
oltre che per consentire una facile
rimozione del forno dall'unità.
47
8.8 Installazione del piano di
cottura sotto la cappa da cucina
9. DATI TECNICI
9.1 Dimensioni del piano di cottura
Larghezza 744 mm
Profondità 510 mm
Se si installa il piano di
cottura sotto a una cappa da
cucina, fare riferimento alle
istruzioni per l'installazione
della cappa per la distanza
minima tra le
apparecchiature.
Page 48

www.electrolux.com48
9.2 Diametri bypass
BRUCIATORE Ø BYPASS 1/100 mm
Tripla corona 56
Rapido 42
Semirapido 32
Ausiliario 28
9.3 Altri dati tecnici
Gas originale: G20 (2H) 20 mbar = 12 kW
POTENZA TOTALE:
Alimentazione elettrica: 230 V ~ 50 Hz
Categoria apparecchiatura:
Collegamento gas: G 1/2"
Classe apparecchiatura: 3
Gas sostitutivo: G30 (3+) 28-30 mbar = 887 g/h
II2H3+
9.4 Bruciatori a GAS NATURALE G20 a 20 mbar
G31 (3+) 37 mbar = 871 g/h
BRUCIATORE POTENZA NOR-
MALE kW
Tripla corona 4,0 1,4 146
Rapido 3,0 0,75 119
Semirapido 2,0 0,45 96
Ausiliario 1,0 0,33 70
POTENZA MINIMAkWSIMBOLO INIET-
TORE 1/100 mm
9.5 Bruciatori a gas per GPL G30/G31 28-30/37 mbar
BRUCIATORE
Tripla coro-na4,0 1,4 98 291 286
Rapido 3,0 0,75 88 233 229
Semirapido 2,0 0,45 71 145 143
Ausiliario 1,0 0,33 50 73 71
POTENZA
NORMALE
kW
POTENZA
MINIMA
kW
SIMBOLO
INIETTORE
1/100 mm
PORTATA NOMINALE GAS
g/h
G30 28-30
mbar
G31 37 mbar
Page 49

10. CONSIDERAZIONI SULL'AMBIENTE
ITALIANO
49
Riciclare i materiali con il simbolo .
Buttare l'imballaggio negli appositi
contenitori per il riciclaggio. Aiutare a
proteggere l’ambiente e la salute umana e
a riciclare rifiuti derivanti da
apparecchiature elettriche ed elettroniche.
Non smaltire le apparecchiature che
riportano il simbolo insieme ai normali
rifiuti domestici. Portare il prodotto al
punto di riciclaggio più vicino o contattare
il comune di residenza.
*
Page 50

www.electrolux.com50
Page 51

ITALIANO
51
Page 52

www.electrolux.com/shop
867305317-A-262014
 Loading...