

Page 1

EFC6422
EFC9422
WHGL6030CN
WHGL9030CN
Cooker Hood
EN
Dunstabzugshaube
DE
Hotte De Cuisine
FR
Cappa
IT
Page 2

EN USER MANUAL .....................................................................................................................3
DE GEBRAUCHSANLEITUNG
FR MANUEL D’UTILISATION
IT LIBRETTO DI USO
..........................................................................................
..........................................................................................
...................................................................................................
14
20
8
Page 3

WE’RE THINKING OF YOU
Thank you for purchasing an Electrolux appliance. You’ve chosen a product that
brings with it decades of professional experience and innovation. Ingenious and
stylish, it has been designed with you in mind. So whenever you use it, you can
be safe in the knowledge that you’ll get great results every time.
Welcome to Electrolux
ACCESSORIES AND CONSUMABLES
In the Electrolux webshop, you’ll nd everything you need to keep all your
Electrolux appliances looking spotless and working perfectly. Along with a wide
range of accessories designed and built to the high quality standards you would
expect, from specialist cookware to cutlery baskets, from bottle holders to delicate
laundry bags…
Visit the webshop at:
www.electrolux.com/shop
ENVIRONMENT CONCERNS
ENGLISH
3
Recycle the materials with the symbol Put the packaging in applicable
containers to recycle it.
Help protect the environment and human health and to recycle waste of
electricaland electronic appliances. Do not dispose appliances marked with the
symbol with the household waste. Return the product to your local recycling
facility orcontact your municipal ofce.
CUSTOMER CARE AND SERVICE
We recommend the use of original spare parts.
When contacting Service, ensure that you have the following data available
The information can be found on the rating plate.
Model ___________________________
PNC ____________________________
Serial Number ____________________
Page 4

4
www.electrolux.com
1. RECOMMENDATIONS
AND SUGGESTIONS
• The Instructions for Use apply
to several versions of this appliance. Accordingly, you may
nd descriptions of individual
features that do not apply to
your specic appliance.
• The manufacturer will not be
held liable for any damages
resulting from incorrect or
improper installation.
• The minimum safety distance
between the cooker top and
the extractor hood is 650
mm (some models can be
installed at a lower height,
please refer to the paragraphs
on working dimensions and
installation).
• Check that the mains voltage
corresponds to that indicated
on the rating plate xed to the
inside of the hood.
• For Class I appliances, check
that the domestic power supply guarantees adequate
earthing. Connect the extrac-
tor to the exhaust ue through
a pipe of minimum diameter
120 mm. The route of the ue
must be as short as possible.
• Do not connect the extractor
hood to exhaust ducts carrying combustion fumes (boil-
ers, replaces, etc.).
• If the extractor is used in conjunction with non-electrical
appliances (e.g. gas burn-
ing appliances), a sufcient
degree of aeration must be
guaranteed in the room in
order to prevent the backow
of exhaust gas. The kitchen
must have an opening communicating directly with the
open air in order to guarantee
the entry of clean air. When
the cooker hood is used in
conjunction with appliances
supplied with energy other
than electric, the negative
pressure in the room must not
exceed 0,04 mbar to prevent
fumes being drawn back into
the room by the cooker hood.
• In the event of damage to
the power cable, it must be
replaced by the manufacturer
or by the technical service department, in order to prevent
any risks.
• If the instructions for installation for the gas hob specify
a greater distance specied
above, this has to be taken
into account. Regulations
concerning the discharge of
air have to be fullled.
• Use only screws and small
parts in support of the hood.
Warning: Failure to install the
screws or xing device in accordance with these instructions may result in electrical
hazards.
• Connect the hood to the mains
through a two-pole switch
having a contact gap of at
least 3 mm.
Page 5
ENGLISH
5
2. USE
• The extractor hood has been
designed exclusively for
domestic use to eliminate
kitchen smells.
• Never use the hood for purposes other than for which it
has been designed.
• Never leave high naked
ames under the hood when
it is in operation.
• Adjust the ame intensity to
direct it onto the bottom of the
pan only, making sure that it
does not engulf the sides.
• Deep fat fryers must be continuously monitored during
use: overheated oil can burst
into ames.
• Do not ambè under the range
hood; risk of re.
• This appliance can be used
by children aged from 8 years
and above and persons with
reduced physical, sensory or
mental capabilities or lack of
experience and knowledge if
they have been given supervision or instruction concerning
use of the appliance in a safe
way and understand the hazards involved. Children shall
not play with the appliance.
Cleaning and user maintenance shall not be made by
children without supervision.
• “CAUTION: Accessible parts
may become hot when used
with cooking appliances.”
3. MAINTENANCE
• Switch off or unplug the appliance from the mains supply before carrying out any
maintenance work.
• Clean and/or replace the Fil-
ters after the specied time
period (Fire hazard).
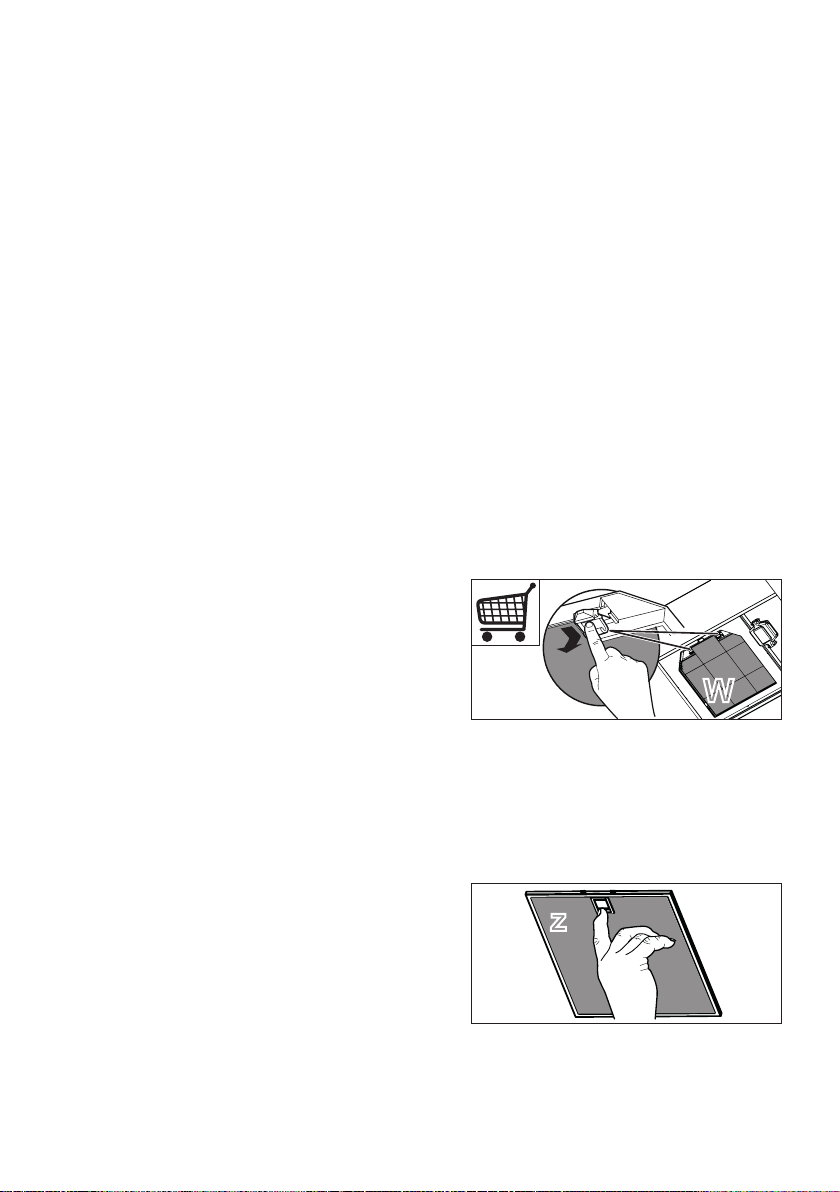
- The Activated charcoal lter
is not washable and cannot
be regenerated, and must
be replaced approximately
every 4 months of operation, or more frequently for
particularly heavy usage (W).
A long life lter, washable and
reusable, can be used, as an
accessory, for some models.
WW
- The Grease lters must be
cleaned every 2 months of
operation, or more frequently for particularly heavy usage, and can be washed in
a dishwasher (Z).
zz
- Control lights, if present.
• Clean the hood using a damp
cloth and a neutral liquid detergent.
Page 6
6
www.electrolux.com
4. CONTROLS
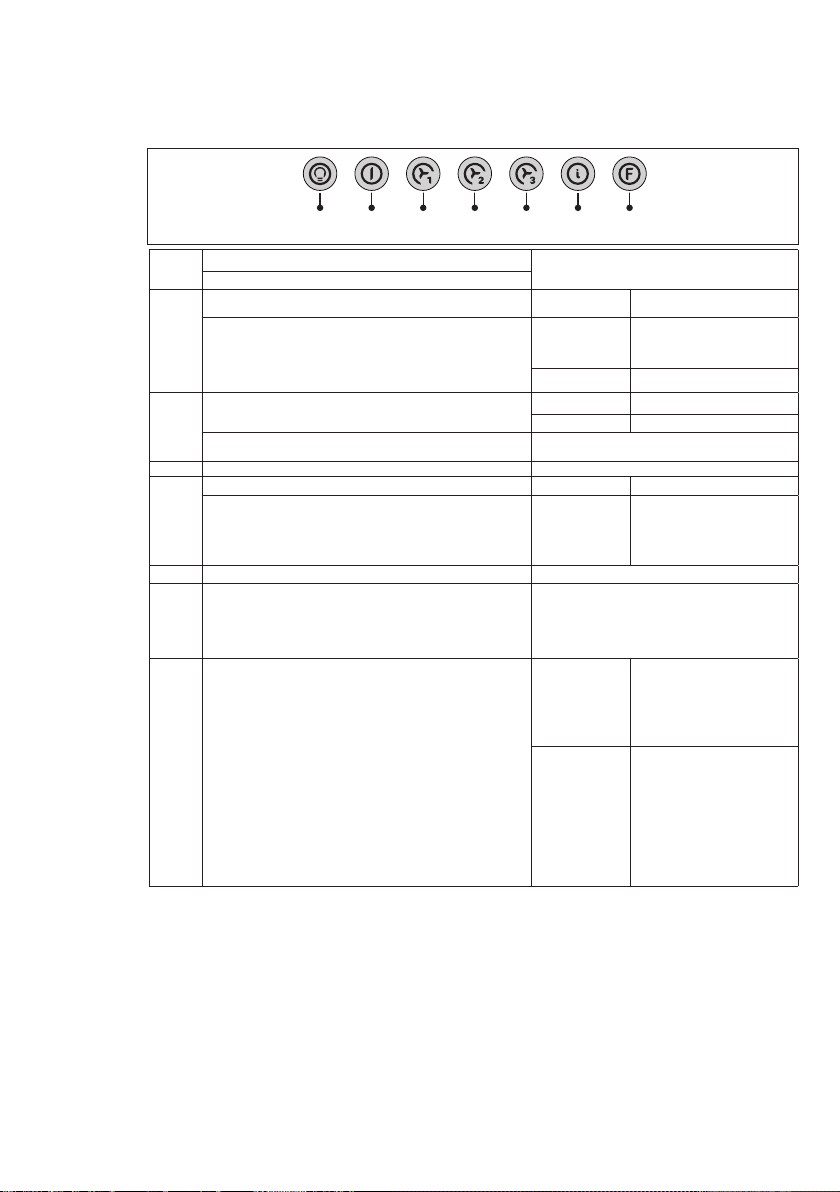
Button
Basic function
Dual Function
Press briey to turn the lighting system on and off. Button off
Press and hold the button for 2 seconds to activate the lighting
system in “courtesy light” mode. The lights are lit at a reduced power
L
of approximately 5W. This function can be disabled by pressing the
button once again for 2 seconds or by pressing it briey to switch to
normal lighting mode.
Turns the motor off from whatever speed it is set to.
T1
Press and hold the button for 3 seconds with all the loads turned off
(Motor and Lights), to turn the Activated Charcoal Filter alarm on/off.
Turns the motor on at speed one. Button on
T2
When pressed briey, turns the motor on at speed two. Button on
Press and hold the button for approximately 2” to turn the Delay
function on and off, that is to say to turn the appliance off after a 20
T3
minute delay. Suitable to complete elimination of residual odours. Can
be activated from the OFF position and from speeds 1, 2, 3. Cannot
be activated with Intensive speed On.
Turns the motor on at speed three. Button on
T4
Turns the motor On and Off at Intensive speed for a timed
period of 5 minutes. At the end of the 5 minutes the appliance
will automatically return to the speed that was set before. If the
T5
appliance was turned off at the time of activation, at the end of
the 5 minutes the system will return to speed one.
Press and hold for 4 seconds to reset the lter alarm indicator,
shown by ashing of button T1. This procedure can only be
F
carried out with the motor off.
Indicator lights
Lights off
Button lit Lights on
Button lit Courtesy light on
Button lit
Button ashes twice F – Alarm On.
Button ashes once F – Alarm Off.
Buttons ashing
(T1+T2 or T3 or T4)
Button on
Button on
Button ashing
Motor active
Motor inactive
Speed two on
Delay functionActive
Signals the Metal Grease Filter
saturation alarm, indicating that it
is necessary to wash the lters.
The alarm is triggered after the
Hood has been in operation for 100
working hours.
When this is activated, it signals
the Activated Charcoal Filter
saturation alarm, indicating that
the lter must be changed;
the Metal Grease Filters must
also be washed. The Activated
Charcoal Filter saturation alarm
comes into operation after the
Hood has been working for
200 hours.
Page 7
5. LIGHTING
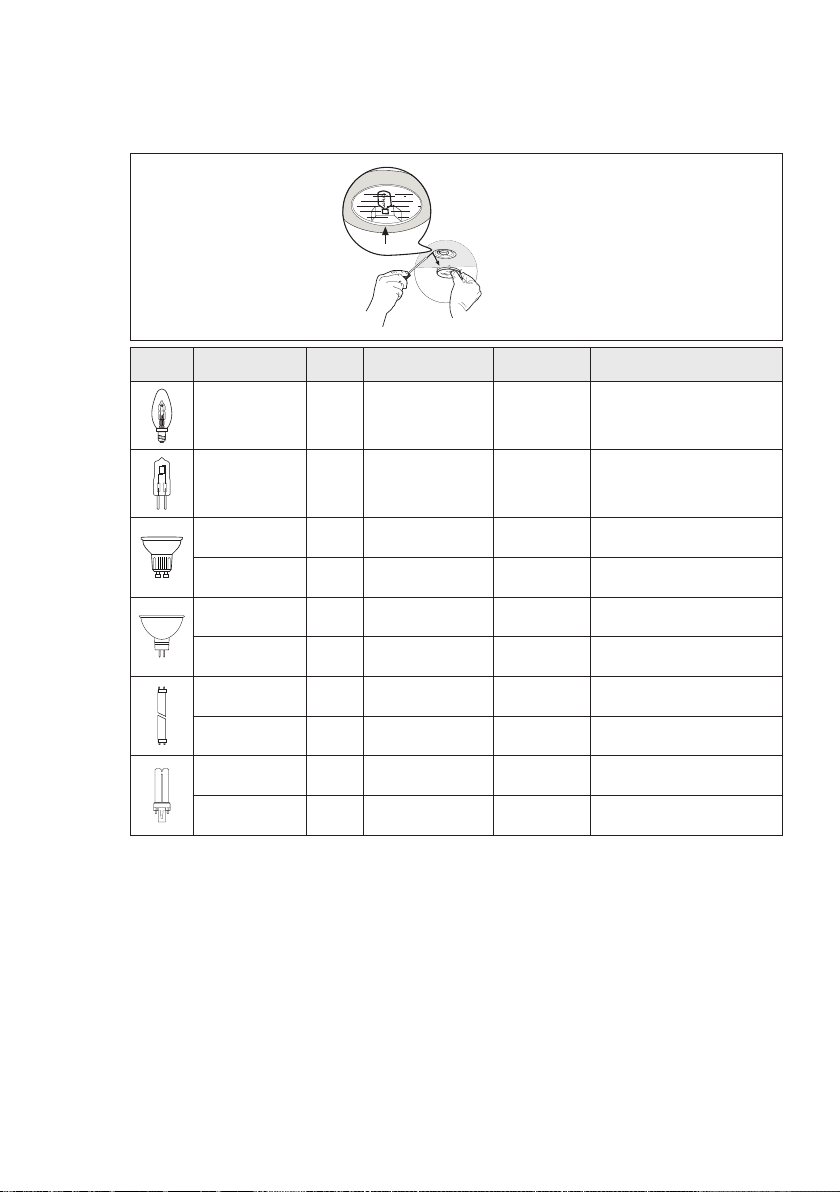
Lamp Power (W) Socket Voltage (V) Dimension (mm) ILCOS Code
28 E14 220-240 104 x 35 HSGSB/C/UB-28-220/240-E14
20 G4 12 33 x 9 HSG/C/UB-20-12-G4
35 GU10 230 51 x 50,7 HAGS-35-230-GU10-51/40
50 GU10 230 51 x 50,7 HAGS-35-230-GU10-51/20
20 GU4 12 40 x 35 HRGS-20-12-GU4-35/30
ENGLISH
7
20 GU5.3 12 46 x 51 HRGS-20-12-GU5.3-50/10
16 G13 95 720 x 26 FD-16/40/1B-E-G13-26/720
18 G13 57 589,8 x 26 FD-18/40/1B-E-G13-26/600
9 G23
11 G23
60 (lamp)
220-240 (starter)
91 (lamp)
220-240 (starter)
167 x 28 FSD-9/27/1B-I-G23
235,8 x 28 FSD-11/40/1B-I-G23
Page 8
8
www.electrolux.com
WIR DENKEN AN SIE
Vielen Dank, dass Sie sich für ein Electrolux Gerät entschieden haben. Sie haben
ein Produkt gewählt, hinter dem eine jahrzehntelange professionelle Erfahrung
und Innovation steht. Bei der Entwicklung dieses großartigen und eleganten
Geräts haben wir an Sie gedacht.
So haben Sie bei jedem Gebrauch die Gewissheit, dass Sie stets großartige
Ergebnisse erzielen werden.
Willkommen bei Electrolux.
ZUBEHÖR UND VERBRAUCHSMATERIALIEN
Im Electrolux Webshop nden Sie alles, was Sie für ein makelloses Aussehen
und perfektes Funktionieren Ihrer Electrolux Geräte benötigen. Wir bieten auch
ein umfangreiches Zubehörsortiment, das Ihre höchsten Qualitätsansprüche
erfüllt, vom Pro-Kochgeschirr bis zu Besteckkörben, von Flaschenhaltern bis hin
zu Wäschebeuteln für empndliche Wäsche...
Besuchen Sie den Webshop unter:
www.electrolux.com/shop
UMWELTTIPPS
Recyceln Sie Materialien mit dem Symbol . Entsorgen Sie die Verpackung in
den entsprechenden Recyclingbehältern.
Recyceln Sie zum Umwelt- und Gesundheitsschutz elektrische und elektronische
Geräte. Entsorgen Sie Geräte mit diesem Symbol nicht mit dem Hausmüll.
Bringen Sie das Gerät zu Ihrer örtlichen Sammelstelle oder wenden Sie sich an
Ihr Gemeindeamt.
KUNDENDIENST UND -BETREUUNG
Wir empfehlen die Verwendung von Originalersatzteilen.
Halten Sie folgende Angaben bereit, wenn Sie sich an den Kundendienst wenden.
Die Informationen nden Sie auf dem Typenschild.
Modell ___________________________
Produkt-Nummer PNC ______________
Seriennummer ____________________
Page 9

GERMAN
9
1. EMPFEHLUNGEN
UND HINWEISE
• Diese Gebrauchsanleitungen beziehen sich auf die
verschiedenen Modelle der
Abzugshaube. Darum kann
es möglich sein, dass die
Beschreibung bestimmter
Merkmale für das vorliegende
Gerät nicht zutrifft.
• Der Hersteller haftet nicht für
etwaige Schäden, die durch
die fehlerhafte Installation
oder falschen Gebrauch entstehen könnten.
• Der min. Sicherheitsabstand
zwischen Kochfeld und Abzugshaube beträgt 650 mm
(einige Modelle können auch
niedriger installiert werden;
siehe Absatz Installation).
• Kontrollieren Sie, ob die
Netzspannung den Daten
des Typenschilds im Innern
der Haube entspricht.
• Für Geräte der Klasse I muss
kontrolliert werden, ob das
häusliche Versorgungsnetz
korrekt geerdet ist. Die Absaughaube mit Hilfe eines
Rohrs mit einem Mindestdurchmesser von 120 mm mit
dem Rauchabzug verbinden.
Der Verlauf des Rauchabzugs
soll so kurz wie möglich sein.
• Die Abzugshaube darf nicht
an einen Schacht angeschlossen werden, in den
Rauchgase geleitet werden
(z. B. von Heizkessel, Kaminen, usw.).
• Falls in dem Raum neben
dem Abzug auch nicht mit
Strom betriebene Geräte
(zum Beispiel Gasgeräte)
eingesetzt werden, muss für
eine ausreichende Belüftung
gesorgt werden, damit der
Rückuss der Abgase verhindert wird. Die Küche muss
eine direkte Öffnung nach
Außen aufweisen, damit ein
ausreichender Luftaustausch
gewährleistet wird. Wird die
Abzugshaube zusammen mit
nicht mit Strom betriebenen
Geräte eingesetzt, darf der
Unterdruck im Raum 0,04
mbar nicht überschreiten,
damit die Abgase nicht wieder
angesaugt werden.
• Schadhafte Kabel müssen
durch den Hersteller oder vom
Kundendienst ausgewechselt
werden, damit jedes Risiko
ausgeschlossen wird.
• Falls die Montageanweisungen für die gasbetriebene
Kochmulde einen größeren
Abstand vorschreiben, als der
oben angegebene, muss diese Vorgabe befolgt werden.
Es sind sämtliche Abluftvorschriften zu beachten.
• Nur für die Abzugshaube
geeignete Schrauben und
Kleinteile verwenden.
Achtung: Werden die
Schrauben und Befestigungselemente nicht entsprechend
der vorliegenden Anleitungen
verwendet, besteht Strom-
Page 10
10
www.electrolux.com
schlaggefahr.
• Die Abzugshaube mittels
zweipoligem Schalter mit
einer Öffnung der Kontakte
von mindestens 3 mm an das
Netz anschließen.
2. GEBRAUCH
• Die Abzugshaube wurde ausschließlich für den häuslichen
Gebrauch entwickelt, um
Kochdünste zu beseitigen.
• Die Haube darf nur für die ihr
zugedachten Zwecke benutzt
werden.
• Unter der eingeschalteten
Haube keine offenen Flammen benutzen.
• Die Flamme so regulieren,
dass sie nicht über den Boden
des Kochgeschirrs hinausreicht.
• Fritteusen müssen während
des Gebrauchs ständig überwacht werden: überhitztes Öl
könnte sich entzünden.
• Auf keinen Fall unter der Hau-
be ambieren: Brandgefahr.
• Kinder ab 8 Jahren und Personen mit eingeschränkten
physischen, sensorischen
oder psychischen Fähigkeiten, oder mit mangelnden
Erfahrungen oder Kenntnissen dürfen nicht mit dem
Gerät umgehen, es sei denn,
sie werden von einer für ihre
Sicherheit verantwortlichen
Person beaufsichtigt oder
angeleitet. Sicherstellen,
dass Kinder nicht mit dem
Gerät herumspielen können.
Reinigungs- und Wartungsarbeiten dürfen nicht von
unbeaufsichtigten Kindern
durchgeführt werden.
• ACHTUNG: Die zugänglichen Teile können während
des Gebrauchs der Kochgeräte sehr heiß werden.
3. WARTUNG
• Vor Reinigungs- oder Wartungsarbeiten am Gerät,
muss dieses ausgeschaltet
und spannungslos gemacht
werden.
• Die Filter stets nach den
angegebenen Intervallen
reinigen oder auswechseln
(Brandgefahr).
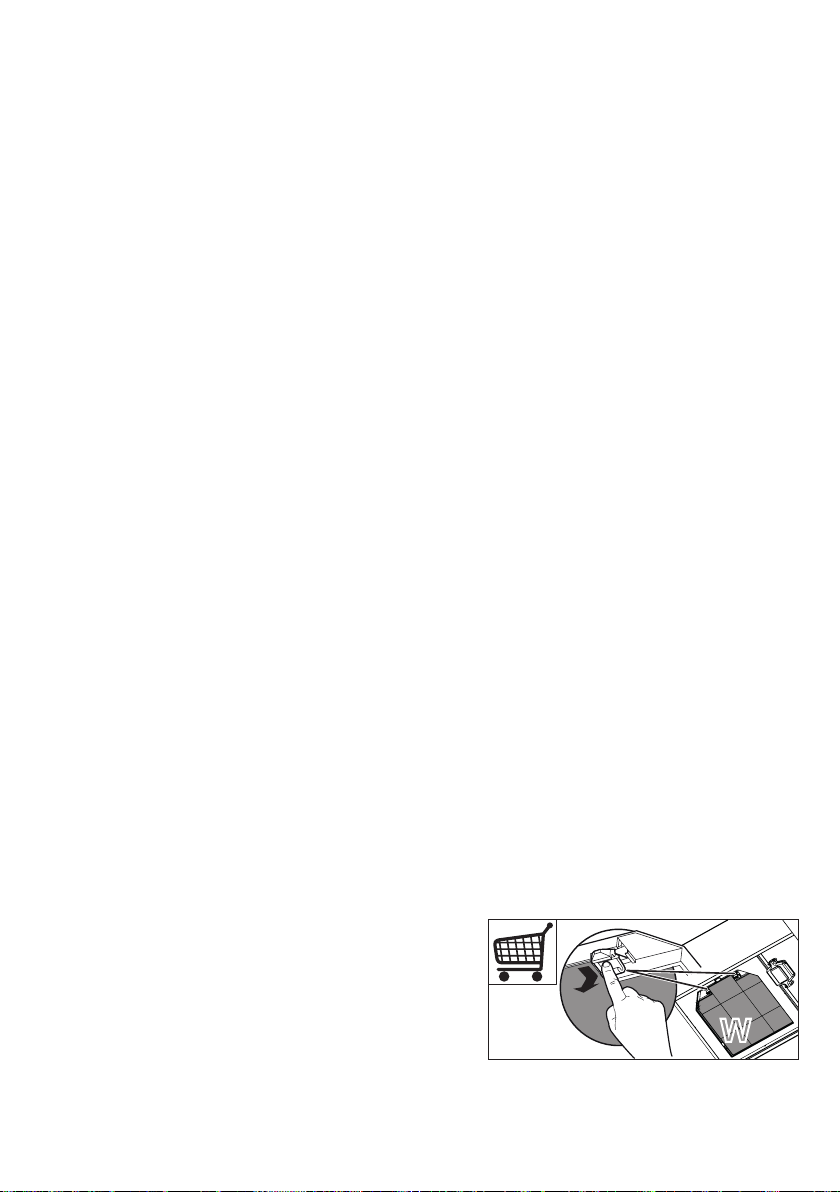
- Der Aktivkohlelter ist weder
waschbar, noch regenerierbar und muss bei normalem
Betrieb zirka alle 4 Monate
oder auch öfter ausgewechselt werden, je nach Intensität des Gebrauchs (W).
Der Long Life Filter ist
waschbar und wiederverwendbar, und ist für verschiedene Modelle passend.
WW
- Die Fettfilter sind alle 2
Monate oder bei intensiver
Nutzung öfter zu reinigen
Page 11

und können in der Spülmaschine gespült werden (Z).
ZZ
- Kontrolllampen der Steuerungen, wo vorhanden.
• Die Haube mit einem feuchten
Lappen und einem neutralen
Reinigungsmittel abwischen.
GERMAN
11
Page 12
12
www.electrolux.com
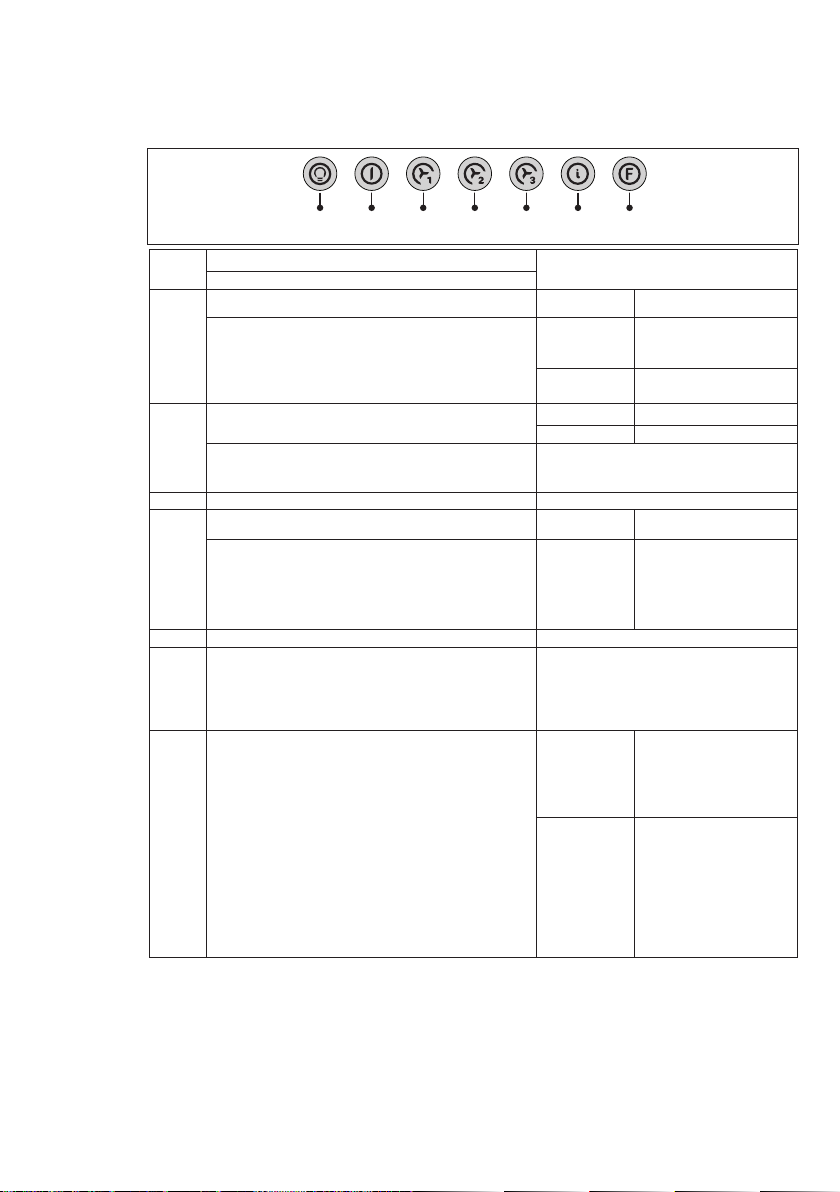
4. BEDIENELEMENTE
Basisfunktion
Taste
Zweifache Funktion
Schaltet bei kurzem Drücken die Beleuchtung ein oder aus. Taste aus
Durch 2 Sekunden langes Drücken der Taste wird die Beleuchtung im
Modus “Notbeleuchtung” aktiviert. Die Lampen werden mit einer ge-
L
ringeren Leistung von zirka 5W gespeist. Diese Funktion kann durch
erneutes 2 Sekunden langes Drücken der Taste deaktiviert werden;
durch kurzes Antippen wird hingegen zu der normalen Lichtstärke
gewechselt.
Deaktiviert den Motor von jeder eingestellten Geschwindigkeitsstufe aus.
T1
Mit zirka 3 Sekunden langem Drücken der Taste bei abgeschalteten
Verbrauchern (Motor+Licht) wird der Alarm der Aktivkohlelter aktiviert/
deaktiviert.
Aktiviert den Motor bei der ersten Betriebsgeschwindigkeit ein. Taste leuchtet
T2
Schaltet den Motor durch kurzes Drücken bei der zweiten
Betriebsgeschwindigkeit ein.
Durch zirka 2 Sekunden langes Drücken der Taste wird die Funktion
Delay, das heißt das um 20 Minuten verzögerte Ausschalten des Ge-
T3
rätes aktiviert/deaktiviert. Vervollständigt die Beseitigung von Restgerüchen. Von der Position OFF oder den Geschwindigkeitsstufen 1, 2, 3
aus aktivierbar. Bei Intensivgeschwindigkeit auf On nicht aktivierbar.
Aktiviert den Motor bei der dritten Betriebsgeschwindigkeit ein. Taste leuchtet
T4
Aktiviert und deaktiviert den Motor bei auf 5 Minuten eingestellter Intensivgeschwindigkeit. Nach Ablauf der 5 Minuten kehrt
das Gerät zur zuvor eingestellten Geschwindigkeit zurück. Wird
T5
das nach Ablauf der 5 Minuten abgeschaltete Gerät wieder
aktiviert, kehrt das System zur ersten Geschwindigkeitsstufe
zurück.
Stellt bei 4 Sekunden langem Drücken den Filteralarm wieder
her, der durch Blinken der Taste T1 angezeigt wird. Diese
F
Prozedur kann nur abgestelltem Motor durchgeführt werden.
Leuchtanzeigen
Beleuchtung aus
Taste leuchtet Beleuchtung an
Taste leuchtet Notbeleuchtung an
Taste leuchtet
Taste aus Motor ausgeschaltet
2 Mal Blinken der Taste F – Alarm aktiviert.
1 Mal Blinken der Taste F – Alarm deaktiviert.
Taste leuchtet
Tasten blinken
(T1+T2 oder T3
oder T4)
Taste leuchtet
Taste leuchtet
Taste blinkt
Motor eingeschaltet
Zweite Betriebsgeschwindigkeit
aktiv
Funktion DelayAktiv
Meldet den Alarm für Sättigung
der Metallfettlter und die Notwendigkeit, diese zu waschen. Dieser
Alarm wird nach 100 effektiven
Betriebsstunden der Abzugshaube
ausgelöst.
Meldet, sofern aktiviert, den
Alarm für Sättigung des Aktiv-
kohlelters, der ausgewechselt
werden muss; auch die
Metallfettlter müssen gewaschen werden. Der Alarm für
Sättigung des Aktivkohlelters
wird nach 200 effektiven Betriebsstunden der Abzugshaube
ausgelöst.
Page 13
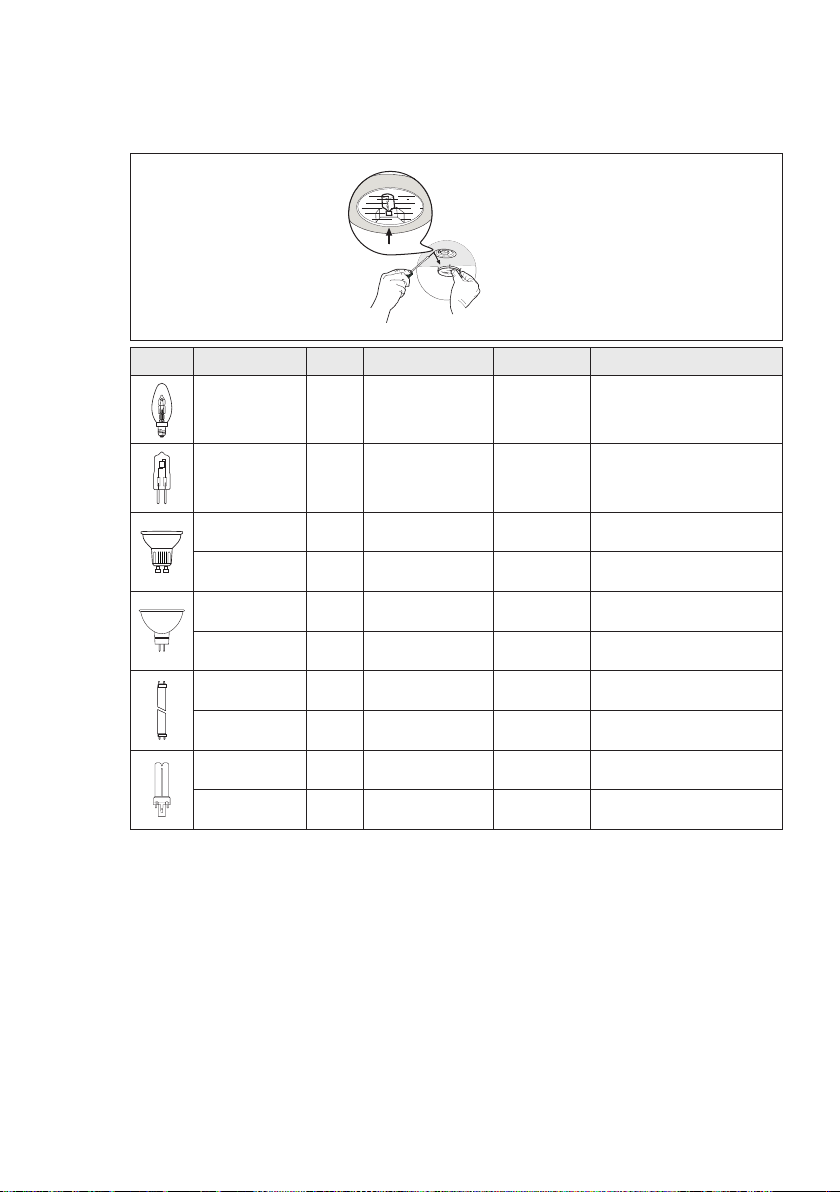
5. BELEUCHTUNG
Lampe Leistung (W) Fassung Spannung (V) Größe (mm) ILCOS-Code
28 E14 220-240 104 x 35 HSGSB/C/UB-28-220/240-E14
20 G4 12 33 x 9 HSG/C/UB-20-12-G4
35 GU10 230 51 x 50,7 HAGS-35-230-GU10-51/40
50 GU10 230 51 x 50,7 HAGS-35-230-GU10-51/20
20 GU4 12 40 x 35 HRGS-20-12-GU4-35/30
FRENCH
13
20 GU5.3 12 46 x 51 HRGS-20-12-GU5.3-50/10
16 G13 95 720 x 26 FD-16/40/1B-E-G13-26/720
18 G13 57 589,8 x 26 FD-18/40/1B-E-G13-26/600
9 G23
11 G23
60 (Lampe)
220-240 (Starter)
91 (Lampe)
220-240 (Starter)
167 x 28 FSD-9/27/1B-I-G23
235,8 x 28 FSD-11/40/1B-I-G23
Page 14
14
www.electrolux.com
NOUS PENSONS À VOUS
Merci d’avoir choisi ce produit Electrolux. Avec ce produit, vous bénéciez de
dizaines d’années d’expérience professionnelle et d’innovation. Ingénieux et
élégant, il a été conçu sur mesure pour vous.
Grâce à cet appareil, vous savez que chaque utilisation vous apportera
satisfaction.
Bienvenue chez Electrolux.
ACCESSOIRES ET CONSOMMABLES
Dans la boutique en ligne d’Electrolux, vous trouverez tout ce qu’il vous faut
pour que vos appareils Electrolux soient toujours impeccables et fonctionnent
parfaitement, sans oublier une vaste gamme d’accessoires conçus et fabriqués
selon les critères de qualité les plus élevés qui soient, des ustensiles de cuisine
spécialisés aux range-couverts, des porte-bouteilles aux sacs à linge délicats...
Visitez notre boutique en ligne
www.electrolux.com/shop
EN MATIÈRE DE PROTECTION DE L’ENVIRONNEMENT
Recyclez les matériaux portant le symbole . Déposez les emballages dans les
conteneurs prévus à cet effet.
Contribuez à la protection de l’environnement et à votre sécurité, recyclez
vos produits électriques et électroniques. Ne jetez pas les appareils portant le
symbole avec les ordures ménagères. Emmenez un tel produit dans votre
centre local de recyclage ou contactez vos services municipaux.
SERVICE APRÈS-VENTE
N’utilisez que des pièces de rechange d’origine.
Avant de contacter le service, assurez-vous de disposer des informations suivantes:
Vous trouverez ces informations sur la plaque signalétique.
Modèle __________________________
PNC ____________________________
Numéro de série ___________________
Page 15

FRENCH
15
1. CONSEILS ET
SUGGESTIONS
• Les instructions pour l’utilisa-
tion se réfèrent aux différents
modèles de cet appareil. Par
conséquent, certaines descriptions de caractéristiques
particulières pourraient ne
pas appartenir spécique-
ment à cet appareil.
• En aucun cas le fabricant ne
peut être tenu pour responsable d’éventuels dommages
dus à une installation ou à une
utilisation impropre.
• La distance de sécurité minimum entre le plan de cuisson
et la hotte aspirante est de
650 mm (certains modèles
peuvent être installés à une
hauteur inférieure; voir le
paragraphe concernant les
dimensions de travail et l’installation).
• Assurez-vous que la tension
de votre secteur correspond
à celle indiquée sur la plaque
des données appliquée à
l’intérieur de la hotte.
• Pour les appareils de Classe
I, s’assurer que l’installation
électrique de votre intérieur
dispose d’une mise à la terre
adéquate. Relier l’aspirateur
au conduit de cheminée avec
un tube d’un diamètre minimum de 120 mm. Le parcours
des fumées doit être le plus
court possible.
• Ne pas relier la hotte aspirante
aux conduits de cheminée qui
acheminent les fumées de
combustion (par exemple de
chaudières, de cheminées,
etc.).
• Si vous utilisez l’aspirateur en
combinaison avec des appareils non électriques (par ex.
appareils à gaz), vous devez
garantir un degré d’aération
sufsant dans la pièce, an
d’empêcher le retour du ux
des gaz de sortie. La cuisine
doit présenter une ouverture
communiquant directement
vers l’extérieur pour garantir
l’amenée d’air propre. Si vous
utilisez la hotte de cuisine en
combinaison avec des appareils non alimentés à l’électricité, la pression négative dans
la pièce ne doit pas dépasser
0,04 mbar an d’éviter que la
hotte ne réaspire les fumées
dans la pièce.
• Si le cordon d’alimentation est
endommagé, veuillez le faire
remplacer par le fabricant ou
par un service après-vente
agréé pour éviter tout risque
d’accident.
• Si les instructions d’installation du plan de cuisson à gaz
spécient une distance supérieure à celle indiquée ci-dessus, veuillez impérativement
en tenir compte. Toutes les
normes concernant l’évacuation de l’air doivent être
respectées.
• Utiliser exclusivement des vis
et des petites pièces du type
Page 16

16
www.electrolux.com
adapté pour la hotte.
Attention: toute installation
des vis et des dispositifs de
xation non conforme aux
présentes instructions peut
entraîner des risques de
décharges électriques.
• Brancher la hotte à l’alimentation de secteur avec un
interrupteur bipolaire ayant
une ouverture des contacts
d’au moins 3 mm.
2. UTILISATION
• Cette hotte aspirante a été
conçue exclusivement pour
un usage domestique, dans
le but d’éliminer les odeurs
de cuisine.
• Ne jamais utiliser la hotte
pour des objectifs différents
de ceux pour lesquels elle a
été conçue.
• Ne jamais laisser un feu vif
allumé sous la hotte lorsque
celle-ci est en fonction.
• Régler l’intensité du feu de
manière à l’orienter exclusivement vers le fond de la
casserole, en vous assurant
qu’il ne déborde pas sur les
côtés.
• Contrôler constamment les
friteuses durant leur utilisation: l’huile surchauffée risque
de s’incendier.
• Ne pas amber des mets
sous la hotte: sous risque de
provoquer un incendie.
• Cet appareil n’est pas destiné
à être utilisé par des enfants
d’un âge inférieur à 8 ans, ni
par des personnes dont les
capacités physiques, sensorielles ou mentales sont diminuées ou qui ont une expérience et des connaissances
insufsantes, à moins que ces
enfants ou ces personnes ne
soient attentivement surveil-
lés et instruits sur la manière
d’utiliser cet appareil en sécurité et sur les dangers que cela
comporte. Assurez-vous que
les enfants ne jouent pas avec
cet appareil. Le nettoyage et
l’entretien de la part de l’utilisateur ne doivent pas être
effectués par des enfants, à
moins que ce ne soit sous la
surveillance d’une personne
responsable.
• ATTENTION: les parties
accessibles peuvent devenir
très chaudes durant l’utilisation des appareils de cuisson.
3. ENTRETIEN
• Avant d’effectuer toute opération de nettoyage et d’entretien, éteindre ou débrancher
l’appareil du secteur.
• Nettoyer et/ou remplacer les
ltres après le délai indiqué
(danger d’incendie).
- Le ltre à charbon actif ne
peut être ni lavé ni régénéré
et il doit être remplacé environ tous les 4 mois de fonctionnement ou plus souvent
en cas d’utilisation particulièrement intense (W).
Page 17
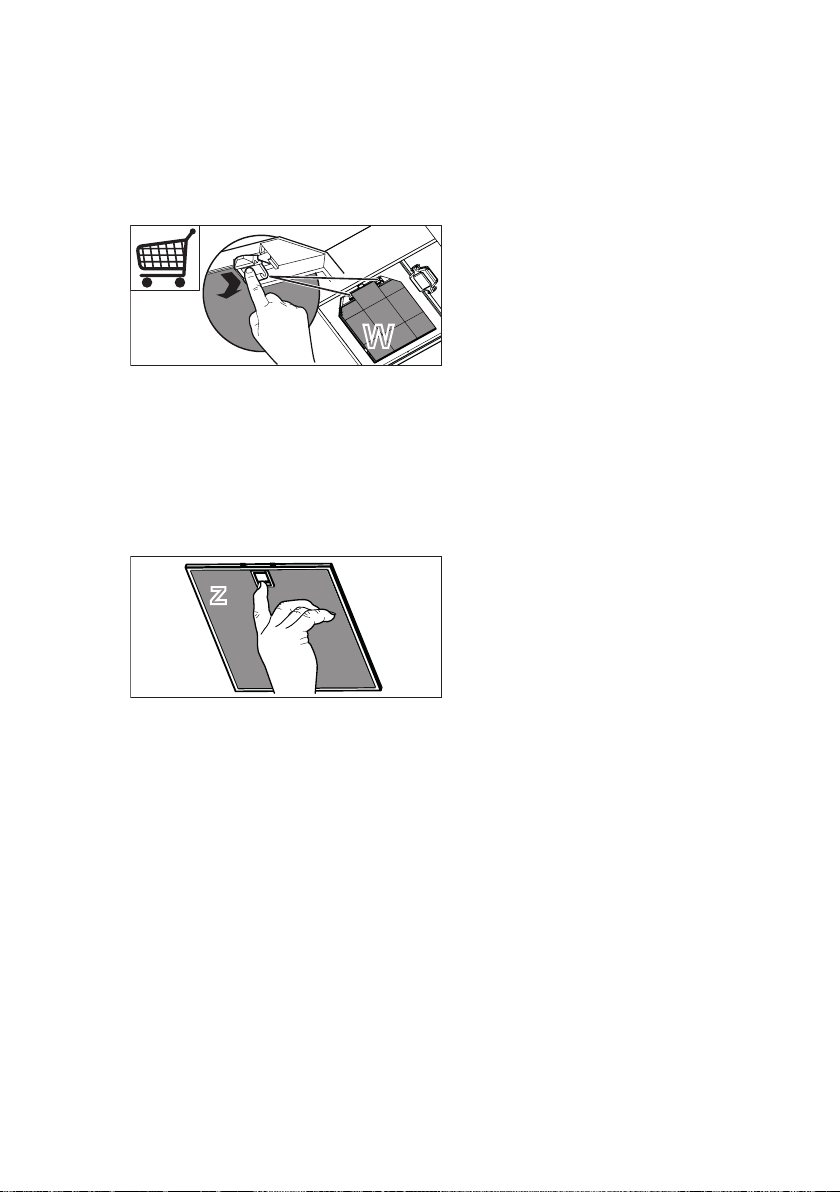
Le ltre Long Life est lavable
zz
et réutilisable, il peut être
utilisé comme accessoire
pour certains modèles.
WW
- Nettoyer les ltres à graisse
tous les 2 mois de fonctionnement ou plus souvent en
cas d’utilisation particulièrement intense. Ces ltres
peuvent être lavés au lavevaisselle (Z).
FRENCH
17
- Voyants commandes si
présents.
• Nettoyer la hotte avec un
chiffon humide et un détergent
liquide neutre.
Page 18
18
www.electrolux.com
4. COMMANDES
Fonction de base
Tasto
Double fonction
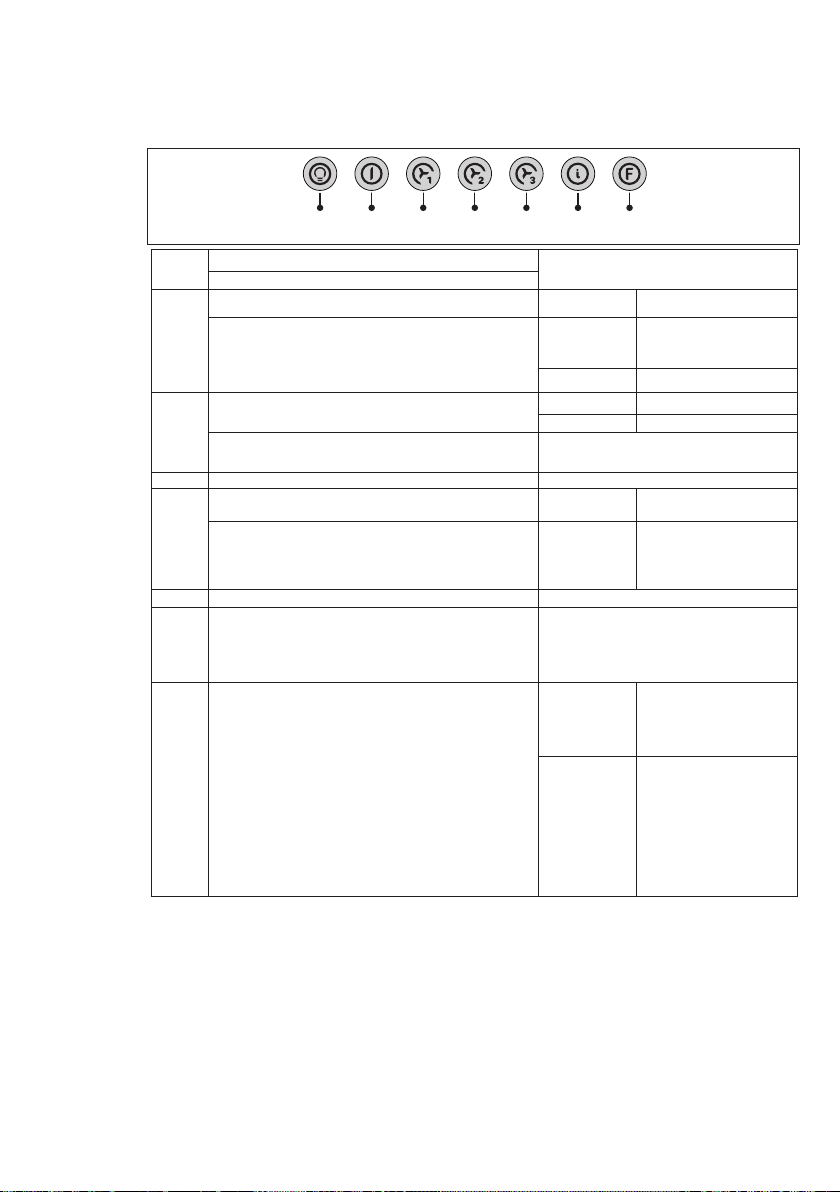
Appuyée brièvement elle allume et éteint l’installation d’éclairage.
Appuyée pendant 2 secondes elle active l’éclairage en mode «
lumière de courtoisie ». Les lampes sont alimentées à une puissance
L
réduite d’environ 5W. Pour débrancher cette fonction appuyer de
nouveau sur la touche pendant 2 secondes ou appuyer brièvement
pour passer en mode d’éclairage normal.
Éteint le moteur à partir de n’importe quelle vitesse programmée.
T1
L’appui sur cette touche pendant 3 secondes lorsque toutes les charges sont éteintes (Moteur+Éclairage) Branche / Débranche l’alarme
des ltres à charbon actif.
Branche le moteur à la première vitesse. Touche allumée
T2
Appuyée brièvement, elle branche le moteur à la deuxième
vitesse.
L’appui sur cette touche pendant 2'' branche et débranche la fonction
T3
Delay, c'est-à-dire l'extinction différée de 20 minutes de l’appareil.
Adaptée pour compléter l’élimination d’odeurs résiduelles. Activable
à partir de la position OFF et des vitesses 1, 2, 3. Non activable si
Intensive On.
Branche le moteur à la troisième vitesse. Touche allumée
T4
Branche et Débranche le moteur à la vitesse Intensive
temporisée à 5 minutes. Après 5 minutes l’appareil retourne à
la vitesse précédemment programmée. En cas d’activation à
T5
partir de l’appareil éteint, après 5 minutes le système retourne
en première vitesse.
Appuyée pendant 4 secondes elle restaure la signalisation
d’alarme des ltres en l’indiquant par le clignotement de la
F
touche T1. Cette procédure ne peut être effectuée qu’avec le
moteur éteint..
Signalisations lumineuses
Touche éteinte
Touche éclairée Lumières allumées
Touche éclairée Lumière de courtoisie allumée
Touche éclairée
Touche éteinte Moteur coupé
2 clignotements Touche F – Alarme branchée
1 clignotement Touche F – Alarme débranchée
Touche allumée
Touches clignotantes
(T1+T2 ou T3
ou T4)
Touche allumée
Touche
allumée
Touche
clignotante
Lumières éteintes
Moteur actif
Deuxième vitesse branchée.
Fonction DelayActive
Signale l’alarme saturation ltres à
graisse métalliques et la nécessité
de les laver. L’alarme entre en
fonction après 100 heures de
travail effectif de la hotte.
Lorsque l’alarme saturation
ltre anti-odeur à charbon actif
est activée, c’est l’indice que
le ltre doit être remplacé ; les
ltres à graisse métalliques
doivent aussi être lavés.
L’alarme saturation ltre anti-
odeur à charbon actif entre en
fonction après 200 heures de
travail effectif de la hotte.
Page 19
5. ÉCLAIRAGE
FRENCH
19
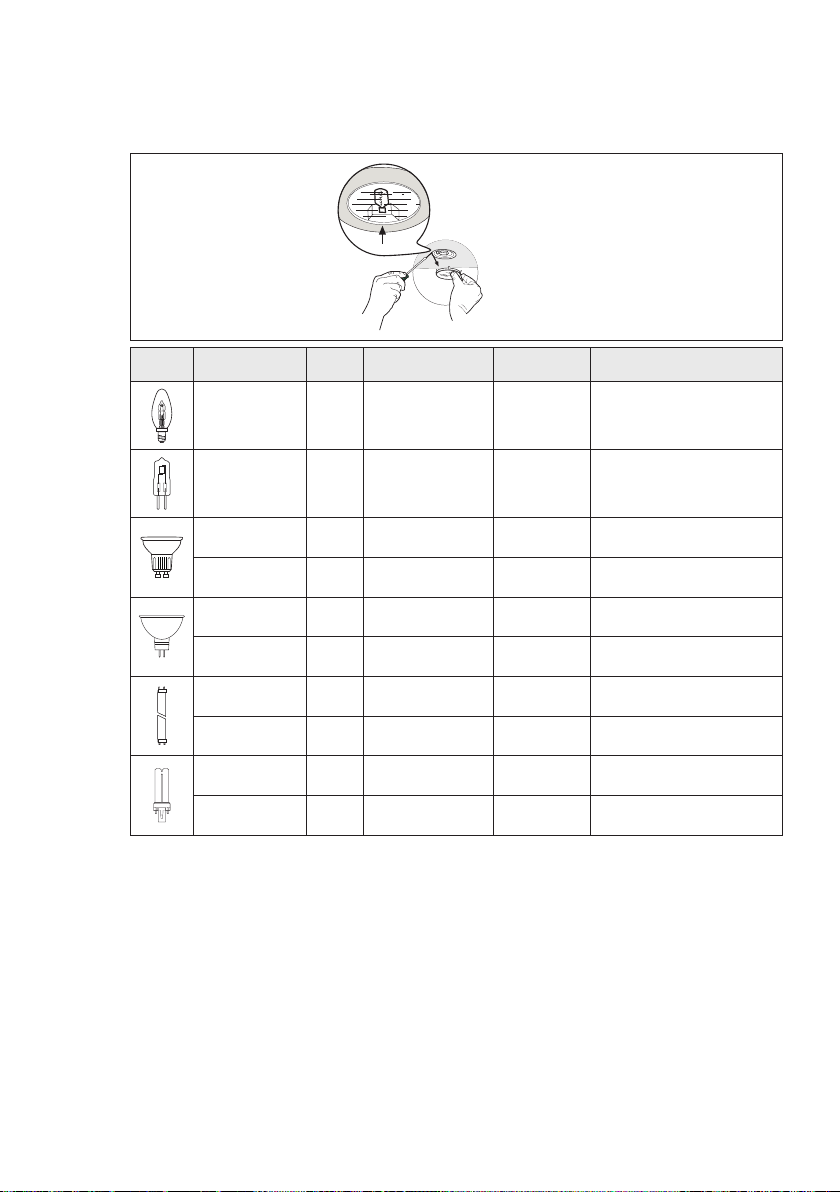
Ampoule Absorption (W) Culot Voltage (V)
28 E14 220-240 104 x 35 HSGSB/C/UB-28-220/240-E14
20 G4 12 33 x 9 HSG/C/UB-20-12-G4
35 GU10 230 51 x 50,7 HAGS-35-230-GU10-51/40
50 GU10 230 51 x 50,7 HAGS-35-230-GU10-51/20
20 GU4 12 40 x 35 HRGS-20-12-GU4-35/30
20 GU5.3 12 46 x 51 HRGS-20-12-GU5.3-50/10
16 G13 95 720 x 26 FD-16/40/1B-E-G13-26/720
18 G13 57 589,8 x 26 FD-18/40/1B-E-G13-26/600
9 G23
11 G23
60 (ampoule)
220-240 (starter)
91 (ampoule)
220-240 (starter)
Dimensions
(mm)
167 x 28 FSD-9/27/1B-I-G23
235,8 x 28 FSD-11/40/1B-I-G23
Code ILCOS
Page 20
20
www.electrolux.com
PENSATI PER VOI
Grazie per aver acquistato un’apparecchiatura Electrolux. Avete scelto un
prodotto che ha alle spalle decenni di esperienza professionale e innovazione.
Ingegnoso ed elegante, è stato progettato pensando a voi.
Quindi, in qualsiasi momento desiderate utilizzarlo, potete esser certi di ottenere
sempre i migliori risultati.
Benvenuti in Electrolux.
ACCESSORI E CONSUMABILI
All’interno del webshop Electrolux troverete tutto ciò che vi serve per fare in
modo che le vostre apparecchiature Electrolux siano sempre perfettamente pulite
e funzionanti. Non mancano inoltre una vasta gamma di accessori studiati e
realizzati conformemente ai più elevati standard qualitativi: pentole, scolaposate,
portabottiglie, sacchi biancheria delicati...
Visitate il webshop all’indirizzo:
www.electrolux.com/shop
CONSIDERAZIONI AMBIENTALI
Riciclare i materiali con il simbolo . Buttare l’imballaggio negli appositi
contenitori per il riciclaggio.
Aiutare a proteggere l’ambiente e la salute umana e a riciclare riuti derivanti da
apparecchiature elettriche ed elettroniche. Non smaltire le apparecchiature che
riportano il simbolo insieme ai normali riuti domestici. Portare il prodotto al
punto di riciclaggio più vicino o contattare il comune di residenza.
ASSISTENZA
Consigliamo sempre l’impiego di ricambi originali.
Prima di contattare il centro di assistenza, assicurarsi di avere a portata di mano i
seguenti dati.
Le informazioni sono riportate sulla targhetta.
Modello __________________________
PNC ____________________________
Numero di serie ___________________
Page 21

ITALIAN
21
1. AVVERTENZE
E SUGGERIMENTI
• Le Istruzioni per l’uso si riferiscono ai diversi modelli di
questo apparecchio. Pertanto,
si potrebbero trovare descrizioni di singole caratteristiche
che non appartengono al
proprio apparecchio specico.
• Il fabbricante non potrà ritenersi responsabile per eventuali
danni risultanti da un’installazione o utilizzazione impropria.
• La distanza minima di sicurezza tra il piano cottura e
la cappa aspirante è di 650
mm (alcuni modelli possono
essere installati a un’altezza
inferiore; vedere il paragrafo
relativo alle dimensioni di
lavoro e all’installazione).
• Controllare che la tensione di
rete corrisponda a quella indicata sulla targa dati applicata
all’interno della cappa.
• Per gli apparecchi di Classe
I, controllare che la rete di
alimentazione domestica
disponga di un adeguato collegamento a massa. Collegare
l’aspiratore al condotto dei
fumi mediante un tubo con
diametro minimo di 120 mm. Il
percorso dei fumi deve essere
il più corto possibile.
• Non collegare la cappa aspirante ai condotti fumari che
trasportano fumi di combustione (per es. caldaie, camini
ecc.).
• Se l’aspiratore è utilizzato
in combinazione con apparecchi non elettrici (per es.
apparecchi a gas), deve
essere garantito un sufficiente grado di aerazione
nel locale per impedire il
ritorno di usso dei gas di
scarico. La cucina deve avere
un’apertura comunicante
direttamente con l’esterno
per garantire l’afusso di aria
pulita. Quando la cappa per
cucina è utilizzata in combinazione con apparecchi non
alimentati dalla corrente elettrica, la pressione negativa nel
locale non deve superare 0,04
mbar per evitare che i fumi
vengano riaspirati nel locale
dalla cappa.
• In caso di danneggiamento
del cavo di alimentazione,
occorre farlo sostituire dal
produttore o dal reparto di
assistenza tecnica per evitare
qualsiasi rischio.
• Se le istruzioni di installazione
del piano cottura a gas speci-
cano una distanza maggiore
di quella sopra indicata, è
necessario tenerne conto.
Devono essere rispettate
tutte le normative riguardanti
lo scarico dell’aria.
• Usare solo viti e minuteria di
tipo idoneo per la cappa.
Avvertenza: la mancata installazione delle viti o dei dispo-
sitivi di ssaggio in conformità
alle presenti istruzioni può
comportare rischi di scosse
Page 22
22
www.electrolux.com
elettriche.
• Collegare la cappa all’alimentazione di rete mediante un
interruttore bipolare con distanza tra i contatti di almeno
3 mm.
2. USO
• La cappa aspirante è proget-
tata esclusivamente per l’uso
domestico allo scopo di eliminare gli odori dalla cucina.
• Non usare mai la cappa per
scopi diversi da quelli per cui
è stata progettata.
• Non lasciare mai amme alte
sotto la cappa quando è in
funzione.
• Regolare l’intensità della
amma in modo da dirigerla
esclusivamente verso il fondo
del recipiente di cottura, assicurandosi che non ne avvolga
i lati.
• Le friggitrici devono essere
costantemente controllate
durante l’uso: l’olio surriscaldato potrebbe incendiarsi.
• Non cuocere al ambé sotto la
cappa: si potrebbe sviluppare
un incendio.
• Questo apparecchio può
essere utilizzato da bambini di
età non inferiore a 8 anni e da
persone con ridotte capacità
psico-sico-sensoriali o con
esperienza e conoscenze
insufcienti, purché attentamente sorvegliati e istruiti su
come utilizzare in modo sicuro
l’apparecchio e sui pericoli
che ciò comporta. Assicurarsi
che i bambini non giochino
con l’apparecchio. Pulizia
e manutenzione da parte
dell’utente non devono essere
effettuate da bambini, a meno
che non siano sorvegliati.
• “ATTENZIONE: le parti ac-
cessibili possono diventare
molto calde durante l’uso degli
apparecchi di cottura”.
3. MANUTENZIONE
• Spegnere o scollegare l’apparecchio dalla rete di alimentazione prima di qualunque
operazione di pulizia o manutenzione.
• Pulire e/o sostituire i ltri dopo
il periodo di tempo specicato
(pericolo di incendio).
- Il ltro al carbone attivo non
è lavabile né è rigenerabile
e deve essere sostituito ogni
4 mesi di funzionamento
circa o più frequentemente
in caso di utilizzo molto
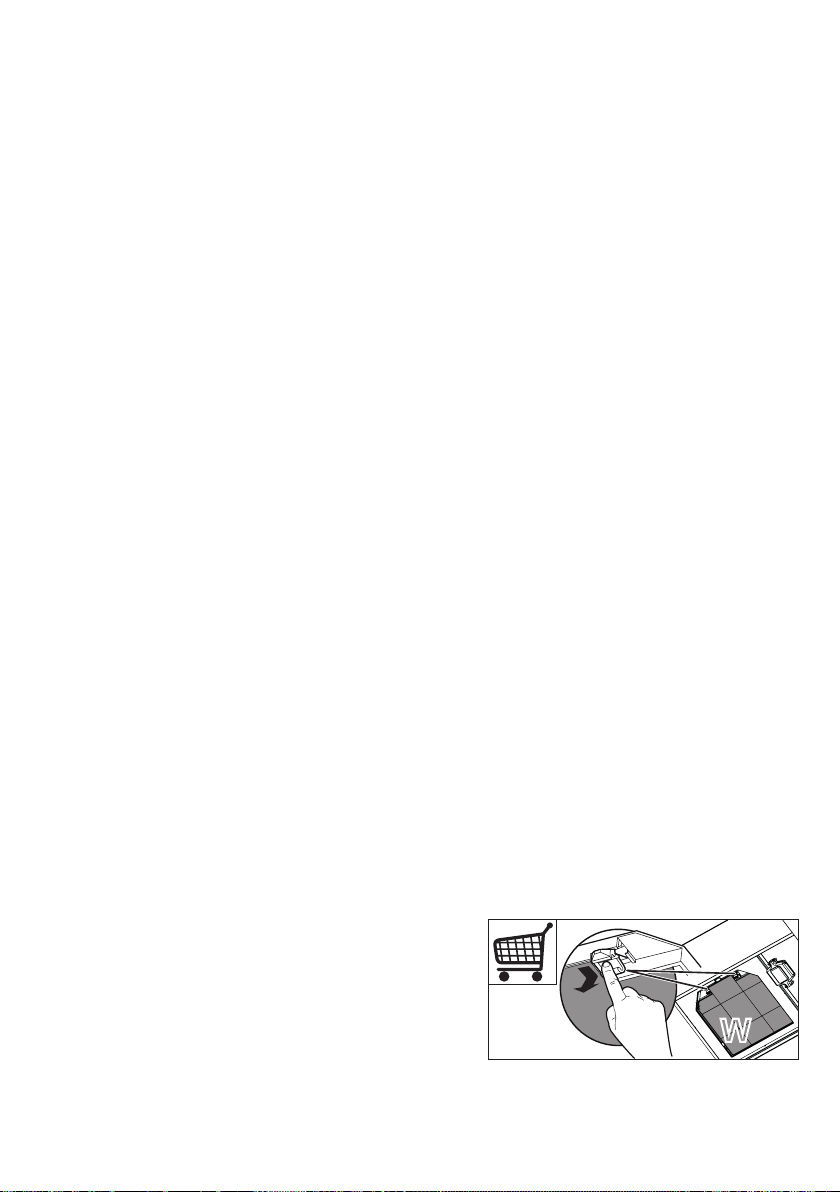
intenso (W).
Il ltro Long Life è lavabile
e riutilizzabile, può essere
utilizzato come accessorio
per alcuni modelli.
WW
- I ltri antigrasso devono
essere puliti ogni 2 mesi
di funzionamento o più
Page 23
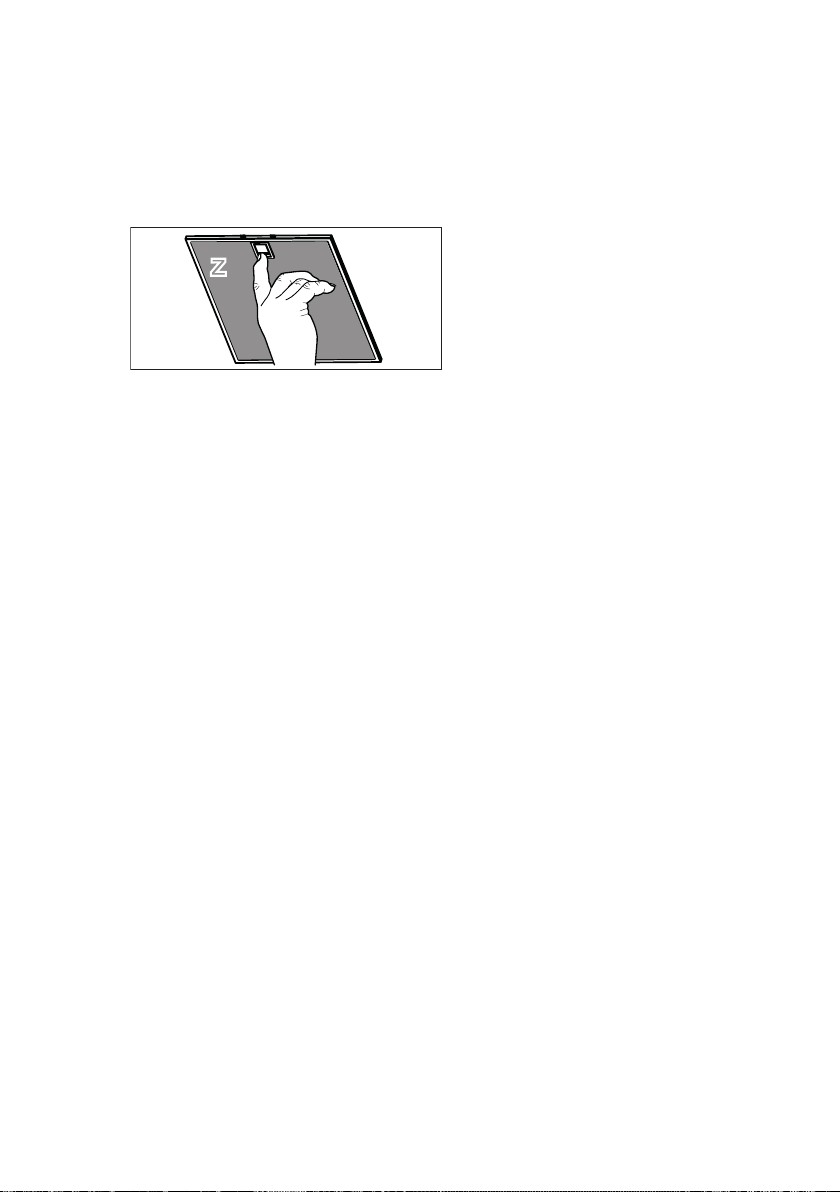
frequentemente in caso
zz
di utilizzo molto intenso e
possono essere lavati in
lavastoviglie (Z).
- Spie comandi ove presenti.
• Pulire la cappa utilizzando un
panno umido e un detergente
liquido neutro.
ITALIAN
23
Page 24
24
www.electrolux.com
4. COMANDI
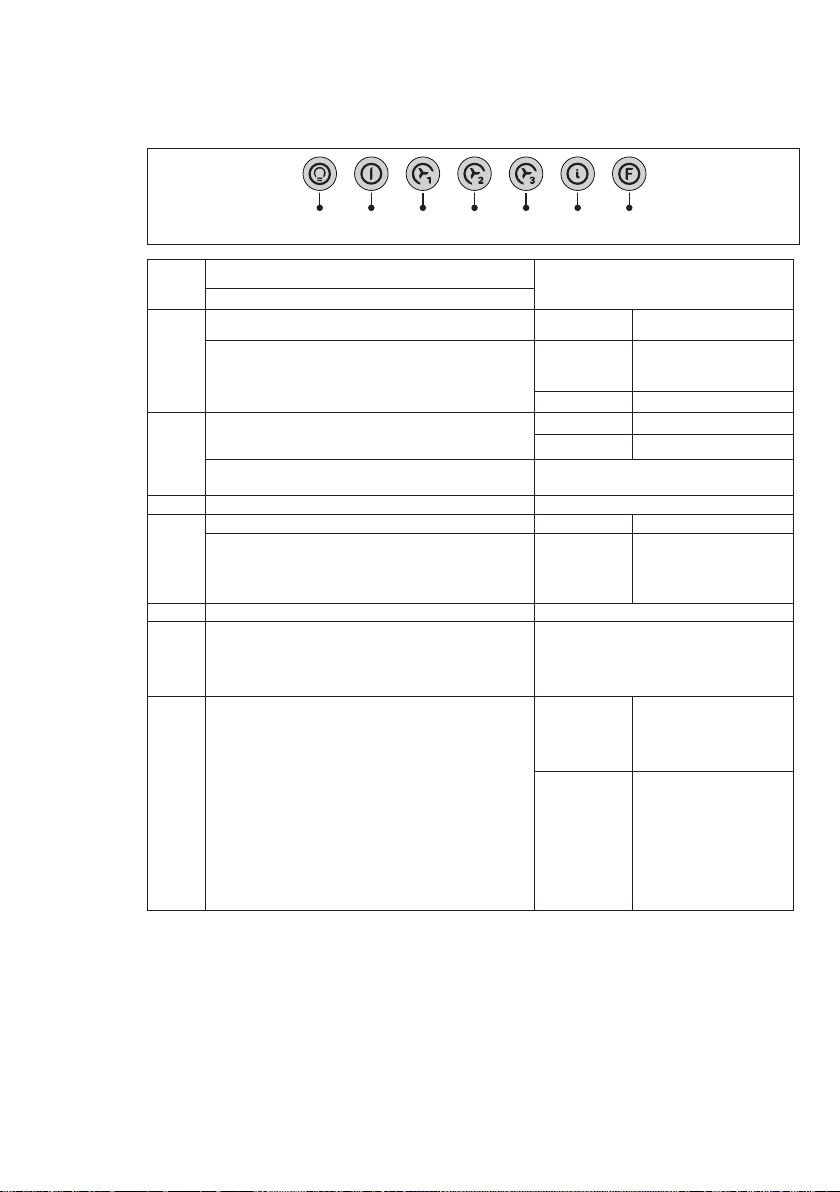
Funzione
Tasto
Doppia Funzione
Premuto brevemente accende e spegne l’impianto di illuminazione.
Premendo il tasto per 2 secondi si attiva l’impianto di illu-minazione
L
in modalità “luce di cortesia”. Le lampade ven-gono alimentate ad
una potenza ridotta di circa 5W. Tale funzione può essere disinserita
ripremendo il tasto per 2 secondi o premendolo brevemente per
passare alla normale modalità di illuminazione.
Spegne il motore da qualsiasi velocità impostata.
T1
Premendo il tasto per 3 secondi quando tutti i carichi sono spenti
(Motore+Luce), si Attiva / Disattiva l’allarme dei Filtri al Carbone attivo.
Attiva il motore alla prima velocità. Tasto acceso
T2
Premuto brevemente attiva il motore alla seconda velocità. Tasto acceso
Premendo per circa 2” il tasto, si attiva e disattiva la funzione Delay,
T3
cioè lo spegnimento ritardato dell’apparecchio di 20 minuti. Adatto per
completare l’eliminazione di odori residui. Attivabile dalla posizione
OFF e dalle velocità 1, 2, 3 . Non attivabile se Intensiva On.
Attiva il motore alla terza velocità. Tasto acceso
T4
Attiva e Disattiva il motore alla velocità Intensiva temporizzata
a 5 minuti. Al termine dei 5 minuti l’apparecchio ritorna alla
velocità precedentemente impostata. Nel caso di attivazione
T5
da apparecchio spento alla scadenza dei 5 minuti il sistema
ritorna alla prima velocità.
Premuto per 4 secondi ripristina la segnalazione di allarme ltri
segnalandola con il lampeggio del tasto T1. Questa pro-cedura
F
è eseguibile solo a motore spento.
Segnalazioni luminose
Tasto spento
Tasto illuminato Luci accese
Tasto illuminato Luce di cortesia accesa
Tasto illuminato
Tasto spento Motore inattivo
2 Lampeggi Tasto F – Allarme Attivato.
1 Lampeggio Tasto F – Allarme Disattivato.
Tasti lampeggianti
(T1+T2 o T3 o T4)
Tasto acceso
Tasto acceso
Tasto
lampeggiante
Luci spente
Motore attivo
Seconda velocità attiva
Funzione Delay Attiva
Segnala l’allarme saturazione Filtri
Antigrasso Metallici e la necessità di lavarli. L’allarme entra in
funzione dopo 100 ore di lavoro
effettivo della Cappa.
Segnala, quando è attivato,
l’allarme saturazione Filtro Antiodore al Carbone Attivo, che
deve essere sostituito; devono
anche essere lavati i Filtri
Antigrasso Metallici. L’allarme
saturazione Filtro Antiodore al
Carbone Attivo entra in funzione dopo 200 ore di lavoro
effettivo della Cappa.
Page 25
5. ILLUMINAZIONE
ITALIAN
25
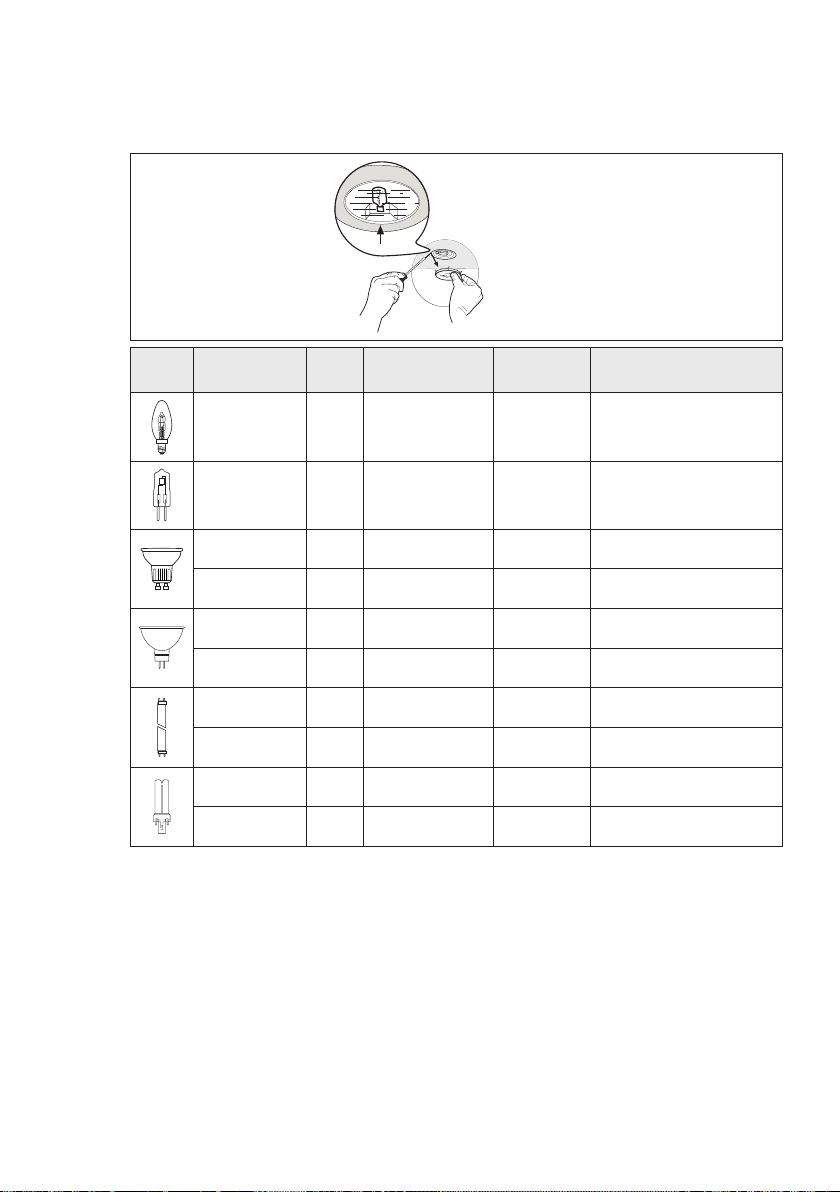
Lampada
Assorbimento
(W)
28 E14 220-240 104 x 35 HSGSB/C/UB-28-220/240-E14
20 G4 12 33 x 9 HSG/C/UB-20-12-G4
35 GU10 230 51 x 50,7 HAGS-35-230-GU10-51/40
50 GU10 230 51 x 50,7 HAGS-35-230-GU10-51/20
20 GU4 12 40 x 35 HRGS-20-12-GU4-35/30
20 GU5.3 12 46 x 51 HRGS-20-12-GU5.3-50/10
16 G13 95 720 x 26 FD-16/40/1B-E-G13-26/720
18 G13 57 589,8 x 26 FD-18/40/1B-E-G13-26/600
9 G23
11 G23
Attacco
Voltaggio
(V)
60 (lampada)
220-240 (starter)
91 (lampada)
220-240 (starter)
Dimensione
(mm)
167 x 28 FSD-9/27/1B-I-G23
235,8 x 28 FSD-11/40/1B-I-G23
Codice ILCOS
Page 26

Page 27

Page 28

www.electrolux.com/shop
991.0279.334_05 - 160108
 Loading...