


Use & Care Guide
D u a l F u e l R a n g e s
|
|
|
|
|
|
|
|
|
|
|
|
E30DF74EPS |
E36DF76EPS |
E48DF76EPS |
5995447074 |
||
|
|
|
|
|
|

2 FindingInformation
Attach your sales receipt to this page for future reference.
PLEASE READ AND SAVE THIS GUIDE
Thank you for choosing Electrolux, the new premium brand in home appliances. This Use & Care Guide is part of our commitment to customer satisfaction and product quality throughout the service life of your new range.
We view your purchase as the beginning of a relationship. To ensure our ability to continue serving you, please use this page to record key product information.
IMPORTANT
PLEASE READ all instructions completely before attempting to install or operate the unit.
Once you have your unit installed, we suggest you keep this manual in a safe place for future reference. Should any problems occur, refer to the Troubleshooting section of this manual. This information will help you quickly identify a problem and get it remedied. In the event you require assistance, please contact the dealer where you purchased your unit.
MAKE A RECORD FOR QUICK REFERENCE
Whenever you call to request information or service, you will need to know your model number and serial number. You can find this information on the serial plate located behind the air intake vents. With the oven door open, the air intake vents are located just below the control panel on the front of the appliance. These numbers are also printed on the product registration card.
©2005 Electrolux Home Products, Inc.
Post Office Box 212378, Augusta, Georgia 30917, USA All rights reserved. Printed in the USA

FindingInformation 3
PRODUCT REGISTRATION CARD
The package containing this manual also includes your product registration information. Warranty coverage begins at the time your Electrolux range was purchased.
If you received a damaged product, immediately contact your dealer or builder. Do not install or use a damaged appliance.
NOTE
Registering your product with Electrolux enhances our ability to serve you. You can register online (at the Internet address below) or by dropping your Product Registration Card in the mail. Complete and mail the Product Registration Card as soon as possible to validate the registration date.
Please record the purchase date of your Electrolux unit and your dealer’s name, address and telephone number.
________________________________________________
Purchase Date
________________________________________________
Electrolux Model Number
________________________________________________
Electrolux Serial Number
________________________________________________
Dealer Name
________________________________________________
Dealer Address
________________________________________________
Dealer Telephone
Keep this manual and the sales receipt together in a safe place for further reference.
QUESTIONS?
For toll-free telephone support in the U.S. and Canada:
1-877- 4ELECTROLUX (1-877-435-3287)
For online support and Internet product information:
www.electroluxusa.com

4 FindingInformation
TABLE OF CONTENTS |
|
Finding Information ........................................... |
2 |
Please Read And Save This Guide ................... |
2 |
Make A Record For Quick Reference ................ |
2 |
Questions .......................................................... |
3 |
Table Of Contents .............................................. |
4 |
Safety ................................................................... |
5 |
Important Safety Instructions .............................. |
5 |
General Precautions .......................................... |
6 |
Liquified Petroleum (Propane) |
|
Gas Conversion ................................................ |
9 |
Feature Overview .............................................. |
10 |
Control Panel Layouts ..................................... |
10 |
Cooktop Features .............................................. |
11 |
Proper Burner Adjustments ............................... |
11 |
Burner Locations .............................................. |
11 |
Sealed Burner Configurations ......................... |
12 |
Brass Burner Rings ......................................... |
12 |
Burner Igniters ................................................ |
12 |
Control Knobs ................................................. |
13 |
Placement of Burner Grates ............................. |
13 |
Surface Cooking ............................................... |
13 |
FlameAdjustment ............................................. |
13 |
Utensils for Best Performance .......................... |
14 |
Using the Griddle ............................................. |
14 |
Using the Wok Stand ....................................... |
15 |
Using the Simmer Plate .................................... |
16 |
Setting Surface Controls ................................... |
17 |
Operation ........................................................... |
18 |
Before Cooking ............................................... |
18 |
Operating the Control Valves ........................... |
18 |
Setting the Burner Flame Height ...................... |
20 |
Energy Saving Tips ........................................ |
20 |
Getting Started ................................................. |
21 |
Before Setting Oven Controls .......................... |
21 |
Companion Oven ............................................ |
23 |
Setting Oven Controls ..................................... |
24 |
Selector Knob Functions .................................. |
24 |
Oven Functions ............................................... |
25 |
Cooking Instructions ....................................... |
26 |
Baking ............................................................. |
26 |
Baking Problems ............................................. |
27 |
Convection Baking .......................................... |
28 |
Convection Roasting ....................................... |
29 |
Broiling ............................................................ |
31 |
Care and Cleaning ............................................ |
33 |
Using the Self-Clean Feature .......................... |
33 |
Starting the Self-Clean Cycle ........................... |
34 |
Cleaning Tips .................................................. |
35 |
Cleaning Stainless Steel Surfaces .................... |
37 |
Cleaning Porcelain Grates ............................... |
37 |
Cleaning Knobs and Bezels ............................ |
38 |
Cleaning Burner Bases ................................... |
38 |
Cleaning Burner Rings .................................... |
39 |
Cleaning Burner Igniters .................................. |
39 |
General Cleaning ............................................ |
40 |
Oven Light ...................................................... |
41 |
Solutions to Common Problems ..................... |
42 |
Warranty ............................................................ |
44 |

Safety 5
IMPORTANT SAFETY INSTRUCTIONS
Safety Precautions
Do not attempt to install or operate your appliance until you have read the safety precautions in this manual. Safety items throughout this manual are labeled with a Warning or Caution based on the risk type.
Definitions
 This is the safety alert symbol. It is used to alert you to potential personal injury hazards. Obey all safety messages that follow this symbol to avoid possible injury or death.
 WARNING
WARNING indicates a potentially hazardous situation which, if not avoided, could result in death or serious injury.
 CAUTION
CAUTION indicates a potentially hazardous situation which, if not avoided, may result in minor or moderate injury.
CAUTION
CAUTION used without the safety alert symbol indicates a potentially hazardous situation which, if not avoided, may result in property damage.
IMPORTANT
Indicates installation, operation or maintenance information which is important but not hazard related.

6 Safety
General Precautions
IMPORTANT
•Begin by ensuring proper installation and grounding of the appliance by a qualified technician according to the accompanying Installation Instructions. Have the installer show you where the fuse or junction box is located so that you know how and where to turn off power. Also, have the installer show you the location of the gas supply. If you smell gas, do not use the range. Immediately turn off the gas supply at the shut off valve, disconnect electrical power to the unit at the fuse or junction box and contact the gas supplier or qualified appliance technician.
•Ensure that the range is used only by those individuals who are able to operate it properly.
•Use the range only for cooking tasks expected of a home appliance as outlined in this manual.
•Properly clean and maintain as recommended in this manual, cleaning only the parts listed.
•Use only dry potholders to avoid steam burns when removing hot cookware.
•In the event that a burner flame goes out and gas escapes, open a window or door. Wait at least 5 minutes before attempting to use the range.
•Select utensils of the proper size, material and construction for the particular type of cooking being done. Select utensils that are large enough to contain food without boil-overs or spillovers. Choose pans with easily grasped handles that will stay cool while cooking. Do not use utensils with loose handles. Avoid using pans that are too heavy to lift safely. Use cookware only for its intended purpose. Certain types of glass, ceramic, and earthenware utensils are suitable for use only in an oven and not in cooktop applications.
•When cooking, set the burner controls so that the flame heats only the bottom of the utensil and does not extend up the sides of the utensil.
•When deep fat frying, be certain that the pan is large enough to contain the desired volume of food without overflow caused by bubbling of the fat. Never leave a deep fat fryer unattended. Avoid deep fat frying of moist or frost-covered foods. Foods with high water content may cause spattering or spilling of the hot fat. Heat fat slowly and stir together any combinations of oils and fats prior to applying heat. Utilize a deep fat frying thermometer to avoid heating the fat to temperatures above the flash point.
•Always turn pan handles to the side or back of the cooktop. Do not turn handles towards the room where they are easily hit. Handles should not extend over adjacent burners.
•Always check the positions of the control knobs to make sure the cooktop is off when you are finished cooking.
•Before performing any service, turn off the gas supply by closing the gas shut-off valve and turning off the electrical power supply.

Safety 7
IMPORTANT
•Always light each burner prior to placing a utensil on the burner grate. Also, turn the control knob to the “off” position before removing a utensil from the burner grate.
•Always clean the cooktop cautiously. If using a damp sponge or cloth, wait until the cooktop has cooled sufficiently to prevent steam burns. Also, some cleaners can produce harmful or unpleasant fumes if applied to hot surfaces.
•Clean only those parts listed in this manual.
•Keep any ventilation filters clean to avoid grease fires.
•Always set utensils gently onto the grates and center them so that they are wellbalanced.
•Always keep the cooktop surface clean and dry.
•This unit is designed as a cooking appliance. Never use it for warming or heating a room.
•Before performing any service, turn off the gas supply by closing the gas shut-off valve and turning off electrical power supply.
•Use this appliance only for its intended use as described in this manual. Do not use corrosive chemicals or vapors in this appliance. This type of appliance is not designed for industrial or laboratory use.
•Exercise caution when opening the oven door. Let hot air or steam escape before looking or reaching into the oven.
•Position oven racks in desired locations when the oven is cool. (If a rack must be repositioned after the oven is already hot, be certain that the potholder does not contact a hot heating element in the oven.)
•Before Self-Cleaning the oven, remove the broiler pan and insert, oven racks, rack glides, convection fan filter and any other utensils.
•In the event that a burner flame goes out and gas escapes, turn off the gas control and open a window or door. Wait at least 5 minutes before attempting to use the cooktop.

8 Safety
 CAUTION
•Do not use the range for warming or heating the room.
•Do not leave children alone or unattended in the area where the range is in use. Never allow children to sit or stand on any part of the range. Do not let children play with the range.
•Do not store items of interest to children above the range. Children could be burned or injured while climbing on the appliance.
•Do not wear loose or hanging apparel while using the range.
•Do not store combustible, flammable or explosive materials in the range or in adjacent cabinets.
•Do not leave food or cooking utensils, etc., in the oven during the self-clean cycle.
•Do not attempt to repair or replace any part of the range unless specifically recommended in literature accompanying this appliance. All other service should be referred to a qualified technician.
•Do not use water on grease fires. A violent steam explosion may result. Smother any flames with a lid, cookie sheet or flat tray. Flaming grease can be extinguished with baking soda or a multipurpose chemical or foam extinguisher.
•Do not allow potholders to touch gas burners. Do not use a towel or bulky cloth as a potholder.
•Do not use commercial oven cleaners or oven liner protective coatings on any part of the oven.
•Do not clean the door gasket, because rubbing, moving or in any way damaging the gasket, may eliminate the required tight door seal.
•DO NOT TOUCH INTERIOR SURFACES OF THE OVEN. During and after use, do not touch or let clothing or other flammable materials contact heating elements or interior surfaces of the oven until they have had sufficient time to cool.
•Do not block or obstruct the holes beneath the control knobs. Blocking these holes may affect burner operation and may result in a hazard.
•When using the cooktop, do not touch the grates, burner caps, burner bases, or any other parts in proximity to the flame. These components may be hot enough to cause burns.
•If the range is near a window, do not use long curtains as a window treatment. They can blow over the cooktop and create a fire hazard.
•Do not cover the burners and grates with anything except properly selected utensils. Decorative covers should not be used.
•Do not heat unopened food containers such as baby food jars and cans. Pressure buildup may cause the container to burst and cause injury.
•Do not use abrasive or caustic cleaners or detergents on this appliance, as these may cause permanent damage. Do not use aerosol cleaners, as these may be flammable or cause corrosion of metal parts.
•Do not use or attempt to use this appliance in the event of a power failure.
•Do not slide cookware across the grates. Sliding may damage the finish of the grates. Lift utensils to reposition them.
•Do not allow acids (citrus juices, tomato sauces, etc.) to remain on the oven cell surfaces. The porcelain finish may stain.
•Do not touch the range top or backguard with your bare hands during all cooking and self cleaning modes. Venting from the oven may cause the backguard to become hot.

Safety 9
LIQUIFIED PETROLEUM (PROPANE) GAS CONVERSION
This appliance can be used with Natural Gas and Propane Gas. It is shipped from the factory for use with natural gas.
A kit for converting to LP gas is supplied with your range. The kit is marked “FOR LP/PROPANE GAS CONVERSION”. Follow the installation instructions which are inside the envelope.
The conversion must be performed by a qualified service technician in accordance with the kit instructions and all local codes and requirements. Failure to follow instructions could result in serious injury or property damage. The qualified agency performing this work assumes responsibility for the conversion.
 WARNING
Severe shock, or damage to the range may occur if the range is not installed by a qualified installer or electrician.
 CAUTION
Any additions, changes or conversions required in order for this appliance to satisfactorily meet the application needs must be made by a qualified service technician in accordance with the manufacturer’s instructions and all codes and requirements of the authority having jurisdiction. Failure to follow the instructions could result in serious injury or property damage. The qualified agency performing this work assumes responsibility for the conversion.
10 FeatureOverview
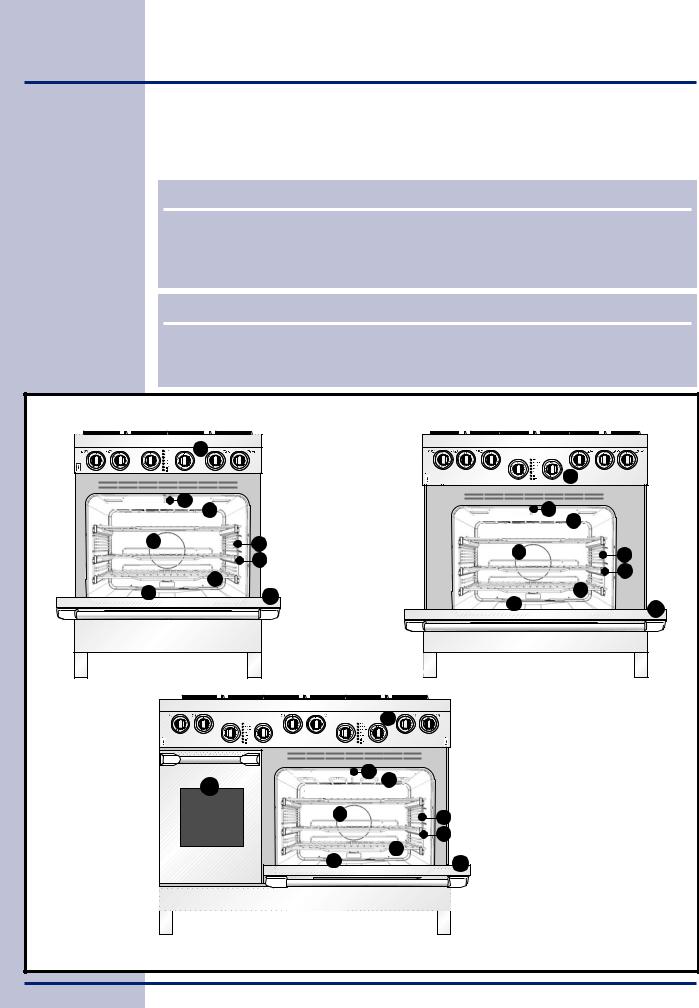
Before using your range, become familiar with the features and control panel layout. See Figure 1 for a detailed control panel layout for your model.
NOTE
Upon initial power being applied to the range, the function LED lights will flash while the electronic control completes its self test mode. The lights will continue flashing until the Function Knob is moved to some other position and back to "Off". At this time the range is ready for use.
NOTE
If a power outage occurs, the above noted test sequence will take place. The function LED lights will flash. The LED lights will continue to flash until the Function Knob is moved to some other position and back to "Off". At this time the range is re-set for use.
|
|
|
Model Features |
|
|
|
1 |
|
|
|
|
|
|
|
|
|
1 |
3 |
2 |
|
|
3 |
2 |
|
|
|
|
|
|
4 |
8 |
|
4 |
|
8 |
|
9 |
|
|
||
|
|
|
|
9 |
|
|
7 |
|
|
|
|
5 |
6 |
|
|
7 |
|
|
5 |
|
|||
|
|
|
|
6 |
|
|
|
|
|
|
10 |
E30DF74EPS |
|
|
|
E36DF76EPS |
|
|
|
|
|
|
|
|
|
|
1 |
|
|
|
|
|
|
|
|
|
1. Control Panel |
|
|
|
|
|
|
2. Broiling Element |
|
|
3 |
2 |
|
|
3. |
Oven Door Latch |
|
|
|
4. |
Convection Fan & Element |
||
|
10 |
|
|
|
5. |
Bake Element |
|
|
|
|
|
||
|
4 |
|
8 |
|
6. |
Oven Door |
|
|
|
9 |
|
7. |
Oven Racks |
|
|
7 |
|
8. |
Oven Rack Supports |
|
|
|
|
|
|||
|
5 |
|
6 |
9. Oven Rack Glides |
||
|
|
|
||||
|
|
|
10. Companion Oven |
|||
|
|
|
|
|
||
E48DF76EPS
Figure 1

CooktopFeatures 11
PROPER BURNER ADJUSTMENTS
The color of the flame is the key to proper burner adjustment. A good flame is clear, blue and hardly visible in a well-lighted room. Each cone of flame should be steady and sharply defined. Adjust or clean burner if flame is yellow-orange. To clean burner, see instructions under General Care & Cleaning.
BURNER LOCATIONS
All Electrolux Icon range cooktops are equipped with sealed burners. Burner configurations vary by the model number of your range. See Figure 2 for a detailed burner layout for your model.
|
|
Burner Configurations |
|
|
15000 BTU |
15000 BTU |
15000 BTU |
17000 BTU |
8500 BTU |
8500 BTU |
17000 BTU |
8500 BTU |
17000 BTU |
15000 BTU |
E30DF74EPS |
|
|
|
E36DF76EPS |
|
15000 BTU |
17000 BTU |
8500 BTU |
|
8500 BTU |
17000 BTU |
15000 BTU |
Figure 2 |
E48DF76EPS |
|
12 CooktopFeatures
SEALED BURNER CONFIGURATIONS
On E30DF74EPS ranges, there are a total of four burners, including one burner rated at a maximum output of 17,000 BTU/HR, two burners rated at a maximum of 15,000 BTU/HR and one burner rated at a maximum output of 8,500 BTU/HR. The knobs are grouped in twos. The left two knobs operate the left two burners, and the right two knobs control the two right burners.
On E36DF76EPS and E48DF76EPS ranges, there are a total of six burners, including two burners rated at a maximum output of 17,000 BTU/HR, two burners rated at a maximum of 15,000 BTU/HR and two burners rated at a maximum output of 8,500 BTU/HR. The knobs are positioned to correspond with the burner layout.
BRASS BURNER RINGS
All burners are attached to the cooktop by retaining nuts. Gaskets around the undersides of the burner bases ensure that the burners are sealed, thereby preventing any liquid spills from entering the cooktop chassis. All spills remain on the surface of the cooktop.
The brass burner heads spread the flame evenly around the burner perimeters. The burner heads must seat properly in the burner bases to enable proper cooktop operation. To ensure proper seating, positioning tabs have been placed on the bottom of each burner head to slide into corresponding notches in the fixed burner base.
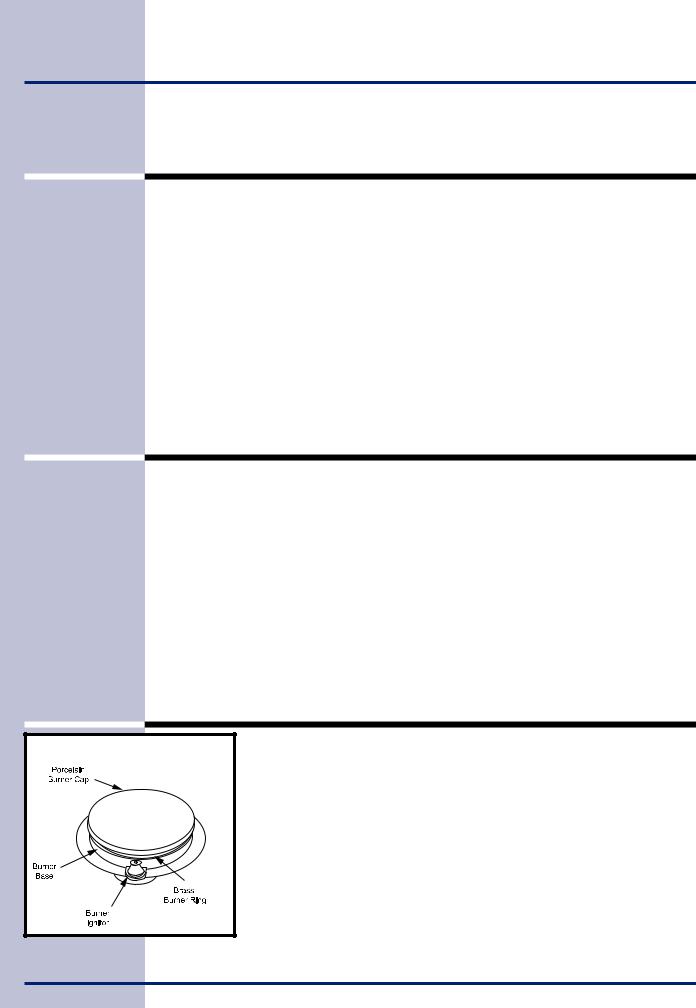
BURNER IGNITORS
Figure 3
A burner igniter is located on each gas burner base. When a control knob is rotated more than 90 degrees counterclockwise, the ignitor will spark and the selected burner will ignite. Additionally, due to Vantage Flame™, the automatic reignition feature, the igniters will spark automatically if a flame should blow out or be severely distorted by a draft or by a ventilation system. Burner igniters must always be kept clean and dry to function properly. Dirty or wet igniters will result in constant sparking, even if there is a flame present. See Figure 3.
Burner Assembly
CooktopFeatures/SurfaceCooking 13
CONTROL KNOBS
The control knobs provided with this range are designed for ease of use and longevity. The “D” shaped design of the knob shaft ensures proper orientation when reinstalling the knob. Located beneath each knob is a bezel ring that mounts to the range.
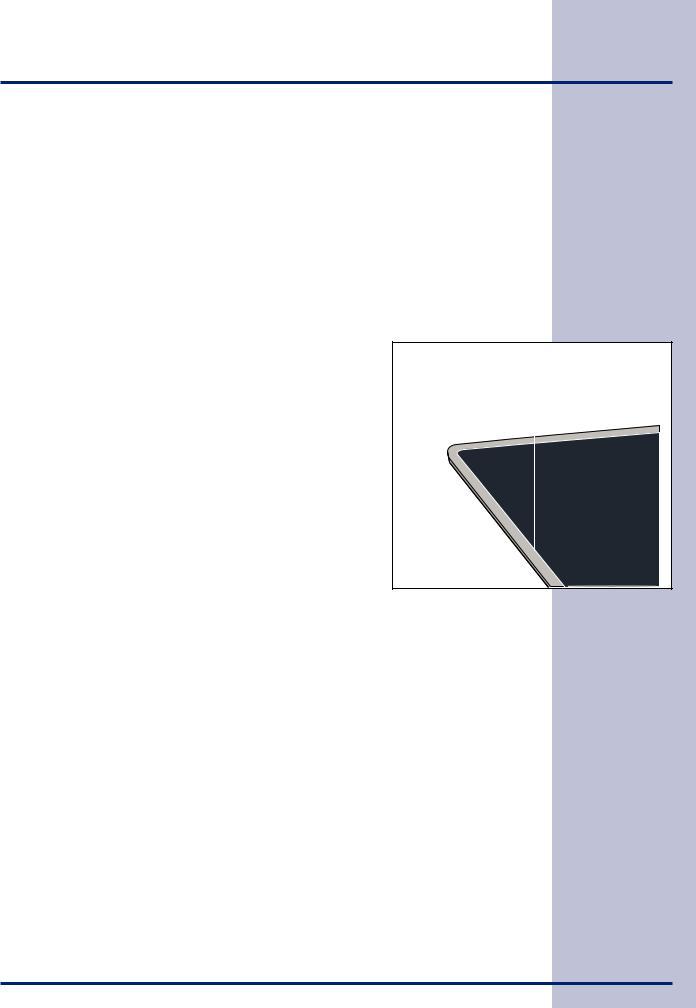
PLACEMENT OF BURNER GRATES
Place grates on the porcelain coated spill tray. See Figure 4. Be sure they are located correctly inside the stainless steel frame.
IMPORTANT
Do not slide the grates on the stainless steel frame. Doing so can damage the surface.
FLAME ADJUSTMENT
Figure 4 |
For most cooking, start on the highest control setting and then turn to a lower one to complete the process. Use the chart below as a guide for determining proper flame size for various types of cooking. The size and type of utensil used and the amount of food being cooked will influence the setting needed for cooking.
For deep fat frying, use a thermometer and adjust the surface control knob accordingly. If the fat is too cool, the food will absorb the fat and be greasy. If the fat is too hot, the food will brown so quickly that the center will be undercooked. Do not attempt to deep fat fry too much food at once as the food will neither brown nor cook properly.
*Flame Size |
Type of Cooking |
High Flame |
Start most foods; bring water to a boil; pan broiling |
Medium Flame |
Maintain a slow boil; thicken sauces, gravies; steam |
Low Flame |
Keep foods cooking; poach; stew |
*These settings are based on using medium-weight aluminum pans with lids. Settings may vary when using other types of pans.
Correct |
RIGHT |
Incorrect |
WRONG |
Figure 5 |
Never extend the flame beyond the outer edge of the utensil. A higher flame simply wastes heat and energy, and increases your risk of being burned by the flame.
14 Surface Cooking
UTENSILS TO USE FOR BEST PERFORMANCE
*GOOD |
POOR |
Figure 6
Pans should have flat bottoms. Check for flatness by rotating a ruler across the bottom. There should be no gaps between the pan and ruler.
* Specialty pans such as lobster pots, griddles and pressure cookers may be used but must conform to the above recommended cookware requirements.
•Flat bottom and straight sides.
•Tight fitting lids.
•Weight of handle does not tilt pan. Pan is well balanced.
•Pan sizes match the amount of food to be prepared and the size of burner.
•Made of material that conducts heat well.
•Easy to clean.
•Curved and warped pan bottoms.
•Pan overhangs unit by more than 2.5 cm (1”).
•Heavy handle tilts pan.
•Flame extends beyond unit.
Note: Always use a utensil for its intended purpose. Follow manufacturer's instructions. Some utensils were not made to be used in the oven or on the cooktop.
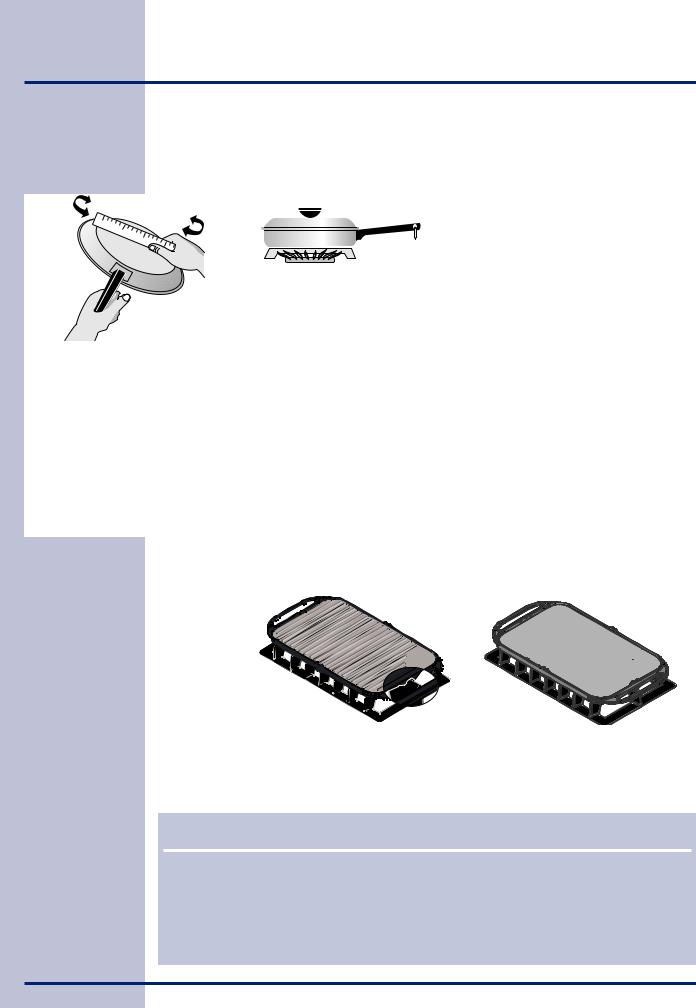
USING THE GRIDDLE
|
Figure 8 |
Figure 9 |
|
Side with grill |
|
|
Flat Side |
|
|
|
|
|
The griddle is intended for direct food cooking and can be used on both sides |
|
|
(Figures 8 and 9). Do not use pans or other cookware on the griddle. Doing so |
|
Figure 7 |
could damage the finish. With the grate in position over the burner, set the |
|
griddle on top of the grate positioning the notches in the griddle over the grate |
||
|
fingers(Figures 7 and 8). |
|
 CAUTION
Always place the griddle on the grate before to turn on the burner.
Always use potholders to remove the griddle from the grate. Allow the griddle to cool before removing. Do not set hot griddle on surfaces that cannot withstand high heat; such as countertops.
Be sure the griddle is positioned correctly and stable before use to prevent hot spills and possible burns.
 Loading...