

Page 1
Use & Care Guide
Induction Cooktop
Dishwasher
318 200 630 (0602) Rev. A
Page 2

2
Finding Information
MAKE A RECORD FOR FUTURE USE
Brand_______________________________________________________________
Purchase Date______________________________________________________
Model Number______________________________________________________
Serial Number______________________________________________________
NONO
TETE
NO
TE
NONO
TETE
The serial and model numbers may be found on the serial plate located under the
cooktop.
QUESTIONS?
For toll-free telephone support in the U.S. and Canada:
1-877-4ELECTROLUX (1-877-435-3287)
For online support and internet product information:
www.electrolux.com
©2006 Electrolux Home Products, Inc.
Post Office Box 212378, Augusta, Georgia 30917, USA
All rights reserved. Printed in the USA
Page 3

Finding Information
TABLE OF CONTENTS
3
Finding Information .......................................... 2-3
Make a Record for Future use ................................. 2
Questions? ............................................................... 2
Safety .................................................................. 4-6
Important Safety Instructions ..................................... 4
Induction Cooktop Features ........................... 7-8
Induction Cooktop Display Messages .......... 9-10
LED Messages or Light Indicators Displayed by
Main Control ............................................................ 9
LED Messages or Light Indicators Displayed by
Cooking Zone Controls ....................................... 9-10
Before Using the Cooktop ............................ 11-13
Use the Correct Cookware Type............................. 11
Minimum Pan Size Requirements
for Each Cooking Zones .......................................... 11
Cookware Recommendations ................................. 12
Use Quality Cookware in Good Condition .............. 13
Setting Surface Controls .............................. 14-18
Using the Touch Control ......................................... 14
Operating the Cooking Zones ........................... 14-15
Preheat Recommendations ..................................... 16
Keep Warm Feature ............................................... 16
Minute Timer .......................................................... 17
Locking the Controls ............................................... 17
Power Sharing ....................................................... 18
Operational Noises ................................................. 18
General Care & Cleaning ............................... 19-20
Ceramic Glass Cooktop Cleaning & Maintenance ... 19
Cleaning Recommendations for
Ceramic Glass Cooktop ..................................... 19-20
Solutions to Common Problems .................. 21-23
Entire Cooktop Does Not Operate .......................... 21
Cooktop Turns Off While Cooking ........................... 21
Cooking Zone Does Not Heat Food ....................... 21
Cooking Zone Heats Food
Too Hot or Not Enough .......................................... 22
Food Does Not Heat Evenly .................................. 22
Poor Cooking Results ............................................ 22
Cooktop Zone Control Displays
Main Control Displays
Cooking Zone LED Continuously Flashes
Metal Marks on Ceramic Cooktop Glass ................. 23
Scratches or Abrasions on
Ceramic Cooktop Glass .......................................... 23
Brown Streaks or Specks on Ceramic
Cooktop Surface .................................................... 23
Area of Discoloration with Metallic Sheen
on Ceramic Cooktop Glass ..................................... 23
Warranty Information ......................................... 24
00, 03, 04, 05, 06
E
and 2 Digits LED
or
07 ........
F ............
22
22
Page 4

4
Safety
IMPORTANT SAFETY INSTRUCTIONS
Read all instructions before using this appliance. Save these instructions for future reference.
This manual contains important safety symbols and instructions. Please pay attention to these
symbols and follow all instructions given.
WARNINGWARNING
WARNING
WARNINGWARNING
This symbol will help alert you to situations that may cause serious bodily harm, death or property
damage.
CACA
UTIONUTION
CA
UTION
CACA
UTIONUTION
This symbol will help alert you to situations that may cause bodily injury or property damage.
WARNINGWARNING
WARNING
WARNINGWARNING
To reduce the risk of fire, electrical shock, or injury when using your electric cooktop, follow basic
precaution including the following:
This unit has been tested and found to comply with the limits for a class B digital device,
pursuant to Part 18 of the FCC rules. These limits are designed to provide reasonable
protection against harmful interference in a residential installation. This unit generates, uses
and can radiate radio frequency energy and, if not installed and used in accordance with the
instructions, may cause harmful interference to radio communications. However there is no
guarantee that interference will not occur in a particular installation. If this unit does cause
harmful interference to radio or television reception, which can be determined by turning the
unit off and on, the user is encouraged to try to correct the interference by one or more of the
following measures:
• Reorient or relocate the receiving antennae.
• Increase the distance between the unit and receiver.
• Connect the unit into an outlet or a circuit different from that to which the receiver is
connected.
CACA
UTIONUTION
CA
UTION
CACA
UTIONUTION
Persons with a pacemaker or similar medical device should exercise caution using or standing near an induction
unit while it is in operation, as the electromagnetic field may affect the working of the pacemaker or similar medical
device. It would be advisable to consult your Doctor or the pacemaker or similar medical device manufacturer
about your particular situation.
• Remove all tape and packaging wrap before using the appliance. Destroy the carton
and plastic bags after unpacking the appliance. Never allow children to play with
packaging material.
• Proper Installation. Be sure your appliance is properly installed and grounded by a
qualified technician in accordance with the National Electrical Code ANSI/NFPA
No. 70 - latest edition in the United States, or CSA Standard C22.1, Canadian Electrical
Page 5

Safety
Code, Part 1, in Canada, and local code requirements. Install only per installation
instructions provided in the literature package for this appliance.
Ask your dealer to recommend a qualified technician and an authorized repair service. Know
how to disconnect the electrical power to the appliance at the circuit breaker or fuse box in
case of an emergency.
• User Servicing. Do not repair or replace any part of the appliance unless specifically
recommended in the manuals. All other servicing should be done only by a qualified
technician to reduce the risk of personal injury and damage to the appliance.
• Never modify or alter the construction of an appliance such as removal of panels, wire
covers or any other permanent part of the product.
• Storage on Appliance. Flammable materials should not be stored near or on the
cooking surface. This includes paper, plastic and cloth items, such as cookbooks,
plasticware and towels, as well as flammable liquids. Do not store explosives, such as aerosol
cans, on or near the appliance. Flammable materials may explode and result in fire or property
damage.
CACA
UTIONUTION
CA
UTION
CACA
UTIONUTION
Do not store items of interest to children in the cabinets above the appliance. Children climbing on the
cooktop to reach items could be seriously injured.
5
• Do not leave children alone. Children should not be left alone or unattended in the
area where an appliance is in use. They should never be allowed to sit or stand on any
part of the appliance.
CACA
UTIONUTION
CA
UTION
CACA
UTIONUTION
DO NOT TOUCH COOKING ZONES OR AREAS NEAR THESE SURFACES. Cooking Zones may be hot from
residual heat even though they are dark in color. Areas near the Cooking Zones may become hot enough to cause
burns. During and after use, do not touch, or let clothing or other flammable materials touch these areas until they
have had sufficient time to cool.
WARNINGWARNING
WARNING
WARNINGWARNING
Never use your appliance for warming or heating a room.
• Wear Proper Apparel. Loose-fitting or hanging garments should never be worn while
using the appliance. Do not let clothing or other flammable materials contact hot surfaces.
• Do Not Use Water or Flour on Grease Fires. Smother the fire with a pan lid, or use
baking soda, a dry chemical or foam-type extinguisher.
• When heating fat or grease, watch it closely. Fat or grease may catch fire if allowed to
become too hot.
• Use Only Dry Pot holders. Moist or damp pot holders on hot surfaces may result in
burns from steam. Do not let the pot holders touch hot surface units. Do not use a towel or
other bulky cloth instead of a pot holder.
• Do Not Heat Unopened Food Containers. Buildup of pressure may cause the container
to burst and result in injury.
Page 6

6
Safety
IMPORTANT SAFETY INSTRUCTIONS FOR USING YOUR COOKTOP
• Know which touch key pads controls each surface of the Cooking Zones.
• Clean the appliance regularly to keep all parts free of grease that could catch fire.
Exhaust fan ventilation hoods and grease filters should be kept clean. Do not allow grease to
accumulate on hood or filter. Greasy deposits in the fan could catch fire. When flaming food
under the hood, turn fan on. Refer to hood manufacturer's instructions for cleaning.
• Use Proper Pan Size. This appliance is equipped with one or more Cooking Zones of different
sizes. Select utensils having flat bottoms large enough to cover the Cooking Zones. The pan
detection sensors will not allow the affected Cooking Zones to operate without a pan present.
• Utensil Handles Should Be Turned Inward and Should Not Extend Over Adjacent
Cooking Zones. To reduce the risk of burns, ignition of flammable materials, and spillage due
to unintentional contact with the utensil.
• Never Leave Prepared Food on the Cooking Zones. Boilovers cause smoking and greasy
spillovers that may ignite, or a pan that has boiled dry may melt or become damaged.
• Protective Liners. Do not use aluminum foil to line any part of the cooktop. Only use
aluminum foil as recommended after cooking process, if used as a cover to be placed over the
food. Any other use of aluminum foil may result in the risk of electric shock, fire or short circuit.
• Glazed Cooking Utensils. Only certain types of glass, glass/ceramic, ceramic,
earthenware, or other glazed utensils are suitable for range top service without breaking due
to the sudden change in temperature. Check the manufacturer's recommendations for
cooktop use.
• Ventilating hood. The ventilating hood above your cooking surface should be cleaned
frequently, so the grease from cooking vapors does not accumulate on the hood or filter.
FOR CERAMIC-GLASS COOKTOP ONLY
• Do Not Clean or Operate a Broken Cooktop. If cooktop should break, cleaning solutions
and spillovers may penetrate the broken cooktop and create a risk of electric shock. Contact
a qualified technician immediately.
• Clean Cooktop with Caution. If a wet sponge or cloth is used to wipe spills on a hot cooking
area, be careful to avoid a steam burn. Some cleaners can produce harmful fumes if applied
to a hot surface.
• Do Not Place Hot Cookware on Cold Cooktop Glass. This could cause glass to break.
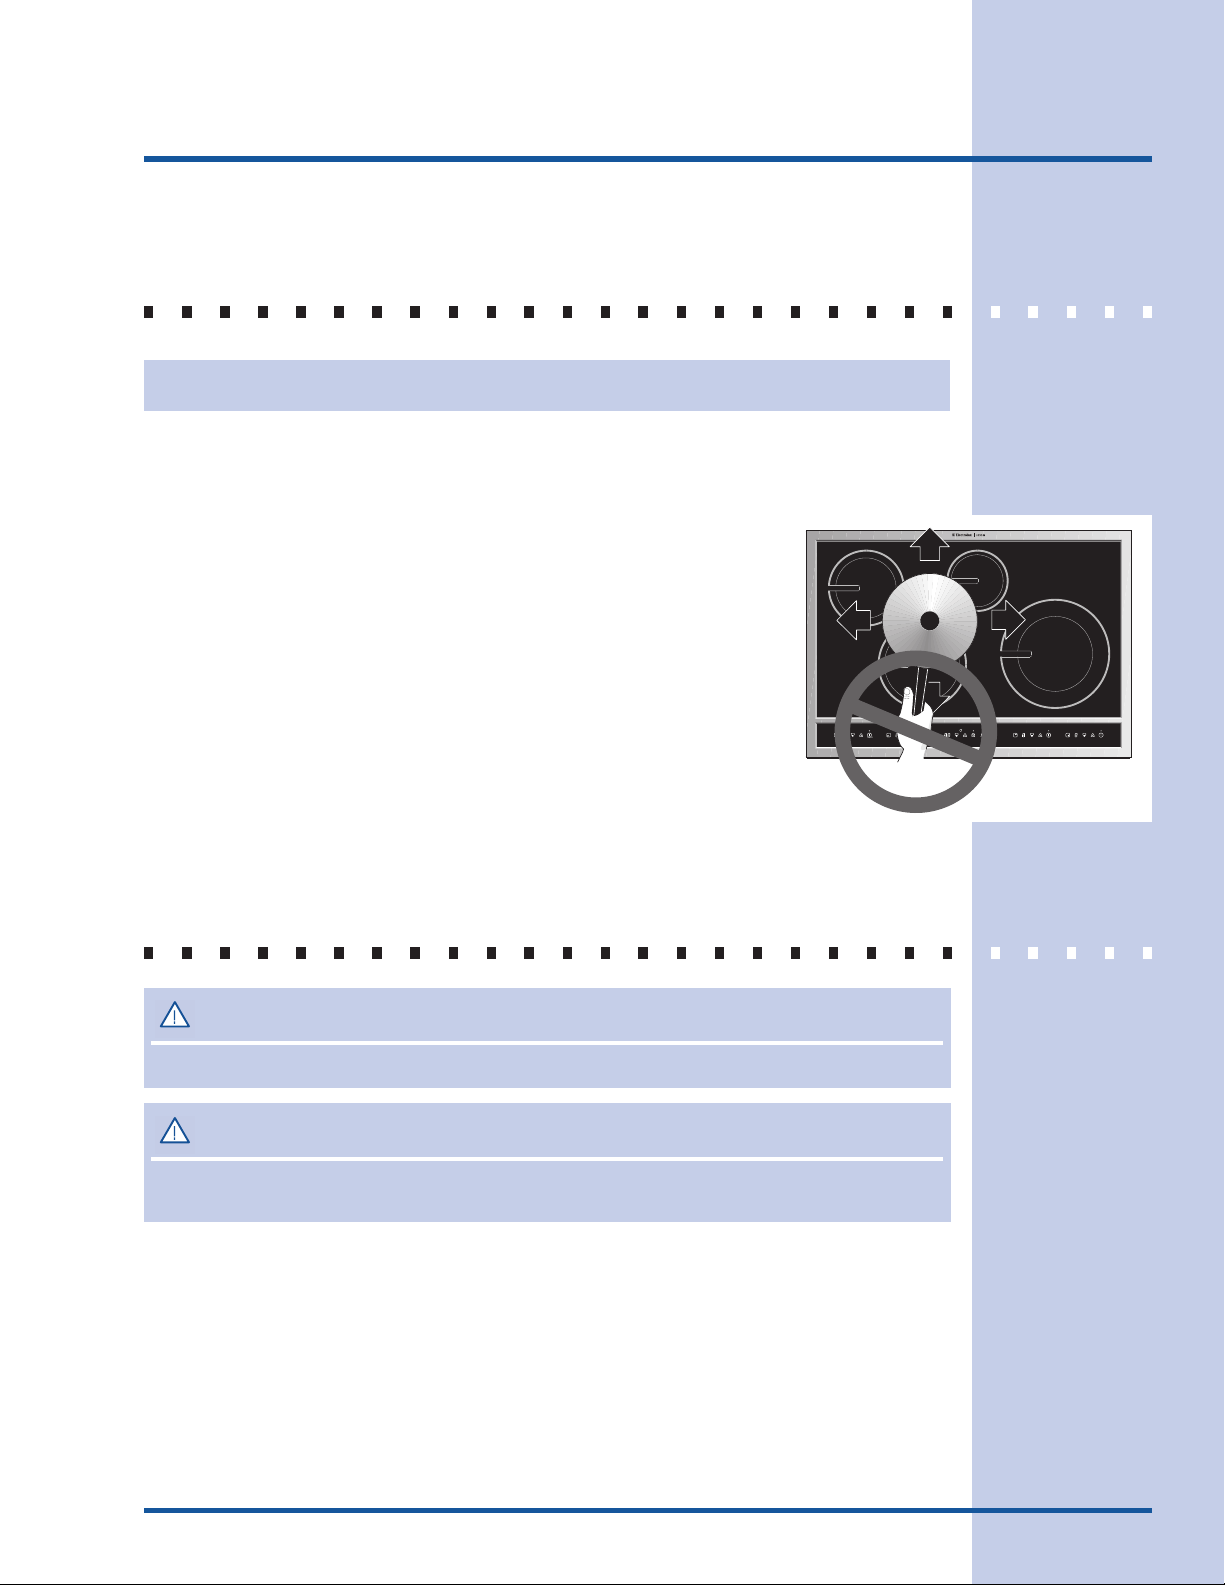
• Do not slide pan across the cooktop surface. They may scratch the cooktop surface.
• Do Not Let Pans Boil Dry. This may cause permanent damage in the form of breakage,
fusion, or marking that can affect the ceramic-glass cooktop. (This type of damage is not
covered by your warranty).
IMPORIMPOR
IMPOR
IMPORIMPOR
The California Safe Drinking Water and Toxic Enforcement Act requires the Governor of California to
publish a list of substances known to the state to cause cancer, birth defects or other reproductive harm,
and requires businesses to warn customers of potential exposure to such substances.
TT
ANT SAFETY NOANT SAFETY NO
T
ANT SAFETY NO
TT
ANT SAFETY NOANT SAFETY NO
TICETICE
TICE
TICETICE
Page 7
Induction Cooktop Features
INDUCTION COOKTOP FEATURES
READ THESE INSTRUCTIONS CAREFULLY BEFORE USING THE COOKTOP
A COOLER COOKTOP - A unique feature of the Induction Cooktop is whether turned ON or
OFF, the cooktop surface remains cooler than standard ceramic cooktops.
CACA
UTIONUTION
CA
UTION
CACA
UTIONUTION
The Cooking Zones may appear to be cool while turned ON and after they have been turned OFF. The glass surface
may be HOT form residual heat transfered from the cookware and burns may occur.
MAGNETIC DETECTOR - The coil sensor automatically detects whether the pan is magnetic
and eliminates accidental “turn-ONs.”
PAN SIZE DETECTION - The pan recognition sensor automatically detects and adapts the
Cooking Zones to the pan sizes in use.
EFFICIENT - Induction cooking heats faster while using less energy. Induction power levels
are quick to boil and when simmering.
7
1
2
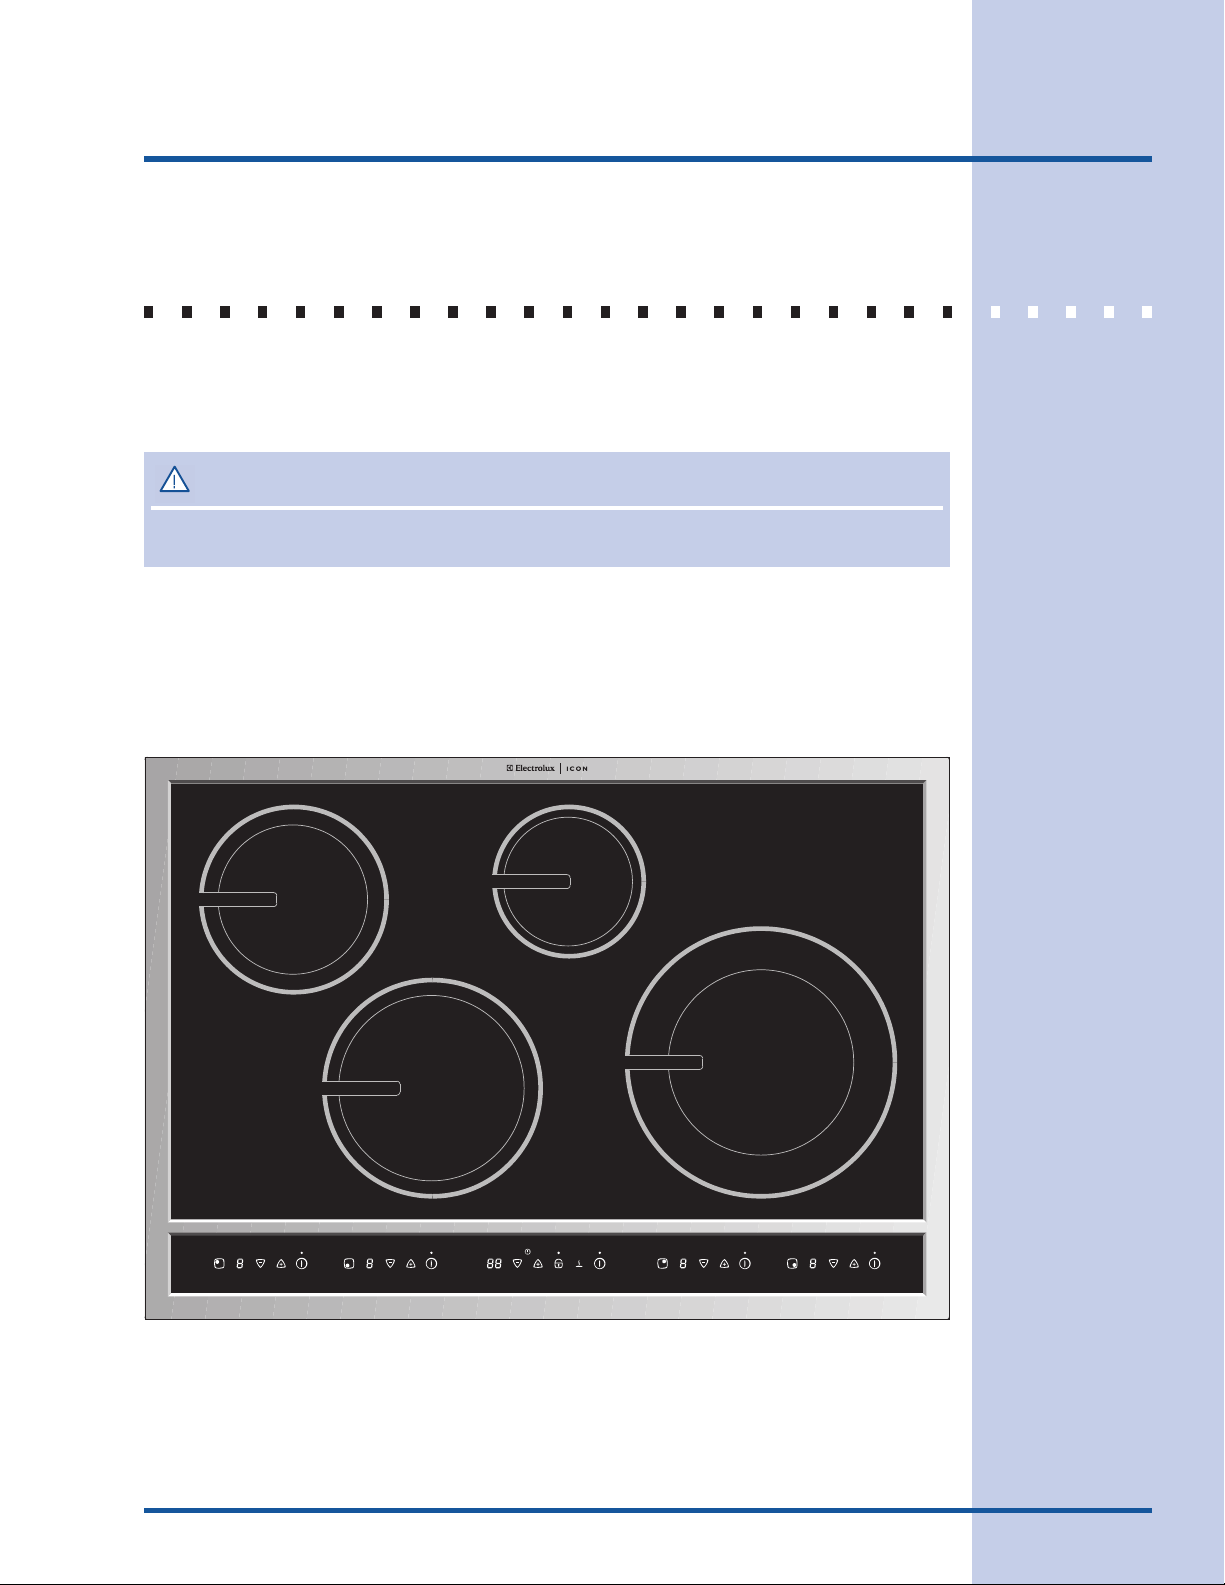
1. Left Rear Cooking Zone.
2. Left Front Cooking Zone.
3. Right Rear Cooking Zone.
4. Right Front Cooking Zone.
5. Left Rear Cooking Zone Control Pads.
3
4
956 78
POWER
Fig. 1
6. Left Front Cooking Zone Control Pads.
7. Right Rear Cooking Zone Control Pads.
8. Right Front Cooking Zone Control Pads.
9. Main Cooktop Controls (See Fig 2).
On/Off On/OffOn/OffOn/Off
Page 8
8
Induction Cooktop Features
INDUCTION COOKTOP FEATURES (CONT’D)
9
Main Cooktop Controls
16
5
15
6 7 8
14
1213
Fig 2.
Cooking Zone Controls
(at 4 locations)
192021
Fig 3.
11
POWER
10
18
On/Off
17
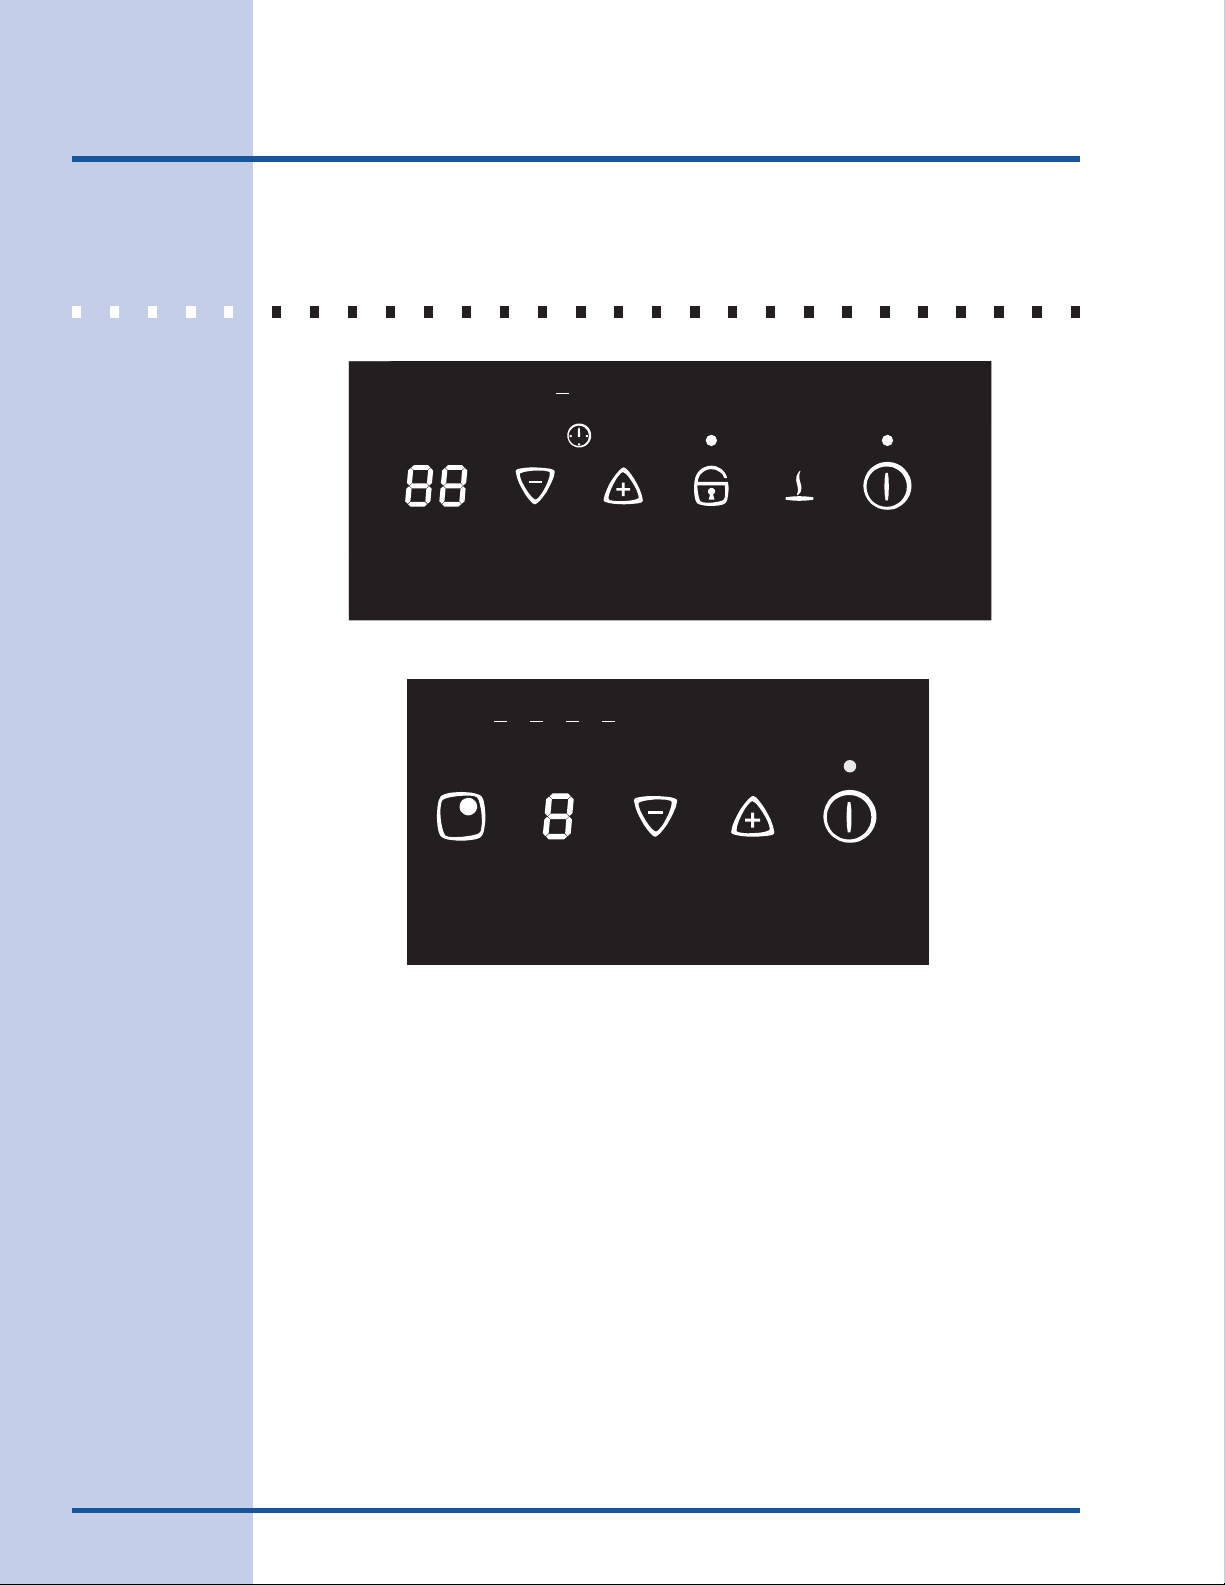
5. Left Rear Cooking Zone Control Pads.
6. Left Front Cooking Zone Control Pads.
7. Right Rear Cooking Zone Control Pads.
8. Right Front Cooking Zone Control Pads.
9. Main Cooktop Controls (See Fig 2).
10. Cooktop Power Key Pad (See p. 9).
11. Cooktop Power Indicator Light (See p. 9).
12. Keep Warm Setting Key Pad (See pages 10 & 16).
13. Controls Lock Key Pad (See pages 9 & 17).
14. Controls Lockout Indicator Light (See pages 9 & 17).
15. Minute Timer Setting Up/Down Arrow Key Pads (See pages 16 & 17).
16. Minute Timer LED (displays up to 99 minutes - (See pages 16 & 17).
17. Cooking Zone ON/OFF Key Pad (for each Cooking Zone).
18. Cooking Zone ON/OFF Indicator Light (for each Cooking Zone).
19. Cooking Zone Up Arrow Power Key Pad (for each Cooking Zone).
20. Cooking Zone Down Arrow Power Key Pad (for each Cooking Zone).
21. Cooking Zone Power Level LED (for each Cooking Zone).
Page 9
Induction Cooktop Display Messages
LED MESSAGES OR LIGHT INDICATORS DISPLAYED
BY MAIN CONTROL
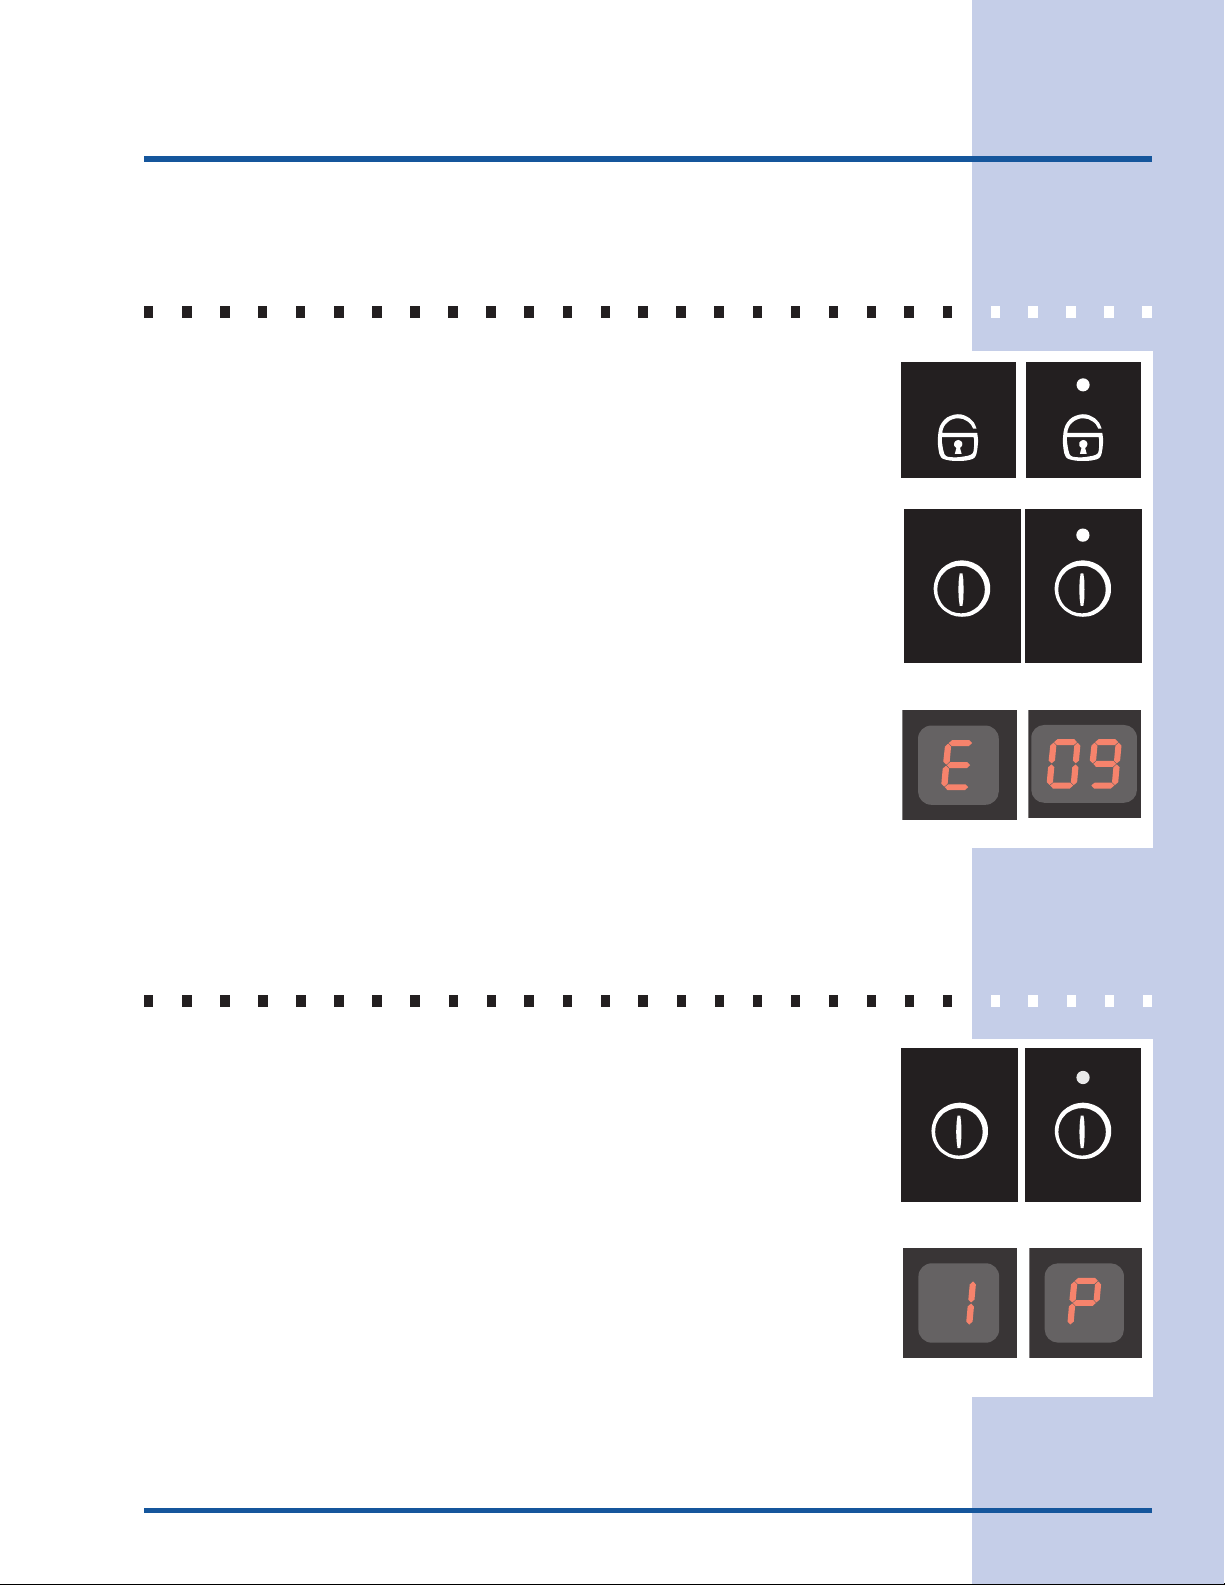
CONTROLS LOCK - This feature allows the cooktop to be locked only when the
cooktop is switched to OFF. Touch and hold the LOCK key pad for 5 seconds. A
beep will sound and the Lock indicator light will glow (Fig. 5). Once locked, no other
displays will glow and no Cooking Zones will activate. To turn the Controls Lock
OFF, touch and hold the LOCK key pad for 5 seconds. A beep will sound, the Lock
indicator light will turn OFF (Fig. 4) and the cooktop may be used normally (See p.
17 for more instructions).
COOKTOP POWER - The Cooktop POWER key pad activates the entire Cooktop.
To power the cooktop, touch and hold the POWER key pad for 2 seconds. A beep
will sound and the Power LED will glow (See Fig. 7). The cooktop will be in a ready
mode for 10 seconds. If no other key pads are touched the Cooktop Main POWER
will turn OFF automatically. To turn the Main Power OFF touch and hold the Main
POWER key pad for 1 second. A beep will sound and the Power Indicator Light will
turn OFF (See Fig. 6).
Fig. 4 Fig. 5
POWER
Fig. 6 Fig. 7
9
POWER
Errors Codes E00 thru E11 - The control displays
and digits in Main Control LED (Fig. 9) together showing an error code.
EE
E in Cooking Zones LEDs (Fig. 8)
EE
Fig. 8 Fig. 9
LED MESSAGES OR LIGHT INDICATORS DISPLAYED
BY COOKING ZONE CONTROLS
COOKING ZONE ON/OFF PAD - Each of the four Cooking Zones have separate
ON/OFF key pads. Once the Main Power key pad has been touched to activate the
cooktop, touch the corresponding Cooking Zone ON/OFF key pad once to active
the Cooking Zone needed.
UP/DOWN Arrow key pad is not touched within 5 seconds, the request to turn the
Cooking Zone ON will cancel and the Cooktop Main Power will turn OFF. To set a
Cooking Zone power level touch the corresponding Cooking Zone UP or DOWN
Arrow key pad once. The Cooking Zone ON/OFF Indicator Light will glow (Fig. 11).
To turn OFF a Cooking Zone, touch the Cooking Zone ON/OFF key pad once. The
Cooking Zone Indicator Light will turn OFF (Fig. 10).
00
0 will appear in the LED display. If the corresponding
00
On/Off
Fig. 10 Fig. 11
On/Off
Fig. 12 Fig.13
Page 10

10
Fig. 14
Fig. 15
Induction Cooktop Display Messages
LED MESSAGES OR LIGHT INDICATORS DISPLAYED
BY COOKING ZONE CONTROLS (CONT’D)
POWER LEVEL SETTINGS - The Cooking Zones have four separate Power Level LEDs.
P P
P or
P P
11
1
11
Once active, the Cooking Zones will provide 15 Power Levels to choose from. These include
33
22
44
55
66
77
88
(Fig. 12),
2. 2.
of
2. (2.5),
2. 2.
“Power Boost” provides 125% power level for 10 minutes (See Fig. 13). Each key pad touch
(or just holding down the Power Level key pad) will scroll through all the available power
levels for any Cooking Zone quickly (See pages 14-17 for complete instructions).
RESIDUAL HEAT - Once any Cooking Zone has been used for cooking and turned OFF, and
if the cooktop surface temperature on any of the Cooking Zones is still too HOT,
15) will appear in the LED display for the affected Cooking Zone. The
display if the temperature is still too HOT.
3
2,
,
4,
33
22
44
3. 3.
3. (3.5),
3. 3.
5,
6,
55
66
4. 4.
4. (4.5),
4. 4.
99
7,
8,
9; including precise half-increment Cooking Zone Power Levels
77
88
99
5. 5.
5. (5.5) and
5. 5.
6. 6.
6. (6.5; See Fig. 14).
6. 6.
The highest setting of
HH
H will continue to
HH
HH
H (See Fig.
HH
Fig. 16
Fig. 17
CACA
UTIONUTION
CA
UTION
CACA
UTIONUTION
The Cooking Zones may appear to be cool while turned ON and after they have been turned OFF. The glass surface
may be HOT form residual heat transfered from the cookware and burns may occur.
KEEP WARM - Use the WARM (or LOW) key pad to activate the Warm setting for any of the
Cooking Zones. The ON/OFF key pad for the desired Cooking Zone must be activated first,
then touch the WARM key pad located in the Cooktop Main Control area once to set.
(LOW) should appear in the corresponding Cooking Zone LED (See Fig. 16 & page 16 for
complete information).
PAN DETECTION - All four Cooking Zones will provide a Pan Detection message. If a Cooking Zone is turned ON and no pan is detected for the Cooking Zone, the pan has been moved
or if the pan is not centered correctly or if the pan is not made of magnetic material,
Fig. 17) will appear in the affected Cooking Zone LED display.
LL
L
LL
FF
F (See
FF
Page 11
Before Using the Cooktop
11
USE THE CORRECT COOKWARE TYPE
The magnetic Cooking Zone sensors located below the cooktop surface
require the use of cookware made with magnetic material in order to start the
heating process on any of the Cooking Zones.
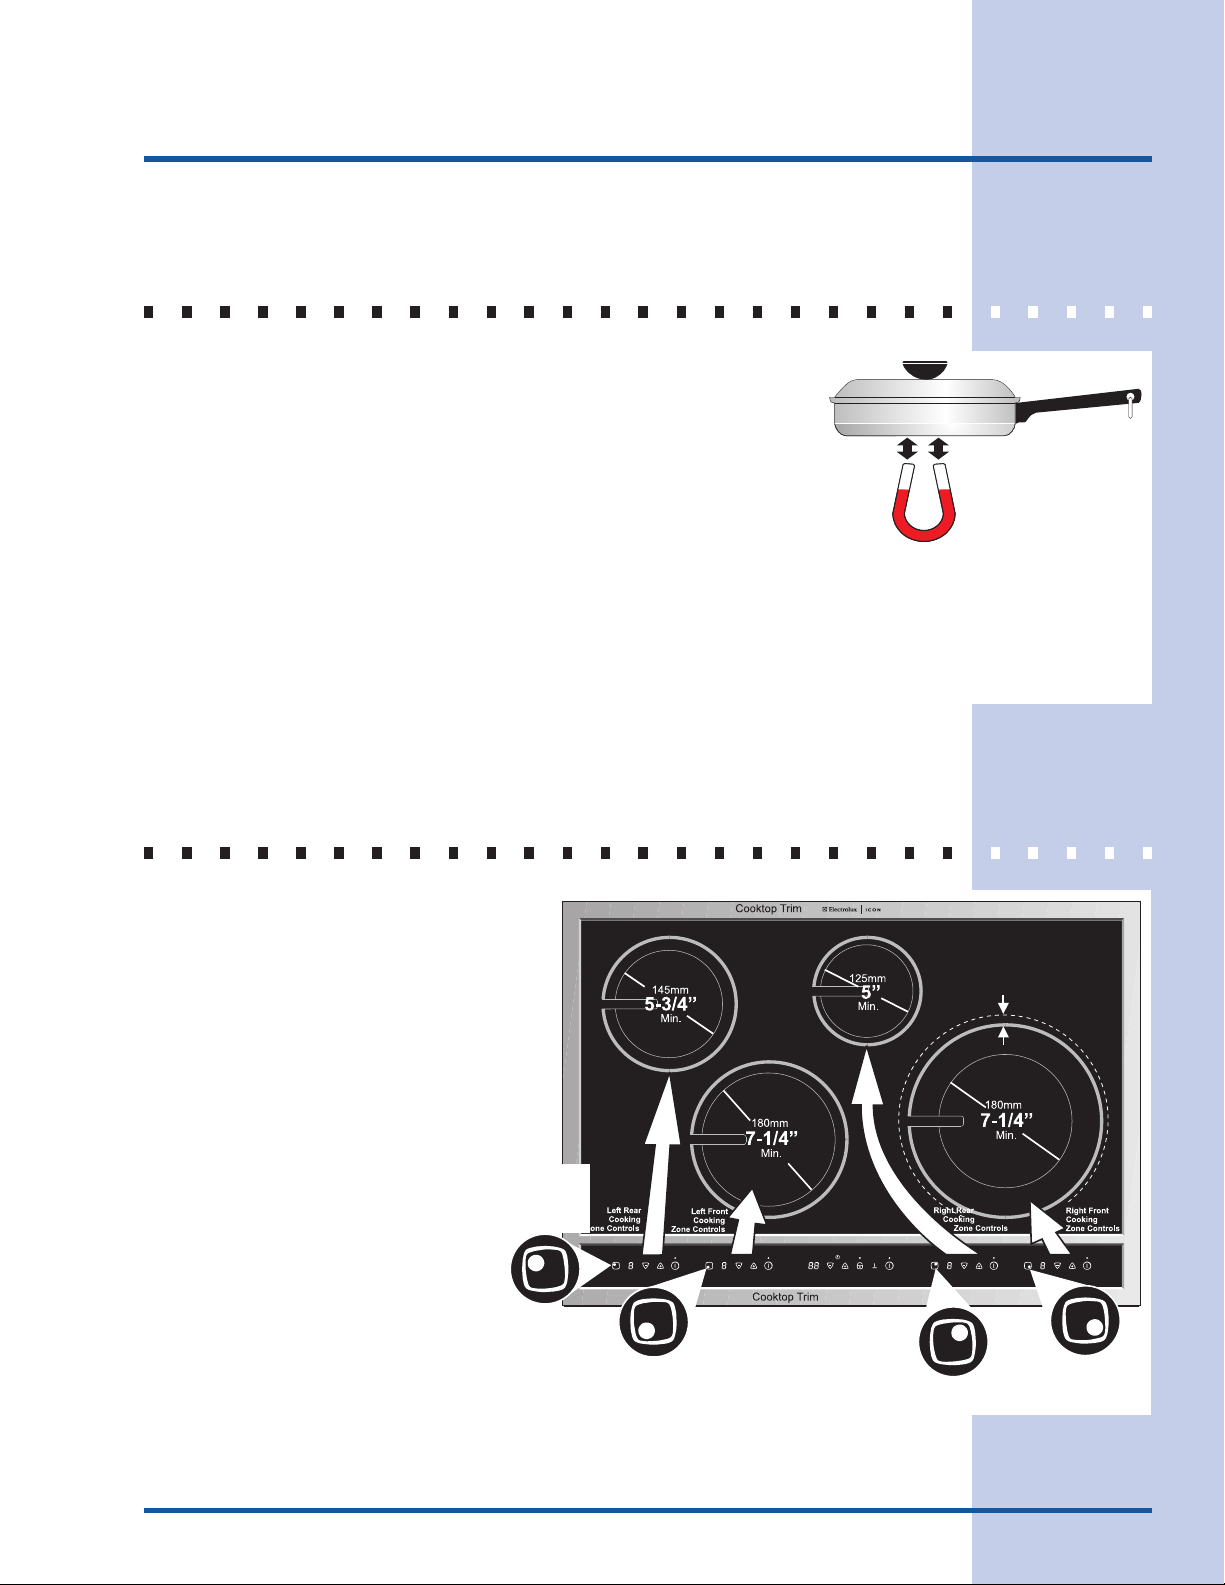
When purchasing pans, look for cookware specifically identified by the
manufacturer for use with Induction cooktops. If your not sure, use a magnet
to test whether the cookware type will work. If a magnet sticks to the bottom
of the cookware, the material type is correct for Induction cooking (See Fig.
18).
It is recommended to always use heavier high quality stainless steel cookware on your Induction Cooktop surface.
This will greatly reduce the possibility of developing scratches on the ceramic surface.
Even quality cookware can scratch the cooktop surface, especially if cookware is slid over the ceramic cooktop
surface without being lifted up. Over time sliding ANY type of cookware over the ceramic cooktop will likely alter the
overall appearance of the cooktop. Eventually the buildup of scratches will make cleaning the surface difficult and
degrade the overall appearance of the cooktop.
Fig. 18
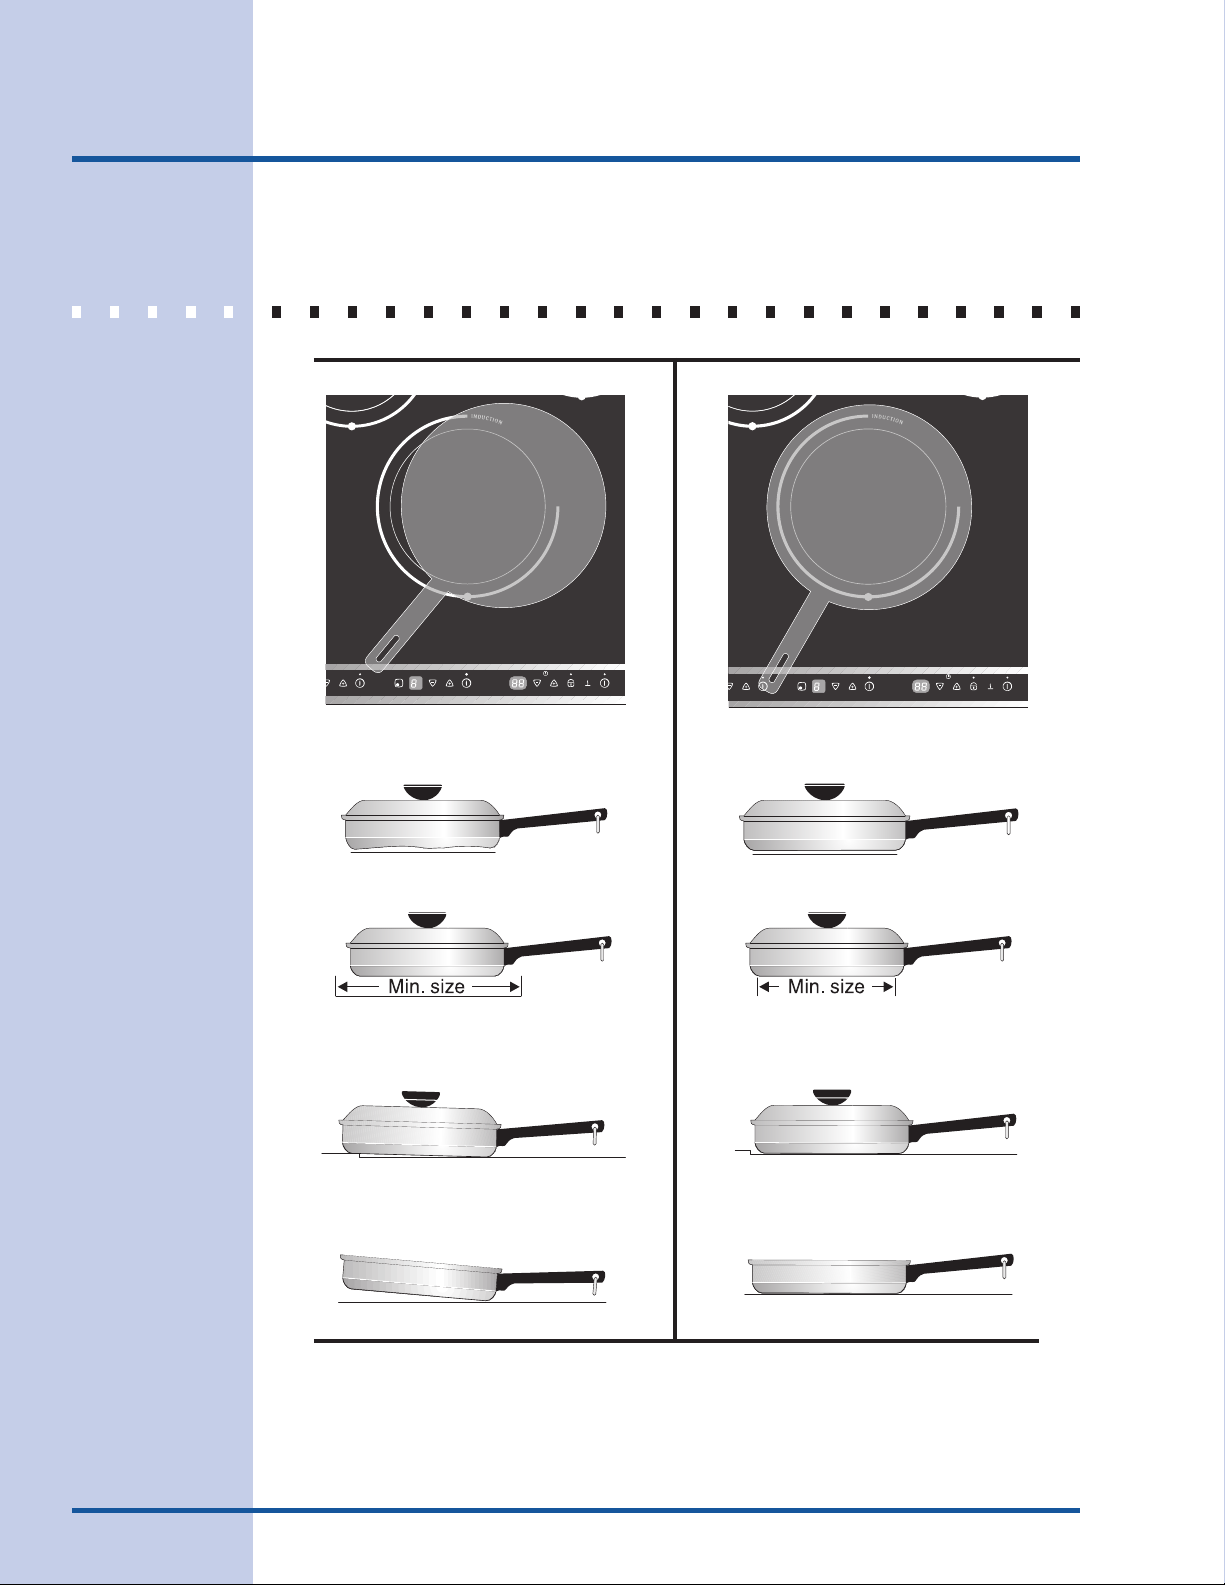
MINIMUM PAN SIZE REQUIREMENTS FOR EACH
COOKING ZONES
USE THE CORRECT SIZE COOKWARE
- The 4 Cooking Zones available on the
Induction Cooktop require a MINIMUM
pan size to be used at each location
(Fig. 19). The inner ring of each Cooking
Zone is your guide to the correct
MINIMUM pan size. The pan bottom
must FULLY cover the inner ring for
proper cooking to occur.
The thicker outer ring at each Cooking
Zone is helpful to determine the pan
MAXIMUM size. After centering the
cookware of the cooktop, make sure the
cookware does not extend more than ½”
beyond the thicker line on the Cooking
Zone (See example in Fig. 19). The pan
must make FULL contact on the glass
surface without the bottom of the pan
touching the metal cooktop trims
(Shown in Fig. 19).
NOTE: If a pan made of the correct material is centered properly on any of the active Cooking
Zones but is TOO SMALL, the affected Cooking Zone LED will display an
will not heat.
Left Rear
Cooking
Zone
Left Front
Cooking Zone
Right Rear
Cooking Zone
Fig. 19
FF
F code and the pan
FF
NOTE: Pan bottom should
not exceed 1/2” (13mm) from
outer Cooking Zone
(Induction) rings
POWER
Right
Front Cooking
Zone
On/OffOn/OffOn/OffOn/Off
Page 12
12
Before Using the Cooktop
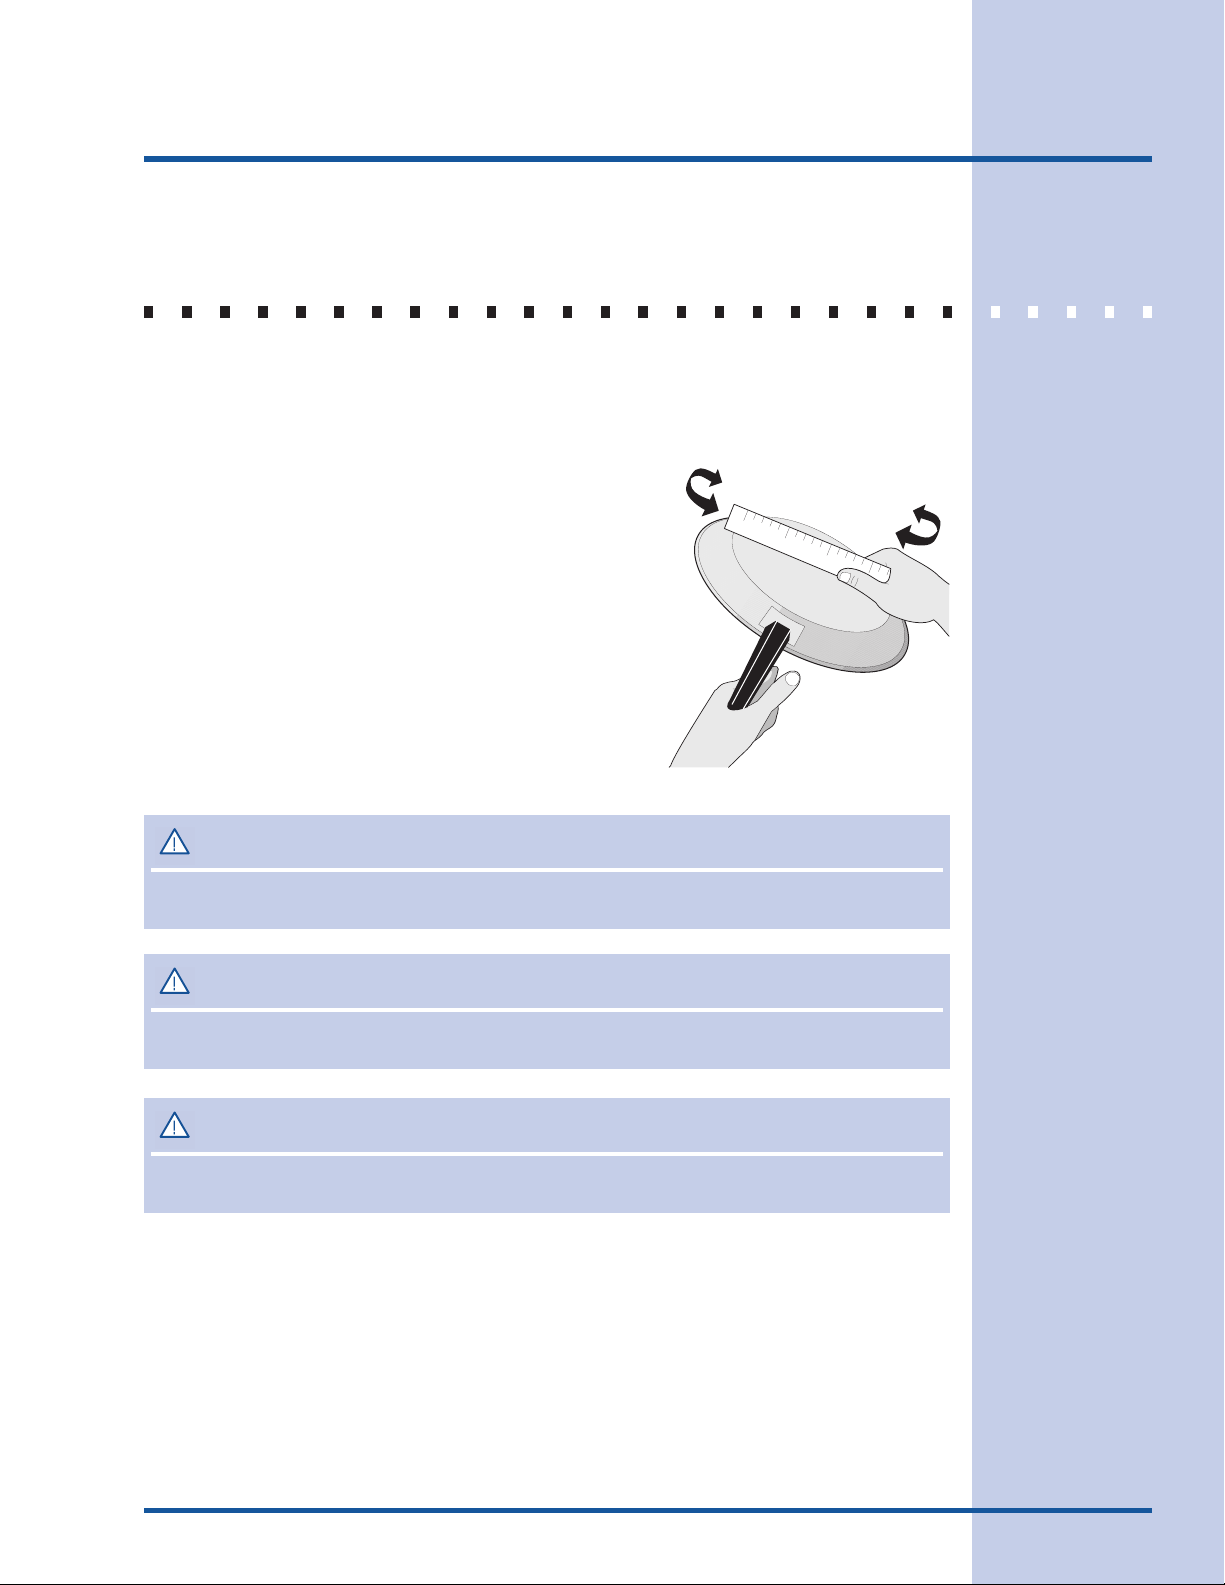
COOKWARE RECOMMENDATIONS
INCORRECT
On/OffOn/Off
• Cookware not centered on Cooking Zone surface.
• Curved or warped pan bottoms or
sides.
POWER
CORRECT
On/OffOn/Off
• Cookware centered correctly on
Cooking Zone surface.
• Flat pan bottom & straight sides.
POWER
• Pan does not meet the minimum
size required for the Cooking Zone
used (See Fig. 19).
• Pan bottom rests on cooktop trim
or does not rest completely on the
cooktop surface.
• Heavy handle tilts pan. • Pan is properly balanced.
Fig. 20
PLEASE NOTE - ANY one of the incorrect conditions listed above in Fig. 20 may be
detected by the sensors located below the ceramic cooktop surface. If the cookware
does not meet any of these conditions, one or more of the Cooking Zones will not
heat indicated by an
before attempting to activate the cooktop.
F F
F in the affected Cooking Zone display. Correct the problems
F F
• Pan size meets or exceeds the
recommended minimum size for
the Cooking Zone (See Fig. 19).
• Pan rests completely on the
Cooktop surface.
Page 13
Before Using the Cooktop
USE QUALITY COOKWARE IN GOOD CONDITION
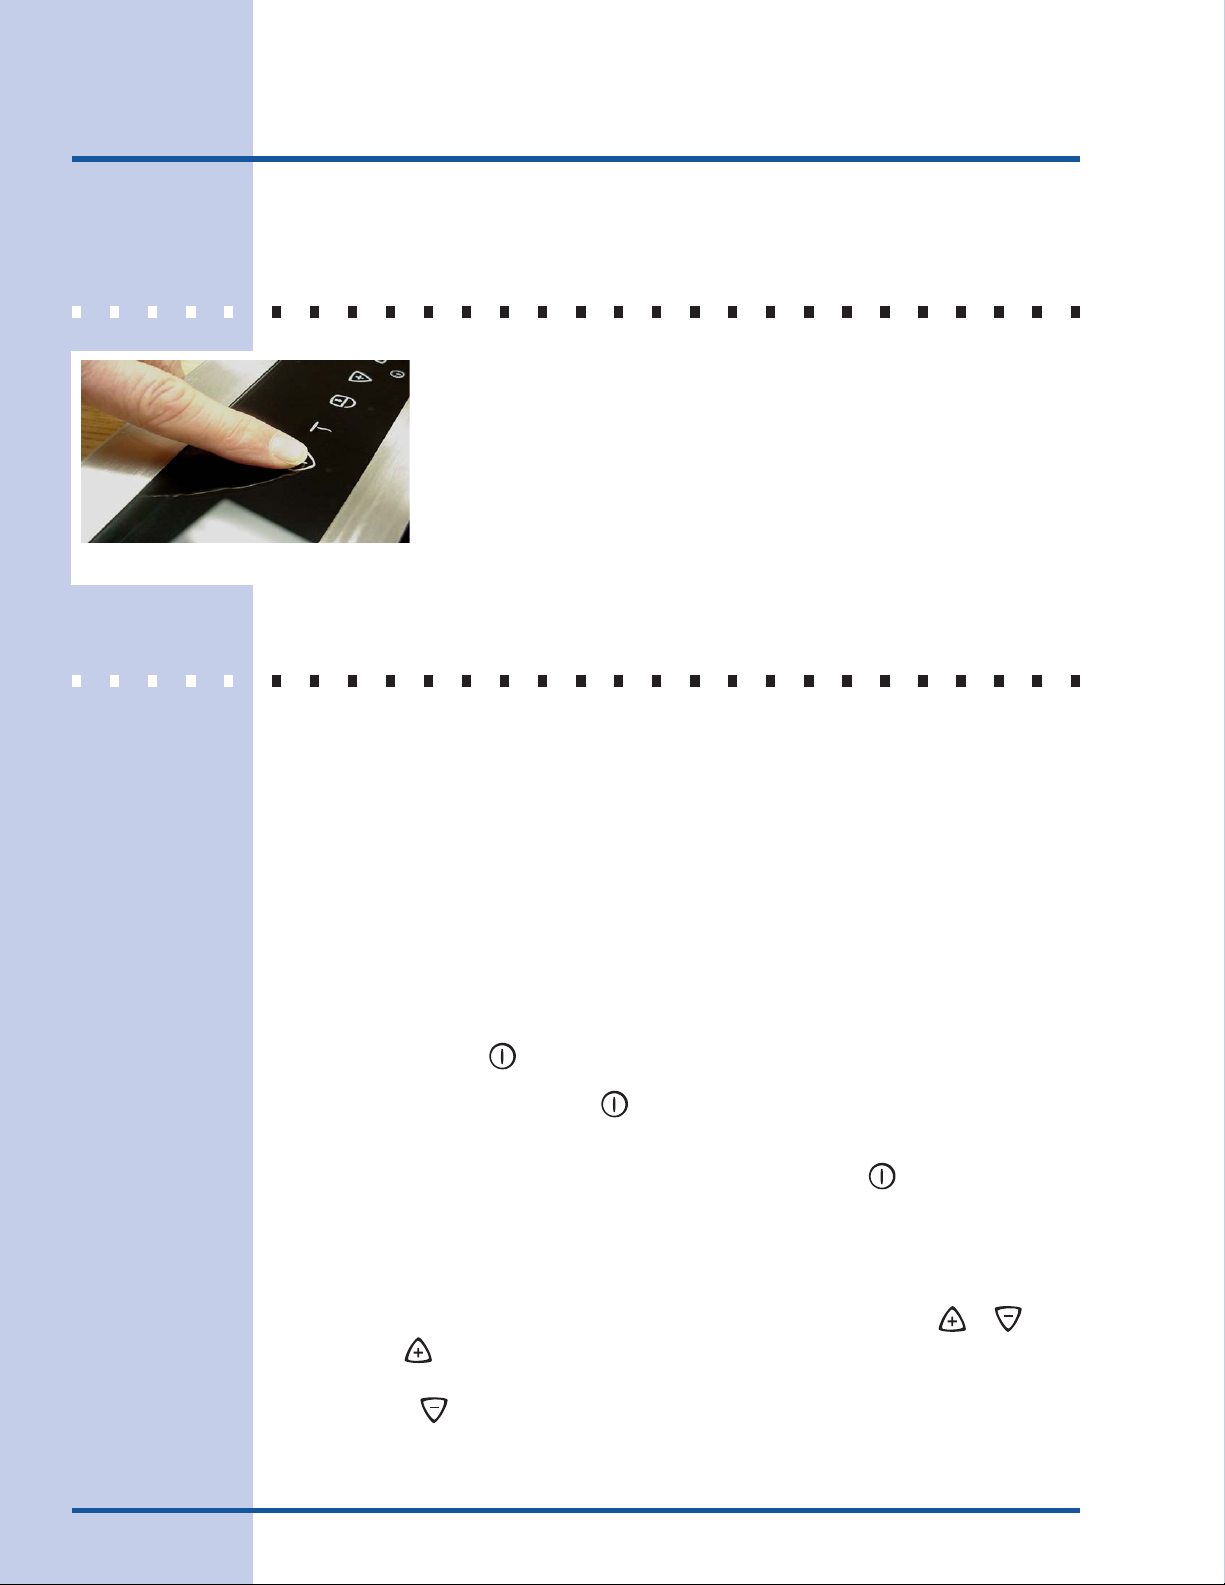
The cookware used with the Induction Cooktop should have flat bottoms that make good
contact with the entire surface of the Cooking Zone. Check for flatness by rotating a ruler
across the bottom of the cookware (See Fig. 21). Be sure to follow all the recommendations
for using cookware as shown in Fig. 20.
Also remember to:
• Use cookware made with the correct material type for
Induction Cooking (See Fig. 18).
• Use quality cookware with heavier bottoms for better
heat distribution allowing for more even cooking results.
• The pan size should match the amount of food being
prepared.
• Do not let pans boil dry. This may cause permanent
damage in the form of breakage, fusion, or marring that
can affect the ceramic cooktop. (This type of damage
is not covered by your warranty).
• Do not use dirty pans with grease buildup. Always use
pans that are easy to clean after cooking.
Fig. 21
13
CACA
UTIONUTION
CA
UTION
CACA
UTIONUTION
The Cooking Zones may appear to be cool while turned ON and after they have been turned OFF. The glass surface
may be HOT form residual heat transfered from the cookware and burns may occur.
CACA
UTIONUTION
CA
UTION
CACA
UTIONUTION
DO NOT TOUCH HOT COOKWARE or PANS directly with hands. Always use oven mitts or pot holders to
protect hands from burns.
CACA
UTIONUTION
CA
UTION
CACA
UTIONUTION
DO NOT SLIDE Cookware across the cooktop surface. Doing so may permanently damage the
appearance of the ceramic cooktop.
Prior to using your cooktop for the first time, apply the recommended cooktop cleaning
creme to the ceramic surface. Buff with a non-abrasive cloth or pad. This will make cleaning
easier when soiled from cooking. The special cooktop cleaning cream leaves a protective
finish on the glass to help prevent scratches and abrasions.
Page 14
14
Setting Surface Controls
USING THE TOUCH CONTROL
The recommended way to use the touch pads on the cooktop is shown in
Fig. 22. Be sure that your finger is placed in the center of the touch pad
as shown. If the finger is not placed on the center of a pad, the cooktop
may not respond to the selection made.
Lightly contact the pad with the flat part of your entire fingertip. Do not just
use the narrow end of your fingertip.
Fig. 22
OPERATING THE COOKING ZONES
The Induction cooktop has four Cooking Zones designed for cookware of various sizes. Be
sure to place cookware that meets the minimum and maximum pan size requirements (Fig.
19) for the Cooking Zone desired and is best for the amount of food being prepared. Place
the cookware with the prepared food on the Cooking Zone BEFORE setting any of the
Cooktop controls.
To Turn ON one or more of the Cooking Zones:
1. Place the prepared food using the correct type and size cookware on the desired
Cooking Zone. Be sure to center the cookware on Cooking Zone completely covering
the minimum ring marked on the Zone surface. PLEASE NOTE: If the cookware
requirements for the Cooking Zone (See Fig. 20) are not met the sensors will detect a
problem and display the letter
be corrected before proceeding.
2. Touch and hold the
Indicator light located above the
touched within 10 seconds the request to Power ON the cooktop will clear.
3. To start one or more of the four Cooking Zones lightly touch the
Cooking Zones needed. A beep will sound and the chosen Cooking Zone power level
digital display will show
NOTE: If no other key pad is touched within 5 seconds the request to Power ON the
Cooktop Zone will clear.
4. Set the desired power level for the Cooking Zone by touching either the or key
pad. If the key pad is touched the Cooking Zone will start at a “Power Boost”
maximum power level (the Cooking Zone LED will display
once). If the key pad is touched once the Cooking Zone will start at 1.0 (the
Cooking Zone LED will display
POWER
FF
F in the affected Cooking Zone LED. Any problems must
FF
key pad for 2 seconds (or until a beep sounds). The Power
key pad will turn ON. NOTE: If no other key pad is
POWER
key pad for the
On/Off
00
0 indicating no power level for the Zone has been set yet.
00
PP
P and the control will beep
PP
11
1 and the control will beep once).
11
Page 15
Setting Surface Controls
OPERATING THE COOKING ZONES (CONT’D)
To Turn ON one or more of the Cooking Zones (cont’d)
NOTE: Touch once, or repeatedly touch the or key pads to adjust or scroll
through power levels at any time during the cooking process (To scroll through the
power levels quickly touch and hold the or key pads until the power level desired
is reached). Once the Cooking Zone power level has been set the food will begin to heat
at that level until the power level is manually changed. For more information about the
available Cooktop Zones power levels available see “Power Level Settings” section on
page 10.
IMPORTANT OPERATING NOTES:
• Fluids spilled or objects lying on the controls area of the cooktop may cause the cooktop to
turn OFF while cooking. Clean the spills or remove the objects from the cooktop.
• Be sure the cooktop vent holes are NOT blocked. If the vent holes are blocked the cooktop
internal sensor may shut OFF of the cooktop to avoid over heating the appliance.
• If the cookware or pan is moved from the center of any active Cooking Zone for any
reason, a sensor will detect the situation and the cookware will no longer heat. The
affected Cooking Zone LED will flash between
Cooking Zone. The Cooking Zone will remember the power level setting for up to 3 minutes
before the Cooking Zone will automatically shut OFF.
FF
F and the last power level set for the
FF
15
To Turn OFF the Cooking Zones:
1. Once cooking is complete, touch the
2. The corresponding Cooking Zone ON/OFF Indicator light located above the
will turn OFF. A beep will sound and the chosen Cooking Zone power level LED will
display
automatically in 5 seconds. If no other Cooking Zones are active and no other key pads
are touched the entire cooktop will shut OFF automatically in 5 more seconds.
3. When any Cooking Zone is OFF, the corresponding Cooking Zone LED may display
if the Cooking Zone temperature is too HOT. The LED will continue to display
even if the Cooktop is switched OFF the LED will continue to display
cooktop remains HOT.
The Cooking Zones may appear to be cool while turned ON and after they have been turned OFF. The glass surface
may be HOT form residual heat transfered from the cookware and burns may occur.
00
0. If no other key pads are touched the Cooking Zone will shut OFF
00
CACA
UTIONUTION
CA
UTION
CACA
UTIONUTION
key pad to turn the Cooking Zone OFF.
On/Off
HH
H as long as the
HH
On/Off
HH
H , and
HH
key pad
HH
H
HH
Page 16
16
Setting Surface Controls
PREHEAT RECOMMENDATIONS
When preheating a pan on the cooktop always watch carefully. Whenever using the
cooktop the user should always pay attention to any items cooking and remain attentive
until the cooking process is complete.
Keep in mind that induction may decrease the amount of time required to preheat a cooking
utensil.
KEEP WARM FEATURE
The Warm feature may be used with any of the Cooking Zones.
To Turn the Keep Warm Feature ON:
1. To select the Keep Warm feature for any Cooking Zone touch the
corresponding Cooking Zone.
2. Touch the key pad located in the main control area. The Cooking Zone will display
(LOW) indicating that the Cooking Zone is properly set to Keep Warm. If no other key
pads are pressed for a period of 5 seconds the control will activate the desired Cooking
Zone at the Keep Warm setting (See Fig. 16).
key pad for the
On/Off
MINUTE TIMER
The Minute Timer feature may be useful in the kitchen if a recipe calls for keeping track of
time. This feature will keep track of time from 1 to 99 minutes. The LED display located to
the left of the Timer UP/DOWN arrow key pads will begin to count down minutes once set.
To Set the Minute Timer:
1. Touch the listed under the word “TIMER”. Touching and releasing the or the
key pads will increase or decrease the Minute Timer setting by 1 minute with each key
press (up to
2. Once the Timer LED displays the desired amount of time, release the UP or DOWN
Arrow key pads. The Minute Timer LED will flash the time with a small dot to the right.
Once the LED quits flashing and the dot disappears the MinuteTimer will begin the
countdown with remaining minutes. Once the Minute Timer reaches
sound indicating that the time is up.
9999
99 minutes).
9999
0000
00 a long beep will
0000
LL
L
LL
Page 17
Setting Surface Controls
MINUTE TIMER
To Cancel the Minute Timer:
1. Touch the
key pad and scroll to
2. If cancelling the Minute Timer using the scrolling method, once the Main Control LED
reaches
3. The LED will flash momentarily and then quit flashing. The set time will disappear from
the LED indicating that the MinuteTimer is no longer active.
LOCKING THE CONTROLS
and key pads at the same time or touch and hold either the or
0000
00.
0000
0000
00, release the Arrow key pad.
0000
17
The Induction Cooktop may be locked in order to prevent the cooktop from accidentally
being turned ON.
To Turn ON the Controls Lock Feature:
1. The Cooktop Lock will not activate until the cooktop is OFF. If the cooktop power is not
OFF, touch and hold the
Indicator light located above the
2. Touch the key pad until a beep sounds (about 5 seconds). The Lock Indicator Light
above the key pad will turn ON indicating the cooktop is locked. This will keep any
Cooking Zone or Cooktop functions from being accidentally turned ON (See Fig. 5)
To Turn OFF the Controls Lock Feature:
1. Touch the key pad until a beep sounds (about 5 seconds). The Lock Indicator Light
above the key pad will turn OFF indicating the cooktop is unlocked. The Cooking
Zones or any of the other Cooktop functions may now be used (See Fig. 4).
2. If the cooktop is needed you must touch and hold the
(about 1 second). The Power Indicator Light located above the
ON. (See Fig. 7). You may now activate any of the Cooking Zones.
key pad until a beep sounds (about 1 second). The Power
POWER
key pad will turn OFF.
POWER
key pad until a beep sounds
POWER
key pad will turn
POWER
Page 18
18
Setting Surface Controls
POWER SHARING
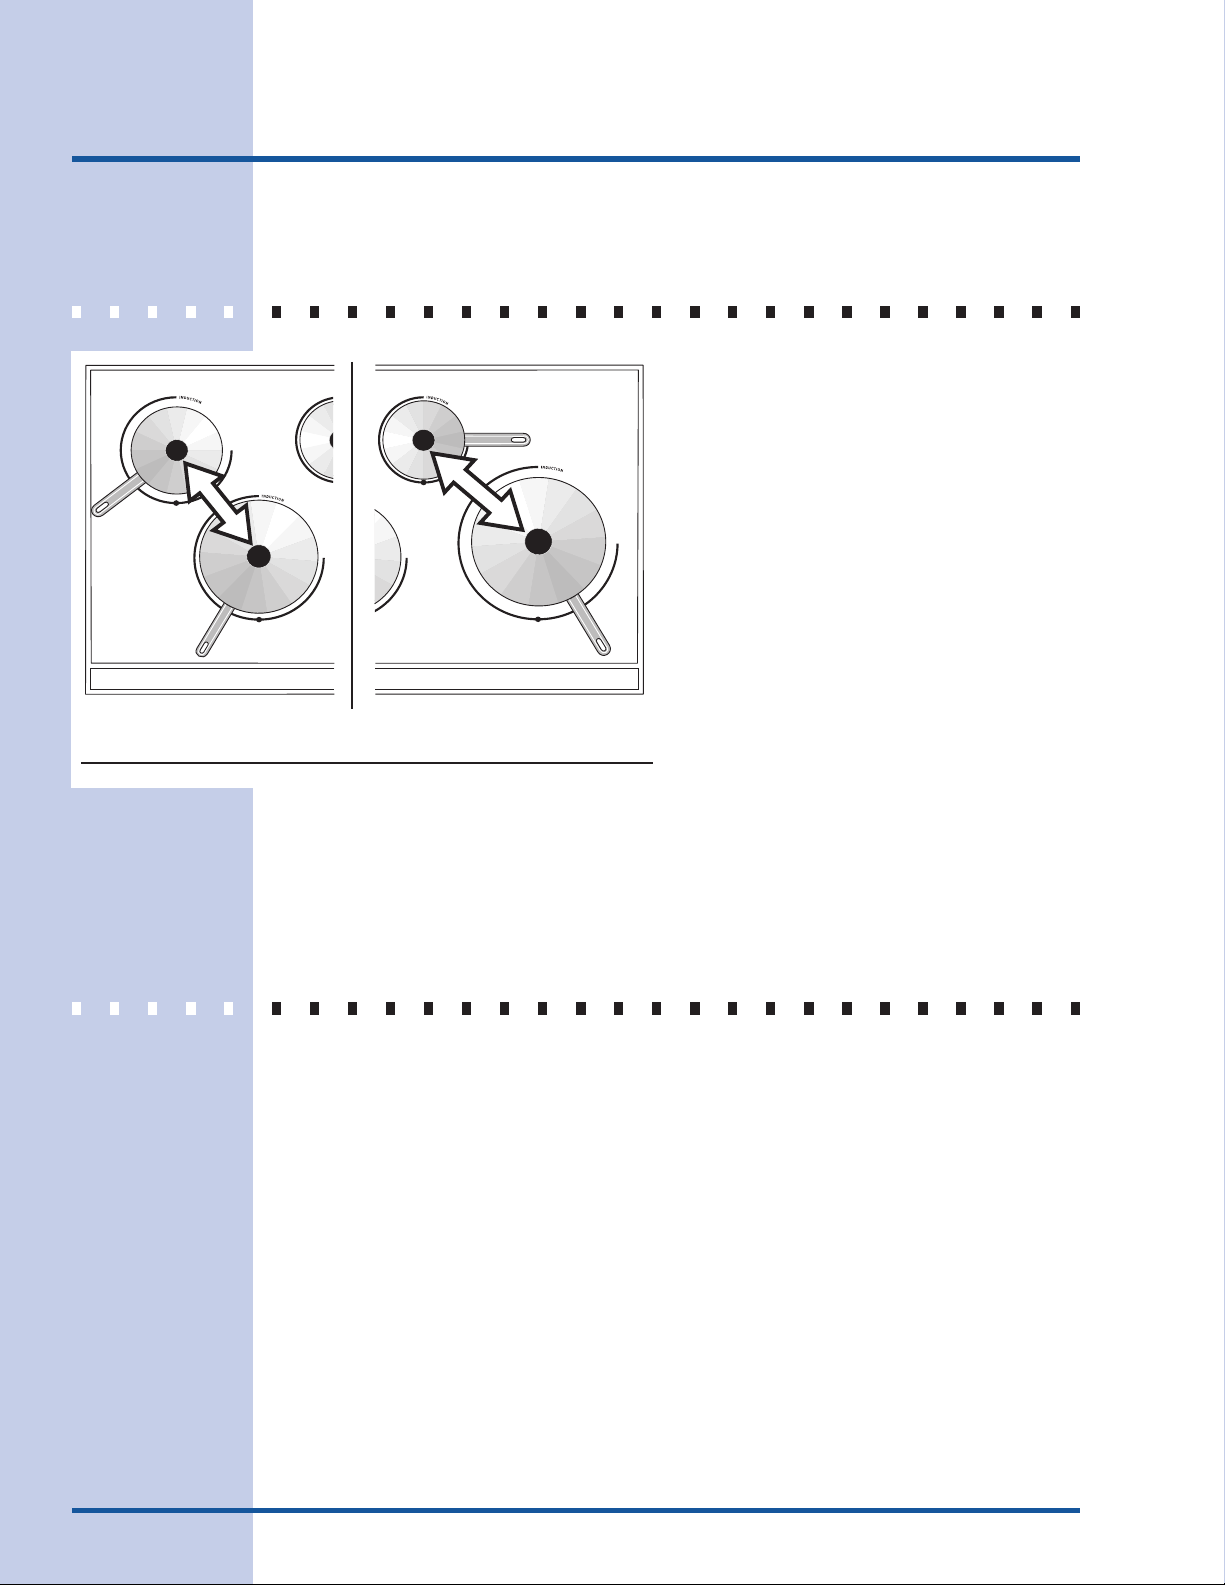
Your cooktop is equipped with four induction
elements within two heating sections. The
right-hand and left-hand Cooking Zones are
powered by two independent induction
inverters - one inverter for each of the two
heating sections. Two Cooking Zones in a
heating section share the power of one
inverter. This is called Power Sharing.
For example, if pans are cooking food items
on both right-hand Cooking Zones, the last
Power Level set will be maintained, while the
first pan may experience a slight reduction in
the power level setting.
Left-hand
Cooking Zones section
POWER SHARING TIPS: Remember to set the power level for the food item you wish to
maintain last. Or, you may choose to maintain a constant power level for 2 food items by
placing the pans on one of the Cooking Zones of the left-hand heating section and the other
pan on one of the Cooking Zones of the right-hand heating section (See Fig. 23).
OPERATIONAL NOISES
The electronic processes involved with Induction Cooking create some unusual background
noises. These noises are normal and part of the Induction Cooking process.
Please note that these noises are more noticeable while cooking at the Power BOOST
level. Very loud noises are not part of normal Induction Cooking.
Right-hand
Cooking Zones section
Fig. 23
Page 19
On/Off On/OffOn/OffOn/Off
POWER
General Care & Cleaning
19
CERAMIC GLASS COOKTOP CLEANING & MAINTENANCE
Consistent and proper cleaning is essential to maintaining your ceramic glass cooktop
Prior to using your cooktop for the first time, apply the recommended CookTop® Cleaning Creme
to the ceramic surface. Buff with a non-abrasive cloth or no-scratch cleaning pad. This will make
cleaning easier when soiled from cooking. The special cooktop cleaning cream leaves a protective
finish on the glass to help prevent scratches and abrasions.
Sliding aluminum or copper clad bottom pans on the cooktop can cause metal
markings on the cooktop surface. These marks should be removed immedi-
ately after the cooktop has cooled using the cooktop cleaning cream. Metal
marks can become permanent if not removed prior to future use.
Cookware (cast iron, metal, ceramic or glass) with rough bottoms can mark or
scratch the cooktop surface. Do not slide anything metal or glass across
the cooktop. Do not use your cooktop as a cutting board or work surface in the
kitchen. Do not cook foods directly on the cooktop surface without a pan. Do
not drop heavy or hard objects on the glass cooktop, because they may cause
it to crack.
Fig. 24
CLEANING RECOMMENDATIONS FOR CERAMIC GLASS
COOKTOP
CACA
UTIONUTION
CA
UTION
CACA
UTIONUTION
Before cleaning the cooktop, be sure the controls are turned to OFF and the cooktop is COOL.
WARNINGWARNING
WARNING
WARNINGWARNING
DO NOT use a cooktop cleaner on a hot cooktop. The fumes can be hazardous to your health, and
can chemically damage the ceramic-glass surface.
For light to moderate soil:
Apply a few drops of CookTop® Cleaning Creme directly to the cooktop. Use a paper towel or use
a non-abrasive plastic type no-scratch pad to clean the entire cooktop surface. Make sure the
cooktop is cleaned thoroughly, leaving no residue.
For heavy, burned on soil:
Apply a few drops of CookTop® Cleaning Creme directly to the soiled area. Rub the soiled area
using a non-abrasive plastic type no-scratch pad, applying pressure as needed. Do not use the
pad you use to clean the cooktop for any other purpose.
Page 20
20
Fig. 25
General Care & Cleaning
CLEANING RECOMMENDATIONS FOR THE CERAMIC GLASS
COOKTOP (CONTINUED)
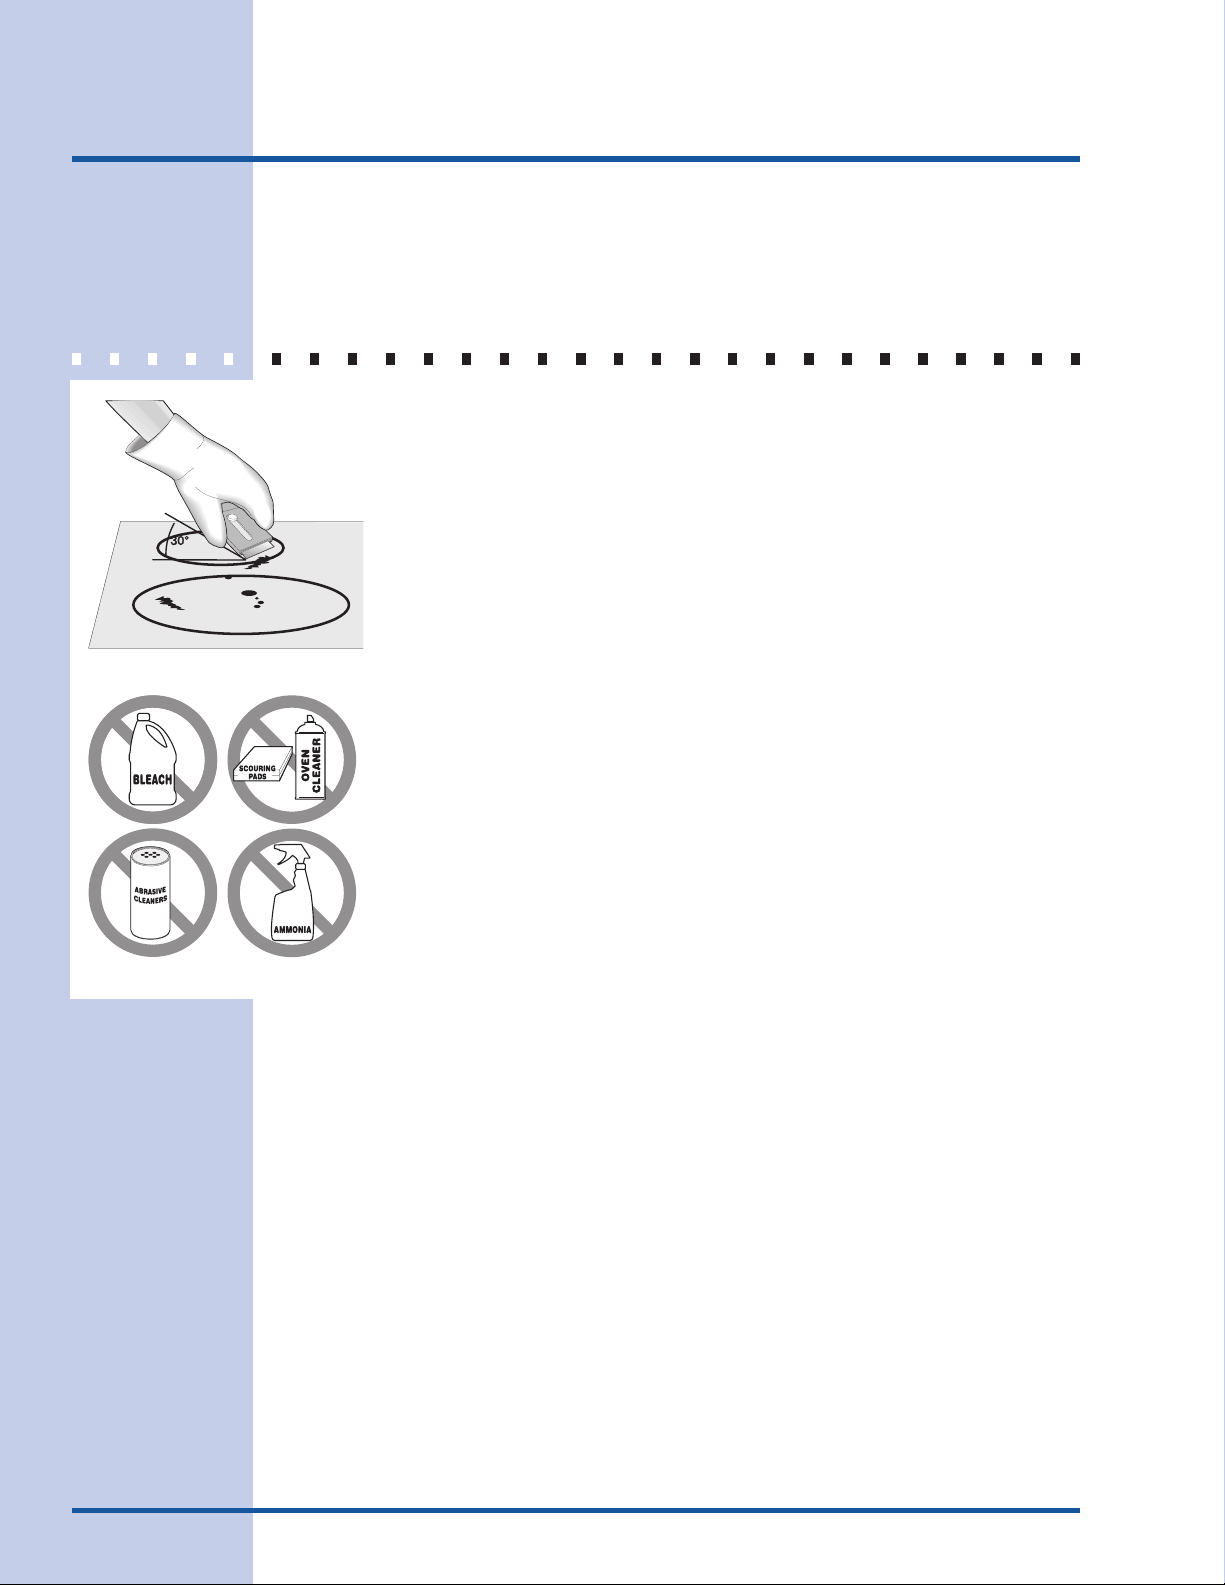
If soils remain, carefully scrape soils with a metal razor blade scraper, holding
scraper at a 30 degree angle to the surface. Remove loosened soils with cooktop
cleaning cream and buff surface clean.
IMPORTANT NOTE: Damage to the ceramic glass cooktop may occur if you use an
abrasive type scratch pad. Only use cleaning products that have been specifically
designed for ceramic glass cooktop.
Plastic or foods with a high sugar content:
These types of soils need be removed immediately if spilled or melted onto the
ceramic cooktop surface. Permanent damage (such as pitting of the cooktop
surface) may occur if not removed immediately. After turning the surface elements
OFF, use a razor blade scraper or a metal spatula with a mitt and scrape the soil
from the hot surface (as illustrated). Allow the cooktop to cool, and use the same
method for heavy or burned on soils.
Fig. 26
Do not use the following on the ceramic cooktop (See Fig. 26):
• Do not use abrasive cleaners and scouring pads, such as metal and
some nylon pads. They may scratch the cooktop, making it more
difficult to clean.
• Do not use harsh cleaners, such as chlorine bleach, ammonia or
oven cleaners, as they may etch or discolor the cooktop.
• Do not use dirty sponges, cloths or paper towels, as they can leave
soil or lint on the cooktop which can burn and cause discoloration.
Special Caution for Aluminum Foil and Aluminum Cooking Utensils
• Aluminum foil - Use of aluminum foil will damage the cooktop. Do not use thin aluminum
cooking utensils or allow foil to touch the ceramic cooktop under ANY circumstances.
• Aluminum utensils - The melting point of aluminum is much lower than that of other metals.
Care must be taken when aluminum pots or pans are used on the cooktop. If allowed to boil
dry, not only will the utensil be destroyed, but it may fuse to, break or mark the ceramic
glass surface, permanently damaging the cooktop surface.
Page 21

Solutions to Common Problems
21
IMPORIMPOR
IMPOR
IMPORIMPOR
Before calling for service, review the following problems first. It may save you both time
and expense. This list includes common experiences that are not the result of defective
workmanship or material in your cooktop.
TT
ANTANT
T
ANT
TT
ANTANT
ENTIRE COOKTOP DOES NOT OPERATE
• Cooktop controls are locked. Set the cooktop controls to unlock the Cooktop (See p. 17
for further instructions).
• Make sure household electrical circuit breaker is ON and that power is properly supplied
to the Cooktop.
• Service wiring not complete. Contact installation agent or dealer.
• Power outage. Check house lights to be sure. Call local electric company.
COOKTOP TURNS OFF WHILE COOKING
• The automatic shut-off feature will turn all of the Cooking Zones and the entire
Cooktop OFF after any Cooking Zone has been in continuous use for 18 hours.
• Cooktop internal heat sensor has detected high temperatures inside the appliance. Be
sure the appliance vent holes are not blocked. (Refer to the Installation Instructions
supplied with the cooktop for more detailed cooktop installation information).
• Fluids spilled or object lying on controls area of cooktop. Clean spills or remove object.
Repower cooktop.
COOKING ZONE DOES NOT HEAT FOOD
• No cookware was placed on the Cooking Zone or cookware material type incorrect for
Induction Cooking (See Figs. 18 & 20).
• Cookware bottom not large enough for Cooking Zone (See Fig. 19).
• Cookware is warped or in poor condition (See Figs. 20 & 21).
• Cookware is not centered on Cooking Zone (See Fig. 20).
• Cookware resting on cooktop trim or does not rest completely on cooktop surface (See
Figs. 19 & 20).
• No power to the appliance. Check steps under "Entire cooktop does not operate" in
this checklist.
• Incorrect Cooking Zone control setting. Make sure the correct control is ON for the Cooking
Zone being used.
Page 22

22
Solutions to Common Problems
COOKING ZONE HEATS FOOD TOO HOT OR NOT HOT ENOUGH
• Incorrect power level setting. Adjust the power level setting higher or lower and refer to
recipe for guidance and adjust accordingly.
FOOD DOES NOT HEAT EVENLY
• Lightweight or warped pans were used. Be sure to use good quality cookware (Refer to
Figs. 20 & 21).
• Use only flat bottom, evenly balanced medium or heavyweight cookware. Heavy and
medium weight pans heat evenly. Because lightweight pans heat unevenly, foods may
burn more easily (See pages 12 & 13 for further information).
• Adjust Cooking Zone power level setting until the proper amount of heat is obtained.
POOR COOKING RESULTS
• Many factors affect cooking results. Adjust the recipe's recommended power levels or
cooking times.
• Cookware is too lightweight or warped. Use heavier quality cookware so foods being
prepared may cook more evenly.
0404
04
0404
EE
E
AND 2 DIGITS LED
EE
0505
,
05
0505
,
0606
06
0606
OR
00
0
00
77
7
77
FF
F
FF
COOKTOP ZONE CONTROL DISPLAYS
0000
MAIN CONTROL DISPLAYS
• Induction Cooktop main control has detected a fault or error condition. Try turning electrical
power supply OFF and back ON to cooktop in order to reset Cooktop main controls. If
fault recurs, record fault number and turn power supply to Cooktop OFF.
00
0000
,
0303
03
0303
,
COOKING ZONE LED CONTINUOUSLY FLASHES
• Induction Cooktop pan detection sensors do not see the correct cookware. Test with a
magnet to be sure cookware is made with Induction compatible material.
• Cookware has been removed from the Cooking Zone without turning the Cooking Zone
OFF. Place cookware back on to the Cooking Zone or if finished cooking turn of the
affected Cooking Zone.
• Cookware is not centered over the Cooking Zone properly. Refer to Fig. 20 for correct
cookware placement.
Page 23

Solutions to Common Problems
METAL MARKS ON CERAMIC COOKTOP GLASS
• Sliding or scraping of metal utensils on cooktop surface. DO NOT slide cookware or
cooking utensils across the cooktop surface. Use the recommended ceramic glass
cooktop cleaning creme to remove the marks. See "Cooktop Cleaning & Maintenance" in
the General Care & Cleaning section (Refer to ps. 19 & 20).
SCRATCHES OR ABRASIONS ON CERAMIC
COOKTOP GLASS
• Coarse particles such as salt or sand between cooktop and cookware or cooking utensils
can cause scratches. Be sure cooktop surface and bottoms of utensils are clean before
placing on cooktop. Small scratches do not affect cooking and will become less visible
with time.
• Cleaning materials not recommended for ceramic-glass cooktop have been used. See
"Cooktop Cleaning & Maintenance" in the General Care & Cleaning section.
• Cookware with rough bottoms were used. Use smooth, flat-bottomed cookware ONLY
(See Figs. 20 & 21).
23
BROWN STREAKS OR SPECKS ON CERAMIC
COOKTOP SURFACE
• Boil overs are cooked onto cooktop surface. Use a razor blade scraper to remove soil.
See "Cooktop Cleaning & Maintenance" in the General Care & Cleaning section (Refer
to ps. 19 & 20).
AREA OF DISCOLORATION WITH METALLIC SHEEN
ON CERAMIC COOKTOP GLASS
• Mineral deposits from food and/or water. Remove using a ceramic-glass cooktop cleaning
creme. Remember to use cookware with clean, dry bottoms. For more information See
"Cooktop Cleaning and Maintenance" in the General Care & Cleaning section.
Page 24

24
Warranty Information
COOKTOP WARRANTY
In the U.S.A., your appliance is warranted by Electrolux Home Products North America, a division of White Consolidated Industries, Inc. We
authorize no person to change or add to any of our obligations under this warranty. Our obligations for service and parts under this warranty must
be performed by us or an authorized Electrolux Home Products North America servicer. In Canada, your appliance is warranted by Electrolux
Canada Corp.
WARRANTY PERIOD
FULL ONE-YEAR
WARRANTY
LIMITED 2
YEAR
WARRANTY
(Glass Smoothtop,
Seal & Elements)
LIMITED
WARRANTY
(Applicable to the
State of Alaska)
*NORMAL
RESPONSIBILITIES
OF THE CONSUMER
EXCLUSIONS
IF YOU NEED
SERVICE
One year from original
purchase date
ND-5TH
Second through fifth
years from original
purchase date
Time periods listed
above.
This warranty applies only to products in ordinary household use, and the consumer is responsible
for the items listed below:
1. Proper use of the appliance in accordance with instructions provided with the product.
2. Proper installation by an authorized servicer in accordance with instructions provided with the appliance and
in accordance with all local plumbing, electrical and/or gas codes.
3. Proper connection to a grounded power supply of sufficient voltage, replacement of blown fuses, repair of
loose connections or defects in house wiring.
4. Expenses for making the appliance accessible for servicing, such as removal of trim, cupboards, shelves,etc.,
which are not a part of the appliance when it was shipped from the factory.
5. Damages to finish after installation.
6. Replacement of light bulbs and/or fluorescent tubes (on models with these features).
This warranty does not cover the following:
1.CONSEQUENTIAL OR INCIDENTAL DAMAGES SUCH AS PROPERTY DAMAGE AND INCIDENTAL
EXPENSES RESULTING FROM ANY BREACH OF THIS WRITTEN OR ANY IMPLIED WARRANTY.
NOTE: Some states do not allow the exclusion or limitation of incidental or consequential damages, so this
limitation or exclusion may not apply to you.
2. Service calls which do not involve malfunction or defects in workmanship or material, or for appliances not
in ordinary household use. The consumer shall pay for such service calls.
3. Damages caused by services performed by servicers other than Electrolux Home Products North America
or its authorized servicers; use of parts other than genuine Electrolux Home Products parts; obtained from
persons other than such servicers; or external causes such as abuse, misuse, inadequate power supply or
acts of God.
4. Products with original serial numbers that have been removed or altered and cannot be readily determined.
Keep your bill of sale, delivery slip, or some other appropriate payment record. The date on the bill establishes
the warranty period should service be required. If service is performed, it is in your best interest to obtain and
keep all receipts. This written warranty gives you specific legal rights. You may also have other rights that vary
from state to state. Service under this warranty must be obtained by contacting Electrolux Home Products:
THROUGH OUR AUTHORIZED SERVICERS,
Pay all costs for repairing or replacing any
parts of this appliance which prove to be
defective in materials or workmanship.
Provide a replacement for any defective
surface heating element, deteriorated
rubberized-silicone seal (upswept models
only), or glass smoothtop that craks due to
thermal breakage (not customer abuse).
All of the provisions of the full and limited
warranties above and the exclusion listed
below apply.
Your cooktop is protected by this warranty
WE WILL:
THE CONSUMER WILL BE RESPONSIBLE FOR:
Costs of service calls that are listed under NORMAL
RESPONSIBILITIES OF THE CONSUMER. *
Diagnostic and any transportation and labor costs which
are required because of service.
Costs of the technician’s travel to the home and any
costs for pick up and delivery of the appliance required
because of service.
USA
1•800•944•9044
Electrolux Home Products
North America
P.O. Box 212378
Augusta, GA 30917
Canada
1•866•294•9911
Electrolux Home Products
North America
802, boul. L’Ange-Gardien
L’Assomption, Québec
J5W 1T6
This warranty only applies in the 50 states of the U.S.A., Puerto Rico, and Canada.
Product features or specifications as described or illustrated are subject to change
without notice. All warranties are made by Electrolux Home Products North
America, a division of White Consolidated Industries, Inc. In Canada, your appliance
is warranted by Electrolux Canada Corp.
 Loading...