

Electrolux E23BC78ISS7, E23BC78ISS5, E23BC78ISS4, E23BC78ISS0, E23BC78IPS6 Owner’s Manual
...
Use a Care Guide
Frer_ch Door Bottom Freezer/Refrigerator
Guia de Uso y Cuidado
Refrigerador (o_ cor_gelador ir_fefior de puerta doble
Guide d'utilisation et d'entretien
R_ffig_rateur i_portes fran{:aisesiCor_g{qa_eur er_ bas
241978401 June 2009
2 Finding information
P_ease read and save this 9uide
Thank you for choosing Electrolux, our new premium
brand in home appliances.This Use & Care Guide is
part of our commitment to customer satisfaction and
product quality throughout the service life of your new
appliance.
Keep a record for quick
Purchase date
Etectrolux model number
Electrolux serial number
NOTE
Registering your product with Electrolux enhances
our ability to serve you. You can register online at
www.electroluxappliances.com or by sending your
Product Registration Card in the mail.
TabJe of contents
FindingInformation .............................................. 2
Salely ............................................................... 3
FeatureOverview ................................................. 5
installation......................................................... G
RemovingtheDoors............................................ 10
Connectingthe WaterSupply .................................. 12
Controls........................................................... 13
AutomaticIce &Water Maker/Dispenser.................... 1G
StorageFeatures ................................................ 18
Storing Foodand Saving Energy.............................. 23
Normal Operating Sounds & Sights .......................... 24
Changingthe Water andAir Filters ........................... 25
Careand Cleaning............................................... 27
For toll-free telephone support in the U.S. and Canada:
1-877-4ELECTROLUX (1-877-435-3287)
For online support and product information visit http:/i
www.electroluxicon.com
Jnsta_mation Checklist
Doors
[] Handles are secure and tight
rq Door seals completely to cabinet on all sides
[] Freezer door is level across the top
Leveling
[] Refrigerator is level, side-to-side and tilted 1/4"
(Cmm) front-to-back
13 Toe grille is properly attached to refrigerator
[] Cabinet is setting solid on all corners
Electrical Power
83 House power turned on
[] Refrigerator plugged in
Solutions to CommonProblems............................... 30
Warranty.......................................................... 34
Ice Maker
[:3 House water supply connected to refrigerator
[:3 No water leaks present at all connections -
recheck in 24 hours
[] Ice maker is turned ON
[] Ice & water dispenser operates correctly
[] Front filter must be flush with filter housing
(select models)
Final Checks
[] Shipping material removed
[] Fresh food and freezer temperatures set
[] Crisper humidity controls set
[] Registration card sent in
Important safety instructions
Safety 3
Safety Precautions
Do not attempt to install or operate your unit until
you have read the safety precautions in this manual.
Safety items throughout this manual are labeled with a
Danger, Warning, or Caution based on the risk type.
Definitions
_This is the safety alert symbol. It is used to alert
you to potential personal injury hazards. Obey all safety
messages that follow this symbol to avoid possible
injury or death.
DANGER
DANGER indicates an imminently hazardous
situation which, if not avoided, will result in death
or serious injury.
WARNING
WARNING indicates a potentially hazardous
situation which, if not avoided, could result in
death or serious injury.
CAUTION
CAUTION indicates a potentially hazardous
situation which, if not avoided, may result in
minor or moderate injury.
IMPORTANT
Indicates installation, operation, or maintenance
information which is important but not hazard-related.
General Safety
WARNING
Please read all safety instructions before using
your new refrigerator.
,, Do not store or use gasoline or other flammable
liquids near this or any other appliance.
Read product labels for 'warnings regarding
flammability and other hazards.
• Do not operate the refrigerator in the presence of
explosive fumes.
,, Avoid contact with any moving parts of the
automatic ice maker.
Remove all staples from the carton to avoid
injury. Staples can also damage finishes if
they come in contact with other appliances or
furniture.
Child Safety
Packing Materials:
o
Packing cartons covered with rugs, bedspreads,
plastic sheets, or stretch wrap may become
airtight chambers and can quickly cause
suffocation.
Destroy or recycle the product's carton, plastic
bags, and any other exterior wrapping material
immediately after the refrigerator is unpacked.
Children should never play with these items.
Child Entrapment and Suffocation:
. These problems are not limited to the past.
Whether junked, abandoned, or temporarily
stored (even for a few hours), unattended
refrigerators and freezers are dangerous. Please
take the precautions listed below.
Proper Disposal of Refrigerators/Freezers
We strongly encourage responsible appliance recycling/
disposal methods. Check with your utility,company or
visit www.recyctemyoldfridge.com for more information
on recycling your old refrigerator.
Before you recycle or dispose of your old refrigerator/
freezer:
Remove the
doors.
Leave the
shelves and
baskets in place
so children may
not easily climb
inside.
Have refrigerant
and compressor
oil removed by a
qualified service technician.
4 Safety
Emectdcal information
WARNING
You must follow these guidelines to ensure
that your refrigerator's safety mechanisms are
operating correctly,
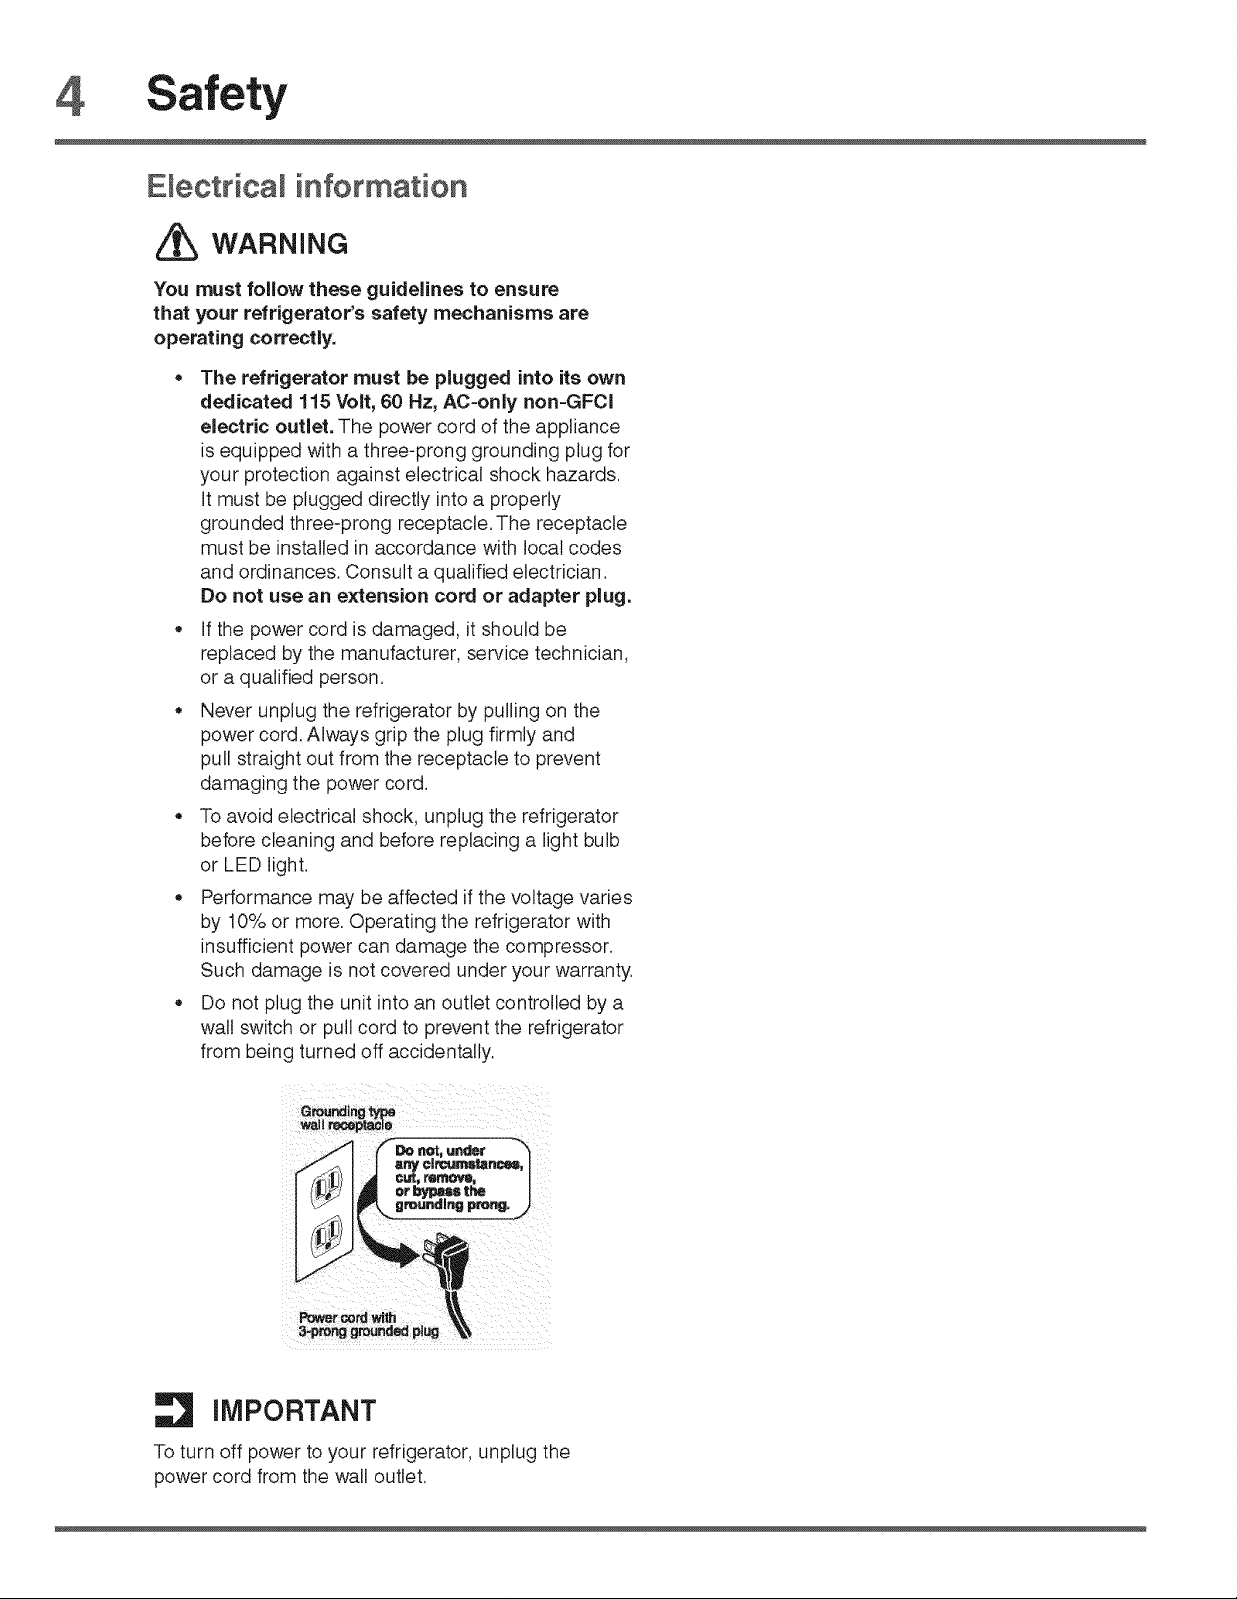
. The refrigerator must be plugged into its own
dedicated 115 Volt, 60 Hz, AC-only non=GFCl
electric outlet. The power cord of the appliance
is equipped with a three-prong grounding plug for
your protection against electrical shock hazards.
It must be plugged directly into a properly
grounded three-prong receptacle. The receptacle
must be installed in accordance with local codes
and ordinances. Consult a qualified electrician.
Do not use an extension cord or adapter plug.
o If the power cord is damaged, it should be
replaced by the manufacturer, service technician,
or a qualified person.
• Never unplug the refrigerator by pulling on the
power cord. Always grip the plug firmly and
pull straight out from the receptacle to prevent
damaging the power cord.
• To avoid electrical shock, unplug the refrigerator
before cleaning and before replacing a light bulb
or LED light.
o Performance may be affected if the voltage varies
by 10% or more. Operating the refrigerator with
insufficient power can damage the compressor.
Such damage is not covered under your warranty.
• Do not plug the unit into an outlet controlled by a
walt switch or pull cord to prevent the refrigerator
from being turned off accidentally.
Grounding
wall reeeptac e
| IMPORTANT
To turn off power to your refrigerator, unplug the
power cord from the wall outlet.
Feature Overview 5
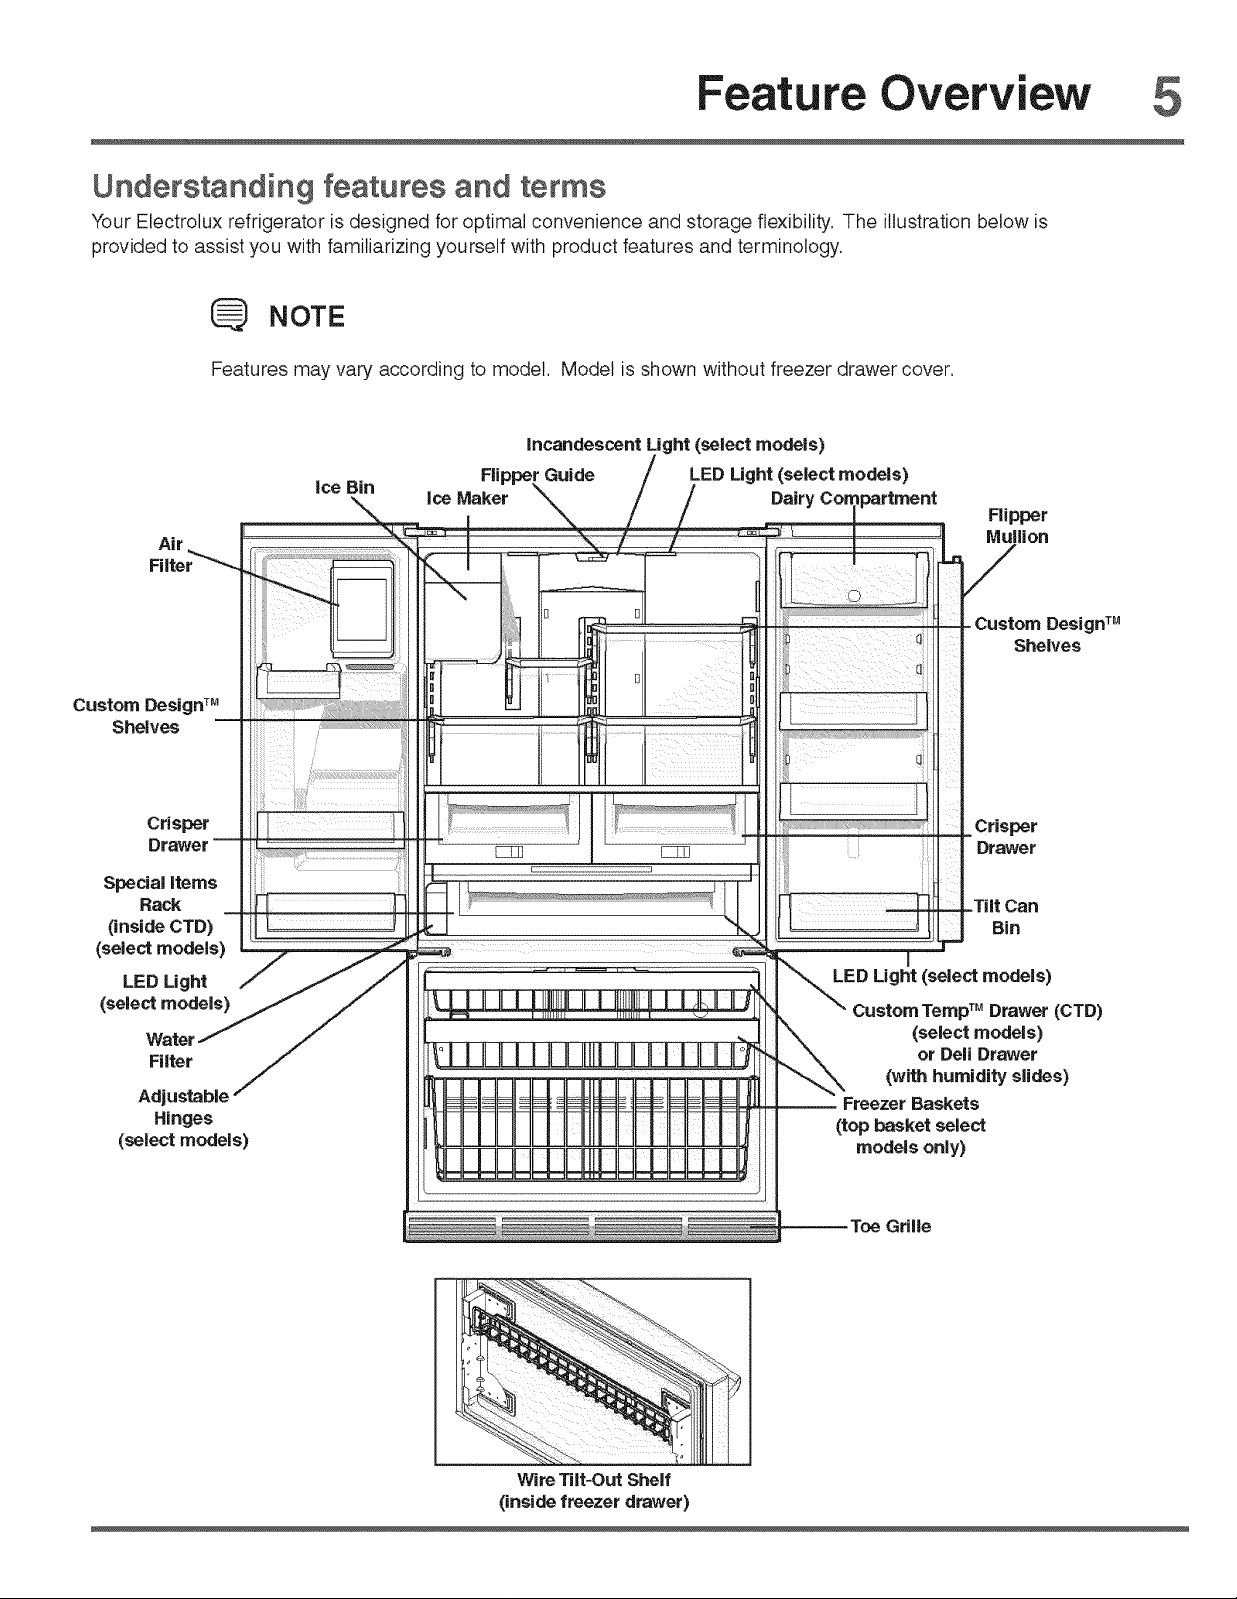
Understanding features and terms
Your Electrolux refrigerator is designed for optimal convenience and storage flexibility. The illustration below is
provided to assist you with familiarizing yourself with product features and terminology,
NOTE
Custom Design TM
Shelves
Crisper
Drawer--
Special Items
Rack
(inside CTD)
(select models)
LED Light
(select models)
Watel
Filter
Adjustable
Hinges
(select models)
Features may vary according to model,
Incandescent Light (select models)
Ice Bin
m
Flipper Guide LED Light(select models)
Ice Maker Dairy
Model is shown without freezer drawer cover.
[:1
[]
I
LED Light(select models)
Custom TempTM Drawer (CTD)
(select models)
or Dell Drawer
(with humidityslides)
Freezer Baskets
(top basket select
modelsonly)
Flipper
Mullion
/
Custom DesignTM
Shelves
Crisper
Drawer
Tilt Can
Bin
I1:_'b,
WireTilt-Out Shelf
(inside freezer drawer)
Grille
6
installation
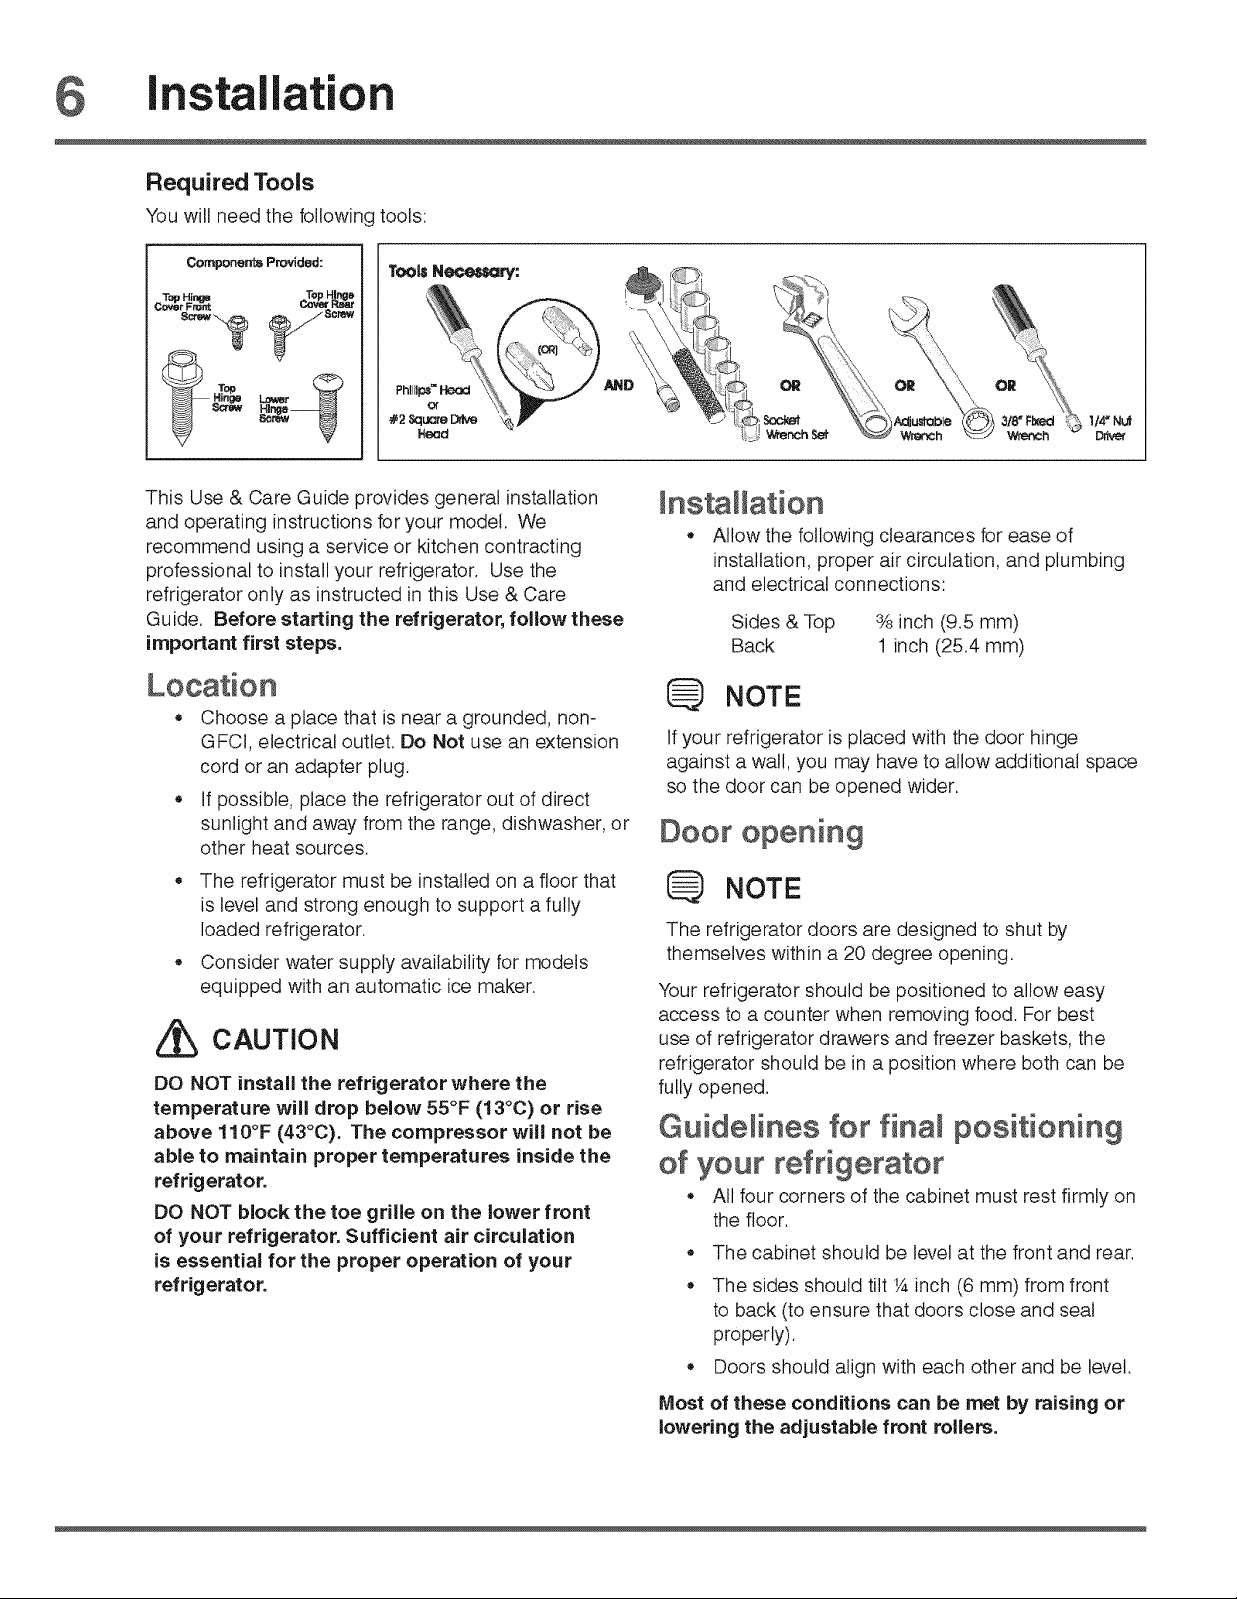
Required Tools
You will need the following tools:
Components Provided."
Top Hi_ _ToP Ht_
CoverFro_
$ctew _ _ Screw
This Use & Care Guide provides general installation
and operating instructionsfor your model. We
recommend using a service or kitchen contracting
professional to install your refrigerator. Use the
refrigerator only as instructed in this Use & Care
Guide. Before starting the refrigerator, follow these
important first steps.
,, Choose a place that is near a grounded, non-
GFCI, electrical outlet. Do Not use an extension
cord or an adapter plug.
• If possible, place the refrigerator out of direct
sunlight and away from the range, dishwasher, or
other heat sources.
,, The refrigerator must be installed on a floor that
is level and strong enough to support a fully
loaded refrigerator.
,, Consider water supply availability for models
equipped with an automatic ice maker.
ToolsN_n/:
CAUTION
DO NOT install the refrigerator where the
temperature will drop below 55°F (13°O) or rise
above 110°F (43°C). The compressor will not be
able to maintain proper temperatures inside the
refrigerator,
DO NOT block the toe grille on the lower front
of your refrigerator. Sufficient air circulation
is essential for the proper operation of your
refrigerator.
114" Nut
Driv_
Installation
,, Allow the following clearances for ease of
installation, proper air circulation, and plumbing
and electrical connections:
Sides & Top ¾ inch (9.5 mm)
Back 1 inch (25.4 mm)
NOTE
If your refrigerator is placed with the door hinge
against a wall, you may have to allow additional space
so the door can be opened wider.
Door opening
NOTE
The refrigerator doors are designed to shut by
themselves within a 20 degree opening.
Your refrigerator should be positioned to aitow easy
access to a counter when removing food. For best
use of refrigerator drawers and freezer baskets, the
refrigerator should be in a position where both can be
fully opened.
Guidelines for final positioning
of your refrigerator
* All four corners of the cabinet must rest firmly on
the floor.
e
The cabinet should be level at the front and rear.
o
The sides should tilt ¼ inch (6 mm) from front
to back (to ensure that doors close and seal
properly).
Doors should align with each other and be level.
Most of these conditions can be met by raising or
lowering the adjustable front rollers.
installation 7
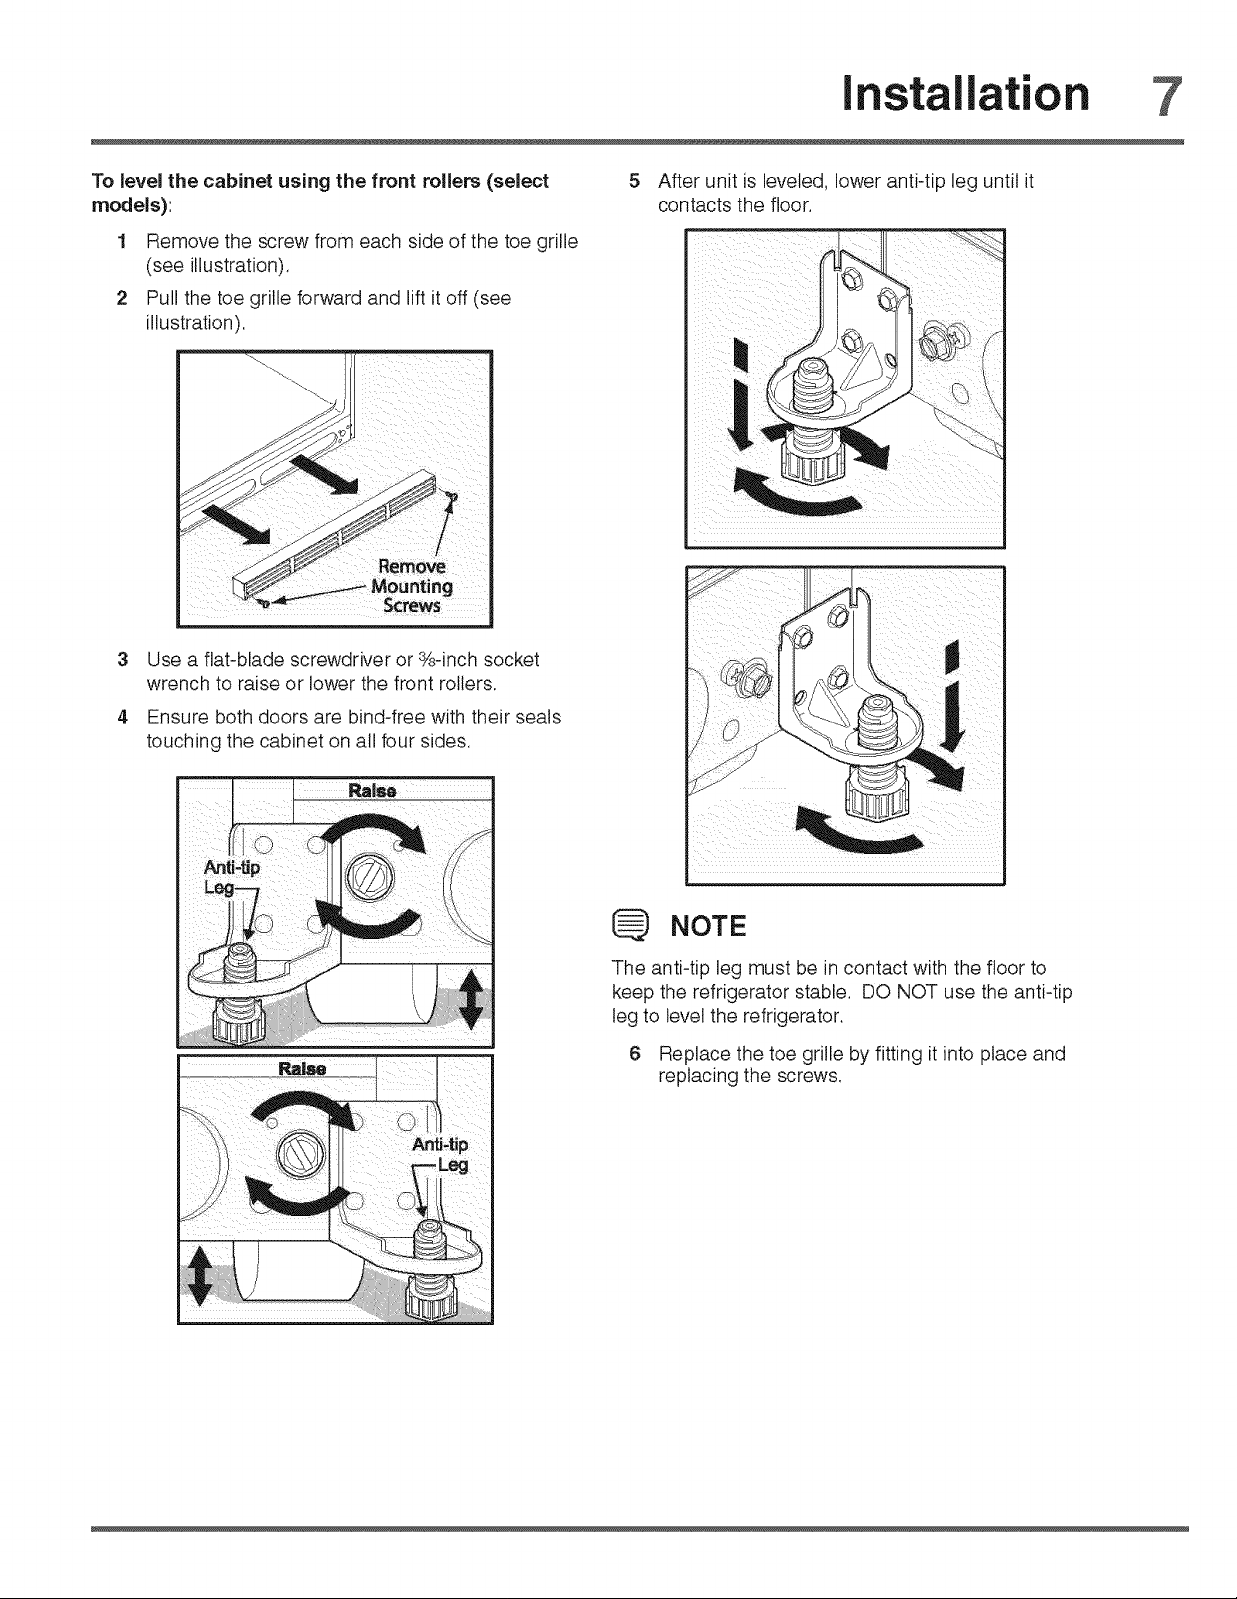
To level the cabinet using the front rollers (select
models):
1 Remove the screw from each side of the toe grille
(see illustration),
2 Pull the toe grille forward and lift it off (see
illustration),
34Use a flat-blade screwdriver or ¾-inch socket
wrench to raise or lower the front rollers,
Ensure both doors are bind-free with their seals
touching the cabinet on all four sides,
5
After unit is leveled, lower anti-tip leg until it
contacts the floor,
NOTE
The anti-tip leg must be in contact with the floor to
keep the refrigerator stable. DO NOT use the anti-tip
leg to level the refrigerator,
6 Replace the toe grille by fitting it into place and
replacing the screws,
installation
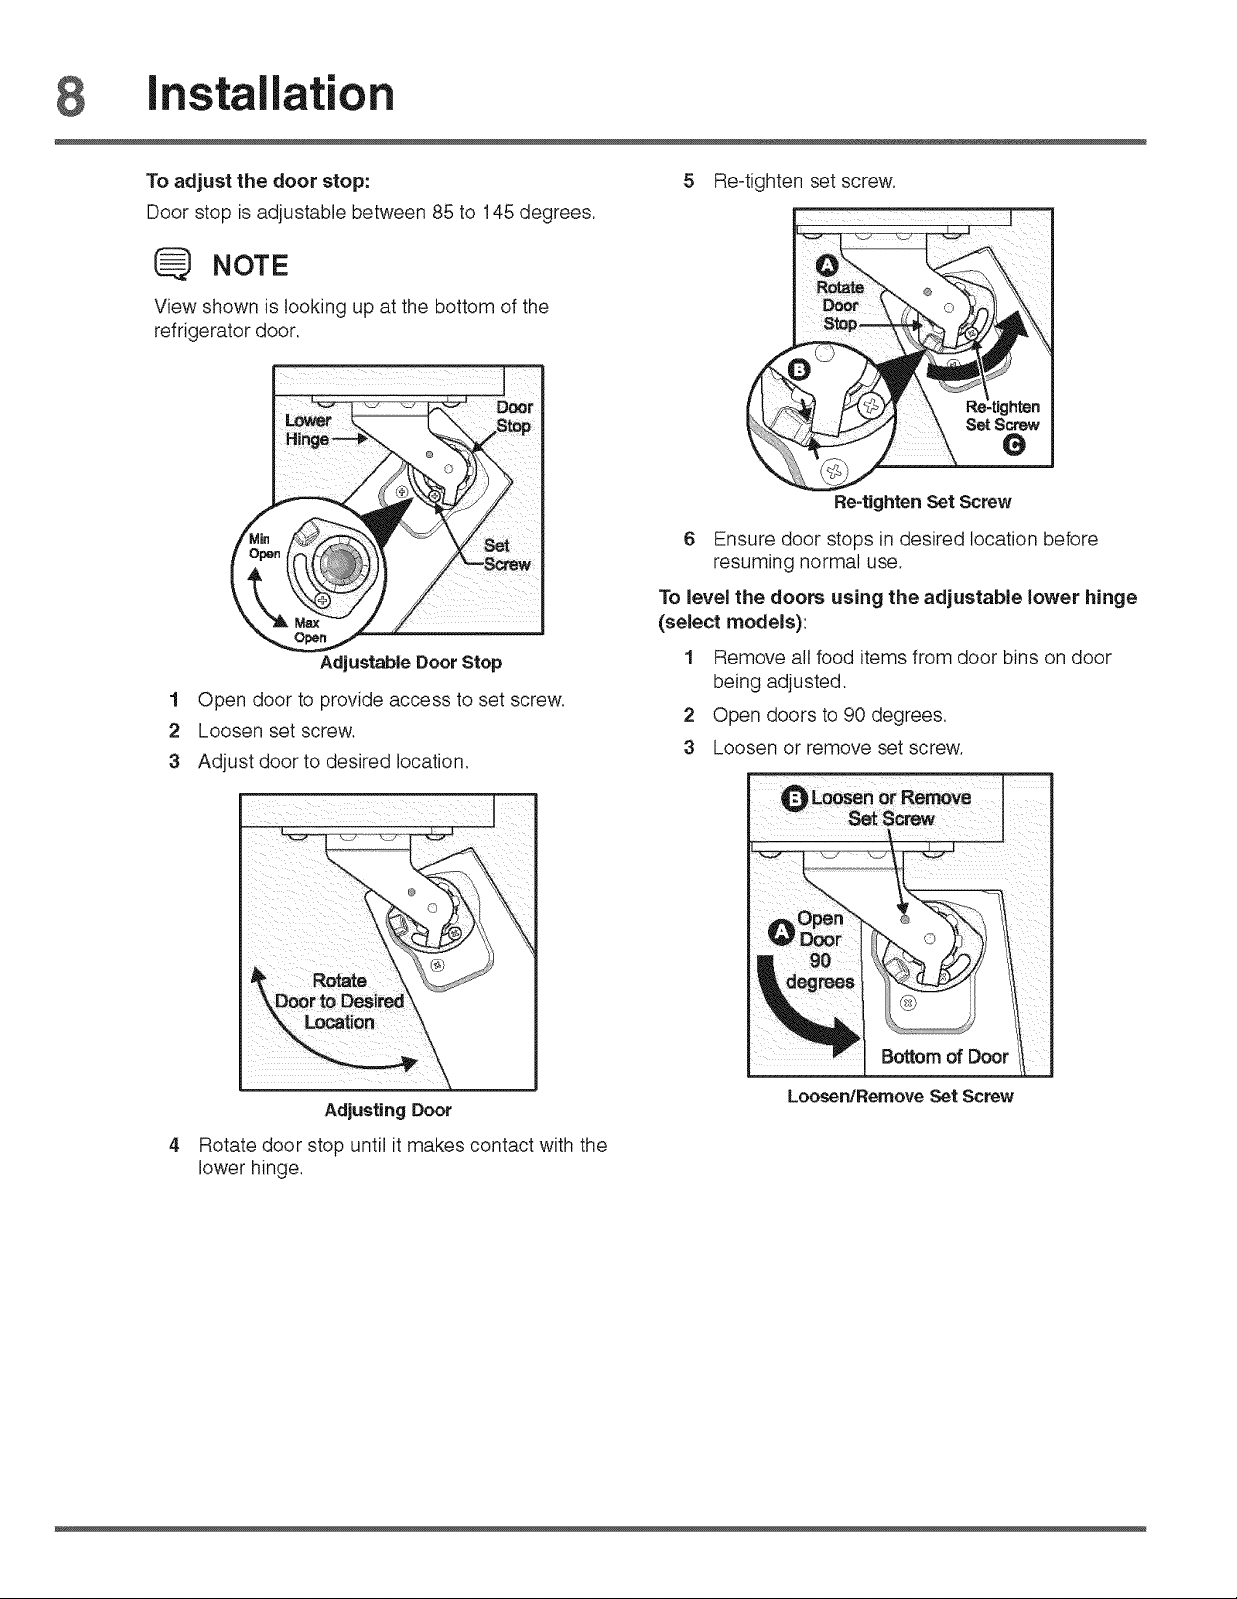
To adjust the door stop:
Door stop is adjustable between 85 to 145 degrees.
NOTE
View shown is looking up at the bottom of the
refrigerator door,
Adjustable Door Stop
1 Open door to provide access to set screw.
2 Loosen set screw.
3 Adjust door to desired location,
5 Re-tighten set screw.
SetScrew
e
Re-tighten Set Screw
6 Ensure door stops in desired location before
resuming normal use.
To level the doors using the adjustable lower hinge
(select models):
1 Remove all food items from door bins on door
being adjusted.
2 Open doors to 90 degrees.
3 Loosen or remove set screw.
AdjustingDoor
Rotate door stop until it makes contact with the
lower hinge.
Bottom of Door
Loosen/RemoveSet Screw
installation 9
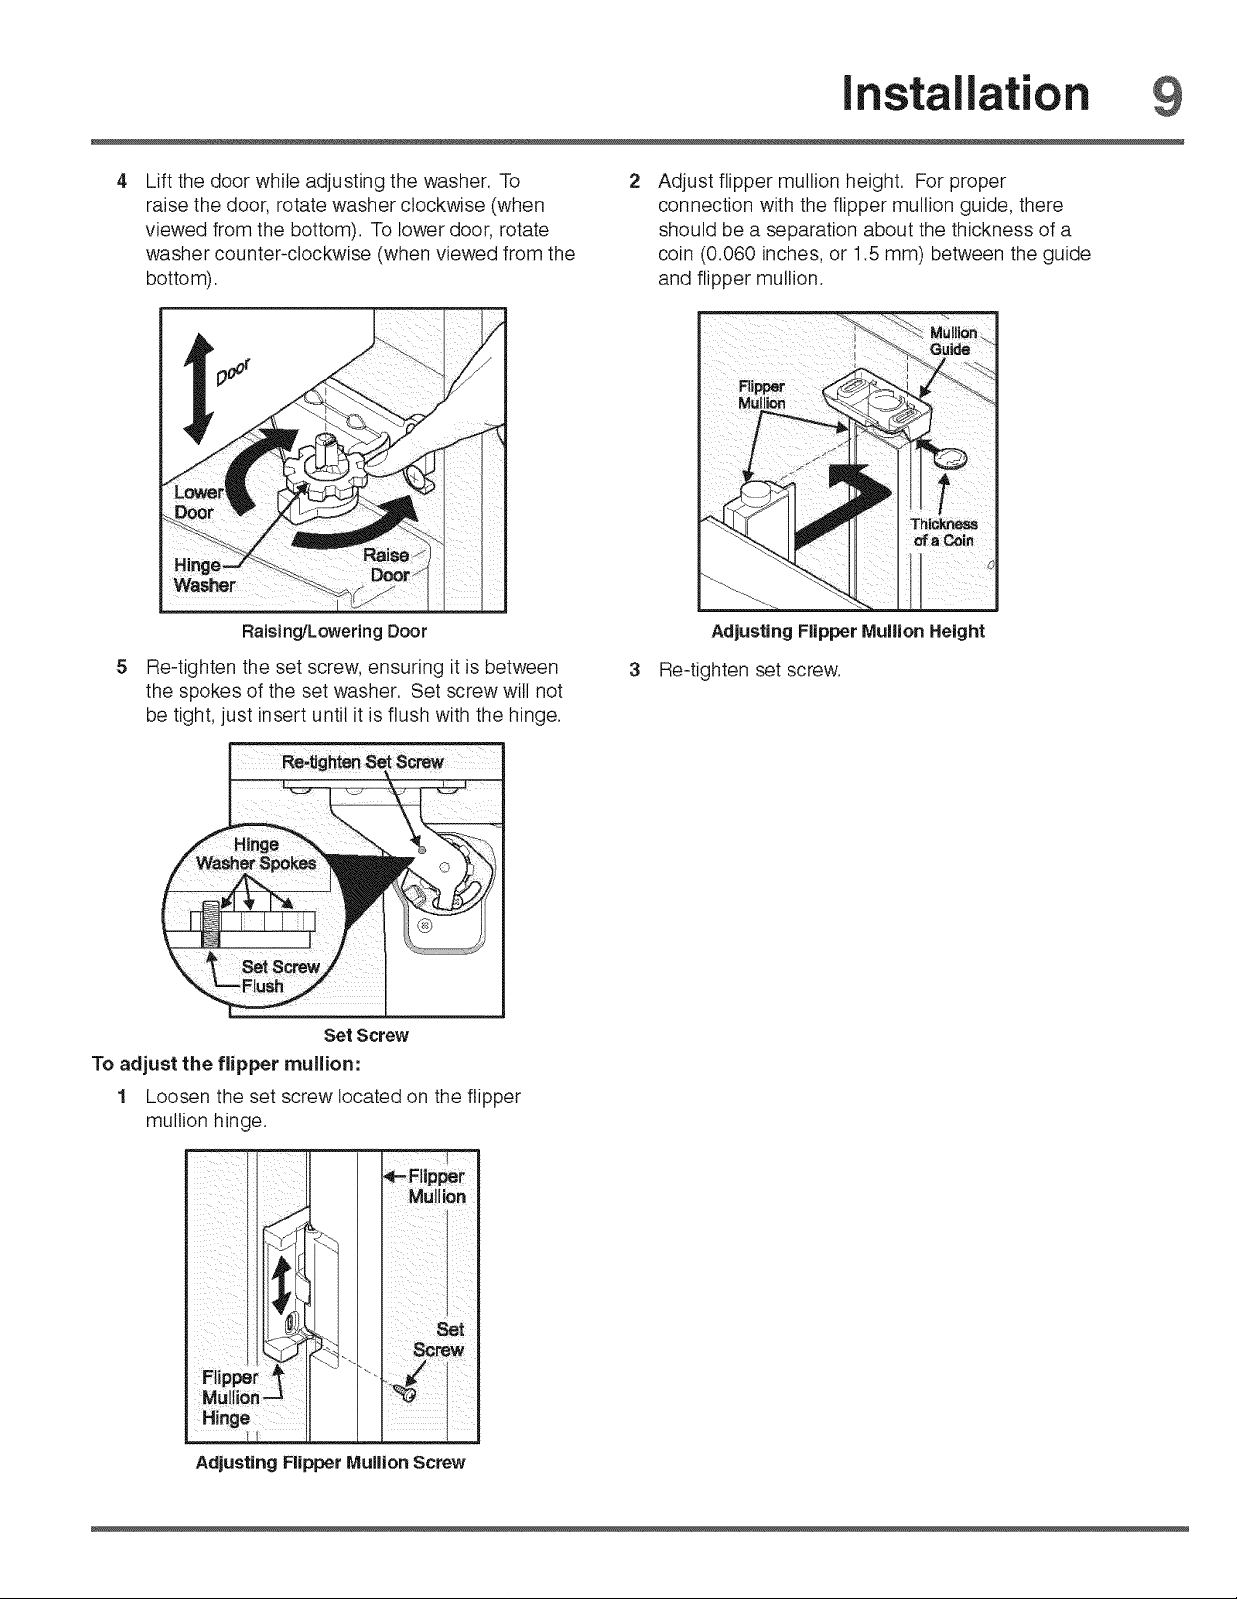
Lift the door while adjusting the washer. To
raise the door, rotate washer clockwise (when
viewed from the bottom). To lower door, rotate
washer counter_clockwise 'when viewed from the
bottom).
Raising/Lowering Door
5 Re-tighten the set screw, ensuring it is between
the spokes of the set washer. Set screw will not
be tight, just insert until it is flush with the hinge.
2
Adjust flipper mullion height. For proper
connection with the flipper mullion guide, there
should be a separation about the thickness of a
coin (0.060 inches, or 1.5 mm) between the guide
and flipper mullion.
Adjusting Flipper Mullion Height
3 Re-tighten set screw.
Set Screw
To adjust the flipper mullion:
1 Loosen the set screw located on the flipper
mullion hinge.
m_
_ _ Mullion
_Flipper
iI
Set
Mullion
Adjusting Flipper MullionScrew
Removing e Doors
Getting through narrow spaces
if your refrigerator will not fit through an entrance area,
you can remove the doors. Check first by measuring the
entrance.
To prepare for removing the doors:
Make sure the electrical power cord is unplugged
from the wall outlet.
2 Open the freezer drawer and remove the toe
grille (see "1nstallation" section).
3 Remove any food from the door shelves and
close the doors.
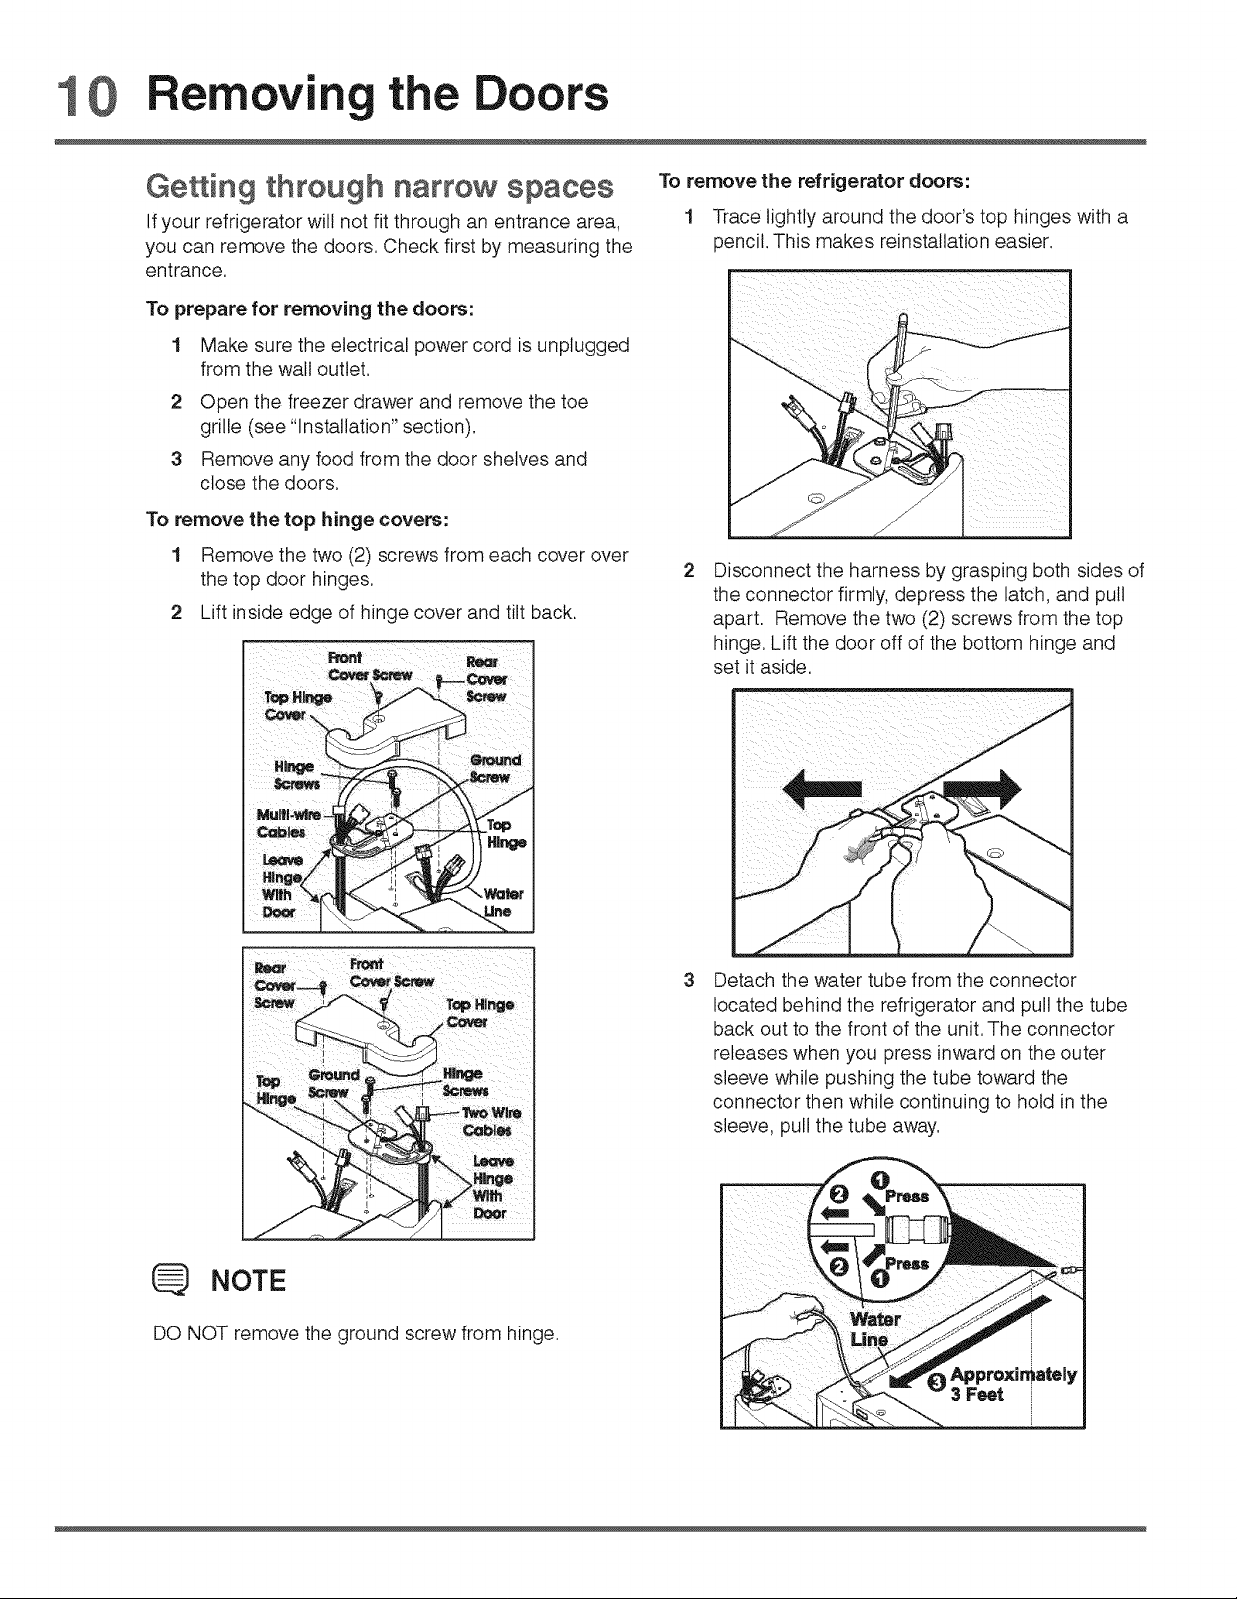
To remove the top hinge covers:
1 Remove the two (2) screws from each cover over
the top door hinges,
2 Lift inside edge of hinge cover and tilt back.
i
Hi
To remove the refrigerator doors:
1 Trace lightly around the door's top hinges with a
pencil. This makes reinstallation easier.
Disconnect the harness by grasping both sides of
the connector firmly, depress the latch, and pull
apart. Remove the two (2) screws from the top
hinge. Lift the door off of the bottom hinge and
set it aside.
Mulll-v_
I
I scr_ jzF'--....f
I "%_b _"-. I1| "._,l,Qe
NOTE
DO NOT remove the ground screw from hinge.
Detach the water tube from the connector
located behind the refrigerator and pull the tube
back out to the front of the unit, The connector
releases when you press inward on the outer
sleeve while pushing the tube toward the
connector then while continuing to hold in the
sleeve, pull the tube away.
Removin
the Doors 11
NOTE
You will be pulling approximately three (3) feet of
water tube from the back of the refrigerator.
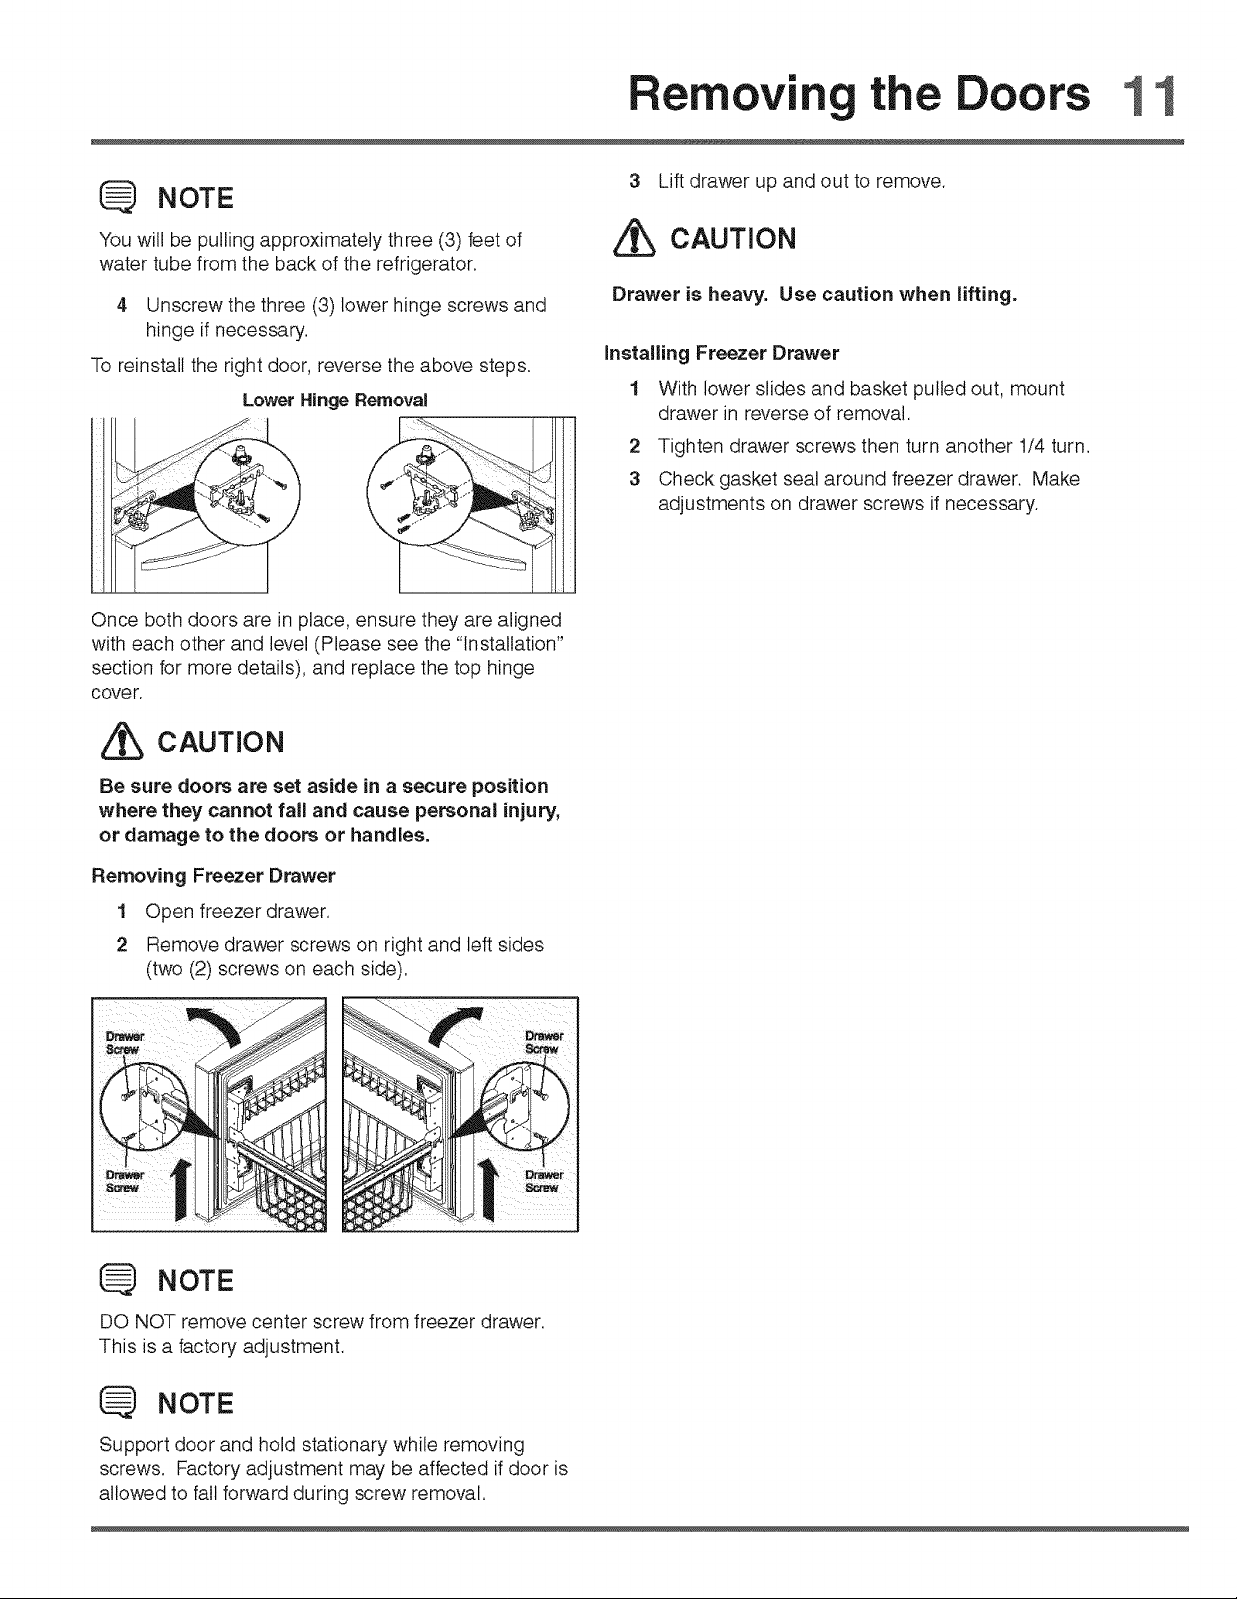
4 Unscrew the three (3) lower hinge screws and
hinge if necessary.
To reinstall the right door, reverse the above steps.
Lower Hinge Removal
Once both doors are in place, ensure they are aligned
with each other and level (Please see the "Installation"
section for more details), and replace the top hinge
cover.
CAUTION
3 Lift drawer up and out to remove.
CAUTION
Drawer is heavy. Use caution when lifting.
Installing Freezer Drawer
1 With lower slides and basket pulled out, mount
drawer in reverse of removal.
2 Tighten drawer screws then turn another 1/4 turn.
3 Check gasket seal around freezer drawer. Make
adjustments on drawer screws if necessary.
Be sure doors are set aside in a secure position
where they cannot fall and cause personal injury,
or damage to the doors or handles.
Removing Freezer Drawer
1 Open freezer drawer,
2 Remove drawer screws on right and left sides
(two (2) screws on each side),
NOTE
DO NOT remove center screw from freezer drawer.
This is a factory" adjustment.
NOTE
Support door and hold stationary while removing
screws. Factory adjustment may be affected if door is
allowed to fall forward during screw removal.
2 Connecting theWater upply
To Connect Water Supply Line To ice Maker inlet Valve
WARNING
To avoid electric shock, which can cause death or
severe personal injury, disconnect the refrigerator
from electrical power before connecting a water
supply line to the refrigerator.
CAUTION
To Avoid Properly Damage:
* Copper or Stainless Steel braided tubing is
recommended for the water supply line.Water
supply tubing made of ¼ inch plastic is not
recommended to be used. Plastic tubing greatly
increases the potential for water leaks, and the
manufacturer will not be responsible for any
damage if plastic tubing is used for the supply fine.
* DO NOT install water supply tubing in areas
where temperatures fall below freezing.
° Chemicals from a malfunctioning softener
can damage the ice maker, if the ice maker
is connected to soft water, ensure that the
softener is maintained and working properly.
IMPORTANT
Ensure that your water supply line connections
comply with all local plumbing codes.
Before Installing The Water Supply Line, YouWill Need:
* Basic Tools: adjustable wrench, flat-blade
screwdriver, and PhillipsTM screwdriver
- Access to a household cold water line with water
pressure between 30 and 100 psi.
,, A water supply line made of ¼ inch (6.4 mm) OD,
copper or stainless steel tubing.To determine the
length of tubing needed, measure the distance
from the ice maker inlet valve at the back of the
refrigerator to your cold 'water pipe.Then add
approximately 7 feet (2.1 meters), so the refrigerator
can be moved out for cleaning (as shown).
* A shutoff valve to connect the water supply line
to your household water system. DO NOT use a
self-piercing type shutoff valve.
,, A compression nutand ferrule(sleeve) forconnecting
a copper water supply lineto the ice maker inletvalve.
NOTE
Check with your local buildingauthority for
recommendations on ,waterlinesand associated materials
prior to installingyour new refrigerator. Depending on
your local/statebuildingcodes, Electroluxrecommends for
homes with existingvalves itsSmart Choice@water line kit
5305513409 (with a 6 ft.Stainless Steel Water Line)and for
homes without an existingvalve, Etectrotuxrecommends
its Smart Choice water_lblinekit5305510264 (with a 20 ft.
CopperWater Line with self-tappingsaddle valve). Please
referto vvvvw'frigidaire'c°rrdst°refor more information.
1. Disconnect refrigerator from electric power source.
2. Placeend of water supply line into sink or bucket.
-rijrn ON water supply and flush supply line until
water is clear.Turn OFF water supply at shutoff valve.
3. Remove plastic cap from water valve inlet and
discard cap.
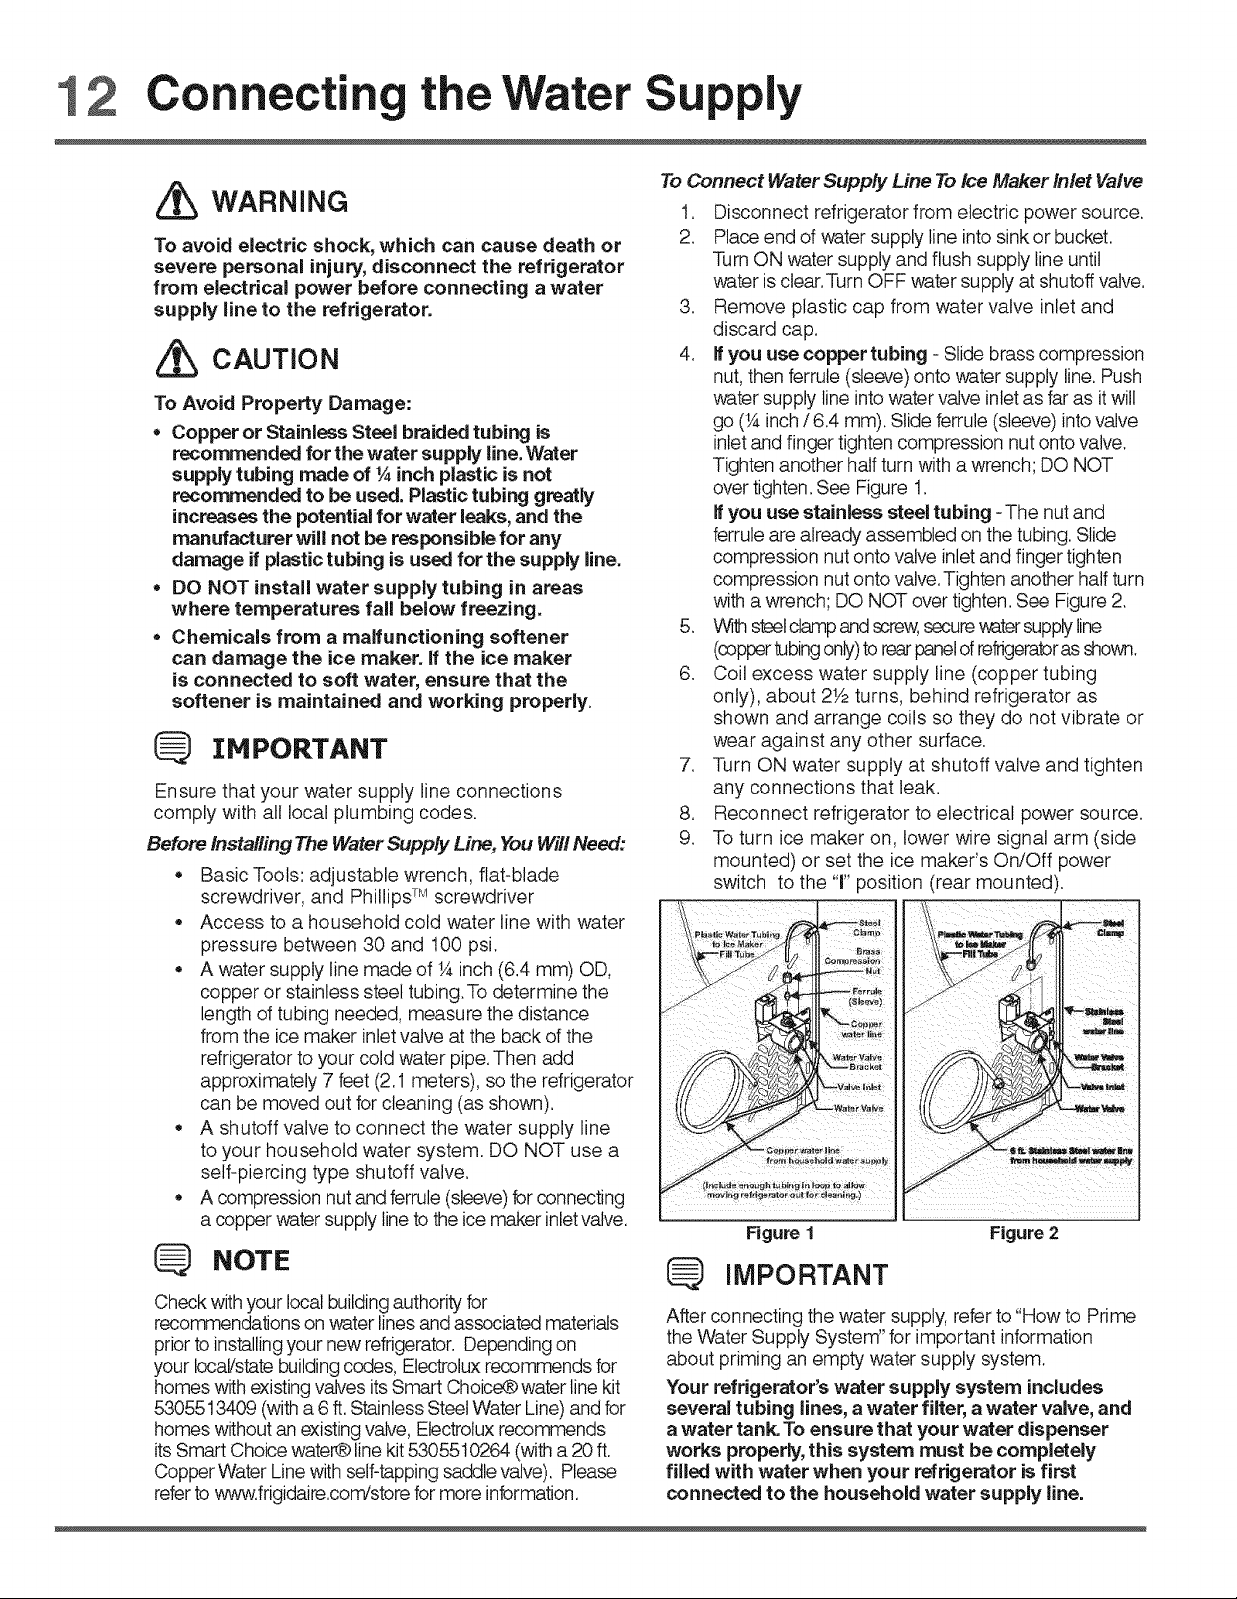
4. If you use copper tubing - Slide brass compression
nut, then ferrule (sleeve) onto water supply line. Push
water supply line into water valve inlet as far as itwill
go (¼ inch/ 6.4 mm). Slide ferrule (sleeve) into valve
inlet and finger tighten compression nut onto valve.
Tighten another half turn with a wrench; DO NOT
over tighten. See Figure 1.
If "you use stainless steel tubing -The nut and
ferrule are already assembled on the tubing. Slide
compression nutonto vakseinlet and finger tighten
compression nutonto valve.Tighten another half turn
with a wrench; DO NOT over tighten. See Figure 2.
5. Wllhsteelclampand screw,secure'watersupplyline
(coppertubingonb!)torearpanelofrefrigeratoras shown.
6. Coil excess water supply line (copper tubing
only), about 2Y2turns, behind refrigerator as
shown and arrange coils so they do not vibrate or
wear against any other surface.
7. Turn ON water supply at shutoff valve and tighten
any connections that leak.
8. Reconnect refrigerator to electrical power source.
9. To turn ice maker on, lower wire signal arm (side
mounted) or set the ice maker's On/Off power
switch to the 'T' position (rear mounted).
-- m
t_ I_ Make_
_r_
Ill /I/ L_ ".41\
tff //t2_.-,_ _,,.,o,,,.,.o
i
Figure 1 Figure 2
IMPORTANT
After connecting the water supply, refer to"How to Prime
the Water Supply System" for important information
about priming an empty water supply system.
Your refrigerator's water supply system includes
several tubing lines, a water filter, a water valve, and
a water tank.To ensure that your water dispenser
works properly, this system must be completely
filled with water when your refrigerator is first
connected to the household water supply line.
NI
Controls 13
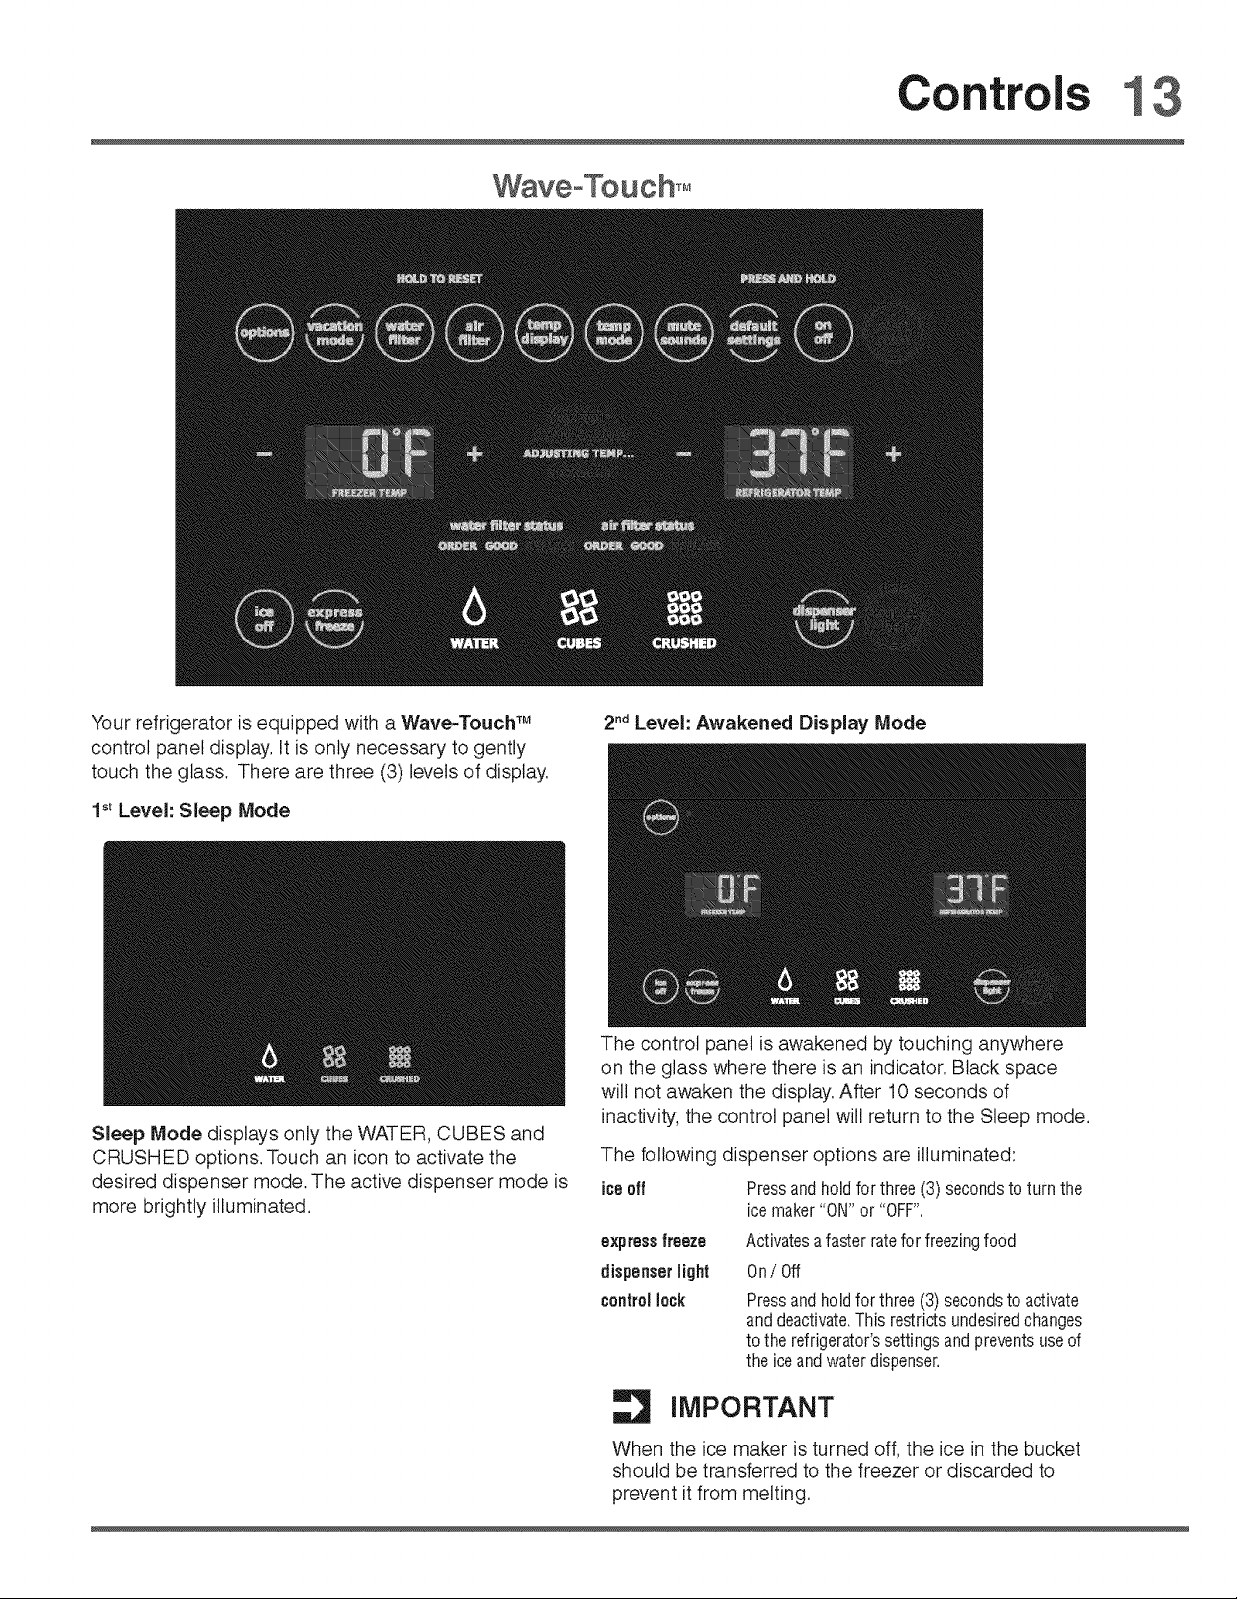
Your refrigerator is equipped with a Wave-Touch TM
control panel display, It is only necessary to gently
touch the glass. There are three (3) levels of display,
1_tLevel: Sleep Mode
Sleep Mode displays only the WATER, CUBES and
CRUSHED options. Touch an icon to activate the
desired dispenser mode. The active dispenser mode is
more brightly illuminated.
2ndLevel: Awakened Display Mode
The control panel is awakened by touching anywhere
on the glass where there is an indicator, Black space
will not awaken the display, After 10 seconds of
inactivity; the control panel will return to the Sleep mode.
The following dispenser options are illuminated:
ice off Pressand hold for three (3) seconds to turn the
ice maker "ON" or "OFF".
expressfreeze Activates afaster ratefor freezingfood
dispenser light On/Off
controllock Pressand hold for three (3) secondsto activate
anddeactivate.This restricts undesiredchanges
to the refrigerator's settings andpreventsuseof
the ice and water dispenser,
IMPORTANT
When the ice maker is turned off, the ice in the bucket
should be transferred to the freezer or discarded to
prevent it from melting.
8 Centre
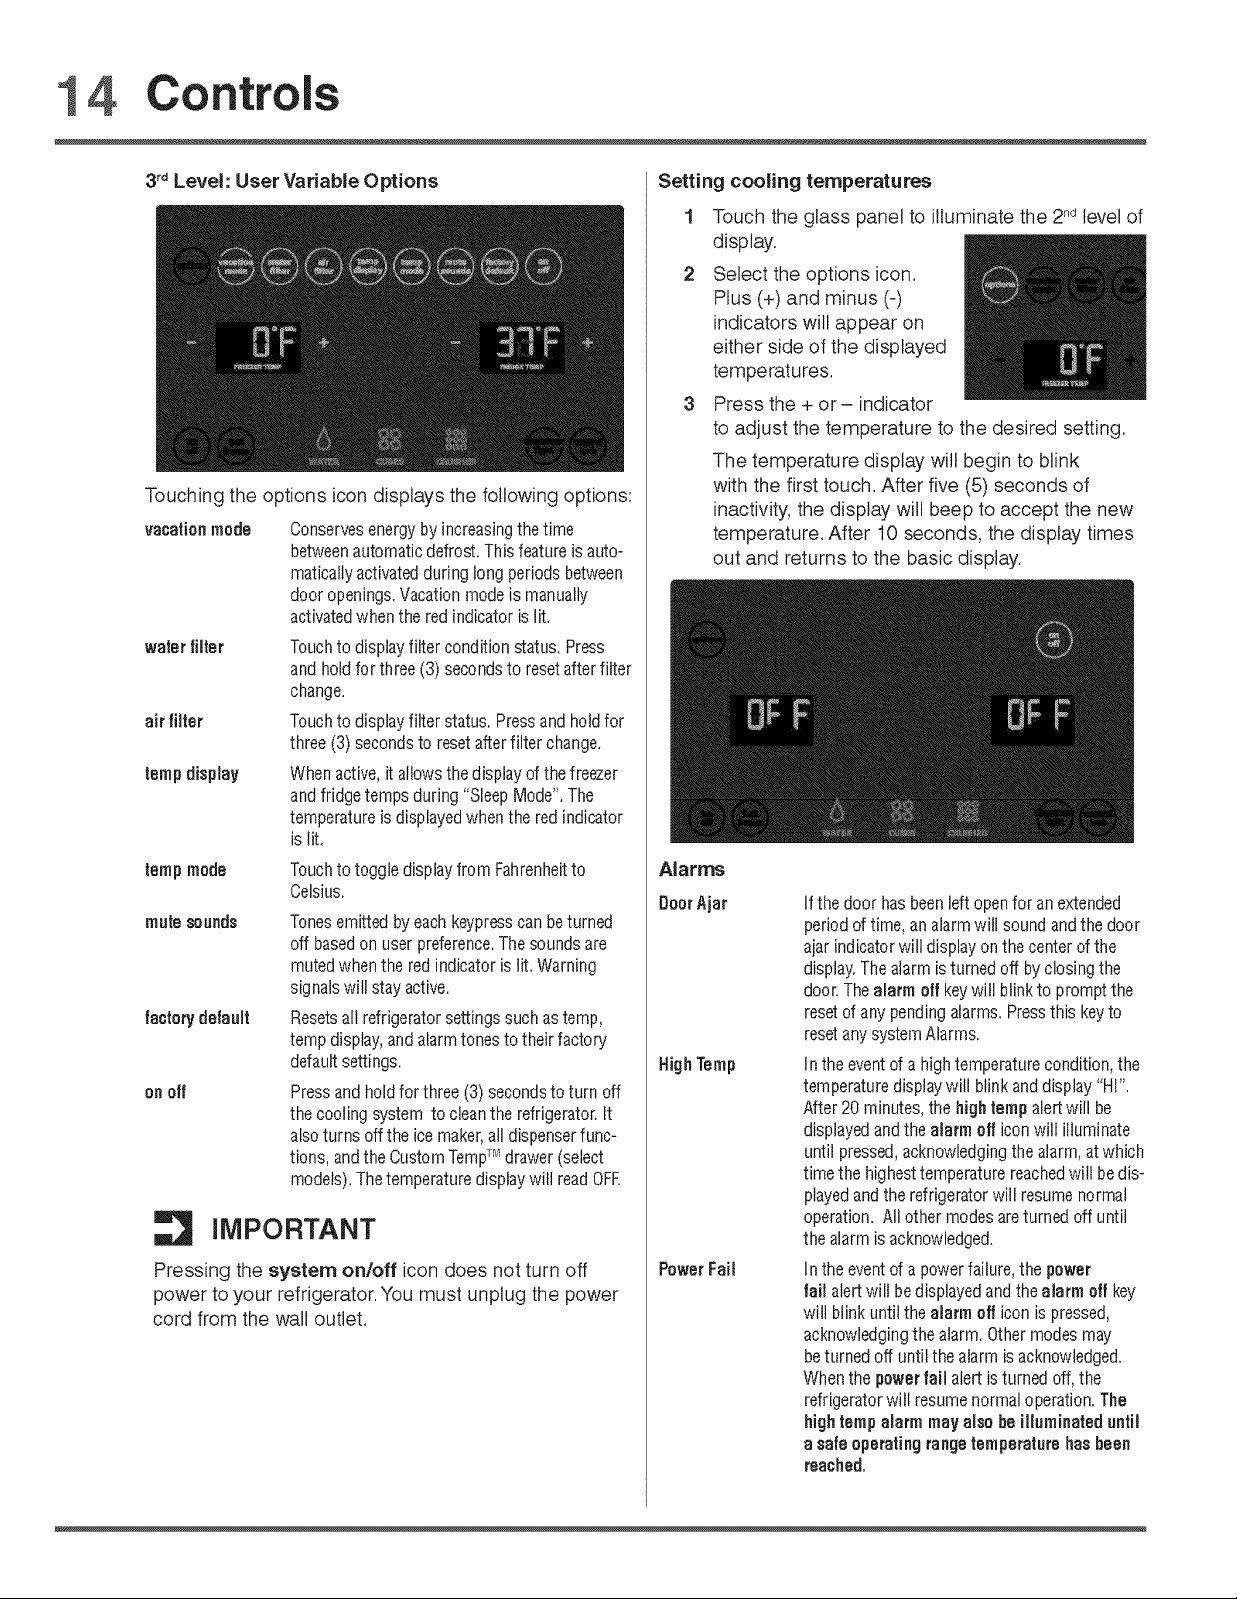
3rdLevel: User Variable Options
Touching the options icon displays the following options:
vacationmode
waterfilter
air filter
tempdisplay
fempmode
Conservesenergyby increasing the time
betweenautomatic defrost. This feature is auto-
matically activatedduring long periods between
door openings.Vacation mode is manually
activatedwhen the red indicator is fit.
Touch to display filter condition status. Press
and holdfor three (3) secondsto reset afterfilter
change.
Touch to display filter status. Press and holdfor
three (3) seconds to resetafter filter change.
When active, it allows the display ofthe freezer
andfridge temps during "Sleep Mode". The
temperature is displayedwhen the red indicator
istit.
Touchto toggledisplayfromFahrenheitto
Celsius.
mutesounds
factorydefault
onoff
Tones emitted by each keypresscan beturned
off basedon user preference.Thesounds are
muted when the redindicator is tit, Warning
signalswitl stayactive.
Resetsall refrigerator settings such as temp,
temp display,andalarm tonesto their factory
default settings.
Pressand hold for three (3) secondsto turn off
the cooling system to cleanthe refrigerator. It
alsoturns off the ice maker,all dispenserfunc-
tions, andthe Custom TempTM drawer (select
models). Thetemperature displaywill readOFF.
| IMPORTANT
Pressing the system onloff icon does not turn off
power to your refrigerator. You must unplug the power
cord from the wall outlet.
Setting cooling temperatures
Touch the glass panel to illuminate the 2ndlevel of
display.
Select the options icon.
Plus (+) and minus (-)
indicators will appear on
either side of the displayed
temperatures.
Press the + or- indicator
to adjust the temperature to the desired setting.
The temperature display will begin to blink
with the first touch. After five (5) seconds of
inactivity, the display will beep to accept the new
temperature. After t0 seconds, the display times
out and returns to the basic display.
Alarms
DoorAjar
HighTemp
PowerFail
Ifthe door has beenleft openfor anextended
period of time, analarmwill sound andthe door
ajarindicator will display onthe centerofthe
display.The alarm isturned off by closing the
door.Thealarm elf keywill blink to prompt the
resetof any pending alarms. Pressthis keyto
resetanysystem Alarms.
Inthe eventof a high temperature condition,the
temperature displaywitl blink and display "HI'.
After 20 minutes, the hightemp alertwill be
displayedandthe alarm off iconwill illuminate
until pressed, acknowledgingthe alarm,at which
time the highest temperature reachedwill bedis-
playedand the refrigerator will resume normal
operation. All other modesareturned off until
the alarrn isacknowledged.
Inthe eventof a powerfailure, the power
failalert wilt bedisplayed and the alarm off key
witi blinkuntil the alarm off icon is pressed,
acknowledgingthe atarrn.Other modes may
beturned off until the alarm is acknowledged.
When the power fail alert is turned off, the
refrigerator witl resumenormal operation.The
highletup alarm may also be illuminated until
asafe operating rangetemperaturehas been
reached,
Controls 15
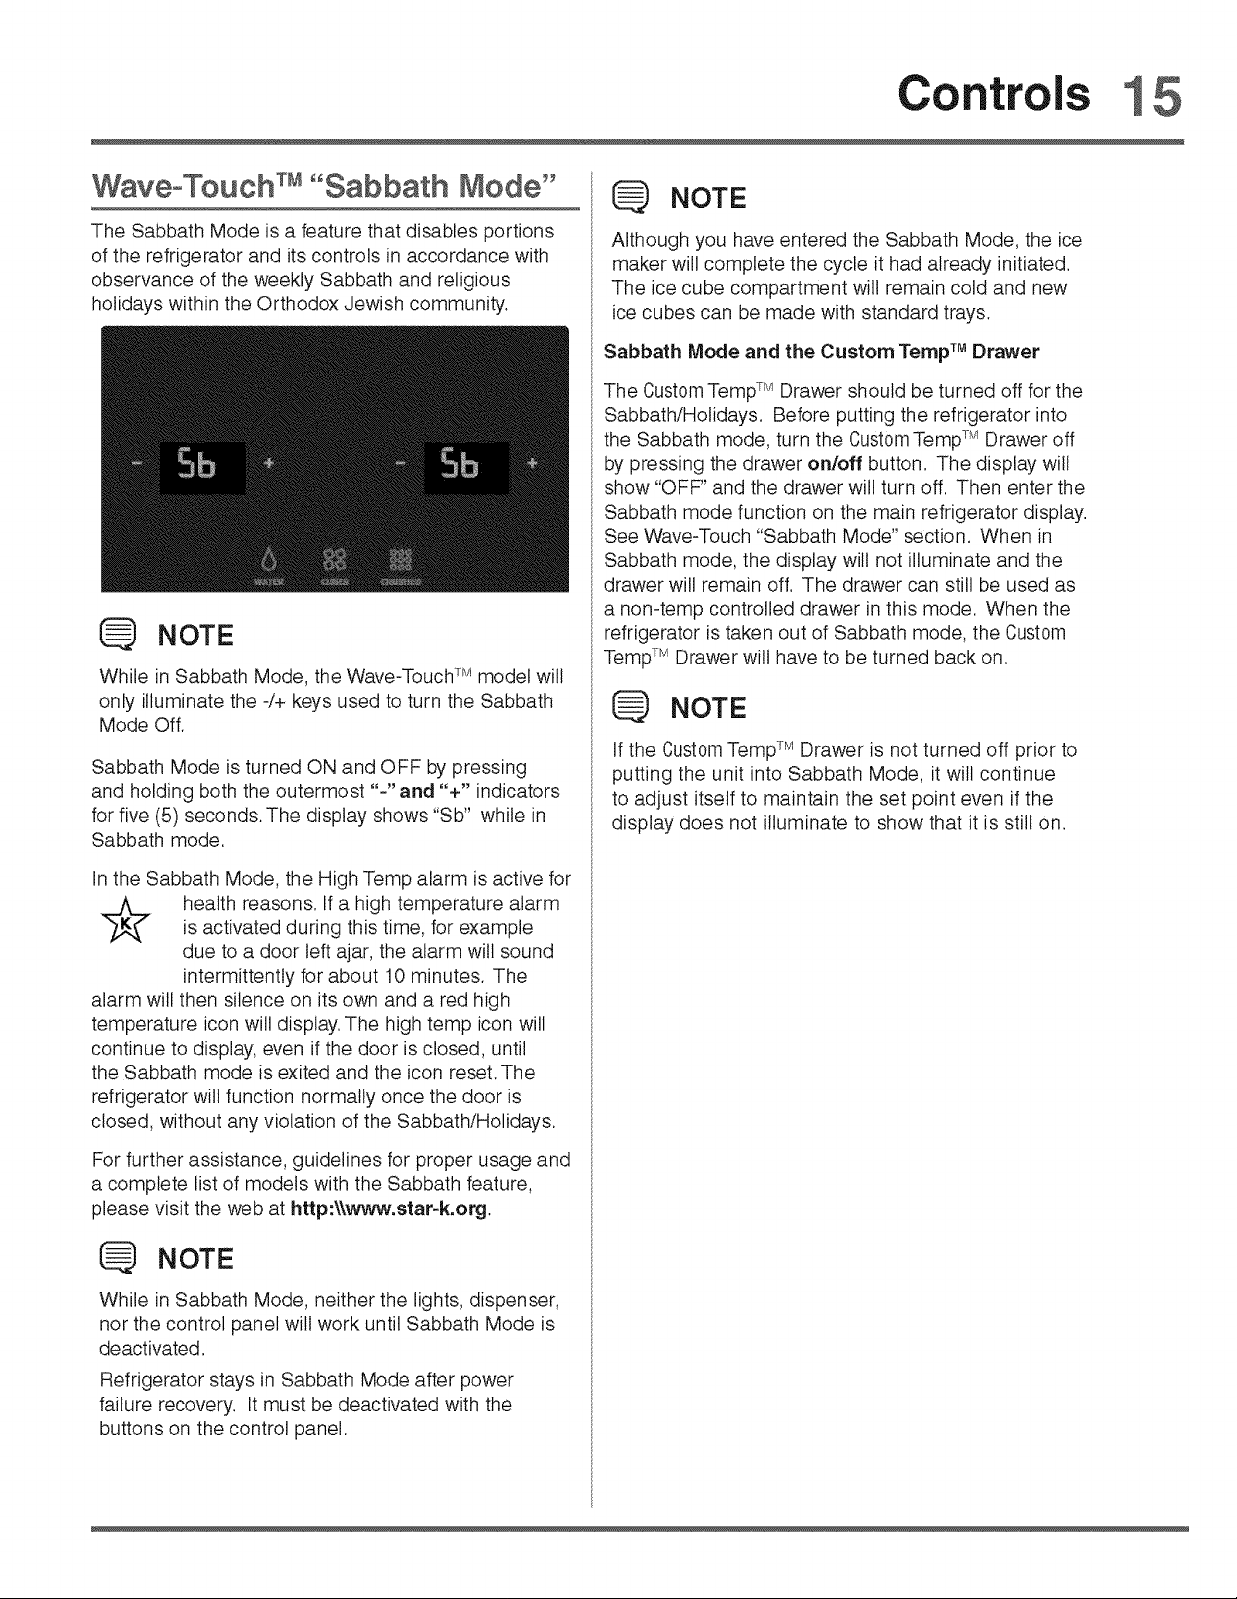
WaveoTouch TM"Sabbath Mode"
The Sabbath Mode is a feature that disables portions
of the refrigerator and its controls in accordance with
observance of the weekly Sabbath and religious
holidays within the Orthodox Jewish community.
NOTE
While in Sabbath Mode, the Wave-Touch TM model will
only illuminate the -/+ keys used to turn the Sabbath
Mode Off.
Sabbath Mode is turned ON and OFF by pressing
and holding both the outermost "-" and "+" indicators
for five (5) seconds. The display shows "Sb" while in
Sabbath mode.
! NOTE
Although you have entered the Sabbath Mode, the ice
maker will complete the cycle it had already initiated.
The ice cube compartment will remain cold and new
ice cubes can be made with standard trays.
Sabbath Mode and the Custom TempTM Drawer
The CustomTemp TM Drawer should be turned off for the
Sabbath/Holidays. Before putting the refrigerator into
the Sabbath mode, turn the CustomTempTM Drawer off
by pressing the drawer on/off button. The display will
show "OFF" and the drawer will turn off. Then enter the
Sabbath mode function on the main refrigerator display.
See Wave-Touch "Sabbath Mode" section. When in
Sabbath mode, the display wilt not illuminate and the
drawer will remain off. The drawer can still be used as
a non-temp controlled drawer in this mode. When the
refrigerator is taken out of Sabbath mode, the Custom
TempTM Drawer will have to be turned back on.
NOTE
If the CustomTemp TM Drawer is not turned off prior to
putting the unit into Sabbath Mode, it will continue
to adjust itself to maintain the set point even if the
display does not illuminate to show that it is still on.
In the Sabbath Mode, the High Temp alarm is active for
health reasons. If a high temperature alarm
is activated during tMs time, for example
due to a door left ajar, the alarm wilt sound
intermittently for about 10 minutes. The
alarm will then silence on its own and a red high
temperature icon will display. The high temp icon will
continue to display, even if the door is closed, until
the Sabbath mode is exited and the icon reset. The
refrigerator will function normally once the door is
closed, without any violation of the Sabbath/Holidays.
For further assistance, guidelines for proper usage and
a complete list of models with the Sabbath feature,
please visit the web at http:\\v, rww.star-k.org.
NOTE
While in Sabbath Mode, neither the lights, dispenser,
nor the control panel will work until Sabbath Mode is
deactivated.
Refrigerator stays in Sabbath Mode after power
failure recovery. It must be deactivated with the
buttons on the control panel.
6 Automatic ice Water Maker/Dispenser
Priming the water supply system
CAUTION
For proper dispenser operation, recommended
water supply pressure should fall between 30 psi
and 100 psi. Excessive pressure may cause water
filter to malfunction.
Begin filling the tank by pressing and holding
a drinking glass against the water dispenser
paddle, r=
2
Keep the glass
in this position
until water
comes out of the
dispenser, it may
take about 1½
minutes.
3
Continue
dispensing water
for about three
(3) minutes to
flush the system and plumbing connections of
any impurities (stopping to empty the glass as
necessary).
2-
NOTE
The water dispenser has a built-in device that shuts
off the water flow after three (3) minutes of continuous
use. To reset this shutoff device, simply release the
dispenser paddle.
maker operation & care
After the refrigerator is installed properly and has
cooled for several hours, the ice maker can produce ice
within 24 hours. It can completely fill an ice bin in about
eight (8) hours.
The ice maker will produce up to nine (9) pounds of ice
every 24 hours depending on usage conditions.
IMPORTANT
Your ice maker isturned on at the factory so itcan work
as soon as you install your refrigerator. Ifyou cannot
connect a water supply, set the ice maker's On/Off icon
to Off and turn off the water supply valve; otherwise, the
ice maker's fill valve may make a loud chattering noise
when it attempts to operate without water.
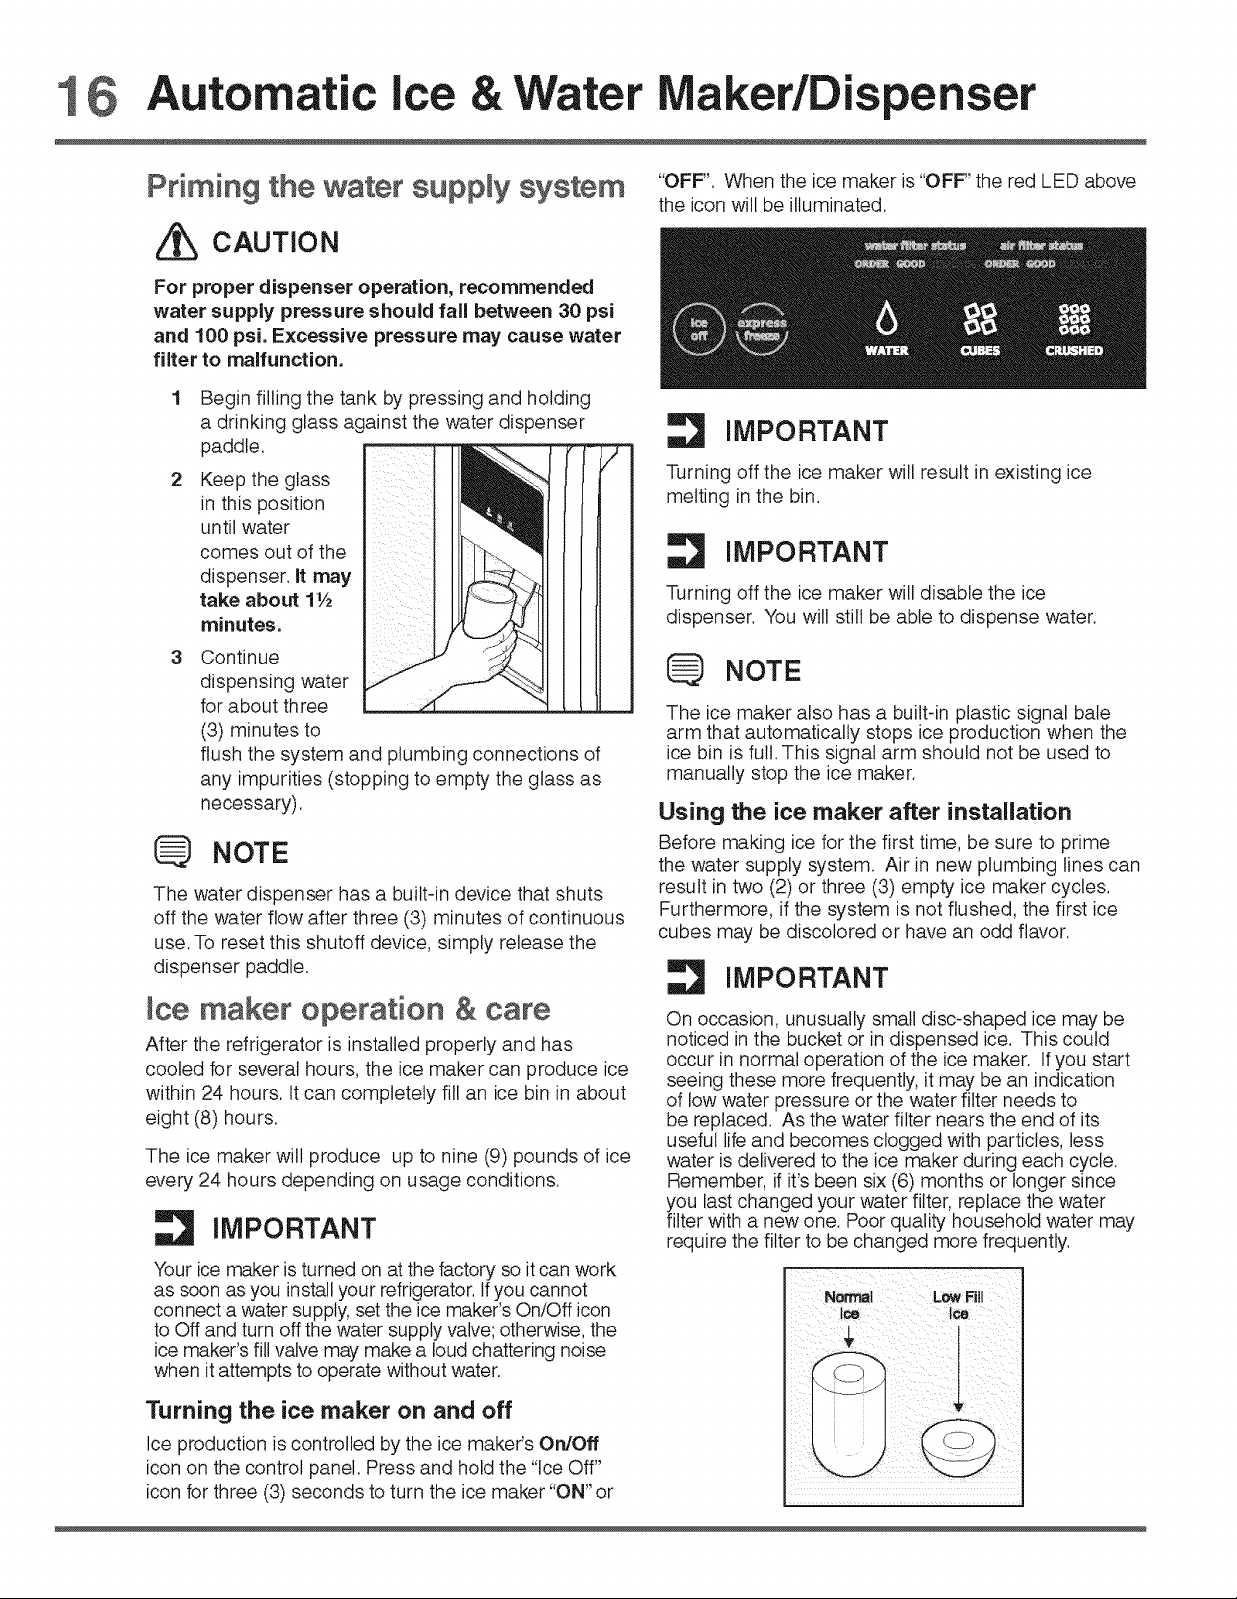
"OFF". When the ice maker is "OFF" the red LED above
the icon will be illuminated.
IMPORTANT
Turning off the ice maker will result in existing ice
melting in the bin.
IMPORTANT
Turning off the ice maker will disable the ice
dispenser. You will still be able to dispense water.
NOTE
The ice maker also has a built-in plastic signal bate
arm that automatically stops ice production when the
ice bin is full, This signal arm should not be used to
manually stop the ice maker.
Using the ice maker after installation
Before making ice for the first time, be sure to prime
the water supply system. Air in new plumbing lines can
result in two (2) or three (3) empty ice maker cycles.
Furthermore, if the system isnot flushed, the first ice
cubes may' be discolored or have an odd flavor.
IMPORTANT
On occasion, unusually small disc-shaped ice may be
noticed in the bucket or in dispensed ice. This could
occur in normal operation of the ice maker. If you start
seeing these more frequently, it may be an indication
of low water pressure or the water filter needs to
be replaced. As the water filter nears the end of its
useful life and becomes clogged with particles, less
water is delivered to the ice maker during each cycle.
Remember, if it's been six (6) months or longer since
you last changed your water filter, replace the water
filter with a new one. Poor quality household water may
require the filter to be changed more frequently.
Turning the ice maker on and off
Ice production is controlled by the ice maker's On/Off
icon on the control panel. Press and hold the "Ice Off"
icon for three (3) seconds to turn the ice maker "ON" or
Automatic ice Water aker/Dispenser 17
ice maker/dispenser tips
• If your refrigerator is not connected to a water
supply or the water supply is turned off, turn off
the ice maker by holding the On/Off soft-touch
icon for three (3) seconds.
The following sounds are normal when the ice
maker is operating:
- Motor running
Ice dropping into ice bin
- Water valve opening or closing
Running water
,, When dispensing ice, you will hear a snapping
or clicking sound when the ice chute opens and
closes.
• If you need a large quantity of ice at one time, it is
best to get cubes directly from the ice bin.
o When dispensing cubed ice, it is normal to have
a small quantity of little pieces along with the
whole cubes.
,, ice cubes stored too tong may develop an odd
flavor. Empty the ice bin as explained below.
CAUTION
if the water supply to your refrigerator is softened,
be sure the softener is properly maintained.
Chemicals from a water softener can damage the
ice maker.
Remove and empty the ice bin if:
An extended power failure (one hour or longer)
causes ice cubes in the ice bin to melt and freeze
together, jamming the dispenser mechanism.
You do not use the ice dispenser frequently. Ice
cubes will freeze together in the bin, jamming the
dispenser mechanism.
Remove the ice bin and shake to loosen the cubes or
clean as explained above.
CAUTION
NEVER use an ice pick or similar sharp
instrument to break up the ice. This could damage
the ice bin and dispenser mechanism.
To loosen stuck ice, use warm water. Before
replacing the ice bin, make sure it is completely
dry.
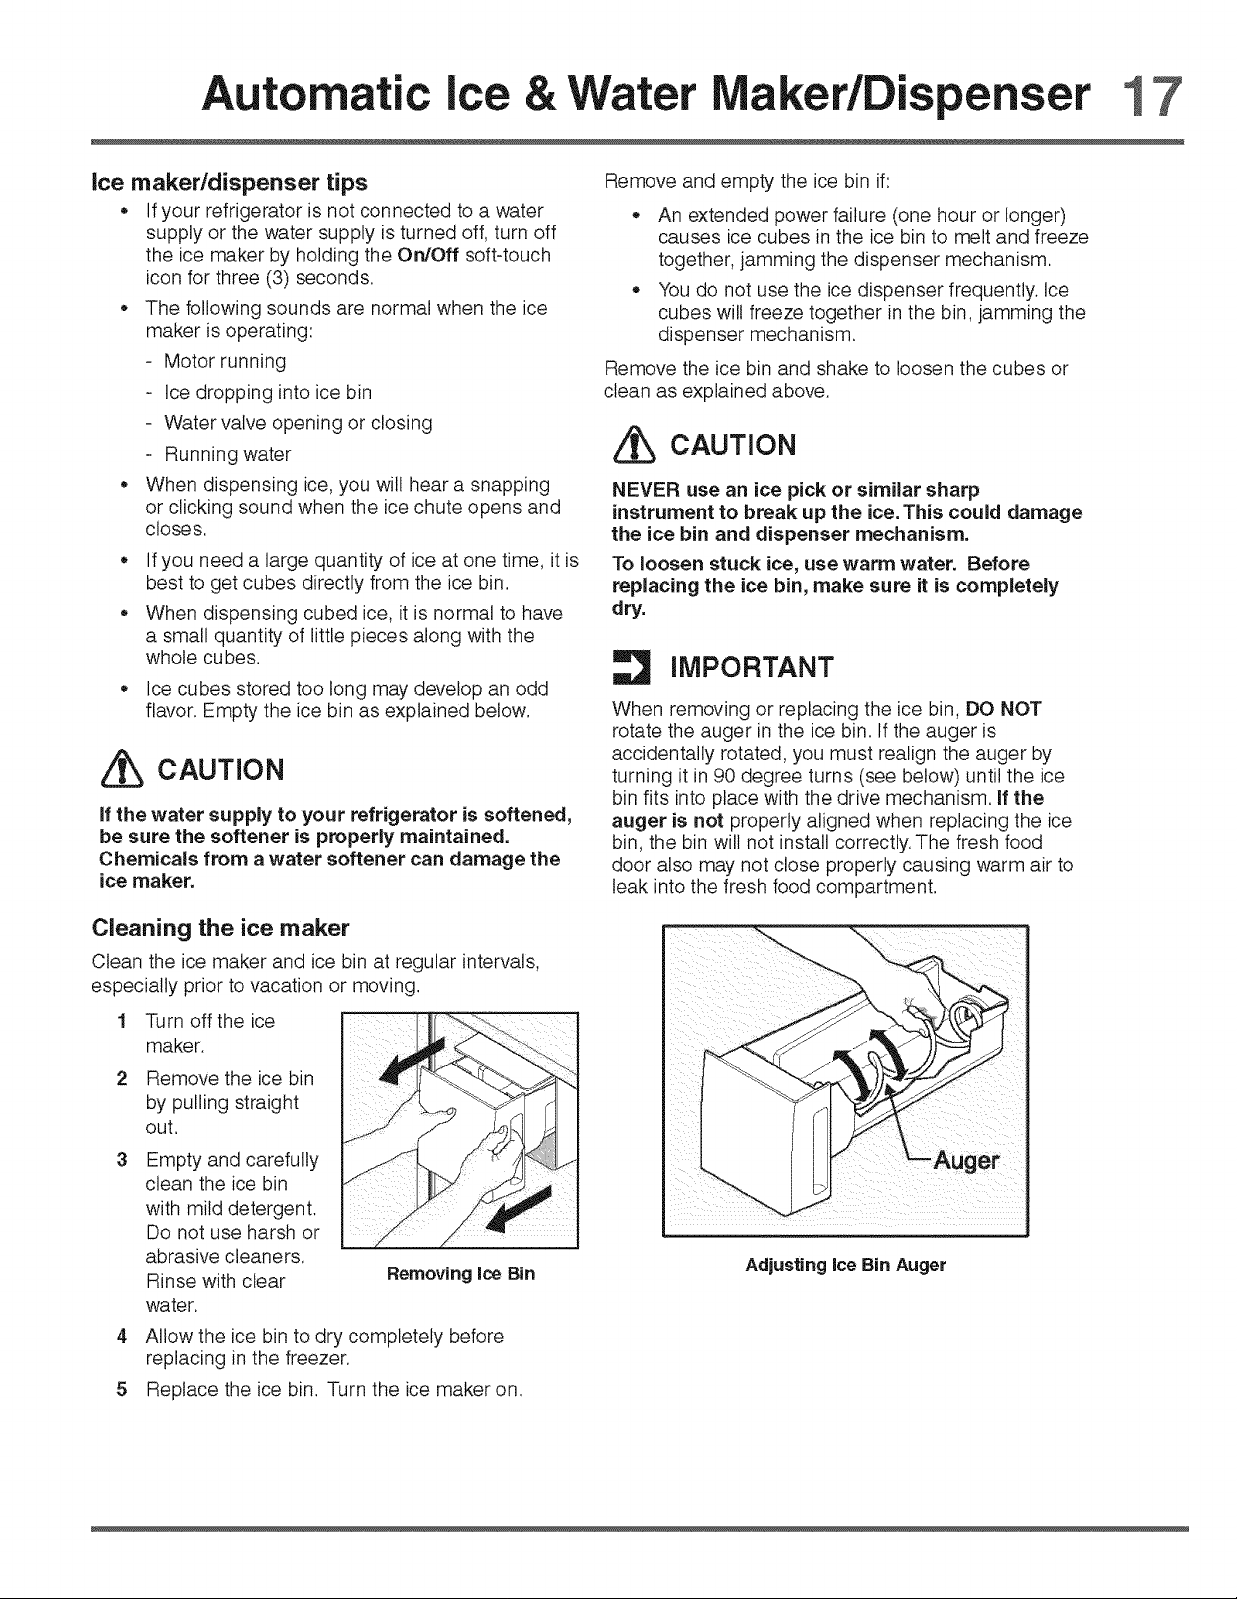
IMPORTANT
When removing or replacing the ice bin, DO NOT
rotate the auger in the ice bin. If the auger is
accidentally rotated, you must realign the auger by
turning it in 90 degree turns (see below) until the ice
bin fits into place with the drive mechanism, if the
auger is not properly aligned when replacing the ice
bin, the bin will not install correctly. The fresh food
door also may not close properly causing warm air to
leak into the fresh food compartment.
Cleaning the ice maker
Clean the ice maker and ice bin at regular intervals,
especially prior to vacation or moving.
1 Turn off the ice
maker.
2 Remove the ice bin
by pulling straight
out.
Empty and carefully
clean the ice bin
with mild detergent.
Do not use harsh or
abrasive cleaners.
Rinse with clear
water.
4 Allow the ice bin to dry completely before
replacing in the freezer.
5 Replace the ice bin. Turn the ice maker on.
Removing Ice Bin
Adjusting ice Bin Auger
Storage Features
CAUTION
To avoid injury from breakage, handle tempered
glass shelves carefully.
NOTE
Features may vary according to model.
Your refrigerator includes Custom DesignTM glass shelves
that are designed to catch and hold accidental spills.
"Youcan easily adjust shelf positions in the fresh food
compartments to suit your needs. The shelves have
mounting brackets that attach to slotted supports at the
rear of each compartment.
To change the position of a shelf:
1 Before adjusting a shelf, remove all food.
2 Lift the front edge up and pull the shelf out.
3 Replace by inserting the mounting bracket hooks
into the desired support slots.
4 Lower the shelf and lock into position.
Shemffeatures
Your refrigerator includes a variety of storage drawers.
These drawers are located in fixed positions at the
bottom of the fresh food compartment.
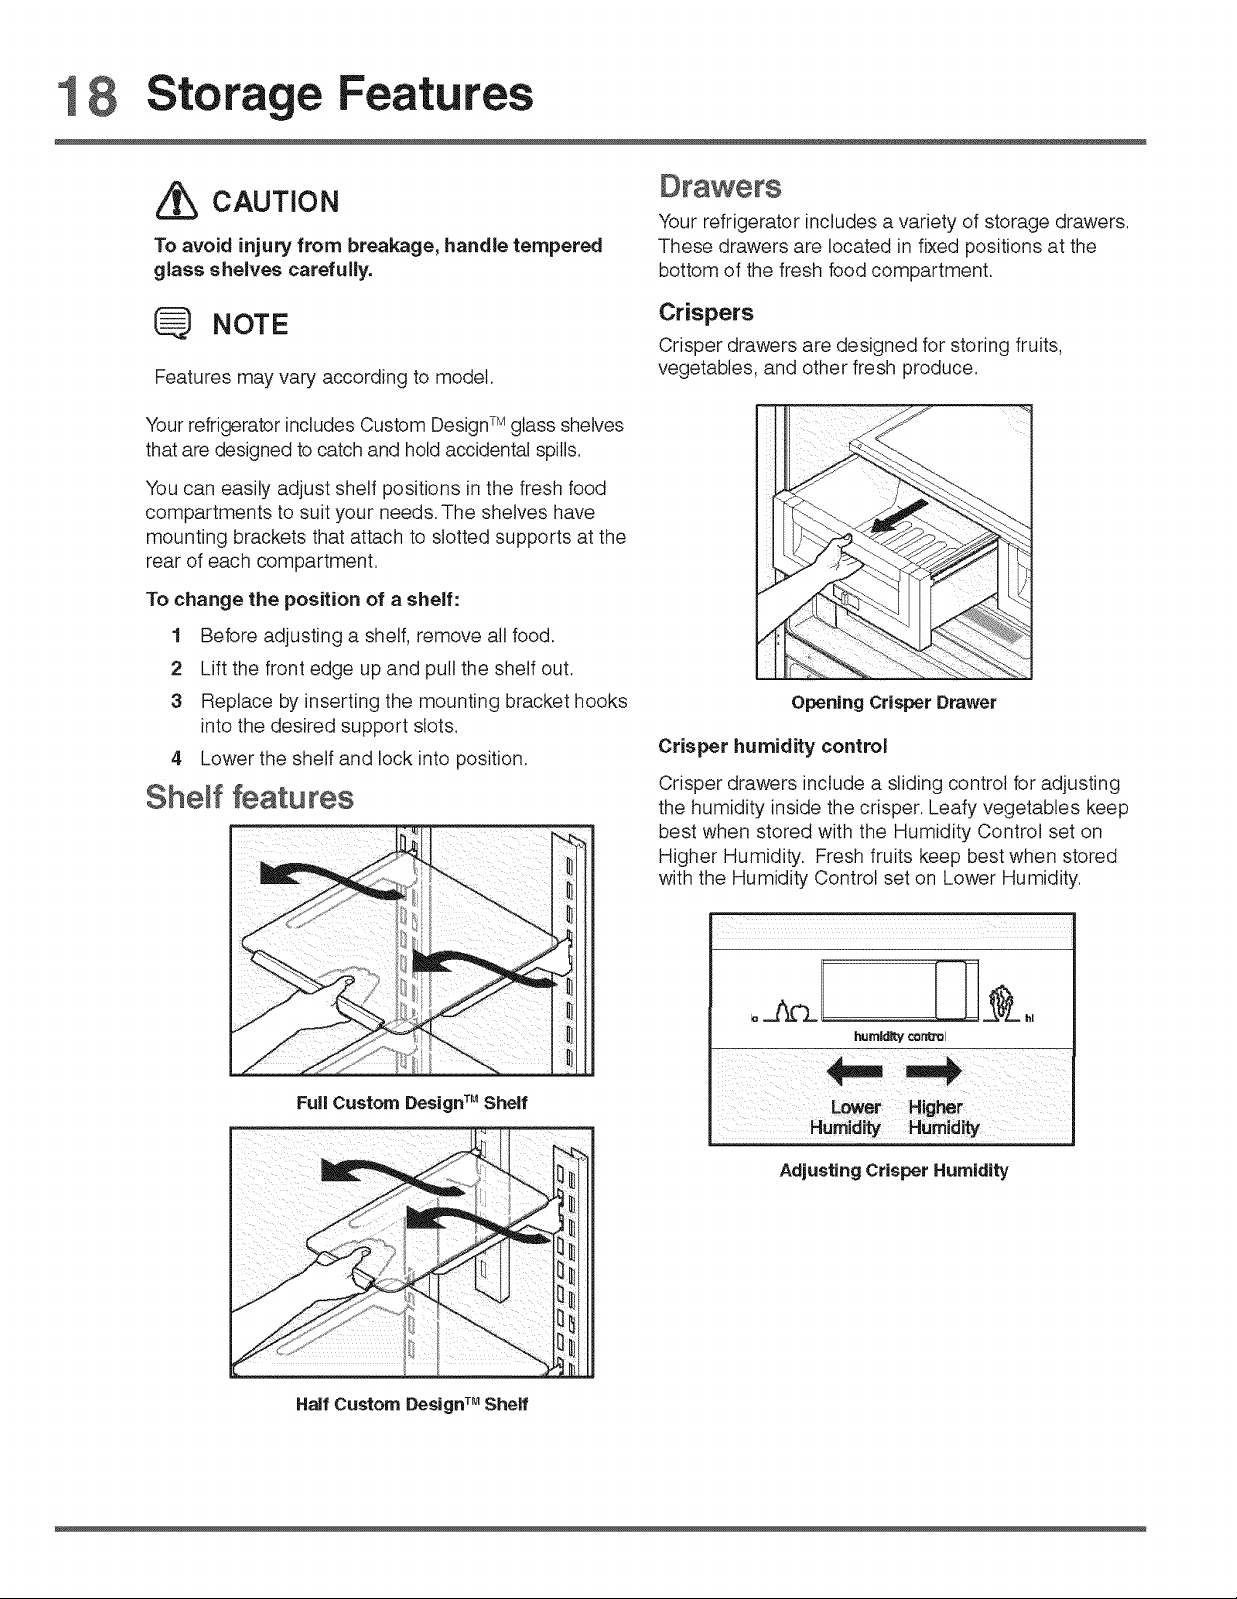
Crispers
Crisper drawers are designed for storing fruits,
vegetables, and other fresh produce.
Opening Crisper Drawer
Crisper humidity control
Crisper drawers include a sliding control for adjusting
the humidity inside the crisper. Leafy vegetables keep
best when stored with the Humidity Control set on
Higher Humidity. Fresh fruits keep best when stored
with the Humidity Control set on Lower Humidity.
Full Custom Design TM Shelf
HaJf Custom Design TM Shelf
humidity corf_ol
Adjusting Crisper Humidity
Storage Features 19
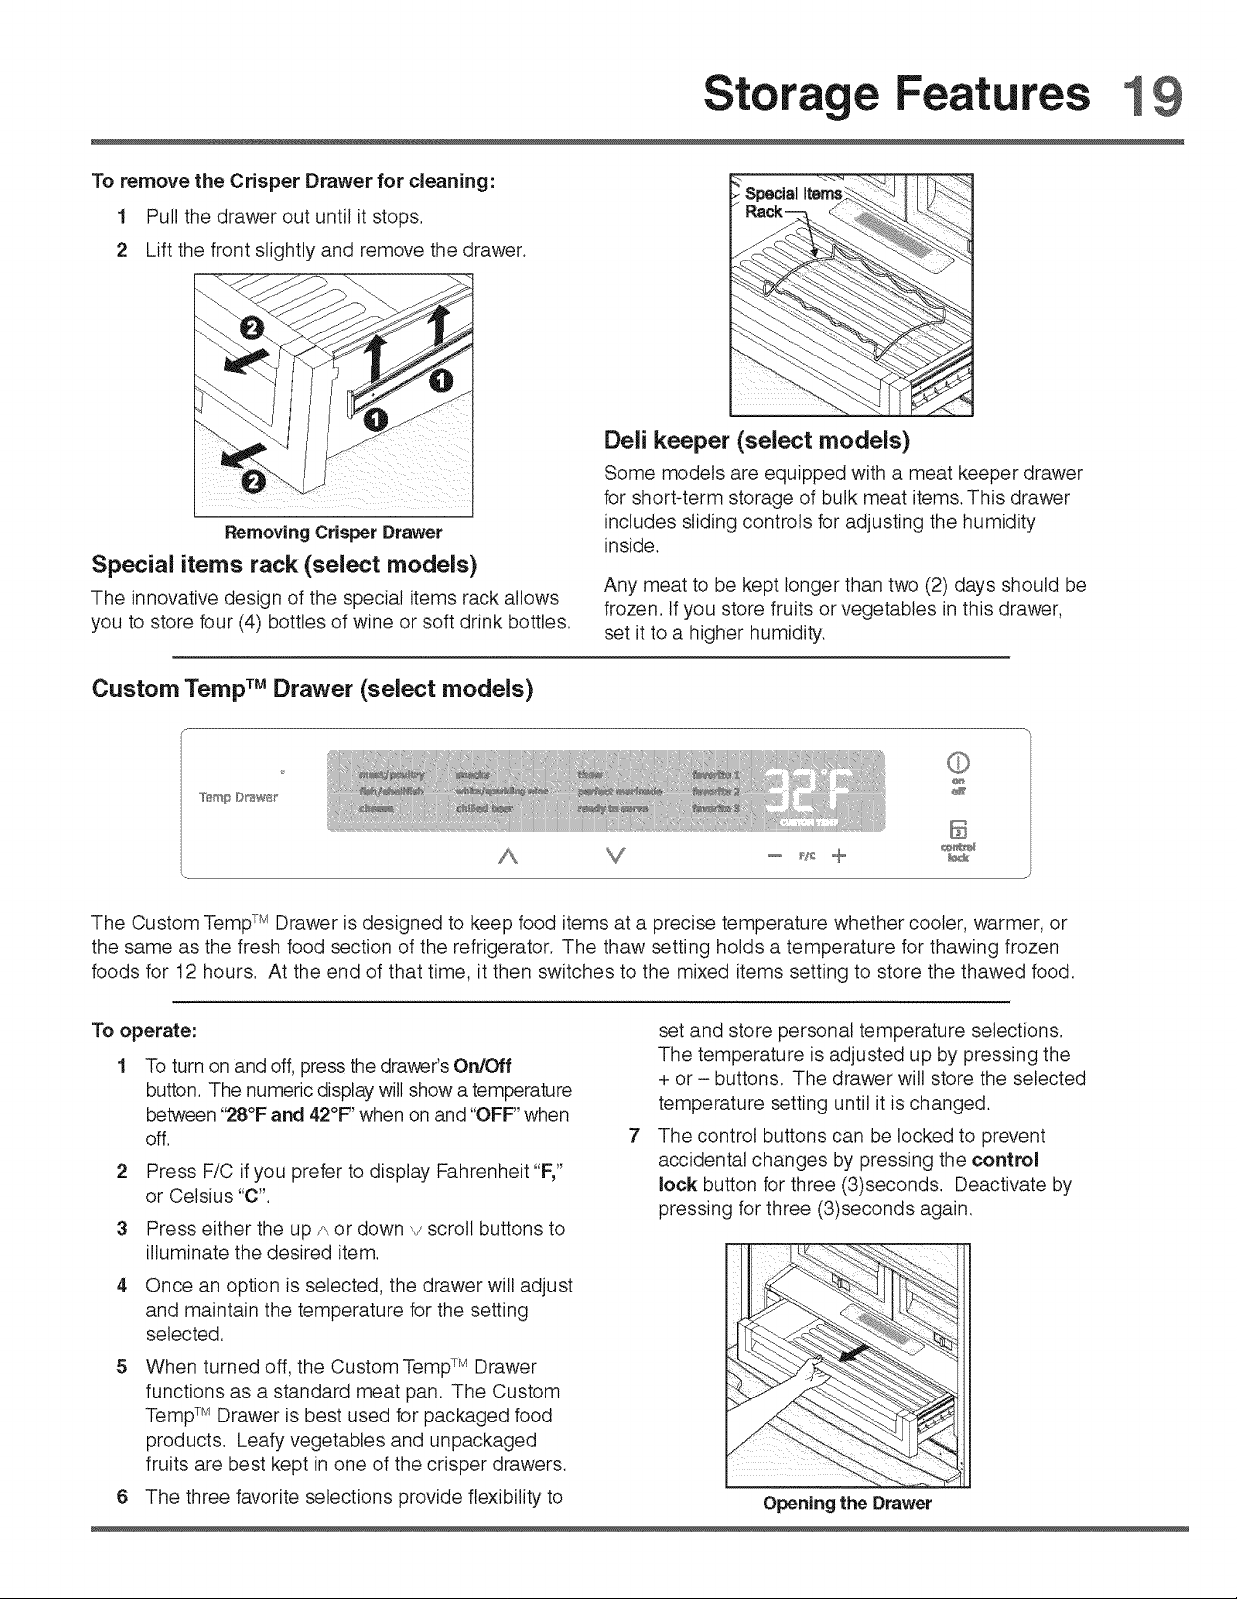
To remove the Crisper Drawer for cleaning:
1 Pull the drawer out until it stops.
2 Lift the front slightly and remove the drawer.
Removing Crisper Drawer
Special items rack (select models)
The innovative design of the special items rack allows
you to store four (4) bottles of wine or soft drink bottles.
Custom Temp TM Drawer (select models)
Special Items
Deli keeper (select models)
Some models are equipped with a meat keeper drawer
for short-term storage of bulk meat items. This drawer
includes sliding controls for adjusting the humidity
inside.
Any meat to be kept longer than two (2) days should be
frozen. If you store fruits or vegetables in this drawer,
set it to a higher humidity.
'Tt_'@_S_sw__
The Custom TempTM Drawer is designed to keep food items at a precise temperature whether cooler warmer, or
the same as the fresh food section of the refrigerator. The thaw setting holds a temperature for thawing frozen
foods for 12 hours. At the end of that time, it then switches to the mixed items setting to store the thawed food.
To operate:
To turn on and off, press the drawer's On/Off
button. The numeric display will show a temperature
between "28°F and 42°F ' when on and "OFF" when
off.
2 Press FiC if you prefer to display Fahrenheit "F,"
or Celsius "C".
3 Press either the up _.,or down v scroll buttons to
illuminate the desired item.
4 Once an option is selected, the drawer will adjust
and maintain the temperature for the setting
selected.
5 When turned off, the Custom TempTM Drawer
functions as a standard meat pan. The Custom
TempTM Drawer is best used for packaged food
products. Leafy vegetables and unpackaged
fruits are best kept in one of the crisper drawers.
6 The three favorite selections provide flexibility to
i: ;iiii ii ii
set and store personal temperature selections.
The temperature is adjusted up by pressing the
+ or - buttons. The drawer will store the selected
temperature setting until it is changed.
7
The control buttons can be locked to prevent
accidental changes by pressing the control
lock button for three (3)seconds. Deactivate by
pressing for three (3)seconds again.
Opening the Drawer
Storage Features
IMPORTANT
DO NOT clean the display area of the Custom Temp TM
Drawer with abrasive or caustic cleaners. Wipe clean
with a moist sponge.
CAUTION
The Custom TempTM Drawer and cover can
be removed for cleaning but the control unit,
attached to the right side of the fridge, cannot be
removed. Do not immerse the Custom Temp TM
Drawer cover in water or put it in a dishwasher.
Clean with a damp cloth or sponge.
To remove the Custom Temp TM Drawer for cleaning:
1 Pull the drawer out until it stops.
2 Lift the front slightly and remove the drawer.
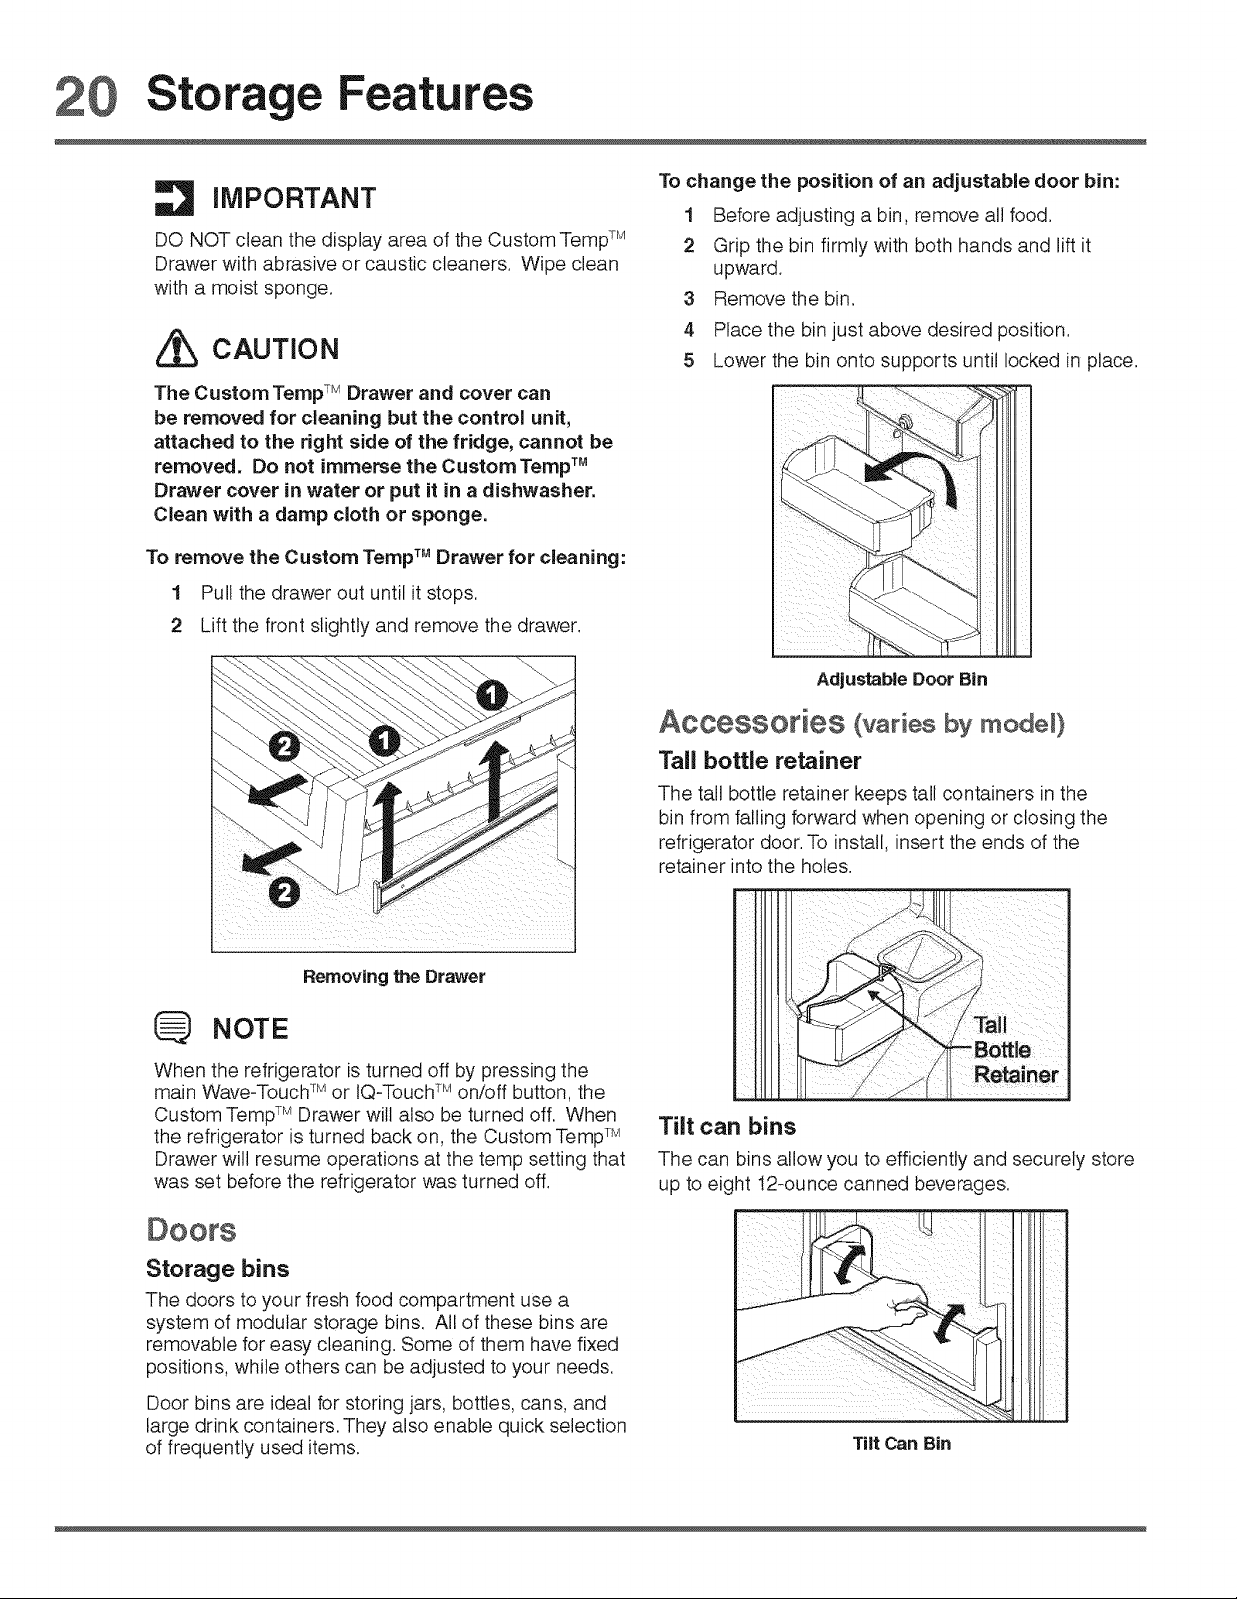
To change the position of an adjustable door bin:
1 Before adjusting a bin, remove all food.
2 Grip the bin firmly with both hands and lift it
upward.
3 Remove the bin.
4 Place the bin just above desired position.
5 Lower the bin onto supports until locked in place.
Adjustable Door Bin
Removingthe Drawer
NOTE
When the refrigerator is turned off by pressing the
main Wave-Touch TM or IQ-Touch TM on/off button, the
Custom TempTM Drawer wilt also be turned off. When
the refrigerator is turned back on, the Custom TempTM
Drawer will resume operations at the temp setting that
was set before the refrigerator was turned off.
Storage bins
The doors to your fresh food compartment use a
system of modular storage bins. All of these bins are
removable for easy cleaning. Some of them have fixed
positions, while others can be adjusted to your needs.
Accessories (varies by model)
Tall bottle retainer
The tall bottle retainer keeps tall containers in the
bin from falling forward when opening or closing the
refrigerator door. To install, insert the ends of the
retainer into the holes.
Tilt can bins
The can bins allow you to efficiently and securely store
up to eight !2-ounce canned beverages.
Door bins are ideal for storing jars, bottles, cans, and
large drink containers. They also enable quick selection
of frequently used items.
n
Tilt Can Bin
Storage Features 21
Dairy compartment
Use the dairy compartment, at the top of the fresh food
compartment door, for short-term storage of cheese,
spreads, or butter.The dairy compartment is designed
to be warmer than the open area and includes a lift-up
cover that may be locked and a dairy divider (select
models).
m
i iiiiiii _ ii_i
iill ii i _
ill iii _
Dairy Compartment
Freezer Features (varies by model)
To reinstall upper and middle baskets (select models),
position basket onto the retainer clips making sure
the front of the basket rests in the retainer clips on the
stabilizer bar.
If the upper basket is installed with the tabs towards the
front of the unit, the upper basket will "kick out" when
the drawer is opened.
If the upper basket is installed with the tabs towards
the rear of the unit (backwards), the upper basket will
remain inside the freezer when the drawer is opened.
NOTE
If basket is not resting on stabilizer bar retainer clips,
the drawer will not close properly.
To Remove Lower Basket
1 Remove all items from basket.
2
Remove the basket by tilting it forward and lifting
it from the retainer clips.
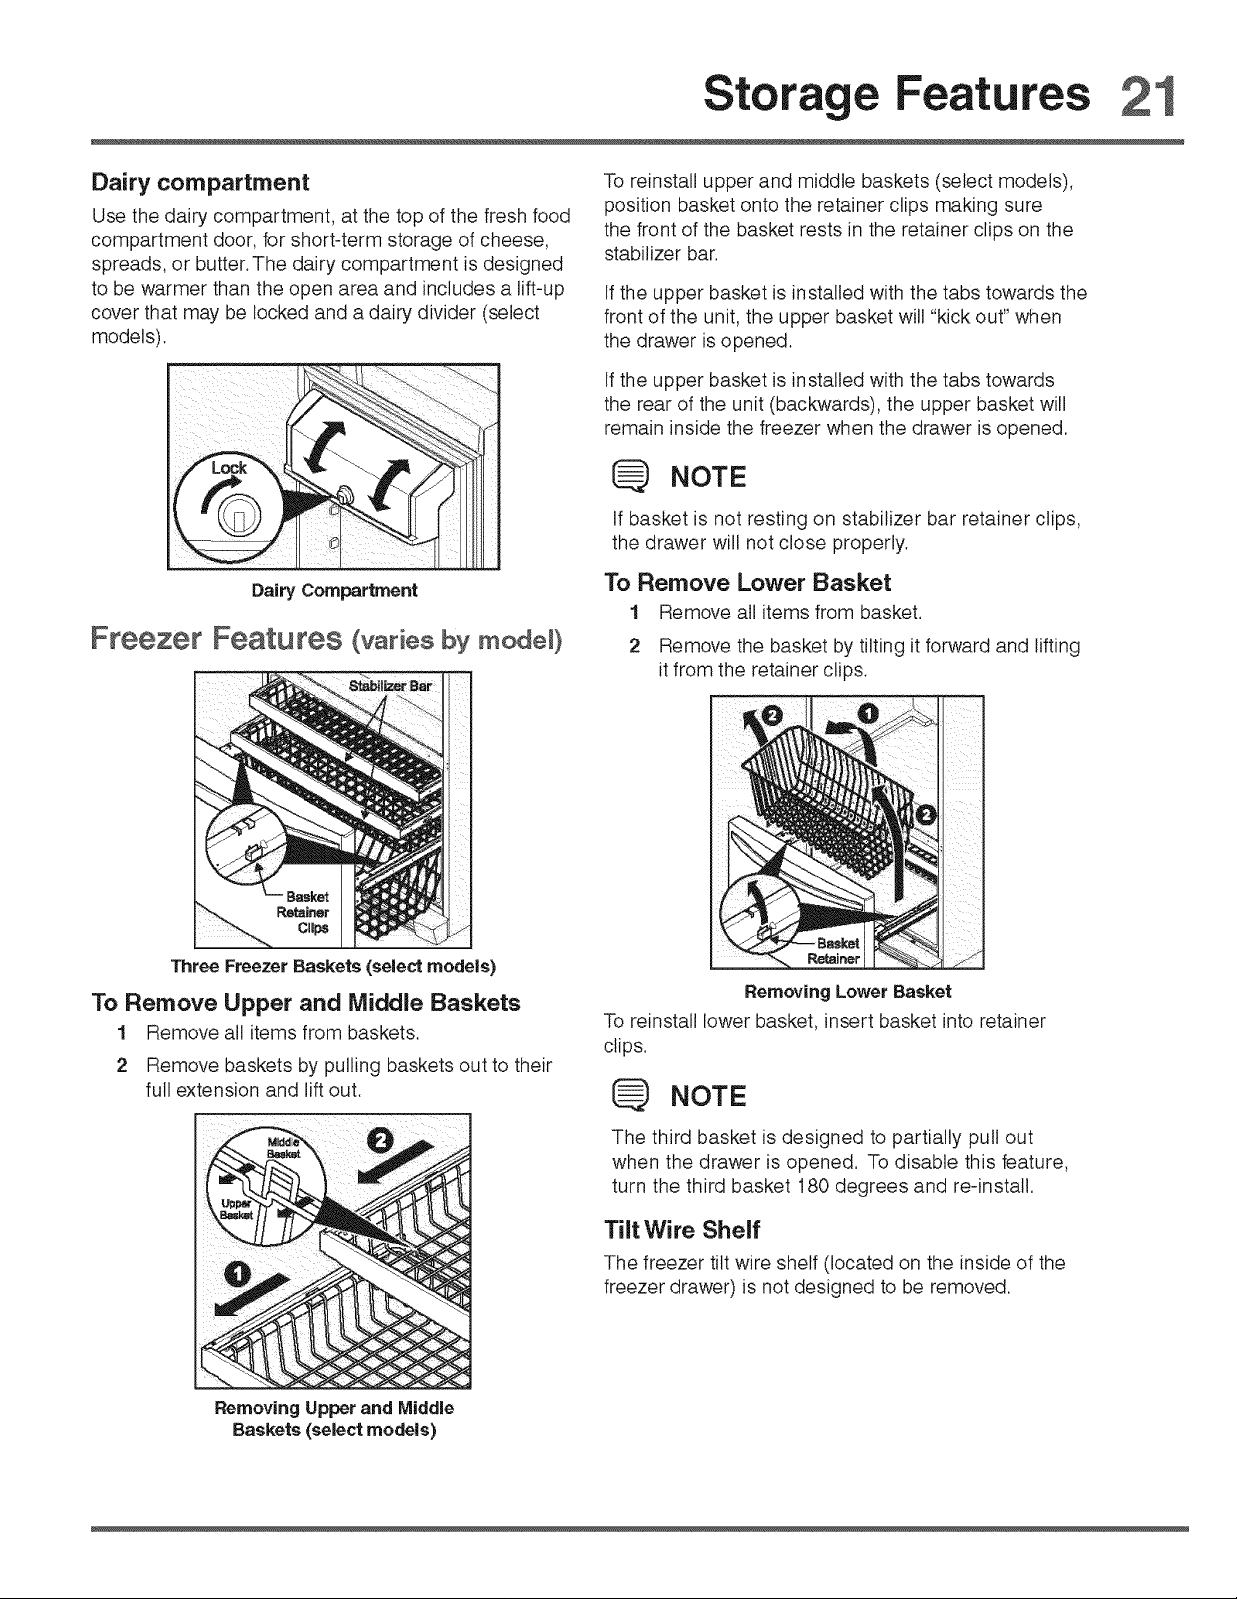
Three Freezer Baskets (select models)
To Remove Upper and Middle Baskets
1 Remove all items from baskets.
2 Remove baskets by pulling baskets out to their
full extension and lift out.
RemovingUpper and Middle
Baskets(select models)
i iii
Removing Lower Basket
To reinstall lower basket, insert basket into retainer
clips.
NOTE
The third basket is designed to partially pull out
when the drawer is opened. To disable this feature,
turn the third basket 180 degrees and re-install.
Tilt Wire Shelf
The freezer tilt wire shelf (located on the inside of the
freezer drawer) is not designed to be removed.
 Loading...