

Electrolux Diva EDW 2000 Service Manual
SOI/TD - PR 1 599 35 94-03
SERVICE MANUAL
DISHWASHERS
ELECTROLUX HOME PRODUCTS
ITALY S.p.A.
Spares Operations Italy
Corso Lino Zanussi, 30
Publication no.
I - 33080 PORCIA /PN (ITALY)
599 35 94-03
Fax +39 0434 394096
Edition: 2003-12
EN
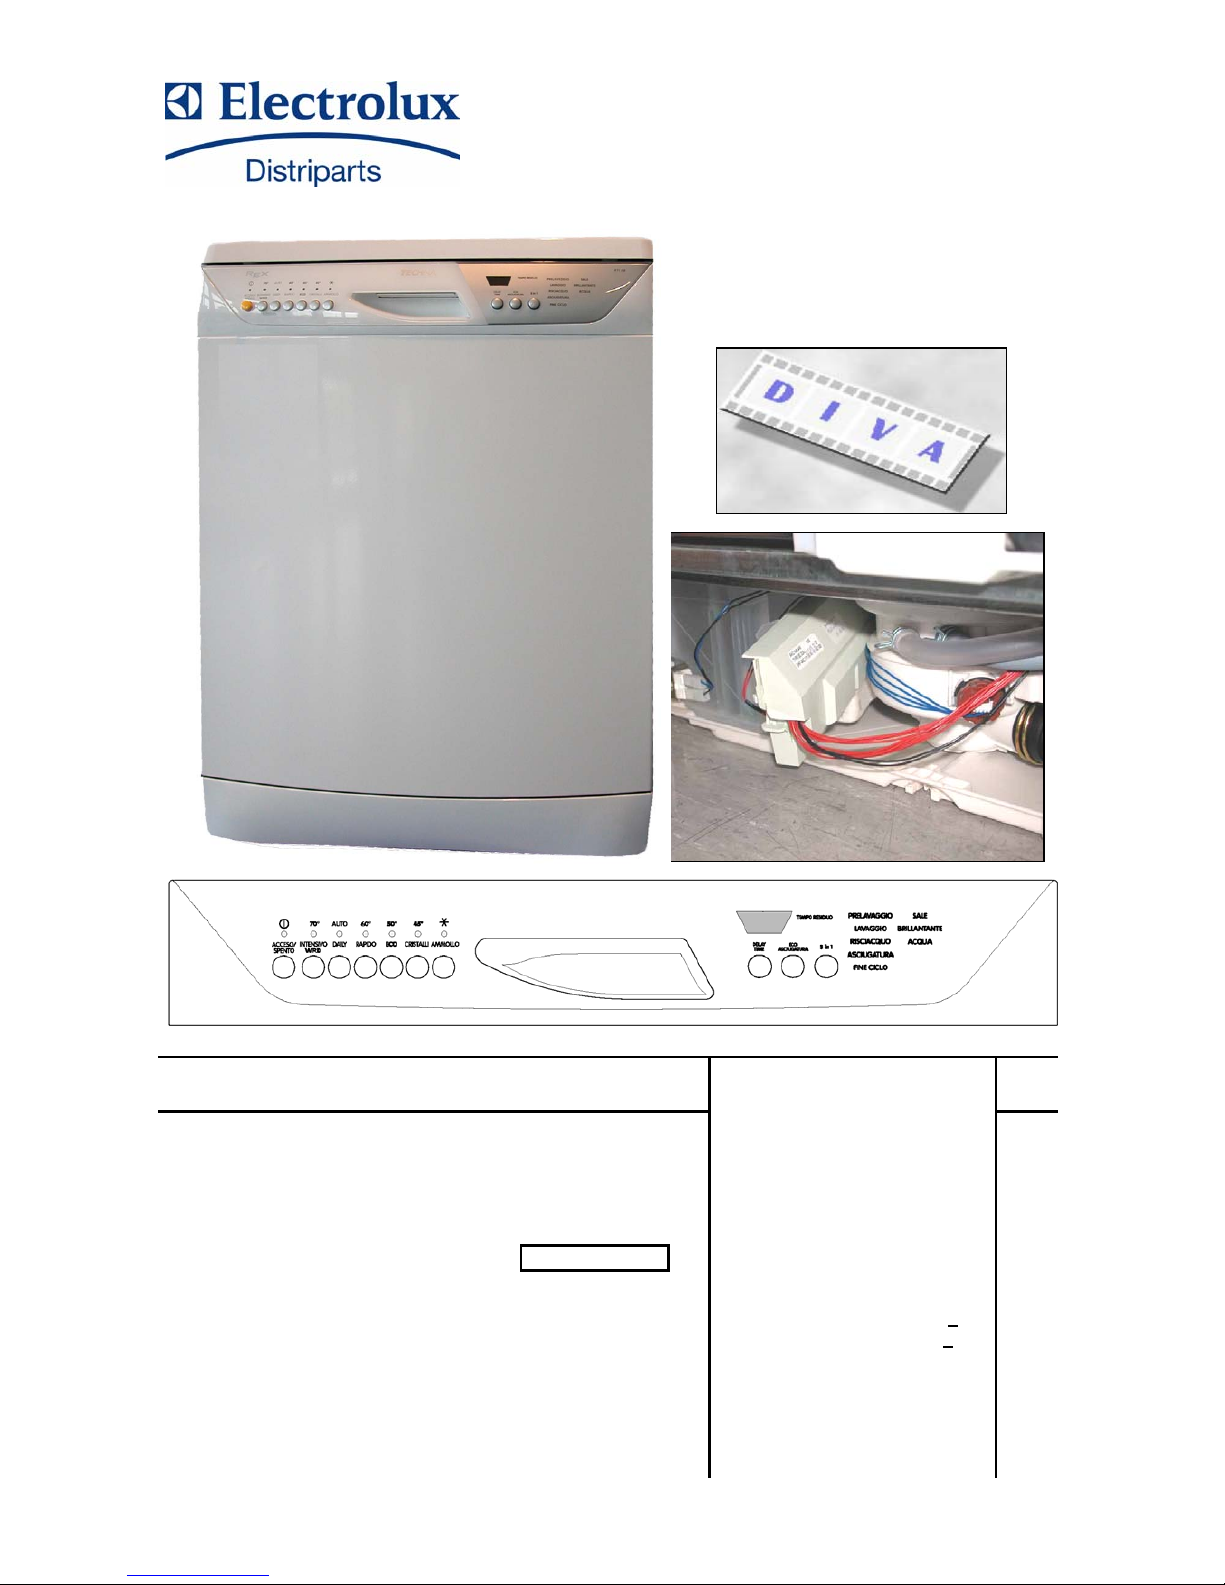
DIVA EDW 2000 - 60 cm
Dishwasher with
electronic control
(Functionality)
free- standing 911 917
…
built-in 911 927
…
Produced by:
ZM - Solaro (IT)

SOI/TD - PR 2 599 35 94-03
TABLE OF CONTENTS
1
Purpose of this manual ........................................................................................................................... 4
2 GENERAL CHARACTERISTICS............................................................................................................ 4
3 CONTROL PANEL AND PROGRAMMES ............................................................................................. 5
3.1 Control panel....................................................................................................................................... 5
3.1.1 ON / OFF button (S0)..................................................................................................................................5
3.1.2 Programme buttons and options (S1-S9)....................................................................................................6
3.1.3 LEDs for phases, options and warnings (LD7-LD20) ..................................................................................6
3.1.4 Display ........................................................................................................................................................6
3.2 Wash programmes ............................................................................................................................. 7
3.3 Options................................................................................................................................................ 7
3.3.1 “3 in 1”.........................................................................................................................................................7
3.3.2 Extra rinse...................................................................................................................................................7
3.3.3 “1/2 load”.....................................................................................................................................................7
3.3.4 Sanitising ....................................................................................................................................................8
3.3.5 Eco-drying...................................................................................................................................................8
3.3.6 Delayed start...............................................................................................................................................8
3.4 Buzzer (installed on certain models, only)........................................................................................ 10
3.5 Selecting a programme..................................................................................................................... 11
3.6 Programme execution....................................................................................................................... 11
3.6.1 Cycle start.................................................................................................................................................11
3.6.2 Cycle execution.........................................................................................................................................12
3.6.3 End of cycle ..............................................................................................................................................12
3.7 Modifying a programme .................................................................................................................... 12
3.7.1 Cancelling a programme (reset)................................................................................................................12
3.7.2 Changing a programme ............................................................................................................................13
3.7.3 Interrupting a programme .........................................................................................................................14
3.8 Sequence of operations.................................................................................................................... 16
4 BUILD CHARACTERISTICS ................................................................................................................17
4.1 Structure ...........................................................................................................................................17
4.2 Hydraulic and functional characteristics ........................................................................................... 17
4.3 Water circuit ...................................................................................................................................... 18
5 ELECTRICAL COMPONENTS AND FUNCTIONS .............................................................................. 19
5.1 EDW2000 electronic control system................................................................................................. 19
5.1.1 Functions provided by the mother board...................................................................................................19
5.1.2 Memories contained in the electronic control system................................................................................19
5.2 Specifications of actuators and sensors ........................................................................................... 20
5.2.1 Components..............................................................................................................................................20
5.2.2 Sensors.....................................................................................................................................................20
5.3 Power feed and selection of programmes........................................................................................ 21
5.4 Fill circuit ........................................................................................................................................... 21
5.4.1 Pressure switches on fill level and anti-overflow system...........................................................................21
5.4.2 Filling system ............................................................................................................................................21
5.4.3 Anti-flooding device...................................................................................................................................21
5.4.4 Operation of the anti-overflow device........................................................................................................22
5.5 Control of water filling ....................................................................................................................... 22
5.5.1 Static filling................................................................................................................................................22
5.5.2 Dynamic filling...........................................................................................................................................22
5.5.3 Level control..............................................................................................................................................22
5.6 Water filling time ............................................................................................................................... 23
5.6.1 Static filling time ........................................................................................................................................23
5.6.2 Dynamic filling time ...................................................................................................................................23
5.6.3 Interruptions in water filling .......................................................................................................................23
5.7 Level control during washing ............................................................................................................ 23
5.8 Washing system ............................................................................................................................... 23
5.8.1 Control of wash pump ...............................................................................................................................24
5.9 Heating.............................................................................................................................................. 25
5.9.1 Built-in detergent dispenser ......................................................................................................................25
5.10 Draining ......................................................................................................................................... 26
5.10.1 “Siphon” effect...........................................................................................................................................26
5.11 Regeneration system ....................................................................................................................27
5.12 Resin washing ............................................................................................................................... 27
5.12.1 “Blending” function ....................................................................................................................................28
5.12.2 Table of regeneration values.....................................................................................................................28
5.13 Drying ............................................................................................................................................ 28
5.13.1 ”Turbo-dry” drying .....................................................................................................................................29

SOI/TD - PR 3 599 35 94-03
5.14
Automatic cycle ............................................................................................................................. 30
5.15 Turbidity sensor........................................................................................................................... 30
5.15.1 Detection of dirtiness ................................................................................................................................30
5.15.2 Detection of load .......................................................................................................................................30
5.16 Automatic Programme .................................................................................................................. 30
6 A GUIDE TO THE DIAGNOSTIC SYSTEM.......................................................................................... 31
6.1 Displaying alarms and enabling mechanical systems ...................................................................... 31
6.2 Table of alarm codes ........................................................................................................................ 32
6.3 Cancelling alarms from memory / testing the LEDs .........................................................................34
7 Options that can be selected by the user ............................................................................................. 34
7.1 Buzzer............................................................................................................................................... 34
7.2 Setting the regeneration level........................................................................................................... 35
7.3 Rinse-aid dispensing ........................................................................................................................36
8 Options that can be selected by service personnel ..............................................................................37
8.1 Extra rinse cycle................................................................................................................................ 37
8.2 Functional test cycle .........................................................................................................................38
8.2.1 Executing the test cycle ............................................................................................................................38
8.2.2 Phases in the test cycle ............................................................................................................................38
8.3 Pulse washing................................................................................................................................... 39
8.4 Exiting the diagnostic mode.............................................................................................................. 39
9 ELECTRICAL FUNCTIONS.................................................................................................................. 40
9.1 Circuit diagram.................................................................................................................................. 40
9.2 Basic circuit diagram......................................................................................................................... 41
9.2.1 Button to electrical diagrams.....................................................................................................................41
9.3 Table of programmes........................................................................................................................ 42
9.4 Checking components for proper operation .....................................................................................43
10 A QUICK GUIDE TO SPECIAL FUNCTIONS ...................................................................................... 45
SOI/TD - PR 4 599 35 94-03
1 Purpose of this manual
The purpose of this manual is to provide service personnel (who already have the basic knowledge
necessary for repairing dishwashers) with information on dishwashers equipped with the EDW2000 electronic
control system, which are produced in the Solaro (MI - Italy) factory.
The EDW2000 control system is composed of a main (input) board, a display (output/interface) board
housed in the control panel, and a mother board housed in the lower part of the appliance.
The subjects covered in this manual are:
• General characteristics
• Control panel and programming
• Build features
• Electrical components and their operation
• Guide to the diagnostic system
• Operation of electrical systems
For detailed information on the water circuits and build characteristics of the appliance, refer to the Service
Manual for the “DIVA 60cm” (publication no. 599 35 55-25).
Work on electrical equipment must be performed by qualified personnel, only.
Pull out the power plug before working on internal components.
2
GENERAL CHARACTERISTICS
Important
When the appliance is plugged in, mains voltage is present on all circuit boards even if the
ON/OFF button is OFF.
Power supply ⇒ 230 - 240 V / 50 Hz (limits 187-254 V)
Total power drawn ⇒ 2300 W
Water supply ⇒ Min. / Max. Pressure: 5 - 80 N/cm
2
Load capacity ⇒ 12 Place settings
Dimensions:
- width ⇒ 59.6 cm
- height ⇒ 81.8 -87.8 cm
- depth ⇒ 55.5 cm
Controls ⇒ Horizontally arranged
- Power up / Power down ⇒ ON/OFF button
- Selection of programmes/options ⇒ By button (min. 3, max. 9)
- Display ⇒ 2.5 digit display, backlit characters and/or LEDs
Washing systems ⇒ Combined / Pulse
Water fill level control ⇒ Pressure switch + Software
Water heating ⇒ Heating element enclosed in tube (2100 W)
Temperature control ⇒ NTC temp. sensor
Drying systems ⇒ Activ / Turbo
Safety systems / Alarms ⇒ Full protection of water/electrical systems and Software
SOI/TD - PR 5 599 35 94-03
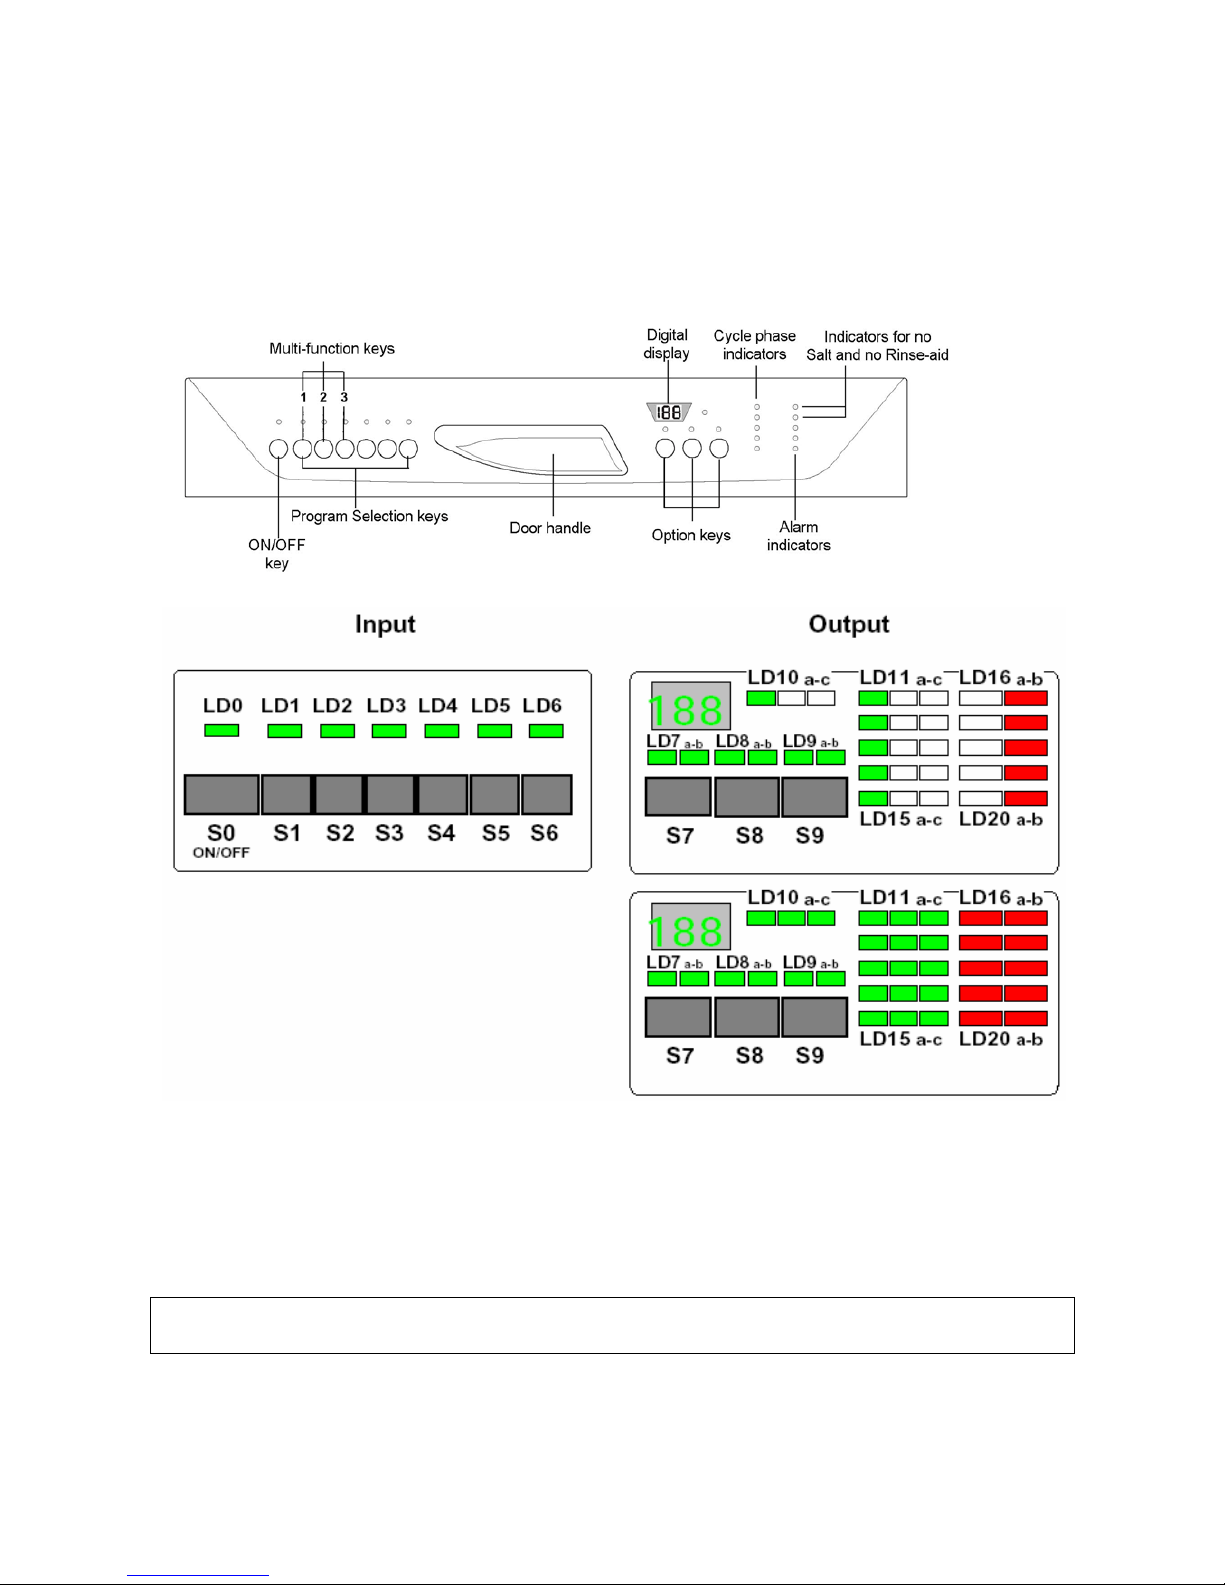
3 CONTROL PANEL AND PROGRAMMES
3.1 Control panel
The configuration of the control panel may vary with:
Type of circuit boards used
Number of pushbuttons for selecting programmes/options
Number of LEDs or backlit characters
3.1.1 ON / OFF button (S0)
This button is installed on all EDW2000 units and is used to turn the appliance on and off.
NB: Turning the appliance off does not cancel the programme in progress.
Important: Voltage is present on the circuit boards even when the corresponding
indicator [LD0] is off!

SOI/TD - PR 6 599 35 94-03
3.1.2 Programme buttons and options (S1-S9)
The functions and number of buttons depends exclusively on the software in the appliance, which
can be equipped with a minimum of 3 and a maximum of 9 buttons.
The system used for selecting the wash programmes also depends on the configuration of the
model in question..
Buttons S1, S2, S3 are always present because they control special functions
. Each button is
associated with a specific programme.
3.1.3 LEDs for phases, options and warnings (LD7-LD20)
OPTIONS:
• 3 in 1
• Extra rinse cycle
• 1/2 load
• Sanitize
• Eco-drying
• Delayed start
CYCLE PHASES:
• Prewash
• Wash
• Rinse
• Dry
• End of cycle
INDICATORS & ALARMS:
• Time to end of cycle: lights up when display shows the time remaining until the end of the cycle
• No salt: lights up when regeneration salt requires replenishment. If the “regeneration level” is set to
1 (no regeneration) this LED does not light up
• No rinse aid: lights up when rinse aid must be added
• Water off: lights up when the water feed to the appliance is shut off
• Filter: lights up regularly. Reminds user to clean the filters.
• Door: lights up when door is open
• Spray arm: lights up when the spray arm(s) is(are) clogged
NB: The operation and presence of the LEDs depends on the software in the appliance. All the LEDs are
located near a “programme” or “option” button and indicate that it has been selected. The LEDs stay lit
during the entire cycle.
3.1.4 Display
The display, which is composed of 2.5 digits, may indicate:
The time in minutes remaining until the end of the programme:
The value is counted down from minute to minute and is updated at the end of every phase in
the programme (when this occurs, the countdown may decrease by more than one minute at a
time or stop for a longer time than previously).
The end of the cycle[0]
The delayed start time in hours, if set (from 1 hr to 19 hrs)
The time decreases one hour at a time; during the final hour, it decreases one minute at a time
The regeneration level selected
The alarm code, if a malfunction has occurred
The status of special functions (disabling of rinse-aid and buzzer)
The status of functions that can be selected by the service technician
SOI/TD - PR 7 599 35 94-03
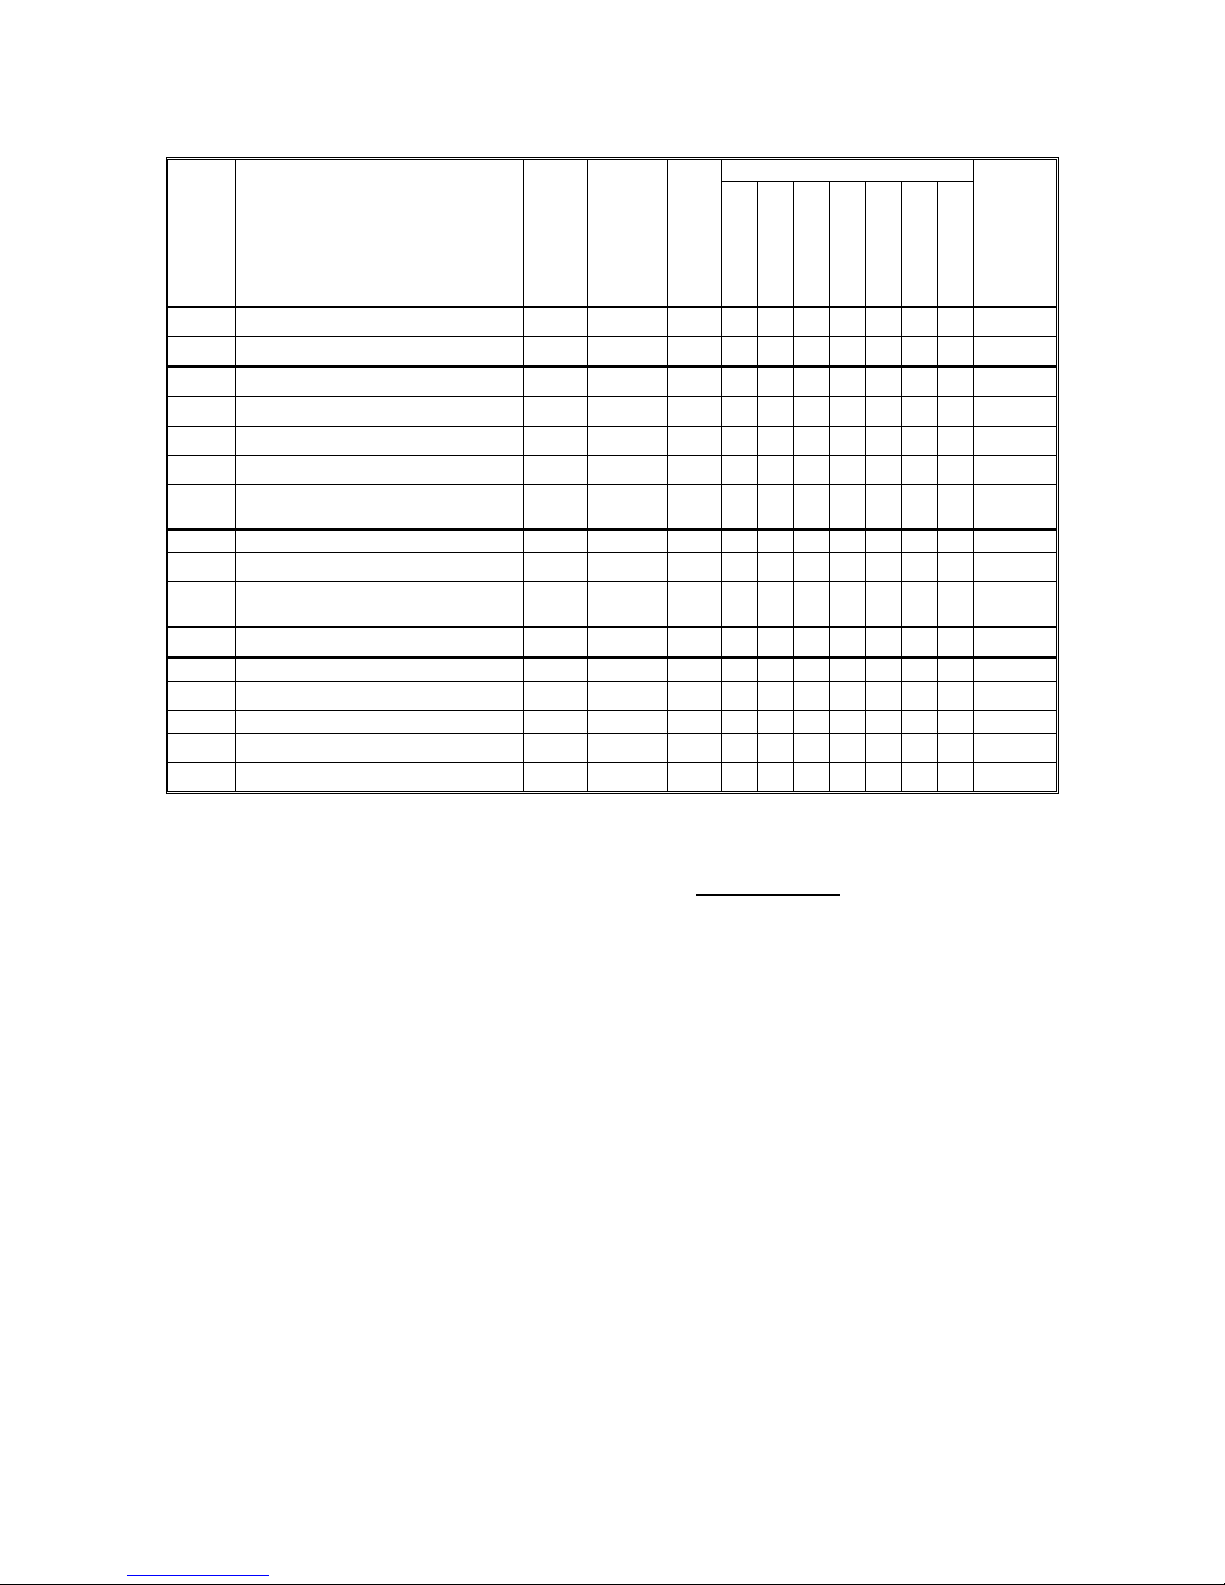
3.2 Wash programmes
The number and types of wash programmes and options vary with the configuration of the
model.
Possible options
Type
Programme
Prewash (ºC)
Wash (ºC)
No. of rinses
Half load
Sanitize
3 in 1
Extra rinse
Bio detergent
“Tablet”
Eco drying
Min. ~
I2
Intensive (maximum speed)
55 68 2 ☺ ☺ ☺ ☺
♦
☺
120’
I3
Short intensive
50 68 2 ☺ ☺ ☺ ☺ ☺
♦
88‘
N2
Normal (maximum speed)
--
68 1 ☺ ☺ ☺ ☺
♦
☺
100‘
N3
Delicate
--
55 1 ☺ ☺ ☺ ☺ ☺
♦
☺
98‘
N4
Delicate without prewash
--
55 1 ☺ ☺ ☺ ☺ ☺
♦
☺
89‘
N5
Normal 3 rinses
--
68 2 ☺ ☺ ☺ ☺ ☺
♦
☺
102‘
N6
Normal 3 rinses
without prewash
-68 2 ☺ ☺ ☺ ☺ ☺
♦
☺
93‘
E1
Axx Energy label
-- 60 max 1 ☺ ☺ ☺ ☺ ☺ ☺ ☺
162‘
E4
Fast Energy label
--
55 max 1 ☺ ☺ ☺ ☺ ☺
♦
☺
134‘
E5
Auto performance
Energy label
--
65 max 1 ☺ ☺ ☺ ☺ ☺ ☺ ☺
141‘
Auto
Auto 50-65°C
--
50-68 1 ☺ ☺ ☺ ☺
♦
☺
92‘-115’
Q1
Short
-- 50 1 ☺ ☺ ☺ ☺ ☺
52‘
Q4
Soak
--
-- --
♦
♦ ♦
12‘
Q5
Short 30 min
-- 65 max -- ☺ ☺ ☺ ☺ ☺
31‘
Q6
Dish heating
--
-- --
♦
♦ ♦
30‘
Q7
Crystal ware and glasses
--
45 1 ☺ ☺ ☺
♦
☺
71‘
3.3 Options
3.3.1 “3 in 1”
This option is selected by pressing the relative button and remains selected
until the button is pushed
again.. The option modifies the phases in the programme to optimise operation when “3 in 1” detergent
tablets are used and is not available in the “Soak” and “Dish heating” cycles:
The length of the programmes and the temperatures are varied to dissolve the detergent tablets
Water exchange (dilution drainage) is diminished
Rinse-aid is not dispensed
Regeneration (washing of resins) is disabled
3.3.2 Extra rinse
This option can be temporarily selected by pressing the relative button, if present, or by using the
“Service” mode (see 10.5.1). It is not available in the “Soak” and “Dish heating” cycles:
A rinse with pulse washing is added that lasts around 9 minutes.
3.3.3 “1/2 load”
• using the 1/2 load button
When this button on the control panel is pressed, certain parameters in the selected wash cycle are
modified with respect to the standard cycle. The wash cycle is optimised to handle the reduced amount of
dishes loaded into the machine. This option is not available in the “Automatic”, “Short”, “Short 30 min”,
“Soak”, “Crystal ware” and “Dish heating” cycles:
Prewash is skipped (if included in cycle)
Wash temperature is lowered
Programme is shortened (down to a minimum of 36 minutes)
• using automatic 1/2 load detection
When the 1/2 load button is not installed, certain programmes can be set to automatically detect a
1/2 load by measuring variations in temperature during the first heating phase
The temperature and length of washing are reduced
SOI/TD - PR 8 599 35 94-03
This option is not available in the “Short Intensive”, “Intensive Maximum Speed”, “Short”, “Short 30 min.”,
“Soak”, “Dish Heating” and “Crystal Ware” cycles.
3.3.4 Sanitising
This special option sanitises the dishes and is not compatible with the “Crystal Ware” cycle.
During the final hot rinse, a temperature of 68ºC is maintained for 10 minutes
If selected during the Soak
cycle, a special “sanitising” programme lasting 46 minutes is performed
(involving a hot rinse at 68 ºC; this temperature is then maintained for 10 minutes)
3.3.5 Eco-drying
This option is temporarily selected by pressing the relative button. It is available in all programmes
with at least 15 minutes of drying time (excluding “Short Intensive”, “Short”, “Short 30 min”, “Soak” and “Dish
Heating”):
Drying time is reduced to only 15 minutes
“Energy Label” programmes are shorted by 39 minutes; all other programmes are shortened by 9
minutes
3.3.6 Delayed start
This option enables the user to delay the start of the washing cycle for a minimum time of 1 hour to
a maximum time of 19 hours from the moment the option is set. The appliance must not be turned off during
the countdown.
Selecting delayed start after the programme has been selected:
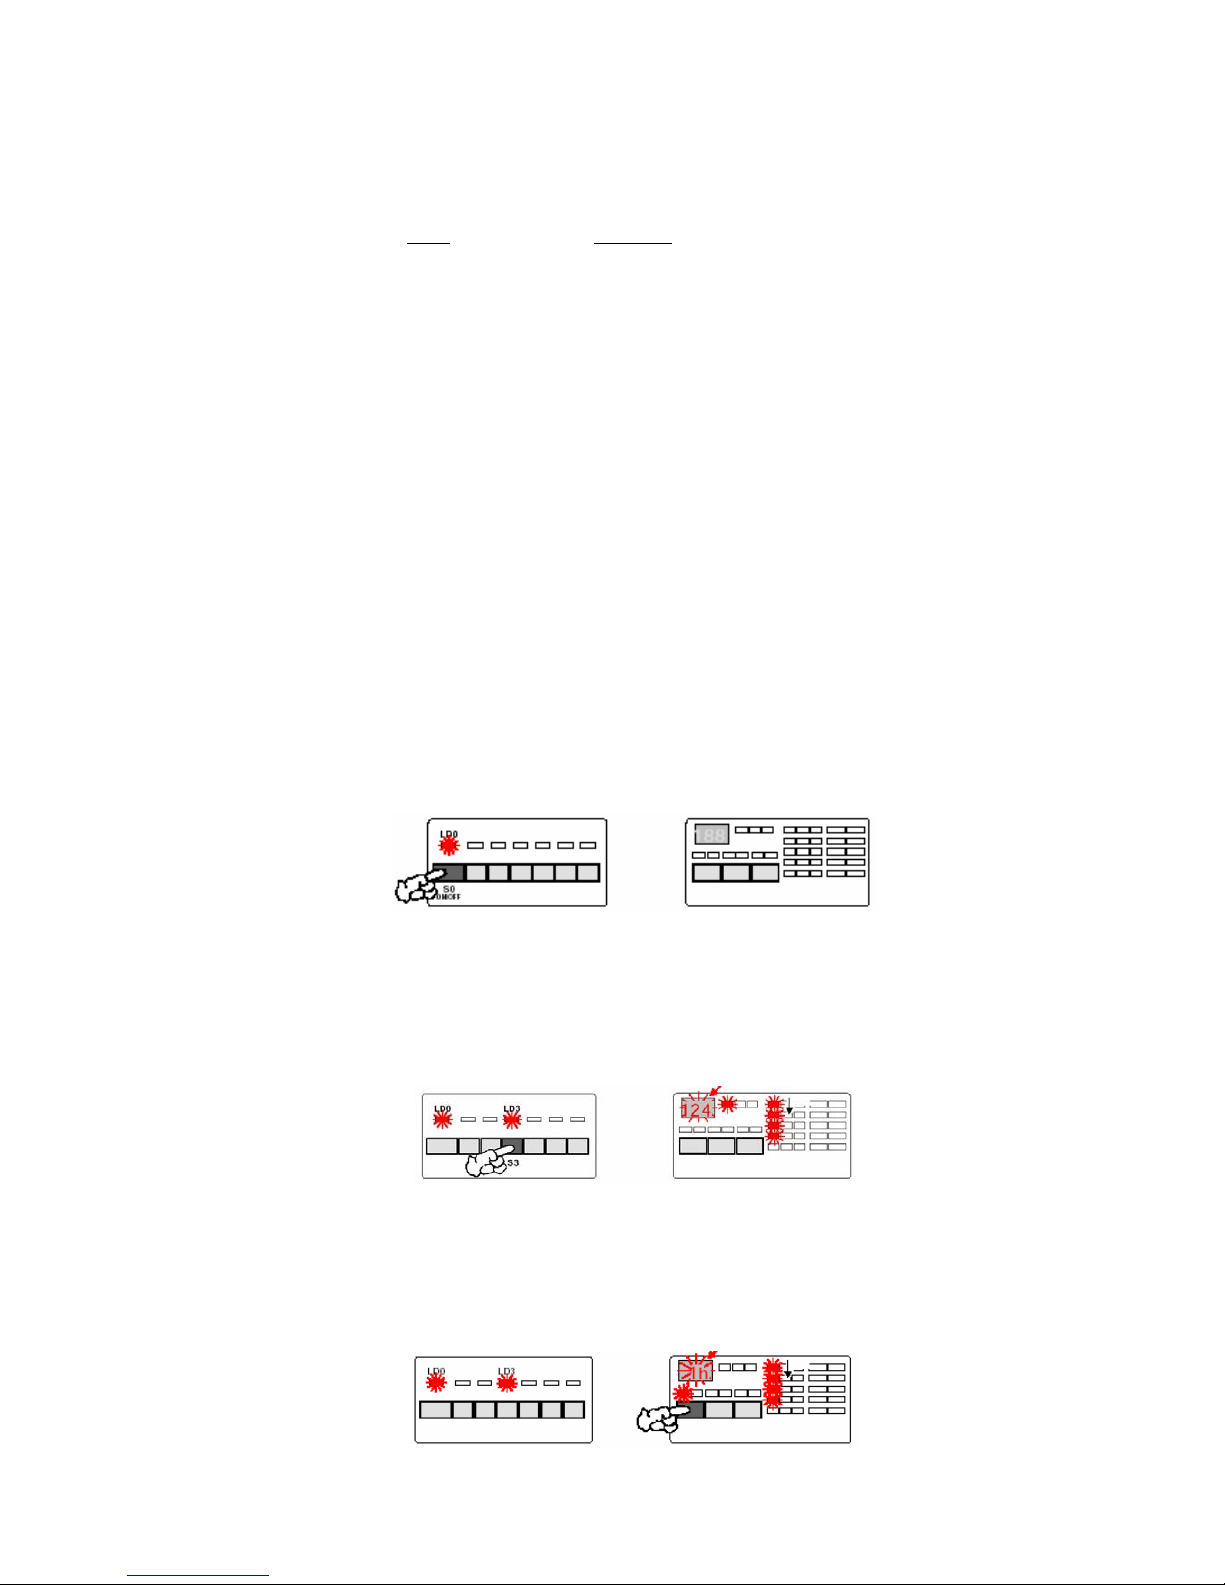
1. Turn the appliance on by pressing button S0
LED LD0 lights up
The appliance is set to the selection mode
All the programme buttons and options are now available
After the desired programme is selected, options can still be chosen as long as they are
compatible with the selected programme
2. Press the button for the desired programme:
LED LD0 is lit
The LED for the selected programme lights up to show that the selection has been made
The display lights up and the time remaining (from beginning to end of cycle) flashes
LED LD10 lights up
LEDs LD11, LD12, LD13, LD14 light up to indicate the phases that make up the programme
3. Press delayed start button S7 within 3 seconds from the moment the programme is selected:
LED LD0 is lit
The LED for the selected programme is lit
LED LD7 indicating delayed start is lit
The display flashes the delayed start time
LEDs LD11, LD12, LD13, LD14 light up to indicate the phases that make up the programme
SOI/TD - PR 9 599 35 94-03
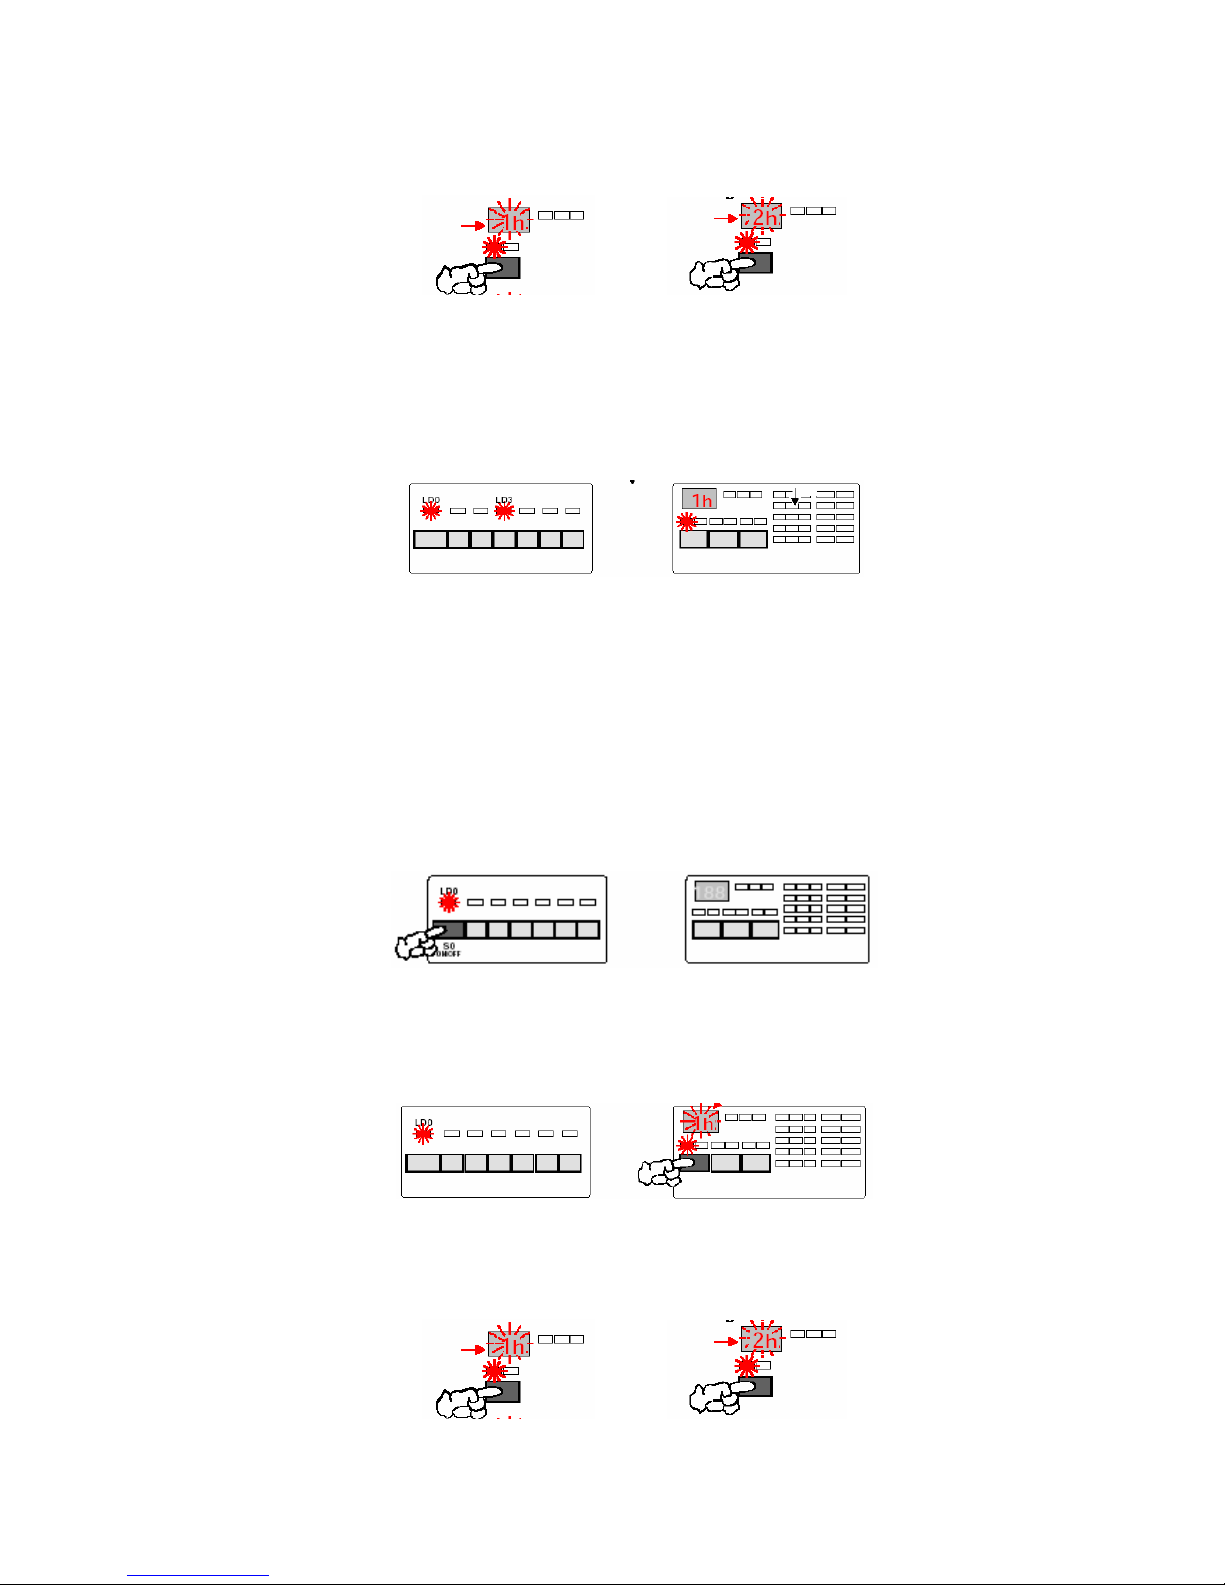
Every time button S7 is pressed, the delayed start time increases by 1 hour up to a maximum of 19
hours:
When the selection exceeds 19, the system begins the count again starting from 0
4. 3 seconds after the last press of button S7, the time set on the display is stored and the countdown to
start begins
LED LD0 is lit
The LED for the selected programme is lit
LED LD7 indicating delayed start is lit
The display shows the delayed start time
NB: the countdown of the delayed start time can begin only when the door is closed
Selecting delayed start before the programme is selected:
1. Turn the appliance on by pressing button S0
LED LD0 lights up
The appliance starts up in the selection mode
All the programme buttons and options are now available
After the desired programme is selected, options can still be chosen as long as they are
compatible with the selected programme
2. Press delayed start button S7:
LED LD0 is lit
LED LD7 is lit
The display flashes the delayed start time
NB: Every time button S7 is pressed, the delayed start time increases by 1 hour up to a maximum of 19
hours:
When the selection exceeds 19, the system begins the count again starting from 0
SOI/TD - PR 10 599 35 94-03
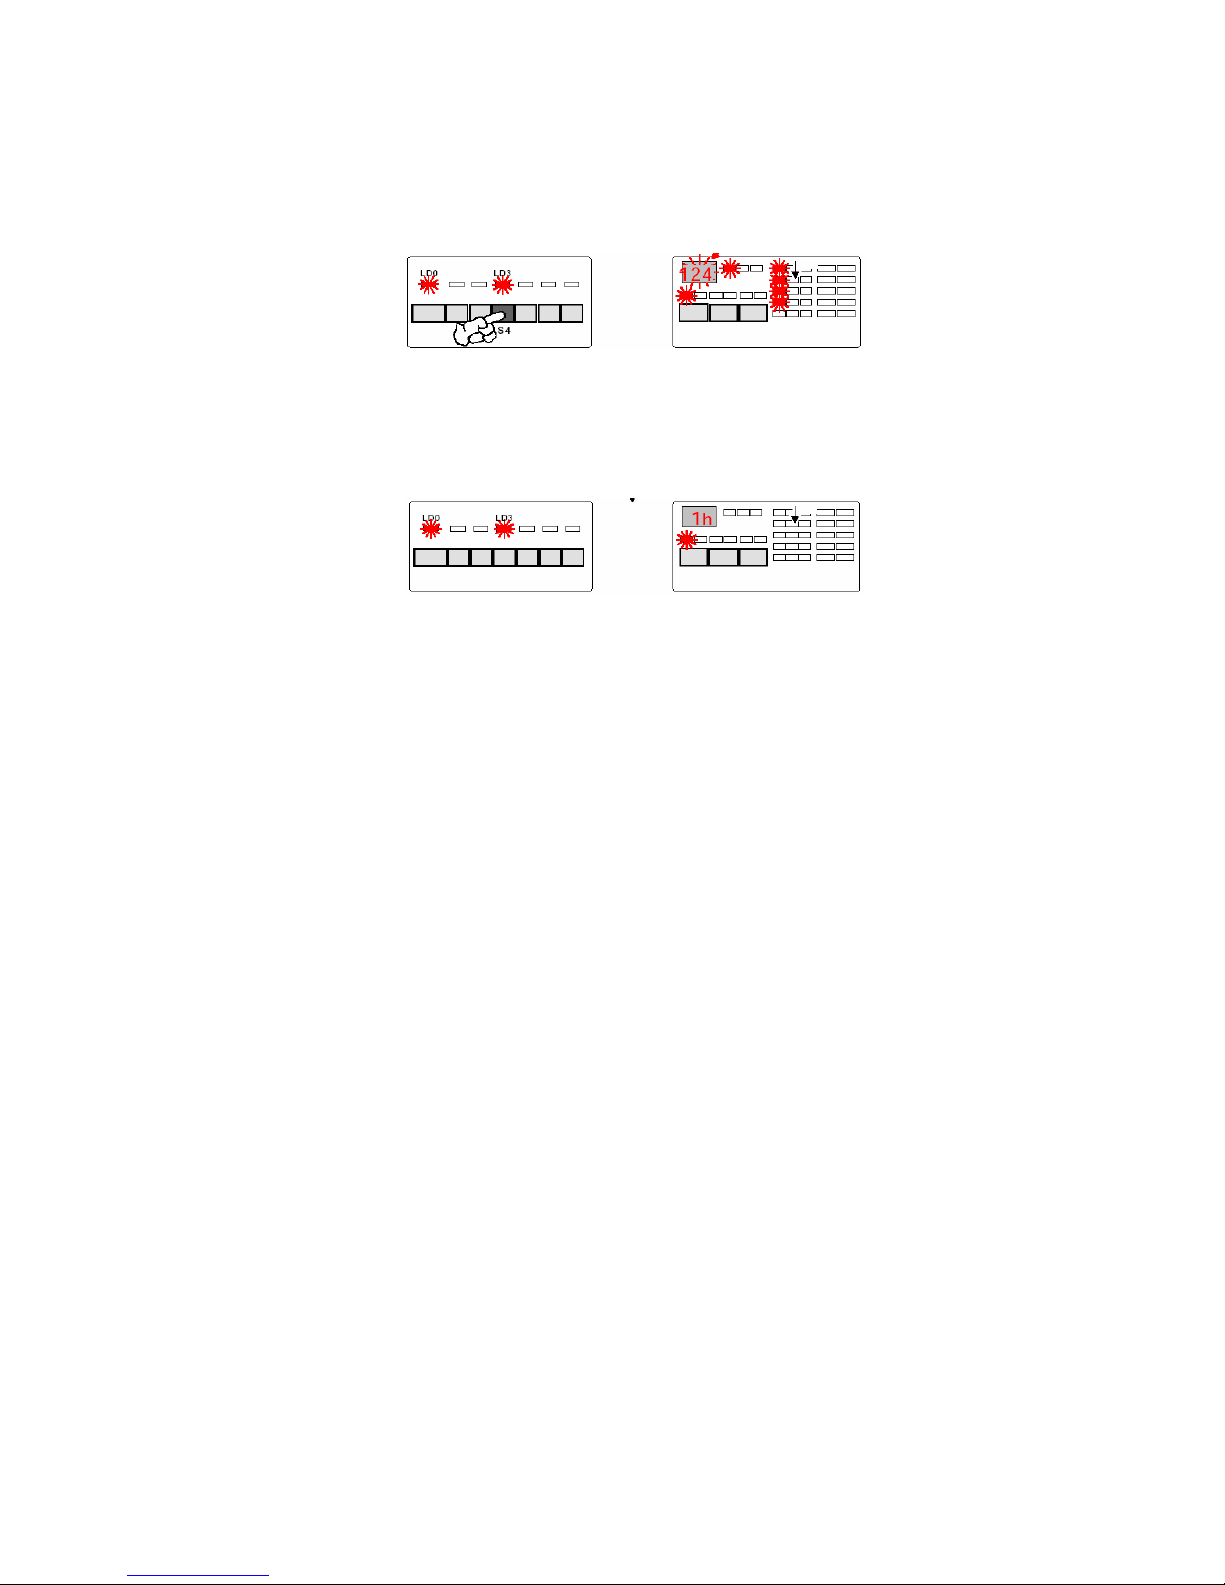
3. Press the button for the desired programme:
LED LD0 is lit
The LED for the selected programme lights up to show that the selection has been made
The display lights up and the time remaining (from beginning to end of cycle) flashes
LED LD7 is lit
LED LD10 lights up
LEDs LD11, LD12, LD13, LD14 light up to indicate the phases that make up the programme
4. 3 seconds after the last press of button S7, the time set on the display is stored and the countdown to
start begins
LED LD0 is lit
The LED for the selected programme is lit
LED LD7 indicating delayed start is lit
The display shows the delayed start time
NB: the countdown of the delayed start time can begin only when the door is closed
3.4 Buzzer (installed on certain models, only)
This series of dishwashers is not normally equipped with a buzzer, but some models may have one.
The buzzer is a device that signals the End of cycle and an Alarm should one occur. The buzzer
goes off three times at the end of the cycle and is immediately silenced when the door is opened.
SOI/TD - PR 11 599 35 94-03
3.5 Selecting a programme
With the dishwasher OFF:
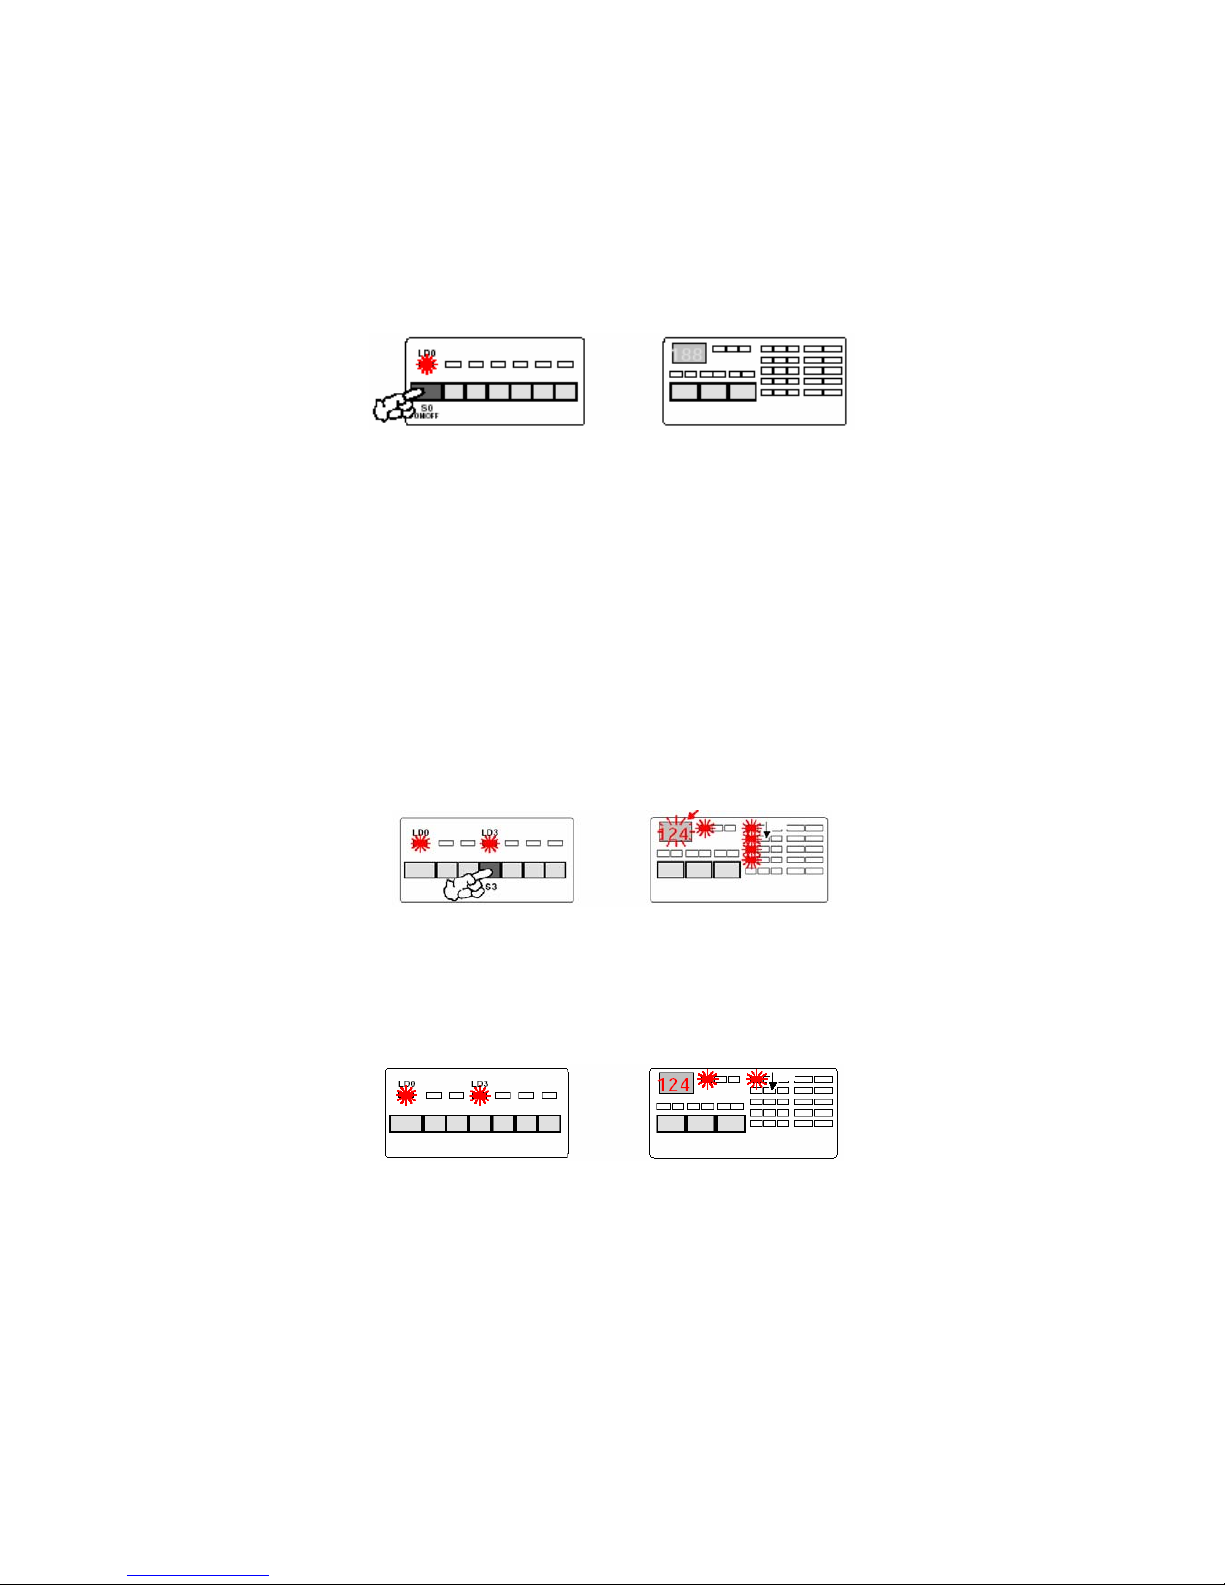
1. Turn the appliance on by pressing button S0
LED LD0 lights up
The appliance is set to the selection mode
All the programme buttons and options are now available
After the desired programme is selected, options can still be chosen as long as they are
compatible with the selected programme
Delayed start can be selected; see 3.3.6
2. Press the button for the desired programme:
LED LD0 is lit
The LED for the selected programme lights up to show that the selection has been made
The display lights up and the time remaining (from beginning to end of cycle) flashes
LED LD10 lights up
LEDs LD11, LD12, LD13, LD14 light up to indicate the phases that make up the programme
With the door open:
Other options or modifications can be added before the door is closed
Delayed start can be selected; see 3.3.6
The programme can begin only when the door is closed
With the door closed:
Other options or modifications can be added within 3 seconds from the moment the programme is
selected
Otherwise, the programme will automatically start 3 seconds after the last button is pressed
Delayed start can be selected during this 3 second period, see 3.3.6
3. The programme starts
LED LD0 is lit
The LED for the selected programme is lit
The display shows the time remaining
LED LD10 is lit
The LED for the current phase in the programme is lit
3.6 Programme execution
3.6.1 Cycle start
The selected programme automatically starts 3 seconds after the final button press (with the door
closed) and after the countdown has elapsed
At this point, the delayed start time cannot be changed and no other options can be selected
The programme in progress can be cancelled, see 3.7.1
The programme can be modified, see 3.7.2
SOI/TD - PR 12 599 35 94-03
3.6.2 Cycle execution
LED LD0 is lit
The LED for the selected programme is lit
LED LD10 stays lit for the duration of the cycle
The display shows the minutes of wash time remaining
The time until the end of the cycle is updated at every new phase in the programme
When the system moves from one phase to another, the time remaining until the end of the cycle
may be lowered more than the actual time elapsed
When the system moves from one phase to another, the time remaining until the end of the cycle
may stop until the system synchronises
The LEDs for the phases in the wash cycle light sequentially to indicate the current phase in progress
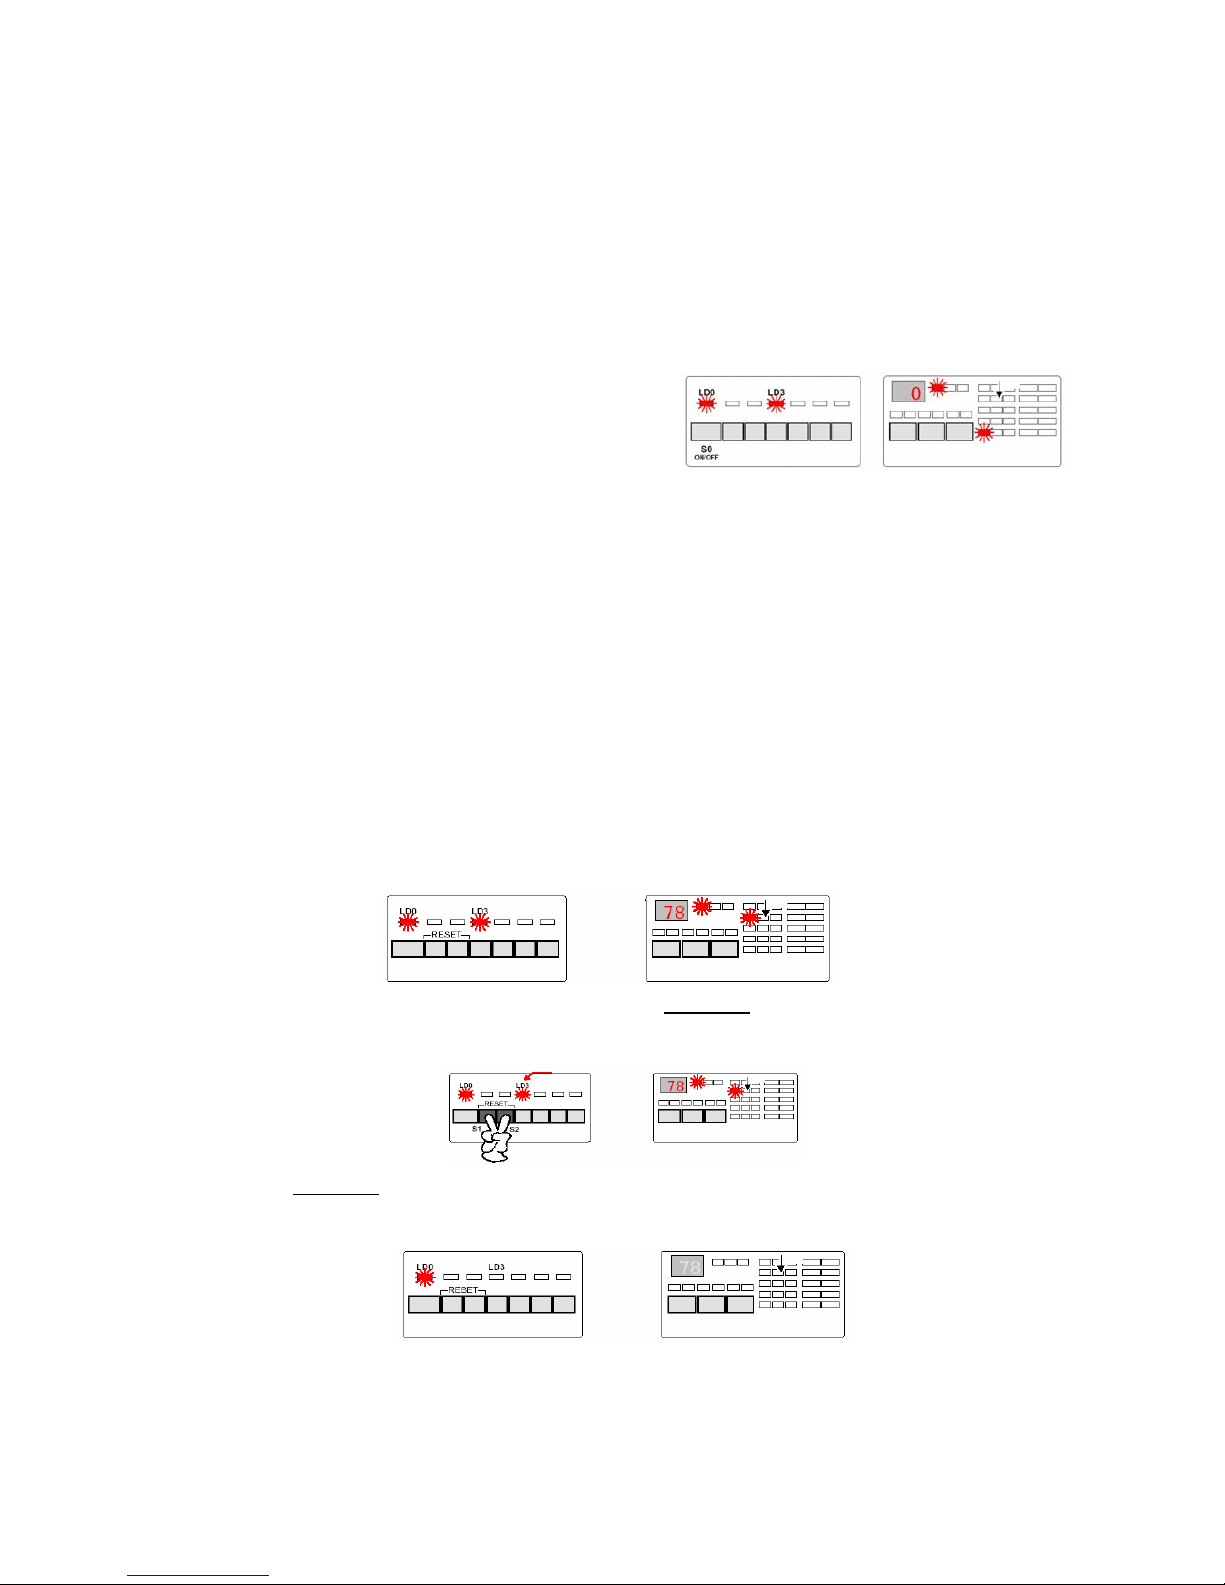
3.6.3 End of cycle
LED LD0 is lit
The LED for the selected programme is lit
The display shows “0”
LED LD10 is lit
The LED showing the end of the cycle is lit
If it is installed and enabled, the buzzer will emit a sequence of sounds at the following intervals:
15 seconds on - 3 minutes off - 15 seconds on – 3 minutes off - 15 seconds on – buzzer
remains off
The buzzer is disabled as soon as the door is opened
At the end of the cycle, the “0” on the display can be eliminated by opening and closing the door
After the door has been closed, the appliance will automatically be set to the selection mode
Press the S0 button to turn the appliance off completely.
3.7 Modifying a programme
3.7.1 Cancelling a programme (reset)
A cycle that is in progress or is programmed to start at the end of the delayed start countdown can be
cancelled at any time:
1. The cycle is proceeding normally with no alarms
LED LD0 is lit
The LED for the cycle in progress is lit
LED LD10 for time remaining until end of cycle is lit
The display shows the time remaining until the end of the cycle
The LED for the current phase in the cycle is lit
2. Press the S1 and S2 buttons at the same time for around 2 seconds
the LED for the cycle in progress flashes
3. After around 2 seconds
all the indicators except for LED LD0, will turn off
the cycle has been cancelled
SOI/TD - PR 13 599 35 94-03
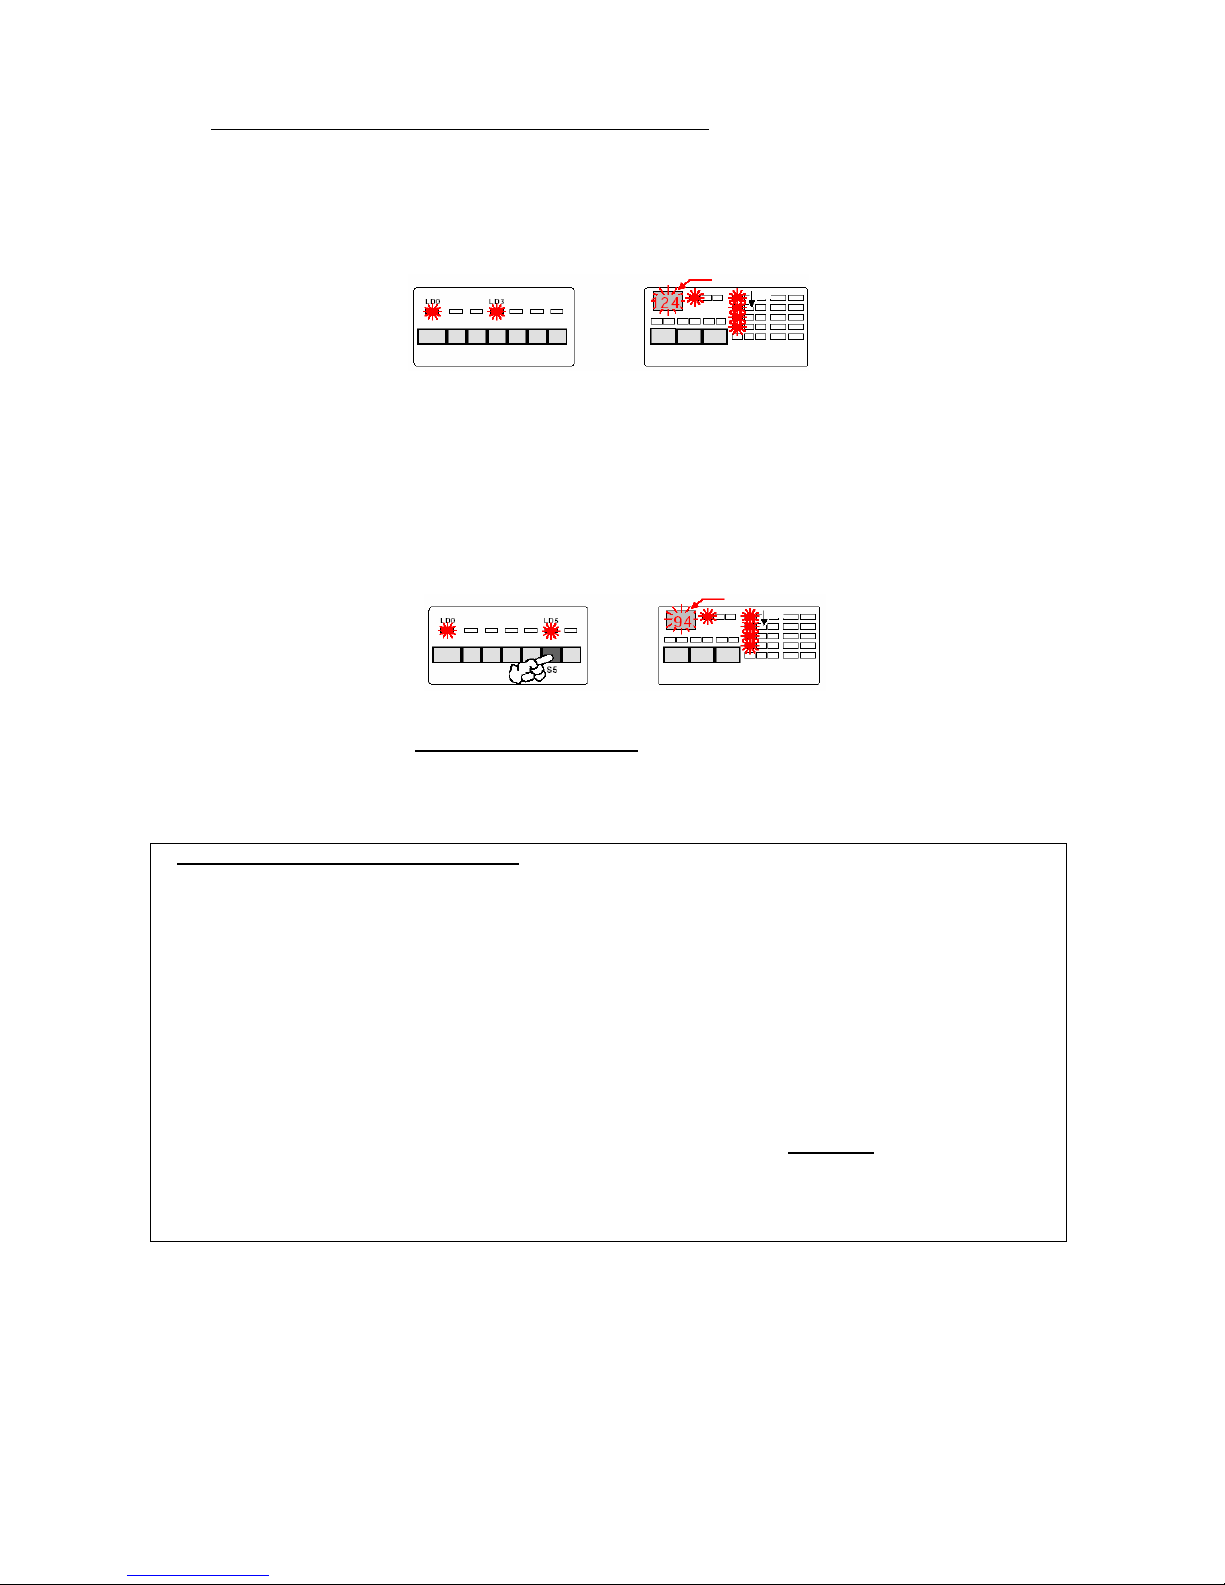
3.7.2 Changing a programme
1. If the programme has been selected but has not yet started:
LED LD0 is lit
The LED for the cycle in progress is lit
LED LD10 for the time remaining until end of cycle is lit
The display shows time remaining until the end of the cycle
All the LEDs that indicate the phases in the programme are lit
2. Press the button for the new programme
LED LD0 is lit
The LED for the new cycle is lit
LED LD10 for the time until the end of the cycle is lit
The display flashes the duration of the new cycle in minutes
All the LEDs that indicate the phases in the new programme are lit
NB: all the options selected previously are cancelled and must be selected again
3. The programme can still be changed within 3 seconds after the last button press
If no button is pressed within the 3 second period,
the cycle will begin
NB: The cycle will begin only if the door is closed
If a delayed start has also been selected:
The programme has been selected but has not yet started
LED LD0 is lit
The LED for the selected cycle is lit
LED LD7 for delayed start time is lit
The display flashes the time set for delayed start
All the LEDs that indicate the phases in the programme are lit
Press the button for the new programme
The delayed start time that was previously programmed remains in memory
The options selected previously are cancelled and must be selected again
LED LD0 is lit
The LED for the new cycle is lit
LED LD7 for delayed start time is lit
The display flashes the time until the end of the cycle for around 2 seconds
The display then flashes the time set for delayed start
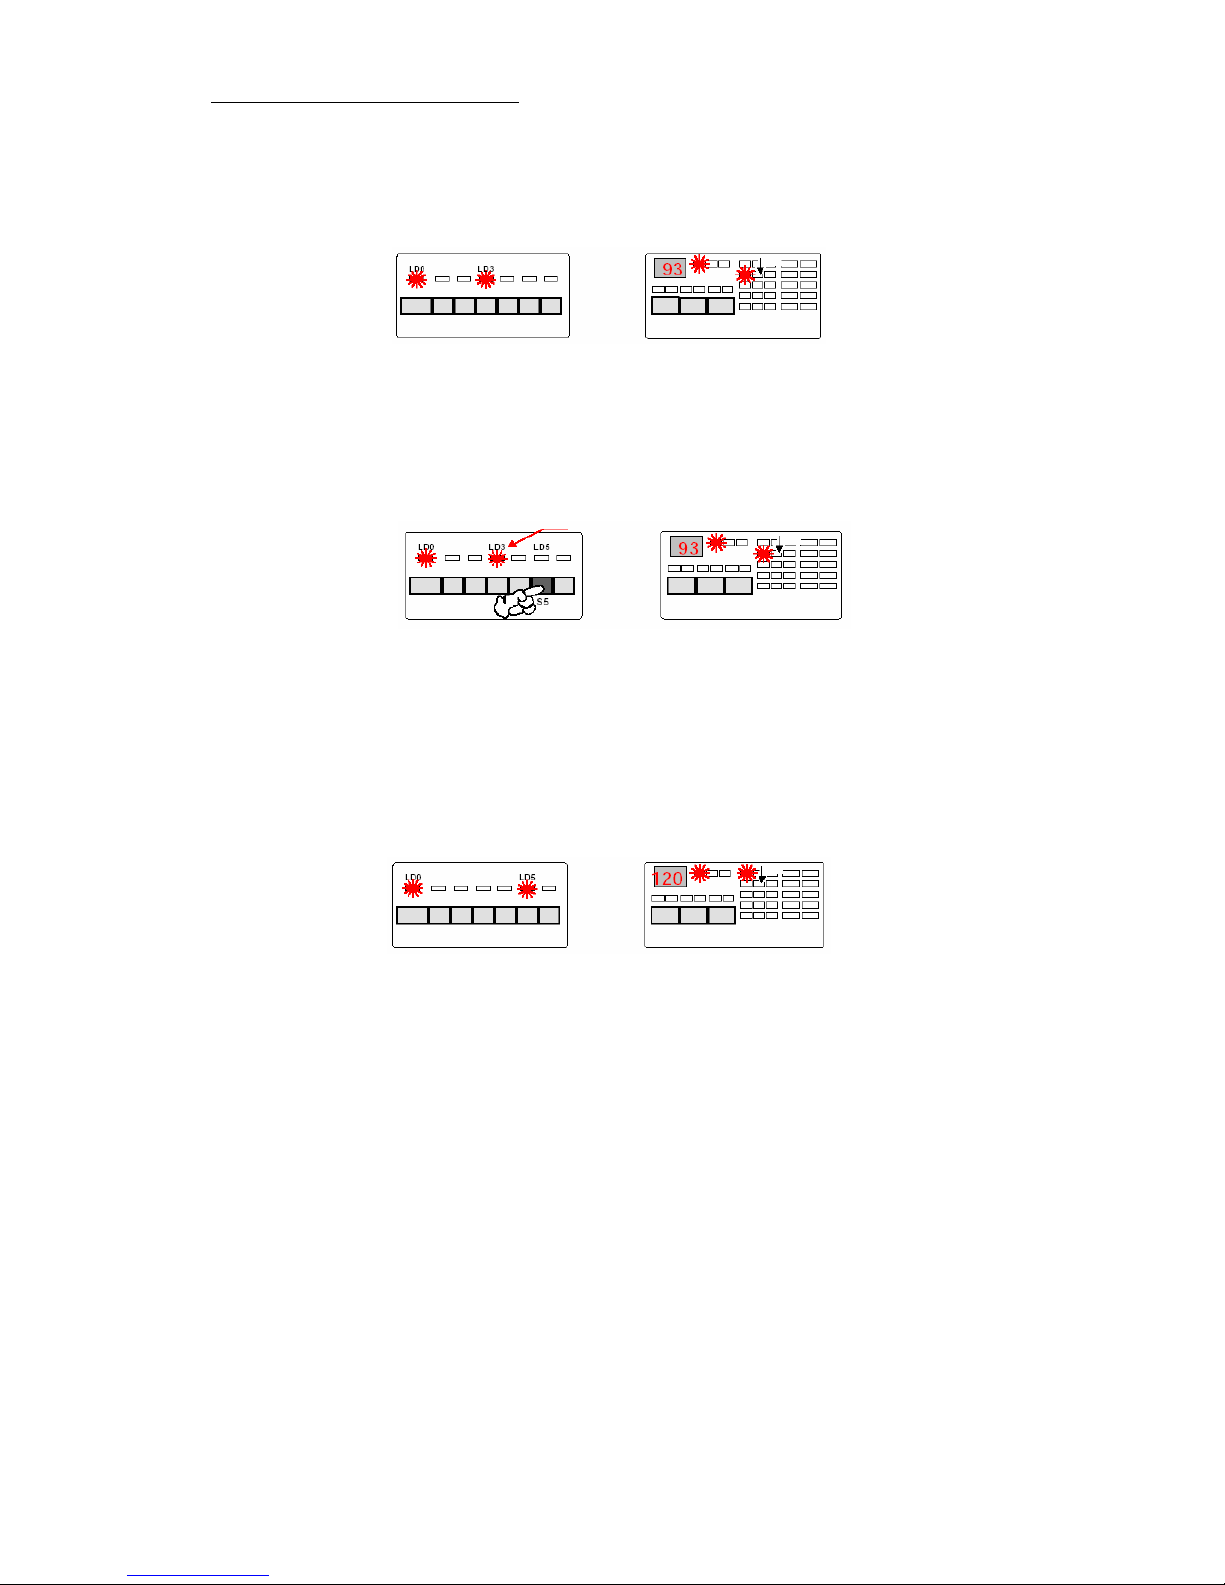
NB: if the countdown for delayed start has already begun (and the display is not flashing), follow these
instructions to change the selected programme:
SOI/TD - PR 14 599 35 94-03
1. If the cycle is running without alarms:
LED LD0 is lit
The LED for the selected cycle is lit
The LED that indicates the phase in progress is lit
LED LD10 for the time until the end of the cycle is lit
The display shows (but does not flash) the time until the end of the cycle
2. Press the button for the new programme for at least 6 seconds
LED LD0 is lit
The LED for the previously selected cycle flashes
LED LD10 for the time until the end of the cycle is lit
The display shows (but does not flash) the time until the end of the cycle
The LED that indicates the phase in progress is lit
3. After around 6 seconds:
The LED for the previously selected cycle turns off
The LED for the new programme lights up
The LED LD0 is lit
LED LD10 for the time until the end of the cycle is lit
The display shows (but does not flash) the time until the end of the cycle
The LED that indicates the phase in progress is lit
NB: When a selected programme is modified, the new cycle will generally start from the beginning. The
options selected previously are cancelled and must be selected again.
3.7.3 Interrupting a programme
Shutting off the appliance
1. Shut off the machine by pressing the S0 button (there are no limits on time)
No previously selected option is cancelled
All indicators on the control panel turn off.
2. To restart the cycle, press button S0 once again
The cycle resumes from the point at which it was interrupted, but with a slight delay
No other button needs to be pressed
All the indicators on the control panel appear exactly the way they were before the interruption
Important: If the appliance is turned off or the door is opened for more than 30 seconds during the
drying cycle, the cycle will end after the regeneration phase and the appliance will be set to the
selection mode when it is turned back on.
 Loading...