

Electrolux DIVA 60 cm Service Manual
1
SERVICE MANUAL
DISHWASHER
© ELECTROLUX HOME PRODUCTS
ITALY S.p.A.
Spares Operations Italy
Corso Lino Zanussi, 30
Publication
number
I - 33080 PORCIA /PN (ITALY)
599 37 31-43
Fax +39 0434 394096
Edition: 2005-10
SOI/TD-PR
EN
Dishwasher with
electronic control
EDW 2500-LCD
& “Talkie”
(Functionality)
“DIVA” 60 cm
“free-standing” 911 918
…
“built-in” 911 928 …
Production:
ZM - Solaro (IT)

2
CONTENTS
1
PRECAUTIONS ...................................................................................................................................... 4
2 GENERAL CHARACTERISTICS............................................................................................................ 4
3 CONTROL PANEL.................................................................................................................................. 5
3.1 LCD ................................................................................................................................................. 5
3.2 “Talkie” Version ............................................................................................................................... 6
3.2.1 Vocal messages..........................................................................................................................................7
3.3 Controls .........................................................................................................................................10
3.3.1 Turning the appliance on and off (S0).......................................................................................................10
3.3.2 Selecting programmes ..............................................................................................................................10
3.3.3 Selecting options.......................................................................................................................................10
4 WASHING ............................................................................................................................................. 11
4.1 Wash programmes........................................................................................................................ 11
4.1.1 Automatic programme...............................................................................................................................11
4.2 Selecting a programme ................................................................................................................. 12
4.2.1 Cancelling a programme...........................................................................................................................13
4.2.2 Interrupting a programme .........................................................................................................................13
4.3 Options .......................................................................................................................................... 14
4.3.1 Eco-drying:................................................................................................................................................14
4.3.2 Extra rinse:................................................................................................................................................14
4.3.3 Detergent ..................................................................................................................................................14
4.3.4 Rinse-aid:..................................................................................................................................................14
4.3.5 Water hardness:........................................................................................................................................14
4.3.6 Language: .................................................................................................................................................14
4.3.7 Buzzer volume: .........................................................................................................................................15
4.3.8 Brightness of LCD:....................................................................................................................................15
4.3.9 Contrast of LCD: .......................................................................................................................................15
4.3.10 Delayed start:............................................................................................................................................15
4.4 Sequence of operations ................................................................................................................ 16
5 BUILD CHARACTERISTICS ................................................................................................................18
5.1 Structure........................................................................................................................................ 18
5.2 Hydraulic circuit............................................................................................................................. 19
6 ELECTRICAL COMPONENTS AND FUNCTIONS .............................................................................. 20
6.1 EDW2500 electronic control system ............................................................................................. 20
6.1.1 Functions performed by the mother board ................................................................................................21
6.1.2 Memories contained in the electronic control system................................................................................21
6.1.3 Power failures ...........................................................................................................................................21
6.2 Electrical specifications ................................................................................................................. 22
6.2.1 Actuators/Sensors/NTC ............................................................................................................................22
6.3 Power feed and selection of programmes ....................................................................................22
7 Water filling ...........................................................................................................................................22
7.1 Fill circuit .......................................................................................................................................22
7.1.1 Pressure switches on fill level and anti-overflow system...........................................................................22
7.1.2 Fill system.................................................................................................................................................22
7.1.3 Anti-flooding device...................................................................................................................................23
7.1.4 Anti-overflow system.................................................................................................................................23
7.2 Control of water filling.................................................................................................................... 23
7.2.1 Static filling................................................................................................................................................23
7.2.2 Dynamic filling...........................................................................................................................................23
7.2.3 Level control during washing ....................................................................................................................23
7.3 Water filling time............................................................................................................................ 24
7.3.1 Static filling time ........................................................................................................................................24
7.3.2 Dynamic filling time...................................................................................................................................24
7.3.3 Interruption of water filling.........................................................................................................................24
7.4 Washing system........................................................................................................................... 24
7.5 Level control during washing......................................................................................................... 25
7.5.1 Control of wash pump ...............................................................................................................................25
7.6 Heating .......................................................................................................................................... 25
7.7 Built-in detergent dispenser .........................................................................................................26
7.8 Draining......................................................................................................................................... 26
7.8.1 “Siphon” effect...........................................................................................................................................26
7.9 Regeneration system .................................................................................................................... 27
7.10 Resin washing ............................................................................................................................... 27
7.11 Regeneration levels ...................................................................................................................... 27
7.11.1 “Blending” function ....................................................................................................................................28
8 DRYING ................................................................................................................................................ 28
8.1 “Turbo-dry” drying .........................................................................................................................28

3
9
SERVICE ..............................................................................................................................................29
9.1 Accessing the diagnostic mode .................................................................................................... 29
9.2 Displaying alarms and activating individual components.............................................................. 30
9.2.1 Table of alarm codes ................................................................................................................................31
9.3 Cancelling alarms from memory ...................................................................................................33
9.4 Test cycle ...................................................................................................................................... 33
9.5 Disabling / enabling pulse washing............................................................................................... 33
9.6 Enabling / disabling an extra rinse ................................................................................................ 34
9.7 Brightness .....................................................................................................................................34
9.8 Contrast......................................................................................................................................... 34
9.9 Setting the water hardness ...........................................................................................................34
10 CIRCUIT DIAGRAMS ........................................................................................................................... 35
10.1 “Free-standing” model ................................................................................................................... 35
10.2 “Talkie - Free-standing” model ...................................................................................................... 36
10.3 “Built-in” model .............................................................................................................................. 37
10.4 “Talkie - Built-in” model ................................................................................................................38
11 BASIC CIRCUIT DIAGRAMS ...............................................................................................................39
11.1 “Free-standing” model ................................................................................................................... 39
11.2 “Talkie – Free-standing” model .................................................................................................... 40
11.3 “Built-in” model .............................................................................................................................. 41
11.4 “Talkie – Built-in” model ................................................................................................................ 42
11.5 Checking components for proper operation.................................................................................. 43
12 “DEMO” mode....................................................................................................................................... 44
13 QUICK GUIDE ...................................................................................................................................... 46
14 TABLE OF PROGRAMMES ................................................................................................................. 48
4
Purpose of this manual
The purpose of this manual is to provide service personnel (who have the basic knowledge necessary for
repairing dishwashers) with information on dishwashers equipped with the EDW2500 electronic control system
with/without “Talkie” functionality, which are produced in the Solaro (MI - Italy) factory.
For detailed information on the water circuits and build characteristics of the appliance, refer to the Service
Manual for the “DIVA 60 cm” (publication no. 599 35 55-25 e 599 35 87-82).
1 PRECAUTIONS
Electrical equipment must be serviced by qualified personnel, only.
Pull out the power plug before working on internal components.
Important!
When the appliance is plugged in, mains voltage is present on all circuit
boards even if the ON/OFF button is OFF
2 GENERAL CHARACTERISTICS
Power supply ⇒ 230 - 240 V / 50 Hz (limits 187-254 V)
Total power drawn ⇒ 2300 W
Water supply ⇒ Min. / Max. Pressure: 5 - 80 N/cm
2
Load capacity ⇒ 12 Place settings
Dimensions:
- width ⇒ 59.6 cm
- height ⇒ 81.8 - 87.8 cm
- depth ⇒ 55.5 cm
Controls:
Power up / Power down ⇒ ON/OFF button, always installed
Selection of programmes ⇒ By button
Selection of options ⇒ By button
Display system ⇒ LCD and LEDs
Communication (Talkie vers.) ⇒ Specific electronic board and speaker
Washing systems ⇒ Combined / Pulse
Water level control ⇒ Pressure switch + Software
Water heating ⇒ Heating element enclosed in tube (2100 W)
Temperature control ⇒ NTC temp. sensor
Drying systems ⇒ Activ / Turbo
Safety systems / Alarms ⇒ Full protection of water/electrical systems and software
5
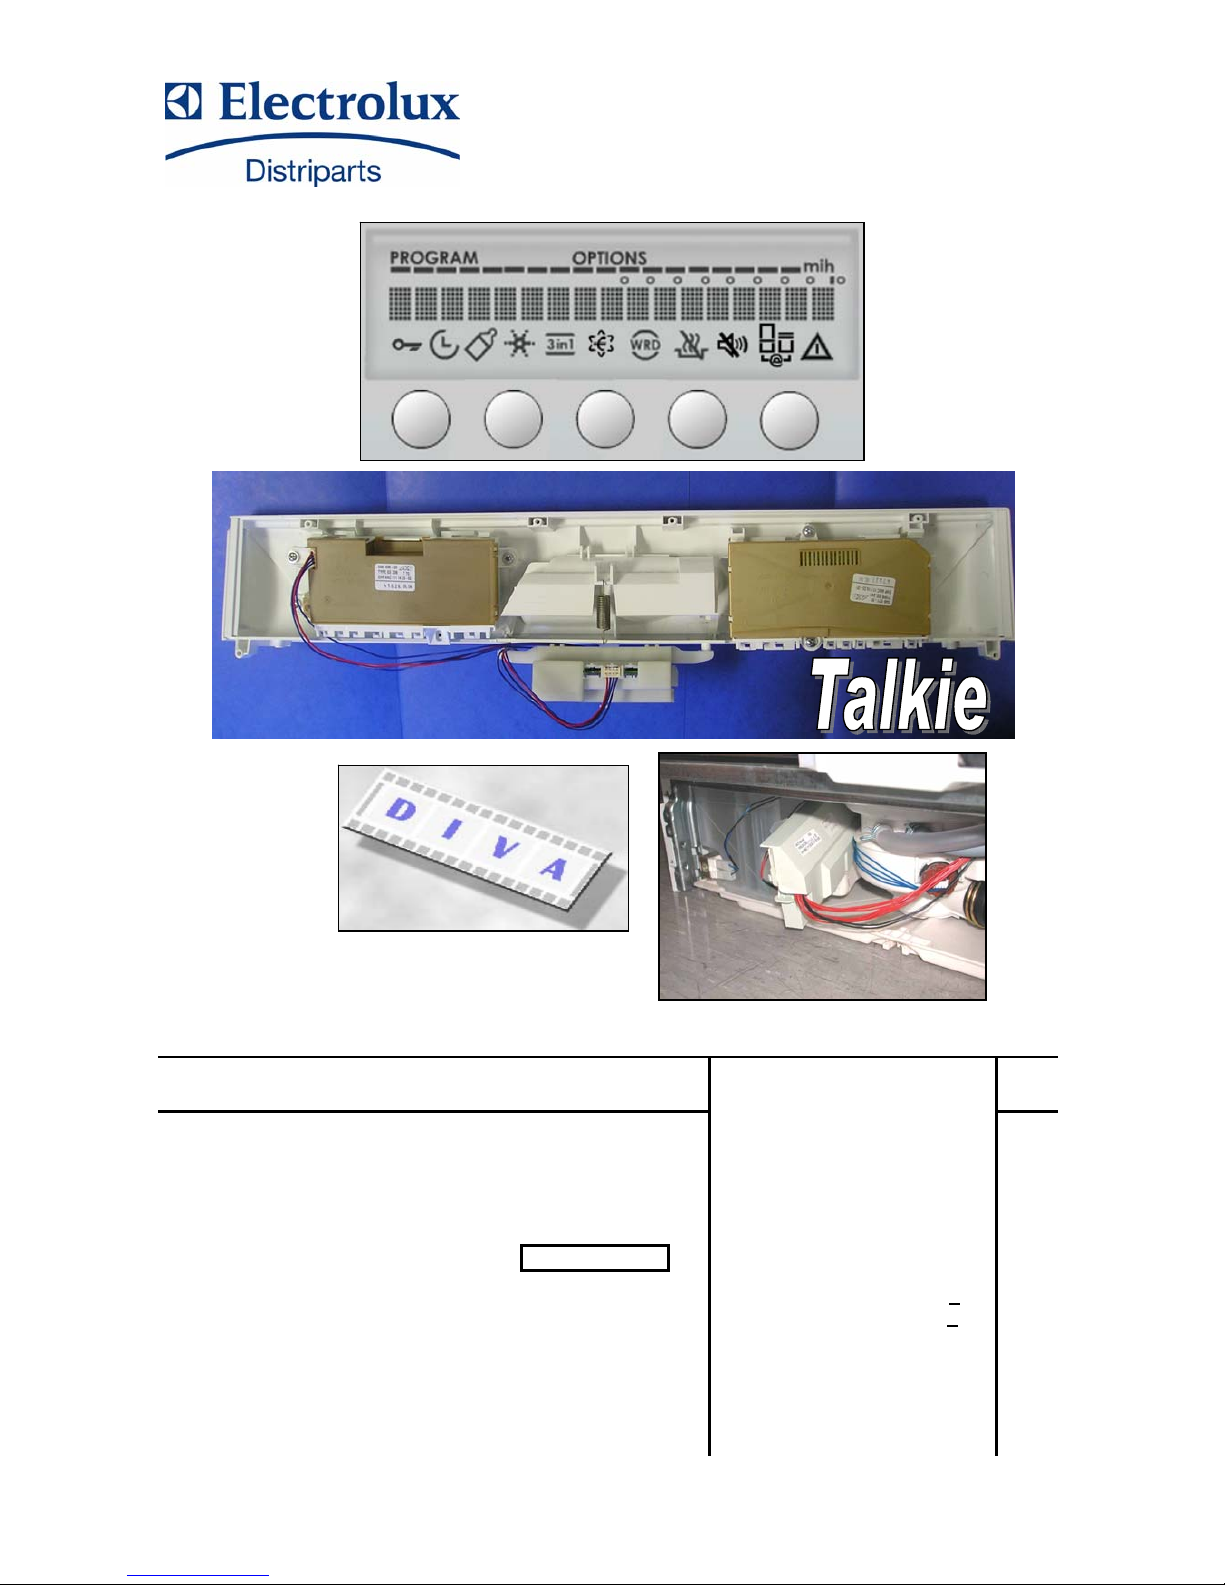
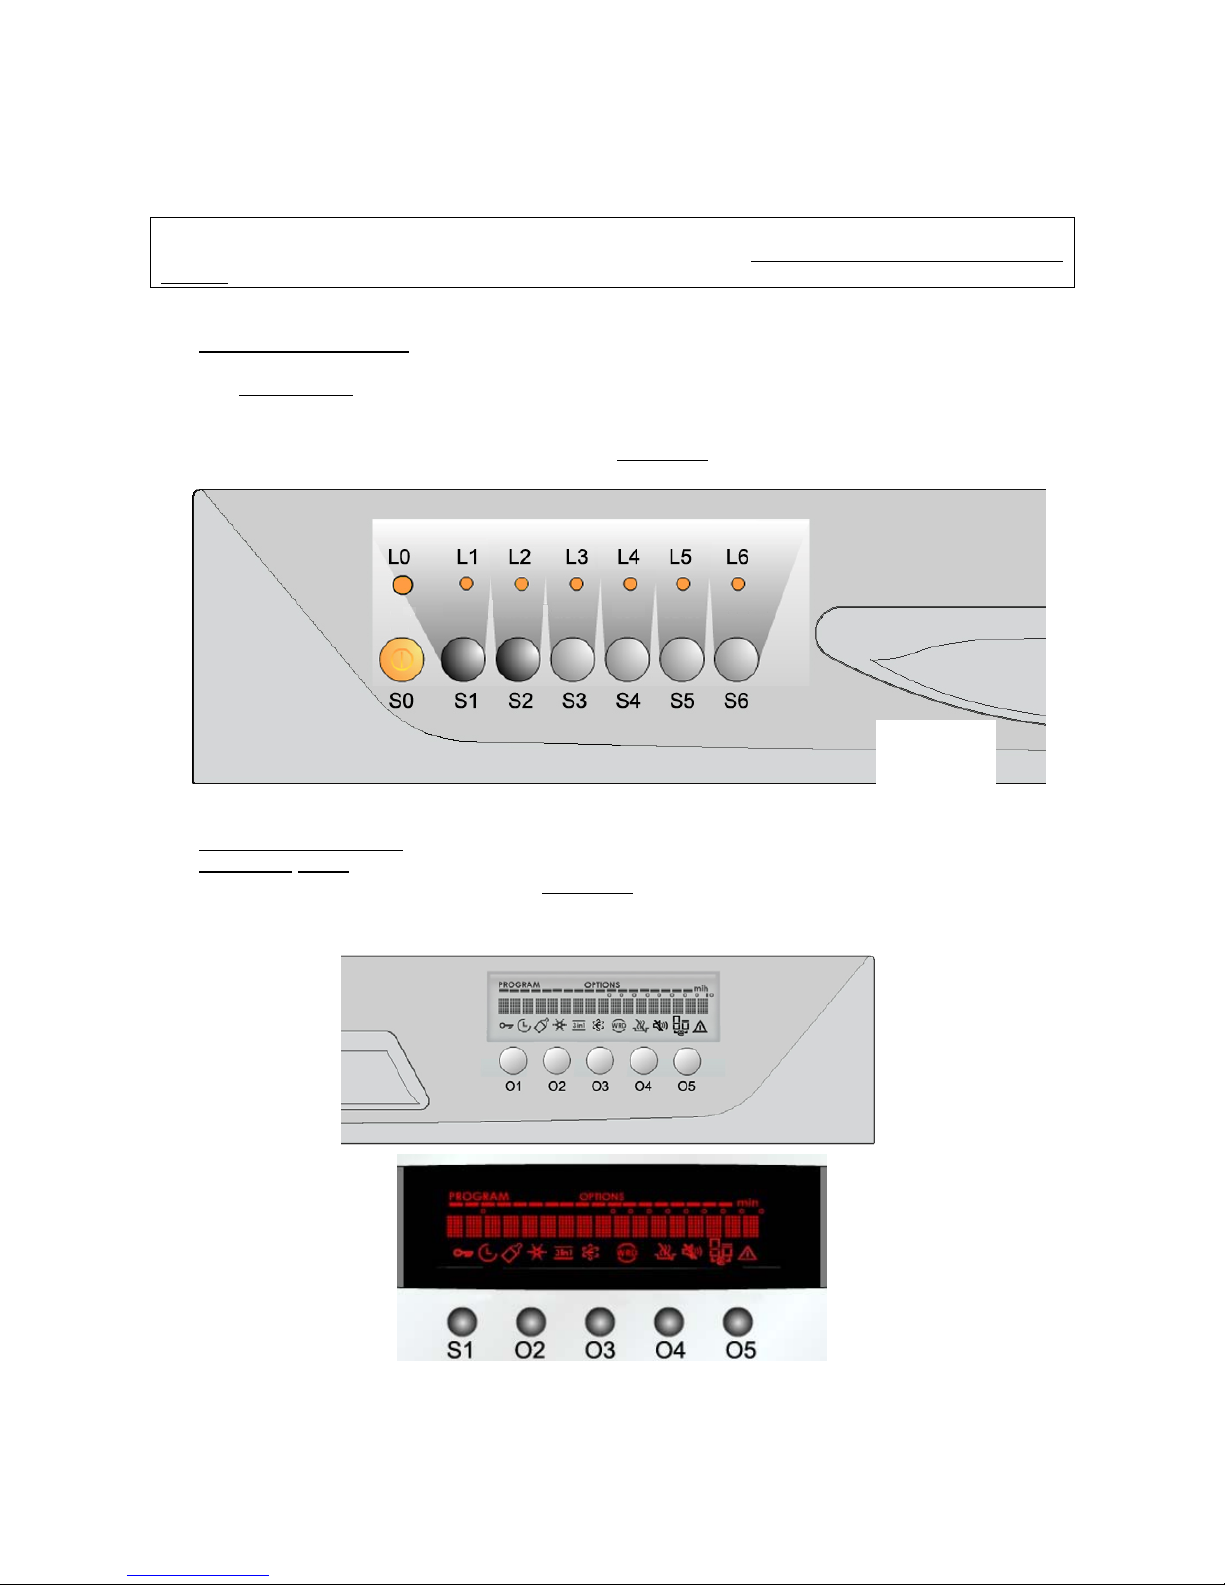
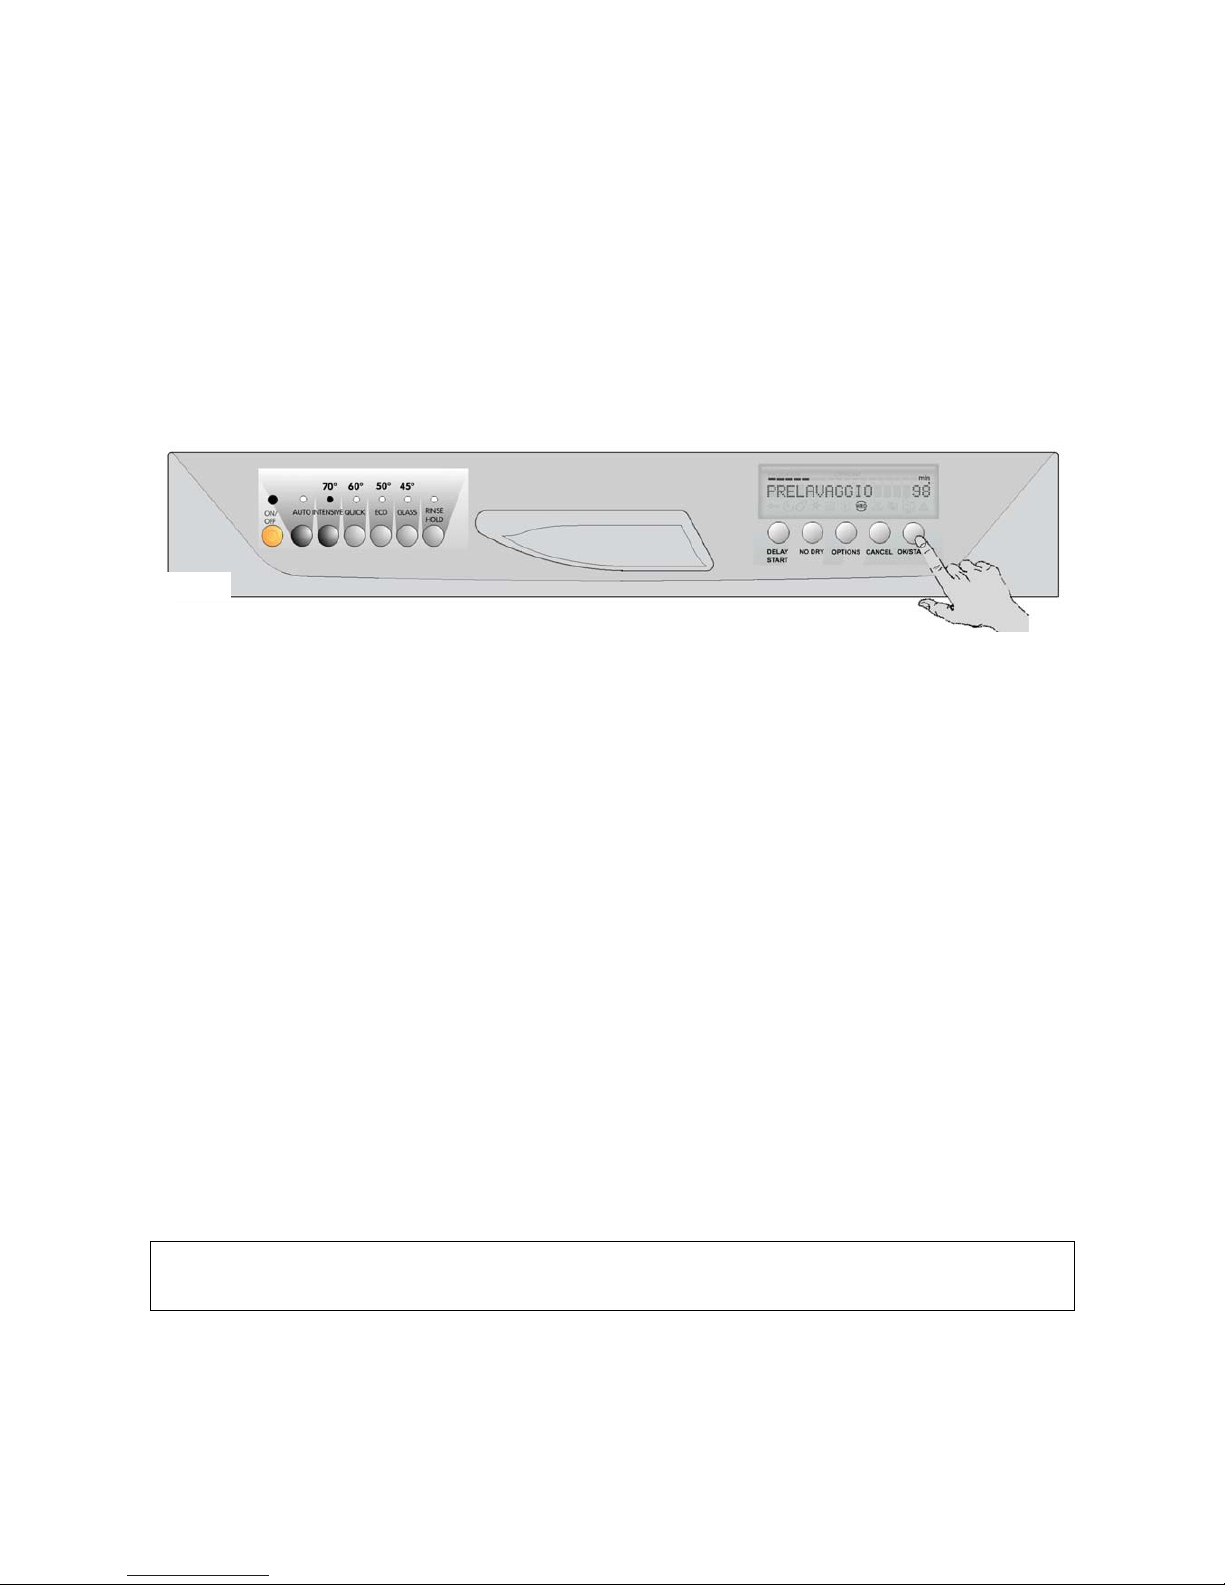
3 CONTROL PANEL
The configuration of the control panel may vary with:
Brand and appearance of unit
Type of dishwasher: free-standing or built-in
Type of circuit boards used
Number of buttons for selecting programmes
Number of buttons for selecting options
Number of LEDs and/or configuration of LCD
3.1 LCD
These models use a new LCD display which can display the most common languages and all letters
of the alphabet, numbers and symbols.
Depicted above are the LCD displays used in free-standing and built-in models, with all elements lit.
Depicted below are figures and explanations of what may appear line-by-line on the display.
The first line shows the current selection: programme
or options.
1. The segments below “PROGRAMME”
identify the number of washing phases
included in the cycle selected
2. The segments below “OPTIONS” identify the
number of choices that are possible for the
option selected
The following may appear on the second line:
1. the name of the cycle selected (while it is
being set)
2. once the cycle has started, the washing
phases in the cycle and the temperatures
involved)
3. options selected/suggested
4. time to end of cycle or delayed starting
time (in hours or minutes)
The following appears on the third line:
1. the symbols that identify the cycles and
options selected, or any advisories/warnings
Door is open
Certain types of programmes have been
selected
Delayed start time has been
selected
“Eco-drying” option has been selected
“Sanitize” programme has been
selected
Buzzer has been disabled
“Extra rinse” option has been
selected
@LINK connection
“3-in-1 detergent” option has been
selected
An advisory/alarm has occurred
“Bio detergent” option has been
selected
Free-standing model
Built-in model
6
3.2 “Talkie” Version
Some EDW2500 dishwasher models features also the “Talkie” functionality. These models are
configured so that they can communicate in different languages according to the brand/market.
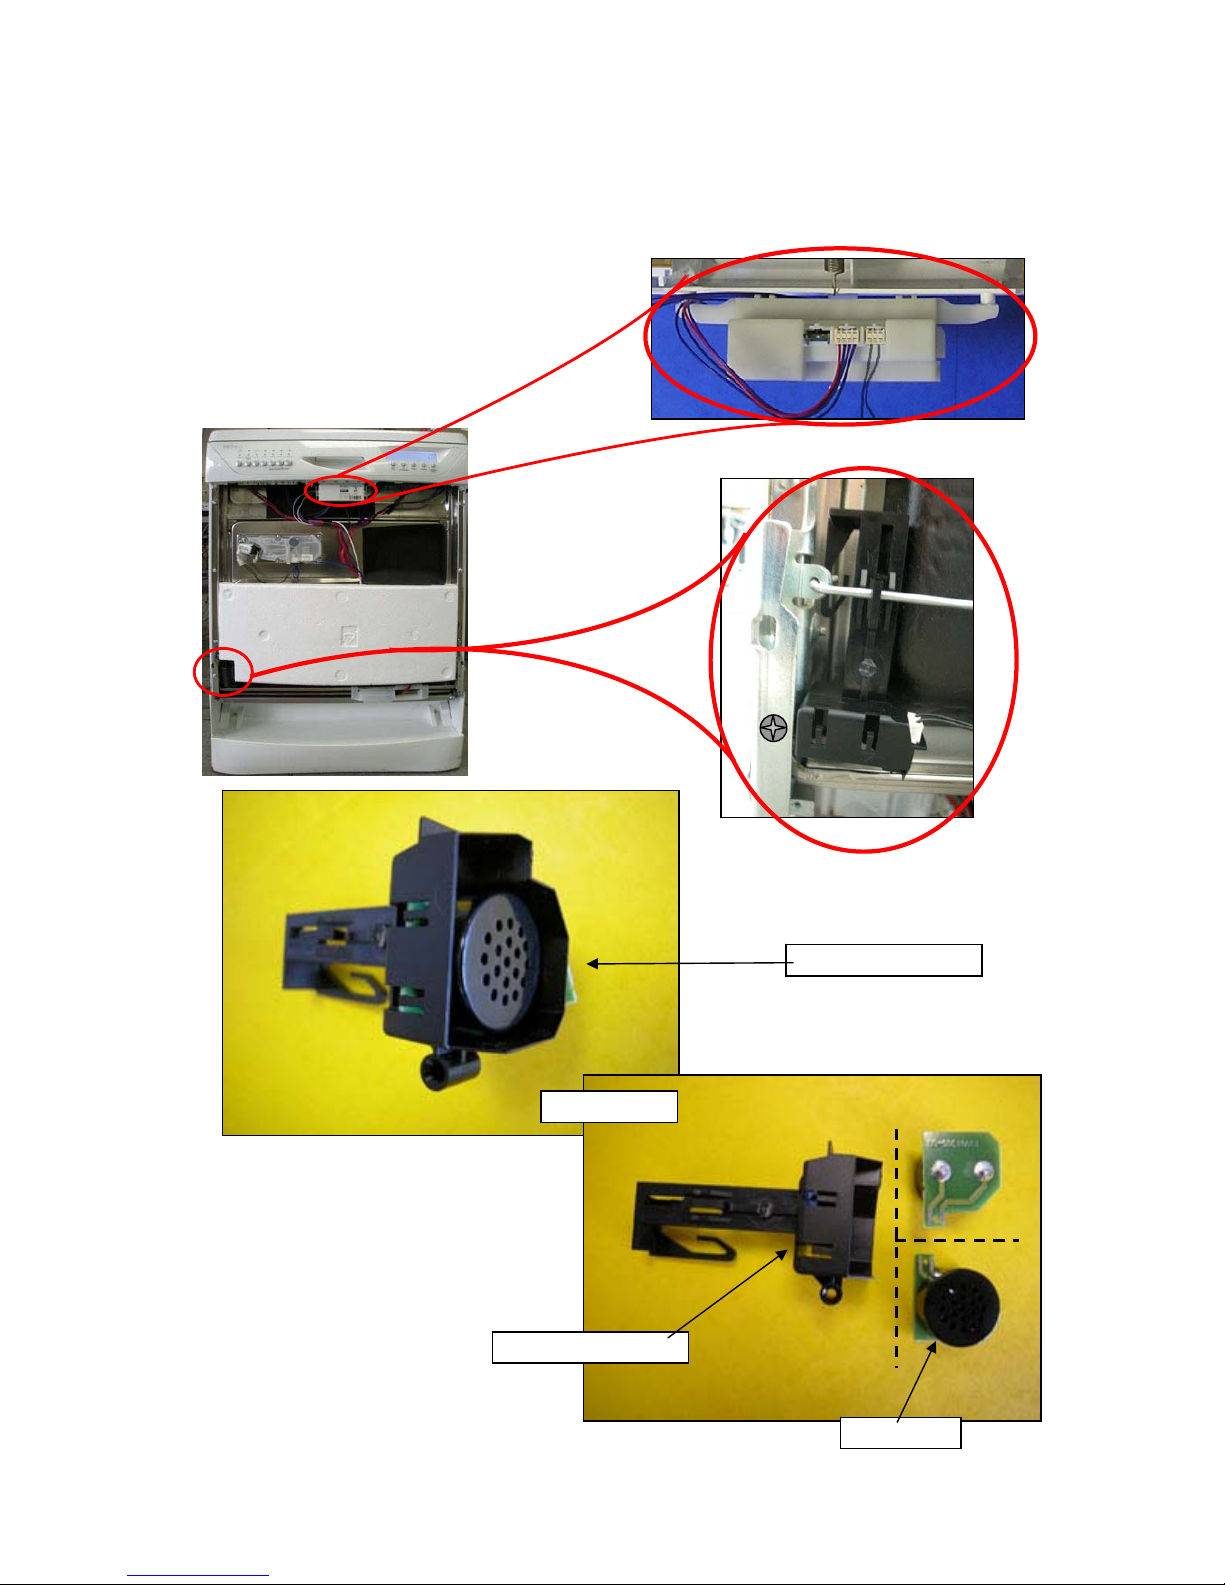
The “Talkie” version of the EDW2500 features a speaker contained in a plastic box (figg. A and B),
hooked to the tie and screwed to the hinge, positioned on the left front side of the inner door (fig. C) and
connected electrically to the board with the voice function, which is fitted with 2 screws under the control
panel (fig. D).
Speaker Assembly
figg. A and B
Speaker Box
Speaker
fig. C
fig. D
7
3.2.1 Vocal messages
During the setting of the washing programme three types of vocal messages can be heard:
• messages that explain the utility of the programme and describe the various options
• messages that confirm the selection of the option
• messages that remind the possible necessary operations of maintenance
During the programme it can be heard:
• alarm messages in case of malfunctioning also temporary; in these cases the message is immediate
and is repeated till the solution of the problem
The vocal messages can be deactivated using the button Options and adjusting the volume on Level 0.
Warning: even if the voice is excluded, the alarm vocal messages remain always active!
NOTE: The vocal messages can be reproduced in different languages. Selecting the desired language to
display the messages on the display, the same language will be automatically set in the voice control board.
All the possible vocal fragments are listed below; the software will buil the message by composing
one, two or more fragments:
English
Messages
Hello
The program is running. To complete the program
Close the door
Remember to clean the dishwasher filter
Remember to put salt in the special container
Remember to put rinse aid in the special container
Press OK-Start to continue
Programs
Select the program
70° INTENSIVE
AUTOMATIC
30 MINUTES
ENERGY-SAVING
45° GLASS
50° NORMAL
65° NORMAL
PREWASH
65° QUICK
50° SAVING
45° GLASS
50° ECO
65° ECO
50° BIO
50° BIO SAVING
60° QUICK
70° INTENSIVE
AUTO DAILY
60° QUICK
45° GLASS
PREWASH

8
50° ECO
PLATE WARMER
AUTOMATIC
70° INTENSIVE
55° SHORT
20 MINUTES
EAT-LOAD-RUN
Very dirty pots and dishes
daily use. Automatically adjusts times, temperatures and consumption according to the quantity and
dirtiness of dishes.
normally dirty dishes with minimum consumption
fragile glasses and dishes
not very dirty dishes
daily use, washing at 65°C
rinse dishes awaiting subsequent complete washing
warm the dishes before taking them to the table or for removing the dust from dishes that have been in
the cupboards for a long time
reduced load of dishes used daily
It is advisable to place a teaspoon of detergent in the WRD container
Select possible required options
Before starting the program make sure the spray arms turn freely
Press OK-START to start the program
The program is finished. You can switch off the dishwasher
The dishwasher is in demo mode.
Options and menus
Childlock, keyboard safety lock
Childlock is selected
Childlock is deselected
Childlock is active. You can deactivate it by pressing any key for 5 seconds and modifying the relevant
option.
You can delay the start of the program by 1 to 19 hours. Select the required time and press OK-START
You have selected delayed start
The count-down has started
Special sanitizing option.
The option has been selected
The option has been deselected
Add an extra rinse
You have selected the extra rinse
You have deselected the extra rinse
With the program selected you cannot add the extra rinse
The profile of the wash programs is adapted to optimize results according to the detergent selected
You have selected "Normal Detergent"
You have selected "3in1 Detergent"
You have selected "BIO Detergent"
You have selected "4in1 Detergent"
Reduce drying time
You have selected Eco drying
You have selected normal drying

9
You can adjust the volume of all the acoustic signals
The required volume has been stored
You can activate or deactivate rinse aid dispensing. The modification is valid only if you have selected the
3in1 detergent option.
Rinse aid dispensing is selected
Rinse aid dispensing is deselected
You can adjust the water softener according to water hardness
The required water hardness has been stored
You can adjust the display contrast
The required contrast has been stored
You can adjust the display brightness
The required brightness has been stored
The option selected is not available with this program
Press OK-START to select the options displayed in sequence
Press OK-START to confirm the selection
Alarms
Attention: the dishwasher is not filling with water. Make sure the water cock is not closed and that the
filling pipe is not constricted.
Attention: the dishwasher is not draining the water. Make sure the drain pipe is properly connected and
not bent, and that the sink drain is not blocked.
Attention: the antiflood system has been activated
Attention: there may be a fault in the water recirculating pump
Attention: there may be a fault in the water heating device. The program has been zero-set
Press OK-START to resume program execution. If the alarm occurs again.
Close the water cock, switch the dishwasher off and contact Assistance Service
Cancel
You have cancelled the previous selection. You can make a new one.
You have cancelled the program
You have cancelled the delayed start
10
3.3 Controls
3.3.1 Turning the appliance on and off (S0)
The ON/OFF button with corresponding LED L0 is installed on all models. The S0 button is used to
turn the unit on and off. Turning off the unit with the S0 button does not cancel the programme in progress.
Important!
If the unit is plugged in, mains voltage is present on all circuit boards even when the ON/OFF button is not
pressed (when appliance is shut off).
3.3.2 Selecting programmes
The free-standing model
can be equipped with up to 6 buttons (S1-S6) with 6 accompanying LEDs,
which correspond to 6 different washing programmes.
The built-in model
is equipped with a button (S1) for selecting the programmes. When the button is
pressed repeatedly, the various programmes included in the machine appear in sequence on the
display.
The operation of the buttons and their number exclusively
depend on the software in the machine.
3.3.3 Selecting options
The free-standing model
can be equipped with up to 5 dedicated buttons (O1-O5) for selecting options.
The built-in model is equipped with 4 dedicated buttons (O2-O5) for selecting options.
The operation and number of buttons exclusively
depend on the software in the machine.
In any event, the “Options” button, the “Cancel” button and and the “OK/START” button are always
present since these buttons are used to access the service mode (see section 9).
Freestanding
model
Free-standing
model
Built-in model
11
4 WASHING
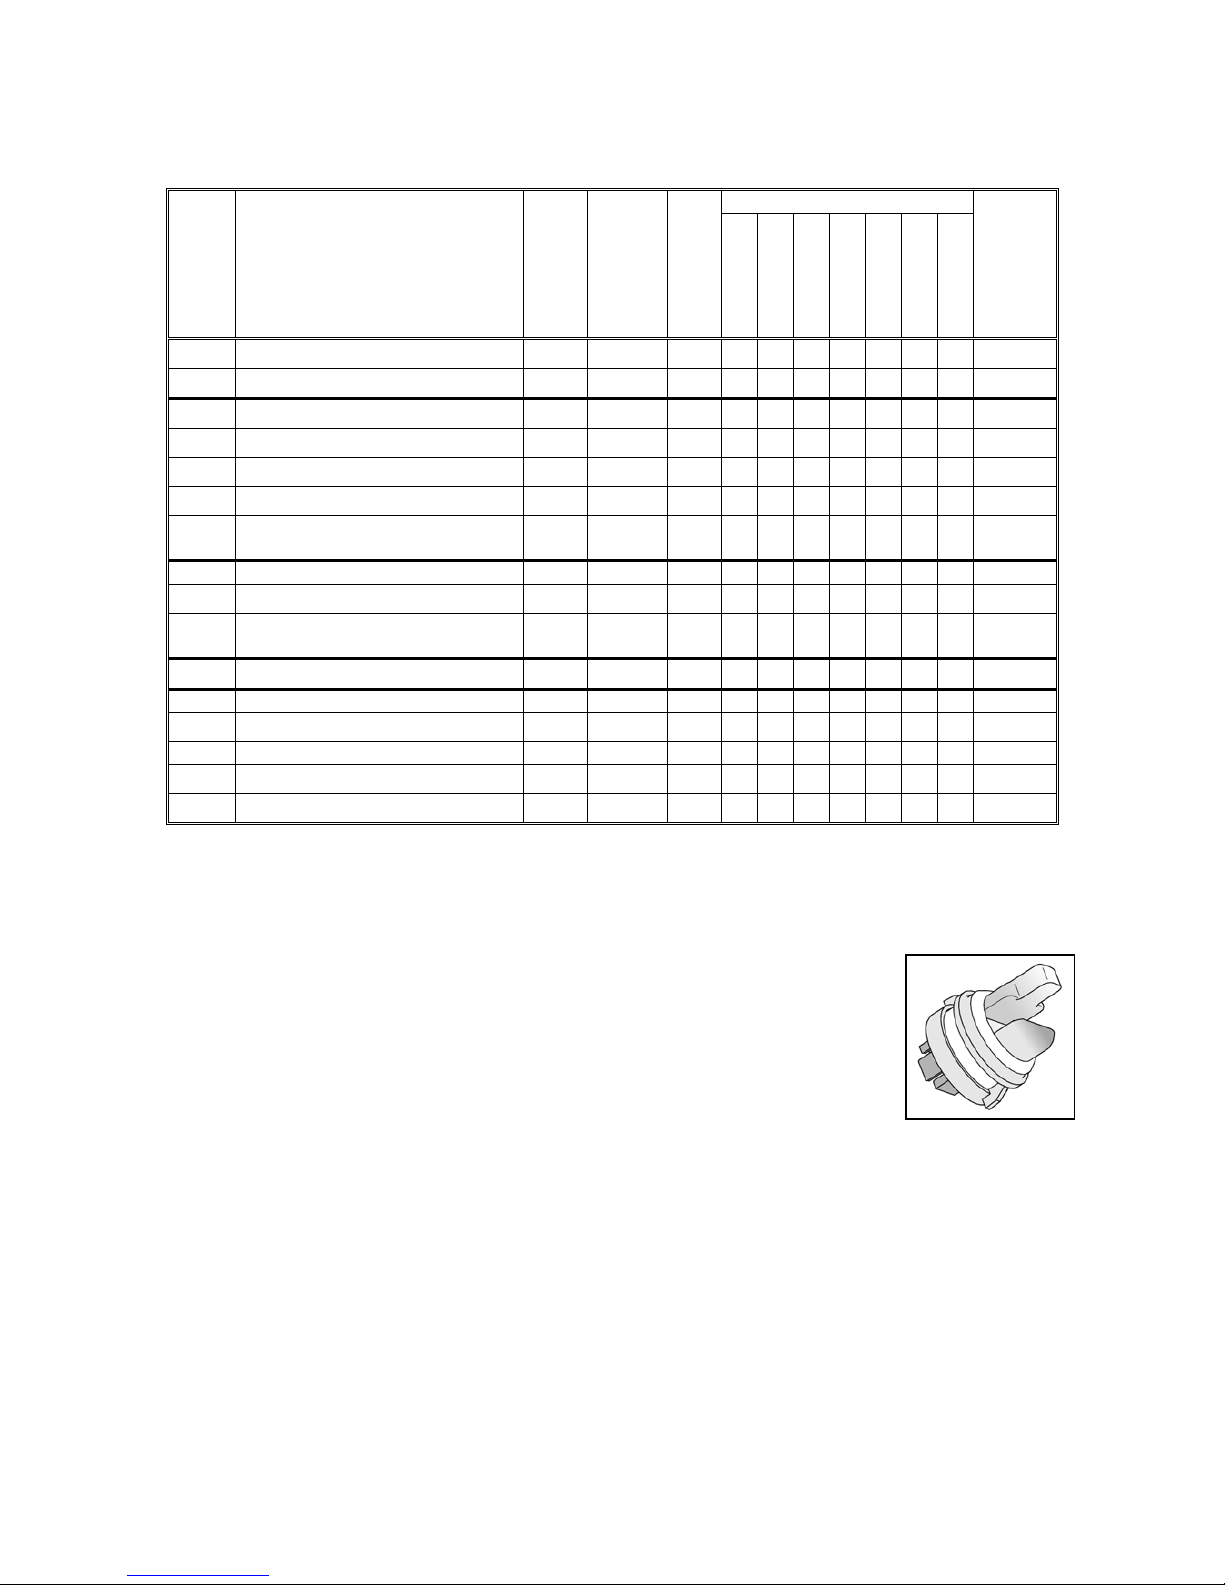
4.1 Wash programmes
Possible options
Type
Programme
Prewash (ºC)
Wash (ºC)
No. of rinses
Half load
Sanitize
3 in 1
Extra rinse
Bio detergent
“Tablet”
Eco drying
Min. ~
I2
Intensive (maximum speed)
55 68 2 ☺ ☺ ☺ ☺
♦
☺
120’
I3
Short Intensive
50 68 2 ☺ ☺ ☺ ☺ ☺
♦
88‘
N2
Normal (maximum speed)
--
68 1 ☺ ☺ ☺ ☺
♦
☺
100‘
N3
Delicate
--
55 1 ☺ ☺ ☺ ☺ ☺
♦
☺
98‘
N4
Delicate without prewash
--
55 1 ☺ ☺ ☺ ☺ ☺
♦
☺
89‘
N5
Normal 3 rinses
--
68 2 ☺ ☺ ☺ ☺ ☺
♦
☺
102‘
N6
Normal 3 rinses
without prewash
-68 2 ☺ ☺ ☺ ☺ ☺
♦
☺
93‘
E1
Axx Energy label
-- 60 max 1 ☺ ☺ ☺ ☺ ☺ ☺ ☺
162‘
E4
Fast Energy label
--
55 max 1 ☺ ☺ ☺ ☺ ☺
♦
☺
134‘
E5
Auto performance
Energy label
--
65 max 1 ☺ ☺ ☺ ☺ ☺ ☺ ☺
141‘
Auto
Auto 50-65°C
--
50-68 1 ☺ ☺ ☺ ☺
♦
☺
92‘-115’
Q1
Short
-- 50 1 ☺ ☺ ☺ ☺ ☺
52‘
Q4
Soak
--
-- --
♦
♦ ♦
12‘
Q5
Short 30 min
-- 65 max -- ☺ ☺ ☺ ☺ ☺
31‘
Q6
Heat plates
--
-- --
♦
♦ ♦
30‘
Q7
Glassware
--
45 1 ☺ ☺ ☺
♦
☺
71‘
NB: The number and types of wash programmes vary with the configuration of the model.
4.1.1 Automatic programme
Turbidity sensor
Some models fitted with a turbidity sensor can be equipped with a special
“Automatic” programme that optimises the cycle to compensate for the quantity of
dishes loaded and the amount of dirt on them. The sensor is located on the outside of
the sump and directly contacts the water.
The NTC sensor that controls wash water temperature and the infrared
turbidity sensor that checks the turbidity of the water (and thus the amount of dirt
deposited on the dishes) are contained in a single component.
Detection of dirtiness
The degree of turbidity is measured during the cold prewash.
A LED powered by the main board (connector H5) projects a beam of light at a photo receiver.
In the photo receiver circuit (connector H6 on the main board), a current circulates that is proportional to
the amount of light received (and is thus inversely proportional to the degree of turbidity).
The microprocessor measures the signal in the circuit and determines the most appropriate cycle for
the amount of dirt dissolved in the water.
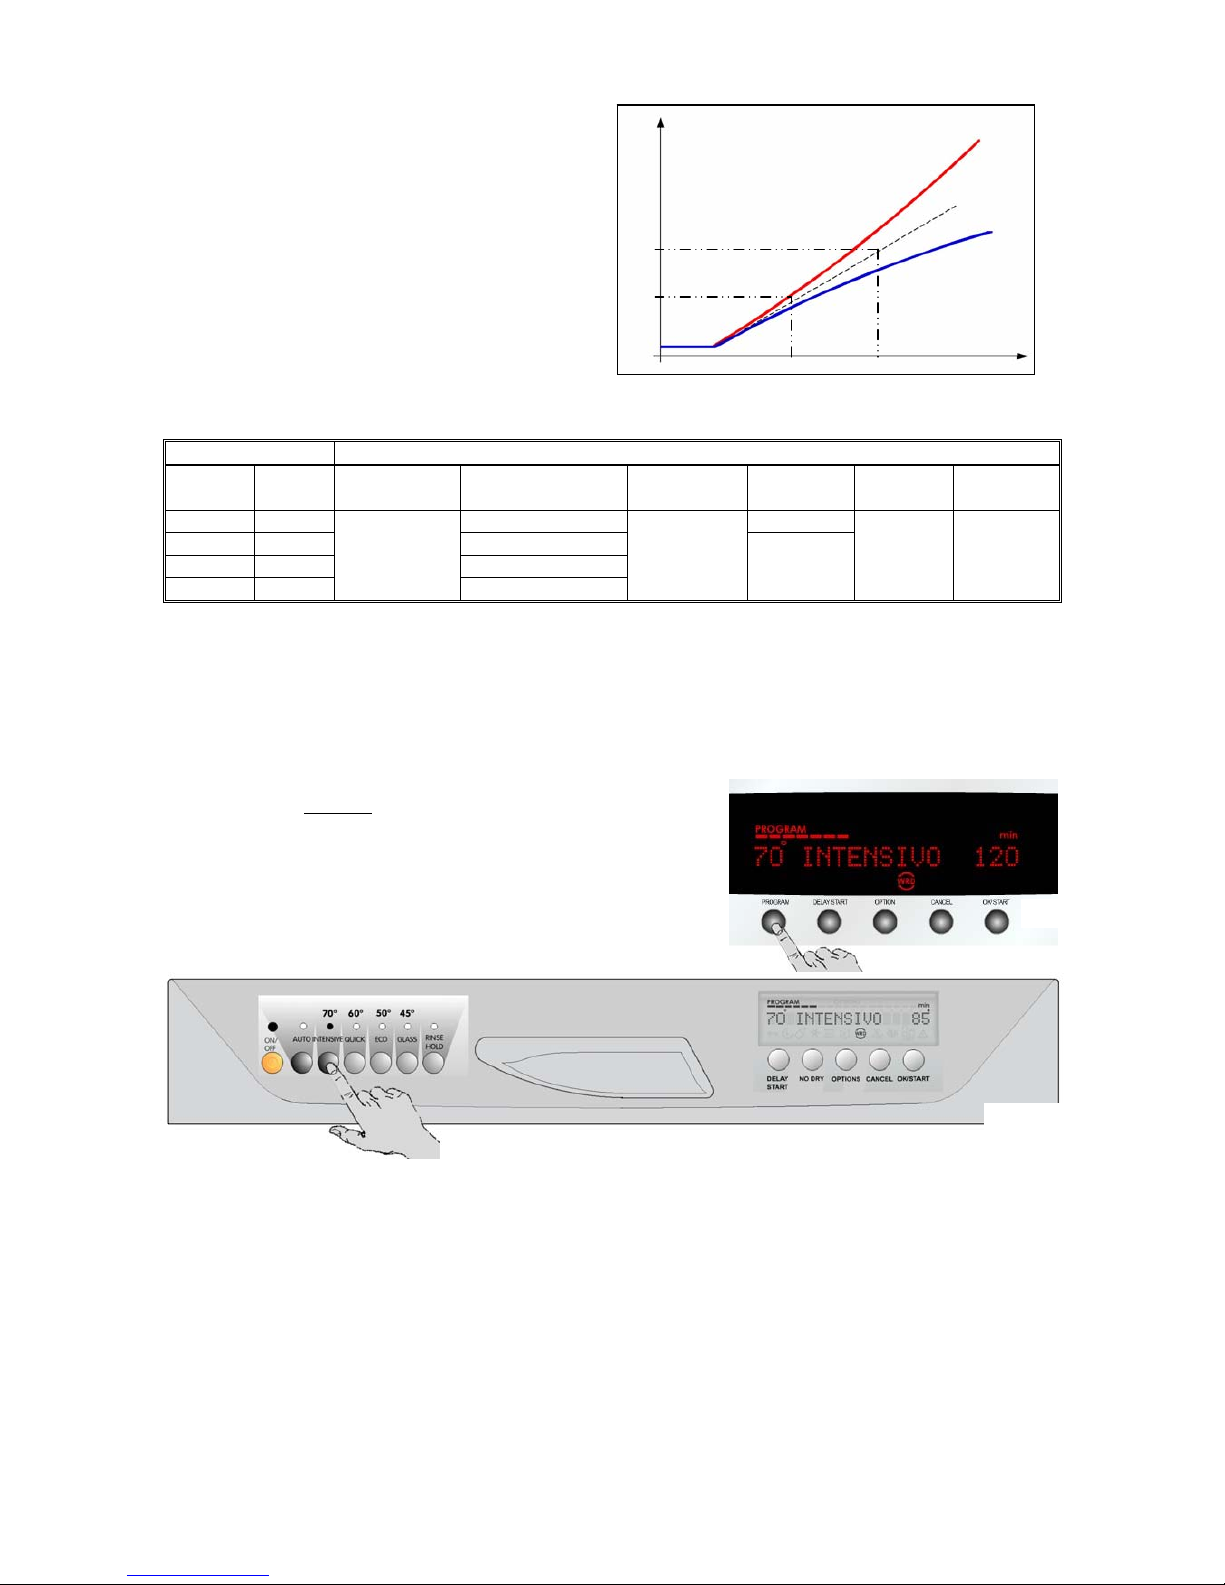
12
Detection of load
The quantity of dishes loaded (full or 1/2 load)
is detected during the first heating phase in the
washing cycle by measuring the speed of water
temperature increase (NTC sensor, connector H8).
Full load: when the slope of the curve is less
than the programmed standard threshold
Half load when the slope of the curve is
greater than the programmed standard
threshold
Phases in the automatic programme
Shown below are the variations in programme phases which are made as a function of dirt level and load.
Type Phases in the programme
Load
Very
dirty?
Prewash Wash First rinse Second rinse Hot rinse Drying
Full Yes 68º C cold
Full No 55º C
Half full Yes 55º C
Half full No
cold
50º C
cold
no
68º C 24 min.
4.2 Selecting a programme
1. Close the door and turn the appliance on by pressing button S0
The relative LED L0 lights up
The LCD display lights up with a welcome message and then flashes the last programme run (to run
this programme again, skip to point 4)
2. To choose a different
programme:
a) On the free-standing model, press the button for the
desired programme (S1-S5): the relative LED lights up to
confirm that the selection has been made, see fig. 2a
b) On the built-in model, press button S1 repeatedly until the
desired programme appears on the display; see fig. 2b
3. The following then appears on the LCD:
The name of the programme, which flashes
The time in minutes from the beginning to the end of the cycle
Segments at the top of the display, in the same number as the number of washing phases in the
programme selected
The symbols that characterise the programme
fig. 2a
fig. 2b
temperature
time
threshold
1/2 load
full load
13
4. Press the “OK/START” button to confirm the choice and start the cycle
5. At this point, the LCD will display advisories, for example, such as no salt and/or no rinse-aid in the
machine (on free-standing models, text will appear against a red background)
Correct the problems displayed
NB: If the 3-in-1 detergent option has been chosen, the no rinse-aid advisory is disabled
6. Press the “OK/START” button again to start the programme. See fig. 6.
The following items appear on the LCD:
The name of the phase in progress
The washing temperature
The time remaining in minutes to the end of the cycle
The symbols that characterise the programme / phase in progress
The phase in progress, which flashes
4.2.1 Cancelling a programme
To cancel a programme after it has been started:
1. Press the “Cancel” button:
• On free-standing models, the LED for the programme in progress begins to flash
• The LCD displays “Interrupt?”
2. Press the “OK/START” button: the programme is cancelled and the machine sets itself to the cycle
selection mode with “Set the programme” on the display
3. At this point, a new cycle can be selected by following the instructions reported above at section 4.3.1.4
or 4.3.1.5, depending on the model.
NB: If the cycle has not yet been started, all the selections made can be changed by pressing the proper
buttons.
4.2.2 Interrupting a programme
To interrupt a programme in progress:
1. Shut off the machine by pressing the S0 button
Press button S0 once again. The cycle resumes from the point at which it was interrupted.
OR
2. Open the door carefully
When the door is closed, the cycle resumes from the point at which it was interrupted, but with a
slight delay
NB: “Close the door” appears on the display while the door is open
Important: If the appliance is turned off or the door is opened for more than 30 seconds during the
drying cycle, the cycle will end after the regeneration phase and the appliance will be set to the cycle
selection mode when the machine is turned back on (the last cycle run will flash on the LCD).
fig. 6

14
4.3 Options
Every dishwasher with the EDW2500 control system is equipped with an “Options” button:
1. When Options button is pressed repeatedly, all available options are displayed in sequence
o All available options are displayed on the LCD in sequence
o The LCD shows the current setting for the option displayed
2. Press “OK/START” button to select the option to be modified
o The LCD flashes the current setting for the option displayed
3. When Options button is now pressed repeatedly, all the available modifications for the selected
option are displayed in sequence
o The LCD flashes the new setting for the option displayed
4. Press “OK/START” button to confirm the new setting
o The system now returns to the cycle selection mode
NB: If “Cancel” button is pressed repeatedly before point 4 is reached, the system exits the options mode
and returns to the cycle selection mode, and no modification is made.
Here is a description of all the options available:
4.3.1 Eco-drying:
this option must be selected every time it is desired, and its availability depends on the duration of the cycle
that will be run. The option is selected by pressing the relative button, and the relative icon then appears on
the LCD. It is available in all programmes with at least 15 minutes of drying time (excluding “Short
Intensive”, “Short”, “Short 30 min”, “Soak” and “Heat plates”):
Drying time is reduced to only 15 minutes
“Energy Label” programmes are shorted by 39 minutes; all other programmes are shortened by 9 minutes
4.3.2 Extra rinse:
this option must be selected every time it is desired. When it is selected, the relative icon appears on the
LCD. It can also be selected from the “Service” mode (see section 8). It is not available in the “Soak” and
“Heat plates” cycles:
A rinse with pulse washing is added that lasts around 9 minutes.
4.3.3 Detergent
• NORMAL
• “3 in 1”: When this option is selected, it remains selected
until it is disabled, and the relative icon
appears on the LCD. The option modifies the phases in the programme to optimise performance
when “3 in 1” detergent tablets are used. It is not available in the “Soak” and “Heat plates” cycles:
The programme length and the temperatures are specially varied to dissolve the detergent tablets
Water exchange (dilution drainage) is diminished)
Rinse-aid is not dispensed from the corresponding container
Regeneration (washing of resins) and salt are disabled from the corresponding container
• “Bio”: When this option is selected, it remains selected until it is disabled, and the relative icon
appears on the LCD. The option modifies the phases in the programme to optimise performance
when “bio” (organic) detergent is used and is available in all programmes:
The wash times and certain temperatures are increased (in all programmes except for “Soak” and
“Heat plates”)
4.3.4 Rinse-aid:
When this option is selected, it remains selected
until the setting is changed. Only when the “3in1” option is
selected, in case of not satisfying drying results, it enables or disables the delivery of rinse-aid from the
detergent dispenser. If delivery is disabled, the “Put the rinse aid” advisory does not appear on the display”.
4.3.5 Water hardness:
When this option is selected, it remains selected
until the setting is changed. Using a sequence of water
hardness values expressed in French degrees, the user can adjust the amount of water loaded into the
machine between regeneration steps. The adjustment is subdivided into 10 levels. If the first level is set,
the regeneration step is disabled and the “Put the salt” advisory does not appear on the display.
4.3.6 Language:
When this option is set, it remains set
until the setting is changed. The language, in which the menus,
programmes, options and advisories are displayed and heard, can be changed.
15
4.3.7 Buzzer volume:
When this option is set, it remains set
until the setting is changed. The option is used to vary the volume of
the buzzer and of the vocal messages from 0 to 5. The “buzzer disabled” icon appears on the display when
the setting is “0”. The alarm vocal messages remain always active even if the selected level is “0”.
4.3.8 Brightness of LCD:
When this option is set, it remains set
until the setting is changed. It is used to set the brightness of the back
of the LCD from “0” (minimum setting) to “10” (maximum setting).
4.3.9 Contrast of LCD:
When this option is set, it remains set
until the setting is changed. It is used to set the contrast between the
back and the writings of the LCD from “0” (minimum setting) to “10” (maximum setting).
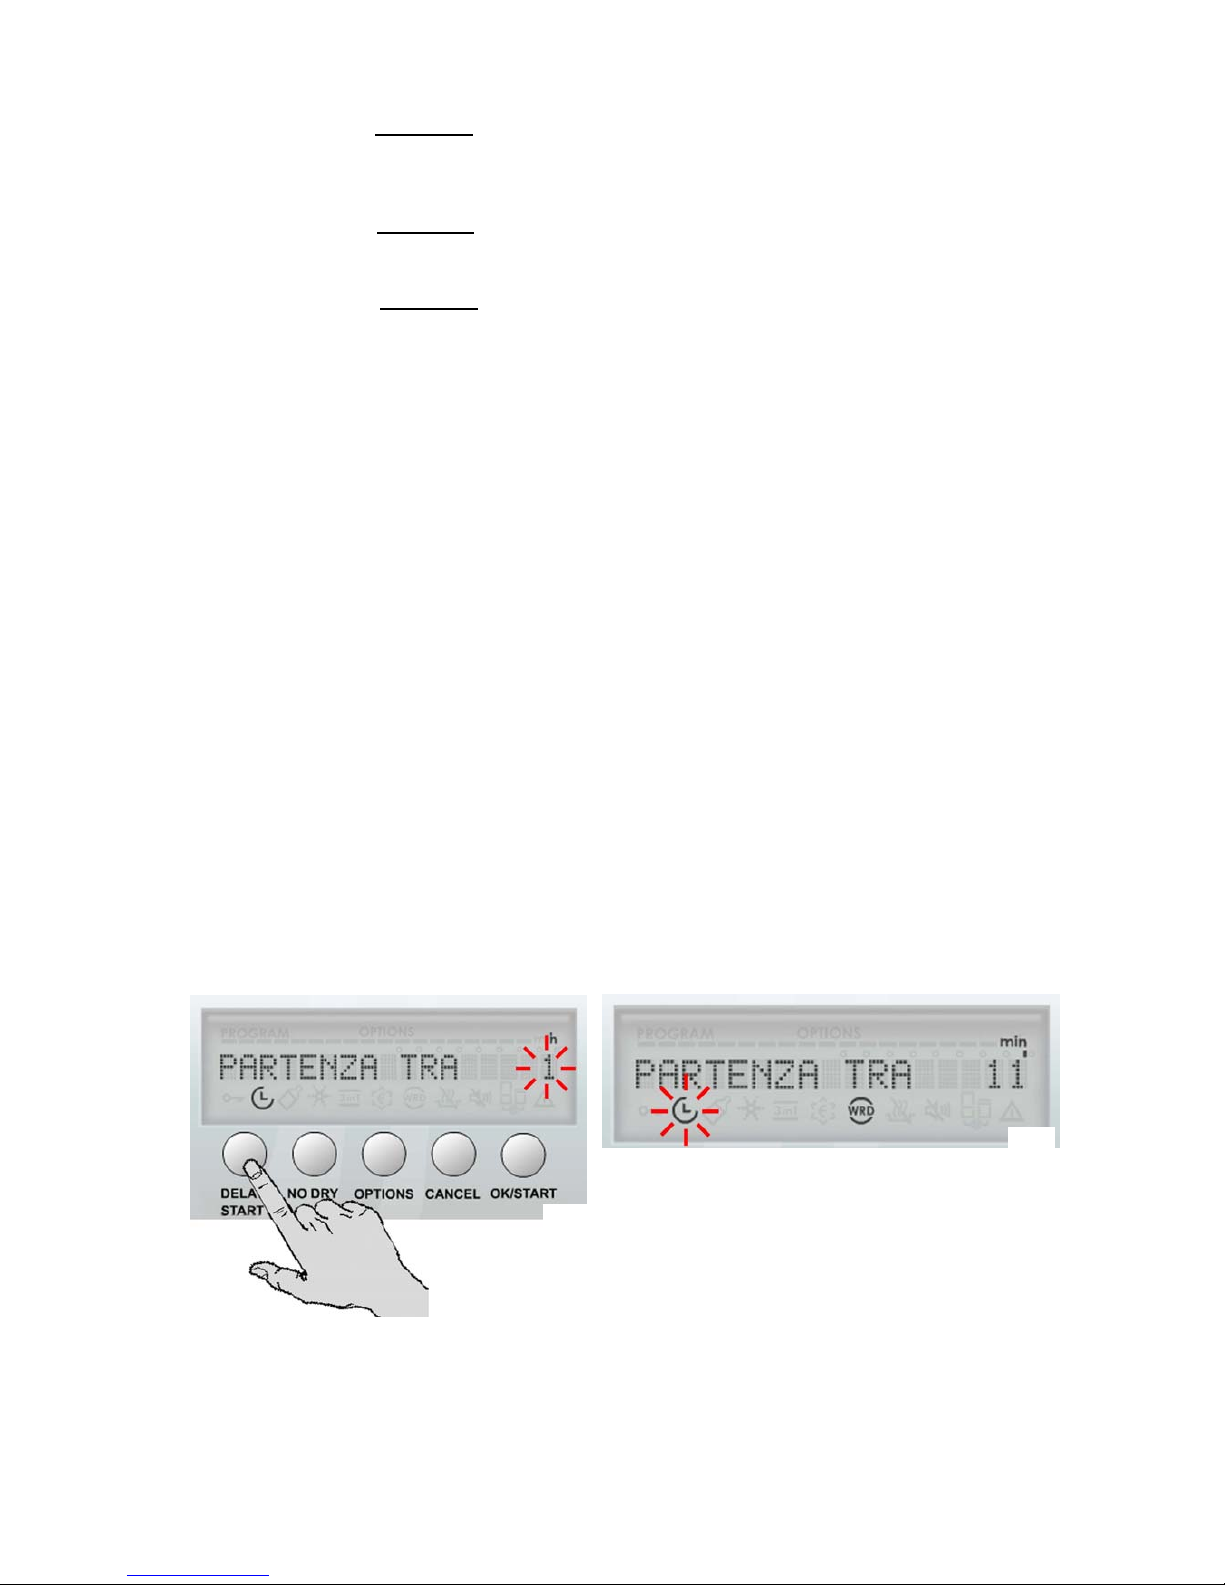
4.3.10 Delayed start:
This option enables the user to delay the start of the washing cycle and the relative options. A dedicated
button is assigned to this option.
To select a “delayed start” time:
1. Close the door and turn the appliance on by pressing button S0
LED L0 lights up
The LCD lights up with a welcome message and is then set to the cycle selection mode
2. Press the DELAY START button
The delayed start time flashes on the display
Every time the button is pressed, the delayed start time increases by 1 hour up to a maximum of 19
hours [1 hr – 2 hrs …..19 hrs…0 hr]
3. Choose the programme and any options desired:
The time remaining to the end of the cycle appears momentarily on the display
4. Press “OK/START” button O5 to confirm the settings
5. The “delayed start” time now begins:
The time set now appears steadily on the display while the icon on the third line flashes to indicate
the countdown: the time decreases by hours [19 hrs – 18 hrs – 17 hrs …..1 hr] and then by
minutes during the final hour [1 hr - 59 min – 58 min… 0]
NB: During the countdown (until the machine starts), the “delayed start” time can be changed or zeroed by
pressing the DELAY START button.
6. When the countdown is over, the machine starts automatically
“Time to end of cycle” now appears on the display, along with the step in progress and the relative
temperature.
NB: The delayed start time can be set after the wash programme has been selected.
(2)
(5)
 Loading...