

Page 1
BR3000
Page 2
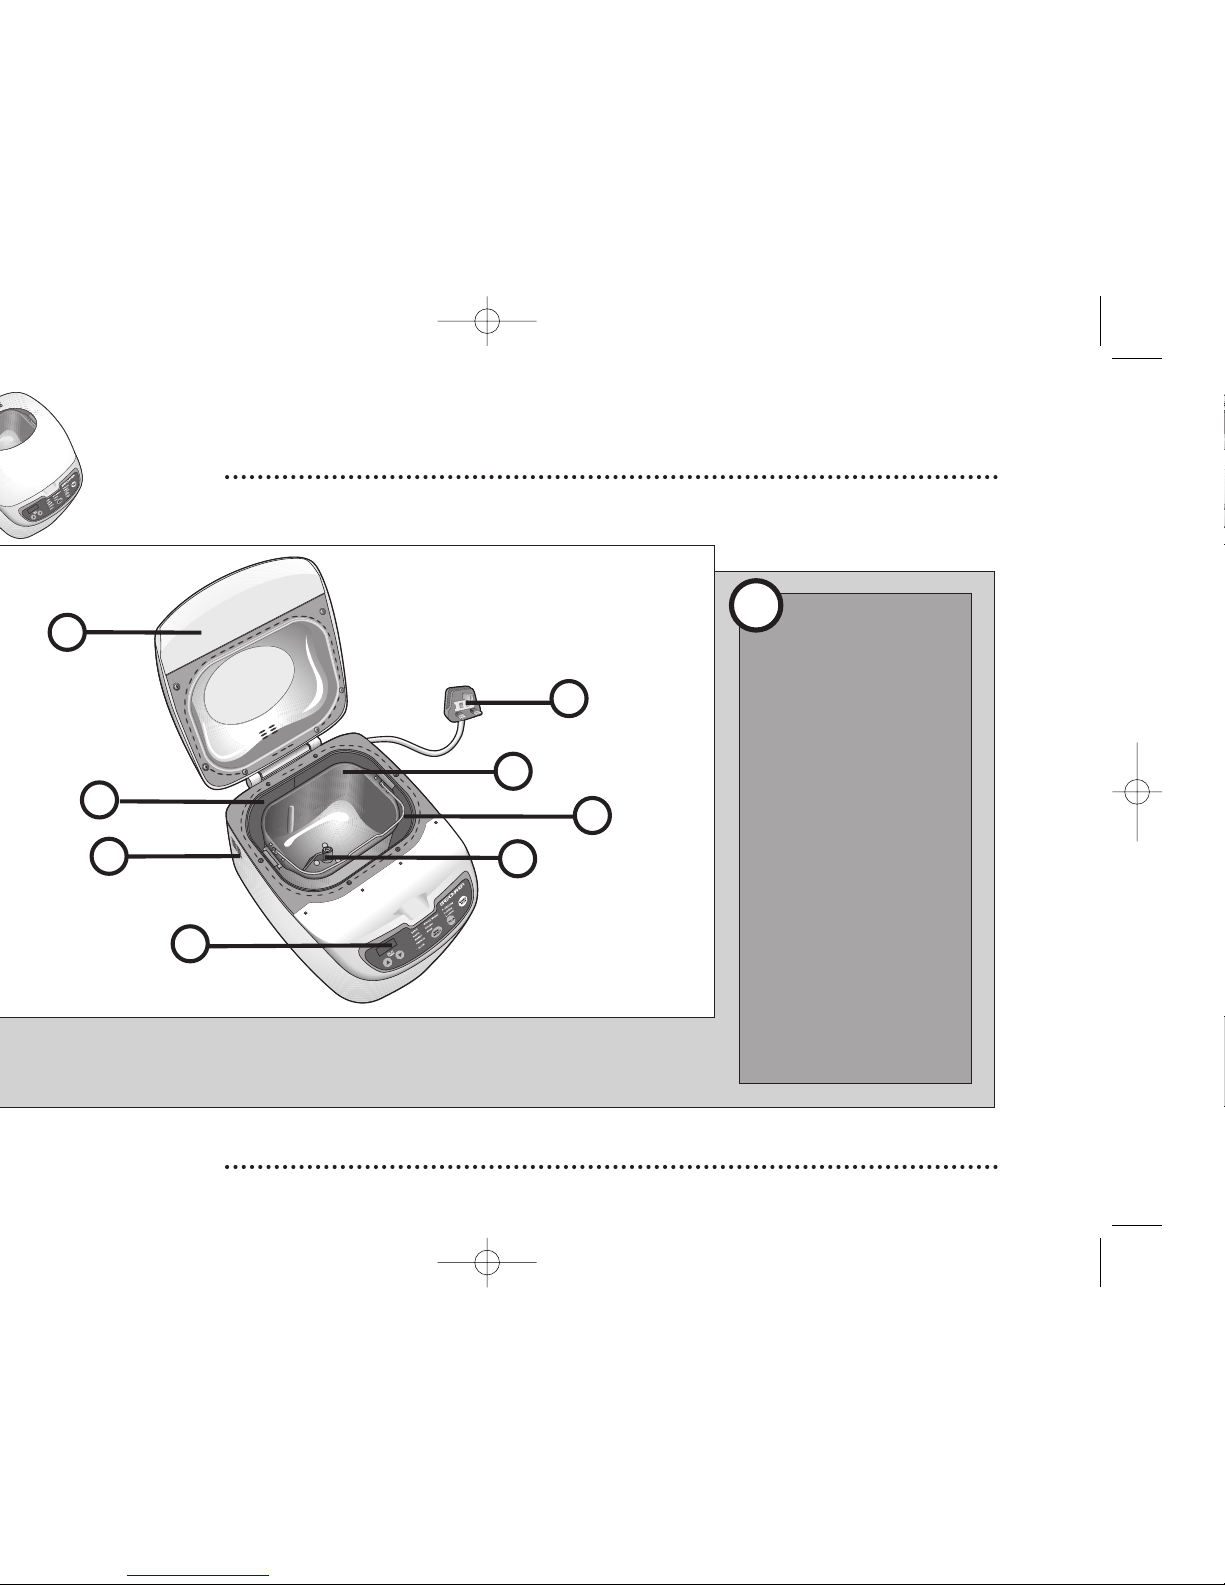
Know your breadmaker
1. Lid
2. Plug
3. Bread pan
4. Baking chamber
5. Bread pan handle
6. Kneading blade
7. Vents
8. Control panel
Also included:
Measuring cup
Spoon
i
Information
Please read these instructions before using your breadmaker.
1
4
3
2
5
7
8
6
Page 3
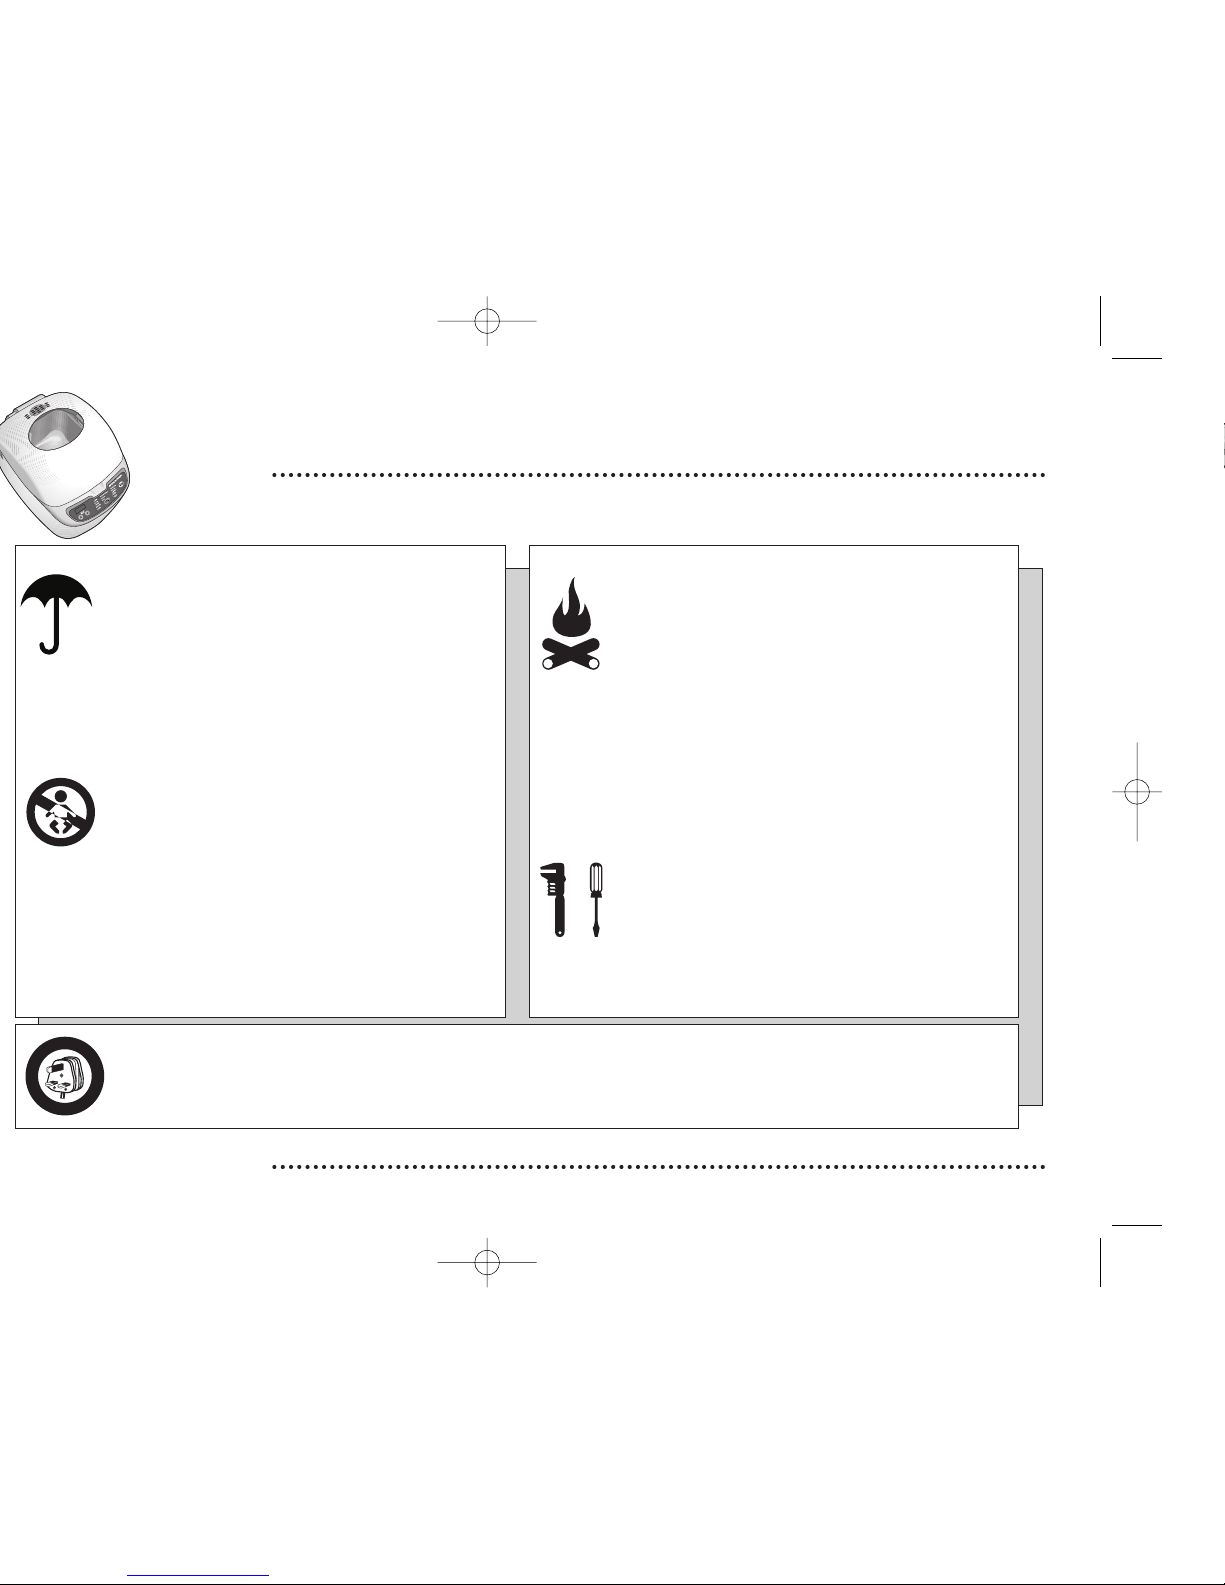
Your breadmaker should be used in
such a way that it is protected from
moisture. e.g. condensation, splashed water
etc. Do not place or store your breadmaker
where it can fall or be pulled into water or
any other liquid.
Stand your breadmaker on a stable, level
surface during use. Do not allow your
breadmaker to sit on top of the mains lead.
Make sure that children cannot touch the
breadmaker when hot or pull the mains
lead. Do not allow young children to play
with your breadmaker.
Handle the bread pan with care. Remove
the bread pan by pulling straight up on the
handle using oven mitts.
While in use, do not block up the steam
vents or open the lid.
Your breadmaker must not be used near or
below curtains or other combustible
materials. It must be watched when in use.
Do not leave your breadmaker unattended.
Your breadmaker should be placed away
from heat sources such as radiators,
gas/electric fires and direct sunlight.
Keep the power cord away from any
heated surfaces.
Use the appliance only for its intended use,
as described in this manual.
Do not use outdoors.
Never use your breadmaker if it is
damaged in any way. Do not remove any
fixed covers. If the power cable is damaged
it must be repaired by a qualified repairer.
The use of accessory attachments not
recommended by the appliance
manufacturer may cause injuries.
Information and advice
Your breadmaker is supplied with an approved 13 amp fused mains plug. When replacing the fuse always use a 13 amp
(BS 1362)
approved type. If the mains sockets in your home differ or are not suitable for the type of plug supplied, then the plug should be
removed and a suitable type fitted.
Please refer to the wiring instructions at the back of this book.
C
O
M
P
L
E
T
E
W
I
T
H
F
I
T
T
E
D
P
L
U
G
Safety warnings and correct procedures.
Page 4
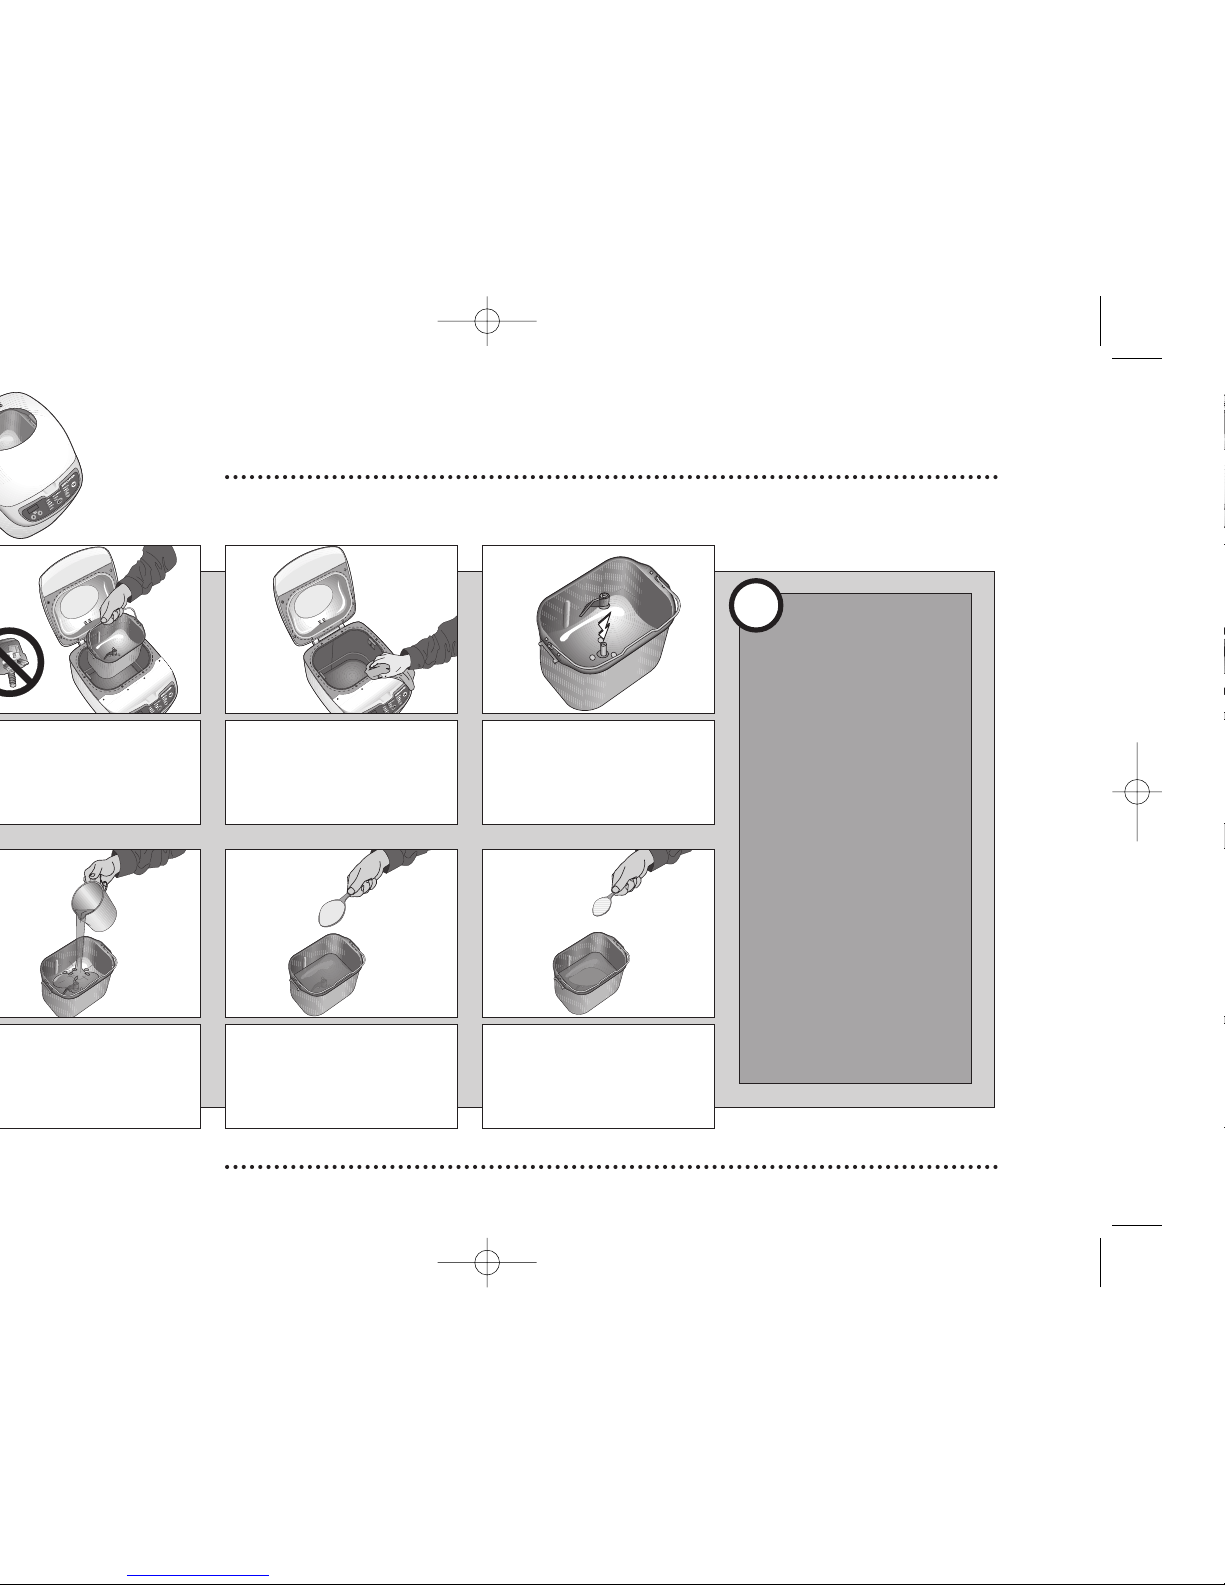
Preparing ingredients for a white loaf
Clean the surface of the
breadmaker with a damp cloth
and wipe dry. Wash the bread
pan thoroughly before use.
Make sure that the kneading
blade is securely positioned on
the drive shaft.
All ingredients should
be at room temperature
(21-27ºC). Always
measure ingredients
into the bread pan in
the order listed.
The clips holding the
bread pan in place
may be stiff for the first
few times that the
bread pan is removed.
i
Information
3
2
Put two level tablespoons (30g)
of butter or margarine into the
bread pan
(you can use the
spoon provided to measure both
teaspoons and tablespoons)
.
Put two level teaspoons of salt
into the bread pan.
5
Check quantities of ingredients carefully.
Page 5
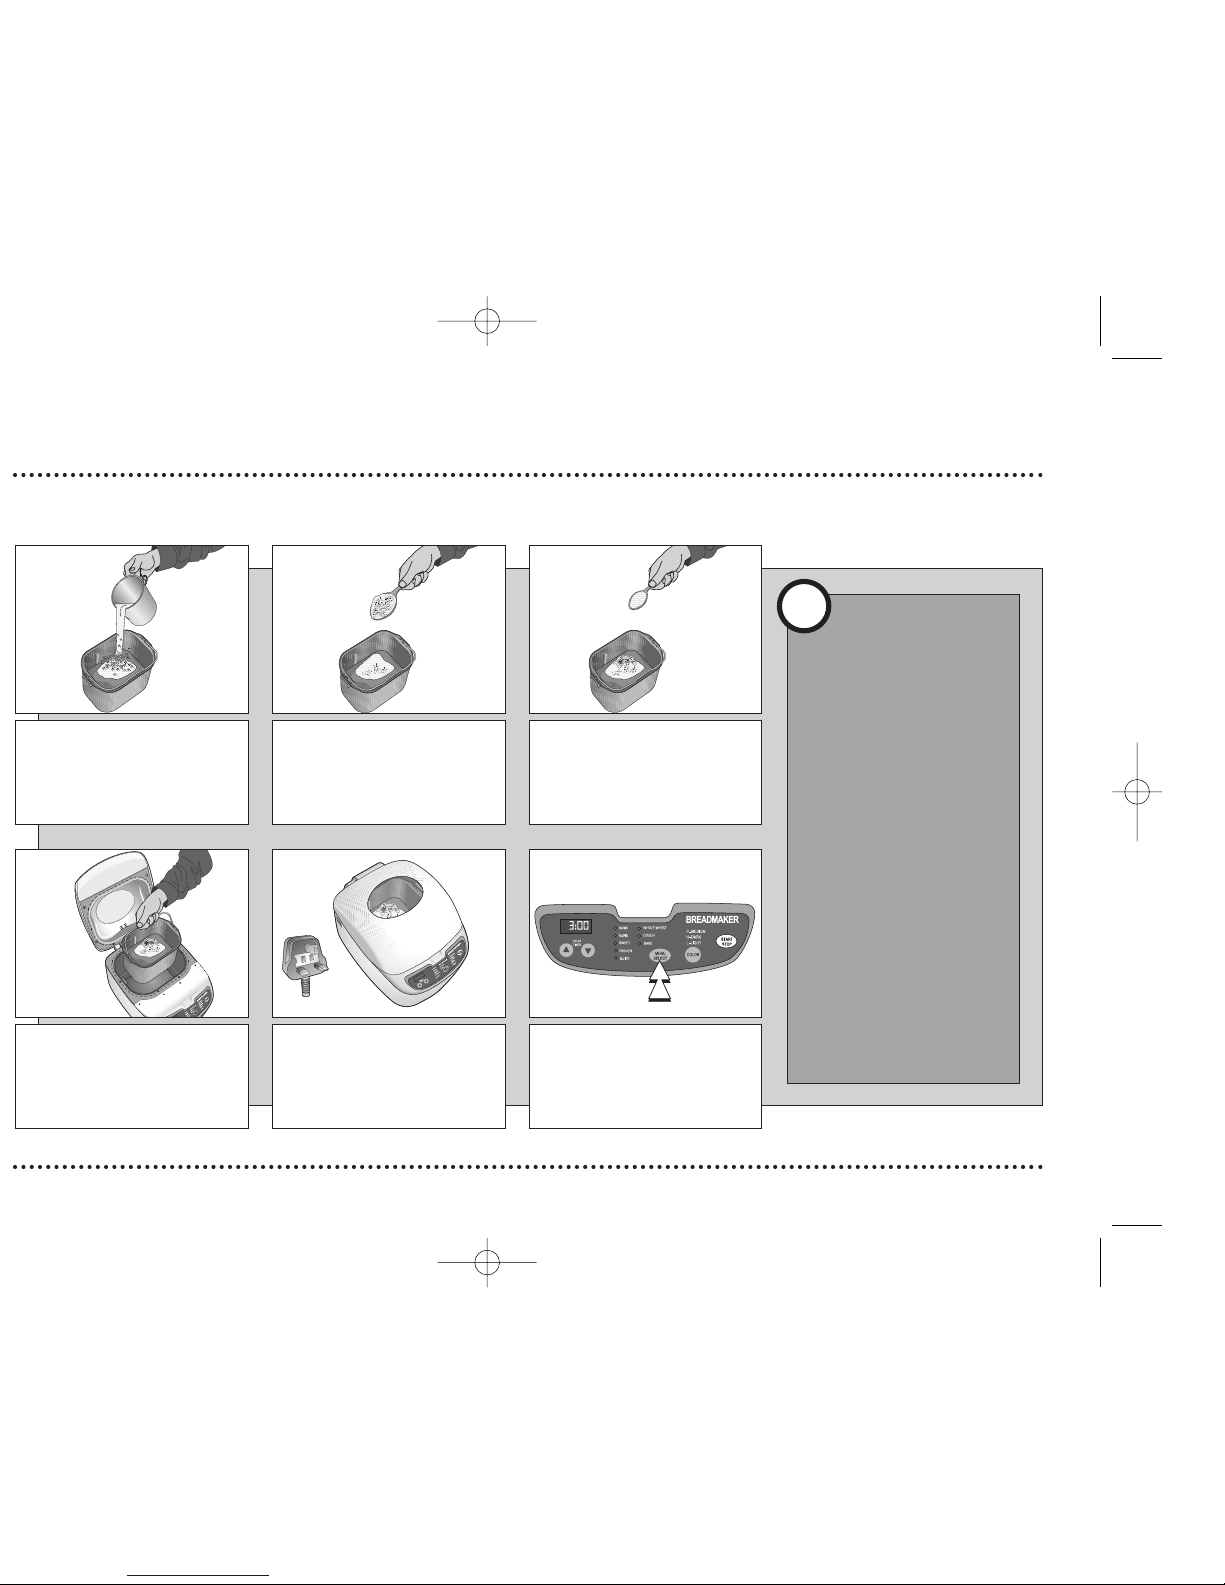
Make sure that the
bread pan is
positioned securely
back into the baking
chamber. Align the
bread pan with the
brackets and press
down without upsetting
the mixture to lock into
position.
i
Information
Press the MENU SELECT button
continuously on the control panel
to select the basic or rapid
setting.
Wipe down the outside of the
bread pan and place it securely
back into the baking chamber.
Press the pan down until it locks
into position.
Pour 600g of strong, bread
making flour into the bread pan.
87
Make a small hole in the mound of
flour and put four level teaspoons
of Easy Bake yeast into it.
At this point do not let the
yeast touch the water or salt!
9
Close the breadmaker lid and
plug into a mains outlet. The unit
will beep and the display should
read 1P for a couple of seconds
and then change to 3:00.
Put two level tablespoons (15g)
of milk powder into the bread
pan. Put two level teaspoons of
sugar into the bread pan.
10 11
12
Page 6
Using different baking settings
When using the timer
feature for more than a
couple of hours during
hot weather, slightly
increase the amount of
water that you use in
the mixture.Do not use
the timer if your recipe
includes fresh eggs,
milk or other
ingredients that may
spoil.
i
Information
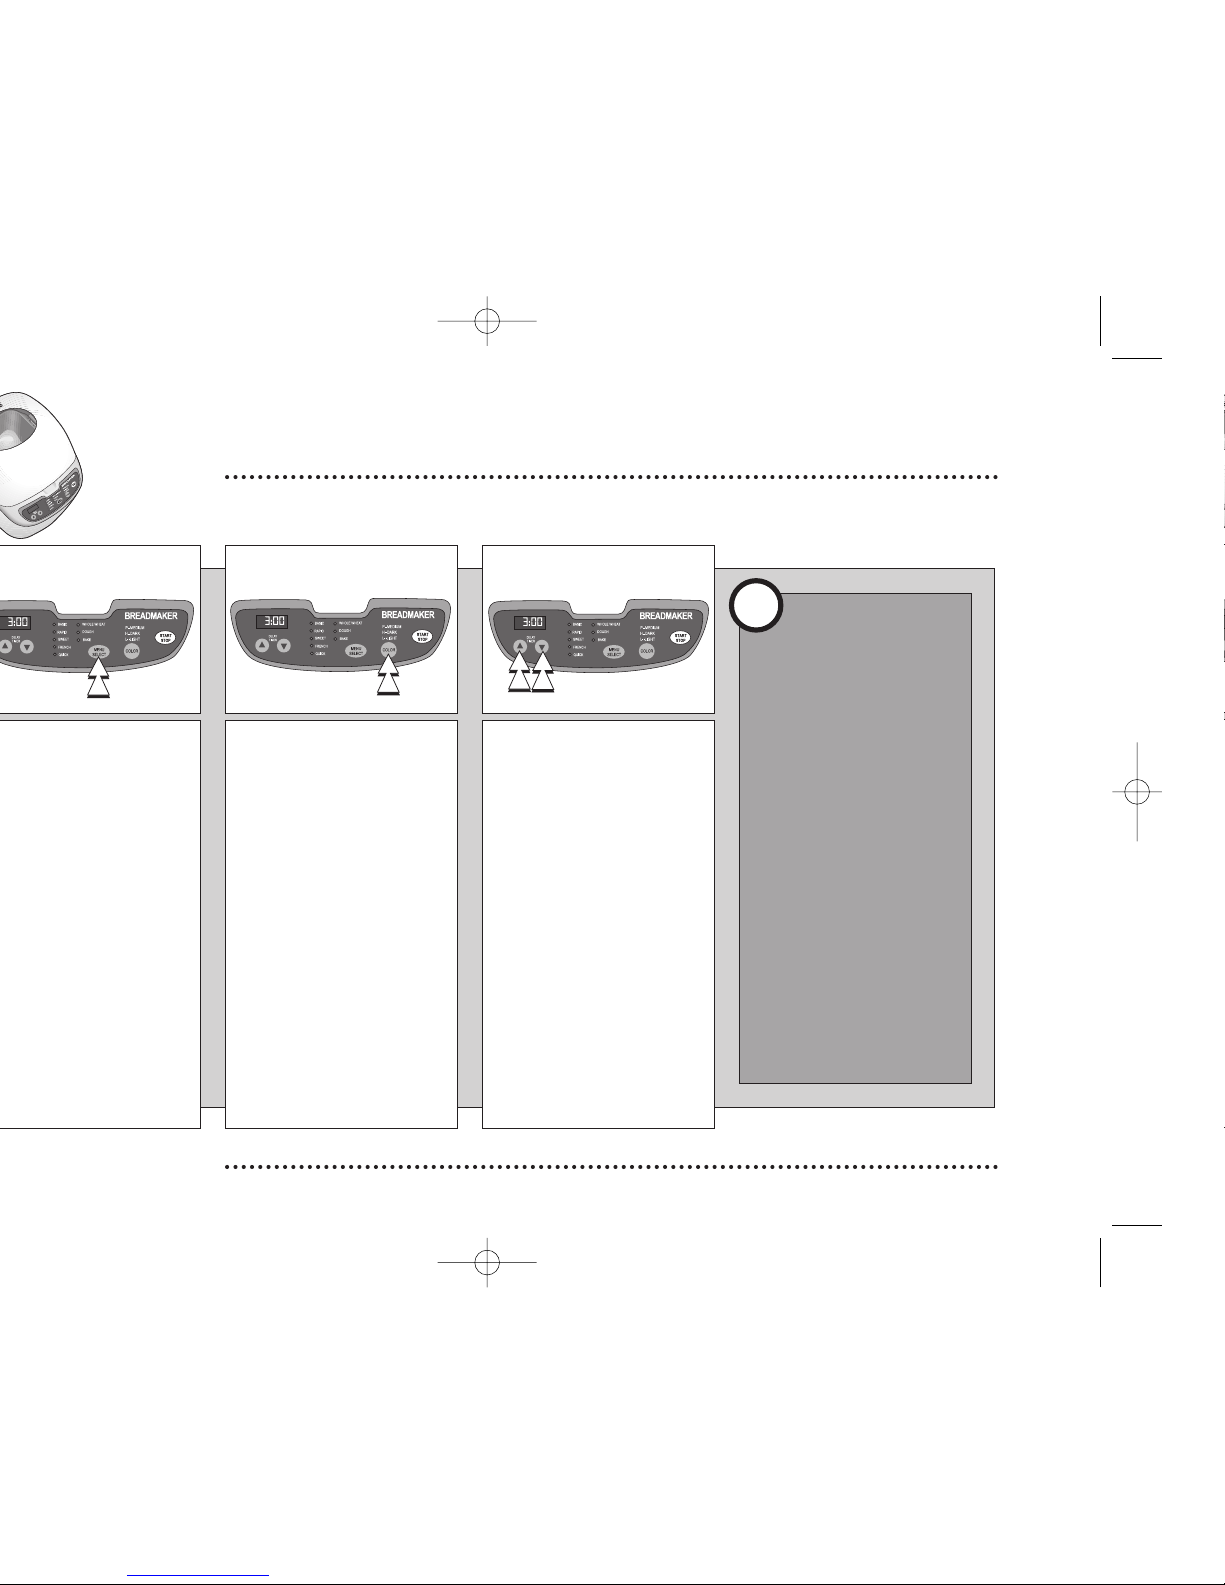
Press the color button to select
one of the following crust
colours:
P - medium crust
H - dark crust
L - Light crust
Your breadmaker will
automatically produce a medium
crust colour unless you choose a
different setting.
Press the start/stop button to
start baking immediately or
alternatively see stage 3 if you
wish to delay the baking time.
2
You can add ingredients into
your bread pan and set the
timer to delay baking by up to
13 hours. This function is useful
if you wish to have freshly
baked bread at a certain time.
Press the timer up or down
buttons to set the time delay.
e.g. If the time is 9.00 a.m. and
you set the timer for two hours it
will start to make bread at
11.00 a.m. On the basic setting
your bread will be ready at
2.00 p.m. The display will show
5:00 (3:00 Basic + 2:00 time
delay). Press the start/stop
button to start the program.
*
The white loaf recipe is
suitable for using timer delay.
3
Page 7
Removing the bread pan
Always use oven gloves when the breadmaker is hot.
The keep warm setting
will automatically
continue to keep bread
warm for up to an hour
after baking has
finished (except when
using the dough
setting). For best results
remove the bread as
soon as possible to
stop the crust from
getting soggy.
i
Information
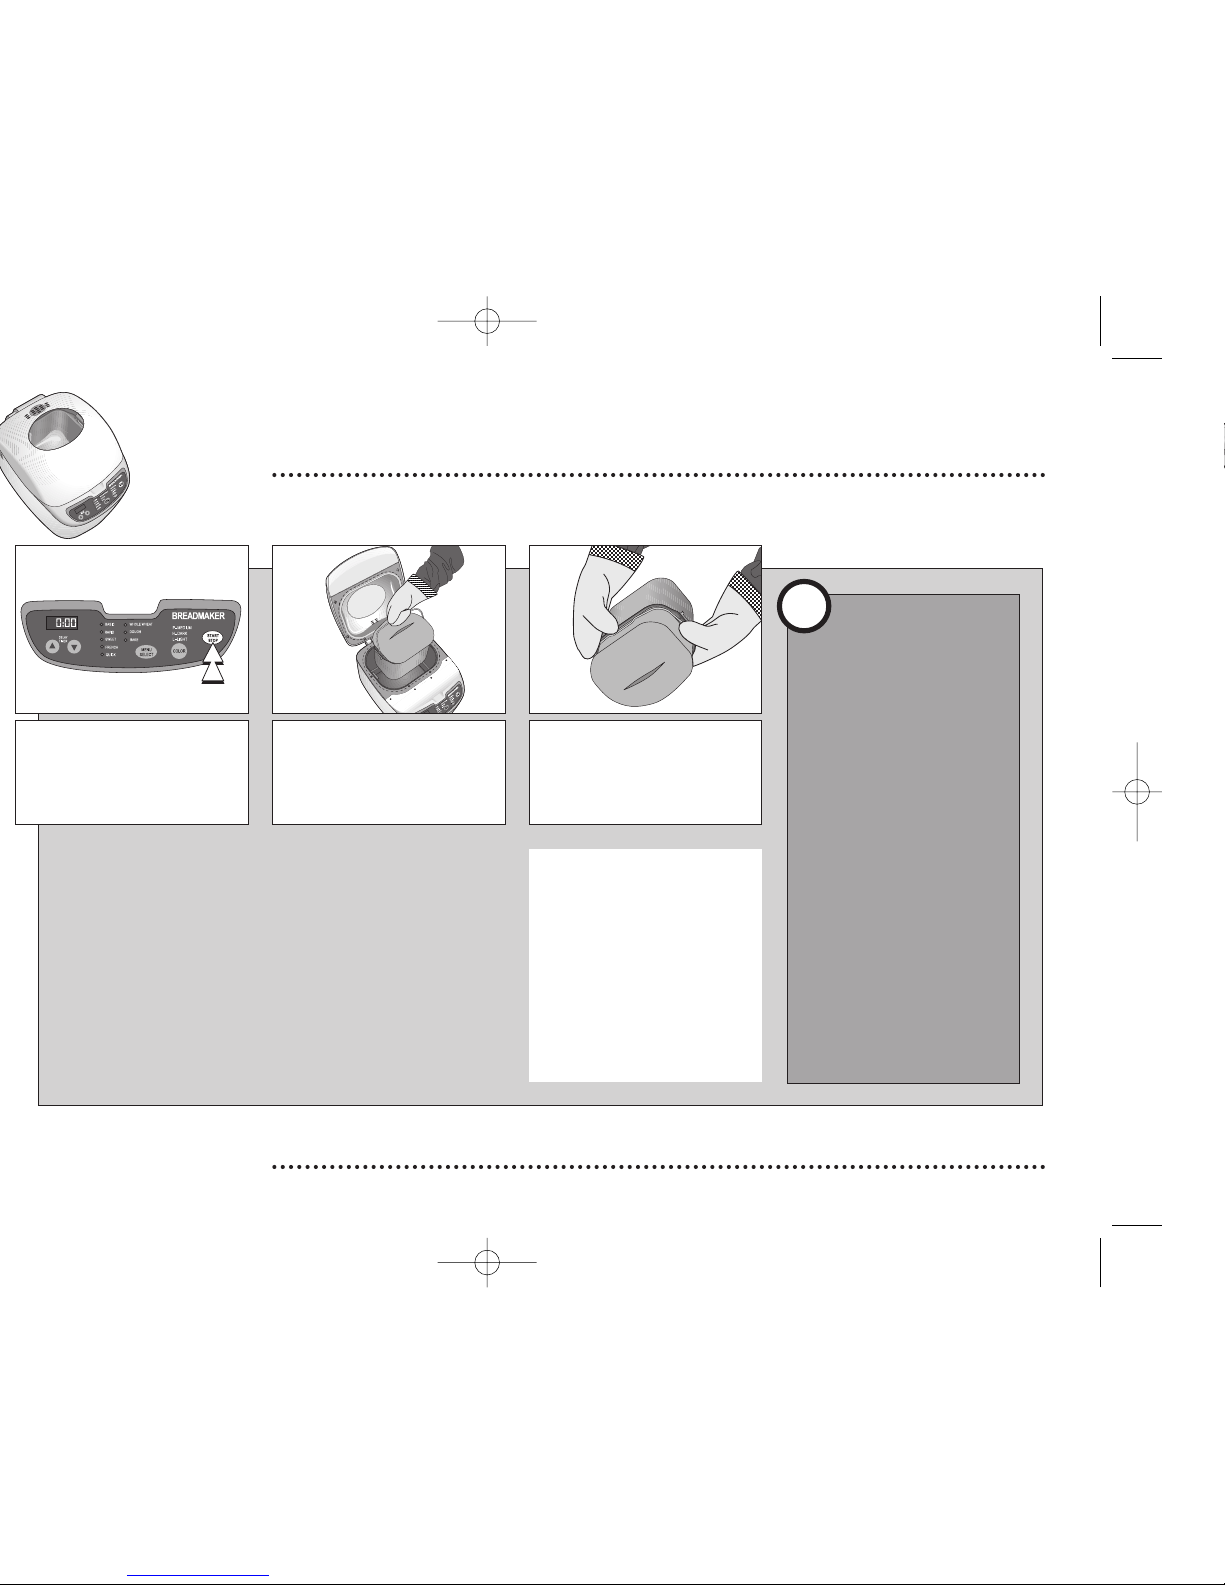
When baking is finished the unit
will signal and the display will
show 0:00. Press the start/stop
button down for 5 to 6 seconds
until the unit sounds.
Lift the lid of the breadmaker
using oven gloves and remove
the bread pan from the baking
chamber.
12
Remove the bread from the pan
as soon as possible after
baking. Hold the bread pan
upside down and shake it
gently.
3
NOTE:
If the breadmaker is
accidentally unplugged, or in
the event of power failure, the
breadmaker will automatically
resume power if the power
comes back on within 6
minutes of the interruption.
Page 8
Using other recipes
The recipes in this book have been created in collaboration
with Allinson.
BRIOCHE
bread flour
yeast*
1/2 teaspoon salt
2 tablespoon sugar
2 eggs (beaten)
2 tablespoon milk
ITALIAN POLENTA STICKS
1 1/8 cups water
1 teaspoon sugar
1 teaspoon salt
1 teaspoon honey
1/8 cup butter (softened)
5/16 cup polenta
3/8 cup pine nuts
3 cups Allinson soft grain strong
white flour
1 x 7g sachet Allinson Easybake
yeast*
Set the setting to Dough. When the
breadmaker has finished, remove
the dough, divide into two and
knead. Shape each piece into a
long loaf and place onto greased
baking sheets. Leave to rise until
double in size. Bake at
190/375/Gas mark 5 for 25
minutes. Dust lightly with more
softgrain flour.
WHEATY YOGHURT BREAD
3/4 cup water
1 tablespoon skimmed milk
powder
2 tablespoons honey
1 tablespoon sugar
1 tablespoon salt
1/2 cup natural yoghurt
1 tablespoon vegetable oil
3 cups Allinson country grain
strong brown flour
1/8 cup Allinson wheatgerm
1 teaspoon Allinson Easybake
yeast*
Set the setting to basic.
If you would like further
information on
breadmaking please
call the Allinson Baking
Club on:
(0870 240 2237) and
ask for a factsheet or
visit their website at
www.allinsonbaking.com
The recipes shown
opposite should only
be used as a guideline
and may need to be
adapted.
i
Information
*NOTE: We recommend you
use only Easybake yeast - a
combination of dried yeast
and the bread improver
Vitamin C (Ascorbic Acid).
Page 9
Tips for improved breadmaking
Tips to help you improve your breadmaking.
Ingredients: Use only fresh ingredients.
Timer: When using the timer for delayed baking
in warm weather conditions, you may need to
reduce the yeast by ¼ to ½ teaspoon and use
only half the amount of sugar called for in the
recipe to prevent over-rising.
Slicing: For best results always allow bread to
cool before slicing. To slice warm bread use a
sharp serrated-edge knife.
Storage: After cooling completely, store
immediately in a tightly sealed plastic bag, or
covered container. Do not store in the refrigerator
as this will cause the bread to dry out faster. For
longer storage, tightly seal bread in a moistureproof bag and store in the freezer.
Temperature: If you are making bread in a
cool room (under 18ºC) use warmer water
(38-43ºC).
Bread mixes: You can use bread mixes in
your breadmaker. Follow package instructions.
Do not exceed bread pan capacity.
Eggs: If you wish to add an egg to a recipe that
does not include eggs, crack the egg into a
measuring cup and fill with water to the level
specified in the recipe.
Cheese: Reduce the amount of water when
adding cheese to a recipe as the cheese melts
into liquid during baking.
Cooling: To re-use the breadmaker immediately
after baking, allow unit to cool down for 10 to
15 minutes with the lid open and the pan
removed.
Weather: In high humid weather, reduce the
amount of water that you use in the recipe by 1
to 2 tablespoons.
Flour: Flour should be stored in a cool dry place
and should stay fresh for up to two years. Always
use highgrade flour for breadmaking and never
use self raising flour.
*Yeast: Too little or too much yeast can result in
your bread rising too little or too much. See
information opposite...
i
Information
*We recommend you use
only Easybake Yeast.
Easybake yeast is a
combination of dried yeast
and the bread improver
Vitamin C (Ascorbic Acid).
Ascorbic Acid guarantees the
fast action of the yeast,
allowing a quick rise and
eliminating the need to 'knock
back' the dough (therefore
appropriate for use in
breadmakers). Easybake
Yeast can be added directly
to the dry ingredients (there is
no need for re-hydration) and
the dough will only require
one kneading and one period
of proving.
Page 10
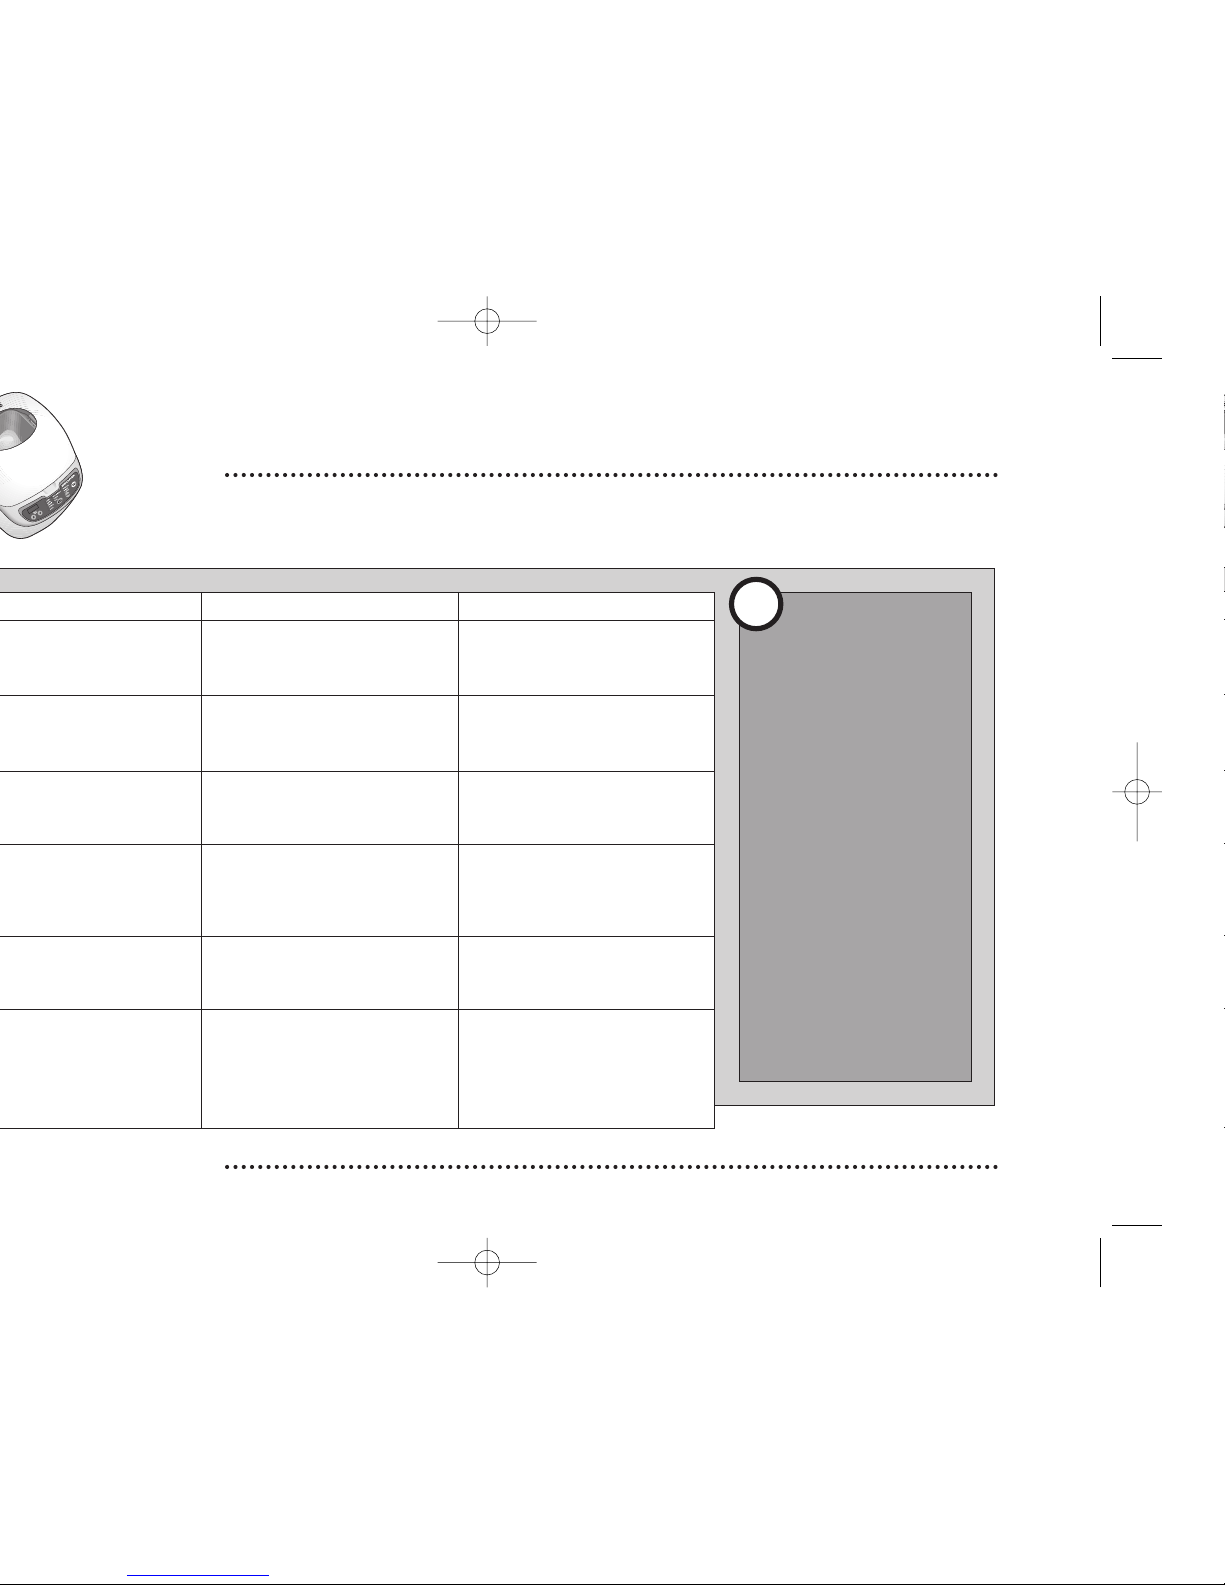
Troubleshooting
Fixing problems that may occur when making bread
Cause
The unit is unplugged?
Setting was not selected?
Too much yeast or moisture?
Too much flour or not enough yeast?
Unit is too hot.
Room temperature is too low.
The sensor is open.
Solution
Plug into an electrical socket.
Select the setting that you require
from the setting menu.
Check the recipe and make
adjustments according to humidity
(see tips page for further details).
Check the recipe and make
adjustments according to humidity
(see tips page for further details).
Press the Start/Stop button to
cancel. Open the lid, remove the
bread pan and allow unit to cool
with the lid open.
Press the Start/Stop button to
cancel. Place breadmaker in a
warm room and allow to warm up.
Unplug from the socket. It must be
repaired by a qualified repairer.
Never use scouring pads or
other abrasive materials or
chemicals to clean your
breadmaker as this could
cause damage.
Customer Service
The highest quality
requirements are placed on
our appliances. However,
should a malfunction occur
for which you cannot find
any information in the
operating instructions, please
contact your local Dixons or
Currys store.
Because we continually strive
to improve our products,
specifications may change
without prior notice.
i
Information
Page 11
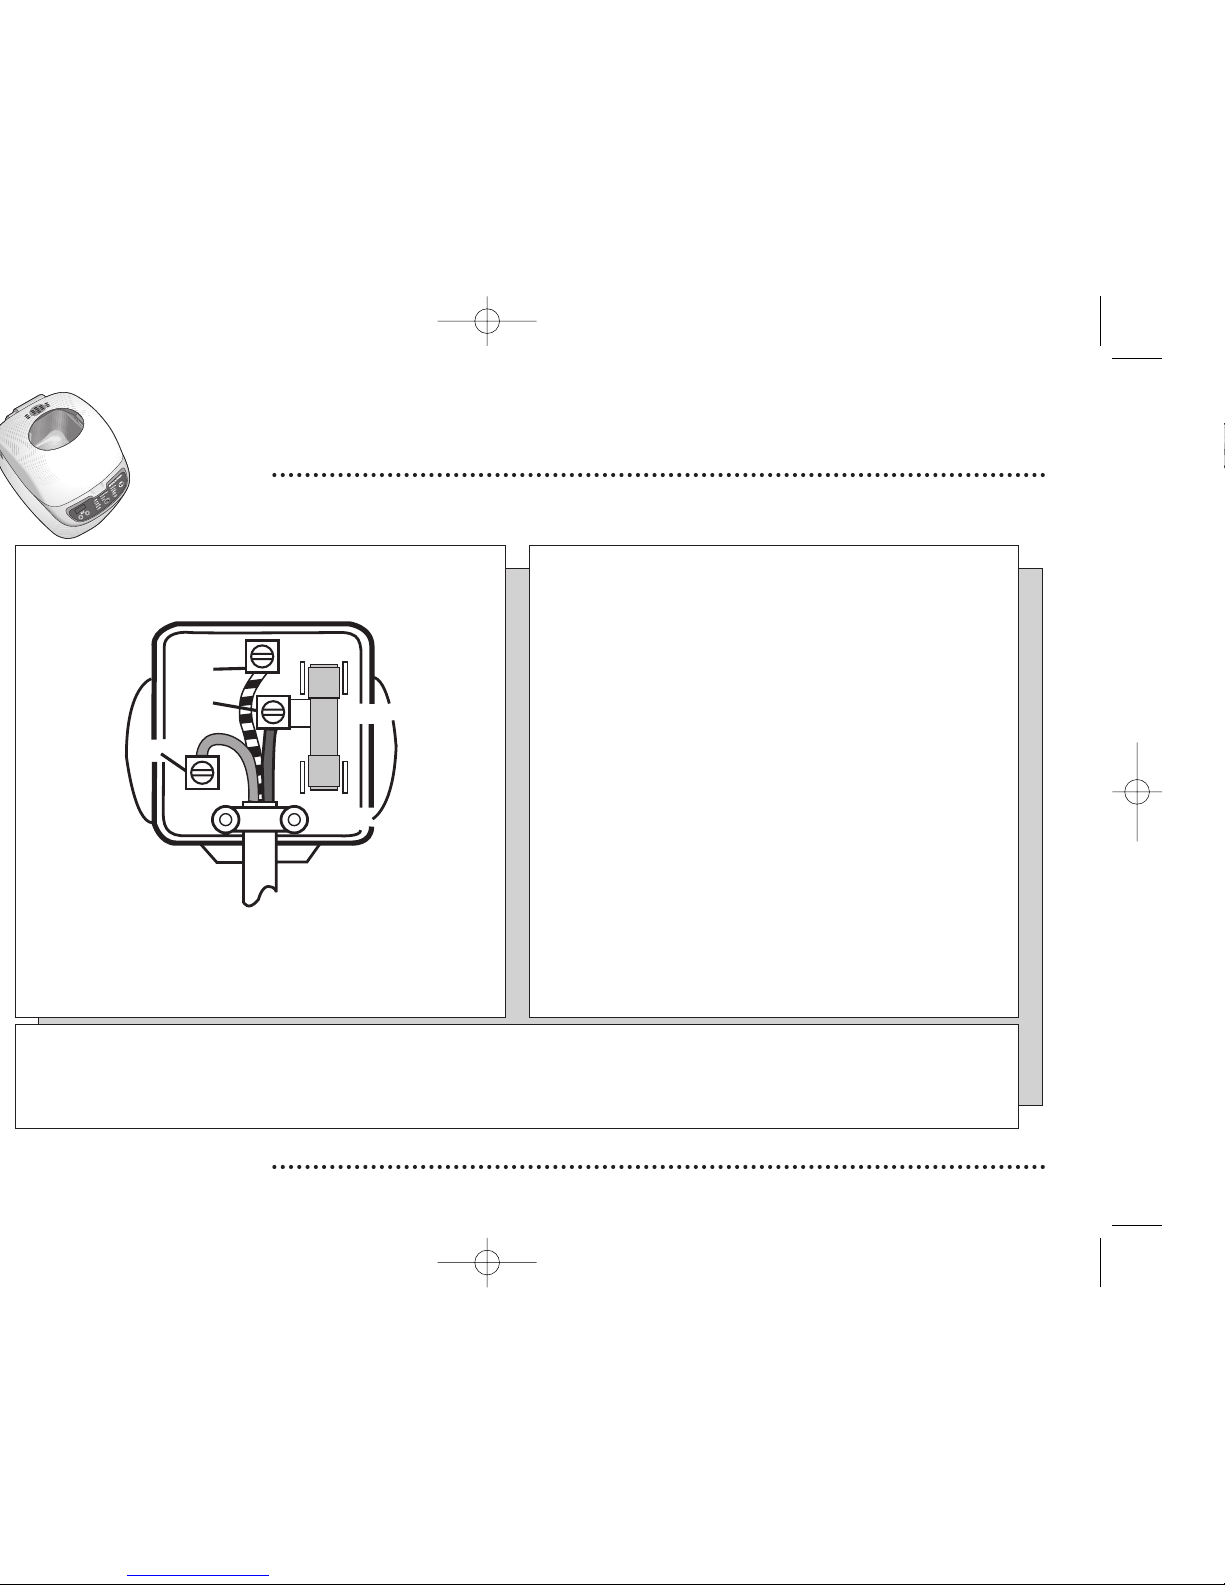
The wires in your breadmaker’s power cord are coloured as follows:
This appliance must be earthed.
If the power cable is damaged it must be repaired by a qualified
repairer.
Wiring instructions
Specifications: 230-240V ~ 50Hz 715-770W
Remove any stickers or
protective foil and unroll mains
lead. This is with a fourth line
added. This is with a fifth line of
text.
Brown
(Live)
Blue
(Neutral)
13 amp fuse
Cord grip
N
L
E
Green &
Yellow
(Earth)
The wire which is coloured Green and Yellow must be connected
to the terminal in the plug which is marked with the letter E or by the
Earth symbol, or coloured Green or Green and Yellow.
The wire which is coloured Blue must be connected to the terminal in
the plug which is marked with the letter N or coloured Black.
The wire which is coloured Brown must be connected to the terminal
in the plug which is marked with the letter L or coloured Red.
You must use a 13 amp plug
(BS 1363)
, and fit a 13 amp
fuse
(BS 1362)
.
WARNING. A mains plug severed from the mains lead of this
appliance must be destroyed. A mains plug with bared wires is
hazardous if engaged in a mains socket.
We continually strive to improve our products, specifications may change without notice.
No part of this publication may be produced, stored in a retrieval system or transmitted in any form or by any means, without the prior permission
in writing of Dixons Stores Group, nor be otherwise circulated in any form or binding or cover other than that in which is published and without a
similar condition including this condition being imposed on the subsequent purchaser.
Page 12

 Loading...