

Electrolux ARCTIS No-frost User Manual

ARCTIS
No-frost (frost free) Cooling and
Freezing Appliance
g Operating Instructions

Dear customer,
Pri
Before placing your new appliance into operation please read these
operating instructions carefully. They contain important information
for safe use, for installation and for care of the appliance.
Please keep these operating instructions for future reference. Pass them
on to possible new owners of the appliance.
These operating instructions are for use with several technically
comparable models with varying accessories. Please observe the notes
which apply to your model.
Notes which are important for your safety or for the proper
1
functioning of the appliance are stressed with a warning triangle and/
or with signal words (Warning!, Caution!, Attention!). Please observe
the following carefully.
0 1. This symbol and numbered instructions guide you step by step in the
operation of the appliance.
2. .....
Supplementary information regarding operation and practical applica-
3
tions of the appliance appear after this symbol.
Tips and notes concerning economical and environmentally sound use
2
of the appliance are marked with the cloverleaf.
Explanations of the technical terminology used in the operating
instructions can be found at the end in the section "Technical
Terminology".
The operating instructions contain instructions for the correction of
possible malfunctions by the user in the section "What to do if ...". If
these instructions should not be sufficient, our customer service
department is always available to you.
2
nted on paper manufactured with environmentally sound processes.
he who thinks ecologically acts accordingly ...

Contents
Safety Instructions . . . . . . . . . . . . . . . . . . . . . . . . . . . . . . . . . . . . . . . . . . . . 5
Disposal . . . . . . . . . . . . . . . . . . . . . . . . . . . . . . . . . . . . . . . . . . . . . . . . . . . . . . 7
Appliance Transport . . . . . . . . . . . . . . . . . . . . . . . . . . . . . . . . . . . . . . . . . . . 8
Remove transport safeguard . . . . . . . . . . . . . . . . . . . . . . . . . . . . . . . . . . . . 8
Installation . . . . . . . . . . . . . . . . . . . . . . . . . . . . . . . . . . . . . . . . . . . . . . . . . . . 9
Installation Location . . . . . . . . . . . . . . . . . . . . . . . . . . . . . . . . . . . . . . . . . . . . 9
The appliance needs ventilation . . . . . . . . . . . . . . . . . . . . . . . . . . . . . . . . . . . 10
Appliance Alignment . . . . . . . . . . . . . . . . . . . . . . . . . . . . . . . . . . . . . . . . . . . . 10
Electrical Connection . . . . . . . . . . . . . . . . . . . . . . . . . . . . . . . . . . . . . . . . . . . 11
Reversing the Door . . . . . . . . . . . . . . . . . . . . . . . . . . . . . . . . . . . . . . . . . . . . 13
Door Alignment . . . . . . . . . . . . . . . . . . . . . . . . . . . . . . . . . . . . . . . . . . . . . . . 15
The most important characteristic of your appliance . . . . . . . . . . . . . . 16
Appliance Description . . . . . . . . . . . . . . . . . . . . . . . . . . . . . . . . . . . . . . . . . . 17
View of Appliance . . . . . . . . . . . . . . . . . . . . . . . . . . . . . . . . . . . . . . . . . . . . . . 17
Freezer tray . . . . . . . . . . . . . . . . . . . . . . . . . . . . . . . . . . . . . . . . . . . . . . . . . . . . 18
Quick door-opener . . . . . . . . . . . . . . . . . . . . . . . . . . . . . . . . . . . . . . . . . . . . . 18
Interior Illumination . . . . . . . . . . . . . . . . . . . . . . . . . . . . . . . . . . . . . . . . . . . . 18
Control Panel . . . . . . . . . . . . . . . . . . . . . . . . . . . . . . . . . . . . . . . . . . . . . . . . . . 19
ON/OFF button . . . . . . . . . . . . . . . . . . . . . . . . . . . . . . . . . . . . . . . . . . . . . . 19
Buttons for Adjusting the Temperature . . . . . . . . . . . . . . . . . . . . . . . . . . 20
Temperature Display . . . . . . . . . . . . . . . . . . . . . . . . . . . . . . . . . . . . . . . . . 20
FROSTMATIC button . . . . . . . . . . . . . . . . . . . . . . . . . . . . . . . . . . . . . . . . . . 21
WARNING OFF button . . . . . . . . . . . . . . . . . . . . . . . . . . . . . . . . . . . . . . . . 21
Prior to initial start-up . . . . . . . . . . . . . . . . . . . . . . . . . . . . . . . . . . . . . . . . . 21
Initial Start-Up . . . . . . . . . . . . . . . . . . . . . . . . . . . . . . . . . . . . . . . . . . . . . . . . 22
Select "Freezing" or "Cooling" . . . . . . . . . . . . . . . . . . . . . . . . . . . . . . . . . . 22
Temperature Adjustment . . . . . . . . . . . . . . . . . . . . . . . . . . . . . . . . . . . . . . . 23
Switch on COOLMATIC . . . . . . . . . . . . . . . . . . . . . . . . . . . . . . . . . . . . . . . . . 24
Switch on FROSTMATIC . . . . . . . . . . . . . . . . . . . . . . . . . . . . . . . . . . . . . . . . 24
Switching the Appliance Off . . . . . . . . . . . . . . . . . . . . . . . . . . . . . . . . . . . . 25
3

Contents
Control and Information Systems . . . . . . . . . . . . . . . . . . . . . . . . . . . . . . . . 26
Temperature and Thawing/Defrosting Warning . . . . . . . . . . . . . . . . . . . . . . 26
"Open Door"-Warning . . . . . . . . . . . . . . . . . . . . . . . . . . . . . . . . . . . . . . . . . . . 27
Function Errors . . . . . . . . . . . . . . . . . . . . . . . . . . . . . . . . . . . . . . . . . . . . . . . . . 27
Freezing . . . . . . . . . . . . . . . . . . . . . . . . . . . . . . . . . . . . . . . . . . . . . . . . . . . . . . 28
Frozen Storage . . . . . . . . . . . . . . . . . . . . . . . . . . . . . . . . . . . . . . . . . . . . . . . . 29
Preparation of Ice Cubes . . . . . . . . . . . . . . . . . . . . . . . . . . . . . . . . . . . . . . . 29
Storage Goods Symbols/Freezing Calendar . . . . . . . . . . . . . . . . . . . . . . . . 30
Cooling . . . . . . . . . . . . . . . . . . . . . . . . . . . . . . . . . . . . . . . . . . . . . . . . . . . . . . . 30
"Long Fresh" Cooling . . . . . . . . . . . . . . . . . . . . . . . . . . . . . . . . . . . . . . . . . . . . 30
"Standard" Cooling . . . . . . . . . . . . . . . . . . . . . . . . . . . . . . . . . . . . . . . . . . . . . 31
Cooling drinks . . . . . . . . . . . . . . . . . . . . . . . . . . . . . . . . . . . . . . . . . . . . . . . . . 31
Cleaning and Maintenance . . . . . . . . . . . . . . . . . . . . . . . . . . . . . . . . . . . . . 32
Energy Saving Tips . . . . . . . . . . . . . . . . . . . . . . . . . . . . . . . . . . . . . . . . . . . . . 33
What to do if ... . . . . . . . . . . . . . . . . . . . . . . . . . . . . . . . . . . . . . . . . . . . . . . . 34
Correcting Malfunctions . . . . . . . . . . . . . . . . . . . . . . . . . . . . . . . . . . . . . . . . . 34
Replacing the light bulb . . . . . . . . . . . . . . . . . . . . . . . . . . . . . . . . . . . . . . . . . 37
Noises during Operation . . . . . . . . . . . . . . . . . . . . . . . . . . . . . . . . . . . . . . . . 37
Regulations, Standards, Guidelines . . . . . . . . . . . . . . . . . . . . . . . . . . . . . . 38
Special Accessory . . . . . . . . . . . . . . . . . . . . . . . . . . . . . . . . . . . . . . . . . . . . . . 38
Technical Terminology . . . . . . . . . . . . . . . . . . . . . . . . . . . . . . . . . . . . . . . . . 38
Customer Service . . . . . . . . . . . . . . . . . . . . . . . . . . . . . . . . . . . . . . . . . . . . . . 39
4

1 Safety Instructions
The safety of our appliances is in accordance with recognised technological standards and appliance safety legislation. We nevertheless feel
that it is important to acquaint you with the following safety guidelines:
Use for Intended Purpose
• The appliance is intended for use at home. Depending on the preset
operation mode, this appliance becomes suitable for freezing, for frozen storage of foods, for ice preparation or for cooling of foods. The
manufacturer assumes no liability for damages occurring through
improper operation or use of the appliance for unintended purposes.
• Alterations or changes to the appliance are not permitted for reasons
of safety.
• Do not use this appliance in a commercial environment or for purposes other than freezing, or frozen storage of foods or for cooling of
foods.
Prior to initial start-up
• Check the appliance for transport damage. Do not under any
circumstances connect a damaged appliance! Please contact your
supplier in the event of damage.
Refrigerant
The refrigerant isobutane (R600a) is contained within the refrigerant
circuit of the appliance, a natural gas with a high level of
environmental compatibility, which is nevertheless flammable.
• Warning - During transportation and installation of the appliance,
be certain that none of the components of the refrigerant circuit
become damaged.
• If the refrigerant circuit should become damaged:
– avoid open flames and sources of ignition;
– thoroughly ventilate the room in which the appliance is situated.
Safety for Children
• Packaging materials (e.g. films, styrofoam) can be dangerous for
children. Danger of suffocation! Keep packaging materials away from
children!
• Before disposing of old appliances make them inoperable. Remove
plug from mains, sever the power cable, remove or destroy any snap
or latch closures. This eliminates the danger that playing children lock
5

Safety Instructions
themselves into the appliance (danger of suffocation!) or place
themselves into other life-endangering situations.
• Children often do not recognise the dangers involved with household
appliances. Please provide for the necessary supervision and do not
allow children to play with the appliance!
Daily Operation
• Containers with flammable gases or fluids can develop leaks through
contact with the cold. Danger of explosion! Do not store containers
with flammable substances, such as aerosol cans, refill cartridges for
cigarette lighters etc. in the appliance.
• Bottles and cans may not be placed in the freezer compartment. They
can burst when the contents freeze - or even explode if the contents
contain carbonic acid! Never place sodas, juices, beer, wine,
champagne etc. into the freezer compartment. Exception: Spirits with
high alcohol content may be stored in the freezer compartment.
• Do not place ice cream or ice cubes directly from the freezer
compartment into the mouth. Very cold ice can freeze to the lips or
tongue and cause injury.
• Never touch frozen goods with wet hands. Hands can freeze to the
goods.
• Warning - Do not operate any electrical appliances in the appliance
(e.g. electric ice cream makers, mixers etc.).
• Warning - Do not cover or obstruct the ventilation openings as this
will impair the operation of the appliance.
• Warning - Do not use any mechanical devices or other artificial
means to speed up defrosting unless they are recommended by the
manufacturer.
• Before cleaning the appliance switch off and remove the plug from
the mains, or switch off or turn out the circuit breaker or fuse.
• Placing frozen goods on the top of the appliance can lead to the
accumulation of condensation on the top panel through contact with
the cold. Electronic components are housed within this top panel. If
water should drip onto these components, the appliance could be
damaged by a short circuit. For this reason do not place frozen goods
on top of the appliance.
• When unplugging always pull the plug from the mains socket, do not
pull on the cable.
6

In case of malfunction
• If a malfunction should occur at the appliance, refer first to the
section "What to do if ..." in these operating instruction. If the
instructions in this section are not sufficient, do not undertake any
further work on your own.
• Refrigerators or feezers may only be repaired by trained personnel.
Repairs carried out by untrained personnel can lead to substantial
danger. Please contact your dealer or our customer service
department for repairs.
Disposal
Appliance Packaging Information
Dispose of the packaging material of your appliance correctly. All the
packaging materials used are harmless to the environment and can be
recycled.
About the materials: The plastics can be recycled and are identified as
follows:
>PE< for polyethylene, e.g. the outer covering and the bags in the
interior.
>PS< for polystyrene foam, e.g. the pads, which are all free of
chlorofluorocarbon.
The carton parts are made from recycled paper and should be disposed
of at a waste-paper recycling collection location.
Disposal of old Appliances
For environmental reasons, refrigeration appliances must be disposed
of properly. This applies to your old appliance, and - at the end of its
service life - for your new appliance as well.
Warning! Before disposing of old appliances make them inoperable.
1
Remove plug from mains, sever the power cable, remove or destroy any
snap or latch closures. This eliminates the danger that playing children
lock themselves into the appliance (danger of suffocation!) or place
themselves into other life-endangering situations.
Disposal:
• The appliance may not be disposed of with domestic waste or bulky
refuse.
• The refrigerant circuit, especially the condenser at the back of the
appliance, must not be damaged.
• Information concerning collection schedules or locations can be
obtained from the local disposal authorities or town hall.
7
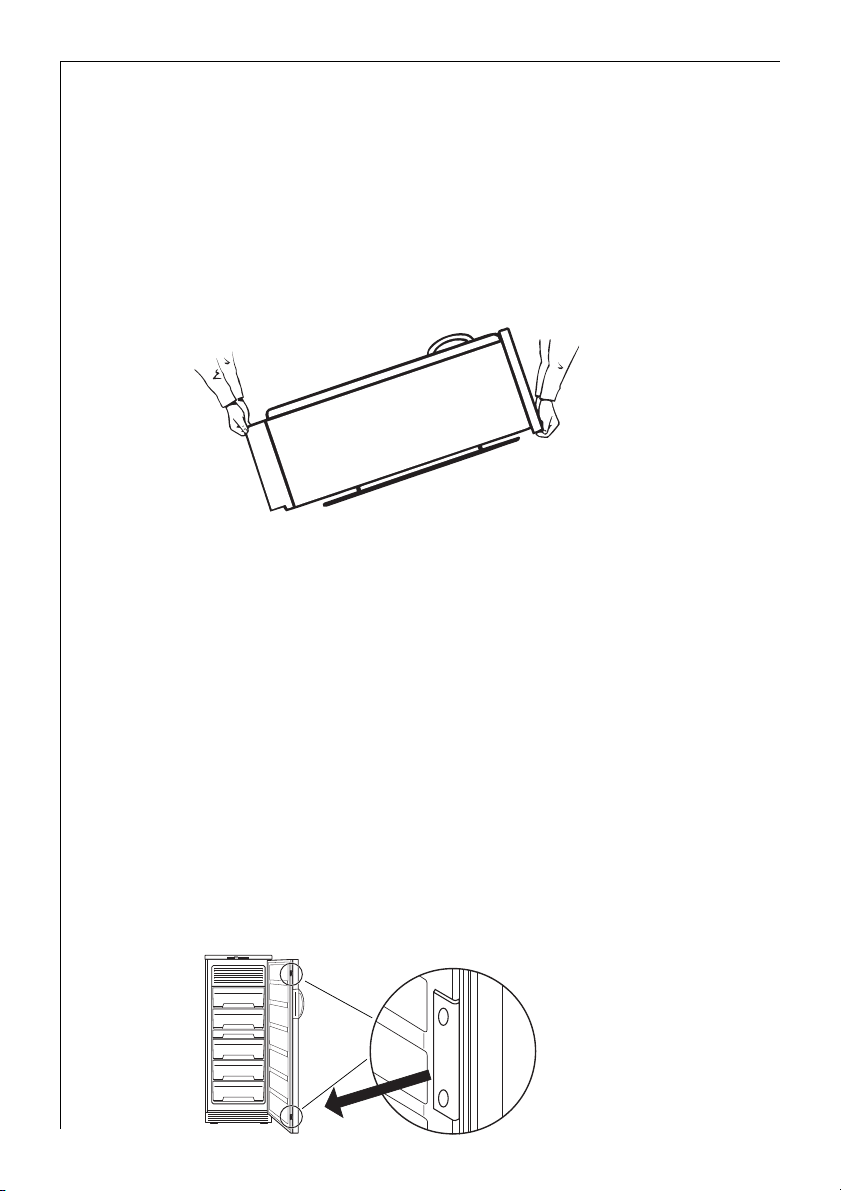
Appliance Transport
Two people are required to transport the appliance. There are two
recessed handles at the front of the base and at the back of the
appliance at the top for improved gripping.
0 1. Pull the plinth cover forwards to remove (see „Reversing the door“, Item
1).
2. Grip the appliance with the recessed handles positioned as in the drawing, and transport the appliance.
3. In order to push the appliance into its final position, press carefully at
the top of the door and tip the appliance back slightly. The weight is
thus transferred to the back casters and the appliance can be easily
pushed.
Remove transport safeguard
The appliance as well as interior accessory parts are protected for
transport.
0 1. Remove tape from left and right of the outside of the door.
Tape remnants can be removed with white spirit. Wipe off white spirit.
3
2. Remove all tape and pads from the interior of the appliance.
3. Peal off the protective film from the control panel, if existing.
4. Remove door seal safeguards from door seal on the inside of the door.
8

Installation
Installation Location
The appliance should be installed in a well ventilated, dry room.
Energy use and efficient performance of the appliance is affected by
the ambient temperature.
The appliance should therefore
– not be exposed to direct sunlight;
– not be installed next to radiators, cookers or other sources of heat;
– only be installed at a location whose ambient temperature
corresponds to the climate classification, for which the appliance is
designed.
The climate classification can be found on the rating plate, which is
located at the left on the inside of the appliance.
The subsequent table shows which ambient temperature is assigned to
which climate class if the operation mode "Freezing" is selected:
Climate classification for an ambient temperature of
SN +10 to +32 °C
N +16 to +32 °C
ST +18 to +38 °C
T +18 to +43 °C
Attention! If the operation mode "Cooling" is selected, the ambient
temperature at the installation place must be at least 2 °C higher than
the preset DESIRED temperature.
9
Installation
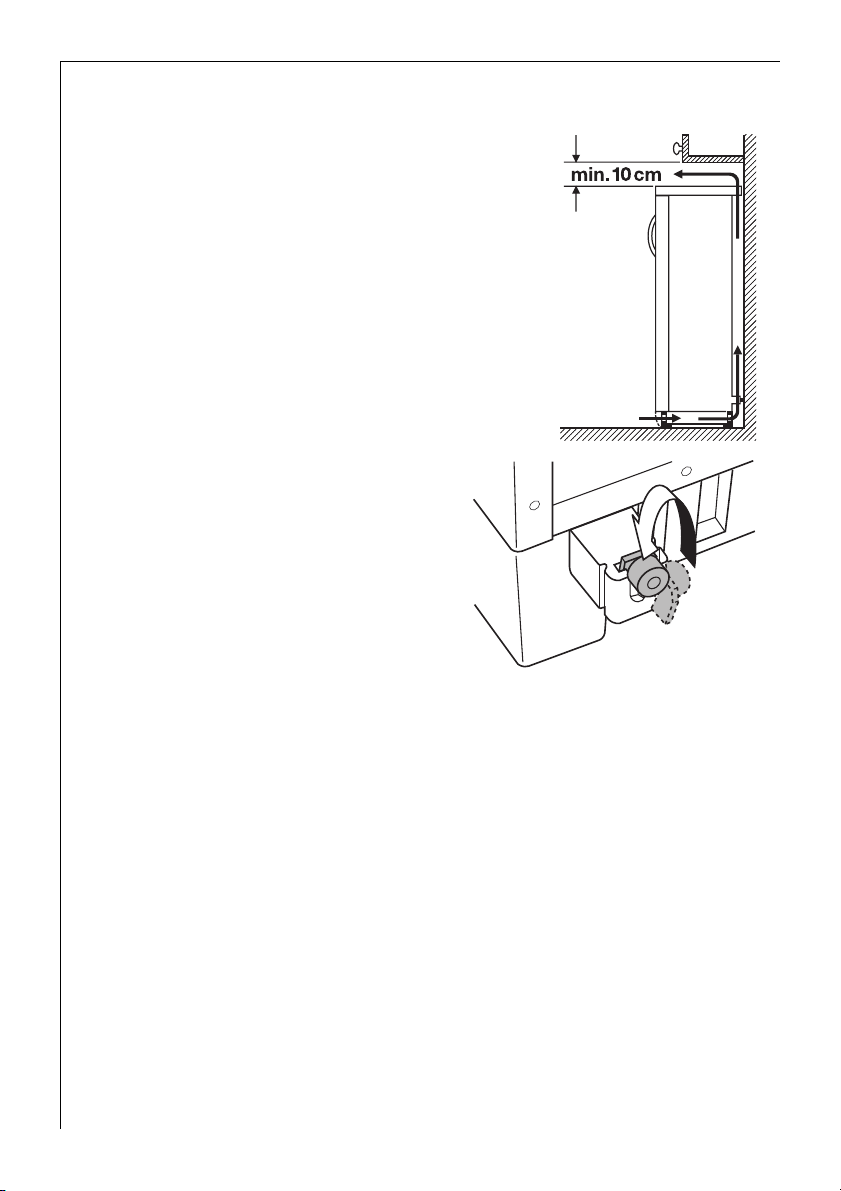
The appliance needs ventilation
Air is fed under the door through the
vent slots in the base and is vented
upwards along the back wall. To
ensure proper air circulation never
cover or alter the vent openings.
Attention! If the appliance is
installed under, for example, a
hanging cabinet, a clearance of at
least 10 cm between the top of the
appliance and the cabinet above it
must be maintained.
0 1. Break both wall spacing elements
from the plinth and insert them into
the sockets at the back side of the
appliance, according to the figure,
so that the required wall gap for the
necessary ventilation at the back of
the appliance is provided for.
Appliance Alignment
0 1. The appliance must have a solid, level footing. Please compensate for
unevenness in the floor by turning the two adjustable feet at the front
in or out.
10

Installation
Electrical Connection
A properly installed socket outlet with earthing contact is required for
electrical connection. Electrical fuse protection must be of at least 10
ampere.
If the outlet socket is no longer accessible after installation of the
appliance, appropriate measures must be taken during electrical
installation to assure that the appliance can be disconnected from the
mains (e.g. fuse, circuit breaker, non-operate current safety-switch or
the like, with a contact opening of at least 3 mm).
0 1. Before initial start-up, refer to the appliance rating plate to ascertain if
supply voltage and current values correspond with those of the mains
at the installation location.
e.g.: AC 220 ... 240 V 50 Hz or
220 ... 240 V~ 50 Hz
(i.e. 220 to 240 volts alternating current, 50 Hertz)
The rating plate is inside the appliance at the left.
Warning: To avoid potential danger, if the mains connection lead of
this appliance is damaged, it must be replaced by our customer service
representative or a person with similar qualifications.
Warning: Under no circumstances should the appliance be connected
to electronic “power saving plugs” or to a.c.-d.c. converters which convert direct current to 230 V alternating current (e.g., solar installations,
ship networks)
11
Installation
G
Electrical Connection (valid for United Kingdom only)
Any electrical work required to install this appliance should be carried
out by a qualified electrician or competent person.
WARNING – THIS APPLIANCE MUST BE EARTHED
1
The manufacturer declines any liability should these safety measures
not be observed.
Before switching on, make sure the electricity supply voltage is the
same as that indicated on the appliance rating plate. The rating plate is
inside, on the left.
The appliance is supplied with a 13 amp plug fitted. In the event of
having to change the fuse in the plug supplied, a 13 amp ASTA approved (BS 1362) fuse must be used.
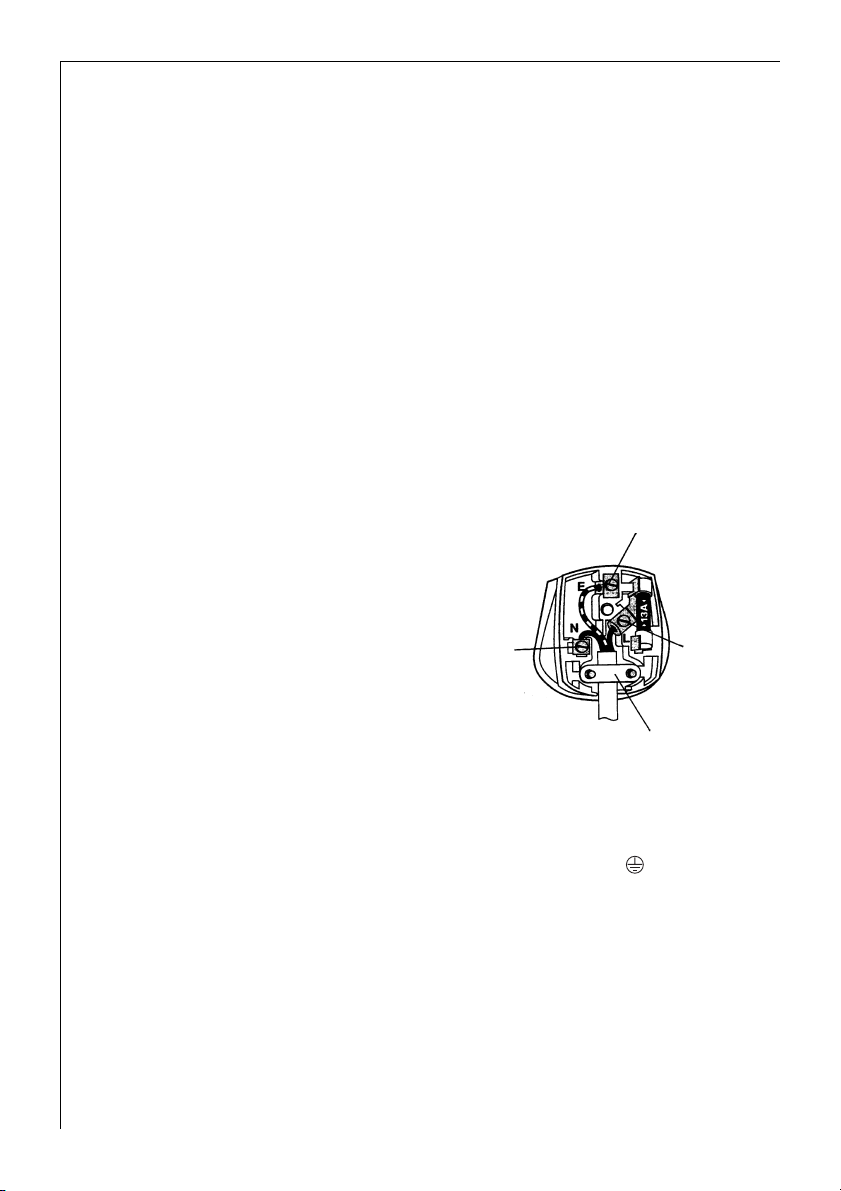
Important
The wires in the mains lead are coloured in accordance with the following code:
reen
& Yellow
Green and Yellow Earth
Blue Neutral
Brown Live
12
Blue
Cord Clamp
As the colours of the wires in the
mains lead of this appliance may not correspond with the coloured
markings indentifying the terminals in your plug, proceed as follows:
1. The wire coloured green and yellow must be connected to the termi-
nal marked with the letter „E“ or by the earth symbol or coloured
green and yellow.
2. The wire coloured blue must be connected to the terminal „N“ or
coloured black.
3. The wire coloured brown must be connected to the terminal marked
„L“ or coloured red.
4. Upon completion there must be no cut, or stray strands of wire pre-
sent and the cord clamp must be secure over the outer sheath.
Warning! A cut-off plug inserted into a 13 amp socket is a serious
1
safety (shock) hazard. Ensure that the cut-off plug is disposed of safely.
Brown
 Loading...