

Electrolux Air-O-Speed 593800300, Air-O-Speed, Air-O-Speed Series Service Manual

Electrolux Professional S.p.A.
Ovens Platform Customer Support
Technical Training & Service
AOSpeed OVENS
Service Manual
(593800300 - ENG)
File: AOSpeed service manual (ENG).001 ©Copyright 2002 by Electrolux Professional P.1/20
Air-O-Speed OVEN
- Service Manual -
CONTENTS:
This document contains the information about parameters that can be
read and/or modified by means of user interface, service utilities, ...
PROJECT REF:
AOS ovens
AUTHORS:
F.Ornella
CONTRIBUTION BY:
DOCUMENT HISTORY:
Rel. Date: File: Author: Note:

Electrolux Professional S.p.A.
Ovens Platform Customer Support
Technical Training & Service
AOSpeed OVENS
Service Manual
(593800300 - ENG)
File: AOSpeed service manual (ENG).001 ©Copyright 2002 by Electrolux Professional P.2/20
INDEX
1. PROGRAMMING THE DEFAULT PARAMETERS................................................................................3
2. ADVANCED PROGRAMMING.........................................................................................................4
3. LAMBDA PROBE CALIBRATION ....................................................................................................6
4. OFFSET CALIBRATION OF CAVITY PROBE.....................................................................................7
5. ALARM CODES ...........................................................................................................................7
5.1. ERRORS ..................................................................................................................................7
5.2. WARNINGS...............................................................................................................................8
6. IDENTITY CARD (FIRMWARE VERSION).........................................................................................9
7. OVEN STATUS ............................................................................................................................9
8. SERVICE UTILITIES....................................................................................................................10
8.1. UTILITIES THAT CAN BE ACTIVATED WITH THE OVEN SWITCHED ON...........................................10
8.2. UTILITIES THAT CAN BE ACTIVATED IN PARAMETER PROGRAMMING..........................................11
11. SELECTION OF THE LANGUAGE FOR THE RECIPE MENU (LEV. A) ....................................................11
12. CLEANING CYCLE.........................................................................................................................12
9. CYCLES, UTILITIES, IMPORTANT PARAMETERS...........................................................................12
10. CHANGE OF THE MICROPROCESSOR BOARD..............................................................................13
APPENDIX A – WATER BOILING POINT.......................................................................................14
APPENDIX B – CONTACTORS DIAGRAM ....................................................................................15
APPENDIX C – CONNECTIONS ON MAIN BOARD.......................................................................16
APPENDIX D – LAMBDA PROBE ..................................................................................................19
APPENDIX E – WATER TREATMENT............................................................................................20

Electrolux Professional S.p.A.
Ovens Platform Customer Support
Technical Training & Service
AOSpeed OVENS
Service Manual
(593800300 - ENG)
File: AOSpeed service manual (ENG).001 ©Copyright 2002 by Electrolux Professional P.3/20
1. Programming the default parameters
Fig.1
Switch on the oven. (Fig.1)
Just after the switching on, the start-up page will appear.
At this point, press the external service buttons (fig.2) till you hear two beeps.
At this point press the right buttons till you hear other two beeps (fig. 3).
Press then the left service buttons and wait for other two beeps (fig. 4).
At this point release the left buttons keeping pressed the middle one (fig. 5) till you hear 2 beeps.
Release the middle button and wait until the standard page for selecting cycles in “Manual mode” appear
and the cavity lights are on.
Fig. 2
Fig. 3 Fig. 4 Fig. 5
1 2
1 2
1 2
1 2

Electrolux Professional S.p.A.
Ovens Platform Customer Support
Technical Training & Service
AOSpeed OVENS
Service Manual
(593800300 - ENG)
File: AOSpeed service manual (ENG).001 ©Copyright 2002 by Electrolux Professional P.4/20
2. Advanced programming
The procedure to enter in advanced programming is similar to the procedure for programming the defaults
parameters.
Switch on the oven. (fig. 7).
Just after the switching on, the start-up page will appear.
At this point, press the external service buttons (fig.8) till you hear two beeps.
Now press the right buttons till you hear other two beeps (fig. 9).
Press then the left service buttons and wait for other two beeps (fig. 10).
Release the buttons and on the display you will see the following (fig. 11).
Fig. 8
Fig. 7
Fig. 9 Fig. 10
1 2
1 2
1 2
Electrolux Professional S.p.A.
Ovens Platform Customer Support
Technical Training & Service
AOSpeed OVENS
Service Manual
(593800300 - ENG)
File: AOSpeed service manual (ENG).001 ©Copyright 2002 by Electrolux Professional P.5/20
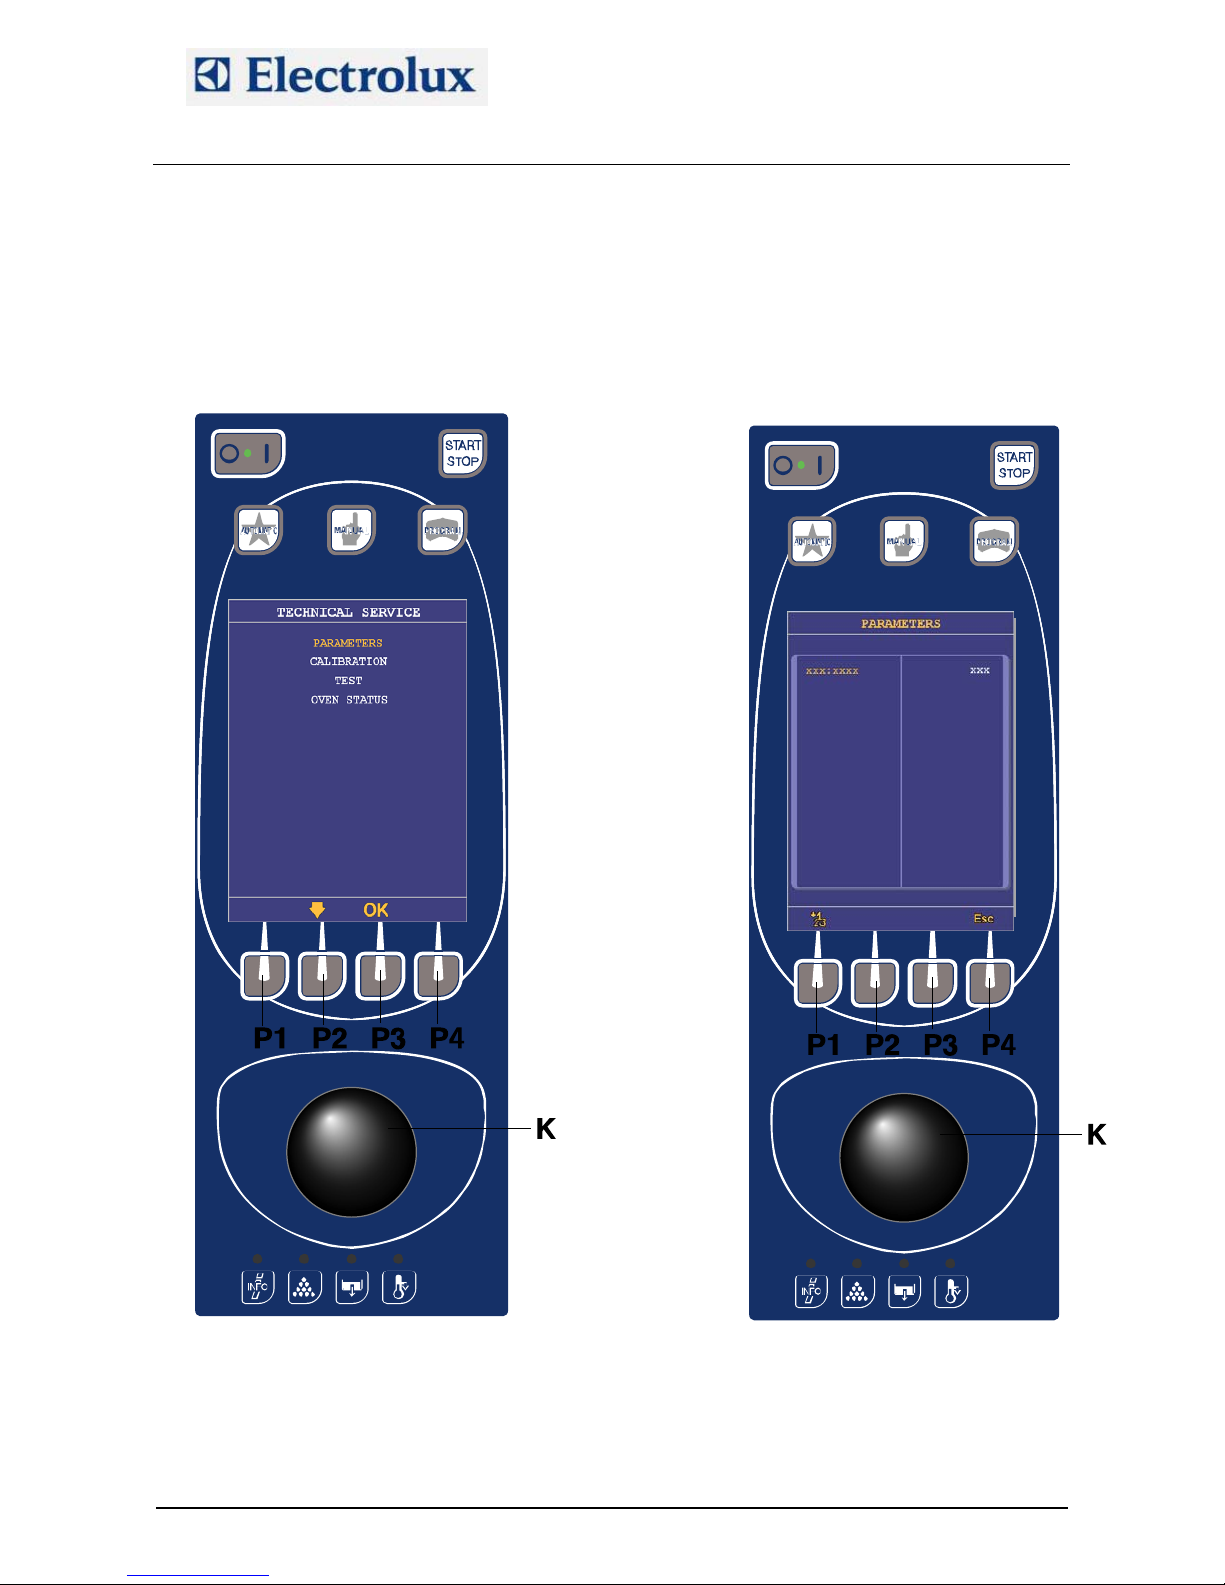
1. Pressing the button P3 (OK) it is possible to enter in the parameter list.
2. Now you can scroll the parameters by turning the knob (K).
3. To enter and see the value of the parameter press the button P1 (ABC). See fig.12. Now you can
change the value by turning the knob (K).
4. By pressing again the button P1 you store the new value and go again to the displaying of the
number of the parameter.
Repeat steps from n.2 to n.4 to change all the parameters you need.
Switch off the oven to exit from advanced programming.
Fig.11 Fig.12
Electrolux Professional S.p.A.
Ovens Platform Customer Support
Technical Training & Service
AOSpeed OVENS
Service Manual
(593800300 - ENG)
File: AOSpeed service manual (ENG).001 ©Copyright 2002 by Electrolux Professional P.6/20
3. Lambda probe calibration
The calibration of the lambda probe is necessary for the right working of the oven. With this procedure we
have to find the 0% humidity point.
The lambda calibration is necessary when you:
• Change the lambda probe
• Change the power board (PCB)
• The value stored on the specific parameter (Oldb) is out of range. Correct range : -30 < Oldb < -80
The procedure is done automatically. These are the steps:
1) Enter in advance programming;
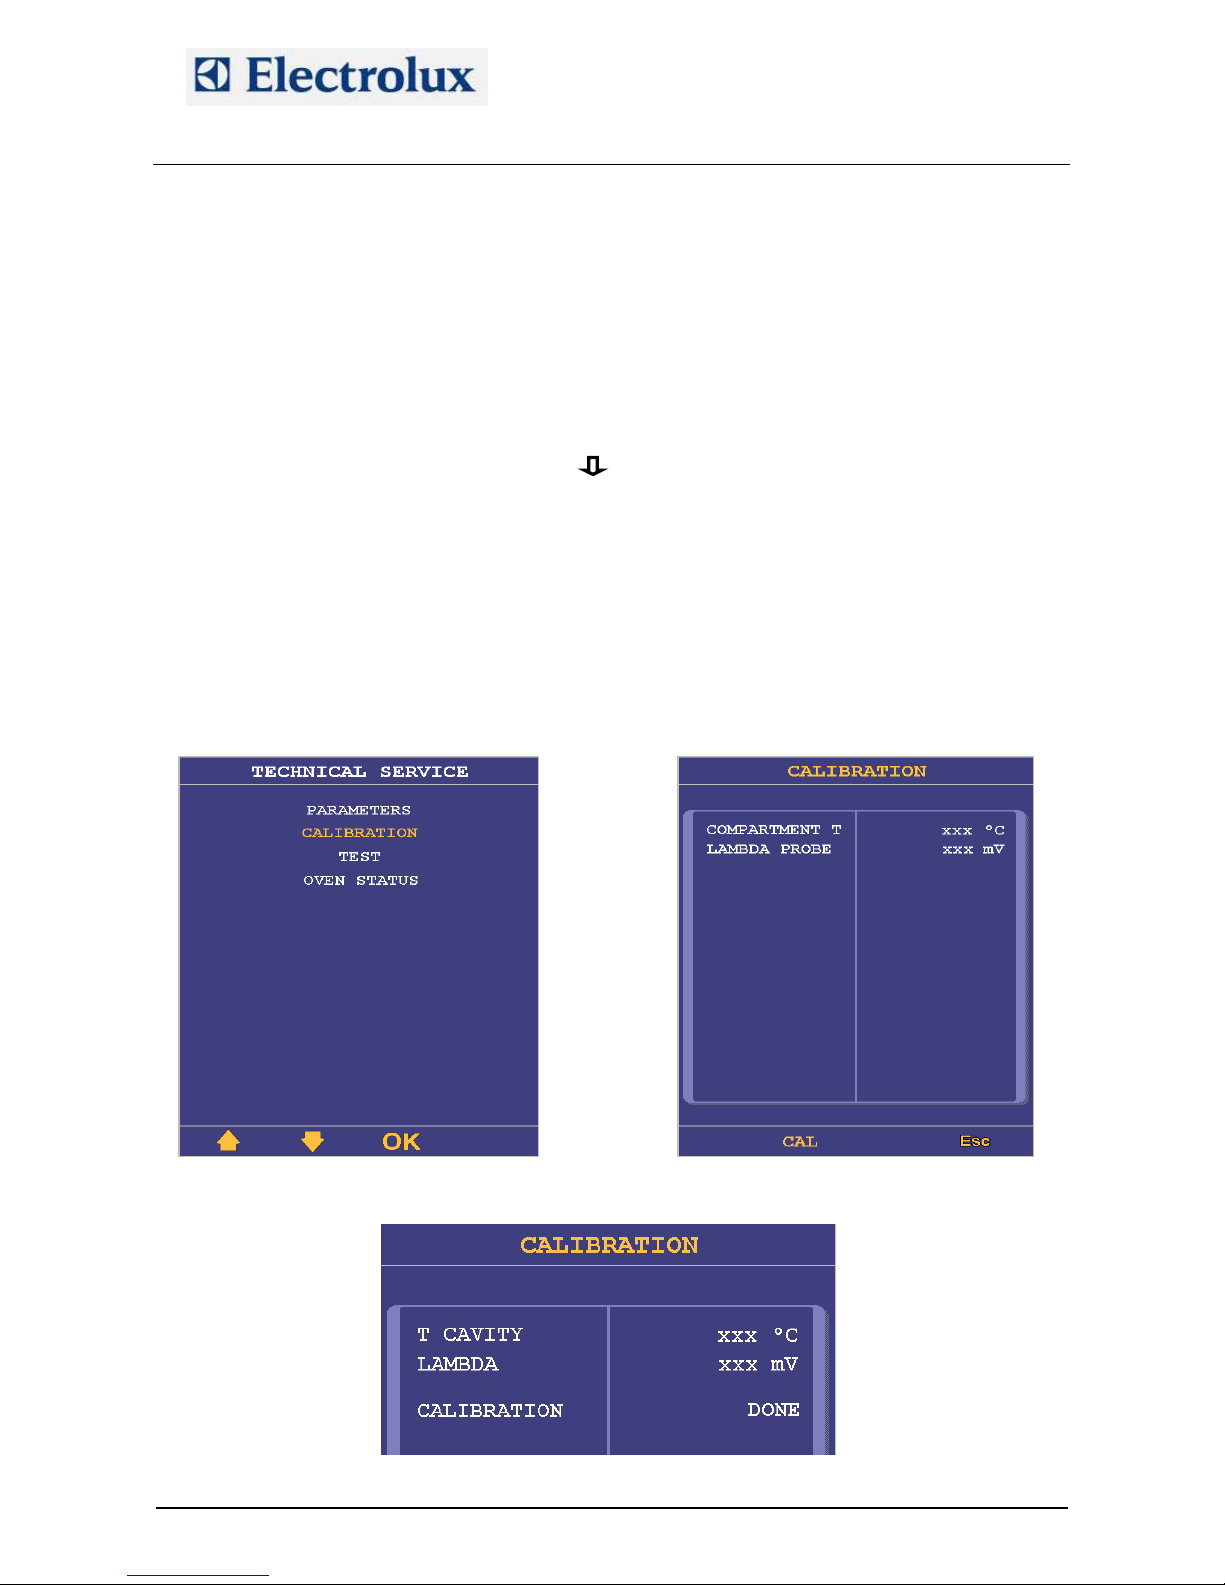
2) Choose “ CALIBRATION” with button P2( )and confirm by pres sing the button P3 (OK).( Fig.13)
3) By pressing the button P2 (CAL) the calibration starts (Fig.14). The compartment temperature
displayed will increase up to 160 ºC (320 ºF) and the value (in mV) of the lambda probe will change;
4) After 10-15 minutes the mV displayed should be stabilized and the cavity will be completely dry. In
this case you can confirm by pressing again the button P2 (MEM)
5) A message “CALIBRATION DONE” will appear (Fig.15)
6) Push button P4 (ESC) to exit the calibration or switch off the oven to exit from advanced
programming
NOTE: If you press ESC during the calibration, this will stop the procedure without success.
This calibration is very important and has to be done with care. If the dry point (0% of humidity) is
not correctly stored, the reading of the relative humidity could be overestimated or un derestimated.
Fig. 13 Fig.14
Fig.15
 Loading...