

Page 1
Vacuum Cleaner
Bode nstaubsauger
Aspirateur traîneau
Vloe rstofzuiger
Aspirado de polvo
Aspirador
Aspirapolve re
Η λεκτρική σκούπ α
Operating Instructions
Gebrauch sanw e isung
M ode d'em ploi
Gebruik saanw ijzing
Instrucciones de uso
Instruções de utilização
Instruzioni per l’uso
Οδη ϊες χρήσεω ς
Page 2
1
2
3
4
5
6
10
13
7
9
16
14
11
8
12
15
17
18
19
Page 3
20
21 22
30
23
27
24
31
28
25
32
26
29
33
34
35
36
Page 4

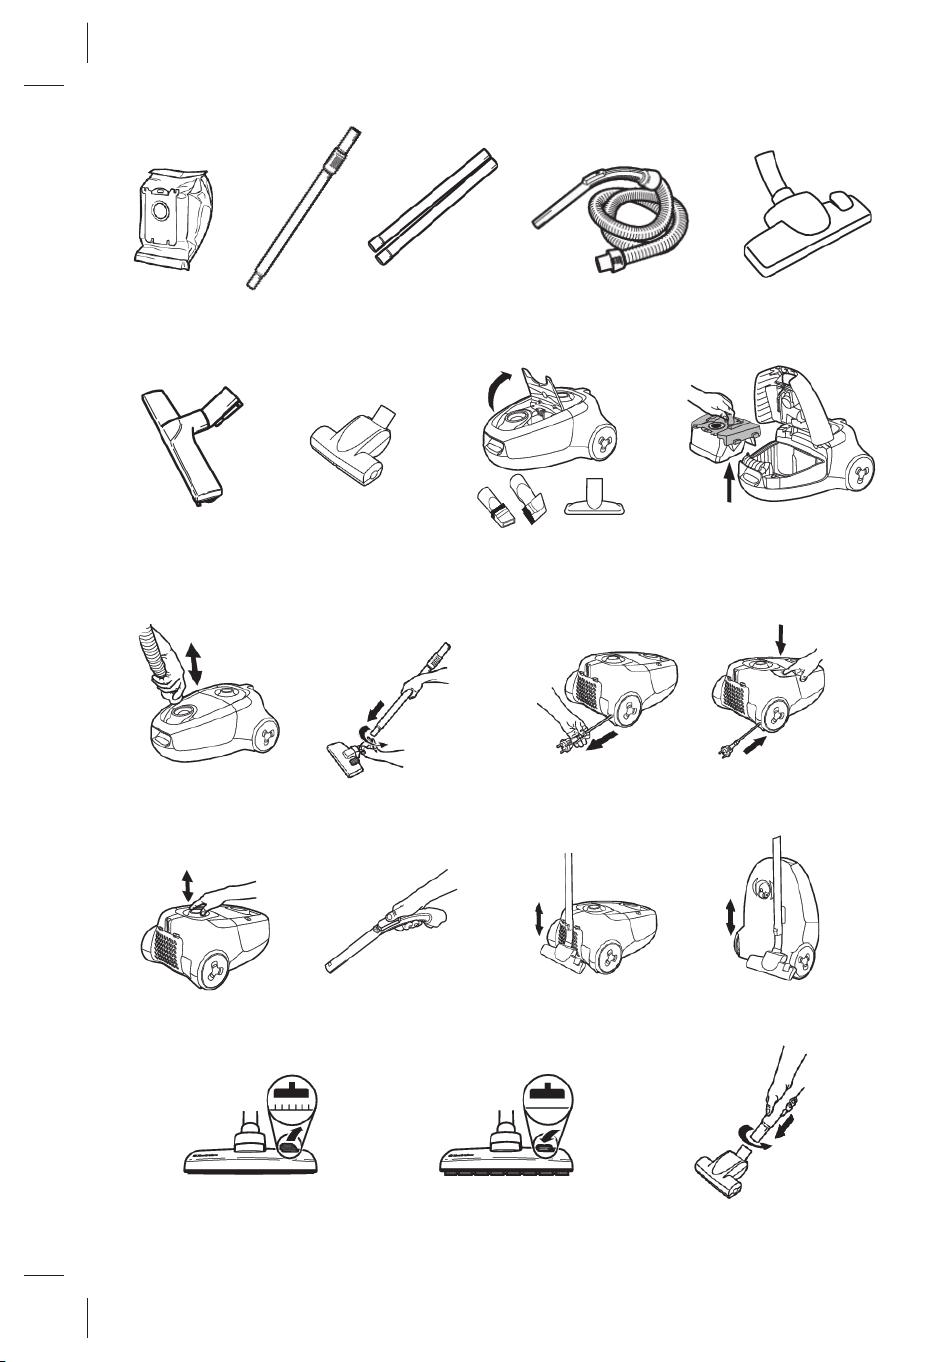
Accessories
1 Du st bag
2* Te lescopic tube
3* Extension tube (2)
4 H ose h andle + h ose
5 Carpet/h ardfloor nozzle
6* Parq uet nozzle
7* Turbo nozzle
8a Com bination nozzle
8b Uph olste ry nozzle
Safety precautions
Th is appliance is not intende d for use by persons
(including ch ildre n) w ith redu ced ph ysical, sensory or
m ental capab ilitie s, or lack of experience and k now ledge,
unless th ey h ave be e n give n supe rvision or instruction
concerning use of th e appliance by a person responsible
for th e ir safety.
Th e vacuum cleaner feature s dou ble insulation and doe s
not need to be e arth ed.
Ch ildren sh ould be supervised to ensure th at th ey do not
play w ith th e appliance.
Nevervacuum :
• In w et areas.
• Close to flam m able gases, etc.
• W ith out a dust bag (th is m ay dam age th e cleaner). A
safety device is fitte d w h ich prevents th e cove r to
close w ith out a dust bag. D o not attem pt to force
cove r to close.
• Sh arp obje cts.
• Fluids (th is can cause serious dam age to th e
m ach ine).
• H ot or cold cinders, lit cigarette butts, etc.
• Fine dust from plaster, concre te , or ash , for exam ple.
Th e above can cause serious dam age to th e m otor –
dam age w h ich is not cove re d by th e w arranty.
Electrical cable pre cautions:
• If th e supply cord is dam aged, it m ust be replaced by
th e m anufacturer, it’s service agent or sim ilary
q ualifie d person in order to avoid a h azard. Dam age
to th e cleaner cable w ill not be cove red by th e
w arranty.
• Neve r pull or lift th e vacuum cleaner by th e cable .
• Disconnect th e plug from th e w all socket be fore
cleaning or m aintaining th e vacuum cle ane r.
• Re gularly ch eck th at th e cable is not dam aged.
Neve r use th e vacuum cle ane r if th e cable is
dam aged.
All service and repairs m ust be carrie d out by an
auth orised AEG- Electrolux service centre. Alw ays k e e p th e
vacuum cleane r in a dry place.
Before starting
(9 .) Ch eck th at th e dust bag and m otor filter are in place.
(10.) Insert th e h ose until th e catch click s to e ngage
(press th e catch to rele ase th e h ose).
(11.) Attach th e extension w and or te lescopic w and (only
on certain m odels) to th e h ose h andle and or nozzle
(to tak e th e m apart again, tw ist and pull).
(12.) Extend th e cord and plug it into th e w all sock et. Th e
vacuum cleane r h as an inte grate d cord w inder. To
rew ind th e cable press th e foot pedal (tak e h old of
th e plug to prevent it strik ing you).
(13.) Press th e ON/O FF button to sw itch th e appliance on.
(13./14.) Adjust suction pow er using th e pow er control
bu tton on th e vacuum cleane r or th e suction control
on th e h ose h andle.
(15.) A practical park ing fe ature (as w ell as m inim izing
th e risk of breakage) m ak e s th ings easier w h e n
pausing du ring cleaning.
(16.) Th e park ing fe ature m ak e s it easier to m ove and
store th e vacuum cle ane r.
Use th e nozzles as follow s:
Carpets: U se th e carpet/h ardfloor nozzle w ith th e le ver in
position (17). Reduce suction pow er for sm all carpe ts.
H ard floors: Use th e carpe t/h ardfloor nozzle w ith th e
leve r in position (18).
W oode n floors: Use th e parquet nozzle (ce rtain m odels
only, 6).
Spe cial com b ined nozzle: Detach th e nozzle from th e
accesory dock and use it for book sh elve s (w ith folding out
of th e „b rush ” end) or cre vices, corne rs (w ith th e „crevice ”
end) (8a.)
Uph olstery nozzle: Use th e furniture nozzle (8b).
Curtains, ligh tw eigh t fabrics, etc.: Use th e furniture
nozzle (8b).
Re duce suction pow er if necessary.
Using th e turbo nozzle (certain m odels only) (7)
(19 .) Attach th e nozzle to th e tube.
Note: Do not use th e pow er or turbo nozzle on fur rugs,
rugs w ith long fringes or a pile depth exceeding 15 m m .
To avoid dam aging th e carpet, do not k eep th e nozzle
stationary w h ilst th e brush is rotating. D o not pass th e
nozzle across ele ctric cables, and be sure to sw itch off
th e vacuum cle ane r im m e diately after use .
* Depending on th e m odel
1
Page 5

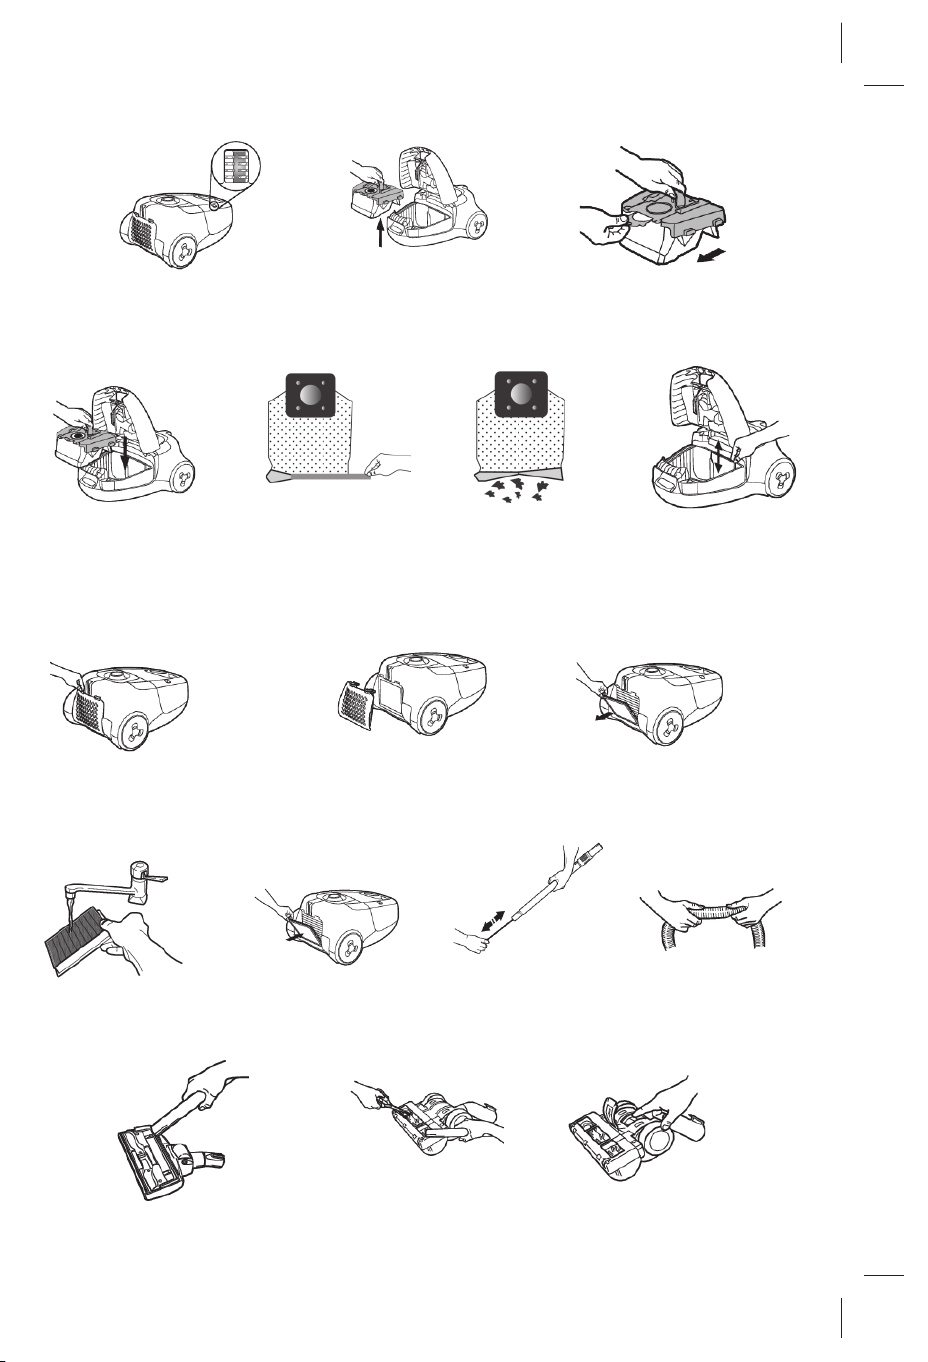
Re placing th e dust bag/cleaning th e filter
Ch anging th e du st bag
Th e dust bag m ust be replace d late st w h en th e indicator
w indow is com ple te ly red. Read w ith th e nozzle lifted up
(20.).
1 Open th e lid
2 Re m ove th e dustbag h olde r. (21)
3 Pull th e cardboard to tak e th e dustbag out th e
grooves.
Th is autom atically se als th e dustbag and prevents
dust from le ak ing out of th e bag. (22)
4 Insert a new dustb ag by push ing th e cardboard to
th e end of th e groove s in th e h older, you w ill fe e l a
“click ”. Replace th e h olde r and close th e cover. (23)
Dustbag Ref. num ber: S- bag® classic (GR 200)
Cleaning th e textile dustb ag (23, 24, 25)*
1 Open th e cleaner cover.
2 Re m ove th e textile bag from th e h older.
3 Slide th e plastic clip aw ay from th e bag to ope n and
em pty.
4 Re place th e plastic clip ensuring th at both sides of
th e bag are paralle l.
5 Re place th e bag into th e h olde r.
Note: Th e bag m ay be w ash ed in luk e w arm w ate r and
dried com pletely.
It sh ould not be w ash ed in w ash ing m ach ine.
6 Close th e cover by pre ssing dow n until it click s.
Re placing th e m otor filte r
Sh ou ld be done w ith eve ry 5th replacem ent of th e dust
bag
1 Open th e lid.
2 Re m ove th e old filter (26).
3 Insert a new filter and close th e lid.
Re place m ent of th e m icro filter and th e
nonw ash able H EPA filte r*
Th e filter m ust alw ays be replace d w ith new ones and
cannot be w ash ed. Sh ould be done w ith every 5th
replace m ent of th e dust bag.
1 Open and rem ove th e lid (27. ; 28.).
2 Re m ove th e filter and replace it w ith a new one as
sh ow n in th e picture (29 .; 31.).
Im portant: snap on th e low er part of th e filter fram e first
th en after th e upper one. Mak e sure th e sealing is in place .
Cleaning th e w ash able H EPA filte r*
Sh ou ld be done w ith eve ry 5th replacem ent of th e dust
bag
1 Open and rem ove th e lid, th e n rem ove th e filter (27.
; 28.).
2 Rinse th e inside (dirty side) of th e filter in w arm tap
w ater.
(30.) Tap th e filte r fram e to rem ove excess w ater. Re pe at
four tim es and allow th e filter to dry.
Note: Do not use cle aning agents and avoid touch ing th e
de licate filte r surface.
3 Re place th e filter and lid as sh ow n (29 . ; 31.).
Im portant: snap on th e low er part of th e filter fram e first
th en after th e upper one. Mak e sure th e sealing is in place .
Re com m ended filters:
M otor filte r: EF 1
Exh aust filter: AEF 08
Cleaning th e h ose and nozzle
Th e vacuum cleaner stops autom atically if th e nozzle ,
tube, h ose or filters and dust bag b e com es block e d. In
such cases, disconnect from w all socket and allow to cool
for 20- 30 m inutes.
Clear b lock age and/or replace filters and dust bag and
restart.
Cleaning tubes and h ose
(32.) Use a cle aning strip or sim ilar to clear th e tub e s and
h ose.
(33.) It m ay also be possible to rem ove th e obstruction in
th e h ose by sq ueezing it. H ow ever, be careful in case
th e obstruction is caused by glass or needles caugh t
inside th e h ose.
Note: Th e w arranty does not cover any dam age to th e
h ose caused by cle aning it.
Cleaning th e floor nozzle
(34.) To avoid deterioration of suction pow er, fre q uently
cle an th e carpet/h ard floor nozzle. Th e easiest w ay
to clean it is by using th e h ose h andle.
Cleaning th e turbo nozzle (certain m odels only)
(35.) Disconnect th e nozzle from th e vacuum cleaner tube
and rem ove e ntangle d th re ads, etc. by snipping
th em aw ay w ith scissors. Use th e h ose h andle to
cle an th e nozzle.
(36.) In case th e turbo nozzle stops w ork ing, open th e
cle aning lid and rem ove any obje cts th at obstructs
th e turbine to rotate free ly.
2
Page 6

Trouble sh ooting
Th e vacuum cleaner does not start
1 Ch eck th at th e cable is connected to th e m ains.
2 Ch eck th at th e plug and cable are not dam aged.
3 Ch eck for a blow n fuse.
Th e vacuum cleaner stops
1 Ch eck w h eth er th e dust bag is full. If so, replace it
w ith a new one.
2 Is th e nozzle , tube or h ose blocked?
3 Are th e filters blocked?
W ate r h as entered th e vacuum cleaner
It w ill be ne cessary to replace th e m otor at an auth orise d
AEG- Ele ctrolux service ce ntre . Dam age to th e m otor
caused by th e penetration of w ate r is not cove re d by th e
w arranty.
Custom er inform ation
Sh ou ld you req uire service or consum able spares for your
Ele ctrolux cleaner, ple ase consult th e service providers
listing enclosed w ith th is cleaner, for your nearest
Ele ctrolux auth orised service provider or contact th e
custom er se rvice h elpline .
Please spe cify m odel type w h en ordering spares.
Please se e additional inform ation in th e separate AEGEle ctrolux W arranty Book let.
Electrolux
Features of th e vacuum cle ane r and accessories are
prote cted abroad by registered pate nts of Registered
Designs.
Th e Electrolux group m ay introduce m odifications to th eir
product from tim e to tim e, and, conseq uently, th e de tails
given in th is book let are subje ct to alteration w ith ou t
notice.
Dustbags and accessorie s!
If you are experie ncing difficulties in finding th e righ t
dustbag, filter or accessories to your new vacuum cleaner please call our callcentre (you w ill find th e num ber in th e
w arranty folde r) or visit our w ebsh op at
w w w .m e nalux.com
Th e sym bol on th e product or on its pack aging
indicates th at th is product m ay not be treated as
h ouseh old w aste. Inste ad it sh all be h anded over to th e
applicable collection point for th e recycling of electrical
and electronic e q uipm ent. By ensuring th is product is
disposed of correctly, you w ill h elp preve nt pote ntial
negative conse q uence s for th e environm ent and h um an
h ealth , w h ich could oth erw ise be cause d by inappropriate
w aste h andling of th is product. For m ore detaile d
inform ation about recycling of th is product, please contact
your local city office, your h ouseh old w aste disposal service
or th e sh op w h ere you purch ase d th e product.
* Depending on th e m odel
3
Page 7

Zub eh ör
1 Staubbeutel
2* Te lesk oproh r
3* Ve rlängerungsroh r (2)
4 Sch lauch griff + Sch lauch
5 Um sch altbare K om bi- Bodendüse
6* Park ettbürste
7* Turbodüse
8a K om binationsdüse
8b Polsterdüse
Sich erh eitsvork eh rungen
Pe rsone n (e insch lie ßlich Kindern) m it eingesch ränkten
k örperlich en, sensorisch en oder geistige n Fäh igk eite n oder
m it fe h lende r Erfah rung und Kenntnissen dürfen dieses
Gerät nu r unter Aufsich t oder nach Anleitung durch eine
für ih re Sich e rh e it ve rantw ortlich e Pe rson benutze n.
Der Staubsauger ist doppe lt isoliert und brauch t nich t
geerdet zu w erden.
Kinder m üsse n beaufsich tigt w erden, um zu
gew äh rle iste n, dass sie nich t m it dem Gerät spie le n.
Niem als staubsaugen:
• In nassen Bere ich en.
• In der Näh e von brennbaren Gasen etc.
• Oh ne Staubbeutel (k ann zu einer Besch ädigung des
Staubsaugers füh ren). Eine Sich erh eitsvorrich tung
verh indert das Sch lie ßen de r Abde ck ung oh ne
eingesetzte n Staubbeutel. Abdeckung nich t
gew altsam sch lie ßen.
• Sch arfe O bje k te.
• Flüssigk e ite n (dies k ann sch w ere Besch ädigungen des
Geräte s verursach en).
• H e iße ode r k alte Asch e, bre nnende Z igarettenk ippen
etc.
• Z . B. feine r Gips- , Beton- , M e h l- ode r Asch enstaub.
Obe ngenannte s k ann den M otor ernsth aft
be sch ädigen - Sch äden, die nich t durch die Garantie
abgede ck t sind.
Vork eh runge n be i elek trisch en Kabeln:
W enn das Netzk abel be sch ädigt ist, m uss es zur
Ve rm eidung von Gefah ren vom H erstelle r, ih rem
Kunde ndienst ode r von e ine r entsprech end q ualifizierten
Pe rson ausgetausch t w erden. Sch äden am Kabel de s
Staubsaugers sind nich t von der Garantie abgedeckt.
• Den Staubsauger niem als am Kabel zieh en ode r
h och h eben.
• Vor de m Re inigen oder der Durch fü h rung von
Se rvice arbeite n am Staubsauger den Ne tzste ck e r aus
de r Ste ck dose zieh en.
• Re gelm äßig Kabel auf Sch äden prüfe n. Staubsauge r
niem als benutze n, w enn das Netzkabe l besch ädigt
ist.
Alle W artungs - und Reparaturarbeiten dürfen nur vom
autorisierten AEG- Ele ctrolux- Kunde ndienst durch gefüh rt
w erden.
Bew ah ren Sie den Staubsauge r im m er an einem trockene n
Ort auf.
Vorbe re itungen
(9 .) Prüfen, ob der Staubbe u tel und der Motorfilter
rich tig eingele gt sind.
(10.) Den Sch lauch einsetze n, bis die Ve rriegelung m it
einem Klick einraste t (zur Freigabe des Sch lauch s die
Ve rriegelung drück en).
(11.) Das Verlängerungsroh r bzw . das Telesk oproh r (nur
be i bestim m ten M odelle n) m it dem Sch lauch griff
und de r Bode ndüse verbinden (zum Abne h m en
dreh en und zieh e n).
(12.) Netzk abel h e rauszieh en und an die Ne tzste ck dose
ansch ließen. D e r Staubsauger verfügt übe r eine
autom atisch e Kabelaufw ick lung. Z um zurück spule n
de s K abels Fußpedal drück e n. (Netzsteck er
festh alten, dam it er nich t gegen Sie ode r eine n
Gegenstand sch lägt).
(13.) Z um Einsch alten de s Ge räts de n Ein- /Aus - Sch alter
drücken.
(13./14.) Ste llen Sie die Saugleistung über den
Le istungsregler am Staubsauge r ode r die
Saugsteue rung am Sch lauch griff ein.
(15.) Die praktisch e und rückensch onende Park funk tion
erleich tert die Arbeit be i Saugpause n.
(16.) Die Park funk tion erleich te rt auch den Transport und
die Aufbew ah ru ng de s Staubsauge rs.
Die Düsen w ie folgt be nutzen:
Teppich e : D ie D üse für Teppich e und h arte Böden m it
de m H e bel in Stellung (17) ve rw ende n. Be i k leinen
Te ppich en Saug- Leistung reduzie ren.
H artböden: D ie Düse für Teppich e und h arte Böden m it
de m H e bel in Stellung (18) ve rw ende n.
H olzböden: Die Park ettbürste (nur be i bestim m te n
M odelle n verw enden, 6)
Spe zie lle Kom binationsdüse: D ü se aus dem
Z u beh örh alte r entne h m en und für Büch erregale (durch
Auszieh en de s Bürstenteils) ode r Fuge n und Eck en (m it
Fugense ite ) verw enden (8a).
Polsterm öbe l: Polste rdüse verw enden (8b).
Vorh änge, leich te Stoffe etc.: Polste rdü se (8b) ve rw ende n.
Gegebe nfalls Saugleistung reduzieren.
Verw e ndu ng der Turbodü se (nur bestim m te Mode lle ) (7).
4
* Nur bestim m te M odelle
Page 8

(19 .) Die Düse am Roh r anbringen.
H inw eis: Ele k trosaugbürste ode r Turbodüse nich t auf FellVorlegern oder Teppich en/Vorlegern m it lange n Franse n
ode r m it m eh r als 15 m m Flor ve rw ende n. Um Sch äde n
am Teppich zu verm e iden, Düse be i rotie rende r Bürste
nich t auf einer S te lle lasse n. Mit de r Düse nich t übe r
Kabel fah ren und Staubsauge r unm ittelbar nach der
Ve rw endung aussch alten.
Austausch en de s Staub be utels/Reinigen des
Filters
Staubb e utelw ech sel
Den Staubb e utel spätestens austausch e n, w enn das
Anzeige fe nste r vollständig rot ist. Able sen, w enn die D üse
angeh oben ist (20).
1 Den Deck e l öffnen.
2 Staubbeutel entneh m en. (21)
3 Staubbeutel am Pappstreifen aus der Füh rungnu t
zie h e n.
Auf die se W e ise w ird de r Staubbe utel autom atisch
versch lossen und das Austreten von Staub verh inde rt. (22)
4 Neuen Staub beute l einsetze n. D azu Pappstreifen bis
zu m Einrasten in die Füh rungsnut sch ieben.
Staubbeutelh alter w ieder einse tzen und Abdeck ung
sch lie ßen. (23)
Staubb e utel Ref- Nr: S- bag® classic (GR 200)
Textil- Staubbeutel (23, 24, 25) (Nur b e stim m te
M odelle )
1 Neh m en Sie de n Textil- Staubbeutel aus de r
H alte rung.
2 Um den Beu tel zu entle e ren, lösen Sie die
Plastik sch iene durch seitlich es W egsch ieben.
3 Nach dem Entleeren die Plastik sch iene auf dem
gleich en W e g w ieder zu rück füh ren. D arauf ach ten,
daß beide Seiten des Textil- Staubbeute ls parallel sind.
4 Te xtil- Staubbe utel w iede r in die H alte rung
zu rück füh ren.
5 H inw eis: der Textil- Staub beute l k ann in lauw arm e m
W asser ausgew asch e n w erde n. Vor dem
W iede re inse tzen in den Staubsauger m uss er
vollständig trock en se in! Der Beutel ist nich t zum
W asch en in der W asch m asch ine gee igne t.
6 Sch ließen Sie die Abdeckung durch nie derdrück en
bis sie e inrastet.
Austausch en des M otorfilte rs
Sollte bei jedem fünften Austausch des Staubb eutels
erfolgen
1 Den Deck e l öffnen.
2 Den alten Filter entfernen (26).
3 Eine n ne uen Filter einle gen und den Deck el sch ließe n.
Ersetzen des M ik rofilters und des nich t
ausw asch baren H EPA- Filters*
Der Filter m uss stets durch ne uen Filte r ersetzt w erden
und ist nich t w asch bar. Sollte bei je dem fünften
Austausch des Staubbeutels erfolgen
1 Den Deck e l öffnen und abneh m en (27, 28).
2 Den Filter entneh m en und neue n Filter einse tzen,
w ie in der Abbildung gezeigt (29 , 31).
W ich tig: Filte r zuerst unte n und dann oben einraste n.
Rich tigen Sitz der D ich tung k ontrolliere n..
Re inigung des ausw asch bare n H EPA- Filters*
Sollte bei jedem fünften Austausch des Staubb eutels
erfolgen
1 Den Deck e l öffnen und abneh m en, dann den Filter
entfernen (27, 28).
2 Innenseite (versch m utzte Seite ) de s Filte rs m it
w arm em Leitungsw asser spülen. (30.) Gegen den
Filterrah m e n k lopfen, um das übe rsch üssige W asser
zu entfernen.
Vie rm al w iederh olen und Filter trock nen lassen.
H inw eis: K e ine Reinigungsm ittel ve rw ende n und die
em pfindlich e Filterobe rfläch e nich t be rüh ren. D e n
Filter w ie geze igt w ieder einsetzen und den Deck el
sch lie ßen (29 , 31).
W ich tig: Filte r zuerst unte n und dann obene inrasten.
Kontrollie ren, dass die Dich tung vorh ande n ist. Setzen Sie
de n Filte r im m e r nur völlig ausgetrock net w ieder e in.
M otor Filter Ref- Nr: EF 1
Abluftfilte r Ref- Nr: AEF 08
Re inigung de s Sch lauch es und der Düsen
Der Staubsauger stoppt autom atisch , w enn die D ü se , das
Roh r, der Sch lauch , der Filter oder der Staubbeute l
blockiert ist. Z ieh e n Sie in solch en Fälle n den Netzste ck e r
und lassen Sie den Staubsauger 20- 30 M inuten abk üh le n.
Die Block ie rung be se itigen und/ode r die Filter und den
Staubbeutel ersetzen und de n Staubsauger erneut
einsch alten.
Re inigung von Roh ren und Sch läuch en
(32.) Roh re und Sch läuch e m it einem Reinigungsband
ode r Äh nlich em reinigen.
(33.) Es ist auch m öglich , die Block ierung im Sch lauch
durch Drück e n auf de n Sch lauch zu beseitigen. D abei
je doch vorsich tig sein, falls die Block ierung durch Glas
oder Nadeln im Sch lauch verursach t w urde.
H inw eis : Die Garantie deck t k einerlei durch Reinigung
verursach te Sch äden an den Sch läuch en ab.
5
* Nur bestim m te M odelle
Page 9

Re inigung der Bodendüse
(34.) D üse für Teppich e und h arte Böden regelm äßig
reinigen, um ein Nach lassen der Saugleistung zu
verm eiden.
Dies geh t am einfach ste n indem Sie die D üse m it
de m Sch lauch griff aussaugen.
Re inigung der Turbobü rste (nur be stim m te
M odelle )
(35.) D üse vom Staub saugerroh r entfernen und in de r
Düse verw ick elte Fäden etc. zum Entfernen m it e ine r
Sch ere durch sch neiden. M it dem Sch lauch griff die
Düse aussaugen.
(36.) Falls die Turbobürste nich t rich tig funk tionie rt, die
Re inigungsk lappe öffnen und alle Obje k te entfernen,
die das Turbinenrad beh inde rn.
(37.) D üse vom Staub saugerroh r entfernen und in de r
Düse verw ick elte Fäden etc. zum Entfernen m it e ine r
Sch ere durch sch neiden. M it dem Sch lauch griff die
Düse aussaugen.
Fe h lersuch e
Der Staubsauger startet nich t
1 Prüfen, ob das Netzk abel an die Netzste ck dose
angesch losse n ist.
2 Prüfen, ob der Stecker und das Kabe l nich t
be sch ädigt sind.
3 Prüfen, ob eine Sich erung durch geb rannt ist.
Der Staubsauger sch altet ab.
1 Prüfen, ob der Staubbe u tel voll ist. In die se m Fall
durch e inen neue n e rsetzen.
2 Sind Düse, Roh r oder Sch lauch verstopft?
3 Sind die Filte r ve rstopft?
W asser ist in den Staubsauger eingedrungen.
Es ist notw endig, den M otor in einem autorisierten AEGEle ctrolux- Servicezentrum auszutausch en. Sch äden am
M otor, die durch eingedrungenes W asser verursach t
w urde n, sind nich t durch die Garantieabgedeck t.
Kundeninform ationen
Sollte n Sie den K unde ndienst für Ih ren ElectroluxStaubsauger in Anspruch neh m en m üssen, w enden Sie
sich bitte an den autorisierte n Electrolux- Kundendienst,
ode r rufe n Sie die K undenbe ratung an.
AEG- Ele ctrolux Service line: 01805 – 30 60 80*
*aus dem Festnetz der Deutsch en Te lek om Euro 0,12/M in.
Fax: 09 11- 323- 49 19 30
W eb: w w w .aeg- electrolux.de
Beach te n Sie bitte die zusätzlich e n Inform ationen im
separate n AEG- Electrolu x Garantie h e ft.
Kundenbetreu u ng und Z ub e h ör
Benötigen Sie fü r Ih ren Staub sauger Z ubeh ör w ie
prak tisch e Spezialdüsen, die Original AEG- Ele ctrolux Filte r
ode r Staubb eutel ode r abe r h abe n Sie Frage n zu Ih re m
Gerät? In unserer Kundenbetreu ung steh en w ir Ih nen
gerne zur Verfügung, te lefonisch erreich en Sie uns
m ontags bis freitags von 8 bis 18.00 Uh r, die
Kontak tadressen entne h m en Sie bitte aus de n
Garantiebe dingunge n.
Das Sym bol auf de m Produk t oder seiner Verpack ung
w eist darauf h in, dass die se s Produk t nich t als norm aler
H aush altsabfall zu be h andeln ist, sonde rn an einem
Sam m elpunk t für das Re cycling von elek trisch en und
elek tronisch en Geräte n abgege ben w erden m uss. Durch
Ih re n Be itrag zum korrek ten Entsorgen dieses Produk ts
sch ütze n Sie die Um w elt und die Gesundh e it Ih rer
M itm ensch en. Um w elt und Gesu ndh eit w erde n durch
falsch es Entsorgen ge fäh rdet. W eitere Inform atione n über
das Re cycling dieses Produk ts erh alte n Sie von Ih rem
Rath aus, Ih rer Müllabfuh r ode r dem Gesch äft, in de m Sie
das Produk t gek auft h aben.
6
* Nur bestim m te M odelle* Nur bestim m te M odelle
Page 10

Accessoires
1 Sac à poussière
2* Tube télescopique
3* Tube rigide (2)
4 Poignée du flexible + flexible
5 Suceur pour tapis/sols durs
6* Brosse pour parquets, sols durs
7* Turbobrosse
8a Com biné suceur long/brosse m eub le s
8b Pe tit suceur pour canapés, tenture s
Précautions de sécurité
Cet appareil n’est pas destiné à être utilisé par des
personnes (y com pris des enfants) dont les capacités
ph ysiq ues, sensorielle s ou m entale s sont dim inuée s, ou q ui
ne dispose nt pas de s connaissance s ou de l’e xpérie nce
nécessaires, à m oins qu’ elle s n’aie nt été form ées et
encadrées pour l’u tilisation de ce t appareil par une
personne responsable de leur sécurité.
L’aspirateur présente une double isolation et n’a pas
be soin d’être relié à la te rre.
Le s e nfants doivent être surve illés afin q u’ils ne puisse nt
pas jouer avec cet appare il.
Le s produits en bom be aérosol peuvent être inflam m ables.
Ne pas vaporiser de tels produits à proxim ité ou sur
l’aspirate ur.
Ne jam ais aspirer:
• Dans les endroits h um ides.
• A proxim ité de gaz inflam m ab le s, etc.
• Sans utilise r de sac à poussière (cela pourrait
endom m ager l’aspirate u r). Un dispositif de sécurité
est intégré afin d'évite r la ferm eture du couve rcle en
l’absence de sac à pou ssière . Surtout ne pas forcer
pour fe rm er le couve rcle.
• D’obje ts pointus.
• De liq uide s (cela pourrait endom m ager sérieuse m ent
l’appareil).
• De cendres ch audes ou refroidies, de m égots de
cigarettes incandescents, etc.
• De particule s de poussière très fines issues entre
autres du plâtre, du béton, de la farine ou de cendres.
Le s élém ents susm entionnés peuvent provoq uer de
grave s dom m ages au m ote ur. La garantie ne prend
pas en ch arge ce type de dom m age .
Précautions liée s au câble électrique :
• Si le cordon d’alim entation est endom m agé, il doit
être re m placé par le fabricant, l’un de se s
réparate urs ou toute autre personne dûm ent
q ualifiée afin d’éviter tout danger.
• Le s dom m ages portés au câble de l’aspirateur ne
sont pas couve rts par la garantie.
• Ne jam ais tirer ni souleve r l’aspirate u r par le câble.
• Débranch er la prise avant de nettoye r ou
d’e ntre te nir votre aspirateur.
• Vérifie r régulièrem e nt q ue le câb le n’est pas
endom m agé.
Ne jam ais utilise r l’aspirateur si le câble e st endom m agé.
Toutes le s révisions et réparations doivent être effectuées
par le pe rsonne l d’un centre service agréé AEG- Ele ctrolux.
Toujours e ntreposer l’aspirate u r dans un endroit sec.
Avant de com m encer
(9 ) Vérifier que le sac à poussière e t q ue le filtre m oteur
sont corre cte m ent positionnés.
(10) Introduire le flexible jusq u’à ce q ue le cliq uet
s’enclench e (appuyer sur le cliq uet pour dégager le
fle xible ).
(11) Fixer le tube rallonge ou télescopiq ue (suivant les
m odèle s) à la poignée du flexible et au suceur pour
sols (pour les séparer, tou rne r et tire r).
(12) Tire r sur le cordon d’alim entation et le branch er sur
le secte ur. L’aspirate ur est équipé d’un enrouleur.
Pour enrouler le câble , appuyer sur la pédale (tenir la
prise pour éviter q u ’elle ne vous h eurte).
(13) Appuye z sur la pédale M arch e /arrèt pour m ettre e n
m arch e l’aspirate ur.
(13/14) Régler la puissance d’aspiration en actionnant le
bou ton m arch e / arrèt de l’aspirateur ou à l’aide du
réglage d’aspiration sur la poignée du fle xible .
(15) Une fonction «park ing» h orizontal très pratiq ue
facilite les ch oses lors des pauses pendant
l’utilisation.
(16) La fonction «park ing» ve rtical facilite le transport et
le rangem ent de l’aspirateur.
Utiliser les suceurs de la m anière suivante :
Tapis : Utiliser le suceur tapis / sols durs ave c le levier en
position (17). Il e st préférable de réduire la puissance
d’aspiration pour le s pe tits tapis.
Sols durs : Utiliser le suce ur tapis / sols durs avec le le vier
en position (18).
Parquets / sols durs : Utilise r la brosse pour parque ts, sols
durs (suivant les m odèles) (6).
Com b iné suce u r long / brosse m eub les : D étach er le
suceur de son support d’accessoires. Pour les étagères,
m eubles utiliser l'extrém ité brosse et pour le s fe nte s e t le s
coins, l'extrém ité suceur long. (8a) (8a).
M obilie r recouve rt de tissu : Utiliser le petit suceur (8b).
Rideaux, tissus légers etc. : Utilise r le pe tit suce ur (8b).
Réduire la puissance d’aspiration si nécessaire.
7
* Suivant le s m odèles
Page 11

Utilisation de la turbobrosse (suivant les m odèles) (7).
(19 ) Raccorder la turbobrosse au tube .
Rem arq ue : Ne pas utiliser la turbobrosse sur des tapis en
fourrure, des tapis avec de longues franges ou des tapis
dont l’épaisseur dépasse 15 m m . Pour évite r d’abîm er le
tapis, ne pas garder la brosse im m obile pendant qu’ elle
tourne. Ne pas la passer sur les câble s éle ctriques et ve iller
à arrêter l’aspirateur im m édiate m ent après utilisation.
Re m placem ent du sac à poussière / filtres
Re m placem ent du sac à poussière
Le sac à poussière doit être rem placé au plus tard lorsq u e
la fenêtre tém oin est rouge. La vérification doit toujours
se faire le suceur soulevé du sol (20).
1 Ouvrir le couve rcle.
2 Re tirer le support du sac à poussière (21)
3 Tire r sur la partie cartonnée pour dégager le sac à
poussière des rainures. (22))
4 Insérer le sac a poussiere neuf e n introduisant la
partie cartonnée jusq u'au bout des rainure s du
support (jusqu'au click ). (23)
Sac à poussière recom mandé : S- bag® classic (GR 200)
Sac tissu (23,24,25)
1 Enlever le sac tissu du support sac.
2 Faire glisse r le clip plastique pour ouvrir et vider le
sac.
3 Re m ettre en place le clip plastiq ue q ui perm et aux
de ux côtés du sac d’être parallèle s.
4 Re m ettre le sac tissu sur le support sac.
5 Attention : le sac tissu doit e tre lavé à l’e au tiède et
séch é com plètem ent. Il ne doit pas etre lavé en
m ach ine.
6 Re fe rm er le couve rcle du com partim ent sac à
poussière e n le poussant jusq u’ au «click ».
Re m placem ent du filtre m oteur
Effe ctu e r cette opération tous les cinq rem placem ents du
sac à poussière.
1 Enlever la grille.
2 Re tirer l’ancien filtre (26).
3 Insérer un nouveau filtre e t ferm er le couvercle.
Re m placem ent du m icrofiltre ou du filtre H EPA
non lavable * (su ivant les m odèles)
Le s filtres doive nt toujours être rem placés par de s filtres
neufs et ne pe uve nt pas être lavés. Effectuer ce tte
opération tous les cinq rem placem ents du sac à poussière.
1 Ouvrir et retirer le couve rcle (27, 28).
2 Re tirer le filtre et le rem placer par un filtre ne uf,
com m e indiq ué sur le sch ém a (29 et 31).
Im portant : Encle nch e r tout d’abord la partie inférieure
de la grille du filtre, puis la partie supérieure. Vérifie r q ue
le filtre est bien en place.
Nettoyage du filtre H EPA lavable * (si l’appareil
en est éq uipé)
Effe ctu e r cette opération tous les cinq rem placem ents du
sac à poussière.
1 Ouvrir et retirer la grille , puis ôte r le filtre (27,28).
2 Rincer l’intérieur (côté sale) du filtre à l’eau tiède
sous le robine t (30). Tapote r le cadre du filtre pour
élim iner l’excès d’eau. Répéter quatre fois l’opération
et bie n le laisser séch er. Rem arque : Ne pas utiliser
de produits de ne ttoyage et éviter de touch er la
surface délicate du filtre.
3 Re m ettre en place le filtre et la grille , com m e
indiq ué sur le sch ém a (29 ,31).
Im portant : Encle nch e r tout d’abord la partie inférieure
de la grille du filtre, puis la partie supérieure. Vérifie r q ue
le filtre est bien en place.
Filtre m ote u r recom m andé : EF 1
Filtre de sortie d'air recom m andé : AEF 08
Nettoyage du flexible et du suceu r
L’aspirateur s’arrête autom atiq u em ent en cas
d’ob struction au niveau du suceur, du tube , du fle xible ou
de s filtres e t lorsq ue le sac à poussière est plein. S il’un de
ces cas se prése nte , débranch e r l’aspirateur du se cte ur et
le laisser refroidir pendant 20 à 30 m inute s. Retirer le ou
les élém ents responsables de l’obstruction et / ou
rem placer le s filtres et le sac à poussière, puis rem ettre
l’aspirate ur en m arch e.
Nettoyage des tubes et du fle xible
(32) Utilise r un ch iffon pour nettoyer le s tubes et le
fle xible .
(33) Il est aussi possible d’élim iner ce q ui obstrue le
fle xible en appuyant dessus. Cependant, il faut faire
atte ntion e n cas d’obstruction par du verre ou de s
aiguilles q ui seraient coincée s dans le flexible.
Re m arque : La garantie ne couvre pas les dom m ages
portés au fle xible lors de son ne ttoyage.
Nettoyage du suce ur pour sols
(33) Pou réviter que la puissance d’aspiration ne se
détériore, nettoyer régulièrem ent le suceur pour tapis
/ sols durs. Pour cela, utiliser la poignée du flexible .
Nettoyage de la turbobrosse (suivant le s m odèle s)
(35) Enlever la tu rbobrosse du tube de l’aspirate ur, puis
retire r le s fils em m êlés, etc. e n les coupant ave c des
ciseaux. Utiliser la poignée du flexible pour nettoye r
la tu rbobrosse .
8
Page 12

(36) Si la turbobrosse ne fonctionne plus, ouvrir le
couvercle de nettoyage et retirer le s objets qui
em pêch e nt la turbine de tourner librem ent.
Gestion de s panne s
L’aspirate ur ne se m et pas en m arch e
1 Vérifie r q ue le câble d’alim entation est relié au
secteur.
2 Vérifie r q ue la prise et le câble ne sont pas abîm és.
3 Vérifie r q u’aucun fusible n’a sauté.
L’aspirate ur s’arrête
1 Vérifie r si le sac à poussière est plein. Si c’e st le cas,
le rem place r par un sac ne uf.
2 Vérifie r q ue le suceur, le tube e tle flexible ne sont
pas obstrués.
3 Vérifie r q ue le s filtres ne sont pas obstrués.
De l’e au a été aspirée
Le m oteur doit être rem placé par un Centre Service Agréé
AEG- Ele ctrolux. Les dom m ages portés au m ote ur par
l’e ntrée d’eau ou de liq uides ne sont pas couve rts par la
garantie .
Inform ations consom m ate ur
Pour toute de m ande de réparation ou de pièces de
rech ange conce rnant votre aspirate ur AEG- Ele ctrolux,
consulte r la liste se trouvant dans le carton de cet
aspirateur pour trouve r Centre Service Agréé le plus
proch e de ch e z vous ou appele r le se rvice consom m ateurs.
Spécifier le m odèle de l'aspirateur pour toute com m ande
de pièces de rech ange.
Ve uillez égalem ent vous reporter à la broch ure
‘Conditions de garantie et Se rvice après - vente’ pour plus
d’inform ations sur AEG- Electrolu x.
Electrolux
Le s fonctions de l'aspirate ur et les accessoires sont
protégés à l'étranger par des breve ts déposés.
Le groupe Electrolux peut, de te m ps à autre, apporte r des
ch ange m ents à ses produits ; par conséq uent, les
inform ations fournies dans ce livret peu ve nt faire l'objet
de m odifications sans préavis.
Sacs et accessoires
Si vous rencontrez des difficultés pour trouver le bon sac,
filtre ou accessoire pour votre nouvel aspirate ur, nou s
vous invitons à visite r notre site w eb à l’adresse :
w w w .m e nalux.com
Le sym bole sur le produit ou son em ballage indiq ue
q ue ce produit ne peut être traité com m e déch et
m énager. Il doit être rem is au point de collecte dédié à ce t
effet (colle cte e t recyclage du m atériel électrique et
électroniq ue). En procédant à la m ise au rebut de
l'appareil dans les règles de l’art, nou s préservons
l'environnem ent et notre sécurité, s’assurant ainsi que les
déch ets se ront traités dans de s conditions optim um . Pour
obte nir plu s de détails sur le recyclage de ce produit,
veuille z prendre contact avec le s se rvice s de votre
com m une ou le m agasin où vous ave z effe ctué l'ach at.
9
* Suivant le s m odèles
Page 13

Accessoires
1 Stofzak
2.* Tele scoopbuis
3.* Verlengbuis (2)
4 Slanggree p + slang
5 Z u igm ond voor tapijt/gladde
6 Z uigm ond voor park e t
7.* Turbozuigm ond
8a Com binatiezuigm ond
8b M ondstuk voor bek leding
Veiligh eidsinstructie s
Dit apparaat m ag nie t w orden gebruik t door personen
(m et inbegrip van k inderen) m et be pe rk te lich am elijk e,
zintuiglijk e of geestelijk e ve rm ogens, w einig ervaring of
onvoldoe nde k e nnis van h et apparaat, tenzij dit gesch iedt
onde r toezich t en be ge le iding van iem and die de
verantw oordelijk h e id draagt voor h un veiligh eid.
De stofzuiger is dubbel geïsoleerd en h oeft niet te w orden
geaard. Let op dat k inderen niet spelen m et h e t apparaat.
Stofzuig nooit:
• In natte ruim ten.
• In de buurt van ontvlam bare gassen, e nz.
• Z onder een stofzak (h ierdoor k an de stofzuiger
be sch adigd rak e n). De stofzuiger is voorzien van een
veiligh e idsm ech anism e, w aardoor de k lep niet k an
w orden gesloten w annee r er gee n stofzak aanw ezig
is. Probeer de k le p nooit m et k rach t te sluiten.
• Sch erpe voorw erpen.
• Vloeistoff en (dit k an ernstige sch ade toe brengen
aan h et apparaat).
• H e te of k oude as, brande nde sigarettenpe uk en, enz.
• Fijn stof van bijvoorbe e ld gips, be ton, bloem of as.
Bovengenoem de voorw erpen en vloe istoff e n
k unnen sch ade aan de m otor veroorzak en. Dergelijk e
sch ade valt niet onde r de garantie .
Voorzorgsm aatregelen betre ff e nde h et
aansluitsnoer. Als h et aansluitsnoe r is be sch adigd,
m oet dit door onze se rvice- afdeling w orden
vervangen om risico te verm ijden.
Sch ade aan h et snoer van de stofzuige r valt niet
onde r de garantie .
• Tre k de stofzuige r nooit aan h et snoe r om h oog of
naar u toe.
• Tre k ee rst de ste k k e r uit h et stopcontact voordat u
de stofzuiger gaat reinigen of onde rh oude n.
• Controleer regelm atig of h et snoer niet is
be sch adigd. Gebruik de stofzuiger nooit als h e t
aansluitsnoer besch adigd is.
• Re paratie s m oge n allee n door onze service- afdeling
w orden uitgevoe rd. Be rg de stofzuiger altijd op een
droge plaats op.
Voordat u begint
(9 ) Controleer of de stofzak en de m otorfilter in de
stofzuiger zijn geplaatst.
(10) Plaats de slang in de opening totdat deze vastk lik t.
(Druk op de vergrendeling om de slang los te m ak en.)
(11) Bevestig de ve rle ngbuis of de tele scoopbuis (alle en
bij bepaalde m ode llen) op de slanggree p e n de
zu igm ond. Als u deze w eer uit elk aar w ilt h alen,
draait en trek t u eraan.
(12) Rol h et snoer uit en steek de stek k er in h et
stopcontact. De stofzuiger h ee ft e e n geïnte greerd
opw indm ech anism e. Druk op h e t voe tpe daal om h et
snoer op te rollen (stek ker vasth ouden zodat deze
niet tegen u aanslaat).
(13) Druk op de aan/u it k nop om de stofzuige r aan te
ze tte n.
(13/14) Ste l de zuigk rach t in m et de verm ogensrege laar
op de stofzuiger of m et de zuigk ra ch tregelaar op de
slanggree p.
(15) De prak tisch e park eerstand m aakt h et gem ak k elijk er
om even te pauze ren tijdens h et stofzuigen, e n
verm inde rt ook h e t risico op besch adigingen.
(16) In de park eerstand k unt u de stofzuiger
gem ak k elijk er ve rplaatse n en opbergen.
Gebruik de zuigm onden als volgt.
Tapijt: geb ruik de zuigm ond voor tapijt/gladde vloeren
m et de greep in positie (17). Ve rm inde r de zuigk rach t voor
k le ine tapijte n.
Gladde vloeren: gebruik de zuigm ond voor tapijt/gladde
vloe re n m et de gree p in positie (18).
H outen vloeren: gebruik de zuigm ond voor park e t (alle e n
be paalde m ode lle n, 6).
Spe ciale com b inatiezuigm ond: neem de zuigm ond uit de
h ouder voor accessoire s e n gebruik de ze voor
boe k enplank en (door de “borste l” uit te vouw en) of k iere n
en h oek en (m et h e t “k iere n”-uite inde ) (8a).
Gestoffeerd m eubilair: Gebruik h et m ondstuk voor
m eubels (8b).
Gordijnen, lich tge w ich t stoffen, enz.: Gebruik h et
m ondstuk voor m eube ls (8b). Verm inder zo nodig de
zu igk rach t.
H e t gebruik van de turbozu igm ond (alle e n bij be paalde
m odellen) (7)
(19 ) Be vestig de zuigm ond aan de zuigbuis.
10
* Alleen be paalde m odelle n
Page 14

Opm erk ing: ge bruik de turbozuigm ond nie t op
die renh uiden, k le den m et lange franje s of k lede n m et een
(pool)dik te van m ee r dan 15 m m . Laat de zuigm ond niet
op één plaats staan terw ijl de borstel ronddraait.
H ie rdoor k an h e t tapijt be sch adigd raken.
Ga m et de zuigm ond niet ove r elek trisch e snoeren en
sch ak e l de stofzuiger na gebruik onm idde llijk u it.
De stofzak vervangen/de filte r sch oonm ak en
Vervangen van de stofzak
De stofzak m oet in iede r geval w orden vervangen
w annee r h et indicatie venster h elem aal rood is. Lees h et
venste r af te rw ijl u de zuigm ond om h oog h oudt (20).
1 Open de k lep.
2 De stofzak h ouder ve rw ijderen (21)
3 Tre k aan h e t k arton om de stofzak uit de
insteek h oude r te tille n. De stofzak w ordt
autom atisch gesloten, zodat er gee n stof k an
ontsnappen. (22)
4 Plaats een nieuw e stofzak door h et k arton tot aan
h et einde van de groef op de insteek h oude r te
duw en (u voe lt ee n k lik ). Plaats de h ouder te rug en
sluit de k lep.(23)
Stofzak ref. nr.: S- bag® classic (GR 200)
Stoffe n stofzak (23, 24, 25)
1 Ve rw ijder de stoffen stofzak van de h aak.
2 Ve rw ijder de plastic clip van de stofzak om die te
open en en te legen.
3 Ve rvang de plastic clip en verze k er u dat de 2 k ante n
van de stofzak paralel zijn.
4 Ste e k de stofzak te rug in de h aak.
5 Nota: de stofzak m ag gew assen w orde n in lauw
w ater, laat die ach teraf volle ding drogen. Nie t
w assen in e en w asautom aat.
6 Sluit h e t dek sel.
H e t m otorfilter vervangen
Dit is noodzakelijk bij e lk e vijfde vervanging van de stofzak
1 Open de k lep.
2 Ve rw ijder h et oude filter (26).
3 Breng ee n nie uw filter aan en sluit de k lep.
H e t m icrofilte r en h et niet- uitw asbare H EPAfilter vervangen *
De filter m oet altijd door ee n nie uw e w orden vervangen
en m ag nie t w orden gew assen. Dit is noodzak elijk bij elk e
vijfde ve rvanging van de stofzak.
1 H aal de k lep los (27; 28).
2 Ve rw ijder h et filter en vervang h et door e e n nieuw e
zoals w ordt aange geve n in de afbeelding (29 ; 31).
Belangrijk : m aak ee rst de onderk ant van h et filterfram e
vast en daarna de bovenk ant. Controle e r of de sluiting
goed op zijn plaats zit.
H e t uitw asbare H EPA- filter reinigen *
Dit is noodzakelijk bij e lk e vijfde vervanging van de
stofzak .
1 H aal de k lep los en ve rw ijder h et filter (27; 28).
2 Spoe l de (vuile ) binnenk ant van h et filter sch oon
onde r de w arm e k raan. (30) K lop op h et filterfram e
om h et w ate r te verw ijde re n. H erh aal dit vier k e e r en
laat h e t filte r opdrogen. Opm erk ing: ge bruik gee n
sch oonm aak m idde len en raak h et k w etsbare
filte roppervlak niet aan.
3 Ve rvang h et filter en de k le p zoals in de afbeelding
w ordt aange geve n (29 ; 31).
Belangrijk : m aak ee rst de onderk ant van h et filterfram e
vast en daarna de bovenk ant. Controle e r of de sluiting
goed op zijn plaats zit.
Filters ref. nr.:
M otorfilter: EF 1
M icrofilter: AEF 08
De zuigbuis en de zuigm ond reinigen
De stofzuiger stopt autom atisch als h e t m ondstuk , de
zu igbuis, de slang of de filters en stofzak ve rs topt raken.
Tre k in dergelijk e gevallen de stek k e r uit h e t stopcontact
en laat de stofzuiger 20 à 30 m inute n afk oelen. Verw ijder
h et m ate riaal dat de verstopping veroorzaak t en/of ve
rvang de filters en de stofzak .
Z e t ve rvolgens de stofzuiger w ee r aan.
Buizen en slang sch oonm ak en
(32) Gebruik ee n sch oonm aak strip of een soortgelijk
m ate riaal voor h et reinigen van de buizen en de slang.
(33) U k unt eve ntueel de verstopping uit de slang
verw ijderen door in de slang te k nijpe n. W ee s ech ter
voorzich tig als de k ans bestaat dat de verstopping
w ordt veroorzaak t door glas of naalde n in de slang.
Opm erk ing: de garantie is niet van toe passing indien
sch ade aan de slang als gevolg van reinigen is ontstaan.
De zuigm ond voor tapijt/gladde vloeren reinigen
(34) Re inig de zuigm ond voor tapijt/gladde vloeren
regelm atig om ve rm inde ring van de zuigk rach t te
voork om e n. U k unt de zuigm ond gem ak k elijk
reinigen m et de slanggreep
De tu rbozuigm ond sch oonm ak en (alleen bij
bepaalde m odellen)
(35) M aak de zuigm ond los van de zuigbuis en ve rw ijder
alle ve rw arde draadje s, enz., door deze m et een
sch aar los te k nippen. Gebruik de slanggreep om de
zu igm ond te reinigen.
11
* Alleen be paalde m odelle n
Page 15

(36) Als de turbozuigm ond niet m ee r w erk t, opent u de
reinigingsk le p en ve rw ijdert u eve ntuele voorw erpen
die de turbine ve rh inderen vrije lijk te draaien.
(37.) Maak h et m ondstuk los van de zuigbu is en ve rw ijder
alle ve rw arde draadje s, enz., door deze m et een
sch aar los te k nippen. Gebruik de slanggreep om h e t
m ondstuk te reinigen
Problem en oplossen
Stofzuiger doet h et nie t
1 Controleer of de ste k k er in h et stopcontact zit.
2 Controleer of de ste k k er en h et snoer niet
be sch adigd zijn.
3 Controleer of de zek eringe n nie t doorgebrand zijn.
Stofzuiger h oudt erm ee op
1 Controleer of de stofzak vol is. Vervang deze indien
nodig door ee n nie uw e.
2 Is de zuigm ond, de buis of de slang ve rstopt?
3 Z ijn de filters verstopt?
Er is w ater in de stofzuiger ge k om en
De m otor m oet door onze se rvice- afdeling w orden
vervangen.
Sch ade aan de m otor ve roorzaak t door binne ndringend
w ater valt niet onde r de garantie .
Klantinform atie
Raadple e g, als u se rvice of onderde len voor uw Ele ctroluxstofzuiger nodig h eb t, de lijst m et se rvicepunte n die bij
uw stofzuiger is gele verd voor h et dich tstbijzijnde erk ende
Ele ctrolux- se rvice pu nt of ne em contact op m et de serviceinform atielijn. Gee f h et type van uw stofzuiger op als u
onde rdelen bestelt.
Z ie ook de extra AEG- Ele ctrolux inform atie in de aparte
AEG- Ele ctrolux garatievoorw aarden.
Electrolux
Bepaalde eigensch appen en accessoires van de stofzuiger
w orden in h et buitenland besch erm d door geregistreerde
octrooien van geregistreerde ontw erpen.
De Ele ctrolux Groep k an op elk m om ent producten
m odificeren zonder voorafgaande k ennisgeving en als
gevolg h iervan zijn de details in deze h andleiding
onde rh e vig aan w ijziging.
Stofzak k en en Accessoires
Indien U problem en h e e ft m et h et vinde n van de juiste
stofzak k e n, filte rs of accessoires, raadple e g dan de
volge nde w ebsites: w w w .m enalux.com
H e t sym bool op h et product of op de ve rpak king
w ijst erop dat dit product niet als h uish oudafval m ag
w orden be h andeld. H et m oet e ch te r naar een plaats
w orden geb rach t w aar e lek trisch e en ele k tronisch e
apparatuur w ordt gerecycled. Als u e rvoor zorgt dat dit
product op de corre cte m anie r w ordt ve rw ijderd,
voork om t u m ogelijk voor m ens en m ilieu ne gatieve
gevolgen die zich zoude n k unne n voordoen in geval van
verk ee rde afvalbeh ande ling. Voor m ee r de tails in ve rband
m et h e t recyclen van dit product, neem t u h et best
contact op m et de gem eentelijk e instanties, h et bedrijf of
de die nst be last m et de verw ijde ring van h uish oudafval of
de w ink el w aar u h et product h ebt gek och t.
12
* Alleen be paalde m odelle n* Alleen be paalde m odelle n
Page 16

Accesorios
1 Bolsa para e l polvo
2* Tubo te lescópico
3* M ango y tubo de e xte nsión (2)
4 M ango y tubo flexible
5 Boq uilla para alfom bra y supe rficies duras
6* Cepillo Park etto
7* Cepillo Turbo
8a Boq uilla com binada
8b Boq uilla para tapice ría
Precaucione s de se guridad
Este ele ctrodom éstico no está indicado para q ue lo
utilicen personas (incluidos niños ) con discapacidades
físicas, sensoriale s o m entales o que no cue nte n con
experiencia o conocim ientos, a m e nos que lo h agan bajo
supe rvisión o según las instruccione s de una persona
responsable de su se guridad.
El aspirador dispone de doble aislam iento y no ne cesita
conexión a tierra. Se de berá controlar que los niños no
jueguen con e ste ele ctrodom éstico.
Nunca pase el aspirador:
• En zonas m ojadas.
• En las proxim idade s de gases inflam able s, e tc.
• Sin bolsa para e l polvo (porq ue podría dañarse la
aspiradora). La aspiradora dispone de un dispositivo de
seguridad que im pide q ue se cie rre la tapa si no h ay
una bolsa. No intente forzar la tapa para q ue se cierre.
• Objetos cortantes.
• Fluidos (esto podría ocasionar graves daños al aparato).
• Cenizas cande nte s o frías, colillas de cigarro
encendidas, etc.
• Polvo fino, por ejem plo de ye so, cem ento, h arina o
ceniza. Estas m ate rias podrían ocasionar grave s
daños en el m otor (este tipo de daños no está
cubie rto por la garantía).
Advertencias acerca del cable de alim entación:
• Si e l cable de alim entación no está e n perfectas
condiciones, de be ser sustituido por el fabricante ,
por su servicio de asiste ncia o por personal
cualificado, para evitar todo tipo de riesgos.
• La garantía no cubre los daños ocasionados al cable
de l aparato.
• No utilice el cable para tirar del aspirador o
levantarlo.
• Desconecte el ench ufe de la tom a de corrie nte de la
pared ante s de lim piar o realizar cualq u ier tarea de
m antenim iento en el aspirador.
• Com pruebe periódicam ente q ue el cable no está
de teriorado. Bajo ninguna circunstancia utilice e l
aspirador si el cable no está en perfectas condiciones.
Todas las tareas de m ante nim iento y reparacione s
de ben ser confiadas exclusivam ente a un ce ntro de
servicio técnico autorizado de AEG- Ele ctrolux.
Guarde sie m pre el aspirador en un lugar seco.
Preparativos
(9 ) Verifiq ue q ue la bolsa de polvo y e l filtro del m otor
estén de bidam ente colocados.
(10) Inserte el tubo flexible h asta q ue el enganch e h aga
un sonido de clic al encajar (para soltar el tubo
fle xible , presione el enganch e ).
(11) Conecte el tubo de e xtensión o e l tubo te lescópico
(únicam ente en de te rm inados m odelos) al m ango del
tubo fle xible y al cepillo para suelos (para volver a
separarlos, gire y tire).
(12) Desenrolle el cable y e nch úfelo a la tom a de red. El
aspirador incorpora un siste m a para enrollar el cab le .
Para enrollar el cable , pise el pedal (suje te el e nch ufe
para e vitar q ue le golpee).
(13) Pulse e l botón de ence ndido / apagado para poner el
aparato en m arch a.
(13/14) Ajuste la pote ncia de aspiración m ediante el
botón de control de potencia del aspirador o el
control de aspiración del m ango del tubo fle xib le.
(15) El aspirador incorpora posiciones de uso cóm odas
para cuando h aga una pau sa m ientras lim pie o
durante la lim pie za, y redu ce al m ínim o el riesgo de
contractu ras lum bares.
(16) Este sistem a facilita adem ás m over y guardar el aspirador.
Utilice las boq uillas tal y com o se de scribe a
continuación:
Alfom bras y m oquetas: Utilice el cepillo para alfom bras,
m oquetas y suelos duros con la palanca en la posición (17).
Re duzca la potencia de aspiración si va a aspirar
alfom bras pequeñas.
Suelos duros: Utilice el cepillo para alfom bras, m oq uetas
y suelos duros con la palanca en la posición (18).
Suelos de m adera: Utilice el ce pillo Park etto para parq ué
(solam ente en algunos m odelos, 6).
Boquilla com binada especial: D e sm onte la boq uilla del
soporte de accesorios y utilícela para estanterías (pieza
con term inación de ce pillo) o ranuras, e sq uinas (pieza con
term inación para ranuras) (8a).
M u e ble s tapizados: Utilice la boquilla para m uebles (8b).
Cortinas, te jidos ligeros, etc.: Utilice la boquilla para
m uebles (8b). Re duzca la potencia de aspiración si fue ra
necesario.
13
* Sólo algunos m ode los
Page 17

Uso de la boquilla turbo solo dete rm inados m odelos) (7).
(19 ) Conecte el cepillo al tubo.
Nota: No utilice el cepillo turbo o potencia sobre
alfom bras de piel, alfom bras con fle cos largos o
alfom bras de pelo tupido de una profundidad q ue
sobrepase los 15 m m . Para evitar daños, no m antenga la
boq uilla parada m ientras esté girando el cepillo. No pase
la boquilla sobre cables de alim entación eléctrica y
ase gúrese de apagar el aspirador inm ediatam ente
de spués de term inar de usarlo.
Cam bio de la bolsa y lim pieza de l filtro
Cam b io de la bolsa para el polvo
No de be cam biar la bolsa h asta q ue el indicador de la
ventana se ponga en rojo com ple tam ente. Puede m irarlo
con la boquilla le vantada (20).
1 Abra la tapa.
2 Quite el soporte de la bolsa (21)
3 Tire del cartón para sacar la bolsa del polvo de las
ranuras.(22)
4 Inserte una nue va bolsa de l polvo em pujando el
cartón h asta el final de las ranuras del soporte, h asta
q ue note un “clic”. (23)
La referencia de la bolsa es: S- bag® classic (GR 200)
Bolsa de te la (23, 24, 25)
1 Re tire la bolsa de tela del conte ne dor.
2 Para ab rir y vaciar la bols a levante el clip.
3 Coloq ue de nuevo el clip de plastico, asegurandose
de q ue am bos lados de la bolsa q u e den paralelos.
4 Coloq ue la bolsa de nu evo dentro del conte nedor.
5 Nota: se puede lavar la bolsa en agua tibia y secar
com pletam e nte . No se debe lavar en lavadora.
6 Cierre la cubierta presionándola h asta q ue sue ne un
clic.
Re e m plazar e l filtro del m otor
Re com endam os sustituirlos cada cinco cam bios de bolsa
1 Abra la tapa.
2 Quite el filtro antiguo (26).
3 Inserte un nuevo filtro y cierre la tapa.
Cam b io del m icrofiltro y de l filtro no lavable
H EPA*
Los filtros deben sustituirse siem pre por filtros nuevos, ya
q ue los usados no pue den lavarse. Recom endam os
sustitu irlos cada cinco cam bios de bolsa
1 Abra y quite la tapa (27; 28).
2 Quite el filtro y reem plácelo por uno nuevo com o se
m uestra en la im agen (29 ; 31).
Im portante : inserte la parte inferior de l borde de l filtro
prim e ro y después la superior. Asegúrese de q ue q ueda
bie n encajado.
Lim pieza del filtro lavable H EPA*
Re com endam os sustituirlos cada cinco cam bios de bolsa
1 Abra y quite la tapa, de spués q u ite el filtro (27, 28).
2 Ponga el interior (lado sucio) de l filtro de bajo de
agua corriente caliente. (30.) Golpe e lige ram ente e l
contorno de l filtro para e lim inar e l exce so de agua
de l m ism o. Repita la operación cuatro ve ces y déje lo
secar. Nota: no utilice ningún producto de lim pieza y
evite tocar la supe rficie delicada del filtro.
3 Re e m place el filtro y la tapa com o se m uestra en (29
; 31).
Im portante : inserte la parte inferior de l borde de l filtro
prim e ro y después la superior. Asegúrese de q ue el cierre
se h a realizado correctam ente.
Re fe rencia de los filtros es:
Filtro de protección de l m otor: EF 1
Filtro de salida de aire: AEF 08
Lim pieza del tubo y de los cepillos
La aspiradora dejará de funcionar autom áticam ente si la
boq uilla, el tubo, el tubo flexible, los filtros o la bolsa
q uedan obstruidos. En ese caso, desconécte la de la tom a
de corriente y espere entre 20 y 30 m inutos h asta que se
enfríe. D e satasq ue las obstruccione s, o bie n cam b ie los
filtros y la bolsa, y vu elva a pone r en m arch a la aspiradora.
Lim pieza de tubos y tubo fle xible
(32) Utilice una tira de tela o sim ilar para lim piar los
tubos y e l tubo flexible.
(33) Tam bién es posible desatascar e l tu bo flexible
apretándolo. No obstante, tenga cuidado, ya q ue
podría estar ob turado por fragm entos de vidrio o
agujas atascados en el interior del tub o fle xible .
Nota: la garantía no cubre los daños ocasionados e n e l
tubo fle xible al lim piarlo.
Lim pieza del cepillo para suelos
(34) Para evitar la pérdida de potencia de aspiración,
lim pie frecue nte m ente el cepillo para alfom bras,
m oquetas y suelos duros. La form a m ás fácil de
h ace rlo e s utilizando el m ango del tub o fle xible .
Lim pieza del cepillo turbo (solo en de term inados
m odelos)
(35) Desconecte e l ce pillo de l tubo de l aspirador y retire
los h ilos u otras fibras enre dadas cortándolos con
tije ras. U tilice el m ango del tubo fle xible para
lim piar el cepillo.
14
Page 18

(36) En caso de que e l ce pillo turbo de je de funcionar,
abra la tapa de lim pieza y retire cualq uier objeto q ue
obstaculice el libre m ovim iento de la turbina.
(37.) Desenganch e la boq uilla del tubo de la aspiradora y
retire los pelos enganch ados, etc., cortándolos con
las tije ras. Utilice el m ango del tub o fle xib le para
lim piar la boquilla
Solución de problem as
El aspirador no se pone en funcionam iento
1 Com pruebe si el cable de alim entación está
ench ufado a la tom a de corriente .
2 Ase gúrese de q ue el ench ufe y e l cable no están
dañados.
3 Com pruebe si se h a fundido algún fusible.
El aspirador deja de funcionar
1 Com pruebe si está llena la bolsa de polvo. En tal
caso, cám biela por otra nueva.
2 ¿Se h an atascado la boq uilla, el tubo o el tub o
fle xible ?
3 ¿Están los filtros atascados?
H a entrado agu a en el aspirador
En este caso e s ne cesario cam biar e l m otor en un ce ntro
técnico autorizado de AEG- Electrolux. Los daños en el
m otor causados por la entrada de agua no están cubiertos
por la garantía.
El sím bolo en el producto o en su em balaje indica
q ue este producto no se puede tratar com o desperdicios
norm ale s del h ogar. Este producto se de be entregar al
punto de recolección de eq uipos eléctricos y electrónicos
para reciclaje. Al asegurarse de q u e este producto se
de se ch e correctam e nte , usted ayudará a evitar posible s
consecue ncias negativas para e l am biente y la salud
pública, lo cual podría ocurrir si este producto no se
m anipula de form a adecuada. Para obte ne r inform ación
m ás detallada sobre el reciclaje de este producto, póngase
en contacto con la adm inistración de su ciudad, con su
servicio de desech os del h ogar o con la tie nda donde
com pró el producto.
Inform ación para el cliente
Si ne cesita servicio técnico, recam bios o consum ibles para
su aspirador Ele ctrolux, por favor, consulte la lista de
Talleres de Se rvicio Técnico autorizados, q ue se adjunta en
la caja de este aspirador, para ve r cuál e s el m ás próxim o
a su dom icilio, o llam e al teléfono de atención al cliente.
Cuando h aga un pedido de recam bios, no olvide
especificar el tipo de m odelo.
Por favor vea tam bién la inform ación adicional de AEGEle ctrolux en el libro de garantía de AEG- Ele ctrolux.
Electrolux
Las caracte rísticas del aspirador y sus acce sorios están
prote gidas en e l extranjero bajo patentes o dise ños
registrados.
El grupo Ele ctrolux puede introdu cir m odificaciones en
sus productos y, en consecue ncia, los datos conte nidos en
esta guía serán susceptible s cam bios sin previo aviso.
Bolsas y accesorios
En caso de q ue no encu entre los accesorios adecuados
para su aspirador (bolsas, filtros … ), por favor, llam e a
nuestro centro de atención al cliente (el núm ero está e n la
garantía) o visite nu estra página w eb w w w .m e naulx.com
15
* Sólo algunos m ode los
Page 19

Acessórios
1 Saco do pó
2* Tubo te lescópico
3* Tubo de extensão (2)
4 Pe ga da m angueira + m angueira
5 Bocal para tapete/piso duro
6* Bocal para soalh o
7* Bocal tu rbo
8a Com binação bocal/e scova
8b Bocal de forro interno
Precauções de se gurança
Este aparelh o não se destina a se r utilizado por pessoas
(incluindo crianças) com deficiências físicas, sensitivas ou
m entais ou com falta de experiência e conh ecim entos, a
m enos que sejam supervisionadas ou instruídas no que se
refere à utilização do aparelh o por um a pe ssoa
responsáve l pe la sua segurança.
O aspirador está e q uipado com isolam ento du plo e não é
necessário q ue seja ligado à terra.
As crianças deve rão ser supervisionadas de m odo a
garantir q ue não brincam com o aparelh o.
Nunca aspire :
• Em áreas m olh adas.
• Pe rto de gases inflam áveis, etc.
• Se m um saco do pó colocado (is to pode danificar o
aspirador). Está instalado um dispositivo de
segurança que e vita q u e a tam pa se fech e se m q ue
esteja colocado um saco do pó. Não tente fech ar a
tam pa à força.
• Objectos aguçados.
• Líq uidos (este s podem provocar sérios danos na
m áquina).
• Cinzas q uentes, pontas de cigarros acesas, e tc.
• Pó fino de gesso, cim e nto, farinh a ou cinzas, por
exem plo.
Estes pode m causar sérios danos no m otor, não
cobertos pela garantia.
Precauções com cabos eléctricos:
• Se o cabo de alim entação estiver danificado, deve rá
ser substituído pelo fabricante , pelo representante
da assistência técnica ou por um a pe ssoa com
h abilitações sem elh antes, de m odo a e vitar possíve is
riscos. A garantia não cobre os danos no cabo do
aspirador.
• Nunca puxe nem le vante o aspirador pelo cabo.
• Desligue a fich a da tom ada ante s de lim par ou faze r
a m anutenção do aspirador.
• Ve rifiq ue regularm ente se o cab o não se encontra
danificado. Nunca u tilize o aspirador se o cab o
estiver danificado.
Qualq uer assistência oureparação tem de ser
executada por u m ce ntro de assistência AEGEle ctrolux autorizado. Guarde sem pre o aspirador
num local seco.
Antes de com eçar
(9 .) Ve rifiq ue se o saco do pó e o filtro do m otor estão
be m colocados.
(10.) Introduza a m angueira até o engate faze r cliq ue
para prender (em purre o engate para soltar a
m angueira).
(11.) Ligue o tubo da exte nsão ou o tubo telescópico
(apenas em alguns m ode los) à pe ga da m angueira e
ao bocal para piso (para os separar, rode e puxe ).
(12.) Estiq u e o cabo e ligue - o à tom ada. O aspirador te m
integrado um enrolador de cabos. Para enrolar o
cabo, prim a o pedal de pé (segure na fich a para
evitar que e sta o atinja).
(13.) Carregue no botão Ligar/D e sligar para ligar o
apare lh o.
(13./14.) Ajuste o pode r de sucção com o botão de
controlo de potência do aspirador ou o controlo de
sucção na pega da m angueira.
(15.) Um a função de arrum ação prática (além de
m inim izar o risco de q uebra do eq uipam ento) facilita
as pausas ao aspirar.
(16.) A função de arru m ação facilita a m ovim entação e o
arm azenam ento do aspirador.
Utilize os bocais com o se se gue :
Tapete s: Utilize o bocal para tapete/pis o duro com a
alavanca na posição (17). Reduza a potência de sucção
para tapetes peq uenos.
Pisos duros: Utilize o bocal para tapete/piso duro com a
alavanca na posição (18).
Pisos de m adeira: U se o bocal para soalh o (apenas em
alguns m ode los, 6).
Com b inação bocal/escova espe cial: Retire o bocal do
com partim ento de acessórios e utilize - o para e stantes
(de sdobrando a e xtre m idade de “escova”) ou fendas e
cantos (com a extrem idade de “fe ndas”) (8a).
M obiliário estofado: Utilize o bocal de m obília (8b).
Cortinas, tecidos lige iros, etc.: Utilize o bocal de m obília
(8b).
Re duza o poder de sucção se necessário.
Utilização do bocal turbo (apenas determ inados m odelos)
(7.)
(19 .) Prenda o b ocal ao tubo.
16
* Apenas para alguns m odelos
Page 20

Nota: Não utilize o bocal m otorizado ou turbo em
tapetes com pêlo, tape te s com franjas ou tape te s com
um a espe ssura supe rior a 15 m m . Para e vitar danificar o
tapete, não m ante nh a o bocal parado enq uanto a escova
estiver a rodar. Não passe o bocal por cim a de cabos
eléctricos e certifiq ue- se de q ue de sliga o aspirador
im ediatam ente de pois de o utilizar.
Sub stituir o saco do pó/lim par o filtro
Substituir o saco do pó
O saco do pó tem de ser substituído, o m ais tardar,
q uando a janela do indicador estiver com ple tam ente
verm elh a. Verificar com o bocal levantado (20.).
1 Abra a tam pa.
2 Re m ove r o suporte do saco de pó (21)
3 Puxe o cartão para retirar o saco de pó das ranh uras.
Isto fe ch a autom aticam e nte o saco de pó e e vita que
o pó saia. (22)
4 Insira um novo saco de pó em purrando o cartão até
ao final das ranh uras no suporte . Sentirá um “cliq ue”.
Substitua o suporte e fech e a tam pa. (23)
Saco de pó re f. nr.: S- bag® classic (GR 200)
Saco de pano (23, 24, 25)
1 Re tire o saco de pano do pó do suporte.
2 Faça deslizar o clip de plástico do saco para o abrir e
esvaziar.
3 Torne a colocar o clip de plástico assegurando- se
q ue am bos os lados do saco estão parale los.
4 Volte a colocar o saco no seu suporte .
5 Nota: o saco pode ser lavado em agua m orna e de ve
secar com pletam ente antes de voltar a ser utilizado.
Não de ve se r lavado na m áq uina de lavar.
6 Fech e a tam pa pressionando- a até ouvir um estalido.
Substituição do filtro do m otor
Deve ser efectuado de 5 em 5 substituições do saco do pó
1 Abra a tam pa.
2 Re tire o filtro antigo (26.).
3 Insira um novo filtro e fe ch e a tam pa.
Substituição do m icrofiltro e do filtro H EPA não
lavável*
O filtro deve se m pre ser substituído por filtros novos e
não pode ser lavado. De ve ser e fe ctuado de 5 e m 5
sub stituições do saco do pó
1 Abra e retire a tam pa (27. ; 28.).
2 Re tire o filtro e substitua- o por um novo, conform e
aprese ntado na im agem (29 . ; 31.).
Im portante: encaixe a parte inferior da estrutura do filtro
em prim eiro lugar, em seguida, a supe rior. Certifiq ue - se
de q ue o vedante e stá colocado no re spectivo lugar.
Lim pe za do filtro H EPA lavável*
Deve ser efectuado de 5 em 5 substituições do saco do pó
1 Abra e retire a tam pa e, em seguida, retire o filtro
(27. ; 28.).
2 Lave o interior (lado sujo) do filtro em água tépida.
(30.)
Bata na estrutura do filtro para rem ove r o excesso de
água.
Re pita este procedim ento q uatro ve zes e deixe o filtro
secar. Nota: Não utilize agentes de lim peza e e vite tocar
na supe rfície delicada do filtro.
3 Substitua o filtro e a tam pa tal com o indicado (29 . ;
31.).
Im portante : encaixe a parte infe rior da estrutura do
filtro em prim e iro lugar e, em seguida, a superior.
Certifiq ue- se de q ue o vedante está colocado no
respectivo lugar.
Filtros ref. nr.:
Filtro de prote cção do m otor: EF 1
Filtro de escape : AEF 08
Lim peza da m angueira e do bocal
O aspirador parará autom aticam ente s e o bocal, tubo,
m angueira ou filtros e saco do pó ficarem bloq ue ados.
Nestes casos, de sligue - o da tom ada e deixe- o arrefecer
durante 20 a 30 m inutos. Lim pe a obstrução e/ou
sub stitua os filtros e o saco do pó e ligue o aspirador
novam ente.
Lim peza de tubos e m angue ira
(32.) Utilize um a fita de lim peza ou um instrum ento
sem elh ante para lim par os tubos e a m angue ira.
(33.) Tam bém é possível rem over a obstrução na
m angueira ape rtando- a. No entanto, tenh a cuidado
no caso de a ob strução ser causada por vidros ou
agulh as presas no inte rior da m angueira.
Nota: A garantia não cobre q ualq uer dano da m angue ira
provocado pela sua lim peza.
Lim peza do bocal de piso
(34.) Para evitar a dete rioração da potência de sucção,
lim pe freq uente m ente o bocal para tapete/piso duro.
A form a m ais sim ples de o lim par é utilizando a pega
da m angueira. Lim peza do bocal turbo (apenas em
alguns m ode los)
(35.) Se pare o bocal do tubo do aspirador e rem ova fios
q ue possam estar presos, etc., cortando- os com um a
tesoura.
17
* Apenas para alguns m odelos
Page 21

Utilize a pega da m angue ira para lim par o bocal.
(36.) No caso de o bocal tu rbo deixar de funcionar, abra a
tam pa de lim peza e rem ova q uaisq uer objectos q ue
possam estar a obstruir a tu rbina e a im pedi- la de
girar livrem ente.
(37.) Se pare o bocal do tubo do aspirador e rem ova fios
enrolados, etc. cortando- os com um a te soura. Use a
pega da m angue ira para lim par o bocal.
Re solução de problem as
O aspirador não arranca
1 Ve rifiq ue se o cabo está ligado à corrente.
2 Ve rifiq ue se a fich a e o cabo não estão danificados.
3 Ve rifiq ue se h á algum fusíve l queim ado.
O aspirador pára
1 Ve rifiq ue se o saco do pó está ch eio. Se estiver,
sub stitua- o por um novo.
2 Estará o bocal, tubo ou m angueira entupido?
3 Estarão os filtros entupidos?
Entrou água no aspirador
Se rá ne cessário procede r à substituição do m otor num
centro de assistência AEG- Ele ctrolux autorizado. Os danos
causados no m otor pela entrada de água não estão
cobertos pela garantia.
O sím bolo no produto ou na em balagem indica q u e
este produto nao pode se r tratado com o lixo dom éstico.
Em vez disso, deve se r entregue ao ce ntro de re colh a
selectiva para a reciclagem de eq uipam ento e léctrico e
electrónico. Ao garantir um a e lim inaçao ade q uada deste
produto, irá ajudar a evitar eventuais conse q uencias
negativas para o m eio am biente e para a saúde pública,
q ue, de outra form a, pode riam ser provocadas por um
tratam ento incorrecto do produto. Para obte r
inform açoes m ais porm e norizadas sobre a reciclagem
de ste produto, contacte os serviços m unicipalizados
locais, o ce ntro de recolh a selectiva da sua áre a de
residencia ou o estabelecim e nto onde adq uiriu o produto.
Inform ação ao Cliente
Se ne cessitar de assistência ou de peças sobressele nte s
para o se u aspirador Ele ctrolux, consulte a lista de centros
de assistência forne cida com este aspirador para obte r
inform ações sobre o centro de assistência autorizado
Ele ctrolux m ais próxim o ou contacte a linh a apoio ao
clie nte . Especifiq ue o m odelo q uando encom endar peças
sobresse lentes.
Por favor veja tam bém a inform ação adicional de AEGEle ctrolux no livreto separado da garantia de AEGEle ctrolux.
Electrolux
As funções e acessórios do aspirador estão protegidos por
pate nte s registadas de Re giste red D e signs.
O grupo Ele ctrolux poderá introduzir m odificações ao
produto sem pre q ue necessário e conseq uentem ente as
inform ações fornecidas neste m anual estão suje itas a
alteração se m aviso prévio.
Sacos de poeira e acessórios !
Se você tiver dificuldades em encontrar o e xacto saco de
poeira, filtro ou acessórios para seu aspirador, por favor,
entre em contacto com nossa central de atendim ento
(você pode encontrar o núm ero no m anual de garantia)
ou aceda à nossa loja virtual- w w w .m enaulx.com
18
* Apenas para alguns m odelos* Apenas para alguns m odelos
Page 22

Accessori
1 Sacch e tto raccoglipolve re
2* Tubo te lescopico
3* Tubo estensibile (2)
4 Im pugnatura per fle ssibile e flessibile
5 Bocch etta per tappeti/pavim enti duri
6* Bocch etta per parquet
7* Bocch etta Turbo
8a Bocch etta com binata
8b Bocch etta per im bottiti
Norm e di sicurezza
L’apparecch io non è de stinato ad essere utilizzato da
persone, com presi i bam bini, con ridotte capacità fisich e,
m entali o se nsoriali o con espe rienza e /o com pe te nze
istruite , a m e no ch e non siano sotto la supe rvisione di una
persona responsabile de lla loro sicurezza o non vengano
da essa is truite sull’utilizzo de ll’apparecch io.
L’aspirapolve re è dotato di doppio isolam ento e non
necessita di m essa a te rra. Tene rei bam bini sotto
supe rvisione per e vitare ch e gioch ino con l’apparecch io.
Non aspirare m ai:
• In are e bagnate.
• In prossim ità di gas infiam m abili, ecc.
• Se nza un sacch etto raccoglipolvere (in caso
contrario, l’aspirapolve re potrebb e essere
danne ggiato). Un dispositivo di sicurezza installato
sull’aspirapolve re im pedisce la ch iusura del
coperch io se m anca il sacch etto raccoglipolvere. Non
forzare il coperch io per ch iude rlo.
• Oggetti appuntiti.
• Fluidi (possono causare se ri danni alla m acch ina).
• Cene re calda o fredda, m ozziconi accesi di sigarette ,
ecc.
• Polvere fine di intonaco, calcestruzzo, farina o
cene re, ad ese m pio.
I m ateriali riportati sopra possono causare se ri danni
al m otore.
Questa evenienza non è coperta da garanzia
Precauzioni per il cavo ele ttrico:
• Se il cavo di alim entazione è danneggiato, de ve
essere sostitu ito dal produttore, da un suo agente
de ll’assistenza
• o da una persona egualm ente qualificata evitando
q ualsiasi form a di risch io. L’ eve ntuale
danne ggiam ento del cavo de ll’aspirapolvere non è
coperto da garanzia.
• Non tirare o sollevare m ai l’aspirapolve re per il cavo.
• Staccare la spina dalla presa di corrente ele ttrica
prim a della pulizia o de lla m anute nzione
de ll’aspirapolvere.
• Ve rificare periodicam e nte ch e il cavo non sia
danne ggiato.
Non utilizzare l’aspirapolvere se il cavo è
danne ggiato.
Tutti gli interventi di m anute nzione e riparazione
de vono essere e se guiti presso un centro di assiste nza
autorizzato AEG- Electrolux.
Conservare sem pre l’aspirapolvere in un am biente as
ciutto.
Prim a di com inciare
(9 .) Assicurarsi ch e il sacch etto raccoglipolvere e il filtro
de l m otore siano posizionati correttam ente.
(10.) Inserire il flessibile finch é il fe rm o non si blocca con
uno scatto (prem ere il ferm o per rilasciare il flessibile ).
(11.) Collegare il tubo di este nsione o il tubo telescopico
(solo per determ inati m ode lli) all’im pugnatura e alla
bocch etta per pavim enti (per riporli, piegare e tirare).
(12.) Estendere il cavo e inse rirlo ne lla presa a m uro.
L’aspirapolve re dispone di un riavvolgitore inte grato
de l cavo. Per riavvolge re il cavo, prem ere il pedale
(aff e rrare la spina pe r evitare di essere colpiti).
(13.) Per accende re l'apparecch io prem ere il tasto ON/OFF.
(13./14.) Regolare la pote nza di aspirazione tram ite il
pulsante di controllo de ll’accensione
sull’aspirapolve re o il com ando di aspirazione
sull’im pugnatura del fle ssibile.
(15.) Una com oda funzione di parch e ggio, oltre a ridurre
il risch io di rotture , sem plifica la siste m azione de
ll’as pirapolve re du rante le pause de lla pulizia.
(16.) La funzione di parch eggio sem plifica lo spostam ento
e la siste m azione dell’aspirapolvere.
Utilizzare le bocch ette com e segue :
Tappeti: utilizzare la bocch etta per tappeti/pavim enti duri
con la le va in posizione (17). Per i tappeti piccoli, ridurre
la pote nza di aspirazione .
Pavim enti duri: utilizzare la bocch e tta per
tappeti/pavim enti duri con la le va in posizione (18).
Pavim enti in legno: utilizzare la bocch etta per parquet
(solo per alcuni m odelli, 6).
Bocch etta com binata: estrarre la bocch etta dal vano
accessori e utilizzarla per m ensole (estraendo l’e stre m ità
con la spazzola) o fe ssure e angoli (con l’estrem ità a
fessura) (8a).
M obili im bottiti: Utilizzare la bocch etta per im bottiti (8b).
Tende, tessuti leggeri, ecc.: U tilizzare la bocch etta per
im bottiti (8b). Se necessario, ridurre la pote nza di
aspirazione.
19
* Solo per alcuni m ode lli
Page 23

Uso della bocch etta Turbo (solo per alcuni m ode lli) (7)
(19 .) Fissare la bocch etta al tubo.
Nota: non utilizzare la bocch etta Pow e r o Turbo su
tappetini di pe lliccia, tappetini con frange lungh e o con
una profondità di te ssitura supe riore a 15 m m . Per
evitare di danne ggiare il tappeto, non te ne re la bocch etta
ferm a m entre la spazzola ruota. Non passare la
bocch etta su cavi e lettrici e spegnere l’aspirapolve re
subito dopo l’uso.
Sostituzione de l sacch etto raccoglipolvere/
pulizia del filtro
Sostituzione del sacch etto raccoglipolve re
Il sacch etto raccoglipolvere deve esse re sostituito al più
tardi quando la spia indicatrice diventa com pletam e nte
rossa.
Controllare la spia con la bocch e tta solle vata (20.).
1 Aprire il coperch io.
2 Rim uovere il supporto del sacch etto raccoglipolvere
(21)
3 Tirare il cartone per estrarre il sacch e tto dalle
scanalature.
In tal m odo il sacch etto raccoglipolvere si ch iude
autom aticam e nte , evitando la fuoriuscita di polvere. (22)
4 Inserire un nuovo sacch etto spingendo a fondo il
cartone ne lle scanalature del supporto, fino a
q uando non si avve rte un “click ”. Rim ette re a posto
il supporto e ch iudere il coperch io. (23)
Sacch etto consigliato: S- bag® classic (GR 200)
Sacch etto in tessuto (23, 24, 25) Solo per alcuni
m odelli
1 Rim uovere il sacch etto in te ssuto dal conte nitore .
2 Far scivolare via la linguetta in plastica e svuotare il
sacch etto.
3 Rim ettere a posto la lingue tta in pla tica
assicu randos i ch e entram b i le parti siano parallele.
4 Rim ettere il sacch etto all’inte rno del conte nitore.
5 Attenzione: In sacco puo’ essere lavato con acq ua
tiepida e quindi asciugato. Non deve essere m esso in
lavatrice .
6 Ch iude re il coperch io spingendolo verso il basso fino
ad avvertire un “clic”.
Sostituzione del filtro del m otore
(dovrebbeessere effettuata ogni cinq ue sostituzioni del
sacch etto raccoglipolvere)
1 Aprire il coperch io.
2 Rim uovere il vecch io filtro (26.).
3 Inserire un nuovo filtro e ch iudere il coperch io.
Sostituzione del m icrofiltro e del filtro H EPA non
lavabile *
I filtri de vono esse re sem pre sostituiti e non è possibile
lavarli.
Il filtro de ve essere se m pre sostitu ito e non è possibile
lavarlo.
Questa operazione dovre bbe essere effe ttuata ogni cinque
sostituzioni del sacch e tto raccoglipolve re
1 Aprire e rim uove re il coperch io (27. ; 28.).
2 Rim uovere il filtro e sostituirlo con uno nu ovo, com e
m ostrato nella figura (29 . ; 31.).
Im portante : provocare lo scatto prim a ne lla parte
inferiore del telaio de l filtro, q uindi in quella supe riore.
Controllare ch e la guarnizione sia posizionata
correttam ente .
Pulizia del filtro lavabile H EPA* (dovrebbe essere
effettuata ogni cinq ue sostituzioni de l sacch etto
raccoglipolvere)
1 Aprire e rim uove re il coperch io, q uindi rim uovere il
filtro (27. ; 28.).
2 Sciacq uare la parte interna (lato sporco) del filtro
con acqua tie pida. (30.) Batte re delicatam ente sul
telaio del filtro per rim uove re l’acqua in ecce sso.
Ripe te re q uattro volte e lasciare asciugare il filtro.
Nota: non utilizzare detergenti ed evitare di toccare
la delicata supe rficie del filtro.
3 Riposizionare il filtro e il cope rch io com e illustrato
(29 . ;31.).
Im portante : provocare lo scatto prim a ne lla parte
inferiore del telato de l filtro, q uindi in quella superiore.
Controllare ch e la ch iu sura sia posizionata correttam ente.
Filtro m otore consigliato: EF 1
Filtro di scarico consigliato: AEF 08
Pulizia del flessibile e della bocch etta
L’as pirapolve re s i fe rm a autom aticam e nte s e la
bocch e tta, il tubo, il flessibile , i filtri o il s acch e tto
raccoglipolve re s i intas ano. In q ue s ti cas i, s taccare la
s pina dalla pre s a di corre nte e las ciar raffre ddare l’as
pirapolve re per 20- 30 m inuti. Rim uove re l’os truzione e
/o s os tituire i filtri e il s acch e tto raccoglipolve re ,
q uindi riacce nde re l’as pirapolve re.
Pulizia dei tubi e de l fle ssibile
(32.) Per pulire i tubi e i flessibili, utilizzare un panno o
sim ili.
(33.) L’ostruzione ne l flessibile può esse re rim ossa anch e
sch iacciandolo. Tuttavia, prestare atte nzione nel
caso in cui l’ostruzione sia causata da fram m e nti di
vetro o agh i all’inte rno del fle ssibile .
20
Page 24

Nota: la garanzia non copre ne ssun danno al flessibile
causato dalla relativa pulizia.
Pulizia della bocch etta per pavim enti
(34.) Per evitare ch e la potenza di aspirazione si riduca,
pulire freq uente m ente la bocch e tta per
tappeti/pavim enti duri. Il m odo più se m plice pe r
pulirla consiste nell’u tilizzare l’im pugnatura del
fle ssibile .
Pulizia della bocch etta Turbo (solo per alcuni
m odelli)
(35.) Scolle gare la bocch e tta dal tubo de ll’aspirapolve re e
rim uove re i fili e gli altri oggetti im pigliati
tagliandoli con le forbici. Pe r pulire la bocch e tta,
utilizzare l’im pugnatura del fle ssibile.
(36.) Se la bocch etta Turbo sm ette di funzionare, aprire il
coperch io per la pulizia e rim uove re eventuali
oggetti ch e im pediscono alla tu rbina di ruotare
liberam e nte
(37.) Scolle gare la bocch e tta dal tubo de ll’aspirapolve re e
rim uove re le fibre attorcigliate e cc. tagliandole con
le forbici. Utilizzare l’im pugnatura per fle ssib ile per
pulire la bocch e tta.
Ricerca e d elim inazione dei guasti
L’aspirapolvere non si acce nde
1 Controllare ch e il cavo sia collegato alla rete.
2 Controllare ch e la spina e il cavo non siano
danne ggiati.
3 Controllare ch e non vi sia un fusibile bruciato.
L’aspirapolvere si spegne
1 Controllare se il acch e tto raccoglipolve re è pieno. In
q uesto caso, sostituirlo con uno nuovo.
2 La bocch etta, il tubo o il flessibile sono ostruiti?
3 I filtri sono intasati?
Infiltrazione d’acq ua nell’aspirapolvere
Sarà necessario far sostituire il m otore presso un centro di
assistenza autorizzato AEG- Electrolux. I danni al m otore
causati dall’infiltrazione d’acq ua non sono coperti dalla
garanzia.
garanzia di AEG- Ele ctrolux.
Electrolux
Le funzioni dell'aspirapolve re e de gli accessori sono
prote tte all'estero dai breve tti registrati di D e sign
registrato.
Il gruppo Electrolux potrà apportare m odifich e al
prodotto di tanto in tanto, di consegue nza le inform azioni
contenute in q uesto opuscolo sono soggette a m odifica
senza preavviso.
Sacch etti e acce ssori!
Se h ai difficoltà nel trovare il giusto sacch etto, filtro o
accessorio per il tuo nuovo aspirapolve re per favore
ch iam a il nostro servizio clienti (troverai il num ero nel
libretto di istruzioni) o visitail nostro sito
w w w .m e naulx.com
Il sim bolo sul prodotto o sulla confe zione indica ch e
il prodotto non deve essere considerato com e un norm ale
rifiuto dom estico, m a deve essere portato nel punto di
raccolta appropriato per il riciclaggio di apparecch iature
elettrich e ed ele ttronich e. Provve dendo a sm altire questo
prodotto in m odo appropriato, si contribuisce a evitare
potenziali consegue nze ne gative per l’am biente e per la
salute , ch e potrebb e ro de rivare da uno sm altim ento
inadeguato de l prodotto. Per inform azioni piu dettagliate
sul riciclaggio di q uesto prodotto, contattare l’ufficio
com unale, il servizio locale di sm altim ento rifiuti o il
negozio in cui e stato acquistato il prodotto.
Inform azioni per il cliente
Qualora siano necessari parti di ricam bio o m ate riali di
consum o per l'aspirapolvere Electrolux, consultare l'elenco
de i centri di assiste nza, allegato a q uesto aspirapolve re
per individuare il centro assistenza autorizzato Ele ctrolux
più vicino oppure te lefonare al se rvizio assiste nza clie nti.
Spe cificare il m ode llo durante l'ordinazione dei ricam bi.
Fate riferim ento anch e ad ulteriori inform azioni sui
prodotti AEG- Electrolux ne l libretto se parato della
21
* Solo per alcuni m ode lli
Page 25

Εξαρτήµατα
1 Σακούλα σκόνη ς
2* Τη λεσκοπικός σω λήνας
3* Σω λήναςπ ροέ κταση ς (2)
4 Χειρολαβή + εύκαµπ τος σω λήνας
5 Ακροφύσιο για χαλί/σκλη ρό π άτω µα
6* Ακροφύσιο για ξύλινο δάπ εδο
7* Ακροφύσιο Turbo
8a Ακροφύσιο συνδυασµού
8b Ακροφύσιο ταπ ετσαρίας
Προφυλάξεις ασφαλείας
Αυτή η συσκευή δεν προορίζεται για χρήση απ ό άτοµα
(συµπ εριλαµβανοµέ νω ν και π αιδ ιών) µε µειω µέ νες
σω µατικέ ς, αισθη τη ριακέ ς ή π νευµατικέ ς ικανότη τες ή µε
έ λλειψ η εµπ ειρίας και γνώση ς, εκτός αν υπάρχει επ ίβλεψ η
ή έ χουν δ οθεί οδη γίες σχετικά µε τη χρήση τη ς συσκευής
απ ό άτοµο υπ εύθυνο για τη ν ασφάλειά τους.
Η η λεκτρική σκούπ α έ χει διπ λή µόνω ση και δεν χρειάζεται
να γειω θεί. Πρέπ ει να επιβλέ πετε τα µικρά π αιδιά,για να
βεβαιω θείτε ότι δεν παίζουν µε τη συσκευή.
Ποτέ µη ν σκουπ ίζετε:
Σε βρεγµέ νους χώρους.
• Κοντά σε εύφλεκτα αέ ρια, κλπ .
• Χωρίς σακούλα σκόνη ς (ενδέ χεται να π ροκλη θεί
βλάβη στη σκούπα). Ο µη χανισµός ασφαλείας π ου
διαθέ τει εµποδίζει το κάλυµµα να κλείσει όταν δεν
υπ άρχει σακούλα σκόνη ς . Μ η δ οκιµάσετε να
κλείσετε το κάλυµµα δια τη ς βίας.
• Αιχµη ράα ντικείµενα.
• Υγρά (ενδέ χεται να π ροκαλέ σουν σοβαρή ζη µιά
στο µη χάνη µα).
• Ζεστά ή σβη σµέ να κάρβουνα, αναµµέ να
απ οτσίγαρα, κ.λ.π.
• Για π αράδειγµα, σκόνη απ ό ασβέ στη , τσιµέ ντο,
αλεύρι ή στάχτη .
Τα π αραπ άνω ενδ έ χεται να π ροκαλέ σουν σοβαρή
ζη µιά στον κινη τήρα-ζη µιά π ου δεν καλύπ τεται απ ό
τη ν εγγύη ση .
Προφυλάξεις για το η λεκτρικό καλώδιο
Εάν υπάρχει βλάβη στο καλώδιο τροφοδοσίας, πρέπ ει
να αντικατασταθεί απ ό τον κατασκευαστή, τον
αντιπ ρόσω πο σέ ρβις ή από άλλο εξειδικευµέ νο άτοµο
για τη ν αποφυγή κινδύνου. Η εγγύη ση δεν καλύπτει
φθορέ ς του καλω δίου τη ς η λεκτρικής σκούπας.
• Ποτέ µη ν τραβάτε και µη ν αναση κώνετε τη ν
η λεκτρική σκούπ α απ ό το καλώδιο.
• Πριν απ ό τον καθαρισµό ή τη συντήρη ση τη ς
η λεκτρικής σκούπ ας να βγάζετε το βύσµα απ ό τη ν
π ρίζα στον τοίχο.
• Ελέγχετε τακτικά ότι το καλώδιο δ εν είναι
κατεστραµµέ νο. Μη ν χρη σιµοπ οιείτε π οτέ τη ν
η λεκτ ρική σκούπ α αν το καλώδιο είναι
κατεστραµµέ νο.
• Όλες οι επ ιδιορθώσεις και η συντήρη ση π ρέ π ει να
π ραγµατοπ οιούνται απ ό εξουσιοδοτη µέ νο κέ ντρο
σέ ρβις τη ς AEG-Ele ctrolux. Π άντα να βεβαιώνεστε
ότιη η λεκτρική σκούπ α φυλάσσεται σεστεγνό
µέ ρος.
Πριν τη ν εκκίνη ση
(9 .) Βεβαιω θείτε ότι η σακούλα σκόνη ς και το φίλτρο
του κινη τήρα είναι στη θέ ση τους.
(10.)Τοπ οθετήστε τον εύκαµπ το σω λήνα ώστε να
εφαρµόσει στη θέ ση του ασφαλίζοντας µε ένακ
λικ(για να απ οσυνδέ σετε τον εύκαµπ το σω λήνα,
π ιέ στε τη ν ασφάλεια).
(11.)Συνδέ στε το βραχίονα π ροέ κταση ς ή τον
τη λεσκοπ ικό βραχίονα (µόνο σε ορισµέ να µοντέ λα)
στη χειρολαβή εύκαµπ του σω λήνα και στο
ακροφύσιο δαπ έ δου (για να τα
απ οσυναρµολογήσετε, π εριστρέ ψ τε και τραβήξτε
π ρος τα έ ξω ).
(12.)Ξετυλίξτε το καλώδιο και συνδέ στε το στη ν π ρίζα.
Η η λεκτρική σκούπ α διαθέ τει ενσω µατω µέ νο
µη χανισµό π εριέ λιξη ς του καλω δίου. Πατήστε
τοπ εντάλ π οδιού για να µαζέ ψ ετε το καλώδιο
(κρατήστε το βύσµα για να µη σας χτυπ ήσει).
(13.)Пιέ στε το ττλήκτρο έ ναρξη ς / λήξη ς για να θέ σετε
τη συκευή συσκεή σε λειτουργία.
(13./14.) Ρυθµίστε τη ν ισχύ αναρρόφη ση ς
χρη σιµοπ οιώντας το χειριστήριο αναρρόφη ση ς
π άνω στη ν η λεκτρική σκούπ α ή το χειριστήριο
αναρρόφη ση ς π άνω στη χειρολαβή του εύκαµπ του
σω λήνα.
(15.)Η πρακτική θέ ση στάθµευση ς (που ελαχιστοπ οιεί
επ ίση ς τον κίνδυνο καταπ όνη ση ς τη ς π λάτη ς) είναι
π ολύ βολική όταν κάνετε διάλειµµα κατά τη
διάρκεια του σκουπ ίσµατος.
(16.)Η θέ ση στάθµευση ς διευκολύνει τη µετακίνη ση και
τη ν απ οθήκευση τη ς η λεκτρικής σκούπας.
Χρη σιµοπ οιήστε τα ακροφύσια ω ς εξής:
Χαλιά: Χρη σιµοποιήστε το ακροφύσιο για
χαλιά/σκλη ρά π ατώµατα µε το µοχλό στη θέ ση (17). Για
µικρά χαλιά ελαττώστε τη ν ισχύ αναρρόφη ση ς.
Σκλη ρά δάπ εδα: Χρη σιµοπ οιήστε το ακροφύσιο για
χαλιά/σκλη ρά π ατώµατα µε το µοχλό στη θέ ση (18).
Ξύλινα δάπ εδ α: Χρη σιµοπ οιήστε το ακροφύσιο για
ξύλινα δ άπ εδα (ορισµέ να µόνο µοντέ λα, 6).
Ειδικό ακροφύσιο συνδυασµού: Απ οσυνδέ στε το
ακροφύσιο απ ό τη βάση εξαρτη µάτω ν και
χρη σιµοπ οιήστε το για ράφια βιβλιοθήκη ς (µε το
άκρο„βούρτσας”)ή για χαραµάδ ες, γω νίες (µετο „στενό”
άκρο)(8a)
22
* Μ όνο ορισµ έ να µ οντέ λα.
Page 26

Έ π ιπ λα µε ταπ ετσαρία: Χρη σιµ οπ οιήστε το
ακροφύσιο επ ίπ λω ν (8b).
Κουρτίνες, ελαφρά υφάσµ ατα κλπ .: Χρη σιµοπ οιήστε
το ακροφύσιο επίπ λω ν (8b). Ελαττώστε τη ν ισχύ
αναρρόφη ση ς εάν χρειάζεται.
Χρήση του ακροφυσίου Turbo (ορισµέ να µοντέ λα
µόνο)(7.)
(19 .) Προσαρµόστε το εξάρτη µα στο σω λήνα.
Ση µείω ση : Μ η χρη σιµοπ οιείτε το ακροφύσιο
αναρρόφη ση ς ή το ακροφύσιο turbo σε χαλιά απ ό
γούνα, χαλιά µε µακριά κρόσσια ή χαλιά µε π έ λος
µεγαλύτερο απ ό15m m . Για να αποφύγετε να
καταστρέ ψ ετε το χαλί, µη ν κρατάτε ακίνη το το
ακροφύσιο όταν περιστρέ φεται η βούρτσα. Μ η ν π ερνάτε
το ακροφύσιο π άνω απ ό η λεκτρικά καλώδια και
βεβαιω θείτε ότι έ χετε σβήσει τη ν η λεκτρική σκούπ α
αµέ σω ς µετά τη χρήση .
Αλλαγή τη ς σακούλας
σκόνη ς/καθαρισµ ός του φίλτρου
Αλλαγή τη ς σακούλας σκόνη ς
Πρέπ ει να αλλάξετε τη σακούλα σκόνη ς όταν η έ νδειξή
τη ς γίνει εντελώς κόκκινη .∆ιαβάστε µε το ακροφύσιο
αναση κω µέ νο (20.).
1 Ανοίξτε το καπ άκι.
2 Αφαιρέ στε τη θήκη τη ς σακούλας. (21)
3 Τραßήξτε το χαρτόνι για να ßγάλετε τη σακούλα
απ ό τη ν εγκοπ ή. (22)
4 Τοπ οθετήστε µια νεά σακούλα π ιέ ζοντας το χαρτόνι
ω ς το τέ λος τη ς εγκοπ ής µέ χρι να ακούσετε
χαρακτη ριστικλό ήχο κουµπ ώµατος. (23)
Κω δ ικός σακούλας: S-bag® clas s ic (GR 200)
Υφασµάτινη σακούλα (23,24,25)
1 Αφαιρέ στε τη ν υφασµάτινη σακούλα απ ό τη ν θήκη .
2 Βγάλτε οµαλά το π λαστικό συνδετήρα απ ό τη
σακούλα για να ανοίξει και αδ ειάστε τη ν.
3 Επανατοπ οθετήστε το π λαστικό συνδετήρα,
ελέ γχοντας ότι και οι δύο πλευρές τη ς σακούλας
είναι π αράλλη λες µεταξύ τω ν.
4 Επανατοπ οθετήστε τη σακούλα στη ν θήκη .
5 Ση µείω ση :Η σακούλα µπ ορεί να π λυθεί σε χλιαρό
νερό και να στεγνώσει εντελώς. ∆εν π ρέ π ει να
π λυθεί σε π λυντήριο.
6 Κλείστε το κάλυµµα σπ ρώχνονταςµέ χρι να
ακουστεί χαρακτη ριστικός ήχος ότι κούµπω σε.
Αντικατάσταση του φίλτρου του κινη τήρα
Πρέπ ει να γίνεται σε κάθε 5η αντικατάσταση τη ς
σακούλας σκόνη ς
1 Ανοίξτε το καπ άκι.
2 Αφαιρέ στε το π αλιό φίλτρο (26.).
3 Τοπ οθετήστε καινούριο φίλτρο και κλείστε το
καπ άκι.
Αντικατάσταση του µικροφίλτρου και του
φίλτρου H EPA χω ρίς δυνατότη τα πλύση ς*
Τα φίλτρα π ρέπ ει π άντα να αντικαθίστανται µε καινούρια
και δεν π ρέπ ει να π λέ νονται.Πρέ π ει να γίνεται σε κάθε
5η αντικατάσταση τη ς σακούλας σκόνη ς
1 Ανοίξτε και βγάλτε το καπ άκι (27.,28.).
2 Βγάλτε το φίλτρο και αντικαταστήστε το µε έ να
καινούριο όπ ω ς φαίνεται στη ν εικόνα (29 .,31.).
Ση µαντικό: στερεώστε το π ρώτα στο κάτω µέ ρος του
π λαισίου του φίλτρου και έ π ειτα στο π άνω µέ ρος.
Βεβαιω θείτε ότι το στεγανοπ οιη τικό είναι στη θέ ση του.
Καθαρισµός του φίλτρου H EPA µε δυνατότη τα
π λύση ς*
Πρέπ ει να γίνεται σε κάθε 5η αντικατάσταση τη ς
σακούλας σκόνη ς
1 Ανοίξτε και αφαιρέ στε το καπ άκι, στη συνέ χεια
αφαιρέ στε το φίλτρο (27. ,28.).
2 Ξεπ λύνετε το εσω τερικό (βρώµικη π λευρά) του
φίλτρου µε ζεστό νερό τη ς βρύση ς. (30.) Χτυπ ήστε
ελαφρά το π λαίσιο του φίλτρου για να
απ οµακρύνετε τα νερά. Επ αναλάβετε τέ σσερις
φορέ ς και αφήστε το φίλτρο να στεγνώσει.
Ση µείω ση : Μ η ν χρη σιµοπ οιείτε απ ορρυπαντικά και µη ν
αγγίζετε τη ν επ ιφάνεια του φίλτρου.
3 Επανατοπ οθετήστε το φίλτρο και το καπ άκι όπ ω ς
φαίνεται (29 . , 31.).
Ση µαντικό: στερεώστε το π ρώτα στο κάτω µέ ρος του
π λαισίου του φίλτρου και έ π ειτα στο π άνω µέ ρος.
Βεβαιω θείτε ότι το στεγανοπ οιη τικό είναι στη θέ ση του.
Καθαρισµός του εύκαµπ του σω λήνα και του
ακροφυσίου
Η λειτουργία τη ς η λεκτρικής σκούπ ας διακόπ τεται
αυτόµατα σε περίπ τω ση απ όφραξη ς τω ν ακροφυσίω ν,
του σω λήνα, του εύκαµπ του σω λήνα, τω νφίλτρω νή τη ς
σακούλας σκόνη ς.
Σε π αρόµοιες π εριπ τώσεις, απ οσυνδέ στε τη ν απ ό τη ν
π ρίζα και αφήστε τη ν να κρυώσει για 20-30 λεπ τά.
Καθαρίστε τη ν απ όφραξη ή/και αντικαταστήστε τα φίλτρα
και τη σακούλα σκόνη ς π ροτού τη θέ σετε ξανά σε
λειτουργία.
23
* Μ όνο ορισµ έ να µ οντέ λα.
Page 27

Καθαρισµ ός σω λήνω ν και εύκαµ π τω ν
σω λήνω ν
(32.)Χρη σιµοποιήστε ταινία καθαρισµού ή κάτι
π αρόµοιο για να καθαρίσετε τους σω λήνες και τον
εύκαµπ το σω λήνα.
(33.)Είναι επίση ς π ιθανό να µπ ορέ σετε να
απ οµακρύνετε το εµπ όδιο π ου βρίσκεται στο
σω λήνα π ιέ ζοντάς το. Ωστόσο, να είστε
π ροσεκτικοί στη ν περίπ τω ση π ου η απ όφραξη
π ροκαλείται απ ό γυαλιά ή βελόνες π ου έ χουν
π ιαστεί µέ σα στον εύκαµπ το σω λήνα.
Ση µείω ση : Η εγγύη ση δεν καλύπ τει οποιαδ ήπ οτε ζη µιά
π ροκλη θεί στον εύκαµπ το σω λήνα ω ς απ οτέ λεσµα του
καθαρισµού του.
Καθαρισµ ός του ακροφυσίου δαπ έ δου
(34.)Για να απ οφύγετε µείω ση τη ς ισχύος
αναρρόφη ση ς, να καθαρίζετε συχνά το ακροφύσιο
για χαλιά/σκλη ρά π ατώµατα.Ο ευκολότερος
τρόπ ος καθαρισµού είναι χρη σιµοπ οιώντας τη
χειρολαβή του εύκαµπ του σω λήνα.
Καθαρισµός του εξαρτήµατος turbo (ορισµέ να
µόνο µοντέ λα)
(35.)Απ οσυνδέ στε το ακροφύσιο απ ό το σω λήνα τη ς
η λεκτρικής σκούπ ας και αφαιρέστε τις µπ λεγµέ νες
κλω στέ ς κ.λ.π . κόβοντάς τις µε κάπ οιο ψ αλίδι.
Χρη σιµοπ οιήστε τη ν χειρολαβή του εύκαµπ του
σω λήνα για να καθαρίσετε το ακροφύσιο.
(36.)Σε π ερίπ τω ση π ου σταµατήσει η λειτουργία του
ακροφυσίου turbo, ανοίξτε το καπ άκι καθαρισµού
και απ οµακρύνετε τυχόν αντικείµενα π ου
εµπ οδ ίζουν τη ν ελεύθερη π εριστροφή τη ς
τουρµπ ίνας.
(37.)Απ οσυνδέ στε το ακροφύσιο απ ό το σω λήνα τη ς
η λεκτρικής σκούπ ας και αφαιρέστε τις µπ λεγµέ νες
κλω στέ ς κλπ . κόβοντάς τις µε έ ναψ αλίδ ι.
Χρη σιµοπ οιήστε τη χειρολαβή του εύκαµπ του
σω λήνα για να καθαρίσετε το ακροφύσιο.
Επ ίλυση π ροβλη µάτω ν
Η η λεκτρική σκούπα διακόπ τει τη λειτουργία
τη ς
1 Ελέγξτε εάν έ χει γεµίσει η σακούλα σκόνη ς. Αν
είναι, αντικαταστήστε τη µε µία καινούρια.
2 Μήπ ω ς έ χει φράξει το ακροφύσιο, ο σω λήνας ήο
εύκαµπ τος σω λήνας;
3 Μήπ ω ς έ χουν φράξει τα φίλτρα;
Έ χει µπ ει νερό στη ν η λεκτρική σκούπ α
Η αντικατάσταση του κινη τήρα θα π ρέ π ει να γίνει απ ό
εξουσιοδοτη µέ νο κέντρο σέ ρβις τη ς AEG-Ele ctrolux.
Τυχόν βλάβη του µοτέ ρ π ου έ χει π ροκλη θεί απ ό είσοδ ο
νερού δεν καλύπ τεται απ ό τη ν εγγύη ση .
Πλη ροφορίες για τον π ελάτη
Η AEG-Ele ctrolux δ εν φέρει καµία ευθύνη για τυχόν
ζη µίες απ ό εσφαλµέ νη χρήση τη ς συσκευής ή απ ό
π αρέ µβαση στη συσκευή. Το π ροϊόν αυτό έ χει
σχεδ ιαστεί µ επ εριβαλλοντική συνείδη ση . Όλα τα
π λαστικά µέ ρη είναι ση µειω µέ να µε σκοπό να
ανακυκλω θούν. Για λεπ τοµέ ρειες, επ ισκεφθείτε τη ν
ιστοσελίδα µας: w w w.ae g-e le ctrolux.com
Το σύµβολο στο R π ροϊόν ή επ άνω στη συσκευασία
του υπ οδεικνύει ότι δεν π ρέπ ει να µ εταχειρίζεστε το
π ροϊόν αυτό ω ς οικιακό απ όρριµµα . Αντιθέ τω ς θα π ρέ π ει
να π αραδίδεται στο κατάλλη λο ση µείο συλλογής για τη ν
ανακύκλωση η λεκτρικού και η λεκτρονικού εξοπ λισµού.
Εξασφαλίζοντας ότι το π ροϊόν αυτό διατίθεται σω στά,
συµβάλλετε στη ν απ οτροπ ή ενδεχόµενω ν αρνη τικών
συνεπ ειών για το π εριβάλλον και τη ν ανθρώπ ινη υγεία, οι
οποίες θα µπ ορούσαν διαφορετικά να π ροκλη θούν απ ό
ακατάλλη λο χειρισµό απ όρριψ η ς του προϊόντος αυτού.
Για λεπ τοµερέ στερες π λη ροφορίες σχετικά µε τη ν
ανακύκλωση του π ροϊόντος αυτού, επ ικοινω νήστε µε το
δη µαρχείο τη ς π εριοχής σας, τη ν τοπ ική σας υπ η ρεσία
απ οκοµιδ ής οικιακών
Η η λεκτρική σκούπα δεν λειτουργεί
1 Βεβαιω θείτε ότι το καλώδιο είναι συνδεδεµέ νοµε το
ρεύµα.
2 Βεβαιω θείτε ότι η π ρίζα και το καλώδιο δεν
π αρουσιάζουν βλάβη .
3 Ελέγξτε για καµέ νη ασφάλεια.
24
* Μ όνο ορισµ έ να µ οντέ λα.
46xx 02 06 01
Page 28

Ele ctrolux H ausgeräte Ve rtriebs Gm bH
M uggenh ofer Str. 135
D– 9 0429 Nürnberg
h ttp://w w w .e lectrolux.de
© Copyrigh t by Electrolux
46xx 02 06 01
Sh are m ore of our th ink ing at
w w w .electrolux.com
 Loading...