

Page 1
AE3450
AE3455
AE3460
Vacuum Cleaner
Bode nstaubsauger
Vloe rstofzuiger
Aspirateur traîneau
Aspirapolvere
Aspirado de polvo
Aspirador
Elek trik li süpürge
Η λεκτρική σκούπ α
Støvsuger
Operating Instructions
Gebrauch sanw e isung
Gebruik saanw ijzing
M ode d'em ploi
Instruzioni per l’uso
Instrucciones de uso
Instrucçõe s de utiliyacçâo
Kullanm a talim atları
Οδη ϊες χρήσεω ς
Brugsanvisning
AEG H ausgeräte Gm bH
Postfach 1036
D- 9 0327 Nü rnberg
h ttp://w w w .aeg- electrolux.de
© Copyrigh t by AEG
3609 02 06 05
Sh are m ore of our th ink ing at
w ww .electrolux.com
Page 2
AE3450 AE3455 AE3460
14
15
11
16
12
17
18
• •
XL
•
• • •
• •
A
•
• • •
B
MICRO
8
9
1
3
4
10
6
7
2
5
13
• • •
• • •
Page 3
A
D E F
B
C
1
1
1
2 3
2
2 3
4
3
4
Page 4

Dear Custom er,
th ank you for ch oosing an AEG- Electrolux vacuum
cleaner. To ensure total satisfaction, read th is Instruction
book carefully.
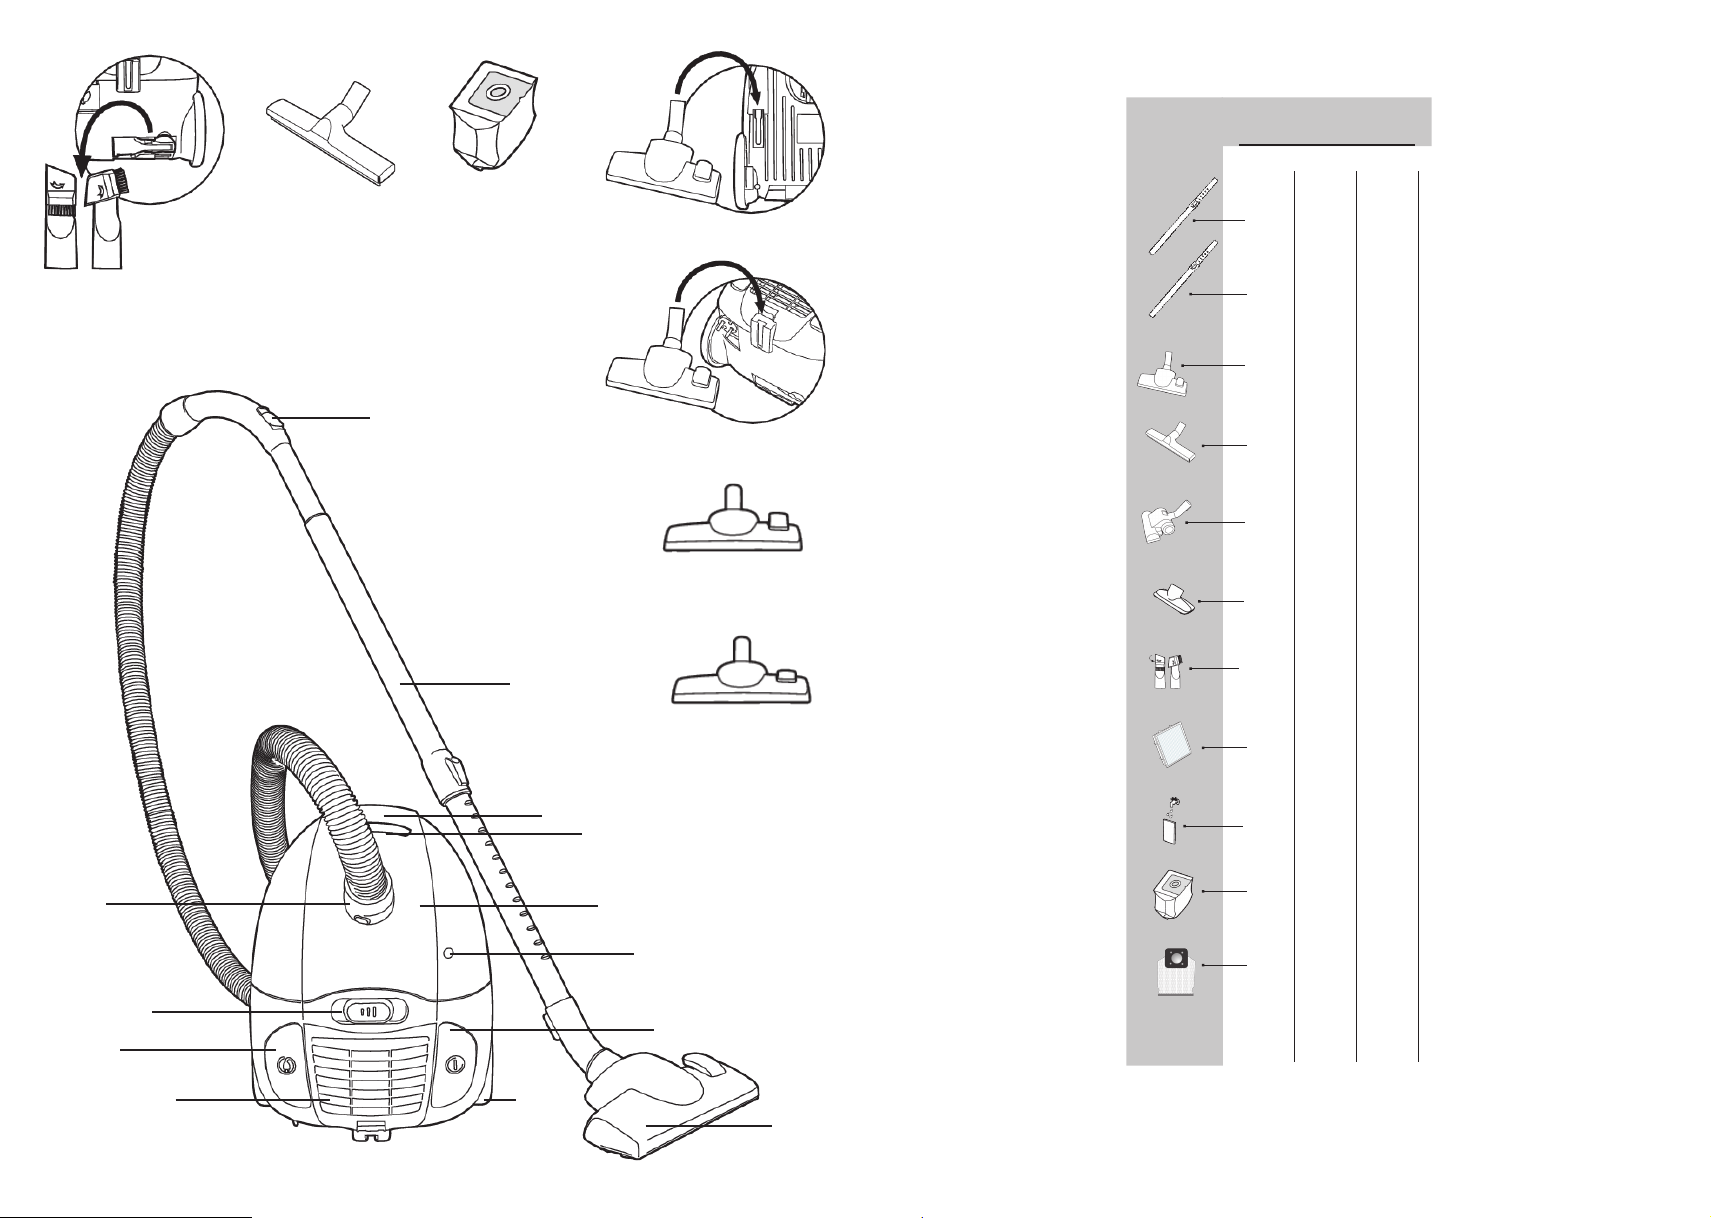
Features of th e vacuum cleaner / Accessories
1 H ose connection
2 Mech anical dustbag full indicator
3 Suction control regulator
4 Cable rew ind button
5 On/off button
6 W h eel
7 Dustb ag com partm ent
8 Carrying h andle
9 Cove r rele ase catch for dustb ag com partm ent
10 Exh aust filtergrill
11 Sw ive l h ose and h andle w ith m anual suction control
12 Te lescopic tub e
13 Com b ination carpe t/h ard floor nozzle
14 Com b ination crevice nozzle/ brush
15 H ard floor nozzle *
16 Dustbag
17 Park ing position (Nr 1.)
18 Storage slot (Nr 2.)
Getting th e best results
• Carpets: Use floor nozzle w ith lever in
th is position (A).
• H ard floors: Use floor nozzle w ith lever in th is
position (B).
• Loose rugs: Re duce th e suction pow er. Use th e floor
nozzle for loose rugs.
• Confined areas: Use th e crevice nozzle for tigh t
corners and radiators etc.
• H ard floor / parq ue try: use th e h ard floor nozzle to
avoid scratch ing *.
Ensuring your safety
Th e cle aner is for dom estic use only and h as be e n
de signe d to e nsu re m axim um safe ty and perform ance .
Please follow th ese sim ple precautions:
• Th e cleaner is double insulate d so it m ust not be
earth ed
• Th e cleaner is only to be use d by adults
• Do not pick up ve ry fine dust (plaster, cem ent, cold
cinders...)
• Alw ays store in a dry place
• Do not use to pick up liq uids
• Avoid sh arp obje cts
• Do not pick up h ot cinders or ligh ted cigare tte ends
• Do not use ne ar flam m able gases
• Avoid tu gging on th e m ains cable and ch eck cable
regularly for dam age
• Do not pull th e appliance by th e cord. D o not unplug
by pulling on th e cord. D o not use th e cle aner w ith a
dam aged cable. If th e cable dam aged, it sh ould be
replaced at a service center. Th is is not covered by
th e w arranty.
• Th e plug m ust be rem ove d from th e socket- outle t
be fore cleaning or m aintaining th e appliance
• All service and repairs m ust be carried out by
auth orised se rvice staff
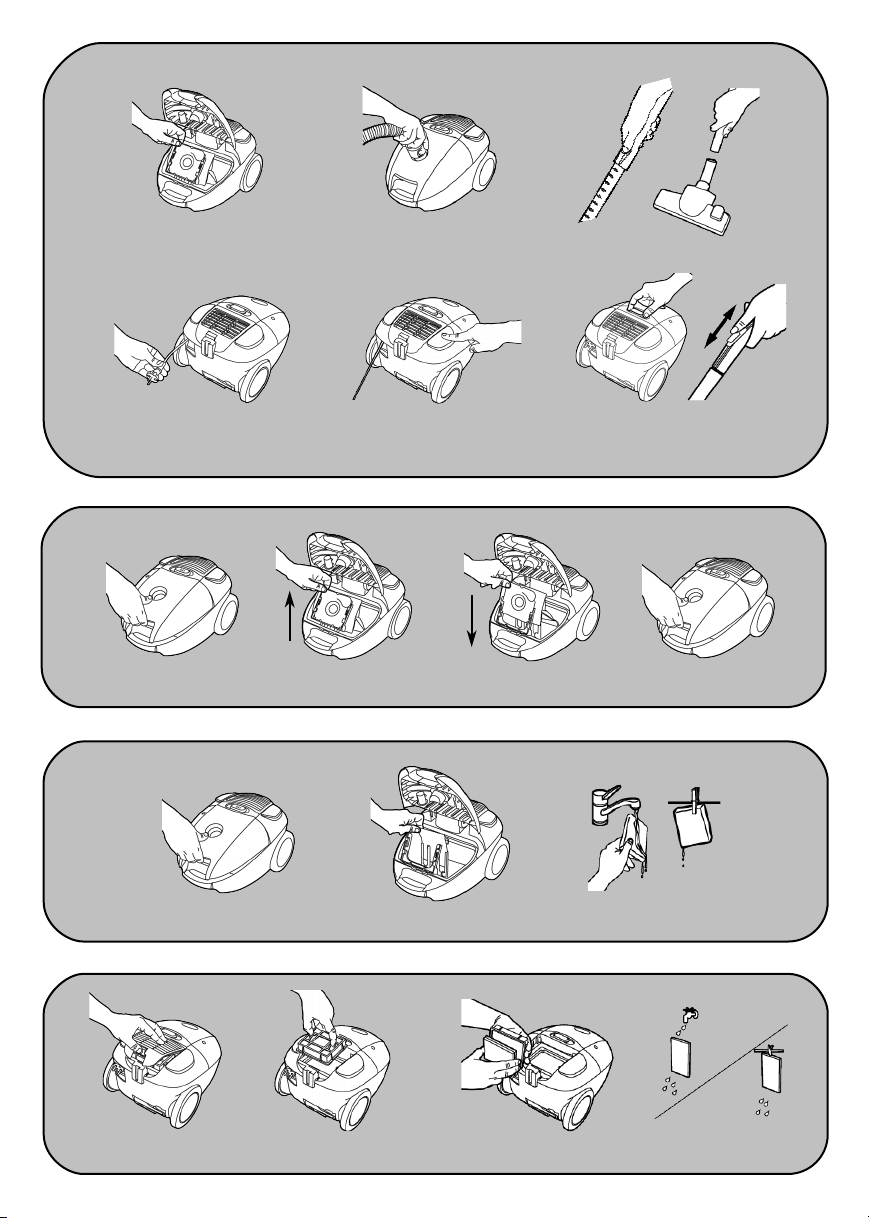
Getting Started
A Ch e ck th at th e dustb ag is in place.
B Inse rt th e h ose until th e catch es click to engage
(press catch es inw ards to release).
C Attach th e telescopic tube to th e h ose h andle and
floor nozzle by tw isting toge th e r (tw ist and pull
apart to dism antle).
D Exte nd th e cable and connect to m ains, e nsuring th e
cable is not tw isted before use (Pre ss cable rew ind
bu tton to rew ind cable. Please h old th e plug to
prevent it strik ing you).
E Press th e on/off button to start th e cleaner.
F To increase/de crease suction, adjust th e rolling w h ee l
control.
Suction can also be re gulated on th e h ose h andle by
opening/closing th e ve nt.
Dustbag indicator and ch anging th e du stb ag
Alw ays operate th e cleaner w ith th e dust bag installed.
For peak perform ance th e dustbag sh ould be ch anged w h en
full. Th e m ech anical dustbag indicator w indow w ill gradually
turn re d w h en filling and com pletely red w h en full.
If th e dustbag sh ould get brok en in th e cleaner, tak e
cleaner to service centre for cleaning. Th is is not cove red
by th e guarantee.
Th e dustbag full indicator m ay signify th at th e bag is
blocked (occasionally caused by finer dust) w h ich w ill
cause loss of suction and m ay result in overh eating. If
th is occurs ch ange th e bag even if it is not full.
Do not vacuum very fine du st (plaster, ce m ent, cold
cinde rs...).
To ch eck th e dustbag, th e cleaner m ust be sw itch ed on,
w ith all attach m e nts connected but th e nozzle does not
h ave to be placed on th e floor.
To ch ange th e dustbag
1 Open th e cle aner cover.
2 Rem ove th e dustbag from its h older.
3 Insert th e new dustbag into th e h olde r.
4 Close th e cove r.
W e recom m end th e dustb ag is ch anged afte r using a
carpet cleaning pow der or if th e re is a bad sm ell from
th e cleaner.
Note: Only use original dustbag and filte rs
Dustbag Ref. num ber: AEG GR5
* Depending on th e m odel
1
Page 5

Dustbag safety device
To avoid dam aging th e cleaner, do not use it w ith out a
dust bag. A safe ty device is fitte d w h ich prevents th e
cove r closing w ith out a dust bag in place . Do not attem pt
to force cover sh ut.
Cleaning th e filte rs
Neve r use th e cleaner w ith out th e filters in place.
Th e filters sh ould be ch anged/cleaned approxim ate ly
every fifth du stbag.
Cleaning th e m otor protection filte r
1 Open th e cle aner cover.
2 Rem ove th e filte r unit.
3 Rinse th e filte r unde r w arm tap w ate r only and dry
th e filte r com pletely. Th e original filte ring
perform ance is now restore d.
2,1 Re place th e unit back into th e cleaner and close
cove r ensuring it is securely in place and th e cove r is
properly close d.
Latest every second ye ar replace th e old filte r w ith a
new one.
Cleaning th e exh aust filter
1 Open th e e xh aust filter grill.
2 Tak e th e filte r w ith grill.
3 Tak e th e filte r out of th e grill.
4 Rinse th e filte r unde r tap w ater and dry it com pletely.
3 Put th e filter back into th e grill.
2 Put th e filter grill back into th e cle aner.
1 Close th e exh aust filter cove r.
Re com m ended filte rs:
M otor filte r: AEG GR5
Exh aust filter: AEG GR5
Trou ble sh ooting
• Dustbag: please ch eck th at th e du stbag is place d
corre ctly and e nsure th at it is not jam m ed.
• Pow er: if th e e lectric pow e r does not com e on,
disconnect from m ains and ch e ck plugs, cable and
fuses w h ere appropriate .
Th e cle aner m ay sw itch itse lf off in event of seve re
blockage or excessively dirty filters. In such cases,
disconnect from m ains and allow to cool for 20- 30
m inute s. Clear block age and/or replace filter(s) and
restart.
Th e cle aring of block ed h oses is not cove red by th e
guarante e . To avoid block age s and m aintain suction
efficiency, th e floor nozzle s sh ould be cleaned
regularly using th e h ose h andle.
• W ate r: if w ater is suck e d into th e cle aner th e m otor
m ust be ch anged at a service ce ntre . Th is is not
cove red by th e guarantee.
Custom er inform ation
Sh ou ld you require se rvice or consum able spares for your
Electrolux cleaner, please consult th e se rvice providers
listing enclose d w ith th is cleaner, for your nearest
Electrolux auth orise d service provider or contact th e
custom er se rvice h elpline.
Please spe cify m odel type w h en orde ring spares.
Please se e additional inform ation in th e separate AEGElectrolux W arranty Book let.
Electrolux
Features of th e vacuum cleane r and accessories are
prote cted abroad by registered pate nts of Registe re d
Designs.
Th is appliance conform s w ith th e follow ing EC
Directive s:
• Low Voltage D irective 2006/9 5/EC
• EM C Directive 89 /336/EEC w ith am endm ents
9 2/31/EEC and 9 3/68/EEC
Th e Ele ctrolux group m ay introduce m odifications to
th eir product from tim e to tim e, and, conseq uently, th e
de tails give n in th is book let are subject to alteration
w ith out notice.
Th e sym bol on th e product or on its pack aging
indicates th at th is product m ay not be treated as
h ouseh old w aste. Instead it sh all be h anded over to th e
applicable collection point for th e recycling of ele ctrical
and electronic e q uipm ent. By ensuring th is product is
disposed of correctly, you w ill h elp preve nt potential
negative conse q uence s for th e environm ent and h um an
h ealth , w h ich could oth erw ise be caused by inappropriate
w aste h andling of th is product. For m ore detailed
inform ation about recycling of th is product, please contact
your local city office , your h ouse h old w aste disposal
service or th e sh op w h e re you purch ased th e product.
2
Page 6

Se h r geeh rte Kundin, seh r ge eh rter Kunde,
le se n Sie bitte diese Geb rauch sanw eisung sorgfältig
durch . Beach ten Sie vor alle m die Sich erh eitsh inw eise auf
de n e rsten Seite n dieser Gebrauch sanw eisung! Bew ah ren
Sie bitte die Gebrauch sanw eisung zum späte re n
Nach sch lagen auf. Ge ben Sie diese an eventue lle
Nach b esitzer de s Ge rätes w eite r.
Ausstattung / Zubeh ör
1 Sch lauch ansch luss
2 Mech anisch e Staubb e utelw ech selanze ige
3 Le istungsregulierung
4 Kabeleinzug
5 Ein- /Aus- Sch alter
6 Rad
7 Inte griertes Z ubeh ör
8 Tragegriff
9 Öffnu ngstaste für Staubbe utelfach
10 Ablu ftfilter- Grill
11 Dreh barer Sch lauch und Griff m it m anueller
Saugle istungsregulierung
12 Te lesk oproh r
13 Um sch altbare Bodendüse für Teppich e und h arte
Böden
14 Kom binie rte Fugendüse / Bürste
15 H artbodendüse *
16 Staubbeutel
17 Park position für Bodendüse
18 Ste llh ilfe für Bodendüse
Beste Reinigungse rge b nisse erzie le n
• Bodendüse für Te ppich e und glatte Böden: Um
Ve rstopfungen zu verm eide n und eine w irk sam e
Saugle istung zu gew äh rleisten, sollten die
Bode ndüsen rege lm äßig m it H ilfe de s Sch lauch griffs
ausgesaugt w erden.
• Lose Te ppich e: D ie Saugleistung reduzieren.
• Enge Räum e: Fu gendüse für Ritzen, Eck e n und
H e izk örper ve rw ende n.
• H artbode n Parque tt: Benütze n Sie die
H artbodendüse um Kratzer zu ve rm eiden *
Sich erh eitsh inw eise
Der Staubsauger ist nur fü r de n privaten Einsatz im
H aush alt gedach t und für m axim ale Sich erh eit und
Le istung k onzipiert. Bitte beach te n Sie die folgenden
Sich erh eits- Vork eh rungen:
• Ansch luss: nur W ech selstrom 220/230 Volt,
Sich erung 16A oder 10A träge.
• Nur für trock e nes Sauggut verw enden, k e ine
Flüssigk eite n aufsaugen.
• Der Staub sauger darf nur von Erw ach sene n bedie nt
w erden.
• Ste ts an einem trock e ne n O rt aufbew ah ren.
• Fe u ch t gereinigte Teppich böden vollständig trock nen
lasse n.
• Keine sch arfe n O bjek te aufsaugen.
• Keine h eiße Asch e oder glüh ende Z igare tte nk ippen
aufsaugen.
• Keine größeren M e ngen Feinstaub einsaugen, z.B.
Gips, M eh l, Asch e, Sch lacke) Diese M aterialien k önnen
ernste Besch ädigung des Motors verursach e n, die
durch die Garantie nich t abgedeckt w ird.
• Kein Toner- Staub (von Laserdruck e rn, K opie rern)
einsaugen.
• Nich t in de r Näh e entflam m barer Gase verw enden.
• Nich t am Netzk abe l ze rren; das Kabe l regelm äßig auf
Sch äde n überprüfen.
• H inw e is: Nich t am H auptk abel zerren! Den
Staubsauger nie m it be sch ädigtem Kabel benutze n.
Bei Besch ädigung m u ss das Kabel in eine m Se rvice -
Cente r ersetzt w erden. Die s ist nich t durch die
Garantie gew äh rle iste t.
• Vor de m Ausw ech seln des Filters oder Staubbeute ls
de n Stecker aus de r Ste ck dose zieh en.
• Alle W artungs- und Re paraturarbeiten sind von
zu gelassene n Ele ctrolux K u ndendie nst durch zufüh ren.
Dieses Gerät erfüllt folgende EC Norm en:
• Niedrig- Spannungs- Norm 2006/9 5/EC
• EM C Norm 89 /336/EEC und Ergänzung 9 2/31/EEC
sow ie 9 3/68/EEC
Inbetriebnah m e
A Prüfen Sie, ob der Staubbeute l und alle Filter
eingesetzt ist.
B Sch lauch so w e it e insch iebe n, bis er h örbar einraste t.
(Z u m Abneh m en des Sch lauch es die Taste n am
Sch lauch ansch luss drück en und den Sch lauch
h erauszieh en)
C Roh re auf Sch lauch griff und Bodendüse stecken und
dreh en. Zum Abbau dre h e n und auseinanderzieh en.
D Netzsteck er in die Steck dose ste cken. D as Gerät verfügt
über eine Kabelautom atik : Ach ten Sie vor dem Einsatz
darauf, dass das Kabel nich t verdreh t ist. Z um
Z urück spulen des Kabels auf die Kabelrollertaste drück en,
bitte dabei den Steck er festh alten und das Kabel füh ren.
E Z um Einsch alten de s Staubsaugers de n Ein- /Au s-
Sch alter drück en.
F Z ur Erh öh ung/Reduzierung der Saugstärk e den
Le istungsregle r ve rsch iebe n.
Die Saugstärke kann auch durch Öffnen/Sch ließe n der
Leistungsregulierung am Sch lauch griff reguliert w erden.
Optim ale Reinigungsergebnisse
Optim ale Leistung ist nur m öglich , w enn volle
Staubbeutel und verstopfte Filte r rech tze itig
ausgew ech se lt bzw . gere inigt w erden. Staubbe utel und
Filte r regelm äßig üb erprüfen und bei Bedarf reinige n
bzw . ausw ech seln. W ir e m pfe h len, den Staubbeute l auch
auszuw ech seln nach der Verw endung eines
Te ppich reinigungspulve rs oder w e nn ein vom
Staubsauger au sgeh ender, unangene h m er Geruch
feststellbar ist; in die se m Fall sollte auch der Abluftfilte r
ausgew ech se lt w erden.
3
* Nur bestim m te M odelle
Page 7
Staubb e utelw ech selanzeige
Die Filterw ech selanzeige w ird bei zuneh m end gefülltem
Staubbeutel allm äh lich rot und zeigt bei vollem
Staubbeutel ganz rot an. Z um Prüfen der
Filterw ech se lanzeige de n Staubsauger einsch alten,
Sch lauch , Roh r und Bode ndüse ansch ließen, die Bodendüse
darf k eine n Bodenk ontak t h aben. Auch bei nich t vollem
Staubbeutel k ann die Anzeige anzeigen, w enn z.B.
Fe instaub die Poren des Staubbeute l ve rstopft h at. Eine
Verstopfung reduziert die Saugle istung und k ann zu
Übe rh itzung füh ren, das Ge rät sch altet dann ab. In diesem
Fall das Gerät ca. 20 M inute n abk üh len lassen, den
Staubbeutel und Filter k ontrollieren und ggf. w ech se ln.
W ech sel de s Staub b e u tels
1. Öffnu ngstaste be tätigen und Ab deck ung öffne n.
2. Staubbeutel entfe rne n.
3. Z u m Einlegen des neue n Staubbeute ls diesen in die
Füh rungsh alte rung sch ie ben.
4. Sch lie ßen Sie die Abdeck ung durch niederdrücken bis
sie einraste t.
H inw eis: Nur Original Electrolux- Staubbeute l und Filte r
verw ende n, für Sch äden, die durch de n Gebrauch von
Frem dproduk ten e ntsteh en, k ann k eine H aftung
übe rnom m en w erden.
Staubb e utel Ref- Nr: AEG GR5
M otor Filte r Re f- Nr: AEG GR5
Abluftfilte r Re f- Nr: AEG GR5
Staubb e utel- Sich erh eitsvorrich tung
Um eine Besch ädigung des Geräte s zu verm eiden, nich t
oh ne Staubbeutel und Filte r arbe iten. De r vorh ande ne
Sich erh eitsm e ch anism us verh inde rt ein Sch ließe n der
Abde ck ung oh ne eingele gte n Staubbe utel. D ie
Abde ck ung nich t m it Gew alt sch lie ßen.
Re inigen de r Filter
Ih r Staubsauger ist m it zw e i Filte rn ausge stattet. D e n
Staubsauger nie oh ne Filte r benutzen.
Re inigen de s M otorsch utzfilte rs
Der Motorsch utzfilte r sollte gereinigt w erde n, sobald e r
versch m utzt ist.
Bild 1 Öffnungstaste betätigen.
Bild 2 Abdeck ung und Filte r entfernen.
Bild 3 Filter m it w arm em W asser au sspülen.
Bild 2 Trock ne n lassen und sauberen Filte r w ieder
einse tzen.
Bild 1 Abdeck ung sch ließe n.
Re inigen de s Abluftfilters
Bild 1, 2 Öffnen Sie de n Filtergrill um den Abluftfilter (1)
und entfe rne n sie die Filte r m it Grill (2)
Bild 3 Entfernen sie die Filte r von Grill.
Bild 4 Filte r m it w arm em W asser ausspülen und
k om plett trock nen lassen.
Bild 3,2,1 Den saub eren, trock e nen Filter w iede r einse tzen
und Ab deck ung sch ließen.
W as tun w enn?
• Strom versorgu ng: Sollte k eine Strom zufuh r
vorh ande n sein, Netzste cker zieh en und entsprech ende
Steck er, Kabel und Sich e rungen übe rprüfen.
• Verstopfung in Sch lauch , Roh r oder D ü se:
verstopfte Staubbe utel oder Filte r: Der Staubsauger
k ann sich bei eine r Verstopfung in Sch lauch oder
Roh r oder bei übe rm äßiger Filterversch m utzung selbst
absch alte n. In diesen Fällen den Netzste cker aus der
Steckdose zie h e n und das Gerät 20– 30 Minuten
abk üh le n lasse n. Ve rstopfung entfernen bzw . Filte r
oder Staubbeute l ausw ech seln und Staubsauger
w iede r einsch alten. D ie Beh ebung von Ve rstopfungen
und die dadurch eventuell entstande ne n Sch äde n sind
nich t durch die Garantiele istung ge deck t.
Kundeninform ationen
Sollte n Sie den K undendienst für Ih ren ElectroluxStaubsauger in Anspruch neh m en m üssen, w enden Sie
sich bitte an den autorisierte n Ele ctrolux- Kunde ndienst,
ode r rufe n Sie die K undenbe ratung an.
Progre ss- Se rvice- Line : 01805 – 30 60 80*
*aus dem Festnetz der Deutsch en Te lek om Euro 0,12/M in.
Fax: 09 11- 323- 49 19 30
E- Mail: info.service@ progress- staugsauger.de
Beach te n Sie bitte die zusätzlich en Inform atione n im
separate n AEG- Ele ctrolux Garantie h e ft.
Das Sym bol auf de m Produk t oder seiner
Ve rpackung w eist darauf h in, dass die se s Produk t nich t
als norm aler H aush altsabfall zu be h andeln ist, sonde rn an
einem Sam m e lpunk t für das Recycling von ele k trisch en
und elek tronisch e n Geräten abge geben w erden m uss.
Durch Ih ren Beitrag zum korrek te n Entsorgen dieses
Produk ts sch ützen Sie die Um w e lt und die Gesundh e it
Ih re r M itm ensch en. Um w elt und Gesundh eit w erden
durch falsch es Entsorge n gefäh rde t. W eite re
Inform ationen über das Recycling dieses Produ k ts
erh alten Sie von Ih re m Rath aus, Ih re r M üllabfuh r ode r
de m Gesch äft, in dem Sie das Produk t gek au ft h abe n.
4
Page 8

Geach te k lant,
Dank u voor h et k iezen van de AEG- Ele ctrolux. O m geh eel
aan uw beh oeften te voldoen is h et raadzaam h et
instructieboe k je grondig door te lezen. Bew aar dit te r
referentie .
Kenm erk en en h ulpstuk k en
1 Pijpverbinding
2 Mech anisch e stofzak indicator
3 Z uigk rach tre gelaar
4 Snoe rk nop
5 Aan/U it- k nop
6 W iel
7 Stofzak com partim ent
8 Draagh andgree p
9 Afsluitbare k le p voor stofzakcom partim ent
10 Rooste r uitlaatfilter
11 Slang m et draaitopbeve stiging en pistoolgreep m et
h andm atige zuigrege ling
12 Te lescopisch e zuigbuis
13 Com b inatie m ondstuk voor tapijt/ h arde vloer
14 Com b inatie m ondstuk voor k ie ren/borste l
15 Park etborstel *
16 Stofzak k en
17 Opslagruim te voor vloerm ondstuk e n zuigbuizen
w annee r niet in gebruik
18 Opslagruim te voor vloerm ondstuk e n zuigbuizen
w annee r in gebruik
Optim ale resu ltate n
• Tapijten: Gebruik h et vloerm ondstuk m et de
h andgreep in verticale positie.
• H arde vloeren: Gebruik h et vloerm ondstuk m et de
h andgreep in h orizontale positie .
• Losse vloerkleden: Verm inder de zuigk rach t. Gebruik
h et vloe rm ondstuk voor losse vloerk lede n.
• Beslote n gebieden: Gebruik h et k ierenm ondstuk
voor k ieren, h oek en en radiatoren.
• Gladde vloeren / park e t: gebruik de parketborste l
voor gladde vloere n om k rassen te voork om e n *.
Veiligh eid voorop
De AEG- Electrolux is allee n voor h uish oude lijk gebruik e n
is ontw orpen m et h et oog op m axim ale veiligh eid en
gebruik . Volg a.u.b. de volge nde eenvoudige
voorzorgsm aatregele n:
• De stofzu iger is dubbel geïsoleerd en h oeft niet te
w orden geaard.
• De stofzu iger dient alleen door volw assenen geb ruik t
te w orden.
• Berg h et apparaat altijd op een droge plaats op.
• Gebruik h et apparaat niet om vloeistoffe n m ee op te
zu igen.
• Ve rm ijd sch erpe voorw erpen.
• Z uig geen h ete as naar b inne n of brandende
sigarettenpeuk en.
• Z uig om h oog zeer gee n fijn stof van ple iste r, cem ent,
k oude cinders, bloem of as.
• Gebruik h et apparaat niet in de nabijh eid van
ontvlam b are gassen.
• Deze m ate riale n k unne n e rnstige sch ade aan de
m otor ve roorzak en - e e n sch ade die niet door de
garantie w ordt beh andeld.
• Ve rm ijd ruk k e n aan h et snoe r en controleer dit
regelm atig.
• NB: Tre k h et toestel niet voort aan h et snoe r. Gebruik
niet h et snoer om de ste k k er uit h e t stopcontact te
h alen. Gebruik h et toe ste l niet m et een be sch adigd
snoer. Indie n h et snoer be sch adigd is, m oet h et
vervangen w orden door een reparateur. D it w ordt
niet gedek t door de w aarborg.
• U dient de stek k e r uit h e t stopcontact te h ale n,
voordat u h e t apparaat sch oonm aak t of er
onde rh oudsw erk zaam h e den aan ve rrich t.
• Alle service e n reparaties die nen te w orden
uitge voe rd door uw vak h andelaar of door de
ELGRO EP FABRIEKSSERVICE.
Voordat u begint
A Ga na of de stofzak zich op zijn plaats bevindt.
B Duw de zuigbuis op de stofzuiger totdat u een k lik h oort.
(Druk de vergrendelingen in om h em los te k rijgen.)
C Bevestig de tele scopisch e zuigbu is aan de
pistoolgre ep van de slang en aan h et buisje van h et
m ondstuk door deze al draaie nd sam en te druk ken.
(De buizen draaie n e n van elk aar aftrek k e n om ze uit
elk aar te h ale n)
D Trek h et snoer uit en ste ek de stek k e r in h et
stopcontact. ergo e ssence is uitgerust m et autom atisch e
snoeropw inder. Z org dat h et snoer niet gedraaid is
voordat u begint te w erk e n. (D ruk op h et voetpedaal
om h et snoe r w eer op te rolle n. H oud de knop
ingedruk t om te voorkom en dat h et snoer u niet raak t.)
E Druk op de Aan/Uit- k nop om de stofzuiger aan te zetten.
F De zuigk rach t k an w orden afgesteld m et beh ulp van
de zuigk rach tregelaar.
De zuigk rach t k an ook ge re geld w orden door de
opening op de slanggre e p te openen of te sluiten.
De stofzak indicator en h et verw isselen van de
stofzak
Voor optim aal functioneren dient de stofzak verw ijderd te
w orden w anneer deze vol is. Moch t de stofzak per ongeluk in
de stofzuiger barsten, laat h et apparaat dan door Elgroep
Fabriek sservice sch oonm aken. Controleer de stofzak
regelm atig en vervang deze w annee r noodzak elijk . H et
stofzak indicatorvenster wordt gaandew eg rood w anneer deze
gevuld w ordt en wordt geh eel rood w anneer de stofzak vol is.
Als u de stofzak w ilt controleren, die nt h e t apparaat aan
te staan, w aarbij alle toe beh oren ve rbonde n zijn en zich
niet op de grond bevinde n.
5
* Alle en bepaalde m odelle n
Page 9

De indicator voor de volle stofzak k an ook be tek ene n dat
de zak geblok k eerd is (som s ve roorzaak t door zeer fijne
stofde e ltje s), w at ve rlies aan zuigk rach t ve roorzaak t en
oververh itting tot ge volg k an h ebbe n. Geb e urt dit,
verw issel de stofzak , ook al is deze nie t vol.
Als u de stofzak w ilt verw isselen
1 Maak de vergrendeling los alvore ns de stofzak te
verw ijderen.
2 Verw ijder de stofzak .
3 Breng de nieuw e stofzak aan door de zak sleuven
over de h ouders te tre k k e n.
4 Nu k unt u de stofzak ruim te slu iten en ve rder
stofzuigen.
W ij raden u aan om de stofzak te vervangen
• Na h et gebruik van een tapijtsch oonm aak m iddel.
• W anneer er e en onaangenam e reuk van de stofzuiger
k om t. U die nt dan te ve ns h et filter te ve rvangen.
• NB: Gebruik alle e n origine le AEG- Ele ctrolux
stofzak k e n (ref. AEG GR5) en filte rs of AEG GR5.
Stofzak be ve iliging
Om sch ade aan de stofzuige r te voork om e n dient u deze
niet te gebruik en zonder stofzak . Er is een
veiligh eidsapparaat in de stofzuiger dat voork om t dat de
de k sel sluit zonder stofzak . Probe e r niet geforce e rd de
de k sel te sluiten.
De filte rs sch oonm ak en
Er zitte n tw ee filte rs in uw stofzuiger.
Gebruik de stofzuiger nooit zonder dat de filte rs zijn
geïnstallee rd.
H e t m otorbe sch e rm filte r sch oonm aken
H e t m otorbe sch erm filte r m oet w orde n sch oongem aak t
als h et vuil is.
1 H e t de k sel losm aken.
2 Z ow el h et de k sel als h et filte r ve rw ijderen.
3 H e t filte r in w arm w ate r sch oonm ak en.
2 Laten drogen en h et sch one filter w eer op zijn plaats
ze tte n.
1 H e t de k sel w eer sluiten.
Proble m en oplossen
• Elek triciteit: W erk t de aansluiting m et h e t lich tne t
niet, trek dan de stek k er uit h et stopcontact en
controlee r stek k e r, snoer en zek eringe n in de
h uisinstallatie.
• Blok k ades/vuile filte rs: D e stofzuiger k an
autom atisch uitgesch ak eld w orden w anneer er een
ernstige blok k ade optre e dt of uitzonderlijk vuile
filte r(s) gebruik t w orde n. In zulk e gevallen tre k t u de
stek ker uit h et stopcontact en laat de m ach ine 20- 30
m inute n afk oelen. H ef de blok k ade op en/of vervang
h et filte r/de filte rs en begin opnieuw .
H e t sch oonm aken van geblok keerde onderdele n valt
niet onde r de garantie .
• W ate r: W ordt w ate r opgezoge n in de stofzuige r, dan
die nt de m otor te w orde n ve rvangen door de
ELGRO EP FABRIEKSSERVICE.
Klantinform atie
Raadplee g, als u service of onde rdele n voor uw Ele ctroluxstofzuiger nodig h eb t, de lijst m et se rvicepunte n die bij
uw stofzuiger is geleverd voor h et dich tstbijzijnde
erk e nde Electrolux- servicepunt of neem contact op m et
de service- inform atielijn. Gee f h e t type van uw stofzuiger
op als u onderde len be ste lt.
Z ie ook de extra AEG- Electrolux inform atie in de aparte
AEG- Electrolux garatievoorw aarden.
Electrolux
Bepaalde eigensch appe n en accessoire s van de stofzuiger
w orden in h et buitenland be sch erm d door gere gistreerde
octrooien van gere gistreerde ontw erpen.
Dit apparaat voldoet aan de volgende EU rich tlijne n:
• Laagspanningsrich tlijn 2006/9 5/EC
• EM C- rich tlijn 89 /336/EEC m e t toevoe ging 9 2/31/EEC
en 9 3/68/EEC
De Electrolux Groep k an op elk m om e nt producte n
m odificeren zonder voorafgaande k ennisgeving en als
gevolg h iervan zijn de de tails in deze h andleiding
onde rh e vig aan w ijziging.
De uitlaatfilter sch oonm ak e n
1 Open h et rooster rondom de uitlaatfilter.
1 Neem de filter m et grill.
2 Neem de filter uit de grill.
3 Spoe l de filte rs uit onder strom end w arm w ate r en
laat de filte rs drogen.
3 Z e t de filterrug in de grill.
1 Z e t de filtergrill terug in de stofzuige r zette.
1 Sluit h e r rooster om de uitlaatfilter.
H e t sym bool op h et product of op de verpak k ing
w ijst erop dat dit product niet als h uish ou dafval m ag
w orden be h andeld. H et m oet ech te r naar een plaats
w orden geb rach t w aar e lek trisch e en elek tronisch e
apparatuur w ordt gerecycled. Als u ervoor zorgt dat dit
product op de corre cte m anie r w ordt verw ijderd,
voork om t u m ogelijk voor m ens en m ilie u negatieve
gevolgen die zich zouden k unne n voordoen in geval van
verk eerde afvalbeh ande ling. Voor m ee r de tails in ve rband
m et h e t recyclen van dit product, neem t u h et best
contact op m et de gem eentelijk e instantie s, h et be drijf of
de die nst be last m et de verw ijde ring van h uish oudafval
of de w ink el w aar u h et product h ebt gek och t.
6
Page 10

Ch ére Cliente, Ch er Client,
Nous vous rem ercions d'avoir ch oisi un aspirateur AEGElectrolux. Pour garantir une satisfaction totale, lire
attentivem ent ce m ode d'em ploi. A conserver pour s'y référer.
Caractéristiq ues / Accessoires
1 Raccord pour tuyau flexible
2 Indicate ur m écaniq ue de rem plissage du sac à
poussière
3 Variateur de puissance
4 Enroule ur autom atiq ue de câble
5 Bouton m arch e /arrêt
6 Roues
7 Capot du com partim ent sac à poussière
8 Poignée de transport
9 Cliq u et de dégage m ent du couve rcle du
com partim ent sac à poussière
10 Filtre de sortie d‘air
11 Tuyau fle xible ave c réglage de débit d'air sur la
poignée
12 Tube télescopique
13 Suceur com biné pour tapis et sols durs
14 Com b iné suceur long/ brosse m eub les
15 Suceur spécial pour sols durs *
16 Sac à poussière
17 Park ing vertical
18 Park ing h orizontal
Com m ent obtenir le s m eilleu rs résultats
• M oq uette s: Utilise r le suceur com biné ave c le levier
en position A.
• Sols du rs: Utiliser le suceur com biné ave c le levier en
position B.
• Tapis: Réduire la pu issance d'aspiration. U tiliser le
suceur com biné pour les tapis (position A).
• Espaces restreints: Utiliser le côté suceur long du
com biné suceur long/brosse m eub les pour le s fe nte s,
le s coins et les radiateurs.
• Sols du rs/parq uets: Utilisez le suceur spécial sols
durs /parq uets pour ne pas abîm er les sols *.
Assurer votre sécurité
L'aspirate ur AEG- Electrolux e st réservé uniq uem ent à
l'utilisation dom estique et a été conçu pour assurer une
sécurité et des perform ances m axim ales. Veuillez suivre
ces sim ple s précautions :
• Votre aspirateur a une double isolation e t ne doit
donc pas être raccordé à la te rre.
• Votre aspirateur ne doit être utilisé q ue par des
adulte s.
• Toujours ranger l'aspirateur dans un endroit se c.
• Ne pas aspire r de liq uide s.
• Ne pas aspire r d'obje ts pointus.
• Ne pas aspire r de braises ch audes ou de m égots
incandescents.
Ne pas aspirer de poussières extrèm em ent fines
(plâtre , cim e nt, cendres froides ou ch aude s...).
• Ne jam ais aspire r à proxim ité de gaz inflam m ab les.
Le s produits en bom be aérosol peuvent être
inflam m ables. Ne pas vaporiser de tels produ its à
proxim ité ou sur l'aspirate ur.
• Tous ces m atériaux peuve nt e ndom m ager le m oteur
sérieuse m ent - ces dom m ages ne sont pas couve rts
par la garantie.
• ATTENTIO N ! Ne jam ais tirer l’appareil par le cordon
d’alim entation. Ne pas tire r sur le cordon pour le
débranch e r. Pour l’utilisation, ve uille z vous
conform ez aux instructions figurant sur cette notice.
Ne pas utiliser l’aspirateur si le cordon d’alim e ntation
est endom m agé. Si c’e st le cas, il doit être rem placé
par un Centre Service Agréé. Cette intervention n’e st
pas couverte par la garantie.
• Débranch er l'appareil avant toute opération d'e ntretien.
• Toutes le s révisions et réparations doivent être
effectuées par le personnel des Centres Se rvices
Agréés.
M ise en m arch e
A Vérifier que le sac à poussière et le s filtres sont en place.
B Insérer le tuyau flexible jusqu'à ce que le s cliq uets
s'encle nch ent. Appuyer sur le s cliq uets vers l'intérieur
pour le dégager.
C Raccorde r le tube télescopique sur la poignée du
flexible e t au suceur en le s tournant d'u n q uart de
tour. (Pour le dém ontage tirer sur le s tubes en les
faisant tourner.)
D Tirer sur le cordon d'alim entation et le branch e r sur
le se cte ur. L'aspirate ur est éq uipé d'un e nrouleur de
câble , s'assurer q ue le câble n'est pas tordu avant
l'utilisation. Appu yer sur la pédale pour enrouler.
À noter : Veuillez te nir la prise pour l'em pêch e r de
vous h eurter ou de h eurter l'appare il.
E Appuyer sur le bouton m arch e/arrêt pour la m ise e n
m arch e de l'aspirate ur.
F La puissance d'aspiration peut être m odulée à l'aide
du régulateur de débit d'air se trouvant sur la
poignée du fle xible.
Elle peut égalem ent se régler en actionnant le
variateur électroniq ue de puissance .
Indicateur de rem plissage de sac e t ch angem ent
du sac à poussière
Pour un fonctionnem ent optim al, il convie nt de ch anger le
sac à poussière lorsqu'il est plein. Si le sac à poussière se
rom pt accidentellem ent dans l'aspirateur, il faut le faire
nettoye r dans un centre service agréé. Ce tte intervention
n'est pas prise en ch arge par la garantie. Vérifier
régulièrem ent le sac à poussière et le rem placer lorsque
cela est nécessaire. L'indicateur de rem plissage du sac à
poussière deviendra rouge à m esure q u'il se rem plit, et il
sera com plète m ent rouge lorsq u'il sera plein.
7
* Suivant les m odèles
Page 11

Pour vérifier le rem plissage du sac à poussière, l'appareil
doit être branch é, avec les accessoires raccordés et non en
contact avec le sol. L'indicateur de rem plissage du sac à
poussière peut indique r q ue le sac est colm até (de tem ps à
autre ceci est causé par de la poussière très fine) ce qui
entraîne une perte d'aspiration et peut provoquer une
surch auffe. Si cela se produit, il convient de ch anger le sac
à poussière m êm e s'il n'e st pas plein.
Ne jam ais aspire r de poussière s très fines (plâtre,
cim ent, ce ndres froides ou ch audes...) qui peuvent
endom m ager l'aspirateur.
Pour ch anger le sac à poussière
1 Dégager le cliq uet pour retirer le couve rcle.
2 Enlever le sac à poussière.
3 Mettre en place le sac neuf en le plaçant sur le s
ergots prévus à cet effet.
4 Fe rm er le com partim ent sac à poussière avant de
rem ettre en m arch e l’aspirate ur.
Nous recom m andons de ch anger le sac à pou ssière
après l’utilisation d’une poudre de nettoyage pour
m oquette ou si une m auvaise ode u r ém ane de
l'aspirateur, le s filtres devront aussi être ch angés.
Note : N’u tiliser que des sacs à poussière et des filtres
originaux.
Sac à poussière recom m andé : AEG GR5
Filtre m oteur recom m andé : AEG GR5
Filtre de sortie d'air recom m andé : AEG GR5
Sécurité de présence du sac à poussière
Afin d'éviter d'endom m age r l'aspirate ur, ne jam ais l'utiliser
sans sac à poussière. Il est m uni d'un dispositif de sécurité
pour em pêch e r q ue le couvercle ne se refe rm e sans sac à
poussière. N'essayer pas de ferm er le couve rcle en forçant.
Nettoyer les filtres
Votre aspirateur est doté de deux filtres; Il ne faut jam ais
utiliser l'aspirate ur sans que les filtre s de protection
soient en place.
Pour nettoyer le filtre de protection du m oteur
Le filtre de prote ction du m oteur doit être ne ttoyé
lorsq u'il est sale.
1 Dégager le cliq uet.
2 Ouvrir le cou ve rcle et retire r le filtre.
3 Laver le filtre à l'eau ch aude du robine t.
2 Laisser séch er com plètem ent et rem ettre le filtre
propre e n place .
1 Fe rm er le couve rcle.
Ce filtre doit être rem placé par un filtre neuf au
m oins tous les deux ans.
Pour nettoyer le filtre de sortie d’air
1 Ouvrir la grille du filtre de sortie d’air.
1 Enlever le filtre avec grille de son logem ent.
2 Enlever le filtre de la grille.
4 Le rincer à l'eau tiède et le laisser séch er
com plètem ent.
3 Rem ettre le filtre dans la grille.
2 Rem ettre en place le filtre ave c grille dans l’aspirateur
1 Referm er la grille du filtre de sortie d’air.
Gestion de s pannes
• Alim entation : Si le courant électriq ue n'arrive pas,
débranch e r l'appareil et vérifier le s prises, le câble et
le s fusibles si nécessaire.
• Blocage s/filtres sale s : L'aspirate ur peut s'arrêter en
cas de blocage grave ou si un ou des filtre (s) est/sont
excessive m ent sale (s). Dans de te ls cas, débranch e r
l'appare il et laisser le refroidir pendant 20- 30
m inute s. Enle ver ce q ui cause le blocage et/ou
rem place r le/les filtres. Rem ettre l'appare il en
m arch e. Le débouch age de s tuyaux flexible s bloq ués
n'est pas cou ve rt par la garantie .
• Eau : Si de l'e au est aspirée par l'aspirateur, il est
nécessaire de faire ch anger le m oteur par un Centre
Se rvice Agréé AEG- Electrolux. Ce tte interve ntion
n'est pas prise en ch arge par la garantie.
Inform ations consom m ate ur
Pour toute de m ande de réparation ou de pièces de
rech ange conce rnant votre aspirate ur AEG- Electrolux,
consulte r la liste se trouvant dans le carton de cet
aspirateur pour trouve r Centre Service Agréé le plus
proch e de ch e z vous ou appeler le service
consom m ateurs. Spécifie r le m odèle de l'aspirate ur pour
toute com m ande de pièce s de rech ange.
Ve uillez égalem ent vous re porter à la broch ure
‘Conditions de garantie et Se rvice après - vente’ pour plus
d’inform ations sur AEG- Ele ctrolux.
Electrolux
Les fonctions de l'aspirateur et les acce ssoires sont protégés
à l'étranger par des brevets déposés.
Cet appareil est conform e aux directives suivante s de
la C.E. :
• 2006/9 5/CE relative a la “basse te nsion”
• 89 /336/CEE “Directive CEM ” y com pris les directives
de m odifications 9 2/31/CEE e t 9 3/68/CEE.
Le groupe Ele ctrolux pe ut, de tem ps à autre, apporter des
ch ange m ents à ses produits ; par conséq uent, les
inform ations fournies dans ce livret peuve nt faire l'objet
de m odifications sans préavis.
Le sym bole sur le produit ou son em ballage indiq ue
q ue ce produit ne peut être traité com m e déch et
m énager. Il doit être rem is au point de collecte dédié à
cet effet (colle cte et recyclage du m atérie l électriq ue et
éle ctroniq ue). En procédant à la m ise au rebut de
l'appare il dans les règles de l’art, nou s préservons
l'environne m ent et notre sécurité, s’assurant ainsi q ue le s
déch ets se ront traités dans des conditions optim um . Pour
obte nir plus de détails sur le recyclage de ce produit,
veuillez prendre contact avec les services de votre
com m une ou le m agasin où vous ave z effectué l'ach at.
8
Page 12

Gentile cliente,
grazie per aver sce lto AEG- Electrolux. Per garantire la
m assim a soddisfazione, legge re atte ntam ente questo
lib retto di istruzioni. Conservate lo per farvi riferim ento.
Caratteristich e / Accessori
1 Attacco del tubo flessibile
2 Indicatore m eccanico di sacch etto pie no pe r
3 Regolatore di controllo dell’aspirazione
4 Pulsante per il riavvolgim ento del cavo
5 Pulsante Acceso/Spento
6 Ruota
7 Accessori nell'appare cch io
8 Maniglia per il trasporto
9 Coperch io del fe rm o a scatto pe r lo scom parto degli
accessori
10 Filtro di scarico
11 Tubo fle ssib ile girevole e im pugnatura con com ando
m anuale de ll’aspirazione
12 Tubo te lescopico
13 Spazzola doppio uso (pavim enti duri/tappeti)
14 Bocch etta per fessure com binazione
15 Spazzola parq u et *
16 Sacch e tti per la polvere
17 Posizionam ento ve rticale
18 Posizionam ento orizzontale
Per otte nere i m igliori risultati
• M oq uette : utilizzare la spazzola doppio uso con la
le vetta in posizione orizzontale.
• Pavim enti senza m oq uette: utilizzare la spazzola
doppio uso con la levetta in posizione ve rticale.
• Tappeti: ridurre la potenza d’aspirazione. Usare
l’acce ssorio per pavim enti per pulire i tappeti.
• Spazi ristretti: usare la bocch etta per fe ssure, ne gli
angoli e intorno ai calorife ri.
• Pavim enti parq uet: usare la spazzola parque t per
evitare graffi *
Per la vostra sicu rezza
L'aspirapolve re de ll'AEG- Electrolux è solo pe r uso
dom estico ed è stato ideato in m odo da garantire la
m assim a sicurezza e le m igliori prestazioni. Osservare
q ueste sem plici precauzioni:
• L'aspirapolve re h a un doppio isolam ento q u indi non
de ve ave re la m essa a te rra.
• L'aspirapolve re de ve e sse re usato solo da adulti.
• Riporre solo in luogo asciutto.
• Non usarlo per aspirare liq uidi.
• Evitare oggetti appuntiti.
• Non aspirare cenere o m ozziconi accesi di sigarette.
• Non aspirare su polve re m olto fine da intonaco, da
cem ento, dalla cenere fredda, dalla farina o dalla
cene re.
• Da non usare vicino a gas infiam m abili.
• Questi m ateriali possono danneggiare se rio il m otore
- danni ch e non sono coperti dalla garanzia.
• Evitare di tirare il cavo elettrico e controllare
regolarm ente se presenti segni di danne ggiam ento.
• Nota: non usare l’aspirapolvere se il cavo è
danne ggiato. Se lo fosse , sostituirlo presso un Ce ntro
assistenza Electrolux.
• Prim a di proce dere alla pulizia o alla m anutenzione
de ll’appare cch io, staccar la spina dalla presa.
• Ogni gene re di m anutenzione e di riparazione deve
essere ese guita da personale autorizzato pe r
l’assiste nza de ll'AEG- Electrolux.
Per com inciare
A Controllare ch e il sacch etto sia stato inse rito.
B Inserire il tubo fle ssibile finch è i fe rm i si blocch ino
con uno scatto. Per rilasciarli, prem ere i fe rm i verso
l’inte rno).
C Applicare il tubo te lescopico all’im pugnatura del
tubo flessibile e spazzola doppio uso spingendoli uno
nell’altro con un m ovim ento rotatorio. (Per lo
sm ontaggio, staccarli con un m ovim ento rotatorio).
D Svolgere il cavo e collegarlo alla presa d’elettricità.
Negli e rgo essence dotati di avvolgicavo controllare
ch e q uesto non sia attorcigliato prim a dell’uso. (Per
riavvolge rlo, prem ere il pedale. Nota: te ne re in m ano
la spina, pe r evitare ch e colpisca la persona o
l’apparecch io).
E Per m ette re in funzione l’aspirapolve re, prem ere il
pulsante Acceso/Spe nto.
F La potenza assorbita puo e sse re regolata spostando
l'apposito tasto di com ando.
Si può regolare l’aspirazione m eccanicam ente anch e
aprendo/ch iudendo l’apertura sull’im pugnatura del
tubo flessibile.
Indicatore di sacch etto pieno e com e cam biare il
sacch etto
Pe r una prestazione ottim ale , il sacch e tto va cam biato
q uando è pieno. Se il sacch etto per la polve re dovesse
rom persi accide ntalm ente all’interno de ll’aspirapolve re ,
portare l’aspirapolve re presso un Centro assistenza AEG-
Electrolux per farlo pulire.
Controllare regolarm e nte il sacch etto e sostituirlo q u ando
necessario. L’indicatore di sacch etto pieno dive nte rà
gradualm ente rosso m entre il sacch etto si riem pe e
com pletam e nte rosso q uando il sacch etto è pieno.
Pe r controllare lo stato di riem pim e nto del sacch e tto,
l’aspirapolve re de ve essere acceso, con tutti gli accessori
colle gati e sollevati dal pavim ento.
L’indicatore di sacch etto pieno può se gnalare ch e il
sacch etto è bloccato (occasionalm e nte a causa di polvere
m olto fine), situazione ch e riduce l’aspirazione e può
provocare un surriscaldam ento. Se ci dove sse ve rificarsi,
cam biare il sacch etto anch e se non è pie no.
9
* Solo per alcuni m odelli
Page 13

Per cam biare il sacch etto
1 Rilasciare il ferm o e solle vare coperch io all’indie tro
prim a di estrarre il sacch etto
2 Estrarre il sacch etto.
3 Inserire il sacch etto nuovo face ndo scorre re le guide
de l sacch etto sui supporti.
4 Ora pote te ch iudere il vano in cui vi è il sacch e tto e
continuare le vostre pulizie .
Raccom andiam o di cam biare il sacch etto de lla
polve re
• dopo avere usato un detergente in polvere per la
pulizia delle m oque ttes
• se l’aspirapolvere e m ana un cattivo odore, ne l q ual
caso cam biare anch e il filtro
• Nota: usare solo i sacch etti e i filtri originali
Electrolux.
Sacch etto consigliato: AEG GR5
Filtro m otore consigliato: AEG GR5
Filtro di scarico consigliato: AEG GR5
Dispositivo di sicurezza per il sacch etto
Pe r evitare di danne ggiare l’aspirapolvere non usarlo
senza sacch etto.
Esiste un dispositivo di sicurezza ch e im pedisce al
coperch io di ch iude rsi se non c’è un sacch etto. Non
cercare di forzare la ch iusura de l cope rch io.
Per pulirei filtri
All’inte rno dell’aspirapolve re sono presenti due filtri. Non
usare m ai l’aspirapolve re senza i filtri.
Per pulire il filtro di protezione del m otore
Il filtro di protezione del m otore va pulito q uando è
sporco.
1 Rilasciare il ferm o.
2 Togliere il cope rch io e il filtro.
3 Lavare il filtro in acqua tiepida. Lasciare asciugare.
2 Reinse rire il filtro pulito.
1 Ch iude re il coperch io.
Per pulire il filtro di scarico
1 Aprite la griglia di scarico.
2 Togliete il filtro con la griglia.
3 Togliete il filtro dalla griglia.
4 Risciacq uate lo sotto il rubinetto e lasciatelo
asciugare com pletam ente.
3 Inserire il filtro nella griglia.
2 Inserie il filtro con la griglia nell”aspirapolvere.
1 Ch iude re la griglia di scarico.
Diagnosi de i guasti
• Elettricità: se l’apparecch io non si accende ,
scollegarlo dalla corrente e controllare prim a le prese
ed il cavo ed e ve ntu alm ente i fusibili.
• Intasam e nti/Filtri sporch i: l’aspirapolvere si può
spegnere da solo in caso di eccessivo intasam ento o
sporcizia dei filtri. In tali casi, scollegarlo dalla
corre nte e lasciarlo raffreddare per 20- 30 m inuti.
Elim inare l’intasam ento e/o sostituire i filtri, q uindi
riaccendere. Lo sbloccaggio dei tubi flessibili intasati
non è coperto dalla garanzia. Fate riferim ento anch e
ad ulteriori inform azioni sui prodotti Electrolu x ve rso
la fine di q uesto lib retto.
• Acqua: se vie ne aspirata de ll’acqua all’inte rno
de ll’aspirapolvere il m otore deve essere cam biato
presso un Centro assiste nza AEG- Electrolux.
Inform azioni per il cliente
Qualora siano nece ssari parti di ricam bio o m ate riali di
consum o per l'aspirapolvere Ele ctrolux, consultare
l'ele nco dei ce ntri di assiste nza, allegato a que sto
aspirapolvere per individuare il centro assistenza
autorizzato Electrolux più vicino oppure tele fonare al
servizio assiste nza clienti. Specificare il m odello durante
l'ordinazione dei ricam bi.
Fate riferim ento anch e ad ulte riori inform azioni sui
prodotti AEG- Electrolux ne l libretto separato de lla
garanzia di AEG- Ele ctrolux.
Electrolux
Le funzioni dell'aspirapolve re e de gli accessori sono
prote tte all'este ro dai bre vetti registrati di Design
registrato.
Questa appare cch iatura è conform e alle segue nti
Direttive CE:
• Direttiva Bassa te nsione 2006/9 5/CE
• Direttiva EM C 89 /336/EEC e succe ssivi em e ndam enti
9 2/31/EEC e 9 3/68/EEC
Il gruppo Electrolux potrà apportare m odifich e al
prodotto di tanto in tanto, di consegue nza le
inform azioni conte nute in q uesto opuscolo sono soggette
a m odifica senza preavviso.
Il sim bolo sul prodotto o sulla confe zione indica ch e
il prodotto non deve essere conside rato com e un norm ale
rifiuto dom estico, m a deve essere portato nel punto di
raccolta appropriato per il riciclaggio di appare cch iature
ele ttrich e e d elettronich e. Provvede ndo a sm altire q uesto
prodotto in m odo appropriato, si contribuisce a evitare
potenziali conseguenze ne gative per l’am bie nte e per la
salute, ch e potrebbe ro derivare da uno sm altim ento
inadeguato de l prodotto. Per inform azioni piu dettagliate
sul riciclaggio di q uesto prodotto, contattare l’ufficio
com unale , il servizio locale di sm altim ento rifiuti o il
negozio in cui e stato acquistato il prodotto.
10
Page 14

Estim ado cliente
Le agradece m os q u e h aya elegido un aspirador AEGElectrolux. Para obtener un óptim o resultado, le rogam os
le a de te nidam ente estas instrucciones.
Características/acce sorios
1 Conexión tubo
2 Indicador m ecánico de llenado de bolsa
3 Regulador de pote ncia de succión
4 Botón recogecables
5 Botón de encendido/apagado
6 Rueda
7 Com partim ento bolsa
8 Asa de transporte
9 Dispositivo apertura tapa com partim ento de bolsa
10 Re jilla filtro salida de aire
11 Tubo orientable y m ango con control m anual de
potencia
12 Tubo te lescópico
13 Cepillo com binado alfom bras/suelos duros
14 Boq uilla com binada m ueble s/espacios estre ch os
15 Cepillo de sue los duros *
16 Bolsa
17 Ranura posición aparcado (nº 1)
18 Ranura alm acenado aspirador
Cóm o obtene r los m ejores resultados
• Alfom bras/m oq uetas: Utilice el cepillo para suelo
con la pestaña en posición (A)
• Suelos duros: Utilice el cepillo para suelo con la
pestaña en posición (B)
• Alfom bras de pelo largo: Reduzca la pote ncia de
succión. Use el cepillo para pelo largo.
• Areas reducidas: Use la boq uilla estre ch a en
rincones, radiadores etc...
• Suelos duros / parque t: utilice el cepillo de sue los
duros para e vitar rayar las supe rficies *.
Para garantizar su seguridad
El aspirador es solo para uso dom éstico y se h a diseñado
para garantizar la m áxim a se guridad y rendim iento. Le
rogam os q ue siga estas sencillas precauciones:
• El aspirador tie ne doble aislam iento, por lo q ue no
de be conectarse a u na tom a de tierra.
• Solam ente de be ser utilizado por personas adultas.
• No recoger polvo dem asiado fino (yeso, cem ento,
etc...)
• Se debe guardar sie m pre en un lugar se co.
• No utilizar para recoger líq uidos.
• Evitar objetos afilados.
• No se debe recoger ni ceniza caliente ni colillas
encendidas.
• No utilizar cerca de gases inflam ables.
• Evitar tirar de l ench ufe y com prob ar periódicam ente
el buen estado del cable.
• No arrastrar el aparato ni de se nch ufarlo, tirando de l
cable. No utilizar el aspirador si el cable e stá dañado,
en cuyo caso h abrá que substituirlo en un Servicio
Técnico de AEG- Ele ctrolux. Este cam bio no lo cubre
la garantía.
• Desench ufe el aspirador antes de realizar ope raciones
de lim pieza o m ante nim iento e n el m ism o.
• Todos los se rvicios y reparaciones los debe e fe ctu ar
personal autorizado por AEG- Ele ctrolux.
Listo para com enzar
A Cerciore se de que la bolsa está en su sitio
B Introdoezca el tubo h asta oir un clic. (Pre sione las
pestañas h acia adentro para soltarlo).
C Acople el tubo telescópico al tubo flexib le y al
cepillo, presionando y enroscándolos. (Gire y separe
para su de sm ontaje ).
D Extie nda el cable y ench úfe lo, asegurándose de q ue
no q ueda retorcido ante s de usarlo. Para re bobinar el
cable, presione la tecla recogecables, cuidando de
suje tar el ench ufe para q ue no le golpee durante el
rebobinado.
E Presione el botón de e ncendido / apagado para
activar el aspirador.
F Aum ente o dism inuya la potencia de succión con la
rue da de control de potencia.
La succión tam bién se pue de regular en el m ango del
tubo flexib le, abrie ndo/cerrando la rejilla de
ventilación.
Indicador de llenado de bolsa y cam bio de esta
Ante s de utilizar el aspirador, asegúrese de q ue tiene una
bolsa instalada.
Para obtener el m ayor rendim iento, la bolsa deb e
cam biarse cuando esté llena. El indicador de llenado de
bolsa se irá poniendo rojo paulatinam ente, a m edida q ue
ésta se vaya llenando, y q uedará com pletam ente rojo
cuando la bolsa esté totalm ente llena. Si la bolsa se
rom piese accide ntalm ente de ntro del aspirador, llévelo a
un Servicio Técnico AEG- Ele ctrolux para su lim pie za. Este
servicio no lo cu bre la garantía.
El indicador de llenado de bolsa puede señalar q ue la
bolsa está bloqueada (posiblem ente m otivado por polvo
m uy fino), lo q ue produciría pérdida en el poder de
succión y podría provocar un sobrecalentam iento. Si esto
sucedie ra, cam bie la bolsa aunq ue no esté llena.
11
* Sólo algunos m odelos
Page 15

Para cam biar la bolsa
1 Abra la tapa del aspirador.
2 Retire la bolsa.
3 Introduzca la nue va bolsa e ncajando las ranuras de la
m ism a e n los soporte s.
4 Cierre la tapa.
Re com endam os que se cam bie la bolsa después de
utilizar lim piadores de alfom bras en polvo o si
h ub iera m al olor en el aspirador.
Nota: Use unicam ente bolsas y filtros.
La refe rencia de la bolsa es: AEG GR5.
Re fe rencia de los filtros es: AEG GR5.
Dispositivo de seguridad de la bolsa de recogida
de polvo
Para evitar dañar el aspirador, no lo use sin bolsa. El
aspirador va eq uipado con un dispositivo de seguridad
q ue evita que se cierre la cub ie rta si no tie ne una bolsa
de ntro. No inte nte cerrar la cubierta a la fue rza.
Lim pieza de los filtros
No utilice nunca e l aspirador sin que lleve los filtros
corre spondientes. Éstos de ben cam biarse/lim piarse 1 ve z
por cada cinco ve ces que cam bie la bolsa.
Lim pieza del filtro de protección de l m otor
El filtro de prote cción del m otor debe lim piarse cuando
esté sucio.
1 Abra la tapa del aspirador.
2 Retire el filtro.
3 Lave el filtro al ch orro del grifo con agua tem plada y
déjelo secar com pletam ente . Las prestaciones del
filtro vuelven a ser óptim as nuevam ente.
2.1 Vue lva a introdu cir el filtro en el aspirador y cierre la
tapa, asegurándose de q ue queda corre ctam ente
colocado y q ue la tapa está perfe ctam e nte cerrada.
Lim pieza del filtro de salida de aire
1 Abra la rejilla del filtro de salida de aire.
2 Extraiga e l filtro junto con su rejilla.
3 Extraiga e l filtro de la rejilla.
4 Aclare e l filtro al ch orro del grifo y déjelo secar
com pletam e nte .
3 Coloq ue el filtro en su rejilla.
2 Vuelva a colocar e l filtro con la rejilla en el aspirador.
1 Cierre la tapa del filtro de salida de aire .
Re solución de proble m as
• Bolsa: Por favor, com pruebe q ue la bolsa está
colocada correctam ente y asegúrese de q ue no está
atascada
• Sum inistro eléctrico: Si no le lle ga corriente
eléctrica al aparato, de sconéctelo y com prue b e q ue
la clavija, el cable y los fusib les están correctam ente
El aspirador pue de apagarse en caso de atasco o si
los filtros están excesivam ente sucios.
En estos casos, desconécte lo de la re d y déjelo enfriar
30 m inutos. Elim ine el atasco y/o sustituya los filtros
y vuélvalo a poner en m arch a.
La garantía no cubre la elim inación de atasco de los
tubos. Para e vitarlos y m ante ner la eficacia de
succión, lim pie periódicam e nte los ce pillos con la
boq uilla de la m angue ra.
• Agua: Si entrara agua en el aspirador, h abría q ue
cam biar e l m otor en un Se rvicio Técnico de AEGElectrolux. Esto no lo cubre la garantía.
Inform ación para e l cliente
Si ne cesita servicio técnico, recam bios o consum ible s para
su aspirador Electrolux, por favor, consulte la lista de
Talle res de Servicio Técnico autorizados, q ue se adjunta
en la caja de este aspirador, para ve r cuál es el m ás
próxim o a su dom icilio, o llam e al teléfono de ate nción al
cliente.
Cuando h aga un pedido de recam bios, no olvide
especificar e l tipo de m odelo.
Por favor vea tam bién la inform ación adicional de AEGElectrolux en el libro de garantía de AEG- Ele ctrolux.
Electrolux
Las caracte rísticas del aspirador y sus accesorios están
prote gidas en e l extranjero bajo patentes o diseños
registrados.
Este aparato cum ple los req uisitos de las siguientes
directivas europeas:
• Directiva de baja te nsión 2006/9 5/CE
• Directiva EM C (Com patibilildad e lectrom agnética)
89 /336/CEE con las m odificaciones 9 2/31/CEE y
9 3/68/CEE
El grupo Electrolux pue de introducir m odificacione s e n
sus productos y, en consecue ncia, los datos contenidos en
esta guía serán susceptibles cam bios sin previo aviso.
El sím bolo e n e l producto o en su em balaje indica
q ue este producto no se puede tratar com o desperdicios
norm ales del h ogar. Este producto se debe e ntre gar al
punto de recole cción de eq uipos eléctricos y electrónicos
para reciclaje. Al asegurarse de que este producto se
de se ch e correctam e nte , uste d ayudará a e vitar posible s
consecue ncias negativas para e l am biente y la salud
pública, lo cual podría ocurrir si este producto no se
m anipula de form a ade cuada. Para obtener inform ación
m ás detallada sobre el reciclaje de este producto, póngase
en contacto con la adm inistración de su ciudad, con su
servicio de desech os del h ogar o con la tie nda donde
com pró el producto.
12
Page 16

Instruções de utilização
Obridado por te r escolh ido um aspirador AEG- Ele ctrolux.
Para garantir satisfação total, leia este livro de instruções
com cuidado.
Características e ace ssórios
1 Ligação da m angueira
2 Indicador m ecanico do saco de pó, consoante os
m odelos
3 Regulador do controlo de sucção
4 Botão para enrolam ento do cabo
5 Botão Ligar/D e sligar
6 Roda
7 Com partim ento do saco de pó
8 Pega de transporte
9 Patilh a de soltar a tam pa para o com partim ento dos
ace ssórios
10 Grelh a do filtro de exaustão
11 M angueira giratória e pega com controlo m anual de
sucção
12 Tubo te lescópico
13 Escova de dupla funcao, para alcatifas/ pavim e ntos
duros
14 Com b inação bocal com fe nda / escova
15 Escova parq uet *
16 Sacos de pó
17 Parq ueam ento para a e scova e tubos de exte nsão
q uando não estive rem em utilização
18 Parq ueam ento para a e scova e tubos de exte nsão
q uando estive rem em utilização
Com o conse guir os m elh ores resultados
• Alcatifas: Use a e scova com a alavanca h orizontal
posição.
• Pavim entos du ros: Use a escova com a alavanca
nesta posição ve rtcal.
• Tapete s: Redu za a sucção. Use a escova para
pavim entos na posição para tapete s.
• Áreas restritas: use o bocal de fe ndas para frestas,
cantos e radiadores.
• Piso duro / parq uet: use a escova parque t para
evitar riscar o ch ao *.
Certifiq ue- se da su a se gurança
AEG- Electrolux destina- se apenas a uso dom éstico e foi
concebido para asse gurar a m áxim a segurança e
de se m penh o.
Siga estas precauções sim ples:
• O aspirador AEG- Ele ctrolux isolam ento duplo,
portanto não deve estar ligado à te rra.
• O aspirador AEG- Ele ctrolux ser utilizado apenas por
adultos.
• Guarde - o sem pre num local seco.
• Não o utilize para aspirar líq uidos.
• Evite obje ctos afiados.
• Não aspire cinzas q uentes ou pontas de cigarro
ace sas.
• Não aspire acim a da poeira m uito fina do em plastro,
do cim ento, dos cinders frios, da farinh a ou da cinza.
• Não o utilize junto de gases inflam áve is.
• Estes m ateriais pode m causar os danos sérios ao m otor
- uns danos que não sejam cobertos pela garantia.
• Evite puxar o cabo e verifiq u e - o com regularidade
para detectar q uaisq uer danos.
• Nota: Não utilize o se u aspirador com o cabo
danificado. Se este estiver danificado deve se r
sub stituído num Servico de Assiste ncia Técnica da
AEG- Electrolux.
• Antes de lim par o aparelh o ou executar a sua
m anutenção, retire a fich a da tom ada de rede.
• Toda a assistência e reparaçõe s devem ser efectuadas
por técnicos da AEG- Electrolux ou por
concessionários autorizados.
Preparação Inicial
A Verifiq ue se o saco de pó está no lugar respectivo.
B Introduza a m angueira até as patilh as e ncaixarem .
(Prim a as patilh as para dentro para a soltar).
C Ligue o tubo te lescópico, á pega da m angueira e à
escova para pavim entos em purrando e encaixando
um contra o outro. (D ese ncaixe e separe- os para
de sm ontar.)
D Pu xe o cabo para fora e ligue- o à rede. Los m ode los
estão equipados com enrolador de cabo; certifiq uese
de q ue este não e stá torcido antes de o utilizar.
(Prim a a te cla para o enrolar.)
Nota: Segure na fich a para im pedir que esta o atinja
ou bata no aparelh o.
E Prim a o botão Ligar/Desligar para activar o
funcionam ento doaspirador.
F Move ndo o sele ctor de pote ncia pode ajustar a força
de aspiraçao.
A sucção tam bém pode ser regulada na pe ga da
m angueira abrindo/fe ch ando a abertura.
Indicador do saco de pó e m udança do saco de pó
Para um desem penh o óptim o o saco de pó deve ser m udado
quando estive r ch eio. Se o saco de pó rebe ntar
acidentalm ente dentro do aspirador, le ve o aspirador ao
Servico de Assistencia Técnica AEG- Electrolux para sel lim po.
Consoante os m odelos: verifique o saco de pó com
regularidade e substitua-o sem pre que for necessário. Nos
m odelos m acanicos a janela do indicador do saco de pó ficará
gradualm ente vermelh a à m edida q ue o saco se for ench endo
e com pletam ente vermelh a q uando estiver ch eio/nos m odelos
electrónicos: o indicador electrónico piscará de m eio em m eio
segundo quando o saco e stiver ch eio.
Para ve rificar se o saco de pó está ch e io o aspirador deve
estar ligado, com todos os acessórios m ontados e a
escova le vantada do ch ão.
O indicador de saco de pó ch eio pode significar tam bém
q ue o saco está bloq u eado (ocasionalm ente provocado
por poeira m uito fina) o que causará perda de sucção e
q ue pode rá resultar em sobre aq uecim e nto. Se isto ocorre r
m ude o saco de pó, m esm o que este não esteja ch eio.
13
* Apenas para alguns m odelos
Page 17

Para m udar o saco de pó:
1 Solte a patilh a e le vante a tam pa para trás, antes de
retirar o saco de pó.
2 Retire o saco de pó
3 Introduza novo saco de pó colocando as ranh uras do
saco sobre os suportes.
4 Agora você pode fech ar o com partim ento do saco de
pó e continuar lim pando.
Re com endam os a m udança do saco de pó:
• de pois de utilizar um produto e m pó para a lim peza
de alcatifas.
• se o aspirador tiver m au ch eiro de ve rá tam bém
m udar o saco.
• Nota: Use apenas sacos de pó (Ref. AEG GR5) e filtros
de origem AEG- Ele ctrolux o M enalu x (AEG GR5).
Dispositivo de segurança do saco de pó:
• Para evitar danificar o aspirador não o utilize sem
um saco de pó. O aparelh o te m um dispositivo de
segurança instalado que im pede a tam pa de fe ch ar
sem um saco de pó colocado. Não te nte fe ch ar a
tam pa à força.
Lim peza dos filtros
H á dois filtros dentro do seu aspirador. Nu nca utilize o
aspirador sem os filtros no lugar respe ctivo.
Para lim par o filtro de prote cção do m otor:
O filtro de protecção do m otor de ve ser lim po quando
estiver sujo.
1 Solte a patilh a.
2 Rem ova a tam pa e o filtro.
3 Lave o filtro com água m orna.
2 Deixe o filtro lim po secar e o insira de novo.
1 Fe ch e a tam pa.
Para lim par o filtro de escape
1 Abra a tam pa do filtro de e xaustão.
2 Rem ova o filtro com grade.
3 Rem ova o filtro para fora da grade.
4 Lave o filtro unicam ente de baixo de água m orna e
segne- o com pletam ente .
3 Ponh a o filtro para trás na grade.
2 Ponh a a grade do filtro para trás no líq uido de
lim peza.
1 Fe ch e a tam pa do filtro de e xaustão.
Identificação e resolução de proble m as
• Ligação: Se não h ouver corrente no apare lh o,
de sligue - o da rede e ve rifiq ue as fich as, cabo e
fusíveis.
• Entupim entos/filtros sujos: O aspirador pode- se
de sligar por si só se h ouver um entupim ento sério ou
se o(s) filtro(s) estive r(e m ) excessivam ente sujo(s).
Nessas circunstâncias, de sligue da rede e de ixe
arrefe cer durante 20 a 30 m inutos.
Desentupa e/ou substitua o(s) filtro(s) e volte a pôr
em funcionam e nto.
A lim peza de m angueiras entupidas não está coberta
pela garantia.
Ve ja tam bém as inform ações adicionais de AEGElectrolux perto do final deste folh e to.
• Água: Se aspirar água para de ntro do aspirador de ve
trocar o m otor num Servico de Assistencia Técnica da
AEG- Electrolux.
Inform ação ao Cliente
Se ne cessitar de assistência ou de peças sobresselente s
para o se u aspirador Electrolux, consulte a lista de
centros de assistência fornecida com este aspirador para
obte r inform ações sobre o ce ntro de assistência
autorizado Electrolux m ais próxim o ou contacte a linh a
apoio ao clie nte . Especifiq ue o m odelo q uando
encom e ndar peças sobre sse lentes.
Por favor veja tam bém a inform ação adicional de AEGElectrolux no livreto separado da garantia de AEGElectrolux.
Electrolux
As funções e acessórios do aspirador estão protegidos por
pate nte s registadas de Re giste red D e signs.
Este aparelh o está de acordo com as seguintes
Directivas EC :
• Directiva Baixa Voltagem 2006/9 5/EC
• Directiva EM C 89 /336/EEC com aditam entos
9 2/31/EEC e 9 3/68/EEC
O grupo Electrolux poderá introduzir m odificaçõe s ao
produto sem pre q ue necessário e conseq uentem ente as
inform ações fornecidas neste m anual e stão suje itas a
alteração sem aviso prévio.
O sím bolo no produto ou na em balagem indica q ue
este produto nao pode se r tratado com o lixo dom éstico.
Em vez disso, deve ser entregue ao ce ntro de recolh a
sele ctiva para a reciclagem de eq uipam ento e léctrico e
ele ctrónico. Ao garantir um a e lim inaçao ade q uada deste
produto, irá ajudar a evitar eventuais conse q uencias
negativas para o m eio am biente e para a saúde pública,
q ue, de outra form a, pode riam ser provocadas por u m
tratam ento incorrecto do produto. Para obte r
inform açoes m ais porm e norizadas sobre a reciclagem
de ste produto, contacte os serviços m unicipalizados
locais, o centro de recolh a selectiva da sua áre a de
residencia ou o estabele cim ento onde adq uiriu o produ to.
14
Page 18

Sayın M üşterim iz,
AEG- Electrolux e lek trik li süpürgeyi se çtiğiniz için
teşek k ür e deriz. Tam olarak m em nun k alm anız için, bu
k ullanm a k ılavuzunu dik k atlice ok u yu nuz.
Elek trik li süpürgenin özellik leri / Ak sesuarları
1 H ortum bağlantısı
2 Mek anik toz torbası göste rgesi
3 Em iş gücü k ontrol regülatörü
4 Kablo geri sarm a düğm e si
5 Açm a/K apam a düğm esi
6 Te k erlek
7 Toz torbası bölm esi
8 Taşım a kolu
9 Toz bölm esi için k apak açm a m andalı
10 H ava çık ış filtre ızgarası
11 Em iş gücü k ontrol regülatörlü tutm a yeri
12 Te lesk opik boru
13 H alı/se rt yüzey ucu
14 Kom bine dar aralık ucu/fırça
15 Se rt yüzey bağligi *
16 Toz torbası
17 Dik ey park pozisyonu (Nr 1.)
18 Yatay park pozisyonu (Nr 2.)
En iyi sonu çları alm ak için
• H alılar: H alı/se rt yüzey başlığını resim de göste rilen
pozisyona getirerek kullanınız (13A).
• Se rt yüzeyler: H alı/sert yüzey başlığı resim de
göste rilen pozisyona getirerek k ullanınız (13B).
• Kilim ler: Em iş gücünü azaltın. Kilim ler için ye r
başlığını k ullanın.
• Dar alanlarda: Dar alanlar, k öşeler, radyatörle r, vs.
için dar aralık lı başlığı k ullanın.
• Se rt yüzey / park e: Çizilm eyi önlem ek için sert yüzey
basligi k ullaniniz *.
Em niyet Önlem leri
Bu e lek trik li süpürge yalnızca ev k ullanım ı içindir ve en
yük sek perform ansı ve em niyeti sağlam ak için
tasarlanm ıştır. Lütfe n aşağıdak i basit önle m lere uyunuz:
• AEG- Electrolux çift yalıtım lıdır bu nede nle
topraklanm am alıdır
• AEG- Electrolux yalnızca yetişk inlerin k ullanım ı içindir.
• Çoçuk ların ve bu süpürgenin k u llanım ı k onusunda
bilgisi olm ayan k işilerin cih az ile oynam adık larindan
em in olunuz.
• H e r zam an k uru ye rde saklayınız.
• Süpürgeyi sıvıları e m m ek için k ullanm ayınız.
• Kesk in nesnele ri süpürm ek ten k açınınız.
• Sıcak k ül ve ya yanan sigara izm aritlerini alm ayınız.
• Yanıcı gazların yanında k ullanm ayınız.
• Ana k abloyu fazla çek m eyiniz ve k abloyu olabilecek
h asarlara k arşı düze nli olarak k ontrol ediniz.
• UYARI: Cih azı k ablosundan çek m eyin. Aynı şek lide,
prizden çık arm ak için cih azı k ablosundan çek m eyin.
Cih azı h asarlı k ablo ile k ullanm ayın. H asarlanm ış kablo,
yetk ili servis m erk esi tarafından değiştirilm elidir. Bu
de ğişim garanti k apsam ında değildir.
• Elek trik li süpü rgenizi te m izlem eden ya da bak ım
yapm adan önce, fişi prizden çek iniz.
• Bütün servis ve tam ir h izm etleri, ye tk ili AEGElectrolux se rvis e lem anları tarafından yapılm alıdır.
Kullanım a b aşlark e n
A Toz torbasının ye rinde olduğundan em in olun.
B H ortum u tutuculardan ‘k lik ’ sesi gelip tam yerine
oturana k adar ye rleştirin. (Serbest k alm ası için
tutucuları içeri doğru bastırın).
C Te lesk opik boruyu, h ortum tutm a yerine ve yer
ucuna, birlik te iterek ve çevirerek tak ın. (Çık arm ak
için çeviriniz ve ayırınız).
D Kabloyu uzatın ve fişe tak ın; k ullanm adan önce
k ablonun düğüm lenm ediğinden em in olun. K abloyu
geri sarm ak için k ablo geri sarm a düğm esine basın. Size
veya m akineye çarpm asını önlem ek için fişi tutunuz).
E Tem izliğe başlam ak için açm a/k apam a düğm esine basınız.
F Güç ayarlam a düğm e sini k ullanarak , em iş gücünü
süpürm e esnasında ih tiyacınıza göre ayarlayabilirsiniz.
Ayrıca h ortum tu tm a yerindek i delik
açılarak/k apatılarak e m iş gücü k ontrol edilebilir.
Toz torbası göstergesi ve toz torbasının degiştirilm esi
Süpürgeyi toz torbasını yerine yerleştirilm eden asla
çalıştırm ayınız.
En iyi sonucu alm ak için, toz torbası dolduğunda h em en
de ğiştirilm elidir. Toz torbası dolm aya başladığında toz
torbası göstergesi k adem eli olarak k ırm ızıya dönüşe cek tir
ve tam dolduğunda k ırm ızı olacak tır.
Eğer toz torbası elek trik li süpürgenin içinde delinirse ve ya
yırtılırsa, tem izlenm esi için Servis M e rk ezine
getirilm elidir. Bu garanti k apsam ına girm em ek tedir.
Toz torbası dolum göste rgesi, em işin azalm ası ve fazla
ısınm a nedeniyle torbanın tık anm ış olduğunu da
göste re bilir (nadiren çok ince tozdan dolayı). Eğer böyle
bir durum olursa, torba dolu olm asa bile değiştirin.
Çok ince tozu elek trik li süpürge ile süpürm ek te n k açının
(alçı, çim e nto, k öm ür...).
Toz torbasını k ontrol etm ek için, elek trik li süpürgenin
bü tün ek leri tak ılı durum dayk e n çalışır ve yere değm iyor
olm ası gere k ir.
Toz torbasını değiştirm ek için:
1 Süpürgenin k apağını açın.
2 Toz torbasını yuvasından çık artın.
3 Yeni toz torbasını yuvasına yerleştirin.
4 Kapağı k apatın.
5 H alı tem izlem e tozu k ullandık tan sonra veya
ele k trik li süpürgede n k ötü k okular geliyorsa toz
torbasının değiştirlim esini tavsiye e deriz.
Not: Yalnızca AEG- Electrolux orijinal toz torbalarını ve
filtrele rini k ullanın
Toz torbası Ref. num arası: AEG GR5
15
* Yalnýzca be lirli m ode lle rde
Page 19

Toz torbası em niyet m andalı
ek trik li süpürgenizin zarar görm e sini enge lle m ek için, toz
torbası olm adan k ullanm ayın. K apağın toz torbası
olm adan k apanm asını engellem ek için bir em niyet
m andalı ye rleştirilm iştir. Kapağı k apatm ak için
zorlam ayınız.
Filtrelerin de ğiştirilm esi
Filtreler tak ılı değilk en elek trik li süpürgeyi asla
k ullanm ayın.
H e r beşinci toz torbasından sonra filtreler
de ğiştirilm eli/tem izlenm elidir.
M otor k orum a filtresinin te m izlem enm esi
1 Kapağı açın.
2 Filtre ünite sini k aldırın.
3 Filtreyi sadece ılık sula yık ayın ve tam am en k uruyana
k adar bek leyin. Bu şek ilde filtre den ilk perform ansını
elde edebilirsiniz.
2,1 Üniteyi e lek trik li süpürgenin içine tek rar ye rleştirin
ve güvenliği sağlam ak için k apağı k apatın.
H e r ik i yılın sonunda esk i filtreyi yenisi ile değiştirin.
H ava çıkış filtresinin tem izlenm esi
1 H ava çık ış filtresinin ızgarasını açınız.
2 Filtreyi ızgarayla birlik te çık arınız.
3 Filtreyi ızgaradan çık arınız.
4 Filtreyi m usluk suyu ile durulayın ve tam am en
k uruyana k adar bek leyin.
3 Filtreyi tek rar ızgaranın içine yerle ştirin.
2 Filtre ızgarasını elek tik li süpürgenin içine yerleştirin.
1 H ava çık ış filtresinin k apağını k apatınız.
Tavsiye edilen filtrele r:
M otor filtresi: AEG GR5
H ava çık ış filtresi: AEG GR5
Sorun çözm e
• Güç: Eğer ele k trik gelm iyorsa, fişi prizden çık artın ve
fişleri, k abloları ve sigortaları k ontrol edin.
• Tık anm alar/k irli filtrele r: Çok ciddi tık anm alarda ve
fazla k irli filtrelerde , elek trik li süpürge k e ndi k endine
k apanabilir. Bu durum larda cih azı fişten çek in ve 20-
30 dakik a soğum asına izin ve rin. Tık anık lığı tem izle yin
ve/veya filtreyi de gŠiştirin ve yeniden başlatın.
Tık anm ış h ortum ların tem izlenm esi garanti
k apsam ında de ğildir.
Lütfen, bu k itapçığın ark a k ısm ındak i e k AEG-
Electrolux bilgilerine de bakın.
• Su: Eğer ele k trik li süpü rge ile su çek tirilm iş ise,
m otor ye tk ili AEG- Electrolux Servis tarafından
de ğiştirilm elidir.
Ancak bu işlem garanti h arici olacaktır.
Elek trik li süpürgeyle ya da çalıştırm ayla
talim atlarıyla ilgili bir yorum unuz varsa lütfen
aşağıdak i adresim ize e- posta gönderin:
floorcare@ e lectrolux.se
M üşteri bilgisi
Ürünle ilgili dah a fazla bilgiye, servis h izm e tine ya da
yedek parçaya ih tiyacınız olm ası h alinde, lütfen cih azı
satın aldığınız bayi, size en yak ın AEG- Ele ctrolux Yetk ili
Se rvis ya da Müşte ri H izm etle rim iz ile irtibata geçiniz.
Yede k parça siparişi ve rirk en lütfe n elek trik li süpü rgenizin
m odel ism ini belirtiniz.
Dah a dazla bilgi için AEG-Electrolux garanti belgesine bak ınız.
Electrolux
Bu elek trik li süpürgenin özellik leri ve aksesuarları tescillidir.
Bu cih az aşağıdak i EC Direk tifle ri ile uyum ludur:
• 2006/9 5/EC sayılı D üşük Voltaj Direk tifi
• 9 2/31/EEC ve 9 3/68/EEC de ğişik lik lerini de k apsayan
89 /336/EEC sayılı EMC Direk tifi
Electrolux Grubu, ürünlerinde zam an içinde değişik lik
yapm a h ak k ını sak lı tutar ve bu k ullanm a kılavuzunda
verilen bilgilerde h abe r ve rm ek sizin de ğişik lik yapab ilir.
Cih azınızın k ullanm a öm rü 10 yıldır. K u llanm a öm rü,
üre tici ve /ve ya ith alatçı firm anın cih azınızla ilgili yedek
parça tem ini ve bak ım süresini ifade eder.
Ürün veya ürünün am balajı üzerindek i sem bolü, bu
ürünün norm al ev atığı gib i işlem göre m eye ceğini belirtir.
Bunun yerine, elek trik li ve ele k tronik e k ipm anların geri
dönüşüm ü için belirlenen toplam a nok talarına te slim
edilm elidir. Bu ürünün doğru bir şek ilde elden
çık arılm asını sağlayarak , ak si bir şek ilde şek ilde
atılm asının ve ya im h a edilm esinin ortaya çık arabile ceği,
çevre ve insan sağlığı açısından potansiyel olum suz
sonuçları önle m eye yardım cı olm uş olursunuz. Bu ürünün
geri dönüşüm ü h ak k ında dah a detaylı bilgi için lütfen
yerel şeh ir bü ronuz, e v çöpü toplam a se rvisiniz ya da
ürünü satın aldığınız m ağaza ile te m asa ge çiniz.
ELECTROLUX A.Ş
Tarlabaşı Cad.No 35 Tak sim / İSTANBU L
TEL : 0 212 29 3 10 20
FAX : 0 212 251 9 1 44
ÜCRETSİZ TÜKETİCİ DANIŞMA H ATTI
0 800 211 61 69
Tek nik Veriler:
M otor Güçü: 1800 W
Çalışm a Ge rilim i: 230V/ 50H z
Ağırlık : 4,6 k g
Ölçüler: 370x275x230 m m
Fabrik a Yeri:
Suzh ou Kingclean Floorcare Co. Ltd.
Xiangyang Road, Suzh ou New District
Suzh ou, Jiangsu, 215009
Ch ina
16
Page 20

Αγαπ η τή π ελάτισσα, αγαπ η τέ π ελάτη ,
Ευχαριστούµε που διαλέ ξατε µια σκούπα AEG-Ele ctrolux.
∆ια βάστε π ροσεκτικά τις οδη γίες.
Χαρακτη ριστικά / Αξεσουάρ
1 Σύνδεση λάστιχου
2 Μ η χανική έ νδ ειξη γεµάτη ς σακούλας
3 Ρυθµιστής ισχύος
4 Πλήκτρο π εριέ λιξη ς καλω δίου
5 Πλήκτρο έ ναρξη ς/λήξη ς
6 Ρόδα
7 Χώρος απ οθήκευση ς σακούλας
8 Λαβή µ εταφοράς
9 Λαβή ανοίγµ ατος χώρου απ οθήκευση ς σακούλας
10 Πλέ γµα φίλτρου εξαγω γής
11 Χειροκίνη τος έ λεγχος ισχύος
12 Τη λεσκοπ ικός σω λήνας
13 Πέ λµ α χαλιών/σκλη ρών δαπ έ δ ω ν
14 Συνδυασµ ός π έ λµ ατος για στενέ ς κοιλότη τες/βούρτσα
15 Πέ λµα για σκλη ρά δάπ εδα *
16 Σακούλα
17 Θέ ση στάθµευση ς (Νο. 1)
18 Θέ ση α π οθήκευση ς (Νο. 2)
Πώς να π ετύχετε το καλύτερο απ οτέ λεσ µ α
● Χαλιά: Χρη σιµοπ οιήστε το π έ λµ α δαπ έ δω ν µε το
π εντάλ στη θέ ση 13Α .
● Σκλη ρά πατώµ ατα: Χρη σιµ οπ οιήστε το π έ λµ α
δαπ έ δω ν µε το π εντάλ στη θέ ση 13Β.
● Μ ικρά χαλάκια/ελαφριά υφάσµατα: Μειώστε τη ν ισχύ.
Να χρη σιµοποιείτε το πέ λµα δαπ έδου για µικρά χαλάκια.
● Στενοί χώροι: Να χρη σιµ οπ οιείτε το εξάρτη µ α για
γω νίες και καλοριφέ ρ.
● Σκλη ρά πατώµ ατα / π αρκέ : Χρη σιµοπ οιείτε το π έ λµα
για σκλη ρά πατώµατα για να απ οφύγετε γδαρσίµατα *.
Υπ οδείξεις ασφαλείας
Η σκούπ α π ροορίζεται για οικιακή χρήση και έ χει
κατασκευαστεί ώστε να π ροσφέ ρει τη ν µέ γιστη
ασφάλεια και ισχύ.
Παρακαλούµε προσέ ξτε τις υπ οδείξεις ασφαλείας π ου
ακολουθούν:
● Η σκούπ α διαθέ τει διπ λή µόνω ση και για τον λόγο
αυτό δεν π ρέπ ει να γειω θεί.
● Η συσκευή π ρέ π ει να χρη σιµ οπ οιείται µ όνο απ ό
ενήλικες.
● Να απ οθη κεύεται σε ξη ρό µέ ρος.
● Μ η ν τη ν χρη σιµοπ οιείτε για τη ν απ ορρόφη ση υγρών.
● Μ η ν απ ορροφάτε αιχµη ρά αντικείµ ενα.
● Μ η ν απ ορροφάτε στάχτη και υπ ολείµµατα τσιγάρου.
● Μ η ν τη ν χρη σιµοπ οιείτε κοντά σε γκάζι.
● Μ η ν τη ν τραβάτε απ ό το καλώδιο, το οπ οίο π ρέπ ει να
ελέ γχετε τακτικά για φθορέ ς.
Μ η ν χρη σιµοπ οιείτε τη ν σκούπα αν το καλώδιο
ρεύµατος έ χει φθορέ ς! Πρέ π ει να επ ισκευαστεί
οπω σδ ήπ οτε απ ό το σέ ρβις τη ς AEG. Αυτό δεν
καλύπ τεται απ ό τη ν εγγύη ση .
● Π ριν καθαρίσετε τη συσκευή π ρέ π ει να βγάλετε το φις
του καλω δίου ρεύµατος απ ό τη π ρίζα.
● Όλες οι επισκευέ ς π ρέ π ει να γίνονται απ ό το σέ ρβις
τη ς εταιρείας και µ όνο.
Λειτουργία
Α Ελέ γξτε αν έχετε τοπ οθετήσει µέ σα στη σκούπ α
σακούλα.
Β Σπρώξτε τόσο τον σω λήνα µ έ χρι να α κουστεί ότι
µπ ήκε στη σω στή θέ ση . (Για να τον ελευθερώσετε
π ιέ στε π ρος τα µέ σα).
Γ Τοπ οθετήστε τους τη λεσκοπικούς σω λήνες στη ν λαβή
και στο π έ λµα. Για να τα απ οσυνδέ σετε τα γυρίζετε και
τα τραβάτε, ώστε να βγει το έ να απ ό το άλλο.
∆ Βάλτε το φις στη ν πρίζα. Το καλώδιο δ ιαθέ τει
αυτοµατισµό. Προσέ ξτε π ριν τοπ οθετήσετε το φις στη ν
π ρίζα να µη ν είναι µπ ερδεµέ νο. (Για να µπ εί στη θέ ση
του π ιέ στε το π εντάλ. Κα τά τη διάρκεια του µ αζέ µατος
του καλω δίου π ρέπ ει να κρατάτε το φις για να
απ οφύγετε τυχόν τραυµατισµό ή ζη µιά στη σκούπα.
Ε Για να θέ σετε τη ν σκούπ α σε λειτουργία π ιέ ζετε το
π λήκτρο έ ναρξη ς/λήξη ς.
ΣΤ Για να αυξοµειώσετε τη ν ισχύ απ ορρόφη ση ς γυρίστε
τον διακόπ τη ισχύος. Η ισχύς µπ ορεί να ρυθµ ιστεί και
ανοίγοντας/κλείνοντας το άνοιγµα στη λαβή.
Έ νδειξη γεµ άτη ς σακούλας και αλλαγή
σακούλας
Η καλύτερη απ όδ οση επιτυγχάνεται όταν αλλάζετε τη
σακούλα όταν αυτή γεµίσει. Αν η σακούλα σκιστεί όταν
βρίσκεται µέ σα στη σκούπ α, πη γαίνετε τη σκούπ α στο
κέντρο σέ ρβις τη ς AEG-Ele ctrolux. Ελέ γχετε τη σακούλα
τακτικά και αν χρειαστεί αλλάξτε τη ν. Η έ νδειξη αρχίζει και
κοκκινίζει όταν γεµίζει η σακούλα και όταν είναι εντελώς
γεµάτη , το χρώµ α είναι τελείω ς κόκκινο.
Για να ελέ γξετε τη σακούλα πρέπ ει να έ χετε θέ ση τη ν σκούπα
σε λειτουργία, µ ε το σω λήνα και το πέ λµ α συνδεδεµ έ να, αλλά
χω ρίς να ακουµπ άει το π έ λµα στο π άτω µα.
Η έ νδειξη για τη σακούλα µπ ορεί να φω τίζει και όταν µια
σακούλα έ χει βουλώσει (συνήθω ς γίνεται αυτό απ ό πολύ ψ ιλή
σκόνη ). Αυτό έ χει ω ς απ οτέ λεσµα τη ν µείω ση τη ς δύναµη ς
απ ορρόφη ση ς και µπ ορεί να οδη γήσει σε υπ ερθέ ρµανση τη ς
σκούπας. Στη ν περίπ τω ση αυτή π ρέ π ει να αλλάξετε τη ν
σακούλα ακόµα και όταν δεν είναι τελείω ς γεµάτη .
Αλλαγή τη ς σακούλας
1 Ανοίξτε το κάλυµµ α.
2 Αφαιρέ στε τη σακούλα.
3 Τοπ οθετήσετε τη ν νέα σακούλα.
4 Κλείστε το κάλυµµ α.
Σας π ροτείνουµε να αλλάξετε τη ν σ ακούλα µετά απ ό
τη ν χρήση σκόνη ς καθαρισµού χαλιών ή όταν απ ό τη
συσκευή βγαίνει µια δυσάρεστη οσµή. Υπ όδ ειξη : Να
χρη σιµ οπ οιείτε µόνο γνήσιες σακούλες και φίλτρα.
Κω δ ικός σακούλας: Ε51Ν
17
* Μ όνο ορισµ έ να µ οντέ λα.
Page 21

Ασφάλεια σακούλας
Για να απ οφύγετε τυχόν βλάβες, µ η ν χρη σιµ οποιείτε π οτέ τη
σκούπα χω ρίς σακούλα. Έ νας µη χανισµός ασφαλείας υπάρχει
για να απ οτρέψ ει το κλείσιµ ο του καπ ακιού αν δεν υπ άρχει
σακούλα. Μ η ν π ροσπ αθείτε να κλείσετε το καπ άκι µε το ζόρι.
Αλλαγή τω ν φίλτρω ν
Ποτέ µη ν χρη σιµοπ οιείται τη σκούπ α χω ρίς τα φίλτρα. Τα
φίλτρα π ρέ π ει να αλλάζονται/καθα ρίζονται π ερίπ ου ύστερα
απ ό αλλαγή 5 σακουλών.
Καθαρισµ ός του φίλτρου του µοτέ ρ
1 Ανοίξτε το κάλυµµ α.
2 Αφαιρέ στε το φίλτρο.
3 Αφαιρέ στε το φίλτρο απ ό το π λέ γµα.
4 Ξεπ λύνετε το φίλτρο µε νερό.
5 Τοπ οθετήστε το φίλτρο µέ σα στο π λέ γµα.
6 Τοπ οθετήστε το π λέ γµα µέ σα στη σκούπα.
7 Κλείστε το κάλυµµ α.
Καθαρισµ ός του φίλτρου εξαγω γής
1 Ανοίξτε το π λέ γµα του φίλτρου εξαγω γής ..
2 Αφαιρέ στε το φίλτρο µε το π λέ γµ α.
3 Αφαιρέ στε το φίλτρο απ ό το π λέ γµα και στεγνώστε το
τελείω ς..
4 Τοπ οθετήστε το φίλτρο µέ σα στο π λέ γµα.
5 Τοπ οθετήστε το π λέ γµα µέ σα στη σκούπα.
6 Κλείστε το κάλυµµ α.
Λάθη χειρισµ ού
● Σακούλα: Βεβαιω θείτε ότι η σακούλα είναι
τοπ οθετη µ έ νη σω στά.
● Ρεύµα: Αν δεν γίνεται π αροχή ρεύµατος, βγάλτε το φις
απ ό τη π ρίζα ελέ γξτε τη ν ίδια όπ ω ς και το καλώδιο
ρεύµατος και τις ασφάλειες τη ς η λεκτρικής
εγκατάσταση ς του σπ ιτιού.
● Βούλω µ α/βρώµικα φίλτρα: Η σκούπα µπορεί να
τεθεί απ ό µ όνη τη ς εκτός λειτουργίας όταν έ χει
βουλώσει ή όταν τα φίλτρα είναι π ολύ λερω µέ να Στη ν
π ερίπ τω ση αυτή βγάλτε το φις απ ό τη π ρίζα και
αφήστε τη συσκευή να κρυώσει 30 λεπτά.
Αφαιρέ στε το αντικείµ ενο π ου π ροκάλεσε το βούλω µ α,
αλλάξτε σακούλα ή φίλτρα και θέ στε και π άλι τη
συσκευή σε λειτουργία.
Ο καθαρισµός βουλω µέ νου σω λήνα δεν είναι εντός
εγγυήσεως.
● Νερό: Αν η συσκευή απ ορροφήσει νερό, π ρέ π ει να
γίνει αντικατάσταση του µοτέ ρ απ ό το σέ ρβις τη ς
εταιρείας.
Η συσκευή αυτή συµµορφώνεται µ ε τους ακόλουθους
νόµους τη ς ΕΕ:
● Κανονισµ ός χαµ η λής τάση ς 2006/9 5/EC
● Κανονισµ ός EMC 89 /336/EEC συµ π εριλ.
τροπ οπ οίη ση 9 2/31/EEC και 9 3/68/EEC
Το σύµβολο στο π ροϊόν ή επάνω στη συσκευασία του
υπ οδεικνύει ότι δεν π ρέ π ει να µ εταχειρίζεστε το προϊόν αυτό
ω ς οικιακό απ όρριµµα . Αντιθέ τω ς θα πρέπ ει να παραδίδ εται
στο κατάλλη λο ση µείο συλλογής για τη ν ανακύκλω ση
η λεκτρικού και η λεκτρονικού εξοπ λισµού. Εξασφαλίζοντας ότι
το προϊόν αυτό διατίθεται σω στά, συµβάλλετε στη ν απ οτροπή
ενδεχόµενων αρνη τικών συνεπ ειών για το περιβάλλον και τη ν
ανθρώπ ινη υγεία, οι οπ οίες θα µπ ορούσαν διαφορετικά να
π ροκλη θούν από ακατάλλη λο χειρισµό απ όρριψ η ς του
π ροϊόντος αυτού. Για λεπτοµερέ στερες π λη ροφορίες σχετικά
µε τη ν ανακύκλω ση του π ροϊόντος αυτού, επ ικοινω νήστε µε
το δη µαρχείο τη ς π εριοχής σας, τη ν τοπική σας υπη ρεσία
απ οκοµιδής οικιακών
18
Page 22

AEG– Electrolux h ar et stort sortim ent af støvsugere m ed
forsk elligt tilbeh ør, som bliver besk reve t i denne h åndbog.
Læ g venligst m æ rke til støvsugerens m odelnum m er og
tilbeh ør, som figurerer på støvsugerbok sen.
Støvsugerens features / Tilbeh ør
1 Slangens tilk oblingsste d
2 Mek anisk indik ator for fyldt pose
3 Regule ring af sugeevne
4 Pedal til ledningsoprulning
5 Tæ nd- /sluk - k ontak t
6 H jul
7 Pose rum
8 Bæ reh åndtag
9 Lågåbne r til pose rum
10 Filte rgitter
11 Dreje lig slange og h åndtag m e d m anue l sugek ontrol
12 Te lesk oprør
13 Dobbe lt m undstyk ke til tæ ppe r/h årde gulve
14 Kom bine re t m øbe l- og børste m undstyk k e
15 Park etm undstyk k e til h ardt unde rlag *
16 Pose
17 Opbe varingsste d til m undstyk k e (Nr 1.)
18 Opbe varingsste d til m undstyk k e (Nr 2.)
H vordan m an opnår det bedste resultat:
• Tæ pper/løse m åtte r: Brug gulvm undstyk k et
indstillet til tæ ppe støvsugning (A).
• H årde gulve: Brug gulvm undstyk k e t indstillet til
gulvstøvsugning (B).
• Svæ rt tilgæ ngelige om råder: Brug fugem undstyk ket
til spræ k k er, h jørner og radiatorer, etc.
• Park e tm undstyk k e : benytte s for at undga
eventuelle ridser *.
Sik k erh ed
Støvsugeren er udeluk kende beregnet til h ush oldningsbrug
og e r frem stillet til at yde m ak sim al sikk e rh ed og effek tiv
drift. Følg ve nligst nedennæ vnte forh oldsregler:
• Støvsugeren er dobbe lt isole ret, og beh øver derfor
ik ke tilslutte s til jord
• Støvsugeren m å k un bruge s af vok sne. Børn sk al
væ re unde r opsyn af vok sne
• Støvsug aldrig gips, m urestøv, cem entstøv, k old ask e
og andre m eget fine partik ler.
• Støvsugeren sk al altid opbevares tørt
• Støvsugeren m å ik k e bruge s til at opsuge vand og
andre væ sk er
• Undgå at støvsuge sk arpe genstande op
• Støvsugeren m å ik k e bruge s til at opsuge varm ask e,
tæ ndte cigare tsk od eller tonerpulver
• Støvsugeren m å ik k e bruge s i næ rh eden af
bræ ndbare gasarter
• Undgå at træ k k e støvsugeren v.h .a. ledninge n.
Kontroller rege lm æ ssigt ledningen for sk ader
• Bem æ rk: Støvsugeren m å ik ke bruges, h vis ledningen
er besk adiget. H vis le dningen e r besk adiget, sk al den
udsk ifte s h os et autoriseret H videvare- Servicecente r
• Træ k stik k et ud af stik k ontak te n inden rengøring og
vedligeh oldelse af støvsugere n
• Se rvice og reparation sk al udføres af et autoriseret
H vide vare - S e rvicece nte r
Sådan k om m er du i gang
A Se efter om støvsuge rposen sidder som den sk al
B Sæ t slangen i, så den k lik k e r på plads (tryk clipse ne
indad for at udløse slangen).
C M onte r telesk oprøret til slangeh åndtaget og
m undstyk k e t ve d at dre je og sk ubbe dem sam m en
(rørene dreje s og træ k kes for at frigøres).
D Træ k ledningen ud og sæ t stik k e t i stik kontak ten.
Kontroller, at le dningen ik k e er snoet (tryk på
pedalen til le dningsoprulle t for at rulle ledningen
ind. Sørg for at h olde i stik k et, så det ik k e ram m er
dig eller støvsugere n).
E Tryk på tæ nd- /sluk -k ontak ten for at starte støvsugeren.
F Sugeevnen øges/nedsæ tte s ve d at juste re
reguleringsanordningen.
Sugeevne n k an også reguleres ved at åbne eller
luk k e sugek ontrolle n på slangeh åndtaget.
Støvsugerposeindik ator og sk ift af støvsuge rpose
For be dste ydeevne bør posen sk ifte s når den er fyldt..
Det m ek anisk e indik atorvindue vil stille og roligt blive
rød som posen fyldes og e r h elt rød når den er fyldt.
Når ruden er h elt rød, e r posen fuld. H vis støvposen
revner inden i støvsugeren, sk al støvsugeren sendes til
rengøring h os e t servicecente r. D e tte er ik ke om fattet
af rek lam ationsretten. H vis indik atoren viser, at posen
er fuld, k an de t også evt. sk yldes, at posen er
tilstoppet (pga. fint støv), h vilk et giver m indsk et
sugeevne og kan resulte re i overoph edning. H vis dette
forek om mer, sk al støvposen udsk iftes, også selv om
den ik k e er fuld. Støvsug aldrig gips, m urestøv,
cem entstøv, k old ask e og andre m eget fine partik ler.
Når støvposen k ontrolle res, sk al støvsuge ren væ re
tæ ndt m ed alle de le påm onteret, og de n m å ik k e
væ re i be røring m ed gulvet.
Sk ift af støvsu gerpose
1 Åben støvsugerens låg.
2 Fjern støvsugerposen fra h olderen
3 Sæ t e n ny støvsuge rpose ind i beh olderen.
4 Luk lågen.
Vi anbefaler, at støvposen udsk ifte s e fte r brug af
tæ pperensepulve r, eller h vis støvsugere n lugte r grim t.
NB! Brug k u n originale støvsugerpose r og filtre:
Støvsuge rpose refe rence num m er: AEG GR5
* Endast vissa m odeller
19
Page 23

Støvsugerpose sik k erh edsenh e d
For at undgå at be sk adige støvsugeren m å den ik k e
be nyttes uden støvpose. S tøvsugeren er udstyret m ed e n
sik kerh edsindretning, der forh indrer, at låge t k an luk k es
uden støvpose.
Forsøg ikk e at tvinge låget i.
Udsk iftning/rengøring af filtrene
Støvsugeren m å aldrig bruges, uden at filtrene er på
plads.
Filtrene bør udsk iftes/re nses ve d h vert fem te
støvposesk ift.
Vedligeh oldelse af m otorfilter
1 Åben støvsugerens låg.
2,3 Fje rn filterenh eden og rens filtre t unde r de n varm e
h ane og lad de t tørre. Filtre ringse vnen er nu
genetablere t.
2,1 Sæ t filte re nh e den tilbage i m ask inen og luk
h olderen. Væ r sik k e r på at filterenh eden er placeret
k orre k t og dæ k sle t er forsvarligt luk k e t.
Filtret bør udsk iftes m indst én gang h vert andet år.
Vedligeh oldelse af m ikroudsugningsfilter
Det anbe fales at udsk ifte m ik roudsugningsfilteret h ver
fje rde m åne d.
1 Åbn låse n bag på filte rgitteret, og løft det af
støvsugere n.
1 Fjern filte ret og ram m en.
2 Tag m ikrofilte ret ud af ram m en.
3 Fjern filte renh e den og rens filtret under den varm e
h ane og lad de t tørre.
3 Filterenh eden tilbage i m ask inen og luk h olde ren.
Filtreringsevne n e r nu genetable re t.
2 Sæ t m ik rofilte re t og ram m en i støvsugere n.
1 Sæ t filtergitte ret på plads, og tryk låsen ned på plads.
Anb e falede filter:
M otorfilter: AEG GR5
M ik rofilte r: AEG GR5
Proble m løsning
• Støvpose n: Væ r sik k e r på at pose n er placere t
k orre k t og at den ik ke er be sk adiget.
• Strøm : H vis støvsugere n ik k e starter, når de r tæ ndes
for den, træ k kes stik ket ud af stik k ontak te n.
Kontroller stik , ledning, stik kontak t og, om
nødvendigt, sik ringe r.
Støvsugeren sluk k e r selv, h vis der fore k om m e r en
alvorlig blok e ring, overfyldt pose eller
filte ret/filtre ne er m ege t besk idte. I så fald træ k kes
stik ket ud, og støvsugeren k øles af i 30 m inutter.
Fje rn blok eringer og/e ller udsk ift filtret/filtrene.
H e re fte r starte s støvsugeren igen.
Garantie n dæ k k e r ik k e rensning af blok erede
slanger, rør, m undstyk k e , filtre eller pose.
M undstyk k erne bør re nses jæ vnligt m ed slangens
h åndtag for at forebygge blok e ringer og opreth olde
god sugestyrk e .
• Vand: H vis støvsugere n bruge s til at suge vand,
ødelæ gges m otoren og en udsk iftning er nødve ndig.
Denne sk al foretages af e t autorise ret H vide vareSe rvice center. D e tte er ik k e om fattet af
rek lam ationsrette n.
KUNDEINFO RM ATION
Kontak t et af de autorise re de Ele ctroluxservicevæ rk ste der, de r er angivet på listen, som fulgte
m ed denne støvsu ger, e lle r k ontak t vore s
serviceorganisation, h vis du får brug for service eller
reservede le til din Electrolu x- støvsuge r.
H usk at oplyse m odeltypen ved bestilling af re se rve dele .
ELECTROLUX
Støvsugerens funk tione r og tilbeh ør er i udlandet
be sk yttet af re gistrerede pate nte r på registrere de design.
Den h är produk te n är anpassad enligt följande EGdirek tiv:
• Lågspänningsdirek tiv 2006/9 5/EG
• EM C- direk tiv 89 /336/EEG m ed ändringarna
9 2/31/EEG och 9 3/68/EEG
Electrolux- gruppen k an fra tid til ande n fore tage
æ ndringer af de res produk ter, h vorfor oplysningerne i
de tte h æ fte k an æ ndres ude n varsel.
Sym bolet på produk te t eller på pak k en angive r, at
de tte produk t ik ke m å beh andles som
h ush oldningsaffald. D e t sk al i ste det overgives til en
affaldsstation for be h andling af ele k trisk og elek tronisk
udstyr. Ve d at sørge for at dette produk t bliver
bortsk affe t på den rette m åde , h jæ lper du m ed til at
forebygge e ve ntuelle negative påvirk ninger af m iljøe t og
af pe rsone rs h elbred, de r elle rs k unne forårsages af
fork ert bortsk affe lse af dette produ k t. Kontak t de t lok ale
k om m unek ontor, affaldsselsk ab eller de n forre tning, h vor
produk t er k øbt, for yderligere oplysninger om
genanvende lse af dette produk t.
20
 Loading...