

Page 1

S75358KG38
User manual Fridge Freezer
Notice d'utilisation Réfrigérateur/
congélateur
Benutzerinformation Kühl - Gefrierschrank
Page 2
2 Contents
Thank you for choosing one of our high-quality products.
To ensure optimal and regular performance of your appliance please read this
instruction manual carefully. It will enable you to navigate all processes perfectly
and most efficiently. To refer to this manual any time you need to, we recommend
you to keep it in a safe place. And please pass it to any future owner of the
appliance.
We wish you much joy with your new appliance.
CONTENTS
SAFETY INFORMATION 2
Children and vulnerable people safety 3
General safety 3
Daily Use 4
Care and cleaning 4
Installation 4
Service 5
CONTROL PANEL 5
Switching on 6
Switching off 6
Temperature regulation 6
COOLMATIC function 6
Holiday function 6
FROSTMATIC function 7
High temperature alarm 7
FIRST USE 7
Cleaning the interior 7
DAILY USE 7
Storage of frozen food 7
Thawing 8
Carbon Air Filter 8
Movable shelves 8
Bottle rack 9
Vegetable Drawer 9
Positioning the door shelves 9
Chiller Zone 10
Removal of freezing baskets from the freezer
10
HELPFUL HINTS AND TIPS 11
Normal Operating Sounds 11
Hints for energy saving 11
Hints for fresh food refrigeration 11
Hints for refrigeration 11
Hints for freezing 11
Hints for storage of frozen food 12
CARE AND CLEANING 12
Periodic cleaning 12
Replacing the carbon air filter 13
Defrosting 13
WHAT TO DO IF… 13
Replacing the lamp 15
Closing the door 15
TECHNICAL DATA 15
INSTALLATION 15
Positioning 15
Location 16
Electrical connection 16
Rear spacers 17
Levelling 17
Removing the shelf holders 18
Installation of the carbon air filter 18
Door reversibility 18
ENVIRONMENTAL CONCERNS 20
Subject to change without notice
SAFETY INFORMATION
In the interest of your safety and to ensure the correct use, before installing and first using
the appliance, read this user manual carefully, including its hints and warnings. To avoid
Page 3

Safety information
unnecessary mistakes and accidents, it is important to ensure that all people using the appliance are thoroughly familiar with its operation and safety features. Save these instructions and make sure that they remain with the appliance if it is moved or sold, so that everyone using it through its life will be properly informed on appliance use and safety.
For the safety of life and property keep the precautions of these user's instructions as the
manufacturer is not responsible for damages caused by omission.
Children and vulnerable people safety
• This appliance is not intended for use by persons (including children) with reduced physical, sensory or mental capabilities, or lack of experience and knowledge, unless they have
been given supervision or instruction concerning use of the appliance by a person responsible for their safety.
Children should be supervised to ensure that they do not play with the appliance.
• Keep all packaging well away from children. There is risk of suffocation.
• If you are discarding the appliance pull the plug out of the socket, cut the connection
cable (as close to the appliance as you can) and remove the door to prevent playing children to suffer electric shock or to close themselves into it.
• If this appliance featuring magnetic door seals is to replace an older appliance having a
spring lock (latch) on the door or lid, be sure to make that spring lock unusable before
you discard the old appliance. This will prevent it from becoming a death trap for a child.
General safety
CAUTION!
Keep ventilation openings clear of obstruction.
3
• The appliance is intended for keeping foodstuff and/or beverages in a normal household
as explained in this instruction booklet.
• Do not use a mechanical device or any artificial means to speed up the thawing process.
• Do not use other electrical appliances (such as ice cream makers) inside of refrigerating
appliances, unless they are approved for this purpose by the manufacturer.
• Do not damage the refrigerant circuit.
• The refrigerant isobutane (R600a) is contained within the refrigerant circuit of the appliance, a natural gas with a high level of environmental compatibility, which is nevertheless flammable.
During transportation and installation of the appliance, be certain that none of the components of the refrigerant circuit become damaged.
If the refrigerant circuit should become damaged:
– avoid open flames and sources of ignition
– thoroughly ventilate the room in which the appliance is situated
• It is dangerous to alter the specifications or modify this product in any way. Any damage
to the cord may cause a short-circuit, fire and/or electric shock.
WARNING!
Any electrical component (power cord, plug, compressor) must be replaced by a certified
service agent or qualified service personnel to avoid hazard.
1. Power cord must not be lengthened.
Page 4

4 Safety information
2. Make sure that the power plug is not squashed or damaged by the back of the appli-
ance. A squashed or damaged power plug may overheat and cause a fire.
3. Make sure that you can come to the mains plug of the appliance.
4. Do not pull the mains cable.
5. If the power plug socket is loose, do not insert the power plug. There is a risk of elec-
tric shock or fire.
6.
You must not operate the appliance without the lamp cover
1)
of interior lighting.
• This appliance is heavy. Care should be taken when moving it.
• Do not remove nor touch items from the freezer compartment if your hands are damp/
wet, as this could cause skin abrasions or frost/freezer burns.
• Avoid prolonged exposure of the appliance to direct sunlight.
•
Bulb lamps
2)
used in this appliance are special purpose lamps selected for household ap-
pliances use only. They are not suitable for household room illumination.
Daily Use
• Do not put hot pot on the plastic parts in the appliance.
• Do not store flammable gas and liquid in the appliance, because they may explode.
•
Do not place food products directly against the air outlet on the rear wall.
• Frozen food must not be re-frozen once it has been thawed out.
• Store pre-packed frozen food in accordance with the frozen food manufacturer's instructions.
• Appliance's manufacturers storage recommendations should be strictly adhered to. Refer
to relevant instructions.
• Do not place carbonated or fizzy drinks in the freezer compartment as it creates pressure
on the container, which may cause it to explode, resulting in damage to the appliance.
• Ice lollies can cause frost burns if consumed straight from the appliance.
3)
Care and cleaning
• Before maintenance, switch off the appliance and disconnect the mains plug from the
mains socket.
• Do not clean the appliance with metal objects.
• Do not use sharp objects to remove frost from the appliance. Use a plastic scraper.
• Regularly examine the drain in the refrigerator for defrosted water. If necessary, clean
the drain. If the drain is blocked, water will collect in the bottom of the appliance.
Installation
For electrical connection carefully follow the instructions given in specific paragraphs.
• Unpack the appliance and check if there are damages on it. Do not connect the appliance if it is damaged. Report possible damages immediately to the place you bought it.
In that case retain packing.
• It is advisable to wait at least four hours before connecting the appliance to allow the oil
to flow back in the compressor.
1) If the lamp cover is foreseen.
2) If the lamp is foreseen.
3) If the appliance is Frost Free.
Page 5
Control panel 5
• Adequate air circulation should be around the appliance, lacking this leads to overheating. To achieve sufficient ventilation follow the instructions relevant to installation.
• Wherever possible the back of the product should be against a wall to avoid touching or
catching warm parts (compressor, condenser) to prevent possible burn.
• The appliance must not be located close to radiators or cookers.
• Make sure that the mains plug is accessible after the installation of the appliance.
•
Connect to potable water supply only.
4)
Service
• Any electrical work required to do the servicing of the appliance should be carried out by
a qualified electrician or competent person.
• This product must be serviced by an authorized Service Centre, and only genuine spare
parts must be used.
Environment Protection
This appliance does not contain gasses which could damage the ozone layer, in either its
refrigerant circuit or insulation materials. The appliance shall not be discarded together
with the urban refuse and rubbish. The insulation foam contains flammable gases: the appliance shall be disposed according to the applicable regulations to obtain from your local
authorities. Avoid damaging the cooling unit, especially at the rear near the heat exchanger. The materials used on this appliance marked by the symbol
are recyclable.
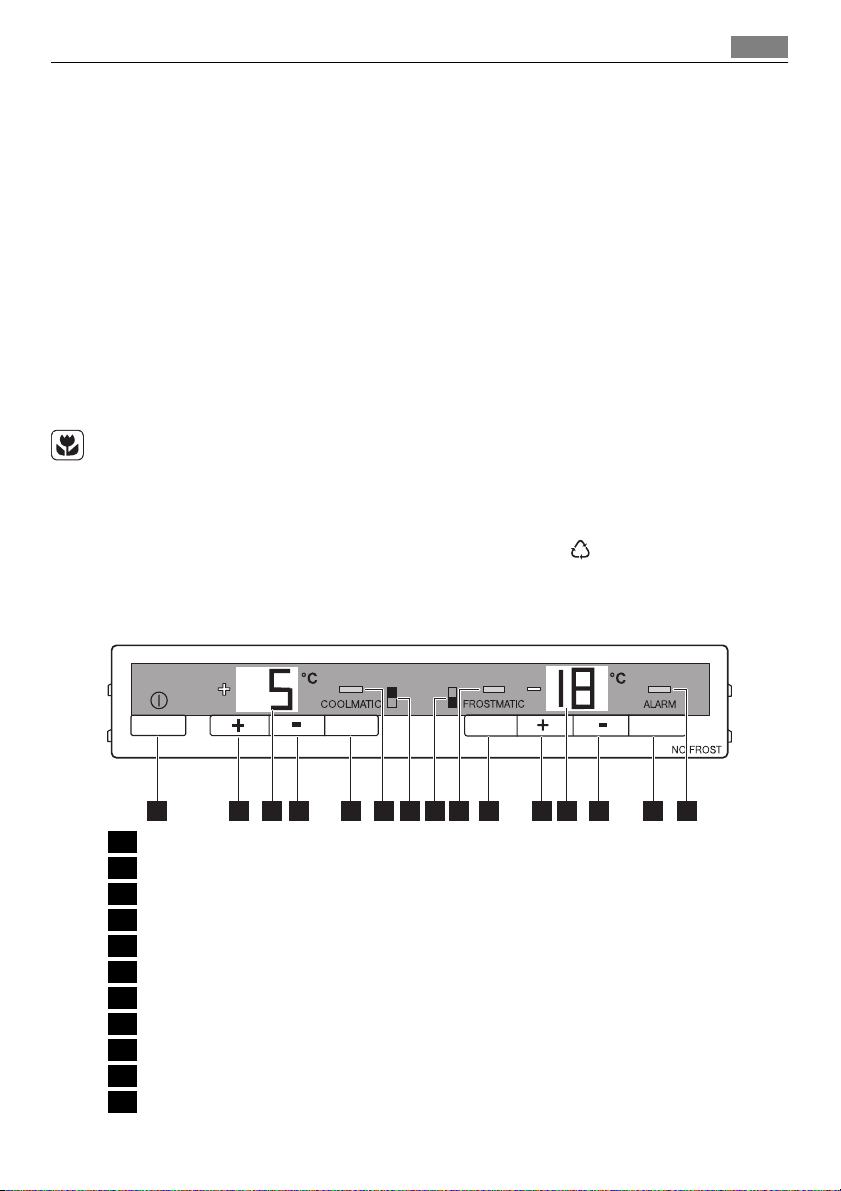
CONTROL PANEL
65 7 84321 15141312119 10
1 ON/OFF switch
2 Fridge temperature regulator, + button
3 Fridge temperature indicator
4 Fridge temperature regulator, - button
5 COOLMATIC button
6 COOLMATIC indicator
7 Fridge compartment indicator
8 Freezer compartment indicator
9 FROSTMATIC indicator
10 FROSTMATIC button
11 Freezer temperature regulator, + button
4) If a water connection is foreseen.
Page 6

6 Control panel
12 Freezer temperature indicator
13 Freezer temperature regulator, - button
14 Alarm reset button
15 Alarm indicator
Switching on
1. Insert the plug into the mains socket.
2. Set ON/OFF switch to ON.
3. The alarm indicator light flashes since the temperature is reached.
The acoustic alarm sounds.
4. Press the alarm reset button to reset the alarm.
If the door remains ajar for some minutes, the internal lighting will turn off electronically;
after this, the lighting function will be reset by closing and opening the door itself.
Switching off
To switch the entire appliance off:
1. Set ON/OFF switch to OFF.
2. Disconnect the mains plug from the mains socket.
Temperature regulation
The set temperature of the fridge and of the freezer may be adjusted by pressing the temperature regulator button. The temperature indicators show the set temperature.
For a correct storage of the food the following temperatures should be set:
• +5 °C in the fridge
• -18 °C in the freezer.
The set temperature will be reached within 24 hours.
Fluctuations of some degrees around set temperature are normal and does not mean any
fault in the appliance.
COOLMATIC function
The COOLMATIC function is suited for quick cooling of large quantities of goods in the refrigerator.
To activate the function, do these steps:
1. Press the COOLMATIC button.
2. The COOLMATIC indicator switches on.
The COOLMATIC function now provides for intensive cooling. A temperature of +2°C is automatically selected.
The COOLMATIC function is ended automatically after a period of 6 hours.
You can deactivate the function at any time:
1. Press the COOLMATIC button.
2. The COOLMATIC indicator switches off.
Holiday function
This function allows you to keep the refrigerator shut and empty during a long holiday period (e.g. the summer holidays) without the formation of a bad smell.
Page 7

The fridge compartment must be empty when the holiday function is on.
To activate the function, do this step:
1. press continuously the temperature regulator (warmest) until the letter "H" (Holiday)
appears on the temperature indicator. The Holiday function sets the temperature approx +15°C. The refrigerator is in the energy-saving mode.
To deactivate the function, do this step:
1. set the required temperature by pressing the fridge temperature regulator.
FROSTMATIC function
The FROSTMATIC function accelerates the freezing of fresh food and, at the same time, protects foodstuffs already stored from undesirable warming.
To activate the function, do these steps:
1. Press the FROSTMATIC button.
2. The FROSTMATIC indicator switches on.
The FROSTMATIC function is ended automatically after a period of 52 hours.
You can deactivate the function at any time:
1. Press the FROSTMATIC button.
2. The FROSTMATIC indicator switches off.
High temperature alarm
In the event of an abnormal temperature rise inside the freezer (e.g. power cut) alarm indicator light will start to flash and a buzzer will sound.
Push the alarm reset button to stop the buzzer sound, while the alarm indicator light will
continue to flash.
The buzzer will stop automatically when the temperature has returned to normal while the
alarm indicator light will continue to flash.
Press the alarm reset button. The alarm indicator light goes out and at the same time the
freezer temperature indicator show for about 5 seconds the warmest temperature reached
in the freezer compartment.
First use
7
FIRST USE
Cleaning the interior
Before using the appliance for the first time, wash the interior and all internal accessories
with lukewarm water and some neutral soap so as to remove the typical smell of a brandnew product, then dry thoroughly.
Do not use detergents or abrasive powders, as these will damage the finish.
DAILY USE
Storage of frozen food
When first starting-up or after a period out of use, before putting the products in the compartment let the appliance run at least 2 hours on the higher settings.
Page 8
8 Daily use
In the event of accidental defrosting, for example due to a power failure, if the power has
been off for longer than the value shown in the technical characteristics chart under "rising
time", the defrosted food must be consumed quickly or cooked immediately and then refrozen (after cooling).
Thawing
Deep-frozen or frozen food, prior to being used, can be thawed in the refrigerator compartment or at room temperature, depending on the time available for this operation.
Small pieces may even be cooked still frozen, directly from the freezer: in this case, cooking
will take longer.
Carbon Air Filter
Your appliance is equipped with a carbon filter
behind a flap in the rear wall of the air distributing box.
The filter purifies the air from unwanted odours in
the fridge compartment meaning that the storage
quality will be further improved.
During the operation, always keep the air ventilation flap closed.
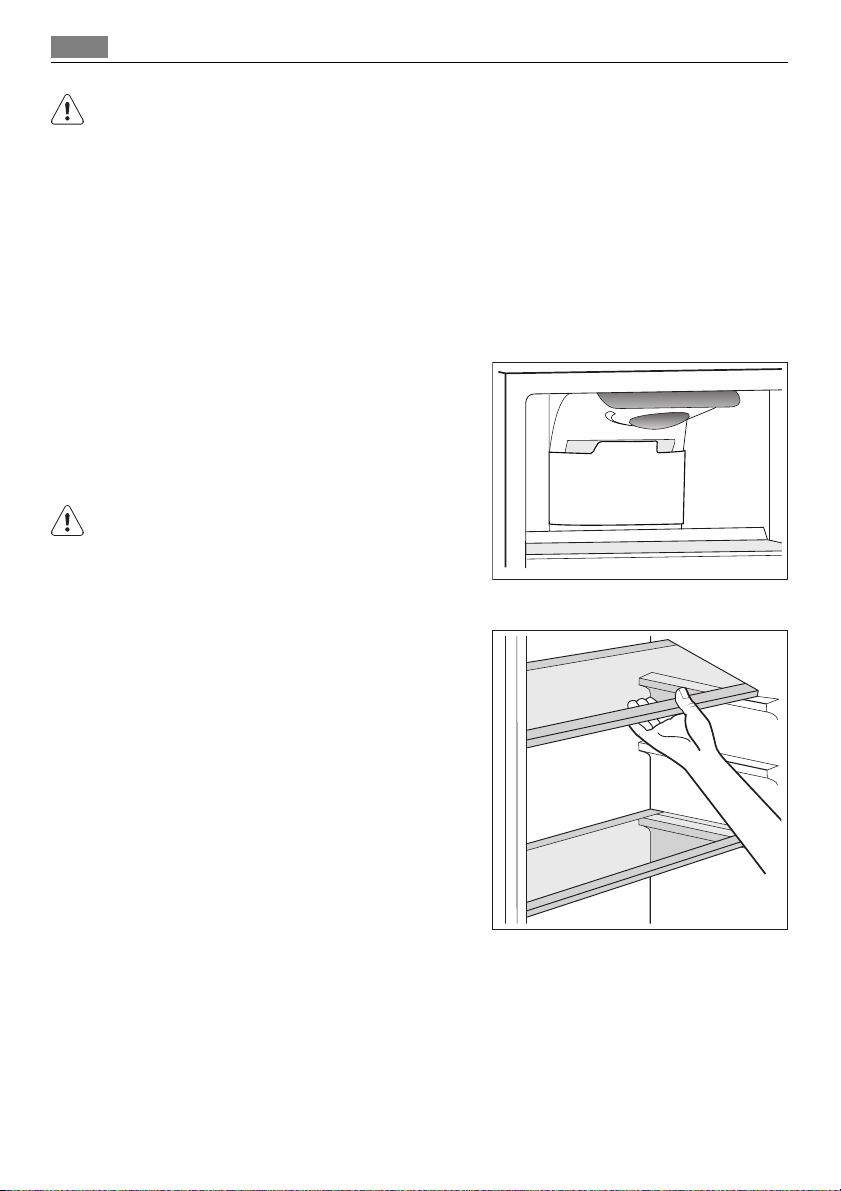
Movable shelves
The walls of the refrigerator are equipped with a
series of runners so that the shelves can be positioned as desired.
Page 9
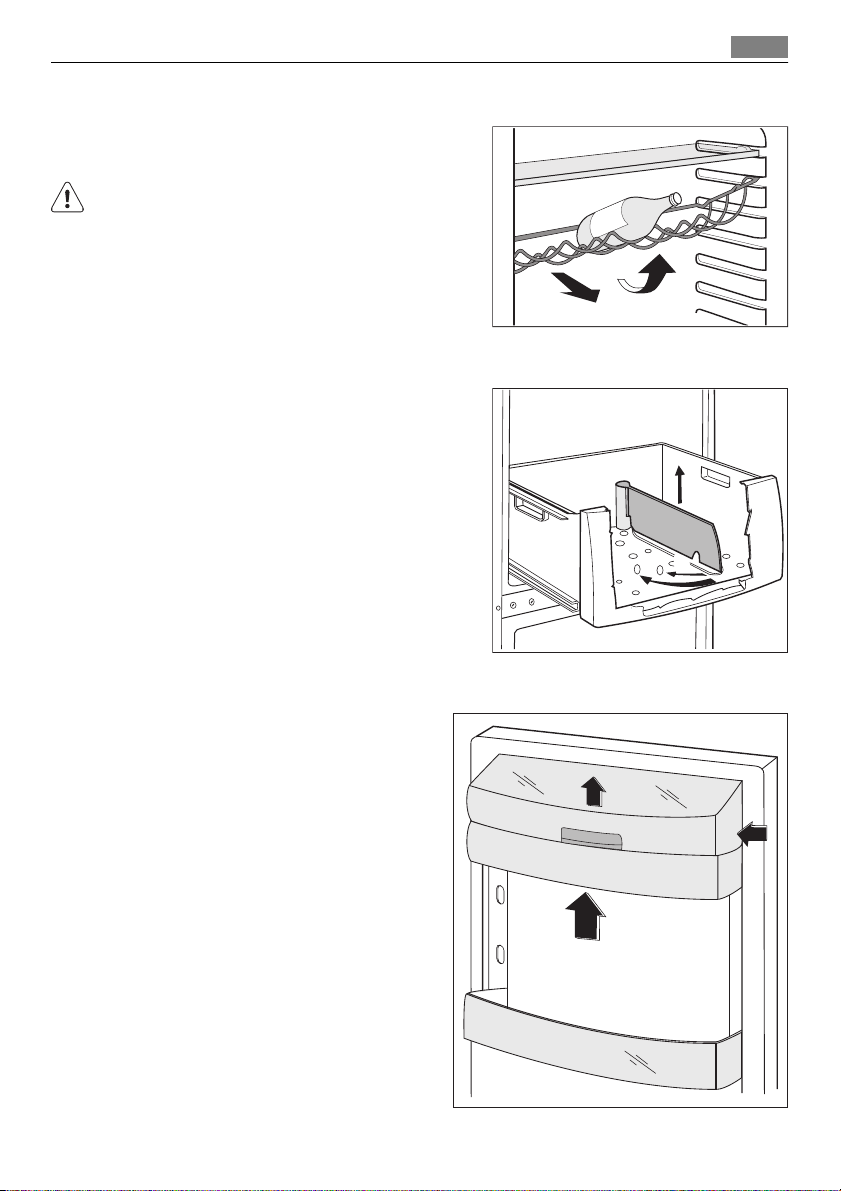
Bottle rack
Place the bottles (with the opening facing front)
in the pre-positioned shelf.
If the shelf is positioned horizontally, place only
closed bottles.
This bottle holder shelf can be tilted in order to
store previously opened bottles. To obtain this result, pull the shelf up so it can rotate upwards and
be placed on the next higher level.
Vegetable Drawer
The drawer is suitable for storing fruit and vegetables.
There is a separator inside the drawer that can be
placed in different positions to allow for the subdivision best suited to personal needs.
There is a grille (if foreseen) on the bottom of the
drawer to separate the fruit and vegetables from
any humidity that may form on the bottom surface.
All parts inside the drawer can be removed for
cleaning purposes
Daily use 9
1
2
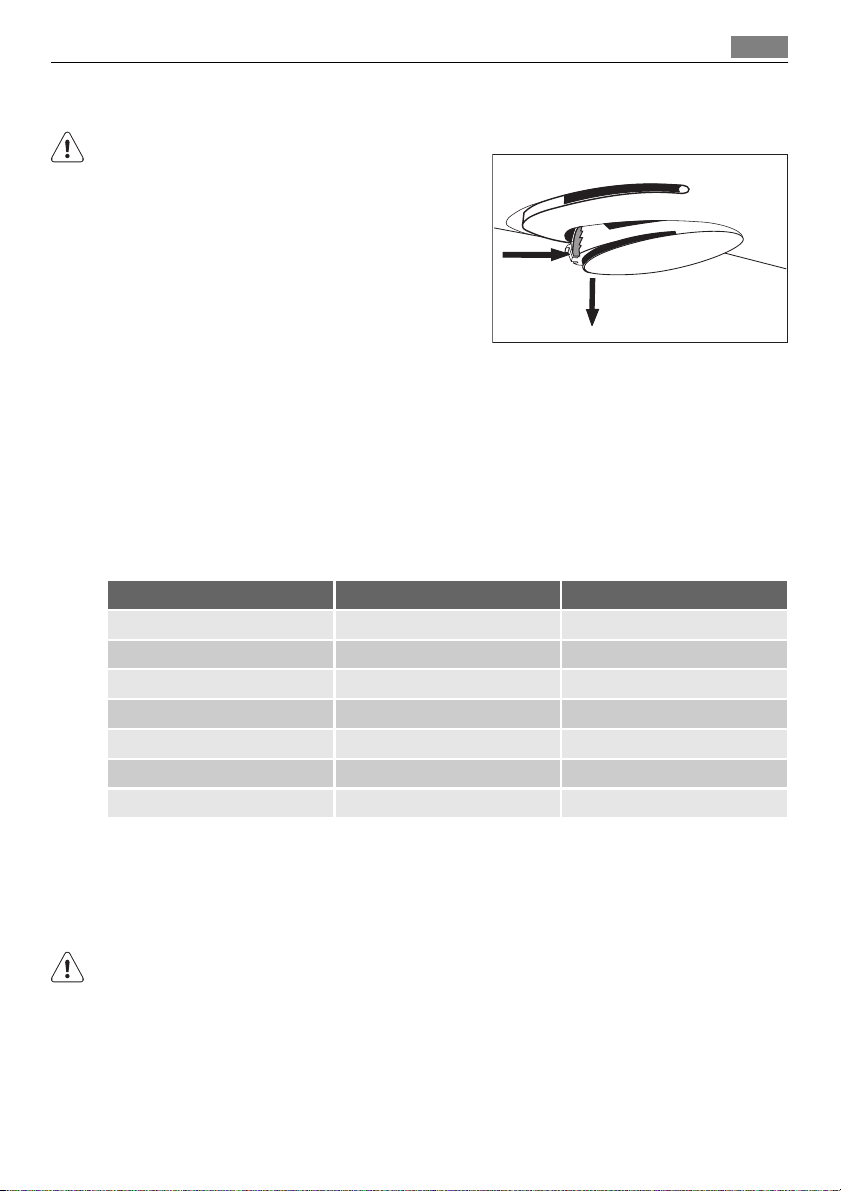
Positioning the door shelves
To permit storage of food packages of various sizes, the door shelves can be placed at
different heights.
To make these adjustments proceed as follows:
gradually pull the shelf in the direction of
the arrows until it comes free, then reposition as required.
Page 10
10 Daily use
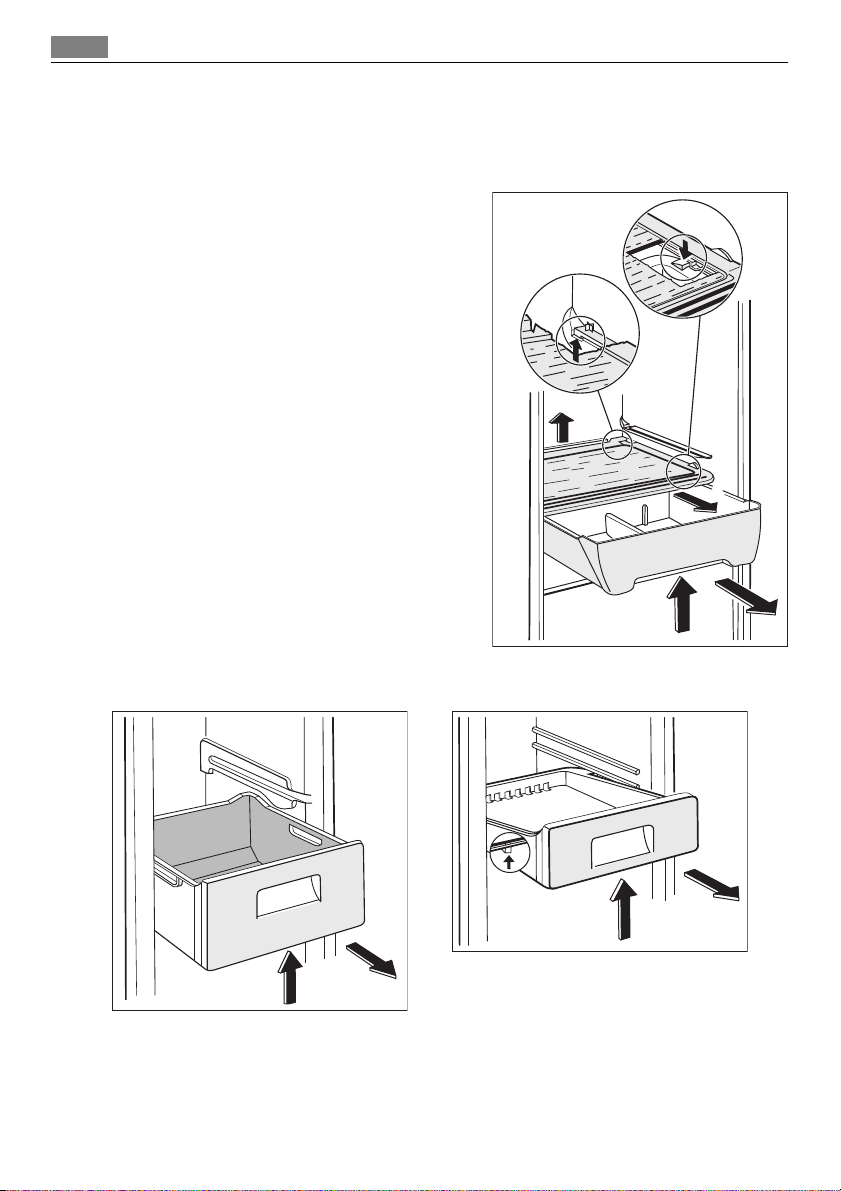
Chiller Zone
The Chiller Zone compartment is suitable for storing fresh food like fish, meat, seafood, because the temperature is lower here than in the rest of the fridge. It is placed in the lower
part of the refrigerator, directly above of the vegetable drawer.
If you wish to remove the Chiller Zone compartment, do these steps:
1. Open the door of the refrigerator as wide as
possible. If you cannot open the door at an
angle of 180° because of a limit stop or any
other objects , remove the bottle shelf from
the door.
2. Pull the drawer towards yourself to the end
point.
3. Slightly lift the front part of the drawer.
4. Remove the drawer from its support.
5. Lift the back of the support from its nest.
6. Pull the frame towards yourself.
7. Remove the support frame.
To put the Chiller Zone compartment to its initial
position, do above steps in opposite sequence.
5
3
6
2
Removal of freezing baskets from the freezer
2
1
The freezing baskets have a limit stop to prevent their accidental removal or falling out.
At the time of its removal from the freezer, pull the basket towards yourself and, upon
reaching the end point, remove the basket by tilting its front upwards.
At the time of putting it back, slightly lift the front of the basket to insert it into the
freezer. Once you are over the end points, push the baskets back in their position.
2
1
Page 11

Helpful hints and tips
HELPFUL HINTS AND TIPS
Normal Operating Sounds
• You may hear a faint gurgling and a bubbling sound when the refrigerant is pumped
through the coils or tubing. This is correct.
• When the compressor is on, the refrigerant is being pumped around and you will hear a
whirring sound and a pulsating noise from the compressor. This is correct.
• The thermic dilatation might cause a sudden cracking noise. It is natural, not dangerous
physical phenomenon. This is correct.
Hints for energy saving
• Do not open the door frequently or leave it open longer than absolutely necessary.
• If the ambient temperature is high and the Temperature Regulator is set to low tempera-
ture and the appliance is fully loaded, the compressor may run continuously, causing
frost or ice on the evaporator. If this happens, set the Temperature Regulator toward
warmer settings to allow automatic defrosting and so a saving in electricity consumption.
Hints for fresh food refrigeration
To obtain the best performance:
• do not store warm food or evaporating liquids in the refrigerator
• do cover or wrap the food, particularly if it has a strong flavour
• position food so that air can circulate freely around it
11
Hints for refrigeration
Useful hints:
Meat (all types) : wrap in polythene bags and place on the glass shelf above the vegetable
drawer.
For safety, store in this way only one or two days at the most.
Cooked foods, cold dishes, etc..: these should be covered and may be placed on any shelf.
Fruit and vegetables: these should be thoroughly cleaned and placed in the special drawer(s) provided.
Butter and cheese: these should be placed in special airtight containers or wrapped in aluminium foil or polythene bags to exclude as much air as possible.
Milk bottles: these should have a cap and should be stored in the bottle rack on the door.
Bananas, potatoes, onions and garlic, if not packed, must not be kept in the refrigerator.
Hints for freezing
To help you make the most of the freezing process, here are some important hints:
• the maximum quantity of food which can be frozen in 24 hrs. is shown on the rating
plate;
• the freezing process takes 24 hours. No further food to be frozen should be added during
this period;
• only freeze top quality, fresh and thoroughly cleaned, foodstuffs;
• prepare food in small portions to enable it to be rapidly and completely frozen and to
make it possible subsequently to thaw only the quantity required;
Page 12
12 Care and cleaning
• wrap up the food in aluminium foil or polythene and make sure that the packages are
airtight;
• do not allow fresh, unfrozen food to touch food which is already frozen, thus avoiding a
rise in temperature of the latter;
• lean foods store better and longer than fatty ones; salt reduces the storage life of food;
• water ices, if consumed immediately after removal from the freezer compartment, can
possibly cause the skin to be freeze burnt;
• it is advisable to show the freezing in date on each individual pack to enable you to keep
tab of the storage time.
Hints for storage of frozen food
To obtain the best performance from this appliance, you should:
• make sure that the commercially frozen foodstuffs were adequately stored by the retail-
er;
• be sure that frozen foodstuffs are transferred from the foodstore to the freezer in the
shortest possible time;
• not open the door frequently or leave it open longer than absolutely necessary.
• Once defrosted, food deteriorates rapidly and cannot be refrozen.
• Do not exceed the storage period indicated by the food manufacturer.
CARE AND CLEANING
CAUTION!
Unplug the appliance before carrying out any maintenance operation.
This appliance contains hydrocarbons in its cooling unit; maintenance and recharging must
therefore only be carried out by authorized technicians.
Periodic cleaning
The equipment has to be cleaned regularly:
• clean the inside and accessories with lukewarm water and some neutral soap.
• regularly check the door seals and wipe clean to ensure they are clean and free from
debris.
• rinse and dry thoroughly.
Do not pull, move or damage any pipes and/or cables inside the cabinet.
Never use detergents, abrasive powders, highly perfumed cleaning products or wax polishes
to clean the interior as this will damage the surface and leave a strong odour.
Clean the condenser (black grill) and the compressor at the back of the appliance with a
brush or a vacuum cleaner. This operation will improve the performance of the appliance
and save electricity consumption.
Take care of not to damage the cooling system.
Many proprietary kitchen surface cleaners contain chemicals that can attack/damage the
plastics used in this appliance. For this reason it is recommended that the outer casing of
this appliance is only cleaned with warm water with a little washing-up liquid added.
Page 13
What to do if… 13
After cleaning, reconnect the equipment to the mains supply.
Replacing the carbon air filter
To get the best performance the carbon air filter should be changed once every six months.
New active air filters can be purchased from your local dealer.
Refer to "Installation of the carbon air filter" for the instructions.
Defrosting
Your appliance is frost free. This means that there is no buildup of frost when it is in operation, neither on the internal walls nor on the foods.
The absence of frost is due to the continuous circulation of cold air inside the compartment, driven by an automatically controlled fan.
WHAT TO DO IF…
CAUTION!
Before troubleshooting, disconnect the power supply.
Only a qualified electrician or competent person must do the troubleshooting that is not in
this manual.
There are some sounds during normal use (compressor, refrigerant circulation).
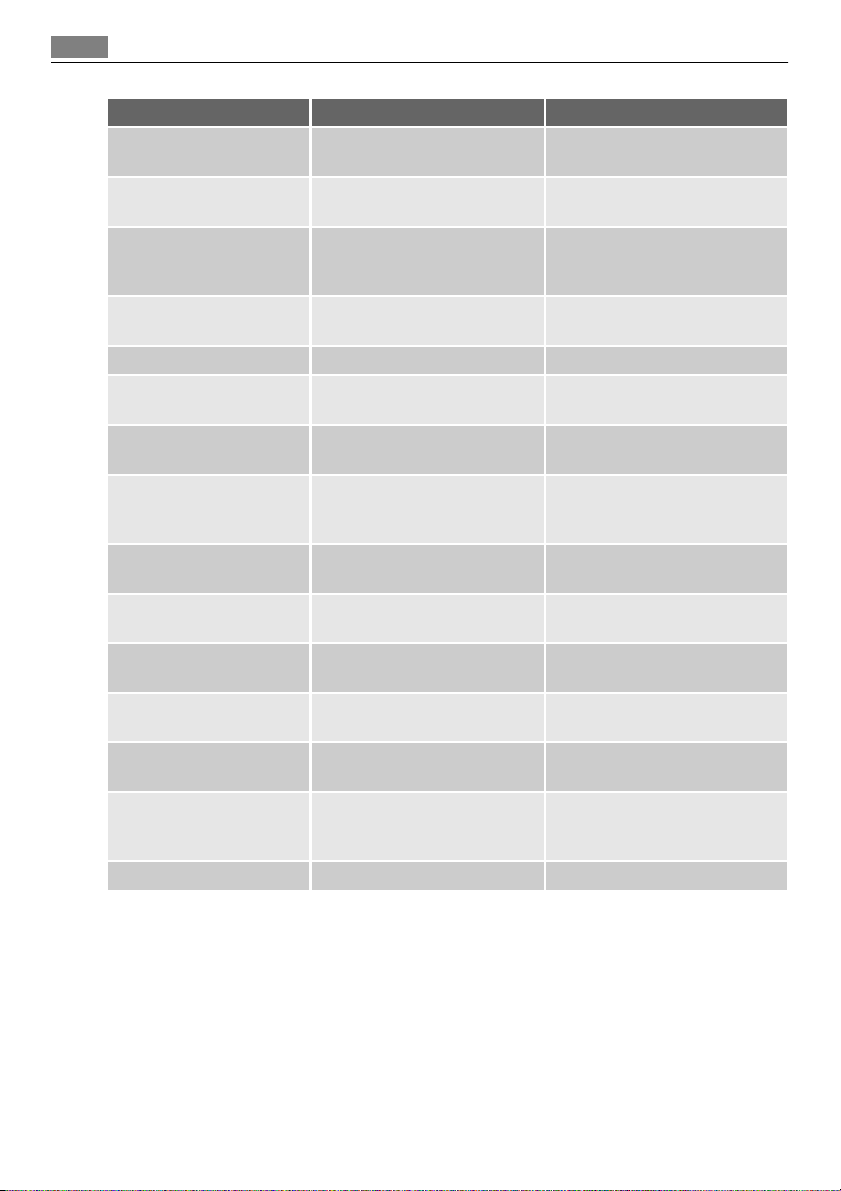
Problem Possible cause Solution
The appliance is noisy.
The compressor operates
continually.
The door is not closed correctly. Refer to "Closing the door".
The door has been opened too
The product temperature is too
The room temperature is too
The FROSTMATIC function is
The COOLMATIC function is
Water flows on the rear
plate of the refrigerator.
The appliance is not supported
properly.
The Temperature regulator may
be set incorrectly.
frequently.
high.
high.
switched on.
switched on.
During the automatic defrosting
process, frost defrosts on the
rear plate.
Check if the appliance stands stable (all the four feet should be on
the floor).
Set a warmer temperature.
Do not keep the door open longer
than necessary.
Let the product temperature decrease to room temperature before storage.
Decrease the room temperature.
Refer to "FROSTMATIC function".
Refer to "COOLMATIC function".
This is correct.
Page 14
14 What to do if…
Problem Possible cause Solution
Water flows into the refrigerator.
Products prevent that water
Water flows on the
ground.
There is too much frost
and ice.
The door is not closed correctly. Refer to "Closing the door".
The Temperature regulator may
The temperature in the
appliance is too high.
The product temperature is too
Many products are stored at the
The temperature in the
refrigeration is too high.
The temperature in the
freezer is too high.
The appliance does not
operate.
The mains plug is not connected
The appliance has no power.
The lamp does not work.
The water outlet is clogged. Clean the water outlet.
flows into the water collector.
The melting water outlet does
not flow in the evaporative tray
above the compressor.
Products are not wrapped properly.
be set incorrectly.
The door is not closed correctly. Refer to "Closing the door".
high.
same time.
There is no cold air circulation in
the appliance.
Products are too near to each
other.
The appliance is switched off. Switch on the appliance.
to the mains socket correctly.
There is no voltage in the mains
socket.
The lamp is in stand-by. Close and open the door.
Make sure that products do not
touch the rear plate.
Attach the melting water outlet
to the evaporative tray.
Wrap the products better.
Set a higher temperature.
Let the product temperature decrease to room temperature before storage.
Store less products at the same
time.
Make sure that there is cold air
circulation in the appliance.
Store products so that there is
cold air circulation.
Connect the mains plug to the
mains socket correctly.
Connect a different electrical appliance to the mains socket. Contact a qualified electrician.
As much as the advice does not lead to result, call the nearest brand-mark service.
Page 15
Technical data 15
Replacing the lamp
CAUTION!
Disconnect the plug from the mains socket.
1. Pull outwards the hook of the lamp cover.
2. Remove the lamp cover.
3. Replace the lamp with one of the same power
(the maximum power is shown on the light
bulb cover).
4. Install the lamp cover.
5. Connect the plug to the mains socket.
6. Open the door. Make sure that the light
comes on.
1
2
Closing the door
1. Clean the door gaskets.
2. If necessary, adjust the door. Refer to "Installation".
3. If necessary, replace the defective door gaskets. Contact the Service Center.
TECHNICAL DATA
Dimension
Height 1850 mm
Width 595 mm
Depth 658 mm
Rising Time 16 h
Voltage 230 V
Frequency 50 Hz
The technical information are situated in the rating plate on the internal left side of the
appliance and in the energy label.
INSTALLATION
WARNING!
Read the "Safety Information" carefully for your safety and correct operation of the appliance before installing the appliance.
Positioning
Install this appliance at a location where the ambient temperature corresponds to the climate class indicated on the rating plate of the appliance:
Page 16
16 Installation
Climate class Ambient temperature
SN +10°C to + 32°C
N +16°C to + 32°C
ST +16°C to + 38°C
T +16°C to + 43°C
Location
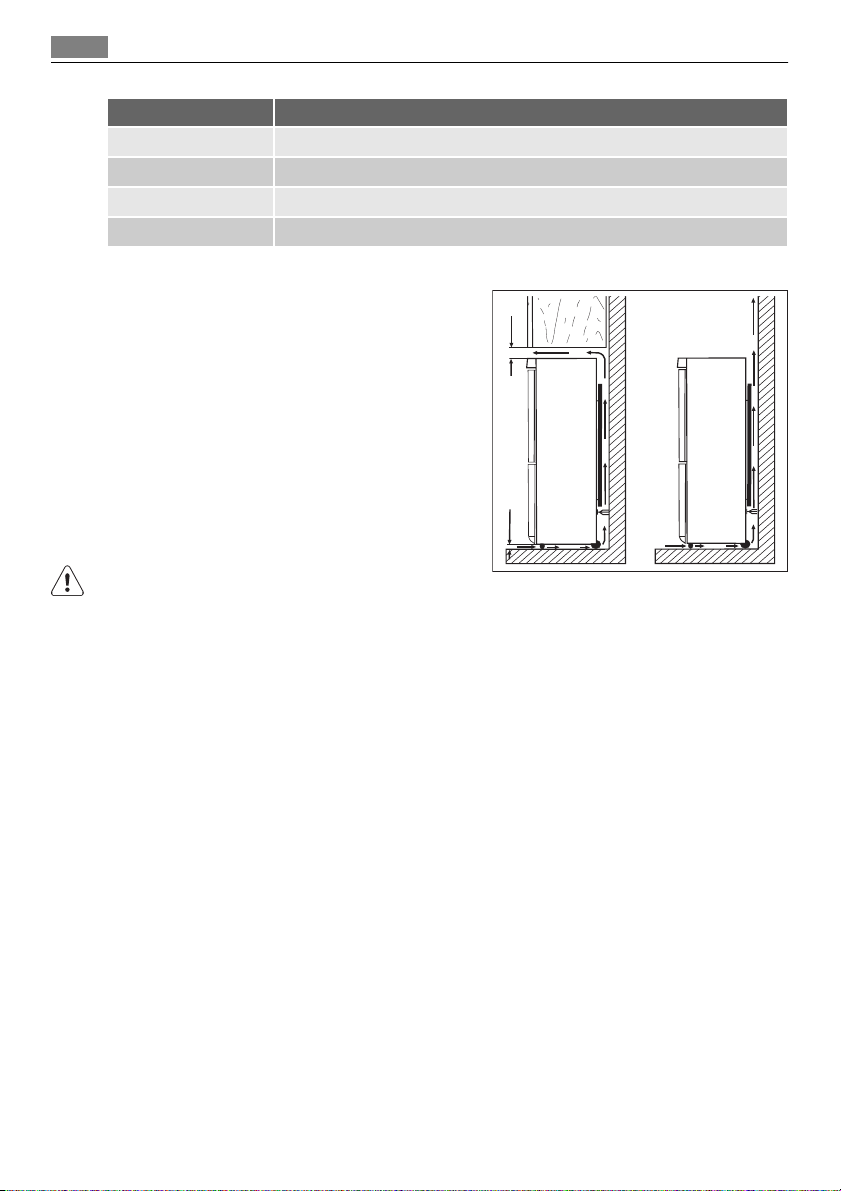
The appliance should be installed well away from
sources of heat such as radiators, boilers, direct
sunlight etc. Ensure that air can circulate freely
around the back of the cabinet. To ensure best
performance, if the appliance is positioned below
an overhanging wall unit, the minimum distance
between the top of the cabinet and the wall unit
must be at least 100 mm . Ideally, however, the
appliance should not be positioned below overhanging wall units. Accurate levelling is ensured
by one or more adjustable feet at the base of the
cabinet.
WARNING!
It must be possible to disconnect the appliance
from the mains power supply; the plug must therefore be easily accessible after installation.
mm
min
100
A
mm
20
B
Electrical connection
Before plugging in, ensure that the voltage and frequency shown on the rating plate correspond to your domestic power supply.
The appliance must be earthed. The power supply cable plug is provided with a contact for
this purpose. If the domestic power supply socket is not earthed, connect the appliance to a
separate earth in compliance with current regulations, consulting a qualified electrician.
The manufacturer declines all responsibility if the above safety precautions are not observed.
This appliance complies with the E.E.C. Directives.
Page 17
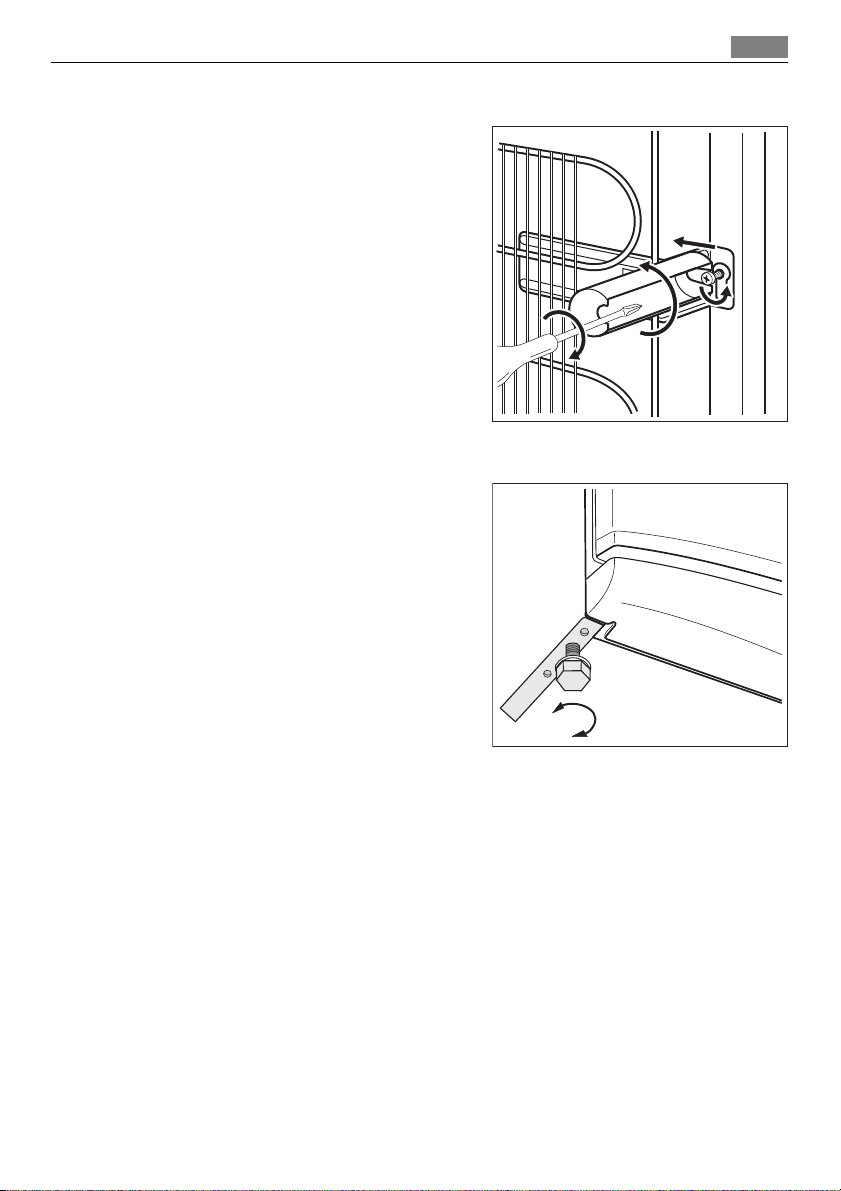
Rear spacers
You can find the two spacers in the bag with documentation.
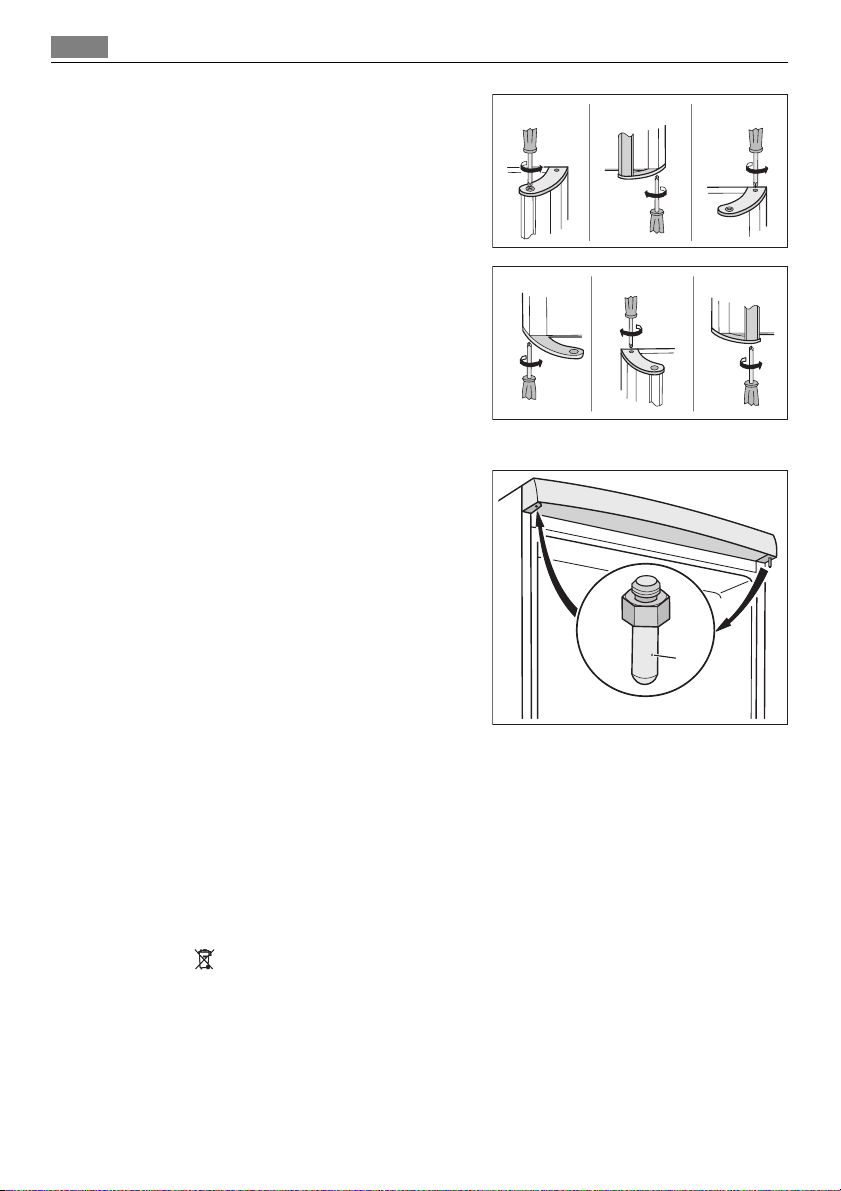
Do these steps to install the spacers:
1. Release the screw.
2. Engage the spacer below the screw.
3. Turn the spacer to the right position.
4. Tighten again the screws.
Levelling
When placing the appliance ensure that it stands
level. This can be achieved by two adjustable feet
at the bottom in front.
Installation 17
4
2
1
3
Page 18
18 Installation
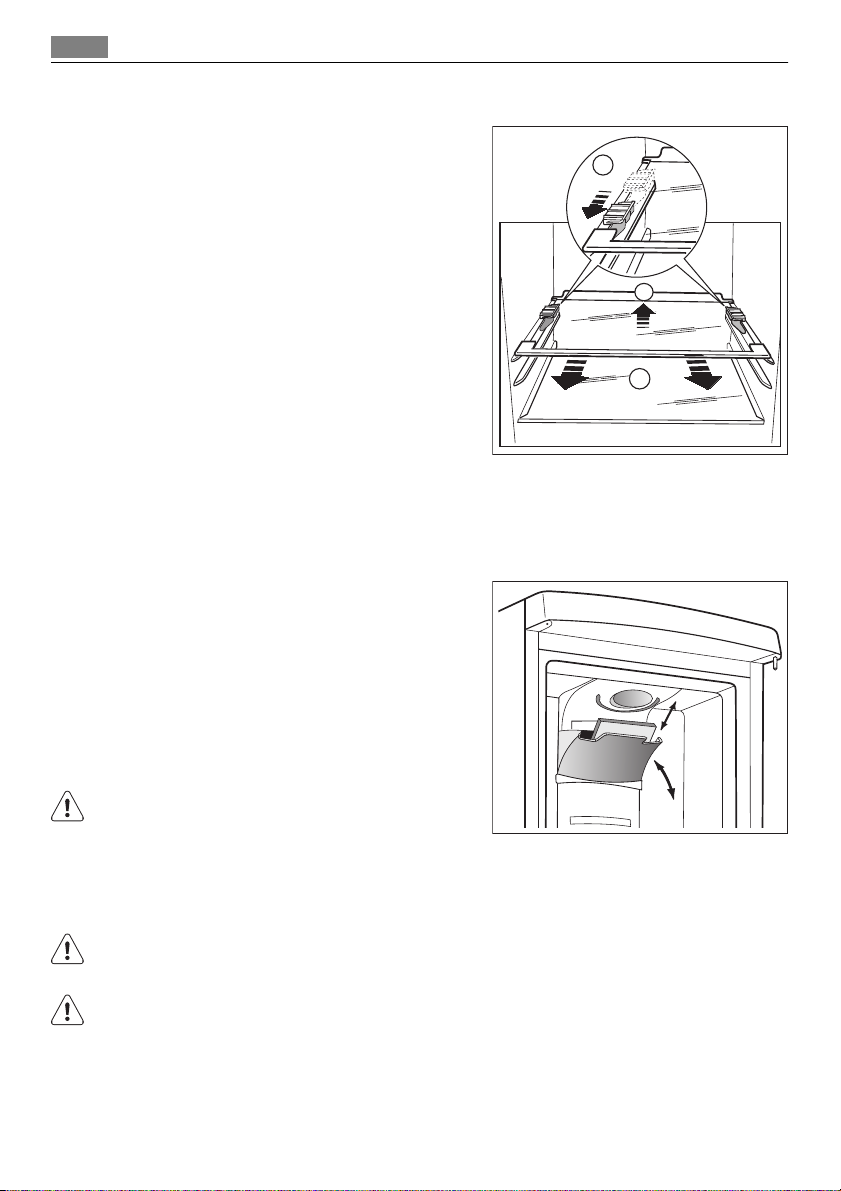
Removing the shelf holders
Your appliance is equipped with shelf retainers
that make it possible to secure the shelves during
transportation.
To remove them proceed as follows:
1. Move the shelf holders in the direction of the
arrow (A).
2. Raise the shelf from the rear and push it forward until it is freed (B).
3. Remove the retainers (C).
A
B
C
Installation of the carbon air filter
The carbon air filter is an active carbon filter which absorbs bad odours and permits to
maintain the best flavour and aroma for all foodstuffs without risk of odour cross contamination.
On delivery the carbon filter is in a plastic bag to
maintain it’s duration and characteristics. The filter should be placed behind the flap before the
appliance is turned on.
1. Open the flap cover (1)
2. Remove the filter from the plastic bag
3. Insert the filter in the slot found in the back
of the flap cover (2)
4. Close the flap cover
During operation, always keep the air ventilation
flap closed.
The filter should be handled carefully so fragments do not loosen from the surface.
2
1
Door reversibility
WARNING!
Before carrying out any operations, remove the plug from the power socket.
To carry out the following operations, we suggest that this be made with another person
that will keep a firm hold on the doors of the appliance during the operations.
Page 19
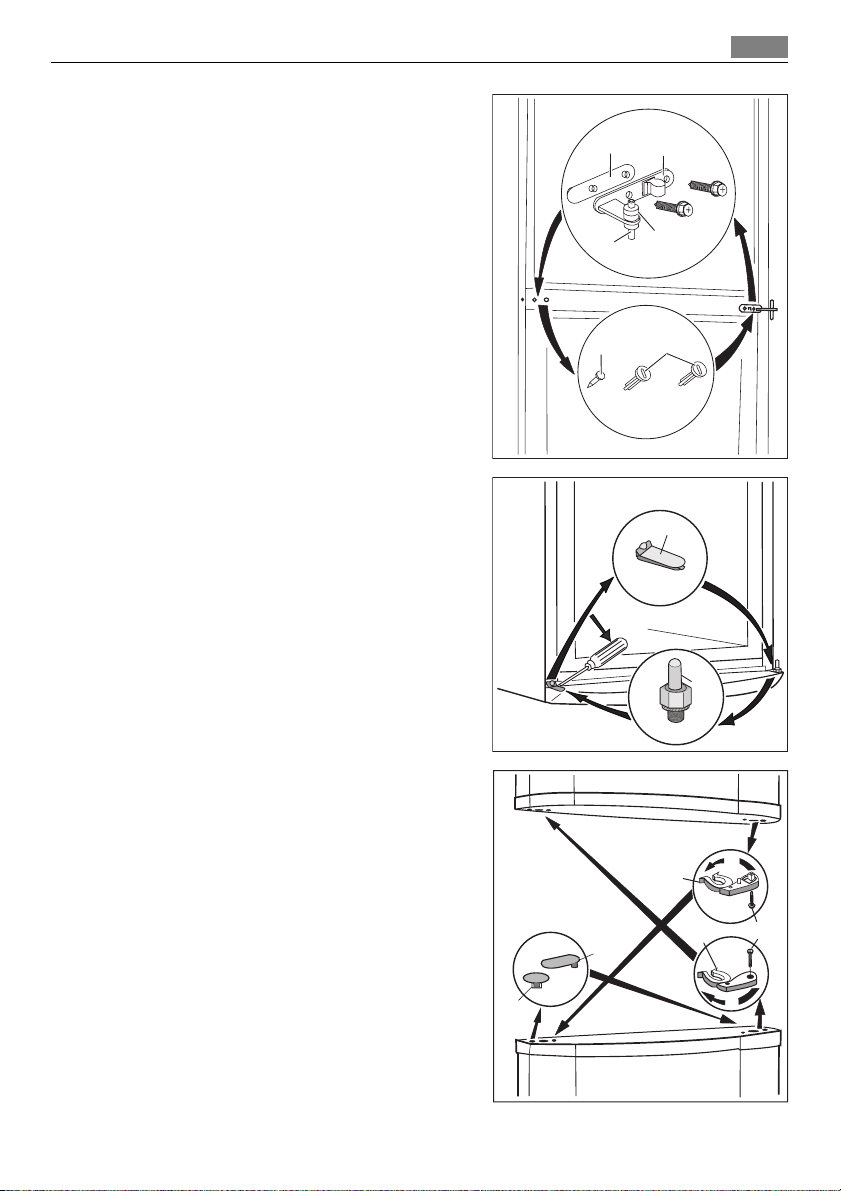
1. Open the doors. Unscrew the middle
hinge (m2). Remove the plastic spacer
(m1).
2. Remove the spacer (m6) and move to
the other side of the hinge pivot (m5).
3. Remove the doors.
4. Remove the left-hand cover pin of the
middle hinge (m3,m4) and move to the
other side.
5. Fit the pin of the middle hinge (m5) into
the left-hand hole of the lower door.
6. Remove using a tool the cover (b1). Un-
screw the lower hinge pivot (b2) and the
spacer (b3) and place them on the opposite side.
7. Re-insert the cover (b1) on the opposite
side.
Installation 19
m1
m2
m6
m5
m3
m4
b1
8. Reverse the door locking elements
(d2,d3), move to the other side of the
other door and fix by screwing in the
screw (d4).
9. Re-insert the stoppers (d5,d6) on the
other side of the doors.
d5
d6
b3
d2
d3
b2
d4
Page 20
20 Environmental concerns
10. Remove the handle. Unscrew the top
handle bracket from the handle rod (h1).
Unscrew the bottom handle bracket
from the door (h2)
Unscrew the top handle bracket from
the door (h3).
11. Install the handle in the opposite side.
Re-screw the handle bracket on the
door (h4). Turn the handle bracket with
the handle and screw them to the door
(h5) and the fitted handle bracket (h6).
12. Re-insert the lower door on the lower
hinge pivot (b2).
13. Insert the middle hinge (m2) into the
left drill of the lower door.
14. Unscrew the upper hinge pivot (t1) and
place it on the opposite side.
15. Fit the upper door on the upper door
pivot.
16. Re-insert the upper door on the middle
hinge pivot (m5) slightly tilting both
doors.
17. Re-screw the middle hinge (m2). Do not
forget the plastic spacer (m1).
Do a final check to make sure that:
• All screws are tightened.
• The magnetic seal adheres to the cabinet.
• The door opens and closes correctly.
If the ambient temperature is cold (i.e. in Winter), the gasket may not fit perfectly to the
cabinet. In that case, wait for the natural fitting of the gasket.
In case you do not want to carry out the above mentioned operations, contact the nearest
After Sales Service Force. The After Sales Service specialist will carry out the reversibility of
the doors at your cost.
h1 h2 h3
h4 h5 h6
t1
ENVIRONMENTAL CONCERNS
The symbol on the product or on its packaging indicates that this product may not be
treated as household waste. Instead it should be taken to the appropriate collection point
for the recycling of electrical and electronic equipment. By ensuring this product is
disposed of correctly, you will help prevent potential negative consequences for the
environment and human health, which could otherwise be caused by inappropriate waste
handling of this product. For more detailed information about recycling of this product,
please contact your local council, your household waste disposal service or the shop where
you purchased the product.
Page 21

Sommaire 21
Nous vous remercions d’avoir choisi l’un de nos produits de qualité.
Afin de garantir une performance optimale et constante de votre appareil, veuillez
lire attentivement cette notice d'utilisation. Il vous permettra d’utiliser correctement
et efficacement toutes les fonctions de l’appareil. Nous vous recommandons de
conserver cette notice à proximité pour une utilisation rapide et optimale. Si
l'appareil devez être vendu ou cédé à une autre personne, assurez-vous que la
notice d'utilisation l'accompagne.
Nous vous souhaitons beaucoup de plaisir avec votre nouvel appareil.
SOMMAIRE
CONSIGNES DE SÉCURITÉ 22
Sécurité des enfants et des personnes
vulnérables 22
Mesures générales de sécurité 22
Utilisation quotidienne 23
Entretien et nettoyage 24
Installation 24
Maintenance 24
BANDEAU DE COMMANDE 25
Mise en fonctionnement 25
Mise à l'arrêt 25
Réglage de la température 25
Fonction COOLMATIC 26
Fonction Vacances 26
Fonction FROSTMATIC 26
Alarme haute température 27
PREMIÈRE UTILISATION 27
Nettoyage intérieur 27
UTILISATION QUOTIDIENNE 27
Conservation des aliments congelés 27
La décongélation 27
Filtre à charbon 28
Clayettes amovibles 28
Porte-bouteilles 28
Bac à légumes 29
Emplacement des balconnets de la porte
29
Compartiment fraîcheur 29
Retrait des paniers de congélation du
congélateur 30
CONSEILS UTILES 31
Bruits de fonctionnement normaux 31
Conseils pour l'économie d'énergie 31
Conseils pour la réfrigération de denrées
fraîches 31
Conseils pour la réfrigération 31
Conseils pour la congélation 31
Conseils pour la conservation des produits
surgelés et congelés du commerce 32
ENTRETIEN ET NETTOYAGE 32
Nettoyage périodique 32
Remplacement du filtre à charbon 33
Dégivrage 33
EN CAS D'ANOMALIE DE FONCTIONNEMENT
33
Remplacement de l'ampoule 35
Fermeture de la porte 35
CARACTÉRISTIQUES TECHNIQUES 36
POSE 36
Emplacement 36
Emplacement 37
Branchement électrique 37
Entretoises arrière 37
Mise à niveau 38
Retrait des supports de clayette 38
Installation du filtre à charbon 38
Réversibilité de la porte 39
EN MATIÈRE DE SAUVEGARDE DE
L'ENVIRONNEMENT 41
Sous réserve de modifications
Page 22

22 Consignes de sécurité
CONSIGNES DE SÉCURITÉ
Pour votre sécurité et garantir une utilisation correcte de l'appareil, lisez attentivement cette notice, y compris les conseils et avertissements, avant d'installer et d'utiliser l'appareil
pour la première fois. Pour éviter toute erreur ou accident, veillez à ce que toute personne
qui utilise l'appareil connaisse bien son fonctionnement et ses fonctions de sécurité. Conservez cette notice avec l'appareil. Si l'appareil doit être vendu ou cédé à une autre personne, veillez à remettre cette notice au nouveau propriétaire, afin qu'il puisse se familiariser
avec son fonctionnement et sa sécurité.
Pour la sécurité des personnes et des biens, conservez et respectez les consignes de sécurité
figurant dans cette notice. Le fabricant décline toute responsabilité en cas de dommages
dus au non-respect de ces instructions.
Sécurité des enfants et des personnes vulnérables
• Cet appareil n'est pas destiné à être utilisé par des enfants ou des personnes dont les
capacités physiques, sensorielles ou mentales, ou le manque d'expérience et de connaissance les empêchent d'utiliser l'appareil sans risque lorsqu'ils sont sans surveillance ou en
l'absence d'instruction d'une personne responsable qui puisse leur assurer une utilisation
de l'appareil sans danger.
Empêchez les enfants de jouer avec l'appareil.
• Ne laissez pas les différents emballages à portée des enfants. Ils pourraient s'asphyxier.
• Si l'appareil doit être mis au rebut, veillez à couper le câble d'alimentation électrique au
ras de l'appareil pour éviter les risques d'électrocution. Démontez la porte pour éviter que
des enfants ne restent enfermés à l'intérieur.
• Cet appareil est muni de fermetures magnétiques. S'il remplace un appareil équipé d'une
fermeture à ressort, nous vous conseillons de rendre celle-ci inutilisable avant de vous en
débarrasser. Ceci afin d'éviter aux enfants de s'enfermer dans l'appareil et de mettre ainsi
leur vie en danger.
Mesures générales de sécurité
ATTENTION
Veillez à ce que les orifices de ventilation ne soient pas obstrués.
• Cet appareil est destiné uniquement à la conservation d’aliments et/ou de boissons dans
le cadre d’un usage domestique normal, tel que celui décrit dans la présente notice.
• N'utilisez pas d'appareils électriques, d'agents chimiques ou tout autre système artificiel
pour accélérer le processus de dégivrage.
• N’utilisez pas d'autres appareils électriques (par exemple, sorbetières) à l'intérieur d’appa-
reils réfrigérants sauf s’ils sont homologués pour cet usage par leur fabricant.
• Faites très attention lorsque vous déplacez l'appareil afin de ne pas endommager des
parties du circuit de refroidissement et ainsi d'éviter des risques de fuite.
• Le circuit de refroidissement de l’appareil contient de l’isobutane (R600a), un gaz naturel
offrant un haut niveau de compatibilité avec l’environnement mais qui est néanmoins
inflammable.
Pendant le transport et l'installation de l’appareil, assurez-vous qu'aucune pièce du circuit de refroidissement n'est endommagée.
Page 23

Consignes de sécurité 23
Si tel est le cas :
– Évitez les flammes vives (briquet) et tout autre allumage (étincelles).
– Aérez soigneusement la pièce où se trouve l'appareil.
• Ne modifiez pas les spécifications de l'appareil. Un cordon d'alimentation endommagé
peut être la cause de courts-circuits, d'incendies et/ou de décharges électriques.
AVERTISSEMENT
Les éventuelles réparations ou interventions sur votre appareil, ainsi que le remplacement
du câble d'alimentation, ne doivent être effectuées que par un professionnel qualifié.
1. L'appareil ne doit pas être raccordé à l'aide d'un prolongateur, d'une prise multiple
ou d'un raccordement multiple (risque d'incendie).
2. Assurez-vous que la prise n'est pas écrasée ou endommagée par l'arrière de l'appareil. Une prise de courant endommagée peut surchauffer et provoquer un incendie.
3. Vérifiez que la prise murale reste accessible une fois que l'installation est terminée.
4. Ne débranchez pas l'appareil en tirant sur le câble, particulièrement lorsque l'appareil
est tiré de son logement.
5. Si la fiche du cordon d'alimentation est desserrée, ne la branchez pas dans la prise
murale. Risque d'électrocution ou d'incendie !
6.
N'utilisez pas l'appareil si le diffuseur de l'ampoule d'éclairage n'est pas présent
5)
pour l'éclairage intérieur.
• Cet appareil est lourd. Faites attention en le déplaçant.
• Ne touchez pas avec les mains humides les surfaces givrées et les produits congelés (risque de brûlure et d'arrachement de la peau).
• Évitez une exposition prolongée de l'appareil aux rayons solaires.
•
Ampoules
6)
utilisées dans cet appareil sont des ampoules spéciales dédiées uniquement à
un usage avec des appareils ménagers. Elles ne conviennent pas à l'éclairage des pièces
d'une habitation.
Utilisation quotidienne
• Ne posez pas d'éléments chauds sur les parties en plastique de l'appareil.
• Ne stockez pas de gaz ou de liquides inflammables dans l'appareil (risque d'explosion).
• Ne placez pas d'aliments directement contre la sortie d'air sur la paroi arrière de l'appa-
7)
reil.
• Un produit décongelé ne doit jamais être recongelé.
• Conservez les aliments emballés conformément aux instructions de leur fabricant.
• Respectez scrupuleusement les conseils de conservation donnés par le fabricant de l'appareil. Consultez les instructions respectives.
• Ne mettez pas de bouteilles ni de boîtes de boissons gazeuses dans le compartiment congélateur, car la pression se formant à l'intérieur du contenant pourrait le faire éclater et
endommager ainsi l'appareil.
• Ne consommez pas certains produits tels que les bâtonnets glacés dès leur sortie de l'appareil, car ils peuvent provoquer des brûlures.
5) Si le diffuseur est prévu.
6) Si l'ampoule est prévue.
7) Si l'appareil est sans givre.
Page 24

24 Consignes de sécurité
Entretien et nettoyage
• Avant toute opération d'entretien, mettez l'appareil hors tension et débranchez-le de la
prise de courant.
• N'utilisez pas d'objets métalliques pour nettoyer l'appareil.
• N'utilisez pas d'objet tranchant pour gratter la couche de givre. Utilisez une spatule en
plastique.
• Contrôlez régulièrement l'orifice d'évacuation de l'eau de dégivrage dans le compartiment réfrigérateur. Nettoyez-le, si besoin. Si l'orifice est bouché, l'eau s'écoulera en bas
de l'appareil.
Installation
Avant de procéder au branchement électrique, respectez scrupuleusement les instructions
fournies dans cette notice.
• Déballez l'appareil et vérifiez qu'il n'est pas endommagé. Ne branchez pas l'appareil s'il
est endommagé. Signalez immédiatement au revendeur de l'appareil les dommages
constatés. Dans ce cas, gardez l'emballage.
• Il est conseillé d'attendre au moins quatre heures avant de brancher l'appareil pour que
le circuit frigorifique soit stabilisé.
• Veillez à ce que l'air circule librement autour de l'appareil pour éviter qu'il ne surchauffe.
Pour assurer une ventilation suffisante, respectez les instructions de la notice (chapitre
Installation).
• Placez l'appareil dos au mur pour éviter tout contact avec le compresseur et le condenseur (risque de brûlure).
• Placez de préférence votre appareil loin d'une source de chaleur (chauffage, cuisson ou
rayons solaires trop intenses).
• Assurez-vous que la prise murale reste accessible après l'installation de l'appareil.
•
Branchez à l'alimentation en eau potable uniquement.
8)
Maintenance
• Les branchements électriques nécessaires à l'entretien de l'appareil doivent être réalisés
par un électricien qualifié ou une personne compétente.
• Cet appareil ne doit être entretenu et réparé que par un Service après-vente autorisé,
exclusivement avec des pièces d'origine.
Protection de l'environnement
Le système frigorifique et l'isolation de votre appareil ne contiennent pas de C.F.C. contribuant ainsi à préserver l'environnement. L'appareil ne doit pas être mis au rebut avec les
ordures ménagères et les déchets urbains. La mousse d'isolation contient des gaz inflammables : l'appareil sera mis au rebut conformément aux règlements applicables disponibles auprès des autorités locales. Veillez à ne pas détériorer les circuits frigorifiques, notamment au
niveau du condenseur. Les matériaux utilisés dans cet appareil identifiés par le symbole
sont recyclables.
8) Si un branchement sur le réseau d'eau est prévu.
Page 25

BANDEAU DE COMMANDE
1 Touche ON/OFF
2 Dispositif de réglage de température du réfrigérateur, touche +
3 Affichage de la température du compartiment réfrigérateur
4 Dispositif de réglage de température du réfrigérateur, touche -
5 Touche COOLMATIC
6 Voyant COOLMATIC
7 Voyant du compartiment réfrigérateur
8 Voyant du compartiment congélateur
9 Voyant FROSTMATIC
10 Touche FROSTMATIC
11 Dispositif de réglage de température du compartiment congélateur, touche +
12 Affichage de la température du compartiment congélateur
13 Dispositif de réglage de température du compartiment congélateur, touche -
14 Touche Arrêt alarme
15 Voyant Alarme
65 7 84321 15141312119 10
Bandeau de commande
25
Mise en fonctionnement
1. Branchez l'appareil.
2. Appuyez sur la touche Marche / Arrêt ON/OFF.
3. Le voyant d'alarme clignote indiquant que la température est atteinte.
L'alarme sonore retentit.
4. Appuyez sur la touche Arrêt alarme pour mettre à l'arrêt l'alarme sonore.
Si la porte reste trop longtemps entre-ouverte, l'éclairage interne s'éteint automatiquement ; pour rallumer, fermez et ouvrez de nouveau la porte.
Mise à l'arrêt
Pour mettre l'appareil à l'arrêt :
1. Appuyez sur la touche Marche / Arrêt ON/OFF.
2. Débranchez l'appareil.
Réglage de la température
La température programmée du réfrigérateur et du congélateur peut être réglée à l'aide du
thermostat. Les voyants du thermostat indiquent la température programmée.
Page 26

26 Bandeau de commande
Pour une conservation correcte des aliments, sélectionnez les températures suivantes :
• +5 °C dans le compartiment réfrigérateur
• -18 °C dans le congélateur.
La température programmée sera atteinte en 24 heures.
Des variations de quelques degrés par rapport à la température programmée sont normales
et ne signifient pas un dysfonctionnement de l'appareil.
Fonction COOLMATIC
La fonction COOLMATIC permet un refroidissement rapide de grandes quantités d'aliments
à conserver dans le compartiment réfrigérateur, après avoir fait de gros achats par exemple.
Pour activer la fonction, procédez comme suit :
1. Appuyez sur la touche COOLMATIC.
2. Le voyant COOLMATIC s'allume.
La fonction COOLMATIC permet maintenant un refroidissement intensif. Une température
de +2°C est automatiquement sélectionnée.
Cette fonction COOLMATIC se désactive au bout de 6 heures.
Vous pouvez désactiver la fonction manuellement à tout moment. Pour cela :
1. Appuyez sur la touche COOLMATIC.
2. Le voyant COOLMATIC s'éteint.
Fonction Vacances
Cette fonction vous permet de garder le compartiment réfrigérateur vide et fermé pendant
une longue période (p.ex. les vacances d'été), sans formation de mauvaises odeurs.
Le compartiment réfrigérateur doit être vide quand la fonction Vacances est activée. Vous
ne devez pas conserver de marchandises dans ce compartiment.
Pour activer la fonction, procédez comme suit :
1. Maintenez appuyé le dispositif de réglage de température (moins de froid), jusqu'à ce
que la lettre « H » (pour vacances) apparaisse sur l'afficheur. La fonction Vacances règle
la température sur +15 °C environ. Le réfrigérateur est en mode économie d'énergie.
Pour désactiver la fonction, procédez comme suit :
1. réglez la température souhaitée en utilisant le dispositif de réglage de température correspondant.
Fonction FROSTMATIC
Cette fonction FROSTMATIC accélère la congélation des aliments frais et protège en même
temps les denrées déjà entreposées d'un réchauffement indésirable.
Pour activer la fonction, procédez comme suit :
1. Appuyez sur la touche FROSTMATIC.
2. Le voyant FROSTMATIC s'allume.
La fonction FROSTMATICest automatiquement désactivée au bout de 52 heures.
Vous pouvez désactiver la fonction manuellement à tout moment. Pour cela :
1. Appuyez sur la touche FROSTMATIC.
2. Le voyant FROSTMATIC s'éteint.
Page 27

Première utilisation
Alarme haute température
Si la température remonte anormalement à l'intérieur du compartiment congélateur (par
exemple en cas de coupure de courant), le voyant alarme clignote et une alarme sonore
retentit.
Pour arrêter l'alarme sonore, appuyez sur la touche Arrêt alarme. Le voyant rouge alarme
continue de clignoter.
Une fois rétablies les conditions normales de fonctionnement, le signal sonore s'arrête alors
que le voyant alarme continue de clignoter.
Appuyez sur la touche Arrêt alarme. Le voyant Alarme s'éteint tandis que s'affiche pendant
5 secondes la température la plus élevée atteinte dans le compartiment congélateur.
PREMIÈRE UTILISATION
Nettoyage intérieur
Avant d'utiliser l'appareil pour la première fois, nettoyez l'intérieur et tous les accessoires
internes avec de l'eau tiède savonneuse pour supprimer l'odeur caractéristique du "neuf"
puis séchez soigneusement.
N'utilisez pas de produits abrasifs, poudre à récurer, éponge métallique pour ne pas abîmer
la finition.
UTILISATION QUOTIDIENNE
27
Conservation des aliments congelés
À la mise en service ou après un arrêt prolongé, placez le thermostat sur la position Max
pendant 2 heures environ, avant d'introduire les produits dans le compartiment.
En cas de dégivrage accidentel, dû par exemple à une panne de courant, si la panne doit se
prolonger plus longtemps qu'il n'est indiqué à la rubrique "temps d'augmentation" dans la
section Caractéristiques techniques, consommez les aliments décongelés le plus rapidement
possible ou recongelez-les après les avoir cuits (une fois refroidis).
La décongélation
Les aliments surgelés ou congelés peuvent être décongelés dans le compartiment réfrigérateur ou à température ambiante, avant d'être utilisés, en fonction du temps disponible pour
cette opération.
Les petites pièces peuvent même être cuites sans décongélation préalable : dans ce cas, la
cuisson est plus longue.
Page 28

28 Utilisation quotidienne
Filtre à charbon
Votre appareil est équipé d'un filtre à charbon situé au-dessous d'un volet situé sur la paroi arrière
du diffuseur d'air .
Le filtre purifie l'air en éliminant les odeurs des
aliments du compartiment réfrigérateur ce qui
améliore la qualité de leur conservation.
Pendant le fonctionnement, veillez à toujours laisser le volet d'aération fermé.
Clayettes amovibles
Les parois du réfrigérateur sont équipées d'une
série de glissières pour que les clayettes puissent
être placées en fonction des besoins.
Porte-bouteilles
Placez les bouteilles (ouverture vers l'avant) dans
le compartiment prévu à cet effet.
Si le compartiment est positionné dans le sens horizontal, n'y placer que des bouteilles fermées.
Ce porte-bouteilles peut être incliné afin de pouvoir y ranger des bouteilles déjà ouvertes. Pour ce
faire, tirez le compartiment vers le haut afin qu'il
puisse tourner vers le haut et être placé sur le niveau supérieur.
Page 29

Bac à légumes
Ce bac est adapté pour la conservation de fruits et
légumes.
Il possède une cloison repositionnable permettant
de séparer les aliments selon vos besoins.
Selon le modèle, une grille permet de préserver les
fruits et légumes de toute humidité pouvant s'accumuler au fond du bac.
Tous les éléments du bac sont amovibles pour faciliter le nettoyage
Emplacement des balconnets de la porte
En fonction de la taille des paquets d'aliments conservés, les balconnets de la porte
peuvent être positionnés à différentes hauteurs.
Pour les ajuster, procédez comme suit :
tirez progressivement dans le sens des flèches pour les dégager, puis repositionnez-les
selon les besoins.
Utilisation quotidienne 29
1
2
Compartiment fraîcheur
Ce compartiment est spécialement dédié à la conservation des denrées fraîches et hautement périssables (poissons, viandes). La température à l'intérieur de ce compartiment est inférieure aux autres zones du réfrigérateur. Il se place en bas du compartiment réfrigérateur,
juste au-dessus du bac à légumes.
Page 30

30 Utilisation quotidienne
Si vous souhaitez retirer le compartiment fraîcheur, procédez comme suit :
1. Ouvrez complètement la porte du compartiment réfrigérateur. Si vous ne réussissez pas à
ouvrir la porte à 180°, retirez le balconnet
porte-bouteilles de la porte.
2. Tirez le tiroir vers vous jusqu'à la butée.
3. Relevez légèrement l'avant du tiroir.
4. Sortez le tiroir de son support.
5. Soulevez l'arrière du support pour le dégager.
6. Tirez le cadre du support vers vous.
7. Enlevez le cadre du support.
Replacez le compartiment fraîcheur dans sa position d'origine en suivant les instructions ci-dessus
mais dans l'ordre inverse.
Retrait des paniers de congélation du congélateur
5
6
2
3
2
1
2
1
Les paniers de congélation sont équipés d'un arrêt afin d'empêcher leur retrait accidentel
ou leur chute. Pour retirer le panier du compartiment congélateur, tirez-le vers vous et,
lorsque vous atteignez le point d'arrêt, retirez-le en inclinant la partie avant vers le haut.
Pour le remettre, relevez légèrement l'avant du panier et insérez-le dans le congélateur.
Dès que vous avez dépassé les points d'arrêt, poussez les paniers dans la bonne position.
Page 31

Conseils utiles
CONSEILS UTILES
Bruits de fonctionnement normaux
• Il n'est pas anormal d'entendre le bruit de circulation du fluide frigorigène selon son état
liquide, gazeux ou vaporeux. Ce phénomène est normal.
• Le compresseur peut produire un ronronnement aigu ou un bruit de pulsation. Ce phé-
nomène est normal.
• La dilatation thermique peut provoquer un soudain, léger bruit de craquement. C'est un
phénomène normal et sans gravité. Ce phénomène est normal.
Conseils pour l'économie d'énergie
• N'ouvrez pas la porte trop souvent ou plus longtemps que nécessaire.
• Si la température ambiante est élevée, le dispositif de réglage de température est sur la
position de froid maximum et l'appareil est plein : il est possible que le compresseur
fonctionne en régime continu, d'où un risque de formation excessive de givre sur l'évaporateur. Pour éviter ceci, modifiez la position du dispositif de réglage de température de
façon à obtenir des périodes d'arrêt du compresseur et ainsi permettre un dégivrage automatique, d'où des économies d'énergie.
Conseils pour la réfrigération de denrées fraîches
Pour obtenir les meilleures performances possibles :
• N'introduisez pas d'aliments encore chauds ou de liquides en évaporation dans le réfrigé-
rateur.
• Couvrez ou enveloppez soigneusement les aliments, surtout s'ils sont aromatiques.
• Placez les aliments pour que l'air puisse circuler librement autour.
31
Conseils pour la réfrigération
Conseils utiles :
Viande (tous les types) : enveloppez-la dans des sachets en plastique et placez-la sur la tablette en verre au-dessus du bac à légumes.
La période de conservation est de 1 à 2 jours au maximum.
Aliments cuits, plats froids, etc. : placez-les bien couverts sur une clayette.
Fruits et légumes : placez-les une fois nettoyés dans le(s) bac(s) à légumes fourni(s).
Beurre et fromage : placez-les dans des récipients étanches spéciaux ou enveloppez-les soigneusement dans des feuilles d'aluminium ou de polyéthylène, pour emmagasiner le moins
d'air possible.
Lait en bouteille : bouchez-le et placez-le dans le balconnet de la contreporte réservé aux
bouteilles.
Bananes, pommes de terre, oignons et ail ne se conservent pas au réfrigérateur, s'ils ne sont
pas correctement emballés.
Conseils pour la congélation
Pour obtenir les meilleurs résultats, voici quelques conseils importants :
• la quantité maximale de denrées que vous pouvez congeler par 24 heures est indiquée
sur la plaque signalétique.
• le temps de congélation est de 24 heures. Aucune autre denrée à congeler ne doit être
ajoutée pendant cette période.
Page 32

32 Entretien et nettoyage
• congelez seulement les denrées alimentaires fraîches, de qualité supérieure (une fois net-
toyées).
• préparez la nourriture en petits paquets pour une congélation rapide et uniforme, adap-
tés à l'importance de la consommation.
• enveloppez les aliments dans des feuilles d'aluminium ou de polyéthylène et assurez-
vous que les emballages sont étanches ;
• ne laissez pas des aliments frais, non congelés, toucher des aliments déjà congelés pour
éviter une remontée en température de ces derniers.
• les aliments maigres se conservent mieux et plus longtemps que les aliments gras ; le sel
réduit la durée de conservation des aliments
• la température très basse à laquelle se trouvent les bâtonnets glacés, s'ils sont consom-
més dès leur sortie du compartiment congélateur, peut provoquer des brûlures.
• L'identification des emballages est importante : indiquez la date de congélation du pro-
duit, et respectez la durée de conservation indiquée par le fabricant.
Conseils pour la conservation des produits surgelés et congelés du commerce
Pour une bonne conservation des produits surgelés et congelés, vous devez :
• vous assurer qu'ils ont bien été conservés au magasin ;
• prévoir un temps réduit au minimum pour leur transport du magasin d'alimentation à
votre domicile ;
• éviter d'ouvrir trop souvent la porte du congélateur et ne la laisser ouverte que le temps
nécessaire.
• une fois décongelés, les aliments se détériorent rapidement et ne peuvent pas être re-
congelés.
• respecter la durée de conservation indiquée par le fabricant.
ENTRETIEN ET NETTOYAGE
ATTENTION
débrancher l'appareil avant toute opération d'entretien.
Cet appareil contient des hydrocarbures dans son circuit réfrigérant : l'entretien et la recharge ne doivent donc être effectués que par du personnel autorisé.
Nettoyage périodique
Cet appareil doit être nettoyé régulièrement :
• Nettoyez l'intérieur et tous les accessoires avec de l'eau tiède savonneuse.
• Vérifiez régulièrement les joints de porte et nettoyez-les en les essuyant pour éviter tou-
te accumulation de déchets.
• Rincez et séchez soigneusement.
Ne pas tirer, déplacer ou endommager les tuyaux et/ou câbles qui se trouvent à l'intérieur
de l'appareil.
Ne JAMAIS utiliser de produits abrasifs ou caustiques ni d'éponges avec grattoir pour nettoyer l'intérieur de façon à ne pas l'abîmer et laisser de fortes odeurs.
Page 33

En cas d'anomalie de fonctionnement 33
Nettoyer le condenseur (grille noire) et le compresseur situés à l'arrière de l'appareil avec
une brosse ou un aspirateur. Cette opération améliore les performances de l'appareil et permet des économies d'énergie.
Attention à ne pas endommager le système de réfrigération.
De nombreux détergents pour la cuisine recommandés par les fabricants contiennent des
produits chimiques qui peuvent attaquer/endommager les pièces en plastique utilisées dans
cet appareil. Il est par conséquent recommandé d'utiliser seulement de l'eau chaude additionnée d'un peu de savon liquide pour nettoyer la carrosserie de l'appareil.
Après le nettoyage, rebranchez l'appareil.
Remplacement du filtre à charbon
Lors d'un usage normal et afin de permettre un bon fonctionnement, il est recommandé de
changer le filtre à charbon tous les six mois.
Vous pouvez vous procurer ce filtre auprès de votre magasin vendeur.
Reportez-vous aus instructions fournies au chapitre "Installation du filtre à charbon".
Dégivrage
Votre appareil est sans givre. Cela signifie que le givre ne se forme pas pendant que l'appareil est en fonctionnement, que ce soit sur les parois internes ou sur les aliments.
L'absence de givre est due à la circulation permanente d'air froid dans le compartiment, circulant grâce à un ventilateur automatique.
EN CAS D'ANOMALIE DE FONCTIONNEMENT
ATTENTION
Avant d'intervenir sur l'appareil, débranchez-le.
La résolution des problèmes, non mentionnés dans la présente notice, doit être exclusivement confiée à un électricien qualifié ou à une personne compétente.
Certains bruits pendant le fonctionnement (compresseur, circuit de réfrigérant) sont normaux.
Problème Cause possible Solution
L'appareil est bruyant.
Le compresseur fonctionne en permanence.
La porte n'est pas correctement
La porte a été ouverte trop sou-
L'appareil n'est pas stable. Vérifiez la stabilité de l'appareil
Le dispositif de réglage de température n'est pas correctement
réglé.
fermée.
vent.
(les quatre pieds doivent être en
contact avec le sol).
Modifiez le dispositif de réglage
de température pour obtenir
moins de froid.
Consultez le paragraphe « Fermeture de la porte ».
Ne laissez pas la porte ouverte
plus longtemps que nécessaire.
Page 34

34 En cas d'anomalie de fonctionnement
Problème Cause possible Solution
La température du produit est
La température ambiante est
La fonction FROSTMATIC est ac-
La fonction COOLMATIC est acti-
De l'eau s'écoule sur la
plaque arrière du réfrigérateur.
De l'eau s'écoule dans le
réfrigérateur.
Des denrées empêchent l'eau de
De l'eau coule sur le sol.
Il y a trop de givre et de
glace.
La porte n'est pas correctement
Le dispositif de réglage de tem-
La température à l'intérieur de l'appareil est
trop élevée.
La température du produit est
Trop de produits ont été placés
La température du compartiment réfrigérateur
est trop élevée.
La température du congélateur est trop élevée.
trop élevée.
trop élevée.
tivée.
vée.
Pendant le dégivrage automati-
que, le givre fond sur la plaque
arrière.
L'orifice d'évacuation de l'eau
est obstrué.
s'écouler dans le réservoir d'eau.
L'eau de dégivrage ne s'écoule
pas dans le plateau d'évaporation situé au-dessus du compresseur.
Les produits ne sont pas correctement emballés.
fermée.
pérature n'est pas correctement
réglé.
La porte n'est pas correctement
fermée.
trop élevée.
simultanément dans l'appareil.
L'air froid ne circule pas dans
l'appareil.
Les produits sont trop près les
uns des autres.
Laissez le produit revenir à température ambiante avant de le
placer dans l'appareil.
Réduisez la température ambiante.
Reportez-vous au paragraphe «
Fonction FROSTMATIC ».
Reportez-vous au paragraphe «
Fonction COOLMATIC ».
Ce phénomène est normal.
Nettoyez l'orifice.
Assurez-vous que les produits ne
touchent pas la plaque arrière.
Fixez le tuyau de sortie de l'eau
au plateau d'évaporation.
Emballez mieux les produits.
Consultez le paragraphe « Fermeture de la porte ».
Modifiez la position du dispositif
de réglage de température pour
obtenir moins de froid.
Consultez le paragraphe « Fermeture de la porte ».
Laissez le produit revenir à température ambiante avant de le
placer dans l'appareil.
Placez moins de produits en même temps dans l'appareil.
Assurez-vous que l'air froid circule dans l'appareil.
Rangez les produits de façon à
permettre la circulation de l'air
froid.
Page 35

Problème Cause possible Solution
L'appareil ne fonctionne
pas.
La fiche d'alimentation n'est pas
Le courant n'arrive pas à l'appa-
L'éclairage ne fonctionne
pas.
L'appareil est à l'arrêt. Mettez l'appareil sous tension.
correctement branchée dans la
prise de courant.
reil. La prise de courant n'est pas
alimentée.
L'éclairage est en mode veille. Fermez puis ouvrez la porte.
Si ces conseils n'apportent pas de solution à votre problème, veuillez consulter le service
après-vente de votre magasin vendeur.
Remplacement de l'ampoule
ATTENTION
Débranchez l'appareil du secteur.
1. Tirez le crochet du diffuseur vers l'extérieur.
2. Enlevez le diffuseur.
3. Remplacez l'ampoule par un modèle identique
et de même puissance (la puissance maximale
est indiquée sur le diffuseur).
4. Installez le diffuseur.
5. Branchez l'appareil.
6. Ouvrez la porte. Vérifiez que l'ampoule s'allume.
En cas d'anomalie de fonctionnement 35
Branchez correctement la fiche
d'alimentation dans la prise de
courant.
Branchez un autre appareil électrique sur la prise de courant. Faites appel à un électricien qualifié.
1
2
Fermeture de la porte
1. Nettoyez les joints de la porte.
2. Si nécessaire, ajustez la porte. Consultez le paragraphe "Installation".
3. Si nécessaire, remplacez les joints défectueux. Contactez le Service Après-vente.
Page 36

36 Caractéristiques techniques
CARACTÉRISTIQUES TECHNIQUES
Dimension
Hauteur 1850 mm
Largeur 595 mm
Profondeur 658 mm
Autonomie de fonctionnement 16 h
Tension 230 V
Fréquence 50 Hz
Les caractéristiques techniques figurent sur la plaque signalétique située sur le côté gauche
à l'intérieur de l'appareil et sur l'étiquette énergétique.
POSE
AVERTISSEMENT
Pour votre sécurité et le bon fonctionnement de l'appareil, veuillez lire attentivement les
"Consignes de sécurité" avant d'installer l'appareil.
Emplacement
Installez cet appareil à un endroit où la température ambiante correspond à la classe climatique indiquée sur la plaque signalétique de l'appareil :
Classe climatique Température ambiante
SN +10 à + 32 °C
N +16 à + 32 °C
ST +16 à + 38 °C
T +16 à + 43 °C
Page 37

Emplacement
L'appareil doit être installé à bonne distance de
toute source de chaleur telle que les radiateurs,
chauffe-eau, lumière directe du soleil etc. Assurez-vous que l'air circule librement à l'arrière de
l'appareil. Pour garantir un rendement optimum si
l'appareil est installé sous un élément suspendu, la
distance entre le haut de l'armoire et l'élément
suspendu doit être de 100 mm minimum. Si possible, évitez de placer l'appareil sous des éléments
suspendus. La mise à niveau se fait à l'aide d'un
ou de plusieurs pieds réglables à la base de l'armoire.
AVERTISSEMENT
L'appareil doit pouvoir être débranché à tout moment ; il est donc nécessaire que la prise murale reste accessible après l'installation.
mm
min
100
A
mm
20
B
Branchement électrique
Contrôlez, avant de brancher l'appareil, si la tension et la fréquence indiquées sur la plaque
signalétique correspondent à celles de votre réseau.
L'appareil doit être relié à la terre. La fiche du câble d'alimentation comporte un logement
pour mise à la terre. Si la prise de courant murale n'est pas mise à la terre, branchez l'appareil sur une prise de terre conformément aux normes en vigueur, en demandant conseil à
un électricien qualifié.
Le fabricant décline toute responsabilité en cas d'incident suite au non-respect des consignes de sécurité sus-mentionnées.
Cet appareil est conforme aux directives communautaires.
Pose 37
Entretoises arrière
Vous trouverez les deux filtres dans le sac avec la
documentation.
Pour installer les filtres, procédez comme suit :
1. Desserrez la vis.
2. Insérez le filtre sous la vis.
3. Tournez le filtre dans la bonne position.
4. Resserrez les vis.
2
1
4
3
Page 38

38 Pose
Mise à niveau
Lors de la mise en place de l'appareil, assurez-vous
qu'il soit positionné de façon plane. Servez-vous
des deux pieds réglables se trouvant à l'avant de
l'appareil.
Retrait des supports de clayette
Votre appareil est équipé de dispositifs de retenue
qui permettent d'immobiliser les clayettes au
cours du transport.
Pour les enlever, procédez comme suit :
1. Déplacez les supports de clayette dans le sens
de la flèche (A).
2. Soulevez la clayette de l'arrière et poussez-la
vers l'avant pour la dégager (B).
3. Enlevez les dispositifs de retenue (C).
A
B
Installation du filtre à charbon
Le filtre est un filtre à charbon actif qui réduit les odeurs et évite qu'elles imprégnent les
aliments et altérent leur arome et saveur naturels.
C
Page 39

Le filtre est livré dans un emballage en plastique
pour préserver et garantir sa longévité et ses caractéristiques. Le filtre doit être placé derrière le
volet d'aération avant la mise en fonction de l'appareil.
1. Ouvrez le volet (1)
2. Retirez le filtre du sachet en plastique
3. Insérez le filtre dans la fente située à l'arrière
du volet (2)
4. Fermez le volet
Pendant le fonctionnement, veillez à toujours laisser le volet d'aération fermé.
Le filtre doit être manipulé avec précaution pour éviter que des résidus en sortent.
Réversibilité de la porte
AVERTISSEMENT
Avant toute opération, débranchez la prise d'alimentation électrique.
Pour effectuer les opérations suivantes, il est conseillé de se faire aider par une autre personne pour maintenir fermement les portes de l'appareil pendant les opérations.
1. Ouvrez les portes. Dévissez la charnière
du milieu (m2). Déposez l'entretoise en
plastique (m1).
2. Enlevez l'entretoise (m6) et placez-la de
l'autre côté du gond de la charnière
(m5).
3. Enlevez les portes.
4. Retirez la goupille du cache gauche de
la charnière centrale (m3, m4) et placezla de l'autre côté.
5. Insérez la goupille de la charnière cen-
trale (m5) dans le trou gauche de la porte inférieure.
m1
m5
m3
Pose 39
2
1
m2
m6
m4
Page 40

40 Pose
6. Retirez le cache (b1) à l'aide d'un outil.
Dévissez le gond de la charnière inférieure (b2) et l'entretoise (b3) et placezles du côté opposé.
7. Réinsérez le cache (b1) du côté opposé.
8. Inversez les crochets de fermeture de la
porte (d2,d3), placez-les du côté opposé
puis fixez-les en vissant les vis (d4).
9. Placez les butées (d5,d6) du côté opposé
des portes.
b1
b2
b3
d2
d6
d5
10. Retirez la poignée. Dévissez le support
supérieur de la tige de la poignée (h1).
h1 h2 h3
Dévissez le support inférieur de la poignée de la porte (h2)
Dévissez le support supérieur de la poignée de la porte (h3).
11. Installez la poignée sur le côté opposé.
h4 h5 h6
Revissez le support de la poignée sur la
porte (h4). Tournez le support de la poignée avec la poignée et vissez l'ensemble sur la porte (h5) et sur le support installé (h6).
12. Replacez la porte inférieure sur le gond
de la charnière inférieure (b2).
13. Insérez la charnière centrale (m2) dans le trou gauche de la porte inférieure.
d3
d4
Page 41

En matière de sauvegarde de l'environnement 41
14. Dévissez le gond de la charnière supéri-
eure (t1) et placez-le du côté opposé.
15. Installez la porte supérieure sur le gond
supérieur.
16. Replacez la porte supérieure sur le gond
de la charnière centrale (m5) en inclinant légèrement les deux portes.
17. Revissez la charnière centrale (m2).
N'oubliez pas l'entretoise en plastique
(m1).
Contrôlez une dernière fois pour vous assurer
que :
• Toutes les vis sont correctement serrées.
• Le joint magnétique adhère bien à l'appareil.
• La porte ouvre et ferme correctement.
Si la température ambiante est basse (en hiver, par exemple), il se peut que le joint n'adhère
pas parfaitement. Dans ce cas, attendez que le joint reprenne sa taille naturelle.
Si vous ne voulez pas effectuer personnellement les opérations décrites ci-dessus, contactez
le S.A.V. le plus proche. Un technicien du S.A.V. inversera le sens d'ouverture de la porte à
vos frais.
EN MATIÈRE DE SAUVEGARDE DE L'ENVIRONNEMENT
t1
Le symbole sur le produit ou son emballage indique que ce produit ne peut être traité
comme déchet ménager. Il doit être remis au point de collecte dédié à cet effet (collecte et
recyclage du matériel électrique et électronique).
En procédant à la mise au rebut de l'appareil dans les règles de l’art, nous préservons
l'environnement et notre sécurité, s’assurant ainsi que les déchets seront traités dans des
conditions optimum.
Pour obtenir plus de détails sur le recyclage de ce produit, veuillez prendre contact avec les
services de votre commune ou le magasin où vous avez effectué l'achat.
Page 42

42 Inhalt
Danke, dass Sie sich für eines unserer hochqualitativen Produkte entschieden haben.
Lesen Sie für eine optimale und gleichmäßige Leistung Ihres Gerätes diese
Benutzerinformation bitte sorgfältig durch. Sie wird Ihnen helfen, alle Vorgänge
perfekt und äußerst effizient zu steuern. Damit Sie diese Benutzerinformation bei
Bedarf stets zur Hand haben, empfehlen wir Ihnen, sie an einem sicheren Ort
aufzubewahren. Und geben Sie diese Benutzerinformation bitte an einen
eventuellen neuen Besitzer dieses Gerätes weiter.
Wir wünschen Ihnen viel Freude mit Ihrem neuen Gerät.
INHALT
SICHERHEITSHINWEISE 43
Sicherheit von Kindern und hilfsbedürftigen
Personen 43
Allgemeine Sicherheitshinweise 43
Täglicher Gebrauch 44
Reinigung und Pflege 44
Montage 45
Kundendienst 45
BEDIENFELD 46
Einschalten des Gerätes 46
Ausschalten des Geräts 46
Temperaturregelung 47
COOLMATIC Funktion 47
Urlaubsschaltung 47
FROSTMATIC Funktion 47
Temperaturwarnung 48
ERSTE INBETRIEBNAHME 48
Reinigung des Innenraums 48
TÄGLICHER GEBRAUCH 48
Lagerung gefrorener Produkte 48
Auftauen 48
Kohlefilter 49
Verstellbare Ablagen/Einsätze 49
Flaschenhalter 49
Obst-/Gemüseschublade 50
Positionierung der Türeinsätze 50
Frischebox (Kühlzone) 50
Entnahme von Gefrierkörben aus dem
Gefrierschrank 51
PRAKTISCHE TIPPS UND HINWEISE 52
Normale Betriebsgeräusche 52
Energiespartipps 52
Hinweise für die Kühlung frischer
Lebensmittel 52
Hinweise für die Kühlung 52
Hinweise zum Einfrieren 52
Hinweise zur Lagerung gefrorener Produkte
53
REINIGUNG UND PFLEGE 53
Regelmäßige Reinigung 53
Wechseln des Kohlefilters 54
Abtauen 54
WAS TUN, WENN … 54
Austauschen der Lampe für die
Innenbeleuchtung 56
Schließen der Tür 56
TECHNISCHE DATEN 57
INBETRIEBNAHME 57
Aufstellung 57
Standort 58
Elektrischer Anschluss 58
Distanzstücke hinten 58
Ausrichten 59
Entfernen der Ablagenhalter 59
Einsetzen des Kohlefilters 59
Wechsel des Türanschlags 60
HINWEISE ZUM UMWELTSCHUTZ 62
Änderungen vorbehalten
Page 43

Sicherheitshinweise
SICHERHEITSHINWEISE
Lesen Sie zu Ihrer Sicherheit und für die optimale Geräteanwendung vor der Installation
und dem Gebrauch des Gerätes die vorliegende Benutzerinformation aufmerksam durch,
einschließlich der Ratschläge und Warnungen. Es ist wichtig, dass zur Vermeidung von Fehlern und Unfällen alle Personen, die das Gerät benutzen, mit der Bedienung und den Sicherheitsvorschriften vertraut sind. Heben Sie die Benutzerinformation gut auf und übergeben
Sie sie bei einem Weiterverkauf des Gerätes dem neuen Besitzer, so dass jeder während der
gesamten Lebensdauer des Gerätes über Gebrauch und Sicherheit informiert ist.
Halten Sie sich zu Ihrer Sicherheit und zum Schutz Ihres Eigentums strikt an die Vorsichtsmaßnahmen der vorliegenden Benutzerinformation, da der Hersteller bei Missachtung derselben von jeder Haftung freigestellt ist.
Sicherheit von Kindern und hilfsbedürftigen Personen
• Das Gerät darf von Personen (einschließlich Kindern), deren physische, sensorische Fähig-
keiten und deren Mangel an Erfahrung und Kenntnissen einen sicheren Gebrauch des
Gerätes ausschließen nur unter Aufsicht oder nach ausreichender Einweisung durch eine
verantwortungsbewusste Person benutzt werden, die sicherstellt, dass sie sich der Gefahren des Gebrauchs bewusst sind.
Kinder müssen beaufsichtigt werden, damit sie nicht am Gerät herumspielen können.
• Halten Sie das Verpackungsmaterial unbedingt von Kindern fern. Erstickungsgefahr!
• Ziehen Sie vor der Entsorgung des Gerätes den Netzstecker, schneiden Sie das Netzkabel
(so nah wie möglich am Gerät) ab und entfernen Sie die Tür, so dass spielende Kinder vor
elektrischem Schlag geschützt sind und sich nicht in dem Gerät einschließen können.
• Wenn dieses Gerät mit magnetischer Türdichtung ein älteres Modell mit Schnappver-
schluss (Türlasche) an der Tür oder auf dem Deckel ersetzt, machen Sie den Schnappverschluss vor dem Entsorgen des Altgerätes unbrauchbar. So verhindern Sie, dass das Gerät
nicht zu einer Todesfalle für Kinder wird.
43
Allgemeine Sicherheitshinweise
VORSICHT!
Die Belüftungsöffnungen müssen immer frei zugänglich sein.
• Das Gerät ist für die Aufbewahrung von Lebensmitteln und/oder Getränken in einem
normalen Haushalt bestimmt, wie in der vorliegenden Gebrauchsanweisung beschrieben
wird.
• Benutzen Sie keine mechanischen oder sonstigen Hilfsmittel, um den Abtauprozess zu
beschleunigen.
• Verwenden Sie keine anderen Elektrogeräte (wie Speiseeisbereiter) in Kühlgeräten, wenn
solche Geräte nicht ausdrücklich vom Hersteller für diesen Zweck zugelassen sind.
• Achten Sie darauf, den Kältekreislauf nicht zu beschädigen.
• Das Kältemittel Isobutan (R600a) im Kältekreislauf des Gerätes ist ein natürliches und
sehr umweltfreundliches Gas, das jedoch leicht entflammbar ist.
Achten Sie beim Transport und bei der Aufstellung des Gerätes darauf, nicht die Kompo-
nenten des Kältekreislaufs zu beschädigen.
Bei einer eventuellen Beschädigung des Kältekreislaufs:
Page 44

44 Sicherheitshinweise
– Offene Flammen und Zündfunken vermeiden
– Den Raum, in dem das Gerät installiert ist, gut lüften
• Änderungen der technischen Eigenschaften oder am Gerät sind gefährlich. Ein defektes
Netzkabel kann Kurzschlüsse und einen Brand verursachen und/oder zu Stromschlägen
führen.
WARNUNG!
Elektrische Bauteile (Netzkabel, Stecker, Kompressor) dürfen zur Vermeidung von Unfällen
nur vom Kundendienst oder einer kompetenten Fachkraft ausgewechselt werden.
1. Das Netzkabel darf nicht verlängert werden.
2. Vergewissern Sie sich, dass der Netzstecker nicht von der Geräterückseite gequetscht
oder beschädigt wird. Ein gequetschter oder beschädigter Netzstecker überhitzt und
kann einen Brand verursachen.
3. Vergewissern Sie sich, dass der Netzstecker des Gerätes frei zugänglich ist.
4. Ziehen Sie nicht am Netzkabel.
5. Stecken Sie den Netzstecker nie in eine lockere Steckdose. Es besteht Brand- und
Stromschlaggefahr.
6.
Betreiben Sie das Gerät nicht ohne Lampenabdeckung
9)
, der Innenbeleuchtung.
• Dieses Gerät ist schwer. Vorsicht beim Transport.
• Entnehmen oder berühren Sie nie mit nassen/feuchten Händen Tiefkühlgut, da dies zu
Hautverletzungen oder Kälteverbrennungen führen kann.
• Das Gerät nicht direkter Sonneneinstrahlung aussetzen.
•
Die Leuchtmittel
10)
in diesem Gerät sind Speziallampen, die nur für Haushaltsgeräte ge-
eignet sind. Sie eignen sich nicht zur Raumbeleuchtung.
Täglicher Gebrauch
• Stellen Sie keine heißen Töpfe auf die Kunststoffteile des Gerätes.
• Lagern Sie keine feuergefährlichen Gase oder Flüssigkeiten in dem Gerät. Explosionsgefahr.
•
Legen Sie Lebensmittel nicht direkt vor den Luftauslass auf der Rückwand.
• Ein aufgetautes Produkt darf nicht wieder eingefroren werden.
• Abgepackte Tiefkühlkost immer entsprechend den Herstellerangaben aufbewahren.
• Die Lagerempfehlungen des Geräteherstellers sollten strikt eingehalten werden. Halten
Sie sich an die betreffenden Anweisungen.
• Keine kohlensäurehaltigen Getränke oder Sprudel in den Tiefkühlschrank stellen, da der
Druckanstieg in den Behältern zur Explosion führen und das Gerät beschädigen kann.
• Eis am Stiel kann Kälteverbrennungen verursachen, wenn es direkt nach der Entnahme
aus dem Gefrierschrank gegessen wird.
Reinigung und Pflege
• Schalten Sie vor Wartungsarbeiten immer das Gerät ab und ziehen Sie den Netzstecker
aus der Steckdose.
• Reinigen Sie das Gerät nicht mit Metallgegenständen.
• Keine scharfen Gegenstände zum Entfernen von Reif und Eis im Gerät verwenden. Verwenden Sie einen Kunststoffschaber.
9) Falls Lampenabdeckung vorhanden.
10) Falls Lampe vorhanden.
11) Wenn das Gerät mit dem Frost-Free-System ausgestattet ist.
11)
Page 45

Sicherheitshinweise 45
• Kontrollieren Sie den Tauwasserabfluss im Kühlraum in regelmäßigen Abständen. Reinigen Sie den Ablauf, falls nötig. Bei verstopftem Wasserabfluss sammelt sich das Wasser
auf dem Boden des Geräts an.
Montage
Halten Sie sich für den elektrischen Anschluss strikt an die Anweisungen der betreffenden
Abschnitte.
• Kontrollieren Sie nach dem Auspacken das Gerät auf eventuelle Beschädigungen. Nehmen Sie das Gerät nicht in Betrieb, wenn es beschädigt ist. Melden Sie die Schäden umgehend dem Händler, bei dem Sie es erworben haben. Bewahren Sie in diesem Fall die
Verpackung auf.
• Lassen Sie das Gerät mindestens vier Stunden stehen, bevor Sie es elektrisch anschließen,
damit das Öl in den Kompressor zurückfließen kann.
• Ausreichenden Freiraum zur Luftzirkulation um das Gerät lassen; anderenfalls besteht
Überhitzungsgefahr. Halten Sie sich für die Belüftung an die Installationsanweisungen.
• Das Gerät sollte zur Vermeidung von Verbrennungen durch Berührung von heißen Bauteilen (Kompressor, Kondensator) möglichst mit der Rückseite gegen eine Wand aufgestellt werden.
• Das Gerät darf nicht in der Nähe von Heizkörpern oder Kochern installiert werden.
• Vergewissern Sie sich, dass der Netzstecker des Gerätes nach der Installation frei zugänglich ist.
•
Verbinden Sie das Gerät ausschließlich mit einer Trinkwasserzuleitung.
12)
Kundendienst
• Sollte die Wartung des Gerätes elektrische Arbeiten verlangen, so dürfen diese nur von
einem qualifizierten Elektriker oder einem Elektro-Fachmann durchgeführt werden.
• Wenden Sie sich für Reparaturen und Wartung nur an Fachkräfte der autorisierten Kundendienststellen und verlangen Sie stets Original-Ersatzteile.
Umweltschutz
Das Gerät enthält im Kältekreis oder in dem Isoliermaterial keine ozonschädigenden Gase.
Das Gerät darf nicht wie normaler Hausmüll entsorgt werden. Die Isolierung enthält entzündliche Gase: das Gerät muss gemäß den geltenden Vorschriften entsorgt werden; sie erhalten diese bei Ihrer Gemeindeverwaltung. Nicht das Kälteaggregat beschädigen, insbesondere nicht in der Nähe des Wärmetauschers. Die Materialien, die bei der Herstellung dieses
Geräts verwendet wurden und mit dem Symbol
12) Falls ein Wasseranschluss erforderlich ist.
markiert sind, können recycelt werden.
Page 46

46 Bedienfeld
BEDIENFELD
1 ON/OFF-Taste
2 Temperaturregelung Kühlschrank, + Taste
3 Temperaturanzeige Kühlschrank
4 Temperaturregelung Kühlschrank, - Taste
5 COOLMATIC Taste
6 COOLMATIC Anzeige
7 Anzeige Kühlraum
8 Anzeige Gefrierraum
9 FROSTMATIC Anzeige
10 FROSTMATIC Taste
11 Temperaturregelung Gefriergerät, + Taste
12 Temperaturanzeige Gefriergerät
13 Temperaturregelung Gefriergerät, - Taste
14 Taste zum Rücksetzen des Alarms
15 Warnlicht
65 7 84321 15141312119 10
Einschalten des Gerätes
1. Stecken Sie den Stecker in die Netzsteckdose.
2. Stellen Sie den Schalter ON/OFF auf EIN.
3. Das Warnlicht blinkt, da die Temperatur erreicht ist.
Der Warnton schaltet sich ein.
4. Drücken Sie die Alarm-Löschtaste, um den Alarm rückzusetzen.
Falls die Tür längere Zeit offen steht, schaltet sich die Innenbeleuchtung elektronisch aus;
anschließend stellt sich die Beleuchtungs-Funktion durch das Schließen und Öffnen der Tür
selbst zurück.
Ausschalten des Geräts
So schalten Sie das Gerät aus:
1. Stellen Sie den Schalter ON/OFF auf AUS.
2. Trennen Sie den Netzstecker von der Netzversorgung.
Page 47

Bedienfeld
Temperaturregelung
Die Temperatur des Kühl- und Gefrierschranks lässt sich durch Drücken der jeweiligen Temperaturreglertaste einstellen. Die Temperaturanzeigen zeigen die eingestellten Temperaturen an.
Für eine ordnungsgemäße Lagerung von Lebensmitteln sollten Sie folgende Temperatur einstellen:
• +5 °C im Kühlschrank
• -18 °C im Gefriergerät.
Die eingestellte Temperatur wird innerhalb von 24 Stunden erreicht.
Schwankungen von einigen Graden um die eingestellte Temperatur sind normal und kein
Gerätefehler.
COOLMATIC Funktion
Die COOLMATIC Funktion dient zum schnellen Herunterkühlen großer Lebensmittelmengen
im Kühlschrank
So schalten Sie die Funktion ein:
1. Taste COOLMATIC drücken.
2. Die COOLMATIC Anzeige schaltet sich ein.
Die COOLMATIC Funktion sorgt jetzt für intensives Kühlen. Eine SOLL-Temperatur von +2°C
wird automatisch gewählt.
Die COOLMATIC-Funktion endet automatisch nach einer Dauer von 6 Stunden.
Sie können die Funktion jederzeit ausschalten:
1. Taste COOLMATIC drücken.
2. Die COOLMATIC Anzeige schaltet sich aus.
47
Urlaubsschaltung
Mit dieser Funktion können Sie den Kühlschrank über längere Zeit (z. B. den Sommerurlaub)
mit geschlossener Tür leer stehen lassen, ohne dass sich ein unangenehmer Geruch entwickelt.
Der Kühlschrank muss leer sein, wenn Sie die Urlaubsschaltung nutzen wollen.
So schalten Sie die Funktion ein:
1. Halten Sie die Taste zur Erhöhung der Temperatur gedrückt, bis der Buchstabe „H“ (für
„Holiday“ - Urlaub) in der Temperaturanzeige erscheint. Der Urlaubsmodus stellt die
Temperatur auf ca. +15 °C ein. Der Kühlschrank funktioniert im Energiesparmodus.
So schalten Sie die Funktion aus:
1. Stellen Sie die gewünschte Temperatur über die Tasten Temperatureinstellung ein.
FROSTMATIC Funktion
Die FROSTMATIC Funktion ist eine Schnellgefrierfunktion, die die Tiefkühlung neu hinzukommender Lebensmittel beschleunigt und gleichzeitig die bereits tiefgekühlten Lebensmittel vor unerwünschter Erwärmung schützt.
So schalten Sie die Funktion ein:
1. Taste FROSTMATIC drücken.
2. Die FROSTMATIC Anzeige schaltet sich ein.
Die FROSTMATIC Funktion endet automatisch nach einer Dauer von 52 Stunden.
Page 48

48 Erste Inbetriebnahme
Sie können die Funktion jederzeit ausschalten:
1. Taste FROSTMATIC drücken.
2. Die FROSTMATIC Anzeige schaltet sich aus.
Temperaturwarnung
Bei einem außergewöhnlichen Temperaturanstieg innerhalb des Gefriergeräts (z. B. bei
Stromausfall) beginnt die Warnleuchte zu blinken, und ein Warnton ertönt.
Um die Ausgabe des Warntons zu beenden, drücken Sie die Taste zum Rücksetzen des
Alarms; die Alarmanzeige blinkt weiterhin.
Der Warnton verstummt automatisch nach Erreichen der normalen Temperatur, während
die Warnleuchte weiterhin blinkt.
Drücken Sie die Alarm-Rückstelltaste. Die Alarmanzeige erlischt, und 5 Sekunden lang wird
die höchste im Gefrierraum erreichte Temperatur auf der Temperaturanzeige des Gefriergeräts angezeigt.
ERSTE INBETRIEBNAHME
Reinigung des Innenraums
Bevor Sie das Gerät in Betrieb nehmen, beseitigen Sie den typischen "Neugeruch" am besten
durch Auswaschen der Innenteile mit lauwarmem Wasser und einem neutralen Reinigungsmittel. Sorgfältig nachtrocknen.
Verwenden Sie keine Reinigungsmittel oder Scheuerpulver, da hierdurch die Oberfläche beschädigt wird.
TÄGLICHER GEBRAUCH
Lagerung gefrorener Produkte
Lassen Sie das Gerät vor der ersten Inbetriebnahme oder nach einer Zeit, in der das Gerät
nicht benutzt wurde, mindestens zwei Stunden lang auf den höheren Einstellungen laufen,
bevor Sie Lebensmittel in das Gefrierfach hinein legen.
Kam es zum Beispiel durch einen Stromausfall, der länger dauerte als der in der Tabelle mit
den technischen Daten angegebene Wert (siehe "Ausfalldauer") zu einem ungewollten Abtauen, dann müssen die aufgetauten Lebensmittel sehr rasch verbraucht oder sofort gekocht und (nach dem Abkühlen) erneut eingefroren werden.
Auftauen
Tiefgefrorene oder gefrorene Lebensmittel können vor der Verwendung je nach der zur Verfügung stehenden Zeit im Kühlschrank oder bei Raumtemperatur aufgetaut werden.
Kleinere Gefriergutteile können unter Umständen sogar direkt aus dem Gefrierschrank entnommen und anschließend sofort gekocht oder gegart werden: in diesem Fall dauert der
Garvorgang allerdings etwas länger.
Page 49

Kohlefilter
Das Gerät ist mit einem Kohlefilter hinter einer
Klappe in der Rückwand des Luftverteilungsfachs
ausgerüstet.
Der Filter reinigt die Luft von unerwünschten Gerüchen im Kühlfach und verbessert so die Aufbewahrungseigenschaften.
Die Lüftungsklappe muss während des Betriebs
stets geschlossen sein.
Verstellbare Ablagen/Einsätze
Die Wände des Kühlschranks sind mit einer Anzahl
von Führungsschienen ausgestattet, die verschiedene Möglichkeiten für das Einsetzen der Ablagen
bieten.
Täglicher Gebrauch 49
Flaschenhalter
Im voreingestellten Flaschenhalter können Flaschen (mit der Öffnung nach vorn) gelagert werden.
Legen Sie nur verschlossene Flaschen in den Flaschenhalter, wenn er sich in horizontaler Stellung
befindet.
Sie können die Neigung des Flaschenhalters nach
oben verstellen, damit dort auch bereits geöffnete
Flaschen gelagert werden können. Ziehen Sie dazu
den Flaschenhalter nach oben und lassen Sie ihn in die nächste Stellung einrasten.
Page 50

50 Täglicher Gebrauch
Obst-/Gemüseschublade
Die Schublade eignet sich zur Aufbewahrung von
Obst und Gemüse.
Die Schubladentrennwand lässt sich in verschiedenen Positionen verstellen, so dass die entstehenden Fächer den verschiedenen Bedürfnissen
angepasst werden können.
Am Schubladenboden befindet sich (je nach Ausstattung) ein Gitter, damit Obst und Gemüse nicht
direkt mit eventueller Feuchtigkeit auf dem Boden
in Berührung kommen.
Alle Teile in der Schublade können zur Reinigung
heraus genommen werden
Positionierung der Türeinsätze
Die Türeinsätze können in verschiedener Höhe positioniert werden; damit ermöglichen
Sie das Lagern verschieden großer Lebensmittelpackungen.
Bitte nehmen Sie die Einstellungen wie folgt
vor:
Ziehen Sie den Einsatz langsam in Richtung
der Pfeile soweit heraus, bis er ganz aus der
Führung ist, und setzen Sie ihn dann nach
Wunsch wieder ein.
1
2
Frischebox (Kühlzone)
Die Frischebox ist eine Kühlzone, die zur Aufbewahrung von frischen Lebensmitteln wie
Fisch, Fleisch und Meeresfrüchten geeignet ist, da die Temperatur hier niedriger ist als im
restlichen Kühlschrank. Sie befindet sich im unteren Teil des Kühlschranks, direkt über der
Gemüseschublade.
Page 51

Gehen Sie zum Herausnehmen der Frischebox wie
folgt vor:
1. Öffnen Sie die Tür des Kühlschranks so weit
wie möglich. Wenn Sie die Tür wegen eines
Anschlags oder aufgrund anderer Objekte
nicht in einem Winkel von 180° öffnen können, nehmen Sie bitte die Flaschenablage aus
der Tür heraus.
2. Ziehen Sie die Schublade bis zum Endpunkt
heraus.
3. Heben Sie den vorderen Teil der Schublade etwas an.
4. Nehmen Sie die Schublade aus der Halterung
heraus.
5. Heben Sie den hinteren Teil der Halterung aus
seiner Aufnahme.
6. Ziehen Sie den Rahmen zu sich her.
7. Nehmen Sie den Rahmen der Halterung heraus.
Wenn Sie die Frischebox wieder in die ursprüngliche Position bringen möchten, führen Sie bitte die
oben genannten Schritte in umgekehrter Reihenfolge durch.
Entnahme von Gefrierkörben aus dem Gefrierschrank
Täglicher Gebrauch 51
5
6
2
3
2
1
2
1
Die Gefrierkörbe sind mit einem Anschlag ausgestattet, der die versehentliche Entnahme
oder ein Herausfallen verhindert. Um einen Gefrierkorb aus dem Gefrierschrank zu nehmen, ziehen Sie den Korb zu sich her, bis er den Anschlag erreicht, und kippen den Korb
mit der Vorderseite nach oben, bis er sich herausnehmen lässt.
Wenn Sie den Gefrierkorb wieder zurück in das Gerät legen möchten, heben Sie die Vorderseite des Korbs leicht an und setzen ihn in das Gefriergerät ein. Sobald Sie über den
Anschlag hinweg sind, drücken Sie den Gefrierkorb wieder in seine ursprüngliche Position.
Page 52

52 Praktische Tipps und Hinweise
PRAKTISCHE TIPPS UND HINWEISE
Normale Betriebsgeräusche
• Unter Umständen ist ein leichtes Gurgeln und Blubbern zu hören, wenn das Kältemittel
durch die Leitungen gepumpt wird. Das ist normal.
• Bei eingeschaltetem Kompressor wird das Kältemittel umgewälzt und Sie hören ein Sur-
ren und ein pulsierendes Geräusch vom Kompressor. Das ist normal.
• Die thermische Ausdehnung kann ein plötzliches Krachen verursachen. Das ist eine na-
türliche und nicht gefährliche physikalische Erscheinung. Das ist normal.
Energiespartipps
• Öffnen Sie die Tür nicht zu häufig, und lassen Sie diese nicht länger offen als unbedingt
notwendig.
• Wenn die Umgebungstemperatur hoch ist und der Temperaturregler auf eine niedrige
Temperatur eingestellt und das Gerät voll beladen ist, kann es zu andauerndem Betrieb
des Kompressors und damit zu Reif- oder Eisbildung am Verdampfer kommen. Stellen Sie
in diesem Fall den Temperaturregler auf eine höhere Einstellung ein, die ein automatisches Abtauen und damit auch einen niedrigeren Energieverbrauch ermöglicht.
Hinweise für die Kühlung frischer Lebensmittel
So erzielen Sie beste Ergebnisse:
• Legen Sie bitte keine warmen Lebensmittel oder dampfende Flüssigkeiten in den Kühl-
schrank.
• Decken Sie die Lebensmittel ab oder verpacken Sie diese entsprechend, besonders wenn
diese stark riechen.
• Legen Sie die Lebensmittel so hinein, dass um sie Luft frei zirkulieren kann.
Hinweise für die Kühlung
Tipps:
Fleisch (alle Sorten): wickeln Sie Fleisch in lebensmittelechte Tüten und legen Sie diese auf
die Glasablage über der Gemüseschublade.
Bitte lagern Sie Fleisch aus Sicherheitsgründen nur einen oder maximal zwei Tage auf diese
Weise.
Gekochte Lebensmittel, kalte Gerichte usw.: diese können abgedeckt auf eine Ablage gelegt
werden.
Obst und Gemüse: bitte waschen Sie Obst und Gemüse gründlich und legen Sie es in die
speziell dafür vorgesehene(n) Schublade(n).
Butter und Käse: diese sollten stets in speziellen luftdichten Behältern verpackt sein oder in
Aluminiumfolie bzw. in lebensmittelechte Tüten eingepackt werden, um so wenig Luft wie
möglich in der Verpackung zu haben.
Milchflaschen: bitte bewahren Sie Milchflaschen stets mit Deckel im Flaschenregal in der
Tür auf.
Bananen, Kartoffeln, Zwiebeln und Knoblauch sollten nicht im Kühlschrank aufbewahrt
werden, außer diese sind dafür speziell verpackt.
Hinweise zum Einfrieren
Im Folgenden finden Sie einige wertvolle Tipps für einen optimalen Gefriervorgang:
Page 53

Reinigung und Pflege
• die maximale Menge an Lebensmitteln, die innerhalb von 24 Stunden eingefroren wer-
den kann. ist auf dem Typschild angegeben;
• der Gefriervorgang dauert 24 Stunden. Legen Sie während dieses Zeitraums keine weite-
ren einzufrierenden Lebensmittel in das Gefrierfach;
• frieren Sie ausschließlich frische und gründlich gewaschene Lebensmittel von sehr guter
Qualität ein;
• teilen Sie die Lebensmittel in kleinere Portionen ein, damit diese schnell und vollständig
gefrieren und Sie später nur die Menge auftauen müssen, die Sie gerade benötigen;
• die einzufrierenden Lebensmittelportionen sollten stets luftdicht in Aluminiumfolie oder
in lebensmittelechte Gefrierbeutel verpackt werden, um so wenig Luft wie möglich in der
Verpackung zu haben;
• achten Sie beim Hineinlegen von frischen, noch ungefrorenen Lebensmitteln darauf, dass
diese keinen Kontakt mit Gefriergut bekommen, da dieses sonst antauen kann;
• weniger fetthaltige Lebensmittel lassen sich besser lagern als fetthaltigere; Salz verkürzt
die Lagerzeit von Lebensmitteln im Gefrierfach;
• werden Gefrierwürfel direkt nach der Entnahme aus dem Gefrierfach verwendet, können
Sie zu Frostbrand auf der Haut führen;
• es empfiehlt sich, das Einfrierdatum auf jeder einzelnen Packung zu notieren, um einen
genauen Überblick über die Lagerzeit zu haben.
Hinweise zur Lagerung gefrorener Produkte
So erzielen Sie die besten Ergebnisse mit Ihrem Gerät:
• Prüfen Sie sorgfältig, dass die im Handel erworbenen gefrorenen Lebensmittel sachge-
recht gelagert wurden.
• Achten Sie unbedingt darauf, die eingekauften gefrorenen Lebensmittel in der kürzest
möglichen Zeit in Ihren Gefrierschrank zu bringen.
• Öffnen Sie die Tür nicht zu häufig, und lassen Sie diese nicht länger offen als unbedingt
notwendig.
• Abgetaute Lebensmittel verderben sehr schnell und eignen sich nicht für ein erneutes
Einfrieren.
• Das Haltbarkeitsdatum auf der Tiefkühlkostverpackung sollte nicht überschritten werden.
53
REINIGUNG UND PFLEGE
VORSICHT!
Ziehen Sie bitte vor jeder Reinigungsarbeit immer den Netzstecker aus der Steckdose.
Der Kältekreis des Gerätes enthält Kohlenwasserstoffe; Wartungsarbeiten und Nachfüllen
von Kältemittel dürfen daher nur durch vom Hersteller autorisiertes Fachpersonal ausgeführt werden.
Regelmäßige Reinigung
Der gesamte Kühlschrank muss regelmäßig gereinigt werden:
• Reinigen Sie die Innenseiten und die Zubehörteile mit lauwarmem Wasser und etwas
Neutralseife.
• Prüfen und säubern Sie die Türdichtungen in regelmäßigen Abständen und kontrollieren
Sie, dass diese sauber und frei von Verunreinigungen sind.
Page 54

54 Was tun, wenn …
• Spülen und trocknen Sie diese sorgfältig ab.
Ziehen Sie nicht an Leitungen und/oder Kabeln im Innern des Kühlschranks und achten Sie
darauf, diese nicht zu verschieben oder zu beschädigen.
Benutzen Sie zur Reinigung des Innenraums keinesfalls Putzmittel, Scheuerpulver, stark
parfümierte Reinigungsmittel oder Wachspolituren, da diese die Oberfläche des Innenraums
beschädigen und einen starken Eigengeruch hinterlassen können.
Reinigen Sie den Kondensator (schwarzes Gitter) und den Motorkompressor auf der Geräterückseite mit einer Bürste oder einem Staubsauger. Dadurch verbessert sich die Leistung des
Geräts und es verbraucht weniger Strom.
Bitte achten Sie darauf, das Kühlsystem nicht zu beschädigen.
Viele Haushaltsreiniger für Küchen enthalten Chemikalien, die den im Gerät verwendeten
Kunststoff angreifen können. Aus diesem Grund ist es empfehlenswert, das Gerät außen nur
mit warmem Wasser und etwas flüssigem Tellerspülmittel zu reinigen.
Schließen Sie das Gerät nach der Reinigung wieder an die Netzversorgung an.
Wechseln des Kohlefilters
Um die optimale Leistung zu erzielen, sollte der Kohlefilter nach jeweils sechs Monaten gewechselt werden.
Neue Aktivluftfilter erhalten Sie bei Ihrem Händler vor Ort.
Die Gebrauchsanweisung für das "Einsetzen des Kohlefilters" beachten.
Abtauen
Ihr Gerät ist ein No-Frost-Gerät. Dies bedeutet, dass sich während des Gerätebetriebs kein
Eis oder Reif bildet, und zwar weder an den Innenwänden noch auf dem Lebensmitteln.
Es bildet sich weder Eis noch Reif, da kontinuierlich kalte Luft innerhalb des Kühlschrankfachs zirkuliert, die von einem automatisch gesteuerten Lüfter erzeugt wird.
WAS TUN, WENN …
VORSICHT!
Ziehen Sie vor der Fehlersuche immer den Netzstecker aus der Steckdose.
Die Fehlersuche, die in der vorliegenden Gebrauchsanweisung nicht beschrieben ist, darf
nur von einem qualifizierten Elektriker oder einer kompetenten Person durchgeführt werden.
Während das Gerät in Betrieb ist, entstehen bestimmte Geräusche (Kompressor und Kühlkreislauf).
Problem Mögliche Ursache Abhilfe
Das Gerät ist zu laut.
Unebenheiten im Boden wurden
nicht ausgeglichen.
Kontrollieren Sie, ob eventuelle
Unebenheiten der Standfläche
korrekt ausgeglichen wurden, so
dass alle vier Füße fest auf dem
Boden stehen.
Page 55

Problem Mögliche Ursache Abhilfe
Der Kompressor arbeitet
ständig.
Die Tür ist nicht richtig ge-
Die Tür wurde zu häufig geöff-
Die Temperatur der zu kühlen-
Die Raumtemperatur ist zu
Die FROSTMATIC-Funktion ist
Die COOLMATIC-Funktion ist
Wasser fließt an der
Rückwand des Kühlschranks hinunter.
Wasser fließt in den
Kühlschrank.
Die eingelagerten Lebensmittel
Wasser fließt auf den Boden.
Zu starke Reif- und Eisbildung.
Die Tür ist nicht richtig ge-
Der Temperaturregler kann
Die Temperatur im Gerät
ist zu hoch.
Die Temperatur der zu kühlen-
Es wurden zu viele Lebensmittel
Die Temperatur im Kühlschrank ist zu hoch.
Der Temperaturregler kann
falsch eingestellt sein.
schlossen.
net.
den Lebensmittel ist zu hoch.
hoch.
eingeschaltet.
eingeschaltet.
Beim automatischen Abtauen
fließt das abgetaute Wasser an
der Rückwand des Kühlschranks
hinunter.
Der Wasserablauf ist verstopft. Reinigen Sie den Ablauf.
verhindern, dass das Wasser
zum Wassersammler fließt.
Der Tauwasserablauf läuft nicht
in die Verdampferschale über
dem Kompressor.
Das Gefriergut ist nicht korrekt
verpackt.
schlossen.
falsch eingestellt sein.
Die Tür ist nicht richtig ge-
schlossen.
den Lebensmittel ist zu hoch.
auf einmal eingelegt.
Die Kaltluft kann nicht im Gerät
zirkulieren.
Was tun, wenn … 55
Stellen Sie eine höhere Temperatur ein.
Siehe hierzu „Schließen der Tür“.
Lassen Sie die Tür nicht länger als
erforderlich offen.
Lassen Sie Lebensmittel auf
Raumtemperatur abkühlen, bevor
Sie sie in das Gerät legen.
Senken Sie die Raumtemperatur.
Siehe die Funktion „ FROSTMATIC“.
Siehe die Funktion „ COOLMATIC“.
Das ist normal.
Stellen Sie sicher, dass die Lebensmittel nicht die Rückwand
berühren.
Befestigen Sie den Tauwasserablauf an der Verdampferschale.
Verpacken Sie die Lebensmittel
besser.
Siehe hierzu „Schließen der Tür“.
Stellen Sie eine höhere Temperatur ein.
Siehe hierzu „Schließen der Tür“.
Lassen Sie Lebensmittel auf
Raumtemperatur abkühlen, bevor
Sie sie in das Gerät legen.
Legen Sie weniger Lebensmittel
auf einmal ein.
Stellen Sie sicher, dass die Kaltluft
im Gerät zirkulieren kann.
Page 56

56 Was tun, wenn …
Problem Mögliche Ursache Abhilfe
Die Temperatur im Gefrierraum ist zu hoch.
Das Gerät funktioniert
nicht.
Der Netzstecker steckt nicht
Das Gerät bekommt keinen
Die Lampe funktioniert
nicht.
Die einzufrierenden Lebensmittel liegen zu dicht aneinander.
Das Gerät ist abgeschaltet. Gerät einschalten.
richtig in der Steckdose.
Strom. Es liegt keine Spannung
an der Netzsteckdose an.
Die Lampe befindet sich im
Standby-Modus.
Bitte rufen Sie den nächsten Marken-Kundendienst in Ihrer Nähe an, wenn alle genannten Abhilfemaßnahmen nicht zum gewünschten Erfolg führen.
Austauschen der Lampe für die Innenbeleuchtung
VORSICHT!
Trennen Sie den Netzstecker von der Netzversorgung.
Stellen Sie sicher, dass die Kaltluft
im Gerät zirkuliert und die eingelagerten Lebensmittel dies nicht
verhindern.
Stecken Sie den Netzstecker richtig in die Steckdose.
Testen Sie bitte, ob ein anderes
Gerät an dieser Steckdose funktioniert. Kontaktieren Sie einen
qualifizierten Elektriker.
Schließen und öffnen Sie die Tür.
1. Ziehen Sie den Haken an der Lampenabdeckung nach außen.
1
2. Nehmen Sie die Lampenabdeckung ab.
3. Ersetzen Sie die Lampe durch eine Lampe der
2
gleichen Leistung (die maximal erlaubte Leistung steht auf der Lampenabdeckung).
4. Bringen Sie die Lampenabdeckung an.
5. Stecken Sie den Netzstecker in die Steckdose.
6. Öffnen Sie die Tür. Prüfen Sie, ob die Lampe brennt.
Schließen der Tür
1. Reinigen Sie die Türdichtungen.
2. Stellen Sie die Tür nach Bedarf ein. Siehe hierzu "Montage".
3. Ersetzen Sie die defekten Türdichtungen, falls erforderlich. Kontaktieren Sie den Kundendienst.
Page 57

Technische Daten 57
TECHNISCHE DATEN
Abmessungen
Höhe 1850 mm
Breite 595 mm
Tiefe 658 mm
Ausfalldauer 16 h
Spannung 230 V
Frequenz 50 Hz
Die technischen Informationen befinden sich auf dem Typschild innen links im Gerät sowie
auf der Energieplakette.
INBETRIEBNAHME
WARNUNG!
Lesen Sie bitte die "Sicherheitshinweise" sorgfältig vor der Aufstellung des Geräts durch, um
Gefahren für Sie selbst zu vermeiden und einen korrekten Betrieb des Geräts zu gewährleisten.
Aufstellung
Installieren Sie dieses Gerät an einem Ort, an dem die Umgebungstemperatur mit der Klimaklasse übereinstimmt, die auf dem Typschild des Geräts angegeben ist:
Klimaklasse Umgebungstemperatur
SN +10°C bis + 32°C
N +16°C bis + 32°C
ST +16°C bis + 38°C
T +16°C bis + 43°C
Page 58

58 Inbetriebnahme
Standort
Das Gerät sollte möglichst weit entfernt von Wärmequellen wie Heizungen, Boilern oder direktem
Sonnenlicht usw. aufgestellt werden. Die Luft
muss frei auf der Geräterückseite zirkulieren können. Damit das Gerät die optimale Leistung bringen kann, wenn es unter einer überhängenden
Wand installliert wird, muss der Mindestabstand
zwischen der Geräteoberseite und der Wand mindestens 100 mm betragen. Allerdings sollte die
Aufstellung des Gerätes unter einer überhängenden Wand nach Möglichkeit vermieden werden.
Die korrekte waagerechte Ausrichtung des Gerätes
kann mit Hilfe eines oder mehrerer Schraubfüße
am Sockel des Gerätes erfolgen.
WARNUNG!
Es muss möglich sein, das Gerät vom Netz zu trennen; nach der Installation muss die Steckdose daher zugänglich bleiben.
mm
min
100
A
mm
20
B
Elektrischer Anschluss
Kontrollieren Sie vor der ersten Benutzung des Gerätes, ob die Netzspannung und -frequenz Ihres Hausanschlusses mit den auf dem Typenschild angegebenen Anschlusswerten
übereinstimmen.
Das Gerät muss geerdet sein. Zu diesem Zweck ist die Netzkabelsteckdose mit einem
Schutzkontakt ausgestattet. Falls die Steckdose Ihres Hausanschlusses nicht geerdet sein
sollte, lassen Sie das Gerät bitte gemäß den geltenden Vorschriften erden und fragen Sie
dafür einen qualifizierten Elektriker.
Der Hersteller übernimmt keinerlei Haftung für Schäden oder Verletzungen, die durch Missachtung der oben genannten Sicherheitshinweise entstehen.
Das Gerät entspricht den EU- Richtlinien.
Distanzstücke hinten
Die beiden Distanzstücke befinden sich im Beutel
mit den Unterlagen.
Gehen Sie wie folgt vor, um die Distanzstücke anzubringen:
1. Lösen Sie die Schraube.
2. Setzen Sie das Distanzstück unter der Schraube ein.
3. Drehen Sie das Distanzstück in die richtige
Position.
4. Ziehen Sie die Schrauben wieder an.
2
1
4
3
Page 59

Ausrichten
Bei der Aufstellung des Gerätes ist dieses waagerecht auszurichten. Dies lässt sich mit zwei
Schraubfüßen am vorderen Sockel des Gerätes erreichen.
Entfernen der Ablagenhalter
Das Gerät ist mit Ablagenhaltern ausgestattet, die
zum Sichern der Ablagen während des Transports
dienen.
Entfernen Sie diese Halter wie folgt:
1. Schieben Sie die Ablagenhalter in Pfeilrichtung (A).
2. Heben Sie die Ablage hinten an und drücken
Sie sie nach vorn, bis sie sich herausnehmen
lässt (B).
3. Entfernen Sie die Halter (C).
Inbetriebnahme 59
A
B
Einsetzen des Kohlefilters
Der Kohlefilter ist ein Aktivkohlefilter, der schlechte Gerüche aufsaugt und so den Geschmack und das Aroma der Lebensmittel ohne Risiko von Geruchsübertragung optimal
aufrecht erhält.
C
Page 60

60 Inbetriebnahme
Der Filter wird mit einer Plastikumhüllung geliefert, die seine Haltbarkeit und die Bewahrung seiner Eigenschaften gewährleistet. Der Filter muss
hinter der Klappe eingesetzt werden, bevor das
Gerät eingeschaltet wird.
1. Öffnen Sie die Klappenabdeckung (1)
2. Entnehmen Sie den Filter aus der Plastikumhüllung
3. Setzen Sie den Filter in den Schlitz an der
Rückseite der Klappenabdeckung (2) ein
4. Schließen Sie die Klappenabdeckung
Die Lüftungsklappe muss während des Betriebs
stets geschlossen sein.
Behandeln Sie den Filter sorgfältig, damit sich keine Partikel von der Oberfläche ablösen.
Wechsel des Türanschlags
WARNUNG!
Vor dem Durchführen von Arbeiten am Gerät ist stets der Stecker aus der Steckdose zu ziehen.
Die nachfolgend beschriebenen Tätigkeiten müssen mit Hilfe einer zweiten Person durchgeführt werden, um ein Herunterfallen der Türen zu vermeiden.
1. Öffnen Sie die Türen. Das mittlere
Scharnier (m2) lösen. Das KunststoffDistanzstück (m1) entfernen.
2. Das Distanzstück (m6) entfernen und an
der anderen Seite des Scharnierhaltestifts (m5) befestigen.
3. Die Türen entfernen.
4. Den linken Stift der mittleren Abde-
ckung (m3, m4) entfernen und an der
anderen Seite befestigen.
5. Den Stift der mittleren Abdeckung (m5)
in der linken Bohrung der unteren Tür
befestigen.
m3
m1
m5
m6
2
1
m2
m4
Page 61

6. Die Abdeckung (b1) mit einem geeigne-
ten Werkzeug entfernen. Den Haltestift
(b2) des unteren Scharniers lösen, das
Distanzstück (b3) entfernen und an der
gegenüberliegenden Seite montieren.
7. Die Abdeckung (b1) auf der anderen Sei-
te wieder anbringen.
8. Die Türverriegelungselemente (d2, d3)
umkehren, auf die andere Seite der anderen Tür versetzen und durch Hereinschrauben der Schraube (d4) befestigen.
9. Die Anschläge (d5, d6) auf der anderen
Seite der Türen wieder einsetzen.
Inbetriebnahme 61
b1
b2
b3
d2
d6
d5
10. Den Griff abziehen. Schrauben Sie die
obere Griffhalterung von der Griffstange
h1 h2 h3
(h1) ab. Schrauben Sie die untere Griffhalterung von der Tür (h2) ab.
Schrauben Sie die obere Griffhalterung
von der Tür (h3) ab.
11. Bauen Sie den Griff auf der anderen Sei-
te an.
h4 h5 h6
Schrauben Sie die Griffhalterung wieder
an der Tür (h4) an. Drehen Sie die Griffhalterung mit dem Griff und schrauben
Sie sie an die Tür (h5) und an die angebrachte Griffhalterung (h6).
12. Die untere Tür wieder in den Haltestift
des unteren Scharniers (b2) einhängen.
13. Das mittlere Scharnier (m2) in die linke Bohrung der unteren Tür einsetzen.
d3
d4
Page 62

62 Hinweise zum Umweltschutz
14. Den Haltestift des oberen Scharniers (t1)
lösen und an der gegenüberliegenden
Seite montieren.
15. Die obere Tür in den Haltestift des obe-
ren Scharniers einhängen.
16. Die obere Tür wieder in den Haltestift
des mittleren Scharniers (m5) einhängen; dabei beide Türen leicht neigen.
17. Das mittlere Scharnier (m2) festschrau-
ben. Das Kunststoff-Distanzstück (m1)
nicht vergessen.
Prüfen Sie alles erneut, um sicherzustellen,
dass:
• Alle Schrauben fest angezogen sind.
• Der Magnet am Gerät haftet.
• Die Tür korrekt öffnet und schließt.
Bei niedrigen Umgebungstemperaturen (z.B. im Winter) kann es sein, dass die Türdichtung
nicht richtig am Gerät anliegt. Warten Sie in diesem Fall auf die natürliche Anpassung der
Dichtung.
Wenden Sie sich bitte an den Kundendienst, falls Sie die oben beschriebenen Tätigkeiten
nicht selber durchführen möchten. Ein Kundendiensttechniker wird die Türen dann auf Ihre
Kosten umbauen.
HINWEISE ZUM UMWELTSCHUTZ
t1
Das Symbol auf dem Produkt oder seiner Verpackung weist darauf hin, dass dieses
Produkt nicht als normaler Haushaltsabfall zu behandeln ist, sondern an einem
Sammelpunkt für das Recycling von elektrischen und elektronischen Geräten abgegeben
werden muss. Durch Ihren Beitrag zum korrekten Entsorgen dieses Produkts schützen Sie
die Umwelt und die Gesundheit Ihrer Mitmenschen. Umwelt und Gesundheit werden durch
falsches Entsorgen gefährdet. Weitere Informationen über das Recycling dieses Produkts
erhalten Sie von Ihrem Rathaus, Ihrer Müllabfuhr oder dem Geschäft, in dem Sie das
Produkt gekauft haben.
Page 63

63
Page 64

www.aeg.com/shop
210621750-A-512010
 Loading...