

Electrolux 67160KFN User Manual

67160 KF-N
User manual Ceramic glass
induction hob

2
The followi
1
Dear Customer
Thank you for choosing one of our high-quality products.
With this appliance you will experience the perfect combination of functional
design and cutting edge technology.
Convince yourself that our appliances are engineered to deliver the best performance and control - indeed we are setting the highest standards of excellence.
In addition to this you find environmental and energy saving aspects as an integral part of our products.
To ensure optimal and regular performance of your appliance please read this
instruction manual carefully. It will enable you to navigate all processes perfectly and most efficiently.
To refer to this manual any time you need to, we recommend you to keep it in a
safe place. And please pass it to any future owner of the appliance.
We wish you much joy with your new appliance.
ng symbols are used in this user information:
Warning! This must be read! Important advice for the safety of persons and
information on avoiding damage to the appliance
3 General information and advice
2 Information on environmental protection
z Dangerous voltage

Contents
Operating Instructions 4
Safety instructions 4
Description of the Appliance 6
Cooking surface layout 6
Control panel layout 6
Touch Control sensor fields 7
Displays 8
Residual heat indicator 8
Operating the appliance 9
Switching the appliance on and off 9
Setting the heat setting 9
Switching the double ring cooking zone on and off 10
Switching the STOP+GO function on and off 10
Using the automatic warm-up function 11
Locking/unlocking the control panel 12
Using the child safety device 13
Switching the power function on and off 14
Using the timer 15
Automatic switch off 18
Tips on Cooking and Frying 19
Cookware 20
Cookware for induction cooking zones 21
Tips on energy saving 22
Examples of cooking applications 23
Cleaning and Care 24
3Contents
What to do if … 25
Disposal 27
Installation Instructions 28
Safety instructions 28
Assembly 30
Rating Plate 35
Guarantee/Customer Service 36
Service 39

Operating Instructions4
Operating Instructions
1 Safety instructions
Please comply with these instructions. If you do not, any damage resulting is not
covered by the warranty.
Correct use
• This appliance is not intended for use by children or other persons whose
physical, sensory or mental capabilities or lack of experience and knowledge
prevents them from using the appliance safely without supervision or instruction by a responsible person to ensure that they can use the appliance safely.
• Do not leave the appliance unattended during operation.
• This appliance should be used only for normal domestic cooking and frying of
food.
• The appliance must not be used as a work surface or as a storage surface.
• Additions or modifications to the appliance are not permitted.
• Do not place or store flammable liquids, highly inflammable materials or fusi-
ble objects (e.g. plastic film, plastic, aluminium) on or near the appliance.
Children’s safety
• Small children must be kept away from the appliance.
• Only let bigger children work on the appliance under supervision.
• To avoid small children and pets unintentionally switching the appliance on,
we recommend activation of the child safety device.
General safety
• The appliance may only be installed and connected by trained, registered
service engineers.
• Built-in appliances may only be used after they have built in to suitable builtin units and work surfaces that meet standards.
• In the event of faults with the appliance or damage to the glass ceramic
(cracks, scratches or splits), the appliance must be switched off and disconnected from the electrical supply, to prevent the possibility of an electric
shock.
• Repairs to the appliance must only be carried out by trained registered service
engineers.

5Safety instructions
Safety during use
• Remove stickers and film from the glass ceramic.
• There is the risk of burns from the appliance if used carelessly.
• Cables from electrical appliances must not touch the hot surface of the appli-
ance or hot cookware.
• Overheated fats and oils can ignite very quickly. Warning! Fire hazard!
• Switch the cooking zones off after each use.
• Users with implanted pacemakers should keep their upper body at least 30 cm
from induction cooking zones that are switched on.
• Risk of burns! Do not place objects made of metal, such as knives, forks,
spoons and saucepan lids on the cooking surface, as they can get hot.
Safety when cleaning
• For cleaning, the appliance must be switched off and cooled down.
• For safety reasons, the cleaning of the appliance with steam jet or high-pres-
sure cleaning equipment is not permitted.
How to avoid damage to the appliance
• The glass ceramic can be damaged by objects falling onto it.
• The edge of the glass ceramic can be damaged by being knocked by the cook-
ware.
• Cookware made of cast iron, cast aluminium or with damaged bottoms can
scratch the glass ceramic if pushed across the surface.
• Objects that melt and things that boil over can burn onto the glass ceramic
and should be removed straightaway.
• Do not use the cooking zones with empty cookware or without cookware.
• To avoid damaging cookware and glass ceramics, do not allow saucepans or
frying pans to boil dry.
• The ventilation gap of 5mm between the worktop and front of the unit underneath it must not be covered.
Description of the Appliance6
Description of the Appliance
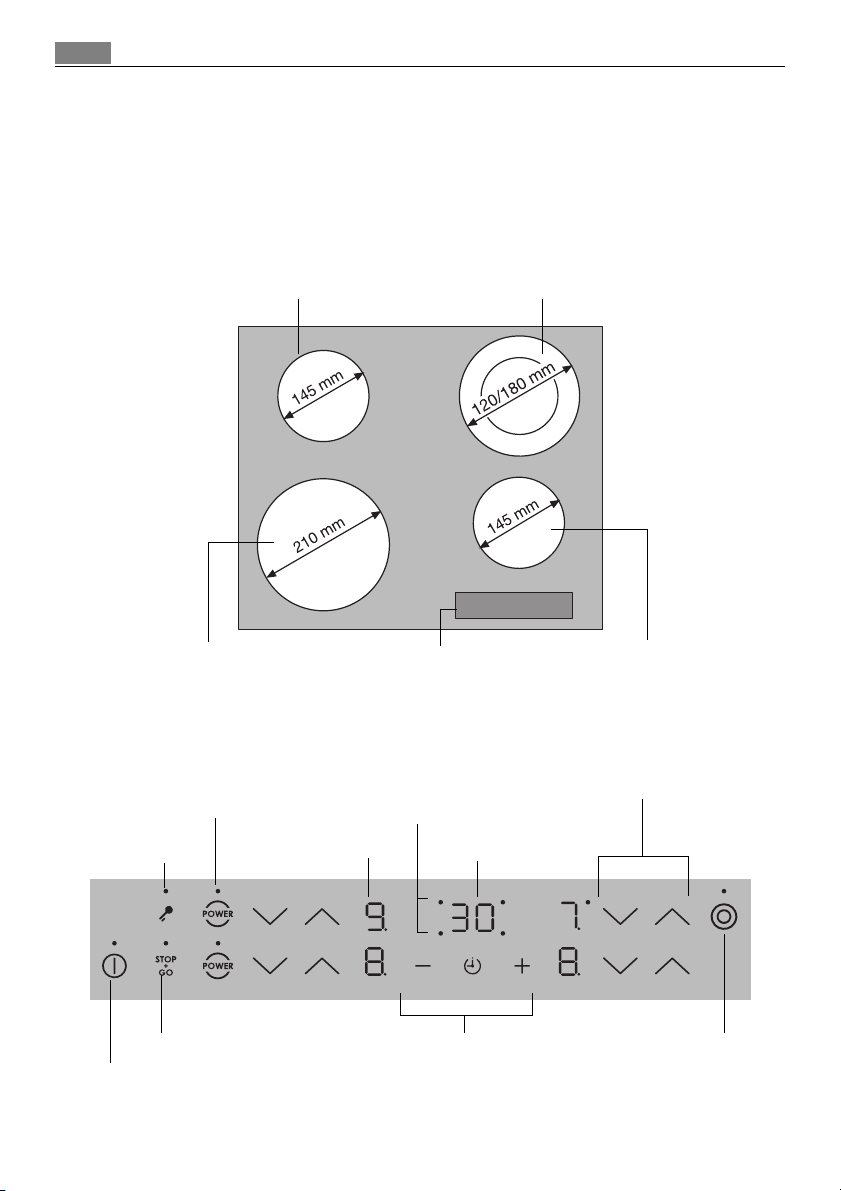
Cooking surface layout
Induction cooking zone 1400 W
with power function 2500 W
Double ring cooking zone 700/1700 W
Induction cooking zone 2200 W
with power function 3100 W
Control panel layout
Power function with
pilot light
Lock
with pilot light
STOP+GO
with pilot light
On/Off
with power indicator
Control panel Single cooking zone 1200 W
Cooking zone indicators
Timer function
Display
Timer display
Timer
Heat setting selection
double ring cooking zone
with power indicator
Connection
7Description of the Appliance
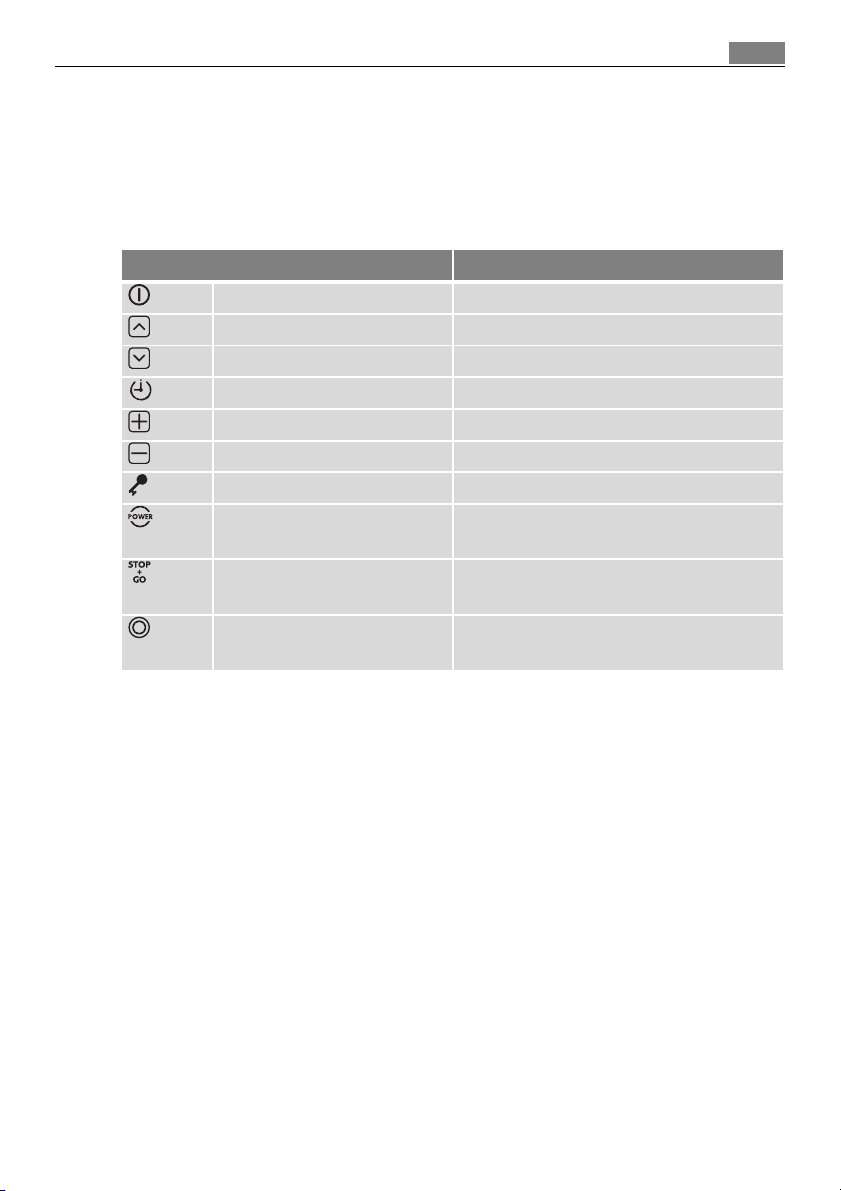
Touch Control sensor fields
The appliance is operated using Touch Control sensor fields. Functions are controlled by touching sensor fields and confirmed by displays and acoustic signals.
Touch the sensor fields from above, without covering other sensor fields.
Sensor field Function
On / Off To switch the appliance on and off
Increase settings Increasing heat setting
Decrease settings Decreasing heat setting
Timer Timer selection
Increase settings To increase Timer time
Reduce settings To reduce Timer time
Lock Locking/unlocking the control panel
Power Switching the power function on and
off
Stop+Go To switch the Keep Warm setting on/
off
Double ring switch Switches outside ring
on and off
Description of the Appliance8
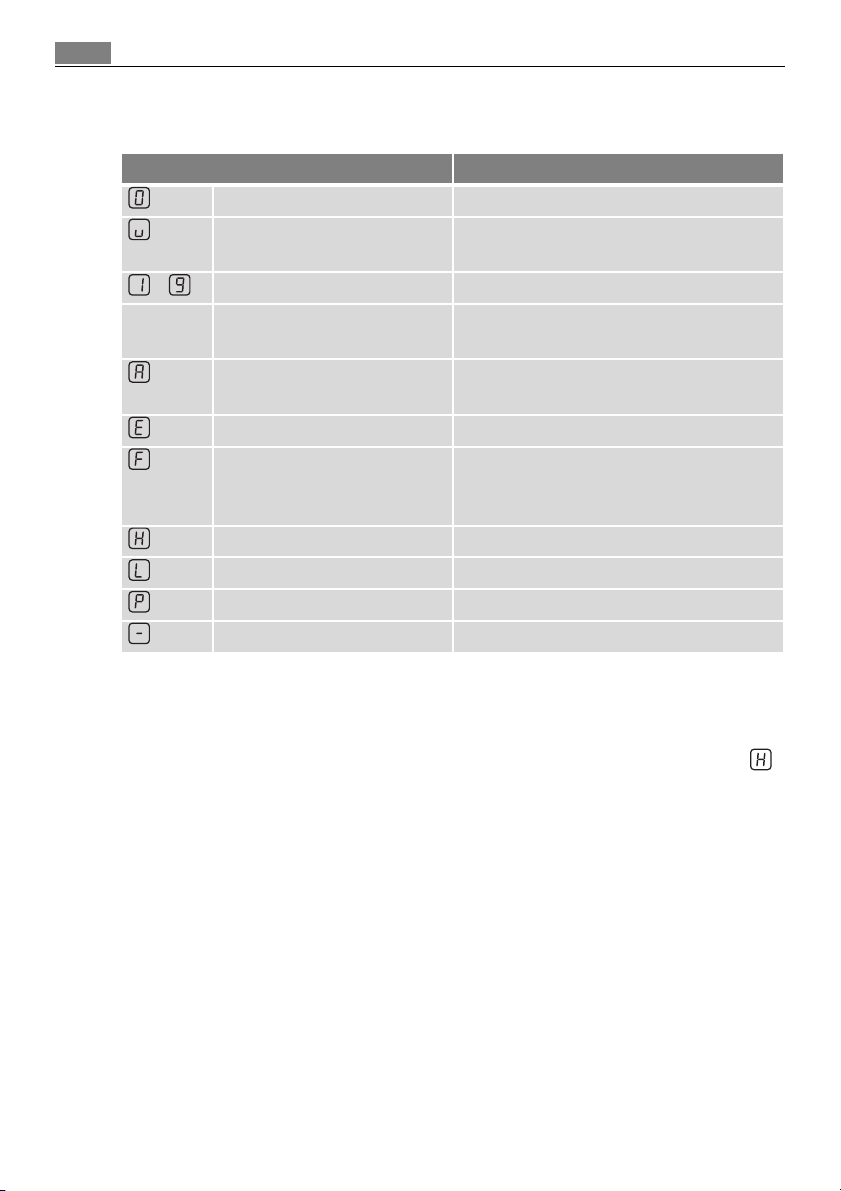
Displays
Display Description
Cooking zone is switched off
Keep warm setting Keep warm setting/ STOP+GO function
is set
- Heat settings Heat setting is set
2 - 6 Heating setting plus
decimal point
Automatic warm up
function
Fault Malfunction has occurred
Pan detection Cookware is unsuitable or too small or
Residual heat Cooking zone is still hot
Child safety device Lock/child safety device is engaged
Power Power function is switched on
Automatic switch off Switch off is active.
Intermediate heat setting is set
Automatic warm-up function is
activated
no cookware has been placed on the
cooking zone
Residual heat indicator
1 Warning! Risk of burns from residual heat. After being switched off, the cook-
ing zones need some time to cool down. Look at the residual heat indicator .
3 Residual heat can be used for melting and keeping food warm.
The induction cooking zones create the heat required for cooking directly in
the base of the cookware. The glass ceramic is merely heated by the residual
heat of the cookware.
The cooling fan switches itself on and off depending upon the temperature of
the electronics.

Operating the appliance
9Operating the appliance
3
Use the induction cooking zones with suitable cookware.
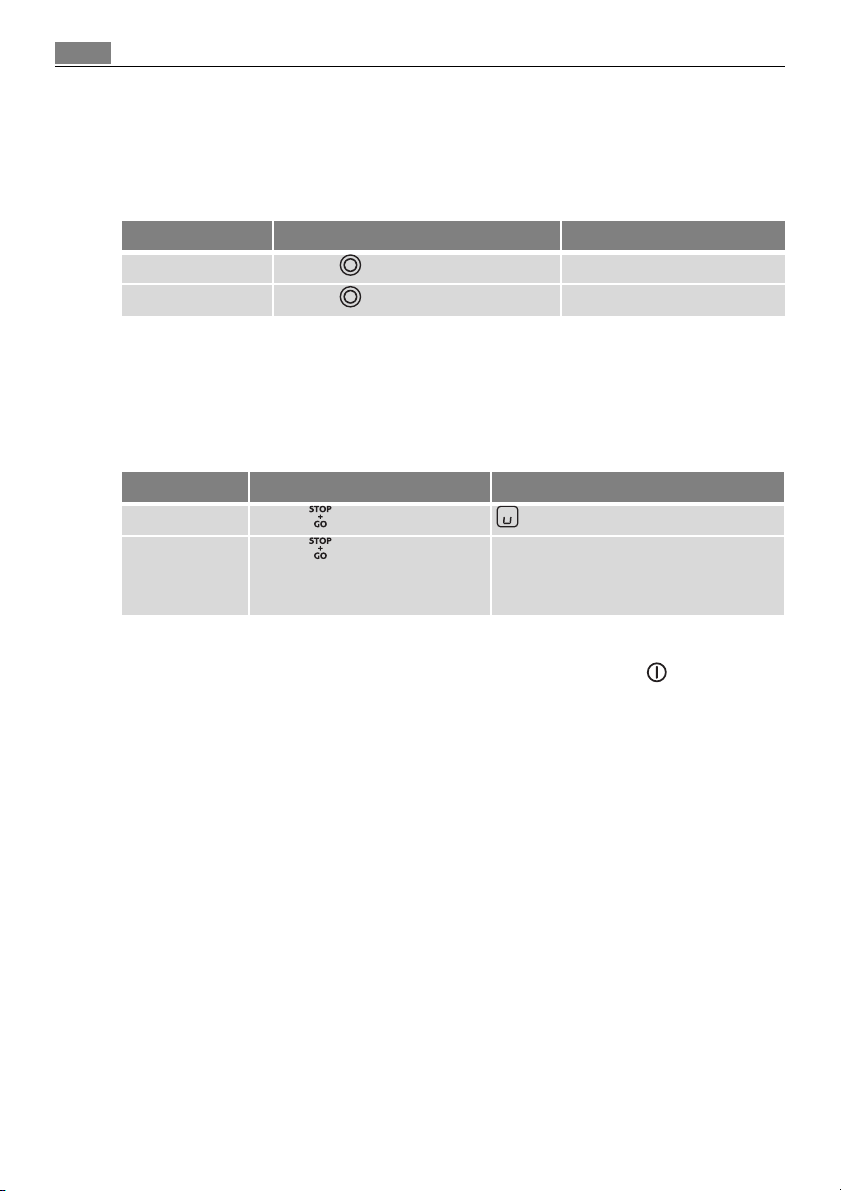
Switching the appliance on and off
Control panel Display Pilot light
Switch on Touch for 2 seconds / lights up
Switch off Touch for 1 second / none goes out
3 After switching on, within approx. 10 seconds a heat setting or a function must
be set, otherwise the appliance automatically switches itself off.
Setting the heat setting
Control panel Display
Increase Touch to /
Decrease Touch to
Switch off Touch and at the same time
3 The keep warm setting lies between and . It is used to keep food warm.
Operating the appliance10
Switching the double ring cooking zone on and off
With the double ring cooking zone the heating surface can be matched to the
size of the cookware.
Control panel Pilot light
Switch on Touch for 1-2 seconds lights up
Switch off Touch for 1-2 seconds goes out
Switching the STOP+GO function on and off
The STOP+GO function simultaneously switches all cooking zones that are
switched on to the keep warm setting and then back to the heat setting that
was previously set.
Control panel Display
To switch on Touch
To switch off Touch heat setting that was previously
set (not automatic warm up
function)
3 Timer functions are not stopped by STOP+GO.
3 STOP+GO locks the whole control panel except the sensor field .
11Operating the appliance
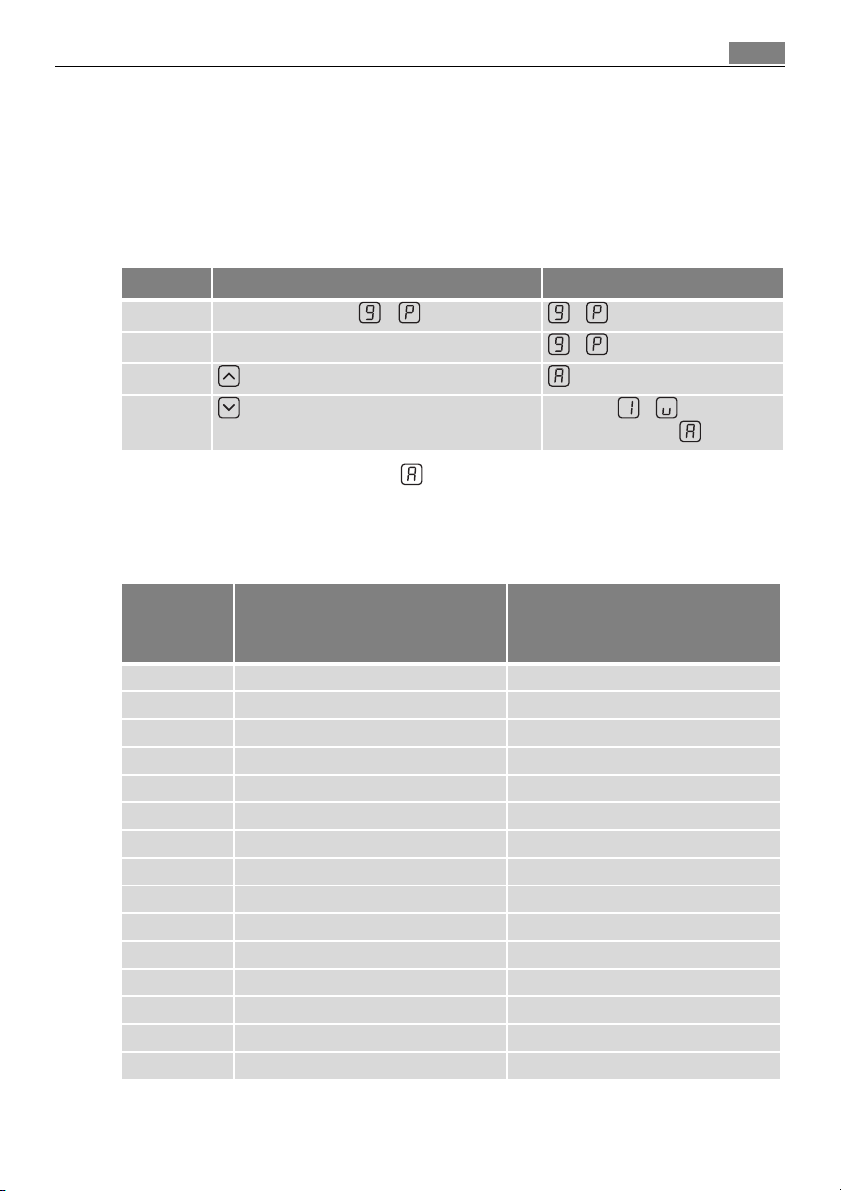
Using the automatic warm-up function
All cooking zones are equipped with an automatic warm-up function. The automatic warm-up function sets the cooking zone to the highest setting for a certain period of time and then automatically switches back to the cooking setting
that was originally set.
Step Control panel Display
1. Setting the level / /
2. Place to one side for a moment /
3. touch
4. touch in order to set the desired
cooking setting
Æ until /
after 3 seconds
3 If during the automatic warm up a higher heat setting is selected, e.g. from
Á to Ã, the automatic warm up is adjusted.
The length of time that the automatic warm up function operates depends on
the heat setting selected.
Heat
setting
v 0:30 0:10
1 1:00 0:10
2 1:40 0:10
2. 2:40 1:20
3 4:50 3:10
3. 5:30 4:20
4 6:30 5:50
4. 8:10 8:10
5 10:10 10:10
5. 12:20 10:30
6 2:30 2:00
6. 2:30 2:00
7 3:30 2:30
8 4:30 2:50
9 --- ---
Length of the automatic
warm up
radiation element [min: sec]
Length of the automatic
warm up
induction [min: sec]

Operating the appliance12
Locking/unlocking the control panel
The control panel, with the exception of the “On/Off” sensor field, can be locked
at any time in order to prevent the settings being changed e.g. by wiping over
the panel with a cloth.
Control panel Display
Switch on Touch (for 5 seconds)
Switch off Touch previously set heat setting
3 When you switch the appliance off, the locking function is automatically
switched off.
 Loading...