

Page 1
FAVORIT 66610 VI1P
EN
User Manual 2
Notice d'utilisation 20
FR
Benutzerinformation 40
DE
Page 2
www.aeg.com
2
CONTENTS
1. SAFETY INFORMATION...........................................................................................3
2. SAFETY INSTRUCTIONS.......................................................................................... 4
3. PRODUCT DESCRIPTION........................................................................................ 5
4. CONTROL PANEL.....................................................................................................6
5. PROGRAMMES......................................................................................................... 7
6. SETTINGS.................................................................................................................. 8
7. OPTIONS................................................................................................................. 11
8. BEFORE FIRST USE.................................................................................................12
9. DAILY USE................................................................................................................13
10. HINTS AND TIPS...................................................................................................14
11. CARE AND CLEANING........................................................................................ 16
12. TROUBLESHOOTING...........................................................................................17
13. TECHNICAL INFORMATION...............................................................................19
FOR PERFECT RESULTS
Thank you for choosing this AEG product. We have created it to give you
impeccable performance for many years, with innovative technologies that help
make life simpler features you might not find on ordinary appliances. Please
spend a few minutes reading to get the very best from it.
Visit our website for:
Get usage advice, brochures, trouble shooter, service information:
www.aeg.com
Register your product for better service:
www.registeraeg.com
Buy Accessories, Consumables and Original spare parts for your appliance:
www.aeg.com/shop
CUSTOMER CARE AND SERVICE
Always use original spare parts.
When contacting our Authorised Service Centre, ensure that you have the
following data available: Model, PNC, Serial Number.
The information can be found on the rating plate.
Warning / Caution-Safety information
General information and tips
Environmental information
Subject to change without notice.
Page 3

1. SAFETY INFORMATION
Before the installation and use of the appliance,
carefully read the supplied instructions. The
manufacturer is not responsible if an incorrect
installation and use causes injuries and damages. Always
keep the instructions with the appliance for future
reference.
1.1 General Safety
• This appliance is intended to be used in household
and similar applications such as:
– farm houses; staff kitchen areas in shops, offices
and other working environments;
– by clients in hotels, motels, bed & breakfast and
other residential type environments.
• Do not change the specification of this appliance.
• The operating water pressure (minimum and
maximum) must be between 0.5 (0.05) / 8 (0.8) bar
(Mpa)
• Obey the maximum number of 13 place settings.
• If the supply cord is damaged, it must be replaced by
the manufacturer, its Authorised Service Centre or
similarly qualified persons in order to avoid a hazard.
• Put knives and cutlery with sharp points in the cutlery
basket with the points down or in a horizontal
position.
• Do not keep the appliance door open without
supervision to prevent to fall on it.
• Before maintenance, deactivate the appliance and
disconnect the mains plug from the mains socket.
• Do not use water spray and steam to clean the
appliance.
• The appliance is to be connected to the water mains
using the new supplied hose-sets. Old hose sets must
not be reused.
ENGLISH
3
Page 4

www.aeg.com
4
1.2 Children and vulnerable people safety
• This appliance can be used by children aged from 8
years and above and persons with reduced physical,
sensory or mental capabilities or lack of experience
and knowledge if they have been given supervision or
instruction concerning use of the appliance in a safe
way and understand the hazards involved.
• Do not let children play with the appliance.
• Keep all detergents away from children.
• Keep children and pets away from the appliance door
when it is open.
• Cleaning and user maintenance shall not be made by
children without supervision.
2. SAFETY INSTRUCTIONS
2.1 Installation
• Remove all the packaging.
• Do not install or use a damaged
appliance.
• Do not install or use the appliance
where the temperature is less than 0
°C.
• Obey the installation instruction
supplied with the appliance.
• Make sure that the appliance is
installed below and adjacent to safe
structures.
2.2 Electrical connection
WARNING!
Risk of fire and electrical
shock.
• The appliance must be earthed.
• Make sure that the electrical
information on the rating plate agrees
with the power supply. If not contact
an electrician.
• Always use a correctly installed
shockproof socket.
• Do not use multi-plug adapters and
extension cables.
• Make sure not to cause damage to
the mains plug and to the mains
cable. Should the mains cable need
to be replaced, this must be carried
out by our Authorised Service Centre.
• Connect the mains plug to the mains
socket only at the end of the
installation. Make sure that there is
access to the mains plug after the
installation.
• Do not pull the mains cable to
disconnect the appliance. Always pull
the mains plug.
• This appliance complies with the
E.E.C. Directives.
• Only for UK and Ireland. The
appliance has a 13 amp mains plug. If
it is necessary to change the fuse in
the mains plug, use a 13 amp ASTA
(BS 1362) fuse.
2.3 Water connection
• Make sure not to cause damage to
the water hoses.
• Before you connect the appliance to
new pipes or pipes not used for a
long time, let the water flow until it is
clean.
• The first time you use the appliance,
make sure that there is no leakage.
• The water inlet hose has a safety valve
and a sheath with an inner mains
cable.
Page 5
WARNING!
5
4
67
9
8
12
2
3
1
11 10
Dangerous voltage.
• If the water inlet hose is damaged,
immediately disconnect the mains
plug from the mains socket. Contact
the Authorised Service Centre to
replace the water inlet hose.
2.4 Use
• Do not sit or stand on the open door.
• Dishwasher detergents are
dangerous. Obey the safety
instructions on the detergent
packaging.
3. PRODUCT DESCRIPTION
ENGLISH
• Do not drink and play with the water
in the appliance.
• Do not remove the dishes from the
appliance until the programme is
completed. There can be detergent
on the dishes.
• The appliance can release hot steam
if you open the door while a
programme operates.
• Do not put flammable products or
items that are wet with flammable
products in, near or on the appliance.
2.5 Disposal
WARNING!
Risk of injury or suffocation.
• Disconnect the appliance from the
mains supply.
• Cut off the mains cable and discard it.
• Remove the door catch to prevent
children and pets to get closed in the
appliance.
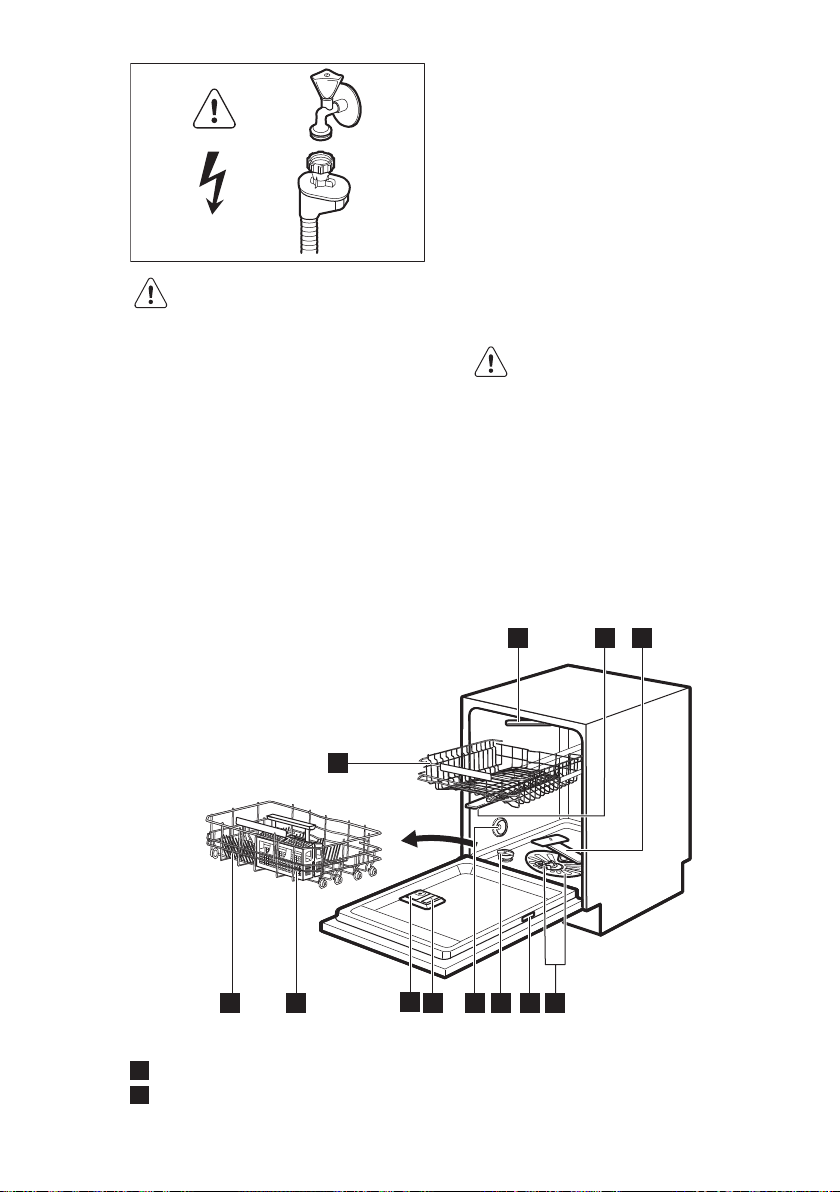
5
Top spray arm
1
Upper spray arm
2
Page 6
1 2
83 4 5 6 7
9
www.aeg.com6
Lower spray arm
3
Filters
4
Rating plate
5
Salt container
6
Air vent
7
Rinse aid dispenser
8
3.1 Beam-on-Floor
The Beam-on-Floor is a light that shows
on the kitchen floor below the appliance
door.
• When the programme starts, a red
light comes on and stays on for all the
duration of the programme.
• When the programme is completed, a
green light comes on.
4. CONTROL PANEL
Detergent dispenser
9
Cutlery basket
10
Lower basket
11
Upper basket
12
• When the appliance has a
malfunction, the red light flashes.
The Beam-on-Floor goes off
when the appliance is
deactivated.
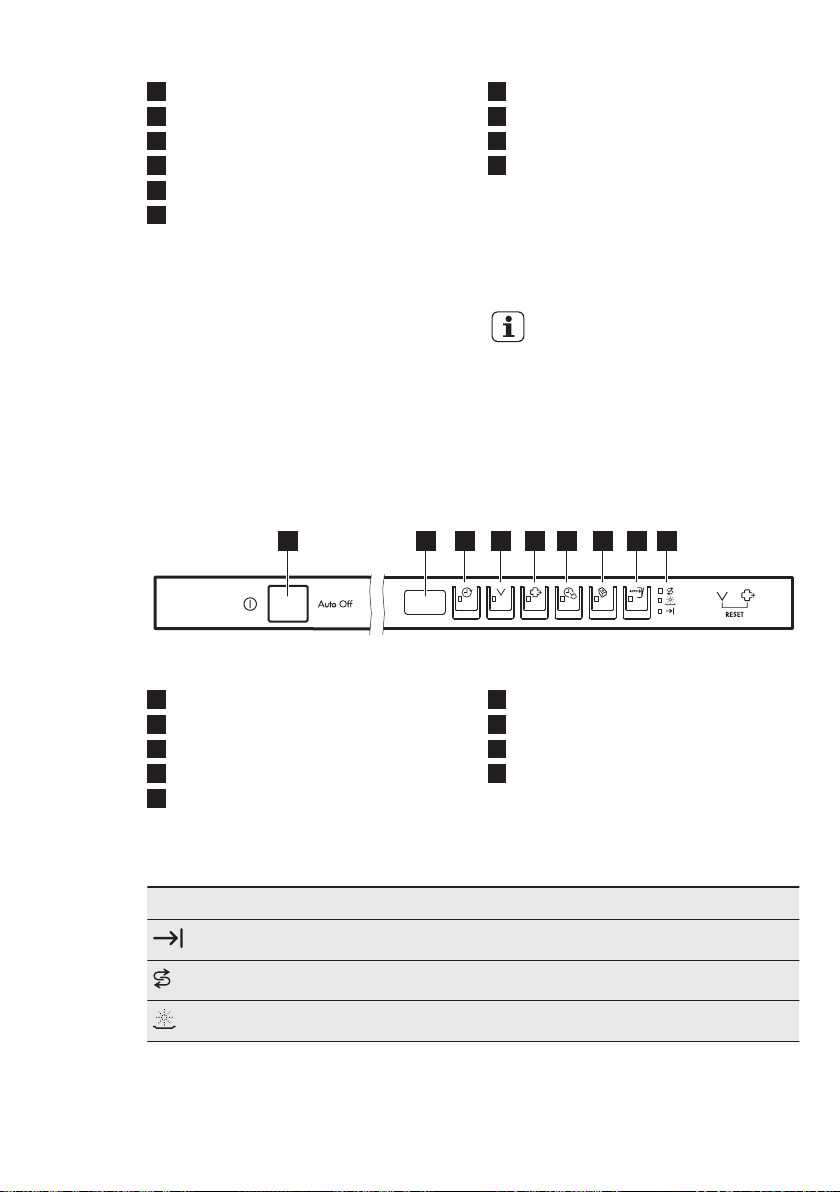
On/off button
1
Display
2
Delay button
3
Program button
4
ExtraHygiene button
5
4.1 Indicators
Indicator Description
End indicator.
Salt indicator. It is always off while the programme operates.
Rinse aid indicator. It is always off while the programme operates.
TimeSaver button
6
Multitab button
7
AutoOpen button
8
Indicators
9
Page 7
5. PROGRAMMES
ENGLISH
7
Programme Degree of soil
Programme phases Options
Type of load
P1
P2
1)
2)
• Normal soil
• Crockery and
cutlery
• All
• Crockery, cutlery, pots and
pans
• Prewash
• Wash 50 °C
• Rinses
• Dry
• Prewash
• Wash from 45 °C to 70
°C
• Rinses
• ExtraHygiene
• TimeSaver
• AutoOpen
• Multitab
• ExtraHygiene
• Multitab
• Dry
P3
3)
P4 • Normal or light
• Heavy soil
• Crockery, cutlery, pots and
pans
soil
• Delicate crock-
• Prewash
• Wash 70 °C
• Rinses
• Dry
• Wash 45 °C
• Rinses
• Dry
• TimeSaver
• Multitab
• Multitab
ery and glassware
P5
P6
4)
5)
• Fresh soil
• Crockery and
cutlery
• Normal soil
• Crockery and
cutlery
• Wash 60 °C
• Rinses
• Prewash
• Wash 50 °C
• Rinses
• ExtraHygiene
• Multitab
• Multitab
• Dry
1)
With this programme you have the most efficient use of water and energy consumption for crockery
and cutlery with normal soil. (This is the standard programme for test institutes).
2)
The appliance senses the degree of soil and the quantity of items in the baskets . It automatically ad-
justs the temperature and the quantity of water, the energy consumption and the programme duration.
3)
This programme has a high temperature rinsing phase for better hygiene results. During the rinsing
phase, the temperature stays at 70 °C for at least 10 minutes.
4)
With this programme you can wash a load with fresh soil. It gives good washing results in a short time.
5)
This is the most silent programme. The pump works at a very low speed to decrease the level of noise.
Because of the low speed, the programme duration is long.
5.1 Consumption values
Programme
1)
P1 9.9 0.832 225
Water
(l)
Energy
(kWh)
Duration
(min)
Page 8
8
www.aeg.com
Programme
P2 7 - 14 0.6 - 1.4 40 - 150
P3 12.5 - 14.5 1.4 - 1.6 154 - 164
P4 12 - 14 0.7 - 0.9 75 - 85
P5 10 0.9 30
P6 9 - 10 1.0 - 1.2 219 - 229
1)
The pressure and the temperature of the water, the variations of the mains supply, the options and the
quantity of dishes can change the values.
5.2 Information for test institutes
For all the necessary information for test
performance, send an email to:
6. SETTINGS
6.1 Programme selection
mode and user mode
When the appliance is in programme
selection mode it is possible to set a
programme and to enter the user mode.
In user mode, the following settings
can be changed:
• The level of the water softener
according to the water hardness.
• The activation or the deactivation of
the acoustic signal for end of
programme.
• The deactivation of the rinse aid
dispenser when you want to use the
Multitab option without rinse aid.
• The level of rinse aid according to the
required dosage.
These settings will be saved until you
change them again.
1)
Water
(l)
Energy
(kWh)
info.test@dishwasher-production.com
Write down the product number (PNC)
that is on the rating plate.
Duration
(min)
How to set the programme selection mode
The appliance is in programme selection
mode when the display shows the
programme number P1.
When you activate the appliance, usually
it is in programme selection mode.
However, if this does not happen, you
can set the programme selection mode
in the following way:
Press and hold simultaneously and
until the appliance is in programme
selection mode.
6.2 The water softener
The water softener removes minerals
from the water supply, which would have
a detrimental effect on the washing
results and on the appliance.
Page 9
ENGLISH
9
The higher the content of these minerals,
the harder your water is. Water hardness
is measured in equivalent scales.
The water softener should be adjusted
according to the hardness of the water in
your area. Your local water authority can
advise you on the hardness of the water
in your area. It is important to set the
right level of the water softener to assure
good washing results.
Water hardness
German de-
grees (°dH)
47 -50 84 - 90 8.4 - 9.0 58 - 63 10
43 - 46 76 - 83 7.6 - 8.3 53 - 57 9
37 - 42 65 - 75 6.5 - 7.5 46 - 52 8
29 - 36 51 - 64 5.1 - 6.4 36 - 45 7
23 - 28 40 - 50 4.0 - 5.0 28 - 35 6
19 - 22 33 - 39 3.3 - 3.9 23 - 27
15 - 18 26 - 32 2.6 - 3.2 18 - 22 4
11 - 14 19 - 25 1.9 - 2.5 13 - 17 3
4 - 10 7 - 18 0.7 - 1.8 5 - 12 2
<4 <7 <0.7 < 5
1)
Factory setting.
2)
Do not use salt at this level.
French degrees
(°fH)
mmol/l Clarke de-
grees
Water softener lev-
el
1)
5
2)
1
How to set the water softener level
The appliance must be in programme
selection mode.
1. To enter the user mode, press and
hold simultaneously and until
the indicators , , and
start to flash and the display is blank.
2. Press
• The indicators , and go
• The indicator continues to
• The display shows the current
3. Press again and again to change
the setting.
4. Press the on/off button to confirm
the setting.
.
off.
flash.
setting: e.g. = level 5.
6.3 The rinse aid dispenser
The rinse aid helps to dry the dishes
without streaks and stains.
The rinse aid is automatically released
during the hot rinse phase.
You can set the released quantity of rinse
aid between level 1 (minimum quantity)
and level 6 (maximum quantity). Level 0
will deactivate the rinse aid dispenser
and no rinse aid will be released.
Factory setting: level 4.
How to set the rinse aid level
The appliance must be in programme
selection mode.
1. To enter the user mode, press and
hold simultaneously and until
the indicators , , and
start to flash and the display is blank.
2. Press
.
Page 10
10
www.aeg.com
• The indicators , and go
off.
• The indicator continues to
flash.
• The display shows the current
setting: e.g.
– The levels of rinse aid are
from 0A to 6A.
– Level 0 = no rinse aid is
released.
3. Press
the setting.
4. Press the on/off button to confirm
the setting.
again and again to change
= level 4.
6.4 Use of rinse aid and multitablets
When you activate the option Multitab,
the rinse aid dispenser continues to
release rinse aid. However you can
deactivate the rinse aid dispenser. In this
case the drying results may not be
satisfactory.
With the rinse aid dispenser deactivated,
the rinse aid indicator is always off.
How to deactivate the rinse aid dispenser
The appliance must be in programme
selection mode.
1. To enter the user mode, press and
hold simultaneously and until
the indicators , , and
start to flash and the display is blank.
2. Press
• The indicators , and go
• The indicator
• The display shows the current
.
off.
continues to
flash.
setting: = rinse aid dispenser
activated.
3. Press
= rinse aid dispenser deactivated.
The rinse aid indicator goes off.
4. Press the on/off button to confirm
the setting.
to change the setting.
6.5 Acoustic signals
Acoustic signals sound when a
malfunction of the appliance occurs. It is
not possible to deactivate these acoustic
signals.
There is also an acoustic signal that
sounds when the programme is
completed. By default this acoustic
signal is deactivated but it is possible to
activate it.
How to activate the acoustic signal for the end of programme
The appliance must be in programme
selection mode.
1. To enter the user mode, press and
hold simultaneously and until
the indicators , , and
start to flash and the display is blank.
2. Press
• The indicators , and go
off.
• The indicator
flash.
• The display shows the current
setting: = Acoustic signal off.
3. Press
= Acoustic signal on.
4. Press the on/off button to confirm
the setting.
to change the setting.
continues to
Page 11

7. OPTIONS
ENGLISH
11
Desired options must be
activated every time before
you start a programme. It is
not possible to activate or
deactivate options while a
programme is running.
Not all options are compatible
with each other. If you have
selected non compatible
options, the appliance will
automatically deactivate one
or more of them. Only the
indicators of the options still
active will stay on.
7.1 Multitab
Activate this option when you use multitablets that integrate the salt, rinse aid
and detergent functions. They can also
contain other cleaning or rinsing agents.
This option deactivates the release of
salt. The salt indicator does not come on.
With the use of this option the
programme duration is prolonged to
increase the cleaning and drying results
with the use of multi-tablets.
How to activate Multitab
not come on or it flashes quickly for a
few seconds and then goes off.
The display shows the updated
programme duration.
7.3 ExtraHygiene
With this option you have better hygiene
results. During the last rinsing phase, the
temperature stays at 70 °C for at least 10
minutes.
How to activate ExtraHygiene
Press , the related indicator comes on
If the option is not applicable to the
programme, the related indicator does
not come on or it flashes quickly for a
few seconds and then goes off.
The display shows the updated
programme duration.
7.4 AutoOpen
This option improves the drying results
with less energy consumption.
Press .
The related indicator comes on.
7.2 TimeSaver
This option increases the pressure and
the temperature of the water. The
washing and the drying phases are
shorter.
The total programme duration decreases
by approximately 50%.
The washing results are the same as with
the normal programme duration. The
drying results can decrease.
How to activate TimeSaver
Press , the related indicator comes on.
If the option is not applicable to the
programme, the related indicator does
• While the drying phase operates, a
device opens the appliance door and
keeps it ajar.
• At the end of the programme, the
device and the appliance door retract.
The appliance is automatically
deactivated.
CAUTION!
Do not try to close the
appliance door while the
device keeps the door ajar.
This can cause damage to the
appliance.
Page 12
www.aeg.com12
This option is automatically activated
when you select the programme .
The indicator comes on.
It is not possible to select this option
with other programmes.
8. BEFORE FIRST USE
1. Make sure that the current level of
the water softener agrees with the
hardness of the water supply. If
not, adjust the level of the water
softener.
2. Fill the salt container.
3. Fill the rinse aid dispenser.
4. Open the water tap.
5. Start a programme to remove any
processing residuals that can still be
inside the appliance. Do not use
detergent and do not load the
baskets.
When you start a programme, the
appliance can take up to 5 minutes to
recharge the resin in the water softener.
It seems that the appliance is not
working. The washing phase starts only
after this procedure is completed. The
procedure will be repeated periodically.
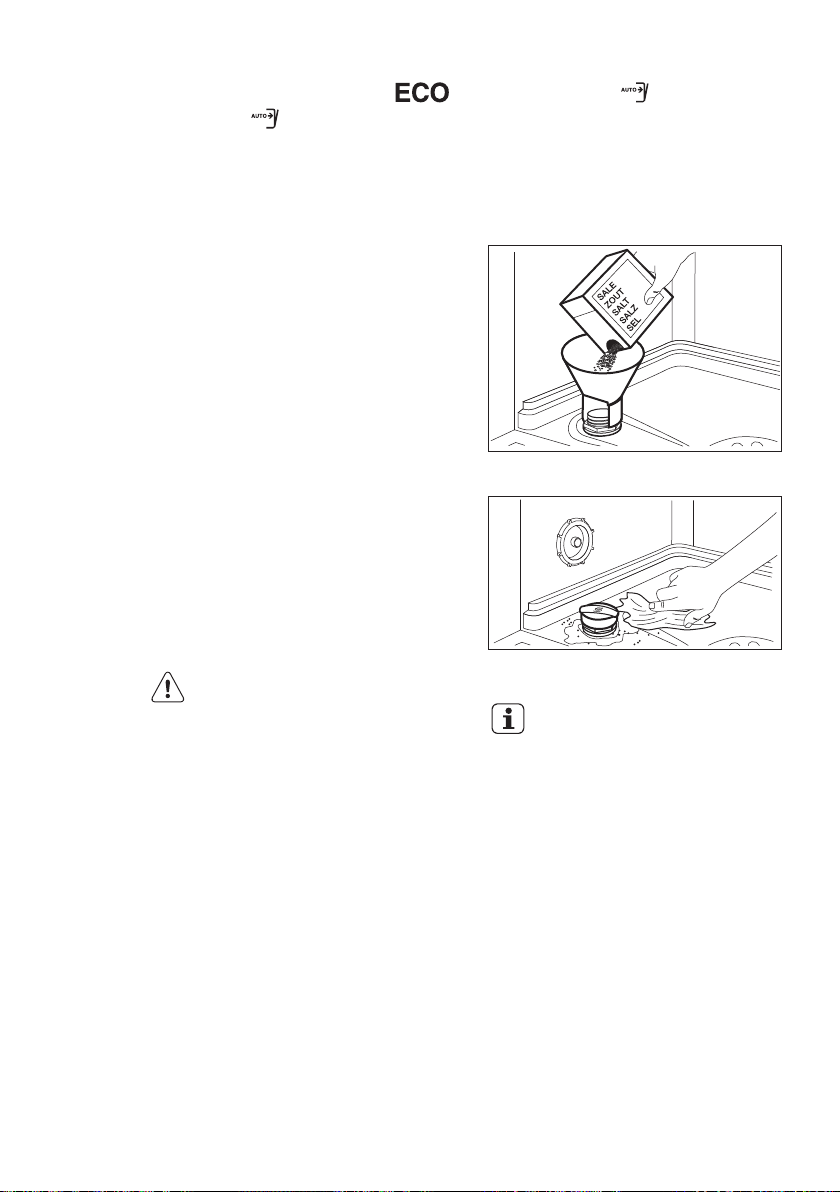
8.1 The salt container
CAUTION!
Only use salt specifically
designed for dishwashers.
The salt is used to recharge the resin in
the water softener and to assure good
washing results in the daily use.
If you want to deactivate the option
AutoOpen, press . The related
indicator goes off. In this condition, the
energy consumption of the programme
increases.
4. Remove the salt around the opening
of the salt container.
5. Turn the cap of the salt container
clockwise to close the salt container.
Water and salt can come out
from the salt container when
you fill it. Risk of corrosion. To
prevent it, after you fill the salt
container, start a programme.
How to fill the salt container
1. Turn the cap of the salt container
counterclockwise and remove it.
2. Put 1 litre of water in the salt
container (Only for the first time).
3. Fill the salt container with dishwasher
salt.
Page 13
A
B
C
A
B
C
ENGLISH
13
8.2 How to fill the rinse aid
dispenser
9. DAILY USE
1. Open the water tap.
2. Press the on/off button to activate
the appliance.
Make sure that the appliance is in user
mode.
• If the salt indicator is on, fill the
salt container.
• If the rinse aid indicator is on, fill
the rinse aid dispenser.
3. Load the baskets.
4. Add the detergent. If you use multi-
tablets, activate the option Multitab.
5. Set and start the correct programme
for the type of load and the degree
of soil.
9.1 Using the detergent
CAUTION!
Only use rinse aid specifically
designed for dishwashers.
1. Open the lid (C).
2. Fill the dispenser (B) until the rinse
aid reaches the marking ''MAX''.
3. Remove the spilled rinse aid with an
absorbent cloth to prevent too much
foam.
4. Close the lid. Make sure that the lid
locks into position.
Fill the rinse aid dispenser
when the indicator (A)
becomes clear.
CAUTION!
Only use detergent
specifically designed for
dishwashers.
1. Press the release button (A) to open
the lid (C).
2. Put the detergent, in powder or
tablets, in the compartment (B).
3. If the programme has a prewash
phase, put a small quantity of
detergent on the inner part of the
appliance door.
4. Close the lid. Make sure that the lid
locks into position.
9.2 Setting and starting a
programme
This function decreases energy
consumption by deactivating
automatically the appliance when it is not
operating.
The function comes into operation:
• 5 minutes after the completion of the
programme.
• After 5 minutes if the programme has
not started.
The Auto Off function
Page 14
www.aeg.com14
Starting a programme
1. Keep the appliance door ajar.
2. Press the on/off button to activate
the appliance. Make sure that the
appliance is in programme selection
mode.
3. Press repeatedly until the display
shows the number of the programme
you want to start. The display will
show the programme number for
approximately 3 seconds and then
show the programme duration.
The display shows the programme
duration.
4. Set the applicable options.
5. Close the appliance door to start the
programme.
Starting a programme with delay start
1. Set a programme.
2. Press
display shows the delay time you
want to set (from 1 to 24 hours).
The delay indicator comes on.
3. Close the appliance door to start the
countdown.
While a countdown is running it is
possible to increase the delay time but
not to change the selection of the
programme and options.
When the countdown is completed, the
programme starts.
again and again until the
Opening the door while the appliance operates
If you open the door while a programme
is running, the appliance stops. When
you close the door, the appliance
continues from the point of interruption.
If the door is opened for more
than 30 seconds during the
drying phase, the running
programme will end. This will
not happen when programme
with AutoOpen is
running.
Cancelling the delay start while the countdown operates
When you cancel the delay start you
have to set the programme and options
again.
Press and hold simultaneously and
until the appliance is in programme
selection mode.
Cancelling the programme
Press and hold simultaneously and
until the appliance is in programme
selection mode.
Make sure that there is detergent in the
detergent dispenser before you start a
new programme.
End of programme
When the programme is completed and
you open the door, the appliance is
automatically deactivated.
Close the water tap.
HINTS AND TIPS
10.
10.1 General
The following hints will ensure optimal
cleaning and drying results in daily use
and also help to protect the
environment.
• Remove larger residues of food from
the dishes into the waste bin.
• Do not pre-rinse dishes by hand.
When needed, use the prewash
programme (if available) or select a
programme with a prewash phase.
• Always use the whole space of the
baskets.
• When loading the appliance, make
sure that the dishes can be
completely reached and washed by
the water released from the spray arm
nozzles. Make sure that items do not
touch or cover each other.
Page 15

ENGLISH
15
• You can use dishwasher detergent,
rinse aid and salt separately or you
can use the multi-tablets (e.g. ''3in1'',
''4in1'', ''All in 1''). Follow the
instructions written on the packaging.
Multi-tablets are usually suitable in
areas with a water hardness up to 21
°dH. In areas exceeding this limit,
rinse aid and salt must also be used. If
you use multi-tablets you can select
the Multitab option (if available). This
option increases the cleaning and
drying results with the use of multitablets.
• Select the programme according to
the type of load and degree of soil.
With the ECO programme you have
the most efficient use of water and
energy consumption for crockery and
cutlery with normal soil.
10.2 Using salt, rinse aid and
detergent
• Only use salt, rinse aid and detergent
for dishwasher. Other products can
cause damage to the appliance.
• Detergent tablets do not fully dissolve
with short programmes. To prevent
detergent residues on the tableware,
we recommend that you use the
tablets with long programmes.
• Do not use more than the correct
quantity of detergent. Refer to the
instructions on the detergent
packaging.
10.3 What to do if you want to
stop using multi-tablets
Before you start to use separately
detergent, salt and rinse aid do the
following procedure.
1. Set the highest level of the water
softener.
2. Make sure that the salt and rinse aid
containers are full.
3. Start the shortest programme with a
rinsing phase. Do not add detergent
and do not load the baskets.
4. When the programme is completed,
adjust the water softener according
to the water hardness in your area.
5. Adjust the released quantity of rinse
aid.
10.4
Loading the baskets
• Only use the appliance to wash items
that are dishwasher-safe.
• Do not put in the appliance items
made of wood, horn, aluminium,
pewter and copper.
• Do not put in the appliance items that
can absorb water (sponges,
household cloths).
• Remove remaining food from the
items.
• Make soft the remaining burned food
on the items.
• Put hollow items (cups, glasses and
pans) with the opening down.
• Make sure that cutlery and dishes do
not bond together. Mix spoons with
other cutlery.
• Make sure that glasses do not touch
other glasses.
• Put small items in the cutlery basket.
• Put light items in the upper basket.
Make sure that the items do not
move.
• Make sure that the spray arm can
move freely before you start a
programme.
10.5 Before starting a
programme
Make sure that:
• The filters are clean and correctly
installed.
• The cap of the salt container is tight.
• The spray arms are not clogged.
• There is dishwasher salt and rinse aid
(unless you use combi detergent
tablets).
• The position of the items in the
baskets is correct.
• The programme is applicable for the
type of load and for the degree of
soil.
• The correct quantity of detergent is
used.
10.6 Unloading the baskets
1. Let the tableware cool down before
you remove it from the appliance.
Hot items can be easily damaged.
2. First remove items from the lower
basket, then from the upper basket.
Page 16
C
B
A
www.aeg.com
16
At the end of the programme
water can still remain on the
sides and on the door of the
appliance.
11. CARE AND CLEANING
WARNING!
Before maintenance,
deactivate the appliance and
disconnect the mains plug
from the main socket.
Dirty filters and clogged spay
arms decrease the washing
results. Make a check regularly
and, if necessary, clean them.
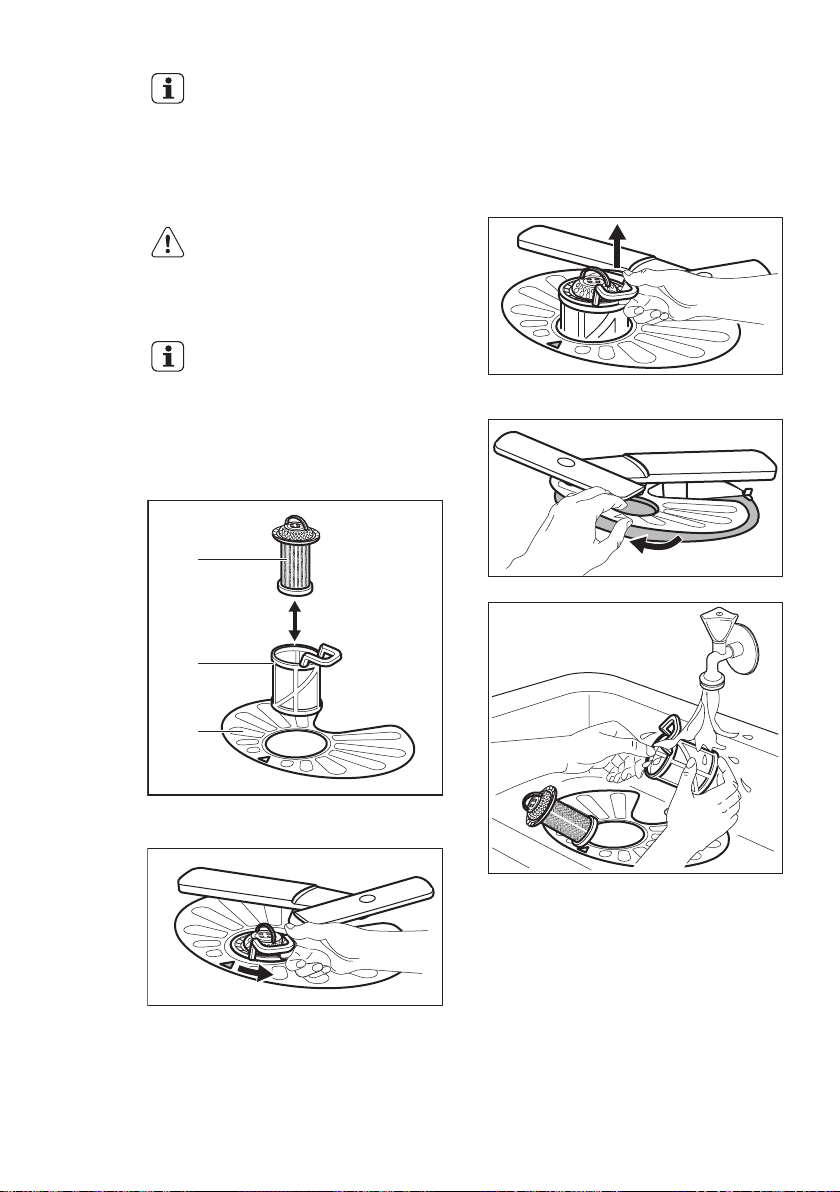
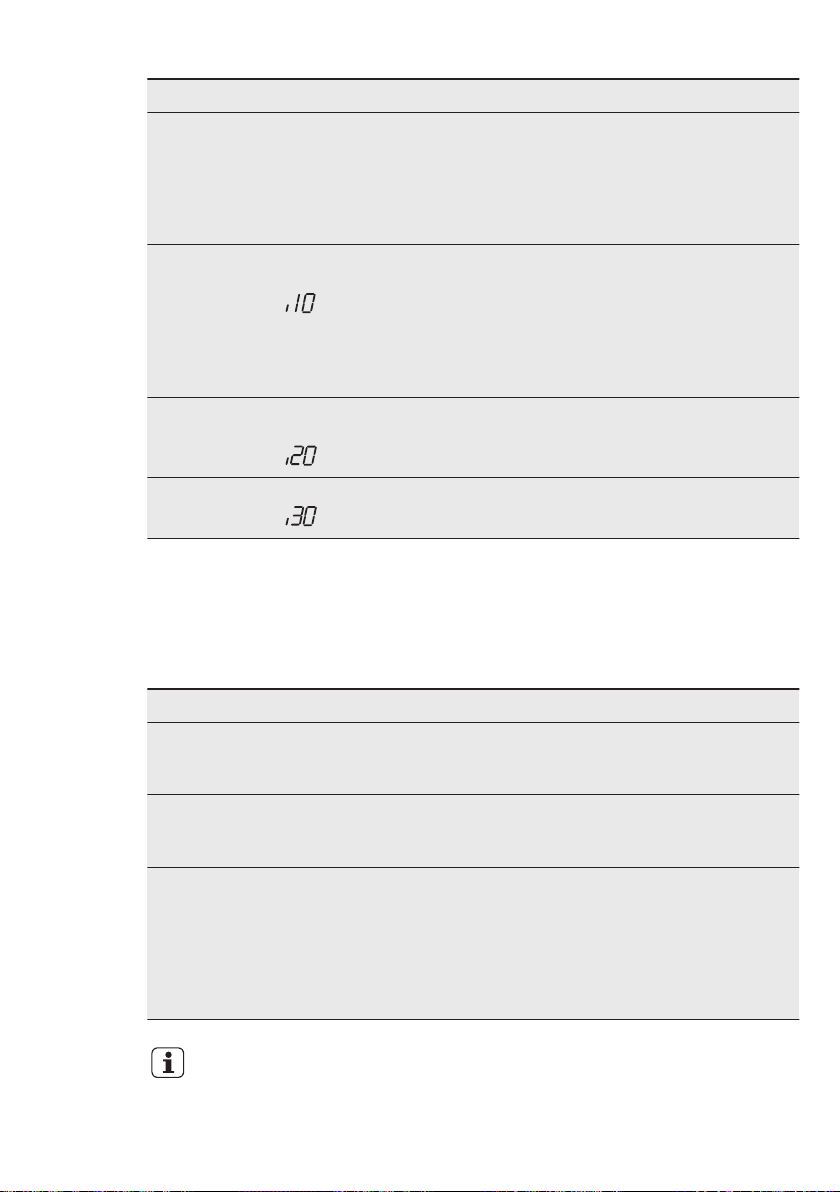
11.1 Cleaning the filters
The filter system is made of 3 parts.
2. Remove the filter (C) out of filter (B).
3. Remove the flat filter (A).
4. Wash the filters.
1. Turn the filter (B) counterclockwise
and remove it.
5. Make sure that there are no residues
of food or soil in or around the edge
of the sump.
6. Put back in place the flat filter (A).
Make sure that it is correctly
positioned under the 2 guides.
Page 17
7. Reassemble the filters (B) and (C).
8. Put back the filter (B) in the flat filter
(A). Turn it clockwise until it locks.
ENGLISH
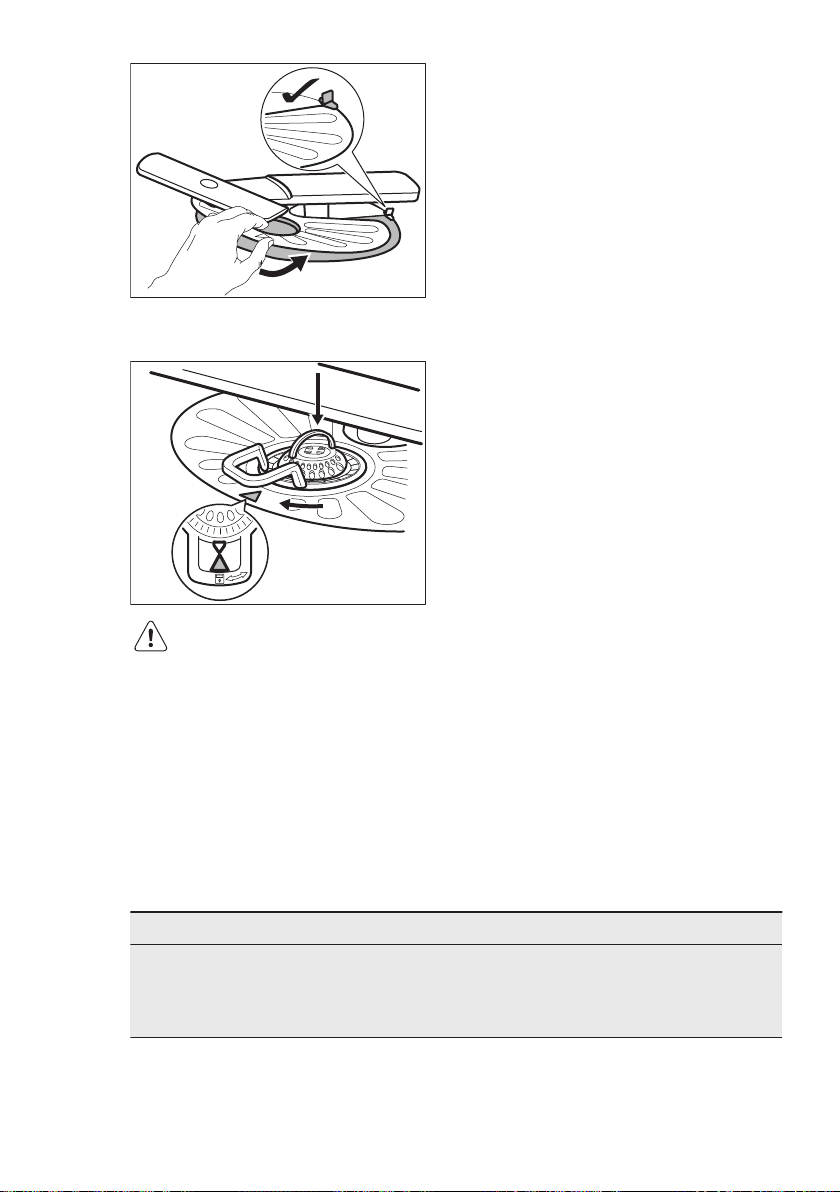
11.2 Cleaning the spray arms
Do not remove the spray arms. If the
holes in the spray arms are clogged,
remove remaining parts of soil with a thin
pointed object.
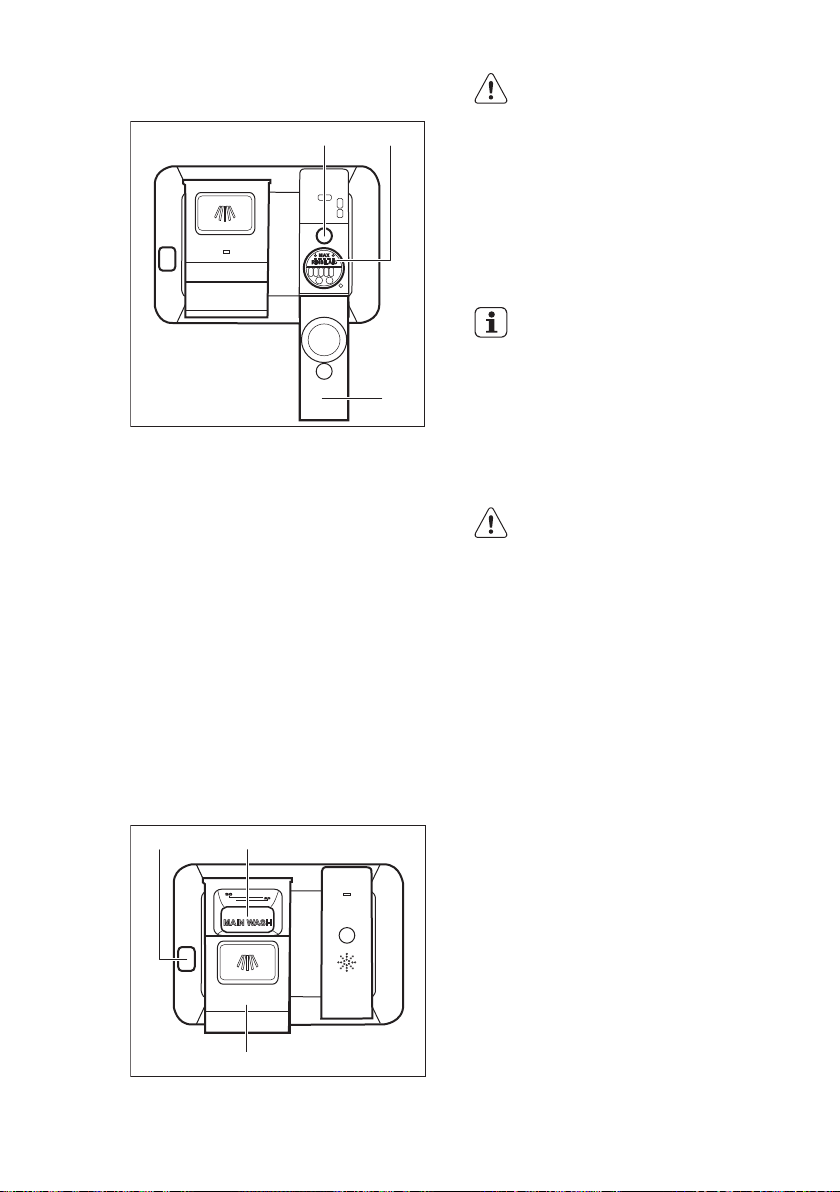
11.3 External cleaning
• Clean the appliance with a moist soft
cloth.
• Only use neutral detergents.
• Do not use abrasive products,
abrasive cleaning pads or solvents.
11.4 Internal cleaning
• Carefully clean the appliance,
including the rubber gasket of the
door, with a soft moist cloth.
• If you regularly use short duration
programmes, these can leave
deposits of grease and limescale
inside the appliance. To prevent this,
we recommend to run long duration
programmes at least 2 times per
month.
17
CAUTION!
An incorrect position of the
filters can cause bad washing
results and damage to the
appliance.
12. TROUBLESHOOTING
If the appliance does not start or it stops
during operation. Before you contact an
Authorised Service Centre, check if you
can solve the problem by yourself with
the help of the information in the table.
Problem and alarm code Possible solution
You cannot activate the appliance.
With some problems, the display
shows an alarm code.
• Make sure that the mains plug is connected to the
mains socket.
• Make sure that there is no a damage fuse in the fuse
box.
Page 18
www.aeg.com18
Problem and alarm code Possible solution
The programme does not
start.
The appliance does not fill
with water.
The display shows .
The appliance does not
drain the water.
The display shows .
The anti-flood device is on.
The display shows .
• Make sure that the appliance door is closed.
• If the delay start is set, cancel the setting or wait for the
end of the countdown.
• The appliance has started the procedure to recharge
the resin inside the water softener. The duration of the
procedure is approximately 5 minutes.
• Make sure that the water tap is open.
• Make sure that the pressure of the water supply is not
too low. For this information, contact your local water
authority.
• Make sure that the water tap is not clogged.
• Make sure that the filter in the inlet hose is not clogged.
• Make sure that the inlet hose has no kinks or bends.
• Make sure that the sink spigot is not clogged.
• Make sure that the drain hose has no kinks or bends.
• Close the water tap and contact an Authorised Service
Centre.
Once you have checked the appliance,
deactivate and activate the appliance. If
the problem occurs again, contact an
For alarm codes not described in the
table, contact an Authorised Service
Centre.
Authorised Service Centre.
12.1 The washing and drying results are not satisfactory
Problem Possible solution
There are whitish streaks or
bluish layers on glasses and
dishes.
There are stains and dry water
drops on glasses and dishes.
The dishes are wet. • The programme does not have a drying phase or has
Refer to "Hints and tips" for
other possible causes.
• The release quantity of rinse aid is too much. Adjust
the rinse aid selector to a lower position.
• The quantity of detergent is too much.
• The released quantity of rinse aid is not sufficient. Adjust the rinse aid selector to a higher position.
• The quality of the rinse aid can be the cause.
a drying phase with low temperature.
• The rinse aid dispenser is empty.
• The quality of the rinse aid can be the cause.
• The quality of the multi-tablets can be the cause. Try a
different brand or activate the rinse aid dispenser and
use rinse aid and multi-tablets together.
Page 19

13. TECHNICAL INFORMATION
ENGLISH
19
Dimensions Width / Height / Depth
(mm)
Electrical connection
Water supply pressure Min. / Max. bar (MPa) 0.5 (0.05) / 8 (0.8)
Capacity Place settings 13
Power consumption Left-on mode (W) 0.99
Power consumption Off-mode (W) 0.10
1)
Refer to the rating plate for other values.
1)
Voltage (V) 220-240
Frequency (Hz) 50
14. ENVIRONMENTAL CONCERNS
Recycle the materials with the symbol .
Put the packaging in applicable
containers to recycle it. Help protect the
environment and human health and to
recycle waste of electrical and electronic
appliances. Do not dispose appliances
marked with the symbol with the
household waste. Return the product to
your local recycling facility or contact
your municipal office.
596 / 818-898 / 550
Page 20

www.aeg.com
20
TABLE DES MATIÈRES
1. CONSIGNES DE SÉCURITÉ................................................................................... 21
2. INSTRUCTIONS DE SÉCURITÉ.............................................................................. 22
3. DESCRIPTION DE L'APPAREIL.............................................................................. 24
4. BANDEAU DE COMMANDE................................................................................. 24
5. PROGRAMMES....................................................................................................... 25
6. RÉGLAGES...............................................................................................................27
7. OPTIONS................................................................................................................. 29
8. AVANT LA PREMIÈRE UTILISATION.....................................................................31
9. UTILISATION QUOTIDIENNE................................................................................32
10. CONSEILS..............................................................................................................34
11. ENTRETIEN ET NETTOYAGE..............................................................................35
12. EN CAS D'ANOMALIE DE FONCTIONNEMENT..............................................37
13. CARACTÉRISTIQUES TECHNIQUES.................................................................. 39
POUR DES RÉSULTATS PARFAITS
Merci d'avoir choisi ce produit AEG. Nous l'avons conçu pour qu'il vous offre des
performances irréprochables pour longtemps, en intégrant des technologies
innovantes qui vous simplifient la vie grâce à des caractéristiques que vous ne
trouverez pas forcément sur des appareils ordinaires. Veuillez prendre quelques
instants pour lire cette notice afin d'utiliser au mieux votre appareil.
Visitez notre site Internet pour :
Obtenir des conseils d'utilisation, des brochures, de l'aide, des informations :
www.aeg.com
Enregistrez votre produit pour obtenir un meilleur service :
www.registeraeg.com
Acheter des accessoires, consommables et pièces de rechange d'origine pour
votre appareil :
www.aeg.com/shop
SERVICE APRÈS-VENTE
Utilisez toujours des pièces d'origine.
Avant de contacter le service, assurez-vous de disposer des informations
suivantes : Modèle, PNC, numéro de série.
Vous trouverez ces informations sur la plaque signalétique.
Avertissement/Consignes de sécurité
Informations générales et conseils
Informations en matière de protection de l'environnement
Sous réserve de modifications.
Page 21

1. CONSIGNES DE SÉCURITÉ
Avant d'installer et d'utiliser cet appareil, lisez
soigneusement les instructions fournies. Le fabricant ne
peut être tenu pour responsable des dommages et
blessures liés à une mauvaise installation ou utilisation.
Conservez toujours cette notice avec votre appareil
pour vous y référer ultérieurement.
1.1 Consignes générales de sécurité
• Cet appareil est conçu uniquement pour un usage
domestique et des situations telles que :
– bâtiments de ferme, cuisines réservées aux
employés dans les magasins, bureaux et autres
lieux de travail ;
– pour une utilisation privée, par les clients, dans des
hôtels et autres lieux de séjour.
• Ne modifiez pas les caractéristiques de cet appareil.
La pression de l'eau en fonctionnement (minimale et
•
maximale) doit se situer entre 0.5 (0.05) / 8 (0.8) bar
(Mpa)
• Respectez le nombre maximum de 13 couverts.
• Si le câble d'alimentation est endommagé, il doit être
remplacé par le fabricant, son atelier d'entretien ou un
technicien qualifié afin d'éviter tout danger.
• Placez les couteaux et les couverts avec des bouts
pointus dans le panier à couverts avec les pointes
tournées vers le bas ou en position horizontale.
• Ne laissez pas la porte de l'appareil ouverte sans
surveillance pour éviter tout risque de chute.
• Avant toute opération d'entretien, éteignez l'appareil
et débranchez la prise secteur.
• Ne pulvérisez pas d'eau ni de vapeur pour nettoyer
l'appareil.
• L'appareil doit être raccordé au circuit d'eau à l'aide
des tuyaux neufs fournis. N'utilisez pas de tuyaux
provenant d'anciens appareils.
FRANÇAIS
21
Page 22

www.aeg.com
22
1.2 Sécurité des enfants et des personnes
vulnérables
• Cet appareil peut être utilisé par des enfants de plus
de 8 ans, ainsi que des personnes dont les capacités
physiques, sensorielles et mentales sont réduites ou
dont les connaissances et l'expérience sont
insuffisantes, à condition d'être surveillés ou d'avoir
reçu des instructions concernant l'utilisation sécurisée
de l'appareil et de comprendre les risques encourus.
• Ne laissez pas les enfants jouer avec l'appareil.
• Ne laissez pas les détergents à la portée des enfants.
• Tenez les enfants et les animaux éloignés de la porte
de l'appareil lorsque celle-ci est ouverte.
• Les enfants ne doivent pas nettoyer ni entreprendre
une opération de maintenance sur l'appareil sans
surveillance.
2. INSTRUCTIONS DE SÉCURITÉ
2.1 Installation
• Retirez l'intégralité de l'emballage.
• N'installez pas et ne branchez pas un
appareil endommagé.
• N'installez pas l'appareil ou ne
l'utilisez pas dans un endroit où la
température ambiante est inférieure à
0 °C.
• Suivez scrupuleusement les
instructions d'installation fournies
avec l'appareil.
• Vérifiez que l'appareil est installé sous
et à proximité de structures sûres.
2.2 Branchement électrique
AVERTISSEMENT!
Risque d'incendie ou
d'électrocution.
• L'appareil doit être relié à la terre.
• Vérifiez que les données électriques
figurant sur la plaque signalétique
correspondent à celles de votre
réseau. Si ce n'est pas le cas,
contactez un électricien.
• Utilisez toujours une prise antichoc
correctement installée.
• N'utilisez pas d'adaptateurs
multiprises ni de rallonges.
• Veillez à ne pas endommager la fiche
secteur ni le câble d'alimentation. Le
remplacement du cordon
d'alimentation de l'appareil doit être
effectué par notre service aprèsvente.
• Ne branchez la fiche d'alimentation à
la prise de courant qu'à la fin de
l'installation. Assurez-vous que la
prise de courant est accessible une
fois l'appareil installé.
• Ne tirez jamais sur le câble
d'alimentation pour débrancher
l'appareil. Tirez toujours sur la fiche.
• Cet appareil est conforme aux
directives CEE.
• Pour le Royaume-Uni et l'Irlande
uniquement. L'appareil est livré avec
une fiche secteur de 13 ampères. Si
vous devez changer le fusible de la
fiche secteur, utilisez un fusible 13 A
approuvé ASTA (BS 1362).
Page 23

FRANÇAIS
23
2.3 Raccordement à l'arrivée
d'eau
• Veillez à ne pas endommager les
tuyaux de circulation d'eau.
• Avant de brancher l'appareil à des
tuyaux neufs ou n'ayant pas servi
depuis longtemps, laissez couler l'eau
jusqu'à ce qu'elle soit propre.
• Avant d'utiliser l'appareil pour la
première fois, assurez-vous de
l'absence de fuites.
• Le tuyau d'arrivée d'eau comporte
une vanne de sécurité et une gaine
avec un câble d'alimentation intérieur.
AVERTISSEMENT!
Tension dangereuse.
• Si le tuyau d'arrivée d'eau est
endommagé, débranchez
immédiatement la fiche de la prise
secteur. Contactez le service aprèsvente pour remplacer le tuyau
d'arrivée d'eau.
• Les produits de lavage pour lavevaisselle sont dangereux. Suivez les
consignes de sécurité figurant sur
l'emballage du produit de lavage.
• Ne buvez pas l'eau de l'appareil ; ne
jouez pas avec.
• N'enlevez pas la vaisselle de l'appareil
avant la fin du programme. Il peut
rester du produit de lavage sur la
vaisselle.
• De la vapeur chaude peut s'échapper
de l'appareil si vous ouvrez la porte
pendant le déroulement d'un
programme.
• Ne placez pas de produits
inflammables ou d'éléments imbibés
de produits inflammables à l'intérieur
ou à proximité de l'appareil, ni sur
celui-ci.
2.5 Mise au rebut
AVERTISSEMENT!
Risque de blessure ou
d'asphyxie.
• Débranchez l'appareil de
l'alimentation électrique.
• Coupez le câble d'alimentation et
mettez-le au rebut.
• Retirez le dispositif de verrouillage de
la porte pour empêcher les enfants et
les animaux de s'enfermer dans
l'appareil.
2.4 Utilisation
• Ne montez pas sur la porte ouverte
de votre appareil ; ne vous asseyez
pas dessus.
Page 24

5
4
67
9
8
12
2
3
1
11 10
1 2
83 4 5 6 7
9
www.aeg.com24
3. DESCRIPTION DE L'APPAREIL
Bras d'aspersion supérieur
1
Bras d'aspersion intermédiaire
2
Bras d'aspersion inférieur
3
Filtres
4
Plaque de calibrage
5
Réservoir de sel régénérant
6
Fente d'aération
7
3.1 Beam-on-Floor
Le faisceau Beam-on-Floor est une
lumière projetée sur le sol, sous la porte
de l'appareil.
• Lorsque le programme démarre, le
faisceau rouge s'allume et reste
allumé pendant toute la durée du
programme.
4. BANDEAU DE COMMANDE
Distributeur de liquide de rinçage
8
Distributeur de produit de lavage
9
Panier à couverts
10
Panier du bas
11
Panier du haut
12
• Lorsque le programme est terminé, le
faisceau devient vert.
• En cas de dysfonctionnement de
l'appareil, le faisceau rouge clignote.
Le faisceau Beam-on-Floor
s'éteint lorsque vous arrêtez
l'appareil.
Page 25

FRANÇAIS
25
Touche Marche/Arrêt
1
Affichage
2
Touche Delay
3
Touche Program
4
Touche ExtraHygiene
5
4.1 Voyants
Voyant Description
Voyant de fin.
Voyant du réservoir de sel régénérant. Ce voyant est toujours éteint pendant le déroulement du programme.
Voyant du réservoir de liquide de rinçage. Ce voyant est toujours éteint
pendant le déroulement du programme.
5. PROGRAMMES
Programme Degré de salissure
P1
1)
P2
2)
P3
3)
P4 • Normalement
P5
4)
Type de vaisselle
• Normalement
sale
• Vaisselle et couverts
• Tous
• Vaisselle, couverts, plats et
casseroles
• Très sale
• Vaisselle, couverts, plats et
casseroles
ou légèrement
sale
• Vaisselle fragile
et verres
• Vaisselle fraîchement salie
• Vaisselle et couverts
Touche TimeSaver
6
Touche Multitab
7
Touche AutoOpen
8
Voyants
9
Phases du programme Options
• Prélavage
• Lavage à 50 °C
• Rinçages
• Séchage
• Prélavage
• Lavage de 45 °C à
70 °C
• Rinçages
• Séchage
• Prélavage
• Lavage à 70 °C
• Rinçages
• Séchage
• Lavage à 45 °C
• Rinçages
• Séchage
• Lavage à 60 °C
• Rinçages
• ExtraHygiene
• TimeSaver
• AutoOpen
• Multitab
• ExtraHygiene
• Multitab
• TimeSaver
• Multitab
• Multitab
• ExtraHygiene
• Multitab
Page 26

www.aeg.com26
Programme Degré de salissure
Phases du programme Options
Type de vaisselle
P6
5)
1)
Ce programme vous permet d'optimiser votre consommation d'eau et d'énergie pour la vaisselle et
les couverts normalement sales. (Il s'agit du programme standard pour les instituts de tests.)
2)
L'appareil détecte le degré de salissure et la quantité de vaisselle dans les paniers. Il règle automatiquement la température ainsi que le volume d'eau, la consommation d'énergie et la durée du programme.
3)
Ce programme comprend une phase de rinçage à haute température, pour des résultats plus hygiéniques. Au cours de la phase de rinçage, la température reste à 70 °C pendant au moins 10 minutes.
4)
Ce programme permet de laver une charge de vaisselle fraîchement salie. Il offre de bons résultats de
lavage en peu de temps.
5)
Il s'agit du programme le plus silencieux. La pompe fonctionne à une vitesse très faible pour diminuer
le niveau sonore. En raison de la vitesse réduite, la durée du programme est longue.
• Normalement
sale
• Vaisselle et couverts
• Prélavage
• Lavage à 50 °C
• Rinçages
• Séchage
• Multitab
5.1 Valeurs de consommation
Programme
1)
P1 9.9 0.832 225
P2 7 - 14 0.6 - 1.4 40 - 150
Eau
(l)
Consommation
électrique
(kWh)
Durée
(min)
P3 12.5 - 14.5 1.4 - 1.6 154 - 164
P4 12 - 14 0.7 - 0.9 75 - 85
P5 10 0.9 30
P6 9 - 10 1.0 - 1.2 219 - 229
1)
Les valeurs de consommation peuvent changer en fonction de la pression et de la température de
l'eau, des variations de l'alimentation électrique, de la quantité de vaisselle chargée ainsi que des options sélectionnées.
Page 27

FRANÇAIS
27
5.2 Informations pour les
instituts de test
Pour toute information relative aux
performances de test, envoyez un
courrier électronique à l'adresse :
6. RÉGLAGES
6.1 Mode de sélection de
programme et mode utilisateur
Lorsque l'appareil est en mode de
sélection de programme, il est possible
de régler un programme et d'entrer dans
le mode utilisateur.
En mode utilisateur, les réglages
suivants peuvent être modifiés :
• Niveau de l'adoucisseur d'eau en
fonction de la dureté de l'eau.
• Activation ou désactivation du signal
sonore de fin de programme.
• Désactivation du distributeur de
liquide de rinçage lorsque vous
souhaitez utiliser l'option Multitab
sans liquide de rinçage.
• Niveau du liquide de rinçage en
fonction du dosage nécessaire.
Ces réglages seront sauvegardés
jusqu'à ce que vous les modifiez à
nouveau.
Comment régler le mode Programmation
L'appareil est en mode Programmation
lorsque le numéro de programmeP1
s'affiche.
info.test@dishwasher-production.com
Notez le numéro du produit (PNC)
indiqué sur la plaque signalétique.
Lorsque vous allumez l'appareil, il est
généralement en mode Programmation.
Cependant, si ce n'est pas le cas, vous
pouvez régler le mode Programmation
de la façon suivante :
Maintenez les touches et
enfoncées simultanément jusqu'à ce que
l'appareil se mette en mode
Programmation.
6.2 Adoucisseur d'eau
L'adoucisseur d'eau élimine les minéraux
de l'arrivée d'eau qui pourraient avoir un
impact négatif sur les résultats de lavage
et sur l'appareil.
Plus la teneur en minéraux est élevée,
plus l'eau est dure. La dureté de l'eau est
mesurée en échelles d'équivalence.
L'adoucisseur doit être réglé en fonction
du degré de dureté de l'eau de votre
région. Votre compagnie des eaux peut
vous indiquer la dureté de l'eau dans
votre région. Il est important de régler
l'adoucisseur d'eau sur un niveau
adéquat pour vous garantir de bons
résultats de lavage.
Dureté de l'eau
Degrés alle-
mands (°dH)
47 -50 84 - 90 8.4 - 9.0 58 - 63 10
43 - 46 76 - 83 7.6 - 8.3 53 - 57 9
37 - 42 65 - 75 6.5 - 7.5 46 - 52 8
29 - 36 51 - 64 5.1 - 6.4 36 - 45 7
23 - 28 40 - 50 4.0 - 5.0 28 - 35 6
Degrés français
(°fH)
mmol/l Degrés
Clarke
Réglage du niveau
de l'adoucisseur
d'eau
Page 28

28
www.aeg.com
Degrés allemands (°dH)
19 - 22 33 - 39 3.3 - 3.9 23 - 27
15 - 18 26 - 32 2.6 - 3.2 18 - 22 4
11 - 14 19 - 25 1.9 - 2.5 13 - 17 3
4 - 10 7 - 18 0.7 - 1.8 5 - 12 2
<4 <7 <0.7 < 5
1)
Réglages d'usine.
2)
N'utilisez pas de sel à ce niveau.
Comment régler le niveau de l'adoucisseur d'eau
L'appareil doit être en mode
Programmation.
1. Pour entrer en mode utilisateur,
maintenez les touches et
enfoncées simultanément jusqu'à ce
que les voyants , , et se
mettent à clignoter et que plus rien
ne s'affiche.
2. Appuyez sur la touche
• Les voyants , et
s'éteignent.
• Le voyant
• L'affichage indique le réglage
actuel : Par ex., = niveau 5.
3. Appuyez sur la touche à plusieurs
reprises pour modifier le réglage.
4. Appuyez sur la touche Marche/Arrêt
pour confirmer le réglage.
Degrés français
(°fH)
.
continue à clignoter.
mmol/l Degrés
Clarke
désactive le distributeur de liquide de
rinçage, et le liquide n'est pas diffusé.
Réglage usine : dosage 4.
Comment régler le niveau de liquide de rinçage
L'appareil doit être en mode
Programmation.
1. Pour entrer en mode utilisateur,
maintenez les touches
enfoncées simultanément jusqu'à ce
que les voyants , , et se
mettent à clignoter et que plus rien
ne s'affiche.
2. Appuyez sur la touche .
• Les voyants
s'éteignent.
• Le voyant continue à
clignoter.
• L'affichage indique le réglage
actuel : Par ex., = niveau 4.
6.3 Le distributeur de liquide de rinçage
Le liquide de rinçage permet de sécher
la vaisselle sans laisser de traînées ni de
taches.
Le liquide de rinçage est
automatiquement ajouté au cours du
rinçage chaud.
– Les niveaux de liquide de
rinçage s'échelonnent de 0A
à 6A.
– Niveau 0 = aucun liquide de
rinçage n'est libéré.
3. Appuyez sur la touche
reprises pour modifier le réglage.
4. Appuyez sur la touche Marche/Arrêt
pour confirmer le réglage.
Vous pouvez régler le dosage du liquide
de rinçage entre 1 (dosage minimum) et
6 (dosage maximum). Le dosage 0
Réglage du niveau
de l'adoucisseur
d'eau
1)
5
2)
1
et
, et
à plusieurs
Page 29

FRANÇAIS
29
6.4 Utilisation du liquide de
rinçage et des pastilles touten-un
Lorsque vous activez l'option Multitab, le
distributeur de liquide de rinçage
continue à libérer le liquide de rinçage.
Vous pouvez cependant désactiver le
distributeur de liquide de rinçage. Dans
ce cas, les résultats de séchage risquent
d'être insatisfaisants.
Lorsque le distributeur de liquide de
rinçage est désactivé, le voyant de
contrôle du liquide de rinçage est
toujours éteint.
Comment désactiver le distributeur de liquide de rinçage
L'appareil doit être en mode
Programmation.
1. Pour entrer en mode utilisateur,
maintenez les touches
enfoncées simultanément jusqu'à ce
que les voyants , , et se
mettent à clignoter et que plus rien
ne s'affiche.
2. Appuyez sur la touche
• Les voyants , et
s'éteignent.
• Le voyant
clignoter.
• L'affichage indique le réglage
actuel : = distributeur de
liquide de rinçage activé
3. Appuyez sur pour modifier le
réglage. = distributeur de
liquide de rinçage désactivé
continue à
et
.
Le voyant de liquide de rinçage s'éteint.
4. Appuyez sur la touche Marche/Arrêt
pour confirmer le réglage.
6.5 Signaux sonores
Les signaux sonores se déclenchent en
cas d''anomalie de fonctionnement de
l'appareil. Il est impossible de désactiver
ces signaux sonores.
Un signal sonore retentit également
lorsque le programme est terminé. Par
défaut, ce signal sonore est désactivé,
mais il est possible de l'activer.
Comment activer le signal sonore de fin de programme
L'appareil doit être en mode
Programmation.
1. Pour entrer en mode utilisateur,
maintenez les touches
enfoncées simultanément jusqu'à ce
que les voyants , , et se
mettent à clignoter et que plus rien
ne s'affiche.
2. Appuyez sur
• Les voyants , et
s'éteignent.
• Le voyant
• L'affichage indique le réglage
actuel : = Signal sonore
désactivé.
3. Appuyez sur
réglage.
= Signal sonore activé.
4. Appuyez sur la touche Marche/Arrêt
pour confirmer le réglage.
continue à clignoter.
pour modifier le
et
7.
OPTIONS
Vous devez activer les options
souhaitées à chaque fois avant
de lancer un programme.
Vous ne pouvez pas activer ni
désactiver d'options pendant
le déroulement d'un
programme.
Page 30

30
www.aeg.com
Certaines options ne sont pas
compatibles entre elles. Si
vous avez choisi des options
incompatibles, l'appareil en
désactivera automatiquement
une ou plusieurs. Seuls les
voyants correspondant aux
options encore actives
resteront allumés.
7.1 Multitab
Activez cette option lorsque vous utilisez
des pastilles tout-en-un qui intègrent les
fonctions sel régénérant, aide au rinçage
et détergent. Elles peuvent également
contenir d'autres agents nettoyants ou
rinçants.
Cette option désactive la libération du
sel régénérant. Le voyant de
réapprovisionnement en sel régénérant
ne s'allume pas.
Avec cette option, la durée du
programme est prolongée de manière à
augmenter les résultats de nettoyage et
de séchage avec l'utilisation de pastilles
tout-en-un.
Comment activer l'option Multitab
ne s'allume pas ou clignote rapidement
pendant quelques secondes, puis
s'éteint.
L'affichage indique la durée du
programme réactualisée.
7.3 ExtraHygiene
Cette option assure des résultats plus
hygiéniques. Au cours de la dernière
phase de rinçage, la température reste à
70 °C pendant au moins 10 minutes.
Comment activer l'option ExtraHygiene
Appuyez sur ; le voyant
correspondant s'allume.
Si cette option n'est pas compatible avec
le programme, le voyant correspondant
ne s'allume pas ou clignote rapidement
pendant quelques secondes, puis
s'éteint.
L'affichage indique la durée du
programme réactualisée.
7.4 AutoOpen
Cette option améliore les résultats de
séchage en utilisant moins d'énergie.
Appuyez sur la touche .
Le voyant correspondant s'allume.
7.2 TimeSaver
Cette option augmente la pression et la
température de l'eau. Les phases de
lavage et de séchage sont réduites.
La durée totale du programme diminue
d'environ 50 %.
Les résultats de lavage seront les mêmes
qu'avec la durée normale du
programme. Les résultats de séchage
peuvent être moins satisfaisants.
Comment activer l'option TimeSaver
Appuyez sur ; le voyant
correspondant s'allume.
Si cette option n'est pas compatible avec
le programme, le voyant correspondant
• Durant la phase de séchage, un
dispositif entrouvre la porte de
l'appareil.
• À la fin du programme, le dispositif se
rétracte et la porte de l'appareil se
referme. L'appareil s'éteint
automatiquement.
Page 31

FRANÇAIS
31
ATTENTION!
N'essayez pas de fermer la
porte de l'appareil lorsque le
dispositif la maintient
entrouverte. Vous risqueriez
d'endommager l'appareil.
Cette option s'active automatiquement
lorsque vous sélectionnez le programme
. Le voyant s'allume.
Cette option n'est pas compatible avec
d'autres programmes.
Si vous souhaitez désactiver l'option
AutoOpen, appuyez sur . Le voyant
correspondant s'éteint. Dans ces
conditions, la consommation d'énergie
du programme augmente.
8. AVANT LA PREMIÈRE UTILISATION
1. Assurez-vous que le réglage actuel
de l'adoucisseur d'eau est
compatible avec la dureté de
l'arrivée d'eau. Si ce n'est pas le
cas, réglez le niveau de
l'adoucisseur d'eau.
2. Remplissez le réservoir de sel
régénérant.
3. Remplissez le distributeur de liquide
de rinçage.
4. Ouvrez le robinet d'eau.
5. Lancez un programme pour éliminer
tous les résidus qui peuvent toujours
se trouver à l'intérieur de l'appareil.
N'utilisez pas de produit de lavage et
ne chargez pas les paniers.
Lorsque vous démarrez un programme,
l'appareil peut prendre 5 minutes pour
recharger la résine dans l'adoucisseur
d'eau. Pendant ce temps, l'appareil
semble ne pas fonctionner. La phase de
lavage ne démarre qu'une fois cette
procédure achevée. La procédure sera
répétée régulièrement.
8.1 Réservoir de sel
régénérant
Remplissage du réservoir de sel régénérant
1. Tournez le couvercle du réservoir de
sel régénérant vers la gauche et
retirez-le.
2. Versez 1 litre d'eau dans le réservoir
de sel régénérant (uniquement la
première fois).
3. Remplissez le réservoir avec du sel
régénérant.
4. Enlevez le sel qui se trouve autour de
l'ouverture du réservoir de sel
régénérant.
ATTENTION!
Utilisez uniquement du sel
régénérant conçu pour les
lave-vaisselle.
Le sel permet de recharger la résine dans
l'adoucisseur d'eau et de garantir de
bons résultats de lavage en utilisation
quotidienne.
5. Tournez le couvercle du réservoir de
sel régénérant vers la droite pour
refermer le réservoir.
Page 32

A
B
C
A
B
C
www.aeg.com32
De l'eau et du sel peuvent
sortir du réservoir de sel
régénérant lorsque vous le
remplissez. Risque de
corrosion. Afin d'éviter cela,
après avoir rempli le réservoir
de sel régénérant, démarrez
un programme.
8.2 Comment remplir le distributeur de liquide de rinçage
ATTENTION!
Utilisez uniquement du liquide
de rinçage spécialement
conçu pour les lave-vaisselle.
1. Ouvrez le couvercle (C).
2. Remplissez le distributeur (B) jusqu'à
ce que le liquide de rinçage atteigne
le repère « MAX ».
3. Si le liquide de rinçage déborde,
épongez-le avec un chiffon
absorbant pour éviter tout excès de
mousse.
4. Fermez le couvercle. Assurez-vous
que le couvercle se verrouille
correctement.
Remplissez le distributeur de
liquide de rinçage lorsque le
voyant (A) s'allume.
9. UTILISATION QUOTIDIENNE
1. Ouvrez le robinet d'eau.
2. Appuyez sur la touche Marche/Arrêt
pour allumer l'appareil.
Assurez-vous que l'appareil est en mode
Utilisateur.
• Si le voyant du réservoir de sel
régénérant est allumé, remplissez
le réservoir.
• Si le voyant du liquide de rinçage
est allumé, remplissez le
3. Chargez les paniers.
4. Ajoutez du produit de lavage. Si vous
utilisez des pastilles « Tout en 1 »,
activez l'option Multitab.
5. Réglez et lancez le programme
adapté au type de vaisselle et au
degré de salissure.
distributeur de liquide de rinçage.
9.1 Utilisation du produit de lavage
Page 33

FRANÇAIS
33
ATTENTION!
Utilisez uniquement un
produit de lavage spécial pour
lave-vaisselle.
1. Appuyez sur la touche de
déverrouillage (A) pour ouvrir le
couvercle (C).
2. Versez le produit de lavage sous
forme de poudre ou tablette dans le
compartiment approprié (B).
3. Si le programme comporte une
phase de prélavage, versez une
petite quantité de produit de lavage
à l'intérieur de la porte de l'appareil.
4. Fermez le couvercle. Assurez-vous
que le couvercle se verrouille
correctement.
9.2 Réglage et départ d'un
programme
Fonction Auto Off
Cette fonction réduit la consommation
d'énergie en éteignant
automatiquement l'appareil lorsqu'il ne
fonctionne pas.
La fonction s'active :
• 5 minutes après la fin du programme
de lavage.
• Au bout de 5 minutes si le
programme n'a pas démarré.
Départ d'un programme
1. Laissez la porte de l'appareil
entrouverte.
2. Appuyez sur la touche Marche/Arrêt
pour allumer l'appareil. Assurez-vous
que l'appareil est en mode
Programmation.
3. Appuyez à plusieurs reprises sur la
touche
indique le numéro du programme
que vous souhaitez lancer. Le
numéro du programme s'affiche
pendant environ 3 secondes, puis la
durée du programme s'affiche.
L'affichage indique la durée du
programme.
4. Sélectionnez les options
compatibles.
5. Fermez la porte de l'appareil pour
démarrer le programme.
jusqu'à ce que l'affichage
Démarrage d'un programme avec départ différé
1. Sélectionnez un programme.
2. Appuyez sur à plusieurs reprises
jusqu'à ce que l'affichage indique le
délai choisi pour le départ différé (de
1 à 24 heures).
Le voyant du départ différé s'allume.
3. Fermez la porte de l'appareil pour
démarrer le décompte.
Pendant un décompte, il est possible
d'allonger le délai du départ différé,
mais pas de changer le programme et
les options.
Lorsque le décompte est terminé, le
programme démarre.
Ouverture de la porte au cours du fonctionnement de l'appareil
Si vous ouvrez la porte lorsqu'un
programme est en cours, l'appareil
s'arrête. Lorsque vous refermez la porte,
l'appareil reprend là où il a été
interrompu.
Durant la phase de séchage, si
la porte est ouverte pendant
plus de 30 secondes, le
programme en cours s'arrête.
Cela ne se produit pas lorsque
le programme avec
l'option AutoOpen est en
cours.
Annulation du départ différé au cours du décompte
Lorsque vous annulez le départ différé,
vous devez régler de nouveau le
programme et les options.
Appuyez simultanément sur les touches
et et maintenez-les enfoncées
jusqu'à ce que l'appareil soit en mode
de sélection du programme.
Annulation du programme
Appuyez simultanément sur les touches
et et maintenez-les enfoncées
Page 34

34
www.aeg.com
jusqu'à ce que l'appareil soit en mode
de sélection du programme.
Assurez-vous que le distributeur de
produit de lavage n'est pas vide avant de
démarrer un nouveau programme de
lavage.
10. CONSEILS
10.1 Généralités
Les conseils suivants garantissent un
résultat de nettoyage et de séchage
optimal pour une utilisation quotidienne
et contribuent également à protéger
l'environnement.
• Retirez les gros résidus alimentaires
des plats et jetez-les à la poubelle.
• Ne rincez pas la vaisselle à la main. Si
nécessaire, utilisez le programme de
prélavage (si disponible) ou
sélectionnez un programme avec une
phase de prélavage.
• Utilisez toujours tout l'espace
disponible dans les paniers.
• Lors du chargement de l'appareil,
assurez-vous que l'eau libérée par les
diffuseurs du bras d'aspersion peut
atteindre la vaisselle et la laver.
Vérifiez que la vaisselle ne se touche
pas et ne se chevauche pas.
• Vous pouvez utiliser à la fois un
produit de lavage, du liquide de
rinçage et du sel régénérant conçus
pour les lave-vaisselle ou des pastilles
de détergent multifonctions (par ex :
« 3 en 1 », « 4 en 1 », « Tout en 1 »).
Suivez les instructions figurant sur
l'emballage. Les pastilles de
détergent multifonctions conviennent
généralement pour les zones où la
dureté de l'eau ne dépasse pas
21 °dH. Dans les zones dépassant
cette limite, il est recommandé
d'utiliser également du liquide de
rinçage et du sel régénérant. Si vous
utilisez des pastilles de détergent
multifonctions, sélectionnez l'option
Multitab (si disponible). Cette option
améliore les résultats de lavage et de
séchage en permettant l'utilisation de
pastilles de détergent multifonctions.
• Sélectionnez le programme adapté au
type de vaisselle et au degré de
salissure. Le programme ECO vous
Fin de programme
Lorsque le programme est terminé et
que vous ouvrez la porte, l'appareil
s'éteint automatiquement.
Fermez le robinet d'eau.
permet d'optimiser votre
consommation d'eau et d'énergie
pour la vaisselle et les couverts
normalement sales.
10.2 Utilisation de sel régénérant, de liquide de rinçage et de produit de lavage
• Utilisez uniquement du sel
régénérant, du liquide de rinçage et
du produit de lavage conçus pour les
lave-vaisselle. D'autres produits
peuvent endommager l'appareil.
• Les pastilles de détergent ne se
dissolvent pas complètement durant
les programmes courts. Pour éviter
que des résidus de produit de lavage
ne se déposent sur la vaisselle, nous
recommandons d'utiliser des pastilles
de détergent avec des programmes
longs.
• N'utilisez que la quantité nécessaire
de produit de lavage. Reportez-vous
aux instructions figurant sur
l'emballage du produit de lavage.
10.3 Que faire si vous ne
voulez plus utiliser de pastilles
de détergent multifonctions
Avant de commencer à utiliser du
produit de lavage, du sel régénérant et
du liquide de rinçage séparément,
effectuez la procédure suivante :
1. Réglez l'adoucisseur d'eau au niveau
maximal.
2. Assurez-vous que le réservoir de sel
régénérant et le distributeur de
liquide de rinçage sont pleins.
3. Lancez le programme le plus court
avec une phase de rinçage. N'utilisez
pas de produit de lavage et ne
chargez pas les paniers.
Page 35

FRANÇAIS
35
4. Lorsque le programme de lavage est
terminé, réglez l'adoucisseur d'eau
en fonction de la dureté de l'eau
dans votre région.
5. Ajustez la quantité de liquide de
rinçage libérée.
10.4 Chargement des paniers
• Utilisez uniquement cet appareil pour
laver des articles qui peuvent passer
au lave-vaisselle.
• Ne mettez pas dans le lave-vaisselle
des articles en bois, en corne, en
aluminium, en étain et en cuivre.
• Ne placez pas dans l'appareil des
objets pouvant absorber l'eau
(éponges, chiffons de nettoyage).
• Enlevez les restes d'aliments sur les
articles.
• Laissez tremper les casseroles
contenant des restes d'aliments
brûlés.
• Chargez les articles creux (tasses,
verres et casseroles) en les retournant.
• La vaisselle et les couverts ne doivent
pas être insérés les uns dans les
autres ni se chevaucher. Mélangez les
cuillères avec d'autres couverts.
• Vérifiez que les verres ne se touchent
pas pour éviter qu'ils ne se brisent.
• Placez les petits articles dans le panier
à couverts.
• Placez les objets légers dans le panier
supérieur. Disposez-les de façon à ce
qu'ils ne puissent pas se retourner.
• Assurez-vous que le bras d'aspersion
tourne librement avant de lancer un
programme.
10.5 Avant le démarrage d'un programme
Assurez-vous que :
• Les filtres sont propres et
correctement installés.
• Le bouchon du réservoir de sel
régénérant est vissé.
• Les bras d'aspersion ne sont pas
obstrués.
• Vous avez utilisé du sel régénérant et
du liquide de rinçage (sauf si vous
utilisez des pastilles de détergent
multifonctions).
• La vaisselle est bien positionnée dans
les paniers.
• Le programme est adapté au type de
vaisselle et au degré de salissure.
• Vous utilisez la bonne quantité de
produit de lavage.
10.6 Déchargement des
paniers
1. Attendez que la vaisselle refroidisse
avant de la retirer du lave-vaisselle.
La vaisselle encore chaude est
sensible aux chocs.
2. Déchargez d'abord le panier
inférieur, puis le panier supérieur.
À la fin du programme, les
côtés et la porte de l'appareil
peuvent être mouillés.
11. ENTRETIEN ET NETTOYAGE
AVERTISSEMENT!
Avant toute opération
d'entretien, éteignez
l'appareil et débranchez la
fiche de la prise secteur.
Les filtres sales et les bras
d'aspersion obstrués
diminuent les résultats de
lavage. Contrôlez-les
régulièrement et nettoyez-les
si nécessaire.
11.1 Nettoyage des filtres
Le système de filtrage se compose de
trois éléments.
Page 36

C
B
A
36
www.aeg.com
1. Faites pivoter le filtre (B) dans le sens
antihoraire puis sortez-le.
5. Assurez-vous qu'il ne reste aucun
résidu alimentaire ni salissure à
l'intérieur ou autour du bord du
collecteur d'eau.
6. Remettez le filtre plat à sa place (A).
Vérifiez qu'il est correctement
positionné sous les deux guides.
7. Remontez les filtres (B) et (C).
2. Retirez le filtre (C) du filtre (B).
3. Retirez le filtre plat (A).
4. Lavez les filtres.
8. Remettez le filtre (B) dans le filtre plat
(A). Tournez-le dans le sens horaire
jusqu'à la butée.
Page 37

FRANÇAIS
37
ATTENTION!
Une position incorrecte des
filtres peut donner de mauvais
résultats de lavage et
endommager l'appareil.
11.2 Nettoyage des bras d'aspersion
Ne retirez pas les bras d’aspersion. Si
des résidus ont bouché les orifices des
bras d'aspersion, éliminez ceux-ci à l'aide
d'un objet fin et pointu.
11.3 Nettoyage extérieur
• Nettoyez l'appareil avec un chiffon
doux humide.
• Utilisez uniquement des produits de
lavage neutres.
• N'utilisez pas de produits abrasifs, de
tampons à récurer ni de solvants.
11.4 Nettoyage intérieur
• Nettoyez soigneusement l'appareil, y
compris le joint caoutchouc du hublot
avec un chiffon doux humide.
• Si vous utilisez régulièrement des
programmes de courte durée, des
dépôts de graisse et des dépôts
calcaires peuvent se former à
l'intérieur de l'appareil. Pour éviter
cela, nous recommandons de lancer
un programme long au moins 2 fois
par mois.
12. EN CAS D'ANOMALIE DE FONCTIONNEMENT
Si l'appareil ne démarre pas ou s'arrête
en cours de programme, avant de
contacter le service après-vente, vérifiez
d'abord si vous ne pouvez pas résoudre
le problème vous même à l'aide des
informations du tableau.
Problème et code d'alarme Solution possible
L'appareil ne s'allume pas. • Assurez-vous que la fiche du câble d'alimentation est bi-
en insérée dans la prise de courant.
• Assurez-vous qu'aucun fusible n'est grillé dans la boîte à
fusibles.
Le programme ne démarre
pas.
L'appareil ne se remplit pas
d'eau.
L'affichage indique .
• Vérifiez que la porte de l'appareil est fermée.
• Si vous avez sélectionné un départ différé, annulez-le ou
attendez la fin du décompte.
• L'appareil a commencé la procédure de recharge de la
résine dans l'adoucisseur d'eau. La durée de la fonction
est d'environ 5 minutes.
• Assurez-vous que le robinet d'eau est ouvert.
• Assurez-vous que la pression de l'arrivée d'eau n'est pas
trop basse. Pour obtenir cette information, contactez
votre compagnie des eaux.
• Assurez-vous que le robinet d'eau n'est pas obstrué.
• Assurez-vous que le filtre du tuyau d'arrivée d'eau n'est
pas obstrué.
• Assurez-vous que le tuyau d'arrivée d'eau n'est pas tordu ni plié.
Pour certaines anomalies, l'écran
affiche un code d'alarme.
Page 38

www.aeg.com38
Problème et code d'alarme Solution possible
L'appareil ne vidange pas
l'eau.
L'affichage indique .
Le système de sécurité antidébordement s'est déclenché.
L'affichage indique .
• Assurez-vous que le siphon de l'évier n'est pas obstrué.
• Assurez-vous que le tuyau d'arrivée d'eau n'est pas tordu ni plié.
• Fermez le robinet d'eau et contactez votre service après
vente.
Une fois que vous avez contrôlé
l'appareil, éteignez l'appareil puis
rallumez-le. Si le problème persiste,
Si des codes d'erreurs non décrits dans
le tableau fourni s'affichent, contactez le
service après-vente.
contactez le service après-vente.
12.1 Les résultats de lavage et de séchage ne sont pas satisfaisants
Problème Solution possible
Traînées blanchâtres ou pellicules bleuâtres sur les verres
et la vaisselle.
Taches et traces de gouttes
d'eau séchées sur les verres et
la vaisselle.
La vaisselle est mouillée. • Le programme ne comprend pas de phase de séch-
• La quantité de liquide de rinçage libérée est trop importante. Placez le sélecteur de dosage du liquide de
rinçage sur un niveau plus faible.
• La quantité de produit de lavage est excessive.
• La quantité de liquide de rinçage libérée n'est pas suffisante. Placez le sélecteur de dosage du liquide de
rinçage sur un niveau plus élevé.
• Il se peut que la qualité du liquide de rinçage soit en
cause.
age ou inclut une phase de séchage à basse température.
• Le distributeur de liquide de rinçage est vide.
• Il se peut que la qualité du liquide de rinçage soit en
cause.
• Il se peut que la qualité des pastilles de détergent
multifonctions soit en cause. Essayez une marque différente ou activez le distributeur de liquide de rinçage
et utilisez du liquide de rinçage avec les pastilles de
détergent multifonctions.
Pour trouver d'autres causes
possibles, reportez-vous au
chapitre « Conseils ».
Page 39

13. CARACTÉRISTIQUES TECHNIQUES
FRANÇAIS
39
Dimensions Largeur / Hauteur / Profon-
deur (mm)
1)
Branchement électrique
Pression de l'eau d'alimentation
Capacité Couverts 13
Consommation électrique Mode « Veille » (W) 0.99
Consommation électrique Mode « Éteint » (W) 0.10
1)
Reportez-vous à la plaque signalétique pour les autres valeurs.
Tension (V) 220-240
Fréquence (Hz) 50
Min. / max. bar (MPa) 0.5 (0.05) / 8 (0.8)
14. EN MATIÈRE DE PROTECTION DE
L'ENVIRONNEMENT
Recyclez les matériaux portant le
symbole . Déposez les emballages
dans les conteneurs prévus à cet effet.
Contribuez à la protection de
l'environnement et à votre sécurité,
recyclez vos produits électriques et
électroniques. Ne jetez pas les appareils
portant le symbole avec les ordures
ménagères. Apportez ce produit à votre
centre de recyclage local ou contactez
votre administration municipale.
596 / 818-898 / 550
Page 40

www.aeg.com
40
INHALTSVERZEICHNIS
1. SICHERHEITSANWEISUNGEN.............................................................................. 41
2. SICHERHEITSINFORMATIONEN.......................................................................... 42
3. GERÄTEBESCHREIBUNG.......................................................................................44
4. BEDIENFELD........................................................................................................... 44
5. PROGRAMME..........................................................................................................45
6. EINSTELLUNGEN....................................................................................................47
7. OPTIONEN.............................................................................................................. 49
8. VOR DER ERSTEN INBETRIEBNAHME.................................................................51
9. TÄGLICHER GEBRAUCH........................................................................................52
10. TIPPS UND HINWEISE..........................................................................................54
11. REINIGUNG UND PFLEGE...................................................................................55
12. FEHLERSUCHE......................................................................................................57
13. TECHNISCHE DATEN.......................................................................................... 58
FÜR PERFEKTE ERGEBNISSE
Danke, dass Sie sich für dieses AEG-Produkt entschieden haben. Wir haben es
geschaffen, damit Sie viele Jahre von seiner ausgezeichneten Leistung und den
innovativen Technologien, die Ihnen das Leben erleichtern, profitieren können.
Es ist mit Funktionen ausgestattet, die in gewöhnlichen Geräten nicht vorhanden
sind. Nehmen Sie sich ein paar Minuten Zeit zum Lesen, um seine Vorzüge
kennen zu lernen.
Besuchen Sie uns auf unserer Website, um:
Anwendungshinweise, Prospekte, Fehlerbehebungs- und ServiceInformationen zu erhalten:
www.aeg.com
Ihr Produkt für einen besseren Service zu registrieren:
www.registeraeg.com
Zubehör, Verbrauchsmaterial und Original-Ersatzteile für Ihr Gerät zu kaufen:
www.aeg.com/shop
REPARATUR- UND KUNDENDIENST
Bitte verwenden Sie ausschließlich Original-Ersatzteile für Ihre Produkte.
Halten Sie folgende Angaben bereit, wenn Sie sich an den Kundendienst wenden
Modell, Produktnummer (PNC), Seriennummer.
Die Informationen finden Sie auf dem Typenschild.
Warn-/ Sicherheitshinweise
Allgemeine Informationen und Empfehlungen
Umweltinformationen
Änderungen vorbehalten.
Page 41

1. SICHERHEITSANWEISUNGEN
Lesen Sie vor der Montage und dem Gebrauch des
Geräts zuerst die Gebrauchsanleitung. Der Hersteller
übernimmt keine Verantwortung für Verletzungen und
Beschädigungen durch unsachgemäße Montage.
Bewahren Sie die Gebrauchsanleitung griffbereit auf.
1.1 Allgemeine Sicherheit
• Dieses Gerät ist für die Verwendung im Haushalt und
ähnliche Zwecke vorgesehen, wie z. B.:
– Bauernhöfe, Personalküchenbereiche in
Geschäften, Büros und anderen Arbeitsumfeldern
– Für Gäste in Hotels, Motels, Pensionen und
anderen wohnungsähnlichen Räumlichkeiten.
• Nehmen Sie keine technischen Änderungen am Gerät
vor.
• Der Betriebswasserdruck (Mindest- und Höchstdruck)
muss zwischen 0.5 (0.05) / 8 (0.8) bar (Mpa) liegen.
• Beachten Sie, dass die Höchstzahl an Maßgedecken
13 beträgt.
• Wenn das Netzkabel beschädigt ist, muss es vom
Hersteller, seinem autorisierten Kundenservice oder
einer gleichermaßen qualifizierten Person
ausgetauscht werden, um Gefahrenquellen zu
vermeiden.
• Stellen Sie Messer und Besteck mit scharfen Spitzen
mit der Spitze nach unten in den Besteckkorb oder
legen Sie sie waagerecht in das Gerät.
• Lassen Sie die Gerätetür nicht ohne Beaufsichtigung
offen stehen, damit von der Tür keine Stolpergefahr
ausgeht.
• Schalten Sie das Gerät immer aus und ziehen Sie den
Netzstecker aus der Steckdose, bevor
Reinigungsarbeiten durchgeführt werden.
• Reinigen Sie das Gerät nicht mit einem Wasser- oder
Dampfstrahl.
DEUTSCH
41
Page 42

42
www.aeg.com
• Das Gerät muss mit den mitgelieferten neuen
Schläuchen an die Wasserversorgung angeschlossen
werden. Alte Schläuche dürfen nicht wieder
verwendet werden.
1.2 Sicherheit von Kindern und schutzbedürftigen Personen
• Das Gerät kann von Kindern ab 8 Jahren und
Personen mit eingeschränkten physischen,
sensorischen oder geistigen Fähigkeiten oder mit
mangelnder Erfahrung und/oder mangelndem Wissen
nur dann verwendet werden, wenn sie durch eine für
ihre Sicherheit zuständige Person beaufsichtigt
werden oder in die sichere Verwendung des Geräts
eingewiesen wurden und die mit dem Gerät
verbundenen Gefahren verstanden haben.
• Kinder dürfen nicht mit dem Gerät spielen.
• Alle Reinigungsmittel von Kindern fernhalten.
• Halten Sie Kinder und Haustiere vom geöffneten
Gerät fern.
• Wartung oder Reinigung des Geräts dürfen nicht von
Kindern ohne Aufsicht erfolgen.
SICHERHEITSINFORMATIONEN
2.
2.1 Montage
• Entfernen Sie das
Verpackungsmaterial.
• Stellen Sie ein beschädigtes Gerät
nicht auf und benutzen Sie es nicht.
• Stellen Sie das Gerät nicht an einem
Ort auf, an dem die Temperatur unter
0 °C absinken kann, und benutzen Sie
das Gerät nicht, wenn die Temperatur
unter 0 °C absinkt.
• Halten Sie sich an die mitgelieferte
Montageanleitung.
• Stellen Sie sicher, dass das Gerät
unter und an angrenzenden sicheren
Konstruktionen montiert ist.
2.2 Elektrischer Anschluss
WARNUNG!
Brand- und
Stromschlaggefahr.
• Das Gerät muss geerdet sein.
• Stellen Sie sicher, dass die
elektrischen Daten auf dem
Typenschild den Daten Ihrer
Stromversorgung entsprechen.
Wenden Sie sich andernfalls an eine
Elektrofachkraft.
• Schließen Sie das Gerät nur an eine
ordnungsgemäß installierte
Schutzkontaktsteckdose an.
• Verwenden Sie keine
Mehrfachsteckdosen oder
Verlängerungskabel.
Page 43

DEUTSCH
43
• Achten Sie darauf, Netzstecker und
Netzkabel nicht zu beschädigen. Falls
das Netzkabel des Geräts ersetzt
werden muss, lassen Sie diese Arbeit
durch unseren autorisierten
Kundendienst durchführen.
• Stecken Sie den Netzstecker erst nach
Abschluss der Montage in die
Steckdose. Stellen Sie sicher, dass der
Netzstecker nach der Montage noch
zugänglich ist.
• Ziehen Sie nicht am Netzkabel, wenn
Sie das Gerät von der
Stromversorgung trennen möchten.
Ziehen Sie stets am Netzstecker.
• Das Gerät entspricht den EWGRichtlinien.
• Nur für GB und Irland Das Gerät
besitzt einen Netzstecker mit einer 13
A Sicherung. Muss die Sicherung im
Netzstecker ausgetauscht werden,
setzen Sie eine 13 A Sicherung des
Typs ASTA (BS 1362) ein.
2.3 Wasseranschluss
• Achten Sie darauf, die
Wasserschläuche nicht zu
beschädigen.
• Bevor Sie neue oder lange Zeit nicht
benutzte Schläuche an das Gerät
anschließen, lassen Sie Wasser durch
die Schläuche fließen, bis es sauber
austritt.
• Achten Sie darauf, dass beim ersten
Gebrauch des Geräts keine
Undichtheiten vorhanden sind.
• Der Wasserzulaufschlauch verfügt
über ein Sicherheitsventil und eine
Ummantelung mit einem
innenliegenden Netzkabel.
WARNUNG!
Gefährliche Spannung.
• Ziehen Sie sofort den Netzstecker aus
der Steckdose, wenn der
Wasserzulaufschlauch beschädigt ist.
Wenden Sie sich für den Austausch
des Wasserzulaufschlauchs an den
autorisierten Kundendienst.
2.4 Gebrauch
• Setzen oder stellen Sie sich niemals
auf die geöffnete Gerätetür.
• Geschirrspüler-Reinigungsmittel sind
gefährlich. Beachten Sie die
Sicherheitsanweisungen auf der
Reinigungsmittelverpackung.
• Trinken Sie nicht das Wasser aus dem
Gerät und verwenden Sie es nicht
zum Spielen.
• Nehmen Sie kein Geschirr aus dem
Gerät, bevor das Programm beendet
ist. Es könnte sich noch
Reinigungsmittel auf dem Geschirr
befinden.
• Es kann heißer Dampf aus dem Gerät
austreten, wenn Sie die Tür während
des Ablaufs eines Programms öffnen.
• Platzieren Sie keine entflammbaren
Produkte oder Gegenstände, die mit
entflammbaren Produkten benetzt
sind, im Gerät, auf dem Gerät oder in
der Nähe des Geräts.
2.5 Entsorgung
WARNUNG!
Verletzungs- und
Erstickungsgefahr.
• Trennen Sie das Gerät von der
Stromversorgung.
• Schneiden Sie das Netzkabel ab, und
entsorgen Sie es.
• Entfernen Sie das Türschloss, um zu
verhindern, dass sich Kinder oder
Haustiere in dem Gerät einschließen.
Page 44

5
4
67
9
8
12
2
3
1
11 10
1 2
83 4 5 6 7
9
www.aeg.com44
3. GERÄTEBESCHREIBUNG
Oberster Sprüharm
1
Oberer Sprüharm
2
Unterer Sprüharm
3
Filter
4
Typenschild
5
Salzbehälter
6
Lüftungsschlitze
7
3.1 Beam-on-Floor
Der Beam-on-Floor ist ein Lichtstrahl, der
unterhalb der Gerätetür auf den
Küchenboden projiziert wird.
• Nach dem Start des Programms
leuchtet der rote Lichtstrahl auf und
bleibt während der gesamten
Programmdauer eingeschaltet.
4. BEDIENFELD
Klarspülmittel-Dosierer
8
Reinigungsmittelbehälter
9
Besteckkorb
10
Unterkorb
11
Oberkorb
12
• Nach Ende des Programms leuchtet
der Lichtstrahl grün.
• Bei einer Störung des Geräts blinkt
der rote Lichtstrahl.
Nach dem Abschalten des
Gerätes erlischt der Beam-onFloor.
Page 45

DEUTSCH
45
Taste „Ein/Aus“
1
Display
2
Delay Taste
3
Program Taste
4
ExtraHygiene Taste
5
4.1 Kontrolllampen
Kontrolllampe
5. PROGRAMME
Programm Verschmutzungs-
P1
1)
P2
2)
P3
3)
P4 • Normal oder
TimeSaver Taste
6
Multitab Taste
7
AutoOpen Taste
8
Kontrolllampen
9
Beschreibung
Kontrolllampe „Programmende“.
Kontrolllampe „Salz“. Sie erlischt während des Programmbetriebs.
Kontrolllampe „Klarspülmittel“. Sie erlischt während des Programmbetriebs.
Programmphasen Optionen
grad
Beladung
• Normal versch-
mutzt
• Geschirr und
Besteck
• Alle
• Geschirr, Bes-
teck, Töpfe und
Pfannen
• Stark versch-
mutzt
• Geschirr, Bes-
teck, Töpfe und
Pfannen
leicht verschmutzt
• Empfindliches
Geschirr und
Gläser
• Vorspülen
• Hauptspülgang 50 °C
• Spülgänge
• Trocknen
• Vorspülen
• Hauptspülgang von 45
°C bis 70 °C
• Spülgänge
• Trocknen
• Vorspülen
• Hauptspülgang 70 °C
• Spülgänge
• Trocknen
• Hauptspülgang 45 °C
• Spülgänge
• Trocknen
• ExtraHygiene
• TimeSaver
• AutoOpen
• Multitab
• ExtraHygiene
• Multitab
• TimeSaver
• Multitab
• Multitab
Page 46

www.aeg.com46
Programm Verschmutzungs-
Programmphasen Optionen
grad
Beladung
P5
4)
• Vor kurzem be-
nutztes Geschirr
• Geschirr und
• Hauptspülgang 60 °C
• Spülgänge
• ExtraHygiene
• Multitab
Besteck
P6
5)
1)
Dieses Programm gewährleistet den wirtschaftlichsten Wasser- und Energieverbrauch für normal
verschmutztes Geschirr und Besteck. (Dies ist das Standardprogramm für Prüfinstitute.)
2)
Das Gerät erkennt den Verschmutzungsgrad und die Anzahl der Geschirrteile in den Körben. Es stellt
dann automatisch die Wassertemperatur und -menge, den Energieverbrauch und die Programmdauer
ein.
3)
Dieses Programm enthält eine Spülphase mit hoher Temperatur, um hygienischere Spülergebnisse zu
liefern. Während der Spülphase wird die Temperatur für mindestens 10 Minuten auf 70 °C gehalten.
4)
Mit diesem Programm können Sie vor kurzem benutztes Geschirr spülen. Sie erhalten gute Spülergebnisse in kurzer Zeit.
5)
Dies ist das leiseste Programm. Die Pumpe arbeitet mit einer sehr niedrigen Drehzahl, um die Geräuschentwicklung zu verringern. Aufgrund der niedrigen Drehzahl verlängert sich die Programmdauer.
• Normal verschmutzt
• Geschirr und
Besteck
• Vorspülen
• Hauptspülgang 50 °C
• Spülgänge
• Trocknen
• Multitab
5.1 Verbrauchswerte
Programm
1)
P1 9.9 0.832 225
Wasser
(l)
Energieverbrauch
(kWh)
Dauer
(Min.)
P2 7 - 14 0.6 - 1.4 40 - 150
P3 12.5 - 14.5 1.4 - 1.6 154 - 164
P4 12 - 14 0.7 - 0.9 75 - 85
P5 10 0.9 30
P6 9 - 10 1.0 - 1.2 219 - 229
1)
Druck und Temperatur des Wassers, die Schwankungen in der Stromversorgung, die ausgewählten
Optionen und die Geschirrmenge können die Werte verändern.
Page 47

DEUTSCH
47
5.2 Informationen für
Prüfinstitute
Möchten Sie Informationen zum
Leistungstest erhalten, schicken Sie eine
E-Mail an:
6. EINSTELLUNGEN
6.1 Programmwahlmodus und
Benutzermodus
Wenn sich das Gerät im
Programmwahlmodus befindet, kann ein
Programm eingestellt und der
Benutzermodus aufgerufen werden.
Im Benutzermodus können folgende
Einstellungen geändert werden:
• Die Stufe des Wasserenthärters
gemäß der Wasserhärte.
• Ein- und Ausschalten des Signaltons
für das Programmende.
• Ausschalten des KlarspülmittelDosierers, wenn Sie die Option
Multitab ohne Klarspülmittel
verwenden möchten.
• Klarspülmittelstufe gemäß der
erforderlichen Dosierung.
Diese Einstellungen bleiben
gespeichert, bis sie von Ihnen wieder
geändert werden.
Einstellen des Programmwahlmodus
Das Gerät befindet sich im
Programmwahlmodus, wenn im Display
die Programmnummer P1 angezeigt
wird.
info.test@dishwasher-production.com
Notieren Sie die Produktnummer (PNC),
die Sie auf dem Typenschild finden.
Wenn Sie das Gerät einschalten,
befindet es sich normalerweise im
Programmwahlmodus. Anderenfalls
können Sie den Programmwahlmodus
folgendermaßen einstellen:
Halten Sie und gleichzeitig
gedrückt, bis sich das Gerät im
Programmwahlmodus befindet.
6.2 Wasserenthärter
Der Wasserenthärter entfernt Mineralien
aus dem Spülwasser, die sich nachteilig
auf die Spülergebnisse und das Gerät
auswirken könnten.
Je höher der Mineralgehalt ist, um so
härter ist das Wasser. Die Wasserhärte
wird in gleichwertigen Einheiten
gemessen.
Der Enthärter muss entsprechend der
Wasserhärte in Ihrem Gebiet eingestellt
werden. Ihr lokales Wasserwerk kann Sie
über die Wasserhärte in Ihrem Gebiet
informieren. Der Wasserenthärter muss
unbedingt auf die richtige Stufe
eingestellt werden, um gute
Spülergebnisse zu garantieren.
Wasserhärte
Deutsche Was-
serhärtegrade
(dH°)
47 -50 84 - 90 8.4 - 9.0 58 - 63 10
43 - 46 76 - 83 7.6 - 8.3 53 - 57 9
37 - 42 65 - 75 6.5 - 7.5 46 - 52 8
29 - 36 51 - 64 5.1 - 6.4 36 - 45 7
23 - 28 40 - 50 4.0 - 5.0 28 - 35 6
Französische
Wasserhärte-
grade (°fH).
mmol/l Clarke Was-
serhärte-
grade
Einstellung für den
Wasserenthärter
Page 48

48
www.aeg.com
Deutsche Was-
serhärtegrade
(dH°)
19 - 22 33 - 39 3.3 - 3.9 23 - 27
15 - 18 26 - 32 2.6 - 3.2 18 - 22 4
11 - 14 19 - 25 1.9 - 2.5 13 - 17 3
4 - 10 7 - 18 0.7 - 1.8 5 - 12 2
<4 <7 <0.7 < 5
1)
Werkseitige Einstellung
2)
Verwenden Sie kein Salz bei diesen Werten.
Einstellen des Wasserenthärters
Das Gerät muss sich im
Programmwahlmodus befinden.
1. Halten Sie zum Aufrufen des
Benutzermodus gleichzeitig und
gedrückt, bis die Kontrolllampen
, , und blinken und das
Display nichts anzeigt.
2. Drücken Sie .
• Die Kontrolllampen , und
erlöschen.
• Die Kontrolllampe blinkt
weiter.
• Im Display wird die aktuelle
Einstellung angezeigt: z.B. =
Stufe 5.
3. Drücken Sie wiederholt, um die
Einstellung zu ändern.
4. Drücken Sie die Taste „Ein/Aus“ zum
Bestätigen der Einstellung.
Französische
Wasserhärte-
grade (°fH).
mmol/l Clarke Was-
serhärte-
grade
wird der Klarspülmittel-Dosierer
ausgeschaltet und es wird kein
Klarspülmittel zugegeben.
Werkseitige Einstellung: Stufe 4.
Einstellen der Klarspülmittelstufe
Das Gerät muss sich im
Programmwahlmodus befinden.
1. Halten Sie zum Aufrufen des
Benutzermodus gleichzeitig
gedrückt, bis die Kontrolllampen
, , und blinken und das
Display nichts anzeigt.
2. Drücken Sie
• Die Kontrolllampen , und
erlöschen.
• Die Kontrolllampe blinkt
weiter.
• Im Display wird die aktuelle
Einstellung angezeigt: z.B. =
Stufe 4.
6.3 Klarspülmittel-Dosierer
Klarspülmittel ermöglichen das Trocknen
des Geschirrs ohne Streifen und Flecken.
Das Klarspülmittel wird automatisch
während der heißen Spülphasen
abgegeben.
Sie können die Zugabemenge für
– Die Klarspülmittelstufen
reichen von 0A bis 6A.
– Stufe 0 = Es wird kein
Klarspülmittel zugegeben.
3. Drücken Sie
Einstellung zu ändern.
4. Drücken Sie die Taste „Ein/Aus“ zum
Bestätigen der Einstellung.
Klarspülmittel zwischen Stufe 1
(Mindestmenge) und Stufe 6
(Höchstmenge) einstellen. Bei Stufe 0
Einstellung für den
Wasserenthärter
1)
5
2)
1
und
.
wiederholt, um die
Page 49

DEUTSCH
49
6.4 Gebrauch des
Klarspülmittels mit MultiReinigungstabletten
Wenn Sie die Option Multitab
einschalten, gibt der KlarspülmittelDosierer weiterhin Klarspülmittel zu. Sie
können den Klarspülmittel-Dosierer
jedoch ausschalten. In diesem Fall sind
die Trockenergebnisse möglicherweise
nicht zufriedenstellend.
Ist der Klarspülmittel-Dosierer
ausgeschaltet, leuchtet die
entsprechende Kontrolllampe nie.
Ausschalten des KlarspülmittelDosierers
Das Gerät muss sich im
Programmwahlmodus befinden.
1. Halten Sie zum Aufrufen des
Benutzermodus gleichzeitig
gedrückt, bis die Kontrolllampen
, , und blinken und das
Display nichts anzeigt.
2. Drücken Sie .
• Die Kontrolllampen
erlöschen.
• Die Kontrolllampe
weiter.
• Im Display wird die aktuelle
Einstellung angezeigt: =
Klarspülmittel-Dosierer
eingeschaltet.
3. Drücken Sie zum Ändern der
Einstellung. = KlarspülmittelDosierer abgeschaltet.
und
, und
blinkt
Die Kontrolllampe
„Klarspülmittel“ erlischt.
4. Drücken Sie die Taste „Ein/Aus“ zum
Bestätigen der Einstellung.
6.5 Signaltöne
Bei einer Störung des Geräts ertönen
akustische Signale. Es ist nicht möglich,
diese Signaltöne auszuschalten.
Es ertönt auch ein Signalton, wenn das
Programm beendet ist. Standardmäßig
ist dieser Signalton ausgeschaltet, es ist
jedoch möglich, ihn einzuschalten.
So schalten Sie den Signalton für das Programmende ein:
Das Gerät muss sich im
Programmwahlmodus befinden.
1. Halten Sie zum Aufrufen des
Benutzermodus gleichzeitig
gedrückt, bis die Kontrolllampen
, , und blinken und das
Display nichts anzeigt.
2. Drücken Sie
• Die Kontrolllampen , und
erlöschen.
• Die Kontrolllampe
weiter.
• Im Display wird die aktuelle
Einstellung angezeigt: =
Signalton ist ausgeschaltet.
3. Drücken Sie
Einstellung.
= Signalton ist eingeschaltet.
4. Drücken Sie die Taste „Ein/Aus“ zum
Bestätigen der Einstellung.
zum Ändern der
und
blinkt
7.
OPTIONEN
Sie müssen die gewünschten
Optionen vor dem
Programmstart einschalten. Es
ist nicht möglich, Optionen
während eines laufenden
Programms ein- oder
auszuschalten.
Page 50

50
www.aeg.com
Nicht alle Optionen lassen
sich miteinander kombinieren.
Wenn Sie Optionen
einschaltet haben, die nicht
miteinander kombinierbar
sind, schaltet das Gerät
automatisch eine oder
mehrere von ihnen aus. Es
leuchten dann nur die
Anzeigen der noch
eingeschalteten Optionen.
7.1 Multitab
Schalten Sie diese Option ein, wenn Sie
Multi-Reinigungstabletten verwenden,
die Salz, Klarspül- und Reinigungsmittel
enthalten. Sie enthalten zum Teil auch
andere Reinigungs- und Spülmittel.
Diese Option schaltet die Zufuhr von Salz
aus. Die Salz-Kontrolllampe leuchtet
nicht.
Bei Verwendung dieser Option
verlängert sich die Programmdauer, um
die Spül- und Trocknungsergebnisse bei
Verwendung von MultiReinigungstabletten zu verbessern.
Einschalten von Multitab
entsprechende Kontrolllampe nicht oder
sie blinkt ein paar Sekunden schnell und
erlischt dann.
Das Display zeigt die aktualisierte
Programmdauer an.
7.3 ExtraHygiene
Diese Option sorgt für hygienischere
Ergebnisse. Während der letzten
Spülphase wird die Temperatur für
mindestens 10 Minuten auf 70 °C
gehalten.
Einschalten von ExtraHygiene
Drücken Sie , die entsprechende
Kontrolllampe leuchtet auf.
Ist die Option nicht mit dem Programm
kombinierbar, leuchtet die
entsprechende Kontrolllampe nicht oder
sie blinkt ein paar Sekunden schnell und
erlischt dann.
Das Display zeigt die aktualisierte
Programmdauer an.
7.4 AutoOpen
Mit dieser Option erhalten Sie bessere
Trockenergebnisse bei einem geringeren
Energieverbrauch.
Drücken Sie .
Die entsprechende Kontrolllampe
leuchtet auf.
7.2 TimeSaver
Wenn diese Option eingeschaltet ist,
erhöht sich der Wasserdruck und die
Wassertemperatur. Die Spül- und
Trockenphasen verkürzen sich.
Die Programmdauer verkürzt sich um
etwa 50 %.
Die Spülergebnisse entsprechen denen
einer normalen Programmdauer. Die
Trockenergebnisse können
beeinträchtigt werden.
Einschalten von TimeSaver
Drücken Sie , die entsprechende
Kontrolllampe leuchtet auf.
Ist die Option nicht mit dem Programm
kombinierbar, leuchtet die
• Während der Trockenphase wird die
Gerätetür von einer besonderen
Vorrichtung einen Spaltbreit geöffnet.
• Am Programmende werden
Vorrichtung und Tür zurückgezogen.
Das Gerät wird automatisch
ausgeschaltet.
Page 51

DEUTSCH
51
ACHTUNG!
Versuchen Sie nicht, die
Gerätetür zu schließen,
während sie von der
Vorrichtung offen gehalten
wird. Andernfalls kann das
Gerät beschädigt werden.
Diese Option wird automatisch
eingeschaltet, wenn das Programm
eingestellt wird. Die
Kontrolllampe „
“ leuchtet auf.
Diese Option ist nicht für andere
Programme verfügbar.
Wenn Sie die Option AutoOpen
ausschalten möchten, drücken Sie .
Die zugehörige Kontrolllampe erlischt. In
diesem Zustand erhöht sich der
Energieverbrauch des Programms.
8. VOR DER ERSTEN INBETRIEBNAHME
1. Prüfen Sie, ob die Einstellung des
Wasserenthärters der Wasserhärte
in Ihrem Gebiet entspricht. Wenn
nicht, stellen Sie die
Wasserenthärterstufe ein.
2. Füllen Sie den Salzbehälter.
3. Füllen Sie den Klarspülmittel-
Dosierer.
4. Öffnen Sie den Wasserhahn.
5. Starten Sie ein Programm, um
Fertigungsrückstände, die sich
möglicherweise noch im Gerät
befinden können, zu beseitigen.
Verwenden Sie kein Reinigungsmittel
und beladen Sie die Körbe nicht.
Wenn Sie ein Programm starten, kann es
bis zu 5 Minuten dauern das Filterharz
des Wasserenthärters zu regenerieren.
Das Gerät scheint nicht zu arbeiten. Die
Spülphase startet erst nach Abschluss
dieses Vorgangs. Dieser Vorgang wird
regelmäßig wiederholt.
8.1 Salzbehälter
2. Füllen Sie 1 Liter Wasser in den
Salzbehälter (nur beim ersten Mal).
3. Füllen Sie den Salzbehälter mit
Geschirrspülsalz.
4. Entfernen Sie das Salz, das sich um
die Öffnung des Salzbehälters herum
angesammelt hat.
ACHTUNG!
Verwenden Sie nur Spezialsalz
für Geschirrspüler.
Das Salz wird für die Regenerierung des
Filterharzes im Wasserenthärter und zur
Erzielung guter Spülergebnisse im
täglichen Gebrauch benötigt.
So füllen Sie den Salzbehälter:
1. Drehen Sie den Deckel des
Salzbehälters gegen den
Uhrzeigersinn und entfernen Sie ihn.
5. Drehen Sie den Deckel des
Salzbehälters im Uhrzeigersinn, um
den Salzbehälter zu schließen.
Beim Befüllen des
Salzbehälters können Wasser
und Salz austreten.
Korrosionsgefahr. Starten Sie
ein Programm, nachdem Sie
den Salzbehälter befüllt
haben, um die Korrosion zu
vermeiden.
Page 52

A
B
C
A
B
C
52
www.aeg.com
8.2 Füllen des Klarspülmittel-
Dosierers
9. TÄGLICHER GEBRAUCH
1. Öffnen Sie den Wasserhahn.
2. Drücken Sie die Taste „Ein/Aus“, um
das Gerät einzuschalten.
Stellen Sie sicher, dass sich das Gerät im
Benutzermodus befindet.
• Füllen Sie den Salzbehälter auf,
wenn die Kontrolllampe
„Salz“ leuchtet.
• Leuchtet die Kontrolllampe
„Klarspülmittel“, füllen Sie den
Klarspülmittel-Dosierer.
3. Beladen Sie die Körbe.
4. Füllen Sie Reinigungsmittel ein.
Wenn Sie die MultiReinigungstabletten verwenden,
schalten Sie die Option Multitab ein.
5. Stellen Sie je nach Beladung und
Verschmutzungsgrad das passende
Programm ein.
ACHTUNG!
Verwenden Sie ausschließlich
Klarspülmittel für
Geschirrspüler.
1. Öffnen Sie den Deckel (C).
2. Füllen Sie den Dosierer (B) mit
Klarspülmittel bis zur Marke „MAX“.
3. Wischen Sie verschüttetes
Klarspülmittel mit einem saugfähigen
Tuch auf, um zu große
Schaumbildung zu vermeiden.
4. Schließen Sie den Deckel. Achten Sie
darauf, dass der Deckel einrastet.
Füllen Sie den KlarspülmittelDosierer auf, wenn die
Füllstandsanzeige für den
Klarspüler (A) durchsichtig
wird.
9.1 Verwenden des Reinigungsmittels
ACHTUNG!
Verwenden Sie nur
Reinigungsmittel für
Geschirrspüler.
1.
Drücken Sie die Entriegelungstaste
(A), um den Deckel (C) zu öffnen.
2. Füllen Sie das Reinigungsmittel ein
oder legen Sie eine
Reinigungstablette in den Behälter
(B).
3. Wenn das Programm einen
Vorspülgang hat, schütten Sie eine
Page 53

DEUTSCH
53
kleine Menge Reinigungsmittel auf
die Innenseite der Gerätetür.
4. Schließen Sie den Deckel. Achten Sie
darauf, dass der Deckel einrastet.
9.2 Einstellen und Starten eines Programms
Funktion Auto Off
Mit dieser Funktion wird der
Energieverbrauch gesenkt, da sich das
Gerät automatisch ausschaltet, wenn es
nicht in Betrieb ist.
Die Funktion schaltet sich in folgenden
Fällen ein:
• 5 Minuten nach Programmende.
• Nach 5 Minuten, wenn das Programm
nicht gestartet wurde.
Starten eines Programms
1. Lassen Sie die Gerätetür einen
Spaltbreit offen.
2. Drücken Sie die Taste „Ein/Aus“, um
das Gerät einzuschalten. Stellen Sie
sicher, dass sich das Gerät im
Programmwahlmodus befindet.
3. Drücken Sie wiederholt die Taste
, bis im Display die Zahl des
gewünschten Programms erscheint.
Die Programmnummer wird etwa 3
Sekunden lang im Display angezeigt,
anschließend wird die
Programmdauer angezeigt.
Im Display wird die Programmdauer
angezeigt.
4. Stellen Sie die verfügbaren Optionen
ein.
5. Schließen Sie die Gerätetür, um das
Programm zu starten.
Starten eines Programms mit Zeitvorwahl
1. Wählen Sie ein Programm.
2. Drücken Sie die Taste wiederholt,
bis im Display die gewünschte
Zeitvorwahl angezeigt wird (zwischen
1 und 24 Stunden).
Die Kontrolllampe der Zeitvorwahl
leuchtet auf.
3. Schließen Sie die Gerätetür, um den
Countdown zu starten.
Während des Countdowns kann die
Zeitvorwahl weiter verlängert werden, es
ist jedoch nicht möglich, die
ausgewählten Programme und Optionen
zu ändern.
Nach Ablauf der Zeitvorwahl wird das
Programm gestartet.
Öffnen der Tür während eines laufenden Programms
Wenn Sie die Tür während eines
laufenden Programms öffnen, stoppt das
Gerät. Wenn Sie die Tür wieder
schließen, läuft das Programm ab dem
Zeitpunkt der Unterbrechung weiter.
Wenn die Tür während der
Trockenphase länger als 30
Sekunden geöffnet wird, wird
das laufende Programm
beendet. Dies geschieht nicht,
wenn das Programm
mit AutoOpen läuft.
Abbrechen einer eingestellten Zeitvorwahl während des Countdowns
Wenn Sie die eingestellte Zeitvorwahl
abbrechen, müssen das Programm und
die Optionen erneut eingestellt werden.
Halten Sie und gleichzeitig
gedrückt, bis sich das Gerät im
Programmwahlmodus befindet.
Beenden des Programms
Halten Sie und gleichzeitig
gedrückt, bis sich das Gerät im
Programmwahlmodus befindet.
Bevor Sie ein neues Programm starten,
stellen Sie sicher, dass der
Reinigungsmittelbehälter gefüllt ist.
Programmende
Wenn das Programm beendet ist und Sie
die Tür öffnen, schaltet sich das Gerät
automatisch aus.
Schließen Sie den Wasserhahn.
Page 54

www.aeg.com
54
10. TIPPS UND HINWEISE
10.1 Allgemeines
Die folgenden Hinweise stellen optimale
Reinigungs- und Trocknungsergebnisse
im täglichen Gebrauch sicher, und
tragen auch zum Umweltschutz bei.
• Schütten Sie größere
Lebensmittelreste auf dem Geschirr in
den Abfallbehälter.
• Spülen Sie das Geschirr nicht von
Hand vor. Verwenden Sie bei Bedarf
das Vorspülprogramm (wenn
verfügbar) oder wählen Sie ein
Programm mit Vorspülgang.
• Nutzen Sie die Körbe immer ganz aus.
• Wenn Sie das Gerät beladen, achten
Sie darauf, dass das Geschirr
komplett von dem Wasser aus den
Sprüharmdüsen erreicht und gespült
wird. Achten Sie darauf, dass das
Geschirr sich weder berührt noch von
anderem Geschirr verdeckt wird.
• Sie können Geschirrspülreiniger,
Klarspüler und Salz separat oder
Kombi-Reinigungstabletten (z.B.
„3in1“, „4in1“, „All in 1“) verwenden.
Befolgen Sie die Anweisungen auf der
Verpackung. KombiReinigungstabletten werden
üblicherweise in Bereichen mit einer
Wasserhärte von bis zu 21 °dH
verwendet. In Regionen mit einer
höheren Wasserhärte müssen auch
Klarspüler und Salz verwendet
werden. Wenn Sie die KombiReinigungstabletten verwenden,
können Sie die Option Multitab
verwenden (falls verfügbar). Diese
Option verbessert die Reinigungsund Trocknungsergebnisse bei
Verwendung von KombiReinigungstabletten.
• Stellen Sie je nach Beladung und
Verschmutzungsgrad das passende
Programm ein. Mit dem Programm
ECO erhalten Sie den
wirtschaftlichsten Energie- und
Wasserverbrauch für Geschirr und
Besteck mit normaler Verschmutzung.
10.2 Verwendung von Salz, Klarspül- und Reinigungsmittel
• Verwenden Sie nur Salz, Klarspüler
und Reinigungsmittel für
Geschirrspüler. Andere Produkte
können das Gerät beschädigen.
• Geschirrspüler-Tabs lösen sich bei
kurzen Programmen nicht vollständig
auf. Wir empfehlen, die Tabletten nur
mit langen Programmen zu
verwenden, damit keine
Reinigungsmittel-Rückstände auf dem
Geschirr zurückbleiben.
• Verwenden Sie nicht mehr als die
angegebene Reinigungsmittelmenge.
Siehe hierzu die Angaben auf der
Reinigungsmittelverpackung.
10.3 Was tun, wenn Sie keine
Multi-Reinigungstabletten
mehr verwenden möchten
Vorgehensweise, um zurück zur
separaten Verwendung von
Reinigungsmittel, Salz und Klarspülmittel
zu kehren:
1. Stellen Sie die höchste
Wasserenthärterstufe ein.
2. Stellen Sie sicher, dass der
Salzbehälter und der KlarspülmittelDosierer gefüllt sind.
3. Starten Sie das kürzeste Programm
mit einer Spülphase. Verwenden Sie
kein Reinigungsmittel und beladen
Sie die Körbe nicht.
4. Stellen Sie den Wasserenthärter nach
Ablauf des Programms auf die
Wasserhärte in Ihrer Region ein.
5. Stellen Sie die Menge des
Klarspülmittels ein.
10.4 Beladen der Körbe
• Spülen Sie im Gerät nur
spülmaschinenfestes Geschirr.
• Spülen Sie im Gerät keine
Geschirrteile aus Holz, Horn,
Aluminium, Zinn oder Kupfer.
• Spülen Sie in diesem Gerät keine
Gegenstände, die Wasser aufnehmen
können (Schwämme, Geschirrtücher
usw.).
Page 55

C
B
A
DEUTSCH
55
• Entfernen Sie Speisereste vom
Geschirr.
• Weichen Sie eingebrannte
Essensreste ein.
• Ordnen Sie hohle Gefäße (z. B.
Tassen, Gläser, Pfannen) mit der
Öffnung nach unten ein.
• Stellen Sie sicher, dass Geschirr und
Besteck nicht aneinander haften.
Mischen Sie Löffel mit anderem
Besteck.
• Achten Sie darauf, dass Gläser
einander nicht berühren.
• Ordnen Sie kleine Gegenstände in
den Besteckkorb ein.
• Ordnen Sie leichte Gegenstände im
Oberkorb an. Achten Sie darauf, dass
diese nicht verrutschen können.
• Vergewissern Sie sich, dass sich der
Sprüharm ungehindert bewegen
kann, bevor Sie ein Programm starten.
10.5 Vor dem Starten eines
Programms
Kontrollieren Sie folgende Punkte:
• Die Filter sind sauber und
ordnungsgemäß eingesetzt.
11. REINIGUNG UND PFLEGE
• Der Deckel des Salzbehälters ist fest
geschlossen.
• Die Sprüharme sind nicht verstopft.
• Geschirrspülsalz und Klarspülmittel
sind vorhanden (außer Sie verwenden
Kombi-Reinigungstabletten).
• Die Geschirrteile sind richtig in den
Körben angeordnet.
• Das Programm eignet sich für die
Beladung und den
Verschmutzungsgrad.
• Die Reinigungsmittelmenge stimmt.
10.6 Entladen der Körbe
1. Lassen Sie das Geschirr abkühlen,
bevor Sie es aus dem Gerät nehmen.
Heißes Geschirr ist stoßempfindlich.
2. Entladen Sie zuerst den Unter- und
dann den Oberkorb.
Am Programmende kann sich
noch Wasser an den
Seitenwänden und der
Gerätetür befinden.
WARNUNG!
Schalten Sie das Gerät immer
aus und ziehen Sie den
Netzstecker aus der
Steckdose, bevor
Reinigungsarbeiten
durchgeführt werden.
Verschmutzte Filter und
verstopfte Sprüharme
beeinträchtigen das
Spülergebnis. Prüfen Sie die
Filter regelmäßig und reinigen
Sie diese, falls nötig.
11.1 Reinigen der Filter
Das Filtersystem besteht aus 3 Teilen.
1. Drehen Sie den Filter (B) nach links
und nehmen Sie ihn heraus.
Page 56

56
www.aeg.com
2. Nehmen Sie den Filter (C) aus dem
Filter (B).
3. Entfernen Sie den flachen Filter (A).
7. Bauen Sie die Filter (B) und (C)
wieder zusammen.
8. Setzen Sie den Filter (B) in den
flachen Filter (A) ein. Drehen Sie ihn
nach rechts, bis er einrastet.
4. Reinigen Sie die Filter.
5. Achten Sie darauf, dass sich keine
Lebensmittelreste oder
Verschmutzungen in oder um den
Rand der Wanne befinden.
6. Setzen Sie den flachen Filter (A)
wieder ein. Stellen Sie sicher, dass er
korrekt unter den beiden Führungen
eingesetzt wurde.
ACHTUNG!
Eine falsche Anordnung der
Filter führt zu schlechten
Spülergebnissen und kann das
Gerät beschädigen.
11.2 Reinigen der Sprüharme
Bauen Sie die Sprüharme nicht aus. Falls
die Löcher in den Sprüharmen verstopft
sind, reinigen Sie sie mit einem dünnen
spitzen Gegenstand.
11.3 Reinigen der Außenseiten
• Reinigen Sie das Gerät mit einem
weichen, feuchten Tuch.
• Verwenden Sie ausschließlich
Neutralreiniger.
• Benutzen Sie keine Scheuermittel,
scheuernde Reinigungsschwämmchen
oder Lösungsmittel.
Page 57

DEUTSCH
57
11.4 Reinigung des
Geräteinnenraums
• Reinigen Sie das Gerät und die
Gummidichtung der Tür sorgfältig mit
einem weichen, feuchten Tuch.
• Wenn Sie regelmäßig
Kurzprogramme verwenden, können
12. FEHLERSUCHE
Das Gerät startet nicht oder bleibt
während des Betriebs stehen. Prüfen Sie,
bevor Sie sich an einen autorisierten
Kundendienst wenden, ob Sie die
Störung anhand der in der Tabelle
Problem und Alarmcode Mögliche Abhilfe
Das Gerät lässt sich nicht
einschalten.
Das Programm startet nicht. • Vergewissern Sie sich, dass die Tür geschlossen ist.
Es läuft kein Wasser in das
Gerät.
Im Display erscheint .
Das Gerät pumpt das Wasser nicht ab.
Im Display erscheint .
Das Wasserauslauf-Schutzsystem ist eingeschaltet.
Im Display erscheint .
diese zu Fett- und Kalkablagerungen
im Gerät führen. Um dieses zu
vermeiden, wird empfohlen,
mindestens zweimal im Monat
Programme mit langer Laufzeit zu
verwenden.
enthaltenen Hinweise selbst beheben
können.
Bei manchen Störungen zeigt das
Display einen Alarmcode an.
• Vergewissern Sie sich, dass der Netzstecker in die Netzsteckdose eingesteckt ist.
• Vergewissern Sie sich, dass im Sicherungskasten keine
Sicherung ausgelöst hat.
• Wenn die Zeitvorwahl eingestellt ist, brechen Sie die
Zeitvorwahl ab, oder warten Sie, bis sie abgelaufen ist.
• Das Gerät regeneriert das Filterharz des Wasserenthärters. Dieser Vorgang dauert ca. 5 Minuten.
• Vergewissern Sie sich, dass der Wasserzulauf geöffnet
ist.
• Vergewissern Sie sich, dass der Wasserdruck der Wasserversorgung nicht zu niedrig ist. Diese Information erhalten Sie von Ihrem Wasserversorger.
• Vergewissern Sie sich, dass der Wasserzulauf nicht verstopft ist.
• Vergewissern Sie sich, dass der Filter im Zulaufschlauch
nicht verstopft ist.
• Vergewissern Sie sich, dass der Zulaufschlauch nicht geknickt oder zu stark gekrümmt ist.
• Vergewissern Sie sich, dass der Siphon nicht verstopft
ist.
• Vergewissern Sie sich, dass der Ablaufschlauch nicht geknickt oder zu stark gekrümmt ist.
• Drehen Sie den Wasserhahn zu und wenden Sie sich an
einen autorisierten Kundendienst.
Schalten Sie nach der Überprüfung das
Gerät aus und wieder ein. Tritt das
Problem erneut auf, wenden Sie sich an
einen autorisierten Kundendienst.
Page 58

www.aeg.com58
Wenden Sie sich an einen autorisierten
Kundendienst, wenn Alarmcodes
angezeigt werden, die nicht in der
Tabelle angegeben sind.
12.1 Die Spül- und Trocknungsergebnisse sind nicht zufriedenstellend
Problem Mögliche Abhilfe
Weiße Streifen oder blau
schimmernder Belag auf Gläsern und Geschirr.
Wasserflecken und andere
Flecken auf Gläsern und Geschirr.
Das Geschirr ist nass. • Das Programm enthält keine Trocknungsphase oder
• Die zugegebene Klarspülmittelmenge ist zu hoch.
Stellen Sie den Dosierwähler für Klarspülmittel niedriger ein.
• Die Reinigungsmittelmenge ist zu hoch.
• Die zugegebene Klarspülmittelmenge ist zu niedrig.
Stellen Sie den Dosierwähler für Klarspülmittel höher
ein.
• Die Ursache kann in der Qualität des Klarspülmittels
liegen.
eine Trocknungsphase mit niedriger Temperatur.
• Der Klarspülmittel-Dosierer ist leer.
• Die Ursache kann in der Qualität des Klarspülmittels
liegen.
• Die Ursache kann in der Qualität der Multi-Reinigungstabletten liegen. Probieren Sie eine andere Marke
aus oder schalten Sie den Klarspülmittel-Dosierer ein
und verwenden Sie ihn zusammen mit den Multi-Reinigungstabletten.
Mögliche andere Ursachen
finden Sie unter „Tipps und
Hinweise“.
13. TECHNISCHE DATEN
Abmessungen Breite / Höhe / Tiefe (mm) 596 / 818-898 / 550
Elektrischer Anschluss
Wasserdruck Min. / Max. bar (MPa) 0.5 (0.05) / 8 (0.8)
Fassungsvermögen Gedecke 13
Leistungsaufnahme Ein-Zustand (W) 0.99
Leistungsaufnahme Aus-Zustand (W) 0.10
1)
Weitere Angaben finden Sie auf dem Typenschild.
1)
14. UMWELTTIPPS
Recyceln Sie Materialien mit dem Symbol
. Entsorgen Sie die Verpackung in den
Spannung (V) 220-240
Frequenz (Hz) 50
entsprechenden Recyclingbehältern.
Recyceln Sie zum Umwelt- und
Page 59

Gesundheitsschutz elektrische und
elektronische Geräte. Entsorgen Sie
Geräte mit dem Symbol nicht mit dem
Hausmüll. Bringen Sie das Gerät zu Ihrer
örtlichen Sammelstelle oder wenden Sie
sich an Ihr Gemeindeamt.
DEUTSCH
59
*
Page 60

www.aeg.com/shop
117902260-A-012014
 Loading...