

Page 1
66201 KF-N
Ceramic hob
Installation and Operating Instructions
Page 2

Dear Customer,
Please read these user instructions carefully and keep them to refer to
later.
Please pass the user instructions on to any future owner of the appliance.
The following symbols are used in the text:
1 Safety instructions
Warning! Notes that concern your personal safety.
Important! Notes that show how to avoid damage to the appliance.
3 Useful tips and hints
2 Environmental information
2
Page 3

Contents
Operating Instructions. . . . . . . . . . . . . . . . . . . . . . . . . . . . . . . . . . . . . 5
Safety instructions. . . . . . . . . . . . . . . . . . . . . . . . . . . . . . . . . . . . . . . . . . . . . . 5
Description of the Appliance. . . . . . . . . . . . . . . . . . . . . . . . . . . . . . . . . . . . . 7
Cooking surface layout . . . . . . . . . . . . . . . . . . . . . . . . . . . . . . . . . . . . . . . . . . . 7
Control panel layout . . . . . . . . . . . . . . . . . . . . . . . . . . . . . . . . . . . . . . . . . . . . . 7
Digital displays . . . . . . . . . . . . . . . . . . . . . . . . . . . . . . . . . . . . . . . . . . . . . . . . . . 8
Safety cut-out function for the cooking zones . . . . . . . . . . . . . . . . . . . . . . . 8
Operating the hob . . . . . . . . . . . . . . . . . . . . . . . . . . . . . . . . . . . . . . . . . . . . . . 9
Touch control sensor panels . . . . . . . . . . . . . . . . . . . . . . . . . . . . . . . . . . . . . . . 9
Switching on the appliance . . . . . . . . . . . . . . . . . . . . . . . . . . . . . . . . . . . . . . . 9
Switching off the appliance . . . . . . . . . . . . . . . . . . . . . . . . . . . . . . . . . . . . . . . 9
Heat settings selecting . . . . . . . . . . . . . . . . . . . . . . . . . . . . . . . . . . . . . . . . . . . 10
Keep warm setting. . . . . . . . . . . . . . . . . . . . . . . . . . . . . . . . . . . . . . . . . . . . . . . 10
Switching the triple ring zone on and off . . . . . . . . . . . . . . . . . . . . . . . . . . . 11
Switching the double ring cooking zone off and on . . . . . . . . . . . . . . . . . . . 12
STOP+GO function. . . . . . . . . . . . . . . . . . . . . . . . . . . . . . . . . . . . . . . . . . . . . . . 13
Switching off a cooking zone. . . . . . . . . . . . . . . . . . . . . . . . . . . . . . . . . . . . . . 14
Residual Heat Indicator. . . . . . . . . . . . . . . . . . . . . . . . . . . . . . . . . . . . . . . . . . . 14
Cooking using the automatic warm up function. . . . . . . . . . . . . . . . . . . . . . 15
Cooking without the automatic warm up function. . . . . . . . . . . . . . . . . . . . 16
Child safety lock. . . . . . . . . . . . . . . . . . . . . . . . . . . . . . . . . . . . . . . . . . . . . . . . . 17
Timer . . . . . . . . . . . . . . . . . . . . . . . . . . . . . . . . . . . . . . . . . . . . . . . . . . . . . . . . . . 19
Uses, tables and tips . . . . . . . . . . . . . . . . . . . . . . . . . . . . . . . . . . . . . . . . . . . . 23
Pans. . . . . . . . . . . . . . . . . . . . . . . . . . . . . . . . . . . . . . . . . . . . . . . . . . . . . . . . . . . 23
Advice on cooking with and without automatic warm up . . . . . . . . . . . . . . 24
Settings for Cooking on the Zones . . . . . . . . . . . . . . . . . . . . . . . . . . . . . . . . . 25
Cleaning and care . . . . . . . . . . . . . . . . . . . . . . . . . . . . . . . . . . . . . . . . . . . . . . 26
What to do if … . . . . . . . . . . . . . . . . . . . . . . . . . . . . . . . . . . . . . . . . . . . . . . . . 27
Rectifying faults. . . . . . . . . . . . . . . . . . . . . . . . . . . . . . . . . . . . . . . . . . . . . . 27
Disposal . . . . . . . . . . . . . . . . . . . . . . . . . . . . . . . . . . . . . . . . . . . . . . . . . . . . . . . 28
3
Page 4

Installation Instructions . . . . . . . . . . . . . . . . . . . . . . . . . . . . . . . . . . . 29
Installation proud of the work surface . . . . . . . . . . . . . . . . . . . . . . . . . . . . 30
Assembly . . . . . . . . . . . . . . . . . . . . . . . . . . . . . . . . . . . . . . . . . . . . . . . . . . . . . . 31
Warranty conditions . . . . . . . . . . . . . . . . . . . . . . . . . . . . . . . . . . . . . . . 34
Service and Spare Parts . . . . . . . . . . . . . . . . . . . . . . . . . . . . . . . . . . . 35
4
Page 5

Operating Instructions
1 Safety instructions
Please comply with these instructions. If you do not, any damage re-
3
sulting is not covered by the warranty.
5 This appliance conforms with the following EU Directives:
– 73/23/EEC dated 19.02.1973 Low Voltage Directive
– 89/336/EEC dated 03.05.1989 EMC Directive inclusive of Amending
Directive 92/31/EEC
– 93/68/EEC dated 22.07.1993 CE Marking Directive
Correct use
• This appliance should be used only for normal domestic cooking and
frying of food.
• The appliance must not be used as a work surface or as a storage surface.
• Additions or modifications to the appliance are not permitted.
Child safety
• Small children must be kept away from the appliance.
• Only let older children work on the appliance under supervision.
General safety
• The appliance may only be installed and connected by trained, registered service engineers.
• Built-in appliances may only be used after they have built in to suitable built-in units and work surfaces that meet standards.
• In the event of faults with the appliance or damage to the glass ceramic (cracks, scratches or splits), the appliance must be switched off
and disconnected from the electrical supply.
• Repairs to the appliance must only be carried out by trained registered service engineers.
5
Page 6

Safety during use
• Remove stickers and film from the glass ceramic.
• There is the risk of burns from the appliance if used carelessly.
• Cables from electrical appliances must not touch the hot surface of
the appliance or hot cookware.
• Overheated fat and oil can ignite quickly. When cooking with fat or
oil (e.g. frying chips) do not leave the appliance unattended.
• Switch the cooking zones off after each use.
Safety when cleaning
• For cleaning, the appliance must be switched off and cooled down.
• For safety reasons, the cleaning of the appliance with steam jet or
high-pressure cleaning equipment is not permitted.
How to avoid damage to the appliance
• The ceramic glass can be damaged by objects falling onto it.
• The edge of the ceramic glass can be damaged by being knocked by
the cookware.
• Cookware made of cast iron, cast aluminium or with damaged bottoms can scratch the ceramic glass if pushed across the surface.
• Objects that melt and things that boil over can burn onto the ceramic
glass and should be removed straightaway.
• Do not use the cooking zones with empty cookware or without cookware.
6
Page 7

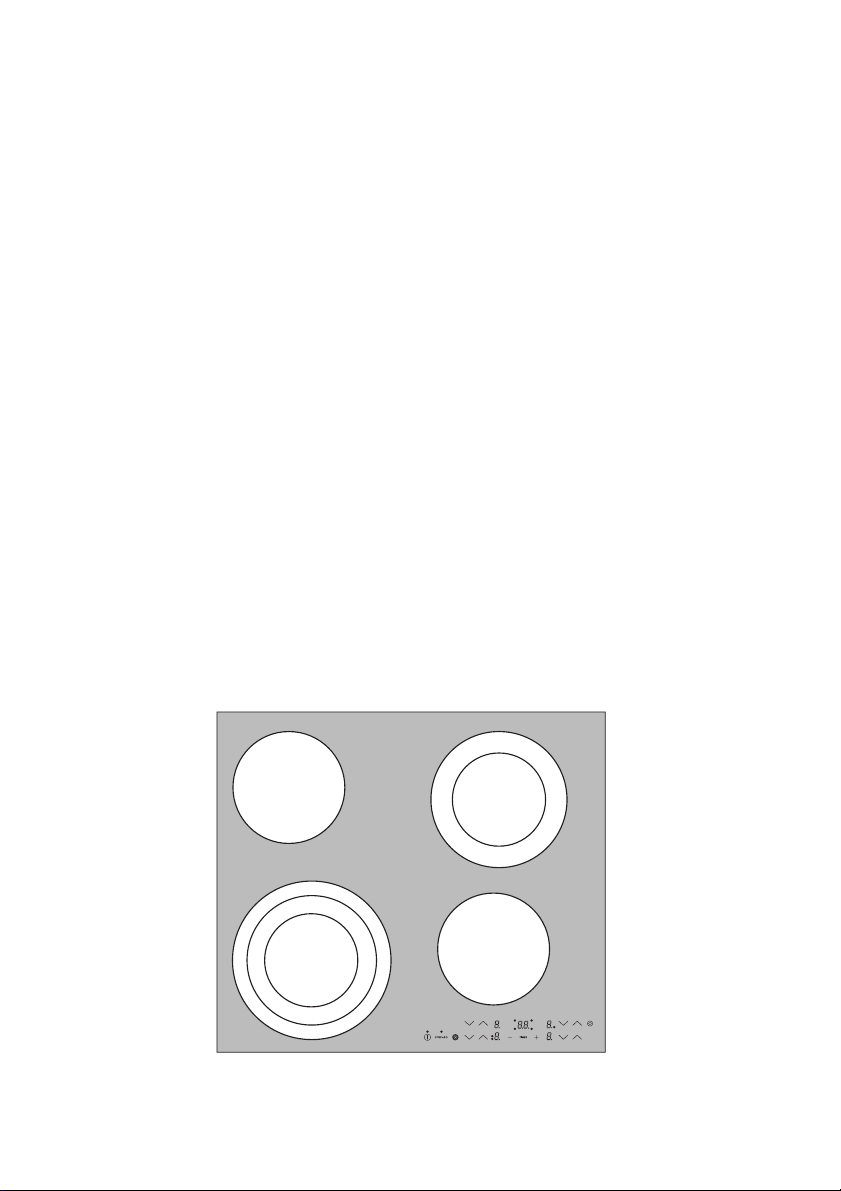
Description of the Appliance
Doubl
Singl
Cooking surface layout
e ring cooking zone
1200W
e ring cooking zone
700/1700W
Triple cooking zone
800/1600/ 2300W
Control panel layout
Triple-ring sensor field
„Stop+Go“
sensor field
Sensor panel
”On/Off”
Triple-ring control lamps
Cooking setting
selector
Control panel Single ring cooking zone
1200W
Double ring zone control lamp
“Timer” with
control indicators
Indicator for cooking setting/ residual heat
Double ring zone sensor field
Cooking setting selector
7
Page 8

Digital displays
The four display panels that belong to the four cooking zones indicate:
– ¾ after having been switched on,
– u when a keep warm setting has been selected,
– ¿ to Ç, depending on the cooking setting selected,
– 2 to 6 (with decimal point) for intermediate cooking settings,
– a when the automatic warm up function is in operation,
– h when there is residual warmth,
– l when the child safety device has been switched on,
– e when there is a malfunction
1 Safety cut-out function for the cooking zones
If one of the cooking zones is not switched off after a certain period of
time or the cooking setting is not altered, that particular cooking zone
will automatically switch itself off.
Any residual warmth will be indicated with h (as for “hot”) in the digital displays corresponding to the particular cooking zones.
The cooking zones switch themselves off when:
• Heat setting u, 1 - 2 after 6 hours
• Heat setting 3 - 4 after 5 hours
• Heat setting 5 after 4 hours
• Heat setting 6 - 9 after 1.5 hours
3 Should one or more cooking zones switch themselves off before the pe-
riods of time indicated have elapsed, see the chapter “What to do if …”.
Other causes for a cooking zone switching itself off
All cooking zones will immediately switch themselves off if liquid boils
over and lands on the control panel.
The same thing will happen if you place a damp cloth on the control
panel. In both instances, after the liquid or cloth has been removed, the
appliance will need to be switched on again using the main switch I.
8
Page 9

Operating the hob
Touch control sensor panels
To operate the touch control sensor panels, touch the desired panel
with the tip of your pointed finger until the relevant displays illuminate
or go out, or until the desired function is carried out.
3 Ensure that you are only touching one sensor panel when operating the
appliance. If you finger is too flat on the panel, the sensor panel below
may be actuated as well.
Switching on the appliance
The entire appliance is switched on using the ”On/Off” sensor panel
I.
Touch the “On/Off” sensor panel for approx. two seconds.
The digital displays will show ¾.
3 After the “On/Off” sensor panel has been actuated to switch on your
appliance, a cooking setting must be selected for a cooking zone within
approx. 10 seconds, or a time must be set using the timer (egg timer
function). If not, the appliance will switch itself off again for reasons
related to safety.
9
Page 10

Switching off the appliance
To completely switch off the appliance, actuate the “On/Off” sensor
panel I.
Touch the “On/Off” sensor panel for approx. one second.
3 After switching off a single cooking zone or the entire cooking surface,
the existing residual warmth will be displayed in the digital displays of
the corresponding cooking zones in the form of h (for “hot”).
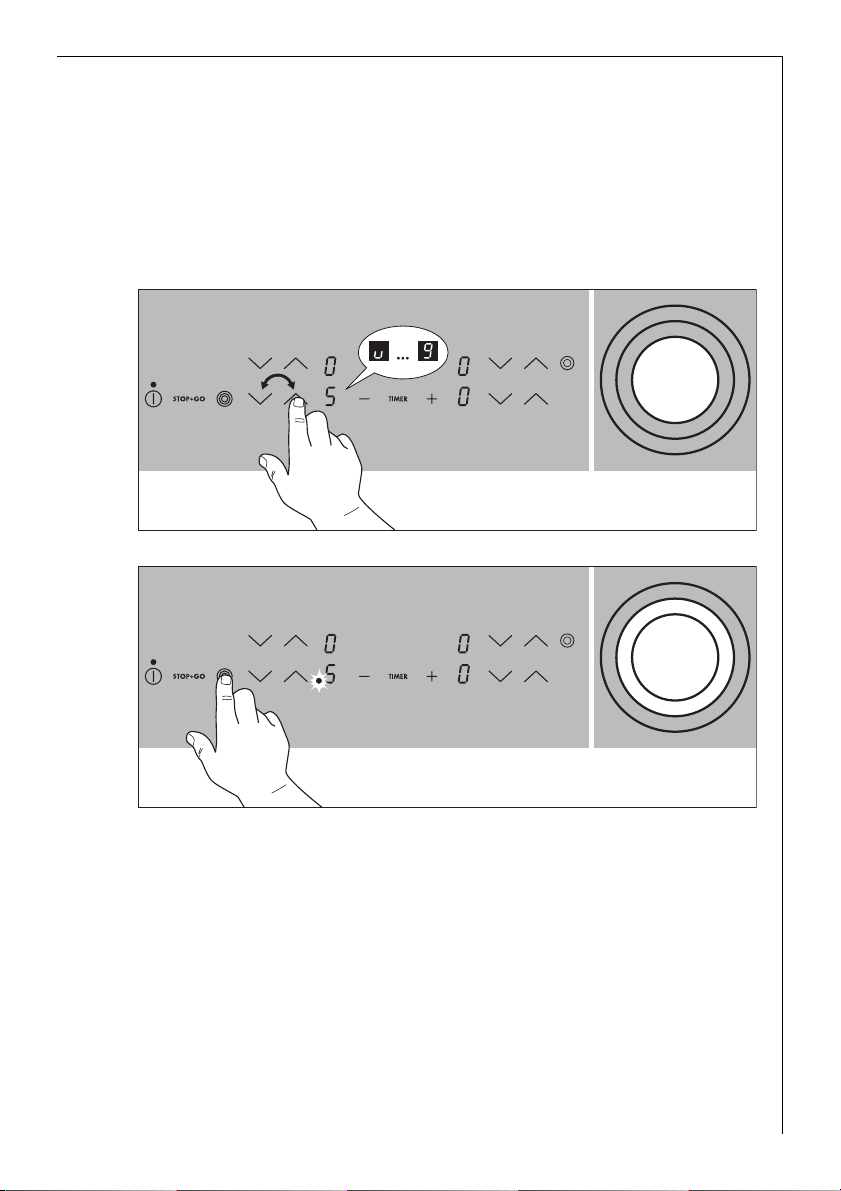
Heat settings selecting
For setting and changing the heat setting (u to Ç) for the selected
cooking zone.
Raise the heat setting using the heat setting selector sensor panel .
Lower the heat setting using the heat setting selector sensor panel .
Keep warm setting
Each of the 4 cooking zones has a keep warm setting u.
Use the heat setting selector sensor panel to set the keep warm set-
ting u.
10
Page 11
Switching the triple ring zone on and off
According to the size of the saucepan or frying pan, when using the triple ring cooking zone you can switch from a smaller cooking zone to a
larger cooking zone using the “triple ring zone” sensor panel.
3 You can only switch to the next size if a heat setting has already been
set for the smaller heating ring.
1. Set the desired heat setting.
2. Touch the “triple ring” sensor panel.
This will switch the setting to the centre heating ring. The lower control
lamp will illuminate.
11
Page 12

3. Touch the “triple ring” sensor panel to activate the outer heating ring.
The upper control lamp will illuminate.
4. To switch off the outer heating ring, touch the “triple ring” sensor panel, and the heating ring that is outermost at the time will switch off.
Switching the double ring cooking zone off and on
According to the size of the saucepan or frying pan, when using the
double ring cooking zone you can switch between the smaller cooking
zone and the larger cooking zone using the “double ring zone” sensor
panel.
3 You can only switch between the two if a heat setting has already been
set for the smaller heating ring.
1. Set the desired heat level.
12
Page 13

2. Touch the “double ring” sensor panel.
This will switch the setting to the outer heating ring. The control light
will illuminate.
3. To switch off the outer heating ring, touch the “double ring” sensor
panel, and the outer heating ring will switch off.
STOP+GO function
When the “Stop+Go” sensor panel is actuated all cooking zones that
are switched on are simultaneously switched to the keep warm setting.
The control light for the “Stop+Go” sensor panel will illuminate. The
keep warm setting will be indicated in the display with u.
When the “Stop+Go” sensor panel is actuated again, the cooking settings that were previously selected are reset and the control light goes
out.
3 The timer is not stopped by the Stop+Go function.
If an automatic warm up function was selected in the heating up
stage a this will be stopped by the Stop+Go function, and the previously selected cooking setting will be reset by actuating the “Stop+Go”
sensor panel again.
13
Page 14

Switching off a cooking zone
1. To switch off a cooking zone touch the heat setting selector sensor
panel and simultaneously, or return the setting to zero using the
heat setting selector sensor panel .
Residual Heat Indicator
When an individual cooking zone or the entire hob is
switched off, any residual heat is shown with an h (for
“Hot”) in the digital display for the appropriate cooking
zones.
Even after the cooking zone has been switched off, the
residual heat indicator only goes out when the cooking zone is cold.
2 You can use the residual heat for melting and keeping food warm.
1 Important! As long as the residual heat indicator is illuminated, there
is a risk of burns.
1 Important! If the power supply is interrupted the h symbol will also
go out and information about residual heat will no longer be available.
However, it is still possible to burn yourself. This can be avoided by taking care around the hob.
14
Page 15

Cooking using the automatic warm up function
All of the cooking surface’s four cooking zones can be adjusted to any
of nine settings, and are equipped with an automatic warm up function:
– ¿, lowest heat setting
– Ç, highest heat setting
– a, automatic warm up function.
When you select the desired heat setting using the heat setting selector sensor panel, the cooking zone will operate at maximum power
for a certain period of time and will then automatically switch back to
the follow-on heat setting that has been set.
The length of time that the automatic warm up function operates depends on the follow-on heat setting selected.
1. Touch the heat setting selector sensor panel to set the desired heat
setting from ¿ to Æ. The heat setting that has been set will then be
displayed. After a period of 5 seconds, the a (=automatic warm up
function) will appear in the display in place of the heat setting. After
the warm up period has finished, the heat setting will once more be
displayed.
3 If you should choose a higher heat setting while the automatic func-
tion is in operation, e.g. from Á to Ã, the period of time that the warm
up function is in operation will be adjusted accordingly. If you select a
lower setting, the warm up period will end immediately.
You can cook using the automatic warm up function only if the cooking zone is cold or moderately warm. If a cooking zone is already hot
when you switch it on (h indicator), the automatic warm up function
cannot be used.
15
Page 16

Cooking without the automatic warm up function
If you wish to use the cooking zones without the automatic warm up
function, select the desired heat setting using the heat setting selector
sensor panel .
1. Touch the heat setting selector sensor panel in order to set the de-
sired heat setting from Ç to ¿.
3 You can change the setting at any time using the heat setting selector
sensor panels and .
16
Page 17

Child safety lock
You can use the child safety lock to safeguard against unwanted use of
the cooking surface.
Switching on the child safety lock
To be able to switch on the child safety lock the appliance must be
switched on, but all the cooking zones must be switched off.
1. Touch the sensor field for approx. three seconds.
An acoustic signal will sound as confirmation.
2. Touch any heat setting sensor field .
l will appear in the displays, and the child safety lock is activated. The
appliance will switch itself off automatically after a few seconds.
17
Page 18

Overriding the child safety lock
The child safety lock can be overridden in order to use the appliance
(until the appliance is switched off again). When the appliance is
switched on again the child safety device is activated once again.
1. Switch on the appliance.
When the child safety device has been activated, l will be displayed.
2. Touch any two heat setting sensor fields and simultaneously.
18
An acoustic signal will sound as confirmation. The child safety device
has been overridden until the appliance is switched off, and the cooking surface can be used as normal.
Page 19

Switching off the child safety lock
1. Switch on the appliance.
When the child safety device has been activated, l will be displayed.
2. Touch the sensor field for approx. three seconds.
An acoustic signal will sound as confirmation.
3. Touch any heat setting sensor field .
The displays will become dark, and the child safety device is switched
off. The appliance will switch itself off automatically after a few seconds.
19
Page 20

Timer
There are two ways to use the timer:
– as a safety cut-out function. Set a cooking period for a cooking
zone, and after this time has elapsed the cooking zone will automatically switch itself off. This function can be used for more than one
cooking zone simultaneously.
– as a countdown timer without a cut-out function (“egg timer”),
whereby an acoustic signal can be heard after the set period of time
has elapsed.
3 The countdown timer cannot be used if a cooking zone is switched on.
Safety cut-out
The cooking zone(s) for which you want to use the safety cut-out function must be switched on.
1. Using the timer sensor panel, select the cooking zone for which the
safety cut-out is to be set.
20
By touching the timer sensor panel once the first active cooking zone is
selected in a clockwise direction, and the corresponding control lamp
will flash rapidly. Hereby the (e.g.) left rear control lamp corresponds to
the left rear cooking zone. 00 will appear in the timer display.
The next active cooking zone is selected by touching the timer sensor
panel again.
Page 21

2. While the control lamp is flashing rapidly, use the + or - timersetting
sensor panels to set the desired period of time for this cooking zone up
until the point where it automatically switches itself off (e.g.
15 minutes).
The safety cut-out function will be activated after several minutes
The control lamp will now flash more slowly and the remaining cooking
time will be shown in the display as it elapses. If the safety cut-out
function has been set for more than one cooking zone, the time displayed will be that for the cooking zone with the shortest period of
cooking time remaining. The control lamps for the other cooking zones
for which the safety cut-out function has been set will illuminate. To
display the remaining cooking time for any of these cooking zones, it
must be selected using the timer sensor panel, and the corresponding
control lamp will then flash rapidly.
To reset the remaining cooking time the desired cooking zone must be
selected using the timer sensor panel. The corresponding control lamp
will then flash more rapidly. The settings are reset using the + or -
timer setting sensor panels.
After the set period of cooking time has elapsed the cooking zone automatically switches itself off, an acoustic signal sounds for two minutes and the timer display flashes 00.
3. To switch off the signal, touch the timer sensor panel.
3 To make the setting more quickly, touch any of the + or - timer set-
ting sensor panels until the desired value is reached.
If the - timer setting sensor panel is actuated first, the time setting
will begin at 99 minutes, and if the + timer setting sensor panel is actuated first, the time setting will begin at 1 minute.
21
Page 22

Switching off the safety cut-out function before it
has come to an end
There are two ways to switch off the safety cut-out function before it
has come to an end.
Switch off the cooking zone and timer simultaneously
1. Using the heat setting selector sensor panel, reset the desired cook-
ing zone to zero: the cooking zone and timer will switch themselves
off.
Switch off the timer – the cooking zone remains active
1. Select the desired cooking zone using the timer sensor panel. The corre-
sponding control lamp will then flash more rapidly.
2. Using the - timer setting sensor panel, set the timer to 00:
– only the timer will switch itself off.
– the cooking zone will remain in operation.
Countdown timer
To be able to use the countdown timer the appliance must be switched
on, but all the cooking zones must be switched off.
1. Touch the timer sensor panel.
00 will be shown in the timer display.
2. Set the desired period of time using the + or - timer setting sensor
panels.
The countdown timer function will be activated after several minutes
and the remaining time will be displayed.
To reset the remaining time, touch the timer sensor panel and change
the setting using the + or - sensor panels for setting the timer.
After the set period of time has elapsed an acoustic signal sounds and
the timer display flashes 00.
3. To switch off the signal, touch the timer sensor panel.
22
Page 23

Uses, tables and tips
Pans
• You can recognise good pans by their bases. The base should be as
thick and flat as possible.
• Pay particular attention when buying new pans to the diameter of
the base. Manufacturers often give only the diameter of the upper
rim.
• Pots with aluminium or copper bases can cause metallic discolouring
on the ceramic glass surface, which is very difficult or impossible to
remove.
• Do not use cast iron pans or pans with a rough, burred or damaged
base. This can produce permanent scratching if the pan is slid across
the surface.
• When cold, pan bases are normal-
ly bowed slightly inwards (concave). They should never be
bowed outwards (convex).
• If you wish to use special types of
pan (e.g. a pressure cooker, simmering pan, wok, etc.), please observe the manufacturer's instructions.
2 Energy saving tips
• Always position pots and pans before switching on the cooking zone.
• Whenever possible always posi-
tion the lids firmly on pots and
pans to cover completely.
• Switch off the cooking zones be-
fore the end of the cooking time
to use the residual heat such as to
keep foods warm or for melting.
• The base of the pan should be the
same size as the cooking zone.
23
Page 24

Advice on cooking with and without automatic warm up
The automatic warm up function is suitable for:
• dishes that start off cold, are heated up at high power and do not
need to be continually watched when cooking on the selected heat
setting,
• dishes that are put in a hot frying pan.
The automatic warm up function is not suitable for:
• goulash, beef olives and similar braised dishes that need continual
turning until browned correctly, have liquid added and are then
braised until cooked,
• dumplings, pasta dishes with large amounts of liquid,
• cooking with pressure cookers,
• very large quantities of soup/stew with more than 2 litres of liquid.
General notes:
• When cooking without the automatic warm up function, we recom-
mend the use of a high heat setting to warm up the food (using the
) and then leave the dish to finish cooking at an appropriate lower
heat setting.
• Take special note of the results when you first use the appliance! You
can then decide which heat setting is the best for "your dishes" in the
"quantities you are accustomed to preparing" with "your pans". You
will then quickly appreciate the advantages of the automatic function and will feel relaxed about using your new hob.
24
Page 25

Settings for Cooking on the Zones
The figures in the following table are benchmark figures. The switch
setting required for a certain cooking method depends on the quality
of the pans and the type and amount of food.
Automatic
Switch
setting
warm up func-
1)
tion
(min.)
Cooking
method
Examples for use
Warming
9
8 4,5
7 3,5
6 2,0 Frying
5 10,2
4 6,5
3 4,8
2 1,7
1 1,0 Melting
u 0,5 Keeping warm Keeping meals warm
1) When cooking without the automatic function the warm up period can be individually selected.
3
Sautéing
Frying
Intensive fry-
ing
Boiling
Steaming
Stewing
Boiling
Warming large amounts of liquid,
boiling noodles,
searing meat,
(browning goulash, braising meat)
Steak, sirloin,
hash browns,
sausages,
pancakes/griddle cakes
Schnitzel/chops,
liver, fish,
rissoles, fried eggs
Cooking up to 1.5 l liquid,
potatoes, vegetables
Steaming and stewing of
small amounts of vegetables,
boiling rice and
milk dishes
Melting butter,
dissolving gelatine,
melting chocolate
3 When warming or sautéing food we recommend that you set the appli-
ance to warm up setting “9” and then, for food which requires a longer
cooking time, switch to the appropriate follow on heat setting to finish
cooking the food.
25
Page 26

Cleaning and care
Take care! Risk of burns from residual heat.
1
Let the appliance cool down.
1 Important Sharp objects and abrasive cleaning materials will damage
the appliance. Clean with water and washing up liquid.
1 Important Residues from cleaning agents will damage the appliance.
Remove residues with water and washing up liquid.
Cleaning the appliance after each use
1. Wipe the appliance with a damp cloth and a little washing up liquid.
2. Rub the appliance dry using a clean cloth.
Removing deposits
1. Place the scraper on the glass ceramic surface at an angle.
2. Remove residues by sliding the blade over the surface.
3. Wipe the appliance with a damp cloth and a little washing up liquid.
4. Rub the appliance dry using a clean cloth.
Remove
Type of dirt
sugar, food containing sugar yes ---
plastics, tin foil yes ---
limescale and water rings --- yes
fat splashes --- yes
shiny metallic discolorations --- yes
*Scrapers and cleaners for glass ceramic and stainless steel can be purchased in specialist shops
immediately
when the appliance has
cooled down
using
a scraper*
cleaner for glass ce-
ramic or stainless
steel*
3 Remove stubborn residues with a cleaner for glass ceramic or stainless
steel.
3 Scratches or dark stains on the glass ceramic that cannot be removed
do not however affect the functioning of the appliance.
26
Page 27

What to do if …
Rectifying faults
It is possible that faults have been caused by a minor error, which you
can correct yourself with the help of the following instructions. Do not
attempt any further repairs if the following instructions do not help in
each specific case.
1 Warning! Repairs to the appliance are only to be carried out by ap-
proved service engineers. Improperly effected repairs may result in considerable risk to the user. If your appliance needs repairing, please
contact your specialist dealer or local Service Force Centre.
If the ceramic glass hob is broken, please quote the 3-digit number on
the glass hob when contacting customer service.
What to do if …
… the cooking zones are not functioning.
Check whether
– the fuse in the house wiring (fuse box) is intact. If the fuses trip a
number of times, please call an authorised electrician.
– the appliance is properly switched on,
– the control lamps in the control panel are illuminated,
– the relevant cooking zone is switched on,
– the cooking zones are set at the desired settings,
– the cooking zones’ safety switchoff function has been activated (see
“Safety” chapter).
… you cannot switch on the cooking zones.
Check whether
– a period of more than 10 seconds has elapsed between when the On/
Off button was actuated and the desired cooking zone switches on
(see chapter “Switching on the appliance”).
– the sensor panels are partially covered by a damp cloth or liquid.
… the display suddenly disappears except for h for residual
warmth.
Check whether
– the On/Off button was accidentally actuated.
– the sensor panels are partially covered by a damp cloth, liquid or sim-
ilar.
– the safety switchoff function has been activated.
27
Page 28

… after having switched off the cooking zones, no h for residual
warmth is indicated in the display.
Check whether
– the cooking zone was only briefly used and therefore did not become
hot enough.
If the cooking zone is hot, please call customer service.
… a cooking zone will not switch off.
Check whether
– the sensor switches are partially covered by a damp cloth or liquid.
– the Stop+Go function is switched on.
…a cooking zone will not switch on.
Check whether
– the child safety device is swiched on.
– the Stop+Go function is switched on.
…the e display is illuminated?
Check whether the cooking zone has been overheated.
This display illuminates in the event of overheating, errors in the electronic equipment or for reasons related to safety.
… the appliance is not responding when a sensor panel is actuated.
The appliance will not respond to a sensor panel being actuated if you
are simultaneously touching another sensor panel that is not part of a
combination.
If you request a visit from customer service because of an error made in
operating the appliance, a visit from a customer service engineer may
not be free of charge even during the warranty period.
Disposal
Packaging material
2
The packaging materials are environmentally friendly and can be recycled. The plastic components are identified by markings, e.g. >PE<,
>PS<, etc. Please dispose of the packaging materials in the appropriate
container at your local waste disposal facilities.
2 Old appliance
Please dispose of your old appliance in line with the guidelines for disposal in your area.
28
Page 29

Installation Instructions
Safety instructions
The laws, ordinances, directives and standards in force in the country of
use are to be followed (safety regulations, proper recycling in accordance with the regulations, etc.)
Installation may only be carried out by a qualified electrician.
The minimum distances to other appliances are to be observed.
Drawers may only be installed with a protective board directly under the appliance.
The cut surfaces of the work top are to be protected against moisture
using a suitable sealant.
The sealant seals the appliance to the work top with no gap.
Do not use silicon sealant between the appliance and the work top.
Avoid installing the appliance next to doors and under windows. Otherwise hot cookware may be knocked off the rings when doors and windows are opened.
1 WARNING!
Risk of injury from electrical current.
• The electrical mains terminal is live.
• Observe connection schematic.
• Observe electrical safety rules.
• Ensure anti-shock protection through correct installation by a quali-
fied electrician.
• The appliance must be connected to the electrical supply by a qualified electrician.
1 IMPORTANT!
Risk of injury from electrical current.
Loose and inappropriate plug and socket connections can make the terminal overheat.
• Have the clamping joints correctedly installed by a qualified electrician.
• Use strain relief clamp on cable.
A device must be provided in the electrical installation which allows the
appliance to be disconnected from the mains at all poles with a contact
opening width of at least 3 mm
Suitable isolation devices include line protecting cut-outs, fuses (screw
type fuses are to be removed from the holder), earth leakage trips and
contactors.
29
Page 30

Appliance dimensions
Width 590 mm
Depth 520mm
Height 47mm
Installation proud of the work surface
• Clean the worktop in the area of the cut-out section.
• Stick the one-sided self-adhesive sealing tape supplied all the way
round the lower edge of the cooking surface along the outer edge of
the glass ceramic panel. Do not stretch it. The cut ends should lie in
the middle of one side. When you have cut it to length (add a few
mm), press the two ends flush up against one another.
30
Page 31

Assembly
31
Page 32

32
Page 33

33
Page 34

Warranty conditions
Great Britain
Standard guarantee conditions
We, AEG, undertake that if within 12 months of the date of the purchase this AEG appliance or
any part thereof is proved to be defective by reason only of faulty workmanship or materials, we
will, at our discretion repair or replace the same FREE OF CHARGE for labour, materials or carriage
on condition that:
• The appliance has been correctly installed and used only on the electricity or gas supply stated
on the rating plate.
• The appliance has been used for normal domestic purposes only, and in accordance with the
manufacturer's operating and maintenance instructions.
• The appliance has not been serviced, maintained, repaired, taken apart or tampered with by any
person not authorised by us.
• All service work under this guarantee must be undertaken by a Service Force Centre. Any appliance or defective part replaced shall become the Company's property.
• This guarantee is in addition to your statutory and other legal rights.
• Home visits are made between 8.30am and 5.30pm Monday to Friday. Visits may be available
outside these hours in which case a premium will be charged.
Exclusions
This guarantee does not cover:
• Damage or calls resulting from transportation, improper use or neglect, the replacement of any
light bulbs or removable parts of glass or plastic.
• Costs incurred for calls to put right an appliance which is improperly installed or calls to appliances outside the United Kingdom.
• Appliances found to be in use within a commercial environment, plus those which are subject
to rental agreements.
• Products of AEG manufacture which are not marketed by AEG.
European Guarantee
If you should move to another country within Europe then your guarantee moves with you to
your new home subject to the following qualifications:
• The guarantee starts from the date you first purchased your product.
• The guarantee is for the same period and to the same extent for labour and parts as exists in
the new country of use for this brand or range of products.
• This guarantee relates to you and cannot be transferred to another user.
• Your new home is within the European Community (EC) or European Free Trade Area.
• The product is installed and used in accordance with our instructions and is only used domesti-
cally, i.e. a normal household.
• The product is installed taking into account regulations in your new country.
Before you move please contact your nearest Customer Care centre, listed below, to give them details of your new home. They will then ensure that the local Service Organisation is aware of your
move and able to look after you and your appliances.
France Senlis +33 (0) 3 44 62 29 29
Germany Nürnberg +49 (0) 800 234 7378
Italy Pordenone +39 (0) 800 117511
Sweden Stockholm +46 (0) 8 672 5360
UK Slough +44 (0) 1753 219899
34
Page 35

Service and Spare Parts
If you wish to purchase spare parts or require an engineer, contact your
local AEG Service Force Centre by telephoning:
08705 929 929
Your telephone call will be automatically routed to the Service Force
Centre covering your post code area.
For the address of your local Service Force Centre and further information about Service Force, please visit the website at
www.serviceforce.co.uk
When you contact the Service Centre they will need the following information:
1. Your name & address, including post code.
2. Your telephone number
3. Clear and concise details of the fault.
4. The model and serial number of the
appliance (found on the rating plate).
5. The purchase date:
Please note that a valid purchase re-
ceipt or guarantee documentation is
required for in-guarantee service
calls.
Customer Care
For general enquiries concerning your AEG appliance or for further information on AEG products please contact our Customer Care Department by letter or telephone at the address below or visit our website at
www.aeg.co.uk.
Customer Care Department
AEG Domestic Appliances
55-77 High Street
Slough
Berkshire, SL1 1DZ
Tel. 08705 350350 (*)
(*) Calls may be recorded for training purposes.
35
Page 36

From the Electrolux Group. The world´s No.1 choice.
The Electrolux Group is the world´s largest producer of powered appliances for kitchen, cleaning and outdoor
use. More than 55 million Electrolux Group products (such as refrigerators, cookers, washing machines,
vacuum cleaners, chain saws and lawn mowers) are sold each year to a value of approx. USD 14 billion in more
than 150 countries around the world.
Hier Typenschild aufkleben
(nur für Werk)
AEG Hausgeräte GmbH
Postfach 1036
D-90327 Nürnberg
http://www.aeg.hausgeraete.de
© Copyright by AEG
822 924 720-A-280104-01
Subject to change without notice
 Loading...