

Page 1

FAVORIT 50873
User manual Dishwasher
Notice d'utilisation Lave-vaisselle
Page 2
Contents
2
Thank you for choosing one of our high-quality products.
To ensure optimal and regular performance of your appliance please read this
instruction manual carefully. It will enable you to navigate all processes perfectly
and most efficiently. To refer to this manual any time you need to, we recommend
you to keep it in a safe plac e. An d p le as e pass it to any future owner of the appliance.
We wish you much joy with your new appliance.
Contents
Operating instructions 3
Safety information 3
Correct use 3
General safety 3
Child safety 3
Installation 4
Product description 4
Control panel 5
Delay start button 6
Digital display 6
Function buttons 6
Setting mode 6
Use of the appliance 7
Setting the water softener 7
Manual adjustment 8
Electronic adjustment 8
Use of dishwasher salt 8
Use of rinse aid 9
Adjusting the rinse aid dosage 10
Loading cutlery and dishes 10
Helpful hints and tips 10
Lower basket 11
Cutlery basket 12
The upper basket 13
Adjustment of the height of the upper
basket 14
Use of detergent 14
Multitab function 16
Washing programmes 17
Setting and starting a washing programme
Cancelling a washing programme 18
Interrupting a washing programme 18
Setting and starting a washing programme
with delay start 19
End of the washing programme 19
Removing the load 19
Care and cleaning 20
Cleaning the filters 20
External cleaning 21
Frost precautions 21
What to do if… 21
Technical data 23
Installation instructions 23
Installation 23
Fitting under a counter 23
Do these steps to remove the appliance
worktop: 24
Adjusting the level of the appliance 24
Water connection 25
Water inlet hose 25
Water drain hose 25
Electrical connection 26
Environment concerns 26
Subject to change without notice
18
Page 3

Safety information
Operating instructions
Safety information
For your safety and correct operation of the appliance, read this manual carefully before
installation and use. Always keep these instructions with the appliance even if you move
or sell it. Users must fully know the operation and safety features of the appliance.
Correct use
• The appliance is designed exclusively for domestic use.
• Only use the appliance to clean household utensils that are applicable for dishwashers.
• Do not put solvents in the appliance. Risk of explosion.
• Put the knives and all items with sharp points in the cutlery basket with their points
down. If not, put in a horizontal position in the upper basket.
• Use only branded products for dishwashers (detergent, salt, rinse aid).
• If you open the door while the appliance is in operation, hot steam can escape. Risk of
skin burns.
• Do not remove dishes from the dishwasher before the end of the washing programme.
• When the washing programme is completed, disconnect the mains plug from the mains
socket and close the water tap.
• Only an authorised service engineer can repair this appliance. Use only original spare
parts.
• Do not do repairs yourself to prevent injury and damage to the appliance. Always contact
your local Service Force Centre.
3
General safety
• Persons (including children) with reduced physical sensory, mental capabilities or lack
of experience and knowledge must not use the appliance. They must have supervision
or instruction for the operation of the appliance by a person responsible for their safety.
• Obey the safety instructions from the manufacturer of the dishwasher detergent to
prevent burns to eyes, mouth and throat.
• Do not drink the water from the dishwasher. Detergent residues can stay in your appliance.
• Always close the door when you do not use the appliance to prevent injury and not to
stumble over the open door.
• Do not sit or stand on the open door.
Child safety
• Only adults can use this appliance. Children must get supervision to make sure that they
do not play with the appliance.
• Keep all the packaging away from children. There is a risk of suffocation.
• Keep all detergents in a safe area. Do not let children touch the detergents.
• Keep children away from the appliance when the door is open.
Page 4

Product description
4
Installation
• Make sure that the appliance is not damaged because of transport. Do not connect a
damaged appliance. If necessary, contact the supplier.
• Remove all packaging before first use.
• A qualified and competent person must do the electrical installation.
• A qualified and competent person must do the plumbing installation.
• Do not change the specifications or modify this product. Risk of injury and damage to
the appliance.
• Do not use the appliance:
– if the mains cable or water hoses are damaged,
– if the control panel, worktop or plinth area are damaged, that you can get access to
the inner side of the appliance.
Contact your local Service Force Centre.
• Do not drill into the sides of the appliance to prevent damage to hydraulic and electrical
components.
WARNING!
Carefully obey the instructions for electrical and water connections.
Product description
Page 5
1 Upper basket
2 Water hardness dial
3 Salt container
4 Detergent dispenser
5 Rinse aid dispenser
6 Rating plate
7 Filters
8 Lower spray arm
9 Upper spray arm
10 Worktop
Control panel
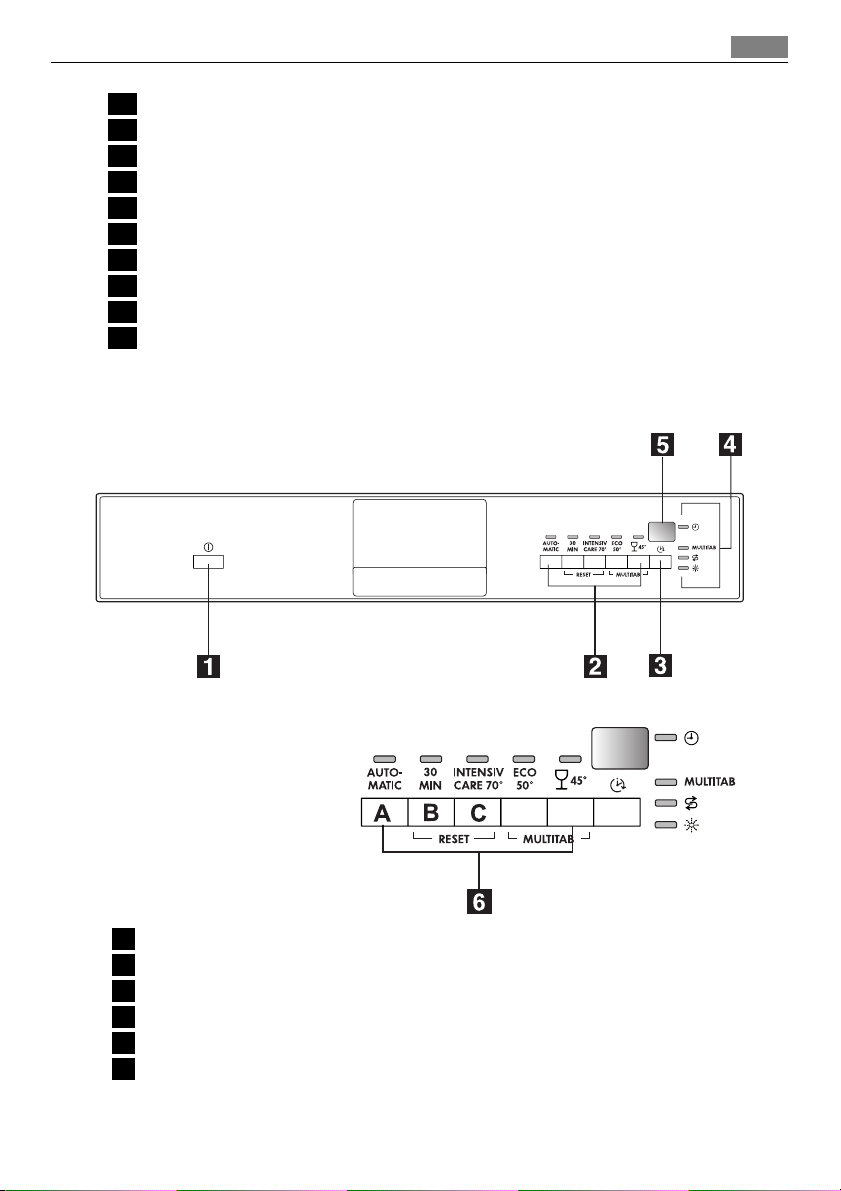
Control panel
5
1 On/off button
2 Programme selection buttons
3 Delay start button
4 Indicator lights
5 Digital display
6 Function buttons
DE
Page 6

Control panel
6
Indicator lights
Programme in progress The indicator light comes on when you select a
washing programme.
Multitab The indicator light shows the activation/deacti-
1)
Salt
Rinse aid
1) When the salt and/or rinse aid containers are empty, the related indicator lights do not come on while a washing
1)
programme operates.
vation of the multitab function. Refer to 'Multitab function'.
The indicator light comes on when it is necessary
to fill the salt container. Refer to 'Use of dishwasher salt'.
After you fill the container, the salt indicator
light can continue to stay on for some hours.
This does not have an unwanted effect on the
operation of the appliance.
The indicator light comes on when it is necessary
to fill the rinse aid. Refer to 'Use of rinse aid'.
Delay start button
Use the delay start button to delay the start of the washing programme with an interval
between 1 and 19 hours. Refer to the chapter 'Setting and starting a washing programme'.
Digital display
The display shows:
• the set level of the water softener.
• Remaining time to the end of the programme.
• Activation/deactivation of the rinse aid dispenser (only with multitab function on).
• End of the washing programme. The display shows a zero.
• Number of hours in delay start.
•Fault codes.
Function buttons
Use the function buttons for these operations:
• To set the water softener. Refer to the chapter 'Setting the water softener'.
• To cancel the washing programme in progress or a delay start in progress. Refer to the
chapter 'Setting and starting a washing programme'.
• To activate/deactivate the multitab function. Refer to the chapter 'Multitab function'.
• To deactivate/activate the rinse aid dispenser, when multitab function is active. Refer to
the chapter 'Multitab function'.
Setting mode
The appliance must be in setting mode for these operations:
• To set a washing programme.
• To set the water softener level.
• To deactivate/activate the rinse aid dispenser.
Page 7
Use of the appliance
Press the on/off button. The appliance is in setting mode when:
– All the programme indicator lights come on.
Press the on/off button. The appliance is not in setting mode when:
– Only one programme indicator light comes on
– A washing programme is set. It is necessary to cancel the programme to go back to the
setting mode. Refer to the chapter 'Setting and starting a washing programme'.
Use of the appliance
Refer to the following instructions for each step of procedure:
1. Make a check if the water softener level is correct for the water hardness in your area.
If necessary set the water softener.
2. Fill the salt container with dishwasher salt.
3. Fill the rinse aid dispenser with rinse aid.
4. Load cutlery and dishes into the dishwasher.
5. Set the correct washing programme for the type of load and soil.
6. Fill the detergent dispenser with the correct quantity of detergent.
7. Start the washing programme.
If you use combi detergent tablets ('3 in 1', '4 in 1', '5 in 1', etc.), refer to the chapter 'Multitab
function'.
Setting the water softener
7
The water softener removes minerals and salts from the water supply. Minerals and salts
can have bad effect on the operation of the appliance.
Water hardness is measured in equivalent scales:
• German degrees (dH°).
• French degrees (°TH).
• mmol/l (millimol per litre - international unit for the hardness of water).
•Clarke.
Adjust the water softener to the water hardness in your area. If necessary, contact your
local water authority.
Water hardness Water hardness setting
°dH °TH mmol/l Clarke manually electronically
51 - 70 91 - 125 9,1 - 12,5 64 - 88 2 10
43 - 50 76 - 90 7,6 - 9,0 53 - 63 2 9
37 - 42 65 - 75 6,5 - 7,5 46 - 52 2 8
29 - 36 51 - 64 5,1 - 6,4 36 - 45 2 7
23 - 28 40 - 50 4,0 - 5,0 28 - 35 2 6
19 - 22 33 - 39 3,3 - 3,9 23 - 27 2 5
15 - 18 26 - 32 2,6 - 3,2 18 - 22 1 4
Page 8
Use of dishwasher salt
8
Water hardness Water hardness setting
°dH °TH mmol/l Clarke manually electronically
11 - 14 19 - 25 1,9 - 2,5 13 - 17 1 3
4 - 10 7 - 18 0,7 - 1,8 5 - 12 1 2
< 4 < 7 < 0,7 < 5
1) No use of salt required.
You must set the water softener manually and electronically.
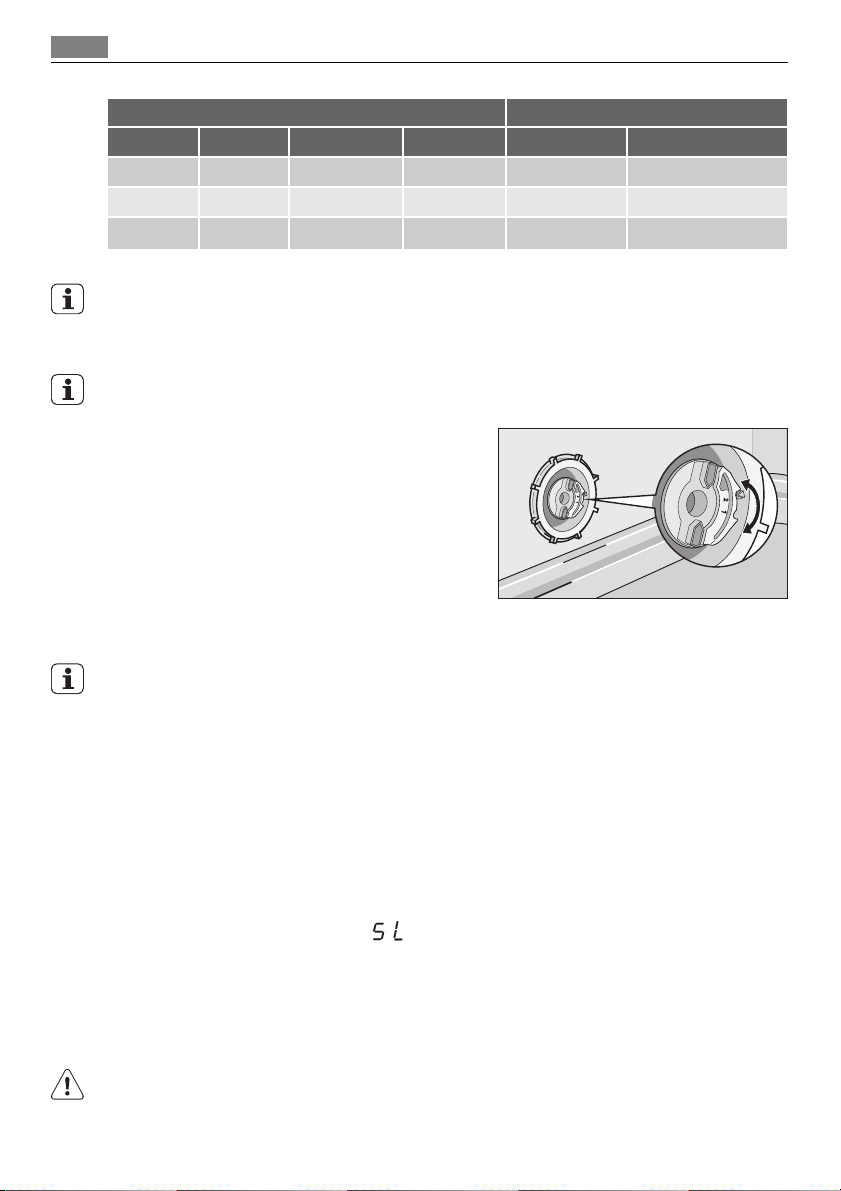
Manual adjustment
The appliance is set at the factory at position 2.
1. Open the door.
2. Remove the lower basket.
3. Turn the water hardness dial to position 1
or 2 (refer to the chart).
4. Install the lower basket.
5. Close the door.
1)
1
1)
1
Electronic adjustment
The water softener is set at the factory at level 5.
1. Switch on the appliance.
2. Make sure that the appliance is in setting mode.
3. Press and hold function buttons B and C until the indicator lights of function buttons
A, B and C start to flash.
4. Release function buttons B and C.
5. Press function button A.
– The indicator lights for function buttons B and C go off.
– The indicator light for function button A continues to flash.
– The digital display shows the current level.
Example: digital display shows
= level 5.
6. Press the function button A one time to increase the water softener level by one step.
7. Press the on/off button to save the operation.
Use of dishwasher salt
CAUTION!
Only use dishwashers salt. Types of salt that are not applicable for dishwashers cause damage to the water softener.
Page 9
Use of rinse aid
CAUTION!
Grains of salt and salty water on the bottom of the appliance can cause corrosion. Fill the
appliance with salt before you start a washing programme to prevent corrosion.
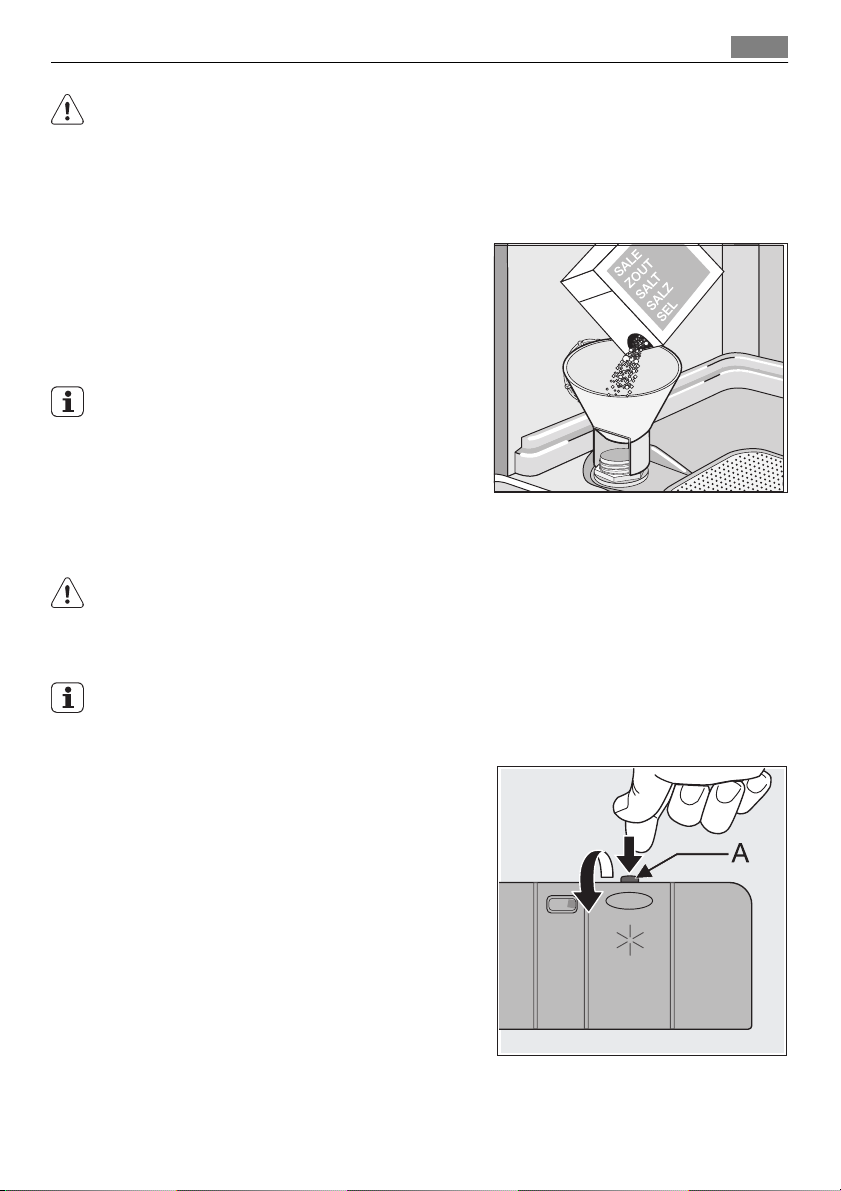
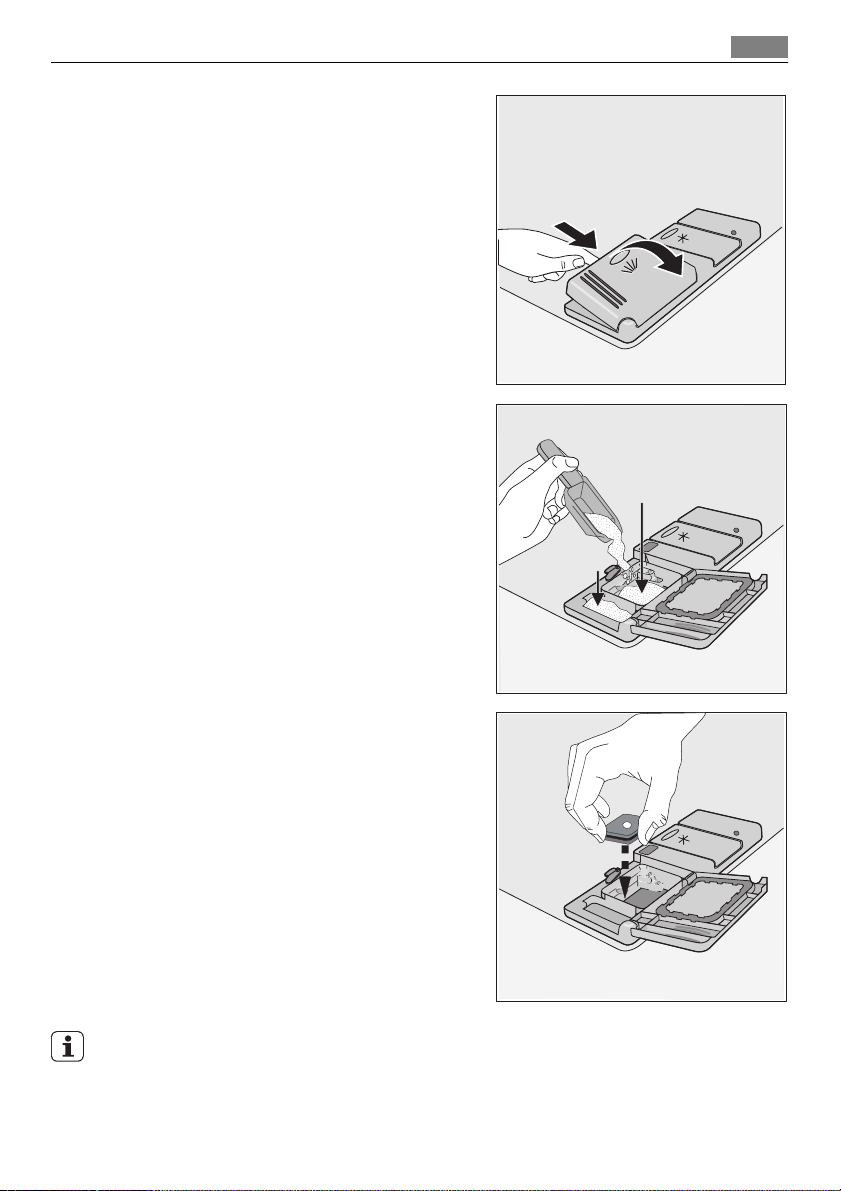
Do these steps to fill the salt container:
1. Turn the cap anticlockwise to open the salt container.
2. Fill the salt container with 1 litre of water (only the first operation).
3. Use the funnel to fill the salt container
with salt.
4. Remove the salt around the opening of
the salt container.
5. Turn the cap clockwise to close the salt
container.
It is normal that water overflows from the salt
container when you fill it with salt.
Use of rinse aid
CAUTION!
Only use branded rinse aid for dishwashers.
Do not fill the rinse aid dispenser with other products (e.g. dishwasher cleaning agent, liquid
detergent). This can cause damage to the appliance.
9
Rinse aid makes it possible to dry the dishes without streaks and stains.
Rinse aid is automatically added during the last rinsing phase.
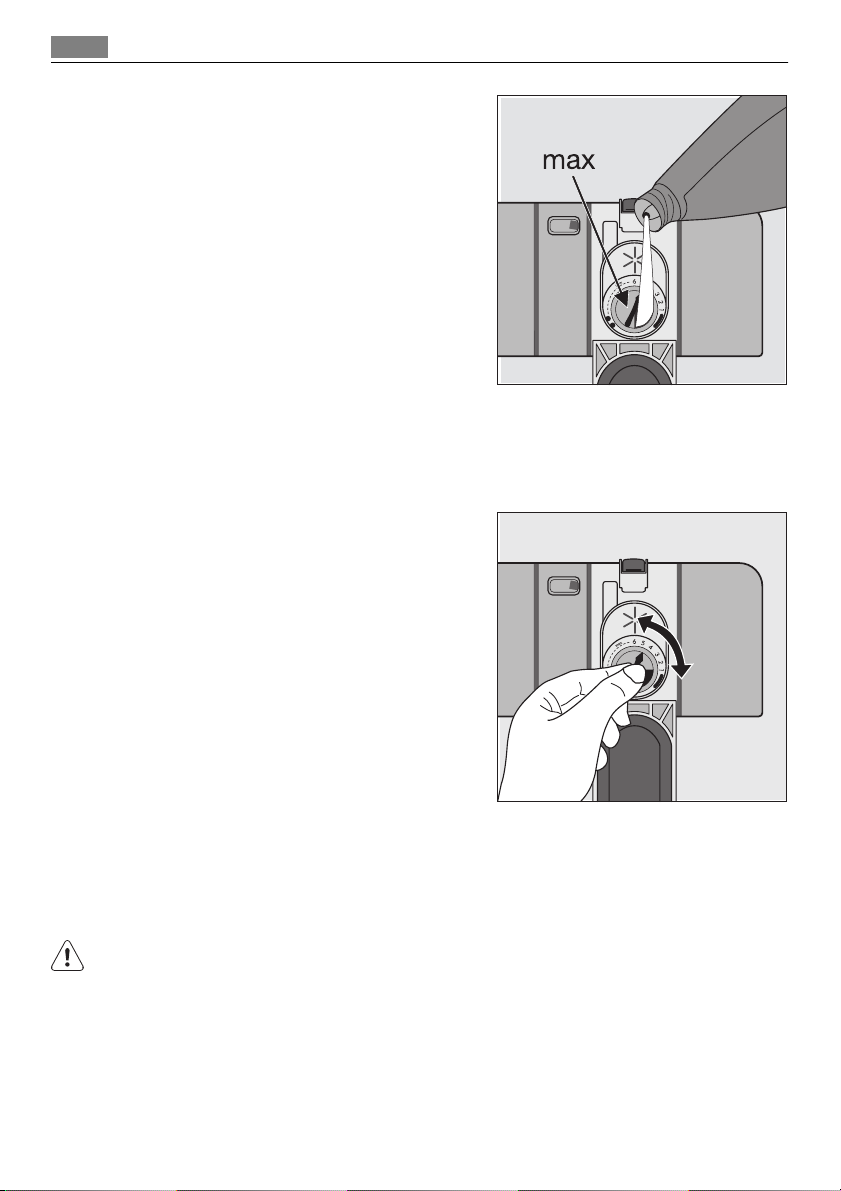
Do these steps to fill the rinse aid dispenser:
1. Press the release button (A) to open the
rinse aid dispenser.
Page 10
Loading cutlery and dishes
10
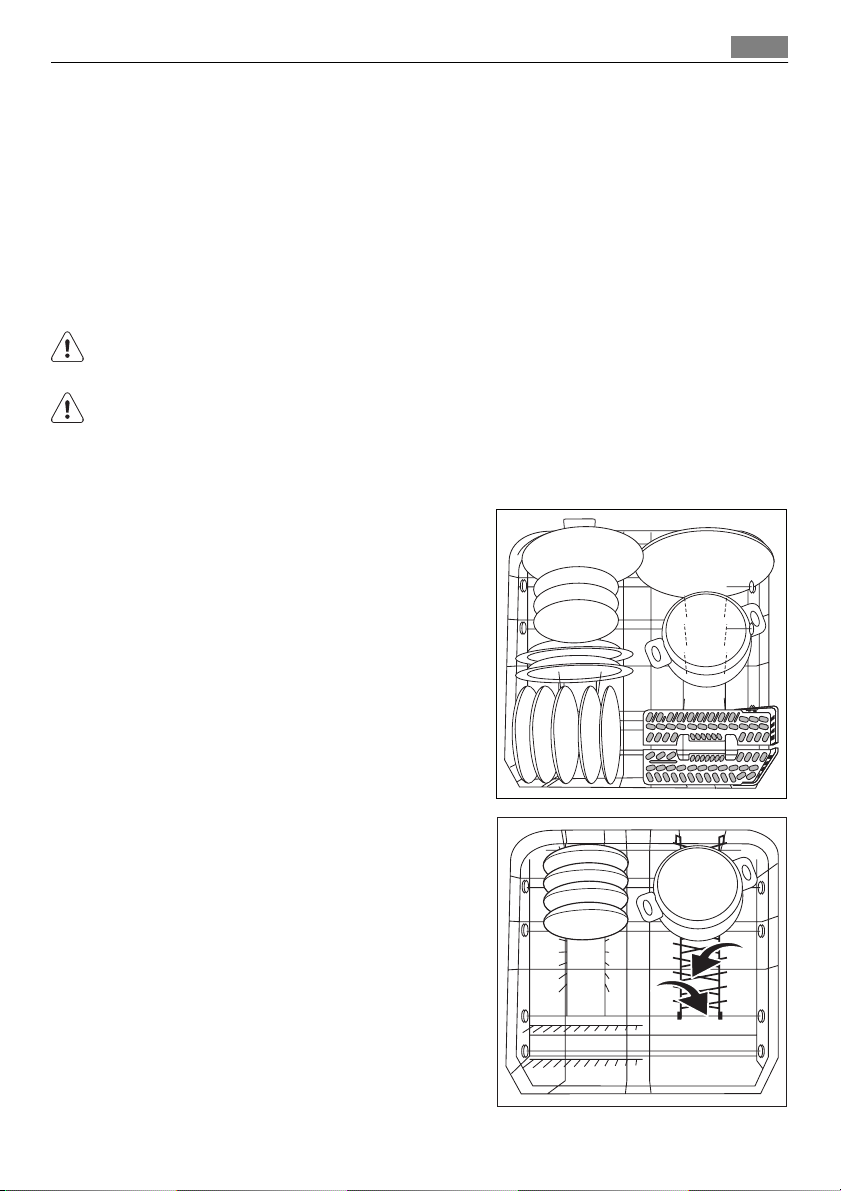
2. Fill the rinse aid dispenser with rinse aid.
The mark 'max.' shows the maximum level.
3. Remove the spilled rinse aid with an absorbent cloth to prevent too much foam
during the subsequent washing programme.
4. Close the rinse aid dispenser.
Adjusting the rinse aid dosage
The rinse aid is set at the factory at position 4.
You can set the rinse aid dosage between position 1 (lowest dosage) and position 6 (highest
dosage).
Turn the rinse aid dial to increase or decrease the
dosage.
– Increase the dosage if there are water droplets
or limescale on the dishes.
– Decrease the dosage if there are streaks, whitish
stains or bluish layers on the dishes.
Loading cutlery and dishes
Helpful hints and tips
CAUTION!
Only use the appliance for household utensils that are applicable for dishwashers.
Do not use the appliance to clean objects that can absorb water (sponges, household cloths,
etc.).
• Before you load cutlery and dishes, do these steps:
– Remove all food remainings and debris.
– Make burnt, remaining food in pans soft.
Page 11
Loading cutlery and dishes
• While you load cutlery and dishes, do these steps:
– Load hollow items (e.g. cups, glasses and pans) with the opening down.
– Make sure that water does not collect in the container or in a deep base.
– Make sure that cutlery and dishes do not lie inside one another.
– Make sure that cutlery and dishes do not cover other cutlery and dishes.
– Make sure that glasses do not touch other glasses.
– Put small objects in the cutlery basket.
• Plastic items and pans with non-stick coatings can keep water droplets. Plastic items do
not dry as well as porcelain and steel items.
• Put light items in the upper basket. Make sure that the items do not move.
CAUTION!
Make sure that the spray arms can move freely before you start a washing programme.
WARNING!
Always close the door after you load or unload the appliance. An open door can be dangerous.
Lower basket
Put large and heavily soiled dishes and pans in the
lower basket.
11
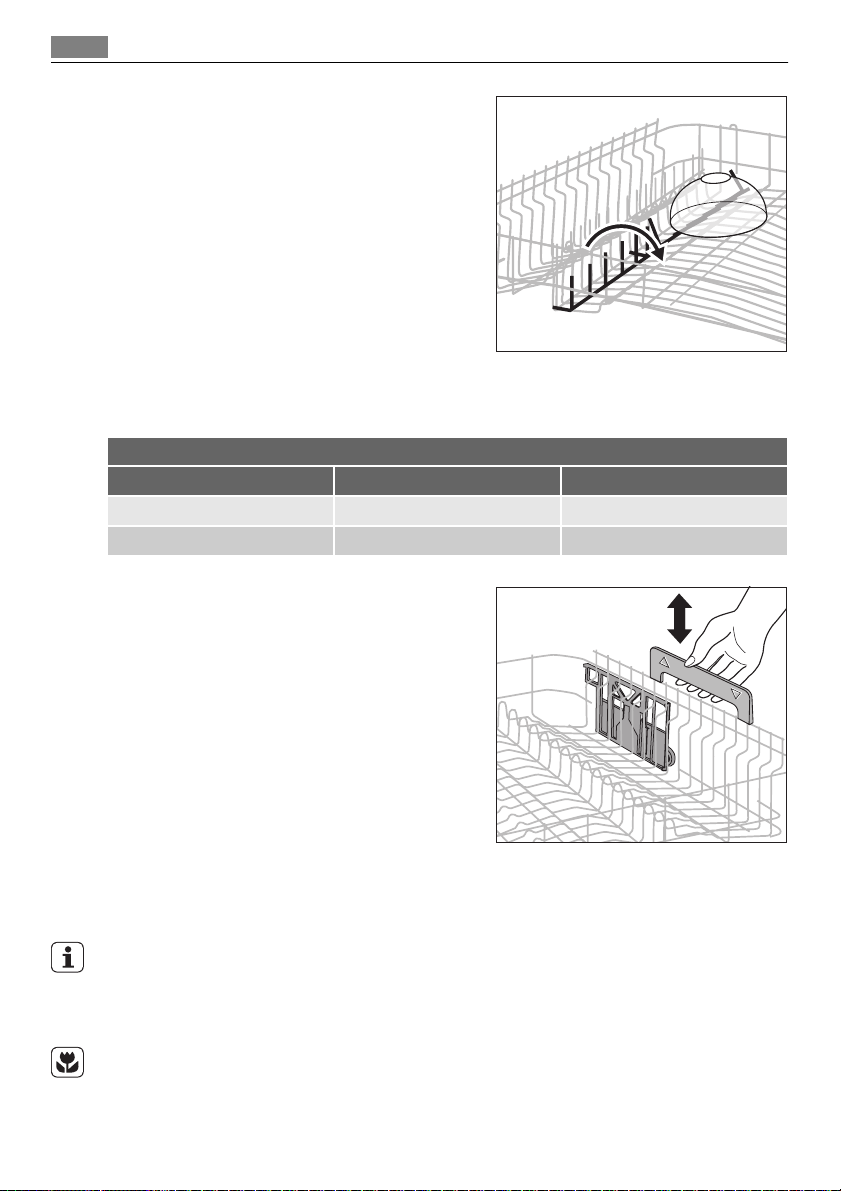
The rows of prongs in the lower basket can be flat
to load large dishes, pots, pans and bowls.
Page 12
Loading cutlery and dishes
12
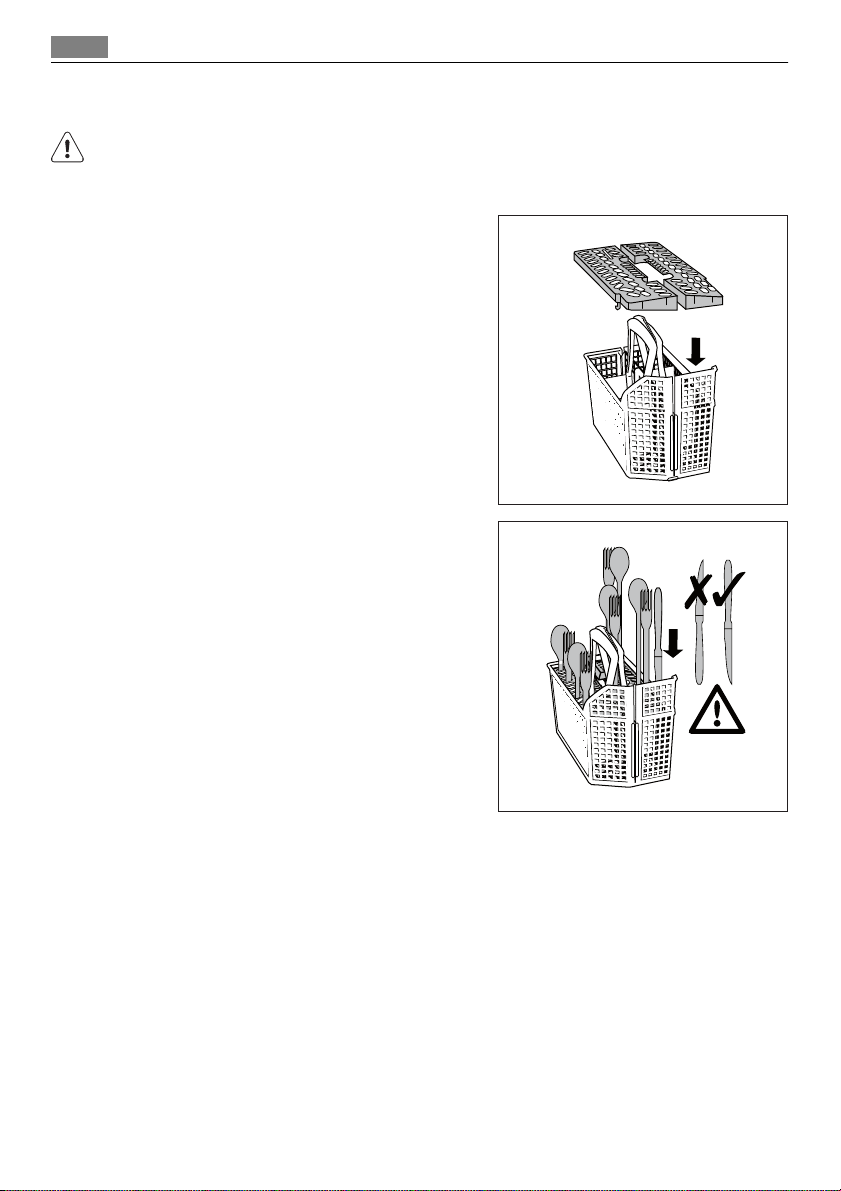
Cutlery basket
WARNING!
Do not put long-bladed knives in a vertical position. Arrange long and sharp cutlery horizontally in the upper basket. Be careful with sharp items.
Use the cutlery grids.
• Put the grids on the cutlery basket.
• For larger items use only one of the cutlery grids.
• Put forks and spoons with the handles down.
• Put knives with the handles up.
• Mix spoons with other cutlery to prevent
them to bond together.
Page 13

The upper basket
The upper basket is for saucers, salad bowls, cups,
glasses, pots and lids. Arrange the items to let water touch all surfaces.
• Put knives and small cutlery in the cutlery
tray. Put cutlery that is too large for the cutlery tray in the cutlery basket.
• For longer items fold the cup racks up.
• Put glasses with long stems in the cup racks
with the stems up.
Loading cutlery and dishes
13
• For glasses with long stems, turn the glass
holder to the left or to the right.
Page 14
Use of detergent
14
• You can fold up or down the row of prongs
on the left side of the upper basket to increase load flexibility.
Adjustment of the height of the upper basket
You can put the upper basket in two positions to increase load flexibility.
Maximum height of the dishes in:
the upper basket the lower basket
Upper position 22 cm 30 cm
Lower position 24 cm 29 cm
Do these steps to move to the upper basket to the lower/upper position:
1. Pull out the upper basket until it stops.
2. Hold the upper basket by the handle, lift it
as far as possible and lower it vertically.
The upper basket latches into the lower or
the upper position.
Use of detergent
Only use detergents (powder, liquid or tablet) that are applicable for dishwashers.
Follow the data on the packaging:
• Dosage recommended by the manufacturer.
• Storage recommendations.
Do not use more than the correct quantity of detergent to save an environment.
Do these steps to fill the detergent dispenser:
Page 15
1. Open the lid of the detergent dispenser.
2. Fill the detergent dispenser (A) with detergent. The marking shows the dosage:
20 = approximately 20 g of detergent
30 = approximately 30 g of detergent.
3. If you use a washing programme with prewash phase, put more detergent in the
prewash detergent compartment (B).
Use of detergent
A
B
15
4. If you use detergent tablets, put the detergent tablet in the detergent dispenser
(A).
5. Close the lid of the detergent dispenser.
Press the lid until it locks into position.
Different brands of detergent dissolve in different times. Some detergent tablets do not
have the best cleaning results during short washing programmes. Use long washing programmes when you use detergent tablets to fully remove the detergent.
Page 16
Multitab function
16
Multitab function
The multitab function is for combi detergent tablets.
These tablets contain agents such as detergent, rinse aid and dishwasher salt. Some types
of tablets can contain other agents.
Do a check if these tablets are applicable for the local water hardness. Refer to the instructions from the manufacturer.
When you set the multitab function, it stays on until you deactivate it.
The multitab function stops automatically the flow of rinse aid and salt. The rinse aid
indicator light and salt indicator light are deactivated.
The programme duration can increase if you use the multitab function.
Activate or deactivate the multitab function before the start of a washing programme.
You cannot activate or deactivate the multitab function when the programme operates.
Cancel the washing programme, then set the programme again.
To activate the multitab function:
• Press and hold the two multitab buttons (function buttons D and E). The multitab indi-
cator light comes on.
To deactivate the multitab function:
• Press and hold the two multitab buttons (function buttons D and E). The multitab indi-
cator light goes off.
Do these steps if the drying results are not satisfactory:
1. Fill the rinse aid dispenser with rinse aid.
2. Activate the rinse aid dispenser.
3. Set the rinse aid dosage to position 2.
• You can only activate or deactivate the rinse aid dispenser when the multitab function
is activated.
To activate/deactivate the rinse aid dispenser:
1. Switch on the appliance.
2. Make sure that the appliance is in setting mode.
3. Press and hold function buttons B and C.
– The indicator lights for function buttons A, B, and C start to flash.
4. Release function buttons B and C.
5. Press function button B.
– The indicator lights for function buttons A and C go off.
– The indicator light for function button B continues to flash.
– The digital display shows the setting.
Rinse aid dispenser deactivated
Rinse aid dispenser activated
6. Press function button B again.
– The digital display shows the new setting.
7. Switch off the appliance to save the operation.
Page 17
Washing programmes
To use normal detergent again:
1. Deactivate the multitab function.
2. Fill the salt container and rinse aid dispenser.
3. Adjust the water hardness setting to the highest level.
4. Do a washing programme without dishes.
5. Adjust the water softener to the water hardness in your area.
6. Adjust the rinse aid dosage.
Washing programmes
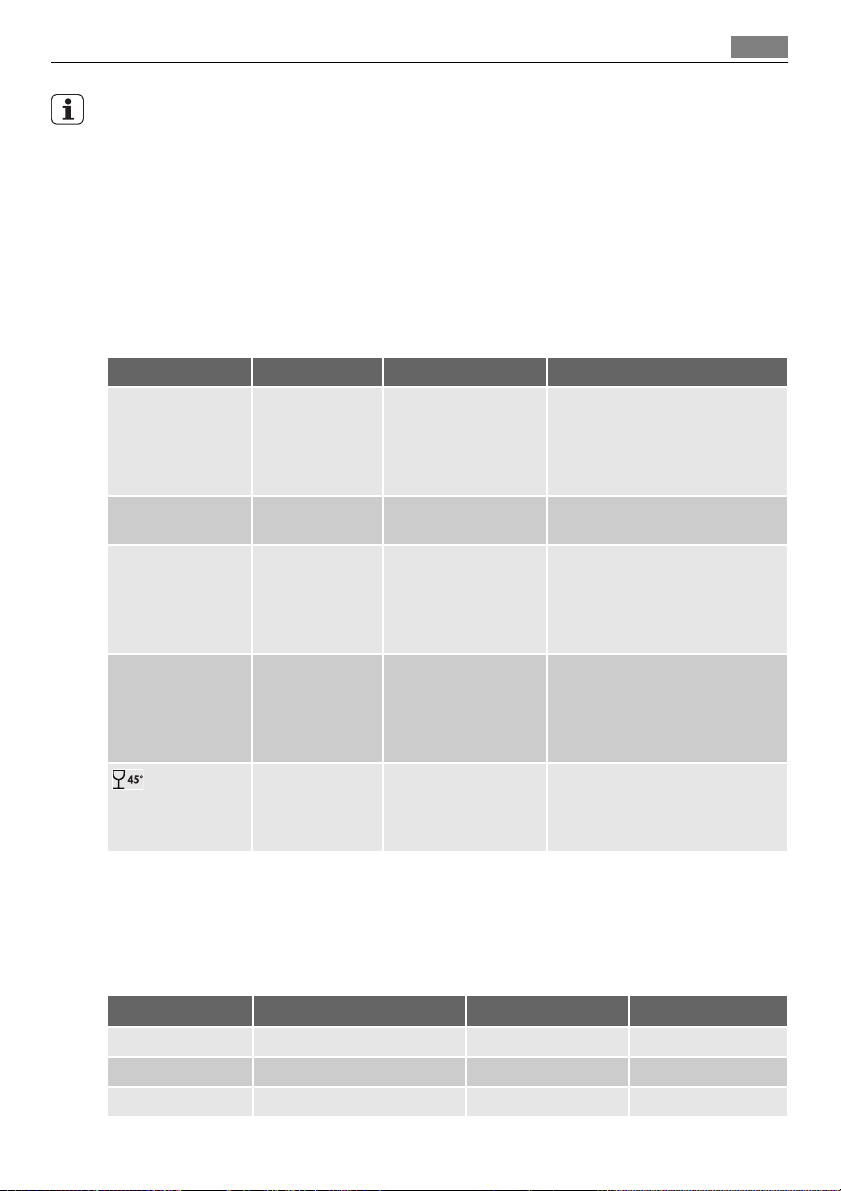
Washing programmes
Programme Degree of soil Type of load Programme description
AUTOMATIC
30 MIN
INTENSIV CARE 70° Heavy soil Crockery, cutlery,
ECO 50°
1) During the Automatic programme, the soil level of the dishes is given by how cloudy the water is. The programme
duration and consumptions can change. This depends if the appliance is fully or not and on the level of soil on
the dishes. The appliance adjusts automatically the temperature of the water during the main wash.
2) This is the perfect daily programme to clean a not fully load. Ideal for a family of 4 persons who only want to
load breakfast and dinner crockery and cutlery.
3) Test programme for test institutes. Please refer to separate leaflet supplied, for test data.
1)
2)
3)
Consumption values
Programme
AUTOMATIC - 1,1 - 1,7 12 - 23
30 MIN - 0,9 9
INTENSIV CARE 70° - 1,5 - 1,7 16 - 18
Any Crockery, cutlery,
Normal or light
soil
Normal soil Crockery and cutlery Prewash
Normal or light
soil
Duration (in minutes)
pots and pans
Crockery and cutlery Main wash up to 60°C
pots and pans
Delicate crockery and
glassware
1)
Energy (in kWh) Water (in litres)
Prewash
Main wash up to 45°C or 70°C
1 or 2 intermediate rinses
Final rinse
Drying
Final rinse
Prewash
Main wash up to 70°C
1 intermediate rinse
Final rinse
Drying
Main wash up to 50°C
1 intermediate rinse
Final rinse
Drying
Main wash up to 45°C
1 intermediate rinse
Final rinse
Drying
17
Page 18

Setting and starting a washing programme
18
Programme
ECO 50° - 1,0 - 1,1 12 - 13
1) The digital display shows the programme duration.
Duration (in minutes)
- 0,8 - 0,9 14 - 15
1)
Energy (in kWh) Water (in litres)
The pressure and temperature of the water, the variations of power supply and the quantity
of dishes can change these values.
Setting and starting a washing programme
Set the washing programme with the door ajar. The washing programme only starts after
you close the door. Until then it is possible to modify the settings.
Do these steps to set and start a washing programme:
1. Switch on the appliance.
2. Make sure that the appliance is in setting mode.
3. Press one of the programme buttons. Refer to the chapter 'Washing programmes'.
– The programme indicator light comes on.
– All other programme indicator lights go off.
– The digital display shows in flashing the programme duration.
– The programme in progress indicator light comes on.
4. Close the door.
– The washing programme starts automatically.
– The programme in progress indicator light remains on.
When the washing programme operates, you cannot change the programme. Cancel the
washing programme.
WARNING!
Only interrupt or cancel a washing programme if necessary.
CAUTION!
Open the door carefully. Hot steam can come free.
Cancelling a washing programme
1. Press and hold function buttons B and C until:
– All the programme lights come on,
– The programme-in-progress indicator light goes off.
2. Release function buttons B and C to cancel the washing programme.
At this time you can do these steps:
1. Switch off the appliance.
2. Set a new washing programme .
Fill the detergent dispenser with detergent before you set a new washing programme.
Interrupting a washing programme
Open the door.
Page 19

Setting and starting a washing programme
• The programme stops.
Close the door.
• The programme continues from the point of interruption.
Setting and starting a washing programme with delay start
1. Press the on/off button.
2. Set a washing programme.
3. Press the delay start button until the display shows on flashing the necessary delay
start of the washing programme.
4. Close the door.
– The number on the display comes on with fixed light.
– The programme-in-progress indicator light goes off.
– The countdown of the delay start starts.
– The countdown of the delay start decreases with steps of 1 hour.
– When the countdown is completed, the washing programme starts automatically.
– The programme-in-progress indicator light comes on.
Do not open the door during the countdown to prevent interruption of the countdown.
When you close the door again, the countdown continues from the point of interruption.
Cancelling a delay start:
1. Press and hold function buttons B and C until:
– All the programme lights come on
– The programme-in-progress indicator light goes off.
When you cancel a delay start, you also cancel the washing programme.
2. Set a new washing programme.
You can select the washing programme and delay start also with the door closed. When
you press a programme button you have only 3 seconds to select a different washing
programme or a delay start. After these 3 seconds, the selected programme starts automatically.
19
End of the washing programme
Switch off the appliance in these conditions:
• The appliance stops automatically.
• The display shows 0.
• The programme in progress indicator light remains on.
1. Press the on/off button.
2. Open the door.
3. For better drying results, keep the door ajar for some minutes before you remove the
dishes.
Let the dishes cool down before you remove them from the appliance. Hot dishes are easily
damaged.
Removing the load
• First remove items from the lower basket, then from the upper basket.
• There can be water on the sides and door of the appliance. Stainless steel becomes cool
more quickly than the dishes.
Page 20

Care and cleaning
20
Care and cleaning
WARNING!
Switch the appliance off before you clean the filters.
Cleaning the filters
CAUTION!
Do not use the appliance without the filters. Make sure that the installation of the filters
is correct. Incorrect installation will cause unsatisfactory washing results and damage to
the appliance.
If necessary, clean the filters. Dirty filters decrease the washing results.
The dishwasher has three filters:
1. coarse filter (A)
2. microfilter (B)
3. flat filter (C)
Do these steps to clean the filters:
1. Open the door.
2. Remove the lower basket.
A
B
3. To unlock the filter system, turn the han-
dle on the microfilter (B) approximately
1/4 anticlockwise.
4. Remove the filter system.
5. Hold the coarse filter (A) by the handle
with the hole.
6. Remove the coarse filter (A) from the
microfilter (B).
C
Page 21

What to do if…
7. Remove the flat filter (C) from the bot-
tom of the appliance.
8. Clean the filters below running water.
9. Put the flat filter (C) in the bottom of the
appliance.
10. Put the coarse filter (A) in the microfilter
(B) and push the filters together.
11. Put the filter system in position.
12. To lock the filter system, turn the handle
on the microfilter (B) clockwise until it
lock in position.
13. Install the lower basket.
14. Close the door.
Do not remove the spray arms.
If the holes in the spray arms become clogged, remove remaining parts of soil with a cocktail
stick.
External cleaning
Clean the external surfaces of the appliance and control panel with a damp soft cloth. Only
use neutral detergents. Do not use abrasive products, scouring pads or solvents (acetone,
trichloroethylene etc...).
Frost precautions
21
CAUTION!
Do not install the appliance where the temperature is below 0 °C. The manufacturer is not
responsible for damage because of frost.
If not possible, empty the appliance and close the door. Disconnect the water inlet hose
and remove water from the water inlet hose.
What to do if…
The appliance does not start or stops during operation.
If there is a fault, first try to find a solution to the problem yourself. If you cannot find a
solution to the problem yourself, contact the Service Force Centre.
CAUTION!
Switch off the appliance before you do the below suggested corrective actions.
Page 22

What to do if…
22
Fault code and malfunction Possible cause and solution
•
digital display shows
The dishwasher does not fill with
water
•
digital display shows
The dishwasher will not drain
•
digital display shows
The anti-flood device operates
The programme does not start • The appliance door is not closed.
• The water tap is blocked or furred with limescale.
Clean the water tap.
• The water tap is closed.
Open the water tap.
• The filter in the water inlet hose is blocked.
Clean the filter.
• The connection of the water inlet hose is not correct. The
hose can be kinked or squashed.
Make sure that the connection is correct.
• There is a blockage in the sink spigot.
Clean the sink spigot.
• The connection of the water drain hose is not correct. The
hose can be kinked or squashed.
Make sure that the connection is correct.
• Close the water tap and contact your local Service Force
Centre.
Close the door.
• Mains plug is not connected in.
Put in the mains.
• The fuse has blown out in the household fuse box.
Replace the fuse.
• Delay start is set.
Cancel the delay start to start the programme immedi-
ately.
After the check, switch on the appliance. The programme continues from the point of
interruption. If the malfunction shows again, contact your Service Force Centre.
These data are necessary to help you quickly and correctly:
• Model (Mod.)
• Product number (PNC)
• Serial number (S.N.)
For these data, refer to the rating plate.
Write the necessary data here:
Model description : ..........
Product number : ..........
Serial number : ..........
Page 23

The dishes are not clean • The selected washing programme is not applicable for the type
Limescales particles on the
dishes
The dishes are wet and dull • No rinse aid has been used.
There are streaks, milky spots
or a bluish coating on glasses
and dishes
Dry water drop signs on
glasses and dishes
Technical data
Technical data
The cleaning results are not satisfactory
of load and soil.
• The baskets are loaded incorrectly so that water cannot reach all
surfaces.
• Spray arms do not turn freely because of incorrect arrangement
of the load.
• The filters are dirty or not correctly installed.
• The quantity of detergent is too little or missing.
• The salt container is empty.
• The water softener is adjusted on a wrong level.
• The salt container cap is not closed correctly.
• The rinse aid dispenser is empty.
• Decrease the rinse aid dosage.
• Increase rinse aid dosage.
• The detergent can be the cause.
23
Dimensions Width cm 59,6
Height cm 85
Depth cm 62,5
Electrical connection - Voltage
- Overall power - Fuse
Water supply pressure Minimum 0,5 bar (0,05 MPa)
Maximum 8 bar (0,8 MPa)
Capacity Place settings 12
Information on the electrical connection is given on the rating
plate on the inner edge of the dishwasher door.
Installation instructions
Installation
Fitting under a counter
WARNING!
Make sure that the mains plug is disconnected from the mains socket during installation.
Page 24

Installation
24
Put the appliance adjacent to a water tap and a
water drain. Remove the appliance worktop to
install it under a sink unit or a kitchen worktop.
Make sure that the dimensions of the recess
agree with the given dimensions.
Do these steps to remove the appliance worktop:
1. Remove the rear screws (1).
2. Pull the worktop from the behind the appliance.
3. Lift the worktop and move it from the
front slots.
4. Use the adjustable feet to adjust the level
of the appliance.
Install the appliance under the kitchen worktop. Make sure that there are no kinks in the
water hoses and that the water hoses are not
squashed.
If a repair is necessary, the appliance must be easily accessible for the engineer. Install the
appliance worktop to the appliance if you want to use the dishwasher as a freestanding
appliance.
The plinth on freestanding appliance is not adjustable.
Adjusting the level of the appliance
Make sure that the appliance is level to close and seal the door correctly. If the level of the
appliance is correct, the door does not catch on the sides of the cabinet. If the door does
not close correctly, loosen or tighten the adjustable feet until the appliance is level.
Page 25

Water connection
Water connection
Water inlet hose
Connected the appliance to a hot (max. 60°) or cold water supply.
If the hot water comes from alternative sources of energy that are more environmentally
friendly (e.g. solar or photovoltaic panels and aeolian), use a hot water supply to decrease
energy consumption.
Connect the inlet hose to a water tap with an external thread of 3/4”.
CAUTION!
Do not use connection hoses from an old appliance.
The water pressure must be in the limits (refer to 'Technical data'). Make sure that the local
water authority gives you the average mains pressure in your area.
Make sure that there are no kinks in the water inlet hose and that the water inlet hose is
not squashed or entangled.
Fit the locknut correctly to prevent water leaks.
CAUTION!
Do not connect the appliance to new pipes or pipes that are not used for a long time. Let
the water run for some minutes, then connect the inlet hose.
The water inlet hose is double-walled and has an inner mains cable and a safety valve. The
water inlet hose is under pressure only while the water is running. If there is a leak in the
water inlet hose, , the safety valve interrupts the running water.
Be careful when you connect the water inlet hose:
• Do not put the water inlet hose or the safety valve in water.
• If the water inlet hose or the safety valve is damaged, immediately disconnect the mains
plug from the mains socket.
• Only let the Service Force Centre replace the water inlet hose with safety valve.
WARNING!
Dangerous voltage
25
Water drain hose
1. Connect the water drain hose to the sink spigot and attach it under the work surface.
This prevents that the waste water from the sink goes back into the appliance.
Page 26

Electrical connection
26
2. Connect the water drain hose to a stand pipe with vent-hole (minimum internal diameter 4 cm).
Make sure that the drain hose is not bent or
squashed to prevent that the water drains does
max 85 cm
not drain correctly.
Remove the sink plug when the appliance drains
the water to prevent that the water goes back into
min 40 cm
the appliance.
A drain hose extension must not be longer than 2
max 400 cm
m. The internal diameter must not be smaller than
the diameter of the hose.
If you connect the water drain hose to a trap spigot under the sink, remove the plastic membrane
(A). If you do not remove the membrane, remaining food can cause a blockage in the drain hose
spigot
The appliance has a security feature to prevent
that dirty water goes back into the appliance. If,
the spigot of the sink has a 'non-return valve', this
valve can cause the appliance to drain incorrectly.
Remove the non-return valve.
CAUTION!
Make sure that the water couplings are tight to prevent water leakage.
Electrical connection
WARNING!
The manufacturer is not responsible if you do not follow these safety precautions.
Ground the appliance according to safety precautions.
Make sure that the rated voltage and type of power on the rating plate agree with the
voltage and the power of the local power supply.
Always use a correctly installed shockproof socket.
Do not use multi-way plugs, connectors and extension cables. There is a risk of fire.
Do not replace the mains cable yourself. Contact the Service Force Centre.
Make sure that the mains plug is accessible after installation.
Do not pull the mains cable to disconnect the appliance. Always pull the mains plug.
Environment concerns
The symbol on the product or on its packaging indicates that this product may not be
treated as household waste. Instead it should be taken to the appropriate collection point
for the recycling of electrical and electronic equipment. By ensuring this product is disposed
of correctly, you will help prevent potential negative consequences for the environment
Page 27

Environment concerns
and human health, which could otherwise be caused by inappropriate waste handling of
this product. For more detailed information about recycling of this product, please contact
your local council, your household waste disposal service or the shop where you purchased
the product.
The packaging materials are environmentally friendly and can be recycled. The plastic components are identified by markings, e.g. >PE<, >PS<, etc. Discard the packaging materials
in the applicable container at the community waste disposal facilities.
WARNING!
To discard the appliance, follow the procedure:
• Pull the mains plug out of the socket.
• Cut off the mains cable and mains plug and discard them.
• Discard the door catch. This prevents the children to close themselves inside the appliance
and endanger their lives.
27
Page 28

Sommaire
28
Nous vous remercions d’avoir choisi l’un de nos produits de qualité.
Afin de garantir une performance optimale et constante de votre appareil, veuillez
lire attentivement cette notice d'utilisation. Il vous permettra d’utiliser
correctement et efficacement toutes les fonctions de l’appareil. Nous vous
recommandons de conserver cette notice à proximité pour une utilisation rapide et
optimale. Si l'appareil devez être vendu ou cédé à une autre personne, assurez-vous
que la notice d'utilisation l'accompagne.
Nous vous souhaitons beaucoup de plaisir avec votre nouvel appareil.
Sommaire
Notice d'utilisation 29
Consignes de sécurité 29
Utilisation réglementaire 29
Sécurité générale 29
Sécurité enfants 30
Installation 30
Description de l'appareil 31
Bandeau de commande 32
Touche Départ différé 33
Affichage numérique 33
Touches de fonction 33
Mode Programmation 33
Avant la première utilisation 34
Réglage de l'adoucisseur d'eau 34
Réglage manuel 35
Réglage électronique 35
Utilisation du sel régénérant 35
Utilisation du liquide de rinçage 36
Réglage du dosage du liquide de rinçage
37
Rangement des couverts et de la vaisselle
37
Conseils utiles 37
Panier inférieur 38
Panier à couverts 39
Panier supérieur 40
Réglage de la hauteur du panier supérieur
41
Utilisation du produit de lavage 41
Fonction "Tout en 1" 43
Programmes de lavage 44
Sélection et départ d'un programme de lavage
45
Annulation d'un programme de lavage
46
Interruption d'un programme 46
Sélection et départ d'un programme de
lavage avec départ différé 46
Fin du programme de lavage 47
Déchargement du lave-vaisselle 47
Entretien et nettoyage 47
Nettoyage des filtres 47
Nettoyage extérieur 49
Précautions en cas de gel 49
En cas d'anomalie de fonctionnement 49
Caractéristiques techniques 51
Instructions d'installation 51
Installation 51
Encastrement sous un comptoir 51
Procédez de la manière suivante pour enlever
le plan de travail de l'appareil : 52
Mise à niveau de l'appareil 52
Raccordement à l'arrivée d'eau 52
Tuyau d'arrivée d'eau 52
Tuyau de vidange 53
Branchement électrique 54
En matière de protection de l'environnement
54
Sous réserve de modifications
Page 29

Consignes de sécurité
Notice d'utilisation
Consignes de sécurité
Pour votre sécurité et le bon fonctionnement de l'appareil, lisez attentivement ce manuel
avant l'installation et l'utilisation. Conservez ces instructions à proximité de l'appareil. Les
utilisateurs doivent connaître parfaitement le fonctionnement et les fonctions de sécurité
de l'appareil.
Utilisation réglementaire
• Cet appareil est exclusivement destiné à un usage domestique.
• Ce lave-vaisselle est conçu pour laver la vaisselle et les ustensiles de cuisine pouvant être
lavés en machine.
• N'utilisez pas de solvants dans votre appareil. Ceux-ci pourraient provoquer une explosion !
• Les couteaux et autres ustensiles pointus ou tranchants doivent être placés dans le panier
à couverts avec la pointe vers le bas. ou posez-les en position horizontale dans le panier
supérieur.
• N'utilisez que des produits (sel, produit de lavage, liquide de rinçage) spécifiques pour
lave-vaisselle.
• Evitez d'ouvrir la porte pendant que l'appareil fonctionne : une vapeur brûlante peut s'en
échapper. Risque de brûlures !
• Ne sortez pas la vaisselle du lave-vaisselle avant la fin du cycle de lavage.
• Lorsque le programme est terminé, débranchez l'appareil et fermez le robinet d'arrivée
d'eau.
• Cet appareil ne peut être entretenu et réparé que par un technicien autorisé, exclusivement avec des pièces d'origine.
• N'essayez en aucun cas de réparer le lave-vaisselle vous-même. Les réparations effectuées par du personnel non qualifié peuvent provoquer des blessures ou le mauvais
fonctionnement du lave-vaisselle. Contactez votre service après vente. Exigez des pièces
d'origine.
29
Sécurité générale
• Les personnes (y compris les enfants) qui souffrent de capacités mentales, physiques et
sensorielles réduites ou qui ne se sont pas familiarisées avec le mode de fonctionnement
de l'appareil, ne doivent pas l'utiliser. Elles doivent être surveillées ou dirigées par une
personne responsable de leur sécurité.
• Respectez les consignes de sécurité du fabricant du détergent pour éviter les brûlures
aux yeux, à la bouche et la gorge.
• Ne buvez pas l'eau du lave-vaisselle. Des résidus de produit de lavage peuvent rester dans
l'appareil.
• Fermez toujours la porte de l'appareil lorsqu'il n'est pas utilisé pour empêcher tout risque
de blessure ou de chute accidentelle.
• Ne vous asseyez pas ou ne montez pas sur la porte ouverte.
Page 30

Consignes de sécurité
30
Sécurité enfants
• Seuls les adultes doivent utiliser cet appareil. Veillez à ce que les enfants ne jouent pas
avec l'appareil.
• Rangez les emballages hors de la portée des enfants. Ils présentent un risque de suffocation.
• Rangez les détergents dans un endroit sûr. Veillez à ce que les enfants ne touchent pas
les produits de lavage.
• Ne laissez pas les enfants s'approcher de l'appareil quand la porte est ouverte.
Installation
• Vérifiez que l'appareil n'a pas été endommagé pendant le transport. Ne branchez pas un
appareil endommagé. Si nécessaire, contactez le fournisseur.
• Déballez l'appareil avant de l'utiliser pour la première fois.
• Une personne compétente et qualifiée doit prendre en charge l'installation électrique.
• Une personne compétente et qualifiée doit prendre en charge le travail de plomberie.
• Ne modifiez ni les spécifications ni le produit. Risque de blessure ou d'endommagement
de l'appareil.
• N'utilisez pas l'appareil :
– si le câble secteur ou les tuyaux d'eau sont endommagés,
– si le bandeau de commande, le plan de travail ou la plinthe sont endommagés, si vous
pouvez accéder à l'intérieur de l'appareil.
Contactez le service après-vente de votre magasin vendeur.
• Ne percez pas dans les côtés de l'appareil pour ne pas endommager les composants
électriques et hydrauliques.
AVERTISSEMENT
Respectez scrupuleusement les consignes données pour les branchements électriques et le
raccordement de l'eau.
Page 31

Description de l'appareil
Description de l'appareil
31
1 Panier supérieur
2 Sélecteur de dureté de l'eau
3 Réservoir de sel régénérant
4 Distributeur de détergent
5 Distributeur de liquide de rinçage
6 Plaque signalétique
7 Filtres
8 Bras d'aspersion inférieur
9 Bras d'aspersion supérieur
10 Plan de travail
Page 32

Bandeau de commande
32
Bandeau de commande
DE
1 Touche Marche/Arrêt
2 Touches de sélection des programmes
3 Touche Départ différé
4 Voyants
5 Affichage numérique
6 Touches de fonction
Voyants
Programme en cours Le voyant s'allume quand vous sélectionnez un
Tout en 1 Le voyant indique que la fonction "Tout en 1" est
1)
Sel
programme de lavage.
activée/désactivée. Reportez-vous au chapitre "
Fonction Tout en 1 ".
Le voyant s'allume lorsque le réservoir de sel régénérant doit être rempli. Reportez-vous au
chapitre " Utilisation du sel régénérant ".
Le voyant de réapprovisionnement en sel régénérant peut rester allumé plusieurs heures après
le remplissage du réservoir à sel. Cela n'affecte
pas le fonctionnement de l'appareil.
Page 33

Bandeau de commande
Voyants
Liquide de rinçage
1) Lorsque les réservoirs à sel et liquide de rinçage sont vides, les voyants ne s'allument pas pendant qu'un
programme est en cours.
1)
Le voyant s'allume lorsque le distributeur de liquide de rinçage doit être rempli. Reportez-vous
au chapitre " Utilisation du liquide de rinçage ".
Touche Départ différé
Cette touche permet de différer le départ du programme de lavage de 1 à 19 heures.
Consultez le chapitre "Réglage et démarrage d'un programme de lavage".
Affichage numérique
L'affichage indique :
• le niveau courant de l'adoucisseur d'eau.
• Temps restant (approximatif) avant la fin du programme.
• Activation/désactivation du distributeur de liquide de rinçage (seulement si la fonction
"Tout en 1" est activée).
• Fin d'un programme de lavage. Un zéro apparaît sur l'affichage.
• Décompte du départ différé.
• Codes d'anomalie de l'appareil.
Touches de fonction
Appuyez sur les touches de fonction pour :
• Régler l'adoucisseur d'eau. Reportez-vous au chapitre "Réglage de l'adoucisseur d'eau".
• Annuler le départ différé ou le programme de lavage en cours. Reportez-vous au chapitre
"Réglage et départ d'un programme de lavage".
• Activer/désactiver la fonction "Tout en 1". Reportez-vous au chapitre "Fonction Tout en
1".
• Activer/désactiver le distributeur de liquide de rinçage lorsque la fonction "Tout en 1"
est activée. Reportez-vous au chapitre "Fonction Tout en 1".
33
Mode Programmation
L'appareil doit être en mode Programmation pour effectuer les opérations suivantes :
• Sélectionner un programme de lavage.
• Régler le niveau de l'adoucisseur d'eau.
• Activer/désactiver le distributeur de liquide de rinçage.
Appuyez sur la touche Marche/Arrêt. L'appareil se trouve en mode Programmation lorsque :
– Tous les voyants du programme s'allument.
Appuyez sur la touche Marche/Arrêt. L'appareil n'est pas en mode Programmation lorsque :
– Un seul voyant de programme s'allume
– Un programme de lavage a été sélectionné. Pour revenir au mode Programmation, an-
nulez le programme. Reportez-vous au chapitre " Réglage et départ d'un programme de
lavage ".
Page 34

Avant la première utilisation
34
Avant la première utilisation
Appliquez la procédure pas à pas en vous reportant aux instructions suivantes :
1. Réglez l'adoucisseur d'eau en fonction du degré de dureté de l'eau de votre région. Si
nécessaire, ajustez le niveau de l'adoucisseur d'eau.
2. Remplissez le réservoir de sel régénérant avec du sel spécial pour lave-vaisselle.
3. Remplissez le distributeur de liquide de rinçage.
4. Rangez les couverts et la vaisselle dans le lave-vaisselle.
5. Sélectionnez le programme de lavage en fonction de la charge et du degré de salissure.
6. Versez le produit de lavage dans le compartiment correspondant.
7. Démarrez le programme de lavage.
Si vous utilisez des pastilles de détergent multifonctions ('3 en 1', '4 en 1', '5 en 1', etc.),
reportez-vous au chapitre "Fonction Tout en 1".
Réglage de l'adoucisseur d'eau
L'adoucisseur d'eau élimine les minéraux et les sels de l'alimentation en eau. Les sels et les
minéraux peuvent affecter le fonctionnement de l'appareil.
La dureté de l'eau est mesurée par échelles équivalentes :
• °dH allemand.
•°TH français.
• mmol/l (millimole par litre – unité internationale de la dureté de l'eau).
•Clarke.
Ajustez l'adoucisseur en fonction de la dureté de l'eau de votre région. Renseignez-vous
auprès de la Compagnie locale de distribution des eaux pour connaître le degré de dureté
de l'eau de votre zone d'habitation.
Dureté de l'eau Réglage de la dureté de l'eau
°dH °TH mmol/l degrés Clar-
ke
51 - 70 91 - 125 9,1 - 12,5 64 - 88 2 10
43 - 50 76 - 90 7,6 - 9,0 53 - 63 2 9
37 - 42 65 - 75 6,5 - 7,5 46 - 52 2 8
29 - 36 51 - 64 5,1 - 6,4 36 - 45 2 7
23 - 28 40 - 50 4,0 - 5,0 28 - 35 2 6
19 - 22 33 - 39 3,3 - 3,9 23 - 27 2 5
15 - 18 26 - 32 2,6 - 3,2 18 - 22 1 4
11 - 14 19 - 25 1,9 - 2,5 13 - 17 1 3
4 - 10 7 - 18 0,7 - 1,8 5 - 12 1 2
< 4 < 7 < 0,7 < 5
1) Ne pas approvisionner en sel régénérant.
manuel électronique
1)
1
1)
1
Page 35

Utilisation du sel régénérant
Réglez manuellement et électroniquement l'adoucisseur d'eau.
Réglage manuel
L'adoucisseur est réglé d'usine sur 2.
1. Ouvrez la porte.
2. Sortez le panier inférieur.
3. Tournez le sélecteur de dureté de l'eau sur
1 ou 2 (reportez-vous au tableau).
4. Installez le panier inférieur.
5. Fermez la porte.
Réglage électronique
L'adoucisseur d'eau est réglé d'usine sur la position 5.
1. Mettez l'appareil en fonctionnement.
2. Assurez-vous que l'appareil est en mode programmation.
3. Appuyez simultanément sur les touches de fonction B et C, et maintenez-les appuyées
jusqu'à ce que les voyants des touches de fonction A, B et C clignotent.
4. Relâchez les touches B et C.
5. Appuyez sur la touche de fonction A.
– Les voyants des touches de fonction B et C s'éteignent.
– Le voyant de la touche de fonction A continue de clignoter.
– Le niveau réglé apparaît sur l'affichage numérique.
Exemple : l'affichage numérique indique
6. Chaque pression de la touche de fonction A détermine le niveau suivant.
7. Appuyez sur la touche Marche/Arrêt pour mémoriser le réglage.
= niveau 5.
35
Utilisation du sel régénérant
ATTENTION
Utilisez uniquement du sel spécial pour lave-vaisselle. Tout autre type de sel non spécialement étudié pour être utilisé dans un lave-vaisselle, en particulier le sel de cuisine, peut
endommager l'adoucisseur d'eau.
ATTENTION
Pour éviter que des grains de sel ou de l'eau salée qui a débordé n'entre en contact avec le
fond de la cuve pendant un laps de temps prolongé, approvisionnez en sel juste avant de
démarrer un programme de lavage complet pour éviter tout risque de corrosion.
Pour réapprovisionner, procédez comme suit :
Page 36

Utilisation du liquide de rinçage
36
1. Dévissez le bouchon du réservoir de sel en le tournant dans le sens inverse des aiguilles
d'une montre.
2. Versez 1 litre d'eau à l'intérieur du réservoir (cette opération est nécessaire uniquement
lorsque vous remplissez le réservoir pour la première fois).
3. Versez le sel à l'aide de l'entonnoir jusqu'à
ce que le réservoir soit rempli.
4. Veillez à ce que le filetage et le joint du
réservoir ne présentent aucune trace de
sel.
5. Remettez le bouchon en place et serrezle en le tournant dans le sens des aiguilles
d'une montre jusqu'à ce que vous entendiez un clic.
Il est normal que l'eau déborde du réservoir au
moment où vous le remplissez de sel.
Utilisation du liquide de rinçage
ATTENTION
N'utilisez que des liquides de rinçage spécifiques pour lave-vaisselle.
Ne remplissez jamais le distributeur de liquide de rinçage avec d'autres produits (par ex. un
agent de nettoyage pour lave-vaisselle, un détergent liquide). Vous risqueriez d'endommager l'appareil.
Le liquide de rinçage assure un rinçage optimal et un séchage sans taches ni striures.
Le liquide de rinçage est automatiquement ajouté au cours du dernier rinçage.
Pour remplir le distributeur de liquide de rinçage, procédez comme suit :
1. Ouvrez le distributeur en appuyant sur le
levier de fermeture (A).
Page 37

Rangement des couverts et de la vaisselle
2. Remplissez le distributeur de liquide de
rinçage. Le repère "max." indique le niveau
maximum.
3. Essuyez tout débordement de liquide de
rinçage à l'aide de papier absorbant, afin
d'éviter une formation excessive de mousse lors du lavage suivant.
4. Vérifiez que le couvercle est fermé après
chaque remplissage.
Réglage du dosage du liquide de rinçage
Le liquide de rinçage est réglé d'usine sur le niveau 4.
Vous pouvez régler le dosage du liquide de rinçage entre 1 (minimum) et 6 (maximum).
Tournez le sélecteur pour augmenter ou réduire le
dosage.
– Augmentez le dosage si vous constatez la pré-
sence de gouttes d'eau ou de taches de calcaire
sur la vaisselle au terme du lavage.
– Réduisez la dose si vous constatez des rayures,
des taches blanches ou une pellicule bleuâtre
sur la vaisselle.
37
Rangement des couverts et de la vaisselle
Conseils utiles
ATTENTION
Ce lave-vaisselle est conçu pour laver la vaisselle et les ustensiles de cuisine pouvant être
lavés en machine.
Tout objet absorbant l'eau (chiffon, éponges de nettoyage, ...) ne doit pas être lavé au lavevaisselle.
• Avant de charger la vaisselle, veillez à :
– Enlever tous les restes d'aliments.
– Laisser tremper les casseroles au fond desquelles adhèrent des restes d'aliments brûlés
ou attachés.
Page 38

Rangement des couverts et de la vaisselle
38
• Lorsque vous chargez la vaisselle et les couverts :
– Chargez les articles creux tels que tasses, verres et casseroles, etc. en les retournant.
– Assurez-vous que l'eau ne s'accumule pas dans un creux ou dans un fond bombé.
– Assurez-vous que la vaisselle et les couverts ne soient pas insérés les uns dans les
autres, ou ne se chevauchent.
– Assurez-vous que les couverts et la vaisselle ne recouvrent pas d'autres ustensiles.
– Vérifiez que les verres ne se touchent pas pour éviter qu'ils ne se brisent.
– Placez les petites pièces dans le panier à couverts.
• La vaisselle en plastique et les poêles en matériau antiadhésif tendent à retenir les gouttes
d'eau. Ces articles ne seront pas séchés aussi bien que les articles en porcelaine et en
acier.
• Placez les articles légers (bols,...) dans le panier supérieur. Disposez-les de façon à ce qu'ils
ne puissent se retourner.
ATTENTION
Assurez-vous que la vaisselle et les couverts n'entravent pas la rotation du bras d'aspersion
avant de lancer un programme de lavage.
AVERTISSEMENT
Fermez toujours la porte après avoir chargé ou déchargé l'appareil. Une porte ouverte est
source de danger.
Panier inférieur
Rangez les casseroles et les grands plats très sales
dans le panier inférieur.
Page 39

Rangement des couverts et de la vaisselle
Abaissez les rangées d'ergots du panier inférieur
pour pouvoir charger des grands plats, des casseroles, des poêles et des saladiers.
Panier à couverts
AVERTISSEMENT
Ne placez pas les couteaux longs en position verticale. Disposez les éléments longs et coupants à l'horizontale dans le panier supérieur. Attention aux éléments coupants.
Utilisez les séparateurs à couverts.
• Placez les séparateurs à couverts sur le panier à
couverts.
• Pour les gros ustensiles, utilisez un seul séparateur à couverts.
39
• Placez les fourchettes et les cuillères, manche
tourné vers le bas.
• Les couteaux, manche tourné vers le haut.
• Intercalez les cuillères aux autres couverts,
afin d'éviter qu'elles ne s'emboîtent.
Page 40

Rangement des couverts et de la vaisselle
40
Panier supérieur
Le panier supérieur est conçu pour des sous-tasses,
saladiers, tasses, verres, casseroles et couvercles.
L'eau doit pouvoir atteindre toutes les surfaces de
la vaisselle.
• Placez les couteaux et les petits couverts dans
le range couverts. Placez dans le panier à
couverts les couverts qui ne peuvent pas être
rangés dans le range couverts
• Pour les articles de plus grande dimension,
rabattez les supports pour tasses vers le haut.
• Placez les verres à long pied dans les supports
pour tasses en les retournant.
• Pour les verres à long pied, vous pouvez relever le support vers la gauche ou vers la
droite.
Page 41

Utilisation du produit de lavage
• Vous pouvez relever ou abaisser la rangée
d'ergots de gauche du panier supérieur pour
faciliter le chargement.
Réglage de la hauteur du panier supérieur
Vous pouvez placer le panier supérieur dans deux positions pour faciliter le chargement.
Hauteur maximale de la vaisselle dans :
Panier supérieur Panier inférieur
position la plus haute 22 cm 30 cm
position la plus basse 24 cm 29 cm
Pour régler en hauteur le panier supérieur, procédez comme suit :
1. Tirez le panier supérieur jusqu'à la butée.
2. Tout en le maintenant par la poignée, relevez le panier supérieur le plus possible
puis abaissez-le verticalement.
Le panier supérieur se verrouille dans sa
position la plus haute ou la plus basse.
41
Utilisation du produit de lavage
Utilisez uniquement des produits de lavage (poudre, liquide ou en pastilles) spécialement
conçus pour une utilisation au lave-vaisselle.
Veuillez respecter les indications du fabricant figurant sur l'emballage :
• Le dosage recommandé par le fabricant.
• Les consignes de stockage.
En utilisant la quantité de produit de lavage strictement nécessaire, vous contribuerez à la
protection de l'environnement.
Page 42

Utilisation du produit de lavage
42
Pour remplir le distributeur de produit de lavage, procédez comme suit :
1. Ouvrez le couvercle du distributeur de détergent.
2. Versez le détergent dans le distributeur (A).
Le repère indique le dosage :
20 = environ 20 g de produit de lavage
30 = environ 30 g de produit de lavage.
3. Si vous sélectionnez un programme de lavage avec prélavage, versez une dose supplémentaire dans le compartiment ( B).
A
B
4. Si vous utilisez des pastilles de détergent,
placez-les dans le distributeur ( A).
5. Fermez le couvercle. Appuyez sur le couvercle jusqu'à ce qu'il soit verrouillé.
Le produit de lavage se dissout avec une rapidité qui diffère selon la marque. Certaines
pastilles ne donnent pas le meilleur résultat possible avec des programmes de lavage courts.
Utilisez des programmes de lavage longs lorsque vous utilisez les pastilles afin d'éliminer
complètement le détergent.
Page 43

Fonction "Tout en 1"
Fonction "Tout en 1"
La fonction "Tout en 1" vous permet d'utiliser des produits de lavage combinés en pastille.
Ces produits combinent les fonctions de produit de lavage, de produit de rinçage et de sel
régénérant. Ils peuvent également contenir d'autres substances.
Vérifiez que ces produits sont appropriés au degré de dureté de l'eau d'alimentation. Consultez les consignes du fabricant.
Dès que la fonction "Tout en 1" est sélectionnée, elle restera également activée pour les
programmes de lavage suivants.
Lorsque cette fonction "Tout en 1" est sélectionnée, l'alimentation en liquide de rinçage et
en sel à partir des réservoirs respectifs est automatiquement désactivée. Les voyants respectifs du sel et du liquide de rinçage sont également désactivés.
L'utilisation de la fonction "Tout en 1" peut entraîner une modification de la durée du cycle.
Activez ou désactivez la fonction "Tout en 1" avant le départ du programme de lavage.
Dès que le cycle a démarré, la fonction "Tout en 1" ne peut plus être modifiée. Si vous
souhaitez exclure cette fonction, il vous faudra d'abord annuler le réglage du programme
de lavage, désactivez la fonction "Tout en 1". Dans ce cas, vous devrez régler à nouveau le
programme de lavage.
Pour activer la fonction "Tout en 1" :
• Maintenez appuyées les deux touches de la fonction "Tout en 1" (touches de fonction D
et E). Le voyant de la fonction "Tout en 1" s'allume.
Pour désactiver la fonction "Tout en 1" :
• Maintenez enfoncées les deux touches Tout en 1 (touches de fonction D et E). Le voyant
de la fonction "Tout en 1" s'éteint.
Si le séchage n'est pas satisfaisant, nous vous suggérons de procéder de la manière
suivante :
1. Remplissez le distributeur de liquide de rinçage.
2. Activez le distributeur de liquide de rinçage.
3. Réglez le dosage du liquide de rinçage sur 2.
• L'activation/la désactivation du distributeur de liquide de rinçage est possible unique-
ment si la fonction "Tout en 1" est activée.
43
Pour activer ou désactiver le distributeur de liquide de rinçage :
1. Mettez l'appareil en fonctionnement.
2. L'appareil doit se trouver en mode programmation.
3. Appuyez et maintenez appuyées les touches B et C.
– Les voyants des touches de fonction A, B et C clignotent.
4. Relâchez les touches de fonction B et C.
5. Appuyez sur la touche de fonction B.
– Les voyants des touches de fonction A et C s'éteignent.
– Le voyant de la touche de fonction B clignote.
– L'affichage numérique indique le réglage.
Distributeur de liquide de rinçage désactivé
Page 44

Programmes de lavage
44
Distributeur de liquide de rinçage activé
6. Appuyez à nouveau sur la touche de fonction B.
– Le nouveau réglage apparaît sur l'affichage numérique.
7. Mettez l'appareil à l'arrêt pour mémoriser l'opération.
Si vous souhaitez réutiliser des produits de lavage traditionnels :
1. Désactivez la fonction "Tout en 1".
2. Remplissez le réservoir à sel et le distributeur de liquide de rinçage.
3. Réglez la position maximale du degré de dureté de l'eau
4. Faites un lavage sans vaisselle.
5. Réglez ensuite le degré de dureté de l'eau en fonction de la dureté de l'eau de votre
région.
6. Réglez le dosage du liquide de rinçage.
Programmes de lavage
Programmes de lavage
Programme Degré de salissu-reType de vaisselle Description du programme
AUTOMATIC
30 MIN
INTENSIV CARE 70° Très sale Vaisselle, couverts,
ÉCO 50°
1)
2)
3)
Tous Vaisselle, couverts,
Moyennement
ou légèrement
sale
Moyennement
sale
plats et casseroles
Vaisselle et couverts Lavage principal à 60°C
plats et casseroles
Vaisselle et couverts Prélavage
Prélavage
Lavage principal à 45°C ou 70°C
1 ou 2 rinçages intermédiaires
Rinçage final
Séchage
Rinçage final
Prélavage
Lavage principal à 70°C
1 rinçage intermédiaire
Rinçage final
Séchage
Lavage principal à 50°C
1 rinçage intermédiaire
Rinçage final
Séchage
Page 45

Sélection et départ d'un programme de lavage
Programme Degré de salissu-reType de vaisselle Description du programme
45
Moyennement
ou légèrement
sale
1) Au cours du programme Automatic, le degré de salissure de la vaisselle est déterminé par le degré de turbidité
de l'eau. La durée du programme et les consommations varient. Cela dépend si l'appareil est plein ou non et du
degré de salissure de la vaisselle. L'appareil règle automatiquement la température de l'eau pendant le lavage
principal.
2) Programme de lavage quotidien parfait pour un lave-vaisselle partiellement chargé. Idéal pour une famille de
4 personnes qui souhaite seulement laver la vaisselle et les couverts du dîner et du petit déjeuner.
3) Programme de test des organismes de contrôle. Veuillez consulter la brochure fournie séparément pour
connaître les résultats des tests.
Vaisselle et verres fragiles
Lavage principal à 45°C
1 rinçage intermédiaire
Rinçage final
Séchage
Valeurs de consommation
Programme
AUTOMATIC - 1,1 - 1,7 12 - 23
30 MIN - 0,9 9
INTENSIV CARE 70° - 1,5 - 1,7 16 - 18
ECO 50° - 1,0 - 1,1 12 - 13
1) L'affichage numérique indique la durée du programme.
Durée (en minutes)
- 0,8 - 0,9 14 - 15
1)
Énergie (en kWh) Eau (en litres)
Ces valeurs changent en fonction de la pression et de la température de l'eau, des variations
dans l'alimentation électrique et de la quantité de vaisselle.
Sélection et départ d'un programme de lavage
Sélectionnez le programme de lavage en laissant la porte légèrement ouverte. Le programme démarre uniquement après la fermeture de la porte. Vous pouvez effectuer toutes les
modifications souhaitées jusqu'à ce moment-là.
Procédez comme suit pour sélectionner et lancer un programme de lavage.
1. Mettez l'appareil en fonctionnement.
2. Assurez-vous que l'appareil est en mode programmation.
3. Appuyez sur la touche du programme correspondant. Reportez-vous au chapitre "Programmes de lavage".
– Le voyant du programme s'allume.
– Les voyants des autres programmes s'éteignent.
– La durée du programme de lavage clignote sur l'affichage numérique.
– Le voyant correspondant au programme en cours s'allume.
4. Fermez la porte.
– Le programme de lavage démarre automatiquement.
– Le voyant correspondant au programme en cours reste allumé.
Page 46

Sélection et départ d'un programme de lavage
46
Une fois le programme de lavage lancé, vous ne pouvez plus le modifier. Vous devez pour
cela annuler le programme.
AVERTISSEMENT
Annulez ou interrompez un programme de lavage uniquement si cela est absolument nécessaire.
ATTENTION
Ouvrez la porte avec précaution. Une vapeur chaude peut s'échapper de l'appareil.
Annulation d'un programme de lavage
1. Appuyez sur les touches de fonction B et C et maintenez-les appuyées jusqu'à ce que :
– Tous les voyants du programme s'allument.
– Le voyant indiquant qu'un programme est en cours s'éteigne.
2. Relâchez les touches B et C pour annuler le programme de lavage.
Dès lors, vous pouvez :
1. mettre l'appareil à l'arrêt,
2. sélectionner un nouveau programme de lavage.
Vérifiez qu'il y a du produit de lavage dans le distributeur correspondant si vous souhaitez
sélectionner un nouveau programme de lavage.
Interruption d'un programme
Ouvrez la porte.
• Le programme s'arrête.
Fermez la porte.
• Le programme reprend à partir du moment de l'interruption.
Sélection et départ d'un programme de lavage avec départ différé
1. Appuyez sur la touche Marche/Arrêt.
2. Sélectionnez un programme de lavage.
3. Appuyez sur la touche de départ différé jusqu'à ce que le nombre d'heures correspondant au départ différé souhaité clignote sur l'affichage numérique.
4. Fermez la porte.
– Le chiffre s'allume sur l'affichage de manière fixe.
– Le voyant indiquant qu'un programme est en cours s'éteigne
– Le décompte du départ différé démarre automatiquement.
– Le décompte s'effectue par intervalles de 1 heure.
– Lorsque le décompte est terminé, le programme de lavage démarre automatique-
ment.
– Le voyant correspondant au programme en cours s'allume.
L'ouverture de la porte interrompt le décompte. Lorsque vous refermez la porte, le décompte
reprend là où il a éta interrompu.
Annulation du départ différé :
1. Appuyez sur les touches de fonction B et C et maintenez-les enfoncées jusqu'à ce que :
– Tous les voyants du programme s'allument.
– Le voyant indiquant qu'un programme est en cours s'éteigne.
Page 47

Entretien et nettoyage
L'annulation d'un départ différé détermine aussi l'annulation du programme de lavage
sélectionné.
2. Sélectionnez un nouveau programme de lavage.
Vous pouvez également sélectionner le programme de lavage et le départ différé lorsque
la porte est fermée. N'oubliez pas dans ce cas que, lorsque vous appuyez sur la touche d'un
programme, vous disposez de 3 secondes seulement pour sélectionner un autre programme
ou un départ différé. Au bout de ces 3 secondes, le programme sélectionné démarre automatiquement.
Fin du programme de lavage
Mettez l'appareil à l'arrêt :
• Le lave-vaisselle se met à l'arrêt automatiquement.
• L'affichage indique 0.
• Le voyant correspondant au programme en cours reste allumé.
1. Appuyez sur la touche Marche/Arrêt.
2. Ouvrez la porte.
3. Pour laisser refroidir la vaisselle et améliorer le processus de séchage, laissez la porte
du lave-vaisselle entrouverte et attendez quelques minutes avant de décharger la vaisselle.
Attendez que la vaisselle refroidisse avant de la retirer du lave-vaisselle. Les plats encore
chauds sont sensibles aux chocs.
Déchargement du lave-vaisselle
• Déchargez d'abord le panier inférieur, puis le panier supérieur.
• Les côtés et la porte de l'appareil peuvent être mouillés. L'acier inox refroidit plus rapi-
dement que la vaisselle.
47
Entretien et nettoyage
AVERTISSEMENT
Mettez l'appareil à l'arrêt avant de procéder au nettoyage des filtres.
Nettoyage des filtres
ATTENTION
N'utilisez pas l'appareil sans les filtres. Contrôlez que les filtres sont correctement installés.
Si les filtres ne sont pas correctement installés, les performances de lavage peuvent être
compromises et l'appareil pourrait être endommagé.
Nettoyez les filtres, le cas échéant. Avec des filtres sales les résultats du lavage sont inférieurs.
Le lave-vaisselle possède 3 filtres :
1. filtre grossier (A)
2. micro-filtre (B)
Page 48

Entretien et nettoyage
48
3. filtre plat (C)
Pour le nettoyage des filtres, procédez comme
suit :
1. Ouvrez la porte.
2. Sortez le panier inférieur.
3. Pour déverrouiller le système de filtrage,
tournez la poignée du micro-filtre (B)
d'environ 1/4 de tour vers la gauche.
4. Retirez le système de filtrage.
5. Saisissez le filtre grossier (A) par la poi-
gnée annulaire.
6. Retirez le filtre grossier (A) du microfiltre
(B).
A
B
C
7. Retirez le filtre plat (C) du fond de la cu-
ve.
8. Nettoyez les filtres sous l'eau courante.
9. Réinstallez le filtre plat (C) dans le fond
de la cuve.
10. Placez le filtre grossier (A) dans le mi-
crofiltre (B) et appuyez sur les deux filtres
à la fois.
11. Mettez le système de filtrage en place.
12. Bloquez-les en tournant la poignée du
microfiltre (B) dans le sens des aiguilles
d'une montre jusqu'à la butée.
13. Installez le panier inférieur.
14. Fermez la porte.
Ne retirez pas les bras d'aspersion.
Si les orifices des bras d'aspersion sont bouchés, éliminez les résidus de salissure à l'aide
d'un cure-dent.
Page 49

En cas d'anomalie de fonctionnement
Nettoyage extérieur
Nettoyez les surfaces externes de l'appareil, de même que le bandeau de commande, à l'aide
d'un chiffon doux humide. Utilisez uniquement des produits nettoyants neutres. N'utilisez
aucun produit abrasif, éponges à récurer ou solvants (acétone, trichloroéthylène etc.
Précautions en cas de gel
ATTENTION
N'installez pas l'appareil dans une pièce où la température descend au-dessous de 0 °C. Le
fabricant n'est pas responsable des dommages encourus à cause du gel.
Si cela est impossible, videz l'appareil et fermez la porte. Débranchez le tuyau d'arrivée d'eau
et videz-la.
En cas d'anomalie de fonctionnement
L'appareil ne démarre pas ou se met à l'arrêt en cours de programme.
Certaines anomalies de fonctionnement peuvent dépendre d'opérations d'entretien non
correctes ou d'oubli et peuvent être résolues à l'aide des indications fournies dans le tableau,
sans faire appel au Service après-vente. Si l'anomalie persiste, contactez le Service aprèsvente.
ATTENTION
Mettez à l'arrêt l'appareil avant d'effectuer les contrôles que nous vous suggérons ci-après.
49
Code d'erreur et anomalie de fonc-
tionnement
• L'affichage numérique indique
Le lave-vaisselle n'est pas approvisionné en eau.
• L'affichage numérique indique
Le lave-vaisselle ne vidange pas.
• L'affichage numérique indique
Le dispositif de sécurité anti-débordement s'est déclenché.
Cause possible et solution
• Le robinet d'arrivée d'eau est obstrué ou incrusté de tartre.
Nettoyez le robinet d'arrivée d'eau.
• Le robinet d'arrivée d'eau est fermé.
Ouvrez le robinet d'arrivée d'eau.
• Le filtre (s'il est présent) dans le tuyau d'arrivée d'eau est
bouché.
Nettoyez le filtre.
• Le tuyau d'arrivée d'eau n'a pas été correctement installé.
Le tuyau est peut-être plié ou écrasé.
Vérifiez le raccordement.
• Le robinet de l'évier est bouché.
Nettoyez à fond le robinet de l'évier.
• Le tuyau de vidange n'est pas raccordé correctement. Le
tuyau est peut-être plié ou écrasé.
Assurez-vous que le raccordement est correct.
• Fermez le robinet d'arrivée d'eau et contactez le Service
Après-vente.
Page 50

En cas d'anomalie de fonctionnement
50
Code d'erreur et anomalie de fonc-
tionnement
Le programme ne démarre pas. • La porte du lave-vaisselle n'a pas été fermée correctement.
Fermez la porte.
• La prise du câble d'alimentation électrique de l'appareil
n'est pas branchée.
Insérez la fiche dans la prise secteur.
• Le fusible a grillé dans la boîte à fusibles.
Remplacez le fusible.
• Le départ différé est réglé.
Si la vaisselle doit être lavée immédiatement, annulez le
départ différé.
Cause possible et solution
Après avoir effectué ces contrôles, mettez l'appareil en fonctionnement. Le programme
reprend là où il s'était arrêté. Si l'anomalie persiste, contactez le Service Après-vente.
Les informations suivantes sont nécessaires pour une aide rapide et adaptée :
•Modèle (Mod.)
• Numéro de produit
• Numéro de série
Vous trouverez ces informations sur la plaque signalétique située sur l'appareil.
Inscrivez les informations ici :
Modèle : ..........
Numéro de produit : ..........
Numéro de série : ..........
Les résultats de lavage sont insatisfaisants
La vaisselle n'est pas propre • Vous n'avez pas sélectionné le programme approprié.
Des dépôts de tartre sont
présents sur la vaisselle
La vaisselle est mouillée et
terne
Les verres et la vaisselle présentent des rayures, des taches blanches ou un film
bleuâtre
Des gouttes d'eau ont séché
sur les verres et la vaisselle
• La vaisselle est disposée de manière telle à empêcher l'eau d'atteindre toutes les surfaces. Ne surchargez pas les paniers.
• La rotation des bras d'aspersion est entravée par de la vaisselle
mal rangée.
• Les filtres sont encrassés ou mal installés.
• La quantité de détergent est insuffisante ou le distributeur de
détergent n'a pas été approvisionné.
• Le compartiment de sel est vide.
• Le niveau de l'adoucisseur d'eau est mal réglé.
• Le bouchon du compartiment de sel n'est pas vissé correctement.
• Vous n'avez pas utilisé de liquide de rinçage.
• Le distributeur de liquide de rinçage est vide.
• Réduisez le dosage du liquide de rinçage.
• Augmentez le dosage du liquide de rinçage.
• Il se peut que le détergent en soit la cause.
Page 51

Caractéristiques techniques
Caractéristiques techniques
Dimensions Largeur cm 59,6
Hauteur cm 85
Profondeur cm 62,5
Branchement électrique - Ten-
sion - Puissance totale - Fusible
Pression de l'eau d'alimentation
Maximale 8 bars (0,8 MPa)
Capacité Couverts 12
Les informations concernant le branchement électrique figurent
sur la plaque signalétique apposée sur le bord intérieur de la porte
du lave-vaisselle.
Minimale 0,5 bar (0,05 MPa)
Instructions d'installation
Installation
Encastrement sous un comptoir
AVERTISSEMENT
Avant toute intervention sur le lave-vaisselle, il est nécessaire de débrancher l'appareil.
51
Placez l'appareil à proximité d'un robinet d'arrivée d'eau et d'une vidange. Enlevez le dessus de
l'appareil pour encastrer celui-ci sous un évier
ou un plan de travail de cuisine. Assurez-vous
que les dimensions correspondent à celles du lave-vaisselle.
Page 52

Raccordement à l'arrivée d'eau
52
Procédez de la manière suivante pour enlever le plan de travail de l'appareil :
1. Dévissez les vis situées à l'arrière (1).
2. Tirez le plan de travail par l'arrière.
3. Soulevez le plan de travail et dégagez-le
des emboîtements avant.
4. Desserrez ou serrez les pieds jusqu'à ce que
l'appareil soit de niveau.
Installez l'appareil sous le plan de travail de la
cuisine. Assurez-vous que les tuyaux d'eau ne
sont ni coudés ni écrasés.
L'appareil doit être facile d'accès afin de permettre à un technicien de le réparer en cas de
panne. Installez le plan de travail sur l'appareil si vous souhaitez l'utiliser de manière indépendante.
Le socle d'un lave-vaisselle indépendant n'est pas réglable.
Mise à niveau de l'appareil
Assurez-vous que l'appareil est à niveau pour que la porte se ferme correctement. Si l'appareil n'est pas à niveau, la porte ne se fermera pas correctement. Dans ce cas, vissez ou
dévissez les pieds de l'appareil jusqu'à ce qu'il soit à niveau.
Raccordement à l'arrivée d'eau
Tuyau d'arrivée d'eau
Cet appareil peut être alimenté en eau chaude (max. 60°) ou en eau froide.
Si l'eau chaude provient de sources d'alimentation écologiques (comme des panneaux solaires ou des éoliennes), utilisez de l'eau chaude pour réduire la consommation d'énergie.
Raccordez le tuyau d'alimentation à un robinet d'eau à filetage pour tuyau 3/4".
ATTENTION
N'utilisez pas les tuyaux d'un ancien appareil.
La pression de l'eau doit se situer dans les limites indiquées dans les "Caractéristiques techniques". Pour connaître la pression d'alimentation moyenne de votre zone d'habitation,
adressez-vous à votre société locale de distribution d'eau.
Veillez à ce que le tuyau d'arrivée d'eau ne soit pas enroulé, écrasé ou enchevêtré lorsque
vous effectuez le raccordement.
Page 53

Raccordement à l'arrivée d'eau
53
Installez correctement le contre-écrou pour éviter toute fuite d'eau.
ATTENTION
Si l'a ppa reil est r acc ord é au m oye n de tuy aux ou de tuyaux ayant peu servis, faites s'écouler
l'eau pendant quelques minutes avant de brancher le tuyau d'arrivée d'eau.
Le tuyau d'arrivée d'eau est à double paroi et comporte une soupape de sécurité avec un
fil électrique. Le tuyau d'arrivée d'eau est sous pression uniquement lorsque l'eau s'écoule.
Si le tuyau fuit, la soupape de sécurité coupe automatiquement l'eau.
Faites attention au moment de raccorder le tuyau d'arrivée d'eau :
• N'immergez pas le tuyau d'arrivée d'eau ou la soupape de sécurité dans l'eau.
• Si le tuyau d'arrivée d'eau ou la soupape de sécurité est endommagé, débranchez im-
médiatement la prise secteur.
• Le Service Après-vente de votre magasin vendeur est seul habilité à remplacer le tuyau
d'arrivée d'eau avec soupape de sécurité.
AVERTISSEMENT
Tension dangereuse
Tuyau de vidange
1. Raccordez le tuyau de vidange au robinet de sortie de l'évier et fixez-le sous le plan de
travail. Cela empêche que les eaux usées de l'évier ne repartent dans l'appareil.
2. Raccordez le tuyau de vidange à une conduite fixe dotée d'une ventilation spéciale,
(diamètre intérieur de 4 cm minimum).
Assurez-vous que le tuyau n'est pas courbé ou
écrasé, sous peine d'empêcher ou de ralentir l'évacuation de l'eau.
Enlevez le bouchon d'évier lorsque l'appareil évacue l'eau pour empêcher tout reflux de l'eau vers
l'appareil.
Une rallonge de tuyau ne doit pas dépasser 2 mètres de long. Le diamètre intérieur ne doit pas être
inférieur au diamètre du tuyau d'évacuation.
max 85 cm
min 40 cm
max 400 cm
Page 54

Branchement électrique
54
Lorsque vous raccordez le tuyau de vidange à un
embout du siphon sous l'évier, n'oubliez pas d'enlever toute la membrane en plastique (A). Si vous
oubliez d'enlever toute la membrane, les particules
d'aliments risquent de s'accumuler avec le temps
et de boucher l'embout du tuyau de vidange du
lave-vaisselle
L'appareil est doté d'un système de sécurité qui
empêche l'eau sale de retourner dans l'appareil. Si
le robinet de votre évier est doté d'un clapet de
retenue, cela pourrait entraver la vidange correcte de l'appareil. Enlevez le clapet de retenue.
ATTENTION
Vérifiez l'étanchéité des raccords.
Branchement électrique
AVERTISSEMENT
Le fabricant ne peut être tenu responsable en cas de non-respect de ces mesures de sécurité.
Mettez l'appareil à la terre conformément aux instructions.
Assurez-vous que la tension nominale et le type d'alimentation indiqués sur la plaque
signalétique correspondent à ceux de l'alimentation locale.
Utilisez toujours une prise à l'épreuve des chocs.
N'utilisez pas des multiprises, des adaptateurs ou des rallonges. Ils présentent un risque
d'incendie.
Ne remplacez pas le câble secteur vous-même. Contactez le service après-vente de votre
magasin vendeur.
Assurez-vous que la prise est accessible après l'installation.
Ne tirez pas sur le câble secteur pour débrancher l'appareil. Tirez toujours sur la prise.
En matière de protection de l'environnement
Le symbole sur le produit ou son emballage indique que ce produit ne peut être traité
comme déchet ménager. Il doit être remis au point de collecte dédié à cet effet (collecte et
recyclage du matériel électrique et électronique).
En procédant à la mise au rebut de l'appareil dans les règles de l’art, nous préservons
l'environnement et notre sécurité, s’assurant ainsi que les déchets seront traités dans des
conditions optimum.
Pour obtenir plus de détails sur le recyclage de ce produit, veuillez prendre contact avec les
services de votre commune ou le magasin où vous avez effectué l'achat.
Tous les matériaux d'emballage sont écologiques et recyclables. Les composants en plastique
sont identifiables grâce aux sigles >PE<, >PS<, etc. Veuillez jeter les matériaux d'emballage
dans le conteneur approprié du centre de collecte des déchets de votre commune.
Page 55

55
AVERTISSEMENT
Le fabricant décline toute responsabilité en cas de non-respect des précautions de sécurité
mentionnées dans ce chapitre.
• Retirez la fiche de la prise secteur.
• Coupez le câble d'alimentation et la prise et mettez-les au rebut.
• Éliminez le dispositif de bloquage de porte. Ceci pour empêcher que des enfants ne
restent enfermés à l'intérieur de l'appareil et ne mettent leur vie en danger.
Page 56

www.electrolux.com
Vous pouvez commander des accessoires, consommables et pièces détachées via notre magasin
online sur: www.aeg-electrolux.be
117952110-00-042009
 Loading...