

Page 1
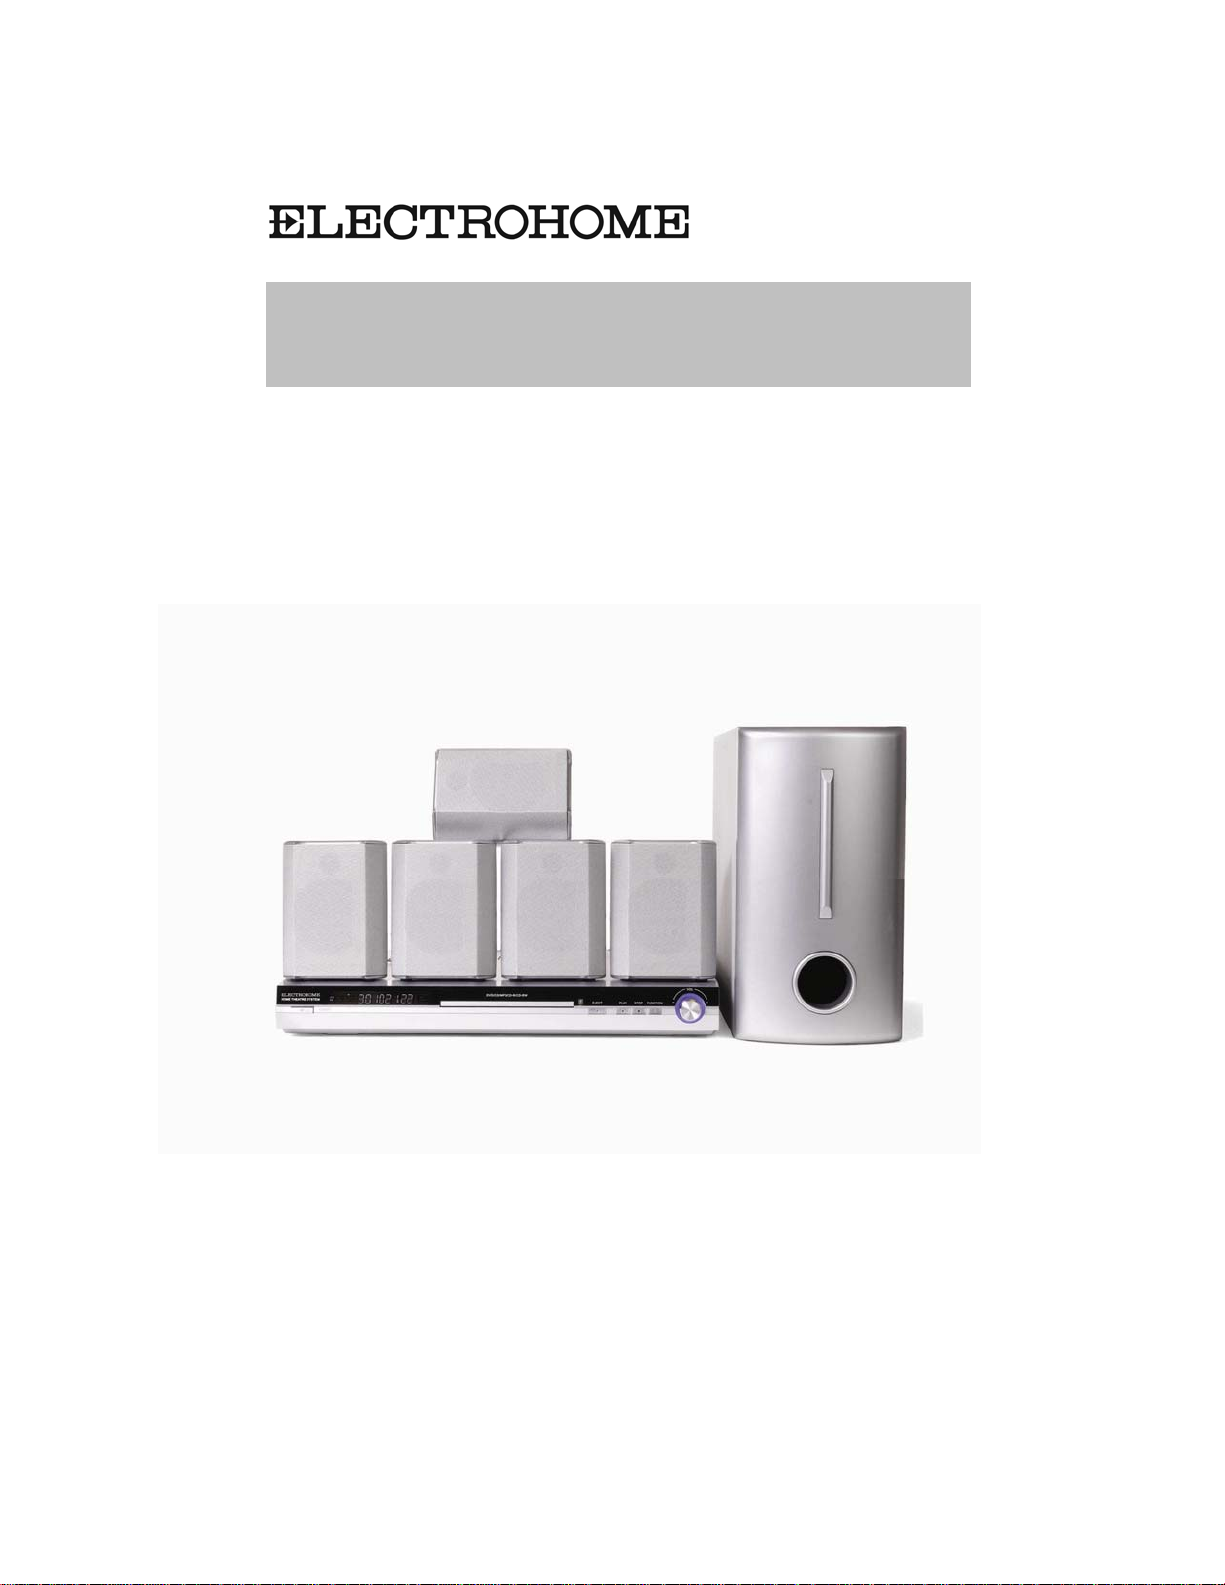
MODEL #: HTB903E
HOME THEATRE SYSTEM
DVD RECEIVER WITH BUILT IN AMPLIFIER AND FM/AM RADIO
FUNCTION
USER MANUAL
- 1 -
Page 2

CONTENTS
Safety Warnings………………………………………………………………………. 4
Product Features………………………………………………………………………5
Location of Controls………………………………………………………………… 6
Remote Control……………………………………………………………………… 9
System Connection………………………………………………………………… 11
Operation Functions…………………………………………………………………15
System Setup………………………………………………………………………... 18
Trouble Shooting……………………………………………………………………. 20
Specifications………………………………………………………………………... 21
- 2 -
Page 3
SAFETY WARNINGS
WARNING: TO REDUCE THE RISK OF FIRE OR ELECTRIC SHOCK, DO NOT EXPOSE
THIS APPLIANCE TO RAIN OR MOISTURE.
RISK OF ELECTRIC SHOCK
CAUTION: TO REDUCE THE RISK OF ELECTRIC
SHOCK, DO NOT REMOVE COVER (OR BACK).
.
NO USER SERVICEABLE PARTS INSIDE. REFER
SERVICING TO QUALIFIED SERVICE PERSONNEL
CAUTION
DO NOT OPEN
The important note is located on the rear of the cabinet.
IMPORTANT SAFEGUARDS
1. READ INSTRUCTIONS
All the safety and operating instructions should be read before the unit is operated.
2. RETAIN INSTRUCTIONS
The safety and operating instructions should be retained for future reference.
3. HEED WARNINGS
All warnings on the unit and in the operating instructions should be adhered to.
4. FOLLOW INSTRUCTIONS
All operating and use instructions should be followed.
5. CLEANING
Unplug this unit from the wall outlet before cleaning. Do not use liquid cleaners or aerosol cleaners.
Use a damp cloth for cleaning the exterior cabinet only.
6. A TTACHMENTS
The manufacturer of this unit does not make any recommendations for attachments, as they may cause hazards.
7. WATER AND MOISTURE
Do not use this unit near water. For example, near a bathtub, washbowl, kitchen sink, laundry tub, in a wet
basement, or near a swimming pool.
8. ACCESSORIES
Do not place this unit on an unstable cart, stand, tripod, bracket, or table. The unit may fall, causing serious injury,
and serious damage to the unit.
S3126A
(symbol provided by RETAC)
8A. An appliance and cart combination should be moved with care. Quick stops, excessive force,
and uneven surfaces may cause the appliance and cart combination to overturn.
9. VENTILATION
Slots and openings in the cabinet back or bottom are provided for ventilation, and to ensure
reliable operation of the unit, and to protect it from overheating. These openings must not be
blocked or covered. The openings should never be blocked by placing the unit on a bed, sofa, rug, or other similar
surface. This unit should never be placed near or over a radiator or heat source. This unit should not be placed in a
built-in installation such as a bookcase or rack unless proper ventilation is provided or the manufacturer’s
instructions have been adhered to.
10. POWER SOURCE
This unit should be operated only from the type of power source indicated on the rating plate. If you are not sure of
the type of power supply to your home, consult your appliance dealer or local power company. For units intended to
operate from battery power, or other sources, refer to the respective pages in this Owner's Manual for their
operating instructions.
11. GROUNDING OR POLARIZATION
This unit is equipped with a polarized alternating-current line plug (a plug having one blade wider than the other).
This plug will fit into the power outlet only one way. This is a safety feature. If you are unable to insert the plug fully
THIS SYMBOL INDICATES THAT
DANGEROUS VOLTAGE CONSTITUTING A
RISK OF ELECTRIC SHOCK IS PRESENT
WITHIN THIS UNIT.
THIS SYMBOL INDICATES THAT THERE
ARE IMPORTANT OPERATING AND
MAINTENANCE INSTRUCTIONS IN THE
LITERATURE ACCOMPANYING THE
APPLIANCE.
- 3 -
Page 4
SAFETY WARNINGS
into the outlet, try reversing the plug. If the plug should still fail to fit, contact your electrician to replace your
obsolete outlet. Instead of the polarized alternating-current line plug, your unit may be equipped with a 3-wire
grounding-type plug (a plug having a third (grounding) pin). This plug will only fit into a grounding-type power outlet.
This too, is a safety feature. If you are unable to insert the plug into the outlet, contact your electrician to replace
your obsolete outlet. Do not defeat the safety purpose of the grounding-type plug.
12. POWER-CORD PROTECTION
Power-supply cords should be routed so that they are not likely to be walked on or pinched by items placed upon or
against them, paying particular attention to cords at plugs, convenience receptacles, and the point where they exit
from the appliance.
13. LIGHTNING
To protect your unit from a lightning storm, or when it is left unattended and unused for long periods of time, unplug
it from the wall outlet and disconnect the antenna or cable system. This will prevent damage to the unit due to
lightning and power line surges.
14. POWER LINES
An outside antenna system should not be located in the vicinity of overhead power lines or other electric light or
power circuits, or where it can fall onto or against such power lines or circuits. When installing an outside antenna
system, extreme care should be taken to keep from touching such power lines or circuits, as contact with them
might be fatal.
15. OVERLOADING
Do not overload wall outlets and extension cords, as this can result in a risk of fire or electric shock.
16. OBJECT AND LIQUID ENTRY
Do not push objects through any openings in this unit, as they may touch dangerous voltage points or short out
parts that could result in fire or electric shock. Never spill or spray any type of liquid into the unit.
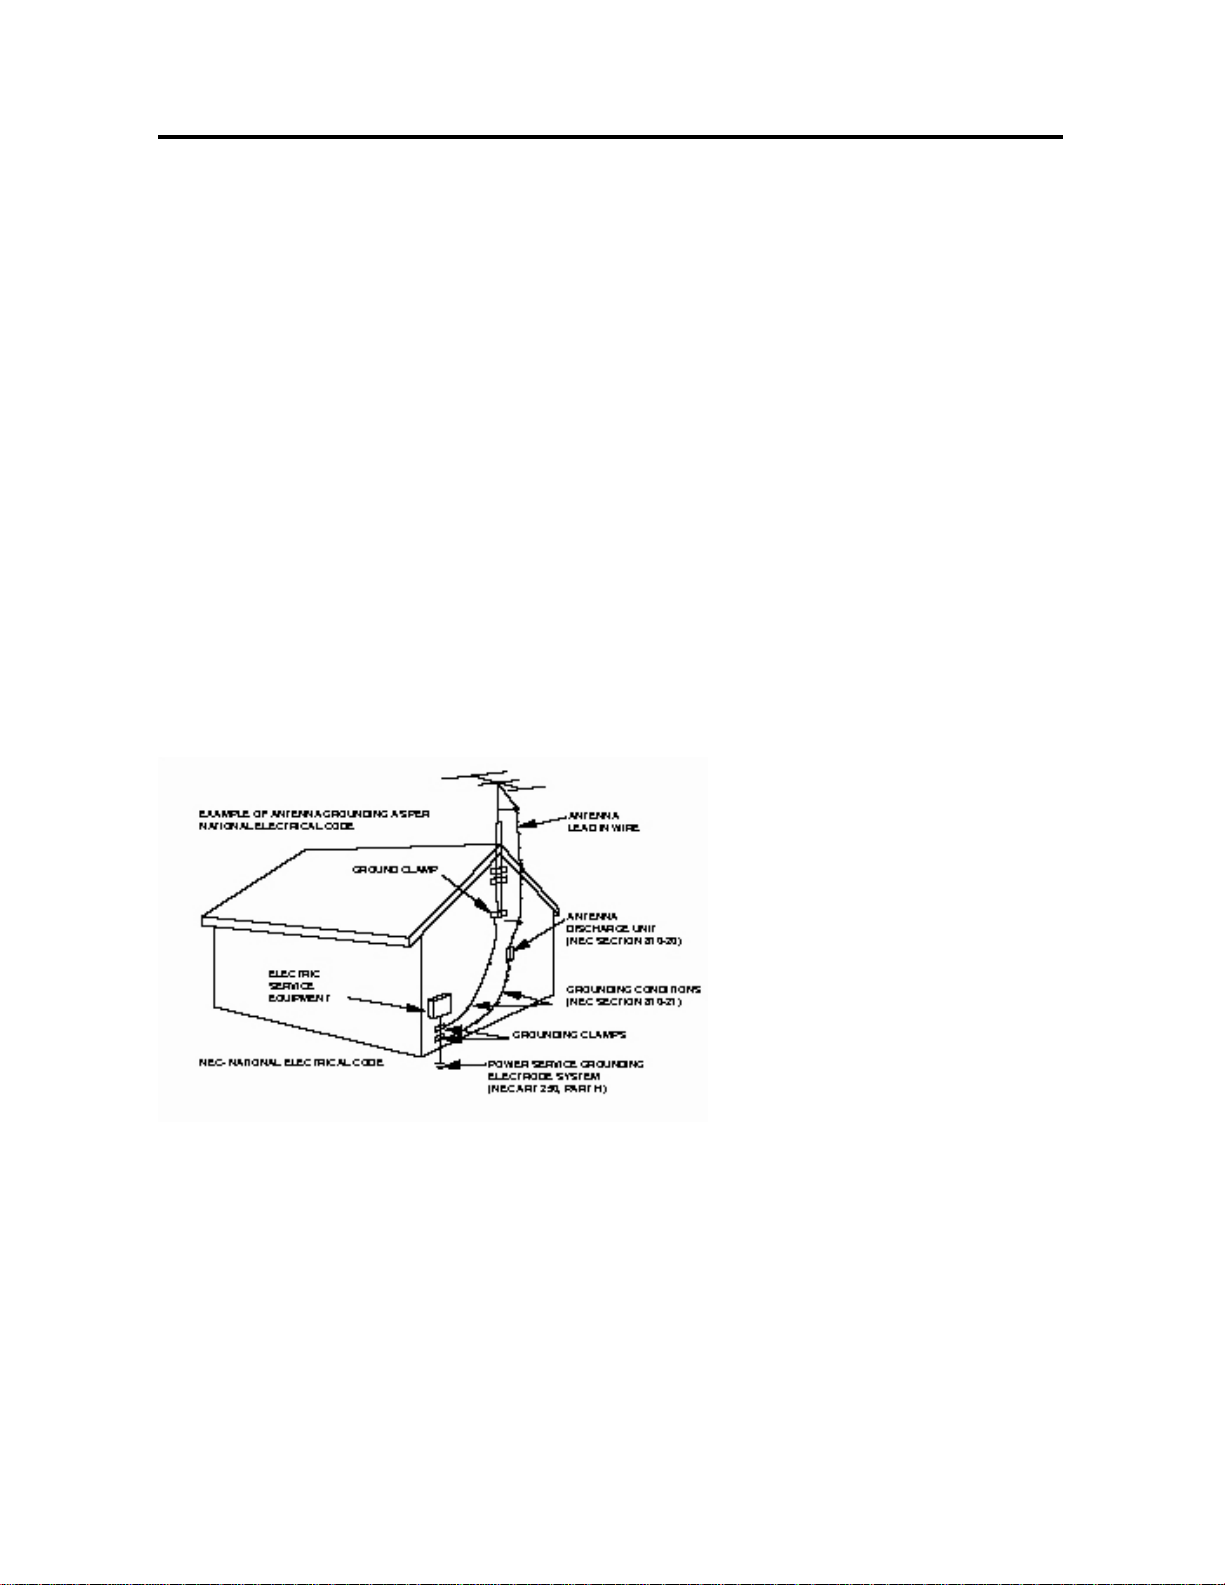
17. OUTDOOR ANTENNA GROUNDING
If an outside antenna or cable system is connected to the unit, be sure the antenna or cable system is grounded to
provide some protection against voltage surges and built-up static charges, Section 810 of the National Electrical
Code (NEC), ANSI/NFPA 70, provides information with respect to proper grounding of the mast and supporting
structure, grounding of the lead-in wire to an antenna discharge unit, size of grounding conductors, location of
antenna discharge unit, connection to grounding electrodes, and requirements for the grounding electrode.
18. SERVICING
Do not attempt to service this unit yourself as opening or removing covers may expose you to dangerous voltage or
other hazards. Refer all servicing to qualified service personnel.
19. DAMAGE REQUIRING SERVICE
Unplug this unit from the wall outlet and refer servicing to qualified service personnel under the following
conditions:
a. When the power-supply cord or plug is damaged.
b. If liquid has been spilled, or objects have fallen into the unit.
c. If the unit has been exposed to rain or water.
d. If the unit does not operate normally by following the operating instructions. Adjust only those controls that
are covered by the operating instructions, as an improper adjustment of other controls may result in damage
and will often require extensive work by a qualified technician to restore the unit to its normal operation.
- 4 -
Page 5

SAFETY WARNINGS
e. If the unit has been dropped or the cabinet has been damaged.
f. When the unit exhibits a distinct change in performance, this indicates a need for service.
20. REPLACEMENT PARTS
When replacement parts are required, be sure the service technician uses replacement parts specified by the
manufacturer or those that have the same characteristics as the original part.
Unauthorized substitutions may result in fire, electric shock or other hazards.
21. SAFETY CHECK
Upon completion of any service or repairs to this unit, ask the service technician to perform safety checks to
determine that the unit is in proper operating condition.
22. HEAT
The product should be situated away from heat sources such as radiators, heat registers, stoves, or other products
(including amplifiers) that produce heat.
23. DISC SLOT
Keep your fingers well clear of the disc slot as it is closing. It may cause serious personal injury.
24. CONNECTING
When you connect the product to other equipment, turn off the power and unplug all of the equipment from the wall
outlet. Failure to do so may cause an electric shock and serious personal injury. Read the owner's manual of the
other equipment carefully and follow the instructions when making any connections.
25. SOUND VOLUME
Reduce the volume to the minimum level before you turn on the product. Otherwise, sudden high volume sound
may cause hearing or speaker damage.
26. SOUND DISTORTION
Do not allow the product output distorted sound for a longtime. It may cause speaker overheating and fire.
27. HEADPHONES
When you use the headphones, keep the volume at a moderate level. If you use the headphones continuously with
high volume sound, it may cause hearing damage.
28. LASER BEAM
Do not look into the opening of the disc slot or ventilation opening of the product to see the source of the laser
beam. It may cause sight damage.
29. DISC
Do not use a cracked, deformed, or repaired disc. These discs are easily broken and may cause serious personal
injury and product malfunction.
30. LCD
Should the LCD panel be broken and liquid leaks out, do not inhale or swallow it. Doing so may cause poisoning. If
you have got it into your mouth, wash it out and consult your doctor. If your hands or clothes have touched it, wipe
them with alcohol and a cleaning cloth and then wash them well.
31. NOTE TO CABLE TV SYSTEM INSTALLER
This reminder is provided to call the Cable TV system installer’s attention to Article 820-40 of the NEC that
provides guidelines for proper grounding and, in particular, specifies that the cable ground shall be connected to
the grounding system of the building, as close to the point of cable entry as practical.
Maintenance:
Clearing the Cabinet:
● Use s soft cloth slightly moistened with a mild detergent solution. Do not use a solution containing alcohol,
spirits, ammonia or abrasive.
Clearing Discs
● When a disc becomes dirty, clean it with a cleaning cloth. Wipe the disc from the center to the edge of the disc.
Do not wipe in a circular motion.
● Do not use solvents such as benzene, thinner, commercially available cleaners, or antistatic spray intended for
analog records.
- 5 -
Page 6

PRODUCTS FEATURES
DIGITAL HOME THEATER SYSTEM
z Digital Audio/Video All-in-one
Enjoy digital Audio/Video media in
hi-resolution with hi-fi sound. This Digital
Home Theatre System includes a DVD
player, six-channel hi-fi amplifier and digital
AM/FM radio.
z Compatibility
DVD, CD, CD-R, CD-RW, MP3 and JPEG
discs compatible.
DVD FUNCTIONS
z High Resolution z Two front speakers, one centre speaker, two
Adopt an MPEG2 decoding format to
achieve
lines.
horizontal resolution more than 500
z Superior sound
Built-in Dolby Digital decoder to output digital
audio signal to reproduce high quality sound
effects.
z Special Function
Supports multi-angle and multi-language
playback for enjoying unique video features.
z Video Output
Composite Video, S-Video and Y/Pb/Pr.
z Audio Output
Connect any audio device using 2-channel,
Optical or Digital Coax connectors.
z Aspect Ratio
Supports 4:3 and 16:9 aspect ratios.
z All Playback Functions
Fast forward and backward, slow playback,
step playback, repeat playback and
program playback.
z Search By Time
To skip to an exact point on a disc.
z Last Memory Playback
Continue to play from where you stopped
previously while still in power on status.
HI-FI POWER AMPLIFIER
z Full amplifier with six built-in separate
amplifying units.
surround speakers and one subwoofer.
z One-line external analog stereo audio input
amplifiers.
z The volume of front, surround, centre and
subwoofer can be controlled independently,
or together, and settings can be memorized.
z Subwoofer outputs high power to produce
intense bass.
RADIO FUNCTIONS
z Receive AM/FM signals clearly.
z Search for radio stations automatically.
z Memorize radio stations easily.
- 6 -
Page 7
LOCATION OF CONTROLS
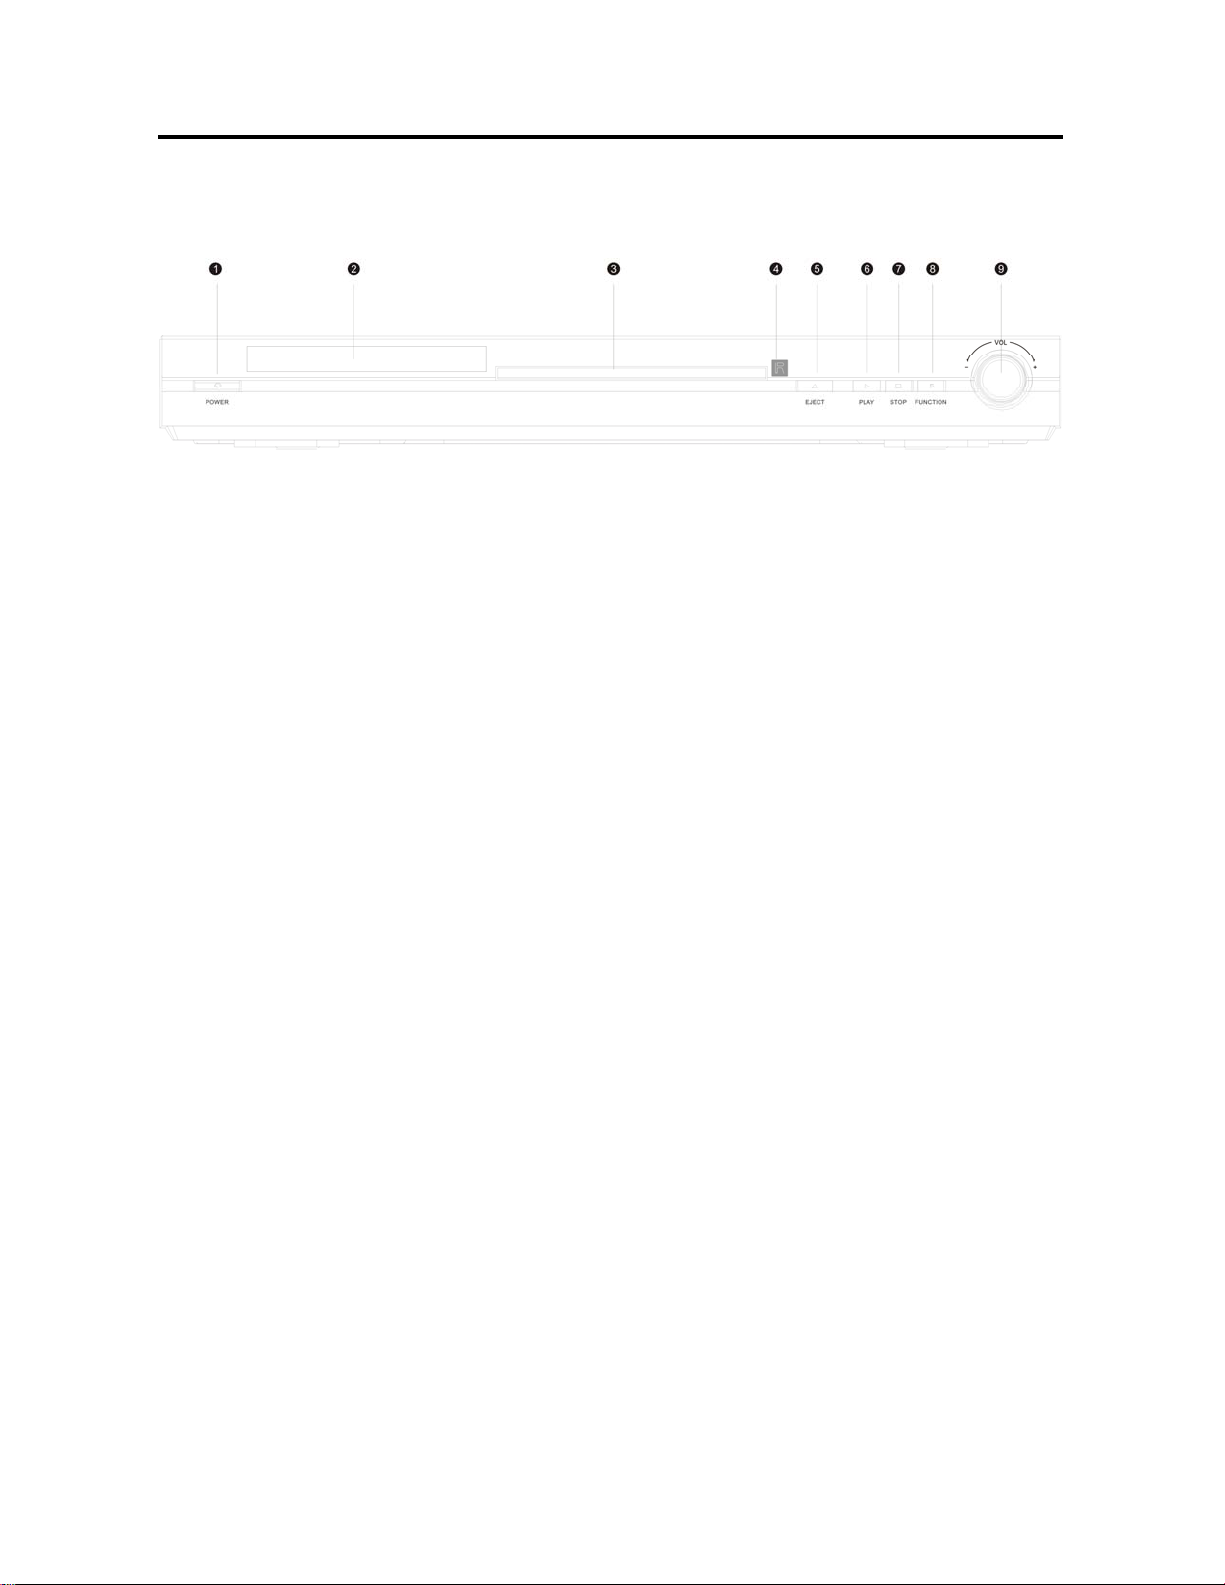
Front Panel
1. POWER button
-Press to turn on/off the power.
2. Display panel
- Indicates the current status of the unit.
3. Disc tray
-Used to load disc.
4. REMOTE sensor
-Receiving the signal from the remote
control.
5. EJECT button
-Press to open/close the disc tray.
6. PLAY button
-Press to begin the playback of the inserted
disc.
7. STOP/BAND button
- Press to stop playback in DVD status.
-Press to shift between AM and FM in radio
status.
-Press to stop tuning in auto tuning status.
8. FUNCTION button
-Press to select DVD, Radio and Audio IN.
9. VOL - button
-Turn to lower volume of amplifier.
VOL + button
-Turn to raise volume of amplifier.
- 7 -
Page 8
LOCATION OF CONTROLS
A
A
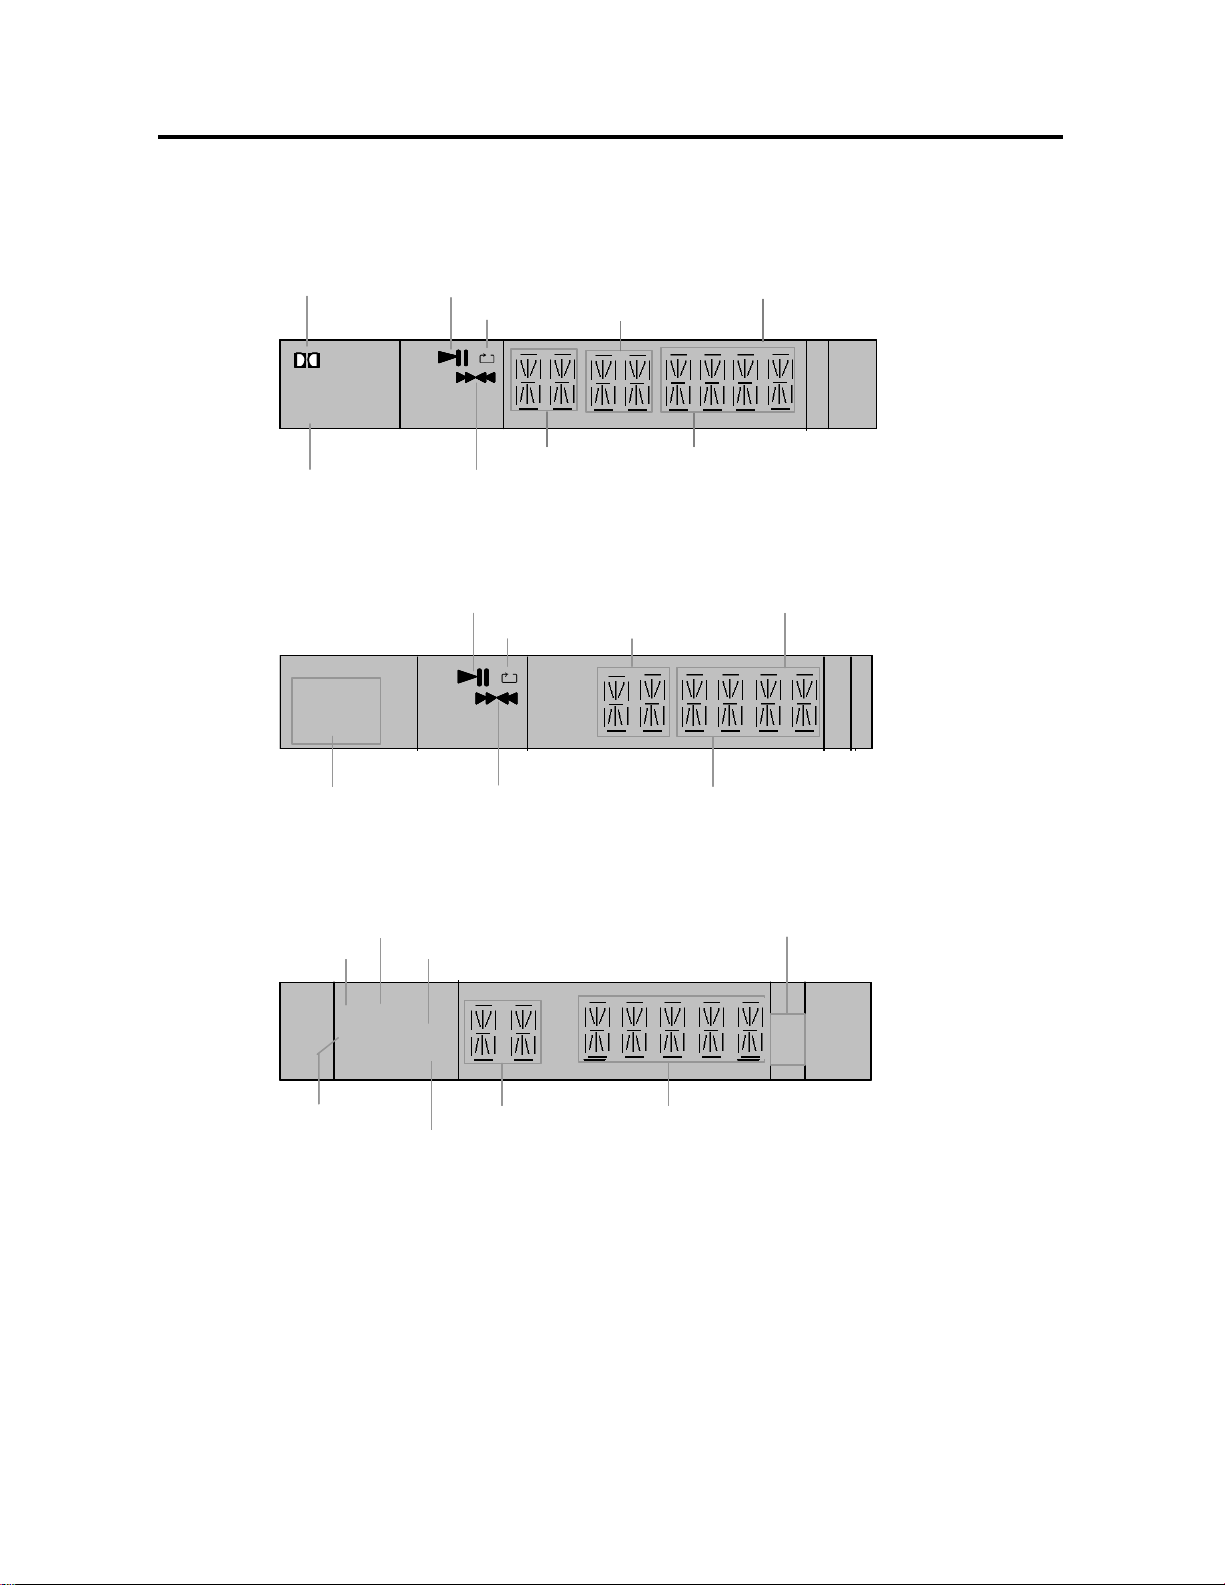
DISPLAY PANEL
DVD DISC PLAYBACK
PL A Y / PA US E
DOLBY DOUBL E D
DOLBY DOUBL E D
PL A Y / PA US E
DVD
DVD
DISC TYPE
DISC TYPE
CD/MP3 DISC PLAYBACK
CD MP3
CD MP3
DISC TYPE
DISC TYPE
RADIO
AM RADIO
AM RADIO
FM RAD IO
FM RAD IO
FM AM
FM AM
AUTO
AUTO
TUNED
TUNED
UTO SEARCH
UTO SEARCH
MONO CHANNEL
MONO CHANNEL
REPEAT
REPEAT
FWD/REV SCAN
FWD/REV SCAN
PL A Y / PA US E
PL A Y / PA US E
REPEAT
REPEAT
FWD/REV SCAN
FWD/REV SCAN
LOCK
LOCK
MON O
MON O
CHA PT ER
CHA PT ER
TRACK
TRACK
FREQUENCYRADIO NUMBER
FREQUENCYRADIO NUMBER
MINUTETITL E
MINUTETITL E
SECOND
SECOND
:
:
SECOND
SECOND
::
::
MINUTE
MINUTE
FREQUENCY UNIT
FREQUENCY UNIT
:
:
KH
KH
MHz
MHz
z
z
- 8 -
Page 9

LOCATION OF CONTROLS
REAR PANEL
1. Stereo audio output jack (Left)
2. Stereo audio output jack (Right)
3. Audio input jack (Left)
4. Audio input jack (Right)
5. Coaxial digital audio output jack
6. Optical digital audio output jack
7. Composite video output jack
8. S-Video output jack
9. FM 75Ω coaxial antenna jack
10. AM antenna jack
11. Speaker output jacks
12. Power supply cord
13-15. Component video output jacks (Y/PbCb/PrCr)
- 9 -
Page 10

REMOTE CONTROL
REMOTE CONTROL
4. ANGLE
- Press to access various camera angles (if
the DVD disc contains multiple camera
angles)
1. POWER
- Press to turn the DVD player on or off
2. MUTE
- Press to instantly turn off the sound, press
again to resume sound
3. SUBTITLE
- When a DVD is playing, press to select a
subtitle language
5. NUMBER
- Select numbers by pressing these buttons
6. PROG
- Allows you to play the disc in a
programmed sequence
7. SCAN
- In radio mode, press to search the radio
programs automatically
8. DIRECTION BUTTONS
- Use to select menu items or settings
9. SETUP
- Press to access the DVD player’s setup
menu
10. TITLE
- Press to display titles if present on the disc
11. Pause
Press to pause playback.
12. PLAY
- Press to enter playback mode.
13. VOLUME
- Press to raise or lower the DVD volume.
14. SLOW
- Press to activate slow playback.
15. REPEAT
- Press to repeat a chapter, track, title or all
contents
16. Channel
- If you want to adjust the signal of front
left/right, subwoofer, center, surround
left/right or the whole signals, press this
button to shift to the signal needing
adjusting and then press VOL- or VOL+ to
adjust the volume
17. ZOOM
- When a DVD is playing, press this key to
activate zoom function.
- 10 -
Page 11

REMOTE CONTROL
18. EJECT
- Press to open or close the disc tray.
19. DISPLAY
- Press repeatedly to show the disc
information
20. SEARCH
- Allow you to select the desired disc starting
time, track or title
21. MENU
- Press to display the disc menu on the TV
screen in Play mode
22. ENTER
- Press to enter a command or confirm a
selection.
23. STEP
- Press to pause playback or play frame by
frame.
24. AUDIO
- Press to access various audio change (if the
DVD disc contains multiple audio change).
.
25. STOP/BAND
- When a DVD is playing, press to stop
playback; when listening to the radio, press
to stop searching
26. FWD
- Press to search forward
27. REV
- Press to search backward
28. NEXT
- When a DVD is playing press to skip to the
next chapter. When listening to the radio,
press to search the next radio station
29. PREV
- When a DVD is playing press to skip to the
previous chapter. When listening to the radio,
press to search the previous radio station
30. A-B
- Press to mark a segment to repeat between
two points.
31. FUNCTION
- Press to select DVD, Radio or external
audio input.
REMOTE CONTROL BATTERIES
Open the battery case cover, and insert two “AAA” batteries in accordance with +/- indicators inside the
compartment. Point the remote control at the remote sensor for operation within an angle of 60°and a
distance of 7m.
Note: Normally the batteries can last up to six months. If the remote control does not work, replace
the batteries.
If the player is not used for a long time, take out the batteries to prevent leakage and possible
damage to the remote control.
- 11 -
Page 12

SYSTEM CONNECTION
z Do not connect the power cord until all other connections have been made.
Connecting to the TV
To connect the video (picture) signal to your television, please follow these guidelines. You only need to
use one of these methods for video connection.
GOOD: Connect with a Composite Video cable (yellow);
BETTER: Connect with an S-Video cable.
BEST: Connect with a Component Video cable (red, green and blue).
- 12 -
Page 13

SYSTEM CONNECTION
Connecting to the Antenna
Connect the supplied AM and FM antennas for listening to the radio.
z In order to improve the signal, move the AM loop antenna away from system and other equipment.
z Extend the antenna fully.
z Keep the FM antenna as horizontal as possible after connection.
z When connecting the supplied AM loop antenna, connect two black cords to the AM and ground
jacks as shown below:
z If the FM reception is poor, please use a 75Ω coaxial cable (not supplied) to connect system to an
outdoor FM antenna as shown above.
NOTE: If you connect system with outdoor FM antenna, you should ground the system in order to
avoid lightning surge.
IMPORTANT: Do not connect the ground wire to gas pipe to prevent gas explosion.
- 13 -
Page 14

SYSTEM CONNECTION
Connecting the Speakers to the Player
Use the supplied cables to connect the player to the speakers. Note that the polarity should be correct.
IMPORTANT: Do not connect the player to speakers other than those supplied.
In order to enhance sound quality, please refer to the speaker placement section on the next page.
When connecting the speakers, be sure to match the colour of each side of the wire to the
corresponding jack; black to black, white to white, etc.
- 14 -
Page 15

SYSTEM CONNECTION
Speaker Placement
In order to enhance sound quality, all speakers (except the subwoofer) should be at equal distances
from the listening position (A).
However, if needed, you can move the centre speaker 1.6m closer to the listening position (B), and
move the surround speakers 4.6m closer to the listening position (C).
The front speakers can be placed between 1.0-15.0m from the listening position (A).
The subwoofer can be placed anywhere.
You can place the surround speakers beside or behind you depending on the shape of your room.
Beside you
Behind you
B
B
BB
A
A
AA
AA
0
0
45
C
CC
45
C
C
CC
0
0
90
90
CC
BB
A
A
AA
AA
0
0
45
45
C
CC
0
0
90
90
0
0
20
20
0
0
20
20
60-90cm
45°
If possible, place the surround speakers on
the two sidewalls opposite to each other,
60-90cm higher than the listener.
There should be 45 ° between the front
speakers. The center speaker can be placed
in the same plane as the front speakers.
- 15 -
Page 16

OPERATION FUNCTIONS
Preparation:After connection, you should turn
on TV and select relevant video input before
playback.
Basic Playback
1. Press the POWER button on the front panel
to turn on the player.
2. Press the EJECT button to open the disc
loading tray.
3. Place the chosen disc in the tray, with the
label facing up.
4. Press the EJECT again to close the disc tray.
5. After recognizing this disc the player begins
to playback automatically.
DVD PLAYBACK
MENU
Normally there is a menu in DVD discs, you can
press the MENU button to display the menu
directly, and use the direction buttons to choose
the item you like and press the ENTER button.
TITLE & CHAPTER
Normally there are several titles in a DVD disc,
and also there are several chapters in a title. You
can select any one of titles or chapters quickly by
using the number buttons to enter to the number
of the chapter.
SUBTITLE
The DVD player can support up to 32 kinds of
subtitles. When you play a multi-subtitle disc,
press the SUBTITLE button on the remote
control to select different subtitle.
NOTE: This function is only available for discs
that several audio bit streams have been
recorded onto.
LANGUAGE
There are up to 8 kinds of audio languages in a
DVD disc. When you play a multi-language DVD
disc, press the AUDIO button to select a different
audio language.
NOTE: This function is only available for discs
that have several audio
bit streams.
ANGLE
The DVD player supports multi-angle function.
Multi-angle means that a scene is shot from
more than one angle so that audience can watch
from any angle. If there are multiples in a scene,
you can use the ANGLE button to select the
angle you like to enjoy. Press the ANGLE button
continuously to view different angles.
VOLUME
During playback, press the VOLUME+ button to
increase the volume and press the VOLUMEbutton to decrease the volume.
MP3 PLAYBACK
When you insert a MP3 disc, you will see a menu
showing the folders. Use the keys to select
the folder, then press ENTER key or key to
open this folder. Now the tracks inside are
displayed.
Use these buttons to choose a song, then
press the ENTER or PLAY key to start playback.
Press or key to increase the playback
speed backward or forward. Press the PLAY
button to resume playback with normal speed.
Press or to skip to next or previous page.
- 16 -
Page 17

OPERATION FUNCTIONS
PICTURE-CD AND CD PLAYBACK
The player will play the PICTURE-CD and CD
discs continuously in default status. You can
press the keys or number keys to select a
certain track. Press or to skip to next or
previous page.
RADIO OPERATION
The player has AM and FM radio functions to
receive clear radio stations.
Operation steps:
1. Press the FUNCTION button to change to
Radio Mode.
2. Then press the STOP/BAND button to select
AM or FM .
3. Press the SCAN button to search and
memory the radio station automatically.
4. Press the
frequency. The display panel will display the
radio frequency.
5. Press the ENTER key to save the radio
station.
6. While listening to the radio, press or
key to skip the next or previous radio
station.
Operation introduction
1. Press FUNCTION button to select radio,
external audio input or DVD playback.
2. Press MUTE button to turn off amplifier signal
output. Press again to resume it.
or keys to fine-tune the
3. If you want to adjust the signal of front
left/right, subwoofer, centre, surround
left/right or the whole signals, press
CHANNEL button to shift to the signal
needed adjusting and then press VOLUMEor VOLUME+ to adjust the effect you like.
4. DVD functions:
For enjoying stories or music, set speakers
to be:
Front Centre Rear Subwoofer
Small Small Small On
The following is the relevant display when
adjusting the all volume or separate volume.
FRONT LEFT
REAR LEFTREAR LEFT
SUBWOOFER
ALL VOLUME
FRONT RIGHT
REAR RIGHTREAR RIGHT
CENTRE
- 17 -
Page 18

OPERATION FUNCTIONS
STOP
If you press STOP key only once, playback will
resume at the same point if you press PLAY
later to restart playback. If you press STOP key
more than once to stop playback, play will start at
the beginning of the Disc again if you press
PLAY
later to restart playback.
PAUSE/STEP
To get a still picture, press STEP key during
playback. To step forward to the next frame
picture, press STEP key again. To resume
normal playback, press PLAY
.
REPEAT
1. Use the REPEAT button to repeat a
chapter, a title, a track or a disc respectively
according to different discs, and also press
REPEAT key to exit repeat mode.
2. Use the A-B button to repeat section A to B.
Press it once to set the starting point A,
twice to set the ending point B, and the third
time to cancel repeat.
z Some discs do not support repeat function.
SEARCH
You can use the SEARCH button to search the
contents by time, title, chapter or tracks. Press
SEARCH key repeatedly and input the desired
title/chapter number or time, and then playback
immediately jumps to the requested title/chapter.
FAST FORWARD & REVERSE PLAYBACK
Press the
control to activate fast forward or reverse.
and buttons on the remote
SLOW MOTION
Press the SLOW button to activate slow forward
z There is no slow playback function for CD
and MP3 discs.
ON SCREEN DISPLAY
Press the DISPLAY button on remote control to
display relevant disc information.
PROGRAM PLAYBACK
Use the PROG key to activate program playback
Operation steps:
1. Press the PROG button to enter program
status.
2. Use number buttons to input program
contents according to the prompts.
3. Repeat step 2 to program more contents.
4. After finishing the program, use direction
buttons to move cursor to “START” and then
press the ENTER button to start program
playback. Or select the “EXIT” to quit
program playback.
ZOOM
The ZOOM function allows you to change the
image size and scan through the enlarged
image.
1. Press the ZOOM key to activate the function.
Use the key to view the rest part of
the zoomed picture.
2. Press the ZOOM key repeatedly to return to
the original size.
z This function is NOT available for some
discs.
- 18 -
Page 19

SYSTEM SETUP
Basic Operation
1. Press the SETUP key to enter the Setup
Menu.
2. Press the ENTER key to open the next level
submenu or confirm your selection.
3. Press
return to the previous menu.
4. Press
5. Press the SETUP key to quit the setup menu.
NOTE: When you quit the setup menu, the
settings will be stored in the player’s memory
even if the player is switched to power off.
keys to enter the submenu or
keys to select the desired item.
GENERAL SETUP
TV DISPLAY
Select the aspect ratio of the TV to be connected.
Support NORMAL PS, NORMAL LB and WIDE
aspect ratios.
ANGLE MARK
“ON”: When playing the contents with different
angles, you can press ANGLE key repeatedly
to watch the scenes from a different angle.
“OFF”: Disable this function
OSD LANG
There are three options available for information
display on TV screen.
CAPTIONS
Some DVD discs have hidden captions. You can
enable or disable the hidden captions by using
this item.
SCREEN SAVER
Choose on and the unit will enter the mode of
screen saver automatically if there has been no
operation for a period of time.
HDCD
This setting allows you to select “OFF”, “1X” or
“2X”.
AUDIO SETUP
SPEAKER SETUP PAGE 1 DOWNMIX
‘LT/RT’: Choose this item if you connected the
Player to a stereo that has Dolby Pro Logic.
‘STEREO’: this item will help to downmix the
signal into stereo signals directly outputting from
L/R port.
‘OFF’: The player will output the 5.1CH audio
signals (now the setups of the centre speaker
and the rear speaker are active).
2 FRONT SPEAKER
Set the audio output level, ‘LARGE’ or ‘SMALL’.
3 CENTRE SPEAKER
When ‘DOWNMIX’ is in ‘OFF’ status, you can set
‘CENTR SPEAKER’ to be ‘LARGE’, ‘SMALL’ or
‘OFF’.
4 REAR SPEAKER
When ‘DOWNMIX’ is in ‘OFF’ status, you can set
‘REAR SPEAKER’ to be ‘LARGE’, ‘SMALL’ or
‘OFF’.
5 SUBWOOFER
‘ON’: Enable the Subwoofer output
‘OFF’: Disable the Subwoofer output.
SPDIF SETUP PAGE
SPDIF OUTPUT
This item is used to set the format of digital audio.
‘SPDIF OFF’: Turn off the digital audio output
‘SPDIF/RAW’: Outputs the original digital signal
‘SPDIF/PCM’: Convert to PCM signals to output
which only contains left/right audio signals
- 19 -
Page 20

SYSTEM SETUP
DOLBY DIGITAL SETUP
DUAL MONO
This function is used to set Dolby audio output.
Stereo, L-Mono, R-Mono and Mix-Mono.
DYNAMIC
The Dynamic Range Compression can be turned
off by selecting ‘OFF’, or set to full compression
by selecting ‘FULL’. There are also intermediate
levels of compression available for selection.
VIDEO SETUP
COMPONENT
It is used to setup video output.
‘OFF’: Turn off the component video signal.
‘YUV’: Output YUV video signal.
TV MODE
You can choose PROGRESSIVE or
INTERLACED output when playing with ‘YUV’
mode.
SHARPNESS
This menu allows the settings for the sharpness
of the picture: High, Medium or Low.
BRIGHTNESS and CONTRAST
It is used to adjust the parameters for your
preference
PREFERENCE SETUP
This setup is only available when the disc has
stopped.
TV Type
Before viewing the DVD or VCD, ensure that the
PAL or NTSC setting of the system matches your
TV set.
Audio, Subtitle and Disc Menu
DVD discs are available for multiple audio,
subtitle or disc menu languages. Use these
items to choose default audio, subtitle or disc
menu language.
PARENTAL
Movies on DVDs may contain scenes not suitable
for children. Therefore, discs may contain
“Parental Control” information which applies to the
complete disc or to certain scenes on the disc.
These scenes are rated from 1 to 8, and
alternative, more suitable scenes are available on
the discs.
To set up the parental level on the sub-menu,
press buttons to select a rating for the disc
inserted and press the ENTER button to confirm.
PASSWORD
This item is used for the parental control and disc
lock. This player has a default password code of
136900.
DEFAULT
If some problems occur during setting DVD, the
DEFAULT function is used to reset all items to
factory default and all your personal setting will be
erased.
- 20 -
Page 21

TROUBLE SHOOTING
WARNING
Under no circumstances should you try to repair the system yourself, as this will invalidate the
warranty. Do not open the system as there a risk of electric shock.
If a fault occurs, first check the points below before taking the system for repair. If you are unable
to remedy a problem by following these
Problem Solution
- Check if the system connection is correct.
There is no sound.
- Check if the sound setup of DVD disc is correct.
- Check if your disc dirty or warped? Clean or replace disc.
suggestions, consult your dealer or service center.
There is no picture.
The player does not play.
Poor AV performance - Is your disc dirty or warped? Clean or replace disc.
Cannot continue to play and
play a section repeatedly.
There is no sound from
speaker.
Poor radio sound.
- Make sure TV is on and in correct video mode.
- Make sure your system connection is correct.
- Make sure the disc isn’t loaded upside down.
- Disc should be clean, not dirty or warped.
- Make sure the player is not in A-B repeat status.
- Press A-B button to cancel A-B repeat status.
- Is your disc dirty or wrapped? Clean or replace disc.
- Make sure it isn’t in mute status.
- If it is true, press the MUTE button to cancel it.
- Make sure antenna connection is correct.
- Make sure antenna is fully extended.
Others:
Static or other external interference may cause the abnormity of the player. In this circumstance, unplug
the power-supply cord from the outlet and plug it in again to reset the player so that the normal operation
will be resumed. If you are still having problems, then please disconnect the power and consult your
service centre or a qualified technician.
- 21 -
Page 22

SPECIFICATIONS
Power AC 120V, 60Hz
General
Specification
Player
Power Consumption 250W (max.)
Weight (approx.) 13.8kg
Dimensions 430 X 335 X 53mm (W×D×H)
Operating Temperature +2~+40
Disc Type DVD, CD, CD-R, CD-RW, MP3, JPEG
Video System NTSC/PAL/AUTO
Frequency Response
Audio Signal-to-noise Ratio ≥ 80dB (1kHz)
Audio Distortion + Noise ≤-70dB (1kHz)
Channel Separation ≥ 70dB (1kHz)
Dynamic Range ≥ 80dB (1kHz)
Analog Audio Output
Output
Video Output
20Hz~20kHz ±2.5dB
0.2
Voltage:2V±
Voltage:1Vp-p±0.2,Impedance:75Ω
Unbalanced Negative
, Impedance:10KΩ
1.0
Amplifier
Radio
S-Video Output
Total Power Output 110W (MAX)
Analog Input
Total Harmonic Distortion ≤1%
Signal-to-noise Ratio ≥60dB
Frequency Response
System PLL
Frequency
Range
AM 520~1710kHz
FM 87.5~108MHz
Voltage:Y:1Vp-p, C:0.286Vp-p,Impedance:75Ω
Impedance:10KΩ
20Hz~20kHz ±3dB
Manufactured under license from Dolby Laboratories.
“Dolby” and the double-D symbol are trademarks of Dolby Laboratories.
Confidential unpublished works.
All rights reserved.
© 1992—1997 Dolby Laboratories.
This product incorporates copyright protection technology that is protected by method claims of
certain U.S. patents and other intellectual property rights owned by Macrovision Corporation and
other rights owners. Use of this copyright protection technology must be authorized by Macrovision
Corporation, and is intended for home and other limited viewing uses only unless otherwise
authorized by Macrovision Corporation. Reverse engineering or disassembly is prohibited.
- 22 -
Page 23

ELECTROHOME WARRANTY
Consumer Electronics Products
Thank you for choosing Electrohome!
Jutan International (hereinafter called “Jutan”) gives the following express warranty to the original
consumer purchaser or gift recipient for this Electrohome brand product, when shipped in its original
container and sold or distributed in Canada by Jutan or by an Authorized Electrohome Dealer:
Jutan warrants that this product is free, under normal use and maintenance, from any defects in material
and workmanship. If any such defects should be found in this product within the applicable warranty
period, Jutan shall, at its option, repair or replace the product as specified herein. Replacement parts
furnished in connection with this warranty shall be warranted for a period equal to the unexpired portion of
the original equipment warranty.
This warranty shall not apply to:
a. Any defects caused or repairs required as a result of abusive operation, negligence, accident,
improper installation or inappropriate use as outlined in the owner’s manual.
b. Any Electrohome product tampered with, modified, adjusted or repaired by any party other than
Jutan or Electrohome’s Authorized Service Centres.
c. Damage caused or repairs required as a result of the use with items not specified or approved by
Jutan, including but not limited to head cleaning tapes and chemical cleaning agents.
d. Any replacement of accessories, glassware, consumable or peripheral items required through
normal use of the product including but not limited to earphones, remote controls, AC adapters,
batteries, temperature probe, stylus, trays, filters, cables and paper.
e. Any cosmetic damage to the surface or exterior that has been defaced or caused by normal wear
and tear.
f. Any damage caused by external or environmental conditions, including but not limited to
transmission line/power line voltage or liquid spillage.
g. Any product received without appropriate model, serial number and CSA/cUL markings.
h. Any products used for rental or commercial purposes.
i. Any installation, setup and/or programming charges.
Should this Electrohome product fail to operate during the warranty period, warranty service may be
obtained upon delivery of the Electrohome product together with proof of purchase and a copy of this
LIMITED WARRANTY statement to an Authorized Electrohome Service Centre. In-home warranty service
may be provided at Jutan’s discretion on any Electrohome television with the screen size of 27” or larger.
This warranty constitutes the entire express warranty granted by Jutan and no other dealer, service centre
or their agent or employee is authorized to extend, enlarge or transfer this warranty on behalf of Jutan. To
the extent the law permits, Jutan disclaims any and all liability for direct or indirect damages or losses or
for any incidental, special or consequential damages or loss of profits resulting from a defect in material or
workmanship relating to the product, including damages for the loss of time or use of this Electrohome
product or the loss of information. The purchaser will be responsible for any removal, reinstallation,
transportation and insurance costs incurred. Correction of defects, in the manner and period of time
described herein, constitute complete fulfillment of all obligations and responsibilities of Jutan to the
purchaser with respect to the product and shall constitute full satisfaction of all claims, whether based on
contract, negligence, strict liability or otherwise.
WARRANTY PERIODS: Parts & Labour (exceptions noted)
¾ Audio Products: 1 Year (Remote Control, if applicable – 90 Days)
¾ DVD Products: 1 Year (Remote Control – 90 Days)
¾ LCD & Plasma Display TV: 1 Year (Remote Control – 90 Days)
¾ Microwave Oven: 1 Year
¾ Television Products: 1 Year (Remote Control – 90 Days)
¾ VCR Products: 1 Year (Remote Control – 90 Days, Video Heads – 6 Months)
To obtain the name and address of the nearest Authorized Electrohome Service Centre or Dealer, please
- 23 -
Page 24

contact:
Jutan International, 455 Gordon Baker Road, Toronto, Ontario M2H 4H2 or visit our web site:
www.jutan.ca
For more information on this Warranty or Service Locations, please call (416) 499-5611 or toll free
1-800-663-5954, Monday to Friday 9:00am – 5:00pm Eastern Standard Time.
EH 02/22/2005
- 24 -
 Loading...