

Page 1
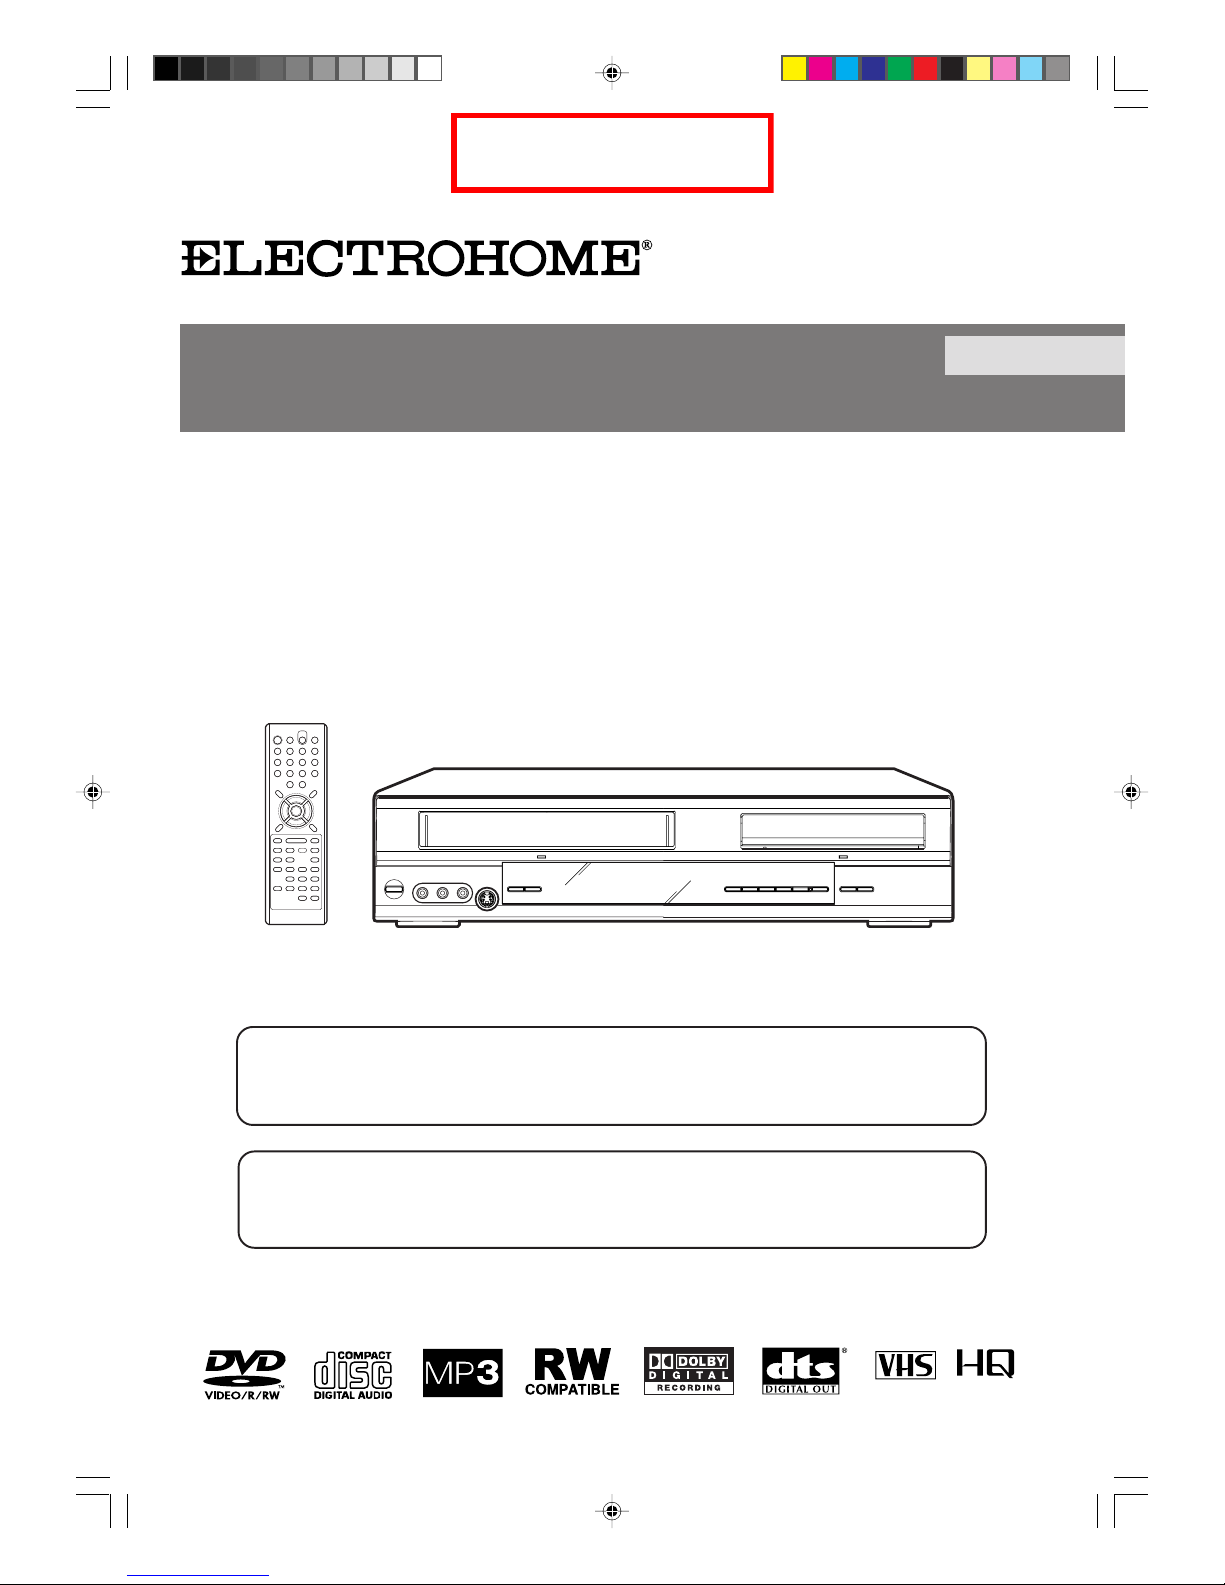
TV/CABLE MODE SELECTION
When shipped from the factory, the TV/CABLE menu option is set to the “CABLE” (Cable Television)
mode. If not using Cable TV, set this menu option to the “TV” position.
ATTENTION
If you purchase a universal remote control from your local retailer, please contact the remote
manufacturer for the required programming code.
DVD-RW RECORDER & VCR
USER MANUAL
ENGLISH
DVRC802E
Before operating the unit, please read this manual thoroughly.
2H6P001A[E] Cover 6/28/05, 5:33 PM1
DRAFT
Page 2
2
Contents
Setting the screen ...................................................29
TV SCREEN ........................................................29
STILL MODE ....................................................... 29
LINE1 INPUT ....................................................... 29
LINE2 INPUT ....................................................... 29
Setting the image quality.........................................30
BRIGHTNESS ..................................................... 30
Setting the audio .....................................................30
DRC ..................................................................... 30
EXTERNAL AUDIO INPUT..................................30
SAP (Second Audio Program) ............................. 30
Setting the recording ............................................... 31
INITIAL REC TO ..................................................31
INITIAL REC MODE ............................................31
AUTO CHAPTER.................................................31
INDEX PICTURE ................................................. 31
Setting the channel ................................................. 32
TV/CABLE SELECT ............................................32
AUTO CH MEMORY............................................32
ADD/DELETE (channels) .................................... 32
Setting other items ..................................................32
JPEG INTERVAL .................................................32
Disc playback
Playback procedure ................................................ 33
Playback by selecting a title .................................... 34
Checking media information....................................35
Special playback .....................................................36
Fast forward playback..........................................36
Review playback ..................................................36
Still playback........................................................36
Frame advance....................................................36
Slow motion playback .......................................... 36
Locating a chapter or track ..................................36
Commercial skip......................................................37
Locating a specific scene ........................................ 37
Repeat playback ..................................................... 38
One touch repeat ................................................. 38
A-B repeat playback ............................................38
Title, Chapter repeat playback.............................38
Title selection ..........................................................39
DVD menu...............................................................39
Changing angles .....................................................40
Zooming ..................................................................40
Karaoke playback....................................................40
Changing soundtrack language ..............................41
Subtitles .................................................................. 41
Turning the subtitles On and Off ..........................41
Various operations on CD ....................................... 42
MP3/WMA/JPEG playback ..................................... 44
Progressive scan.....................................................47
Before using your unit
CAUTION .................................................................. 4
IMPORTANT SAFEGUARDS....................................5
Features .................................................................... 8
Disc ...........................................................................9
Handling discs ....................................................... 9
Discs which can be played back............................9
Discs on which video can be recorded ................10
Recording format .................................................10
Disc playback in other players .............................11
Parts and functions ................................................. 12
Front ....................................................................12
Rear ..................................................................... 12
Display window .................................................... 13
Remote control ....................................................14
Power Source ......................................................15
Antenna connections ..............................................16
Cable TV connections .............................................18
Connections with the TV or audio component ........ 20
Auto clock setting .................................................... 22
Setting the video channel........................................22
Various settings
SETUP MENU.........................................................23
Using the SETUP MENU ..................................... 23
Setting the language ...............................................24
OSD LANGUAGE ................................................ 24
DVD MENU..........................................................24
AUDIO .................................................................24
SUBTITLE............................................................24
Setting the parental control .....................................25
Selecting parental control ....................................25
Temporarily cancelling parental control ...............25
Setting the clock......................................................26
CLOCK (manually)...............................................26
AUTO CLOCK......................................................26
STANDARD TIME (Time zone)............................26
DAYLIGHT SAVING TIME ...................................26
Setting the disc .......................................................27
REFORMAT.........................................................27
NEW DISC FORMAT ........................................... 27
FINALIZE ............................................................. 27
PROTECT DISC .................................................. 28
UNDO FINALIZE ................................................. 28
Other (SYSTEM SETUP) ........................................ 28
DIMMER (Brightness of the display window).......28
DISPLAY/CALL (Turning the screen display
“ON” or “OFF”) ....................................................28
2H6P001A[E] P02-11 6/28/05, 5:33 PM2
Page 3
3
Contents
: DVD-Video : DVD-R
: DVD-RW in VR mode : Audio CD and CD-R/CD-RW
: DVD-RW in Video mode : Video tape
Media mark
Each applicable media are indicated using the symbol shown below.
Dubbing
Dubbing a tape onto a disc .....................................76
Dubbing a disc onto a tape .....................................77
Dubbing using other equipment ..............................78
Additional information
Glossary .................................................................. 79
Language code list .................................................. 81
Error/Warning message list.....................................82
Problems and troubleshooting ................................ 83
Video head cleaning ...............................................84
Specifications .......................................................... 85
WARRANTY............................................................86
Tape playback
Loading and unloading a cassette tape ............. 48
Cassette tape playback...................................... 49
Special playback ................................................ 50
Picture search................................................. 50
Still picture ...................................................... 50
Slow motion .................................................... 50
Frame by frame picture ................................... 50
Adjusting tracking condition ............................ 50
Repeat playback ............................................. 50
Commercial skip ............................................. 50
To display VCR operation status..................... 50
ZERO RETURN function.................................... 51
Video index search system ................................ 51
Recording
Read this before recording on disc .................... 52
Types of disc................................................... 52
Recording modes ........................................... 52
Disc remaining time ........................................ 53
Images that cannot be recorded ..................... 53
Recording a TV program.................................... 54
One-touch Timer Recording (OTR) .................... 56
Timer recording .................................................. 57
Stereo recording and playback .......................... 60
Editing the disc
Editing the disc................................................... 61
Editing a playlist ................................................. 62
Creating a playlist ........................................... 62
Changing a title name..................................... 63
Erasing a scene (Edit title).............................. 64
Combining the title .......................................... 66
Erasing a playlist............................................. 67
Editing an original title ........................................ 68
Adding a chapter mark ................................... 68
Combining chapters........................................ 69
Changing an original title name ...................... 70
Erasing a scene (Edit title).............................. 71
Erasing an original title ................................... 72
Changing a disc name ....................................... 73
Changing a disc name .................................... 73
Using the keyboard screen ............................. 74
Disc playback
Before using
your unit
Additional
information
Editing the discV arious settings T ape pla ybac k Recording Dubbing
2H6P001A[E] P02-11 6/28/05, 5:33 PM3
Page 4
4
WARNING: TO REDUCE THE RISK OF FIRE OR ELECTRIC SHOCK, DO NOT EXPOSE THIS APPLI-
ANCE TO RAIN OR MOISTURE.
CAUTION: TO PREVENT ELECTRIC SHOCK DO NOT USE THIS POLARIZED PLUG WITH AN EXTEN-
SION CORD, RECEPTACLE OR OTHER OUTLET UNLESS THE BLADES CAN BE FULLY
INSERTED TO PREVENT BLADE EXPOSURE.
CAUTION:
THIS DIGITAL VIDEO PLAYER EMPLOYS A LASER SYSTEM.
TO ENSURE PROPER USE OF THIS PRODUCT, PLEASE READ THIS USER’S GUIDE CAREFULLY AND
RETAIN FOR FUTURE REFERENCE. SHOULD THE UNIT REQUIRE MAINTENANCE, CONTACT AN AUTHORIZED SERVICE LOCATION-SEE SERVICE PROCEDURE.
USE OF CONTROLS, ADJUSTMENTS OR THE PERFORMANCE OF PROCEDURES OTHER THAN THOSE
SPECIFIED HEREIN MAY RESULT IN HAZARDOUS RADIATION EXPOSURE.
TO PREVENT DIRECT EXPOSURE TO LASER BEAM, DO NOT TRY TO OPEN THE ENCLOSURE. VISIBLE LASER RADIATION MAY BE PRESENT WHEN THE ENCLOSURE IS OPENED. DO NOT STARE
INTO BEAM.
RISK OF ELECTRIC SHOCK
DO NOT OPEN
CAUTION
The lightning flash with arrowhead symbol, within an equilateral triangle is intended to alert the user to the presence
of uninsulated dangerous voltage within
the product’s enclosure that may be of
sufficient magnitude to constitute a risk
of electric shock to persons.
The exclamation point within an equilateral triangle is intended to alert the user
to the presence of important operating
and maintenance (servicing) instructions
in the literature accompanying the appliance.
CAUTION: TO REDUCE THE RISK OF ELECTRIC
SHOCK, DO NOT REMOVE COVER (OR
BACK). NO USER-SERVICEABLE PARTS
INSIDE. REFER SERVICING TO QUALIFIED SERVICE PERSONNEL.
WARNING: This equipment has been tested and found to comply with the limits for a Class B digital device,
pursuant to Part 15 of the FCC Rules. These limits are designed to provide reasonable protection
against harmful interference in a residential installation. This equipment generates, uses and can
radiate radio frequency energy and, if not installed and used in accordance with the instructions, may
cause harmful interference to radio communications.
However , there is no guar antee that interference will not occur in a particular installation. If this equipment does cause harmful interference to radio or television reception, which can be determined by
turning the equipment off and on, the user is encouraged to try to correct the interference by one or
more of the following measures:
- Reorient or relocate the receiving antenna.
- Increase the separation between the equipment and receiver.
- Connect the equipment into an outlet on a circuit different from that to which the receiver is connected.
- Consult the dealer or an experienced radio/TV technician for help.
CAUTION: Changes or modifications not expressly approved by the partly responsible for compliance with the
FCC Rules could void the user’s authority to operate this equipment.
CAUTION
CERTIFICATION: COMPLIES WITH FDA RADIATION PERFORMANCE
STANDARD, 21 CFR SUBCHAPTER J.
Location of the required Marking
The rating sheet and the safety caution are on the rear of the unit.
2H6P001A[E] P02-11 6/28/05, 5:33 PM4
Page 5

5
1. READ INSTRUCTIONS
All the safety and operating instructions should be read before the unit is operated.
2. RETAIN INSTRUCTIONS
The safety and operating instructions should be retained for future reference.
3. HEED WARNINGS
All warnings on the unit and in the operating instructions should be adhered to.
4. FOLLOW INSTRUCTIONS
All operating and use instructions should be followed.
5. CLEANING
Unplug this unit from the wall outlet before cleaning. Do not use liquid cleaners or aerosol cleaners.
Use a damp cloth for cleaning the exterior cabinet only.
6. ATTACHMENTS
The manufacturer of this unit does not make any recommendations for attachments, as they may cause
hazards.
7. WATER AND MOISTURE
Do not use this unit near water. For example, near a bathtub, washbowl, kitchen sink, laundry tub, in a wet
basement, or near a swimming pool.
8. ACCESSORIES
Do not place this unit on an unstable cart, stand, tripod, bracket, or table.
The unit may fall, causing serious injury, and serious damage to the unit.
8A. An appliance and car t combination should be moved with care. Quick
stops, excessive force, and uneven surfaces may cause the appliance
and cart combination to overturn.
9. VENTILATION
Slots and openings in the cabinet back or bottom are provided for v entilation, to ensure reliable operation of the unit, and to protect it from overheating.
These openings must not be blocked or covered. The openings should
never be blocked by placing the unit on a bed, sofa, rug, or other similar
surface. This unit should ne ver be placed near or ov er a radiator or heat source. This unit should not be placed
in a built-in installation such as a bookcase or rack unless proper ventilation is pro vided and/or the manufacturer’ s
instructions have been adhered to.
10. POWER SOURCES
This unit should be operated only from the type of power source indicated on the rating plate. If you are not
sure of the type of power supply to your home, consult y our appliance dealer or local power company. For units
intended to operate from battery power, or other sources, refer to the operating instructions.
11. GROUNDING OR POLARIZATION
This unit is equipped with a polarized alternating-current line plug (a plug having one blade wider than the
other). This plug will fit into the power outlet only one w ay. This is a saf ety f eature. If you are unable to insert the
plug fully into the outlet, try reversing the plug. If the plug should still fail to fit, contact your electrician to
replace your obsolete outlet. Do not defeat the safety purpose of the polarized plug, if your unit is equipped
with a 3-wire grounding-type plug, a plug having a third (grounding) pin. This plug will only fit into a groundingtype power outlet. This too, is a safety feature. If you are unable to insert the plug into the outlet, contact your
electrician to replace your obsolete outlet. Do not defeat the safety purpose of the grounding-type plug.
12. POWER-CORD PROTECTION
Power-supply cords should be routed so that they are not likely to be walked on or pinched by items placed
upon or against them, paying particular attention to cords at plugs, convenience receptacles, and the point
where they exit from the appliance.
13. LIGHTNING
To protect your unit from a lightning stor m, or when it is left unattended and unused for long periods of time,
unplug it from the wall outlet and disconnect the antenna or cable system. This will pre vent damage to the unit
due to lightning and power line surges.
S3125A
PORTABLE CART WARNING
(symbol provided by RETAC)
IMPORTANT SAFEGUARDS
Before using
your unit
2H6P001A[E] P02-11 6/28/05, 5:33 PM5
Page 6

6
IMPORTANT SAFEGUARDS
14. POWER LINES
An outside antenna system should not be located in the vicinity of overhead power lines or other electric light
or power circuits, or where it can fall into such power lines or circuits. When installing an outside antenna
system, extreme care should be taken to keep from touching such pow er lines or circuits, as contact with them
might be fatal.
15. OVERLOADING
Do not overload wall outlets and extension cords, as this can result in a risk of fire or electric shock.
16. OBJECT AND LIQUID ENTRY
Do not push objects through any openings in this unit, as they may touch dangerous voltage points or short
out parts that could result in fire or electric shock. Never spill or spray any type of liquid into the unit.
17. OUTDOOR ANTENNA GROUNDING
If an outside antenna or cable system is connected to the unit, be sure the antenna or cable system is grounded
to provide some protection against voltage surges and built-up static charges, Section 810 of the National
Electrical Code, ANSI/NFPA 70, provides information with respect to proper grounding of the mast and supporting structure, grounding of the lead-in wire to an antenna discharge unit, size of grounding conductors,
location of antenna discharge unit, connection to grounding electrodes, and requirements for the grounding
electrode.
18. SERVICING
Do not attempt to service this unit yourself as opening or removing covers may expose you to dangerous
voltage or other hazards. Refer all servicing to qualified service personnel.
19. DAMAGE REQUIRING SERVICE
Unplug this unit from the wall outlet and refer servicing to qualified service personnel under the following
conditions:
a. When the power-supply cord or plug is damaged.
b. If liquid has been spilled, or objects have fallen into the unit.
c. If the unit has been exposed to rain or water.
d. If the unit does not operate normally by following the operating instructions. Adjust only those controls
that are covered by the operating instructions, as an improper adjustment of other controls ma y result in
damage and will often require extensive work by a qualified technician to restore the unit to its normal
operation.
e. If the unit has been dropped or the cabinet has been damaged.
f. When the unit exhibits a distinct change in performance, this indicates a need for service.
20. REPLACEMENT PARTS
When replacement parts are required, be sure the service technician uses replacement parts specified by the
manufacturer or those that have the same characteristics as the original part.
Unauthorized substitutions may result in fire, electric shock or other hazards.
21. SAFETY CHECK
Upon completion of any service or repairs to this unit, ask the service technician to perform safety checks to
determine that the unit is in proper operating condition.
22. HEAT
The product should be situated away from heat sources such as radiators, heat registers, stoves, or other
products (including amplifiers) that produce heat.
23. DISC TRA Y
Keep your fingers well clear of the disc tray as it is closing. It may cause serious personal injury.
24. CONNECTING
When you connect the product to other equipment, turn off the power and unplug all of the equipment from
the wall outlet. Failure to do so may cause an electric shock and serious personal injur y. Read the owner’s
manual of the other equipment carefully and follow the instructions when making any connections.
25. LASER BEAM
Do not look into the opening of the disc tray or ventilation opening of the product to see the source of the laser
beam. It may cause sight damage.
2H6P001A[E] P02-11 6/28/05, 5:33 PM6
Page 7
7
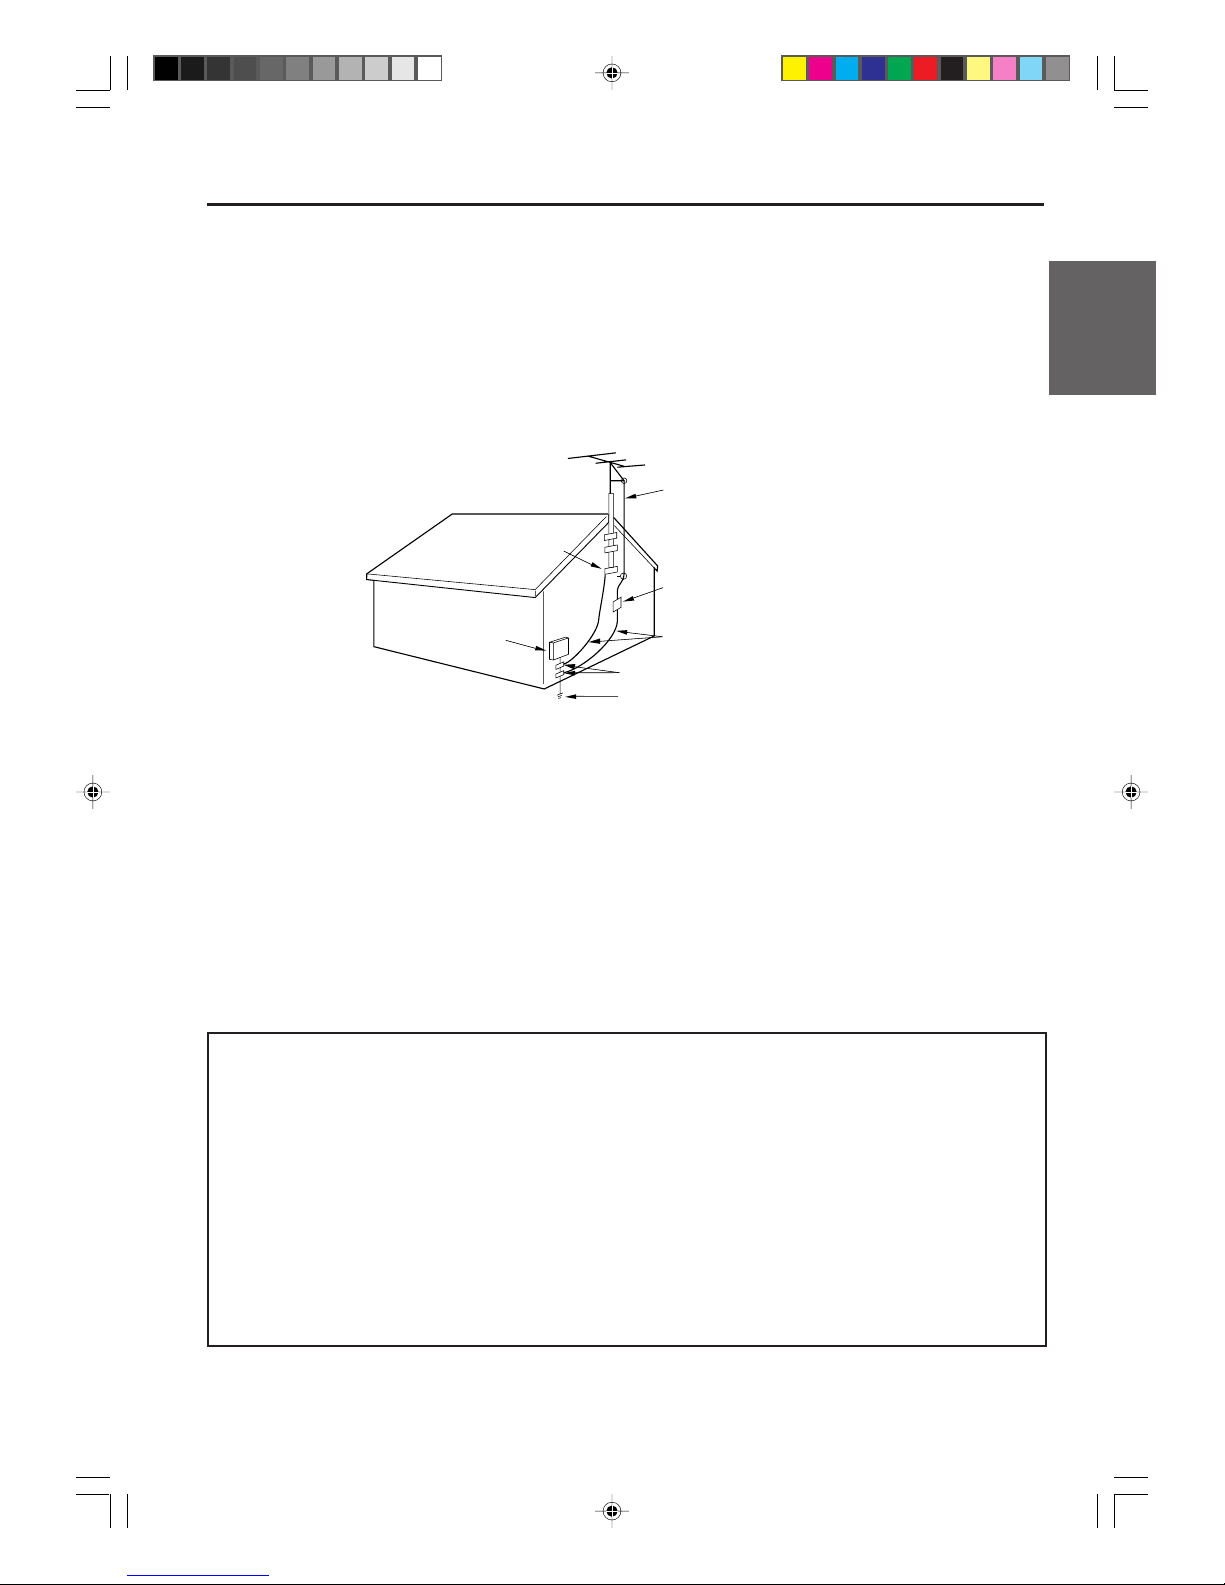
EXAMPLE OF ANTENNA GROUNDING AS PER THE
NATIONAL ELECTRICAL CODE
26. DISC
Do not use a cracked, deformed, or repaired disc. These discs are easily broken and may cause serious
personal injury and product malfunction.
27. NOTE TO CABLE TV SYSTEM INSTALLER
This reminder is provided to call the cable TV system installer’s attention to Article 820-40 of the NEC that
provides guidelines for proper grounding and, in particular, specifies that the cab le ground shall be connected
to the grounding system of the building, as close to the point of cable entry as practical.
ANTENNA
DISCHARGE UNIT
(NEC SECTION 810-20)
ANTENNA LEAD IN WIRE
GROUNDING CONDUCTORS
(NEC SECTION 810-21)
GROUND CLAMPS
POWER SERVICE GROUNDING
ELECTRODE SYSTEM
(NEC ART 250, PART H)
GROUND CLAMP
ELECTRIC
SERVICE
EQUIPMENT
S2898A
IMPORTANT SAFEGUARDS
* This product incorporates copyright protection technology that is protected by U.S. patents and other intel-
lectual property rights. Use of this copyright protection technology must be authorized by Macrovision, and
is intended for home and other limited viewing uses only unless otherwise authorized by Macrovision. Reverse engineering or disassembly is prohibited.
* Consumers should note that not all high definition tele vision sets are fully compatib le with this product and
may cause artifacts to be displayed in the picture. In case of 525 progressive scan picture problems, it is
recommended that the user switch the connection to the “STANDARD DEFINITION” output. If there are
questions regarding our TV set compatibility with this model 525p D VD pla y er , please contact our customer
service center.
* Manufactured under license from Dolby Laboratories. “Dolby” and the double-D symbol are trademarks of
Dolby Laboratories.
* “DTS” and “DTS Digital Out” are trademarks of Digital Theater Systems, Inc.
* Unauthorized recording of copyrighted television programs , films , video cassettes and other materials ma y
infringe the rights of copyright owners and be contrary to copyright laws.
Before using
your unit
MOISTURE CONDENSATION
DO NOT OPERATE THIS DVD/VCR FOR AT LEAST TWO OR THREE HOURS WHEN MOISTURE IN THE AIR
CONDENSES ON THE DVD/VCR.
WHAT IS MOISTURE CONDENSA TION?
When cold liquid is poured into a glass, for example , water vapour in the air will condense on the surf ace of the glass.
This is called moisture condensation.
MOISTURE WILL CONDENSE ON THE UNIT IN THE FOLLOWING CASES;
• When you move this DVD/VCR from a cold to a w arm place.
• After heating a cold room or under extremely humid conditions.
WHEN YOU EXPERIENCE THE ABOVE CONDITIONS;
Plug the power cord into an AC outlet, set the power switch to ON and leave the unit at room temperature until
moisture condensation disappears. Depending on the surrounding conditions , this may tak e from two or three hours.
NEC-NATIONAL ELECTRICAL CODE
2H6P001A[E] P02-11 6/28/05, 5:33 PM7
Page 8
8
Features
Playback function
Title menu
Recording function
Timer recording
The timer recording system allows you to select the
date, time and channel and record the desired programs.
Up to 12 timer programs within a month can be stored
in this unit.
One-touch Timer Recording (OTR)
The One-touch Timer Recording feature provides a
simple and convenient way to make a timed recording.
Edit function
Editing recorded material without changing
the original titles
You can create a playlist based on the original titles.
The playlist won’t affect the original titles. If you erase
the playlist, the original titles remain. It is recommended
to create and edit the playlist to prevent important titles
from being erased accidentally.
Chapter mark
You can add (or delete) a chapter mark to (from) the
original title. This function is useful when searching for
the scene you wish to watch that you have marked with
the Chapter mark function.
Erasing scenes
You can erase an unnecessary scene from the created
playlist or the original titles.
Combining titles
You can combine several original titles or playlists to a
separate playlist.
Dubbing function
Dubbing a tape onto a disc or a disc onto a
tape
MP3/WMA/JPEG playback
MP3 and WMA files can be play ed bac k. Also, you can
display JPEG files on the TV screen and enjo y them as
a slide show.
Progressive scan
This unit supports the progressive scanning system. If
your TV is equipped with component video input jacks
which support the progressive video input, you can
enjoy high quality picture.
Thumbnail image will not appear after finalizing DVDRW (recorded in the Video mode) and DVD-R.
•
•
Dubbing cannot be carried out when attempting to
copy a “copy guarded” video tape or disc.
Not only can you playback and record video tapes, but
you can also playback DVD discs or make recordings
using DVD-RW, DVD-R discs with this unit. In addition,
you can enjoy editing the programs you record.
A realistic, powerful, Movie Theater sound
When connected to Dolby Digital and DTS compliant
devices, you can enjoy realistic, powerful surround
sound.
Playback the scene you want to see immediately
As DVD’s do not require re winding lik e video tapes, y ou
can get to the scene you wish to watch immediately. A
variety of search functions allow you to find the scene
you wish to watch.
As thumbnail images are displayed in the title menu,
you can find the title you want to play back quickly.
With just this one unit, you can dub however you like,
from video tape to disc, or from disc to video tape.
2H6P001A[E] P02-11 6/28/05, 5:33 PM8
Page 9
9
Disc
Region management information
This unit is designed and manufactured to support the
region management information that is recorded on a
DVD disc. If the region number written on the DVD disc
does not correspond to the region number of this unit,
this unit cannot play that disc.
• The region number of this unit is “1”.
• The unit will play DVD-Video discs mar ked with labels containing “1” or “ALL”.
Example:
1
Operating DVD-Video
• Some operations of DVD-Video may be prohibited
by the manufacturer, or some operation methods or
functions of the DVD-Video ma y be different from the
description in this manual.
• If you attempt an operation that is prohibited by either the disc or the unit, a “
” mark will appear on the
TV monitor. For oper ations prohibited by the disc, see
the information that came with the disc.
• When the menu screen or the operation guide appears during disc playback, follow the displayed information.
Discs which cannot be played back
The discs listed below cannot be played back in general. Even if one of these can be played back, it may
not be played back correctly. If a disc is play ed bac k by
mistake, extensiv ely loud sounds may blow the speakers or may damage the hearing of those in hearing
range. Do not playback the discs listed below.
CDG, Photo-CD, CD-ROM, CD-TEXT, CD-EXTRA,
VCD, SVCD , SA CD , PD , CDV, DVD-R OM, D VD-RAM,
DVD+R/RW, DVD audio, etc.
The below DVD-Video may not be played back.
• D VD-Video that do not have the region n umber “1” or
“ALL ”.
• PAL or SECAM DVD-Video.
• Prohibited or business-use DVD-Video.
Use only CD-R discs and CD-RW discs - all other CD
discs will not work in this unit.
CD-R/CD-RWs cannot be played back for the follo wing reasons.
• Compatibility of the disc and this unit.
• Compatibility of the disc and the recorder used.
• Unfinalized discs.
Do not playback the following discs. Playback of
these discs may cause a failure.
• Discs on which paper, labels or stickers are affixed.
• Discs that have sticky areas left by adhesive tape.
• Special-shaped discs.
* This unit is designed to playback music Compact Discs (CD) that
conform to the CD standard. CDs that contain (copy-restriction) signals to protect copyrights cannot be played back.
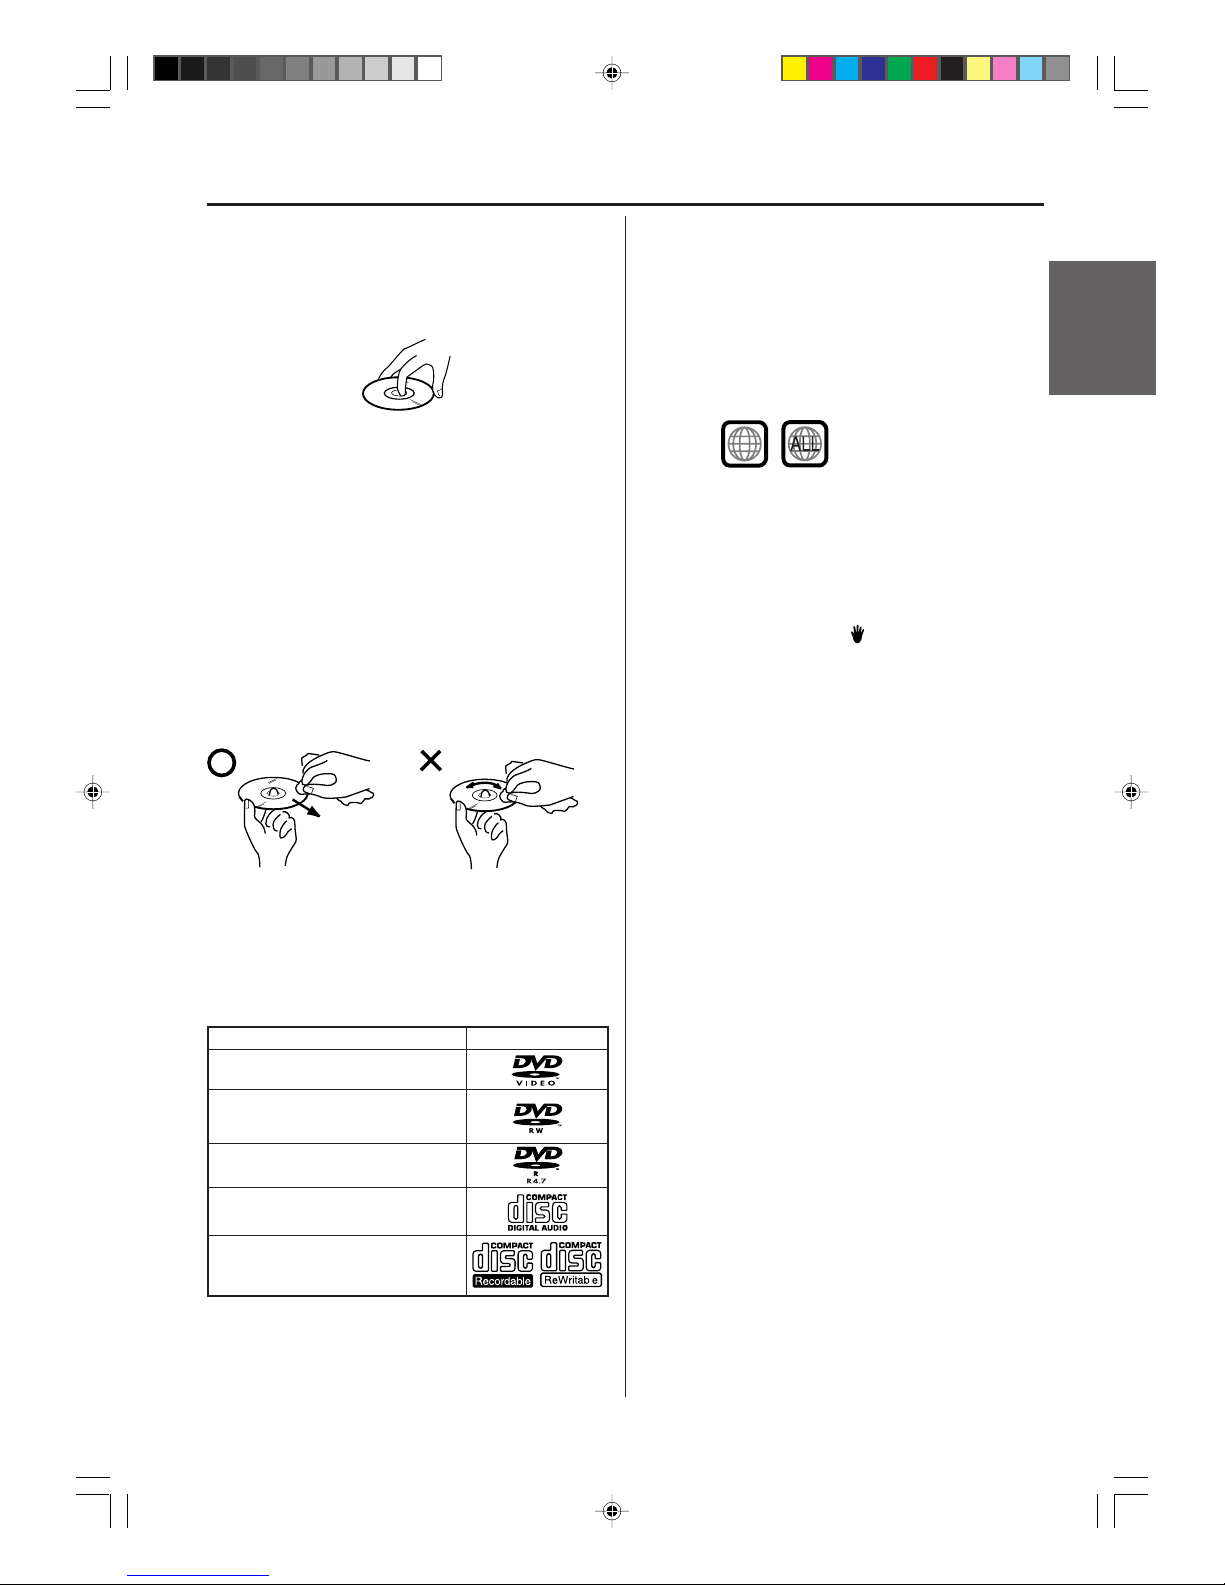
Media type
Logo mark
DVD-Video
DVD-RW Ver.1.0 Ver.1.1 V er.1.2
Ver.1.1 CPRM
support
DVD-R Ver.2.0 (Ver .2.0/4x/8x)
Audio CD*
CD-R/CD-RW
l
Before using
your unit
Handling discs
Removing the Disc from its case
Be sure to hold the disc by its edges. Do not touch the
surface of the disc.
Take the disc carefully from its case.
• Do not scratch the disc.
• Do not get dirt on the surface of the disc.
• Do not stick labels or adhesive tapes on the disc.
• Do not drop or bend the disc.
Storing discs
• Store the disc in the case to avoid any risk of
scratches, dirt or damage.
• Do not leave the disc e xposed to direct sunlight or in
hot or humid places.
Cleaning discs
Wipe the disc with a clean, dry cloth from the center
outward toward the edges.
• Do not wipe the disc in a circular motion around the
center.
• Do not use liquid or aerosol cleaners.
Discs which can be played back
In this unit, use only discs that meet the standard, such
as those bearing the below logo marks on the disc label
surface. If you use a non-standard disc, we cannot guarantee playback. Ev en if such a disc can be played bac k,
we cannot guarantee the image or sound quality.
The DVD logo is a registered trademark.
2H6P001A[E] P02-11 6/28/05, 5:34 PM9
Page 10
10
Recording format
This unit has two modes for formatting discs for recording: VR mode and Video mode.
When a blank, new disc is loaded into this unit, the automatic format function starts to format the disc. (For
the disc format setting in this step, see page 27.)
VR mode
• This mode can be used for DVD-RW.
• In this mode, the discs can be recorded and edited
repeatedly.
• The disc recorded in this mode can be played back
with other DVD-RW-compatible players.
• When a Ver.1.1 CPRM or Ver.1.2 disc is used, you
can record a “Copy Once” program (see page 53).
Video mode
• This mode can be used for DVD-R and DVD-RW
(Ver.1.1/1.2).
• When you finalize the disc after recording, the disc
recorded with this unit can be played back with other
DVD players.
• Recording, editing or playback of an unfinaliz ed disc
can be done only with this unit. However, there are
some limitation to editing operations.
• In this mode, you cannot record a “Copy Once” program (see page 53).
• When you record a TV prog r am of a bilingual broadcast, only one of the audio modes can be recorded.
You have to select it.
Format modes that can be used each disc
The usable format depends on the media type as shown
in the below table.
Disc
Discs on which video can be recorded
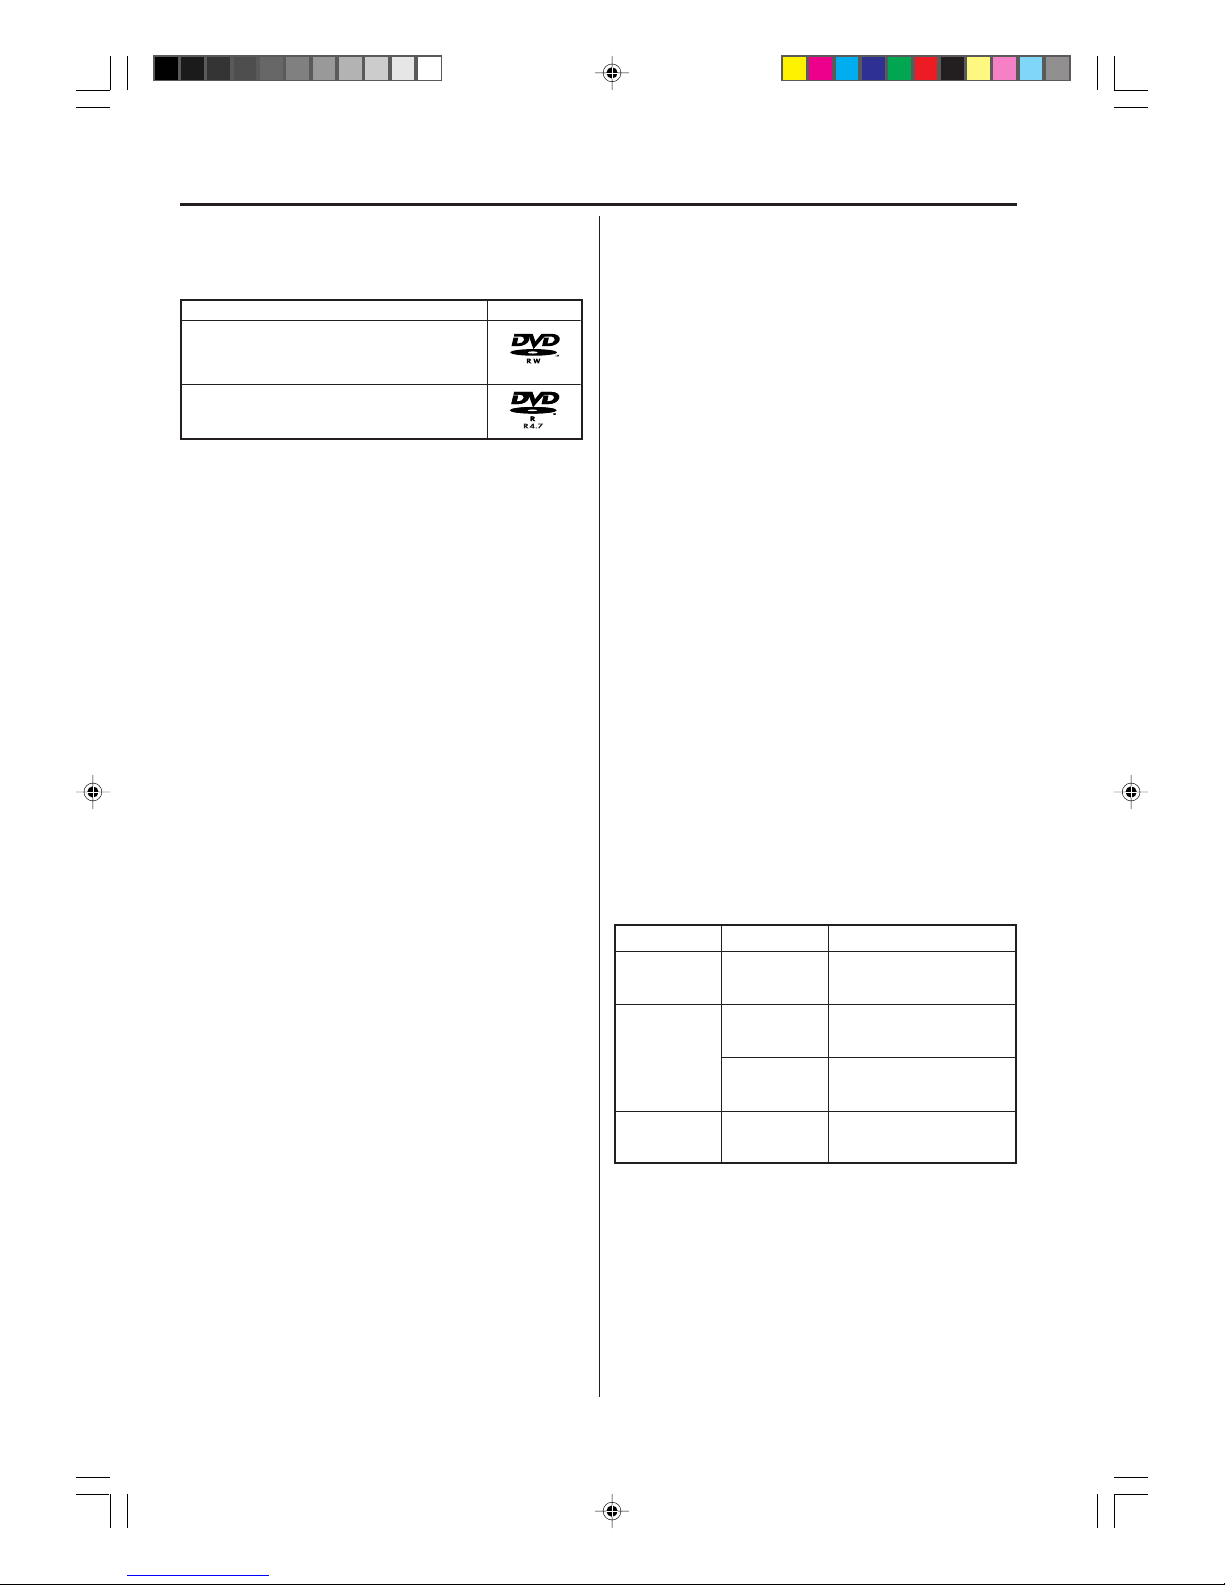
To record video with this unit, use the discs below:
DVD-RW
• The disc can be erased and used again about 1,000
times.
• Only the VR mode can be used for Ver.1.0 discs.
• With Ver.1.1/1.2 discs, you can record by selecting
the VR mode or Video mode.
• When you record in the VR mode, you can repeatedly record and erase. By erasing unnecessary titles,
you effectively increase remaining time.
• When you record in the Video mode, y ou can record
until the disc becomes full.
• When you use the Video mode, you can newly record
on the disc by formatting the disc. However, if the
disc is formatted, all the recorded contents will be
erased.
DVD-R
• You can record on the disc only in the Video mode.
• You can record until the disc becomes full.
• Finalizing the discs allows playback on other DVD
players. However, the finalized discs can no longer
be recorded.
• Discs can be recorded to repeatedly until they are
finalized.
NOTES:
• There are some players that cannot playback discs
that were recorded with this unit. We cannot guarantee the playback with other units.
• This unit cannot record on D VD-R and DVD-R W discs
that are 8 cm in diameter.
• This unit cannot record on CD-R or CD-RW.
Media type
Format
DVD-RW
(Ver.1.0)
DVD-RW
(Ver.1.1 and
1.2)
DVD-R
(Ver.2.0/4x/8x)
Available functions
VR mode
VR mode
Video mode
Video mode
Playback, recording and
editing (Original/playlist)
Playback, recording and
editing (Original/playlist)
Playback and recording
Editing (with limitation)
Playback and recording
Editing (with limitation)
Media type Logo mark
DVD-RW Ver.1.0 Ver.1.1 Ver.1.2
Ver.1.1 CPRM support
DVD-R Ver.2.0 (Ver .2.0/4x/8x)
2H6P001A[E] P02-11 6/28/05, 5:34 PM10
Page 11
11
Disc
CHAPTER 1
TITLE 1 TITLE 2
DVD DISC
CHAPTER 2 CHAPTER 2 CHAPTER 3CHAPTER 1
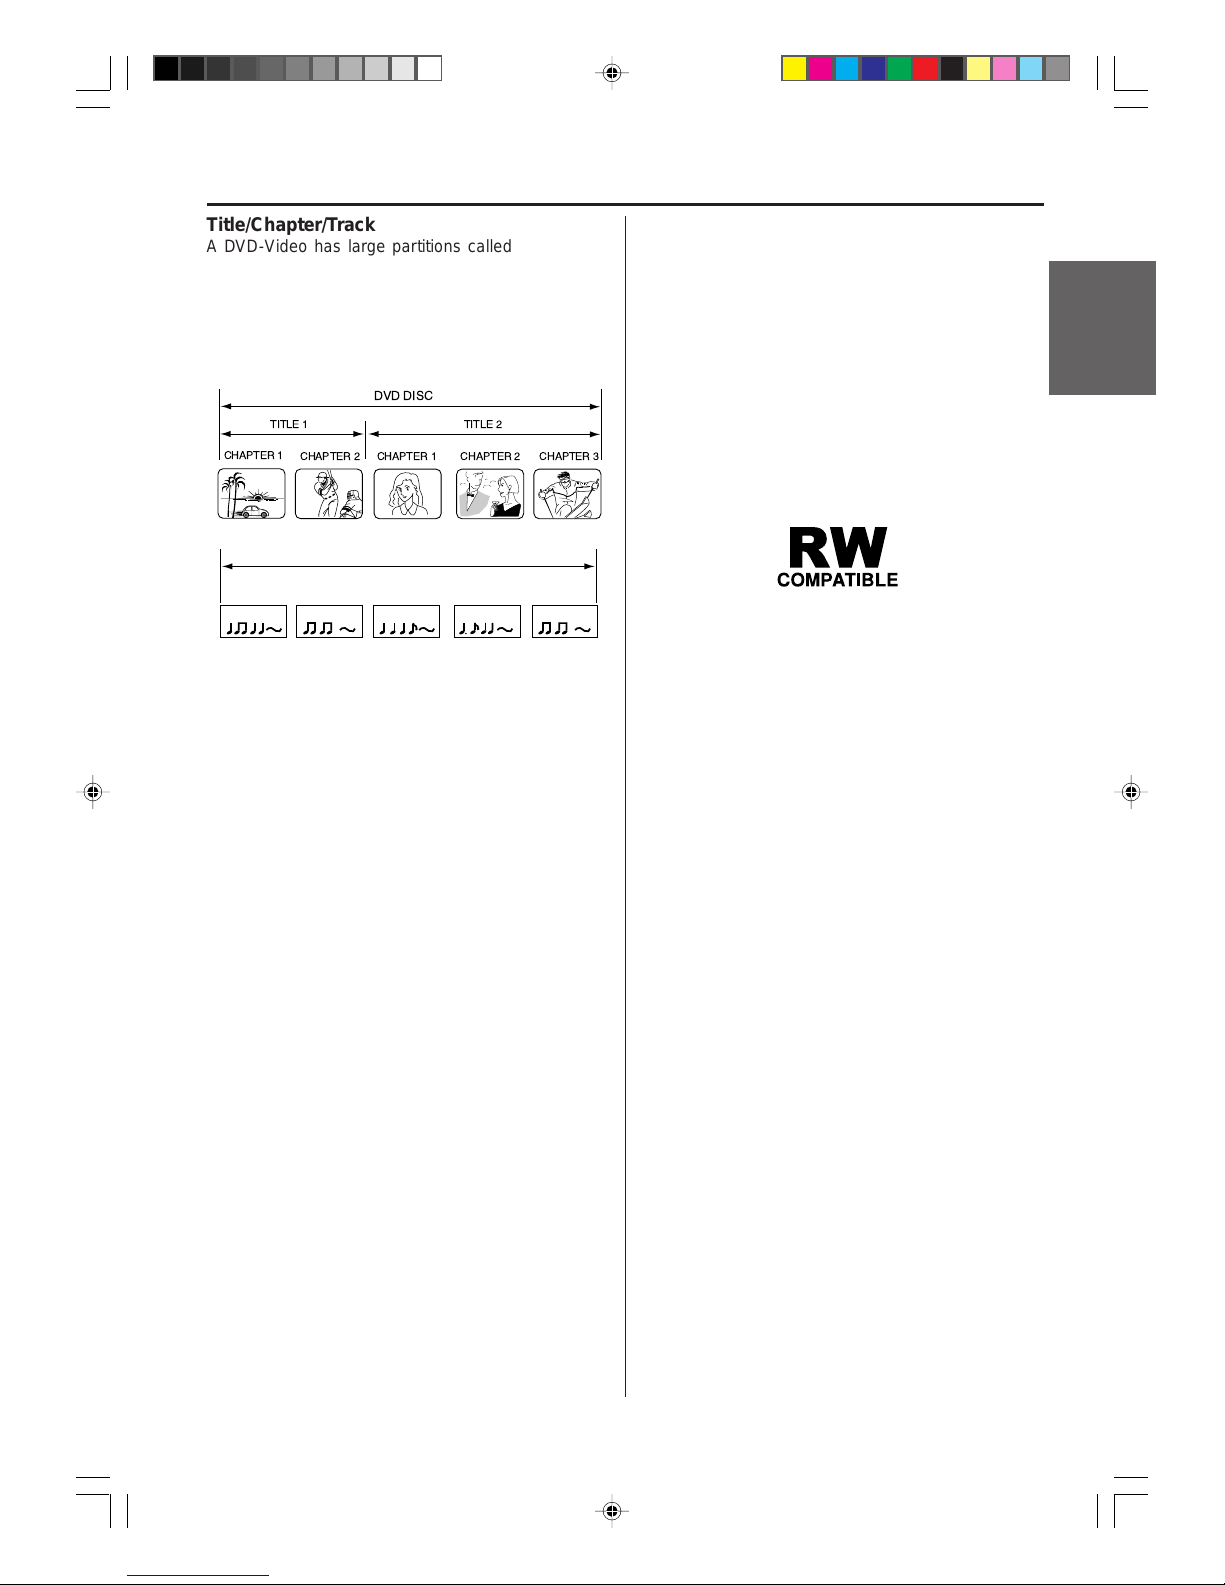
Title/Chapter/Track
A DVD-Video has large partitions called “Titles”, and
smaller partitions within them called “Chapters”.
A music CD has other partitions called “T racks”. A number is allotted to each partition and these numbers are
called “title numbers”, “chapter numbers” or “trac k numbers”.
When recording in the VR mode
One-time recording is set to 1 title (1 chapter). However , if y ou stop recording tempor arily or erase scenes
by editing, the chapter will automatically be partitioned.
The interval between chapters can be specified. (See
page 31.)
When recording in the Video mode
One-time recording is set to 1 title. In recording, chapters are set automatically. The interval between chapters can be specified. (See page 31.)
NOTES:
• The title, chapter and track are numbered, b ut some
discs may not record the numbers.
• Recording on D VD-R/RW in the Video mode is a new
standard approved at the 2000 DVD forum. Conformity to this standard varies with each DVD player
manufacturer. Some models of DVD player or DVDROM drive, therefore , will not playbac k recorded videos.
Disc playback in other players
A disc recorded in this unit can be finalized. The disc
can be played back in other players that can playback
DVD-RW and DVD-R.
For more information on finalization, see “FINALIZE” in
“Setting the disc” (page 27).
When recording in the VR mode
Even if a disc recorded in the VR mode is finaliz ed, you
can record or edit by cancelling the finalization. (See
“UNDO FINALIZE” on page 28.)
When you playback the disc with another pla y er, make
sure that the DVD pla y er supports D VD-R W and bears
the following mark.
When recording in the Video mode
When a disc recorded in the Video mode is finalized, it
cannot be recorded onto any more. Therefore, before
finalization, be sure to perform all desired recording.
After finalization, a title list that can be used by the D VD
player is automatically created.
NOTES:
• The finalization process may require from a fe w minutes up to 1 hour depending on the disc type and the
amount of free space on the disc.
• A DVD-RW Ver.1.1/1.2 recorded in the Video mode
cannot be recorded or edited after finalization, but if
you format the disc by erasing all the content, you
can again record on this disc.
• A finalized disc may not play because of the condition of the DVD or the compatibility with the player
used for playback.
• Some players may not playback the discs recorded
with this unit. We cannot guarantee the playback using other players.
TRACK 1 TRACK 2 TRACK 3 TRACK 4 TRACK 5
Audio-CD
Before using
your unit
2H6P001A[E] P02-11 6/28/05, 5:34 PM11
Page 12
12
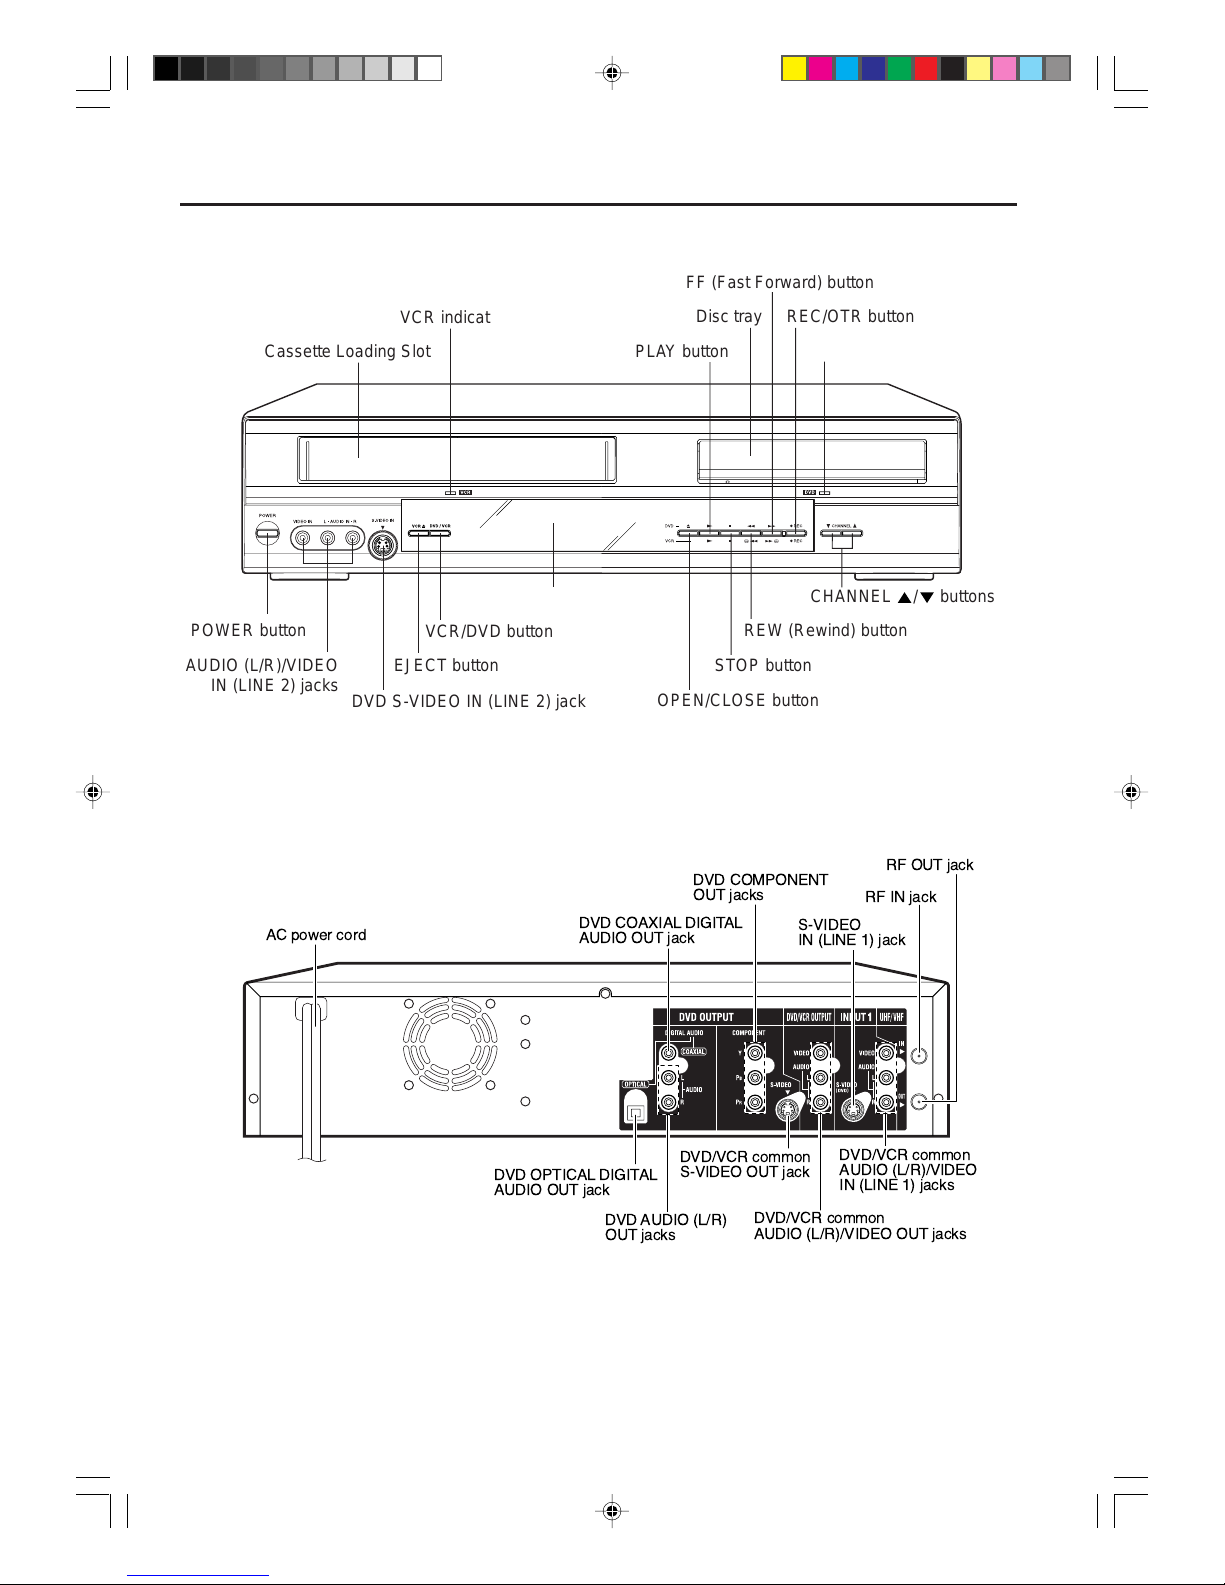
Parts and functions
Rear
Front
AC power cord
DVD COAXIAL DIGITAL
AUDIO OUT jack
DVD/VCR common
AUDIO (L/R)/VIDEO OUT jacks
DVD AUDIO (L/R)
OUT jacks
DVD/VCR common
AUDIO (L/R)/VIDEO
IN (LINE 1) jacks
S-VIDEO
IN (LINE 1) jack
DVD/VCR common
S-VIDEO OUT jack
DVD COMPONENT
OUT jacks
DVD OPTICAL DIGITAL
AUDIO OUT jack
RF IN jack
RF OUT jack
POWER button
AUDIO (L/R)/VIDEO
IN (LINE 2) jacks
EJECT button
DVD S-VIDEO IN (LINE 2) jack
VCR/DVD button
OPEN/CLOSE button
PLAY button
STOP button
FF (Fast Forward) button
REW (Rewind) button
REC/OTR button
CHANNEL
/ buttons
Disc tray
Cassette Loading Slot
VCR indicator
DVD indicator
Display window
2H6P001A[E] P12-21 6/28/05, 5:34 PM12
Page 13
13
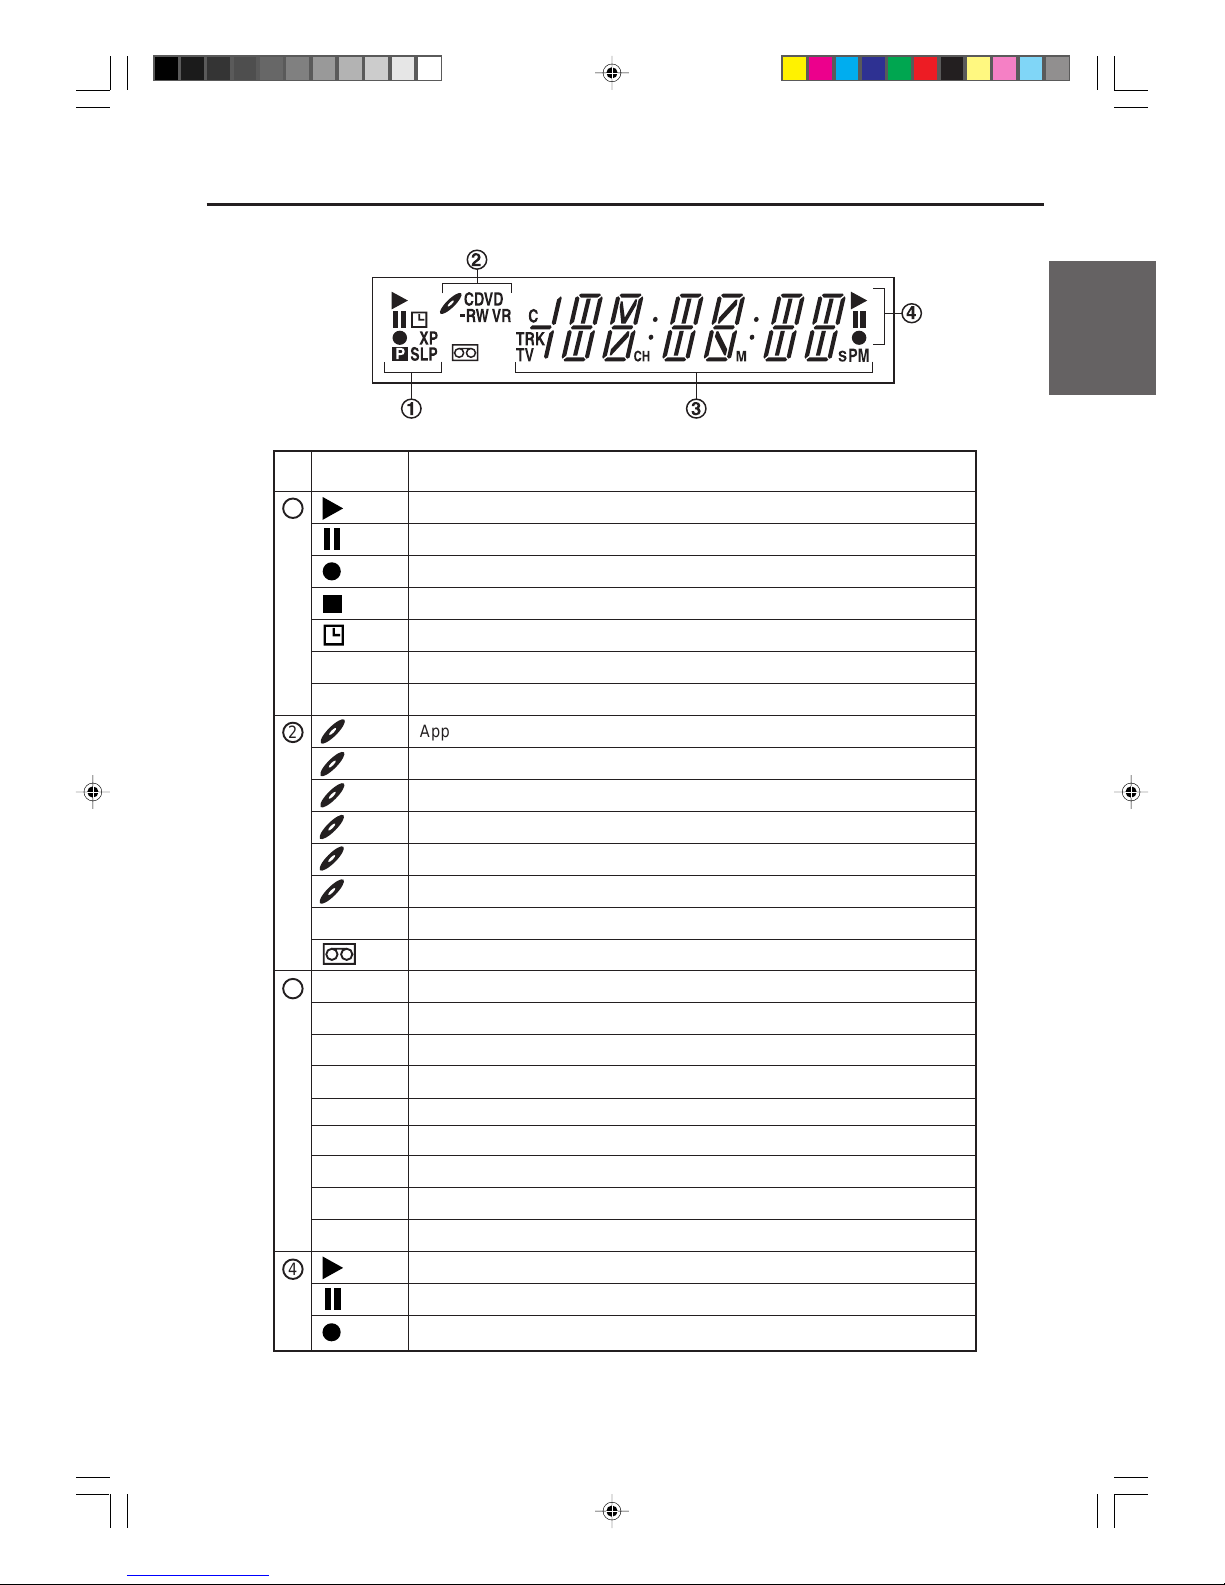
No. Display Description
Lights during video tape playback.
1
Parts and functions
NOTE:
Some discs may not playback correctly, or chapter number, playback time, etc may not be displayed.
Display window
Video tape is temporarily stopped.
Lights during video tape recording.
Progressive scanning mode.
Timer recording display.
P
P
2
1 3
4
2
4
Appears when a CD is inserted.
Appears when a CD-R is inserted.
Appears when a DVD-Video is inserted.
Appears when a DVD-R is inserted.
Appears when a DVD-RW is inserted.
Appears when a DVD-R W in VR mode is inserted. When the disc is set to video mode , VR does not appear .
Video tape is in the unit.
Clock display (Colon [ : ] flashes).
Counter display in hour/minute/second for VCR/DVD, minute/second for CD.
Cable TV channel display.
TV channel display.
Track number display for CD.
Display for afternoon (out in the morning).
The external input channel (L1 or L2) display.
Error display.
Lights during playback of DVD and CD. Flashes in auto resume.
DVD or CD is temporarily stopped.
Lights during DVD recording.
CD
CD-R
DVD
DVD-R
DVD-RW
VR
10:00
01
H00M00S
C 36CH
2CH
TRK 002
PM
L1/L2
Err
3
4 DVD recording modes . XP, SP, LP or SLP can be selected in turn by pressing the REC MODE/SPEED repeatedly.
2 VCR recording modes. SP or SLP can be selected in turn by pressing the REC MODE/SPEED repeatedly.
SP/SLP
XP/SP/LP/SLP
Before using
your unit
Appears when a CD-RW is inserted.
CD-RW
Appears when the tuner built into this unit is not selected. When you press TV/VIDEO disappears.
TV
2H6P001A[E] P12-21 6/28/05, 5:34 PM13
Page 14
14
Remote control
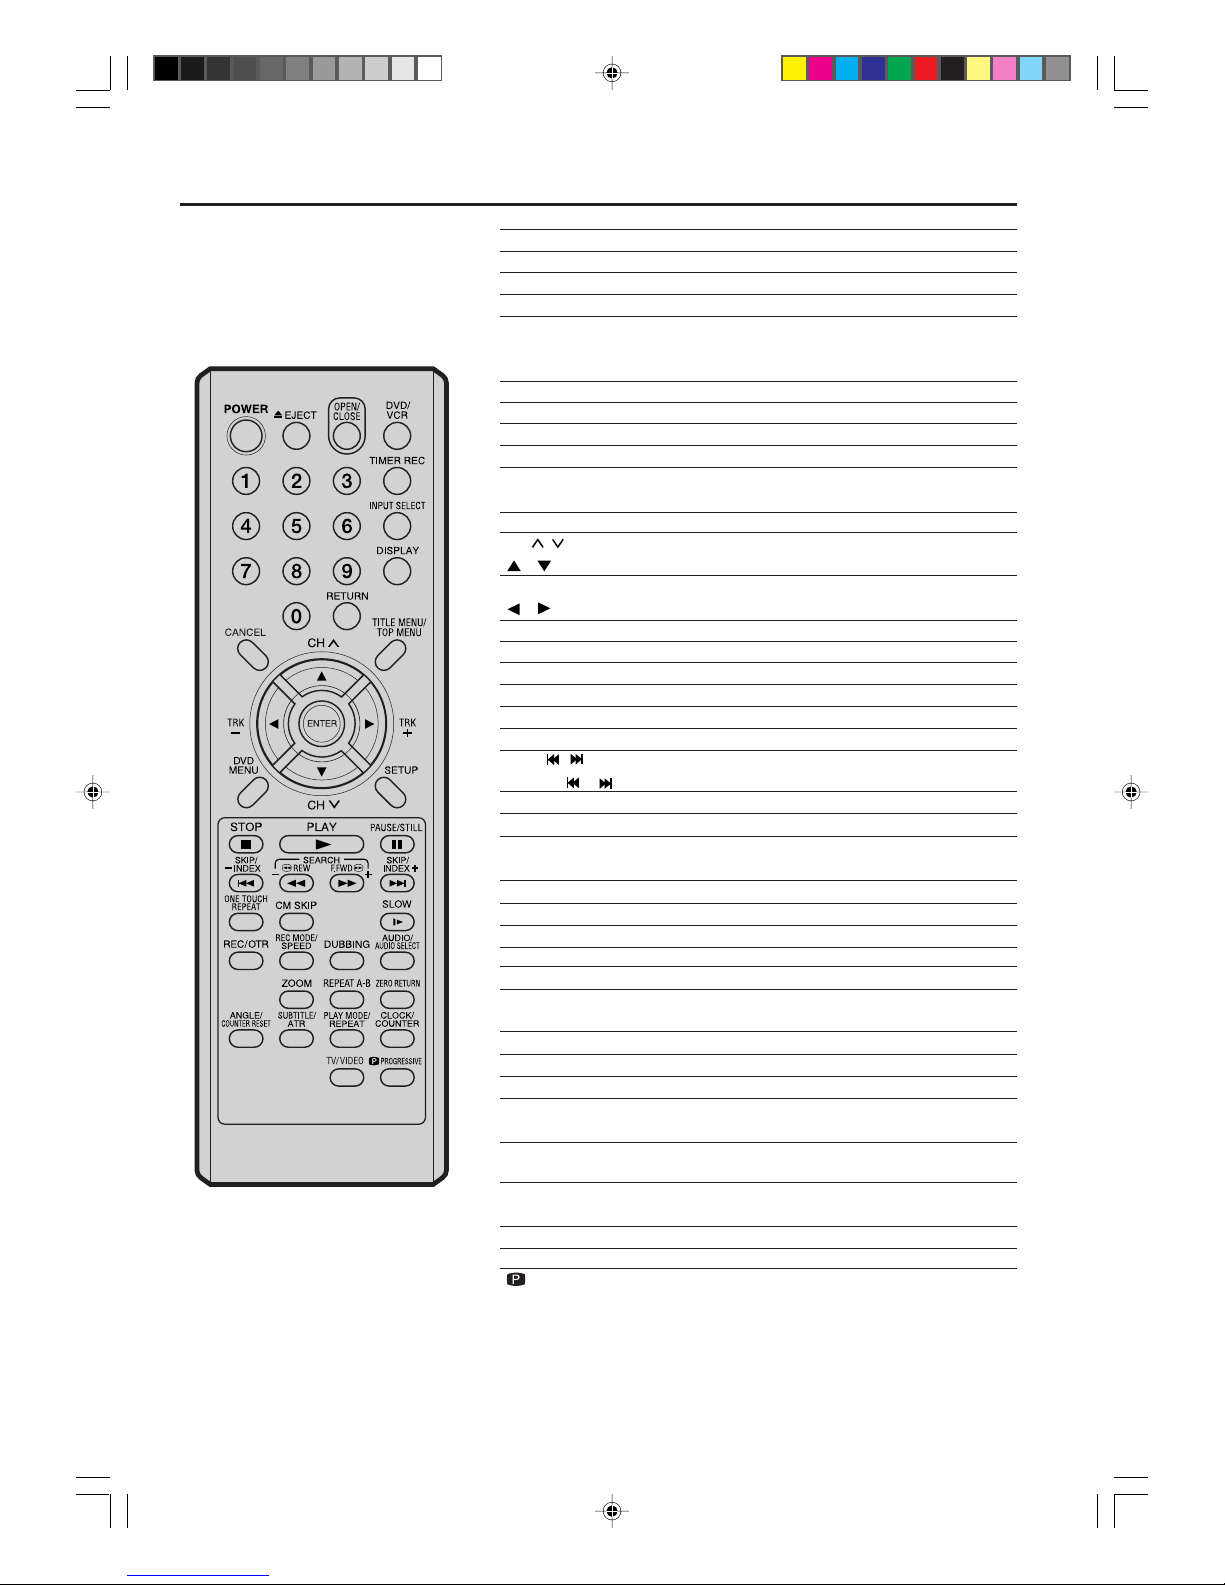
Page
Parts and functions
POWER Turns power on/off 22
EJECT Ejects the cassette tapes 48
OPEN/CLOSE Opens or Closes the tray. 33
DVD/VCR
Switches to operation between VCR and DVD
33, 49, 76, 77
0-9 Direct channel selection of TV 54
Setting input 37, 74
Entering a password 25
TIMER REC Sets the unit to start recording at a preset time 59
INPUT SELECT Switches between the external inputs 78
DISPLAY Displays VCR or DVD operation status 35, 51
RETURN Close the menu window 23, 45
CANCEL Deletes the Timer recording program 59
Cancels input data in the setting mode 25
TITLE MENU/TOP MENU
Selects titles of a DVD disc 34, 39, 42, 62
CH / Channel selection for the connected TV or VCR 54
/ Cursor buttons 23, 33, 37, 57
TRK +/– Manual tracking in the playback mode for VCR 50
/ Cursor buttons 33, 37
ENTER Option selection in the menu 23, 33, 37, 57
DVD MENU Displays the menu of the DVD disc 39
SETUP Displays the setup menu 23, 57
STOP Stop 33, 49, 55
PLAY Playback 33, 49
PAUSE/STILL Still picture/Recording pause on/off 36, 50
SKIP
/ Skips chapters in the forward or reverse direction 36
INDEX –
/+ Searches for the INDEX mark of a tape 51
REW/SEARCH
–
Rewind/Review playback 36, 49, 50
F.FWD/SEARCH +Fast Forward/Forward search playback 36, 49, 50
ONE TOUCH REPEA T
Repeats playback between the section played
10 seconds before and present section 38
CM SKIP Skips commercial breaks 37, 50
SLOW Slow motion playback 36, 50
REC/OTR Recording 54, 56, 78
REC MODE/SPEED Selects the recording mode 54, 56
DUBBING Copies VCR to DVD or DVD to VCR 76,77
AUDIO/AUDIO SELECT
Switches sound between mono and stereo 60
Changes the language of the DVD 41
ZOOM Zoom 40
REPEAT A-B Repeats playback between A and B 38
ZERO RETURN
Stops the tape when the counter reaches 00H00M00S51
ANGLE Changes playback angle 40
COUNTER RESET Resets the counter to 00
H00M00S
51
SUBTITLE Selects subtitles of the DVD disc 41
ATR Digital AUTO TRACKING 50
PLAY MODE Selects the playback mode 37
REPEAT Repeats playback 38, 50
CLOCK/COUNTER Changes the front panel display mode 51
TV/VIDEO Switches input between the TV and VCR 22, 55
PROGRESSIVE Activates the progressive scanning mode 47
2H6P001A[E] P12-21 6/28/05, 5:34 PM14
Page 15
15
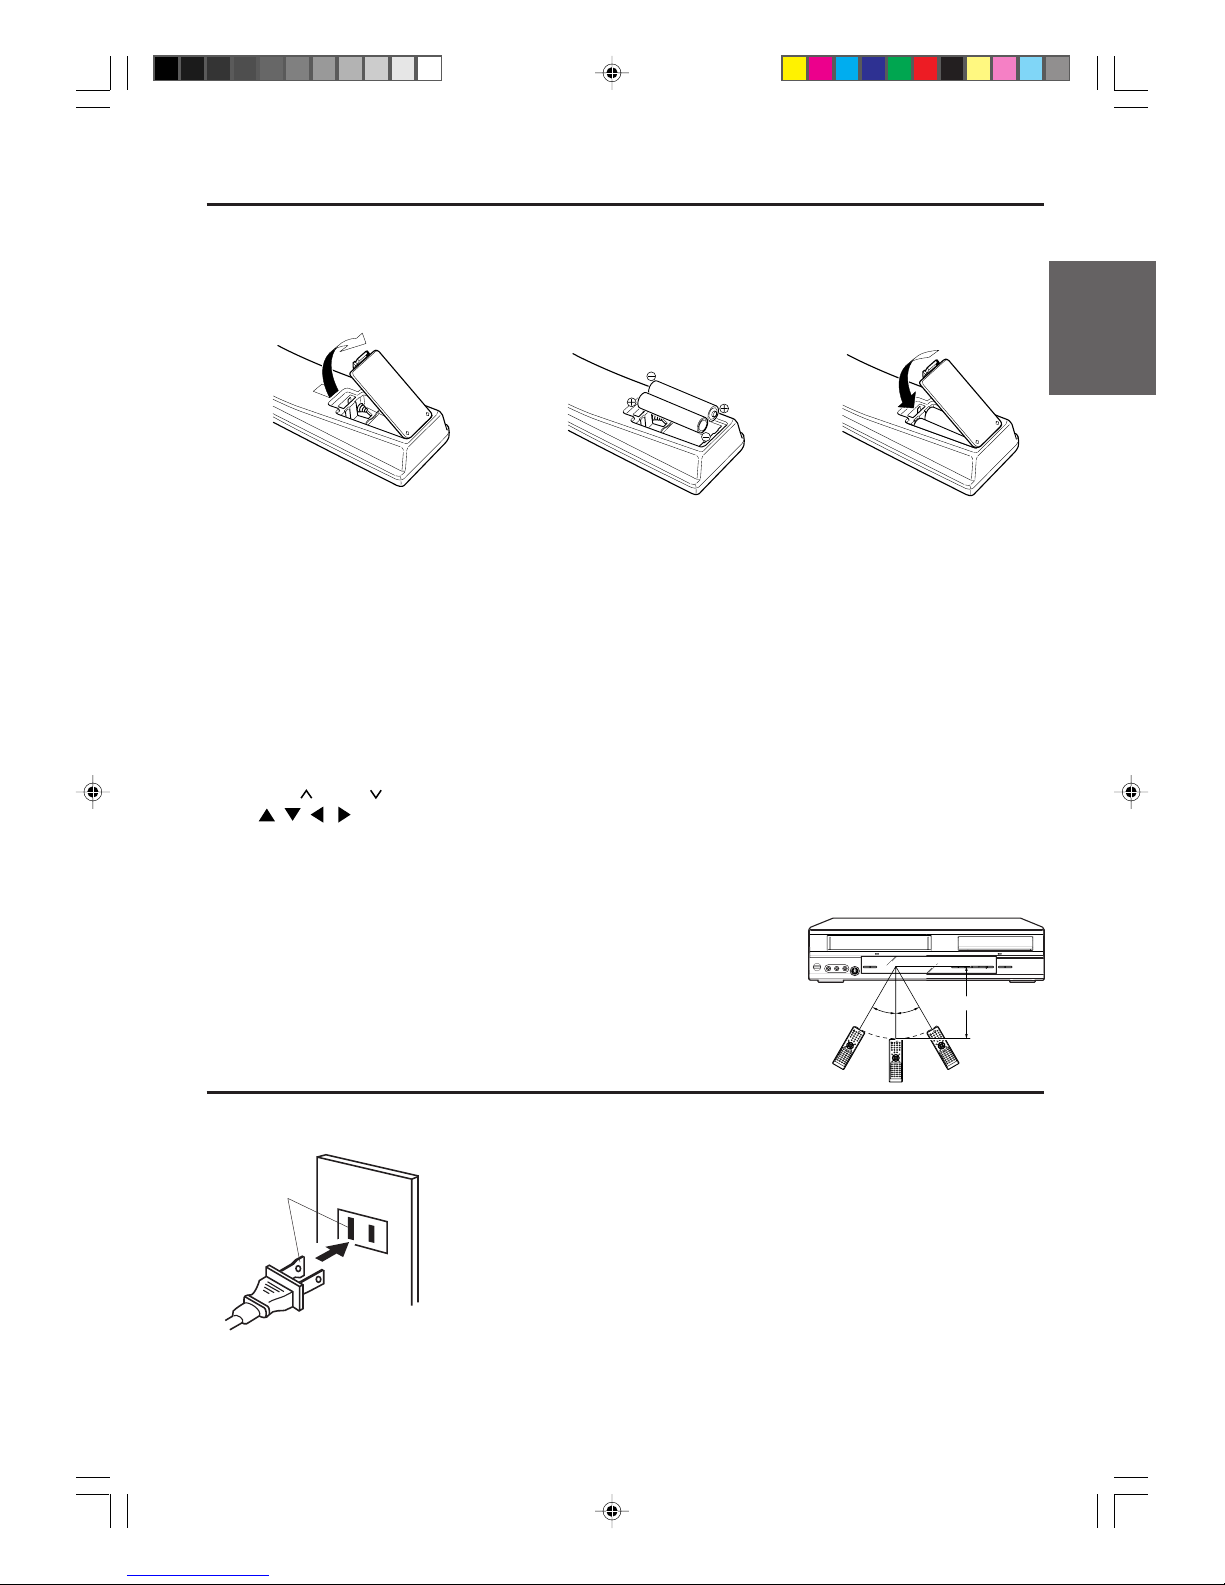
Inserting Batteries into the Remote Control:
Parts and functions
3
Replace the compartment cover.
2
Install two “AAA” batteries (not
supplied), paying attention to the
polarity diagram in the battery
compartment.
1
Open the battery compartment
cover in the direction of the arrow.
Battery precautions
The precautions below should be followed when using batteries in this device:
1.Use only the size and type of batteries specified.
2. Be sure to follow the correct polarity when installing the batteries as indicated in the battery compartment.
Reversed batteries may cause damage to the device. To avoid a potential short circuit, insert the “–” end first.
3.Do not mix different types of batteries together (e.g. Alkaline and Carbon-zinc) or old batteries with fresh ones.
4.If the device is not to be used for a long period of time, remove the batteries to prevent damage or injury from
possible battery leakage.
5. Do not tr y to recharge batteries not intended to be recharged; they can overheat and rupture. (Follow battery
manufacturer’s directions.)
Remote control basics
• Press POWER to turn the DVD/VCR on or off.
• Press CH or CH to move through the channels one channel at a time.
• The
/ / / are also used to navigate on-screen menu system.
• You can directly access specific channels using numeric keys.
• Each press of DVD/VCR, s witches the screen between the D VD screen (DVD mode) and the VCR screen (VCR
mode).
Operation
• Aim the remote control at the remote sensor and press control buttons to operate.
• Operate the remote control within 30° angle on either side of the remote sensor, up to a distance of approximately 5 meters (15 feet).
Polarized AC Cord Plug
(One blade is wider than the other.)
AC Outlet
Wider Hole
and Blade
Power Source
TO USE AC POWER SOURCE
Use the AC polarized line cord provided for oper ation on A C. Insert the AC
cord plug into a standard 120V 60Hz polarized AC outlet.
NOTES:
• Never connect the AC line cord plug to other than the specified voltage
(120V 60Hz). Use the attached power cord only.
• If the polarized AC cord does not fit into a non-polarized AC outlet, do not
attempt to file or cut the blade. It is the user’s responsibility to have an
electrician replace the obsolete outlet.
• If you cause a static discharge when touching the unit and the unit fails to
function, simply unplug the unit from the AC outlet and plug it back in. The
unit should return to normal operation.
Before using
your unit
30°
30°
Approx.5 meters (15 feet)
2H6P001A[E] P12-21 6/28/05, 5:34 PM15
Page 16
16
NOTES: • A clear picture will not be obtained by the DVD/VCR unless the antenna signal is good. Connect the
antenna to the DVD/VCR properly.
• For better quality recording, an indoor antenna or a telescopic antenna is not recommended. The use
of an outdoor type antenna is required.
• If you are not sure about the connection, please refer to qualified service personnel.
If you are using an antenna system, f ollow these instructions. If y ou are a cab le TV subscriber, skip ahead
to page 18 for the proper connections.
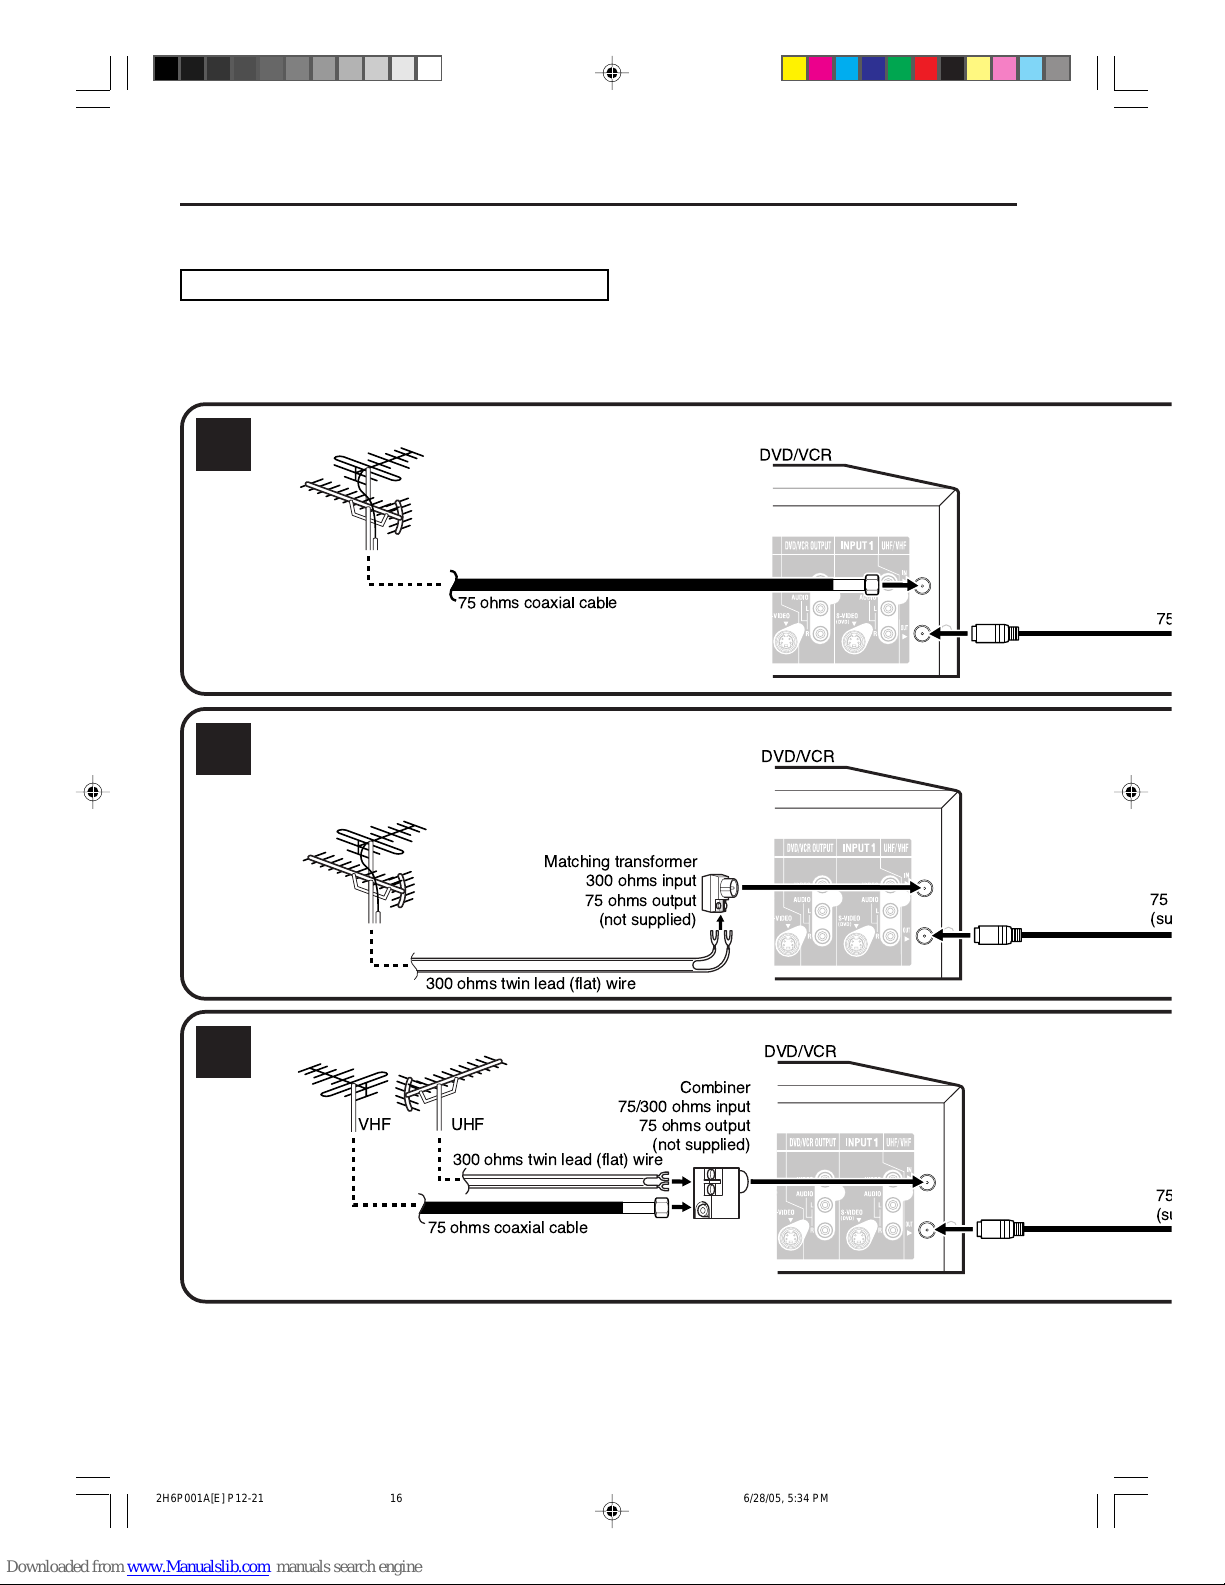
ANTENNA TO DVD/VCR CONNECTION
The DVD/VCR must be connected “between” the antenna and the TV. First, disconnect the antenna from the TV
and connect it to the DVD/VCR. Then connect the DVD/VCR to the TV. Belo w are 3 common methods of connecting an antenna system to a DVD/VCR. Find the type of antenna system you are using and follow the connection
diagram.
If both UHF and VHF antennas have 300 ohms twin lead (flat) wires,
use a combiner having two 300 ohms inputs and one 75 ohms output.
NOTE:
Antenna connections
Combination UHF/VHF antenna with 75 ohms coaxial cable
Combination UHF/VHF antenna with 300 ohms twin lead (flat) wire
Separate UHF and VHF antennas
1
2
3
DVD/VCR
300 ohms twin lead (flat) wire
75
(su
Matching transformer
300 ohms input
75 ohms output
(not supplied)
DVD/VCR
300 ohms twin lead (flat) wire
75 ohms coaxial cable
UHFVHF
75
(su
Combiner
75/300 ohms input
75 ohms output
(not supplied)
DVD/VCR
75 ohms coaxial cable
75
2H6P001A[E] P12-21 6/28/05, 5:34 PM16
Page 17
17
NOTE: If a UHF or VHF antenna is used,
set the TV/CABLE menu option
to the “TV” mode.
TV with single 75 ohms UHF/VHF antenna input
NOTE: If a UHF or VHF antenna is used,
set the TV/CABLE menu option
to the “TV” mode.
TV with 300 ohms UHF and 75 ohms
VHF antenna inputs
NOTE: If a UHF or VHF antenna is used,
set the TV/CABLE menu option to
the “TV” mode.
TV with 300 ohms UHF and 300 ohms
VHF antenna inputs
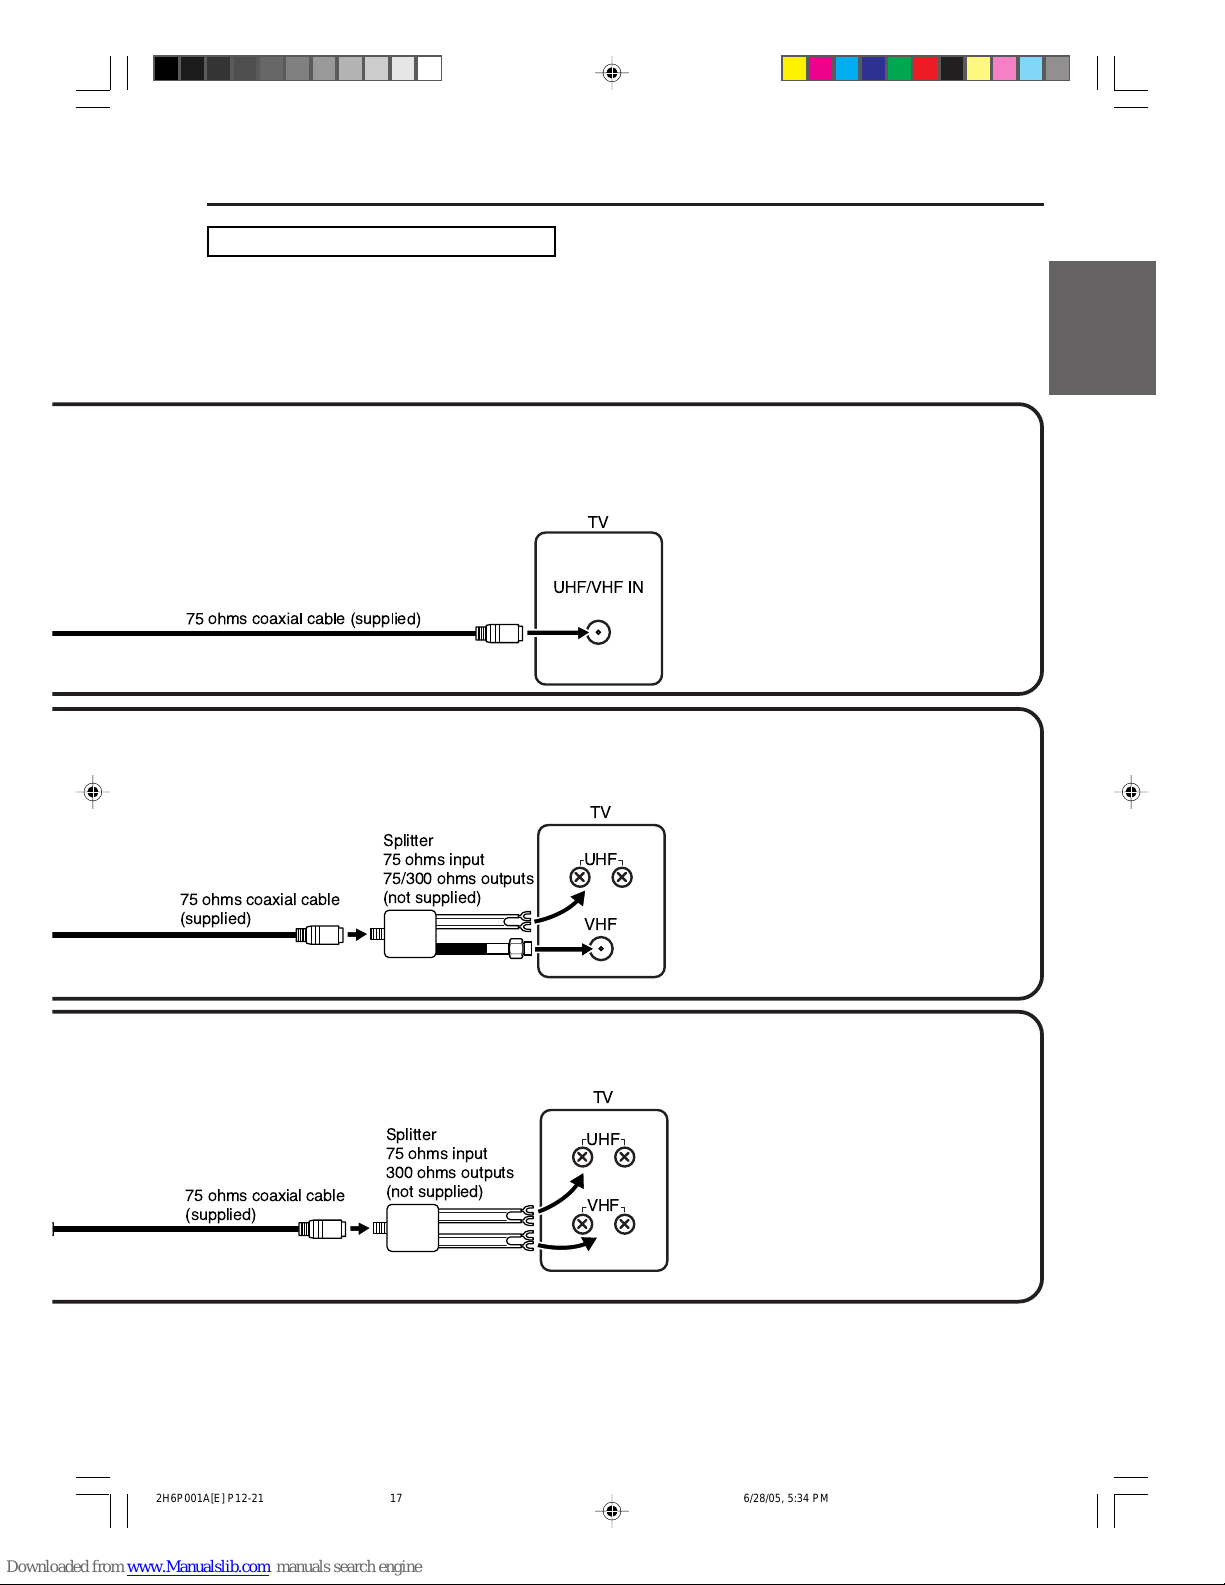
DVD/VCR TO TV CONNECTION
After you have connected the antenna to the DVD/VCR, you must connect the DVD/VCR to the TV.
Below are 3 common methods of connecting your DVD/VCR to a TV. Find the type of TV you are using and follow
the connection diagram.
This DVD/VCR has a single 75 ohms output f or connection to a TV. If your TV has separate UHF and VHF antenna
inputs (numbers 2 and 3 below), use a splitter to connect the DVD/VCR to the TV for UHF and VHF reception.
Antenna connections
Before using
your unit
UHF
VHF
TV
75 ohms coaxial cable
(supplied)
Splitter
75 ohms input
75/300 ohms outputs
(not supplied)
UHF
VHF
TV
75 ohms coaxial cable
(supplied)
Splitter
75 ohms input
300 ohms outputs
(not supplied)
UHF/VHF IN
TV
75 ohms coaxial cable (supplied)
2H6P001A[E] P12-21 6/28/05, 5:34 PM17
Page 18
18
UHF/VHF
IN (ANT)
TV
DVD/VCR
Incoming cable
Converter/
descrambler
UHF/VHF
IN (ANT)
TV
DVD/VCR
Incoming
cable
Converter/
descrambler
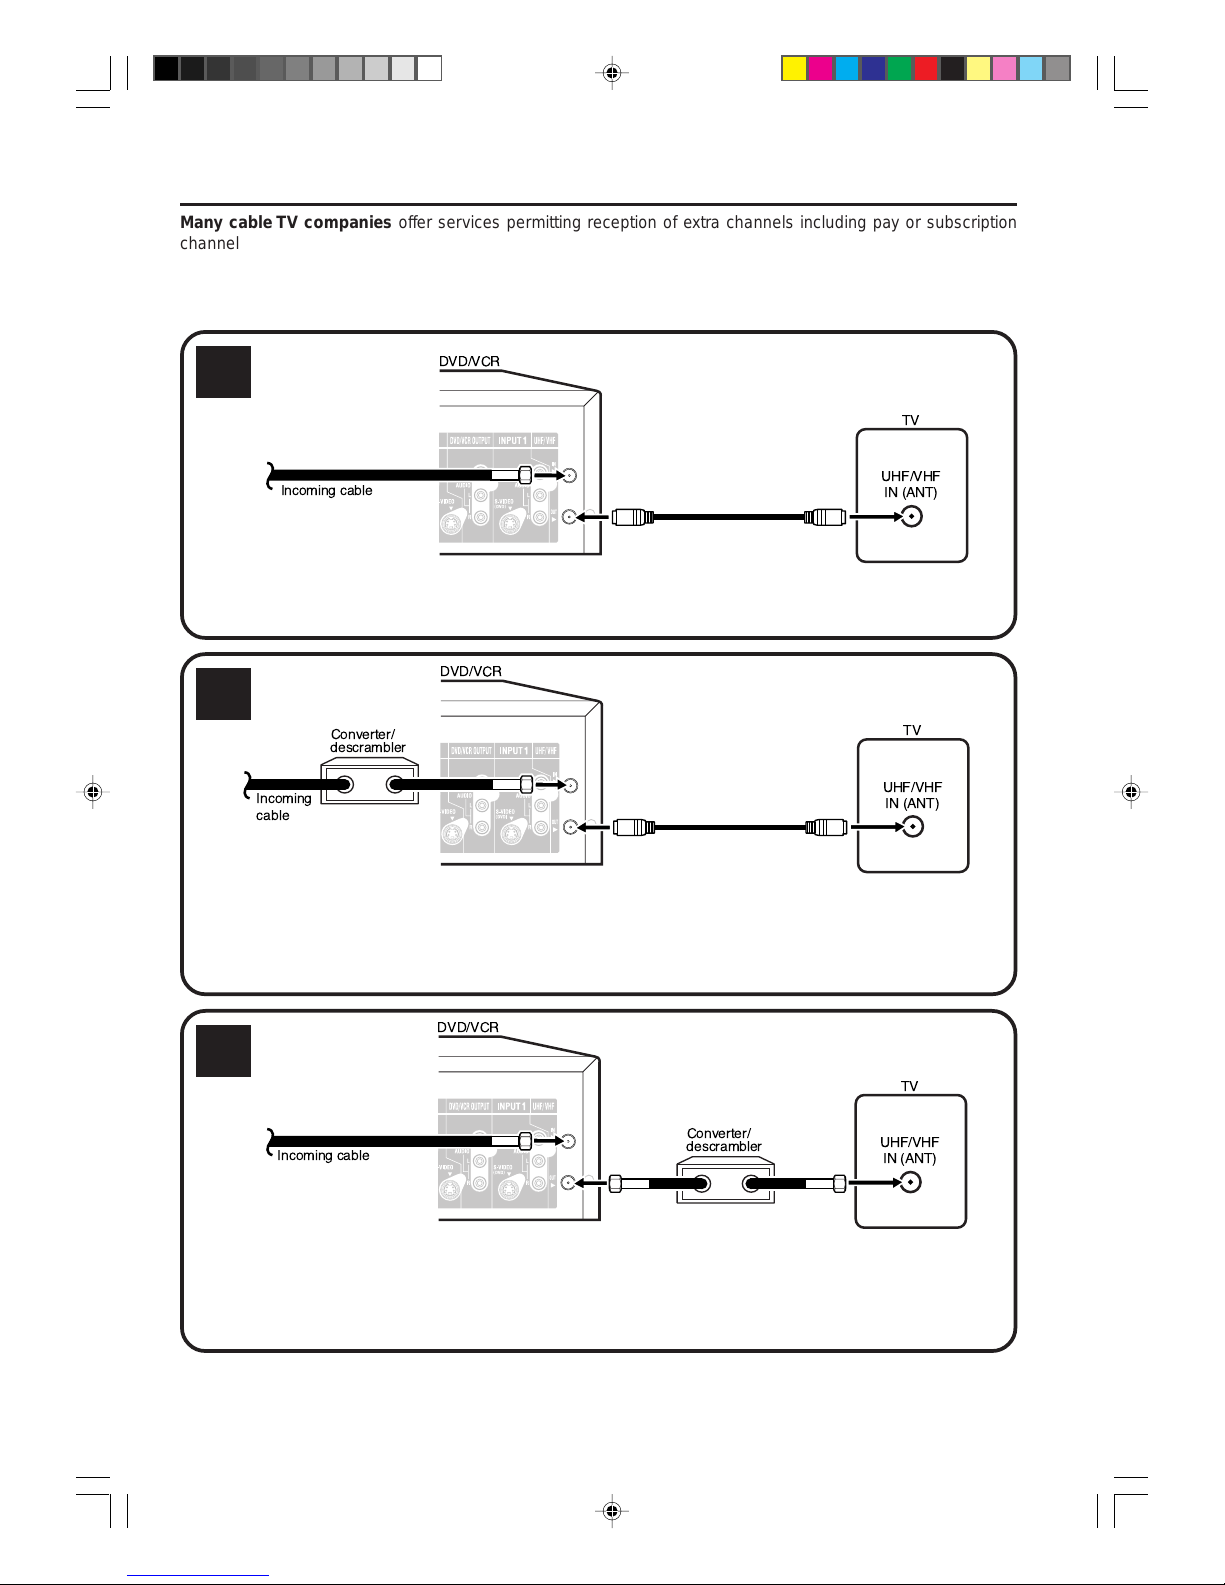
Many cable TV companies offer services per mitting reception of extra channels including pay or subscription
channels. This DVD/VCR has an extended tuning range and can be tuned to most cable channels without using a
cable TV company supplied converter box, except for those channels which are intentionally scrambled. If you
subscribe to a special channel which is scrambled, you must have a descrambler box for proper reception.
Cable TV connections
NOTE: Whenev er a converter/descrambler box is placed bef ore the D VD/VCR, you must tune the D VD/VCR to the
output of the converter/descrambler box, usually channel 3 or 4.
ALLOWS: • Recording of nonscrambled channels.
• Use of the programmable timer.
• Recording of one channel while watching another.
ALLOWS: • Recording of channels through the converter box
(scrambled and unscrambled).
• Using the programmable timer to record only the
channel selected at the converter box.
PREVENTS: • Recording one channel while watching another.
• Using the DVD/VCR tuner to select channels.
1
2
3
ALLOWS: • Recording of nonscrambled channels.
• Use of the programmable timer.
• Recording an unscrambled channel while watch-
ing any channel selected at the converter box.
PREVENT: Recording scrambled channels.
NOTE:
If you are playing a tape or using the
tuner built into the DVD/VCR, the converter must be set to the video channel
output of the DVD/VCR (either 3 or 4).
NOTE:
To record from converter/descrambler,
DVD/VCR tuner must be tuned to the
converter output channel, usually channel 3 or 4.
UHF/VHF
IN (ANT)
TV
DVD/VCR
Incoming cable
2H6P001A[E] P12-21 6/28/05, 5:34 PM18
Page 19
19
UHF/VHF
IN (ANT)
TV
DVD/VCR
Incoming
cable
Splitter
Converter/descrambler
A/B switch
UHF/VHF
IN (ANT)
TV
DVD/VCR
Incoming
cable
Splitter
Converter/
descrambler
A/B switch
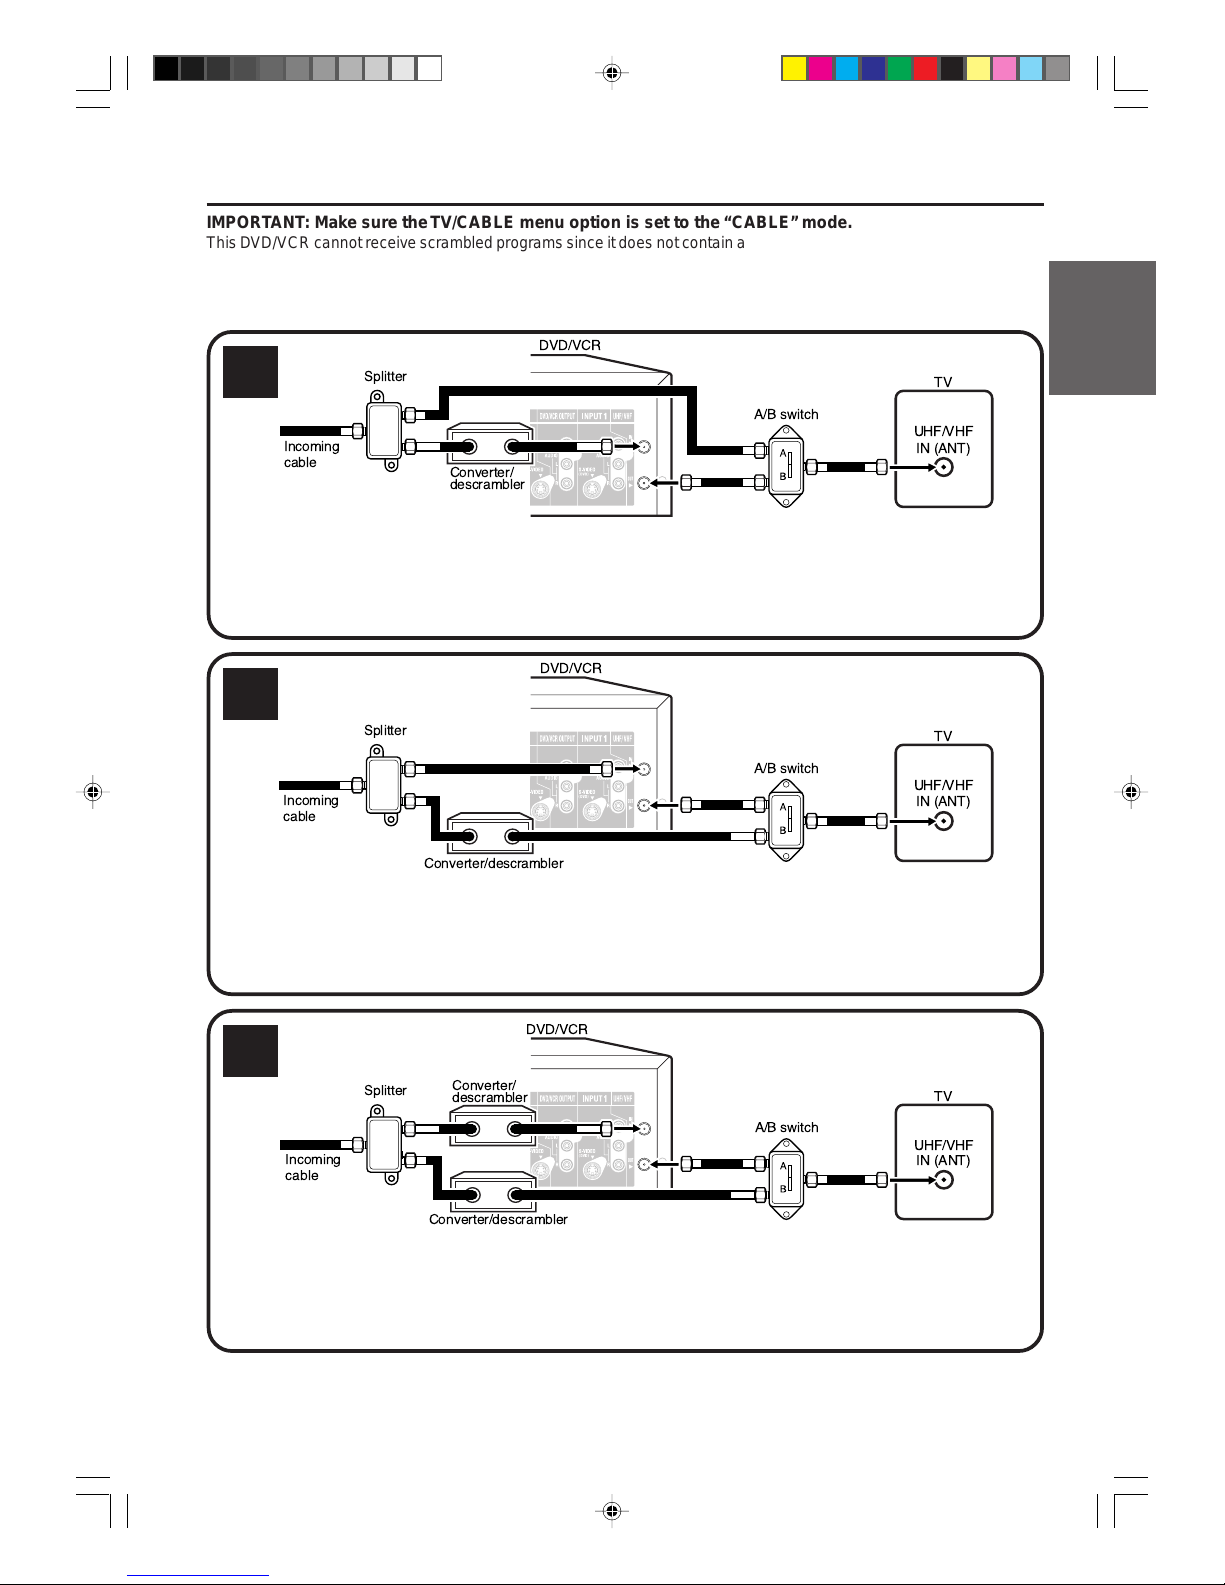
IMPORTANT: Make sure the TV/CABLE menu option is set to the “CABLE” mode.
This DVD/VCR cannot receiv e scrambled programs since it does not contain a descramb ler. In order to receiv e scrambled
programs, your existing descr ambler must be used. Descrambler bo xes are av ailable from cable companies . Consult your
local cable company for more inf ormation concerning connection to their descrambler equipment. There are many w ays
to connect your DVD/VCR to a cable system. Below are six common methods of connection.
4
5
6
ALLOWS: • Recording of one channel while watching another.
• Using the programmable timer to record only the channel selected at the converter box.
• Recording of all channels through the converter box.
PREVENTS: • Watching scrambled channels while recording another channel.
• Using the DVD/VCR tuner to select channels.
ALLOWS: •Recording of nonscrambled channels.
•Recording of one channel while watching another.
•Watching premium channels through the converter while recording nonscrambled channels.
•Using the programmable timer.
PREVENT: Recording scrambled channels.
ALLOWS: • Recording of all channels through the converter box.
• Recording a scrambled or unscrambled channel while watching another (scrambled or
unscrambled) channel.
• Using the programmable timer to record only the channel selected at the converter box.
PREVENT: Using the DVD/VCR tuner to select channels.
Cable TV connections
UHF/VHF
IN (ANT)
TV
DVD/VCR
Incoming
cable
Splitter
Converter/descrambler
A/B switch
Converter/
descrambler
Before using
your unit
2H6P001A[E] P12-21 6/28/05, 5:34 PM19
Page 20
20
Connections with the TV or audio component
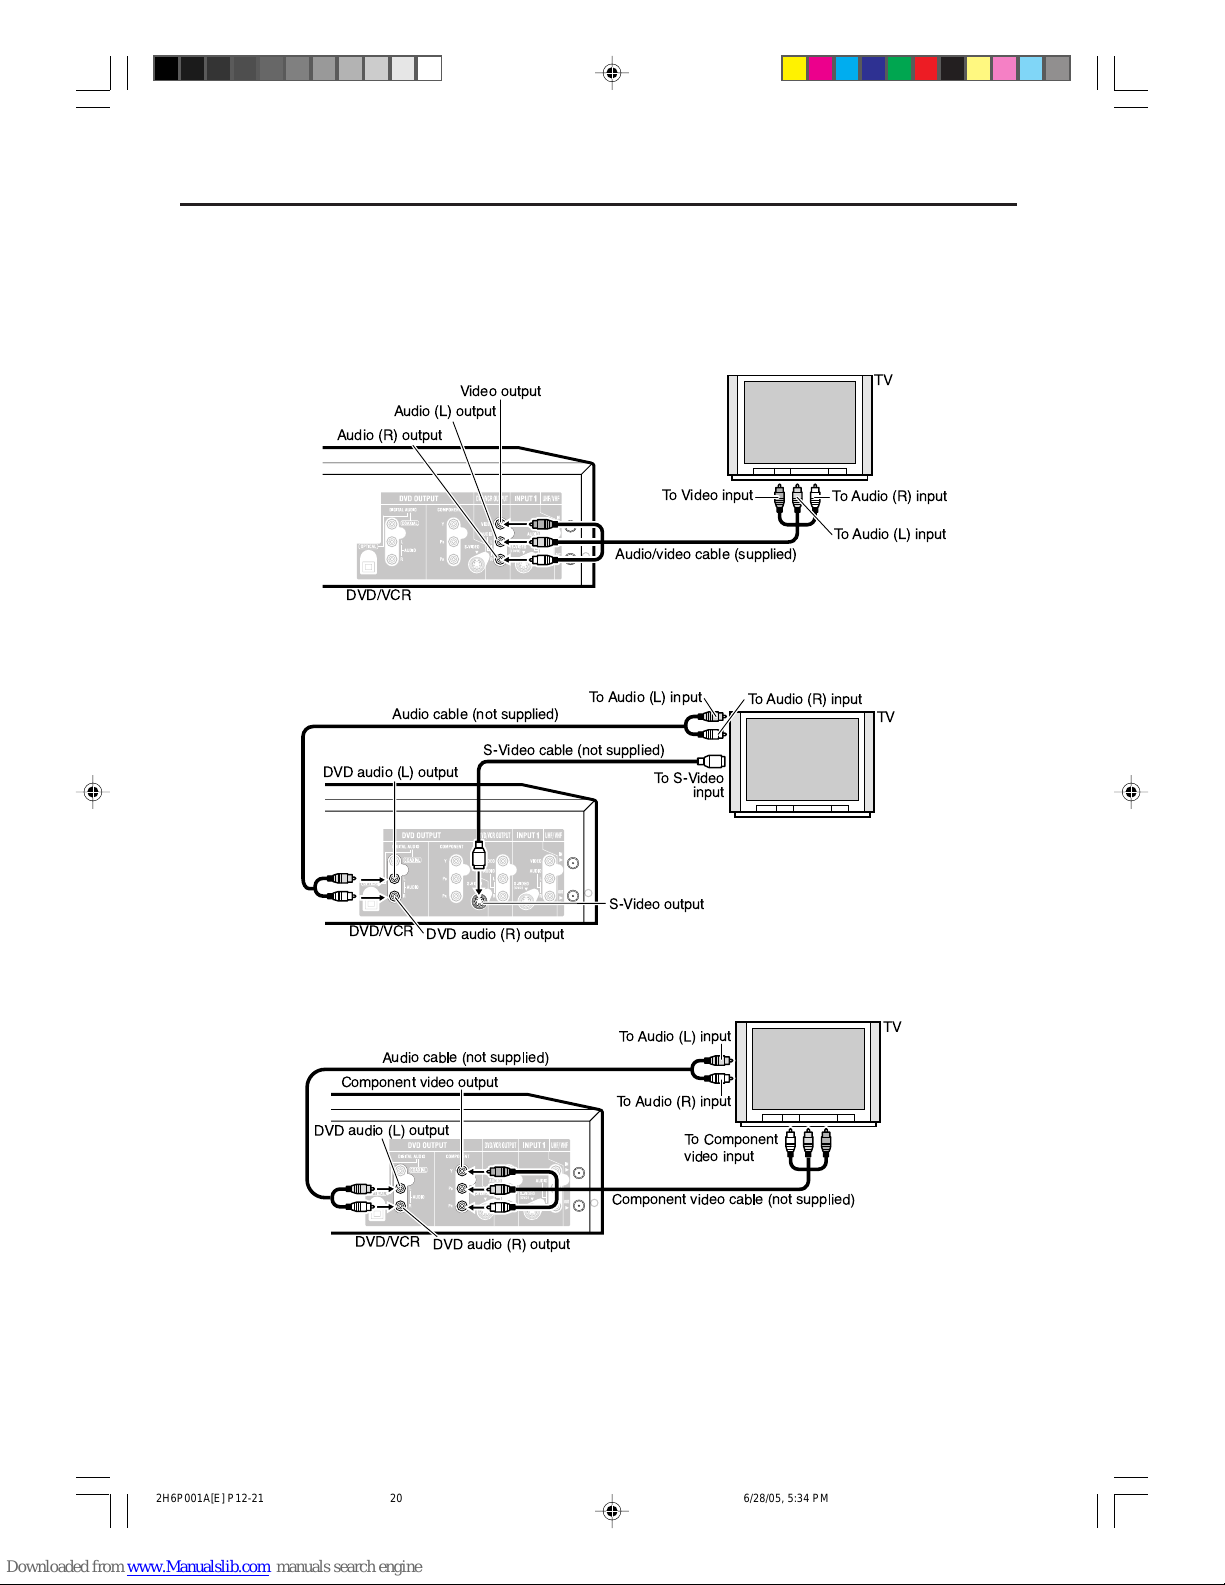
The exact arrangement you use to interconnect various video and audio components to the DVD/VCR is dependent on the model and features of each component. Check the Owner’ s Manual pro vided with each component for
the location of video and audio inputs and outputs.
Connect to a TV with Audio/Video output
You can enjoy playback by connecting the unit to a TV.
Connect the unit to a TV equipped with audio input (L/R) and video input jacks using the supplied audio/video cab le.
Connect to a TV with S-Video output
If your TV has an S-Video input, y ou can get higher quality by connecting it with the S-Video output of the unit using
the S-Video cable instead of connecting the video input of the TV to the video output jack of the unit.
Connect to a TV with Component video output (for DVD/CD playback)
You can enjoy the highest quality picture by connecting the unit’s component video out jacks to the component
video input jacks of your TV, with component video cables (not supplied).
NOTES:
• When connecting to a TV using the video or S-Video jack, make sure that the progressive indicator on the
display window is not lit. If it is lit, the video and S-Video outputs do not feed the correct signals and you cannot
see any picture. To turn off the progressive indicator, make the progressive scanning mode inactive (see page
47).
• If the component video input jacks on a TV are the BNC type, use an adapter to con v ert the RCA jacks from the
component video cables to BNC (not supplied).
To Audio (R) input
Audio/video cable (supplied)
Audio (R) output
To Audio (L) input
Audio (L) output
To Video input
Video output
TV
DVD/VCR
To Audio (R) input
Audio cable (not supplied)
DVD audio (R) output
DVD audio (L) output
S-Video output
To S-Video
input
S-Video cable (not supplied)
To Audio (L) input
TV
DVD/VCR
To Audio (R) input
Audio cable (not supplied)
DVD audio (R) output
To Audio (L) input
DVD audio (L) output
TV
DVD/VCR
Component video cable (not supplied)
Component video output
To Component
video input
2H6P001A[E] P12-21 6/28/05, 5:34 PM20
Page 21
21
Connections with the TV or audio component
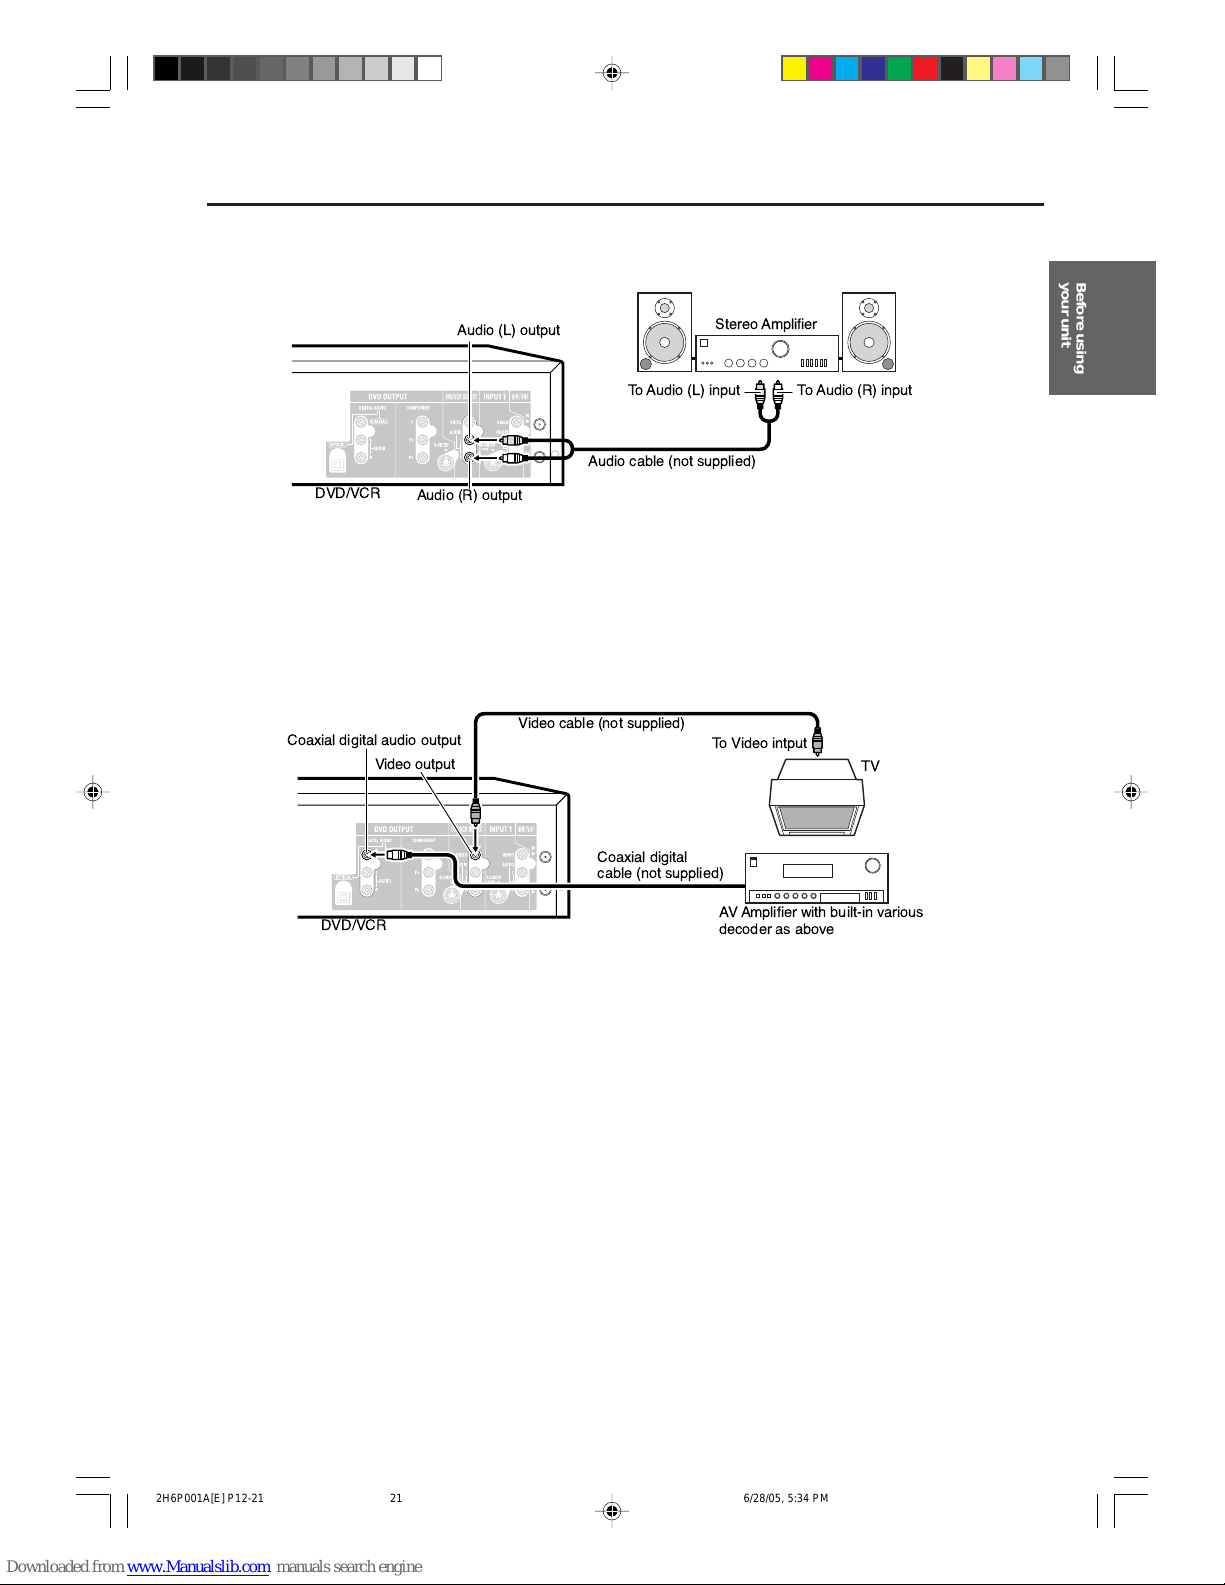
Connect to a stereo amplifier with audio output
You can enjoy high quality audio by connecting the audio output to your amplifier.
Connect the audio output jacks to any line-level inputs (such as AUX, DVD, CD, etc.) of an audio amplifier.
Connect to an AV Amplifier with built-in digital surround
If you are using an Amplifier with a built-in digital surround as follows, you can enjoy the various audio systems
such as Dolby Digital and DTS by using the optical or coaxial digital output.
Use this connection to connect an:
• AV amplifier with built-in *Dolby Digital decoder
• AV amplifier with built-in *DTS decoder
Connecting the optical digital cable
Y ou ma y connect to an AV Amplifier with an optical digital cable (not supplied) instead of a coaxial digital
cable.
When you connect the optical digital cable (not supplied), remove the dust protection cap from the rear panel.
When not using the optical digital cable, attach the dust protection cap to protect against dust.
NOTES:
• The DVD OUTPUT jacks (OPTICAL, COAXIAL, AUDIO L/R and COMPONENT) are useful only for DVD
section. The VHS signal is output only from the S-Video output jack, composite jacks (DVD/VCR OUTPUT) and UHF/VHF OUT.
• When you make the connections abov e, do not set DOLBY DIGITAL to DOLBY DIGIT AL or DTS to ON on the A V
amplifier. If you do, a loud noise will suddenly come out from the speakers, affecting your ears or causing the
speakers to be damaged.
• Caution for the optical digital audio output connector: Do not connect to an amplifier (with an optical digital input
connector) which does not contain a Dolby Digital or DTS decoder. Otherwise, any attempt to play DVDs may
cause such a high level of noise that it may be harmful to your ears and damage your speakers.
• DTS audio will be output only from the COAXIAL or OPTICAL output. To hear DTS audio, DTS-Decoder is
necessary.
• When playing DTS-encoded CDs, only noise will be heard from the speakers or analog stereo outputs.
• Some DTS decoders which do not support DVD-DTS interface may not work properly with the unit.
• The optical or coaxial digital output jack output sounds in the bitstream.
NOTE:
You may connect to a TV with a component
video cable (not supplied) or S-Video cable
(not supplied) instead of a video cable (not
supplied).
To Audio (R) input
Audio cable (not supplied)
Audio (R) output
To Audio (L) input
Audio (L) output
Stereo Amplifier
DVD/VCR
DVD/VCR
AV Amplifier with built-in various
decoder as above
Video output
To Video intput
Coaxial digital audio output
Coaxial digital
cable (not supplied)
Video cable (not supplied)
TV
Before using
your unit
2H6P001A[E] P12-21 6/28/05, 5:34 PM21
Page 22
22
Auto clock setting / Setting the video channel
NOTES:
• When shipped from factory, the
video channel is set to CH 3.
• If the unit does not operate prop-
erly , or there is no key operation
from the unit and/or the remote
control: Static electricity , etc., may
affect the operation. Disconnect
the AC power cord over 30 minutes, then connect it again.
Auto clock setting
Preparation:
You must connect the antenna or cable before connecting the AC cord
to the power source.
Wait at least 3 minutes with the power turned off, after the antenna or
cable is connected, for the auto clock feature to activate.
After the clock is set automatically, you may have to set the time zone
and daylight saving time. (See page 26.)
Press POWER to turn on the DVD/VCR after the auto clock operation
completed.
• When shipped from factory , the “A UTO CLOCK” option is set to “ON”
position.
• If you turn the D VD/VCR on during auto clock setting, the clock is not
set.
• Depending on the reception condition, auto clock setting may take
approx. 30 minutes.
• After a power failure or disconnection of the power plug, the cloc k will
be lost. In this case, w ait 3 min utes before turning the DVD/VCR on.
• With cable box connection, if the auto clock setting is unsuccessful,
select the PBS channel carrying the XDS information, then turn the
DVD/VCR off. After 3 minutes, turn the DVD/VCR on.
• If the clock is not set automatically , set the cloc k manually . (See page
26.)
Setting the video channel
To view playback of a recorded tape or DVD disc, or to watch a
program selected by the VCR’s channel selector, the TV must be
set to channel 3 or 4 (video channel).
When a TV is connected with the 75 ohms coaxial cable only:
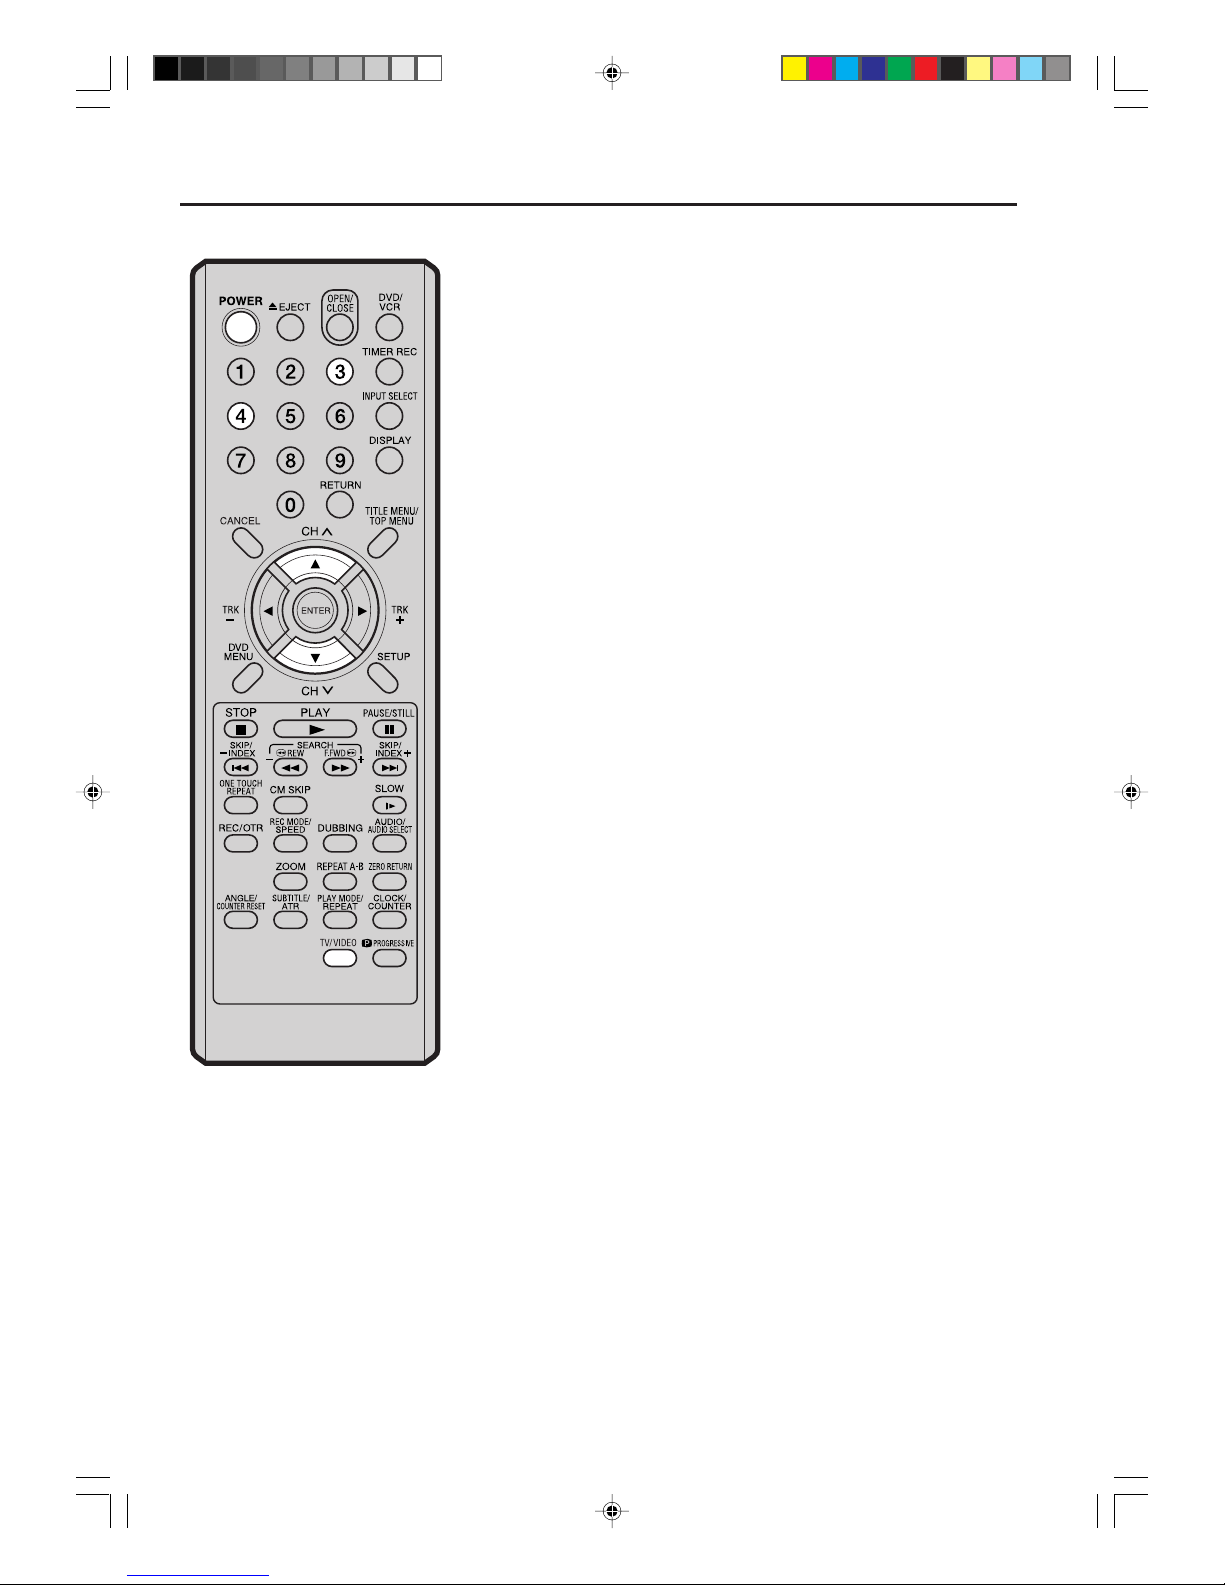
1
Press and hold 3 or 4 on the remote control for 3 seconds in the
standby mode to select CH 3 or 4. The selected channel number
will flash on the display for about 4 seconds.
2
Turn ON the TV and set to CH 3 or 4 to correspond with the channel selected in step 1.
3
Press POWER to turn on the DVD/VCR.
4
Press TV/VIDEO to select the VIDEO position.
The TV indicator will disappear in the display.
5
Select any channel to receive a TV station in your area.
The channel number will appear on the screen for about 4 seconds.
For a push-button TV tuner
If CH 3 or 4 corresponding to the video channel cannot be tuned on
your TV, proceed as follows: set the VCR 3/4 channel selector and the
TV to CH 3 or 4, playback a prerecorded tape and tune the TV to receive a sharp color picture from the video cassette recorder. Refer to
your TV owner’s manual for details.
2H6P001A[E] P22-32 6/28/05, 5:34 PM22
Page 23
23
V arious settings
SETUP MENU
The SETUP MENU consists of several menus where
you can make various settings concerning language, audio functions, and ima ges. In addition, this
menu includes a clock, channel and other things
that require setting just after purchase.
For details of each menu, see the corresponding
section in this chapter.
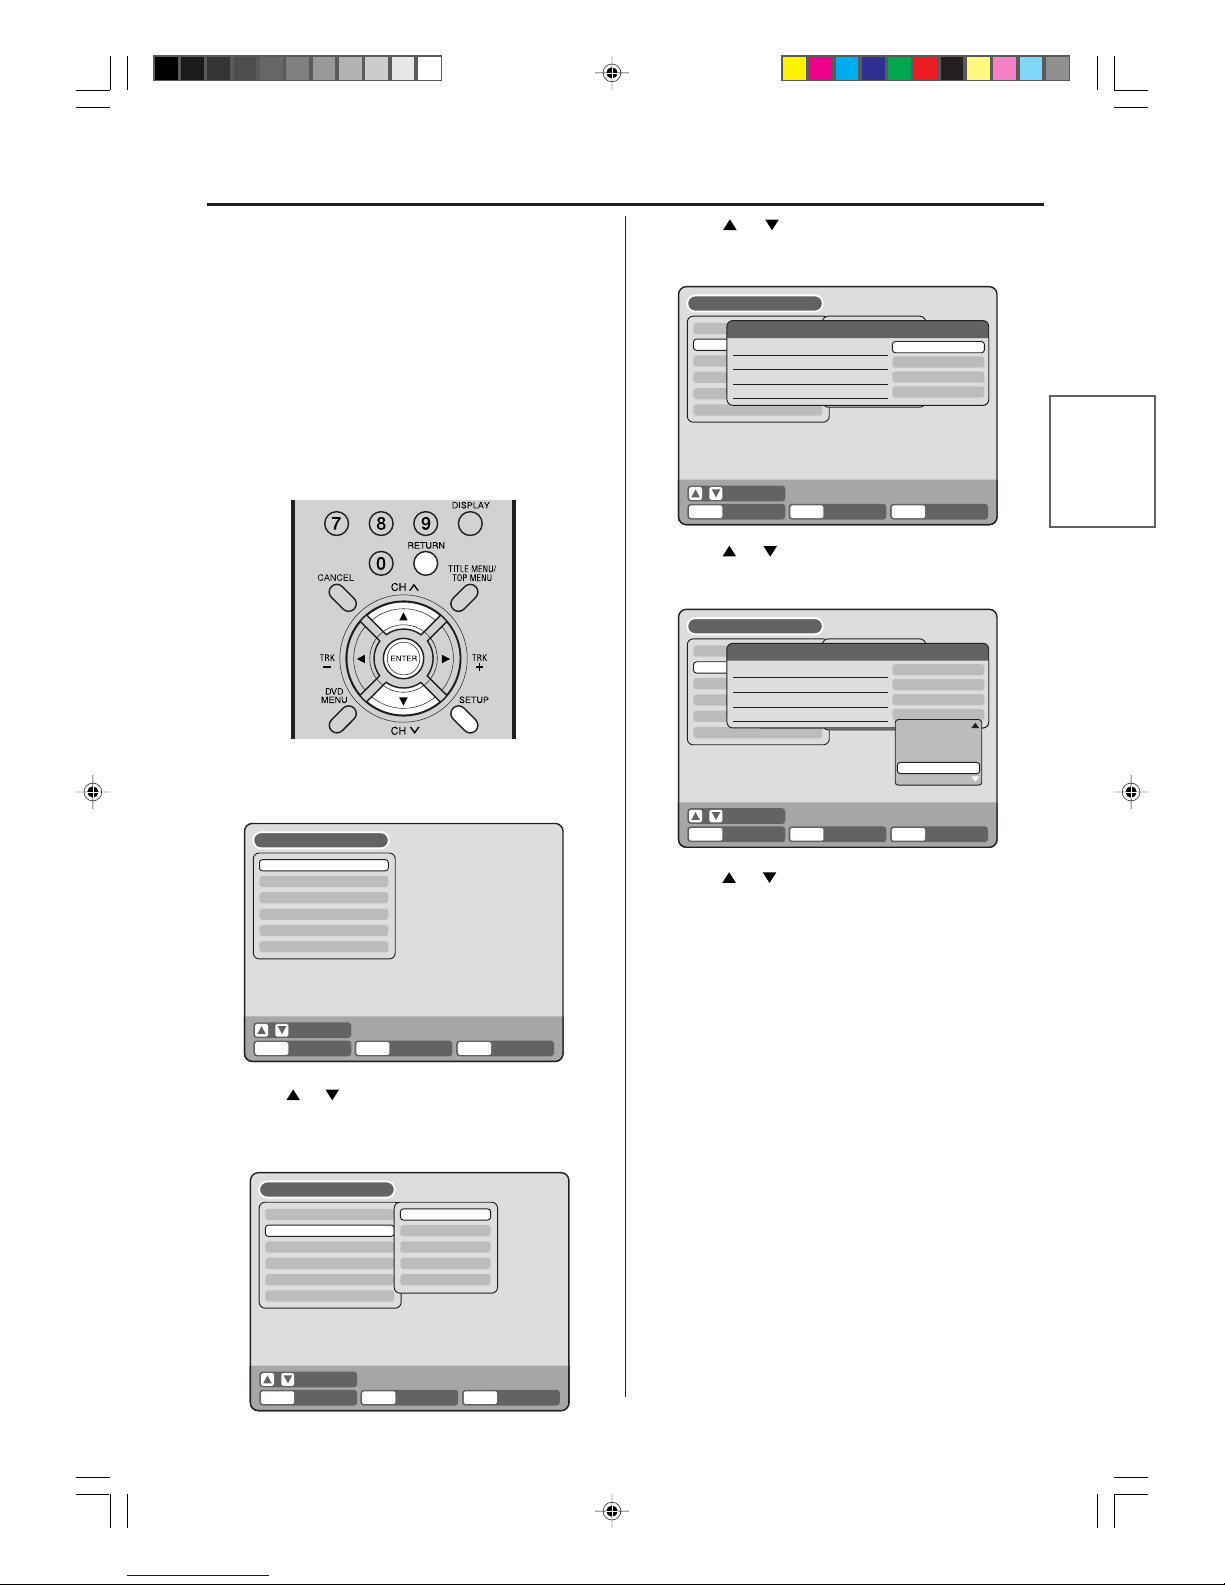
Using the SETUP MENU
The following example shows the basic setting procedure of the SETUP MENU. The remote control keys
that operate the SETUP MENU are displayed at the
bottom of the screen.
1
Press SETUP while the DVD or video tape is
stopped.
The SETUP MENU screen will appear.
2
Press or to select the desired menu and press
ENTER.
The submenu screen of the selected menu will appear.
3
Press or to select the desired submenu and
press ENTER.
The screen for the selected submenu will appear.
4
Press or to select the desired item you want,
and press ENTER.
Selectable items will be listed.
5
Press or to select the desired item and press
ENTER.
This completes the setting procedure.
• T o return to the previous screen, press RETURN .
• To close the SETUP MENU, press SETUP.
NOTES:
• For items that require different operations from the
basic setting procedure, the setting procedure is described in each individual section.
• The item which is indicated by green color cannot be
selected.
• “TIMER REC SET” cannot be selected when the
clock is not set.
TIMER REC SET
SYSTEM SETUP
AV SETUP
REC SETUP
CH SETUP
OTHER
LANGUAGE
PARENTAL
CLOCK
DISC SETUP
OTHER
SETUP MENU
RETURN SETUPENTER BACK END
SELECT
ENTER
TIMER REC SET
SYSTEM SETUP
AV SETUP
REC SETUP
CH SETUP
OTHER
LANGUAGE
PARENTAL
CLOCK
DISC SETUP
OTHER
LANGUAGE
OSD LANGUAGE
DVD MENU
AUDIO
SUBTITLE
SETUP MENU
RETURN SETUPENTER BACK END
ENGLISH
ENGLISH
AUTOMATIC
ENGLISH
SELECT
ENTER
TIMER REC SET
SYSTEM SETUP
AV SETUP
REC SETUP
CH SETUP
OTHER
LANGUAGE
PARENTAL
CLOCK
DISC SETUP
OTHER
LANGUAGE
OSD LANGUAGE
DVD MENU
AUDIO
SUBTITLE
SETUP MENU
RETURN SETUPENTER BACK END
ENGLISH
ENGLISH
AUTOMATIC
ENGLISH
SELECT
ENTER
ENGLISH
FRANCAIS
ESPANOL
OTHER
AUTOMATIC
OFF
----
TIMER REC SET
SYSTEM SETUP
AV SETUP
REC SETUP
CH SETUP
OTHER
SETUP MENU
RETURN SETUPENTERENTER B ACK END
SELECT
2H6P001A[E] P22-32 6/28/05, 5:34 PM23
Page 24
24
Setting the language
You can choose the language of the menu screen,
DVD menu, DVD audio and subtitles.
Preparation:
• Turn ON the TV and set it to the video input mode.
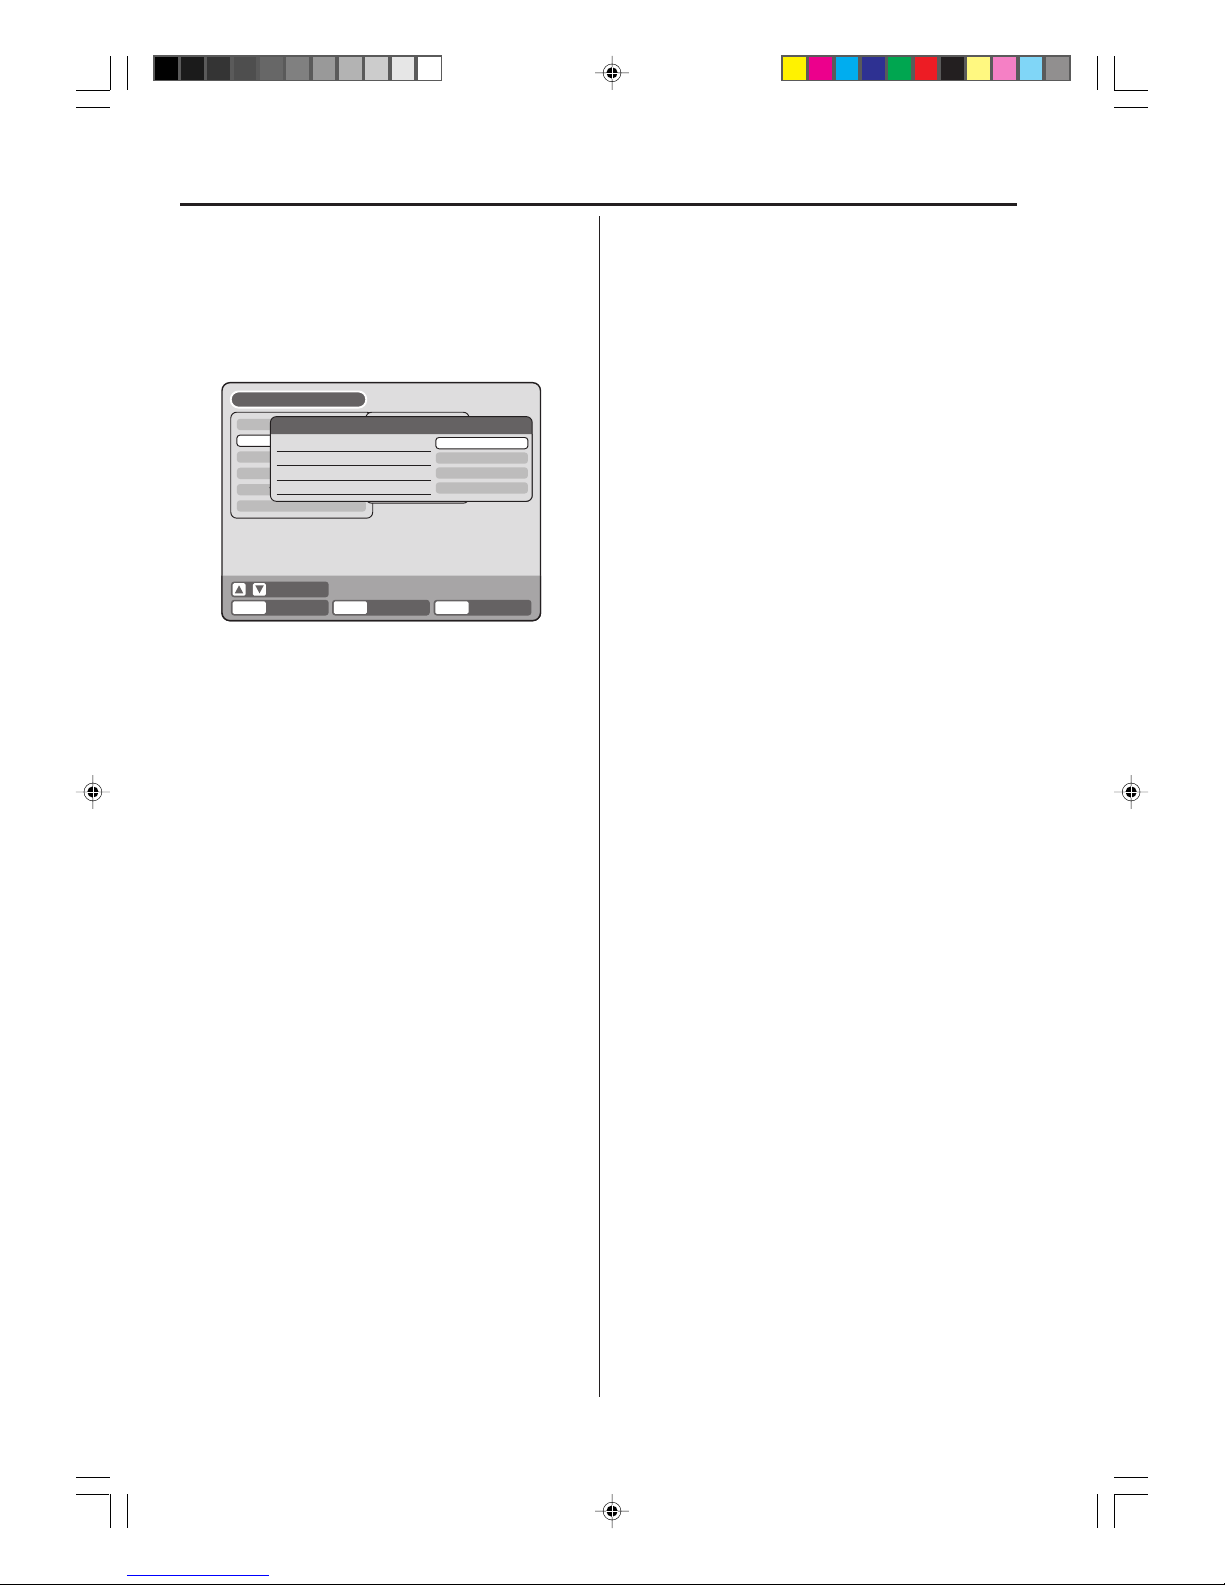
• Select “LANGUAGE” from “SYSTEM SETUP”. For
the procedure, see steps 1 to 3 in “Using the SETUP
MENU” on page 23.
Selectable languages:
ENGLISH, FRANCAIS, ESPANOL
The language you have selected will play if it is recorded on the disc.
ORIGINAL
The unit will select the first priority language of each
disc.
OTHER
If you want to select another language, before pressing ENTER, input the language code by using the
numeric keys. (See the Language code list on page
81). Then press ENTER.
• If you input a wrong number, press CANCEL.
NOTE:
If the selected language is not recorded on the disc,
the first-priority language is selected.
SUBTITLE
When several subtitles languages are recorded on D VD ,
you can select the language to be used for the subtitles. The selected language remains in eff ect after the
power is turned off or the disc is replaced.
Select “SUBTITLE” and select the men u language from
the list below.
Selectable languages:
ENGLISH, FRANCAIS, ESPANOL
The subtitle is displayed with the selected language
if it is recorded on the disc.
OTHER
If you want to select another language, before pressing ENTER, input the language code by using the
numeric keys. (See the Language code list on page
81). Then press ENTER.
• If you input a wrong number, press CANCEL.
AUTOMATIC
• The unit will automatically select the same language in the AUDIO setting.
• When the unit selects the same language as the
AUDIO setting, the subtitles will not appear during playback.
• When you do not use the same language as the
AUDIO setting, the subtitles will appear during
playback.
OFF
Subtitles do not appear.
NOTE:
If the selected language is not recorded on the disc,
the first-priority language is selected.
OSD LANGUAGE
You can set the language for on screen display.
Select “OSD LANGUA GE” and select the language from
the list below.
Selectable languages:
ENGLISH, FRANCAIS, ESPANOL
DVD MENU
When several menu languages are recorded on a D VD ,
you can select the language to be used for the DVD
menu.
Select “DVD MENU” and select the language from the
list below.
Selectable languages:
ENGLISH, FRANCAIS, ESPANOL
The selected language is the first priority menu language.
OTHER
If you want to select another language, before pressing ENTER, input the language code by using the
numeric keys. (See the Language code list on page
81). Then press ENTER.
• If you input a wrong number, press CANCEL.
AUDIO
When several audio languages are recorded on a D VD ,
you can select the audio language to be played back.
The selected language remains in effect after the power
is turned off or the disc is replaced.
Select “A UDIO” and select the audio language from the
list below.
TIMER REC SET
SYSTEM SETUP
AV SETUP
REC SETUP
CH SETUP
OTHER
LANGUAGE
PARENTAL
CLOCK
DISC SETUP
OTHER
LANGUAGE
OSD LANGUAGE
DVD MENU
AUDIO
SUBTITLE
SETUP MENU
RETURN SETUPENTER BACK END
ENGLISH
ENGLISH
AUTOMATIC
ENGLISH
SELECT
ENTER
2H6P001A[E] P22-32 6/28/05, 5:34 PM24
Page 25
25
V arious settings
Setting the parental control
Some discs are specified as not suitable for children. This unit can prevent playback of such discs.
Preparation:
• Turn ON the TV and set it to the video input mode.
• Select “P ARENT AL” from “SYSTEM SETUP”. F or the
procedure, see steps 1 to 3 in “Using the SETUP
MENU” on page 23.
NOTE:
• The selected level will apply to operations executed
after this.
• The unit cannot restrict playback of some discs.
• Some discs may not be encoded with specific rating
level information though its disc jacket says “adult”.
Parental control will not work with those discs.
• Do not forget the password. If you forget the password, contact the dealer that you purchased the unit
from.
T emporaril y cancelling parental control
Parental control can temporarily be cancelled with some
DVDs .
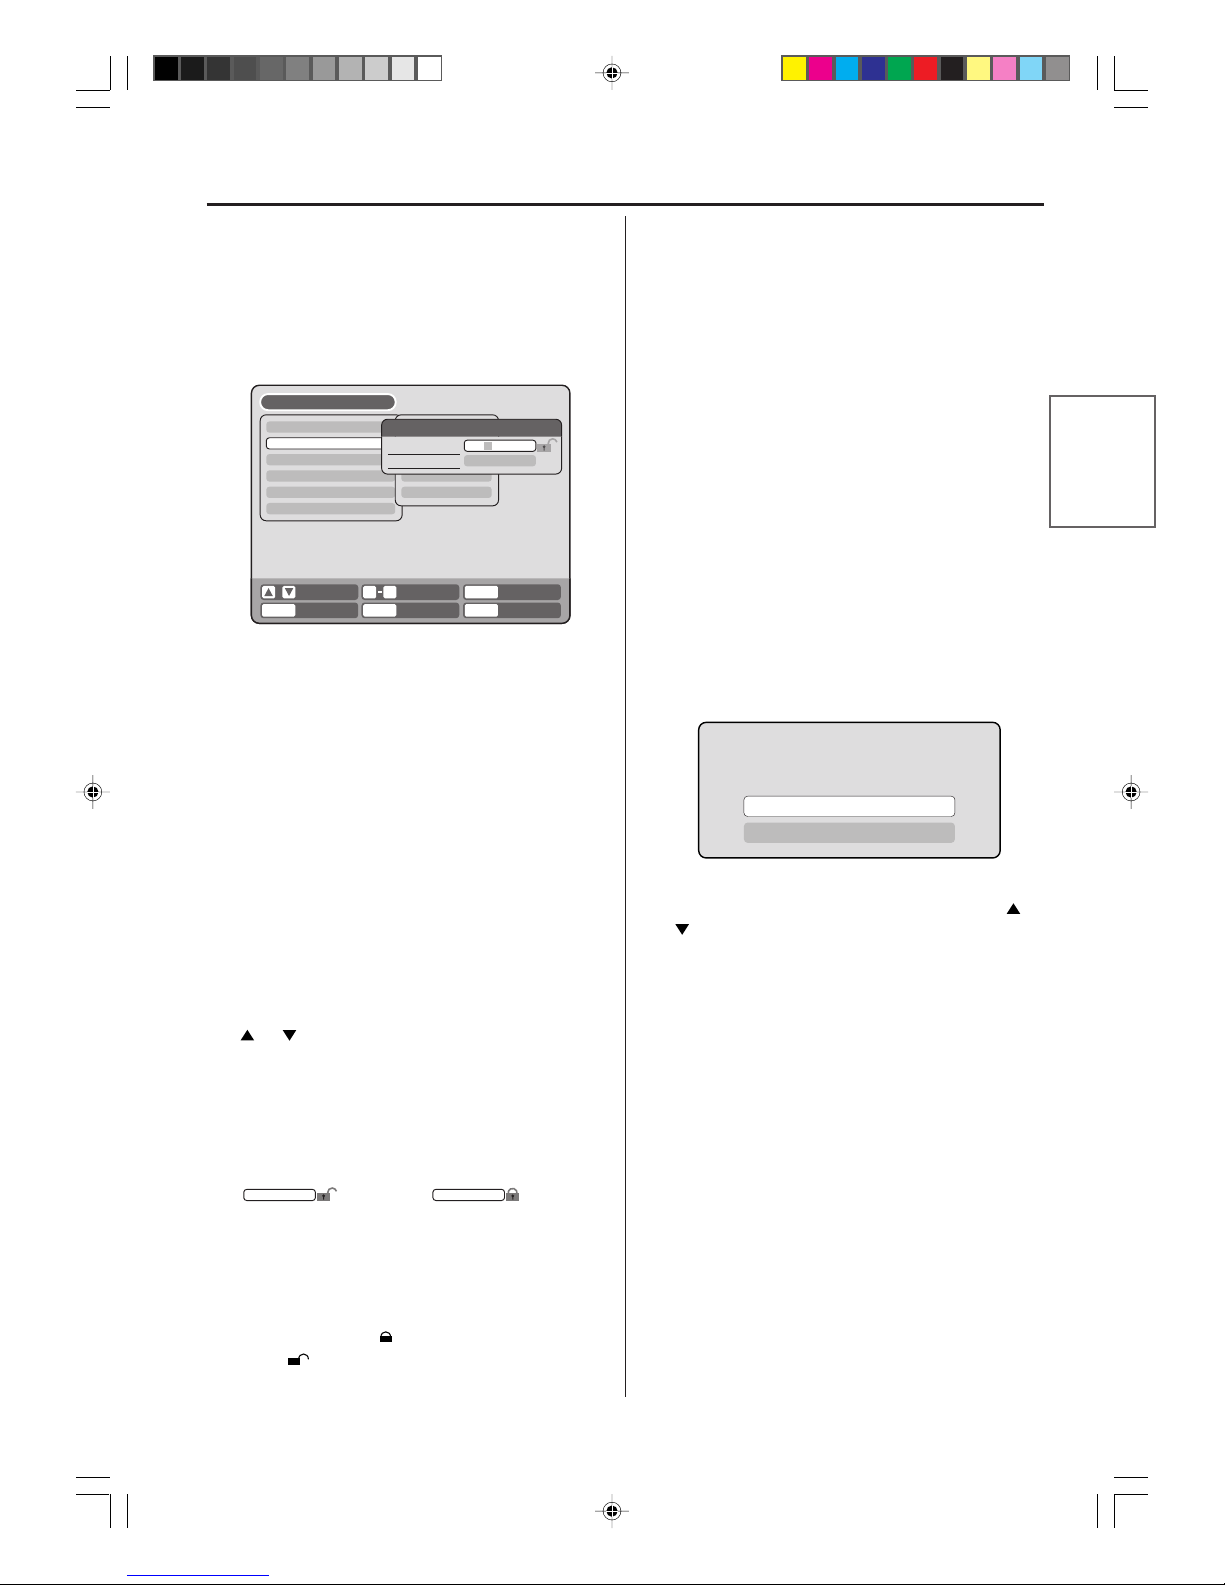
1
Playback a DVD. (See page 33.)
2
If the DVD disc has been designed to temporarily
cancel the rating level, the screen that follows the
“READING” screen will change. If you select “YES”
with the ENTER, the message “YOUR DISC EXCEEDS THE PARENTAL CONTROL LEVEL
1.”(e.g.) will then appear.
3
If you wish to cancel the set rating level tempor arily,
select “PARENTAL CONTROL LEVEL” with or
, then press ENTER. If the password has been
selected, the password input screen will appear .
Alternatively , if the password has not been set, playback will commence. If you don’t know (or have
forgotten) the password, select “CANCEL PICTURE”. The setting screen will disappear. Press
OPEN/CLOSE to remove the disc.
4
Use the numeric keys to input the password.
• To interrupt the input process, press RETURN.
5
Press ENTER.
6
Playback will commence if the entered password
was correct.
NOTE:
This temporary cancellation of the rating level will remain active until the disc is ejected.
When the disc is ejected, the original rating level will be
set again automatically.
Selecting parental control
Select “P ARENTAL ” and select the parental control lev el
from the list below.
Level Off: Parental control is turned off.
Level 1:
Adult discs and general discs (R-rated
disks included) cannot be played back.
Level 2 to 3: Adult discs and R-rated discs cannot
be played back.
Level 4 to 7: Adult discs cannot be played back.
(Level 4 to 7 discs contain content children age 15 and younger may not see .)
Level 8: All discs can be played back without
restriction.
Select from level 1 to level 8.
On a scale of 1- 8, “1” is the most restrictive.
To lock the selected parental control level
1
To lock the selected parental control level, press
or to select “PASSWORD”.
2
Use the numeric keys to input a 4-digit password.
• If you input a wrong number, press CANCEL.
• Be sure to remember this number!
3
Press ENTER.
To cancel the locked parental control level
1
Select “P ASSW ORD” shown in step 1 of the above section and use the numeric keys to input the password.
2
Press ENTER.
The locked mark
“
”
will change to an unlocked
mark “
”.
Then, you can change the parental control level, or
enter a new password.
----
change to
1234
YOUR DISC EXCEEDS THE PARENTAL
CONTROL LEVEL 1.
PARENTAL CONTROL LEVEL
CANCEL PICTURE
TIMER REC SET
SYSTEM SETUP
AV SETUP
REC SETUP
CH SETUP
OTHER
LANGUAGE
PARENTAL
CLOCK
DISC SETUP
OTHER
PARENTAL
PASSWORD
PARENTAL
SETUP MENU
RETURN SETUPENTER BACK END
DELETECANCEL
- - - -
INPUT NO.
09
SELECT
PARENTAL
OFF
ENTER
2H6P001A[E] P22-32 6/28/05, 5:34 PM25
Page 26
26
Setting the clock
The clock is set to the correct time automatically,
but it can also be set manually . The c lock can be set
for daylight saving time and time zone.
Preparation:
• Turn ON the TV and set it to the video input mode.
• Select “CLOCK” from “SYSTEM SETUP”. For the procedure, see steps 1 to 3 in “Using the SETUP MENU”
on page 23.
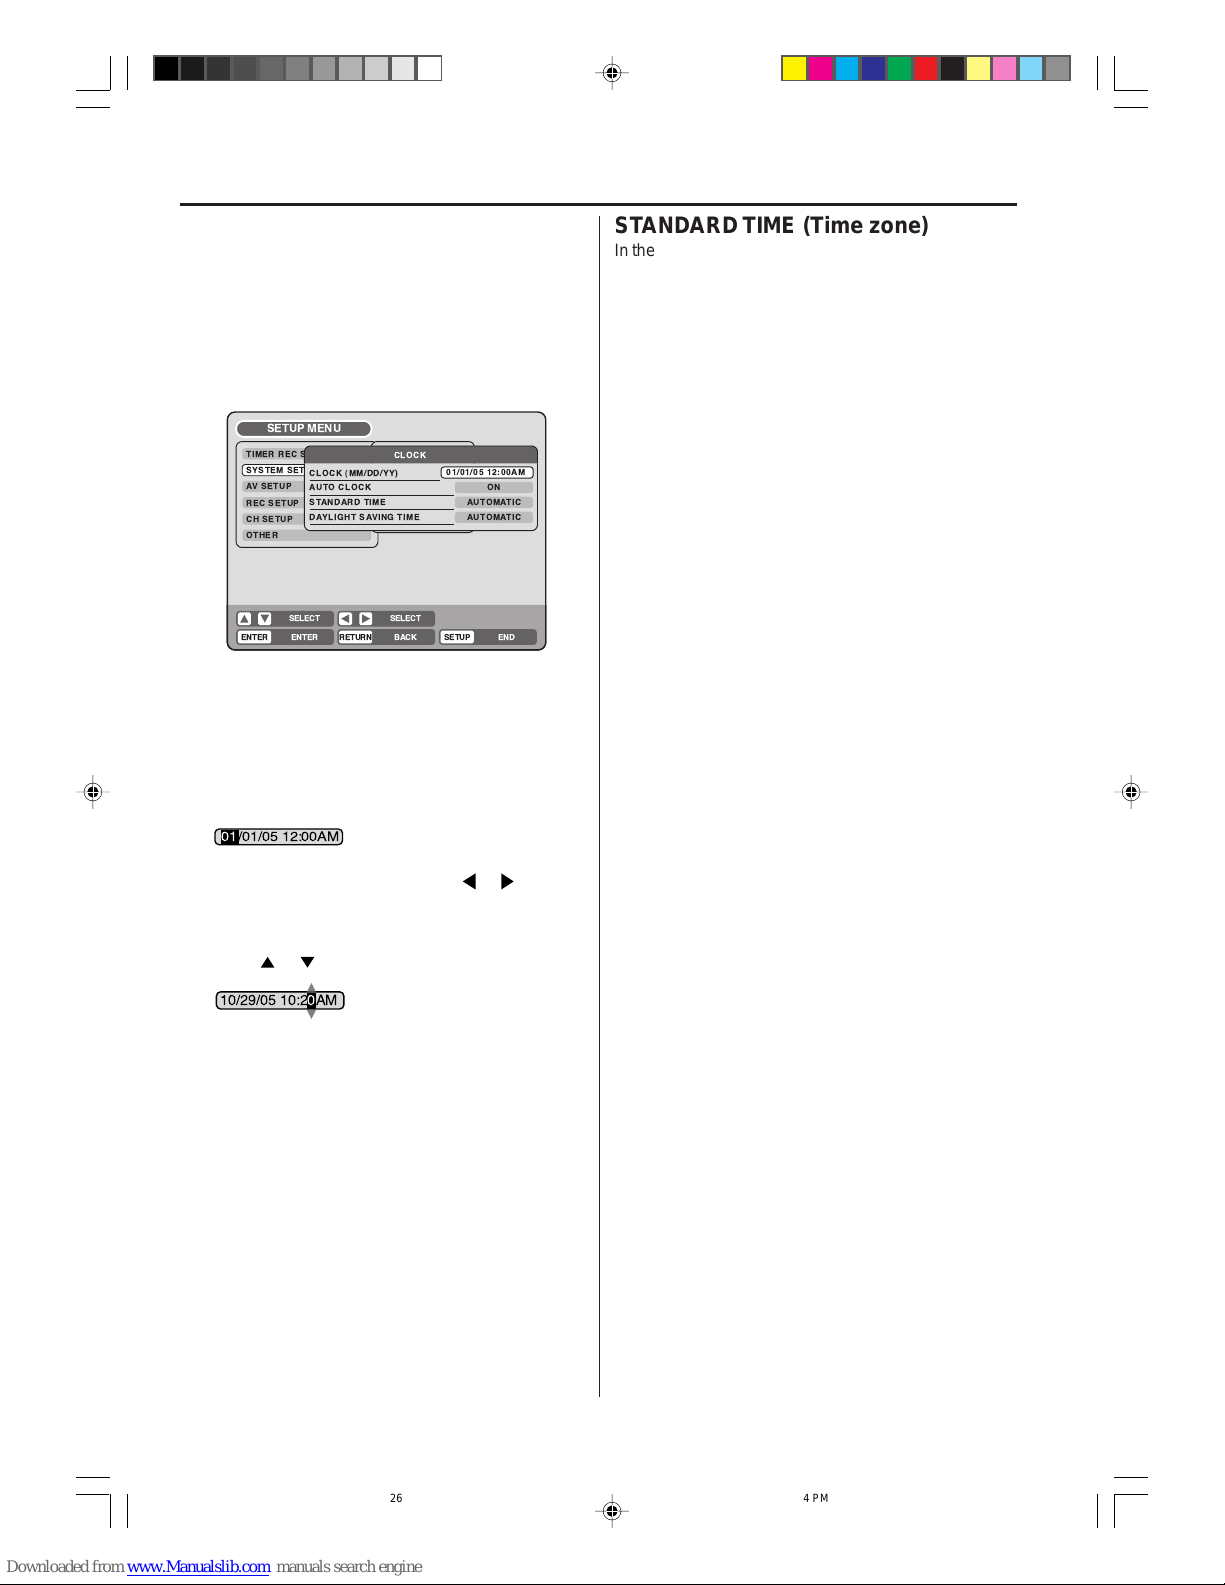
CLOCK (manually)
You can manually set the date, year and present time
with the remote control.
Ex.: Setting the clock to “10:20AM” October , 29th, 2005.
1
Select “CLOCK” and press ENTER.
2
Select the desired items using or (month,
date, year, hour, minute and AM/PM), then press
ENTER.
3
Press or to set the value of the selected item.
4
Repeat steps 2 and 3 to set the date, year and
present time, and press ENTER. The SETUP
MENU will close.
This completes clock time setting.
AUTO CLOCK
You can automatically set the clock by turning “ON” the
AUTO CLOCK function.
When you want to set the auto clock function to “OFF”,
select “AUT O CLOCK”, press ENTER and select “OFF”
from the list.
For more information see page 22.
/01/05 12:00AM01
10/29/05 10:20AM
0
STANDARD TIME (Time zone)
In the rare event that y ou live within the broadcast range
of two stations in two different time zones, the DVD/
VCR may recognize the wrong station for the auto cloc k
set. To correct the situation:
Select “ST AND ARD TIME” and select the time zone from
the list below.
Selectable time zones and correction times
ATLANTIC: GMT – 4 hours
(GMT: Greenwich Mean Time)
EASTERN: GMT – 5 hours
CENTRAL: GMT – 6 hours
MOUNTAIN: GMT – 7 hours
PACIFIC: GMT – 8 hours
ALASKA: GMT – 9 hours
HAWAII: GMT – 10 hours
AUTOMATIC: AUTO SET
NOTES:
• When shipped from the factory, the “STANDARD
TIME” is set to “AUTOMATIC”.
• After making the auto clock setting, in some cases
the clock may displa y another time zone. You can correct the clock by selecting your time zone setting
above.
• When the clock is not set or y ou set the cloc k man ually, the time zone setting is not available.
DAYLIGHT SAVING TIME
You can set the clock to daylight saving time automatically or manually.
To select daylight saving time, select “DAYLIGHT SAVING TIME” and select “ON”, while to cancel the daylight saving time, select “OFF”.
ON: For manual setting (forward 1 hour)
OFF: For manual setting (back 1 hour)
AUTOMATIC: For automatic setting (read XDS in the
signal)
NOTES:
• When you want to set daylight saving time, on the
first Sunday in April you set it to “ON”, and on the last
Sunday in October you set it to “OFF”.
• When shipped from the factory, the “DA YLIGHT SAV
ING TIME” option is set to “AUTOMATIC”.
• When the clock is not set, the daylight saving time
setting is not available.
• When there is no daylight saving time in your area,
always select “OFF”.
LANGUAGE
PARENTAL
CLOCK
DISC SETUP
OTHER
LANGUAGE
TIMER REC SET
SYSTEM SETUP
AV SETUP
REC SETUP
CH SETUP
OTHER
CLOCK
CLOCK (MM/DD/YY)
AUTO CLOCK
STANDARD TIME
DAYLIGHT SAVING TIME
ON
AUTOMATIC
AUTOMATIC
01/01/05 12:00AM
SETUP MENU
RETURN SETUPENTER BACK END
SELECT
SELECT
ENTER
2H6P001A[E] P22-32 6/28/05, 5:34 PM26
Page 27
27
V arious settings
Setting the disc
You can format, protect, or finalize a disc.
Preparation:
• Turn ON the TV and set it to the video input mode.
• Select “DISC SETUP” from “SYSTEM SETUP”. For
the procedure, see steps 1 to 3 in “Using the SETUP
MENU” on page 23.
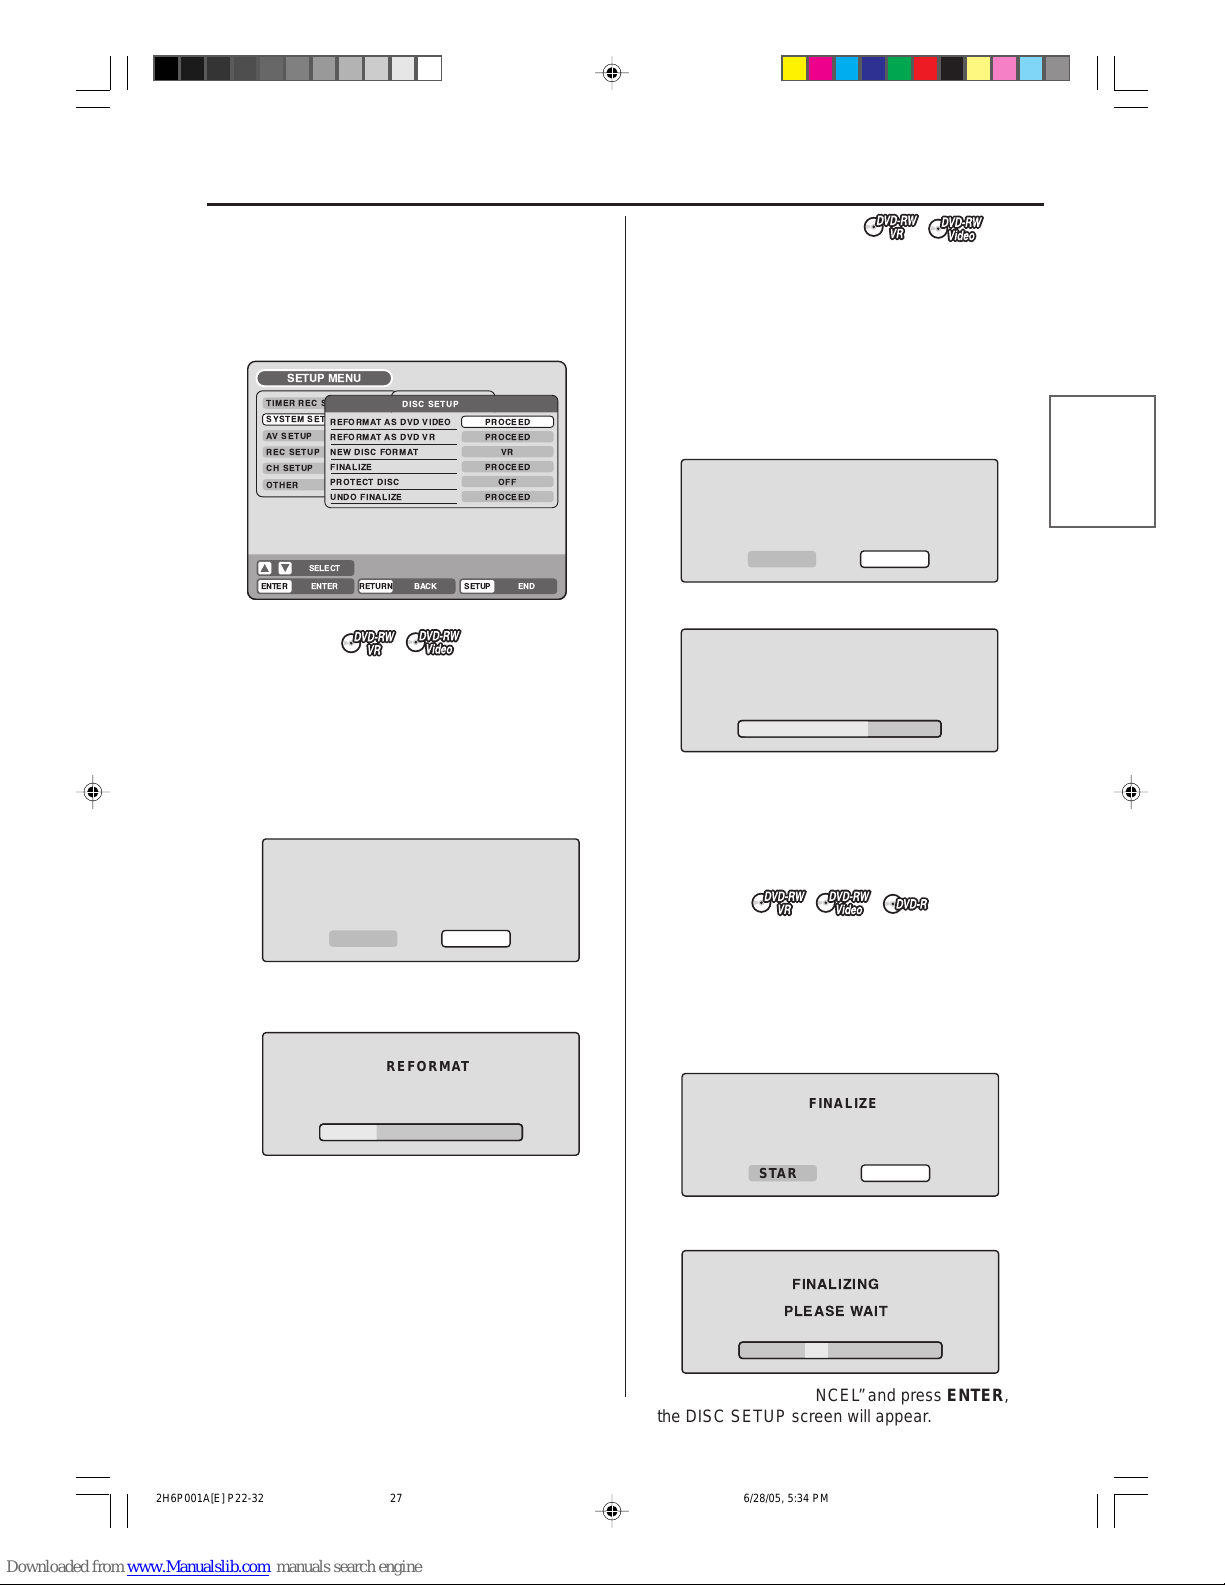
REFORMAT
You can format a recorded DVD-RW.
Check the content of the disc before format. If you format the disc, the recorded content of the disc will be
erased.
To format a DVD in the Video mode, select “REFORMAT AS DVD VIDEO”, and to format it in the VR mode ,
select “REFORMAT AS DVD VR”.
The screen below will appear.
• When you select “START” and press ENTER, f ormat
will start. The screen below will appear.
• When you select “CANCEL” and press ENTER, the
DISC SETUP screen will appear.
NOTES:
• You cannot format Ver. 1.0 DVD-RW and DVD-R.
• You cannot format a disc if the disc protection is “ON”.
In such a case, be sure to cancel the disc protection
(see page 28) before format.
REFORMAT
START CANCEL
FINALIZING
PLEASE WAIT
REFORMAT
FINALIZE
START CANCEL
NEW DISC FORMAT
START CANCEL
INITIALIZING DISC
NEW DISC FORMAT
If you insert an unused disc, the disc is automatically
formatted.
If you use the DVD-RW (Ver.1.1/1.2), you can select
the mode to be used for automatic format.
Select “NEW DISC FORMA T” and select the mode from
the list below.
VR: Format the disc in the VR mode.
VIDEO: Format the disc in the Video mode.
When you insert an unused disc, the following message screen will appear.
• When you select “START” and press ENTER, f ormat
will start. The screen below will appear.
• When you select “CANCEL” and press ENTER, the
normal TV screen will appear.
NOTE:
If a recorded disc has scratches or contamination on it,
the “NEW DISC FORMAT” screen may appear.
If this happens, select “CANCEL”.
FINALIZE
T o pla y a D VD disc recorded on this unit you must finaliz e
the disc to insure compatibility with other DVD pla y ers. In
addition if you are using a D VD-RW disc y ou must record
in Video mode. DVD-RW is the only disc that needs
to be finalized.
When “FINALIZE” is selected, the screen below will
appear.
• When you select “START” and press ENTER, finalization will start. The screen below will appear.
TIMER REC SET
SYSTEM SETUP
AV SETUP
REC SETUP
CH SETUP
OTHER
LANGUAGE
PARENTAL
CLOCK
DISC SETUP
OTHER
LANGUAGECLOCK
CLOCK (MM/DD/YY)
AUTO CLOCK
STANDARD TIME
DAYLIGHT SAVING TIME
DISC SETUP
REFORMAT AS DVD VIDEO
REFORMAT AS DVD VR
NEW DISC FORMAT
FINALIZE
PROTECT DISC
UNDO FINALIZE
PROCEED
VR
PROCEED
OFF
PROCEED
PROCEED
SETUP MENU
RETURN SETUPENTERENTER BACK END
SELECT
• When you select “CANCEL” and press ENTER,
the DISC SETUP screen will appear.
2H6P001A[E] P22-32 6/28/05, 5:34 PM27
Page 28
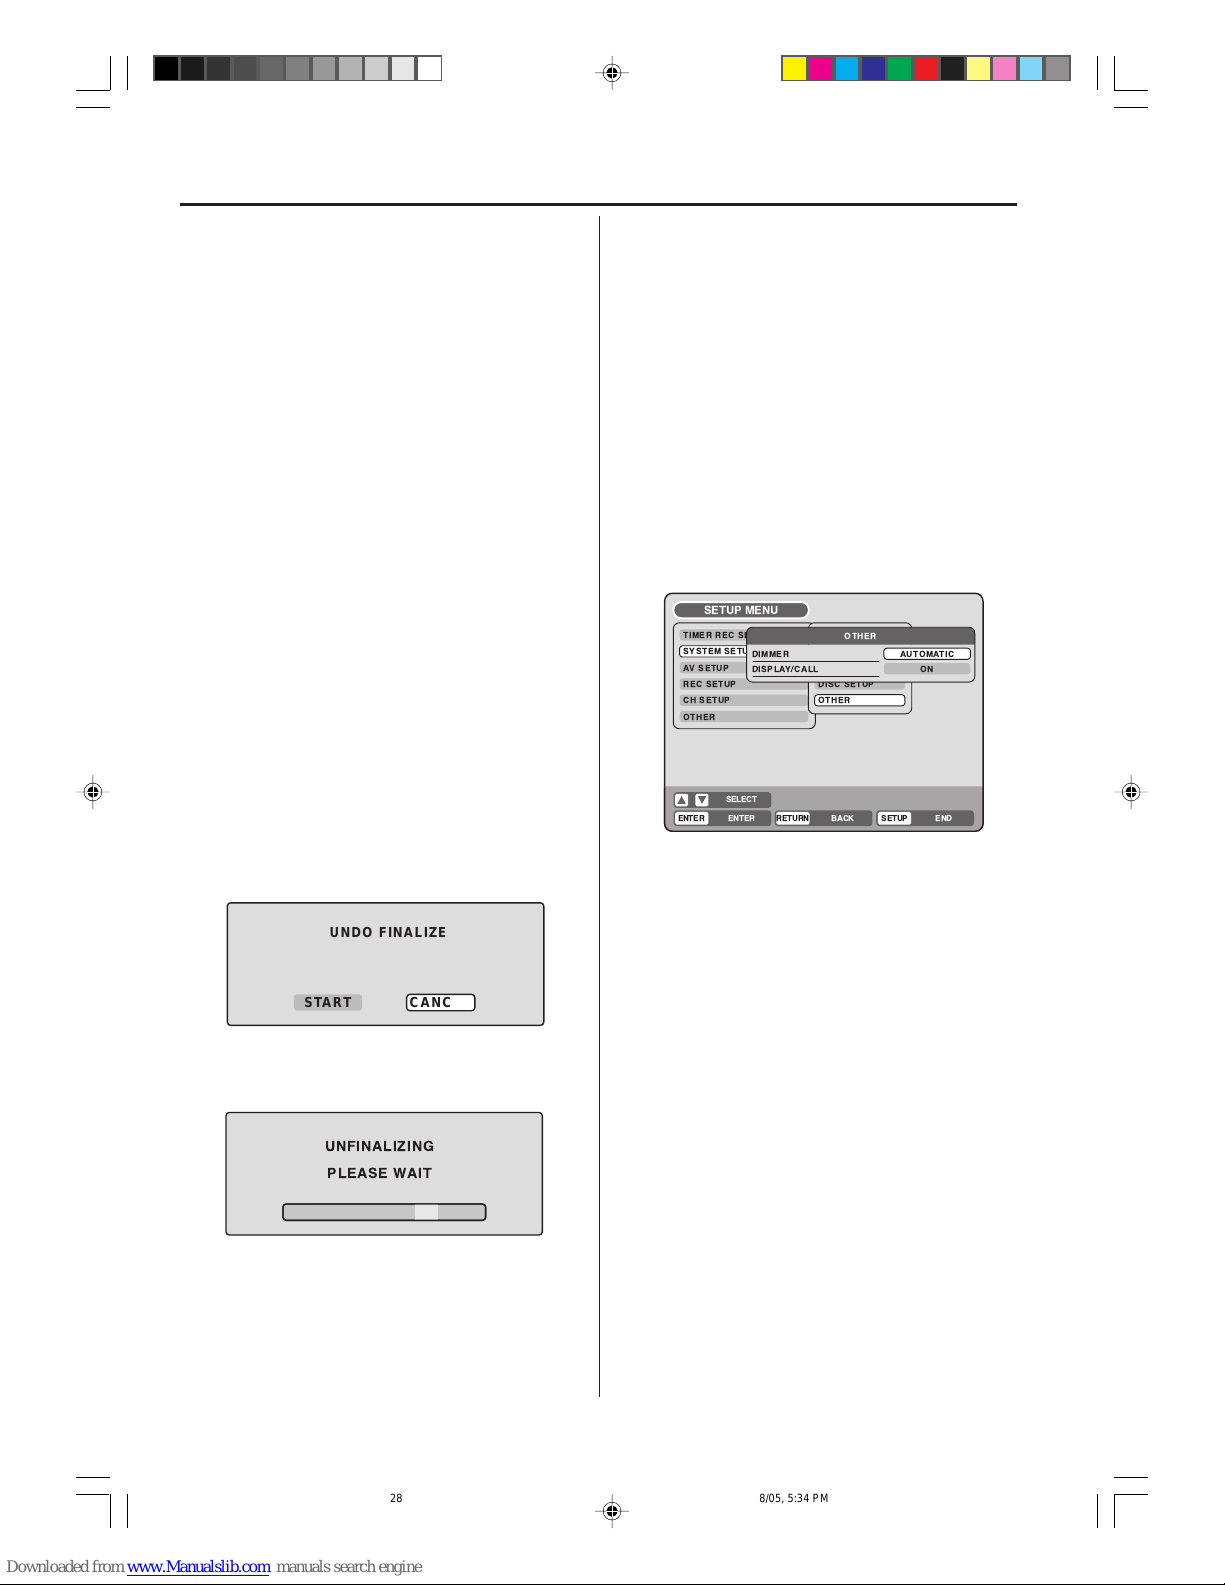
28
Setting the disc / Other (SYSTEM SETUP)
UNDO FINALIZE
You can cancel the finalization of a finalized DVD-RW
(in VR mode).
You cannot cancel the finalization for discs other than
above. You can record or edit on a disc whose finalization has been cancelled.
Select “UNDO FINALIZE”, and the screen below will
appear.
• When you select “START” and press ENTER, the
cancelling finalization will start. The screen belo w will
appear.
• When you select “CANCEL” and press ENTER, the
DISC SETUP screen will appear.
NOTES:
• During the cancelling finalization the cursor will move
repeatedly .
• The cancelling finalization process may require a fe w
minutes to about 1 hour according to disc type or the
amount of free space on the disc.
• When the disc’s finalization cannot be cancelled, y ou
cannot select “UNDO FINALIZE”.
Y ou can turn the display window and on-screen display “ON” or “OFF”.
Preparation:
• Turn ON the TV and set it to the video input mode.
• Select “OTHER” from “ SYSTEM SETUP”. F or the procedure, see steps 1 to 3 in “Using the SETUP MENU”
on page 23.
DIMMER (Brightness of the display
window)
You may adjust the brightness or turn off the display on
the front panel of the unit.
Select “DIMMER” and select the displa y window status
from the list below.
AUTOMATIC: When the power is on, the display win-
dow appears bright. When the power
is off, it appears dark.
DIM: The window display always appears
dark.
OFF: When the power is on, the display win-
dow appears dark. When the power
is off, it is turned off.
DISPLAY/CALL (Turning the screen
display “ON” or “OFF”)
You can turn off the screen display that is output to the
TV screen by this unit. Select “DISPLAY/CALL”, and
select “ON” or “OFF”.
ON: The screen display appears.
OFF: Nothing but the SETUP MENU and error mes-
sages appear.
UNFINALIZING
PLEASE WAIT
UNDO FINALIZE
START CANCEL
NOTES:
• During the finalization the cursor will move repeatedly .
When the finalization finished, “DISC FINALIZED” will
appear.
• The finalization process may require a few minutes
to about 1 hour according to disc type or the amount
of free space on the disc.
• You can record or edit a finalized DVD-RW (in VR
mode) by cancelling the finalizing, but you cannot do
these operations with a DVD-RW (Video mode), or
with a DVD-R.
• You cannot playback a disc recorded on VR mode on
a unit that does not support DVD-RW.
• Even if you finalize a disc in the Video mode, the disc
cannot be played back in some DVD players.
• A DVD-R disc cannot be named after it is finalized.
PROTECT DISC
You can protect a disc to prevent the content recorded
on it from being erased, edited or re-recorded.
Only DVD-RW (in VR mode) can be protected.
Select “PRO TECT DISC” and select “ON” to protect the
disc.
To cancel the disc protection, select “OFF”.
TIMER REC SET
SYSTEM SETUP
AV SETUP
REC SETUP
CH SETUP
OTHER
LANGUAGE
PARENTAL
CLOCK
DISC SETUP
OTHER
SETUP MENU
RETURN SETUPENTER BACK END
SELECT
OTHER
DIMMER
DISPLAY/CALL
AUTOMATIC
ON
ENTER
2H6P001A[E] P22-32 6/28/05, 5:34 PM28
Page 29
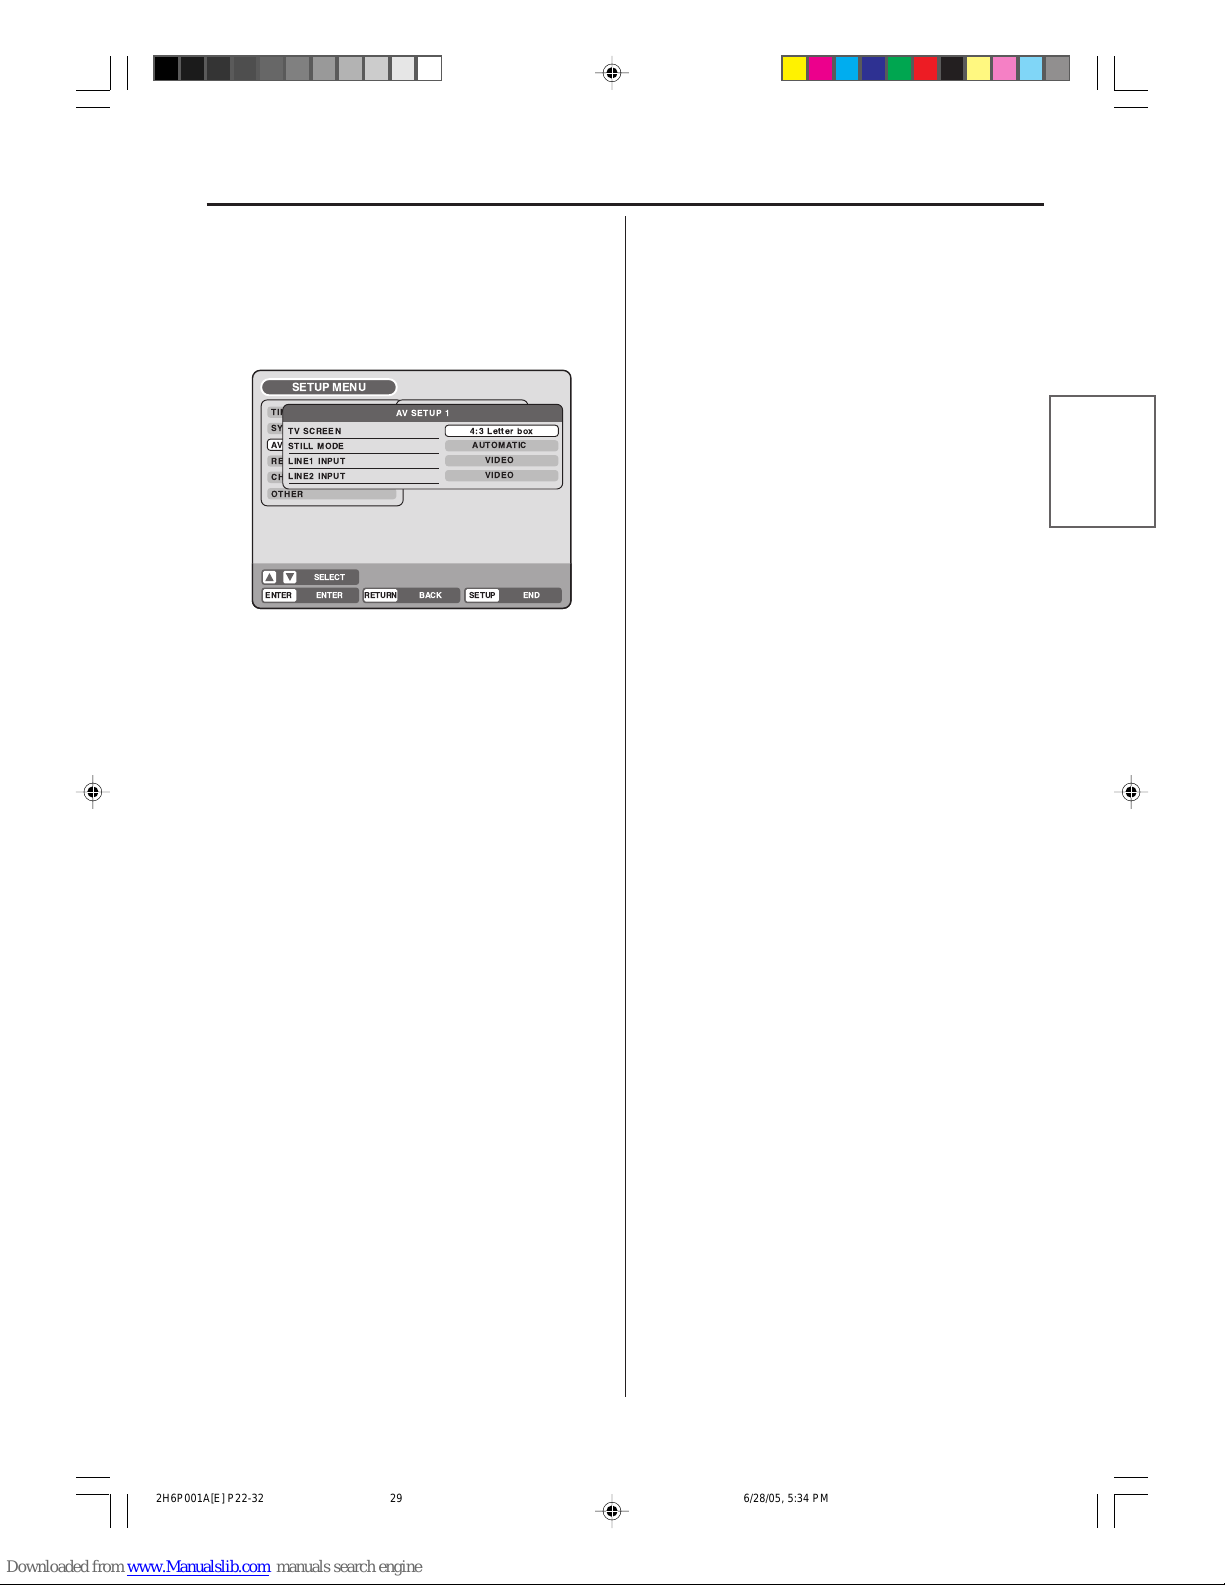
29
V arious settings
Setting the screen
This section describes settings about the screen.
Preparation:
• Tur n ON the TV and set it to the video input mode.
• Select “A V SETUP 1” from “AV SETUP”. For the pro-
cedure, see steps 1 to 3 in “Using the SETUP MENU”
on page 23.
TV SCREEN
You can select the TV screen size to suit the screen
image.
Select “TV SCREEN” and select screen size from the
list below.
4:3 Pan scan
It displays a wide picture across the whole screen
with left and right edges automatically cut off.
4:3 Letter box
Select this mode when connecting to a conventional
TV. When playing back a wide screen DVD disc, it
displays a wide picture with black bands at the top
and bottom of screen.
16:9
Select this mode when connecting to a wide-screen
TV. A wide-screen picture is displayed in full size.
NOTE:
If the DVD disc is not formatted in the Pan scan format,
it displays a 4:3 aspect ratio.
STILL MODE
You can set the type of image displayed on the TV
screen when the playback of the DVD is stilled.
Select “STILL MODE” and select the image to be displayed from the list below.
AUTOMATIC
The field still or frame still is automatically selected.
(For normal use.)
STILL BY FRAME
The frame still is set.
Note for the field still and frame still:
(with 480i interlaced scanning mode)
• Field* still (240 lines)
Since only one field (half of the video information) is
shown on the TV screen, the picture appears rough
but does not shake.
• Frame* still (480 lines)
Two fields are alternativ ely sho wn on the TV screen.
The picture shakes but the resulting picture quality is
superior to the field still pictures.
Field*: A field refers to the video information in one-
half of a frame. 1 frame (screen) consists of 2
fields.
Frame*: A frame refers to the total area occupied by
each picture on the TV screen.
LINE1 INPUT/LINE2 INPUT
This unit comes with an S-Video input jack and Video
input jack. When you use an S-Video or Video input
jack, you must select the input mode.
Select “LINE1 INPUT” (“LINE2 INPUT”) and select the
mode from the following list.
S-VIDEO
The video signal is input only from the S-Video input
jack.
VIDEO
The video signal is input only from the video input
jack.
LANGUAGE
PARENTAL
CLOCK
TIMER REC SET
SYSTEM SETUP
AV SETUP
REC SETUP
CH SETUP
OTHER
AV SETUP 1
TV SCREEN
STILL MODE
LINE1 INPUT
LINE2 INPUT
SETUP MENU
RETURN SETUPENTER BACK END
4:3 Letter box
AUTOMATIC
VIDEO
VIDEO
SELECT
ENTER
2H6P001A[E] P22-32 6/28/05, 5:34 PM29
Page 30
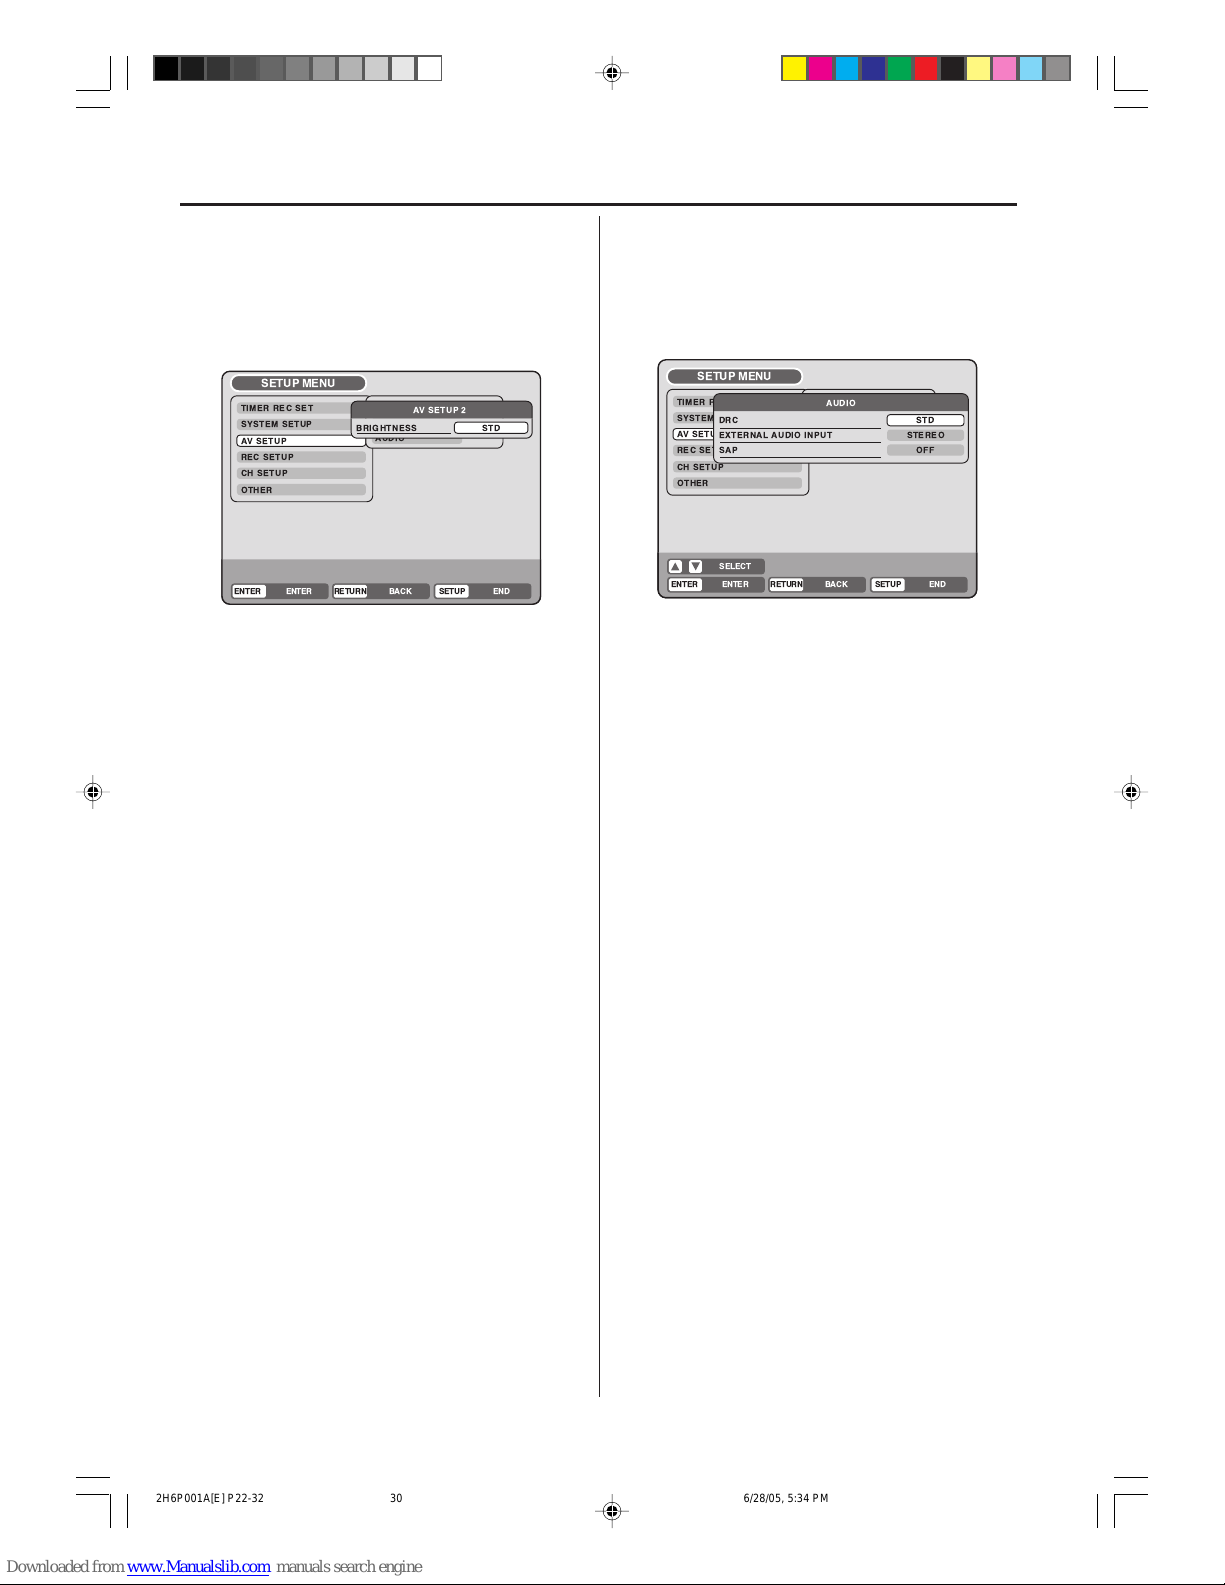
30
SAP (Second Audio Program)
This unit is fitted with an SAP broadcast system that
enables you to switch to a second audio progr am while
viewing a selected channel.
This function applies only when the program is broadcast in multiple languages through the SAP broadcast
system.
Select “SAP” and select “ON” to use SAP, and to not
use it, select “OFF”.
Listening to SAP
When the unit is turned on or a channel selection is
made, make certain the letters “SAP” appear on the
screen. This means that “Second A udio Program” broadcasting is available.
Setting the image quality / Setting the audio
This section describes audio settings.
Preparation:
• Turn ON the TV and set it to the video input mode.
• Select “AUDIO” from “A V SETUP”. For the procedure ,
see steps 1 to 3 in “Using the SETUP MENU” on page
23.
DRC
DRC (Dynamic Range Control) enables you to control
the dynamic range so as to achieve a suitable sound
for your equipment.
Select “DRC” and select the level from the list below.
MAX:Full dynamic range is maintained.
STD: Full dynamic range is reduced.
TV: Dynamic range is reduced.
NOTES:
• This function works only during playback of Dolby
Digital recorded discs.
• When you listen to the sound from TV’s speaker, we
recommend that you select “TV”.
• The level of Dynamic Range Reduction may differ
depending on the DVD.
EXTERNAL AUDIO INPUT
The audio mode for the audio input jack can be selected, choosing either stereo or monaural.
Select “EXTERNAL AUDIO INPUT” and select from the
list below.
STEREO: The sound is treated as stereo sound.
L CH: The sound is treated as the monaural
sound of the left channel.
R CH: The sound is treated as the monaural
sound of the right channel.
This section describes image quality settings.
Preparation:
• Turn ON the TV and set it to the video input mode.
• Select “A V SETUP 2” in “A V SETUP ”. F or the procedure, see steps 1 to 3 in “Using the SETUP MENU”
on page 23.
BRIGHTNESS
You can control the brightness level of the image.
Select “BRIGHTNESS” and select the level from the
list below.
MAX: The image becomes brighter.
STD: The image is of standard brightness.
MIN: The image becomes darker.
LANGUAGE
PARENTAL
CLOCK
TIMER REC SET
SYSTEM SETUP
AV SETUP
REC SETUP
CH SETUP
OTHER
AUDIO
DRC
EXTERNAL AUDIO INPUT
SAP
STD
STEREO
OFF
SETUP MENU
RETURNENTER BACK END
SELECT
SETUPENTER
TIMER REC SET
SYSTEM SETUP
AV SETUP
REC SETUP
CH SETUP
OTHER
LANGUAGE
PARENTAL
AUDIO
AV SETUP 2
BRIGHTNESS
SETUP MENU
RETURN SETUPENTER BACK ENDENTER
STD
2H6P001A[E] P22-32 6/28/05, 5:34 PM30
Page 31
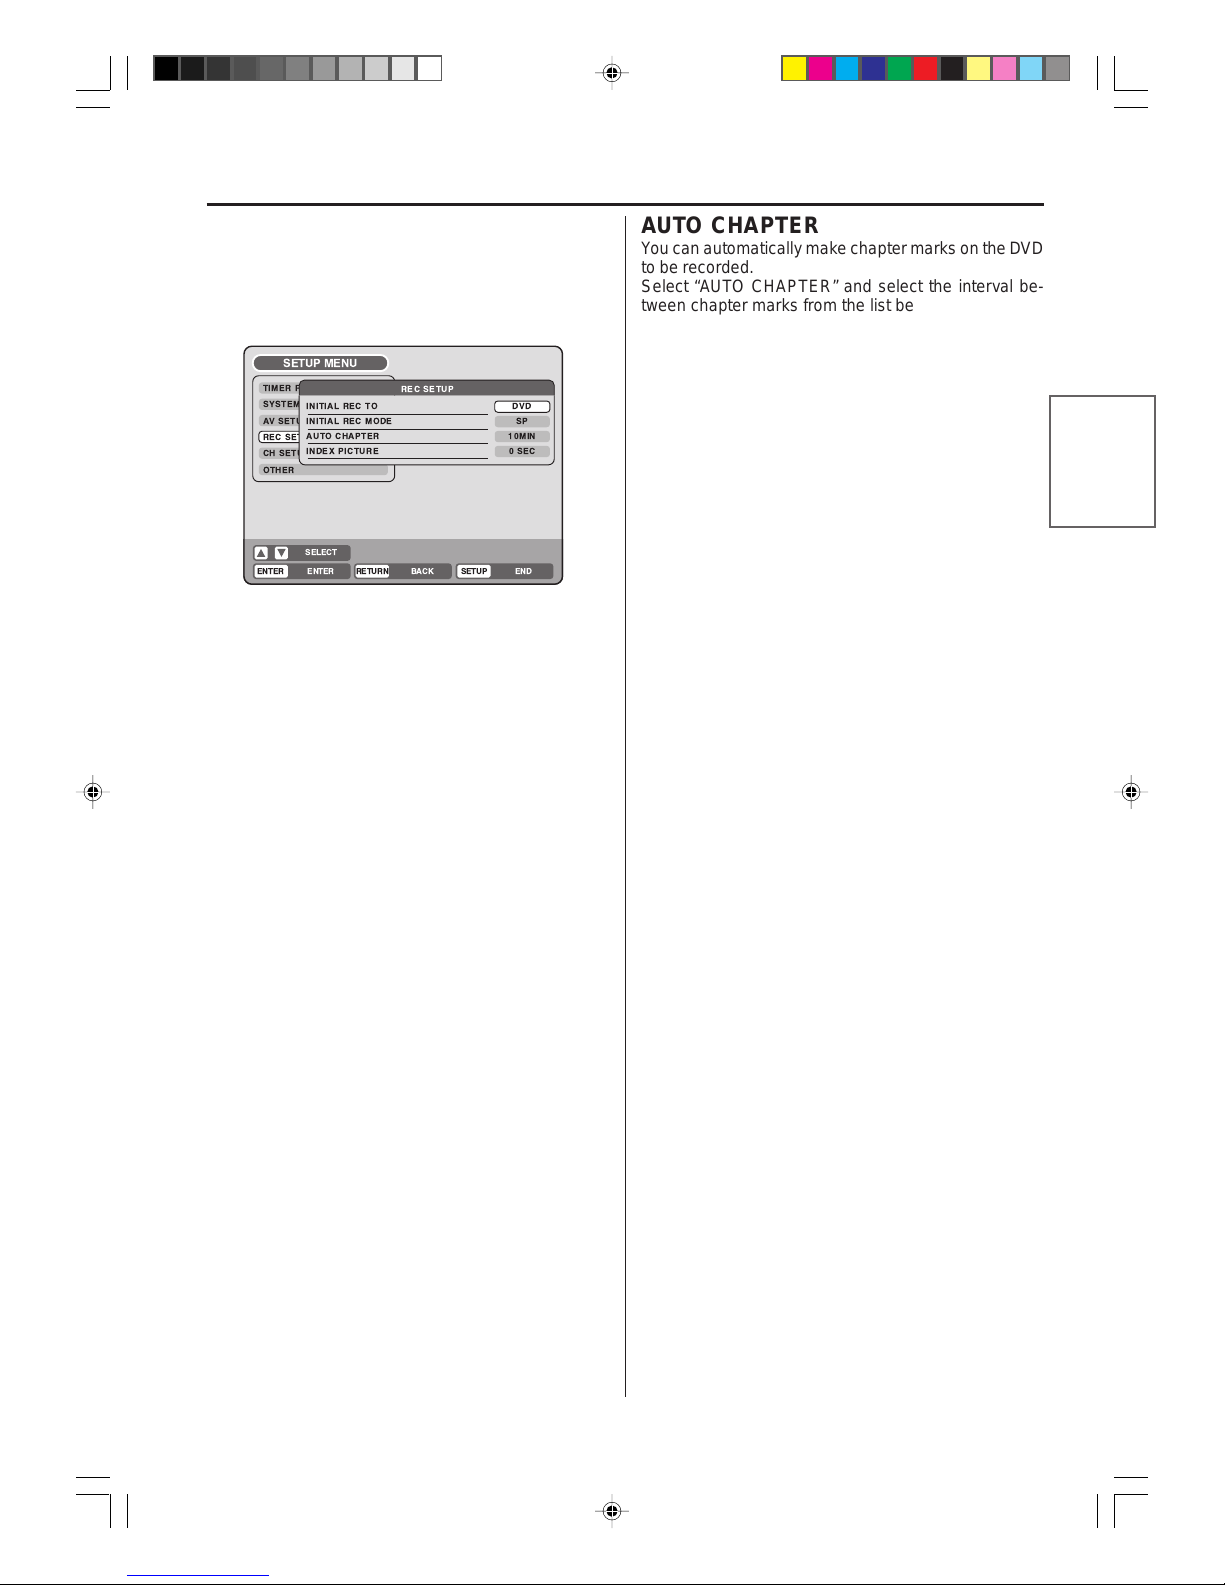
31
V arious settings
Setting the recording
This section describes recording settings.
Preparation:
• Turn ON the TV and set it to the video input mode.
• Select “REC SETUP”. For the procedure, see steps
1 to 3 in “Using the SETUP MENU” on page 23.
INITIAL REC TO
Y ou can select the recording media that is first displa yed
in the item “REC TO” on the timer recording screen.
Select “INITIAL REC TO” and select “DVD” or “VCR”.
INITIAL REC MODE
Y ou can select the recording mode that is first displayed in
the item “REC MODE” on the timer recording screen.
Select “INITIAL REC MODE” and select XP, SP, LP, or SLP.
NOTES:
• For the DVD recording mode, see page 52. And for
the VCR recording mode, see page 48.
• Even if you select the recording mode by “INITIAL
REC MODE”, the recording mode on the display
window does not change. If you want to change the
recording mode, press REC MODE/SPEED on the
remote control.
TIMER REC SET
SYSTEM SETUP
AV SETUP
REC SETUP
CH SETUP
OTHER
REC SETUP
INITIAL REC TO
INITIAL REC MODE
AUTO CHAPTER
INDEX PICTURE
SETUP MENU
RETURN SETUPENTER BACK END
DVD
SP
10MIN
0 SEC
SELECT
ENTER
AUTO CHAPTER
Y ou can automatically mak e chapter marks on the DVD
to be recorded.
Select “AUTO CHAPTER” and select the interval between chapter marks from the list below.
OFF: The automatic chapter is not used.
5 MIN: The interval is set to 5 minutes.
10 MIN: The interval is set to 10 minutes.
15 MIN: The interval is set to 15 minutes.
30 MIN: The interval is set to 30 minutes.
INDEX PICTURE
You can set the time that the thumbnail image is registered in the title menu of DVD-RW (VR mode).
Select “INDEX PICTURE” and select from the list below .
0 SEC: The image of a recording start point is regis-
tered.
1 MIN: The image 1 minute after a recording star t
is registered.
3 MIN: The image 3 minutes after a recording start
is registered.
NOTE:
Y ou cannot select the thumbnail image f or Video mode .
2H6P001A[E] P22-32 6/28/05, 5:34 PM31
Page 32
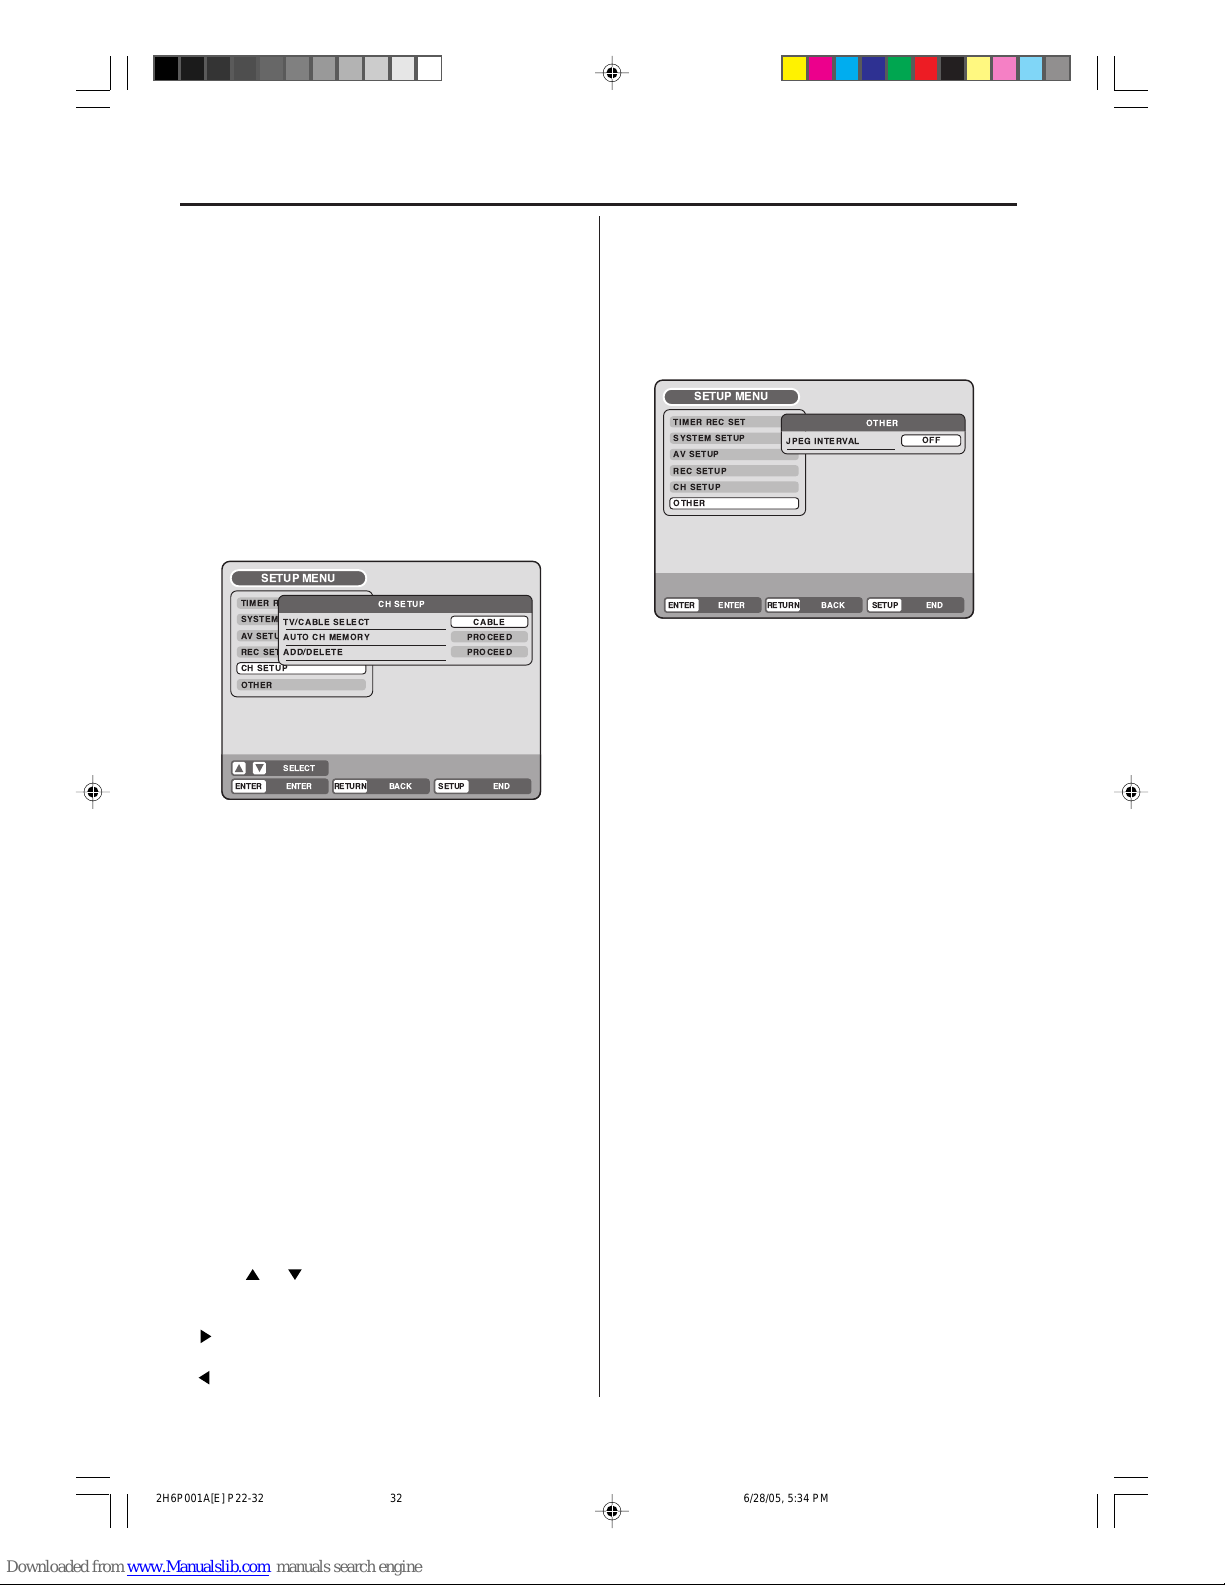
32
Setting the channel / Setting other items
This DVD/VCR is equipped with a channel memory
feature that allows you to skip channels up or down
to the next channel set in memory , hence skip over
unwanted channels.
Before selecting channels, they must be programmed into the DVD/VCR’s memory. In addition
to normal VHF and UHF channels, this DVD/ VCR
can receive up to 113 Cable TV channels. To use
this DVD/VCR with an antenna, set the TV/CABLE
menu option to the TV mode. When shipped from
the factory, this menu option is in the CABLE mode.
Preparation:
• Turn ON the TV and set it to the video input mode.
• Select “CH SETUP”. For the procedure, see steps 1
to 3 in “Using the SETUP MENU” on page 23.
TV/CABLE SELECT
Select “TV/CABLE SELECT” and select “TV” or “CABLE”.
TV: VHF/UHF channels
CABLE: CABLE TV channels
AUTO CH MEMORY
The VCR can receive a maximum of 181 channels by
presetting the channels into memory.
When you select “A UT O CH MEMORY” and press EN-
TER.
The AUTO CH MEMORY function will be activated.
The channel display will count up and, when finished,
the screen returns to normal.
ADD/DELETE (channels)
You can add the channels you want or delete the channels you do not want manually.
Select “ADD/DELETE” and select “ADD” or “DEL.” for
each channel.
• Press
or to select the channel.
The numeric keys can also be used for selection.
• When you want to delete the selected channel, press
to select “DEL.” and press ENTER.
• When you want to use the selected channel, press
to select “ADD” and press ENTER.
You can set the switching interval between played
back images in the slide show mode.
Preparation:
• Turn ON the TV and set it to the video input mode.
• Select “OTHER”. F or the procedure , see steps 1 to 3
in “Using the SETUP MENU” on page 23.
JPEG INTERVAL
You can select the inter val time for JPEG slide show
(page 46).
Select “JPEG INTERVAL” and select the switching interval between images from the list below.
OFF: The slide show mode is not used.
5 SEC: The interval is set to 5 seconds.
10 SEC: The interval is set to 10 seconds.
15 SEC: The interval is set to 15 seconds.
TIMER REC SET
SYSTEM SETUP
AV SETUP
REC SETUP
CH SETUP
OTHER
CH SETUP
TV/CABLE SELECT
AUTO CH MEMORY
ADD/DELETE
CABLE
PROCEED
PROCEED
SETUP MENU
RETURNENTER BACK END
SELECT
SETUPENTER
TIMER REC SET
SYSTEM SETUP
AV SETUP
REC SETUP
CH SETUP
OTHER
OTHER
JPEG INTERVAL
SETUP MENU
RETURN SETUPENTER BACK END
OFF
ENTER
2H6P001A[E] P22-32 6/28/05, 5:34 PM32
Page 33
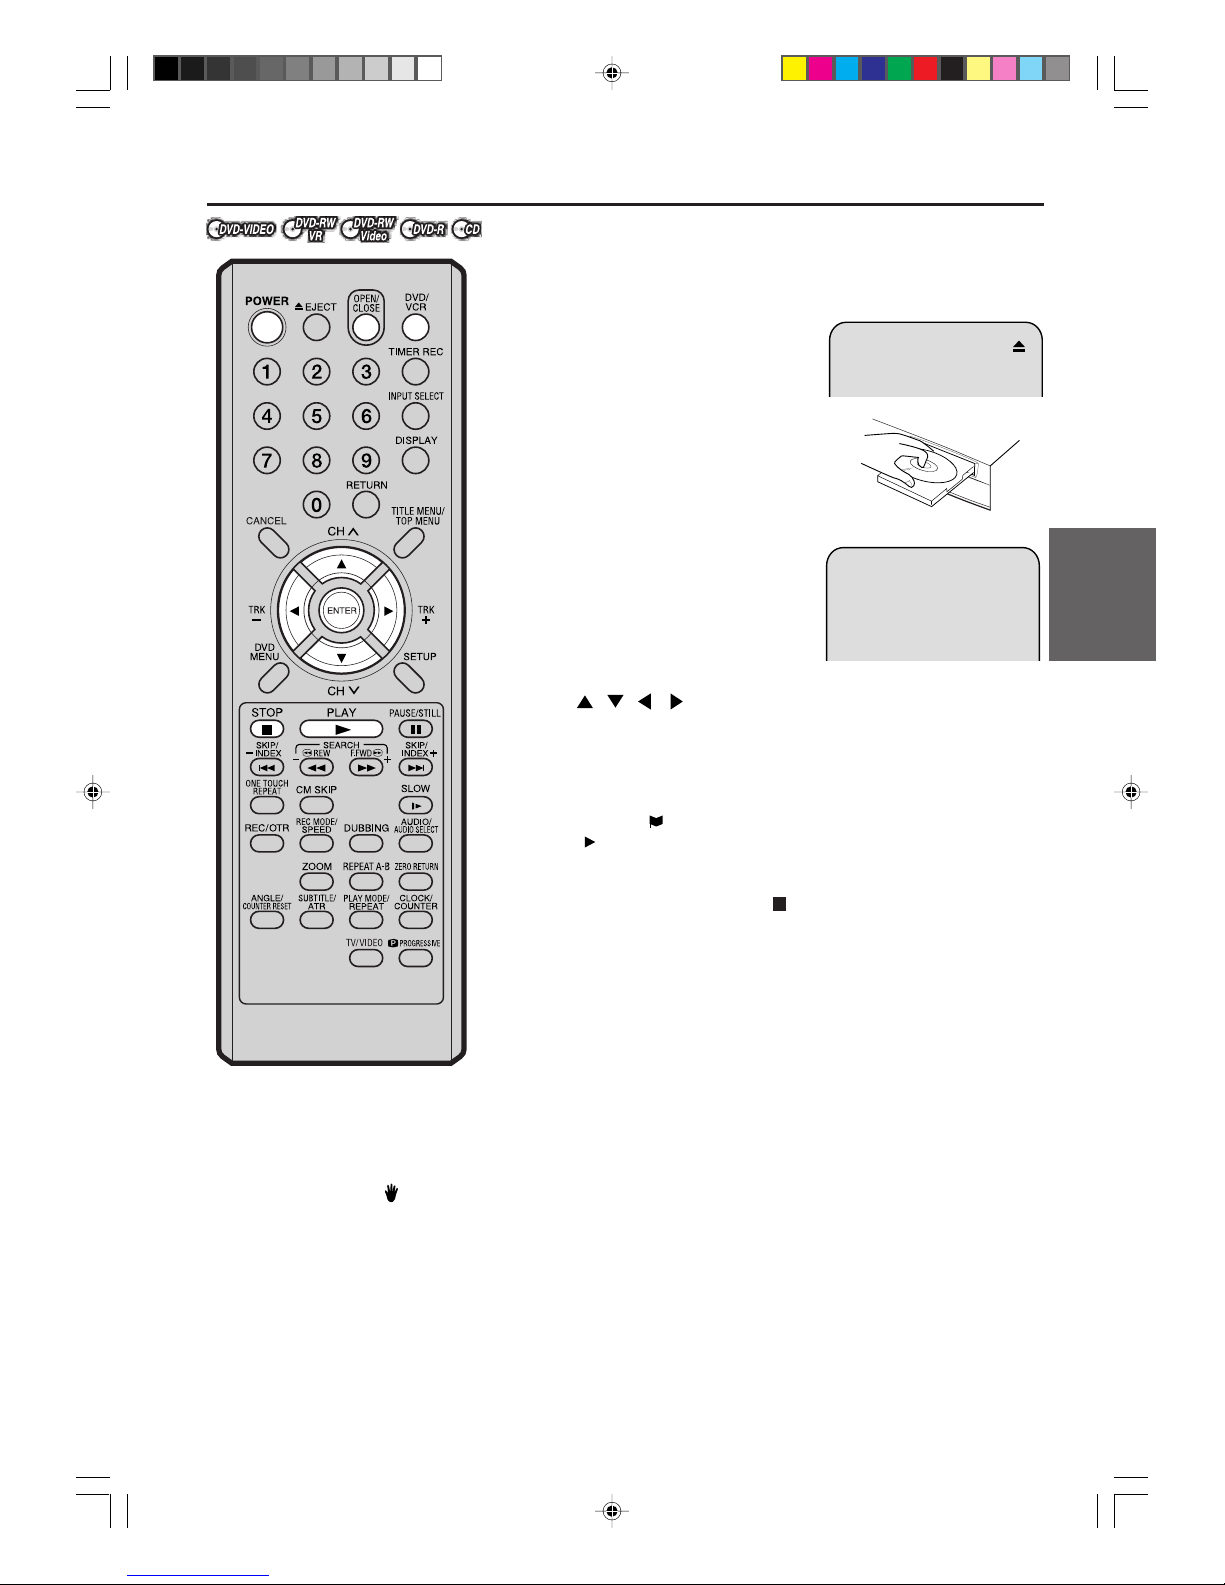
33
Disc playback
READING
Playback procedure
Preparation:
• Turn ON the TV and set to the video input mode.
• Press DVD/VCR to select the DVD mode. (The DVD indicator will
light.)
1
Press OPEN/CLOSE.
The disc tray will open.
2
Place a disc onto the tray.
Hold the disc, position it with the
printed label side up, align it with
the guides, and place it in its proper
position.
3
Press OPEN/CLOSE to close the
disc tray.
“READING” appears on the screen
and some discs start playback automatically .
• A menu screen may appear on
the TV screen, if the disc has a menu f eature. In this case , press
, , , or ENTER to operate a menu feature.
4
Press PLAY to start playback.
5
Press STOP to end playback.
• The DVD/VCR memorizes the stopped point, depending on
the disc. “
” appears on the screen for approx. 4 seconds.
“ ” keeps blinking in the display until the playback is stopped
completely. Press PLAY to resume playback (from the scene
point).
• If you press ST OP again (“
” appears on the screen), the D VD/
VCR will clear the stopped point.
6
Then press OPEN/CLOSE.
The disc tray opens.
Remove the disc and press POWER.
The disc tray closes automatically and DVD/VCR turns off.
NOTES:
• If a non-compatible disc is loaded, “INCORRECT DISC”, “REGION CODE ERROR” or “PARENTAL ERROR”
will appear on the TV screen according to the type of loaded disc. In this case, chec k your disc again (See pages
9 and 25).
• Some discs may take a minute or so to start playback.
• A prohibition symbol “
” may appear at the upper right of the screen. This symbol means either the f eature y ou
tried is not available on the disc, or the DVD/VCR can not access the feature at this time. This does not indicate
a problem with the DVD/VCR.
• When you set a single-faced disc label downwards (ie. the wrong way up) and press PLAY or OPEN/CLOSE,
“READING” will appear and then it will change to “NO DISC”.
• Some playback operations of DVDs may be intentionally fixed by software producers. Since this DVD/VCR plays
DVDs according to the disc contents the software producers designed, some playback features may not be
available. Also refer to the instructions supplied with the DVDs.
• When playing DTS-encoded Audio CDs , e xcessiv e noise will be heard from the analog stereo outputs . T o avoid
possible damage to the audio system, the consumer should take proper precautions when the analog stereo
outputs of the DVD/VCR are connected to an amplification system.
2H6P001A[E] P33-46 6/28/05, 5:34 PM33
Page 34
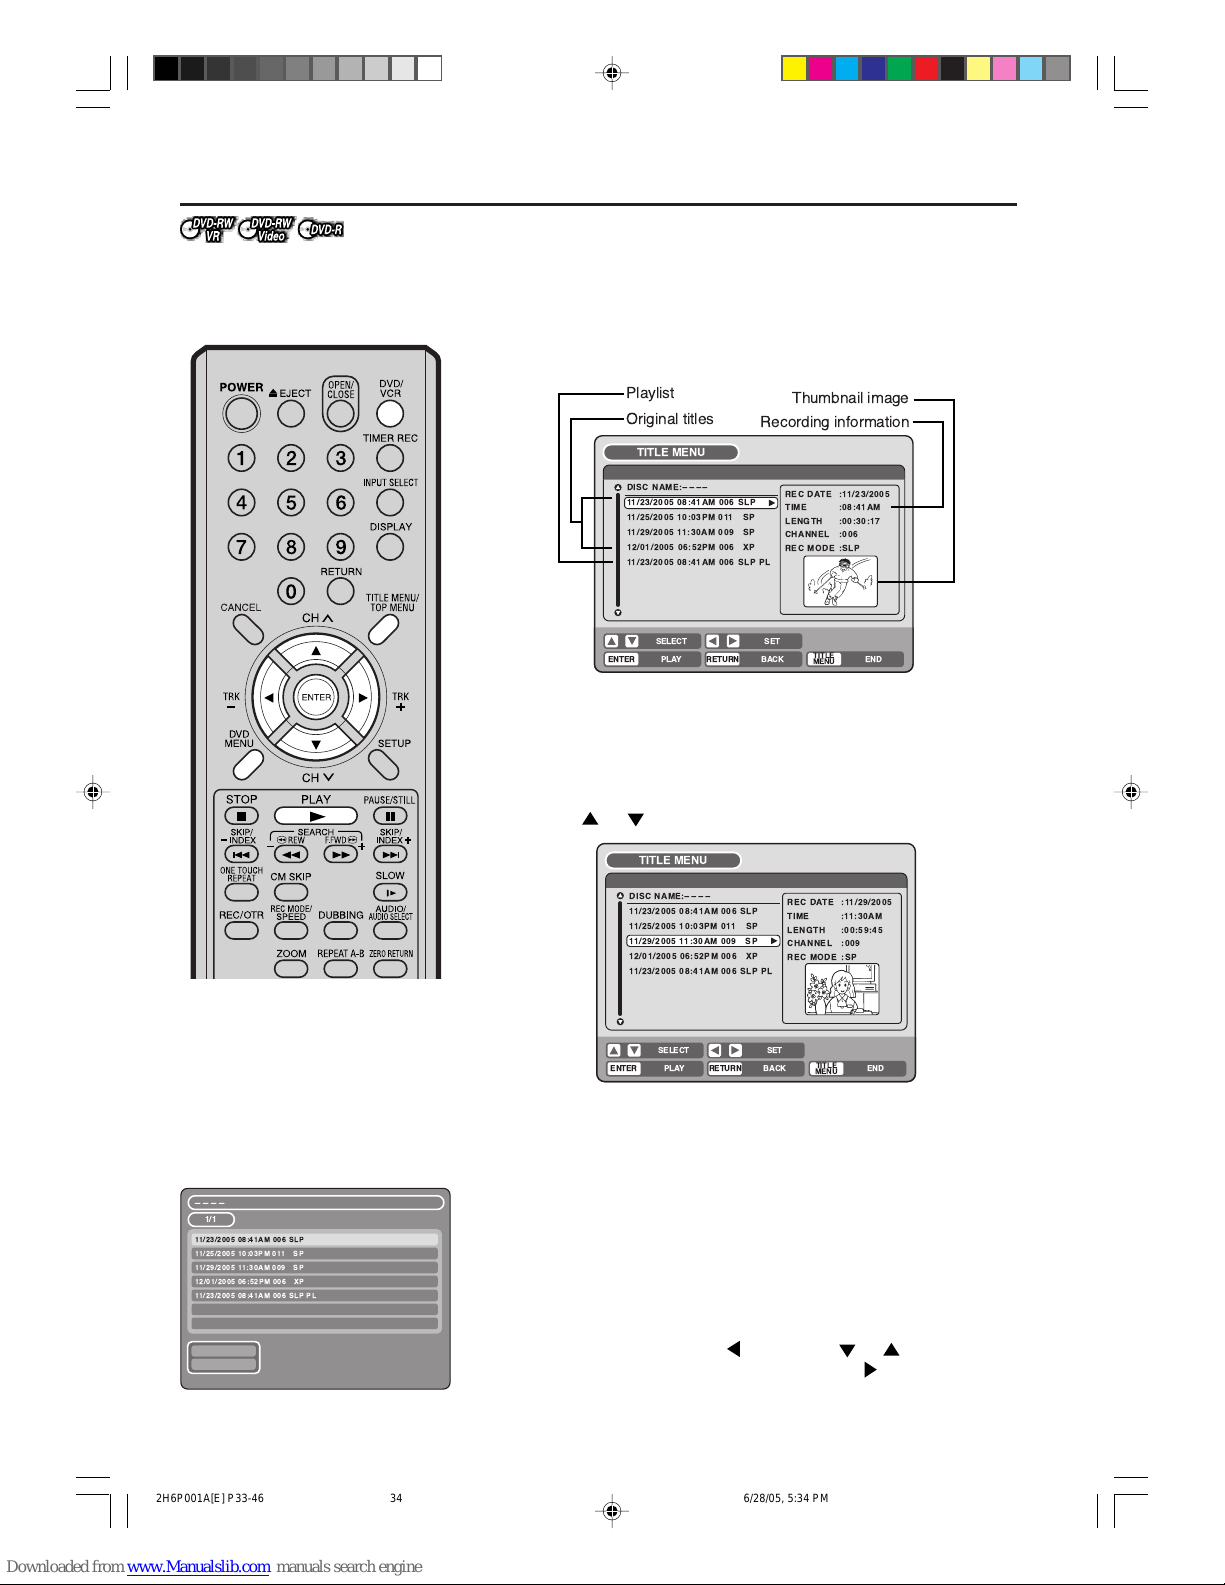
34
Playback by selecting a title
When playing back a recorded
disc, you can display the title
menu and select the title to be
played back.
Preparation:
• Tur n ON the TV and set to the video input mode.
• Load a recorded DVD.
• Press DVD/VCR to select the DVD mode. (The DVD indicator will
light.)
1
Press TITLE MENU.
The title menu will appear.
If there are many original titles and playlists...
Before pressing TITLE MENU, press DVD MENU until “VR ORG”
or “VR PL” will appear on the upper right of the TV screen, then
press TITLE MENU.
The first original title or playlist will be highlighted.
2
Press or to select the title you want to playback.
3
Press ENTER.
The selected title is played back.
NOTES:
• If you don’t display the title menu and press PLAY, the first title is
played back.
• The title menu is used not only for playing back titles but also for
editing various discs and titles. For details of editing operation, see
page 61.
• If you create a playlist, an original title and playlist appear in the title
menu. For creating a playlist, see page 62.
• In case the disc includes more than 10 titles, you can turn to the next
or the previous page. Press
, then press or to display next/
previous page. To return to normal use, press .
• You cannot switch to the VCR mode when the title menu is showing.
Press TITLE MENU to clear the title menu, then press DVD/VCR to
switch to the VCR mode.
NOTE:
When a disc that has been recorded
in the Video mode is finalized, a title
list is automatically created that can
be played back e ven with other DVD
players. Consequently, the menu
before finalizing is different from that
of after finalizing.
ÐÐÐÐ
1/1
11/23/2005 08:41AM 006 SLP
11/25/2005 10:03PM 011 SP
PREV
NEXT
11/29/2005 11:30AM 009 SP
12/01/2005 06:52PM 006 XP
11/23/2005 08:41AM 006 SLP PL
RETURNPLAY BACK
SET
END
SELECT
TITLE
MENU
ENTER
TITLE MENU
Original titles
Playlist
Thumbnail image
Recording information
DISC NAME:
----
11/23/2005 08:41AM 006 SLP
11/25/2005 10:03PM 011 SP
11/29/2005 11:30AM 009 SP
12/01/2005 06:52PM 006 XP
11/23/2005 08:41AM 006 SLP PL
REC DATE :11/23/2005
TIME :08:41AM
LENGTH :00:30:17
CHANNEL :006
REC MODE :SLP
RETURNPLAY BACK
SET
END
SELECT
TITLE
MENU
ENTER
TITLE MENU
DISC NAME:
----
11/23/2005 08:41AM 006 SLP
11/25/2005 10:03PM 011 SP
11/29/2005 11:30AM 009 SP
12/01/2005 06:52PM 006 XP
11/23/2005 08:41AM 006 SLP PL
REC DATE :11/29/2005
TIME :11:30AM
LENGTH :00:59:45
CHANNEL :009
REC MODE :SP
2H6P001A[E] P33-46 6/28/05, 5:34 PM34
Page 35
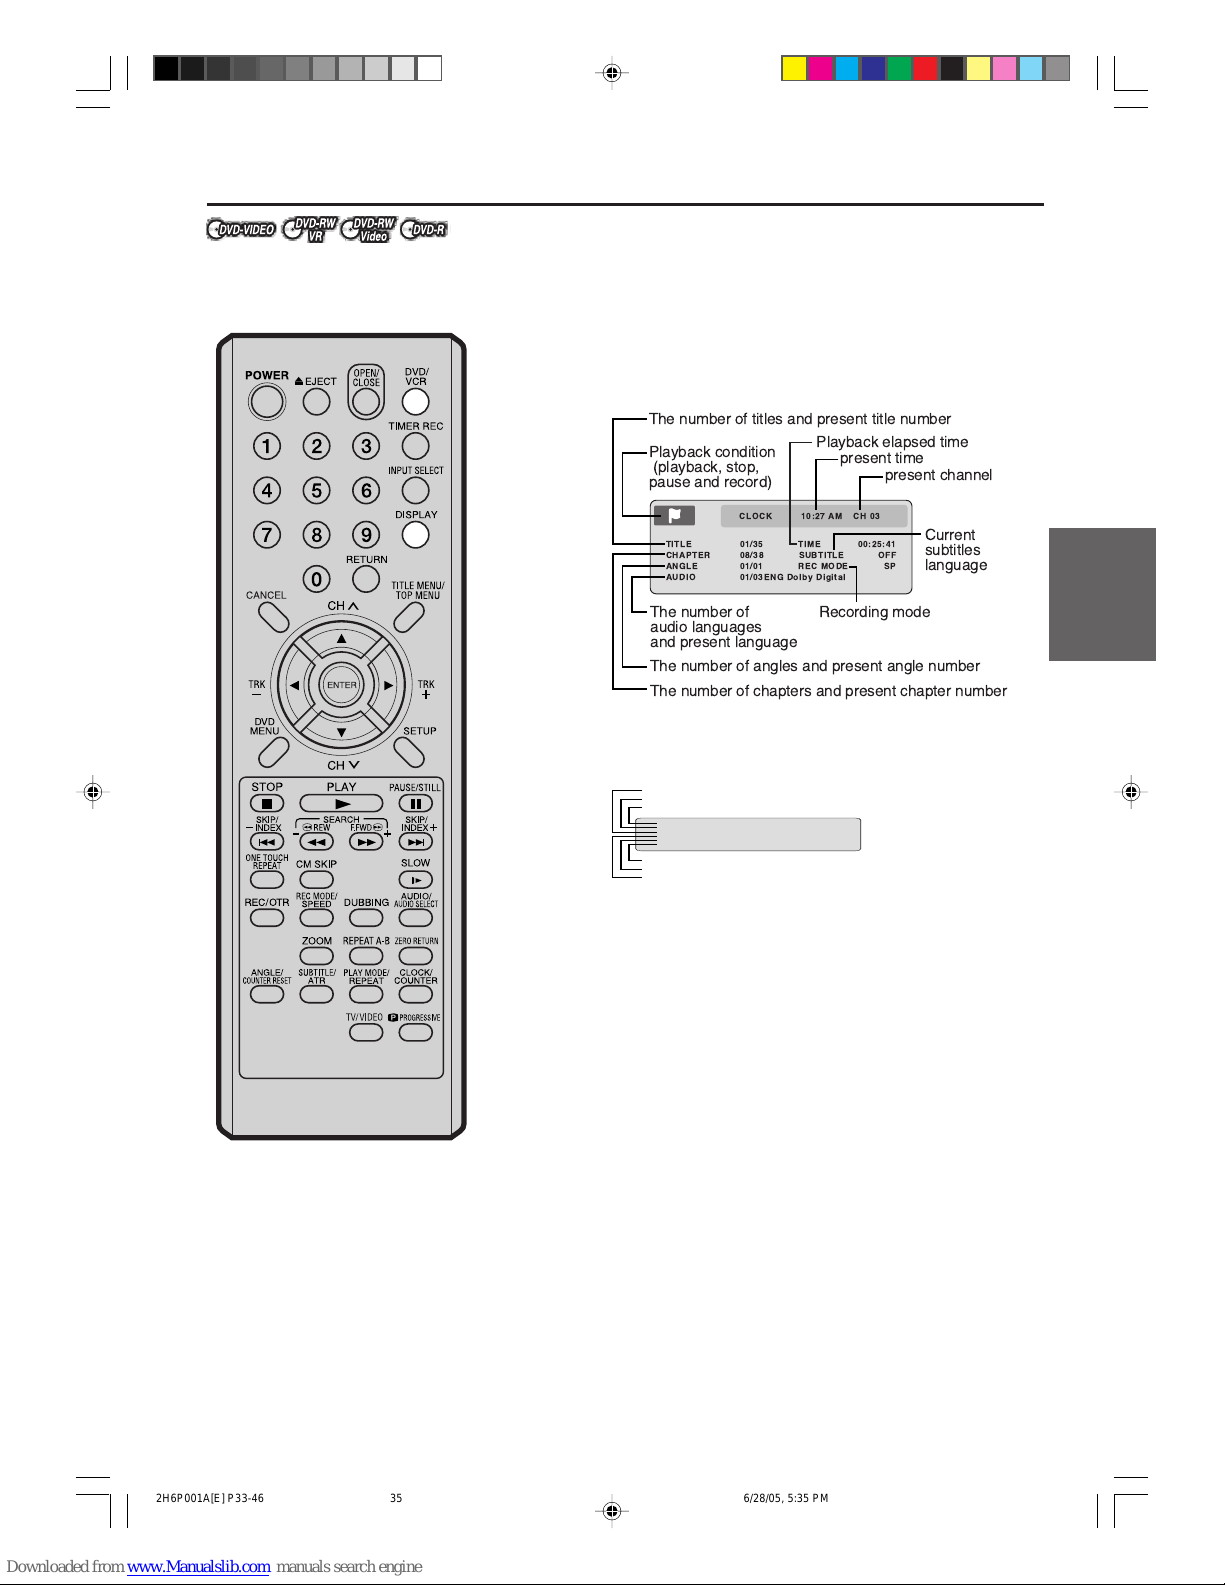
35
Disc playback
Checking media information
DISC NAME ––––
MEDIA TYPE DVD VIDEO
TITLE ORIGINAL35
REMAINING TIME ––––/ SP
DISC PROTECT NO
FINALIZED YES
Finalize
Disc protect
Remaining time*
Title
Media type
Disc name
Various information on the loaded
disc can be displayed on the TV
screen.
NOTES:
• The displayed information varies
with the type of media.
• Some information may not appear
due to media type or operating
conditions.
• In stop mode, some information
does not appear.
Preparation:
• Turn ON the TV and set it to the video input mode.
• Load the disc.
• Press DVD/VCR to select the DVD mode. (The DVD indicator will
light.)
1
Press DISPLAY.
Media information will appear.
2
Press DISPLAY while the media information above is displayed.
The next media information will appear.
*The remaining time displayed during recording may be different
from the actual remaining time. When you want to check the correct remaining time, stop recording and display the media information again.
3
Press DISPLAY again while the media information above is displayed. The media information will disappear.
TITLE 01/35 TIME 00:25:41
CHAPTER 08/38 SUBTITLE OFF
ANGLE 01/01 REC MODE SP
AUDIO 01/03ENG Dolby Digital
CLOCK 10:27 AM CH 03
Playback condition
(playback, stop,
pause and record)
The number of
audio languages
and present language
Playback elapsed time
Current
subtitles
language
Recording mode
The number of titles and present title number
present channel
present time
The number of angles and present angle number
The number of chapters and present chapter number
2H6P001A[E] P33-46 6/28/05, 5:35 PM35
Page 36
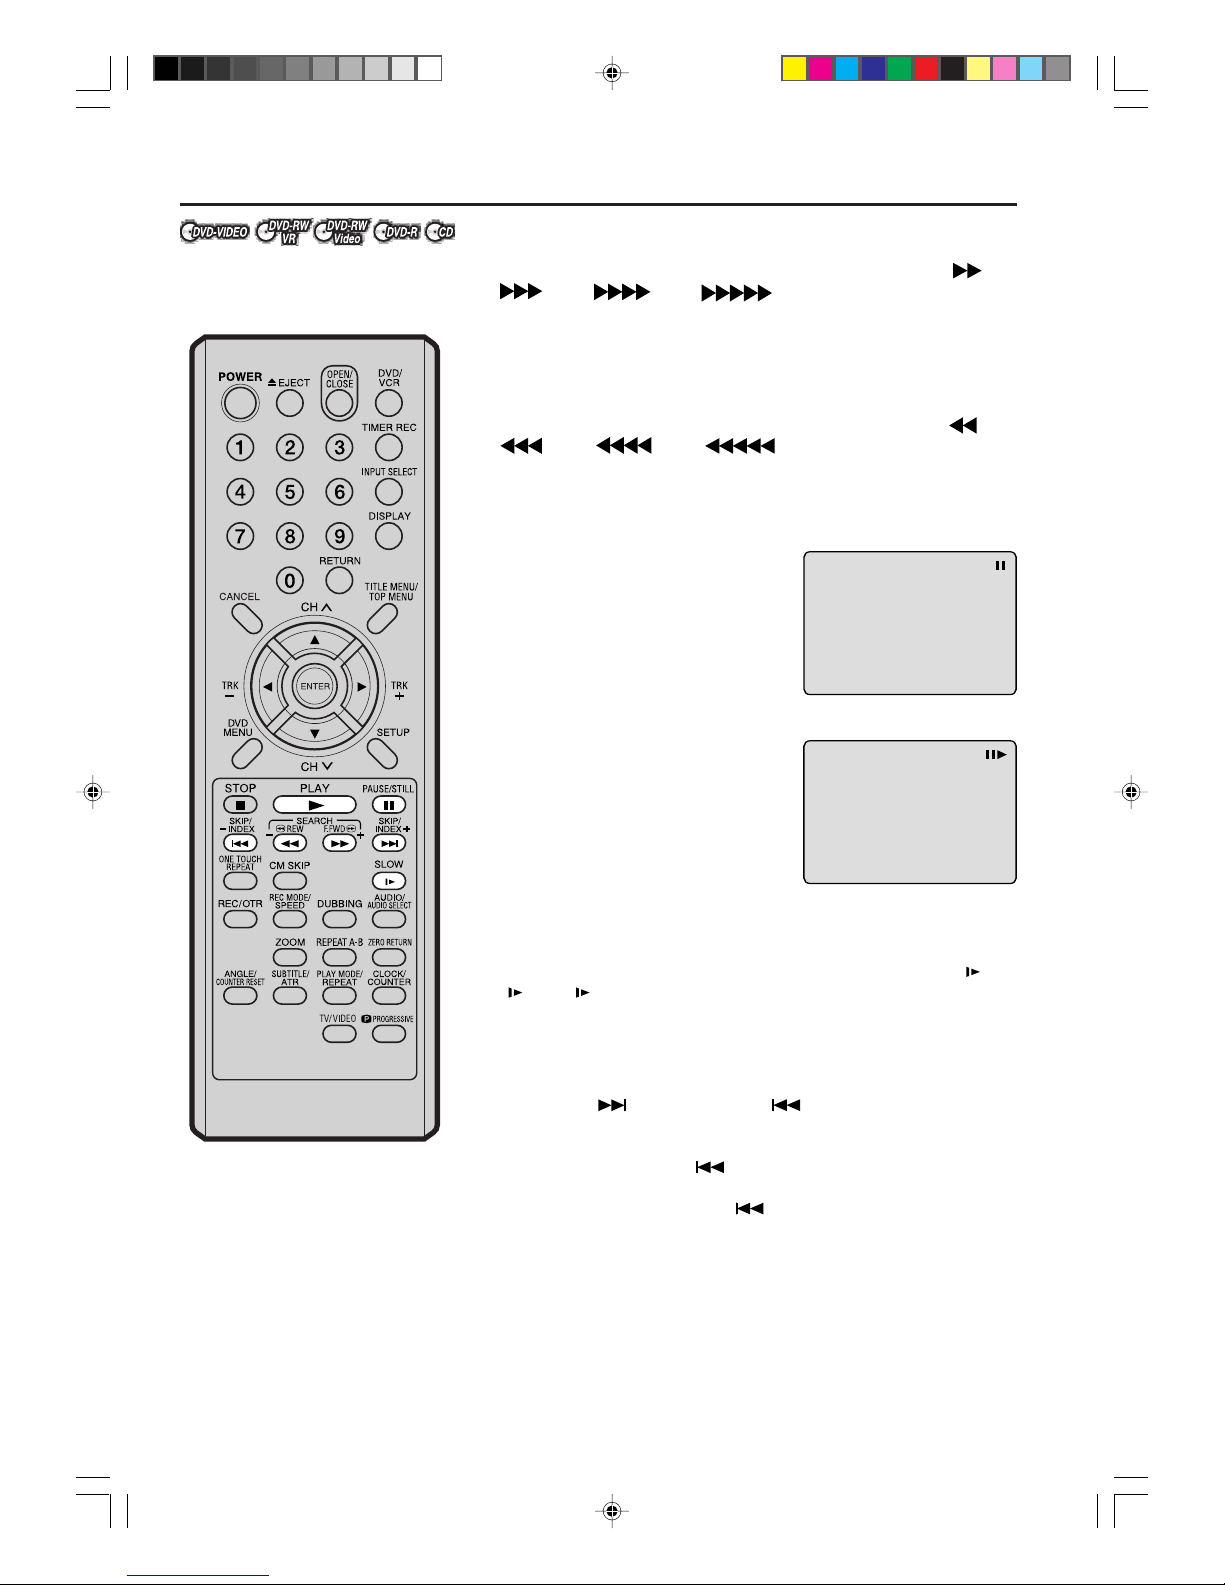
36
Special playbac k
NOTE: There may be a slight delay between pressing the button
and the function activation.
Fast forward playback
Press F.FWD during normal playback.
Each press of F.FWD will increase the speed of the search
(x2),
(x12), (x24), (x60).
(The speed of the search is increased up to only 2 steps in Audio CD .)
• To resume normal pla ybac k, press PLAY.
Review playback
Press REW during normal playback.
Each press of REW will increase the speed of the search (x2),
(x12), (x24), (x60).
(The speed of the search is increased up to only 2 steps in Audio CD .)
• To resume normal pla ybac k, press PLAY.
Still playback
Press PAUSE/STILL during normal
playback.
• To resume normal playback, press
PLAY.
Frame advance
Press PAUSE/STILL during still play-
back.
One frame is advanced each time you
press PAUSE/STILL.
• To resume normal playback, press
PLAY.
Slow motion playback
Press SLOW during normal playback or still playback.
Each press of SLOW will change the speed of the slow “ 1/2”,
“
1/4”, “ 1/8”.
• To resume normal pla ybac k, press PLAY.
• To resume the still playback, press PAUSE/STILL.
Locating a chapter or track
Press SKIP Forward or SKIP Reverse during playback to
locate a chapter that you want to watch.
Each time you press the button, a chapter or track is skipped.
• When you press SKIP
once, playback starts from the beginning of the current chapter or track. If you w ant to pla y the preceding
chapter or track, press SKIP
twice in quick successions.
NOTES:
• The unit is capable of holding a still video image or on-screen display image on your television screen indefinitely . If you leave the still video image or on-screen display image display ed on your TV for an extended period
of time, you risk permanent damage to your television screen. Projection televisions are very susceptible.
• Fast forward and review playback does not work with a MP3/WMA/JPEG-CD.
• Frame advance and slow motion does not work with a CD.
2H6P001A[E] P33-46 6/28/05, 5:35 PM36
Page 37
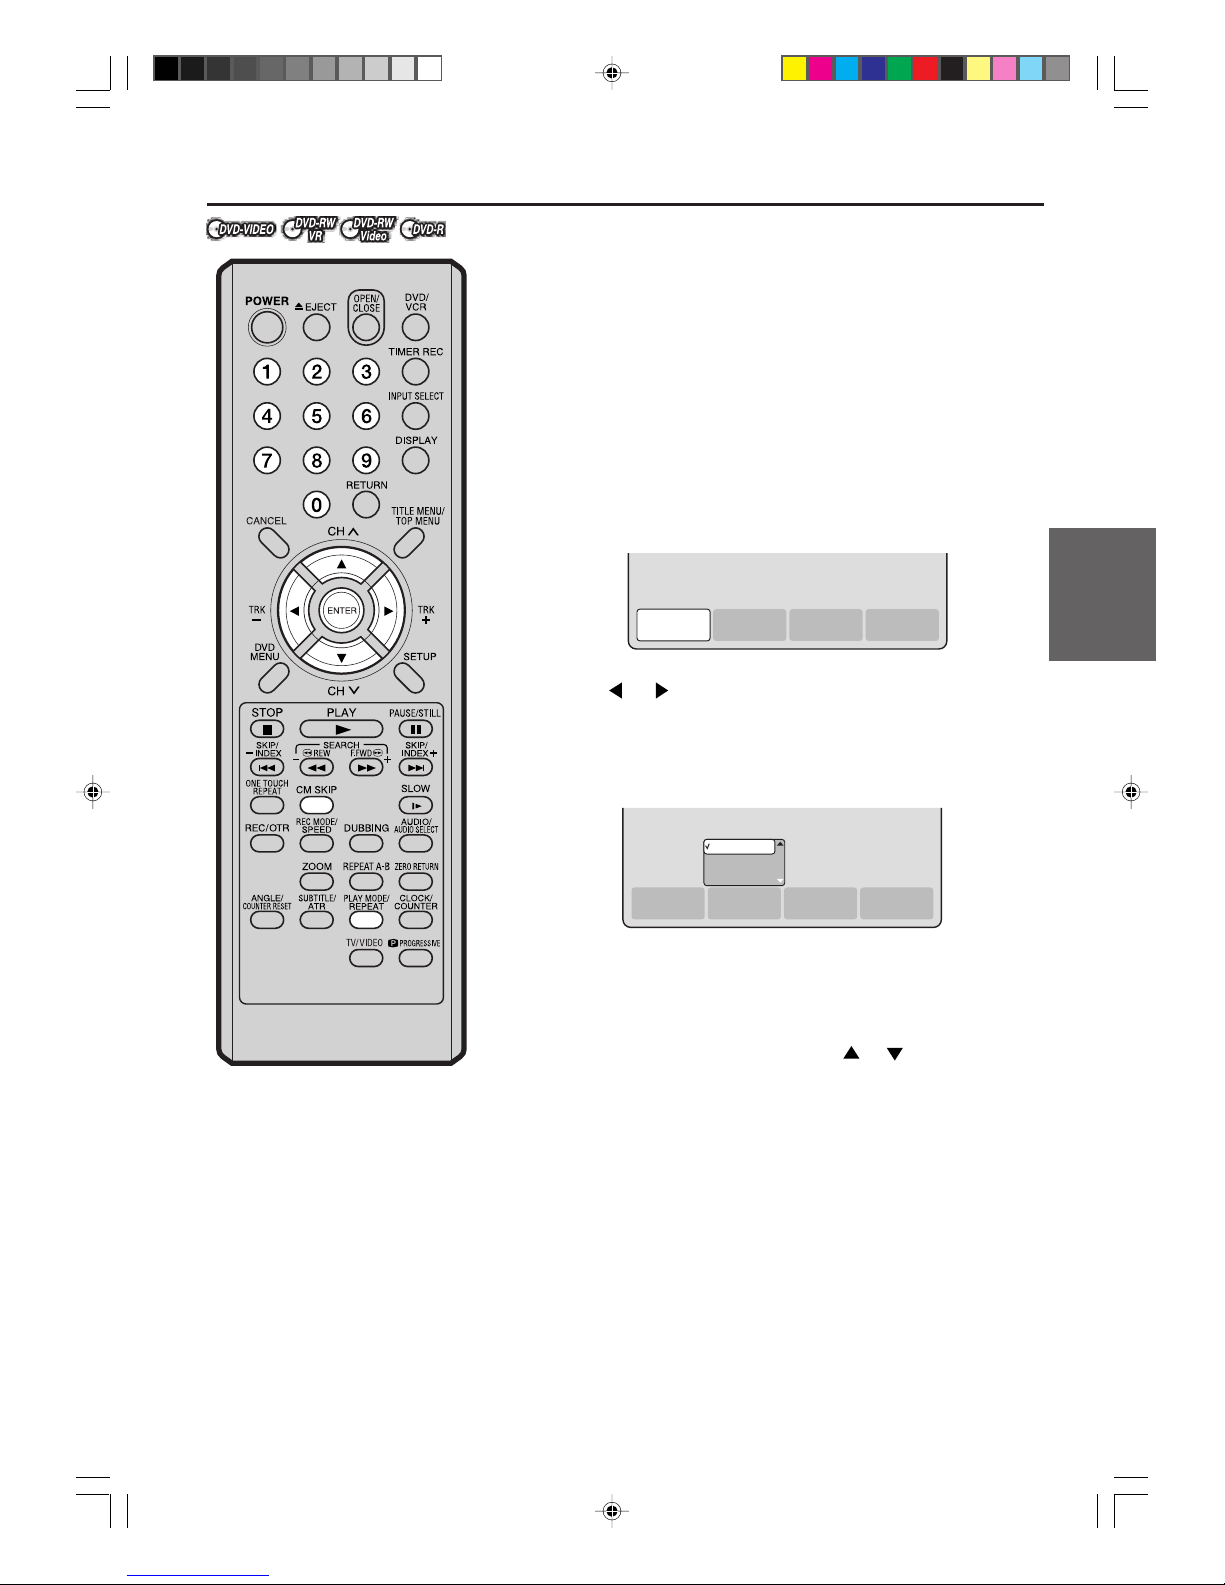
37
Disc playback
Commercial skip / Locating a specific scene
Commercial skip
Use this function to skip commercials while you playback.
Press CM SKIP during playback.
The time jumps to a point approx. 30 seconds later and playback resumes.
NOTE:
With some DVD-Video, the Commercial skip operation may not work.
Locating a specific scene
Specify the time recorded on the disc, chapter or title to pla yback.
1
Press PLAY MODE.
The play mode screen will appear.
2
Press or to select “TIME SEARCH”, “CHAPTER SEARCH”
or “TITLE SEARCH”, and press ENTER.
TIME SEARCH: Input the time until the playback is restarted.
CHAPTER SEARCH: Select the chapter number to be played bac k.
TITLE SEARCH: Select the title number to be played back.
The screen above shows the display when “CHAPTER SEARCH”
is selected.
3
When selecting “TIME SEARCH”, input the time until the playback
is restarted with the numeric keys. When selecting “CHAPTER
SEARCH” or “TITLE SEARCH”, press
or to select the chap-
ter number or title number.
4
Press ENTER.
The playback starts at the point you selected.
NOTE:
For “REPEAT”, see “Title, Chapter repeat playbac k” (page 38).
TIME
SEARCH
CHAPTER
SEARCH
TITLE
SEARCH
REPEAT
TIME
SEARCH
CHAPTER
SEARCH
TITLE
SEARCH
REPEAT
CHAPTER1
CHAPTER2
CHAPTER3
2H6P001A[E] P33-46 6/28/05, 5:35 PM37
Page 38
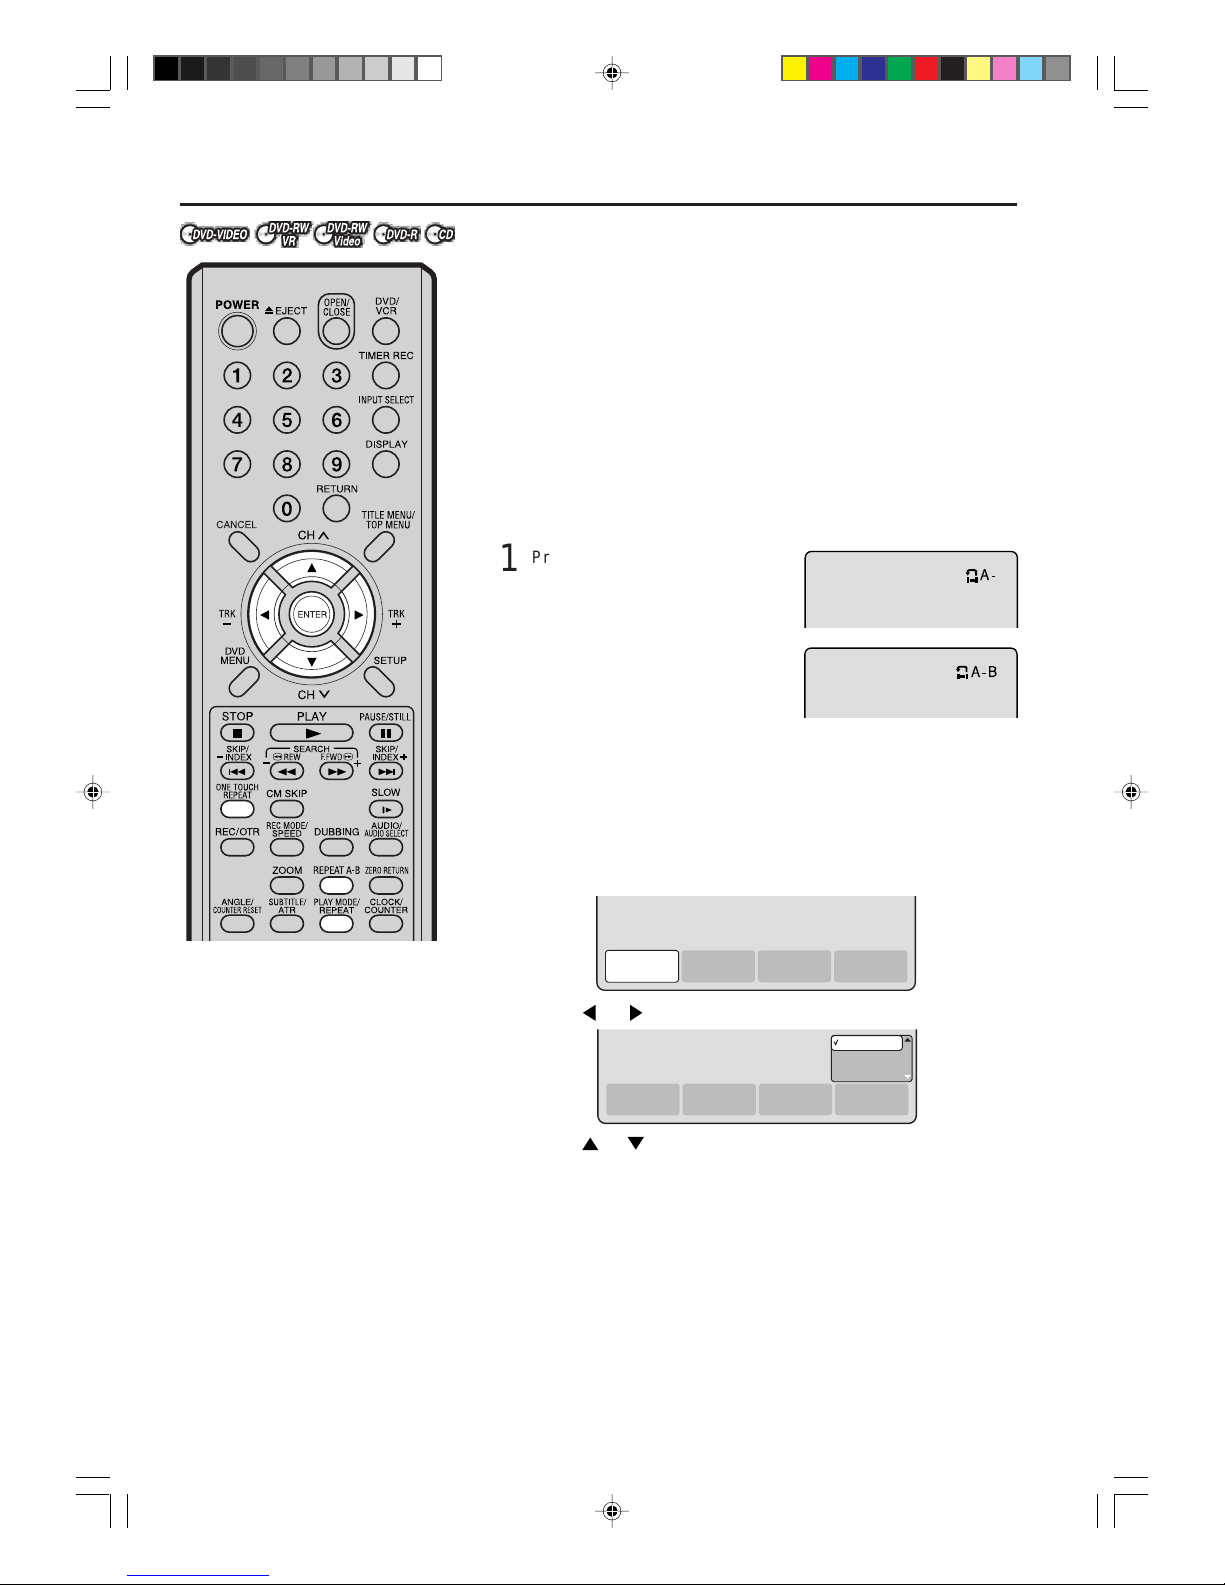
38
NOTES:
• Some discs may not work with the
repeat operation.
• In A-B repeat mode, subtitles near
point A or B may not appear.
• A-B repeat does not work during
the Title and the Chapter repeat
playback.
• You may not be able to set A-B
repeat, depending on the scenes
of the DVD.
• A-B repeat and Title, Chapter repeat does not work with a MP3/
WMA/JPEG-CD.
Repeat playback
A
B
A
1
Press REPEAT A-B dur ing play-
back.
The start point is selected.
2
Press REPEAT A-B again.
The end point is selected. Pla yback
starts at the point that you selected.
Playback stops at the end point,
returns to point A automatically,
then starts again.
To resume normal playback press REPEAT A-B again.
“OFF” appears on the screen.
Title, Chapter repeat playback
1
Press REPEAT.
The play mode screen will appear.
2
Press or to select “REPEAT” and press ENTER.
3
Press or to select “OFF”, “CHAPTER” or “TITLE”.
OFF: Playback is not repeated.
CHAPTER:The chapter in playback is repeatedly played back.
TITLE: The title in playback is repeatedly played back.
4
Press ENTER.
To cancel the repeat playback, select “OFF” in step 3.
One touch repeat
This feature can be used to repeat the last 10 seconds of viewed
material, and continues to play as normal.
Press ONE TOUCH REPEAT during playback.
The video returns to a point 10 seconds before and playback resumes.
NOTES:
• If the time from the title top is less than 10 seconds when ONE TOUCH
REPEA T is pressed, the title top is repeated and then the video is
played back.
• With some D VD-Video, the one touch repeat operation ma y not work.
TIME
SEARCH
CHAPTER
SEARCH
TITLE
SEARCH
REPEAT
OFF
CHAPTER
TITLE
TIME
SEARCH
CHAPTER
SEARCH
TITLE
SEARCH
REPEAT
A-B repeat playback
A-B repeat playback allows you to repeat material between two
selected points.
2H6P001A[E] P33-46 6/28/05, 5:35 PM38
Page 39
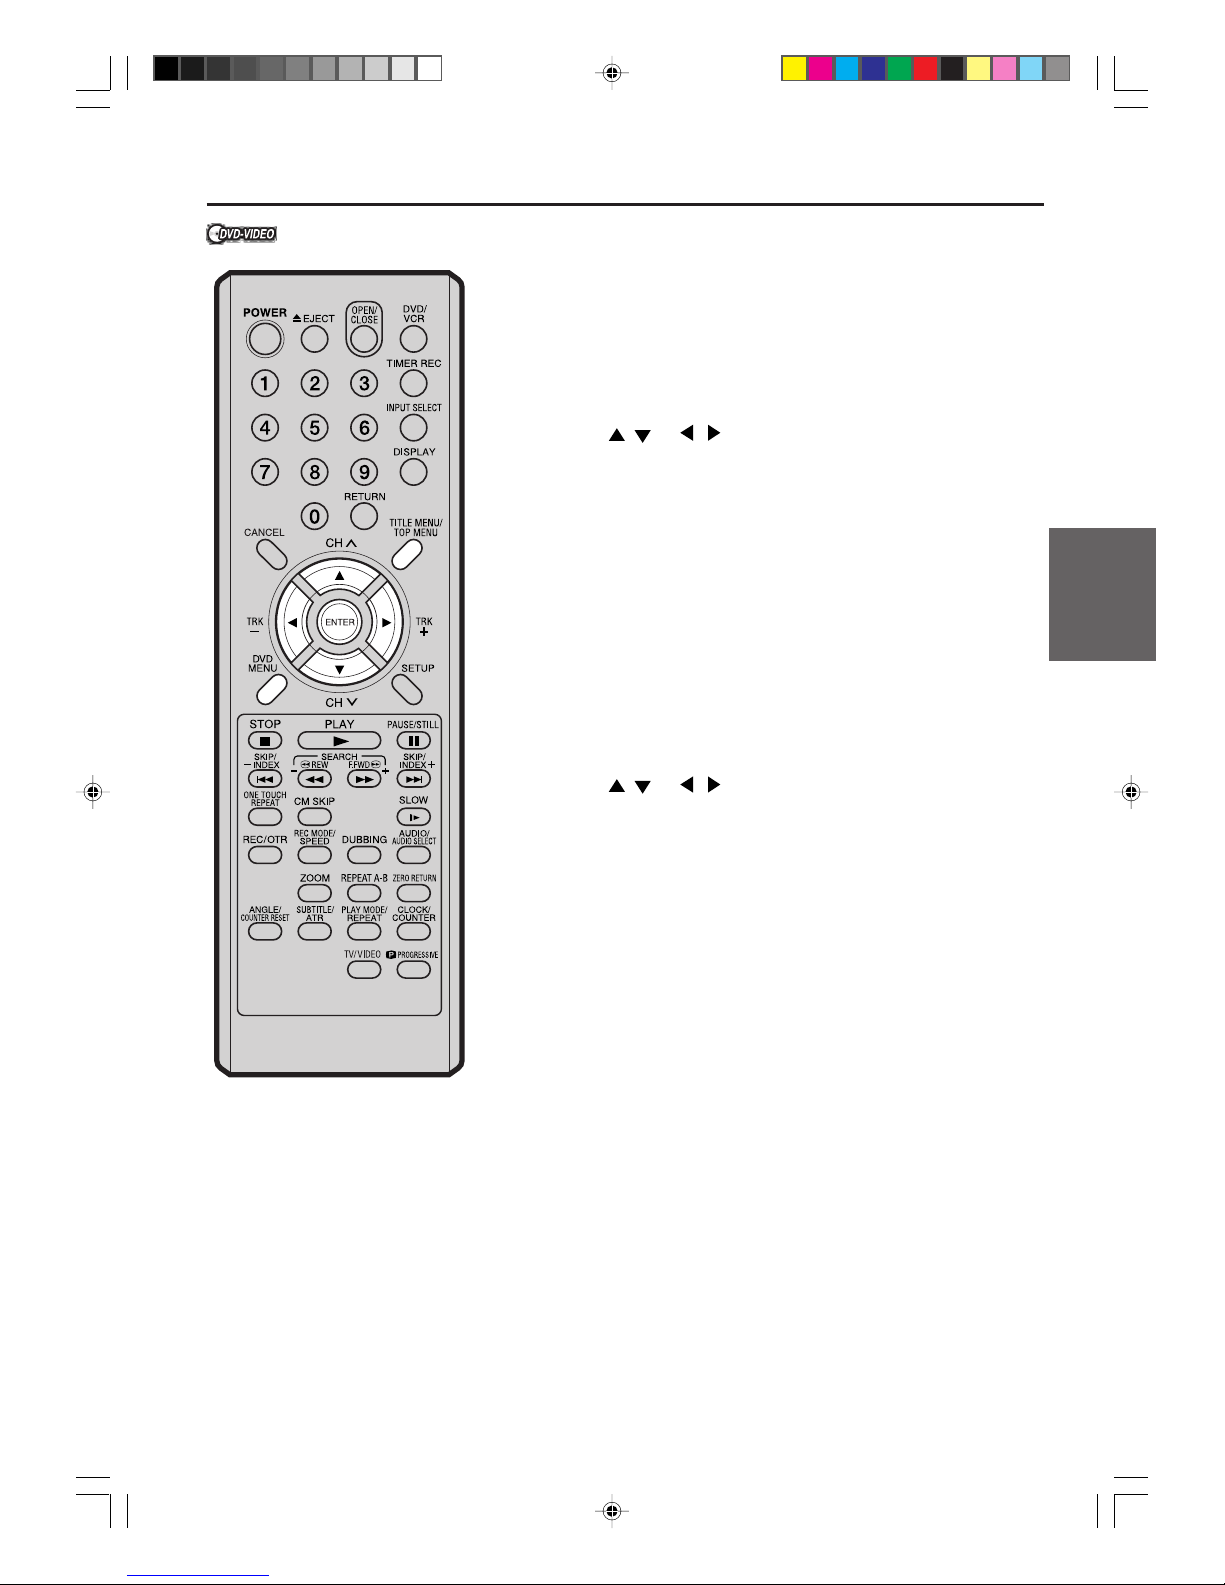
39
Disc playback
Title selection / DVD menu
NOTE:
Depending on the DVD, you may be
unable to select the title, and a “title
menu” may simply be called a
“menu” or “title” in the instructions
supplied with the disc.
Title selection
Two or more titles are recor ded on some discs. If the title menu is
recorded on the disc, you can select the desired title.
1
Press TITLE MENU/TOP MENU during playbac k.
The title menu appears on the screen.
• Press TITLE MENU/TOP MENU again to resume playback at
the scene when you pressed TITLE MENU/TOP MENU.
2
Press / or / to select the desired title.
3
Press ENTER.
The playback of the selected title will start.
DVD menu
Some DVDs allow you to select the disc contents using the men u.
When you playback these DVDs, you can select the subtitles language and soundtrack language, etc. using the DVD menu.
1
Press DVD MENU during playback.
The DVD menu appears on the screen.
• Press D VD MENU again to resume pla yback at the scene when
you pressed DVD MENU.
2
Press / or / to select the desired item.
3
Press ENTER.
The menu continues to another screen. Repeat steps 2 and 3 to
set the item completely.
2H6P001A[E] P33-46 6/28/05, 5:35 PM39
Page 40
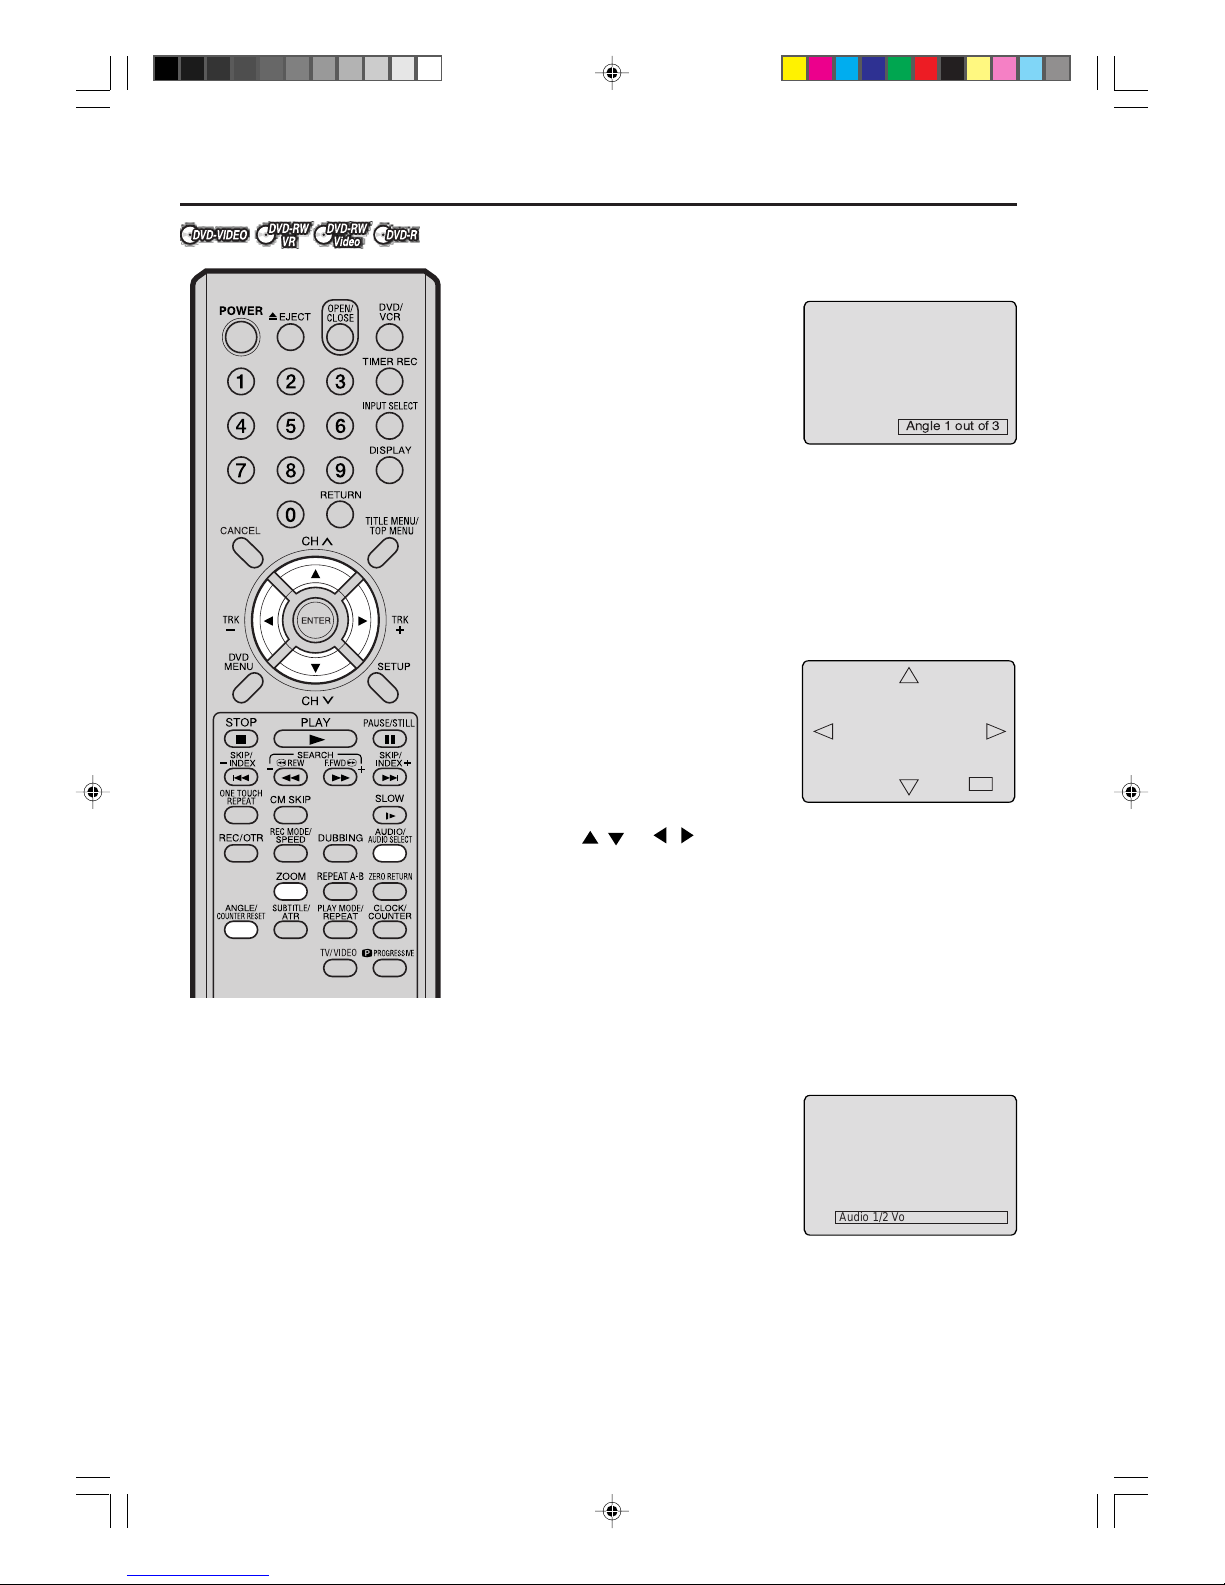
40
Changing angles / Zooming / Karaoke playback
x2
Changing angles
When playing back a disc recorded with multi-angle facility, you
can change the angle that you are viewing the scene from.
1
Press ANGLE during playback.
The current angle will appear.
2
Press ANGLE repeatedly until the desired angle is selected.
Zooming
This unit will allow you to zoom in on the frame image. You can
then make selections by switching the position of the frame.
1
Press ZOOM during playback.
The center part of the image will
be zoomed in.
Each press of ZOOM will change
the ZOOM “x2” , “x3” and “x4”.
2
Press / or / to view a different part of the frame.
You may move the frame from the center position to UP, DOWN,
LEFT or RIGHT direction.
3
In the zoom mode press ZOOM repeatedly to return to a 1:1 view
“x1”.
Angle 1 out of 3
Audio 1/2 Vo. OFF Dolby Digital
Karaoke playback
You can turn the vocal on or off recorded on the DVD KARAOKE.
During DVD KARA OKE disc playback,
press AUDIO repeatedly until the
desired setting is selected.
Vo. ON : The primary vocal is output
when it is recorded on the
disc.
Vo. OFF : The primary vocal is not
output.
NOTES :
• Some Karaoke discs may not have the vocal on/off function.
• The on screen display will disappear after a few seconds.
NOTES:
• Depending on the DVD, you may
not be able to change the angles
even if multi-angles are recorded
on the disc.
• You can use the Pause, Slow,
Search or Skip feature in the zoom
mode.
• The vocal output feature is used
during playback of Dolby Digital
(multi-channel) recorded DVD
KARAOKE discs. This feature
allows you to turn off vocal audio
tracks, or restore them for
background accompaniment.
• When playing Karaoke, connect
appropriate audio equipment
such as an amplifier to this unit.
2H6P001A[E] P33-46 6/28/05, 5:35 PM40
Page 41
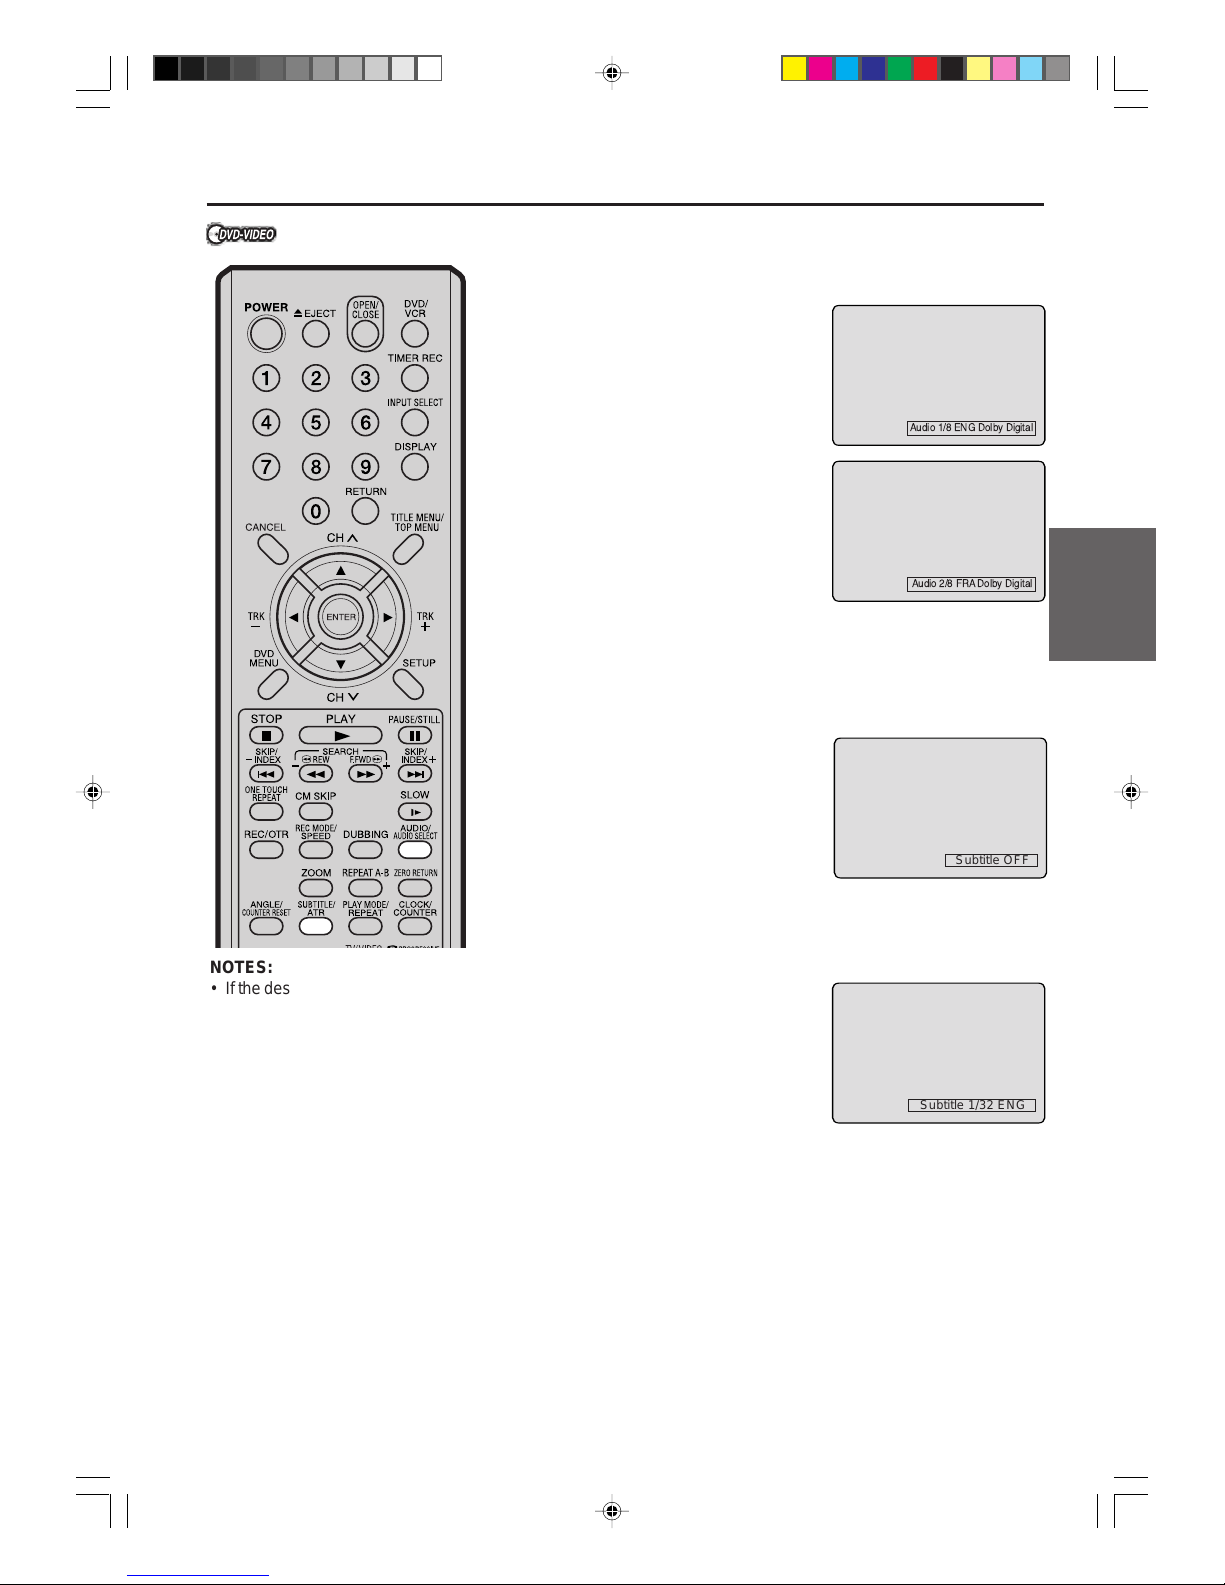
41
Disc playback
Changing soundtrack language / Subtitles
Audio 1/8 ENG Dolby Digital
Audio 2/8 FRA Dolby Digital
Subtitle OFF
Subtitle 1/32 ENG
NOTES:
• If the desired language is not heard
after pressing the button several
times, the language is not recorded
on the disc.
• Changing soundtrack or subtitles
language is cancelled when you
open the disc tray. The initial default
language or available language will
be heard and seen if the disc is
played back again.
• Depending on the D VD you may be
unable to turn on, turn off, or change
the subtitles, even if they are recorded on the disc. While playing
the DVD, the subtitles may change
while opening or closing the disc
tray, or while changing the title.
• In some cases, the subtitles language is not changed to the selected one immediately.
Changing soundtrack language
You can select the language when you play a multilingual disc.
1
Press AUDIO during playback.
The current soundtrack language
will appear.
2
Press AUDIO repeatedly until the
desired language is selected.
The on-screen display will disappear after a few seconds.
Subtitles
Turning the subtitles On and Off
When playing back a disc recorded with subtitles, you can turn
the subtitles on or off.
Press SUBTITLE during playbac k until
“Subtitle OFF” appears.
Changing the subtitles language
You can select the language when playing back a disc recorded
with multilingual subtitles.
Press SUBTITLE repeatedly during
playback until your desired language
appears.
The on screen display will disappear
after a few seconds.
2H6P001A[E] P33-46 6/28/05, 5:35 PM41
Page 42
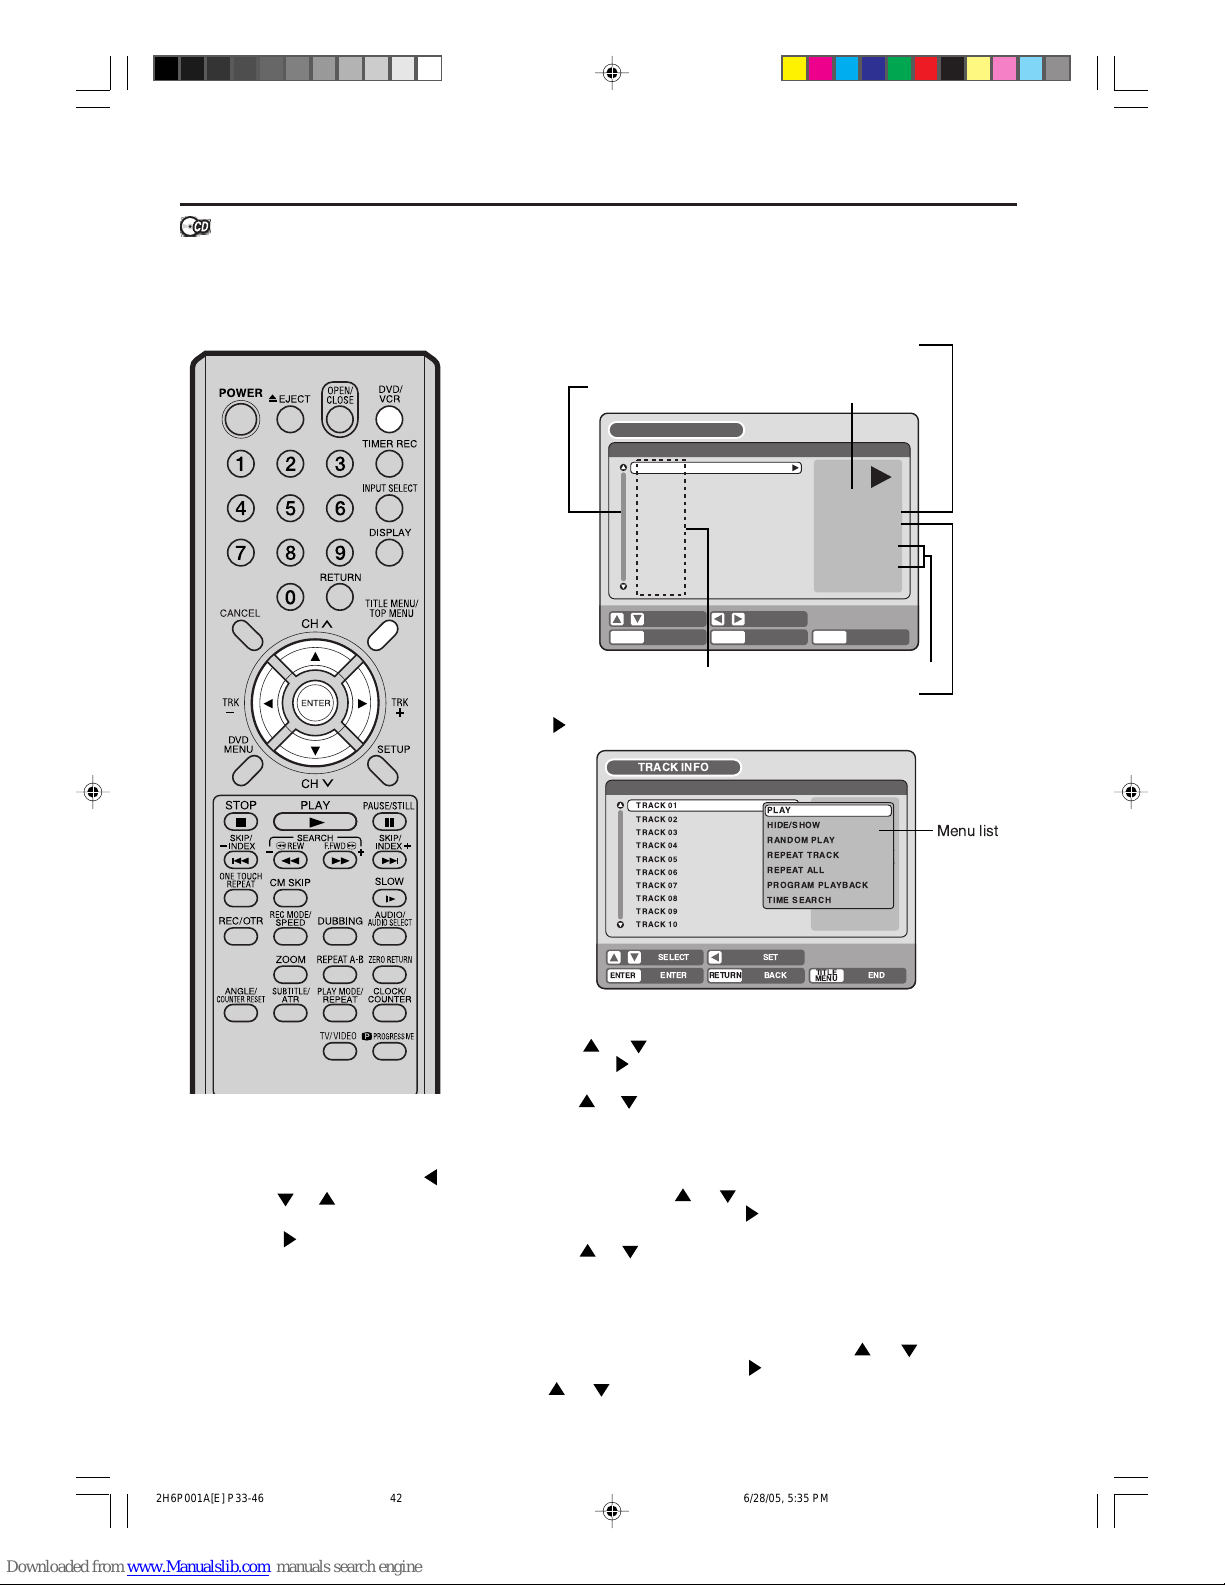
42
Various operations on CD
Preparation:
• Turn ON the TV and set to the video input mode.
• Load the music CD.
• Press DVD/VCR to select the DVD mode . (The D VD indicator will light.)
Press TITLE MENU/TOP MENU.
The TRACK INFO screen will
appear.
This section describes the TRACK
INFO screen where music CDs can
be played back using the various
operations.
Press . The menu list will appear.
Playing back a selected track
1
Press or to select the track number you want to playback
and press
.
2
Press or to select “PLA Y” from the menu list and press ENTER.
The selected track will be played back.
Excluding specified track
1
During stop, press or to select the track number you do not
want to playback and press
.
2
Press or to select “HIDE/SHOW” from the menu list and press
ENTER.
The selected track will not be play ed back. (“H” appears at the side
of the track number.)
When you want to cancel the exclusion, press
or to select the
track number with “H” and press
.
Press
or to select “HIDE/SHOW” from the menu list and press
ENTER, “HIDE” will be cancelled.
NOTES:
• In case the disc includes more than
10 tracks, you can turn to the next
or the previous page. Press
,
then press
or to display next/
previous page. To return to normal
use, press .
• You cannot switch to the VCR
mode when the TRACK INFO
screen is showing. Press TITLE
MENU/TOP MENU to clear the
TRACK INFO screen, then press
DVD/VCR to switch to the VCR
mode.
TRACK 02
TRACK 03
TRACK 04
TRACK 05
TRACK 06
TRACK 07
TRACK 08
TRACK 09
TRACK 10
TRACK 01
TRACK 01
00:00:19/00:03:54
00:00:19/00:45:28
MODE: NORMAL
REPEAT: OFF
TRACK INFO
ENTER
RETURNPLAY BACK END
SELECT
SET
TITLE
MENU
The elapsed time and
total time of the music
data (during playback)
Scroll bar
The elapsed time and
total time of the whole CD
Current playback mode
The track number
during playback
The music data
recorded on the CD
TRACK 02
TRACK 03
TRACK 04
TRACK 05
TRACK 06
TRACK 07
TRACK 08
TRACK 09
TRACK 10
TRACK 01
TRACK 01
00:00:19/00:03:54
00:00:19/00:45:28
Mode: NORMAL
REPEAT: OFF
TRACK INFO
ENTER
RETURNENTER BACK END
SELECT
TITLE
MENU
SET
PLAY
HIDE/SHOW
RANDOM PLAY
REPEAT TRACK
REPEAT ALL
PROGRAM PLAYBACK
TIME SEARCH
PLAY
Menu list
2H6P001A[E] P33-46 6/28/05, 5:35 PM42
Page 43
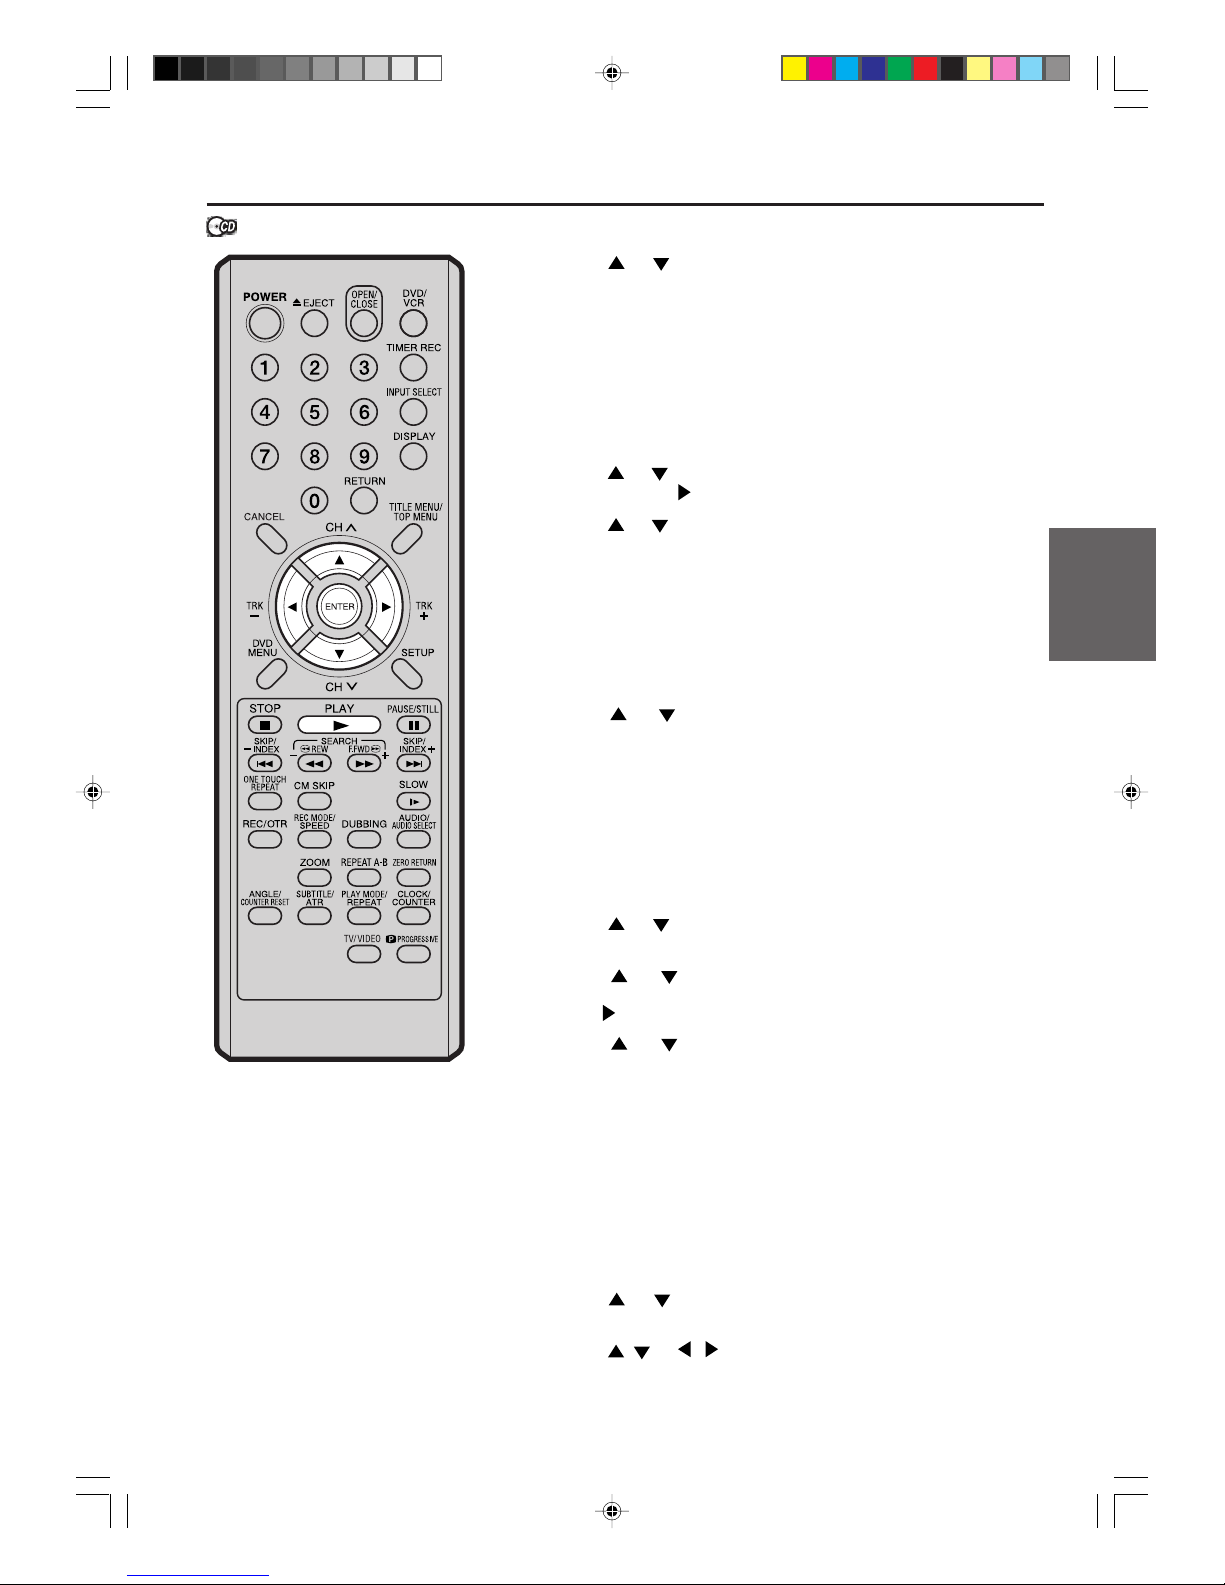
43
Disc playback
Various operations on CD
NOTE:
When recording on a CD-R/CD-RW
in the MP3 or WMA modes, “RANDOM PLAY” and “TIME SEARCH”
will not appear in the menu list.
Random playback
1
Press or to select “RANDOM PLAY” from the menu list and
press ENTER.
The order of music tracks is randomly changed.
2
Press PLAY.
Music is played back in random order.
To cancel random playback, select “RANDOM PLAY” from the menu
list again, and press ENTER.
Repeat playback of selected track
1
Press or to select the track number you want to repeat playback and press .
2
Press or to select “REPEA T TRA CK” from the menu list and
press ENTER.
3
Press PLAY.
The selected track will be played back repeatedly.
To cancel repeat track playback, select “REPEAT TRACK” from the
menu list again, and press ENTER.
Repeat playback of all tracks
1
Press or to select “REPEAT ALL” from the menu list and
press ENTER.
2
Press PLAY.
All tracks on CD will be played back repeatedly.
T o cancel the repeat all pla ybac k, select “REPEAT ALL” from the menu
list again, and press ENTER.
Playing back programs
You can specify the playback order yourself.
1
Press or to select “PROGRAM PLA YBA CK” from the menu
list and press ENTER.
2
Press or to select to the track number that you want to
change the order of and press ENTER.
The “
” mark will appear at the right side of the track number.
3
Press or to select to the track number that you want to
specify and press ENTER.
The track number that you select in step 2 moves to the position
that you specified.
4
Repeat steps 2 and 3 to change the playback order.
5
Press PLAY.
The tracks will be played back in the changed order.
To cancel program playback, select “EXIT PROGRAM MODE” from
the menu list and press ENTER.
Playing back track by specifying the time
1
Press or to select “TIME SEARCH” from the menu list during playback and press ENTER.
2
Press / or / to specify the elapsed time of the track (this
will be the starting point of playback) and press ENTER.
Playback will start from the specified elapsed time.
2H6P001A[E] P33-46 6/28/05, 5:35 PM43
Page 44
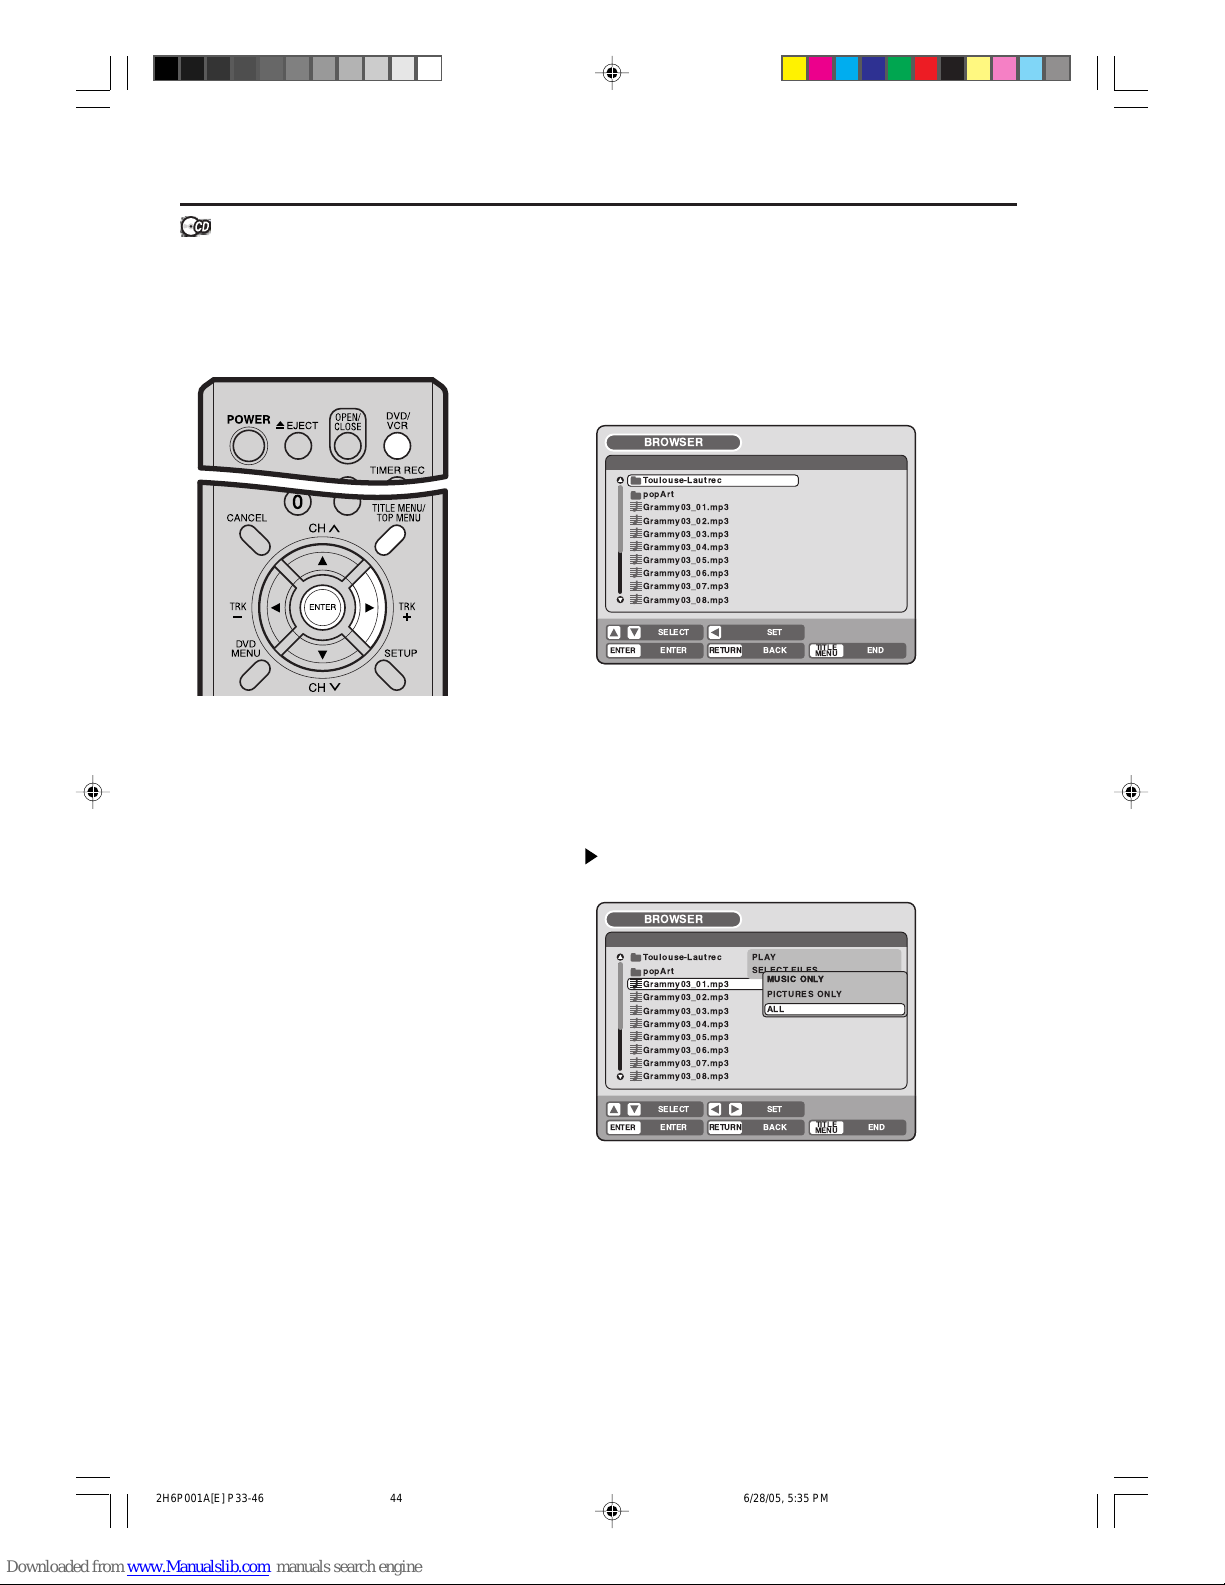
44
MP3/WMA/JPEG playback
MP3 and WMA files can be pla yed
back. Also, you can display JPEG
files on the TV screen and enjoy
them as a slide show.
Some discs may not play due to
the condition of the recording.
Limitations on MP3/WMA/
JPEG CD playback:
• MP3/WMA/JPEG CD is a disc that
is standardized by ISO9660.
• The directory and file names of the
MP3/WMA/JPEG CD must correspond to the ISO standardized file
names.
• This unit can read 200 files per
disc. If one directory has more than
200 files, it reads up to 200 files,
the remaining files will be omitted.
• The unit is able to recognize up to
a maximum of 50 directories per
disc.
• If the CD has both audio tracks and
MP3/WMA/JPEG files, only audio
tracks are play ed.
• It may take more than one minute
for this unit to read MP3/WMA/
JPEG files depending on its structure.
• Music recorded by “Joliet Recording Specification” can be played
back. Long file names will be cut.
• The music files recorded by “Hierarchical File System ” (HFS) cannot be played.
Preparation:
• Turn ON the TV and set to the video input mode.
• Load the disc storing MP3, WMA or JPEG.
• Press DVD/VCR to select the D VD mode. (The D VD indicator will light.)
Using the BROWSER screen
1
Press TITLE MENU.
The BROWSER screen will appear.
2
The MP3, WMA and JPEG files and folders stored in the disc are
displayed on the BROWSER screen.
• Select a folder and press ENTER. The files in the folder appear.
When the file to be displayed is selected
You can select the file types to be displayed on the BROWSER screen.
1
Press to select “SELECT FILES” and press ENTER.
The following list will appear.
MUSIC ONLY: Only the MP3 and WMA files appear.
PICTURES ONLY: Only the JPEG files appear.
ALL: All files and folders appear.
2
Select one item in the above list and press ENTER.
The display will be changed to the selected display type.
popArt
Grammy03_01.mp3
Grammy03_02.mp3
Grammy03_03.mp3
Grammy03_04.mp3
Grammy03_05.mp3
Grammy03_06.mp3
Grammy03_07.mp3
Grammy03_08.mp3
Toulouse-Lautrec
BROWSER
ENTER
RETURNENTER BACK
SET
END
SELECT
TITLE
MENU
PLAY
SELECT FILES
BROWSER
ENTER
RETURNENTER BACK END
SELECT
TITLE
MENU
MUSIC ONLY
MUSIC ONLY
PICTURES ONLY
ALL
SET
popArt
Grammy03_01.mp3
Grammy03_02.mp3
Grammy03_03.mp3
Grammy03_04.mp3
Grammy03_05.mp3
Grammy03_06.mp3
Grammy03_07.mp3
Grammy03_08.mp3
Toulouse-Lautrec
2H6P001A[E] P33-46 6/28/05, 5:35 PM44
Page 45
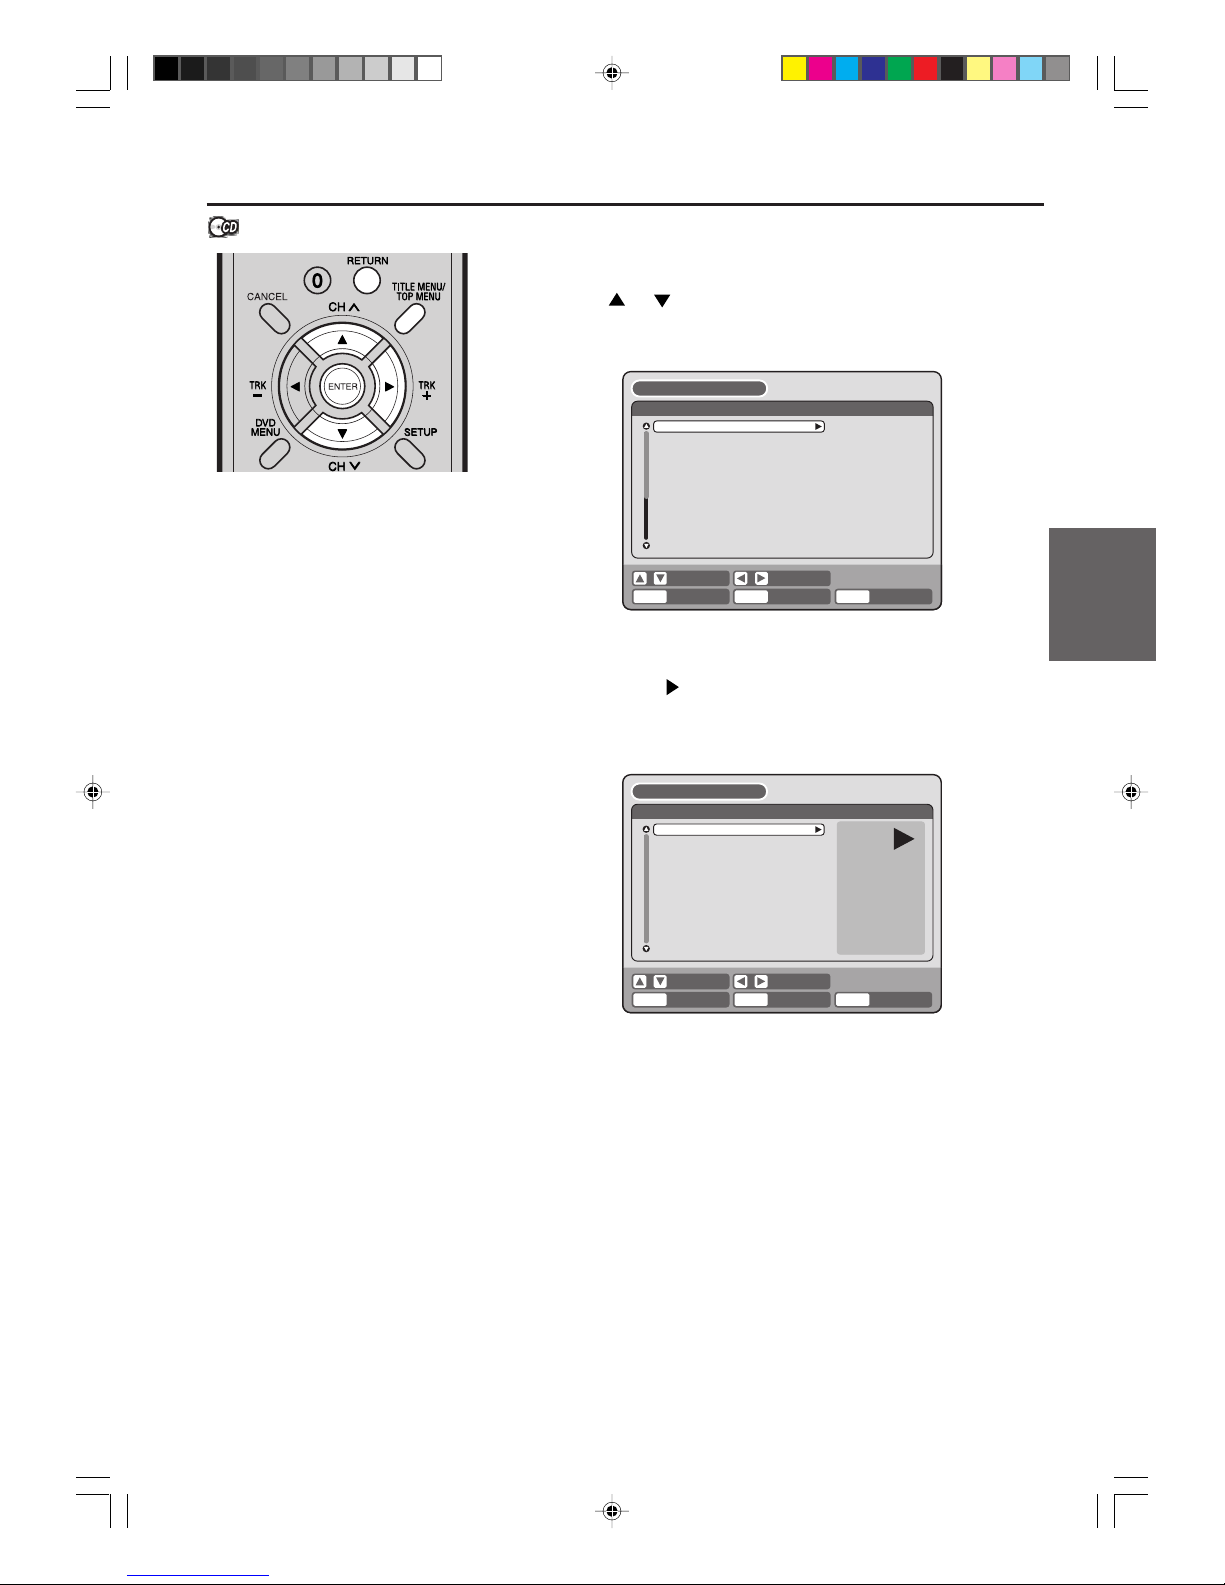
45
Disc playback
MP3/WMA/JPEG playback
MP3 CD
• MP3 files must have the e xtension
letters “.mp3”.
• Standard, sampling frequency , and
the bit rate:
MPEG-1 Audio
32kHz, 44.1kHz, 48kHz
32kbps to 320kbps (constant bit
rate or variable bit rate)
• The recommend recording setting
for a high quality sound is 44.1kHz
of sampling frequency and
128kbps of constant bit rate.
WMA CD
• When creating a WMA disc, make
sure that the copyright function is
off. DRM (Digital Rights Management) files cannot be played back.
• WMA files must have the e xtension
letters “.wma”.
• Standard, sampling frequency , and
the bit rate:
WMA version 7 and 8
32kHz, 48kbps
44.1kHz, 48kbps to 192kbps
48kHz,128kbps to 192kbps
• Music files recorded as mono,
48kHz, 48kbps cannot be played
back by this unit.
Playing back MP3/WMA files
1
Press or to select MP3 or WMA file.
• In case the disc includes more than 10 files, you can turn to the
next or the previous page. (See page 42.)
2
Carry out either of the item a or b below.
a: Press ENTER.
b: Press to select “PLAY” and press ENTER.
The TRACK INFO screen appears to playback the selected file.
For the details of the TRACK INFO screen, see “Var ious operations on CD” on page 42.
3
To return to the BROWSER screen, press RETURN.
• To stop playback of the MP3 or WMA files, press TITLE MENU.
Grammy03_02.mp3
Grammy03_03.mp3
Grammy03_04.mp3
Grammy03_05.mp3
Grammy03_06.mp3
Grammy03_07.mp3
Grammy03_08.mp3
Grammy03_09.mp3
Grammy03_10.mp3
Grammy03_01.mp3
BROWSER
ENTER
RETURNPLAY BACK
SET
END
SELECT
TITLE
MENU
Grammy03_02.mp3
Grammy03_03.mp3
Grammy03_04.mp3
Grammy03_05.mp3
Grammy03_06.mp3
Grammy03_07.mp3
Grammy03_08.mp3
Grammy03_09.mp3
Grammy03_10.mp3
Grammy03_01.mp3
Grammy03_01.mp3
00:00:19
MODE: NORMAL
REPEAT: OFF
TRACK INFO
ENTER
RETURNPLAY BACK END
SELECT
SET
TITLE
MENU
2H6P001A[E] P33-46 6/28/05, 5:35 PM45
Page 46
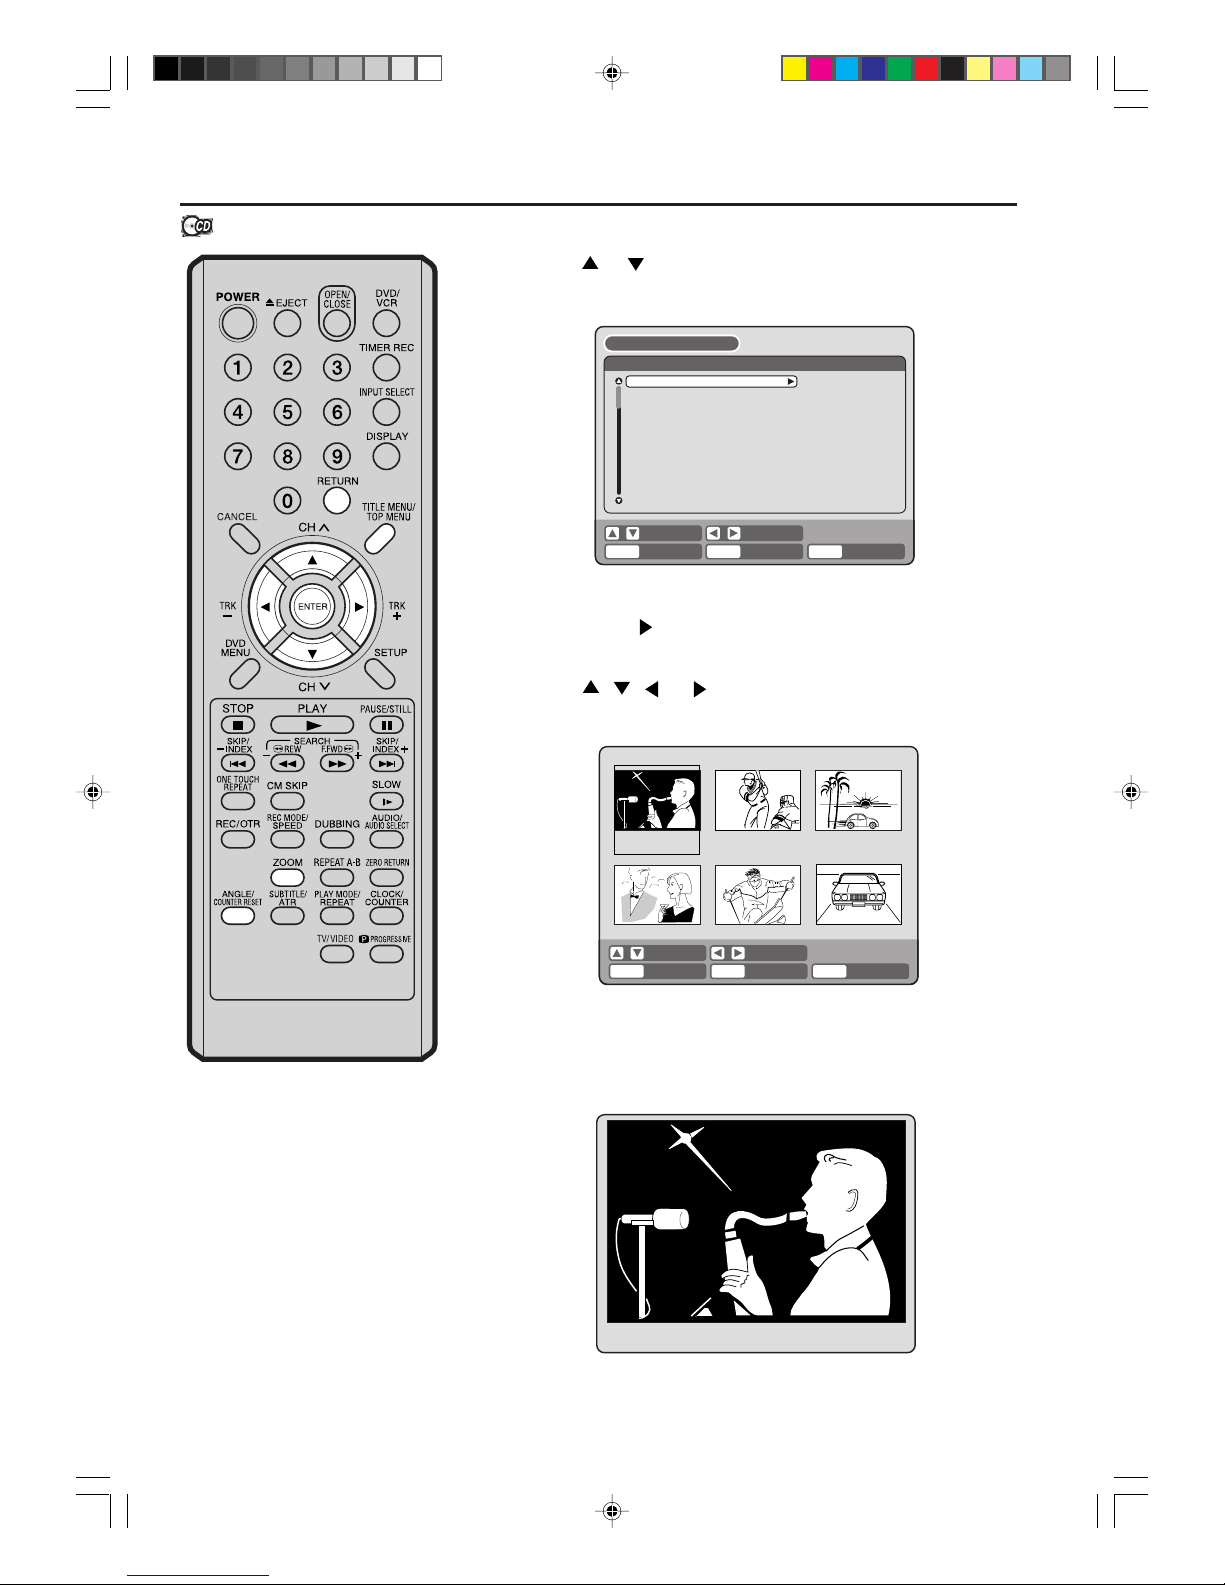
46
MP3/WMA/JPEG playback
Playing back JPEG files
1
Press or to select JPEG file.
• In case the disc includes more than 10 files, you can turn to the
next or the previous page. (See page 42.)
2
Carry out either of the item a or b below.
a: Press ENTER.
b: Press
to select “PLAY” and press ENTER.
The thumbnail images of the JPEG files stored in the route directory or the folder appear.
Press
, , or to select the pages of the thumbnail images, or select the JPEG file to be displayed at first for the slide
show.
3
Press ENTER to play the selected picture.
If you have set the interval time for JPEG slide show, the pictures
will be played back one after another automatically. (See page 32.)
• Press ZOOM to enlarge the displayed image.
• Press ANGLE to rotate the image by 90 degrees each time.
JPEG CD
JPEG files must have the extension
letters “.jpe”, “.jpeg” or “.jpg”.
4
To return to the thumbnail screen, press RETURN.
• To stop the slide show, press TITLE MENU.
Alone.jpg
Ambassadeurs-Aristide_Bruant.jp
Arlstide Bruant.jpg
At_the_Moulin_Rouge.jpg
Clown Cha-U-Kao.jpg
Dancer Seated.jpg
EI Dorado.jpg
Galerie 65 Cannes.jpg
Jane Avril-1893.jpg
Alfred Ia Guigne.jpg
/popArt
BROWSER
ENTER
RETURNPLAY BACK
SET
END
SELECT
TITLE
MENU
Saxophone.jpg Baseball.jpg Drive.jpg
party_240803.jpg practice_ski.jpg My_car.jpg
ENTER
RETURNPLAY BACK END
SELECT
SELECT
TITLE
MENU
2H6P001A[E] P33-46 6/28/05, 5:35 PM46
Page 47
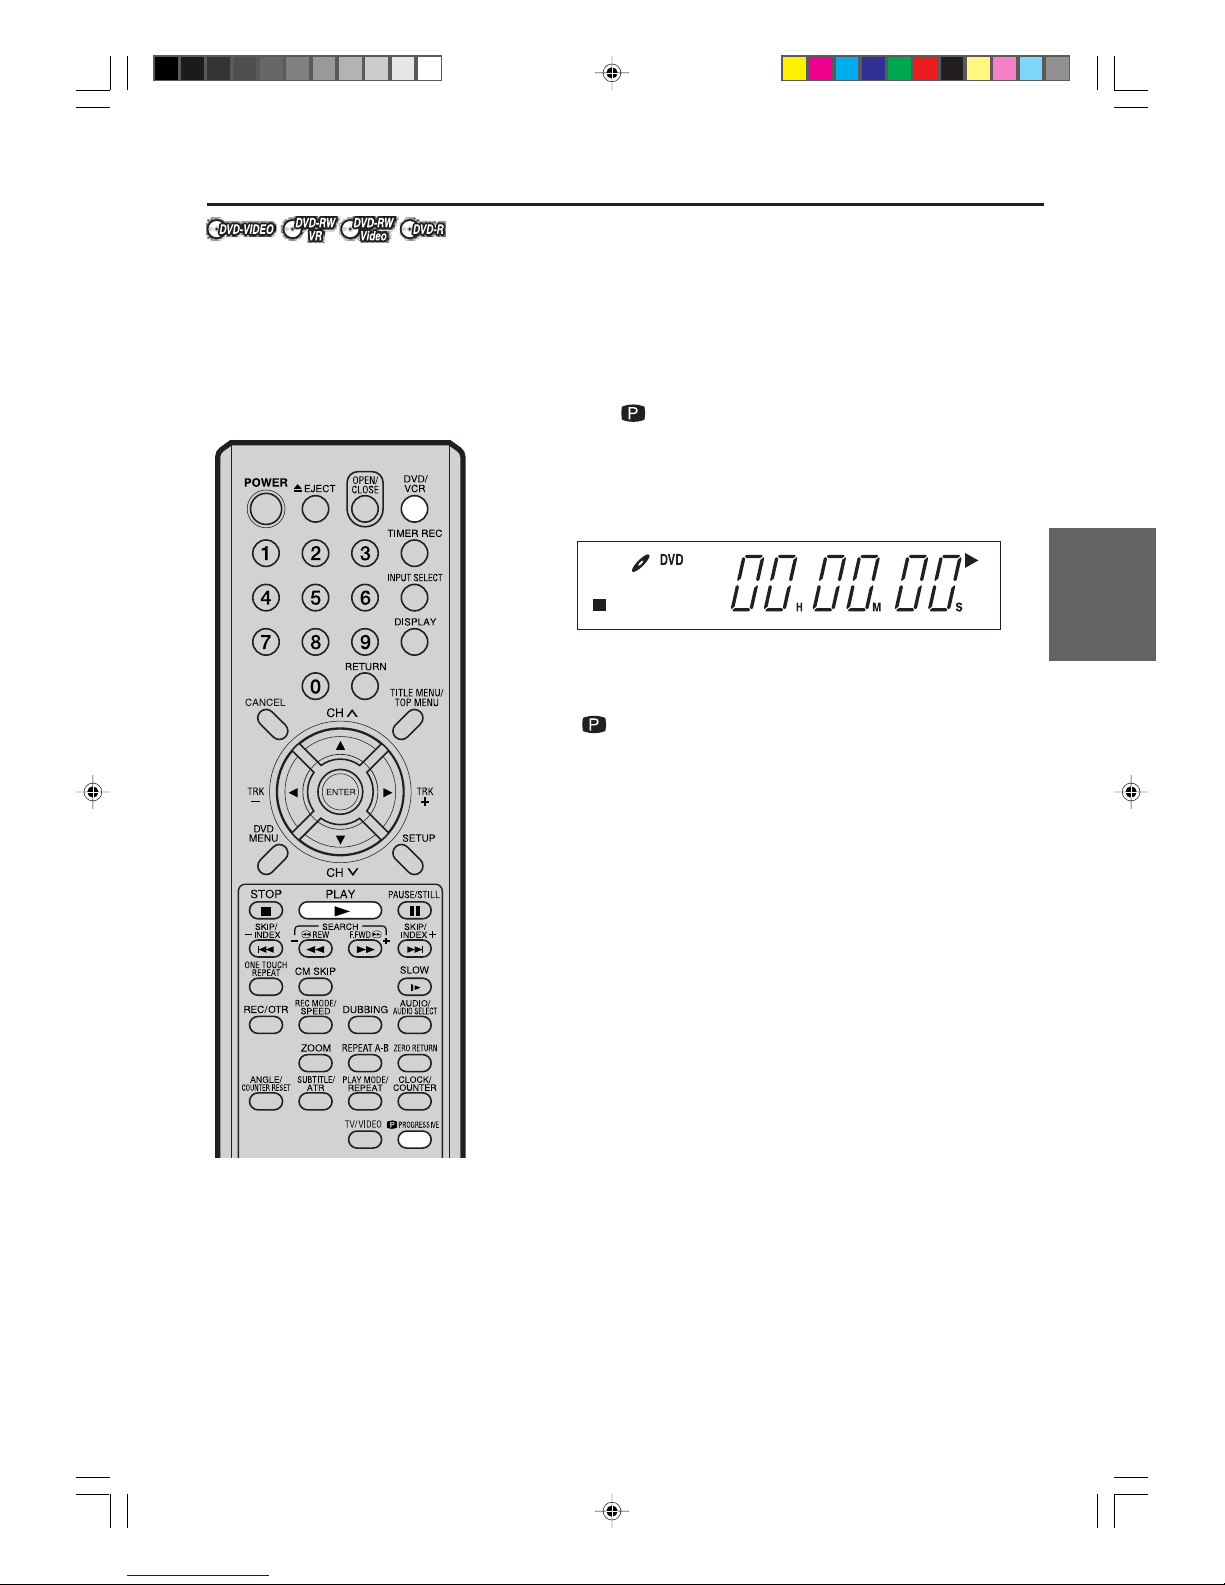
47
T ape pla ybac k
Progressive scan
The unit supports the progressive
scanning system as well as the conventional interlaced scanning system. If your TV is equipped with component video input jacks which support the progressive video input, you
can enjoy high quality picture by
making the progressive scanning
mode active.
Preparation:
• Connect to a TV equipped with component jacks which support the
progressive video input.
• Turn ON the TV and set it to the corresponding video input mode.
• Press DVD/VCR to select the DVD mode. (The DVD indicator will
light.)
1
Press PROGRESSIVE in the stop mode . The PROGRESSIVE in-
dicator “ ” on the display window will light.
• The unit recognizes the picture source (film or video) of the current disc according to the disc information.
2
Press PLAY to start playback.
NOTES:
• Some discs may not be played back with the progressive scan mode correctly because of the disc characteristics or recording condition.
• There are some progressive TV and High-Definition TV sets that are not fully compatible with the unit, resulting
in an unnatural picture when playing back a DVD disc in the progressive scan mode. In such a case, use the
interlaced scanning mode.
• You cannot activate the progressive scan mode in the following cases:
- The unit is in the VCR mode.
- A DVD disc is currently playing. You must stop playback first.
• To make the progressive scanning mode inactive, press PRO-
GRESSIVE in the stop mode. The PROGRESSIVE indicator
“
” on the display window will go off.
Different scanning modes
Interlaced scan
T echnology that alternately displays odd-numbered scanning lines
and even-numbered scanning lines . Also called “480i”, “i” meaning
“interlace”.
Progressive scan
Technology that simultaneously displays odd-numbered scanning
lines and even-numbered scanning lines from top to bottom. Also
called “480p”, “p” meaning “progressive”.
Disc playback
P
2H6P001A[E] P47-60 6/28/05, 5:35 PM47
Page 48
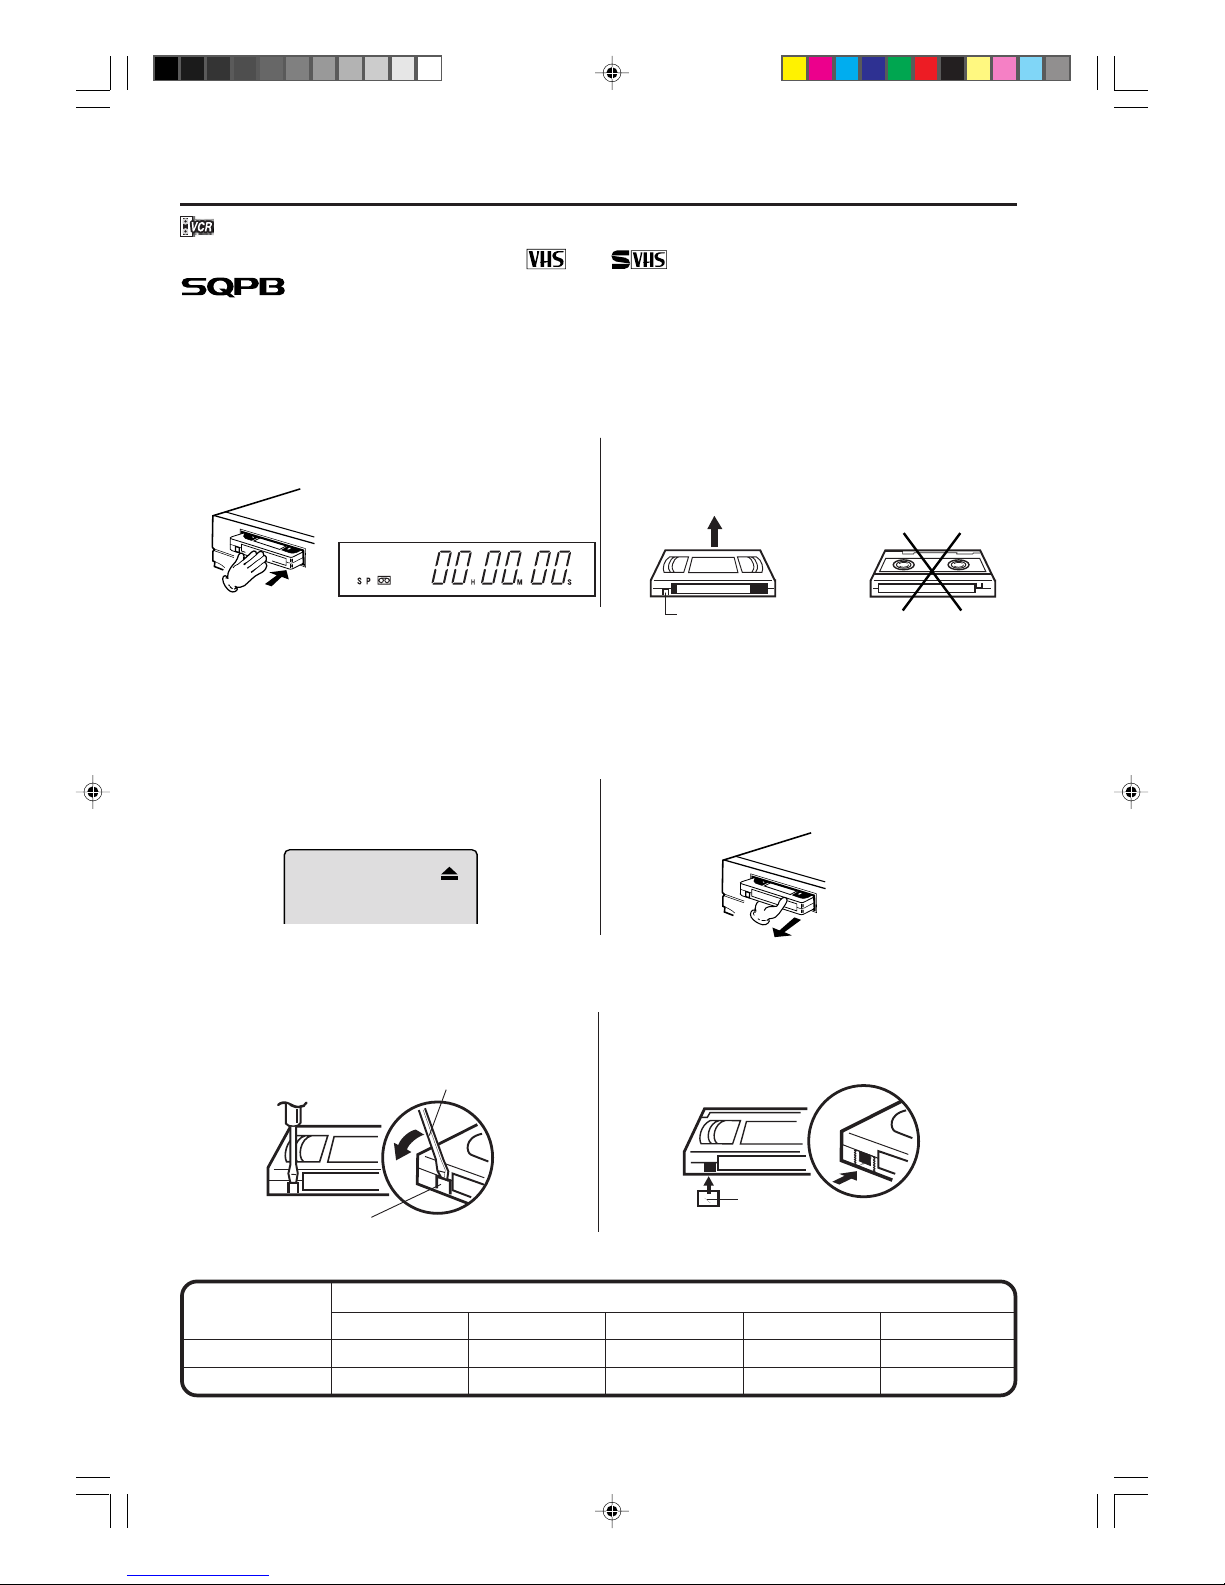
48
Video cassette tape
Tape speed and maximum recording time
Loading and unloading a cassette tape
Use only video cassette tapes marked
and
.
• Cassettes marked “VHS” (or “S-VHS”) can be used with this video cassette recorder How ever , S-VHS recording
is not possible with this model.
• This model is equipped with SQPB (S-VHS QUASI PLAYBACK) that makes it possible to playback S-VHS
recordings with regular VHS resolution.
• HQ VHS is compatible with existing VHS equipment.
Erase prevention tab
VCR
Erase prevention tab
Screwdriver
Tape Speed
SLP (Super Long Play)
T-160 T-120 T-90 T-60 T-30
2-2/3 hours 2 hours 1-1/2 hours 1 hour 30 minutes
8 hours 6 hours 4-1/2 hours 3 hours 1-1/2 hours
SP (Standard Play)
Loading
Push the center of the tape until it is automatically inserted.
Insert the cassette tape with its labeled side facing up
and the erase prevention tab positioned at your left. An
inverted cassette tape cannot be inserted.
Automatic power ON
When you insert a cassette tape the VCR power will turn ON automatically.
Automatic playback
When loading a cassette tape without an erase prevention tab, playback will start automatically.
Unloading
You can eject the video tape while the unit is turned off .
1
Press EJECT on the unit or the remote control.
2
Remove the cassette tape.
Automatic tape eject
This VCR will automatically rewind the tape when the tape has ended. And when the tape is rewound to its
beginning, the cassette tape will be ejected automatically.
To prevent accidental erasure
Remove the erase prevention tab with a screwdriver.
To record again
Cover the hole with a piece of adhesive tape.
Adhesive
Tape
P
2H6P001A[E] P47-60 6/28/05, 5:36 PM48
Page 49
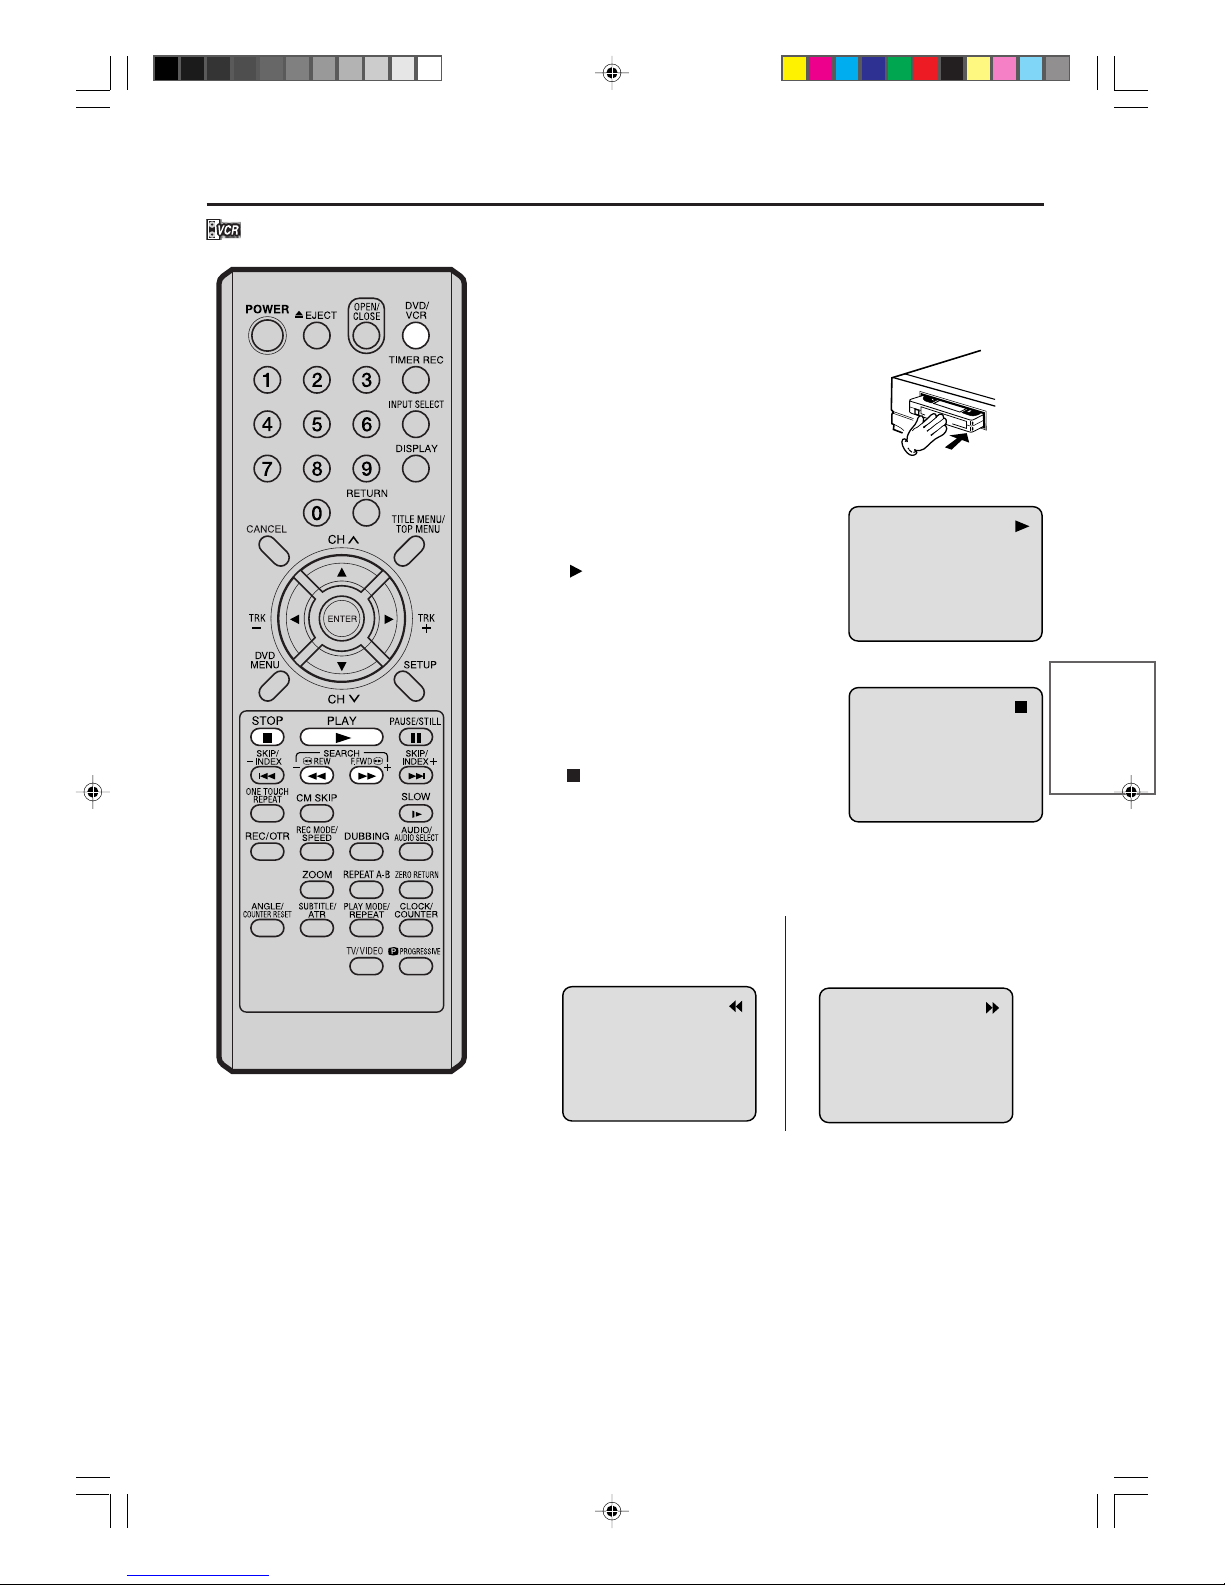
49
T ape pla ybac k
Cassette tape playback
NOTES:
• This VCR selects the playback
tape speed SP, LP or SLP automatically.
• A cassette tape and DVD disc can
be played back simultaneously. If
you press DVD/VCR, the tape
playback and DVD playback alternate with each other on the screen.
Preparation:
• Turn ON the TV and set to the video input mode.
• Press DVD/VCR to select the VCR mode. (The VCR indicator will
light.)
1
Load a prerecorded tape
(When loading a cassette tape
without the erase prevention
tab, playback will start automatically).
2
To start playback
Press PLAY.
Playback will start.
“
” will appear on the screen for
about 4 seconds.
To stop playback
Press STOP once.
The tape will stop but remain fully
loaded and ready to play.
“
” will appear on the screen for about
4 seconds.
To rewind the tape or forward it rapidly
Press STOP.
To rewind the tape:
Press REW.
To forward the tape:
Press F.FWD.
To stop the tape-winding, press STOP. To switch to playback directly
(without STOP), press PLAY.
Forward/Reverse picture search mode
When the tape is being winded, you can switch to picture search mode
(see next page). To do this, press REW or F .FWD and hold it down. The
unit will resume the tape winding as soon as the button is released.
2H6P001A[E] P47-60 6/28/05, 5:36 PM49
Page 50
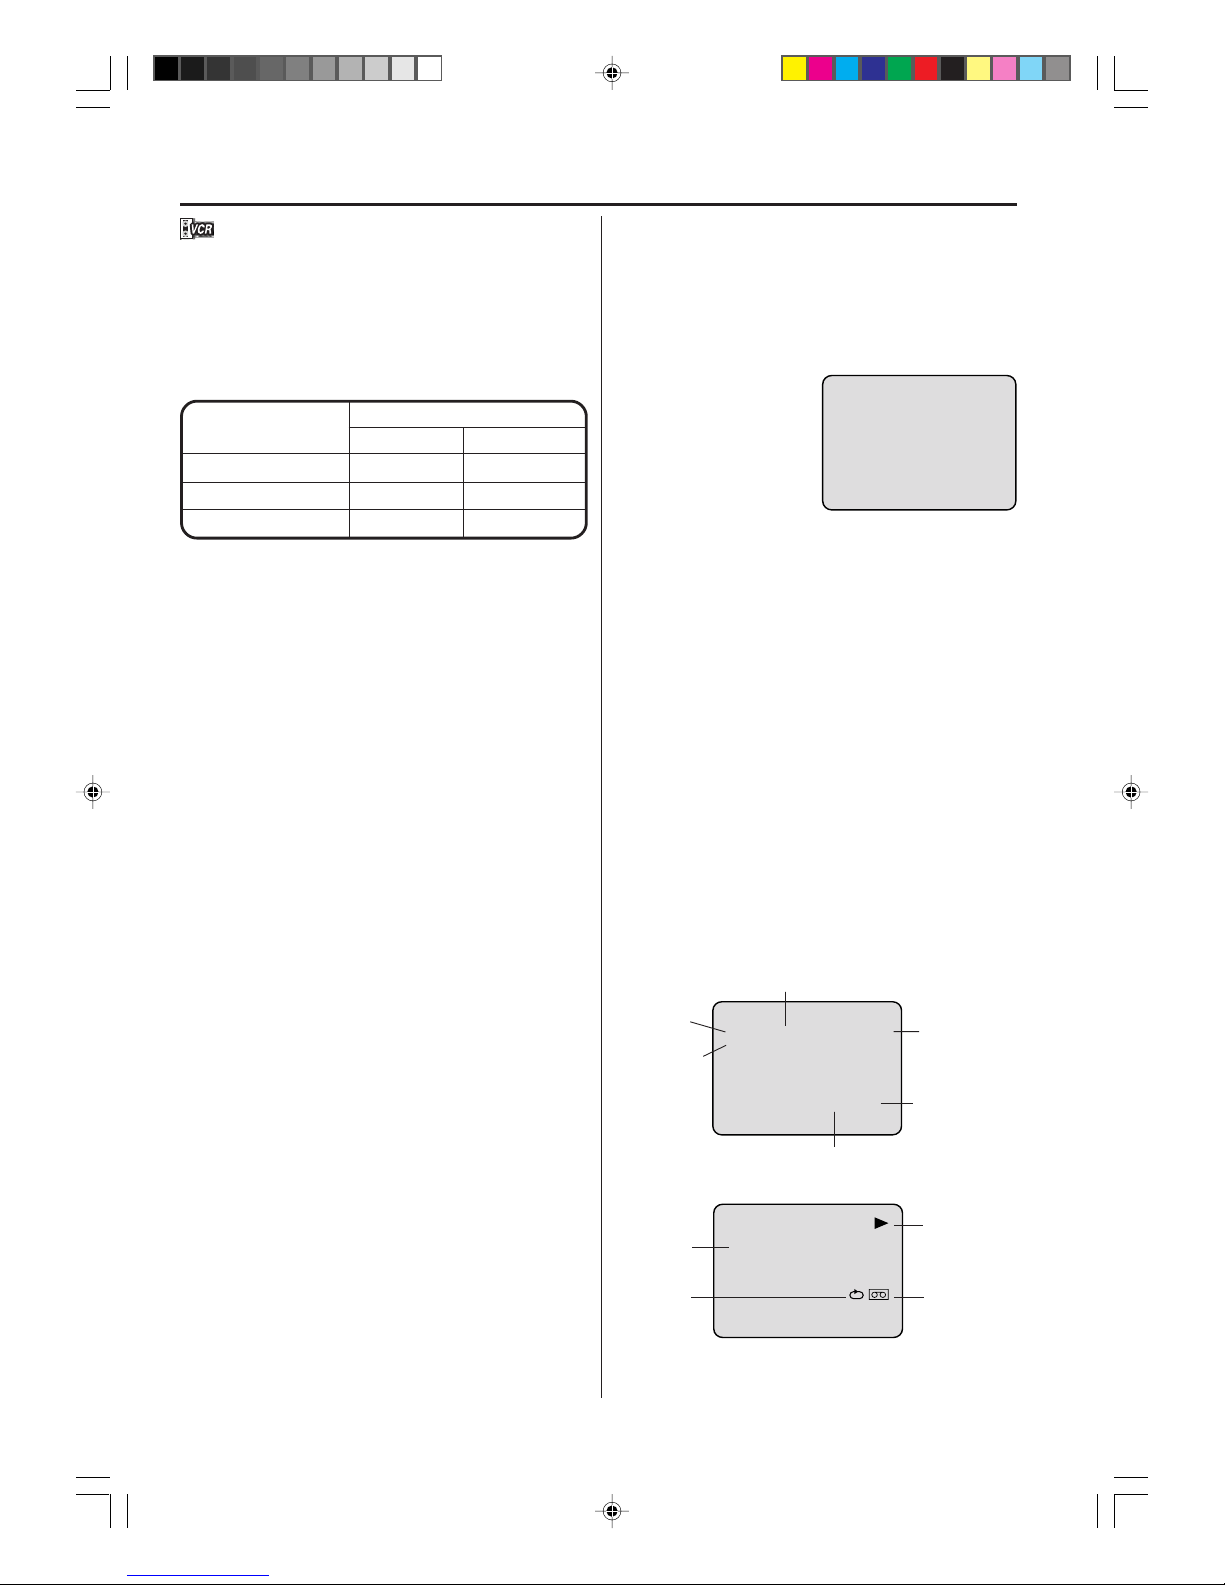
50
Special playbac k
Picture search
Reverse picture search function
Press REW x 1 or x 2 during the playback.
Forward picture search function
Press F.FWD x 1 or x 2 during the playback.
To return to pla yback: Press PLAY.
Still picture
Press PAUSE during playback.
To resume normal playback: Press PLAY or PAUSE.
Slow motion
During playback press SLO W.
To return to pla ybac k: Press PLAY or SLO W.
Slow tracking and vertical lock adjustment
If noise bars appear in the picture during slow motion,
press the TRK + or – to reduce the noise bars.
If the still picture jitters excessively, press TRK + or – to
stabilize the still picture.
Frame by frame picture
Press PAUSE during playback.
Press SLOW one by one: The picture advances frame
by frame.
To return to playback: Press PLAY or PAUSE.
Adjusting tracking condition
Automatic tracking adjustment
Whenever you insert a tape and start playback, automatic
tracking starts working and continuously analyzes the signal
to enable optimum picture quality during playback.
Manual tracking adjustment
If automatic tracking cannot eliminate noises well during
playback, press TRK +/– to eliminate the noises.
“MANUAL TR.” will appear. Press it briefly for a fine adjustment, or press and hold for a coarse adjustment.
• Press ATR to reactivate automatic tracking again.
“AUTO TR.” will appear.
NOTES:
• The audio output is muted during SPEED SEARCH,
STILL, FRAME ADVANCE and SLOW MOTION.
• During picture search mode there will be noise bars
which are caused by the system.
• The Special Playback will automatically change to
playback after appro x. 5 min utes to protect the video
tape against excessive wear.
Repeat playback
The entire video tape will be played until its end. The
tape will then automatically rewind to the beginning and
the playback will be repeated.
1
Press REPEAT while the VCR is playing back.
2
By pressing REPEAT
each time, “REPEAT
ON” or “REPEAT OFF”
is selected in turn.
3
When “REPEA T ON” is selected, the tape is play ed
back to the end, and then, it is automatically rewound to the starting point and played back again.
The display “REPEAT ON” goes out in about 3 seconds.
To cancel repeat playback: Press REPEAT to se-
lect “REPEAT OFF”.
Commercial skip
Press CM SKIP during playback.
The video is rapidly forwarded for approx. 30 seconds
and playback resumes.
You may press the button up to six times in a row to
move 180 seconds ahead.
To display VCR operation status
Press DISPLAY. The clock, day of the week and more
information will be indicated.
While watching TV
While operating a tape
To cancel the display: Press DISPLAY until all indi-
cators disappear.
REPEAT ON
PICTURE SEARCH SPEED
PRESS TWICE
TAPE SPEED
PRESS ONCE
SP (Standard Play)
LP (Long Play)
SLP (Super Long Play)
5 X
9 X
15 X
3 X
7 X
9 X
SPEED SEARCH TIMES
CH 125
8 : 47
AM
MON
00 : 00 : 00 SP
STEREO SAP
DAY OF THE WEEK
CHANNEL
TAPE SPEED
REAL TIME COUNTER
CLOCK
STEREO AND
SECOND
AUDIO
PROGRAM
(SAP)
8 : 30AM MON
00 : 15 : 12 SP
HI-FI
OPERATING
MODE
TAPE INAUTO
REPEAT
HI-FI
STEREO
2H6P001A[E] P47-60 6/28/05, 5:36 PM50
Page 51
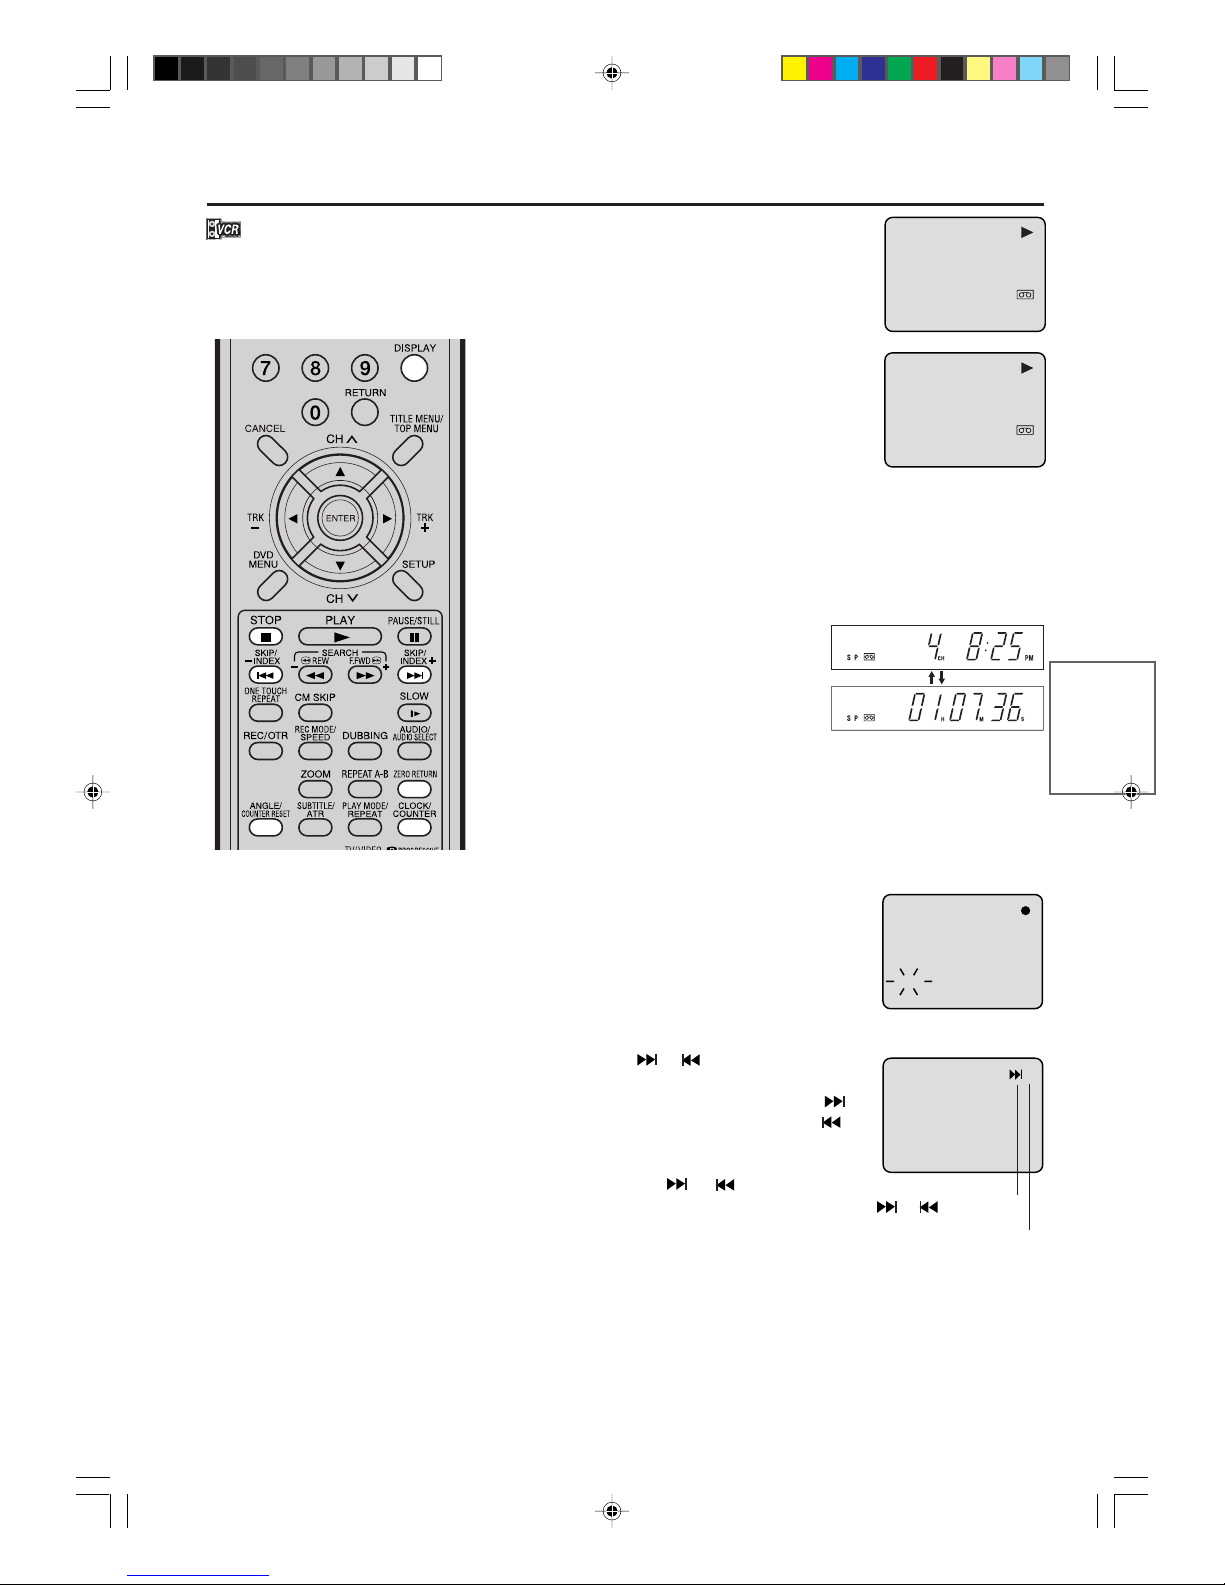
51
T ape pla ybac k
ZERO RETURN function / Video index search system
ZERO RETURN function
This function makes tape rewinding stop at the counter “00:00:00”
position automatically .
8 : 47AM MON
00 : 04 : 38 SP
HI-FI
8 : 47AM MON
00 : 00 : 00 SP
HI-FI
CH 001
INDEX
or is displayed
+3
INDEX NO. (up to 9)
1
Press DISPLAY.
The counter display shows the tape running time during playback or recording.
2
Press COUNTER RESET at the desired
tape position. The counter display will be
reset to the “00:00:00” position (e .g. the beginning of recording).
3
Press STOP when pla yback or recording is finished.
Press ZERO RETURN.
The tape will be rewound or fast f orwarded and automatically stop
at the “00:00:00” position.
Switching the display between clock and counter
Press CLOCK/COUNTER. The clock
and tape counter alternate with each
other in the display.
Video index search system
This function enables you to locate the beginning of any recording made on the VCR.
Recording an INDEX MARK
The Index search function automatically records
an INDEX mark on the tape whenever a recording is initiated.
Index search
Press INDEX or during stop or play
mode.
For Succeeding programs: Press INDEX .
For Preceding programs: Press INDEX .
(Additional press increases the INDEX NO.
up to 9.)
When the INDEX or is pressed, the
unit starts searching the INDEX NO. selected
and finds the portion, then playback starts
automatically.
To stop the Index Search, press STOP.
NOTES for Counter Display:
• If you rewind the tape beyond
“00:00:00”, a minus sign (“–”) will
be displayed in front of the time.
• When you load a tape, the counter
will reset to “00:00:00”.
• The counter does not function on
nonrecorded (blank) sections of
the tape. When you rewind, fast
forward or play tapes through
blank sections, the counter stops.
NOTES for Video index search
system:
• When you record an INDEX mark
at the very beginning of the tape,
the mark may not be found.
• During INDEX search, the tape
may stop and begin to play at a
slightly different location.
• INDEX may not function properly
with old or worn out video tapes.
• INDEX marks may not be found if
it is extremely close to the point
where the search began.
• In recording, if you stop recording
temporarily , the INDEX mark is not
recorded on the tape.
2H6P001A[E] P47-60 6/28/05, 5:36 PM51
Page 52
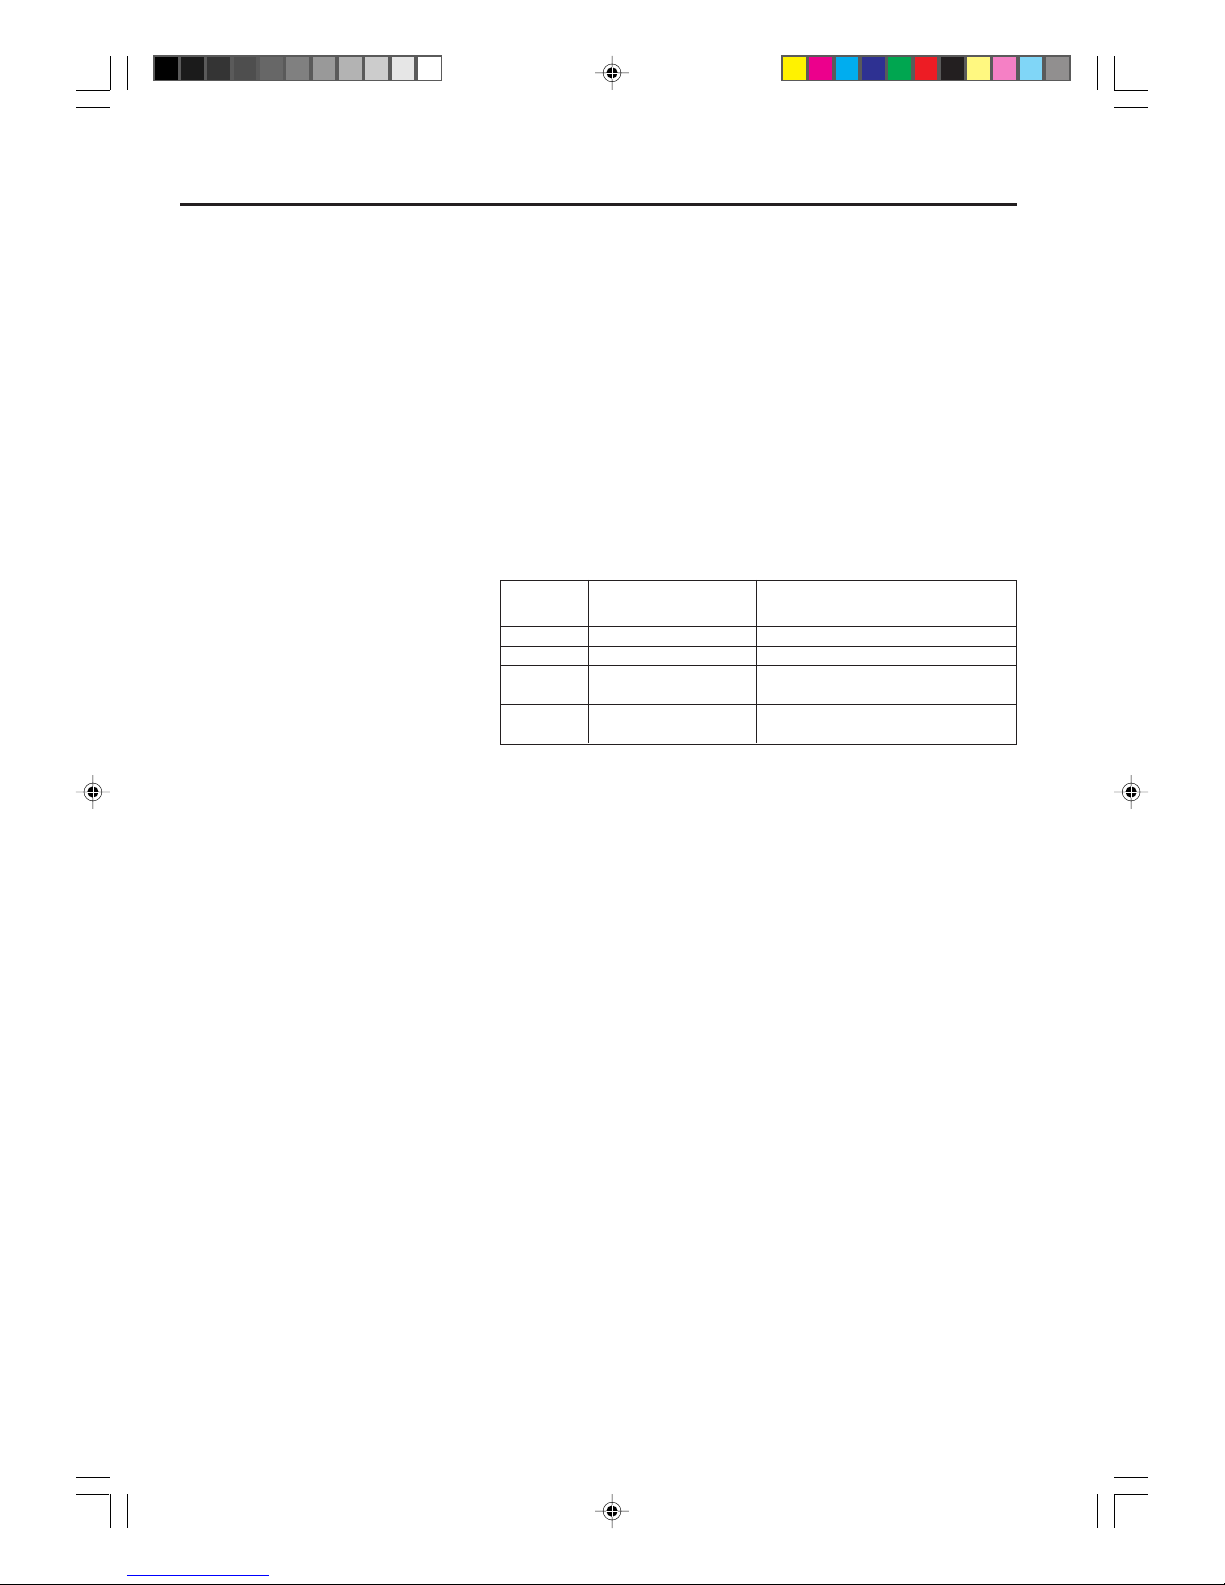
52
Read this before recording on disc
Types of disc
You can use DVD-RW and DVD-R discs to record video.
DVD-RW (VR mode)
• This mode involves multiple editing functions.
• Various editing options using a created Playlist.
DVD-RW (Video mode)/-R
• Simple editing (renaming titles).
For more information on recording format, see “Recording format” (page 10).
Recording modes
There are 4 modes for recording on disc. Recording time and quality
vary according to mode.
This section explains things you must
know to record onto a disc. Read it
before attempting to record.
NOTES:
Recording time can change for the
following reasons.
• When image quality is poor as during poor TV reception.
• When recording on a disc that has
been edited before.
• When the video is followed with recordings of still images or just audio.
NOTE:
Should a power failure occur or
should the AC cord plug be disconnected while recording, editing, initializing, finalizing or any other function, the program being recorded will
be lost or the disc may not be playable. Manufacturer can not guarantee against loss of program or disc
should this occur. To start recording
again, re-format the disc or use a
new disc and follow the instruction
on recording.
Recording
mode
XP
SP
LP
SLP
Recording time
Approx. 60 min
Approx. 120 min
Approx. 240 min
Approx. 360 min
Quality
Can record high quality images.
Can record normal quality images.
Quality deteriorates slightly, but
recording time is longer.
Recording time is prioritized over
quality.
• Recording time above is based on a 4.7GB disc.
Since DVD recording is performed using VBR (Variable Bit Rate), re-
cording time varies according to the recorded content.
To know the correct recording time, stop recording and check the media information. (See page 35.)
2H6P001A[E] P47-60 6/28/05, 5:36 PM52
Page 53

53
T ape pla ybac k
NOTES:
• When using one touch timer recording to record on a DVD disc , it
takes some time from when you
press REC/OTR until recording
actually starts.
Press REC/OTR a little before your
preferred starting point.
• Even if STOP is pressed during
recording, recording does not stop
instantly. Recording may continue
for as long as 5 seconds maximum
in the VR mode or 30 seconds
maximum in the Video mode.
• Because of characteristics peculiar to digital video compression
technology, scenes with fast motion may appear as a matrix of
larger blocks.
Read this before recording on disc
Disc remaining time
VR mode
• Recording is possible as long as there is av ailable space on the disc.
(Finalized discs can be recorded by cancelling the finalization, see
“UNDO FINALIZE” on page 28.)
• Erasing unnecessary title frees up available space on the disc. (Titles
can be erased from finalized discs by first undoing the finalization.
See “UNDO FINALIZE” on page 28.)
Video mode
• Up until the disc is finalized, recording is possible as long as there is
available space on the disc. (Once the disc has been finaliz ed, additional recording and erasing are not possible.)
• The remaining time cannot be increased, nor can recorded title be
overwritten.
• Titles cannot be erased nor can recorded titles be overwritten.
Images that cannot be recorded
Some DVD-Video and broadcasts contain copy-restriction signals to
protect copyrights. There are 3 types of cop y-restriction signals: “Cop y
Free”, “Copy Never” and “Copy Once”.
“Copy Free” (unrestricted recording)
Land-based TV broadcasts and images you record y ourself with a video
camera allow unrestricted recording. There are no restr ictions on recording.
“Copy Never” (recording prohibited)
• Images that contain the recording prohibited signal cannot be recorded.
• If the recording prohibited signal appears halfway through an image
you are recording, recording is paused at that instant. When the recording prohibited signal ends, recording resumes.
• This unit incorporates a built-in copy guard. It cannot record software or broadcasted programs that contain copy restriction signals
designed to protect copyright, etc.
“Copy Once” (one-time recordable)
Programs (images) that contain the one-time recordable signal can be
recorded only in the VR mode using a DVD-RW disc that suppor ts
CPRM V er . 1.1.
Recording
2H6P001A[E] P47-60 6/28/05, 5:36 PM53
Page 54
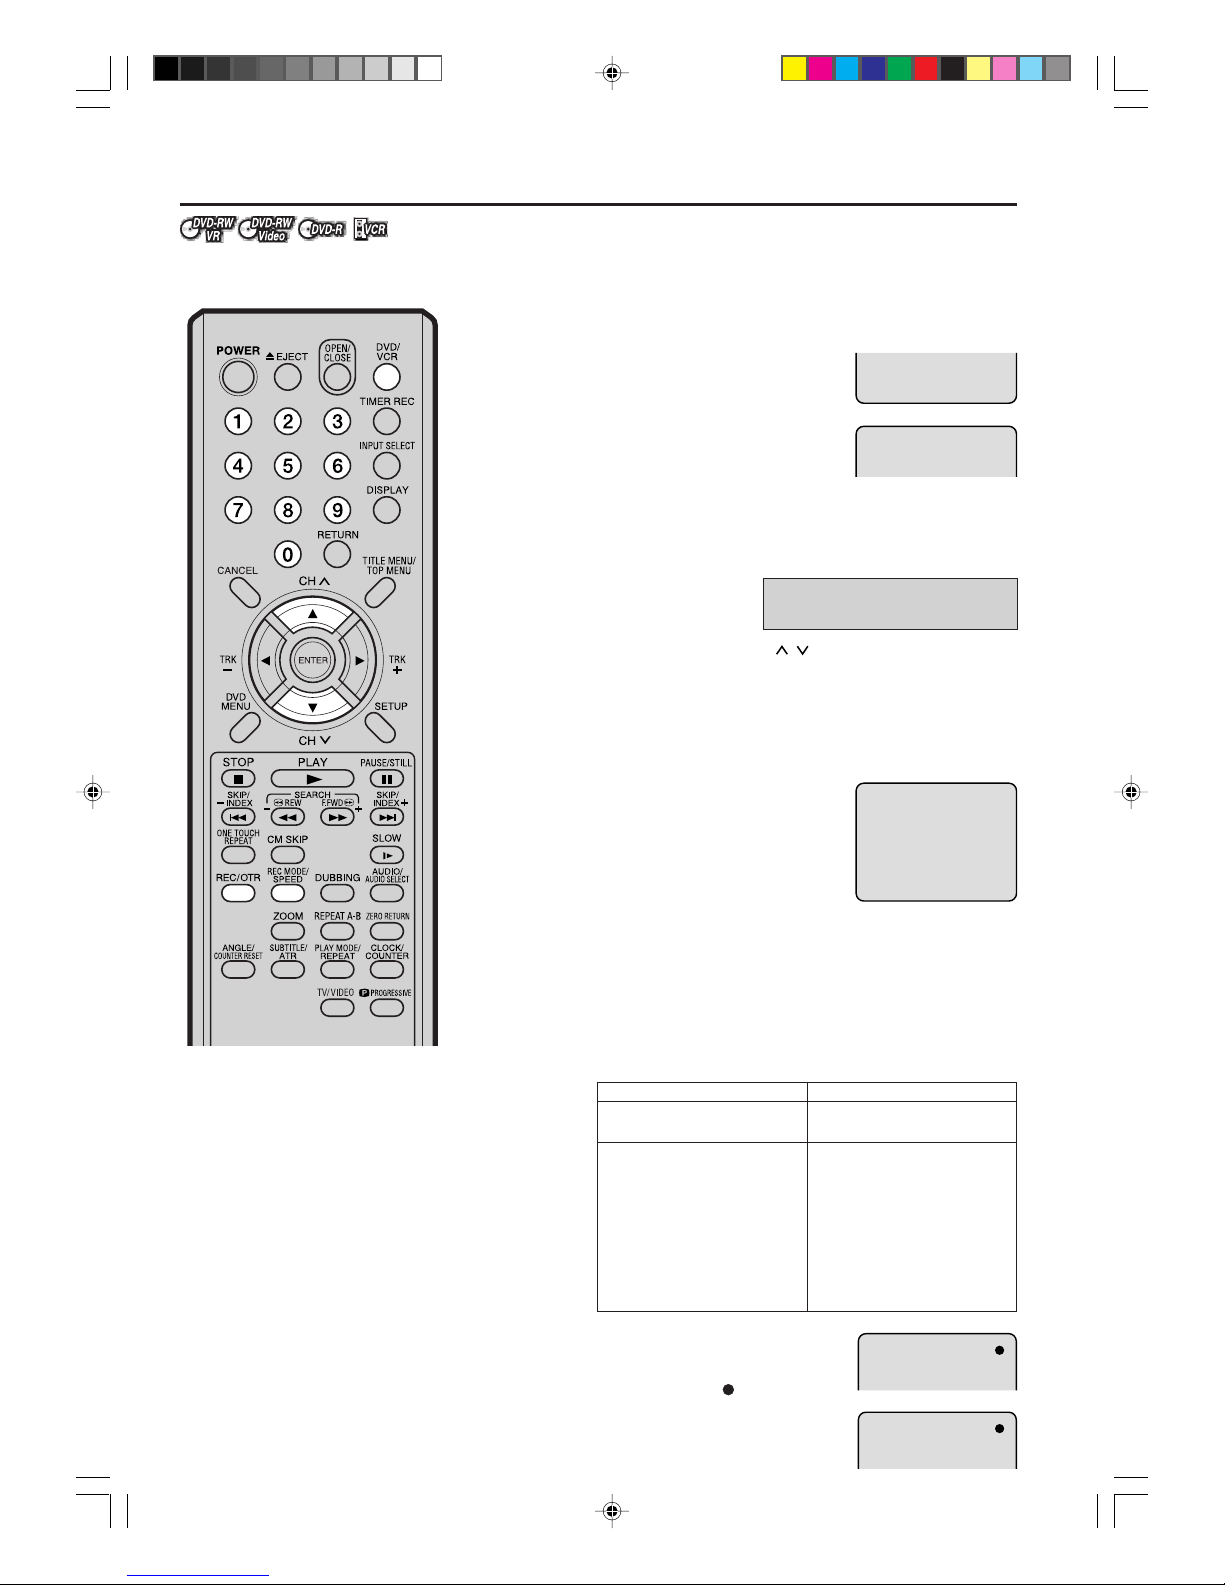
54
Recording a TV program
Preparation:
• Turn ON the TV and set it to the video input mode.
• Load a recordable DVD or video tape into the unit.
• Press DVD/VCR to select the appropriate mode.
1
Press REC MODE/SPEED to select the re-
cording mode.
The recording mode will appear on the TV
monitor and change every time REC
MODE/SPEED is pressed.
VCR recording modes: SP/SLP
DVD recording modes: XP/SP/LP/SLP
SP is the normal recording mode for video
tapes. SLP off ers 3 times the recording time as SP. F or more inf ormation on DVD recording modes, see page 52.
2
Set the TV/CATV option to the appropriate position (page 32).
3
Press the numeric keys or CH / to select the channel to be
recorded.
TO SELECT Cable TV CHANNELS:
1-9 Press 0 twice and then 1-9 as required.
Example: To select 2, Press “002”.
10-12 Press 0 first and then the re-
maining 2 digits in order from
left to right.
Example: Press 012 for “12”.
13-99 Press 2 digits in order.
Example: Press 22 for “22”.
100-125 Press the 3 digits in order.
Example: Press 110 for “110”.
TO SELECT TV CHANNELS:
All channels can be instantly selected by using two buttons. (For
example, to select channel 2, press 0, then 2. If you press only 2,
channel selection will be delayed for a f ew seconds .) For channels
10 and above, press the 2 digits in order.
VHF/UHF/CABLE CHANNELS
4
Press REC/OTR.
When recording starts, “
” appears on
the screen for about 4 seconds.
NOTES:
• When recording onto a DVD, it
takes some time from when you
press REC/OTR until recording
actually starts.
Press REC/OTR a little before your
preferred starting point.
With a video tape, recording starts
almost at the same time you press
REC/OTR.
• If the erase prevention tab of video
tapes is removed, the tape will
eject when REC/OTR is pressed
for recording.
You can record programs you watch
on TV onto video tapes or DVDs.
TV
VHF
2-13
UHF
14-69
CABLE
VHF
2-13
STD/HRC/IRC
14-36 (A) (W)
37-59 (AA) (WW)
60-85 (AAA) (ZZZ)
86-94 (86) (94)
95-99 (A-5) (A-1)
100-125 (100) (125)
01 (5A)
TV - VHF/UHF channels
CABLE - CABLE TV channels
00 : 00 : 00 SP
SP
DVD mode
VCR mode
CH 110
CH 110
VCR mode
DVD mode
2H6P001A[E] P47-60 6/28/05, 5:36 PM54
Page 55
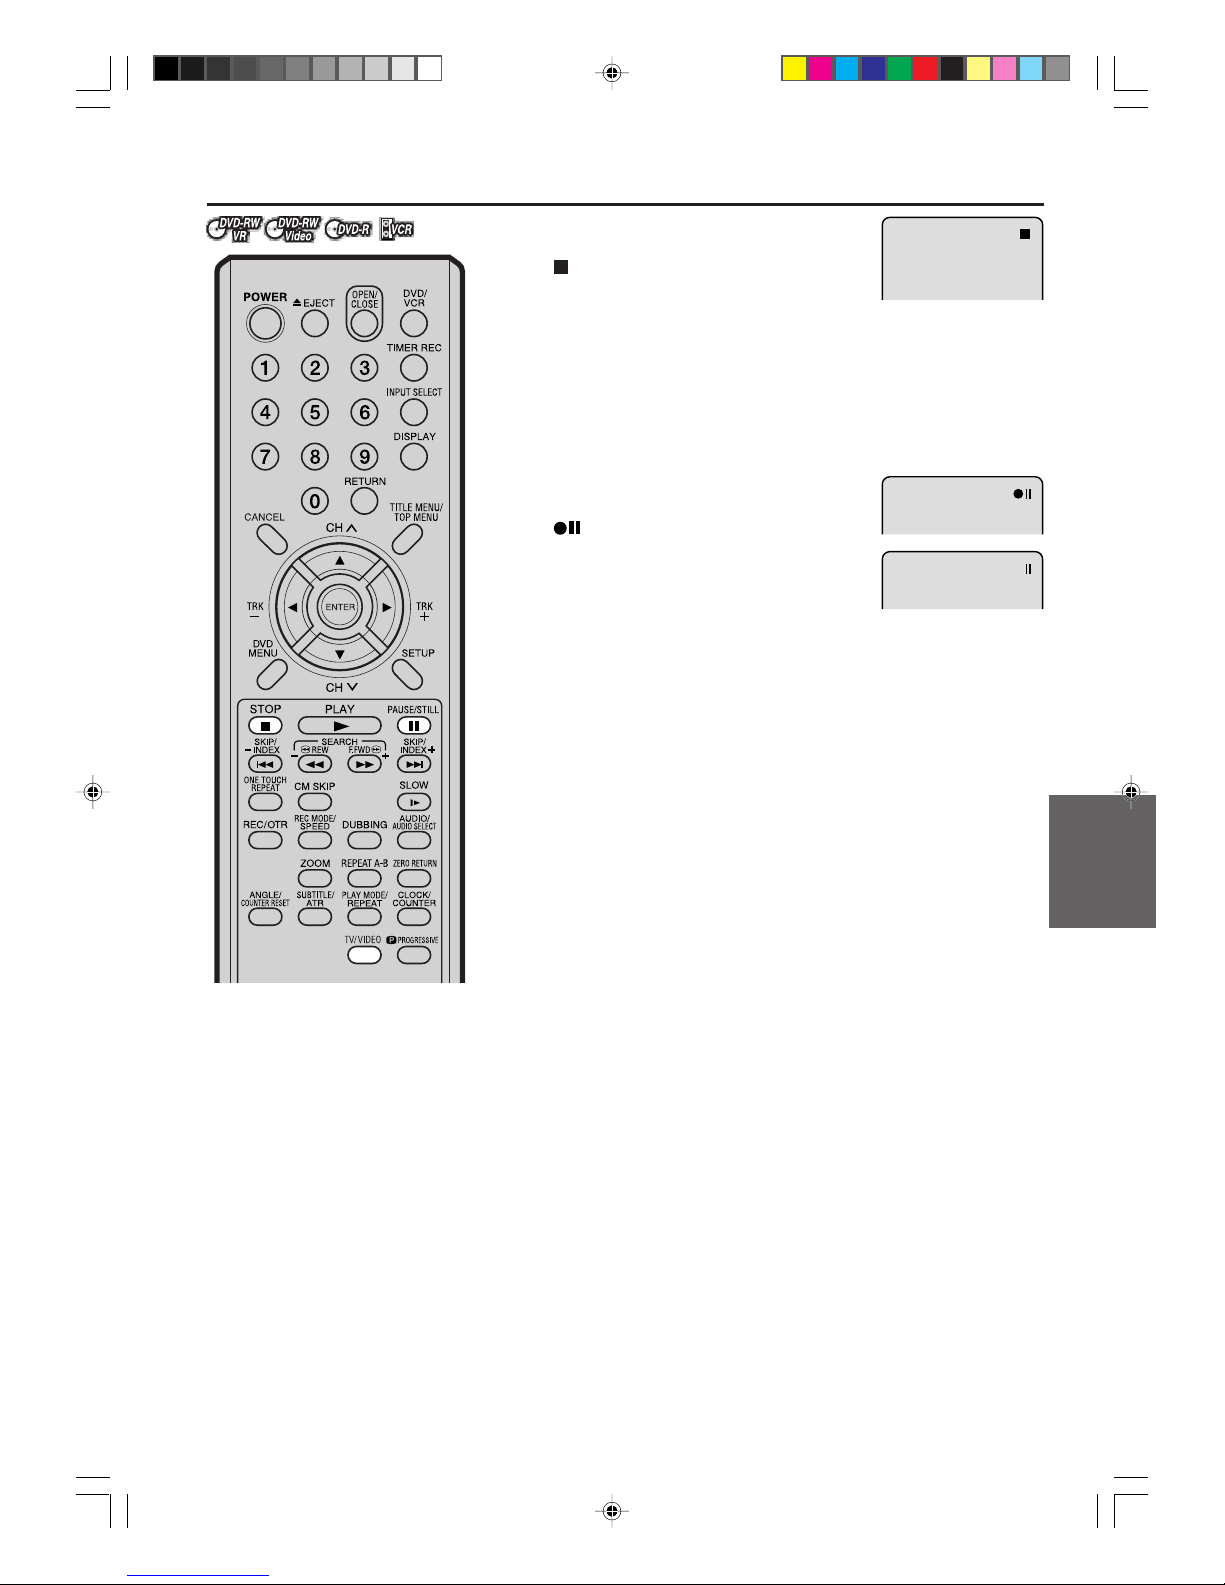
55
T ape pla ybac k
Recording a TV program
To stop recording
Press STOP to stop recording.
“
” will appear on the screen for about 4
seconds.
NOTE:
When recording onto a DVD, even if STOP is pressed during recording, recording does not stop instantly. Recording may continue for as
long as 1 minute maximum.
To stop recording temporarily
Press PAUSE/STILL to avoid recording
unwanted material.
“ ” will appear on screen for about 4 seconds.
Press again to resume recording.
NOTES:
• In video recording, the pause function will be released after 5 minutes to prevent damage the video tape. The unit will change to the
STOP mode.
• When recording onto a video tape, you can select a recording channel in the recording pause mode (You cannot change a recording
channel in the DVD recording pause mode.)
Recording one program while watching another
While the unit is recording, press TV/VIDEO to select the TV position.
The “VCR” will go off and recording will continue.
Select the TV channel you want to watch by using the TV channel
selector.
NOTE:
Some cableTV hookups do not permit viewing one channel while recording another. See pages 18, 19.
Auto Rewind feature
This VCR will automatically rewind
the tape when the tape has ended
(except during OTR and TIMER
REC). It will also eject the tape.
VCR mode
DVD mode
NOTES:
• If the disc space become full, the
recording is stopped and “Disc is
full” will appear on the screen.
•
In the event of a power f ailure during
DVD recording including O TR and
TIMER REC, the program can not
be recorded on the disc.
When the power resumes, after the
VCR/DVD is turned on, the set
checks the disc to repair the error
which is caused by a power
failure. This checking process ma y
require a few minutes to about 1
hour according to disc condition.
In this process “SYSTEM ERROR
PLEASE W AIT DISC CHECKING”
will appear on the screen.
Recording
2H6P001A[E] P47-60 6/28/05, 5:36 PM55
Page 56
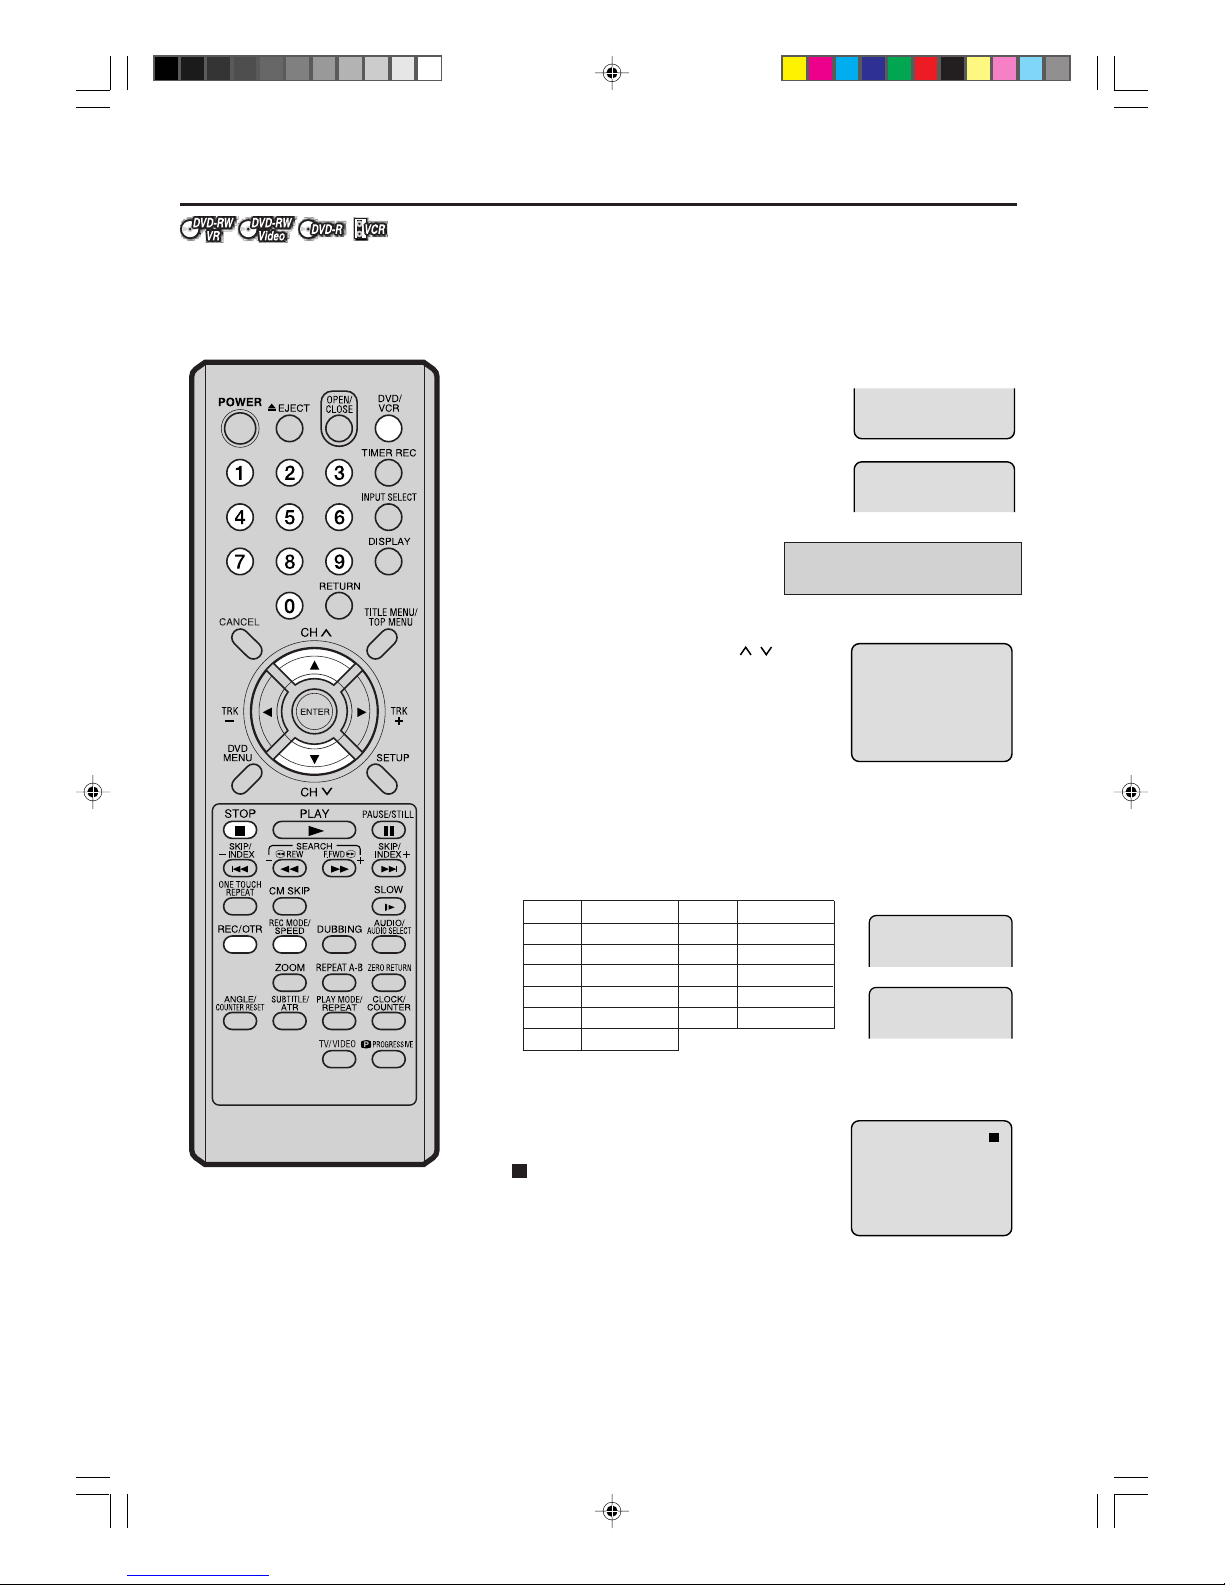
56
One-touch Timer Recording (OTR)
The One-touch Timer Recording
feature provides a simple and convenient way to make a timed recording.
00 : 00 : 00 SP
SP
DVD mode
VCR mode
CH 110
CH 110
OTR 0 : 30
OTR 0 : 30
VCR mode
DVD mode
Preparation:
• Turn ON the TV and set to the video input mode.
• Load a recordable DVD or video tape into the unit.
• Press DVD/VCR to select the appropriate mode.
Example: One-touch Timer Recording for 30 minutes.
1
Press REC MODE/SPEED to select the
recording mode.
For the recording mode, see the step 1 on
page 54.
2
Set the TV/CABLE option to the
appropriate position (See page
32).
3
Press numeric keys or CH / to select
the channel to be recorded.
4
Press REC/OTR. Each additional press of REC/OTR will increase
recording time as shown in the chart below, up to a maximum of 6
hours. The OTR and recording time will appear on the screen for
about 4 seconds.
To cancel OTR
Press STOP or turn off the power.
“
” will appear on screen for about 4 sec-
onds.
TV - VHF/UHF channels
CABLE - CABLE TV channels
NOTE:
If you wish to watch the DVD playback during the VCR OTR, press
DVD/VCR to change to DVD mode
and perform the DVD playback. You
can also playback the VCR during
DVD OTR.
Press
once
twice
3 times
4 times
5 times
6 times
NORMAL REC
OTR - : - -
OTR 0:30
OTR 1:00
OTR 1:30
OTR 2:00
OTR 3:00
OTR 4:00
OTR 5:00
OTR 6:00
NORMAL REC
Recording time
Press
7 times
8 times
9 times
10 times
11 times
Recording time
2H6P001A[E] P47-60 6/28/05, 5:36 PM56
Page 57
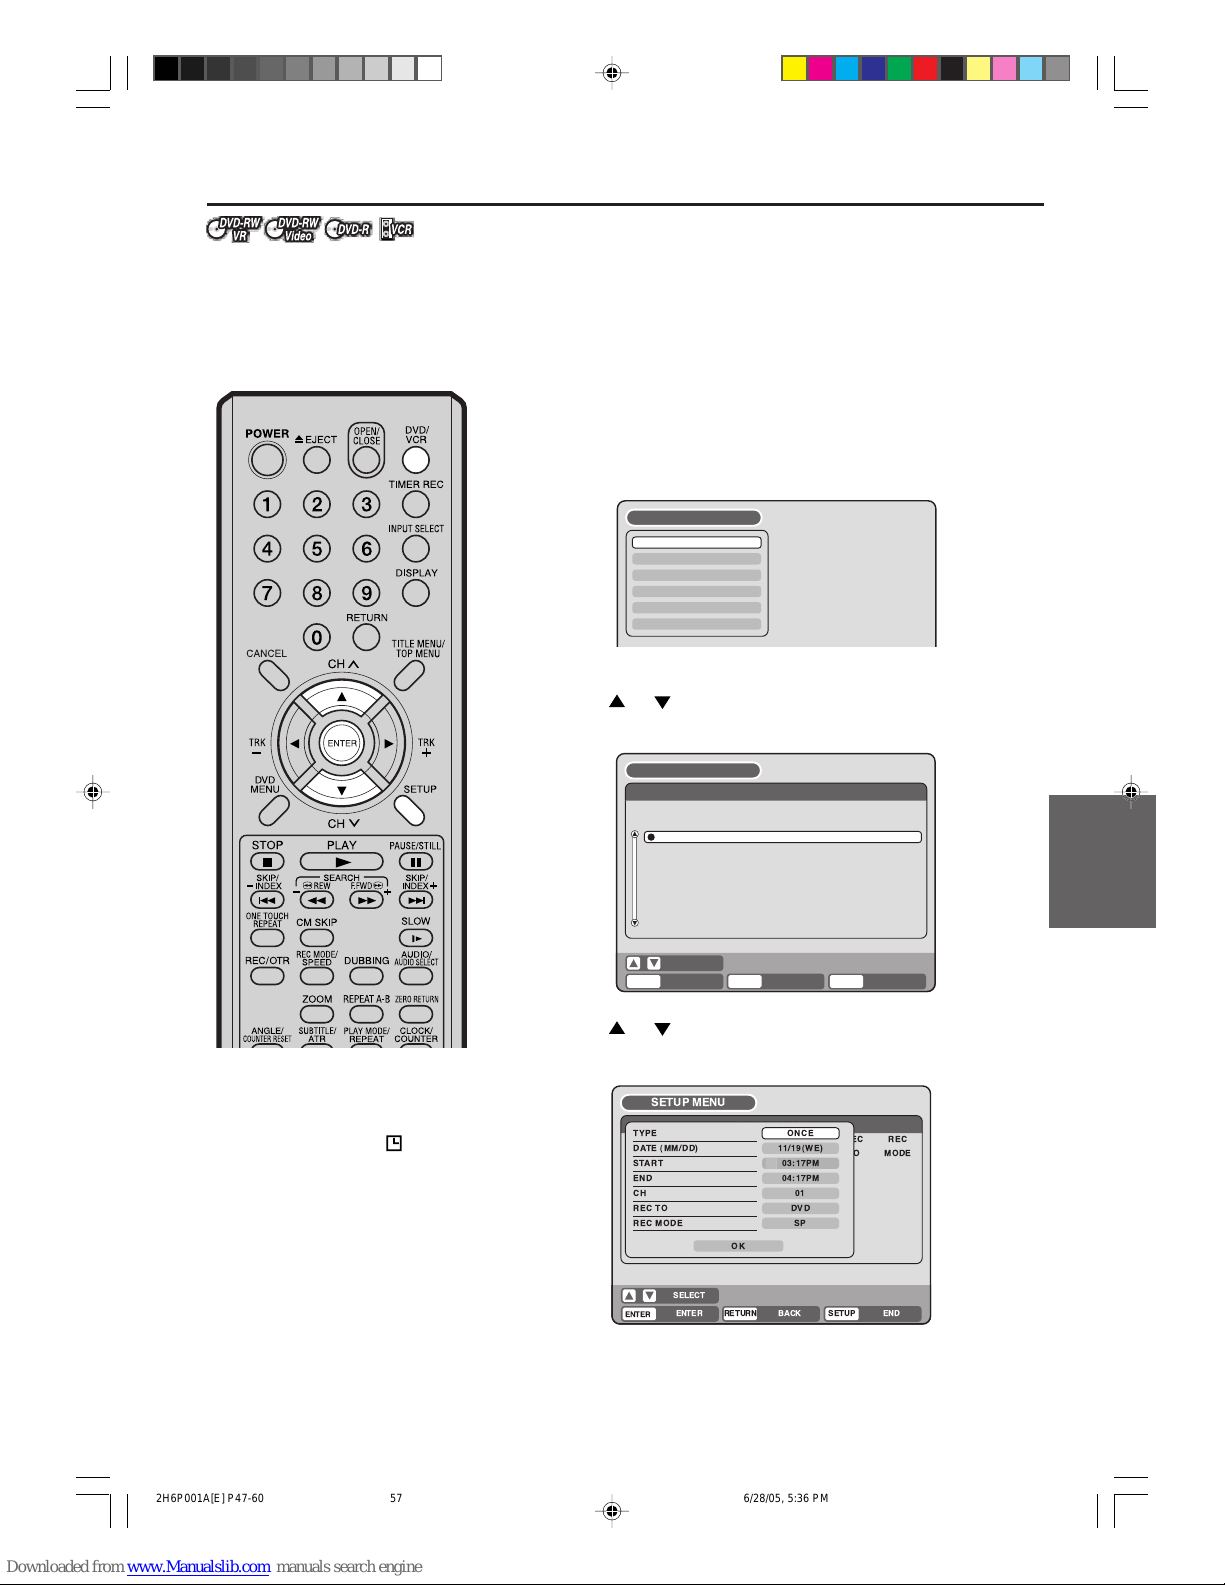
57
T ape pla ybac k
Timer recording
The timer recording system allows
you to select the date, time and
channel and record the desired programs. Up to 12 timer programs
within a month can be stored in this
unit.
Setting timer recording
Preparation:
• Turn ON the TV and set to the video input mode.
• Load a recordable DVD or video tape.
• Press DVD/VCR to select the appropriate mode.
• Confirm that the clock is indicating the correct time.
Example: Set the recording mode to LP; the TV program is on channel
12 starting at 8:00 PM and stopping at 9:30 PM on a date of 20th.
1
Press SETUP.
The SETUP MENU screen appears.
NOTE:
If a recordable tape is not inserted
or no disc space is available, the
timer record indicator “
” flashes.
Replace the tape or disc to allow recording.
2
Press or to select “TIMER REC SET” and press ENTER.
The TIMER REC SET screen will appear.
TIMER REC SET
SYSTEM SETUP
AV SETUP
REC SETUP
CH SETUP
OTHER
SETUP MENU
3
Press or to select “NEW” and press ENTER.
The program screen will appear.
Recording
ENTER
RETURN BACK END
SELECT
SETUP
ENTER
TIMER REC SET
REC REC
TO MODECHENDSTARTDATE
NEW
SETUP MENU
ENTER
RETURN BACK END
SELECT
SETUP
ENTER
TIMER REC SET
REC REC
TO MODE
TYPE
DATE (MM/DD)
START
END
CH
REC TO
REC MODE
ONCE
01
DVD
SP
OK
11/19(WE)
03:17PM
04:17PM
SETUP MENU
2H6P001A[E] P47-60 6/28/05, 5:36 PM57
Page 58
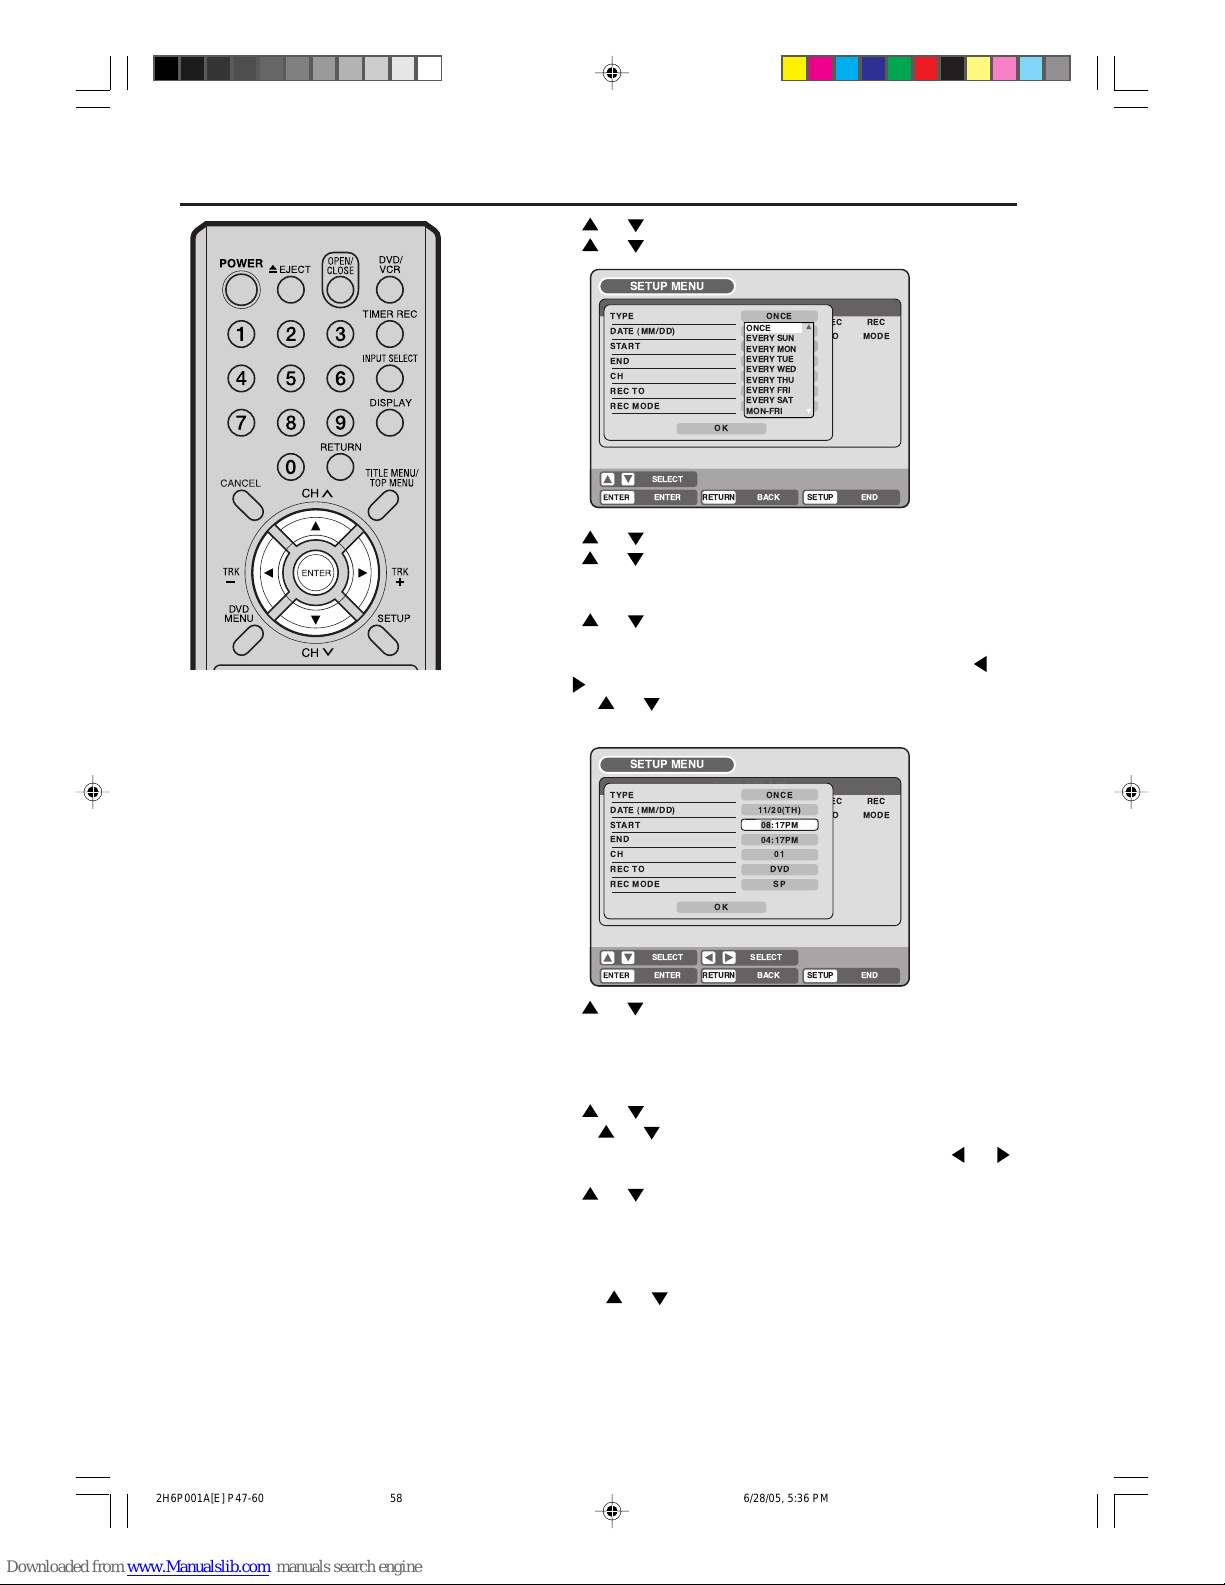
58
Timer recording
NOTES:
•
If you select timer recording on a
specified date only one time, select
“ONCE” in the “TYPE” for recording.
You can record same days of every
week or from Monday to Friday using the item “TYPE”. The items you
can select are as follows:
ONCE: Recording on the selected
“DATE”
EVERY SUN: Recording ev ery Sun.
EVERY MON: Recording every
Mon.
EVERY TUE: Recording every Tue.
EVERY WED:
Recording every W ed.
EVERY THU: Recording e very Thu.
EVERY FRI: Recording every Fri.
EVERY SAT: Recording every Sat.
MON-FRI: Recording from Mon. to
Fri.
MON-SAT: Recording from Mon. to
Sat.
EVERYDAY: Recording everyday.
•
The starting and stopping times for
the recording are displayed on the
12-hour (am/pm) clock. Twelve
o’clock midnight is displayed as
“12:00AM ”, whereas twelve o’clock
noon is displayed as “12:00PM”.
•
The initial setting of “REC TO” and
“REC MODE” can be changed using “Setting the recording”. (See
page 31.)
4
Press or to select “TYPE” and press ENTER.
Press or to select “ONCE” from the list and press ENTER.
5
Press or to select “DATE” and press ENTER.
Press
or to select the date to be recorded from the list and
press ENTER.
6
Press or to select “START” and press ENTER.
Set the time when the recording is started.
• To switch over the selection item (hour or minute), press
or , then press ENTER.
• Press or to adjust the time.
• After setting the time, press ENTER.
7
Press or to select “END” and press ENTER.
Set the stopping time in the same manner for setting the starting
time of timer recording.
8
Press or to select “CH” and press ENTER.
• Press or to select the channel to be recorded.
• You can select the external input (L1 or L2) by pressing or .
9
Press or to select “REC TO” and press ENTER.
Select the media (DVD or VCR) to be recorded from the list and
press ENTER.
10
Press or to select “REC MODE” and press ENTER.
The recording modes for the media selected in “REC TO” item
are listed up.
Select the recording mode and press ENTER.
For the recording modes in VCR, see page 48, and for the recording modes in DVD, see page 52.
ENTER
RETURN BACK END
SELECT
SETUP
ENTER
TIMER REC SET
REC REC
TO MODE
TYPE
DATE (MM/DD)
START
END
CH
REC TO
REC MODE
ONCE
01
DVD
SP
OK
11/20(TH)
08:17PM
04:17PM
SETUP MENU
SELECT
ENTER
RETURN BACK END
SELECT
SETUP
ENTER
TIMER REC SET
REC REC
TO MODE
TYPE
DATE (MM/DD)
START
END
CH
REC TO
REC MODE
ONCE
000
DVD
SP
OK
11,08,03(--)
02:17
03:17
SETUP MENU
ONCE
EVERY SUN
EVERY MON
EVERY TUE
EVERY WED
EVERY THU
EVERY FRI
EVERY SAT
MON-FRI
2H6P001A[E] P47-60 6/28/05, 5:36 PM58
Page 59
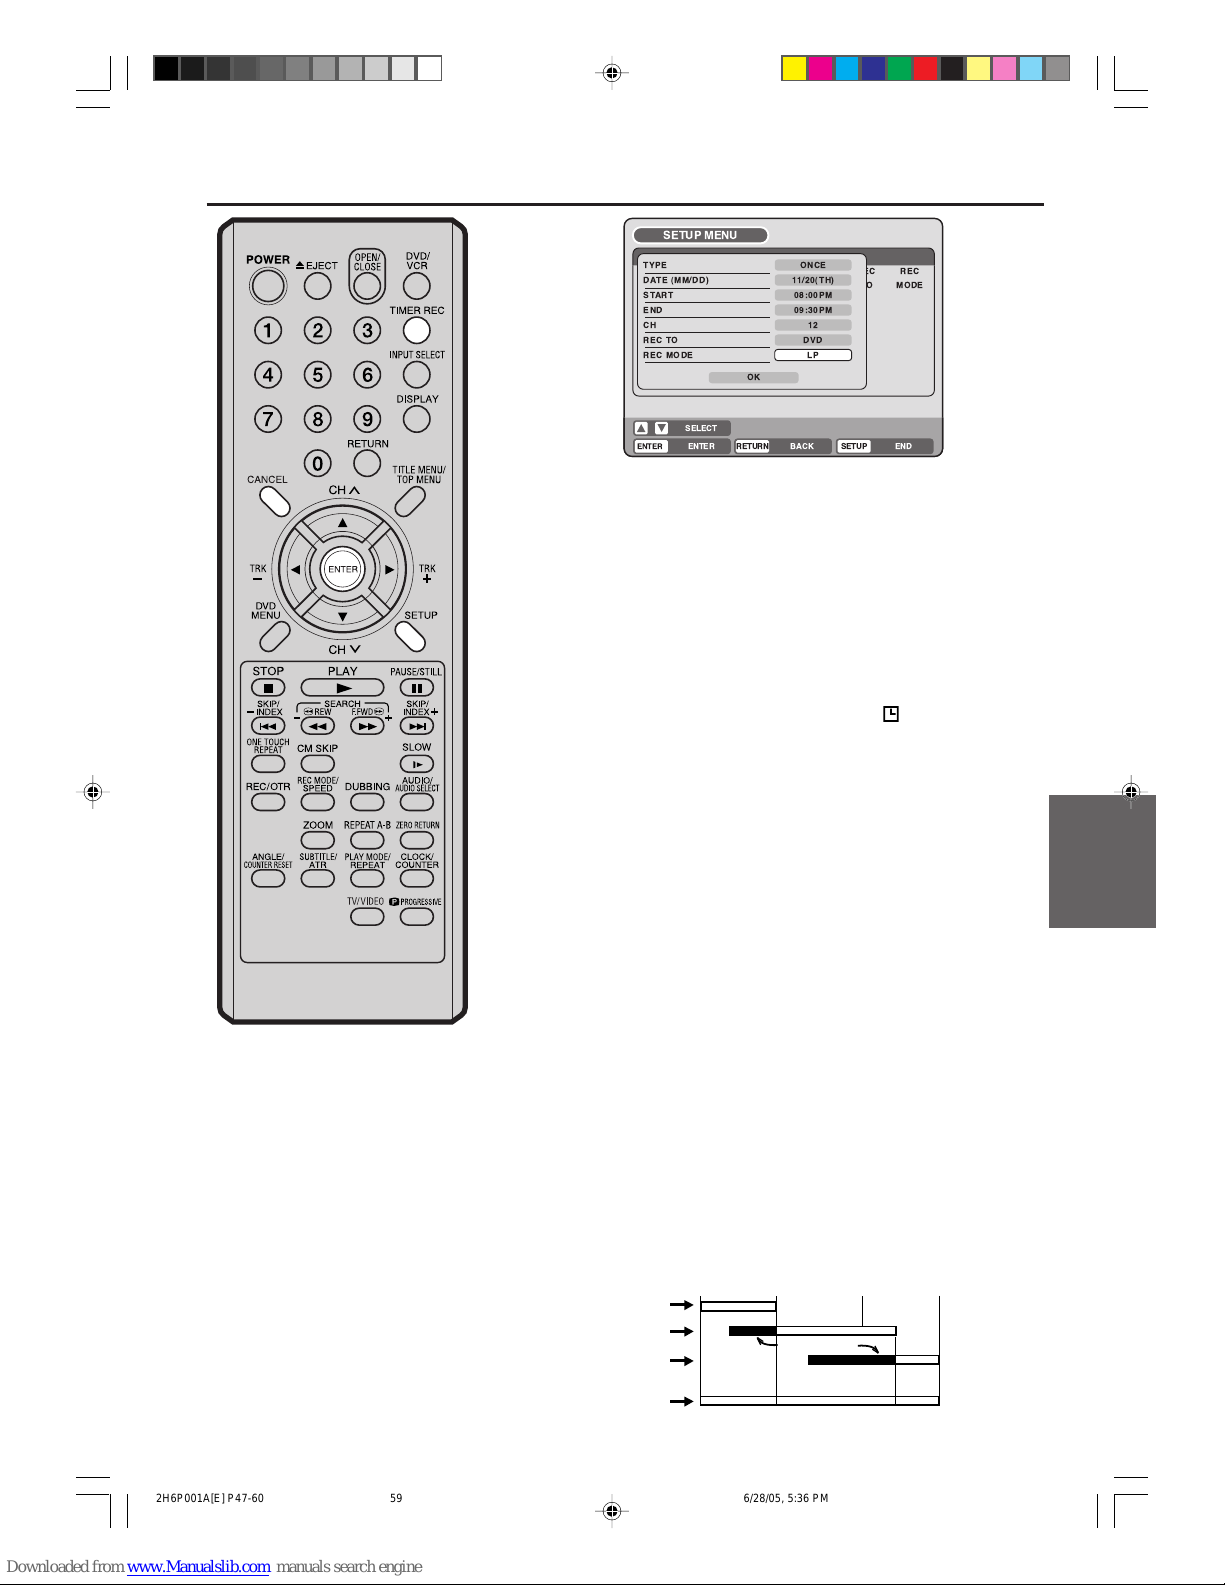
59
T ape pla ybac k
8 : 00
11 : 00
9 : 00
10 : 00
Program 1
Prog.1
Deleted Parts
Non Recorded Portion Parts
Prog.2 Prog.3
Program 2
Program 3
Recording
Control Settings
Timer recording
11
Select “OK” and press ENTER.
The timer program is determined and the TIMER REC SET
screen appears again.
12
When you enter the other program for the timer recording, re-
peat the steps 3 to 11.
13
Press SETUP.
The TIMER REC SET screen disappears and the display will
return to the normal screen.
14
Press TIMER REC. The timer indicator “ ” will appear on the
display and the unit stands by for recording.
• If the program is DVD recording only, the unit will change to
VCR mode automatically . (The D VD mode cannot be selected.)
• If the program is VCR recording only, the unit will change to
DVD mode automatically. (The VCR mode cannot be selected.)
• If the programs are DVD and VCR recording, the unit will turn
off. If you want to use the unit, press TIMER REC again to
deactivate the timer.
Checking or changing the timer recording
When you want to check the selected timer recording, follow the steps 1
and 2 of “Setting timer recording” and display the TIMER REC SET screen.
To change the timer recording, select the program to be changed and
press ENTER. The changing method is the same as that for the recording a program for the first time.
Cancelling the timer recording
Display the TIMER REC SET screen.
Select the program you want to cancel and press CANCEL, then the
selected program will be erased from the timer recording list.
In case Timer programs-overlap
Do not overlap timer programs as portions of the conflicting programs
will be lost. The first recording time has priority ov er the ne xt recording
time as shown in the diagram below.
In this case, the next recording time is delayed a maximum of about
1 minute.
Recording
NOTES:
• Recording starts a few seconds
before the preset starting time.
• You cannot use the timer recording for the both DVD and VCR at
the same time.
• You can playback the DVD during
the VCR timer recording, and you
can playback the VCR during the
DVD timer recording.
ENTER
RETURN BACK END
SELECT
SETUP
ENTER
TIMER REC SET
REC REC
TO MODE
TYPE
DATE (MM/DD)
START
END
CH
REC TO
REC MODE
ONCE
12
DVD
LP
OK
11/20(TH)
08:00PM
09:30PM
SETUP MENU
2H6P001A[E] P47-60 6/28/05, 5:36 PM59
Page 60
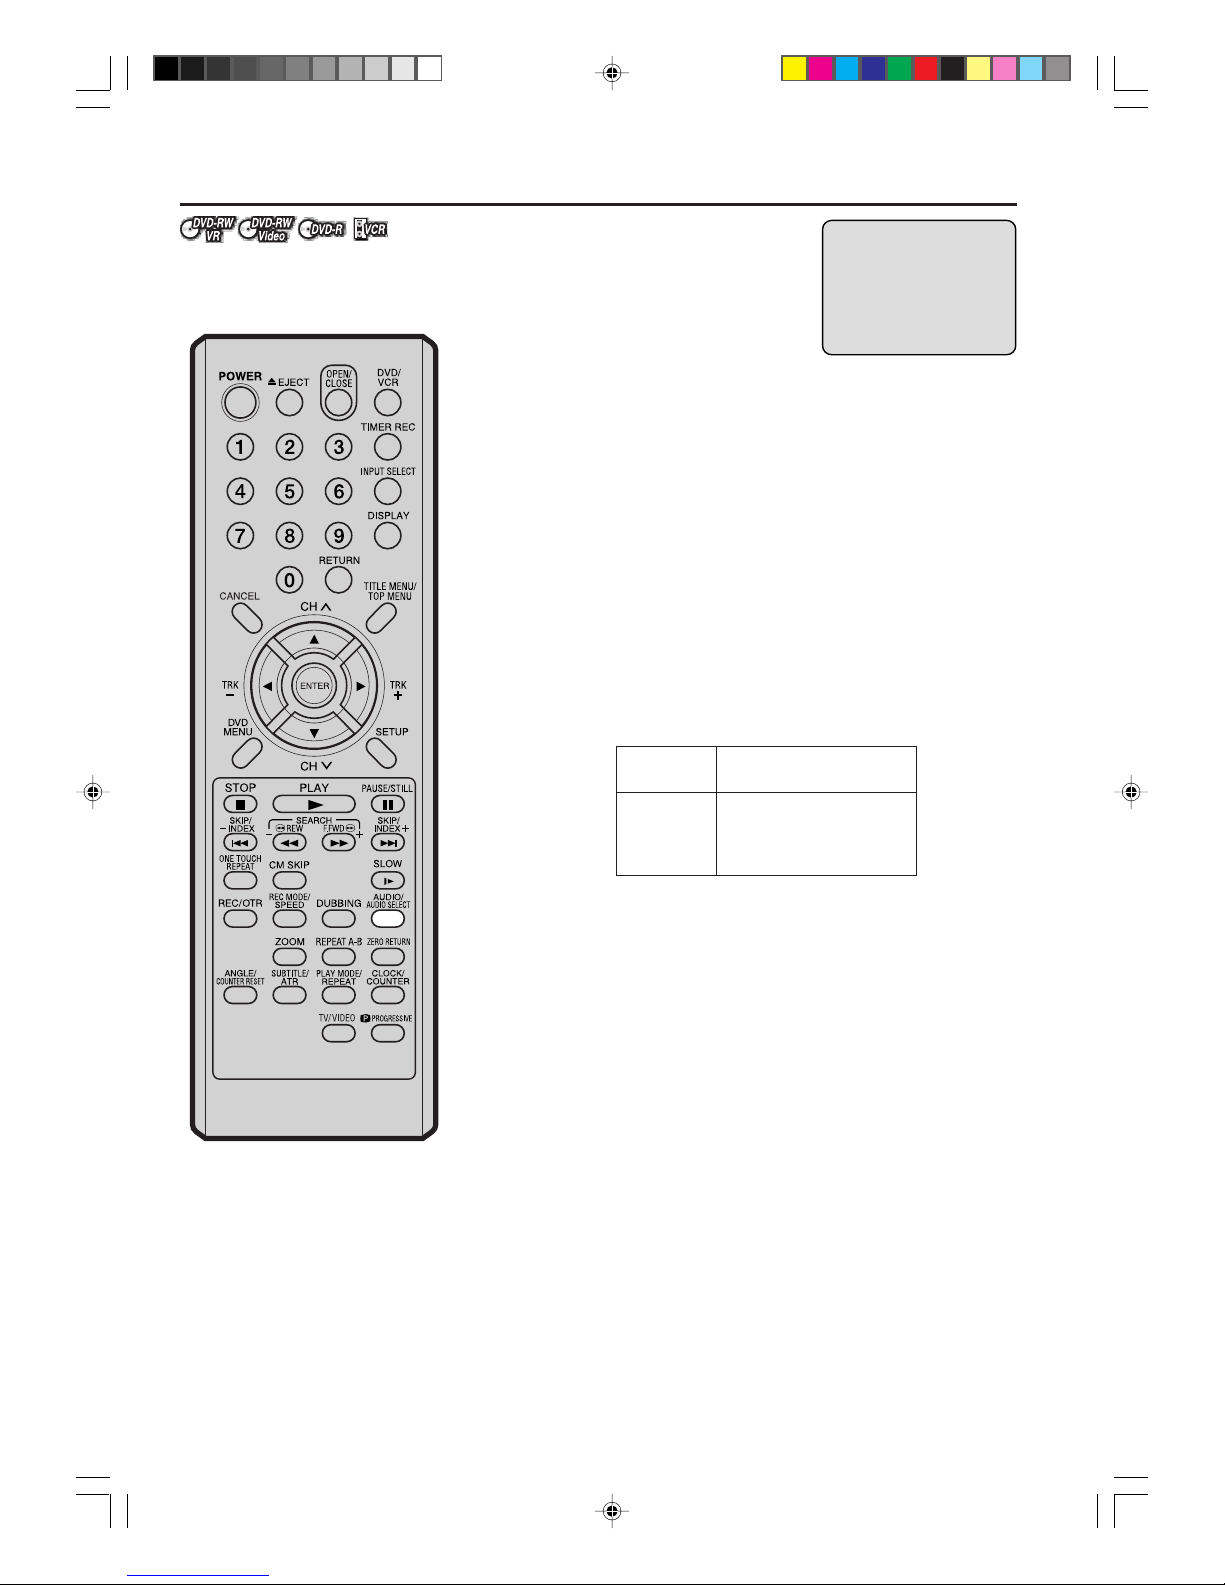
60
Stereo recording and playback
The VHS Hi-Fi audio system permits high fidelity recording of MTS
STEREO TV broadcasts.
STEREO
OUTPUT
SELECTION
STEREO
L ch
R ch
MONO
SOUND HEARD ON BOTH
SPEAKERS
STEREO
LEFT CHANNEL AUDIO
RIGHT CHANNEL AUDIO
MONO
NOTES:
• When playing back a video tape
or disc that is not recorded in Hi-Fi
stereo mode, the audio will automatically be monaural.
• When listening to a Hi-Fi video
tape, disc or MTS broadcast
through the RF OUT (UHF/VHF)
jack (Audio/Video cord not connected), the sound will be monaural.
When a MTS STEREO broadcast is received, the word “STEREO” will appear on
the screen and the program can be viewed
or recorded in stereo.
The Hi-Fi STEREO recording procedure is
the same as for normal recordings.
NOTE:
When using a Cable TV system, stereo TV programs ma y be transmitted over a mono cable channel. In this case the word “STEREO” will
not appear and the sound will be in mono.
Output selection
When viewing an MTS STEREO TV progr am, or playing a prerecorded
Hi-Fi STEREO on video tape or disc, press AUDIO SELECT to select
how the audio will be heard through the speakers. Normally set to the
Hi-Fi STEREO position, this button can be set to the MONO position if
the stereo audio is of poor quality. The “R” and “L” positions allow the
audio from the Right or Left Hi-Fi channel to be heard over both TV
speakers. This button has no effect when viewing a monaural audio
program. Each time when you press the button, output selection display appears on the screen for several seconds. Refer to the chart
below.
Output selection for DVD
You can switch between the left or right channel and stereo only
when playing a disc on which a bilingual broadcast was recorded in
the DVD-RW VR mode. It is not possible to switch between channels
otherwise as only the channel selected in the setting of SAP (Second
Audio Program; ON or OFF) is recorded in the DVD-RW Video mode
or DVD-R (see page 31).
NOTE:
When a stereo or monaural broadcast is recorded, either stereo or
monaural, respectively, is played back and it is not possible to switch
between channels.
2H6P001A[E] P47-60 6/28/05, 5:36 PM60
Page 61
61
Editing the disc
Editing the disc
This section explains how to edit
the recorded contents on DVDRWs. However, the items that you
can edit vary with the recording
formats. In VR mode, you can edit
various title menus, whereas in
Video mode, you can edit only a
few items.
Title menu
When the content is recorded, a title name that includes the date, time,
channel number and other information is created automatically.
The title menu can be used when you playback after confirming the
contents (see page 34), or when you check the contents recorded on
the disc.
Original title
The titles explained above are called original titles; these will be added
with every recording. In VR mode you can do various editing operations i.e., you can rename the titles, or add the chapter marks. In addition, you can erase the unnecessary titles to increase the disc space.
Playlist
You can create a playlist based on the original titles.
You can combine or erase undesired scenes.
If you create a playlist it will become the primary list used by the disc.
If you create a playlist to customize your viewing preferences, and
choose to delete it, the original titles will not be affected. It is recommended to create and edit the playlist to prevent important titles from
being erased accidentally.
If you create a playlist, both the original title and playlist will be displayed on the title menu.
Editable items
The items that can be edited are different between original title and
playlist. For the disc in Video mode, only the title name can be edited.
The items can be edited in each are as follows:
NOTES:
• This unit can not record or edit a
disc which was recorded or edited
using another DVD recorder.
• You cannot edit or record the disc
on which disc protection is set. In
such a case, be sure to cancel the
disc protection (see page 28) before starting the operation.
• When a scene has been erased,
the selected position for erasing
may vary slightly from the actual
erased position.
Editing items
VR mode
Video mode
Original
Playback
Adding chapter mark
Combining chapters
Erasing scenes
Erasing titles
Renaming titles
Creating playlist
Combining titles
Original Playlist
Y
Y
Y
Y
Y
Y
Y
N
Y
N
N
Y
Y
Y
N
Y
Y
N
N
N
N
Y
N
N
If you finalize the disc in Video mode, the title menu is automatically
changed. Thumbnail image and recording information will not appear
in the title menu after finalizing.
2H6P001A[E] P61-69 6/28/05, 5:36 PM61
Page 62
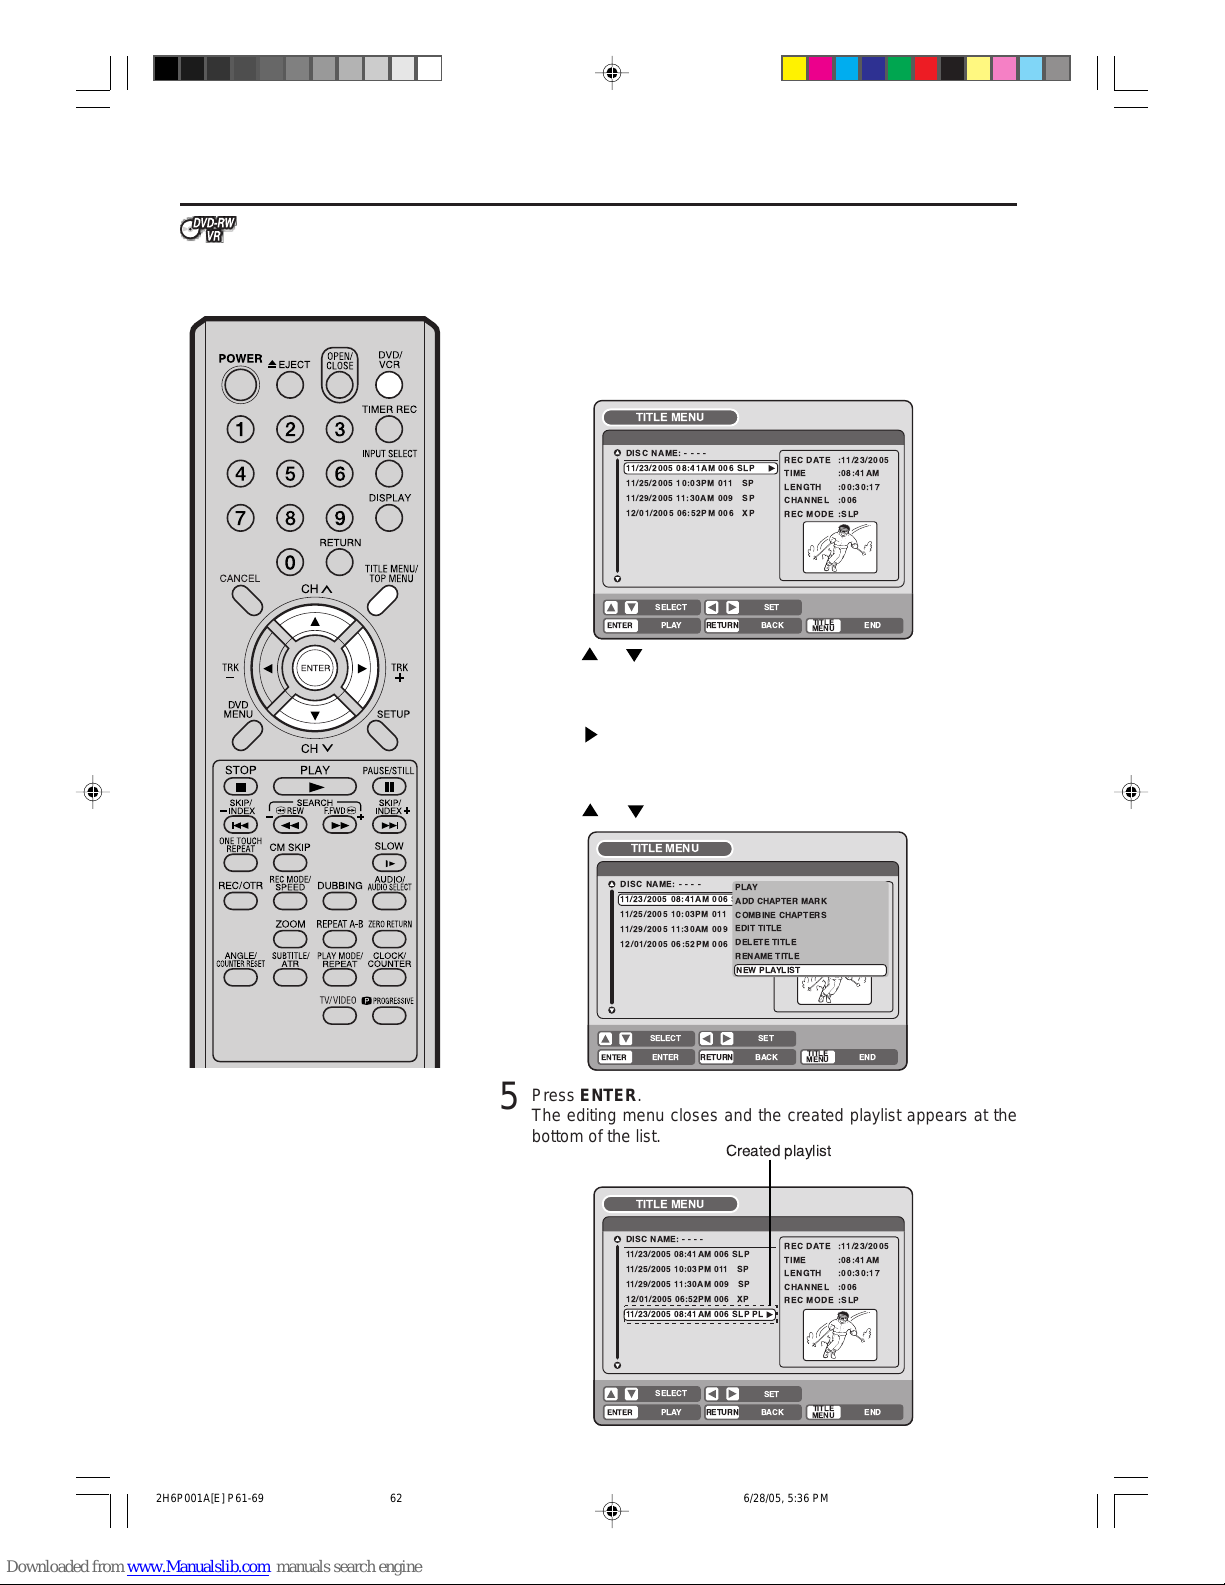
62
Editing a playlist
Y ou can create and edit the playlist
based on the original title.
NOTES:
• A playlist can only be created with
a DVD-RW in VR mode. You cannot create a playlist with a DVDRW in Video mode, nor with a
DVD-R.
• In case the disc includes more than
10 titles, you can turn to the next
or the previous page. (See page
34.)
Preparation:
• Turn ON the TV and set to the video input mode.
• Load the recorded DVD-RW (VR).
• Press DVD/VCR to select the D VD mode. (The DVD indicator will light.)
Creating a playlist
1
Press TITLE MENU.
The title menu will appear.
2
Press or to select the original title which will be used as the
base of a playlist.
3
Press .
The editing menu of original title will appear.
4
Press or to select “NEW PLAYLIST”.
ENTER
RETURNPLAY BACK
SET
END
SELECT
TITLE
MENU
DISC NAME:----
Title 1
11/25/2005 10:03PM 011 SP
11/29/2005 11:30AM 009 SP
12/01/2005 06:52PM 006 XP
11/23/2005 08:41AM 006 SLP
REC DATE :11/23/2005
TIME :08:41AM
LENGTH :00:30:17
CHANNEL :006
REC MODE :SLP
TITLE MENU
ENTER
RETURNPLAY BACK
SET
END
SELECT
TITLE
MENU
DISC NAME:----
11/23/2005 08:41AM 006 SLP
11/25/2005 10:03PM 011 SP
11/29/2005 11:30AM 009 SP
12/01/2005 06:52PM 006 XP
11/23/2005 08:41AM 006 SLP PL
11/23/2005 08:41AM 006 SLP PL
REC DATE :11/23/2005
TIME :08:41AM
LENGTH :00:30:17
CHANNEL :006
REC MODE :SLP
TITLE MENU
Created playlist
ENTER
RETURNENTER BACK
SET
END
SELECT
TITLE
MENU
DISC NAME:----
Title 1
11/25/2005 10:03PM 011 SP
11/29/2005 11:30AM 009 SP
12/01/2005 06:52PM 006 XP
11/23/2005 08:41AM 006 SLP
REC DATE :11/23/2005
TIME : 08:41AM
LENGTH : 00:01:17
TITLE MENU
PLAY
ADD CHAPTER MARK
COMBINE CHAPTERS
EDIT TITLE
DELETE TITLE
RENAME TITLE
NEW PLAYLIST
NEW PLAYLIST
5
Press ENTER.
The editing menu closes and the created playlist appears at the
bottom of the list.
2H6P001A[E] P61-69 6/28/05, 5:36 PM62
Page 63
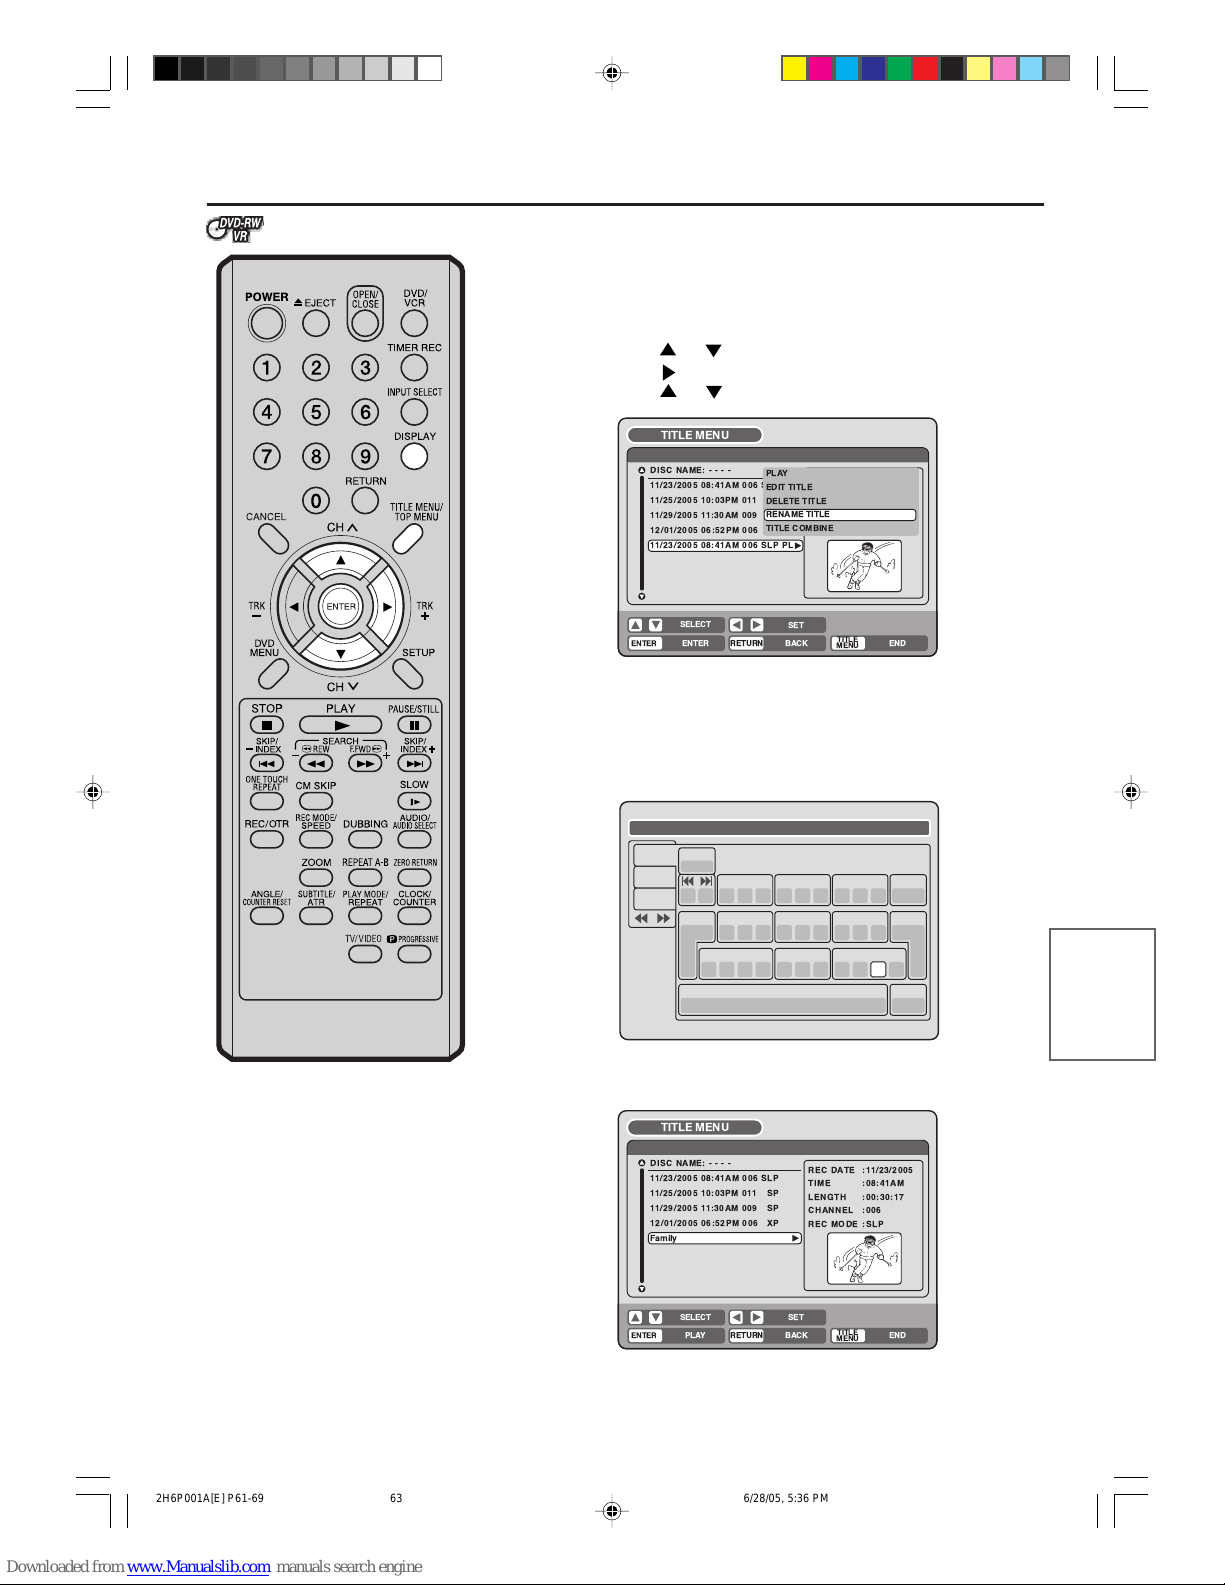
63
Editing the disc
Editing a playlist
NOTES:
• The title name can be a maximum
of 64 characters. Long names will
be shortened in the title menu.
•
For using the keyboard screen, see
“Changing a disc name” (page 74).
Changing a title name
1
Press TITLE MENU to display the title menu.
2
Select the playlist where you want to change the title name.
• Press or to select the playlist.
• Press
to display the editing menu of the playlist.
• Press or to select “RENAME TITLE”.
3
Press ENTER.
The keyboard screen will appear.
4
Use the keyboard screen to enter the title name.
5
Press DISPLAY to return the title menu.
Family
1
( .< > #2a b c3d e f
CANCEL
Back
RETURN
Exit
STOP
Caps
0
Space bar
4
g h i5j k l6m n o
7
qp r s8t u v9w x y z
DISPLAY
OK
DISPLAY
OK
Numbers
Signs
Letters
ENTER
RETURNENTER BACK
SET
END
SELECT
TITLE
MENU
DISC NAME:----
11/23/2005 08:41AM 006 SLP
11/25/2005 10:03PM 011 SP
11/29/2005 11:30AM 009 SP
12/01/2005 06:52PM 006 XP
11/23/2005 08:41AM 006 SLP PL
REC DATE :11/23/2005
TIME :08:41AM
LENGTH :00:30:17
CHANNEL :006
REC MODE :SLP
TITLE MENU
PLAY
EDIT TITLE
DELETE TITLE
RENAME TITLE
TITLE COMBINE
RENAME TITLE
ENTER
RETURNPLAY BACK
SET
END
SELECT
TITLE
MENU
DISC NAME:----
11/23/2005 08:41AM 006 SLP
11/25/2005 10:03PM 011 SP
11/29/2005 11:30AM 009 SP
12/01/2005 06:52PM 006 XP
Family
REC DATE :11/23/2005
TIME :08:41AM
LENGTH :00:30:17
CHANNEL :006
REC MODE :SLP
TITLE MENU
2H6P001A[E] P61-69 6/28/05, 5:36 PM63
Page 64
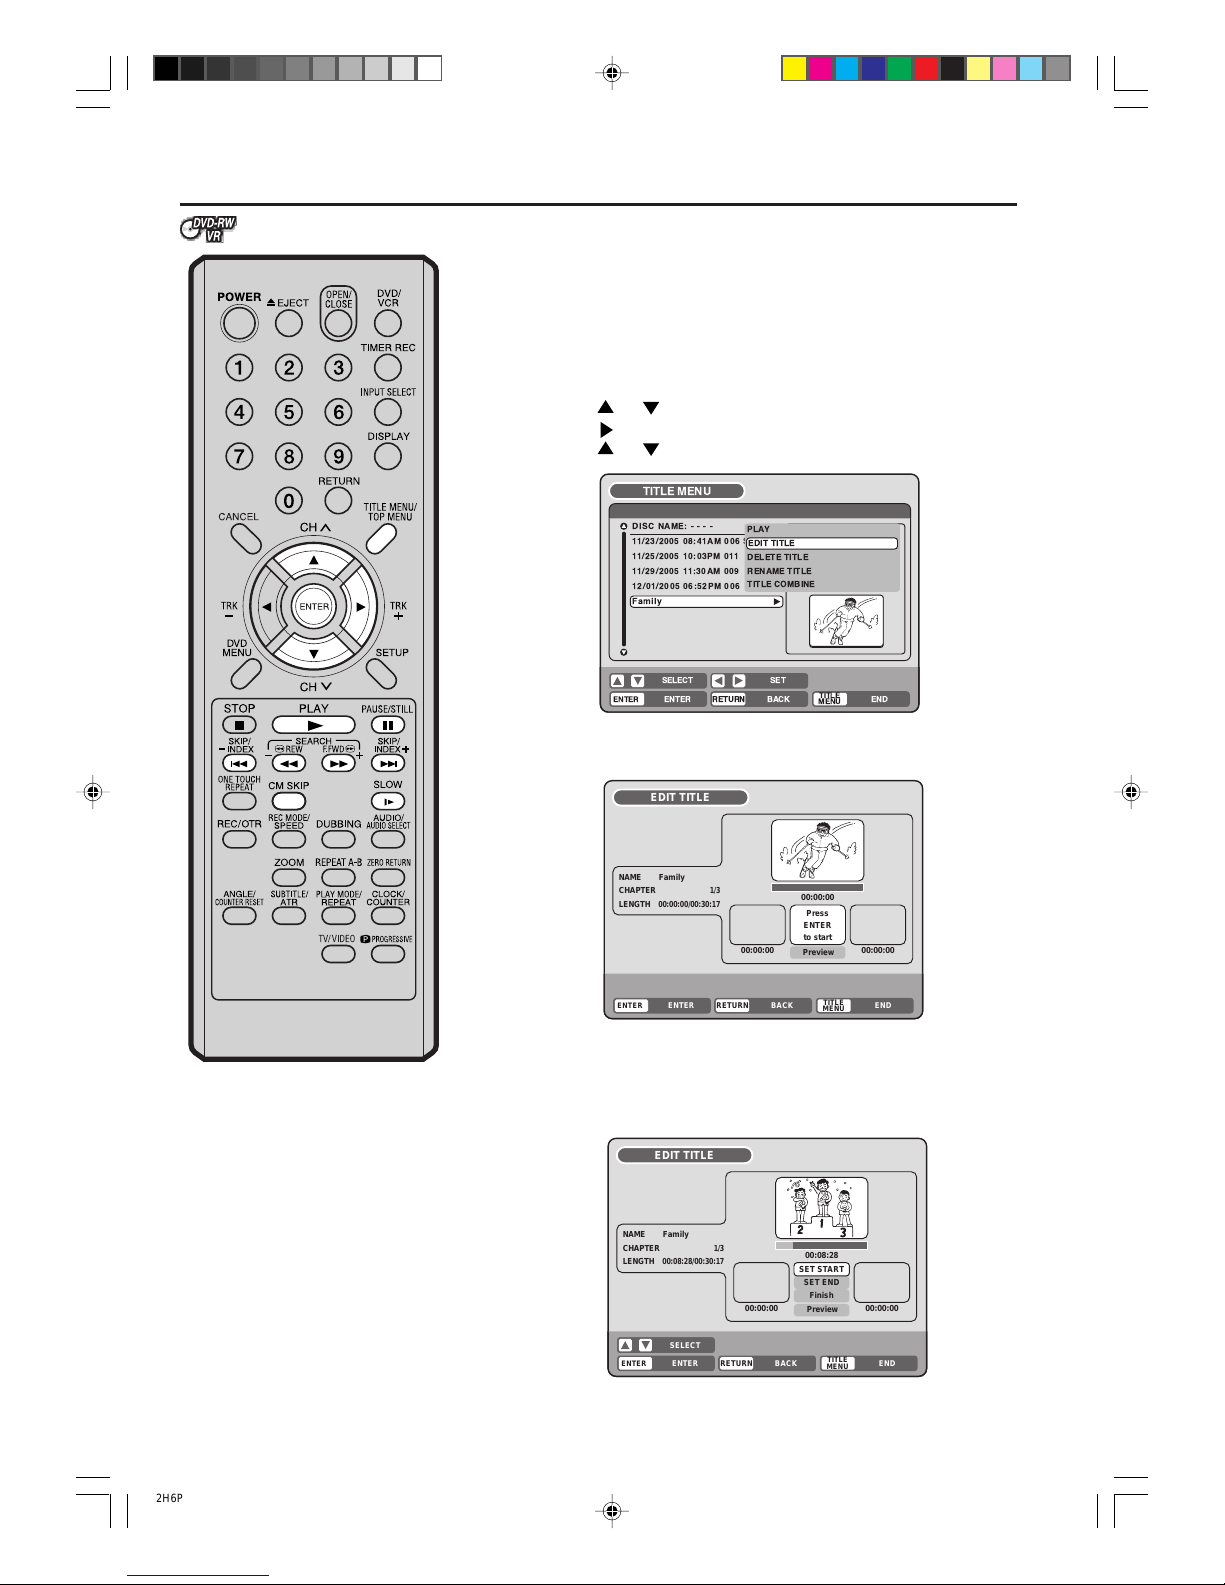
64
Editing a playlist
Erasing a scene (Edit title)
You can erase an unnecessary scene from the created playlist.
When you erase the scene from the playlist, the scene is not erased
from the original title.
1
Press TITLE MENU to display the title menu.
2
Select the playlist where a scene you want to erase is included.
• Press
or to select the playlist.
• Press to display the editing menu of the playlist.
• Press or to select “EDIT TITLE”.
3
Press ENTER.
The EDIT TITLE screen appears.
4
Press ENTER to playback the playlist on the EDIT TITLE screen.
• Use each operation button (F .FWD, REW, SKIP +, SKIP –, PLA Y,
P A USE/STILL, SLOW, CM SKIP) f or the playbac k to search the
starting point of the scene you want to erase.
ENTER
RETURNENTER BACK
SET
END
SELECT
TITLE
MENU
DISC NAME:----
11/23/2005 08:41AM 006 SLP
11/25/2005 10:03PM 011 SP
11/29/2005 11:30AM 009 SP
12/01/2005 06:52PM 006 XP
Family
REC DATE :11/23/2005
TIME :08:41AM
LENGTH :00:30:17
CHANNEL :006
REC MODE :SLP
TITLE MENU
PLAY
EDIT PROGRAM
DELETE TITLE
RENAME TITLE
TITLE COMBINE
EDIT TITLE
ENTER
RETURNENTER BACK END
TITLE
MENU
EDIT TITLE
NAME Family
CHAPTER
1/3
LENGTH
00:00:00/00:30:17
00:00:00
00:00:00 00:00:00
Preview
Press
ENTER
to start
SELECT
ENTER
RETURNENTER BACK END
TITLE
MENU
EDIT TITLE
00:08:28
00:00:00 00:00:00
Preview
SET START
SET END
Finish
NAME Family
CHAPTER
1/3
LENGTH
00:08:28/00:30:17
2H6P001A[E] P61-69 6/28/05, 5:36 PM64
 Loading...