

Page 1
www.electrohome.ca
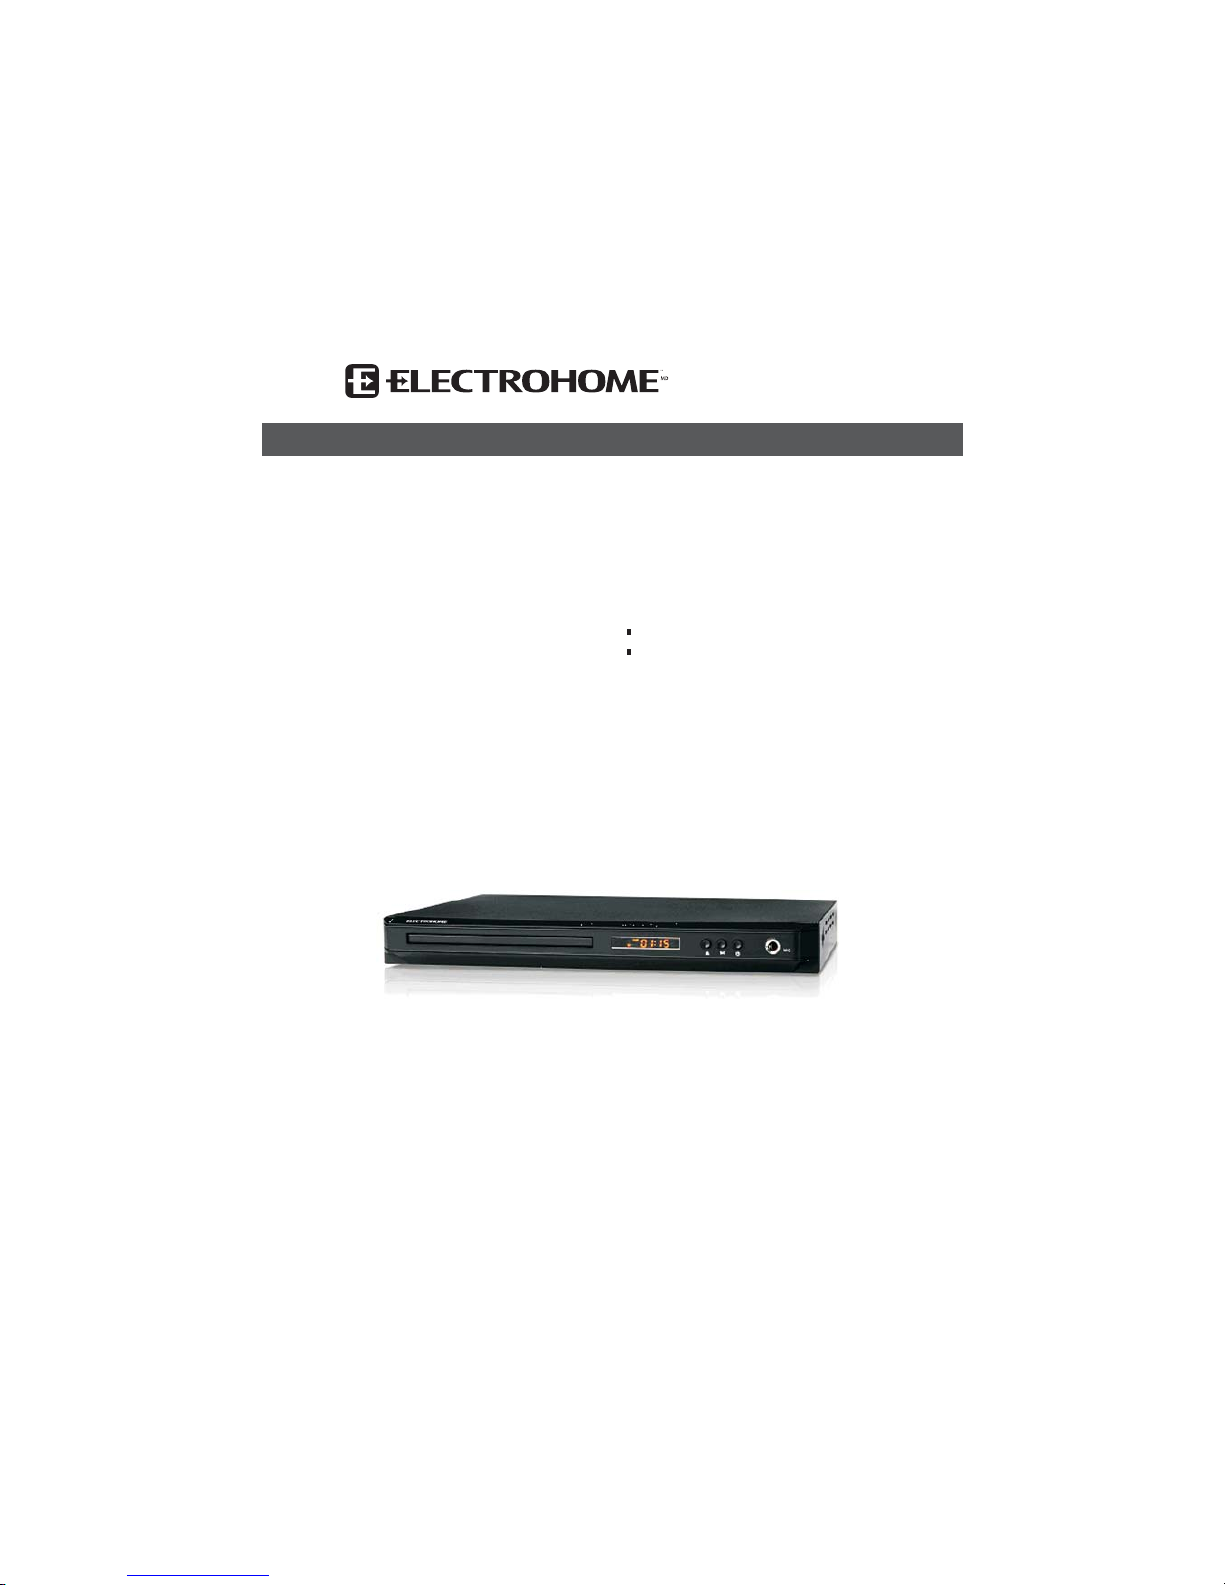
1080p Up Converting
DVD Player with Karaoke
Karaoke Playback
1080p Up Conversion
User’s Manual
Page 2
Dear Customer:
Thank you for purchasing this Electrohome DVD player. It is recommended you read this manual carefully prior to
using the productand pay close attention to the following items:
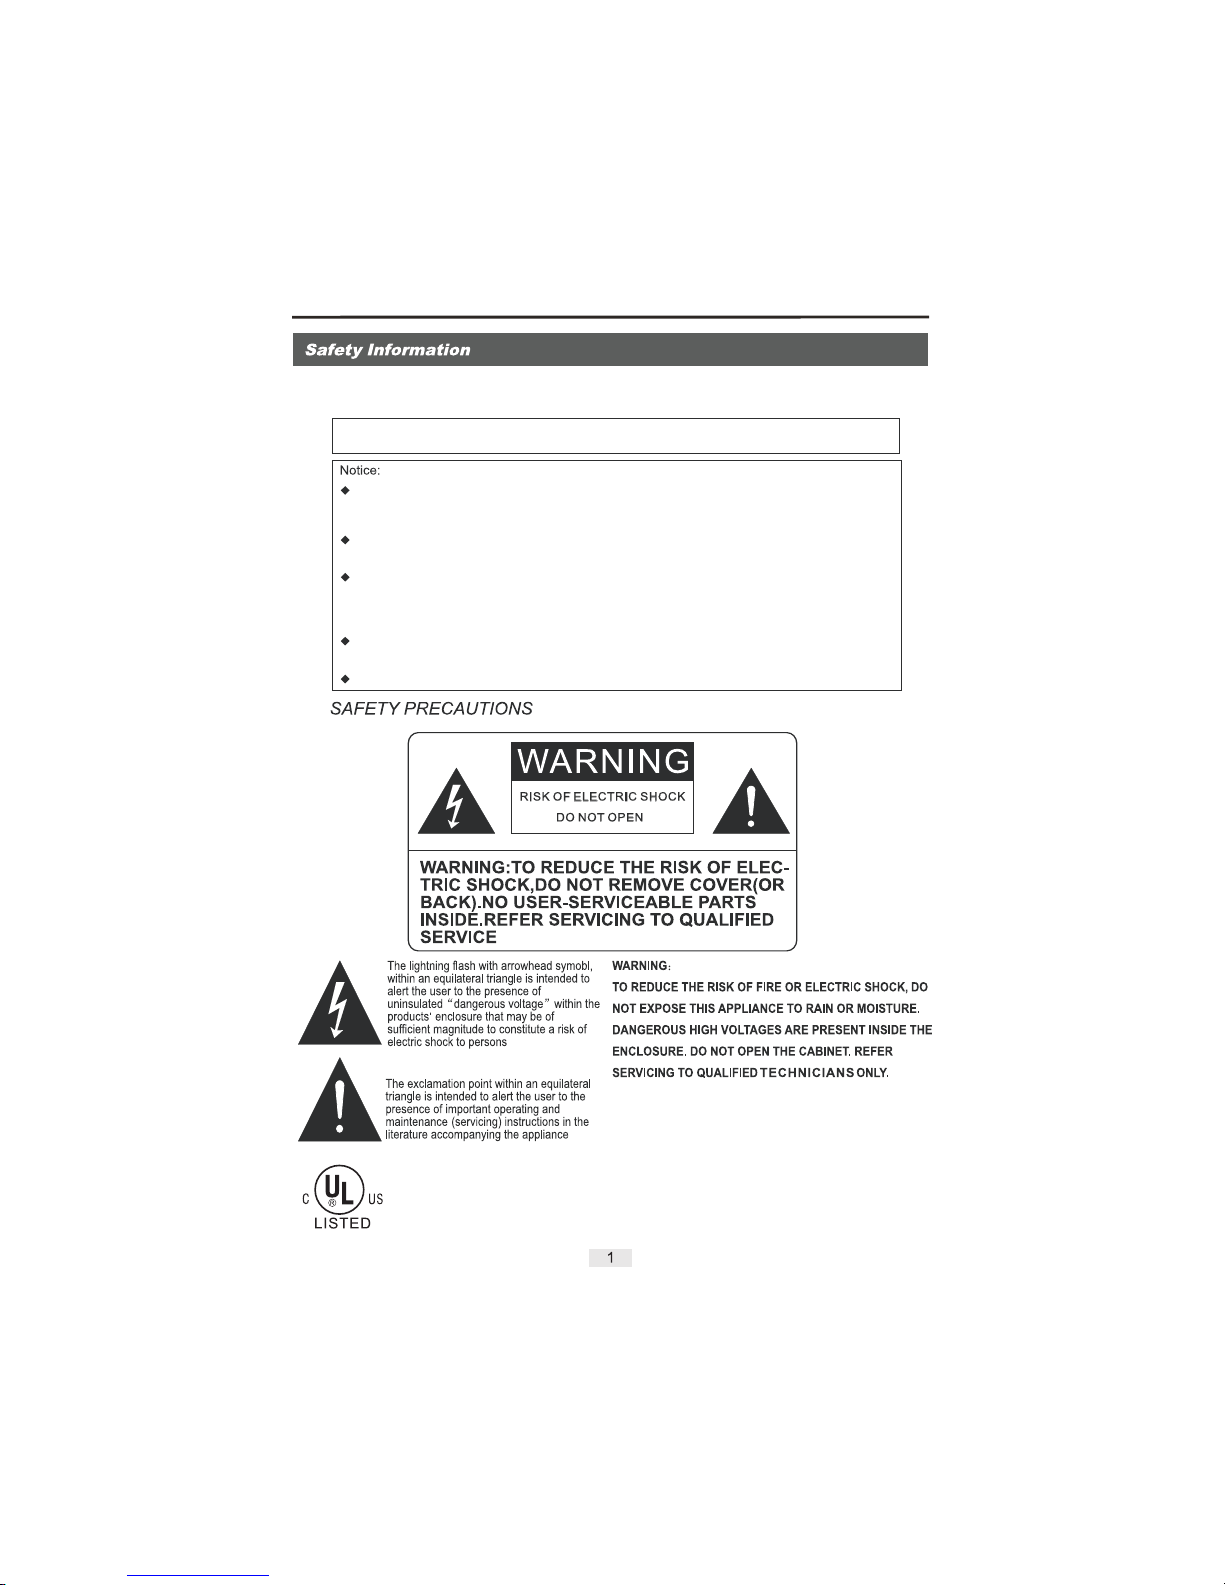
This DVD player is a Class I laser device that uses visible laser beams and direct exposure to
suc h laser b eams ma y be harm ful to th e human b ody. Do no t rem ove the c asing o r the
mechanism cover.
Do not attempt to view the disc inside the player while it is in use. The laser can be harmful to your
eyes if viewed directly.
Do not remove the protective cap over the optical audio output jack, unless to connect an optical
audio cable, or look into the jack when the player is on. There is a red laser beam that emits from
the jack that is harmful to the eye. When this jack is not in use, the protective cap should be
inserted.
Follow the instructions provided for the operation, adjustment and control of the product to avoid
any possible radioactive hazards.
For any question or technical support, please contact 1-800-663-5954.
TECHNICIANS
WARNING:
The product should never be exposed to dripping or splashing and no objects filled with liquid,
such as vases, should be placed on the product.
Power supply:AC/CA 120V ~60Hz
Page 3
All the safety and operating instructions should be
read before this product is operated.
These safety and operating instructions should be
retained for future reference.
All warnings on this product and in the operating
instructions should be adhered to.
Do not use attachments not recommended by
Electrohome as they may cause hazards.
Do not place this product on an unstable card,
stand, tripod, bracket, or table.The product may
fall, causing serious injury and serious damage.
Use only with accessories recommended by
Electrohome. Any mounting of this product should
be done using mounting accessories and
instructions recommended by Electrohome.
A product and cart combination should be moved
with care. Quick stops, excessive force, and
uneven surfaces may cause the product and cart
combination to overturn.
Slots and openings in the cabinet are provided
for ventilation and to ensure reliable operation
of the product and protect it from overheating.
These openings must not be blocked or
covered. The openings should never be
blocked by placing the product on a bed, sofa,
rug, or other similar surface.This product
should not be placed in a built-in installation
such as a bookcase or rack unless proper
ventilation is provided or Electrohome's
instructions have been adhered to.
This product should be operated only from the
type of power source indicated on the product
rating label. If you are not sure of the type of
power supply where this product is being
operated, consult your product dealer, local
power company or call 1-800-663-5954.
This product may be equipped with a polarized
alternating current line plug (a plug having one
blade wider than the other).This plug will fit
into the power outlet only one way. This is a
safety feature. Make sure to match the wide
blade to the wide slot on the outlet. Do not use
excessive force when plugging into the outlet.
If the plug fails to fit, contact your electrician to
replace the obsolete outlet. Do not defeat the
safety purpose of the polarized plug.
This product is equipped with an attachment
plug with overload protection. This is a safety
feature. Refer to the Instruction Manual for the
replacement or resetting of the protective
device. If replacement of the plug is required,
contact 1-800-663-5954 for servicing.
Do not place this product new water, liquids or
objects containing liquids such as vases.
Page 4
Features & Special Attentions
This player uses the Dolby Digital
decoding system.
Uses the latest decoding servo chip technology,
stable and reliable.
Hi-Fi sound quality, 96KHz/24bit digital audio
processing.
Read the following prior to operating this player:
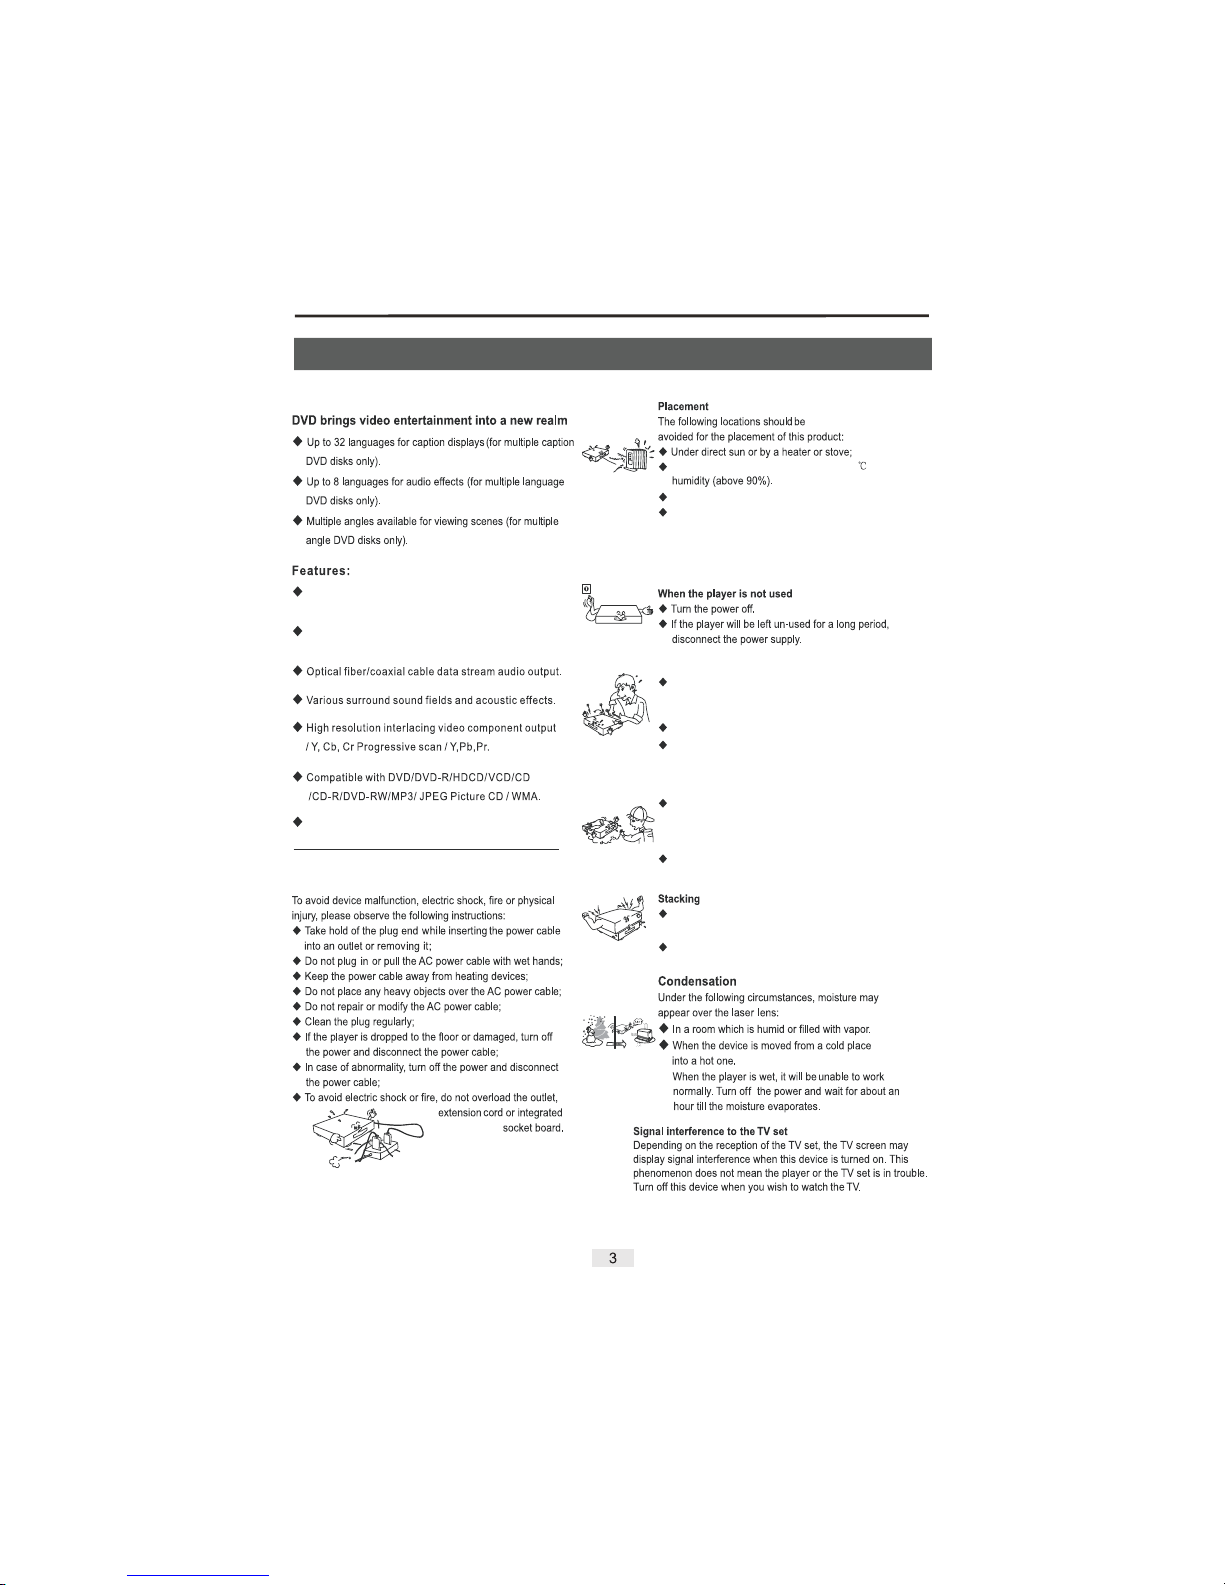
Protection of the Power Cable
Near high temperatures (above 35 ), or high
In a dusty or sandy place.
Near a strong magnetic field or strong
electrostatic field.
Vibration, impacts or uneven surfaces may
also cause problems with the operation of
this product.
Do not put objects into the player.
High voltage inside.Touching the parts
inside may result in damage to the device
or serious injury.
Do not dismantle this device.
Do not place anything other then a DVD
or CD o nto the C D tray.
Water and magnetic objects should be avoided
Keep any objects containing liquids such as
a vase, bucket or washing basin away from
the device.Any liquid that may enter the
device may cause serious damage.
Keep strong magnetic objects such as a
loudspeaker away from the device.
Place the device in a level position. Do not
put any objects on top of it.
Do not place the product over any heating
devices.
Page 5
Safety Information --------------------------------------------------1
Features & Special Attentions ------------------------------------3
Content ---------------------------------------------------------------4
General Features ---------------------------------------------------5
Front Panel and Rear Panel --------------------------------------6
Remote Control -----------------------------------------------------7
System Connection -------------------------------------------- 9-13
Basic Operation ---------------------------------------------- 14-15
Program Setting ---------------------------------------------------16
HDMI Operation ---------------------------------------------------17
Menu Structure ------------------------------------------------18-19
Using the Setup Menu --------------------------------------- 20-21
Troubleshooting ---------------------------------------------------22
Specifications -----------------------------------------------------23
Warranty ------------------------------------------------------------24
Remote Control Preparation --------------------------------------8
Karaoke Operation ------------------------------------------------17
Page 6
Audio
Screen
Slow Motion
Programmed Play(CD)
Parental Control(DVD)
Various On-Screen Menu Functions
Digital Photo Viewer (JPEG)
Repeat
MP3
Dobly Digital, a technology developed by Dolby
Laboratories, provides crystal clear sound reproduction.
Video with MPEG-2 compression technology.
Both regular and widescreen (16:9) pictures can be
viewed.
A scene can be viewed in slow motion.
You ca n pro gra m tra cks t o play in a d esire d order.
The parental control allows users to set a level
necessary to prohibit children from viewing unsuitable
content.
You can select various languages (Audio/Subtitle) and
screen angles while enjoying movies.
You can view Digital Photos on your TV.
You can repeat a song or movie simply by pressing the
REPEAT button.
This unit can play discs created from MP3 files.
Page 7
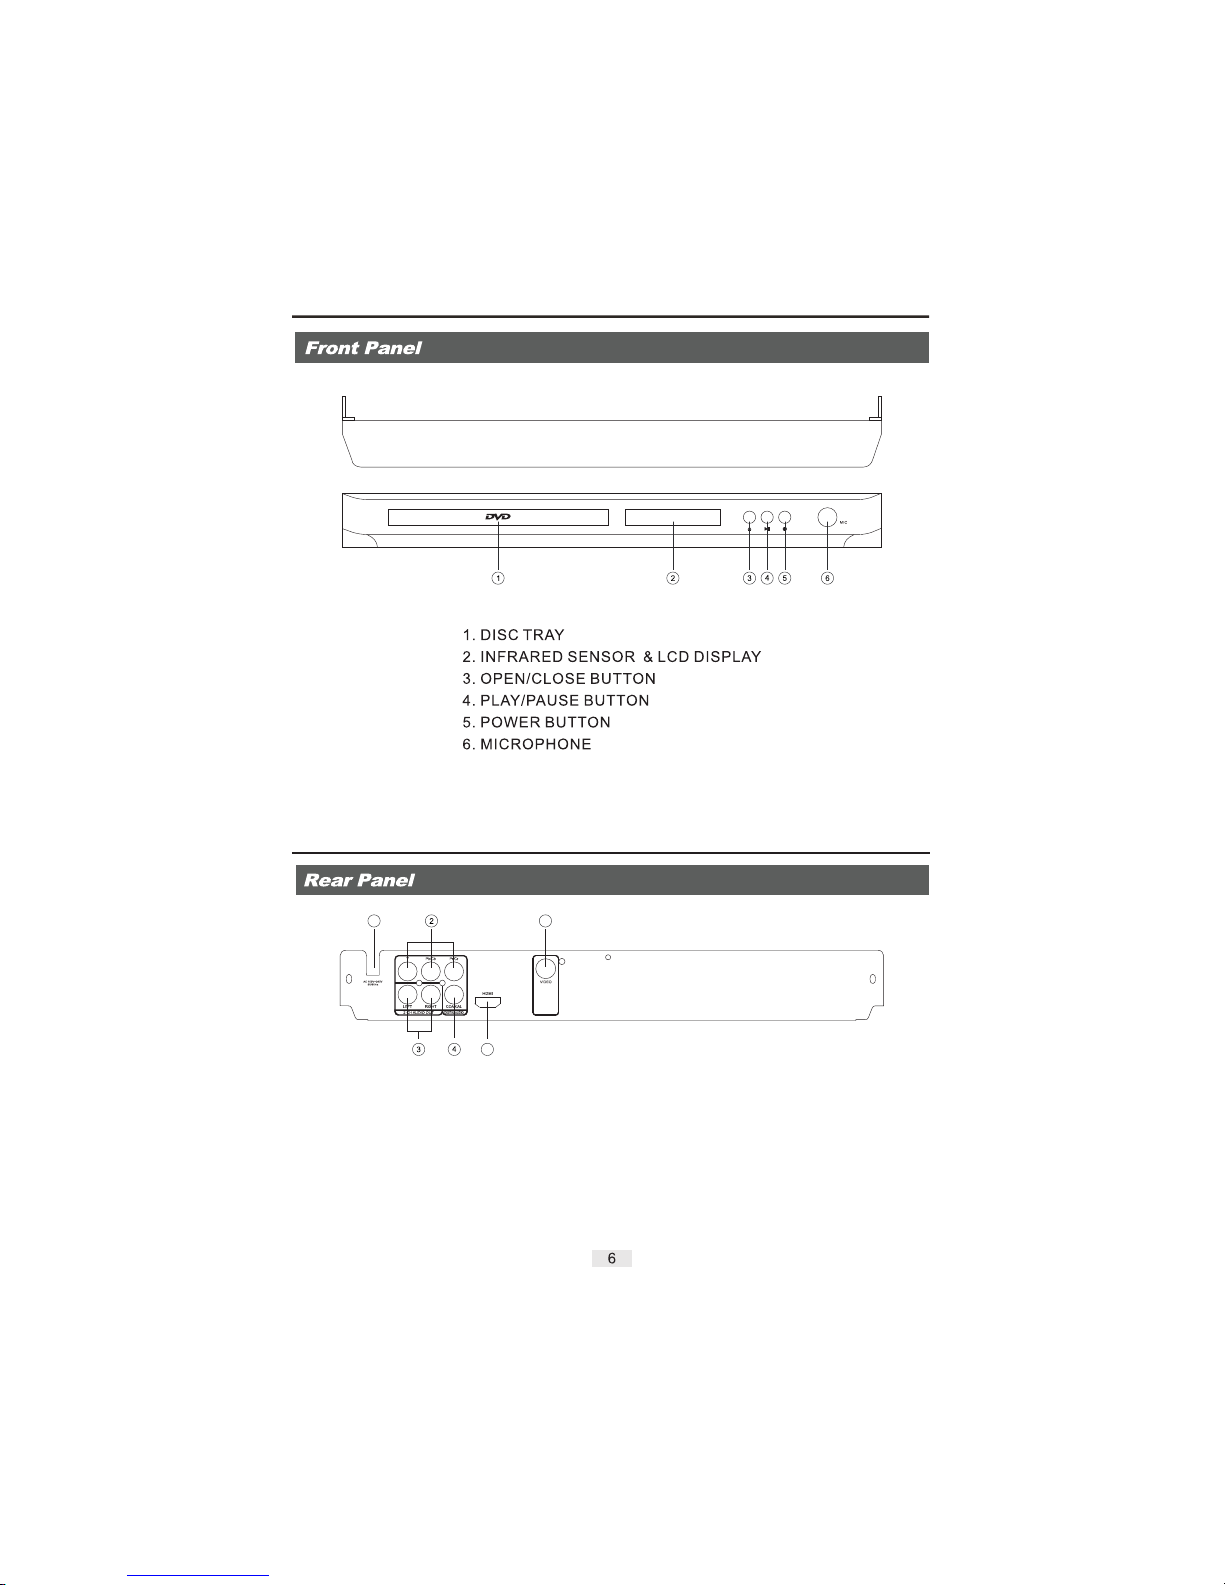
1. AC Power Cord
2. Y, Pb/Cb, Pr/Cr Component output jack
3. 2ch Left/Right output jack
4. Digital Signal Coaxial output jack
5. High Definition Multimedia Interface output
6. Video output jack
6
5
1
Page 8
VOLUME
EDVD655
Page 9
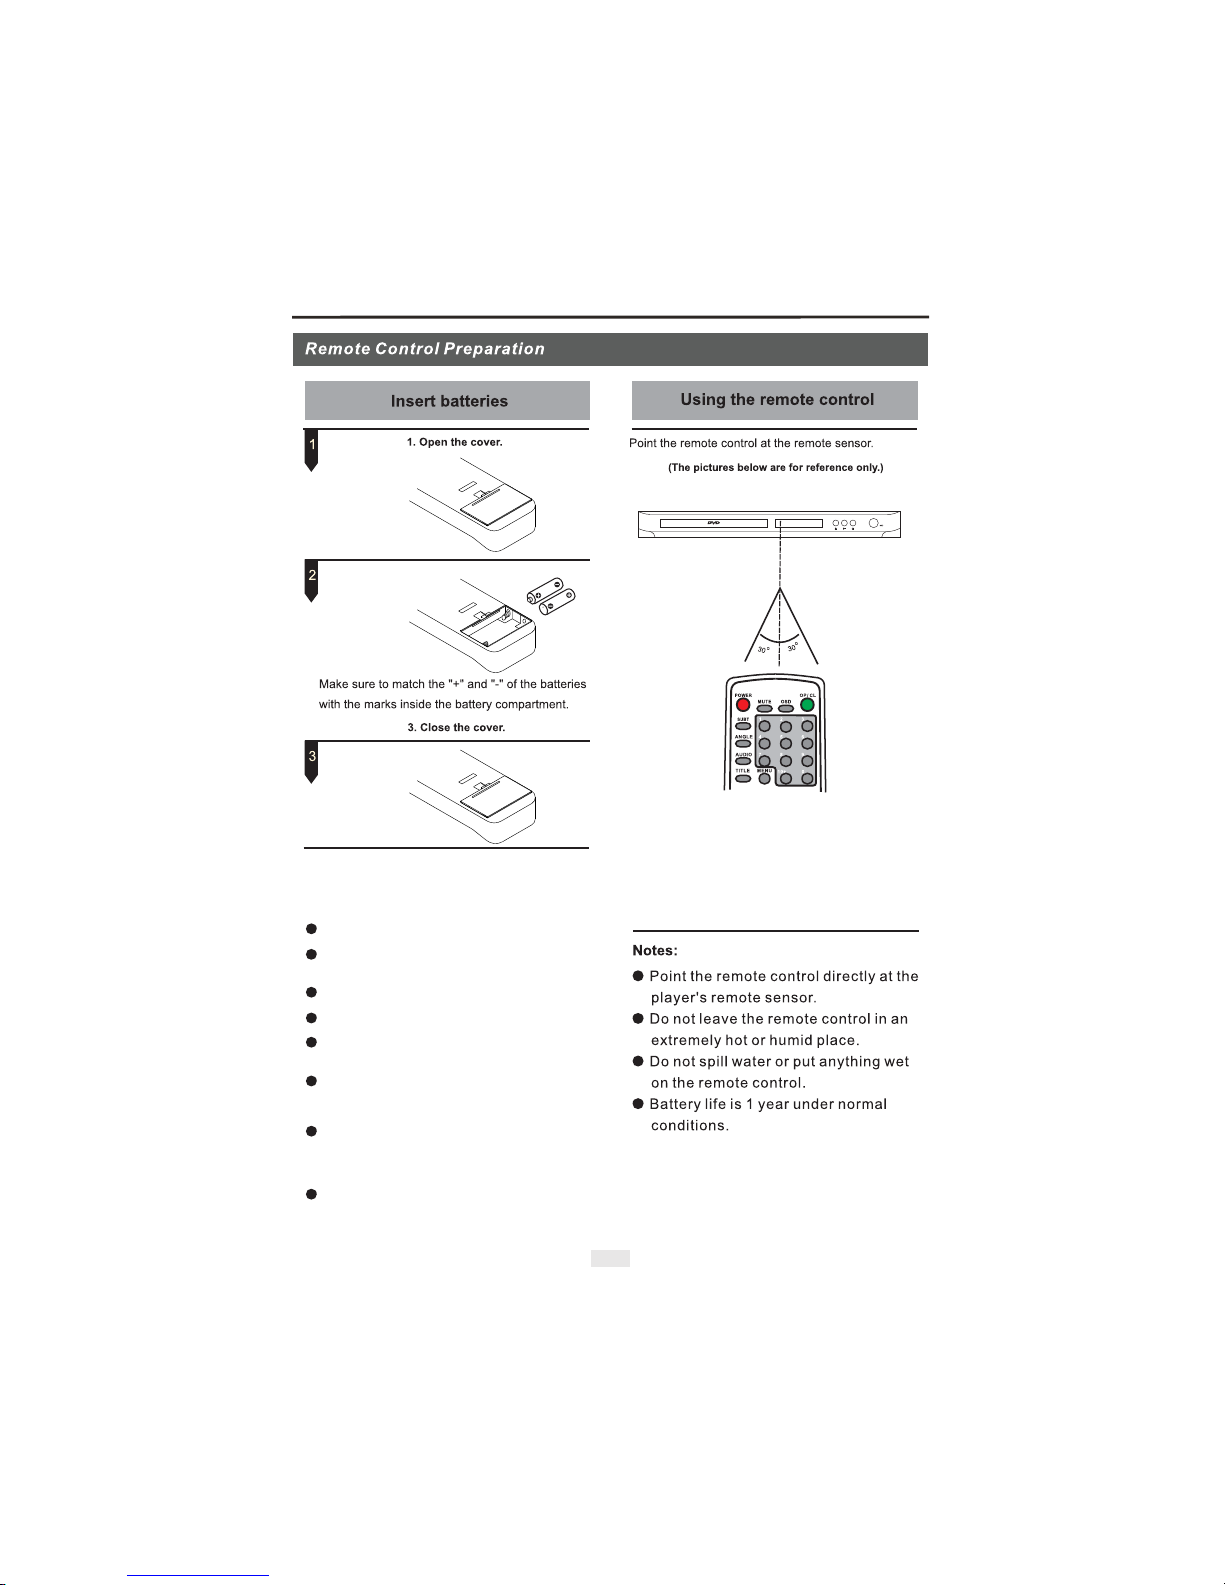
2. Insert the batteries.
Note: Do not expose the remote sensor of the
DVD Player to a strong light source, such as direct
sunlight.
Notes:
Improper use of batteries may cause battery
leakage and corrosion.To operate the remote
control correctly, follow the instructions below:
Do not insert the batteries in the wrong direction.
Do not charge, heat, open, or short-circuit the
batteries.
Do no t throw t he batt eries i nto a fir e.
Do not leave dead batteries in the Remote Control.
Do not use different types of batteries together, or
mix old and new batteries.
If yo u do not us e the rem ote con trol fo r a long
period of time, remove the batteries to avoid
possible damage from battery corrosion.
If the remote control does not function correctly or
the operating range is reduced or limited
substantially, replace all of the batteries with new
ones.
If battery leakage occurs, clean the battery
compartment, then insert new ones.
8
Page 10
9
Page 11
10
Page 12
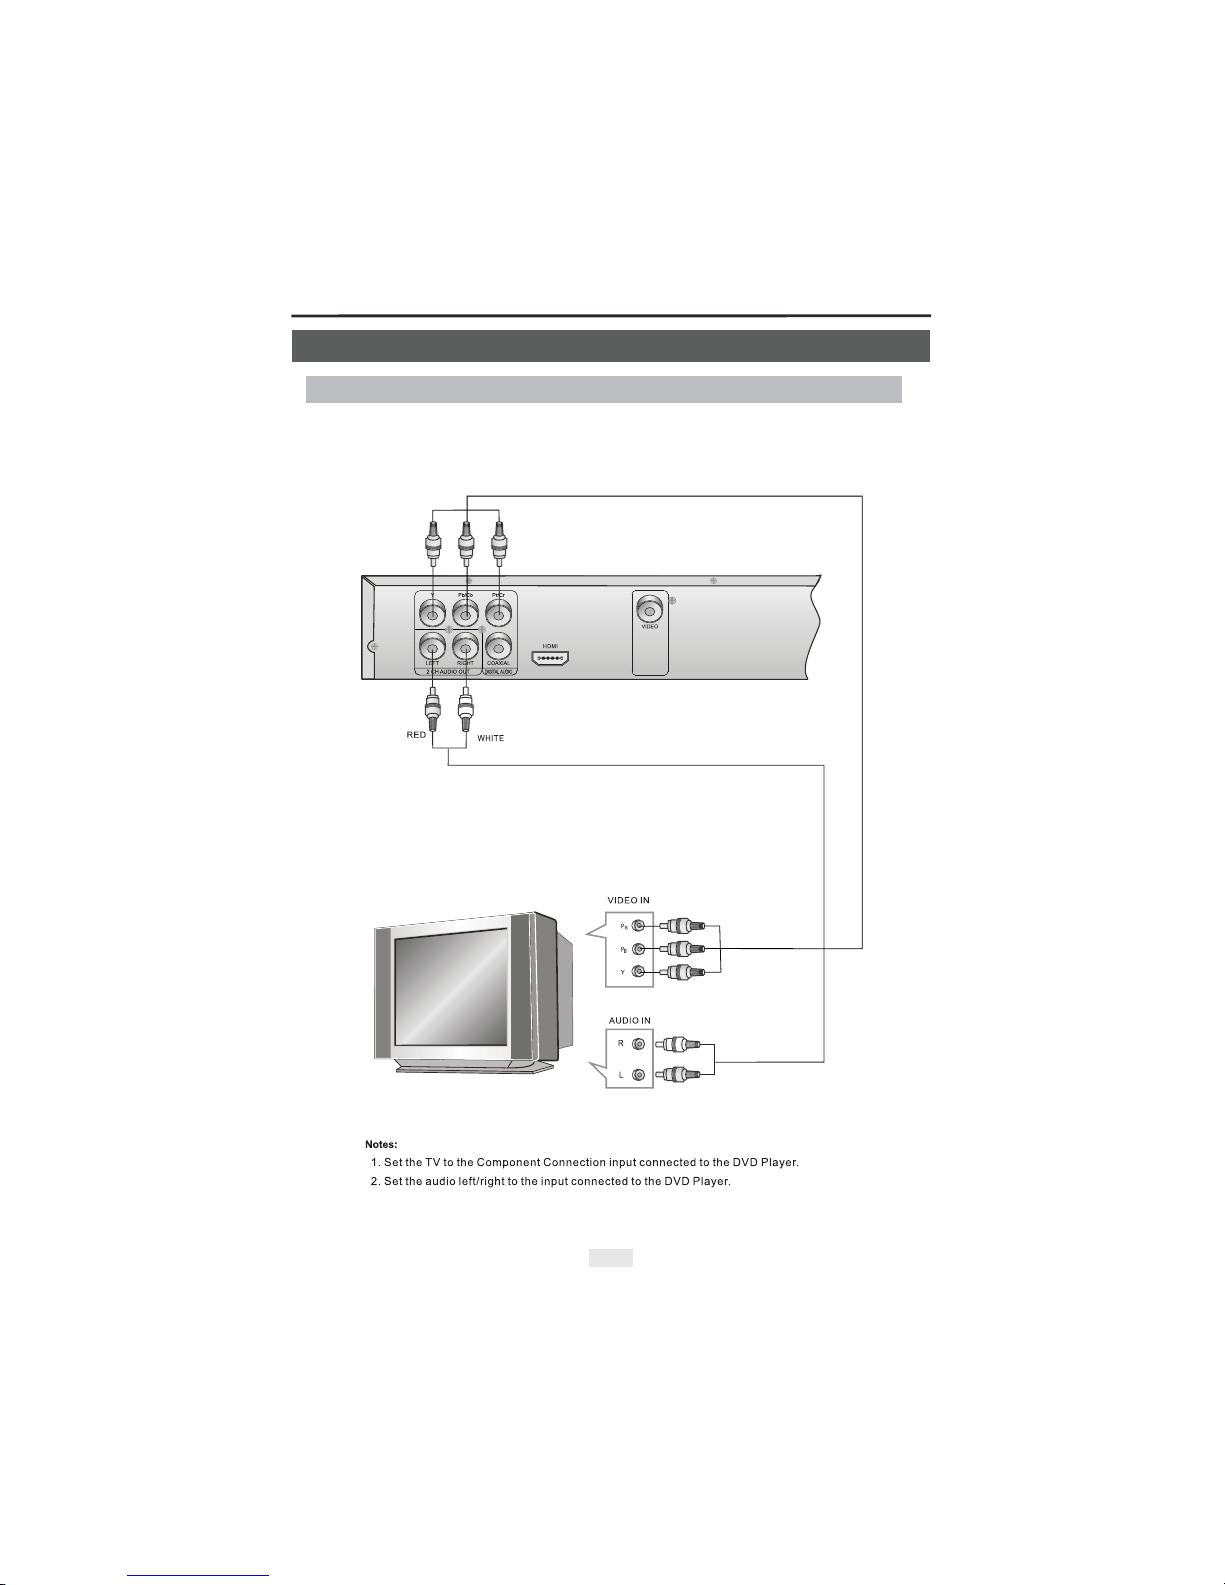
System Connection (Component Connection)
(Connecting a Component Cable with 2 Channel Analog Audio Input)
11
Page 13
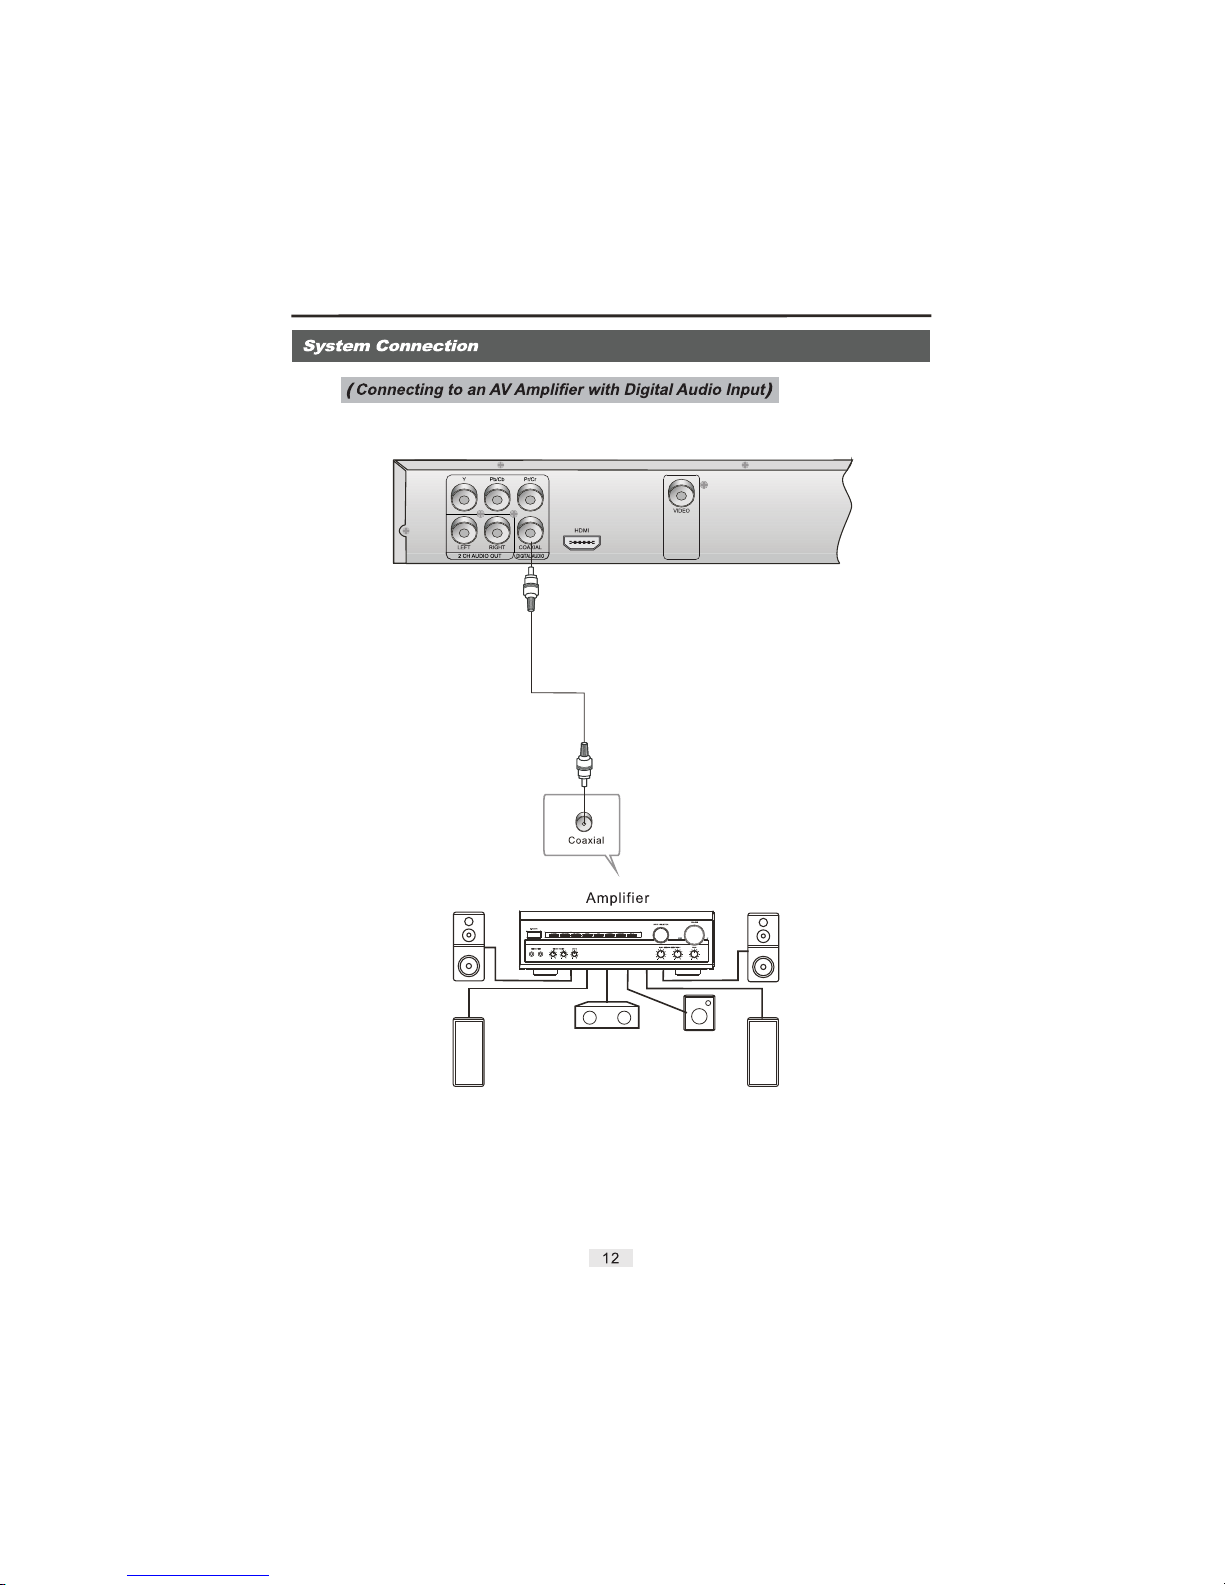
Notes:
1. Select the Coaxial digital audio output.
2. S et th e DVD player's audio out to or mode.
3. Set the amplifier to the AV input connected to the DVD player.
ALL PCM
Digital Coaxial Cable
Page 14
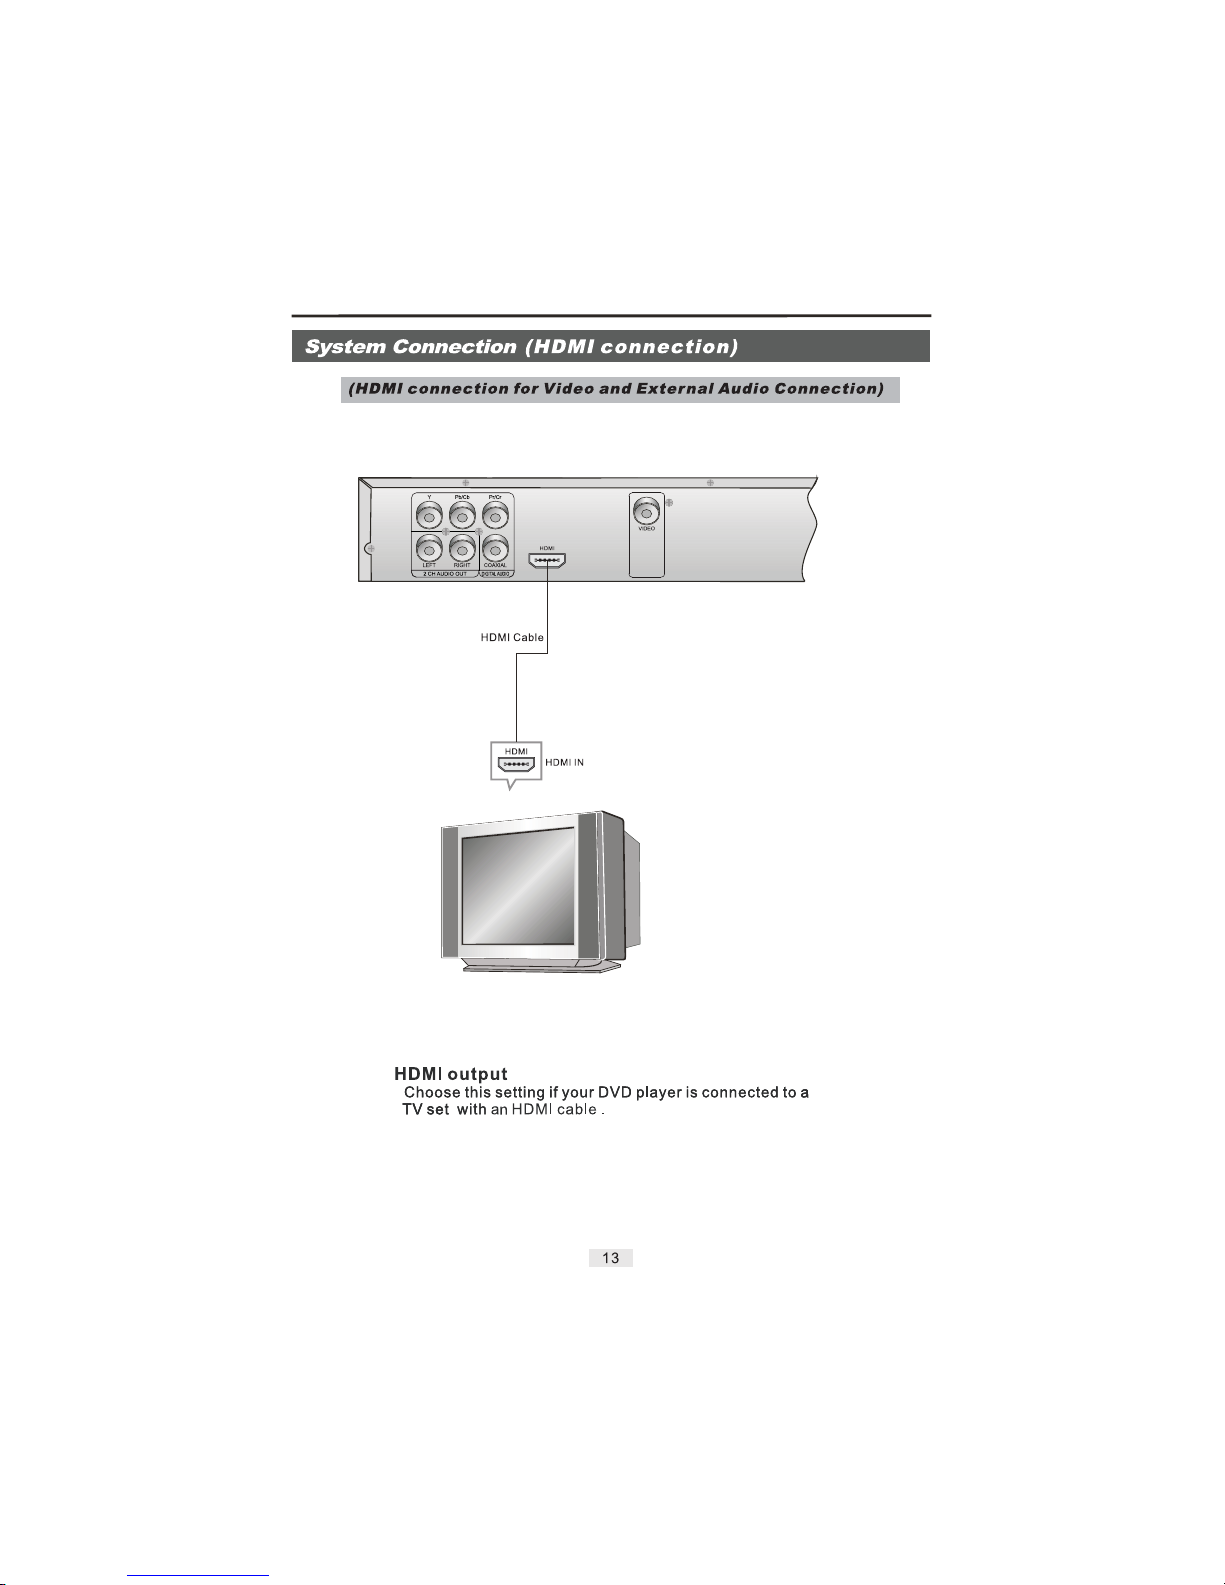
Note: Go to page 17 for HDMI setup.
Page 15
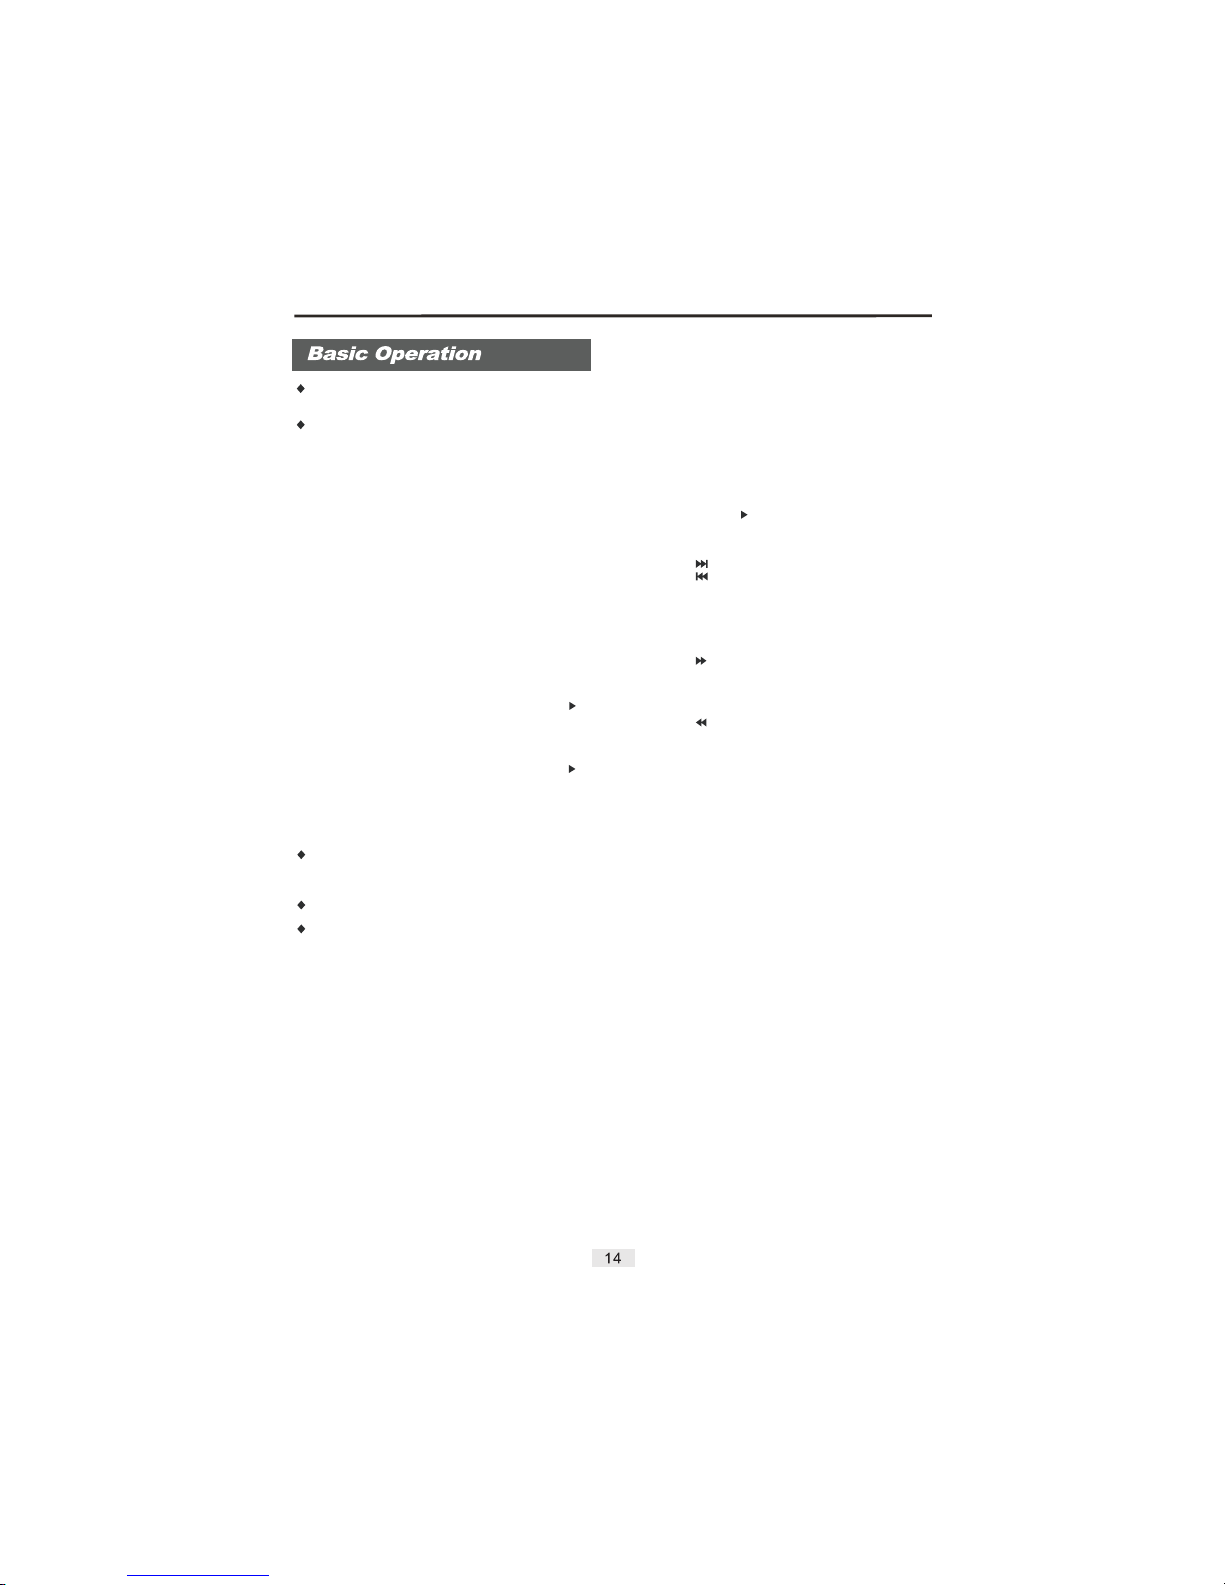
Turn on your TV and set it to the correct Video
input.
If you connected an external Audio system, turn on
your Audio system and set it to the correctAudio
input
Ope n the tra y and pla ce a disc g ently i nto the t ray wit h
the disc's label facing up. Press again
to cl ose the t ray.
When the player is playing, press the button
to pause.
Note: The picture is now frozen or in Still Frame
mode.
Press the button to stop in two ways:
a) Press Once:The DVD will stop and you can
resume where you left off by pressing the PLAY
button.
b) Press Twice: The DVD will stop and you will lose
the resume function.
Note: STOP memorizes the last frame displayed. If
the DVD is completely stopped, pressing the PLAY
button will start the disc from the beginning.
Press the button during play.
With each press of the button. you can
select slow motion play for 1/2, 1/4, 1/6 or 1/8 of
The normal speed.
No sound is heard during SLOW mode.
Press PLAY button to resume normal playback.
When the DVD is playing, press the button to
step forward the picture frame by frame.
Press the buttons to select the
desired feature in the menu, and then press the
button to confirm a selection.
Whe n the pla yer is pl aying a V CD disc , you may h ave
to press button to select the Left, Right or
Stereo soundtrack output.
1. Press the POWER button.
2. Press the OPEN/CLOSE button.
OPEN/CLOSE
3. Pause
PAUSE
4. STOP Play
STOP
5. Slow Motion Play
SLOW
SLOW
6. Step Function
STEP
7. Cursor Function
DIRECTIONAL
ENTER/PLAY
8. Audio Function
AUDIO
9. Using the Goto Function.
SEARCH
LEFT/RIGHT
Title/Chapter ---/--Time --:--:--
ENTER
10. Skip Forward/Backward.
Note:
11. Fast Forward/Rewind
Note:
12. On Screen Display Menu
DISPLAY
13. Disc/Title Menu
MENU
TITLE
Note:
Press the button to play at a specific Title,
Chapter or Time.
Press the directional buttons to
highlight the desired selection.
Input title / chapter number
Input time hh:mm:ss
Press the / button to confirm your selection.
Press the button to skip forward.
Press the button to skip backward.
The p layer m ay not ad vance o r rever se duri ng
"WARNING" sections of the disc.
Press the button to search forward.
Repeatedly pressing the button will change the
search speed by 2x, 4x, 8x, and 16x the normal
speed.
Press the button to search backward.
Repeatedly pressing the button will change the
search speed by 2x, 4x, 8x, and 16x the normal
speed.
The player may not fast forward or rewind
during "WARNING" sections of the disc.
Pre ss the but ton to sw itch th e OSD (On Screen Display) on or off while the disc is playing. The
OSD provides information about the disc you are
playing. (i.e. elapsed play-time, remaining play-time,
etc.).
There are different OSD indicators for different disc
for mats: D VD, CD, M P3, and P ictur e CD's.
The Disc Menu is a DVD disc feature that allows users
to select content on the screen.
Pre ss the b utton t o retur n to the DV D Disc
Menu.
Press the button to return to the DVD Disc Title.
Disc Title is the beginning of a DVD Disc.
Certain DVD Discs may not respond to the
“TITLE" function.
Page 16
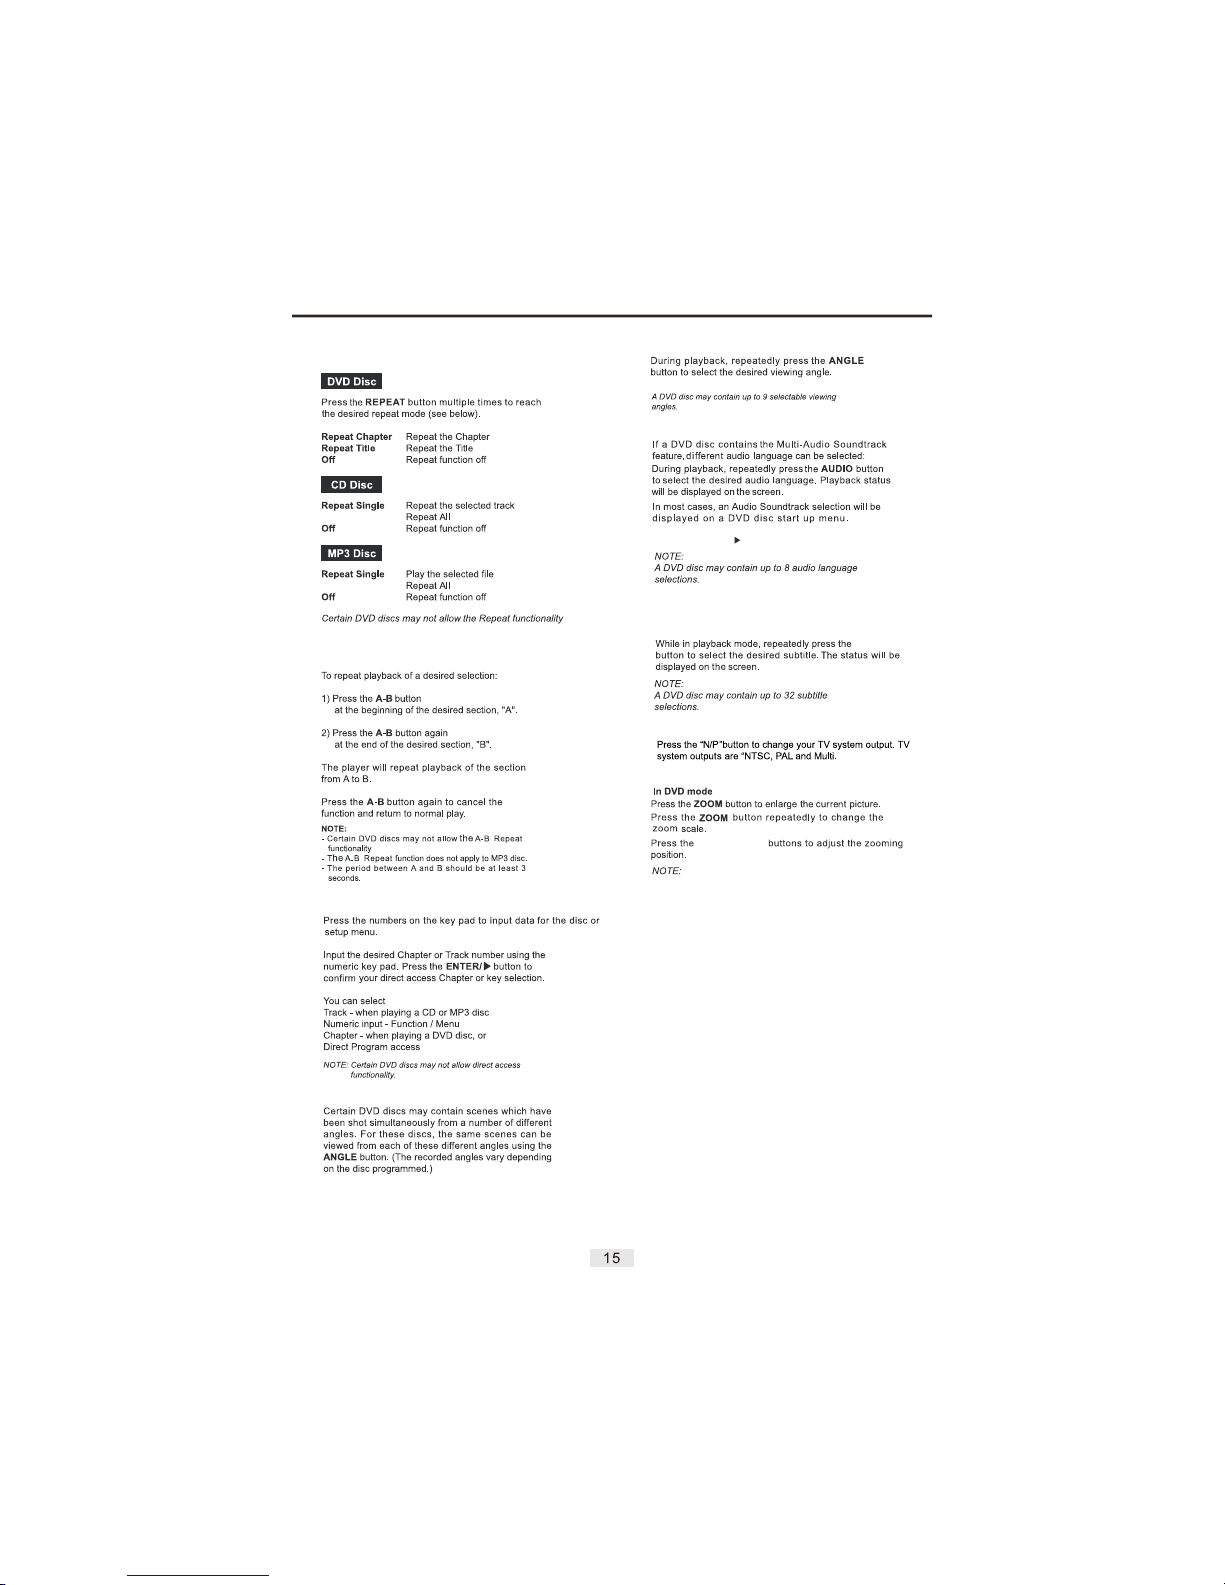
Press the button to mute (turn off) the audio
output.
MUTE
14. Repeat
15. Repeat A-B
16. Numeric Key Pad / Direct Program Access
17. Multiple Angles
18. Multi-Audio Soundtrack
19. Multiple Subtitles
If a DVD disc contains the Multi-Subtitle feature,
you may select from the discs available Subtitles.
SUBTITLE
20. N/P Button Function
21. Zoom Function
DIRECTIONAL
The picture quality will be degraded the more the picture
is zoomed.
22. Volume Up/Down
During disc playback. Press the buttons
- or + to adjust the volume output.The Volume
level will be displayed on the screen.
Volume
23. Mute
Press the button again to resume normal
audio output.
MUTE
Use
The buttons to make a selection and
press the button to confirm.
DIRECTIONA
ENTER/
Repeat Folder
Repeat Folder
Page 17
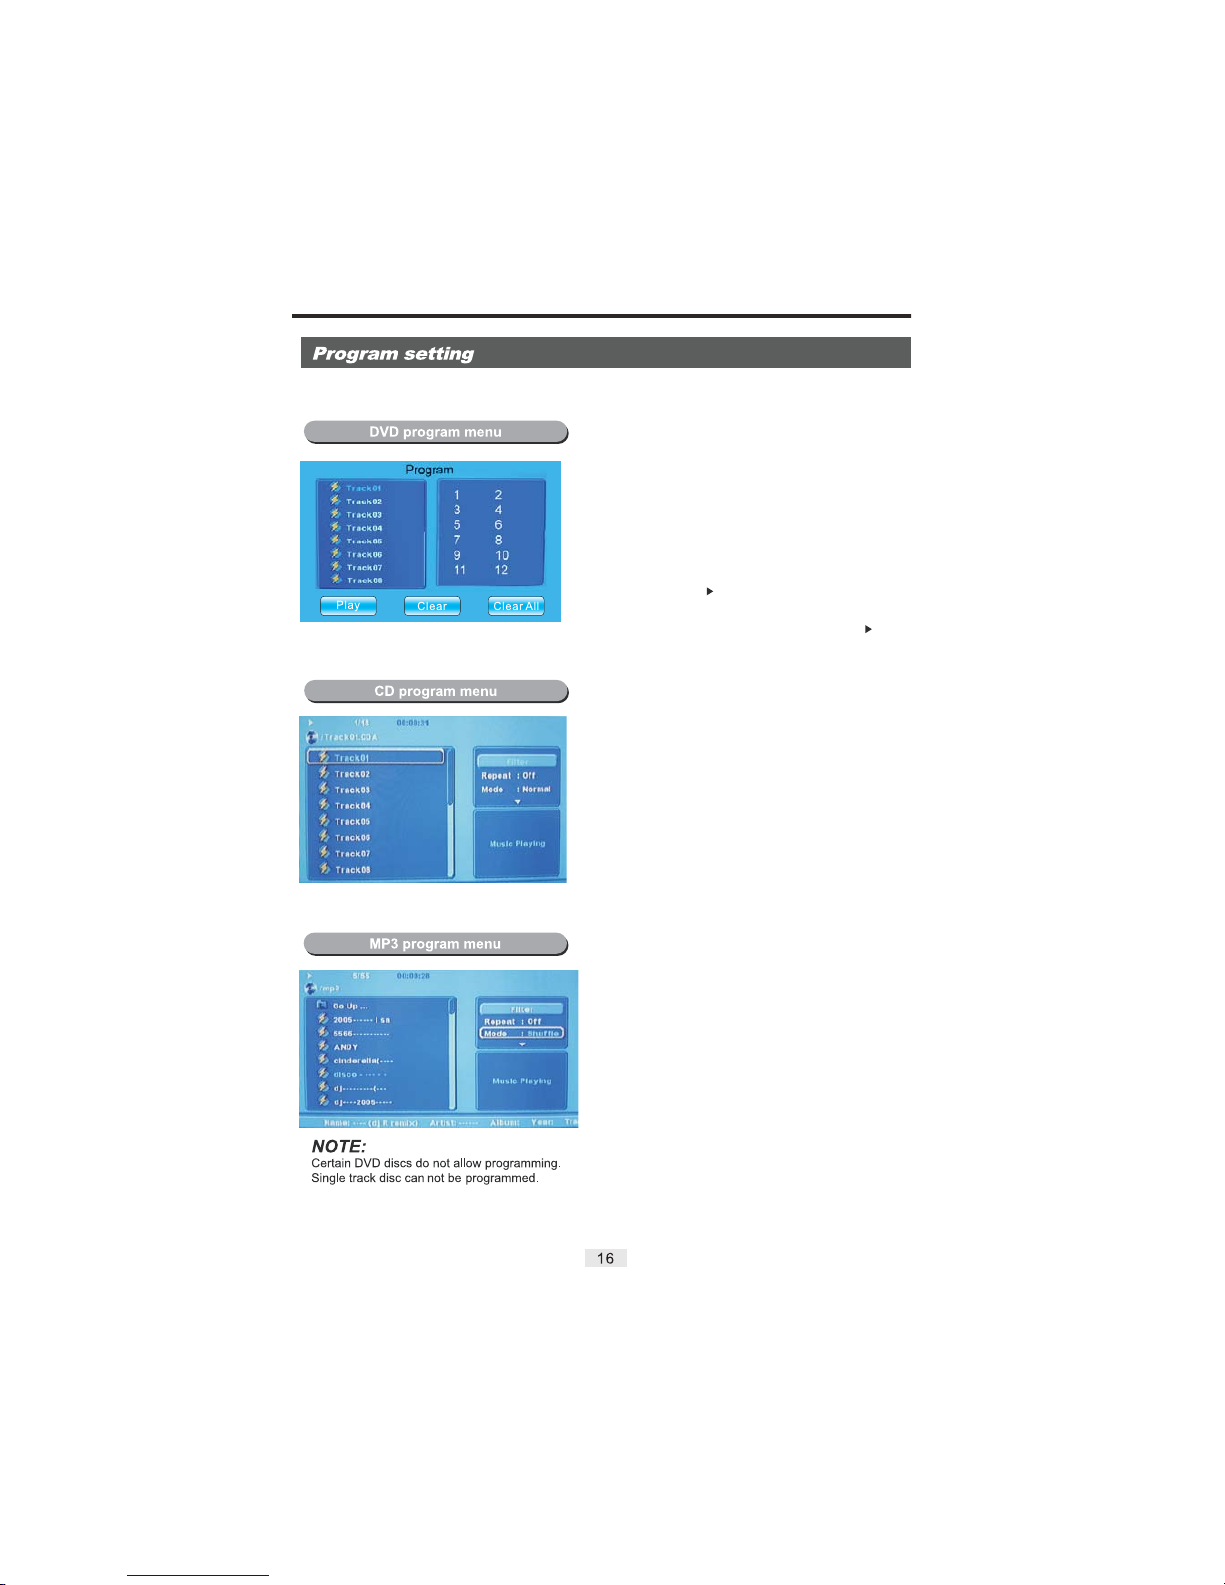
This Program Function is used to play a DVD, CD and MP3 disc in a desired sequence automatically.
Loading a DVD disc.
PROGRAM
DIRECTIONAL
CLEAR
ENTER
PROGRAM
ENTER/
STOP
1) Press the button and a DVD program menu
Will appear.
2) Use the numeric keys to input the Title and Chapter
numbers.
3) Use the buttons to select the next
program input.
Repeat step 2 until the programming is completed.
To clear the last input, press the button.
To clear all the inputs, highlight the “Clear All”icon and
press the / button to confirm.
To exit the Program Menu, press the
button.
4) Highlight the "Play" icon and press the
button to begin program playback.
5) Press the button twice to cancel the program.
Loading a CD disc.
1) Pl ace a CD di sc into t he DVD pl ayer.
2) Press the buttons to move the indicator
to "Edit Mode", and then press the button. Move
the pointer to the left side to begin selecting songs.
3) Use the buttons to highlight and then
select your favourite songs.
4) Select the "Add to Program" icon to add your songs to
your play list. Select the "Program View" Icon to display
your selected songs. Press the button to load the
songs.
5) You can delete the songs you have chosen by selecting
"Clear Program".
Note: The "Clear Program" Function can only be used
while the disc is stopped.
LEFT/RIGHT
ENTER
DIRECTIONAL
PLAY
Loading an MP3 disc.
LEFT/RIGHT
ENTER
DIRECTIONAL
PLAY
1) Place an MP3 disc into the DVD player.
2) Press the buttons to move the indicator
to "Edit Mode", and then press the button. Move
the pointer to the left side to begin selecting songs.
3) Use the buttons to highlight and then
select your favourite songs.
4) Select the "Add to Program" icon to add your songs to
your play list. Select the "Program View" Icon to display
your selected songs. Press the button to load the
songs.
5) You can delete the songs you have chosen by selecting
"Clear Program".
Note: The "Clear Program" Function can only be used
while the disc is stopped.
Page 18
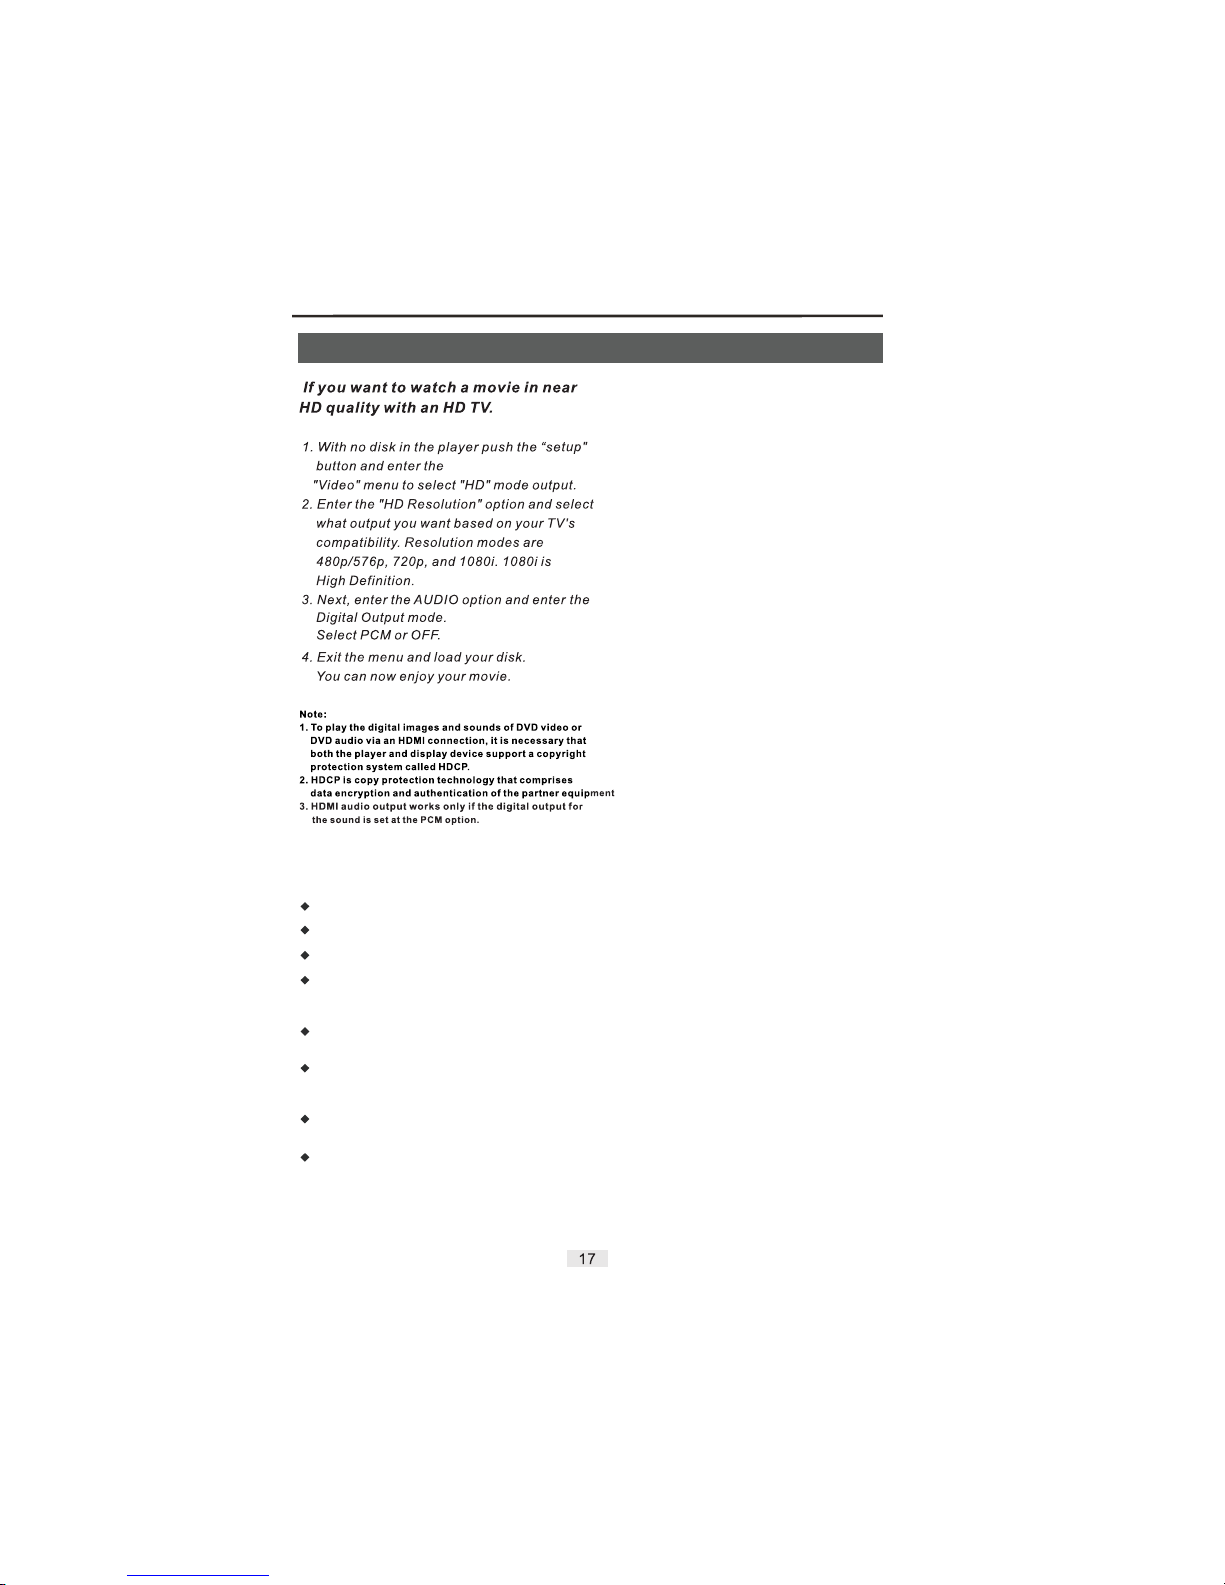
HDMI & Karaoke Operation
To play disc with Karaoke function (DVD, VCD, CDG).
Insert a microphone to front panel into MIC hole.
Press the Karaoke button on remote control.
Press the button on remote control to select“ON”
status (the icon is appearred on the TV screen upper left
side).
Press the button to select the Audio channel for your
choice.
Pre ss the but tons ev ery onc e, you ca n get the
control function of Karaoke for your need (Volume, Shift,
etc).
Press the buttons to control the advance or
reduce.
If you finish the Karaoke than you must press the Karaoke
button and enter again and switch to “OFF” status.
ENTER
AUDIO
UP/DOWN
LEFT/RIGHT
Karaoke Operation
If you want to enjoy Karaoke function please read the
following items:
Page 19
Fill
Original
Italiano
Italian
Italian
Italian
Audio
DVD Menu
YUV
MEPG 4 Subtitle
ASCII
Western European
Central European
Composite
Page 20
This product default password is “0000”
Screen Saver
OFF
ON
Page 21
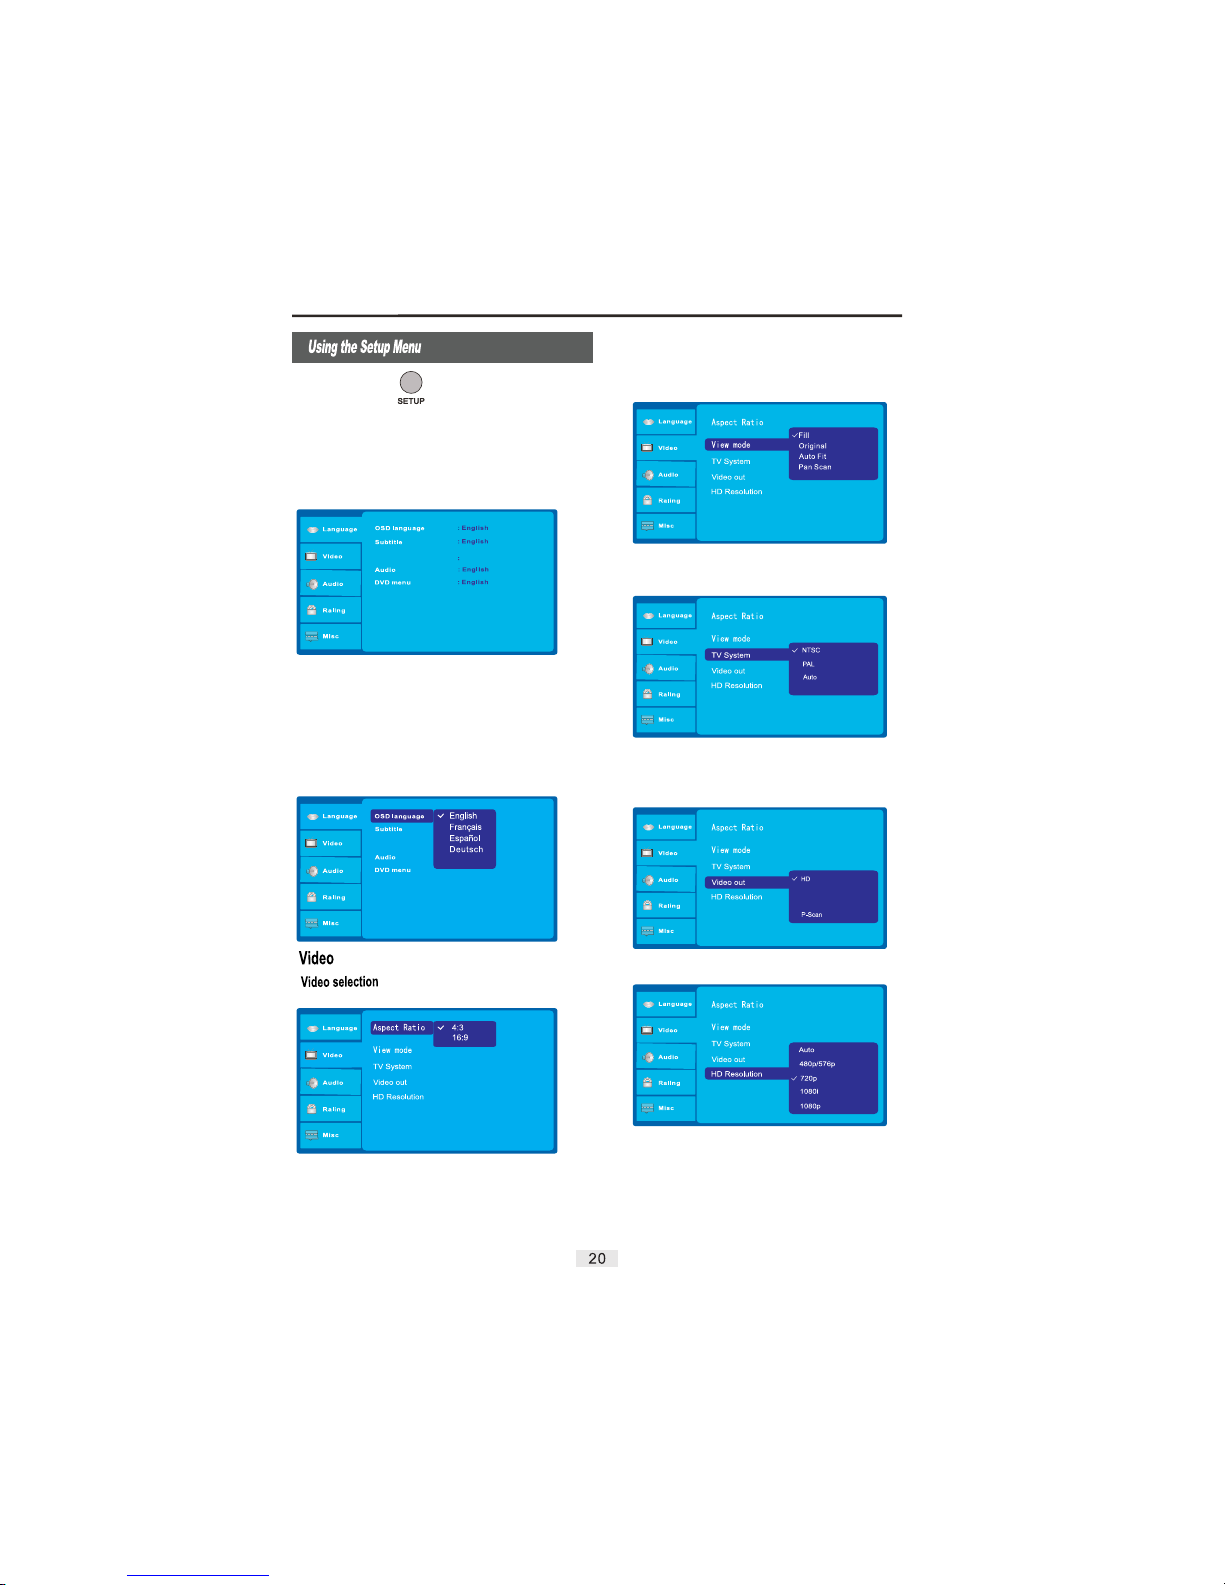
Press the button to enter the DVD player setup menu.
(This can only be accessed when the unit is not playing back
a disc).
1) Press the or buttons to changeitems.
2) Press the button to enter the submenu.
3) Press the to confirm and return to the upper menu.
4) Press the button at any time to exit the setup menu.
SETUP
LEFT RIGHT
ENTER
ENTER
SETUP
Video:
Audio:
Rating:
Misc:
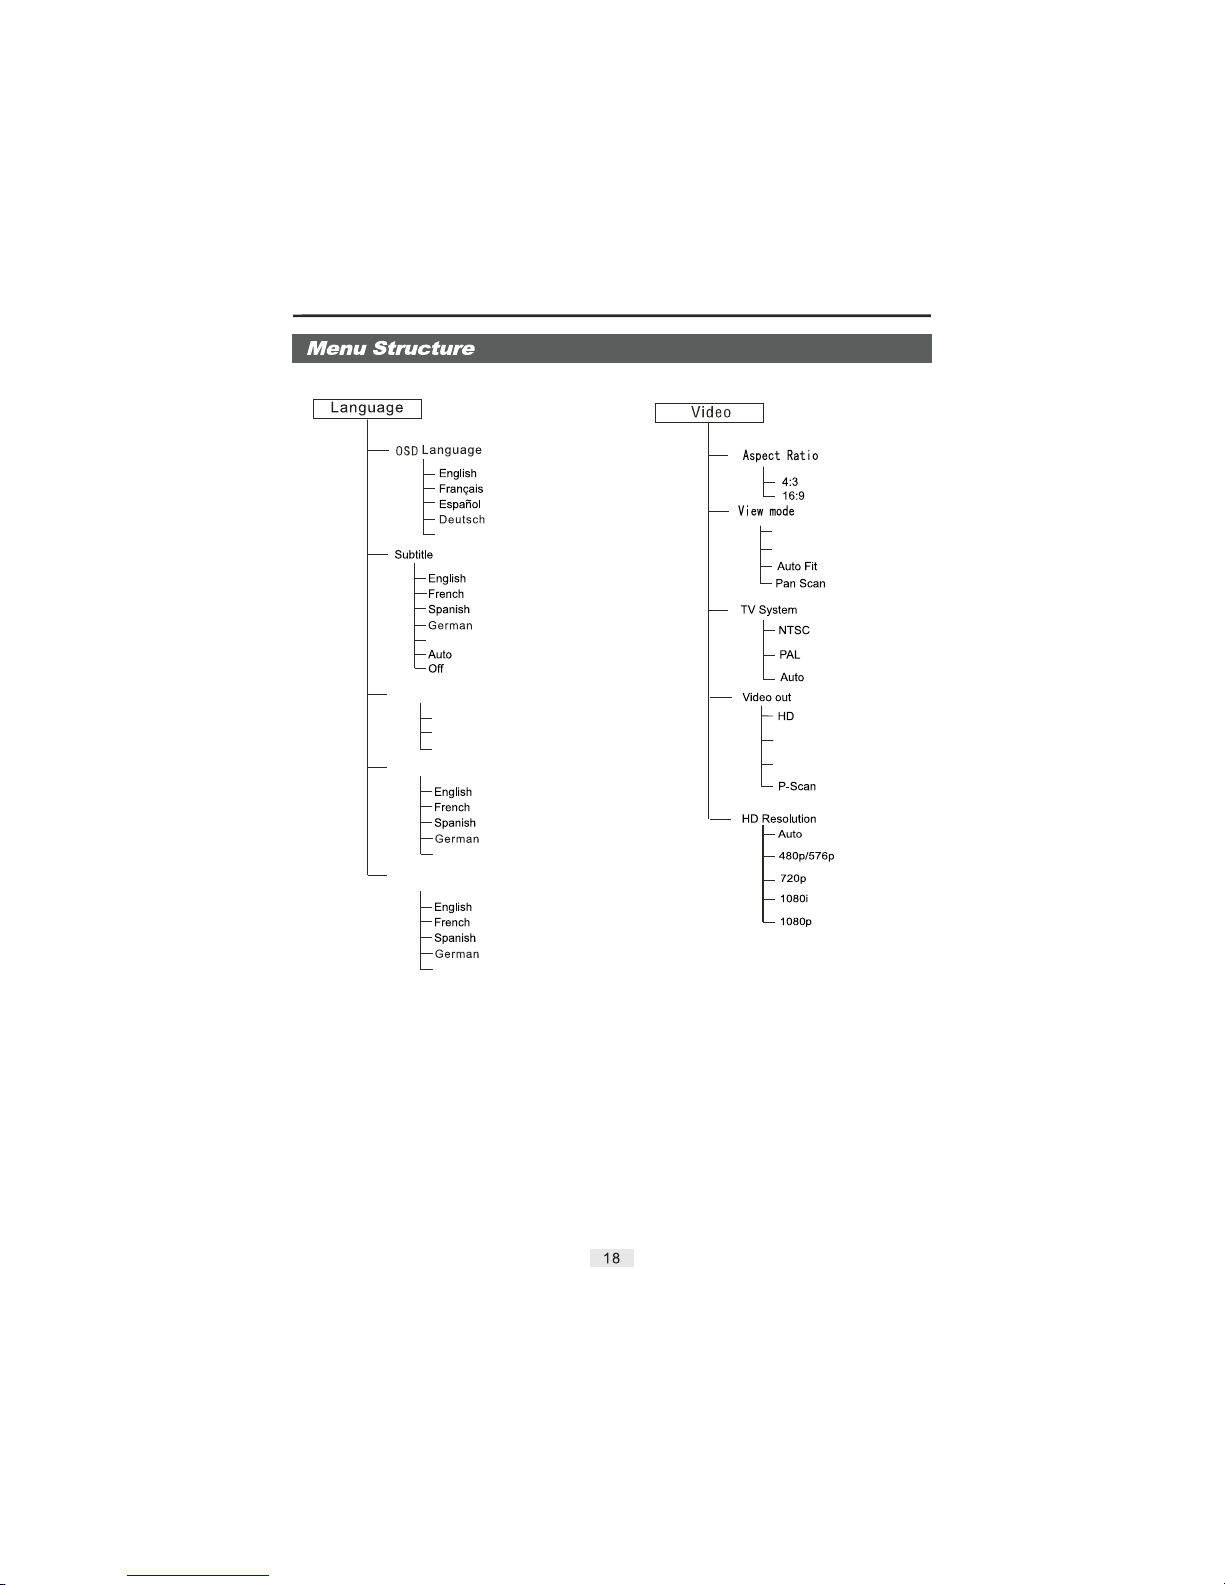
Language
Video setup.
Audio setup.
Parental control setup.
Further audio / video settings.
: Language setup
Note: The language setup is used to set the
language of the OSD (On-Screen Display),
Subtitle, MEPG 4,Audio and DVD Menus.
View Mode:This option allows you to set the TV viewing mode:
Fill, Original,Auto Fit, or Pan Scan..
TV System: This option allows you to set the type of system your
television uses: NTSC, PAL andAuto. Choose the proper system
that relates to your TV (Refer to yourTelevisions instruction
manual if you are unsure).
Video Output:This Option is used to select the appropriate signal
type for a cable connection.
MEPG 4 Subtitle
Italiano
YUV
The aspect ratio of the picture provided by the DVD player can
vary depending on the type of TV in use.
4:3: Choose this setting if your DVD player is connected to a
standard ratio TV.
16:9: Choose this setting when you connect to a wide screen TV.
This setting will allow the original aspect ratio to be displayed.
HD Resolution: This option is used for a High Definition signal.
Choose any of the available resolution options:Auto, 480p/576p,
720p, and 1080i. Please use an HDMI cable when setting this
option.
MEPG 4 Subtitle
Off
Composite
Page 22
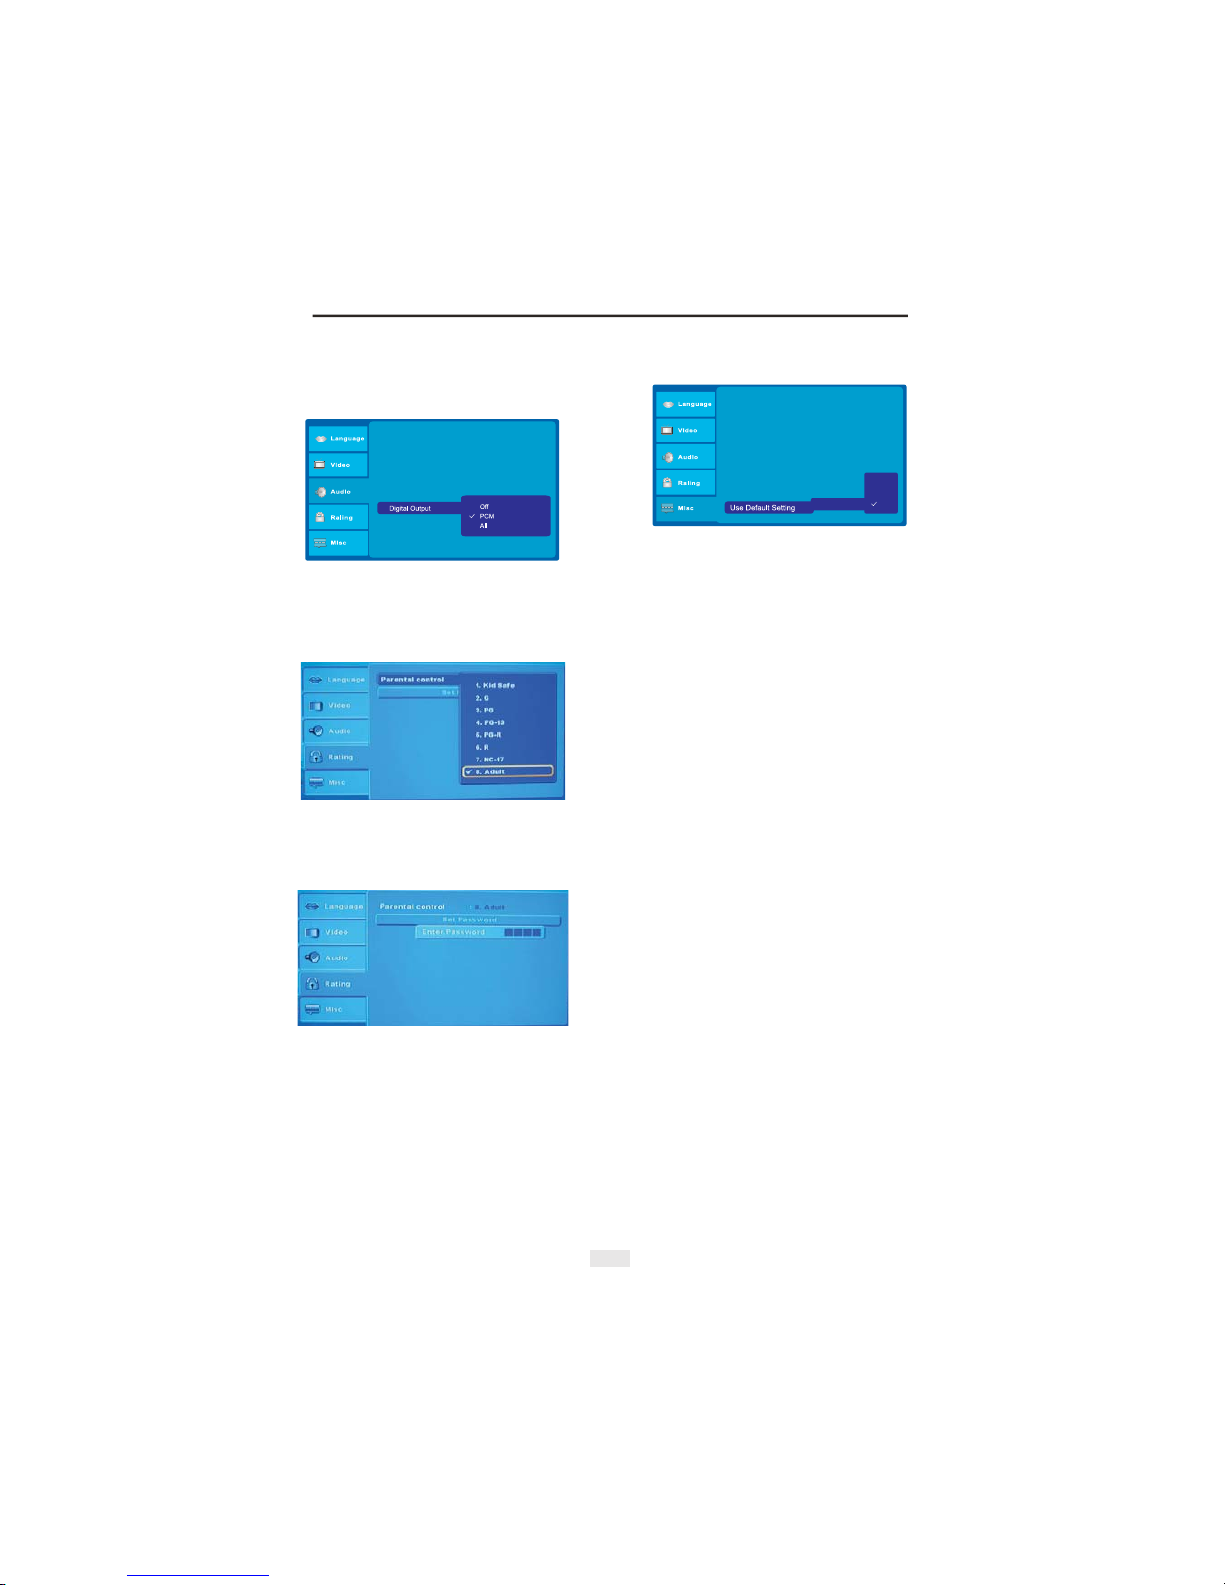
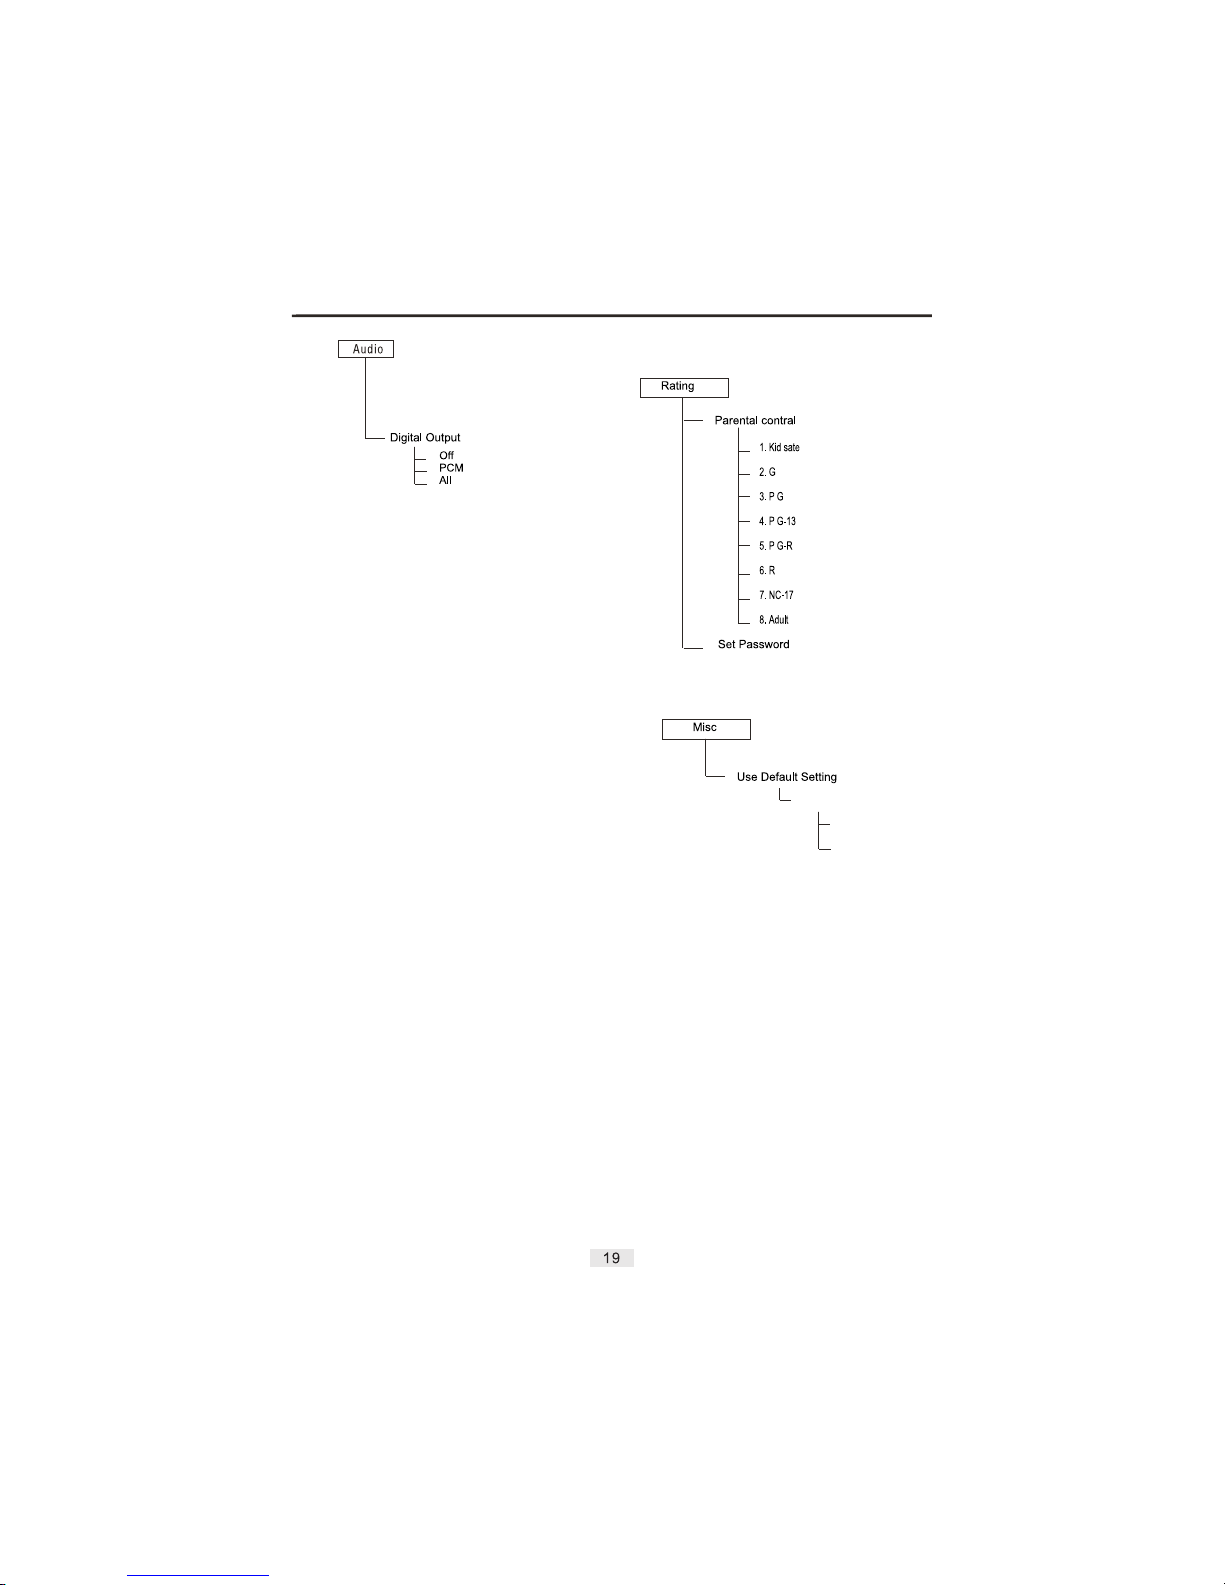
Digital Output
Off: Does not output a digital signal.
PCM: Converts to PCM 48KHz audio. Select PCM when using
the DigitalAudio Output.
ALL: Outputs the audio through the digital output without any
conversion.
Rating
Parental Control: Some discs are programmed with rating
features. You can select an appropriate age restriction and
any disc ratingabove the selected will not play without a
password. The password for this DVD Player is 0000.
Set Password: Use the number keys to input a four digit password.
Press the button to confirm your password. If you forget
your password, please use the universal password "0000" to
unlock.
ENTER
Misc
Use Default Settings:This function resets all of your settings
back to their original setup.
OFF
ON
Screen Saver
21
Page 23
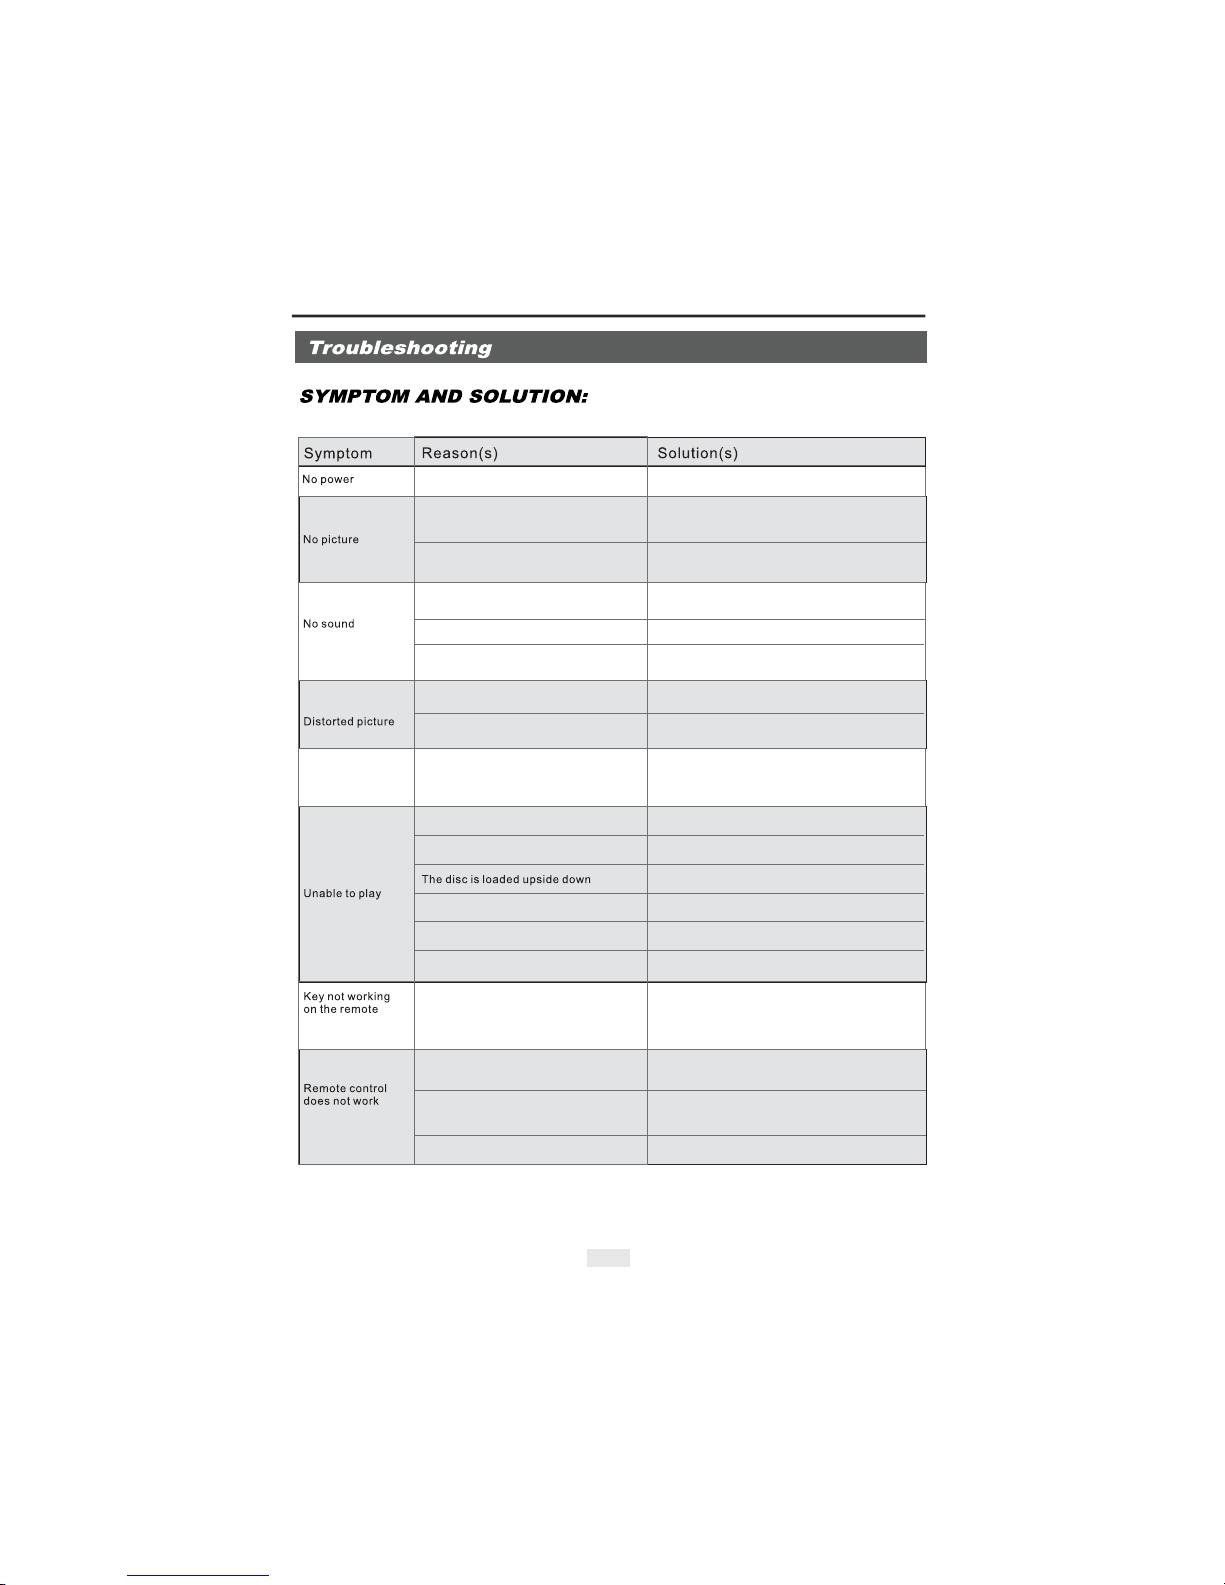
The power cord may not be connected
to the wall outlet.
TV ma y not be se t up with t he corr ect
settings.
The video cables my not be connected
or secured properly.
The audio cables my not be connected
properly.
An external audio system connected
may n ot be tur ned on.
The audio output settings may not be
correct.
The d isc may b e dirty.
During fastforward or rewind modes.
Possible interference with other
connected devices.
Unsteady picture
or picture with
noise interface
Disc may not be loaded.
The d isc typ e is not co rrect .
Disc not inserted properly into the guide
slot.
The d isc may b e dirty .
TV screen is displaying the setup menu.
Power waves or other abnormal
phenomenon (such as static) may
disturb the normal conditions of the
remote control.
Try turning the player Off/On or Unplugging/
Plugging in the player.
Remote control may not be pointed
directly at the remote sensor.
The r emote c ontro l is too fa r from th e
player.
The batteries may be depleted.
Insure the power cord is completely plugged into
the outlet.
Refer to this manual on adjusting the proper
settings.
Insure all cable connections are in the proper
places and plugged in.
Insure all cable connections are in the proper
places and plugged in.
Insure any external devices attached to this
player are set up and turned on.
Refer to this manual on adjusting the proper
settings.
Contact disc manufacturer for cleaning
instructions or try another disc.
Sometimes a tiny distortion appears. This is a
normal condition.
Connect the player directly to the TV.
Ins ure the d isc is in t he play er.
Load a compatible disc.
Insure the disc is inserted with the label side up.
Insure the disc is inserted correctly.
Contact disc manufacturer for cleaning
instructions or try another disc.
Press SETUP button to turn off the menu.
Insure the remote control is pointed directly at
the sensor.
Operate the remote control within 7 meters
(23 f t) of the p layer.
Replace the batteries with fresh ones.
22
Page 24
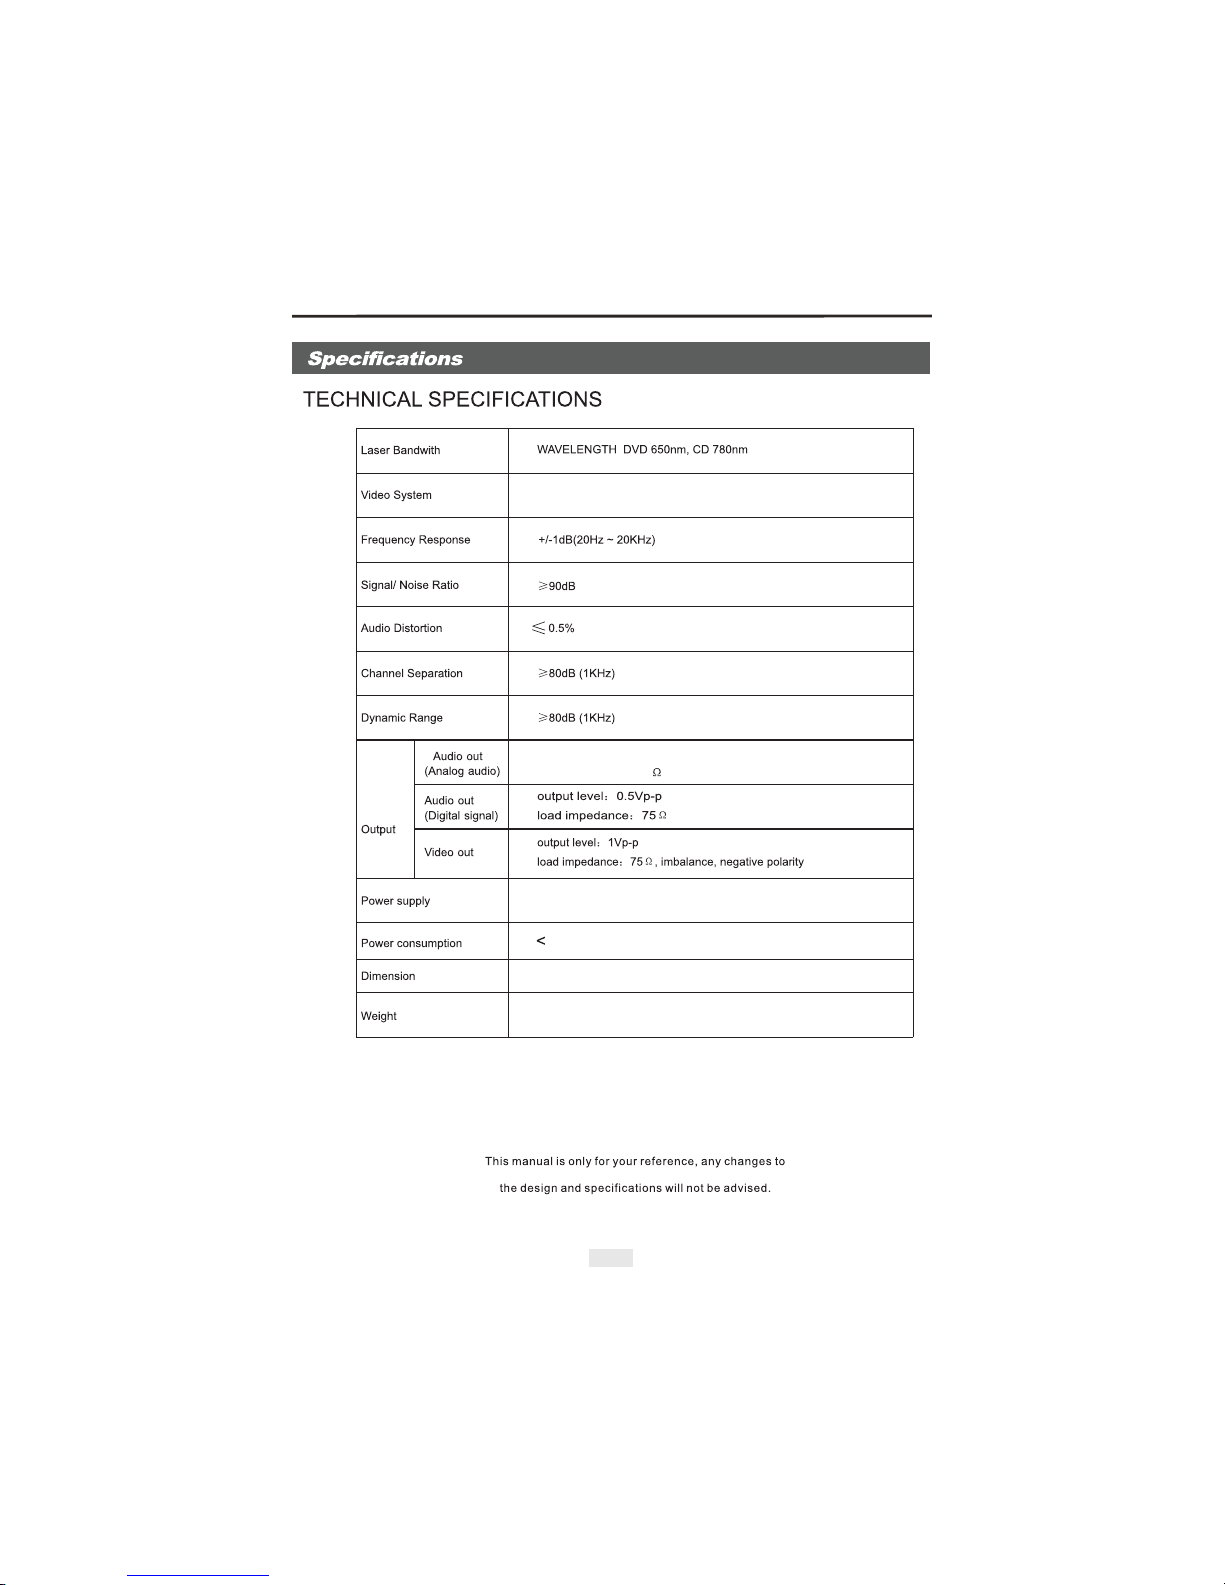
300mm x 230mm x 33mm
Around 1.8 Kgs
Note:
Specifications are subject to change without notice.
Weight and dimensions are approximate.
23
output level: 2V RMS AT1KHz 0dB
load impedance: 10K
15W
NTSC/PAL/AUTO
AC 120V ~ 60Hz
Page 25
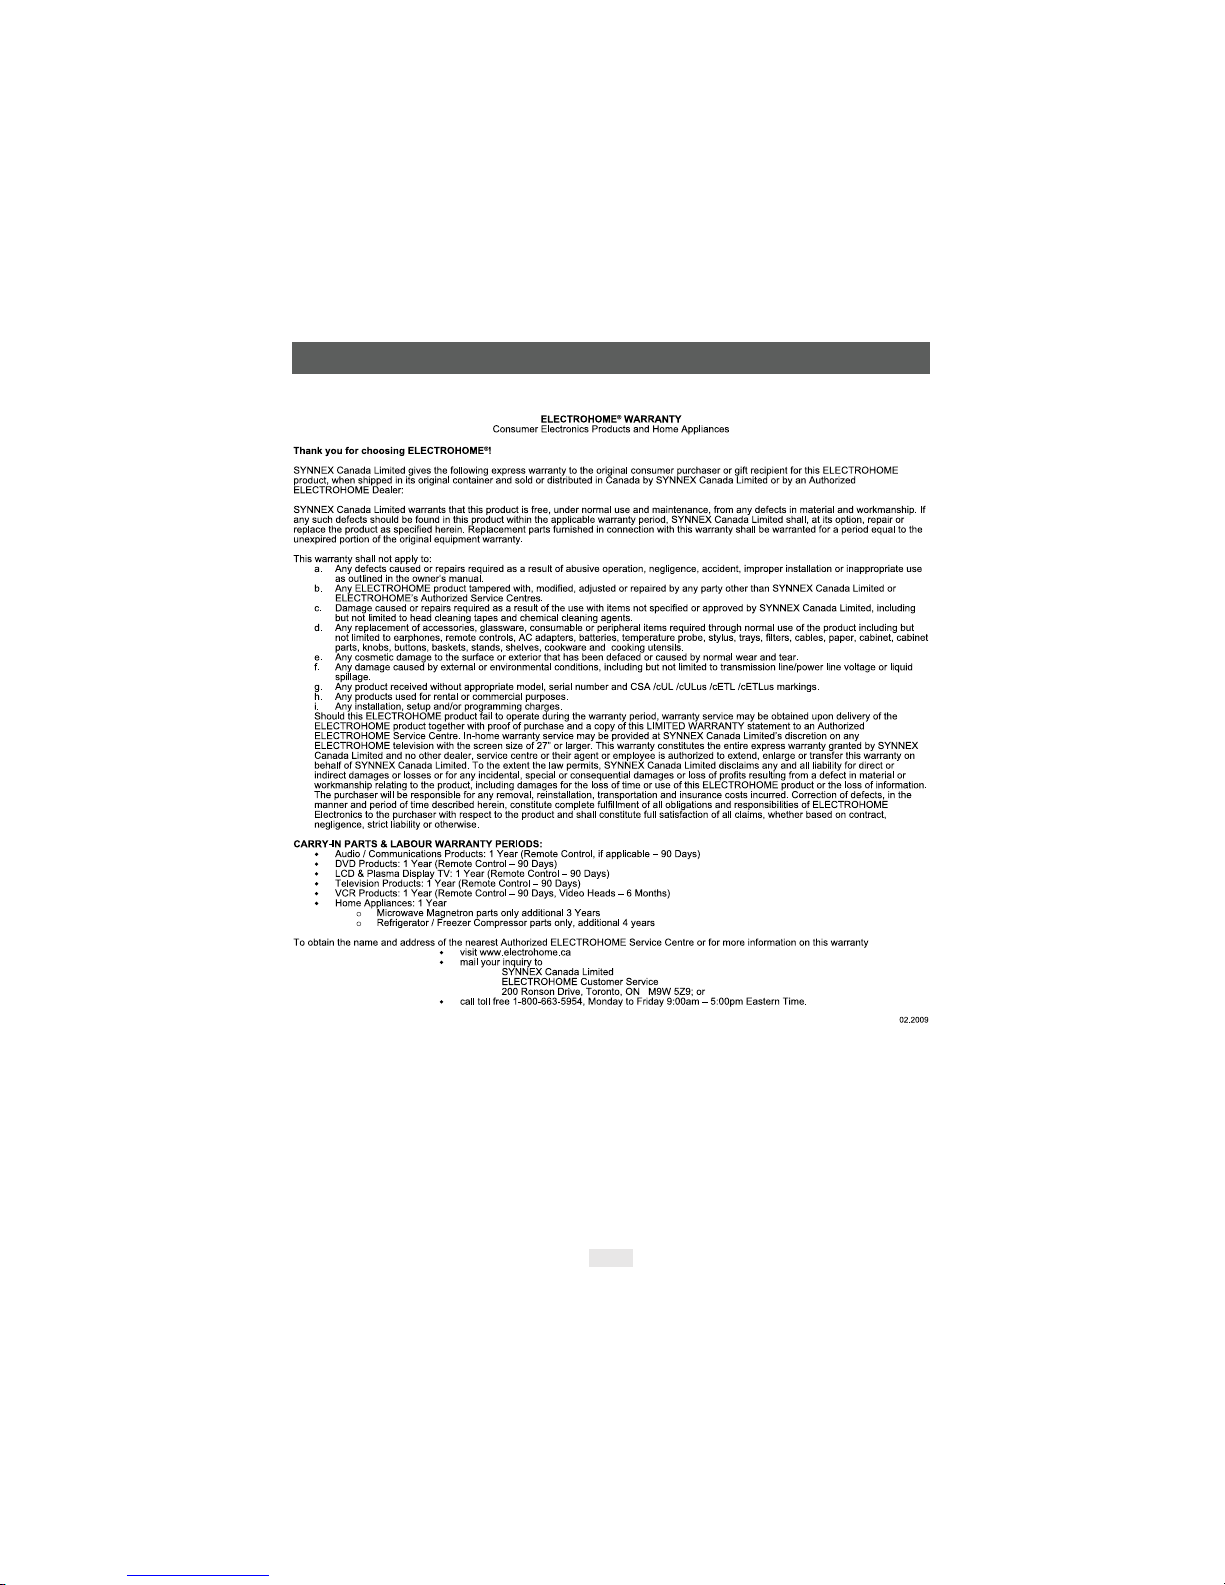
Warranty
24
 Loading...