

CR6 Series User Manual
Alarm Clock Radio with USB Charging
CR61-CR62-CR63-CR64
Thank you for your purchase of this Electrohome product. Please read this
user manual carefully before using product to ensure proper use.
Keep this manual in a safe place for future reference.
electrohome.com/support

WE BELIEVE IN MUSIC’S POWER TO BRING PEOPLE TOGETHER.
Since 1907 Electrohome has been developing high delity
audio products & has been welcomed into homes for generations.
One thing that remains the same in our more than 100 year history
is our unmatched dedication to design and premium craftsmanship.

IMPORTANT SAFETY INFORMATION
RETAIN THIS MANUAL FOR FUTURE REFERENCE
1. Read these instructions.
2. Keep these instructions.
3. Read all warnings.
4. Follow all instructions.
5. Do not use this product near water.
6. Clean only with a dry cloth.
7. Clean the screen only with a dry cloth, moistened slightly if needed. Do not clean the inside of this
product.
8. Check that the power voltage stated on the rating label corresponds to your local electricity supply.
9. Do not block any ventilation openings. Install in accordance with the manufacturer’s instructions.
10. Do not place this product near any heat sources such as radiators, heat registers, stoves or other
apparatus (including ampliers) that produce heat.
11. Do not immerse this product, the power cord or any accessories in water or any other liquid.
12. Unplug the power adapter from the wall when the product is unused for a long period of time and
during thunderstorms.
13. Only use attachments / accessories specied by the manufacturer.
14. Unwind and straighten the power cord before use.
15. Damage Requiring Service
Unplug the power cord and refer servicing to qualied service professional under the following
conditions:
16. If liquid has been spilled on or into the product.
17. If the product has been exposed to rain, water, or other liquids.
18. If the product does not operate normally by following the operating instructions. Adjust only those
controls that are covered by the operating instructions. Improper adjustment of other controls may
result in damage and will often require extensive work by a qualied technician to restore the product
to its normal operation.
19. If the product has been dropped or damaged in any way.
20. When the product exhibits a distinct change in performance. This may indicate a need for service.
21. Servicing
Do not attempt to service this product yourself as opening or removing covers may expose you to
dangerous voltages or other hazards. Refer all servicing to a qualied service professional.
22. Replacement Parts
When replacement parts are required, be sure the service technician has used replacement parts
specied by the manufacturer, or have the same characteristics as the original parts. Unauthorized
substitutions may result in re, electric shock, or other hazards.
23. Safety Check
Upon completion of any service or repairs to this product, ask the service technician to perform safety
checks to determine that the product is in proper operating condition.
24. Caution marking is located at the back of apparatus.
25. The marking information is located on the bottom of apparatus.
33
WARNING INFORMATION
WARNING
To reduce the risk of re or electric shock, do not expose this appliance to rain or moisture.
CAUTION
Use of controls or adjustments or performance of procedures other than those specied may result in
hazardous radiation exposure.
ATTENTION
RISK OF ELECTRIC SHOCK
DO NOT OPEN
CAUTION - TO REDUCE THE RISK OF ELECTRIC SHOCK, DO NOT REMOVE COVER (OR BACK).
NO USER-SERVICEABLE PARTS INSIDE, REFER TO QUALIFIED USER PERSONNEL.
The lightning ash with arrowhead symbol, within an equilateral triangle, is intended to alert the
user to the presence of uninsulated “dangerous voltage” within the product’s enclosure that may
be of sucient magnitude to constitute a risk of electric shock to persons.
The exclamation point within an equilateral triangle is intended to alert the user to the presence
of important operating and maintenance (servicing) instructions in the literature accompanying
the appliance.
WARNING: DO NOT INGEST BATTERY, CHEMICAL BURN HAZARD
• This product contains a coin/button cell battery. If the coin/button cell battery is swallowed, it can cause
severe internal burns in just 2 hours and can lead to death.
• Keep new and used batteries away from children. If the battery compartment does not close securely,
stop using the product and keep it away from children.
• If you think batteries might have been swallowed or placed inside any part of the body, seek immediate
medical attention.

CAUTION
Danger of explosion if battery is incorrectly replaced. Replace only with the same or equivalent type.
WARNING
To prevent electric shock; do not use this plug with an extension cord receptacle or other outlet unless the
blades can be fully inserted to prevent blade exposures. To prevent re or shock hazard; do not install this
product in a conned spaced such as a book case or similar unit.
1. No naked ame sources, such as lighted candles, should be placed on the apparatus.
2. Do not place the product in closed bookcases or racks without proper ventilation.
3. The mains plug is used as the disconnect device, the disconnect device shall remain readily operable.
4. The ventilation should not be impeded by covering the ventilation openings with items, such as
newspapers, table-cloths, curtains, etc.
5. It shall not be exposed to dripping or splashing and that no objects lled with liquids, such as vases,
shall be placed on the apparatus.
6. Do not connect FM antenna to outside antenna.
7. The unit should not be exposed to direct sunlight, very high or low temperature, moisture, vibrations
or placed in dusty environment.
8. Do not use abrasive, benzene, thinner or other solvents to clean the surface of the unit. To clean, wipe
it with mild non-abrasive detergent solution and clean soft cloth.
9. Never attempt to insert wires, pins or other such objects into the vents or opening of the unit.
10. Batteries shall not be exposed to excessive heat such as sunshine, re or the like.
11. Attention should be drawn to the environmental aspects of battery disposal.
Do not dispose this product into usual household garbage at the end of its life cycle; hand it over to
a collection center for recycling the electrical and electronic appliances. By recycling, some of the
materials can be reused. You are making an important contribution to protect our environment.
Please inquire your community administration for the authorized disposal center.
54

TABLE OF CONTENTS
IMPORTANT SAFETY INFORMATION ............................................................................................................. 3
WARNING INFORMATION .................................................................................................................................. 4
TABLE OF CONTENTS........................................................................................................................................... 6
WHAT’S INCLUDED ............................................................................................................................................... 7
PRODUCT INFORMATION .................................................................................................................................. 7
LCD DISPLAY ................................................................................................................................................ 7
BUTTONS AND FUNCTIONS .................................................................................................................. 8
QUICK START GUIDE ..........................................................................................................................................10
CONNECTING POWER ...........................................................................................................................10
TIME ZONE SETTING ..............................................................................................................................11
SETTING AN ALARM ...............................................................................................................................11
SNOOZE FUNCTION ...........................................................................................................................................12
SETTING THE DATE/TIME ................................................................................................................................. 12
RADIO FUNCTION ...............................................................................................................................................13
RADIO PRESET FUNCTION ..............................................................................................................................13
SLEEP FUNCTION ................................................................................................................................................ 14
DIMMER FUNCTION ...........................................................................................................................................14
DATE DISPLAY ......................................................................................................................................................15
TEMPERATURE FUNCTION .............................................................................................................................. 15
AUTOMATIC DAYLIGHT SAVING TIME FUNCTION .................................................................................15
USB CHARGING FUNCTION ............................................................................................................................ 16
PROJECTION FUNCTION .................................................................................................................................. 16
AUX IN FUNCTION .............................................................................................................................................. 17
BATTERY BACKUP ...............................................................................................................................................18
REPLACING THE BATTERY ................................................................................................................................19
TROUBLESHOOTING ..........................................................................................................................................20
SPECIFICATIONS ..................................................................................................................................................21
CARE AND MAINTENANCE ..............................................................................................................................21
IC AND FCC WARNINGS ....................................................................................................................................22
WARRANTY ............................................................................................................................................................ 23

WHAT’S INCLUDED
• Clock Radio
• Power Adapter
• User Manual
• Flat Lithium Battery
PRODUCT INFORMATION
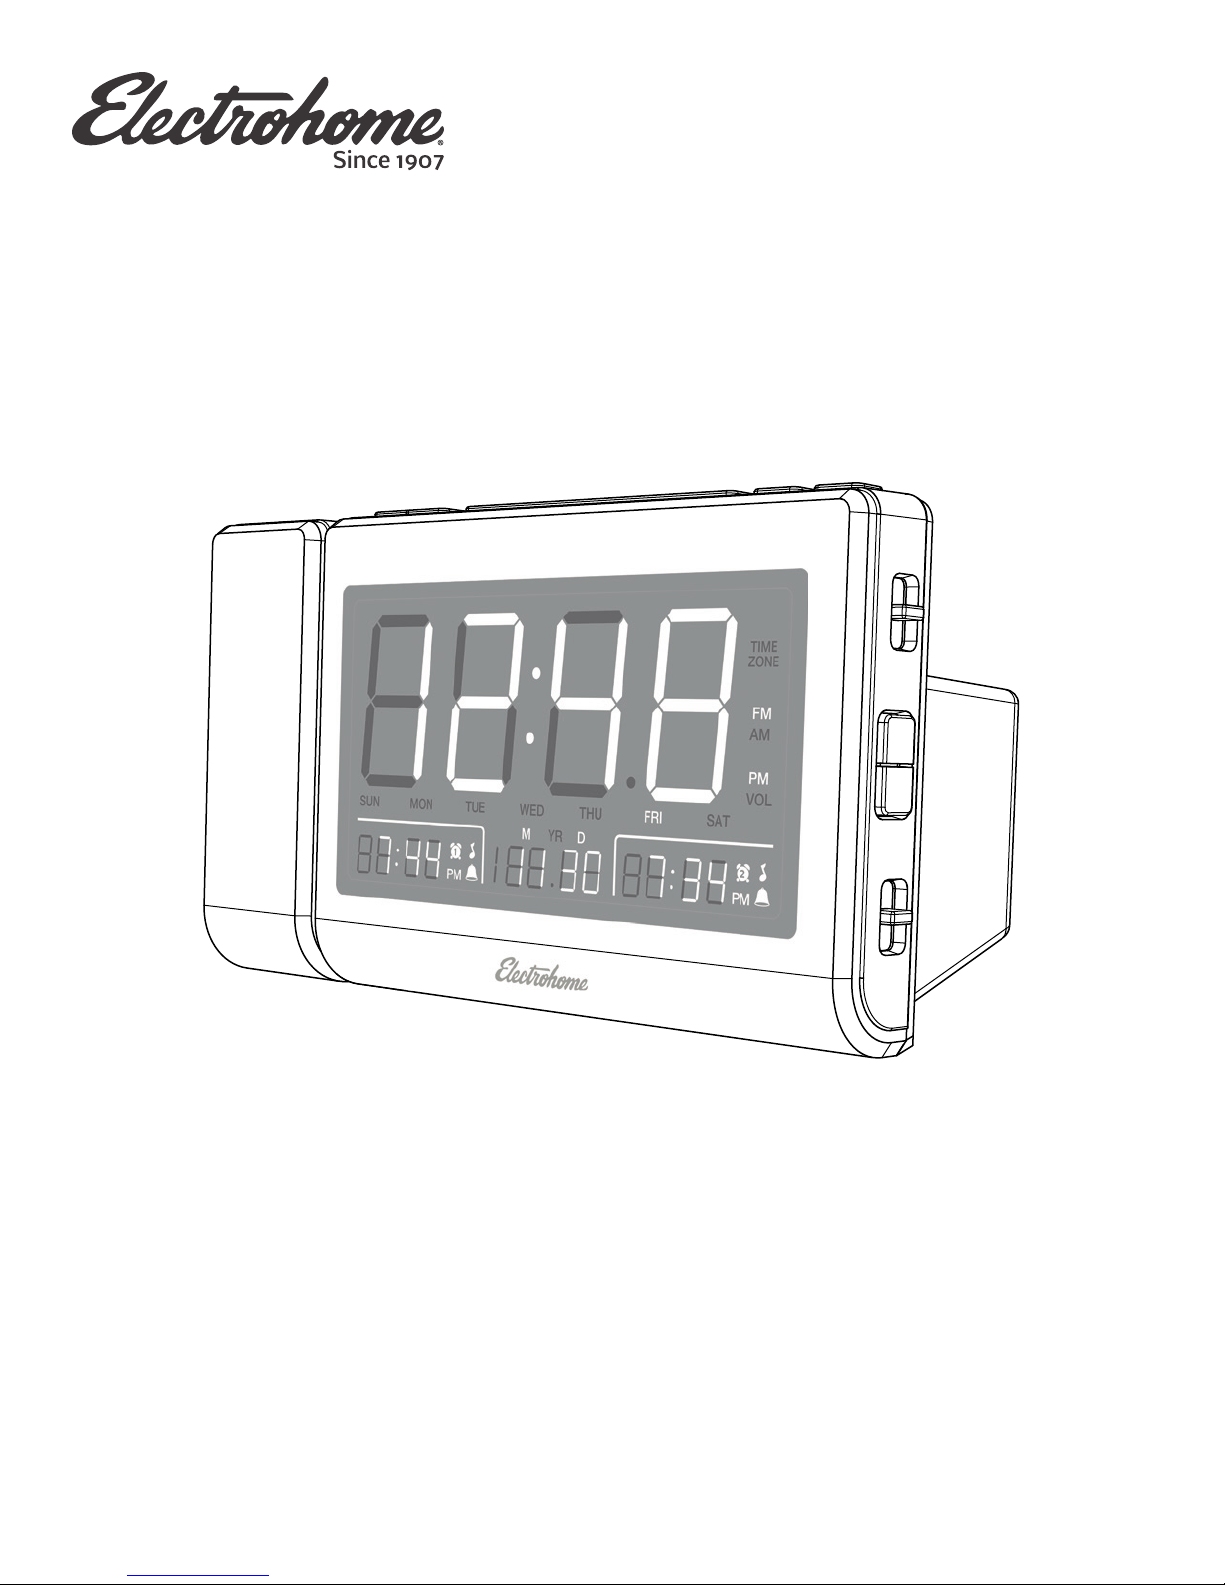
LCD DISPLAY
1 2 3
4
1. Hour
2. Minutes
3. Time Zone Indicator
16182021
1719
15
8. Volume Indicator
9. Day Indicator
10. Alarm 2 Indicator
5
AUX IN
121314
6
7
8
9
10
11
15. Temperature Display
16. Year Indicator
17. Month Indicator
4. FM Radio Indicator
5. AM Radio / AM Time
Indicator
6. Aux In Indicator
7. PM Time Indicator
11. Alarm 2 Alarm Type
Indicator
12. Alarm 2 PM Indicator
13. Alarm 2 Time Display
14. Date Indicator
7
18. Alarm 1 Alarm Type
Indicator
19. Alarm 1 PM Indicator
20. Alarm 1 Indicator
21. Alarm 1 Time Display
BUTTONS AND FUNCTIONS
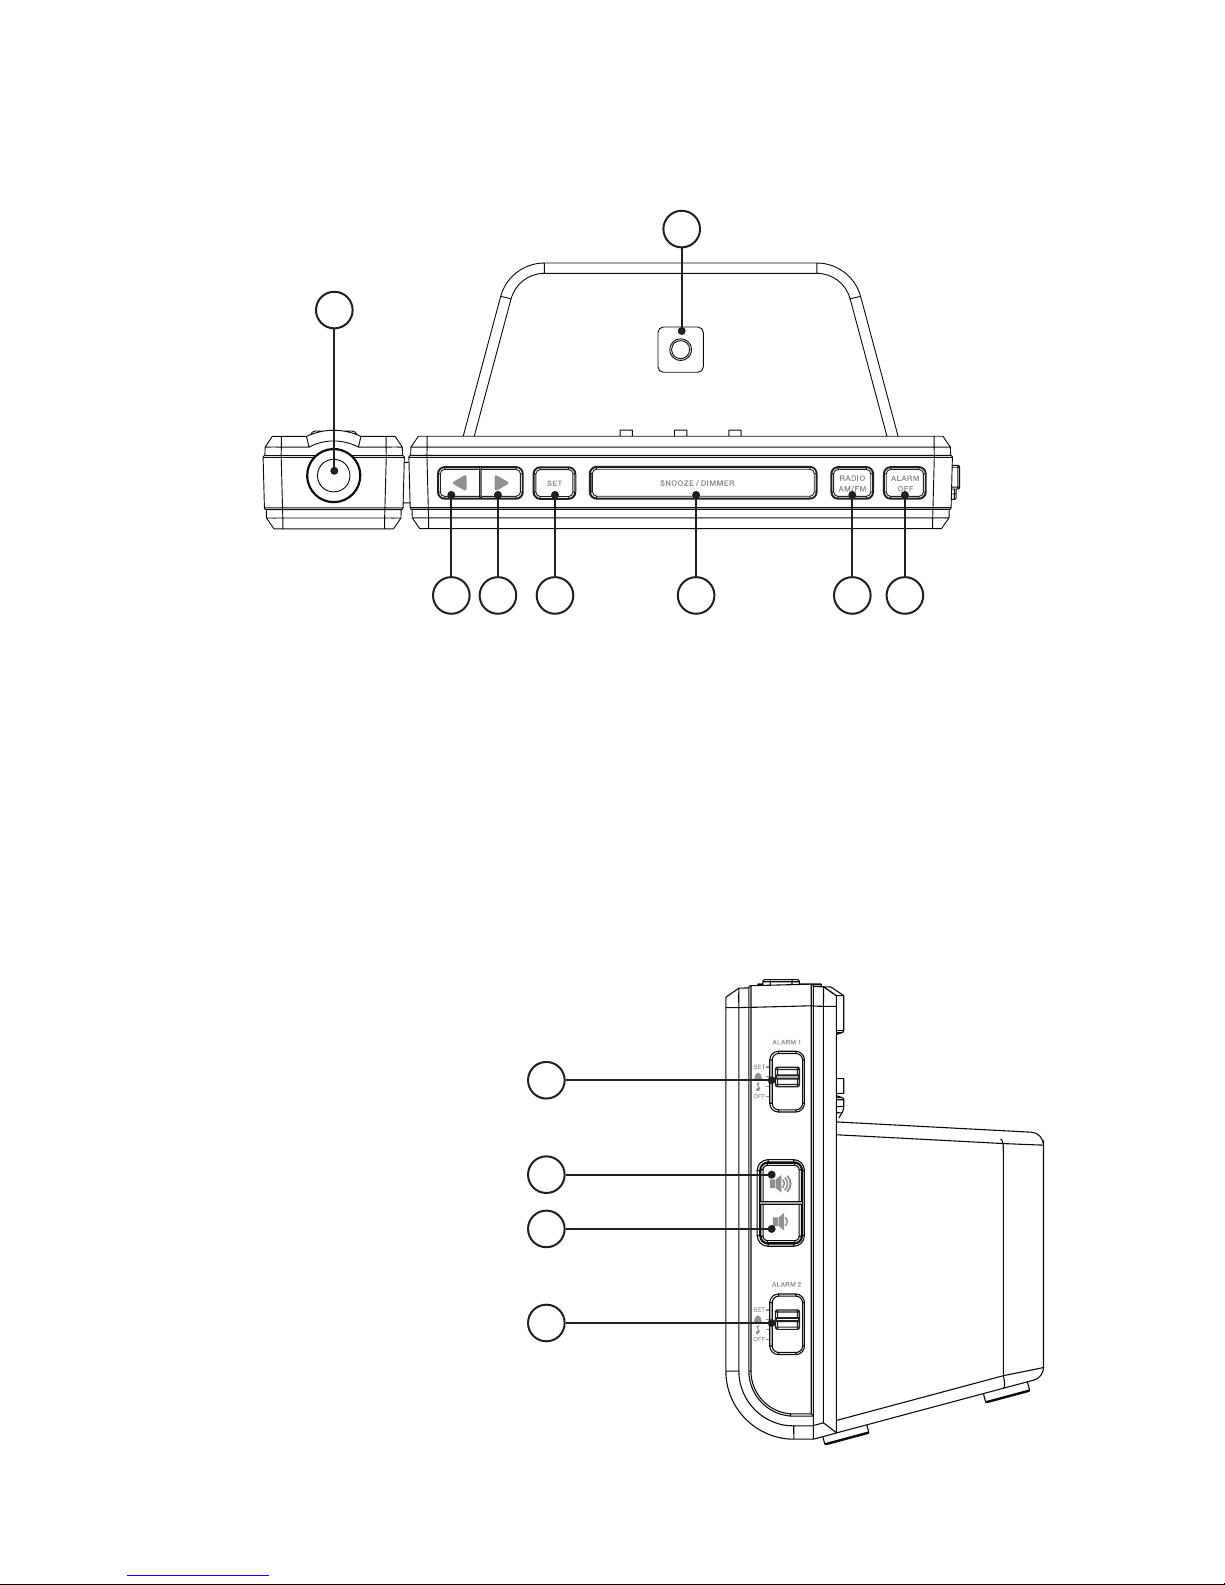
TOP
*
1
8
1. Projection Lens (*Only
available on some models)
2. Back Arrow Button
SIDE
1. Alarm 1 Toggle
2. Volume Up Button
3. Volume Down Button
4. Alarm 2 Toggle
2 3
4 5 6 7
3. Forward Arrow Button
4. Set Button
5. Snooze / Dimmer /
Sleep Button
1
2
3
6. Radio On/O / AM/FM
Band Selection Button
7. Alarm O Button
8. Photo Sensor
4

BACK
1
2 3 5 9
4
6
7
1. Preset Setting and
Selection Button
2. Time Zone Setting
Button
3. Daylight Saving Time
Button
USB
8
4. Date Display / Year
Display Button
5. Temperature Display/
Celsius/Fahrenheit
Cycle Button
6. Aux In Connection
10
11
7. DC Input
8. USB Charging Port
9. Projection Focus
Adjustment Dial
10. Projection 180° Flip
Button
11. Projection On/O Button
BOTTOM
1
1. Battery Compartment
98

Variation Warning – There are four dierent models covered by this manual. Use the model number indicators
to determine which information is applicable to which model.
Example:
CR61 - Does apply to this model
CR61 - Does NOT apply to this model
QUICK START GUIDE
CONNECTING POWER
CR61 - CR62 - CR63 - CR64
Connect the power cord to a standard AC wall outlet
CR61 - CR62 - CR63 - CR64
Connect the power adapter to the DC IN connection. Then connect the adapter plug to a
standard AC wall outlet
USB

TIME ZONE SETTING
CR61 - CR62 - CR63 - CR64
1. Use to select correct Timezone using the below chart:
0 - Newfoundland time
1 - Atlantic time
2 - Eastern time (default)
3 - Central time
4 - Mountain time
5 - Pacic time
6 - Alaska time
7 - Hawaiian time
2. Press to proceed
To change the selected time zone after setting up the clock:
1. Hold for 2 seconds
2. Use to select correct Timezone
3. Press to conrm
SETTING AN ALARM
CR61 - CR62 - CR63 - CR64
Follow these steps to set Alarm 1 or Alarm 2
Alarm settings will ash in the following order:
Hour > Minute > Days of the Week > Radio Alarm Volume
1. Slide to the SET position
2. Use to decrease or increase setting
3. Use to conrm and go to the next setting until complete
1110

4. Slide to the or position
AUX IN
- Will wake to current radio station
- Will wake to buzzer
5. When an Alarm is enabled, the Alarm information will be displayed on the LCD screen
6. When the Alarm is sounding, press to silence the alarm.
Note: If the Alarm is not silenced it will sound for 30 minutes and turn o automatically.
7. To disable an Alarm, slide to the OFF position
SNOOZE FUNCTION
CR61 - CR62 - CR63 - CR64
When the Alarm is sounding, press to silence the alarm for 9
minutes. After 9 minutes the alarm will resume
Press to cancel the Snooze function
SETTING THE DATE/TIME
CR61 - CR62 - CR63 - CR64
The Date/Time settings will ash in the following order: Year > Month > Day > 12/24H
Time Format > Hour > Minute
1. Press and hold for 2 seconds
2. Use to decrease or increase numbers

RADIO FUNCTION
CR61 - CR62 - CR63 - CR64
1. Press to turn the radio on or o
2. Press and hold for 1 second to change between AM/FM bands
3. Press to move forward/backward one station at a time
4. Press and hold to scan forward/backward to the next
broadcasting station
Note: Please ensure the FM antenna is completely unrolled and extended for best FM reception.
5. Use to adjust the music volume
RADIO PRESET FUNCTION
CR61 - CR62 - CR63 - CR64
Setting a Radio Preset
1. Press to turn the radio on
2. Use to select your desired radio station
3. Press and hold to begin the radio preset setting process
4. Use to select your desired preset number
5. Press to set the selected preset number to the current radio station
Note: The preset number will ash twice to conrm the preset was set successfull.
Selecting a Radio Preset
1. Press to cycle through presets until the desired preset is displayed
1312

SLEEP FUNCTION
CR61 - CR62 - CR63 - CR64
The Sleep timer allows you to listen to music for a preset amount of time. It is commonly used
to fall asleep to music.
1. Press to turn the radio on
2. Press and hold for 2 seconds to enter Sleep Timer setting mode
3. Use to select the desired time from the available preset times of 90, 60, 30,
and 15 minutes.
Note: You can also select OFF to cancel a Sleep Timer.
4. Press to exit Sleep Timer setting mode
5. Press and hold to check the time remaining on the Sleep Timer
DIMMER FUNCTION
CR61 - CR62 - CR63 - CR64
Press to cycle through the LCD display brightness options of HI, LO, OFF
CR61 - CR62 - CR63 - CR64
Press to cycle through the LCD display brightness options of Auto, HI,
LO, OFF
Note: The Auto option will use the photo sensor on the back of the clock to automatically adjust the LCD display brightness to match
the light level in the room. For best results, ensure the photo sensor is unobstructed and that the clock is placed in a well-lit location.

DATE DISPLAY
CR61 - CR62 - CR63 - CR64
The current Month and Day will be displayed in the Date Display on the LCD display.
CR61 - CR62 - CR63 - CR64
Press to change the Date/Temperature Display to Date. Press again to show the current
Year for 10 seconds
TEMPERATURE FUNCTION
CR61 - CR62 - CR63 - CR64
Press to change the Date/Temperature Display to Temperature. Press again to cycle
between Celsius and Fahrenheit
AUTOMATIC DAYLIGHT SAVING TIME FUNCTION
CR61 - CR62 - CR63 - CR64
By default the Automatic Daylight Saving Time (DST) function will be enabled. When
enabled, ON will show briey on the screen and when disabled, OFF will show briey
on the screen.
• Daylight Saving Time begins at 2:00 AM on the second Sunday of March
• Standard Time begins at 2:00 AM on the rst Sunday of November
Press and hold to enable/disable the Automatic Daylight Saving Time function
1514

USB CHARGING FUNCTION
CR61 - CR62 - CR63 - CR64
The USB port on the back of the clock provides 1.0A to charge your electronic devices.
Connect your electronic device to the USB port on the back of the clock.
USB
Note: Charging time will vary depending on the charging current that your device requires. Therefore, some devices will take longer
to charge than others.
PROJECTION FUNCTION
CR61 - CR62 - CR63 - CR64
1. Press to turn the time projection on or o
2. Adjust the angle of the projection unit forward or backward until the projection is in
the desired location
Note: Recommended distance is 3-9 feet

3. Use the FOCUS dial to bring the projected time into focus
Note: Projection is most visible in darker environments. For maximum projection size, recommended distance is 3-9 feet.
4. Press to rotate the projected image 180°
AUX IN FUNCTION
CR61 - CR62 - CR63 - CR64
1. Using a 3.5mm audio cable (sold separately), connect your source device (mobile
phone, tablet, or MP3 player)
USB
2. Use to adjust the volume of the clock
Note: Volume can be adjusted on both your source device and the clock.
1716

3. When a 3.5mm cable is connected to the clock the Aux In function will override
the Radio function. To resume listening to the radio ensure the cable has been
disconnected
Note: If a radio alarm activates when a 3.5mm audio cable is connected, the alarm will default to a buzzer instead of the
radio. To resolve this, ensure the cable is disconnected prior to alarm activation.
BATTERY BACKUP
CR61 - CR62 - CR63 - CR64
This clock radio is equipped with the Sure Alarm battery backup feature. In the event of a
power outage, Sure Alarm ensures the alarm will sound even when the power is out, and will
restore your alarm and time settings when power resumes.
Note: Regular operation of this clock radio requires it to be plugged into an AC wall outlet.
ATTENTION - REPLACING THE BATTERY
• Batteries must be installed by an adult
• Use only the recommended size and type of battery specied
• Please be sure to follow the correct polarity when installing the battery in the battery
compartment. A reversed battery may cause damage to the clock radio
• When not using the unit for a prolonged period of time, please remove the battery to
avoid possible damage caused by leaking
• Do not plug or unplug the power cable if you have wet hands
• If you are not planning to use the unit for an extended period of time, disconnect the
power cable from the wall outlet
• Do not pull on the cord! You may damage the power cord and may cause an electric
shock when disconnecting the power cord from the wall outlet. Pull rmly at the base
of the plug

REPLACING THE BATTERY
CR61 - CR62 - CR63 - CR64
When replacing the battery, do not disconnect the power cable from the AC outlet. Current
time and alarm will be lost.
1. Loosen the screw using a small Phillips
Head screwdriver
Note: The screw is designed to be held by the battery panel
and cannot be fully removed.
2. Remove the battery compartment panel
3. Remove and recycle the depleted battery.
Replace with a new 3V, CR2032 Flat Lithium
battery
4. Close the battery compartment and tighten
the screw to secure the battery panel
1918

TROUBLESHOOTING
CR61 - CR62 - CR63 - CR64
Please consult the Troubleshooting chart below before communicating with ELECTROHOME
Customer Support.
SYMPTOM POSSIBLE CAUSE POSSIBLE SOLUTION
GENERAL
Power Cord not plugged in to wall
outlet or to clock
Screen brightness is set to OFF Tap SNOOZE/DIMMER button to
No Display
Screen brightness is set to LOW Low brightness is best for darker
Ensure power cord is rmly
connected
change LCD brightness
environments. Tap SNOOZE/
DIMMER button to change LCD
brightness
RADIO
Radio is not on Press the RADIO ON/OFF button
No Sound
Volume is at minimum setting Press the VOLUME UP button
Noise or sound distorted on FM FM antenna is not fully extended Unroll and extend the antenna
CLOCK
Clock not set to correct time zone Set correct time zone and ensure
clock is set to correct time
Incorrect time
Battery is inserted incorrectly,
or depleted
Check/replace the battery and
ensure time is set to correct time
Alarm does not turn on
Radio alarm triggers buzzer
alarm
Alarm is not set to turn on Slide Alarm 1 or Alarm 2 toggle
to Music or Bell position to
enable
Clock is set to incorrect time Set the time to correct time
Alarm time is not set Set alarm time for Alarm 1 or
Alarm 2
3.5mm cable is connected to
Aux In
Remove 3.5mm cable from Aux
In when using radio alarm

CARE AND MAINTENANCE
1. Disconnect the unit from any power sources before cleaning.
2. Keep the unit away from magnetic objects, water, or heat sources.
3. Clean only with a dry cloth.
SPECIFICATIONS
Display Size
Display Colour CR61 - CR62 - CR63 - CR64 White LED / Blue LCD Display
Automatic Time Set CR61 - CR62 - CR63 - CR64 Yes
WakeUp Technology CR61 - CR62 - CR63 - CR64 Yes
Battery Back-up for Time/Date CR61 - CR62 - CR63 - CR64 Ye s
PLL Digital Radio Tuner CR61 - CR62 - CR63 - CR64 Yes - AM/FM
Radio Station Presets CR61 - CR62 - CR63 - CR64 Yes 10 AM/ 10 FM
Dual Alarm CR61 - CR62 - CR63 - CR64 Yes
Calendar Display CR61 - CR62 - CR63 - CR64 Yes
Indoor Temperature Reading
Adjustable Brightness
CR61 - CR62 - CR63 - CR64 4.8"
CR61 - CR62 - CR63 - CR64 Yes
CR61 - CR62 - CR63 - CR64 No
CR61 - CR62 - CR63 - CR64 Yes – High, Low, O
CR61 - CR62 - CR63 - CR64 Yes – High, Low, O, Auto
Sleep Timer CR61 - CR62 - CR63 - CR64 Yes
USB Charging
Speaker Size CR61 - CR62 - CR63 - CR64 1.5" 0.5W, 8 Ohms
Power Adapter Input
Power Adapter Output CR61 - CR62 - CR63 - CR64 DC5V 1200mA
CR61 - CR62 - CR63 - CR64 No
CR61 - CR62 - CR63 - CR64 1,000mA
CR61 - CR62 - CR63 - CR64 AC 100V-240V 50- 60 Hz
2120

Frequency Range (AM) CR61 - CR62 - CR63 - CR64 520 - 1710 kHz
Frequency Range (FM) CR61 - CR62 - CR63 - CR64 87.5 – 107.9 MHz
Battery Backup
Alarm Options CR61 - CR62 - CR63 - CR64 Radio / Buzzer
Size (W x D x H)
Weight
CR61 - CR62 - CR63 - CR64 1 x 3V, CR2032 Flat Lithium
battery (Included)
CR61 - CR62 - CR63 - CR64 2.9 x 5.9 x 4.1 inches
CR61 - CR62 - CR63 - CR64 2.9 x 7.5 x 4.1 inches
CR61 - CR62 - CR63 - CR64 1.15 lbs.
CR61 - CR62 - CR63 - CR64 1.25 lbs.
CR61 - CR62 - CR63 - CR64 1.15 lbs.
CR61 - CR62 - CR63 - CR64 1.25 lbs.
IC AND FCC WARNINGS
NOTICE: CAN ICES-3(B)/NMB-3(B)
This device complies with Part 15 of the FCC Rules. Operation is subject to the following two conditions:
1. This device may not cause harmful interference, and
2. This device must accept any interference received, including interference that may cause undesired
operation.
REMARQUE: CAN IECS-3(B)/NMB-3(B)
Cet appareil est conforme a la partie 15 des regles FCC. Le fonctionnement est autorise sous reserce des
deux conditions suivantes:
1. Cet appareil ne doit pas provoquer d’interference nuisible, et
2. Cet appareil doit accepter toute interference recue, y compris les interferences pouvant provoquer
un mauvais fonctionnement.

WARRANTY
Thank you for choosing Electrohome. We guarantee your investment in our products is a solid one!
Extensive thought, research, planning and design goes into every product we make. High quality components
combined with precision manufacturing allows us to maintain the highest possible production standards.
All items are guaranteed against defects in materials and craftsmanship.
Electrohome products come with a complete one-year parts and labour warranty. This warranty is nontransfe
able and proof of purchase is required when seeking warranty assistance. Electrohome has outstanding
quality control, if something should go wrong with any of our products, we will repair it free of charge! If the
product cannot be repaired, we will replace the product. If the product has been discontinued, we will replace
the product with either the newest version of said product or current equivalent. Replacement parts furnished
in connection with this warranty shall be warranted to a period equal to the unexpired portion of the original
product warranty.
This warranty shall not apply to:
A. Any defects caused or repairs required as a result of abusive operation, negligence, accident, improper
installation or inappropriate use as outlined in the owner’s manual.
B. Any Electrohome product tampered with, modied, adjusted or repaired by any party other
than Electrohome.
C. Any cosmetic damage to the surface or exterior that has been defaced or caused by normal wear
and tear.
D. Any damage caused by external or environmental conditions, including but not limited to transmission
line/power line voltage or liquid spillage.
E. Any product received without appropriate model, serial number and CSA /cUL /cULus /cETL /cETLus
markings.
F. Any products used for rental or commercial purposes.
G. Any installation, setup and/or programming charges.
If in any situation your purchase displays a manufacturer’s defect during the warranty period and does not
function correctly, Electrohome will repair your product and cover all parts, labour, and return costs upon
delivery of the Electrohome product together with proof of purchase. Products returned to Electrohome for
warranty service must be shipped prepaid (paid by the customer). Products must be shipped in the original
shipping container or its equivalent; in any case the risk of loss or damage in transit is to be borne by you.
We believe in music’s power to bring people together. We pledge to work with you in resolving any issue that
occurs with your product. If you are in need of assistance do not hesitate to contact us via our Contact Us
page on www.electrohome.com/support.
2322

www.electrohome.com
 Loading...